

Page 1

OWNER’S MANUAL
E
N
G
L
SI
H
DNI
O
N
E
S
AI
AIR CONDITIONER
Please read this manual carefully before operating
your set and retain it for future reference.
TYPE : WALL MOUNTED
STANDARD
MODELS :
S05LFG S07LFG S09LFG S05LPBX-R
S12LFG S18LFG S24LFG
P/NO : MFL67104816
www.lge.com
Page 2
2 Room Air Conditioner
Room Air Conditioner Owner’s Manual
TABLE OF CONTENTS
FOR YOUR RECORDS
Write the model and serial numbers here:
Model #
Serial #
You can find them on a label on the side of each unit.
Dealer's Name
Date Purchased
Staple your receipt to this page in the event you need
it to prove date of purchase or for warranty issues.
READ THIS MANUAL
Inside you will find many helpful hints on how to use
and maintain your air conditioner properly. Just a little
preventive care on your part can save you a great deal
of time and money over the life of your air conditioner.
You'll find many answers to common problems in the
chart of troubleshooting tips. If you review our chart of
Troubleshooting Tips first, you may not need to call
for service at all.
PRECAUTION
• Contact the authorized service technician for
repair or maintenance of this unit.
• Contact the installer for installation of this unit.
• The air conditioner is not intended for use by
young children or invalids without supervision.
• Young children should be supervised to ensure
that they do not play with the air conditioner.
• When the power cord is to be replaced,
replacement work shall be performed by
authorized personnel only using only genuine
replacement parts.
A. Safety Precautions ..............................3
B. Electrical Safety...................................6
Temporary Use of an Adapter ...............6
Temporary Use of an Extension Cord ...6
Symbols used in this Manual.................6
C. Product Introduction...........................7
Indoor Units ...........................................7
Operation Indication Lamps ..................7
Outdoor Unit ..........................................7
D. Operating Instructions........................8
How to insert the Batteries ....................8
Wireless Remote Controller
Maintenance..........................................8
Operating Method..................................8
Wireless Remote Controller...................9
Operation Mode...................................10
Healthy Dehumidification Operation....11
Auto Operation
(Cooling Only Model)...........................11
Jet Cool/Heat Operation......................12
PLASMA Purification Operation
(Optional).............................................12
Auto Clean (Optional)..........................12
Display Luminosity (Optional)..............13
Forced operation .................................13
Sleep Mode .........................................14
Timer Setting .......................................14
Vertical / Horizontal Airflow Direction
Control (Optional) ................................15
Air Circulation Mode ............................15
Auto Restart Function..........................15
E. Maintenance and Service
..................16
Indoor Unit...........................................16
Outdoor Unit ........................................17
Operation Tips!....................................17
Self-Diagnosis Function ......................17
Troubleshooting Tips!
Save time and money!.........................18
Call the service immediately in the
following situations ..............................18
Page 3
Owner's Manual 3
Safety Precautions
ENGLISH
Safety Precautions
To prevent injury to the user or other people and property damage, the following instructions must be followed.
■ Incorrect operation due to ignoring instruction will cause harm or damage. The seriousness is classified by
the following indications.
■ Meanings of symbols used in this manual are as shown below.
This symbol indicates the possibility of death or serious injury.
This symbol indicates the possibility of injury or damage.
Be sure not to do.
Be sure to follow the instruction.
Always use a power plug and socket with
a ground terminal.
• There is a risk of electric shock.
Do not use a defective or underrated
circuit breaker. Use the correctly rated
breaker and fuse.
• There is risk of fire or electric shock .
Do not use a multi consent. Always use
this appliance on a dedicated cicuit and
breaker.
• Otherwise it can cause electric shock or fire.
For electrical work, contact the dealer, seller,
a qualified electrician, or an Authorized
Service Center. Do not disassemble or repair
the product by yourself.
• There is risk of fire or electric shock.
Always ground the product as per the
wiring diagram. Do not connect the
ground wire to gas or water pipes
lightening rod or telephone ground wire.
• There is risk of fire or electric shock.
Install the panel and the cover of control
box securely.
• There is risk of fire or electric shock due to
dust , water etc.
Use the correctly rated breaker or fuse.
• There is risk of fire or electric shock.
Do not modify or extend the power cable.
If the power cable or cord has scrathes or
skin peeled off or deteriorated then it
must be replaced.
• There is risk of fire or electric shock.
For installation, removal or reinstall ,
always contact the dealer or an
Authorized Service Center.
• There is risk of fire, electric shock, explosion,
or injury.
Do not install the product on a defective
installation stand. Be sure that the
installation area does not deteriorate with
age.
• It may cause product to fall.
Never install the outdoor unit on a
moving base or a place from where it
can fall down.
• The falling outdoor unit can cause damage or
injury or even death of a person.
When the product is soaked (flooded or
submerged) in water , contact an
Authorized Service Center for repair
before using it again.
• There is risk of fire or eletric shock.
In outdoor unit the step-up capacitor
supplies high voltage electricity to the
electrical components. Be sure to
discharge the capacitor completely
before conducting the repair work.
• An charged capacitor can cause electrical
shock.
When installing the unit, use the
installation kit provided with the product.
• Otherwise the unit may fall and cause severe
injury.
Be sure to use only those parts which
are listed in the svc parts list. Never
attempt to modify the equipment.
• The use of inappropriate parts can cause an
electrical shock, excessive heat generation or
fire.
Page 4
4 Room Air Conditioner
Safety Precautions
Indoor/outdoor wiring connections must
be secured tightly and the cable should
be routed properly so that there is no
force pulling the cable from the
connection terminals.
• Improper or loose connections can cause
heat generation or fire.
Safely dispose off the packing materials.
Like screws, nails, batteries, broken
things etc after installation or svc and
then tear away and thraw away the plastic
packaging bags.
• Children may play with them and cause
injury.
Make sure to check that the power cable
plug is not dirty, loose or broken and
then only insert the plug completely.
• Dirty, loose or broken power plug can
cause electric shock or fire.
Be sure to check the refrigerant to the
used. Please read the label on the product.
• Incorrect refrigerant used can prevent the
normal operation of the unit.
Don't use a power cord, a plug or a loose
socket which is damaged.
• Otherwise it may cause a fire or electrical
shock.
Do not touch , operate, or repair the
product with wet hands. Hold the plug by
hand when taking out
• There is risk of electric shock or fire.
Do not place a heater or other heating
appliances near the power cable.
• There is risk of fire and electric shock.
Do not allow water to run into electric
parts. Install the unit away from water
sources.
• There is risk of fire, failure of the product, or
electric shock.
Do not store or use or even allow
flammable gas or combustibles near the
product.
• There is risk of fire.
Do not use the product in a tightly closed
space for a long time. Perform ventilation
regularly.
• Oxygen deficiency could occur and hence
harm your health.
Do not open the front grille of the product
during operation. (Do not touch the
electrostatic filter, if the unit is so equipped.)
• There is risk of physical injury, electric shock,
or product failure.
If strange sounds, smell or smoke comes
from product.Immediately turn the breaker
off or disconnect the power supply cable.
• There is risk of electric shock or fire.
Ventilate the product room from time to
time when operating it together with a
stove, or heating element etc.
• Oxygen deficiency can occur and hence harm
your health.
Turn the main power off and unplug the
unit when cleaning or repairing the
product.
• There is risk of electric shock.
When the product is not to be used for a
long time, disconnect the power supply
plug or turn off the breaker.
• There is risk of product damage or failure, or
unintended operation.
Take care to ensure that nobody
especially kids could step on or fall onto
the outdoor unit.
• This could result in personal injury and
product damage.
Take care to ensure that power cable
could not be pulled out or damaged
during operation.
• There is risk of fire or electric shock.
Do not place ANYTHING on the power
cable.
• There is risk of fire or electric shock.
Do not plug or unplug the power supply plug to turn the unit
ON/OFF .
• There is risk of fire or electric shock.
When flammable gas leaks, turn off the gas and open a window
for ventilation before turn the product on.
• Do not use the telephone or turn switches on or off. There is risk of
explosion or fire.
Two or more people must lift and
transport the product.
• Avoid personal injury.
Do not install the product where it will be
exposed to sea wind (salt spray) directly.
• It may cause corrosion on the product.
Install the drain hose to ensure that the
condensed water is drained away properly.
• A bad connection may cause water leakage.
Keep level even when installing the
product.
• To avoid vibration or noise.
Do not install the product where the noise
or hot air from the outdoor unit could
damage or disturb the neighborhoods.
• It may cause a problem for your neighbors
and hence dispute.
Always check for gas (refrigerant)
leakage after installation or repair of
product.
• Low refrigerant levels may cause failure of
product.
Page 5

Owner's Manual 5
Safety Precautions
ENGLISH
Do not use the product for special purposes,
such as preserving foods, works of art, etc. It
is a consumer air conditioner, not a precision
refrigeration system.
• There is risk of damage or loss of property.
Do not block the inlet or outlet of air flow.
• It may cause product failure.
Use a soft cloth to clean. Do not use
harsh detergents, solvents or splashing
water etc .
• There is risk of fire, electric shock, or damage
to the plastic parts of the product.
Do not touch the metal parts of the
product when removing the air filter.
• There is risk of personal injury.
Do not step on or put anyting on the
product. (outdoor units)
• There is risk of personal injury and failure of
product.
Always insert the filter securely after
cleaning. Clean the filter every two weeks
or more often if necessary.
• A dirty filter reduces the efficiency.
Do not insert hands or other objects
through the air inlet or outlet while the
product is operating.
• There are sharp and moving parts that could
cause personal injury.
Be cautious when unpacking and
installing the product.
• Sharp edges could cause injury.
If the refrigerant gas leaks during the
repair, do not touch the leakaing
refrigerant gas.
• The refrigernat gas can cause frostbite (cold
burn)
Do not tilt the unit when removing or
uninstalling it.
• The condensed water inside can spill .
Do not mix air or gas other than the
specified refrigerant used in the system .
• If air enters the refrigerant system, an
excessively high pressure results, causing
equipment damage or injury.
If the refrigerant gas leaks during the
installation, ventilate the area immediately.
• Otherwise it can be harmfull for your health.
Dismantling the unit, treatment of the
refrigerant oil and eventual parts should
be done in accordance with local and
national standards.
Replace the all batteries in the remote
control with new ones of the same type.
Do not mix old and new batteries or
different types of batteries.
• There is risk of fire or product failure.
Do not recharge or disassemble the
batteries. Do not dispose off batteries in
a fire.
• They may burn or explode.
If the liquid from the batteries gets onto
your skin or clothes, wash it well with
clean water. Do not use the remote if the
batteries have leaked.
• The chemicals in batteries could cause burns
or other health hazards.
Do not let the air conditioner run for a
long time when the humidity is very high
and a door or a window is left open.
• Moisture may condense and wet or damage
furniture.
Do not expose your skin or kids or
plants to the cool or hot air draft.
• This could harm to your health.
If you eat the liquid from the batteries,
brush your teeth and see doctor. Do not
use the remote if the batteries have
leaked.
• The chemicals in batteries could cause burns
or other health hazards.
Do not drink the water drained from the
product.
• It is not sanitary and could cause serious
health issues.
Use a firm stool or ladder when cleaning,
maintaining or repairing the product at
an height.
• Be careful and avoid personal injury.
Page 6
6 Room Air Conditioner
Electrical Safety
Electrical Safety
• This appliance must be properly grounded.
To minimize the risk of electric shock, you must alway plug into a grounded oulet.
• Do not cut or remove the grounding prong from the power plug.
• Attaching the adapter ground terminal to the wall receptacle cover screw does not ground the appliance
unless the cover screw is metal and not insulated, and the wall receptacle is grounded through the
house wiring.
• If you have any doubt whether the air conditioner is properly grounded, have the wall receptacle and
circuit checked by a qualied electrician.
We strongly discourage the use of an adapter due to potential safety hazards. For temporary connections,
use only a genuine adapter, available from most local hardware stores. Ensure that the large slot in the
adapter is aligned with the large slot in the receptacle for a proper polarity connection.
To disconnect the power cord from the adapter, use one hand on each to avoid damaging the ground
terminal. Avoid frequently unplugging the power cord as this can lead to eventual ground terminal damage.
• Never use the appliance with a broken adapter.
We strongly discourage the use of an extension cord due to potential safety hazards.
Temporary Use of an Adapter
Temporary Use of an Extension Cord
This symbol alerts you to the risk of electric shock.
This symbol alerts you to hazards that may cause harm to the
air conditioner.
This symbol indicates special notes.
NOTE
Symbols used in this Manual
This appliance should be installed in accordance with national wiring regulations. This guide acts as a
guide to help to explain product features.
Page 7
NGLISHE
Owner's Manual 7
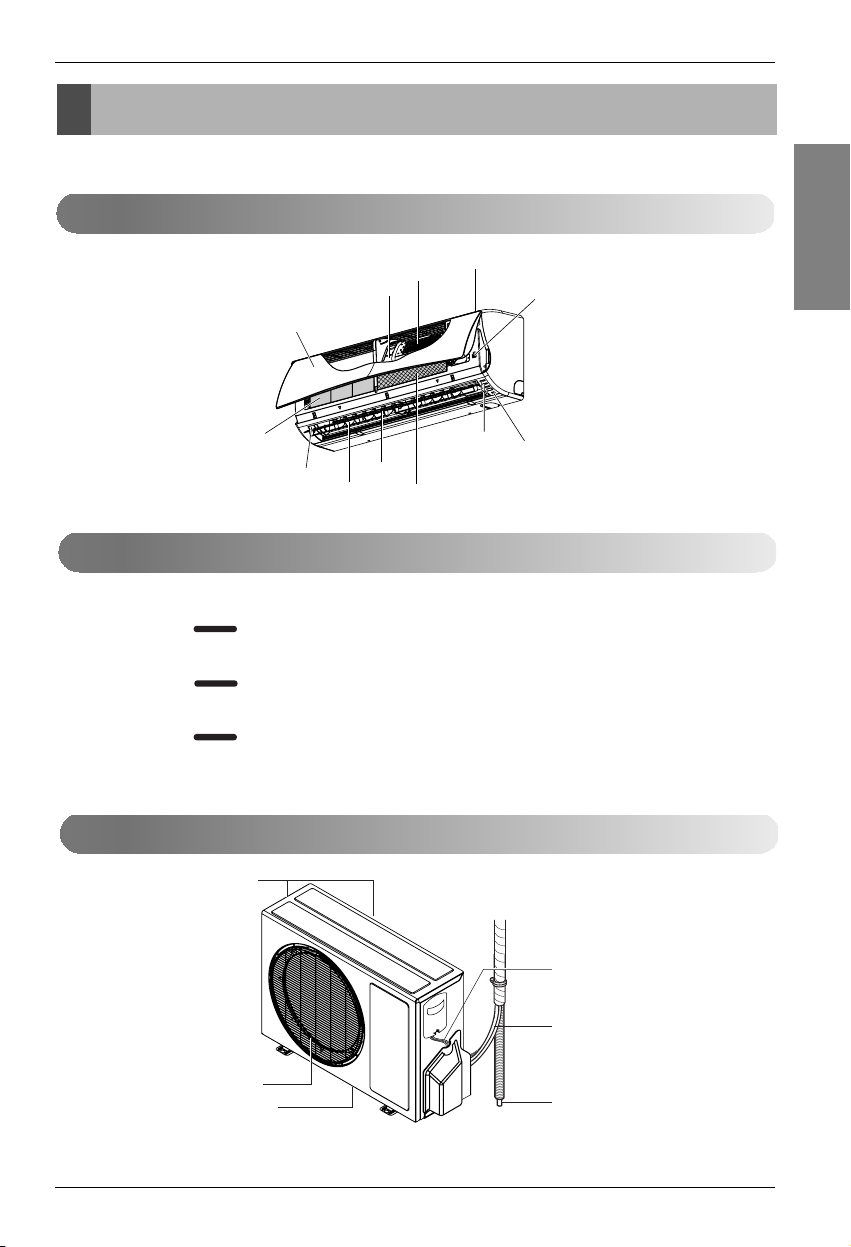
Here is a brief introduction of the indoor and outdoor units. Please see the information specific to your
indoor unit type.
Product Introduction
Product Introduction
Indoor Units
Plasma lter (Optional)
Air lter
Front grille
Triple lter
Air outlet
Horizontal vane
Vertical louver
Operation Indication Lamps
Power
Timer
Outdoor
On/O
Timer
Outdoor
: Lights up during the system operation.
: Lights up during timer operation.
: Lights up during outdoor operation.
Outdoor Unit
Air inlet
Operation lamp
Allergy free lter
ON/OFF button
Signal Receiver
Air intake vents
Air outlet vents
Base plate
Connecting
wires
Refrigerant pipes
Drain hose
Page 8
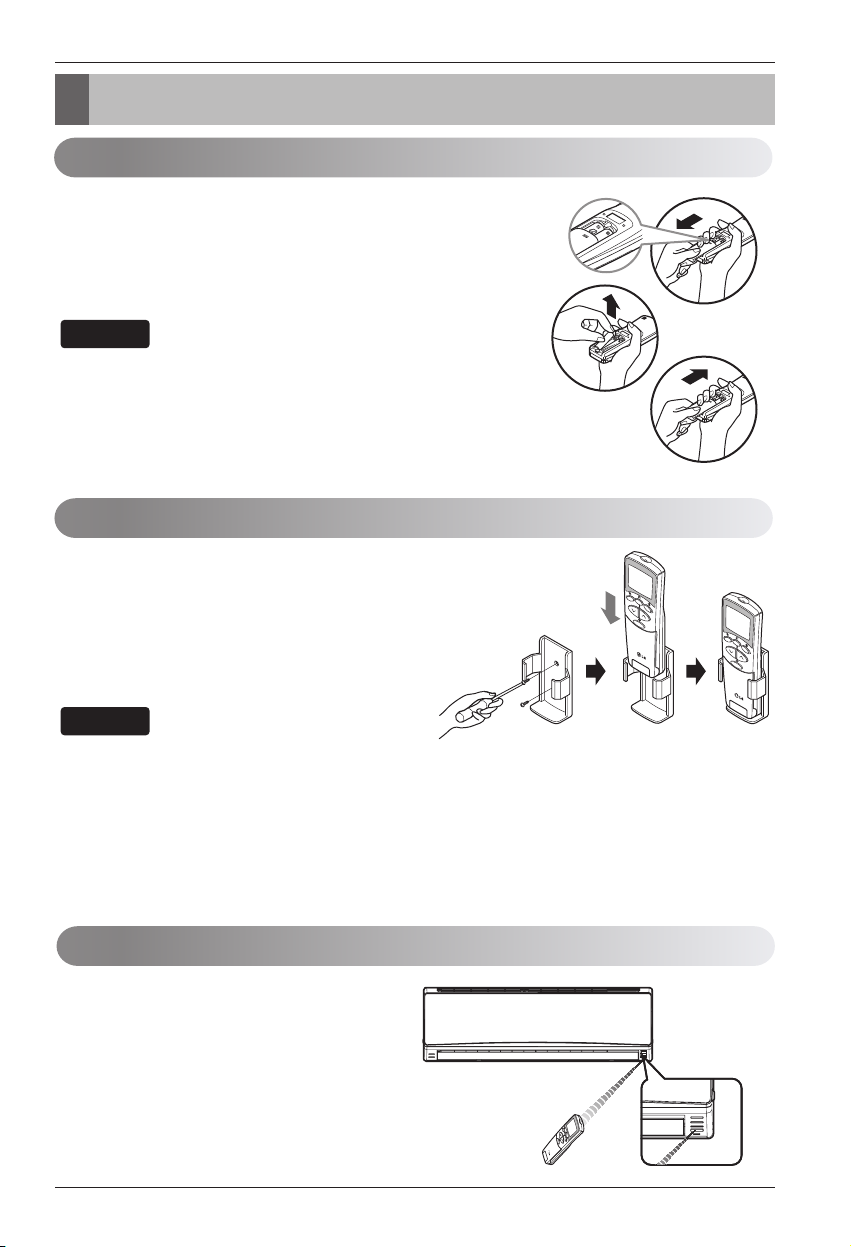
Operating Instructions
How to insert the Batteries
Wireless Remote Controller Maintenance
1. Remove the battery cover by pulling it according to the arrow
direction.
2. Insert new batteries making sure that the (+) and (-) of battery are
installed correctly.
3. Reattach the cover by sliding it back into position.
1. Always use/replace both batteries of same type.
2. If the system is not to be used for a long time, remove the
batteries to save their working life.
3. If the display screen of remote controller starts, fading replace
both of the batteries.
4. Use 2 AAA(1.5 volt) batteries.
NOTE
1. Choose a suitable place where its safe & easy
to reach.
2. Fix the holder to wall etc with the supplied
screws rmly.
3. Slide the remote controller inside the holder.
1. Remote controller should never be exposed to
direct sunlight.
2. Signal transmitter & receiver should always be
clean for proper communication. Use a soft
cloth to clean them.
3. In case some other appliances also get
operated with remote control, change their
position or consult your serviceman.
1. The signal receiver is inside the unit.
2.
Aim the remote controller towards the unit to operate it.
There should not be any blockage in between.
NOTE
Product Instructions
Operating Method
8 Room Air Conditioner
Page 9
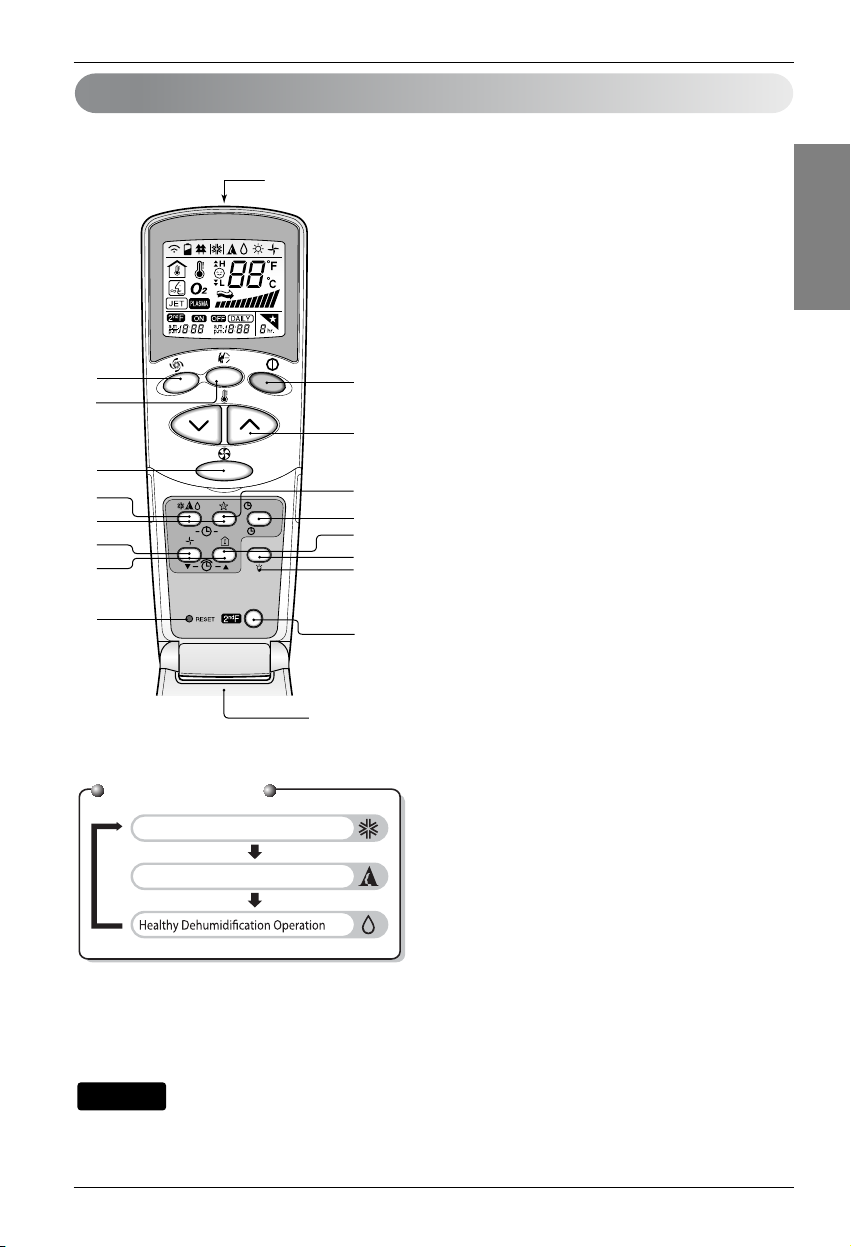
9
ON
OFF
CANCEL
AUTO CLEAN
SET
1
3
5
4
9
10
12
14
7
2
8
13
11
6
Flip-up door
(opened)
Signal transmitter
15
16
Operating Instructions
The controls will look like the following.
Wireless Remote Controller
1. START/STOP BUTTON
Used to turn off/on the unit.
2. OPERATION MODE SELECTION BUTTON
Used to select the operation mode.
3. ROOM TEMPERATURE SETTING BUTTONS
Used to select the room temperature.
4. INDOOR FAN SPEED SELECTOR BUTTON
Used to select fan speed in four steps
low, medium, high and CHAOS.
5. JET COOL BUTTON
Used to start or stop the speed cooling.
(It operates fan in super high speed in cooling mode)
6. CHAOS SWING BUTTON
Used to stop or start louver movement and set the
desired up/down airflow direction.
7. ON/OFF TIMER BUTTONS
Used to set the time of starting and stopping
operation.
8. TIME SETTING BUTTONS
Used to adjust the time.
9. TIMER SET/CANCEL BUTTON
Used to set and to cancel the timer operation.
10. SLEEP MODE AUTO BUTTON
Used to set sleep mode auto operation.
11. AIR CIRCULATION BUTTON
Used to circulate the room air without cooling or
heating.
12. ROOM TEMPERATURE CHECKING BUTTON
Used to check the room temperature.
13. RESET BUTTON
Used prior to resetting time.
14. 2nd F BUTTON
Used prior to using modes printed in blue at the
bottom of buttons.
15. AUTO CLEAN BUTTON(OPTIONAL)
Used to set auto clean mode.
In some models this button has a 2nd function of LED
luminosity control.
16. LCD LUMINOSITY BUTTON(OPTIONAL)
Used to adjust LCD luminosity.
To use the functions printed in blue at the bottom of the buttons press 2ndF button first and then the required function
button. Pressing the 2ndF button activates the blue printed function of the respective button. To cancel the function
press the 2nd F button again else it will automatically cancel if remains idle after 10 seconds.
NOTE
ENGLISH
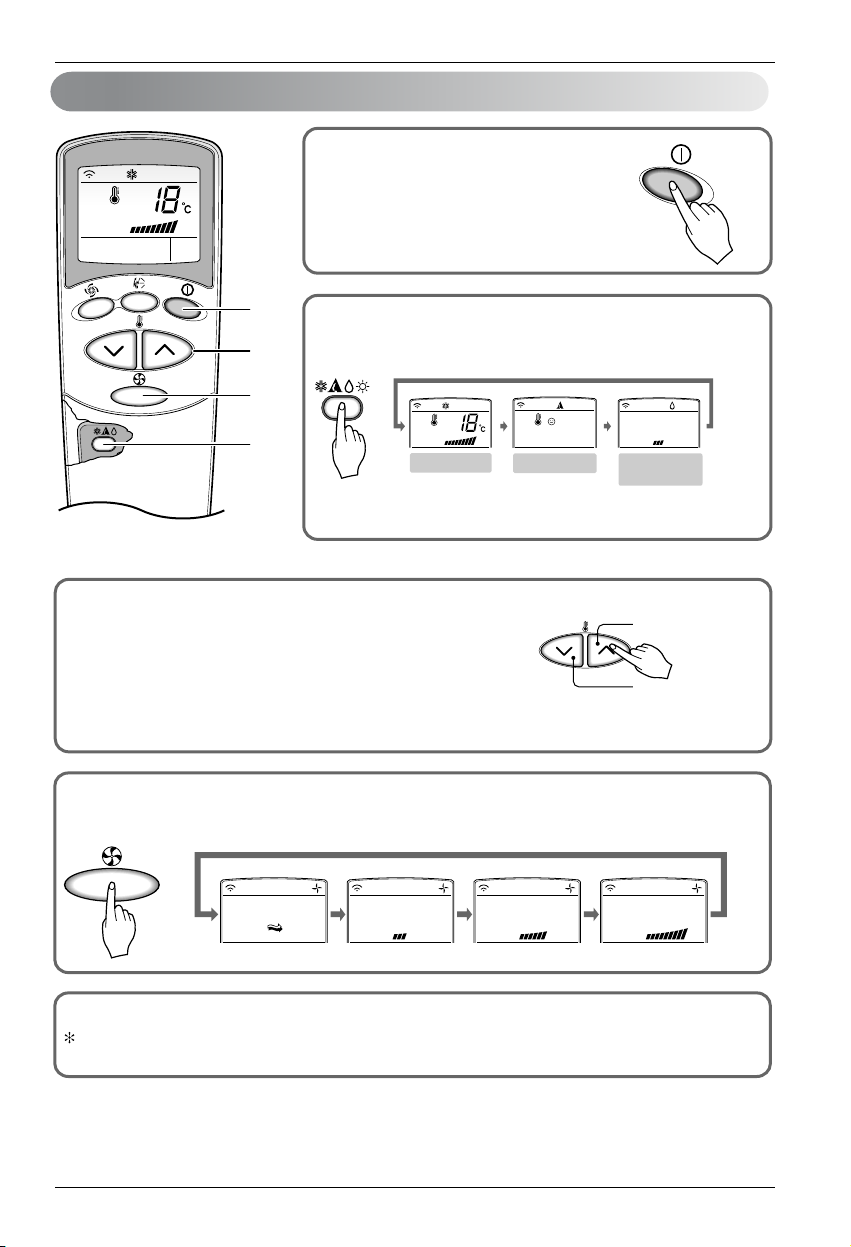
Operation Mode
Cooling Operation
Auto Operation or Auto Changeover
Owner's Manual
Page 10
ENGLISH
Room Air Conditioner 10
ON
Cooling
Healthy
Dehumidification
To lower the temperature
To raise the temperature
1
2
3
4
Fan speed is on low. Fan speed is on medium. Fan speed is on high.CHAOS Air
Operating Instructions
Press the START/STOP BUTTON to
turn the unit on.
The unit will respond with a beep.
Open the door of the remote controller and press the
operation mode button. Each time the button is pressed, the
operation mode is shifted in the direction of the arrow.
Auto Operation (Cooling Only Model)
For cooling or heating operation set the desired indoor
temperature by pressing the ROOM TEMPERATURE
SETTING BUTTONS.
For cooling the temperature can be set within 18°C-30°C and
for heating the temperature range is 16°C-30°C
Set the fan speed with the remote controller. You can select the fan speed in four steps-low,
medium, high and CHAOS by pressing the INDOOR FAN SPEED SELECTOR BUTTON.
Each time the button is pressed, the fan speed mode is shifted.
1
2
3
4
Natural wind by the CHAOS logic
For fresher feeling, press the INDOOR FAN SPEED SELECTOR BUTTON selector and set to CHAOS mode.
In this mode, the wind blows like a natural breeze by automatically changing fan speed according to the CHAOS logic.
Operation Mode
Auto
Page 11
11Owner’s Manual
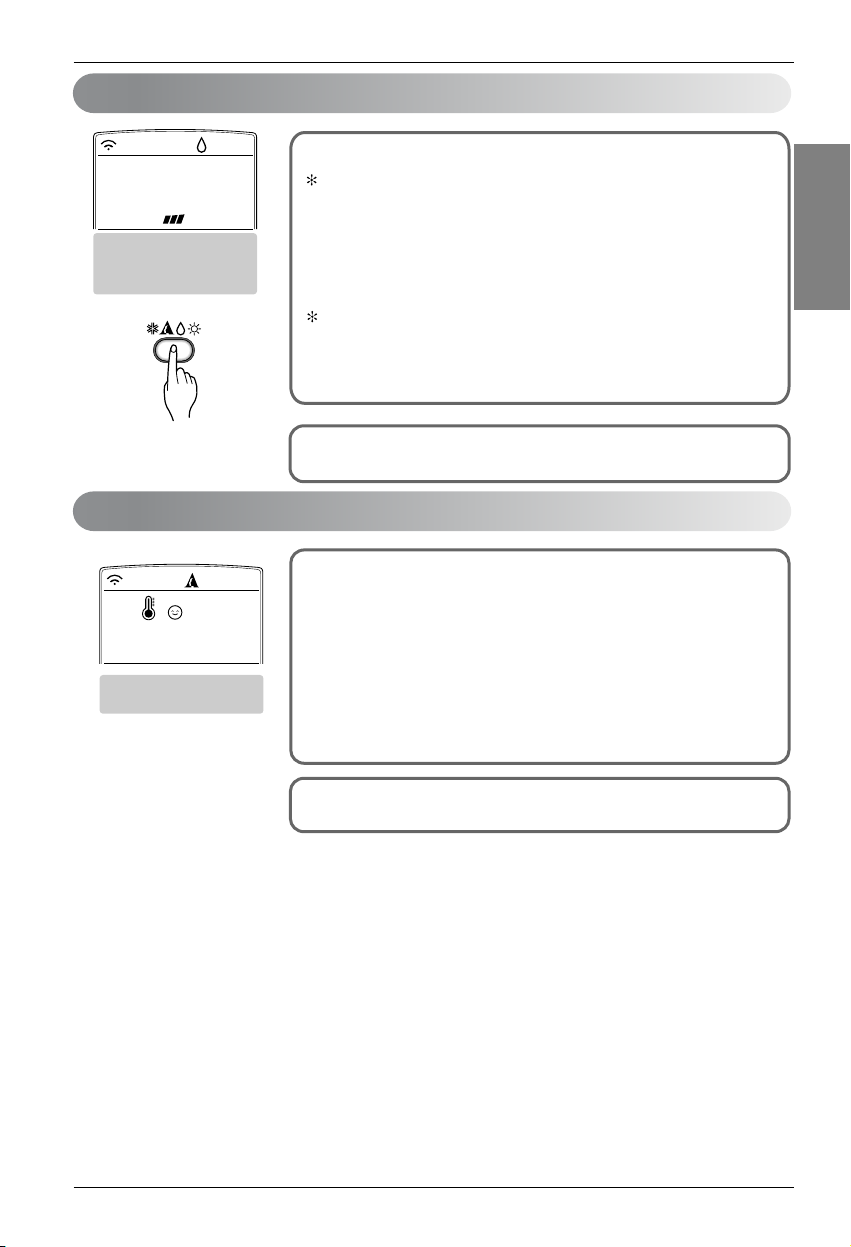
During Healthy Dehumidification Operation
If you select the dehumidification mode on the OPERATION MODE
SELECTION BUTTON, the product starts to run the dehumidification
function. It automatically sets the room temperature and airflow volume to
the best condition for dehumidification, based on the sensed current room
temperature.
In this case, however, the setting temperature is not displayed on the remote
controller and you are not able to control the room temperature either.
During th e health y dehumidifica ti on function, th e airf lo w volume i s
automatically set according to the optimization algorithm responding to the
current room temperature status, so that the room condition is kept healthy
and comfortable even in the very humid season.
Healthy
Dehumidification
Auto
Operating Instructions
In this operation mode the actual setting temperature and the fan speed
are automatically set by the electronic control logic based on the current
room temperature. If you feel hot or cold press the temperature setting
buttons respectively for more cooling or heating effect.
NOTE : You cannot set the actual setting temperature and the indoor fan
speed in this operation mode. But you can use the Chaos swing
in this operation.
If the system is not operating as desired, switch manually to
another mode.
To run the healthy dehumidification mode follow steps 1, and 2 and 4
(See operation mode)
To run the auto operation follow steps 1, and 2. (See operation mode)
Auto Operation
Healthy Dehumidification Operation
ENGLISH
Page 12
Operating Instructions
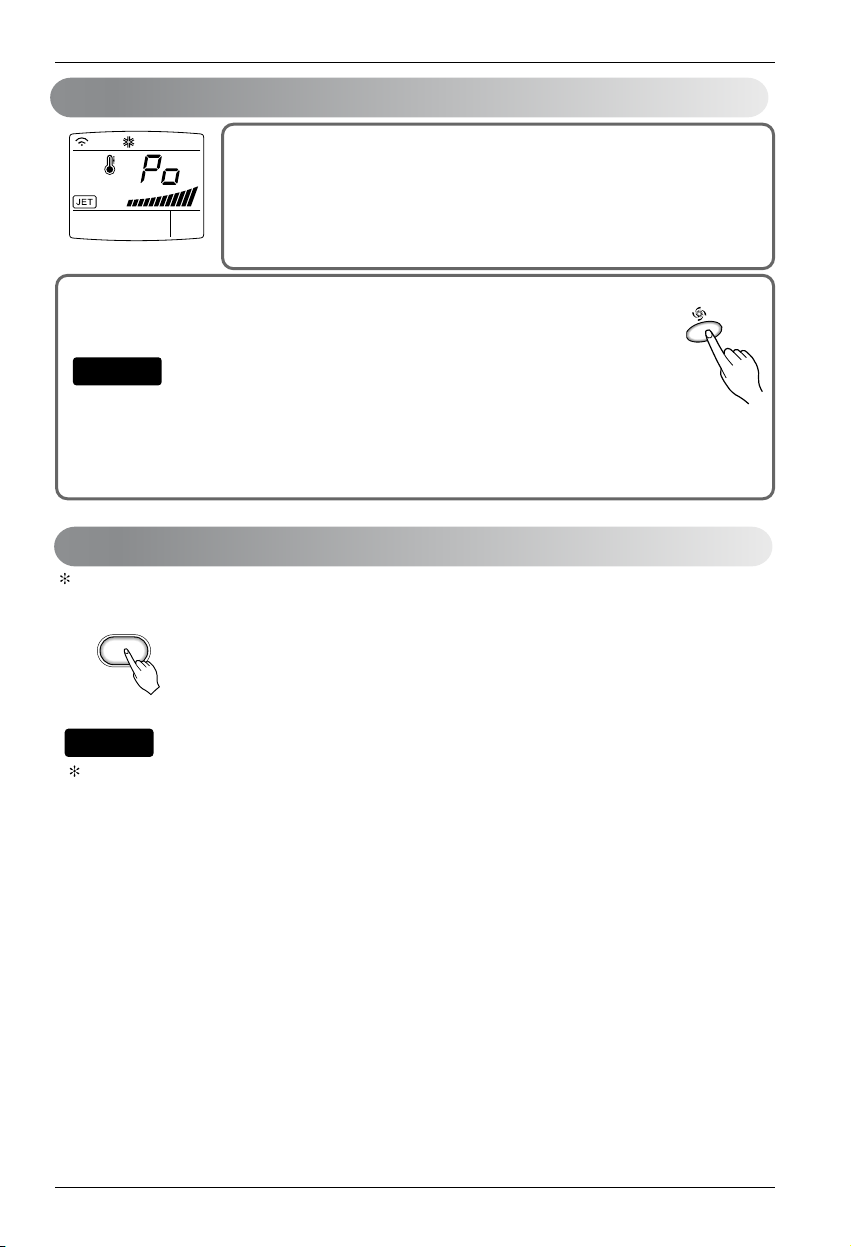
Jet Cool
AUTO CLEAN
During auto clean function, only START/STOP BUTTON, PLASMA BUTTON and AUTO CLEAN BUTTON
can be used.
NOTE
During auto clean function, moistures left in indoor units after cooling operation or healthy dehumidification
operation can be removed.
1. Press the AUTO CLEAN BUTTON to activate this function.
2. Now whenever the unit is turned off, the indoor fan is still running for about 30
minutes internally without cooling or dehumidification operation. Also the louver is
closed.
3. This dries up any remains of moisture & cleans the unit internally.
4. If you press AUTO CLEAN BUTTON again during operation, this function is
cancelled.
Auto Clean (Optional)
Jet cool function can be used to cool the room quickly in hot summer. When this
function is turned on, the air conditioner runs in cooling operation mode with super
high fan speed and 18°C setting temperature for 30 minutes for fast and effective
cooling.
Similarly, jet heat function (available only in some models) warms up the room quickly
by operating at super high fan speed and 30°C setting temperature for 60 minutes.
You can activate this operation by pressing the JET COOL BUTTON.
To change from jet cool mode to high fan speed cooling mode, press the JET COOL BUTTON or
INIDOOR FAN SPEED SELECTOR BUTTON or the ROOM TERPERATURE SETTING BUTTON again.
• Jet cool function cannot be activated during heating or auto changeover operations.
• In case of Inverter, Art Cool and Art Cool Wide(non-Deluxe) model, you can use jet heat function by
pressing JET COOL BUTTON for heating operation.
• Art Cool and Art Cool Wide models close the side discharges during jet cool/heat operation, for strong
cooling and heating.
NOTE
Room Air Conditioner 12
Page 13
Operating Instructions
Forced operation
Operation procedures when the remote control can't be used.
The operation will be started if the ON/OFF button is pressed.
If you want to stop operation, re-press the button.
Cooling Model
Operating mode Cooling
Indoor FAN Speed
High
Setting Temperature
22°C
Test operation
During the TEST OPERATION, the unit operates in cooling mode at high speed fan, regardless of room
temperature and resets in 18 minutes.
During test operation, if remote controller signal is received, the unit operates as remote controller sets.
If you want to use this operation, Press and hold the ON/OFF button for 3~5 seconds, then the buzzer sound
1 "beep".
If you want to stop the operation, re-press the button.
Display Luminosity (Optional)
ON/OFF
button
ENGLISH
The unit display Luminosity can be adjusted by using the remote controller.
Open the cover of the remote controller and press the LED LUMINOSITY button.
Display LED will be dark. Press the button again to set bright display.
(The order of 100%
If you press any button it will return to 100% LUMINOSITY.
But, except ROOM TEMPERATURE CHECKING BUTTON.
0% LUMINOSITY is repeated whenever you press the button.)
13Owner’s Manual
Page 14

Operating Instructions
NOTE
ON
OFF
CANCEL
SET
CANCEL
SET
NOTE
Timer Setting
1. Make sure to set current time correctly on the display of the remote controller.
2. Press 2nd F button.
3. Press the ON/OFF TIMER BUTTONS to turn timer on or o.
4. Press the TIME SETTING BUTTONS until the desired time is set.
5. To set the selected time, press the TIMER SETTING BUTTONS aiming the remote controller at the
signal receptor.
To cancel the timer setting
Check if icon is o.
Press the TIMER CANCEL BUTTON aiming the remote controller at the signal receptor.
(The timer lamp on the air conditioner and the display will go o.)
Select one of the following four types of operation.
Delay o timer
Delay on timer
Delay o and on timer Delay on and o timer
Sleep Mode
1. Press the SLEEP MODE AUTO BUTTON to set the time when you want the unit to stop automatically.
2. The timer is programmed in one-hour increments by pressing the SLEEP MODE AUTO BUTTON 1 to 7 times.
The sleep mode is available for 1 to 7 times.
To alter the time period in steps of 1 hour, press the SLEEP MODE AUTO BUTTON while aiming at air conditioner.
3. Make sure the Timer LED lights up.
To cancel the sleep mode, press the SLEEP MODE AUTO BUTTON several times until the Timer LED lights o.
The sleep mode will operate indoor fan at slow speed in cooling mode and at medium speed in heating mode for
pleasant sleep.
In cooling mode or healthy dehumidication mode:
The setting temperature will rise automatically two times by 1
comfortable sleep. Now this will be the nal setting temperature as long as sleep mode is functioning.
°C over next consecutive 30 minutes (2 ° C in 1 hour) for a
Room Air Conditioner 14
Page 15

This operation circulates the air without cooling or heating. It can
be activated by pressing the AIR CIRCULATION BUTTON. Once
the air circulation is activated you can select the air speed by
pressing the INDOOR FAN SPEED SELECTOR BUTTON.
Operating Instructions
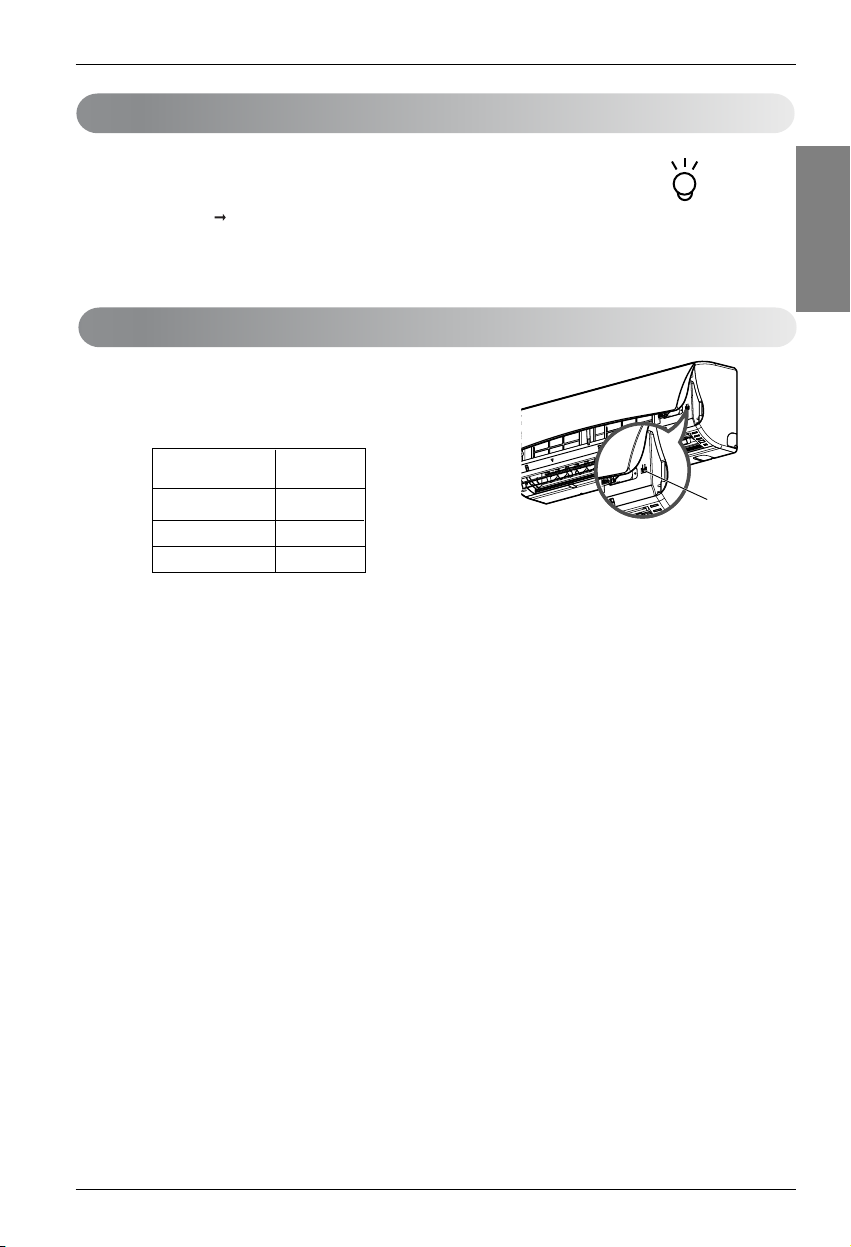
This feature is enabled by factory default setting, but you can disable it by pressing the
ON/OFF button for 6 seconds. The unit will beep twice and the indicator lamp(2) will blink 4
times.
To enable it, press the button again for 6 seconds. The unit will beep twice and the indicator
lamp(1) will blink 4 times.
NOTE
Air Circulation Mode
This function is useful in the situation of power failure.
When power regains after a failure this feature restore the previous operating condition
and the air conditioner will run in the same settings.
Auto Restart Function
ENGLISH
1. Press the Start/Stop button to start the unit.
NOTICE
(Optional)
Always use the remote control to adjust the
damage the air conditioner.
direction louver will close the air outlet vent of the
system.
15Owner’s Manual
Page 16

ENGLISH
Maintenance and Service
Indoor Unit
Before performing any maintenance, turn off the main power to the system, disconnect the circuit breaker and
unplug the power cord.
Clean the unit with a soft dry cloth. Do not use bleach or abrasives.
Never use any of these
• Water hotter than 40°C. It may cause deformation and discoloration.
• Volatile substances. They may damage the surface of the air conditioner.
Air Filters
The air filters behind the front panel / grill should be checked and
cleaned once in every 2 weeks or more often if necessary. To
remove the filters see the self explanatory diagrams for each
model type. Clean the filters with a vacuum cleaner or warm
soapy water. If dirt is not easily removed, wash with a solution of
detergent in luke warm water. Dry well in shade after washing and
reinstall the filters back in place.
Plasma Filters
The plasma filters behind the air filter should be checked and
cleaned once in every 3 months or more often if necessary. To
remove the filters see the self explanatory diagrams for each
model type. Clean the filters with a vacuum cleaner. If it is dirty
wash it with water and dry well in shade an install back in place.
Virus & Allergy safe Filters, Triple Filter
Remove the Virus & Allergy safe Filter and Triple Filters behind
the air filter and expose expose them in direct sunlight for 2 hours.
And then insert these filters into original position.
Maintenance and Service
G
a
s
o
l
i
n
e
P
o
w
d
e
r
Removal of Filters
Open the front panel as shown.
Then pull the filter tab slightly forward to remove the air filter.
After removing the air filter remove the plasma and Virus & Allergy safe Filter by slightly pulling downwards.
Plasma lter
Don't touch this plasma filter within 10 seconds after opening the inlet grille, it may cause an electric shock.
Room Air Conditioner 16
Page 17

Owner's Manual 17
ENGLISH
Maintenance and Service
Outdoor Unit
The heat exchanger coils and panel vents of the outdoor unit should be checked regularly.
If clogged with dirt or soot, the heat exchanger
and panel vents may be professionally steam cleaned.
Dirty or clogged coils will reduce the operating efficiency of the system and cause higher operating costs.
NOTE
Operation Tips!
Self-Diagnosis Function
Error Display LED
Check Point
• Indoor room temperature thermistor open/short.
• Indoor pipe temperature thermistor open/short.
(once)
3 sec 3 sec 3 sec
This unit has an inbuilt error diagnosis capability. Unit LED will blink in case if thermistor fails.
Please contact your serviceman/dealer in such a situation
Do not overcool the room.
This is not good for the health and
wastes electricity.
Keep blinds or curtains
closed.
Do not let direct sunshine enter
the room when the air conditioner
is in operation.
Keep the room temperature
uniform.
Adjust the vertical and horizontal
airflow direction to ensure a
uniform temperature in the room.
Make sure that the
doors and windows
are shut thight.
Avoid opening doors and
windows as much as
possible to keep the cool
air in the room.
Clean the air filter
regularly.
Blockages in the air filter
reduce the airflow and
lower cooling and
dehumidifying effects.
Clean at least once every
two weeks.
Ventilate the room
occasionally.
Since windows are kept
closed, it is a good idea
to open them and
ventilate the room now
and ten.
Use high fan speed
for effective and fast
cooling.
The unit gives its rated
cooling capacity when the
fan speed is high.
Page 18

18 Room Air Conditioner
Troubleshooting Tips! Save time and money!
The air conditioner may be operating abnormally when:
Problem
The air conditioner is
unplugged.
The fuse is blown/circuit
breaker is tripped.
Power failure.
High voltage.
Airflow is restricted.
The air filter is dirty.
The room may have been hot.
Cold air is escaping.
Check the temperature settings.
There might be any heating
source in the room.
Air
conditioner
does not start
Air
conditioner
does not cool
as it should
• Make sure the air conditioner plug is
pushed completely into the outlet.
• Check the house fuse/circuit breaker box
and replace the fuse or reset the breaker.
• If power failure occurs, turn the mode
control to OFF.
When power is restored, wait 3 minutes to
restart the air conditioner to prevent
tripping of the compressor overload.
• If the voltage is unusually very high or low
the circuit Breaker will trip.
• Make sure there are no curtains, blinds, or
furniture blocking the front of the air
conditioner.
• Clean the filter at least every 2 weeks.
See the Maintenance and Service section.
• When the air conditioner is first turned on,
you need to allow time for the room to cool
down.
• Check for open furnace floor registers and
cold air returns.
• Make sure they are correct.
• Check and remove such source or turn it
off while using the air conditioner.
What To DoPossible Causes
1. Anything abnormal such as burning smell, loud noise etc. happen. Stop the unit and
turn the breaker off. Never try to repair by yourself or restart the system in such cases.
2. Main power cord is too hot or damaged.
3. Error code is generated by self diagnosis.
4. Water leaks from indoor unit even if the humidity is low.
5. Any switch, breaker (safety, earth) or fuse fails to work properly
User must carry routine checkup & cleaning to avoid unit’s poor performance.
In case of special situation, the job must be carried out by service person only.
Call the service immediately in the following situations
Maintenance and Service
Page 19

PT. LG ELECTRONICS INDONESIA
Kawasan Industri MM2100 Blok G
Cikarang Barat, Bekasi, Jawa Barat 17520
INDONESIA
Page 20

Panduan Pengguna
AC
Silakan baca buku petunjuk ini dengan seksama sebelum operasi.
Menetapkan dan mempertahankan Anda untuk referensi di masa mendatang.
TYPE : AC Dinding
E
LGN
I
S
H
I
N
D
O
N
SE
AI
STANDARD
MODELS :
S05LFG S07LFG S09LFG S05LPBX-R
S12LFG S18LFG S24LFG
Page 21

2 AC
Panduan Pengguna AC
DAFTAR ISI
UNTUK CATATAN ANDA
Tulis nomor model dan seri di sini:
Model #
Seri #
Anda dapat melihatnya pada label yang ada di sisi
masing-masing unit.
Nama Dealer
Tanggal Pembelian
Lampirkan lembar kuitansi pada halaman ini bila diperlukan
sebagai bukti tanggal pembelian atau untuk keperluan garansi.
BACA PANDUAN INI
Di dalam buku panduan ini, Anda akan menemukan beberapa tips
bermanfaat tentang cara menggunakan dan memelihara AC Anda
dengan benar. Hanya perlu sedikit melakukan perawatan preventif,
selama masa pemakaian AC.
Anda akan menemukan jawaban-jawaban atas masalah-masalah
umum yang terjadi di bagian tips penelusuran gangguan. Jika Anda
membaca bagan Tips Penelusuran Gangguan terlebih dahulu, Anda
mungkin tidak perlu menghubungi layanan servis sama sekali.
PRECAUTION
• Hubungi teknisi servis resmi untuk perbaikan atau
perawatan unit ini.
• Hubungi pemasang AC untuk memasang unit ini.
• AC ini tidak boleh digunakan oleh anak-anak atau
orang cacat tanpa pengawasan.
• Anak-anak harus diawasi agar tidak bermain-main
dengan AC.
• Jika kabel daya harus diganti, mintalah teknisi terlatih
untuk melakukannya dengan menggunakan hanya
suku cadang asli.
A. Tindakan Pencegahan Keselamatan ............3
B. Keamanan Elektrik ...............................................6
Penggunaan Sementara Adaptor..................6
Penggunaan Sementara Kabel Ekstensi......6
Simbol yang digunakan di Panduan ini.......6
C. Pengenalan Produk ....................................7
Unit Dalam Ruangan...........................................7
Lampu Indikasi Pengoperasian.......................7
Unit Luar Ruangan...............................................7
D. Instruksi Pengoperasian ................................8
Bagaimana memasang Baterai.......................8
Remote Control Nirkabel
Perawatan...............................................................8
Metode Pengoperasian.....................................8
Remote Control Nirkabel..................................9
Mode Pengoperasian.......................................10
Pengoperasian Pengeringan
Udara yang Sehat .............................................11
Pengoperasian Otomatis................................11
Pengoperasian Auto Clean............................12
Plasma bersuci
pengoperasian
...................................................12
Kecerahan Display.............................................13
Pengaturan Timer..............................................14
Untuk membatalkan pengaturan timer....13
Pengoperasian Mode Sleep...........................14
Kontrol Arah Udara Vertikal ...........................15
Kontrol Arah Aliran
Udara Horizontal (Tambahan) .......................15
Mode Sirkulasi Udara .......................................15
Pengoperasian Jet Cool...................................12
Pengoperasian Paksa........................................13
Fungsi Pengaktifan Ulang Otomatis...........15
E. Perawatan dan Servis........................................16
Unit Dalam Ruangan.........................................16
Unit Luar Ruangan.............................................17
Tips Pengoperasian! .........................................17
Fungsi Diagnosis Otomatis.............................17
Tips Penelusuran Gangguan! Hemat
waktu dan uang!.................................................18
Segara hubungi layanan servis
dalam situasi berikut.........................................18
Memo......................................................................19
Page 22

Panduan Pengguna 3
Tindakan Pencegahan Keselamatan
Tindakan Pencegahan Keselamatan
Untuk mencegah terjadi cedera pada pengguna atau orang lain dan kerusakan unit, instruksi berikut harus diikuti.
Pengoperasian yang tidak benar karena mengabaikan instruksi yang diberikan akan menimbulkan cedera atau
kerusakan. Tingkat risiko yang ditimbulkan dikategorikan melalui indikasi berikut.
Arti simbol yang digunakan dalam panduan ini dipaparkan di bawah ini.
Simbol ini mengindikasikan kemungkinan kematian atau cedera serius.
Simbol ini mengindikasikan kemungkinan cedera atau kerusakan.
Pastikan tidak dilakukan.
Pastikan untuk mengikuti instruksi.
Gunakan selalu konektor dan soket daya
dengan terminal ground.
• Ada risiko tersengat listrik.
Jangan gunakan pemutus sirkuit yang rusak
atau dengan nilai tidak memadai. Gunakan
pemutus dan sekring dengan nilai yang sesuai.
• Ada risiko kebakaran atau tersengat listrik.
Jangan gunakan pemutus sirkuit multiguna.
Selalu gunakan peralatan ini pada pemutus
sirkuit yang sesuai.
• Jika hal ini diabaikan dapat menyebabkan
sengatan listrik atau kebakaran.
Untuk pekerjaan kelistrikan, hubungi dealer,
penjual, teknisi listrik terlatih, atau Pusat Servis
Resmi. Jangan lakukan sendiri pembongkaran
dan perbaikan produk.
• Ada risiko kebakaran atau sengatan listrik.
Selalu hubungkan produk ke ground sesuai
diagram kabel. Jangan hubungkan kabel
ground ke pipa gas atau air, batang penangkal
petir, atau kabel ground telepon.
• Ada risiko kebakaran atau tersengat listrik.
Pasang panel dan penutup kotak kontrol
dengan kencang.
• Ada risiko kebakaran atau sengatan listrik karena
debu, air, dsb.
Gunakan pemutus atau sekring dengan nilai
• Ada risiko kebakaran atau tersengat listrik.
daya. Jika kabel daya tergores atau terkelupas
atau rusak, ganti kabel.
• Ada risiko kebakaran atau tersengat listrik.
Untuk pemasangan, pelepasan, atau
pemasangan kembali, hubungi selalu dealer
atau Pusat Servis Resmi.
• Ada risiko kebakaran, sengatan listrik, ledakan,
atau cedera.
Jangan pasang produk pada dudukan pemasangan
yang rusak. Pastikan area pemasangan tidak
mengalami deteriorasi karena dimakan usia.
• Hal tersebut dapat menyebabkan produk jatuh.
Jangan pernah memasang unit luar ruangan
pada dudukan yang bergerak atau di tempat
tidak kokoh yang dapat menyebabkan unit jatuh.
• Unit luar ruangan yang jatuh dapat menyebabkan
kerusakan atau cedera atau bahkan kematian
seseorang.
Jika unit masuk (tenggelam atau terendam)
ke dalam air, hubungi Pusat Servis Resmi untuk
diperbaiki sebelum digunakan kembali.
• Ada risiko kebakaran atau tersengat listrik.
Pada unit luar ruangan, kapasitor penaik
menyuplai listrik tegangan tinggi ke komponen
kelistrikan. Pastikan arus listrik di kapasitor
dikosongkan sepenuhnya sebelum melakukan
perbaikan.
• Kapasitor yang masih dialiri arus dapat
mengakibatkan sengatan listrik.
Saat memasang unit, gunakan perlengkapan
pemasangan yang disertakan bersama produk.
• Jika tidak, unit dapat jatuh dan menyebabkan
cedera serius.
Pastikan untuk menggunakan hanya
komponen yang tercantum dalam daftar
komponen servis. Jangan pernah coba-coba
• Penggunaan komponen yang tidak tepat dapat
menyebabkan sengatan listrik, menghasilkan
panas yang sangat berlebih atau kebakaran.
AWAS
PERHATIAN
AWAS
yang benar.
INDONESIA
Page 23

4 AC
Tindakan Pencegahan Keselamatan
Koneksi perkabelan dalam ruangan/luar
ruangan harus dikencangkan dengan kuat
dan kabel harus diarahkan dengan benar
sehingga kabel tidak dapat dilepaskan dari
terminal koneksi.
• Koneksi yang tidak tepat atau kendur dapat
menimbulkan panas atau kebakaran.
Buang bahan-bahan kemasan di tempat
yang aman, seperti baut, paku, baterai,
benda-benda yang patah dsb setelah
pemasangan atau servis dan kemudian r
obek atau buang kantung plastik kemasan.
• Anak-anak dapat menjadikan benda-benda
tersebut sebagai mainan dan menyebabkan cedera.
Pastikan untuk memeriksa konektor kabel
daya tidak kotor, tidak kendur atau patah
dan pasang konektor sepenuhnya.
• Konektor daya yang kendur atau patah dapat
menyebabkan sengatan listrik atau kebakaran.
Pastikan untuk memeriksa refrigeran yang
akan digunakan. Baca label pada produk.
• Refrigeran yang tidak sesuai dapat mencegah
unit tidak beroperasi normal.
Jangan gunakan kabel daya, konektor, atau
soket kendur yang rusak.
• Jika hal ini diabaikan dapat menyebabkan
kebakaran atau sengatan listrik.
Jangan sentuh, operasikan, atau perbaiki
produk dengan tangan basah. Pegang
konektor dengan tangan saat melepaskannya.
• Ada risiko sengatan listrik atau kebakaran.
Jangan letakkan pemanas atau perlengkapan
pemanas lainya di dekat kabel daya.
• Ada risiko kebakaran atau sengatan listrik.
Jangan biarkan air mengenai komponen
listrik. Pasang unit di tempat yang jauh dari
sumber air.
• Ada risiko kebakaran, kegagalan produk, atau
sengatan listrik.
Jangan simpan atau gunakan atau bahkan
membiarkan gas yang dapat terbakar atau
mudah terbakar di dekat produk.
• Ada risiko kebakaran.
Jangan gunakan produk di ruangan tertutup
yang sempit dalam jangka waktu lama. Lakukan
pergantian udara dengan teratur.
• Kandungan zat oksigen dapat berkurang dan
dapat menganggu kesehatan Anda.
Jangan buka gril depan selama produk
dioperasikan. (Jangan sentuh lter elektrostatik
pada unit jika ada.)
• Ada risiko cedera sik, sengatan listrik, atau
kegagalan produk.
Jika keluar bunyi aneh, bau tidak enak, atau
asap dari produk, segera matikan unit pemutus
atau cabut kabel catu daya.
• Ada risiko sengatan listrik atau kebakaran.
Lakukan pertukaran udara dari waktu ke waktu
saat dioperasikan bersama dengan kompor,
atau elemen pemanas dsb.
• Kandungan zat oksigen dapat berkurang dan
dapat menganggu kesehatan Anda.
Matikan daya utama dan putuskan
koneksi unit saat produk dibersihkan
atau diperbaiki.
• Ada risiko sengatan listrik.
Jika produk tidak akan digunakan dalam
waktu lama, cabut konektor catu daya atau
matikan unit pemutus.
• Ada risiko kerusakan atau kegagalan produk,
atau pengoperasian yang tidak diinginkan.
Pastikan tidak seorang pun terutama
anak-anak dapat menginjak atau jatuh
mengenai unit luar ruangan.
• Hal ini dapat menyebabkan cedera atau
kerusakan produk.
Pastikan kabel daya tidak dapat
ditarik atau rusak selama
pengoperasian.
• Ada risiko kebakaran atau tersengat listrik.
Jangan letakkan APA PUN di
kabel daya.
• Ada risiko kebakaran atau tersengat listrik.
Jangan pasang atau mencabut konektor catu daya untuk menyalakan
atau mematikan unit.
• Ada risiko kebakaran atau tersengat listrik.
Jika ada kebocoran gas, matikan gas dan buka jendela untuk melakukan
pergantian udara sebelum menyalakan produk tersebut.
• Jangan gunakan telepon atau memutar switch ke posisi ON atau OFF.
Ada risiko ledakan atau kebakaran.
Dua orang atau lebih harus mengangkat dan
memindahkan produk.
• Hindari terjadinya cedera pada seseorang.
Jangan pasang produk dengan posisi mengarah
langsung ke udara laut (terkena garam).
• Hal tersebut dapat menyebabkan korosi pada
produk.
Pasang selang penguras untuk memastikan
bahwa air kondensasi dikuras dengan benar.
• Koneksi yang buruk dapat menyebabkan
kebocoran air.
Pastikan permukaan rata saat memasang
produk.
• Untuk mencegah getaran atau bunyi bising.
Jangan pasang produk di mana bunyi berisik
atau udara panas dari unit luar ruangan dapat
merusak atau mengganggu lingkungan tetangga.
• Hal tersebut dapat menyebabkan masalah bagi
tetangga Anda dan akhirnya menimbulkan
Selalu periksa apakah ada kebocoran gas
(refrigeran) setelah pemasangan atau
perbaikan produk.
• Level refrigeran yang rendah dapat
menyebabkan kegagalan produk.
PERHATIAN
pertengkaran.
Page 24

Panduan Pengguna 5
Tindakan Pencegahan Keselamatan
Jangan gunakan produk untuk tujuan tertentu
seperti mengawetkan makanan, pekerjaan seni,
dsb. Produk ini merupakan AC pelanggan, bukan
sistem refrigeran yang akurat.
• Ada risiko kerusakan atau kehilangan properti.
Jangan hambat inlet atau outlet aliran udara.
• Hal ini dapat menyebabkan kegagalan produk.
Gunakan kain yang lembut untuk
membersihkan. Jangan gunakan detergen,
cairan yang keras atau cipratan air dsb.
• Ada risiko kebakaran, sengatan listrik, atau
kerusakan pada komponen plastik pada produk.
Jangan sentuh komponen metal produk
• Ada risiko cedera.
Jangan injak atau letakkan apa pun pada
produk. (unit luar ruangan)
• Ada risiko cedera atau kegagalan
produk.
minggu atau lebih sering jika diperlukan.
• Filter yang kosong akan mengurangi esiensi.
Jangan memasukkan tangan atau objek lain
melalui inlet atau outlet udara saat
produk beroperasi.
• Komponen tajam dan bergerak dapat
menyebabkan cedera.
Berhati-hatilah saat membongkar dan
memasang produk.
• Tepi yang tajam dapat menyebabkan cedera.
Jika gas refrigeran bocor selama
perbaikan, jangan sentuh gas refrigeran
yang keluar.
• The refrigernat gas can cause frostbite (cold
burn)
Jangan miringkan unit saat memindahkan
atau melepaskannya.
• Air kondensasi di dalam wadahnya dapat tumpah.
Jangan campur udara atau gas selain refrigeran
yang telah ditentukan untuk digunakan
• Udara yang memasuki sistem refrigeran akan
menyebabkan tekanan yang sangat tinggi dan
mengakibatkan perlengkapan rusak atau timbul
Jika gas refrigeran bocor selama pemasangan,
lakukan segera pergantian udara di area yang
• Jika tidak dilakukan dapat membahayakan
Membongkar unit, menangani oli refrigeran
oil dan komponen harus dilakukan sesuai
dengan standardisasi setempat dan
nasional.
Ganti semua baterai di remote control
dengan tipe yang sama. Jangan kombinasikan
baterai lama dan baterai baru atau baterai
dengan tipe yang berbeda-beda.
• Ada risiko kebakaran atau kegagalan produk.
Jangan isi ulang atau membongkar
baterai. Jangan buang baterai ke
dalam api.
• Baterai dapat terbakar atau meledak.
Jika cairan dari baterai mengenai kulit atau
baju Anda, segera basuh atau cuci dengan
air bersih. Jangan gunakan remote jika
baterai bocor.
• Bahan kimiawi dalam baterai dapat menyebabkan
luka bakar atau gangguan kesehatan lainnya.
Jika cairan dari baterai tertelan, sikat gigi
Anda dan kunjungi dokter. Jangan
gunakan remote jika baterai
bocor.
• Bahan kimiawi dalam baterai dapat menyebabkan
luka bakar atau gangguan kesehatan lainnya.
Jangan operasikan AC dalam jangka waktu
lama jika kelembapan udara sangat tinggi
dan pintu atau jendela dibiarkan terbuka.
• Moisture may condense and wet or damage
furniture.
Jangan biarkan kulit Anda atau anak-anak atau
tanaman terkena hisapan udara dingin
• Hal ini dapat membayakan kesehatan Anda.
Jangan meminum air yang dikuras dari
produk.
• Air tersebut tidak higienis dan dapat
menyebabkan masalah kesehatan yang serius.
Gunakan bangku atau tangga yang kokoh saat
membersihkan, melakukan perawatan, atau
• Berhati-hatilah dan hindari timbulnya cedera.
pada sistem.
cedera.
INDONESIA
bersangkutan.
kesehatan Anda.
atau panas.
memperbaiki produk yang dipasang di ketinggian.
Page 25

6 AC
Keamanan Elektrik
Keamanan Elektrik
• Peralatan ini harus dihubungkan ke ground dengan benar.
Untuk meminimalisir risiko tersengat listrik, Anda harus selalu menghubungkannya ke outlet yang memiliki
koneksi ke ground.
• Jangan memotong atau melepaskan konektor ground dari konektor daya.
• Menghubungkan terminal ground adaptor ke baut penutup stop kontak dinding tidak berarti perangkat
telah terhubung ke ground kecuali baut penutup dari bahan metal dan tidak diinsulasi, dan stop kontak
dinding dihubungkan ke ground melalui perkabelan rumah.
• Jika Anda ragu apakah AC telah terhubung ke ground dengan benar, mintalah teknisi terlatih untuk
memeriksa stop kontak dinding dan sirkuit.
Kami sangat tidak menganjurkan penggunaan adaptor karena dapat membahayakan. Untuk koneksi
sementara, gunakan hanya adaptor yang asli, yang dapat ditemukan di banyak toko perlengkapan
setempat. Pastikan slot yang besar di adaptor berada lurus dengan slot besar di stop kontak untuk koneksi
polaritas yang benar.
Untuk mencabut kabel daya dari adaptor, pegang kabel daya dengan satu tangan dan tangan lainnya
memegang adaptor untuk mencegah terminal ground rusak. Jangan sering mencabut kabel daya karena ini
dapat menyebabkan kerusakan pada terminal ground.
• Jangan pernah gunakan perlengkapan dengan adaptor yang rusak.
Kami sangat tidak menyarankan penggunaan kabel ekstensi karena dapat membahayakan.
Penggunaan Sementara Adaptor
Penggunaan Sementara Kabel Ekstensi
Simbol ini memberi peringatan kepada Anda tentang risiko tersengat listrik.
Simbol ini memberi peringatan kepada Anda tentang bahaya yang
dapat menyebabkan AC rusak.
Simbol ini mengindikasikan catatan khusus.
CATATAN
Simbol yang digunakan di Panduan ini
Perlengkapan ini harus dipasang sesuai dengan standardisasi perkabelan setempat. Panduan ini berfungsi
AWAS
AWAS
AWAS
Page 26

Panduan Pengguna 7
Pengenalan Produk
Pengenalan Produk
Berikut adalah pengenalan singkat tentang unit dalam dan luar ruangan.
Unit Dalam Ruangan
Unit Luar Ruangan
Lampu Indikasi Pengoperasian
Gril depan
Triple Filter
Ionizer
Outlet Udara
Kisi-Kisi Vertikal
Power
Timer
Outdoor
On/O
Timer
Outdoor
: Menyala selama pengoperasian sistem, kode kesalahan, dan pengaturan
pengaktifan ulang otomatis.
: Menyala selama pengoperasian timer atau pengoperasian otomatis
mode sleep.
:
Fungsi ini melukiskan mode dinamik dengan menggunakan sistem
pencahayaan multipel.
Plasma Filter
Filter udara
H1N1 Filter
Bilah Horizontal
Inlet udara
INDONESIA
Tombol ON/OFF
Penerima Sinyal
LED Display
Ventilasi intake udara
Ventilasi outlet udara
Pelat dasar
Kabel penghubung
Saluran refrigeran
Selang penguras
Page 27

8 AC
Instruksi Pengoperasian
1.
Pilih lokasi tepat yang aman & mudah dijangkau.
2. Pasang kencang dudukan remote di dinding atau lokasi
lainnya dengan sekrup yang tersedia.
3. Masukkan remote control ke dalam dudukannya.
1. Remote control tidak boleh terpapar langsung
oleh sinar matahari.
2. Unit pengirim & penerima sinyal harus tetap bersih
agar sistem komunikasi tetap baik. Gunakan kain
lembut untuk membersihkan bagian tersebut.
Instruksi Pengoperasian
Bagaimana Memasang Baterai
Remote Control Nirkabel Perawatan
1. Lepaskan penutup baterai dengan menariknya sesuai arah tanda panah.
2. Pasang baterai baru dengan memastikan bahwa sisi (+) dan (-) baterai
berada di posisi yang benar.
3. Pasang kembali penutup baterai dengan menggesernya kembali
ke posisinya.
1. Selalu gunakan/ganti baterai dengan tipe baterai yang sama.
2. Jika sistem AC tidak ingin digunakan dalam waktu yang cukup lama,
lepaskan baterai untuk menghemat masa pakainya.
3. Jika layar display remote control mulai memudar, ganti
kedua baterai.
4. Gunakan baterai dengan tipe 2 AAA (1,5 volt).
CATATAN
3. Jika beberapa peralatan lain juga dioperasikan dengan remote
control, ubah posisinya atau tanyakan kepada staf servis.
1. Unit penerima sinyal berada di bagian dalam unit.
2.
Arahkan remote control ke unit untuk mengoperasikannya. Tidak boleh ada benda apa pun yang
menghalangi unit dan remote control.
Metode Pengoperasian
CATATAN
Page 28

Kontrol-kontrol akan tampak seperti di bawah ini.
1. TOMBOL ON/OFF
Operasi akan mulai bila tombol ini ditekan dan
berhenti bila tombol ini ditekan lagi.
2. TOMBOL SELEKSI MODE PENGOPERASIAN
Digunakan untuk memilih mode operasi.
3. TOMBOL PENGATURAN SUHU RUANGAN
Digunakan untuk memilih temperatur ruang
4. TOMBOL SELEKSI KECEPATAN KIPAS DALAM
Digunakan untuk memilih kecepatan kipas dalam
empat tingkat: rendah, sedang, tinggi dan ACAK.
5. TOMBOL JET COOL
Digunakan untuk memulai atau menghentikan
speed cooling: (speed cooling mengoperasikan
kipas dengan kecepatan super tinggi dalam mode
penyejukan.)
6. TOMBOL CHAOS SWING
Digunakan untuk mematikan atau menghidupkan
gerakan louver dan mengeset arah aliran udara
naik/turun seperti yang dikehendaki.
7. TOMBOL TIMER ON/OFF
Digunakan untuk menyetel waktu dimulainya dan
dihentikannya pengoperasian.
8. TOMBOL TIME SETTING
Digunakan untuk menyetel waktu.
9. TOMBOL TIMER SET/CANCEL
Digunakan untuk menyetel timer ketika waktu
yang dikehendaki dicapai dan untuk membatalkan
operasi Timer.
10. TOMBOL SLEEP MODE OTOMATIS
Digunakan untuk menyetel operasi Sleep Mode
Auto
11. TOMBOL “ AIR CIRCULATION ”
12. TOMBOL PEMERIKSAAN SUHU RUANG
Digunakan untuk mengecek temperatur ruang
13. TOMBOL RESET
Digunakan untuk menyetel ulang waktu
14. TOMBOL 2nd F
Digunakan sebelum menggunakan mode-mode
yang dicetak dalam warna biru pada bawah
tombol.
15. TOMBOL AUTO CLEAN (Opsional)
Digunakan untuk menyetel mode Auto Clean.
16. TOMBOL LCD LUMINOSITAS (Opsional)
Digunakan untuk mengatur LCD luminositas.
CATATAN
Remote Control Nirkabel
Instruksi Pengoperasian
Pemancar sinyal
5
6
4
2
7
ON
11
OFF
CANCEL
SET
AUTO CLEAN
8
13
Mode
Pengoperasian
Pengoperasian Pendinginan
Operasi Otomatis atau Pergantian Otomatis
Pengoperasian Pengeringan Udara yang Sehat
1
3
10
9
12
15
16
14
Flip-up door
(opened)
Digunakan untuk mensirkulasikan udara dalam ruangan
tanpa fungsi mendinginkan ataupun memanaskan.
INDONESIA
Untuk menggunakan fungsi dicetak dengan warna biru
di bagian bawah tombol tekan 2 nd F tombol terlebih
dulu, kemudian diperlukan tombol fungsi. Menekan
tombol 2 n d F tombol mengaktifkan cetak biru fungsi
dari masing-masing tombol. Membatalkan fungsi tekan
tombol F-2 lagi yang lain akan secara otomatis
membatalkan jika tetap menganggur setelah 10 detik.
Panduan Pengguna 9
Page 29

Instruksi Pengoperasian
ON
Penyejukan Otomatis Anti Lembab
Sehat
Untuk menaikkan
temperatur
Untuk menurunkan
temperatur
1
2
3
4
Kecepatan Kipas rendah.. Kecepatan Kipas menengah.. Kecepatan Kipas tinggi.Udara ACAK (CHAOS)
1
2
3
4
Mode Pengoperasian
t roller
Tekan tombol Start/Stop
Unit akan merespons
dengan suara bip.
Buka pintu remote control. Untuk memilih Operasi
Pemanasan,.tekan tombol Operation Mode Selection.
Setiap kali tombol ditekan, mode operasi akan berubah
sesuai arah panah.
Tutup pintu remote control.
Setel temperaturnya lebih rendah daripada temperatur ruang
Temper atur bisa disetel dalam kisaran 16°C~30° C pada
interval 1°C.
Setel kecepatan kipas lagi dengan pintu remote control dalam k eadaa n tertutup.
Anda dapat memilih kecepatan kipas dalam empat tingkat: rendah, medium, tinggi atau ACAK.
Setiap kali tombol ditekan, mode kecepatan kipas akan berubah.
Angin alami dengan logika CHAOS
Untuk mendapatkan suasana yang lebih segar, tekan selektor kecepatan kipas Unit-Dalam dan pilih
mode CHAOS. Dengan mode ini, udara akan berembus seperti hembusan udara alami dengan cara
mengubah kecepatan kipas secara otomatis ke logika CHAOS.
10 AC
Page 30

Auto
Pengeringan
Udara yang Sehat
Instruksi Pengoperasian
Untuk menjalankan operasi otomatis ikuti langkah 1 dan 2. (Lihat mode operasi)
Pengoperasian Pengeringan Udara yang Sehat
Selama Operasi Dehumidication Sehat
Jika Anda memilih modus di dehumidication MODE OPERASI
SELEKSI BUTTON, produk mulai menjalankan dehumidication
fungsi. Secara otomatis mengatur suhu ruangan dan aliran udara
volume ke kondisi terbaik untuk dehumidication, berdasarkan
merasakan saat ini suhu ruangan.
Dalam hal ini, Namun, pengaturan suhu tidak ditampilkan pada
remote kontrol dan Anda tidak dapat mengendalikan ruangan
suhu baik.
Selama fungsi dehumidication sehat, volume aliran udara
secara otomatis diatur sesuai dengan algoritma optimasi
menanggapi suhu ruang saat ini status, sehingga kondisi
ruangan tetap sehat dan nyaman bahkan dalam sangat
lembab musim.
Untuk menjalankan modus dehumidication sehat ikuti
langkah 1, dan 2 dan 4 (Lihat mode operasi)
Pengoperasian Otomatis
Dalam modus operasi ini sebenarnya pengaturan suhu dan kecepatan
kipas secara otomatis ditetapkan oleh kontrol elektronik berdasarkan
logika saat ini suhu kamar. Jika Anda merasa panas atau dingin tekan
pengaturan suhu tombol masing-masing untuk lebih cooling atau
efek pemanasan.
INDONESIA
CATATAN : Anda tidak dapat menetapkan pengaturan yang sebenarnya
suhu dan kipas indoor kecepatan dalam modus operasi ini. Tetapi Anda
dapat menggunakan ayunan Chaos dalam operasi ini. Jika sistem ini
tidak beroperasi seperti yang dikehendaki, switch secara manual untuk
modus lain.
Panduan Pengguna 11
Page 31

12 AC
Instruksi Pengoperasian
Pengoperasian Jet Cool
Fungsi jet cool dapat digunakan untuk mendinginkan ruangan secara cepat saat cuaca
panas. Saat fungsi ini diaktifkan, AC akan beroperasi di mode pengoperasian pendinginan
dengan kecepatan kipas sangat tinggi dan pengaturan suhu 18°C selama 30 menit
untuk pendinginan yang cepat dan efektif.
Sama halnya dengan jet cool, fungsi jet heat (hanya tersedia di model tertentu) akan
menghangatkan ruangan secara cepat dengan beroperasi di kecepatan kipas sangat
tinggi dan pengaturan suhu 30°C selama 30 menit.
Anda dapat mengaktifkan pengoperasian ini dengan menekan TOMBOL JET COOL.
Untuk berganti dari mode jet cool ke mode pendinginan kecepatan kipas tinggi, tekan TOMBOL JET COOL
atau TOMBOL SELEKTOR KECEPATAN KIPAS DALAM atau tekan lagi TOMBOL PENGATURAN SUHU
RUANGAN.
NOTE
CATATAN
• Jet fungsi dingin tidak dapat diaktifkan selama pemanasan atau auto changeover operasi.
• Dalam kasus Inverter, Seni Cool dan Art Cool Wide (non-Deluxe) model, Anda dapat menggunakan
fungsi panas jet oleh JET COOL menekan TOMBOL untuk pemanas operasi.
• Seni Dinginkan dan Seni Best Wide model tutup samping jet pembuangan selama dingin / panas
operasi, untuk kuat pendinginan dan pemanasan.
Pengoperasian Auto Clean (Opsional)
Selama fungsi auto bersih, moistures tersisa di dalam ruangan unit setelah operasi atau sehat
pendingin dehumidication operasi dapat dihapus.
AUTO CLEAN
1. Tekan TOMBOL OTOMATIS BERSIH untuk mengaktifkan fungsi ini.
2. Sekarang setiap kali unit ini dimatikan, kipas indoor masih berjalan selama 15
menit internal tanpa cooling atau dehumidication operasi. Juga louver ditutup.
3. Mengering ini setiap sisa kelembaban & membersihkan unit internal.
4. Jika Anda menekan TOMBOL OTOMATIS BERSIH lagi selama operasi, fungsi ini
dibatalkan.
CATATAN
Selama fungsi auto bersih, hanya START / STOP BUTTON, PLASMA TOMBOL dan
AUTO CLEAN TOMBOL dapat digunakan.
Page 32

Panduan Pengguna 13
Instruksi Pengoperasian
ON/OFF
TOMBOL
Kecerahan Display (Opsional)
Kecerahan display unit dapat diatur menggunakan remote control.
Buka penutup remote control dan tekan tombol KECERAHAN LED.
LED display akan menjadi gelap. Tekan kembali tombol untuk mengatur kecerahan display.
(Urutan 100% 0% LUMINOSITY akan diulang setiap kali Anda menekan tombol.)
Jika Anda menekan tombol apa pun, pengaturan akan kembali ke 100% LUMINOSITY.
Kecuali, jika Anda menekan TOMBOL PEMERIKSAAN SUHU RUANGAN.
Pengoperasian paksa
Pengoperasian paksa dilakukan saat remote control tidak dapat digunakan. Pengoperasian akan dimulai
INDONESIA
saat tombol ON/OFF ditekan. Jika Anda ingin menghentikan pengoperasian, tekan lagi tombolnya.
Model Pendinginan
Mode pen goperasian
Kecepatan KIPAS Dalam
Pengaturan Suhu
Pendinginan
Tinggi
22°C
Pengoperasian tes
Selama PENGOPERASIAN TES, unit akan beroperasi di mode pendinginan dengan kipas pada kecepatan
tinggi, berapa pun suhu ruangan dan akan direset dalam 18 menit. Selama pengoperasian tes, jika sinyal
remote control diterima, unit akan beroperasi saat remote control digunakan. Jika Anda ingin menggunakan
pengoperasian ini, Tekan dan tahan tombol ON/OFF selama 3~5 detik, kemudian buzzer akan
mengeluarkan bunyi 'bip' 1 kali. Jika Anda ingin menghentikan pengoperasian, tekan lagi tombolnya.
Page 33

Instruksi Pengoperasian
CATATAN
CATATAN
Pengaturan Timer
1. Pastikan waktu telah disetel dengan benar pada layar remote control.
2. Tekan tombol 2nd F.
3. Tekan tombol Timer ON/OFF untuk menghidupkan atau mematikan Timer.
ON
OFF
4. Tekan tombol Penyetelan Waktu hingga diperoleh waktu yang diinginkan.
5. Untuk menyetel waktu yang telah dipilih, tekan tombol Penyetelan Timer sambil mengarahkan
CANCEL
SET
remote control ke penerima sinyal.
Membatalkan penyetelan timer
Periksalah apakah ikon 2nd F telah mati.
Tekan tombol Batalkan Timer sambil mengarahkan remote control ke penerima sinyal.
CANCEL
SET
(Lampu timer pada unit penyejuk ruangan dan pada layar remote control akan mati.)
Pilih salah satu dari empat tipe operasi berikut ini.
Delay OFF Timer Delay ON Timer Delay OFF and ON Timer Delay ON and OFF Timer
dengan unit berjalan
Pengoperasian Mode Sleep
1. Tekan tombol Mode Sleep Otomatis untuk menyetel waktu untuk menghentikan kerja unit secara otomatis.
2. Timer diprogram dengan interval 1-jam dengan menekan tombol Mode Sleep Otomatis 1 kali hingga 7 kali.
Mode Sleep tersedia untuk 1 kali hingga 7 kali. Untuk mengubah masa waktu dalam langkah-langkah interval
1 jam, tekan tombol Mode Sleep dengan mengarahkan remote control ke unit.
3. Pastikan LED dari Model Sleep Otomatis menyala.
Untuk membatalkan Mode Sleep, tekan tombol Mode Otomatis beberapa kali hingga tanda bintang ( )
menghilang dari layar remote control.
Mode Sleep akan bekerja pada kecepatan kipas yang rendah (pendinginan) atau kecepatan
kipas yang medium (pompa panas saja) untuk mendapatkan suasana tidur yang nyaman.
Pada Mode Sleep: Fungsi Ayunan Chaos tidak bekerja.
Pada mode pendinginan atau mode dehumidifikasi sehat:
Suhu akan secara otomatis meningkat dengan 1°C selama 30 menit berikutnya dan dengan 2° C selama 1 jam
untuk mendapatkan suasana tidur yang nyaman.
14 AC
Page 34

Instruksi Pengoperasian
Fitur ini diaktifkan pada pengaturan default pabrik, namun Anda dapat menonaktifkannya dengan menekan
tombol ON/OFF selama 6 detik. Unit akan mengeluarkan bunyi bip dua kali dan lampu akan berkedip 6 kali.
Untuk mengaktifkannya, tekan lagi tombol selama 6 detik. Unit akan mengeluarkan bunyi bip dua kali dan
lampu biru akan berkedip 4 kali.
Fungsi ini bermanfaat jika terjadi gangguan daya.
Saat daya didapatkan kembali setelah terjadi gangguan daya, ?tur ini akan akan mengembalikan kondisi
pengoperasian sebelumnya dan AC akan berfungsi dengan pengaturan yang sama.
Kontrol Arah Udara Vertikal (Opsional)
Aliran udara naik/turun (Aliran Udara Vertikal) dapat
diatur dengan menggunakan remote control.
1. Tekan tombol Start/Stop untuk mengoperasikan
unit AC.
2. Tekan tombol Chaos Swing dan bilah-bilah akan
bergerak naik dan turun. Tekan tombol Chaos
swing untuk menyetel bilah vertikal pada arah
aliran udara yang diinginkan.
Mode Sirkulasi Udara
Program ini mensirkulasikan udara tanpa mendinginkan ataupun memanaskan.
Program ini dapat diaktifkan dengan menekan tombol “AIR CIRCULATION”.
Ketika sirkulasi udara bekerja anda dapat memilih tingkat kecepatan angin
dengan menekan tombol “FAN SPEED”
PERHATIAN
PERHATIAN
Apabila Anda menekan tombol CHAOS swing,
arah aliran udara horizontal diubah secara
otomatis berdasarkan algoritma CHAOS untuk
mendistribusikan udara di dalam ruangan secara
merata dan pada saat yang sama untuk membuat
tubuh manusia merasa nyaman, seperti sedang
menikmati sepoi-sepoi angin alami.
Selalu gunakan remote control untuk mengatur
arah aliran udara naik/turun. Mengubah posisi
bilah pengatur arah aliran udara vertikal secara
manual dapat merusak AC.
Apabila unit AC dimatikan, bilah pengatur arah
aliran udara naik/turun akan menutup saluran
keluar udara dari unit AC.
INDONESIA
Fungsi Pengaktifan Ulang Otomatis
CATATAN
Panduan Pengguna 15
Page 35

16 AC
Perawatan dan Servis
Melepaskan Filter
Buka panel depan seperti yang diperlihatkan.
Kemudian, tarik tab lter sedikit ke arah depan untuk melepaskan lter udara.
Setelah melepaskan lter udara, lepaskan plasma dan H1N1 Filter dengan menariknya sedikit ke arah bawah.
Jangan sentuh lter plasma ini dalam waktu 10 detik setelah membuka gril inlet, hal tersebut dapat
menyebabkan sengatan listrik.
Bersihkan unit dengan kain kering yang lembut. Jangan gunakan pemutih atau pembersih yang bersifat abrasif.
Jangan gunakan salah satu dari bahan berikut
• Air dengan panas di atas 40°C. Ini dapat menyebabkan perubahan bentuk dan perubahan warna.
• Unsur yang mudah menguap. Ini dapat merusak permukaan AC.
Filter Udara
Filter udara di belakang panel depan / gril harus diperiksa dan dibersihkan setiap 2 minggu
sekali atau lebih sering, jika diperlukan. Untuk melepaskan lter, lihat diagram penjelasan
yang terpisah untuk setiap tipe model. Bersihkan lter dengan penyedot
debu atau air hangat bersabun. Untuk kotoran yang membandel, bersihkan
dengan larutan deterjen dalam air hangat. Setelah lter dibersihkan,
jemur di area yang tidak terkena sinar matahari langsung dan pasang
kembali ke tempatnya.
Plasma Filter (Opsional)
Filter plasma di belakang lter udara harus diperiksa dan dibersihkan setiap 3
bulan sekali atau lebih sering, jika diperlukan. Untuk melepaskan lter, lihat
diagram penjelasan yang terpisah untuk setiap tipe model. Bersihkan lter
dengan penyedot debu atau air hangat bersabun. Untuk kotoran yang
membandel, bersihkan dengan larutan deterjen dalam air hangat. Setelah lter
dibersihkan, jemur di area yang tidak terkena sinar matahari langsung dan pasang
kembali ke tempatnya.
H1N1 Filter + Triple Filter
Lepaskan H1N1 Filter + Triple Filter di belakang lter udara dan letakkan di bawah sinar matahari
selama 2 jam.
Dan kemudian masukkan lter tersebut ke posisi sebelumnya.
Perawatan dan Servis
Sebelum melakukan perawatan apa pun, matikan daya utama ke sistem, lepaskan koneksi pemutus sirkuit
dan lepaskan kabel daya.
PERHATIAN
Unit Dalam Ruangan
PERHATIAN
Filter Plasma
PERHATIAN
Page 36

Perawatan dan Servis
Error Display LED
(once)
3 sec 3 sec 3 sec
CATATAN
Unit Luar Ruangan
Koil penukar panas dan ventilasi panel pada unit luar ruangan harus diperiksa secara teratur.
Jika tersumbat oleh kotoran atau jelaga, penukar panas, dan ventilasi panel dapat dibersihkan
di tempat pencucian uap profesional.
Koil yang kotor atau tersumbat akan mengurangi esiensi pengoperasian sistem dan menyebabkan
biaya pengoperasian yang tinggi.
Tips Pengoperasian!
Jangan dinginkan ruangan
secara berlebihan.
Ini tidak bagus untuk kesehatan
dan boros listrik.
Pastikan pintu dan
jendela tertutup rapat.
secara teratur.
Biarkan kerai dan tirai tertutup.
Jarang biarkan sinar matahari
langsung masuk ke dalam ruangan
saat AC dioperasikan.
Atur ventilasi ruangan
secara berkala.
Jaga agar suhu di dalam
ruangan rata.
Atur arah aliran udara vertikal dan
horizontal untuk memastikan suhu
di dalam ruangan rata.
Gunakan kecepatan
kipas tinggi untuk
pendinginan yang efektif
INDONESIA
dan cepat.
Hindari untuk terlalu sering
membuka pintu dan jendela
untuk mempertahankan
udara dingin di dalam
ruangan.
dapat mengurangi aliran
udara dan menurunkan efek
pendinginan dan pengeringan
udara. Bersihkan minimal
setiap dua minggu sekali.
Karena jendela selalu
dibiarkan tertutup, ada
baiknya jika dibuka dan
sesekali lakukan pergantian
udara dalam ruangan.
Unit memberikan daya
pendinginan yang telah
ditentukan saat kecepatan
kipas tinggi.
Fungsi Diagnosis Otomatis
Unit ini memiliki kemampuan diagnosis kesalahan yang terintegrasi. LED unit akan berkedip jika thermistor
mengalami gangguan.
Silakan hubungi staf servis/dealer Anda pada situasi seperti ini
Panduan Pengguna 17
Page 37

18 AC
Perawatan dan Servis
Tips Penelusuran Gangguan! Hemat waktu dan uang!
AC dapat beroperasi secara tidak normal jika:
Masalah
AC tidak terkoneksi.
Sekering putus/pemutus
sirkuit mengalami gangguan.
Gangguan daya.
Tegangan tinggi.
Aliran udara terbatas.
Filter udara kotor.
Ruangan mungkin terlalu panas.
Udara dingin keluar.
Periksa pengaturan suhu.
Mungkin terdapat sumber
panas di dalam ruangan.
AC tidak
menyala
AC tidak
sedingin
biasanya
• Pastikan konektor AC didorong secara
penuh ke dalam outlet.
• Periksa rumah sekring/kotak pemutus sirkuit
dan ganti sekring atau reset pemutus sirkuit.
• Jika terjadi gangguan daya, putar kontrol
mode ke posisi OFF.
Jika daya telah normal kembali, tunggu 3 menit
untuk menyalakan kembali AC agar tidak terjadi
kerusakan pada kompresor yang memiliki muatan
berlebih.
• Jika tegangan sangat tinggi atau sangat rendah
secara tidak normal, pemutus sirkuit akan
mengalami gangguan.
• Pastikan tidak ada tirai, kerai, atau perabot
rumah tangga yang memblokir bagian
depan AC.
•
Lihat bagian Perawatan dan Servis.
• Jika AC pertama kali dinyalakan, ruangan
perlu waktu untuk mendingin.
• Periksa apakah ada gril lantai unit pemanas
dan saluran balik udara dingin yang terbuka.
• Pastikan pengaturannya benar.
• Periksa dan pindahkan sumber tersebut atau
matikan saat menggunakan AC.
Yang Harus DilakukanKemungkinan Penyebab
1. Terjadi hal yang tidak normal seperti misalnya bau terbakar, bunyi yang keras, dan lain-lain.
memperbaikinya sendiri atau menyalakan kembali sistem.
2. Kabel daya utama terlalu panas atau rusak.
3. Kode kesalahan dihasilkan oleh diagnosis otomatis.
4. Air bocor dari unit dalam ruangan bahkan jika kelembapan rendah.
5. Semua switch, pemutus (pengaman, ground) atau sekring tidak berfungsi dengan benar
Pengguna harus melakukan pembersihan & pemeriksaan rutin agar performa unit tidak buruk.
Dalam situasi khusus, pekerjaan harus dilakukan hanya oleh staf servis.
Segera hubungi layanan servis dalam situasi berikut
Page 38

Panduan Pengguna 19
Memo
INDONESIA
Page 39

20 AC
Memo
Page 40

Panduan Pengguna 21
Memo
INDONESIA
Page 41

PT. LG ELECTRONICS INDONESIA
Kawasan Industri MM2100 Blok G
Cikarang Barat, Bekasi, Jawa Barat 17520
INDONESIA
 Loading...