


LCD
Colour
OWNER'S
Please
Retainitfor
Record
See
Model
Serial
read
model
the
label
information
number
number
this
manual
future
reference.
number
attachedonthe
to
your
:
:
Television
MANUAL
serial
when
back
before
number
cover
you
operating
of
and
require
the
quote
service.
carefully
and
dealer
set.
BZ03
your
this
set.
P/NO:3828TUL284J
PrintedinKorea
(0411-REV00)
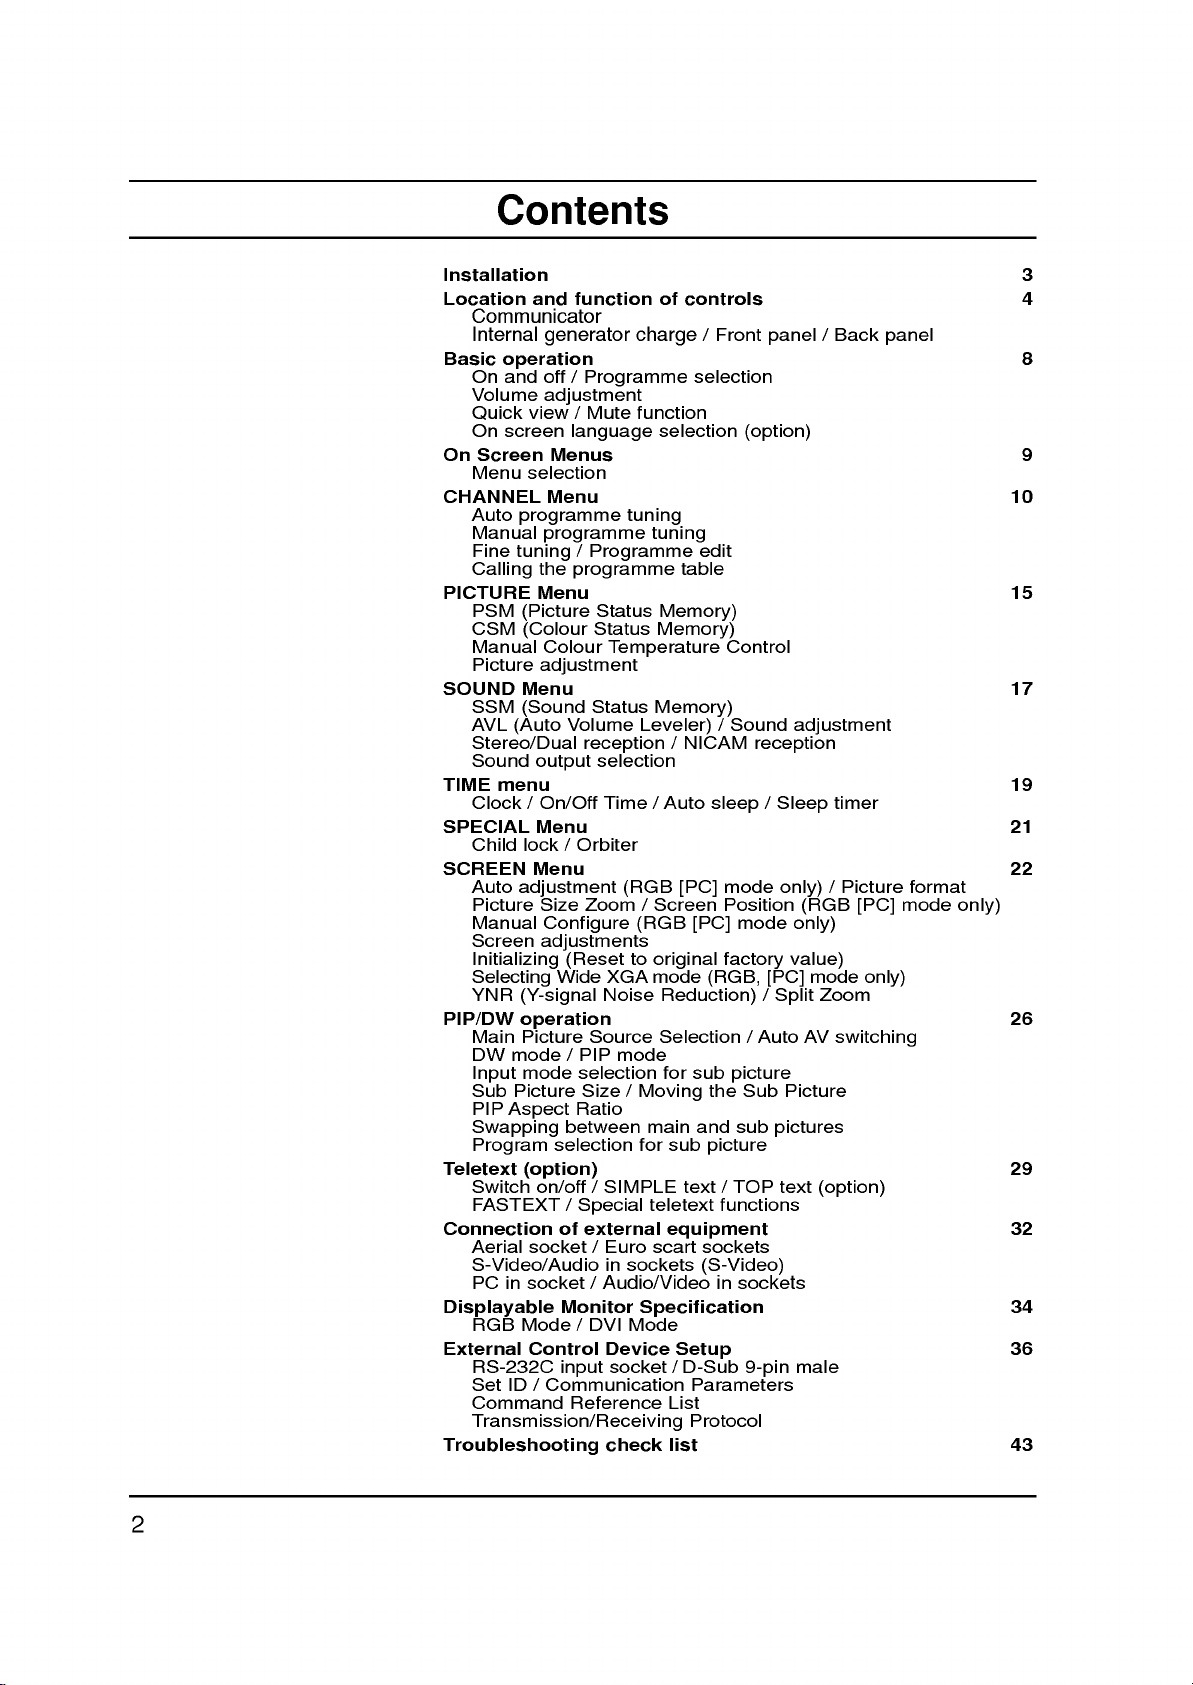
Contents
Installation
Location
and
function
Communicator
Internal
Basic
On
Volume
Quick
On
On
Screen
Menu
CHANNEL
Auto
Manual
Fine
Calling
PICTURE
PSM
CSM
Manual
Picture
SOUND
SSM
AVL
Stereo/Dual
Sound
TIME
Clock/On/Off
SPECIAL
Child
SCREEN
Auto
Picture
Manual
Screen
Initializing
Selecting
YNR
PIP/DW
Main
DW
Input
Sub
PIP
Swapping
Program
Teletext
Switch
FASTEXT
Connection
Aerial
S-Video/Audio
PC
Displayable
RGB
External
RS-232C
Set
Command
generator
operation
and
off
/
adjustment
view/Mute
screen
language
Menus
selection
Menu
programme
programme
tuning/Programme
the
programme
Menu
(Picture
(Colour
Colour
adjustment
Menu
(Sound
Volume
(Auto
reception
output
menu
Menu
lock/Orbiter
Menu
adjustment
Size
Zoom
Configure
adjustments
(Resettooriginal
Wide
(Y-signal
operation
Picture
mode
/
PIP
mode
Picture
Aspect
in
ID/Communication
selection
Size
Ratio
between
selection
(option)
on/off/SIMPLE
/
Special
of
external
socket/Euro
socket
Monitor
Mode
/
Control
input
Reference
Transmission/Receiving
Troubleshooting
charge
Programme
function
tuning
Status
Status
Temperature
Status
Leveler)
selection
Time/Auto
(RGB
/
(RGB
XGA
Noise
Source
mode
/
Moving
main
for
teletext
in
sockets
/
Audio/Video
Specification
DVI
Mode
Device
socket/D-Sub
check
of
controls
/
Front
panel
selection
selection
tuning
table
(option)
edit
Memory)
Memory)
Memory)
/
NICAM
Control
/
Sound
reception
sleep/Sleep
Screen
mode
[PC]
[PC]
(RGB,
Position
mode
factory
only)
[PC]
mode
Reduction)/Split
Selection/Auto
for
sub
picture
the
Sub
and
sub
/
TOP
functions
in
sockets
pictures
text
sub
text
equipment
scart
picture
sockets
(S-Video)
Setup
9-pin
Parameters
List
Protocol
list
/
Back
adjustment
timer
/
Picture
(RGB
only)
value)
mode
Zoom
AV
switching
Picture
(option)
male
[PC]
only)
panel
format
mode
3
4
8
9
10
15
17
19
21
22
only)
26
29
32
34
36
43
2

Power
This
set
ed
on
the
In
the
event
ial
and
a.
Open
b.
After
cord
c.
Fix
cables
cables.
d.
Pull
e.
Close
Warning
To
prevent
ture.
Do
this
may
The
working
consumer
operates
labelonthe
of
thunderstorms
mains
plugs.
the
back
connecting
to
an
AC
with
the
cables
the
back
fireorshock
not
ruborstrike
scratch,
lifeofthis
(RUSSIA
on
panel
the
mains.
the
through
panel
mar,
only).
an
AC
back
cover.
power
supplyed
cover.
hazard,
the
or
damage
set
mains
cover.
the
Active
is
supply,
Never
or
powercuts,
cord
cable
hole
do
not
Matrix
the
7
years
Installation
the
voltage
DC
to
tie
on
expose
Active
since
apply
the
the
set,
after
set.
LCD
Matrix
power
please
connect
collecting
the
set
with
anything
LCD
the
date
isasindicat-
to
out
the
connected
to
rainormois-
the
pull
permanently.
of
delivery
the
power
hard
set.
aer-
a/e
as
to
Service
Never
high
ly,
remove
voltage
unplug
Aerial
Connect
For
the
best
Location
Position
the
screen.
unnecessary
set
is
placed
the
ventilation
If
intend
you
interface
ing
the
set
to
so
fully
as
Cleaning
the
set
not
the
by
screen
use
Unplug
the
If
Do
it
the
your
use
not
wiping
and
set
liquid
the
back
and
other
call
aerial
cable
reception
set
so
Care
should
vibration,
in
a
position
openings
to
mount
(optional
the
wall
to
drop.
before
the
requires
cleaners
cover
hazards.
your
an
that
moisture,
on
the
parts)
mounting
cleaning
screen
additional
dealer.
to
the
outdoor
no
bright
be
to
allowafree
the
TV
to
to
and
or
aerosol
of
the
set
If
the
set
socket
marked
aerial
lightorsunlight
taken
not
dust
or
back
cover.
a
attach
wall,
the
back
bracket
the
face
the
cabinet
cleaning,
cleaners.
as
this
does
should
to
expose
heat.
Also
flowofair.
VESA
of
the TV.
(optional
of
the
with
use a
can
not
+75
be
falls
When
parts),
LCD
a
soft,
clean,
expose
operate
Ω
on
used.
directly
the
ensure
Do
standard
Screen.
clean
damp
set
you
fix
the
that
not
you
proper-
back.
onto
to
any
cover
mount-
install
it
care-
Dust
cloth.
cloth.
b
to
d
the
On
Disposal
The
fluorescent
of
mercury.
Do
not
dispose
Disposal
of
regulations
this
of
lamp
of
product
your
this
local
used
in
product
mute
authority.
this
with
be
product
general
carried
containsasmall
household
out
in
accordance
waste.
amount
to
the
3

14
89
17
10
1
7
5
6
13
SIZE
REVEAL
?
TIME
MIX
SSM
PSM
SPUT
ZOOM
ZOOM
PIP
ARC
WIN.SIZE
RESET
POWER
TV/AV
123
456
7890
MENU
VOL VOL
MUTE
PIP
PR
PIP
PR
Location
Communicator
HOLD
UPDATE
MODE
INDEX
i
M
I/II
Q.VIEW
SLEEP
ZOOM
WIN.POSIOTION
MULTIMEDIA
ARC
PIP/DW
LIST
PR
PR
EXIT
OK
TEXT
SWAP
PIP
INPUT
and
All
2.
3.
4.
11
16
4
2
3
15
5.
6.
12
5
7.
8.
9.
function
the
functions
Some
functions
of
panel
Communicator
1.
the
POWER
switches
MULTIMEDIA
selects
ARC
(Aspect
changes
PIP
BUTTONS
PIP/DW
switches
PIP
PR
selects
SWAP
alternates
PIP
INPUT
selects
WIN.SIZE
adjusts
WIN
POSITION
moves
PIP
ARC
changes
MENU
selects
E
D
/
(Programme
selects
switches
F/G
(Volume
adjusts
adjusts
OK
accepts
NUMBER
switches
PSM
(Picture
recalls
SPLIT
Enlarge
set.
the
RGB
the
the
+/-
a
programme
the
the
the
the
a
menu.
a
programme
the
the
menu
your
the
your
ZOOM
the
can
can
also
set
or
DVI
Ratio
picture
sub
between
input
sub
picture
sub
picture
picture
set
Up/Down)
volume.
settings.
selection
BUTTONS
set
Status
preferred
screen
be
controlled
be
on
from
modes.
Control)
format.
picture
main
mode
format
Up/Down)
on
from
on
from
with
of
controls
with
the
or
sub
off,
sub
sub
with
or
select
picture.
picture.
picture.
adjusted
standby
on
for
the
and
for
the
size.
E
/
or
sub
F/G
picture.
item.
D
to
oramenu
of
standby.
or
displays
the
standbyordirectly
Memory)
picture
setting.
regular
ration.
Communicator.
the
off
to
PIPorDW
direction.
current
buttons
on
standby.
mode.
selectanumber.
the
modes.
front
10.
RESET
When
by
Communicator
pressing
the
reset
does
point
not
with
work,
sharp
reset
one.
the
Communicator
4

11.
12.
13.
14.
15.
I/II
selects
selects
TELETEXT
These
For
further
MUTE
switches
SSM
(Sound
recalls
LIST
displays
Location
the
language
the
sound
BUTTONS
buttons
details,
the
sound
Status
your
preferred
the
programme
are
during
output.
used
see
the
on
or
Memory)
sound
for
'Teletext'
off.
table.
and
dual
language
teletext.
setting.
function
broadcast.
section.
of
controls
Communicator
16.
SLEEP
sets
17.
ZOOM+
Enlarges
:
Note
tons
are
Internal
The
communicator
ator.
To
1.
In
first
20
->
waiting
minute
2.
In
usual
5or6
the
sleep
/
ZOOM-
or
reduces
In
teletext
used
mode,
for
generator
use,
for
again
use
rotation
the
one
->
charge
rotationofthe
timer.
the
teletext
charge
can
be
communicator
handle
minute
20
rotation
->
resuming
the
main
picture
PIP
PR
function.
charged
do
in
the
arrow
->
20
rotation
again->beginning
to
use
+/-,
with
the
size.
SWAP
the
internal
and
PIP
followings;
direction
as
again->waiting
to
INPUT
electric
picture
use
gener-
below
for
but-
one
14
89
17
10
1
7
5
6
13
SIZE
REVEAL
?
TIME
MIX
SSMPSM
SPUT
ZOOM
ZOOM
PIP
ARC
WIN.SIZE
RESET
POWER
TV/AV
123
456
789
MENU
VOL VOL
MUTE
PIP
PR
PIP
PR
UPDATE
INDEX
ZOOM
WIN.POSIOTION
MULTIMEDIA
PR
OK
PR
SWAP
HOLD
MODE
i
M
I/II
Q.VIEW
SLEEP
11
16
4
2
ARC
PIP/DW
LIST
3
15
0
EXIT
TEXT
12
PIP
INPUT
5
Note:Do
communicator.
not
rotate
the
handle
too
rapidly
for
the
protection
of
the
5

Location
and
function
of
controls
Front
panel
PR
5
VOL
OK
MENU
TV
AV
/
ON/OFF
6
7
4
3
2
1
1.
2.
3.
4.
5.
POWER
switches
TV/AV
selects
clears
switches
MENU
selects
OK
accepts
mode.
F/G
adjusts
adjusts
E
D
/
selects
switches
(ON/OFF)
the
set
TV
or
AV,
the
menu
the
set
a
menu.
selection
your
(Volume
the
volume.
menu
settings.
(Programme
a
program
the
set
on
or
monitor
from
the
on
from
Down/Up)
Up/Down)
oramenu
on
from
off.
mode.
screen.
standby.
or
displays
standby.
item.
the
current
6.
POWER/STANDBY
illuminates
illuminates
7.
REMOTE
red
green
CONTROL
in
standby
when
INDICATOR
mode.
the
SENSOR
set
is
switched
on.
6

Location
and
function
of
controls
Back
panel
S-VIDEO
S-VDEO
R AUDIO L/MOLO VDEO
A3
R AUDIO L / MOLO VIDEO
AV3
6
1.
2.
3.
4.
POWER
RS-232C
PORT
connect
RGB
INPUT
connect
SONAL
Note
function
jack
EURO
connect
these
1
INPUT
:
for
connection
SCART
sockets.
CORD
INPUT
to
the
/
the
set
COMPUTER
This
set
although
the
euro
2
SOCKET
RS-232C
DVI
output
is
SOCKET
(CONTROL/SERVICE)
on
port
to
this
jack
socket
Visual
socket
socket.
provided
drawing
(Digital
only
DVI
convenience.
scart
3
a
PC.
of
of
the
Interface)
the
PER-
DVI-D
the
DVI-I
is
VCR
4
AERIAL
5.
connect
ial
6.
AUDIO/VIDEO
Connect
nal
S-VIDEO/AUDIO
Connect
VCR
Connects
VIDEO
to
SOCKET
the
socket.
the
equipment
the
to
the
VCR
RF
socket
IN
audio/video
to
video
S-VIDEO
the
audio out
to
the
SOCKETS
these
IN
SOCKETS
out
audio
5
of
out
sockets.
socket
socket.
the
VCR
(AV3)
sockets
ofanS-VIDEO
sockets
sockets
to
(SAV)
of
as
of
in
the
exter-
the
AV3.
aer-
S-
7

Basic
On
1.
2.
3.
4.
Comm
Note
nected
plugisreplaced
and
Press
If
the
set
TIMEDIA,
it
on
fully.
Press
The
set
Press
:
If,
the
Operation
off
the
main
power
is
in
standby
or
NUMBER
the
reverts
the
while
set
POWER
main
will
the
in
to
standby
power
set
switch
the
button
is
mains
buttontoswitch
mode,
button
to
buttons
on
mode.
switched
standby
power
press
on
the
communicator.
again
on,
or
socket.
the
the
communicator
to
switch
the
power
the
POWER,
mains
set
on.
D
/E,MUL-
to
switch
the
set
off.
is
the
discon-
mains
plug
on
when
SSM
POWER
123
456
7890
MENU
VOL VOL
MUTE
PR
PR
MULTIMEDIA
OK
I/II
Q.VIEW
Programme
You
can
select
buttons.
Volume
Press
the
Quick
Press
view
the
selection
a
programme
adjustment
F/G
button
Q.VIEW
button
to
number
adjust
to
view
the
volume.
the
with
last
D
the
programme
E
or
/
NUMBER
you
were
watching.
Mute
Press
SWAP
PIP
INPUT
You
On
The
guage.
Mute
function
the
appears.
can
screen
menu
First
MUTE
cancel
can
button.
it
by
language
be
select
The
pressing
displayed
your
language.
sound
the
MUTE,
selection
on
the
is
switched
F
(option)
screen
off
/G,I/II
in
your
and
or
the
SSM
desired
display
button.
lan-
1.
2.
Press
SPECIAL
Press
the
the
MENU
menu.
button
G
button
and
and
then
then
D
D
button
/
E
/
button
to
select
to
the
select
E
Language.
3.
Press
4.
desired
All
the
Press
theGbutton
language.
on
screen
the
MENU
and
displays
button
then
to
will
save.
8
the
appear
D
/Ebutton
in
the
selected
to
select
your
language.

On
Screen
Menus
The
an
Menu
1.
2.
3.
Note
a.
b.
c.
operator
menu.
item.
viewing.
G
CHANNEL
dialogue
selection
Press
the
Press
theGbutton
Repeatedly
:
In
the
AV
In
the
teletext
On
some
CHANNEL
Auto
Programme
Manual
Programme
Programme
Edit
between
menu.
MENU
or
models,
menu
press
RGB
mode,
you
button
and
the
mode,
the
and
and
then
MENU
the
menus
Language
set
your
then
takes
D
/Ebutton
theD/Ebutton
button
to
CHANNEL
are
not
displayed.
will
not
place
return
menu
be
on
screen
to
display
to
select
to
normal
is
not
displayed.
displayed.
PICTURE
PSM
G
CSM
Colour
Temp.
Contrast
Brightness
Colour
Sharpness
PICTURE
with
each
a
menu
TV
Comm
100
50
55
70
menu
G
G
Input
DW
PIP
PIP
Input
Win. Size
Win.
Position
PIP
ARC
PIP/DW
Auto
Configure
ARC
Zoom
Position
Manual
Screen
Reset
YNR
SCREEN
PIP/DW
SCREEN
In/Out
Config.
Adj.
menu
menu
Language
Child
Orbiter
Set
G
SPECIAL
ID
SPECIAL
Lock
menu
SOUND
SSM
AVL
Treble
G
Bass 50
Balance
SOUND
TIME
Clock
Off
Time
On
Time
Auto
Sleep
G
TIME
menu
menu
MENU
50
0
PR
VOL
PR
9

G
CHANNEL
Auto
Programme
Manual
Programme
Programme
Edit
CHANNEL
to
100
Up
bers
(0to99).
to
use
theD/
grammed.
Stations
can
TV
stations
Once
E
or
be
tuned
Menu
can
you
NUMBER
using
be
storedinthis
have
preset
buttons
automatic
the
to
scan
or
set
by
stations,
the
manual
programme
you
stations
modes.
num-
willbeable
you
pro-
MENU
123
456
7890
CHANNEL
PR
Auto
All
menu
ommended
1.
2.
Comm
3.
4.
5.
6.
programme
stations
Press
the
CHANNEL
Press
the
Programme.
Press
theGbutton
F/G
the
L
:
SECAM
:
PAL
BG
I
:
PAL
DK:PAL
Press
the
programme
on
the
Storage
Press
theEbutton
Press
theGbutton
that
can
that
you
MENU
menu.
G
button
button;
B/G,
I/II
(U.K./Ireland)
D/K,
E
button
number
be
use
L/L'
SECAM
SECAM
menu.
tuning
received
auto
button
and
CHANNEL
Auto
Programme
Manual
Programme
Programme
Prev.
MENU
to
select
(France)
to
select
with
to
select
to
begin
Auto
10
BG
are
program
and
then
then
G
Edit
System.
B/G
(Europe/East
D/K
(East
F/G
the
Start.
auto
Programme
C40
stored
during
D
/Ebutton
D
/Ebutton
System
Storage
Start
SelectaTV
Europe)
Storage.
button
programming.
77%
this
by
method.
installationofthis
to
to
select
BG
2
system
Europe)
Select
or
the
NUMBER
It
is
rec-
set.
select
the
Auto
with
beginning
buttons
10
VOL VOL
PR
All
stations
PDC
station
is
followed
To
When
menu
to
7.
Repeatedly
viewing.
receivable
(Programme
name
assigned
auto
stop
auto
appears
edit
the
stations
which
can
and
a
number.
by
programming,
programming
on
stored
press
broadcast
Delivery
be
assigned
stored
the
programme.
the
MENU
are
as
screen.
MENU
Stop
stored.
VPS
Control)
to
C
(V/UHF
press
is
completed,
See
button
The
(Video
or
a
station,
01-69)
the
the
station
name
Programme
TELETEXT
the
or
the
button.
Programme
MENU
'Programme
to
return
channel
S
(Cable
to
is
stored
Service),
data.
number
01-47),
edit'
section
normal
If
edit
for
no
TV

Manual
Manual
programme
programme
tionsinwhatever
name
with
five
lets
order
characters
tuning
you
you
to
CHANNEL
manually
desire.
each
tune
Also
programme
you
and
can
number.
arrange
assign
Menu
the
a
station
sta-
G
CHANNEL
Auto
Programme
Manual
Programme
Programme
Edit
1.
Press
CHANNEL
2.
Press
Programme.
3.
Press
ning
tons
withanumeric
4.
Press
5.
SelectaTV
L:
BG
I
DK:PAL
6.
Press
7.
Press
You
buttons.
with
8.
Press
9.
Press
found
10.
Press
11.
To
12.
Repeatedly
viewing.
the
theGbutton
theGbutton
programme
on
the
theEbutton
SECAM
:
PAL
:
PAL
theEbutton
the
can
select
If
the
number
theEbutton
the
the
the
store
another
menu.
button
Auto
Manual
Programme
MENU
MENU
number
Storage
in
'0'
system
L/L'
(France)
SECAM
B/G,
I/II
(U.K./Ireland)
SECAM
D/K,
F/G
button
the
possible,
buttons.
F/G
button
search
OK
button
press
will
station,
the
and
CHANNEL
Programme
Programme
Prev.
to
menu.
front
to
select
with
to
select
desired
select
to
select
stop.
to
and
then
Edit
display
with
of
it,
System.
F/G
the
B/G
D/K
(East
CH..
to
select
channel
the
Search.
to
commence
store
repeat
MENU
D
then
D
G
the
the
Any
i.e.
E
/
Storage
System
V/UHF
CH.
Fine
Search
Name
Storage.
F/G
number
'05'
/Ebutton
button
button
for
button;
(Europe/East
Europe)
V/UHF
number
channel
it.
steps
button
number(1to69)
searching.
3to10.
to
2
BG
1
C01
under
5.
Europe)
or
Cable
return
to
Select
or
with
to
select
NUMBER
10
as
the
Ifastation
to
normal
select
Manual
the
begin-
but-
is
entered
required.
NUMBER
directly
the
TV
CHANNEL
menu
Comm
123
456
7890
MENU
is
PR
OK
VOL
VOL
PR
11

G
Auto
Manual
Programme
CHANNEL
CHANNEL
Programme
Programme
Edit
menu
Comm
CHANNEL
Assigning
1.
Repeat
2.
Press
3.
Press
toZandthenumeric0to9.
With
theEbutton
4.
Select
choice
your
5.
Press
6.
Repeatedly
viewing.
Fine
tuning
a
station
the
'Manual
theGbutton
theDbutton.
the
next
positionbypressing
of
the
the
button.
OK
press
Menu
name
programme
and
You
can
you
second
the
D
then
can
selectinthe
character,
MENU
tuning'
/Ebutton
use a
button
steps
to
blank,
+,
opposite
theGbutton
and
so
on.
to
return
1to2.
select
the
-,
to
Name.
alphabet
direction.
and
then
normal
A
take
TV
MENU
VOL VOL
Normally
1.
Repeat
2.
Press
3.
Press
fine
tuningisonly
the
'Manual
theGbutton
F/G
the
programme
and
button
necessary
then
to
D
fine
if
reception
tuning'
/Ebutton
tune
for
steps
the
to
is
poor.
1to2.
select
best
Fine.
picture
and
sound.
CHANNEL
Auto
Programme
4.
Press
5.
Repeatedly
the
OK
button.
press
Manual
Programme
the
Programme
Edit
MENU
Storage
System
CH.
Fine
Search
Name
MENU
button
2
BG
1
V/UHF
GGG
C01
Prev.
Store
to
return
to
normal
TV
viewing.
The
PR
OK
PR
during
finely
programme
tuned
programme
selection.
willbeindicated
by
yellow
number
12

CHANNEL
Programme
This
function
Also
you
a
copy
1.
2.
3.
Deleting
1.
2.
Copying
1.
2.
Moving
1.
2.
3.
4.
Skipping
1.
2.
3.
Repeatedly
blank
Press
CHANNEL
Press
Programme
Press
SelectaprogrammetobedeletedwiththeD/EorF/Gbut-
ton.
Press
The
grammes
SelectaprogrammetobecopiedwiththeD/EorF/Gbut-
ton.
Press
All
the
a
SelectaprogrammetobemovedwiththeD/EorF/Gbut-
ton.
Press
Move
theD/EorF/Gbutton.
Press
Select
G
/
button.
Press
Press
gramme.
When
unable
viewing.
enter
selectitin
edit
enables
can
move
station
the
MENU
menu.
G
the
theGbutton
a
programme
the
RED
selected
are
a
programme
the
GREEN
following
programme
the
YELLOW
the
programme
the
YELLOW
a
programme
a
programme
the
BLUE
the
BLUE
a
programme
to
select
If
you
the
programme
the
press
you
some
data
button
button
Edit.
button
programme
shifted
button.
programmes
button.
button
it
want
programme
the
MENU
to
stations
into
to
display
0-----5C05
1BLN2
2C01
3C04
4C05
Del
MENU
twice.
up
button.
to
button
number
number
number
using
to
delete
the
and
then
and
Programme
Copy
OK
is
one
the
again
The
again
is
the
select
number
editortable
button
or
skip
to
other
selected
use
D
then
the
Programme
Edit
6C07
7C55
8S27
9S29
Move
Skip
deleted,
position.
are
shifted
desired
to
release
to
be
skipped
skipped
to
release
skipped
E
D
/
the
skipped
with
to
return
the
programme
programme
E
D
/
/
all
down
programme
programme
it
means
button
the
NUMBER
menu.
to
stored
programmes.
numbers
number.
buttontoselect
E
button
Edit
the
following
one
position.
number
this
function.
with
the
turns
the
skipped
that
during
programme,
normal
TV
Menu
to
menu.
E
D
/
to
you
normal
directly
buttons
viewing.
the
select
pro-
with
or
blue.
pro-
will
CHANNEL
G
Auto
Programme
Manual
Programme
or
Programme
CHANNEL
Edit
menu
Comm
MENU
F
be
TV
or
PR
VOL VOL
PR
13

CHANNEL
Menu
can
check
program
the
programme
the
program
LIST
programme
the
table.
button
table
programmes
table
to
appears
Calling
You
the
Displaying
Press
The
Comm
:
Note
a.
You
have
b.
Some
gram
Selecting
Select
Then
press
The
set
LIST
MENU
PR
Paging
There
grammes.
Pressing
may
been
programmes
table
a
a
programme
switches
through
are
the
find
set
indicate
programme
the
10
programme
D
some
OK
to
a
E
/
in
up
with
button.
the
programme
F/G
or
display
0-----5C05
1BLN2
2C01
3C04
4C05
MENU
blue
the
program
with
there
in
the
chosen
table
the
the
button
table
storedinthe
the
Programme
on
the
screen.
6C07
7C55
8S27
9S29
OK
highlighted
edit
channel
isnostation
programme
E
D
F/G
/
or
programme
table
pages
repeatedly
memory
programmes
mode.
number
name
table
button.
number.
in
which
turns
by
table
menu.
shown.
shown
in
assigned.
contain
the
pages.
displaying
They
the
pro-
100
pro-
14
VOL VOL
PR
Repeatedly
press
the
MENU
button
to
return
to
normal
TV
viewing.

PICTURE
Menu
PSM
1.
Press
TURE
2.
Press
3.
Press
ting
4.
Press
You
can
or
User)
Dynamic,
ture
reproduction
CSM
To
initialize
option.
blue)
manually,
1.
Press
PICTURE
2.
Press
3.
Press
colour
4.
Press
(Picture
the
MENU
menu.
theGbutton
theGbutton
on
the
the
MENU
also
recalladesired
with
Standard
(Colour
values
When
adjusting
the
MENU
menu.
G
the
theGbutton
temperature.
the
MENU
PSM
PSM
Status
CSM
button
Status
button
CSM
Colour
Contrast
Colour
Sharpness
menu.
button
at
the
(reset
is
button
Colour
Contrast
Colour
Sharpness
button
and
PSM
Brightness
MENU
and
button
and
PSM
CSM
Brightness
MENU
Memory)
and
then
D
then
PICTURE
Temp.
Prev.
then
to
100
save.
/
G
50
55
70
D
/
picture
on
the
Mild
are
factory
and
Memory)
to
default
color
temperature
automatically
and
then
then
then
to
100
save.
D
G
50
55
70
D
and
PICTURE
Temp.
Prev.
and
E
D
/
buttontoselect
E
button
Dynamic
Standard
Mild
User
E
buttontoselect
(Dynamic,
communicator.
programmed
cannot
be
settings),
options
changed
E
D
/
E
/
button
Normal
Cool
Warm
User
E
/
buttontoselect
to
select
Standard,
for
changed.
select
(red,
to
User.
button
to
select
the
PSM.
a
picture
The
optimum
the
Normal
green
to
select
CSM.
the
PIC-
set-
Mild
picture
pic-
the
desired
PICTURE
PSM
G
CSM
Colour
Temp.
Contrast
Brightness
Colour
Sharpness
PICTURE
100
50
55
70
menu
Comm
PSM
or
MENU
PR
VOL
PR
15

PICTURE
Menu
G
MENU
PICTURE
PSM
CSM
Colour
Temp.
Contrast
Brightness
Colour
Sharpness
PICTURE
100
50
55
70
menu
Comm
Manual
You
prefer.
1.
2.
3.
4.
5.
Note:The
Picture
You
ness
1.
2.
3.
can
adjust
Press
PICTURE
Press
Temp..
Press
Use
the
Press
can
adjust
and
Press
PICTURE
Press
picture
Press
Colour
Temperature
red,
the
MENU
menu.
G
the
button
theGbutton
F/G
button
the
MENU
adjustment
adjustment
picture
tint
(NTSC
the
MENU
menu.
theGbutton
option.
theGbutton
green,
button
PSM
CSM
Colour
Contrast
Brightness
Colour
Sharpness
MENU
and
button
range
contrast,
AV
only)
button
and
and
and
PICTURE
Temp.
Prev.
to
or
blue
and
then
100
50
55
70
then
make
to
save.
of
Red,
brightness,
to
the
and
then
then
Control
to
any
D
then
E
D
/
G
Red
Green
Blue
E
D
/
button
appropriate
Green
levels
D
then
E
D
/
button
F/G
button
colour
E
/
button
button
50
50
50
to
adjustments.
and
colour
you
prefer.
E
/
button
to
to
temperature
to
select
to
select
Colour
selectacolour.
Blue
is
0~100.
intensity,
select
make
sharp-
to
select
the
desired
appropriate
you
the
the
adjustments.
PR
Contrast
FG
100
16
VOL
VOL
PR
4.
Press
the
MENU
button
to
save.

SOUND
Menu
SSM
You
can
Music
1.
Press
SOUND
2.
Press
3.
Press
ting
4.
Press
You
can
Movie,
The
sound
grammed
not
be
Note
ment
appears
Flat,
(Sound
select
and
the
theGbutton
theGbutton
on
the
also
Music
for
changed.
:
If
you
on
the
even
Speech,
your
can
you
MENU
menu.
the
SSM
MENU
recall
settings
optimum
press
User
though
Movie
Status
preferred
also
menu.
or
User)
Flat,
the
adjust
button
SSM
AVL
Treble
Bass
Balance
MENU
and
and
button
a
sound
SSM
sub
you
or
Memory)
sound
the
and
SOUND
Prev.
then
then
to
save.
desired
with
SSM
Speech,
reproduction
button
menu,
have
already
Music.
Flat,
frequencyofequalizer.
E
D
/
button
buttontoselectasound
setting
on
and
at
making
display
set
a
factory
50
50
D
then
G
0
D
sound
the
setting;
sound
Flat
Speech
Movie
Music
User
E
/
E
/
button
Movie
after
Speech,
button
to
to
select
(Flat,
the
communicator.
Music
the
factory
appropriate
User
automatically
preset
Movie
select
SSM.
Speech,
are
and
or
the
set-
pro-
can-
adjust-
setting;
SOUND
SSM
AVL
Treble
G
Bass
Balance
SOUND
50
50
0
menu
Comm
SSM
AVL
(Auto
If
select
you
ume
level
1.
Press
SOUND
2.
Pressthe
3.
Press
4.
Press
Sound
You
can
prefer.
1.
Press
SOUND
2.
Press
sound
3.
Press
adjustments.
4.
Press
Volume
AVL
On,
even
if
you
the
MENU
menu.
Gbutton
theGbutton
the
MENU
adjustment
the
adjust
the
MENU
menu.
theGbutton
item.
theGbutton
the
MENU
button
sound
button
Leveler)
the
set
change
button
andthenD
and
treble,
button
and
then
and
automatically
programmes.
and
then
/Ebuttonto
E
D
then
to
then
to
and
save.
save.
bass
then
D
F/G
/
E
/
keeps
E
D
/
button
button
and
to
balance
E
D
/
button
buttontoselect
button
to
on
an
to
selectAVL.
select
to
the
to
make
appropriate
equal
select
On
levels
select
the
vol-
or
Off.
you
desired
the
the
MENU
PR
VOL
VOL
PR
17

SOUND
Menu
SOUND
SSM
AVL
Treble
G
Bass
Balance
SOUND
50
50
0
menu
Comm
I/II
Stereo/Dual
When
a
program
stereo
sound
after
Broadcast
Mono
Stereo
Dual
sound
by
pressing
is
again.
appears
Mono
In
mono
of
twice
Language
If
a
program
switch
ton
DUAL
ers.
DUAL
to
repeatedly.
I
sends
II
reception
the
selection
reception
improved.
selection
received
DUAL
I,
the
sends
is
selected,
program
if
the
DUAL
primary
the
number
the
stereo
button
I/II
To
switch
for
dual
in
two
II
or
broadcast
secondary
the
sound
and
On
MONO
STEREO
DUAL
signal
twice.
back
to
language
languages
DUAL
broadcast
information
station
Screen
I
is
weak,
In
mono
stereo,
broadcast
(dual
I+II
by
language
language
for
name
disappear.
Display
can
you
reception
the
press
language),
pressing
to
the
the
station
switch
the
depth
button
I/II
you
the
I/II
loudspeak-
to
the
loud-
to
can
but-
speakers.
I+II
DUAL
sends
a
separate
language
to
each
loudspeaker.
NICAM
If
high
your
set
quality
Multiplex)
Sound
broadcast
1.
2.
3.
When
MONO
When
STEREO
FM
When
NICAM
I,
output
mono.
Sound
In
AV,
RGB,
right
loudspeakers.
Repeatedly
L+R
:
Audio
speaker
right
L+L
:
Audio
speakers.
R+R
:
Audio
speakers.
reception
is
equipped
NICAM
sound
digital
can
as
follows
NICAM
or
FM
NICAM
or
FM
NICAM
output
DVI
press
loud
signal
signal
dual
DUAL
selection
mode,
the
signal
and
speaker.
with
(Near
can
be
selected
by
pressing
mono
MONO.
stereo
MONO.
is
II
you
I/II
from
audio
from
from audio
the
Instantaneous
be
is
received,
is
received,
If
received,
or
NICAM
can
button
audio
signal
audio
receiver
received.
according
the
the
stereo
you
DUAL
select
to
select
L
input
from audio
L
input
R
input
I/II
can
output
is
is
is
for
to
button
you
you
signal
the
sent
sent
sent
NICAM
Companding
the
repeatedly.
can
can
is
select
I+II
or
sound
sound
to
the
R
input
to
left
to
left
reception,
of
type
select
select
weak,
NICAM
MONO.
for
the
output.
left
is
sent
and
and
received
NICAM
NICAM
switch
DUAL
left
loud
right
right
Audio
and
to
loud-
loud-
the
to
the
18

TIME
Menu
Clock
You
1.
Press
TIME
2.
Press
3.
Press
4.
Press
5.
Press
On/Off
The
set
time.
1.
Press
TIME
2.
Press
or
must
off
timer
On
set
the
time
the
MENU
menu.
theGbutton
theGbutton
theGbutton
the
MENU
Time
automatically
the
MENU
menu.
G
the
Time.
button
correctly
button
and
TIME
Clock
Off
Time
On
Time
Auto
Sleep
Prev.
MENU
and
and
button
switches
button
and
TIME
Clock
Off
Time
On
Time
Auto
Sleep
and
then
then
then
to
and
then
before
save.
then
D
G
D
D
then
D
GOn
/
/
/
E
the
/
Off
Vol.
E
--
E
E
12:00
using
D
/
button
--
:
button
button
set
D
/
button
30
on/off
E
to
E
button
to
select
to
adjust
to
adjust
standby
button
to
select
time
function.
to
select
Clock.
the
the
at
to
select
Off
hour.
minute.
the
Time
the
pre-
the
TIME
Clock
Off
Time
On
Time
Auto
Sleep
G
TIME
menu
Comm
3.
4.
5.
6.
7.
Note
a.
b.
c.
d.
e.
Press
theGbutton
To
cancel
select
Off.
Press
theGbutton
Press
theGbutton
On
Only
button
has
to
Press
the
:
In
the
event
the
ure),
Two
hours
will
automatically
been
Once
the
the
preset
Off
Time
the
same
The
set
Off/On
Time
adjust
MENU
of
clock
after
pressed.
on
or
time.
function
time.
must
MENU
function;
volume
button
power
must
the
switch
off
overrides
in
be
Prev.
and
then
Time
function,
and
then
and
then
Press
level.
to
interruption
be
reset.
set
is
switched
back
time
is
set,
standby
save.
mode
E
D
/
E
D
/
E
D
/
the
(disconnection
on
to
standby
these
On
Time
for
button
press
button
button
G
by
functions
function
the
to
select
D
the
to
adjust
to
adjust
button
and
theontime
mode
if
On
Time
On.
E
/
button
the
hour.
the
minute.
D
then
or
power
fail-
function
unlessabutton
operate
they
daily
are
set
to
work.
MENU
to
E
/
PR
VOL
PR
it
at
to
19

TIME
Menu
TIME
Clock
Off
Time
On
Time
Auto
Sleep
G
TIME
menu
Comm
SLEEP
Auto
If
you
cally
a
TV
1.
Press
TIME
2.
Press
Sleep.
3.
Press
4.
Press
Sleep
You
don't
sleep.
after
Press
play
60,
90,
number
sleep
select
switch
station
timer
The
the
the
zz
'
120,
preset
---
of
on
On
itself
to
stops
broadcasting.
the
MENU
menu.
G
the
button
theGbutton
the
MENU
have
to
remember
timer
sleep
time
Min'
180
button
will
and
selected.
SLEEP
minutes
the
Auto
standby
button
and
TIME
Clock
Off
Time
On
Time
Auto
Sleep
Prev.
MENU
and
button
automatically
has
elapsed.
to
appear
The
240.
mode
and
then
then
to
to
select
on
timer
Sleep
menu,
approximately
then
D
GOn
Off
E
D
/
save.
switch
the
switches
the
number
the
screen,
begins
D
E
/
button
E
/
button
set
followed
to
the
button
to
off
of
count
set
ten
select
before
the
minutes.
to
set
down
will
minutes
to
select
On
to
10,
by
automati-
select
Auto
or
you
go
standby
The
20,
from
after
the
Off.
to
dis-
30,
the
20
:
Note
a.
To
view
the
MENU
PR
VOL
PR
once.
b.
To
cancel
until
the
c.
When
you
time.
remaining
the
display
switch
sleep
'
the
time,
zz
---
Min'
set
time,
sleep
repeatedly
appears.
the
off,
press
set
press
releases
the
the
the
SLEEP
SLEEP
preset
button
button
sleep

SPECIAL
Menu
Child
The
control
lock
TV
can
it.
ing.
1.
Press
SPECIAL
2.
Press
Lock.
3.
Press
4.
Press
With
the
if
button
any
Note:The
button
any
menus.
be
set
This
feature
the
MENU
menu.
theGbutton
theGbutton
the
MENU
lock
on,
on
the
the
display
on
the
so
that
the
can
button
and
SPECIAL
Language
Child
Lock
Orbiter
Set
ID
Prev.
MENU
and
button
display
front
panelispressed
Child
front
panelispressed
be
then
to
and
then
Lock
remote
used
D
save.
Child
control
to
prevent
D
then
E
D
/
GOn
Off
E
buttontoselect
/
Lock
will
not
E
/
button
while
appear
handset
unauthorized
button
appears
viewing
while
is
needed
to
select
to
select
On
on
the
the
on
the
displaying
Child
or
screen
screen
view-
TV.
the
Off.
the
SPECIAL
Language
Child
G
Orbiter
Set
ID
SPECIAL
Lock
menu
to
Comm
if
Orbiter
Orbiter
itisbest
avoid
10
1.
2.
3.
4.
Note:The
screen
may
a
minutes.
Press
SPECIAL
Press
Press
Press
because
prolonged
help
to
menu.
prevent
allow
MENU
not
the
theGbutton
theGbutton
the
MENU
white
entire
image
button
line
ghost
fixed
any
on
button
SPECIAL
Language
Child
Lock
Orbiter
Set
ID
Prev.
MENU
and
and
sometimes
screen
the
and
then
then
to
images
image
screen,
D
D
save.
moves
(image
to
the
D
then
GOn
Off
E
button
/
E
buttontoselect
/
displays
by
remain
screen
E
/
at
orbiter
sticking).
on
the
will
button
to
select
the
top
function.
However,
screen.
move
to
select
Orbiter.
On
or
leftofthe
or
every
the
Off.
To
MENU
PR
VOL
PR
21

SCREEN
Menu
SCREEN
Auto
Configure
ARC
Zoom
In/Out
Position
Manual
Config.
Screen
Adj.
Reset
YNR
G
SCREEN
menu
Comm
ARC
MENU
PR
VOL
PR
Auto
adjustment
Automatically
1.
Press
SCREEN
2.
Press
Configure.
3.
Press
theGbutton
The
display
If
the
position
ment
Repeatedly
viewing.
:
If
picture
RGB
Although
properly
The
Auto
don't
can
watch
16:9,
Press
SCREEN
Press
Press
Press
can
also
with
your
the
screen.
your
the
the
entire
your
changed
lead
bars
(Wide)
lead
to
fill
can
enjoy
the
4:3
lead
the
entire
:
In
the
available.
In
RGB,
again.
(PC),
need
format
14:9
theGbutton
theGbutton
the
you
appearing
the
the
4.
Note
a.
b.
c.
Picture
You
4:3,
1.
2.
3.
4.
You
Zoom
Spectacle
When
adjust
entire
Full
When
adjust
fill
Original
When
cally
4:3
It
will
gray
16:9
It
will
tion,
14:9
You
through
screen
Zoom
It
will
ing
However,
Note
a.
b.
adjusts
the
MENU
menu.
G
the
needs
the
but
TVinvarious
and
the
MENU
menu.
MENU
select
the
TV
picture
TV
picture
screen
TV
to
to
you
entire
the
14:9
is
magnified
to
you
screen.
top
double
DVI
(RGB
picture
button
button
OK
will
Auto
ARC
Zoom
Position
Manual
Screen
Reset
XGA
MENU
of
the
the
press
to
can
you
image
needs
Configure
to
be
run
Zoom.
button
button
Spectacle,
ARC
button
receives
horizontally,
receives
horizontallyorvertically,
fully.
receives
the
picture
view
a
at
both
to
adjust
screen
picture
mode.
view
the
and
bottom
window
modes,
and
to
start
appear.
SCREEN
Configure
In/Out
Config.
Adj.
Mode
Prev.
image
MENU
be
adjusted
adjust
is
still
further
for
and
then
to
select
on
the
the
the
picture
the
the
(useful
format
The
to
the
picture
and
you
[PC]
position
and
then
then
Auto
G
is
still
the
Manual
not
adjustment.
and
the
DVI
mode.
picture
and
then
D
your
to
save.
Full,
the
wide
screen
in
a
wide
screen
wide
screen
format
with
left
picture
for
of
screen
left
/right.
without
portions
PIP/DW
can
olny
button
communicator.
mode
and
D
minimizes
D
/Ebutton
E
/
only)
button
Configure.
Toset
not
correct,
to
more
after
Manual
D
Config..
your
Spectacle,
/Ebutton
correct,
formats;
/Ebutton
desired
Original,
signal,
non
linear
signal,
inalinear
signal,
tobesent.
an
original
and
horizontally,
viewing
14:9
14:9
right
or
is
sides.
general
viewed
any
of
the
picture
mode,
select
4:3
image
to
try
return
Auto
to
adjustment
TV
is
Config.
to
select
picture
format.
4:3,
it
will
proportion,
it
will
proportion,
it
willbeautomati-
4:3
aspect
inalinear
4:3
formatted
TV
just
alternation,
will
ARC
function
and
16:9
shaking.
to
select
select
Auto
Auto
adjust-
normal
functioning
functions
Full,
Original,
to
select
ARC.
14:9
16:9,
lead
you
to
fill
lead
you
ratio,
propor-
DVDs).
programme
like
that
while
be
cropped.
screen.
the
TV
the
the
with
the
fill-
isn't
in
or
to
to
to
22

SCREEN
Menu
Picture
When
unnatural
1.
Size
enlargingorreducing
picture.
Press
the
SCREEN
2.
Press
the
In/Out.
3.
Press
theGbutton
the
Press
can
the
Press
SCREEN
Press
picture
the
also
remote
:
The
Position
screen
the
theGbutton
4.
You
on
theD/E/
Note
Screen
When
ture.
1.
2.
Zoom
MENU
menu.
G
button
size.
MENU
enlarge
control
F/G
buttons
adjustment
is
enlarged,
MENU
menu.
button
Auto
ARC
Zoom
Position
Manual
Screen
Reset
YNR
MENU
and
button
or
reduce
and
range
(RGB
button
and
Auto
ARC
Zoom
Position
Manual
Screen
Reset
XGA
and
SCREEN
Configure
In/Out
Config.
Adj.
Prev.
then
then
in
you
then
SCREEN
Configure
In/Out
Config.
Adj.
Mode
the
picture,
and
then
to
save.
the
adjust
enlarged
of
zoom
[PC]
can
and
then
D
G
F/G
picture
mode
change
then
D
/Ebutton
G
the
D
E
/
100
F G
button
the
picture
is
100~300.
D
F
screen
/Ebutton
button
%
to
size
with
main
picture
mode.
only)
the
position
/Ebutton
to
D
G
E
may
to
select
enlarge
Zoom+/Zoom-
select
be
to
select
or
position
of
the
to
select
Position.
display
the
Zoom
reduce
with
pic-
the
SCREEN
Auto
Configure
ARC
Zoom
In/Out
Position
Manual
Config.
Screen
Adj.
Reset
YNR
G
SCREEN
menu
Comm
ZOOM
ZOOM
MENU
PR
Prev.
MENU
3.
PresstheGbuttonandthenD/EorF/Gbuttontoadjustthe
position.
4.
Press
the
Manual
If
the
characters
correct
1.
Press
SCREEN
2.
Press
Config..
3.
Press
or
4.
Press
5.
Press
Note
a.
The
b.
The
Configure
picture
the
the
theGbutton
theGbutton
Clock.
the
the
:
adjustment
adjustment
MENU
isn't
are
screen
MENU
menu.
F/G
MENU
still
button
(RGB
clear
after
trembling,
size,
adjust
button
and
and
button
button
of
range
of
range
to
then
then
to
to
save.
[PC]
auto
adjust
Clock.
and
make
save.
Phase
Clock
mode
adjustment
the
picture
D
then
D
/Ebutton
D
/Ebutton
appropriate
is
0~31.
is
-50~+50.
only)
and
phase
/Ebutton
to
to to
adjustments.
especially
manually.
to
select
select
select
Manual
Phase
that
the
VOL
VOL
PR
To
23

SCREEN
Menu
SCREEN
Auto
Configure
ARC
Zoom
In/Out
Position
Manual
Config.
Screen
Adj.
Reset
YNR
G
SCREEN
menu
Comm
MENU
PR
VOL
PR
Screen
You
mode.
viewing
1.
are
Press
available
Use
a
adjustment
this
video
the
SCREEN
2.
Press
theGbutton
Adj..
3.
Press
theGbutton
4.
Press
the
:
Note
a.
Select
b.
Select
the
the
Initializing
You
can
initialize
Press
SCREEN
PIP
size,
the
zoom,
1.
to
Screen
function
tape.
MENU
menu.
MENU
VCR
TV
button
Auto
ARC
Zoom
Position
Manual
Screen
Reset
YNR
MENU
button
optionifwatching
option
(Reset
Zoom
PIP
position
MENU
menu.
button
Auto
ARC
Zoom
Position
Manual
Screen
Reset
XGA
MENU
to
correct
and
SCREEN
Configure
In/Out
Config.
Adj.
Prev.
and
then
for
to
original
In/Out,
SCREEN
Configure
In/Out
Config.
Adj.
Mode
Prev.
in
Adj.
AV1, AV2,
jitteringorpicture
and
then
then
to
other
save.
E
D
/
GTV
VCR
E
D
/
a
equipment.
factory
Position,
and
sub
picture
and
then
G
Toset
AV3
E
/
button
button
to
D
buttontoselect
VCR.
(Except
value)
Manual
size
for
E
D
button
/
and
S-Video
instability
to
select
select
Screen
TV
or
VCR.
VCR)
Config.,
twin
picture.
to
select
while
the
Split
the
24
2.
Press
3.
Press
The
4.
display
Repeatedly
viewing.
Note:This
ed
value.
theGbutton
theGbutton
OK
press
function
and
to
will
appear.
the
operates
then
start
MENU
in
D
Reset.
every
E
buttontoselect
/
button
mode.
to
return
To
initialize
to
Reset.
normal
the
TV
adjust-

SCREEN
Menu
Selecting
To
see
selection
1.
2.
3.
4.
Note
YNR
To reduce
ing
You
1.
2.
3.
4.
a
Press
SCREEN
Press
Mode.
Press
XGA
Press
:
XGA
(Y-signal
watching
are
available
Press
SCREEN
Press
Press
Press
Wide
normal
of
XGA
the
MENU
menu.
G
the
theGbutton
resolution.
the
MENU
resolution
the
picture
the
TV
the
MENU
menu.
theGbutton
theGbutton
the
MENU
XGA
picture,
mode.
button
button
Auto
ARC
Zoom
Position
Manual
Screen
Reset
XGA
MENU
button
Noise
noise
inaweak
to
YNR
button
button
mode
match
and
SCREEN
Configure
In/Out
Config.
Adj.
Mode
Prev.
and
then
to
can
be
Reduction)
which
in
TV,
and
and
then
and
then
to
and
then
save.
select
signal
save.
(RGB,
the
resolution
then
D
1024x768
G
1360x768
1366x768
D
/Ebutton
automatically
may
area.
AV1,
AV2,
then
use
D
/Ebutton
D
/Ebutton
D
/Ebutton
E
/
appear
AV3
D
[PC]
of
button
to
select
on
and
/Ebutton
to
to
select
mode
RGB
to
for
the
S-Video
select
to
select
the
DVI
screen
to
On
only)
mode
select
desired
mode.
select
YNR.
mode.
or
XGA
and
the
dur-
the
Off.
SCREEN
Auto
Configure
ARC
Zoom
In/Out
Position
Manual
Config.
Screen
Adj.
Reset
YNR
G
SCREEN
menu
Comm
SPUT
ZOOM
Zoom
Split
Thisisthe
Press
the
changes
In
case
a.
Press
you
the
b.
To
return
again.
9-Split
:
Note
a.
It's
With
or
downside.
If
a
section
available
b.
c.
function
SPLIT
the
screen
Zoom
2-Split
1
4
of
9-Split
the
choose
enlarged
Zoom
123
456
789
2-Spilt
screen
of
FG
number
No.5,
to
D
E
FG
is
screen.
ZOOM
D
E
screen
normal
to
Zoom,
to
enlarge
button.
display
Zoom
button
the5section
use
this
enlarged,
as
:
with
using
viewing,
function
can
you
a
the
shown
4-Split
to
screen
Each
1
4
select
Zoom
only
screen
press
below.
D
2
E
5
FG
is
enlarged
theD/
press
in
move
can
the
the
every
with
move
of
SPLIT
section
E
SPLIT
input
the
regular
9-Split
and
F/G
or
source.
screen
without
123
456
789
you
also
ZOOM
ration.
ZOOM
Zoom
button
D
E
FG
enlarge.
can
move
button.
button
into
upside
selecting
MENU
PR
VOL
VOL
PR
If
a
25

PIP/DW
operation
G
MENU
Input
DW
PIP
PIP
Win. Size
Win.
PIP
123
456
7890
PIP/DW
Input
Position
ARC
PIP/DW
TV/AV
menu
PIP
(PictureinPicture)
Main
Inputs
mode.
other
Picture
can
be
AV
mode
equipment
Note:When
in
used
TV
mode.
set
a
Source
for
is
used
is
connected
VCR
See
displaysapicture
Selection
TV,
AV1,
AV2, AV3,
when
a
video
to
the
is
connected
the
'Connection
set.
via
within
cassette
the
of
external
a
S-Video,
recorder
aerial
picture.
RGB
(VCR),
socket
the
equipment'
or
DVI
or
set
is
sec-
tion.
E
D
then
D
D
E
button
/
E
/
/
button
button
to
select
to
to
select
select
Input.
TV,AV1,
the
1.
Comm
2.
3.
Press
PIP/DW
Press
Press
the
MENU
menu.
theGbutton
theGbutton
button
and
and
and
then
then
AV2,AV3,S-Video,RGBorDVI.
PIP/DW
Input
DW
PIP
PIP
Input
Win. Size
Win.
Position
PIP
ARC
Prev.
MENU
AV1:VCR
AV2:VCR
AV3:VCR
S-Video:S-VIDEO
the
back
RGB:PC
DVI
:
4.
Press
You
PR
VOL
by
pressing
In
AV1,
can
AV2,
NUMBER
PR
your
will
want
buttons.
AV
VCR
auto
Auto
If
set
you
BER
connected
connected
connected
set
panel
connected
PC
MENU
the
connected
TV,
TV/AV
S-Video,
to
Digital
the
select
the
AV3,
buttons
switching
outputs
switch
to
keeponwatching
to
Press
button
return
an
the
VCR
AV1,
button.
AV
AV
to
to
to
to
1,AV2mode
TV/AV
GTV
the
Euro
the
Euro
the
RCA
connected
the
RGB
to
the
to
save.
AV2,
AV3,
RGB
or
to
TV
mode.
switching
in
TV
button
AV1
AV2
AV3
S-Video
RGB
DVI
scart
scart
jacks
socket
DVI
DVI
signal
mode,
to
socket
socket
on
to
the
on
socket
S-Video,
mode,
via
on
start
press
return
the
S-VIDEO
the
on
RGB
press
the
of
the
to
AV
1
on
the
2
on
the
side
panel.
sockets
set
the
set
or
DVI
D
the
Scart
playback,
E
D
or
/
mode.
lead
set
set
mode
/
but
NUM-
on
E
or
the
if
26

PIP/DW
operation
DW
1.
Press
PIP/DW
2.
Press
3.
Press
or
4.
Press
Note
Win.
PIP
1.
Press
PIP/DW
2.
Press
3.
Press
4.
Press
You
can
on
the
Input
mode
the
theGbutton
theGbutton
Off.
the
:
When
Position,
mode
the
theGbutton
theGbutton
the
also
communicator.
mode
MENU
menu.
MENU
the
PIP
MENU
menu.
MENU
select
selection
DW
Win. Size
Win.
button
ARC
button
PIP,
button
and
PIP/DW
Input
DW
PIP
PIP
Input
Position
PIP
ARC
Prev.
MENU
and
(Double
button
and
and
DW1,
and
then
then
to
save.
function
and
then
then
to
save.
DW2
for
then
E
D
/
G
DW1
DW2
Off
E
D
/
Window)
isn't
then
E
D
/
E
D
/
or
sub
E
D
button
/
buttontoselect
button
to
select
function
available.
E
D
button
/
buttontoselect
buttontoselect
with
Off
the
picture
is
PIP/DW
to
select
DW.
DW1,
switched
to
select
PIP.
On
DW2
or
button
the
on,
the
Off.
PIP/DW
Input
DW
PIP
PIP
Input
Win.
Size
Win.
Position
PIP
ARC
G
PIP/DW
menu
Comm
WIN.SIZE
PIP/DW
Press
the
picture.
You
can
Sub
Picture
1.
Press
PIP/DW
2.
Press
3.
Press
ture
size.
4.
Press
You
can
communicator.
PIP
INPUT
also
adjust
Size
the
MENU
menu.
theGbutton
theGbutton
the
MENU
also
adjust
this
button
this
button
function
button
and
and
function
then
then
to
to
and
select
save.
in
then
D
F/G
with
RGB
S-Video
10:30
PIP/DW
E
/
the
the
D
button
button
input
menu.
E
button
/
to
to
WIN.SIZE
mode
select
adjust
for
to
Win.
the
button
the
select
sub
Size.
on
sub
the
pic-
the
MENU
PR
VOL
VOL
PR
PIP
INPUT
27

PIP/DW
operation
PIP
G
MENU
Input
DW
PIP
PIP
Win. Size
Win.
PIP
VOL
PR
PIP/DW
Input
Position
ARC
PIP/DW
PIP
PR
WIN.POSIOTION
PR
PR
the
Sub
MENU
G
button
Picture
button
and
and
then
then
E
D
D
/
E
/
button
button
to
to
select
select
the
Win.
Moving
1.
Press
PIP/DW
2.
Press
the
menu.
the
Position.
PIP/DW
Input
moves
button
this
DW
PIP
PIP
Win.
Win.
PIP
ARC
MENU
and
function
Input
Size
Position
Prev.
D
then
up/down
to
save.
with
G
E
or
/
or
left/right.
WIN.POSITION
D
F
E
F/G
G
button
until
button
desired
on
the
menu
Comm
3.
4.
You
Press
theGbutton
position
The
sub
Press
the
can
also
is
achieved.
picture
MENU
adjust
communicator
PIP
Aspect
1.
Press
PIP/DW
2.
Press
3.
VOL
SWAP
Press
4.
Press
You
can
municator.
Ratio
the
MENU
menu.
theGbutton
theGbutton
the
MENU
also
adjust
button
and
Input
DW
PIP
PIP
Input
Win. Size
Win.
Position
PIP
ARC
MENU
and
button
this
function with
PIP/DW
Prev.
then
then
to
and
save.
D
then
D
E
/
G
4:3
16:9
E
/
PIP
E
D
button
/
buttontoselect
buttontoselect
button
ARC
to
select
PIP
ARC.
4:3or16:9.
on
the
the
com-
28
Swapping
Press
the
Program
The
sub
sub
picture
picture.
isTVmode.
the
between
SWAP
selection
Press
button
program
the
main
to
for
and
exchange
sub
sub
the
picture
selectionisavailable
PIP
PR
+/-
buttons
pictures
main
and
when
to
select
sub
the
a
pictures.
sub
picture
program
for

Teletext
(option)
Teletext
with
Teletext
the
TOP
(or
teletext
isafree
up-to-the-minute
teletext
of
pages
the
initial
page
screen
while
the
selection
Enter
share
decoder
systems.
page
allowing
on/off
TEXT
page
numbers,
headline.
the
TEXT
text
the
desired
buttons.
must
you
the
correct
E
D
/
page.
which
second
grammes,
The
FASTEXT
ber
sponding
methods
Switch
Press
The
Two
on
the
tion,
Press
reappears.
SIMPLE
Page
1.
NUMBER
ber,
enter
2.
The
lowing
Programming
If
the
M
button
TVisin
to
SIMPLE
switch
is
text)
information
and
of
this
SIMPLE
are
quick
to
last
page
TV
The
shows
button
can
and
station
system
service
prices
number.
button
or
page
If
complete
page
button
a
can
colour button
text,
to
LIST
an
optional
receive
broadcast
many
TV
(standard
selected
TOP
easy
switch
appears
first
the
to
switch
number
during
the
number.
be
TOP
mode.
on
other
can
and
selection
to
name,
page
current
selection
three
used
in
text
function,
the
most
by
news,
support
by
directly
FASTEXT
teletext.
on
date
number
off
teletext.
as
a
to
select
LIST
or
therefore
teletext
TV
stations
weather,
topics.
the
teletext)
of
teletext
the
screen.
and
indicates
page
displayed.
The
three
digit
you
pressawrong
number
digit
the
mode
FASTEXT
broadcast.
television
SIMPLE,
consists
entering
are
more
time
are
previous
number
and
preceding
mode,
a
only
which
gives
TOP
of
a
num-
the
corre-
modern
information.
displayed
selec-
your
mode
with
num-
then
or
press
set
pro-
and
the
re-
fol-
the
Comm
M
123
456
7890
MENU
PR
TEXT
PR
Four
teletext
selected
easily
the
communicator
1.
Pressacoloured
2.
Using
gramme.
3.
Press
ed
page
can
you
4.
The
three
the
the
page
by
NUMBER
OK
number,
select
other
numbers
pressing
handset.
button.
button.
blinking
this
coloured
buttons,
The
page
of
your
the
corresponding
select
selected
once
with
the
buttons
choice
to
same
are
can
the
page
is
page
confirm
coloured
programmed
be
colour
coloured
you
stored
this.
coded and
wish
as
From
button.
in
button
the
this
to
select-
now
on
pro-
on,
way.
29

Comm
i
Teletext
TOP
text
The
user
the
and
Block
1.
2.
3.
4.
guide
bottom
the
blue
/
group/page
With
the
Use
the
matic
overflow
With
the
with
page
Alternatively
The
red
Alternatively
(option)
(option)
displays
of
the
screen.
field
indicates
blue
button
yellow
button
to
green
automatic
theDbutton
button
theEbutton
the
button
four
The
the
selection
you
to
next
you
overflow
permits
fields-red,
yellow
next
block.
can
progress
proceed
block.
can
proceed
to
the
can
be
to
return
can
be
field
to
used.
used.
green,
from
the
next
to
yellow
denotes
blocktoblock.
next
to
the
group.
previous
the
group
and
next
with
next
selection.
blue
at
group
auto-
existing
123
456
7890
Direct
Corresponding
by
entering
TOP
mode.
page
selection
to
it
as
a
the
three
SIMPLE
digit
teletext
number
mode,
using
the
you
can
NUMBER
select
a
buttons
page
in
FASTEXT
The
teletext
and
are
selected
selection
Page
1.
Press
PR
PR
2.
3.
4.
the
You
can
tom
line
Corresponding
page
by
buttons
The
lowing
D
in
/
page.
are
pages
by
i
buttontoselect
select
the
with
the
entering
FASTEXT
E
button
colour
pressing
pages
same
to
the
its
three
can
coloured
SIMPLE
mode.
be
coded
along
the
corresponding
the
which
are
buttons.
teletext
digit
page
used
to
index
colour
select
the
mode,
number
page.
the
bottom
coloured
coded
you
with
preceding
of
the
along
can
the
screen
button.
the
select
NUMBER
bot-
a
or
fol-
30

Teletext
(option)
Special
teletext
REVEAL
Press
this
solutions
Press
this
display.
SIZE
Selects
Press
this
Press
page.
Press
this
UPDATE
Displays
new
teletext
left
hand
available
ber.
Press
this
HOLD
the
Stops
text
page
sub
pages
on
the
the
stop
the
screen
To
continue
MIX
Displays
ture.
To
switch the
functions
button
of
double
this
the
corner
then
automatic
consists
screen
riddles
button
button
button
button
TV
page.
button
and
to
display
or
puzzles.
again
text.
height
to
enlarge
againtoenlarge
again
picture
The
of
the
display
to
view
page
of
2
the
sub
below
the
symbolisdisplayed
and
the
automatic
this
press
the
teletext
TV
pages
picture
to
remove
to
return
on
the
display
screen.
the
change
or
more
page
time.
button
off
concealed
the
the
will
top
to
screen
When
change
halfofthe
the
the
updated
which
sub
pages.
displayed
When
this
at
the
top
page
change
again.
superimposed
this
press
information,
information
page.
bottom
normal
while
will
the
teletext
button
waiting
appear
updated
to
the
will
occur
The number
is,
usually,
button
left-hand
is
on
again.
display.
page.
inhibited.
such
from
halfofthe
for
at
the
page
num-
page
ifatele-
shown
is
pressed
corner
the
TV
as
the
the
top
is
of
of
pic-
REVEAL
Comm
SIZE
?
TIME
MIX
123
456
789
PR
PR
UPDATE
HOLD
0
TIME
When
the
timeatthe
this
mode,
sub
page
To
hold
E
D
/
Press
viewing
button
press
or
or
this
again
number
change
NUMBER
button
a
this
TV
top
button
again
programme,
right
to
remove
is
displayed
the
sub
buttons.
to
hand
corner
the
to
selectasub
at
page, press
exit
this
press
display.
the
function.
this
of
page
bottom
the
the
button
screen.
In
of
RED
to
the
number.
the
/
display
Press
teletext
The
screen.
GREEN,
31

Connection
You
etc.
Here
can
to
of
external
connect
your
shown
set.
may
additional
be
somewhat
equipment
equipment,
different
such
from
as
your
VCRs,
camcorders
set.
VCR
VCR
Aerial
1.
Connect
the
2.
Connect
3.
Store
the
4.
Select
stored.
5.
Press
Euro
1.
Connect
socket
2.
Press
If
socket
ly.
E
Otherwise
set
the
You
tape.
socket
back
'Manual
scart
your
But
button.
to
screen.
can
the
the
the
1,
the
VCR
1,
if
you
select
the
of
the
the
VCR
programme
programme
PLAY
sockets
the
2
of
PLAY
outputs
2
the
want
press
AV
also
RF
set.
aerial
channel
Euro
the
set
record
out
socket
cable
to
on
a
tuning'
number
button
button
the
1,AV
on
the
scart
socket
set.
on
the
a
switching
will
switch
to
keeponwatching
TV/AV
2
.
The
programmes
of
the
desired
to
button
VCR
the
VCR
RF
aerialinsocket
programme
section.
where
VCR.
of
the
VCR.
voltage
AV
1,AV2mode
on
playback
received
the
to
VCR
TV
the
the
connect
mode,
remote
picture
by
aerial
VCR
to
the
socket
of
the
number
channel
the
Euro
to
Euro
automatical-
press
control
appears
TV
on
the
on
VCR.
using
scart
scart
D
hand-
on
video
is
/
32
:
Note
a.
Signal
be
selected
These
decoder,
b.Ifboth
VCRs
If
c.
the
change
i.e.
RGB,
type
for
the
signals
game
Euro
are
machine
scart
simultaneously,
S-VHS
signal
to
the
S-Video
the
signals
Euro
scart
transmitted,
or
photo
2
sockets
1,
is
only
received
mode.
the
red,
1
and
for
CD
have
AV
2
through
green
AV
the
example,
unit,
been
can
be
the
and
1
can
by
etc.
connected
received.
S-VIDEO,
blue
be
can
received.
a
pay
you
to
only
TV
the
must

Connection
of
external
equipment
S-Video/Audio
When
picture
2.
3.
4.
2.
3.
4.
Note
block
signal
1.
PC
1.
connecting
quality
Connect
et
of
the
Connect
S-VIDEO
Select
Press
The
VCR
in
socket
Connect
SONAL
of
the
Connect
sockets
Press
Switch
The
set
:
If
you
(not
cable
S-Video
the
set.
the
on
supplied)
in
an
willbefurther
the
S-Video
set.
the
audio
sockets
L/R
by
PLAY
playback
the
signal
COMPUTER
the
audio
of
the
set.
MULTIMEDIA
the
PC,
can
be
operated
have
an
and
connect
sockets
S-VIDEO
cable
pressing
button
picture
cable
cable
and
Apple
from
improved.
socket
from
of
the
on
from
to
the
or
the
as
macintosh,
the
the
(S-Video)
VCR
of
the
the
set.
the
the
VCR.
appears
the
RGB
from
TV/AV
PC
screen
the
3
row
VGA
desktop
to
the
S-VIDEO
VCR
to
S-VIDEO
TV/AV
the
PC
15
button
on
the
TV
output
PC
appears
monitor.
connect
to
pin
blocktothe
or
to
2
INPUT
buttontoselect
the
S-VIDEO
VCR
repeatedly.
screen.
socket
DVI
INPUT
the
AUDIO
on
the
row
15
socket,
to
the
of
the
RGB
the
set.
VGA
pin
Macintosh.
the
sock-
AV3
PER-
socket
INPUT
or
DVI.
desktop
with
the
S-VIDEO
R AUDIO L / MOLO VIDEO
AV3
/
S-VIDEO
PERSONAL
VCR
COMPUTER
Audio/Video
1.
Connect
in
sockets
2.
Press
3.
Press
The
VCR
:
Note
VCR
If
you
to
the
the
the
the
AUDIO
in
sockets
audio/video
of
the
TV/AV
PLAY
playback
have
a
L/MONO
set.
button
button
picture
mono
out
to
on
VCR,
sockets
select
the
appears
socket
VCR.
connect
of
AV3.
on
the
S-VIDEO
of
the
VCR
to
audio/video
R AUDIO L / MOLO VIDEO
AV3
the
screen.
the
audio
cable
from
the
set.
VCR
33

Displayable
Monitor
Specification
RGB
MODE
SVGA
EGA
DOS
VGA
Mode
Resolution
640x350
720x400
640x480
800x600
(Synchronization
input
Horizontal
Frequency
(KHz)
31.468
37.861
31.469
37.927
31.469
37.861
37.500
43.269
35.156
37.879
form
:
separate)
Vertical
Frequency
(Hz)
70.09
85.08
70.08
85.03
59.94
72.80
75.00
85.00
56.25
60.31
MODE
SVGA
XGA
WXGA
(CVT)
MAC
Resolution
800x600
1024x768
1024x768
1360x768
1366x768
832x624
Horizontal
Frequency
(KHz)
48.077
46.875
53.674
48.363
56.476
60.023
68.677
47.7
49.725
Vertical
Frequency
(Hz)
72.18
75.00
85.06
60.00
70.06
75.02
84.99
60.00
74.55
:
Note
a.
If
the
when
there
b.
If
possible,
mode
LCD
tions,
appear
quency
PIP
quency
c.
Some
like
will
performance.
d.
Do
for
a
porary
e.
When
message
message
system
appears
es.
set
the
is
to
monitor.
some
is
Red,
have
not
long
is
cold,
set
nothing
obtain
scaled
on
the
85Hz,
on.
In
to
60Hz.
dot
defects
Green
no
press
timeasthis
distortion
the
PC
may
will
version
click
is
use
the
If
screen.
some
this
impact
the
screen
appear
differ
"Next"
there
switched
wrong
the
1,360x768@60Hz
best
used
or
processed
If
noise
case,
may
or
Blue
or
LCD
may
effects
according
(Win98,
until
beasmall
may
on.
with
the
image
under
usedtoPC
can
set
the
appear
spots.
effect
screen
produce
on
the
appears
on
the
2000).
the
This
set.
quality
the
be
PC
on
However,
on
with
screen.
on
screen,
to
If
message
"flicker"
is
normal,
for
other
resolu-
pictures
vertical
seen
vertical
the
screen,
the
monitor
your
some
the
and
the
Window
a
message
video
your
may
fre-
when
fre-
this
finger
tem-
set,
the
finish-
a
f.Ifthe
screen,
Monitor
message
adjust
"No
the
Specification'
Signal"
PC
section.
on
as
appears
in
the
'Displayable
the
34
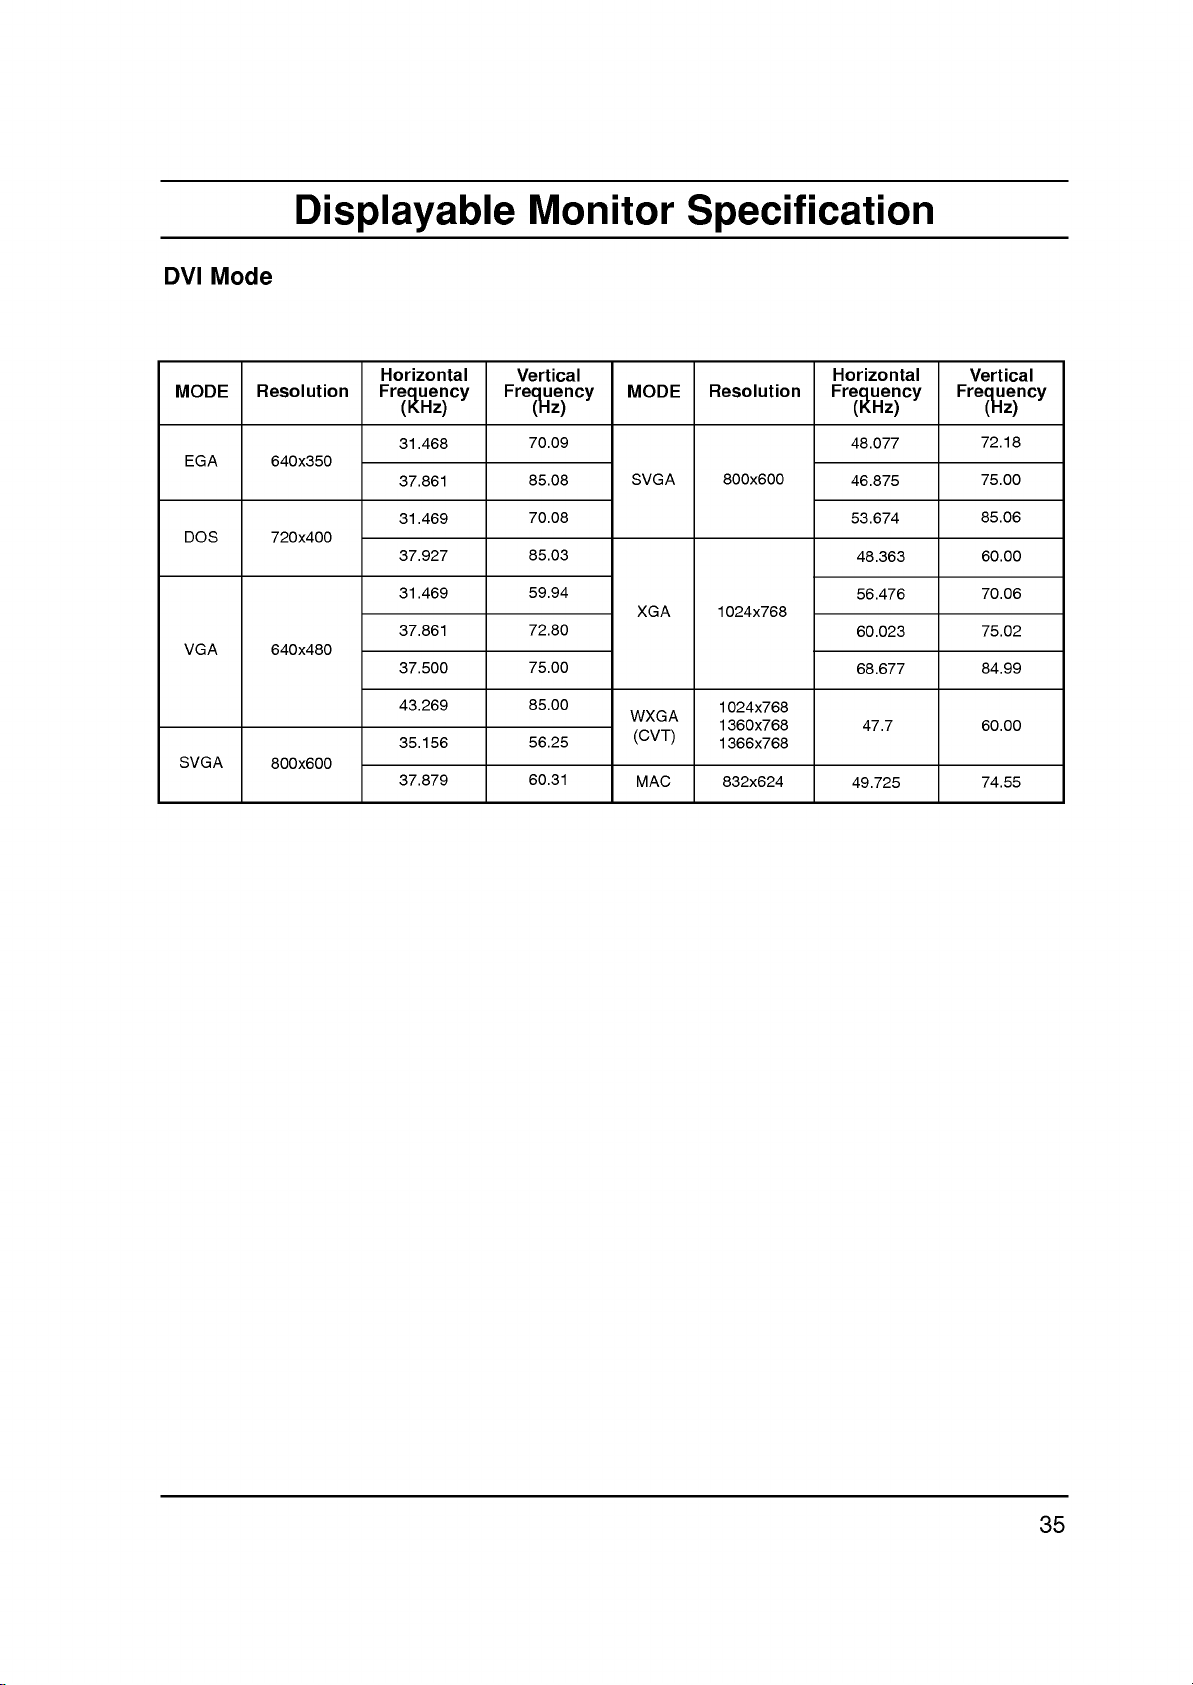
DVI
Mode
Displayable
Monitor
Specification
MODE
DOS
VGA
SVGA
EGA
Resolution
640x350
720x400
640x480
800x600
Horizontal
Frequency
(KHz)
31.468
37.861
31.469
37.927
31.469
37.861
37.500
43.269
35.156
37.879
Vertical
Frequency
(Hz)
70.09
85.08
70.08
85.03
59.94
72.80
75.00
85.00
56.25
60.31
MODE
SVGA
XGA
WXGA
(CVT)
MAC
Resolution
800x600
1024x768
1024x768
1360x768
1366x768
832x624
Horizontal
Frequency
(KHz)
48.077
46.875
53.674
48.363
56.476
60.023
68.677
47.7
49.725
Vertical
Frequency
(Hz)
72.18
75.00
85.06
60.00
70.06
75.02
84.99
60.00
74.55
35

External
Control
Device
Setup
Connect
as
a
computer
tions
RS-232C
1.
Connect
jack
2.
RS-232C
3.
The
(except
by
D-Sub
No.
1
2
3
4
5
6
7
8
9
the
RS-232C
or
externally.
input
the
on
the
connection
set's
remote
main
a
PC
computer
9-pin
Pin
name
No
connection
RXD
(Receive
TXD
(Transmit
DTR
(DTE
GND
DSR
(DCE
RTS
(Readytosend)
CTS
(Cleartosend)
No
Connection
an
serial
set.
power)
male
input
A/V
socket
control
or
side
side
control
port
cables
will
other
data)
data)
ready)
ready)
jack
of
not
to
an
external
system)
the
control
are
not
handset
be
functionalifthe
external
and
control
device
supplied
and
front
device.
control
to
with
the
the
panel
set
device
set's
RS-232C
the
is
controlled
(such
func-
set.
controls
1
5
9
6
ID
Set
Use
this
function
Refer
to
'Real
1.
Press
the
the
SPECIAL
2.
Press
theGbutton
3.
Press
theGbutton
to
choose
Note:The
Communication
?
Baud
?
?
*
rate
:
Parity
None
Communication
Useacrossed
to
specify
Data
Mapping
MENU
menu.
the
desired
adjustment
:
115200
code:ASCII
(reverse)
a
button
and
SPECIAL
Language
Child
Lock
Orbiter
Set
ID
Prev.
MENU
and
then
and
then
monitor
range
Parameters
bps
(UART)
cable.
monitor
1'.
See
then
use
of
Set
code
G
use
page
use
D
F/G
ID
IDis1
ID
number.
41.
the
1
E
buttontoselect
/
button
number.
?
?Stopbit:1bit
D
~
99.
Data
/
E
to
length
buttontoselect
ID.
Set
Set
adjust
:
8
bits
ID
36

External
Control
Device
Setup
Command
01.
Power
02.
TV/AV
03.
Aspect
04.
Screen
05.
Volume
06.
Volume
07.
Contrast
08.
Brightness
09.
Colour
10.
Tint
11.
Sharpness
12.
OSD
13.
External
14.
PIP/Twin
15.
PIP
16.
Split
17.
PIP
18.
Treble
19.
Bass
20.
Balance
21.
Colour
22.
Red
23.
Green
24.
Blue
25.
PIP
26.
SSM
27.
Orbiter
Reference
Ratio
Mute
Mute
Control
Select
Control
Picture
Ratio
Aspect
Zoom
Position
Temperature
Adjustment
Adjustment
Adjustment
Source
input
Mode
Mode
(DW)
(CSM)
List
COMMAND
j
1
COMMAND
k
k
k
k
k
k
k
k h
k
k
k k
k
k
k
k
k
k
k
k
k
k
k
k
k
k
k
2
DATA
(Hexadecimal)
a
b
c
d
e
f
g
i
j
l
m
n
o
p
q
r
s
t
u
v
w
$
y
x
p
0~1
0~6
0~2
0~1
0~1
0~64
0~64
0~64
0~64
0~64
0~64
0~1
0~1
0~3
0~1
0~3
0~64
0~64
0~64
0~2
0~64
0~64
0~64
0~6
0~4
0~1
Transmission
Transmission
[Command1][Command2][
*
[Command
*
[Command
*
[Set
ID]
2]
1]
:
First
(jork)
:
Second
:
You
desired
cial
Adjustment
When
connected
Set
(1~99)
decimal
*
[DATA]
*
[Cr]
*[]
sion/receiving
:
To
Transmit
of
:
Carriage
'0x0D'
:
ASCII
/
Receiving
][Set
command
command
can
adjust
monitor
menu.
selecting
ID
is
on
(0x0~0x63)
transmit
command.
code
See
range
set
indicated
menu
command
'FF'
Return
Protocol
ID][
][Data][Cr]
to
control
the
setIDto
ID
previous
Set
is
controlled.
protocol.
data
'space
to
control
number
is
1~99.
ID
and
on
to
ASCII
(0x20)'
page.
'0',
as
as
transmis-
data.
read
set.
choose
in
decimal
status
set.
spe-
every
Hexa
code
OK
Acknowledgement
[Command2][
*
The
Monitor
based
on
At
this
cates
mode,
Error
time,
present
it
Acknowledgement
[Command2][
*
The
Monitor
based
data
errors.
Data
from
1
2
3
on
:
:
:
][Set
this
if
returns
][Set
this
non-viable
illegal
not
support
wait
ID][
][OK][Data][x]
transmits
format
transmits
more
when
the
dataisdata read
status
data.Ifthe
the
dataofthe
ID][
][NG][Data][x]
format
functions
code
function
time
ACK
(acknowledgement)
receiving
ACK
(acknowledgement)
when
receiving
or
normal
mode,
dataisdata
PC
computer.
communication
data.
it
abnormal
indi-
write
37

External
Control
Device
Setup
01.
Power
G
To
control
Transmission
[k][a][
][Set
Data
Ack
[a][
][Set
G
To
show
Transmission
[k][a][
][Set
Ack
[a][
][Set
*
In
like
data
feed
02.
TV/AV
G
To
select
You
can
button
Transmission
[k][b][
][Set
Data
0
1
2
3
Ack
[b][
][Set
03.
Aspect
G
To
adjust
You
can
ARC
controlorin
Transmission
[k][c][
][Set
Data
0
1
2
3:14:9
4
Ack
[c][
][Set
*
Using
screen
0
:
ID][
ID][
manner,
based
back
also
on
:TV
:AV1
:AV2
:AV3
ID][
Ratio
(Aspect
:
Auto
:
:
:
ID][
the
aspect
(Command
ID][
Power
Power
ID][
(Command
input
the
ID][
the
also
ID][
Normal
Wide
Full
Power
On/Off
][Data][Cr]
Off
][OK][Data][x]
On/Off.
][FF][Cr]
][OK][Data][x]
if
other
on
this
format,
source
select
set's
status
an
remote
input
presents
][Data][Cr]
][OK][Data][x]
(Command
screen
the
][Data][Cr]
screen
][OK][Data][x]
PC
adjust
Ratio
SPECIAL
screen
screen
input,
ratio.
format.
the
Control)
(Zoom)
you
:
a)
of
the
TV.
1:PowerOn
functions
Acknowledgement
about
:
b)
for
the
set.
source
control.
4
5
6
:
c)
(Main
(Main
screen
button
menu.
(4:3)
(16:9)
select
transmit
each
using
:
:RGB
:DVI
picture
format
either
function.
the
S-Video
Picture
using
on
16:9or4:3
'0xFF'
data
TV/AV
Size)
format)
the
remote
04.
Screen
G
To
select
Transmission
[k][d][
][Set
Data
0
1
Ack
[d][
][Set
05.
Volume
G
To
control
You
can
on
remote
Transmission
[k][e][
][Set
Data
0
1
Ack
[e][
][Set
06.
Volume
G
To
adjust
You
can
tons
on
Transmission
[k][f][
][Set
Data
Min:0~Max:64
*
Ack
[f][
][Set
07.
Contrast
G
To
adjust
You
menu.
Transmission
[k][g][
][Set
Data
Min:0~Max:64
*
Ack
[g][
][Set
Mute
screen
ID][
:
Screen
:
Screen
ID][
][OK][Data][x]
Mute
volume
also
control.
ID][
:
Volume
:
Volume
ID][
][OK][Data][x]
Control
volume.
also
remote
ID][
Refer
to
ID][
][OK][Data][x]
screen
can
also
ID][
Refer
to
ID][
][OK][Data][x]
(Command
mute
][Data][Cr]
mute
mute
(Command
mute
adjust
][Data][Cr]
mute
mute
adjust
control.
][Data][Cr]
'Real
(Command
contrast.
adjust
][Data][Cr]
'Real
on/off.
off
(Picture
on
(Picture
on/off.
mute
using
on
(Volume
off
(Volume
(Command
volume
data
mapping1'.
:
g)
contrast
data
mapping1'.
:
with
d)
on)
off)
:
e)
the
MUTE
button
off)
on)
:
f)
the
volume
See
in
the
See
page
PICTURE
page
but-
42.
42.
38

External
Control
Device
Setup
08.
Brightness
G
To
adjust
You
can
menu.
Transmission
[k][h][
][Set
Data
Min:0~Max:64
*
Ack
[h][
][Set
09.
Colour
G
To
adjust
You
can
Transmission
[k][i][
][Set
Data
Min:0~Max:64
*
Ack
[i][
][Set
10.
Tint
G
To
adjust
You
can
Transmission
[k][j][
][Set
Data
Red:0~Green:64
*
Ack
[j][
][Set
screen
also
ID][
Refer
to
ID][
][OK][Data][x]
(Command
the
also
ID][
Refer
to
ID][
][OK][Data][x]
(Command
the
also
ID][
Refer
to
ID][
][OK][Data][x]
(Command
brightness.
adjust
][Data][Cr]
'Real
screen
adjust
][Data][Cr]
'Real
screen
adjust
][Data][Cr]
'Real
brightness
data
colour.
colourinthe
data
:
j)
tint.
tintinthe
data
:
h)
mapping1'.
:
i)
mapping1'.
(option)
mapping1'.
in
PICTURE
PICTURE
the
See
See
See
PICTURE
page
page
menu.
page
menu.
42.
42.
42.
12.
OSD
G
To
select
controlling
Transmission
[k][l][
][Set
Data
Ack
[l][
][Set
13.
External
G
To
lock
remote
trol
the
Transmission
[k][m][
][Set
Data
Ack
[m][
][Set
*
If
you're
mode.
trol
lockisreleased.
14.
PIP/DW
G
To
control
Window)
You
can
PIP/DW
PIP/DW
Transmission
[k][n][
][Set
Data
Select
OSD
remotely.
ID][
0:OSDoff
ID][
][OK][Data][x]
Control
the
control.
monitor
ID][
0:off
ID][
not
When
the
picture.
also
button
menu.
ID][
0:PIPoff
2:DW1
(Command
Screen
(On
][Data][Cr]
Mode
front
When
with
][Data][Cr]
][OK][Data][x]
using
main
(Command
PIP
control
on
][Data][Cr]
controls
panel
setting
RS-232C.
1:on
the
remote
power
:
(PictureInpicture)/DW
the
PIP/DW
the
remote
:
l)
Display)
1:OSDon
(Command
this
is
on/off,
n)
control
1:PIP
3:DW2
on/off
on
the
mode,
control,
external
picture
when
:
m)
set
only
use
(Double
using
or
in
and
con-
this
con-
the
the
11.
Sharpness
G
To
adjust
You
can
menu.
Transmission
[k][k][
][Set
Data
Min:0~Max:64
*
Ack
[k][
][Set
the
also
ID][
Refer
ID][
(Command
screen
][Data][Cr]
to
'Real
][OK][Data][x]
adjust
sharpness.
sharpness
data
:
k)
mapping1'.
Ack
[n][
][Set
ID][
][OK][Data][x]
in
the
PICTURE
See
page
42.
PIP
15.
G
To
select
You
can
the
PIP/DW
Transmission
[k][o][
][Set
Data
Ack
[o][
][Set
Aspect
also
0
:
Normal
1
:
Wide
ID][
the
ID][
Ratio
(Command
PIP
picture
the
adjust
menu.
][Data][Cr]
screen
screen
(16:9)
][OK][Data][x]
format.
screen
(4:3)
:
format
o)
for
PIP
in
39
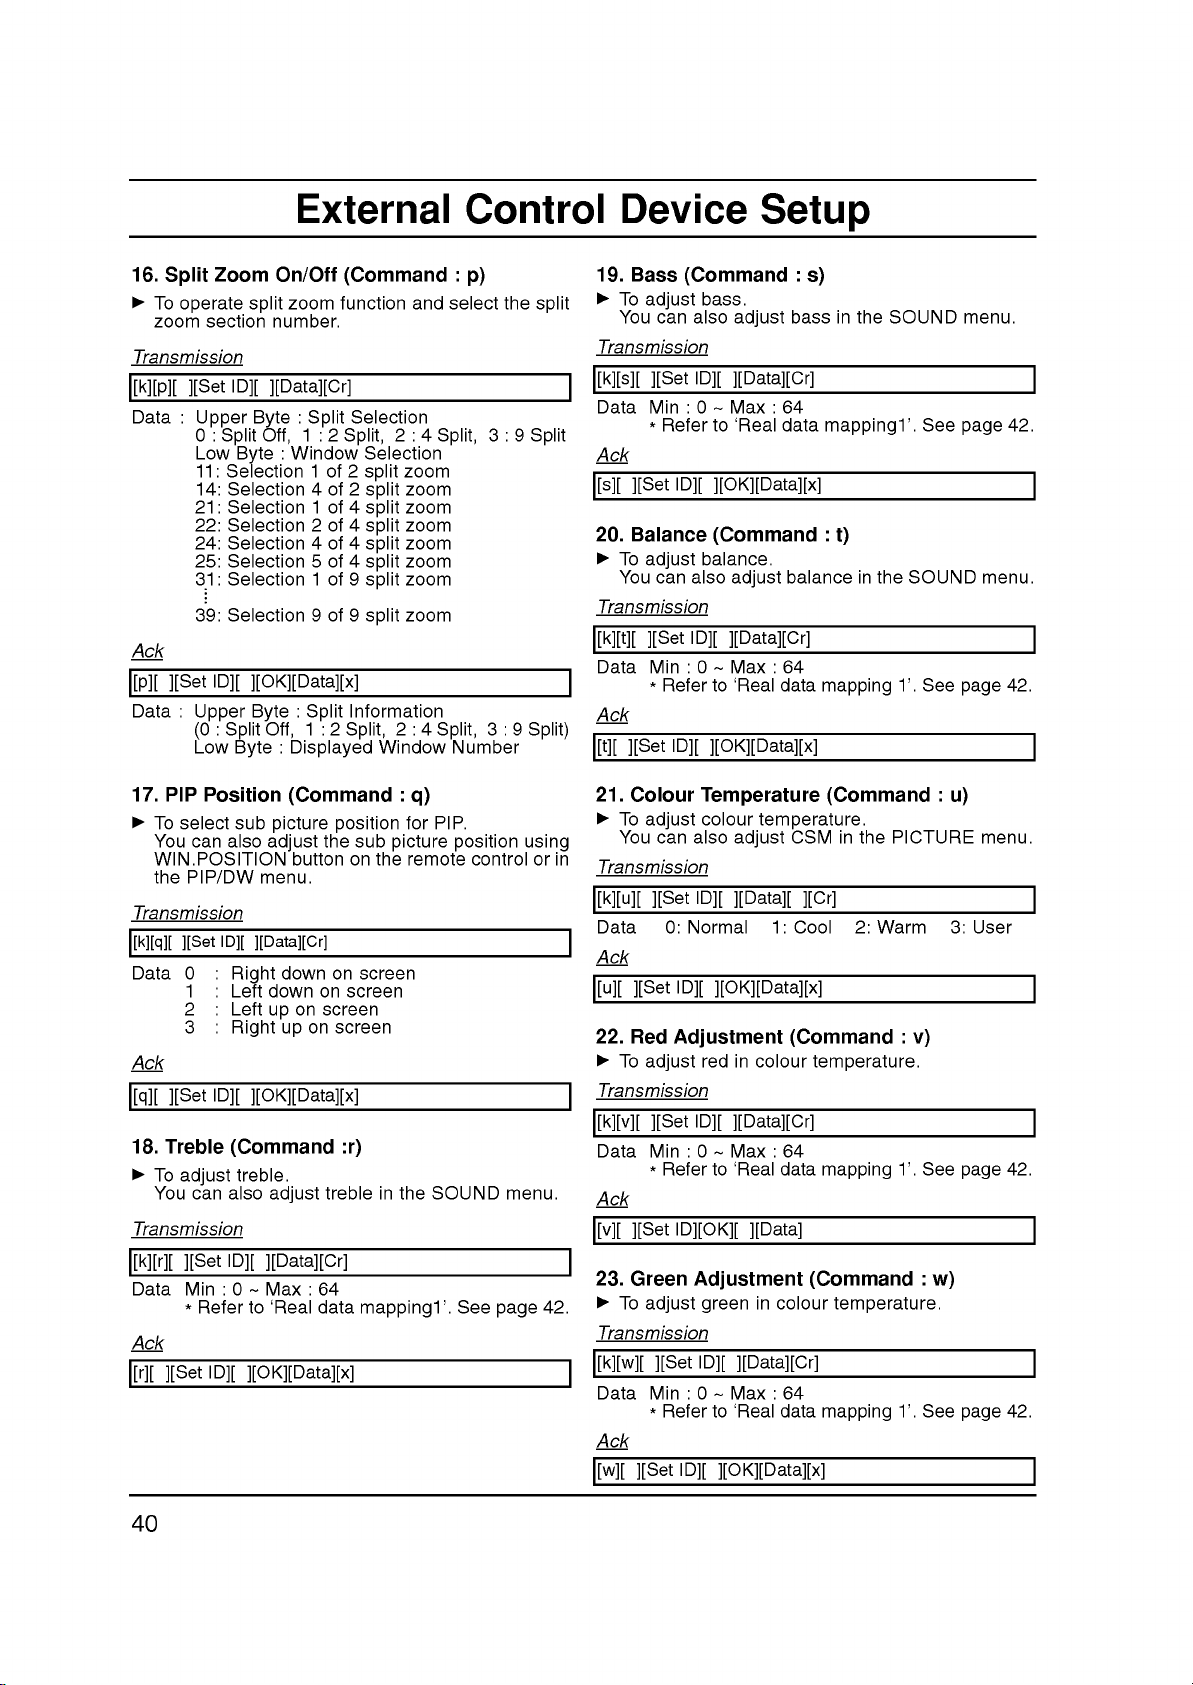
External
Control
Device
Setup
16.
Split
G
To
operate
zoom
Transmission
[k][p][
][Set
Data
:
Ack
[p][
][Set
Data
:
(0:SplitOff,
Low
17.
PIP
G
To
select
You
can
WIN.POSITION
the
PIP/DW
Transmission
[k][q][
][Set
Data
0
1
2
3
Ack
[q][
][Set
18.
Treble
G
To
adjust
You
can
Transmission
[k][r][
][Set
Data
Min:0~Max:64
*
Ack
[r][
][Set
Zoom
split
section
Upper
0:SplitOff,
Low
11:
14:
21:
22:
24:
25:
31:
39:
Upper
number.
ID][
][Data][Cr]
Byte:Split
Byte
Selection1of
Selection4of
Selection1of
Selection2of
Selection4of
Selection5of
Selection1of
Selection9of
ID][
][OK][Data][x]
Byte:Split
Byte:Displayed
Position
sub
picture
also
adjust
menu.
ID][
][Data][Cr]
:
Right
:
Left
down
:
Left
up
:
Right
ID][
][OK][Data][x]
(Command
treble.
also
adjust
ID][
][Data][Cr]
Refer
to
'Real
ID][
][OK][Data][x]
On/Off
zoom
1:2Split,
:
Window
1:2Split,
(Command
button
down
on
on
on
up
data
(Command
function
Selection
Selection
2
split
2
split
4
split
4
split
4
split
4
split
9
split
9
split
Information
Window
position
the
sub
picture
on
the
on
screen
screen
screen
screen
:r)
trebleinthe
mapping1'.
:
and
select
2:4Split,
zoom
zoom
zoom
zoom
zoom
zoom
zoom
zoom
2:4Split,
Number
:
q)
for
PIP.
position
remote
SOUND
p)
the
3:9Split
3:9Split)
using
controlorin
menu.
See
page
split
42.
19.
Bass
G
To
adjust
You
can
Transmission
[k][s][
][Set
Data
Min:0~Max:64
*
Ack
[s][
][Set
20.
Balance
G
To
adjust
You
can
Transmission
[k][t][
][Set
Data
Min:0~Max:64
*
Ack
[t][
][Set
21.
Colour
G
To
adjust
You
can
Transmission
[k][u][
][Set
Data
Ack
[u][
][Set
22.
Red
G
To
adjust
Transmission
[k][v][
][Set
Data
Min:0~Max:64
*
Ack
[v][
][Set
23.
Green
G
To
adjust
Transmission
[k][w][
][Set
Data
Min:0~Max:64
*
Ack
[w][
][Set
(Command
bass.
also
ID][
Refer
to
ID][
][OK][Data][x]
(Command
balance.
also
ID][
][Data][Cr]
Refer
to
ID][
][OK][Data][x]
Temperature
colour
also
ID][
0:
Normal
ID][
][OK][Data][x]
Adjustment
redincolour
ID][
Refer
to
ID][OK][
Adjustment
green
ID][
Refer
to
ID][
][OK][Data][x]
:
bassinthe
adjust
][Data][Cr]
'Real
data
balance
adjust
'Real
data
temperature.
CSM
adjust
][Data][
][Cr]
1:
Cool
(Command
][Data][Cr]
'Real
data
][Data]
in
colour
][Data][Cr]
'Real
data
s)
mapping1'.
:
t)
in
the
mapping
(Command
in
the
2:
Warm
temperature.
mapping
(Command
temperature.
mapping
SOUND
SOUND
1'.
PICTURE
:
v)
1'.
1'.
:
See
See
See
See
w)
menu.
42.
page
menu.
42.
page
:
u)
menu.
3:
User
42.
page
42.
page
40

External
Control
Device
Setup
24.
Blue
G
To
adjust
Transmission
[k][$][
][Set
Data
Min:0~Max:64
*
Ack
[$][
][Set
25.
PIP
G
To
select
mode.
picture
trol.
Transmission
[k][y][
][Set
Data
0
1
2
3
Ack
[y][
][Set
*It's
disable
input
Adjustment
blueincolour
ID][
Refer
to
ID][
][OK][Data][x]
INPUT
input
You
can
using
ID][
:TV
:AV1
:AV2
:AV3
ID][
][OK][Data][x]
to
source
(Command
temperature.
][Data][Cr]
'Real
data
mapping
SELECT
PIP
][Data][Cr]
choose
simultaneously.
source
also
INPUT
(Command
for
adjust
the
sub
input
button
main
:
$)
1'.
See
:
picture
source
on
4
:
S-Video
5
:RGB
6
:DVI
and
y)
remote
sub
in
page
PIP/DW
for
picture
con-
42.
sub
27.
Orbiter
(Command
G
To
control
ISM
Method
Transmission
[j][p][
][Set
Data
Ack
[p][
][Set
*
10:Step16(SetID16)
64
1
:
Command
j,
the
ISM
method.
in
SPECIAL
ID][
][Data][Cr]
0:off
ID][OK][
Real
data
][Data]
mapping
0:Step0
A:Step10(SetID10)
F:Step15(SetID15)
:
100
Step
1:on
menu.
1
You
2
:
p)
can
also
adjust
26.
SSM
G
To
select
Transmission
[k][x][
][Set
Data
0
1
2
Ack
[x][
][Set
Mode
(Command
sound
ID][
][Data][Cr]
:
Flat
:
Speech
:
Movie
ID][
][OK][Data][x]
mode.
:
x)
3
:
Music
4
:User
41

Note
42

Symptoms
Troubleshooting
check
list
No
picture,
Sound
no
sound
OK,
poor
Picture
Picture blurred
OK,
Lines
picture
sound
poor
or
streaks
Poor
in
reception
No
colour
Poor
picture
on
colour
Remote
some
control
Incorrect
Vertical
channels
does
position
Horizontal
bars
Signal
not
work
or
stripesonbackground
noise
Cable
message
Check
adjust
The
switched
Is
Try
Check
Check
Check
Check
Adjust
Adjust
Adjust
Adjust
Check
Check
mains
the
another
these
these
plug-(plugged
on)
TV
switched
channel
aerial
aerial
aerial
for local
contrast
brightness
colour
volume
the
batteries
Audio/Video
(plugged
(broken
Auto-configureoradjust
Auto-configure
Auto-configure
Is
the
Signal
or
or
Cable connected
appears
items
on
(weak
into
lead?)
interference
in
remote
sockets
adjust
adjust
the
and
in
Clock
Clock
try
and
signal)
TV?)
control
(VCR
H/V
Phase
or
to
only)
position
loose
43

 Loading...