

LG Risio LG-H343 User Manual
www.lg.com
MFL69146401 (1.0)
ENGLISH
LG-H343
USER GUIDE


User Guide
• Some content and illustrations may differ from your device depending on the region, service
provider, software version, or OS version, and are subject to change without prior notice.
• Always use genuine LG accessories. The supplied items are designed only for this device
and may not be compatible with other devices.
• This device is not suitable for people who have a visual impairment due to the touchscreen
keyboard.
• Copyright ©2015 LG Electronics, Inc. All rights reserved. LG and the LG logo are registered
trademarks of LG Group and its related entities. All other trademarks are the property of
their respective owners.
• Google™, Google Maps™, Gmail™, YouTube™, Hangouts™ and Play Store™ are
trademarks of Google, Inc.
• Your phone is designed to make it easy for you to access a wide variety of content. For your
protection, we want you to be aware that some applications that you enable may involve
the location of your phone being shared. For applications available through Cricket, we
offer privacy controls that let you decide how an application may use the location of your
phone and other phones on your account. However, the Cricket privacy tools do not apply
to applications available outside of Cricket. Please review the terms and conditions and the
associated privacy policy for each location-based service to learn how location information
will be used and protected. In addition, your Cricket phone may be used to access the
internet and to download, and/or purchase goods, applications, and services from Cricket or
elsewhere from third parties. Cricket provides tools for you to control access to the Internet
and certain Internet content. These controls may not be available for certain devices which
bypass Cricket controls.
© 2015 Cricket Wireless LLC. All rights reserved. Cricket and the Cricket logo are
trademarks under license to Cricket Wireless LLC.
ENGLISH

2
Table of contents
Important notice .......................................4
Getting to know your phone .....................7
Phone layout ............................................7
Installing the SIM or USIM card and
battery .....................................................9
Charging the battery ..............................11
Inserting a memory card ........................12
Removing the memory card ...................13
Locking and unlocking the device ..........13
Your Home screen ...................................15
Touch screen tips ..................................15
Home screen .........................................16
Customizing the Home screen ...............17
Returning to recently-used
applications ........................................... 18
Notifi cations panel .................................18
On-screen keyboard ..............................21
Special Features .....................................23
Gesture shot ..........................................23
KnockON ...............................................24
Knock Code ...........................................25
QuickMemo+ .........................................26
Google account setup .............................27
Creating your Google account ................27
Signing into your Google account ...........27
Connecting to Networks and Devices ....29
Wi-Fi .....................................................29
Bluetooth ...............................................30
Wi-Fi Direct ...........................................31
Transferring data between a PC and the
device....................................................32
Calls ........................................................33
Making a call .........................................33
Calling your contacts .............................33
Answering and rejecting a call ...............33
Making a second call .............................34
Viewing your call logs ............................34
Call settings ...........................................34
Contacts ..................................................35
Searching for a contact ..........................35
Adding a new contact ............................35
Favorites contacts..................................35
Creating a group ....................................36
Messaging ...............................................37
Sending a message ...............................37
Conversation view .................................38
Changing your messaging settings ........38
E-mail ......................................................39
Managing email accounts ......................39
Working with account folders .................39
Composing and sending email ...............40
Camera and Video ...................................41
Table of contents

3
Table of contents
Camera options on the viewfi nder ..........41
Using the advanced settings ..................42
Taking a photo .......................................43
Once you have taken a photo .................43
Recording a video ..................................44
After recording a video...........................44
Gallery ................................................... 45
Multimedia ..............................................48
Music ....................................................48
Utilities ....................................................50
Clock .....................................................50
Calculator ..............................................51
Calendar ................................................52
Voice Recorder ......................................52
Voice Search..........................................52
Downloads ............................................53
LG SmartWorld ......................................53
Browsing the Web...................................55
Chrome .................................................55
Settings ...................................................56
Networks ...............................................56
Sound & notifi cation ..............................58
Display ..................................................59
General ..................................................61
Phone software update ..........................67
Phone software update ..........................67
About this user guide .............................69
About this user guide .............................69
Trademarks ...........................................69
Accessories .............................................70
FAQ ..........................................................71
For Your Safety........................................77
4
Important notice
Please read this before you start using your phone!
Please check to see whether any problems you encountered with your phone are
described in this section before taking the phone in for service or calling a service
representative.
1. Phone memory
When there is less than 10MB of space available in your phone memory, your phone
cannot receive new messages. You may need to check your phone memory and delete
some data, such as applications or messages, to make more memory available.
To uninstall applications:
1 Tap > > > General tab > Apps.
2 Once all applications appear, scroll to and select the application you want to
uninstall.
3 Tap Uninstall > OK.
2. Optimizing battery life
Extend your battery's power by turning off features that you do not need to run
constantly in the background. You can monitor how applications and system resources
consume battery power.
Extending your phone's battery life:
• Turn off radio communications when you are not using. If you are not using Wi-Fi,
Bluetooth or GPS, turn them off.
• Reduce screen brightness and set a shorter screen timeout.
• Turn off automatic syncing for Gmail, Calendar, Contacts and other applications.
Important notice
5
Important notice
• Some applications you download may consume battery power.
• While using downloaded applications, check the battery charge level.
3. Before installing an open source application and OS
WARNING
If you install and use an OS other than the one provided by the manufacturer
it may cause your phone to malfunction. In addition, your phone will no longer
be covered by the warranty.
WARNING
To protect your phone and personal data, only download applications from
trusted sources, such as Play Store™. If there are improperly installed
applications on your phone, the phone may not work normally or a serious
error may occur. You must uninstall those applications and all associated data
and settings from the phone.
4. Using the Hard Reset (Factory Reset)
If your phone does not restore to its original condition, use a Hard Reset (Factory Reset)
to initialize it.
1 Turn the power off.
2 Press and hold the Power/Lock Key + Volume Down Key on the back of the
phone.
3 Release the Power/Lock Key only when the boot logo is displayed, then
immediately press and hold the Power/Lock Key again.
4 Release all keys when the Factory reset screen is displayed.
5 Press the Volume Keys to highlight Yes, then press the Power/Lock Key to
continue.
6
Important notice
6 Press the Volume Keys to highlight Yes once more, then press the Power/Lock
Key to confirm.
WARNING
If you perform a Hard Reset, all user applications, user data and DRM licenses
will be deleted. Please remember to backup any important data before
performing a Hard Reset.
5. Opening and switching applications
Multitasking is easy with Android; you can keep more than one application running at
the same time. There is no need to quit an application before opening another. Use and
switch between several open applications. Android manages each application, stopping
and starting them as needed to make sure that idle applications don't consume
resources unnecessarily.
1 Tap . App previews of recently used applications will be displayed.
2 Tap the application you want to access. This does not stop the previous app from
running in the background. Make sure to tap
to back out of an app after using it.
• To close an app from the recent apps list, swipe the app preview to the left or right.
To clear all apps, tap Clear all.
6. If the screen freezes
If the screen freezes or the phone does not respond when you try to operate it, remove
the battery and reinsert it. Then power the phone back on.
7
Getting to know your phone
Phone layout
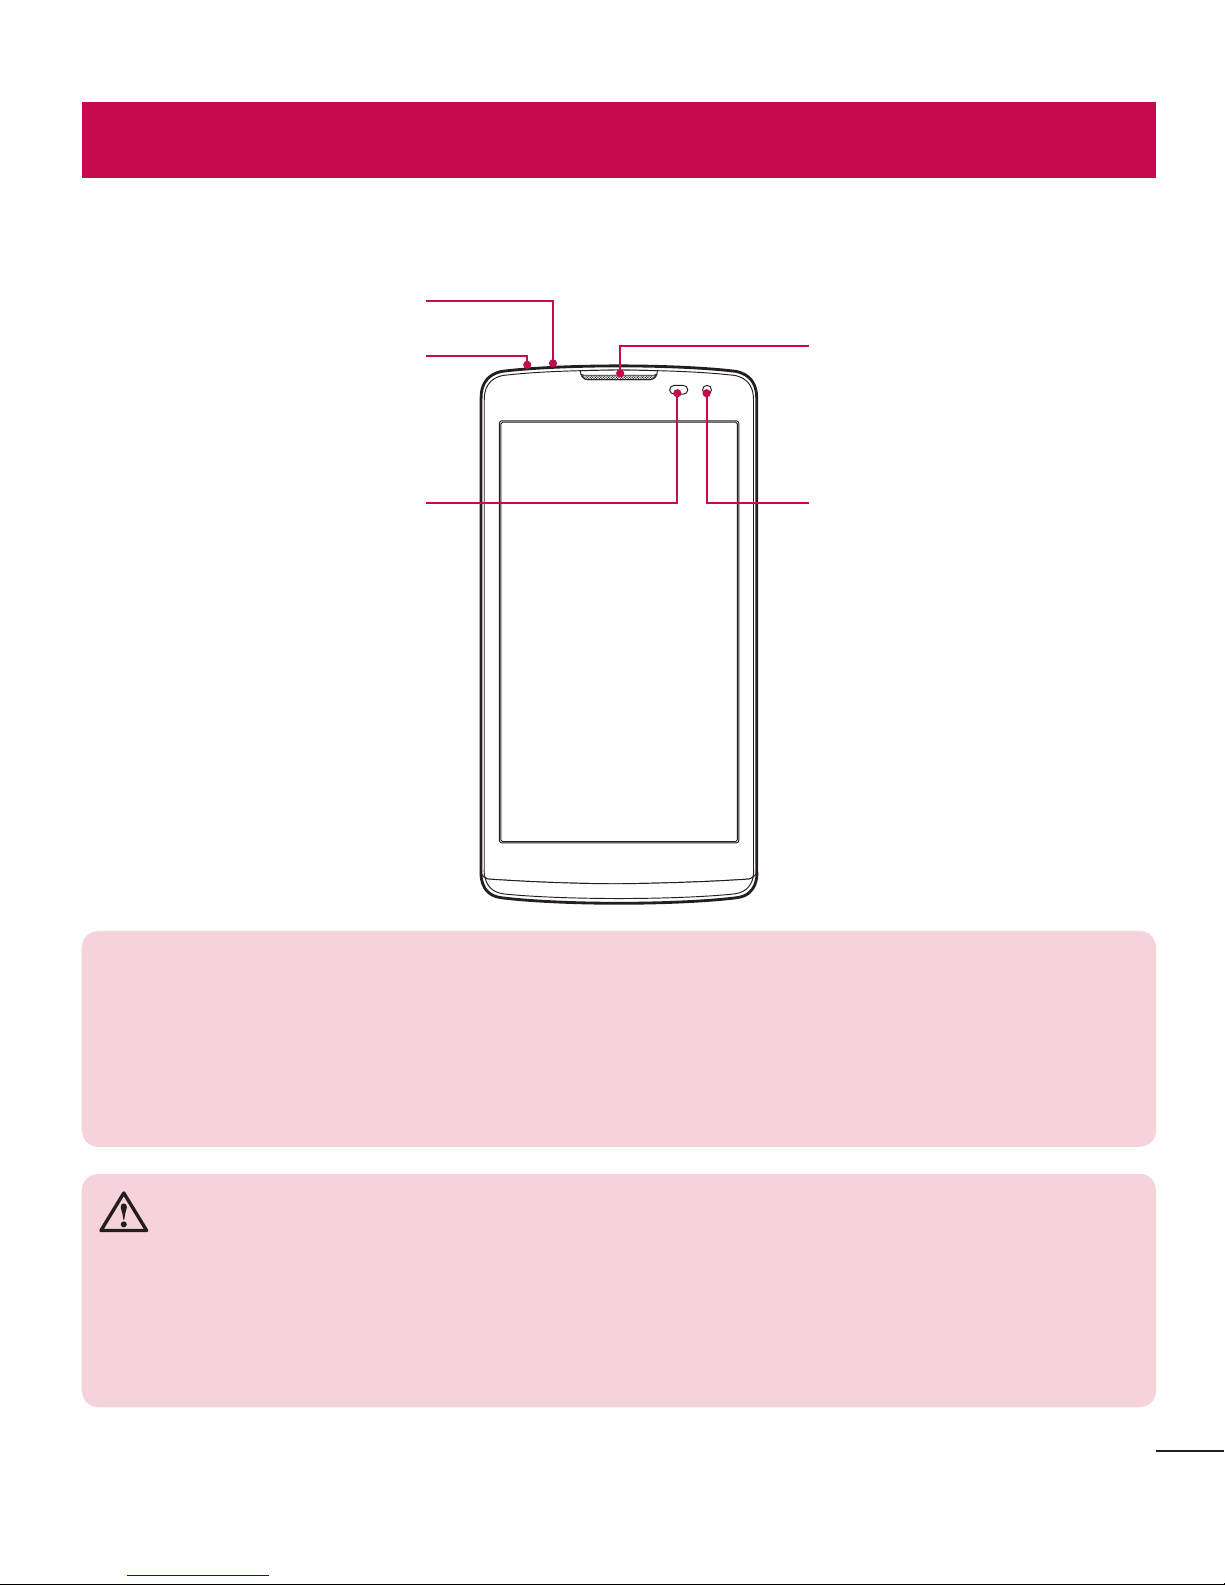
Proximity Sensor
Earpiece
Headset Jack
Front Camera Lens
Microphone
NOTE: Proximity sensor
When receiving and making calls, the proximity sensor automatically turns
the backlight off and locks the touch screen by sensing when the phone is
near your ear. This extends battery life and prevents you from unintentionally
activating the touch screen during calls.
WARNING
Placing a heavy object on the phone or sitting on it can damage the display
and touch screen functions. Do not cover the proximity sensor with screen
protectors or any other type of protective film. This could cause the sensor to
malfunction.
Getting to know your phone
8
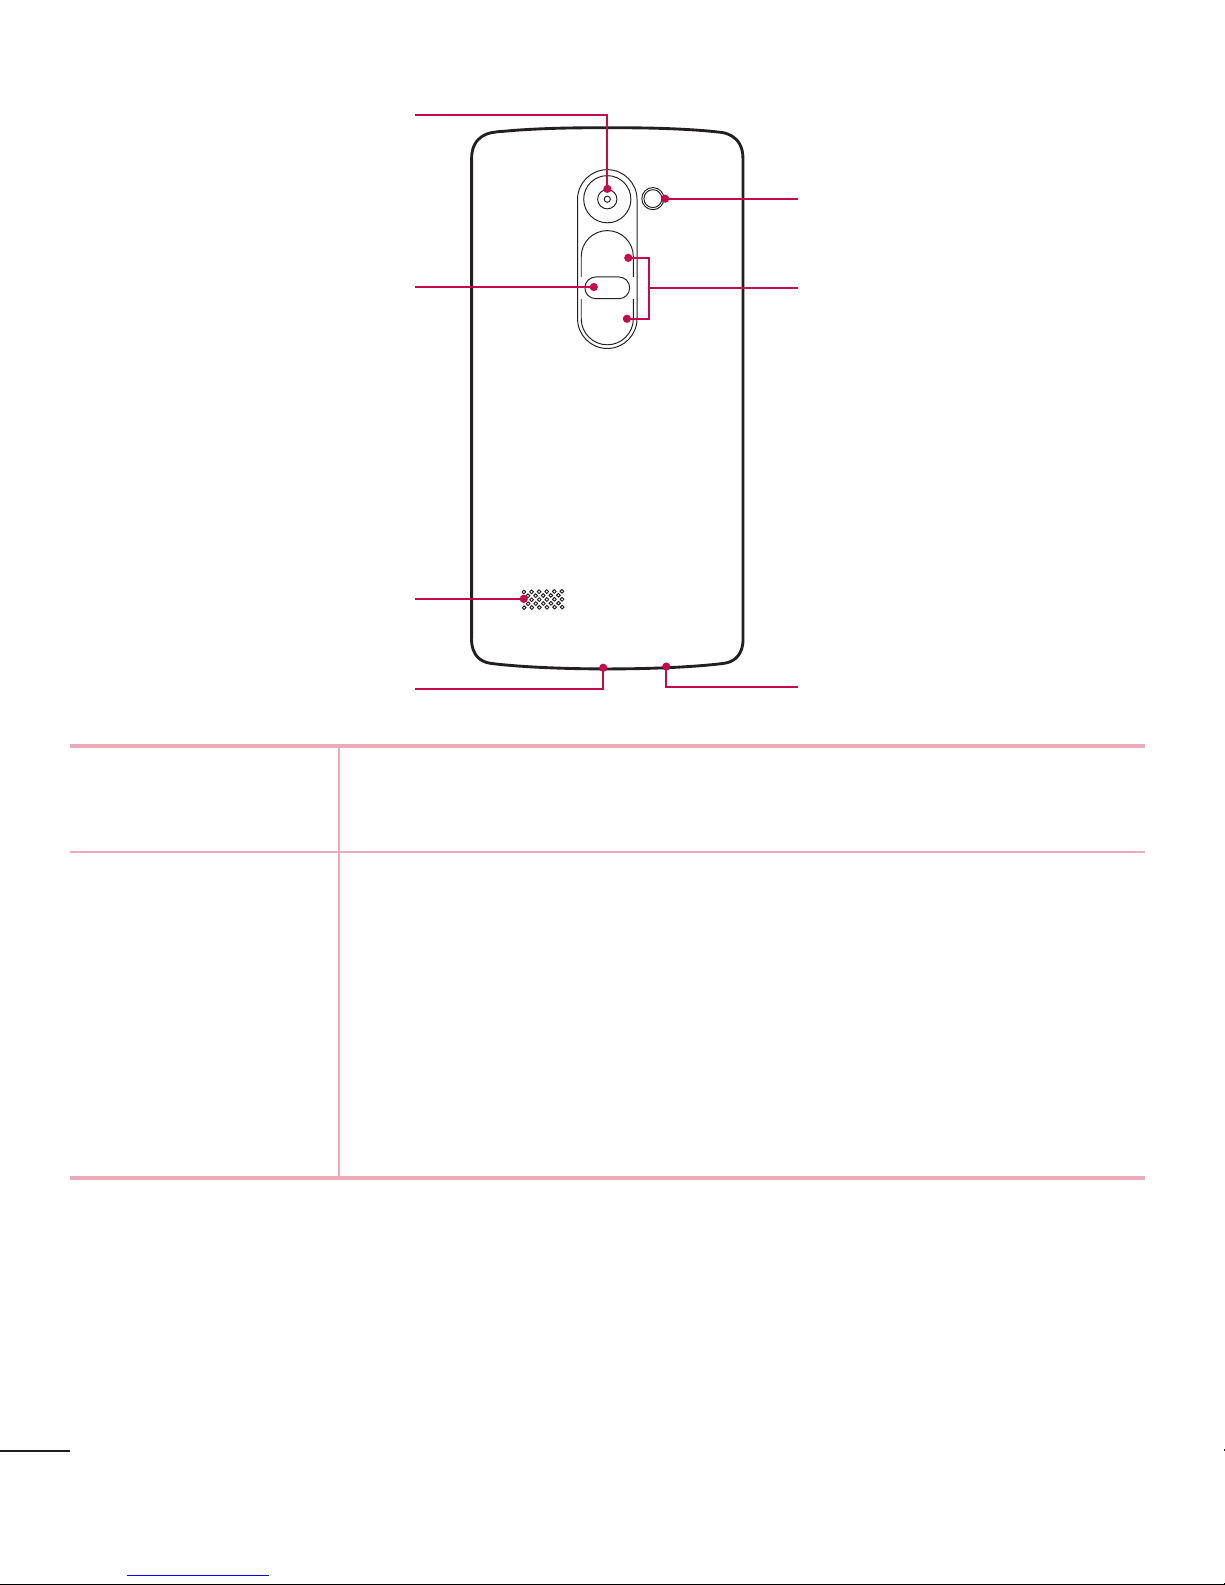
Getting to know your phone
Microphone
Volume Keys
Charger/USB Port
Power/Lock Key
Rear Camera Lens
Speaker
Flash
Power/Lock Key • Turn your phone on/off by pressing and holding this key.
• Press once quickly to lock/unlock the screen.
Volume Keys While the screen is off:
• Press Volume Up Key twice to launch QuickMemo+.
• Press Volume Down Key twice to launch the camera.
While the screen is on:
• From the Home screen, press to change the ringer type.
• While listening to music or on a call, press to adjust the
volume.
9
Getting to know your phone
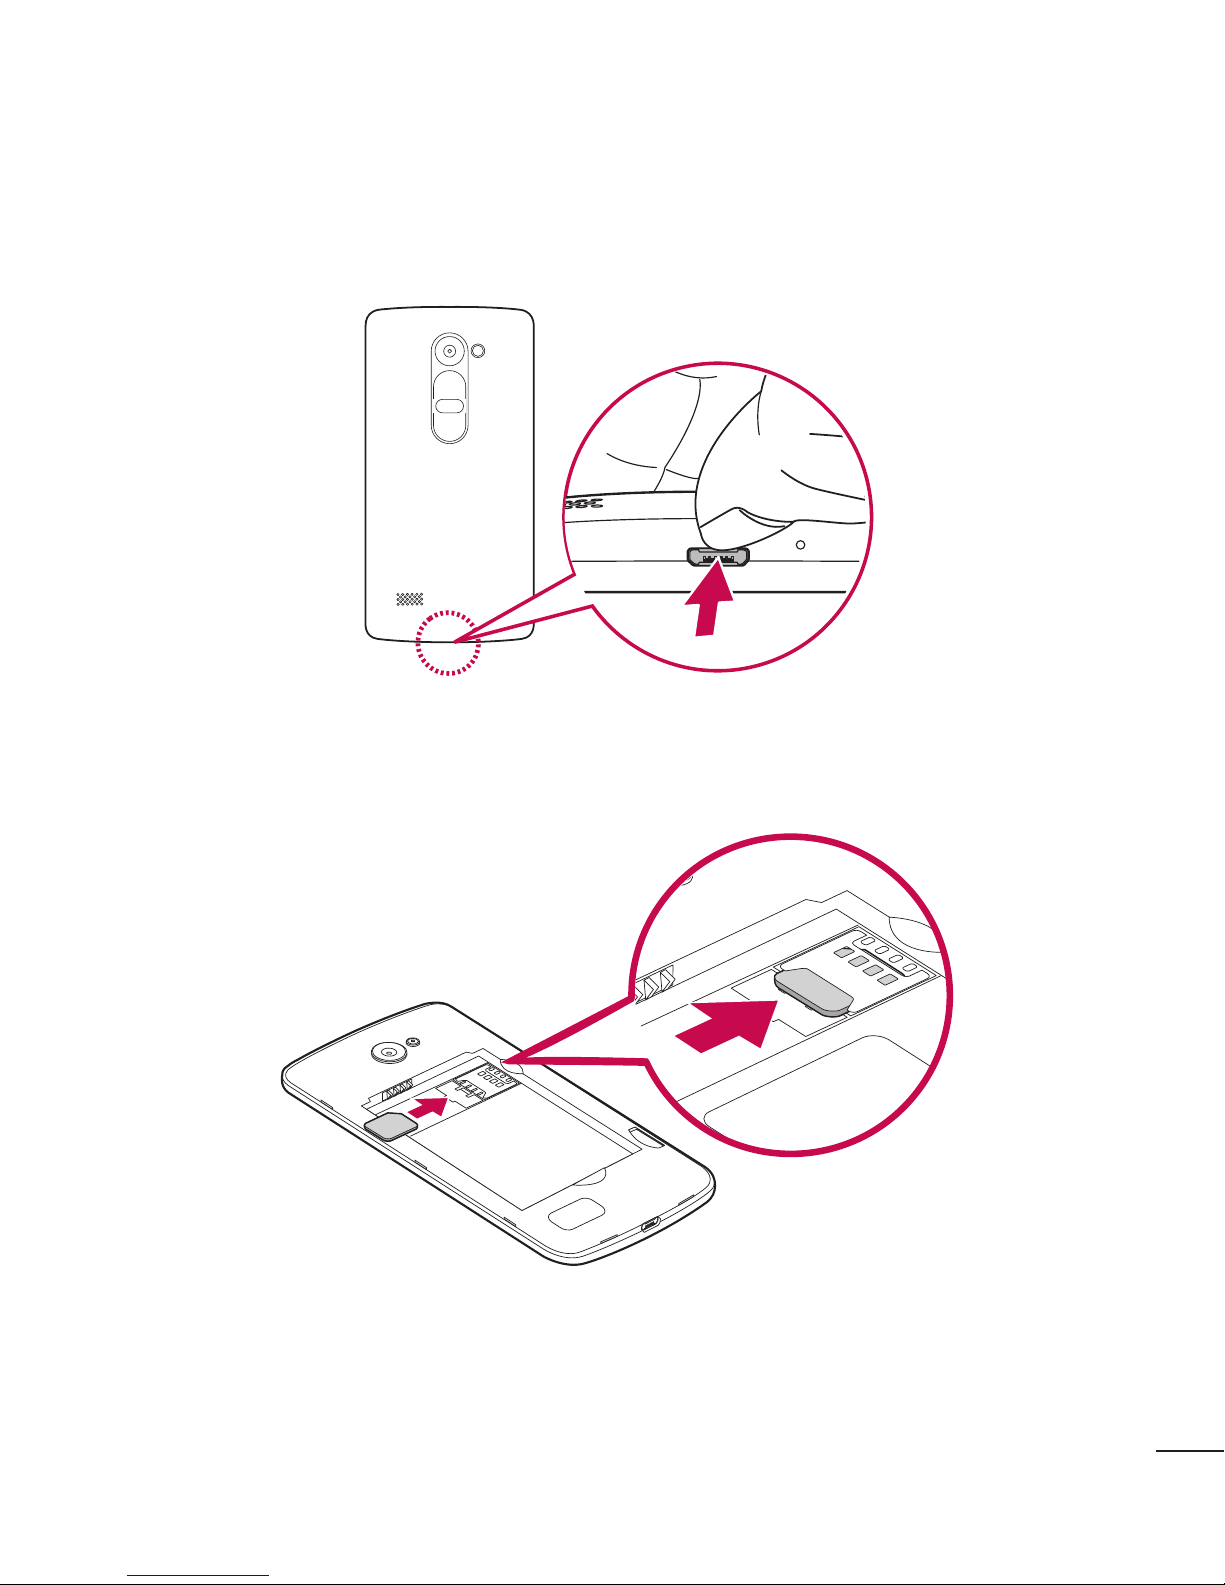
Installing the SIM or USIM card and battery
Before you can start exploring your new phone, you need to set it up.
1 To remove the back cover, hold the phone firmly in one hand. With your other hand,
lift off the back cover with your thumbnail as shown in the figure below.
2 Slide the SIM card into the lower slot for the SIM card as shown in the figure. Make
sure the gold contact area on the card is facing downward.
10
Getting to know your phone
WARNING
Do not insert a memory card into the SIM card slot. If a memory card
happens to be lodged in the SIM card slot, take the device to a LG Service
Center to remove the memory card.
NOTE: Only microSIM cards work with this device.
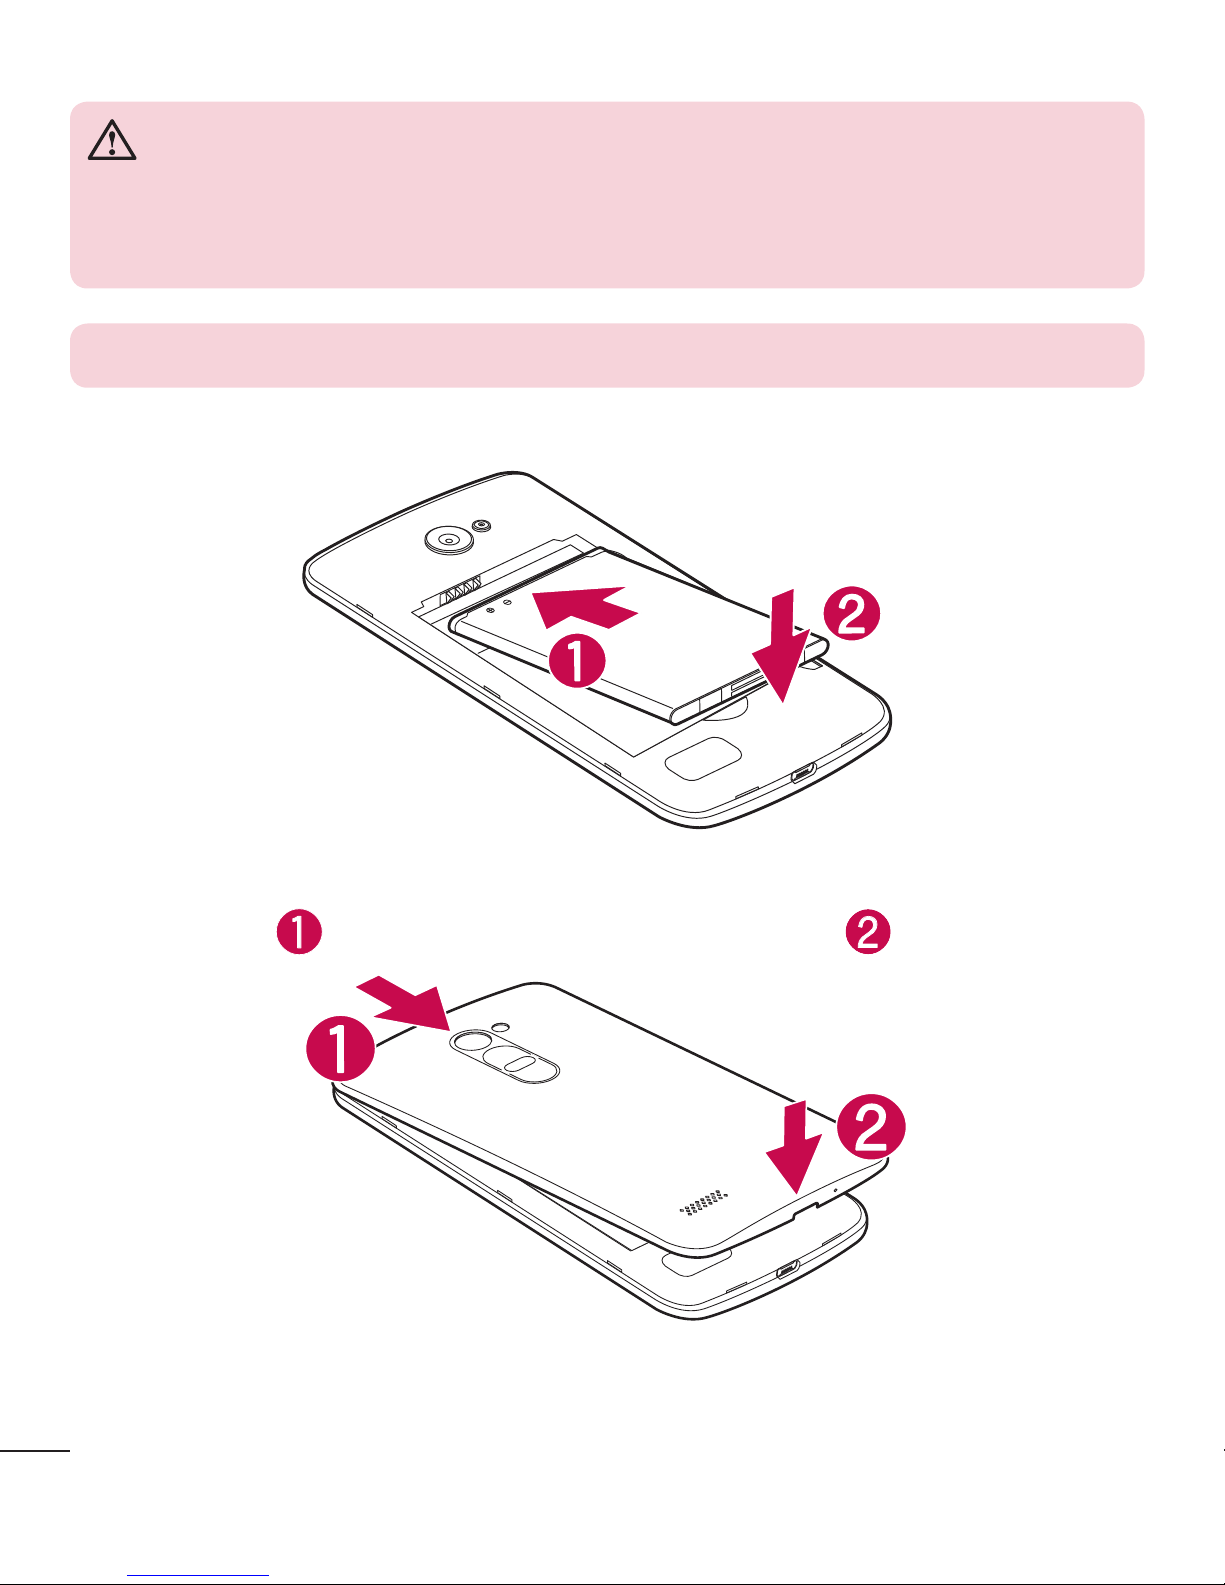
3 Insert the battery.
4 To replace the cover onto the device, align the back cover over the battery
compartment
and press it down until it clicks into place .
11
Getting to know your phone
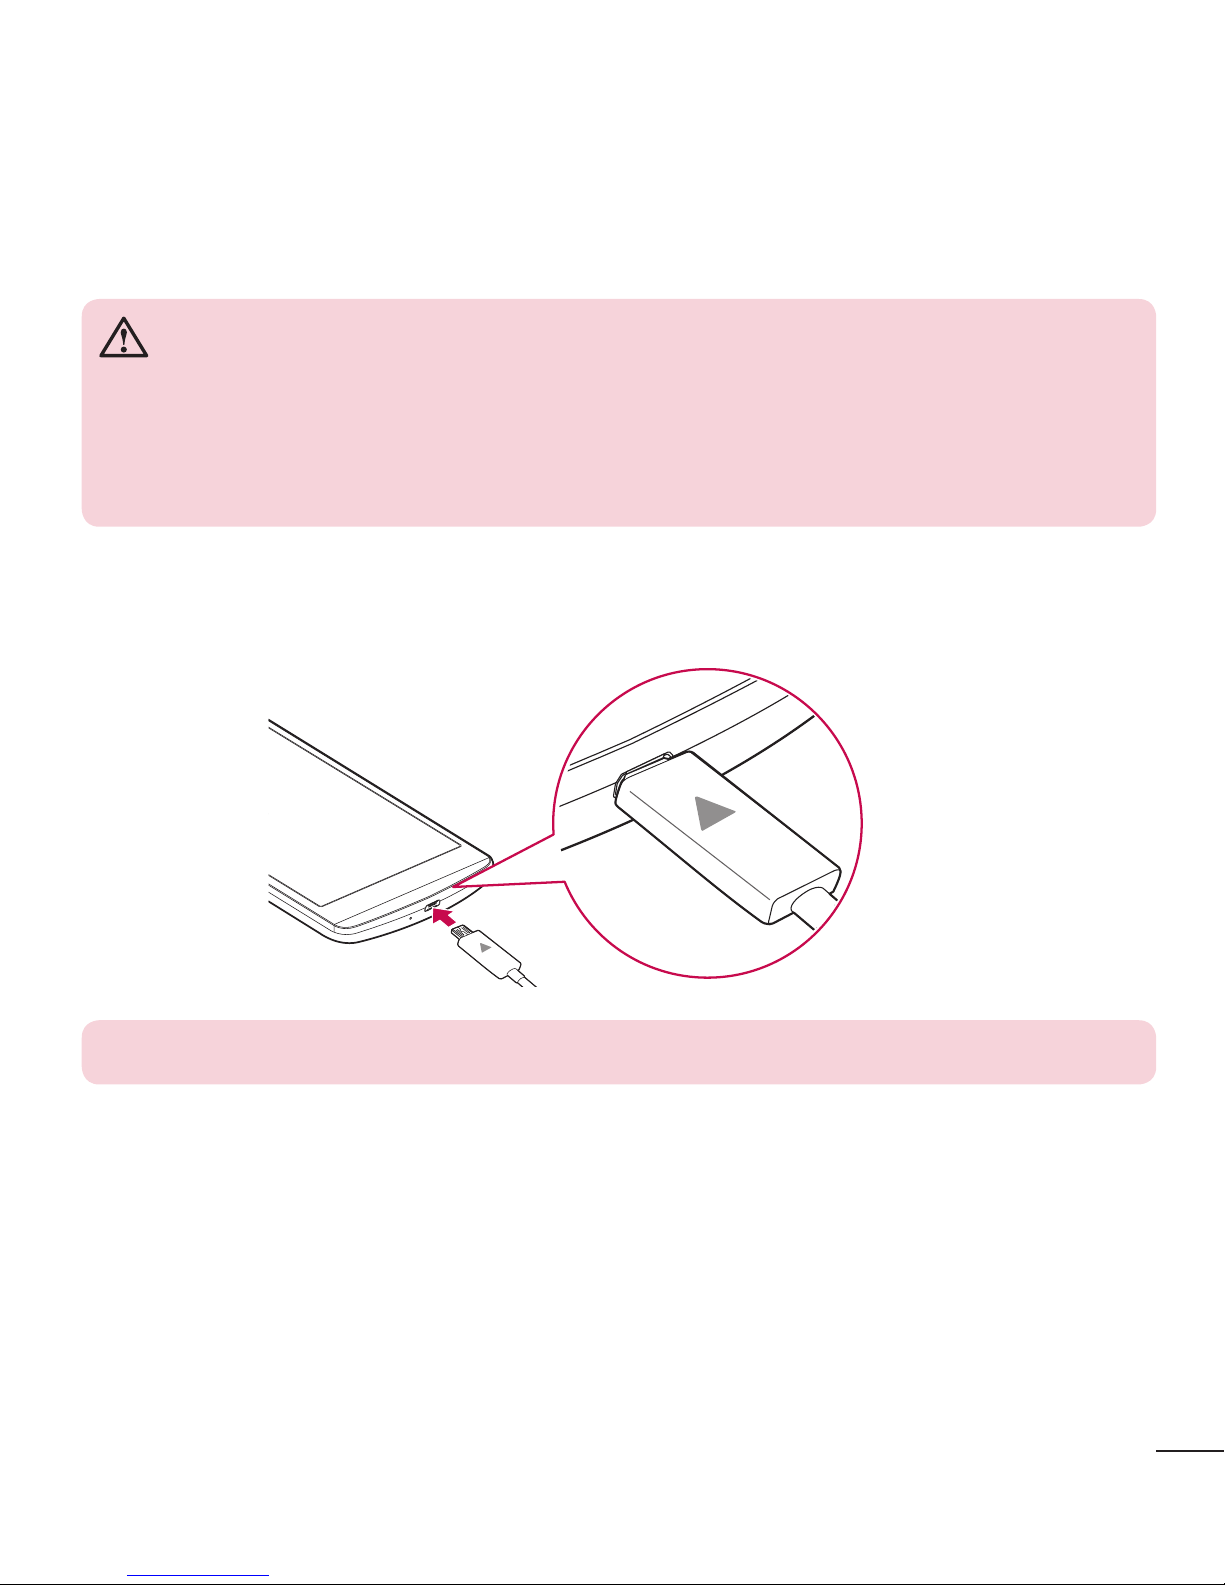
Charging the battery
Charge the battery before using it for first time. Use the charger to charge the battery.
A computer can also be used to charge the battery by connecting the phone to it using
the USB cable.
WARNING
Use only LG-approved chargers, batteries and cables. If you use unapproved
chargers, batteries or cables, it may cause a battery charging delay. This can
also cause the battery to explode or damage the device, which is not covered
by the warranty.
The Charger/USB Port is located at the bottom of the phone. Insert the charger and
plug it into a power outlet.
NOTE: Do not open the back cover while your phone is charging.
12
Getting to know your phone
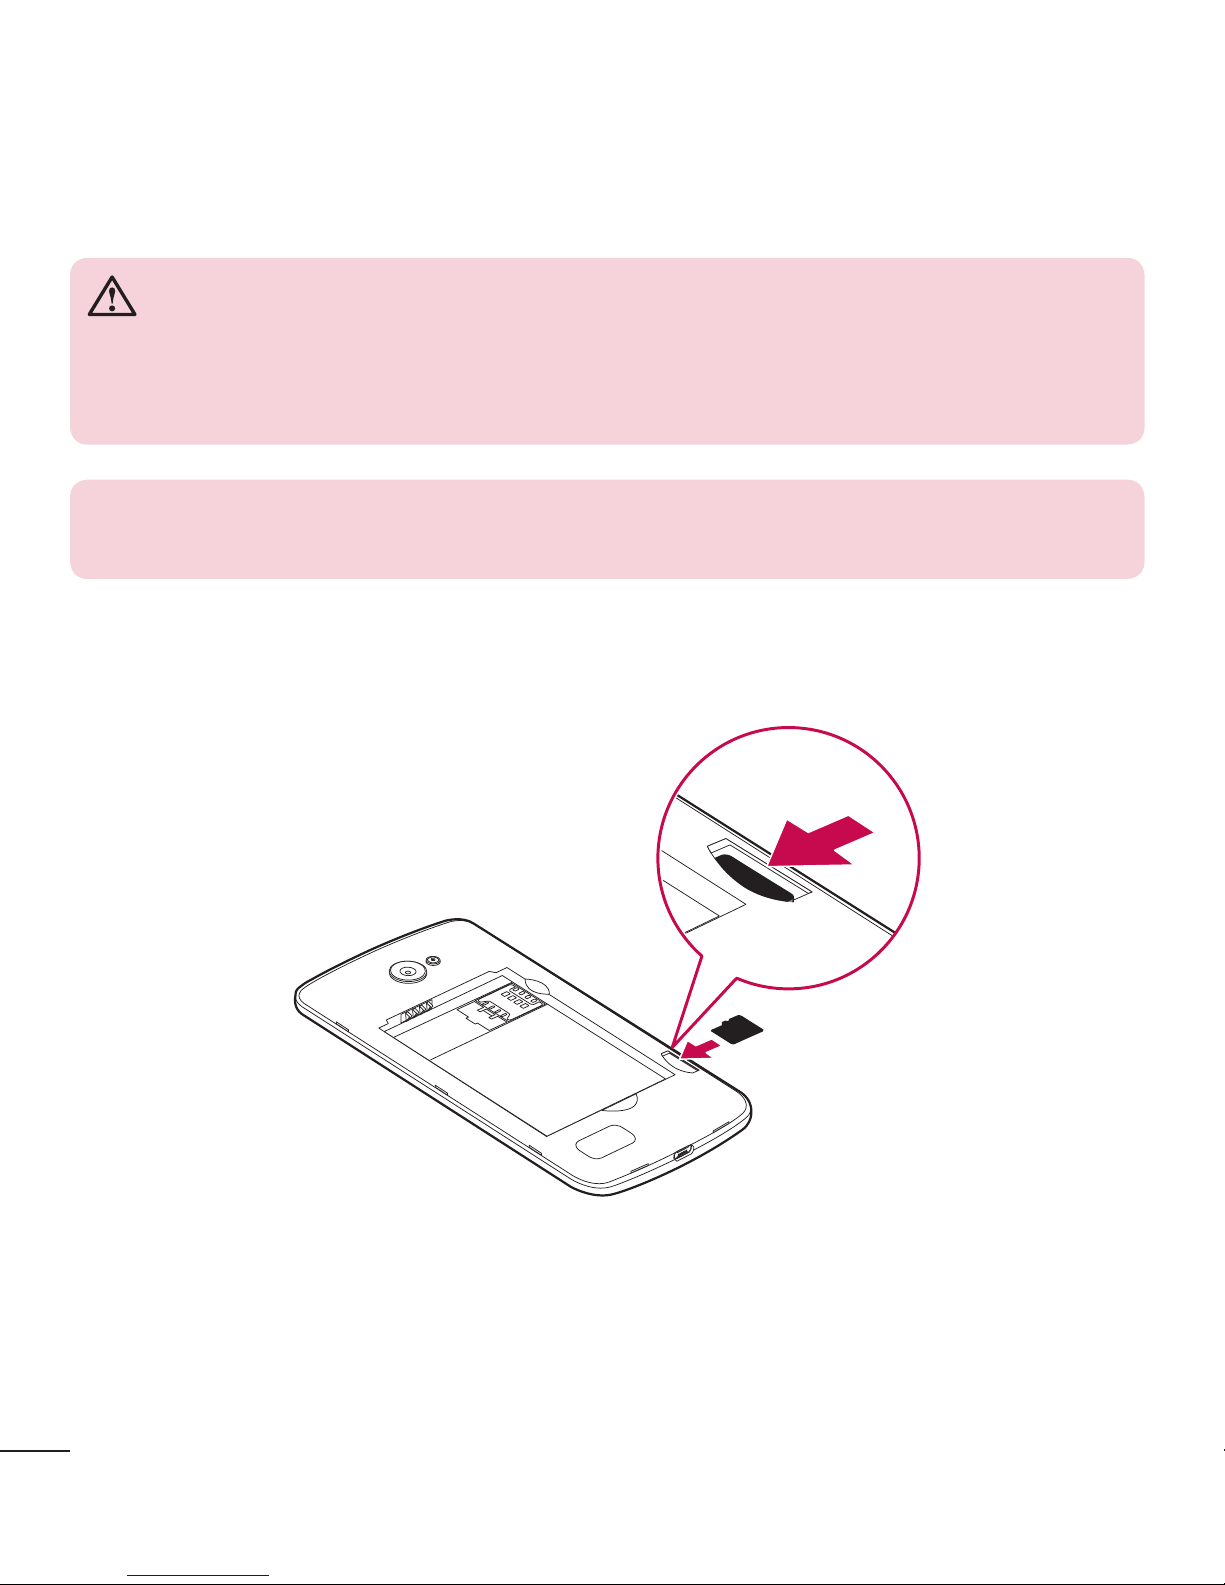
Inserting a memory card
Your device supports up to a 32GB microSD card. Depending on the memory card
manufacturer and type, some memory cards may not be compatible with your device.
WARNING
Some memory cards may not be fully compatible with the device. Using an
incompatible card may damage the device or the memory card, or corrupt the
data stored in it.
NOTE: Frequent writing and erasing of data shortens the lifespan of memory
cards.
1 Remove the back cover.
2 Insert a memory card with the gold-colored contacts facing downwards.
3 Replace the back cover.
13
Getting to know your phone
Removing the memory card
Before removing the memory card, first unmount it for safe removal.
1 Tap > > > General tab > Storage > Unmount SD card.
2 Remove the back cover and pull out the memory card.
WARNING
Do not remove the memory card while the device is transferring or accessing
information. Doing so can cause data to be lost or corrupted or damage to
the memory card or device. LG is not responsible for losses that result from
the misuse of damaged memory cards, including the loss of data.
Locking and unlocking the device
Pressing the Power/Lock Key turns off the screen and puts the device into lock mode.
The device automatically gets locked if it is not used for a specified period. This helps to
prevent accidental taps and saves battery power.
To unlock the device, press the Power/Lock Key and swipe the screen in any direction.
NOTE: Double-tapping on the screen also can wake up the screen instead of
the Power/Lock Key.
Changing the screen lock method
You can change the way that you lock the screen to prevent others accessing your
personal information.
1 Tap > > > Display tab > Lock screen > Select screen lock.
2 Select a desired screen lock from None, Swipe, Knock Code, Pattern, PIN and
Password.
14
Getting to know your phone
NOTE: Create or sign in to a Google account before setting an screen lock
and remember the backup PIN you created when creating your screen lock.
Caution! If you haven't created or signed in to a Google account on the
phone and you forgot your PIN, Password, and the backup PIN, you need to
perform a hard reset. Performing a hard reset deletes all user applications and
user data. Please remember to back up any important data before performing
a hard reset.
TIP! Smart Lock
You can use Smart Lock to make unlocking your phone easier. You can set
it to keep your phone unlocked when you have a trusted Bluetooth device
connected to it, when it's in a familiar location like your home or work, or
when it recognises your face.
Setting up Smart Lock
1 Tap > > .
2 Tap Display tab > Lock screen > Smart Lock.
3 Before you add any trusted devices, trusted places, or trusted face, you
need to set up a screen lock (pattern, PIN, or password).

15
Your Home screen
Touch screen tips
Here are some tips on how to navigate on your phone.
• Tap or touch – A single finger tap selects items, links, shortcuts and letters on the
on-screen keyboard.
• Touch and hold – Touch and hold an item on the screen by tapping it and not
lifting your finger until an action occurs.
• Drag – Touch and hold an item for a moment and then, without lifting your finger,
move your finger on the screen until you reach the target position. You can drag
items on the Home screen to reposition them.
• Swipe or slide – To swipe or slide, quickly move your finger across the surface
of the screen, without pausing when you first tap it (so you don't drag an item
instead).
• Double-tap – Double-tap to zoom on a webpage or a map.
• Pinch-to-Zoom – Use your index finger and thumb in a pinching or spreading
motion to zoom in or out when using the browser, Maps, or when viewing pictures.
• Rotate the screen – From many applications and menus, the screen orientation
adjusts to the device's physical orientation.
NOTE:
• Do not press too hard; the tap screen is sensitive enough to pick up a light,
yet firm tap.
• Use the tip of your finger to tap the option you want. Be careful not to tap
any other buttons.
Your Home screen

16
Your Home screen
Home screen
The Home screen is the starting point for many applications and functions. It allows you to
add items like app shortcuts and Google widgets to give you instant access to information
and applications. This is the default canvas and accessible from any menu by tapping
.
Status Bar
Application Icons
Widget
Location Indicator
Quick Button Area
Home Touch Buttons
Shows the phone's status information, including the time, signal strength, battery
status and notification icons.
Widgets are self-contained applications that can be accessed through the Apps
drawer or on the Home screen. Unlike a shortcut, a Widget can function as an
on-screen application.
Tap an icon (application, folder, etc.) to open and use it.
Indicates which Home screen canvas you are currently viewing.
Provides one-touch access to the function from any Home screen canvas.
17
Your Home screen
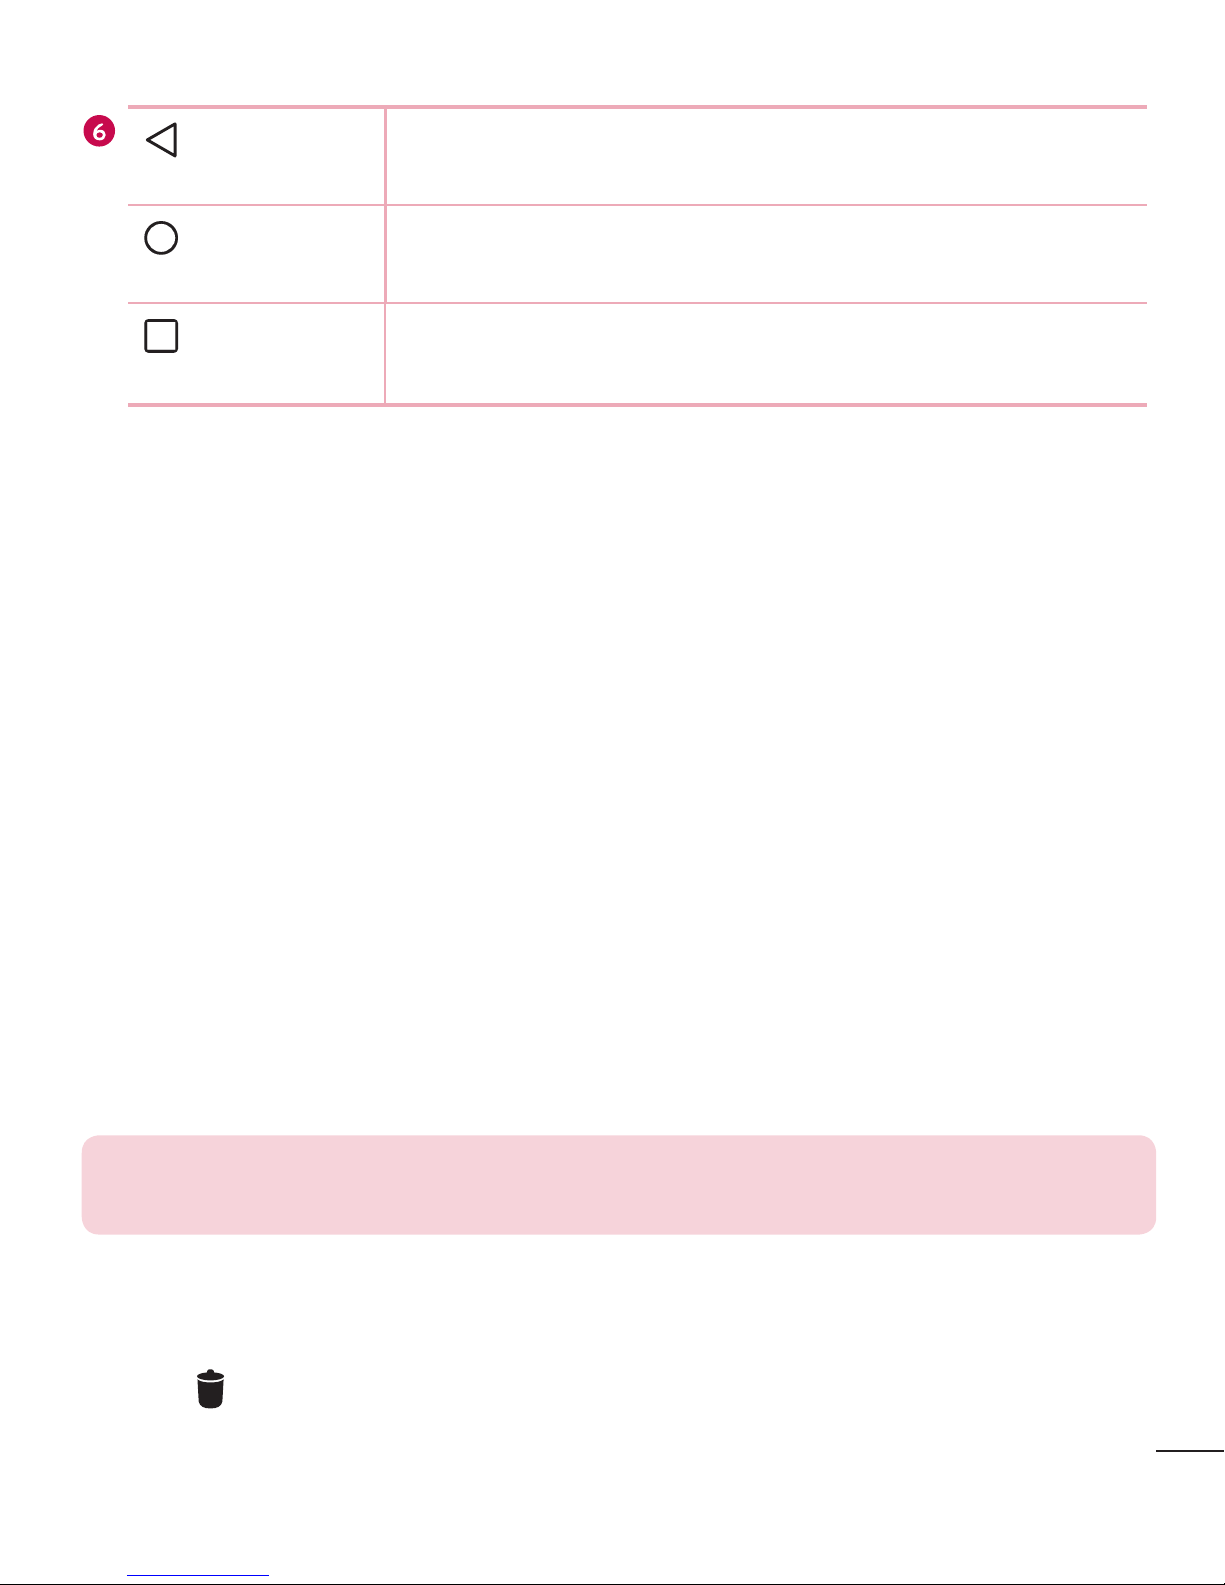
Back Button
Returns to the previous screen. Also closes pop-up items,
such as menus, dialog boxes and the on-screen keyboard.
Home Button
Return to the Home screen from any screen. Touch and hold
to access the Google Now shortcut.
Recent Apps
Button
Displays recently used applications. If you touch and hold
this button, it opens a menu of available options.
Extended Home screen
The operating system provides multiple Home screen canvases to provide more space
for adding icons, widgets and more.
• Slide your finger left or right across the Home screen to access additional
canvases.
Customizing the Home screen
You can customize your Home screen by adding apps and widgets and changing
wallpapers.
Adding items on your Home screen
1 Touch and hold the empty part of the Home screen.
2 Tap the Widgets tab and select the item you want to add. You then see this added
item on the Home screen.
3 Drag it to the desired location and lift your finger.
TIP! To add an application icon to the Home screen from the Apps screen,
touch and hold the application you want to add.
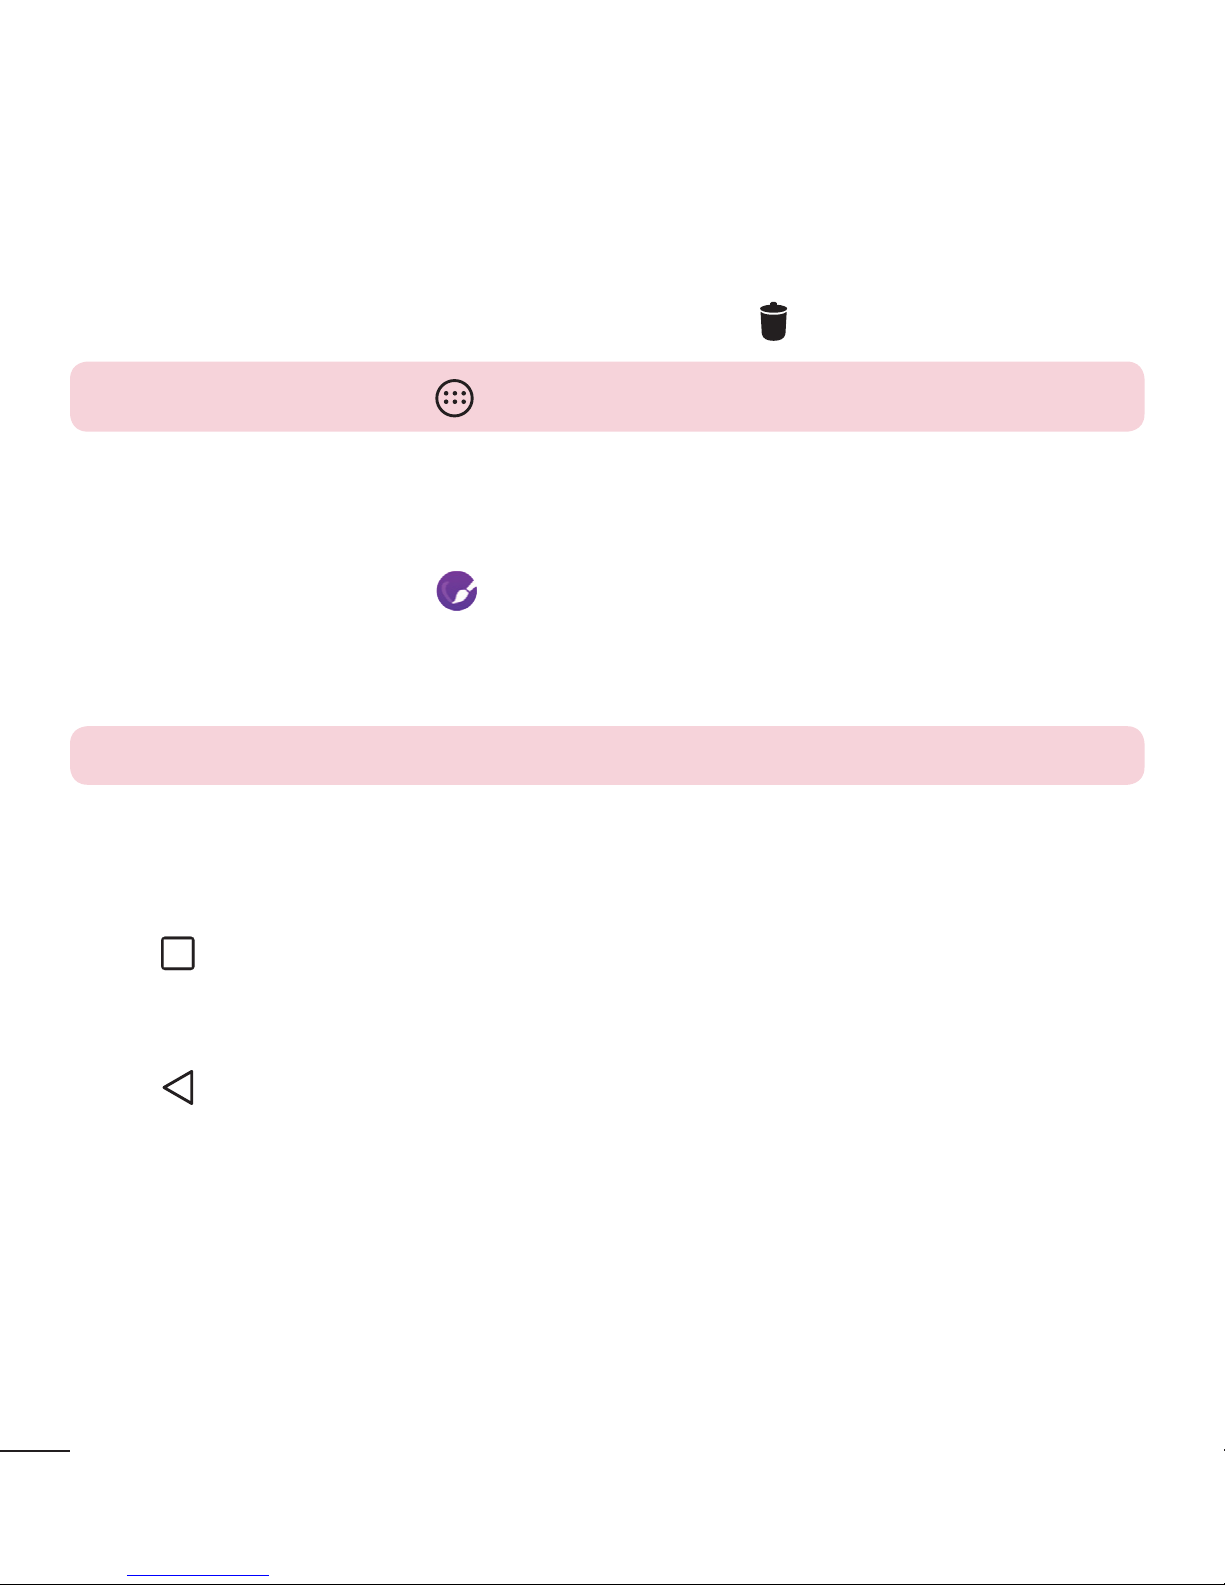
Removing an item from the Home screen
• While on the Home screen, touch and hold the icon you want to remove, then drag
it to
and release it.
18
Your Home screen
Adding an app to the Quick Button area
• From the Apps screen or on the Home screen, touch and hold an application icon
and drag it to the Quick Button area. Then release it in the desired location.
Removing an app from the Quick Button area
• Touch and hold the desired Quick Button, drag it to , and release it.
NOTE: The Apps Button cannot be removed.
Customizing app icons on the Home screen
1 Touch and hold an application icon until it unlocks from its current position, then
release it. The editing icon
appears in the upper-right corner of the application.
2 Tap the application icon again and select the desired icon design and size.
3 Tap OK to save the change.
NOTE: You can also tap Add new to personalize icons with your pictures.
Returning to recently-used applications
1 Tap . App previews of recently used applications will be displayed.
2 Tap an app preview to open the application.
- OR Tap
to return to your previous screen.
Notifications panel
Notifications alert you to the arrival of new messages, calendar events and alarms, as
well as ongoing events, such as when you are on a call.
When a notification arrives, its icon appears at the top of the screen. Icons for pending
notifications appear on the left, and system icons, such as Wi-Fi and battery strength
are shown on the right.
19
Your Home screen
NOTE: The available options may vary depending on the region or service
provider.
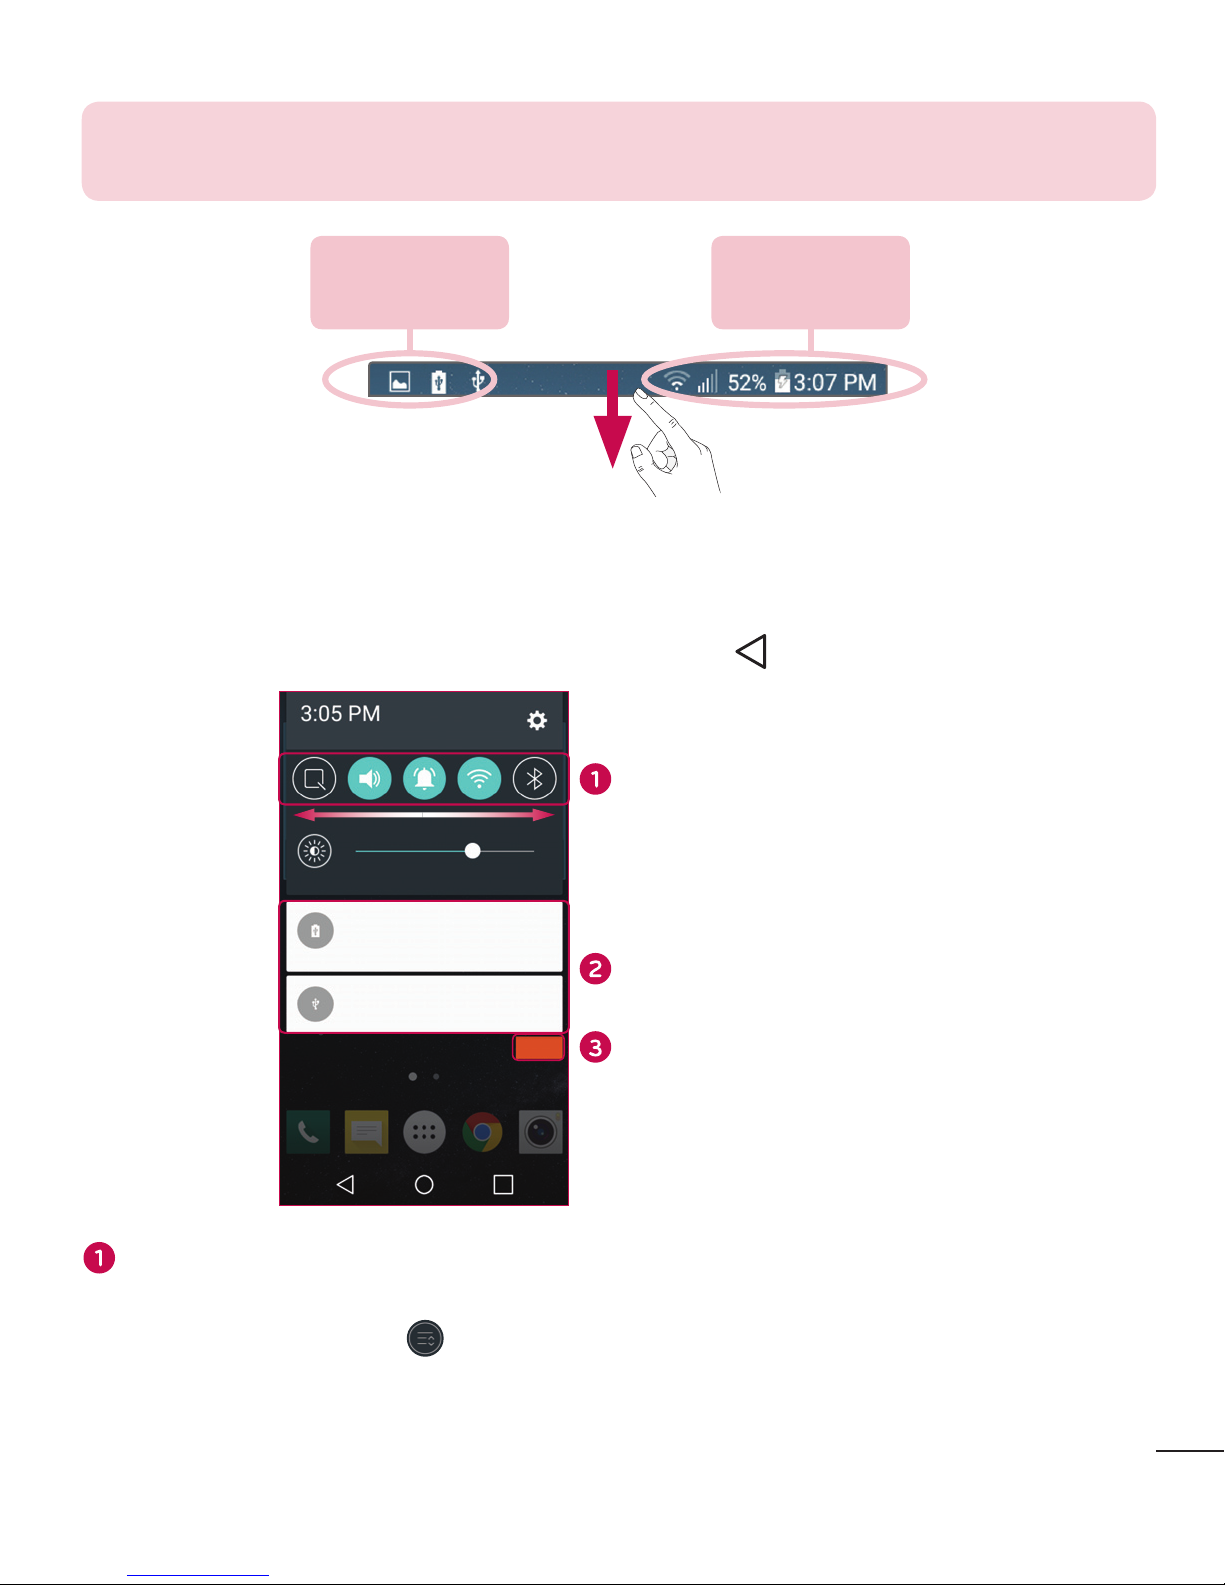
Pending
notifications
System
notifications
Opening the Notifications panel
Swipe down from the Status bar to open the Notifications panel. To close the
Notifications panel, swipe the screen upwards or tap
.
Quick Settings Area
Notifications
Clear
Tap each quick setting button to toggle it on/off. Touch and hold the desired button
to directly access the settings menu for the function. To see more toggle keys,
swipe left or right. Tap
to remove, add or rearrange quick setting buttons.

20
Your Home screen
Current notifications are listed, each with a brief description. Tap a notification to
view it.
Tap to clear all of the notifications.
Indicator icons on the Status Bar
Indicator icons appear on the status bar at the top of the screen to report missed calls,
new messages, calendar events, device status and more.
The icons displayed at the top of the screen provide information about the status of the
device. The icons listed in the table below are some of the most common ones.
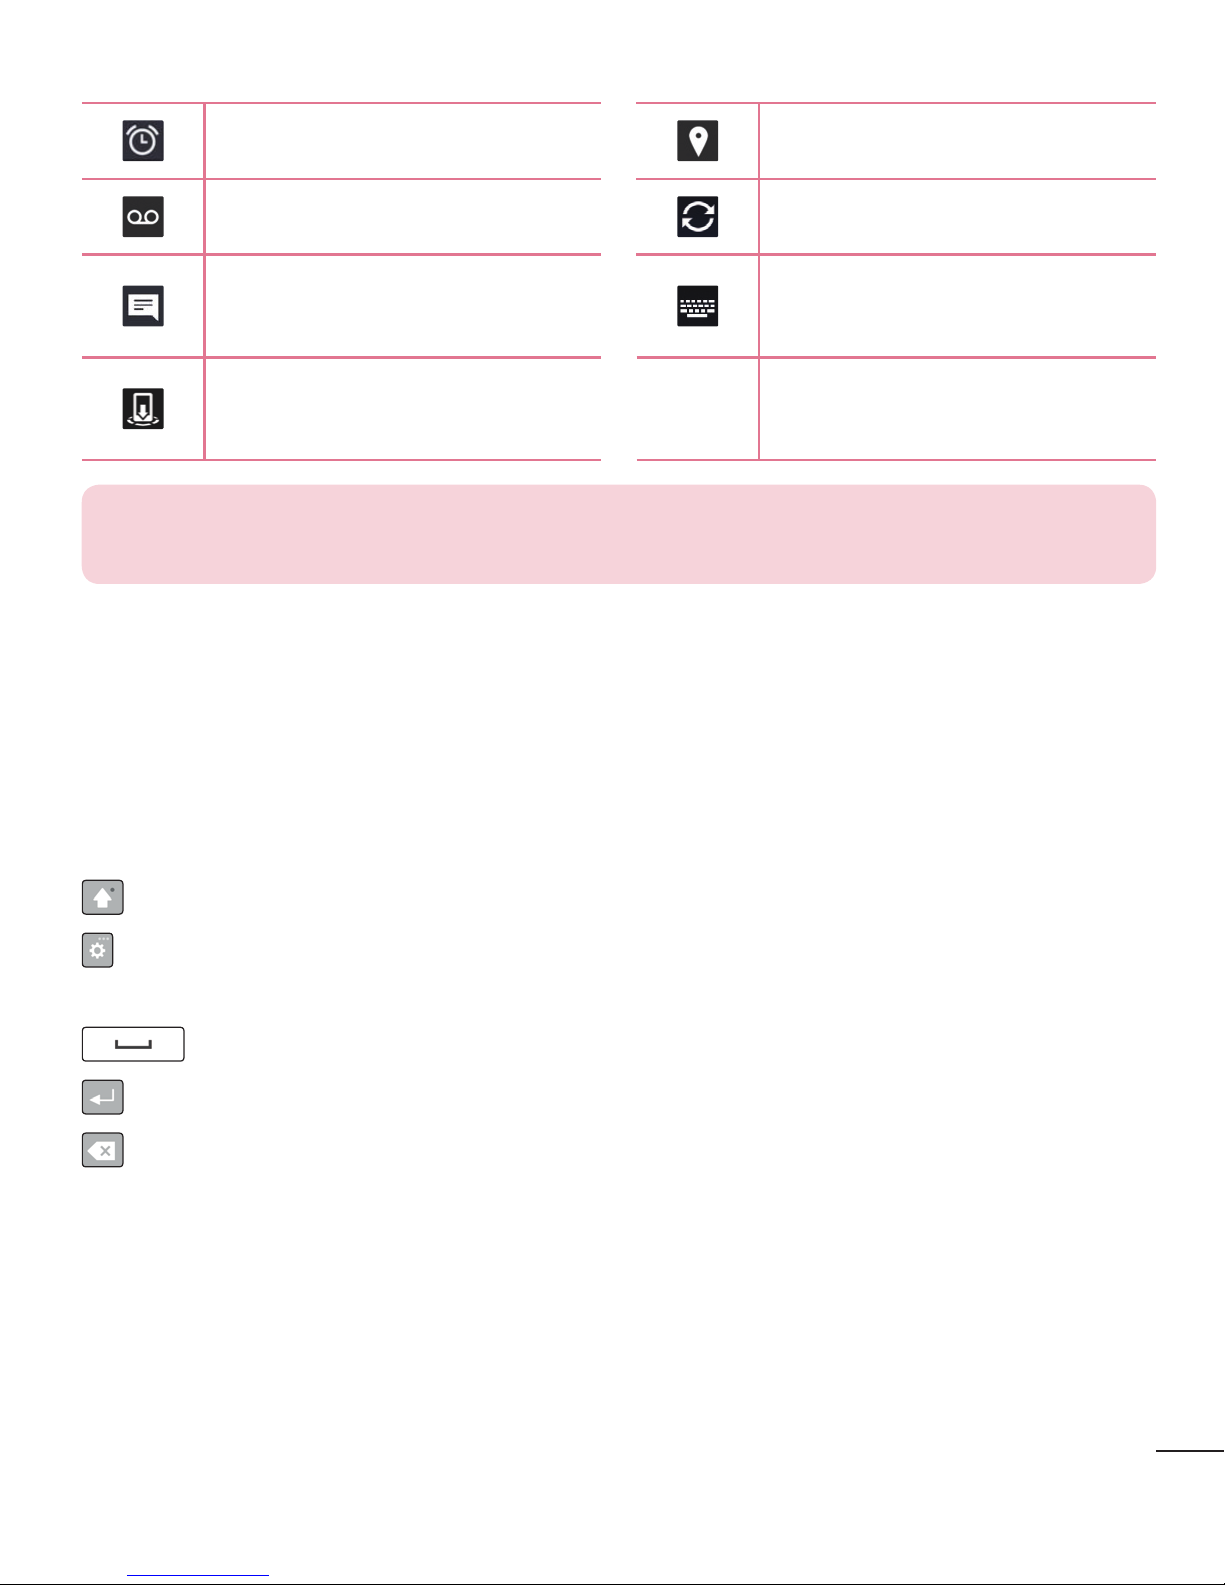
Icon Description Icon Description
No SIM card inserted A song is currently playing
No network signal available Ringer is silenced
Airplane mode is on
Priority only is on
Connected to a Wi-Fi network Vibrate mode is on
Wired headset (with mic)
connected
Battery fully charged
Call in progress Battery is charging
Missed call
The phone is connected to a
PC via a USB cable
Bluetooth is on Downloading data
System warning Uploading data
21
Your Home screen
An alarm is set GPS is on
New voicemail available Data is synchronizing
New text or multimedia
message
Choose input method
Media server content sharing
is on
NOTE: The icon's location in the Status bar may differ according to the
function or service.
On-screen keyboard
You can enter text using the on-screen keyboard. The on-screen keyboard appears on
the screen when you tap an available text entry field.
Using the keypad and entering text
Tap once to capitalize the next letter you type. Double-tap for all caps.
Tap to enter text with your voice. Touch and hold to enter text by handwriting, access
the Clip Tray, and access the keyboard settings.
Tap to enter a space.
Tap to create a new line.
Tap to delete the previous character.

22
Your Home screen
Entering special characters
The on-screen keyboard allows you to enter special characters.
For example, to input "á", touch and hold the "a" button until the zoom-in key expands
and displays special characters. Without lifting your finger, drag your finger to the
desired special character. Once it's highlighted, lift your finger.
NOTE: A symbol at the top right corner of a key indicates that additional
characters are available for that key.
23
Special Features
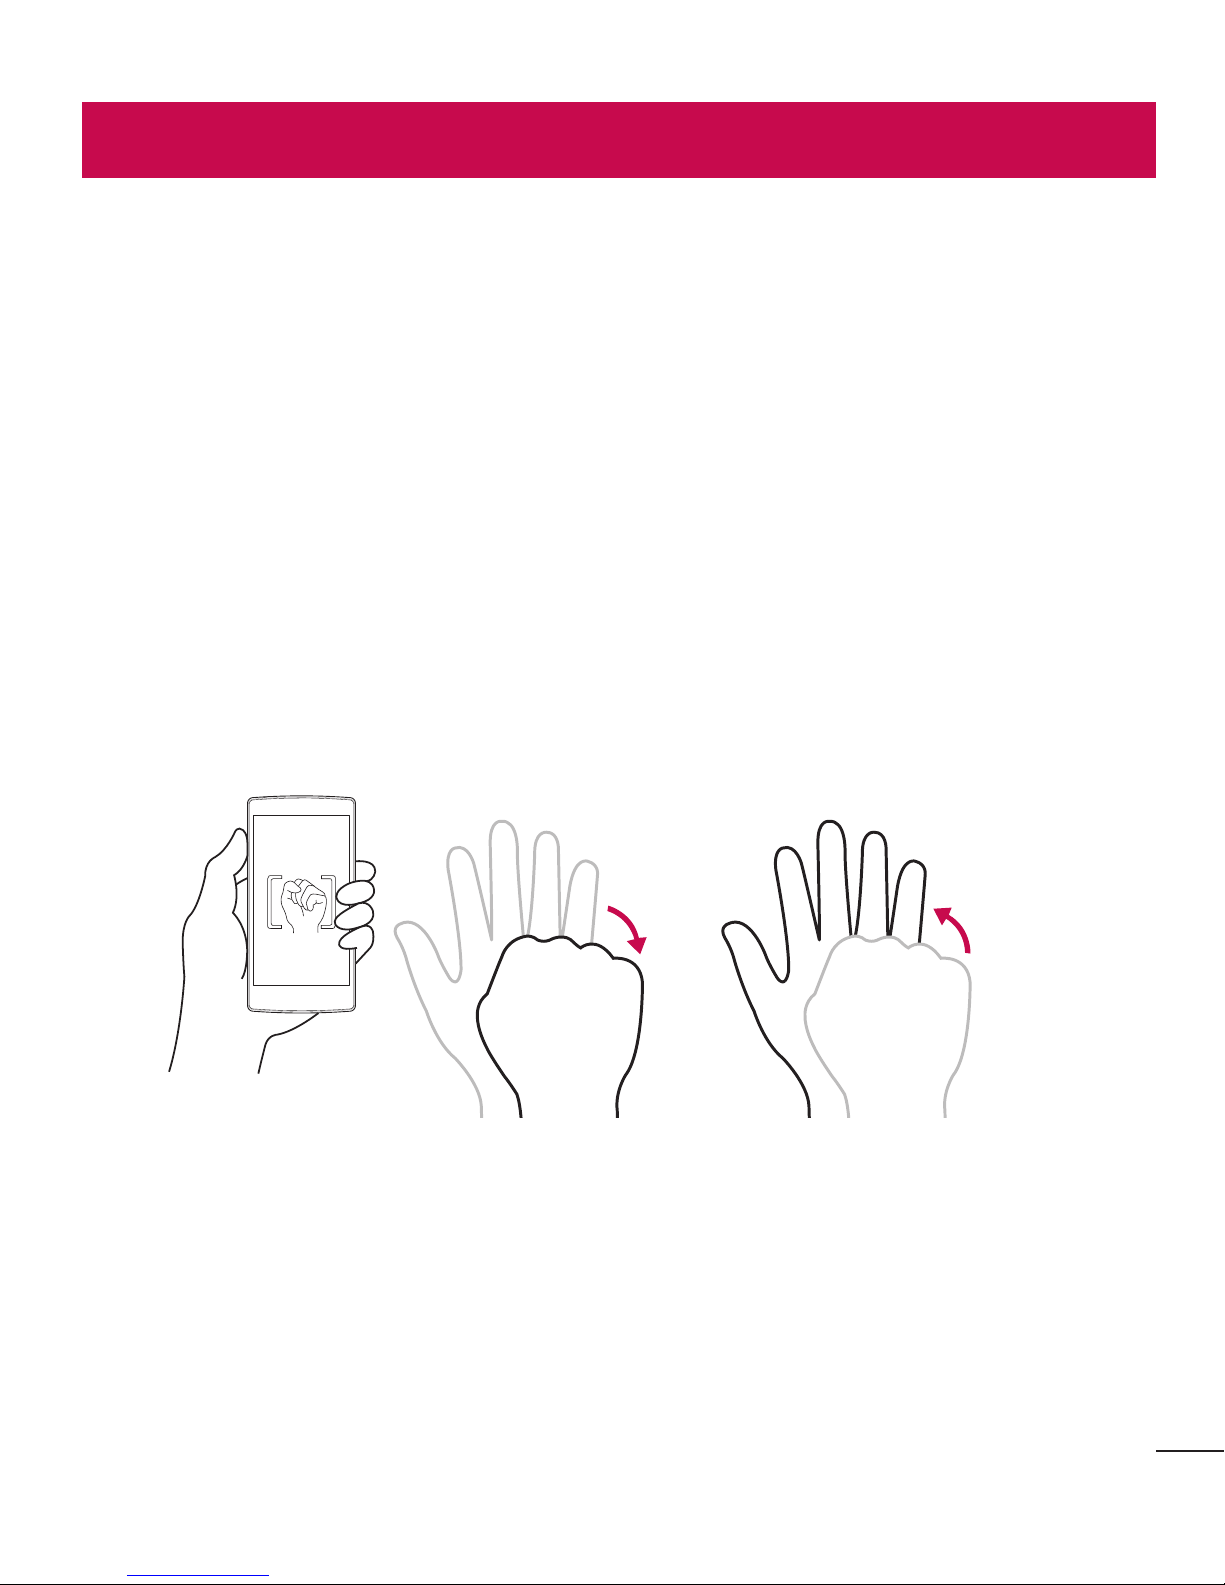
Gesture shot
The Gesture shot feature allows you to take a picture with a hand gesture using the
front camera.
To take photo
There are two methods for using the Gesture shot feature.
• Raise your hand, with an open palm, until the front camera detects it and a box
appears on the screen. Then close your hand into a fist to start the timer, allowing
you time to get ready.
OR
• Raise your hand, in a clenched fist, until the front camera detects it and a box
appears on the screen. Then unclench your fist to start the timer, allowing you time
to get ready.
OR
Special Features

24
Special Features
KnockON
The KnockON feature allows you to double-tap the screen to easily turn it on or off.
To turn the screen on
1 Double-tap the center of the Lock screen to turn the screen on.
2 Unlock the screen or access any of the available shortcuts or widgets.
To turn the screen off
1 Double-tap an empty area of the Home screen or the Status Bar.
2 The screen will turn off.
NOTE: Tap on the center area of the screen. If you tap on the bottom or the
top area, the recognition rate may decrease.
25
Special Features
Knock Code
The Knock Code feature allows you to create your own unlock code using a
combination of knocks on the screen. You can access the Home screen directly when
the screen is off by tapping the same sequence on the screen.
NOTE:
• If you enter the wrong Knock Code 6 times, it will compulsorily take you to
your Google account log in/backup PIN.
• Use the fingertip instead of finger nail to tap the screen for turning it on or
off.
• When the Knock Code is not in use, you can use Knock On function by
taping the screen.
1 Tap > > > Display tab > Lock screen > Select screen lock > Knock
Code.
2 Tap the squares in a pattern to set your Knock Code. Your Knock Code pattern can
be 3 to 8 taps.
Unlocking the screen using the Knock Code
You can unlock the screen by tapping the Knock Code pattern you already set, when
the screen turns off.
26
Special Features
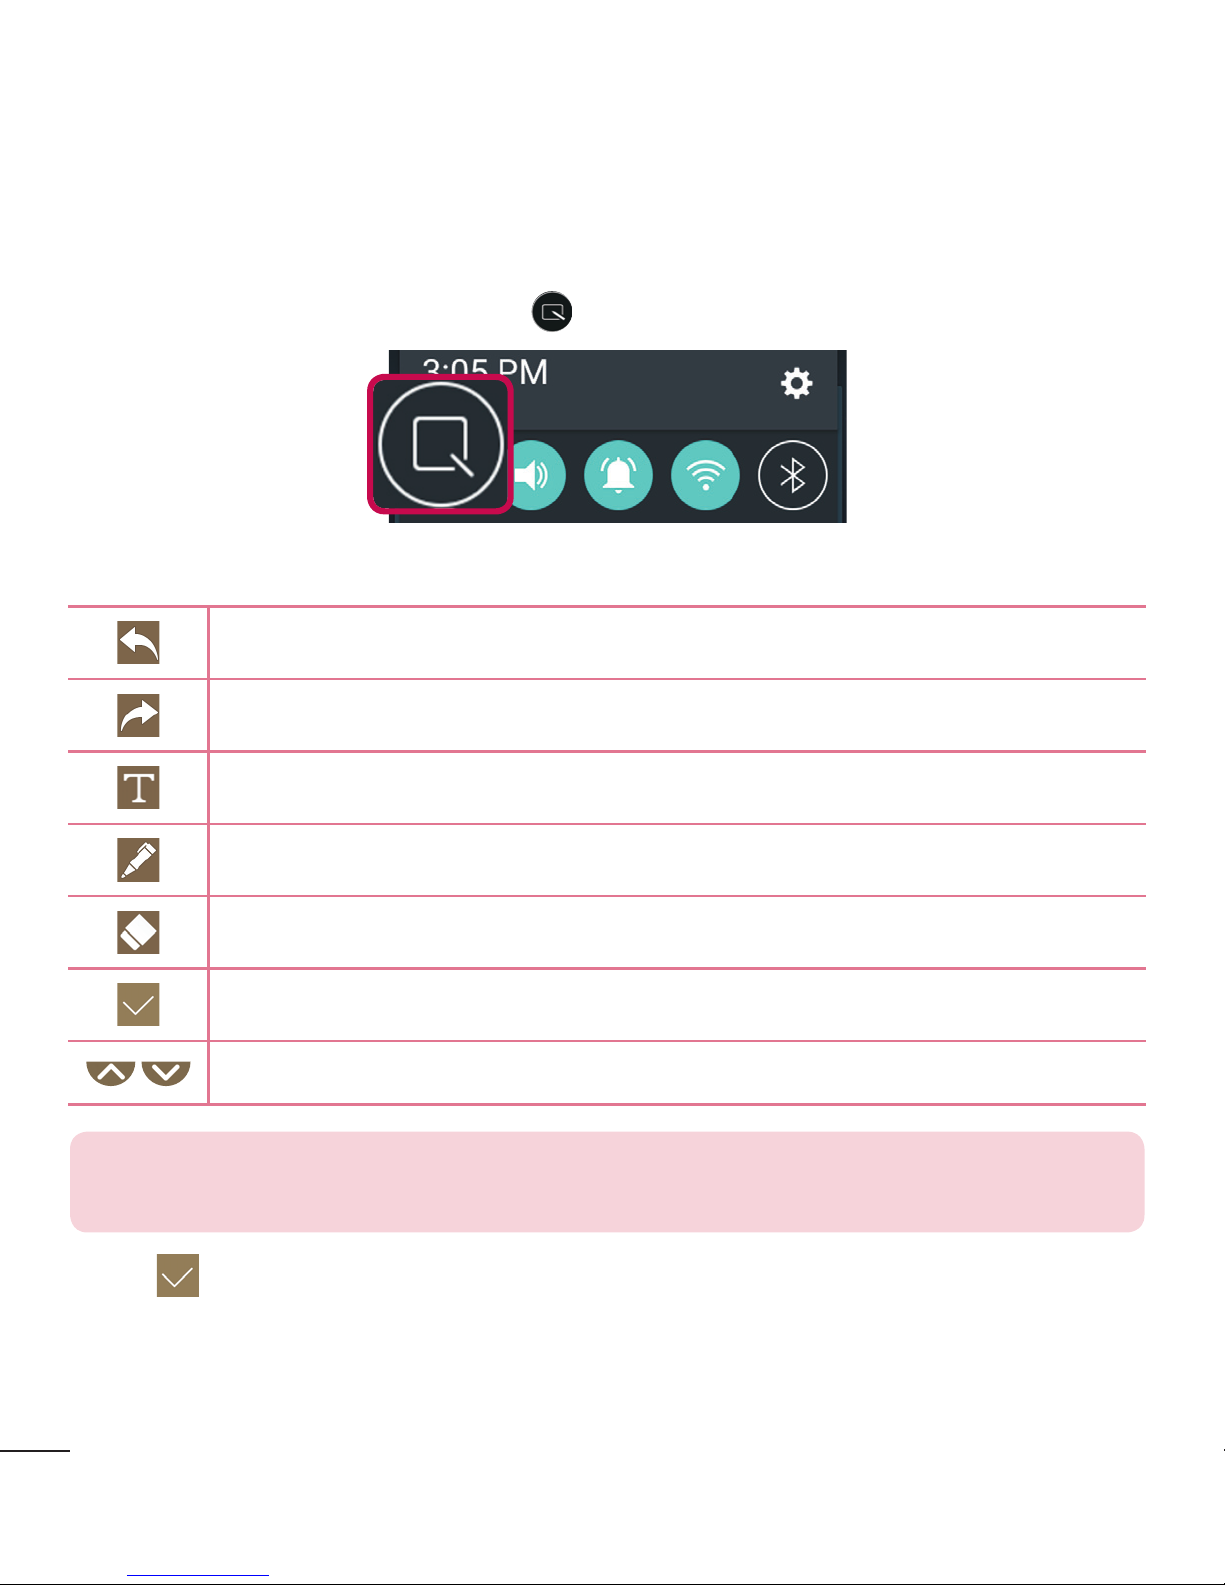
QuickMemo+
The QuickMemo+ feature allows you to create memos and capture screen shots.
You can use QuickMemo+ to easily and efficiently create memos during a call, with a
saved picture or on the current phone screen.
1 Drag the Status bar down and tap .
2 Create a memo using the following options:
Tap to undo the most recent action.
Tap to redo the most recently deleted action.
Tap to insert text into your memo.
Tap to select the pen type and color.
Tap to use the eraser to erase the pen marks on the memo.
Tap to save the memo you've created.
Tap to hide or display the toolbar.
NOTE: Please use a fingertip while using the QuickMemo+ feature. Do not
use your fingernail.
3 Tap to save the current memo to the QuickMemo+ or Gallery.
27
Google account setup
The first time you open a Google application on your phone, you will be required to sign
in with your existing Google account. If you do not have a Google account, you will be
prompted to create one.
Creating your Google account
1 Tap > > > General tab > Accounts & sync.
2 Tap Add account > Google > Or create a new account.
3 Enter your first and last name, then tap Next.
4 Enter a username and tap Next. Your phone will communicate with Google servers
and check for username availability.
5 Enter your password and tap Next.
6 Follow the instructions and enter the required and optional information about the
account. Wait while the server creates your account.
Signing into your Google account
1 Tap > > > General tab > Accounts & sync.
2 Tap Add account > Google.
3 Enter your email address and tap Next.
4 Once you have set up your Google account, your phone will automatically
synchronize with your Google account on the web (if a data connection is available).
Google account setup

28
Google account setup
After signing in, your phone will sync with your Google services, such as Gmail,
Contacts, and Google Calendar. You can also use Maps, download applications from
Play Store, back up your settings to Google servers, and take advantage of other Google
services on your phone.
IMPORTANT
• Some applications, such as Calendar, work only with the first Google Account
you add. If you plan to use more than one Google Account with your phone,
be sure to sign into the one you want to use with such applications first. When
you sign in, your contacts, Gmail messages, Calendar events, and other
information from these applications and services on the web are synchronized
with your phone. If you don't sign into a Google Account during setup, you will
be prompted to sign in or to create a Google Account the first time you start
an application that requires one, such as Gmail or Play Store.
• If you have an enterprise account through your company or other organization,
your IT department may have special instructions on how to sign into that
account.
 Loading...