

Page 1

RRDD66000000
Cellular Phone
RD6000-E.qxd 6/18/04 9:56 AM Page 1
Page 2
3
RD6000
Contents
RD6000
2
WARNING! To reduce the possibility of
electric shock, do not expose your phone to
high humidity areas, such as a bathroom,
swimming area, etc.
Caution: Use only LG-approved batteries and
travel chargers to avoid the damage to the
phone. Using other batteries or chargers
voids your warranty and may cause an
explosion.
Caution: Do not use batteries and travel
chargers for other than the intended
purposes.
Never store your phone in temperatures less
than -20° C or greater than 50° C, such as
outside during a snowstorm or in your car on
a hot day. Exposure to excessive cold or heat
may result in phone malfunction, damage
and/or failure.
Use caution when using your phone near
other electronic devices. RF emissions from
your mobile phone may affect nearby
inadequately shielded electronic equipment.
Consult manufacturers of any personal
medical devices such as pacemakers and
hearing aides to determine if they are
susceptible to interference from your mobile
phone.Turn off your phone in a medical
facility or at a gas station.
IMPORTANT! Please read the TIA safety
information in chapter 5 before using your phone.
Introduction . . . . . . . . . . . . . . . . . . . . . . . . . . . . . . . . . . . . . .7
Important Information . . . . . . . . . . . . . . . . . . . . . . .7
Check Accessories . . . . . . . . . . . . . . . . . . . . . . . . .7
Bodily Contact During Operation . . . . . . . . . . . . . .8
Vehicle-Mounted External Antenna . . . . . . . . . . . .9
FCC Part 15 Class B Compliance . . . . . . . . . . . . .9
Battery Safety . . . . . . . . . . . . . . . . . . . . . . . . . . . . .9
Battery Disposal . . . . . . . . . . . . . . . . . . . . . . . . . .10
Charger and Adapter Safety . . . . . . . . . . . . . . . . .10
Getting Started . . . . . . . . . . . . . . . . . . . . . . . . . . . . . . . . . .11
Phone Components . . . . . . . . . . . . . . . . . . . . . . . . . . .11
Phone Overview . . . . . . . . . . . . . . . . . . . . . . . . . . . . . .12
Using the Battery Pack . . . . . . . . . . . . . . . . . . . . . . . .14
Installing the Battery . . . . . . . . . . . . . . . . . . . . . . .14
Removing the Battery . . . . . . . . . . . . . . . . . . . . . .14
Battery Charge Level . . . . . . . . . . . . . . . . . . . . . .15
Battery Information and Care . . . . . . . . . . . . . . . . . . . .16
Screen Icons . . . . . . . . . . . . . . . . . . . . . . . . . . . . . . . . .17
Phone Menu Reference . . . . . . . . . . . . . . . . . . . . . . . .18
Accessories . . . . . . . . . . . . . . . . . . . . . . . . . . . . . . . . .20
Travel Charger . . . . . . . . . . . . . . . . . . . . . . . . . . .20
Battery . . . . . . . . . . . . . . . . . . . . . . . . . . . . . . . . .20
Cigarette Lighter Charger . . . . . . . . . . . . . . . . . . .20
Hands-Free Car Kit (Portable) . . . . . . . . . . . . . . .21
Data Cable . . . . . . . . . . . . . . . . . . . . . . . . . . . . . . .21
Headset . . . . . . . . . . . . . . . . . . . . . . . . . . . . . . . . .21
Safety Information . . . . . . . . . . . . . . . . . . . . . . . . . . . .22
Explosion, Shock, and Fire Hazards . . . . . . . . . .22
General Warnings and Cautions . . . . . . . . . . . . . .23
Basic Functions . . . . . . . . . . . . . . . . . . . . . . . . . . . . . . . . .25
Turning the Phone On and Off . . . . . . . . . . . . . . . . . . .25
Turning the Phone On . . . . . . . . . . . . . . . . . . . . . .25
Turning the Phone Off . . . . . . . . . . . . . . . . . . . . . .25
Making a Call . . . . . . . . . . . . . . . . . . . . . . . . . . . . . . . .26
Correcting Dialling Mistakes . . . . . . . . . . . . . . . . .26
Receiving Calls . . . . . . . . . . . . . . . . . . . . . . . . . . . . . .27
RD6000-E.qxd 6/18/04 9:56 AM Page 2
Page 3
RD6000
4
Using Vibrate, Silence All, and Lock Mode . . . . . . . . .27
Vibrate Mode (Quick) . . . . . . . . . . . . . . . . . . . . . .27
Silence All Mode (Quick) . . . . . . . . . . . . . . . . . . .28
Lock Mode (Quick) . . . . . . . . . . . . . . . . . . . . . . . .28
Call Waiting . . . . . . . . . . . . . . . . . . . . . . . . . . . . . . . . .28
Mute . . . . . . . . . . . . . . . . . . . . . . . . . . . . . . . . . . . . . . .29
Redialling Calls . . . . . . . . . . . . . . . . . . . . . . . . . . . . . .29
Adjusting the Volume . . . . . . . . . . . . . . . . . . . . . . . . . .29
Power Save Mode . . . . . . . . . . . . . . . . . . . . . . . . . . . .29
Signal Strength . . . . . . . . . . . . . . . . . . . . . . . . . . . . . . .30
Speed Dialling . . . . . . . . . . . . . . . . . . . . . . . . . . . . . . .30
Caller ID . . . . . . . . . . . . . . . . . . . . . . . . . . . . . . . . . . . .30
Additional Functions . . . . . . . . . . . . . . . . . . . . . . . . . . . . .31
Entering information using T9 Text Input . . . . . . . . . . .31
Input Mode . . . . . . . . . . . . . . . . . . . . . . . . . . . . . .31
Key Functions . . . . . . . . . . . . . . . . . . . . . . . . . . . .32
Changing Letter Case . . . . . . . . . . . . . . . . . . . . . .33
Example: Using T9 Text Input . . . . . . . . . . . . . . . .33
Using the NEXT Key . . . . . . . . . . . . . . . . . . . . . . .34
Adding Words to the T9 Database . . . . . . . . . . . . . . . .34
Examples Using Abc (Multi-tap) Text Input . . . . . .35
Phone Book Features . . . . . . . . . . . . . . . . . . . . . . . . .35
Personal Phone Book Memory . . . . . . . . . . . . . . .35
Saving Numbers in Your Personal Phone Book . . .35
Retrieving Numbers . . . . . . . . . . . . . . . . . . . . . . .36
Retrieving by Name Seach . . . . . . . . . . . . . . . . . .36
Menu Features . . . . . . . . . . . . . . . . . . . . . . . . . . . . . . . . . .37
General Guidelines . . . . . . . . . . . . . . . . . . . . . . . . . . .37
Camera . . . . . . . . . . . . . . . . . . . . . . . . . . . . . . . . . . . .38
Take Pix . . . . . . . . . . . . . . . . . . . . . . . . . . . . . . . .38
Gallery . . . . . . . . . . . . . . . . . . . . . . . . . . . . . . . . .39
Send Pix Msg . . . . . . . . . . . . . . . . . . . . . . . . . . .40
Pix Inbox . . . . . . . . . . . . . . . . . . . . . . . . . . . . . . .40
Pix Outbox . . . . . . . . . . . . . . . . . . . . . . . . . . . . . .41
Pix Draft . . . . . . . . . . . . . . . . . . . . . . . . . . . . . . . .42
Pix Settings . . . . . . . . . . . . . . . . . . . . . . . . . . . . .43
Erase All . . . . . . . . . . . . . . . . . . . . . . . . . . . . . . .44
RD6000
5
Contacts . . . . . . . . . . . . . . . . . . . . . . . . . . . . . . . . . . .45
List Contacts . . . . . . . . . . . . . . . . . . . . . . . . . . . .45
New Number . . . . . . . . . . . . . . . . . . . . . . . . . . . .45
New E-mail . . . . . . . . . . . . . . . . . . . . . . . . . . . . .46
Groups . . . . . . . . . . . . . . . . . . . . . . . . . . . . . . . .46
Speed Dials . . . . . . . . . . . . . . . . . . . . . . . . . . . .47
Voice Dials . . . . . . . . . . . . . . . . . . . . . . . . . . . . .47
My Contact Info . . . . . . . . . . . . . . . . . . . . . . . . .48
Call History . . . . . . . . . . . . . . . . . . . . . . . . . . . . . . . . .48
Dialled Calls . . . . . . . . . . . . . . . . . . . . . . . . . . . . .48
Received Calls . . . . . . . . . . . . . . . . . . . . . . . . . . .49
Missed Calls . . . . . . . . . . . . . . . . . . . . . . . . . . . .49
Erase Calls . . . . . . . . . . . . . . . . . . . . . . . . . . . . .50
Call Duration . . . . . . . . . . . . . . . . . . . . . . . . . . . .50
1x Packet Counter . . . . . . . . . . . . . . . . . . . . . . . .50
Messages . . . . . . . . . . . . . . . . . . . . . . . . . . . . . . . . . .51
Message Menu . . . . . . . . . . . . . . . . . . . . . . . . . . .52
New Message Alert . . . . . . . . . . . . . . . . . . . . . . .52
Voice Mail . . . . . . . . . . . . . . . . . . . . . . . . . . . . . . .53
New Message . . . . . . . . . . . . . . . . . . . . . . . . . .53
Inbox . . . . . . . . . . . . . . . . . . . . . . . . . . . . . . . . .56
Out of Memory Warning . . . . . . . . . . . . . . . . . . . .57
Outbox . . . . . . . . . . . . . . . . . . . . . . . . . . . . . . . .58
Message Status Reference . . . . . . . . . . . . . . . . .60
Draft . . . . . . . . . . . . . . . . . . . . . . . . . . . . . . . . . . .60
Msg Settings . . . . . . . . . . . . . . . . . . . . . . . . . . .61
Erase All . . . . . . . . . . . . . . . . . . . . . . . . . . . . . .63
R World . . . . . . . . . . . . . . . . . . . . . . . . . . . . . . . . . . .64
R World . . . . . . . . . . . . . . . . . . . . . . . . . . . . . . .64
Display . . . . . . . . . . . . . . . . . . . . . . . . . . . . . . . . . . . .65
Service Area . . . . . . . . . . . . . . . . . . . . . . . . . . . . .65
Banner . . . . . . . . . . . . . . . . . . . . . . . . . . . . . . . . .65
Backlight . . . . . . . . . . . . . . . . . . . . . . . . . . . . . . . . .65
Screens . . . . . . . . . . . . . . . . . . . . . . . . . . . . . . . .67
Menu Style . . . . . . . . . . . . . . . . . . . . . . . . . . . . .67
Clocks . . . . . . . . . . . . . . . . . . . . . . . . . . . . . . . . . .67
Theme Colour . . . . . . . . . . . . . . . . . . . . . . . . . .68
RD6000-E.qxd 6/18/04 9:56 AM Page 4
Page 4

RD6000
7
Congratulations on your purchase of the advanced
and compact RD6000 cellular phone, designed to
operate with the latest digital mobile communication
technology, Code Division Multiple Access (CDMA).
Along with the many advanced features of the
CDMA system such as greatly enhanced voice
clarity this phone offers:
Large, easy-to-read, 7-line backlight LCD with
status icons.
Paging, messaging, voice mail, and caller ID.
19-key keypad.
Long battery stand-by and talk time.
Menu-driven interface with prompts for easy
operation and configuration.
Any key answer, auto answer, auto retry, one-
touch and speed dialling with 99 memory
locations.
Important Information
This user’s manual provides important information on
the use and operation of your phone.Please read all
the information carefully prior to using the phone for
the best performance and to prevent any damage to or
misuse of the phone.Any unapproved changes or
modifications void your warranty.
Check Accessories
Your mobile phone comes with a travel charger,
hand strap headset and two rechargeable batteries.
Please verify that these accessories are included.
Introduction
RD6000
6
Fonts . . . . . . . . . . . . . . . . . . . . . . . . . . . . . . . . . . .68
Power Saver . . . . . . . . . . . . . . . . . . . . . . . . . . . . .69
Status Light . . . . . . . . . . . . . . . . . . . . . . . . . . . .69
My Media . . . . . . . . . . . . . . . . . . . . . . . . . . . . . . . . .69
Graphics . . . . . . . . . . . . . . . . . . . . . . . . . . . . . .69
Music . . . . . . . . . . . . . . . . . . . . . . . . . . . . . . . .70
Tools . . . . . . . . . . . . . . . . . . . . . . . . . . . . . . . . . . . . . .71
Scheduler . . . . . . . . . . . . . . . . . . . . . . . . . . . . .71
Alarm Clock . . . . . . . . . . . . . . . . . . . . . . . . . . . .72
Voice Memo . . . . . . . . . . . . . . . . . . . . . . . . . . .72
My Menu . . . . . . . . . . . . . . . . . . . . . . . . . . . . . .73
Notepad . . . . . . . . . . . . . . . . . . . . . . . . . . . . . .73
Easy Tip Calculation . . . . . . . . . . . . . . . . . . . . .73
Calculator . . . . . . . . . . . . . . . . . . . . . . . . . . . . .74
World Clock . . . . . . . . . . . . . . . . . . . . . . . . . . .74
Settings . . . . . . . . . . . . . . . . . . . . . . . . . . . . . . . . . . .75
Sounds . . . . . . . . . . . . . . . . . . . . . . . . . . . . . . .75
Security . . . . . . . . . . . . . . . . . . . . . . . . . . . . . . .78
Call Setup . . . . . . . . . . . . . . . . . . . . . . . . . . . . .81
1x Data . . . . . . . . . . . . . . . . . . . . . . . . . . . . . . .84
Voice Services . . . . . . . . . . . . . . . . . . . . . . . . . .86
Phone Info . . . . . . . . . . . . . . . . . . . . . . . . . . . . .88
Safety Guidelines . . . . . . . . . . . . . . . . . . . . . . . . . . . . . . . . .89
TIA Safety Information . . . . . . . . . . . . . . . . . . . . . . . . .89
Exposure to Radio Frequency Signal . . . . . . . . . .89
FDA Consumer Update . . . . . . . . . . . . . . . . . . . . . . . .93
Consumer Information on SAR . . . . . . . . . . . . . . . . .103
Service Center List . . . . . . . . . . . . . . . . . . . . . . . . . .105
RD6000-E.qxd 6/18/04 9:56 AM Page 6
Page 5
RD6000
9
RD6000
8
FCC RF Exposure Information
WARNING! Read this information
before operating the phone.
In August 1996, the Federal Communications
(FCC) of the United States, with its action in Report
and Order FCC 96-326, adopted an updated safety
standard for human exposure to radio frequency
(RF) electromagnetic energy emitted by FCC
regulated transmitters.Those guidelines are
consistent with the safety standard previously set
by both U.S. and international standards bodies.
The design of this phone complies with the FCC
guidelines and these international standards.
CAUTION
Use only the supplied and approved antenna.Use
of unauthorized antennas or modifications could
impair call quality, damage the phone, void your
warranty and/or result in violation of FCC
regulations.
Do not use the phone with a damaged antenna. If a
damaged antenna comes into contact with the skin
a minor burn may result. Contact your local dealer
for a replacement of antenna.
Bodily Contact During Operation
This device was tested for typical use with the back
of the phone kept 3/4 inches (2 cm) from the body.
To comply with FCC RF exposure requirements, a
minimum separation distance of 3/4 inches (2 cm)
must be maintained between the user’s body and
the back of the phone, including the antenna
whether extended or retracted.Third-party belt-clips,
holsters, and similar accessories containing metallic
components should not be used. Avoid the use of
accessories that cannot maintain 3/4 inches (2 cm)
distance between the user’s body and the back of
the phone and have not been tested for compliance
with FCC RF exposure limits.
Vehicle-Mounted External Antenna
(Optional, if available.)
A minimum distance of 8 inches (20 cm) must be
maintained between the user / bystander and the
vehicle-mounted external antenna to satisfy FCC RF
exposure requirements.For more information about
RF exposure, visit the FCC website at www.fcc.gov.
FCC Part 15 Class B Compliance
This device and its accessories comply with part 15
of FCC rules. Operation is subject to the following
two conditions: (1) This device and its accessories
may not cause harmful interference, and (2) this
device and its accessories must accept any
interference received, including interference that
causes undesired operation.
Battery Safety
Do not disassemble.
Do not shor t-circuit.
Do not expose to high temperatures :60 °C (140 °F)
Do not incinerate.
RD6000-E.qxd 6/18/04 9:56 AM Page 8
Page 6
GETTING STARTED
PPhh oo nnee CCoommppoo nn eennttss
The following shows key components of your mobile
phone.
RD6000RD6000
10 11
1 Getting Started
Battery Disposal
Please dispose of your battery properly.
Do not dispose of your battery in fire or with
hazardous or flammable materials.
Charger and Adaptor Safety
Using the wrong battery charger could damage
your phone and void your warranty.
The charger and adaptor are intended for
indoor use only.
Do not expose the battery charger or adaptor to
direct sunlight or use it in places with high
humidity, such as a bathroom.
Right Soft Key
Lamp
Navigation Key
END/POWER
CLR
Alphanumeric
Keypad
Lock Mode Key
Earpiece
Headset Jack
CALL
Voice Dial
Charger/Data Port
Side Keys
Vibrate/Silence
All Mode Key
Microphone
LCD Screen
Left Soft Key
Camera Key
RD6000-E.qxd 6/18/04 9:56 AM Page 10
Page 7
RD6000
12
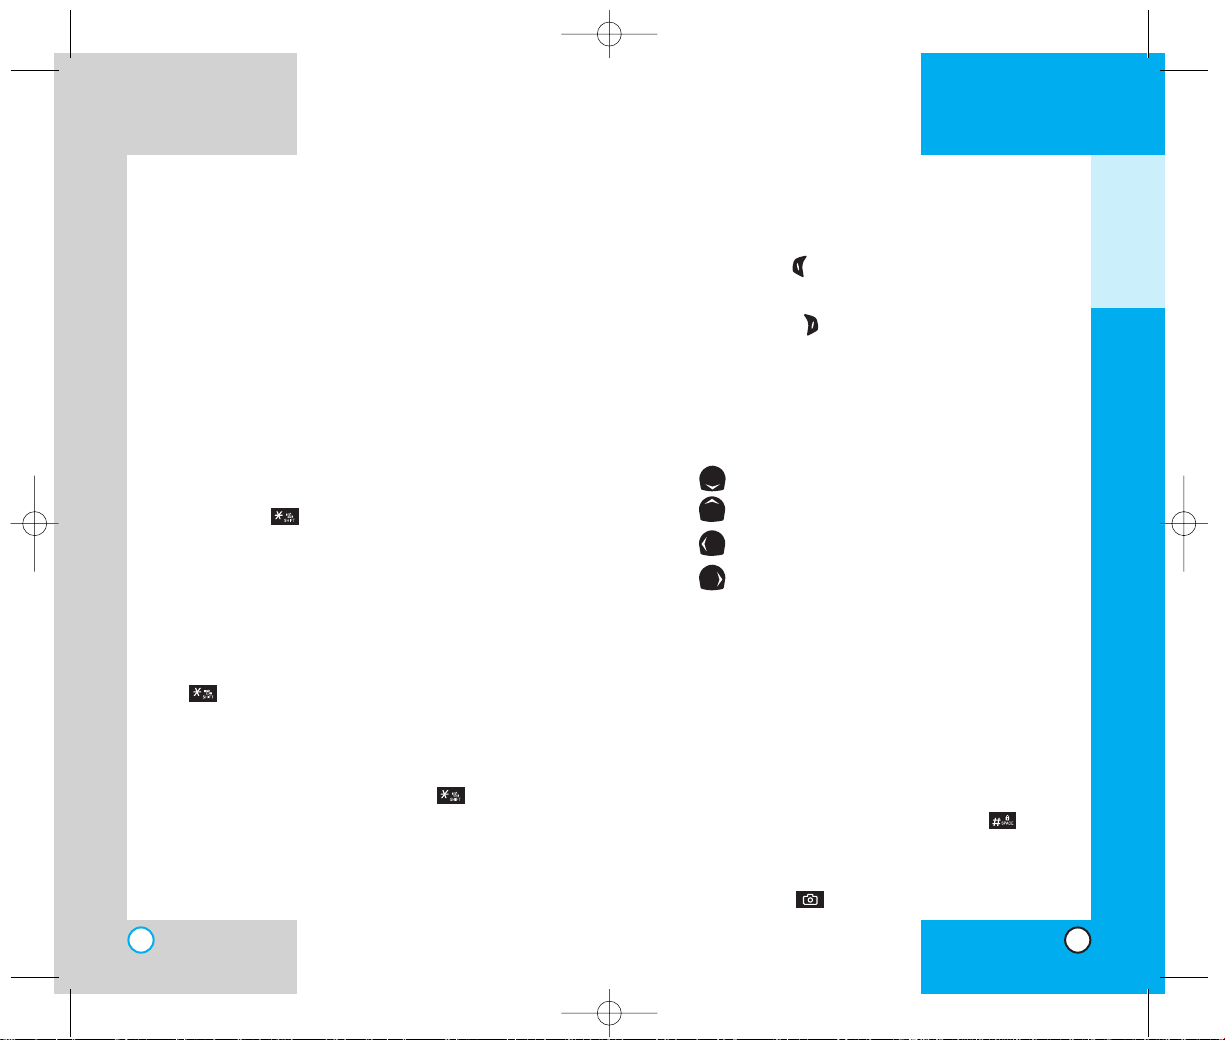
PPhhoo nn ee OOvveerrvv ii ee ww
1. Earpiece
2. Flip Design Open the case to answer an incoming
call and close to end the call.
3. Message Key Use to retrieve or send voice and
text messages.
4. CALL Use to place or answer calls.
5. Side KeysUse to adjust the ringer volume in standby
mode and the earpiece volume during a call.
6. Headset Jack
7. Vibrate Mode
Use to set the Vibrate Mode by pressing and
holding the key for about 3 seconds while in
standby mode.
NOTE: The vibrate mode you select remains in
effect even when you turn the phone off and
back on.
Silence All Mode Key
Set the Silence All Mode by pressing and holding the
key for about 3 seconds while in Vibrate Mode.
When flip of the phone is closed, press and hold
Voice Dial key to change vibrate mode, silence all
and normal mode in sequence.
In silence all mode, press and hold key to be
entered into normal mode.
8. LCD Screen Displays messages and indicator icons.
RD6000
13
9. Soft Keys
Left Soft Key
Use to display the function setting menu.
Right Soft Key
Use to select an action within a menu.
10. Lamp The red light illuminates when you turn the
power on and when you have an incoming call or
message.
11.
Navigation Key Use for quick access to phone functions:
My Menu (Default is Scheduler).
Text and Voice Mail notification messages.
R World.
Ringers.
12. END/PWR Use to turn the power on/off and to end
a call. Using this key, you can return to the main
menu display screen.
13. CLR Press to delete a single space or character.
Press and hold to delete entire words.Press this
key once in a menu to go back one level.
14. Alphanumeric Keypad Use to enter numbers and
characters and choose menu items.
15. Lock Mode Key Use in standby mode to set the
lock function by pressing and holding the key
for about 3 seconds.
16. Microphone
17. Camera Key Use to take pictures.
GETTING STARTED
RD6000-E.qxd 6/18/04 9:56 AM Page 12
Page 8
RD6000
15
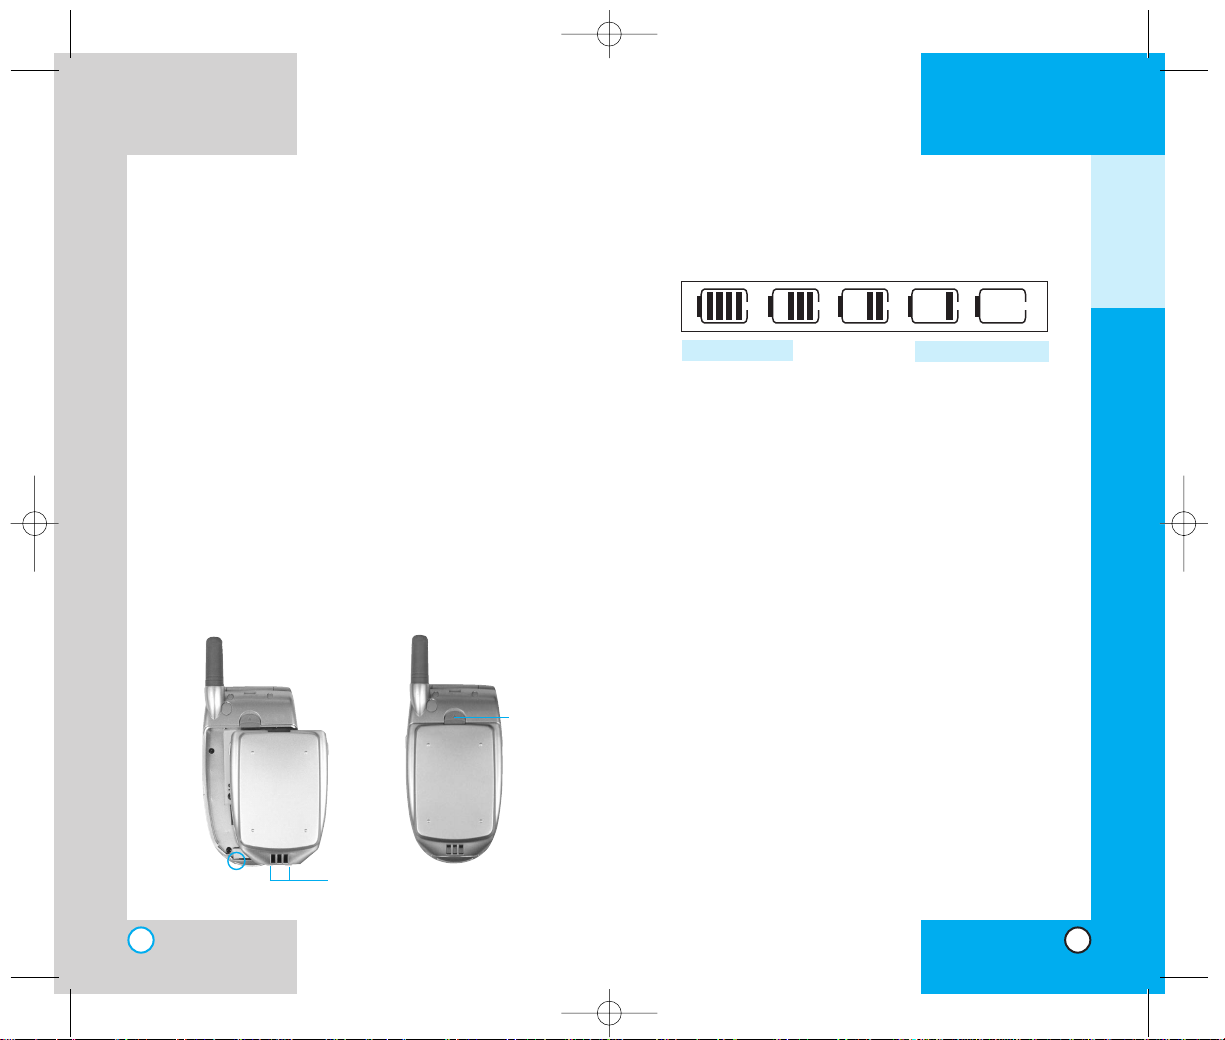
Battery Charge Level
The battery charge level is shown at the top right of
the LCD screen.
When the battery charge level becomes low, the low
battery sensor alerts you in three ways: sounding an
audible tone, blinking the battery icon, and displaying
LOW BATTERY WARNING! If the battery charge level
becomes exceedingly low, the phone automatically
switches off and any function in progress is not saved.
RD6000
14
UUssiinn gg tt hh ee BBaattttee rryy PPaa cc kk
Note: It is important to charge the battery fully
before the initial use of the phone.
The phone comes with a rechargeable battery.
Keep the battery charged while not in use in order
to maximize talk and standby time when using the
phone.
Installing the Battery
To install the battery, insert the bottom of the
battery into the opening on the back of the phone.
Then push the battery down until the latch clicks.
Removing the Battery
Turn the power off. Lift the release latch to detach
the battery.
release
latch
slot
GETTING STARTED
Fully Charged
Fully Discharged
RD6000-E.qxd 6/18/04 9:56 AM Page 14
Page 9
RD6000
17
RD6000
16
BB aatt tt ee rryy II nn ffoo rrmmaattii oonn aa nn dd CCaa rree
1. Never use an unapproved battery since this
could damage the phone and / or battery and
could cause the battery to explode.
2. The battery does not need to be fully discharged
before recharging.
3. Use only LG approved chargers specific to your
phone model since they are designed to
maximize battery life.
4. Do not disassemble or short-circuit the battery.
5. Keep the battery’s metal contacts clean.
6. Replace the battery when it no longer provides
acceptable performance.The battery can be
recharged several hundred times before
replacement.
7. Recharge the battery after long periods of nonuse to maximize battery life.
8. Do not expose the battery charger to direct
sunlight or use it in areas of high humidity such
as a bathroom.
9. Battery life will decrease if exposed to extreme
hot or cold temperatures.
10. Battery life will vary due to usage patterns and
environmental conditions.
11. The use of extended backlighting, and data
connectivity kits affect battery life and talk/
standby times.
GETTING STARTED
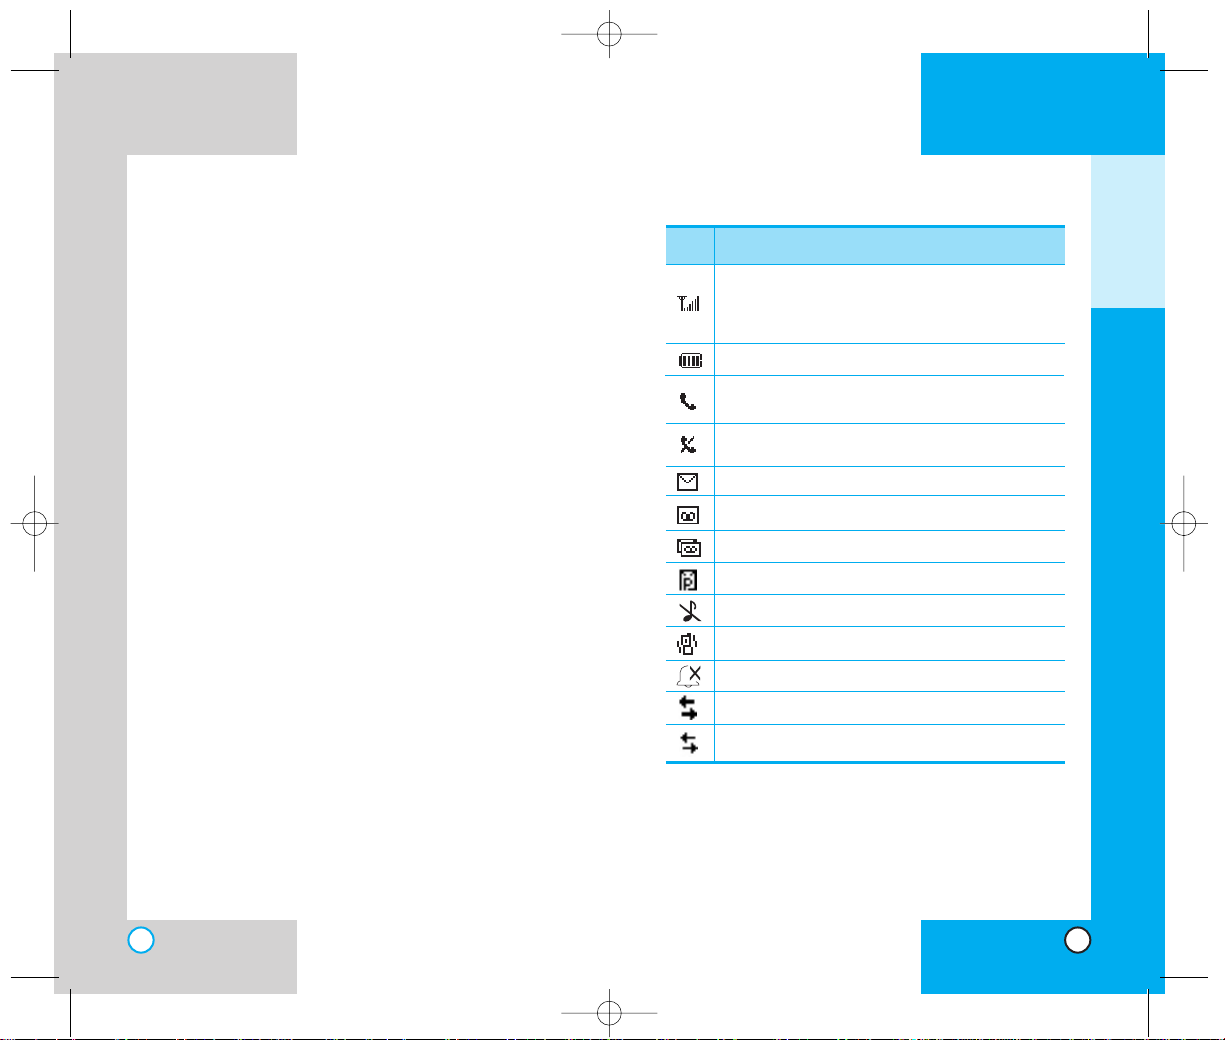
Descriptions
Displays the strength of the signal received by the
phone and current signal strength is indicated by
the number of bars displayed on the screen.
New V oiceMail.
New Text & Voice Message.
New Text Message.
In use.A call is in progress.
* No icon indicates when the phone is in standby mode.
No service.The phone is not receiving a system
signal.
Icons
SSccrreeee nn IIcc oo nnss
New Picture Message.
Ringer Off.
Vibrate Mode.
Silence All.
Transmit/Receive(Packet data mode).
Transmit/Receive(Dormant mode).
Charge level:Indicates battery charge level.
RD6000-E.qxd 6/18/04 9:56 AM Page 16
Page 10
RD6000
18
RD6000
19
G
ETTING STARTED
6. Display
1. Service Area
2. Banner
3. Backlight
1. Main LCD
2. Front LCD
4. Screens
1.Wallpaper
2. Power On
3. Power Off
5. Menu Style
6. Clocks
7.Theme Colour
8. Fonts
1. Calling Digits
2.Text Editor
9. Power Saver
0. Status Light
7. My Media
1. Graphics
2. Music
8.T ools
1. Scheduler
2. Alarm Clock
1. Alarm 1
2. Alarm 2
3. Alarm 3
4. Quick Alarm
3.Voice Memo
4. My Menu
5. Notepad
6. Easy Tip Calculation
7. Calculator
8.World Clock
9. Settings
1. Sounds
1. Ringers
2. Key T one
3.Volume
4. Alerts
1.Service Change
2.Call Connect
3.Back T o Top
5. Power On/Off Tone
2. Security
1. Lock Phone
2. Restrict
3.
Emergency Numbers
4. Change Code
5. Erase Contacts
6. Reset Default
7. Select Line
3. Call Setup
1. Auto Redial
2. Answer Call
3. Auto-Answer
4. One-Touch Dial
5.Voice Privacy
6. Clear Voice
4. 1x Data
1. Data/Fax
2. Select Port
3. Port Speed
5.Voice Services
1.Voice Dial Prompt
2. Answering Machine
3.T r ain Words
6. Phone Info
1. S/W Version
2. Icon Glossary
3. Shortcut Help
1. Camera
1.Take Pix
2. Gallery
3. Send Pix Msg
4. Pix Inbox
5. Pix Outbox
6. Pix Draft
7. Pix Settings
1. Auto Save
2. Auto Delete
3. Auto Receive
4. Pix Msg Alert
5.Text Entry Mode
6. Quick-T e xt
8. Erase All
1. Inbox
2. Outbox
3. Draft
4. All
2. Contacts
1. List Contacts
2. New Number
3. New E-mail
4. Groups
5. Speed Dials
6.Voice Dials
7. My Contact Info
3. Call History
1. Dialled Calls
2. Received Calls
3. Missed Calls
4. Erase Calls
1. Dialled Calls
2. Received Calls
3. Missed Calls
4. All Calls
5. Call Duration
1. Last Call
2. Received Calls
3. Dialled Calls
4. All Calls
6. 1x Packet Counter
1. Received
2.Transmitted
3.Total
4. Messages
1.Voice Mail
2. New Message
3. Inbox
4. Outbox
5. Draft
6. Msg Settings
1. Auto Save
2. Auto Delete
3. Msg Alerts
4. Signature
5. Direct View
6. Entry Mode
7. Edit V oice Mailbox #
8.Template
7. Erase All
1. Inbox
2. Outbox
3. Draft
4. All
5. R World
1. R World
R World Menu
Settings
Help
PPhh oo nnee MM ee nnuu RRee ff eerreenncc ee
Press Left Soft Key Menu. Press to Scroll.
RD6000-E.qxd 6/18/04 9:56 AM Page 18
Page 11

RD6000
20
AA ccccee ss ss oo rriieess
There are a variety of accessories available for your
mobile phone.You can select these options according to
your personal communication requirements.
Consult your local dealer for availability.
Travel Charger
This charger, allows you to
charge the battery.It supports
AC 100 - 240 Volt, 50 - 60 Hz
outlets.An orange light indicates
that it is charging, a green light
indicates charging is complete.
It takes 5 hours to charge a
completely discharged battery.
Battery
Standard batteries is
available for charging.
Cigarette Lighter Charger
You can operate the phone
and trickle charge the
phone’s battery from your
vehicle by using the cigarette
lighter charger.
It takes 5 hours to charge a
completely discharged
battery.
RD6000
21
Hands-Free Car Kit (Portable)
The hands-free car kit enables
you to attach the phone to the
power jack in your car, providing
you with hands-free operation. It
can charge a completely
discharged battery in 5 hours.
Data Cable
Connect your phone to your PC.
Headset
Connects to your phone,
allowing hands- free operation.
Includes earpiece, microphone.
GETTING STARTED
Standard
RD6000-E.qxd 6/18/04 9:56 AM Page 20
Page 12
RD6000
23
If you put your phone in a pocket or bag without covering
the receptacle of the phone (power plug pin), metallic
articles (such as a coin, paperclip or pen) may shortcircuit the phone.Always cover the receptacle when not in
use.
Do not short-circuit the battery.Metallic articles such as a
coin, paperclip or pen in your pocket or bag may shortcircuit the + and – terminals of the battery (metal strips on
the battery) upon moving. Short-circuits of the terminal
may damage the battery and cause an explosion.
Do not disassemble the battery as it may cause electric
shock, short-circuit, or fire.
Do not expose the phone to excessive vibration or a
sharp impact.
Never place your phone in a microwave oven as it will
cause the battery to explode.
General Warnings and Cautions
Store the battery in a place out of reach of children.
Using a damaged battery or placing a battery in your
mouth may cause serious injury.
Do not place items containing magnetic components such
as a credit card, phone card, bank book or a subway
ticket near your phone.The magnetism of the phone may
damage the data stored in the magnetic strip.
Do not hold or let the antenna come in contact with your
body during a call.
Talking on your phone for a long period of time may
reduce the call quality due to heat generated during use.
RD6000
22
SSaaff ee tt yy II nnff oo rrmmaattiioonn
Please read and observe the following information
for the safe and proper use of your phone and to
prevent any unanticipated damage. Also, keep the
user’s manual in an accessible place at all the
times after reading it.
Explosion, Shock, and Fire Hazards
Unplug the power cord and charger during lightning
storms to avoid electric shock or fire.
Do not use your phone in high explosive areas as the
phone may generate sparks.
Do not put your phone in a place subject to excessive
dust and keep the minimum required distance between
the power cord and heat sources.
Unplug the power cord prior to cleaning your phone, and
clean the power plug pin when it is dirty.
Do not damage the power cord by bending, twisting,
pulling, or heating. Do not use the plug if it is loose as it
may cause a fire or an electric shock.
When using the power plug, ensure that it is firmly
connected. If it is not, it may cause excessive heat or fire.
Do not place any heavy items on the power cord.Do not
allow the power cord to be crimped as it may cause fire or
electric shock.
Do not disassemble the phone.
Do not place or answer calls while charging the phone as
it may short-circuit the phone and/or cause electric shock
or fire.
GETTING STARTED
RD6000-E.qxd 6/18/04 9:56 AM Page 22
Page 13
RD6000
25
2 Basic Functions
TTuurrnniinn gg tthh ee PPhh oo nnee OOnn aann dd OOff ff
Turning the Phone On
1. Install a charged battery pack or connect the
phone to an external power source such as a
cigarette lighter adapter or car kit.
2. Press for a few seconds until the red light
in the middle of the phone flashes.
NOTE: Like any other radio device, avoid any
unnecessary contact with the antenna while
your phone is on.
Turning the Phone Off
1. Press and hold until the display turns off.
B
ASIC FUNCTIONS
RD6000
24
When the phone is not used for a long period time, store
it in a safe place with the power cord unplugged.
Only use the batteries, antennas, and chargers provided
by LG. The warranty will not be applied to products
provided by other suppliers.
Using the phone in proximity to receiving equipment (i.e.,
TV or radio) may cause interference in this phone.
Only authorized personnel should service the phone and
its accessories. Faulty installation or service may result in
accidents and consequently invalidate the warranty.
Use only the antenna provided or approved by LG.
Unauthorized antennas, modifications or attachments
may affect the quality of phone call, damage the phone or
result in a violation of FCC regulations.
Do not use the cellular phone if the antenna is damaged.
If the damaged antenna gets in contact with the skin, it
may cause a slight burn.Please contact LG Authorized
Service Center to replace the damaged antenna.
Do not use the cellular phone in areas where its use is
prohibited. (For example: aircraft).
Do not expose the cellular phone to high temperatures or
high humidity.
Do not immerse your cellular phone in water.If this
happens, turn it off immediately and remove the battery. If
the phone does not work, take it to an LG Authorized
Service Center.
RD6000-E.qxd 6/18/04 9:56 AM Page 24
Page 14
RD6000
27
RD6000
26
RR eeccee iivviinn gg CCaa llllss
1. When the phone rings or vibrates press to
answer.
If you press or the side keys while the
phone is ringing, the ringing or vibration is
muted for that call.
2. Press or twice to end the call.
UUssiinngg VVii bbrraa ttee,, SS iillee nn ccee AA llll,, aann dd
LL oocckk MMoo dd ee
Vibrate Mode (Quick)
Use the Vibrate Mode in public places.
1. When in the Standby Mode, activate the Vibrate
Mode quickly by pressing for 3 seconds.
When the Vibrate Mode is set, the key tones are
silent, and the phone is set to vibrate.
When flip of the phone is closed, press and hold
Voice Dial Key to enter into vibrate mode.
NOTE:The phone remains in Vibrate Mode even if
you turn it off and back on.
NOTE:To cancel Vibrate Mode, press to switch
into Silence All or Normal Mode.
MMaakkiinngg aa CCaa llll
When you make a call, follow these simple steps:
1. Make sure the phone is turned on. If not, press
.
2. Enter the phone number, with area code (if needed).
3. Press .lf the phone is locked, enter the lock
code.
Call Failed - indicates that the call did not go
through.
Restricted - indicates outgoing calls are in
restricted mode.You can only dial phone
numbers saved in the Emergency or Phone
Book list.
To turn off this function:
Menu -> Settings -> Security -> Enter
Lock Code -> Restrict -> Off -> OK
4. Press to make the call.
If one-touch is enabled, type in the phone book
speed dial number or hold the last digit until the
call is made.
NOTE:The phone number and entry name appear
on the display when you type in the speed dial
number and hold the last digit.
Correcting Dialling Mistakes
If you make a mistake while dialling a number, press
once to erase the last digit entered or hold down
for at least two seconds to delete all digits.
BASIC FUNCTIONS
RD6000-E.qxd 6/18/04 9:56 AM Page 26
Page 15
RD6000
29
RD6000
28
MMuu ttee
The mute function prevents the other party from hearing
your voice, but allows you to hear the other party.
1. Press Left Soft Key Mute, dur ing a call.
2. To cancel Mute, press Left Soft Key again.
RR eeddiiaa lllliinngg CC aallll ss
1. Press to redial the last number in your call
history.The last 30 numbers are stored in the
call history list and you can also select one of
these to redial.
AA ddjjuussttiinn gg tt hh ee VVoolluummee
Use the side keys to adjust the earpiece, ringer, and
volumes.The upper key is used to increase the volume
and the lower key is used to decrease the volume.
You may adjust the earpiece volume during a call.
The ringer volume can be adjusted through the menu.
The key beep volume is adjusted through the menu.
PPooww eerr SSaa vv ee MMoo ddee
When the phone is in an area without service for 15
minutes, it stops searching for service and enters into
Power Save Mode.When your phone activates this
feature, Power Save is displayed on the screen.
The phone automatically checks for service periodically
or you can check manually by pressing any key.
Silence All Mode (Quick)
1. From the
Vibrate
Mode you can activate the Silence
All Mode quickly by pressing for 3 seconds.
When the Silence All Mode is set, the key tones are
quiet and the lamp blinks instead of the phone
ringing or vibrating.
NOTE:To cancel the Silence All Mode, press to
switch into Vibrate Mode or Normal Mode.
Lock Mode (Quick)
Use the Lock Mode to prevent others from using your
phone.
1. In standby mode, to activate the Lock Mode
quickly, press for 3 seconds. Phone is now
locked is displayed.
NOTE:To cancel the Lock Mode, Press Right Soft
Key Unlock, then enter your 4 digit password.
CC aallll WW aa ii ttiinn gg
If your cellular service offers call waiting, while a
call is in progress you may hear two beeps
indicating another incoming call.When call waiting
is enabled, you may put the active call on hold
while you answer the other incoming call.Check
with your cellular service provider for information
about this function.
1. Press to receive a waiting call.
2. Press again to switch between calls.
BASIC FUNCTIONS
RD6000-E.qxd 6/18/04 9:56 AM Page 28
Page 16

31
RD6000
EEnntteerrii nngg iinnff oo rrmmaattii oonn uu ss iinngg TT 99
TTeexx tt II nnppuu tt
You can edit the Banner , Scheduler , Short Message, Phone
Book and Notepad using T9 Text Input. When editing the
function of soft keys (right and left) in short message is
reverse witn Banner, Scheduler and Phone Book.
Input Mode
T9 Text Input provides five modes for entering text,
numbers, special characters, and punctuation.
T9Word (T9) Mode
Type text using one keystroke per letter.The phone
translates keystrokes into common w ords by using the
letters on each key and a compressed database.
Abc (Multi-tap) Mode
Use Abc mode to add words to the T9 database.
123 (Numbers) Mode
Type numbers using one keystroke per number.To
change to 123 mode in a text entry field, press Right
Soft Key and select123 mode.
Symbols Mode
Insert special characters or punctuation.You may use
any of the 31 special characters.When the cursor is
located where you want the special character, switch to
Symbols Mode.Press the Navigation Key to cycle
through and select the characters.
3 Additional Functions
ADDITIONAL FUNCTIONS
RD6000
30
SSiigg nn aall SS tt rreenn gg tthh
Call quality depends on the signal strength in your area.
The signal strength is indicated on the screen as the
number of bars next to the signal strength icon:The
more bars, the better the signal strength.If the signal
quality is poor, move to an open area. If you are in a
building, the reception may be better near a window..
SSpp ee eedd DDiiaa llllii nngg
Speed dialling is a convenient feature that allows you to
make phone calls quickly and easily (Number 1 is alwa ys
for Voicemail).
1. Enter a speed dial number from 2 to 99.
2. Press .
OR
Press the first digit and then press and hold the key of
the last digit.
Your phone recalls the phone number from your
personal directory, displays it briefly and then dials it.
CC aallll eerr II DD
Caller ID lets you know who is calling by displaying
the number of the person calling when your phone
rings. If the caller’s name and number are already
stored in your phone book, the corresponding name
appears with the number.
Check with your service provider to ensure they
offer this feature.
RD6000-E.qxd 6/18/04 9:56 AM Page 30
Page 17
Changing Letter Case
There are three options for selecting letter case:
Initial Cap (T9Word/Abc)
Only the first letter is capitalized.
Caps Lock (T9WORD/ABC)
Press to change to Caps Lock. All subsequent
letters are capitalized.
Lower Case (T9word/abc)
Press again to change to lower case.
All subsequent letters are in lower case.
Example: Using T9 Text Input
Typing In T9 Mode
To type the message “Call the office” follow these
steps:
1. Press: Right Soft Key
(or Left Soft Key )
to
change the case to T9Word Mode.
2. Press: .
3. Press: to complete the word and add a
space.
4.
Press:
.
5.The display shows: Call the office.
RD6000
33
RD6000
32
Smiley Mode
When the cursor is located where you want to add
a smiley, switch to the smileys mode.Press the
Navigation Key to cycle through and select a
smiley.
Key Functions
() Right Soft Key: Press to scroll through
the menus in the following order:T9Word
-> Abc -> 123 -> Symbols -> Smiley.
Shift: Use to change case.
~ Type T ext:In T9 mode, press one key
per letter to enter text.
~ Type Numbers:In 123 mode, press
once to enter numbers.
Next: In T9 mode, press to display
other matching words.
Punctuation In T9 mode, press to
insert punctuation in a word and
complete a sentence.
Space: Press to complete a word or
insert a space.
Clear: Press to delete a single space or
character.Hold to delete entire words.
ADDITIONAL FUNCTIONS
RD6000-E.qxd 6/18/04 9:56 AM Page 32
Page 18
RD6000
35
Using the NEXT Key
After you have finished entering a word, if the word
displayed is not the one you want, press to display
additional choices of words from the database.
For example:
1. Press: .
2. The display shows the word Good.
3. Press: .
4. The display gives you additional choices such
as: Home, Gone, Hood, etc.
AAddddiinngg WWoorrddss ttoo tthhee TT99 DDaattaabbaassee
If a word is not in the T9 database, add it by using Abc
(Multi-tap) mode text entry.The word is automatically
added to the T9 database when you return to T9 mode.
For example, follow these steps:
1. Press: Right Soft Key
(or Left Soft Key )
to
change case to Abc (multi-tap) mode.
2. Press: .
3. Display: Bop
4. Press: Right Soft Key
(or Left Soft Key )
to
change letter case to T9 mode and then the
word Bop is added to the T9 database.
5. Press: to erase the existing word.
6. Press: .
7. Display: cop
8. Press: .
9. Display: bop
RD6000
34
Examples Using Abc (Multi-tap) Text Input
To type a new message, follow these steps:
1. Press: Right Soft Key (or Left Soft Key ) to
change case to Abc mode.
2. Press: to change to ABC Caps Lock mode.
3. Press: .
4. Display:LG
PPhhoo nn ee BBoo oo kk FFee aa ttuu rree ss
You can store up to 500 entries in your phone book with
easy access to your most frequently dialled phone
numbers.
Personal Phone Book Memory
The phone has 500 personal phone book memory
locations where you can store up to 5 phone numbers
of up to 32 digits.
Saving Numbers in Your Personal Phone Book
1. Input the phone number that you want to save (up
to 32 digits).
2. Press Left Soft Key Save, the submenu appears.
3. Select your desired label types Home, Home2,
Office, Office2, Mobile, Mobile2, Pager, Fax, Fax2,
None using and press .
ADDITIONAL FUNCTIONS
RD6000-E.qxd 6/18/04 9:56 AM Page 34
Page 19

RD6000
37
4 Menu Features
GGeenn ee rraa ll GGuu iiddee lliinn ee ss
1. Press Left Soft Key Menu.Nine menu items will
appear on the display screen.
2. Press to go through the list of menu features.
3. Press the appropriate number key corresponding to
the menu item that you want to select.The submenu list will then appear on the screen.
4. Press the appropriate number key corresponding to
the sub-menu you want to access.
5. Use to select your preferred setting.
Press to go back one step while accessing the
menu or selecting a setting.
6. Press to save the settings or press to
cancel without saving.
MENU FEATURES
RD6000
36
4. Use to select New Name or Existing and
press
.
5. Enter a name for the phone number(up to 22
characters).If you do not want to enter a name,
press .A confirmation message is displayed
briefly .
6. Continue saving the entry as a Speed Dial, press
to select Speed Dial.
7. Enter a Speed Dial digit (e.g., 2) use the keypad and
press or use to highlight the Speed Dial
location and press .
8. Save the entry as a Voice Dial option by highlighting
Voice Dial and press .
9. Press to select OK.
Retrieving Numbers
Retrieving by Name Search
1. Press Right Soft Key Contacts.
2. Enter the character(s) that you want to search
for such as the first letters of the name.
3. You see a list of matches.
4. Press to see more information in that entry,
or press to place the call.
RD6000-E.qxd 6/18/04 9:56 AM Page 36
Page 20

Multishot - (5 shots / 3 shots): Allows you to take
multiple photos without interruption.When you put
the resolution on high, you do not have 5 shots / 3
shots, you only get 2 multishots.
5.Take a picture by pressing , or you can press a
Side Key .
6. Press Left Soft Key Save to save the photo.
Press
Right Soft Key
Reject or retake the photo.
NOTE:“XX/XX” on the upper right corner of the
LCD screen shows how many photos you have
taken and the maximum number you can take.
Gallery (Menu )
Allows you to view photos that are stored in the phone.
1. From the menu, select Camera.
2. Press Gallery.
3. Press Right Soft Key Options to view the list.
4. Select an option with .
Send
Set As -(Contacts / Wallpaper / Power On / Power Off)
Enlarge
Lock
Rename
Erase
Erase All
Picture Info
5. Press .
Press Left Soft Key Camera to take a photo .
RD6000
39
RD6000
38
CC aammee rraa ((MMee nn uu ))
Quick Access to Camera Feature
You can access the camera feature directly by pressing
for approximately 3 seconds.
Take Pix (Menu )
Allows you to take photos up to 20.
1. From the menu, select Camera.
2. Press Take Pix.
3. Press Right Soft Key Options to view the list.
NOTE: Use to adjust the zoom function (x1, x2
and x4 at Low resolution,x1 and x2 at Med resolution,
and only x1 at Hi resolution).
NOTE:To take a photo of yourself,use the mirror on
the top front of the phone.When your image is
centered in the mirror, take the photo using the
volume control key.
4. Select an option with .
Self Timer -(5 sec / 10 sec)
Resolution -(Low 160x120 / Med 320x240 / Hi 640x480)
Brightness -(EV-2 to EV+2)
File Quality -(Economy / Normal / High)
Shutter Sound -(Shutter / Chime / No Sounds)
Colour Effects - (Normal / Antique / Black&White / Negative)
Fun Frames - (Frame 1~5 / None):Allows you to take
photos with a pre-made foreground.
MENU FEATURES
RD6000-E.qxd 6/18/04 9:56 AM Page 38
Page 21

RD6000
41
Options
1) Pix Msg Info 2) Play Again
3) Save Pix
4) Save Sound
5) Save Address 6)
Save Quick-Text
7) Save Pix Msg 8) Forward
9) Erase
Photo Msg Status Reference
:Notified Msg
:Urgent Read Msg
:Urgent Unread Msg
:Read Photo Msg
:Unread Photo Msg
Pix Outbox (Menu )
1. From the menu, select Camera.
2. Press Pix Outbox to view Photo Outbox.
(Max. 10 messages can be stored in Outbox.)
Resend
Options
1) Erase
2) Lock
3. Select a message with .
4. Press to view the message.
Send to
Send Pix Msg (Menu )
1. From the menu, select Camera.
2. Press Send Pix Msg and to enter mobile
number and / or E-mail.
3. Edit subject / text by selecting .
4. Select a picture file and sound file by selecting .
5. Press Right Soft Key Options and select Send.
(Max file size: image 99 kb/ text 1000 byte)
Options
1) Preview 2) Send
3) Priority 4) Enhanced
NOTE: Please contact your service provider for
details on the MMS/Picture Messaging service.
Pix Inbox (Menu )
1. From the menu, select Camera.
2. Press Pix Inbox to view Photo Inbox.
(Max. 10 messages can be stored in Inbox.)
Options
1) Erase 2) Lock
3. Select a message with .
4. Press to view the message.
Reply
1) Pix Msg 2) Text Only
RD6000
40
MENU FEATURES
RD6000-E.qxd 6/18/04 9:56 AM Page 40
Page 22

Pix Settings (Menu )
1. From the menu, select Camera.
2. Press Pix Settings.
3. Select an option with .
Auto Save (Menu )
With this feature on, messages are automatically saved
in the Pix Outbox when transmitted.
Auto Save/Prompt/Do Not Save
Auto Delete (Menu )
With this feature on, old read messages are automatically
deleted when you exceed storage limit.
Auto Receive (Menu )
With this feature on, picture messages will automatically
be received by your phone. With this feature off, you will
be asked if you want to accept your new Photo Msg.
Pix Msg Alert (Menu )
Allows you to select the alert type for a new picture
message.Alert types are Silent, Vibrate Once, Vibrate
and Sound,Custom Ring Tone, Low Beep Once, Low
Beeps, Loud Beep Once and Loud Beeps.
Text Entry Mode (Menu )
Allows you to select the default input method including
T9 Word, Abc, 123.
RD6000
43
Options
1) Pix Msg Info 2) Play Again
3) Erase 4) Save Pix
5) Save Sound 6)
Save Address
7) Save Pix Msg 8)
Lock
Photo Msg Status Reference
:
Delivered Msg
:
Failed Msg
:
Sent Msg
Pix Draft (Menu )
Max. 5Pictures can be stored on Draft.
1. From the menu, select Camera.
2. Press Pix Draft.
Resume
Options
1) Erase 2) Lock
3. Select a message with .
4. Press to view the message.
Resume
Options
1) Pix Msg Info 2) Play Again
3) Erase 4) Save Pix
5) Save Sound 6) Save Address
7) Save Quick-Text 8) Lock
RD6000
42
MENU FEATURES
RD6000-E.qxd 6/18/04 9:56 AM Page 42
Page 23

RD6000
45
CC oonnttaaccttss ((MMee nn uu ))
List Contacts (Menu )
Allows you to view the list of entries in Contacts.
1. Press Left Soft Key Menu.
2. Press Contacts.
3. Press List Contacts.
4. Press Right Soft Key Options, and then press .
Find Name / Find Number / Find Speed Dial / Find Group
/ Find E-mail / Send Message / Erase
5.
You may register a new phone number by pressing
Left Soft Key New.
New Number / New E-mail
New Number (Menu )
Allows you to add a new number into Contacts.
1. Press Left Soft Key Menu.
2. Press Contacts.
3. Press New Number.
4. Enter the number and press .
5. Select the label you want and press .
6. Enter the Name and press .
7. Select either Speed Dial or Voice Dial and press .
MENU FEATURES
Quick-Text (Menu )
Display, edit, and add Canned Messages.
Erase All (Menu )
This allows you to erase all picture messages stored in
your Pix Inbox, Pix Outbox or Pix Draft.You can also
erase all messages stored in these folders at the same
time.
1. From the menu, select Camera.
2. Press Erase All.
Press Inbox to erase all messages stored
in the Inbox
Press Outbox to erase all messages
stored in the Outbox
Press Draft to erase all messages stored
in the Draft
Press All to erase all messages stored in
the Inbox, Outbox,and Draft Items folder
NOTE:Locked messages cannot be erased.
NOTE:If the memory is full, no more messages can
be received until enough memory space becomes
available.The message [Pix Msg Inbox] is full is
displayed and new messages are not accepted.
RD6000
44
RD6000-E.qxd 6/18/04 9:56 AM Page 44
Page 24

RD6000
47
RD6000
46
Speed Dials (Menu )
Allows you to set the speed dial keys for the designated
phone numbers.
1. Press Left Soft Key Menu.
2. Press Contacts.
3. Press Speed Dials.
4. Next empty / Remo ve / Remove all pop up is
displayed by pressing Right Soft Key .
5. Either select the number you wish to speed dial, or
enter the number you want and press .
Voice Dials (Menu )
Allows you to view the list of numbers that have been
programmed with voice dialling or add a voice dial tag to
a number in Contacts.
1. Press Left Soft Key Menu.
2. Press Contacts.
3. Press Voice Dials.
4. Press Left Soft Key New.
How to Use: Record the voice dial tags by following the
phone’s prompts.When recording the voice
tag, place the phone in a normal phone
use position with the speaker by your ear
and the microphone near your mouth.
NOTE:Recordings should be made in a quiet place
using a clear voice. Hands-free car kits or
headsets should be avoided when recording.
MENU FEATURES
RD6000
New E-mail (Menu )
You can save E-mail addresses.
1. Press Left Soft Key Menu.
2. Press Contacts.
3. Press New E-mail.
4. Enter the E-mail address and press .
5. Enter the Name and press .
Groups (Menu )
Allows you to enter a new group, change the name
of a group, or delete a whole group.
1. Press Left Soft Key Menu.
2. Press Contacts.
3. Press Groups.
4. Highlight the Group you wish to view and then
press .
5.To add a new group to the list, press Left Soft
Key Add; to delete a group or to change the
name, press Right Soft Key Options.
Edit title
Erase group
RD6000-E.qxd 6/18/04 9:56 AM Page 46
Page 25

RD6000
49
RD6000
48
1. Press Left Soft Key Menu.
2. Press Call History.
3. Press Dialled Calls.
4. Highlight the entry you wish to view and press or
you may place a call by pressing .
Press Right Soft Key Options to select :
Save / Send Msg./ Prepend / Erase / Erase All
Received Calls (Menu )
Allows you to view the list of incoming calls;up to 30
numbers and entries.
1. Press Left Soft Key Menu.
2. Press Call History.
3. Press Received Calls.
4. Highlight the entry you wish to view and press ,
or you may place a call by pressing .
Press Right Soft Key Options to select :
Save / Send Msg./ Prepend / Erase / Erase All
Missed Calls (Menu )
Allows you to view the list of missed calls;up to 30
numbers and entries.
1. Press Left Soft Key Menu.
2. Press
Call History
.
3. Press Missed Calls.
4. Highlight the entry you wish to view and press ,
or you may place a call by pressing .
MENU FEATURES
RD6000
My Contact Info (Menu )
Allows you to enter your own virtual business card
and save my personal information.
1. Press Left Soft Key Menu.
2. Press Contacts.
3. Press My Contact Info.
4. Select the feature you want to edit by highlighting
it and pressing .
CC aallll HHiiss tt oo rryy (( MMeenn uu ))
Allows you to view a list of the last phone numbers or
Phone Book entries for calls you placed, accepted, or
missed. It is continually updated as new numbers are
added to the beginning of the list and the oldest entries
are removed from the bottom of the list.
Total call history numbers: 90(Dialed Calls:30 / Received
Calls:30 / Missed Call:30)
NOTE:To view a quick list of all your Call History,
press from the main menu.
indicates a Dialled Call.
indicates a Received Call.
indicates a Missed Call.
Dialled Calls (Menu )
Allows you to view the list of outgoing calls;up to 30
numbers and entries.
RD6000-E.qxd 6/18/04 9:56 AM Page 48
Page 26

RD6000
51
RD6000
50
MMeessssaagg ee ss ((MM eennuu ))
Text messages, pages, and the voicemail box become
available as soon as the phone is powered on.You can
access the above types of messages using the
message key .
In addition, you can make a call to the reply number by
pressing during a message check.
The phone can store up to 116 messages (1 voice
message: 50 inbox text messages, 50 outbox text
messages, 15 saved and draft text messages) with up
to 160 characters per message.
Check whether your service provider provides the abov e
features.
Character limits:The RD6000 supports up to 160
characters per message.Limits to available characters
per message may exist;please check with your service
provider for system capabilities.
The information that is stored in the message is
determined by phone mode and service capability.You
can check types of messages by pressing the message
key .
MENU FEATURES
RD6000
Press Right Soft Key Options to select :
Save / Send Msg./ Prepend / Erase / Erase All
Erase Calls (Menu )
Allows you to erase the call history list.
1. Press Left Soft Key Menu.
2. Press
Call History
.
3. Press Erase Calls.
4. Select the list of calls you wish to erase and press .
Dialled Calls / Received Calls / Missed Calls / All Calls
5. Press either 1 Erase, or 2 Cancel and press
.
Call Duration (Menu )
Allows you to view the duration of calls.
1. Press Left Soft Key Menu.
2. Press
Call History
.
3. Press Call Duration.
4. Select from Last Call / Received Calls / Dialled Calls /
All Calls, and press .
1x Packet Counter (Menu )
Allows you to view the duration of calls.
1. Press Left Soft Key Menu.
2. Press
Call History
.
3. Press 1x Packet Counter.
4. Select from Received / Transmitted / Total and
press .
RD6000-E.qxd 6/18/04 9:56 AM Page 50
Page 27

RD6000
53
RD6000
52
Voice Mail (Menu )
Allows you to view new voice messages recorded
in the voice mailbox.Once you exceed the storage
limit, the old messages are overwritten.When you
have a new voice message, your phone alerts you.
NOTE: Only one voice message can be stored in
mailbox.
Checking your Voice Mail box
1. Press Left Soft Key Menu.
2. Press Messages.
3. Select Voice Mail.
To delete information press Left Soft Key Clear
and then select Clear Count.
New Message (Menu )
You can send text messages and pages transmissions.
Text messages:Transmits text (with or without numbers).
Page messages:Transmits only numbers without text.
To send a message, enter an SMS phone number to
Address 1.
MENU FEATURES
RD6000
Message Menu
Voice Mail: Shows the number of messages in voice
mail box.
New Message:Sends a message.
Inbox:Shows the list of received messages.
Outbox:Shows the list of sent messages.
Draft:Shows the list of saved and draft messages.
Msg Settings: Adjusts Msg Setting.
Erase All:Deletes all stored messages.
New Message Alert
There are four ways your phone alerts you to new
messages.
1.The phone displays the message on the screen.
2. One of four ring types is heard if selected.
3.The red light blinks.
4.The message icon is displayed on the display
screen . In the case of an urgent message,
the icon will flash and displays Urgent message.
NOTE: If you receive the same message twice,
your phone deletes the older one and the new
one is stored as a Duplicate.
RD6000-E.qxd 6/18/04 9:56 AM Page 52
Page 28

RD6000
55
RD6000
54
time frame.
Deferred time
frames are as follows:
Immediate, After 30 minutes,
After 1 hour, After 2 hours,
After 12 hours, After 1 day,
After 2 days, and After 3 days.
Validity Indicates the validity of
message delivery to the Short
Message Center (SMC) without
being transmitted to the
destination address for certain
periods of time.Those
messages will be deleted within
the programmed time frame.
Validity time frames are as
follows:Default, 30 minutes, 1
hour, 2 hours, 12 hours, 1 day,
2 days, and 3 days.
Save
Save the message into the Draft
folder.
If you select Send, it notifies you that the message
was sent successfully.
NOTE:If you send an SMS message to a phone
without SMS, you will still be notified that the
message was sent, however the message will not
be received.
MENU FEATURES
RD6000
Menu
Address 1:This feature allows multi-sending of up
to 10 total addresses.
Select Options by using Right Soft Key .
There are 5 optional menus of Send, Priority, Deferred,
Validity, and Save.
1. Press Left Soft Key Menu.
2. Press Messages.
3. Select New Message.
4. Enter the recipients address.The address can be
typed in or taken from a Phone Book entry and Call
History.
5. Enter the message. The text can be entered using the
keypad or by selecting Template with Right Soft
Key Insert from Template.
Template
There are 10 "predefined" phrases included in the
Canned Msg option.You can also add up to 10 of your
own phrases.
6. Select Options using Right Soft Key after entering
the number of other party and the content with the
Navigation Key.Select the item with .
Send Allows you to send the message.
Priority Allows you to give priority to
message.Normal or Urgent.
Deferred Allows you to delay sending the
message until the programmed
RD6000-E.qxd 6/18/04 9:56 AM Page 54
Page 29

RD6000
57
RD6000
56
For an e-mail address, select
the option New Entry and
Old Entry.The new e-mail
address may overwrite an
old address entry.For new
entries, an e-mail address
may be stored with the new
memory number.
NOTE:A phone number having minimum 10 digits
can only be allowed to store.
Save to Template Save the message into the
Template list.
Save Message Save Inbox message into the
Draft Folder.
Lock/Unlock Locks or unlocks the
selected message. Locked
messages cannot be deleted
by the Erase Inbox, Erase
Outbox and Erase All
functions.
Out of Memory Warning
If the memory is full, no more messages can be
received until enough memory space becomes
available.The message Inbox Full Please erase
message is displayed and new messages are not
accepted.
MENU FEATURES
RD6000
Inbox (Menu )
Received text messages and page messages lists may
be searched and the contents may be viewed.Received
messages are displayed from newest to oldest.
To view the list of the received messages:
1. Press Left Soft Key Menu.
2. Press Messages.
3. Select Inbox.
4. Erase / Lock pop up is displayed by pressing Right
Soft Key .
Reply w Copy Replies to the SMS with the
original message attached.
Forward Forwards a received
message to others. After
recipients are entered, the
message can be forwarded.
Erase Deletes the selected
message from the Inbox.
Save Address Stores the reply number, e-mail
address, and numbers in user
data included in the received
message into your Phone Book.
You can store the received
number information in the
corresponding number list in the
Phone Book.
RD6000-E.qxd 6/18/04 9:56 AM Page 56
Page 30

RD6000
59
RD6000
58
For new entries, an e-mail
address may be stored with
the new memory number.
NOTE:A phone number having minimum 10 digits
can only be allowed to store.
Save to Template Save the message into the
Template list.
Save Message Save outbox message into
the Draft folder.
Lock / Unlock Lock a message so that it is
not erased if the Erase Inbox
or Erase All feature is used.
Cancel Cancels the transmitted
message.
Status Code Checks the sent message
information (Err Class/Cause
Code).
MENU FEATURES
RD6000
Outbox (Menu )
Up to 50 sent messages can be stored in the
Outbox. Users may view lists and contents of sent
messages in this menu and may also verify
whether the transmission was successful or not.
1. Press Left Soft Key Menu.
2. Press Messages.
3. Select Outbox.
4. Erase / Lock pop up is displayed by pressing
Right Soft Key .
Resend Allows you to retransmit the
selected message.
Erase Use to delete a selected
message in the Outbox.
Save Address Stores the reply number, e-
mail address, and numbers in
user data included in the
received message into your
Phone Book.You can store the
received number information in
the corresponding number list
in the Phone Book. For an email address, select the option
New Entry and Old Entry.The
new e-mail address may
overwrite an old address entry.
RD6000-E.qxd 6/18/04 9:56 AM Page 58
Page 31

RD6000
61
RD6000
60
Save Address Stores the reply number, e-mail
address, and numbers in user
data included in the received
message into your Phone Book.
You can store the received
number information in the
corresponding number list in the
Phone Book. For an e-mail
address, select the option New
Entry and Old Entry.The new email address may overwrite an
old address entry.For new
entries, an e-mail address may
be stored with the new memory
number .
Save to Template Save the message into the
Template list.
Lock / Unlock Lock a message so that it is not
erased if the Erase Draft or
Erase All feature is used.
Draft Message: Displays the list of messages which
have failed to write a message.
Saved Message: Displays the list of saved messages in
Inbox / Outbox.
Msg Settings (Menu )
1. Press Left Soft Key Menu.
2. Press Messages.
3. Select Msg Settings.
MENU FEATURES
RD6000
Message Status Reference
Draft (Menu )
Displays all the saved and draft messages.
1. Press Left Soft Key Menu.
2. Press Messages.
3. Select Draft.
4. Erase / Lock pop up is displayed by pressing
Right Soft Key .
Send to Allows you to retransmit the
selected message.
Erase Use to delete a selected message
in the Draft.
Messages saved in Short Message Center
(SMC) have been transmitted.
After transmission to message center has
occurred, messages that have not been
delivered may be canceled by transmitting
cancel message.
Transmission is unavailable in a no service
area. Messages are pending transmission.
Pending messages are transmitted
automatically when digital mode becomes
available.
Indicates more than one designated recipient.
Sent
Delivery
Cancel
Multi-
sending
Pending
Icons
Descriptions
Fail
Indicates a failed message transmission.
Message has been delivered.
RD6000-E.qxd 6/18/04 9:56 AM Page 60
Page 32

RD6000
63
RD6000
62
Entry Mode (Menu )
Allows you to select the default input method including
T9 Wor d, Abc, 123.
Edit Voice Mailbox # (Menu )
Allows you to manually enter the access number for
Voice Mail Service.
Template (Menu )
Display, edit, and add Template.
Erase All (Menu )
This allows you to erase all text messages stored in
your Inbox, Outbox or Draft Items folder.You can
also erase all messages stored in these folders at
the same time.
Press Inbox to erase all messages stored
in the Inbox.
Press Outbox to erase all messages stored
in the Outbox.
Press Draft to erase all messages stored
in the Draft.
Press All to erase all messages stored in
the Inbox, Outbox, and Draft Items folder.
MENU FEATURES
RD6000
Auto Delete, Msg Alerts and Direct View may be
configured for receiving new messages.
The phone alerts you in 3 ways when you receive a
new message:
- By displaying a message on the screen.
- By sounding a beep or vibrating.
- By blinking.
Auto Save (Menu )
With this feature on, messages are automatically saved
in the Outbox when transmitted.
Auto Save / Prompt / Do Not Save
Auto Delete (Menu )
With this feature on, old read messages are automatically
deleted when you exceed the storage limit.
Msg Alerts (Menu )
Allows you to select the alert type for a new message.
Alert types are Voice Mail Alert, Text Msg Alert, Page
Alert and 2 MIN Alert.
Signature (Menu )
You may edit the signature you want to automatically
send with your messages.Signature types are None
and Custom.
Direct View (Menu )
Allows you to directly display the content when receiving
a message.
RD6000-E.qxd 6/18/04 9:56 AM Page 62
Page 33

RD6000
65
RD6000
64
DDiissppllaayy ((MMeennuu ))
Service Area (Menu )
This menu displays the current SDCA / calling area the
user is in.
1. Press Left Soft Key Menu.
2. Press Display.
3. Select Service Area.
Banner (Menu )
Allows you to enter a string of up to 16 characters
to be displayed on the LCD screen.
1. Press Left Soft Key Menu.
2. Press Display.
3. Select Banner.
4. Enter a Banner and then press .
Backlight (Menu )
Allows you to set the duration for lea ving the backlight on.
1. Press Left Soft Key Menu.
2. Press Display.
3. Select Backlight.
MENU FEATURES
RD6000
RR WW oo rrlldd (( MMeenn uu ))
R World (Menu )
This connects you to R World Data Services like video,
audio, news, games, messaging etc., provided by your
service provider.
1. Press Left Soft Key Menu.
2. Press R W orld.
3. R World logo will be displayed followed by R World
Data Services Menu.
4. Scroll through the menu using and launch any
Data Service by clicking on
press .
5.T o e xit from Data Services any time, hold down or
for a few seconds.
NOTE:Pressing the left arrow key will start
R World.
NOTE:All Data Services may not be available to
every subscriber. Please contact your service
provider for further information.
RD6000-E.qxd 6/18/04 9:56 AM Page 64
Page 34

RD6000
67
RD6000
66
Screens (Menu )
Allows you to choose the kind of background to be
displayed on the phone.
1. Press Left Soft Key Menu.
2. Press Display.
3. Select Screens.
4. Select Wallpaper/ Power On / Power Off.
5.Select from 7 different screens and press Left
Soft Key Save.
Menu Style (Menu )
Allows you to choose whether you want the men u to
show as a list or as icons.
1. Press Left Soft Key Menu.
2. Press Display.
3. Select
Menu Style.
4. Select Icon or List and press
.
Clocks (Menu )
Allows you to choose the kind of clock to be displayed
on the LCD screen.
1. Press Left Soft Key Menu.
2. Press Display.
3. Select
Clocks.
4. Select Normal / Analog or Digital and press Left Soft
Key Save.
MENU FEATURES
RD6000
Main LCD (Menu )
Timer
7 seconds turns the backlight off 7 seconds
after the last key was pressed.
15 seconds turns the backlight off 15 seconds
after the last key was pressed.
30 seconds turns the backlight off 30 seconds
after the last key was pressed.
Always off means that the backlight is never on.
On flip open means that the backlight is always
on while cellcase is open.
Brightness
Allows you to set the brightness level of the backlight.
Front LCD (Menu )
Timer
5 seconds
1 minute
3 minutes
Patterns
Select Incoming Calls / Missed Calls / New SMS
Alert / Reminders / Standby.
Press until you find the colour you desire.
RD6000-E.qxd 6/18/04 9:56 AM Page 66
Page 35

RD6000
69
RD6000
68
Power Saver (Menu )
Display and buttons are lighted f or a designated length of
time, allowing you to use your mobile phone in the dark
with convenience.
1. Press Left Soft Key Menu.
2. Press Display.
3. Select Power Saver
.
4. Select an option and press .
2 min / 10 min / 30 min / Always On
Status Light (Menu )
1. Press Left Soft Key Menu.
2. Press Display.
3. Select Status Light
.
4. Select an option and press .
On / Off
MMyy MMee dd iiaa ((MM ee nnuu ))
Downloads from R-World can be saved in My Media
upto a maximun of:
Ringer: Brew(30) / MMS(20)
Image: Brew(30) / MMS(20)
Graphics (Menu )
Allows you to choose the background to be displayed
on the phone.
MENU FEATURES
RD6000
Theme Colour (Menu )
Allows you to choose the colour of the background screen.
1. Press Left Soft Key Menu.
2. Press Display.
3. Select
Theme Colour.
4. Select an option and press .
Default / Green / Violet / Orange
Fonts (Menu )
Allows you to choose the size and colour of the number
font.
1. Press Left Soft Key Menu.
2. Press Display.
3. Select
Fonts.
Calling Digits (Menu )
1. Select Size / Colour.
2. Press until you find the size or the colour
you desire.
3. Press to save.
T
ext Editor (Menu )
1. Select Size / Colour.
2. Press until you find the size or the colour
you desire.
3. Press to save.
RD6000-E.qxd 6/18/04 9:57 AM Page 68
Page 36

RD6000
71
RD6000
70
TToooo llss (( MMeenn uu ))
Scheduler (Menu )
Scheduler Functions
Scheduler keeps your agenda convenient and easy to
access.Simply store your appointments and your phone
alerts you with a reminder of your appointment.You can
also take advantage of the Alarm Clock feature.
The total number of schedulers that can be stored is 300.
(30 per day.)
NOTE :Scheduler will not alert you during a call,
when transmitting SMS, or when connecting up.
After exiting, it will sound the reminder.
Allows you to input your schedule.If you input the time
and memo, an alarm rings at the set time.
1. Press Left Soft Key Menu.
2. Press Tools.
3. Press Scheduler.
4. Select the date using your keypad, then press
Left Soft Key Add.
Press Right Soft Key Options to select :
Go To Today / Go To Date / Search / Erase Old / Erase All
How to use buttons
Moves cursor to the left.
Moves cursor to the right.
Moves to the previous week.
Moves to the next week.
MENU FEATURES
RD6000
1. Press Left Soft Key Menu.
2. Press My Media.
3. Press Graphics.
4. Erase / Erase All pop up is displayed by pressing Right
Soft Key .
Aqua / Concept / Cosmos / Desert blues / Ever green /
Eye catch / Homecoming / Roar / Spring / Sunrise
5. Press Left Soft Key Set As to select :
Set As Contacts / Set As Wallpaper / Set As Power On /
Set As Power Off
Music (Menu )
Allows you to choose the ring tones to be heard for
incoming calls.
1. Press Left Soft Key Menu.
2. Press My Media.
3. Press Music.
4. Rename / Erase / Erase All pop up is displayed by
pressing Right Soft Key .
Calypso / Disco / Ejheboy / Pop / Trumpet
5. Press Left Soft Key Set As to select :
Set As Contacts / Set As Caller ID / Set As No Caller ID /
Set As Restrict
RD6000-E.qxd 6/18/04 9:57 AM Page 70
Page 37

RD6000
73
RD6000
72
My Menu (Menu )
1. Press Left Soft Key Menu.
2. Press Tools.
3. Select My Menu.
Notepad (Menu )
Allows you to read, add, edit, and erase notes to yourself .
1. Press Left Soft Key Menu.
2. Press Tools.
3. Select Notepad.
4. Press Left Soft Key Add to write a new note.
Easy Tip Calculation (Menu )
1. Press Left Soft Key Menu.
2. Press Tools.
3. Select Easy Tip Calculation.
MENU FEATURES
RD6000
Alarm Clock (Menu )
1. Press Left Soft Key Menu.
2. Press Tools.
3. Select Alarm Clock.
4. Select the alarm you want to edit.
5. Set the time for alarm and press Left Soft Key
Save.
The current time will be displayed in the upper
portion of the screen.
6.You can change the alar m mode and alar m
ringer type using .
7. At the alarm time, "Alarm x" will be displayed on
the LCD screen and the alarm will sound.
Voice Memo (Menu )
Allows you to listen to, add, and erase short verbal
reminders.
1. Press Left Soft Key Menu.
2. Press Tools.
3. Select Voice Memo.
4. Press Left Soft Key New to record a new voice
memo.
RD6000-E.qxd 6/18/04 9:57 AM Page 72
Page 38

RD6000
75
RD6000
74
SSeettttiinngg ss ((MM eenn uu ))
Sounds (Menu )
Ringers (Menu )
1. Press Left Soft Key Menu.
2. Press Settings.
3.Press Sounds and then press Ringers.
4. Select Caller ID / No Caller ID / Restrict.
5.Then press to save the sound.
Key Tone (Menu )
To set the Key Tone length and touch tone playback speed:
1. Press Left Soft Key Menu.
2. Press Settings.
3. Press Sounds and then press Key Tone.
4. Set Normal / Long with and then press .
Normal Sends out a tone for a fixed period of time
even if you keep the key pressed.
Long
Sends out a continuous tone for as long
as you keep the key pressed.
MENU FEATURES
RD6000
Calculator (Menu )
Calculate simple mathematical computations.(Can enter
numbers up to the second decimal place.)
1. Press Left Soft Key Menu.
2. Press Tools.
3. Select Calculator.
NOTE:Calculations can be made with up to 32
characters at one time (e.g. 63+78-21 would be 9
characters).
World Clock (Menu )
Is useful if you need to make a call to another country
and you are not sure about the time difference.
1. Press Left Soft Key Menu.
2. Press Tools.
3. Select World Clock.
RD6000-E.qxd 6/18/04 9:57 AM Page 74
Page 39

RD6000
77
RD6000
76
Service Change (Menu )
Alerts you when service changes. When you
enter a service area, the phone displays
Entering Service Area message.When you
leave a service area, the phone displays
Leaving Service Area message.
Call Connect
(Menu )
Alerts you when the call is connected.
Back To T
op (Menu )
Alerts you when you scroll through the end of a
menu list.
4. Select an option and press .
5. Set
On / Off
with and then press .
Power On/Off Tone (Menu )
Set Power On/ Off Tones.
1. Press Left Soft Key Menu.
2. Press Settings.
3. Press Sounds and then press Power On/
Off T one.
4. Set On / Off with and then press .
MENU FEATURES
RD6000
NOTE:Dual-Tone Multi Frequency (DTMF) Signaling
by the simultaneous transmission of two tones, one
from a group of low frequencies and another from a
group of high frequencies. Each group of
frequencies consists of four frequencies. Setting
Key Beep length to Long will extend the DTMF tone.
Press Menu, then press
,,
Key Tones
using then select Long. Press .
Volume (Menu )
1. Press Left Soft Key Menu.
2. Press Settings.
3. Press Sounds and then press
Volume.
4. Select Ringer / Earpiece / Key Beep.
5. Adjust the volume of the ringer with .
6.Then press to save the Volume.
Alerts (Menu )
Any of the three Alert options can be turned on or off.
1. Press Left Soft Key Menu.
2. Press Settings.
3. Press Sounds and then press
Alerts.
Check each option and turn it off if not desired.
RD6000-E.qxd 6/18/04 9:57 AM Page 76
Page 40

RD6000
79
RD6000
78
Restrict (Menu )
1. Press Left Soft Key
Menu and then press
Settings.
2. Press Security.
3. Enter the four-digit Lock code.
4. Press Restrict.
5. Select On or Off with and then press .
If you set it to On you can only place calls to emergency
numbers and phone numbers stored in the phone book.
You can still receive calls in the restrict mode.
Emergency Numbers (Menu )
You can call emergency numbers even when the phone
is locked or restricted.To enter 3 emergency numbers:
1. Press Left Soft Key
Menu and then press
Settings.
2. Press Security.
3. Enter the four-digit Lock code.
4. Press Emergency Numbers.
5. Select emergency number using .
6. Enter an emergency number.
7. Press .
MENU FEATURES
RD6000
Security (Menu )
Lock Phone (Menu )
Keeps your phone from unauthorized use. Once the
phone is locked, it is in restricted mode until the lock
code is entered.This allows you to receive phone calls
and still make emergency calls.The lock code is ‘0000’
by default.
You can modify the lock code using the Change Code
within the Security menu.
1. Press Left Soft Key
Menu and then press
Settings.
2. Press Security.
3. Enter the four-digit Lock code.
4. Press Lock Phone.
5. Select an option and press .
Unlock means that the phone is never
locked (Lock mode can be used).
When locked, you can receive
incoming calls or make only
emergency calls.
Lock means that the phone is always
locked.
On Power Up
means the phone is locked when it
is turned on.
RD6000-E.qxd 6/18/04 9:57 AM Page 78
Page 41

RD6000
81
RD6000
80
Select Line (Menu )
1.
Press
Left Soft Key
Menu and then press
Settings.
2. Press Security.
3. Enter the four-digit Lock code.
4. Press Select Line.
5. Select Line1 orLine2 and press .
Call Setup (Menu )
Auto Redial (Menu )
Allows you to set the length of time the phone waits
before automatically redialling a number when the
attempted call fails.
1. Press Left Soft Key Menu.
2. Press Settings.
3. Press Call Setup and then press
Auto
Redial.
4. Select an option and press .
Off / Every 10 seconds / Every 30 seconds / Every
60 seconds.
MENU FEATURES
RD6000
Change Code (Menu )
Allows you to enter a new four-digit lock code number.
1. Press Left Soft Key
Menu and then press
Settings.
2. Press Security.
3. Enter the four-digit Lock code.
4. Press Change Code.
5. For confirmation, it will ask you to enter the new
lock code again.
Erase Contacts (Menu )
1. Press Left Soft Key
Menu and then press
Settings.
2. Press Security.
3. Enter the four-digit Lock code.
4. Press Erase Contacts.
5. Select Erase all and press .
Reset Default (Menu )
1.
Press
Left Soft Key
Menu and then press
Settings.
2. Press Security.
3. Enter the four-digit Lock code.
4. Press Reset Default.
5. Press , select Revert and press .
RD6000-E.qxd 6/18/04 9:57 AM Page 80
Page 42

RD6000
83
RD6000
82
One-Touch Dial (Menu )
1. Press Left Soft Key Menu.
2. Press Settings.
3. Press Call Setup and then press
One-
Touch Dial.
4. Select Enable orDisable and press .
Voice Privacy (Menu )
Set the voice privacy feature f or CDMA calls as Enhanced
or Standard. CDMA offers inherent voice privacy. Check
with your service provider for availability of the enhanced
voice privacy mode .
1. Press Left Soft Key Menu.
2. Press Settings.
3. Press Call Setup and then press
Voice
Privacy.
4. Select Enhanced orStandard and press .
Clear V oice (Menu )
1. Press Left Soft Key Menu.
2. Press Settings.
3. Press Call Setup and then press
Clear
Voice.
4. Select On orOff and press .
MENU FEATURES
RD6000
Answer Call (Menu )
Allows you to determine when to answer the phone.
1. Press Left Soft Key Menu.
2. Press Settings.
3. Press Call Setup and then press
Answer Call.
4. Select an option and press .
Flip Open / Any Key / CALL Only
Auto-Answer (Menu )
Allows you to select the ring type before the phone
automatically answers a call.
1. Press Left Soft Key Menu.
2. Press Settings.
3. Press Call Setup and then press
Auto-
Answer.
4. Select an option and press .
Off
After 3 secs
When you have an incoming call,
the phone automatically responds after 3 secs.
After 9 secs When you have an incoming call,
the phone automatically responds after 9 secs.
Answering Machine The phone automatically
responds with the answering machine.
RD6000-E.qxd 6/18/04 9:57 AM Page 82
Page 43

RD6000
85
RD6000
84
Select Port (Menu )
1. Press Left Soft Key Menu.
2. Press Settings.
3. Press 1x Data and then press Select Port.
4. Select an option and press .
USB / RS-232C(COM Port) / Closed
Port Speed (Menu )
This setting enables you to set the port speed.
1. Press Left Soft Key Menu.
2. Press Settings.
3. Press 1x Data and then press Port Speed.
4. Select an option and press .
19200 / 115200 / 230400
Set the port speed based on your service provider’s
network. Contact your service provider to determine the
maximum available speed.
NOTE:When using the 1X HSPD data service via an
RS-232C data cable, the port speed is set to 115,200.
(230,400 is not supported).When using the 1X HSPD
data service via a USB data cable, you may get better
port speed if the port speed is set to 230,400 rather
than 115,200.
MENU FEATURES
RD6000
1x Data (Menu )
Data/Fax (Menu )
In Data/ Fax setting, you can use your phone as a
wireless modem to avail high speed data
services such as browsing Internet and other
dial-up networking functions.The wireless phone
supports a maximum data rate of 153.6 kbps on the
network side.The speed of your connection depends
upon network congestion, signal strength, and other
variables.
1. Press Left Soft Key Menu.
2. Press Settings.
3. Press 1x Data and then press
Data/ Fax.
4. Select an option and press .
Off / Fax In Once / Fax In Always / Data In Once / Data
In Always
NOTE:You need to purchase the Data Kit in order to
be able to use the phone as modem.The data kit
includes a suitable cable that has RS-232 interface
for connecting the phone to the PC. Please contact
your service provider for further information.
RD6000-E.qxd 6/18/04 9:57 AM Page 84
Page 44

RD6000
87
RD6000
86
Train Words (Menu )
Allows you to help your phone distinguish your voice
when using voice commands.
1. Press Left Soft Key Menu.
2. Press Settings.
3. Press Voice Services and then press
Train Words.
4. Select Yes or No and press .
5. If you have selected Yes, you can record Yes
according to the message of the phone.
6. Select Train or Un-train and press .
7. For voice recognition to be more clear, select
Train.
If you chose Train, press OK and follow the
voice prompts.
or
To reset my voice recognition pattern, select Un-
train.
If you chose Un-train, press Un-train.
MENU FEATURES
RD6000
Voice Services (Menu )
Voice Dial Prompt (Menu )
Allows you to set the command for voice dialling.
1. Press Left Soft Key Menu.
2. Press Settings.
3. Press Voice Services and then press
Voice Dial Prompt.
4. Select an option and press .
Key press / Flip open / Disable
Answering Machine (Menu )
1. Press Left Soft Key Menu.
2. Press Settings.
3. Press Voice Services and then press
Answering Machine.
4. Select an option and press .
Speaker on:You can hear the other party during
the recording of the answering machine.
Speaker off:You cannot hear the other party
during the recording of the answering machine.
RD6000-E.qxd 6/18/04 9:57 AM Page 86
Page 45

RD6000
89
TTIIAA SSaaff eett yy IInnffoo rrmmaattii oonn
The following is the complete TIA Saf ety Inf ormation for Wireless
Handheld phones.
Exposure to Radio Frequency Signal
Your wireless handheld por table telephone is a low power radio
transmitter and receiver. When it is ON, it receives and also
sends out radio frequency (RF) signals.
In August, 1996, the Federal Communications Commissions
(FCC) adopted RF exposure guidelines with safety levels for
hand-held wireless phones.Those guidelines are consistent
with the safety standards previously set by both U.S. and
international standards bodies:
ANSI C95.1 (1992) *
NCRP Report 86 (1986)
ICNIRP (1996)
Those standards were based on comprehensive and periodic
evaluations of the relevant scientific literature.For example, over
120 scientists, engineers, and physicians from universities,
government health agencies, and industry reviewed the
available body of research to develop the ANSI Standard
(C95.1).
The design of your phone complies with the FCC guidelines
(and those standards).
Antenna Care
Use only the supplied or an approved replacement antenna.
Unauthorized antennas, modifications, or attachments could
damage the phone and may violate FCC regulations.
Phone Operation
NORMAL POSITION: Hold the phone as you would any other
telephone with the antenna pointed up and over your shoulder.
5 Safety Guidelines
SAFETY
GUIDELINES
RD6000
88
RD6000
Phone Info (Menu )
S/W Version (Menu )
Allows you to view the software, PRL, and BREW
version.
1. Press Left Soft Key Menu.
2. Press Settings.
3. Press Phone Info and then press
S/W
Version.
Icon Glossary (Menu )
Allows you to view all the icons and their meanings.
1. Press Left Soft Key Menu.
2. Press Settings.
3. Press Phone Info and then press
Icon
Glossary.
Shortcut Help (Menu )
Allows you to view condensed information about
using the phone.
1. Press Left Soft Key Menu.
2. Press Settings.
3. Press Phone Info and then press
Shortcut Help.
From the Standby screen, press .
RD6000-E.qxd 6/18/04 9:57 AM Page 88
Page 46

RD6000RD6000
91
Persons with pacemakers:
• Should ALWAYS keep the phone more than six inches from
their pacemaker when the phone is turned ON;
• Should not carry the phone in a breast pocket
• Should use the ear opposite the pacemaker to minimize the
potential for interference
• Should turn the phone OFF immediately if there is any reason
to suspect that interference is taking place.
Hearing Aids
Some digital wireless phones may interfere with some hearing
aids.In the event of such interference, you may want to consult
the manufacturer.
Other Medical Devices
If you use any other personal medical device, consult the
manufacturer of your device to determine if it is adequately
shielded from external RF energy.Your physician may be able
to assist you in obtaining this information.
Health Care Facilities
Turn your phone OFF in health care facilities when any
regulations posted in these areas instruct you to do so.
Hospitals or health care facilities may use equipment that could
be sensitive to external RF energy.
Vehic les
RF signals may affect improperly installed or inadequately
shielded electronic systems in motor vehicles. Check with the
manufacturer or its representative regarding your vehicle. You
should also consult the manufacturer of any equipment that has
been added to your vehicle.
SAFETY GUIDELINES
90
RD6000
Tips on Efficient Operation:
For your phone to operate most efficiently:
Do not touch the antenna unnecessarily when the phone is in
use.Contact with the antenna affects call quality and may cause
the phone to operate at a higher power level than otherwise
needed.
American National Standards Institute; National Council on
Radiation Protection and Measurements; International
Commission on Non-Ionizing Radiation Protection
Driving
Check the laws and regulations on the use of wireless
telephones in the areas where you drive and always obey
them. Also, if using your phone while driving, please observe
the following:
• Give full attention to driving -- driving safely is your first
responsibility;
• Use hands-free operation, if available;
• Pull off the road and park before making or answering a call if
driving conditions or the law so require.
Electronic Devices
Most modern electronic equipment is shielded from RF signals.
However, certain electronic equipment may not be shielded
against the RF signals from your wireless phone.
Pacemakers
The Health Industry Manufacturers Association recommends
that a minimum separation of 6 in be maintained between a
handheld wireless phone and a pacemaker to avoid potential
interference with the pacemaker.These recommendations are
consistent with the independent research by and
recommendations of Wireless Technology Research.
RD6000-E.qxd 6/18/04 9:57 AM Page 90
Page 47

RD6000RD6000
93
FF DDAA CC oonnssuummeerr UU ppddaa ttee
The U.S.Food and Drug Administration’s Center
for Devices and Radiological Health Consumer
Update on Mobile Phones:
1. Do wireless phones pose a health hazard?
The available scientific evidence does not show that any
health problems are associated with using wireless
phones.There is no proof, however, that wireless
phones are absolutely safe.Wireless phones emit low
levels of radiofrequency energy (RF) in the microwave
range while being used.They also emit very low levels
of RF when in the standby mode.Whereas high levels
of RF can produce health effects (by heating tissue),
exposure to low level RF that does not produce heating
effects causes no known adverse health effects. Many
studies of low level RF exposures have not found any
biological effects.Some studies have suggested that
some biological effects may occur, but such findings
have not been confirmed by additional research.In
some cases, other researchers have had difficulty in
reproducing those studies, or in determining the reasons
for inconsistent results.
2. What is the FDA's role concerning the safety of
wireless phones?
Under the law, the FDA does not review the safety of
radiation-emitting consumer products such as wireless
phones before they can be sold, as it does with new
drugs or medical devices.However, the agency has
authority to take action if wireless phones are shown to
emit radiofrequency energy (RF) at a level that is
hazardous to the user.In such a case, the FDA could
require the manufacturers of wireless phones to notify
SAFETY
GUIDELINES
92
RD6000
Posted Facilities
Turn your phone OFF in any facility where posted notices so
require.
Aircraft
FCC regulations prohibit using your phone while in the air.
Switch OFF your phone before boarding an aircraft.
Blasting Areas
To avoid interfering with blasting operations, turn your phone
OFF when in a “blasting area”or in areas posted: “Turn off twoway radio”.Obey all signs and instructions.
Potentially Explosive Atmosphere
Turn your phone OFF when in any area with a potentially
explosive atmosphere and obey all signs and instructions.
Sparks in such areas could cause an explosion or fire resulting
in bodily injury or even death.
Areas with a potentially explosive atmosphere are often, but not
always marked clearly. Potential areas may include:fueling
areas (such as gasoline stations); below deck on boats; fuel or
chemical transfer or storage facilities;vehicles using liquefied
petroleum gas (such as propane or butane);areas where the
air contains chemicals or particles (such as grain, dust, or metal
powders); and any other area where you would normally be
advised to turn off your vehicle engine.
For Vehicles Equipped with an Air Bag
An air bag inflates with great force.DO NOT place objects,
including either installed or portable wireless equipment, in the
area over the air bag or in the air bag deployment area.If invehicle wireless equipment is improperly installed and the air
bag inflates, serious injury could result.
RD6000-E.qxd 6/18/04 9:57 AM Page 92
Page 48

RD6000RD6000
95
The FCC also regulates the base stations that the
wireless phone networks rely upon.While these base
stations operate at higher power than do the wireless
phones themselves, the RF exposures that people get
from these base stations are typically thousands of
times lower than those they can get from wireless
phones.Base stations are thus not the subject of the
safety questions discussed in this document.
3. What kinds of phones are the subject of this update?
The term “wireless phone” refers here to handheld
wireless phones with built-in antennas, often called
“cell”, “mobile”, or “PCS” phones.These types of
wireless phones can expose the user to measurable
radiofrequency energy (RF) because of the short
distance between the phone and the user’s head.
These RF exposures are limited by FCC safety
guidelines that were developed with the advice of the
FDA and other federal health and safety agencies.
When the phone is located at greater distances from the
user, the exposure to RF is drastically lower because a
person's RF exposure decreases rapidly with increasing
distance from the source.The so-called “cordless
phones,” which have a base unit connected to the
telephone wiring in a house, typically operate at far
lower power levels, and thus produce RF exposures far
below the FCC safety limits.
4. What are the results of the research done already?
The research done thus far has produced conflicting
results, and many studies have suffered from flaws in
their research methods.Animal experiments
investigating the effects of radiofrequency energy (RF)
exposures characteristic of wireless phones have
S
AFETY GUIDELINES
94
RD6000
users of the health hazard and to repair, replace, or
recall the phones so that the hazard no longer exists.
Although the existing scientific data do not justify FDA
regulatory actions, the FDA has urged the wireless
phone industry to take a number of steps, including the
following:
•
Support needed research into possible biological effects
of RF of the type emitted by wireless phones;
•
Design wireless phones in a way that minimizes any RF
exposure to the user that is not necessary for device
function; and
•
Cooperate in providing users of wireless phones with
the best possible information on possible effects of
wireless phone use on human health.
The FDA belongs to an interagency working group of the
federal agencies that have responsibility for different
aspects of RF safety to ensure coordinated efforts at the
federal level. The following agencies belong to this
working group:
•
National Institute for Occupational Safety and Health
•
Environmental Protection Agency
•
Occupational Safety and Health Administration
•
National Telecommunications and Information
Administration
The National Institutes of Health participates in some
interagency working group activities, as well.
The FDA shares regulatory responsibilities for wireless
phones with the Federal Communications Commission
(FCC).All phones that are sold in the United States must
comply with FCC safety guidelines that limit RF exposure.
The FCC relies on the FDA and other health agencies for
safety questions about wireless phones.
RD6000-E.qxd 6/18/04 9:57 AM Page 94
Page 49

RD6000RD6000
97
can provide data that is directly applicable to human
populations, but 10 or more years f ollow-up may be
needed to provide answers about some health effects,
such as cancer.This is because the interval between
the time of exposure to a cancer-causing agent and the
time tumors develop — if they do — may be many,
many years.The interpretation of epidemiological
studies is hampered by difficulties in measuring actual
RF exposure during day-to-day use of wireless phones.
Many factors affect this measurement, such as the
angle at which the phone is held, or which model of
phone is used.
6. What is the FDA doing to find out more about the
possible health effects of wireless phone RF?
The FDA is working with the U.S. National Toxicology
Program and with groups of investigators around the
world to ensure that high priority animal studies are
conducted to address important questions about the
effects of exposure to radio frequency energy (RF).
The FDA has been a leading participant in the World
Health Organization International Electromagnetic Fields
(EMF) Project since its inception in 1996. An influential
result of this work has been the development of a
detailed agenda of research needs that has driven the
establishment of new research programs around the
world.The project has also helped develop a series of
public information documents on EMF issues.
The FDA and the Cellular Telecommunications &
Internet Association (CTIA) have a formal Cooperative
Research and Development Agreement (CRADA) to do
research on wireless phone safety.The FDA provides
the scientific oversight, obtaining input from experts in
government, industry, and academic organizations.
CTIA-funded research is conducted through contracts
SAFETY
GUIDELINES
96
RD6000
yielded conflicting results that often cannot be repeated
in other laboratories.A few animal studies, however,
have suggested that low levels of RF could accelerate
the development of cancer in laboratory animals.
However, many of the studies that showed increased
tumor development used animals that had been
genetically engineered or treated with cancer-causing
chemicals so as to be pre-disposed to develop cancer in
the absence of RF exposure.Other studies exposed the
animals to RF for up to 22 hours per day. These
conditions are not similar to the conditions under which
people use wireless phones, so we don’t know with
certainty what the results of such studies mean for
human health.
Three large epidemiology studies have been published
since December 2000. Between them, the studies
investigated any possible association between the use
of wireless phones and primary brain cancer, glioma,
meningioma, or acoustic neuroma, tumors of the brain
or salivary gland, leukemia, or other cancers.None of
the studies demonstrated the existence of any harmful
health effects from wireless phone RF exposures.
However, none of the studies can answer questions
about long-term exposures, since the average period of
phone use in these studies was around three years.
5. What research is needed to decide whether RF
exposure from wireless phones poses a health risk?
A combination of laboratory studies and epidemiological
studies of people actually using wireless phones would
provide some of the data that are needed.Lifetime
animal exposure studies could be completed in a few
years. However, very large numbers of animals would
be needed to provide reliable proof of a cancer
promoting effect if one exists.Epidemiological studies
RD6000-E.qxd 6/18/04 9:57 AM Page 96
Page 50

RD6000RD6000
99
phones and other wireless handsets with the
participation and leadership of FDA scientists and
engineers.The standard, “Recommended Practice for
Determining the Spatial-Peak Specific Absorption Rate
(SAR) in the Human Body Due to Wireless
Communications Devices:Experimental Techniques,”
sets forth the first consistent test methodology for
measuring the rate at which RF is deposited in the
heads of wireless phone users.The test method uses a
tissue-simulating model of the human head.
Standardized SAR test methodology is expected to
greatly improve the consistency of measurements made
at different laboratories on the same phone.SAR is the
measurement of the amount of energy absorbed in
tissue, either by the whole body or a small part of the
body. It is measured in watts/kg (or milliwatts/g) of
matter.This measurement is used to determine whether
a wireless phone complies with safety guidelines.
9. What steps can I take to reduce my exposure to
radio frequency energy from my wireless phone?
If there is a risk from these products — and at this point
we do not know that there is — it is probably very
small. But if you are concerned about avoiding even
potential risks, you can take a few simple steps to
minimize your exposure to radio frequency energy (RF).
Since time is a key factor in how much exposure a
person receives, reducing the amount of time spent
using a wireless phone will reduce RF exposure.
If you must conduct extended conversations by wireless
phone every day, you could place more distance
between your body and the source of the RF, since the
exposure level drops off dramatically with distance.For
example, you could use a headset and carry the
SAFETY
GUIDELINES
98
RD6000
with independent investigators.The initial research will
include both laboratory studies and studies of wireless
phone users.The CRADA will also include a broad
assessment of additional research needs in the context
of the latest research developments around the world.
7. How can I find out how much radio frequency
energy exposure I can get by using my wireless
phone?
All phones sold in the United States must comply with
Federal Communications Commission (FCC) guidelines
that limit radio frequency energy (RF) exposures.The
FCC established these guidelines in consultation with
the FDA and the other federal health and safety
agencies.The FCC limit for RF exposure from wireless
telephones is set at a Specific Absorption Rate (SAR) of
1.6 watts per kilogram (1.6 W/kg).The FCC limit is
consistent with the safety standards developed by the
Institute of Electrical and Electronic Engineering (IEEE)
and the National Council on Radiation Protection and
Measurement.The exposure limit takes into
consideration the body’s ability to remove heat from the
tissues that absorb energy from the wireless phone and
is set well below levels known to have effects.
Manufacturers of wireless phones must report the RF
exposure level for each model of phone to the FCC.The
FCC website (http://www.fcc.gov/oet/ rfsafety) gives
directions for locating the FCC identification number on
your phone so you can find your phone’s RF exposure
level in the online listing.
8. What has the FDA done to measure the radio
frequency energy coming from wireless phones?
The Institute of Electrical and Electronic Engineers
(IEEE) is developing a technical standard for measuring
the radio frequency energy (RF) exposure from wireless
RD6000-E.qxd 6/18/04 9:57 AM Page 98
Page 51

RD6000RD6000
101
11. What about wireless phone interference with
medical equipment?
Radio frequency energy (RF) from wireless phones can
interact with some electronic devices.For this reason,
the FDA helped develop a detailed test method to
measure electromagnetic interference (EMI) of
implanted cardiac pacemakers and defibrillators from
wireless telephones.This test method is now part of a
standard sponsored by the Association for the
Advancement of Medical instrumentation (AAMI).The
final draft, a joint effort by the FDA, medical device
manufacturers, and many other groups, was completed
in late 2000.This standard will allow manufacturers to
ensure that cardiac pacemakers and defibrillators are
safe from wireless phone EMI.
The FDA has tested hearing aids for interference from
handheld wireless phones and helped develop a
voluntary standard sponsored by the Institute of
Electrical and Electronic Engineers (IEEE).This
standard specifies test methods and performance
requirements for hearing aids and wireless phones so
that no interference occurs when a person uses a
“compatible” phone and a “compatible” hearing aid at
the same time.This standard was approved by the
IEEE in 2000.
The FDA continues to monitor the use of wireless
phones for possible interactions with other medical
devices.Should harmful interference be found to occur,
the FDA will conduct testing to assess the interference
and work to resolve the problem.
SAFETY
GUIDELINES
100
RD6000
wireless phone away from your body or use a wireless
phone connected to a remote antenna.
Again, the scientific data do not demonstrate that
wireless phones are harmful. But if you are concerned
about the RF exposure from these products, you can
use measures like those described above to reduce
your RF exposure from wireless phone use.
10.What about children using wireless phones?
The scientific evidence does not show a danger to
users of wireless phones, including children and
teenagers.If you want to take steps to lower exposure
to radio frequency energy (RF), the measures
described above would apply to children and teenagers
using wireless phones.Reducing the time of wireless
phone use and increasing the distance between the
user and the RF source will reduce RF exposure.
Some groups sponsored by other national governments
have advised that children be discouraged from using
wireless phones at all. For example, the government in
the United Kingdom distributed leaflets containing such
a recommendation in December 2000.They noted that
no evidence exists that using a wireless phone causes
brain tumors or other ill effects.Their recommendation
to limit wireless phone use by children was strictly
precautionary; it was not based on scientific evidence
that any health hazard exists.
RD6000-E.qxd 6/18/04 9:57 AM Page 100
Page 52

RD6000RD6000
103
CC oonnssuummeerr II nn ffoo rrmmaattii oonn oo nn SSAA RR
(Specific Absorption Rate)
This Model Phone Meets the Government’s Requirements
for Exposure to Radio Waves.Your wireless phone is a
radio transmitter and receiver. It is designed and
manufactured not to exceed the emission limits for
exposure to radio frequency (RF) energy set by the Federal
Communications Commission of the U.S.Government.
These limits are part of comprehensive guidelines and
establish permitted levels of RF energy for the general
population.The guidelines are based on standards that
were developed by independent scientific organizations
through periodic and thorough evaluation of scientific
studies.The standards include a substantial safety margin
designed to assure the safety of all persons, regardless of
age and health.
The exposure standard for wireless mobile phones employs
a unit of measurement known as the Specific Absorption
Rate, or SAR.The SAR limit set by the FCC is 1.6W/kg.
Tests for SAR are conducted using standard operating
positions specified by the FCC with the phone transmitting
at its highest certified power level in all tested frequency
bands.Although SAR is determined at the highest certified
power level, the actual SAR level of the phone while
operating can be well below the maximum value.Because
the phone is designed to operate at multiple power levels to
use only the power required to reach the network, in
general, the closer you are to a wireless base station
antenna, the lower the power output.
Before a phone model is available for sale to the public, it
must be tested and certified to the FCC that it does not
exceed the limit established by the government-adopted
requirement for safe exposure.The tests are performed in
positions and locations (e.g.at the ear and worn on the
body) as required by the FCC for each model.
SAFETY GUIDELINES
102
RD6000
12. Where can I find additional information?
For additional information, please refer to the following
resources:
FDA web page on wireless phones
(
http://www.fda.gov/cellphones
)
Federal Communications Commission (FCC) RF Safety
Program
(http://www.fcc.gov/oet/rfsaf ety)
International Commission on Non-lonizing Radiation
Protection
(http://www.icnirp.de)
World Health Organization (WHO) International EMF
Project
(http://www.who .int/emf)
National Radiological Protection Board (UK)
(http://www.nrpb.org.uk/)
RD6000-E.qxd 6/18/04 9:57 AM Page 102
Page 53

RD6000
105
RD6000
104
RD6000
The highest SAR value for this model phone when tested
for use at the ear is 1.320 W/kg and when worn on the
body, as described in this user guide, is 0.686 W/kg (Bodyworn measurements differ among phone models,
depending upon available accessories and FCC
requirements).While there may be differences between
SAR levels of various phones and at various positions, they
all meet the government requirement for safe exposure.
The FCC has granted an Equipment Authorization for this
model phone with all reported SAR levels evaluated as in
compliance with the FCC RF emission guidelines.SAR
information on this model phone is on file with the FCC and
can be found under the Display Grant section of
http://www.fcc.gov/oet/fccid after searching on FCC ID
BEJRD6000. Additional information on Specific Absorption
Rates (SAR) can be found on the Cellular
Telecommunications Industry Association (CTIA) website at
http://www.wo w-com.com.
* In the United States and Canada, the SAR limit for mobile
phones used by the public is 1.6 watts/kg (W/kg)
averaged over one gram of tissue.The standard
incorporates a substantial margin of safety to give
additional protection for the public and to account for any
variations in measurements.
Sr Circle City ASCs Name Address Contact Person Phone
1
2
3
4
5
6
7
8
9
1011121314
15
Andhra
Pradesh
Andhra
Pradesh
Andhra
Pradesh
Andhra
Pradesh
Andhra
Pradesh
Andhra
Pradesh
Andhra
Pradesh
Andhra
Pradesh
Andhra
Pradesh
Andhra
Pradesh
Andhra
Pradesh
Andhra
Pradesh
Bihar
Bihar
Bihar
Guntur
Hydrabad
Hydrabad
Hydrabad
Kurnool
Nellor
Rajamundh
ary
SecundrabadTirupathi
Vijaywada
VisakhapatnamWarrangal
Jamshedpur
Patna
Ranchi
Vasavi
Associates
Sri Varun
Electronics
JVR Infotech Pvt
Ltd
S V Electronics
R K LG CDMA
Siri Enterprises
Siri Infotech
Shweta
Computers
CMT Computer
Services
K L Computer
House
S V Electronics
S S Marketers
Prasad
Electronics
Infotek T rading
Company
Satya Systems &
Solutions
Door no 6-20-4, Swarnalok complex, 4/1 Arandal Pet,
Guntur-522003
D.No 5-8-344/1, " DHAN BHAGYA ESTA TE ", Chir ag Ali Lane ,
Abids, Next to Raghava Ratna Towers, Hyder abad - 500 001
Shop No 8 ,Vanijya Vihar,Nalanda Building, Dilsukh
Nagar Main Road, Hydrabad-500060
Shop No.41, Nilagiri Block, Aditya Enclave, Ameerpet
Main Road, Hydrabad-500038
Shop No 12-A,Abdulla Khan Estate Beside Yamaha
Show Room,Kurnool PIN-518002
Opp.Archana Thearter,A C Centre,Nellore PIN-524001
Police Welfare Complex,City Hospitals Junction,Danvai
Pet Main Road,Rajhamundry-533103
# 1-7-69/1 & 2, OPP Aditya Delux Hotel,Near Paradaise
circel Sarojini Devi Road, Secunderabad - 500003
18-1-624 VV Mahal Road,OPP HDFC BANK,
Tirupathi,PIN-517501
39-9-46 SVS Temple Street,Labbipet,Vijaywada PIN- 520
010
D No.30-15-111,Daba Garden, Main Road,
Visakhapatnam PIN-530020
6-1-73/1,Sai Bhavan, Sridevi Theatre Road,
Hanamkonda,Warrangal-506001
Shop No.29, Ground Floor, Yash Kamal Complex,
Bistupur, Jamshedpur -831001
1st floor, City Palace, New Dak Bunglow Road, Patna-
800001
158, Opp Hotel Palace, Kadru, Ranchi-834002
MR.Satyam
Mr.Raghavendra
EV Ramakanth
Mr.Vankteshw ara
Rao
Mr.G Rama
Krishna
Mr.Parav een
Mr Raghvendra
Mr.Jagdish
Mr.K V asu Naidu
Mr.Kartik
Mr.Nani
Mr.L.Srinivas Rao
Ranjit Kumnar
Prasad
Sanjay Chowbey
Amit Rastogi
0863-2233678, 9848105789, 0863-
3155554
040-55781999, 040-55253888, 040-
56878822, 040-31001463
040-24161848, 040-55109604, 040-
56524157, 040-31131067, 040-36060606
040-55754477/55343030
08518-220201, 08518-310688
0861--3209571, 0861-3100309
0883-2421567, 0883-3125799
040-55334180, 040-27721076, 040-
36532358, 040-31041673
0877-5561979, 0877-3120209
0866-5520461/ 5671461, 0866-
3105222
0891-2598610, 0891-2706074, 0891-
3706074
0870-2552223, 0870-3100708
0657-2487290, 9835164605
0612-2227166
0651-2341361, 9835167667
SSeerrvv iicc ee ccee nn ttee rr LL iisstt
RD6000-E.qxd 6/18/04 9:57 AM Page 104
Page 54

RD6000
107
RD6000
106
RD6000-E.qxd 6/18/04 9:57 AM Page 106
011-22533144, 1136783600, 011-
30955887
011-55154343, 9811682453,
1130925753
011-25888018/023, 9810320170/
9818341677
011-29831108, 9810542287
011-26675900/55655382,
9810297420
Mr Ravi Kant
Gupta
Mr Manoj Garg
Mr Deepak/Mr
Amit
Mr Prabhat
Shelendra Verma
C-1/A Aruna Park, Laxmi Nagar,M S Chamber, Main
Vikas Marg, Delhi-110092
305,Aggarwal Millenium Tower,Netaji Subash Place,Pitam
Pura,Delhi-110088
2/15, F/Floor,West Patel Nagar, Opp Vivek Cinema,
Delhi-110028
J-39,Central Mkt, Lajpat Nagar-II, New Delhi-110024
45, 1st Flr, Corner Mrkt, Malviya Nagar, New Delhi -
110017
ASCs Name Address Contact Person Phone
Comhard
Systems
Innovative
Telecom
Sagar
Technologies
Sagar
Technologies
Ucom T echnologies
Pvt Ltd.
011-28521044, 9810341374,
9810138894
11 30939031
079-6438609, 31037582
079-5430634, 9824025430,
36163645
0278-2415545, 9825206498
Umang Premi
Ashish Dey
Mirza Patel
Rajesh Patel
Nilesh Bagadia
15/23, DDA Complex, Nangal raya, Delhi - 110046
B-52, First Floor,Kalkaji, New Delhi
104, Saarthak Complex, behind Urja House, Swastik
Char Rasta, Navrangpura, Ahmedabad-380009
F/6,Silver lake,Jagabhai Park,Rambaug
Road,Maninagar,Ahmedabad-380008
G/8,Radheshyam Complex,Radha Mandir,Vaghavadi
Road,Bhavnagar-364001
Nice
Telecommunication
Touch Tone
Telecom
Visual
Enterprises
Silicon Valley
Teletext Gold
079-3226241, 9824003132,
31005586
0288-2552696, 9824478203
0281-2464485, 9824068880
3103622
0261-5544500, 9898038480
3344500, 9825399870
0265-2323216/3090969/3112123
K.J.Barot
Amit Unadkat
Kalpesh Rugani
Nitesh Ghosal
Aashish Parmar
F-11,Meghmalhar Complex,'Ch'-Road,Sector-
11,Gandhinagar
1,K.D.Complex,Nr Shrinath Travel Agency,Indira
Marg,Gurudwara Chowkdi,Jamnagar-361001
Vinod Nivas,4,Sardarnagar(West),Nr Astron
Cinema,Rajkot-360001
G-48, Ascon Plaza, Anand Mahal Road, Adajan Surat-
395009
F 50,National Plaza,R.C.Dutt Road,Alkapuri,Vadodara-
390005
Creative
Communications
Sudarshan
Infosys
Roopang info-
care
Excel Solutions
Aashnik Infotech
0171-2641234, 9416021234
0129-2223422, 9810456663
0124- 2220289, 124 3564294
0184-3090717, 9868354205
0180-5005360/59, 9812072860
Rajiv Gupta
Rahul Jindal
G D Bhargava
Ms Pinki
Jagdeep
Sachdeva
92-93, Gandhi market, Ambala Cantt-133001
105, Sector 10, Faridabad-121006
729 A, 1st floor, Mehrauli Road,opp.ITI , Near kalyani
hospital, Gurgaon-122001
7, Dayal Singh Colony, Kunj Pura Road, Karnal-132001
Shop No.1, West Printing Market, Near Hotel West, G T
Road, Panipat-132103
Bee Ess Aar
Communication
Hi - Tech
Communication
Aryan Technologies
& T elecommunication
Mass
Communication
INS T elecom
01262-247242 , 9896243092
01262-371666
0130-2255955, 9812044888
080-56992943/30617345,
8031810375
080-3131953, 8031866656
080-30610202
080-56697937, 080-31860269
80- 56969937, 80-31810269
9845327531/0831-3101800
Mr.Madaan
Vipin Dua
Mr.Ramesh.
Unni Krishnan
Prasad
S.V.Sirish
S.V.Sirish
Sanjay
Shakti Market, Civil Hospital Road, Near Chhotu Ram
Chowk, Rohtak-124001
21, M C Market, Subhash Chowk, Sonipat-131001
#129,Lalbagh Main Road, Bangalore-560027
591-B, Dr Rajkumar road, 2nd
block,Rajajinagar,Bangalore-560010
B-3, Mallikaarjun Complex, Opp R T Nagar Police
Station, 80 Feet Road, R T Nagar, Bangalore-560032
91/92 ,Hemachandra complex,Near VGP Show room,4th
block,jayanagar,Bangalore-560011
267/1,1st Main Road,6th Cross, Behind Shanti
Sagar,Domlur Layout, Bangalore-560071
G-4,Maratha Mandir Complex, Khanapur Road, Near
Telecentre
Teleworld
Meenakshi
Electronics
Optima Mobile
Services
Optima Mobile
Services
Pranav infocom
Pranav infocom
Hello India
0836-2355302, 0836-3403766
0824-3344528, 0824-877528
Naveenraju S V
A V Prabhu
Railway Flyover, Belgaum - 590 001.
# 19,20,2nd floor, Eureka Junction, Travellers Bunglow
Road,Hubli - 580 029.
GURU PLAZA, G-5, Near KSRTC Bus stand, Bejai,
Mangalore - 575001
Telecom
Naveen
Communication
City T alk
Communication
City
Delhi
Delhi
Delhi
Delhi
Delhi
Delhi
Delhi
Ahmedabad
Ahmedabad
Bhavnagar
GandhinagarJamnagar
Rajkot
Delhi
Delhi
Delhi
Delhi
Delhi
Delhi
Delhi
Gujarat
Gujarat
Gujarat
Gujarat
Gujarat
161718192021222324252627282930
Sr Circle
Gujarat
Surat
Vadodra
Gujarat
Gujarat
Ambala
Faridabad
Gurgaon
Karnal
Panipat
Rohtak
Sonipat
Bangalore
Bangalore
Bangalore
Bangalore
Bangalore
Belgaum
Haryana
Haryana
Haryana
Haryana
Haryana
Haryana
Haryana
Karnataka
Karnataka
Karnataka
Karnataka
Karnataka
313233343536373839404142434445
Sr Circle City ASCs Name Address Contact Person Phone
Karnataka
Hubli
Karnataka
Mangalore
Karnataka
Page 55

RD6000
109
RD6000
108
RD6000-E.qxd 6/18/04 9:57 AM Page 108
0821-2422789, 821 3120789
0484-2371511, 9846127878
0480-830796
0476-2620282
Mr.Karunakaran.
Jaimon Joseph
Mr Sebastian
Mr.Ratish
1432/9, T ribhuvan Towers, opp Vetenary Hospital,
Dewan's Road, Dhanwantri Road Cross, Mysore -570001
2nd floor, Tharian's Building,opp .Ship Yard, M.G. Road,
Ernakulam-682015"
376-44, Near St. Josephs college junction,Irinjalakuda-
680121
Opp to KSRTC Bus stand,Karunagapally-690518
ASCs Name Address Contact Person Phone
K.K.Marketing,
Zenicon
Infocom(P) limited
Akbar Mobiles
Supreme
Enterprises
0474-2760647, 9846007059
0481-2565303, 9847310123
0495-2722222
0483-2766835
0479-2441760, 0479-3100025
Johnson
Lawrence
Rajesh K S
Mukundan
Mr Harry
Anu T cheriyan
MC-3087, New Block, Bishop Jeromi Nagar, Chinnakada,
Kollem-691001
NSS Builbing, Near Pallippurathukavu Temple,
Kodimapha,Kottayam - 686 002
Domain Infosystems, 2nd Floor, Darussalam Complex,
Mavoor Road, Kozhikode - 673 004
16-870A,Ooty Road, Manjeri-676121
Ettutharayil complex, K P Road,Kayamkulam-690502
Digital
Infosystems
SVM
Technologies
Domain
Infosystems
Akbar Mobiles
Ettutharayl
Agency
0491-2529829, 9847086446
0471-2340523
0494-2427444
0487-2323424
0755-5277247/2424088, 9826072327
Suresh
Santosh
Mr Byju
Sojan
Ashok Hirwani
N.S.Towers,Kalamandapam junction,Palakkad - 678 001
TC 20/2392, Kalpalayam, Karamana P.O.,
Thiruvananthapuram - 695 002.
7-2,Ancila Building,Terivazhiambalam,Tirur - 676101
Kadarathodh Building,North Bus stand, Trichur - 680 001
F-104, Anmol Tower, E-5/14, Commercial Zone, Arera
Colony, Bhopal-462016
Akbar Mobiles
Appolo Systems
Akbar Mobiles
Akbar Mobiles
Neha Sales
Corporation
0751-2233088
Rishi Sharma
Global Appartments,City Centre, Opp Income Tax Office,
Gwalior.
Computer Clinic
0731-5091833, 9826072327
0761-5063183
0771-2524033, 9826132918
0721-2567302, 0721 3151826,
9422156874
0240-2356447, 9823007730, 0240
3110364
020-7485613, 9822275786, 020
31029777
0231-2541120, 9823026120
0832 3105629, 9822101522, 0832
Contact Person Phone
Ashok Hirwani
Vikas Jain
Anand Singh
Lakhani
Nivedita
Mr Reyaz
Prakash Patil
Sunil
B-2,1st Floor, Garchaz Complex, Jail Road, Raipur -
M-8,Mezanine Floor, Akash Deep Shopping Complex, Sneh
Nagar, Sapana Sangeeta Road, INDORE - 452001(M.P)
846, Chattarpur Bhavan, Nr.Ashoka Hotel, Wright Town,
Jabalpur,Pin 482002
492001
Shop No.84, Ground Floor,GulshanTowers, Nr.
Panchasheel Cinema, Amrawati, Pin-444601
Shop no.108/B,Behind Sajawat Handloom, Tapdiya
Super Market, Nirala Bazar, Aurangabad-431001
Shop No 22, Gawde Kunal garden,Pimpri-Chinchwad
Link Road, Chinchwad, Pune-411033
S5, Diwan Tower, Opp.Nutan Marathi School, Near
Mirajkar Tikkty, Kolhapur, Pin -416005.
Ground Floor, Shop No.i,Garden view building,,Next to UTI
ASCs Name Address
Neha Sales
Corporation
S M Shopee
Cybernet
Systems
Scorpio Services
Unique
Teletmatics
Ritz
Communication
SMS Services
Comlink Synergies
3105637
0712-2527823, 9823338333,
0712-30957001/5618186
0253-2578394, 9822431774
0832-2426978, 9822101522, 0832
3105629
020-4012921, 9822438818, 020
31029798
0233-2327601, 9823085176,0233
3107601
0217-2725030, 9422458830
022-32977555
Sonali
Rajesh Laxmikant
Joshi
Sunil
A Ahmed
Suresh Shegane
Prasanna J
Chavan
Pawan
Bank , Near Margao Municipal Garden,Margao-403601
Shop No.2, Dharampeth Towers, West High Court (WHC)
Road, Dharampeth , Nagpur - 440010
B5,Nidhi Park, Vakilwadi, M G Road, Nasik, Pin 422001
Ground Floor, Gomes Building, opp Hotel Delmon,
Caetano De Albukuerkue Road, Panjim -403001
Shop No.5, Indulal Complex,Besides Kaka Halvai, LBS
Marg, Navi Peth, Pune-411030
Opp.Kanya Purohit prashala,Rajwada,Sangli-416416
184, Gold Finch Peth, nr Hotel Ritesh, Solapur - 413007.
SHOP- 14, GROUND FLR,ARCHIES APARTMENT,OAK
BAUG,KALYAN-421301
India Pvt Limited.
Spectrum
Marketing
Elcomp Services
Comlink
Synergies Pvt Ltd
Digital Concepts
Ramesh
Electronics
Jawaharlal Radio
Service
Vinay T echnologies
Pvt Ltd
City
Mysore
Ernakulam
Irinjalkuda
Karunagapa
lly
Kollam
Kottayam
Kozhikode
Manjeri
Mavellikarra
Pallakad
Thiruvanant
hapuram
Tirur
Trichur
Karnataka
Kerala
Kerala
Kerala
Kerala
Kerala
Kerala
Kerala
Kerala
Kerala
Kerala
Kerala
464748495051525354555657585960
Sr Circle
Kerala
Bhopal
Madhya
Pradesh
Gwalior
Madhya
Pradesh
Indore
Jabalpur
Raipur
Amravati
Aurangabad
Chinchwad
(Pimpri)
Kohlapur
Margoa
Nagpur
Nasik
Panjim
Pune
Sangli
Madhya
Pradesh
Madhya
Pradesh
Madhya
Pradesh
Maharashtra
Maharashtra
Maharashtra
Maharashtra
Maharashtra
Maharashtra
Maharashtra
Maharashtra
Maharashtra
616263646566676869707172737475
Sr Circle City
Maharashtra
Solapur
Maharashtra
Kalyan
Mumbai
Page 56

RD6000
111
RD6000
110
RD6000-E.qxd 6/18/04 9:57 AM Page 110
022-28552087, 9821734223
022-23864166, 9820098916,022
33864166
022-25285561, 9820137910,022
32754745
022- 28775522, 9821048111
Contact Person Phone
Kamlesh
Vishwas
Shailesh
Chetan
Address
Shop No.5, Type C, Bldg no.5/6, Shanti Vihar, Mira Road
-E, Pin Code : 401107.
12, Pawwala Street, Rajaram mohan Roy Road,Patli
Putra Building, Grant Road- East, Mumbai - 400004
Shop No 04, Amar Kunj Building, Peston Sagar Road no.2,Amar
Mahel, Lane Opp Shopper Stop, Chembur, Mumbai - 400089
45, Udyog bhavan, Sonavala Road, Goregoan east,
Mumbai - 400 063.
E-Link Solutions
Roop T echnologies
Pvt Ltd
M R Telecom
Everest
International Pvt Ltd
022-24947375
022-30388052, 022-33490405
022-25304960, 9821068231,
022-31013342
022-27657705, 022 32741396
0674-2573113/4
Rajib Saha
Rajnish
Vinod Jakotiya
Mahesh
Sarabjeet Singh
Third Floor, Trade World,Kamala Mills Compound,
Senapati Bapat Marg, Lower Parel, Mumbai-400013
A Block, Ground Floor, Dhirubhai Ambani Knowledge
City, Navi Mumbai-400709
Shop no 3, Minal Chhaya Aptt, Muncipal Corporation
Road, Panch Pakhadi, Thane (W) - 400601
Shop No 53,GF,Welfare Chambers,Sector-
17,Vashi,Mumbai-400703
291.Bomikhal, Opp.Akamra cinema hall, Bhubaneswar-
751010
LG Service
Centre
LG Service
Centre- DAKC
Vinay T echnologies
Pvt Ltd
Hello World
S.A.INFOSYS
0671-2312613
0183-5096511, 9417040014
01679-238007, 9815075670
0164- 2239500/2236337,
9814222310
Manas
Mahapatro
Suman Bajaj
Pankaj Goyal
Ashok Kakria
Behind Govt Bus Stand, Badambadi, Cuttack -753012
87, G Floor, Nehru Complex, Lawrence Road, Amritsar-143001
Kartar Nagar,Mittal Street, Barnala-148101
1139-A, First Floor, Amrik Singh Road, Nr Gole Diggi,
Bhatinda-151005
O.A.INFOTECH
Bajaj
Telecommunication
Lalli's Electronic
Gallery
Lalli's Electronic
Gallery
0172-388833, 9814002284
01882-226906, 9815073906
Sulalit Gupta
Kuldip
SCO-3021-22, First Floor, Sector 22-D, Chandigarh-
160022
Dhobian Wali Gali,Phagwara Road, Hoshiarpur-146001
Global Systems
Kuldip's Mobile
Care
0181-5073344, 9814029696
0161-2412884, 9814651803
01675-253899, 9814040066, 01675-
331979
01636-227440
Contact Person Phone
Jogesh Diwan
Anil Kumar
Rohit Bansal/Raj
Verma
Jai Deep Mehta
Shop No.5,Hotel Preet Market,Nakoder Road,Jallandhar-
144001
Shop No.5,Skand Tower, Dr Heera Singh Road,Civil
Lines,Ludhiana-141001
Opp.Main gate,Govt College, MalerKotla-148023
Pawan Market,Opp shankar Batteries,Court Road, Moga-
142001
ASCs Name Address
Mobile Center
Rahul T elecom
Image Services
Super
Communication
0175-2222796, 9814040066
0141-5101280, 9829012478, 0141-
3112863
3091219, 0291-3117171
0744-2320153, 9829231847
0294-2410002, 2413002, 3410002
Rohit Bansal
Rahul Bhargav
Pratap Singh
Shyam
Maheshwari
Virendra Ranka
84, First Floor, Leela Bhawan, Patiala-147001
1st floor, Sunny house, K-21 Malviya Nagar, C Scheme,
Near government press, Jaipur-302001
UG/4, Adeshwar Tower, Main Chopasani Road,
Opp.Gehlot Watch Co, Jodhpur-342003
26, Ground floor, Kalawati Paliwal market, Gumanpura,
Kota-324007
13,Darshanpura,Opp.M.B.Commerce College Gate,Nr
Computer Zone,Udaipur-313002
Image Services
Kamakshi
Telecom
Omega
Electronics
Cyber
Infosystems
Ficusa
Enterprises
044-24724666, 9841036466
044-24330889, 9884160010
044-52174656/52175115,
9884187800
044-30901688
0422-2490577, 9843080040, 0422-
3100080
04142-220183
R M
Rajesh/Kartik
Kanirajan
Shyam
Mrs N S Vijaysri
Anand Prakash
Mr Raghupati
73, Nutech Plaza, Shop no G-3, G Floor, Arcot Road,
Kodambakkam, Chennai - 600 024.
547/352, F M Towers, Mount Road, Nandanam, Chennai-
6000035
Shop No.2, Old No.24, New No. 30, Balfour
Appartments, Kilpauk, Chennai-600010
Arunodaya Complex, New No 57-7, Old No 26-7,
Ponnamalai High Road, Chennai-600003
Sudera Complex, 354B, 100 Feet Road, COIMBATORE -
641012
# 2, Uma Complex,Upstairs,Riverside Road,Opp Tharaikakha
Kaliamman Koil,Pudupalayam,Cuddlore-607001
Unicare Infocomm
Services
GS Systems
U Com Technologies
Pvt.Ltd.
Escomm Systems
India P Ltd
Fast Track
Kasturi Cellular
Service
Vasai
Mumbai
Mumbai
Mumbai
Mumbai
Navi
Mumbai
Thane
Navi
Mumbai
BhubneshwarCuttack
Amritsar
Barnala
Bathinda
Mumbai
Mumbai
Mumbai
Mumbai
Mumbai
Mumbai
Mumbai
Mumbai
Orissa
Orissa
Punjab
Punjab
767778798081828384858687888990
Sr Circle City ASCs Name
Punjab
Chandigarh
Hoshiarpur
Punjab
Punjab
Jallandhar
Ludhiana
Malerkotla
Moga
Patiala
Jaipur
Jodhpur
Punjab
Punjab
Punjab
Punjab
Punjab
Rajasthan
919293949596979899
Sr Circle City
Rajasthan
Kota
Udaipur
Rajasthan
Rajasthan
Chennai
Chennai
Tamilnadu
Tamilnadu
100
101
Chennai
Chennai
Tamilnadu
Tamilnadu
102
103
Coimbatore
Cuddlore
Tamilnadu
Tamilnadu
104
105
Page 57

RD6000
113
RD6000
112
RD6000-E.qxd 6/18/04 9:57 AM Page 112
0424-2258526, 9443263508
0452-2526179/3107995
0413-2222148, 9843093348, 0413-
3155351
0427-2335787, 0427-3102124, 0427-
3102124
Contact Person Phone
M Kanan
Guna
G Singaravelu
Vasudev Nayak
Address
148,Nattur Road, Opposite shakti vinayak temple,Dana
Complex, Erode-638011
No.4, Thirumakulam North Street,Near Ayyappan koil,
Thhallakulam,Madurai-625002
126/2, Perumal Koil Street (Bharathi Street Cutting),
Pondicherry-605001
262-A, Advitha Ashram Road, Salem - 636004
JANS
Electronics
Devaa
Electronics
Digital Logistics
Global Care
04362-272595, 04362-313254
0462-2575801
0421-2243005, 98422-74300, 0421-
3105560
0431-2742646, 9843178104, 0431-
3101502
0416-2214396, 9843007761
0562-2528250
0562-2520032, 562 3111350
Ziauddin
Erkins
MR.U.B.Bala
Murali
Krishnan
MR.V .S.K umar an
Rajiv Singhal
33,New Municipal Shopping Complex,Opp LIC,Gandhi ji
road,Thanjavur-613001
39, Trivendrum Road, Opposite Kalimark, Welcome
Complex, Palayamkottai, Tirunilveli-627002
"# 155-303, Mangalam Road,Karuvam palayam,
Tirupur -641604"
2nd Floor, Siva Complex, Bishop Road,Puthur, Trichy-
620017
85A, Officers Line, Toll Gate, Vellore - 632001
Shop No G-124, Block No- 29, Sanjay Place, Agra – 282
Z M Electronics
Classic
Electronic
Shri Vasavi
Electronics
S K Electronics
Kelcom
Engineers
NSC Computers
0571-2506148, 9412274391
0532-2608088
0581-2477552, 9897209594
135 3090895, 135 3112922/135
3119696
Vaibhav
Ms Naina Pandey
Sanjeev Singh
Vinod
002
G-1,Ganpati Plaza ,Jha Compund, Marris Rd, Aligarh-
202001
G-11, Indira Bhawan, Ground Floor, Civil Lines, Allahbad-
211001
106/17 Ist Floor,Civil Lines,Opp Sainik Petrol
Pump,Bareilly,Pin 243001
Shop No 15A, Meedo Plaza, Rajpur Road,
Dehradun,Uttaranchal-248001
A V Computer
Services
B.P .Electronics
Sapan Infotech
Krishna
Communication
0120-2706340, 3298089, 3421669
Mr Aagrahari
G-2, Konark Building Raj Nagar District Centre (RDC),
Rajnagar, Ghaziabad
S P Telecom
Contact Person Phone
ASCs Name Address
0551-2204520
0512-3111662, 9839068734, 0512-
3093011
0522-3094222
0121-2691167, 121 3116631
0131-2635483, 9412110215
0120-2591440, 9818028061
Ram Pratap
Manoj Shukla
Kawaljeet
Vineet Goyal
Manohar Singh
Kailash Aggarwal
Shop No.11, Pandey Complex, 33, Kasya Road, Opp
DIG Bunglow, Gorakhpur -273001
111/87 Ashok Nagar,Kanpur Pin 208012
3 way road, City Point, Opp Krishi Bhawan, Lucknow-
226024
F-124/125 Ist floor Ganga Plaza, Begum Bridge Road,
Meerut-250002
Shop No.4, 1st Floor, Roorkee road, Near Shiv
Chowk,Central Bank Mkt, Muzaffarnagar-251001
J-45, First Floor, Sector-18, NOIDA-201301
Eternal
Electronics
AR Infotech
NET COM
Systech
Computers
Jai Computer
Services
M R Telecom
0132-2720881, 132 3111202
0542-2363296, 9839241004
0341- 2207719, 9832160886
0342-3090265, 9832192170
033-25344377/79, 9831077143
Pankaj Malhotra
Rishi Mohan
Syed Arshad Ali
Sanjit Debnath
Arun Surana
Near Maharaja Palace,Delhi Road, Saharanpur-247001
Shop No.5,B37/115-B-1 Baradari Complex,Rathyatra
Crossing,Varansi Pin 221010
Islam Market, Nuruddin Road, Assansol-713301
Tikonia Bus Stand, Central Mkt, GT Road, Burdawan-
713101
344 Canal Street, Sribhumi, Kolkata - 700048
Maharaj
Communications
Shivam Mobile
Distributers
Sky Computer &
Telecom
San Infosys
Benma Infosol
Pvt Ltd.
033-24401923
033-30903814, 033-32091037
0343-2546893, 9434002244
Somim Kabir
H R Molla
Amitava Banerjee
5B Ekdalia Place, Kolkata - 700019
8/1A, Little Russel Street, Calcutta-700071
Red Cross Road, City Centre, Durgapur-713216
JP Computers
Skylink
Tech
International
Erode
Madurai
Tamilnadu
Tamilnadu
Sr Circle City ASCs Name
106
107
Pondicherry
Salem
Tamilnadu
Tamilnadu
108
109
Thanjavur
Tirunevelli
Tamilnadu
Tamilnadu
110
111
Tirupur
Trichy
Tamilnadu
Tamilnadu
112
113
Vellore
Agra
Tamilnadu
Uttar
114
115
pradesh
Aligarh
Uttar
pradesh
116
Allahbad
Bareilly
Uttar
pradesh
Uttar
117
118
pradesh
Dehradun
Uttar
119
Ghaziabad
pradesh
Uttar
120
pradesh
Sr Circle City
Gorakhpur
Uttar
pradesh
121
Kanpur
Uttar
pradesh
122
Lucknow
Uttar
123
pradesh
Meerut
Uttar
124
pradesh
MuzaffarnagarNoida
Uttar
pradesh
Uttar
pradesh
125
126
Saharanpur
Uttar
127
pradesh
Varanasi
Uttar
128
Assansol
pradesh
W Bengal
129
Burdwan
Calcutta
W Bengal
W Bengal
130
131
Calcutta
Calcutta
W Bengal
W Bengal
132
133
Durgapur
W Bengal
134
 Loading...