

Page 1
LG-RD5340
User Guide
Page 2

Phone Components . . . . . . . . . . . . . .2
Onscreen Icons . . . . . . . . . . . . . . . . . .4
Using the Battery and Charger . . . .5
Installing and Removing the Battery 5
Charging the Battery . . . . . . . . . . . . . . .6
Battery Charge Level . . . . . . . . . . . . . .6
Turning the Phone On and Off . . . . .7
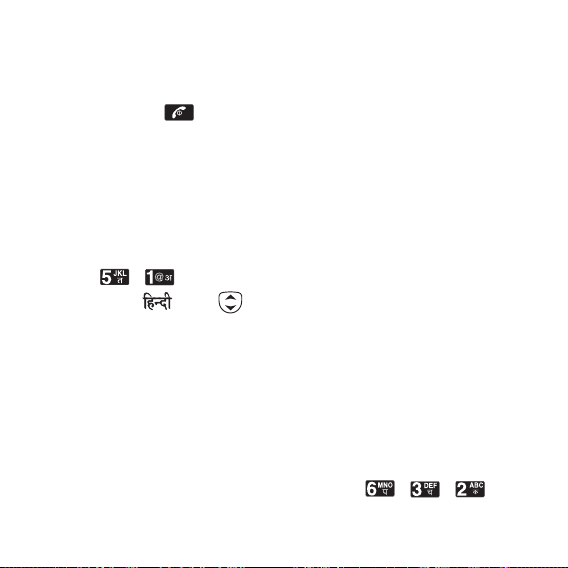
Changing the display language . . . .7
Airplane Mode . . . . . . . . . . . . . . . . . . .7
Making a Call . . . . . . . . . . . . . . . . . . . .8
Receiving Calls . . . . . . . . . . . . . . . . . .8
Quick Adjust . . . . . . . . . . . . . . . . . . . . .9
Adjusting Vibrate Mode . . . . . . . . . . . .9
Select Profiles . . . . . . . . . . . . . . . . . . . . .9
Adjusting Speaker Mode On . . . . . . .9
Select My Menu . . . . . . . . . . . . . . . . . .9
Customize Profiles . . . . . . . . . . . . . .10
General Guidelines to Menu
Access and Settings . . . . . . . . . . . .11
Menu Tree . . . . . . . . . . . . . . . . . . . . . .12
Entering Information Using T9 Text
Input . . . . . . . . . . . . . . . . . . . . . . . . . . .13
Typing In T9 Mode . . . . . . . . . . . . . . . .13
Typing In ABC (Multi-tap) Mode . . .13
123 (Numbers) Mode . . . . . . . . . . . . .14
Symbol/Smileys Mode . . . . . . . . . . . .14
To Edit in Hindi Mode . . . . . . . . . . . .14
Write Text . . . . . . . . . . . . . . . . . . . . . .15
Write E-mail . . . . . . . . . . . . . . . . . . . .18
1234 Services . . . . . . . . . . . . . . . . . . .20
Introduction . . . . . . . . . . . . . . . . . . . .21
Menu Features . . . . . . . . . . . . . . . . .22
Safety Information . . . . . . . . . . . . . .31
LIMITED WARRANTY
STATEMENT . . . . . . . . . . . . . . . . . . . .34
Service Center List . . . . . . . . . . . . . .36
CCoonntteennttss
Page 3
- 2 -
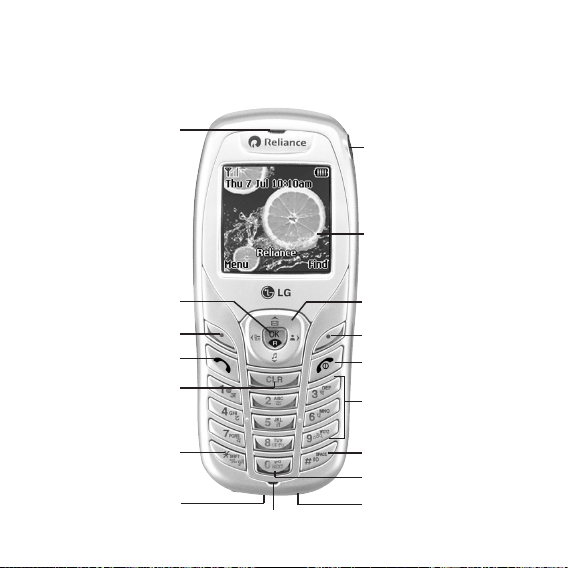
Phone Components
The following shows key components of your mobile phone.
Earpiece
Soft Key1
OK / Speaker ON~OFF /
R World Access Key
CALL Key
Clear Key
Vibrate Mode Key
Data Port
Soft Key2
4 Way Navigation
Key
LCD Screen
END / PWR Key
Alphanumeric
Keypad
Speaker Mode Key
Charger Port
Key Guard Key
Headset Jack
Microphone
Page 4

LCD Screen Displays messages & indicator icons.
Soft Key 1
Used to display the function setting menu.
Soft Key 2
Accepts the highlighted choice when navigating through a menu.
CALL Key Allows user to place or answer calls.
END/PWR Key Used to turn power on/off and to end a call. Using this key,
you can return to the main menu display screen.
Alphanumeric Keypad These keys enable you to enter numbers and characters and
choose menu items.
4 Way Navigation Key This Navigation key allows quick access to Messages
and Voice Mail notification messages.
Ring Tone, Scheduler, Profiles.
Accepts the highlighted choice when navigating through a menu.
During a call, activate speaker mode ON~OFF.
Connect to R World (holding the key about 2 seconds).
Clear Key Press to delete a single space or character. Press and hold to
delete entire words.
Speaker Mode Key In standby mode, set the speaker mode On or Off by
pressing and holding the key about 2 seconds. After
ending a call speaker mode lasts.
Vibrate Mode Key
In standby mode, set the vibrate mode by pressing and holding
the key about 2 seconds.
Soft Keys
(the names of the functions
of these keys appear at the
bottom of the screen)
OK /
Speaker ON~OFF /
R World Access Key
- 3 -
Page 5

- 4 -
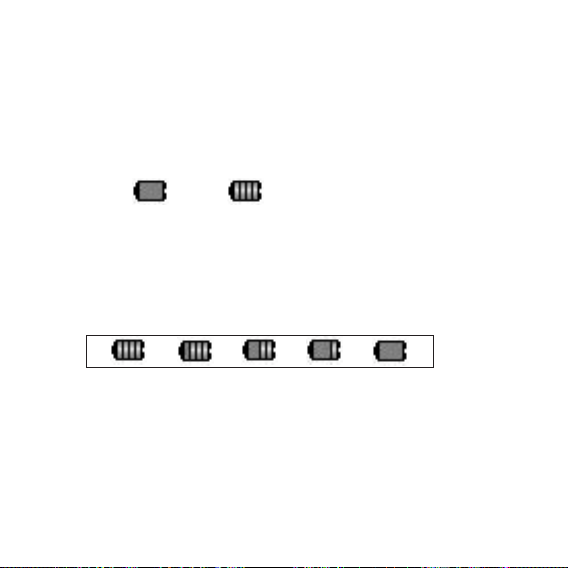
Onscreen Icons
The phone screen displays several onscreen icons which appear when
the phone is powered on.
Icons
Descriptions
Displays the strength of the signal received by the phone and current signal
strength is indicated by the number of bars displayed on the screen.
No service
The phone is not receiving a system signal.
Indicates that a Text Message or E-mail Message has been received
In Vibrate mode.
Charge level
Indicates battery charge level.
When fully charged, battery icon indicates charging by twinkling.
In Alarm mode.
In use
A call is in progress.
*
No icon indicates the phone is in standby mode.
Indicates speaker mode is on.
Page 6
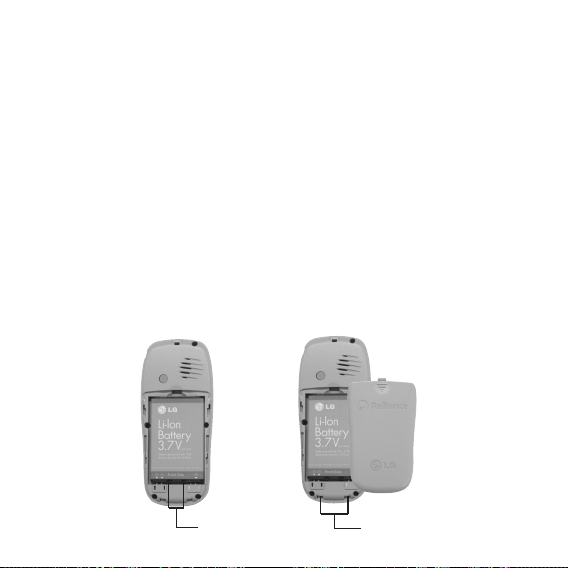
Using the Battery and Charger
Charge the battery fully before the initial use of the phone.
The phone comes with a rechargeable battery. Keep the battery charged
while not in use in order to maximize talk and standby time when using
the phone.
Installing and Removing the Battery
z
To install, insert the battery into the opening on the back of the phone,
and insert the bottom of battery into groove at the bottom of the
handset. Gently press down the cover until the latch snaps into place.
z
To remove, push the back cover down. Push the tab with one hand and
lift the top of the battery to separate.
Groove
Slot
- 5 -
Page 7
- 6 -
Charging the Battery
To use the AC adapter charger provided with your phone:
1. Plug the AC adapter into the electrical outlet.
2. Insert the round end of the adapter into the AC adapter jack on the
bottom of the phone. (Make sure the battery is installed.)
z As the phone charges, the battery icon continually displays a progression
from empty ( ) to full ( ).
It takes about three hours to fully recharge a completely rundown
battery. When fully charged, battery icon indicates charging by twinkling.
Battery Charge Level
The battery charge level is shown at the top right of the LCD screen.
When the battery charge level becomes low, the low battery sensor will
alert you in three ways: sounding an audible tone, blinking the battery
icon outline, and displaying Recharge the battery If the battery charge
level becomes exceedingly low, the phone will automatically switch off
and any function in progress will not be saved.
Page 8
- 7 -
Turning the Phone On and Off
1) Install a charged battery pack or connect the phone to an external power
source such as the cigarette lighter charger, car kit or AC Adaptor.
2) Hold down the Key for 2 seconds until the LCD screen flashes.
NNoottee
As any other communication device, avoid any unnecessary
contact with the antenna while your phone is turned on.
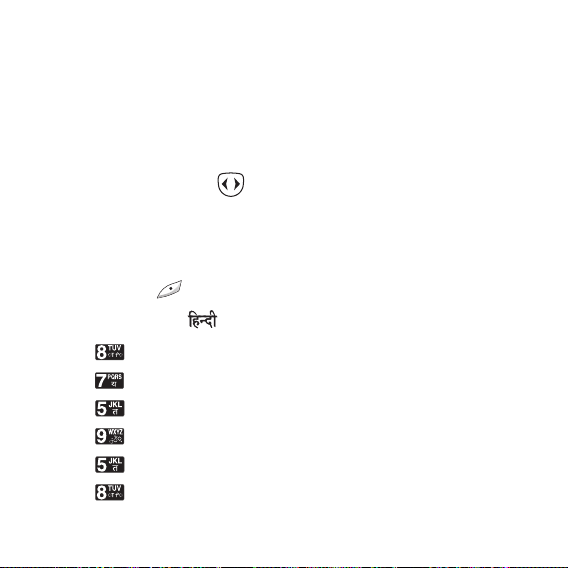
Changing the display language
1) In standby mode, press Soft Key 1 Menu.
2) Press , .
3) Set English/ with and then press Soft Key 1 Select.
Airplane Mode
When your phone is in Airplane Mode, it cannot send or receive any calls
or access online information. You may use the phone’s other features,
such as Game, Scheduler, Memo, etc. When Airplane Mode is enabled,
a message “Airplane Mode” is displayed on the screen.
1) In standby mode, press Soft Key 1 Menu, , , .
2) Select On or Off and press Soft Key 1 Select.
Page 9

- 8 -
Making a Call
Every time you make a call, follow these steps:
1) Make sure that the phone is turned on. If not, hold down for
2 seconds.
2) Type the phone number and then press .
•
If the phone is locked, type the lock code.
3)
To end the call press .
Receiving Calls
1) When the phone rings or vibrate (if the Vibrate Mode is enabled),
press any key (except ) or depending on the Call settings.
•
When you press once, when a call is received, the phone stops
ringing or vibrating depending on the mode it is in. Press twice
to disconnect.
2)
To end an answered call press .
Page 10

- 9 -
Quick Adjust
Adjusting Vibrate Mode
1) In standby mode, activate Vibrate Mode quickly by pressing the .
(for 2 seconds) instead of using the Menu function. To cancel press
again . (for 2 seconds)
Select Profiles
1) In standby mode, press .
2) Select one of four Profiles Vibrate Only, Silent, General and
Outdoor with .
3) Press or Soft Key 1 Select.
Adjusting Speaker Mode On
During a call, to activate or cancel Speaker quickly, press .
• In standby mode, activate Speaker Mode by pressing the for 2
seconds. To Speaker Mode Off press again for 2 seconds.
Select My Menu
1) In standby mode, press to select My Menu.
2) Select the item of choice with then press Soft key 1 Go or to
select the required menu from My Menu.
Page 11

- 10 -
Customize Profiles
You can customize any of the Profiles except Vibrate Only.
1) In standby mode, press Soft Key 1 Menu and .
2) Scroll to the profile you wish to customize and press Soft Key 2 Edit.
Select the ring tone style (Ring, Vibrate, Vibrate & Ring,
Ring After Vibrate, Ascending Ring, Silent, Light).
Select the ring tone for incoming calls from 19 Rings
embedded + 3 SMS Ring Tones + 100 R World Ring Tones
Set the volume of your ring tone.
- Mute, 1~7 level
Set the volume during a call.
- 1~7 level
Set the volume of your keypad tones (or turn them off) Mute, 1~7 level
Select the tone for received messages (Alert Type, Alert Tone
and Message Reminder).
Select the auto answer style (Off, After 5 secs, After 10 secs).
(Option available for only Headset and Carkit profile)
Ring Type
Ring Tone
Ringer Volume
Earpiece Volume
Key Volume
Message Alert
Auto Answer
Page 12
- 11 -
General Guidelines to Menu Access and Settings
1. Press Soft Key 1 Menu. Eight menu items will appear on the display
screen.
2. Press to go through the list of menu features.
3. Press the corresponding number to the menu item that you want to
select. Then the sub-menu list will appear on the screen.
4. Press the appropriate key to select the sub-menu you want to access.
5. Select preferred settings, using the .
Press to go one step backward while accessing menu or
selecting settings.
6. Press to save the settings or to cancel without saving.
NNoottee
key is equivalent to pressing Soft Key 1, in the case of Soft
Key 1 is associated with “Select” option.
key is equivalent to pressing Soft Key + selecting first
option of popup menu in the case of Soft Key 1 is associated
with “Options” option.
Page 13

- 12 -
1. Names
1. Add Name
2. Find
3. Groups
4. Speed Dial
5. Help
2. Messages
1. Write
2. Inbox
3. 1234 Services
4. Outbox
5. Voice Mail
6. Archive
7. Drafts
8. Templates
9. Msg Groups
0. Erase Msgs
*
. Msg Settings
#. Help
3. Call History
1. Missed
2. Received
3. Dialled
4. In Call Memo
5. Call Duration
6. Erase History
7. Help
4. Profiles
1. Vibrate Only
2. Silent
3. General
4. Outdoor
5. Headset
6. Carkit
7. Help
5. Display
1. Language
2. Service Area
3. Clock
4. Wallpaper
5. Menu Style
6. Rhythmic Lighting
7. Backlight
8. Contrast
9. Help
6. Settings
1. My Menu
2. Call
3. Phone
4. Security
7. Organiser
1. Scheduler
2. To Do
3. Memo
4. Alarm
5. D-Day Counter
6. Stopwatch
7. Calculator
8. Currency
Converter
9. World Clock
0. Help
8. R World
1. R-Menu
2. Game
3. Help
Menu Tree
Page 14
Entering Information Using T9 Text Input
In the text input field. you can scroll through the modes using Soft Key
2 in the following order : Abc, T9En, 123, Symbol, Smileys, Hindi.
- Shift Key : Used to change the letter case
Typing In T9 Mode
For example, to write “Call the office”, follow these steps:
1. Press: Soft Key 2 to change letter case to T9En mode.
2. Press: .
3. Press: to complete the word and add a space.
4. Press: .
5. Display: Call the office.
Typing In ABC (Multi-tap) Mode
For example, to type “LG”, follow these steps:
1. Press: Soft Key 2 to change letter case to ABC mode.
2. Press: to change to ABC Caps Lock mode.
3. Press: .
4. Display: LG.
- 13 -
Page 15
123 (Numbers) Mode
Type numbers using one keystroke per number.
To change to 123 mode in a text entry field, press Soft Key 2 until 123
mode is displayed.
Symbol/Smileys Mode
Press the Navigation Key to cycle through the desired characters :
To select Character, Press the assigned number key.
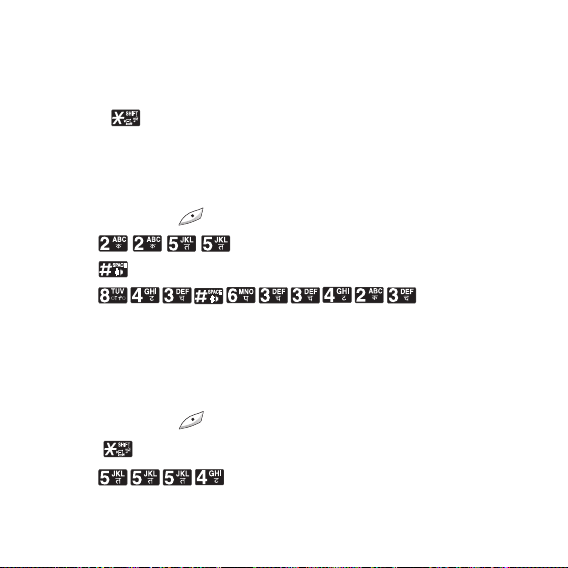
To Edit in Hindi Mode
Press Soft Key 2 , until the soft menu changes to Hindi mode.
For example, to type " "
1. Press 2 times.
2. Press 8 times.
3. Press 5 times.
4. Press 3 times.
5. Press 3 times.
6. Press 3 times.
- 14 -
Page 16
Write Text
LMS(Long Message Service) allows you to send a message upto 462
characters at a time. Before sending LMS message, total number of
SMS packets formed are intimated to the user and confirmation is taken
to send.
Maximum 3 packets for English and 4 for Hindi messages can be sent.
Each LMS packet is received as individual message. Every LMS
message shows the packet sequence number in the message for ex: In
case of 3 packets, <1/3>, <2/3>, <3/3>.
1. Press Soft Key 1 Menu, or .
2. Select Write.
3. Select Write Text.
4. After entering a message to be sent by selecting Send, press Soft Key
1 Options.
G Send Use to send the message.
G Templates Select a Templates message.
G Save Save to Drafts message.
G Help You can get more information about Hindi writing.
- 15 -
Page 17

5. After entering the phone number where the message is to be sent,
enter the next recipients address by pressing . You can add up to
10 recipients. Press Soft Key 1 Options.
G Send Use to send the message.
G Last Select a recent sent number.
G SMS Groups Select SMS Group.
G Names Select a phonebook entry.
6. If you select Send, it notifies you whether the message was sent
successfully.
G Send Use to send the message.
G Priority Allows you to give the priority to message. Normal
or Urgent.
G Delivery Ack This function allows you to know whether the
message is successfully transmitted to other party or
not when the transmitted message is received in
other party’s phone. If you want to activate this
function, set to On.
G Deferred
Allows you to delay sending the message until the
programmed time frame.
Immediate/After 30 Minutes/After 1 Hour/After 2
Hours/After 12 Hours/After 1 Day/After 2 Days
- 16 -
Page 18

G Validity
Indicates the validity of message delivery to the Short
Message Center (SMC) without being transmitted to
the destination address for certain periods of time.
Those messages will be deleted within the
programmed time frame. Validity time frames are as
follows: Default, 30 Minutes, 1 Hour, 2 Hours, 12
Hours, 1 Day and 2 Days.
G
Save Sent Msg
You can save this message in Outbox.
- 17 -
Page 19
Write E-mail
Send message to an E-mail ID with Write E-mail.
1. Press Soft Key 1 Menu, or .
2. Select Write.
3. Select Write E-mail.
There are four optional menus of Send, Last, E-mail Groups and
Names.
G Send Use to send the message.
G Last Select a recent sent E-mail.
G
E-mail Groups
Select a E-mail Group.
G Names Select a phonebook entry.
4. After entering the e-mail address where the message is to be sent,
enter the next recipients address by pressing . You can add up to
10 recipients. Press Soft Key 1 Options.
G Send Use to send the message.
G Domain Select a domain.
5. After entering a Subject, press Soft Key 1 Next.
6. After entering a message to be sent by selecting Send, press Soft Key
1 Options.
G Send Use to send the message.
- 18 -
Page 20

G Templates Select a Templates message.
G Save Save to Drafts message.
G Priority Allows you to give the priority to message.
Normal or Urgent.
G Delivery Ack This function allows you to know whether the
message is successfully transmitted to other
party or not when the transmitted message is
received in other party’s phone. If you want to
activate this function, set to On.
G Deferred
Allows you to delay sending the message until
the programmed time frame.
Immediate/After 30 Minutes/After 1 Hour/After 2
Hours/After 12 Hours/After 1 Day/After 2 Days
G Validity
Indicates the validity of message delivery to the
Short Message Center (SMC) without being
transmitted to the destination address for certain
periods of time. Those messages will be deleted
within the programmed time frame. Validity time
frames are as follows: Default, 30 Minutes, 1
Hour, 2 Hours, 12 Hours, 1 Day and 2 Days.
G
Save Sent Msg
You can save this message in Outbox.
- 19 -
Page 21
1234 Services
Exciting SMS-based Infotainment services such as News, JOKE,
Horoscope etc are available to Reliance subscribers. Using the SMS
1234 services, the user will be able to access interesting information on
common subjects through SMS. User needs to select the Menu
corresponding to the Service Keyword.
1. Press Soft Key 1 Menu, or .
2. Select 1234 Services.
3. Place the cursor on the item that you wants to be served, and then
press Soft key 1 Select. You may select from eleven items. (1.News
2. Cricket 3.Joke of The Day 4.Thought of the Day 5.Contest 6. Beauty
Tips 7.Health 8.Horoscope 9.Bill Info 0.Unbilled Info *.Help)
You may select the keyword that you want to send in subsequentMenu.
Example
For example, to receive the "sports news" you can operate the phone as
follow;
1. Press Menu +2(Messages) + 3(1234 Services) + 1(News) + 6(NEWS
SPORTS)
Display: Sending...(1/1) To 1234"
- 20 -
Page 22

Introduction
Congratulations on your purchase of the LG-RD5340 cellular phone that has been
designed to operate with the latest digital mobile communication technology, Code
Division Multiple Access (CDMA). The CDMA system has greatly enhanced voice
clarity and can provide various types of advanced features.
This is an advanced and compact phone which has diverse features as follows :
• Large, easy-to-read, 5 lines display + 1 Icon Line+ 1 Menu Line .
• Paging, Messaging, Voice mail, and Caller ID.
• 19-key keypad (10 number keys / 2 function keys / 2 Soft keys / 1 clear key /
4 way navigation 1 key / 1 Call key / 1 End key / 1 OK key).
• Long battery stand-by and talk time.
• Choice of 19 ring sounds + 3 downloadable Ringtones by SMS +
Brew downloadable 100 Ringtones.
• Choice of 2 Wallpapers + Brew downloadable 50 Wallpapers
• Menu-driven interface with prompt for easy operation and configuration.
• Voice Privacy inherent with CDMA encoding.
• Any Key Answer, Auto Redial, Speed Diali upto 99 memory locations.
• Optional accessories with greater convenience and enhanced functionality.
• Speaker Phone, In Call Memo.
• Airplane Mode, Rhythmic Lighting.
• SMS, LMS, SMS to E-mail, Group SMS.
- 21 -
Page 23

Menu Features
Add Name
Find
Groups
Speed Dial
Write
Inbox
1234
Services
Store upto 600 contacts, adding 4 phone
numbers + E-mail + Memo with each
entry and assign Group + Ring Tone +
Message Alert Tone to each entry.
To find phone numbers you have stored
in the Phone Book.
This is a function for changing Group
Name and setting Ring tones by Group.
Speed Dial allows you to make a call
faster by just pressing a corresponding
number.
Write and send Message and E-Mail.
Allows y ou to send a message upto 462
characters at a time.
Received Text messages, Page, E-mail
messages, Delivery ack, lists may be
searched, and the contents may be viewed.
Upto 30 can be stored.
Exciting SMS-based Infotainment services
such as News, JOKE, Horoscope etc are
available to Reliance subscribers.
Menu > Names >
Add Name
Menu > Names >
Find
Menu > Names >
Groups
Menu > Names >
Speed Dial
Menu > Messages >
Write
(Refer to 15~19 page)
Menu > Messages >
Inbox
Menu > Messages >
1234 Services
(Refer to 20 page)
Menu Description Select
- 22 -
Page 24

Outbox
Voice Mail
Archive
Drafts
Templates
Msg Groups
Erase Msgs
Msg
Settings
Up to 15 sent messages and 15 unsent
messages can be stored in the Outbox.
Allows you to view the new voice
messages recorded in the voice mail box.
Archive stores what is preferred to
save among messages received. Upto
30 can be stored.
When a user is interrupted by a call
while composing a message, messages
automatically get saved. Upto 30 can be
stored.
There are 10 predefined phrases
included in the Templates. You can add
upto 20 templates more.
Msg Groups consists of 5 SMS/E-mail
Groups with each group consisting of
maximum 10 members.
Allows you to erase messages in each
message box.
Msg Settings can be configured for
receiving new messages.
Menu > Messages >
Outbox
Menu > Messages >
Voice Mail
Menu > Messages >
Archive
Menu > Messages >
Drafts
Menu > Messages >
Templates
Menu > Messages >
Msg Groups
Menu > Messages >
Erase Msgs
Menu > Messages >
Msg Settings
Menu Description Select
- 23 -
Page 25

- 24 -
Missed
Received
Dialled
In Call Memo
Call Duration
Erase History
Profiles
Allows you to view list of all Missed Calls.
(Maximum 60 numbers are possible including
Missed, Received, Dialled and In Call Memo)
Allows you to view list of all Received Calls.
(Maximum 60 numbers are possible including
Missed, Received, Dialled and In Call Memo)
Allows you to view list of all Dialled Calls.
(Maximum 60 numbers are possible including
Missed, Received, Dialled and In Call Memo)
Save the phone numbers taken while
talking and can view the list of numbers
present in In Call Memo. (Maximum 20
numbers are possible)
View the duration and number of recent
calls you have dialled and received. Also
reset the time counter.
Erase the contents of each of the three
call histories.
Profiles let you set your phone’s sound
settings to your environment. Each profile
contains settings for your phone’s Ring
Type, Ring Tone, Ringer Volume, Earpiece
Volume, Key Volume and Message Alert.
Menu > Call History >
Missed
Menu > Call History >
Received
Menu > Call History >
Dialled
Menu > Call History >
In Call Memo
Menu > Call History >
Call Duration
Menu > Call History >
Erase History
Menu > Profiles >
1. Vibrate Only /
2. Silent / 3. General /
4. Outdoor / 5. Headset /
6. Carkit
Menu Description Select
Page 26

- 25 -
Language
Service Area
Clock
Wallpaper
Menu Style
Rhythmic
Lighting
Backlight
Contrast
Set the Bilingual feature according to
your preference, choose between
English and
ffggUUnnhh
.
This menu displays the current
SDCA/calling area the user is in.
Allows you to select a clock on your
mobile phone display.
Enter the string of characters you want
to be displayed. You can set up the
screen displayed on the LCD screen in
the standby mode.
Allows you to select the menu style.
Allows you to select pattern for an
incoming call.
Choose the settings of the LCD and
keypad backlight.
Using the Navigation Key, select the
contrast setting using the scale of
lightest to darkest.
Menu > Display >
Language
Menu > Display >
Service Area
Menu > Display > Clock
Menu > Display >
Wallpaper
Menu > Display >
Menu Style
Menu > Display >
Rhythmic Lighting
Menu > Display >
Backlight
Menu > Display >
Contrast
Menu Description Select
Page 27

- 26 -
My Menu
Call Forward
Call Waiting
Any Key
Answer
Auto Redial
Voice Privacy
Clear Voice
Lets you access to favorite menu
quickly by customising my menu.
Call forward lets you forward all your
incoming calls to another number or
Voice Mail connection.
While a call is in progress, you may
hear two beeps indicating another
incoming call. When call waiting is
enabled, you may put the active call on
hold while you answer the other
incoming call.
When your phone rings, press any key
to answer except .
Set the length of time the phone waits
before automatically redialing a
number when the attempted call fails.
Set the voice privacy feature for CDMA
calls as Enhanced or Standard.
On/Off the function of Audio AGC(Auto
Gain Control) system.
Menu > Settings >
My Menu
Menu > Settings > Call >
Call Forward
Menu > Settings > Call >
Call Waiting
Menu > Settings > Call >
Any Key Answer
Menu > Settings > Call >
Auto Redial
Menu > Settings > Call >
Voice Privacy
Menu > Settings > Call >
Clear Voice
Menu Description Select
Page 28

- 27 -
Call Timer
Call Connect
Alert
Key Guard
Airplane
Mode
Set NAM
Data/Fax
Data Baud
You can set your phone to display the
running elapsed time while a call is
active.
This is a function to alert you that the
call connection has been established.
Allows you to protect the keypad of
your phone from accidental dialing.
When your phone is in Airplane Mode,
it cannot send or receive any calls or
access online information.
Select the phone’s NAM (Number
Assignment Module).
You can use your phone as a wireless
modem to avail high speed data
services such as browsing Internet
and other dial-up networking
functions.
This setting enables the subscriber
terminal to set the baud rate.
Menu > Settings > Call >
Call Timer
Menu > Settings > Call >
Call Connect Alert
Menu > Settings >
Phone > Key Guard
Menu > Settings >
Phone > Airplane Mode
Menu > Settings >
Phone > Set NAM
Menu > Settings >
Phone > Data Settings >
Data/Fax
Menu > Settings >
Phone > Data Settings >
Data Baud
Menu Description Select
Page 29

- 28 -
Service Alert
Version
Lock Mode
Emergency
Numbers
Change Lock
Code
Clear
Memory
Reset Default
Scheduler
Alerts you when service changes.
View the S/W, PRL and BREW version.
Keeps your phone from unauthorized
use. (Default Lock Code is 0000)
You can call these numbers 100, 101,
102 even when the phone is locked or
restricted.
New Lock Code allows you to enter a
new four-digit lock code number.
Deletes all information saved in Phone
Book or all data saved in phone and go
back to default value.
You can reset some of the menu
settings to their original values.
Simply store your appointments and your
phone alerts you with a reminder of your
appointment. Up to 160, can be saved.
Menu > Settings >
Phone > Service Alert
Menu > Settings >
Phone > Version
Menu > Settings >
Security > Lock Mode
Menu > Settings >
Security > Emergency
Numbers
Menu > Settings >
Security > Change Lock
Code
Menu > Settings >
Security > Clear
Memory
Menu > Settings >
Security > Reset Default
Menu > Organiser >
Scheduler
Menu Description Select
Page 30

- 29 -
To Do
Memo
Alarm
D-Day
Counter
Stopwatch
Calculator
Currency
Converter
World Clock
Up to 40, can be saved.
Write memos. Up to 40, can be saved.
To change an event alarm time.
You can use D-day counter to refer to
the day that is chosen for the beginning
or the ending of an important activity.
Up to 5, can be saved.
Allows you to take an accurate
measurement of time.
Calculate simple mathematical
computations.
Before you can make currency
conversions, you need to choose a
base currency (usually your domestic
currency) and add exchange rates.
Is useful if you need to make a call to
another country, and you are not sure
about the time difference.
Menu > Organiser >
To Do
Menu > Organiser >
Memo
Menu > Organiser >
Alarm
Menu > Organiser >
D-Day Counter
Menu > Organiser >
Stopwatch
Menu > Organiser >
Calculator
Menu > Organiser >
Currency Converter
Menu > Organiser >
World Clock
Menu Description Select
Page 31

- 30 -
R-Menu
Game
(Cricket)
Game
Settings
In Call Memo
Mute/
Unmute
Voice Privacy
On/Off
Speaker
Mode On/Off
This connects you to R World Data
Services like Ringtones, Cricket,
Dating, News, Astro, City & TV Guides,
and more provided by your service
provider.
Play games.
You can set sound volume of the game
and backlight to On or Off.
It allows you to note a phone number that
the other person provides you during a
call. Maximun 20 numbers are possible.
This function locks the microphone of
your telephone and prevent sounds
from your end being heard by the
person at the other end.
Set the privacy feature for CDMA calls
as Enhanced or Standard. CDMA offers
inherent voice privacy.
During a call, to activate or cancel
speaker quickly, press .
Menu > R World >
R-Menu
Menu > R World >
Game > Cricket
Menu > R World >
Game > Game Settings
During a Call : Menu 1
During a Call : Menu 2
During a Call : Menu 3
During a Call : Press
Menu Description Select
Functions Used During a Call
Page 32

- 31 -
Safety Information
Please read and observe the following
information for safe and proper use of
your phone and to prevent damage.
Also, keep the user guide in an
accessible place at all the times after
reading it.
Violation of the
instructions
may cause
minor or serious damage to the
product.
Charger and Adapter Safety
G
The charger and adapter are
intended for indoor use only.
Battery Information and Care
G
Please dispose of your battery
properly.
G
The battery does not need to be fully
discharged before recharging.
G
Use only LG-approved chargers
specific to your phone model since
they are designed to maximize
battery life.
G
Do not disassemble or short-circuit
the battery.
G
Keep the battery’s metal contacts
clean.
G
Replace the battery when it no
longer provides acceptable
performance. The battery can be
recharged several hundred times
before replacement.
G
Recharge the battery after long
periods of non-use to maximize
battery life.
G
Battery life will vary due to usage
patterns and environmental
conditions.
G
Use of extended backlighting,
MiniBrowser, and data connectivity
kits affect battery life and
talk/standby times.
G
The self-protection function of the
battery cuts the power of the phone
Page 33

- 32 -
when its operation is in an abnormal
state. In this case, remove the
battery from the phone, reinstall it,
and turn the phone on.
Explosion, Shock, and Fire
Hazards
G
Do not put your phone in a place
subject to excessive dust and keep
the minimum required distance
between the power cord and heat
sources.
G
Unplug the power cord prior to
cleaning your phone, and clean the
power plug pin when it is dirty.
G
When using the power plug, ensure
that it is firmly connected. If it is not,
it may cause excessive heat or fire.
G
If you put your phone in a pocket or
bag without covering the receptacle
of the phone (power plug pin),
metallic articles (such as a coin,
paperclip or pen) may short-circuit
the phone. Always cover the
receptacle when not in use.
G
Do not short-circuit the battery.
Metallic articles such as a coin,
paperclip or pen in your pocket or
bag may short-circuit the + and –
terminals of the battery (metal strips
on the battery) upon moving. Shortcircuit of the terminal may damage
the battery and cause an explosion.
General Notice
G
Using a damaged battery or placing a
battery in your mouth may cause
serious injury.
G
Do not place items containing
magnetic components such as a
credit card, phone card, bank book or
subway ticket near your phone. The
magnetism of the phone may
damage the data stored in the
magnetic strip.
G
Talking on your phone for a long
period of time may reduce call quality
due to heat generated during use.
Page 34

G
When the phone is not used for a long
period time, store it in a safe place
with the power cord unplugged.
G
Using the phone in proximity to
receiving equipment (i.e., TV or radio)
may cause interference to the
phone.
G
Do not use the phone if the antenna
is damaged. If a damaged antenna
contacts skin, it may cause a slight
burn. Please contact an LG
Authorized Service Center to replace
the damaged antenna.
G
Do not immerse your phone in water.
If this happens, turn it off immediately
and remove the battery. If the phone
does not work, take it to an LG
Authorized Service Center.
G
The power cord on this product will
expose you to lead, a chemical
known to the State of California to
cause (cancer) birth defects or other
reproductive harm. Wash hands
after handling.
G
Do not paint your phone.
G
The data saved in your phone might
be deleted due to careless use,
repair of the phone, or upgrade of the
software. Please backup your
important phone numbers. (Ring
tones, text messages, voice
messages, pictures, and videos
could also be deleted.)
The manufacturer is not liable for
damage due to the loss of data.
G
When you use the phone in public
places, set the ring tone to vibration
so as not to disturb others.
G
Do not turn your phone on or off
when putting it in your ear.
- 33 -
Page 35

LG ELECTRONICS Inc. represents and warrants
that this subscriber unit and its accessories
(“PRODUCT”) is free from defects in material and
workmanship.
This warranty is subject to the following terms
and conditions;
1.
This warranty of the PRODUCT extends for a period of
12 months commencing from the date of the activation
or 16 months from the date of manufacture whichever
is less, except for the battery, for which the warranty is
9 months from the date of activation or 12 months from
the date of manufacture whichever is less.
2.
During the warranty period, LG ELECTRONICS Inc. or
its authorized service network will repair or replace, at
LG ELECTRONICS Inc.’s option, the PRODUCT or
any relevant parts thereof in the event that the
PRODUCT is found to be defective. The repaired
PRODUCT or the Product/part provided as a
replacement for a defective PRODUCT/part, shall be
free from defects. The END USER/consumer
purchaser of the PRODUCT or his/her assignee
(“CONSUMER”) shall not be charged (whether for
parts, labour or otherwise) for the repair or replacement
of a defective PRODUCT during the warranty period.
All replaced parts, boards or equipment shall become
the property of LG ELECTRONICS Inc.
3. The warranty in respect of a repaired or replaced
PRODUCT/part shall extend for the remaining
warranty period of the repaired PRODUCT or
replacement thereof to the CONSUMER.
4. Upon request from LG ELECTRONICS Inc., the
CONSUMER may be required to provide the purchase
receipt or other documentation or information in respect
of the date and place of purchase.
5. The CONSUMER shall have no coverage or benefits
under this warranty in the event that any of the following
conditions are applicable:
(a) The PRODUCT has been subject to abnormal use or
conditions, improper storage, exposure to excessive
moisture or dampness, exposure to excessive
temperatures, unauthorized modifications,
unauthorized repair (including but not limited to use
of unauthorized spare parts in repairs), abuse,
accident, Acts of God, spills of food or liquids,
improper installation and breakage or damage to
antennae (otherwise than by reason of any defects in
material or workmanship).
(b) LG ELECTRONICS Inc. has not been notified by the
CONSUMER of the defects of the PRODUCT during
the applicable warranty period.
(c) The PRODUCT serial number code or the accessory
date code has been removed, defaced or altered.
(d) The PRODUCT has been used with or connected to an
accessory (i) not supplied by LG ELECTRONICS Inc. or
LIMITED WARRANTY STATEMENT
- 34 -
Page 36

its affiliates, (ii) not fit for use with the PRODUCT or
(iii) used otherwise than in the manner intended.
(e) The seals of the PRODUCT’S battery enclosure have
been broken or show evidence of tampering or the
PRODUCT’S battery has been used in equipment other
than that for which it has been specified usable by LG
ECLECTRONICS Inc.
(f) All plastic surfaces and all other externally exposed
parts that are scratched or damages due to normal
customer use.
(g) Breakage or damage to antenna unless caused by
defects in material or workmanship.
6.
In order to derive the benefits of this warranty in
respect of any defects in the PRODUCT, the
CONSUMER shall ship the PRODUCTS or part
thereof at its cost to the authorized service center of
LG ELECTRONICS Inc. LG ELECTRONICS Inc.
shall bear the cost of shipping the PRODUCT or part
thereof back to the CONSUMER after the completion
of the service under this limited warranty.
NO OTHER EXPRESS WARRANTY IS APPLICABLE
TO THIS PRODUCT. THE DURATION OF ANY
IMPLIED WARRANTIES, INCLUDING THE IMPLIED
WARRANTY OF MARKETABILITY OR
MERCHANTABILITY OR FITNESS FOR A
PARTICULAR PURPOSE OR USE IS LIMITED TO
THE DURATION OF THE EXPRESS WARRANTY
HEREIN. LG ELECTRONICS Inc. SHALL NOT BE
LIABLE FOR THE LOSS OF USE OF THE
PRODUCT, INCONVENIENCE, LOSS OR ANY
OTHER CONSEQUENTIAL DAMAGE, ARISING
OUT OF THE USE OF, OR INABILITY OF USE, OF
THIS PRODUCT OR FOR BREACH OF ANY
EXPRESS OR IMPLIED WARRANTY, INCLUDING
THE IMPLIED WARRANTY OF MARKETABILTY OR
MERCHANTABILITY OR FITNESS APPLICABLE TO
THIS PRODUCT.
THE CONSUMER UNDERSTANDS THAT LG
ELECTRONICS INC. HAS EMBEDDED RELIANCE
SOFTWARE AND ITS NETWORK PARAMETERS IN
THE PRODUCT. IN CASE THE CONSUMER
DELETES, REMOVES, ALTERS OR MODIFIES
SUCH SOFTWARE AND THE PARAMETERS
AND/OR INSTALLS ANY THIRD PARTY
SOFTWARE, THE WARRANTY AND REMEDIES
HEREUNDER SHALL NOT BE AVAILABLE TO THE
CONSUMER.
7. It is hereby expressly clarified that all warranties
(express or implied) in respect of the PRODUCT are
provided by LG ELECTRONICS Inc. alone.
- 35 -
Page 37

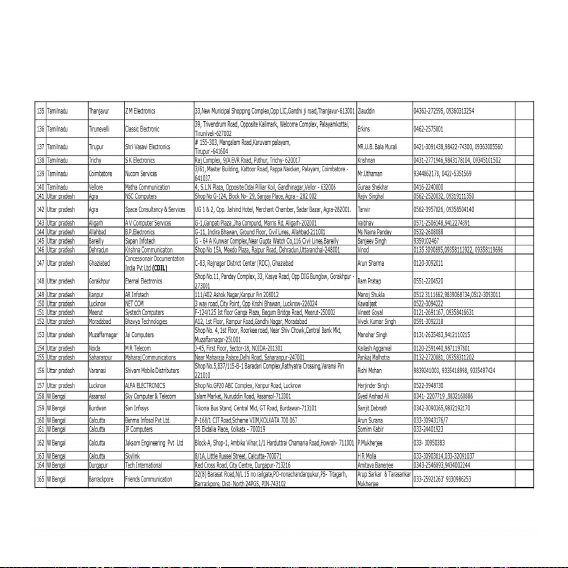
Service Center List
- 36 -
Page 38

- 37 -
Page 39

- 38 -
Page 40

- 39 -
Page 41

- 40 -
Page 42
- 41 -
Page 43

mmiiHHkkkkssDDrrkk eekkxxZZnnff''kkZZddkk
eekkWWMMyy%%
LG-RD5340
Page 44

- 1 -
QQkkssuu ddss iiqqttssZZ----------------------------------------------------------------------------------------------------------------------------------22
LLØØhhuu iijj vvkkuuss ookkyyss ffp
pUUgg----------------------------------------------------------------------44
ccSSVVjjhh vvkkSSjj ppkkttZZjj ddkk mmii;;kkssxx ddjjuukk--------------------------55
ccSSVVjjhh yyxxkkuukk vvkkSSjj ffuuddkkyyuukk --------------------------------------------------------------55
ccSSVVjjhh ppkkttZZ ddjjuukk---------------------------------------------------------
-------------------------------------------------66
ccSSVVjjhh ppkkttZZ LLrrjj----------------------------------------------------------------------------------------------------------------66
QQkkssuu ddkkss ccaann vvkkSSjj ppkkyyww ddjjuukk------------------------------------------------------77
QQkkssuu eessaa HHkkkk""kkkk ddss ppqquukkoo-----------------------------------------
---------------------------------------------77
,,;;jj IIyyssuu eekkssMM ----------------------------------------------------------------------------------------------------------------------77
ddW
Wkkyy ddjjuukk------------------------------------------------------------------------------------------------------------------------------------88
ddWWkkyy ÁÁkkIIrr ddjjuukk---------------------
---------------------------------------------------------------------------------------88
RRooffjjrr lleekk;;kkssttuu ---------------------------------------------------------------------------------
---------------------------99
ddaaiiuu eekkssMM lleekk;;kkssffttrr ddjjuukk ----------------------------------------------------------99
ÁÁkkssQQkkbbyy ppqquuuukk-----------------------------------------------------------------
---------------------------------------------------99
LLiihhddjj eekkssMM vvkkWWuu ddjjuukk--------------------------------------------------------------------------------99
eessjjhh llwwpphh p
pqquuuukk ----------------------------------------------------------------------------------------------------------------99
ççkkssQQkkbbYYll vvuuqqddwwyy ddjjuukk----------------------------------------------------------------------1100
llwwpphh rrdd iiggqq¡¡aappuuss vvkkSSjj llssffVVaaXXll ddss llkkeekkUU;;
ffnn''k
kkkffuunnssZZ""kk----------------------------------------------------------------------------------------------------------------------------------------1111
llwwpphh ÜÜkk``aa[[kkyykk------------------------------------------------------------------------------------------------------------------------------1122
T9
''kkCCnn bbuuiiqqVV eekkssMM llss ttkkuuddkkjjhh
ffyy[[kkuukk-------------------------------------------------------------------------------------------------------------------------------------
---------------1133
T9
eekkssMM eessaa ffyy[[kkuukk----------------------------------------------------------------------------------------------1133
ABC (
eeYYVVhh&&VVSSii)eekkssMM eessaa ffyy[[kkuukk ------------------------------------1133
123 (
vvaadd)eekkssMM ------------------------------------------------------------------------------------------------------------1144
ffppUUgg@@LLeekkbbZZyyhhll eekkssMM-------------------------------------------
-----------------------------------------1144
ffggUUnnhh eekkssMM eessaa llaaiikknnuu ------------------------------------------------------------------------------------1144
''kkCCnn ffyy[[kkssaa-----------------------------------------------
---------------------------------------------------------------------------------------1155
bbZZ&&eessyy ffyy[[kkssaa---------------------------------------------------------------------------------
-------------------------------------------1188
11223344 llffooZZllssll --------------------------------------------------------------------------------------------------------------------2200
ççLLr
rkkoouukk --------------------------------------------------------------------------------------------------------------------------------------------2211
llwwpphh ddhh llqqffoo//kkkk,,¡¡-----------
---------------------------------------------------------------------------------------------2222
llqqjj{{kkkk ttkkuuddkkjjhh-------------------------------------------------------------------------
-------------------------------------3311
vvuuqqØØeeff..kkddkk
Page 45

- 2 -
QQkkssuu ddss iiqqttssZZ
vkids eksckby Qksu ds egRoiw.kZ iqtsZ uhps fn[kk, x, gSa-
b;jihl
LkkW¶V cVu 1
vksds@Lihdj vkWu~vkWQ@
R oYMZ cVu
dkWy cVu
Dyh;j cVu
daiu eksM cVu
MsVk iksVZ
LkkW¶V cVu 2
4&os usfoxs'ku cVu
LCD LØhu
,aM@ikoj cVu
vYQkU;wesfjd cVu iSM
Lihdj eksM cVu
pktZj iksVZ
cVu iSM ykWd cVu
gsMlsV tSd
ekbØksQksu
Page 46

LCD LØhu lans'k vkSj ladsr fpUg çnf'kZr djrh gS-
llkkWW¶¶VV ccVVuu 11
QaD'ku lsfVax lwph çnf'kZr djus ds fy, ç;qDr-
llkkWW¶¶VV ccVVuu 22
lwph esa usfoxs'ku ds le; gkWbykbV gq,s fodYi dks pqusa-
dkWy cVu mi;ksxdrkZ dkWy dj ;k ys ldrk gS-
,aM @ ikoj cVu
ikoj can@pkyw djus vkSj dkWy lekIr djus ds fy, mi;ksx fd;k
tkrk gS- bl cVu ls vki eq[; lwph çn'kZu LØhu ij ykSV ldrs gS-
vYQkU;wesfjd cVu iSM blls vki uacj vkSj v{kj fy[k ldrs gS vkSj lwph vkbVe pqu ldrs gSa-
4&os usfoxs'ku cVu bl usfoxs'ku cVu ls vki rqjar lans'k vkSj okWbl esy
vf/klwpuk lans'k] fjax Loj] VkbZe eSustj]
çksQkbYl ij igq¡p ldrs gS-
fdlh lwph esa usfoxsV djrs le; gkbykbZV fd, x, fodYi dks
Lohdkj djrk gS- dkWy ds nkSjku] Lihdj eksM vkWu@vkWQ lfØ;
djsa- R oYMZ dusDV djsas (cVu dks yxHkx 2 lsdaM rd nck,¡)-
Dyh;j cVu ,d LFkku ;k v{kj feVkus ds fy, blsa nck,¡- iwjs 'kCnksa dks feVkus
ds fy, nck,¡ j[ksa-
Lihdj eksM cVu LVSaMck; eksaM esa] cVu dks yxHkx 2 lsdaM rd nck,¡
j[kdj Lihdj eksM lsV djsa-
daiu eksM cVu LVSaMck; eksaM esa] cVu dks yxHkx 2 lsdaM rd nck,¡ j[kdj
daiu eksM lsV djsa-
lkW¶V cVu
(lc lwph esa] bu cVuksa ds
QaD'ku ds uke LØhu esa
uhps fn[krsa gS)
vksds@Lihdj vkWu~vkWQ@
R oYMZ cVu
- 3 -
Page 47

- 4 -
LLØØhhuu iijj vvkkuuss ookkyyss ffppUUgg
Qksu dk ikoj pkyw gksus ij Qksu LØhu ij vusd fpUg fn[kkbZ nsrs gSa-
ffppUUgg oo..kkZZuu
Qksu }kjk izkIr ladsr dh 'kfDr LØhu ij iznf'kZr djrk gS vkSj LØhu ij
fn[kus okyh iafDr;ksa dh la[;k ls orZeku 'kfDr irk pyrh gS-
lfoZl ugha
Qksu dks fdlh flLVe ls ladsr ugha fey jgk gS-
'kCn lans'k ;k bZ&esy lans'k iznf'kZr gksrk gS-
daiu eksM-
pktZ Lrj
cSVjh pktZ Lrj n'kkZrk gSpktZ iw.kZ gksus ij] cSVjh pkftZax ladsrd >idrk gS-
vykeZ eksM-
mi;ksx esa gS% dksbZ dWky py jgh gS8 dksbZ ladsr u gksuk n'kkZrk gS fd Qksu LVWMck; eksM esa gS-
Lihdj eksM vkWu gS-
Page 48

ccSSVVjjhh vvkkSSjj ppkkttZZjj ddkk mmii;;kkssxx ddjjuukk
iiggyyhh cckkjj QQkkssuu ddkk mmii;;kkssxx ddjjuuss llss iiggyyss iiwwjjhh ccSSVVjjhh ppkkttZZ ddjj yyssaa--
Qksu ds lkFk ,d jhpktsZcy cSVjh vkrh gS- vf/kdre LVWMck; vkSj VWkd Vkbe izkIr
djus ds fy, mi;ksx esa ugha gksus ij Hkh cSVjh dks iwjh rjg pktZ j[ksa-
ccSSVVjjhh yyxxkkuukk vvkkSSjj ffuuddkkyyuukk
G
cSVjh yxkus ds fy, cSVjh dks Qksu ds fiNys fgLls esa [kkyh txg esa Mkysa vkSj
/khjs ls rc rd nck,¡- tc rd fd ySp viuh txg fDyd u gks tk,¡-
G
bls fudkyus ds fy, fiNys fgLls dks uhps dh vksj [khapsa] vyx djus ds fy,
,d gkFk ls VSc [khaps vkSj cSVjh ds Åijh fgLls dks mBk,¡-
xzwo
LykWV
- 5 -
Page 49

- 6 -
ccSSVVjjhh ppkkttZZ ddjjuukk
Qksu ds lkFk feys ,lh ,MkWIVj pktZj dk mi;ksx djus ds fy, %
1- ,lh ,MkWIVj dks fctyh ds Iyx esa yxk,¡2- ,MkWIVj ds xksy fljs dks Qksu ds uhps fLFkr ,lh ,MkWIVj tSd esa yxk,¡
(lqfuf'pr
djsa fd cSVjh yxh gSa)-
G
tSls & tSls Qksu pktZ gksrk gS] cSVjh dk fpUg [kkyh ()ls Hkjs ()
gksus rd ikoj esa o`f) fn[kkrk gS-
iwjh rjg lekIr gks pqdh cSVjh dks jhpktZ djus esa yxHkx rhu ?kaVs yxrs gSa- tc
cSVjh iwjh rjg pktZ gks tkrh gS rks pkftZax ladsrd >idrk gS-
ccSSVVjjhh ppkkttZZ LLrrjj
cSVjh pktZ ,ylhMh LØhu ds Åij nkbZa vksj fn[kkbZ nsrk gS-
tc cSVjh pktZ Lrj de gks tkrk gS] rks de cSVjh lsalj vkidks rhu izdkj ls
psrkouh nsxk% lqukbZ nsus okyh ,d vkokT+k ls] cSVjh fpUg vkmVykbZu fVefVek dj
vkSj
ccSSVVjjhh iiqquu%% ppkkttZZ ddjjssaa
çnf'kZr djds] ;fn cSVjh pktZ Lrj fcydqy de gks tkrk
gS rks Qksu vius vki can gks tk,xk vkSj py jgk dksbZ Hkh QaD'ku lqjf{kr ugha gksxk-
Page 50

- 7 -
QQkkssuu ddkkss ccaann vvkkSSjj ppkkyyww ddjjuukk
1) pktZ fd;k gqvk cSVjh iSd yxk,¡ ;k Qksu dks ckgjh ikoj lzksr ls tksM+sa tSls fd
flxjsV ykbZVj pktZj] dkj fdV ;k ,lh ,MkWIVj-
2) cVu dks 2 lsadM rd nck,¡ tc rd fd ,ylhMh LØhu pkyw u gks tk,¡-
uukkssVV
fdlh Hkh vU; lapkj midj.k dh rjg] Qksu ds pkyw gksus ij ,aVhuk dks
Li'kZ u djsa-
QQkkssuu eessaa HHkkkk""kkkk ddss ppqquukkoo
1) LVWMck; eksM esa] lkW¶V cVu 1
llwwpphh
nck,¡-
2) ] nck,¡-
3) ls English@fgUnh pqusa vkSj lkW¶V cVu 1
ppqquussaa
nck,¡-
,,;;jj IIyyssuu eekkssMM
tc vkidk Qksu ,;j Iysu eksM esa gksrk gS] rc blls u rks dksbZ dkWy fd;k tk ldrk
gS] u ÁkIr fd;k tk ldrk gS vkSj u gh vkWuykbu tkudkjh rd ig¡qpk tk ldrk
gS- vki Qksu dh vU; lqfo/kkvksa tSls xse] fu/kkZjd] eseks vkfn dk mi;ksx dj ldrs gSa,;j Iysu eksM l{ke gksus ij] LØhu ij ^^,;j Iysu eksM^^ lans'k Ánf'kZr gksrk gS-
1) LVWMck; eksM esa] lkW¶V cVu 1
llwwpphh
] ] ] nck,¡-
2)
vvkkWWuu
;k
vvkkWWQQ
pqusa vkSj lkW¶V cVu 1
ppqquussaa
nck,¡-
Page 51

- 8 -
ddWWkkyy ddjjuukk
tc Hkh vki dWky djsa] rks bu pj.kksa dk ikyu djsa %
1) lqfuf'pr djsa fd Qksu pkyw gS- ;fn ugha gS] rks dks 2 lsadM rd nck,¡
j[ksa-
2) Qksu uacj fy[ksa vkSj nck,¡-
•
G
;fn Qksu yWkd gS] rks yWkd dksM fy[ksa-
3) dWky lekIr djus ds fy, nck,¡-
ddWWkkyy ÁÁkkIIrr ddjjuukk
1) tc Qksu dh ?kaVh cts ;k daiu gks (;fn daiu eksM pkyw gS)] rks mRrj nsus ds
fy, ( ds vykok) ;k dWky lsfVaXl ds vk/kkj ij cVu nck,¡-
•
G
dWky izkIr djrs le; tc vki dks ,d ckj nckrsa gSa] rks eksM ds
vuqlkj ?kaVh ;k daiu can gks tkrk gS- fMLdusDV djus ds fy, dks
nksckjk nck,¡-
2) mRrj fn, x, dWky dks lekIr djus ds fy,] nck,¡-
Page 52

- 9 -
RRooffjjrr lleekk;;kkssttuu
ddaaiiuu eekkssMM lleekk;;kkssffttrr ddjjuukk
1) LVaWMck; eksM esa] lwph QaD'ku dk mi;ksx djus ds ctk; nckdj (2 lsdaM
rd) vki rqjar daiu eksM lfØ; dj ldrs gSa- (2 lsdaM rd)
ÁÁkkssQQkkbbYYll ppqquuuukk
1) LVWMck; eksM esa] nck,¡-
2) ls pkj ÁksQkbYl flQZ daiu] Silent, General, vkSj Outdoor esa ls ,d
pqusa-
3) ;k lkW¶V cVu 1
ppqquussaa
nck,¡-
LLiihhddjj eekkssMM vvkkWWuu ddjjuukk
dkWy ds nkSjku] nckdj rqjar Lihdj eksM lfØ; ;k fuf"Ø; dj ldrs gSa-
G
LVaWMck; eksM esa] 2 lsdaM rd dks nckdj Lihdj eksM lfØ; dj ldrs
gSa- Lihdj eksM vkWQ djus ds fy;s dks nksckjk 2 lsdaM rd nck,¡-
eessjjhh llwwpphh ppqquuuukk
1) LVWMck; eksM esa] esjh lwph pquus ds fy;s nck,¡-
2) ls bfPNr vkbVe pqusa vkSj vko';d lwph dks esjh lwph esa tksM+usa ds fy;s
lkW¶V cVu 1
ttkkssMM++ssaa
;k nck,¡-
Page 53

- 10 -
ççkkssQQkkbbYYll vvuuqqddwwyy ddjjuukk
vki flQZ daiu ds vykok fdlh Hkh çksQkbYl dks vius vuqdwy dj ldrs gSa-
1) LVWMck; eksM esa] lkW¶V cVu 1
llwwpphh
vkSj nck,¡-
2) LØkWy djds bfPNr çksQkbYl pqusa vkSj lkW¶V cVu 2
llaaiikknnuu
nck,¡-
fjax Loj dh 'kSyh pqusasa (fjax] daiu] daiu vkSj fjax] daiu
ds ckn fjax] c<+rh gqbZ fjax] ekSu] ykbV)-
vkus okyh dkWy ds fy;s 19 ,EcsMsM Loj $ 3 ,l,e,l
fjax Loj $ 100
R oYMZ fjax Loj esa ls pqusa-
vius fjax Loj dk okWY;we lsV djsa& ekSu] 1 & 7 Lrj
dkWy ds nkSjku okWY;we lsV djsa] 1 & 7 Lrj
vius cVu iSM Loj dk okWY;we lsV djsa
(;k mUgs can djsa)
& ekSu] 1 & 7 Lrj
ÁkIr gksus okys lans'kksa ds fy;s Loj pqusa
(lpsrd Ádkj]
lpsrd Loj] lans'k fjekbaMj)
Lor% mRrj 'kSyh pqusasa (vkWQ] 5 lsds.M ds ckn] 10 lsds.M
ds ckn)] (;g fodYi flQZ gsMlsV vkSj dkjfdV ÁksQkby
ds lkFk miyC/k gSa)-
fjax Ádkj
fjax Loj
fjax oWkY;we
b;jihl oWkY;we
cVu oWkY;we
lans'k lpsrd
Lor% mRrj
Page 54

- 11 -
llwwpphh rrdd iiggqq¡¡aappuuss vvkkSSjj llssffVVaaXXll ddss llkkeekkUU;; ffnn''kkkkffuunnssZZ""kk
1. lkW¶V cVu 1
llwwpphh
nck,¡a] izn'kZu LØhu ij vkB lwph vkbVe fn[kkbZ nsaxs-
2. lwph lqfo/kkvksa dh fyLV ns[kus ds fy, nck,¡a-
3. tks lwph vkbVe vki pquuk pkgrs gSa] mlls lacaf/kr vad nck,¡] rc LØhu ij
lc lwph fn[kkbZ nsxh-
4. bfPNr lc lwph rd igq¡apus ds fy, mi;qDr cVu nck,¡-
5. dk mi;ksx djds ilanhnk lsfVaXl pqusa- lwph rd igq¡prs ;k lsfVaXl pqurs
le; ,d Lrj ihNs tkus ds fy, nck,¡-
6. lsfVaXl lqjf{kr djus ds fy, nck,¡a ;k fcuk lqjf{kr fd, jn~n djus ds
fy, nck,¡-
uukkssVV
cVu lkW¶V cVu 1 ds ^^
ppqquussaa
^^ fodYi ls lacaf/kr gksus dh fLFkfr
esa lkW¶V cVu 1
ppqquussaa
dk dke djrk gS-
cVu lkW¶V cVu 1 ds ^^
ffooddYYii
^^ ls lacaf/kr gksus dh fLFkfr esa
lkW¶V cVu $ ikWivi lwph esa igyk fodYi pquus dk dke djrk gS-
Page 55

- 12 -
11-- uukkee
1- uke tksM+sa
2- [kkstsa
3- xzqIl
4- 'kh?kz Mk;y
5- lgk;rk
22-- llaannss''kk
1- fy[ksa
2- buckWDl
3- 1234 lfoZlsl
4- vkmVckWDl
5- oWkbl esy
6- laxzg
7- Mªk¶V~l
8- VsEIysV~l
9- lans'k xzqIl
0- lans'k feVk,¡
*
- lans'k lsfVaXl
#- lgk;rk
33-- ddkkWWyy ffoooojj..kk
1- NwVh gqbZ
2- çkIr gqvk
3- Mk;y fd;s gq,
4- dkWy eseks esa
5- dkWy vof/k
6- fooj.k feVk,¡
7- lgk;rk
44-- ççkkssQQkkbbYYll
1- flQZ daiu
2- Silent
3- General
4- Outdoor
5- gsMlsV
6- dkjfdV
7- lgk;rk
55-- ççnn''kkZZuu
1- Hkk"kk
2- lfoZl ,fj;k
3- ?kM+h
4- okWyisij
5- lwph LVkby
6- y;c/n jks'kuh
7- LØhu ykbV
8- dkWUVªkLV
9- lgk;rk
66-- llssffVVaaXXll
1- esjh lwph
2- dkWy
3- Qksu
4- lqj{kk
77-- ffuu//kkkkZZjjdd
1- VkbZe eSustj
2- Vq Mw
3- eseks
4- vykeZ
5- D-Day la[;k
6- LVkWi okWp
7- dSyD;qysVj
8- djsUlh dUojVj
9- fo'o ?kM+h
0- lgk;rk
88-- RooYYMMZZ
1- R&lwph
2- xse
3- lgk;rk
llwwpphh ÜÜkk``aa[[kkyykk
Page 56

T9
''kkCCnn bbuuiiqqVV eekkssMM llss ttkkuuddkkjjhh ffyy[[kkuukk
'kCn buiqV fQYM esa vki lWk¶V cVu 2 dks LØkWy dj ds fuEu eksM~l pqu ldrs
gSa % Abc] T9En] 123] fpUg] LekbZyhl] fgUnh&f'k¶V cVu % v{kj dk dsl cnyus ds fy, mi;ksx fd;k tkrk gS-
T9
eekkssMM eessaa ffyy[[kkuukk
mnkgj.k ds fy,
‘‘Call the office’’ bl rjg fy[ksa %
1. v{kj dsl dks T9En eksM esa cnyus ds fy, lWk¶V cVu 2 nck,¡-
2. nck,¡-
3. 'kCn iwjk djus vkSj ,d LFkku tksM+us ds fy, nck,¡-
4. nck,¡-
5. izn'kZu % Call the office.
ABC (
eeYYVVhh&&VVSSii)eekkssMM eessaa ffyy[[kkuukk
mnkgj.k ds fy,]
“LG” fy[kus ds fy,] bu pj.kksa dk ikyu djsa %
1- v{kj dsl dks
ABC eksM esa cnyus ds fy, lWk¶V cVu 2 nck,¡-
2-
ABC cM+k v{kj yWkd eksM dks cnyus ds fy, cVu nck,¡-
3- nck,¡4- izn'kZu %
LG-
- 13 -
Page 57

112233 (vvaadd)eekkssMM
izR;sd vad ds fy, ,d ckj cVu nckdj vad fy[ksa-
fdlh 'kCn izfof"V QhYM esa 123 eksM ds fy,] lWk¶V cVu 2 dks 123 eksM ds iznf'kZr
gksus rd nck,¡-
ffppUUgg@@LLeekkbbZZyyhhll eekkssMM
bfPNr v{kj ns[kus ds fy, usfoxs'ku cVu nck,¡% v{kj pquus ds fy,] fu/kkZfjr
vad cVu nck,¡-
ffggUUnnhh eekkssMM eessaa llaaiikknnuu
lWk¶V cVu 2 dks rc rd nckrs jgsa] tc rd lWk¶V lwph fgUnh eksM esa u
cny tk,¡-
mnkgj.k ds fy,] ^^fgUnh** fy[kus ds fy,1- 2 ckj nck,¡2- 8 ckj nck,¡3- 5 ckj nck,¡4- 3 ckj nck,¡5- 3 ckj nck,¡6- 3 ckj nck,¡-
- 14 -
Page 58

''kkCCnn ffyy[[kkssaa
,y,e,l (y¡kx eSlst lfoZl) ls vki ,d ckj esa 462 v{kjksa rd dk lans'k Hkst
ldrs gSa- ,y,e,l lans'k Hkstus ls igys] cuus okys ,l,e,l iSdsV~l dh dqy la[;k
mi;ksxdrkZ dks crkdj mlls Hkstus dh iqf"V yh tkrh gS-
vaxzsth ds vf/kdre 3 iSdsV~l vkSj fgUnh lans'k ds vf/kdre 4 iSdsV~l Hksts tk
ldrs gSa- çR;sd ,y,e,l iSdsV ,d ,dy lans'k ds #i esa çkIr fd;k tkrk gSçR;sd ,y,e,l lans'k esa iSdsV ds Øe dh la[;k n'kkZrk gS] tSls 3 iSdsV gksus ij]
<1/3>, <2/3>, <3/3>.
1- lWk¶V cVu 1 lwph] ;k nck,¡a2-
ffyy[[kkssaa
pqus-
3-
''kkCCnn ffyy[[kkssaa
pqus-
4- lans'k fy[ksa tks vki Hkstuk pkgrs gSa] vkSj lWk¶V cVu 1
ffooddYYii
nck,¡-
G Hkstsa lans'k Hkstus ds fy;s pqusa
G VsEIysV~l VsEIysV~l lans'k pqusa
G lqjf{kr lans'k Mªk¶V esa lqjf{kr djsa
G lgk;rk vki fgUnh fy[kus ds ckjs esa vkSj T;knk tkudkjh çkIr dj ldrs
gSa-
- 15 -
Page 59

5- xarO; Qksu uacj fy[kus ds ckn] nckdj vxys izkIrdrkZ dk irk fy[ksa- vki
10 çkIrdrkZ rd tksM+ ldrs gSa- lWk¶V cVu 1 fodYi nck,¡a-
G Hkstsa lans'k Hkstus ds fy;s pqusa
G vafre uohu Hksts gq,s uacj esa ls pqusa
G ,l,e,l xzqIl ,l,e,l xzqIl pqusa
G uke Qksucqd esa ls pqusa
6- vxj vki Hkstsa pqurs gSa] rks ;g vkidks lwfpr djsxk fd lans'k lQyrkiwoZd Hkst
fn;k x;k gS ;k ugha-
G Hkstsa lans'k Hkstus ds fy;s pqusa-
G çkFkfedrk vki lans'k dks çkFkfedrk ns ldrs gSa] lkekU; ;k vfr
vko';d-
G Hkst fn;k x;k vxj vki vkWu pqurs gSa] rks ;g vkidks lwfpr djsxk fd
lans'k lQyrkiwoZd Hkst fn;k x;k gS ;k ugha-
G foyafcr vkidks çksxzkEM le; lhek rd lans'k Hkstuk foyafcr
djus dh lqfo/kk nsrk gS- rqjar@30 feuV ds ckn@1 ?kaVs
ds ckn@2 ?kaVs ds ckn@12 ?kaVs ds ckn@1 fnu ds
ckn@2 fnu ds ckn-
- 16 -
Page 60

G oS/krk dqN le; rd xarO; irs dks lans'k u Hksts tkus ij
laf{kIr lans'k dsUnz ij lans'k Hkstus dh oS/krk fn[kkrk gS;s lans'k fu/kkZfjr dh x;h le; lhek esa feVk fn;s tkrs
gSa- oS/krk le; lhek, bl çdkj gSa% iwoZ fu;r@30
feuV@1 ?kaVs@2?kaVs@12 ?kaVs@1 fnu@2 fnu@
G Hksts x, lqjf{kr vki ;g lans'k
vvkkmmVVcckkWWDDll
esa lqjf{kr dj ldrs gSa-
- 17 -
Page 61

bbZZ&&eessyy ffyy[[kkssaa
vki fdlh bZ&esy irs ij ,l,e,l Hkst ldrs gSa1- lWk¶V cVu 1 lwph] ;k nck,¡a2-
ffyy[[kkssaa
pqus-
3-
bbZZ&&eessyy ffyy[[kkssaa
pqusa-
;gk¡ pkj fodYi lwph
HHkkssttssaa] vvaaffrree] bbZZ&&eessyy xxzzqqIIll
vkSj
uukkee
gSa-
G Hkstsa lans'k Hkstus ds fy;s pqusa
G vafre uohu Hksts gq,s bZ&esy esa ls pqusa
G bZ&esy xzqIl bZ&esy xzqIl pqusa
G uke Qksucqd esa ls pqusa
4- xarO; dk bZ&esy fy[kus ds ckn] nckdj vxys izkIrdrkZ dk irk fy[ksa-
vki 10 çkIrdrkZ rd tksM+ ldrs gSa- lWk¶V cVu 1
ffooddYYii
nck,¡a-
G Hkstsa lans'k Hkstus ds fy;s pqusa
G Mksesu Mksesu pqusa
5-
ffoo""kk;;
fy[ksa vkSj lWk¶V cVu 1
vvxxyykk
nck,¡a-
6-
HHkkssttssaa
fy[ksa vkSj lWk¶V cVu 1
ffooddYYii
nck,¡a-
G Hkstsa lans'k Hkstus ds fy;s pqusa
- 18 -
Page 62

G VsEIysV~l VsEIysV~l lans'k pqusa-
G lqjf{kr lans'k Mªk¶V esa lqjf{kr djsa-
G çkFkfedrk vki lans'k dks çkFkfedrk ns ldrs gSa] lkekU; ;k vfr
vko';d-
G Hkst fn;k x;k vxj vki vkWu pqurs gSa] rks ;g vkidks lwfpr djsxk fd
lans'k lQyrkiwoZd Hkst fn;k x;k gS ;k ugha-
G foyafcr vkidks çksxzkEM le; lhek rd lans'k Hkstuk foyafcr
djus dh lqfo/kk nsrk gS- rqjar@30 feuV ds ckn@1 ?kaVs
ds ckn@2 ?kaVs ds ckn@12 ?kaVs ds ckn@1 fnu ds
ckn@2 fnu ds ckn-
G oS/krk dqN le; rd xarO; irs dks lans'k u Hksts tkus ij
laf{kIr lans'k dsUnz ij lans'k Hkstus dh oS/krk fn[kkrk gS;s lans'k fu/kkZfjr dh x;h le; lhek esa feVk fn;s tkrs
gSa- oS/krk le; lhek, bl çdkj gSa% iwoZ fu;r@30
feuV@1 ?kaVs@2?kaVs@12 ?kaVs@1 fnu@2 fnu-
G Hksts x, lqjf{kr vki ;g lans'k vkmVckWDl esa lqjf{kr dj ldrs gSa-
- 19 -
Page 63

11223344 llffooZZllssll
,l,e,l ds }kjk miyC/k lfoZl tSls News (U;wt) JOKE (tksDl)
Horoscops (Hkfo";Qy) vkfn Hkh fjyk;al ds lHkh miHkksDrkvksa dks miyC/k gS-
1234 lfoZlsl ij lans'k Hkst dj vki dbZ fo"k;ksa ij vkd"kZd tkudkjh izkIr dj
ldrs gSa- blds fy;s miHkksDrk dks iwoZfu;r QkesZV esa 1234 ij lans'k Hkstuk gksrk gS-
1- lWk¶V cVu 1 lwph] ;k nck,¡a2-
11223344 llffooZZllssll
pqusa-
3- dlZj dks bfPNr vkbVe ij ys tk,a ftls vki ns[kuk pkgrs gS] vkSj lkW¶V cVu
1 vksds nck,¡- vki bu 11 fodYiksa esa ls pqu ldrs gS
(1. News 2. Cricket
3. Joke of The Day 4. Thought of the Day 5. Contest 6. Beauty Tips 7. Health
8. Horoscope 9. Bill Info 0. Unbilled Info
*
.Help). vki bfPNr vkbVe ls lacf/kr
cVu nckdj Hkh fodYi pqu ldrs gSa-
mmnnkkggjj..kk
mnkgj.k ds fy;s] vki Qksu esa fuEufyf[kr izdkj ls
“sports news” izkIr dj ldrs
gSa %
1- lwph $ 2
(lans'k) $ 3(1234 lfoZlsl) $ 1(News) $ 6(NEWS SPORTS) nck,¡-
2- izn'kZu % Hkst jgk---
(1/1) dks%1234
- 20 -
Page 64

ççLLrrkkoouukk
vkidks LG-RD5340 eksckby Qksu [kjhnus ij c/kkbZ- ;g Qksu uohure fMftVy
eksckby dE;qfuds'ku rduhd CDMA (Code Division Multiple Access) ij dke
djus ds fy;s fMtkbu fd;k x;k gS- blesa CDMA flLVe dh dbZ mUur lqfo/kk,¡
gSa tSls bldh vkokt+ cgqr Li"V gS;g ,d mUUkr vkSj ifjiw.kZ Qksu gS vkSj blesa fuEu fofo/k lqfo/kk,¡ gS-
G
cM+k] vklkuh ls i<+k tk ldus okyk] 5 ykbZuks dk Án'kZu $ 1 vkbdku ykbZu
$ 1 lwph ykbZu-
G
isftax] lans'k Hkstuk] okWbl esy] vkSj dkWyj ID-
G
19 - cVuksa okyk cVu iSM (10 uacj cVu@2 QaD'ku cVu@2 lWk¶V cVu@1
fDy;j cVu@4&os usfoxs'ku 1 cVu@1 dkWy cVu@1 ,aM cVu@1 vksds
cVu)-
G
yack cSVjh LVSaM&ckW; vkSj VkWd Vkbe-
G
19 fjaxLoj $ ,l,e,l }kjk 3 MkmuyksM dk fodYi $ Brew }kjk 100
fjaxLoj MkmuyksM dk fodYi-
G
2 okWyisij $ Brew }kjk 50 okWyisij MkmuyksM dk fodYi-
G
vklku lapkyu vkSj dkWfUQxjs'ku ds fy, rqjar rS;kj lwph&lapkfyr baVjQsl-
G
CDMA ,UdksfMax fufgr okWbl çkboslh-
G
dksbZ cVu T+kokc] Lor% fjMk;y] 99 eseksjh fodYiksa okyh 'kh?kz Mk;fyax-
G
vf/kd lqfo/kk vkSj vf/kd dk;Z{kerk ds fy, oSdfYid lgk;d midj.k-
G
Lihdj Qksu] dWky eseks eas-
G
,;j Iysu eksM] y;c/n jks'kuh-
G
,l,e,l] ,y,e,l] ,l,e,l ls bZ&esy] xzqi ,l,e,l-
- 21 -
Page 65

llwwpphh ddhh llqqffoo//kkkk,,¡¡
uke tksM+sa
[kkstsa
xzqIl
'kh?kz Mk;y
fy[ksa
buckWDl
1234
lfoZlsl
vki 600 çfof"V;k¡ laxzg dj ldrs gSaçR;sd ds lkFk 4 Qksu uacj $ bZ&esy $ eseks
tksM+ ldrs gSa vkSj xzqi $ fjax Loj $ lans'k
lpsrd ,lkWbu dj ldrs gSa-
vkids }kjk Qksu cqd esa laxzfgr Qksu uacj
dks [kkstus ds fy;s-
bl QaD'ku ls vki xzqi dk uke cny ldrs
gSa vkSj xzqi ds fy;s fjax Loj lsV dj ldrs
gSa-
'kh?kz Mk;y ls vki dsoy lacaf/kr uacj nck
dj tYnh ls dkWy dj ldrs gSa-
lans'k vkSj bZ&esy fy[ksa ,oa Hkstsa- vki ,d le;
esa 462 v{kjksa rd dk lans'k Hkst ldrs gSa-
ÁkIr ikB lans'k] i`"B] bZ&esy lans'k] Hkst fn;k
x;k] lwfp;k¡ [kksth tk ldrh gSa vkSj lkexzh
ns[kh tk ldrh gS- 30 lans'k rd laxzg dj
ldrs gSa-
,l,e,l ds }kjk miyC/k lfoZl tSls
News (U;wt) JOKE (tksDl) Horoscope
(
Hkfo";Qy) vkfn Hkh fjyk;al ds lHkh
miHkksDrkvksa dks miyC/k gS-
lwph > uke >
uke tksM+sa
lwph
> uke > [kkstsa
lwph
> uke > xzqIl
lwph
>
uke
>
'kh?kz Mk;y
lwph
> lans'k > fy[ksa
(
nnss[[kkssaa iisstt 1155&&1199
)
lwph > lans'k > buckWDl
lwph
> lans'k >
1234 lfoZlsl
(
nnss[[kkssaa iisstt 2200
)
llwwpphh ffoooojj..kk ppqquussaa
- 22 -
Page 66

vkmVckWDl
oWkbl esy
laxzg
Mªk¶V~l
VsEIysV~l
lans'k xzqIl
lans'k feVk,¡
lans'k
lsfVaXl
15 rd Hksts gq, vkSj 15 ugha Hksts gq, lans'k
;gk¡ laxzg dj ldrs gSa-
vki ;gk¡ okWbl esy ckWDl esa fjdkMZ gq,s u;s
okWbl lans'k dks ns[k ldrs gSa-
laxzg esa vki vius lans'kksa dks fdlh vyx
QksYMj esa laxzfgr dj ldrs gSa- 30 lans'k
rd laxzg dj ldrs gSa-
lans'k fy[krs le; mi;ksxdrkZ dks dksbZ
dkWy vkus ls O;o/kku mRiUu gksus ij
Lopkfyr #i ls lans'k ;gk¡ lgsts tkrs gSa30 lans'k rd laxzg dj ldrs gSa-
VsEiysV~l esa 10 iwoZfu/kkZfjr okD;ka'k 'kkfey
gSa- vki 20 VsEiysV~l vkSj tksM+ ldrs gSa-
lans'k xzqIl esa ik¡p 5 ,l,e,l@bZ&esy
xzqIl gS- vki izR;sd xzqi esa 10 lnL; rd
tksM+ ldrs gSa-
vki lHkh lans'k ckWDlks esa ls lans'kksa dks feVk
ldrs gSa-
u;s vkus okys lans'kks ds lans'k lsfVaXl dh
tk ldrh gS-
lwph > lans'k >
vkmVckWDl
lwph > lans'k >
oWkbl esy
lwph > lans'k > laxzg
lwph > lans'k > Mªk¶V~l
lwph > lans'k > VsEIysV~l
lwph > lans'k >
lans'k xzqIl
lwph > lans'k > lans'k
feVk,¡s
lwph > lans'k > lans'k
lsfVaXl
llwwpphh ffoooojj..kk ppqquussaa
- 23 -
Page 67

- 24 -
NwVh gqbZ
çkIr gqvk
Mk;y fd;s
gq,
dkWy eseks esa
dkWy vof/k
fooj.k feVk,¡
çksQkbYl
vki ;gk¡ NwVh gqbZ dkWYl dk fooj.k ns[k ldrs
gSa- vf/kdre 60 uacj (NwVh gqbZ] çkIr] Mk;y fd;s
x;s] dkWy eseks esa) rd lqjf{kr fd;s tk ldrs gSa-
vki ;gk¡ çkIr gqbZ dkWYl dk fooj.k ns[k ldrs
gSa- vf/kdre 60 uacj
(NwVh gqbZ] çkIr] Mk;y fd;s
x;s] dkWy eseks esa) rd lqjf{kr fd;s tk ldrs gSa-
vki ;gk¡ Mk;y fd;s gq, dkWYl dk fooj.k ns[k
ldrs gSa- vf/kdre 60 uacj (NwVh gqbZ] çkIr]
Mk;y fd;s x;s] dkWy eseks esa) rd lqjf{kr fd;s
tk ldrs gSa-
vki ;gk¡ dkWy ds nkSjku lqjf{kr fd;s x;s uacj
ns[k ldrs gSa (vf/kdre 20 uacj rd lqjf{kr dj
ldrs gSa)-
çkIr vkSj Mk;y fd;s gq, lHkh dkWYl ;k vafre
dkWy dh le; vof/k vki ;gk¡ ns[k ldrs gSale; dkmaVj dks fjlsV Hkh dj ldrs gSa-
rhuks dkWy fooj.k ds daVsUl feVk ldrs gSa-
çksQkbYl ls vki vius ifjos'k ds vuqlkj Qksu
dh vkokt lsV dj ldrs gSa- çksQkbYl lwph esa
vkids Qksu ds fjax çdkj] fjax Loj] fjaxj okWY;we]
b;jihl okWY;we] cVu okWY;we] vkSj lans'k lpsrd
ds fy, lsfVaXl gksrh gSa-
lwph > dkWy fooj.k >
NwVh gqbZ
lwph
> dkWy fooj.k >
çkIr gqvk
lwph
> dkWy fooj.k >
Mk;y fd;s gq,
lwph > dkWy fooj.k >
dkWy eseks esa
lwph
> dkWy fooj.k >
dkWy vof/k
lwph
> dkWy fooj.k >
fooj.k feVk,¡
lwph
> çksQkbYl >
1- flQZ daiu@
2-
Silent@3- General@
4-
Outdoor@5- gsMlsV@
6- dkjfdV
llwwpphh ffoooojj..kk ppqquussaa
Page 68

- 25 -
Hkk"kk
lfoZl ,fj;k
?kM+h
okWyisij
lwph LVkby
y;c/n
jks'kuh
LØhu ykbV
dkWUVªkLV
viuh t#jr ds vuqlkj Hkk"kk dk pquko djsa-
English ;k fgUnh esa ls pqusa-
;g vkidks orZeku dk lfoZl ,fj;k crkrk
gS-
vius eksckby Qksu esa çnf'kZu ds fy;s ?kM+h
pqusa-
mu o.kksZ dh fLVªax Mkysa tks vki çnf'kZr
djuk pkgrs gSa- vki vkbMy fLFkfr esa
çn'kZu ds fy,
LCD LØhu çn'kZu pqu
ldrs gSa
vki lwph dh LVkby pqu ldrs gSa-
dkWy vkrs le; ds fy;s vki iSVuZ pqu
ldrs gSa-
blls vki
LCD vkSj cVu iSM dh
cSdykbV dh lsfVax pqu ldrs gSa-
usfoxs'ku cVu ls] vki lcls pednkj ls
de pednkj ds Ldsy ij dkWULVªkLV lsfVax
pqu ldrs gSa-
lwph > çn'kZu > Hkk"kk
lwph > çn'kZu >
lfoZl ,fj;k
lwph
> çn'kZu > ?kM+h
lwph > çn'kZu >
okWyisij
lwph > çn'kZu >
lwph LVkby
lwph
> çn'kZu >
y;c/n jks'kuh
lwph > çn'kZu >
LØhu ykbV
lwph > çn'kZu >
dkWUVªkLV
llwwpphh ffoooojj..kk ppqquussaa
Page 69

- 26 -
esjh lwph
dkWy QkWjoMZ
dkWy çfr{kk
fdlh cVu
mRrj
Lor% fjMk;y
okWbl
çkboslh
Li"V vkokt+
blls vki esjh lwph dks vuqdwfyr dj
viuh ilan dh lwph pqu ldrs gSa-
dkWy QkWjoMZ ls vki lHkh vkus okyh dkWy]
vU; uacj ;k okWbl esy dusD'ku ij
QkWjoMZ dj ldrs gSa-
tc dksbZ dWky py jgh gks rks vkidks vkus
okyh nwljh dWky dk ladsr djus okyh nks
chi lqukbZ iM+ ldrh gS- dWky izrh{kk ds
lfØ; gksus ij] py jgs dWky dks gksYM ij
j[kdj vki vkus okys nwljh dWky dk mRrj
ns ldrs gS-
tc Qksu dh ?kaVh cts] rks mRrj nsus ds fy,
ds vykok dksbZ Hkh cVu nck,¡-
dWky djus dh dksf'k'k vlQy gksus ij
vius vki uacj fjMk;y djus ds igys Qksu
dh izrh{kk vof/k lsV djsa-
CDMA dkWYk ds fy;s c<+h gqbZ ;k lkekU;
okWbl çkboslh lqfo/kk pqusa;g vkWfM;ks
AGC (vkWVks xsu daVªksy)
flLVe ç.kkyh dks lfØ;@fuf"Ø; djrk
gSa-
lwph > lsfVaXl >
esjh lwph
lwph
> lsfVaXl >
dkWy > dkWy QkWjoMZ
lwph
> lsfVaXl >
dkWy > dkWy çfr{kk
lwph
> lsfVaXl > dkWy
> fdlh cVu mRrj
lwph
> lsfVaXl >
dkWy > Lor% fjMk;y
lwph
> lsfVaXl > dkWy
> okWbl çkboslh
lwph
> lsfVaXl > dkWy
> Li"V vkokt+
llwwpphh ffoooojj..kk ppqquussaa
Page 70

- 27 -
dkWy le;d
dkWy laidZ
lpsrd
cVu j{kd
,;j Iysu
eksM
NAM lsV
djsa
MsVk@QSDl
MsVk ckWM
tc dksbZ dkWy py jgh gks rks mlesa yxk
le; çnf'kZr djus ds fy;s vki viuk Qksu
lsV dj ldrs gSa-
;g QaD'ku dkWy laidZ LFkkfir gks tkus ij
vkidks lpsr djrk gS-
blls vki Qksu ds cVu iSM dh lqj{kk dj
ldrs gSa] rkfd xyrh ls dksbZ uacj Mk;y
u gks-
tc vkidk Qksu ,;j Iysu eksM esa gksrk gS]
rc blls u rks dksbZ dkWy fd;k tk ldrk
gS] u ÁkIr fd;k tk ldrk gS vkSj u gh
vkWuykbu tkudkjh rd ig¡qpk tk ldrk gS-
Qksu dk
NAM (uacj vlkbuesaV ekWM~;wy)
pqusavki gkbZ LihM MsVk lsokvksa tSls baVjusV
czkmt+ djus ;k vU; Mk;y&vi usVofdZax
QaD'ku dk mi;ksx djus ds fy;s vius Qksu
dk ekWMse ds #i esa mi;ksx dj ldrs gSa-
bl lsfVax ls miHkksDrk VfeZuy ij ckWM jsV
lsV fd;k tk ldrk gS-
lwph > lsfVaXl > dkWy
> dkWy le;d
lwph
> lsfVaXl > dkWy
> dkWy laidZ lpsrd
lwph
> lsfVaXl >
Qksu > cVu j{kd
lwph
> lsfVaXl >
Qksu > ,;j Iysu eksM
lwph
> lsfVaXl >
Qksu > NAM lsV djsa
lwph
> lsfVaXl >
Qksu > MsVk lsfVaXl >
MsVk@QSDl
lwph
> lsfVaXl >
Qksu > MsVk lsfVaXl >
MsVk ckWM
llwwpphh ffoooojj..kk ppqquussaa
Page 71

- 28 -
lfoZl
lpsrd
o'kZu
ykWd eksM
vkikrdkyhu
uacj
ykWd dksM
cnysa
eseksjh feVk,¡
iwoZ fu;r
iqu% lsV djsa
VkbZe eSustj
lfoZl cnyus ij vkidks lwfpr djrk
gS-
lk¶Vosvj vkSj ihvkj,y o'kZu ns[ksa-
;g vkids Qksu dks vukf/kÑr mi;ksx
ls lqjf{kr j[krk gSa-
(iwoZfu;r ykWd dksM
00000000
gS)-
vkidk Qksu yWkd vFkok izfrcaf/kr gksus
ij Hkh vki 100] 101] 102 uacjksa ij
dWky dj ldrs gSa-
u;s yWkd dksM ds fy;s vki u;k pkj
vadksa dk yWkd dksM uacj fy[k ldrs gSa-
Qksucqd esa laxzfgr lHkh tkudkjh ;k
lHkh MkVk feVk,¡ vkSj okil iwoZfu;r
lsfVax ij tk ldrs gSa-
vki dqN lsfVaXl dks fjlsV djds
iwoZfu;r lsfVax ij tk ldrs gSa-
vius dk;ZØe blesa laxzghr dj nsa vkSj
vkidk Qksu vkids fu;r le; ds ckjs
esa vkidks lrdZ dj nsxk-
160 lans'k rd
lqjf{kr dj ldrs gSa-
lwph > lsfVaXl > Qksu
> lfoZl lpsrd
lwph
> lsfVaXl > Qksu
> o'kZu
lwph
> lsfVaXl > lqj{kk
> ykWd eksM
lwph
> lsfVaXl > lqj{kk
> vkikrdkyhu uacj
lwph
> lsfVaXl > lqj{kk
> ykWd dksM cnysa
lwph
> lsfVaXl > lqj{kk
> eseksjh feVk,¡
lwph
> lsfVaXl > lqj{kk
> iwoZ fu;r iqu% lsV djsa
lwph
> fu/kkZjd > VkbZe
eSustj
llwwpphh ffoooojj..kk ppqquussaa
Page 72

- 29 -
Vq Mw
eseks
vykeZ
D-Day la[;k
LVkWi okWp
dSyD;qysVj
djsUlh
dUojVj
fo'o ?kM+h
blesa 40 Vq Mw lqjf{kr fd, tk ldrs gSablesa 40 eseks lqjf{kr fd, tk ldrs
gSafdlh dk;Z dk vykeZ le; cnyus ds
fy,vki fdlh vko';d dk;Z dh 'kq#vkr
;k lekfIr ds fnuks dh x.kuk ds fy;s
D-Day la[;k dk bLrseky dj ldrs gSa-
5 lans'k rd lqjf{kr dj ldrs gSa-
LVWki oWkp ls vki le; lhek vkSj le;
dk varjky ;k ySi le; ns[k ldrs gSa;g ljy xf.krh; x.kuk djrk gS-
djsUlh dUoVZ dj ldus ls igys]
vkidks dksbZ vk/kkj djsUlh pquuh gksrh
gS (vkerkSj ij vkidh ?kjsyq djsUlh)
vkSj fofue; nj nsuh gksrh gS-
;g orZeku le; fu/kkZfjr djrh gS
tc fd vki fdlh nwljs Vkbe tksu
;k ns'k esa gksrs gSa-
lwph
> fu/kkZjd > Vq Mw
lwph > fu/kkZjd > eseks
lwph
> fu/kkZjd >
vykeZ
lwph > fu/kkZjd >
D-Day
la[;k
lwph > fu/kkZjd >
LVkWi okWp
lwph
> fu/kkZjd >
dSyD;qysVj
lwph > fu/kkZjd >
djsUlh dUojVj
lwph > fu/kkZjd >
fo'o ?kM+h
llwwpphh ffoooojj..kk ppqquussaa
Page 73

- 30 -
R&lwph
xse
(fØdsV)
xse lsfVaXl
;g vkidks R oYMZ MsVk lfoZlsl tSls fjax
Loj] fØdsV] MsfVax] U;wt] Hkfo";Qy] 'kgj
vkSj Vhoh xkbM] vkSj nwljh dbZ lfoZl
çnkrk }kjk miyC/k djk;h x;h lfoZlsl
ls tksM+rk gS-
xse [ksys
vki xse dh /ofu okWY;we lsV dj ldrs gSa
vkSj LØhu ykbV pkyw ;k can dj ldrs gSa-
lwph >RoYMZ >
R&lwph
lwph
>RoYMZ >
xse > fØdsV
lwph >RoYMZ >
xse > xse lsfVaXl
dkWy ds nkSjku%
lwph 1
dkWy ds nkSjku%
lwph 2
dkWy ds nkSjku%
lwph 3
dkWy ds nkSjku%
nck,¡
blls vki dkWy ds nkSjku vU; O;fDr }kjk
fn;k tkus okyk Qksu uacj uksV dj ldrs gSavf/kdre 20 uacj rd laxzg fd;s tk ldrs gSa-
;g QaD'ku vkids Qksu dk ekbØksQksu ykWd
dj nsrk gS vkSj nwljs O;fDr rd vkidh
vkokt+ ugha igq¡pus nsrk-
CDMA dkWYl ds fy;s ekud ;k c<+k gqvk ds
#i esa çkboslh lqfo/kk lsV djsa- CDMA esa
okWbl çkboslh lqfo/kk gS-
dkWy ds nkSjku Lihdj vkWu eksM dks rqjar
lfØ; ;k jn~n djus ds fy,] nck,¡-
dkWy eseks esa
ekSu@ekSu
ugha
okWbl çkboslh
vkWu@vkWQ
Lihdj eksM
vkWu@vkWQ
llwwpphh ffoooojj..kk ppqquussaa
ddkkWWyy ddss nnkkSSjjkkuu mmii;;kkssxx ggkkssuuss ookkyyss QQaaDD''kkuu
Page 74

- 31 -
llqqjj{{kkkk ttkkuuddkkjjhh
bu ljy fn'kkfunsZ"kksa dks i<sa] fu;eksa dk
mYya?ku [krjukd ;k voS/kkfud gks
ldrk gS- bl miHksDrk ekxZnf'kZdk dks
ges'kk vklku igq¡p okyh txg ij j[ksa-
funsZ'kksa dk
mYya?ku djus
ls çksMDV esa
ekewyh ;k cgqr T;knk [kjkch vk
ldrh gSa-
ppkkttZZjj ,,ooaa ,,MMkkIIVVjj llqqjj{{kkkk
G
pktZj ,oa ,MkIVj flQZ buMskj mi;ksx
ds fy, gS-
ccSSVVjjhh ddhh ttkkuuddkkjjhh ,,ooaa nnss[[kkHHkkkkyy
G
Ñi;k viuh cSVjh dks Bhd ls u"V djsa-
G
cSVjh dks jhpktZ djus ds fy, vkidks
cSVjh ds fcydqy fupys Lrj rd
igq¡pus dk bartkj ugha djuk pkfg,¡-
G
vius LG Qksu ds eWkMy ds fy,
mi;qDr cSVjh vkSj pktZj dk gh
mi;ksx djsa-
LG ds pktZj cSVjh dh
vk;q c<+krs gSa-
G
cSVjh dks u rks [kksysa vkSj u gh 'kWkVZ
lfdZV djsa-
G
cSVjh ds /kkrq ds fljs lkQ j[ksa-
G
cSVjh Bhd ls dke u djs rks mls cny
nsa- cnyus dh t#jr iM+us ls igys
cSVjh dks lSdM+ksa ckj pktZ fd;k tk
ldrk gSa-
G
;fn cSVjh dks cgqr le; ls mi;ksx
ugha fd;k x;k gks rks mldh vk;q
c<+kus ds fy, mls fQj ls pktZ djsa-
G
cSVjh dks xeZ ;k BaMh txg esa u NksMs+a]
blls cSVjh dh dk;Z{kerk ?kV ldrh gS-
G
yach LØhu ykbZV lsfVaXl] feuh czkmlj]
MsVk dusfDVfoVh] cSVjh dh vk;q] VWkd
vkSj LVWMck; le; dks izHkkfor dj
ldrs gSa-
G
vxj Qksu vlk/kkj.k #i ls dke djus
yxrk gS] rks cSVjh dk lsYQ& ÁksVsD'ku
QaD'ku Qksu dk ikWoj can dj nsrk gS,slh fLFkfr esa Qksu ls cSVjh fudky dj
iqu% yxk,¡ vkSj Qksu dks pkyw djsa-
Page 75

- 32 -
ffooLLQQkkssVV]] >>VVddkk vvkkSSjj vvkkxx
G
Qksu dks cgqr T+;knk /kqy Hkjh txg ij
u j[ksa vkSj ikoj dkWMZ vkSj Å"ek ds
Lkzksr ds chp vko';d U;wure nwjh j[ksa-
G
Qksu dks lkQ djus ls igys ikoj dkWMZ
dks Iyx ls fudky ysa vkSj xank gksus
ij ikoj Iyx dks lkQ djsa-
G
Ikkoj Iyx dk mi;ksx djrs] le;
lqfuf'pr djsa dh ;g Bhd ls dusDVsM
gSa- ;fn ;g Bhd ls dusDVsM ugha gS rks
blls cgqr T+;knk Å"ek iSnk gks ldrh
gS vkSj vkx yx ldrh gS-
G
;fn vki Qksu ds fjlsIVsdy (ikoj
Iyx bu
) dks doj fd, fcuk tsc esa
;k fdlh ,sls cSx esa j[krs gSa ftlesa
/kkrq dh oLrq,Wa tSls dksbZ flDds] isij
fDyi ;k isu gS rks Qksu 'kkWVZ & lfdZV
gks ldrk gS- mi;ksx esa ugha gksus ij
fjlsIVsdy dks ges'kk doj djds j[ksa-
G
cSVjh dks 'kWkVZ & lfdZV ugha djsavkidh tsc ;k cSx esa j[kh /kkrq dh
oLrq,¡ tSls dksbZ flDdk] isij fDyi ;k
isu fgyk, tkus ij cSVjh ds $ ;k &
VfeZuy
(cSVjh dh /kkrq fLVªIk) dks 'kWkVZ
& lfdZV dj ldrh gSa- VfeZuy dk
'kWkVZ & lfdZV cSVjh dks uqdlku ig¡qpk
ldrk gS vkSj blls foLQksV gks ldrk
gS-
llkkeekkUU;; uukkssffVVll
G
{kfrxzLr cSVjh dk mi;ksx djus dk cSVjh
dks eq¡g esa j[kus ls xaHkhj pksV yx ldrh
gS-
G
pqacdh; ?kVdks okyh phtsa tSls ØsfMV
dkMZ] Qksu dkMZ] cSad cqd] ;k lcos fVdV
dks Qksu ds ikl u j[ksa- Qksu dk
pqacdRo budh pqacdh; fLVªi esa laxzghr
MsVk dks uqdlku igq¡pk ldrk gS-
G
Qksu ij yacs le; rd ckr djus ls
mi;ksx ds nkSjku iSnk gqbZ Å"ek ds dkj.k
dWky dh xq.kork de gks ldrh gS-
G
tc Qksu dk mi;ksx yacs le; rd ugha
gks] rks bldh ikoj dWkMZ dk Iyx fudky
dj bls lqjf{kr txg ij j[ksa-
G
Qksu dks fdlh Hkh fjlhfoax midj.k (tSls
Vhoh ;k jsfM;ksa
) ds ikl mi;ksx djus ls
Qksu esa O;o/kku vk ldrk gS-
Page 76

G
,aVhuk {kfrxzLr gksus ij Qksu dk mi;ksx
u djsa- ;fn {kfrxzLr ,aVhuk peM+h ds
Ropk ds laidZ essa vkrk gS] rks blls Ropk
FkksM+h ty ldrh gS- {kfrxzLr ,aVhuk dks
cnyus ds fy, Ñi;k vf/kÑr
LG lfoZl
lsaVj ls laidZ djsa-
G
Qksu dks ikuh esa Mqcks,¡ ugha- ;fn ,slk
gks tkrk gS] rks bls rqjar can dj nsa vkSj
cSVjh fudky nsa- ;fn Qksu dke ugha
djrk gS] rks bls vf/kÑr
LG lfoZl
lsaVj ij ys tk,¡-
G
bl mRikn dh ikoj dWkMZ dk mi;ksx
djus ij vki ysM ds laidZ esa vk,¡xas]
ftls dSfyQksfuZ;k jkT; esa ,slk
jklk;fud rRo ekuk tkrk gS tks dSlaj]
izlo ;k vU; iztuu laca/kh ck/kkvksa dk
dkj.k gks ldrk gS- bls gkFk yxkus ds
ckn gkFk /kks,¡-
G
Qksu ij jax ugha djsa-
G
vlko/kkuhiwoZd mi;ksx fd, tkus] Qksu
dks lq/kkjus ;k lWk¶Vos;j ds vixzsMs'ku ds
dkj.k vkids Qksu esa laxzghr MsVk gV
ldrk gS- Ñi;k vius egRoiw.kZ Qksu
uacjksa dk cSdvi j[ksa-
(fjax Vksu] 'kCn
eSlst] oWkbl esy] fp= vkSj ohfM;ks Hkh
gV ldrs gaS-
)
MsVk dh gkfu ds fy, fuekZrk mRrjnk;h
ugha gSa-
G
lkoZtfud LFkkuksa ij Qksu dk mi;ksx
djrs le; Qksu dks daiu eksM ij lsV
djsa rkfd vU; yksxksa dks ijs'kkuh u gks-
G
vius Qksu dks dku esa yxkrs le; bls
vWku ;k vWkQ ugha djsa-
- 33 -
 Loading...