

Page 1

CONTENTS 1
PHONE COMPONENTS 2
ONSCREEN ICONS 4
INSTALLING THE R-SIM CARD AND
BATTERY 5
Installing the R-SIM card 5
Installing and Removing the Battery 5
Charging the Battery 6
Battery Charge Level 6
BASIC FUNCTIONS 7
Turning the Phone On and Off 7
Changing the display language 7
Airplane Mode 7
Making a Call 8
Receiving Calls 8
PLAY FM RADIO 9
MENU TREE 10
ENTERING AND EDITING INFORMATION
11
Entering Information Using T9 Text Input 11
To Edit in Hindi Mode 12
MESSAGES 13
Write Text 13
SMS Chat 15
Inbox 15
Outbox 16
Voice Mail 17
Archive in R-SIM 17
Drafts 18
Templates 18
SMS Groups 18
Erase Msgs 19
Msg Settings 19
PREMIUM SERVICES 20
INTRODUCTION 21
MENU FEATURES 22
FUNCTIONS USED DURING A CALL 31
SAFETY INFORMATION 32
Charger and Adapter Safety 32
Battery Information and Care 32
General Notice 32
LIMITED WARRANTY STATEMENT 34
SERVICE CENTER LIST 36
1
CONTENTS
Page 2

The following shows key components of your mobile phone.
PHONE COMPONENTS
2
1. Earpiece
2. Headset Jack
3. Soft Key 1
4. CALL Key
5. Vibrate Mode Key
6. Microphone
7. LCD Screen
8. 4 Way Navigation Key
9. Soft Key 2/Clear
10. END/PWR Key
11. Alphanumeric Keypad
12. Key Guard
13. International Call Prefix Key
14. Charger Port
Page 3

LCD Screen Displays messages & indicator
icons.
Soft Keys The names of the functions, of these
keys appear on the bottom of the screen.
●
Soft Key 1
Used to display the function setting menu.
Accepts the highlighted choice when
navigating through a menu.
●
Soft Key 2/Clear
Used to search phonebook and clear a single
space or character. Go to previous menu.
During a call, activate speaker On/Off.
Send SMS on call reject during an incoming
call.
CALL Key Allows user to place or answer calls.
See and redial from call history.
END/PWR Key Used to turn power On/Off and
to end a call. Using this key, you can return to the
main menu display screen. When you press once,
when a call is received, the phone stops ringing or
vibrating depending on the mode it is in. Press
twice to reject the call.
Alphanumeric Keypad These keys enable
you to enter numbers and characters and choose
menu items.
Navigation Key This Navigation key allows
quick access Messages and Voice Mail
notification messages.
FM Radio, Reliance Mobile World,
Profiles.
Vibrate Mode Key In standby mode, set the
vibrate mode by pressing and holding the key
about 2 seconds.
3
Page 4

The phone screen displays several onscreen icons which appear when the
phone is powered on.
ONSCREEN ICONS
4
Displays the strength of the signal
received by the phone and current
signal strength is indicated by the
number of bars displayed on the
screen.
No service.
The phone is not receiving a system
signal.
In use. A call is in progress.
* No icon indicates the phone is in
standby mode.
Charge level. Indicates battery charge
level.
Roaming mode.
In General mode.
In Silent mode.
In Alarm mode.
In Vibrate Only mode.
In Outdoor mode.
Indicates that a Text Message or Voice
Mail Messages has been received.
In Headset mode.
Page 5
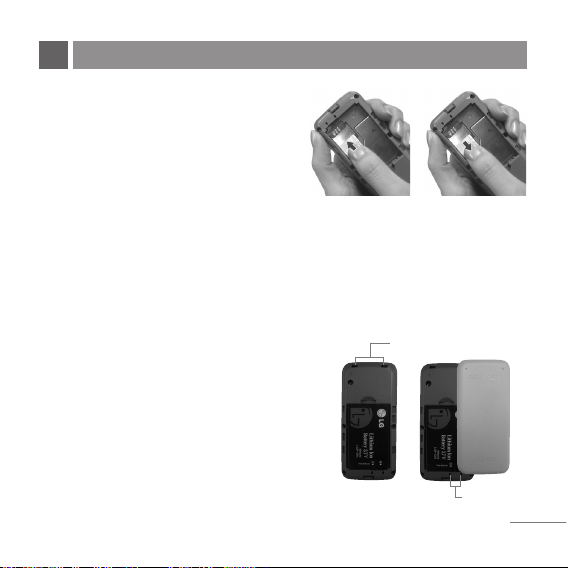
Installing the R-SIM card
Your R-SIM card contains your phone number,
service details and contacts and must be
inserted into your handset. If your R-SIM card is
removed then your handset becomes unusable
until a valid one is inserted. Always disconnect
the charger and other accessories from your
handset before inserting and removing your R-SIM card. Slide the R-SIM card into the RSIM card holder. Make sure that the R-SIM card is properly inserted and the gold contact
area on the card is facing downwards. To remove the R-SIM card, press down lightly and
pull it in the reverse direction.
NNoottee
The metal contact of the R-SIM card can easily be damaged by scratches. Pay special attention
to the R-SIM card while handling.
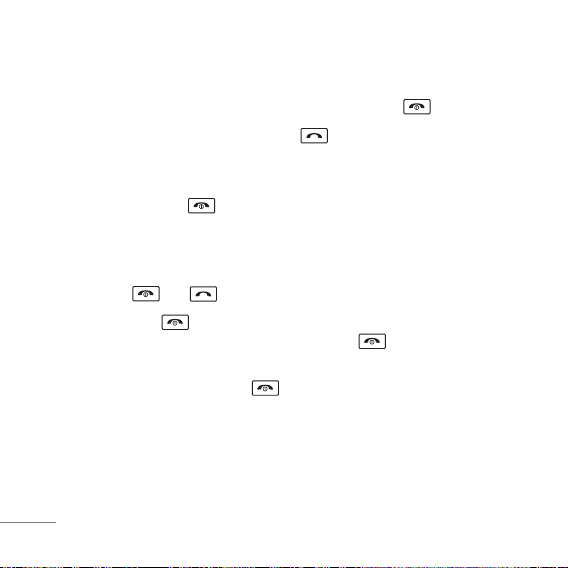
Installing and Removing the Battery
●
To install, insert the battery into the opening on
the back of the phone, and insert the bottom of
battery into groove at the bottom of the handset.
Gently press down the cover until the latch
snaps into place.
●
To remove, push the back cover down. Push the
tab with one hand and lift the top of the battery
to separate.
5
INSTALLING THE R-SIM CARD AND BATTERY
Slot
Groove
Page 6

6
Charging the Battery
To use the AC adapter charger provided with your phone:
1. Plug the AC adapter into the electrical outlet.
2. Insert the micro USB charger of the adapter into the AC adapter jack on the
bottom of the phone. (Make sure the battery is installed.)
●
As the phone charges, the battery icon continually displays a progression
from empty ( ) to full ( ).
It takes about five hours to fully recharge a completely rundown battery through
AC adaptor or through USB cable for laptops and PCs.
Battery Charge Level
The battery charge level is shown at the top right of the LCD screen.
When the battery charge level becomes low, the low battery sensor will alert
you in three ways: sounding an audible tone, blinking the battery icon outline,
and POP UP displaying Recharge the battery If the battery charge level
becomes exceedingly low, the phone will automatically switch off and any
function in progress will not be saved.
Page 7

Turning the Phone On and Off
1. Install a charged battery pack or connect the phone to an external power
source such as the AC adaptor.
2. Hold down the Key for 2 seconds until the LCD screen flashes.
NNoottee
As any other communication device, avoid any unnecessary contact with the antenna
while your phone is turned on.
Changing the display language
1. In standby mode, press Soft Key 1 Menu.
2. Press , , .
3. Set English/
ffggUUnnhh
with and then press Soft Key 1.
Airplane Mode
When your phone is in Airplane Mode, it cannot send or receive any calls or
access online information. You may use the phone’s other features, such as
Game, Scheduler, Memo, etc. When Airplane Mode is enabled, The message is
displayed on the screen “Airplane Mode”.
1. In standby mode, press Soft Key 1 Menu, , , .
2. Select On or Off and press Soft Key 1.
7
BASIC FUNCTIONS
Page 8
Making a Call
Every time you make a call, follow these steps:
1. Make sure that the phone is turned on. If not, hold down for 2 seconds.
2. Type the phone number and then press .
●
If the phone is locked, press Soft Key 2 Unlock and type the 4 digits lock
code.
3. To end the call press .
Receiving Calls
1. When the phone rings or vibrate (if the Vibrate Mode is enabled), press any
key (except ) or depending on the Call setting.
●
When you press once, when a call is received, the phone stops ringing
or vibrating depending on the mode it is in. Press twice to reject the
call.
2. To end an answered call, press .
3. If you are not in the condition to receive call, press Soft key 2 to send
predefined SMS on Call Reject to the caller during incoming call.
8
Page 9

1. Attach headset to the headset jack.
2. Press Menu + 8 FM Radio + 1 Listen To Radio or Press for long time in
idle mode.
3. Press Soft Key 1 for below Options:
G Main Screen Go to main screen.
G Switch Off Switch off the FM Radio.
G Edit Channels Adjust and save channels manually.
G Auto Scanning Auto scan and save channels.
G Reset All Reset all channels to default mode.
G Listen Via Listen FM Radio via Speaker or Headset.
NNoottee
Upto 12 channels can be configured. 92.7 BIG FM is Set as the default FM Channel.
9
PLAY FM RADIO
Page 10

10
1. Names
1. Add Name
2. Find
3. Groups
4. Speed Dial
5. Copy & Move
6. Erase Names
7. My Profile
8. Memory Info
2. Messages
1. Write
2. Inbox
3. Outbox
4. Voice Mail
5. Archive in R-SIM
6. Drafts
7. Templates
8. SMS Groups
9. Erase Msgs
0
. Msg Settings
3. Premium Services
1. SMS 51234 Services
2. Dial 51234 Services
3. Reliance Caller Tunes
4. Call History
1. Missed
2. Received
3. Dialled
4. In Call Memo
5. Call Duration
6. Erase History
5. Mobile World
1. R-Menu
2. Reset R-Menu
3. Games
6. Profiles
1. Vibrate Only
2. Silent
3. General
4. Outdoor
5. Headset
7. Organ.&Tools
1. Scheduler
2. Memo
3. Alarm
4. Stopwatch
5. Calculator
6. World Clock
8. FM Radio
1. Listen To Radio
9. Settings
1. Display
2. My Menu
3. Call
4. Phone
5. Security
MENU TREE
Page 11

11
Entering Information Using
T9 Text Input
In the text input field, press Soft Key
1, and select entry mode by
pressing Up/Down navigation key.
There are 6 entry mode - T9En, Abc,
123, Symbols, Smileys and Hindi.
- Shift Key : Press Shift key to
change the Letter Case.
- Next Key : In T9En mode,
press to display other matching
words.
Typing In T9 Mode
For example, to write “Call the
office”, follow these steps:
1. Press: Soft Key 1, to change
letter case to T9En mode.
2. Press: .
3. Press: to complete the word
and add a space.
4. Press:
.
5. Display: Call the office.
Typing In ABC (Multi-tap) Mode
For example, to type “LG”, follow
these steps:
1. Press: Soft Key 1, to change
letter case to Abc mode.
2. Press: to change to ABC
Caps Lock mode.
3. Press: .
4. Display: LG.
ENTERING AND EDITING INFORMATION
Page 12

12
123 (Numbers) Mode
Type numbers using one keystroke
per number.
To change to 123 mode in a text entry
field, press Soft Key 1, and
select 123 mode.
Symbols/Smileys Mode
To change to Symbols/Smileys mode
in a text entry field, press Soft Key 1,
and select Symbol or Smileys
mode.
Press to cycle through the
desired items. To select item, Press
the assigned number key.
To Edit in Hindi Mode
Press Soft Key 1, and select
Hindi mode.
For example, to type " "
1. Press 2 times.
2. Press 8 times.
3. Press 5 times.
4. Press 4 times.
5. Press 3 times.
6. Press 3 times.
Page 13

13
Write Text
LMS(Long Message Service) allows you to send a message up to 462
characters at a time. Before sending LMS message, total number of SMS
packets formed are intimated to the user and confirmation is taken to send.
Maximum 3 packets for English and 4 for Hindi messages can be sent. Each
LMS packet is received as individual message. Every LMS message shows the
packet sequence number in the message for ex: In case of 3 packets, <1/3>,
<2/3>, <3/3>.
1. Press Soft Key 1 Menu, or .
2. Select Write.
3. Select Write Text.
4. Type your desired message and press Soft Key 1 Options.
G
Send Use to send the message.
G
Text Mode Use to select text type (entry mode).
G
Templates Select a sample message.
G
Save Save to Draft message.
G
Insert Number Insert the desired number saved in phone.
G
Add Signature Insert signature (pre edited in Msg Setting).
5. After selecting Send, enter the contact number where the message is to be
sent, enter the next recipients address by pressing . You can add up to
10 recipients. Press Soft Key 1 Options.
MESSAGES
Page 14

G
Send Use to send the message.
G
The Last Select a recent sent number.
G
SMS Groups Select SMS Group.
G
Find Names Select a phonebook entry.
6. After entering the phone number, press Soft key 1 Options and select utility
for your message. Select send to send your message.
G
Send Use to send the message.
G
Priority Allows you to give the priority to message. Normal
or Urgent.
G
Delivery Ack This function allows you to know whether the
message is successfully transmitted to other party
or not when the transmitted message is received in
other party’s phone. If you want to activate this
function, set to On.
G
Deferred Allows you to delay sending the message until the
programmed time frame. Immediate/After 30
Minutes/After 1 Hour/After 2 Hours/After 12
Hours/After 1 Day/After 2 Days.
G
Validity Indicates the validity of message delivery to the
Short Message Service Center (SMSC) without
being transmitted to the destination address for
certain periods of time. Those messages will be
deleted within the programmed time frame. Validity
time frames are as follows: Default/30 Minutes/
1 Hour/2 Hours/12 Hours/1 Day/2 Days.
G
Save Sent Msg You can save this message in Outbox.
14
Page 15

15
SMS Chat
SMS Chat enhances you text message experience.
1. Press Soft Key 1 Menu, or .
2. Select Write.
3. Select SMS Chat.
4. Insert mobile number of other party and your chat name and press Soft Key 1
Options + 0(Send).
5. Type your message.
6. Press Soft Key 1 Options:
G Send Send the chat message.
G Text Mode Allows you to select text type.
G Templates Select message from preloaded template.
G Change Chat Name Change your chat name.
G Change Receiver Change contact number of receiver.
G Single Line Editor Select editing mode from Single Line Editor.
G Scroll Mode Select scroll mode.
G Exit Exit from SMS chat.
Inbox
Received Text messages, Page, Delivery ack, lists may be searched, and the
Page 16

contents may be viewed. Received messages are sorted in an order of unread
messages and read messages. Up to 30 message can be stored.
To view the list of the received messages.
1. Press Soft Key 1 Menu, or .
2. Select Inbox.
G Messages are saved in order of Unread/Read.
3. After selecting the desired message with key, press Soft Key 1 Options.
G View You can read the selected message.
G Reply This allows you to reply to the selected message.
G Erase Delete the selected message from the inbox.
Outbox
Up to 10 sent messages and 10 unsent messages can be stored in the Outbox.
Users may view lists and contents of sent messages or unsent messages in this
menu. To save a message in Outbox “Save Sent Messages” should be selected
in “Msg Settings”.
1. Press Soft Key 1 Menu, or .
2. Select Outbox.
3. Select Sent or Unsent.
4. After selecting the desired message with key, press Soft Key 1 Options.
G View You can read the selected message.
16
Page 17

G Forward You can modify and forward the message you've got.
G Erase Delete the selected message from the Outbox.
NNoottee
Options for Unsent are as follows; View/Resend/Erase/Forward
Voice Mail
Allows you to view the new voice messages recorded in the voice mail box.
Once you exceed the storage limit, the old messages will be overwritten. When
you have a new voice message your phone will alert you.
1. Press Soft Key 1 Menu, or .
2. Select Voice Mail.
3. Press Soft Key 1 Options. Listen/Erase While you are answering a call, if you
have a new message, the sender’s number will be displayed on the screen.
Archive in R-SIM
Archive allows you to store your messages in a different folder in the R-SIM
card. Storage capacity depends on your R-SIM card.
1. Press Soft Key 1 Menu, or .
2. Select Archive in R-SIM.
3. After selecting the desired message with key, press Soft Key 1 Options.
View/Forward/Erase.
17
Page 18

Drafts
The text message is saved in Drafts. A total of up to 10 messages can be saved
in Drafts.
1. Press Soft Key 1 Menu, or .
2. Select Drafts.
3. After selecting the desired message with key, press Soft Key 1 Options.
View/Erase
Templates
There are 10 predefined phrases included in the Templates. You can add up 20
templates more. A total of 30 templates can be saved.
1. Press Soft Key 1 Menu, or .
2. Select Templates.
3. After selecting the desired message with key, press Soft Key 1 Options.
View/Add/Erase
NNoottee
For the added templates, you can erase template.
SMS Groups
SMS Groups consist of 5 SMS Groups with each group consisting of maximum
10 members. After selecting group and moving input display, send a message to
the phone number of the selected group member.
18
Page 19

1. Press Soft Key 1 Menu, or .
2. Select SMS Groups.
3. After selecting the desired message with key, press Soft Key 1 Options.
View/Send/Rename/Clear Group/Clear All
Erase Msgs
Allows you to erase messages in each message box.
1. Press Soft Key 1 Menu, or .
2. Select Erase Msgs.
3. Select the item of choice with key then press Soft Key 1 Options.
Msg Settings
Allows you to configure settings for messages.
1. Press Soft Key 1 Menu, or
2. Select Msg Settings.
3. Select the item of choice with key then press Soft Key 1 Select.
Customize Msg settings for your preference.
19
Page 20

SMS 51234 Services
Exciting SMS-based Infotainment services such as News, Joke, Horoscope etc
are available to Reliance subscribers. Using the Premium Services, the user will
be able to access interesting information on common subjects through SMS.
User needs to select the Menu corresponding to the Service Keyword.
1. Press Soft Key 1 Menu, .
2. Select SMS 51234 Services.
3. Place the cursor on the item that you want to select, and then press Soft key 1,
You may select from 14 items. (1.Reliance Caller Tunes 2.News 3.Cricket Score
4.Missed Calls 5.Horoscope 6.Jokes 7.Contest 8.Thought of The Day 9.Beauty
Tips 10.Health 11.Prepaid Balance 12.Bill Info 13.Unbilled Info 14.Help)
You may select the keyword that you want to send in subsequent-Menu.
Example
For example, to receive the "sports news" you can operate the phone as follow:
1. Press Menu + 3(Premium Serv) + 1(SMS 51234 Services) + 2(News) +
Soft Key 1 & 5(Sports)
2. Press Soft Key 1 Send.
3. Display: Sending.. To:51234
20
PREMIUM SERVICES
Page 21

21
Congratulations on your purchase of the RD3600 Cellular phone that has been designed to operate with the
latest digital mobile communication technology, Code Division Multiple Access (CDMA). The CDMA
system has greatly enhanced voice clarity and can provide various types of advanced features.
This is an advanced and compact phone which has diverse features as follows:
●
One touch key for FM Radio.
●
Large, easy-to-read, 5 lines display + 1 Icon Line + 1 Menu Line.
●
Paging, Messaging, Voice Mail and Caller ID.
●
17-key keypad (10 number keys / 2 function keys / 2 Soft keys / 1 four way navigation /
1 Call key / 1 End key).
●
Long battery stand-by and talk time.
●
Choice of 17 Ring sounds + 30 Reliance Mobile World downloadable Ring tones.
●
Choice of 4 Wallpapers.
●
Menu-driven interface with prompt for easy operation and configuration.
●
Voice Privacy inherent with CDMA encoding.
●
Any Key Answer, Auto Redial, Speed Dial up to 99 memory locations.
●
Optional accessories with greater convenience and enhanced functionality.
●
In Call Memo, PREMIUM SERVICES, Mobile World, Games.
●
Airplane Mode, Rhythmic Lighting.
●
SMS, LMS, SMS Groups.
●
SMS on call reject.
INTRODUCTION
Page 22

22
Names
AAdddd NNaammee
MMeennuu 11..11
Store up to 500 contacts, adding 3
phone numbers + Memo with each
entry and assign Group + Ring Tone +
Message Alert Tone to each entry.
FFiinndd
MMeennuu 11..22
To find phone numbers you have
stored in the Phone Book.
GGrroouuppss
MMeennuu 11..33
This is a function for managing
groups, group name and setting Ring
tones for each group members.
SSppeeeedd DDiiaall
MMeennuu 11..44
Speed Dial allows you to make a call
faster by just pressing a
corresponding number.
NNoottee
Speed Dial can be assigned only
from the phone memory.
CCooppyy && MMoovvee
MMeennuu 11..55
Select Storage Type between Phone
to R-SIM and R-SIM to Phone.
EErraassee NNaammeess
MMeennuu 11..66
Erase names and numbers saved in
Phone Book.
MMyy PPrrooffiillee
MMeennuu 11..77
Store my profile such as name, phone
numbers, and memo.
MMeemmoorryy IInnffoo
MMeennuu 11..88
Allows you to check memory
infomation of Phone & R-SIM.
MENU FEATURES
Page 23

23
Messages
WWrriittee
MMeennuu 22..11
((RReeffeerr ttoo 1133~~1155 ppaaggee))
Write and send Message. Allows you
to send a message up to 462
characters at a time.
IInnbbooxx
MMeennuu 22..22
Received Text messages, Page,
Delivery Ack, lists may be searched,
and the contents may be viewed. Up
to 30 can be stored.
OOuuttbbooxx
MMeennuu 22..33
Upto 20 messages can be stored in
the Outbox.
VVooiiccee MMaaiill
MMeennuu 22..44
Allows you to view the new voice
messages recorded in the voice mail
box.
AArrcchhiivvee iinn RR--SSIIMM
MMeennuu 22..55
Archive allows you to store your
messages in a different folder in the
R-SIM card. Storage capacity
depends on your R-SIM card.
DDrraaffttss
MMeennuu 22..66
When a user is interrupted by a call
while composing a message,
messages automatically get saved.
Up to 10 can be stored.
TTeemmppllaatteess
MMeennuu 22..77
There are 10 predefined phrases (in
both English & Hindi) included in the
Templates. You can add up to 20
templates more.
SSMMSS GGrroouuppss
MMeennuu 22..88
Msg Groups consists of 5 SMS
Groups with each group consisting of
maximum 10 members.
Page 24

24
EErraassee MMssggss
MMeennuu 22..99
Allows you to erase messages in
each message box.
MMssgg SSeettttiinnggss
MMeennuu 22..00
Message Settings can be configured
for new messages such as priority,
delivery acknowledgement, Validity &
signature etc.
Premium Services
SSMMSS 5511223344 SSeerrvviicceess
MMeennuu 33..11
(Refer to 20 page)
Exciting SMS-based Infotainment
services such as News, Joke,
Horoscope etc are available to
Reliance subscribers.
DDiiaall 5511223344 SSeerrvviicceess
MMeennuu 33..22
Listen and follow the voice and enjoy
lots of wonderful task.
RReelliiaannccee CCaalllleerr TTuunneess
MMeennuu 33..33
Now you can greet your callers with
your favourite tunes every time they
call you. Subscribe to MyTunes, the
caller ringback tune service, and
greet your friends and family with
your favourite song.
Call History
MMiisssseedd
MMeennuu 44..11
Allows you to view list of all Missed
Calls. (Maximum 60 numbers are
possible including Missed, Received
and Dialled)
RReecceeiivveedd
MMeennuu 44..22
Allows you to view list of all Received
Calls. (Maximum 60 numbers are
possible including Missed, Received
and Dialled)
Page 25

25
DDiiaalllleedd
MMeennuu 44..33
Allows you to view list of all Dialled
Calls. (Maximum 60 numbers are
possible including Missed, Received
and Dialled)
IInn CCaallll MMeemmoo
MMeennuu 44..44
Save the phone numbers taken
During a call and view the list of
numbers present in In Call Memo.
(Maximum 20 numbers are possible)
CCaallll DDuurraattiioonn
MMeennuu 44..55
View the duration and number of
recent calls you have dialled and
received. Also reset the time counter.
EErraassee HHiissttoorryy
MMeennuu 44..66
Erase the contents of each of the
three call histories.
Mobile World
RR--MMeennuu
MMeennuu 55..11
This connects you to Reliance Mobile
World Data Services like Ringtones,
News and more provided by your
service provider.
RReesseett RR--MMeennuu
MMeennuu 55..22
You can reset R-Menu.
SSnnaakkee22
MMeennuu 55..33..11
You must eat given food at stage by
managing snake that increase its body
little by little. Use Navigation keys or
2(up), 4(left), 6(right), 8(down)
to move snake. While entering your
name, use Key 5 to submit.
GGaammee SSeettttiinnggss
MMeennuu 55..33..22
Allows you to set the game volume
and backlight.
Page 26

26
Profiles
MMeennuu 66
11.. VViibbrraattee OOnnllyy // 22.. SSiilleenntt // 33.. GGeenneerraall //
44.. OOuuttddoooorr // 55.. HHeeaaddsseett
Profiles let you set your phone’s
sound settings to your environment.
Each profile contains settings for your
phone’s Ring Type, Ring Tone, Get ring
tone, Ringer Volume, Earpiece
Volume, Speaker Volume, Key Volume
and Message Alert.
Organ.&Tools
SScchheedduulleerr
MMeennuu 77..11
Simply store your appointments and
your phone alerts you with a
reminder of your appointment. Up to
60, can be saved.
MMeemmoo
MMeennuu 77..22
Write memos. Up to 20, can be saved.
AAllaarrmm
MMeennuu 77..33
To change an event alarm time. Up to
4, can be saved. (Alarm1~3 and Quick
Alarm)
SSttooppwwaattcchh
MMeennuu 77..44
Allows you to take an accurate
measurement of time.
CCaallccuullaattoorr
MMeennuu 77..55
Calculate simple mathematical
computations.
WWoorrlldd CClloocckk
MMeennuu 77..66
Is useful if you need to make a call to
another country, and you are not sure
about the time difference. DST(Daylightsaving time) can be customized by
option menu.
NNoottee
To Enable or Disable DST press
Options and select DST.
Page 27

27
FM Radio
LLiisstteenn TToo RRaaddiioo
MMeennuu 88..11
The radio supports general features,
such as editing channels, auto scan,
reset channels, and several output
methods of sounds. In addition, while
listening to the radio, the other
functions, supported by phone, can
be used at the same time.
(Refer to 9 page.)
Settings
DDiissppllaayy
MMeennuu 99..11
Allows you to customize display
settings.
LLaanngguuaaggee
MMeennuu 99..11..11
Set the Bilingual feature according to
your preference, choose between
English and Hindi.
SSeerrvviiccee AArreeaa
MMeennuu 99..11..22
This menu displays the current
SDCA/calling area the user is in.
CClloocckk
MMeennuu 99..11..33
Allows you to select a clock on your
mobile phone display. Choose
between Analog & Digital clock.
TTiimmee && DDaattee
MMeennuu 99..11..44
Allows you to select time & date type.
WWaallllppaappeerr
MMeennuu 99..11..55
Enter the string of characters you want
to be displayed. You can set up the
screen displayed on the LCD screen in
the standby mode. (Up to 4 images)
MMeennuu SSttyyllee
MMeennuu 99..11..66
Allows you to select the menu style.
RRhhyytthhmmiicc LLiigghhttiinngg
MMeennuu 99..11..77
You can set rhythmic lighting as On or
Page 28

28
Off. Used for an incoming call or
alarms (scheduler or alarm).
LLCCDD//KKeeyyppaadd BBaacckklliigghhtt
MMeennuu 99..11..88//99..11..99
Choose the settings of the LCD and
keypad backlight.
NNoottee
When press for over half
second in idle mode, backlight turns
off.
CCoonnttrraasstt
MMeennuu 99..11..00
Using the Navigation Key, select the
contrast setting using the scale of
lightest to the darkest.
MMyy MMeennuu
MMeennuu 99..22
Lets you access to favorite menu
quickly by customising my menu.
CCaallll FFoorrwwaarrdd
MMeennuu 99..33..11
Call forward lets you forward all your
incoming calls to another number or
Voice Mail connection.
CCaallll WWaaiittiinngg
MMeennuu 99..33..22
While a call is in progress, you may
hear two beeps indicating another
incoming call. When call waiting is
enabled, you may put the active call
on hold while you answer the other
incoming call.
AAnnyy KKeeyy AAnnsswweerr
MMeennuu 99..33..33
When your phone rings, press any key
to answer except .
AAuuttoo RReeddiiaall
MMeennuu 99..33..44
Set the length of time the phone waits
before automatically redialing a
number when the attempted call fails.
Page 29

29
VVooiiccee PPrriivvaaccyy
MMeennuu 99..33..55
Set the voice privacy feature for
CDMA calls as Standard or
Enhanced.
CClleeaarr VVooiiccee
MMeennuu 99..33..66
On/Off the function of Audio
AGC(Auto Gain Control) system.
CCaallll TTiimmeerr
MMeennuu 99..33..77
You can set your phone to display the
running elapsed time while a call is active.
CCaallll CCoonnnneecctt AAlleerrtt
MMeennuu 99..33..88
This is a function to alert you that the
call connection has been established.
EEddiitt SSMMSS oonn CCaallll RReejjeecctt
MMeennuu 99..33..99
Edit the message, which you want to
send during the call reject by
pressing right soft key.
IInntt’’ll CCaallll PPrreeffiixx
MMeennuu 99..33..00
User can make a international call by
using '+' code as international prefix
during idle number editing. If user
input '+' code during idle number
editing and press send key, '+' code
is changed to user-defined
international prefix.
Hold '#' key, '#' is changed '+'.
KKeeyy GGuuaarrdd
MMeennuu 99..44..11
Allows you to protect the keypad of
your phone from accidental dialing.
Key Guard feature locks the keypad
automatically after some specified
seconds as selected by the user. The
auto key guard can be set from the
phone settings menu item. When set
as Enable, you can set time from 10
sec to 9 min:59 secs.
AAiirrppllaannee MMooddee
MMeennuu 99..44..22
When your phone is in Airplane
Page 30

30
Mode, it cannot send or receive any
calls or access online information.
SSeerrvviiccee AAlleerrtt
MMeennuu 99..44..33
Alerts you when service changes.
VVeerrssiioonn
MMeennuu 99..44..44
View the S/W, PRL and H/W version.
PPIINN CCooddee RReeqquueesstt
MMeennuu 99..55..11
When activated On, phone requests
you to enter PIN Code for card-holder
verification. When booting phone, enter
the PIN Code (personal identification
number) of R-SIM Card. Without PIN
Code, cannot access to contact info,
SMS or making a call/answering a call.
For further assistance please contact
Reliance customer care. Default PIN
Code is 0000.
LLoocckk MMooddee
MMeennuu 99..55..22
Keeps your phone from unauthorized
use. (Default Lock Code is 0000)
EEmmeerrggeennccyy NNuummbbeerrss
MMeennuu 99..55..33
You can call these numbers 100, 101,
102 even when the phone is locked or
restricted.
PPrreemmiiuumm SSeerrvviicceess NNoo..
MMeennuu 99..55..44
Allows you to edit new number for
51234(In SMS 51234 Services).
CChhaannggee CCooddee
MMeennuu 99..55..55
New Lock Code allows you to enter a
new four-digit Lock Code or PIN Code
number.
RReesseett
MMeennuu 99..55..66
Deletes all information saved in
Phone Book or all data saved in
phone and go back to default value or
reset some of the menu settings to
their original values.
Page 31

31
IInn CCaallll MMeemmoo
DDuurriinngg aa CCaallll :: SSoofftt KKeeyy 11 OOppttiioonnss((11))
It allows you to note a phone number
that the other person provides you
during a call. Maximun 20 numbers
are possible.
FFiinndd
DDuurriinngg aa CCaallll :: SSoofftt KKeeyy 11 OOppttiioonnss((22))
It allows you to find contact lists from
your phonebook.
MMuuttee//UUnnmmuuttee
DDuurriinngg aa CCaallll :: SSoofftt KKeeyy 11 OOppttiioonnss((33))
This function locks the microphone of
your telephone and prevent sounds
from your end being heard by the
person at the other end.
VVooiiccee PPrriivvaaccyy OOnn//OOffff
DDuurriinngg aa CCaallll :: SSoofftt KKeeyy 11 OOppttiioonnss((44))
Set the privacy feature for CDMA
calls as Enhanced or Standard.
CDMA offers inherent voice privacy.
AAddjjuussttiinngg SSppeeaakkeerr MMooddee OOnn
DDuurriinngg aa CCaallll :: PPrreessss SSoofftt KKeeyy 22
During a call, to activate or cancel
speaker quickly, press Soft Key 2
again.
MMeessssaaggeess
Press up navigation key to go
messages.
FUNCTIONS USED DURING A CALL
Page 32

32
Please read and observe the following
information for safe and proper use of your phone
and to prevent damage. Also, keep the user guide
in an accessible place at all the times after
reading it.
Charger and Adapter Safety
●
The charger and adapter are intended for
indoor use only.
Battery Information and Care
●
Please dispose of your battery properly.
●
Use only LG-approved chargers specific to
your phone model since they are designed to
maximize battery life.
●
Do not disassemble or short-circuit the
battery.
●
Keep the battery’s metal contacts clean.
●
Recharge the battery after long periods of
non-use to maximize battery life.
●
Battery life will vary due to usage patterns
and environmental conditions.
●
The self-protection function of the battery cuts
the power of the phone when its operation is
in an abnormal state. In this case, remove the
battery from the phone, reinstall it, and turn
the phone on.
General Notice
●
Using a damaged battery or placing a battery
in your mouth may cause serious injury.
●
Do not place items containing magnetic
components such as a credit card, phone
card, bank book or subway ticket near your
phone.
●
Talking on your phone for a long period of time
may reduce call quality due to heat generated
during use.
SAFETY INFORMATION
Page 33

33
●
When the phone is not used for a long period
time, store it in a safe place with the power
cord unplugged.
●
Using the phone in proximity to receiving
equipment (i.e., TV or radio) may cause
interference to the phone.
●
Do not use the phone if the antenna is
damaged. If a damaged antenna comes in
contact with the skin, it may cause a slight
burn. Please contact an LG Authorized
Service Center to replace the damaged
antenna.
●
Do not immerse your phone in water. If this
happens, turn it off immediately and remove
the battery. If the phone does not work, take it
to an LG Authorized Service Center.
●
The power cord on this product will expose
you to lead, a chemical known to the State of
California to cause (cancer) birth defects or
other reproductive harm. Wash hands after
handling.
●
Do not paint your phone.
●
The data saved in your phone might be
deleted due to careless use, repair of the
phone, or upgrade of the software. Please
backup your important phone numbers. (Ring
tones, text messages, voice messages could
also be deleted.) The manufacturer is not
liable for damage due to the loss of data.
●
Do not turn the Phone ON or OFF when it is
held close to your ear.
Page 34

34
LG ELECTRONICS Inc. represents and warrants
that this subscriber unit and its accessories
(“PRODUCT”) is free from defects in material
and workmanship.
This warranty is subject to the following terms
and conditions:
1.
This warranty of the PRODUCT extends for a
period of 12 months commencing from the date
of the activation or 16 months from the date of
manufacture whichever is less, except for the
battery, for which the warranty is 9 months from
the date of activation or 12 months from the date
of manufacture whichever is less.
2.
During the warranty period, LG ELECTRONICS
Inc. or its authorized service network will repair or
replace, at LG ELECTRONICS Inc.’s option, the
PRODUCT or any relevant parts thereof in the
event that the PRODUCT is found to be defective.
The repaired PRODUCT or the PRODUCT/part
provided as a replacement for a defective
PRODUCT/part, shall be free from defects. The
END USER/consumer purchaser of the
PRODUCT or his/her assignee (“CONSUMER”)
shall not be charged (whether for parts, labour or
otherwise) for the repair or replacement of a
defective PRODUCT during the warranty period.
All replaced parts, boards or equipment shall
become the property of LG ELECTRONICS Inc.
3. The warranty in respect of a repaired or replaced
PRODUCT/part shall extend for the remaining
warranty period of the repaired PRODUCT or
replacement thereof to the CONSUMER.
4. Upon request from LG ELECTRONICS Inc., the
CONSUMER may be required to provide the
purchase receipt or other documentation or
information in respect of the date and place of
purchase.
5. The CONSUMER shall have no coverage or
benefits under this warranty in the event that any
of the following conditions are applicable:
(a) The PRODUCT has been subject to abnormal use or
conditions, improper storage, exposure to excessive
moisture or dampness, exposure to excessive
temperatures, unauthorized modifications,
unauthorized repair (including but not limited to use
of unauthorized spare parts in repairs), abuse,
accident, Acts of God, spills of food or liquids,
improper installation and breakage or damage to
antennae (otherwise than by reason of any defects in
material or workmanship).
(b) LG ELECTRONICS Inc. has not been notified by the
CONSUMER of the defects of the PRODUCT during
the applicable warranty period.
LIMITED WARRANTY STATEMENT
Page 35

35
(c) The PRODUCT serial number code or the accessory
date code has been removed, defaced or altered.
(d) The PRODUCT has been used with or connected to
an accessory (i) not supplied by LG ELECTRONICS
Inc. or its affiliates, (ii) not fit for use with the
PRODUCT or (iii) used otherwise than in the manner
intended.
(e) The seals of the PRODUCT’S battery enclosure have
been broken or show evidence of tampering or the
PRODUCT’S battery has been used in equipment
other than that for which it has been specified usable
by LG ECLECTRONICS Inc.
(f) All plastic surfaces and all other externally exposed
parts that are scratched or damages due to normal
customer use.
(g) Breakage or damage to antenna unless caused by
defects in material or workmanship.
6.
In order to derive the benefits of this warranty in
respect of any defects in the PRODUCT, the
CONSUMER shall ship the PRODUCTS or part
thereof at its cost to the authorized service center
of LG ELECTRONICS Inc. LG ELECTRONICS
Inc. shall bear the cost of shipping the PRODUCT
or part thereof back to the CONSUMER after the
completion of the service under this limited
warranty.
NO OTHER EXPRESS WARRANTY IS
APPLICABLE TO THIS PRODUCT. THE
DURATION OF ANY IMPLIED WARRANTIES,
INCLUDING THE IMPLIED WARRANTY OF
MARKETABILITY OR MERCHANTABILITY OR
FITNESS FOR A PARTICULAR PURPOSE OR
USE IS LIMITED TO THE DURATION OF THE
EXPRESS WARRANTY HEREIN. LG
ELECTRONICS Inc. SHALL NOT BE LIABLE
FOR THE LOSS OF USE OF THE PRODUCT,
INCONVENIENCE, LOSS OR ANY OTHER
CONSEQUENTIAL DAMAGE, ARISING OUT OF
THE USE OF, OR INABILITY OF USE, OF THIS
PRODUCT OR FOR BREACH OF ANY
EXPRESS OR IMPLIED WARRANTY,
INCLUDING THE IMPLIED WARRANTY OF
MARKETABILTY OR MERCHANTABILITY OR
FITNESS APPLICABLE TO THIS PRODUCT.
THE CONSUMER UNDERSTANDS THAT LG
ELECTRONICS Inc. HAS EMBEDDED
RELIANCE SOFTWARE AND ITS NETWORK
PARAMETERS IN THE PRODUCT. IN CASE THE
CONSUMER DELETES, REMOVES, ALTERS
OR MODIFIES SUCH SOFTWARE AND THE
PARAMETERS AND/OR INSTALLS ANY THIRD
PARTY SOFTWARE, THE WARRANTY AND
REMEDIES HEREUNDER SHALL NOT BE
AVAILABLE TO THE CONSUMER.
7. It is hereby expressly clarified that all warranties
(express or implied) in respect of the PRODUCT
are provided by LG ELECTRONICS Inc. alone.
Page 36

36
SERVICE CENTER LIST
Page 37

Page 38

Page 39

Page 40

Page 41

Page 42

Page 43

Page 44

Page 45

Page 46

Page 47

Page 48

Page 49

MEMO
 Loading...