

Page 1

FRANÇAISENGLISH ESPAÑOL
OWNER'S MANUAL
R9
• Charge the battery fully before first use.
• Read the Safety Instructions before using the product.
• After reading this manual, keep it in an easily accessible location.
MFL69826107
Copyright © 2020 LG Electronics Inc. All Rights Reserved
www.lg.com
Page 2

Page 3
TABLE OF CONTENTS
4 IMPORTANT SAFETY
INSTRUCTIONS
4 READ ALL INSTRUCTIONS BEFORE USE
4 WARNING STATEMENTS
7 CAUTION STATEMENTS
8 BEFORE USING THE ROBOT
CLEANER
8 Parts and Specifications
11 Charging
14 OPERATION
14 Using the Robot Cleaner
15 Control Panel
16 Choosing a Cleaning Mode
18 Choosing an Auxiliary Function
3
19 SMART FUNCTIONS
19 Using LG ThinQ Application
23 Using Smart Diagnosis
25 MAINTENANCE
25 Regular Cleaning
30 TROUBLESHOOTING
30 Before Calling for Service
32 LIMITED WARRANTY
32 USA
Rev.03_070320
Page 4
4
IMPORTANT SAFETY INSTRUCTIONS
READ ALL INSTRUCTIONS BEFORE USE
Safety Messages
Your safety and the safety of others are very important.
We have provided many important safety messages in this manual and on your appliance. Always read
and follow all safety messages.
This is the safety alert symbol.
The symbol alerts you to potential hazards that can kill or injure you and others. All safety
messages will follow the safety alert symbol and either the word WARNING or CAUTION.
These words mean:
WARNING
You may be killed or seriously injured if you do not follow instructions.
CAUTION
You may be injured or cause damage to the product if you do not follow instructions.
All safety messages will tell you what the potential hazard is, tell you how to reduce the chance of injury,
and tell you what may happen if the instructions are not followed.
WARNING STATEMENTS
WARNING
To reduce the risk of explosion, fire, death, electric shock, scalding or injury to persons when
using this product, follow basic precautions, including the following:
Technical Safety
• This appliance is not intended for use by persons (including children) with reduced physical, sensory or
mental capabilities, or lack of experience and knowledge, unless they have been given supervision or
instruction concerning use of the appliance by a person responsible for their safety. Children should be
supervised to ensure that they do not play with the appliance.
• If the power supply cord is damaged, it must be replaced by an LG Electronics Customer Information
Center or dealer in order to avoid a potential hazard.
• Do not allow children to play with or hang on the appliance.
• Do not allow children to sit on the appliance.
• Do not allow the appliance to be used as a toy. Close attention is necessary when used by or near
children.
• Do not use the appliance outdoors or on wet surfaces.
• Place the cords from other appliances out of the area to be cleaned.
• Do not operate the appliance in a room where an infant or child is sleeping.
Page 5

ENGLISH
5
• Do not operate the appliance in a room that has lit candles on furniture that the appliance may
accidentally hit or bump into.
• Do not operate the appliance in an area where there are lit candles or fragile objects on the floor to be
cleaned.
• For your safety, do not remove the battery from the appliance. If you need to replace the battery of
the appliance, take it to an authorized LG Electronics Customer Information Center or dealer for
assistance.
• Use only as described in this manual. Use only manufacturer’s recommended attachments.
• Do not use the appliance with damaged power cord or plug. The cord must be replaced. If the
appliance is not working as it should, has been dropped, damaged, left outdoors, or dropped into water,
return it to an LG Electronics Customer Information Center.
• Do not put any object into openings. Do not use with any opening blocked; keep free of dust, lint, hair,
and anything that may reduce airflow.
• Keep clothing and hair, fingers, or other parts of the body away from openings and moving parts.
• Do not use the appliance without the dust bin and filters in place.
• Do not pull or carry by cord, use cord as a handle, close a door on cord, or pull cord around sharp
edges or corners. Do not run appliance over cord. Keep cord away from heated surfaces.
• Do not unplug by pulling on cord. To unplug, grasp the plug, not the cord.
• Do not handle the power cord, plug, or appliance controls with wet hands.
Battery
• Read all safety warnings and instructions. Failure to follow the warnings and instructions may result in
electric shock, fire and/or serious injury.
• Prevent unintentional starting. Ensure the switch is in the off position before connecting to the battery
pack, picking up or carrying the appliance. Carrying the appliance with your finger on the switch or
energizing an appliance that has the switch on invites accidents.
• Do not use a battery pack or appliance that is damaged or modified. Damaged or modified batteries
may exhibit unpredictable behavior resulting in fire, explosion or risk of injury.
• Follow all charging instructions and do not charge the battery pack or appliance outside of the
temperature range specified in the instructions. Charging improperly or at temperatures outside of the
specified range may damage the battery and increase the risk of fire.
• Never use the battery, adapter, or charging station from other appliances with this appliance. Use only
the battery and the charging station provided by LG Electronics.
• Never use the battery, adapter, or charging station from this appliance with other appliances.
• Under abusive conditions, liquid may be ejected from the battery. If this happens, avoid contact. If
contact accidentally occurs, flush with water. If liquid contacts eyes, additionally seek medical help.
Liquid ejected from the battery may cause irritation or burns.
• Do not disassemble, remove or short-circuit the battery.
• Do not apply heat or shock to the battery.
• Have the battery replaced when it is no longer able to hold a charge.
• When disposing of this appliance, follow regulations for disposal of rechargeable lithium-ion batteries.
• Follow all local ordinances and regulations when handling or disposing of the battery.
• Have servicing performed by a qualified repair person using only identical replacement parts. This will
ensure that the safety of the product is maintained.
• Do not modify or attempt to repair the appliance or the battery pack (as applicable) except as indicated
in the instructions for use and care.
Page 6
6
• In case rechargeable battery is included in this product, the entire device should be recycled in
compliance with rechargeable battery recycling standards because of the internal battery. To dispose of
properly, call (800) 822-8837 or visit www.call2recycle.org.
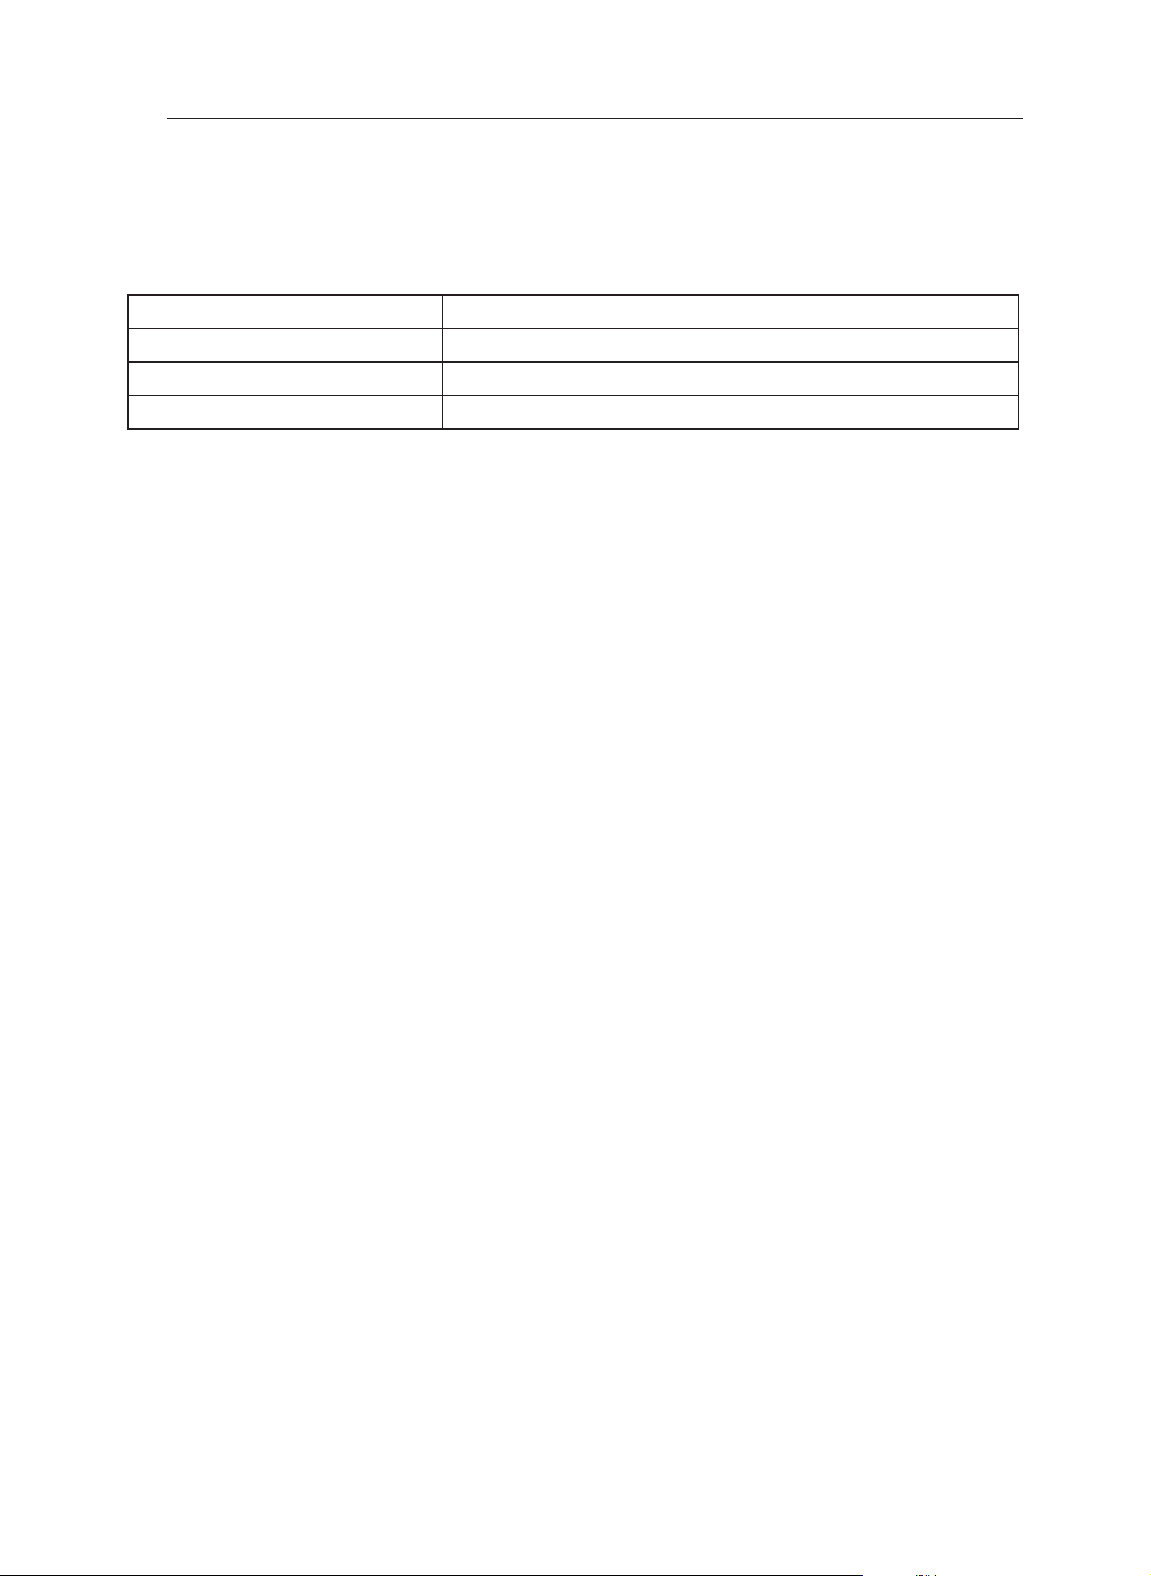
Battery Specifications
Model Name EAC63419402
Type Rechargeable Lithium-ion Battery
Rated Capacity DC 21.6 V / 4000 mAh (Min. 3800 mAh)
Charging Temperature Standard charge at 77±9 °F (25±3 °C)
Installation
• Make sure the power cord of the home station is not crushed under a heavy object or damaged by
contact with sharp objects. If the power cord is broken, do not plug it in. Take it to an authorized LG
Electronics Customer Information Center or dealer for assistance.
• Do not use a power strip, an extension power cable or adapter with this appliance.
• Do not install the appliance where it may be exposed to water, rainfall or moisture.
• Do not install the appliance or the home station in a high temperature environment.
• Do not place the home station and the appliance near a heating device.
Operation
• Do not touch the power cord and plug with wet hands.
• Always grip the power plug firmly, not the cord, and pull straight out from the socket to unplug the power
cord.
• Do not to touch the prongs with your fingers, when pulling out the power plug.
• Do not force the power plug to bend.
• Do not use the power plug when it has been damaged or loosened.
• Do not allow children or pets to play with or sit on the appliance at any time.
• Do not use the appliance while an object is hanging from it.
• Do not leave children or pets near the appliance unsupervised.
• Do not operate the robot cleaner in narrow spaces such as closets or on elevated surfaces such as
stairs or tables.
• Do not insert hands, feet, or any body part, below the brush or wheels of the appliance while in use.
• Do not operate the appliance on a floor that has more than a 10 degree incline.
• The appliance is only intended for domestic use such as household cleaning. Do not use it for
commercial, experimental or industrial purposes.
• Do not use in commercial applications such as workshops or garages or around indoor swimming pools,
etc.
Maintenance
• Turn off the main power switch before cleaning or servicing the robot cleaner.
• If any abnormal sound, odor, or smoke is generated by the appliance, remove it from the home station
and turn off the main switch on the rear side of the appliance.
• Do not spray or use water, inflammable materials such as gasoline or thinners, or surfactants such as
detergent or bath soap near the appliance.
Page 7

ENGLISH
CAUTION STATEMENTS
CAUTION
7
To reduce the risk of minor or moderate injury to persons, malfunction, or damage to the product
or property when using this product, follow basic safety precautions, including the following:
Installation
• Remove any cables or string from the floor before starting.
• Make sure the appliance is not put on a table or desk when the power is on.
Operation
• Do not use the appliance around a banister, staircase or any area where it could fall.
• Close the top cover on the main unit before starting cleaning.
• Do not use the appliance when the dust bin is completely full.
• Use protective covers on chair legs, table legs or other narrow pieces of furniture to reduce the
possibility of scratches or damage from collisions.
• Do not put water, detergent, or other liquids into or onto the appliance.
• Ensure that liquids do not seep into the appliance. If liquid gets inside of the appliance, turn off the
power supply and take the appliance to an authorized LG Electronics Customer Information Center or
dealer for assistance.
• Remove thin mats or carpets that may be damaged.
Maintenance
• Frequently empty the dust bin to maintain the cleaning performance.
• Do not let the appliance and charging terminals of the home station come into contact with metal
objects.
• Do not use or store the appliance at temperatures below 41 °F (5°C) or above 100 °F (38°C).
• Do not allow the appliance to sweep up liquids, blades, thumb tacks, sawdust, sharp objects or hot or
cold ashes.
• Do not drop the appliance or subject it to strong impacts.
• To save energy, turn off the main power switch when the appliance is not in use for long periods.
• Close doors to rooms that do not require cleaning. The robot cleaner may cross over low thresholds and
enter into rooms that you do not want cleaned.
SAVE THESE INSTRUCTIONS
Page 8

BEFORE USING THE ROBOT CLEANER
8
BEFORE USING THE ROBOT CLEANER
Parts and Specifications
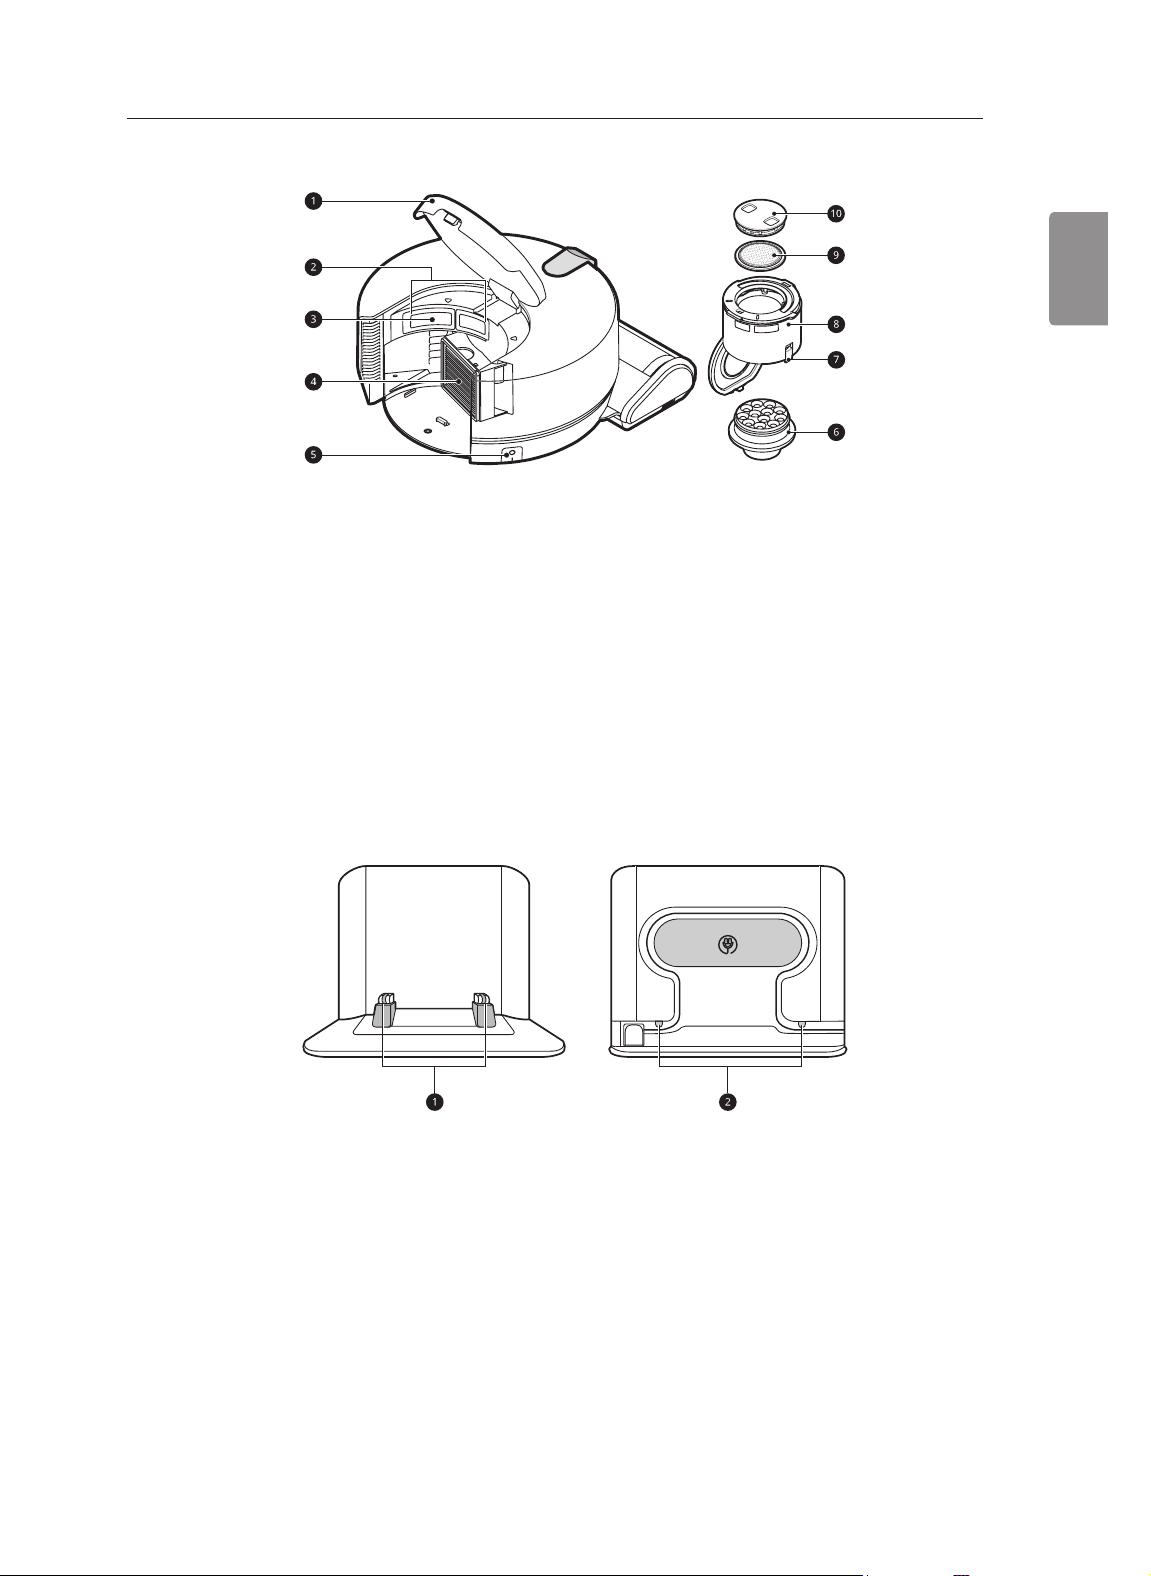
Front View
LED
a
Nozzle
b
Bottom View
Brush
a
Charging Terminals
b
Brush Release Button
c
3D DUAL Eye
c
Control Panel
d
Cliff Detection Sensors
d
Top Cover Release Button
e
Exhaust Port
f
Page 9
ENGLISH
Rear View
BEFORE USING THE ROBOT CLEANER
9
Top Cover
a
Dust Suction Port
b
Dust Sensors
c
HEPA Filter
d
Main Power Switch
e
NOTE
• The filters will eventually need to be replaced. To purchase replacement filters, call an LG Electronics
Customer Information Center or visit www.lg.com
Cyclonic Mesh Filter
f
Dust Bin Release Button
g
Dust Bin
h
Pre-Filter
i
Pre-Filter Case
j
Home Station
Charging Terminals
a
Cord Keeper
b
Page 10
BEFORE USING THE ROBOT CLEANER
10
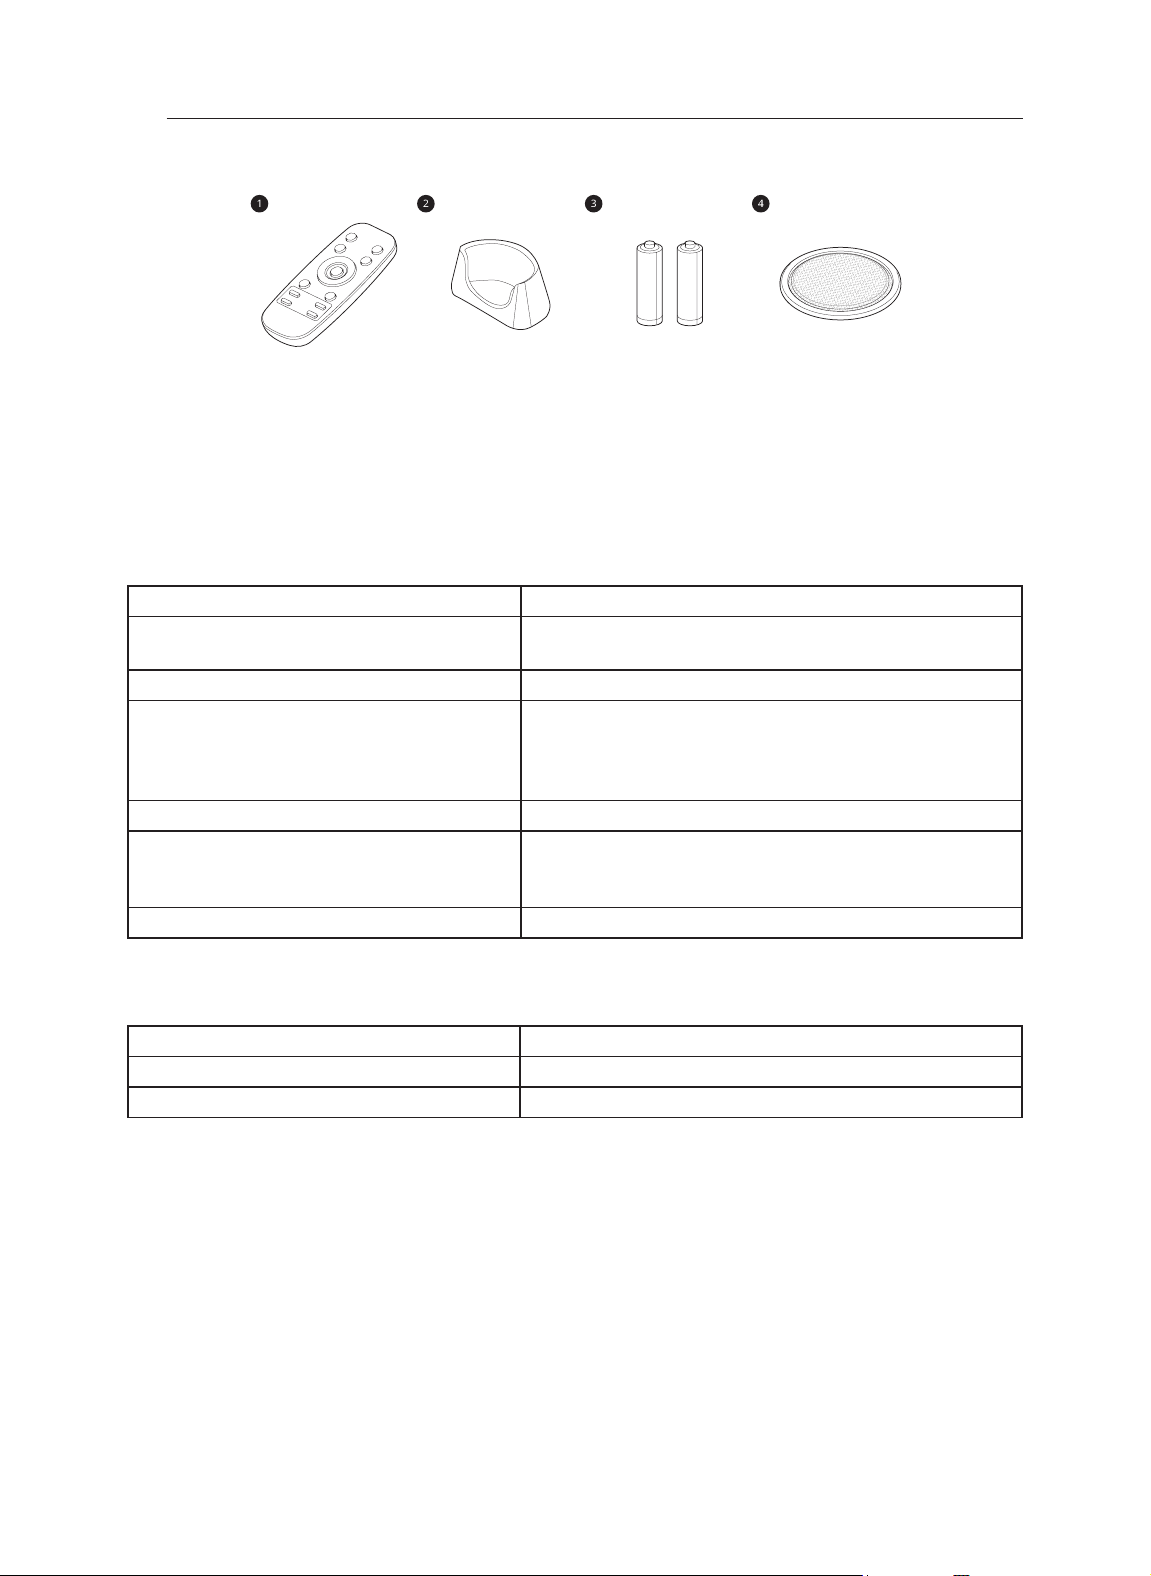
Accessories
Remote Control
a
Remote Control Station
b
Batteries for Remote Control (AAA)
c
Pre-Filter
d
Specifications
Robot Cleaner
Model R975**
Maximum Physical Dimensions
(Width × Depth × Height)
Weight Approximately 9.2 lb (4.17 kg)
Power Consumption 45 W (Zigzag or Edge mode)
Charging Time Approximately 4 hours
Cleaning Time
(Based on general wood floor)
(Smart Turbo off)
Rating DC 21.6 V
10.5 × 13 × 5.6 inches
(286 × 330 × 143 mm)
90 W (Zigzag or Edge mode with Turbo function)
200 W (Spiral Spot mode)
310 W (Spiral Spot mode with Turbo function)
Up to 90 minutes (Zigzag or Edge mode)
Up to 60 minutes (Zigzag or Edge mode with Turbo
function)
Home Station
Model R96C
Input 120 V~ 60 Hz 70 W
Output DC 25.6 V 2.4 A
• This product is a Class I laser device of which conformity assessment is conducted in accordance with
the IEC 60825-1.
• Battery run time is the result of using a fully charged battery according to the LG Electronics test
standard. Results may be different depending on actual use environment and period of use.
Page 11
ENGLISH
BEFORE USING THE ROBOT CLEANER
11
Charging
Before Charging the Battery
• Charging takes place even if the main power
switch of the robot cleaner is turned off.
• The charging time depends on the status of the
battery.
• It takes approximately 4 hours to fully charge
the battery after it is completely discharged.
• Clean the charging terminals using a soft cloth.
If the charging terminals are dirty or covered
or obstructed with foreign material, the robot
cleaner may not be charged normally.
• Charging may not take place if the ambient
temperature is below 41°F (5°C). Charge the
robot cleaner indoors.
• If it is necessary to store the robot cleaner for
a long period of time, fully charge the battery
every 6 months.
• Storing the robot cleaner for a long period of
time without periodically charging the battery
may cause a battery malfunction.
• If cleaning is not started from the home station
or you lift and move the robot cleaner, it may
take a longer time to find the home station.
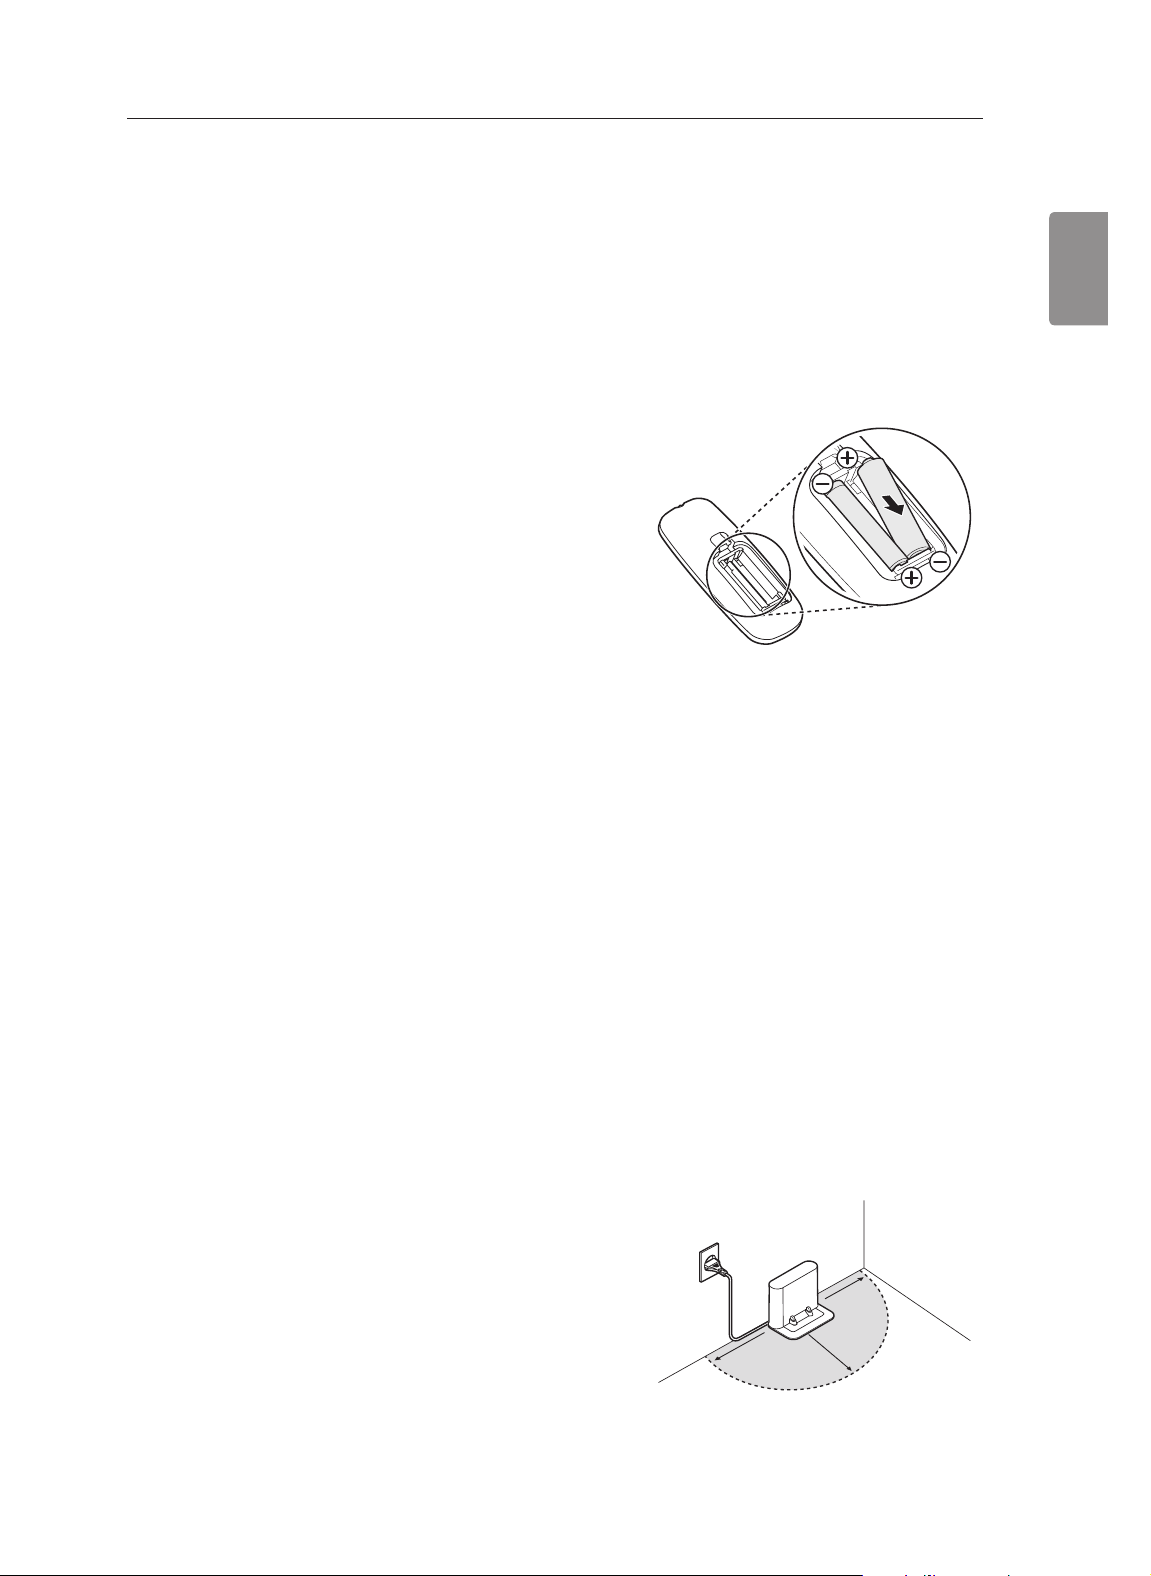
Inserting Batteries into the Remote
Control
Release the tab at the back of the remote
1
control to open the battery cover.
Insert two AAA batteries into the remote
2
control.
• Make sure the + and - ends of the batteries
are aligned properly.
Insert the bottom of the battery cover into the
3
remote control and close the cover.
Battery Level Indicator
• The battery level is indicated on the control
panel, as follows.
− The remaining battery level is displayed in
3 stages (
amount of power remaining.
− The battery level indicator flashes when the
robot cleaner needs to be charged.
− The battery level indicator flashes while
recharging is in progress, showing the battery
level.
− If recharging is complete, the battery level
indicator turns on.
r s t
) according to the
Installing the Home Station
Remove the protective film attached to the
1
home station, the robot cleaner, and the
nozzle.
• If the protective film is not removed, the robot
cleaner may have difficulty finding the home
station or it may affect performance.
Position the home station on a hard, level floor
2
to prevent sliding during docking.
• Locate the home station where there are no
obstacles within 5 ft (1.5 m) of either side and
within 6.5 ft (2 m) of the front.
1.5 m
1.5 m
2 m
Page 12

BEFORE USING THE ROBOT CLEANER
12
Insert the power plug into an outlet.
3
• When the home station is turned on, the LED
will light up.
Wrap the unwanted length of power cable
4
around the cord keeper to prevent the robot
cleaner wheels from rolling over the cable.
NOTE
• If power is not supplied to the home station, the
robot cleaner will not charge.
• Do not place the home station in a confined
space, as this will make it difficult for the robot
cleaner to return to the home station.
• Always keep the home station plugged in when
in use. If the home station is not plugged in, the
robot cleaner will not return to the home station
to charge automatically.
• To secure the location of the home station,
attach an easily removable thin double-sided
adhesive tape to the rubber pads on the left and
right at the bottom of the home station.
Turning on the Power Supply
Turn the main power switch ON a at the back of
the robot cleaner to turn on the power supply.
• To power off the robot cleaner, turn the main
power switch OFF b.
Place the home station against the wall so that
5
it does not move.
WARNING
• Wrap the power cable around the cord
keeper to prevent the robot cleaner wheels
from rolling over the cable. Failure to do so
could damage the robot cleaner or the power
cord, resulting in an electric shock or injury.
NOTE
• If the robot cleaner does not turn on or nothing
is displayed on the control panel, charge the
robot cleaner manually by placing it on the
home station.
• The Power button on the remote control
operates only when the main power switch is
turned on.
Page 13

ENGLISH
BEFORE USING THE ROBOT CLEANER
13
Turning on the Standby Power Supply
Press and hold the Start/Stop button a for 3
seconds or press the Power button b on the
remote control.
• To turn off the standby power supply, press the
Start/Stop button a or press the Power button
b on the remote control again.
NOTE
• Turning off the standby power supply
disconnects the robot cleaner from the LG
ThinQ application.
• In the following situations, the robot cleaner
automatically turns off the standby power supply
after 10 minutes:
− When the robot cleaner is unable to come out
of a complicated space such as the space
below the dining table while cleaning.
• To resume cleaning while the robot cleaner is
charging, press the Start/Stop button on the
control panel or the remote control.
Manual Charging
Moving the Robot Cleaner
Charge the battery manually if using the robot
cleaner for the first time after purchasing or if the
battery is completely discharged.
Insert the power plug of the home station into
1
a power outlet.
Turn on the main power switch.
2
• Charging occurs even if the main power
switch is off.
Place the robot cleaner onto the charging
3
terminals a by aligning it to the front side of
the home station.
• When charging begins, the battery charging
indicator b turns on.
− When the wheels of the robot cleaner spin
with no traction or the robot cleaner is caught
on an obstacle and is unable to escape it.
− When the robot cleaner is standing by in a
place other than the home station.
Automatic Charging
The robot cleaner automatically returns to the
home station at the end of a cleaning cycle or
when its battery is running low.
NOTE
• If the robot cleaner returns to the home station
to recharge during a cleaning cycle, the cleaning
mode icon flashes. After recharging, the robot
cleaner continues the cleaning cycle.
• If the cleaning mode has been changed while
charging, the robot cleaner will not resume
cleaning.
• If the robot cleaner is connected to the LG
ThinQ application and finishes charging
between 9 PM and 6 AM, it will not resume
cleaning. This cannot be changed.
Using the Home Button
To return the robot cleaner to the home station,
press the Home button on the robot cleaner or on
the remote control. The robot cleaner moves to the
home station to start charging.
• If the robot cleaner does not move to the home
station to charge, it can be manually placed onto
the home station.
Page 14

OPERATION
14
OPERATION
Using the Robot Cleaner
Before Starting
• The run time may decrease depending on
conditions of use or selected auxiliary functions.
• Collisions can occur during cleaning when the
sensor cannot detect the obstacle.
− Examples of obstacles that may be difficult to
detect include thin chair or table legs, glossy
or shiny furniture, and mirrors or glass.
• You may hear a tapping sound from the brushes
when the robot cleaner is cleaning laminate
floors or uneven floors.
• If manually placing the robot cleaner away from
the home station to start cleaning, choose an
area that is flat and free of obstacles.
• If the robot cleaner starts cleaning from the
home station, the robot cleaner can find the
home station faster when cleaning is completed.
• If the dust bin cover is open or the dust bin is
missing, the robot cleaner will stop cleaning and
announce a problem.
• If water gets inside the robot cleaner, do not
attempt to shake the water out of the robot
cleaner. Turn off the main power switch and
place the robot cleaner in a well-ventilated area
out of direct sunlight for at least 48 hours until
completely dry.
• The robot cleaner can cross over thresholds that
are up to 0.79 inches (20 mm) high depending
on the shape and material of the threshold.
• If the robot cleaner senses a moving object in its
path, such as a person or pet, it will request that
it move.
Preparing Cleaning Area
• Check the following items before use:
− Remove cables or long strings from the floor.
− Roll up or remove thin mats or thick area rugs.
Thin mats can get stuck in the nozzle, and the
robot cleaner will stop operating. The robot
cleaner may be unable to climb onto area rugs
with pile thicker than 0.79” (20 mm).
− Remove fragile objects and obstacles from the
floor.
− Remove foreign materials such as long
strings, metal objects, liquids, pet waste or
glass from the floor.
− Remove or protect furniture with narrow legs.
The robot cleaner may not detect narrow
objects and could bump into or push them.
− Close the doors of any room that you do not
want the robot cleaner to enter.
− Move shoes or other clutter at least 2 inches
(5 cm) away from thresholds. The robot
cleaner’s cliff sensor may become confused
and cause it to cross over a threshold it
cannot climb back over.
− Close any balcony doors as the robot
cleaner’s wheels may get stuck while
cleaning.
Page 15

ENGLISH
OPERATION
15
Control Panel
Touch Buttons
Press the touch button icons to start the robot
cleaner or quickly choose a cleaning mode.
Start/Stop Button
a
• Press the Start/Stop button to start or stop
the robot cleaner.
• Press and hold the Start/Stop button for 3
seconds to turn the robot cleaner on or off.
Mode Button
b
• Press the Mode button to set a cleaning
mode.
− Options include Spiral Spot mode, Zigzag
mode, and Edge mode
Turbo Button / Wi-Fi Button
c
• Press the Turbo button to activate or
deactivate the Turbo mode.
• Press and hold the Turbo button for 3
seconds to connect the robot cleaner to the
LG ThinQ application.
Home Button
d
• Press the Home button to return the robot
cleaner to the home station to charge.
Status Display
The status display shows the selected cleaning
mode, auxiliary functions, and status of the robot
cleaner.
Cleaning Modes
a
• d: Spiral Spot Mode
• b: Edge Mode
• c: Zigzag Mode
Auxiliary Functions
b
• f: Smart Turbo Function
• i: Repeat Function
Status Indicators
c
• a: HomeView
• f: Wi-Fi Connection
• r: Battery Level
• q: Mute
• z: Schedule
• q: Error Indicator
NOTE
• The Wi-Fi connection indicator lights up when
the robot cleaner is connected to the LG ThinQ
application or a wireless network.
• The Wi-Fi connection indicator blinks while
connecting the robot cleaner in the LG ThinQ
application.
• Use the LG ThinQ application to schedule a
cleaning time.
Page 16

OPERATION
16
Remote Control
Power Button
a
Mode Button
b
Start/Stop Button
c
Repeat Button
d
Language Button
e
a Lock Button
f
Smart Diagnosis Button
g
Mute Button
h
Smart Turbo Button
i
Directional Buttons
j
Turbo Button
k
Home Button
l
NOTE
• The a Lock button will lock the 3D camera
sensor.
• The Power button will only operate when the
main power switch is turned on.
• The Language button will only operate when
the robot cleaner is charging on the home
station.
Choosing a Cleaning Mode
Getting Started
Select a cleaning mode on the control panel or on
the remote control.
Insert the power plug of the home station into
1
a power outlet.
Press the Mode g button to select the desired
2
mode as follows.
• b: Edge mode
• c: Zigzag mode
• d: Spiral Spot mode
Press the Start/Stop button v to start
3
cleaning.
NOTE
• The selected mode displays on the control
panel.
• To change the cleaning mode during operation,
press the Start/Stop button to stop the robot
cleaner and then select another cleaning mode.
• Once selected, the new cleaning mode is
retained even after the power supply is turned
off. (For the Edge and the Zigzag modes only.)
• The robot cleaner utilizes AI (Artificial
Intelligence) technology in the Edge and Zigzag
modes.
− The 3D DUAL Eye is included with the 3D
camera sensor and 3D obstacle detection
sensor. The robot cleaner learns where to go
and identifies objects it needs to avoid.
− The robot cleaner detects obstacles using the
3D DUAL Eye and remembers the locations of
objects in the area being cleaned.
− The obstacle detection sensor of the 3D
DUAL Eye may not operate normally if there
is a human shape or something similar within
the environment.
− When the Smart Turbo function is selected,
the robot cleaner automatically detects dust,
carpets or corners and adjusts the suction
power when cleaning.
Page 17

ENGLISH
OPERATION
17
Edge Mode
The robot cleaner moves in zigzag movements
around the whole house and cleans thoroughly
including the edges up to the wall.
• When a wall is detected, the robot cleaner
reduces its speed and temporarily increases the
suction power.
Zigzag Mode
• The Spiral Spot mode cannot be activated while
the robot cleaner is charging.
Manual Mode
You can move the robot cleaner manually by
pressing the directional buttons on the remote
control.
• Press the Directional buttons on the remote
control to operate the robot cleaner.
− Forward/Backward Buttons (m n): Move
the robot cleaner forward or backward.
− Left/Right Rotation Buttons (o p): Turn the
robot cleaner counter-clockwise or clockwise.
The robot cleaner repeats a zigzag operation to
clean the whole house without coming into contact
with the walls.
• This mode is suitable for quick cleaning of a
large area that is free from obstacles.
Spiral Spot Mode
The robot cleaner cleans a 5 ft x 5 ft (1.5 m x 1.5
m) area with stronger suction power.
• Use this mode to spot clean areas with heavy
soil.
• After cleaning is finished, the robot cleaner will
stop at the location where it started cleaning.
CAUTION
• Do not operate the robot cleaner in narrow
spaces such as closets or on elevated
surfaces such as stairs or tables.
• Be careful when pressing the directional
buttons on the remote control to prevent
collisions or falls.
NOTE
• When the robot cleaner encounters an obstacle
while moving forward, it will stop automatically
and move backward slightly.
• When the robot cleaner encounters an obstacle
while rotating, it will rotate in the opposite
direction.
Page 18

OPERATION
18
Choosing an Auxiliary
Function
Repeat Function
The robot cleaner repeats the selected cleaning
mode.
• To activate the Repeat function, press the
Repeat button on the remote control.
• After cleaning is finished, the robot cleaner
changes its direction and cleans the same area
again.
• To cancel the Repeat function, press the Repeat
button again.
NOTE
In the Repeat function, the robot cleaner repeats
the cleaning for at least 5 minutes, unless the
cleaning is completed within 5 minutes.
NOTE
• The Turbo function uses more battery power.
• The robot cleaner will be louder when running
the Turbo function.
Smart Turbo Function
The robot cleaner automatically detects carpets,
corners or dusty places and increases the suction
power.
• To activate the Smart Turbo function, press the
Smart Turbo button on the remote control.
NOTE
• The Smart Turbo function uses more battery
power.
• The robot cleaner will be louder when running
the Smart Turbo function.
Even if the Repeat function is not selected, the
robot cleaner repeats the cleaning if the area was
cleaned within 30 minutes.
Turbo Function
This function increases the suction power of the
robot cleaner. Use this function for cleaning areas
where strong suction power is necessary.
• To activate the Turbo function, press the Turbo
button on the remote control or the control
panel.
Page 19

ENGLISH
SMART FUNCTIONS
19
SMART FUNCTIONS
Using LG ThinQ Application
Before Using LG ThinQ
Check the distance between the appliance and
1
the wireless router (WLAN network).
• If the distance between the appliance and the
wireless router is too far, the signal strength
becomes weak. It may take a long time to
register or installation may fail.
Turn off the Mobile Data or Cellular Data on
2
your smartphone.
• For iPhones, turn data off by going to
SettingsCellularCellular Data.
Connect your smartphone to the wireless
3
router.
NOTE
• To verify the WLAN connection, check that Wi-Fi
icon f on the control panel is lit.
• The appliance supports 2.4 GHz WLAN
networks only. To check your network frequency,
contact your Internet service provider or refer to
your wireless router manual.
• LG ThinQ is not responsible for any network
connection problems or any faults, malfunctions,
or errors caused by network connection.
• If the appliance is having trouble connecting
to the WLAN network, it may be too far from
the router. Purchase a WLAN repeater (range
extender) to improve the WLAN signal strength.
• The WLAN connection may not connect or may
be interrupted because of the home network
environment.
• The network connection may not work properly
depending on the Internet service provider.
• The surrounding wireless environment can
make the wireless network service run slowly.
• If the appliance cannot be registered due to
problems with the wireless signal transmission,
turn off the main power switch and wait about a
minute before trying again.
• If the firewall on your wireless router is enabled,
disable the firewall or add an exception to it.
• The wireless network name (SSID) should be a
combination of English letters and numbers. (Do
not use special characters.)
• The description of the application in this manual
may vary from the current version of the
application.
• The LG ThinQ application is subject to change
for appliance improvement purposes without
notice to users.
Page 20

SMART FUNCTIONS
20
Installing the LG ThinQ Application
Search for the LG ThinQ application from the
Google Play Store or Apple App Store on a
smartphone. Follow instructions to download and
install the application.
• Depending on your smartphone model, the
LG ThinQ application may have a limited
feature set or may not work properly. Check the
required software versions before downloading.
Using the Smart Functions
The LG ThinQ application includes the following
Smart Functions:
HomeGuard, HomeView, My Zone, Schedule
Cleaning, Cleaning Diary, Smart Diagnosis, etc.
HomeGuard
The robot cleaner uses motion sensor technology
to automatically detect movement at the selected
location, capture images and send them directly to
your smartphone.
Smart Diagnosis
The robot cleaner can self-diagnose with the
Smart Diagnosis function.
• Refer to the Smart Diagnosis Function section
for details.
NOTE
• The HomeGuard and HomeView functions are
provided for personal use only.
• If using the HomeGuard or HomeView service
for other purposes or outside the home,
please use the personal information collection
agreement. LG Electronics is not responsible for
issues arising from negligent use.
• The included functions vary by model.
• Follow LG ThinQ application guide for details
on using the SMART FUNCTIONS.
• LG ThinQ Privacy Policy:
HomeView
The HomeView function displays real-time video
of your home and remotely controls the robot
cleaner.
My Zone
With the My Zone feature and the LG ThinQ
application, a designated area of the home can be
selected for specific cleaning attention.
• Specified Area Cleaning: Allows you to select
part of the mapped area to clean or to clean
selected areas in a certain order.
• Do Not Clean Area: Exclude certain areas
such as mudrooms or pet zones if you need the
vacuum to avoid these areas.
Schedule Cleaning
Use Schedule Cleaning to set a regular cleaning
time for the robot cleaner to begin cleaning.
Cleaning Diary
The Cleaning Diary records the date, cleaning
mode, and start and completion times of each
cleaning session and displays the cleaning history.
• When using the HomeGuard or HomeView
function, you will periodically hear voice
alerts from the robot cleaner when an image
is transmitted.
• When the HomeGuard is set and motion is
detected, the front LED will blink and take 5
pictures with a shutter sound.
• Pictures taken by the R9 are saved in the LG
ThinQ Server and only the registered user can
view the pictures.
• If you lock the HomeView function by pressing
the a Lock button on the remote control, the
HomeGuard and HomeView functions will not be
available in the LG ThinQ Application.
Using the HomeGuard Function
Run the LG ThinQ application.
1
Create a login account for the application.
2
Connect the robot cleaner in the application to
3
control it.
• Use the playback function to view an active
cleaning map of the cleaning session.
Select a HomeGuard function in the menu.
4
Page 21

ENGLISH
SMART FUNCTIONS
21
Set the location from which the HomeGuard
5
function will monitor and tap Save in the
application.
• The HomeGuard location must be within the
area stretching 5 ft (1.5 m) to either side of
the home station and 10 ft (3 m) in front of
the home station.
3 m
1.5 m
Tap Start to activate the HomeGuard function.
6
Select one of the auxiliary functions on the
7
smartphone.
• Scheduled Guard: You can schedule
HomeGuard to begin at a set time every day.
• Check Photos: You can view and save the
photos that the robot cleaner takes. It will
take 5 consecutive photos upon detecting
movement. Pictures taken can only be
viewed for 30 days.
• Push Alert: Select whether you want to
receive push alerts for HomeGuard in the
Settings menu.
1.5 m
Using the My Zone Function
Tap Draw a New Map to create a map of the
1
cleaning area and designate cleaning zones.
• The robot cleaner creates the map while it is
cleaning.
• After drawing a new map, the area separator
icon is displayed at the center of each area
when you tap Use Map.
• To redraw the map, tap Draw a New Map
again.
Tap the icon of the desired area to set the
2
cleaning order.
• The icon in the selected area changes to a
number to indicate the cleaning order.
Tap Start Cleaning to begin cleaning.
3
NOTE
• The 3D DUAL Eye detects obstacles and
divides areas.
• Go to the Selected Area Cleaning screen and
tap on the Settings button at the upper right to
edit the area separator icon, set Do Not Clean
Area, and Draw a New Map.
• Once set, Do Not Clean Areas will remain in
effect until deleted, and the robot cleaner will
restrict its movements in those areas.
Wireless LAN Module Specifications
NOTE
• If the home station is relocated, the Home
Guard position needs to be set again.
• Adjust the ambient lighting to higher than 20 lux
to detect movement.
• The camera sensor for HomeGuard may be
tripped frequently by indoor pets or sudden
changes in lighting.
• The robot cleaner must be charging in order to
schedule or activate the HomeGuard function.
Model LCW-006
Frequency Range 2412 MHz - 2462 MHz
Output Power (Max) < 30 dBm
Page 22

SMART FUNCTIONS
22
FCC Notice
This equipment has been tested and found to
comply with the limits for a Class B digital device,
pursuant to Part 15 of the FCC Rules. These limits
are designed to provide reasonable protection
against harmful interference in a residential
installation. This equipment generates, uses,
and can radiate radio frequency energy and, if
not installed and used in accordance with the
instructions, may cause harmful interference
to radio communications. However, there is no
guarantee that interference will not occur in a
particular installation. If this equipment does
cause harmful interference to radio or television
reception, which can be determined by turning the
equipment off and on, the user is encouraged to
try to correct the interference by one or more of
the following measures:
• Reorient or relocate the receiving antenna.
• Increase the separation between the equipment
and the receiver.
• Connect the equipment into an outlet on a
circuit different from that to which the receiver is
connected.
• Consult the dealer or an experienced radio/TV
technician for help.
This device complies with part 15 of the FCC
Rules. Operation is subject to the following two
conditions:
(1) This device may not cause harmful interference
and
(2) This device must accept any interference
received, including interference that may cause
undesired operation.
FCC RF Radiation Exposure
Statement
This equipment complies with FCC radiation
exposure limits set forth for an uncontrolled
environment. This transmitter must not be
colocated or operating in conjunction with any
other antenna or transmitter.
This equipment should be installed and operated
with a minimum distance of 20 cm (7.8 inches)
between the antenna and your body. Users must
follow the specific operating instructions for
satisfying RF exposure compliance.
Open Source Software Notice
Information
To obtain the source code under GPL, LGPL, MPL,
and other open source licenses, that is contained
in this product, please visit http://opensource.lge.
com.
In addition to the source code, all referred license
terms, warranty disclaimers and copyright notices
are available for download.
LG Electronics will also provide open source code
to you on CD-ROM for a charge covering the cost
of performing such distribution (such as the cost of
media, shipping, and handling) upon email request
to opensource@lge.com. This offer is valid for a
period of three years after our last shipment of this
product. This offer is valid to anyone in receipt of
this information.
Any changes or modifications in construction of
this device which are not expressly approved by
the party responsible for compliance could void the
user’s authority to operate the equipment.
Supplier’s Declaration of Conformity
47 CFR §2.1077 Compliance Information
Trade Name: LG
Responsible Party: LG Electronics USA, Inc.
Address: 111 Sylvan Ave North Building
Englewood Cliffs, NJ 07632
Email: lg.environmental@lge.com
Page 23

ENGLISH
Using Smart Diagnosis
Using the Robot Cleaner to
Diagnose Issues
You can diagnose the current status of the robot
cleaner automatically using the Smart Diagnosis
function.
• If you experience problems with the robot
cleaner, run the Smart Diagnosis function and
use the results to help solve them.
Turn on the main power switch a of the robot
1
cleaner and dock the robot cleaner in the
home station.
• The Smart Diagnosis function is only
available while the robot cleaner is charging.
2
station that are in the way of the robot cleaner.
• During the Smart Diagnosis, the robot
cleaner moves around within an area
approximately 20 inches (50 cm) in diameter.
SMART FUNCTIONS
The robot cleaner announces the result
4
through a voice message.
• To repeat the voice message, press the
Home button.
Press the Start/Stop button to terminate the
5
diagnosing process.
• After the Smart Diagnosis voice message,
the robot cleaner will begin recharging after
1 minute.
• If an error is detected with any of the
obstacle detection sensors during Smart
Diagnosis, a voice message will announce,
and the robot cleaner will not return to the
home station.
• If there is a problem while Smart Diagnosis
is running, the robot cleaner will provide the
diagnosis result from the home station and
the Smart Diagnosis will end.
23
Press the Diagnosis button b on the remote
3
control and the process starts with a voice
message.
• The robot cleaner returns back to the home
station when the Smart Diagnosis has
finished.
Page 24

SMART FUNCTIONS
24
NOTE
• Be careful not to touch the robot cleaner or
disturb its operation before Smart Diagnosis
is complete. If it is accidentally interrupted, turn
the main power switch OFF then ON again to
resume the diagnosis.
• Smart Diagnosis will not be activated in
the following cases. In each case, check the
problem and try again.
− Robot cleaner is detached from the home
station.
− Battery level is insufficient.
− Dust bin filter is not attached.
• Run Smart Diagnosis in an area which is not
too bright or too dark.
• Run Smart Diagnosis on flat, hard flooring.
Running it on carpeting may give incorrect
results.
• If there is a problem with the sensor or the motor
or the problem cannot be solved through Smart
Diagnosis, contact an authorized LG Electronics
Customer Information Center.
• Extremely shiny surfaces may cause the
sensors to react and result in an operational
error.
Page 25

ENGLISH
MAINTENANCE
Regular Cleaning
MAINTENANCE
Press the dust bin release (PUSH) button b
2
to open the dust bin cover and empty the dust
bin.
25
Before Cleaning the Robot Cleaner
• Turn off the main power switch before cleaning
the robot cleaner.
• In order to maintain the optimum suction power
of the robot cleaner, the dust bin, filters, and
brush should be cleaned at least once a month.
• If the dust bin is completely full of dust or the
filters are clogged, the suction power may be
reduced.
• If the brush contains foreign substances, the
brush may not spin or a noise may occur during
operation.
• The filters will eventually need to be replaced.
To purchase replacement filters, call an LG
Electronics Customer Information Center or visit
www.lg.com
CAUTION
• Be sure to install the filter on the dust bin. If
the filter is not installed, the dust will get into
the motor inside the robot cleaner and will
cause damage to the suction motor.
Remove any foreign substances on the rubber
3
at the bottom of the dust bin.
Cleaning the Dust Bin
Press the top cover release (PUSH) button
1
a to open the top cover, and pull the dust bin
upward.
Use a dry cloth to rotate the end of the
4
cyclonic mesh filter c to the unlocked position
l and remove the filter.
Page 26

MAINTENANCE
26
Clean the cyclonic mesh filter thoroughly with
5
a vacuum cleaner or rinse it under running
water.
• To avoid odor, allow the cyclonic mesh filter
to dry completely in a well-ventilated area out
of direct sunlight for at least 24 hours before
reassembling.
Rotate the pre-filter case d to the unlocked
6
position to separate it from the dust bin.
Clean the pre-filter using a vacuum cleaner or
8
rinse it under running water.
• To avoid odor, allow the pre-filter to dry
completely in a well-ventilated area out of
direct sunlight.
Wipe the dust bin with a soft cloth or rinse it
9
under running water.
• Dry it completely before using.
Press and lift the hook e up to remove the
7
pre-filter f.
After cleaning the dust bin, assemble the
10
pre-filter case g by rotating it to the locked
position. Then assemble the cyclonic mesh
filter h by rotating it to the locked position k.
• Be sure to close the dust bin cover.
Page 27

ENGLISH
MAINTENANCE
27
Cleaning the HEPA Filter
Separate the dust bin from the robot cleaner
1
body and pull out the HEPA filter case a.
Separate the HEPA filter b from the HEPA
2
filter case.
Cleaning the Brush
Place a soft cloth on the floor and place the
1
robot cleaner upside down on top of the cloth.
Push the brush release button a to separate
2
the brush case b from the nozzle.
Press the brush hook c and pull the brush up
3
d to separate it from the brush case.
Clean the HEPA filter using a vacuum cleaner
3
or rinse it under running water.
• To avoid odor, allow the HEPA filter to dry
completely in a well-ventilated area out of
direct sunlight for at least 24 hours before
reassembling.
After the HEPA filter has dried, insert it back
4
into the filter case and dust bin, and close the
cover.
Remove foreign substances such as hair and
4
thread from the brush and brush ends.
Page 28

MAINTENANCE
28
Insert the brush into the brush case, starting
5
with the right side.
Reassemble the brush case on the nozzle.
6
NOTE
• If the bristles have become bent, wrap the
brush in a wet towel and wait until they have
straightened out. Allow the the brush to dry
completely before reassembling.
− To avoid corroding the bearings, do not
immerse the brush assembly in water while
cleaning.
• Dust may build up at the brush inlet at the
bottom of the brush. Periodically remove the
buildup using another vacuum cleaner or a soft
brush.
• If the suction power has become weaker,
check the suction port for clogs or foreign
materials. Use a toothpick to remove the foreign
substance.
Page 29

ENGLISH
MAINTENANCE
29
Cleaning the Sensors and the
Charging Terminals
Place a soft cloth on the floor and place the
1
robot cleaner on top of the cloth.
Clean the 3D DUAL Eye of the robot cleaner
2
using a soft cloth.
• Be careful not to scratch the sensors.
Turn the robot cleaner over and clean the
3
cliff detection sensors a and the charging
terminals b using a cotton swab or a soft
cloth.
Clean the dust sensors on the robot cleaner
4
using a soft cloth.
Unplug the power cord of the home station
5
and clean the charging terminals of the home
station.
WARNING
• Pull out the power plug before cleaning
the charging terminals of the home station.
Failure to do so may cause an electric shock
or injury.
CAUTION
• If the sensors or the charging terminals are
damaged, discontinue use and contact an LG
Electronics Customer Information Center.
• Do not wipe the product with a volatile
solvent or an organic solvent (thinner,
solvent, acetone, etc.) Doing so will cause
product damage.
NOTE
• It is very important that the cliff sensors are
cleaned regularly to allow the robot cleaner to
detect surface level differences and prevent it
from falling over edges.
Page 30

TROUBLESHOOTING
30
TROUBLESHOOTING
Before Calling for Service
Troubleshooting Guide
Save time and money by checking the following before calling for service.
Symptom Cause and Solution
Power cannot be
turned on.
Power is turned off
automatically.
Charging cannot be
carried out.
Suction power
becomes weak.
The product is noisy
when it’s running.
Main power switch of the robot cleaner is turned off.
• Turn on the main power switch at the back of the robot cleaner.
Battery is discharged completely.
• If needed, manually move the robot cleaner to the home station to charge.
Robot cleaner was stopped for more than 10 minutes without being
charged.
• If the robot cleaner has been on standby for more than 10 minutes without
being charged, the power will be turned off automatically. Place the robot
cleaner in the home station..
Robot cleaner was trapped by an obstacle for more than 10 minutes.
• Remove obstacles from the area to be cleaned before starting cleaning.
There is an obstacle near the home station.
• Remove the obstacle near the home station.
Battery charging indicator on the home station is turned off.
• Make sure the home station is plugged into an outlet.
Charging terminals are stained with foreign substances.
• Wipe the robot cleaner and the charging terminals of the home station with
a soft cloth.
Robot cleaner was charged in a cool place.
• The battery may not charge properly at temperatures below 41°F (5°C).
Use the robot cleaner after charging the battery at proper temperatures.
There is foreign material blocking the suction port.
• Remove any foreign material in the suction port.
Dust bin is completely filled.
• Empty the dust bin.
HEPA filter or the pre-filter is blocked.
• Clean the HEPA filter or the pre-filter.
Dust bin is not attached to the robot cleaner correctly.
• Attach the dust bin correctly.
HEPA filter or pre-filter is not attached to the dust bin correctly.
• Attach the HEPA filter or the pre-filter correctly.
Page 31

ENGLISH
Symptom Cause and Solution
The product is noisier
than usual.
The robot cleaner will
not run.
The brush will not
spin.
The robot cleaner runs
abnormally.
The robot cleaner
cannot be operated
using the remote
control.
The robot cleaner is
placed on the charging
station, but the battery
is not charging.
TROUBLESHOOTING
Brush is clogged with foreign substances.
• Remove foreign substances from the brush.
Brush case is not installed properly.
• Install the brush case properly.
The robot cleaner is cleaning against the grain of the flooring.
• The robot cleaner may be noisier than usual if it is cleaning against the
grain of the floor.
Main power switch of the robot cleaner is turned off.
• Turn on the main power switch at the back of the robot cleaner.
Battery is discharged completely.
• If needed, manually move the robot cleaner to the home station to charge.
Brush is not installed correctly.
• Separate and install the brush again.
Brush is clogged with foreign substances.
• Remove foreign substances from the brush.
Sensor is blocked with foreign substances.
• Wipe the sensor with a soft cloth.
Wheel is blocked with foreign substances.
• Remove foreign substances from the wheels.
Batteries of the remote control are dead.
• Replace the batteries in the remote control.
Robot cleaner is far away from the remote control.
• Stand within 10 ft (3 m) of the robot cleaner to use the remote.
Robot cleaner is turned off.
• Turn on the robot cleaner.
Battery charging indicator of the home station is not turned on.
• Make sure the home station is plugged into an outlet.
• If the battery charging indicator light is on, turn the main power switch off
and on to reset the robot cleaner.
Charging terminals are dirty.
• Remove any foreign substances from the charging terminals and wipe the
charging terminals with a soft cloth.
31
Page 32

LIMITED WARRANTY
32
LIMITED WARRANTY
USA
TERMS AND CONDITIONS
ARBITRATION NOTICE: THIS LIMITED WARRANTY CONTAINS AN ARBITRATION PROVISION
THAT REQUIRES YOU AND LG ELECTRONICS (“LG”) TO RESOLVE DISPUTES BY BINDING
ARBITRATION INSTEAD OF IN COURT, UNLESS YOU CHOOSE TO OPT OUT. IN ARBITRATION,
CLASS ACTIONS AND JURY TRIALS ARE NOT PERMITTED. PLEASE SEE THE SECTION TITLED
“PROCEDURE FOR RESOLVING DISPUTES” BELOW.
Should your LG Vaccum Cleaner (“Product”) fail due to a defect in materials or workmanship under normal
and proper use, during the warranty period set forth below, LG will, at its option, repair or replace the
Product. This limited warranty is valid only to the original retail purchaser of the Product and applies only
when purchased and used within the United States including U.S. Territories.
WARRANTY PERIOD
Vaccum Cleaner Inverter Motor (Suction Motor)
One (1) year from the date of the original retail
purchase.
Part Only. Customer will be responsible for any
labor or in-home service to replace defective
parts.
EXCEPT TO THE EXTENT PROHIBITED BY APPLICABLE LAW, ANY IMPLIED WARRANTY
OF MERCHANTABILITY OR FITNESS FOR A PARTICULAR PURPOSE ON THE PRODUCT IS
LIMITED IN DURATION TO THE DURATION OF THE ABOVE LIMITED WARRANTY. UNDER NO
CIRCUMSTANCES SHALL LG OR ITS U.S. DISTRIBUTORS/DEALERS BE LIABLE FOR ANY
INDIRECT, INCIDENTAL, CONSEQUENTIAL, SPECIAL, OR PUNITIVE DAMAGES, INCLUDING,
WITHOUT LIMITATION, LOST GOOD WILL, LOST REVENUES OR PROFITS, WORK STOPPAGE,
IMPAIRMENT OF OTHER GOODS, COST OF REMOVAL AND REINSTALLATION OF THE PRODUCT,
LOSS OF USE, OR ANY OTHER DAMAGES WHETHER BASED IN CONTRACT, TORT, OR
OTHERWISE. LG’S TOTAL LIABILITY, IF ANY, SHALL NOT EXCEED THE PURCHASE PRICE PAID
BY YOU FOR THE PRODUCT.
Some states do not allow the exclusion or limitation of incidental or consequential damages or limitations
on how long an implied warranty lasts, so the above exclusions or limitations may not apply to you. This
limited warranty gives you specific legal rights and you may also have other rights that vary from state to
state.
THIS LIMITED WARRANTY DOES NOT COVER:
• Service trips to deliver, pick up, or install, educate how to operate, correct wiring, or correct unauthorized
repairs.
• Damage or failure of the Product to perform during power failures and interrupted or inadequate
electrical service.
• Damage resulting from operating the product in a corrosive atmosphere or contrary to the product
owner’s manual.
• Damage or failure to the Product caused by accidents, pests and vermin, lightning, wind, fire, floods,
acts of God, or any other causes beyond the control of LG.
• Damage or failure caused by unauthorized modification or alteration, or if used for other than the
intended purpose.
• Damage or failure caused by incorrect electrical current, voltage, or plumbing codes.
• Damage or failure caused by transportation and handling, including scratches, dents, chips, and/or other
damage to the finish of the Product, unless such damage is reported within one (1) week of delivery.
Ten (10) years from the date of the original retail
purchase.
Parts & Labor: LG will at its discretion provide
repair or replacement of defective parts.
Page 33

ENGLISH
LIMITED WARRANTY
• Damage or missing items to any display, open box, or discounted Product.
• Products with original serial numbers that have been removed, altered, or cannot be readily determined.
• Increases in utility costs and additional utility expenses.
• When Product is used for other than normal and proper household use (e.g. commercial or industrial
use, offices, and recreational facilities or vehicles) or contrary to the instructions outlined in the Product’s
owner’s manual.
• Costs associated with removal and reinstallation of your Product for repairs.
• Damage or failure resulting from misuse, abuse, improper installation, repair, or maintenance. Improper
repair includes use of parts not authorized by LG. Improper installation or maintenance includes
installation or maintenance contrary to the Product owner’s manual.
• Expendable items that can wear out, including, but not limited to, filters and belts.
• A service technician to instruct the user in correct product assembly, operation or maintenance.
• A service technician to clean or maintain this product.
• Damage to or failure of your product caused by the use of detergents, cleaners, chemicals or utensils
other than those recommended in all instructions supplied with this product.
• Refurbished Product or any Product sold “As Is”, “Where Is”, “With all Faults”, or similar disclaimer.
• Any noises associated with normal operation.
The cost of repair or replacement under these excluded circumstances shall be borne by the
consumer.
TO OBTAIN WARRANTY SERVICE AND ADDITIONAL INFORMATION:
Call 1-800-243-0000 and select the appropriate option from the menu, or visit our website at http://www.
lg.com
33
Or by mail: LG Electronics Customer Service P.O. Box 240007 Huntsville, AL 35813 ATTN: CIC
PROCEDURE FOR RESOLVING DISPUTES:
ALL DISPUTES BETWEEN YOU AND LG ARISING OUT OF OR RELATING IN ANY WAY TO THIS
LIMITED WARRANTY OR THE PRODUCT SHALL BE RESOLVED EXCLUSIVELY THROUGH BINDING
ARBITRATION, AND NOT IN A COURT OF GENERAL JURISDICTION. BINDING ARBITRATION
MEANS THAT YOU AND LG ARE EACH WAIVING THE RIGHT TO A JURY TRIAL AND TO BRING OR
PARTICIPATE IN A CLASS ACTION.
Definitions. For the purposes of this section, references to “LG” mean LG Electronics U.S.A., Inc., its
parents, subsidiaries and affiliates, and each of their officers, directors, employees, agents, beneficiaries,
predecessors in interest, successors, assigns and suppliers; references to “dispute” or “claim” shall
include any dispute, claim or controversy of any kind whatsoever (whether based in contract, tort, statute,
regulation, ordinance, fraud, misrepresentation or any other legal or equitable theory) arising out of or
relating in any way to the sale, condition or performance of the product or this Limited Warranty.
Notice of Dispute. In the event you intend to commence an arbitration proceeding, you must first notify
LG in writing at least 30 days in advance of initiating the arbitration by sending a letter to LG at LG
Electronics U.S.A., Inc. Attn: Legal Department- Arbitration 111 Sylvan Ave, Englewood Cliffs 07632. You
and LG agree to engage in good faith discussions in an attempt to amicably resolve your claim. The notice
must provide your name, address, and telephone number; identify the product that is the subject of the
claim; and describe the nature of the claim and the relief being sought. If you and LG are unable to resolve
the dispute within 30 days, either party may proceed to file a claim for arbitration.
Agreement to Binding Arbitration and Class Action Waiver. Upon failure to resolve the dispute during
the 30 day period after sending written notice to LG, you and LG agree to resolve any claims between
us only by binding arbitration on an individual basis, unless you opt out as provided below. Any dispute
between you and LG shall not be combined or consolidated with a dispute involving any other person’s
or entity’s product or claim. More specifically, without limitation of the foregoing, any dispute between you
and LG shall not under any circumstances proceed as part of a class or representative action. Instead
Page 34

LIMITED WARRANTY
34
of arbitration, either party may bring an individual action in small claims court, but that small claims court
action may not be brought on a class or representative basis.
Arbitration Rules and Procedures. To begin arbitration of a claim, either you or LG must make a written
demand for arbitration. The arbitration will be administered by the American Arbitration Association (“AAA”)
and will be conducted before a single arbitrator under the AAA’s Consumer Arbitration Rules that are in
effect at the time the arbitration is initiated (referred to as the “AAA Rules”) and under the procedures set
forth in this section. The AAA Rules are available online at www.adr.org/consumer. Send a copy of your
written demand for arbitration, as well as a copy of this provision, to the AAA in the manner described in
the AAA Rules. You must also send a copy of your written demand to LG at LG Electronics, USA, Inc.
Attn: Legal Department- Arbitration 111 Sylvan Avenue Englewood Cliffs, NJ 07632. If there is a conflict
between the AAA Rules and the rules set forth in this section, the rules set forth in this section will govern.
This arbitration provision is governed by the Federal Arbitration Act. Judgment may be entered on the
arbitrator’s award in any court of competent jurisdiction. All issues are for the arbitrator to decide, except
that issues relating to the scope and enforceability of the arbitration provision and to the arbitrability of the
dispute are for the court to decide. The arbitrator is bound by the terms of this provision.
Governing Law. The law of the state of your residence shall govern this Limited Warranty and any
disputes between us except to the extent that such law is preempted by or inconsistent with applicable
federal law.
Fees/Costs. You do not need to pay any fee to begin an arbitration. Upon receipt of your written demand
for arbitration, LG will promptly pay all arbitration filing fees to the AAA unless you seek more than
$25,000 in damages, in which case the payment of these fees will be governed by the AAA Rules. Except
as otherwise provided for herein, LG will pay all AAA filing, administration and arbitrator fees for any
arbitration initiated in accordance with the AAA Rules and this arbitration provision. If you prevail in the
arbitration, LG will pay your attorneys’ fees and expenses as long as they are reasonable, by considering
factors including, but not limited to, the purchase amount and claim amount. Notwithstanding the
foregoing, if applicable law allows for an award of reasonable attorneys’ fees and expenses, an arbitrator
can award them to the same extent that a court would. If the arbitrator finds either the substance of your
claim or the relief sought in the demand is frivolous or brought for an improper purpose (as measured
by the standards set forth in Federal Rule of Civil Procedure 11(b)), then the payment of all arbitration
fees will be governed by the AAA Rules. In such a situation, you agree to reimburse LG for all monies
previously disbursed by it that are otherwise your obligation to pay under the AAA Rules. Except as
otherwise provided for, LG waives any rights it may have to seek attorneys’ fees and expenses from you if
LG prevails in the arbitration.
Hearings and Location. If your claim is for $25,000 or less, you may choose to have the arbitration
conducted solely on the basis of (1) documents submitted to the arbitrator, (2) through a telephonic
hearing, or (3) by an in-person hearing as established by the AAA Rules. If your claim exceeds $25,000,
the right to a hearing will be determined by the AAA Rules. Any in-person arbitration hearings will be held
at a location within the federal judicial district in which you reside unless we both agree to another location
or we agree to a telephonic arbitration.
Opt Out. You may opt out of this dispute resolution procedure. If you opt out, neither you nor LG can
require the other to participate in an arbitration proceeding. To opt out, you must send notice to LG no later
than 30 calendar days from the date of the first consumer purchaser’s purchase of the product by either: (i)
sending an e-mail to optout@lge.com, with the subject line: “Arbitration Opt Out” or (ii) calling 1-800-980-
2973. You must include in the opt out e-mail or provide by telephone: (a) your name and address; (b) the
date on which the product was purchased; (c) the product model name or model number; and (d) the serial
number (the serial number can be found (i) on the product; or (ii) online by accessing https://www.lg.com/
us/support/repair-service/schedule-repaircontinued and clicking on “Find My Model & Serial Number”).
You may only opt out of the dispute resolution procedure in the manner described above (that is, by e-mail
or telephone); no other form of notice will be effective to opt out of this dispute resolution procedure.
Opting out of this dispute resolution procedure will not affect the coverage of the Limited Warranty in any
way, and you will continue to enjoy the full benefits of the Limited Warranty. If you keep this product and do
not opt out, then you accept all terms and conditions of the arbitration provision described above.
Page 35

1
1
1
Page 36

 Loading...