

LG OTW420B Owner’s Manual [zh]
Drawn Approved
Signature
Bohyeon.yu Jongok.kim
MMM/DD/YYYY
Oct/14/2016 Oct/14/2016
OTW420B LG MFL68484591
CN Accessory (1707-REV02)
:LGEAK :LGEKR :LGERS
:LGEAZ :LGEMA :LGESY
:LGEEG :LGEMX :LGETH
:LGEIL :LGEND :LGEVN
:LGEIN :LGERA :LGEWR
:LGEAS
Checked
Mira.woo
:Part number
1. Model Description
Printing specification
:Model name (factory)
Oct/14/2016
Printed in Mexico
Printed in Poland
Printed in Kazakhstan
Printed in Brazil
:5. Language
:6. Number of pages
:Brand name
:Product name
:1. Trim size (Format)
2. Printing colors
: • Cover
: • Inside
Printed in Korea
: • Inside
:4. Bindery
(Revision number)
2. Printing Specification
:Suffix
Rev. Number
MMM/DD/YYYY
40
148 mm x 210 mm (A5) (WxH)
1 Color (Black)
1 Color (Black)
Uncoated, wood-free paper 80 g/㎡
Uncoated, wood-free paper 80 g/㎡
Saddle stitching
ENG/CHI (2)
3. Origin Notification
4. Changes
Printed in Mexico
Printed in Egypt
Printed in India
Printed in Algeria
3. Stock (Paper)
: • Cover
Changed the image about OLED65G7* (RMS: 5772)
EKLGB01539
Bohyeon.yu
NOV/23/2016
Jun/12/2017
SunheeLee
EKLH500130
[OTW420] 1. To add model name(55LJ54*, 55/65UJ62*)
2. To arrange component's order in manual
Printed in Indonesia
Printed in Russia
Printed in Poland
Signature
Change Contents
ECO Number
N
O
T
E
“This part contains Eco-hazardous substances (Pb, Cd, Hg, Cr6+, PBB, PBDE, etc.) within LG standard level,
Details should be followed Eco-SCM management standard[LG(56)-A-2524].
Especially, Part should be followed and controlled the following specification.
(1) Eco-hazardous substances test report should be submitted when Part certification test and First Mass Production.
(2) Especially, Don’t use or contain lead(Pb) and cadmium(Cd) in ink.
Printed in China
Printed in China
Printed in Thailand
Printed in Vietnam
Made by LG Electronics (Only TW Suffix)
1
10
9
8 7 6 5 4
3
2
Front Back
(ENG)
P/no 2 … … … … 19
Front Back
(CHI)
2 … … … … 19
Pagination sheet
Install Manual
Wall mounting
bracket
Please read this manual carefully before operating your set and
retain it for future reference.
OTW420B
*MFL68484591*
www.lg.com
P/No : MFL68484591 (1707-REV02)
ENGLISH
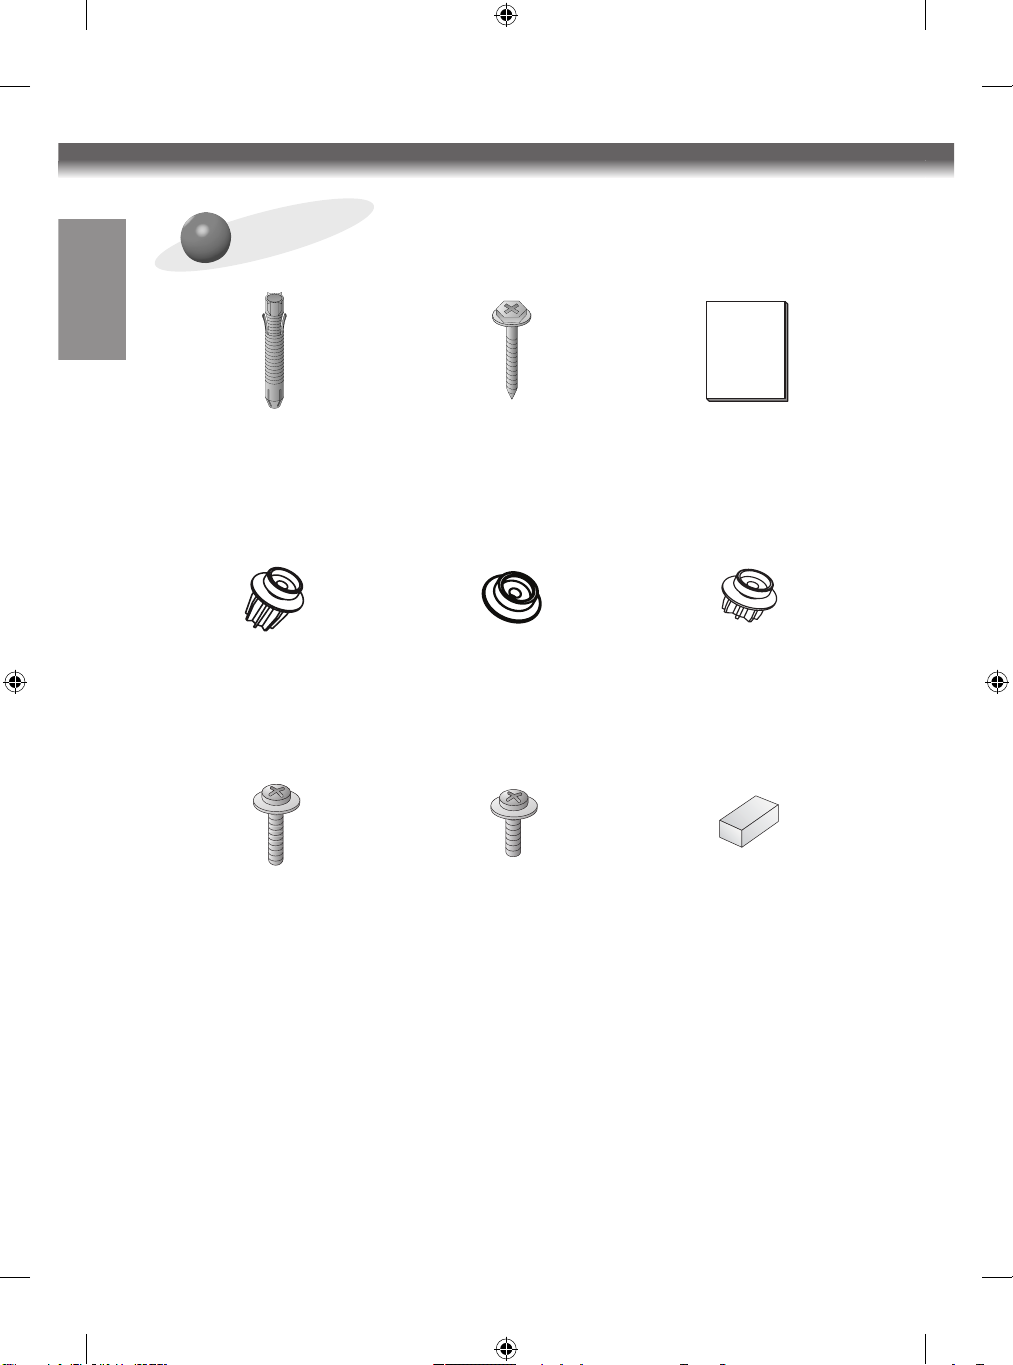
COMPONENT
Wall mounting
anchor
6 units
Guide spacer A
4 units
Guide spacer
screw A
4 units
(M6 x L35)
Wall mounting
screw
6 units
Guide spacer B
4 units
Guide spacer
screw B
4 units
(M6 x L18)
Install manual
Guide spacer C
4 units
Set protection
cushion
4 units
2
ENGLISH
IMPORTANT SAFETY INSTRUCTIONS
- If you are a professional installer, please read this manual
carefully before installing the product.
- If you are a professional installer, please give this manual
to the user after installing the product and ensure that
the user also reads the manual carefully and retains it for
future reference.
After reading the manual, please keep it handy for
future reference.
3
ENGLISH
Warning
The product should be
installed by a qualified
professional specified by
the retail store.
Product installation by nonqualified personnel is very
dangerous and may cause
personal injury.
When moving or replacing
the product after
installation, contact a
qualified installer specified
by the retail store.
Installation or movement of
the product must be carried
out by a skilled professional. If
an unqualified person moves
and installs the product, it
may cause safety risks.
The product should be
installed where its weight
can be fully supported.
If the product is installed on
a weak surface, the product
may fall, causing injury.
Do not hang on this
product, protect the
product from severe
impacts after the
installation.
The product may fall and
cause injury.
Be sure not to hang the
power cable and signal cable
on the back of TV when
installing the wall-mounted
TV.
Damaged cables may result in
fire, electric shock, or damage
to the product.
4
ENGLISH
Caution
Follow the instructions in
this manual to product
properly.
If you do not follow these
instructions, the product may
be installed incorrectly and
cause serious injury or the
product may become
damaged.
When installing the
product, first check that
the wall is strong enough.
Use the anchors and screws
provided.
If you use anchors and
screws that are not specified
by the manufacturer, they
may not hold the weight of
the product, causing safety
issues.
To install or adjust the
height of the product, two
or more people are needed.
If you try to install or move
the product alone, it may fall
and cause injury or the
product may become
damaged.
When drilling holes into the
wall, make sure you use a
drill and drill bit with the
specified diameter. Ensure
that you also follow the
instructions regarding the
depth of the holes.
Otherwise, the product may
be installed incorrectly and
cause safety issues.
5

ENGLISH
Do not clean the product
with a wet towel, and do
not place a heater, or
humidifier beneath it.
Moisture, steam or heat
permeating into this product
may result in fire, electric
shock or product damage.
Keep this product away
from sprinklers, sensors,
high-tension wires and
power sources. Do not
install it in a location where
vibrations or impacts are
likely to occur.
Make sure that the power
cord is removed from the
outlet before installing the
product.
Otherwise, it may cause an
electric shock or fire.
Be sure to use the
accessory cable provided.
Otherwise, friction between
the product and the wall
may cause damage to the
connector. (Depending on
model)
Wear safety gloves when
installing the product. Do
not use your bare hands.
Otherwise, it may cause
personal injury.
6

ENGLISH
BEFORE INSTALLATION
* Do not use the product for purposes other than mounting a
display on the wall.
* When installing/using the wall mount, be cautious of
product damage and avoid accidents.
* Install the wall mount according to the installation manual.
* If you have not fully read and understood the installation
manual, do not install the product and contact the dealer to
have a specialized installer install the product for you.
* Even if you are not a specialized installer, it is advantageous
to have experience in mechanical or construction field in
completely understanding this manual and installing the
product.
* Mount the product only on a concrete wall. LG Electronics
Inc. is not liable for any accidents caused by mounting the
product on walls made of any other materials, including
wood, plywood, and bricks.
* Install the product only on a vertical wall.
The manufacturer is not responsible for issue from installing
the product on an angled wall or on the ceiling.
* Check that the accessories provided with the product are all
included before installing. LG Electronics is not liable for any
damage or loss of accessories after the package has been
opened.
* Keep the included accessories out of reach of babies or
children as it can cause safety issues including suffocation
from swallowing the parts.
7
ENGLISH
* Make sure screws are tight against the wall, but do not
* Be careful not to install a TV that exceeds the weight
* Be careful with the tools used during installation to prevent
<Tools you will need>
Phillips head + driver (manual or motorized) / 8 mm socket
wrench / Level / Drill / You may also need an Ø 4 mm drill bit
for steel or an Ø 8 mm drill bit for concrete.
overtighten.
Applying excessive force to screws may damage to the wall,
affect the product performance, or cause the product to
become damaged.
restrictions of the wall mount.
accidents or damage.
8
ENGLISH
INSTALLATION
- The picture may differ from the actual product.
- Consult a professional installer prior to mounting the TV
using a wall bracket.
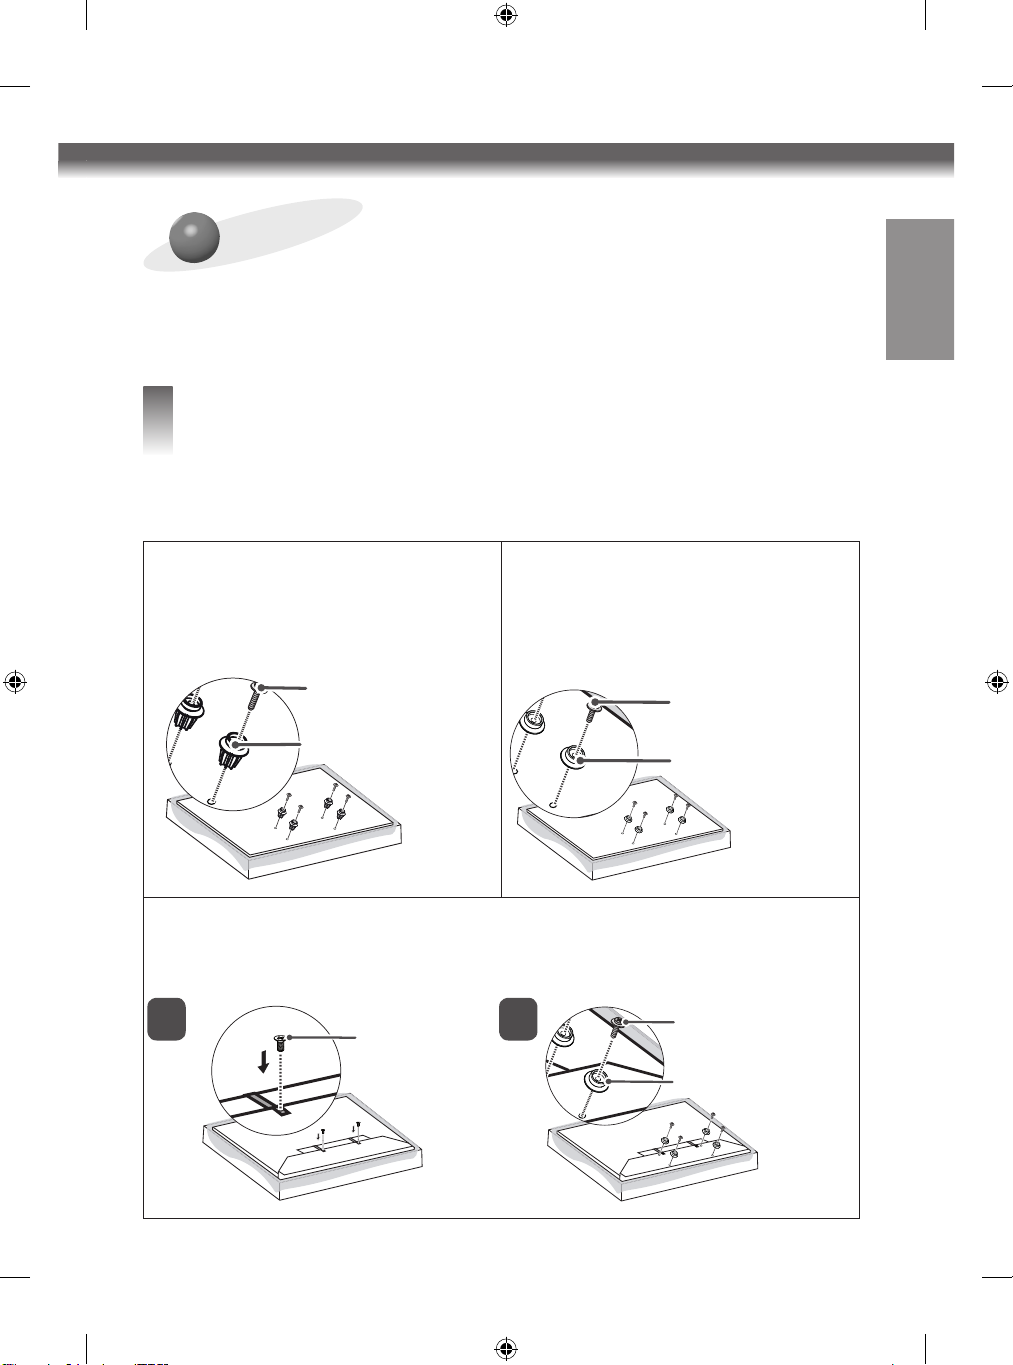
How to Attach the Brackets for the Product
1
to the TV
- Ifthescrewsarenotfullytightenedwhenyouxthe
guide spacers, check the length of the screws again.
(Only OLED55/65C6*,
OLED55/65E6*,
55/65UH95**, 55/65SJ95**,
OLED55/65E7*)
Guide spacer
screw A
Guide Spacer A
(Only OLED65G6*, OLED65G7*)
* Note: tighten the guide spacers after fixing the stand using
the provided stand fixing screws.
1
Stand fixing
screw
(Only OLED55/65B6*,
OLED55/65B7*)
Guide spacer
screw B
Guide Spacer B
2
Guide spacer
screw B
Guide Spacer B
9
ENGLISH
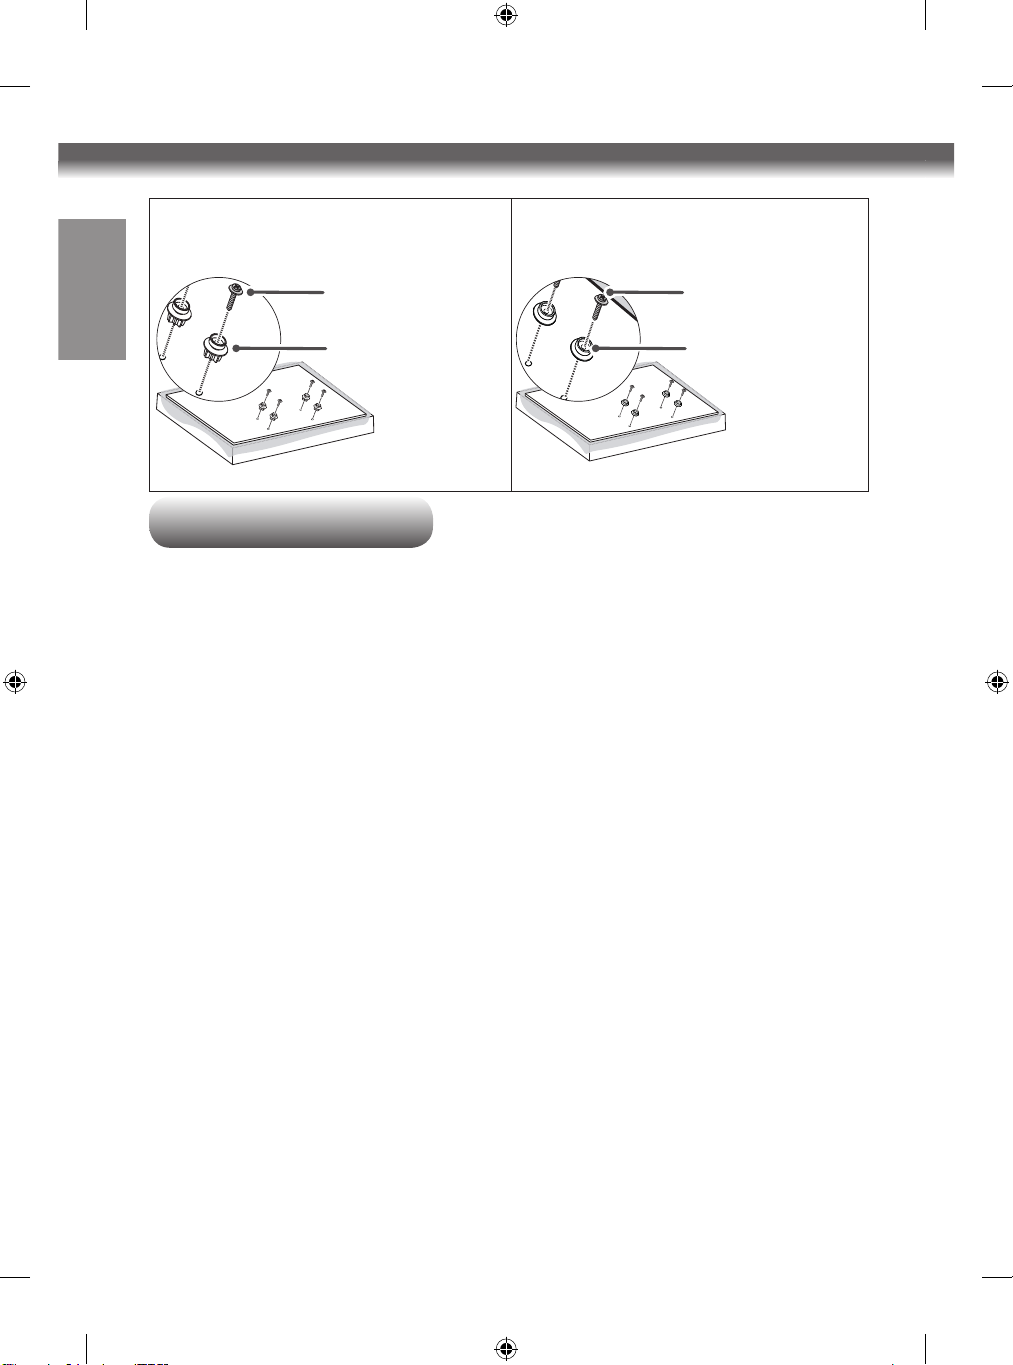
(Only OLED55/65C7*) (Only 55LJ54*, 55/65UJ62*)
1. Check to see if the display has screws installed into the
2. Assemble the guide spacer and the guide spacer screw in
Guide spacer
screw A
Guide spacer C
Guide spacer
screw A
Guide spacer B
Work procedure
mounting holes. If so, remove those.
order as shown in the picture.
- Place the TV on a table with the screen facing down.
Make sure that you place it on a flat surface covered with
a soft cloth or cushion to protect it from scratches.
- Secure the guide spacers to the TV with the screws.
Assemble the guide spacer to the set by tightening the
screw. Tighten the screw until the set, guide spacer and
the screw are fully pressing against one another.
- Use the + driver (manual or motorized) when tightening
the screw.
10
ENGLISH
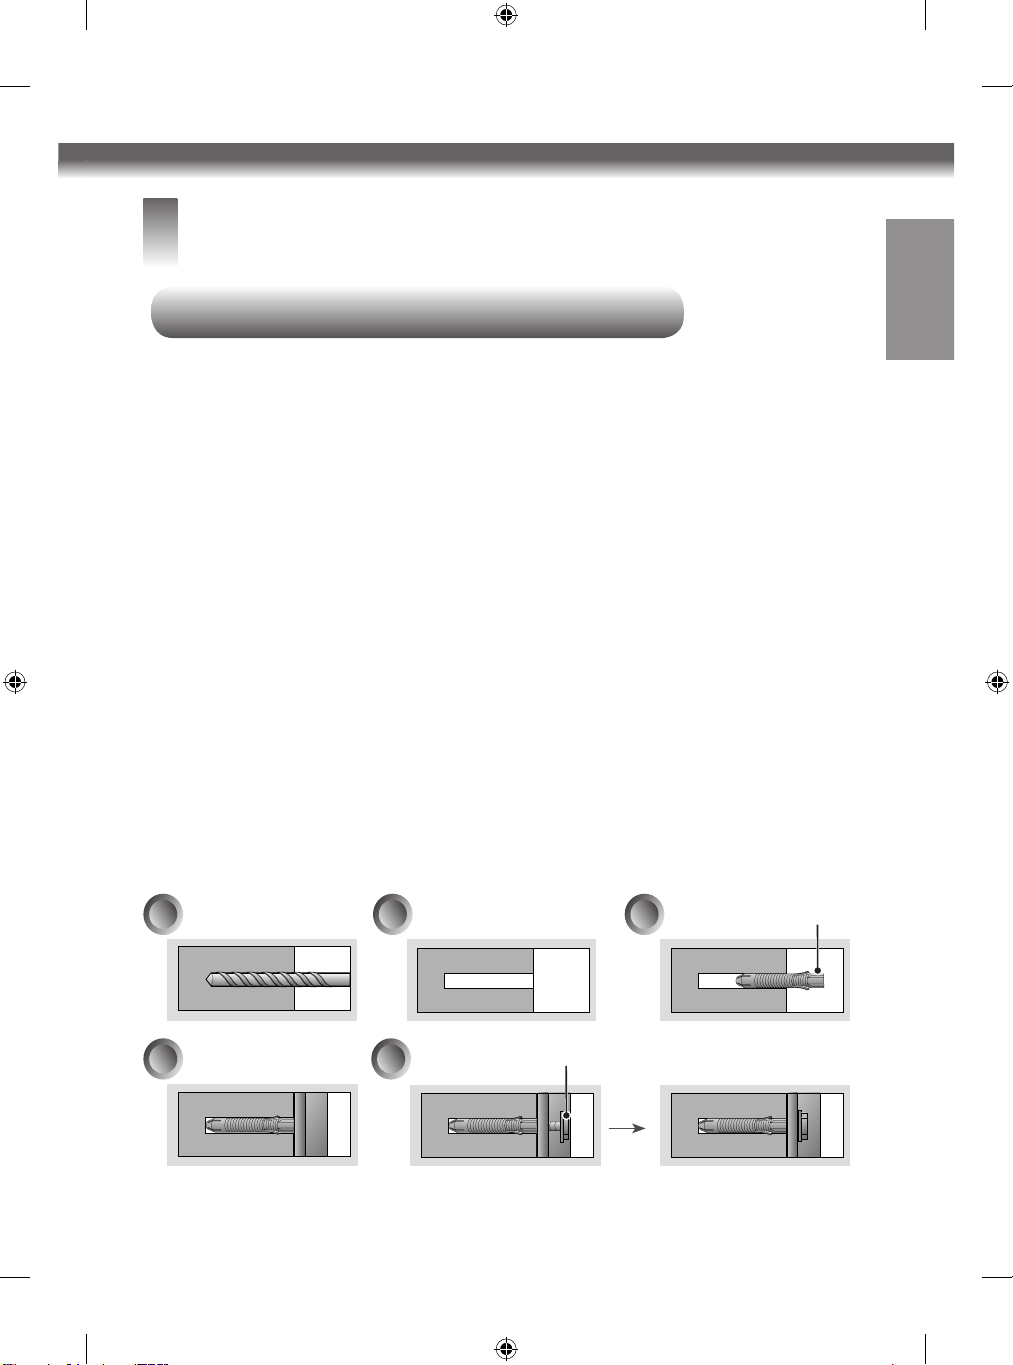
How to attach to masonry walls
2
Please follow the below direction.
- Check the material of the wall and the thickness of the
finishing.
- Use the anchors for wall material of concrete, light concrete,
strong natural stone, soft natural stone masonry brick and
hallow block that do not crack.
- Do not mount the device on the walls made from
plasterboard or medium density fiberboard (MDF). In this
case, the anchor and screws must be inserted into the
concrete behind the finish surface. If there is no concrete on
the other side, then you must first install a separate hanger
to securely install the anchors and screws.
- When installing the product on wall material not designated,
install the product so that each location can withstand the
pull out load of 70 kgf (686 N) and shear load of 100 kgf
(980 N) or above.
a c
d
b
e
Wall mounting screw
Wall mounting
anchor
11
 Loading...