

Page 1
TCS522160.1
MBM64217348 (1.0) Printed in Mexico
BC
Page 2

Page 3

TABLE OF CONTENTS
Your Phone ......................................................... 2
Getting Started
Set Up Your Accounts
Customize Your Phone
Locking & Unlocking the Screen
Guest mode
Camera
Video camera
Browser
Transfer Music and Pictures
Calls and Voicemail........................................... 17
Text Messaging
Email
Input Language Settings
QSlide
Wi-Fi and Bluetooth
Google Play™ Store
Smartphone Mobile HotSpot
Wi-Fi Calling
Network Indicators
Approved Firmware Versions
Safety Tips
Information About Safeguarding Handsets
Emergency Dialing
Caring For Your Phone
................................................... 4
......................................... 9
...................................... 10
........................ 11
...................................................... 13
............................................................ 14
................................................... 15
............................................................ 16
.............................. 16
................................................. 18
................................................................ 19
................................... 20
.............................................................. 21
®
......................................... 22
.......................................... 23
............................. 24
..................................................... 25
............................................ 26
............................. 27
........................................................ 27
........ 27
............................................ 28
...................................... 28
Additional Information
For Your Safety
................................................. 31
...................................... 29
1
Page 4
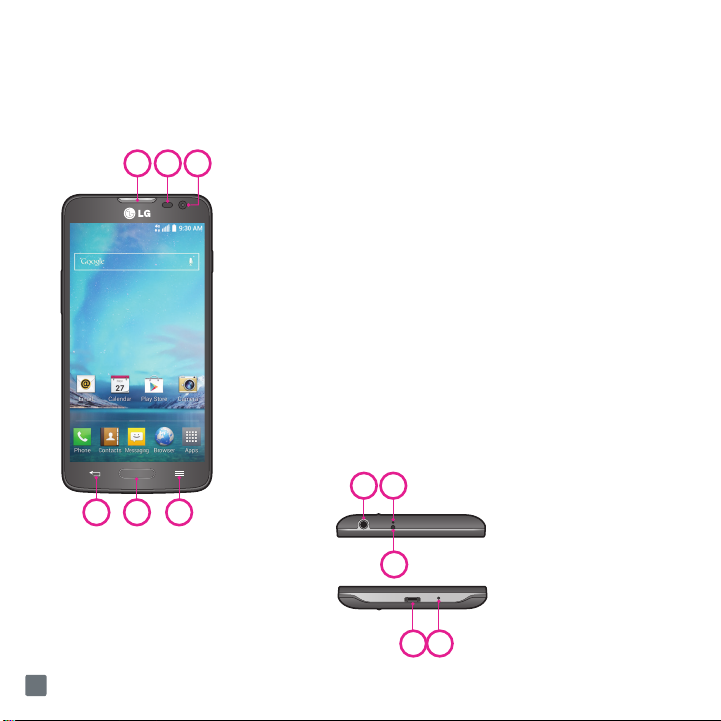
Your Phone
Front view
4
1
2
5 6
3
1 Earpiece
2 Proximity Sensor
3 Front Camera Lens
4 Back Key
5 Home Key
6 Menu Key
7
8
7 3.5mm Headset Jack
8 Microphone (Sub)
9
11
10
9 IR (infrared) LED
10 Charger/USB port
11 Microphone (Main)
2
Page 5
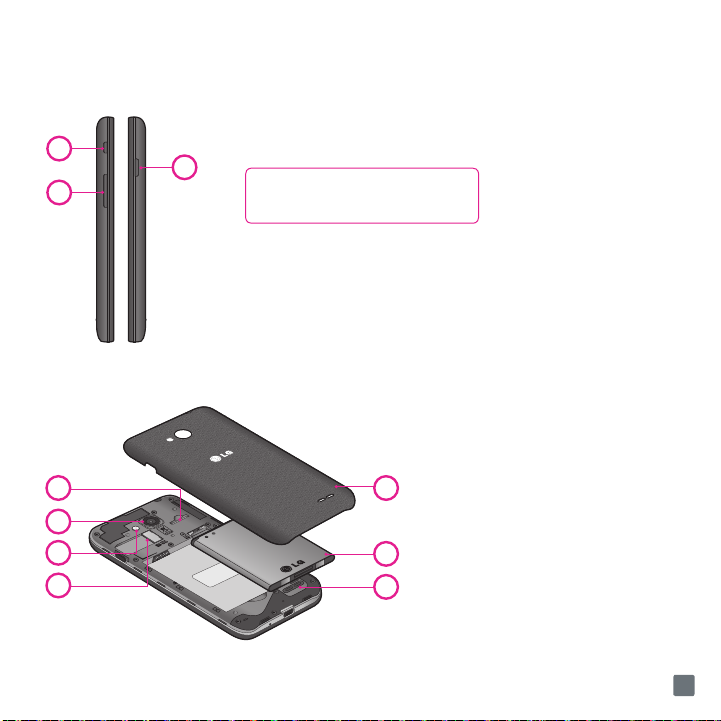
Side view
1
2
Rear view
2
3
4
1 QuickButton Key (Customizable)
3
TIP: QuickButton
Press for quick access to your favorite app.
2 Volume Keys
3 Power/Lock Key
1 Micro SIM Card Slot
2 Back Camera Lens
51
6
3 Flash
4 MicroSD Card Slot
5 Back Cover
6 Battery
7 External Speaker
7
3
Page 6
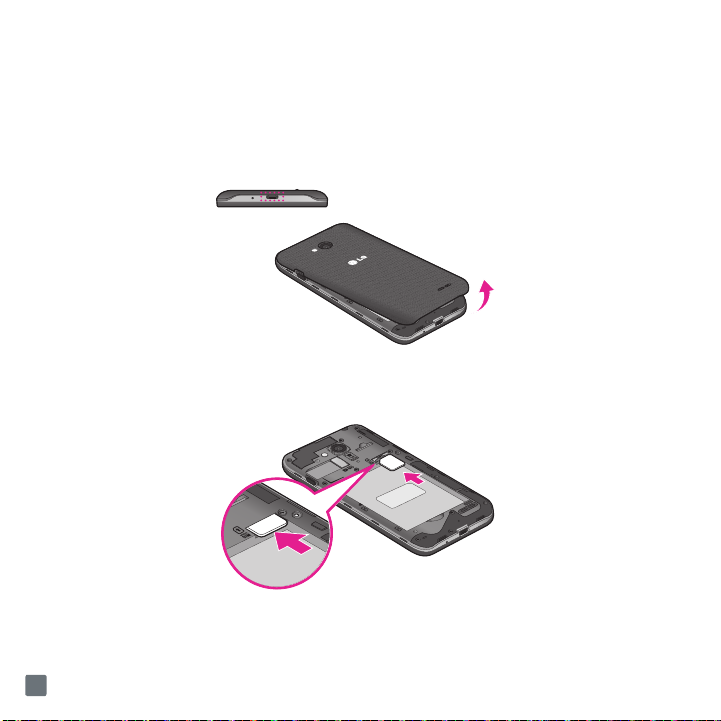
Getting Started
Before you start using the phone, you may need to insert the Micro SIM card.
Installing the Micro SIM card and battery
1 Use the fingertip cutout to remove the back cover.
2 Insert the Micro SIM card. Make sure the gold contact area on the card is facing downwards and the notched side is
inserted first (see image below).
4
Page 7
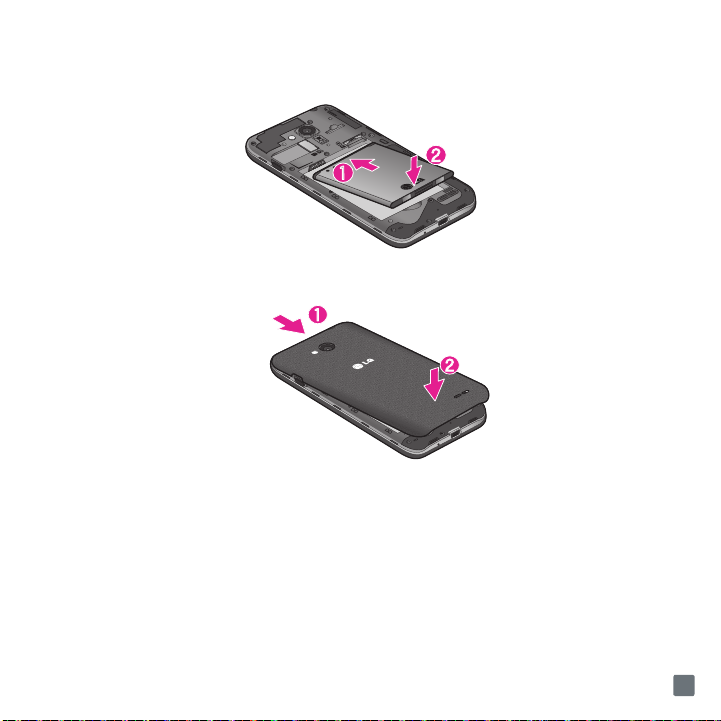
3 To insert the battery, align the gold contacts on the phone and the battery and press it down until it clicks into place.
4 Place the back cover over the battery compartment and press it downwards until it clicks into place.
5
Page 8
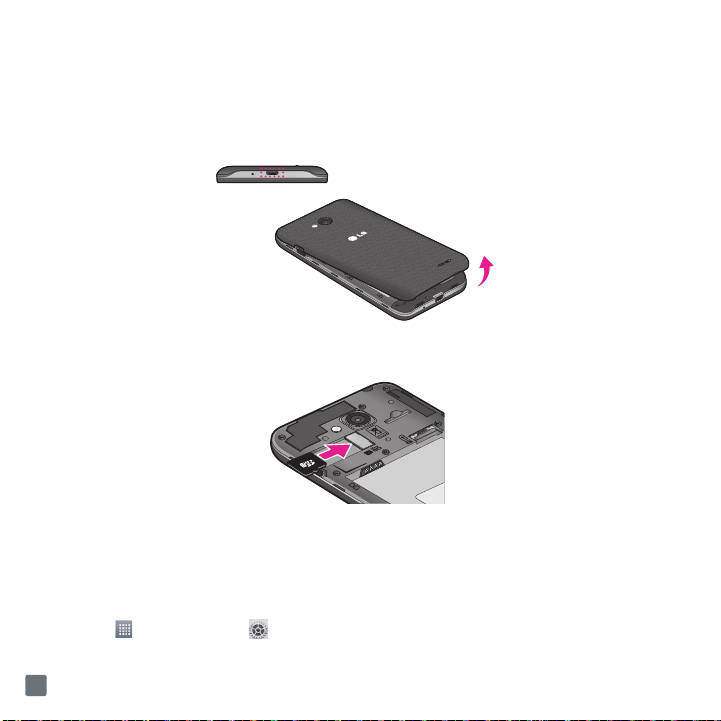
Installing the memory card
To store multimedia files, such as pictures taken using the camera, to an SD card, you must insert a memory card
into your phone.
1 Use the fingertip cutout to remove the back cover.
2 Insert the memory card into the slot. Make sure the gold contact area is facing downwards.
NOTE
The memory card is sold separately.
Warning!
Do not remove the memory card without first unmounting it using the Storage menu. Otherwise the memory card, as well as
your phone, may become damaged and the data stored on the memory card may get corrupted. To unmount the memory card
safely, tap
Apps
> Apps tab > Settings >
General
tab > Storage > Unmount SD card.
6
Page 9
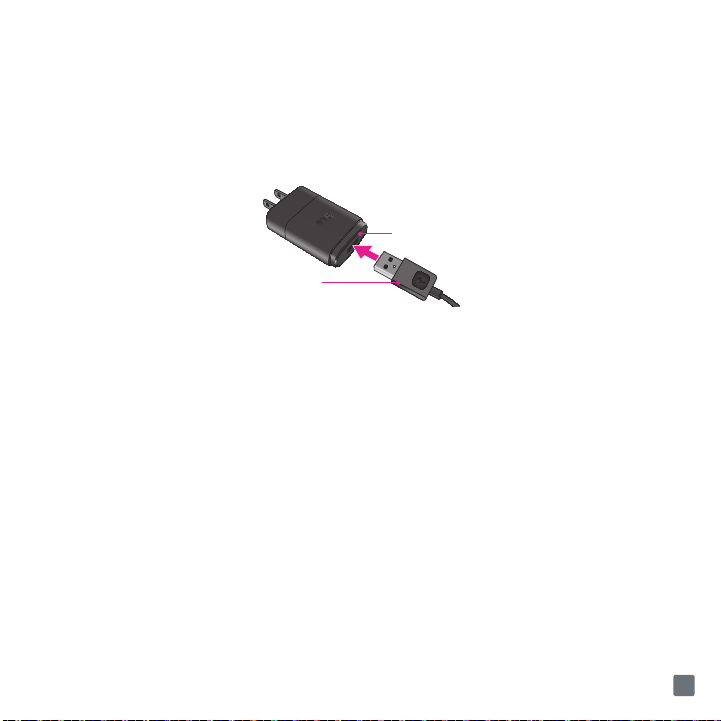
Charging your phone
A rechargeable Li-ion battery is used to power your phone.
A USB Adapter, which is included with your phone, is used to charge the battery.
Before using your phone for the first time, make sure the battery is fully charged. An uncharged battery will fully
recharge after 3 hours.
USB Adapter
USB Cable
NOTE
Make sure the battery is installed before connecting the USB Adapter. If the battery is not installed and the USB Adapter is
connected, the phone will not operate properly due to prolonged power cycling. Also, removing the battery with the USB
Adapter connected may damage the device. Please unplug the USB Adapter before removing the battery.
Warning!
If the touch screen does not function while the phone is in the process of charging, it may be due to an unstable power supply.
As a result, disconnect the USB cable from the device or unplug the USB Adapter from the power outlet.
7
Page 10
1 Connect the USB Adapter and USB cable (as shown on the previous page).
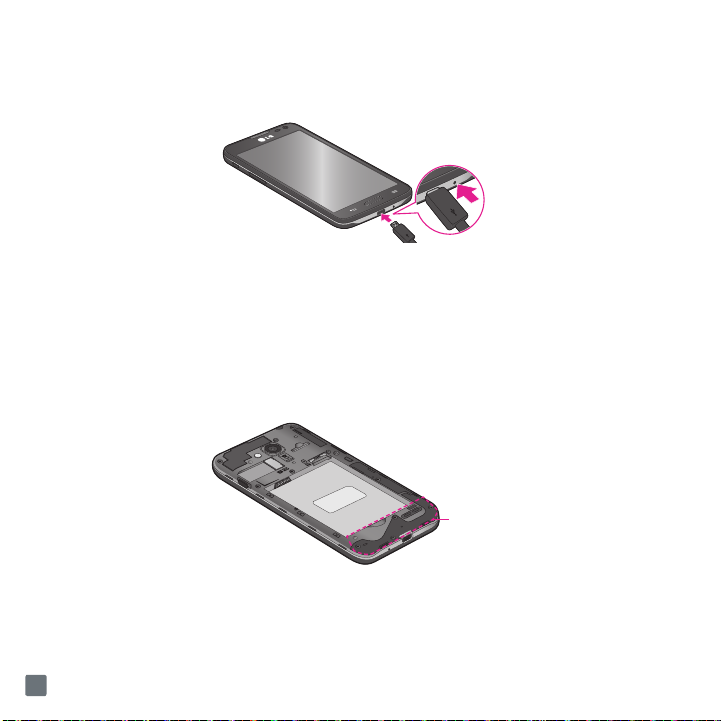
2 Plug the USB cable (as shown on the next image) into the phone’s Charger/USB Port.
NOTE
The battery must be fully charged initially to improve battery lifetime.
NOTE
Your phone has an internal antenna. Be careful not to scratch or damage this rear area, as that will cause loss of performance.
Warning!
Use only approved chargers, batteries and cables. When using unapproved chargers or cables, it may cause battery charging
delay or pop up message regarding slow charging. Or, unapproved chargers or cables can cause the battery to explode or
damage the device, which are not covered by the warranty.
Internal
Antenna
8
Page 11
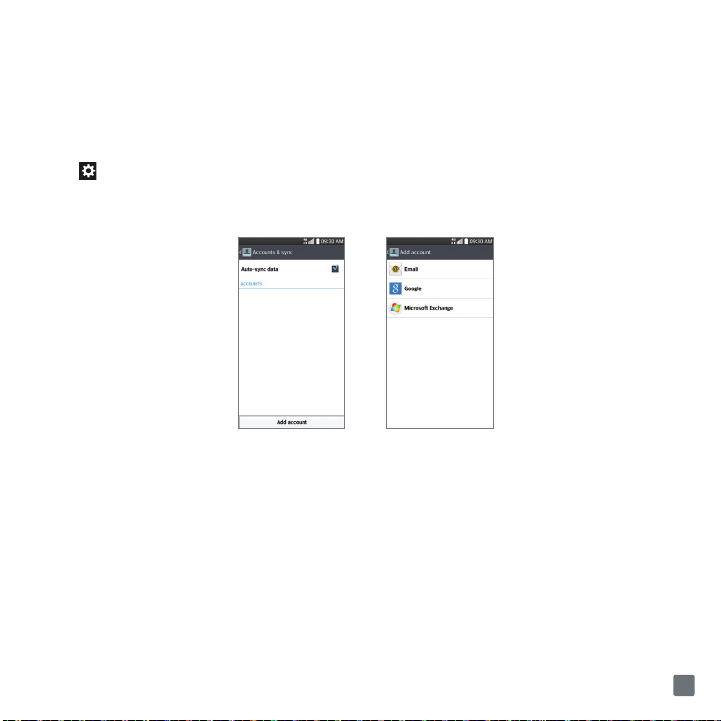
Set Up Your Accounts
Adding accounts will populate email, contacts, calendar, and other information on your device. You may want to
set up accounts over Wi-Fi to save on your data plan usage.
1 On any screen, swipe down from the top of the screen to display the Notifications Panel.
2 Tap at the top right corner of the screen, then tap the General tab > Accounts & sync > Add account
3 Select the type of account you would like to add. Enter your information and follow any additional on-screen
instructions.
NOTE
Contact your IT administrator to help set up your corporate Microsoft® Exchange account.
.
9
Page 12
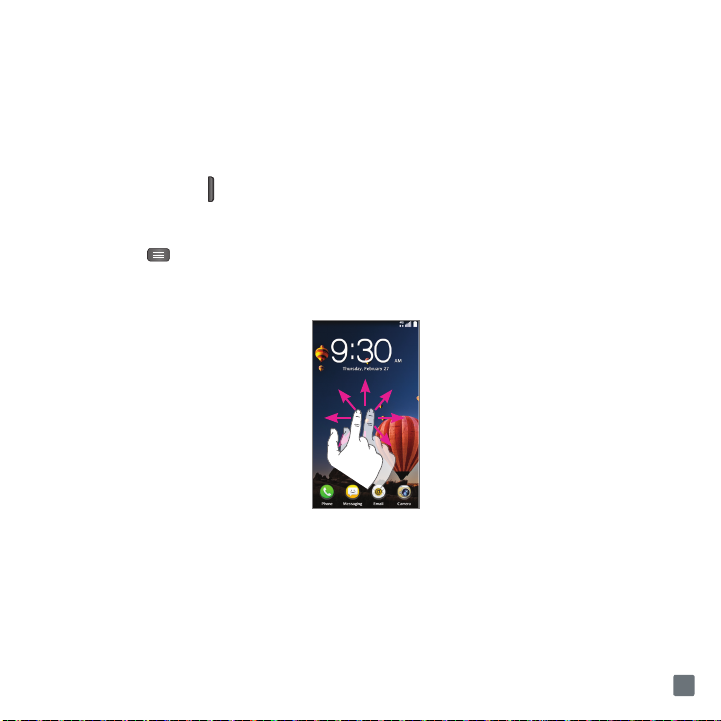
Customize Your Phone
Add widgets and apps to your Home screen, change the wallpaper, and more.
Customize the Home Screen
1 Press and hold an empty spot on a Home screen panel and choose a category:
•
Apps
: Add shortcuts to your favorite apps.
•
Widgets
: Add dynamically updating widgets.
•
Wallpapers
2 Tap the desired option to add it to the Home screen. To move an item, press and hold it and drag it to a new location.
To delete it, drag it to Remove at the top of the screen.
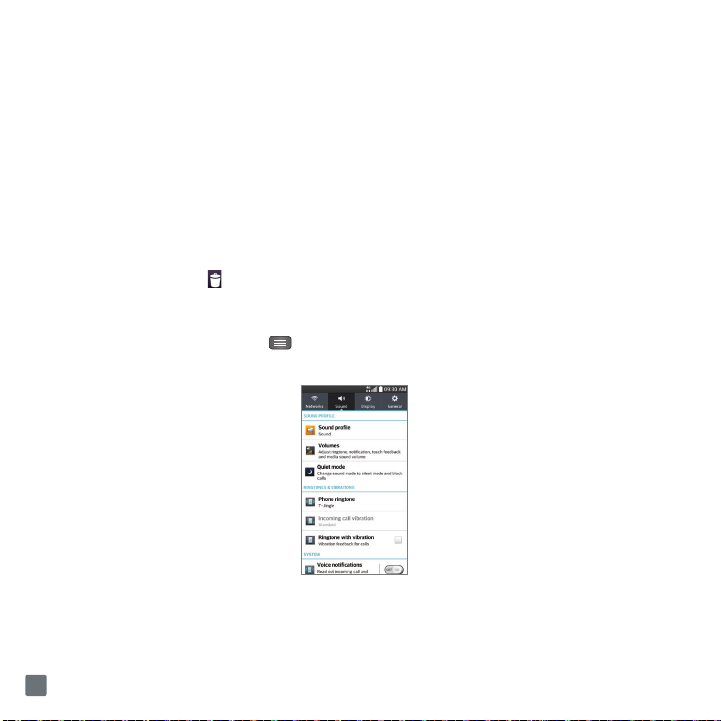
Customize Your Sounds
From the Home screen, tap the
notification sounds, and adjust your tap feedback options.
: Change your wallpaper.
Menu Key
>
System settings
>
Sound
tab. You can change your ringtones, set
10
Page 13
Locking & Unlocking the Screen
After a period of inactivity, the screen you are currently viewing will be replaced by the lock screen to conserve
battery power.
Unlocking the Screen
1 Press the
2 From the center of the screen, swipe in any direction to unlock it.
Power/Lock Key
•Shortcuts can be added for quick access to your favorite apps. To add shortcuts, from the Home screen, tap
the
Menu Key
>
•To use a shortcut, swipe the shortcut icon at the bottom of the screen in any direction. The screen will unlock
and open the application.
to turn on your screen. Your Lock Screen will appear.
System settings
>
Display
tab >
Lock screen
>
Shortcuts
.
11
Page 14

KnockON
The KnockON feature allows you to double-tap the screen to easily turn it on and off. You can enable/disable this
feature in the Gestures settings.
1 KnockON is enabled by default. To turn it on or off, from the Home screen, tap the
settings
>
General
tab >
Gestures.
2 Tap the Screen on/off checkbox to set this feature.
3 With KnockON enabled and the phone locked, quickly double-tap the screen to wake the phone.
4 Double-tap an empty area of the Home screen or the Status Bar to turn the screen off.
Menu Key
>
System
Notifications Panel
Swipe the top of the screen downwards to open the Notifications Panel.
• To respond to a notification, tap it.
• To remove a notification, swipe it left or right.
• To remove all notifications, tap
• Adjust the Quick Settings by tapping them (i.e.,
• Tap at the top right corner of the Notifications Panel to access the Settings menu.
Clear
.
Sound
).
12
Page 15
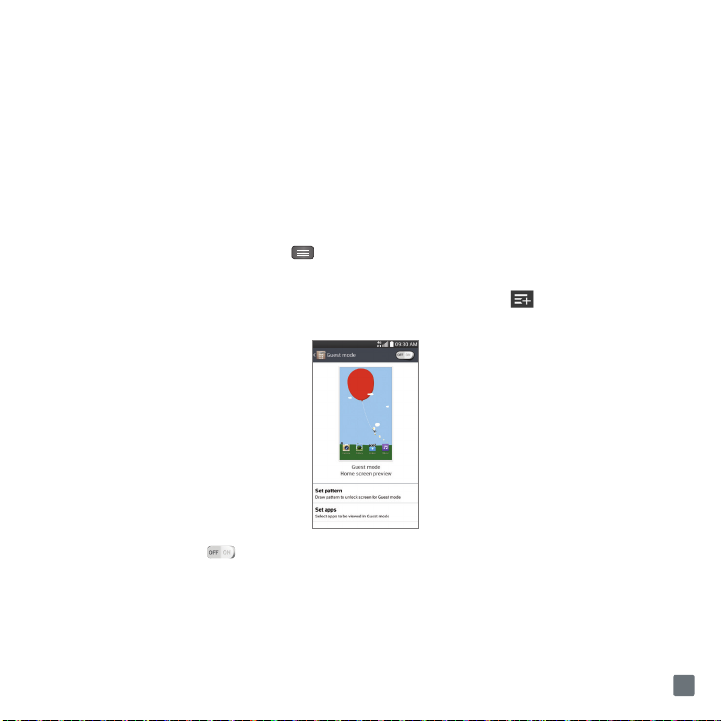
Guest mode
Use Guest mode when you let someone else use your phone. They will only be able to use the applications that you’ve
selected. Once you set it up, you can easily put your phone in Guest mode by drawing the guest pattern on the Lock
screen, which is different from your normal unlock pattern.
NOTE
Guests can also use applications that your selected applications link to.
Setting up Guest mode
1 From the Home screen, tap the
2 Tap Set pattern, then set the pattern you want to use to put your device
3 Tap Set apps to view which apps can be accessed in Guest mode. Tap
of the screen to change the Guest apps list.
4 Tap the Guest mode switch to enable this mode.
Using Guest mode
After you’ve set up and enabled Guest mode, lock the screen so that you can enter your Guest mode pattern. The
Guest mode Home screen is displayed with only the apps you’ve selected for guest access. To exit Guest mode,
enter your normal unlock pattern on the Lock screen.
Menu Key
>
System settings
>
General tab > Guest mode
in Guest mode.
the
Add
icon in the upper right corner
.
13
Page 16
NOTE
Guest mode is automatically disabled if your lock sequence is changed from Pattern. Otherwise, manually disable it if you no
longer want to allow guest access.
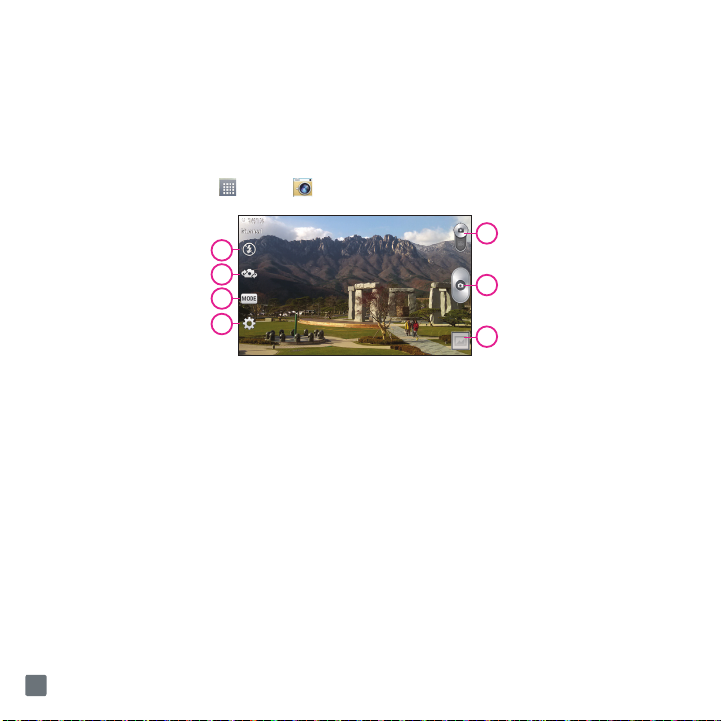
Camera
1 From the Home screen, tap
Apps
>
Camera
.
1
2
3
4
1
Flash
2
Swap camera
3
Shot mode
4
Settings
14
5
Mode switch
6
Capture
7
Gallery
5
6
7
Page 17
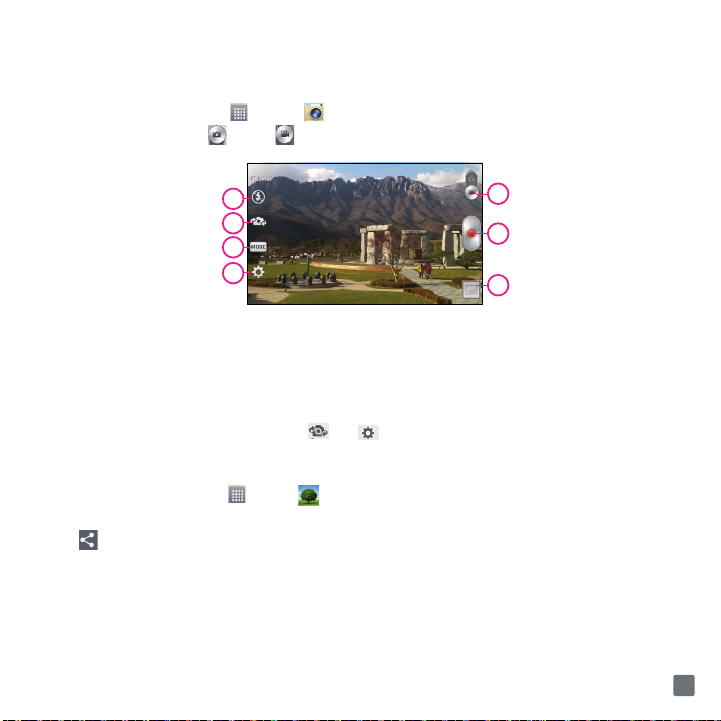
Video camera
1 From the Home screen, tap
2 Slide the Mode Switch icon down to to toggle from Camera to Video camera mode.
Apps
>
Camera
.
1
2
3
4
1
Flash
2
Swap camera
3
Recording mode
4
Settings
5
Mode switch
6
Record
7
Gallery
5
6
7
NOTE
To access the front-facing camera or camcorder, tap . Tap to view and change camera/camcorder settings.
Share Photos or Videos
1 From the home screen, tap
2 Tap an album.
3 Tap and then select the image(s) you wish to share.
4 Tap Share.
5 Select the method you wish to use to share and send it.
Apps
>
Gallery
.
15
Page 18
Browser
Use the Web browser to surf the Web with ease.
Browsing the Web
1 From the Home screen, tap
2 Tap the URL bar at the top of the screen and enter the web site address.
3 Tap Go on the keyboard.
Apps
>
Browser
.
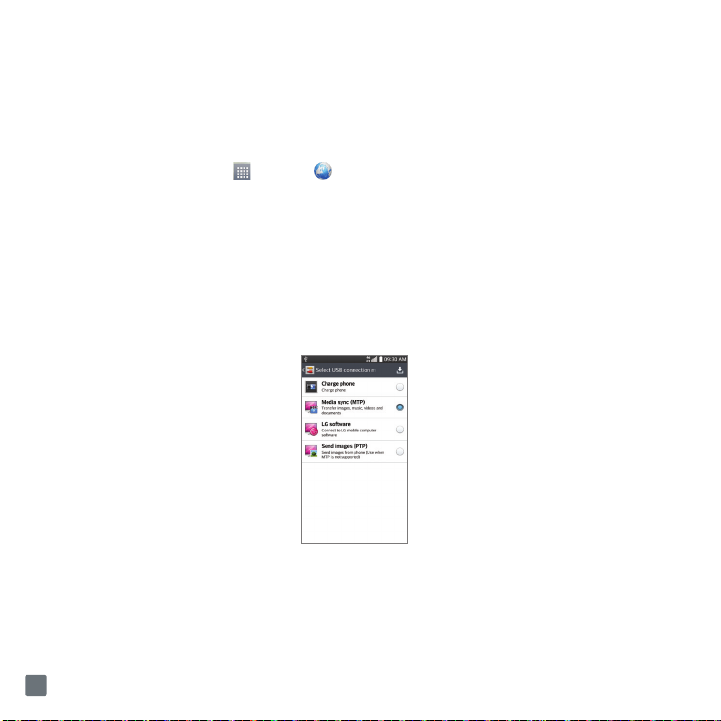
Transfer Music and Pictures
Transfer music and photos to and from your phone in a few simple steps.
1 Connect your phone to your computer with a USB cable. Steps may vary depending on your operating system.
2 You may be prompted to install PC programs. Tap Media sync (MTP).
3 On your PC, choose open device to view files using Windows Explorer.
4 Your phone will appear as another portable device on your computer. Click on the drive to view it.
5 Drag and drop your files* into the corresponding folders, such as music, videos, or pictures. You can also transfer files
from your PC to your phone.
* Files must be Digital Rights Management (DRM) free.
16
Page 19
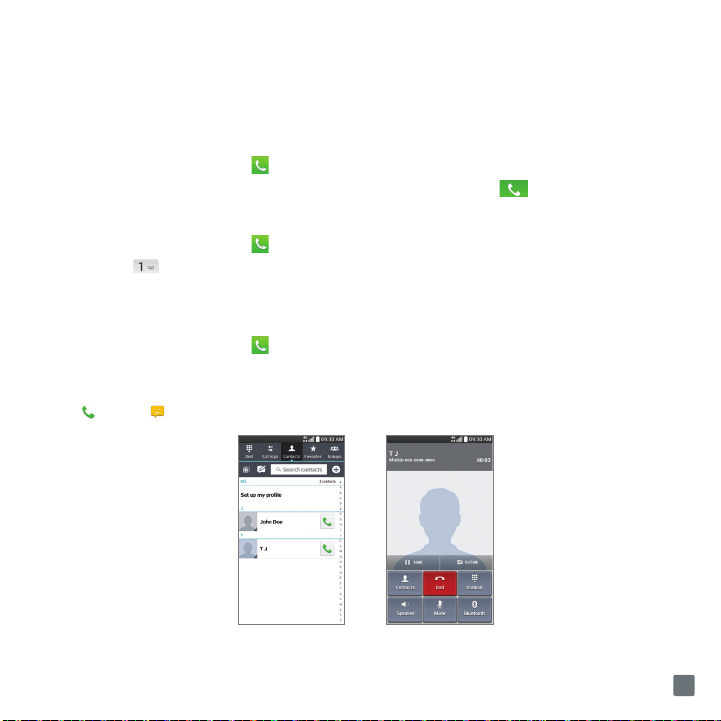
Calls and Voicemail
It’s easy to make calls and access voicemail and your call logs with your phone.
Make a Call
1 From the Home screen, tap
2 Enter a phone number or spell the name of a contact. Tap the contact and then tap to place the call.
Access Voicemail
1 From the Home screen, tap
2 Tap and hold .
3 Follow the voice prompts to listen to messages.
Access Call Logs
1 From the Home screen, tap
2 Tap the Call logs tab.
3 Tap an entry to view it.
4 Ta p to call or to send a message.
Phone
.
Phone
.
Phone
.
17
Page 20
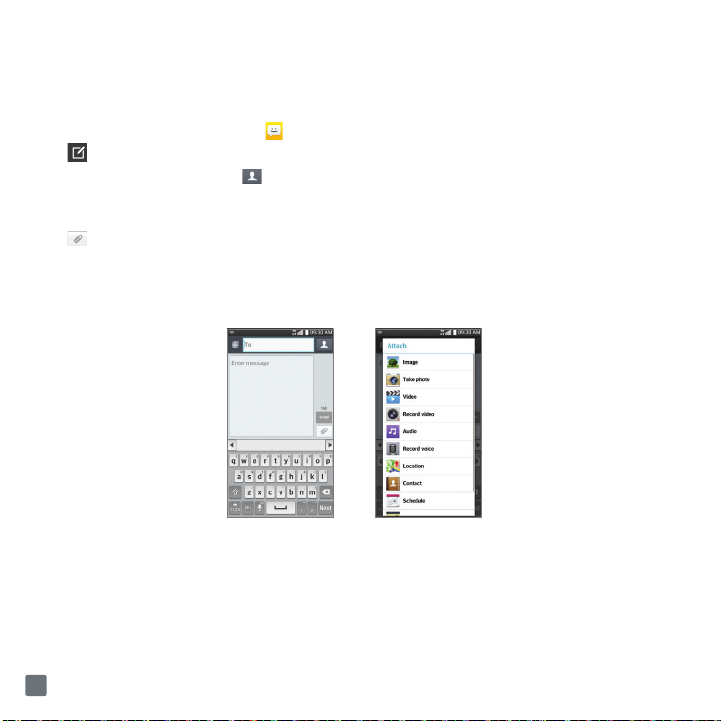
Text Messaging
Communicate quickly via text message with the phone. Attach images, videos, and other files to your messages.
1 From the Home screen, tap
2 Tap to compose a new message.
3 In the To field, enter a number or tap to select a name from your contact list. You can enter several names to send
your message to multiple people.
4 Enter your message.
5 Tap to attach a file.
6 Tap Send to send the message.
NOTE
Messaging rates apply.
WARNING!
The LG Messaging app should be set up as the default SMS app. If not, some message functions will be limited.
Messaging
.
18
Page 21
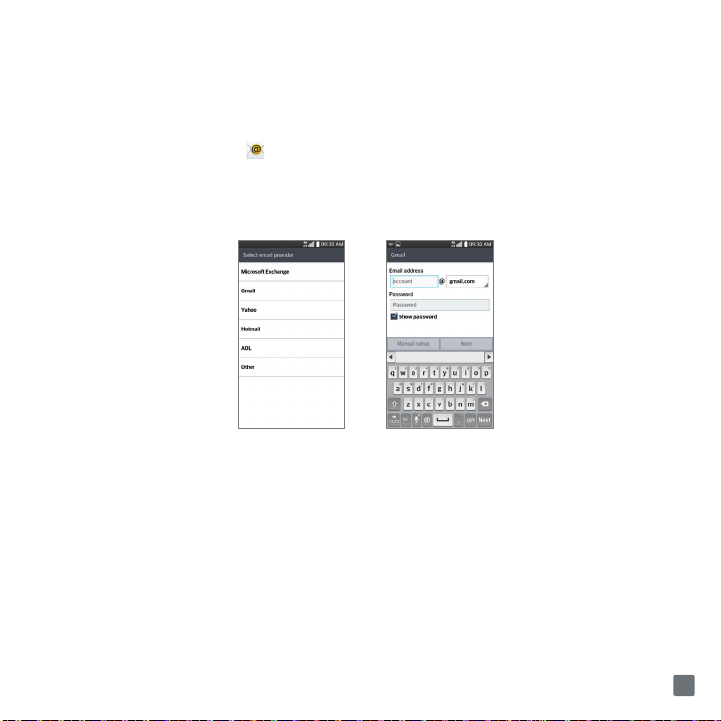
Email
In addition to Gmail™, you can set up other types of email accounts on your phone, including Microsoft®
Exchange accounts.
1 From the Home screen, tap
2 Tap an account type. Steps may vary from this point.
3 Enter your email address and password and tap Next.
4 Follow additional on-screen instructions to complete setup and tap Done.
NOTE
Contact your IT administrator to help set up your corporate Microsoft® Exchange account.
Email
.
19
Page 22
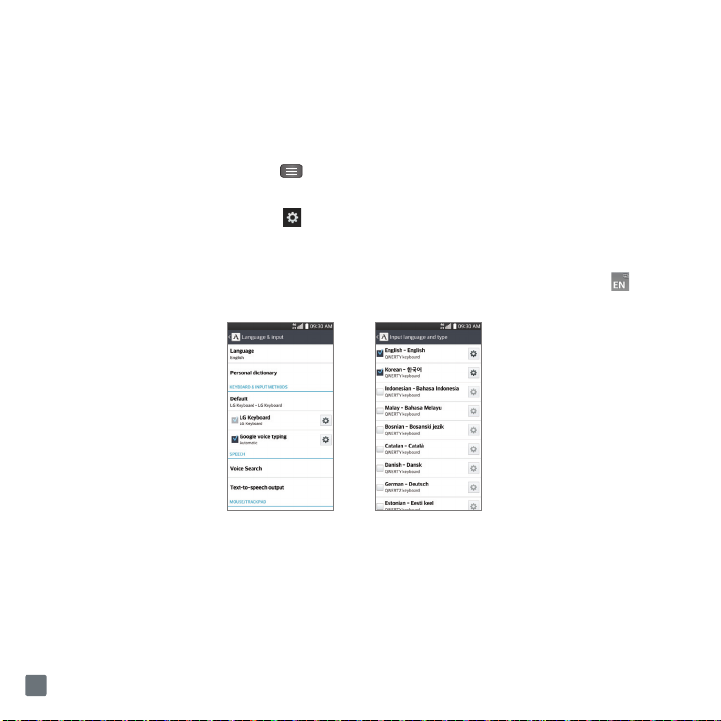
Input Language Settings
Change your phone’s device and keyboard input languages to suit your needs.
Change Device and Input Language
1 From the Home screen, tap the
2 To change the device language, tap Language and select the desired language.
3 To change the keyboard input language, tap next to the desired keyboard under the Keyboard & Input Methods
section.
4 Tap Input language and type.
5 Tap the desired input languages to select them. You can change languages by tapping the Language Key when
you have a keyboard open, for instance while typing a text message.
Menu Key
>
System settings
>
General
tab >
Language & input
.
20
Page 23
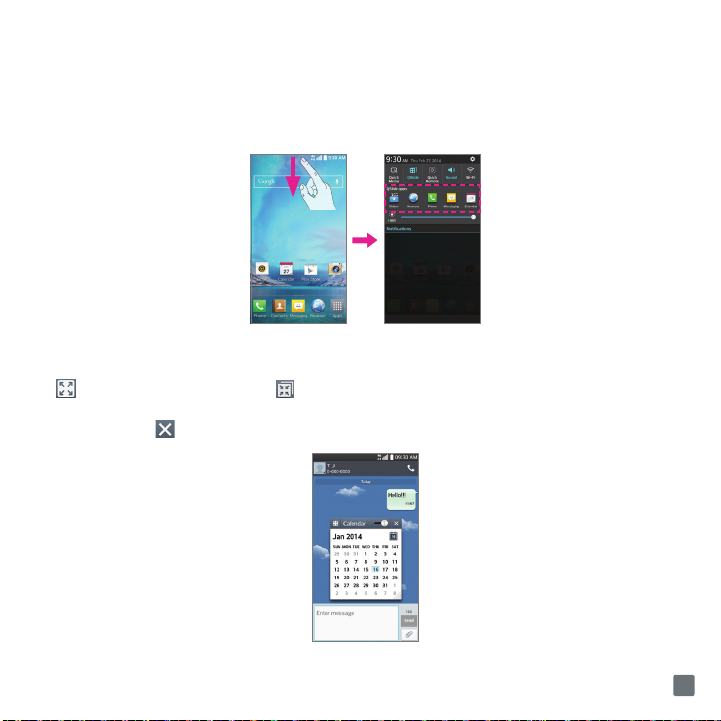
QSlide
This feature enables an overlay on your phone’s screen for easy multitasking.
1 From any screen, swipe down from the top of the screen to display the Notifications Panel.
2 Tap one of the QSlide apps. The app will appear as a resizable, moveable window on the screen.
3 Drag the right-bottom corner to increase or to decrease the window size and drag the title bar to move the window. Tap
to make the QSlide app full size. Tap to make the app smaller again. Use the slider to adjust the transparency
of the window.
4 To exit QSlide, tap .
21
Page 24
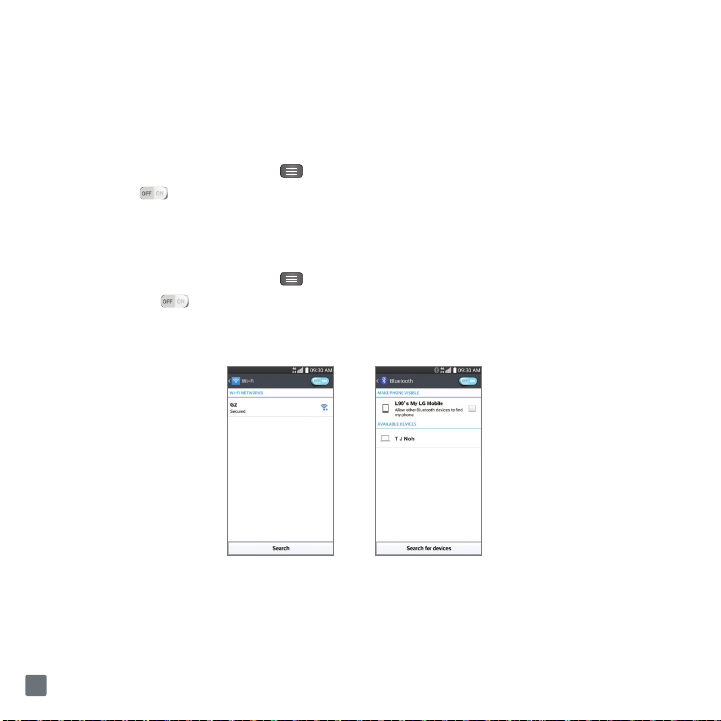
Wi-Fi and Bluetooth
Stay connected with Wi-Fi and Bluetooth connectivity on your phone.
®
Connect to Wi-Fi
1 From the Home screen, tap the
2 If Wi-Fi is off, tap to enable it.
3 Tap a network name. Enter a password if required and then tap Connect.
Menu Key
>
System settings
>
Networks
tab >
Wi-Fi
.
Use Bluetooth
1 From the Home screen, tap the
2 If Bluetooth is off, tap to enable it.
3 Your phone will automatically search for devices. Tap the name of the device you wish to pair with. See the Bluetooth
device’s user manual for more information on pairing.
Menu Key
>
System settings
>
Networks
tab >
Bluetooth
.
22
Page 25
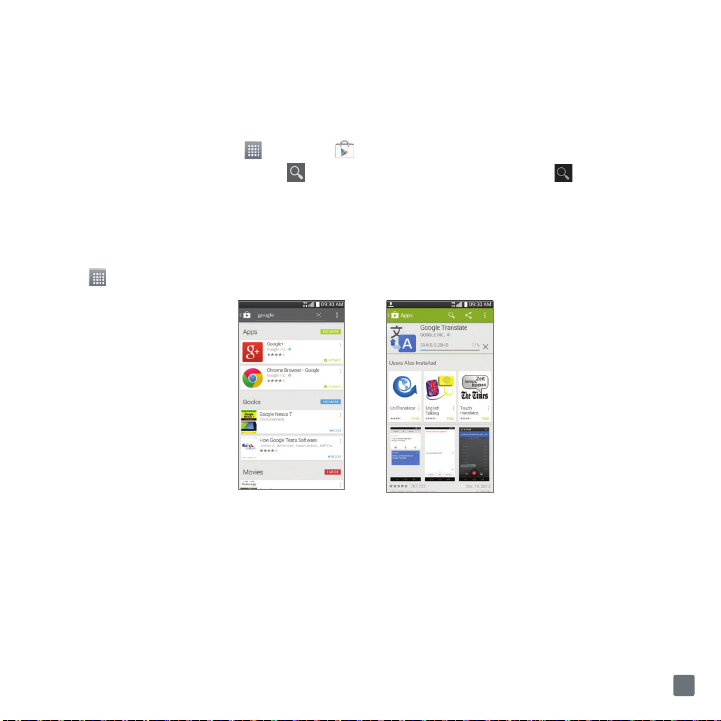
Google Play™ Store
Once you have set up your Google™ account, you can download apps from the Play Store. You may want to
download apps over Wi-Fi to save on your data plan usage.
1 From the Home screen, tap
2 Tap a category to browse selections, or tap to search for an item. Enter a keyword and tap on the keyboard.
3 Tap an app to view information about it, then tap INSTALL.
4 Read the app permissions and, if you agree, tap ACCEPT. Once the app has been downloaded and installed, you will
see a notification in the Status Bar.
5 To open the app, swipe down from the top of the screen and tap the notification. You can also find the app by tapping
Apps .
NOTE
To purchase a paid app, you will need to set up a payment method with Google Wallet™.
Apps
>
Play Store
.
23
Page 26
Smartphone Mobile HotSpot
Turn your phone into a portable Wi-Fi hotspot so you can share your mobile data connection with up to 8 other
devices.
To use your phone’s mobile hotspot capability, you must have the Smartphone Mobile HotSpot service as part of
your rate plan.
You will see on the Status Bar when the feature is active.
NOTE
You cannot use Wi-Fi and use your phone as a hotspot at the same time.
Configure Smartphone Mobile HotSpot
1 From the Home screen EITHER
➊ Tap the
OR
➋ Tap the
2 Tap Configure Mobile HotSpot.
➊ Tap the
➋ Tap the
➌ For any security level but Open, tap the
➍ Tap
WPA2 PSK
•
Open
•
WPA PSK
•
WPA2 PSK
Save
Mobile HotSpot
Menu Key
Network SSID
Security
is recommended due to increased data security and prevents unauthorized use of your data plan:
.
icon .
, then tap
field to enter a new network name, if desired.
drop-down menu and select from the following options.
System settings
Password
>
Networks
tab >
Tethering & networks
field to enter a password.
>
Mobile HotSpot
.
24
Page 27
Turn on/off Smartphone Mobile HotSpot
1 From the Home screen EITHER
➊ Tap the
OR
➋ Tap the
2 Tap the Mobile HotSpot switch to activate (and deactivate) the feature.
After 30 seconds on your Wi-Fi device search for and connect to the Network SSID with the password
configured.
Mobile HotSpot
Menu Key
, then tap
icon .
System settings > Networks
tab >
Tethering & networks
>
Mobile HotSpot
Wi-Fi Calling
To use Wi-Fi Calling please use the SIM card shipped with your device. A different SIM card may not work with the
Wi-Fi Calling feature. You must also have a 911 emergency address registered with your account.
NOTE
Corporate accounts may require administrator assistance for 911 Address registration.
To enable and disable Wi-Fi Calling
1 From any Home screen, tap the
2 Tap the Wi-Fi Calling switch to activate the feature.
To change the connection preference for Wi-Fi Calling
1 From any Home screen, tap the
Calling.
2 Tap Connection preferences and select your connection preference.
About Wi-Fi Calling
Wi-Fi Calling can improve your coverage and allows you to make phone calls and send messages over a Wi-Fi
network (when a Wi-Fi network is available).
Menu Key
Menu Key
>
System settings > Networks tab > Tethering & networks.
>
System settings > Networks tab > Tethering & networks > Wi-Fi
.
25
Page 28

Network Indicators
Your 4G capable wireless device will indicate which of the T-Mobile wireless networks you are connected to. A
network indicator does not necessarily mean that you will experience any particular upload or download data
speeds.
4G
: Connected to the T-Mobile HSPA+.
3G
: Connected to 3G.
2G
: Connected to T-Mobile EDGE.
G
: Connected to T-Mobile GPRS.
26
Page 29

Approved Firmware Versions
This device will only operate with firmware versions that have been approved for use by T-Mobile and the device
manufacturer. If unauthorized firmware is placed on the device it will not function.
Safety Tips
Consider device compatibility
If you have a pacemaker or hearing aid, check with your doctor to make sure it is safe for you to use a cell phone.
In some cases, cellular radio frequencies can disrupt the performance of other electronic equipment. If you
have questions about the interaction between your phone and any other piece of electronic equipment, ask the
equipment manufacturer.
Drive safely
When you are driving, we encourage you to use your phone in a safe and sensible manner. Here are a few tips:
•Assess road conditions before answering your phone. Your safety is more important than any call.
•Prepare your hands-free headset, if you have one, or turn on your speakerphone, before you
start moving.
•Keep your phone close. If it rings and you discover it’s in the back seat, do NOT crawl over the seat to answer it
while driving.
•Pre-program frequently used numbers into your phone for easy, one-touch dialing.
•Remember that laws prohibiting or restricting the use of a cell phone while driving may apply in your area.
Information About Safeguarding Handsets
We encourage customers to take appropriate measures to secure their handsets and invites them to take
advantage of the features available on this handset to help secure it from theft and/or other unauthorized
access and use. This handset has a locking function (e.g., user-defined codes or patterns) that can serve as a
first line of defense against unauthorized use or access to stored information. Preloaded security applications
27
Page 30

that allow customers to track or locate misplaced devices can be found on several T-Mobile devices. Lost or
stolen devices should be immediately reported to T-Mobile so that proper measures can be taken to protect
accounts. For additional information, visit: www.t-mobile.com/devicesecurity and www.t-mobile.com/Company/
PrivacyResources.aspx
Emergency Dialing
Although all phones are equipped with 9-1-1 emergency calling, this phone may or may not permit its location to
be approximated during a 9-1-1 call.*
* Availability of this feature depends on upgrades to the (a) wireless network and (b) 9-1-1 calling system that are required to
be installed by the local 9-1-1 response agency or public safety answering point (PSAP); these upgrades may not be available
everywhere within our wireless coverage area or your roaming area. This approximation of the phone’s location and the
transmittal of location information are subject to emergency situations, transmission limits, network problems/limitations,
interconnecting carrier problems, your phone, buildings/tunnels, signal strength and atmospheric/topographical conditions,
and may be curtailed, interrupted, dropped or refused. The phone’s approximate location is transmitted to the local 9-1-1
response agency or PSAP while the call is in progress; this approximation is intended solely to aid the PSAP in dispatching
emergency assistance or to limit the search area for emergency services personnel. You should not rely solely on a phone for
essential communications (such as a medical or other emergency). Please see T-Mobile’s Terms and Conditions and Privacy
Policy for additional service restrictions and details.
Caring For Your Phone
Your phone is a complex electronic device; think of it as a mini-computer. Here are some tips to help you extend
the life of your new device:
Do not get your device wet.
cause damage.
Protect your phone’s touch screen.
screen protector or by keeping it in a protective case.
Use the original manufacturer’s batteries and accessories.
and damage your phone.
Water will damage your phone and accessories. Even a small amount of moisture can
Your phone’s touch screen is delicate. Guard against scratches by using a
Non-approved batteries and accessories can harm you
28
Page 31

Do not use damaged accessories.
blow, been dropped, or is otherwise damaged; doing so may damage your phone. If your charger or any other
accessory is damaged, replace it or take it to a qualified service dealer.
Do not attempt to charge your phone if the charger has received a sharp
Additional Information
Use of some content or features may incur separate, additional charges, require qualifying service and/or access
to a Wi-Fi connection.
Wi-Fi:
Device will not transition between Wi-Fi and the Wireless network. Devices using wireless connections may
be vulnerable to unauthorized attempts to access data and software stored on the device. Plan data allotment
applies to use by connected devices sharing Wi-Fi. Use of connected devices subject to T-Mobile Terms and
Conditions.
Wi-Fi Calling:
Device will not transition between Wi-Fi and the wireless network. See your selected service for details.
Smartphone Mobile Hotspot (Tethering/Wi-Fi Sharing):
Roaming and on-network data allotments differ; see your selected service for details. Use of connected devices
subject to T-Mobile Terms and Conditions.
Messaging/Data:
of whether or not data is received. Character length/file size of messages/attachments may be limited. T-Mobile is
not liable for content of messages/attachments or for any failures, delays or errors in any T-Mobile generated alerts
or notifications. Your data session, plan, or service may be slowed, suspended, terminated, or restricted if you
use your service in a way that interferes with or impacts our network or ability to provide quality service to other
users, if you roam for a significant portion of your usage, or if you use a disproportionate amount of bandwidth
during a billing cycle. You may not use your plan or device for prohibited uses.
Downloads/Applications:
access using your phone. Additional charges may apply; not all downloads available on all phones. You obtain
no rights in downloads; duration of use may be limited and downloads may be stored solely for use with your
phone. T-Mobile is not responsible for any download lost due to your error. T-Mobile is not responsible for Apps,
including download, installation, use, transmission failure, interruption or delay, third party advertisements you
Capable phone and Wi-Fi connection required for Wi-Fi Calling; may decrement plan minutes.
Qualifying service required. Plan data allotment applies.
You will be charged for all messaging and data sent by or to you through the network, regardless
T-Mobile is not responsible for any third party content or Web site you may be able to
29
Page 32

may encounter while using an App, alterations any App may make to the functionality of your device,
including
any changes that may affect your T-Mobile plan, service, or billing, or any content or website you may be able to
access through an App.
Hearing Aid Compatibility:
This phone has been tested and rated for use with hearing aids for some of the wireless
technologies that it uses. However, there may be some newer wireless technologies used in this phone that have
not been tested yet for use with hearing aids. It is important to try the different features of this phone thoroughly
and in different locations, using your hearing aid or cochlear implant, to determine if you hear any interfering
noise. Consult your service provider or the manufacturer of this phone for information on hearing aid compatibility.
If you have questions about return or exchange policies, consult your service provider or phone retailer.
Device, screen and accessory images simulated. See brochures and
provision)
at T-Mobile.com, for rate plan information, charges for features and services, and restrictions and details,
including important limitations on availability and reliability of 9-1-1 emergency service when using Wi-Fi calling
Terms and Conditions (including arbitration
.
The Bluetooth® word mark and logo are owned by the Bluetooth SIG, Inc. and are used by T-Mobile under license
T-Mobile and the magenta color are registered trademarks of Deutsche Telekom AG. The Visual Voicemail and
T-Mobile TV icons are trademarks of T-Mobile USA, Inc. Android, Google, Google Play Store, Google Maps, and
Gmail are trademarks of Google Inc. ©2014 T-Mobile USA, Inc.
30
Page 33

For Your Safety
Safety Information
Please read and observe the following information for safe and proper use of your phone and to prevent damage.
WARNING!
This product contains chemicals known to the State of California to cause cancer and birth defects or reproductive harm.
hands after handling.
Caution
Violation of the instructions may cause minor or serious damage to the product.
•Do not disassemble or open crush, bend or deform, puncture or shred.
•Do not modify or remanufacture, attempt to insert foreign objects into the battery, immerse or expose to water or
other liquids, expose to fire, explosion or other hazard.
•Only use the battery for the system for which it is specified.
•Only use the battery with a charging system that has been qualified with the system per CTIA Certification
Requirements for Battery System Compliance to IEEE1725. Use of an unqualified battery or charger may
present a risk of fire, explosion, leakage, or other hazard.
•Do not short circuit a battery or allow metallic conductive objects to contact battery terminals.
•Replace the battery only with another battery that has been qualified with the system per this standard, IEEE-
Std-1725. Use of an unqualified battery may present a risk of fire, explosion, leakage or other hazard.
•Only authorized service providers shall replace battery(If the battery is non-user replaceable).
•Promptly dispose of used batteries in accordance with local regulations.
•Battery usage by children should be supervised.
•Avoid dropping the phone or battery. If the phone or battery is dropped, especially on a hard surface, and the
user suspects damage, take it to a service center for inspection.
•Improper battery use may result in a fire, explosion or other hazard.
•Repairs under warranty, at LG’s option, may include replacement parts or boards that are either new or
reconditioned, provided that they have functionality equal to that of the parts being replaced.
•For those host devices that utilize a USB port as a charging source, the host device’s user manual shall include
Wash
31
Page 34

a statement that the phone shall only be connected to products that bear the USB-IF logo or have completed the
USB-IF compliance program.
Charger and Adapter Safety
•The charger and adapter are intended for indoor use only.
•Insert the battery pack charger vertically into the wall power socket.
•Unplug the power cord and charger during lightning storms to avoid electric shock or fire.
•Use the correct adapter for your phone when using the battery pack charger abroad.
Battery Information and Care
•Please read the manual of proper installation and removal of the battery.
•Please read the manual of specified charger about charging method.
•Do not damage the power cord by bending, twisting, or heating. Do not use the plug if it is loose as it may cause
electric shock or fire.
•Do not place any heavy items on the power cord. Do not allow the power cord to be crimped as it may cause
electric shock or fire.
•Unplug the power cord prior to cleaning your phone, and clean the power plug pin when it’s dirty. When using
the power plug, ensure that it’s firmly connected. If not, it may cause excessive heat or fire. If you put your phone
in a pocket or bag without covering the receptacle of the phone (power plug pin), metallic articles (such as a
coin, paperclip or pen) may short-circuit the phone. Short-circuit of the terminal may damage the battery and
cause an explosion. Always cover the receptacle when not in use.
•Recharge the battery after long periods of non-use to maximize battery life. Battery life will vary due to usage
pattern and environmental conditions.
•Never store your phone in temperature less than -4 °F or greater than 122 °F.
•Charging temperature range is between 32 °F and 113 °F. Do not charge the battery out of recommended
temperature range. Charging out of recommended range might cause the generating heat or serious damage
of battery. And also, it might cause the deterioration of battery’s characteristics and cycle life.
•Do not use or leave the battery under the blazing sun or in heated car by sunshine. The battery may generate
heat, smoke or flame. And also, it might cause the deterioration of battery’s characteristics or cycle life.
32
Page 35

•The battery pack has protection circuit to avoid the danger. Do not use near places that can generate static
electricity more than 100V which could damage the protection circuit. Damaged protection circuits may
generate smoke, rupture or ignite.
•When using the battery for the first time, if it emits a bad smell, you see rust on it, or anything else abnormal, do
not use the equipment and bring the battery to the shop which it was bought.
•Keep batteries away from babies and small children. If children use the battery, their parents or legal guardians
are responsible for supervising and teaching them about the safe handling of batteries and how to use batteries
according to the manual with care.
•If liquid from the battery rubs against skin or clothing, wash with fresh water. It may cause the skin inflammation.
Remove and do not use the battery. Be careful that children do not swallow any parts (such as earphone,
connection parts of the phone, etc.). This could cause asphyxiation or suffocation resulting in serious injury or
death.
•Do not handle the phone with wet hands while it is being charged. It may cause an electric shock or seriously
damage your phone.
•Do not place or answer calls while charging the phone as it may short-circuit the phone and/or cause electric
shock or fire.
•Do not use harsh chemicals (such as alcohol, benzene, thinners, etc.) or detergents to clean your phone. This
could cause a fire.
•Always unplug the charger from the wall socket after the phone is fully charged to save unnecessary power
consumption of the charger.
Care and Maintenance
Your mobile device is a product of superior design and craftsmanship and should be treated with care. The
suggestions below will help you fulfill any warranty obligations and allow you to enjoy this product for many years:
Keep your Mobile Device away from:
Liquids of any kind
Keep the mobile device dry. Precipitation, humidity, and liquids contain minerals that will corrode electronic
circuits. If the mobile device does get wet, do not accelerate drying with the use of an oven, microwave, or dryer,
because this may damage the mobile device and could cause a fire or explosion.
33
Page 36

Do not use the mobile device with a wet hand.
Doing so may cause an electric shock to you or damage to the mobile device.
Extreme heat or cold
Avoid temperatures below 0°C / 32°F or above 45°C / 113°F.
Microwaves
Do not try to dry your mobile device in a microwave oven. Doing so may cause a fire or explosion.
Dust and dirt
Do not expose your mobile device to dust, dirt, or sand.
Sunscreen lotion
Do not expose or wear your device to any liquid like sunscreen lotion.
Doing so may cause your device to or damage to the mobile device.
Cleaning solutions
Do not use harsh chemicals, cleaning solvents, or strong detergents to clean the mobile device.
Wipe it with a soft cloths lightly dampened in a mild soap-and-water solution.
Shock or vibration
Do not drop, knock, or shake the mobile device.
Rough handling can break internal circuit boards.
Paint
Do not paint the mobile device. Paint can clog the device’smoving parts or ventilation openings and prevent
proper operation.
General Notice
•An emergency call can be made only within a service area. For an emergency call, make sure that you are
within a service area and that the phone is turned on.
•Do not place items containing magnetic components such as a credit card, phone card, bank book, or subway
ticket near your phone. The magnetism of the phone may damage the data stored in the magnetic strip.
34
Page 37

•Talking on your phone for a long period of time may reduce call quality due to heat generated during use.
•When the phone is not used for a long period time, store it in a safe place with the power cord unplugged.
•Using the phone in proximity to receiving equipment (i.e., TV or radio) may cause interference to the phone.
•Do not use the phone if the antenna is damaged. If a damaged antenna contacts skin, it may cause a slight
burn. Please contact an LG Authorized Service Center to replace the damaged antenna.
•The data saved in your phone might be deleted due to careless use, repair of the phone, or upgrade of the
software. Please backup your important phone numbers. (Ringtones, text messages, voice messages, pictures,
and videos could also be deleted.) The manufacturer is not liable for damage due to the loss of data.
•When you use the phone in public places, set the ringtone to vibration so you don’t disturb others.
•Do not turn your phone on or off when putting it to your ear.
•Your phone is an electronic device that generates heat during normal operation. Extremely prolonged, direct
skin contact in the absence of adequate ventilation may result in discomfort or minor burns. Therefore, use care
when handling your phone during or immediately after operation.
Use accessories, such as earphones and headsets, with caution. Ensure that cables are tucked away safely and do
not touch the antenna unnecessarily.
Part 15.19 statement
This device complies with part 15 of FCC rules. Operation is subject to the following two conditions: (1) This
device may not cause harmful interference. (2) this device must accept any interference received, including
interference that may cause undesired operation.
Part 15.21 statement
Change or Modifications that are not expressly approved by the manufacturer could void the user’s authority to
operate the equipment.
Part 15.105 statement
This equipment has been tested and found to comply with the limits for a class B digital device, pursuant to Part
15 of the FCC Rules. These limits are designed to provide reasonable protection against harmful interference in a
residential installation. This equipment generates uses and can radiate radio frequency energy and, if not installed
and used in accordance with the instructions, may cause harmful interference to radio communications. However,
there is no guarantee that interference will not occur in a particular installation. if this equipment does cause
35
Page 38

harmful interference or television reception, which can be determined by turning the equipment off and on, the
user is encouraged to try to correct the interference by one or more of the following measures:
•Reorient or relocate the receiving antenna.
•Increase the separation between the equipment and receiver.
•Connect the equipment into an outlet on a circuit different from that to which the receiver is connected.
•Consult the dealer or an experienced radio/TV technician for help.
FCC RF Exposure Information
WARNING!
Read this information before operating the phone.
In August 1996, the Federal Communications Commission (FCC) of the United States, with its action in Report
and Order FCC 96-326, adopted an updated safety standard for human exposure to Radio Frequency (RF)
electromagnetic energy emitted by FCC regulated transmitters. Those guidelines are consistent with the safety
standard previously set by both U.S. and international standards bodies. The design of this phone complies with
the FCC guidelines and these international standards.
Body-worn Operation
This device was tested for typical body-worn operations with the back of the phone kept 0.39inches (1cm)
between the user’s body and the back of the phone. To comply with FCC RF exposure requirements, a minimum
separation distance of 0.39 inches (1cm) must be maintained between the user’s body and the back of the
phone. Third-party belt-clips, holsters, and similar accessories containing metallic components may not be used.
Body-worn accessories that cannot maintain 0.39 inches (1cm) separation distance between the user’s body and
the back of the phone, and have not been tested for typical body-worn operations may not comply with FCC RF
exposure limits and should be avoided.
Vehicle-Mounted External Antenna
(Optional, if available.)
To satisfy FCC RF exposure requirements, keep 8 inches (20 cm) between the user / bystander and vehicle-
mounted external antenna. For more information about RF exposure, visit the FCC website at www.fcc.gov.
36
Page 39

Caution
Use only the supplied antenna. Use of unauthorized antennas (or modifications to the antenna) could impair call
quality, damage the phone, void your warranty and/or violate FCC regulations.
Don’t use the phone with a damaged antenna. A damaged antenna could cause a minor skin burn. Contact your
local dealer for a replacement antenna.
Consumer Information About Radio Frequency Emissions
Your wireless phone, which contains a radio transmitter and receiver, emits radio frequency energy during use.
The following consumer information addresses commonly asked questions about the health effects of wireless
phones.
Are wireless phones safe?
Scientific research on the subject of wireless phones and radio frequency (“RF”) energy has been conducted
worldwide for many years, and continues. In the United States, the Food and Drug Administration (“FDA”) and the
Federal Communications Commission (“FCC”) set policies and procedures for wireless phones. The FDA issued
a website publication on health issues related to cell phone usage where it states, “The scientific community
at large … believes that the weight of scientific evidence does not show an association between exposure
to radiofrequency (RF) from cell phones and adverse health outcomes. Still the scientific community does
recommend conducting additional research to address gaps in knowledge. That research is being conducted
around the world and FDA continues to monitor developments in this field. You can access the joint FDA/FCC
website at http://www.fda.gov (under “C” in the subject index, select Cell Phones > Research). You can also
contact the FDA toll-free at (888) 463-6332 or (888) INFO-FDA. In June 2000, the FDA entered into a cooperative
research and development agreement through which additional scientific research is being conducted. The FCC
issued its own website publication stating that “there is no scientific evidence that proves that wireless phone
usage can lead to cancer or a variety of other problems, including headaches, dizziness or memory loss.”
This publication is available at http://www.fcc.gov/oet/rfsafety or through the FCC at (888) 225-5322 or (888)
CALL-FCC.
What does “SAR” mean?
In 1996, the FCC, working with the FDA, the U.S. Environmental Protection Agency, and other agencies,
established RF exposure safety guidelines for wireless phones in the United States. Before a wireless phone
model is available for sale to the public, it must be tested by the manufacturer and certified to the FCC that it does
37
Page 40

not exceed limits established by the FCC. One of these limits is expressed as a Specific Absorption Rate, or “SAR.”
SAR is a measure of the rate of absorption of RF energy in the body. Tests for SAR are conducted with the phone
transmitting at its highest power level in all tested frequency bands. Since 1996, the FCC has required that the
SAR of handheld wireless phones not exceed 1.6 watts per kilogram, averaged over one gram of tissue.
Although the SAR is determined at the highest power level, the actual SAR value of a wireless phone while
operating can be less than the reported SAR value. This is because the SAR value may vary from call to call,
depending on factors such as proximity to a cell site, the proximity of the phone to the body while in use, and the
use of hands-free devices.
For more information about SARs, see the FCC’s OET Bulletins 56 and 65 at http://www.fcc.gov/Bureaus/
Engineering_Technology/Documents/bulletins or visit the Cellular Telecommunications Industry Association
website at http://www.ctia.org/consumer_info/index.cfm/AID/10371. You may also wish to contact the
manufacturer of your phone.
Can I minimize my RF exposure?
If you are concerned about RF, there are several simple steps you can take to minimize your RF exposure. You can,
of course, reduce your talk time. You can place more distance between your body and the source of the RF, as the
exposure level drops off dramatically with distance. The FDA/FCC website states that “hands-free kits can be used
with wireless phones for convenience and comfort. These systems reduce the absorption of RF energy in the head
because the phone, which is the source of the RF emissions, will not be placed against the head. On the other
hand, if the phone is mounted against the waist or other part of the body during use, then that part of the body will
absorb more RF energy. Wireless phones marketed in the U.S. are required to meet safety requirements regardless
of whether they are used against the head or against the body. Either configuration should result in compliance
with the safety limit.” Also, if you use your wireless phone while in a car, you can use a phone with an antenna on
the outside of the vehicle. You should also read and follow your wireless phone manufacturer’s instructions for the
safe operation of your phone.
Do wireless phones pose any special risks to children?
The FDA/FCC website states that “the scientific evidence does not show a danger to users of wireless communication
devices, including children.” The FDA/FCC website further states that “some groups sponsored by other national
governments have advised that children be discouraged from using wireless phones at all”. For example, the Stewart
Report from the United Kingdom [“UK”] made such a recommendation in December 2000. In this report a group of
38
Page 41

independent experts noted that no evidence exists that using a cell phone causes brain tumors or other ill effects.
[The UK’s] recommendation to limit cell phone use by children was strictly precautionary; it was not based on
scientific evidence that any health hazard exists. A copy of the UK’s leaflet is available at http://www.dh.gov.uk (search
“mobile”), or you can write to: NRPB, Chilton, Didcot, Oxon OX11 ORQ, United Kingdom. Copies of the UK’s annual
reports on mobile phones and RF are available online at www.iegmp.org.uk and http://www.hpa.org.uk/radiation/
(search “mobile”). Parents who wish to reduce their children’s RF exposure may choose to restrict their children’s
wireless phone use.
Where can I get further information about RF emissions?
For further information, see the following additional resources (websites current as of April 2005):
U.S. Food and Drug Administration
FDA Consumer magazine
November-December 2000
Telephone: (888) INFO-FDA
http://www.fda.gov (Under “C” in the subject index, select Cell Phones > Research.)
U.S. Federal Communications Commission
445 12th Street, S.W.
Washington, D.C. 20554
Telephone: (888) 225-5322
http://www.fcc.gov/oet/rfsafety
Independent Expert Group on Mobile Phones
http://www.iegmp.org.uk
Royal Society of Canada Expert Panels on Potential Health Risks of Radio Frequency Fields
from Wireless Telecommunication Devices
283 Sparks Street
Ottawa, Ontario K1R 7X9
Canada
39
Page 42

Telephone: (613) 991-6990
World Health Organization
Avenue Appia 20
1211 Geneva 27
Switzerland
Telephone: 011 41 22 791 21 11
http://www.who.int/mediacentre/factsheets/fs193/en/
International Commission on Non-Ionizing Radiation Protection
c/o Bundesamt fur Strahlenschutz
Ingolstaedter Landstr. 1
85764 Oberschleissheim
Germany
Telephone: 011 49 1888 333 2156
http://www.icnirp.de
American National Standards Institute
1819 L Street, N.W., 6th Floor
Washington, D.C. 20036
Telephone: (202) 293-8020
http://www.ansi.org
National Council on Radiation Protection and Measurements
7910 Woodmont Avenue, Suite 800
Bethesda, MD 20814-3095
Telephone: (301) 657-2652
http://www.ncrponline.org
40
Page 43

Engineering in Medicine and Biology Society, Committee on Man and Radiation (COMAR) of
the Institute of Electrical and Electronics Engineers
http://ewh.ieee.org/soc/embs/comar/
TIA Safety Information
The following is the complete TIA Safety Information for wireless handheld phones.
Consumer Information on SAR
(Specific Absorption Rate)
This model phone meets the government’s requirements for exposure to radio waves. Your wireless phone is a
radio transmitter and receiver. It is designed and manufactured not to exceed the emission limits for exposure to
Radio Frequency (RF) energy set by the Federal Communications Commission of the U.S. Government. These
limits are part of comprehensive guidelines and establish permitted levels of RF energy for the general population.
The guidelines are based on standards that were developed by independent scientific organizations through
periodic and thorough evaluation of scientific studies. The standards include a substantial safety margin designed
to assure the safety of all persons, regardless of age and health.
The exposure standard for wireless mobile phones employs a unit of measurement known as the Specific
Absorption Rate, or SAR. The SAR limit set by the FCC is 1.6 W/kg. Tests for SAR are conducted using standard
operating positions specified by the FCC with the phone transmitting at its highest certified power level in all
tested frequency bands. Although SAR is determined at the highest certified power level, the actual SAR level
of the phone while operating can be well below the maximum value. Because the phone is designed to operate
at multiple power levels to use only the power required to reach the network, in general, the closer you are to a
wireless base station antenna, the lower the power output.
Before a phone model is available for sale to the public, it must be tested and certified to the FCC that it does not
exceed the limit established by the governmentadopted requirement for safe exposure. The tests are performed in
positions and locations (e.g., at the ear and worn on the body) as required by the FCC for each model.
The highest SAR values are:
* Head: 0.57 W/kg
* Body (Body-worn/Hotspot): 1.06 W/kg
(body measurements differ among phone models, depending upon available accessories and FCC requirements).
41
Page 44

While there may be differences between SAR levels of various phones and at various positions, they all meet the
government requirement for safe exposure.
The FCC has granted an Equipment Authorization for this model phone with all reported SAR levels evaluated
as in compliance with the FCC RF emission guidelines. SAR information on this model phone is on file with
the FCC and can be found under the Display Grant section of http://www.fcc.gov/oet/fccid after searching on
FCC ID ZNFD415. Additional information on Specific Absorption Rates (SAR) can be found on the Cellular
Telecommunications Industry Association (CTIA) website at http://www.ctia.org/.
* In the United States and Canada, the SAR limit for mobile phones used by the public is 1.6 watts/kg (W/kg)
averaged over one gram of tissue. The standard incorporates a substantial margin of safety to give additional
protection for the public and to account for any variations in measurements.
Exposure to Radio Frequency Signal
Your wireless handheld portable phone is a low power radio transmitter and receiver. When ON, it receives and
sends out Radio Frequency (RF) signals.
In August, 1996, the Federal Communications Commissions (FCC) adopted RF exposure guidelines with safety
levels for handheld wireless phones. Those guidelines are consistent with the safety standards previously set by
both U.S. and international standards bodies:
ANSI C95.1 (1992) *
NCRP Report 86 (1986)
ICNIRP (1996)
* American National Standards Institute; National Council on Radiation Protection and Measurements;
International Commission on Non-Ionizing Radiation Protection
Those standards were based on comprehensive and periodic evaluations of the relevant scientific literature.
For example, over 120 scientists, engineers, and physicians from universities, government health agencies, and
industry reviewed the available body of research to develop the ANSI Standard (C95.1).
The design of your phone complies with the FCC guidelines (and those standards).
Antenna Care
Use only the supplied or an approved replacement antenna. Unauthorized antennas, modifications, or
attachments could damage the phone and may violate FCC regulations.
42
Page 45

Phone Operation
NORMAL POSITION: Hold the phone as you would any other telephone with the antenna pointed up and over
your shoulder.
Tips on Efficient Operation
For your phone to operate most efficiently:
Don’t touch the antenna unnecessarily when the phone is in use. Contact with the antenna affects call quality and
may cause the phone to operate at a higher power level than otherwise needed.
Electronic Devices
Most modern electronic equipment is shielded from RF signals. However, certain electronic equipment may not be
shielded against the RF signals from your wireless phone.
Pacemakers
The Health Industry Manufacturers Association recommends that a minimum separation of six (6) inches be
maintained between a handheld wireless phone and a pacemaker to avoid potential interference with the
pacemaker. These recommendations are consistent with the independent research by and recommendations of
Wireless Technology Research.
Persons with pacemakers:
•Should ALWAYS keep the phone more than six (6) inches from their pacemaker when the phone is turned ON;
•Should not carry the phone in a breast pocket;
•Should use the ear opposite the pacemaker to minimize the potential for interference;
•Should turn the phone OFF immediately if there is any reason to suspect that interference is taking place.
Hearing Aids
Some digital wireless phones may interfere with some hearing aids. In the event of such interference, you may
want to consult your service provider (or call the customer service line to discuss alternatives).
Other Medical Devices
If you use any other personal medical device, consult the manufacturer of your device to determine if it is
adequately shielded from external RF energy. Your physician may be able to assist you in obtaining this
information.
43
Page 46

Health Care Facilities
when putting it to your ear.
● Use accessories, such as
earphones and headsets, with
caution. Ensure that cables are
tucked away safely and do not
touch the antenna unnecessarily.
FDA
Consumer
Update
Turn your phone OFF in health care facilities when any regulations posted in these areas instruct you to do so.
Hospitals or health care facilities may use equipment that could be sensitive to external RF energy.
Vehicles
RF signals may affect improperly installed or inadequately shielded electronic systems in motor vehicles. Check
with the manufacturer or its representative regarding your vehicle. You should also consult the manufacturer of
any equipment that has been added to your vehicle.
Posted Facilities
Turn your phone OFF in any facility where posted notices so require.
Aircraft
FCC regulations prohibit using your phone while in the air. Switch OFF your phone before boarding an aircraft.
Blasting Areas
To avoid interfering with blasting operations, turn your phone OFF when in a “blasting area” or in areas posted:
“Turn off two-way radio”. Obey all signs and instructions.
Potentially Explosive Atmosphere
Turn your phone OFF when in any area with a potentially explosive atmosphere and obey all signs and instructions.
Sparks in such areas could cause an explosion or fire resulting in bodily injury or even death.
Areas with a potentially explosive atmosphere are often, but not always marked clearly. Potential areas may
include: fueling areas (such as gasoline stations); below deck on boats; fuel or chemical transfer or storage
facilities; vehicles using liquefied petroleum gas (such as propane or butane); areas where the air contains
chemicals or particles (such as grain, dust, or metal powders); and any other area where you would normally be
advised to turn off your vehicle engine.
For Vehicles Equipped with an Air Bag
An air bag inflates with great force. DO NOT place objects, including either installed or portable wireless
equipment, in the area over the air bag or in the air bag deployment area. If in-vehicle wireless equipment is
improperly installed and the air bag inflates, serious injury could result.
44
Page 47

FDA Consumer Update
when putting it to your ear.
● Use accessories, such as
earphones and headsets, with
caution. Ensure that cables are
tucked away safely and do not
touch the antenna unnecessarily.
FDA
Consumer
Update
The U.S. Food and Drug Administration’s Center for Devices and Radiological Health Consumer Update on
Mobile Phones:
1. Do wireless phones pose a health hazard?
The available scientific evidence does not show that any health problems are associated with using wireless
phones. There is no proof, however, that wireless phones are absolutely safe. Wireless phones emit low levels
of Radio Frequency (RF) energy in the microwave range while being used. They also emit very low levels of RF
when in idle mode. Whereas high levels of RF can produce health effects (by heating tissue), exposure to low level
RF that does not produce heating effects causes no known adverse health effects. Many studies of low level RF
exposures have not found any biological effects. Some studies have suggested that some biological effects may
occur, but such findings have not been confirmed by additional research. In some cases, other researchers have
had difficulty in reproducing those studies, or in determining the reasons for inconsistent results.
2. What is the FDA’s role concerning the safety of wireless phones?
Under the law, the FDA does not review the safety of radiation-emitting consumer products such as wireless
phones before they can be sold, as it does with new drugs or medical devices. However, the agency has authority
to take action if wireless phones are shown to emit Radio Frequency (RF) energy at a level that is hazardous to
the user. In such a case, the FDA could require the manufacturers of wireless phones to notify users of the health
hazard and to repair, replace, or recall the phones so that the hazard no longer exists.
Although the existing scientific data does not justify FDA regulatory actions, the FDA has urged the wireless phone
industry to take a number of steps, including the following:
•Support needed research into possible biological effects of RF of the type emitted by wireless phones;
•Design wireless phones in a way that minimizes any RF exposure to the user that is not necessary for device
function; and
•Cooperate in providing users of wireless phones with the best possible information on possible effects of
wireless phone use on human health.
The FDA belongs to an interagency working group of the federal agencies that have responsibility for different
aspects of RF safety to ensure coordinated efforts at the federal level. The following agencies belong to this
working group:
•National Institute for Occupational Safety and Health
45
Page 48

•Environmental Protection Agency
•Occupational Safety and Health Administration
•National Telecommunications and Information Administration
The National Institutes of Health participates in some interagency working group activities, as well.
The FDA shares regulatory responsibilities for wireless phones with the Federal Communications Commission
(FCC). All phones that are sold in the United States must comply with FCC safety guidelines that limit RF exposure.
The FCC relies on the FDA and other health agencies for safety questions about wireless phones.
The FCC also regulates the base stations that the wireless phone networks rely upon. While these base stations
operate at higher power than do the wireless phones themselves, the RF exposures that people get from these
base stations are typically thousands of times lower than those they can get from wireless phones. Base stations
are thus not the subject of the safety questions discussed in this document.
3. What kinds of phones are the subject of this update?
The term “wireless phone” refers here to handheld wireless phones with built-in antennas, often called “cell”,
“mobile”, or “PCS” phones. These types of wireless phones can expose the user to measurable Radio Frequency
(RF) energy because of the short distance between the phone and the user’s head.
These RF exposures are limited by FCC safety guidelines that were developed with the advice of the FDA and
other federal health and safety agencies. When the phone is located at greater distances from the user, the
exposure to RF is drastically lower because a person’s RF exposure decreases rapidly with increasing distance
from the source. The so-called “cordless phones,” which have a base unit connected to the telephone wiring in a
house, typically operate at far lower power levels, and thus produce RF exposures far below the FCC safety limits.
4. What are the results of the research done already?
The research done thus far has produced conflicting results, and many studies have suffered from flaws
in their research methods. Animal experiments investigating the effects of Radio Frequency (RF) energy
exposures characteristic of wireless phones have yielded conflicting results that often cannot be repeated in
other laboratories. A few animal studies, however, have suggested that low levels of RF could accelerate the
development of cancer in laboratory animals. However, many of the studies that showed increased tumor
development used animals that had been genetically engineered or treated with cancer-causing chemicals so as
to be pre-disposed to develop cancer in the absence of RF exposure. Other studies exposed the animals to RF
for up to 22 hours per day. These conditions are not similar to the conditions under which people use wireless
46
Page 49

phones, so we do not know with certainty what the results of such studies mean for human health. Three large
epidemiology studies have been published since December 2000. Between them, the studies investigated
any possible association between the use of wireless phones and primary brain cancer, glioma, meningioma,
or acoustic neuroma, tumors of the brain or salivary gland, leukemia, or other cancers. None of the studies
demonstrated the existence of any harmful health effects from wireless phone RF exposures. However, none of the
studies can answer questions about long-term exposures, since the average period of phone use in these studies
was around three years.
5. What research is needed to decide whether RF exposure from wireless phones poses a health risk?
A combination of laboratory studies and epidemiological studies of people actually using wireless phones would
provide some of the data that are needed. Lifetime animal exposure studies could be completed in a few years.
However, very large numbers of animals would be needed to provide reliable proof of a cancer promoting effect
if one exists. Epidemiological studies can provide data that is directly applicable to human populations, but ten
or more years follow-up may be needed to provide answers about some health effects, such as cancer. This is
because the interval between the time of exposure to a cancer-causing agent and the time tumors develop — if
they do — may be many, many years. The interpretation of epidemiological studies is hampered by difficulties in
measuring actual RF exposure during day-to-day use of wireless phones. Many factors affect this measurement,
such as the angle at which the phone is held, or which model of phone is used.
6. What is the FDA doing to find out more about the possible health effects of wireless phone RF?
The FDA is working with the U.S. National Toxicology Program and with groups of investigators around the world
to ensure that high priority animal studies are conducted to address important questions about the effects of
exposure to Radio Frequency (RF) energy.
The FDA has been a leading participant in the World Health Organization International Electro Magnetic Fields
(EMF) Project since its inception in 1996. An influential result of this work has been the development of a detailed
agenda of research needs that has driven the establishment of new research programs around the world. The
project has also helped develop a series of public information documents on EMF issues.
The FDA and the Cellular Telecommunications & Internet Association (CTIA) have a formal Cooperative Research
And Development Agreement (CRADA) to do research on wireless phone safety. The FDA provides the scientific
oversight, obtaining input from experts in government, industry, and academic organizations. CTIA-funded
research is conducted through contracts with independent investigators. The initial research will include both
47
Page 50

laboratory studies and studies of wireless phone users. The CRADA will also include a broad assessment of
additional research needs in the context of the latest research developments around the world.
7. How can I find out how much Radio Frequency energy exposure I can get by using my wireless phone?
All phones sold in the United States must comply with Federal Communications Commission (FCC) guidelines
that limit Radio Frequency (RF) energy exposures. The FCC established these guidelines in consultation with the
FDA and the other federal health and safety agencies. The FCC limit for RF exposure from wireless phones is set at
a Specific Absorption Rate (SAR) of 1.6 watts per kilogram (1.6 W/kg). The FCC limit is consistent with the safety
standards developed by the Institute of Electrical and Electronic Engineering (IEEE) and the National Council on
Radiation Protection and Measurement. The exposure limit takes into consideration the body’s ability to remove
heat from the tissues that absorb energy from the wireless phone and is set well below levels known to have
effects. Manufacturers of wireless phones must report the RF exposure level for each model of phone to the FCC.
The FCC website (http://www.fcc.gov/oet/rfsafety) gives directions for locating the FCC identification number on
your phone so you can find your phone’s RF exposure level in the online listing.
8. What has the FDA done to measure the Radio Frequency energy coming from wireless phones?
The Institute of Electrical and Electronic Engineers (IEEE) is developing a technical standard for measuring the
Radio Frequency (RF) energy exposure from wireless phones and other wireless handsets with the participation
and leadership of FDA scientists and engineers. The standard, “Recommended Practice for Determining the
Spatial-Peak Specific Absorption Rate (SAR) in the Human Body Due to Wireless Communications Devices:
Experimental Techniques”, sets forth the first consistent test methodology for measuring the rate at which RF is
deposited in the heads of wireless phone users. The test method uses a tissue-simulating model of the human
head. Standardized SAR test methodology is expected to greatly improve the consistency of measurements made
at different laboratories on the same phone. SAR is the measurement of the amount of energy absorbed in tissue,
either by the whole body or a small part of the body. It is measured in watts/kg (or milliwatts/g) of matter. This
measurement is used to determine whether a wireless phone complies with safety guidelines.
9. What steps can I take to reduce my exposure to Radio Frequency energy from my wireless phone?
If there is a risk from these products — and at this point we do not know that there is — it is probably very small.
But if you are concerned about avoiding even potential risks, you can take a few simple steps to minimize your
exposure to Radio Frequency (RF) energy. Since time is a key factor in how much exposure a person receives,
reducing the amount of time spent using a wireless phone will reduce RF exposure. If you must conduct extended
48
Page 51

conversations by wireless phone every day, you could place more distance between your body and the source of
the RF, since the exposure level drops off dramatically with distance. For example, you could use a headset and
carry the wireless phone away from your body or use a wireless phone connected to a remote antenna. Again,
the scientific data does not demonstrate that wireless phones are harmful. But if you are concerned about the RF
exposure from these products, you can use measures like those described above to reduce your RF exposure from
wireless phone use.
10. What about children using wireless phones?
The scientific evidence does not show a danger to users of wireless phones, including children and teenagers. If
you want to take steps to lower exposure to Radio Frequency (RF) energy, the measures described above would
apply to children and teenagers using wireless phones. Reducing the time of wireless phone use and increasing
the distance between the user and the RF source will reduce RF exposure.
Some groups sponsored by other national governments have advised that children be discouraged from using
wireless phones at all. For example, the government in the United Kingdom distributed leaflets containing such a
recommendation in December 2000. They noted that no evidence exists that using a wireless phone causes brain
tumors or other ill effects. Their recommendation to limit wireless phone use by children was strictly precautionary;
it was not based on scientific evidence that any health hazard exists.
11. What about wireless phone interference with medical equipment?
Radio Frequency (RF) energy from wireless phones can interact with some electronic devices. For this reason, the
FDA helped develop a detailed test method to measure Electro Magnetic Interference (EMI) of implanted cardiac
pacemakers and defibrillators from wireless telephones. This test method is now part of a standard sponsored
by the Association for the Advancement of Medical Instrumentation (AAMI). The final draft, a joint effort by the
FDA, medical device manufacturers, and many other groups, was completed in late 2000. This standard will allow
manufacturers to ensure that cardiac pacemakers and defibrillators are safe from wireless phone EMI.
The FDA has tested hearing aids for interference from handheld wireless phones and helped develop a voluntary
standard sponsored by the Institute of Electrical and Electronic Engineers (IEEE). This standard specifies test
methods and performance requirements for hearing aids and wireless phones so that no interference occurs
when a person uses a “compatible” phone and a “compatible” hearing aid at the same time. This standard was
approved by the IEEE in 2000.
The FDA continues to monitor the use of wireless phones for possible interactions with other medical devices.
49
Page 52

Should harmful interference be found to occur, the FDA will conduct testing to assess the interference and work to
resolve the problem.
12. Where can I find additional information?
For additional information, please refer to the following resources:
Federal Communications Commission (FCC) RF Safety Program
(http://www.fcc.gov/oet/rfsafety)
International Commission on Non-lonizing Radiation Protection
(http://www.icnirp.de)
World Health Organization (WHO) International EMF Project
(http://www.who.int/emf)
National Radiological Protection Board (UK)
(http://www.hpa.org.uk/radiation/)
Driving
Check the laws and regulations on the use of wireless phones in the areas where you drive and always obey them.
Also, if using your phone while driving, please observe the following:
•Give full attention to driving -- driving safely is your first responsibility;
•Use hands-free operation, if available;
•Pull off the road and park before making or answering a call if driving conditions or the law require it.
HAC statement
This phone has been tested and rated for use with hearing aids for some of the wireless technologies that it uses.
However, there may be some newer wireless technologies used in this phone that have not been tested yet for use
with hearing aids.
It is important to try the different features of this phone thoroughly and in different locations, using your hearing aid
or cochlear implant, to determine if you hear any interfering noise.
Consult your service provider or the manufacturer of this phone for information on hearing aid compatibility.
If you have questions about return or exchange policies, consult your service provider or phone retailer.
50
Page 53

FCC Hearing-Aid Compatibility (HAC) Regulations for Wireless Devices
While some wireless phones are used near some hearing devices (hearing aids and cochlear implants), users
may detect a buzzing, humming, or whining noise. Some hearing devices are more immune than others to this
interference noise, and phones also vary in the amount of interference they generate.
The wireless telephone industry has developed a rating system for wireless phones, to assist hearing device users
to find phones that may be compatible with their hearing devices. Not all phones have been rated. Phones that are
rated have the rating on their box or a label located on the box.
The ratings are not guarantees.
Results will vary depending on the user’s hearing device and hearing loss. If your hearing device happens to be
vulnerable to interference, you may not be able to use a rated phone successfully.
Trying out the phone with your hearing device is the best way to evaluate it for your personal needs.
M-Ratings: Phones rated M3 or M4 meet FCC requirements and are likely to generate less interference to hearing
devices than phones that are not labeled. M4 is the better/higher of the two ratings.
T-Ratings: Phones rated T3 or T4 meet FCC requirements and are likely to generate less interference to hearing
devices than phones that are not labeled. T4 is the better/higher of the two ratings.
Hearing devices may also be rated. Your hearing device manufacturer or hearing health professional may help you
find this rating. Higher ratings mean that the hearing device is relatively immune to interference noise. The hearing
aid and wireless phone rating values are then added together. A sum of 5 is considered acceptable for normal use.
A sum of 6 is considered for best use.
In the above example, if a hearing aid meets the M2 level rating and the wireless phone meets the M3 level rating,
the sum of the two values equal M5. This should provide the hearing aid user with “normal usage” while using
their hearing aid with the particular wireless phone. “Normal usage” in this context is defined as a signal quality
that’s acceptable for normal operation.
51
Page 54

The M mark is intended to be synonymous with the U mark. The T mark is intended to be synonymous with the UT
mark.
The M and T marks are recommended by the Alliance for Telecommunications Industries Solutions (ATIS). The U
and UT marks are referenced in Section 20.19 of the FCC Rules.
The HAC rating and measurement procedure are described in the American National Standards Institute (ANSI)
C63.19 standard.
To enter that the Hearing Aid Compatibility rating for your phone is maintained, secondary transmitters such as
Bluetooth and WLAN components must be disabled during a call.
For information about hearing aids and digital wireless phones
Wireless Phones and Hearing Aid Accessibility
http://www.accesswireless.org/
FCC Hearing Aid Compatibility and Volume Control
http://www.fcc.gov/cgb/consumerfacts/hac_wireless.html
52
Page 55

Limited Warranty Statement
1. WHAT THIS WARRANTY COVERS:
LG offers you a limited warranty that the enclosed subscriber unit and its enclosed accessories will be free from defects in
material and workmanship, according to the following terms and conditions:
(1) The limited warranty for the product extends for TWELVE (12) MONTHS beginning on the date of purchase of the prod-
uct with valid proof of purchase, or absent valid proof of purchase, FIFTEEN (15) MONTHS from date of manufacture as
determined by the unit’s manufacture date code.
(2) The limited warranty extends only to the original purchaser of the product and is not assignable or transferable to any
subsequent purchaser/end user.
(3) This warranty is good only to the original purchaser of the product during the warranty period as long as it is in the U.S.,
including Alaska, Hawaii, U.S. Territories and Canada.
(4) The external housing and cosmetic parts shall be free of defects at the time of shipment and, therefore, shall not be
covered under these limited warranty terms.
(5) Upon request from LG, the consumer must provide information to reasonably prove the date of purchase.
(6) The customer shall bear the cost of shipping the product to the Customer Service Department of LG. LG shall bear the
cost of shipping the product back to the consumer after the completion of service under this limited warranty.
2. WHAT THIS WARRANTY DOES NOT COVER:
(1) Defects or damages resulting from use of the product in other than its normal and customary manner.
(2) Defects or damages from abnormal use, abnormal conditions, improper storage, exposure to moisture or dampness,
unauthorized modifications, unauthorized connections, unauthorized repair, misuse, neglect, abuse, accident, alteration,
improper installation, or other acts which are not the fault of LG, including damage caused by shipping, blown fuses,
spills of food or liquid.
(3) Breakage or damage to antennas unless caused directly by defects in material or workmanship.
(4) That the Customer Service Department at LG was not notified by consumer of the alleged defect or malfunction of the
product during the applicable limited warranty period.
(5) Products which have had the serial number removed or made illegible.
(6) This limited warranty is in lieu of all other warranties, express or implied either in fact or by operations of law, statutory or
otherwise, including, but not limited to any implied warranty of marketability or fitness for a particular use.
(7) Damage resulting from use of non LG approved accessories.
(8) All plastic surfaces and all other externally exposed parts that are scratched or damaged due to normal customer use.
(9) Products operated outside published maximum ratings.
(10) Products used or obtained in a rental program.
(11) Consumables (such as fuses).
Page 56

3. WHAT LG WILL DO:
LG will, at its sole option, either repair, replace or refund the purchase price of any unit that is covered under this limited
warranty. LG may choose at its option to use functionally equivalent re-conditioned, refurbished or new units or parts or any
units. In addition, LG will not re-install or back-up any data, applications or software that you have added to your phone.
It is therefore recommended that you back-up any such data or information prior to sending the unit to LG to avoid the
permanent loss of such information.
4. STATE LAW RIGHTS:
No other express warranty is applicable to this product. THE DURATION OF ANY IMPLIED WARRANTIES, INCLUDING
THE IMPLIED WARRANTY OF MARKETABILITY OR MERCHANTABILITY OR FITNESS FOR A PARTICULAR PURPOSE,
IS LIMITED TO THE DURATION OF THE EXPRESS WARRANTY HEREIN. LG SHALL NOT BE LIABLE FOR THE LOSS
OF THE USE OF THE PRODUCT, INCONVENIENCE, LOSS OR ANY OTHER DAMAGES, DIRECT OR CONSEQUENTIAL,
ARISING OUT OF THE USE OF, OR INABILITY TO USE, THIS PRODUCT OR FOR ANY BREACH OF ANY EXPRESS OR
IMPLIED WARRANTY, INCLUDING THE IMPLIED WARRANTY OF MARKETABILITY OR MERCHANTABILITY OR FITNESS
FOR A PARTICULAR PURPOSE APPLICABLE TO THIS PRODUCT.
Some states do not allow the exclusive limitation of incidental or consequential damages or limitations on how long an
implied warranty lasts; so these limitations or exclusions may not apply to you. This warranty gives you specific legal rights
and you may also have other rights which vary from state to state.
5. HOW TO GETWARRANTY SERVICE:
To obtain warranty service, please call or fax to the following telephone numbers from anywhere in the continental United
States:
Tel. 1-800-793-8896
Or visit http://us.lgservice.com. Correspondence may also be mailed to:
LG Electronics Service- Mobile Handsets, P.O. Box 240007, Huntsville, AL 35824
DO NOT RETURN YOUR PRODUCT TO THE ABOVE ADDRESS.
Please call or write for the location of the LG authorized service center nearest you and for the procedures for obtaining
warranty claims.
Page 57

Tabla de contenido
El teléfono .......................................................... 2
Introducción
Configurar sus cuentas
Personalice su teléfono
Bloqueo y desbloqueo de la pantalla
Modo invitado
Cámara
Video camera
Internet
Transferencia de Música y Fotos
Las llamadas y correo de voz
Mensajería de texto........................................... 18
Correo electrónico
Configuración de idioma de entrada
QSlide
Wi-Fi y Bluetooth
Google Play™ Store
Punto de accesso móvil (Mobile Hotspot)
Llamada de Wi-Fi
Indicadores de red
Versiones de firmware aprobados
Consejos de seguridad
Información sobre como preservar los
dispositivos de mano
Llamada de emergencia.................................... 28
El cuidado de su teléfono.
....................................................... 4
....................................... 9
..................................... 10
................. 11
................................................... 13
............................................................ 14
................................................... 15
............................................................. 16
....................... 16
............................ 17
............................................ 19
................. 20
.............................................................. 21
®
............................................. 22
.......................................... 23
.......... 24
.............................................. 25
............................................ 26
..................... 27
..................................... 27
........................................ 27
................................. 28
Información adicional
Por su seguridad
............................................... 31
....................................... 29
1
Page 58

El teléfono
Vista frontal
4
1
2
5 6
3
1 Auricular
2 Sensor de proximidad
3 Lente de la cámara
4 Tecla Atrás
5 Tecla Inicio
6 Tecla Menú
delantera
7
8
7 Toma de 3.5mm para
auriculares
9
11
10
8 Micrófono (Sub)
9 LED IR (infrarrojo)
10 Puerto para Cargador/
USB
11 Micrófono (Principal)
2
Page 59

Vista lateral
1
2
Vista posterior
2
3
4
1 Tecla rápida (personalizable)
3
SUGERENCIA: Tecla rápida
Presione para acceder rápidamente a su aplicación favorita.
2 Teclas de Volumen
3 Tecla Encender/Bloquear
1 Ranura para tarjeta micro SIM
2 Lente de la cámara posterior
51
6
3 Flash
4 Ranura para tarjeta microSD
5 Tapa posterior
6 Batería
7 Altavoz externo
7
3
Page 60

Introducción
Antes de comenzar a usar el teléfono, debe insertar la tarjeta micro SIM y la batería.
Instalación de la tarjeta micro SIM y la batería
1 Use la abertura para dedo para retirar la tapa posterior.
2 Inserte la tarjeta micro SIM. Asegúrese de que la zona de contacto de color dorado en la tarjeta esté orientada hacia
abajo y el lado con muesca se inserte primero (vea la imagen).
4
Page 61

3 Para insertar la batería, alinee los contactos dorados del teléfono y la batería y presione hacia abajo hasta que encaje
en su lugar.
4 Coloque la tapa posterior sobre el compartimiento de batería y presiónela hacia abajo hasta que encaje en su lugar.
5
Page 62

Instalación de la tarjeta de memoria
Para almacenar archivos multimedia, como imágenes tomadas con la cámara, en una tarjeta SD, debe insertar
una tarjeta de memoria en el teléfono.
1 Use la abertura para dedo para retirar la tapa posterior.
2 Inserte la tarjeta de memoria en la ranura. Asegúrese que el área de contacto dorada de la tarjeta quede orientada
hacia abajo.
NOTA
La tarjeta de memoria se vende por separado.
¡Advertencia!
No inserte o retire la tarjeta de memoria sin desactivarla primero desde el menú Almacenamiento. De lo contrario, podría dañar la
tarjeta de memoria o el teléfono y se podrían corromper los datos almacenados en la tarjeta de memoria. Para retirar la tarjeta de
memoria de manera segura, toque Aplicaciones > ficha Aplicaciones > Ajustes > Almacenamiento > Desactivar la MicroSD.
6
Page 63

Cargar el teléfono
Su teléfono utiliza una batería recargable de iones de litio.
Para cargar su teléfono se utiliza un adaptador USB, incluido con el teléfono.
Antes de usar el teléfono por primera vez, asegúrese de que la batería esté completamente cargada. Una batería
descargada se recargará por completo en 3 horas.
Adaptador USB
Cable USB
NOTA
Antes de conectar el adaptador USB, asegúrese de que la batería esté instalada. Si la batería no está instalada y conecta
el cargador de pared, el teléfono no funcionará adecuadamente debido a un ciclo de energía prolongado. Además, extraer
la batería con el cargador de pared conectado podría dañar al dispositivo. Desconecta el adaptador USB antes de retirar la
batería.
¡Advertencia!
Si la pantalla táctil no funciona mientras el teléfono se carga, podría deberse a una alimentación de energía inestable. Como
resultado, desconecte el cable USB de su dispositivo o desconecte el adaptador USB de la toma de corriente.
7
Page 64

1 Conecte el adaptador USB y el cable USB (tal como se muestra en la imagen arriba).
2 Conecte el cable USB (tal como se muestra en la imagen siguiente) en el puerto para cargador/
USB
.
NOTA
La batería debe cargarse completamente antes de usar el teléfono por primera vez para prolongar su vida útil.
NOTA
Su teléfono cuenta con una antena interna. Tenga cuidado de no rayar o dañar esta área posterior, dado que esto puede
ocasionar pérdida del rendimiento.
¡Advertencia!
Use sólo cargadores, baterías y cables aprobados. Si usa cables o cargadores no aprobados por LG puede ocasionar que la
batería cargue más lentamente el mensaje de retardo de carga de batería. Los cargadores o cables no aprobados también
pueden provocar una explosión de la batería o daño al dispositivo, lo que no está cubierto por la garantía.
Antena
interna
8
Page 65

Configurar sus cuentas
Agregando cuentas rellenará correo electrónico, contactos, calendario, y otra información en su teléfono. Es
posible que desee configurar las cuentas a través de Wi-Fi para ahorrar en el uso de su plan de datos.
1 En cualquier pantalla, deslice el dedo hacia abajo desde la parte superior de la pantalla para mostrar el Panel
de notificaciones.
2 Toque en la esquina superior derecha de la pantalla, después toque la ficha General > Cuentas y sincronización
> Agregar cuenta.
3 Seleccione el tipo de cuenta que desea añadir. Ingresa tus datos y siga las instrucciones adicionales que aparecen
en pantalla.
NOTA
Póngase en contacto con su administrador de TI para ayudar a configurar la cuenta de Microsoft® Exchange corporativo.
9
Page 66

Personalice su teléfono
Añade widgets y aplicaciones a la pantalla principal, cambie el fondo de la pantallaz y mucho más.
Personalizar la pantalla principal
1 Oprima y mantenga oprimido un espacio vacío en un panel de pantalla principal y seleccione una categoría:
•
Aplicaciones: Permite añadir accesos directos a sus aplicaciones favoritas.
•
Widgets: Agregar dinámicamente actualizar widgets.
• Fondos de pantalla: Cambia tu fondo de pantalla.
2 Toque la opción que desee para añadirlo a la pantalla principal. Para mover un elemento, manténgalo presionado y
arrástrelo a una nueva ubicación. Para eliminarlo, arrástrelo a Remover en la parte superior de la pantalla.
Personaliza tus sonidos
Desde la pantalla principal, toque la Tecla Menú > Ajustes del sistema > ficha Sonido. Usted puede cambiar
sus tonos de llamada, fijar los sonidos de notificación, y ajustar sus opciones de retroalimentación táctil.
10
Page 67

Bloqueo y desbloqueo de la pantalla
Después de un período de inactividad, la pantalla que está viendo será reemplazado por la pantalla de bloqueo
para ahorrar batería.
Desbloqueo de la pantalla
1 Presione la Tecla Encender/Bloquear para encender la pantalla. Aparecerá la pantalla de bloqueo.
2 Desde el centro de la pantalla, deslice el dedo en cualquier dirección para desbloquearlo.
•Los atajos pueden ser añadidos para el acceso rápido a sus aplicaciones favoritas. Para añadir accesos
directos, desde la pantalla principal, toque la Tecla Menú > Ajustes del sistema > ficha Pantalla >
Bloqueo de pantalla > Atajos.
•Para usar un atajo, deslice el icono de acceso directo en la parte inferior de la pantalla en cualquier dirección.
La pantalla desbloquear y abrir la aplicación.
11
Page 68

KnockON
La función KnockON le permite tocar dos veces la pantalla para encenderla o apagarla fácilmente. Puede activar /
desactivar esta función en la configuración de los gestos.
1 KnockON está activado por defecto. Para activar o desactivar, desde la pantalla principal, toque la Tecla Menú
>
Ajustes del sistema >
2 Toque la casilla de verificación Encender/Apagar pantalla para ajustar esta función.
3 Con KnockON activada y el teléfono bloqueado, toque la pantalla dos veces rápidamente para activar el teléfono.
4 Toque dos veces rápidamente en un área vacía de la pantalla principal o en la Barra de estado para apagar la
pantalla.
ficha
General > Gestos.
Panel de notificaciones
Deslice la parte superior de la pantalla hacia abajo para abrir el Panel de notificaciones.
•Para responder a una notificación, tóquela.
•Para eliminar una notificación, deslícela hacia la izquierda o derecha.
•Para eliminar todas las notificaciones, toque Borrar.
•Fija los Ajustes Rápidos tocándolos (por ejemplo, Sonido).
•Toque en la esquina superior derecha del Panel de notificaciones para acceder al menú Ajustes.
12
Page 69

Modo invitado
Utilice el Modo invitado cuando le preste el teléfono a otra persona. El invitado solo podrá usar las aplicaciones que
usted ha seleccionado. Una vez configurado este modo, puede colocar fácilmente su teléfono en Modo invitado si
traza el patrón de invitado en la pantalla de bloqueo que ha establecido, que es diferente de su patrón normal de
desbloqueo.
NOTA
El invitado también puede usar aplicaciones que no se han preseleccionado, pero que están vinculadas con las aplicaciones
preseleccionadas.
Configurar el Modo invitado
1 En la pantalla principal, toque la Tecla Menú >
2 Toque Configurar el patrón y luego introduzca el patron que desea usar para establecer su teléfono en el Modo
invitado.
3 Toque Configurar aplicaciones para ver qué aplicaciones se pueden acceder en Modo invitado. Toque el icono
Agregar en la esquina superior derecha de la pantalla para cambiar la lista de aplicaciones del Modo
invitado.
4 Toque el botón Modo invitado para activar este modo.
Ajustes del sistema >
Ficha
General > Modo invitado.
13
Page 70

Cómo usar el Modo invitado
Después que ha establecido y habilitado el modo invitado, bloquee la pantalla para poder entrar con el patrón del
modo invitado. En el modo invitado, la pantalla principal muestra solo las aplicaciones que usted ha seleccionado
para ese modo. Para salir del modo invitado, introduzca su patrón normal de desbloqueo en la pantalla de
bloqueo.
NOTA
Modo invitado se deshabilita automáticamente si su orden de bloqueo se cambia de patrón. De lo contrario, deshabilítela
manualmente si ya no desea permitir el acceso como invitado.
Cámara
1 En la pantalla principal, toque
Aplicaciones
>
Cámara
.
1
2
3
4
1
Flash
2
Cambiar cámara
3
Modo
4
Ajustes
14
5
Cambiar modo
6
Capturar
7
Galería
5
6
7
Page 71

Video camera
1 En la pantalla principal, toque
2 Deslice el icono Cambiar modo a para alternar entre la cámara al modo de cámara de vídeo.
Aplicaciones
>
Cámara
.
1
2
3
4
1
Flash
2
Cambiar camara
3
Modo
4
Ajustes
5
Cambiar modo
6
Grabar
7
Galería
5
6
7
NOTA
Para acceder a la cámara de frente o de la cámara, toque . Toque para ver y cambiar los ajustes de la cámara/
videocámara.
Compartir fotos o videos
1 En la pantalla principal, toque
2 Toque un álbum.
3 Toque y seleccione la imagen (s) que desea compartir.
4 Toque Compartir.
5 Seleccione el método que desea utilizar para compartir y enviarlo.
Aplicaciones
>
Galería
.
15
Page 72

Internet
Utilice el navegador web para navegar en la Internet con facilidad.
Navegar por la Web
1 En la pantalla principal, toque
2 Toque la barra URL en la parte superior de la pantalla e introduzca la dirección del sitio web.
3 Toque Ir para navegar al sitio web.
Aplicaciones
>
Internet
.
Transferencia de Música y Fotos
Transfiere música y fotos desde y hacia su teléfono en unos pocos pasos sencillos.
1 Conecte el teléfono a la computadora con el cable USB. Los pasos pueden variar dependiendo de su sistema
operativo.
2 Es posible que se le pida que instale programas de PC. Toque Sincronización multimedia (MTP).
3 En la PC, seleccione abrir el dispositivo para ver archivos utilizando el Explorador de Windows.
4 El teléfono aparecerá como otro dispositivo portátil en la computadora. Haga clic en la unidad para verla.
5 Arrastre y suelte los archivos * en las carpetas correspondientes, como la música, videos o fotografías. También
puede transferir archivos desde su PC a su teléfono.
* Los archivos deben ser libres de gestión digital de derechos (DRM).
16
Page 73

Las llamadas y correo de voz
Es fácil de hacer llamadas y correo de voz y acceso a los registros de llamadas con su teléfono.
Hacer una llamada
1 En la pantalla principal, toque Teléfono .
2 Introduzca un número de teléfono o escribir el nombre de un contacto. Toque el contacto y después toque para
realizar la llamada.
Acceder al correo de voz
1 En la pantalla principal, toque Teléfono .
2 Toque y mantenga presionado .
3 Siga las indicaciones de voz para escuchar los mensajes.
Registros de acceso de llamadas
1 En la pantalla principal, toque Teléfono .
2 Toque la ficha Registros de llamadas.
3 Toque en una entrada para verla.
4 Toque para llamar o para enviar un mensaje.
17
Page 74

Mensajería de texto
Comunicar de forma rápida a través de mensaje de texto con el teléfono. Adjunta imágenes, videos y otros
archivos a sus mensajes.
1 En la pantalla principal, toque Mensajes .
2 Toque para redactar un nuevo mensaje.
3 En el campo Para, escriba un número o toque para seleccionar un nombre de la lista de contactos. Puede
introducir varios nombres para enviar el mensaje a varias personas.
4 Ingrese el mensaje.
5 Toque para adjuntar un archivo.
6 Toque en Enviar para enviar el mensaje.
NOTA
Se aplican las tarifas de mensajería.
¡ADVERTENCIA!
La aplicación de mensajería LG debe configurarse como la aplicación de SMS predeterminada. Si no, se limitarán algunas
funciones de mensajes.
18
Page 75

Correo electrónico
Además de Gmail ™, puede configurar otros tipos de cuentas de correo electrónico en su teléfono, incluyendo las
cuentas de Microsoft® Exchange.
1 En la pantalla principal, toque E-mail .
2 Toque un tipo de cuenta. Los pasos pueden variar desde este punto.
3 Ingrese su dirección de correo electrónico y contraseña y toque Siguiente.
4 Siga las instrucciones adicionales que aparecen en pantalla para completar la configuración y toque Listo.
NOTA
Póngase en contacto con su administrador de TI para ayudar a configurar la cuenta de Microsoft® Exchange corporativo.
19
Page 76

Configuración de idioma de entrada
Cambiar idiomas de entrada del dispositivo y el teclado del teléfono para que se adapte a sus necesidades.
Cambio de dispositivo y el idioma de entrada
1 Desde la pantalla principal, toque la Tecla Menú >
2 Para cambiar el idioma del teléfono, toque Idioma y seleccione el idioma deseado.
3 Para cambiar el idioma de entrada del teclado, toque situado junto al teclado que desee en la sección Teclado y
métodos de entrada.
4 Toque Idioma y Tipo de teclado.
5 Toque en los idiomas de entrada deseados para seleccionarlos. Puede cambiar el idioma tocando la Tecla Idioma
cuando se tiene un teclado abierto, por ejemplo, al escribir un mensaje de texto.
Ajustes del sistema
> ficha General> Idioma y teclado.
20
Page 77

QSlide
Esta característica permite una superposición en la pantalla de su teléfono para facilitar la multitarea.
1 Desde cualquier pantalla, deslice el dedo hacia abajo desde la parte superior de la pantalla para mostrar el
Panel de notificaciones.
2 Toque en una de las aplicaciones QSlide. La aplicación aparecerá como una ventana de tamaño variable, puede
mover en la pantalla.
3 Arrastre la esquina inferior derecha para aumentar o disminuir el tamaño de la ventana y arrastre la barra de título
para mover la ventana. Toque para hacer que el tamaño total de la aplicación QSlide. Toque para que la
aplicación más pequeños de nuevo. Utilice el control deslizante para ajustar la transparencia de la ventana.
4 Para salir de QSlide, toque .
21
Page 78

Wi-Fi y Bluetooth
Manténgase conectado con las conexiones Wi-Fi y Bluetooth en su teléfono.
®
Conectarse a Wi-Fi
1 Desde la pantalla principal, toque la Tecla Menú >
2 Si Wi-Fi está apagado, toque para activarlo.
3 Toque en el nombre de la red. Introduzca una contraseña si es necesario y luego toque Conectar.
Ajustes del sistema
> ficha
Redes > Wi-Fi.
Utilice Bluetooth
1 Desde la pantalla principal, toque la Tecla Menú >
2 Si Bluetooth está desactivado, toque para activarlo.
3 El teléfono buscará automáticamente los dispositivos. Toque en el nombre del dispositivo que desea emparejar con.
Consulte el manual del usuario del dispositivo Bluetooth para obtener más información sobre el emparejamiento.
Ajustes del sistema >
ficha
Redes > Bluetooth.
22
Page 79

Google Play™ Store
Una vez que haya configurado su cuenta de Google ™, puede descargar aplicaciones desde Play Store. Es
posible que desee descargar aplicaciones a través de Wi-Fi para ahorrar en el uso de su plan de datos.
1 Desde la pantalla principal, toque Aplicaciones > Play Store .
2 Toque una categoría para buscar selecciones, o toque para buscar un elemento. Introduzca una palabra clave y
toque en el teclado.
3 Toca una aplicación para ver la información sobre el mismo y, a continuación, toque INSTALAR.
4 Lea los permisos de aplicaciones y, si está de acuerdo, toque ACEPTAR. Una vez que la aplicación se haya
descargado e instalado, verá una notificación en la Barra de estado.
5 Para abrir la aplicación, deslice el dedo hacia abajo desde la parte superior de la pantalla y toque la notificación.
También puede encontrar la aplicación tocando Aplicaciones .
NOTA
Para comprar una aplicación de pago, tendrá que crear un método de pago con Google Wallet™.
23
Page 80

Punto de accesso móvil (Mobile Hotspot)
Convierte tu teléfono en un hotspot Wi-Fi portátil para que pueda compartir su conexión de datos móviles con
hasta 8 dispositivos.
Para utilizar la capacidad de punto de acceso móvil de su teléfono, debe tener el servicio de HotSpot móvil para
smartphones como parte de su plan de tarifas.
Usted verá en la Barra de estado cuando la función está activada.
NOTA
No se puede utilizar Wi-Fi y utilizar el teléfono como un punto de acceso al mismo tiempo.
Configurar Smartphone Mobile HotSpot
1 Desde la pantalla principal,
➊ Toque en el icono de Mobile hotspot .
O
➋ Toque la Tecla Menú y luego toque Ajustes de sistema > ficha Redes > Conexiones y Redes > Mobile
HotSpot.
2 Toque Configurar el Punto de Acceso.
➊ Toque el campo SSID de red para introducir un nuevo nombre de red, si se desea.
➋ Toque el menú desplegable Seguridad y elija entre las siguientes opciones.
WPA2 PSK
de datos:
•
•
•
➌ Para cualquier nivel de seguridad, pero abierto, toque en el campo Contraseña introduzca una contraseña.
➍ Toque Guardar.
Encender / apagar el HotSpot móvil para smartphones
1 Desde la pantalla principal,
se recomienda debido a la mayor seguridad de los datos y evita el uso no autorizado de su plan
Abierta
WPA PSK
WPA2 PSK
24
Page 81

➊ Toque en el icono Mobile HotSpot .
O
➋ Toque la Tecla Menú y luego toque Ajustes de sistema > ficha Redes > Conexiones y Redes > Mobile
HotSpot.
2 Toque el botón Mobile HotSpot para activar la función.
Después de 30 segundos en su búsqueda de dispositivos Wi-Fi y conectarse con el SSID de la red con la
contraseña configurada.
Llamada de Wi-Fi
Para utilizar Wi-Fi Calling por favor, utilice la tarjeta SIM se entrega con el dispositivo. Una tarjeta SIM no funcionen
con la característica de llamada Wi-Fi. También debe tener una dirección de emergencias 911.
NOTA
Las cuentas corporativas pueden necesitar asistencia del administrador para el registro de direcciones 911.
Para activar y desactivar Llamadas Wi-Fi
1 Desde cualquier pantalla principal, toque la Tecla Menú >
y Redes.
2 Toque el botón Wi-Fi Calling para activar la función.
Para cambiar las preferencias de conexión para llamadas Wi-Fi
1 Desde cualquier pantalla principal, toque la Tecla Menú > Ajustes del sistema > ficha Redes >
Conexiones y Redes > Wi-Fi Calling.
2 Toque Preferencias de conexión y seleccione la preferencia de conexión.
Acerca de las llamadas a través de Wi-Fi
La llamada de Wi-Fi puede mejorar la cobertura y le permite hacer llamadas telefónicas y enviar mensajes a través
de una red Wi-Fi (cuando esté disponible).
Ajustes del sistema
> ficha
Redes > Conexiones
25
Page 82

Indicadores de red
Su dispositivo móvil capaz 4G indicará cuál de las redes inalámbricas de T-Mobile está conectado a. Un indicador
de la red no necesariamente significa que usted experimentará ninguna subida en particular o velocidades de
descarga de datos.
4G
: Conectado con el T-Mobile HSPA +.
3G
: Conectado a 3G.
2G
: Conectado a T-Mobile EDGE.
G
: Conectado a T-Mobile GPRS.
26
Page 83

Versiones de firmware aprobados
Este dispositivo sólo funciona con versiones de firmware que han sido aprobados para su uso por T-Mobile y el
fabricante del dispositivo. Si se coloca firmware no autorizado en el dispositivo no funcionará.
Consejos de seguridad
Tenga en cuenta la compatibilidad del dispositivo
Si tiene un marcapasos o un dispositivo de ayuda auditiva, consulte con el médico para asegurarse de si es
seguro para usted utilizar un teléfono celular. En algunos casos, las frecuencias de radio del teléfono celular
pueden interrumpir el desempeño de otros equipos electrónicos. Si tiene preguntas sobre la interacción entre su
teléfono y cualquier otro equipo electrónico, consulte al fabricante del equipo.
Manejar con seguridad
Mientras está manejando, nosotros le recomienda que use el teléfono de manera segura y sensible. Estas son
algunas sugerencias:
•Evalúe la condiciones del camino antes de responder una llamada. Su seguridad es más importante que
cualquier llamada que reciba.
•Prepare su auricular manos libres, si tiene uno, o encienda el altavoz del teléfono antes de comenzar a andar.
•Mantenga el teléfono cerca. Si suena y se da cuenta de que lo dejó en el asiento de atrás, NO lo busque
mientras está manejando.
•Programe con anticipación sus números frecuentes para marcarlos fácilmente con una sola tecla.
•Recuerde que en su área puede haber leyes que prohíban o restrinjan el uso de teléfonos celulares al manejar,
Información sobre como preservar los dispositivos de mano
Nosotros recomienda a sus clientes tomar medidas apropiadas para asegurar sus dispositivos de mano y les
sugiere que aprovechen las opciones disponibles en sus dispositivos para preservarlos frente a robos y otros
accesos y usos no autorizados. Este dispositivo cuenta con una función de bloqueo (por ejemplo, códigos o
27
Page 84

patrones definidos por el usuario) que pueden servir como primera línea de defensa frente al uso o acceso no
autorizado a la información almacenada en el dispositivo. En muchos de los dispositivos de T-Mobile podrá
encontrar aplicaciones de seguridad precargadas que le permiten rastrear o ubicar a los dispositivos si estos se
pierden. Los equipos perdidos o robados deben reportarse de inmediato a T-Mobile para que se puedan tomar
las medidas adecuadas para proteger las cuentas. Para más información, visite: www.t-mobile.com/devicesecurity
y www.t-mobile.com/Company/PrivacyResources.aspx
Llamada de emergencia
Si bien todos los teléfonos vienen equipados con la llamada de emergencia al 911, este teléfono puede o no
permitir que se tenga acceso a su ubicación durante una llamada al 911.
* La disponibilidad de esta función depende de las actualizaciones (a) de la red inalámbrica y (b) del sistema de llamadas del
911 que la agencia de respuesta del 911 o el punto de respuesta de seguridad pública PSAP) requieren que se instale en el
teléfono. Estas actualizaciones tal vez no estén disponibles en todos lados dentro de nuestra área de cobertura o en su área de
roaming. La aproximación de la ubicación del teléfono y la transmisión de la información sobre la ubicación dependen de las
situaciones de emergencia, los límites de transmisión, los problemas/limitaciones de la red, los problemas de los servicios de
interconexión, su teléfono, la presencia de edificios/túneles y de las condiciones atmosféricas/topográficas, y dicha transmisión
puede verse limitada interrumpida, puede cortarse o ser rechazada. La ubicación aproximada del teléfono se transmite a la
agencia de respuesta del 911 o al PSAP mientras la llamada está en curso. Dicha ubicación aproximada se informa únicamente
con el fin de ayudar al PSAP a despachar la asistencia de emergencia necesaria o para limitar el área de búsqueda para el
personal de servicios de emergencia. Usted no debe confiar exclusivamente en un teléfono para las comunicaciones esenciales
(como las emergencias médicas u otro tipo de emergencias). Consulte los Términos y condiciones y la Política de privacidad de
T-Mobile para ver las restricciones adicionales a los servicios y obtener más información.
El cuidado de su teléfono.
Su teléfono es un dispositivo electrónico complejo, como si fuera una mini computadora. Estos son algunos
consejos para ayudarlo a prolongar la vida útil de su dispositivo nuevo:
No permita que el dispositivo se moje. El agua dañará el teléfono y sus accesorios. Incluso una pequeña
cantidad puede causar daño.
Proteja la pantalla táctil del teléfono. La pantalla táctil de su teléfono es delicada. Protéjala de rayones usando
un protector de pantalla o guardando el teléfono dentro de una funda.
28
Page 85

Utilice baterías y accesorios originales del fabricante. Las baterías y accesorios no aprobados pueden
provocarle daños a usted y al teléfono.
No use accesorios dañados. No intente cargar el teléfono si el cargador ha recibido un golpe seco, si se ha
caído o si tiene algún otro tipo de daño, ya que hacerlo puede dañar a su teléfono. Si el cargador, o cualquier otro
accesorio, está dañado, reemplácelo o llévelo a reparar a un servicio de reparación calificado.
Información adicional
El uso de algunas funciones o contenido pueden generar cargos adicionales separados, requerir servicio
apropiado y/o acceso a una conexión Wi-Fi.
Wi-Fi El dispositivo no pasará de la red celular a la conexión Wi-Fi. Los dispositivos que utilizan conexiones
inalámbricas pueden ser vulnerables a intentos no autorizados de acceso a los datos y al software almacenado en
el dispositivo. La asignación del plan de datos se aplica al uso de dispositivos conectados que comparten Wi-Fi.
El uso de los dispositivos conectados está sujeto a los Términos y condiciones de T-Mobile.
Mobile Security: Se requiere un teléfono compatible; las limitaciones técnicas pueden impedir el funcionamiento
de determinadas funciones (p. ej. el BLOQUEO) en determinados teléfonos. Para ver una lista de dispositivos
compatibles, visite www.T-Mobile.com/mobilesecurity. La habilitación de las funciones del historial de ubicación
de Mobile Security puede ocasionar la disminución de la vida útil de la batería del teléfono o hacer que esta dure
menos tiempo. El dispositivo debe estar encendido, debe ser compatible con el envío de mensajes de texto y
debe estar dentro del área de cobertura de T-Mobile para poder usar las funciones de Mobile Security. El uso de
datos aplica para la descarga y el uso de Mobile Security. Al igual que cualquier otro software, Mobile Security
puede deshabilitarse o desinstalarse mediante otras aplicaciones, software, dispositivos o hacking. En cualquiera
de esos casos, las funciones de protección de Mobile Security tal vez no funcionen correctamente. Además, es
posible que, aunque esté instalado, Mobile Security no funcione correctamente debido a conflictos con algún otro
software instalado previamente en su dispositivo.
Mensajería/Datos: Se le cobrarán todos los mensajes y datos que envíe o reciba a través de la red,
independientemente de si se reciben o no los datos. La longitud de caracteres o el tamaño de los mensajes/
adjuntos pueden estar limitados. T-Mobile no es responsable por el contenido de los mensajes/adjuntos ni por
fallas, demoras o errores en las alertas o notificaciones generadas por T-Mobile. Su sesión, plan o servicio de
datos puede ser más lento, puede supenderse, rescindirse o restringirse si usted usa el servicio de alguna
29
Page 86

manera que interfiera o afecte nuestra red o la capacidad de proveer un servicio de calidad a otros usuarios, o
si utiliza el roaming de manera significativa o bien, si utiliza una cantidad desproporcionada de ancho de banda
durante un ciclo de facturación. No puede usar el plan de datos ni el dispositivo para usos que estén prohibidos.
Descargas/Aplicaciones: T-Mobile no es responsable por el contenido de terceros o de sitios web a los que
usted tenga acceso mediante su teléfono. Pueden aplicar cargos adicionales. No todas las descargas están
disponibles en todos los teléfonos. Usted no obtiene ningún derecho sobre las aplicaciones; la duración del
uso puede estar limitada y las descargas pueden almacenarse para uso exclusivo en su teléfono. T-Mobile no
es responsable de ninguna descarga perdida debido a un error de su parte. T-Mobile no es responsable de las
aplicaciones, incluida la descarga, instalación, uso, fallas en la transmisión, interrupción o demora, publicidades
de terceros que pueda encontrar al usar una aplicación, modificaciones que pueda hacer la aplicación respecto
de la funcionalidad de su dispositivo, incluidos los cambios que puedan afectar a su plan, servicio o facturación
de T-Mobile, y tampoco es responsable de los contenidos o sitios web a los que usted pueda tener acceso a
través de una aplicación
Compatibilidad con audífonos: Este teléfono ha sido probado y clasificado para su uso con audífonos para
algunas de las tecnologías inalámbricas que utiliza. Sin embargo, puede haber algunas tecnologías inalámbricas
más recientes usadas en este teléfono que no se han probado aún para su uso con audífonos. Es importante
probar las diferentes funciones de este teléfono a fondo y en diferentes lugares, utilizando el audífono o implante
coclear, para determinar si escucha algún ruido de interferencia. Consulte a su proveedor de servicios o el
fabricante de este teléfono para obtener información sobre la compatibilidad con audífonos. Si usted tiene
preguntas acerca de las políticas de devolución o cambio, consulte a su proveedor de servicio o vendedor del
teléfono.
La imágenes del dispositivo, de la pantalla y de los accesorios son simuladas. Consulte los folletos y los
Términos y condiciones (incluida la cláusula de arbitraje) en T-Mobile.com para ver información sobre tarifas
de planes, cargos por funciones y servicio, y restricciones y detalles, incluyendo limitaciones importantes sobre
disponibilidad y fiabilidad del servicio de emergencia 911 al usarlo vía Wi-Fi.
La palabra Bluetooth® y el logotipo son propiedad de Bluetooth SIG Inc. y T-Mobile los utiliza bajo licencia.
T-Mobile y el color magenta son marcas comerciales registradas de Deutsche Telekom AG. Visual Voicemail y
T-Mobile TV son marcas comerciales de T-Mobile USA Inc. Android, Google, Google Play Store, Google Maps, y
Gmail son marcas comerciales de Google Inc. ©2013 T-Mobile USA, Inc.
30
Page 87

Por su seguridad
Información de seguridad
Lea y revise la siguiente información para usar el teléfono de manera segura y adecuada, y para evitar daños.
¡ADVERTENCIA!
Este producto contiene químicos que, a saber del Estado de California, pueden provocar cáncer y defectos congénitos u otro
daño al sistema reproductor. Lave sus manos después de manipular el producto.
Precaución
No cumplir con las instrucciones puede causar daños menores o graves en el producto.
•No desarme, abra, aplaste, doble, deforme, perfore ni raye el teléfono.
•Las reparaciones cubiertas por la garantía, según lo considere LG, pueden incluir piezas de repuesto o paneles
que sean nuevos o reacondicionados, siempre que cuenten con la misma funcionalidad que las piezas que se
reemplazarán.
•No modifique ni vuelva a armar la batería, no intente introducirle objetos extraños, no la sumerja ni exponga al
agua u otros líquidos, no la exponga al fuego, explosión u otro peligro.
•Sólo use la batería para el sistema especificado.
•Solo use la batería con un sistema de carga que haya sido calificado con el sistema de conformidad con los
requisitos de certificación de la CTIA para el cumplimiento de los sistemas de baterías del estándar IEEE1725.
El uso de una batería o un cargador no calificado puede presentar peligro de incendio, explosión, escape u
otro riesgo.
•No le provoque un cortocircuito a la batería ni permita que objetos metálicos conductores entren en contacto
con los terminales de la batería.
•Sólo reemplace la batería con otra que haya sido certificada con el sistema según este estándar, IEEE-Std1725-200x. El uso de una batería no calificada puede presentar peligro de incendio, explosión, escape u otro
riesgo.
•Deseche de inmediato las baterías usadas conforme las regulaciones locales.
•Si los niños usan la batería, se los debe supervisar.
•Evite dejar caer el teléfono o la batería. Si el teléfono o la batería se cae, en especial en una superficie rígida,
y el usuario sospecha que se han ocasionado daños, lleve el teléfono o la batería a un centro de servicio para
31
Page 88

revisión.
•El uso inadecuado de la batería puede resultar en un incendio, una explosión u otro peligro.
•El manual del usuario de los dispositivos host que utilizan un puerto USB como fuente de carga debe incluir
una declaración en la que se mencione que el teléfono sólo debe conectarse a productos que tienen el
logotipo USB-IF o que completaron el programa de conformidad USB-IF.
Seguridad del cargador y del adaptador
•El cargador y el adaptador están diseñados sólo para ser usados bajo techo.
•Inserte el cargador de la batería de modo vertical en el tomacorriente de la pared.
•Desconecte el enchufe de la toma de corriente y el cargador cuando se ilumina porque puede provocar un
choque eléctrico o peligro de incendio.
•Cuando use el cargador de batería en el extranjero, use el adaptador correcto para el teléfono.
Información y cuidado de la batería
•Lea el manual de instalación y extracción adecuadas de la batería.
•Lea el manual del cargador especificado sobre el método de carga.
•No dañe el cable de alimentación al doblarlo, retorcerlo o calentarlo. No use el conector si está flojo ya que
podría causar choque eléctrico o incendio.
•No coloque objetos pesados sobre el cable de corriente. No permita que el cable de alimentación quede
prensado ya que podría causar choque eléctrico o incendio.
•Desconecte el cable de alimentación antes de limpiar el teléfono y limpie la clavija del conector de alimentación
cuando esté sucia. Al usar el conector de alimentación, asegúrese de que esté conectado con firmeza. De lo
contrario, podría causar un calentamiento excesivo o incendio. Si coloca el teléfono en un bolsillo o bolso sin
cubrir el receptáculo (clavija de alimentación), los artículos metálicos (tales como una moneda, clip o pluma)
pueden provocarle un corto circuito al teléfono. El cortocircuito de los terminales puede dañar la batería y
ocasionar una explosión. Cubra siempre el receptáculo cuando no se esté usando.
•Cargue la batería después de períodos prolongados sin usar el teléfono para maximizar la vida útil de la misma.
La vida útil de la batería será distinta en función de los patrones de uso y las condiciones medioambientales.
•Nunca guarde el teléfono en lugares con temperaturas inferiores a -15 °C (-4 °F) ni superiores a 50 °C
(122 °F).
32
Page 89

•El rango de temperatura de carga está entre 0 °C (32 °F) y 45 °C (113 °F). No cargue la batería fuera del
rango de temperatura recomendado. Si carga fuera del rango recomendado podría recalentar o dañar
gravemente la batería. Asimismo, puede deteriorar las características de la batería y el ciclo de vida.
•No use ni deje la batería en exposición directa al sol o en un automóvil expuesto a la luz del sol. La batería
puede generar calor, humo o llama. Además, podría deteriorar las características y el ciclo de vida útil de la
batería.
•La batería tiene un circuito de protección para evitar el peligro. No la use cerca de lugares que pueden generar
una electricidad estática superior a 100 V, ya que podría dañar el circuito de protección. Si los circuitos de
protección están dañados, pueden generar humo en la batería, romperla o incendiarla.
•Si usa la batería por primera vez y esta emite un olor desagradable, está oxidada o tiene otra característica que
no es normal, no utilice el equipo y lleve la batería a la tienda donde la adquirió.
•Mantenga las baterías alejadas de bebés y niños. Si los niños usan la batería, los padres o tutores legales
son responsables de supervisar y enseñarles cómo manipular baterías en forma segura y cómo usarlas con
cuidado según el manual.
•Si el líquido de la batería entra en contacto con la piel o una prenda de vestir, lávelos con agua fresca. Puede
causar inflamación de la piel. Quite la batería y no la use. Cuide que los niños no se traguen partes del teléfono
(como un auricular, partes conectoras del teléfono, etc.). Esto podría causar asfixia o ahogo que provoquen
lesiones graves o la muerte.
•No manipule el teléfono con las manos húmedas cuando se esté cargando. Puede causar un choque eléctrico
o dañar gravemente el teléfono.
•No haga ni conteste llamadas mientras esté cargando el teléfono, ya que puede causar un corto circuito en éste
o provocar descargas eléctricas o incendios.
•No use sustancias químicas fuertes (como alcohol, benceno, solventes, etc.) o detergentes para limpiar el
teléfono. Podría causar un incendio.
•Una vez que el teléfono esté totalmente cargado, desenchufe siempre el cargador del tomacorriente para que
el cargador no consuma energía de manera innecesaria.
33
Page 90

Cuidado y mantenimiento
El dispositivo móvil es un producto de diseño y manufactura de primera calidad, por lo que debe tratarse con
cuidado. Las sugerencias a continuación le ayudarán a cumplir con las obligaciones de garantía y le permitirán
disfrutar este producto por muchos años:
Mantenga su dispositivo móvil lejos de:
Cualquier tipo de líquidos
Mantenga su dispositivo móvil seco. Las precipitaciones, la humedad y los líquidos contienen minerales que
corroerán los circuitos electrónicos. Si el dispositivo móvil se moja, no acelere el secado con un horno, un
microondas o un secador, dado que podría dañar el dispositivo y causar un incendio o una explosión.
No utilice el dispositivo móvil con las manos mojadas.
El hecho de hacerlo, podría causarle una descarga eléctrica o dañar el dispositivo.
Calor o frío extremos
Evite las temperaturas inferiores a 0 °C / 32 °F o superiores a 45 °C / 113 °F.
Microondas
No intente secar el dispositivo móvil en un horno de microondas. El hecho de hacerlo podría causar un incendio
o una explosión.
Polvo y suciedad
No exponga el dispositivo móvil al polvo, la suciedad o la arena.
Loción de protección solar
No exponga ni utilice el dispositivo móvil ante ningún líquido similar a la loción de protección solar.
El hecho de hacerlo puede dañar el dispositivo móvil.
Soluciones de limpieza
No utilice sustancias químicas corrosivas, solventes de limpieza ni detergentes fuertes para limpiar el dispositivo
móvil.
Limpie con un paño suave y levemente humedecido en una solución 50% jabón y 50% agua.
34
Page 91

Golpe o vibración
No deje caer, golpee, ni agite el dispositivo móvil.
Una manipulación brusca puede romper las placas de los circuitos internos.
Pintura
No pinte el dispositivo móvil. La pintura puede obstruir las piezas del dispositivo que se mueven o las aberturas de
ventilación y evitar que funcione de manera apropiada.
Aviso general
•Las llamadas de emergencia sólo pueden hacerse dentro de un área de servicio. Para hacer una llamada de
emergencia, asegúrese de estar dentro de un área de servicio y que el teléfono esté encendido.
•No coloque cerca del teléfono artículos que contengan componentes magnéticos como tarjetas de crédito,
tarjetas telefónicas, libretas de banco o boletos del metro. El magnetismo del teléfono puede dañar los datos
almacenados en la tira magnética.
•Hablar por el teléfono durante un período de tiempo prolongado puede reducir la calidad de la llamada debido
al calor generado durante la utilización.
•Cuando el teléfono no se usa durante mucho tiempo, déjelo en un lugar seguro con el cable de alimentación
desconectado.
•El uso del teléfono cerca de equipo receptor (como un televisor o radio) puede causar interferencia el teléfono.
•No use el teléfono si la antena está dañada. Si una antena dañada toca la piel, puede causar una ligera
quemadura. Comuníquese con un Centro de servicio autorizado LG para reemplazar la antena dañada.
•Los datos guardados en el teléfono se pueden borrar al usar de manera incorrecta el teléfono, repararlo o
actualizar el software. Haga una copia de seguridad de los números de teléfono importantes. (Los tonos de
llamada, mensajes de texto, mensajes de voz, imágenes y videos también pueden borrarse). El fabricante no se
hace responsable de los daños ocasionados por la pérdida de datos.
•Cuando esté en lugares públicos, fije el tono de timbre en vibración para no molestar a otras personas.
•No apague ni encienda el teléfono cuando se lo ponga al oído.
35
Page 92

•Su teléfono es un dispositivo eléctrico que genera calor durante su funcionamiento normal. El contacto
demasiado prolongado y directo con la piel sin presencia de ventilación adecuada puede producir
incomodidad y quemaduras menores. Por lo tanto, tenga precaución al manipular su teléfono durante o
inmediatamente después del uso.
Use los accesorios, como audífonos y auriculares, con precaución. Cerciórese de que los cables estén bien
resguardados y no toque la antena innecesariamente.
Enunciado de la sección 15.19
Este dispositivo cumple con la sección 15 de la normativa de la FCC. El funcionamiento está sujeto a las dos
condiciones siguientes: (1) Este dispositivo no puede causar interferencias dañinas y (2) este dispositivo debe
aceptar cualquier interferencia que reciba, incluida la que causa un funcionamiento indeseable.
Enunciado de la sección 15.21
Todo cambio o modificación no aprobada expresamente por el fabricante podría anular la autoridad del usuario
de operar el equipo.
Enunciado de la sección 15.105
Este equipo ha sido evaluado y se ha comprobado que cumple con los límites para un dispositivo digital clase
B, conforme el artículo 15 de las reglas de la FCC. Estos límites han sido diseñados para brindar una protección
razonable contra la interferencia dañina en una instalación residencial. Este equipo genera, utiliza y puede irradiar
energía de radiofrecuencia y, si no se instala y utiliza de acuerdo con las instrucciones, podría causar interferencia
dañina para las comunicaciones radiales. No obstante, no se puede garantizar que la interferencia no se
presentará durante una instalación en particular. Si este equipo ocasiona interferencia dañina en la recepción de
televisión (lo cual puede determinarse encendiendo y apagando el equipo), se recomienda al usuario que intente
corregir la interferencia tomando una o más de las siguientes medidas:
•Reorientar o reubicar la antena receptora.
•Aumentar la distancia entre el equipo y el receptor.
•Conectar el equipo en una toma de un circuito diferente de aquél al que está conectado el receptor.
•Consultar con el distribuidor o un técnico de radio/TV experimentado para obtener ayuda.
36
Page 93

Información sobre la exposición a radiofrecuencias de la FCC
¡ADVERTENCIA!
Lea esta información antes de hacer funcionar el teléfono.
En agosto de 1996, la Comisión federal de comunicaciones (FCC) de los Estados Unidos, con su acción en el
informe y orden FCC 96-326, adoptó una norma de seguridad actualizada para la exposición humana a la energía
electromagnética de radiofrecuencias (RF) que emiten los transmisores regulados por la FCC. Esos lineamientos
se corresponden con la norma de seguridad establecida previamente por los organismos de normalización tanto
de los EE. UU. como internacionales. El diseño de este teléfono cumple con los lineamientos de la FCC y esas
normas internacionales.
Funcionamiento en el cuerpo
Este dispositivo fue probado para operaciones típicas de uso en el cuerpo, con la parte posterior del teléfono
a 0,39 pulgadas (1 cm) del cuerpo del usuario. Para cumplir con los requerimientos de exposición a la
radiofrecuencia de la FCC, se debe mantener una distancia mínima de separación de 0,39 pulgadas (1 cm)
entre el cuerpo del usuario y la parte trasera del teléfono. No se pueden usar broches para el cinto de terceros ni
accesorios similares que contenga componentes metálicos. Puede que los accesorios usados sobre el cuerpo
que no pueden mantener una distancia de 0,39 pulgadas (1 cm) entre el cuerpo del usuario y la parte posterior
del teléfono, y que no han sido probados para operaciones típicas de uso en el cuerpo no cumplan con los límites
de exposición a RF de la FCC y deben evitarse.
Antena externa montada sobre el vehículo
(Opcional, en caso de estar disponible).
Para cumplir con los requisitos de exposición a RF de la FCC, mantenga una distancia de 20 cm (8 pulgadas)
entre el usuario o transeúnte y la antena externa montada sobre el vehículo. Para obtener más información sobre
la exposición a la RF, visite el sitio Web de la FCC en www.fcc.gov.
Precaución
Use solo la antena suministrada. El uso de antenas no autorizadas (o antenas modificadas) puede afectar la
calidad de la llamada telefónica, dañar el teléfono, anular su garantía y/o infringir las normas de la FCC.
No use el teléfono con una antena dañada. Una antena dañada puede producir una leve quemadura en la piel.
Comuníquese con su distribuidor local para obtener un reemplazo de la antena.
37
Page 94

Información para el consumidor sobre emisiones de radiofrecuencia
El teléfono inalámbrico, que contiene un transmisor y receptor de radio, emite energía de radiofrecuencia al
usarlo. La siguiente información para el consumidor responde las preguntas más frecuentes acerca de los efectos
que los teléfonos inalámbricos pueden tener en la salud.
¿Son seguros los teléfonos inalámbricos?
La investigación científica acerca de los teléfonos inalámbricos y la energía de radiofrecuencia (RF) se lleva
a cabo en todo el mundo desde hace ya varios años y continúa en la actualidad. En los Estados Unidos,
la Administración de Medicamentos y Alimentos (FDA, por sus siglas en inglés) y la Comisión Federal de
Comunicaciones (FCC, por sus siglas en inglés) establecen políticas y procedimientos para los teléfonos
inalámbricos. La FDA emitió una publicación en su sitio web acerca de las cuestiones de la salud relacionadas
con el uso de teléfonos celulares, donde declara que “la comunidad científica en general... cree que las
evidencias científicas no indican una relación entre la exposición a la radiofrecuencia (RF) de los teléfonos
celulares y resultados adversos para la salud. De todos modos, la comunidad científica recomienda realizar más
investigaciones para poder dar respuesta a aquellas cuestiones que aún se desconocen. Esas investigaciones se
realizan en todo el mundo y la FDA supervisa los avances en este campo. Puede obtener acceso al sitio web en
común de la FDA y la FCC en http://www.fda.gov (en la letra “C” del índice de temas, seleccione Cell Phones >
Research). También puede comunicarse gratuitamente con la FDA llamando al (888) 463-6332 o al (888) INFOFDA. En junio de 2000, la FDA decidió celebrar un acuerdo de desarrollo e investigación cooperativos mediante el
cual se llevan a cabo investigaciones científicas adicionales. La FCC emitió su propia publicación en su sitio web,
donde declaró que “no existen evidencias científicas que demuestren que el uso de teléfonos inalámbricos pueda
provocar cáncer u otra variedad de problemas, incluidos dolores de cabeza, mareos o pérdida
Esta publicación está disponible en http://www.fcc.gov/oet/rfsafety o a través de la FCC, llamando al (888) 2255322 o al (888) CALL-FCC.
¿Qué significa “SAR”?
en 1996, la FCC, junto con la FDA, la Agencia de Protección Ambiental de los Estados Unidos y otras agencias,
establecieron las pautas de seguridad para la exposición a RF de los teléfonos inalámbricos en los Estados
Unidos. Antes de que un modelo de teléfono inalámbrico comience a venderse al público, el fabricante debe
probar el dispositivo y la FCC debe certificar que no supere los límites establecidos. Uno de estos límites se
expresa como la Tasa de Absorción Específica (SAR, por sus siglas en inglés). La SAR es la medición de la
38
Page 95

tasa de absorción de energía de RF en el cuerpo. Las pruebas para evaluar la SAR se realizan con el teléfono
transmitiendo a su máximo nivel de potencia en todas las bandas de frecuencia evaluadas. Desde 1996, la FCC
exige que la SAR de los teléfonos inalámbricos de mano no superen los 1,6 watts por kilogramo, promediados
sobre un gramo de tejido.
Si bien la SAR se determina al máximo nivel de potencia, el valor real de la SAR de un teléfono inalámbrico
durante su funcionamiento puede ser menor que el valor de la SAR informado. Esto se debe a que el valor de la
SAR puede variar entre una llamada y otra, en función de factores como la proximidad a un sitio de transmisión
celular, la proximidad del teléfono al cuerpo durante su uso y el uso de dispositivos de manos libres.
Para obtener más información acerca de las SAR, consulte los boletines 56 y 65 de la Oficina de ingeniería y
tecnología de la FCC en http://www.fcc.gov/Bureaus/Engineering_Technology/Documents/bulletins o visite el
sitio web de la Asociación de la industria de las telecomunicaciones celulares en http://www.ctia.org/consumer_
info/index.cfm/AID/10371. También puede comunicarse con el fabricante del teléfono.
¿Puedo minimizar mi exposición a la RF?
Si le preocupa la RF, existen varios pasos simples que puede seguir para minimizar su exposición a la RF. Por
supuesto, puede reducir el tiempo que habla por teléfono. Puede dejar más distancia entre su cuerpo y la fuente
de RF, ya que el nivel de exposición disminuye drásticamente con la distancia. La FDA y FCC establecen en su
sitio web que “los kit de manos libres pueden usarse con teléfonos inalámbricos para mayor conveniencia y
comodidad. Estos sistemas reducen la absorción de energía de RF en la cabeza, dado que el teléfono, que es
la fuente de emisiones de radiofrecuencia, no se apoyará en la cabeza. Por otra parte, si el teléfono se coloca
en la cintura u otra parte del cuerpo durante el uso, esa parte del cuerpo absorberá más energía de RF. Los
teléfonos inalámbricos comercializados en los Estados Unidos deben cumplir con los requisitos de seguridad,
independientemente de que se los use en la cabeza o el cuerpo. El límite de seguridad debe respetarse en
ambas configuraciones”. Además, si utiliza el teléfono inalámbrico mientras está en un automóvil, puede usarlo
con una antena en la parte exterior del vehículo. Además, debe leer y seguir las instrucciones del fabricante del
teléfono inalámbrico para el uso seguro del teléfono.
¿Los teléfonos inalámbricos representan un riesgo especial para los niños?
La FDA y FCC establecen en su sitio web que "la evidencia científica no muestra la existencia de peligro para los
usuarios de dispositivos de comunicación inalámbrica, incluidos los niños". La FDA y FCC, además, establecen
en su sitio web que "algunos grupos patrocinados por otros gobiernos nacionales han aconsejado que se debe
39
Page 96

desalentar por completo el uso de los teléfonos inalámbricos por parte de los niños. Por ejemplo, el Reporte
Stewart del Reino Unido realizó esta recomendación en diciembre de 2000. En este informe, un grupo de
expertos independientes declararon que no existen evidencias de que usar un teléfono celular provoque tumores
cerebrales u otras enfermedades. La recomendación [del Reino Unido] de limitar el uso de teléfonos celulares
en los niños era estrictamente preventiva; no se basaba en evidencias científicas de que exista un peligro para
la salud”. Puede acceder a una copia del folleto del Reino Unido en http://www.dh.gov.uk (busque la sección
“mobile”) o puede escribir a la siguiente dirección: NRPB, Chilton, Didcot, Oxon OX11 ORQ, Reino Unido.
También puede acceder en línea a copias de los informes anuales del Reino Unido acerca de teléfonos móviles
y RF en www.iegmp.org.uk y http://www.hpa.org.uk/radiation/ (busque la sección “mobile”). Los padres que
deseen reducir la exposición de sus hijos a la RF pueden optar por restringir el uso que sus hijos realizan de los
teléfonos inalámbricos.
¿Dónde puedo obtener más información sobre las emisiones de radiofrecuencia?
Para obtener más información, consulte los siguientes recursos adicionales (sitios web vigentes desde abril de
2005):
Administración de Medicamentos y Alimentos de los EE. UU.
FDA Consumer magazine
Noviembre-diciembre 2000
Teléfono: (888) INFO-FDA
http://www.fda.gov (en la letra “C” del índice de temas, seleccione Cell Phones > Research.)
Comisión Federal de Comunicaciones de los EE. UU.
445 12th Street, S.W.
Washington, DC 20554
Teléfono: (888) 225-5322
http://www.fcc.gov/oet/rfsafety
Grupo independiente de expertos en teléfonos móviles
http://www.iegmp.org.uk
40
Page 97

Paneles de expertos en riesgos potenciales para la salud de los campos de radiofrecuencia de
dispositivos de telecomunicaciones inalámbricos de la Real Sociedad de Canadá
283 Sparks Street
Ottawa, Ontario K1R 7X9
Canadá
Teléfono: (613) 991-6990
Organización Mundial de la Salud
Avenue Appia 20
1211 Geneva 27
Suiza
Teléfono: 011 41 22 791 21 11
http://www.who.int/mediacentre/factsheets/fs193/en/
Comisión internacional para la protección contra radiación no ionizante
c/o Bundesamt fur Strahlenschutz
Ingolstaedter Landstr. 1
85764 Oberschleissheim
Alemania
Teléfono: 011 49 1888 333 2156
http://www.icnirp.de
Instituto Nacional Estadounidense de Estándares
1819 L Street, N.W., 6º piso
Washington, DC 20036
Teléfono: (202) 293-8020
http://www.ansi.org
41
Page 98

Consejo Nacional para las Mediciones y la Protección contra la Radiación
7910 Woodmont Avenue, Suite 800
Bethesda, MD 20814-3095
Teléfono: (301) 657-2652
http://www.ncrponline.org
Sociedad de ingeniería en medicina y biología, Comisión del hombre y la radiación (COMAR,
por su sigla en inglés) del Instituto de ingenieros eléctricos y electrónicos
http://ewh.ieee.org/soc/embs/comar/
Información de seguridad de la Asociación de la Industria de las Telecomunicaciones
A continuación se incluye información de seguridad de la Asociación de la Industria de las Telecomunicaciones
(TIA, por sus siglas en inglés) para teléfonos inalámbricos de mano.
Información al consumidor sobre las tasas de absorción específicas (SAR)
(SAR, por sus siglas en inglés)
Este modelo de teléfono cumple con los requisitos gubernamentales de exposición a las ondas de radio. Su
teléfono inalámbrico es un transmisor y receptor de radio. Está diseñado y fabricado para que no supere los
límites de emisión para la exposición a la energía de radiofrecuencia (RF) establecidos por la Comisión federal de
comunicaciones (FCC) del gobierno de los EE. UU. Estos límites son parte de extensos lineamientos y establecen
los niveles permitidos de energía de RF para la población general. Estos lineamientos están basados en
estándares que desarrollaron organizaciones científicas independientes por medio de una evaluación periódica
y exhaustiva de los estudios científicos. Los estándares incluyen un notable margen de seguridad diseñado para
garantizar la seguridad de todas las personas sin importar su edad o estado de salud.
El estándar de exposición para los teléfonos celulares inalámbricos emplea una unidad de medida llamada Tasa
de absorción específica o SAR. El límite de SAR establecido por la FCC es de 1,6 W/kg. Las pruebas de SAR se
llevan a cabo usando posiciones de operación estándar especificadas por la FCC con el teléfono transmitiendo
a su nivel de potencia certificado más elevado en todas las bandas de frecuencia probadas. Aunque la SAR se
determina al nivel de potencia más alto certificado, el nivel de SAR real del teléfono en funcionamiento puede
estar muy por debajo del valor máximo. Dado que el teléfono está diseñado para funcionar a varios niveles de
potencia para usar solamente la potencia necesaria para llegar a la red, en general mientras más cerca esté de
42
Page 99

una antena de estación de base inalámbrica, menor será la potencia que se emitirá.
Antes de que un modelo de teléfono esté disponible para su venta al público, debe probarse y certificarse ante
la FCC que no supera el límite establecido por el requisito adoptado por el gobierno para la exposición segura.
Las pruebas se realizan en posiciones y ubicaciones (por ejemplo, en la oreja y llevándolo en el cuerpo) según lo
exige la FCC para cada modelo.
Los valores SAR máximos son:
* Cabeza: 0,57 W/kg
* Cuerpo (Cuerpo-puesto/Punto de acceso): 1,06 W/kg
(Las mediciones del cuerpo varían en función de los modelos de teléfonos y dependen tanto de los accesorios
disponibles como de los requisitos de la FCC).
Aun cuando puede haber diferencias entre los niveles de SAR de varios teléfonos y en varias posiciones, todos
ellos cumplen el requisito gubernamental para una exposición segura.
La FCC ha otorgado una Autorización de equipo para este modelo de teléfono con todos los niveles de SAR
reportados y evaluados en cumplimiento de los lineamientos de emisión de RF de la FCC. La información de la
SAR sobre este modelo de teléfono está archivada en la FCC y puede encontrarse en la sección Display Grant de
http://www.fcc.gov/oet/ea/fccid/ después de buscar FCC ID ZNFD415.
Puede encontrar información adicional sobre las tasas de absorción específicas (SAR, por sus siglas en inglés) en
el sitio web de la Asociación de la Industria de las Telecomunicaciones Celulares (CTIA, por sus siglas en inglés)
en http://www.ctia.org/.
* En los Estados Unidos y Canadá, el límite de SAR para teléfonos celulares usados por el público es de 1.6 watt/
kg (W/kg) en un promedio de más de un gramo de tejido. El estándar incluye un margen sustancial de seguridad
para dar una protección adicional al público y para tomar en cuenta cualquier variación en las mediciones.
Exposición a las señales de radiofrecuencia
El teléfono inalámbrico manual portátil es un transmisor y receptor de radio de baja potencia. Cuando está
ENCENDIDO, recibe y envía señales de radiofrecuencia (RF).
En agosto de 1996, la Comisión Federal de Comunicaciones de los EE. UU. (FCC, por sus siglas en inglés)
adoptó lineamientos de exposición a RF con niveles de seguridad para teléfonos inalámbricos de mano. Estas
pautas son consistentes con el estándar de seguridad establecido previamente por los organismos de estándares
43
Page 100

internacionales y de los EE. UU.:
ANSI C95.1 (1992) *
Informe NCRP 86 (1 986)
ICNIRP (1 996)
* Instituto Nacional Estadounidense de Estándares, Consejo Nacional para las Mediciones y la Protección contra
la Radiación, Comisión Internacional de Protección contra la Radiación No Ionizante.
Estos estándares se basaron en evaluaciones amplias y periódicas de la literatura científica pertinente. Por
ejemplo, más de 120 científicos, ingenieros y médicos de universidades, instituciones de salud gubernamentales
y la industria analizaron el corpus de investigación disponible para desarrollar el estándar ANSI (C95.1).
El diseño de su teléfono cumple los lineamientos de la FCC (y esas normas internacionales).
Cuidado de la antena
Utilice solamente la antena incluida o una antena de reemplazo aprobada. Las antenas, modificaciones o
accesorios no autorizados pueden dañar el teléfono y violar los reglamentos de la FCC.
Funcionamiento del teléfono
POSICIÓN NORMAL: Sostenga el teléfono como cualquier otro teléfono con la antena apuntando hacia arriba por
sobre su hombro.
Sugerencias para un funcionamiento más eficaz
Para que su teléfono funcione con la máxima eficacia:
No toque la antena innecesariamente cuando esté usando el teléfono. El contacto con la antena afecta la calidad
de la llamada y puede ocasionar que el teléfono funcione a un nivel de potencia mayor que el que necesitaría de
otro modo.
Dispositivos electrónicos
La mayoría del equipo electrónico moderno está blindado contra las señales de RF. Sin embargo, algunos
equipos electrónicos pueden no estar blindados contra las señales de RF de su teléfono inalámbrico.
Marcapasos
La Asociación de Fabricantes del Sector de la Salud recomienda mantener al menos 15 cm (6 pulgadas)
de distancia entre el teléfono inalámbrico portátil y el marcapasos para evitar posibles interferencias con
44
 Loading...