

LG NP8740, NP8540 User Manual

SMART Hi-Fi AUDIO
Wireless Multi-room
Model : NP8740 (H7)
NP8540 (H5)
ENGLISH | OWNER’S MANUAL
Please read this manual carefully before
operating your speaker and retain it for future
reference.
Getting Started2
Safety Information
1
Getting Started
CAUTION: TO REDUCE THE RISK OF ELECTRIC
SHOCK DO NOT REMOVE COVER (OR BACK) NO
USER-SERVICEABLE PARTS INSIDE REFER SERVICING
TO QUALIFIED SERVICE PERSONNEL.
enclosure that may be of sucient magnitude to
constitute a risk of electric shock to persons.
instructions in the literature accompanying the
product.
WARNING: TO PREVENT FIRE OR ELECTRIC SHOCK
HAZARD, DO NOT EXPOSE THIS PRODUCT TO RAIN
OR MOISTURE.
WARNING: Do not install this equipment in a
conned space such as a book case or similar unit.
NOTICE: For safety marking information including
product identication and supply ratings, please
refer to the main label on the bottom or rear of the
apparatus.
CAUTION : Only use the AC adapter supplied
with this device. Do not use a power supply from
another device or another manufacturer. Using
any other power cable or power supply may cause
damage to the device and void your warranty.
CAUTION concerning the Power Cord
Most appliances recommend they be placed upon
a dedicated circuit;
That is, a single outlet circuit which powers only
that appliance and has no additional outlets or
branch circuits. Check the specication page of this
owner’s manual to be certain. Do not overload wall
outlets. Overloaded wall outlets, loose or damaged
wall outlets, extension cords, frayed power cords, or
damaged or cracked wire insulation are dangerous.
Any of these conditions could result in electric
CAUTION
RISK OF ELECTRIC SHOCK
DO NOT OPEN
This lightning ash with arrowhead
symbol within an equilateral triangle
is intended to alert the user to the
presence of uninsulated dangerous
voltage within the product’s
The exclamation point within an
equilateral triangle is intended
to alert the user to the presence
of important operating and
maintenance (servicing)
shock or re. Periodically examine the cord of your
appliance, and if its appearance indicates damage
or deterioration, unplug it, discontinue use of the
appliance, and have the cord replaced with an
exact replacement part by an authorized service
center. Protect the power cord from physical or
mechanical abuse, such as being twisted, kinked,
pinched, closed in a door, or walked upon. Pay
particular attention to plugs, wall outlets, and
the point where the cord exits the appliance. To
disconnect power from the mains, pull out the
mains cord plug. When installing the product,
ensure that the plug is easily accessible.
CAUTION:
yThe apparatus should not be exposed to water
(dripping or splashing) and no objects lled with
liquids, such as vases, should be placed on the
apparatus.
yNo naked ame sources, such as lighted candles,
should be placed on the apparatus.
yTo avoid re or electric shock, do not open the
unit. Contact to qualied personnel only.
yDo not leave the unit in a place near the heating
appliances or subject to direct sunlight, moisture,
or mechanical shock.
yTo clean the unit, use a soft, dry cloth. If the
surfaces are extremely dirty, use a soft cloth
lightly moistened with a mild detergent solution.
Do not use strong solvents such as alcohol,
benzine, or thinner, as these might damage the
surface of the unit.
yDo not use volatile liquids such as insecticide
spray near the unit. Wiping with strong pressure
may damage the surface. Do not leave rubber
or plastic products in contact with the unit for a
long period of time.
yDo not place the unit over the vehicle’s air bag.
When the air bag deploys, it may result in injury.
Before using in the car, x the unit.
yDo not leave the unit on an unstable place such
as high shelves. It may fall down because of the
vibration of the sound.

Getting Started 3
For Wireless product European Union Notice
LG Electronics hereby declares that this/these
product(s) is/are in compliance with the essential
requirements and other relevant provisions of
Directive 1999/5/EC, 2004/108/EC, 2006/95/EC,
2009/125/EC and 2011/65/EU.
Please contact to the following address for
obtaining a copy of the DoC (Declaration of
Conformity).
Contact oce for compliance of this product :
LG Electronics Inc.
EU Representative, Krijgsman 1,
1186 DM Amstelveen, The Netherlands
yPlease note that this is NOT a Customer Service
contact point. For Customer Service Information,
see Warranty Card or contact the dealer that you
purchased this product.
Indoor use only.
RF Radiation Exposure Statement
This equipment should be installed and operated
with minimum distance 20 cm between the
radiator and your body.
Disposal of your old appliance
1. When this crossed-out wheeled bin
symbol is attached to a product it
means the product is covered by the
European Directive 2002/96/EC.
2. All electrical and electronic products
should be disposed of separately
from the municipal waste stream
via designated collection facilities
appointed by the government or the
local authorities.
3. The correct disposal of your old
appliance will help prevent potential
negative consequences for the
environment and human health.
4. For more detailed information about
disposal of your old appliance,
please contact your city office, waste
disposal service or the shop where
you purchased the product.
1
Getting Started

Table of Contents4
Table of Contents
1 Getting Started
2 Safety Information
6 Main Features
6 Accessories
6 Introduction
7 Understanding Connection
7 – Basic Connection
7 – Group playback using Music Flow
Player app
8 Top Panel
9 Rear Panel
2 Connecting
10 Connecting the AC Adapter
10 Installing “Music Flow Player” App
11 – Starting with Music Flow Player app
12 Connecting the speaker to your Home
Network
12 – Connecting the speaker to your
network with a LAN cable
14 – Connecting the speaker to your
Network via the Wi-Fi Setup Method
(Android)
17 – Connecting the speaker to your
Network via the Wi-Fi Setup Method
(iOS)
21 Connecting the speakers to your Home
Network (Additional)
21 – Adding another speaker
24 – Connecting the speakers to your
Network with a Music Flow R1
3 Operating
29 Basic Operations
29 – Using 1/!/F button
29 – Using volume button
30 Enjoying the Music with Music Flow Player
app
30 – Overview of Home menu
31 – Overview of the side menu
31 – Playing a song
33 – Overview of Playback
34 – Group Playback
36 – Seamless playback
38 Setting the Speaker with Music Flow
Player app
38 – Overview of setting menu
39 – [General] Menu
39 – [Speakers] Menu
40 – [Alarms/Sleep Timer] Menu
40 – [Music Library] Menu
41 – [Account management] Menu
41 – [Update] Menu
42 Using a Bluetooth Wireless Technology
42 – About Bluetooth
42 – Bluetooth profiles
42 – Listening to Music of a Bluetooth
Device
43 – NFC for Easy Pairing
(Android Only)
43 Listening to Music from Your External
Device
44 Using Media Server for PC
44 – Music Flow PC Software for windows
45 – Nero MediaHome 4 Essentials for
Mac OS
46 Standby mode
46 – Standby mode
46 – Network standby mode
46 Reset the Speaker
46 – Resetting the speaker
46 – Resetting the Music Flow R1
4 Troubleshooting
47 Troubleshooting
47 – General
48 – Network
49 – Application and PC Software
5 Appendix
50 File requirement
50 Trademarks and Licenses
51 Specifications
52 Handling the Speaker
52 Important Information Relating to
Network Services
53 TERMS OF USE
Table of Contents 5
1
2
3
4
5
Some of the content in this manual may dier from Music Flow Player app depending on the
application’s version.
Getting Started6
Main Features
Made for iPod/iPhone/iPad or
1
Android device
Getting Started
Enjoys music from iPod/iPhone/iPad or Android
device with simple connection.
Portable In
Listens to music from your portable device.
Music Flow Player application
Listens to music stored on your smart device.
You can control this speaker with your iPod touch/
iPhone/iPad or Android device via Music Flow
Player app. This speaker and your smart device
must be connected to the same network. Visit
“iTunes store” or “Google Play Store” or use the QR
code shown below to search for “Music Flow Player”
app. For detailed information, refer to page 10.
(Android OS)
yDepending on the application’s version and the
settings of smart device, Music Flow Player app
may not be operated normally.
ySome smart devices may not be compatible with
this speaker.
(Apple iOS)
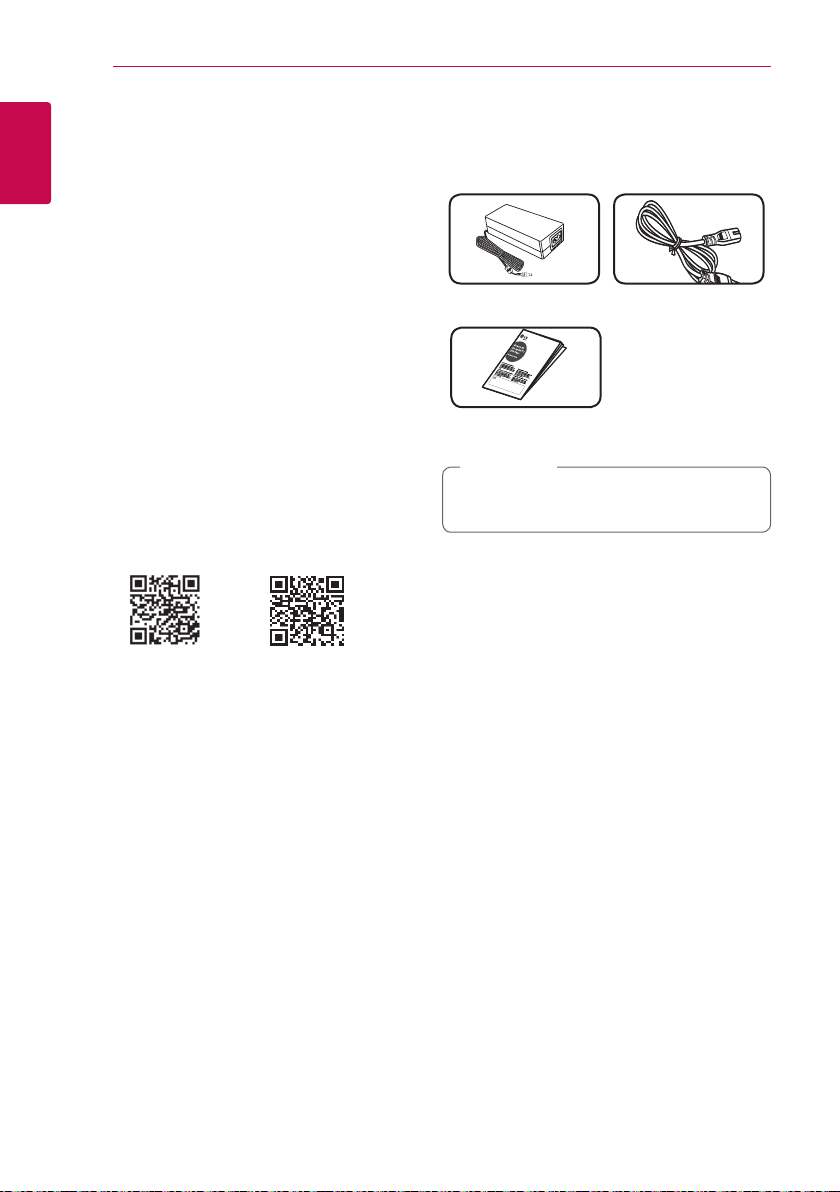
Accessories
Please check and identify the supplied accessories.
AC adapter (1) Power cord (1)
Simple manual
Note
,
The LAN cable and Portable cable are not
included. So purchase the cables separately.
Introduction
Symbol used in this manual
Note
,
Indicates special notes and operating features.
Caution
>
Indicates cautions for preventing possible damages
from abuse.
Understanding Connection
Getting Started 7
Basic Connection
A
Wired or Wi-Fi connection to router.
B
Wired and wireless connection.
C
Wired or Wi-Fi connection using a Music Flow R1.
B C
You can use multiple speakers in a multi-room conguration.
A B C
LAN
Router
Speaker
LAN LAN
OR
Speaker
(Main)
Router
Speaker
Speaker
(Add)
Group playback using Music Flow Player app
You can use multiple speakers in a multi-room conguration. (page 34)
Speaker
1
Getting Started
Music Flow R1
(MR140)
Speaker
Download
Music Flow Player app
Group setting via
Music Flow Player
app
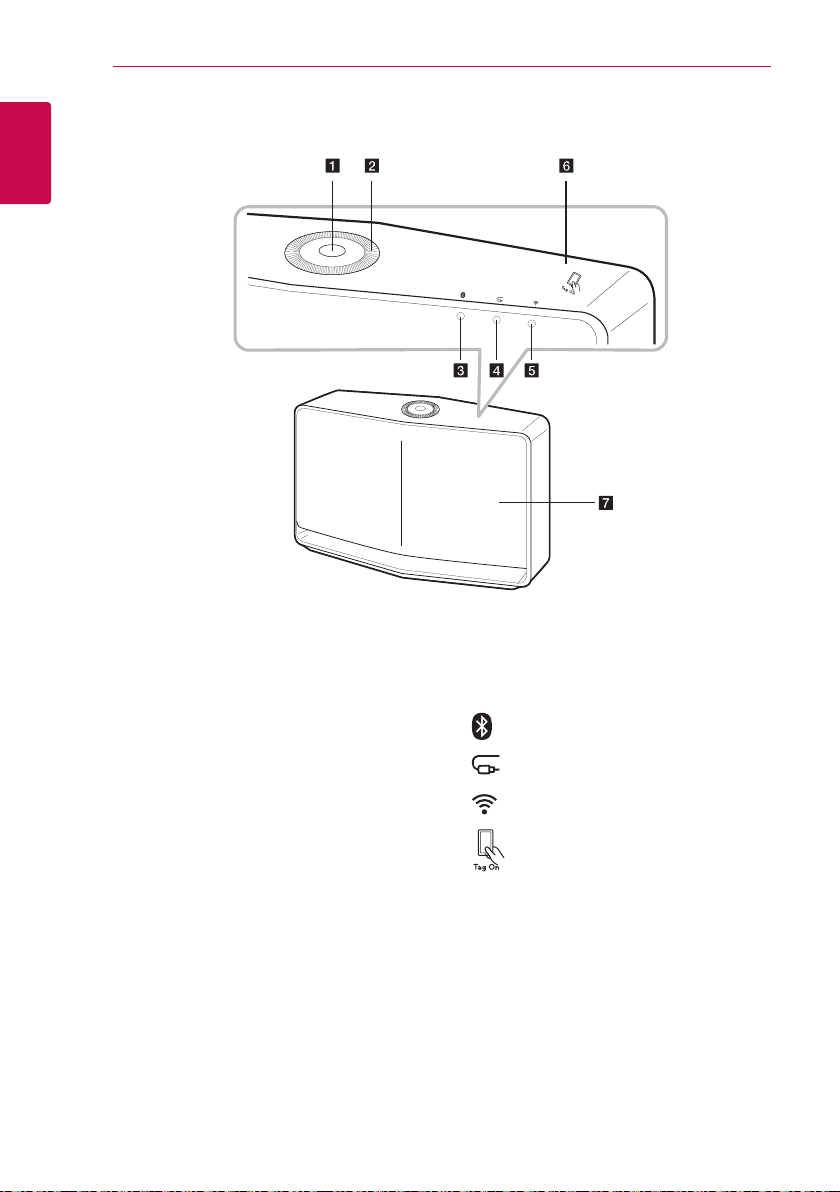
Top Panel
1
Getting Started
Getting Started8
a 1/!/
- Power On / Changing the mode
- Switching to the standby mode (page 29)
Volume wheel
b
Turn the wheel clockwise to increase volume, or
counterclockwise to decrease volume.
button
F
Bluetooth status LED (page 42)
c
Portable In status LED (page 43)
d
Network status LED (page 12)
e
NFC Tag (page 43)
f
Speaker
g
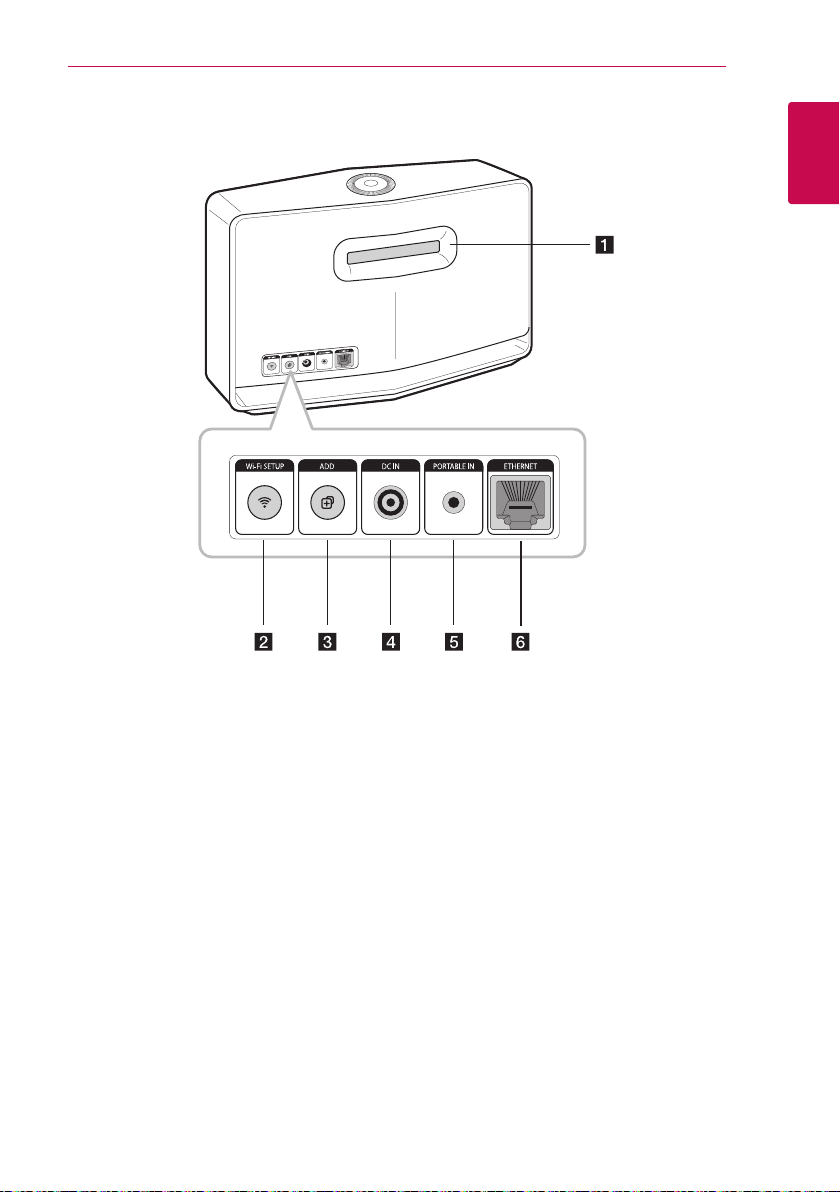
Rear Panel
Getting Started 9
1
Getting Started
Speaker duct
a
A hole for plentiful bass sound on speaker
cabinet.
Wi-Fi SETUP button
b
Connects your speaker to your network using
Wi-Fi setup. (page 14)
ADD button
c
Adds the speaker to your network. (page 21)
DC IN (AC adapter input)
d
PORTABLE IN
e
Listens to music from your portable device.
ETHERNET
f
Connects the speaker to your network using a
LAN cable.
Connecting10
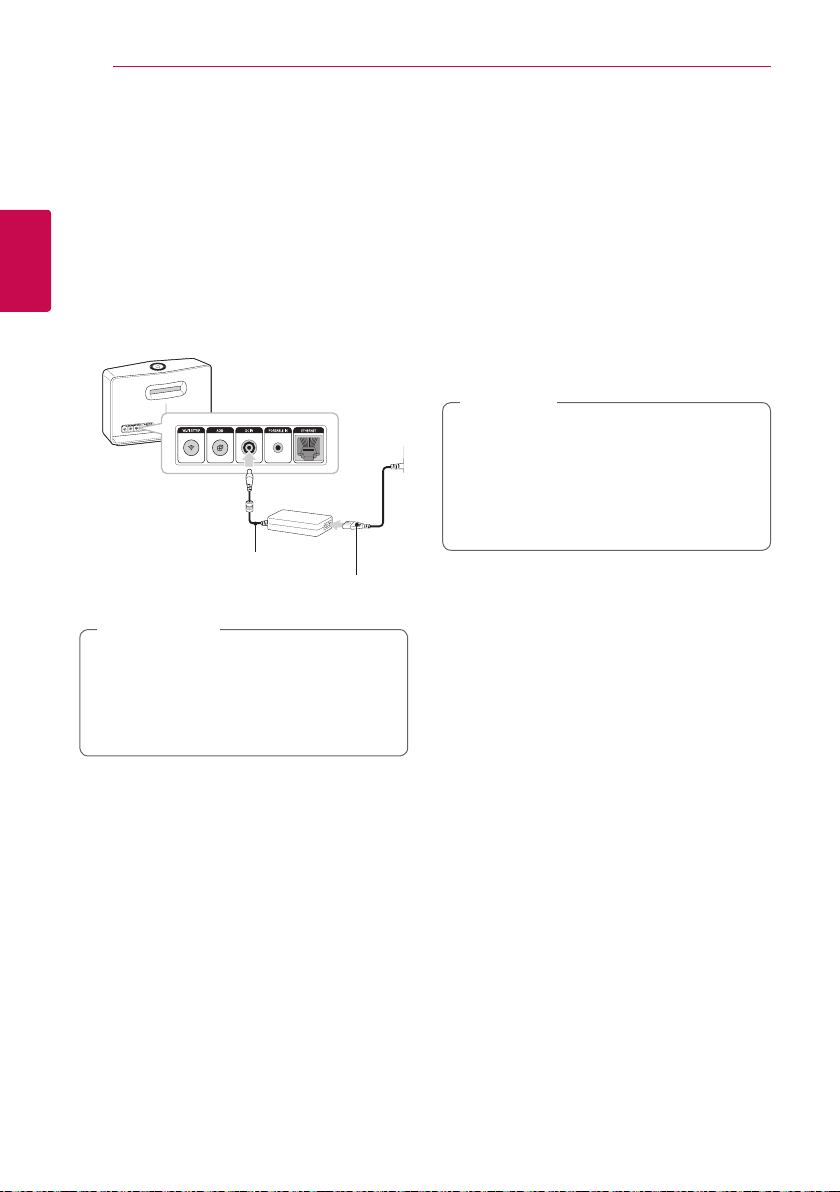
Connecting the AC Adapter
Connect the speaker to the power supply with the
supplied AC adapter.
1. Connect the supplied AC power cord to the AC
adapter.
2. Connect the AC adapter cable to DC. IN adapter
2
Connecting
input.
3. Plug the AC power cord into an AC outlet.
AC Adapter
Caution
>
Only use the AC adapter supplied with this
device. Do not use a power supply from
another device or manufacturer. Using any
other power cable or power supply may cause
damage to the device and void your warranty.
AC power cord
Installing “Music Flow Player” App
Through “iTunes store” or “Google
Play Store”
1. Tap the “iTunes store” icon or “Google Play Store”
icon.
2. Type in “Music Flow Player” in the search bar and
tap “Search”.
3. Select “Music Flow Player” in the search result list
to download.
Note
,
yMusic Flow Player app will be available in
version of the software as follow;
Android O/S : Ver 2.3.3 (or later)
iOS O/S : Ver 5.1.1 (or later)
yDepending on the device, “Music Flow
Player” app may not work.
Connecting 11
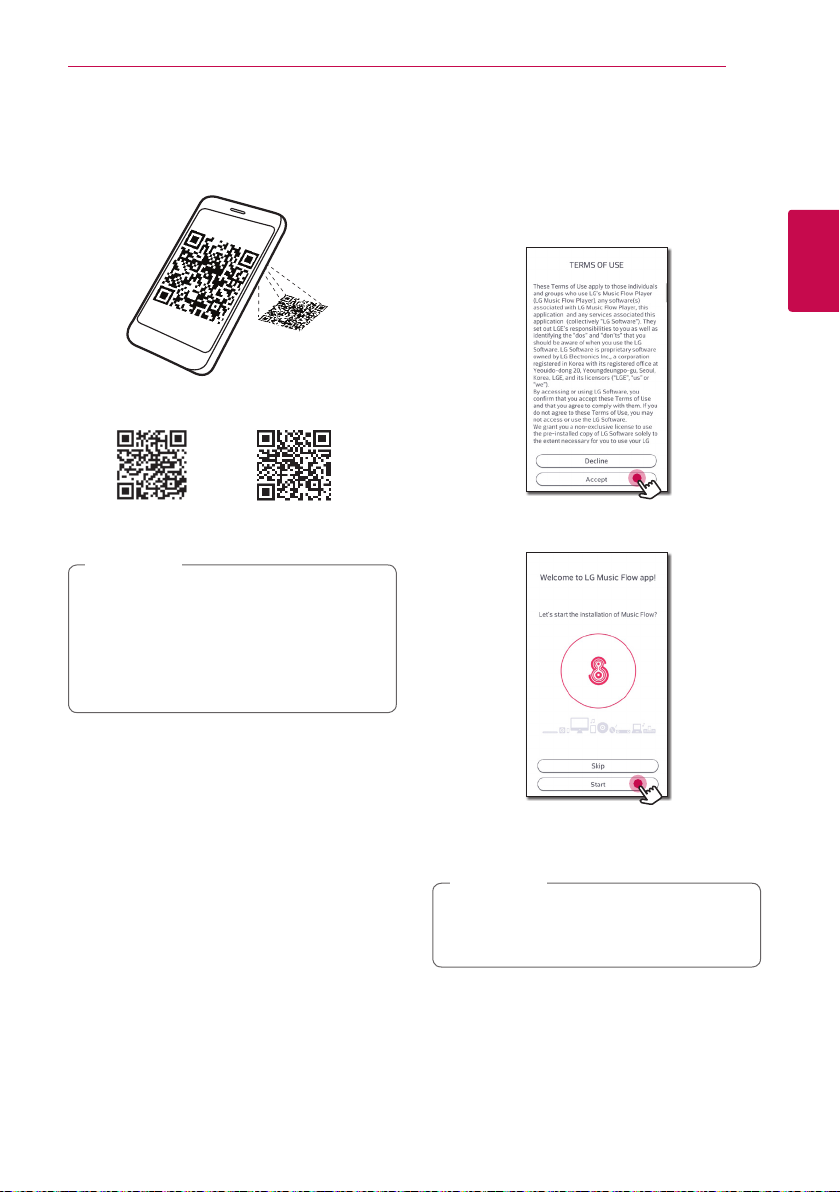
Through QR code
Install “Music Flow Player” app through QR code.
Scan the QR code using the scanning application.
(Android OS)
Note
,
yMake sure that your smart device is
connected to the internet.
Make sure that your smart device has a
y
scanning application. If you don’t have,
download it from “iTunes store” or “Google
Play Store”.
(Apple iOS)
Starting with Music Flow Player app
1. When you launch Music Flow Player app for
the first time, the terms of use appears on the
screen. Check the contents of terms of use and
select [Accpet].
2
Connecting
2. Select [Start] to install the speaker you’ve
purchased.
Refer to “Connecting the speaker to your Home
Network” on page 12.
Note
,
If you want to return to the terms of use
screen, initialize the Music Flow Player app on
the smart device’s setting menu.
Connecting12
Connecting the speaker to your Home Network
Using a wired network provides the best
performance, because the attached devices
connect directly to the network without radio
frequency interference.
2
Please refer to the documentation for your network
Connecting
device for further instructions.
Preparation
yMake sure that wireless network environment
using a router is installed at your home.
yMake sure that the speaker and the smart device
are connected to the same router.
Requirements
yWireless router
ySmart device (Android or iOS)
Note
,
yMake sure that DHCP’s server is activated on
wireless router.
yIf you cannot connect the speaker with your
router, go to setting of the router and then
make sure that “Allow wireless client to see
each other and access my local network”
box is unchecked.
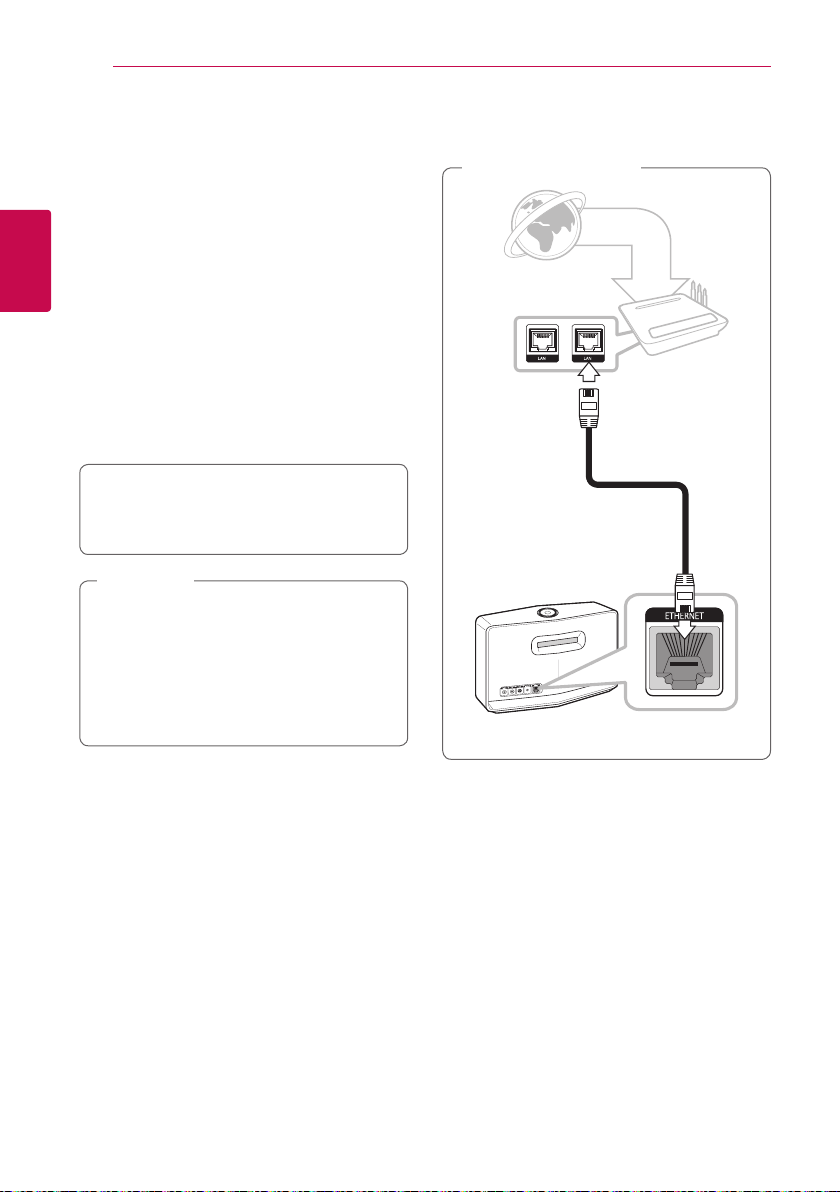
Connecting the speaker to your network with a LAN cable
Connection overview
Broadband
service
Router
LAN
Rear of the speaker
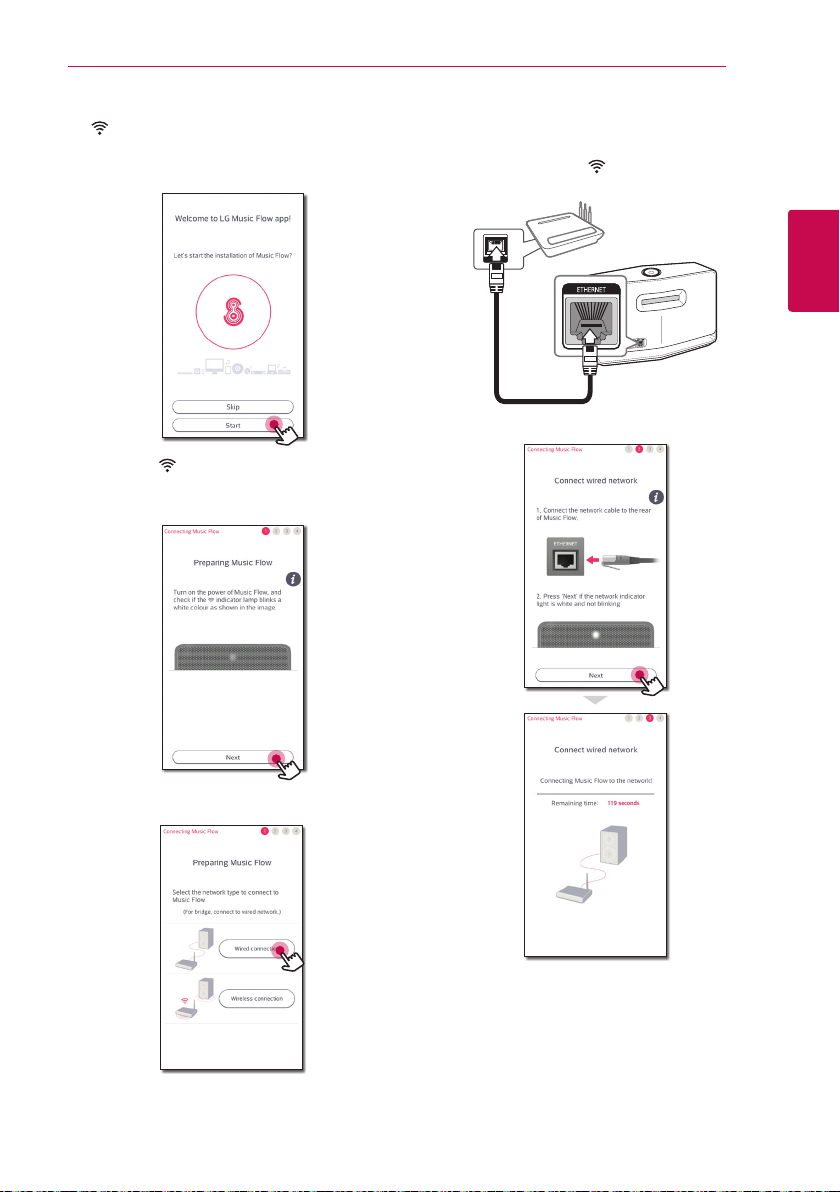
Connecting 13
1. Plug the speaker into an electrical outlet. The
Network status LED starts to blink white.
2. On your smart device, launch Music Flow Player
app. Select [Start] to install the speaker.
3. Check the Network status LED on the
speaker and select [Next] to go to the next
screen.
5. Connect one end of the LAN cable to the
speaker’s ETHERNET port and connect the other
end to your wireless router.
Wait a moment until Network status LED
stops blinking and stays white.
2
Connecting
6. Then select [Next] on the screen.
4. Select [Wired connection] on the screen.
Connecting14
7. Select [Next] to complete the connection.
2
Connecting
After connecting the speaker, you can see the
list of connected music storage device and
music curation screen. Follow the instructions
on the screen.
Note
,
yYou cannot use the speaker without a
router. When using the wired router, you
can control the speaker with Music Flow PC
Software. (page 44)
yThe speaker and the smart device should be
connected to the same router.
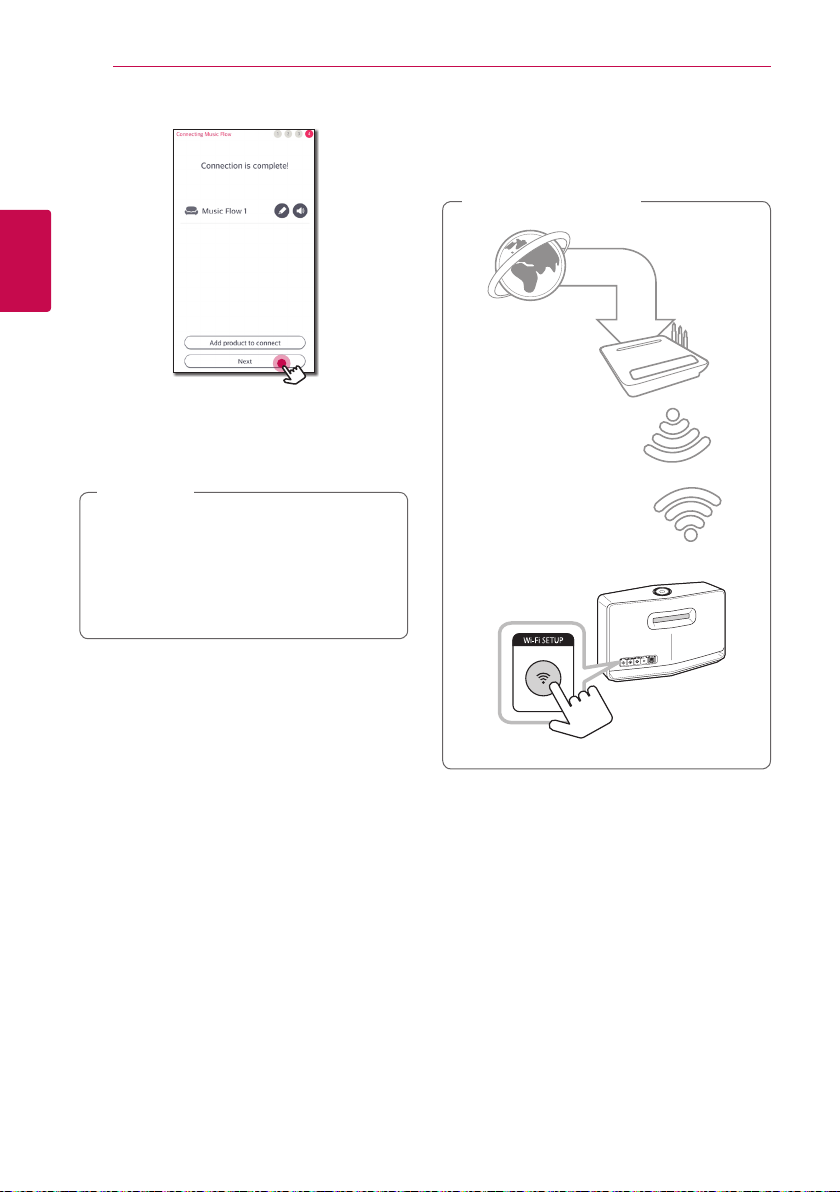
Connecting the speaker to your Network via the Wi-Fi Setup Method (Android)
Connection overview
Broadband
service
Router
Rear of the speaker
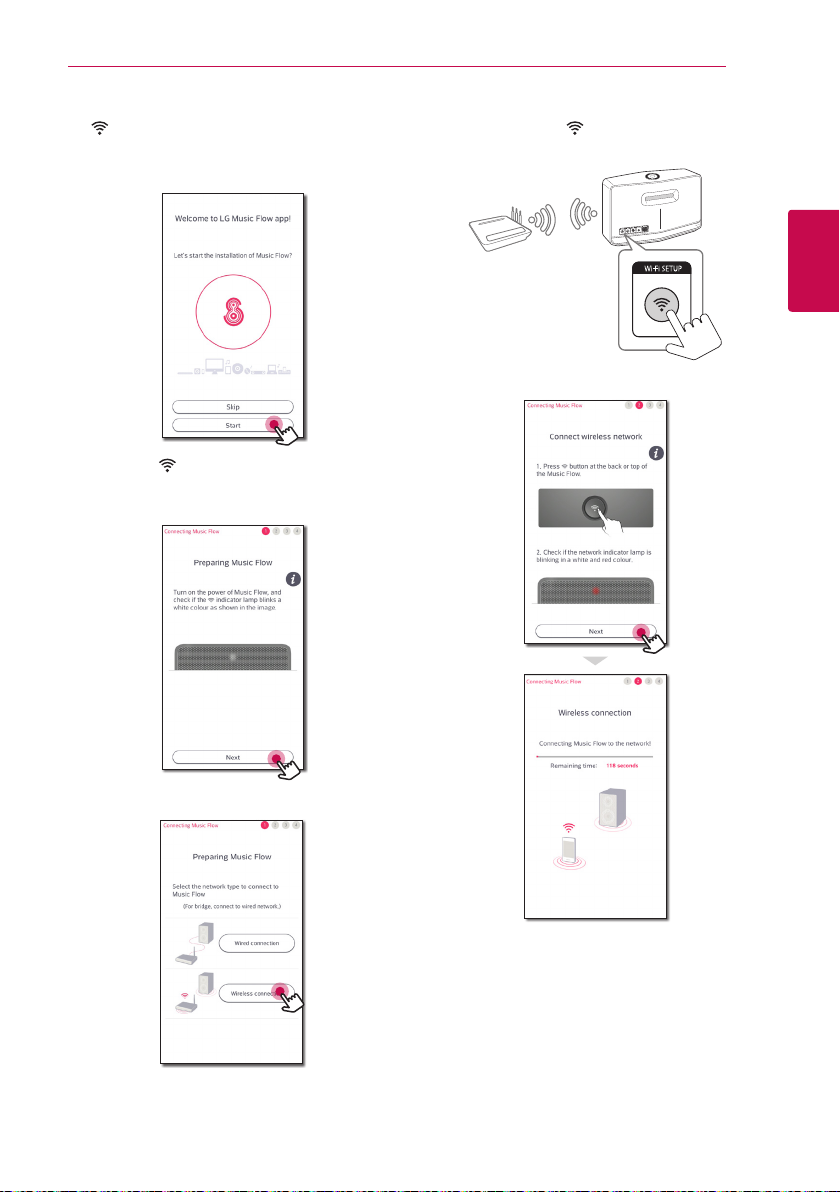
Connecting 15
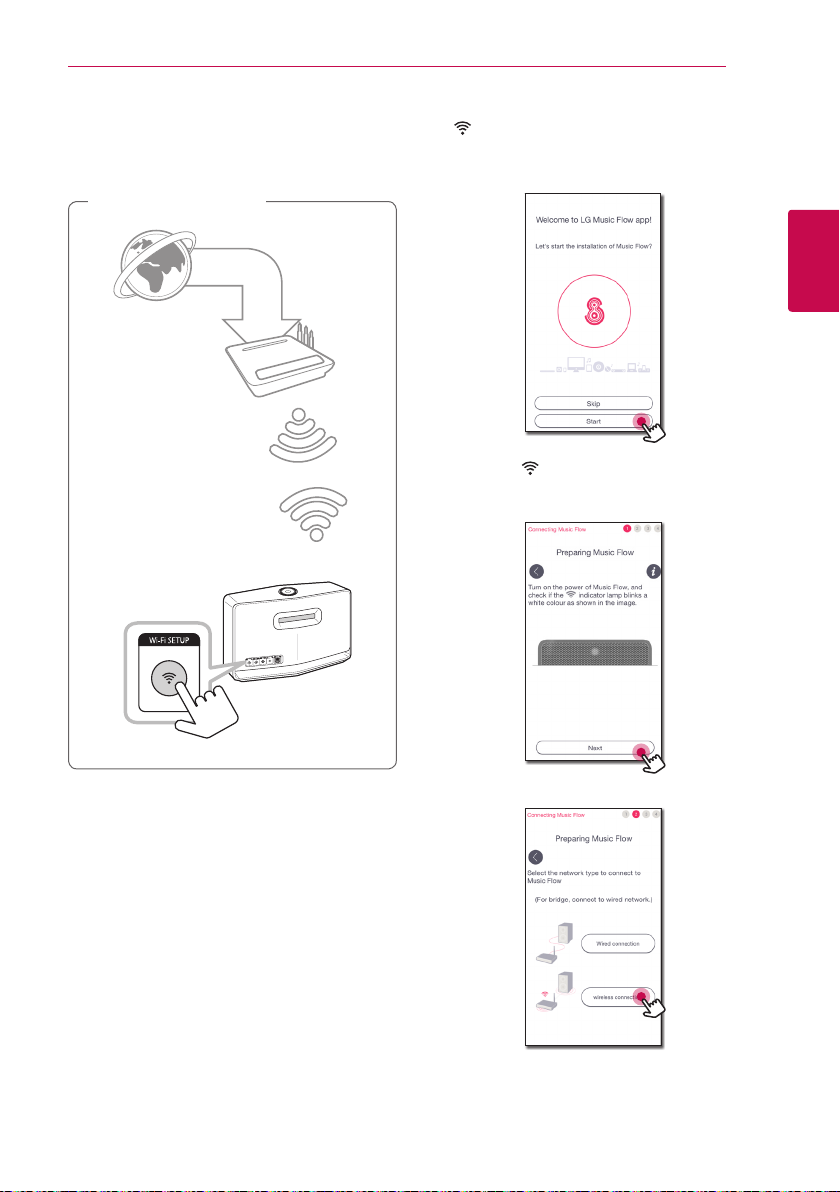
1. Plug the speaker into an electrical outlet. The
Network status LED starts to blink white.
2. On your smart device, launch Music Flow Player
app. Select [Start] to install the speaker.
3. Check the Network status LED on the
speaker and select [Next] to go to the next
screen.
5. Press the Wi-Fi SETUP button on the rear of
the speaker. Then Network status LED blinks
white and red alternately.
2
Connecting
6. Then select [Next] on the screen.
4. Select [ Wireless connection] on the screen.
Connecting16
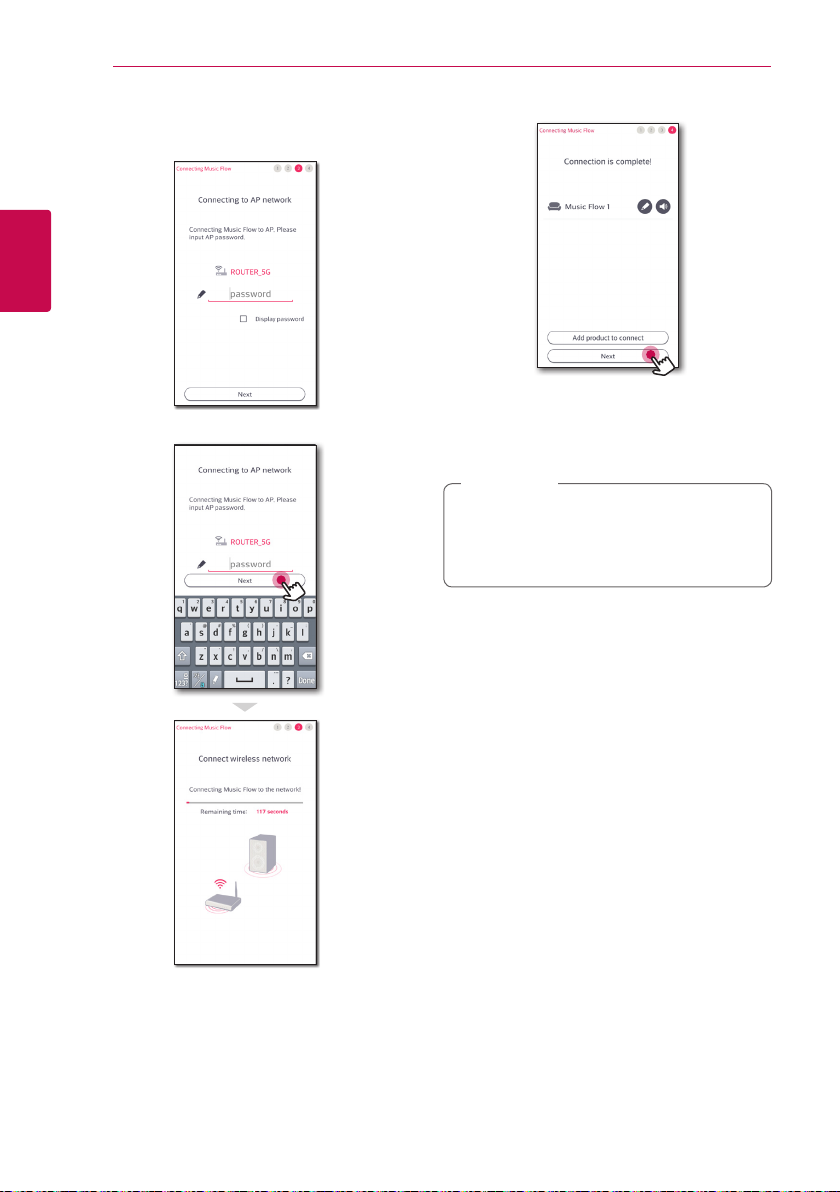
7. If you have a password for your network, the
security screen appears on your smart device.
Enter your password.
2
Connecting
8. Then select [Next] on the screen.
9. Select [Next] to complete the connection.
After connecting the speaker, you can see the
list of connected music storage device and
music curation screen. Follow the instructions
on the screen.
Note
,
If the speaker fails to connect to your network
or its network connection operates abnormally,
place the speaker closer to your router and try
again.
Connecting 17
Connecting the speaker to your Network via the Wi-Fi Setup Method (iOS)
Connection overview
Broadband
service
Router
1. Plug the speaker into an electrical outlet. The
Network status LED starts to blink white.
2. On your smart device, launch Music Flow Player
app. Select [Start] to install the speaker.
2
Connecting
3. Check the Network status LED on the
speaker and select [Next] to go to the next
screen.
Rear of the speaker
4. Select [ Wireless connection] on the screen.
Connecting18
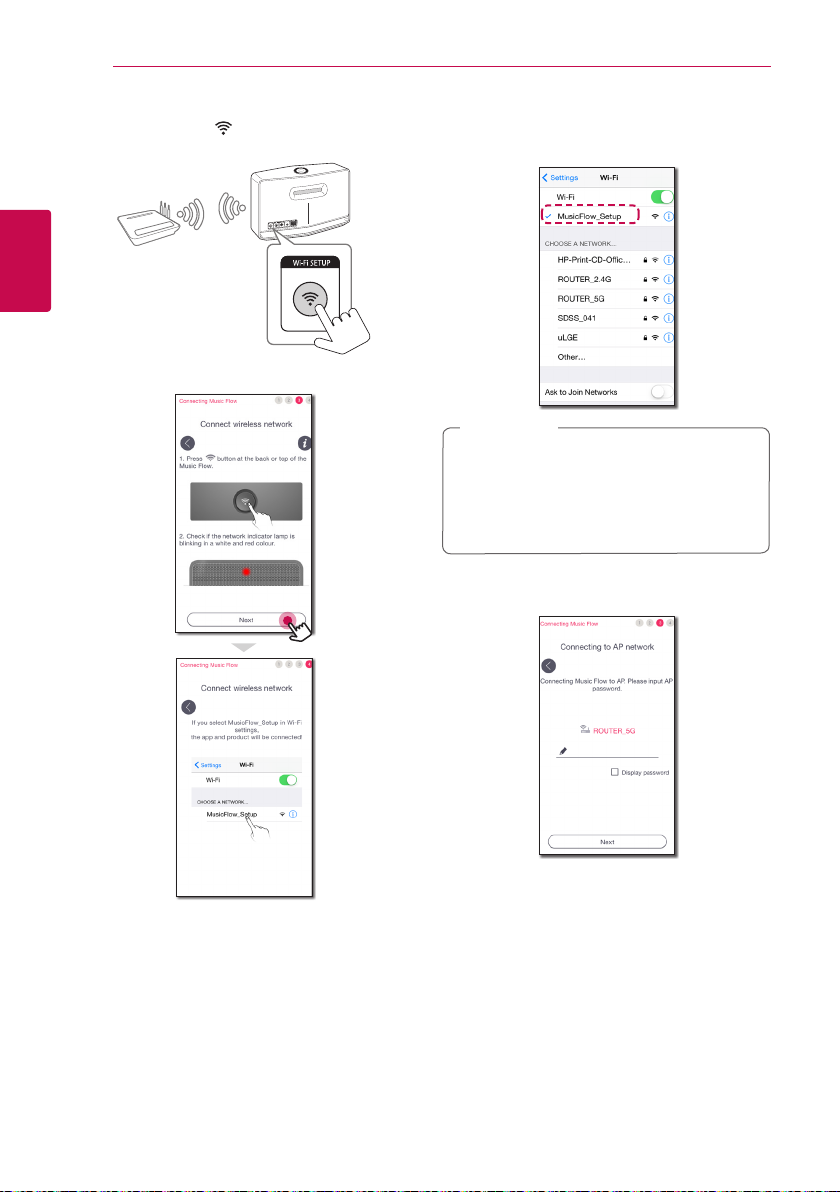
5. Press the Wi-Fi SETUP button on the rear of
the speaker. Then Network status LED blinks
white and red alternately.
2
Connecting
6. Then select [Next] on the screen.
7. On your iOS device, go to iOS setting -> WiFi setting and select “MusicFlow_Setup” to
connect.
Note
,
yIf “MusicFlow_Setup” is not on the list, scan
for available Wi-Fi networks again.
yWhen your smart device is connected to
“MusicFlow_Setup”, you cannot use the
internet.
8. Once the network connection is completed,
return to the Music Flow Player app.
 Loading...