

LG NP7550 Service Manual

SERVICE MANUAL
SERVICE MANUAL
CAUTION
BEFORE SERVICING THE UNIT, READ THE “SAFETY PRECAUTIONS”
IN THIS MANUAL.
Internal Use Only
Website http://biz.lgservice.com
JULY, 2015
MODEL: NP7550
MODEL: NP7550
Portable Bluetooth Speaker
P/NO : AFN77272347

CONTENTS
SECTION 1 ........ GENERAL
SECTION 2 ........ CABINET & MAIN CHASSIS
SECTION 3 ........ ELECTRICAL
SECTION 4 ........ REPLACEMENT PARTS LIST
1-1

SECTION 1
GENERAL
CONTENTS
ESD PRECAUTIONS ......................................................................................................................................... 1-3
HIDDEN KEY MODE ......................................................................................................................................... 1-4
PROGRAM UPDATE GUIDE ............................................................................................................................ 1-5
SERVICE INFORMATION FOR EEPROM ........................................................................................................ 1-9
MCS / EQ PROGRAM USB UPDATE ............................................................................................................. 1-10
PROGRAM UPGRADE USING DOWNLOAD JIG .......................................................................................... 1-11
SPECIFICATIONS ........................................................................................................................................... 1-15
1-2
ESD PRECAUTIONS
Electrostatically Sensitive Devices (ESD)
Some semiconductor (solid state) devices can be damaged easily by static electricity. Such components
commonly are called Electrostatically Sensitive Devices (ESD). Examples of typical ESD devices are integrated
circuits and some field-effect transistors and semiconductor chip components. The following techniques should
be used to help reduce the incidence of component damage caused by static electricity.
1. Immediately before handling any semiconductor component or semiconductor-equipped assembly, drain off
any electrostatic charge on your body by touching a known earth ground. Alternatively, obtain and wear a
commercially available discharging wrist strap device, which should be removed for potential shock reasons
prior to applying power to the unit under test.
2. After removing an electrical assembly equipped with ESD devices, place the assembly on a conductive surface
such as aluminum foil, to prevent electrostatic charge buildup or exposure of the assembly.
3. Use only a grounded-tip soldering iron to solder or unsolder ESD devices.
4. Use only an anti-static solder removal device. Some solder removal devices not classified as "anti-static" can
generate electrical charges sufficient to damage ESD devices.
5. Do not use freon-propelled chemicals. These can generate electrical charges sufficient to damage ESD
devices.
6. Do not remove a replacement ESD device from its protective package until immediately before you are
ready to install it. (Most replacement ESD devices are packaged with leads electrically shorted together by
conductive foam, aluminum foil or comparable conductive materials).
7. Immediately before removing the protective material from the leads of a replacement ESD device, touch the
protective material to the chassis or circuit assembly into which the device will by installed.
CAUTION : BE SURE NO POWER IS APPLIED TO THE CHASSIS OR CIRCUIT, AND OBSERVE ALL OTHER
SAFETY PRECAUTIONS.
8. Minimize bodily motions when handing unpackaged replacement ESD devices. (Otherwise harmless motion
such as the brushing together of your clothes fabric or the lifting of your foot from a carpeted floor can generate
static electricity sufficient to damage an ESD device).
CAUTION. GRAPHIC SYMBOLS
THE LIGHTNING FLASH WITH APROWHEAD SYMBOL. WITHIN AN EQUILATERAL TRIANGLE, IS
INTENDED TO ALERT THE SERVICE PERSONNEL TO THE PRESENCE OF UNINSULATED
“DANGEROUS VOLTAGE” THAT MAY BE OF SUFFICIENT MAGNITUDE TO CONSTITUTE A RISK OF
ELECTRIC SHOCK.
THE EXCLAMATION POINT WITHIN AN EQUILATERAL TRIANGLE IS INTENDED TO ALERT THE
SERVICE PERSONNEL TO THE PRESENCE OF IMPORTANT SAFETY INFORMATION IN SERVICE
LITERATURE.
1-3
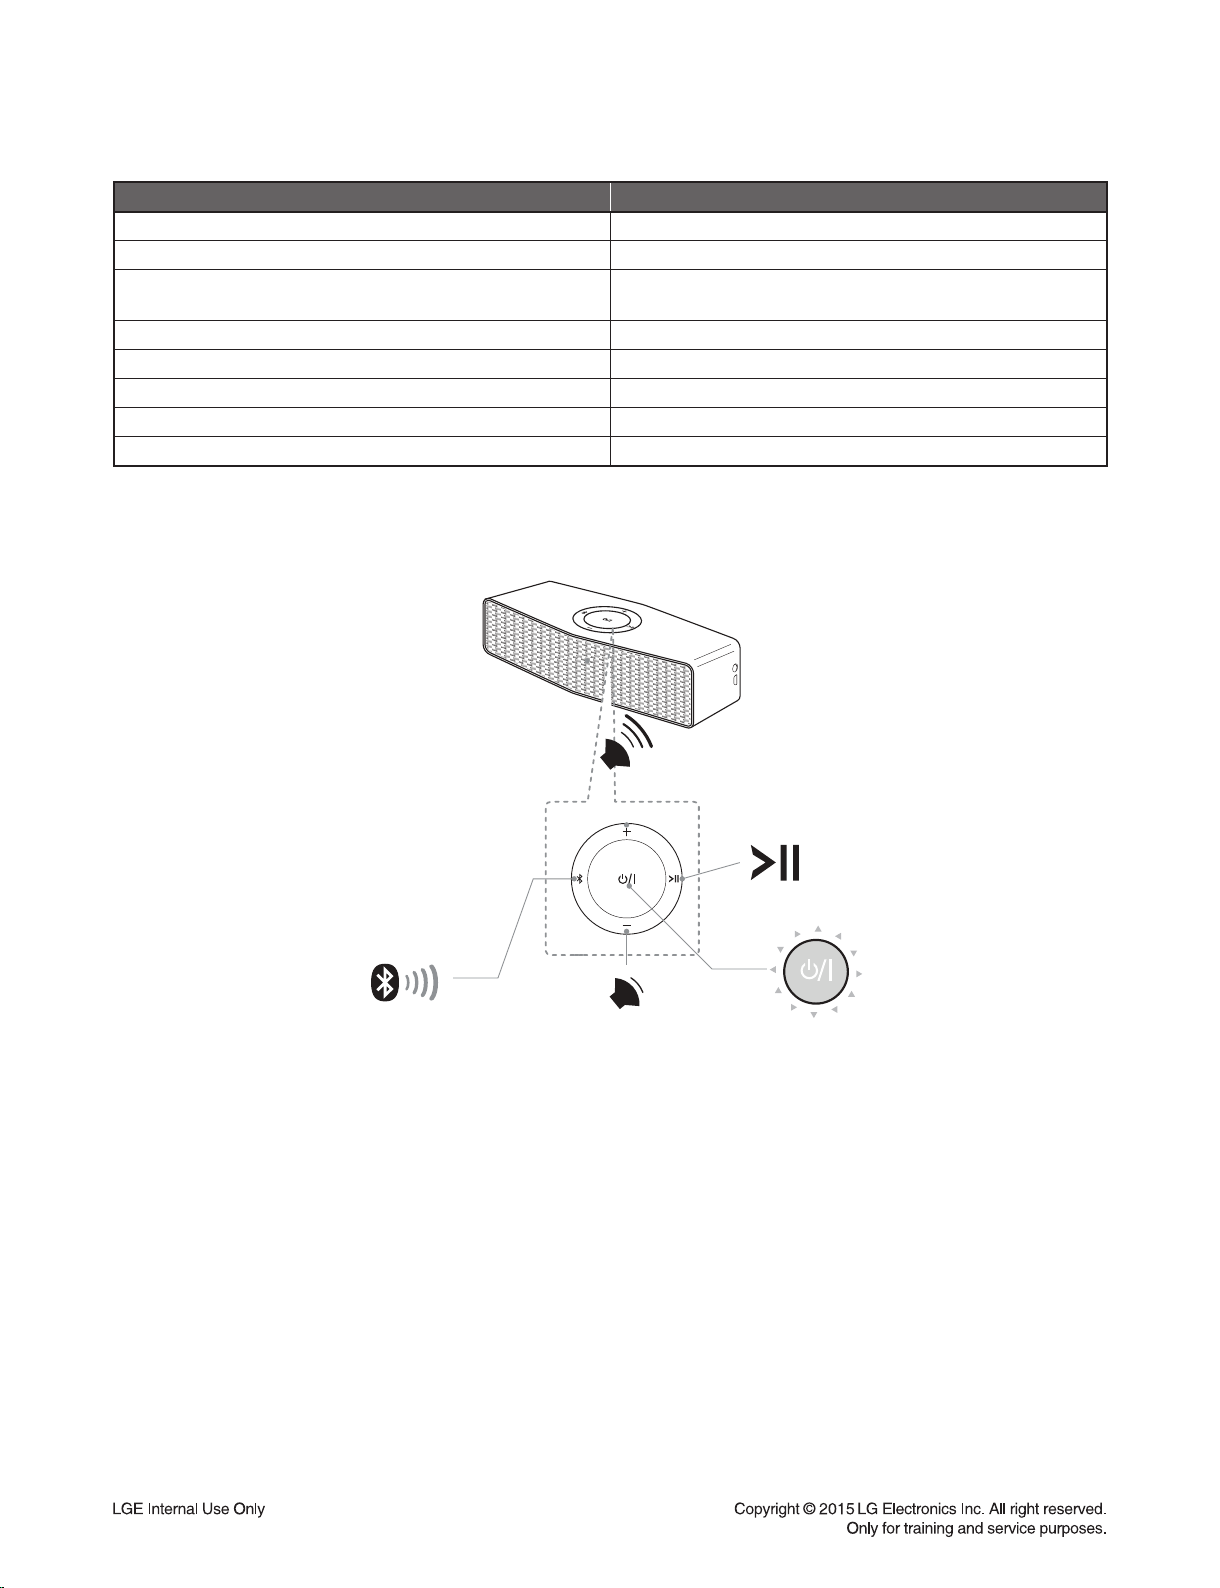
HIDDEN KEY MODE
Hidden Key Description
Demo Wake UP “Bluetooth” + “Power” key for 5 seconds
Factory Reset “Play/Pause” + “Power” key for 3 seconds
APD Off, FOTA Admin Enable/ Disable
Vibration Test Volume 19
Scan Enable “Bluetooth” key for 2 seconds
Bluetooth all Disconnect/ Paired List Clear “Bluetooth” key for 10 seconds
Dual Play Master “Bluetooth” + “Volume Up” key for 2 seconds
Dual Play Slave “Bluetooth” + “Volume Down” key for 2 seconds
Sound Sync “Bluetooth” + “Play/ Pause” key for 2 seconds
“Volume Up” + “Power” key for 3 seconds
Bluetooth
Volume UP
Volume DOWN
Play/Pause
Power
1-4
PROGRAM UPDATE GUIDE
1. INSTALLING “Music Flow Bluetooth” APP
1) Download “Music Flow Bluetooth” on the Apps Store or Google Play Store.
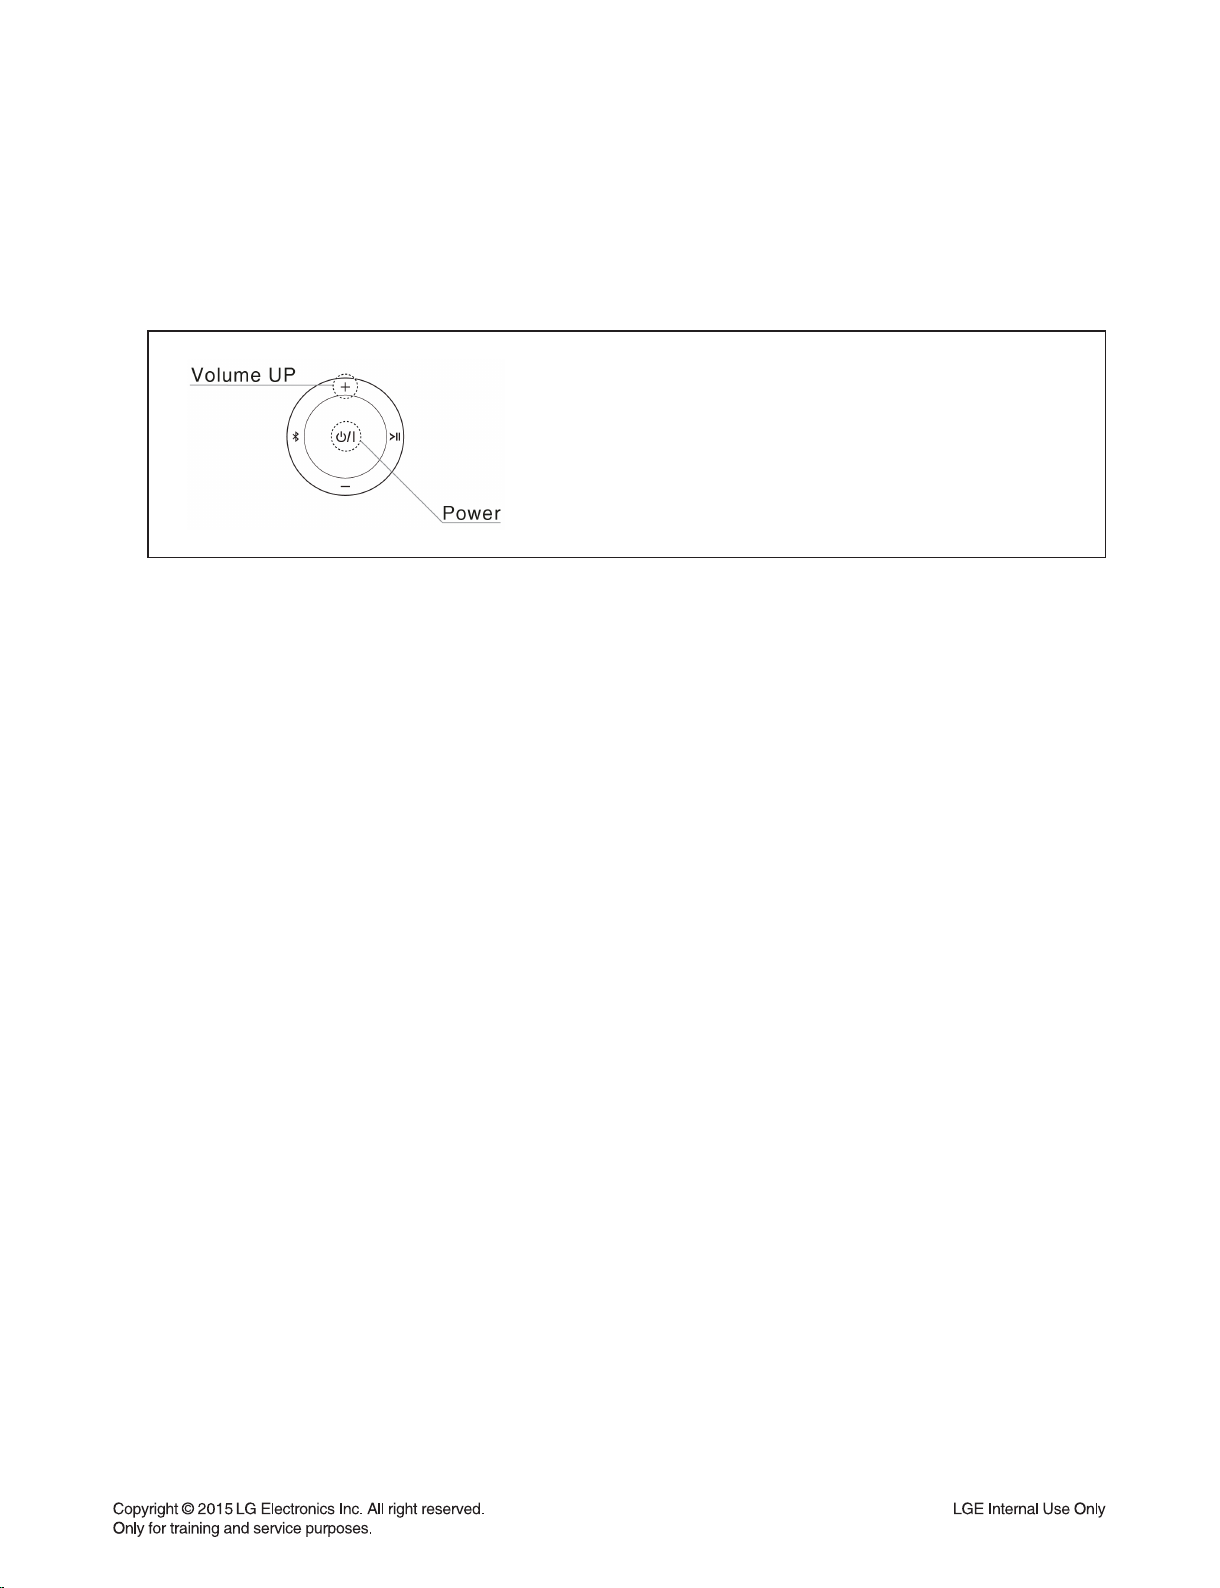
2. PROGRAM UPDATE BY “Music Flow Bluetooth” APP
1) After power on, Press and Hold “Power” + “Volume Up” Key for 3 seconds.
Beep sound is output and all white LED blink once.
2) Run “Music Flow Bluetooth” APP. (ex. Android Bluetooth APP)
1-5
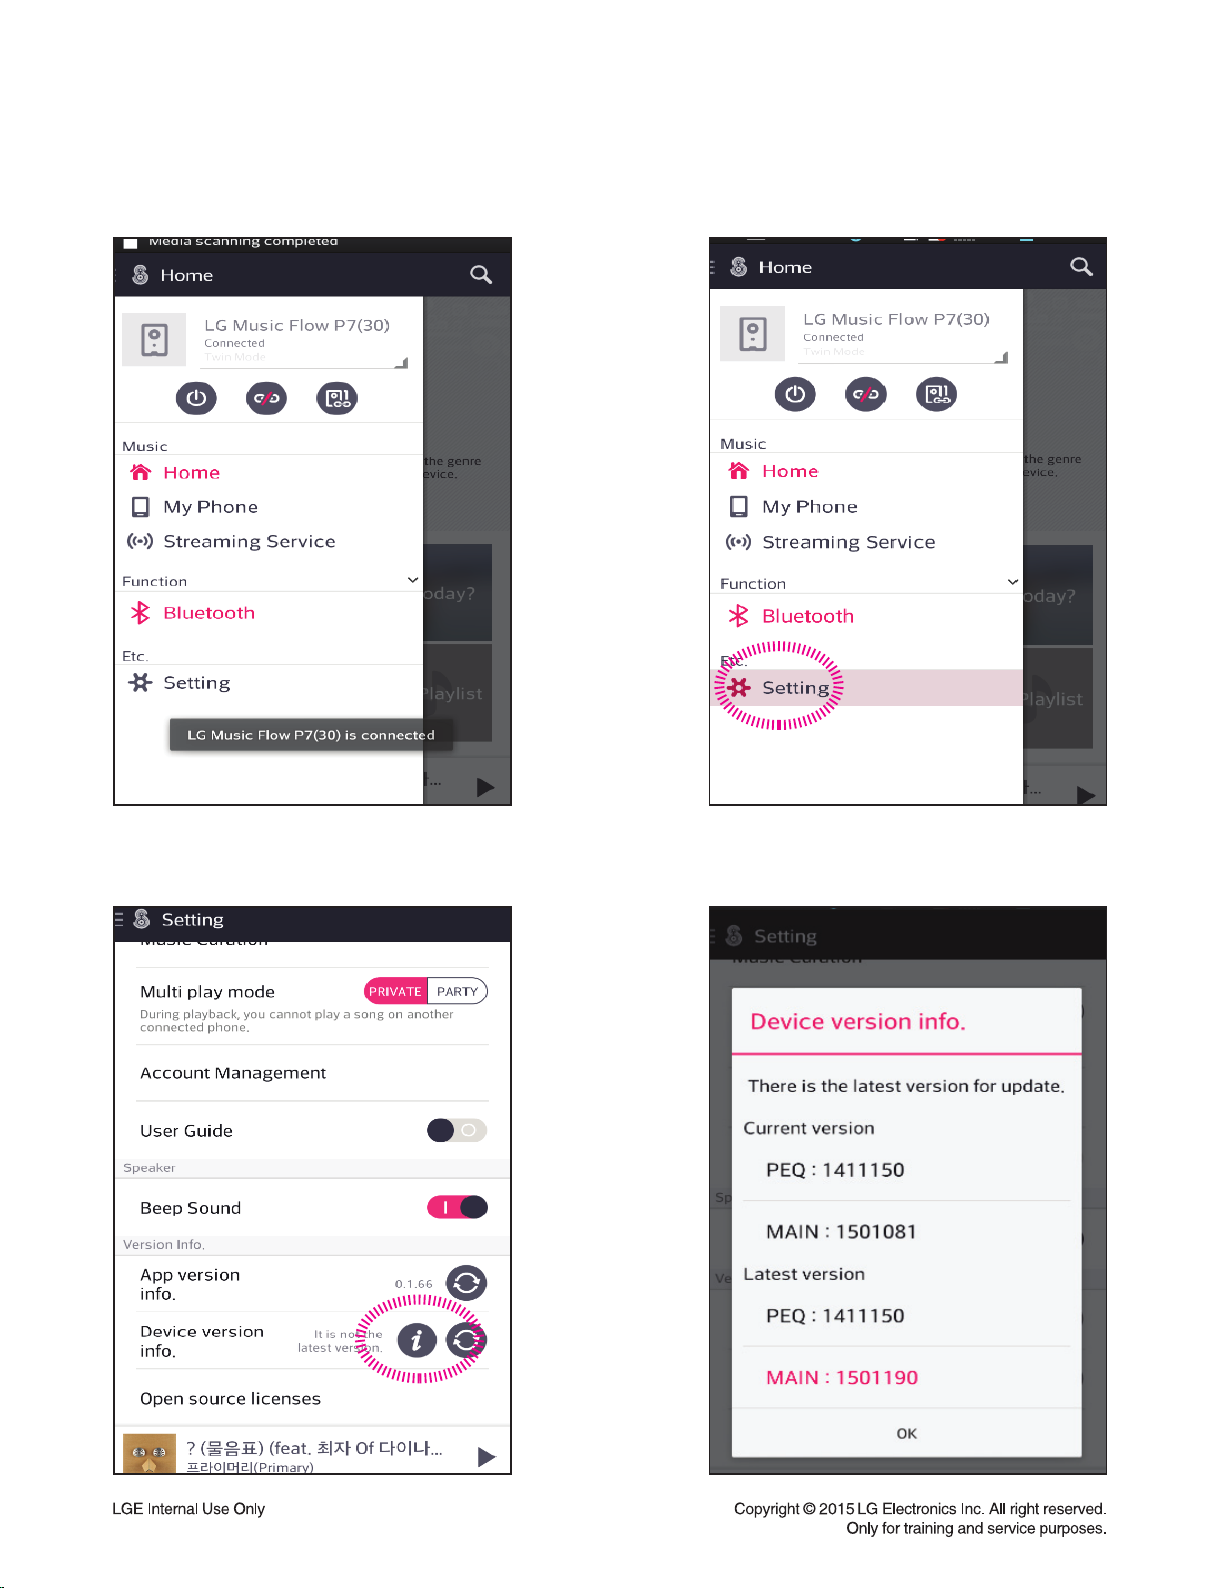
Step 1. Search and connect speaker Step 2. Select “setting”
Step 3. Select “Device version info.”
Step 4. Check new version fi rmware
and press “OK”.
1-6

Step 5. Select update button Step 6. Start downloading fi rmware
Step 7. Download from CDN Server
* During update, do not off Bluetooth connection.
Step 8. Transfer FW
1-7
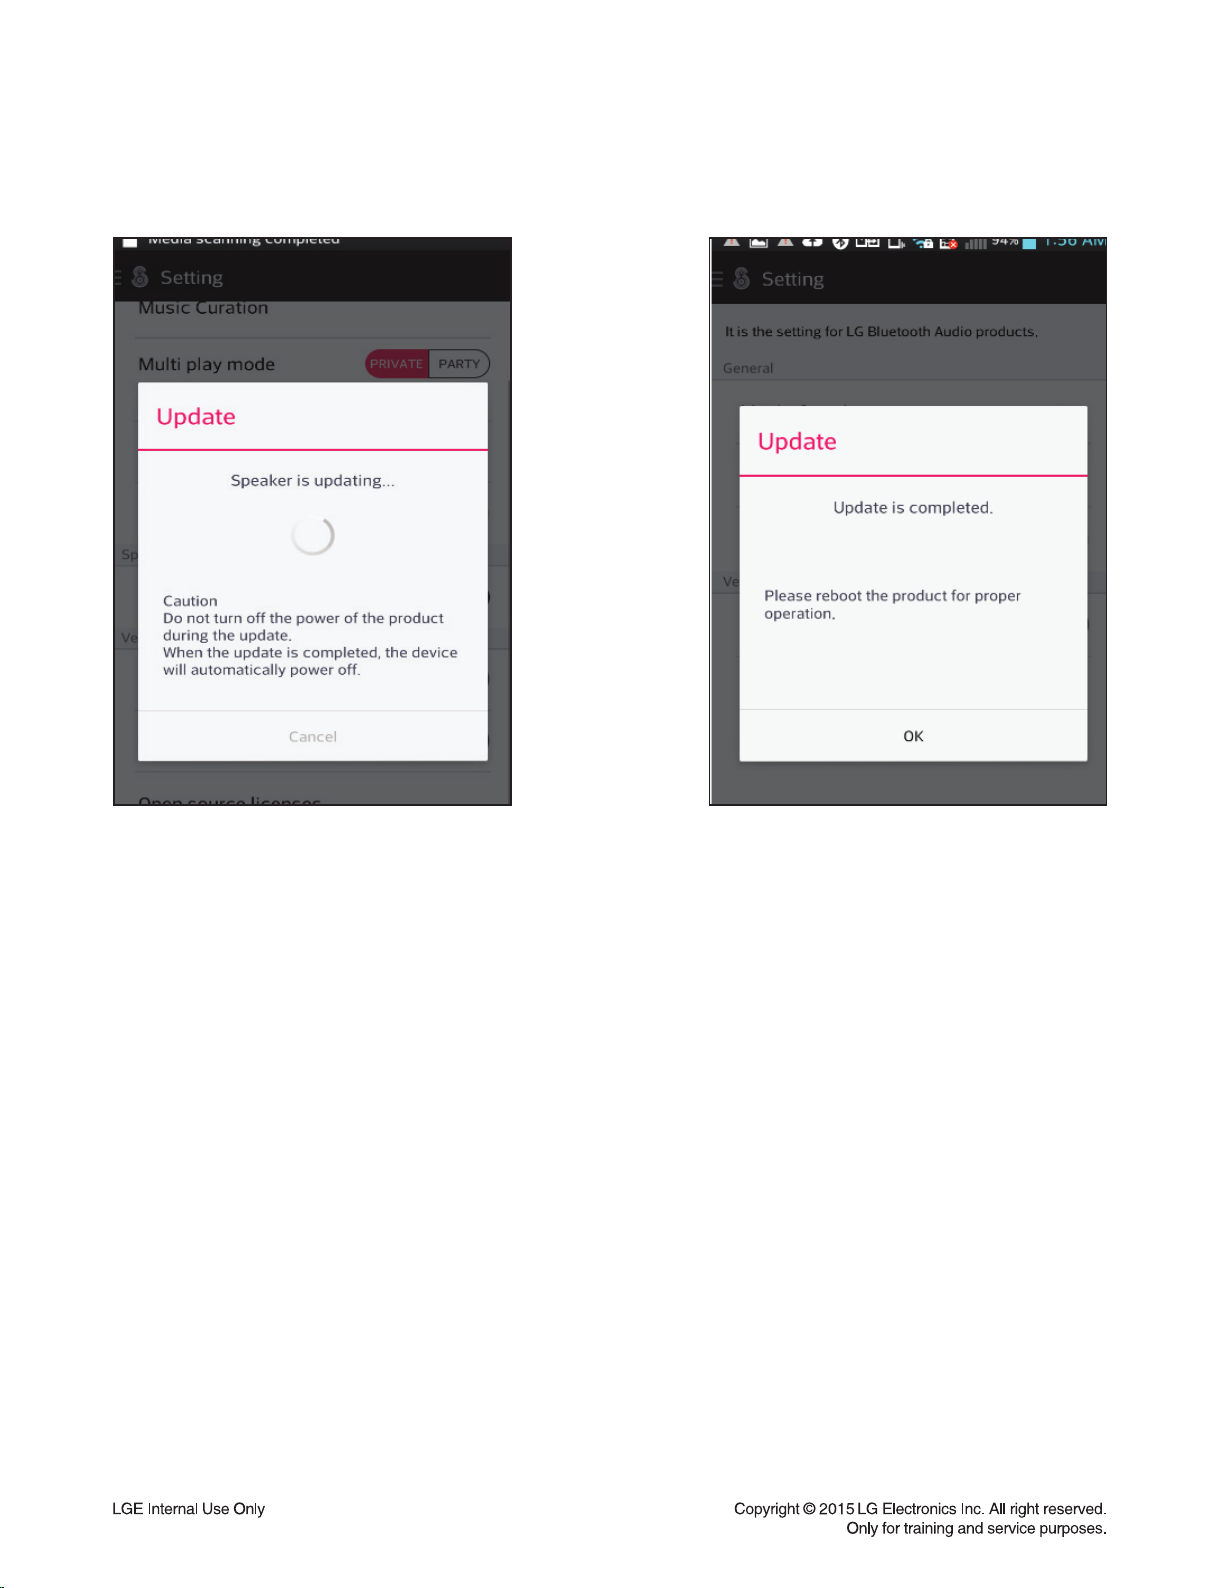
Step 9. FW Flash Writing
* During update, do not turn off the set.
Step 10. Update is completed
CAUTION:
Transfer fi rmware from Phone to Set during upgrade, you can see rotating of white LED of the set.
When upgrade is fi nished, all LED are blinks and off, and then Music Flow set is power off.
1-8
SERVICE INFORMATION FOR EEPROM
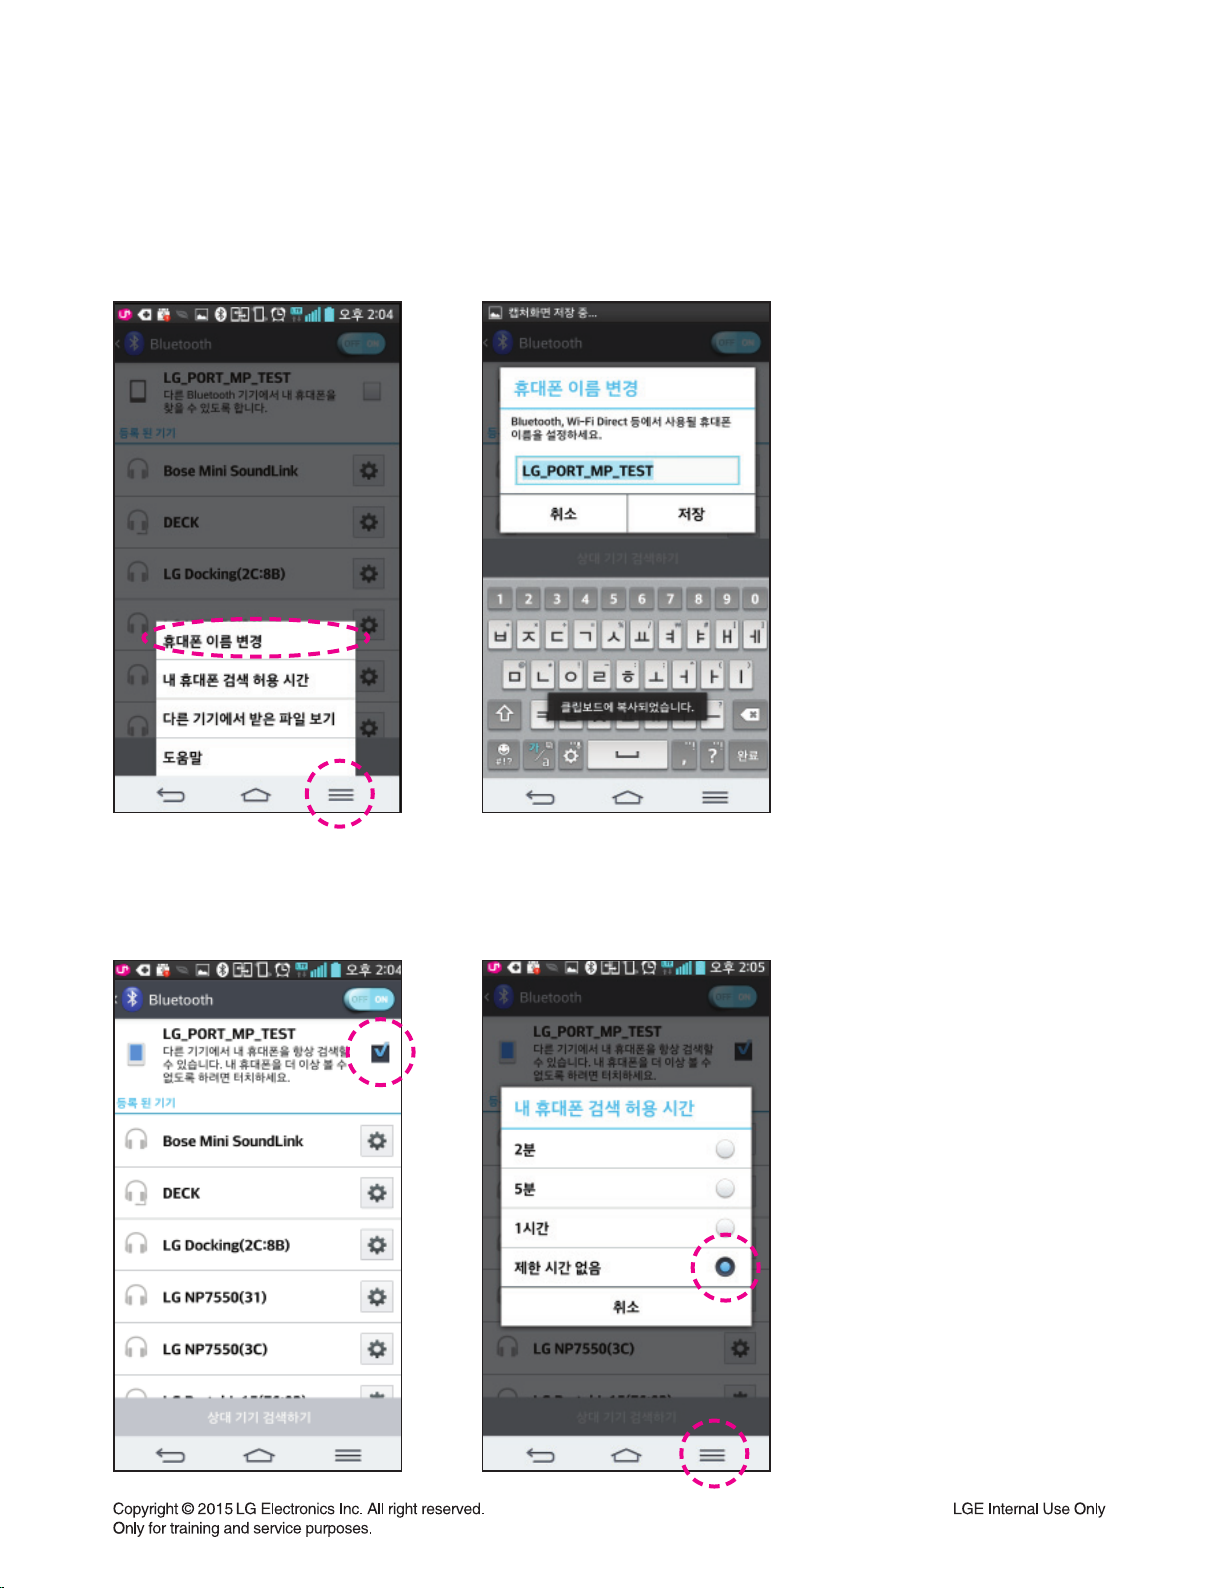
1. PHONE SETTINGS
1) Enable Bluetooth of the mobile device.
2) Change name of mobile device in BLUETOOTH SETTNG MENU.
3) Enable discoverable mode of mobile device.
4) And setting the discoverable time to unlimited.
1-9
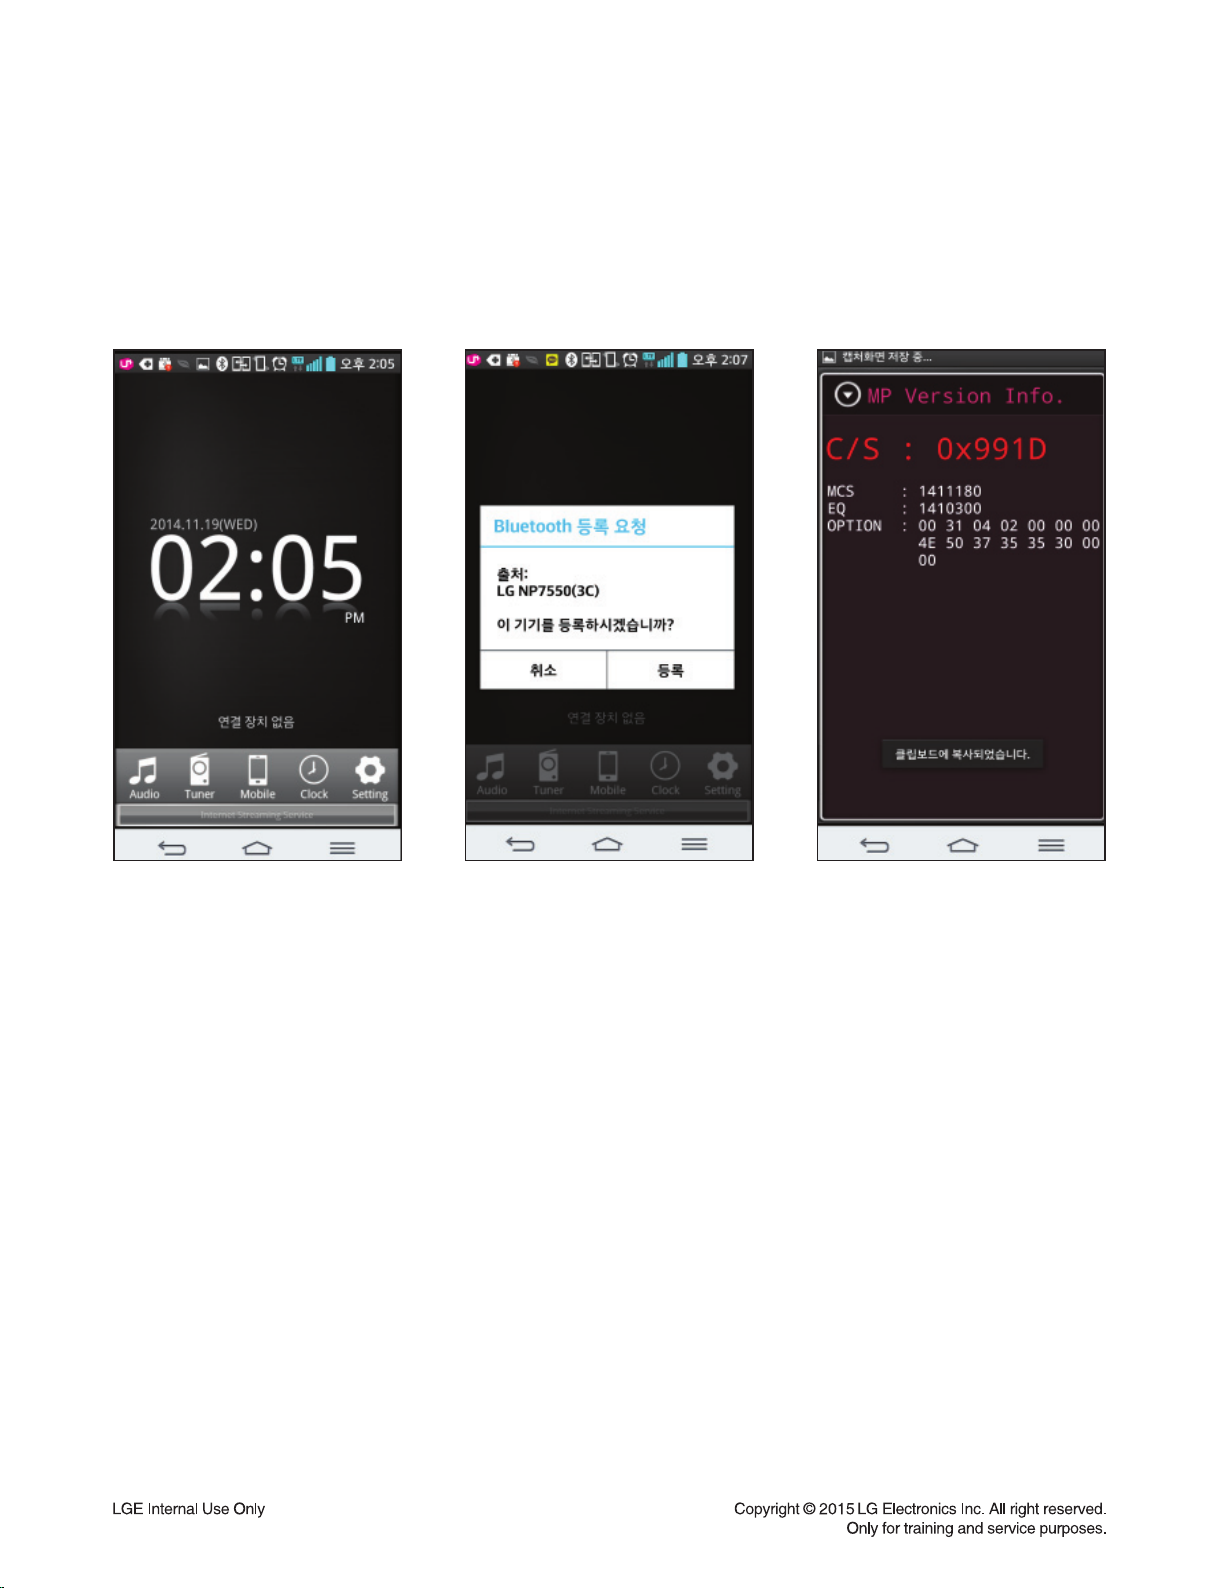
2. INSTALLATION OF MP APP AND VERSION CHECK
1) Install & Run “MP Version_BT App”.
2) Press and Hold “Power” + “Play/ Pause” Key for 3 seconds.
3) After few seconds later, you can see “Connect Request” pop-up message from the mobile device.
4) Select “OK” on pop-up message, then checksum/ Version/ option will be displayed.
MCS / EQ PROGRAM USB UPDATE
Download program fi le name : HG580_NP7550_xxxxxxx.bin
If security program(Water Wall) is activated on PC, you must save the fi le to the USB storage device and
disable the security software, then download the fi le to your set.
CAUTION :
How to update MCS program
1) (Fast) format USB stick.
2) Copy Firmware fi le to USB stick.
3) Insert USB stick to USB Port of the “Display/ Update jig” connected to set assembly.
4) Press and hold home audio Remote Control “Info” key for 3 seconds.
5) You can see rotation of all LED in updating.
6) If updating is fi nished, all LED blink and off.
7) Power off.
When downloading the fi le, you should neither unplug the USB device, change to the other function,
nor power off the device. USB device must be unplugged when the downloading process is completed.
1-10
PROGRAM UPGRADE USING DOWNLOAD JIG
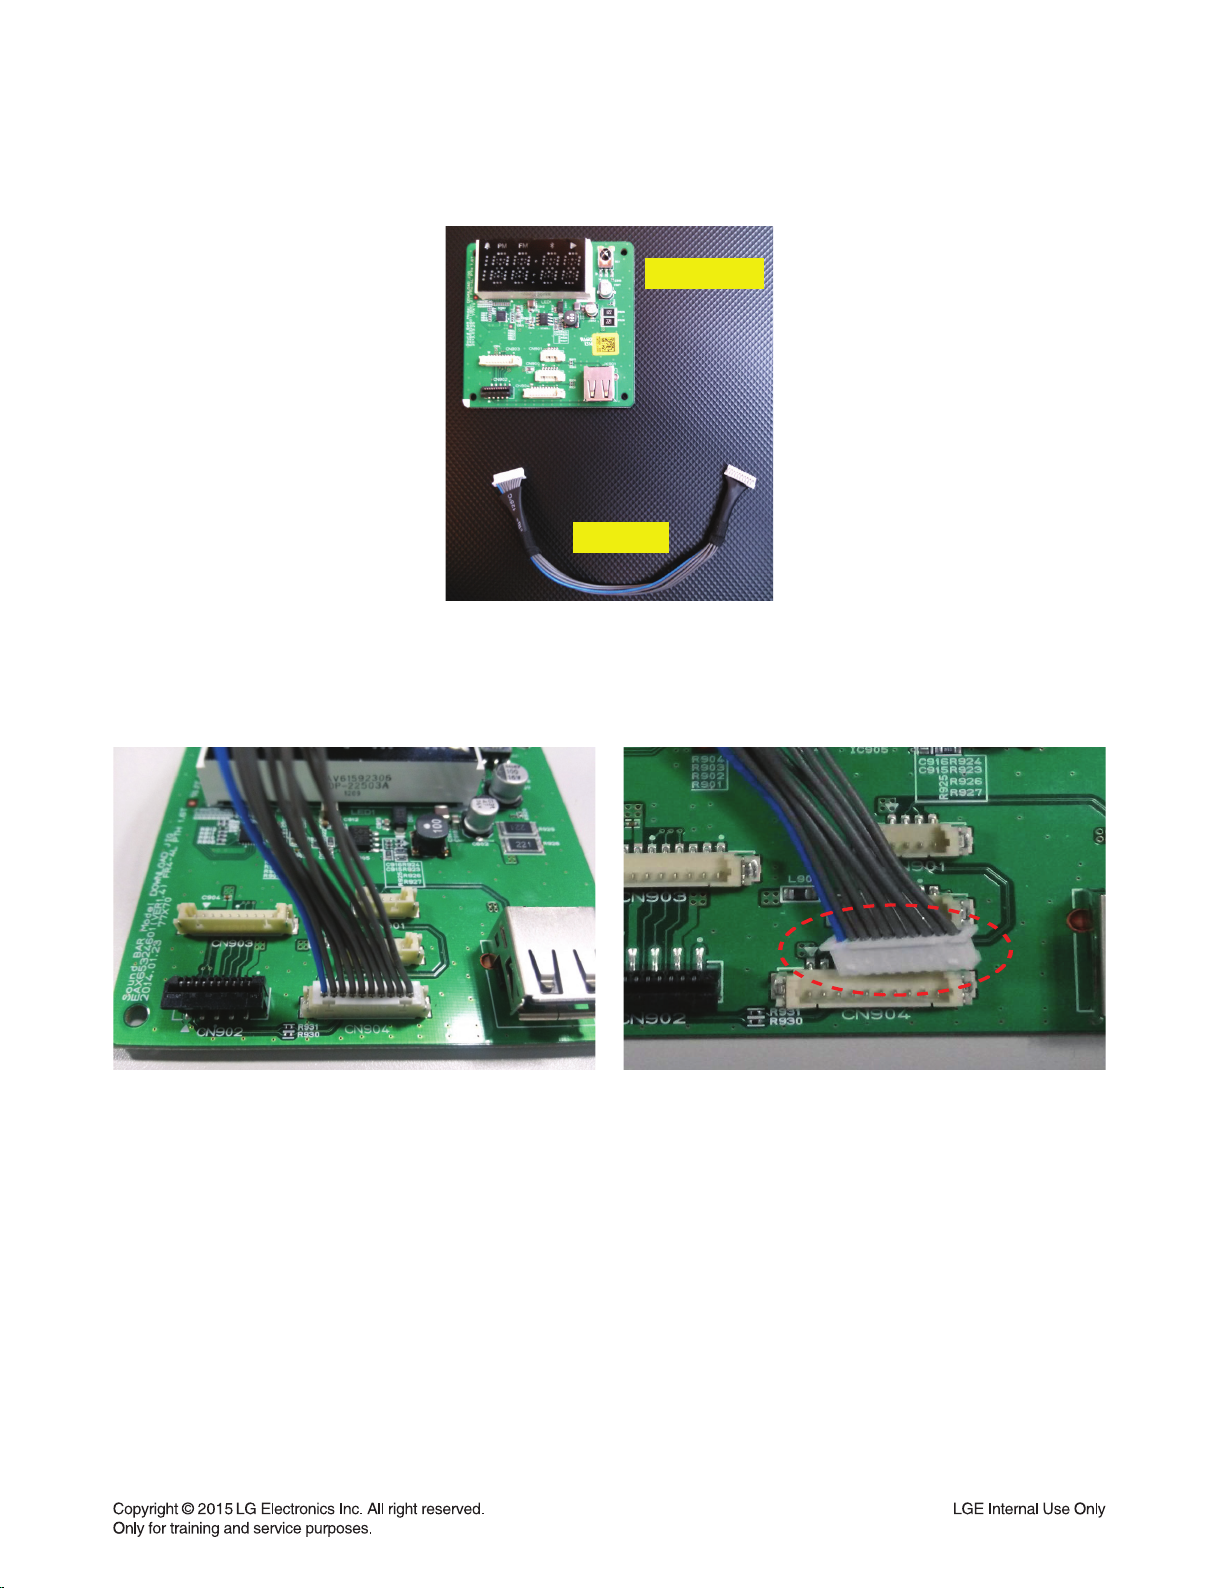
1. CONNECTION OF THE JIG
Caution : Jig cable is same with SoundPlate LAP340.
1) Insert the Jig cable in CN904.
CAUTION : Be careful of the direction of cable.
&KURNC[,KI
,KI%CDNG
1-11
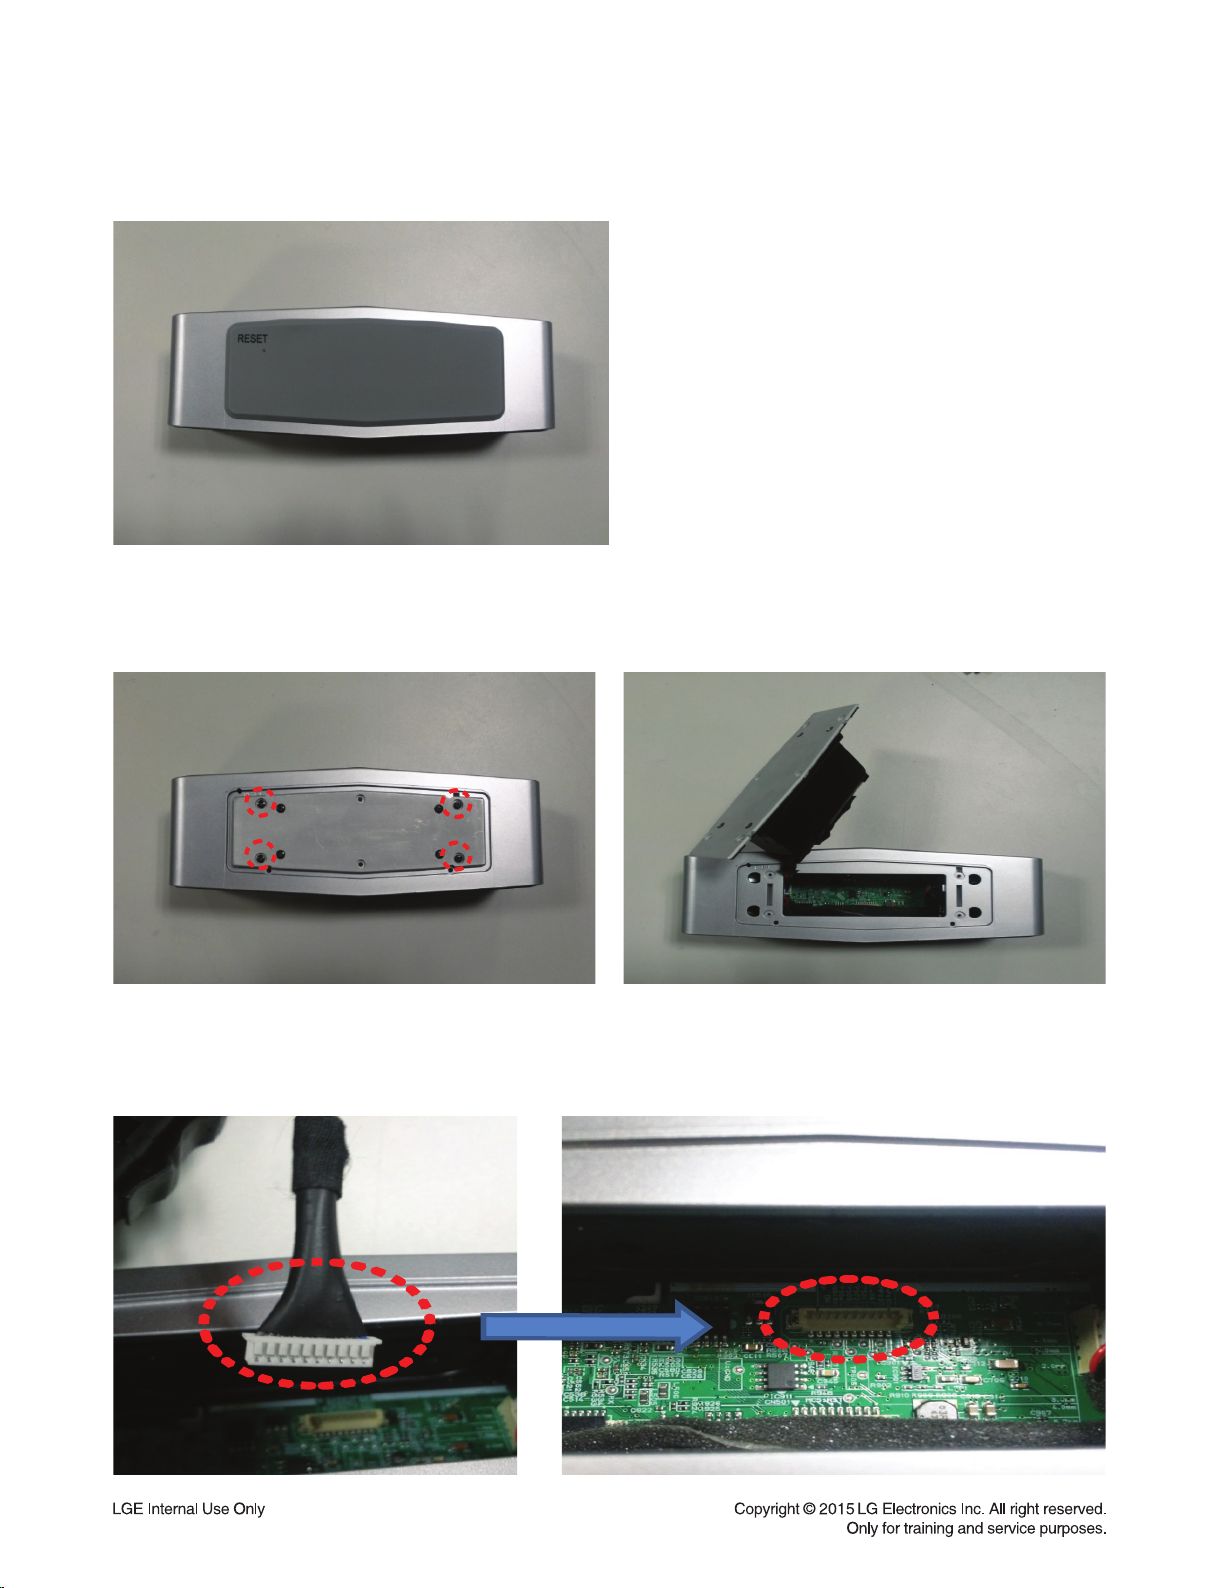
2) See the back side of set. Remove rubber foot.
3) Loosen the screws on the four points. 4) Open the Battery Assembly.
5) Please insert of another side of Jig cable at CN503 of main board.
CAUTION : Be careful of the direction of cable.
1-12
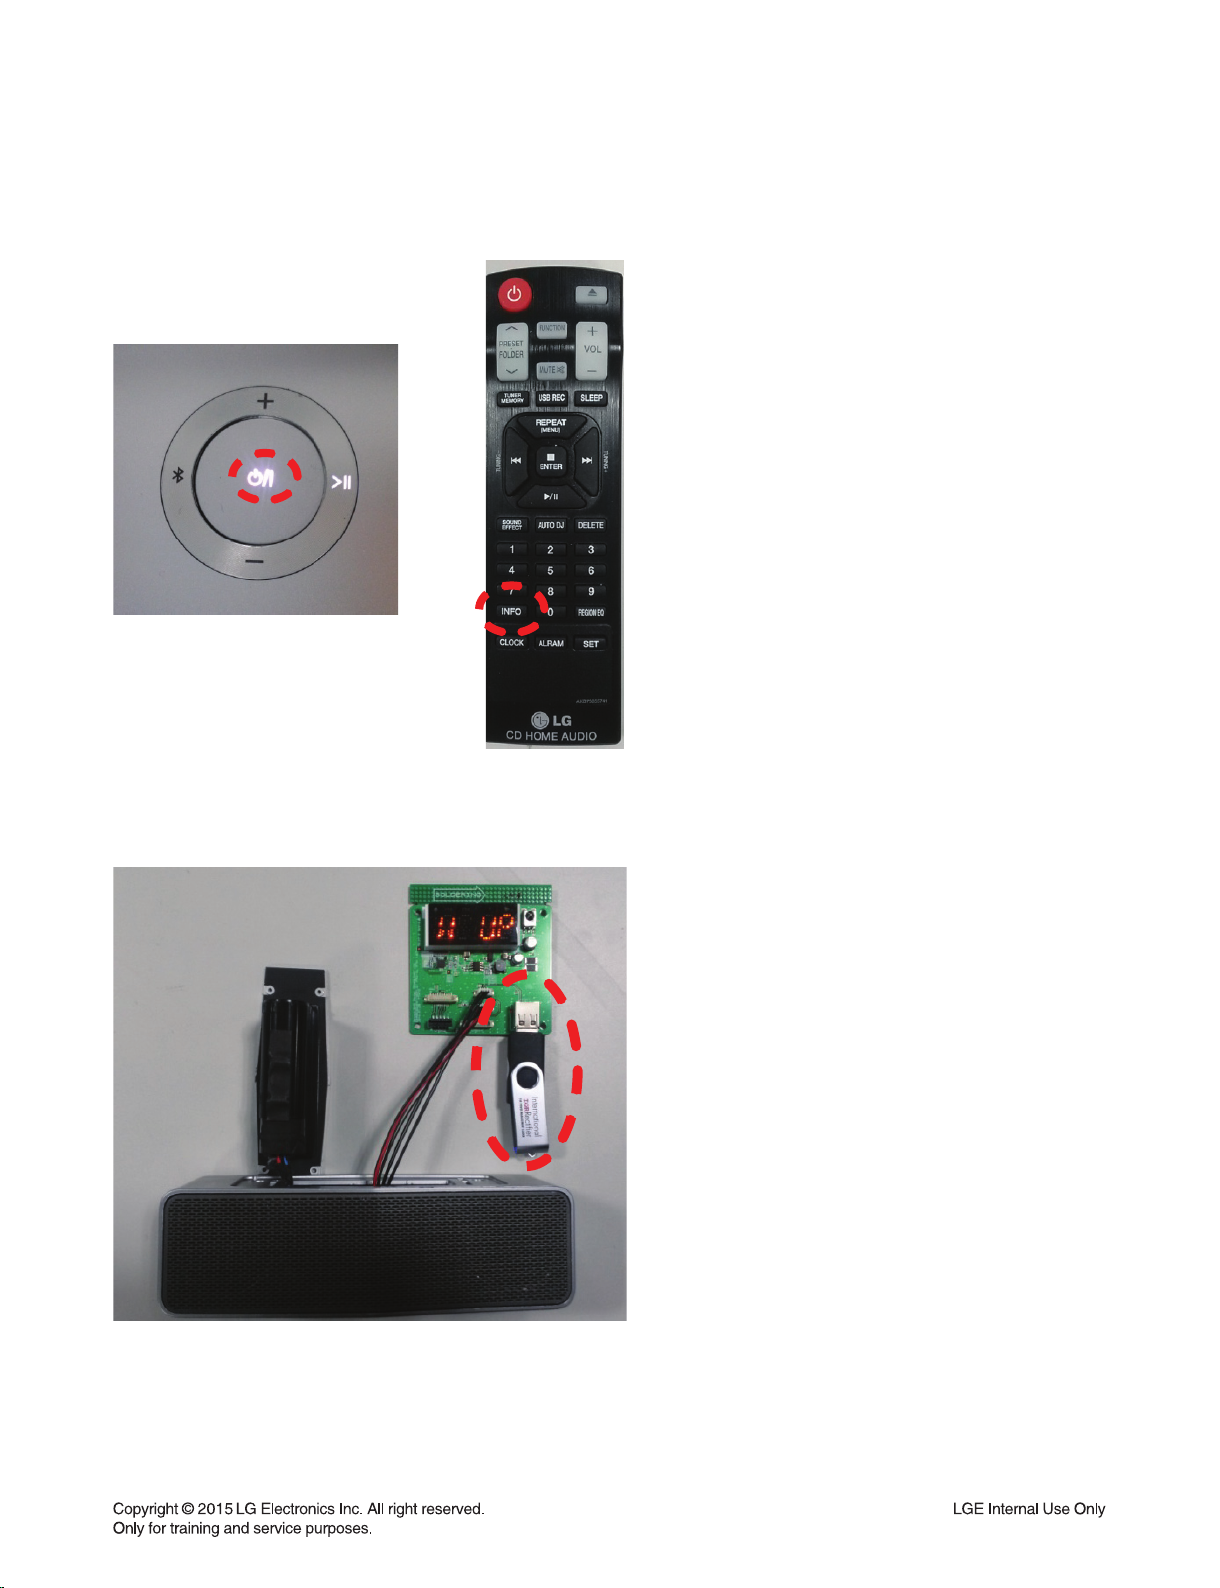
6) Power on set.
Click ‘Info” key of home audio Remoto Control during 3 seconds.
Check Jig display. USB (1 second) No USB.
7) Insert USB. check Jig Display.
Firm “W UP” off
1-13

2. MCS PROGRAM (MCS CHIP)
Download program fi le name : HG580_NP7550_xxxxxxx.bin
If security program(Water Wall) is activated on PC, you must save the fi le to the USB storage device and
disable
the security software, then download the fi le to your set.
CAUTION :
nor power off the device. USB device must be unplugged when the downloading process is completed.
How to update MCS program
1) (Fast) format USB stick.
2) Copy Firmware fi le to USB stick.
3) Insert USB stick to USB Port of the “Display/ Update jig” connected to set assembly.
4) Press and hold home audio Remote Control “Info” key for 3 seconds.
5) You can see rotation of all LED in updating.
6) If updating is fi nished, all LED blink and off.
7) Power off.
When downloading the fi le, you should neither unplug the USB device, change to the other function,
3. EQ PROGRAM
Download program fi le name : EQ_PRG_xxxxxxx.bin
If security program(Water Wall) is activated on PC, you must save the fi le to the USB storage device and
disable
CAUTION :
nor power off the device. USB device must be unplugged when the downloading process is completed.
the security software, then download the fi le to your set.
When downloading the fi le, you should neither unplug the USB device, change to the other function,
How to update MCS program
1) (Fast) format USB stick.
2) Copy Firmware fi le to USB stick.
3) Insert USB stick to USB Port of the “Display/ Update jig” connected to set assembly.
4) Press and hold home audio Remote Control “Info” key for 3 seconds.
5) You can see rotation of all LED in updating.
6) If updating is fi nished, all LED blink and off.
7) Power off.
1-14

SPECIFICATIONS
Power Supply 5 V 2.0 A (AC Adapter)
Built-in rechargeable battery
Power consumption 10 W
AC Adapter Model: WB-10A05FG
Manufacturer: Yang Ming Industrial
Input: AC 100 - 240 V, 50/60 Hz
Output: 5 V 2.0 A
Dimensions (W x H x D) Approx. 184 mm x 55 mm x 63 mm
Net Weight Approx. 0.7 kg
Operating Temperature 5 °C to 35 °C
Operating Humidity 5 % to 60 %
External Connector ø 3.5 mm mini jack
Micro USB port for charging battery
Communication Bluetooth
Amplifier 10 W + 10 W (4 Ω at 1 kHz)
THD: 10%
Speaker Type : Built-in
Impedance Rate : 4 Ω
Rated Input Power : 10 W
Max. Input Power : 20 W
Battery Battery capacity : 2600 mAh
Operating time is approx. 8 hours.
(Based on 30 % volume, 1 kHz signal, 400 mV portable input and
fully charged status)
• Design and specifications are subject to change without notice.
It may vary depending on the battery status and operational conditions.
1-15

1-16
 Loading...