

LG N4B2 4TB, N4B2N, N4B2ND4 User Manual

User Guide and Instruction Manual
LG Network Storage
N4B2 / N4R2

Safety warning
Note
Do not place any objects within 15cm of the unit.
1
The unit reaches high temperatures creating the risk of burn injuries.
Only use compatible devices with the system ports, or the system and devices risk
2
being damaged.
3 Do not use damaged disks. Product can be damaged.
Do not dismantle or change the structure of the system in any way.
4
This may cause electric shock.
When dealing with system components, strictly abide by the instruction manual.
5
Physical contact with the soldering on the backside of components may cause
severe injury.
When transporting the system, rst turn o the system and disconnect the unit
6
from the power source. Sudden tension in cables can cause severe damage to the
system. Loose cables can cause injury.
Take caution when handling the system so as not to corrupt the hard disk data.
- Take caution not to bump or expose the system to extreme temperatures, as it
may damage the sensitive hard disk.
7
- Take caution when turning on the electricity, as during this time any external
bumps to the system may corrupt the hard disk data.
- The manufacturer disclaims all responsibility for loss of hard disk data.
2

Safety warning
Related to damage to the HDD and data:
- during installation or disconnection of the system, ensure that the system does
not experience any external physical shocks.
- During the operation of the HDD, short surges and stoppages of power may
cause the system to turn o and on quickly.
- there may be a sudden stoppage of electricity during operation
- avoid moving the system during operation of the HDD, which may cause
external physical shock
8
- during the conguration of new volumes.
i) if during use, existing volumes are deleted and new volumes are created, data
will be lost.
ii) Before conguration of new volumes, each user must back up data, as well as
when creating new volumes, to ensure the possibility of restoration.
– e.g. virus infections.
• Always back up hard disk data to avoid accidental data loss.
In the event of the administrator forgetting the password, restoration is
impossible. Hence safeguard the password.
9
• To create a new password, the system must be re-initialized. In this case, all
data will be lost, and data recovery will be impossible, for security reasons. The
manufacturer disclaims all responsibility in the event of this occurrence.
In the event of the cover being removed during operation, the user risks electric
10
shock, injury, and damage to the system.
3

Safety warning
Warning
Do not use damaged electrical cords. This may cause electric shock, and is a re
1
hazard.
Use a grounded cord and grounded socket to avoid electric shock and damage to
2
components.
Do not handle the electrical cord with wet hands, as this may cause shock and
3
injury.
When removing the plug from the socket, ensure that the plug is handled and not
4
the cord. Otherwise this may cause damage to the plug and even re.
Always check and use correct voltage to avoid electric shock, severe damage to
5
the system, and re.
Always use grounded cords and grounded sockets with correct capacity (voltage /
6
current) to avoid the danger of damage, electric shock, and injury.
In the event of noise emanating from the electrical cords or sockets, to avoid re
7
and injury immediately disconnect, and contact the service centre.
8 Ensure that electrical cords are correctly plugged into the sockets to avoid re.
Ensure that electrical cords are not damaged or do not have heavy objects placed
9
on them. Keep electrical cords away from children and pets. Damaged cords may
cause electrical shock or re.
Keep the power cords and sockets clean at all times to avoid re and electrical
10
shock.
In the event of moisture entering the system, immediately disconnect the power
11
and contact the service centre, to avoid the danger of system damage, electrical
shock, and re.
12 Do not block vents, as this will cause system damage.
Prior to cleaning the system, always disconnect the power, to avoid damage and
13
electric shock.
4

Safety warning
In the event of lighting and thunderstorms, immediately physically disconnect the
14
system from any power source, to avoid damage to the system.
In the event of dropping the system, contact the service centre for advice and
15
possible service. Not doing this creates the risk of damage, re and electric shock.
Keep the system away from direct sunlight to avoid overheating, and melting of
16
the case, which may eventuate in re and injury.
Do not place ammable objects, candles or cigarettes on the system, as this may
17
cause re
In the event of a burning smell or smoke emanating from the system, immediately
18
disconnect the power, and contact the service centre.
Keep heating devices and other electrical components at a distance from the
19
system to avoid case melting, and hence the danger of damage, re, and electric
shock.
Before disassembling the system, always ensure physical disconnection of the
20
electrical cable from the socket.
21 Do not disassemble the power supply, to avoid the danger of electric shock.
Keep children away from the system, as consuming any parts will cause serious
injury.
22
In the event of swallowing any parts, such as screws, immediately seek medical
treatment.
Ensure that multipoint power sockets are not overloaded, to avoid the danger
of re and electric shock. Ensure that cords are always neatly arranged and are
23
not trapped under the system or other heavy objects. When connecting and
disconnecting the electrical cord, take care in handling the socket to avoid the
danger of electric shock.
Ensure that there are no loose or exposed metallic objects inside the case, to avoid
24
the danger of damage, re and electric shock.
Ensure that hands are never used, to avoid damaging the system and electric
25
shock. Always use screw drivers for work inside the system.
5

x Contents x
Safety warning ......................................................................... 2
1. Introduction .........................................................................12
LG Network Storage Introduction ..........................................................12
Supported OS ..........................................................................................13
Package Contents ...................................................................................14
Name of Each Part ..................................................................................15
2. LG Network Storage Installation .....................................16
Hard disk installation and set up ..........................................................16
‘LG Network Storage Installer’ installation (LG Network Storage
system file installation,volume and RAID configuration) ...................20
LG Network Storage Connection ..........................................................24
‘LG Network Storage PC S/W Installer’ installation (PC Application
program installation and usage) ...........................................................26
PC application program installation ......................................................................... 27
PC Application Program Usage ................................................................................28
3. LCD panel and front button usage ................................. 35
Power Off / On (POWER button).........................................................35
Tray open / close (DISC OPEN button) ...............................................36
Action set up (MODE button) ...............................................................36
IP Setup ........................................................................................................................... 37
Backup data on discs using LG NETWORK STORAGE (ODD Backup) .........38
Writing data to disc (ODD Burn) ...............................................................................39
USB device / memory card back up ........................................................................41
6

x Contents x
LG NETWORK STORAGE State indication (SET button) .................42
Host name and IP confirmation ................................................................................42
Time and date confirmation .......................................................................................43
Save capacity confirmation ........................................................................................43
RAID configuration state confirmation (RAID SYNC STATE) ...........................44
System operating status check .................................................................................44
[System Firmware Version Information] ................................................................................ 45
[FAN RPM Information] ............................................................................................................45
4. LG Network Storage Web Menu Use (for LG Network
Storage administrators) ....................................................... 46
System Settings .....................................................................................46
Network ............................................................................................................................46
Host .................................................................................................................................................47
Interface .........................................................................................................................................47
Workgroup/Domain ................................................................................................................... 50
Date & Time ..................................................................................................................... 51
Date and Time Setup ................................................................................................................. 51
NTP Set-up ..................................................................................................................................52
Mail Notification .............................................................................................................52
Volume .............................................................................................................................54
Volume Array Configuration ....................................................................................................55
Volume create ...............................................................................................................................57
Deleting volumes .........................................................................................................................57
Volume edit ...................................................................................................................................57
Volume expansion .......................................................................................................................57
Volume Migration........................................................................................................................58
Checking Volume ...................................................................................................................... 58
Hard Disk Information .............................................................................................................. 58
Smart information of a Hard Disk .......................................................................................... 59
Hard Disk Scan .........................................................................................................................59
7

x Contents x
Power ................................................................................................................................60
Standby Mode .............................................................................................................................60
Wake On LAN................................................................................................................................61
Power Recovery .............................................................................................................................61
UPS Power Setting ..................................................................................................................... 62
Shutdown ...................................................................................................................................... 63
Language Setting..........................................................................................................64
Firmware ..........................................................................................................................65
Upgrade ........................................................................................................................................ 65
Initialization ..................................................................................................................... 67
Configuration Back-up .............................................................................................................. 68
LCD Control ............................................................................................ 70
LG Network Storage Share Management .............................................71
User ....................................................................................................................................71
Group ................................................................................................................................75
Folder ................................................................................................................................ 77
Trahsbox ........................................................................................................................................ 80
Blu-ray / DVD ..........................................................................................81
Storing – Saving Disc Data to the LG NETWORK STORAGE ...........................81
Disc Data Copy ............................................................................................................................ 82
Disc Image Backup ....................................................................................................................83
Burning .............................................................................................................................84
Burn Disc .....................................................................................................................................85
Burn Image...................................................................................................................................88
Schedule Backup & Restoration ...............................................................................89
Schedule Backup ...................................................................................................................... 89
Restore .......................................................................................................................................... 96
Backup history ............................................................................................................................. 101
8

x Contents x
Service ................................................................................................... 103
Network Server ............................................................................................................. 103
FTP ................................................................................................................................................103
AFP ............................................................................................................................................... 105
Remote Access ............................................................................................................105
DDNS (Dynamic DNS) ............................................................................................................. 105
UPnP ............................................................................................................................................ 106
Network Printer ............................................................................................................ 107
iTunes .............................................................................................................................. 116
Time Machine .................................................................................................................117
[Web Set-up] ............................................................................................................................... 117
[Mac OS] .......................................................................................................................................118
iSCSI ............................................................................................................................... 120
[iSCSI Initiator Installation]......................................................................................................120
[Web Set-up] ............................................................................................................................... 121
[iSCSI Connection] ....................................................................................................................121
Torrent ............................................................................................................................ 130
[Download] ..................................................................................................................................130
[Use]..............................................................................................................................................130
[Set-up] .........................................................................................................................................131
RSYNC (Remote Data Backup Service)............................................. 132
Data Backup using Rsync ......................................................................................... 132
RSYNC-server Configuration .................................................................................................132
RSYNC-client Configuration ...................................................................................................133
Alteration of Configuration for Remote Data Backup ......................................................134
Deletion of Remote Data Backup .......................................................................................... 134
Restore Data Using Rsync ........................................................................................135
NFS ........................................................................................................ 135
USB Sync ...............................................................................................137
USB Device & Memory Card ....................................................................................137
e-SATA ........................................................................................................................... 142
USB / Memory Card .................................................................................................. 143
9

x Contents x
Information ........................................................................................... 144
Status ............................................................................................................................. 144
Log .................................................................................................................................. 146
Top menu .............................................................................................148
File viewer ...................................................................................................................... 148
My Information .............................................................................................................. 151
5. LG Network Storage web menu usage (Regular users) 152
Blu-ray / DVD ....................................................................................... 152
Storing – Saving Disc Data to the LG NETWORK STORAGE ........................ 152
Disc Data Copy ...........................................................................................................................153
Disc Image Backup ...................................................................................................................154
Burning ...........................................................................................................................155
Burn Disc ....................................................................................................................................156
Burn Image..................................................................................................................................159
USB Sync .............................................................................................. 160
USB Device & Memory Card ...................................................................................160
e-SATA ........................................................................................................................... 165
USB / Memory Card .................................................................................................. 166
Top menu ..............................................................................................167
File viewer .......................................................................................................................167
My Information ..............................................................................................................170
6. LG Network Storage via network drive...........................171
Accessing the LG Network Storage data in Windows OS ................. 171
MAC OS connection ............................................................................ 175
Linux OS access ................................................................................... 178
10

x Contents x
7. LG Network Storage Maintenance ................................. 181
LG Network Storage shut down/restart .............................................. 181
Administrator password and network set up initialization ............... 182
System information checking and saving ..........................................183
Self-diagnosis execution ..................................................................... 183
System failure or malfunction ............................................................. 184
Power cut or failure .............................................................................. 184
System temperature protection .......................................................... 184
8. RAID configuration error checkup ............................... 185
Appendix A Volume Construction & RAID
Configuration ........................................................................187
Appendix B Open source software notice .......................194
Appendix C Compatible/Recommended Device List ... 202
11
1. Introduction
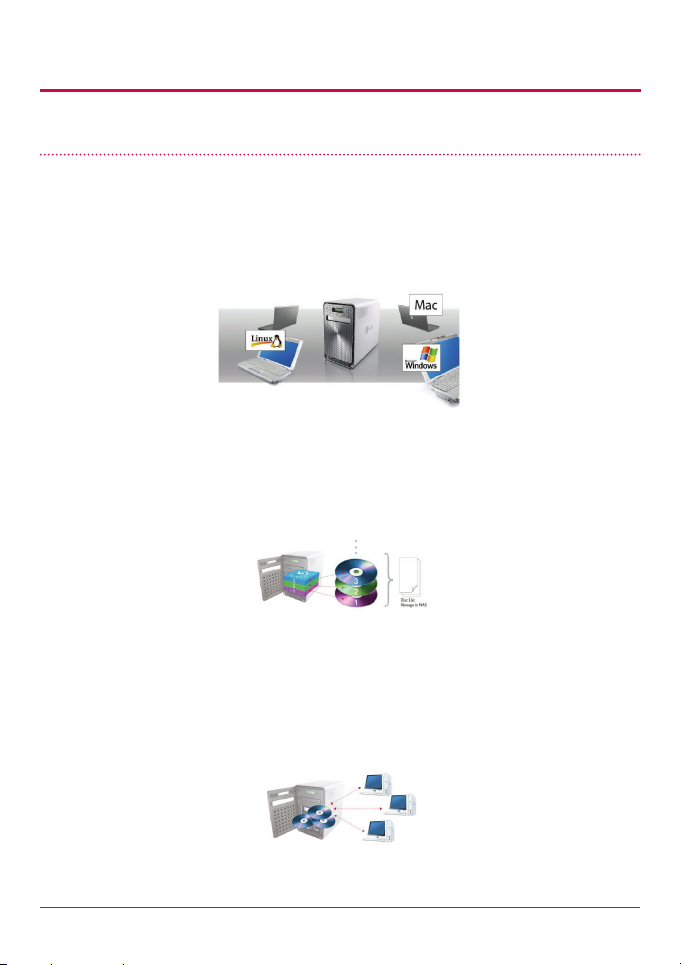
LG Network Storage Introduction
Thank you for purchasing the LG Network Storage with Built-in Blu-ray/DVD Rewriter.
1 Now the LG Network Storage basic data-save and share functions can be used in
Windows, Mac and Linux operating systems.
2 Similarly, the internal Blu-ray / DVD rewriter can be used to eciently save data
securely for long periods.
3 Furthermore, the Blu-ray / DVD drive can be used when directly copying data from
discs to LG Network Storage.
12

1. Introduction
4 The LG Network Storage also allows for mobile synchronization, without the use of a
PC, as mobile devices can be directly synchronized to the LG Network Storage.
This user manual contains express installation information as well as detailed options and
functions.
Supported OS
LG Network Storage
• Windows XP, Server 2003, Vista, Windows 7
• Mac OS 10.x or later
• Linux (Fedora, Suse, Ubuntu)
PC S/W
PC S/W Supported OS
NAS Detector Windows XP, Server 2003, Vista, Windows 7, Mac OS 10.x or
Comnso Backup Windows XP, Server 2003, Vista, Windows 7
Photo DVD Album Windows XP, Server 2003, Vista, Windows 7
CyberLink (BD) Windows XP SP2 or later, Vista, Windows 7
Acrobat Reader Windows, Mac
Flash Player Windows, Mac
later
13
1. Introduction
N2B1 / N2R1
LG Network Storage
N4B2 / N4R2
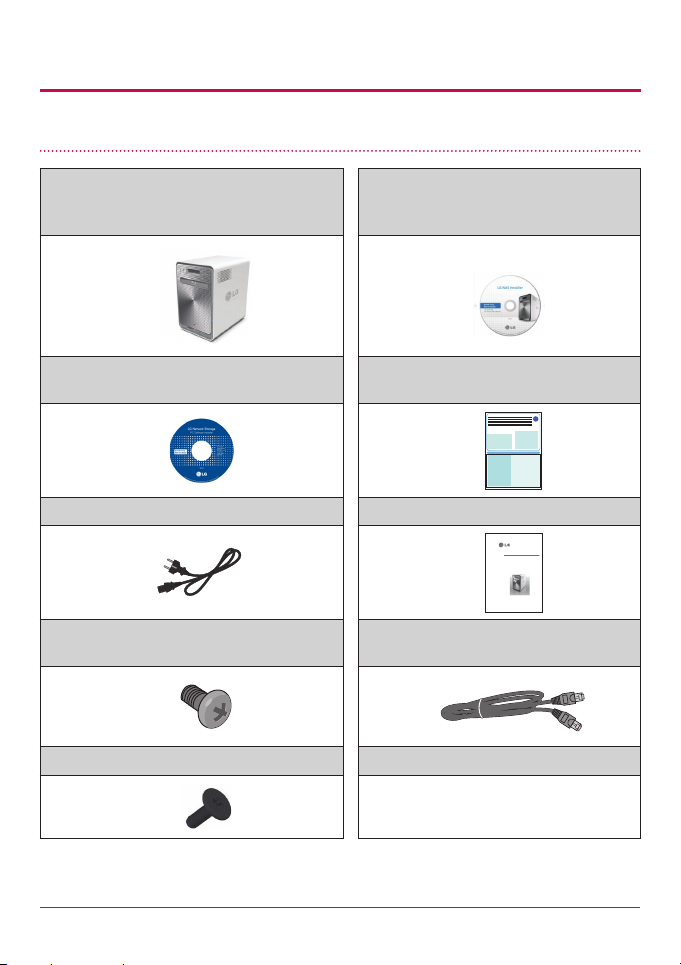
Package Contents
• LG NETWORK STORAGE with built-in BluRay Rewriter
• LG NETWORK STORAGE Installer‘ (LG
NETWORK STORAGE -system le
installation disc)
• ‘LG NETWORK STORAGE PC Software
• Product warranty
Installer‘
• Power cord • Quick install guide
• Hard disk fastening screw (x16)
• LAN cable
– enclosure only
• Hard disk rack securing screw (x4)
Quick install guide
* Photographs of images from the manual may dier depending on model components.
14
1. Introduction
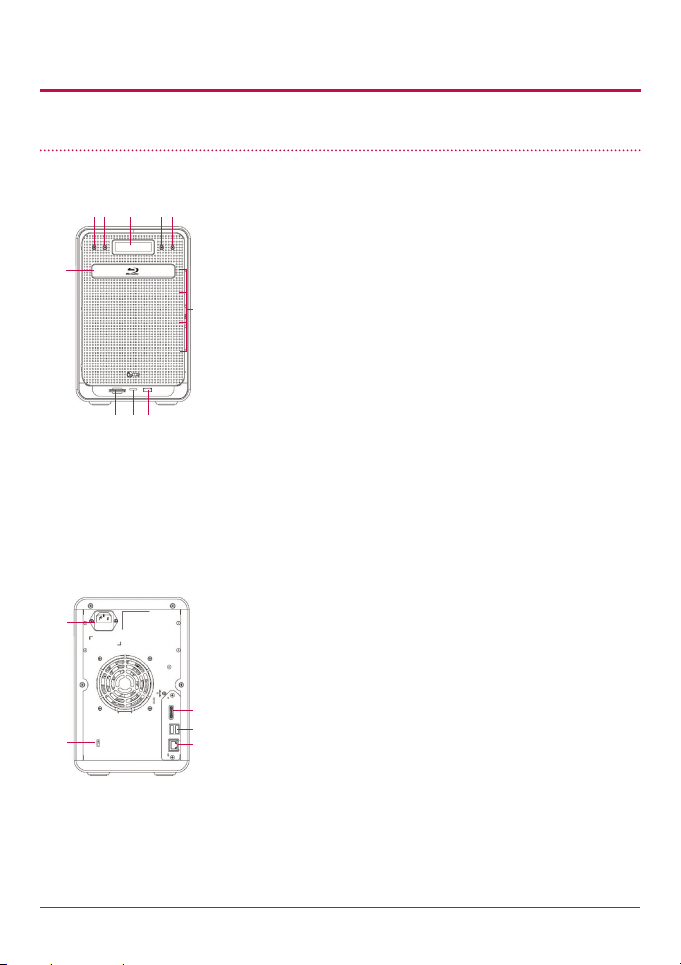
Name of Each Part
<Front>
ab c de
f
j
ghi
<Backside>
a Power button: power on, o (to turn o power, push
button twice)
b Disc Open button: : opens and closes optical disc drive
tray.
c LCD window: displays current state
d Mode button: changes mode
e SET button: selects mode
f Blu-Ray/DVD Drive
g Memory card reader: supports SD, MMC, MS and XD
h Memory card Current state display LED: - Blue : running
correctly
i USB port: USB 2.0 interface
j HDD/ODD state display LED:
- Blue : running correctly
- Red : abnormal state
k
o
k Inlet: AC power cord connection
l e-SATA: External SATA II device support
m USB port: USB 2.0 interface
l
n LAN port: : LAN cable connection
m
o Kensington lock: Antitheft lock.
n
15
2. LG Network Storage Installation
Follow these instructions to install the LG NETWORK STORAGE. If the LG NETWORK
STORAGE is internal, go to <Hard disk installation and setup>, otherwise go to <LG
NETWORK STORAGE connection>.
Hard disk installation and set up
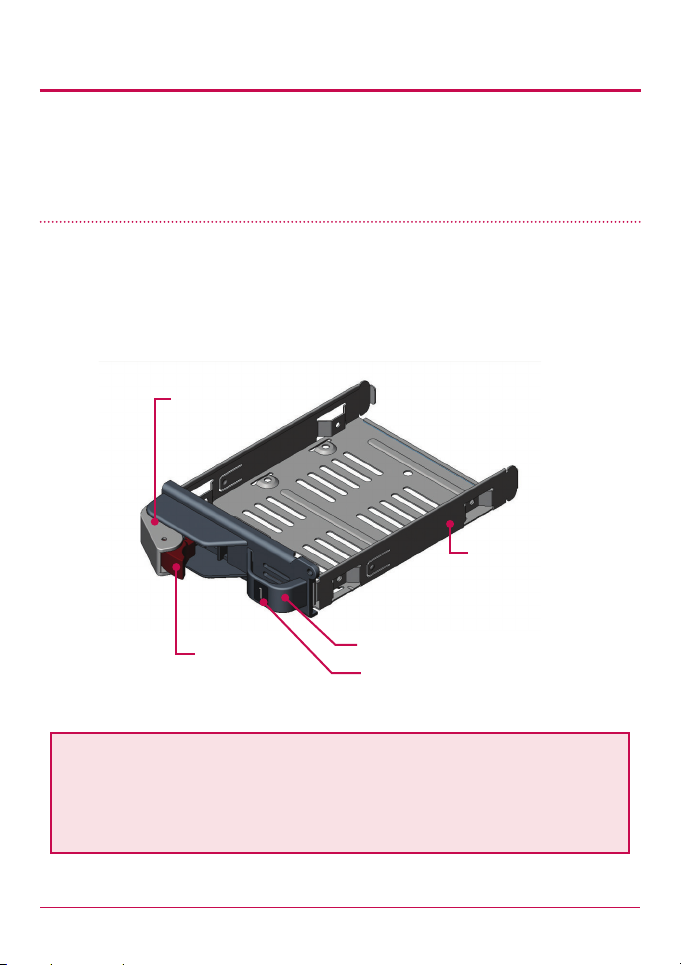
The LG NETWORK STORAGE hard disk rack is shown below. Refer to each part while
installing the HDDs.
Components of Hard Disk Rack
Safety Lever
Hard Disk Rack
Locker Lever
Note: Hard disks of size 500GB/1TB/2TB are recommended, all of which should
be the same size and of the same company. If the disk sizes dier, the RAID
conguration will use the smallest disk as a reference to measure all disk
sizes,therefore the remainder can not be utilized and durability decreases.
Hard Disk Rack Lever
Hard Disk Rack Label No.
16
2. LG Network Storage Installation
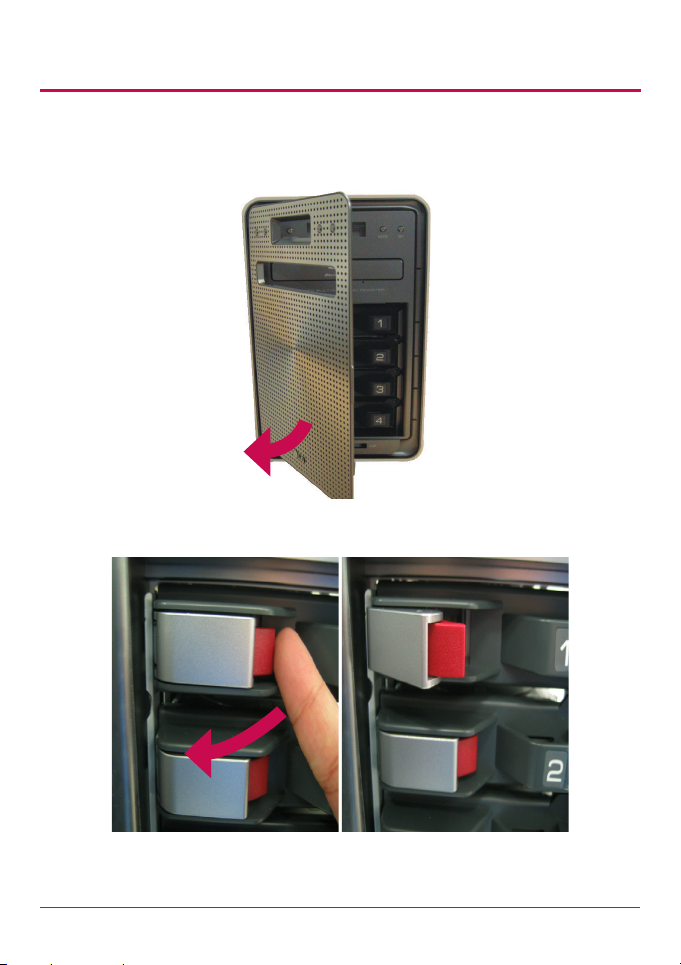
1 First, ensure that the power is o for all components and the main system front cover.
2 Open the LG NETWORK STORAGE front door.
3 Unlock the hard disk rack and pull the lever to draw out the rack.
17
2. LG Network Storage Installation
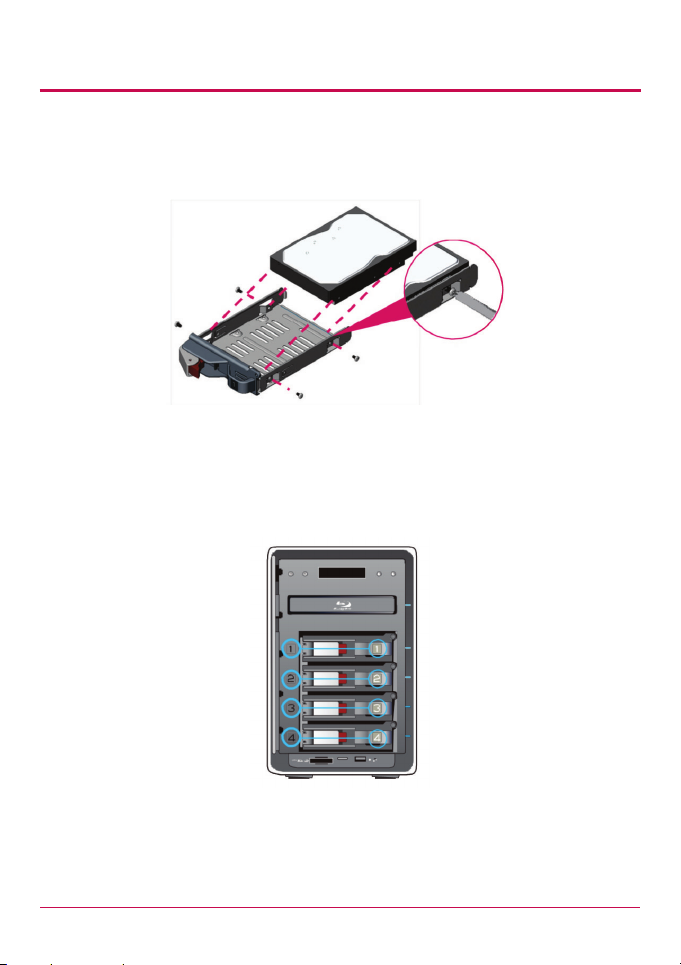
4 Insert the hard disk into the hard disk rack, and with a screw driver, screw the four
screws into place.
5 Match the hard disk rack label number and the NAS front panel number, to insert the
hard disk rack into the slot.
18
2. LG Network Storage Installation
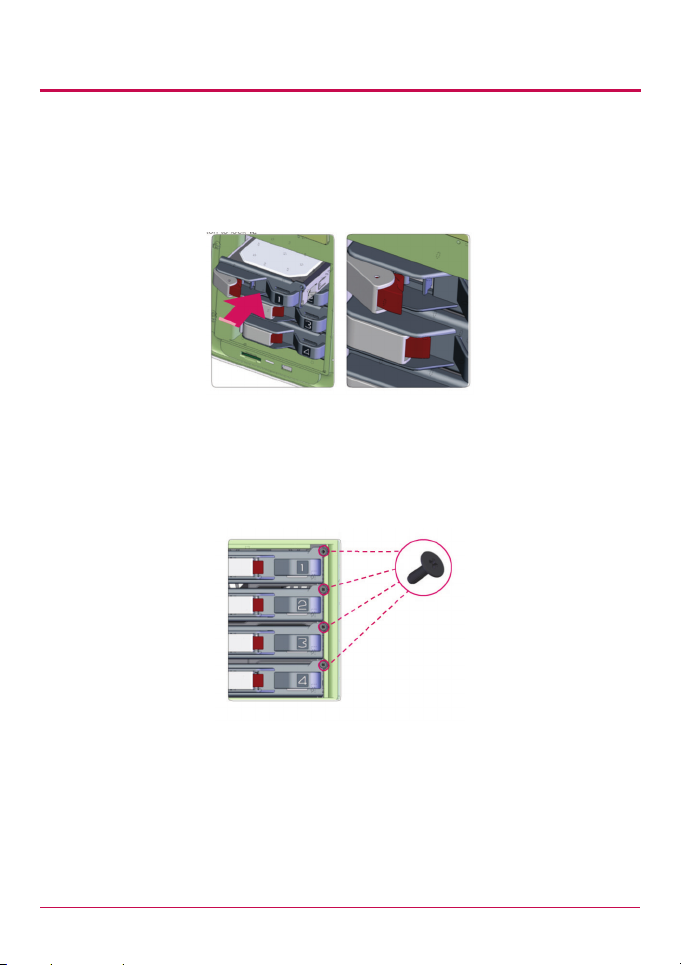
6 Keeping the locker lever out, push the hard disk rack into place, listening, for the
sound. When the hard disk rack is properly and com secure completely pushed in,
press the button to lock it.
Similarly repeat the installation procedure for all the hard disks, one by one.
7 To prevent accidental detachment of the hard disk rack, fasten it using included bolts.
19
2. LG Network Storage Installation
‘LG Network Storage Installer’ installation (LG Network Storage
system file installation,volume and RAID configuration)
Use the included “LG NETWORK STORAGE Installer” disc for automatic system installation
and hard disk volume conguration.
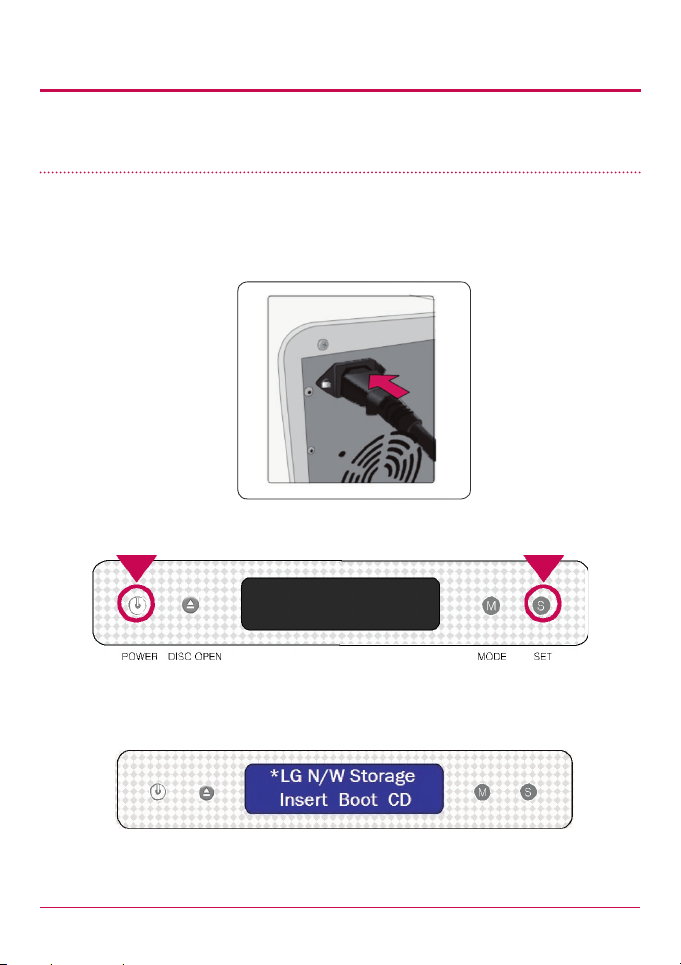
1 Plug the “power cord” into an electrical outlet.
2 While holding the ‘SET’ button, press the ‘POWER’ button to start the LG NETWORK
STORAGE.
3 After approximately 20 seconds the “Insert Boot CD“Message will appear and the tray
will automatically open.
20

2. LG Network Storage Installation
4 Insert the “LG NETWORK STORAGE Installer” disc and push the “DISC OPEN” button to
close the tray. The messages “Checking LG Network Storage ” and ” Loading kernel ”
indicate that the NAS is preparing to organize system les.
5 After 1 minute, the following two messages appear. Click on ‘SET’ and select ‘S:YES’
‘S’ indicates the ‘SET’ button and ‘M’ indicates the ‘MODE’ button.
If manual selection of the RAID level and volume conguration are desired, press the
MODE button to select ‘M: Custom Setup’ When ‘Custom ? /M:No S:yes’ is shown, select Y:
Yes(User to congure volume & RAID. The system le will be installed and LG NETWORK
STORAGE will reboot. The volme can then be congured using web menus. For detailed
contents see <Volume>
The RAID disperses the data to multiple hard disks to guard from data loss due to
physical damage. The default volume conguration of the LG NETWORK STORAGE
depends on the number of the installed HDDs.
The table below shows the list of the default RAID level conguration.
Default RAID Level
Hard disk numbers 1 2 3 or 4
DEFAULT RAID Level ONLY 1 DISK
(No RAID)
RAID 1 (mirroring) RAID 5 (parity)
For detailed contents see <Appendix A Volume and RAID Conguration>.
21
2. LG Network Storage Installation
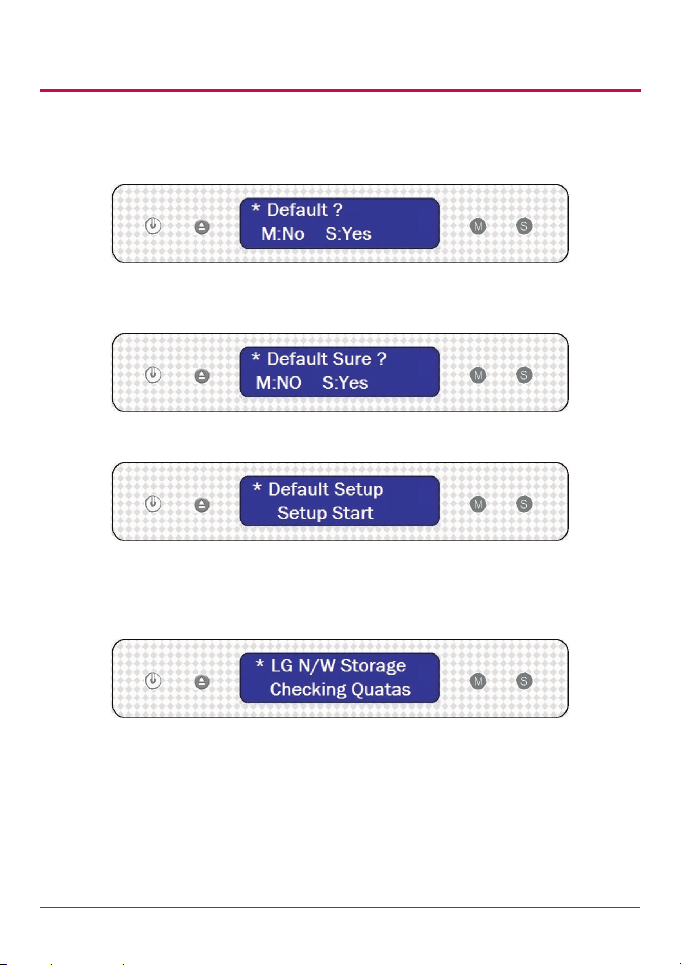
6 When the message below appears, press ‘SET’ button and choose ‘S:YES(Setting to
Basic Mode).
7 Another message about default setup will appear. Press ‘SET’ button and choose ‘S:
YES(Setting to Basic Mode).
8 Setting system les1) will now begin along with the message below.
9 Once the system le is installed and hard disc is formatted2), NAS will reboot with the
alarming sound.
10 Wait a moment when you see the message below after NAS is booted.
22
2. LG Network Storage Installation
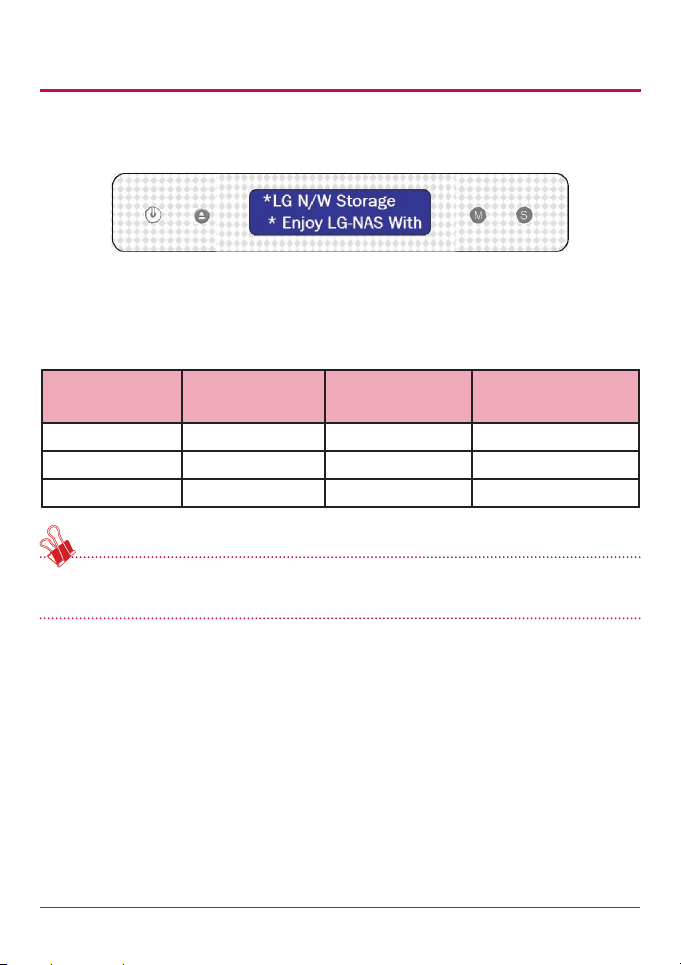
11 Upon completion of booting, the message below will notify that the system is now
booted, with the alarming sound.
12 LG Network Storage will automatically congure RAID of the volume.
* At RAID conguration, the hard drive number and size will determine the RAID
conguration time.
Total HDD
Capacity
2TB (500 GB * 4) About 10 minutes About 8 minutes About 2~3 hour
4TB(1TB * 4) About 10 minutes About 15 minutes About 4~6 hour
8TB (2 TB * 4) About 10 minutes About 30 minutes About 8~10 hour
Note: It is recommended not to use as some services such as SMB and FTP may not be
available and the system may slow down while conguring RAID.
* The progress of conguration of the RAID volume can be checked in the [RAID SYNC
STATE] by pressing SET button on the LG NETWORK STORAGE.
Setting System
Files
Formatting HDDs Volume and RAID
Conguration
23
2. LG Network Storage Installation
LG Network Storage Connection
In an environment with a DHCP server, selecting automatic IP search after connecting the
LG Network Storage to the IP router/switch/hub will acquire the network information from
the DHCP server. For a particular IP address allocated from the Network IP administrator,
installation using an IP address, subnet mask, default gateway and allocated DNS
information is simple.
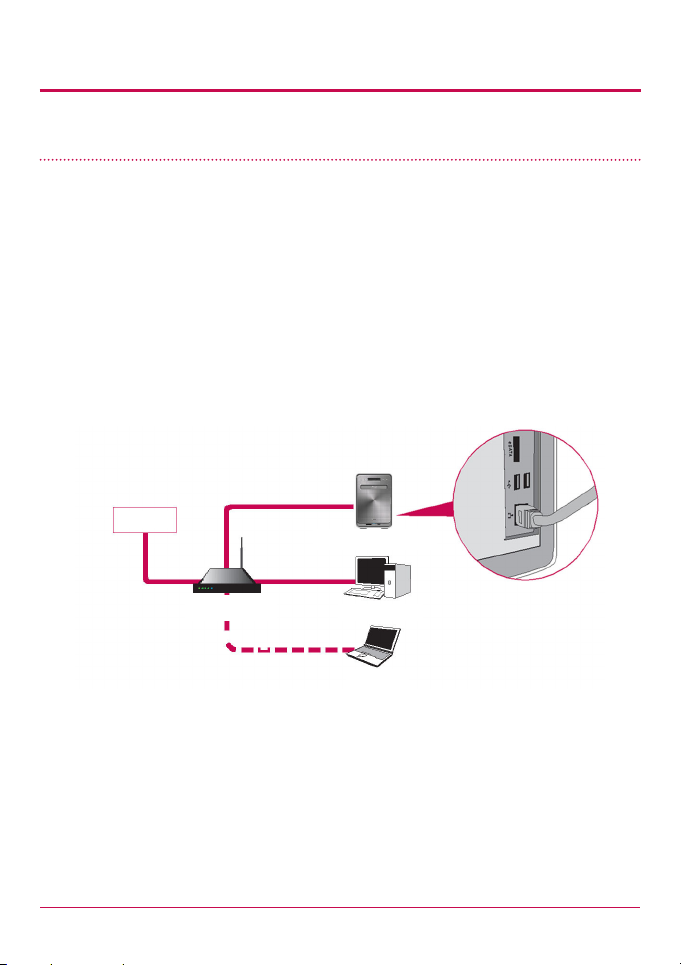
1 Using the included LAN cables, connect LAN ports on LG Network Storage and
network devices (home router/router/switch/hub) to each other or directly plug them
into the LAN port on the PC.
A. If the network component (home router/router/switch/hub) is used to connect
the LG Network Storage (home router/router/switch/hub) to the PC, use the
following
Internet
LG Network Storage
home router / router /
switch / hub
Desktop PC
Notebook
24
2. LG Network Storage Installation
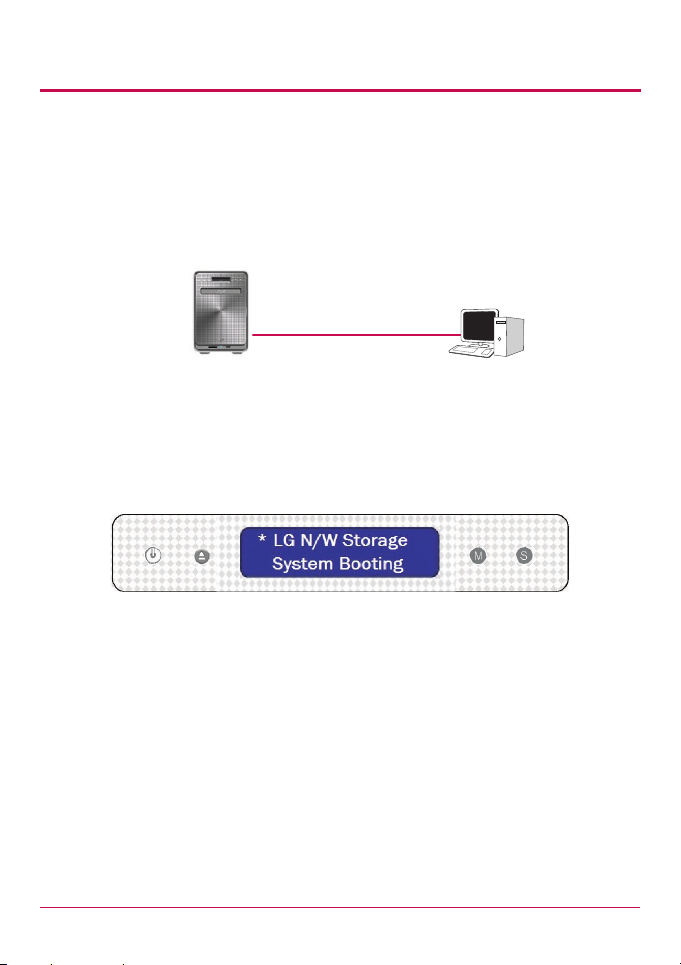
B. If the LG Network Storage is connected directly to the PC without another
network device,
it must be connected directly to the PC using a LAN cable, the LG Network Storage
IP must be set to DHCP, the PC’s IP set to automatic setting and the network will be
automatically set up after approximately 2 minutes
LAN Cable
LG Network Storage
Desktop PC
* If the LG Network Storage is directly connected to the PC through a LAN cable, the
PC’s local internet will not be accessed In this case, PC Internet may be disconnected.
2 After checking that the LG Network Storage power cable has been connected, press
the power button in the front to activate the LG Network Storage.
25

2. LG Network Storage Installation
‘LG Network Storage PC S/W Installer’ installation (PC Application
program installation and usage)
The “LG Network Storage PC Software Intaller” CD enclosed with the LG Network Storage
product purchased includes the following programs:
1 NAS Detector
The “NAS Detector” quickly and easily detects the LG Network Storage on the user’s
network.
2 Comnso Backup
The “Comnso Backup” program allows real-time or scheduled back-ups of important
data from the client’s PCs to the LG Network Storage. Files backed up may be
recovered any time for use as necessary.
3 CyberLink(BD)
CyberLink helps utilizing the ODD of the LG Network Storage.
4 Photo DVD Album
The Photo DVD Album program is a search program of all media les stored within the
user’s PC or the LG Network Storage. It also provides functions to burn media or play
movies
Available programs for installation may vary depending on user’s OS environment
Program
Acrobat Reader O O -
Flash Player O O -
NAS Detector O O -
Comnso Backup O - -
CyberLink(BD) O - -
Photo DVD Album O - -
Windows Mac Linux
Supported Operating System
26
2. LG Network Storage Installation
27
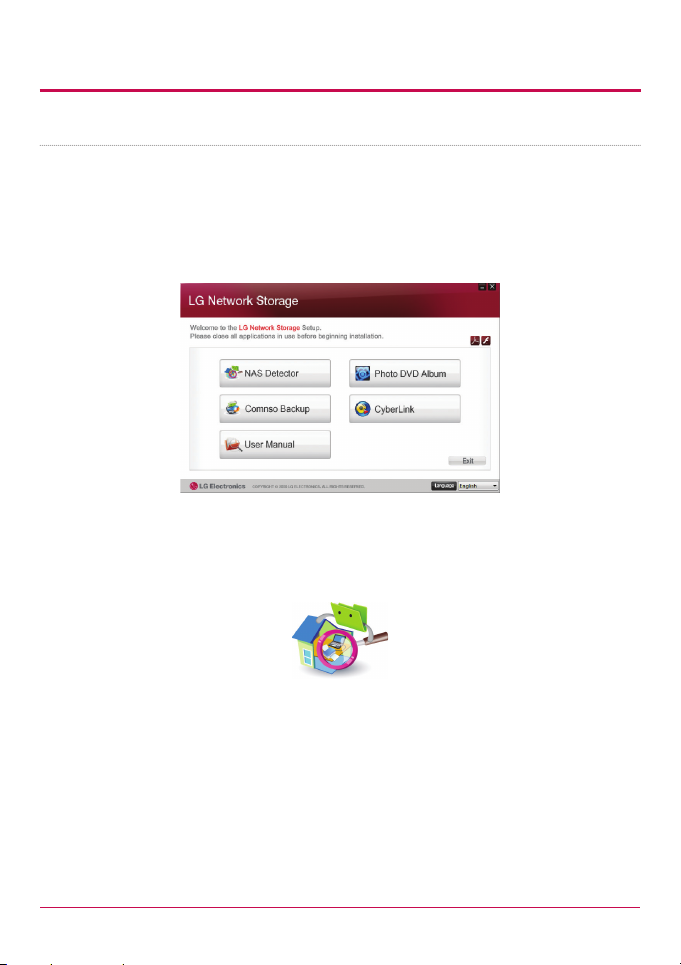
PC application program installation
1 Insert the “LG Network Storage PC Software Installer” CD in the PC’s optical drive
(CD/DVD/BD drives). After a short while, the following menu will appear.
* Installation on PCs without a ber optic drive may be processed using the iSCSI
function of LG Network Storage. Please refer to 4 Service – iSCSI.
2 Click the “NAS Detector” button and install “NAS Detector” on the user’s PC.
After installation the shortcut icon will appear.
3 To install the “Comnso Backup” program, click on the “Comnso Backup” button.
4 To see the LG Network Storage User Manual, click on the “User Manual” button.
2. LG Network Storage Installation
28
PC Application Program Usage
This explains how to use “NAS Detector”
For a detailed explanation for the bundle program, please refer to the built-in manual after
installing the program. (Comnso back-up/Photo DVD Album/CyberLink group)
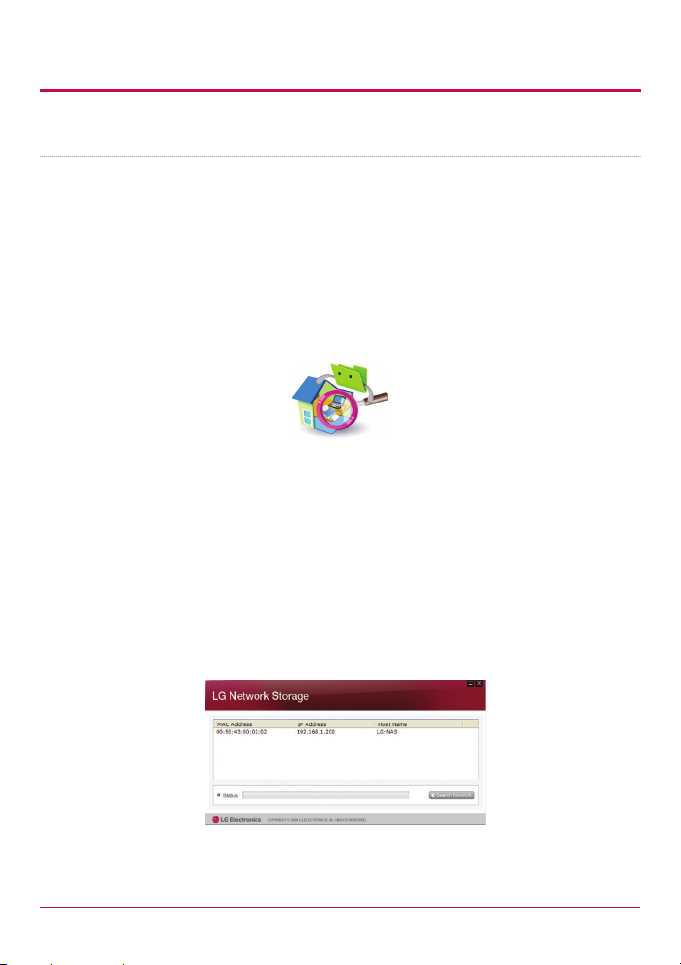
<”NAS Detector” usage>
1 After checking that the PC network is intact, double click the “NAS Detector” icon on
the desk top to open the program.
2 The ‘NAS Detector’ will automatically search the LG Network Storage connected to the
user’s PC.
When the searching is completed, the LG Network Storage IP Address, MAC Address,
and Host Name information are displayed on the screen.
The factory default settings are shown below.
- MAC Address: serial number for each LG Network Storage product is printed in the
back label.
- Host Name : LG-NAS
2. LG Network Storage Installation
* If the desired LG Network Storage is not found, click again on the ‘Search Network’
button to restart the search. If the search on the ‘NAS Detector’ is unsuccessful, re-check
the Network connection. For manual setup see section <IP Setup>.
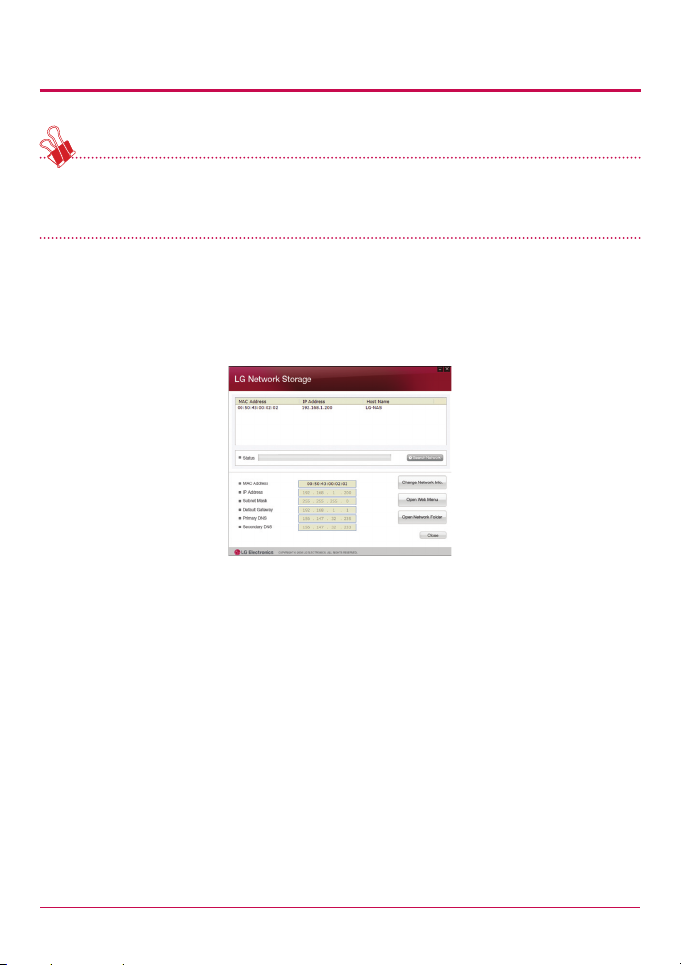
3 If the search result of the LG Network Storage information is chosen, as well as default
network information of the LG Network Storage, including the Subnet mask, Default
Gateway and DNS, ‘Change Network Info’, ‘Open Web Menu’ and ‘Open Network Folder’
buttons will appear.
* For the ‘NAS Detector’ to properly function, the PC needs to be connected to the same
home router/router / switch / hub as the LG Network Storage.
29
2. LG Network Storage Installation
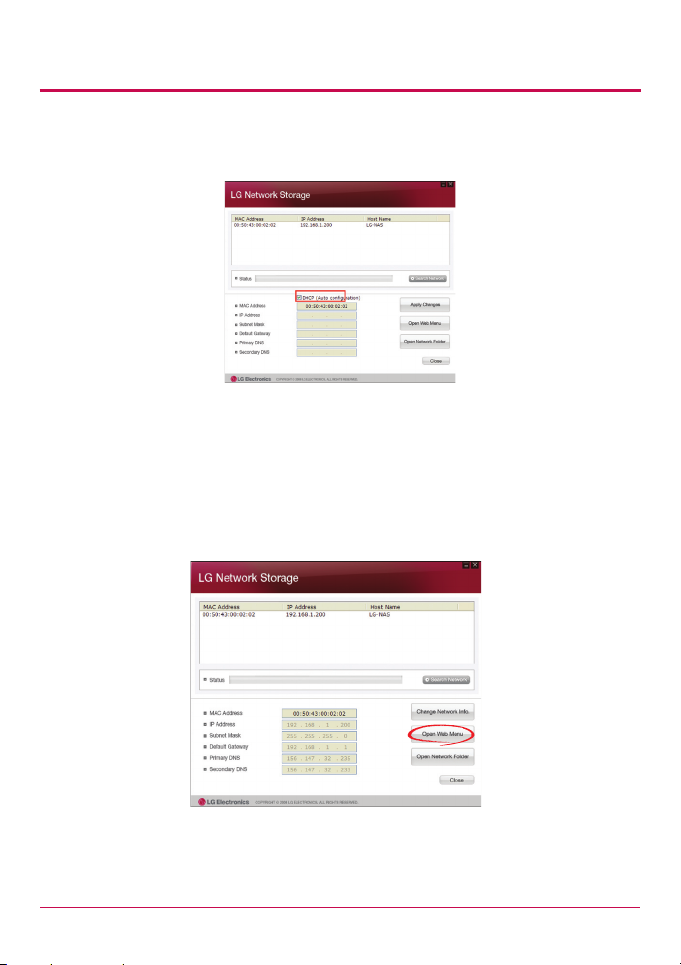
4 ‘Change Network Info’ can be selected to change the IP address.
The DHCP selection option appears if a router is used or if there is a DHCP server on
the network.
* If no IP address is allocated, use the IP address “NAS Detector” or check the DHCP
option and automatically assign an IP address
5 If the ‘Open Web Menu’ button is clicked, the web menu of the selected LG Network
Storage can be accessed.
30
 Loading...