

LG N1A1, N1T3DD1, N1T3DF1, N2A2, N2A2DD2 User Manual
...
This Owner’s manual is copyrighted by [LG Electronics Inc.].
The copy or use of this Owner’s manual, part or whole, without prior consent by [LG Electronics Inc.] is prohibited.
Thank you very much for using products of LG Electronics.
Before using, please read ‘the notice for safety’ carefully and use the products properly.

About LG Network Storage
Freedom to use anytime, anywhere
Thank you for purchasing LG Network Storage.
You can easily save and share files when and wherever
you have internet access with LG Network Storage.
2

3
About LG Network Storage
3

4
Safety warning
Caution
Do not place any objects within 15cm of the unit.
The unit reaches high temperatures creating the risk of burn injuries.
When dealing with system components, strictly abide by the instruction manual. Physical contact with the
soldering on the backside of components may cause severe injury.
Only use compatible devices with the system ports, or the system and devices risk being damaged.
Related to damage to the HDD and data:
- during installation or disconnection of the system, ensure that the system does not experience any
external physical shocks.
- During the operation of the HDD, short surges and stoppages of power may cause the system to turn off
and on quickly.
- there may be a sudden stoppage of electricity during operation
- avoid moving the system during operation of the HDD, which may cause external physical shock
- during the configuration of new volumes.
i) if during use, existing volumes are deleted and new volumes are created, data will be lost.
ii) Before configuration of new volumes, each user must back up data, as well as when creating new
volumes, to ensure the possibility of restoration.
– e.g. virus infections.
Always back up hard disk data to avoid accidental data loss.
In the event of the administrator forgetting the password, restoration is impossible. Hence safeguard the
password.
Do not use damaged disks. Product can be damaged.
Do not dismantle or change the structure of the system in any way. This may cause electric shock.
In the event of the cover being removed during operation, the user risks electric shock, injury, and damage
to the system.
When transporting the system, first turn off the system and disconnect the unit from the power source.
Sudden tension in cables can cause severe damage to the system. Loose cables can cause injury.
Take caution when handling the system so as not to corrupt the hard disk data.
- Take caution not to bump or expose the system to extreme temperatures, as it may damage the sensitive
hard disk.
- Take caution when turning on the electricity, as during this time any external bumps to the system may
corrupt the hard disk data.
- The manufacturer disclaims all responsibility for loss of hard disk data.
1
5
2
8
9
3
4
10
6
7
※
※
To create a new password, the system must be re-initialized. In this case, all data will be lost, and data
recovery will be impossible, for security reasons. The manufacturer disclaims all responsibility in the event
of this occurrence.

5
Safety warning
Do not use damaged electrical cords. This may cause electric shock, and is a fire hazard.
Always check and use correct voltage to avoid electric shock, severe damage to the system, and fire.
Ensure that electrical cords are correctly plugged into the sockets to avoid fire.
Ensure that electrical cords are not damaged or do not have heavy objects placed on them. Keep electrical
cords away from children and pets. Damaged cords may cause electrical shock or fire.
Do not handle the electrical cord with wet hands, as this may cause shock and injury.
When removing the plug from the socket, ensure that the plug is handled and not the cord. Otherwise this
may cause damage to the plug and even fire.
1
5
2
8
9
Keep the power cords and sockets clean at all times to avoid fire and electrical shock.
Do not block vents, as this will cause system damage.
Prior to cleaning the system, always disconnect the power, to avoid damage and electric shock.
In the event of lighting and thunderstorms, immediately physically disconnect the system from any power
source, to avoid damage to the system.
Keep the system away from direct sunlight to avoid overheating, and melting of the case, which may
eventuate in fire and injury.
10
11
12
13
14
15
16
17
18
19
20
3
4
6
7
Do not disassemble the power supply, to avoid the danger of electric shock.
Keep children away from the system, as consuming any parts will cause serious injury. In the event of swallowing any parts, such as screws, immediately seek medical treatment.
Ensure that there are no loose or exposed metallic objects inside the case, to avoid the danger of damage,
fire and electric shock.
Ensure that multipoint power sockets are not overloaded, to avoid the danger of fire and electric shock.
Ensure that cords are always neatly arranged and are not trapped under the system or other heavy objects.
When connecting and disconnecting the electrical cord, take care in handling the socket to avoid the
danger of electric shock.
Ensure that hands are never used, to avoid damaging the system and electric shock. Always use screw
drivers for work inside the system.
If you hear sound from power cord or adapter, unplug the power cord from the outlet immediately.
If water or foreign substances go into the adapter or inside of the products, unplug the power cord from the outlet.
If you drop or damage the system, unplug the power cord from the outlet.
If the system smokes or if you smell burning, stop using it and unplug the power cord from the outlet.
Warning

6
Table of contents
About LG Network Storage
Safety warning
Table of contents
Components and supported OS
Name of the product parts (N1T1/N1T3/N1A1 product)
Name of the product parts (N2A2 product)
Name of the product parts (N2R5/N2B5 product)
Product Installation
Network Storage installation (N1T1/N1T3/N1A1 Product)
Network Storage installation (N2A2 Product)
Network Storage installation
(N2R5/N2B5 Product)
Program Installation
LG Network Storage software installation CD
Network Storage set up
LG Network Storage Installation Wizard
NAS Detector
Connecting to Web Menu
NAS Monitor
File Uploading and Downloading
Network folder (Windows)
Network folder (Mac)
Network folder (Linux)
Remote Network Drive
File Explorer
FTP
Using Network Storage
Enjoying Multimedia on you PC
Sharing through Community Board
Enjoying Multimedia
Play through a Smartphone
Picture backup
Burning files with DVD/BD
Home Monitoring Camera
Family Cast
Account and user registration
Access service with a PC
Accessing from TV
Signing up from the TV
LCD Panel and Buttons (N2R5/N2B5 Product)
Using external HDD (N1T1/N1T3/N1A1 Product)
Using External ODD (N1T1 Product)
Using Advanced Features
Torrent
Network Printer
Home Screen setup
Main Screen setup
Favorites setup
Favorites Mode
LG Network Storage Introduction
02-03
04-05
06-07
08
09-10
11
12
14
15
16
17-18
19-21
22
23
24
26-27
28
29
30
31
32-34
35
36
37-38
39-40
41
42
43
44
45-47
48-51
52
53
54
54
55
56-57
59
59
60
Installing LG Network Storage
LG Network Storage Add-ons setup
Using LG Network Storage
(N1T1/N1T3/N2R5/N2B5 Product)
(LG My Data)

7
Table of contents
System Setting
Brightness and Sound Setting
Managing Power
Language Setting
Time setup
Mail Notification Service
Viewing System Information
System Initialization
DLNA Setup
iTunes Service Setup
Torrent Setup
Backup Setup
Rsync Setup (N2R5/N2B5 Product)
USB Backup Setup
Schedule Backup Setup
Backup Button Setup
USB Backup Mode (N2R5/N2B5 Product)
ODD Backup Mode (N2R5/N2B5 Product)
Time Machine Setup
Selective Mirror
Updating Firmware
Method to set up a network sharing device
Home Monitoring Camera Port Setup
Volume & RAID
A guide to using port number in
LG Network Storage
Open source software information
79
80
81
81
82
83
83
84
85
85
86-87
88
89-90
91
92
93
94
95
96
97-9 9
100
101-102
103
103
Setting up Account and Access
Requesting Account
Approving Account Request
My Information Setting
Managing Users
Managing Groups
Managing Share Folder
Network Setup
Setting Host Name
Setting up LAN
DDNS Setup
UPnP Port Forwarding Setup
Network Folder Setup
Windows Networking
Mac Networking
Unix/Linux Networking
Advanced Network Setup
File Server(FTP) Setup
Web Server Setup
Managing Hard Disk
Volume Setup
External Hard Drive
(N1T1/N1T3/N1A1 Product)
61
62
62
63
64-65
66-67
68
69
70
71
72
73
73
74
75
76-77
78
When you cannot set up automatic network sharing
device (UPnP setting) on DDNS set-up.
It’s a symbol for functions with difficult set up.
This is recommended for experienced and advanced users that are familiar with advanced network
settings and routers.
Supplement

8
Please check the components before installing.
LG Network Storage Introduction
l Components and supported OS
Support OS
Components
- Windows XP SP3, Windows Vista, Windows 7
- MAC OS X 10.5 or higher
- Linux(Ubuntu 10.10 or higher, Fedora 14 or higher, OpenSuse 11.4 or higher)
※
※
※
Refer to quick install guide for component details.
Pictures or photographs used in the user manual are subject to change in accordance with the components of the model.
Components may be changed upon the situation of the company.
Network Storage
PC S/W InstallerProduct Warranty
Power supply cord
and adaptor
Quick Installation Guide
LAN cable
PC S/W
NAS Detector
NAS Monitor
Nero BackItUp & Burn
Support OS
Windows XP, Server 2003, Vista, Mac OS 10.x or higher, Windows 7
Windows XP, Server 2003, Vista, Windows 7
Acrobat Reader
Flash Player
Installation Wizard
Remote Network Drive
Windows, Mac
Windows XP(SP2 or higher), Vista, Windows 7
Windows XP(SP2 or higher), Vista, Windows 7
Windows, Mac
Windows XP(SP3 or higher), Server 2003, Vista, Windows 7
9
LG Network Storage Introduction
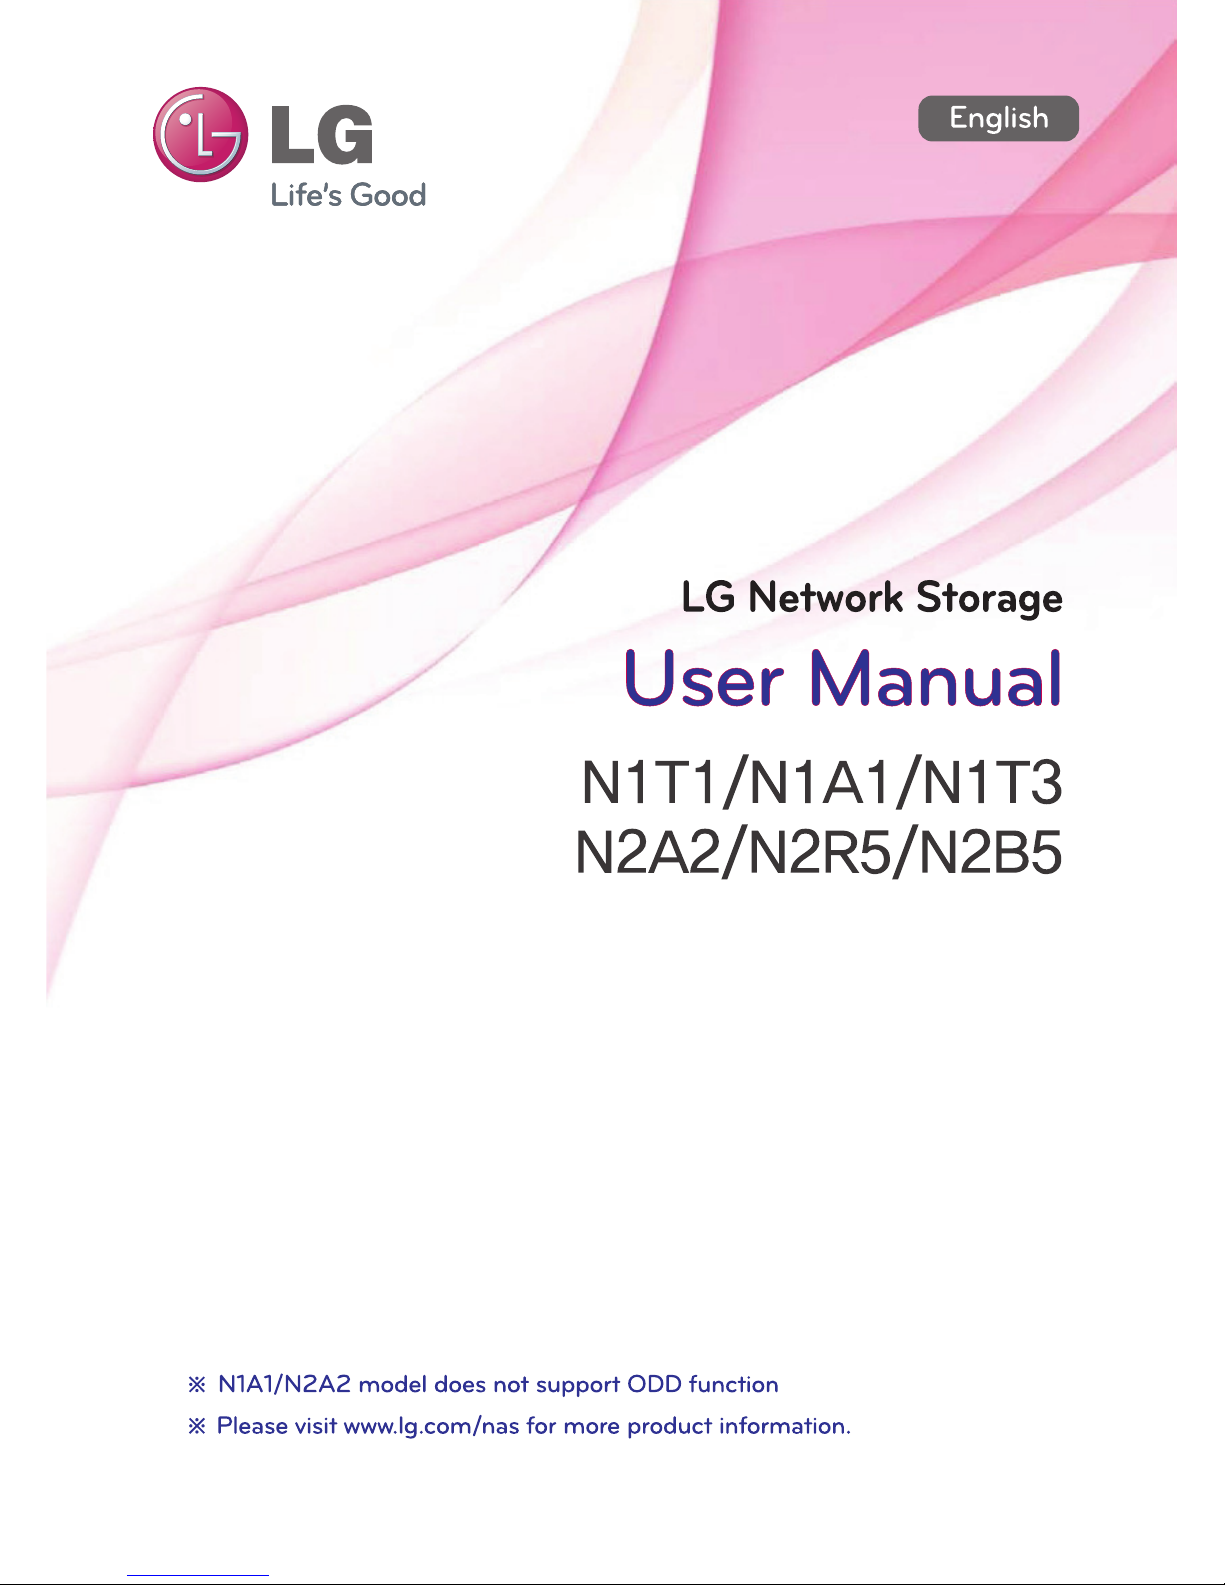
l Name of the product parts (N1T1/N1T3/N1A1 product)
(Front)
ODD Slot hole : You should insert the disc having the writing side as a data side.
Pedestal
Back-up button : A button to back-up data of a disc or USB onto NAS.
ODD eject button
LED panel
:LAN :POWER:HDD :ODD :USB
N1A1N1T1 N1T3
10
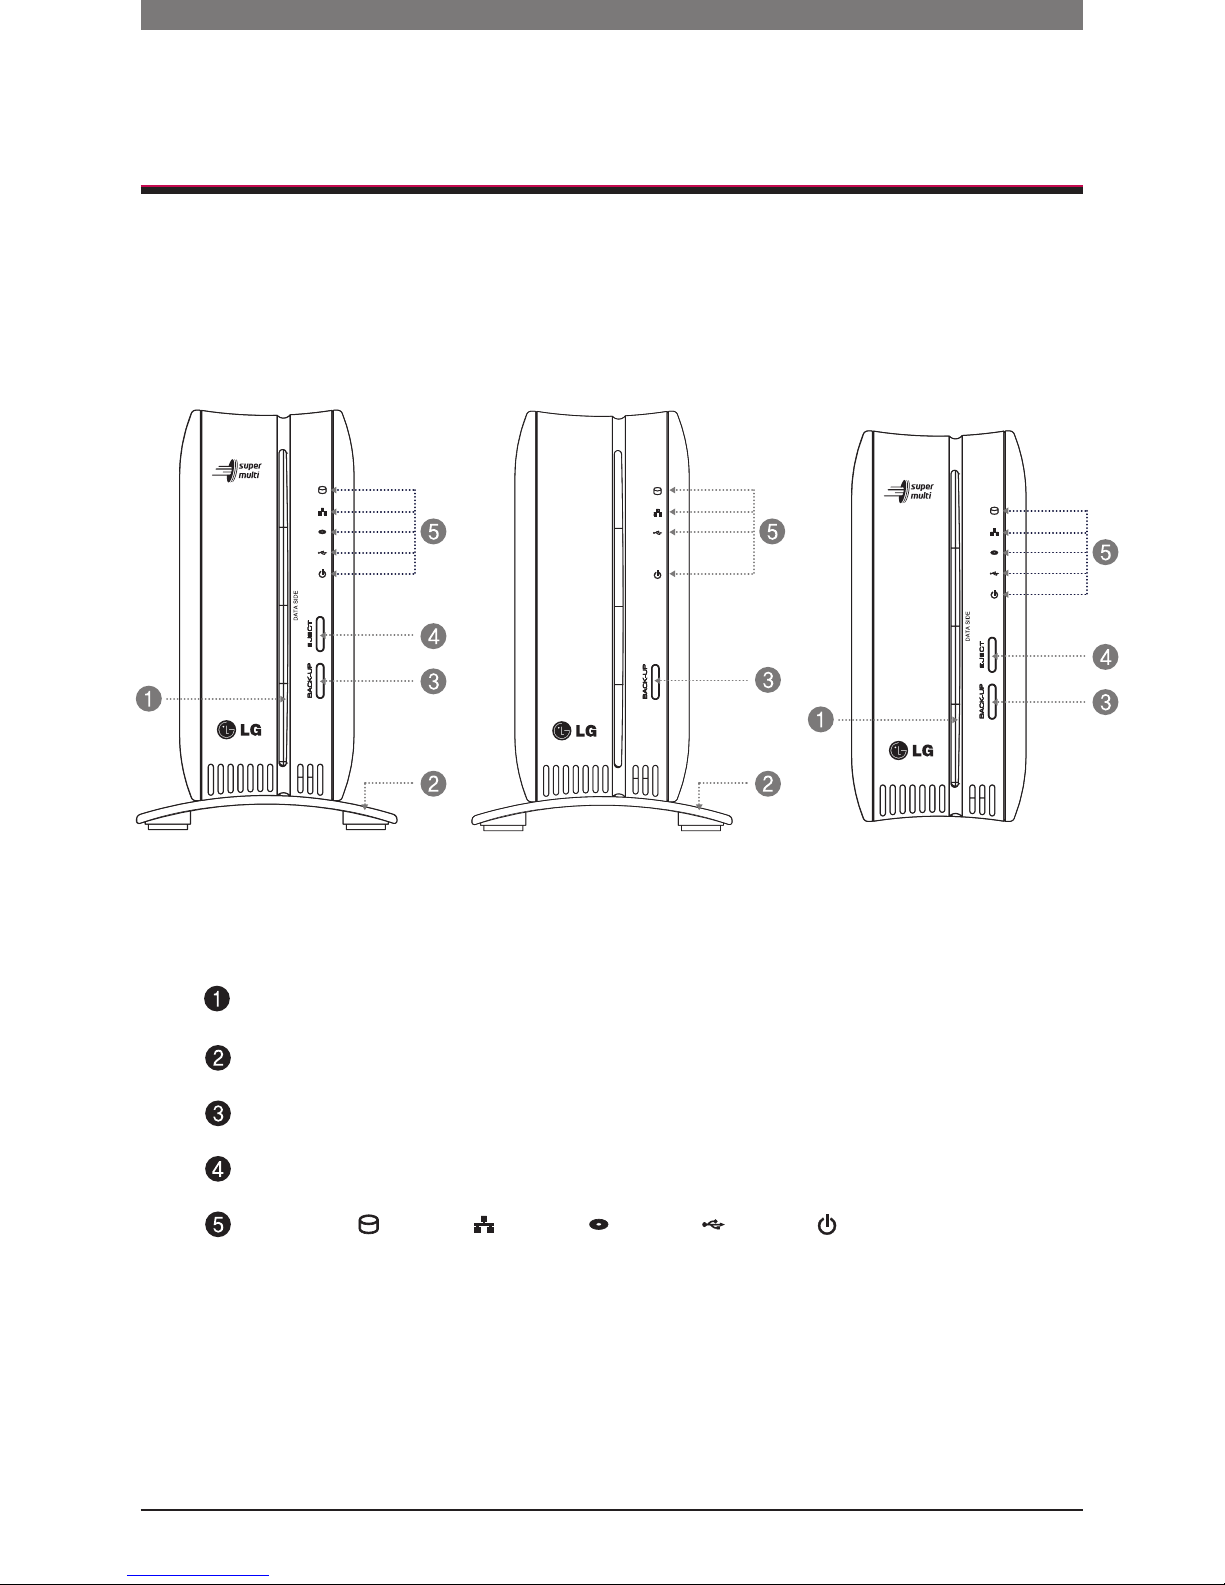
Adaptor cable holder
Kensington Lock
Fan
Power button
Mode changing switch
USB 2.0 port
LAN port
DC-in
(Back)
EX. HDD MODE USB Mini-B Port
Air ventilation hole
LG Network Storage Introduction
l Name of the product parts (N1T1/N1T3/N1A1 product)
N1T1 N1A1 N1T3
11
(Front)
(Back)
LED panel
USB 2.0 port
Back-up button
USB 2.0 port
LAN port
DC-in
Adaptor cable holder
Kensington Lock
Power button
Fan
:LAN:HDD :POWER
LG Network Storage Introduction
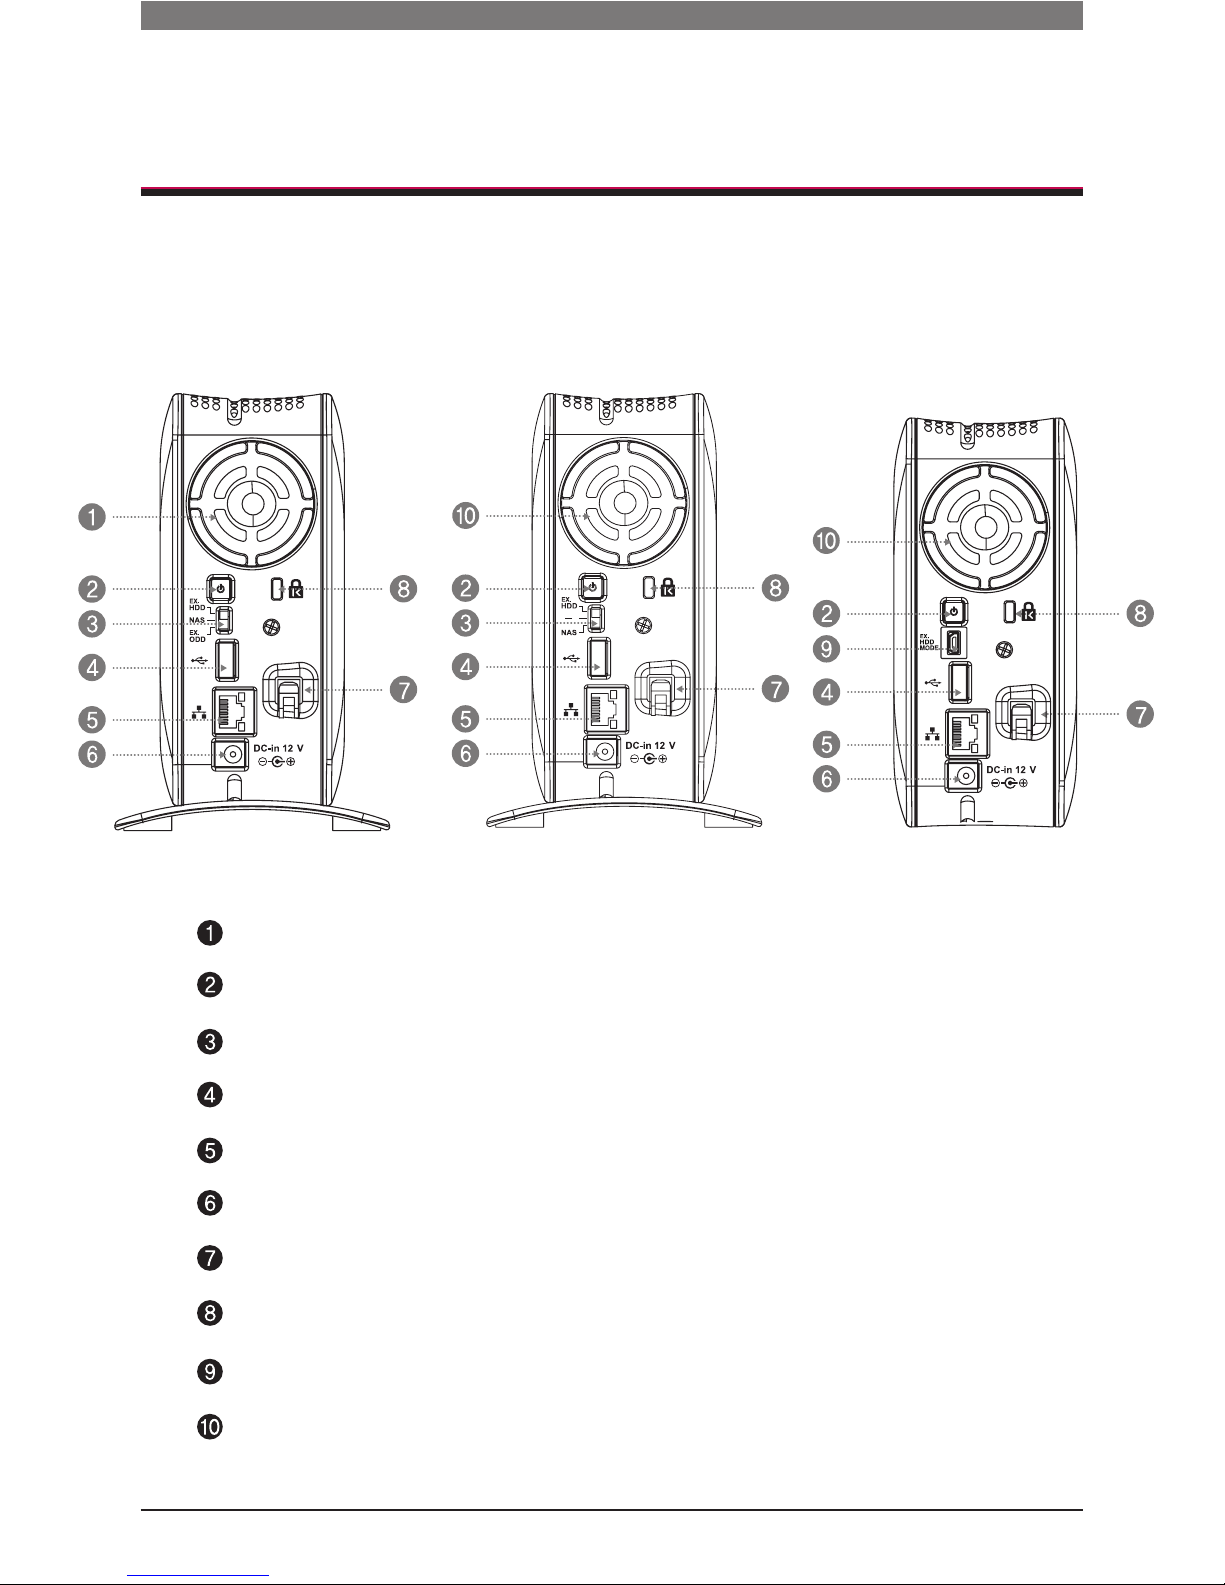
l Name of the product parts (N2A2 product)

12
LCD Panel
Power button
SET (S) button : Selects mode.
Arrow button(
←,→
) : Navigates menu, moves cursor for IP settings Mode button : changes mode
LED panel
Blu-ray/DVD Drive
USB 2.0 port
Disc Open
button
11
USB 2.0 port
12
LAN port
13
e-SATA : External SATA II device support
14
DC-in
15
Adaptor cable holder
Kensington Lock
Fan
LG Network Storage Introduction
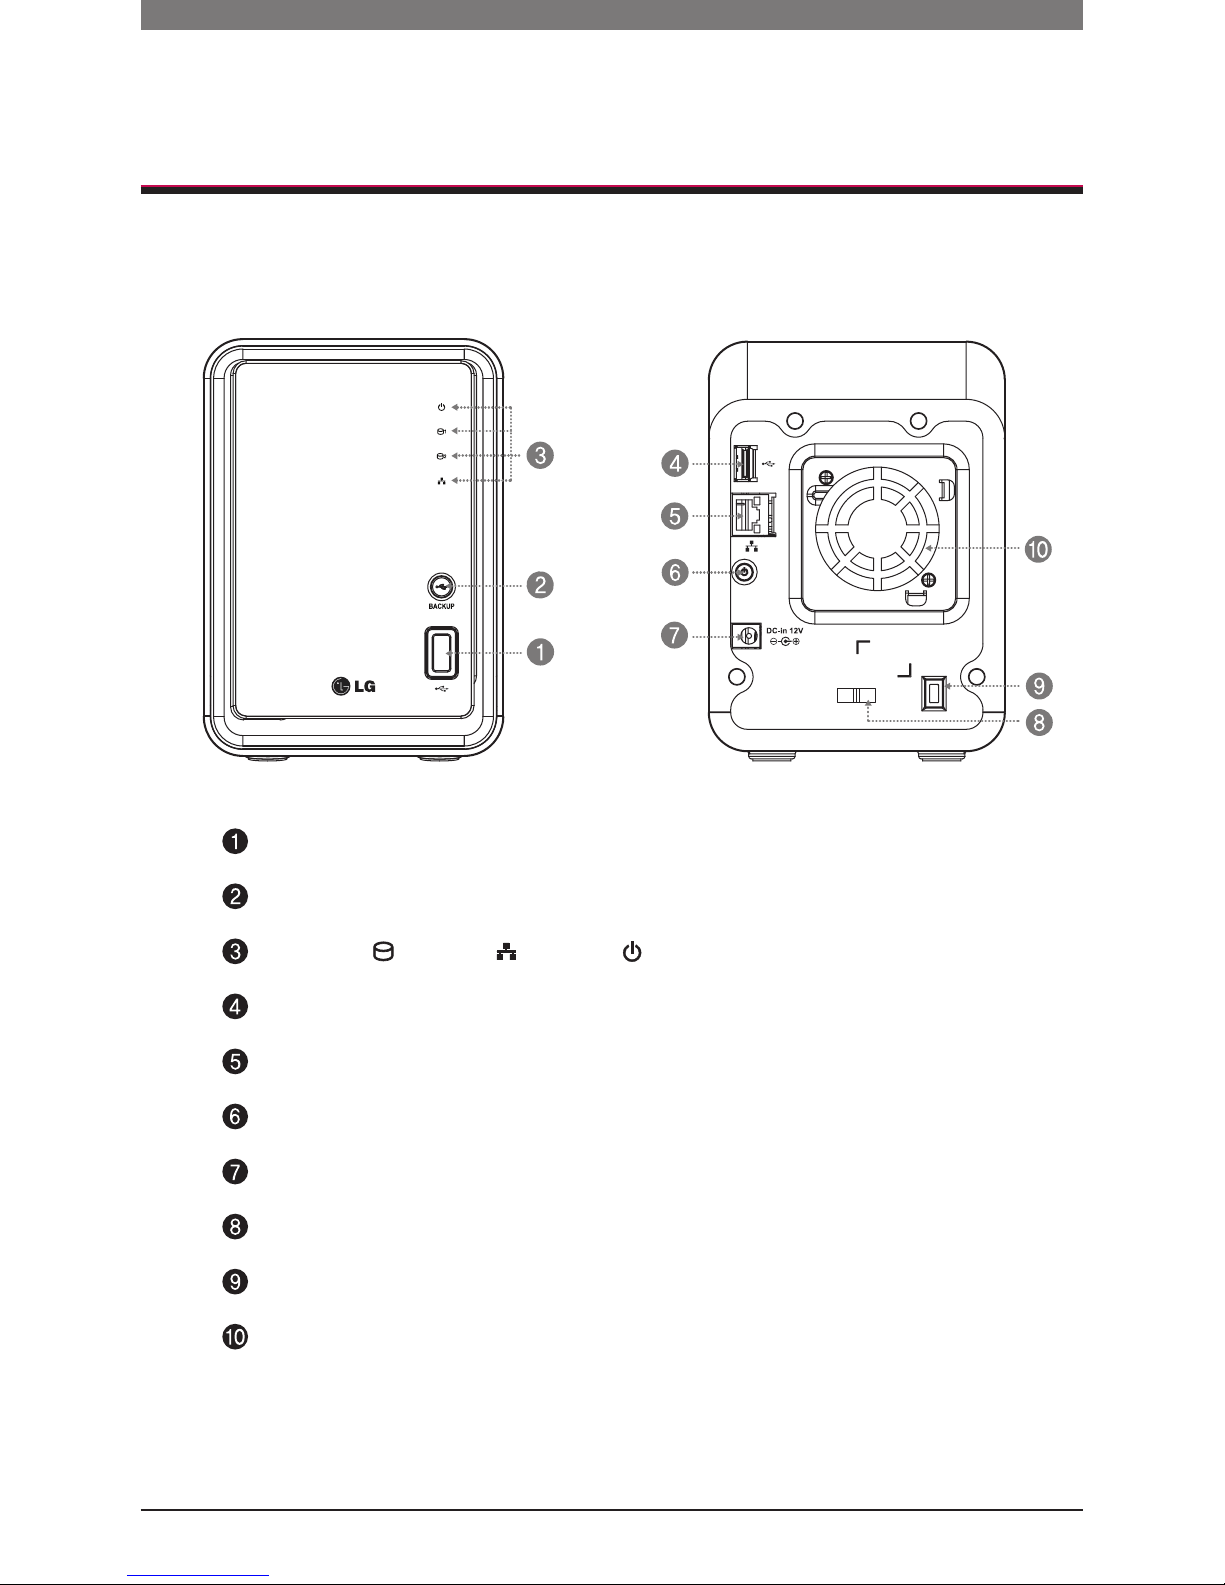
l Name of the product parts (N2R5/N2B5 product)
(Front) (Back)
15
11
12
13
14

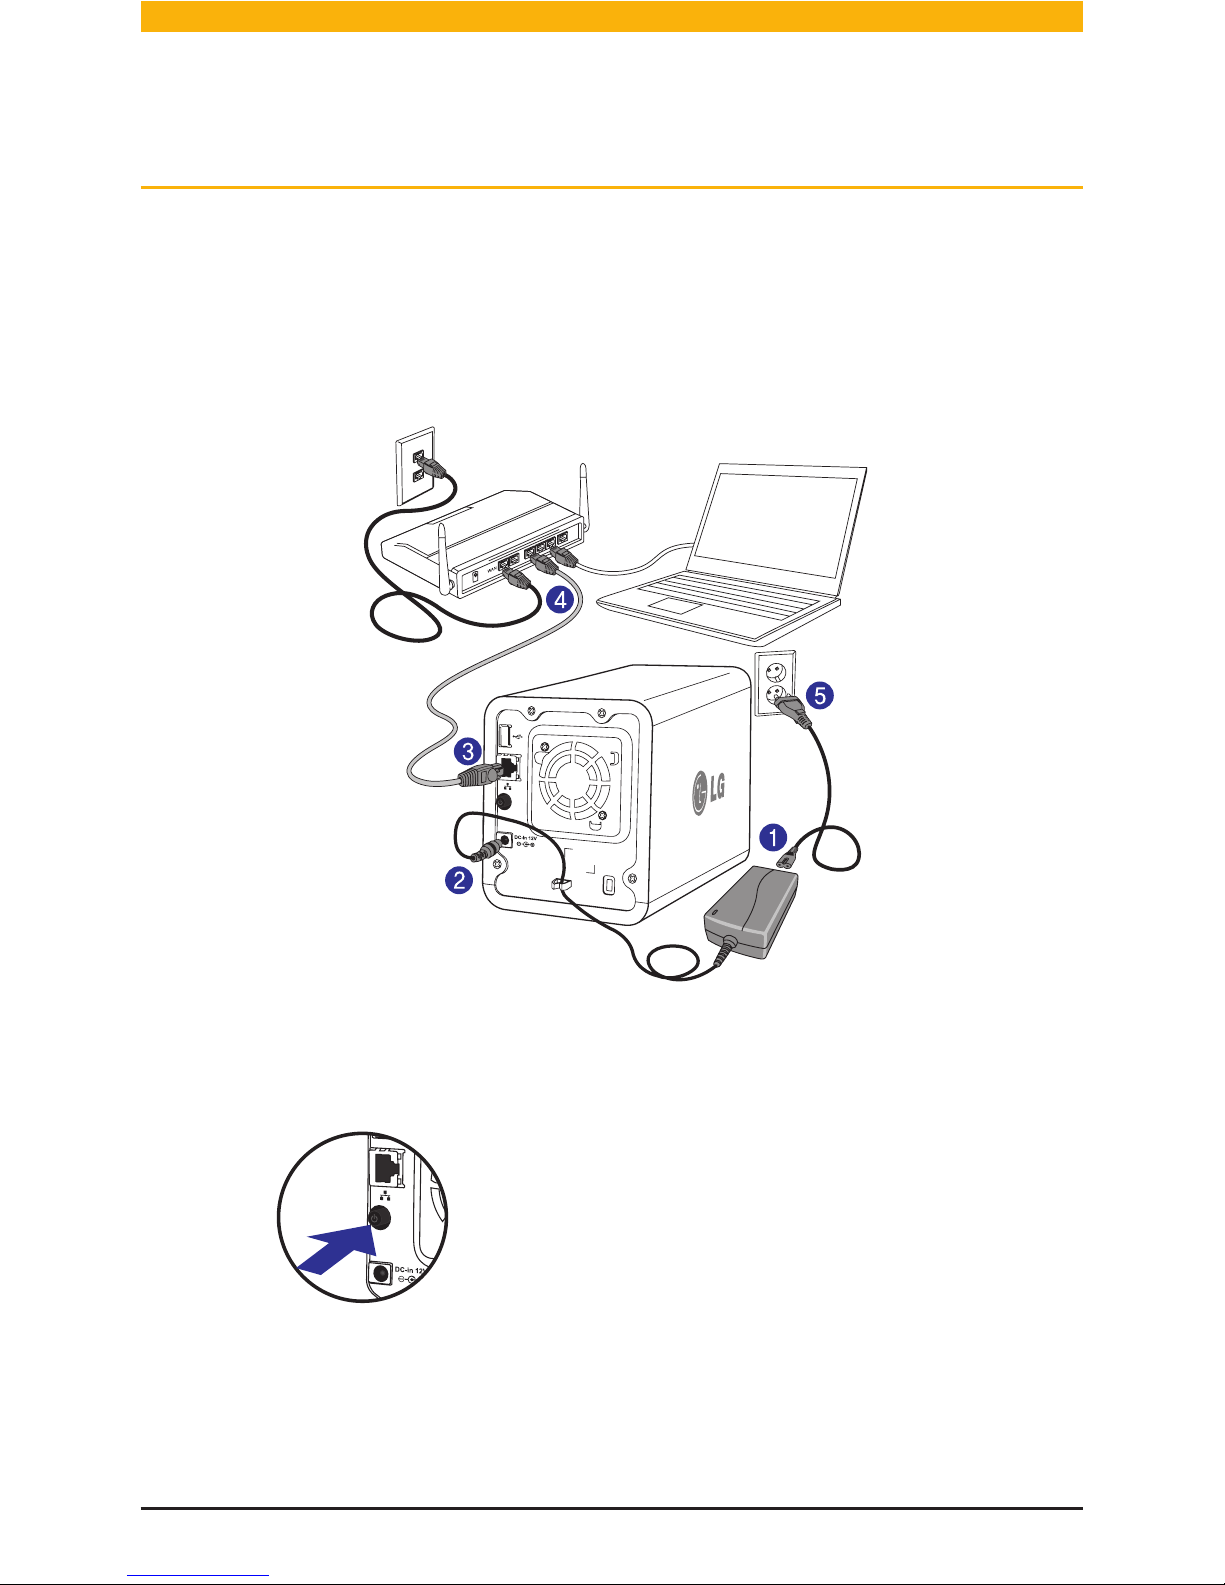
Installing LG Network Storage
This is the preparation process before using Network Storage.
Please follow the installation steps.

14
1
-
1. 제품 소개
제품구성물 및 지원 OS
1. Connect LAN port of Network Storage with LAN port of a network equipment
(IP network sharing device / router / hub / switch) using a LAN cable enclosed,
or directly connect the LAN port of the PC.
[N1T1/N1T3/N1A1]
2. Check to see if it is set to NAS mode.
※
3. After checking the connection of the power supply cable of LG Network Storage,
press the power button at the back and start LG Network Storage.
The booting will take about 40 sec. ~ 1 min. and alert
you with a sound.
(The LED will turn on with proper connection.)
Product Installation
l Network Storage installation (N1T1/N1T3/N1A1 Product)
network sharing device
(Shapes may vary depending on the
network sharing device.)
*
Network Storage
*
For the N1T3 model, if the EX. HDD MODE USB Mini-B port and PC is not
connected it is in NAS mode.
N1T1/N1A1
N1T3
15
2
-
3. 모드 스위치
외장형 HDD 사용하기 (N1T1 제품)
2. After checking the connection of the power supply cable of LG Network Storage,
press the power button at the back and start LG Network Storage.
The booting will take about 40 sec. ~ 1 min. and alert
you with a sound.
(The LED will turn on with proper connection.)
[N2A2]
1. Connect LAN port of Network Storage with LAN port of a network equipment (IP network sharing device / router / hub / switch) using a LAN cable
enclosed, or directly connect the LAN port of the PC.
Product Installation
l Network Storage installation (N2A2 Product)
network sharing device
(Shapes may vary depending on the
network sharing device.)
*
Network Storage
*
N2A2

16
2. After checking the connection of the power supply cable of
LG Network Storage, press the power button at the back and
start LG Network Storage.
The booting will take about 40 sec. ~ 1 min. and alert you
with a sound.
(The LED will turn on with proper connection.)
[N2R5/N2B5]
1. Connect LAN port of Network Storage with LAN port of a network equip-
ment (IP network sharing device / router / hub / switch) using a LAN cable
enclosed, or directly connect the LAN port of the PC.
Product Installation
l Network Storage installation (N2R5/N2B5 Product)
network sharing device
(Shapes may vary depending on the
network sharing device.)
*
Network Storage
*
N2R5/N2B5

17
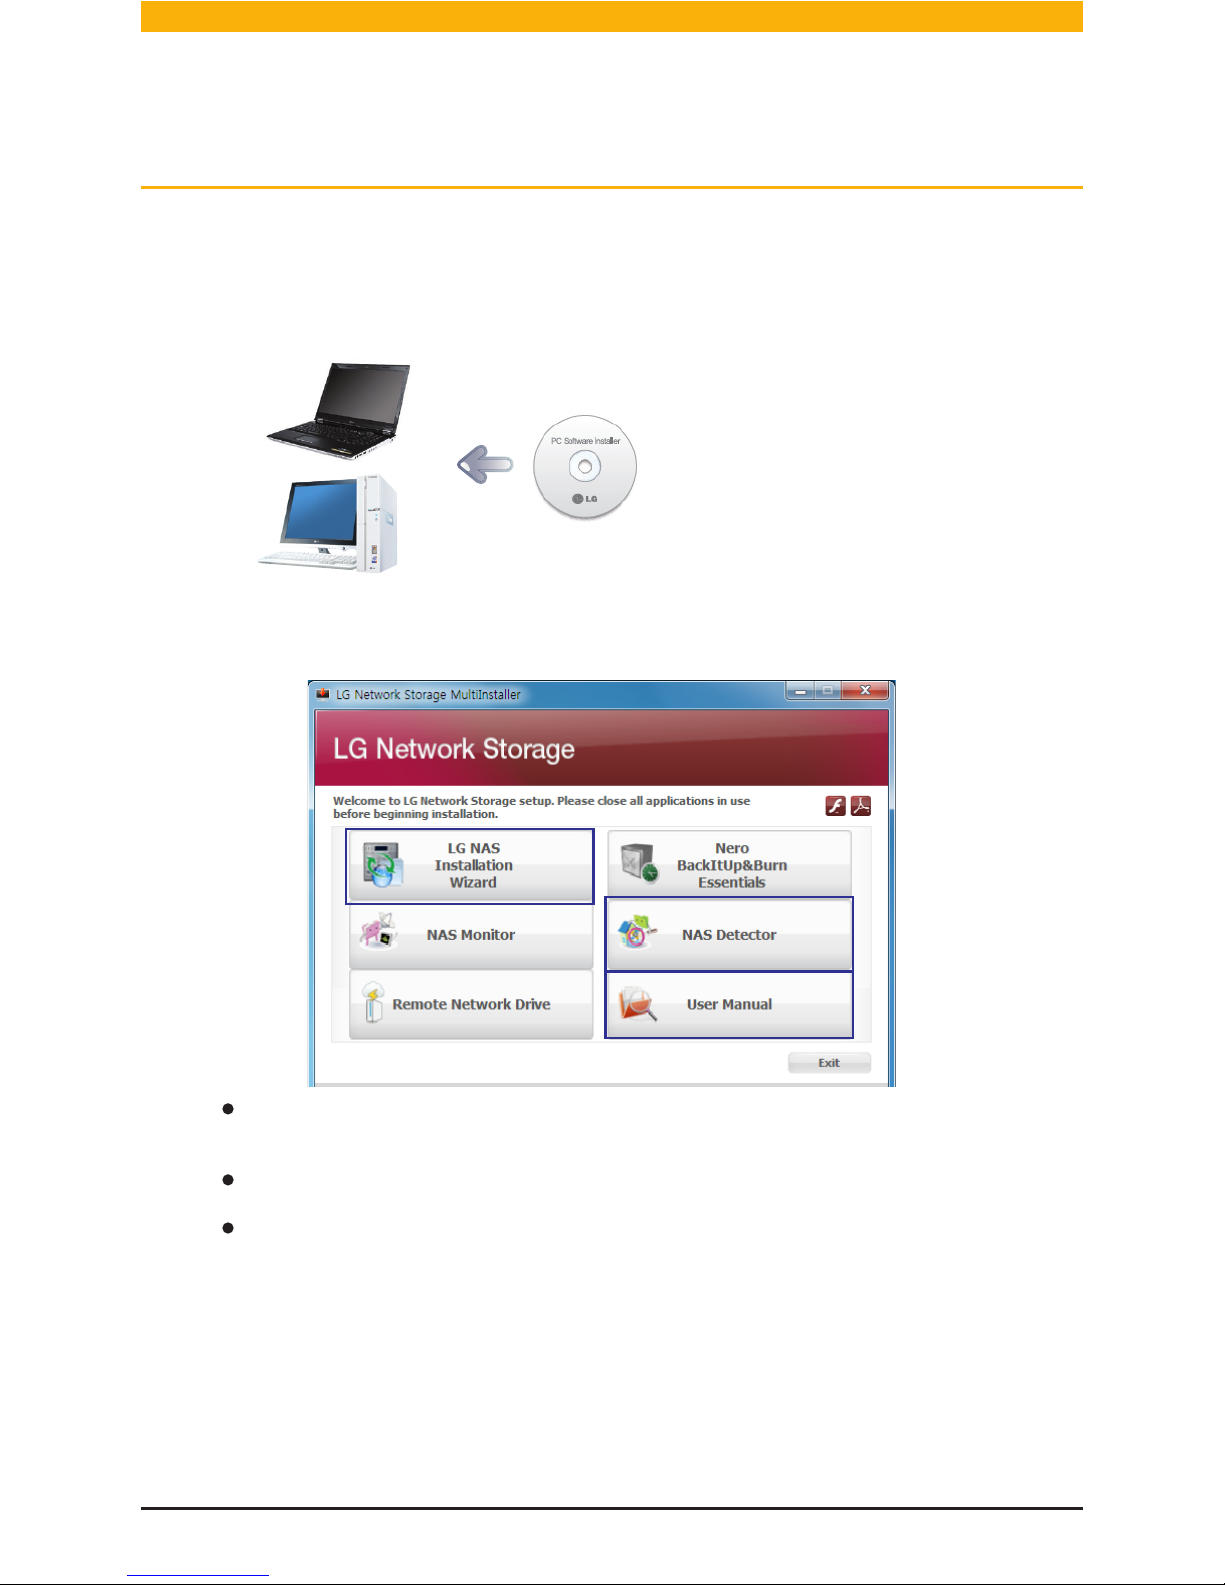
Included CD “LG Network Storage PC Software Installer” provides the following
programs.
2. NAS Monitor
3. Nero Backitup&Burn
4. NAS Detector
Provides a function of easily and quickly finding LG Network Storage present on
the user’s network.
5. Remote Network Drive
Remote Network Drive allows you to use the network folder anywhere, as if you are
in your home, through the Window Explorer.
Provides a function of checking the state of LG Network Storage in real time as
well as a simple control.
Software that protects and stores data for backup and restoration.
1. LG NAS Installation Wizard
Program that helps you to set up network which is complicated to do without
in an easy way.
Program
Windows Mac Linux
Flash Player
Acrobat Reader
NAS Detector
NAS Monitor
Nero backitup&burn
LG NAS Installation Wizard
Remote Network Drive
Supporting operating system
Software supporting OS
Program Installation
l LG Network Storage software installation CD
18
1. Insert “LG Network Storage PC Software Installer”
CD that is provided with the system into an optical drive (CD/DVD drive) of the user’s PC.
2. A pop-up as below appears due to automatic operation.
You should not put in‘Network
Storage’.
※
For detailed instructions on using Nero BackItUp & Burn, refer to the manual
within the program after installation.
To install NAS Monitor, Nero BackItUp & Burn program click each button.
Click on the icon if a flash player is not installed on the PC
※
※
※
Install ‘Installation Wizard’ for Windows users.
It will make Network Storage setup easy.
Install ‘NAS Detector’ for Mac users.
If you click the ‘User Manual’ button, you can download the user
manual in various languages through the web.
Program Installation
l LG Network Storage software installation CD
If you want to install Remote Network Drive, click the Remote Network Drive button.
※
19
If Network Storage doesn’t
appear, recheck the connection and click ‘Search network
button’.
※
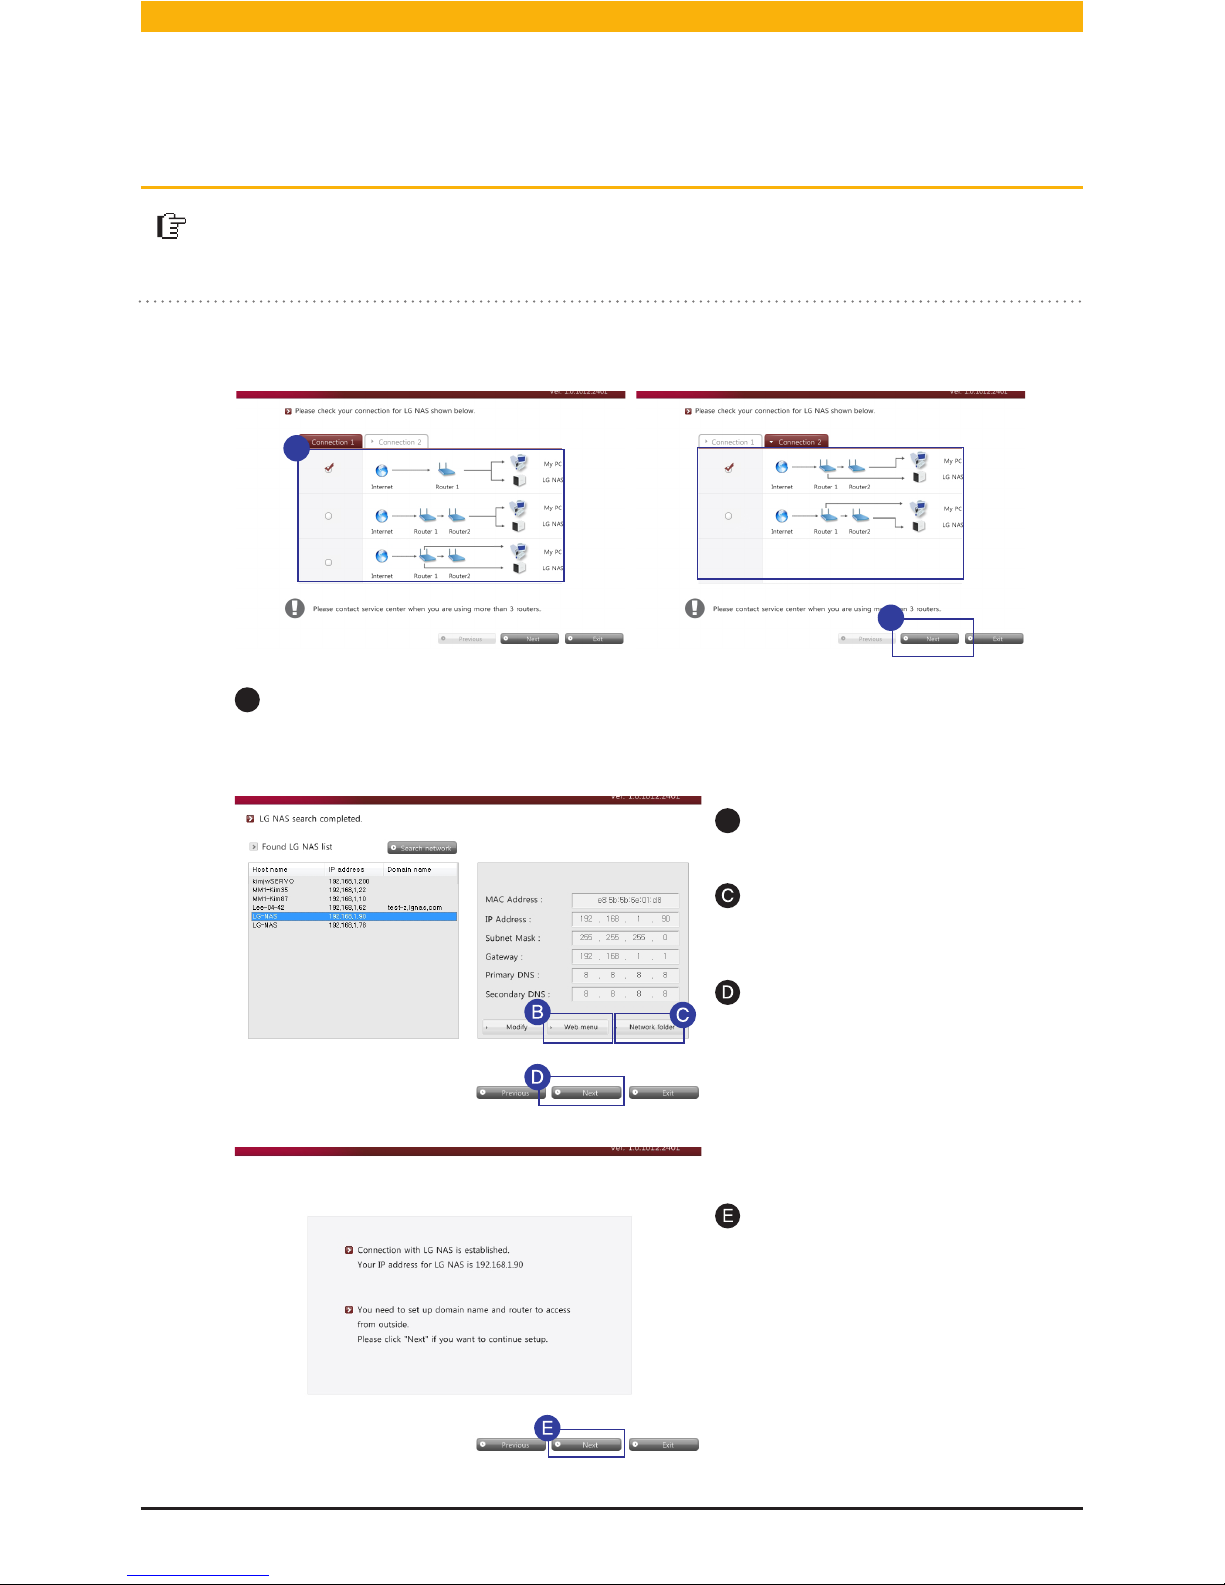
Helps to easily set up Network Storage and complicated networks (DDNS, Port
Forwarding).
A
After running Installation Wizard, choose the router currently connected to Network
Storage and click ‘Next’
Click ‘Next’
After checking the content
click ‘Next’.
Create short cut icon on the
desktop by clicking ‘web menu’
Create short cut icon on the
desktop by clicking ‘Network
Folder’.
※ Compatible with only Windows OS. Use NAS Detector for Mac OS.
B
A
A
Network Storage set up
l LG Network Storage Installation Wizard

20
Enter the name and password of
the domain you would like to use.
Choose the model for your
Network Storage.
Select the item that tests for
external connections.
After entering the password for
Network Storage administrator,
click ‘Ok’. Default Administrator
password is ‘admin’.
Click ‘Next’.
Click ‘Next’.
After checking the results click
‘Next’.
Network Storage set up is
complete. Click ‘Exit’ and enjoy
various features on Network
Storage.
Click ‘Next’.
I
J
Enter the domain name without
special characters and spaces.
(English and digits only)
If the connection fails,
move to and continue
installation.
※
※
K
L
G
F
Network Storage set up
l LG Network Storage Installation Wizard
21
P
Q
O
R
S
If the connection failure persists, you must set up manual Port Forwarding by
referring to the router’s manual.
Refer to Appendix 103p for all LG Network Storage port numbers.
After confirming failed connection,
click on ‘Next’
Select the brand and model of your
router.
After confirming the selection click ‘Next’.
After confirmation, click ‘Next’ to
move to .
P
Q
R
S
Click ‘Next’.
You can change to user defined
settings but we recommend
default settings.
Install the router manually using
the router manual, if the router is
not in the list.
※
※
※
※
Network Storage set up
l LG Network Storage Installation Wizard

22
Recommended for searching Network Storage and setting up networks in Mac
A
B
It shows LG Network Storage’s ‘MAC Adress’, ‘IP Adress’, and ‘Host Name’ in order.
If the LG Network Storage you are searching for fails, click the ‘Search Network’
button.
You can change IP addresses and related information by clicking ‘Change Network Info’
button.
A
You can connect to Web Menu of selected LG Network Storage by clicking ‘Open
Web Menu’ button.
You can connect to LG Network Storage network folder by clicking ‘Open Network Folder’
button.
For “NAS Detector” program to work properly, the PC must be connected to the LG
Network Storage with the same IP Router / Switch / Hub.
※
When you aren’t able to connect to Network Storage remotely, you must use the
Network Storage’s UPnP function, or set up Port Forwarding by referencing your
router’s manual.
※
Also, compatible with Windows
※
Network Storage set up l NAS Detector

23
Connecting to Web Menu
You can easily enjoy Multi-media files and manage LG Network Storage through
Web Menu.
A
Click ‘Web Menu’
1. There are several ways to connect to Web Menu.
2. The login window will appear as below.
※
When connecting through domain, you must first set up DDNS.
See 70p for DDNS set up.
A
A
Connecting through Shortcut icon Connecting through the Internet
address box
Connecting through Installation
Wizard
Connecting through NAS Detector
LG-NAS_We
bMENU
A
Select the wanted language.
The default LG Network Storage
administrator’s ID is ‘admin’ and
the password is ‘admin’
You can request a new account.
B
B
A
※
It is advised to change your
password for security reasons.
(Connect to Network Storage
Web Menu -> Configuration ->
Personal Setting -> My profile)
24
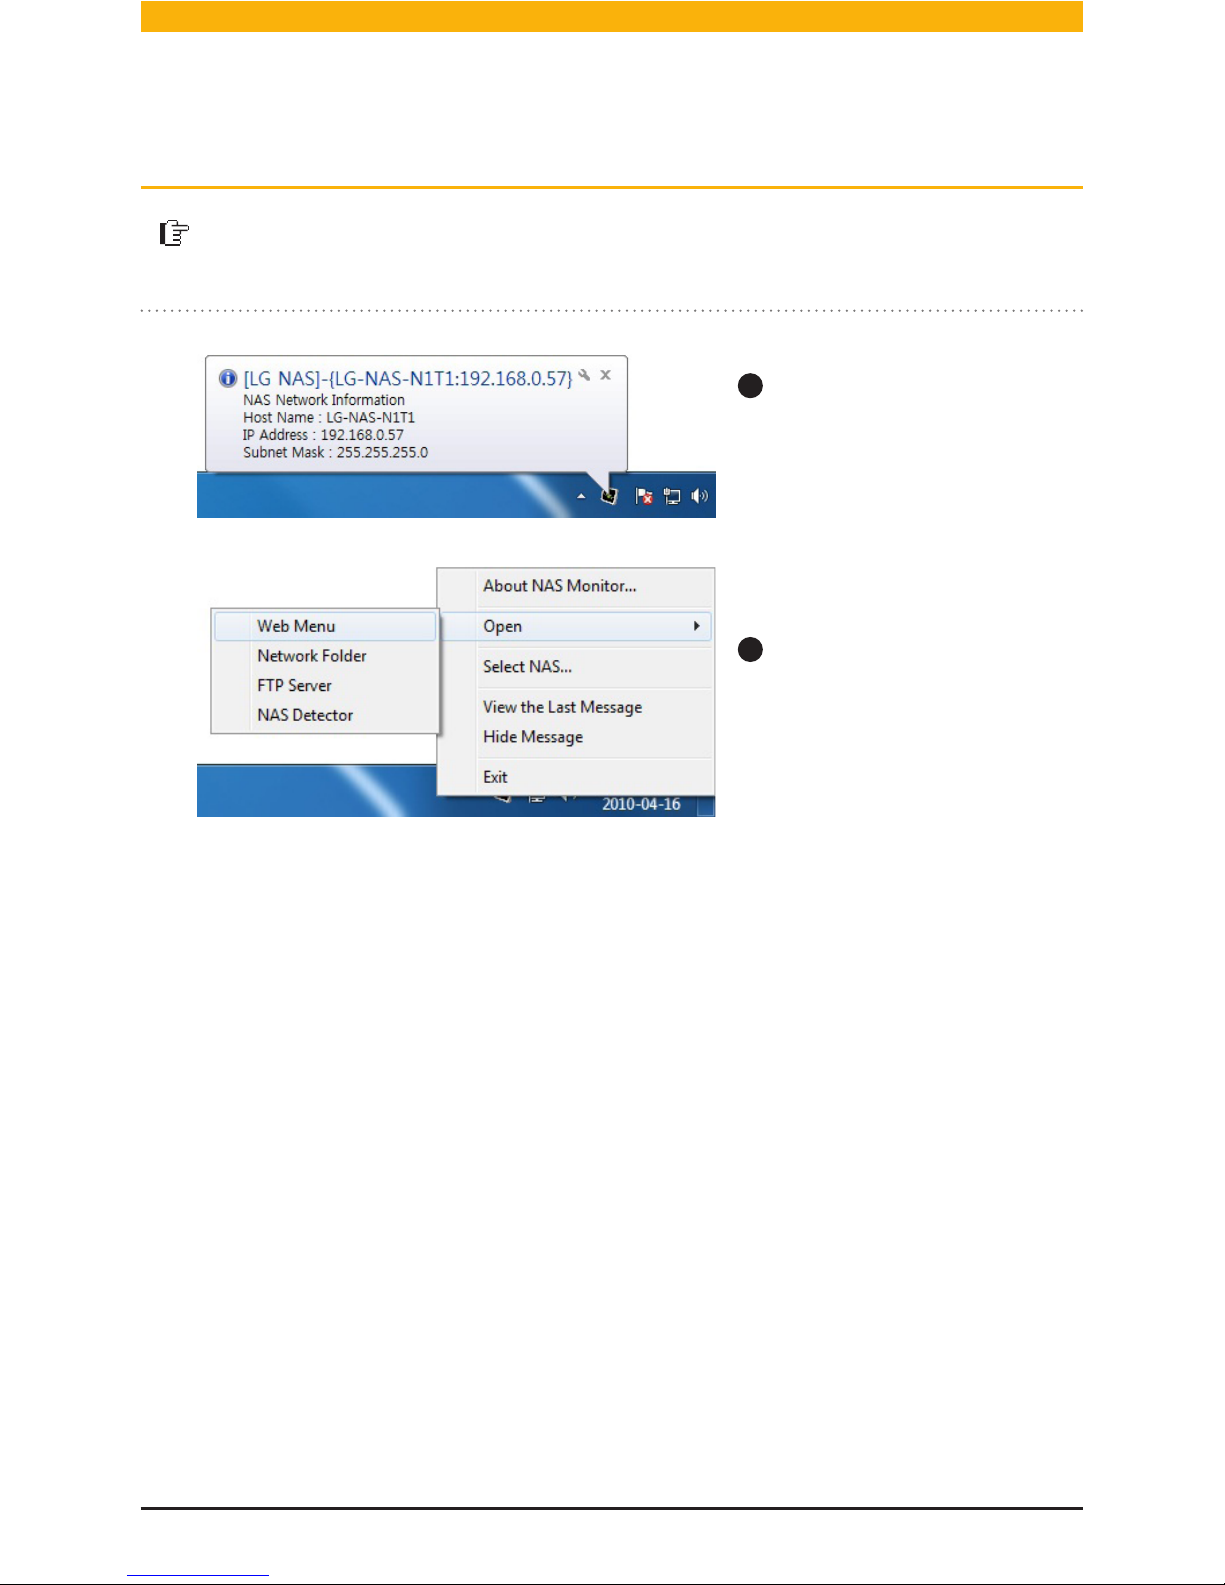
NAS Monitor
The Network Storage’s IP address detected on the local network will be shown
and will connect to the automatically changed IP address.
A
NAS Monitor will automatically
communicate with LG Network
Storage to get IP Address
information.
Right click on windows
notice icon.
B
- Web menu : It is a menu used to access a web page.
- Network Folder : It is used when opening network folde.
- FTP server : It is used to connect to FTP server.
- NAS Detector : Used to change the IP Address of LG Network Storage
NAS Detector must be installed to use this menu.
- NAS Selection : You can select one desired LG Network Storage.
- View the Last Message : Shows the latest network information on the connected Network
Storage.
If there is only one Network Storage connected, it will be automatically selected.
※

Using LG Network Storage
This explains how to use various services supported by LG Network Storage.
※ Network Folder and Remote Network Drive is recommended.

26
File sharing and storing is possible by using ‘My computer’ settings at home or office that uses the same network.
※
As in the picture below, you can enter the ‘\\IP Address’ in the Windows search
box to connect to the server.
1. Connecting to Network Folder
A
Click ‘Network Folder’
Click ‘Run’ from the start menu -> enter‘\\IP Address’-> click ‘Ok’
A
A
Connecting through Installation
Wizard
Connecting through Shortcut
icon
Connecting through Windows ‘Run’
function
Connecting through NAS Detector
※
※
This is Windows7 image.
“Run” short cut key is
[ + R]
B
B
File Uploading and Downloading
l Network folder (Windows)
27
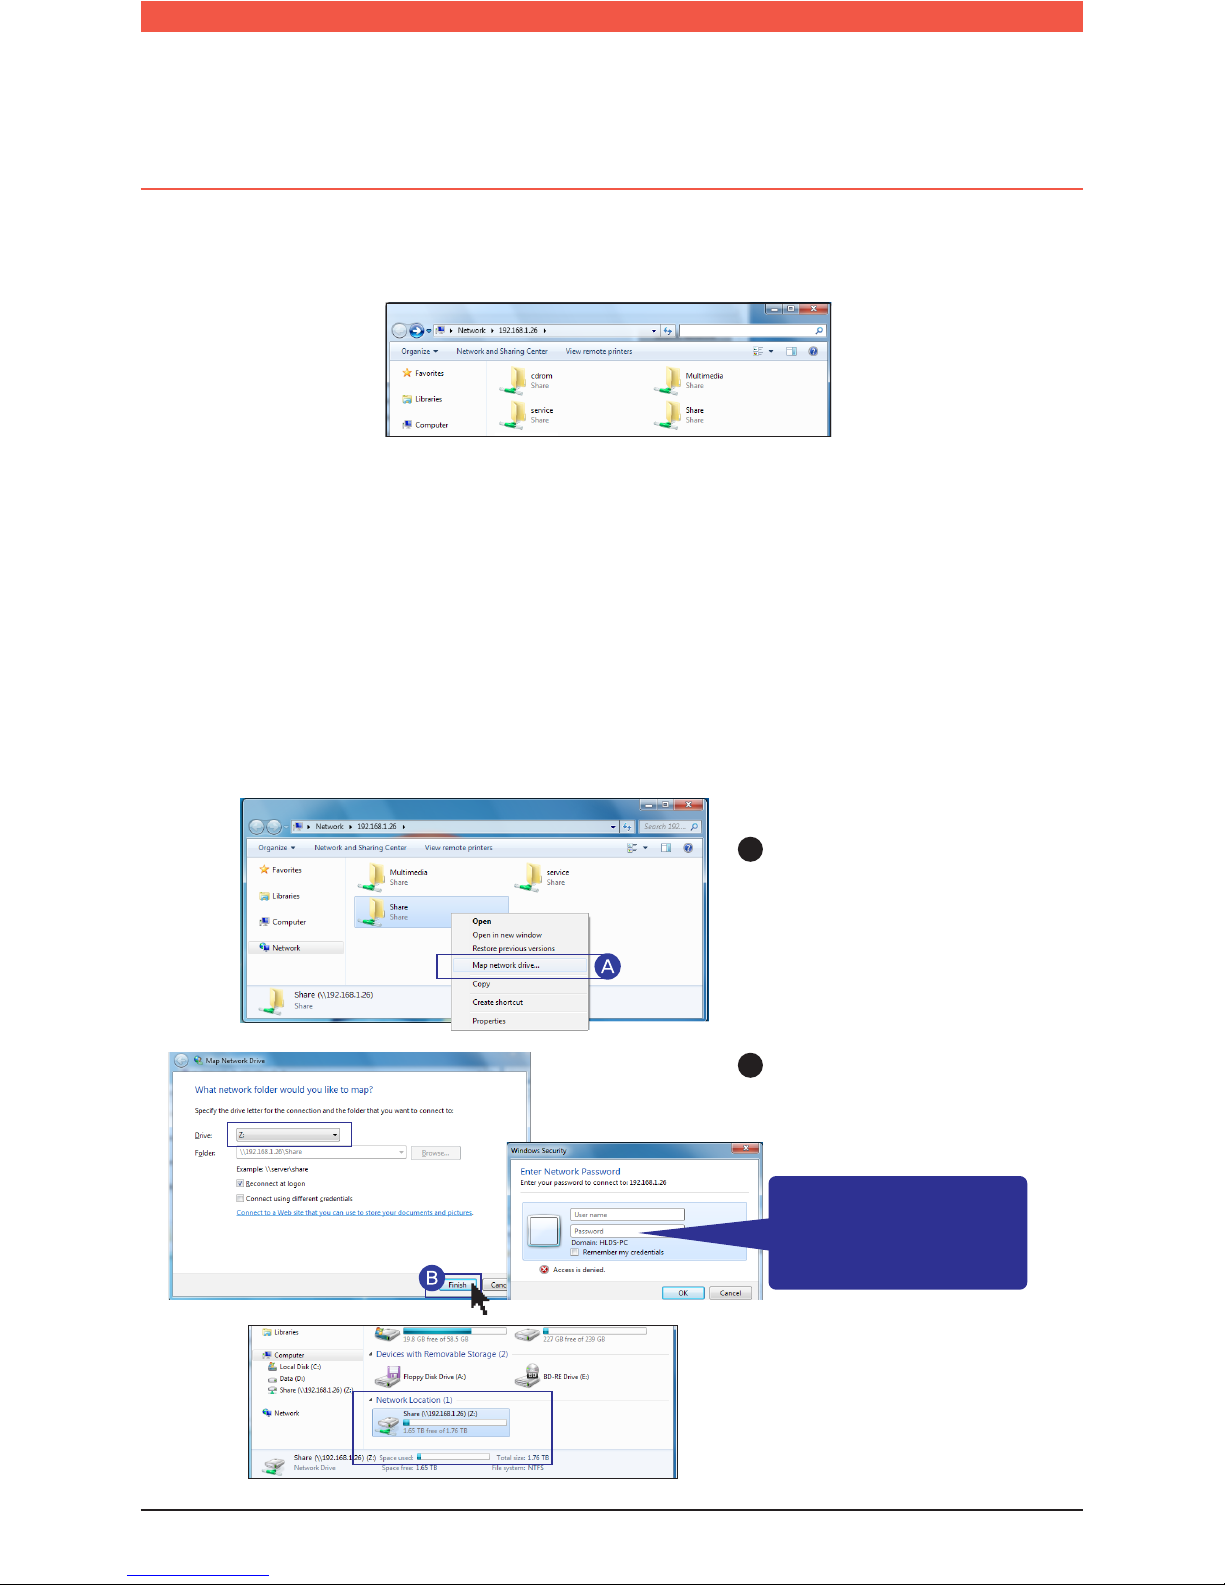
2. Shared folders on LG Network Storage are indicated.
3.
※
LG Network Storage administrator’s default ID and password are admin.
You can view the content of the folder by double clicking the folder and entering the
ID and Password.
cdrom : Content of optical disc (N1T1/N1T3/N2R5/N2B5 product)
service : Files that used Network Storage services such as Backup and Home Monitoring
recording.
Share : General shared file
Multimedia : Shared Multimedia files such as video, music, and pictures.
※
The folder properties can be different depending on the devices.
4. Network Drive Set up
※
You can conveniently connect to LG Network Storage by having it set to Network Drive.
A
Right click mouse button ->
click ‘Map network drive...’
After selecting the drive text
and connecting folder in the
‘Map network drive...’ window,
click ‘Finish’.
After creating the drive in my
computer, it can be used like
a hard disk.
-
B
LG Network Storage
administrator’s default
ID and password are
admin.
File Uploading and Downloading
l Network folder (Windows)
28
A
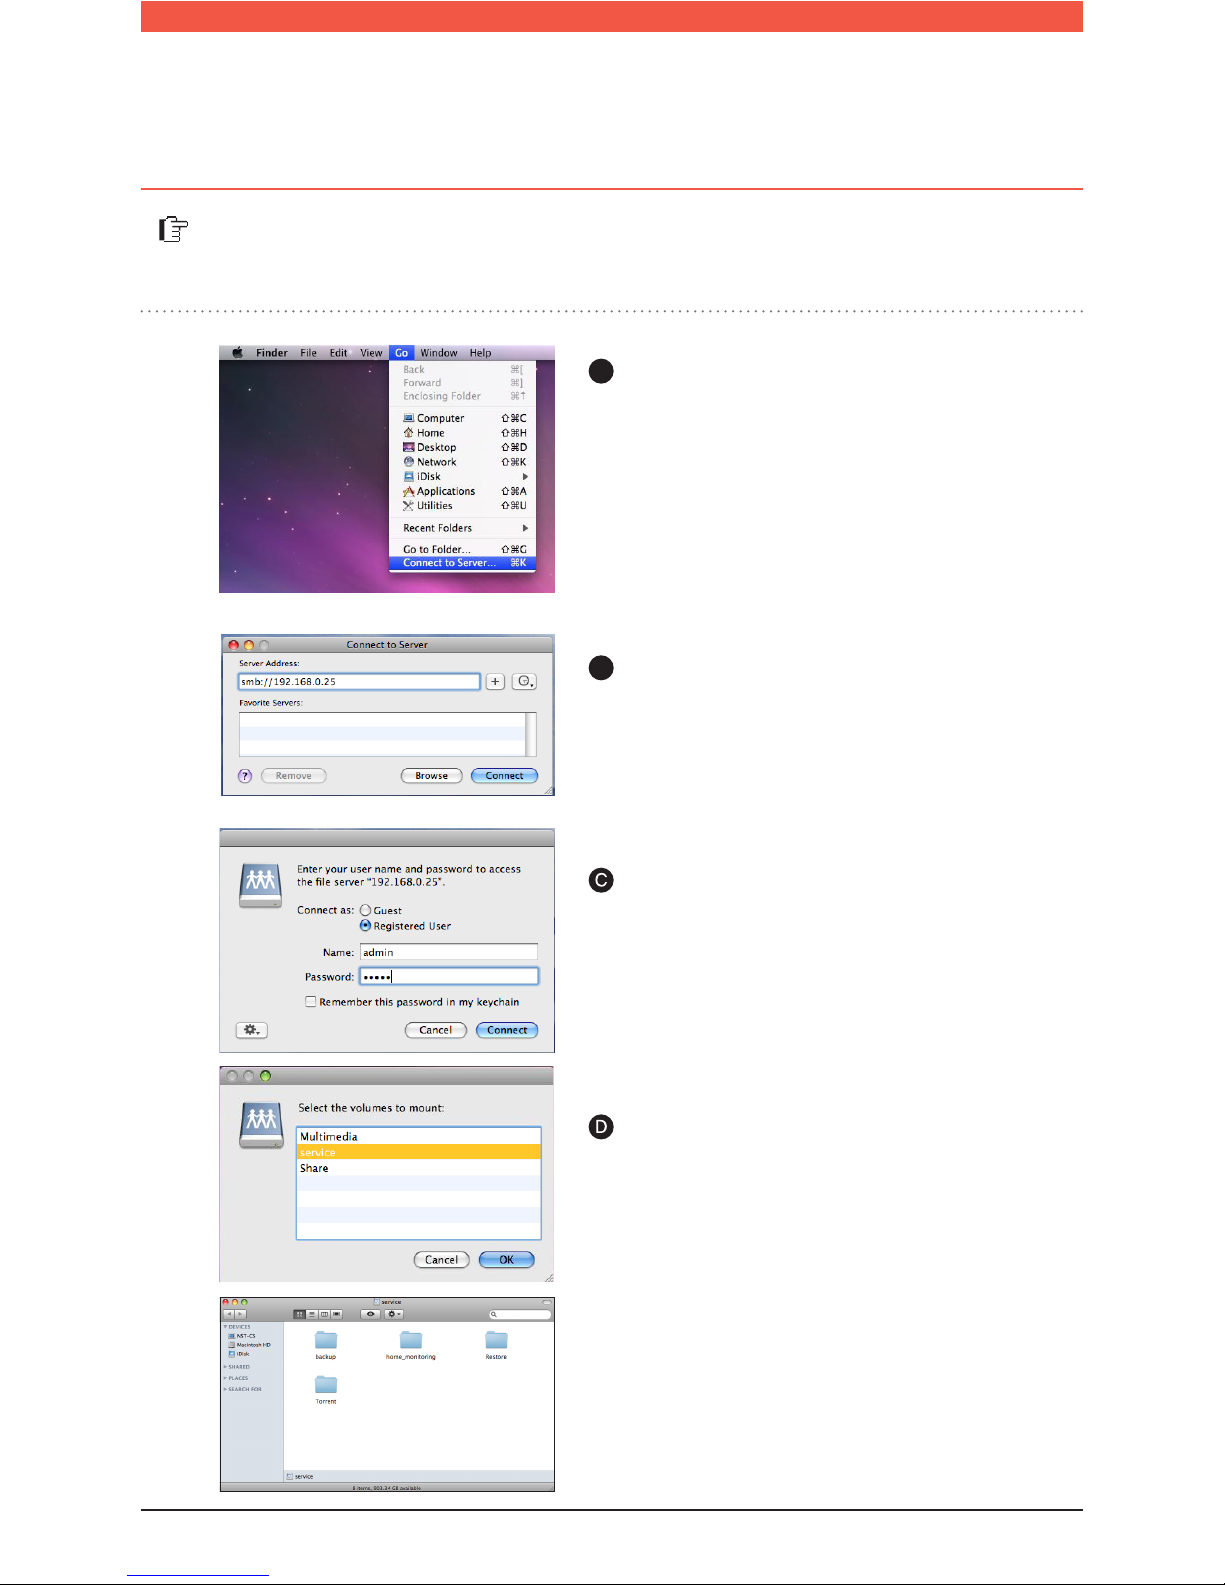
Click “Move” from the Menu bar
-> Select “Connect to Server”.
In the address prompt, add the IP address of
LG Network Storage in this fashion [smb://IP
Address] -> Click the ‘Connect’ button.
B
You can manually add share folders on the Explorer by adding the folder in the
Mac server list.
※
Refer to 22p for LG Network Storage IP
address.
Enter login ID and Password -> Click
‘Connect’ button.
※
Administrators ID : admin,
Default Password : admin
-
Select the desired volume from the LG
Network Storage folder list. (e.g.: /service) ->
Click ‘OK’.
Selected shared folder will open and show its
contents.
File Uploading and Downloading
l Network folder (Mac)
29
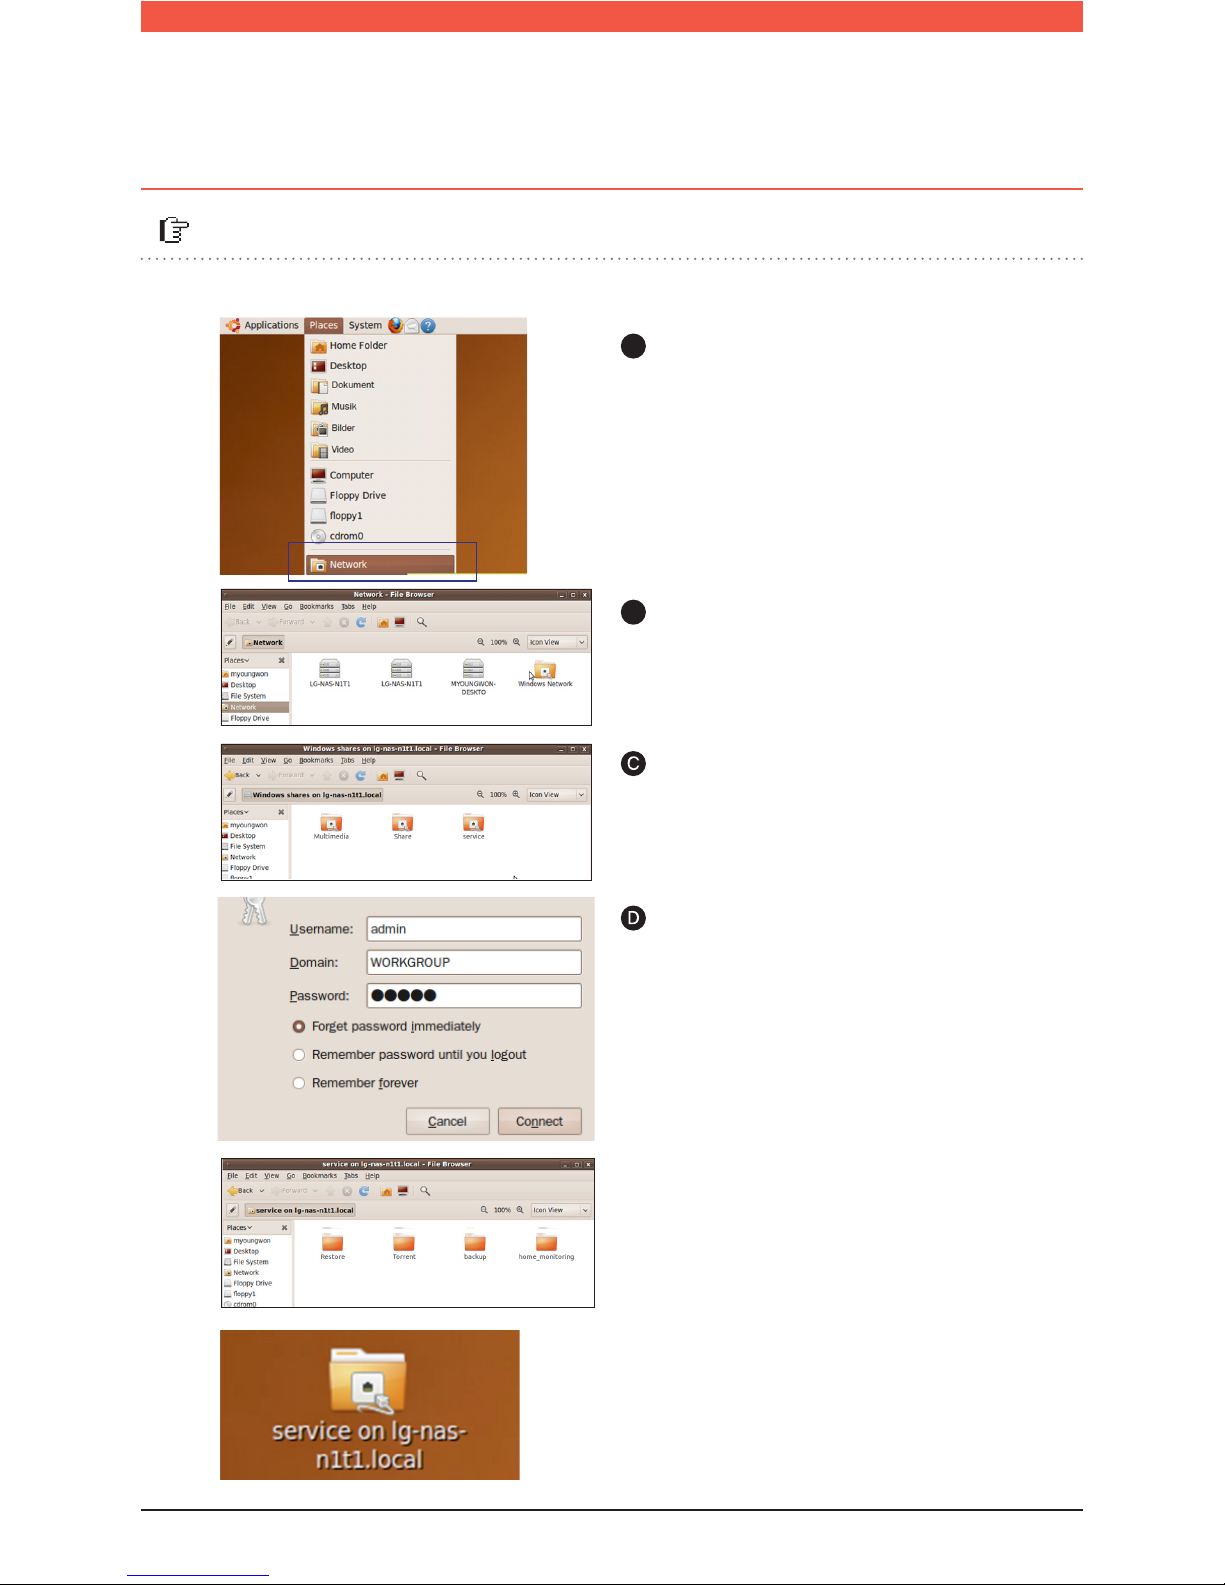
A
Click ‘Places’ on the menu bar, then select
‘Network’. LG Network Storage will be
indicated.
Select the name of LG Network Storage
you want to connect to. LG Network Storage folder list is indicated.
Select the desired volume.
e.g.) /service
B
You can use the Network share folder in the Linux system.
※
Here, it is explained by ubuntu standard.
- After login, LG Network Storage share folder
can be seen.
- A folder will be created on the desktop.
You can connect to LG Network
Storage by entering the ID and
Password
※
LG Network Storage administrator’s default ID and password are admin.
File Uploading and Downloading
l Network folder (Linux)

30
Remote Network Drive allows you to use the network folder anywhere, as if you
are in your home, through the Window Explorer.
A
Right click on the Window’s Remote Network Drive
icon.
- Connect to Network Storage Web Menu
-> Configuration -> Network Service Setting
-> click on ‘Remote Network Drive’
– Click Download to download and
install the latest version of remote
window browser.
Enter Network Storage domain address or the IP
address.
Enter the name of the network folder you wish to
connect to.
Type in the ID and Password used in Network Storage.
Click ‘Detect NAS’ to search for registered
Network Storages within the internal and
external networks.
You can connect to the searched Network Storage
folder in the external network by clicking ‘Remote
NAS List’
Type in the Port Number. (Default : 2020)
Click on ‘Add Remote NAS’.
A
B
B
F
If the name isn’t entered, all the registered folder
will be shown.
※
Click ‘OK’
I
File Uploading and Downloading l Remote Network Drive
J
IP Address : Enter the authorized IP of the Network Storage.
※
※
Domain : You can register the Domain Address of the
Network Storage through the 70p DDNS setting.
Connect on Boot : When the PC is started or waking
from the sleep mode, it automatically reconnects to the
corresponding NAS.
If you want to remotely connect, you must set the
UPnP or Port Forwarding on your sharing device.
Refer to 71p for UPnP setting for NAS, and for
sharing device Port Forwarding setting refer to
97p~99p.
※
In ‘Local NAS Found,’ it shows the connected
Network Storage of internal(LAN) and
external(WAN) networks.
※
 Loading...