

Page 1
OWNER’S MANUAL
AIR CONDITIONER
Please read this manual carefully before operating
your set and retain it for future reference.
www.lg.com
TYPE : CASSETTE
The equipment complies with requirements of the Technical
Regulation, in terms of restrictions for the use of certain dangerous
substances in electrical and electronic equipment.
P/NO : MFL67605119
БЪЛГАРСKN
SRPSKI
HRVATSKI
SVENDKA NORSK
SUOMI
DANSK
ENGLISH ITALIANO
ESPAÑOL FRANÇAIS
DEUTSCH
NEDERLANDS
POLSKI
MAGYAR
ČEŠTINA
LIMBA ROMÂNĂ
Page 2
2 Multi-Type Air Conditioner
Mutli- Type Air Conditioner Ownerʼs Manual
TABLE OF CONTENTS
FOR YOUR RECORDS
Write the model and serial numbers here:
Model #
Serial #
You can find them on a label on the side of each unit.
Dealer's Name
Date Purchased
n
Staple your receipt to this page in the event you need it
to prove date of purchase or for warranty issues.
READ THIS MANUAL
Inside you will find many helpful hints on how to use and
maintain your air conditioner properly. Just a little
preventive care on your part can save you a great deal
of time and money over the life of your air conditioner.
You'll find many answers to common problems in the
chart of troubleshooting tips. If you review our chart of
Troubleshooting Tips first, you may not need to call for
service at all.
PRECAUTION
• Contact the authorized service technician for repair or
maintenance of this unit.
• Contact the installer for installation of this unit.
• The air conditioner is not intended for use by young
children or invalids without supervision.
• Young children should be supervised to ensure that
they do not play with the air conditioner.
• When the power cord is to be replaced, replacement
work shall be performed by authorized personnel only
using only genuine replacement parts.
• Installation work must be performed in accordance
with the National Electric Code by qualified and
authorized personnel only.
Safety Precautions.................3
Operating Instructions...........6
Maintenance and Service ....24
Page 3
Safety Precautions
Owner's Manual 3
Safety Precautions
To prevent injury to the user or other people and property damage, the following instructions
must be followed.
n Incorrect operation due to ignoring instruction will cause harm or damage. The seriousness is
classified by the following indications.
n Meanings of symbols used in this manual are as shown below.
WARNING
CAUTION
This symbol indicates the possibility of death or serious injury.
This symbol indicates the possibility of injury or damage.
Be sure not to do.
Be sure to follow the instruction.
ENGLISH
WARNING
n Installation
Do not use a defective or
underrated circuit breaker.
Use this appliance on a
dedicated circuit.
• There is risk of fire or electric
shock.
For electrical work, contact
the dealer, seller, a qualified
electrician, or an Authorized
Service Center.
• Do not disassemble or repair the
product. There is risk of fire or
electric shock.
Always ground the product.
• There is risk of fire or electric
shock.
Install the panel and the
cover of control box
securely.
• There is risk of fire or electric
shock.
Always install a dedicated
circuit and breaker.
• Improper wiring or installation
may cause fire or electric shock
Use the correctly rated
breaker or fuse.
• There is risk of fire or electric
shock.
Do not modify or extend the
power cable.
• There is risk of fire or electric
shock.
Do not install, remove, or reinstall the unit by yourself
(customer).
• There is risk of fire, electric
shock, explosion, or injury.
Be cautious when unpacking
and installing the product.
• Sharp edges could cause injury.
Be especially careful of the case
edges and the fins on the
condenser and evaporator.
Page 4

Safety Precautions
4 Multi-Type Air Conditioner
Do not allow water to run
into electric parts.
• It may cause There is risk of fire,
failure of the product, or electric
shock.
Do not store or use flammable
gas or combustibles near the
product.
• There is risk of fire or failure of
product.
Do not use the product in a
tightly closed space for a
long time.
• Oxygen deficiency could occur.
When flammable gas leaks,
turn off the gas and open a
window for ventilation
before turn the product on.
• Do not use the telephone or turn
switches on or off.
There is risk of explosion or fire
If strange sounds, or small or
smoke comes from product. Turn
the breaker off or disconnect the
power supply cable.
• There is risk of electric shock or
fire.
Stop operation and close the window
in storm or hurricane. If possible,
remove the product from the window
before the hurricane arrives.
• There is risk of property damage,
failure of product, or electric shock.
Do not open the inlet grill of the
product during operation.
(Do not touch the electrostatic
filter, if the unit is so equipped.)
• There is risk of physical injury,
electric shock, or product failure.
When the product is soaked
(flooded or submerged),
contact an Authorized
Service Center.
• There is risk of fire or electric
shock.
Be cautious that water could
not enter the product.
• There is risk of fire, electric shock,
or product damage.
Ventilate the product from time to time when
operating it together with a stove, etc.
• There is risk of fire or electric shock.
Turn the main power off when cleaning or
maintaining the product.
• There is risk of electric shock.
n Operation
For installation, always contact the
dealer or an Authorized Service Center.
• There is risk of fire, electric
shock, explosion, or injury.
Do not install the product on a
defective installation stand.
• It may cause injury, accident, or
damage to the product.
Be sure the installation area
does not deteriorate with age.
• If the base collapses, the air
conditioner could fall with it,
causing property damage,
product failure, and personal
injury.
Do not plug or unplug the
power supply plug during
operation.
• There is risk of fire or electric
shock.
Do not touch(operate) the
product with wet hands.
• There is risk of fire or electrical
shock.
Do not place a heater or
other appliances near the
power cable.
• There is risk of fire and electric
shock.
Do not let the air conditioner run for a
long time when the humidity is very high
and a door or a window is left open
.
• Moisture may condense and wet
or damage furniture.
Take care to ensure that power
cable could not be pulled out or
damaged during operation.
• There is risk of fire or electric
shock.
Do not place anything on the
power cable.
• There is risk of fire or electric
shock.
When the product is not be used for a long
time, disconnect the power supply plug or
turn off the breaker.
• There is risk of product damage or failure, or
unintended operation.
Take care to ensure that nobody could step
on or fall onto the outdoor unit.
• This could result in personal injury and product
damage.
Page 5
Safety Precautions
Owner's Manual 5
ENGLISH
Do not block the inlet or
outlet of air flow.
• It may cause product failure.
Use a soft cloth to clean. Do
not use harsh detergents,
solvents, etc.
• There is risk of fire, electric shock,
or damage to the plastic parts of
the product.
Do not touch the metal parts of
the product when removing the
air filter. They are very sharp!
• There is risk of personal injury.
Do not step on or put
anyting on the product.
(outdoor units)
• There is risk of personal injury and
failure of product.
Always insert the filter securely.
Clean the filter every two weeks or
more often if necessary.
• A dirty filter reduces the efficiency
of the air conditioner and could
cause product malfunction or
damage.
Do not insert hands or other objects
through the air inlet or outlet while
the product is operated.
• There are sharp and moving parts
that could cause personal injury.
Do not drink the water
drained from the product.
• It is not sanitary and could cause
serious health issues.
Use a firm stool or ladder
when cleaning or
maintaining the product.
• Be careful and avoid personal
injury.
Replace the all batteries in the
remote control with new ones of
the same type. Do not mix old
and new batteries or different
types of batteries.
• There is risk of fire or explosion
Do not recharge or disassemble the batteries.
Do not dispose of batteries in a fire.
• They may burn or explode.
If the liquid from the batteries gets onto your
skin or clothes, wash it well with clean water. Do
not use the remote if the batteries have leaked.
• The chemicals in batteries could cause burns or other
health hazards.
n Installation
CAUTION
n Operation
Always check for gas
(refrigerant) leakage after
installation or repair of product.
• Low refrigerant levels may cause
failure of product.
Install the drain hose to
ensure that water is drained
away properly.
• A bad connection may cause
water leakage.
Keep level even when
installing the product.
• To avoid vibration or water
leakage.
Do not install the product where the
noise or hot air from the outdoor unit
could damage the neighborhoods.
• It may cause a problem for your
neighbors.
Use two or more people to
lift and transport the
product.
• Avoid personal injury.
Do not install the product where
it will be exposed to sea wind
(salt spray) directly.
• It may cause corrosion on the
product. Corrosion, particularly on
the condenser and evaporator fins,
could cause product malfunction or
inefficient operation.
Do not expose the skin directly to cool air for
long periods of time.
(Don't sit in the draft.)
• This could harm to your health.
Do not use the product for special purposes, such as
preserving foods, works of art, etc. It is a consumer air
conditioner, not a precision refrigeration system.
• There is risk of damage or loss of property.
Page 6
6 Multi-Type Air Conditioner
Operating Instructions
Operating Instructions
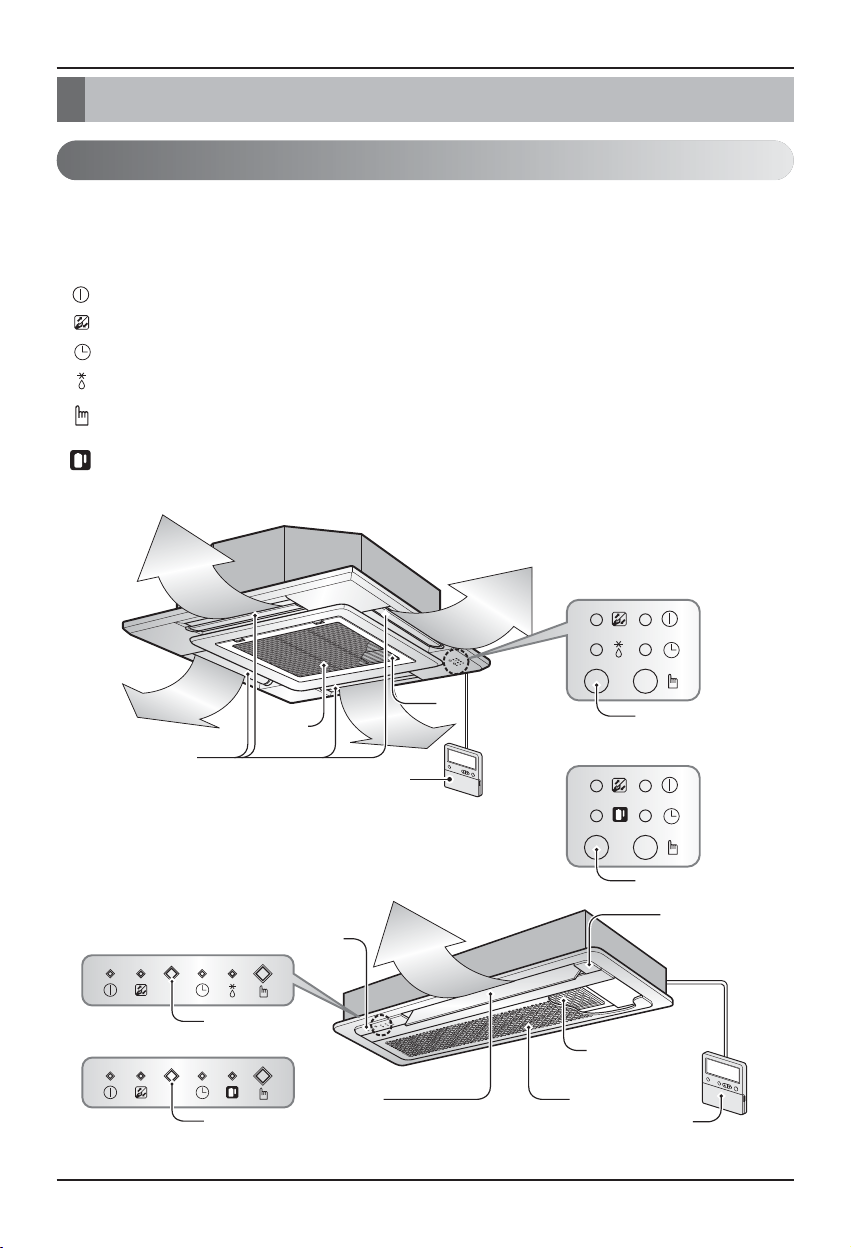
Indoor Unit
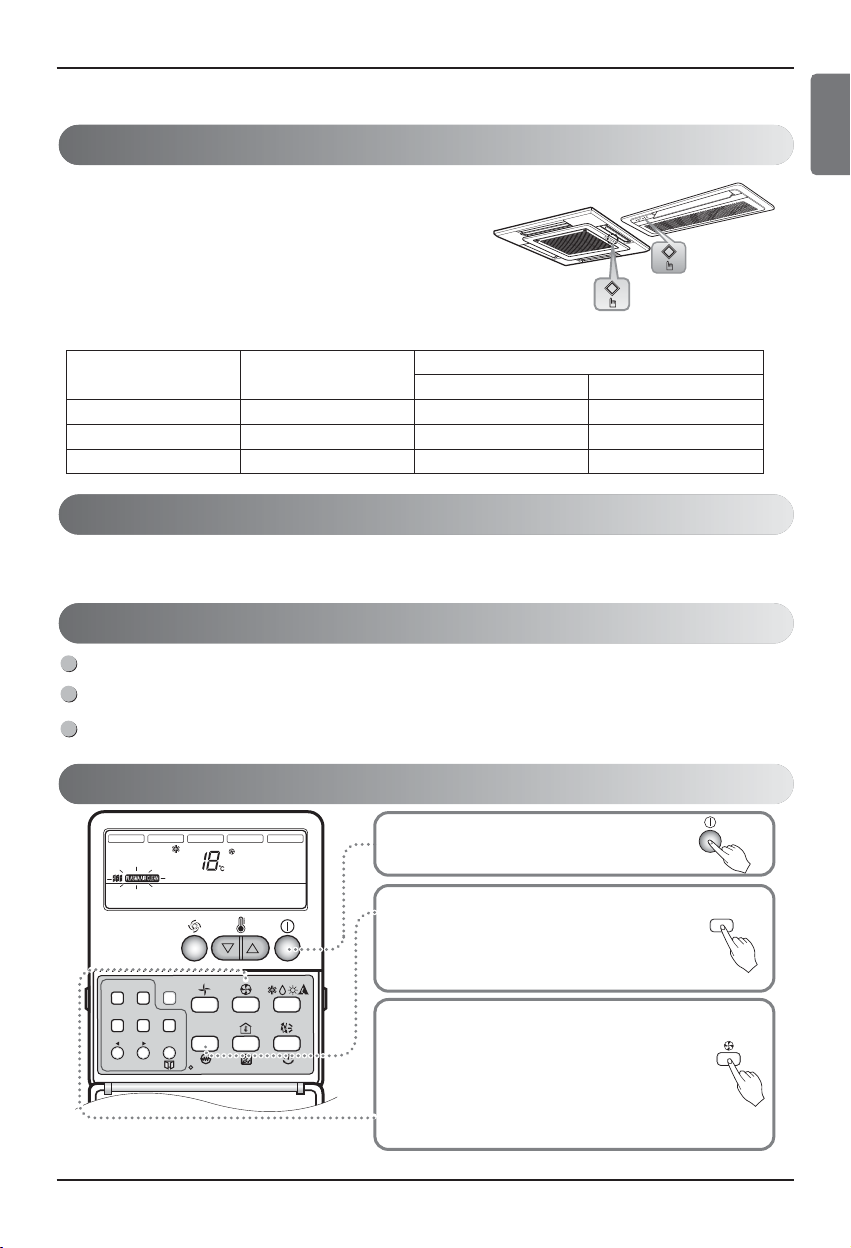
Cassette Type Indoor Unit
On/Off : Lights up during the system operation.
Filter Sign : Lights up after 2400 hours from the time of first operating unit.
Timer : Lights up during Timer operation.
Defrost Mode : Lights up during Defrost Mode or Hot Start operation.
Forced : Operation procedures when the remote control
Operation can't be used.
Outdoor Unit : Lights up during outdoor unit operation.
Operation (Cooling model only)
Signal Receiver
Receives the signals from the remote control.
(Signal receiving sound: two short beeps or one long beep.)
Anti-bacteria
Heat Pump Model
Air
Air Outlet
Heat Pump Model
Signal Receiver
Intake
Cover
display
Cooling Model
Signal Receiver
Remote
Controller
Air Outlet
Anti-bacteria
Anti-bacteria
Signal Receptor
Cooling Model
Signal Receptor
Cover
Anti-bacteria filter
Air Intake
Remote Controller
Page 7
Owner's Manual 7
Operating Instructions
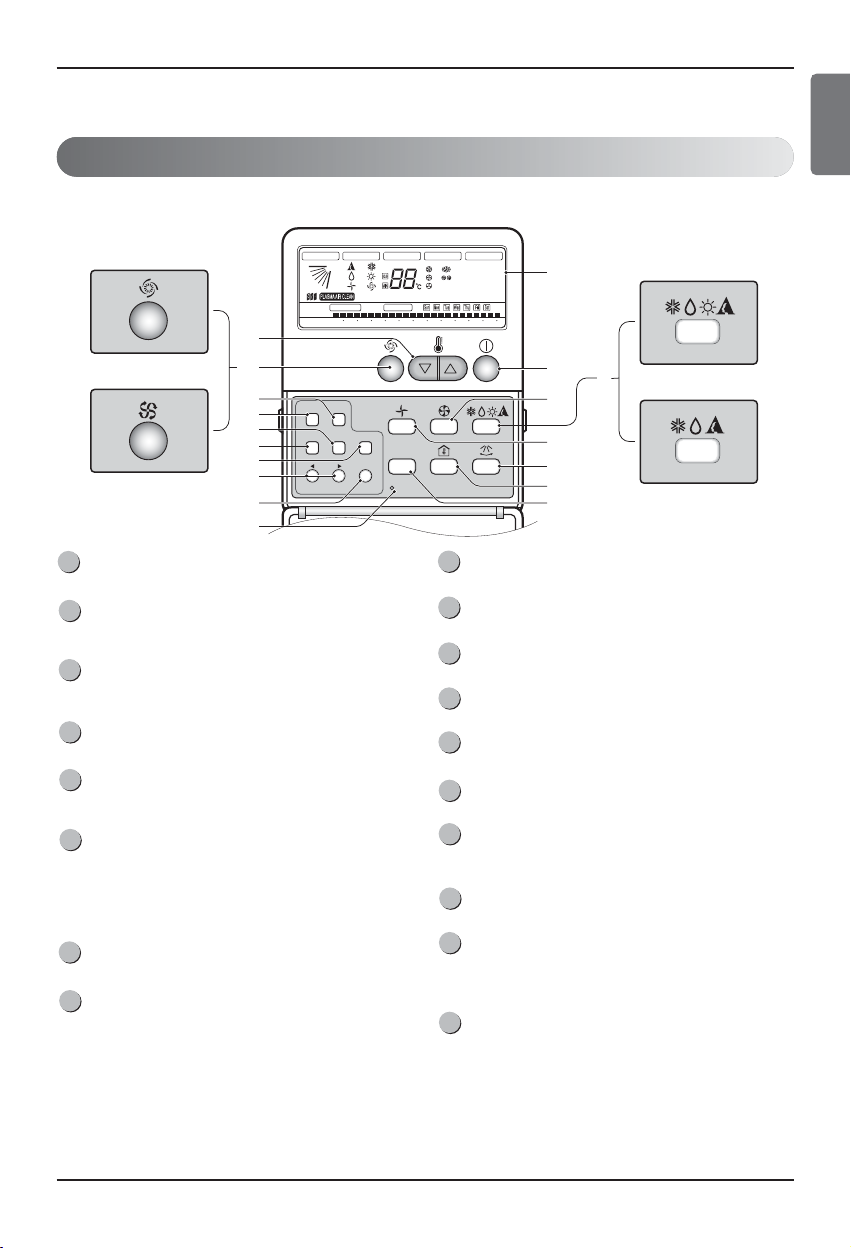
Name and Function of Remote Controller
Operation Display
Displays the operation conditions.
On/Off Button
Operation starts when this button is pressed, and stops
when the button is pressed again.
Set Temperature Button
Used to set the temperature when the desired
temperature is obtained.
FAN Operation Button
Used to circulate room air without cooling or heating.
Fan Speed (Jet Cool Button: 4 Way)
Used to set the desired fan speed or select Jet cool
mode.
Operation Mode Selection Button
Used to select the operation mode.
• Auto Operation Mode
• Cooling Operation Mode
• Soft Dry Operation Mode
• Heating Operation Mode(except cooling model)
Auto Swing Button
Used To Swing Up And Down/ Right And Left(Option)
Room Temperature Checking Button/Filtersign
Release(Option)
Used to check the room temperature.
Plasma Air Clean Button(Option)/Heater(Option)
Timer Cancel Button
Used to cancel the timer.
Timer Set Button
Used to set the timer when the desired time is obtained.
Week Button
Used to set a day of the week.
Program Button
Used to set the weekly timer.
Holiday Button
Used to set a holiday of the week.
Time Set Button
Used to set the time of the day and change the time in
the weekly timer Function.
Set And Clean/Ventilation(Option)
Used to set and clear the weekly timer.
Swirl Button (4 Way)
Used to select swirl mode.
No Function(1 Way 06 Model)
Jet Cool Button(1 Way)
Reset Button
Used to set the current time and clear the setting time.
h Display temperature can be different from actual room temperature if the remote controller is
installed at the place where sun-rays are falling directly or the place nearby heat source.
h
Note : 1 Way '06 Model - AMNH09GTCC0, AMNH12GTCC0
ENGLISH
CST Type Remote Controller
1
9
10
11
12
13
14
15
16
17
18
2
3
4
5
6
7
8
1Way
AUTO SWING OPERATION
Operation unit
Timer
On
Off
01 03 05 07 09 11 13 15 17 19 21 23
Set no. Time
SET TEMP
Room Temp
Time
Program set
FAN SPEED
HI
MED
LO
ZONE
3
4Way,1Way(06 Model)
17
10
11
12
13
14
15
Timer Cancel
Program Week
Hour Min
Holiday
Set/Clr
Plasma
RESET
16
18
SUB FUNCTION
Heater
Preheat
AUTO
Defrost
Humidify
JET
Filter
Out door
1234
1
2
5
Heat Pump Model
6
Cooling Model
4
7
8
9
Page 8
8 Multi-Type Air Conditioner
Operating Instructions
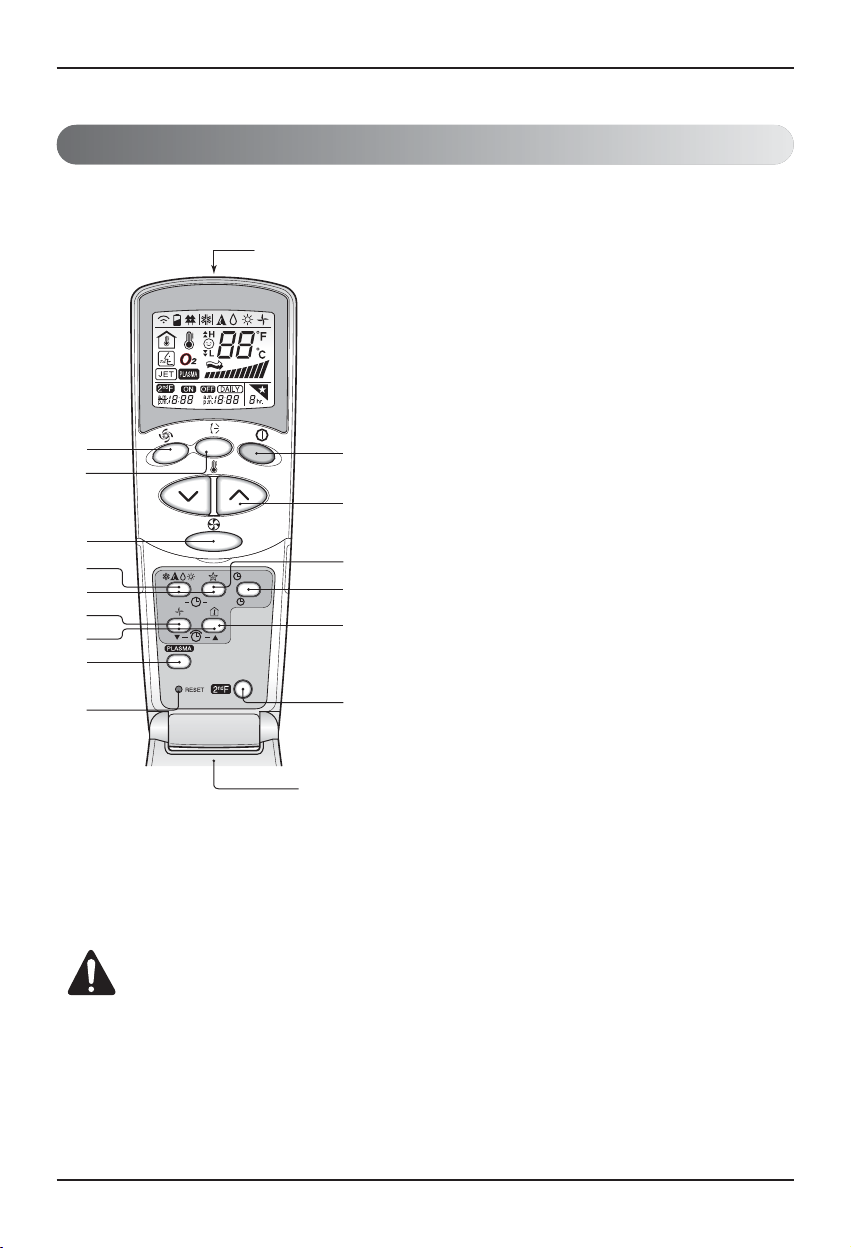
Wireless Remote Controller (optional)
This air-conditioner is equipped with wired remote controller basically. But if you want to be available with
wireless remote controller, you pay for it.
1. START/STOP BUTTON
Operation starts when this button is pressed and stops when the
button is pressed again.
2. OPERATION MODE SELECTION BUTTON
Used to select the operation mode.
3. ROOM TEMPERATURE
SETTING BUTTONS
Used to select the room temperature.
4. INDOOR FAN SPEED SELECTOR
Used to select fan speed in four steps
low, medium, high and CHAOS.
5. JET COOL
Used to start or stop the speed cooling/heating.
(Speed cooling/heating operates super high fan speed.)
6. CHAOS SWING BUTTON
Used to stop or start louver movement and set the desired up/down
airflow direction.
7. ON/OFF TIMER BUTTONS
Used to set the time of starting and stopping operation.
8. TIME SETTING BUTTONS
Used to adjust the time.
9. TIMER SET/CANCEL BUTTON
Used to set the timer when the desired time is obtained and to cancel
the Timer operation.
10. SLEEP MODE AUTO BUTTON
Used to set Sleep Mode Auto operation.
11. AIR CIRCULATION BUTTON
Used to circulate the room air without cooling or heating.
12. ROOM TEMPERATURE CHECKING BUTTON
Used to check the room temperature.
13. PLASMA(OPTIONAL)
Used to start or stop the plasma-purification function.
14. RESET BUTTON
Initialize remote controller.
15. 2nd F Button
Used prior to using modes printed in blue at the bottom of buttons.
CAUTION :
of handling the Remote Controller
• Aim at the signal receiver on the wired remote controller so as to operate.
• The remote control signal can be received at a distance of up to about 7m.
• Be sure that there are no obstructions between the remote controller and the signal receptor.
• Do not drop or throw the remote controller.
• Do not place the remote controller in a location exposed to direct sunlight, or near the heating unit, or
any other heat source.
• Block a strong light over the signal receptor with a curtain or etc. so as to prevent the abnormal
operation. (ex:electronic quick start, ELBA, inverter type fluorescent lamp)
h The wireless remote controller do not operate the swirl mode.
5
6
4
2
7
11
8
13
14
Signal transmitter
1
3
CANCEL
OFF
SET
AUTO CLEAN
ON
10
9
12
15
Flip-up door
(opened)
Page 9
Owner's Manual 9
Operating Instructions
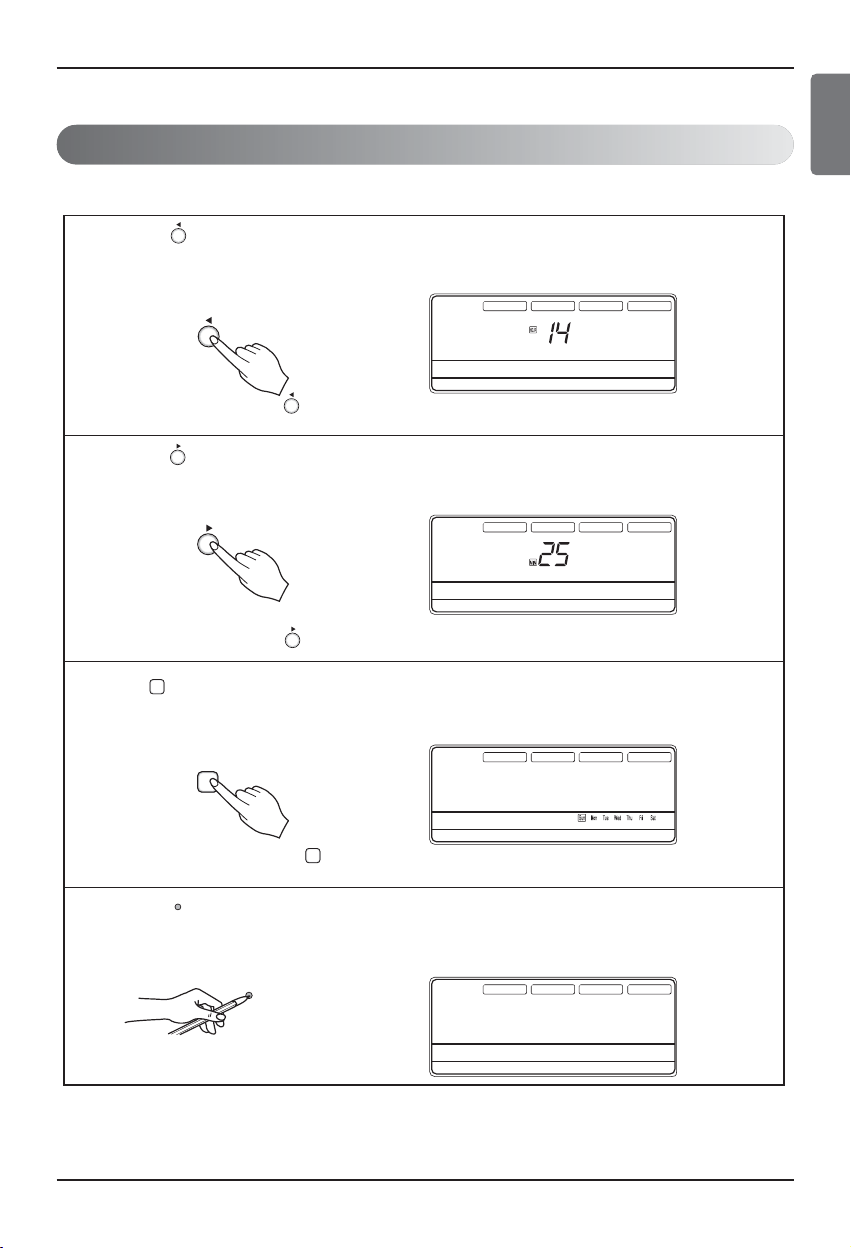
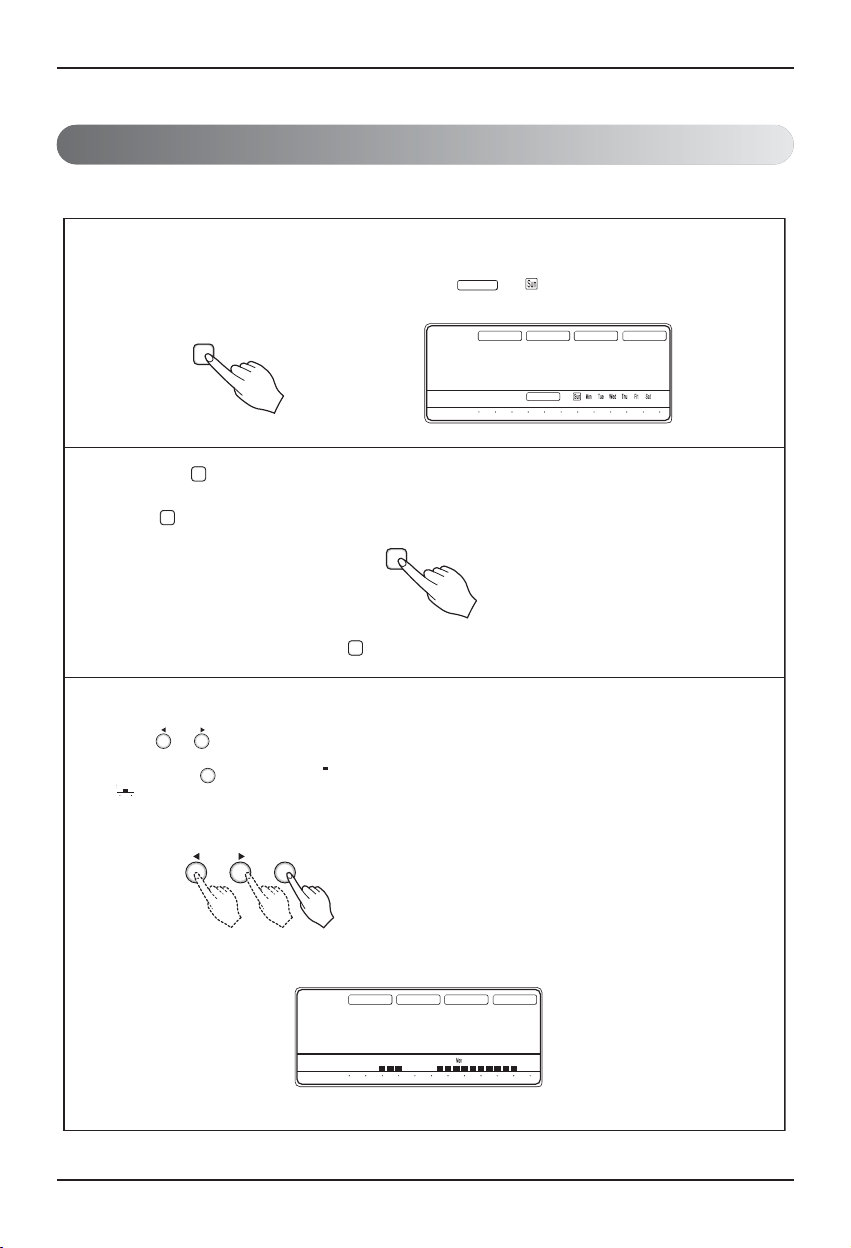
Set the Current Time and day of the Week
Unless you press any button about 5 (sometimes 10) seconds while setting function, the setting mode returns to
initial mode.
1
Press the ' ' button.
Each time the button is pressed, the number is changed from
to 23.
This number indicates current hour.
For example, if it is 14:25, press button 14 times.
2
Press the ' ' button.
Each time the button is pressed, the number increases from 00 to 59.
This number indicates current minute.
For example, if it is 14:25, press button 25 times.
3
Press ' ' button.
Each time the button is pressed, a day of the week is shifted from sunday to saturday.
For example, if today is Wed, press button 3 times.
4
Press the ' ' button.
If you want to confirm the current time and a day of the week, click the Reset button.
Hour
Hour
Min
Min
Week
Week
RESET
ENGLISH
Hour
Min
AUTO SWING
OPERATION
SET TEMP
Room Temp
OPERATION
Time
SET TEMP
Room Temp
Time
Operation unit Program set
Timer
On
Off
01 03 05 07 09 11 13 15 17 19 21 23
Set no. Time
AUTO SWING
Operation unit Program set
Timer
On
Off
01 03 05 07 09 11 13 15 17 19 21 23
Set no. Time
FAN SPEED
HI
MED
LO
ZONE
FAN SPEED
HI
MED
LO
ZONE
SUB FUNCTION
AUTO
Heater
Defrost
JET
Filter
1234
SUB FUNCTION
AUTO
Heater
Defrost
JET
Filter
1234
Preheat
Humidify
Out door
Preheat
Humidify
Out door
Week
OPERATION
Operation unit Program set
Timer
On
Off
01 03 05 07 09 11 13 15 17 19 21 23
Set no. Time
SET TEMP
Room Temp
Time
FAN SPEED
HI
MED
LO
ZONE
SUB FUNCTION
AUTO
Heater
Defrost
JET
Filter
AUTO SWING
AUTO SWING
RESET
OPERATION
Operation unit Program set
Timer
On
Off
01 03 05 07 09 11 13 15 17 19 21 23
Set no. Time
SET TEMP
Room Temp
Time
FAN SPEED
SUB FUNCTION
HI
AUTO
Heater
Defrost
MED
JET
Filter
LO
ZONE
Preheat
Humidify
Out door
1234
Preheat
Humidify
Out door
1234
Page 10
10 Multi-Type Air Conditioner
Operating Instructions
Weekly Programming
1
Press the Program button.
The remote controller is displayed like a picture. Then ' ', ' ' and '01' is blinked.
2
Press the ' ' button.
Press button repeatedly until desired mode appears.
For example, if you want Thu, press button 4 times.
3
Select the time you want.
Press or button, then blinking letter is shown.
If you press button, then ' ' shape appears.
' ' shape means that five o'clock is reserved.
Using below buttons, you can reserve time.
* For example, the air-conditioner is on 6,7,8 and 13~22 o'clock.
Program set
Week
Week
Week
MinHour
SET/CLR
unit
Program
OPERATION
Operation unit
Timer
On
Off
01 03 05 07 09 11 13 15 17 19 21 23
Set no.
Time
SET TEMP
Room Temp
Time
Program set
FAN SPEED
HI
AUTO
MED
JET
LO
ZONE
AUTO SWING
Week
SUB FUNCTION
Heater
Preheat
Defrost
Humidify
Filter
Out door
1234
05
MinHour
SET/CLR
AUTO SWING
OPERATION
SET TEMP
Room Temp
Time
Operation unit
Timer
On
Off
01 03 05 07 09 11 13 15 17 19 21 23
Set no.
Time
Program set
FAN SPEED
HI
MED
LO
ZONE
SUB FUNCTION
AUTO
Heater
Defrost
JET
Filter
1234
Preheat
Humidify
Out door
Page 11
Owner's Manual 11
Operating Instructions
Holiday Setting
Timer Setting
Self-diagnosis Function
If Tuesday is a holiday in this week, you may set a holiday.
Press the Program button.
1
Press the Week button.
Select the Tuesday.
2
Press the Holiday button.
Then the remote controller will be displayed ' '.
The outside rectangular means holiday.
h You cannot set the weekly program for a holiday.
3
Program
Week
Holiday
' CH' will flash in the remote controller display when a problem occurs.
Then please contact your dealer.
Time
HI
ZONE
Operation unit
Room Temp
MED
LO
AUTO
JET
Heater
Defrost
Filter
Preheat
Humidify
Out door
Timer
On
Set no.
Off
1234
OPERATION
FAN SPEED
SUB FUNCTION
SET TEMP
Program set
01 03 05 07 09 11 13 15 17 19 21 23
Time
AUTO SWING
Time
HI
ZONE
Operation unit
Room Temp
MED
LO
AUTO
JET
Heater
Defrost
Filter
Preheat
Humidify
Out door
Timer
On
Set no.
Off
1234
OPERATION
FAN SPEED
SUB FUNCTION
SET TEMP
01 03 05 07 09 11 13 15 17 19 21 23
Time
AUTO SWING
Program set
Program set
Time
HI
ZONE
Operation unit
Room Temp
MED
LO
AUTO
JET
Heater
Defrost
Filter
Preheat
Humidify
Out door
Timer
On
Set no.
Off
1234
OPERATION
FAN SPEED
SUB FUNCTION
SET TEMP
01 03 05 07 09 11 13 15 17 19 21 23
Time
AUTO SWING
Press the Timer button.
1
Timer
MinHour
Press or button, then you can control the desired time.
If you press button, the display panel shows ( ex : ).
It means 3 hours later, it will stop while 'ON' mode, it will operate while 'OFF' mode.
2
MinHour
If you want to cancel the timer setting function, press the Cancel button.
3
Cancel
If you want to turn it 'ON' during 'OFF' mode or turn it 'OFF' during 'ON' mode, you can use timer
setting function.
Min
Operation un
01 03
ENGLISH
Page 12
12 Multi-Type Air Conditioner
ZONE
1234
Operation unit
Humidify
JET
AUTO
AUTO SWING OPERATION
FAN SPEED
Program set
SUB FUNCTION
SET TEMP
Room Temp
HI
MED
LO
Heater
Defrost
Filter
Preheat
Out door
Time
Timer
On
Set no. Time
Off
01 03 05 07 09 11 13 15 17 19 21 23
3
1
4
2
Timer Cancel 2ndF
Program Week
Hour Min
Holiday
Set/Clr
RESET
Plasma
Operating Instructions
Operation Mode
Operation Procedure
Cooling Mode
Cooling Mode
Soft Dry Mode
Auto Mode
(Cooling Model)
Soft Dry Mode
Heating Mode
Auto Mode
(Heat Pump Model)
1st
2nd
3rd
4th
On/Off Button
Operation Mode Selection Button
Room Temperature Setting Button
Indoor Fan Speed Selection Button
Page 13
Owner's Manual 13
ZONE
Operation unit Program set
Room Temp
MED
LO
AUTO
JET
Heater
Defrost
Filter
Preheat
Humidify
Out door
Time
Timer
On
Set no. Time
Off
01 03 05 07 09 11 13 15 17 19 21 23
1234
AUTO SWING OPERATION
FAN SPEED
SUB FUNCTION
SET TEMP
HI
LO
HI
ZONE
Operation unit Program set
Room Temp
MED
JET
Heater
Defrost
Filter
Preheat
Humidify
Out door
Time
Timer
On
Set no. Time
Off
01 03 05 07 09 11 13 15 17 19 21 23
1234
AUTO SWING OPERATION
FAN SPEED
SUB FUNCTION
SET TEMP
AUTO AUTOLOHI
ZONE
Operation unit Program set
Room Temp
MED
Heater
Defrost
Filter
Preheat
Humidify
Out door
Time
Timer
On
Set no. Time
Off
01 03 05 07 09 11 13 15 17 19 21 23
1234
AUTO SWING OPERATION
FAN SPEED
SUB FUNCTION
SET TEMP
HI
ZONE
Operation unit Program set
Room Temp
MED
AUTO
JET
Heater
Defrost
Filter
Preheat
Humidify
Out door
Time
Timer
On
Set no. Time
Off
01 03 05 07 09 11 13 15 17 19 21 23
1234
AUTO SWING OPERATION
FAN SPEED
SUB FUNCTION
SET TEMP
LO
AUTO
HI
ZONE
Operation unit Program set
Room Temp
LO
JET
Heater
Defrost
Filter
Preheat
Humidify
Out door
Time
Timer
On
Set no. Time
Off
01 03 05 07 09 11 13 15 17 19 21 23
1234
AUTO SWING OPERATION
FAN SPEED
SUB FUNCTION
SET TEMP
MED
Operation Display
JET
COOLING MODEL
Cooling Operation Soft Dry Operation
ZONE
Operation unit Program set
Room Temp
MED
LO
AUTO
JET
Heater
Defrost
Filter
Preheat
Humidify
Out door
Time
Timer
On
Set no. Time
Off
01 03 05 07 09 11 13 15 17 19 21 23
1234
AUTO SWING OPERATION
FAN SPEED
SUB FUNCTION
SET TEMP
HI HI
ZONE
Operation unit Program set
Room Temp
MED
AUTO
JET
Heater
Defrost
Filter
Preheat
Humidify
Out door
Time
Timer
On
Set no. Time
Off
01 03 05 07 09 11 13 15 17 19 21 23
1234
AUTO SWING OPERATION
FAN SPEED
SUB FUNCTION
SET TEMP
LO
Auto Operation
HI
LO
ZONE
Operation unit Program set
Room Temp
MED
JET
Heater
Defrost
Filter
Preheat
Humidify
Out door
Time
Timer
On
Set no. Time
Off
01 03 05 07 09 11 13 15 17 19 21 23
1234
AUTO SWING OPERATION
FAN SPEED
SUB FUNCTION
SET TEMP
AUTO
Operation Display
ZONE
Operation unit Program set
Room Temp
MED
LO
AUTO
JET
Heater
Defrost
Filter
Preheat
Humidify
Out door
Time
Timer
On
Set no. Time
Off
01 03 05 07 09 11 13 15 17 19 21 23
1234
AUTO SWING OPERATION
FAN SPEED
SUB FUNCTION
SET TEMP
HI
HI
ZONE
Operation unit Program set
Room Temp
MED
AUTO
JET
Heater
Defrost
Filter
Preheat
Humidify
Out door
Time
Timer
On
Set no. Time
Off
01 03 05 07 09 11 13 15 17 19 21 23
1234
AUTO SWING OPERATION
FAN SPEED
SUB FUNCTION
SET TEMP
LO
ZONE
Operation unit Program set
Room Temp
MED
LO
AUTO
JET
Heater
Defrost
Filter
Preheat
Humidify
Out door
Time
Timer
On
Set no. Time
Off
01 03 05 07 09 11 13 15 17 19 21 23
1234
AUTO SWING OPERATION
FAN SPEED
SUB FUNCTION
SET TEMP
HI HI
ZONE
Operation unit Program set
Room Temp
MEDLOJET
Heater
Defrost
Filter
Preheat
Humidify
Out door
Time
Timer
On
Set no. Time
Off
01 03 05 07 09 11 13 15 17 19 21 23
1234
AUTO SWING OPERATION
FAN SPEED
SUB FUNCTION
SET TEMP
AUTO
HEAT PUMP MODEL
Cooling Operation Soft Dry Operation Heating Operation Auto Operation
Operation Display
To raise the Temperature.
To lower the Temperature.
ZONE
Operation unit Program set
Room Temp
MED
LO
AUTO
JET
Heater
Defrost
Filter
Preheat
Humidify
Out door
Time
Timer
On
Set no. Time
Off
01 03 05 07 09 11 13 15 17 19 21 23
1234
AUTO SWING OPERATION
FAN SPEED
SUB FUNCTION
SET TEMP
HI
Operating Instructions
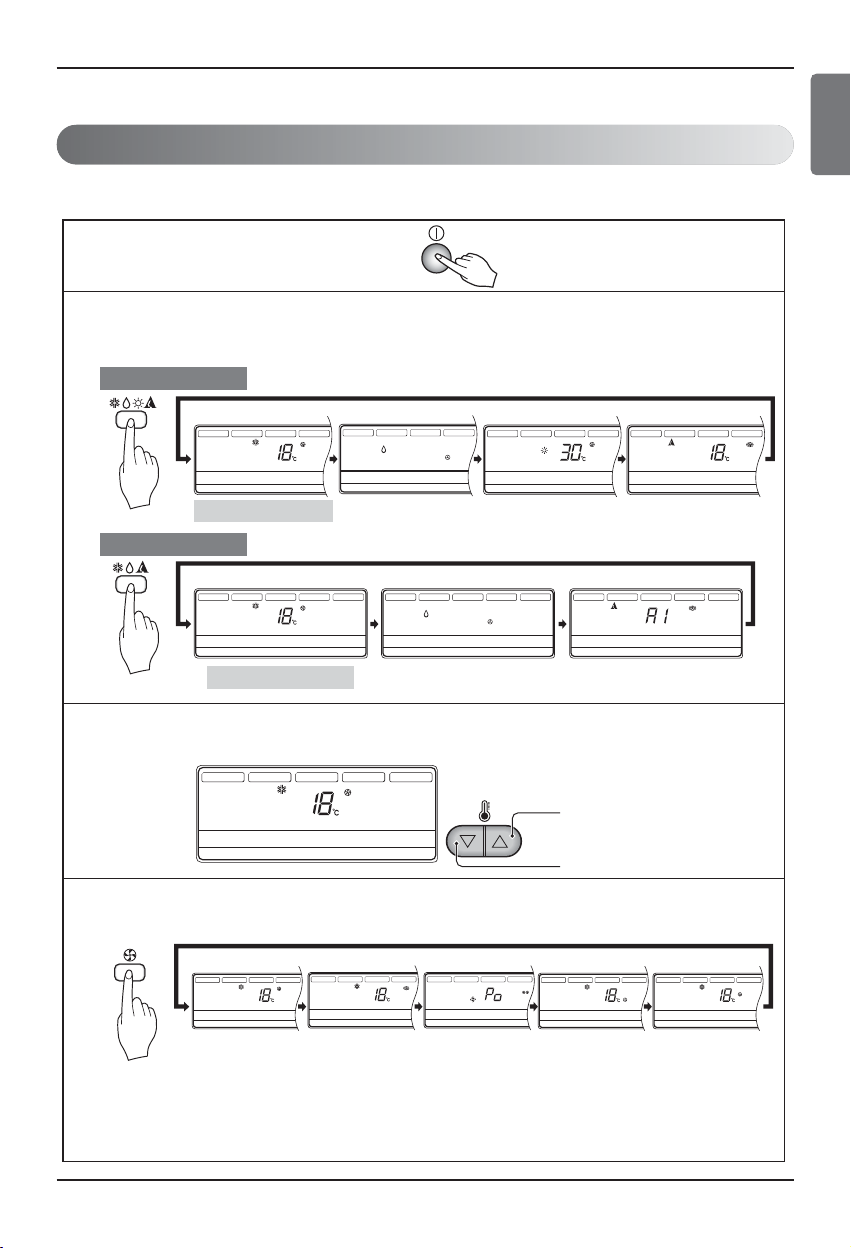
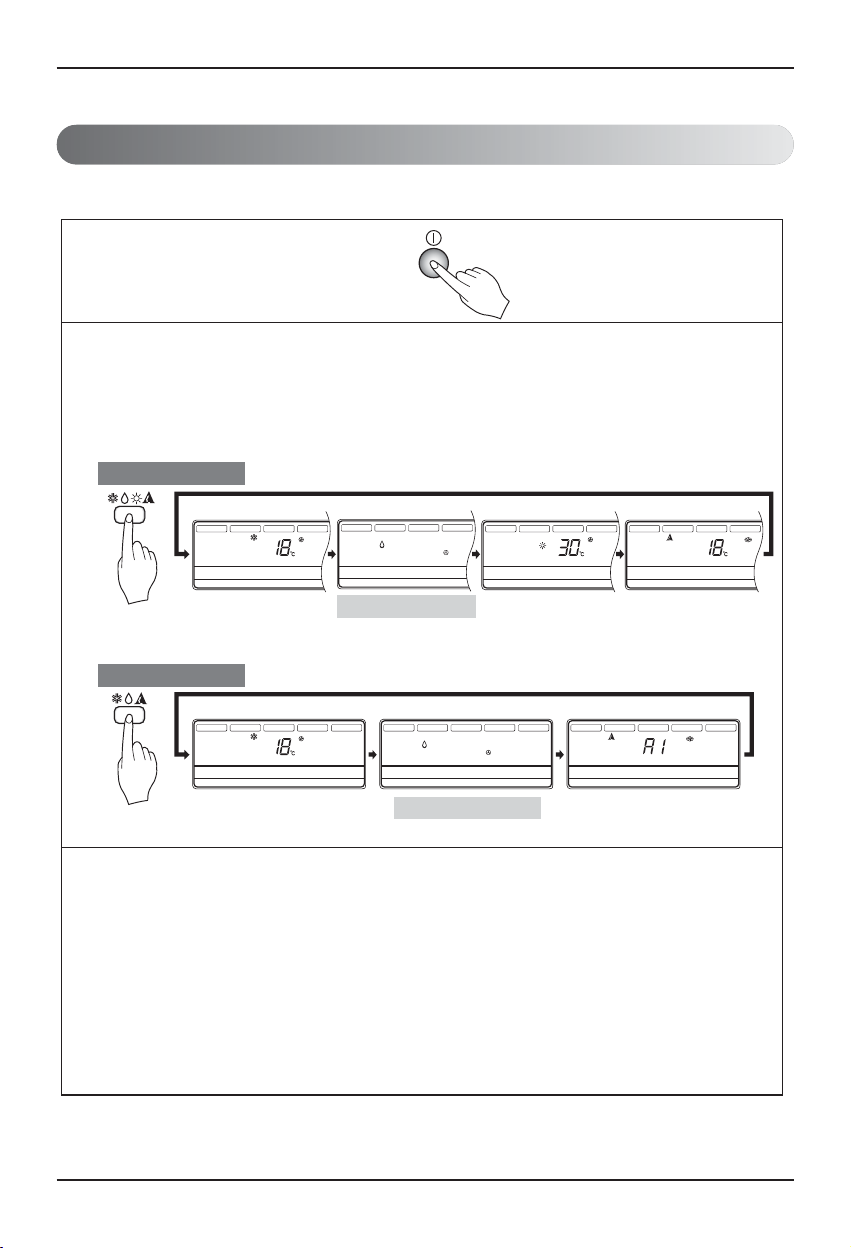
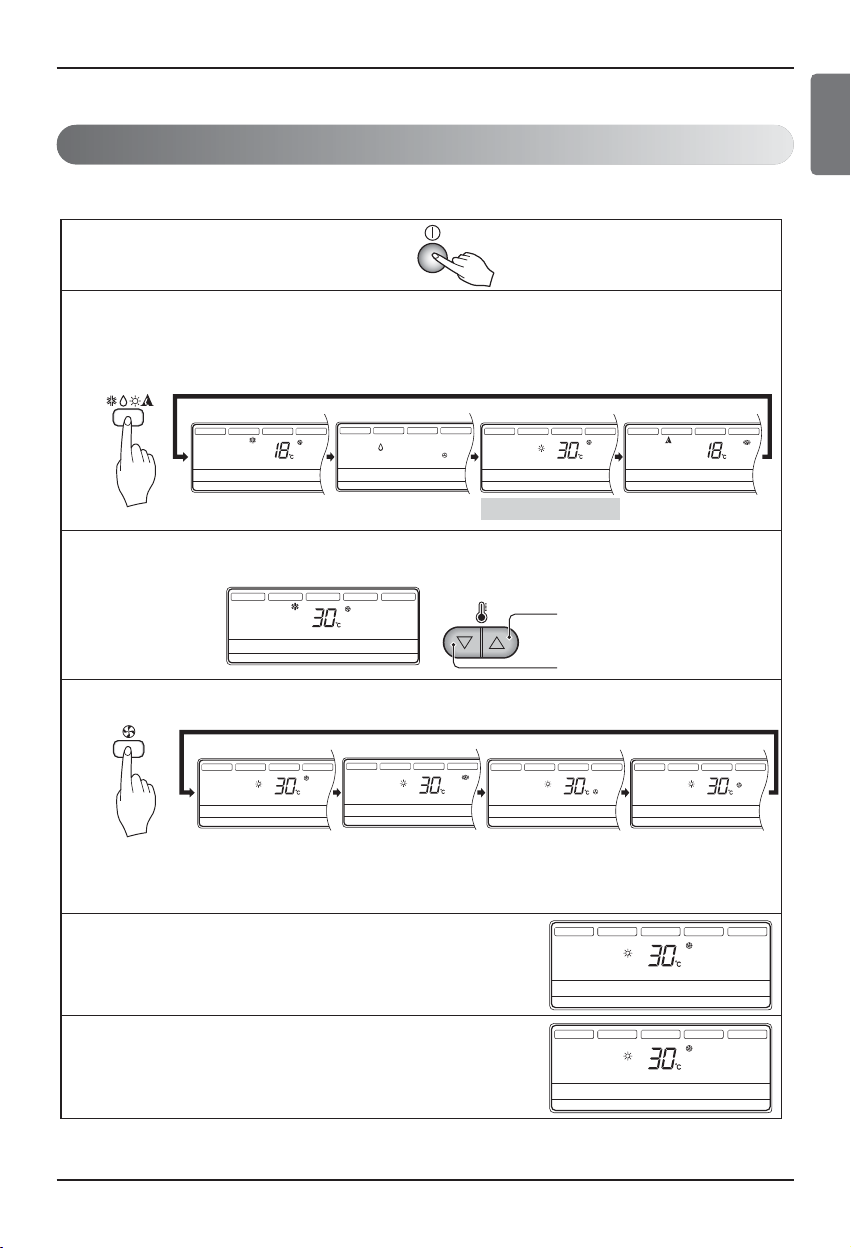
Cooling Operation Mode
2
Select Cooling Operation.
Press the Operation Mode Selection Button.
Each time the button is pressed, the operation mode is shifted in the arrow direction.
1
Press the On/Off Button.
4
Set the fan speed.
3
Set the temperature lower than the room temperature.
• The temperature can be set within
a range of 18°C ~ 30°C by 1°C .
• Select the fan speed in five steps-high, auto, power jet, low, medium.
• The display shows high fan speed.
• Each time the button is pressed, the fan speed mode is shifted.
ENGLISH
Page 14
14 Multi-Type Air Conditioner
Operating Instructions
Soft Dry Operation Mode
3
During Dry Operation.
• The indoor fan speed is automatically set to the low, so the shift of the indoor fan speed is
impossible because of already being set to the best speed for Dry Operation by Micom
Control.
2
Select Soft Dry Operation.
Press the operation Mode Selection Button.
Each time the button is pressed, the operation mode is shifted in the arrow direction.
1
Press the On/Off Button.
This mode dehumidifies without overcooling.
COOLING MODEL
Cooling Operation
Soft Dry Operation Auto Operation
ZONE
Operation unit Program set
Room Temp
MED
LO
AUTO
JET
Heater
Defrost
Filter
Preheat
Humidify
Out door
Time
Timer
On
Set no. Time
Off
01 03 05 07 09 11 13 15 17 19 21 23
1234
AUTO SWING OPERATION
FAN SPEED
SUB FUNCTION
SET TEMP
HI HI
ZONE
Operation unit Program set
Room Temp
MED
AUTO
JET
Heater
Defrost
Filter
Preheat
Humidify
Out door
Time
Timer
On
Set no. Time
Off
01 03 05 07 09 11 13 15 17 19 21 23
1234
AUTO SWING OPERATION
FAN SPEED
SUB FUNCTION
SET TEMP
LO
HI
LO
ZONE
Operation unit Program set
Room Temp
MED
JET
Heater
Defrost
Filter
Preheat
Humidify
Out door
Time
Timer
On
Set no. Time
Off
01 03 05 07 09 11 13 15 17 19 21 23
1234
AUTO SWING OPERATION
FAN SPEED
SUB FUNCTION
SET TEMP
AUTO
Operation Display
ZONE
Operation unit Program set
Room Temp
MED
LO
AUTO
JET
Heater
Defrost
Filter
Preheat
Humidify
Out door
Time
Timer
On
Set no. Time
Off
01 03 05 07 09 11 13 15 17 19 21 23
1234
AUTO SWING OPERATION
FAN SPEED
SUB FUNCTION
SET TEMP
HI
HI
ZONE
Operation unit Program set
Room Temp
MED
AUTO
JET
Heater
Defrost
Filter
Preheat
Humidify
Out door
Time
Timer
On
Set no. Time
Off
01 03 05 07 09 11 13 15 17 19 21 23
1234
AUTO SWING OPERATION
FAN SPEED
SUB FUNCTION
SET TEMP
LO
ZONE
Operation unit Program set
Room Temp
MED
LO
AUTO
JET
Heater
Defrost
Filter
Preheat
Humidify
Out door
Time
Timer
On
Set no. Time
Off
01 03 05 07 09 11 13 15 17 19 21 23
1234
AUTO SWING OPERATION
FAN SPEED
SUB FUNCTION
SET TEMP
HI HI
ZONE
Operation unit Program set
Room Temp
MEDLOJET
Heater
Defrost
Filter
Preheat
Humidify
Out door
Time
Timer
On
Set no. Time
Off
01 03 05 07 09 11 13 15 17 19 21 23
1234
AUTO SWING OPERATION
FAN SPEED
SUB FUNCTION
SET TEMP
AUTO
HEAT PUMP MODEL
Cooling Operation
Soft Dry Operation Heating Operation Auto Operation
Operation Display
Page 15
Owner's Manual 15
ZONE
Operation unit Program set
Room Temp
MED
LO
AUTO
JET
Heater
Defrost
Filter
Preheat
Humidify
Out door
Time
Timer
On
Set no. Time
Off
01 03 05 07 09 11 13 15 17 19 21 23
1234
AUTO SWING OPERATION
FAN SPEED
SUB FUNCTION
SET TEMP
HI
HI
ZONE
Operation unit Program set
Room Temp
MED
AUTO
JET
Heater
Defrost
Filter
Preheat
Humidify
Out door
Time
Timer
On
Set no. Time
Off
01 03 05 07 09 11 13 15 17 19 21 23
1234
AUTO SWING OPERATION
FAN SPEED
SUB FUNCTION
SET TEMP
LO
ZONE
Operation unit Program set
Room Temp
MED
LO
AUTO
JET
Heater
Defrost
Filter
Preheat
Humidify
Out door
Time
Timer
On
Set no. Time
Off
01 03 05 07 09 11 13 15 17 19 21 23
1234
AUTO SWING OPERATION
FAN SPEED
SUB FUNCTION
SET TEMP
HI HI
ZONE
Operation unit Program set
Room Temp
MEDLOJET
Heater
Defrost
Filter
Preheat
Humidify
Out door
Time
Timer
On
Set no. Time
Off
01 03 05 07 09 11 13 15 17 19 21 23
1234
AUTO SWING OPERATION
FAN SPEED
SUB FUNCTION
SET TEMP
AUTO
Cooling Operation Soft Dry Operation Heating Operation Auto Operation
Operation Display
ZONE
Operation unit Program set
Room Temp
MED
LO
AUTO
JET
Heater
Defrost
Filter
Humidify
Out door
Time
Timer
On
Set no. Time
Off
01 03 05 07 09 11 13 15 17 19 21 23
1234
AUTO SWING OPERATION
FAN SPEED
SUB FUNCTION
SET TEMP
HI
Preheat
To raise the Temperature.
To lower the Temperature.
ZONE
Operation unit Program set
Room Temp
MED
LO
AUTO
JET
Heater
Defrost
Filter
Preheat
Humidify
Out door
Time
Timer
On
Set no. Time
Off
01 03 05 07 09 11 13 15 17 19 21 23
1234
AUTO SWING OPERATION
FAN SPEED
SUB FUNCTION
SET TEMP
HI
Preheat
ZONE
Operation unit Program set
Room Temp
MED
LO
AUTO
JET
Heater
Filter
Humidify
Out door
Time
Timer
On
Set no. Time
Off
01 03 05 07 09 11 13 15 17 19 21 23
1234
AUTO SWING OPERATION
FAN SPEED
SUB FUNCTION
SET TEMP
HI
Defrost
ZONE
Operation unit Program set
Room Temp
MED
LO
AUTO
JET
Heater
Defrost
Filter
Preheat
Humidify
Out door
Time
Timer
On
Set no. Time
Off
01 03 05 07 09 11 13 15 17 19 21 23
1234
AUTO SWING OPERATION
FAN SPEED
SUB FUNCTION
SET TEMP
HI
LO
HI
ZONE
Operation unit Program set
Room Temp
MED
JET
Heater
Defrost
Filter
Preheat
Humidify
Out door
Time
Timer
On
Set no. Time
Off
01 03 05 07 09 11 13 15 17 19 21 23
1234
AUTO SWING OPERATION
FAN SPEED
SUB FUNCTION
SET TEMP
AUTO
HI
ZONE
Operation unit Program set
Room Temp
MED
AUTO
JET
Heater
Defrost
Filter
Preheat
Humidify
Out door
Time
Timer
On
Set no. Time
Off
01 03 05 07 09 11 13 15 17 19 21 23
1234
AUTO SWING OPERATION
FAN SPEED
SUB FUNCTION
SET TEMP
LO
AUTO
HI
ZONE
Operation unit Program set
Room Temp
LO
JET
Heater
Defrost
Filter
Preheat
Humidify
Out door
Time
Timer
On
Set no. Time
Off
01 03 05 07 09 11 13 15 17 19 21 23
1234
AUTO SWING OPERATION
FAN SPEED
SUB FUNCTION
SET TEMP
MED
Operation Display
Operating Instructions
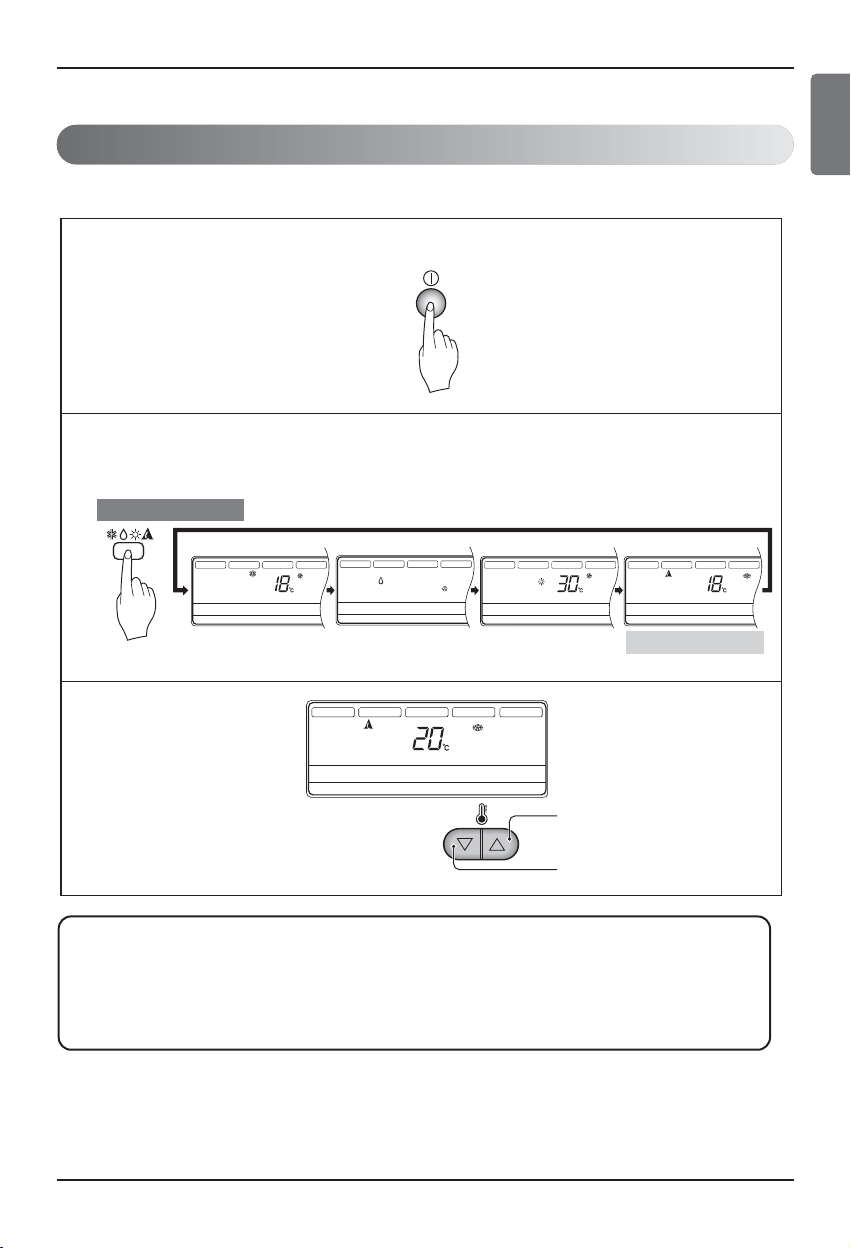
Heating Operation Mode (Heat pump model only)
2
Select Heating Operation.
Press the Operation Mode Selection Button.
Each time the button is pressed, the operation mode is shifted in the arrow direction.
3
Set the temperature higher than the room temperature.
4
Set the fan speed.
5
This air-conditioner is set to the hot start control in order not
to discharge the cold air during the heating operation. This
time, the remote controller indicates ʻPreheatʼ.
6
If the outdoor temperature is too low during the heating
operation, this air-conditioner is set to the defrosting
operation and the remote controller indicates ʻDefrostʼ.
1
Press the On/Off Button.
• Select the fan speed in four steps-high, Auto, low, medium.
• The display shows high fan speed
• Each time the button is pressed, the fan speed mode is shifted.
• The temperature can be set within a
range of 16°C~30°C by 1°C.
ENGLISH
Page 16
16 Multi-Type Air Conditioner
HI
ZONE
Operation unit Program set
Room Temp
MEDLOJET
Heater
Defrost
Filter
Preheat
Humidify
Out door
Time
Timer
On
Set no. Time
Off
01 03 05 07 09 11 13 15 17 19 21 23
1234
AUTO SWING OPERATION
FAN SPEED
SUB FUNCTION
SET TEMP
AUTO
COOLING MODEL
Cooling Operation
Soft Dry Operation Auto Operation
ZONE
Operation unit Program set
Room Temp
MED
LO
AUTO
JET
Heater
Defrost
Filter
Preheat
Humidify
Out door
Time
Timer
On
Set no. Time
Off
01 03 05 07 09 11 13 15 17 19 21 23
1234
AUTO SWING OPERATION
FAN SPEED
SUB FUNCTION
SET TEMP
HI HI
ZONE
Operation unit Program set
Room Temp
MED
AUTO
JET
Heater
Defrost
Filter
Preheat
Humidify
Out door
Time
Timer
On
Set no. Time
Off
01 03 05 07 09 11 13 15 17 19 21 23
1234
AUTO SWING OPERATION
FAN SPEED
SUB FUNCTION
SET TEMP
LO
HI
LO
ZONE
Operation unit Program set
Room Temp
MED
JET
Heater
Defrost
Filter
Preheat
Humidify
Out door
Time
Timer
On
Set no. Time
Off
01 03 05 07 09 11 13 15 17 19 21 23
1234
AUTO SWING OPERATION
FAN SPEED
SUB FUNCTION
SET TEMP
AUTO
Operation Display
To raise the Temperature.
To lower the Temperature.
Cold Cool Proper Warm Hot
Operating Instructions
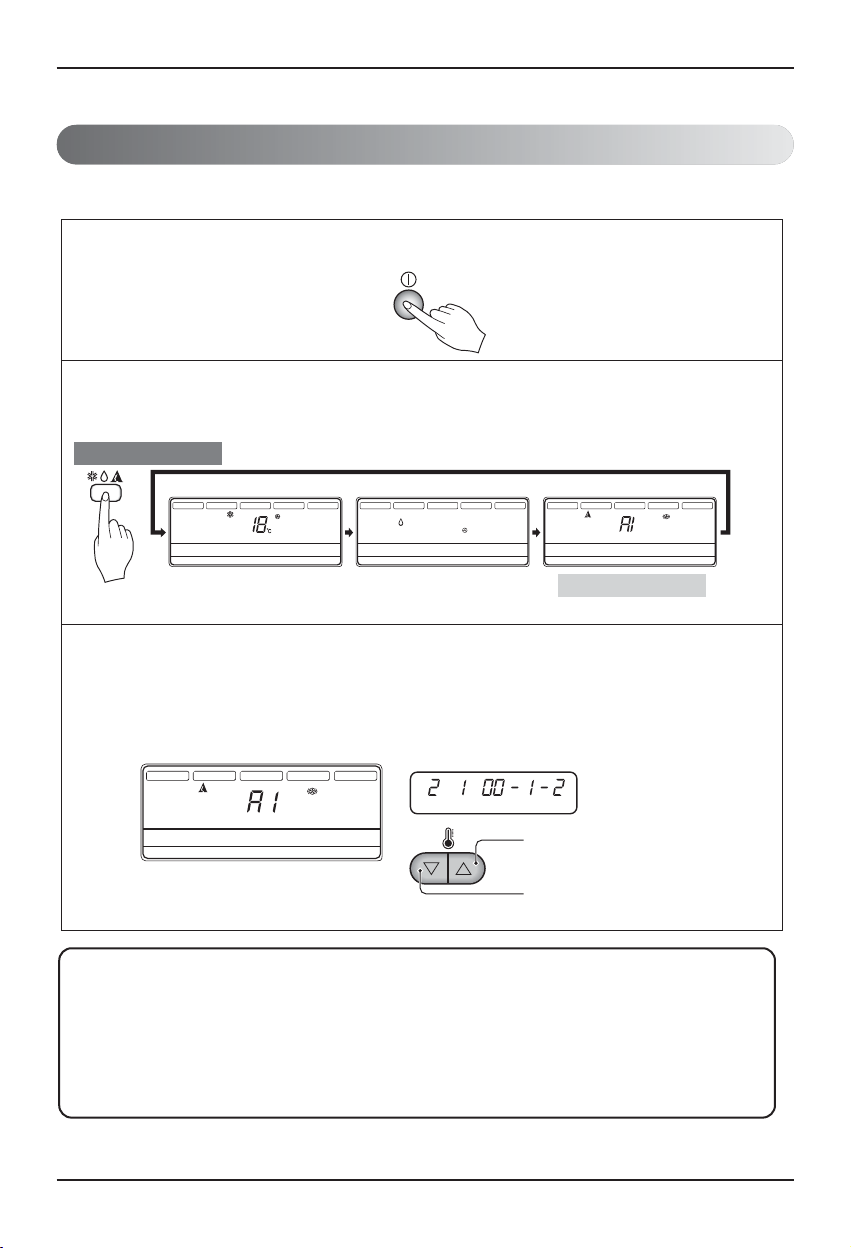
Auto Operation Mode (Cooling model)
1
Press the On/Off Button.
2
To select Auto Operation, press the Operation Mode Selection button.
Each time the button is pressed, the operation mode is shifted in the direction of the arrow.
During Auto Operation:
o You cannot switch the indoor fan speed. It has already been set by the Fuzzy rule.
o If the system is not operating as desired, manually switch to another mode. The system will not
automatically switch from the cooling mode to the heating mode, or from heating to cooling, it must be
done by manually resetting.
o During Auto Operation, pressing the chaos swing button makes the horizontal louvers swing up and
down automatically. If you want to stop auto-swing, press the chaos swing button again.
3
The temperature and fan speed are automatically set by the electronic controls based on the actual
room temperature. If you want to change the set temperature, close the door on the remote control
and press the Room Temperature Setting buttons. The cooler or warmer you feel, the more times
(up to two times) you should press the button. The set temperature will then be changed.
The temperature can be set within a range of -2~2 by 1 level.
(This indication will be shifted to the initial
Auto Mode Display state after 5 seconds.)
Page 17
Owner's Manual 17
Operating Instructions
ZONE
Operation unit Program set
Room Temp
MED
LO
AUTO
JET
Heater
Defrost
Filter
Preheat
Humidify
Out door
Time
Timer
On
Set no. Time
Off
01 03 05 07 09 11 13 15 17 19 21 23
1234
AUTO SWING OPERATION
FAN SPEED
SUB FUNCTION
SET TEMP
HI
HI
ZONE
Operation unit Program set
Room Temp
MED
AUTO
JET
Heater
Defrost
Filter
Preheat
Humidify
Out door
Time
Timer
On
Set no. Time
Off
01 03 05 07 09 11 13 15 17 19 21 23
1234
AUTO SWING OPERATION
FAN SPEED
SUB FUNCTION
SET TEMP
LO
ZONE
Operation unit Program set
Room Temp
MED
LO
AUTO
JET
Heater
Defrost
Filter
Preheat
Humidify
Out door
Time
Timer
On
Set no. Time
Off
01 03 05 07 09 11 13 15 17 19 21 23
1234
AUTO SWING OPERATION
FAN SPEED
SUB FUNCTION
SET TEMP
HI HI
ZONE
Operation unit Program set
Room Temp
MEDLOJET
Heater
Defrost
Filter
Preheat
Humidify
Out door
Time
Timer
On
Set no. Time
Off
01 03 05 07 09 11 13 15 17 19 21 23
1234
AUTO SWING OPERATION
FAN SPEED
SUB FUNCTION
SET TEMP
AUTO
HEAT PUMP MODEL
Cooling Operation
Soft Dry Operation Heating Operation Auto Operation
Operation Display
HI
ZONE
Operation unit Program set
Room Temp
MEDLOJET
Heater
Defrost
Filter
Preheat
Humidify
Out door
Time
Timer
On
Set no. Time
Off
01 03 05 07 09 11 13 15 17 19 21 23
1234
AUTO SWING OPERATION
FAN SPEED
SUB FUNCTION
SET TEMP
AUTO
To raise the Temperature.
To lower the Temperature.
Auto Operation Mode (Heat pump model)
3
The setting temperature
can be changed, when
the set temperature
button is pressed.
1
Press the On/Off Button.
2
To select Auto Operation, press the Operation Mode Selection button.
Each time the button is pressed, the operation mode is shifted in the direction of the arrow.
• The temperature can be set
within a range of 18°C~30°C
by 1°C.
During Auto Operation:
o You can switch the indoor fan speed.
o If the system is not operating as desired, manually switch to another mode. The system will not
automatically switch from the cooling mode to the heating mode, or from heating to cooling, then you
must set the mode and the desired temperature again.
ENGLISH
Page 18
18 Multi-Type Air Conditioner
ZONE
Operation unit Program set
Room Temp
MED
LO
AUTO
JET
Heater
Defrost
Filter
Preheat
Humidify
Out door
Time
Timer
On
Set no. Time
Off
01 03 05 07 09 11 13 15 17 19 21 23
1234
AUTO SWING OPERATION
FAN SPEED
SUB FUNCTION
SET TEMP
HI
ZONE
Operation unit Program set
Room Temp
MED
LO
AUTO
JET
Heater
Defrost
Filter
Preheat
Humidify
Out door
Time
Timer
On
Set no. Time
Off
01 03 05 07 09 11 13 15 17 19 21 23
1234
AUTO SWING OPERATION
FAN SPEED
SUB FUNCTION
SET TEMP
HI
HI
ZONE
Operation unit Program set
Room Temp
MED
AUTO
JET
Heater
Defrost
Filter
Preheat
Humidify
Out door
Time
Timer
On
Set no. Time
Off
01 03 05 07 09 11 13 15 17 19 21 23
1234
AUTO SWING OPERATION
FAN SPEED
SUB FUNCTION
SET TEMP
LO
HI
ZONE
Operation unit Program set
Room Temp
LO
AUTO
JET
Heater
Defrost
Filter
Preheat
Humidify
Out door
Time
Timer
On
Set no. Time
Off
01 03 05 07 09 11 13 15 17 19 21 23
1234
AUTO SWING OPERATION
FAN SPEED
SUB FUNCTION
SET TEMP
MED
HI
ZONE
Operation unit Program set
Room Temp
MED
AUTO
JET
Heater
Defrost
Filter
Preheat
Humidify
Out door
Time
Timer
On
Set no. Time
Off
01 03 05 07 09 11 13 15 17 19 21 23
1234
AUTO SWING OPERATION
FAN SPEED
SUB FUNCTION
SET TEMP
SLO
Operating Instructions
FAN Operation Mode
1
Press the On/Off Button.
2
Press FAN Operation Button.
06' Model : AMNH09GTCCO, AMNH12GTCC0
3
Each time Fan Speed button is pressed, the fan speed mode is shifted in the arrow
direction.
• Fan speed is high.
• Fan speed is medium.
• Fan speed is low.
• Fan speed is super low
(06 Model).
Page 19
Z
ET
CTI
Hea
9
Operating Instructions
Owner's Manual 19
ENGLISH
Comfort Operation with Swirl(4 Way Only)
• It is the function for comfort cooling/heating operation.
• The diagonal two louvers are opened the more larger than the other louvers.
After one minute, it is opposite.
1
Press the On/Off Button.
The unit will respond with a
beep.
2
Press the Swirl Button to operate
comfort cooling or heating.
Then it will be changed the open
angle of two horizontal louvers.
3
To cancel the Swirl Mode, press the Swirl
Button again.
ter
21 23
12
Filter
Defrost
3
ON
Preheat
Humidify
Out door
4
Hour
Timer Cancel
Program Week
Min
Set/Clr
Holiday
RESET
2ndF
Plasma
11 13 1 5
ONE
17
19
AUTO SWING OPERATION
Timer
On
Off
Set no. Time
Timer Cancel 2ndF
Program Week
Hour Min
SET TEMP
Room Temp
Operation unit
Time
Program set
01 03 05 07 09 11 13 15 17 19 21 23
Holiday
Plasma
Set/Clr
RESET
FAN SPEED
HI
MED
LO
ZONE
SUB FUNCTION
AUTO
Heater
JET
Defrost
Filter
1234
Preheat
Humidify
Out door
Page 20
Operating Instructions
20 Multi-Type Air Conditioner
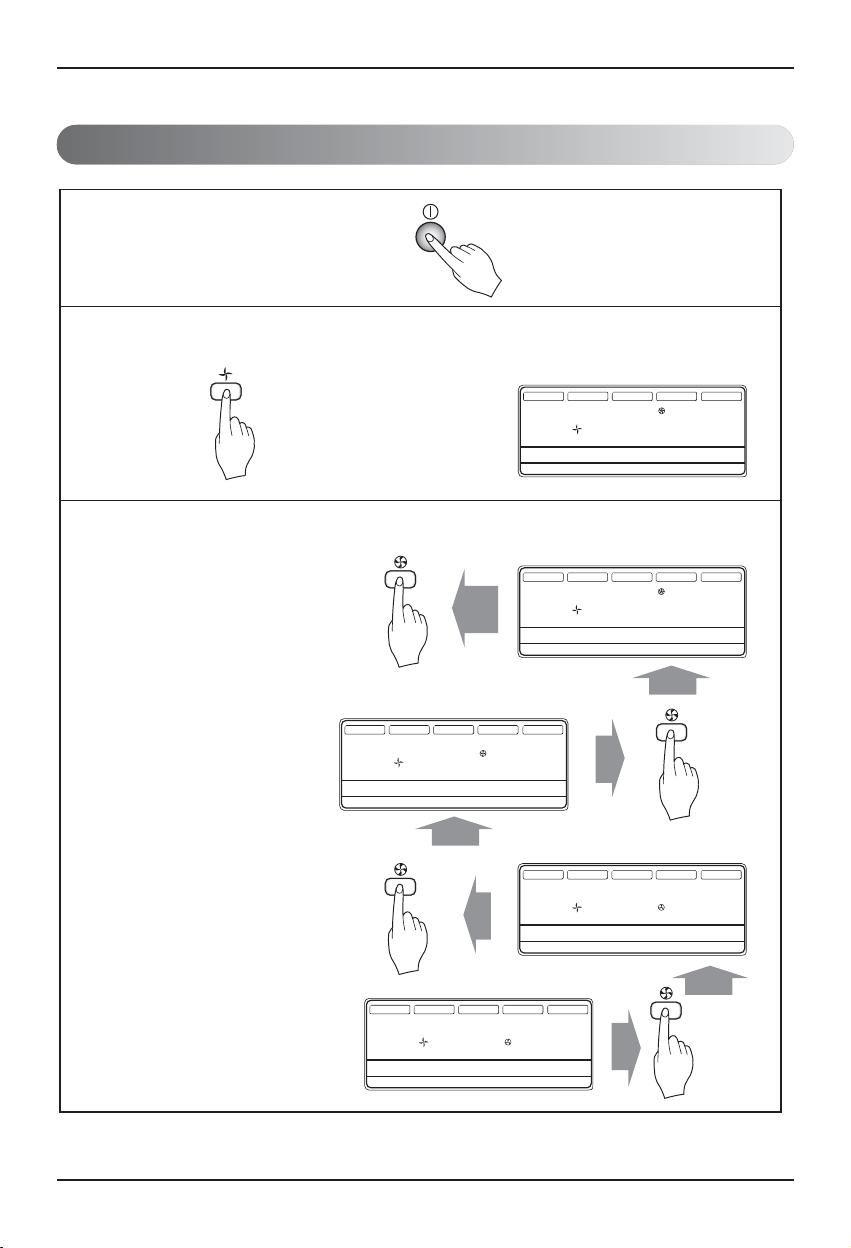
Vane Control
1
Press the On/Off Button.
2
Press the right arrow and auto swing button simultaneously for three seconds.
Then the display will be toggled like before.
Detach your finger from buttons at the moment that it is displayed "P0" in the operation
display.
3
Press the Auto Swing button again.
Then it will be changed the open angle of two horizontal louvers.
(from P0 to P5)
4
Press the right arrow button and Auto Swing button to finish the setting.
5
Press the left arrow button and Auto Swing button for three seconds in order
to set the other two louvers. Next procedure is the same before.
You can change the open angle to the install situation.
6
Although the air conditioner is turned ON/OFF, the previous setting position is not changed
If you want to set the default position, you have to set the "P0". Because the default is the
"P0".
AUTO SWING OPERATION
Operation unit Program set
Timer
On
Off
01 03 05 07 09 11 13 15 17 19 21 23
Set no. Time
SET TEMP
Room Temp
Time
FAN SPEED
MED
ZONE
SUB FUNCTION
AUTOLOHI
Heater
JET
Defrost
Filter
1234
Preheat
Humidify
Out door
AUTO SWING OPERATION
Timer
On
Set no. Time
AUTO SWING OPERATION
Timer
On
Set no. Time
SET TEMP
Room Temp
Time
Operation unit Program set
Off
01 03 05 07 09 11 13 15 17 19 21 23
SET TEMP
Room Temp
Time
Operation unit Program set
Off
01 03 05 07 09 11 13 15 17 19 21 23
FAN SPEED
MED
ZONE
FAN SPEED
MED
ZONE
SUB FUNCTION
AUTOLOHI
Heater
JET
Defrost
Filter
1234
SUB FUNCTION
AUTOLOHI
Heater
JET
Defrost
Filter
1234
Preheat
Humidify
Out door
Preheat
Humidify
Out door
AUTO SWING OPERATION
Timer
On
Set no. Time
AUTO SWING OPERATION
Timer
On
Set no. Time
SET TEMP
Room Temp
Time
Operation unit Program set
Off
01 03 05 07 09 11 13 15 17 19 21 23
SET TEMP
Room Temp
Time
Operation unit Program set
Off
01 03 05 07 09 11 13 15 17 19 21 23
FAN SPEED
MED
ZONE
FAN SPEED
MED
ZONE
SUB FUNCTION
AUTOLOHI
Heater
JET
Defrost
Filter
1234
SUB FUNCTION
AUTOLOHI
Heater
JET
Defrost
Filter
1234
Preheat
Humidify
Out door
Preheat
Humidify
Out door
AUTO SWING OPERATION
Timer
On
Off
Set no. Time
AUTO SWING OPERATION
Timer
On
Off
Set no. Time
+
Min
FAN SPEED
SET TEMP
Room Temp
Operation unit Program set
01 03 05 07 09 11 13 15 17 19 21 23
SET TEMP
Room Temp
Operation unit Program set
01 03 05 07 09 11 13 15 17 19 21 23
Min
Hour
SUB FUNCTION
AUTOLOHI
Heater
JET
MED
Defrost
Filter
ZONE
Time
FAN SPEED
SUB FUNCTION
AUTOLOHI
Heater
JET
MED
Defrost
Filter
ZONE
Time
+
+
Preheat
Humidify
Out door
1234
Preheat
Humidify
Out door
1234
Page 21

Owner's Manual 21
ENGLISH
ZONE
1234
Operation unit
Humidify
AUTO
Program set
Room Temp
HI
MED
LO
Heater
Defrost
Filter
Preheat
Out door
Time
Timer
On
Set no. Time
Off
01 03 05 07 09 11 13 15 17 19 21 23
JET
AUTO SWING OPERATION
FAN SPEED
SUB FUNCTION
SET TEMP
or or
Timer Cancel 2ndF
Program Week
Hour Min
Holiday
Set/Clr
RESET
Plasma
1
Press the On/Off button.
The unit will respond with
a beep.
2
Press the Jet Cool button to operate the
speed cooling mode and the unit will
operate in super high fan speed on cooling
mode.
3
To cancel the Jet Cool mode, press the Jet Cool button
again or the Fan Speed button or the room Set
Temperature button and the unit will operate in high fan
speed on cooling mode.
Operating Instructions
Jet Cool Operation Mode (1 Way - Except - 06 Model)
NOTE:
o During the Jet Cool function at any moment, the A/C starts to blow the cool air at extremely
high speed setting the room temp. automatically to 18°C. It is especially used to cool the
room temp. in the shortest time in a hot summer.
In heating mode however, the Jet Cool function is not available.
o In order to return to the normal cooling mode from the Jet Cool mode, you just press either
the operation mode selection button, airflow volume selection or temp. setting button or the
Jet Cool button again.
h 1 Way '06 Model : AMNH09GTCC0, AMNH12GTCC0
Page 22
22 Multi-Type Air Conditioner
ZONE
1234
Operation unit
Humidify
JET
AUTO
Program set
Room Temp
HI
MED
LO
Heater
Defrost
Filter
Preheat
Out door
Time
Timer
On
Set no. Time
Off
01 03 05 07 09 11 13 15 17 19 21 23
AUTO SWING OPERATION
FAN SPEED
SUB FUNCTION
SET TEMP
High
Speed
High
Speed
3
or
C
Timer Cancel 2ndF
Program
Week
Hour
Min
Holiday
Set/Clr
RESET
Plasma
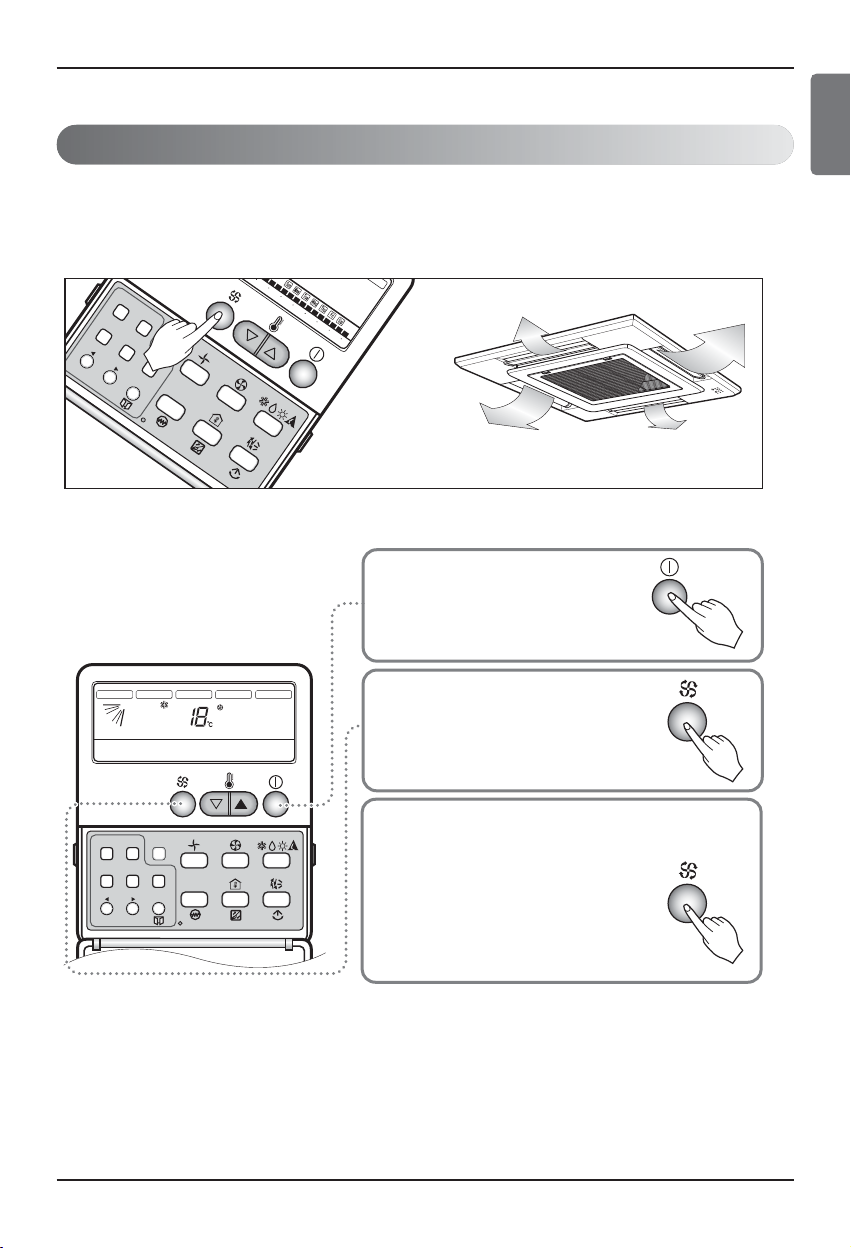
Child Lock Function
1
Press the On/Off
button.
(Confirm the unit
on operation.)
2
Press the Auto Swing
button then the
horizontal
louvers swing
up and down
automatically.
This is the Function that any children cannot used to the air-conditioner.
3
Press again the Auto
Swing button to
cancel the
Auto Swing mode.
Operation procedure
To set the Child-Lock Function
Press the Timer button and Minute Set button for three seconds. Then the operation
mode shift to child lock mode and it is displayed ʻ
CL
ʼ in the operation display.
When you press any button in this time, the remote controller is not converted to any
selected mode and the ʻ CLʼ is displayed in the remote controller for about three
seconds. But the Room Temperature function is operated in spite of child lock mode.
To cancel the Child-Lock Function
Press the Timer button and Minute Set button for three seconds. Then the childlock mode is cancelled and the preselected mode is displayed in the remote
controller.
Helpful information
Fan speed and cooling capacity.
The cooling capacity indicated in the specification is
the value when the fan speed is set to high, and the
capacity will be lower at low or medium fan speed.
High fan speed is recommended when you wish to
cool the room quickly.
1
2
Operating Instructions
Auto Swing Mode
ancel
Program
Hour
Min
Week
Set/Clr
2ndF
Holiday
Plasma
RESET
19 21
4
23
Page 23
Operation unit
Humidify
JET
AUTO
Program set
Room Temp
MED
LO
Heater
Defrost
Filter
Preheat
Out door
Time
Timer
On
Set no. Time
Off
01 03 05 07 09 11 13 15 17 19 21 23
ZONE
1234
AUTO SWING OPERATION
FAN SPEED
SUB FUNCTION
SET TEMP
HI
Plasma
Forced operation
(Tact switch)
Forced operation
(Tact switch)
Timer
Cancel 2ndF
Program
Week
Hour Min
Holiday
Set/Clr
RESET
Plasma
Owner's Manual 23
Forced Operation
Auto Restart Function
Tips for Filter sign LED
PLASMA Purification Operation (Optional)
Operation procedures when the remote control can't be used.
Press the tact switch (Forced operation) for 2 seconds.
If you want to stop operation, press again the tact switch.
In case the power comes on again after power failure on the Forced
Operation mode, the operating conditions are automatically set as
follows:
During Forced Operation, the initial mode continues.
In case the power comes on again after a power failure, Auto Restarting Operation is the function to operate
procedures automatically to the previous operating conditions.
Filter sign lamp (LED) is ON.
If LED indicating filter sign lamp is ON, clean the filter.
After cleaning the filter, press the Timer button and ◀ button of wired remote controller at the same time for 3 sec.
Then filter sign LED is OFF.
Heat pump Model
Cooling Model
Room Temp. ≥ set Temp.-2°C Room Temp. < set Temp.-2°C
Operating mode Cooling Cooling Heating
Indoor FAN Speed High set available set available
Setting Temperature 22°C set available set available
1
Press the On/Off button. The unit will
respond with a beep.
2
Open the door on the remote control. Press the
PLASMA air purifying operation ON/OFF button.
Operation will start when the button is pressed and
stop when the button is pressed again.
3
Set the fan speed again with door of the remote
control closed. You can select the fan speed in four
steps-low, medium, high or Auto.
Each time the button is pressed, the fan speed
mode is shifted.
g Air purifying operation (PLASMA) with cooling, heating
or any other operations.
1
2
3
Operating Instructions
ENGLISH
Page 24
B
e
n
z
e
n
e
S
C
O
U
R
I
N
C
L
B
A
R
G
E
S
I
N
N
E
R
Rack
Air Filter
Anti-
bacteria filter
Air
Intake
Remote
Controller
Air Outlet
Anti-bacteria filter
Air Intake
Air Outlet
Remote Controller
Air Filter
Rack
24 Multi-Type Air Conditioner
Maintenance and Service
Maintenance and Service
Indoor Unit
Grille, Case and Remote Control
p Turn the system off before cleanining, To clean, wipe
with a soft, dry cloth. Do not use bleach or abrasives.
Supply power must be disconnected before cleaning
the indoor unit.
CAUTION:
When the air filter is to
be removed, do not touch the metal
parts of the indoor unit.
It may cause an injury.
Remove the Air filters.
n
Take hold of the tab and pull slightly
forward to remove the filter.
Clean dirt from the air filter using a vacuum
cleaner or washing with water.
n
If dirt is conspicuous, wash with a neutral
detergent in lukewarm water.
n
If hot water (50°C or more) is used, it may
be deformed.
After washing with water, dry well in
the shade.
n
Do not expose the air filter to direct
sunlight or heat from a fire when drying it.
Install the air filter.
Air Filters
The air filters behind the front grille should be checked
and cleaned once every 2 weeks or more often if
neccessary.
n Never use any of the followings:
• Water hotter than 40°C.
Could cause deformation and/or discoloration.
• Volatile substances.
Could damage the
surfaces of the air
conditioner.
1
2
3
4
NOTICE
Page 25
Maintenance and Service
Owner's Manual 25
ENGLISH
Purifying filter(Optional)
Cleaning
The PLASMA filter behind the air filters should be
checked and cleaned once every 3 months or more
often if necessary.
After removing the air filters, pull slightly
forward to remove the PLASMA filter.
Dip the PLASMA filter into the water mixed
with neutral detergent, for 20~30 minutes.
Dry the PLASMA filter in the shade for a day
(Especially, the humidity must be removed
perfectly on this parts).
Note the cuts of electric discharge lines.
Re-install the PLASMA filter to the original
position.
1
2
3
4
5
Replacement
• Recomended use period : About 2 years
Open front panel and remove air
filter.
Remove air purifying filter.
Insert new air purifying filter.
1
2
3
Reinsert air filter and close front
panel.
CAUTION:Donʼt touch this
PLASMA Filter within 10 seconds
after opening the inlet grille, it
may cause an electric shock.
4
2
3
2
3
2
1
Page 26

1 1
2
3
2
Maintenance and Service
26 Multi-Type Air Conditioner
When the air conditioner is not GOING to be used for a long time.
Operation Tips
When it is not going to be used for
a long time.
When the air conditioner is to be used again.
Operate the air conditioner at the
following settings for 2 to 3 hours.
• Type of operation: Fan operation
mode.(Refer to page 18.)
• This will dry out the internal mechanisms.
Helpful information
The air filters and your electiric bill.
If the air filters become clogged with dust, the
cooling capacity will drop, and 6% of the
electricity used to operate the air conditioner will
be wasted.
Clean the air filter and install it in the
indoor unit.
(Refer to page 25 for cleaning it.)
Check that the air inlet and outlet of
the indoor/outdoor unit are not
blocked.
Check that the ground wire is
connected correctly. It may be
connect to the indoor unit side.
Do not overcool the room. Keep blinds or curtains
closed.
Keep the room temperature
uniform.
Make sure that the doors
and windows are shut tight.
Clean the air filter
regularly.
Ventilate the room
occasionally.
This is not good for the health
and wastes electricity.
Do not let direct sunshine enter
the room when the air
conditioner is in operation.
Adjust the vertical and horizontal
airflow direction to ensure a
uniform temperature in the room.
Avoid opening doors and
windows as much as possible to
keep the cool air in the room.
Blockages in the air filter reduce
the airflow and lower cooling and
dehumidifying effects. Clean at
least once every two weeks.
Since windows are kept closed,
it is a good idea to open them
and ventilate the room now and
then.
Turn off the breaker.
CAUTION:
Turn off the breaker
when the air conditioner is not going
to be used for a long time.
Dirt may collect and may cause a fire.
Page 27
Owner's Manual 27
ENGLISH
Maintenance and Service
Troubleshooting
Check the following points before requesting repairs or service.... If the malfunction persist, please contact your
dealer.
The air conditioner does not
operate.
The room has a peculiar odor.
It seems that condensation is
leaking from the air conditioner.
Air conditioner does not operate
for about 3 minutes when restart.
Does not cool or heat effectively.
The air conditioner operation is
noisy.
Crack sound is heard.
Remote control display is faint, or
no display at all.
11
-
-
-
-
25
13, 15
-
-
Case Explanation See page
• Have you made a mistake in timer operation?
• Has the fuse blown or has the circuit breaker
been tripped?
• Check that this is not a damp smell exuded by
the walls, carpet, furniture or cloth items in the
room.
• Condensation occurs when the airflow from the
air conditioner cools the warm room air.
• This is the protector of the mechanism.
• Wait about three minutes and operation will
begin.
• Is the air filter dirty? See air filter cleaning
instructions.
• The room may have been very hot when the
room air conditioner was first turned on. Allow
time for it to cool down.
• Has the setting temperature been set incorrectly?
• Are the indoor unit's air inlet or outlet vents
obstructed?
• For a noise that sounds like water flowing.
-This is the sound of freon flowing inside the air
conditioner unit.
• For a noise that sounds like the compressed air
releasing into atmosphere.
-This is the sound of the dehumidifying water
being processed inside the air conditioning unit.
• This sound is generated by the
expansion/contraction of the inlet grille, etc. due
to changes of temperature.
• Has the circuit breaker been tripped?
• Are the batteries inserted in the opposite (+) and
(-) directions?
Page 28

Memo
28 Multi-Type Air Conditioner
Page 29

MANUALE DEL’UTENTE
CLIMATIZZATORE
Leggere con attenzione questo manuale prima di usare
l’unità e conservare per uso futuro.
www.lg.com
TIPO: CASSETTA
ITALIANO
Page 30
2 Condiaionatore d'aria di tipo Incassato da soffitto
Manuale dellʼutente del Condiaionatore d'aria di tipo Incassato da soffitto
SOMMARIO
DATI DA RICORDARE
Annotare qui il numero di serie e il modello:
N°. modello
N°. di serie
I numeri sono riportati sull'etichetta a lato di ogni unità.
Nome del rivenditore
Data di acquisto
n
Spillare la ricevuta su questa pagina qualora fosse
necessaria per provare la data di acquisto o per motivi di
garanzia.
LEGGERE IL MANUALE
Allʼinterno troverà molti suggerimenti utili sullʼuso e la
manutenzione del condizionatore. Un minimo di
attenzione può far risparmiare molto tempo e denaro nel
corso della vita del condizionatore.
Nella tabella di riferimento per la risoluzione dei problemi
troverà molte risposte ai problemi più comuni.
Consultando la tabella Risoluzione dei problemi potrebbe
non essere necessario contattare il servizio di
assistenza.
AVVERTENZE
• Contattare un tecnico dell'assistenza autorizzato per la
riparazione o la manutenzione dellʼunità.
• Contattare lʼinstallatore per eseguire lʼinstallazione
dellʼunità.
• Il condizionatore non è stato progettato per essere
utilizzato da bambini o invalidi senza supervisione.
• È consigliabile vigilare sui bambini affinché essi non
giochino con il condizionatore.
• Se il cavo di alimentazione deve essere sostituito, il
servizio di sostituzione deve essere eseguito solo da
personale autorizzato utilizzando parti di ricambio
originali.
• Il servizio di installazione deve essere eseguito in
conformità con gli standard elettrici nazionali d
esclusivamente da personale autorizzato.
Precauzioni di sicurezza........3
Istruzioni per il
funzionamento........................6
Manutenzione e
assistenza .............................24
Page 31

Precauzioni di sicurezza
Manuale dell'utente 3
ITALIANO
Precauzioni di sicurezza
Per evitare infortuni dell'utente o altre persone e danni alle cose, attenersi alle seguenti
istruzioni.
n Lʼuso errato causato dalla mancata osservanza delle istruzioni può causare danni o lesioni.
Lʼimportanza è classificata dalle seguenti indicazioni.
n Il significato dei simboli utilizzati in questo manuale è spiegato di seguito.
ATTENZIONE
AVVISO
Questo simbolo indica la possibilità di decesso o di grave
infortunio.
Questo simbolo indica la possibilità di infortunio o danni alle cose.
Azione/operazione da non fare.
Attenersi alle istruzioni.
ATTENZIONE
n Installazione
Non utilizzare interruttori automatici
difettosi o di potenza inferiore.
Utilizzare questa apparecchiatura su
un circuito dedicato.
• Vi è il rischio di scosse elettriche
o incendio.
Per i collegamenti elettrici,
rivolgersi al rivenditore, a un
elettricista qualificato o a un
centro di assistenza autorizzato.
• Non smontare o tentare di
riparare il prodotto. Vi è il rischio
di scosse elettriche o incendio.
Il prodotto deve essere
sempre provvisto di messa a
terra.
• Vi è il rischio di scosse elettriche
o incendio.
Installare il pannello e il
coperchio della scatola di
controllo in modo sicuro.
• Vi è il rischio di scosse elettriche
o incendio.
Installare sempre un
interruttore automatico e
circuito dedicato
• L'errato cablaggio o
installazione può causare
incendi o scosse elettriche.
Utilizzare fusibili o
interruttori automatici di
giusta tensione.
• Vi e il rischio di scosse elettriche
o incendio.
Non modificare o prolungare il
cavo di alimentazione.
• Vi è il rischio di scosse elettriche
o incendio.
L'unità non deve essere
installata né rimossa
dall'utente (cliente).
• Vi è il rischio di scosse elettriche,
incendio, esplosione o lesioni.
Disimballare e installare il
prodotto con attenzione.
• I bordi taglienti possono causare
infortuni. Fare particolare
attenzione ai bordi del
contenitore e alle alette del
condensatore e dell'evaporatore.
Page 32

Precauzioni di sicurezza
4 Condiaionatore d'aria di tipo Incassato da soffitto
Evitare l'ingresso di acqua
nelle parti elettriche.
• Vi è il rischio di scosse elettriche,
incendio o guasti al prodotto.
Non conservare o utilizzare gas
infiammabili o combustibili in
prossimità del prodotto.
• Vi è il rischio di incendio o guasti al
prodotto.
Non utilizzare il prodotto in
luoghi chiusi per periodi
prolungati.
• Potrebbe esservi una scarsità di
ossigeno.
In caso di perdite di gas
infiammabile, aprire la finestra
per ventilare il locale prima di
azionare l'unità.
• Non utilizzare il telefono o
accendere o spegnere interruttori.
Vi è il rischio di esplosioni o
incendi.
In caso di rumori, odori o fumo
anomali provenienti dal prodotto.
Spegnere l'interruttore automatico e
scollegare il cavo di alimentazione.
• Vi è il rischio di scosse elettriche o
incendio.
Arrestare il funzionamento e chiudere la
finestra in caso di tempeste o uragani. Se
possibile, rimuovere il prodotto dalla
finestra prima che arrivi un uragano.
• Vi è il rischio di danni alle cose,
guasti al prodotto o scosse
elettriche.
Non aprire la griglia di aspirazione
del prodotto durante il
funzionamento (non toccare il
filtro elettrostatico, se presente).
• Vi è il rischio di lesioni fisiche,
scosse elettriche o guasti al
prodotto.
In caso di allagamento del
prodotto, rivolgersi a un
centro di assistenza
autorizzato.
• Vi è il rischio di scosse elettriche o
incendio.
Evitare che nel prodotto
entri acqua.
• Vi è il rischio di scosse elettriche,
incendio o danni al prodotto.
Di tanto in tanto, ventilare il prodotto quando
utilizzato insieme a fornelli ecc.
• Vi è il rischio di scosse elettriche o incendio.
Spegnere l'alimentazione prima di pulire o
riparare il prodotto.
• Vi è il rischio di scosse elettriche.
n Funzionamento
Per l'installazione, rivolgersi
sempre al rivenditore o a un
centro di assistenza autorizzato.
• Vi è il rischio di scosse elettriche,
incendio, esplosione o lesioni.
Non installare il prodotto su
supporti di installazione difettosi.
• Ciò potrebbe causare infortuni,
incidenti o danni al prodotto.
Accertarsi che l'area di
installazione non sia soggetta
a deterioramento nel tempo.
• Se la base si rompe, l'unità può
cadere con essa, causando
infortuni a persone, guasti al
prodotto o danni alle cose.
Non collegare/scollegare il cavo
di alimentazione alla/dalla presa
durante il funzionamento.
• Vi è il rischio di scosse elettriche o
incendio.
Non toccare il prodotto con
le mani bagnate.
• Vi è il rischio di scosse elettriche o
incendio.
Non posizionare riscaldatori o
altre apparecchiature vicino al
cavo di alimentazione.
• Vi è il rischio di scosse elettriche e
incendio.
Non utilizzare il prodotto troppo a lungo
in ambienti molto umidi e con una
finestra o una porta aperta.
• L'umidità potrebbe condensarsi e
bagnare o danneggiare i mobili.
Avere cura di non tirare o
danneggiare il cavo di alimentazione
durante il funzionamento.
• Vi è il rischio di scosse elettriche
o incendio.
Non mettere nulla sul cavo
di alimentazione.
• Vi è il rischio di scosse elettriche
o incendio.
In caso di inutilizzo del prodotto per lunghi
periodi, scollegare il cavo di alimentazione e
spegnere l'interruttore automatico.
• Vi è il rischio di guasti al prodotto o attivazione
accidentale.
Evitare che l'unità esterna sia calpestata da
qualcuno.
• Ciò potrebbe lesioni personali e danni al prodotto.
Page 33

Precauzioni di sicurezza
Manuale dell'utente 5
ITALIANO
Non bloccare l'ingresso o
l'uscita del flusso d'aria.
• In caso contrario, si potrebbero
verificare guasti al prodotto.
Utilizzare un panno soffice per la
pulizia. Non utilizzare detergenti
aggressivi, solventi ecc.
• Vi è il rischio di scosse elettriche,
incendio o danno alle parti in
plastica del prodotto.
Non toccare le parti metalliche del
prodotto durante la rimozione del
filtro dell'aria. Sono molto appuntite!
• Vi è il rischio di lesioni personali.
Non calpestare o mettere
oggetti sul prodotto (unità
esterne).
• Vi è il rischio di lesioni personali o
guasti al prodotto.
Inserire sempre il filtro in modo stabile.
Pulire il filtro ogni 2 settimane o più
spesso, se necessario.
• Un filtro sporco riduce l'efficienza
del condizionatore e potrebbe
causare danni o malfunzionamenti
del prodotto.
Non introdurre le mani o altri oggetti
nella bocca di ingresso o uscita
dell'aria durante il funzionamento.
• Le parti mobili metalliche sono
affilate e potrebbero causare
infortuni.
Non bere acqua fuoriuscita
dal prodotto.
• Ciò può causare gravi danni alla
salute.
Utilizzare una scala salda
per pulire o riparare il
prodotto.
• Fare attenzione ed evitare lesioni
personali.
Sostituire tutte le batterie del
telecomando sempre con altre
dello stesso tipo. Non mischiare
batterie nuove e vecchie o
batterie di tipo diverso.
• Vi è il rischio di esplosioni o
incendi.
Non ricaricare o smontare le batterie. Non
gettare le batterie nel fuoco.
• Potrebbero bruciare o esplodere.
In caso di caduta del liquido delle batterie sulla
pelle o sugli indumenti, lavare accuratamente con
acqua pulita. Non utilizzare il telecomando se le
batterie presentano delle perdite.
• Le sostanze chimiche delle batterie potrebbero
causare scottature o altri pericoli.
n Installazione
AVVISO
n Funzionamento
Dopo l'installazione o la riparazione del
prodotto, verificare sempre che non vi
siano perdite di gas (refrigerante).
• Livelli bassi di refrigerante
potrebbero causare guasti al
prodotto.
Installare il tubo flessibile di
scarico in modo da garantire
uno scarico corretto e sicuro.
• Un errato collegamento può
causare perdite d'acqua.
Installare il prodotto
allineandolo in modo
uniforme.
• Per evitare perdite d'acqua.
Non installare il prodotto in modo che il
rumore o l'aria calda provenienti dall'unità
esterna possano causare danni ai vicini.
• Ciò potrebbe causare problemi
con i vicini.
Per sollevare e trasportare il
prodotto sono consigliabili
due persone.
• Evitare lesioni personali.
Non installare il prodotto in
luoghi esposti direttamente al
vento di mare (spruzzi di sale).
•
Ciò potrebbe causare corrosioni al prodotto.
La corrosione, in particolare sul condensatore
e sulle alette dell'evaporatore, può causare
malfunzionamenti o inefficienza.
Non esporre la pelle direttamente all'aria
fresca per periodi prolungati (non sedersi nel
raggio d'azione dell'aspirazione).
• Ciò potrebbe causare danni alla salute.
Non utilizzare il prodotto per scopi specifici, ad esempio per
conservare alimenti, animali, opere d'arte ecc. Questo prodotto è un
condizionatore d'aria, non un sistema di refrigerazione.
• Vi ò il rischio di danni o perdita di cose.
Page 34

Istruzioni per il funzionamento
6 Condiaionatore d'aria di tipo Incassato da soffitto
Istruzioni per il funzionamento
Unità interna
Tipo di Cassetta Unità Interna
On/Off : Si accende durante il funzionamento del sistema
Segnale filtro : Si accende dopo 2400 dalla prima unità di
funzionamento(riferire a pagina 19)
Timer : Si accende durante il funzionamento del timer.
Modo sbrinamento
: Si accende durante il modo sbrinamento o con
l'accensione Hot start.
Funzionamento indotto
: Procedure di funzionamento quando non è possibile
usare il telecomando.
Ricettore Segnale
Riceve il segnale dal telecomando. (Il suono di ricezione segnale è costituito da due bip brevi ed uno lungo.)
Telecomando
Filtro di anti- batterio
Aspirazione Aria
Aspirazione
Aria
Uscita d'aria
Uscita d'aria
Coprire
la mostra
Coperchio
Telecomando
Ricevente segnale
Modello con pompa calore
Modo Raffreddamento
Ricevente segnale
Modello con pompa calore
Modo Raffreddamento
Ricevente segnale
Ricevente segnale
Filtro di anti- batterioFiltro di anti- batterio
Page 35

Timer Cancel 2ndF
Program Week
Hour Min
Holiday
Set/Clr
RESET
Plasma
3
10
12
14
15
11
13
18
16
2
1
Modello con pompa calore
Modello Raffreddamento
5
4
6
8
9
7
17
1 Vie
4 vie,1 via (modello 06)
Operation unit No Func
Humidify
AUTO
AUTO SWING OPERATION
FAN SPEED
Program set
SUB FUNCTION
SET TEMP
Room Temp
HI
MED
LO
Heater
Defrost
Filter
Preheat
Out door
Time
Timer
On
Set no. Time
Off
01 03 05 07 09 11 13 15 17 19 21 23
ZONE
1234
2ndF
JET
SLO
Istruzioni per il funzionamento
Manuale dell'utente 7
ITALIANO
Nome e funzione di telecommando
Display funzionamento
Visualizza le condizioni di funzionamento
Pulsante On/Off
Il funzionamento inizia quando viene premuto
questo pulsante, e si arresta quando il pulsante
viene premuto di nuovo.
Pulsante di impostazione temperatura.
Serve all'impostazione della temperatura per
ottenere la temperatura desiderata.
Pulsante funzionamento Ventilatore
Serve per fare circolare l'aria nell'ambiente senza
né raffreddare né scaldare.
Tasto Fan speed (Jet Cool: solo a 4 vie)
Usato per impostare la desiderata velocità della
ventola e per selezionare la modalità
raffreddamento a getto.
Pulsante di selezione modo operativo.
Serve per selezionare il modo di funzionamento.
• Modo funzionamento automatico.
• Modo funzionamento raffreddamento
• Modo funzionamento Soft Dry
• Modo funzionamento riscaldamento (fatta
eccezione del modello raffreddamento)model
Pulsante oscillazione automatica (Auto Swing)
Serve ad oscillare verso l'alto e verso il basso/
Destra e Sinistra(Opzine)
Pulsante di controllo temperatura
ambiente
/Rilascio Filtro (Opzione)
Serve a controllare la temperatura dell'ambiente.
Pulsante filtraggio dell'aria al plasma
(Opzione)/Riscaldatore (Opzione)
Pulsante di cancellazione del timer
Serve a cancellare i valori del timer.
Pulsante di impostazione timer
Serve all'impostazione del timer per ottenere
l'orario desiderato.
Pulsante settimana
Serve a impostare il giorno della settimana.
Pulsante programma
Serve a impostare il timer settimanale.
Pulsante vacanza
Serve a impostare una vacanza nella settimana.
Pulsante di impostazione ora
Serve a impostare l'ora del giorno e modificare
l'ora nella funzione di timer settimanale.
Pulsante di impostazione e cancellazione
/Ventilazione (Opzione)
Serve a impostare a impostare e cancellare il
timer settimanale
Tasto Swirl (Solo a 4 vie)
Usato per selezionare la modalità operativa a
diffusione
Nessuna funzione (1 via, modello 06)
Tasto Jet Cool (1 via)
Pulsante ripristino
Abituato a Regolare il tempo corrente e remuovere la
regolazione del tempo.
17
18
16
15
14
13
12
11
10
9
8
7
6
5
4
3
2
1
h
La temperatura indicata sul display può essere differente dalla temperatura della stanza se il
telecomando è installato in un luogo esposto a raggi diretti del sole o vicino a una fonte di calore.
h
Nota: 1 Via Modello 06 – AMNH09GTCC0,AMNH12GTCC0
Page 36

Istruzioni per il funzionamento
8 Condiaionatore d'aria di tipo Incassato da soffitto
Telecomando a raggi infrarossi (opzionale)
PERICOLO: nell'uso del telecomando
• Puntare il ricevente del segnale sul telecomando cablato per il funzionamento Il segnale del telecomando può essere ricevuto fino ad
una distanza di 7 m.
• Verificare che no vi siano ostacoli tra il telecomando ed il ricevente del segnale Non lasciar cadere o lanciare il telecomando.
• Non posizionare il telecomando in un punto esposto alla luce diretta del sole, o vicino ad un'apparecchiatura per il riscaldamento o
qualsiasi altra fonte di calore.
• Bloccare eventuali fasci luminosi molto intensi sul ricevente del segnale con una tenda o simili in modo da impedire un funzionamento
anomalo.
(per esempio avvio veloce, ELBA; lampada fluorescente di tipo inverter)
AUTO CLEAN
ON
OFF
CANCEL
SET
5
1
3
10
9
12
15
6
4
2
7
11
8
13
14
Sportello
(aperto)
Ricettore
di segnale
h
Il telecomando senza fili non è in grado di gestire il modo operativo a diffusione.
1. TASTO AVVIO/STOP
Alla pressione di questo tasto lʼunità si avvia e si
arresta premendo nuovamente lo stesso tasto.
2. TASTO DI SELEZIONE DELLA MODALITÀ DI FUNZIONAMENTO
Utilizzato per selezionare la modalità
di funzionamento
3. TASTI DI IMPOSTAZIONE DELLA
TEMPERATURA DELLʼAMBIENTE.
Utilizzato per impostare la temperatura dellʼambiente.
4. SELETTORE VELOCITÀ VENTILATORE INTERNO
Utilizzato per selezionare una delle quattro velocità del ventilatore, bassa,
media, alta o CHAOS.
5. RAFFREDDAMENTO RAPIDO
Utilizzato per avviare o fermare il raffreddamento/ riscaldamento rapido
(questa modalità attiva
un ventilatore a velocità molto elevata).
6. TASTO OSCILLAZIONE CHAOS
Utilizzato per arrestare o avviare il movimento di oscillazione e impostare la
direzione desiderata
del flusso dellʼaria verso lʼalto/basso.
7. TASTI DI ON / OFF DEL TIMER
Utilizzati per impostare lʼora di accensione e di spegnimento.
8. TASTI DI IMPOSTAZIONE DELLʼORA
Utilizzati per la regolazione dellʼorario.
9. TASTO SET / CANCEL DEL TIMER
Utilizzati per impostare il timer allʼora desiderata e annullare il funzionamento
del timer.
10. TASTO MODALITÀ SLEEP AUTOMATICA
Utilizzato per impostare il modalità Sleep in automatico.
11. TASTI DI CIRCOLAZIONE DELLʼARIA
Utilizzato per far circolare lʼaria nellʼambiente senza raffreddamento o
riscaldamento.
12. TASTO DI CONTROLLO DELLA TEMPERATURA DELLʼAMBIENTE
Utilizzato per controllare la temperatura dellʼambiente.
13. PLASMA (OPZIONALE)
Utilizzato per avviare o fermare la funzione di depurazione al plasma.
14. TASTO RESET
Inizializzazione del telecomando.
15. Tasto 2nd F
Per utilizzare le funzioni stampate in blu nella parte inferiore dei tasti.
Page 37

AUTO SWING
HI
ZONE
Operation unit Program set
Room Temp
MED
LO
AUTO
JET
Heater
Defrost
Filter
Preheat
Humidify
Out door
Timer
On
Set no. Time
Off
01 03 05 07 09 11 13 15 17 19 21 23
1234
OPERATION
FAN SPEED
SUB FUNCTION
SET TEMP
Time
AUTO SWING
HI
ZONE
Operation unit Program set
Room Temp
MED
LO
AUTO
JET
Heater
Defrost
Filter
Preheat
Humidify
Out door
Timer
On
Set no. Time
Off
01 03 05 07 09 11 13 15 17 19 21 23
1234
OPERATION
FAN SPEED
SUB FUNCTION
SET TEMP
Time
AUTO SWING
HI
ZONE
Operation unit Program set
Room Temp
MED
LO
AUTO
JET
Heater
Defrost
Filter
Preheat
Humidify
Out door
Timer
On
Set no. Time
Off
01 03 05 07 09 11 13 15 17 19 21 23
1234
OPERATION
FAN SPEED
SUB FUNCTION
SET TEMP
Time
AUTO SWING
HI
ZONE
Operation unit Program set
Room Temp
MED
LO
AUTO
JET
Heater
Defrost
Filter
Preheat
Humidify
Out door
Time
Timer
On
Set no. Time
Off
01 03 05 07 09 11 13 15 17 19 21 23
1234
OPERATION
FAN SPEED
SUB FUNCTION
SET TEMP
Hour
Min
Week
RESET
Istruzioni per il funzionamento
Manuale dell'utente 9
ITALIANO
Impostare l'ora corrente ed un giorno della settimana.
1
Premere il pulsante ' '.
Ogni volta che viene premuto il pulsante, il numero viene modificato da 00 a 23. Potete impostare il
numero dell'ora corrente.
2
Premere il pulsante ' '.
Ogni volta che viene premuto il pulsante, il numero viene modificato da 00 a 59. Potete impostare il
numero del minuto corrente.
3
Premere il pulsante ' '.
Ogni volta che viene premuto il pulsante il giorno della settimana cambia da domenica fino a sabato.
Serve a impostare il giorno della settimana.
4
Premere il pulsante ' '.
Se si desidera impostare nuovamente l'ora corrente e giorno della settimana premere nuovamente il
pulsante Reset.
Hour
Min
Week
RESET
Page 38

Week
Program
SET/CLR
MinHour
AUTO SWING
Time
HI
ZONE
Operation unit
Room Temp
MED
LO
AUTO
JET
Heater
Defrost
Filter
Preheat
Humidify
Out door
Timer
On
Set no.
Off
1234
OPERATION
FAN SPEED
SUB FUNCTION
SET TEMP
Program set
01 03 05 07 09 11 13 15 17 19 21 23
Time
AUTO SWING
Program set
Time
HI
ZONE
Operation unit
Room Temp
MED
LO
AUTO
JET
Heater
Defrost
Filter
Preheat
Humidify
Out door
Timer
On
Set no.
Off
1234
OPERATION
FAN SPEED
SUB FUNCTION
SET TEMP
01 03 05 07 09 11 13 15 17 19 21 23
Time
Istruzioni per il funzionamento
10 Condiaionatore d'aria di tipo Incassato da soffitto
Impostazione programma settimanale
1
Premere il pulsante programma.
Il telecomando viene visualizzato come nell'immagine. ' ', ' ' e lampeggia '01' .
2
Premere il pulsante ' '.
Premere il tasto ' ' ripetutamente fincheʼ non il modo desiderato appare.
Per esempio, se vuole Thu, premere il tasto ' ' 4 volte.
Program set
Week
Week
Week
3
Selezionare il tempo che desiera.
Premere il tasto , , allora lettera lampeggiando appare.
Se preme il tasto , allora la forma ' ' appare.
La forma ' ' significa che le ore cinque sono riservate.
Usando i tasti sotto, puoʼ riservare il tempo.
*Per esempio, lʼaria condizionata eʼ su 6. 7. 8 e le ore 13~22
Hour
Min
SET/CLR
unit
05
Page 39

Istruzioni per il funzionamento
Manuale dell'utente 11
ITALIANO
Time
HI
ZONE
Operation unit
Room Temp
MED
LO
AUTO
JET
Heater
Defrost
Filter
Preheat
Humidify
Out door
Timer
On
Set no.
Off
1234
OPERATION
FAN SPEED
SUB FUNCTION
SET TEMP
Program set
01 03 05 07 09 11 13 15 17 19 21 23
Time
AUTO SWING
Time
HI
ZONE
Operation unit
Room Temp
MED
LO
AUTO
JET
Heater
Defrost
Filter
Preheat
Humidify
Out door
Timer
On
Set no.
Off
1234
OPERATION
FAN SPEED
SUB FUNCTION
SET TEMP
01 03 05 07 09 11 13 15 17 19 21 23
Time
AUTO SWING
Program set
Program set
Time
HI
ZONE
Operation unit
Room Temp
MED
LO
AUTO
JET
Heater
Defrost
Filter
Preheat
Humidify
Out door
Timer
On
Set no.
Off
1234
OPERATION
FAN SPEED
SUB FUNCTION
SET TEMP
01 03 05 07 09 11 13 15 17 19 21 23
Time
AUTO SWING
Impostazione Holiday (festa)
Impostazione timer (Avviamento ritardato/Arresto prefissato)
Funzione autodiagnosi
Se il martedí sarà festa, potete impostare il condizionatore per i
settaggi di festa.
Premere il pulsante programma.
1
Premere il pulsante settimana
Selezionare Tuesday (martedí).
2
Premere il pulsante Holiday (festa).
Dopodiché il display del telecomando visualizza ' '.
Il rettangolo esterno significa festa.
h
Non si può impostare il programma settimanale per una vacanza.
3
Program
Week
Holiday
Quando si verifica un problema sul telecomando lampeggia la scritta "CH". Si prega di rivolgersi al
proprio rivenditore.
1
2
3
Se desidera accenderlo ʻONʼ durante il modo ʻOFFʼ. Oppure lo accende ʻOFFʼ durante il modo ʻONʼ, puoʼ usare la
funzionamento di timer setting.
Premere il tasto Timer.
Timer
Premere il tasto o , allora puoʼ controllare il tempo desiderato.
Se preme il tasto , il pannello di display appare.
Questo signfica 3 ore dopo, fermeraʼ durante il modo ʻONʼ,
opereraʼ durante il modo ʻOFFʼ.
MinHour
Se vuole cancellare la funzionamento di timer setting, preme il tasto cancel .
Cancel
MinHour
Min
Page 40

ZONE
1234
Operation unit
Humidify
JET
AUTO
AUTO SWING OPERATION
FAN SPEED
Program set
SUB FUNCTION
SET TEMP
Room Temp
HI
MED
LO
Heater
Defrost
Filter
Preheat
Out door
Time
Timer
On
Set no. Time
Off
01 03 05 07 09 11 13 15 17 19 21 23
Timer Cancel 2ndF
Program Week
Hour Min
Holiday
Set/Clr
RESET
Plasma
3
1
4
2
Istruzioni per il funzionamento
12 Condiaionatore d'aria di tipo Incassato da soffitto
Modo di funzionamento
Procedura di funzionamento
1°
2°
3°
4°
Pulsante On/Off
Funzionamento Pulsante di
selezione modo operativo
Temperatura ambiente Pulsante
impostazione
Velocità ventilatore interno
Modo Raffreddamento Modo Raffreddamento
Modo funzionamento
Soft Dry
Modo automatico
(Modello
Raffreddamento)
Modo funzionamento
Soft Dry
Modo Riscaldamento
Modo automatico
(Modello con pompa
calore)
Page 41

Istruzioni per il funzionamento
Manuale dell'utente 13
ITALIANO
Modo funzionamento raffreddamento
2
Selezionare il funzionamento di raffreddamento.
Pulsante di selezione modo operativo.
Ad ogni pressione del pulsante, il modo operativo cambia in direzione della freccia.
1
Premere il tasto On/Off .
4
Impostare la velocità del ventilatore.
3
Impostare una temperatura di funzionamento inferiore
alla temperatura dell'ambiente.
• La temperatura può essere
impostata entro un campo di
variazione di 18°C ~ 30°C con
incrementi di 1°C.
• Selezionare la velocità della ventola tra cinque scelte sequenziali - alta, auto, a getto forzato, bassa,
media.
• Il display indica una velocità del ventilatore alta.
• Ogni volta che il pulsante viene premuto, la velocità del ventilatore viene modificata.
ZONE
Operation unit Program set
Room Temp
MED
LO
AUTO
JET
Heater
Defrost
Filter
Preheat
Humidify
Out door
Time
Timer
On
Set no. Time
Off
01 03 05 07 09 11 13 15 17 19 21 23
1234
AUTO SWING OPERATION
FAN SPEED
SUB FUNCTION
SET TEMP
HI
LO
HI
ZONE
Operation unit Program set
Room Temp
MED
JET
Heater
Defrost
Filter
Preheat
Humidify
Out door
Time
Timer
On
Set no. Time
Off
01 03 05 07 09 11 13 15 17 19 21 23
1234
AUTO SWING OPERATION
FAN SPEED
SUB FUNCTION
SET TEMP
AUTO AUTOLOHI
ZONE
Operation unit Program set
Room Temp
MED
Heater
Defrost
Filter
Preheat
Humidify
Out door
Time
Timer
On
Set no. Time
Off
01 03 05 07 09 11 13 15 17 19 21 23
1234
AUTO SWIN G OPERATION
FAN SPEED
SUB FUNCTION
SET TEMP
HI
ZONE
Operation unit Program set
Room Temp
MED
AUTO
JET
Heater
Defrost
Filter
Preheat
Humidify
Out door
Time
Timer
On
Set no. Time
Off
01 03 05 07 09 11 13 15 17 19 21 23
1234
AUTO SWING OPERATION
FAN SPEED
SUB FUNCTION
SET TEMP
LO
AUTO
HI
ZONE
Operation unit Program set
Room Temp
LO
JET
Heater
Defrost
Filter
Preheat
Humidify
Out door
Time
Timer
On
Set no. Time
Off
01 03 05 07 09 11 13 15 17 19 21 23
1234
AUTO SWIN G OPERATION
FAN SPEED
SUB FUNCTION
SET TEMP
MED
JET
MODELLO RAFFREDDAMENTO
Funzione di raffreddamento
ZONE
Operation unit Program set
Room Temp
MED
LO
AUTO
JET
Heater
Defrost
Filter
Preheat
Humidify
Out door
Time
Timer
On
Set no. Time
Off
01 03 05 07 09 11 13 15 17 19 21 23
1234
AUTO SWING OPERATION
FAN SPEED
SUB FUNCTION
SET TEMP
HI HI
ZONE
Operation unit Program set
Room Temp
MED
AUTO
JET
Heater
Defrost
Filter
Preheat
Humidify
Out door
Time
Timer
On
Set no. Time
Off
01 03 05 07 09 11 13 15 17 19 21 23
1234
AUTO SWING OPERATION
FAN SPEED
SUB FUNCTION
SET TEMP
LO
HI
LO
ZONE
Operation unit Program set
Room Temp
MED
JET
Heater
Defrost
Filter
Preheat
Humidify
Out door
Time
Timer
On
Set no. Time
Off
01 03 05 07 09 11 13 15 17 19 21 23
1234
AUTO SWING OPERATION
FAN SPEED
SUB FUNCTION
SET TEMP
AUTO
Display funzionamento
Display funzionamento
ZONE
Operation unit Program set
Room Temp
MED
LO
AUTO
JET
Heater
Defrost
Filter
Preheat
Humidify
Out door
Time
Timer
On
Set no. Time
Off
01 03 05 07 09 11 13 15 17 19 21 23
1234
AUTO SWING OPERATION
FAN SPEED
SUB FUNCTION
SET TEMP
HI
HI
ZONE
Operation unit Program set
Room Temp
MED
AUTO
JET
Heater
Defrost
Filter
Preheat
Humidify
Out door
Time
Timer
On
Set no. Time
Off
01 03 05 07 09 11 13 15 17 19 21 23
1234
AUTO SWING OPERATION
FAN SPEED
SUB FUNCTION
SET TEMP
LO
ZONE
Operation unit Program set
Room Temp
MED
LO
AUTO
JET
Heater
Defrost
Filter
Preheat
Humidify
Out door
Time
Timer
On
Set no. Time
Off
01 03 05 07 09 11 13 15 17 19 21 23
1234
AUTO SWING OPERATION
FAN SPEED
SUB FUNCTION
SET TEMP
HI HI
ZONE
Operation unit Program set
Room Temp
MEDLOJET
Heater
Defrost
Filter
Preheat
Humidif
Out doo
Time
Timer
On
Set no. Time
Off
01 03 05 07 09 11 13 15 17 19 21 23
1234
AUTO SWI NG OPERATION
FAN SPEED
SUB FUNCTION
SET TEMP
AUTO
MODELLO CON POMPA CALORE
Funzionamento
di riscaldamento
Modo funzionamento
Soft Dry
Modo funzionamento
Soft Dry
Funzionamento
automatico
Funzionamento
automatico
Display funzionamento
Funzione di raffreddamento
ZONE
Operation unit Program set
Room Temp
MED
LO
AUTO
JET
Heater
Defrost
Filter
Preheat
Humidify
Out door
Time
Timer
On
Set no. Time
Off
01 03 05 07 09 11 13 15 17 19 21 23
1234
AUTO SWING OPERATION
FAN SPEED
SUB FUNCTION
SET TEMP
HI
Per aumentare la temperatura.
Per diminuire la temperatura.
Page 42

Istruzioni per il funzionamento
14 Condiaionatore d'aria di tipo Incassato da soffitto
ZONE
Operation unit Program set
Room Temp
MED
LO
AUTO
JET
Heater
Defrost
Filter
Preheat
Humidify
Out door
Time
Timer
On
Set no. Time
Off
01 03 05 07 09 11 13 15 17 19 21 23
1234
AUTO SWING OPERATION
FAN SPEED
SUB FUNCTION
SET TEMP
HI HI
ZONE
Operation unit Program set
Room Temp
MED
AUTO
JET
Heater
Defrost
Filter
Preheat
Humidify
Out door
Time
Timer
On
Set no. Time
Off
01 03 05 07 09 11 13 15 17 19 21 23
1234
AUTO SWING OPERATION
FAN SPEED
SUB FUNCTION
SET TEMP
LO
HI
LO
ZONE
Operation unit Program set
Room Temp
MED
JET
Heater
Defrost
Filter
Preheat
Humidify
Out door
Time
Timer
On
Set no. Time
Off
01 03 05 07 09 11 13 15 17 19 21 23
1234
AUTO SWING OPERATION
FAN SPEED
SUB FUNCTION
SET TEMP
AUTO
ZONE
Operation unit Program set
Room Temp
MED
LO
AUTO
JET
Heater
Defrost
Filter
Preheat
Humidify
Out door
Time
Timer
On
Set no. Time
Off
01 03 05 07 09 11 13 15 17 19 21 23
1234
AUTO SWING OPERATION
FAN SPEED
SUB FUNCTION
SET TEMP
HI
HI
ZONE
Operation unit Program set
Room Temp
MED
AUTO
JET
Heater
Defrost
Filter
Preheat
Humidify
Out door
Time
Timer
On
Set no. Time
Off
01 03 05 07 09 11 13 15 17 19 21 23
1234
AUTO SWING OPERATION
FAN SPEED
SUB FUNCTION
SET TEMP
LO
ZONE
Operation unit Program set
Room Temp
MED
LO
AUTO
JET
Heater
Defrost
Filter
Preheat
Humidify
Out door
Time
Timer
On
Set no. Time
Off
01 03 05 07 09 11 13 15 17 19 21 23
1234
AUTO SWING OPERATION
FAN SPEED
SUB FUNCTION
SET TEMP
HI HI
ZONE
Operation unit Program set
Room Temp
MEDLOJET
Heater
Defrost
Filter
Preheat
Humidify
Out door
Time
Timer
On
Set no. Time
Off
01 03 05 07 09 11 13 15 17 19 21 23
1234
AUTO SWI NG OPERATION
FAN S PEED
SUB FUNCTION
SET TEMP
AUTO
MODELLO RAFFREDDAMENTO
MODELLO CON POMPA CALORE
Funzionamento
di riscaldamento
Modo funzionamento
Soft Dry
Modo funzionamento
Soft Dry
Funzionamento
automatico
Funzionamento
automatico
Display funzionamento
Display funzionamento
Funzione di raffreddamento
Funzione di raffreddamento
Modo funzionamento Soft Dry
Questo modo di funzionamento deumidifica senza raffreddare eccessivamente.
3
Durante il funzionamento Soft Dry.
• La velocità del ventilatore interno viene impostata automaticamente su basso, in questo
modo è impossibile impostare cambiare la velocità del ventilatore interno poiché questo
viene già impostato alla migliore velocità dal Controllo Micom per l'operazione a secco.
2
Selezionare il modo funzionamento Soft Dry.
Premere il pulsante di selezione modo operativo.
Ad ogni pressione del pulsante, il modo operativo cambia in direzione della freccia.
1
Premere il tasto On/Off.
Page 43

Istruzioni per il funzionamento
Manuale dell'utente 15
ITALIANO
ZONE
Operation unit Program set
Room Temp
MED
LO
AUTO
JET
Heater
Defrost
Filter
Preheat
Humidify
Out door
Time
Timer
On
Set no. Time
Off
01 03 05 07 09 11 13 15 17 19 21 23
1234
AUTO SWING OPERATION
FAN SPEED
SUB FUNCTION
SET TEMP
HI
HI
ZONE
Operation unit Program set
Room Temp
MED
AUTO
JET
Heater
Defrost
Filter
Preheat
Humidify
Out door
Time
Timer
On
Set no. Time
Off
01 03 05 07 09 11 13 15 17 19 21 23
1234
AUTO SWING OPERATION
FAN SPEED
SUB FUNCTION
SET TEMP
LO
ZONE
Operation unit Program set
Room Temp
MED
LO
AUTO
JET
Heater
Defrost
Filter
Preheat
Humidify
Out door
Time
Timer
On
Set no. Time
Off
01 03 05 07 09 11 13 15 17 19 21 23
1234
AUTO SWING OPERATION
FAN SPEED
SUB FUNCTION
SET TEMP
HI HI
ZONE
Operation unit Program set
Room Temp
MEDLOJET
Heater
Defrost
Filter
Preheat
Humidify
Out door
Time
Timer
On
Set no. Time
Off
01 03 05 07 09 11 13 15 17 19 21 23
1234
AUTO SWING OPERATION
FAN SPEED
SUB FUNCTION
SET TEMP
AUTO
ZONE
Operation unit Program set
Room Temp
MED
LO
AUTO
JET
Heater
Defrost
Filter
Humidify
Out door
Time
Timer
On
Set no. Time
Off
01 03 05 07 09 11 13 15 17 19 21 23
1234
AUTO SWING OPERATION
FAN SPEED
SUB FUNCTION
SET TEMP
HI
Preheat
ZONE
Operation unit Program set
Room Temp
MED
LO
AUTO
JET
Heater
Defrost
Filter
Preheat
Humidify
Out door
Time
Timer
On
Set no. Time
Off
01 03 05 07 09 11 13 15 17 19 21 23
1234
AUTO SWING OPERATION
FAN SPEED
SUB FUNCTION
SET TEMP
HI
Preheat
ZONE
Operation unit Program set
Room Temp
MED
LO
AUTO
JET
Heater
Filter
Humidify
Out door
Time
Timer
On
Set no. Time
Off
01 03 05 07 09 11 13 15 17 19 21 23
1234
AUTO SWING OPERATION
FAN SPEED
SUB FUNCTION
SET TEMP
HI
Defrost
ZONE
Operation unit Program set
Room Temp
MED
LO
AUTO
JET
Heater
Defrost
Filter
Preheat
Humidify
Out door
Time
Timer
On
Set no. Time
Off
01 03 05 07 09 11 13 15 17 19 21 23
1234
AUTO SWING OPERATION
FAN SPEED
SUB FUNCTION
SET TEMP
HI
LO
HI
ZONE
Operation unit Program set
Room Temp
MED
JET
Heater
Defrost
Filter
Preheat
Humidify
Out door
Time
Timer
On
Set no. Time
Off
01 03 05 07 09 11 13 15 17 19 21 23
1234
AUTO SWING OPERATION
FAN SPEED
SUB FUNCTION
SET TEMP
AUTO
HI
ZONE
Operation unit Program set
Room Temp
MED
AUTO
JET
Heater
Defrost
Filter
Preheat
Humidify
Out door
Time
Timer
On
Set no. Time
Off
01 03 05 07 09 11 13 15 17 19 21 23
1234
AUTO SWING OPERATION
FAN SPEED
SUB FUNCTION
SET TEMP
LO
AUTO
HI
ZONE
Operation unit Program set
Room Temp
LO
JET
Heater
Defrost
Filter
Preh
Hum
Out d
Time
Timer
On
Set no. Time
Off
01 03 05 07 09 11 13 15 17 19 21 23
123
AUTO SWING OPERATION
FAN SPEED
SUB FUNCT
SET TEMP
MED
Funzionamento
di riscaldamento
Modo funzionamento
Soft Dry
Funzionamento
automatico
Display funzionamento
Display funzionamento
Per aumentare la temperatura.
Per diminuire la temperatura.
Funzione di raffreddamento
Modo funzionamento riscaldamento (Solo modello con pompa calore)
2
Selezionare il funzionamento di riscaldamento.
Pulsante di selezione modo operativo.
Ad ogni pressione del pulsante, il modo operativo cambia in direzione della freccia.
3
Impostare la temperatura su un valore superiore alla
temperatura dell'ambiente.
4
Impostare la velocità del ventilatore.
5
Questo climatizzatore è stato impostato per il controllo
avviamento a caldo per non scaricare aria fredda durante il
funzionamento di riscaldamento. In questo caso il
telecomando indica "Preheat". (preriscaldamento)
6
Se la temperatura esterna è troppo bassa durante il
riscaldamento, questo climatizzatore viene impostato sul
funzionamento di sbrinamento ed il telecomando indica
"Defrost" (sbrinamento).
1
Premere il tasto On/Off.
• Serve a selezionare una delle quattro velocità del ventilatore: alta, automatica, bassa o media.
• Il display indica la velocità del ventilatore.
• Ogni volta che il pulsante viene premuto, la velocità del ventilatore viene modificata.
• La temperatura può essere impostata
entro un campo di variazione di 18°C
~ 30°C con incrementi di 1°C.
Page 44

Istruzioni per il funzionamento
16 Condiaionatore d'aria di tipo Incassato da soffitto
HI
ZONE
Operation unit Program set
Room Temp
MEDLOJET
Heater
Defrost
Filter
Preheat
Humidify
Out door
Time
Timer
On
Set no. Time
Off
01 03 05 07 09 11 13 15 17 19 21 23
1234
AUTO SWING OPERATION
FAN SPEED
SUB FUNCTION
SET TEMP
AUTO
ZONE
Operation unit Program set
Room Temp
MED
LO
AUTO
JET
Heater
Defrost
Filter
Preheat
Humidify
Out door
Time
Timer
On
Set no. Time
Off
01 03 05 07 09 11 13 15 17 19 21 23
1234
AUTO SWING OPERATION
FAN SPEED
SUB FUNCTION
SET TEMP
HI HI
ZONE
Operation unit Program set
Room Temp
MED
AUTO
JET
Heater
Defrost
Filter
Preheat
Humidify
Out door
Time
Timer
On
Set no. Time
Off
01 03 05 07 09 11 13 15 17 19 21 23
1234
AUTO SWING OPERATION
FAN SPEED
SUB FUNCTION
SET TEMP
LO
HI
LO
ZONE
Operation unit Program set
Room Temp
MED
JET
Heater
Defrost
Filter
Preheat
Humidify
Out door
Time
Timer
On
Set no. Time
Off
01 03 05 07 09 11 13 15 17 19 21 23
1234
AUTO SWING OPERATION
FAN SPEED
SUB FUNCTION
SET TEMP
AUTO
Cold Cool Proper Warm Hot
Modello Raffreddamento
Funzione di raffreddamento Modo funzionamento Soft Dry Funzionamento automatico
Per aumentare la temperatura.
Per diminuire la temperatura.
Display funzionamento
Modo funzionamento automatico (Modello raffreddamento)
1
Premere il tasto On/Off.
2
Ad ogni pressione del pulsante, il modo operativo cambia in direzione della freccia.
Per selezionare il funzionamento automatico, premere il pulsante di selezione del modo di
funzionamento.
3
Le temperature e la velocità del ventilatore vengono impostate automaticamente dai controlli elettronici
che rilevano la temperatura corrente dell'ambiente. Se desiderate modificare la temperatura impostata,
chiudere lo sportellino sul telecomando e premere i pulsanti di impostazione della temperatura
dell'ambiente. A seconda se sentite più freddo o più caldo più volte dovete premere (fino a due volte) il
pulsante. La temperatura impostata viene modificata. La temperatura può essere impostata entro un
campo di variazione di 2 ~ 2 di 1 livello.
Durante il funzionamento Soft Dry
o Non potete modificare la velocità del ventilatore interno. Questa viene già impostata dalla regola Fuzzy.
o Se il sistema non funziona come desiderato, passare manualmente ad un altro modo. Il sistema non è in grado
di passare automaticamente dal modo raffreddamento al modo riscaldamento o viceversa, questa operazione
deve essere eseguita manualmente reimpostando il sistema.
o Durante il funzionamento automatico, la pressione del pulsante di oscillazione chaos provoca il movimento
oscillatorio automatico verso l'alto e verso il basso delle alette. Se si desidera interrompere l'esecuzione,
premere nuovamente il tasto chaos.
(Questa indicazione viene cambiata allo stato
Display modo automatico dopo 5 secondi.)
Page 45

Istruzioni per il funzionamento
Manuale dell'utente 17
ITALIANO
Modo funzionamento automatico (Modello pompa calore)
3
L'impostazione della
temperatura può essere
modificata, tramite la
pressione del pulsante
della temperatura.
1
Premere il tasto On/Off.
2
Per selezionare il funzionamento automatico, premere il pulsante di selezione del modo di
funzionamento. Ad ogni pressione del pulsante, il modo operativo cambia in direzione della
freccia.
• La temperatura può essere
impostata entro un campo di
variazione di 18°C~30°C.
Durante il funzionamento Soft Dry
o Potete modificare la velocità del ventilatore interno.
o Se il sistema non funziona come desiderato, selezionare manualmente unʼaltra modalità. Il sistema non
passa automaticamente dalla modalità raffreddamento alla modalità riscaldamento, o viceversa. Pertanto,
è necessario impostare nuovamente modalità e temperatura desiderate.
ZONE
Operation unit Program set
Room Temp
MED
LO
AUTO
JET
Heater
Defrost
Filter
Preheat
Humidify
Out door
Time
Timer
On
Set no. Time
Off
01 03 05 07 09 11 13 15 17 19 21 23
1234
AUTO SWING OPERATION
FAN SPEED
SUB FUNCTION
SET TEMP
HI
HI
ZONE
Operation unit Program set
Room Temp
MED
AUTO
JET
Heater
Defrost
Filter
Preheat
Humidify
Out door
Time
Timer
On
Set no. Time
Off
01 03 05 07 09 11 13 15 17 19 21 23
1234
AUTO SWING OPERATION
FAN SPEED
SUB FUNCTION
SET TEMP
LO
ZONE
Operation unit Program set
Room Temp
MED
LO
AUTO
JET
Heater
Defrost
Filter
Preheat
Humidify
Out door
Time
Timer
On
Set no. Time
Off
01 03 05 07 09 11 13 15 17 19 21 23
1234
AUTO SWING OPERATION
FAN SPEED
SUB FUNCTION
SET TEMP
HI HI
ZONE
Operation unit Program set
Room Temp
MEDLOJET
Heater
Defrost
Filter
Preheat
Humidify
Out door
Time
Timer
On
Set no. Time
Off
01 03 05 07 09 11 13 15 17 19 21 23
1234
AUTO SWING OPERATION
FAN SPEED
SUB FUNCTION
SET TEMP
AUTO
HI
ZONE
Operation unit Program set
Room Temp
MEDLOJET
Heater
Defrost
Filter
Preheat
Humidify
Out door
Time
Timer
On
Set no. Time
Off
01 03 05 07 09 11 13 15 17 19 21 23
1234
AUTO SWING OPERATION
FAN SPEED
SUB FUNCTION
SET TEMP
AUTO
MODELLO CON POMPA CALORE
Funzione di
raffreddamento
Modo funzionamento
Soft Dry
Funzionamento
di riscaldamento
Funzionamento
automatico
Display funzionamento
Per aumentare la temperatura.
Per diminuire la temperatura.
Page 46

Istruzioni per il funzionamento
18 Condiaionatore d'aria di tipo Incassato da soffitto
ZONE
Operation unit Program set
Room Temp
MED
LO
AUTO
JET
Heater
Defrost
Filter
Preheat
Humidify
Out door
Time
Timer
On
Set no. Time
Off
01 03 05 07 09 11 13 15 17 19 21 23
1234
AUTO SWING OPERATION
FAN SPEED
SUB FUNCTION
SET TEMP
HI
ZONE
Operation unit Program set
Room Temp
MED
LO
AUTO
JET
Heater
Defrost
Filter
Preheat
Humidify
Out door
Time
Timer
On
Set no. Time
Off
01 03 05 07 09 11 13 15 17 19 21 23
1234
AUTO SWING OPERATION
FAN SPEED
SUB FUNCTION
SET TEMP
HI
HI
ZONE
Operation unit Program set
Room Temp
MED
AUTO
JET
Heater
Defrost
Filter
Preheat
Humidify
Out door
Time
Timer
On
Set no. Time
Off
01 03 05 07 09 11 13 15 17 19 21 23
1234
AUTO SWING OPERATION
FAN SPEED
SUB FUNCTION
SET TEMP
LO
HI
ZONE
Operation unit Program set
Room Temp
LO
AUTO
JET
Heater
Defrost
Filter
Preheat
Humidify
Out door
Time
Timer
On
Set no. Time
Off
01 03 05 07 09 11 13 15 17 19 21 23
1234
AUTO SWING OPERATION
FAN SPEED
SUB FUNCTION
SET TEMP
MED
HI
ZONE
Operation unit Program set
Room Temp
MED
AUTO
JET
Heater
Defrost
Filter
Preheat
Humidify
Out door
Time
Timer
On
Set no. Time
Off
01 03 05 07 09 11 13 15 17 19 21 23
1234
AUTO SWING OPERATION
FAN SPEED
SUB FUNCTION
SET TEMP
SLO
Modo funzionamento ventilatore
1
Premere il tasto On/Off.
2
Pulsante funzionamento Ventilatore.
3
Ad ogni pressione del pulsante della velocità del ventilatore, il modo operativo cambia in
direzione della freccia.
• La velocità del ventilatore è alta.
• La velocità del ventilatore è media.
• La velocità del ventilatore è bassa.
• La Velocita' Della Ventola é Molto
Bassa(Modello 06)
Modello 06 : AMNH09GTCCO, AMNH12GTCC0
Page 47

Istruzioni per il funzionamento
Manuale dell'utente 19
ITALIANO
MED
JET
ZONE
1234
Operation unit
Humidify
AUTO
Program set
Room Temp
LO
Heater
Defrost
Filter
Preheat
Out door
Time
Timer
On
Set no. Time
Off
01 03 05 07 09 11 13 15 17 19 21 23
AUTO SWING OPERATION
FAN SPEED
SUB FUNCTION
SET TEMP
HI
Timer Cancel 2ndF
Program Week
Hour Min
Holiday
Set/Clr
RESET
Plasma
Z
ET
CT
I
H
e
a
Funzionamento confortevole con la modalità operativa a diffusione (Solo a 4 vie)
1
Premere il tasto On/Off . L'unità
risponderà con un segnale
acustico (bip).
2
Premere il tasto Swirl per un
confortevole funzionamento
operativo in raffreddamento e
riscaldamento.
Quindi, lʼangolo di apertura dei
due deflettori orizzontali cambierà.
3
Per annullare il modo a
diffusione, premere di nuovo il
tasto swirl.
• È una funzione che fornisce un confortevole regime operativo di raffreddamento/riscaldamento.
• I due deflettori sono aperti meno ampiamente rispetto a quelli diagonali. Dopo qualche minuto, succede lʼopposto.
ter
ON
D
ef
P
r
ost
reheat
Fi
l
ter
Hu
m
id
Out door
1
i
f
y
2
34
21
2
3
Hou
rM
P
r
ogram
in
Timer Cancel
Week
Set/Clr
1
O
11
N
E
3
15 1
7
2
ndF
H
ol
iday
Plasma
R
ES
ET
19
Page 48

Istruzioni per il funzionamento
20 Condiaionatore d'aria di tipo Incassato da soffitto
Controllo alette dellʼaria
1
Premere il tasto On/Off.
2
Premere simultaneamente i tasti freccia destra e auto swing per tre secondi.
Quindi, il display riacquisterà un aspetto simile a quello precedente.
Rilasciare i tasti staccando le dita nel momento in cui compare lʼindicazione ʻP0ʼ nel
display operativo.
3
Premere di nuovo il tasto auto swing.
Quindi, verrà cambiato lʼangolo di apertura dei due deflettori orizzontali
(da ʻP0ʼ a ʻP5ʼ).
4
Premere i tasti freccia destra e auto swing per confermare le impostazioni.
5
Premere i tasti freccia sinistra e auto swing per tre secondi per impostare gli altri due
deflettori.
La successiva procedura è la stessa di quella prima vista.
6
Anche se il condizionatore viene acceso/spento, le impostazioni di posizione effettuate in
precedenza non cambiano.
Se si vuole impostare la posizione predefinita, si deve selezionare ʻP0ʼ. Questo perché
ʻP0ʼ è lʼimpostazione predefinita.
JET
AUTO SWING OPERATION
FAN SPEED
SUB FUNCTION
SET TEMP
AUTOLOHI
ZONE
Operation unit Program set
Room Temp
MED
Heater
Defrost
Filter
Preheat
Humidify
Out door
Time
Timer
On
Set no. Time
Off
01 03 05 07 09 11 13 15 17 19 21 23
1234
Min
+
Min
+
+
Hour
JET
AUTO SW ING OPERATION
FAN SPEED
SUB FUNCTION
SET TEMP
AUTOLOHI
ZONE
Operation unit Program set
Room Temp
MED
Heater
Defrost
Filter
Preheat
Humidify
Out door
Time
Timer
On
Set no. Time
Off
01 03 05 07 09 11 13 15 17 19 21 23
1234
JET
AUTO SW ING OPERATION
FAN SPEED
SUB FUNCTION
SET TEMP
AUTOLOHI
ZONE
Operation unit Program set
Room Temp
MED
Heater
Defrost
Filter
Preheat
Humidify
Out door
Time
Timer
On
Set no. Time
Off
01 03 05 07 09 11 13 15 17 19 21 23
1234
JET
AUTO SW ING OPERATION
FAN SPEED
SUB FUNCTION
SET TEMP
AUTOLOHI
ZONE
Operation unit Program set
Room Temp
MED
Heater
Defrost
Filter
Preheat
Humidify
Out door
Time
Timer
On
Set no. Time
Off
01 03 05 07 09 11 13 15 17 19 21 23
1234
JET
AUTO SW ING OPERATION
FAN SPEED
SUB FUNCTION
SET TEMP
AUTOLOHI
ZONE
Operation unit Program set
Room Temp
MED
Heater
Defrost
Filter
Preheat
Humidify
Out door
Time
Timer
On
Set no. Time
Off
01 03 05 07 09 11 13 15 17 19 21 23
1234
JET
AUTO SW ING OPERATION
FAN SPEED
SUB FUNCTION
SET TEMP
AUTOLOHI
ZONE
Operation unit Program set
Room Temp
MED
Heater
Defrost
Filter
Preheat
Humidify
Out door
Time
Timer
On
Set no. Time
Off
01 03 05 07 09 11 13 15 17 19 21 23
1234
JET
AUTO SW ING OPERATION
FAN SPEED
SUB FUNCTION
SET TEMP
AUTOLOHI
ZONE
Operation unit Program set
Room Temp
MED
Heater
Defrost
Filter
Preheat
Humidify
Out door
Time
Timer
On
Set no. Time
Off
01 03 05 07 09 11 13 15 17 19 21 23
1234
Page 49

Istruzioni per il funzionamento
Manuale dell'utente 21
ITALIANO
Modo funzionamento Jet Cool (1 via, tranne modello 06)
ZONE
1234
Operation unit
Humidify
AUTO
Program set
Room Temp
HI
MED
LO
Heater
Defrost
Filter
Preheat
Out door
Time
Timer
On
Set no. Time
Off
01 03 05 07 09 11 13 15 17 19 21 23
JET
AUTO SWING OPERATION
FAN SPEED
SUB FUNCTION
SET TEMP
oppure
oppure
Timer Cancel 2ndF
Program Week
Hour Min
Holiday
Set/Clr
RESET
Plasma
1
Premere il tasto On/Off . L'unità
risponderà con un segnale
acustico (bip).
2
Premere il pulsante Jet Cool per
attivare il 2 modo di raffreddamento
e l'unità funzionerà con il ventilatore
ad ultra alta veloce nel modo
raffreddamento.
3
Per cancellare il modo Jet Cool, premere il pulsante
Jet Cool 3 di nuovo oppure il pulsante Velocità
ventilatore o il pulsante Imposta temperatura
dell'ambiente e l'unità funzionerà nel modo alta
velocità ventilatore nel modo raffreddamento.
NOTA :
o Durante la funzione di Jet Cool in qualsiasi momento, il C/A inizia a soffiare l'aria fredda ad
alta velocità impostando automaticamente la temperatura della stanza a 18°C. Viene usato
specialmente per abbassare la temperatura dell'ambiente nel tempo più breve possibile
quando l'estate è calda.
Tuttavia nel modo riscaldamento, la funzione Jet Cool non è disponibile.
o Per tornare al modo raffreddamento normale dal modo Jet Cool, basta premere il pulsante
di selezione del modo operativo, oppure i pulsanti di selezione del volume di flusso d'aria o
temperatura oppure nuovamente il pulsante Jet Cool.
h 1 Via Modello 06: AMNH09GTCC0,AMNH12GTCC0
Page 50

ZONE
1234
Operation unit
Humidify
JET
AUTO
Program set
Room Temp
HI
MED
LO
Heater
Defrost
Filter
Preheat
Out door
Time
Timer
On
Set no. Time
Off
01 03 05 07 09 11 13 15 17 19 21 23
AUTO SWING OPERATION
FAN SPEED
SUB FUNCTION
SET TEMP
Alta
Velocità
Alta
Velocità
Timer Cancel 2ndF
Program Week
Hour Min
Holiday
Set/Clr
RESET
Plasma
3
or
C
Modo oscillazione automatica
Funzione blocco minori
Informazioni utili
Velocità del ventilatore e capacità di raffreddamento.
La capacità di raffreddamento indicata nei dati tecnici è il
valore quando la velocità del ventilatore è impostata su alto,
e la capacità sarà inferiore alle velocità media e inferiore del
ventilatore.
Si consiglia di impiegare la velocità alta del ventilatore
quando si desidera raffreddare velocemente l'ambiente.
Questa funzione impedisce ai bambini di usare il condizionatore d'aria.
1
Premere il tasto On/Off .
(Confermare
l'operazione
accensione unità).
2
Premere il pulsante di
oscillazione automatica e
le alette orizzontali
oscillano
automaticamente
verso l'alto e verso
il basso.
3
Premere nuovamente il
pulsante di Oscillazione
automatica per
cancellare il modo
Oscillazione
automatica.
Procedura di funzionamento
Per impostare la funzione Blocco bambini
Premere il pulsante del timer e dell'impostazione dei minuti per tre secondi. Dopodiché
il modo operativo passa al modo blocco bambini e viene visualizzata la scritta "CL" sul
display dell'unità.
Quando si preme qualsiasi pulsante in queste condizioni, il telecomando non viene
convertito ad alcun modo selezionato e la scritta "CL" viene visualizzata sul
telecomando per circa tre secondi. Ma la funzione di temperatura dell'ambiente
funziona nonostante il modo blocco bambini sia stato impostato.
Per cancellare la funzione Blocco bambini
Premere il pulsante del timer e dell'impostazione dei minuti per tre secondi. Dopodiché
viene cancellato il modo blocco bambini ed il modo preselezionato viene visualizzato
sul telecomando.
1
2
Istruzioni per il funzionamento
22 Condiaionatore d'aria di tipo Incassato da soffitto
ancel
Program
Hour
Min
Week
Set/Clr
Holiday
R
2ndF
Plasma
E
S
E
T
1
9
2
123
4
Page 51

Funzionamento indotto
(interruttore Tact)
Funzionamento indotto
(interruttore Tact)
Operation unit
Humidify
JET
AUTO
Program set
Room Temp
MED
LO
Heater
Defrost
Filter
Preheat
Out door
Time
Timer
On
Set no. Time
Off
01 03 05 07 09 11 13 15 17 19 21 23
ZONE
1234
AUTO SWING OPERATION
FAN SPEED
SUB FUNCTION
SET TEMP
HI
Plasma
Timer Cancel 2ndF
Program Week
Hour Min
Holiday
Set/Clr
RESET
Plasma
Funzionamento indotto
Pulsante nuovo avviamento automatico
Notizia per il filtro segno ROSSO
Funzionamento con purificazione al PLASMA (opzionale)
Procedure di funzionamento quando non è possibile
usare il telecomando. Premere il pulsante tact (funzionamento indotto)
Se si desidera interrompere l'esecuzione, premere nuovamente il
pulsante tact. Nel caso di ritorno della corrente dopo un'interruzione
nel modo funzionamento indotto, le condizioni di funzionamento
vengono impostate automaticamente come segue. Durante il
funzionamento indotto, il modo iniziale continua.
Nel caso di ritorno della corrente dopo un'interruzione, la funzione di Riavvio automatico del funzionamento è la funzione che
esegue le procedure automaticamente riportandole alle condizioni di funzionamento antecedenti all'interruzione.
Il filtro segno di lampada (LEC) è acceso.
Se ROSSO indicando il filtro di segno lampada è acceso, pulire il filtro.
Dopo pulisce il filtro, premere il pulsante Tempo è pulsante di telecomando a rete metallica nello stesso
tempo per 3 secondi, allora il filtro segno ROSSO è spento.
Modello con pompa calore
Modello Raffreddamento
Temperatura ambiente > Temp. impos. - 2°C Temperatura ambiente < Temp. impos.. -2°C
Modo di funzionamento Raffreddamento Raffreddamento Riscaldamento:
Velocità del ventilatore interno
Alta Impos. disponibile Impos. disponibile
Impostazione temperatura
22°C Impos. disponibile Impos. disponibile
2
Aprire la porta sul telecomando Premere il pulsante di
funzionamento purificazione aria al PLASMA:
Il funzionamento inizia quando viene premuto questo
pulsante, e si arresta quando il pulsante viene premuto
di nuovo.
3
Impostare nuovamente la velocità del ventilatore con lo
sportellino del telecomando chiuso. Potete selezionare
la velocità del ventilatore da quattro impostazioni:
bassa, media, alta e automatica.
Ogni volta che il pulsante viene premuto, la velocità del
ventilatore viene modificata. Il funzionamento di
purificazione dell'aria (PLASMA) con raffreddamento,
riscaldamento a qualsiasi altra operazione.
1
Premere il tasto On/Off . L'unità
risponderà con un segnale acustico (bip).
1
2
3
Istruzioni per il funzionamento
Manuale dell'utente 23
ITALIANO
Page 52

24 Condiaionatore d'aria di tipo Incassato da soffitto
B
e
n
z
e
n
e
S
C
O
U
R
I
N
G
C
L
B
A
R
G
E
R
S
I
N
N
E
R
Intelaiatura
Intelaiatura
Filtri Aria
Filtri Aria
Il filtro di
Anti- batterio
Aria
Aspirazione
Telecomando
Uscita d'aria
Il filtro di
Anti- batterio
Aria Aspirazione
Uscita d'aria
Telecomando
Manutenzione e assistenza
Manutenzione e assistenza
Unità interna
Griglia, rivestimento e telecomando
p Prima di eseguire la pulizia spegnere il sistema.
Pulire strofinando con un panno morbido ed asciutto.
Non usare candeggiante o abrasivi.
L'alimentazione deve essere disinserita prima di
procedere con la pulizia dell'unità interna.
NOTA
Rimuovere i filtri dell'aria.
n
Afferrare la linguetta e tirare leggermente in
avanti per rimuovere il filtro.
1
2
3
4
Filtri Aria
I filtri dell'aria dietro alla griglia frontale devono essere
devono essere controllati e puliti ogni 2 settimane o
più spesso se necessario.
n Non usare mai i componenti elencati
• Acqua più calda di 40°C
Potrebbe causare deformazione o
scolorimento.
• Sostanze volatili
Potrebbero
danneggiare la
superficie del
condizionatore
d'aria.
AVVISO:
Quando si rimuove il
filtro d'aria, non toccare gli elementi
di metallo dell'unità interna.
Pulire lo sporco presente sul filtro aria usando
un aspirapolvere o lavando con acqua.
n
Se è molto sporco, lavare con una
soluzione detergente neutra e acqua
tiepida.
n
L'uso di acqua calda (50°C e oltre) può
deformare il filtro.
Dopo avere lavato con acqua
asciugare bene all'ombra.
n
Non esporre il filtro alla luce diretta del
sole o ad una fonte di calore quando si
asciuga.
Installare nuovamente il filtro aria.
Page 53

Precauzioni di sicurezza
Manuale dell'utente 25
ITALIANO
Filtro che purifica (OPZIONALE)
Pulizia
Il filtro al PLASMA installato dietro ai filtri aria deve
essere controllato e pulito una volta ogni 3 mesi, più
spesso se necessario.
Una volta rimossi I filtri aria, tirare leggermente in
avanti per rimuovere il Filtro al PLASMA.
Immergere il filtro al PLASMA in acqua miscelata
con un detergente neutro, per 20-30 minuti.
Asciugare il filtro al PLASMA allʼombra per una
giornata (Specialmente, rimuovere lʼumidità
perfettamente da tutti I suoi componenti).
Rilevare eventuali tagli alle linee elettriche di
scarico.
Installare nuovamente il filtro al PLASMA nella
posizione originale.
1
2
3
4
5
Sostituzione
• Uso consigliato: Di 2 anni circa
Aprire il pannello frontale e
rimuovere i filtri aria.
Rimuovere i filtri di
purificazione aria.
Inserire nuovamente i filtri
aria e chiudere il pannello
frontale.
1
2
3
Inserire i nuovi filtri di purificazione
aria.
2
2
3
3
1
2
AVVISO: Non toccare questo
Filtro al PLASMA entro 10
secondi dallʼapertura della griglia
di entrata, si potrebbero ricevere
scosse elettriche.
4
Page 54

Manutenzione e assistenza
26 Condiaionatore d'aria di tipo Incassato da soffitto
1 1
2
3
2
Quando il climatizzatore non verrà usato per un lungo periodo di tempo
Suggerimenti di uso
Non raffreddare in modo
eccessivo l'ambiente
Mantenere tapparelle o
tenede chiuse.
Mantenere uniforme la
temperatura dell'ambiente
Oltre che a nuocere alla salute è
anche uno spreco di corrente.
Non lasciare che la luce diretta del
sole entri nell'ambiente quando il
climatizzatore è in funzione.
Regolare il flusso dell'aria in
direzione orizzontale e verticale
per garantire una temperatura
uniforme dell'ambiente.
Assicurarsi che porte finestre
siano ben chiuse.
Pulire regolarmente il filtro
dell'aria.
Ventilare occasionalmente
l'ambiente.
Evitare il più possibile di aprire le
porte e finestre per mantenere
l'aria fresca nell'ambiente.
Le ostruzioni del filtro dell'aria
riducono il flusso d'aria e
diminuiscono gli effetti di
climatizzazione e deumidificazione.
Pulire i filtri almeno una volta ogni due
settimane.
Poiché le finestre vengono tenute
chiuse, è una buona idea aprirle
regolarmente per aerare
l'ambiente.
Quando il climatizzatore non verrà usato per
un lungo periodo di tempo.
Quando si intende rimettere in funzione il
climatizzatore
Usare il climatizzatore con le seguenti
impostazioni per 2 o 3 ore.
•
Tipo di funzionamento: Modo funzionamento
ventilatore (Fare riferimento a pagina 18)
• Questo asciuga i meccanismi interni.
AVVISO:
Disinserire l'interruttore
automatico quando il climatizzatore non verrà
utilizzato per un lungo periodo di tempo.
Si può accumulare sporcizia e provocare un incendio.
Disinserire l'interruttore automatico.
Informazioni utili
I filtri d'aria e la vostra bolletta.
Se la polvere intasa i filtri d'aria, la capacità di
raffreddamento diminuirà, ed il 6% dell'elettricità
impiegata per far funzionare il climatizzatore sarà
sprecato.
Assicurarsi che il cavo di terra sia
collegato in modo corretto. Può essere
collegato al lato unità interna.
Assicurarsi che le griglie di aspirazione
dell'aria dell'unità interna ed esterna
non siano ostruite.
Pulire il filtro dell'aria ed installarlo
nell'unità interna.
(Fare riferimento alle istruzioni
riportate a pagina 25 per la pulizia)
Page 55

Manutenzione e assistenza
Manuale dell'utente 27
ITALIANO
Controllate i seguenti suggerimenti prima di richiedere riparazioni o assistenza... Se il problema persiste
contattare il proprio rivenditore o centro di assistenza.
Si prega di rivolgersi al proprio rivenditore.
Il condizionatore d'aria non
funziona
La stanza ha uno strano odore
Ci sono perdite di condensa dal
condizionatore d'aria.
Il condizionatore non funziona per
circa 3 minuti all'avviamento.
Non raffredda ne scalda in modo
efficiente.
Il funzionamento del condizionatore
è rumoroso.
Si sente come un rumore di
schiocco.
Il display del telecomando è
scarsamente visibile o non si vede
affatto.
• È stato commesso un errore nella programmazione
del timer?
• C'è un fusibile bruciato o è scattato l'interruttore
automatico?
• Assicurarsi che non sia odore di umido emanato da
pareti, tappeto o altri tessuti nell'ambiente.
• La condensa si verifica quando il flusso d'aria dal
condizionatore raffredda l'aria calda dell'ambiente
• Questa è la protezione del meccanismo
• Attendere circa tre minuti ed inizierà a funzionare.
• Il filtro d'aria è sporco? Vedere le istruzioni per la
pulizia del filtro dell'aria.
• L'ambiente era molto caldo quando è stato acceso il
condizionatore. Dare il tempo sufficiente per
raffreddare.
• La temperatura è stata impostata i modo corretto?
• Controllare se le feritoie di ventilazione delle unità
interna e esterna sono bloccate.
• Per un rumore di acqua che scorre.
- Questo è il rumore del freon che scorre all'interno
dell'unità di condizionamento dell'aria.
• Per un rumore simile all'aria compressa che viene
rilasciata nell'atmosfera. Questo è il rumore
dell'acqua di deumidificazione elaborata all'interno
dell'unità di condizionamento dell'aria.
• Questo rumore viene generato
dall'espansione/compressione del pannello
anteriore causato dalle modifiche delle condizioni di
calore.
• Le batterie sono scariche?
• Le batterie sono inserite in senso (+) e (-) inverso?
11
-
-
-
-
25
13, 15
-
-
-
-
Custodia Spiegazione
Vedere a pagina
Page 56

Note
30 Condiaionatore d'aria di tipo Incassato da soffitto
Page 57

MANUAL DEL PROPIETARIO
AIRE ACONDICIONADO
Por favor lea este manual detenidamente antes de
utilizar su equipo y guárdelo para consultas futuras.
www.lg.com
TIPO: CASSETE
ESPAÑOL
Page 58

2 Aire Acondicionado de tipo casete dé techo
Aire Acondicionado de tipo casete dé techo MANUAL DE USUARIO
ÍNDICE
PARA SU REGISTRO
Escriba aquí el modo y los números de serie :
Nº modelo
Nº serie
Puede encontrarlos en la etiqueta de la parte lateral de
cada unidad.
Nombre del establecimiento
Fecha de compra
n
Grape su recibo a esta página en caso de que lo
necesite para demostrar la fecha de compra para
servicios de garantía.
LEA ESTE MANUAL
En el interior encontrará muchos consejos útiles sobre cómo
utilizar y mantener debidamente su aparato de aire
acondicionado. Sólo unos pequeños cuidados preventivos por
su parte le podrán ahorrar mucho tiempo y dinero a lo largo de
la vida útil de su aparato de aire acondicionado. Encontrará
muchas respuestas a problemas comunes en la tabla de
consejos para la resolución de pequeños problemas. Si revisa
primero nuestra tabla de Consejos para la resolución de
problemas, quizás no debe llamar al equipo de servicio.
PRECAUCIONES
• Contacte con el técnico de servicio autorizado para reparar o
mantener esta unidad.
• Póngase en contacto con el instalador para proceder a la
instalación de este aparato.
• Este aparato de aire acondicionado no está diseñado para ser
utilizado por niños de corta edad ni por personas disminuidas
sin supervisión.
• Deberían supervisarse a los niños de corta edad para asegurarse
de que no juegan con el aparato de aire acondicionado.
• Cuando ha de recambiarse el cable de alimentación, sólo
personal autorizado llevará a cabo las tareas de recambio y
utilizando únicamente piezas de recambio.
• Las tareas de instalación deben realizarse de acuerdo con el
Código Eléctrico Nacional y sólo puede llevarlas a cabo personal
cualificado y autorizado.
Precautiones de seguridad.......3
Instrucciones de operación......6
Mantenimiento y servicio........24
Page 59

Precauciones de seguridad
Manual de Usurio 3
ESPAÑOL
Precauciones de seguridad
Para evitar lesiones al usuario o a otras personas y daños a la propiedad, siga estas
instrucciones.
n Una operaciʼon incorrecta por ignorar las instrucciones provocará lesiones o daños. La
seriedad se clasifica por las siguientes indicaciones.
n Significados de los símbolos utilizados en este manual.
ADVERTENCIA
PRECAUCIÓN
Este símbolo indica la posibilidad de muerte o de seria lesión.
Este símbolo indica sólo la posibilidad de lesión o daño a la propiedad.
Prohibido.
Recuerde seguir las instrucciones.
ADVERTENCIA
n Instalación
No utilice un interruptor automático
defectuoso o de valor nominal inferior
al correspondiente. Utilice un circuito
específico para este aparato.
• Existe riesgo de incendio o
descarga eléctrica.
Para trabajos eléctricos, póngase en
contacto con el distribuidor, vendedor,
técnico cualificado o centro de
asistencia técnica autorizado.
• No desmonte ni repare el
aparato. Existe riesgo de
incendio o descarga eléctrica.
Realice siempre la conexión
del aparato a tierra.
• Existe riesgo de incendio o
descarga eléctrica.
Instale correctamente el
panel y la cubierta de la caja
de control.
• Existe riesgo de incendio o
descarga eléctrica.
Instale siempre un circuito y
un interruptor específico.
• Un cableado o instalación
inadecuados pueden provocar
un incendio o una descarga
eléctrica.
Utilice el interruptor o
fusible de valor nominal
adecuado.
• Existe riesgo de incendio o
descarga eléctrica.
No modifique ni extienda el
cable de alimentación.
• Existe riesgo de incendio o
descarga eléctrica.
No instale, retire ni vuelva a
instalar la unidad por sí
mismo (cliente).
• Existe riesgo de incendio,
descarga eléctrica , explosión o
lesiones.
Tenga cuidado al desembalar
e instalar el aparato.
•
Los bordes afilados podrían provocar
lesiones. Tenga especial cuidado con
los bordes de la caja y las aletas del
condensador y evaporador.
Page 60

Precauciones de seguridad
4 Aire Acondicionado de tipo casete dé techo
No permita que entre agua en las
partes eléctricas.
• Existe riesgo de incendio, avería del
aparato o descarga eléctrica.
No almacene ni utilice gas
inflamable o combustibles cerca
del aparato.
• Existe riesgo de incendio o avería del
aparato.
No utilice el aparato en un espacio
cerrado durante un periodo
prolongado de tiempo.
• Podría producirse una falta de oxígeno.
Si hay fugas de gas, apague el
gas y abra una ventana para
ventilar antes de encender el
aparato.
• No utilice el teléfono ni encienda o
apague los interruptores.
Existe riesgo de explosión o incendio.
Si oye algún ruido extraño, huele
o ve salir humo del aparato.
Desconecte el interruptor
automático o desconecte el cable
de alimentación.
• Existe riesgo de incendio o descarga
eléctrica.
Detenga el funcionamiento y
cierre la ventana en caso de
tormenta o huracán. Si es posible,
retire el aparato de la ventana
antes de que llegue el huracán.
• Existe riesgo de daños materiales, avería
del aparato o descarga eléctrica.
No abra la parrilla de entrada del aparato
mientras está en funcionamiento. (No
toque el filtro electrostático, si la unidad
dispone del mismo).
• Existe riesgo de lesiones personales,
descarga eléctrica o avería del aparato.
Si el aparato se moja (inundado o
sumergido), póngase en contacto
con un centro de asistencia
técnica autorizado.
• Existe riesgo de incendio o descarga
eléctrica.
Tenga cuidado de que no entre
agua en el aparato.
• Existe riesgo de incendio, descarga
eléctrica o daños en el aparato.
Ventile el aparato de vez en cuando si lo utiliza junto
con una estufa, etc.
• Existe riesgo de incendio o descarga eléctrica.
Desconecte la alimentación principal al limpiar o
realizar el mantenimiento del aparato.
• Existe riesgo de descarga eléctrica.
n Operación
Para la instalación, póngase en
contacto siempre con su vendedor o
centro de asistencia técnica autorizado.
• Existe riesgo de incendio, descarga
eléctrica, explosión o lesiones.
No instale el aparato en una
superficie de instalación insegura.
• Podría causar lesiones, accidentes o
daños en el aparato.
Asegúrese de que el soporte de
instalación no se deteriora con el
tiempo.
• Si el soporte cae, el aire acondicionado
también puede caer, causando daños
materiales, avería del aparato y lesiones
personales.
No enchufe ni desenchufe la
clavija de alimentación durante el
funcionamiento
• Existe riesgo de incendio o descarga
eléctrica.
No toque (ni maneje) el aparato
con las manos mojadas.
• Existe riesgo de incendio o descarga
eléctrica.
No coloque una estufa ni otros
aparatos cerca del cable de
alimentación.
• Existe riesgo de incendio y descarga
eléctrica.
No deje funcionando el aire
acondicionado durante mucho tiempo
cuando la humedad sea muy alta y
haya una puerta o ventana abierta.
• Podría condensarse la humedad y mojar
o dañar el mobiliario.
Asegúrese de que el cable de
alimentación no pueda estirarse o
dañarse durante el
funcionamiento.
• Existe riesgo de incendio o descarga
eléctrica.
No coloque nada sobre el cable de
alimentación.
• Existe riesgo de incendio o descarga
eléctrica.
Cuando no vaya a utilizar el aparato durante un largo
periodo de tiempo, desenchufe la clavija de
alimentación o apague el interruptor automático.
• Existe riesgo de daños en el aparato o avería, o funcionamiento
intempestivo.
Asegúrese de que nadie se siente o apoye sobre la
unidad exterior.
• Podrían producirse lesiones personales y daños en el aparato.
Page 61

Precauciones de seguridad
Manual de Usurio 5
ESPAÑOL
No bloquee la entrada ni la salida
del flujo de aire.
• Podría causar una avería en el aparato.
Utilice un paño suave para
limpiar. No utilice detergentes
abrasivos, disolventes, etc.
• Existe riesgo de incendio, descarga
eléctrica o daños en las partes de plástico
del aparato.
No toque las partes de metal del
aparato al sacar el filtro del aire.
¡Son muy afiladas!
• Existe riesgo de lesiones personales.
No se suba ni coloque nada sobre
el aparato. (unidades exteriores)
• Existe riesgo de lesiones personales y
avería del aparato.
Inserte siempre el filtro
correctamente. Limpie el filtro
cada dos semanas o más a
menudo, si fuera necesario.
• Un filtro sucio reduce la eficacia del aire
acondicionado y puede producir un
funcionamiento defectuoso o daños.
No introduzca las manos u otros
objetos en la entrada o salida del
aire acondicionado mientras el
aparato esté en funcionamiento.
• Hay partes afiladas y móviles que podrían
producir lesiones personales.
No beba el agua que drena el
aparato.
• No es potable y podría causar graves
problemas en la salud.
Utilice un taburete o escalera
firme cuando limpie o realice el
mantenimiento del aparato.
• Tenga cuidado y evite lesiones
personales.
Sustituya todas las pilas del mando
a distancia por pilas nuevas del
mismo tipo. No mezcle pilas nuevas
y viejas o diferentes tipos de pilas.
• Existe riesgo de incendio o explosión.
No cargue ni desmonte las pilas. No tire las pilas al
fuego.
• Podrían arder o explotar.
Si entra líquido de las pilas en contacto con la piel o
ropa, lávela inmediatamente con agua. No utilice el
mando a distancia si las pilas tienen fugas.
• Los productos químicos de las pilas podrían causar quemaduras
u otros perjuicios a la salud. .
n Instalación
PRECAUCIÓN
n Operación
Compruebe siempre las fugas de
gas (refrigerante) después de la
instalación o reparación del aparato.
• Niveles bajos de refrigerante pueden
producir una avería del aparato.
Instale la manguera de drenaje
para asegurarse de que el agua se
drena correctamente.
• Una mala conexión puede causar fugas
de agua.
Instale el aparato bien nivelado.
• Para evitar las vibraciones o fugas de
agua.
No instale el aparato donde el ruido o
el aire caliente de la unidad exterior
pueda molestar a los vecinos.
• Podría tener problemas con los vecinos.
Levante y transporte el aparato
entre dos o más personas.
• Evite lesiones personales.
No instale el aparato donde quede
expuesto directamente al viento
del mar (rocío salino).
•
Podría causar corrosión en el aparato. La corrosión,
particularmente en las aletas del condensador y del
evaporador, podría causar un funcionamiento
defectuoso del aparato o un funcionamiento ineficaz.
No se exponga directamente al aire frío durante largos
periodos de tiempo. (No se siente en la corriente de
aire).
• Podría ser perjudicial para su salud.
No utilice este aparato para fines específicos, como la
conservación de alimentos, obras de arte, etc. Se trata
de un aire acondicionado de consumo, no de un
sistema de refrigeración de precisión.
• Existe riesgo de daños o pérdidas materiales.
Page 62

Instrucciones de operación
6 Aire Acondicionado de tipo casete dé techo
Instrucciones de operación
Unidad interior
Receptor de señal
Recibe las señales del control remoto.
(Sonido de recepción de señal: dos pitidos cortos o un pitido largo)
Cassette el Tipo Unidad Interior
On/Off : Se ilumina durante el funcionamiento del sistema.
Señal de filtro : Se ilumina después de 2400 horas a partir de la puesta en funcionamiento de la
unidad por primera vez.
Programador : Se ilumina durante el funcionamiento del programador.
Modo de desescarche
: Se ilumina durante el modo de desescarche o el funcionamiento Hot Start.
Funcionamiento forzado
: Procedimientos operativos cuando no se puede usar el control remoto.
Controlador remoto
Cubra el
despliegue
Cubierta
Receptor de señal
Receptor de señal
Receptor de señal
Receptor de señal
Modelo de bomba de calor
Modelo de bomba de calor
Modelo de refrigeración
Modelo de refrigeración
Filtro anti-bacterial
Controlador remoto
Salida de aire
Salida de aire
Admisión de aire
Admisión de aire
Filtro anti-bacterialFiltro anti-bacterialFiltro anti-bacterial
Page 63

Instrucciones de operación
Manual de Usurio 7
ESPAÑOL
Nombres y funciones del panel de mandos
Pantalla
Visualiza las condiciones operativas.
Botón de encendido
El aparato se pone en funcionamiento cuando se pulsa
este botón, y se para cuando se pulsa el botón de nuevo.
Botón de selección de temperatura
Usado para fijar la temperatura cuando se obtiene la
temperatura deseada.
Botón de funcionamiento FAN (ventilador)
Usado para hacer circular el aire de la habitación sin enfriar
ni calentar.
Velocidad del ventilador (Botón Jet Cool: Sólo 4 vías)
Se usa para ajustar la velocidad deseada del ventilador y
seleccionar el modo jet cool..
Botón de selección de modo de funcionamiento
Se usa para seleccionar el modo de funcionamiento
• Modo Auto
• Modo de frío
• Modo de Soft Dry
• Modo de calor (excepto modelo de refrigeración)
Botón Auto Swing (oscilación de aletas)
Utilizado para la oscilación arriba y debajo de las aletas/
Derecha e Izaquierda(Opción)
Botón de comprobación de la temperatura de la
habitación/
Emisión de la Señal del Filtro (Opción)
Utilizado para comprobar la temperatura de la habitación.
Botón Plasma Air Clean (Opción) / Calefactor (Opción)
Botón Timer Cancel
Se utilizar para cancelar el programador.
Botón Timer Set
Se utiliza para fijar el programador cuando se ha obtenido
la hora deseada.
Botón Week
Usado para seleccionar un día de la semana.
Botón Program
Usado para seleccionar el programador semanal.
Botón Holiday
Usado para seleccionar un día festivo de la semana.
Botón Time Set
Utilizado para seleccionar la hora del día y cambiar la hora
en la función del programador semanal.
Botón Set and Clear / Ventilación (Opcional)
Usado para seleccionar y borrar el programador semanal.
Botón de remolino (4 vías)
Se usa para seleccionar el modo de remolino.
Sin función (1 vía, modelo 06)
Botón de Jet Cool (1 vía)
Botón RESET
Usado para ajustar la hora actual y limpiar la hora
programada.
18
17
16
15
14
13
12
11
10
9
8
7
6
5
4
3
2
1
h
La temperatura del display puede ser diferente de la temperatura real de la habitación si el
control remoto se ha instalado expuesto a la luz solar directa o junto a una fuente de calor.
h
Nota: 1 Vía Modelo 06 - AMNH09GTCC0,AMNH12GTCC0
3
Timer Cancel 2ndF
Program Week
Hour Min
Holiday
Set/Clr
RESET
Plasma
10
12
14
15
11
13
18
16
2
1
Modelo de bomba de calor
Modelo de refrigeración
5
4
6
8
9
7
17
1 Vías
4 Vías, 1 Vía (Modelo 06)
Operation unit No Func
Humidify
AUTO
AUTO SWING OPERATION
FAN SPEED
Program set
SUB FUNCTION
SET TEMP
Room Temp
HI
MED
LO
Heater
Defrost
Filter
Preheat
Out door
Time
Timer
On
Set no. Time
Off
01 03 05 07 09 11 13 15 17 19 21 23
ZONE
1234
2ndF
JET
SLO
Page 64

Instrucciones de operación
8 Aire Acondicionado de tipo casete dé techo
AUTO CLEAN
ON
OFF
CANCEL
SET
5
1
3
10
9
12
15
6
4
2
7
11
8
13
14
Transmisor de señales
Puerta plegable
(abierta)
MANDO A DISTANCIA(OPCIONAL)
Este aire acondicionado está equipado con un panel de mandos. Pero si desea disponer de un mando a
distancia, se deberá solicitar como extra.
1. BOTÓN DE ARRANQUE/PARADA
El aparato arranca al pulsar este botón y se
detiene al pulsarlo de nuevo.
2. BOTÓN DE SELECCIÓN DEL MODO
DE OPERACIÓN
Se usa para seleccionar el modo de operación.
3. BOTONES DE AJUSTE DE LA
TEMPERATURA DE LA SALA
Se usan para seleccionar la temperatura de la sala.
4. SELECTOR DE VELOCIDAD DEL
VENTILADOR INTERIOR
Se usa para seleccionar la velocidad del ventilador
en cuatro etapas, baja, media, alta y CHAOS.
5. JET COOL
Se usa para arrancar o detener la velocidad de calefacción/frío. (La velocidad de la
calefacción/frío opera la velocidad del ventilador superalto).
6. BOTÓN DE OSCILACIÓN CHAOS
Se usa para detener o iniciar el movimiento de las rendijas y ajustar la dirección
del fluj de aire deseado hacia arriba/abajo.
7. BOTONES DE ENCENDIDO/APAGADO DEL TEMPORIZADOR
Se usan para ajustar la hora de arranque y de apagado.
8. BOTONES DE AJUSTE HORARIO
Se usan para ajustar la hora.
9. BOTÓN DE AJUSTE DEL TEMPORIZADOR/CANCELACIÓN
Se usa para ajustar el temporizador cuando se llega al tiempo deseado y para
cancelar la operación del temporizador.
10. BOTÓN PARA MODO SLEEP AUTOMÁTICO
Se usa para ajustar la operación del modo Sleep automático.
11. BOTÓN DE CIRCULACIÓN DE AIRE
Se usa para hacer circular el aire de la sala sin enfriar ni calentar.
12. BOTÓN DE COMPROBACIÓN DE TEMPERATURA DE LA SALA
Se usa para comprobar la temperatura de la sala.
13. PLASMA (OPCIONAL)
Se usa para iniciar o detener la función de purificación plasma.
14. BOTÓN DE RESETEO
Inicializa el mando a distancia.
15. 2º BOTÓN F
Se usa para seleccionar la función antes de los modos anteriores impresos en
azul en la parte inferior de los botones.
AVISO
:
Para el uso del mando a distancia
• Para que pueda funcionar, oriéntelo hacia el receptor de señales del panel de mandos.
• Asegúrese de que no hay obstrucciones entre el mando a distancia y el receptor de señales.
• No deje caer el mando a distancia.
• No deje el mando a distancia expuesto a la luz solar directa, o cerca de fuentes de calor.
• Evite las luces intensas por encima del mando a distancia (por ejemplo, con una cortina) para evitar un funcionamiento
incorrecto. (por ejemplo, arranque rápido electrónico, inversor ELBA, lámparas de tipo fluorescente.)
h
El mando a distancia inalámbrico no activa el modo remolino.
Page 65

AUTO SWING
HI
ZONE
Operation unit Program set
Room Temp
MED
LO
AUTO
JET
Heater
Defrost
Filter
Preheat
Humidify
Out door
Timer
On
Set no. Time
Off
01 03 05 07 09 11 13 15 17 19 21 23
1234
OPERATION
FAN SPEED
SUB FUNCTION
SET TEMP
Time
AUTO SWING
HI
ZONE
Operation unit Program set
Room Temp
MED
LO
AUTO
JET
Heater
Defrost
Filter
Preheat
Humidify
Out door
Timer
On
Set no. Time
Off
01 03 05 07 09 11 13 15 17 19 21 23
1234
OPERATION
FAN SPEED
SUB FUNCTION
SET TEMP
Time
AUTO SWING
HI
ZONE
Operation unit Program set
Room Temp
MED
LO
AUTO
JET
Heater
Defrost
Filter
Preheat
Humidify
Out door
Timer
On
Set no. Time
Off
01 03 05 07 09 11 13 15 17 19 21 23
1234
OPERATION
FAN SPEED
SUB FUNCTION
SET TEMP
Time
AUTO SWING
HI
ZONE
Operation unit Program set
Room Temp
MED
LO
AUTO
JET
Heater
Defrost
Filter
Preheat
Humidify
Out door
Time
Timer
On
Set no. Time
Off
01 03 05 07 09 11 13 15 17 19 21 23
1234
OPERATION
FAN SPEED
SUB FUNCTION
SET TEMP
Hour
Min
Week
RESET
Selección de la hora y día de la semana
1
Pulse el botón ' '.
Cada vez que se pulsa este botón, la cifra cambia de 00 a 23.
Pulse seleccionar el número de la hora actual.
2
Pulse el botón ' '.
Cada vez que se pulsa este botón, la cifra se incrementa de 00 a 59.
Puede seleccionar el número del minuto actual.
3
Pulse el botón ' '.
Cada vez que se pulsa este botón, cambiará el día de la semana de domingo a sábado.
Puede seleccionar el día de la semana.
4
Pulse el botón ' '.
Si desea poner a cero la hora y el día de la semana, haga click en el botón Reset.
Hour
Min
Week
RESET
Instrucciones de operación
Manual de Usurio 9
ESPAÑOL
Page 66

Week
Program
SET/CLR
MinHour
AUTO SWING
Time
HI
ZONE
Operation unit
Room Temp
MED
LO
AUTO
JET
Heater
Defrost
Filter
Preheat
Humidify
Out door
Timer
On
Set no.
Off
1234
OPERATION
FAN SPEED
SUB FUNCTION
SET TEMP
Program set
01 03 05 07 09 11 13 15 17 19 21 23
Time
AUTO SWING
Program set
Time
HI
ZONE
Operation unit
Room Temp
MED
LO
AUTO
JET
Heater
Defrost
Filter
Preheat
Humidify
Out door
Timer
On
Set no.
Off
1234
OPERATION
FAN SPEED
SUB FUNCTION
SET TEMP
01 03 05 07 09 11 13 15 17 19 21 23
Time
Instrucciones de operación
10 Aire Acondicionado de tipo casete dé techo
Programación semanal
1
Pulse el botón Program.
El panel de mando toma el aspecto siguiente. Entonces, parpadean , .
2
Pulse el botón ' '.
Presione repetidamente el botón ' ' hasta que aparezca el modo deseado.
Por ejemplo, si desea Thu (Jueves), presione 4 veces el botón ' '.
3
Seleccione el tiempo que desea.
Presione el botón de , , luego se mostrará la letra palpitante.
Si presiona el botón , entonces aparecerá ' '.
' ' significa que está reservado a las cinco.
Utilizando los botones abajo, puede reservar la hora.
* Por ejemplo, el aire acondicionado está en 6, 7, 8 y 13 ~ 22 horas.
Program set
Week
Week
Week
MinHour
SET/CLR
unit
05
Page 67

Instrucciones de operación
Manual de Usurio 11
ESPAÑOL
Time
HI
ZONE
Operation unit
Room Temp
MED
LO
AUTO
JET
Heater
Defrost
Filter
Preheat
Humidify
Out door
Timer
On
Set no.
Off
1234
OPERATION
FAN SPEED
SUB FUNCTION
SET TEMP
Program set
01 03 05 07 09 11 13 15 17 19 21 23
Time
AUTO SWING
Time
HI
ZONE
Operation unit
Room Temp
MED
LO
AUTO
JET
Heater
Defrost
Filter
Preheat
Humidify
Out door
Timer
On
Set no.
Off
1234
OPERATION
FAN SPEED
SUB FUNCTION
SET TEMP
01 03 05 07 09 11 13 15 17 19 21 23
Time
AUTO SWING
Program set
Program set
Time
HI
ZONE
Operation unit
Room Temp
MED
LO
AUTO
JET
Heater
Defrost
Filter
Preheat
Humidify
Out door
Timer
On
Set no.
Off
1234
OPERATION
FAN SPEED
SUB FUNCTION
SET TEMP
01 03 05 07 09 11 13 15 17 19 21 23
Time
AUTO SWING
Selección de festivo
Selección del programador (Demorar el arranque / parada preajustada)
Función de autodiagnóstico
Si el martes es festivo esta semana, puede seleccionarlo como tal.
Pulse el botón Program.
1
Pulse el botón Week.
2
Pulse el botón Holiday.
El panel de mandos mostrará .
El rectángulo exterior indica un día festivo.
h
Una carga indebida de refrigerante puede ocasionar un ciclo anormal.
3
Program
Week
Holiday
Parpadeará 'CH' en la pantalla del panel de mandos si se produce un problema.
Póngase en contacto con su distribuidor.
1
2
3
Presione el botón de o , entonces podrá controlar la hora deseada.
Si presiona el botón , mostrará el panel de visualización.
Esto significa que después de 3 horas, se apagará mientras está en
el modo ON, se encenderá mientras está en el modo OFF.
Presione el botón del temporizador.
Si desea encenderlo mientras está en el modo OFF o apagarlo mientras está en el modo ON,
puede utilizar la función de ajuste del temporizador
Timer
MinHour
Min
MinHour
Si desea cancelar el la operación de ajuste del temporizador,
presione el botón de cancelar.
Cancel
Page 68

Instrucciones de operación
12 Aire Acondicionado de tipo casete dé techo
ZONE
1234
Operation unit
Humidify
JET
AUTO
AUTO SWING OPERATION
FAN SPEED
Program set
SUB FUNCTION
SET TEMP
Room Temp
HI
MED
LO
Heater
Defrost
Filter
Preheat
Out door
Time
Timer
On
Set no. Time
Off
01 03 05 07 09 11 13 15 17 19 21 23
Timer Cancel 2ndF
Program Week
Hour Min
Holiday
Set/Clr
RESET
Plasma
3
1
4
2
Modo operativo
Procedimiento operativo
1st
2nd
3rd
4th
Botón de encendido
Botón de selección de modo
operativo
Botón de selección de temperatura de
la habitación
Botón de selección de velocidad del
ventilador interior
Modo Frío Modo Frío
Modo Soft Dry
Modo Auto
(modo frío)
Modo Soft Dry
Modo Calor
Modo Auto
(modelo bomba de calor)
Page 69

Instrucciones de operación
Manual de Usurio 13
ESPAÑOL
ZONE
Operation unit Program set
Room Temp
MED
LO
AUTO
JET
Heater
Defrost
Filter
Preheat
Humidify
Out door
Time
Timer
On
Set no. Time
Off
01 03 05 07 09 11 13 15 17 19 21 23
1234
AUTO SWING OPERATION
FAN SPEED
SUB FUNCTION
SET TEMP
HI
LO
HI
ZONE
Operation unit Program set
Room Temp
MED
JET
Heater
Defrost
Filter
Preheat
Humidify
Out door
Time
Timer
On
Set no. Time
Off
01 03 05 07 09 11 13 15 17 19 21 23
1234
AUTO SWING OPERATION
FAN SPEED
SUB FUNCTION
SET TEMP
AUTO AUTOLOHI
ZONE
Operation unit Program set
Room Temp
MED
Heater
Defrost
Filter
Preheat
Humidify
Out door
Time
Timer
On
Set no. Time
Off
01 03 05 07 09 11 13 15 17 19 21 23
1234
AUTO SWING OPERATION
FAN SPEED
SUB FUNCTION
SET TEMP
HI
ZONE
Operation unit Program set
Room Temp
MED
AUTO
JET
Heater
Defrost
Filter
Preheat
Humidify
Out door
Time
Timer
On
Set no. Time
Off
01 03 05 07 09 11 13 15 17 19 21 23
1234
AUTO SWING OPERATION
FAN SPEED
SUB FUNCTION
SET TEMP
LO
AUTO
HI
ZONE
Operation unit Program set
Room Temp
LO
JET
Heater
Defrost
Filter
Preheat
Humidify
Out door
Time
Timer
On
Set no. Time
Off
01 03 05 07 09 11 13 15 17 19 21 23
1234
AUTO SWING OPERATION
FAN SPEED
SUB FUNCTION
SET TEMP
MED
Pantalla
JET
ZONE
Operation unit Program set
Room Temp
MED
LO
AUTO
JET
Heater
Defrost
Filter
Preheat
Humidify
Out door
Time
Timer
On
Set no. Time
Off
01 03 05 07 09 11 13 15 17 19 21 23
1234
AUTO SWING OPERATION
FAN SPEED
SUB FUNCTION
SET TEMP
HI HI
ZONE
Operation unit Program set
Room Temp
MED
AUTO
JET
Heater
Defrost
Filter
Preheat
Humidify
Out door
Time
Timer
On
Set no. Time
Off
01 03 05 07 09 11 13 15 17 19 21 23
1234
AUTO SWING OPERATION
FAN SPEED
SUB FUNCTION
SET TEMP
LO
HI
LO
ZONE
Operation unit Program set
Room Temp
MED
JET
Heater
Defrost
Filter
Preheat
Humidify
Out door
Time
Timer
On
Set no. Time
Off
01 03 05 07 09 11 13 15 17 19 21 23
1234
AUTO SWING OPERATION
FAN SPEED
SUB FUNCTION
SET TEMP
AUTO
ZONE
Operation unit Program set
Room Temp
MED
LO
AUTO
JET
Heater
Defrost
Filter
Preheat
Humidify
Out door
Time
Timer
On
Set no. Time
Off
01 03 05 07 09 11 13 15 17 19 21 23
1234
AUTO SWING OPERATION
FAN SPEED
SUB FUNCTION
SET TEMP
HI
HI
ZONE
Operation unit Program set
Room Temp
MED
AUTO
JET
Heater
Defrost
Filter
Preheat
Humidify
Out door
Time
Timer
On
Set no. Time
Off
01 03 05 07 09 11 13 15 17 19 21 23
1234
AUTO SWING OPERATION
FAN SPEED
SUB FUNCTION
SET TEMP
LO
ZONE
Operation unit Program set
Room Temp
MED
LO
AUTO
JET
Heater
Defrost
Filter
Preheat
Humidify
Out door
Time
Timer
On
Set no. Time
Off
01 03 05 07 09 11 13 15 17 19 21 23
1234
AUTO SWING OPERATION
FAN SPEED
SUB FUNCTION
SET TEMP
HI HI
ZONE
Operation unit Program set
Room Temp
MEDLOJET
Heater
Defrost
Filter
Preh
Hum
Out
Time
Timer
On
Set no. Time
Off
01 03 05 07 09 11 13 15 17 19 21 23
123
AUTO SWING OPERATION
FAN SPEED
SUB FUNCT
SET TEMP
AUTO
ZONE
Operation unit Program set
Room Temp
MED
LO
AUTO
JET
Heater
Defrost
Filter
Preheat
Humidify
Out door
Time
Timer
On
Set no. Time
Off
01 03 05 07 09 11 13 15 17 19 21 23
1234
AUTO SWING OPERATION
FAN SPEED
SUB FUNCTION
SET TEMP
HI
MODELO SÓLO REFRIGERACIÓN
Funcionamiento de refrigeración
Funcionamiento Soft Dry Funcionamiento automático
Pantalla
MODELO BOMBA DE CALOR
Funcionamiento
de refrigeración
Funcionamiento
Soft Dry
Funcionamiento
de calor
Funcionamiento
automático
Pantalla
Para subir la temperatura
Para bajar la temperatura
Funcionamiento de refrigeración
2
Pulse el botón de selección del modo operativo.
Cada vez que se pulsa este botón, se cambia el modo operativo en la dirección de la flecha.
1
Pulse el botón de encendido.
4
Seleccione la velocidad del ventilador.
3
Seleccione una temperatura inferior a la temperatura
de la habitación.
• La temperatura se puede
programar entre 18°C y 30°C en
incrementos de 1°C.
• El siguiente procedimiento es el mismo que el anterior.
• La pantalla muestra velocidad del ventilador alta.
• Cada vez que se pulsa este botón, se cambia el modo de velocidad del ventilador.
Page 70

Instrucciones de operación
14 Aire Acondicionado de tipo casete dé techo
ZONE
Operation unit Program set
Room Temp
MED
LO
AUTO
JET
Heater
Defrost
Filter
Preheat
Humidify
Out door
Time
Timer
On
Set no. Time
Off
01 03 05 07 09 11 13 15 17 19 21 23
1234
AUTO SWING OPERATION
FAN SPEED
SUB FUNCTION
SET TEMP
HI HI
ZONE
Operation unit Program set
Room Temp
MED
AUTO
JET
Heater
Defrost
Filter
Preheat
Humidify
Out door
Time
Timer
On
Set no. Time
Off
01 03 05 07 09 11 13 15 17 19 21 23
1234
AUTO SWING OPERATION
FAN SPEED
SUB FUNCTION
SET TEMP
LO
HI
LO
ZONE
Operation unit Program set
Room Temp
MED
JET
Heater
Defrost
Filter
Preheat
Humidify
Out door
Time
Timer
On
Set no. Time
Off
01 03 05 07 09 11 13 15 17 19 21 23
1234
AUTO SWING OPERATION
FAN SPEED
SUB FUNCTION
SET TEMP
AUTO
ZONE
Operation unit Program set
Room Temp
MED
LO
AUTO
JET
Heater
Defrost
Filter
Preheat
Humidify
Out door
Time
Timer
On
Set no. Time
Off
01 03 05 07 09 11 13 15 17 19 21 23
1234
AUTO SWING OPERATION
FAN SPEED
SUB FUNCTION
SET TEMP
HI
HI
ZONE
Operation unit Program set
Room Temp
MED
AUTO
JET
Heater
Defrost
Filter
Preheat
Humidify
Out door
Time
Timer
On
Set no. Time
Off
01 03 05 07 09 11 13 15 17 19 21 23
1234
AUTO SWING OPERATION
FAN SPEED
SUB FUNCTION
SET TEMP
LO
ZONE
Operation unit Program set
Room Temp
MED
LO
AUTO
JET
Heater
Defrost
Filter
Preheat
Humidify
Out door
Time
Timer
On
Set no. Time
Off
01 03 05 07 09 11 13 15 17 19 21 23
1234
AUTO SWI NG OPERATION
FAN SPEED
SUB FUNCTION
SET TEMP
HI HI
ZONE
Operation unit Program set
Room Temp
MEDLOJET
Heater
Defrost
Filter
Preh
Hum
Out
Time
Timer
On
Set no. Time
Off
01 03 05 07 09 11 13 15 17 19 21 23
123
AUTO SWING OPERATION
FAN S PEED
SUB FUNCT
SET TEMP
AUTO
MODELO SÓLO REFRIGERACIÓN
Funcionamiento de refrigeración
Funcionamiento Soft Dry Funcionamiento automático
MODELO BOMBA DE CALOR
Funcionamiento
de refrigeración
Funcionamiento
Soft Dry
Funcionamiento
de calor
Funcionamiento
automático
Pantalla
Pantalla
Funcionamiento Soft Dry
3
La velocidad del ventilador interior cambia automáticamente a la velocidad baja y el Control
Micom hace imposible cambiar esta velocidad porque es la mejor para el funcionamiento
Soft Dry.
2
Seleccione el funcionamiento Soft Dry.
Cada vez que se pulsa este botón, se cambia el modo operativo en la dirección de la
flecha.
1
Pulse el botón de encendido.
Este modo deshumidifica sin enfriar en exceso.
Page 71

Instrucciones de operación
Manual de Usurio 15
ESPAÑOL
ZONE
Operation unit Program set
Room Temp
MED
LO
AUTO
JET
Heater
Defrost
Filter
Preheat
Humidify
Out door
Time
Timer
On
Set no. Time
Off
01 03 05 07 09 11 13 15 17 19 21 23
1234
AUTO SWING OPERATION
FAN SPEED
SUB FUNCTION
SET TEMP
HI
HI
ZONE
Operation unit Program set
Room Temp
MED
AUTO
JET
Heater
Defrost
Filter
Preheat
Humidify
Out door
Time
Timer
On
Set no. Time
Off
01 03 05 07 09 11 13 15 17 19 21 23
1234
AUTO SWING OPERATION
FAN SPEED
SUB FUNCTION
SET TEMP
LO
ZONE
Operation unit Program set
Room Temp
MED
LO
AUTO
JET
Heater
Defrost
Filter
Preheat
Humidify
Out door
Time
Timer
On
Set no. Time
Off
01 03 05 07 09 11 13 15 17 19 21 23
1234
AUTO SWI NG OPERATION
FAN SPEED
SUB FUNCTION
SET TEMP
HI HI
ZONE
Operation unit Program set
Room Temp
MEDLOJET
Heater
Defrost
Filter
Preheat
Humidify
Out door
Time
Timer
On
Set no. Time
Off
01 03 05 07 09 11 13 15 17 19 21 23
1234
AUTO SWING OPERATION
FAN SPEED
SUB FUNCTION
SET TEMP
AUTO
ZONE
Operation unit Program set
Room Temp
MED
LO
AUTO
JET
Heater
Defrost
Filter
Humidify
Out door
Time
Timer
On
Set no. Time
Off
01 03 05 07 09 11 13 15 17 19 21 23
1234
AUTO SWING OPERATION
FAN SPEED
SUB FUNCTION
SET TEMP
HI
Preheat
ZONE
Operation unit Program set
Room Temp
MED
LO
AUTO
JET
Heater
Defrost
Filter
Preheat
Humidify
Out door
Time
Timer
On
Set no. Time
Off
01 03 05 07 09 11 13 15 17 19 21 23
1234
AUTO SWING OPERATION
FAN SPEED
SUB FUNCTION
SET TEMP
HI
Preheat
ZONE
Operation unit Program set
Room Temp
MED
LO
AUTO
JET
Heater
Filter
Humidify
Out door
Time
Timer
On
Set no. Time
Off
01 03 05 07 09 11 13 15 17 19 21 23
1234
AUTO SWING OPERATION
FAN SPEED
SUB FUNCTION
SET TEMP
HI
Defrost
ZONE
Operation unit Program set
Room Temp
MED
LO
AUTO
JET
Heater
Defrost
Filter
Preheat
Humidify
Out door
Time
Timer
On
Set no. Time
Off
01 03 05 07 09 11 13 15 17 19 21 23
1234
AUTO SWING OPERATION
FAN SPEED
SUB FUNCTION
SET TEMP
HI
LO
HI
ZONE
Operation unit Program set
Room Temp
MED
JET
Heater
Defrost
Filter
Preheat
Humidify
Out door
Time
Timer
On
Set no. Time
Off
01 03 05 07 09 11 13 15 17 19 21 23
1234
AUTO SWING OPERATION
FAN SPEED
SUB FUNCTION
SET TEMP
AUTO
HI
ZONE
Operation unit Program set
Room Temp
MED
AUTO
JET
Heater
Defrost
Filter
Preheat
Humidify
Out door
Time
Timer
On
Set no. Time
Off
01 03 05 07 09 11 13 15 17 19 21 23
1234
AUTO SWI NG OPERATION
FAN S PEED
SUB FUNCTION
SET TEMP
LO
AUTO
HI
ZONE
Operation unit Program set
Room Temp
LO
JET
Heater
Defrost
Filter
Preh
Hum
Out d
Time
Timer
On
Set no. Time
Off
01 03 05 07 09 11 13 15 17 19 21 23
123
AUTO SWI NG OPERATION
FAN SPEED
SUB FUNCT
SET TEMP
MED
Funcionamiento
de refrigeración
Funcionamiento
Soft Dry
Funcionamiento
de calor
Funcionamiento
automático
Pantalla
Pantalla
Para subir la temperatura
Para bajar la temperatura
Funcionamiento de calor (sólo modelo con bomba de calor)
2
Pulse el botón de selección del modo operativo.
Cada vez que se pulsa este botón, se cambia el modo operativo en la dirección de la
flecha.
3
Seleccione una temperatura superior a la
temperatura de la habitación.
4
Seleccione.
5
El aire acondicionado está configurado para el control de
puesta en marcha en calor, para no descargar el aire frío
durante la operación de calentamiento. En estos momentos,
el panel de mandos indica PREHEAT (precalentar).
6
Si la temperatura exterior es demasiado baja durante la
operación de calentamiento, el aire acondicionado pasa al
funcionamiento de desescarche y el panel de mando indica
DEFROST (desescarche).
1
Pulse el botón de encendido.
• Seleccione la velocidad del ventilador en cuatro niveles: alto, auto, bajo, medio
• La pantalla muestra la velocidad alta del ventilador.
• Cada vez que se pulsa este botón, se cambia el modo de velocidad del ventilador.
• La temperatura se puede seleccionar
entre 16°C y 30°C en incrementos de
1°C.
Page 72

Instrucciones de operación
16 Aire Acondicionado de tipo casete dé techo
Modo de funcionamiento automático (modelo refrigeración)
1
Pulse el botón de encendido.
3
2
Para seleccionar Funcionamiento Automático, pulse el botón de selección de modo operativo.
Cada vez que se pulsa este botón, se cambia el modo operativo en la dirección de la flecha.
Durante el funcionamiento automático
o No puede cambiar la temperatura del ventilador interior. Ya ha sido fijada por la norma Fuzzy.
o Si el sistema no está funcionando según lo deseado, cambie manualmente a otro modo. El sistema no
cambiará automáticamente el modo de frío al de calor, o de calor a frío, debe hacerse poniéndolo a cero
manualmente.
o Durante el funcionamiento automático, si pulsa el botón de oscilación Chaos, las aletas horizontales
oscilarán arriba y abajo automáticamente. Si desea detener la oscilación, pulse de nuevo el botón
Chaos.
La temperatura y velocidad del ventilador son seleccionadas automáticamente por los controles
electrónicos en base a la temperatura real de la habitación. Si desea cambiar la temperatura
seleccionada, cierre la puerta del panel de mandos y utilice los botones de selección de
temperatura de la habitación. Según el frío o el calor que sienta, deberá seguir pulsando el botón
(hasta dos veces). Se cambiará entonces la temperatura seleccionada de la habitación, que se
puede fijar en unos valores 2-2 por 1 nivel.
(Esta indicación cambiará al estado de pantalla de
modo automático inicial después de 5 segundos.)
HI
ZONE
Operation unit Program set
Room Temp
MEDLOJET
Heater
Defrost
Filter
Preheat
Humidify
Out door
Time
Timer
On
Set no. Time
Off
01 03 05 07 09 11 13 15 17 19 21 23
1234
AUTO SWING OPERATION
FAN SPEED
SUB FUNCTION
SET TEMP
AUTO
ZONE
Operation unit Program set
Room Temp
MED
LO
AUTO
JET
Heater
Defrost
Filter
Preheat
Humidify
Out door
Time
Timer
On
Set no. Time
Off
01 03 05 07 09 11 13 15 17 19 21 23
1234
AUTO SWING OPERATION
FAN SPEED
SUB FUNCTION
SET TEMP
HI HI
ZONE
Operation unit Program set
Room Temp
MED
AUTO
JET
Heater
Defrost
Filter
Preheat
Humidify
Out door
Time
Timer
On
Set no. Time
Off
01 03 05 07 09 11 13 15 17 19 21 23
1234
AUTO SWING OPERATION
FAN SPEED
SUB FUNCTION
SET TEMP
LO
HI
LO
ZONE
Operation unit Program set
Room Temp
MED
JET
Heater
Defrost
Filter
Preheat
Humidify
Out door
Time
Timer
On
Set no. Time
Off
01 03 05 07 09 11 13 15 17 19 21 23
1234
AUTO SWING OPERATION
FAN SPEED
SUB FUNCTION
SET TEMP
AUTO
Cold Cool Proper Warm Hot
MODELO DE REFRIGERACIÓN
Funcionamiento de refrigeración
Funcionamiento Soft Dry Funcionamiento automático
Pantalla de funcionamiento
Para subir la temperatura
Para bajar la temperatura
Page 73

Instrucciones de operación
Manual de Usurio 17
ESPAÑOL
Modo de funcionamiento automático (modelo de bomba de calor)
3
Se puede cambiar la
temperatura pulsando el
botón de selección de
temperatura.
1
Pulse el botón encendido.
2
Para seleccionar el Funcionamiento automático, pulse el botón de selección de modo operativo.
Cada vez que se pulsa este botón, se cambia el modo operativo en la dirección de la flecha.
• La temperatura se puede
seleccionar dentro de unos
valores de 18°C -30°C en
intervalos de 1°C.
Durante el funcionamiento automático:
o Puede cambiar la velocidad del ventilador interior.
o Si el sistema no funciona como desea, cambie manualmente a otro modo. El sistema no cambiará
automáticamente del modo de frío al modo de calor, o viceversa. Deberá ajustar el modo y la
temperatura deseada de nuevo.
ZONE
Operation unit Program set
Room Temp
MED
LO
AUTO
JET
Heater
Defrost
Filter
Preheat
Humidify
Out door
Time
Timer
On
Set no. Time
Off
01 03 05 07 09 11 13 15 17 19 21 23
1234
AUTO SWING OPERATION
FAN SPEED
SUB FUNCTION
SET TEMP
HI
HI
ZONE
Operation unit Program set
Room Temp
MED
AUTO
JET
Heater
Defrost
Filter
Preheat
Humidify
Out door
Time
Timer
On
Set no. Time
Off
01 03 05 07 09 11 13 15 17 19 21 23
1234
AUTO SWING OPERATION
FAN SPEED
SUB FUNCTION
SET TEMP
LO
ZONE
Operation unit Program set
Room Temp
MED
LO
AUTO
JET
Heater
Defrost
Filter
Preheat
Humidify
Out door
Time
Timer
On
Set no. Time
Off
01 03 05 07 09 11 13 15 17 19 21 23
1234
AUTO SWING OPERATION
FAN SPEED
SUB FUNCTION
SET TEMP
HI HI
ZONE
Operation unit Program set
Room Temp
MEDLOJET
Heater
Defrost
Filter
Preheat
Humidif
Out doo
Time
Timer
On
Set no. Time
Off
01 03 05 07 09 11 13 15 17 19 21 23
1234
AUTO SWING OPERATION
FAN S PEED
SUB FUNCTION
SET TEMP
AUTO
HI
ZONE
Operation unit Program set
Room Temp
MEDLOJET
Heater
Defrost
Filter
Preheat
Humidify
Out door
Time
Timer
On
Set no. Time
Off
01 03 05 07 09 11 13 15 17 19 21 23
1234
AUTO SWING OPERATION
FAN SPEED
SUB FUNCTION
SET TEMP
AUTO
MODELO BOMBA DE CALOR
Funcionamiento
de refrigeración
Funcionamiento
Soft Dry
Funcionamiento
de calor
Funcionamiento
automático
Pantalla de funcionamiento
Para incrementar la temperatura
Para reducir la temperatura
Page 74

ZONE
Operation unit Program set
Room Temp
MED
LO
AUTO
JET
Heater
Defrost
Filter
Preheat
Humidify
Out door
Time
Timer
On
Set no. Time
Off
01 03 05 07 09 11 13 15 17 19 21 23
1234
AUTO SWING OPERATION
FAN SPEED
SUB FUNCTION
SET TEMP
HI
ZONE
Operation unit Program set
Room Temp
MED
LO
AUTO
JET
Heater
Defrost
Filter
Preheat
Humidify
Out door
Time
Timer
On
Set no. Time
Off
01 03 05 07 09 11 13 15 17 19 21 23
1234
AUTO SWING OPERATION
FAN SPEED
SUB FUNCTION
SET TEMP
HI
HI
ZONE
Operation unit Program set
Room Temp
MED
AUTO
JET
Heater
Defrost
Filter
Preheat
Humidify
Out door
Time
Timer
On
Set no. Time
Off
01 03 05 07 09 11 13 15 17 19 21 23
1234
AUTO SWING OPERATION
FAN SPEED
SUB FUNCTION
SET TEMP
LO
HI
ZONE
Operation unit Program set
Room Temp
LO
AUTO
JET
Heater
Defrost
Filter
Preheat
Humidify
Out door
Time
Timer
On
Set no. Time
Off
01 03 05 07 09 11 13 15 17 19 21 23
1234
AUTO SWING OPERATION
FAN SPEED
SUB FUNCTION
SET TEMP
MED
HI
ZONE
Operation unit Program set
Room Temp
MED
AUTO
JET
Heater
Defrost
Filter
Preheat
Humidify
Out door
Time
Timer
On
Set no. Time
Off
01 03 05 07 09 11 13 15 17 19 21 23
1234
AUTO SWING OPERATION
FAN SPEED
SUB FUNCTION
SET TEMP
SLO
Instrucciones de operación
18 Aire Acondicionado de tipo casete dé techo
Modo operativo FAN
1
Pulse el botón de encendido.
2
Pulse el botón de funcionamiento FAN.
3
Cada vez que se pulsa el botón de velocidad FAN, el modo de velocidad del ventilador
cambia en la dirección de la flecha.
• Velocidad del ventilador alta.
• Velocidad del ventilador media.
• Velocidad del ventilador baja.
• La Velocidad del Ventilador Es
muy Reducida(Modello 06).
Modello 06 : AMNH09GTCCO, AMNH12GTCC0
Page 75

Instrucciones de operación
Manual de Usurio 19
ESPAÑOL
MED
JET
ZONE
1234
Operation unit
Humidify
AUTO
Program set
Room Temp
LO
Heater
Defrost
Filter
Preheat
Out door
Time
Timer
On
Set no. Time
Off
01 03 05 07 09 11 13 15 17 19 21 23
AUTO SWING OPERATION
FAN SPEED
SUB FUNCTION
SET TEMP
HI
Z
ET
C
T
I
Hea
Timer Cancel 2ndF
Program Week
Hour Min
Holiday
Set/Clr
RESET
Plasma
• Es la función para un cómodo funcionamiento de frío/calor.
• Las dos persianas diagonarles están abiertas más que las persianas. Después de un minuto se
hace lo opuesto.
Pulse de nuevo el botón de autooscilación. (4 VÍAS)
1
Pulse el botón de encendido.
La unidad responderá con un
pitido.
2
Si sigue el procedimiento anterior,
podrá ajustar el temporizador para
el encendido y apagado durante
toda la semana.
Entonces será cambiado al ángulo
abierto de dos persianas
horizontales.
3
Para cancelar el modo remolino,
pulse de nuevo el botón de
remolino.
ter
ON
D
efrost
Prehea
F
i
lte
Humidify
t
r
O
1
u
t
2
d
oor
3
4
1
23
Hour Min
Program
Timer
11
ONE
1
3
1
51
Can
c
el
2
ndF
Week
H
olid
ay
Set/
C
l
Plas
r
ma
RESET
7
19 2
Page 76

JET
AUTO SWING OPERATION
FAN SPEED
SUB FUNCTION
SET TEMP
AUTOLOHI
ZONE
Operation unit Program set
Room Temp
MED
Heater
Defrost
Filter
Preheat
Humidify
Out door
Time
Timer
On
Set no. Time
Off
01 03 05 07 09 11 13 15 17 19 21 23
1234
Min
+
Min
+
+
Hour
JET
AUTO SW ING OPERATION
FAN SPEED
SUB FUNCTION
SET TEMP
AUTOLOHI
ZONE
Operation unit Program set
Room Temp
MED
Heater
Defrost
Filter
Preheat
Humidify
Out door
Time
Timer
On
Set no. Time
Off
01 03 05 07 09 11 13 15 17 19 21 23
1234
JET
AUTO SW ING OPERATION
FAN SPEED
SUB FUNCTION
SET TEMP
AUTOLOHI
ZONE
Operation unit Program set
Room Temp
MED
Heater
Defrost
Filter
Preheat
Humidify
Out door
Time
Timer
On
Set no. Time
Off
01 03 05 07 09 11 13 15 17 19 21 23
1234
JET
AUTO SW ING OPERATION
FAN SPEED
SUB FUNCTION
SET TEMP
AUTOLOHI
ZONE
Operation unit Program set
Room Temp
MED
Heater
Defrost
Filter
Preheat
Humidify
Out door
Time
Timer
On
Set no. Time
Off
01 03 05 07 09 11 13 15 17 19 21 23
1234
JET
AUTO SW ING OPERATION
FAN SPEED
SUB FUNCTION
SET TEMP
AUTOLOHI
ZONE
Operation unit Program set
Room Temp
MED
Heater
Defrost
Filter
Preheat
Humidify
Out door
Time
Timer
On
Set no. Time
Off
01 03 05 07 09 11 13 15 17 19 21 23
1234
JET
AUTO SW ING OPERATION
FAN SPEED
SUB FUNCTION
SET TEMP
AUTOLOHI
ZONE
Operation unit Program set
Room Temp
MED
Heater
Defrost
Filter
Preheat
Humidify
Out door
Time
Timer
On
Set no. Time
Off
01 03 05 07 09 11 13 15 17 19 21 23
1234
JET
AUTO SW ING OPERATION
FAN SPEED
SUB FUNCTION
SET TEMP
AUTOLOHI
ZONE
Operation unit Program set
Room Temp
MED
Heater
Defrost
Filter
Preheat
Humidify
Out door
Time
Timer
On
Set no. Time
Off
01 03 05 07 09 11 13 15 17 19 21 23
1234
Instrucciones de operación
20 Aire Acondicionado de tipo casete dé techo
JET
AUTO SWING OPERATION
FAN SPEED
SUB FUNCTION
SET TEMP
AUTOLOHI
ZONE
Operation unit Program set
Room Temp
MED
Heater
Defrost
Filter
Preheat
Humidify
Out door
Time
Timer
On
Set no. Time
Off
01 03 05 07 09 11 13 15 17 19 21 23
1234
Min
+
Min
+
+
Hour
JET
AUTO SW ING OPERATION
FAN SPEED
SUB FUNCTION
SET TEMP
AUTOLOHI
ZONE
Operation unit Program set
Room Temp
MED
Heater
Defrost
Filter
Preheat
Humidify
Out door
Time
Timer
On
Set no. Time
Off
01 03 05 07 09 11 13 15 17 19 21 23
1234
JET
AUTO SW ING OPERATION
FAN SPEED
SUB FUNCTION
SET TEMP
AUTOLOHI
ZONE
Operation unit Program set
Room Temp
MED
Heater
Defrost
Filter
Preheat
Humidify
Out door
Time
Timer
On
Set no. Time
Off
01 03 05 07 09 11 13 15 17 19 21 23
1234
JET
AUTO SW ING OPERATION
FAN SPEED
SUB FUNCTION
SET TEMP
AUTOLOHI
ZONE
Operation unit Program set
Room Temp
MED
Heater
Defrost
Filter
Preheat
Humidify
Out door
Time
Timer
On
Set no. Time
Off
01 03 05 07 09 11 13 15 17 19 21 23
1234
JET
AUTO SW ING OPERATION
FAN SPEED
SUB FUNCTION
SET TEMP
AUTOLOHI
ZONE
Operation unit Program set
Room Temp
MED
Heater
Defrost
Filter
Preheat
Humidify
Out door
Time
Timer
On
Set no. Time
Off
01 03 05 07 09 11 13 15 17 19 21 23
1234
JET
AUTO SW ING OPERATION
FAN SPEED
SUB FUNCTION
SET TEMP
AUTOLOHI
ZONE
Operation unit Program set
Room Temp
MED
Heater
Defrost
Filter
Preheat
Humidify
Out door
Time
Timer
On
Set no. Time
Off
01 03 05 07 09 11 13 15 17 19 21 23
1234
JET
AUTO SW ING OPERATION
FAN SPEED
SUB FUNCTION
SET TEMP
AUTOLOHI
ZONE
Operation unit Program set
Room Temp
MED
Heater
Defrost
Filter
Preheat
Humidify
Out door
Time
Timer
On
Set no. Time
Off
01 03 05 07 09 11 13 15 17 19 21 23
1234
Modo operativo FAN
1
Pulse el botón de encendido.
2
Pulse el botón de funcionamiento FAN.
3
Cada vez que se pulsa el botón de velocidad FAN, el modo de velocidad
del ventilador cambia en la dirección de la flecha.
4
Cada vez que se pulsa el botón de velocidad FAN, el modo de velocidad del ventilador
cambia en la dirección de la flecha.
5
Cada vez que se pulsa el botón de velocidad FAN, el modo de velocidad del ventilador
cambia en la dirección de la flecha.
6
Cada vez que se pulsa el botón de velocidad FAN, el modo de velocidad del ventilador
cambia en la dirección de la flecha.
Page 77

ZONE
1234
Operation unit
Humidify
AUTO
Program set
Room Temp
HI
MED
LO
Heater
Defrost
Filter
Preheat
Out door
Time
Timer
On
Set no. Time
Off
01 03 05 07 09 11 13 15 17 19 21 23
JET
AUTO SWING OPERATION
FAN SPEED
SUB FUNCTION
SET TEMP
or or
Timer Cancel 2ndF
Program Week
Hour Min
Holiday
Set/Clr
RESET
Plasma
Modo de funcionamiento Jet Cool (1 Vía – Excepto El Modelo 06)
1
Pulse el botón de encendido. La
unidad responderá con un pitido.
2
Pulse el botón Jet Cool para que la unidad
funcione en modo de refrigeración y se
seleccionará la velocidad de ventilador
súper alta en el modo de refrigeración.
3
Para cancelar el modo Jet Cool, pulse de nuevo el
botón Jet Cool o el botón de velocidad del ventilador o
el botón de selección de temperatura y el equipo
funcionará en velocidad alta del ventilador en el modo de
refrigeración.
NOTA
o Durante la función Jet Cool, en cualquier momento, el aire acondicionado se pone en
marcha para que la temperatura de la habitación baje automáticamente a 18∫C. Se utiliza
especialmente para bajar la temperatura de una habitación en el tiempo más breve posible
durante los días cálidos de verano.
Sin embargo, no se dispone de la función Jet Cool en el modo de calor.
o Para volver al funcionamiento normal desde el modo Jet Cool, pulse el botón de selección
de modo operativo, la selección de volumen de circulación de aire, el botón de selección o
el botón Jet Cool de nuevo.
h 1 Vía Modelo 06: AMNH09GTCC0,AMNH12GTCC0
Instrucciones de operación
Manual de Usurio 21
ESPAÑOL
Page 78

ZONE
1234
Operation unit
Humidify
JET
AUTO
Program set
Room Temp
HI
MED
LO
Heater
Defrost
Filter
Preheat
Out door
Time
Timer
On
Set no. Time
Off
01 03 05 07 09 11 13 15 17 19 21 23
AUTO SWING OPERATION
FAN SPEED
SUB FUNCTION
SET TEMP
Alta
Velocità
Alta
Velocità
Timer Cancel 2ndF
Program Week
Hour Min
Holiday
Set/Clr
RESET
Plasma
3
or
C
Modo Auto Swing
Función de bloqueo para niños.
1
Pulse el botón de encendido
(confirme que el
equipo está
funcionando).
2
Pulse el botón Auto Swing
y las aletas
horizontales
oscilarán arriba
y abajo.
3
Pulse de nuevo el botón
Auto Swing para
cancelar este
modo de
funcionamiento.
Evita que los niños puedan utilizar el aire acondicionado.
Procedimiento operativo
Para seleccionar la función de bloqueo para niños
Pulse el botón Timer y el botón Minute Set durante tres segundos. El modo
operativo cambiará al bloqueo para niños y se visualizará 'CL' en la pantalla. Al
pulsar cualquier botón, el panel de mandos no funcionará y mostrará 'CL'
durante 3 segundos. Pero la función de temperatura de la habitación seguirá
activa, a pesar de tener activado el bloqueo.
Para cancelar la función de bloqueo para niños
Pulse el botón Timer y el botón Minute Set durante tres segundos. El bloqueo
quedará cancelado y se visualizar en el panel de mando el modo
preseleccionado.
Información de utilidad
Velocidad del ventilador y capacidad de refrigeración
La capacidad de refrigeración indicada en la especificación
es el valor con la velocidad del ventilador alta, siendo la
capacidad menor con una velocidad de ventilador media o
baja.
Se recomienda la velocidad alta del ventilador cuando
desee enfriar la habitación con rapidez.
1
2
Instrucciones de operación
22 Aire Acondicionado de tipo casete dé techo
ancel 2ndF
Program
Week
Hour
Holiday
Set/Clr
Min
Plasma
R
E
S
E
T
1
4
9
2
1
2
3
Page 79

Instrucciones de operación
Manual de Usurio 23
ESPAÑOL
Funcionamiento forzado
(interruptor 'tact').
Funcionamiento forzado
(interruptor 'tact').
Operation unit
Humidify
JET
AUTO
Program set
Room Temp
MED
LO
Heater
Defrost
Filter
Preheat
Out door
Time
Timer
On
Set no. Time
Off
01 03 05 07 09 11 13 15 17 19 21 23
ZONE
1234
AUTO SWING OPERATION
FAN SPEED
SUB FUNCTION
SET TEMP
HI
Plasma
Timer Cancel 2ndF
Program Week
Hour Min
Holiday
Set/Clr
RESET
Plasma
Funcionamiento forzado
Función Auto Restart
Consejos para LED de la señal de Filtro
Funcionamiento de purificación PLASMA (opcional)
Cuando no puede utilizarse el panel de mandos, pulse el interruptor
'tact' (funcionamiento forzado) durante 2 segundos. Si desea parar el
aire acondicionado, pulse el botón de nuevo. Si se restablece el
suministro eléctrico tras un corte en el modo de funcionamiento
forzado, las condiciones operativas se establecen automáticamente
en el modo inicial.
Si se restablece el suministro de corriente tras un corte de energía, el funcionamiento Auto Restart es la función que
automáticamente pone el aire acondicionado en las condiciones de funcionamiento anteriores al corte de suministro.
Lámpara de la señal de Filtro está ENCENDIDA.
Si la LED indicador de la lámpara de la señal de filtro está ENCENDIDA, limpiar el filtro.
Después de limpiar el filtro, presione el botón Time y el botón (◀) del controlador remoto alámbrico al
mismo tiempo por tres (3) segundos.
1
Pulse el botón de encendido.
El equipo responderá con un pitido.
2
Abra la puerta del panel de mando.
Pulse el botón ON/OFF de purificación
de aire PLASMA.
El equipo se pondrá en marcha cuando pulse el
botón y se parará cuando vuelva a pulsarlo.
3
Seleccione de nuevo la velocidad del ventilador con la
puerta del panel de mandos cerrada. Puede seleccionar
la velocidad en cuatro niveles: bajo, medio, alto o auto.
Cada vez que se pulsa el botón, cambia el modo de
velocidad del ventilador.
h
Funcionamiento de purificación de aire (PLASMA) en el
modo de refrigeración, calor o cualquier otro.
1
2
3
Modelo de bomba de calor
Modelo refrigeración
Temp. hab. > Temp. selecc. -2°C Temp. hab. < Temp. selecc. -2°C
Modo operativo Refrigeración Refrigeración Calor
Velocidad FAN interior Alta Seleccionar disponible Seleccionar disponible
Selección de temperatura
22°C Seleccionar disponible Seleccionar disponible
Page 80

24 Aire Acondicionado de tipo casete dé techo
Mantenimiento y servicio
Mantenimiento y servicio
Unidad interior
Rejilla, carcasa y panel de mandos
p Apague el sistema antes de proceder a su limpieza.
Utilice un paño suave, limpio y humedecido.
No utilice lejía o abrasivos.
Desconecte el aire acondicionado de la red antes de
limpiar la unidad interior.
AVISO
PRECAUCIÓN:
Cuando haya
soltado el filtro, no toque las partes
metálicas de la unidad interior.
Podrían causarle lesiones.
Suelte los filtros de aire.
n
Sujete la pestaña y tire ligeramente para
soltar el filtro.
Limpie la suciedad del filtro de aire utilizando un
aspirador o lavándolo con agua.
n
Si está muy sucio, lávelo con un detergente
neutro en agua templada.
n
Si utiliza agua caliente (50°C o más), puede
deformarse.
Tras lavar el filtro con agua, déjelo
secar a la sombra.
n
No exponga el filtro a la luz solar directa
o el calor de un fuego para secarlo.
Instale el filtro de aire.
Filtros de aire
Los filtros de aire situados detrás de la rejilla frontal
deben comprobarse y limpiarse cada 2 semanas, o con
mayor frecuencia si se
considera
necesario.
n No utilice los productos siguientes.
• Agua a una temperatura superior a 40°C.
Podría deformar los materiales o
decolorarlos.
• Sustancia volátiles.
Podrían dañar las
superficies del aire
acondicionado.
1
2
3
4
B
e
n
z
e
n
e
S
C
O
U
R
I
N
G
C
L
B
A
R
G
E
R
S
I
N
N
E
R
Soporte
Soporte
Filtro de aire
Filtro de aire
Filtro
Anti-bacterial
Admisión
de aire
Panel de mando
Salida de aire
Filtro
Anti-bacterial
Admisión de aire
Salida de aire
Panel de mando
Page 81

Precauciones de seguridad
Manual de Usurio 25
ESPAÑOL
Filtro que purifica (OPCIONAL)
Limpiar
El filtro de PLASMA situado detrás de los filtros de aire
debe comprobarse y limpiarse cada 3 meses o con mayor
frecuencia si es necesario.
Después de soltar los filtros de aire, tire
ligeramente para desmontar el filtro de PLASMA.
Sumerja el filtro de PLASMA en agua mezclada
con detergente neutro, durante 20-30 minutos.
Seque el filtro de PLASMA a la sombra durante
un día (Es muy importante eliminar
completamente la humedad).
Observe los cortes de la líneas de descarga
eléctrica.
Vuelva a instalar el filtro de PLASMA en su
posición original.
1
2
3
4
5
Reemplazo
• Período de uso recomendado: Aproximadamente por 2 años
OAbrir el panel frontal y retirar los
filtros de aire.
Retirar los filtros
purificadores de aire.
Volver a introducir los
filtros de aire y cerrar el
panel frontal.
1
2
3
Introducir los nuevos filtros purificadores
de aire..
2
2
3
3
1
2
4
PRECAUCIÓN: Donʼt touch this
PLASMA Filter within 10 seconds
after opening the inlet grille, it may
cause an electric shock.
Page 82

Mantenimiento y servicio
26 Aire Acondicionado de tipo casete dé techo
1 1
2
3
2
Cuando no vaya a utilizar el aire acondicionado durante un periodo prolongado de tiempo
Consejos para la utilización
Cuando no lo vaya a usar durante un periodo
prolongado de tiempo
Cuando vaya a usar el aire acondicionado de
nuevo
Utilice el aire acondicionado en el modo
siguiente durante 2 a 3 horas.
• Tipo de funcionamiento: modo de
ventilador.
• Esto secará las partes internas.
Información útil
Los filtros de aire y sus facturas de electricidad
SI los filtros de aire se atascan con suciedad, se
reducirá la capacidad de refrigeración, y se
perderá un 6% de la electricidad utilizada para el
funcionamiento del aire acondicionado.
Limpie el filtro de aire e instálelo en la
unidad interior.
(Para su limpieza, consultar página 25)
Compruebe que la entrada y salida de
aire de la unidad interior/exterior no
están bloqueadas.
Compruebe que la toma de tierra está
conectada correctamente. Puede
conectarse al lateral de la unidad
interior.
No enfríe en exceso la
estancia
No es bueno para la salud y se
malgasta electricidad.
Mantenga las persianas o
cortinas cerradas.
No deje entrar la luz solar directa
en la estancia con el aire
acondicionado en
funcionamiento.
Mantenga la temperatura de la
habitación constante.
Ajuste la dirección vertical y
horizontal para garantizar una
temperatura uniforme en la
habitación.
Asegúrese de que las puertas
y ventanas están cerradas.
Evite abrir las puertas y ventanas
para que no se caliente el aire de
la estancia.
Limpie con regularidad el filtro
del aire.
Los bloqueos en los filtros de aire
reducen la corriente de aire y los
efectos de refrigeración y
deshumidificación. Límpielos al
menos una vez cada dos
semanas.
Ventile la habitación
periódicamente
Ya que las ventanas deben
permanecer cerradas, es una
buena idea abrirlas y ventilar la
estancia de vez en cuando.
Desconecte el disyuntor.
PRECAUCIÓN:
Desconecte el
disyuntor cuando no vaya a usar el
aire acondicionado durante un
periodo prolongado de tiempo.
Puede acumularse suciedad y producirse un incendio.
Page 83

Mantenimiento y servicio
Manual de Usurio 27
ESPAÑOL
Haga las comprobaciones siguientes antes de llamar a un servicio técnico para reparaciones o mantenimiento.
Si el fallo de funcionamiento persiste, póngase en contacto con su distribuidor.
Consejos para la solución de problemas. Ahorre tiempo y dinero.
El aire acondicionado no
funciona
La habitación tiene un olor
peculiar.
Parece que se filtra condensación
del aire acondicionado.
El aire acondicionado no funciona
durante unos 3 minutos tras la
puesta en marcha
No enfría o calienta de forma
efectiva.
El aire acondicionado hace
ruido.
Se oyen crujidos.
La pantalla del panel de
mandos es apenas visible, o no
se ve en absoluto.
• Ha cometido algún error en la programación?
• Se ha fundido el fusible o se ha desconectado el
disyuntor?
• Compruebe que no se trata de olor de humedad
proveniente de las paredes, alfombras o mobiliario
de la habitación.
• Se produce condensación cuando la corriente de aire
enfría el aire caliente de la habitación.
• Se trata del protector de mecanismo.
• Espere alrededor de tres minutos y al aire
acondicionado comenzará a funcionar.
• Está seco el filtro de aire?. Consulte las instrucciones
de limpieza del filtro de aire.
• Quizás hacía mucho calor en la habitación cuando se
ha puesto en funcionamiento el aire acondicionado.
Deje que la habitación se enfríe.
• Se ha seleccionado incorrectamente la temperatura?
• Están obstruidas las tomas de entrada y salida de la
unidad interior?
• Para un sonido producido por agua fluyendo
- Se trata del sonido del freón al fluir al interior del
aparato de aire acondicionado.
• Para un ruido como el de aire comprimido saliendo a
la atmósfera
- Se trata del sonido del agua de deshumidificación
que se está procesando en el interior del aparato.
• Este sonido es generado por la
expansión/contracción de la rejilla de entrada, etc,
debidas a los cambios de temperatura.
• Se han agotado las pilas?
• Ha colocado las pilas en las direcciones (+) y (-)
incorrectas?
11
-
-
-
-
25
13, 15
-
-
Caja Explicación Ver página
Page 84

28 Aire Acondicionado de tipo casete dé techo
LG ESPAÑA, S.A.
RED DE SERVICIOS
DE ASISTENCIA TECNICA
AIRE ACONDICIONADO
POLIGONO INDUSTRIAL, "SECTOR 13", PARCELA 27 A
46190 RIBARROJA DEL TURIA (Valencia)
TEL. 96 305 05 00
FAX 96 305 05 01
Page 85

Manual de Usurio 29
ESPAÑOL
ANDALUCIA
ELECTRO ALTAMIRA, S.A.
C/. ALTAMIRA, 10, BAJO
04005 ALMERIA
TEL. 950 22 01 54
SERVIRAP
C/. ANGEL OCHOTORENA, 11
04005 ALMERIA
TEL. 950 27 40 67
CRUZ Y LATORRE
CENTRAL DE SERVICIOS
C/. UNIVERSIDAD DE
TEXAS, 2
(ESQ. DR. CARRACI)
04005 ALMERIA
TELS. 950 22 43 00 / 22 4
JUAN MANUEL LLORCA
SOLIS
C/. VILLA MARIA, 119
04008 CRUZ DE CARAVACA
ALMERIA
TEL. 950 27 39 57
M.J. RODRIGUEZ
PELEGRIN, S.L.
C/. CONVENTO, 27, BAJO
04610 CUEVAS DE
ALMANZOR - ALMERIA
TEL. 950 45 65 44
TECNI-HOGAR
C/. TOLOSA LATOUR, 19
11007 CADIZ
TEL. 956 28 10 82
ELECTRONICA
MARCHANTE, S.L.
C/. SIERRA BLANQUILLA, 14
11170 MEDINA SIDONIA
CADIZ
TEL. 956 41 03 03
FRANCISCO JAVIER CABA
NARANJO
PZA. DEL QUERER, 2, BAJO
URB. LAS COLINAS
11205 ALGECIRAS - CADIZ
TEL. 956 66 77 79
SERVITEC
C/. LAS PALOMAS, 9
11406 JEREZ DE FRONTERA
CADIZ
TEL. 956 34 88 78
TECNI-REPUESTOS
REYES, S.L.
AVDA. DE ROTA, 72
11550 CHIPIONA - CADIZ
TEL. 956 37 04 53
DOMEFRI
C/. ESCRITOR HOYOS DE
NORIEGA, 13, BAJO, LOC.
14014 CORDOBA
TEL. 957 43 52 85
ALFREDO GARCIA
GARCIA
C/. PABLO PICASSO, 5
14209 EL PORVERNIR DE LA
IND. - CORDOBA
TEL. 957 57 69 03
REPARACIONES LLERGO
C/. DELFIN PEREZ, 20-B
14400 POZOBLANCO
CORDOBA
TEL. 957 13 07 34
ELECTRONICA SATEC, S.L.
C/. MANUEL MELGAR, 37
14500 PUENTE GENIL
CORDOBA
TEL. 957 60 32 50
ELECTRONICA
GONZALEZ, S.L.
C/. FUENSANTA, 12
14640 VILLA DEL RIO
CORDOBA
TEL. 957 17 63 26
FRILUC
C/. LA ESTRELLA, 1, A, BAJO
14900 LUCENA - CORDOBA
TEL. 957 50 93 03
RELEGRA, S.L.
C/. DR. GOMEZ ROMAN, 5
18012 GRANADA
TEL. 958 27 24 50
TALLERES ESPEJO
C/. MANUEL SANCHEZ, 15
21006 HUELVA
TEL. 959 22 09 04
ISIDRO FERNANDEZ
REYES
C/. LUSITANIA, 27
21400 AYAMONTE - HUELVA
TEL. 959 32 06 35
MANUEL SANCHEZ
CASTILLO
C/. RUIZ ROMERO, 8
23003 JAEN
TEL. 953 22 58 05
SEYGAR
C/. LAS DESCALZAS, 2
23700 LINARES - JAEN
TEL. 953 69 18 20
MANUEL CANTUDO
ORTEGA
C/. QUINTERIA, 4
23740 ANDUJAR - JAEN
TEL. 953 50 29 44
CLIMAIRE PLUS, S.L.
POL. AZUCARERA
C/. GUARO, 4
29004 MALAGA
95 223 98 22
T.R. VIDEOTV
ALAMEDA CAPUCHINOS, 5
29014 MALAGA
TEL. 95 225 91 44
ELECTRO DAVID
C/. LA PAZ, 16 - BAJO
29500 ALORA - MALAGA
TEL. 952 49 88 93
INTERSAT SEVILLA, S.L.
C/. BEETHOVEN, LOCAL 5
41008 SEVILLA
TEL. 95 443 02 26
SERYVEN CANTILLANA,
S.L.
AVDA. DE ANDALUCIA, 37
41320 CANTILLANA
SEVILLA
TEL. 95 573 11 69
ELECTRONICA J.J.
DOMINGUEZ
C/. PRINCIPE DE ASTURIAS, 1
41340 TOCINA - SEVILLA
TEL. 95 474 07 98
REP. ELEC. MARQUEZ
C/. DR. SANCHEZ MALO, 3-A
(LA ALMAZARA)
41400 ECIJA - SEVILLA
TEL. 95 483 55 75
ELECTRO 93, S.L.
C/. MELLIZA, 3
41700 DOS HERMANAS
SEVILLA
TEL. 95 472 37 16
GONZALEZ INFANTES, S.L.
C/. BLAS DE OTERO, 26
41730 LAS CABEZAS DE SAN
JUAN - SEVILLA
TEL. 95 587 10 49
ARAGON
SERV. ELECTROD.
GRASAN, S.C.
C/. RAMON Y CAJAL, 59
22006 HUESCA
TEL. 974 22 90 93
S.A.T. TEOFILO
SEBASTIAN PEREZ
C/. SAN MIGUEL, 8 - BAJO
44001 TERUEL
TEL. 978 60 91 19
SERVICIO A.T. MARIO
CASES QUILEZ
AVDA. GALAN BERGUA, 1
44600 ALCAÑIZ - TERUEL
TEL. 978 83 38 51
INSTALACIONES
VILLAGRASA
C/. DOMINGO LOBERA, 6-8
LOCAL
50008 ZARAGOZA
TELS. 976 42 34 63 / 25 5
TAEL
C/. JUSLIBOL, 6-8
50015 ZARAGOZA
TEL. 976 73 67 35
S.T.O. JUAN JOSE LAZARO
PLAZA COSTA, 6
50300 CALATAYUD
ZARAGOZA
TEL. 976 88 51 58
ASTURIAS
SERVITAD
AVDA. CONSTITUCION, 102
33207 GIJON
TEL. 98 538 68 11
BALEARES
A.M.S.A.
C/. ISIDORO ANTILLON, 97
07008 PALMA DE MALLORCA
TEL. 971 27 27 57
TECLURAMI MENORCA,
S.A.L.
C/. PINTOR CALBO, 57
07703 MAHON
TEL. 971 35 28 02
CONSTAN
VIA ROMANA, 15
07800 IBIZA
TEL. 971 30 61 23
CANTABRIA
BEZANILLA PURAS, S.L.
C/. LOS ESTUDIANTES, S/N.
(FRENTE AL N.º 20)
39006 SANTANDER
TEL. 942 22 00 15
REPARACIONES-CICERO, S.L.
C/. LOS CLAVELES, 1
39796 CICERO
TEL. 942 61 65 30
CASTILLA LA MANCHA
LAUREANO GARCIA MURCIA
C/. ALCALDE MARTINEZ DE LA
OSSA, 1
02001 ALBACETE
TEL. 967 24 04 31
SOTO ALBACETE, S.L.
C/. PEREZ PASTOR, 80
02004 ALBACETE
TEL. 967 22 01 42
AROCA-OLAYA, S.L.
C/. SAN ANTONIO, 22-BAJO
02640 ALMANSA - ALBACETE
TEL. 967 34 57 96
SATELEC, S.L.
LIBERTAD, 13, LOCAL 1
13003 CIUDAD REAL
TEL. 926 22 01 55
VITORIANO QUILES PARRA
C/. JOSE RAMON OSORIO, 53
13300 VALDEPEÑAS
CIUDAD REAL
TEL. 926 32 54 38
TALLERES MARI PAZ
C/. SANTA LUCIA, 17
13500 PUERTOLLANO
CIUDAD REAL
TEL. 926 42 49 50
LUCERON UTRILLA, S.L.
C/. JUAN BAUTISTA CONCEP., 16
13600 ALCAZAR DE SAN JUAN
CIUDAD REAL
TEL. 926 54 28 56
ANGEL RODERO BELLON
C/. ASTURIAS, 26
13700 TOMELLOSO
CIUDAD REAL
TEL. 926 51 52 76
Page 86

30 Aire Acondicionado de tipo casete dé techo
CENTRAL SERVICIOS SM,
S.L.
AVDA. REP. ARGENTINA, 5-B
16002 CUENCA
TEL. 969 21 20 20
CAMUÑASE, S.L.
C/. ISABEL I DE CASTILLA, 52
16630 MOTA DEL CUERVO
CUENCA
TEL. 967 18 22 25
S.A.T. FCO. BLANDINO
C/. LAYNA SERRANO, 26
19002 GUADALAJARA
TEL. 949 22 25 46
FRANCISCO RODRIGUEZ
HERNANDEZ
C/. GRAL. MOSCARDO
GUZMAN, 22
19004 GUADALAJARA
TELS. 949 21 87 37/8
ELECTROMECANIA
VICFRIO
C/. ESPEJO, 13
45164 GALVEZ - TOLEDO
TEL. 925 40 00 79
ELECTRO SERVICE
C/. CALVO SOTELO, 15
45510 FUENSALIDA
TOLEDO
TEL. 925 73 07 85
REFRIGERACION
CASTILLA
C/. SOL, 31
45600 TALAVERA DE LA
REINA - TOLEDO
TEL. 925 81 68 79
REPARACIONES
ELECTROMATIC
C/. ANGEL DEL ALCAZAR, 52
45600 TALAVERA DE LA
REINA - TOLEDO
TEL. 925 80 48 26
CASTILLA LEON
ANTONIO SAN SEGUNDO,
C.B.
C/. SORIA, 6
05003 AVILA
TEL. 920 22 33 21
ANGEL MORENO
C/. SANTO TORIBIO, 17
09003 BURGOS
TELS. 947 20 37 69 / 20 52
SERVIREZ BURGOS, S.L.
C/. SAN FRANCISCO, 29-B.
09005 BURGOS
TEL. 947 23 09 90
MAYOR TELESERVICIO
C/. ARLAZON, 2
09400 ARANDA DE DUERO
BURGOS
TEL. 947 50 20 94
ENRIQUE GARCIA TENA
C/. SANTA ENGRACIA, 4,
LOCAL 2
24008 LEON
TEL. 987 22 32 39
CASCALLAR
C/. LA PRESA, 2
24010 TROBAJO DEL
CAMINO - LEON
TEL. 987 80 18 15
MULTISER
C/. EMBALSES DE
BARCENA, 11, 1º D
24400 PONFERRADA - LEON
TEL. 987 41 05 80
MULTISERVICIO
PALENCIA, S.L.
C/. CARDENAL CISNEROS, 20
34002 PALENCIA
TEL. 979 72 20 57
MANUEL ALONSO DE
MIGUEL
C/. DE LA FUCCIA, 1
37004 SALAMANCA
TEL. 923 22 97 51
JOSE ANDRES OBREGON
MATEOS
C/. DOCTOR SANCHEZ, 15
37540 FUENTEGUINALDO
SALAMANCA
TEL. 923 47 14 82
INST. Y ASIST. HNOS.
GORDO
C/. MORILLO, 9
40002 SEGOVIA
TEL. 921 43 79 33
JESUS REVUELTO
SANCHEZ
C/. SANTO TOME, 9
42004 SORIA
TEL. 975 22 00 85
TEFRISA
C/. MIRLO, 55
47011 VALLADOLID
TEL. 983 29 34 11
ELECTRODO MONCASA,
S.L.
C/. URSICINO ALVAREZ, 10
49011 ZAMORA
TEL. 980 52 95 28
CATALUÑA
INGENIERIA DE SISTEMAS
C/. PERE IV, 161
08018 BARCELONA
TELS. 93 485 58 56 / 93 3
S.A.T. PARERA
C/. BARRI XIROTA, 1
08186 LLIÇA D'AMUNT
BARCELONA
TEL. 93 841 44 02
ALIGUE, S.L.
C/. SANTIAGO ROSIÑOL, 30
08192 SANT QUIRZE VALLES
BARCELONA
TEL. 93 721 06 41
SERVEI TECNIC FERRER,
S.C.P.
C/. SARDA, 37
08203 SABADELL
BARCELONA
TEL. 93 710 51 38
TECNO MAE, S.C.P.
C/. LLIBERTAT, 45-47
08240 MANRESA
BARCELONA
TEL. 93 874 66 08
REP. ELEC.
GALVEZ & GALVEZ
RDA. SAN OLEGUER, 9-11
08304 MATARO
BARCELONA
TEL. 93 757 59 39
SERVEI TECNIC JOYMA,
S.L.
AVDA. VIRGEN DE
MONTSERRAT, 19
08380 MALGRAT DE MAR
SUR GERONA
TEL. 93 765 36 33
S.A.T. JUVANTENY, S.L.
C/. NUEVA, 109
08500 VIC - BARCELONA
TEL. 93 886 20 23
CAN-DO
AVDA. PAISOS CATALANS, 91
08700 IGUALADA
BARCELONA
TEL. 93 803 75 52
SATE-PENEDES, S.L.
C/. BOTERS, 4, LOCAL 2
08720 VILAFRANCA DEL
PENEDES - BARCELONA
TEL. 93 890 17 79
TOT SERVEI
C/. SANTA MADRONA, 13
08800 VILANOVA I LA
GELTRU - BARCELONA
TEL. 93 893 15 93
VALVERDE, S.C.P.
C/. MONTAÑA, 16, LOCAL 2
08913 BADALONA
BARCELONA
TEL. 93 398 61 67
ELECTRONICA
ALMENTERO
C/. SAN JUAN BOSCO, 34,
LOCAL 2
08915 SANT BOI
BARCELONA
TEL. 93 640 68 04
CLIMADIS, S.L.
C/. AUSIAS MARCH, 111
08915 BADALONA
BARCELONA
TELS. 93 383 89 62 / 46 03
LINEA BLANCA
BURGUILLOS, S.L.
C/. SANT FRANCESC
XAVIER, 45
08950 ESPLUGUES DE
LLOBREGAT - BARCELONA
TEL. 93 371 40 46
IMTEC, S.L.
C/. CAN CALDERS, 8, LOC. 2
LLOBREGAT - BARCELONA
TEL. 93 666 66 98
CATEIC, S.L.
C/. CARME, 40, BAIXOS
17004 GIRONA
TEL. 972 46 91 48
COMSELEC
C/. REC ARNAU, 17, BAJO
17600 FIGUERES - GIRONA
TEL. 972 50 52 16
GARRIGA
C/. SANT JAUME, 30
17844 CORNELLA DE TERRI
GIRONA
TEL. 972 59 43 06
TECNOSERVEI LLEIDA, S.L.
C/. MARAGALL, 4
25003 LLEIDA
TEL. 973 27 06 11
SATEF
AVDA. RAVAL DEL CARME, 12
25300 TARREGA - LERIDA
TEL. 973 50 08 48
ELECTRODOM. BALAGUER
C/. PARE MANYANET, 23
25620 TREMP - LERIDA
TEL. 973 65 02 57
GERMANS ALEGRET, S.L.
C/. SOLS, 45
25620 TREMP - LERIDA
TEL. 973 65 14 01
ELECTRO-CUPE, S.L.
C/. SIETE, 28, BAJOS DCHA.
43100 BONAVISTA
TARRAGONA
TEL. 977 54 99 85
ELECTRONICA I
MULTISERVEIS JIA, S.L.
C/. MONASTIR RIPOLL, 9
43205 REUS - TARRAGONA
TEL. 977 77 55 04
GOMBAU GARCIA, S.L.
C/. MAYOR, 30
43590 JESUS-TORTOSA
TARRAGONA
TEL. 977 50 12 20
INSTALACIONS BILBE, C.B.
C/. MOLI, 65
43784 CORBERA D'EBRE
TARRAGONA
TEL. 977 42 02 92
CATALUÑA
(DELEGACION SERVICIO
TECNICO)
SR. ALMENTERO
AVDA. ROMA,
ESQ. VILAMARI, 29
BARCELONA
TEL. 93 363 27 10
CEUTA
TECNOGAS CEUTA, C.B.
P.I. LA CHIMENEA, NAVE 39
51003 CEUTA
TEL. 956 50 56 43
Page 87

Manual de Usurio 31
ESPAÑOL
ELECTRODOMESTICOS
BALEA
C/. RUA CATASOL, 3
27002 LUGO
TEL. 982 24 10 22
PABLO PENAS
C/. NOSA SRA. DO CARME,
ED. CELTA 70-4 BAJO, 1º A
27880 BURELA - LUGO
TEL. 982 58 14 62
TALLER DIEZ
C/. ERVEDELO, 94
32002 ORENSE
TEL. 988 22 71 83
IMASON, S.L.
C/. LOUREIRO CRESPO, 43
36004 PONTEVEDRA
TEL. 986 84 16 36
SERTELEC
AVDA. FLORIDA, 123
(125 BAJO)
36210 VIGO - PONTEVEDRA
TEL. 986 20 72 53
ISLAS CANARIAS
CAPRI CANARIAS, S.L.
C/. SAO PAULO, 40
35008 LAS PALMAS
TELS. 928 46 35 91 / 46 2
LA RIOJA
BENITO MUÑOZ PINILLOS
C/. ESCUELAS PIAS, 7, BAJO
26004 LOGROÑO
LA RIOJA
TEL. 941 26 30 88
MADRID
REPARACIONES JUAN
DUQUE, S.L.
RONDA SEGOVIA, 2
28005 MADRID
TEL. 91 365 79 69
MICRO AIRE, S.L.
C/. VICTOR DE LA SERNA, 5
28016 MADRID
TELS. 91 413 34 73 / 92
INELSAT, S.L.
C/. PAULINA ODIAGA, 21
28019 MADRID
TELS. 91 472 48 71 / 37
ACORAIR, S.L.
C/. CIUDAD DE FRIAS, 24,
NAVE 64
28021 MADRID
TELS. 91 505 32 28 / 79 73
CENTRO DE ASISTENCIA
TECNICA CA
C/. OCAÑA, 92
28047 MADRID
TEL. 91 465 34 76
RELAFRI, S.L.
C/. LA GRANJA, 96
28100 ALCOBENDAS
MADRID
TEL. 91 661 71 70
FRIO Y VOLTIO, S.L.
C/. O, NAVE 37,
POLIGONO EUROPOLIS
28230 LAS ROZAS
MADRID
TEL. 91 640 60 49
RUBEN LOZANO
CARRACEDO
C/. SAN NICOLAS, 14
28912 LEGANES - MADRID
TEL. 91 686 33 17
JEYFER
C/. ZARAGOZA, 19 POST.
28934 MOSTOLES - MADRID
TEL. 91 617 70 13
SERTECSUR
C/. LA PALOMA, 33
28980 PARLA - MADRID
TEL. 91 699 40 10
MELILLA
RED DE SERVICIOS VILLEGA
C/. HERMANOS MIRANDA, 17
52005 MELILLA
TEL. 95 267 89 91
MURCIA
KELVIFRIO, S.L.
C/. MATEOS, 51
30002 MURCIA
TEL. 968 25 18 28
SAJOYSA
C/. CONTINENTAL, 5
30310 LOS DOLORES
CARTAGENA
TEL. 968 53 47 15
NAVARRA
LUZ Y SONIDO MARQUEZ
C/. DELGADO GARCES, 2
31500 TUDELA - NAVARRA
TEL. 948 82 28 68
PAIS VASCO
SOGOTZI SERVICIOS, S.L.
C/. ANGLO VASCO, 3
01002 VITORIA-GASTEIZ
ALAVA
TEL. 945 27 13 33
ALZATEK SERVICIOS
C/. ELIZASU, 12, BAJO (ALZA)
20017 SAN SEBASTIAN
TEL. 943 35 14 93
ERNESTO PEREZ DES
PZA. UNZAGA, 11
20600 EIBAR - GUIPUZCOA
TEL. 943 70 26 97
E.C.E., S.L.
C/. SAGARMINAGA, 9
48004 BILBAO - VIZCAYA
TEL. 94 411 12 29
LACOFRIS, S.L.
C/. KASUNE, 18
48990 GETXO
BILBAO - VIZCAYA
TEL. 94 430 52 00
EXTREMADURA
J. FCO. CALDERON
LONGARES
C/. MARTIRES, 11
06300 ZAFRA - BADAJOZ
TEL. 924 55 17 64
ELECTRONICA CENTENO
AVDA. DE ZAFRA, BLOQUE 1
06310 PUEBLA SAN PEREZ
BADAJOZ
TEL. 924 55 27 03
VIDEOSAT ALJOCHA, S.L.
RONDA DEL VALLE, 16, B.
06480 MONTIJO
BADAJOZ
TEL. 924 45 33 44
FLORE MERA SEGADOR,
S.L.
POL. IND. CAGANCHA, P. 13
06700 VILLANUEVA DE LA
SERENA - BADAJOZ
TEL. 924 84 09 07
ATINSA
C/. STA. RAMONA, 3
06800 MERIDA -BADAJOZ
TEL. 924 31 47 51
ELECTRO-MOVACAVE, S.L.
C/. SANGUINO MICHEL, 42
10002 CACERES
TEL. 927 23 69 09
ELECTRO XABIER
C/. ALFAMBRA, 4
10004 CACERES
TEL. 927 22 02 33
REP. ELECTROD. PEDRO
FERNANDEZ
C/. GENARO CAJAL, 23
10300 NAVALMORAL DE LA
MA. - CACERES
TEL. 927 53 57 00
ELECTRODOMESTICOS
ALEMAN
C/. URBANO GONZALEZ
SERRANO, 85
10300 NAVALMORAL DE LA
MA. - CACERES
TEL. 927 53 12 02
CENTRO TECNICO HERTE,
S.L.
RONDA DEL SALVADOR, 61
10600 PLASENCIA
CACERES
TEL. 927 41 27 39
GALICIA
ALPO, S.L.
AVDA. PASAJE, 31
15006 LA CORUÑA
TEL. 981 28 08 68
VICTOR SAT, S.L.
C/. ENTRERRIOS, 35
15705 SANTIAGO
LA CORUÑA
TEL. 981 58 43 92
COMUNIDAD
VALENCIANA
JOASA SERVICIOS, S.L.
C/. ESCORPION, 8, LOC. IZQ.
03006 ALICANTE
TEL. 96 528 73 33
ANGEL JOSE COMPAÑ
GARCIA
C/. CUESTA DE LAS
NARICES, 34 - ED. EL PERAL
03590 ALTEA - ALICANTE
TEL. 96 584 36 94
B. AGUILAR
AVDA. ALICANTE, 3
03700 DENIA - ALICANTE
TEL. 96 578 19 69
DAVID TORREGROSA
JORDA
C/. TARRASA, 6, BAJO
03803 ALCOY - ALICANTE
TEL. 96 533 43 06
VILARSERVI, S.L.
C/. SAN ROQUE, 78
12004 CASTELLON
TEL. 964 23 25 55
VENSAT REPARACIONES,
S.L.
C/. PINTOR LOPEZ, 43
12004 CASTELLON
TEL. 964 25 55 19
SERVIMART
AVDA. CORTS
VALENCIANES, 6
12530 BURRIANA
CASTELLON
TEL. 964 51 32 05
ESMA, C.B.
C/. ESCUELAS CRISTIANAS, 19
CASTELLON
TEL. 964 46 03 08
KELFRI, S.L.
C/. SERPIS, 10, BAJO
46021 VALENCIA
TEL. 96 362 01 62
EFITEC, C.B.
C/. JOSE GROLLO, 14, BAJO
46025 VALENCIA
TEL. 96 346 23 24
J.J. INSTALACIONES
C/. SAN LORENZO, ED. FANI,
LOCAL 4
46400 CULLERA - VALENCIA
TEL. 96 173 18 86
LAVA-FRED, S.L.
C/. OBISPO GILABERTO
MARTI, 5, BAJO
46600 ALZIRA - VALENCIA
TEL. 96 240 49 85
CLIMAELEC MORAGUES,
S.L.
C/. BENIARJO, 4
46700 GANDIA - VALENCIA
TEL. 96 286 02 95
FRICO HIGUERAS, S.L.
CTRA. SAN ANTONIO, 17
46920 MISLATA - VALENCIA
TEL. 96 379 77 42
Page 88

34 Aire Acondicionado de tipo casete dé techo
LINHA BRANCA
- ÁLVARO JOSÉ MORAIS
Lugar do Ratiço
Noura 5090 Murça
Tel.059/511117 Fax.059/511117
- ELECTRO REPARADOURA DA COLINA,Lda.
Rua de São Sebastião,122
4700 Braga
Tel.053/273131 Fax.053/273131
- SETEL - Soc.Técnica Rep.Electro. Vcnda de
Acessórios,Lda.
Rua Silva Tapada,91
4200 Porto
Tel.02/591972 Fax.025506111
- ELECTRMÁQUINAS -
Com.Rcp.Electrodomésticos,Lda.
Rua da Republica - Alagoas
Esgueira 3800 Aveiro
Tel.034/315845 Fax.034/311277
- CENTRO DE ASSIST.TECNICA LEONIDIO
B.FIGUEIREDO
Tondelinha - Apatado 113
3510 Viseu
Tel.032/411380 Fax.411380
- EGIFRIO TOSÉ REPARAÇÕES,Lda
Rau Vila Nova de Foz Côa,Lote 13
6300 Guarda
Tel.071/221732 Fax.071/221732
- STE - Serviços Técnicos de Electrodomésticos,Lda.
Estrada de Coselhas,71
3000 Coimbra
Tel.039/492750 Fax.039/493088
- RUI VAS,Lda
Quinta da Carriça - Apartado 169
6230 Fundão
Tel.075/776375 Fax.075/776375
- CLIMALBI - Lúcio Ribeiro Costa,Lda.
Largo São João, Ger.1
6000 Castelo Branco
Tel.072/328449 Fax.072/328449
- CODELPOR,S A
Estrada Nacional,118 - Km 38
Zona Industrial de Vale Tripeiro,Lote 5
2130 Benavente
Tel.063/519120 Fax.063/519125
- J.B.Frio,Lda.
Parque Industrial e Tecnológico de Évora
Rua T, Lote 17
7000 Évora
Tel.066/771222 Fax.066/771222
- JOSÉ GUERREIRO ESTEVAM
Rua Frei Amador Arrais,20
7800 Beja
Tel.084/323460 Fax.084/323460
- RICAFRE - Reparações de Electrodomésticos,Lda.
Bairro Mendonça à Penha,11
8000 Faro
Tel.089/863663 Fax.089/864256
- FRIO DOMÉSTICO
Zona Industrial Coca Maravilhas,Lote 45
8500 Portimão
Tel.082/417876 Fax.082/416292
Sr. José Neto
CENTRAL ASSISTÊNCIA TÉCNICA PORTUGAL
MEGALÃNDIA
Rua Actriz Adelina Fernandes, n°7-7 A
2795 Linda-a-Velha (Lisboa) (also MNT SVC)
Telefone 4146480
Fax 4146499
Page 89

MANUEL D’UTILISATION
CLIMATISEUR
Veuillez lire attentivement ce manuel avant d’utiliser
votre appareil, et le conserver pour toute consultation ultérieure.
www.lg.com
TYPE: ENCASTRÉ
FRANÇAIS
Page 90

2 Conditionneur d'air de type encastre au plaford
Manuel du Propriétaire du Conditionneur d'air de type encastre au plaford
TABLE DES MATIÈRES
POUR VOS ARCHIVES
Écrivez les numéros de modèle et de série ici :
Modèle #
Série #
Vous les trouverez sur la plaque signalétique située sur
le côté de chaque unité.
Nom du Distributeur:
Date dʼachat
n
Agrafez votre reçu à cette page au cas où vous en auriez
besoin pour démontrer la date d'achat du produit ou pour
avoir droit à la garantie.
LISEZ CE MANUEL
Vous trouverez à lʼintérieur de ce manuel beaucoup de
conseils utiles sur la façon dʼutiliser et dʼentretenir
correctement votre climatiseur. Quelques petites
mesures préventives vous permettront dʼépargner
beaucoup de temps et dʼargent pendant la durée de vie
de votre climatiseur. Vous trouverez beaucoup de
réponses aux problèmes les plus fréquents dans le
tableau du guide de dépannage. Si vous passez en
revue notre Guide de Dépannage d'abord, il se peut que
vous nʼayez pas du tout besoin dʼappeler le Service
Après-Vente.
PRÉCAUTION
• Contactez le service technique agréé pour la réparation ou
l'entretien de cette unité.
• Contactez un technicien autorisé pour l'installation de cette unité.
• Le climatiseur ne doit pas être actionné par des petits enfants ou
par des personnes infirmes sans surveillance.
• Veillez toujours à surveiller les petits enfants pour éviter quʼils
jouent avec l'appareil.
• Si le cordon dʼalimentation doit être remplacé, ce travail ne doit
être accompli que par du personnel autorisé utilisant uniquement
des pièces de rechange authentiques.
• Conformément aux standards nationaux sur le câblage,
lʼinstallation ne doit être effectuée que par du personnel qualifié
et autorisé.
Mesures de sécurité...............3
Mode dʼutilisation...................6
Entretien et Service..............24
Page 91

Mesures de sécurité
Manuel du Propriétaire 3
FRANÇAIS
Mesures de sécurité
Les instructions ci-après doivent être observées dans le but de prévenir tout risque de
dommages corporels ou matériels.
n L'utilisation non conforme, résultant de la négligence des instructions, est susceptible de
provoquer des dommages corporels ou matériels dont la gravité est signalée par les
indications suivantes :
n Les significations des symboles utilisés dans ce manuel sont indiquées ci-dessous.
AVERTISSEMENT
ATTENTION
Ce symbole indique un risque de blessure grave, voire mortelle.
Ce symbole indique un risque de blessure ou des
dommages matériels seulement.
Veillez à ne pas faire cela.
Veillez à suivre les instructions de ce manuel.
AVERTISSEMENT
n Installation
N'utilisez pas un coupe-circuit
défectueux ou à valeur nominale
inférieure. Utilisez cet appareil sur
un circuit dédié.
• Ceci risquerait de provoquer un incendie
ou un choc électrique.
Pour un travail électrique, contactez
le distributeur, le vendeur, un
électricien qualifié ou un Centre de
Service Après Vente Agrée.
• Ne démontez ni réparez le produit. Ceci
risquerait de provoquer un incendie ou un
choc électrique.
Faites toujours une connexion
reliée à la terre.
• Autrement vous risquerez de provoquer
un incendie ou un choc électrique.
Installez fermement le panneau et
le couvercle du tableau de
commande.
• Autrement vous risquerez de provoquer
un incendie ou un choc électrique.
Installez toujours un circuit et un
disjoncteur dédiés.
• Un câblage ou une installation
inappropriés peuvent provoquer un
incendie ou un choc électrique.
Utilisez un disjoncteur ou fusible à
valeur nominale appropriée.
• Autrement vous risquerez de provoquer
un incendie ou un choc électrique.
Ne modifiez ni prolongez le
cordon d'alimentation.
• Ceci risquerait de provoquer un incendie
ou un choc électrique.
N'installez, n'enlevez ni remettez
en place l'unité vous-même (si
vous êtes un client).
• Vous pourriez provoquer un incendie, un
choc électrique, une explosion ou vous
blesser.
Prenez soin lorsque vous déballez
et installez ce produit.
•
Les bords aiguisés peuvent provoquer des
blessures. Faites attention en particulier aux
bords du boîtier et aux ailettes du
condenseur et de l'évaporateur.
Page 92

Mesures de sécurité
4 Conditionneur d'air de type encastre au plaford
Ne permettez pas que de l'eau
s'écoule dans les pièces
électriques.
• Ceci pourrait provoquer un incendie, une
défaillance de l'appareil ou un choc
électrique..
N'emmagasinez ni utilisez de
substances inflammables ou
combustibles près de ce produit.
• Ceci entraînerait un risque d'incendie ou
de défaillance du produit.
N'utilisez pas ce produit dans espace
fermé hermétiquement pendant une
longue période de temps.
• Il peut se produire un manque d'oxygène.
S'il y a une fuite de gaz inflammable,
fermez le robinet à gaz et ouvrez une
fenêtre pour ventiler la pièce avant de
mettre en marche le climatiseur.
• N'utilisez le téléphone ni déplacez les
interrupteurs sur les positions marche/arrêt.
Ceci risquerait de provoquer une explosion ou
un incendie.
Si le climatiseur dégage des sons, des
odeurs ou de la fumée, mettez le
disjoncteur sur la position arrêt (off) ou
débranchez le cordon d'alimentation.
• Il y a risque de choc électrique ou d'incendie.
Arrêtez le climatiseur et fermez la
fenêtre en cas de tempête ou d'ouragan.
Si possible, enlevez le produit de la
fenêtre avant que l'ouragan arrive.
• Il y a risque de dommages à la propriété, de
défaillance du produit ou de choc électrique.
N'ouvrez pas la grille d'entrée d'air du
produit en cours de fonctionnement.
(Ne touchez pas le filtre électrostatique,
si l'unité en est équipée.)
•
Autrement, vous risquerez de subir des
blessures physiques, un choc électrique ou
de provoquer une défaillance du produit.
Contactez le centre de service
après vente agréé si le produit est
trempé(rempli d'eau ou
submergé).
• Ceci risque de provoquer un incendie ou
un choc électrique.
Veuillez à ce que l'eau ne pénètre
pas dans le produit.
• Ceci risquerait de provoquer un incendie,
un choc électrique ou d'endommager le
produit.
Ventilez la pièce de temps en temps lorsque vous
l'utilisez simultanément avec une poêle, etc.
• Autrement, vous risquerez de provoquer un incendie ou un choc
électrique.
Arrêtez le climatiseur avant de procéder à des
opérations de nettoyage ou de maintenance du produit.
• Autrement, vous risquerez de provoquer un incendie ou un choc
électrique.
n Fonctionnement
Contactez toujours le revendeur ou
un centre de service après vente
agréé pour effectuer l'installation.
• Autrement, Vous pourriez provoquer un
incendie, un choc électrique, une
explosion ou vous blesser.
N'installez pas le produit sur un
support d'installation défectueux.
• Ceci peut provoquer des blessures, un
accident ou bien endommager le produit.
Vérifiez que la zone d'installation
n'est pas abîmée par le temps.
• Si la base s'écroule, le climatiseur pourrait
tomber avec elle, provoquant des
dommages matériels, une défaillance du
produit et des blessures.
Ne branchez ni débranchez la
fiche d'alimentation en cours de
fonctionnement.
• Ceci risquerait de provoquer un incendie
ou un choc électrique.
Ne touchez pas (ne faites pas
fonctionner)le produit avec les
mains humides.
• Ceci risquerait de provoquer un incendie
ou un choc électrique.
Ne placez pas de radiateurs ou
d'autres appareils près du cordon
d'alimentation.
• Ceci risquerait de provoquer un incendie
ou un choc électrique.
Ne laissez pas le climatiseur
marcher trop longtemps lorsque
l'humidité est très élevée et qu'il y a
une porte ou une fenêtre ouverte.
• De l'humidité peut se condenser et
mouiller ou endommager le mobilier.
Assurez-vous qu'on ne puisse pas
tirer des câbles ou les
endommager en cours de
fonctionnement.
• Ceci risquerait de provoquer un incendie
ou un choc électrique.
Ne placez aucun objet sur le
cordon d'alimentation.
• Ceci risquerait de provoquer un incendie
ou un choc électrique.
Si vous n'allez pas utiliser le produit pour une longue
période de temps, débranchez le cordon d'alimentation
ou mettez le disjoncteur sur la position Arrêt (off).
•
Autrement, vous risquerez d'endommager le produit ou de provoquer
une défaillance de celui-ci ou bien une mise en marche involontaire.
Assurez-vous que personne ne peut marcher ou
tomber sur l'unité extérieure.
• Ceci pourrait provoquer des blessures personnelles et des
dommages au produit.
Page 93

Mesures de sécurité
Manuel du Propriétaire 5
FRANÇAIS
n Installation
ATTENTION
n Fonctionnement
Vérifiez toujours s'il y a des fuites de
gaz (frigorigène) suite à l'installation
ou réparation du produit.
•
Des niveaux de frigorigène trop bas peuvent
provoquer une défaillance du produit.
Installez le raccord de drainage de
manière à assurer un drainage
approprié.
• Une mauvaise connexion peut provoquer
des fuites d'eau.
Maintenez le produit au niveau
lors de son.
• Installation afin d'éviter des vibrations ou
des fuites d'eau.
N'installez pas le produit à un
endroit où le bruit ou l'air chaud
dégagés de l'unité extérieure
dérangent les voisins.
• Ceci pourrait entraîner des problèmes
avec vos voisins.
Faites appel à deux ou plusieurs
personnes pour enlever et
transporter ce produit.
• Evitez des blessures.
N'installez pas ce produit à un
endroit où il serait exposé
directement au vent de la mer
(pulvérisation d'eau de mer).
•
Ceci peut provoquer de la corrosion sur le produit. La
corrosion, particulièrement sur les ailettes du condenseur
et de l'évaporateur, peut provoquer un dysfonctionnement
ou un fonctionnement inefficace du produit.
N'exposez pas la peau directement sous le jet d'air
froid pendant des longues périodes de temps (Ne vous
asseyez pas sous le courant d'air).
• Ceci peut nuire à votre santé.
N'utilisez pas ce produit pour des objectifs spéciaux
tels que la préservation d'aliments, d'oeuvres d'art, etc.
C'est un climatiseur pour consommateurs, non pas un
système frigorifique de précision.
• Il y a risque de dommage à la propriété ou pertes matérielles.
Ne bloquez pas l'entrée ou la
sortie d'air.
• Ceci peut provoquer une défaillance du
produit.
Utilisez un chiffon doux pour le
nettoyage. N'employez pas de
détergents agressifs, de
dissolvants, etc.V
• Ceci risquerait de provoquer un incendie,
un choc électrique ou des dommages aux
pièces plastiques du produit.
Ne touchez pas les pièces
métalliques du produit lorsque
vous enlevez le filtre à air. Elles
sont très aiguisées!
• Vous risquez de subir des blessures.
Ne marchez ni mettez rien sur le
produit (unités extérieures).
• Ceci risquerait de provoquer des
blessures et une défaillance du produit.
Insérez toujours fermement le
filtre. Nettoyez le filtre toutes les
deux semaines ou plus souvent si
besoin.
•
Un filtre sale réduit l'efficacité du climatiseur
et pourrait provoquer un dysfonctionnement
ou des dommages à l'appareil.
N'insérez pas les mains ou
d'autres objets à travers l'entrée
ou la sortie d'air en cours de
fonctionnement du produit.
• Il y a des bords aiguisés et des pièces
mobiles qui pourraient vous blesser.
Ne buvez pas d'eau drainée du
produit.
• Ceci n'est pas hygiénique et pourrait
provoquer de sérieux problèmes de santé.
Utilisez un outil ou une échelle
solide lorsque vous faites des
opérations de nettoyage ou de
maintenance du produit.
• Faites attention et évitez des blessures.
Remplacez les piles vieilles de la
télécommande par des piles neuves
du même type. Ne mélangez pas de
piles usées et neuves ou de
différentes types de piles.
• Ceci risquerait de provoquer un incendie
ou une explosion.
Ne rechargez ni démontez les piles. Ne placez pas les
piles sur le feu.
• Elle peuvent brûler ou exploser.
Si le liquide des piles tombe sur votre peau ou vos
vêtements, lavez-les avec de l'eau propre. N'utilisez pas
la télécommande si les piles ont des fuites.
• Les substances chimiques des piles pourraient provoquer des
Vbrûlures ou d'autres risques pour la santé.
Page 94

Mode dʼutilisation
6 Conditionneur d'air de type encastre au plaford
Mode dʼutilisation
Unité interne
Cassette tape Unité interne
On/Off : S'allume pendant le fonctionnement du système.
Indication filtre : S'allume après 2400 heures après le premier fonctionnement de l'unité.
Minuterie : S'allume pendant le fonctionnement de la minuterie.
Mode dégivrage : S'allume pendant le mode dégivrage ou le fonctionnement Hot Start .
Fonctionnement forcé : Procédure de fonctionnement quand on ne peut pas utiliser la télécommande.
Récepteur de signal
Il reÁoit les signaux provenant de la télécommande. (Son du signal de réception : deux bips courts ou un bip long)
Couvrir
l'exposition
Couverture
Modèle pompe de chaleur
Modèle refroidissement
récepteur de signal
récepteur de signal
Filtre Anti-bactérie
Télécommande
Télécommande
Sortie d'air
Sortie d'air
Admission d'air
Admission d'air
récepteur de signal
récepteur de signal
Modèle pompe de chaleur
Modèle refroidissement
Filtre Anti-bactFiltre Anti-bactérieFiltre Anti-bactérie
Page 95

Mode dʼutilisation
Manuel du Propriétaire 7
FRANÇAIS
Noms et fonctions de la télécommande
h
La température affichée peut être différente de la température réelle de la pièce si la télécommande est
installée là où les rayons du soleil tombent directement ou à côté dʼune source de chaleur.
h
Remarque: 1 Côté 06 Modèle- AMNH09GTCC0,AMNH12GTCC0
3
Timer Cancel 2ndF
Program Week
Hour Min
Holiday
Set/Clr
RESET
Plasma
10
12
14
15
11
13
18
16
2
1
5
4
6
8
9
7
17
Modèle pompe de chaleur
Modèle de refroidissement
1 côtés
4 côtés, 1 côté (06 modèle)
Operation unit No Func
Humidify
AUTO
AUTO SWING OPERATION
FAN SPEED
Program set
SUB FUNCTION
SET TEMP
Room Temp
HI
MED
LO
Heater
Defrost
Filter
Preheat
Out door
Time
Timer
On
Set no. Time
Off
01 03 05 07 09 11 13 15 17 19 21 23
ZONE
1234
2ndF
JET
SLO
Affichage opérations
Affiche les conditions de fonctionnement.
Touche allumé/éteint
L'appareil se met en marche quand on appuie sur cette
touche et il s'arrête quand on appuie de nouveau.
Touche de réglage de la température
Utilisée pour régler la température quand on a obtenu
la température souhaitée.
Touche fonctionnement VENTILATEUR
Utilisée pour faire circuler l'air dans la pièce sans
refroidissement ou chauffage.
Bouton de vitesse du ventilateur
(Refroidissement rapide: 4 Directions
seulement)
Utilisé pour régler la vitesse de ventilation désirée et
pour sélectionner le mode refroidissement rapide.
Touche de sélection du mode de
fonctionnement
Utilisée pour sélection le mode de fonctionnement.
- Mode fonctionnement automatique
- Mode fonctionnement en refroidissement
- Mode fonctionnement séchage léger
- Mode fonctionnement chauffage (sauf modèle de
refroidissement)
Touche oscillation automatique
Utilisée pour l'oscillation vers le haut ou vers le bas.
/Droite et Gauche(Option)
Touche de contrôle de la température de la pièce
/ Déclencheur du Voyant du Filtre (Option)
Utilisée pour contrôler la température de la pièce.
Touche nettoyage au plasma (Option) /
Radiateur (Option)
Touche annulation minuterie
Utilisée pour annuler la minuterie.
Touche de réglage de la minuterie
Utilisée pour régler la minuterie quand on a obtenu
l'horaire souhaité.
Touche hebdomadaire
Utilisée pour régler le jour de la semaine.
Touche programmation
Utilisée pour régler la minuterie hebdomadairement.
Touche congé
Utilisée pour régler un congé dans la semaine.
Touche de réglage de la minuterie
Utilisée pour régler l'horaire du jour et pour changer
l'horaire dans la fonction minuterie hebdomadaire.
Touche de réglage et d'annulation /
Ventilateur(Option)
Utilisée pour régler et annuler la minuterie
hebdomadaire.
Bouton Swirl (Tourbillon: 4 Directions)
Utilisé pour sélectionner le mode Swirl.
Sans fonction(1côté, 06 modèle)
Bouton Jet Cool (1 Directions)
Touche de réinitialisation
Utilisé à fixer le temps courant et à déblayer le temps
de monture.
18
17
16
15
14
13
12
11
10
9
8
7
6
5
4
3
2
1
Page 96

Mode dʼutilisation
8 Conditionneur d'air de type encastre au plaford
Télécommande sans fils (optionnelle)
Ce climatiseur est équipé normalement d'une télécommande avec fils. Mais, si vous souhaitez une
télécommande sans fils, vous devez payer pour l'avoir.
1. BOUTON DÉMARRAGE/ARRÊT
Le fonctionnement démarre quand ce bouton est
pressé et il sʼarrête quand ce bouton est pressé de nouveau.
2. BOUTON DE SÉLECTION DU
MODE DE FONCTIONNEMENT
Utilisé pour sélectionner le mode de fonctionnement.
3. BOUTONS DE RÉGLAGE DE LA
TEMPÉRATURE AMBIANTE
Utilisé pour sélectionner la température ambiante.
4. SÉLECTEUR DE VITESSE DU VENTILATEUR INTÉRIEUR
Utilisé pour sélectionner la vitesse du ventilateur
à quatre niveaux: basse, moyenne, haute et CHAOS.
5. JET DE FROID
Utilisé pour augmenter ou diminuer la vitesse de refroidissement/réchauffement.(La
vitesse de refroidissement/réchauffement est capable dʼatteindre une vitesse du
ventilateur super haute.)
6. BOUTON CHAOS SWING
Utilisé pour démarrer ou arrêter le mouvement des
volets et établir la direction du flux dʼair (haut/bas) désirée.
7. BOUTONS MINUTERIE ON/OFF
Utilisé pour établir lʼheure de démarrage et dʼarrêt du fonctionnement.
8. BOUTONS RÉGLAGE DE LʼHEURE
Utilisé pour régler lʼheure.
9. BOUTON ÉTABLIR/ANNULER LA MINUTERIE
Utilisé pour établir la minuterie quand lʼheure désirée est atteinte et pour annuler le
fonctionnement de la minuterie.
10. BOUTON MODE AUTO SLEEP
Utilisé pour établir le fonctionnement en mode automatique Sleep.
11. BOUTON CIRCULATION DʼAIR
Utilisé pour faire circuler lʼair ambiant sans refroidissement ni réchauffement.
12. BOUTON VÉRIFICATION DE LA TEMPÉRATURE AMBIANTE
Utilisé pour vérifier la température ambiante.
13. PLASMA (OPTIONNEL)
Utilisé pour démarrer ou arrêter la fonction de purification plasma.
14. BOUTON RESET
Réinitialise la télécommande.
15. Bouton 2nd F
Utilisé avant dʼutiliser les modes imprimés en bleu qui se trouvent en bas des
boutons.
ATTENTION:
à comment vous tenez la télécommande
• Pointez-la vers le récepteur de signal sur la télécommande avec fils pour la faire fonctionner.
• Le signal de la télécommande peut être reÁu jusqu'à une distance d'environ 7 m.
• Faites attention qu'il n'y ait pas d'obstacles entre la télécommande et le récepteur de signal.
• Ne laissez pas tomber ou ne jetez pas la télécommande.
• Ne laissez pas la télécommande exposée à la lumière solaire directe ou à côté du chauffage ou d'une source
de chaleur.
• Bloquez une lumière forte dirigée vers le récepteur de signal avec par ex. un rideau pour éviter un
fonctionnement anormal (ex: lampe électronique à allumage instantané, ELBA, lampe fluorescente).
volet basculant
(ouvert)
AUTO CLEAN
ON
OFF
CANCEL
SET
5
1
3
10
9
12
15
6
4
2
7
11
8
13
14
Transmetteur de signal
h
La télécommande infrarouge ne marche pas en mode Swirl (tourbillon).
Page 97

AUTO SWING
HI
ZONE
Operation unit Program set
Room Temp
MED
LO
AUTO
JET
Heater
Defrost
Filter
Preheat
Humidify
Out door
Timer
On
Set no. Time
Off
01 03 05 07 09 11 13 15 17 19 21 23
1234
OPERATION
FAN SPEED
SUB FUNCTION
SET TEMP
Time
AUTO SWING
HI
ZONE
Operation unit Program set
Room Temp
MED
LO
AUTO
JET
Heater
Defrost
Filter
Preheat
Humidify
Out door
Timer
On
Set no. Time
Off
01 03 05 07 09 11 13 15 17 19 21 23
1234
OPERATION
FAN SPEED
SUB FUNCTION
SET TEMP
Time
AUTO SWING
HI
ZONE
Operation unit Program set
Room Temp
MED
LO
AUTO
JET
Heater
Defrost
Filter
Preheat
Humidify
Out door
Timer
On
Set no. Time
Off
01 03 05 07 09 11 13 15 17 19 21 23
1234
OPERATION
FAN SPEED
SUB FUNCTION
SET TEMP
Time
AUTO SWING
HI
ZONE
Operation unit Program set
Room Temp
MED
LO
AUTO
JET
Heater
Defrost
Filter
Preheat
Humidify
Out door
Time
Timer
On
Set no. Time
Off
01 03 05 07 09 11 13 15 17 19 21 23
1234
OPERATION
FAN SPEED
SUB FUNCTION
SET TEMP
Hour
Min
Week
RESET
Réglage de l'horaire actuel et du jour de la semaine
1
Appuyez sur la touche " ".
Chaque fois que vous appuyez sur cette touche, le chiffre change de 00 à 23.
Vous pouvez régler le chiffre de l'horaire actuel.
2
Appuyez sur la touche " ".
Chaque fois que vous appuyez sur cette touche, le chiffre augmente de 00 à 59.
Vous pouvez régler le chiffre des minutes.
3
Appuyez sur la touche " ".
Chaque fois que vous appuyez sur cette touche, un jour de la semaine s'affiche de lundi à dimanche.
Vous pouvez régler le jour de la semaine.
4
Appuyez sur la touche " ".
Si vous souhaitez réinitialiser l'horaire et le jour de la semaine, cliquez sur la touche Reset.
Hour
Min
Week
RESET
Mode dʼutilisation
Manuel du Propriétaire 9
FRANÇAIS
Page 98

Week
Program
SET/CLR
MinHour
AUTO SWING
Time
HI
ZONE
Operation unit
Room Temp
MED
LO
AUTO
JET
Heater
Defrost
Filter
Preheat
Humidify
Out door
Timer
On
Set no.
Off
1234
OPERATION
FAN SPEED
SUB FUNCTION
SET TEMP
Program set
01 03 05 07 09 11 13 15 17 19 21 23
Time
AUTO SWING
Program set
Time
HI
ZONE
Operation unit
Room Temp
MED
LO
AUTO
JET
Heater
Defrost
Filter
Preheat
Humidify
Out door
Timer
On
Set no.
Off
1234
OPERATION
FAN SPEED
SUB FUNCTION
SET TEMP
01 03 05 07 09 11 13 15 17 19 21 23
Time
Mode dʼutilisation
10 Conditionneur d'air de type encastre au plaford
Réglage de la programmation hebdomadaire
1
Appuyez sur la touche Program (Programmation).
La télécommande s'affiche de la manière suivante. Puis, " ", " " et "01" clignotent.
2
Appuyez sur la touche " ".
Appuyez sur le bouton de semaine à plusieurs reprises jusquʼ à ce que le mode desiré soit
apparu.
Par exemple, si vous voulez mar. , appuyez sur le bouton de semaine 4 fois.
3
Séléctionnez le temps que vous voulez.
Appuyez sur le bouton dʼheure et de minute, puis la lettre clignotante se montre.
Si vous appuyez sur le bouton de , puis la forme de ' ' apparaît.
La forme de ' ' veut dire que cinq heures sont reservées.
En utilisant les boutons ci-dessous, vous pouvez reserver le temps.
* Par exemple, le climatiseur est sur 6,7,8 et 13~22 heures.
Program set
Week
Week
Week
MinHour
SET/CLR
unit
05
Page 99

Mode dʼutilisation
Manuel du Propriétaire 11
FRANÇAIS
Time
HI
ZONE
Operation unit
Room Temp
MED
LO
AUTO
JET
Heater
Defrost
Filter
Preheat
Humidify
Out door
Timer
On
Set no.
Off
1234
OPERATION
FAN SPEED
SUB FUNCTION
SET TEMP
Program set
01 03 05 07 09 11 13 15 17 19 21 23
Time
AUTO SWING
Time
HI
ZONE
Operation unit
Room Temp
MED
LO
AUTO
JET
Heater
Defrost
Filter
Preheat
Humidify
Out door
Timer
On
Set no.
Off
1234
OPERATION
FAN SPEED
SUB FUNCTION
SET TEMP
01 03 05 07 09 11 13 15 17 19 21 23
Time
AUTO SWING
Program set
Program set
Time
HI
ZONE
Operation unit
Room Temp
MED
LO
AUTO
JET
Heater
Defrost
Filter
Preheat
Humidify
Out door
Timer
On
Set no.
Off
1234
OPERATION
FAN SPEED
SUB FUNCTION
SET TEMP
01 03 05 07 09 11 13 15 17 19 21 23
Time
AUTO SWING
Réglage congé
Réglage de la minuterie (\Délai Démarrage/Arrêt préréglé)
Fonction d'auto-diagnostic
Si Mardi est un jour de congé cette semaine, vous pouvez régler un
congé.
Appuyez sur la touche Program.
1
Appuyez sur la touche Week (Semaine).
Sélectionnez Mardi.
2
Appuyez sur la touche Holiday (Congé).
La télécommande affiche " ".
Le rectangle externe indique congé.
h
Vous ne pouvez pas régler la programmation hebdomadaire
pour les vacances.
3
Program
Week
Holiday
"CH" s'allume sur l'affichage de la télécommande quand il y a un problème.
Contactez votre revendeur, SVP.
1
2
3
Si vous voulez faire marcher pendant le mode dʼarrêt ou faire arrêter pendant le mode de marche, vous
pouvez utiliser la fonction de réglage de minuterie.
Appuyez sur le bouton dʼHeure et de Minute, puis vous pouvez contrôler le
temps desiré.
Si vous voulez appuyer le bouton de , le panneau dʼaffichage se montre.
Ça veut dire que dans 3 heures il va sʼarrêter pendant le mode de marche et il
va fonctionner pendant le mode dʼarrêt.
Appuyez sur le bouton de Minuterie.
Timer
Min
MinHour
Si vous voulez annuler la fonction de réglage de minuterie,
appuyez sur le bouton dʼannulation.
Cancel
Page 100

Mode dʼutilisation
12 Conditionneur d'air de type encastre au plaford
ZONE
1234
Operation unit
Humidify
JET
AUTO
AUTO SWING OPERATION
FAN SPEED
Program set
SUB FUNCTION
SET TEMP
Room Temp
HI
MED
LO
Heater
Defrost
Filter
Preheat
Out door
Time
Timer
On
Set no. Time
Off
01 03 05 07 09 11 13 15 17 19 21 23
Timer Cancel 2ndF
Program Week
Hour Min
Holiday
Set/Clr
RESET
Plasma
3
1
4
2
Mode de fonctionnement
Procédure de fonctionnement
1st
2nd
3rd
4th
Touche On/Off
Touche de sélection du mode de
fonctionnement
Touche de réglage de la température
de la pièce
Touche de sélection de la vitesse du
ventilateur interne
Mode
refroidissement
Mode
refroidissement
Mode séchage léger
Mode automatique
Mode séchage léger
Mode chauffage
Mode automatique
(modèle pompe de
chaleur)
(modèle
refroidissement)
 Loading...