

Page 1

www.lg.com
OWNER’S MANUAL
AIR CONDITIONER
Please read this manual carefully before operating
your set and retain it for future reference.
TYPE : CEILING CASSETTE - 1WAY (ART TYPE)
P/NO : MFL67568501
ENGLISH
ITALIANO ESPAÑOL
FRANCAIS DEUTSCH
ΕΛΛΗΝΙΚΆ
PORTUGUÊS
NEDERLANDS
Page 2
2 Indoor Unit
Ceiling Cassette - 1Way Type Indoor Unit Ownerʼs Manual
TABLE OF CONTENTS
FOR YOUR RECORDS
Write the model and serial numbers here:
Model #
Serial #
You can find them on a label on the side of each unit.
Dealer's Name
Date Purchased
n Staple your receipt to this page in the event you need
it to prove date of purchase or for warranty issues.
READ THIS MANUAL
Inside you will find many helpful hints on how to use
and maintain your air conditioner properly. Just a little
preventive care on your part can save you a great deal
of time and money over the life of your air conditioner.
You'll find many answers to common problems in the
chart of troubleshooting tips. If you review our chart of
Troubleshooting Tips first, you may not need to call
for service at all.
PRECAUTION
• Contact the authorized service technician for repair or
maintenance of this unit.
• Contact the installer for installation of this unit.
• The air conditioner is not intended for use by young
children or invalids without supervision.
• Young children should be supervised to ensure that
they do not play with the air conditioner.
• When the power cord is to be replaced, replacement
work shall be performed by authorized personnel only
using only genuine replacement parts.
• Installation work must be performed in accordance with
the National Electric Code by qualified and authorized
personnel only.
Safety Precautions.................3
Prior to Operation ..................7
Operating Instructions...........8
Maintenance and Service ....34
Before you Call for Service
............................................36
Page 3
Ownerʼs Manual 3
ENGLISH
Safety Precautions
To prevent injury to the user or other people and property damage, the following instructions must be
followed.
n Incorrect operation due to ignoring instruction will cause harm or damage. The seriousness is classified
by the following indications.
WARNING
CAUTION
This symbol indicates the possibility of death or serious injury.
This symbol indicates the possibility of injury or damage to properties only.
n Meanings of symbols used in this manual are as shown below.
Be sure not to do.
Be sure to follow the instruction.
WARNING
n Installation
Do not use a defective or
underrated circuit breaker.
Use this appliance on a
dedicated circuit.
• There is risk of fire or electric
shock.
For electrical work, contact
the dealer, seller, a qualified
electrician, or an Authorized
Service Center.
• Do not disassemble or repair
the product. There is risk of fire
or electric shock.
Always ground the product.
• There is risk of fire or electric
shock.
Install the panel and the
cover of control box
securely.
• There is risk of fire or electric
shock.
Always install a dedicated
circuit and breaker.
• Improper wiring or installation
may cause fire or electric shock
Use the correctly rated
breaker or fuse.
• There is risk of fire or electric
shock.
Do not modify or extend the
power cable.
• There is risk of fire or electric
shock.
Do not install, remove, or
re-install the unit by
yourself (customer).
• There is risk of fire, electric
shock, explosion, or injury.
Be cautious when
unpacking and installing
the product.
• Sharp edges could cause injury.
Be especially careful of the
case edges and the fins on the
condenser and evaporator.
Safety Precautions
Page 4
4 Indoor Unit
Safety Precautions
Do not allow water to run
into electric parts.
• It may cause There is risk of
fire, failure of the product, or
electric shock.
Do not store or use flammable
gas or combustibles near the
product.
• There is risk of fire or failure of
product.
Do not use the product in a
tightly closed space for a
long time.
• Oxygen deficiency could occur.
When flammable gas leaks,
turn off the gas and open a
window for ventilation
before turn the product on.
• Do not use the telephone or
turn switches on or off.
There is risk of explosion or fire
If strange sounds, or small or
smoke comes from product. Turn
the breaker off or disconnect the
power supply cable.
• There is risk of electric shock or
fire.
Stop operation and close the window
in storm or hurricane. If possible,
remove the product from the window
before the hurricane arrives.
• There is risk of property
damage, failure of product, or
electric shock.
Do not open the inlet grill of the
product during operation.
(Do not touch the electrostatic
filter, if the unit is so equipped.)
• There is risk of physical injury,
electric shock, or product
failure.
When the product is soaked
(flooded or submerged),
contact an Authorized
Service Center.
• There is risk of fire or electric
shock.
Be cautious that water
could not enter the product.
• There is risk of fire, electric
shock, or product damage.
n Operation
Do not plug or unplug the
power supply plug during
operation.
• There is risk of fire or electric
shock.
Do not touch(operate) the
product with wet hands.
• There is risk of fire or electrical
shock.
Do not place a heater or
other appliances near the
power cable.
• There is risk of fire and electric
shock.
Do not let the air conditioner run for a
long time when the humidity is very high
and a door or a window is left open
.
• Moisture may condense and
wet or damage furniture.
Take care to ensure that power
cable could not be pulled out
or damaged during operation.
• There is risk of fire or electric
shock.
Do not place anything on
the power cable.
• There is risk of fire or electric
shock.
For installation, always contact the
dealer or an Authorized Service Center.
• There is risk of fire, electric
shock, explosion, or injury.
Do not install the product on
a defective installation stand.
• It may cause injury, accident, or
damage to the product.
Be sure the installation area
does not deteriorate with age.
•
If the base collapses, the air
conditioner could fall with it,
causing property damage, product
failure, and personal injury.
Page 5
Ownerʼs Manual 5
ENGLISH
Safety Precautions
Ventilate the product from time to time
when operating it together with a stove, etc.
• There is risk of fire or electric shock.
Turn the main power off when cleaning or
maintaining the product.
• There is risk of electric shock.
n Installation
CAUTION
n Operation
Always check for gas
(refrigerant) leakage after
installation or repair of product.
• Low refrigerant levels may
cause failure of product.
Install the drain hose to ensure
that water is drained away
properly.
• A bad connection may cause
water leakage.
Keep level even when
installing the product.
• To avoid vibration or water
leakage.
Do not install the product where the
noise or hot air from the outdoor unit
could damage the neighborhoods.
• It may cause a problem for your
neighbors.
Use two or more people to lift
and transport the product.
• Avoid personal injury.
Do not install the product
where it will be exposed to
sea wind (salt spray) directly.
•
It may cause corrosion on the product.
Corrosion, particularly on the condenser
and evaporator fins, could cause product
malfunction or inefficient operation
.
When the product is not be used for a long
time, disconnect the power supply plug or
turn off the breaker.
• There is risk of product damage or failure, or
unintended operation.
Take care to ensure that nobody could step
on or fall onto the outdoor unit.
• This could result in personal injury and product
damage.
Do not expose the skin directly to cool air
for long periods of time.
(Don't sit in the draft.)
• This could harm to your health.
Do not use the product for special purposes, such as
preserving foods, works of art, etc. It is a consumer
air conditioner, not a precision refrigeration system.
• There is risk of damage or loss of property.
Do not block the inlet or
outlet of air flow.
• It may cause product failure.
Use a soft cloth to clean. Do
not use harsh detergents,
solvents, etc.
• There is risk of fire, electric
shock, or damage to the plastic
parts of the product.
Do not touch the metal parts of
the product when removing the
air filter. They are very sharp!
• There is risk of personal injury.
Page 6

6 Indoor Unit
Safety Precautions
Do not recharge or
disassemble the batteries.
Do not dispose of batteries
in a fire.
• They may burn or explode.
If the liquid from the batteries gets
onto your skin or clothes, wash it
well with clean water. Do not use the
remote if the batteries have leaked.
•
The chemicals in batteries could
cause burns or other health hazards.
If you eat the liquid from the
batteries, brush your teeth and see
doctor. Do not use the remote if the
batteries have leaked.
• The chemicals in batteries could cause
burns or other health hazards.
Do not drink the water
drained from the product.
• It is not sanitary and could
cause serious health issues.
Use a firm stool or ladder
when cleaning or
maintaining the product.
• Be careful and avoid personal
injury.
Replace the all batteries in the
remote control with new ones
of the same type. Do not mix
old and new batteries or
different types of batteries.
• There is risk of fire or explosion
Do not step on or put
anyting on the product.
(outdoor units)
• There is risk of personal injury
and failure of product.
Always insert the filter securely.
Clean the filter every two weeks
or more often if necessary.
•
A dirty filter reduces the efficiency of
the air conditioner and could cause
product malfunction or damage.
(Grill Type)
Do not insert hands or other objects
through the air inlet or outlet while
the product is operated.
•
There are sharp and moving parts
that could cause personal injury.
Page 7

Ownerʼs Manual 7
ENGLISH
Prior to Operation
Prior to Operation
1. Contact an installation specialist for installation.
2. Use a dedicated circuit.
1. Being exposed to direct airflow for an extended period of time could be hazardous to your health.
Do not expose occupants, pets, or plants to direct airflow for extended periods of time.
2. Due to the possibility of oxygen deficiency, ventilate the room when used together with stoves or
other heating devices.
3. Do not use this air conditioner for non-specified special purposes (e.g. preserving precision
devices, food, pets, plants, and art objects). Such usage could damage the items.
1. Do not touch the metal parts of the unit when removing the filter. Injuries can occur when handling
sharp metal edges.
2. Do not use water to clean inside the air conditioner. Exposure to water can destroy the insulation,
leading to possible electric shock.
3. When cleaning the unit, first make sure that the power and breaker are turned off. The fan rotates
at a very high speed during operation. There is a possibility of injury if the unitʼs power is
accidentally triggered on while cleaning inner parts of the unit.
For repair and maintenance, contact your authorized service dealer.
Preparing for Operation
Usage
Cleaning and Maintenance
Service
Page 8
8 Indoor Unit
Operating Instructions
Operating Instructions
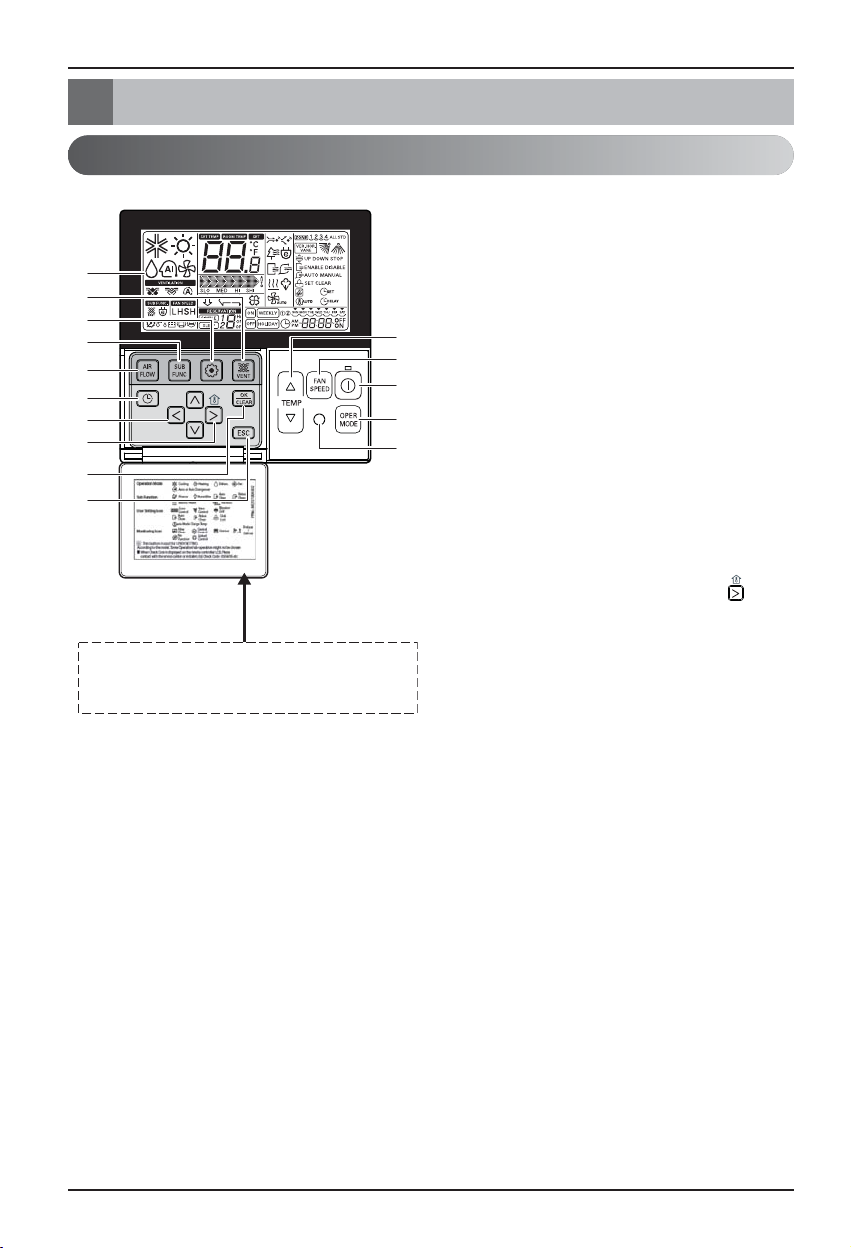
Name and function of wired remote controller
※ Some functions may not be operated and displayed depending on the product type.
※ It will display strange value to the room temperature if wired remote controller is not connected.
Model : PQRCVSL0 (Black Color)
PQRCVSL0QW (White Color)
1. Operation indication screen
2. Set temperature button
•
It will set not room temperature but outlet air temperature.
3. Fan speed button
• Fan Speed have 3 Steps.
• Middle and Low step is same
4. ON/OFF button
5. Opration mode selection button
6. Wireless remote controller receiver
• Some products don't receive the wireless signals.
7. Air flow button
8. Subfunction button
9. Function setting button
10. Ventilation button
11. Reservation
12. Up,down,left,right button
• To check the indoor temperature, press
button.
13. Room temperature button
• Displays only the room temperature of the remote
controller perception.
• There is no control of room temperature.
• In case of fresh air intake unit, displays only the
temperature around remote controller.
14. Setting/Cancel button
15. Exit button
1
10
9
8
7
11
12
13
14
15
Please attach the inform label inside of the door.
Please choose proper language depend on your
country.
2
3
4
5
6
Page 9
Ownerʼs Manual 9
ENGLISH
Operating Instructions
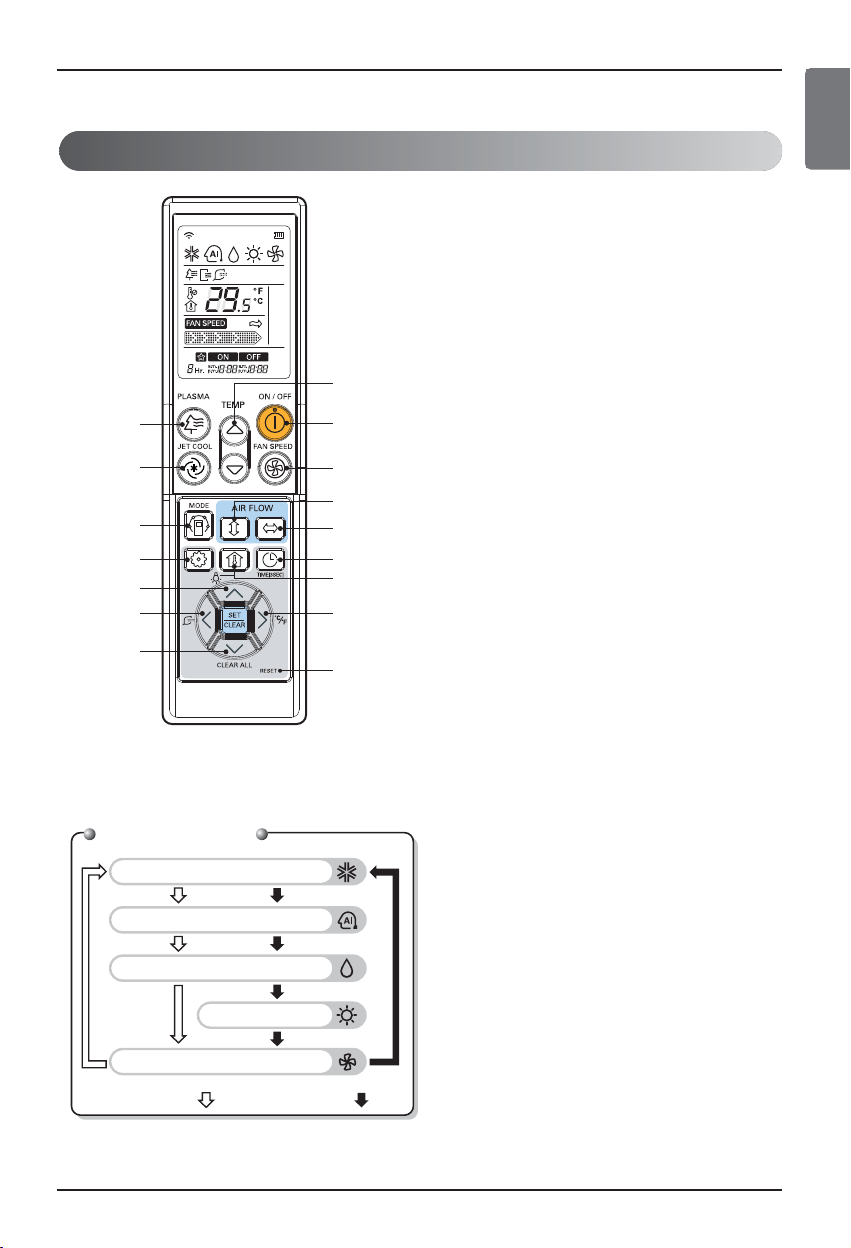
Name and Function of Wireless Remote Controller(Accessory)
1. Plasma button(optional)
Used to start or stop the plasma-purification
function.
2. Jet cool button
Speed cooling operates super high fan speed.
3. Operation mode selection button
Used to select the operation mode.
4. Function setting button
Used to set or clear auto clean or smart clean.
5. LCD luminosity button(optional)
Used to adjust LCD luminosity
6. Smart clean button(optional)
Used to start or stop smart clean.
7. Clean button
Used to clear all timer.
8. Room temperature setting button
Used to select the room temperature.
9. On/Off button
Used to turn on/off the unit.
10. Indoor fan speed selection button
Used to select fan speed in four steps low,
medium, high and chaos.
11. Auto swing button
Used to stop or start louver movement and set the
desired up/down airflow direction.
12. Horizontal airflow direction control
button(optional)
Used to set the desired horizontal airflow direction.
13. Timer and time setting button
Used to set the time of starting or stopping and
sleeping operation.
14. Room temperature checking button
Used to check the room temperature.
15. °C/°F switch button
Used to switch temperature reading from Celsius
to Fahrenheit.
16. Reset button
Used to reset the remote controller.
1
2
3
4
5
6
7
PQWRHDF0 (Heat pump)
PQWRCDF0 (Cooling only)
Operation Mode
Cooling mode
Auto mode or auto changeover
Dehumidification mode
Heating mode
Fan mode
8
9
10
11
12
13
14
15
16
•
Cooling model( ), Heat pump model( )
Page 10
10 Indoor Unit
Operating Instructions
Forced operation
(Tact switch)
Forced Operation
Auto Restart Function
Tips for Filter Sign LED (Grille Type)
Operation procedures when the remote control can't be used.
Press the tact switch (forced operation) for 2 seconds.
If you want to stop operation, press again the tact switch.
In case the power comes on again after power failure on the
forced operation mode, the operating conditions are
automatically set as follows:
During forced operation, the initial mode continues.
In case the power comes on again after a power failure, auto restarting operation is the function to operate
procedures automatically to the previous operating conditions.
1. Filter sign lamp (LED) is on.
2. If LED indicating filter sign lamp is on, clean the filter.
3. After cleaning the filter, press the timer button and ◀ button of wired remote controller at the same time for 3
seconds. Then filter sign LED is off.
Heat pump model
Cooling model
Room temperature Room temperature
≥ set temperature -2°C ≥ set temperature -2°C
Operating mode Cooling Cooling Heating
Indoor fan Speed High Set available Set available
Setting temperature 22°C Set available Set available
Page 11
Ownerʼs Manual 11
ENGLISH
Operating Instructions
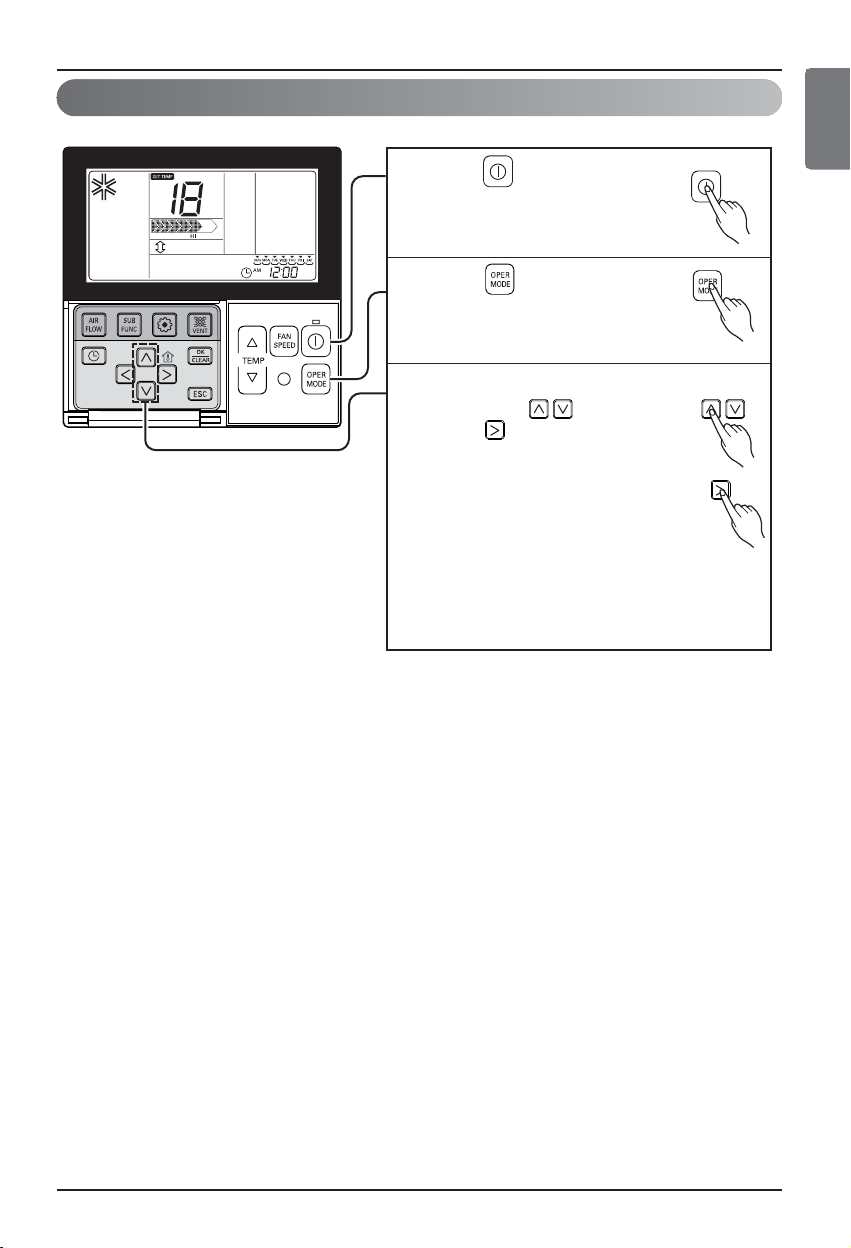
Standard Operation - Standard Cooling
h Setting Temp Range : 18˚C~30˚C (64˚F~86˚F)
It cools the room by comfortable and clean wind.
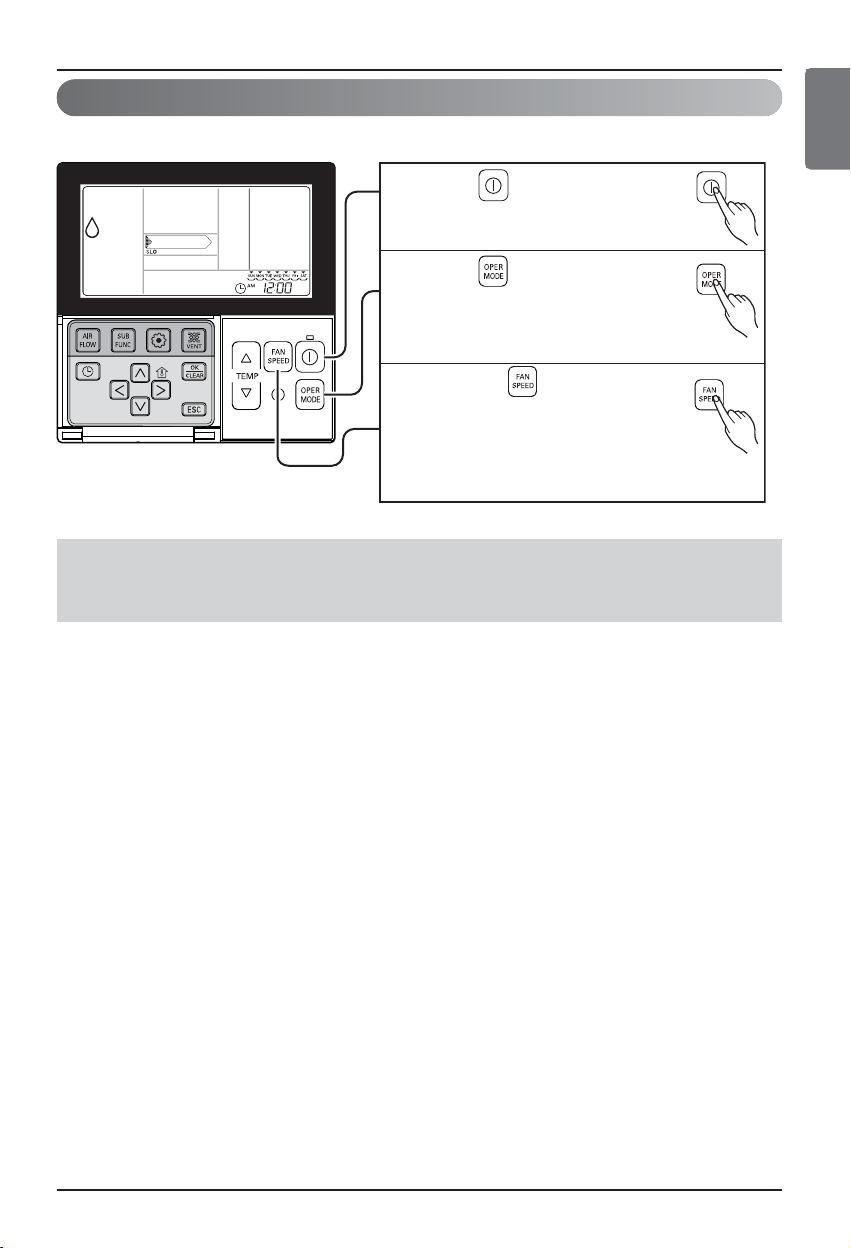
Press button to turn on the
1
indoor.
Press button to select
2
Cooling operation mode.
Adjust the desired temperature
3
by pressing buttons.
Press button to check the
Room temperature.
When setting the desired
temperature higher than room
temperature, only ventilation
wind is blow out instead of
cooling wind.
Page 12

12 Indoor Unit
Operating Instructions
Standard Operation - Power Cooling
It makes the room cool using pleasant and fresh air quickly
It supplies warm wind to the indoor
Standard Operation - Heating Mode
What is Power Cooling?
• Desired temperature: Po (actually 18°C)
• Wind flow: power wind
• Wind direction: fix to air-cooling position
h
Partial product has no power air-cooling function.
• Heating drive only operates at the cooling and heating model.
• Heating doesn't operate at cooling exclusive model.
It make room temperature
drop fast by running
}
Press button to trun on the
1
indoor.
Press button to select
2
cooling operation mode.
Press button continuously
3
until 'Po' displayed.
Press button to turn on the
1
indoor.
Press button to select
2
Heating mode.
(To check the indoor temperature,
press the room temperature button.)
Adjust the desired temperature
3
by pressing buttons.
When setting the desired
temperature lower than room
temperature, there is only
ventilation wind.
Page 13
Ownerʼs Manual 13
ENGLISH
Operating Instructions
It removes humidity while air-cooling weakly.
• In rainy season or high humidity climate, it is possible to operate simultaneously dehumidifier and
cooling mode to remove humidity effectively.
• The menu item of wind powerfulness might not be partially selected according to the product.
Standard Operation - Dehumidification Mode
Press button to turn on the
1
indoor.
Press button to select
2
Dehumidification mode.
The temperature setting can not be
adjusted during operation this mode.
Press the button to select
3
airflow rate feeble → weak →
medium → strong → automatic.
(The initial wind powerfulness of
humidity removal drive is 'weak'.)
Page 14

14 Indoor Unit
Operating Instructions
Press button to turn on the
indoor.
1
Press button to select Fan
Mode.
2
Every time pressing button, you
can select wind flow in order of
feeble → weak → medium → strong
→ automatic.
When running ventilation,
compressor of AHU doesn't work.
3
Standard Operation - Fan Mode
It blows the air as it is in the indoor, not the cold wind.
• Ventilation drive does not release cool wind but general fan
• Because it releases the wind that has no temperature difference from the room, it functions to
circulate the inside air.
• The menu item of wind powerfulness might not be partially selected according to the product.
Page 15
Ownerʼs Manual 15
ENGLISH
Operating Instructions
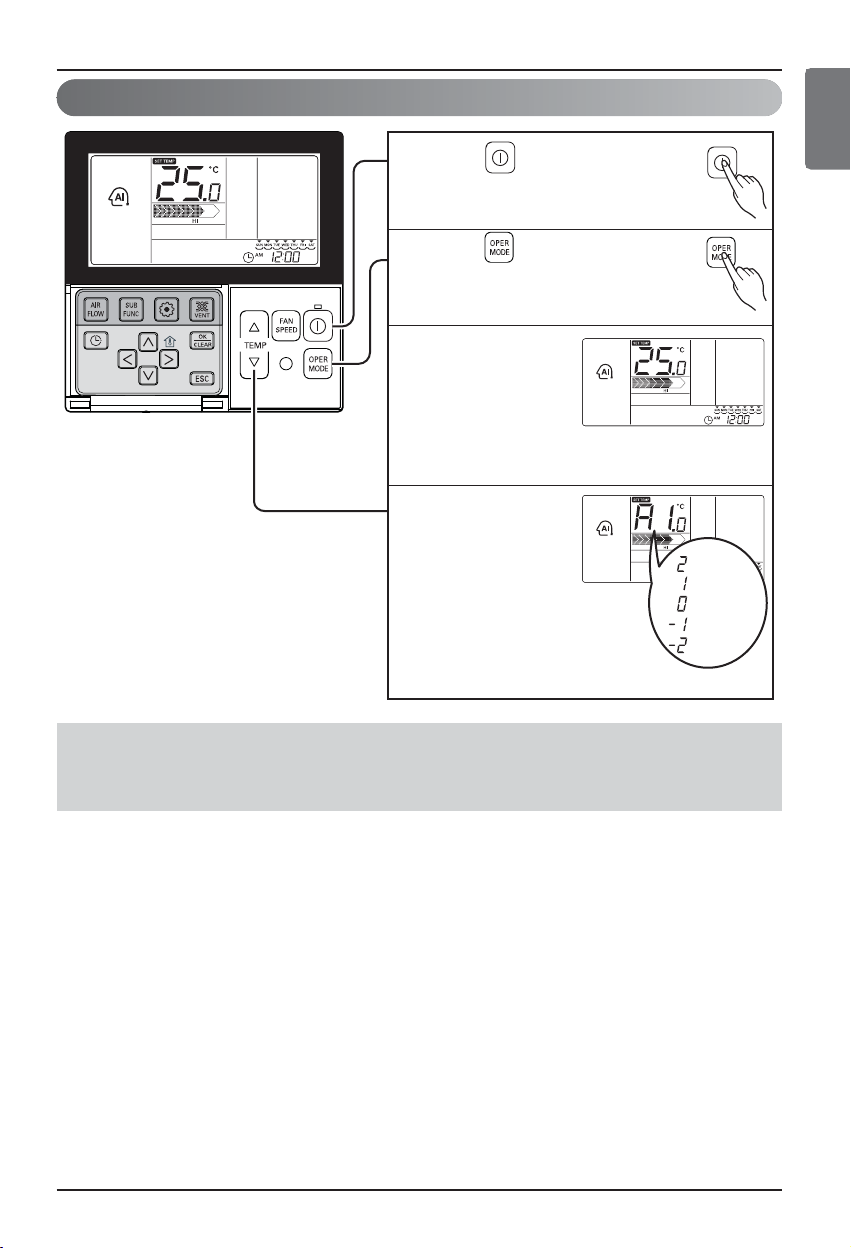
Press button to turn on the
indoor.
1
Press button to select
Artificial intelligence Mode.
2
You can adjust
the temperature
as the picture on
the right for
cooling and
heating model.
3
For the case of
cooling exclusive,
as the picture on
the right, you can
adjust the
temperature from
hot to cold, from
"-2" to "2" based
on "00".
4
When cold
When cool
When appropriate
When warm
When hot
Standard Operation - Auto Operation Mode
During operating Auto Operation mode:
• We can use the FAN SPEED button
• We can change manually to other operation mode.
Page 16
16 Indoor Unit
Operating Instructions
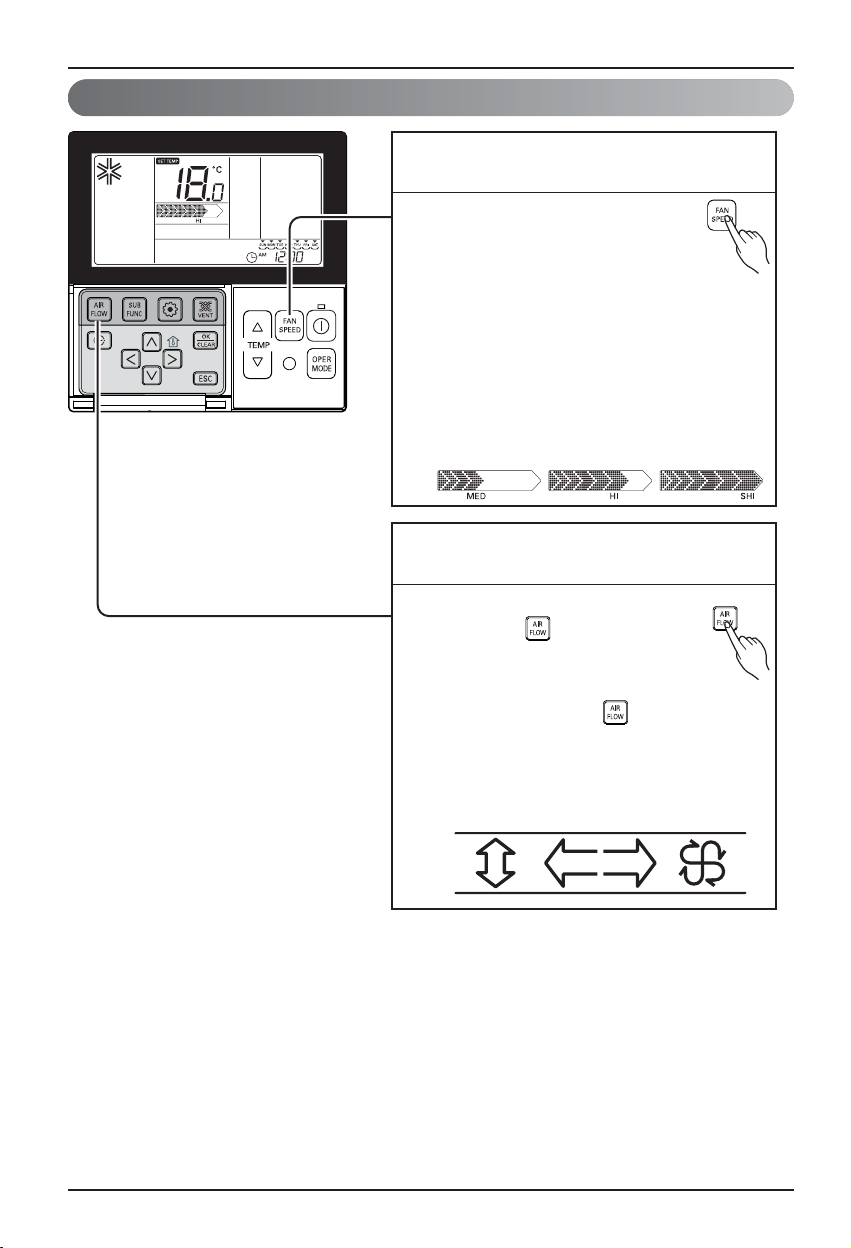
Standard Operation - Airflow Setting
Wind powerfulness : You can simply adjust
desired wind powerfulness.
Please setup desired wind
1
powerfulness by wind powerfulness
button.
• Every time you press wind
powerfulness, you can select the wind flow in
order of ‘feeble → weak → weak medium →
medium → medium strong → strong → power
→ automatic’.
• The menu item might not be partially
selected according to product function.
• Please refer to product manual for product’s
detailed function.
Wind direction : You can simply adjust desired
wind direction.
Please set desired wind direction
1
by pressing button.
You can select wind direction of
(comfortable wind → Up/Down and
Right/Left → Right/Left →
Up/Down) by pressing button.
Partial item of wind directions might not be
selected according to product function.
Please refer to product manual for product’s
detailed function.
Page 17
Ownerʼs Manual 17
ENGLISH
Operating Instructions
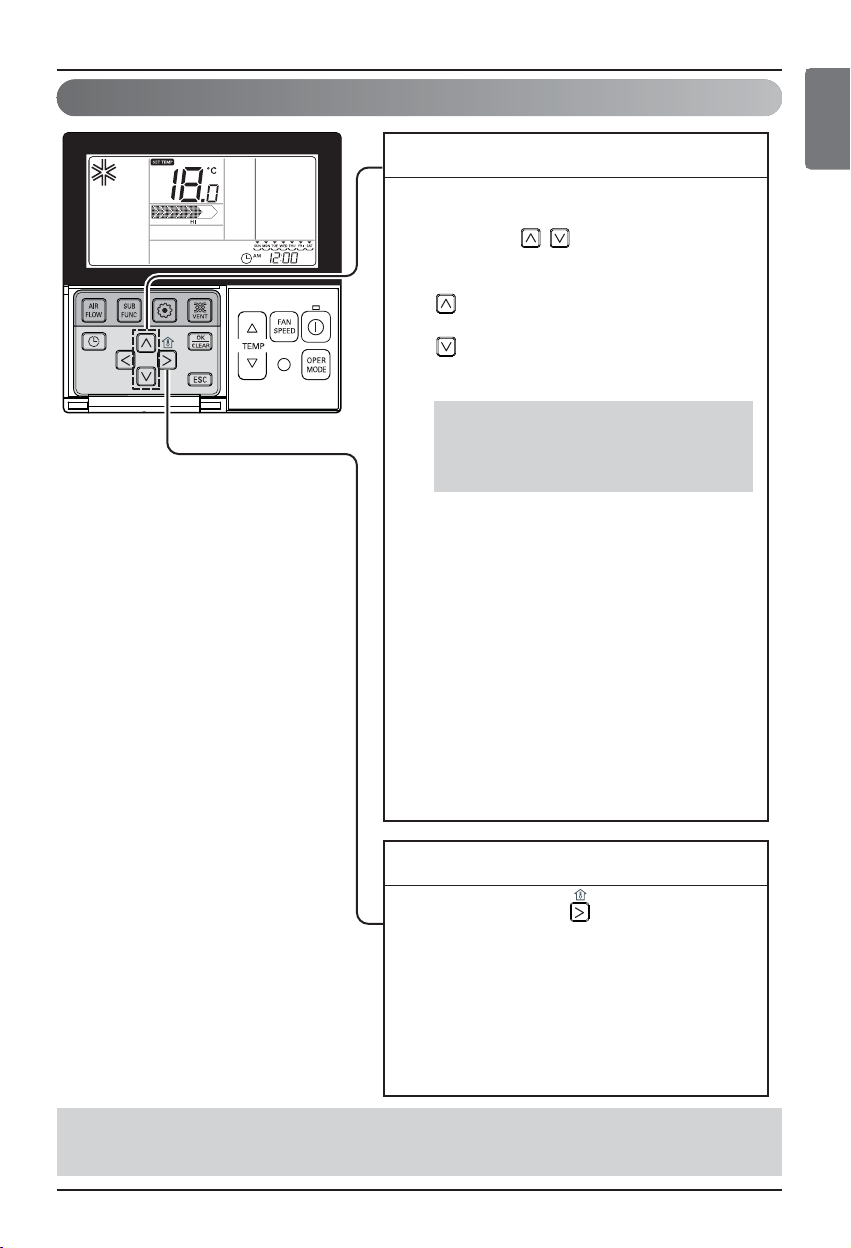
Standard Operation - Temperature Setting/Room Temperature Check
We can simply adjust the desired
temperature.
• Press the buttons to adjust the
desired temperature.
: Increase 1˚C or 2˚F per one time
pressing
: Decrease 1˚C or 2˚F per one time
pressing
Cooling operation:
- The cooling mode doesn't work if
desired temperature is higher than room
temperature Please lower the desired
temperature.
Heating operation:
- The heating mode doesn't work if desired
temperature is lower than room
temperature Please increase the desired
temperature.
1
Whenever press button, the room
temperature will be displayed within 5
seconds.
After 5 seconds, it turns to display the
desired temperature.
Because of location of remote controller,
the real room temperature and the this
displayed value can be different
1
Temperature Setting
Room Temperature Check
• For air-cooling drive, from 18°C to 30°C, and for heating drive, from 16°C to 30°C, you can select
desired temperature.
• 5°C is proper for the difference between room and outside temperature.
• Room temp: Indicate the current room
temperature.
• Set temp: Indicate the temperature that user
want to set.
h
Depend on what kind of controller, the desired
temperature can be adjusted at 0.5˚C or 1˚F.
Page 18
18 Indoor Unit
Operating Instructions
• Cleaning air function is additional function and it might not be indicated or operated at the partial
product.
• Cleaning air function is possible only when product is running.
• If you want independent cleaning air drive, please setup cleaning air by pressing additional drive
button at ventilation drive.
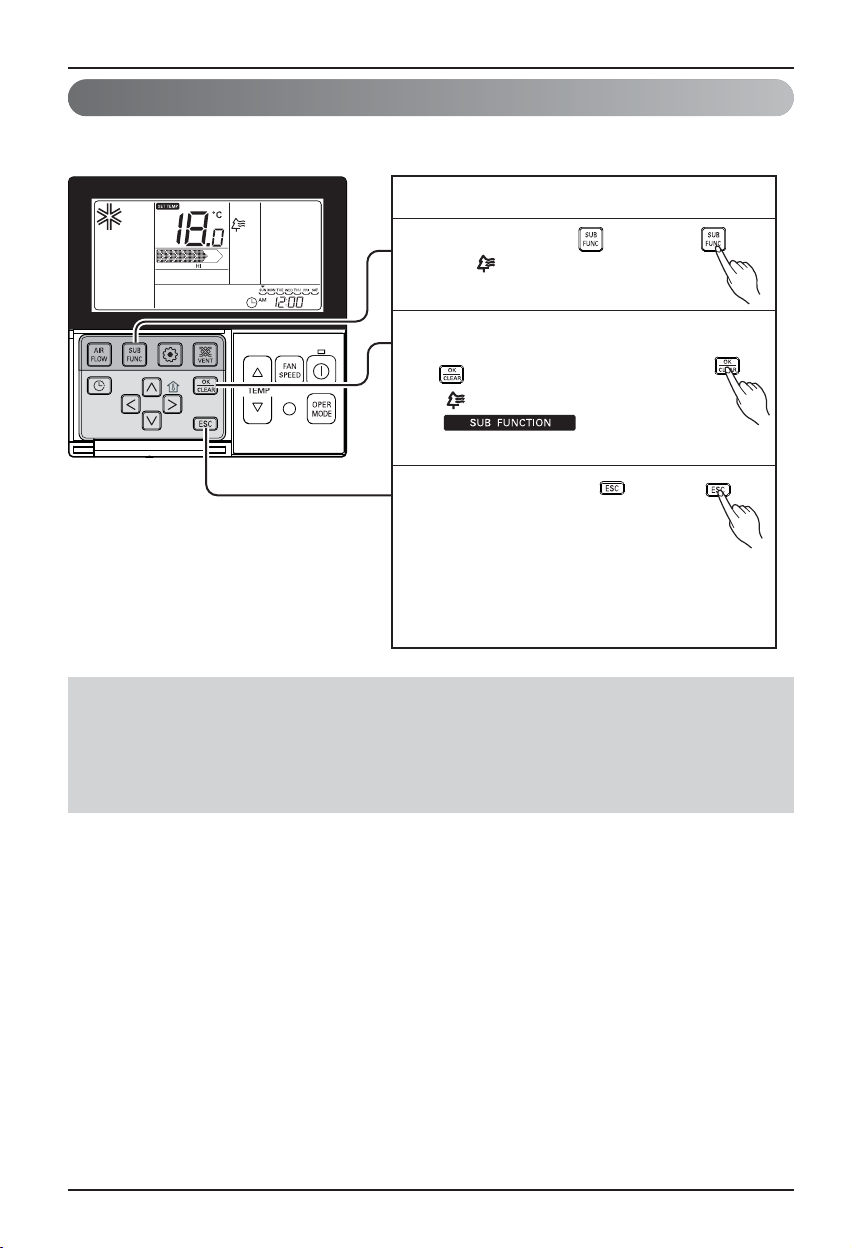
Sub function - Plasma Purification
Only products with humidifying function can use this.
The method to setup cleaning air
Repeat pressing button
1
until icon flash.
Operate or cancel Plasma
2
Purification function by pressing
button.
( icon appears/disappears on
display part up
to selection )
After setting, press button
3
to exit.
❈ After setup, it automatically gets out of setup
mode if there is no button input for 25 seconds.
❈ When exiting without pressing set button, the
manipulated value is not reflected.
Page 19

Ownerʼs Manual 19
ENGLISH
Operating Instructions
It is the function to use preventing children or others from careless using.
Function setting - Child Lock
Press button repeatedly until
1
the is flashing.
If moving to 'setup' icon area by
2
using button, 'setup' icon
blinks, and child lock function is
setup if pressing button at
that time.
When cancelling lock function, if moving
3
to 'cancel' icon by pressing button
and then, pressing button, child lock
function is cancelled.
Press button to exit.
4
❈ After setup, it automatically gets out of
setup mode if there is no button input
for 25 seconds.
❈ When exiting without pressing set
button, the manipulated value is not
reflected.
Page 20
20 Indoor Unit
Operating Instructions
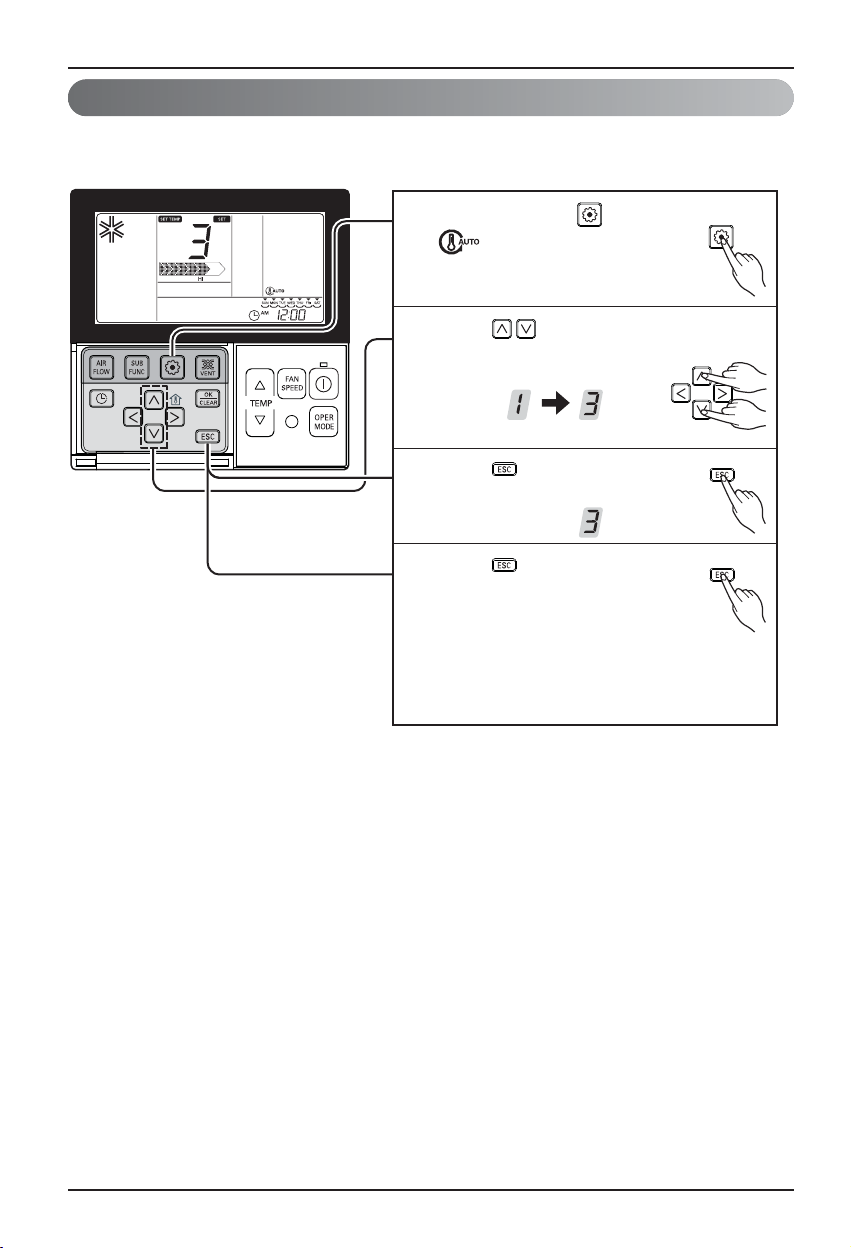
Function Setting - Change Temp
Change temperature is the function to setup air-cooling and heating drive automatically changeable
according to the temperature at artificial intelligence drive mode.
Repeat pressing button until
1
icon flash.
Press button to change.
2
❈ Converting temp value : 1~7
Press button to complete
3
and active the setting process.
Press button to exit or
4
system will automatically release
without any input after 25
seconds.
❈ When exiting without pressing
set button, the manipulated
value is not reflected.
Page 21
Ownerʼs Manual 21
ENGLISH
Operating Instructions
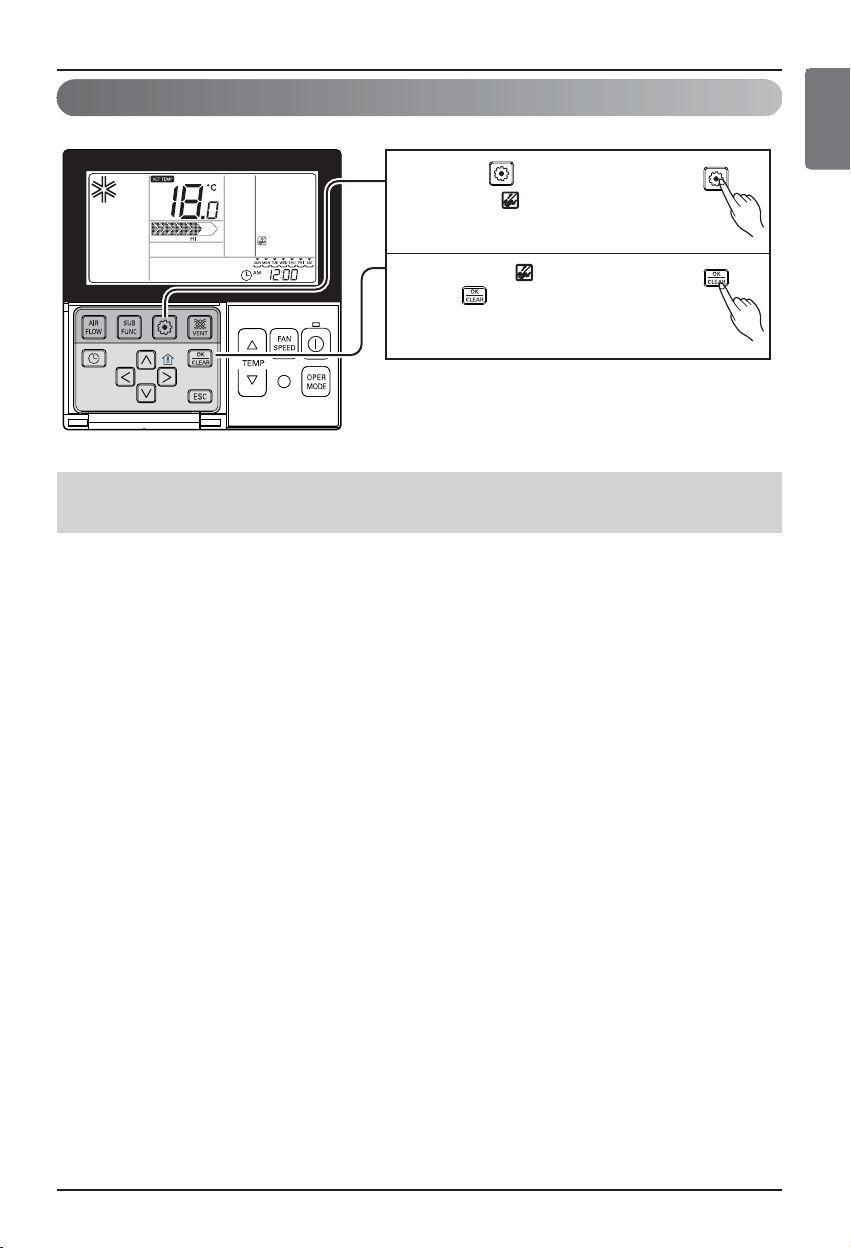
This function is to clear the indicator of indoor filter cleaning.
Function setting - Filter Sign Clear
• When filter is covered by dust, it will reduce cooling/heating efficiency and accumulate more
electric power. Therefore. do clean the filter whenever cleaning time is expired.
h Filter cleaning indication is automatically cancelled without the separate cancellation after certain
period of time.
Press button repeatedly
1
until the is flashing.
When the is flashing, press
2
the to clear this display
Page 22

22 Indoor Unit
Operating Instructions
This function is to adjust angle at which airflow is blow out.
Function setting - Vane Angle Control
Repeat pressing button until
1
icon flash.
Press button to select active vane :
2
1 / 2 / 3 / 4 / All / Standard
Select Vane number using buttons.
❈ Vane number : No. 1, 2., 3, 4, all, or
standard
- Selected vane is in operation.
- Please verify the operating vane.
- To set the angle of all the vanes,
select 'all'.
- To set as the factory default settings,
select 'standard'.
Select wind angle using button, and
3
press button.
- The boundary of wind angle settings can
be changed to 5 levels or 6 levels
according to the product.
- When selecting 'standard' for Vane
number, the wind angle does not move.
Set the wind angles for the remaining
4
vanes as the same as above.
❈ There are products with vanes with
no. 1 and no. 2 only according to the
product types.
Press button to exit.
❈ After setup, it automatically
5
gets out of setup mode if there
is no button input for 60 seconds.
❈ When exiting without pressing set
button, the manipulated value is not
reflected.
Press button to complete and
6
active the setting process.
(Airflow direction function will be
released whenever setting vane angle)
Press button to exit or
7
system will automatically release
without any input after 25
seconds.
Page 23
Ownerʼs Manual 23
ENGLISH
Operating Instructions
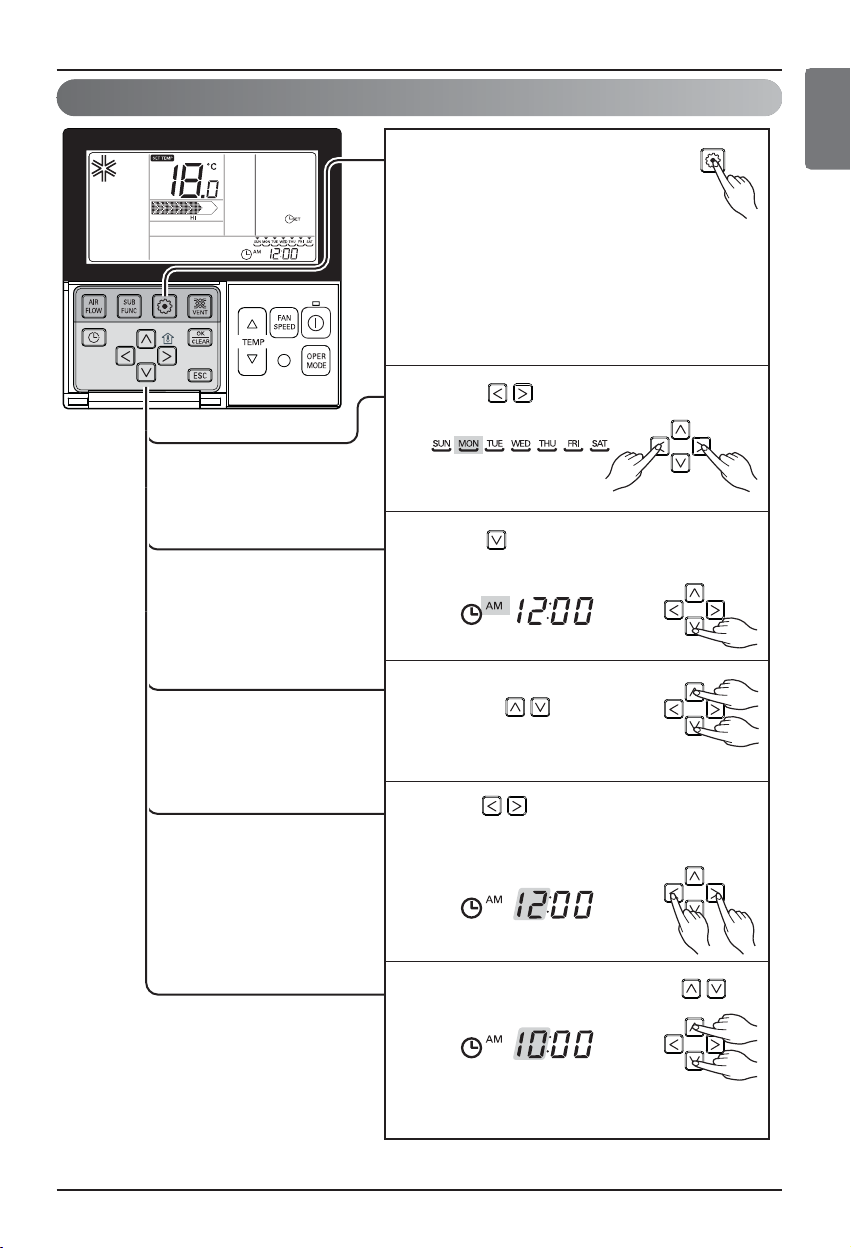
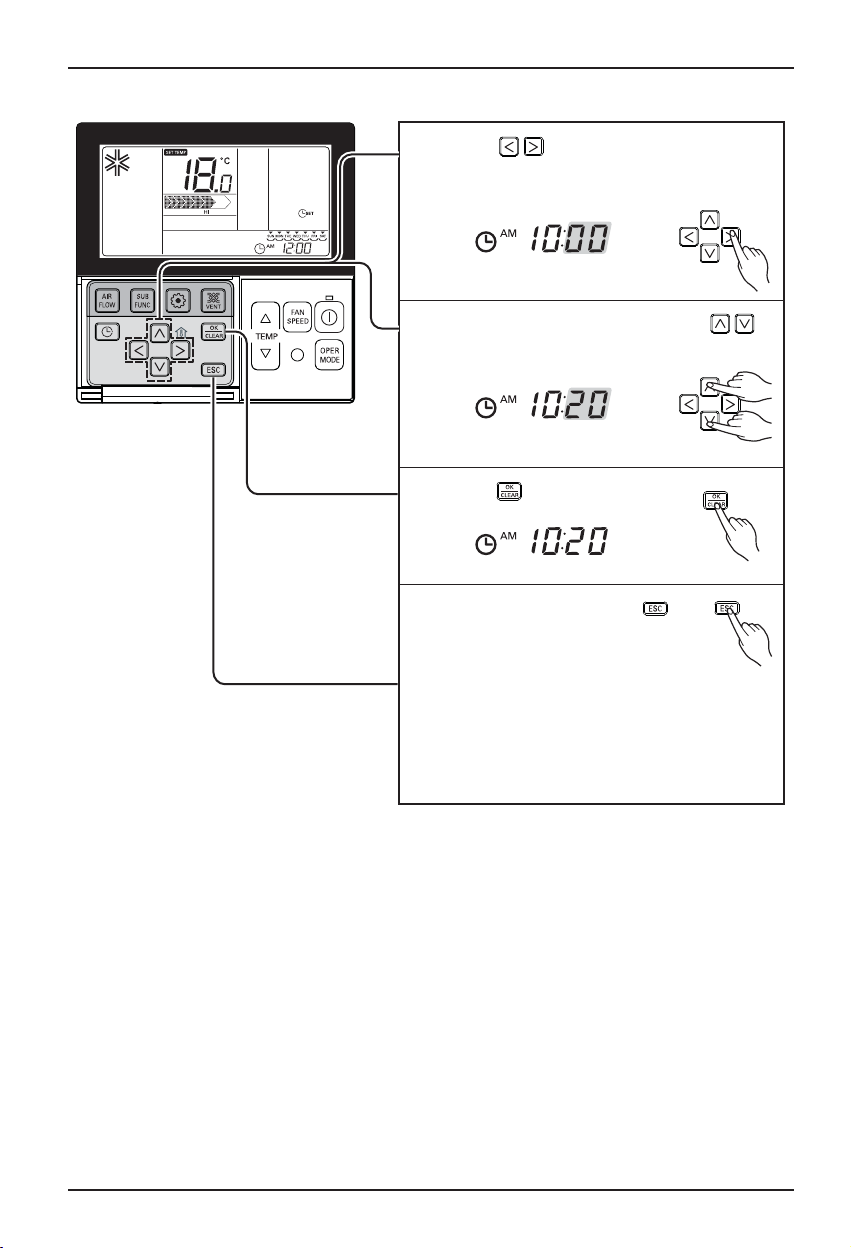
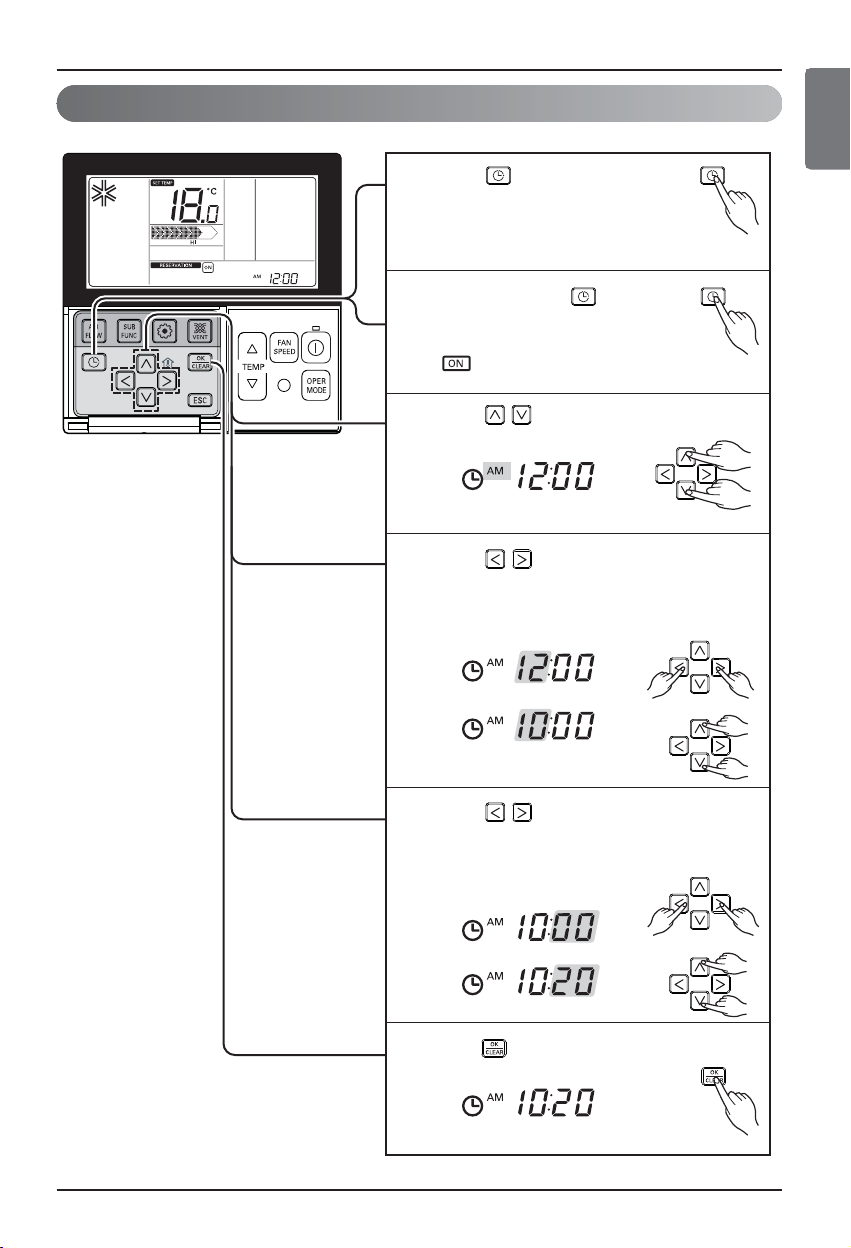
Function setting - Changing Current Time
Please press function setup
1
button. If pressing function setup
button repeatedly, it moves to
time setup menu. ‘Time setup’
icon is indicated at that time and date
blinks at current time indication area.
Ex) Changing Current Time as
'Monday / AM 10:20'.
Press key to adjust the current
2
day.
Press key to move to AM/ PM setting
3
mode (the 'AM/ PM segment will flash).
Setting AM/ PM value by
4
pressing button.
Press button to move to 'Hour'
5
setting mode. (the 'Hour' segment will
flash)
Setting Hour value by pressing
6
button.
Page 24
24 Indoor Unit
Operating Instructions
Press button to move to 'Minute'
7
setting mode. (the 'Minute' segment will
flash)
Setting Minute value by pressing
8
button.
Press button to finish.
9
In the process, press
10
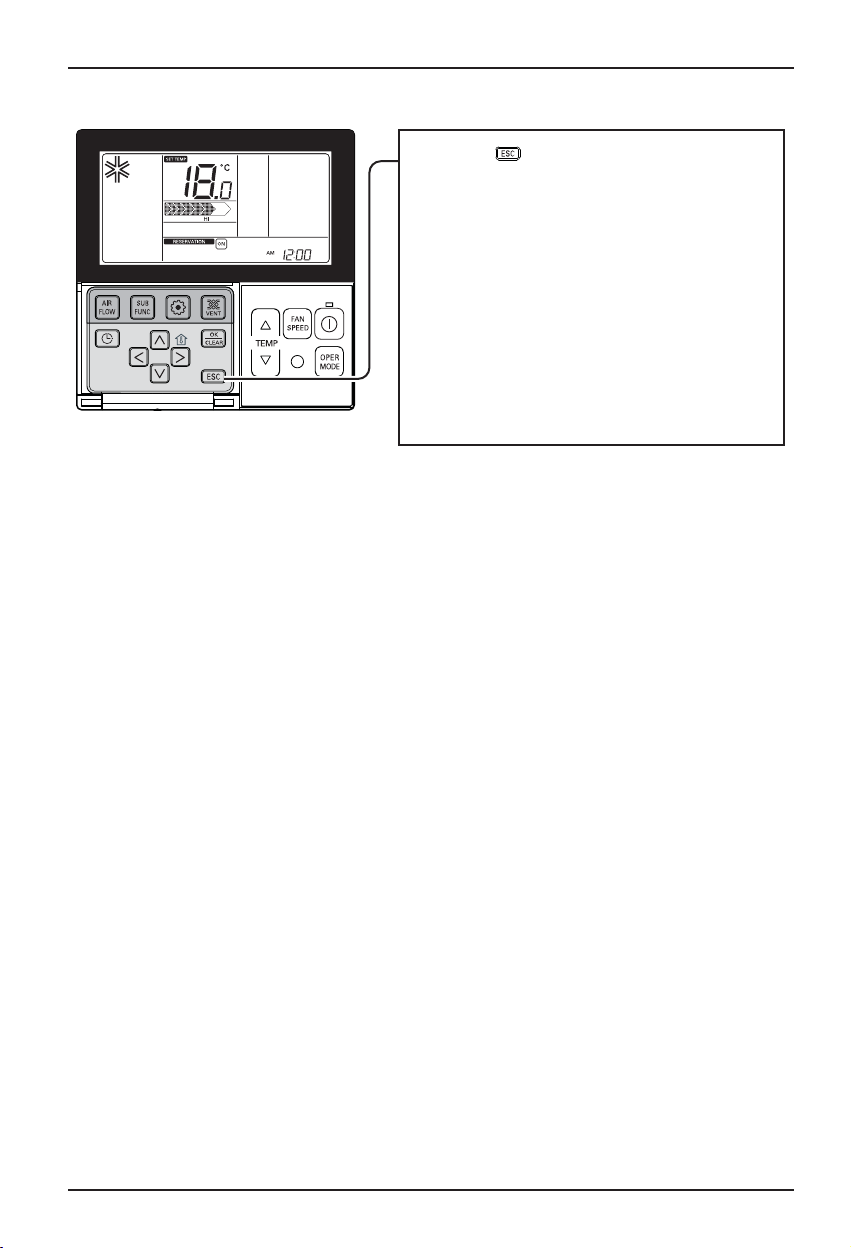
button to release and exit
from setting mode.
(In case of exit with
incomplete information, it will return to
the previous setting)
❈ When exiting without pressing set
button, the manipulated value is not
reflected.
Page 25

Ownerʼs Manual 25
ENGLISH
Operating Instructions
Programming - Simple Reservation
You can set the reservation conveniently in the units of 1 hour from 1 hour to 7 hours.
h When simple reservation setup, product automatically runs or stops after the time that is set.
Press button to enter the
1
Programming mode.
(the segment flashing)
Ex) Setting Simple Reservation
time as '3'.
Press button to adjust reservation
2
time.
Press button to finish setting.
3
Press button to exit.
4
❈ After setup, it automatically gets out of
setup mode if there is no button input
for 25 seconds.
❈ When exiting without pressing set
button, the manipulated value is not
reflected.
Page 26
26 Indoor Unit
Operating Instructions
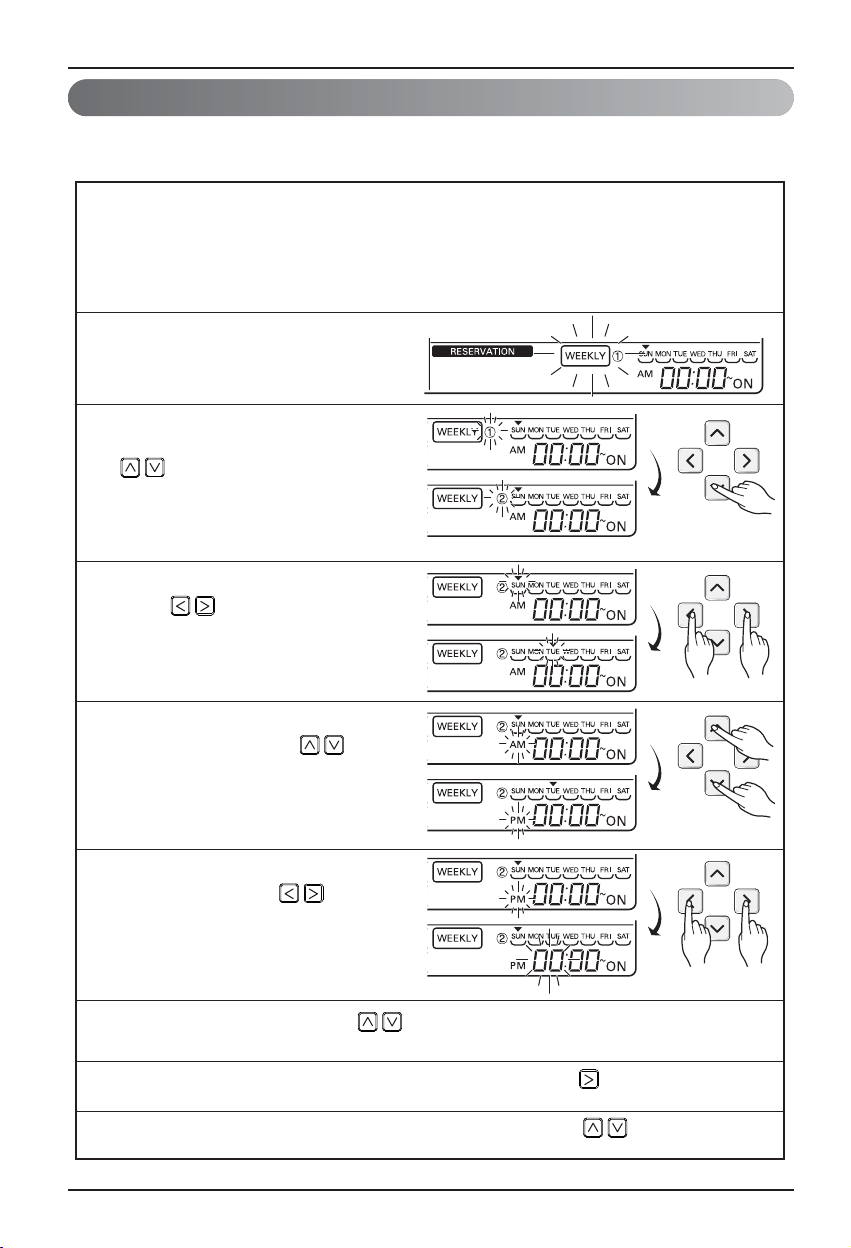
Programming : Weekly Reservation
You can set the daily reservation in weekly unit.
Weekly reservation keeps operating until before you cancel it once you setup
Please move to reservation setup mode by pressing reservation button.
1
❈ You can setup two weekly reservations for one day, and up to fourteen
reservations for a week.
For example, to setup (Tuesday morning 11:30 turned on ~ afternoon 12:30
turned off), you setup in order below.
Please move to 'weekly' by
2
repeatedly pressing reservation
button. 'Weekly' blinks at this time.
Please select weekly reservation or
3
weekly reservation ¡ by using
button.
❈ You can setup two reservations,
weekly reservation 1 and weekly
reservation 2, for a day.
Please move to 'date' setup part by
4
using button. If 'date'
indication blinks, please setup date.
You can setup date from Monday to
Sunday.
Please move to 'AM/PM' setup part
5
of turning on by using button.
Please move to 'hour' setup part of
6
turning on by using button.
- It is the part to setup the time at
which air-conditioner is turned on.
Please change time by using button.
7
- You can setup hour 0~12.
Please move to 'minute' setup part of turning on by using button.
8
If 'minute' indication blinks, please setup 'minute' by using button
9
Page 27
Ownerʼs Manual 27
ENGLISH
Operating Instructions
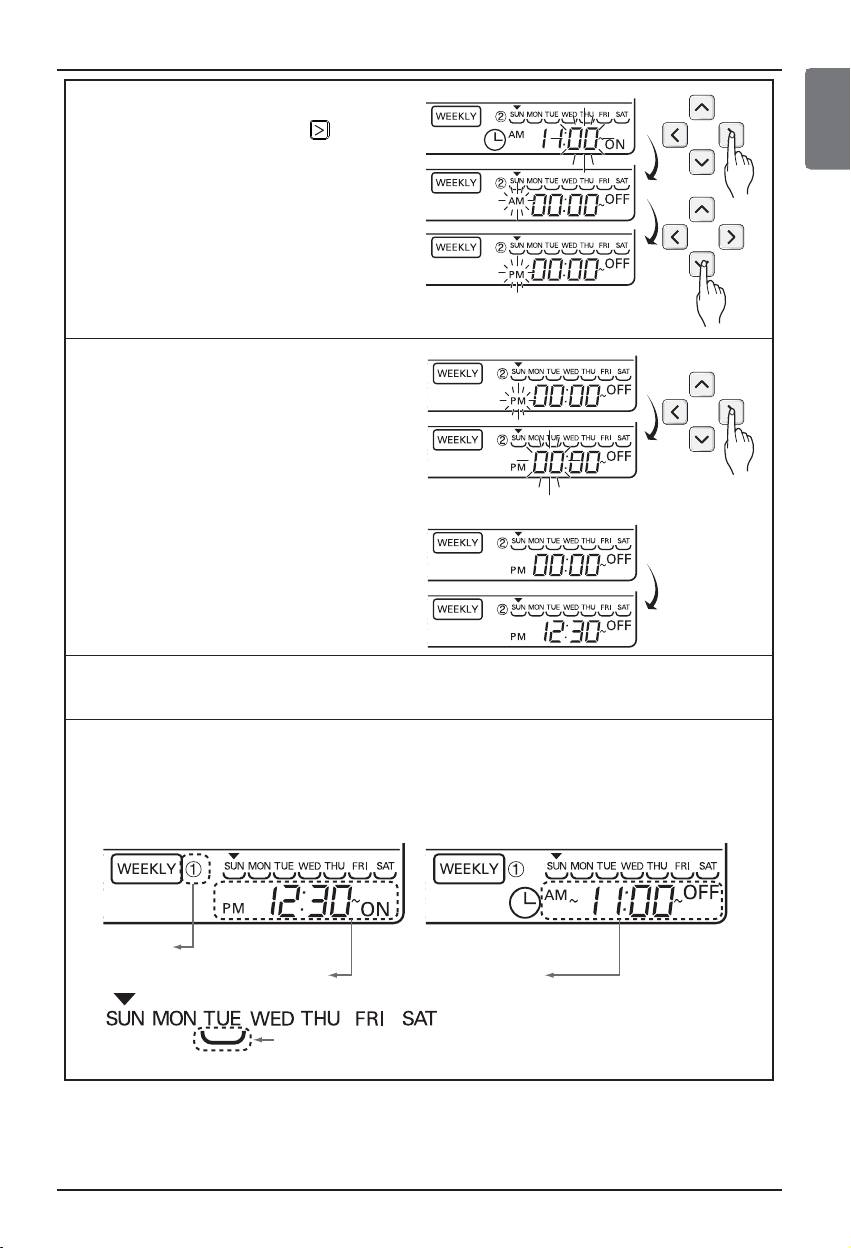
Please move to 'AM/PM' setup part
h Indoor unit is turned on to desired temperature if it is configured using up/down button during preset of weekly operation time.
(Temperature selection range : 18℃~30℃)
- When desired temperature is not set, it is turned on automatically with desired temperature of previous operation.
10
of turning off by using button.
- AM/PM setup is identical with
turning on time setup.
Please move to 'hour' setup part
11
of turning off by using Right
button.
- It is the part to reserve the time
at which air-conditioner is
turned off.
- If 'hour' indication blinks, please
setup 'hour'.
Please setup 'hour' and 'minute'
❈
identically with the method to
setup turning on time.
If finishing weekly reservation setup, please press setup/cancellation button.
12
Weekly reservation setup for the day that you set is finished.
If you setup with the method identical with above by selecting the day that
13
you'd like to setup, it operates weekly reservation.
If you setup both turning on reservation time and turning off reservation time
identically, it doesn't operate reservation drive.
Weekly reservation explanation
Reservation
number
Turning on time
Under bar: the indication that there is weekly reservation for
corresponding day
Turning off time
Page 28
28 Indoor Unit
Operating Instructions
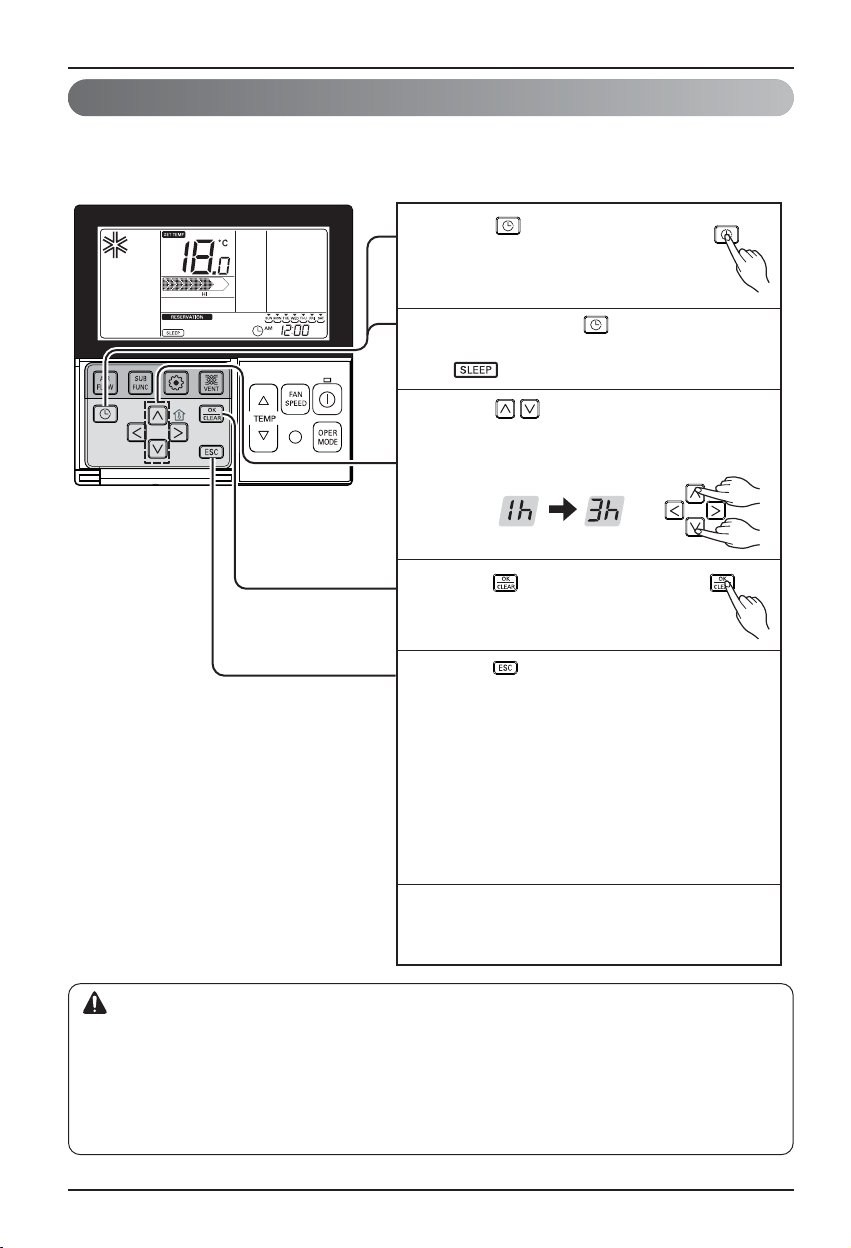
Programming - Sleep Reservation
Sleep reservation is the function of air-conditioner to run and stop after certain period of time at sleep
mode before sleep. When connected to a ventilation product and set the sleep reservation, when it
goes to the sleep mode, after the set time has elapsed.
Please reserve proper time at sleeping. (Too much air-cooling is not good for your health.)
• Because it automatically adjusts desired temperature for comfortable air-cooling at sleep drive,
there could be difference between remote controller's desired temperature and air-conditioner
body's desired temperature.
• Sleep reservation operates as off reservation for the product whose temperature adjustment isn't
controlled by unit of 0.5°C.
CAUTION
Press button to enter the
1
Programming mode.
Ex) Setting Sleep Reservation
time as '3'.
Repeat pressing button to enter the
2
SLEEP reservation setting mode.
( segment flashing)
Press button to adjust reservation
3
time.
The SLEEP reservation time is from 1 to
7 hours.
Press button to finish setting.
4
Whenever reservation is done.
Press button to exit.
5
❈ After setup, it automatically gets out of
setup mode if there is no button input
for 60 seconds.
❈ When exiting without pressing set
button, the manipulated value is not
reflected.
- If reservation is setup, 'sleep'
indication shows up at the lower part
of LCD screen.
If finishing sleep reservation setup,
6
air-conditioner product operates sleep
drive and stops after the time that is set.
Page 29
Ownerʼs Manual 29
ENGLISH
Operating Instructions
Programming - ON Reservation
Automatically turned On at reserved time that you set.
Press button.
1
Ex) Setting ON Reservation
Time as 'AM 10:20'.
Repeat pressing button to
2
enter the ON reservation
setting mode.
( segment flashing)
Press button to adjust AM/ PM
3
setting.
Press button to Hour setting
4
mode. When the Hour icon flash, please
setting time.
The setting range is within 1~12.
Press button to shift to Minute
5
setting mode. When the Minute icon
flash, please setting minute the setting
range is within 00~59.
Press button to finish setting.
6
Page 30
30 Indoor Unit
Operating Instructions
Press button to exit.
7
❈ After setup, it automatically gets out of
setup mode if there is no button input
for 25 seconds.
❈ When exiting without pressing set
button, the manipulated value is not
reflected.
- If reservation is set, 'turned on'
indication shows up at the lower part
of LCD screen, and air-conditioner
product runs at the time that is set.
- If reservation is cancelled, 'turned on'
indication disappears.
Page 31

Ownerʼs Manual 31
ENGLISH
Operating Instructions
Programming - OFF Reservation
Automatically turned Off at reserved time that you set.
Press button.
1
Ex) Setting OFF Reservation
Time as 'AM 10:20'.
Repeatedly pressing button
2
to enter the OFF reservation
setting mode.
( segment flashing)
Press button to adjust AM/ PM
3
setting.
Press button to shift to Hour
4
setting mode. When the Hour icon flash,
please setting time.
The setting range is within 1~12.
Press button to shift to Minute
5
setting mode. When the Minute icon
flash, please setting minute the setting
range is within 00~59.
Press button to finish setting.
6
Page 32

32 Indoor Unit
Operating Instructions
Press button to exit.
7
❈ After setup, it automatically gets out of
setup mode if there is no button input
for 25 seconds.
❈ When exiting without pressing set
button, the manipulated value is not
reflected.
- If reservation is set, 'turned off'
indication shows up at the lower part
of LCD screen, and air-conditioner
product runs at the time that is set.
- If reservation is cancelled, 'turned off'
indication disappears.
Page 33

Ownerʼs Manual 33
ENGLISH
Operating Instructions
Programming : Holiday Reservation
It automatically stops at reserved day that you set.
Please press button.
1
It enters into reservation
setup mode.
Please move to 'holiday' by repeatedly
2
pressing button.
Please move to 'date' that
3
you want to setup holiday
by using button.
Please appoint or cancel holiday by using
4
or button.
For example, when you setup
Monday/Friday to holiday
- 'Monday', 'Friday' letter disappears.
Please press button if finishing
5
holiday setup.
❈ If it comes to appointed holiday,
air-conditioner automatically stops.
Once you setup holiday appointment,
until before you cancel holiday setup,
air-conditioner automatically stops
within one hour even though you run
air-conditioner.
Page 34

34 Indoor Unit
Maintenance and Service
B
e
n
z
e
n
e
S
C
O
U
R
I
N
C
L
B
A
R
G
E
S
I
N
N
E
R
Plasma filter
Air filter
R
e
mote Contr
ol
ler
TE
M
P
Wired remote
controller
Air inlet
Rack
Air outlet
Grille, Case, and Remote Control
o Turn the system off before cleaning. To clean, wipe with
a soft, dry cloth. Do not use bleach or abrasives.
Supply power must be disconnected
before cleaning the indoor unit.
1. Remove air filters.
o Take hold of the tab and pull slightly forward
to remove the filter.
When the air filter is to be removed, do not
touch the metal parts of the indoor unit.
It may cause an injury.
2. Remove plasma filter.
o Unscrew 2 screws from plasma filter.
3. Clean dirt from the air filter using a vacuum
cleaner or washing with water.
o If dirt is conspicuous, wash with a neutral
detergent in lukewarm water.
o If hot water (50°C or more) is used, it may
be deformed.
4. After washing with water, dry well in
the shade.
o
Do not expose the air filter to direct
sunlight or heat from a fire when drying it.
5. Install plasma filter and air filter.
CAUTION
Air Filter
The air filters behind the front grille should be checked and
cleaned once every 2 weeks or more often if neccessary.
Before performing any maintenance, turn off the main power to the system.
CAUTION
o
Never use any of the followings:
• Water hotter than 40°C.
Could cause deformation and/or
discoloration.
• Volatile substances.
Could damage the
surfaces of the air
conditioner.
TU chassis : 4EA Rack
Maintenance and Service
NOTICE
Page 35

Ownerʼs Manual 35
ENGLISH
Maintenance and Service
CAUTION
CAUTION
When the air conditioner is not going to be used for a long time.
Operation Tips
Helpful information
The air filters and your electiric bill.
If the air filters become clogged with dust, the
cooling capacity will drop, and 6% of the electricity
used to operate the air conditioner will be wasted.
When it is not going to be used for
a long time.
When the air conditioner is to be used again.
Operate the air conditioner at the
following settings for 2 to 3 hours.
• Type of operation: Fan operation mode.
• This will dry out the internal mechanisms.
Turn off the breaker.
Turn off the breaker when the air conditioner
is not going to be used for a long time.
Dirt may collect and may cause a fire.
Clean the air filter and install it in the
indoor unit.
Check that the air inlet and outlet of the
indoor/outdoor unit are not blocked.
Check that the ground wire is
connected correctly. It may be connect
to the indoor unit side.
Do not overcool the room.
This is not good for the health
and wastes electricity.
Keep blinds or curtains
closed.
Do not let direct sunshine
enter the room when the air
conditioner is in operation.
Keep the room temperature
uniform.
Adjust the vertical and
horizontal airflow direction to
ensure a uniform temperature
in the room.
Make sure that the doors
and windows are shut tight.
Avoid opening doors and
windows as much as possible
to keep the cool air in the
room.
Clean the air filter regularly.
Blockages in the air filter
reduce the airflow and lower
cooling and dehumidifying
effects. Clean at least once
every two weeks.
Ventilate the room
occasionally.
Since windows are kept
closed, it is a good idea to
open them and ventilate the
room now and then.
Page 36

36 Indoor Unit
Maintenance and Service
?
Before you call for service...
Check the following points before requesting repairs or service.... If the malfunction persist,
please contact your dealer.
Troubleshooting Tips! Save time and money!
• Have you made a
mistake in timer
operation?
• Has the fuse blown
or has the circuit
breaker been
tripped?
• Check that this is not
a damp smell exuded
by the walls, carpet,
furniture or cloth
items in the room.
• Condensation occurs
when the airflow from
the air conditioner
cools the warm room
air.
• This is the protector
of the mechanism.
• Wait about three
minutes and
operation will begin.
The air conditioner
does not operate.
The room has a
peculiar odor.
It seems that
condensation is
leaking from the air
conditioner.
Air conditioner does
not operate for about
3 minutes when
restart.
Does not cool or heat
effectively.
The air conditioner
operation is noisy.
Crack sound is
heard.
Remote control
display is faint, or no
display at all.
• Is the air filter dirty?
See air filter cleaning
instructions.
• The room may have
been very hot when
the room air
conditioner was first
turned on. Allow time
for it to cool down.
• Has the temperature
been set incorrectly?
• Are the indoor unit's
air inlet or outlet vents
obstructed?
• For a noise that
sounds like water
flowing.
-This is the sound of
freon flowing inside
the air conditioner
unit.
• For a noise that
sounds like the
compressed air
releasing into
atmosphere.
-This is the sound of
the dehumidifying
water being
processed inside the
air conditioning unit.
• This sound is generated
by the expansion/
constriction of the front
panel, etc. due to
changes of temperature.
• Cleaning the filter,
press the Timer button
and ◀ button of wired
remote controller at
the same time for 3
sec.
• Are the batteries
depleted?
• Are the batteries
inserted in the
opposite (+) and (-)
directions?
WATER RESISTANT: The outdoor side of this appliance is WATER RESISTANT.
The indoor side is not water resistant and should not be exposed to
excess water.
NOTICE
Filter sign lamp
(LED) is ON.
(Grill Type)
Page 37

www.lg.com
MANUALE DI ISTRUZIONI
CLIMATIZZATORE
Leggere con attenzione questo manuale prima di usare l’unità e
conservare per uso futuro.
TYPE : A CASSETTA (1WAY) DA SOFFITTO (TIPO ART)
ITALIANO
Page 38

2 Unità Interna
A cassetta (1 Way) Manuale di Istruzioni
SOMMARIO
DATI DA RICORDARE
Annotare qui il numero di serie e il modello:
N°. modello
N°. di serie
I numeri sono riportati sull'etichetta a lato di ogni unità.
Nome del rivenditore
Data di acquisto
n
Spillare la ricevuta su questa pagina qualora fosse
necessaria per provare la data di acquisto o per motivi di
garanzia.
LEGGERE IL MANUALE
Allʼinterno troverà molti suggerimenti utili sullʼuso e la
manutenzione del condizionatore. Un minimo di
attenzione può far risparmiare molto tempo e denaro nel
corso della vita del condizionatore.
Nella tabella di riferimento per la risoluzione dei problemi
troverà molte risposte ai problemi più comuni.
Consultando la tabella Risoluzione dei problemi potrebbe
non essere necessario contattare il servizio di
assistenza.
AVVERTENZE
• Contattare un tecnico dell'assistenza autorizzato per la
riparazione o la manutenzione dellʼunità.
• Contattare lʼinstallatore per eseguire lʼinstallazione
dellʼunità.
• Il condizionatore non è stato progettato per essere
utilizzato da bambini o invalidi senza supervisione.
• È consigliabile vigilare sui bambini affinché essi non
giochino con il condizionatore.
• Se il cavo di alimentazione deve essere sostituito, il
servizio di sostituzione deve essere eseguito solo da
personale autorizzato utilizzando parti di ricambio
originali.
• Il servizio di installazione deve essere eseguito in
conformità con gli standard elettrici nazionali d
esclusivamente da personale autorizzato.
Precauzioni di sicurezza.........3
Prima di iniziare.......................7
Istruzioni per l'uso...................8
Manutenzione e assistenza ..34
Prima di chiamare
l'assistenza
........................36
Page 39

Manuale di Istruzioni 3
ITALIANO
Precauzioni di sicurezza
Per evitare infortuni dell'utente o altre persone e danni alle cose, attenersi alle seguenti
istruzioni.
n Lʼuso errato causato dalla mancata osservanza delle istruzioni può causare danni o lesioni.
Lʼimportanza è classificata dalle seguenti indicazioni.
n Il significato dei simboli utilizzati in questo manuale è spiegato di seguito.
ATTENZIONE
AVVISO
Questo simbolo indica la possibilità di decesso o di grave
infortunio.
Questo simbolo indica la possibilità di infortunio o danni alle cose.
Azione/operazione da non fare.
Attenersi alle istruzioni.
ATTENZIONE
n Installazione
Non utilizzare interruttori automatici
difettosi o di potenza inferiore.
Utilizzare questa apparecchiatura su
un circuito dedicato.
• Vi è il rischio di scosse elettriche
o incendio.
Per i collegamenti elettrici,
rivolgersi al rivenditore, a un
elettricista qualificato o a un
centro di assistenza autorizzato.
• Non smontare o tentare di
riparare il prodotto. Vi è il rischio
di scosse elettriche o incendio.
Il prodotto deve essere
sempre provvisto di messa a
terra.
• Vi è il rischio di scosse elettriche
o incendio.
Installare il pannello e il
coperchio della scatola di
controllo in modo sicuro.
• Vi è il rischio di scosse elettriche
o incendio.
Installare sempre un
interruttore automatico e
circuito dedicato.
• L'errato cablaggio o
installazione può causare
incendi o scosse elettriche.
Utilizzare fusibili o interruttori
automatici di giusta tensione.
• Vi e il rischio di scosse elettriche
o incendio.
Precauzioni di sicurezza
Non modificare o prolungare
il cavo di alimentazione.
• Vi è il rischio di scosse elettriche
o incendio.
L'unità non deve essere
installata né rimossa
dall'utente (cliente).
• Vi è il rischio di scosse elettriche,
incendio, esplosione o lesioni.
Disimballare e installare il
prodotto con attenzione.
• I bordi taglienti possono causare
infortuni. Fare particolare
attenzione ai bordi del
contenitore e alle alette del
condensatore e dell'evaporatore.
Page 40

Precauzioni di sicurezza
4 Unità Interna
n Funzionamento
Per l'installazione, rivolgersi
sempre al rivenditore o a un
centro di assistenza autorizzato.
• Vi è il rischio di scosse elettriche,
incendio, esplosione o lesioni.
Non installare il prodotto su
supporti di installazione
difettosi.
• Ciò potrebbe causare infortuni,
incidenti o danni al prodotto.
Accertarsi che l'area di
installazione non sia soggetta a
deterioramento nel tempo.
• Se la base si rompe, l'unità può
cadere con essa, causando
infortuni a persone, guasti al
prodotto o danni alle cose.
Non collegare/scollegare il cavo
di alimentazione alla/dalla presa
durante il funzionamento.
• Vi è il rischio di scosse elettriche o
incendio.
Non toccare il prodotto con
le mani bagnate.
• Vi è il rischio di scosse elettriche o
incendio.
Non posizionare riscaldatori o
altre apparecchiature vicino al
cavo di alimentazione.
• Vi è il rischio di scosse elettriche e
incendio.
Non utilizzare il prodotto troppo a lungo
in ambienti molto umidi e con una
finestra o una porta aperta.
• L'umidità potrebbe condensarsi e
bagnare o danneggiare i mobili.
Avere cura di non tirare o
danneggiare il cavo di alimentazione
durante il funzionamento.
• Vi è il rischio di scosse elettriche
o incendio.
Non mettere nulla sul cavo
di alimentazione.
• Vi è il rischio di scosse elettriche
o incendio.
Non far cadere acqua sui
componenti elettrici.
• Vi è il rischio di scosse elettriche,
incendio o guasti al prodotto.
Non conservare o utilizzare gas
infiammabili o combustibili in
prossimità del prodotto.
• Vi è il rischio di incendio o guasti al
prodotto.
Non utilizzare il prodotto in
luoghi chiusi per periodi
prolungati.
• Potrebbe esservi una scarsità di
ossigeno.
In caso di perdite di gas
infiammabile, aprire la finestra
per ventilare il locale prima di
azionare l'unità.
• Non utilizzare il telefono o
accendere o spegnere interruttori.
Vi è il rischio di esplosioni o
incendi.
In caso di rumori, odori o fumo
anomali provenienti dal prodotto.
Spegnere l'interruttore automatico e
scollegare il cavo di alimentazione.
• Vi è il rischio di scosse elettriche o
incendio.
Arrestare il funzionamento e chiudere la
finestra in caso di tempeste o uragani. Se
possibile, rimuovere il prodotto dalla
finestra prima che arrivi un uragano.
• Vi è il rischio di danni alle cose,
guasti al prodotto o scosse
elettriche.
Non aprire la griglia di aspirazione
del prodotto durante il
funzionamento (non toccare il
filtro elettrostatico, se presente).
• Vi è il rischio di lesioni fisiche,
scosse elettriche o guasti al
prodotto.
In caso di allagamento del
prodotto, rivolgersi a un
centro di assistenza
autorizzato.
• Vi è il rischio di scosse elettriche o
incendio.
Evitare che nel prodotto
entri acqua.
• Vi è il rischio di scosse elettriche,
incendio o danni al prodotto.
Page 41

Precauzioni di sicurezza
Manuale di Istruzioni 5
ITALIANO
Di tanto in tanto, ventilare il prodotto quando
utilizzato insieme a fornelli ecc.
• Vi è il rischio di scosse elettriche o incendio.
Spegnere l'alimentazione prima di pulire o
riparare il prodotto.
• Vi è il rischio di scosse elettriche.
In caso di inutilizzo del prodotto per lunghi
periodi, scollegare il cavo di alimentazione e
spegnere l'interruttore automatico.
• Vi è il rischio di guasti al prodotto o attivazione
accidentale.
Evitare che l'unità esterna sia calpestata da
qualcuno.
• Ciò potrebbe lesioni personali e danni al prodotto.
n Installazione
AVVISO
n Funzionamento
Dopo l'installazione o la riparazione del
prodotto, verificare sempre che non vi
siano perdite di gas (refrigerante).
• Livelli bassi di refrigerante
potrebbero causare guasti al
prodotto.
Installare il tubo flessibile di
scarico in modo da garantire
uno scarico corretto e sicuro.
• Un errato collegamento può
causare perdite d'acqua.
Installare il prodotto
allineandolo in modo
uniforme.
• Per evitare perdite d'acqua.
Non installare il prodotto in modo che il
rumore o l'aria calda provenienti dall'unità
esterna possano causare danni ai vicini.
• Ciò potrebbe causare problemi
con i vicini.
Per sollevare e trasportare il
prodotto sono consigliabili
due persone.
• Evitare lesioni personali.
Non installare il prodotto in
luoghi esposti direttamente al
vento di mare (spruzzi di sale).
• Ciò potrebbe causare corrosioni al
prodotto. La corrosione, in
particolare sul condensatore e
sulle alette dell'evaporatore, può
causare malfunzionamenti o
inefficienza.
Non esporre la pelle direttamente all'aria
fresca per periodi prolungati (non sedersi nel
raggio d'azione dell'aspirazione).
• Ciò potrebbe causare danni alla salute.
Non utilizzare il prodotto per scopi specifici, ad esempio per
conservare alimenti, animali, opere d'arte ecc. Questo prodotto è un
condizionatore d'aria, non un sistema di refrigerazione.
• Vi ò il rischio di danni o perdita di cose.
Non bloccare l'ingresso o
l'uscita del flusso d'aria.
• In caso contrario, si potrebbero
verificare guasti al prodotto.
Utilizzare un panno soffice per la
pulizia. Non utilizzare detergenti
aggressivi, solventi ecc.
• Vi è il rischio di scosse elettriche,
incendio o danno alle parti in
plastica del prodotto.
Non toccare le parti metalliche del
prodotto durante la rimozione del
filtro dell'aria. Sono molto appuntite!
• Vi è il rischio di lesioni personali.
Page 42

Precauzioni di sicurezza
6 Unità Interna
Non calpestare o mettere
oggetti sul prodotto (unità
esterne).
• Vi è il rischio di lesioni personali o
guasti al prodotto.
Inserire sempre il filtro in modo stabile.
Pulire il filtro ogni 2 settimane o più
spesso, se necessario.
•
Un filtro sporco riduce l'efficienza del
condizionatore e potrebbe causare
danni o malfunzionamenti del prodotto.
(Tipo a griglia)
Non introdurre le mani o altri oggetti
nella bocca di ingresso o uscita
dell'aria durante il funzionamento.
• Le parti mobili metalliche sono
affilate e potrebbero causare
infortuni.
Non bere acqua fuoriuscita
dal prodotto.
•
Ciò può causare gravi danni alla salute.
Utilizzare una scala salda
per pulire o riparare il
prodotto.
•
Fare attenzione ed evitare lesioni personali.
Sostituire tutte le batterie del
telecomando sempre con altre dello
stesso tipo. Non mischiare batterie nuove
e vecchie o batterie di tipo diverso.
•
Vi è il rischio di esplosioni o incendi.
Non ricaricare o smontare le
batterie. Non gettare le
batterie nel fuoco.
• Potrebbero bruciare o esplodere.
In caso di caduta del liquido delle
batterie sulla pelle o sugli indumenti,
lavare accuratamente con acqua
pulita. Non utilizzare il telecomando se
le batterie presentano delle perdite.
• Le sostanze chimiche delle
batterie potrebbero causare
scottature o altri pericoli.
In caso di ingestione di liquido
della batteria, lavarsi i denti e
consultare subito un medico. In
caso di perdita dalle batterie,
non utilizzare il telecomando.
•
Le sostanze chimiche contenute nelle
batterie potrebbero causare
scottature o altri pericoli per la salute.
Page 43

Prima di iniziare
Manuale di Istruzioni 7
ITALIANO
Prima di iniziare
1. Per lʼinstallazione rivolgersi a un tecnico specializzato.
2. Utilizzare un circuito dedicato.
1. Lʼesposizione al flusso diretto dellʼaria per un periodo prolungato di tempo può essere pericoloso
per la salute.
Non esporre le persone, gli animali o le piante al flusso d'aria per periodi di tempo prolungati.
2. A causa di una possibile carenza di ossigeno, ventilare la stanza quando viene usato insieme a
stufe o altri dispositivi di riscaldamento.
3. Non usare questo condizionatore dʼaria per scopi speciali non specificati (es. per conservare
strumenti di precisione, cibo, animali, piante o oggetti dʼarte.) Questo tipo di uso può rovinare
questo tipo di oggetti.
1. Quando si rimuove il filtro non toccare mai gli elementi metallici dellʼunità. Si possono procurare
lesioni quando si maneggiano i bordi affilati di metallo.
2. Non pulire lʼinterno del condizionatore dʼaria con acqua. Lʼesposizione allʼacqua può rovinare
lʼisolamento e provocare di conseguenza scosse elettriche.
3. Durante la pulizia del prodotto assicurarsi che lʼinterruttore automatico e lʼalimentazione siano
disattivati. Durante il funzionamento la ventola gira a velocità elevata. Esiste la possibilità di
provocare lesioni se lʼunità viene accidentalmente accesa mentre si puliscono i componenti interni
dellʼapparecchio.
Per le riparazioni e la manutenzione rivolgersi al proprio rivenditore autorizzato.
Preparazione allʼuso
USO
Pulizia e Manutenzione
Assistenza
Page 44

Istruzioni per I'uso
8 Unità Interna
Istruzioni per I'uso
Nome e funzione del telecomando cablato
※ Alcune funzioni potrebbero non essere disponibili e visualizzate in base al tipo di prodotto.
※ Se il telecomando cablato non è collegato, verrà visualizzato un valore strano per la temperatura ambiente.
Modello : PQRCVSL0 (nero)
PQRCVSL0QW (bianco)
1. Display operativo
2. Tasto di impostazione della temperatura
•
Non imposta la temperatura ambiente, ma la temperatura dellʼaria in uscita.
3. Tasto velocità ventola
• Sono disponibili 3 livelli di velocità della ventola.
• Medio e basso sono uguali
4. TASTO ON/OFF
5. Tasto di selezione modalità di funzionamento
6. Ricevitore telecomando senza fili
• Alcuni prodotti non ricevono i segnali wireless.
7. Tasto flusso d'aria
8. Tasto della funzione secondaria
9. Pulsante di impostazione delle funzioni
10. Tasto di ventilazione
11. Programmazione
12. Tasto su, giù, sinistra, destra
• Per controllare la temperatura interna premere il
pulsante .
13. Tasto temperatura ambiente
• Visualizza solo la temperatura ambiente del
sensore del telecomando.
•
Non cʼè nessun controllo della temperatura ambiente.
• Nel caso in cui è presente lʼunità di ingresso aria
fresca, visualizza solo la temperatura nelle
vicinanze del telecomando.
14. Tasto di impostazione/annullamento
15. Pulsante di chiusura
1
10
9
8
7
11
12
13
14
15
Attaccare l’etichetta informativa all’interno del coperchio.
Scegliere la lingua corretta in base al proprio
paese.
2
3
4
5
6
Page 45

Istruzioni per I'uso
Manuale di Istruzioni 9
ITALIANO
Funzionamento del Telecomando(Accessori)
1. Pulsante plasma (opzionale)
Serve per avviare o arrestare la funzione di
depurazione al plasma.
2. Pulsante raffreddamento a getto (jet cool)
Il raffreddamento rapido funziona a ultravelocità
della ventola.
3. Pulsante per la selezione del modo operativo
Serve per selezionare il modo operativo.
4. Pulsante di impostazione funzioni
Utilizzato per impostare le modalità di auto clean e
smart clean
5. Pulsante luminosità del lcd (opzionale)
Serve alla regolazione della luminosità del LCD.
6. Pulsante smart clean (opzionale)
Serve per avviare o arrestare la funzione smart clean.
7. Pulsante clear all
Serve per cancellare il timer.
8. Pulsanti di impostazione della temperatura della
stanza
Serve per selezionare la temperatura della stanza.
9. Pulsante On/Off
Serve per l'accensione/spegnimento dell'unità.
10. Pulsante per l'impostazione della velocità del
ventilatore interno
Serve a selezionare una delle quattro velocità
basso, medio, alto e caos.
11. Pulsante auto swing
Serve per avviare o arrestare il movimento delle alette
e impostare il flusso di direzione dell'aria alto/basso.
12. Pulsante di controllo direzione flusso d'aria
orizzontale (opzionale)
Viene usato per impostare il flusso orizzontale dell'aria
13. Pulsante di impostazione timer e ora
Serve a impostare il tempo di avvio ed arresto di
funzionamento e della funzione sleep.
14. Pulsante per il controllo della temperatura della
stanza
Serve per controllare la temperatura della stanza.
15. Pulsante commutatore ˚C/˚F
Serve passare dalla lettura della temepratura da
centigradi a Fahrenheit.
16. Pulsante di ripristino
Serve per il ripristino del telecomando.
8
1
2
3
4
5
6
7
9
10
11
12
13
14
15
16
PQWRHDF0 (Pompa calore)
PQWRCDF0 (Solo raffreddamento)
Modo operativo
Modalità raffreddamento
Modo automatico o cabiamento automatico
Modo deumidificazione
Modo riscaldamento
Modalità ventola
• Modello raffreddamento ( ), modello
pompa di calore ( )
Page 46

Istruzioni per I'uso
10 Unità Interna
Funzionamento controllato
(tasto a sfioramento)
Funzionamento indotto
Pulsante nuovo avviamento automatico
Notizia per il filtro segno ROSSO (Tipo a griglia)
Procedure di funzionamento quando non è possibile
usare il telecomando. Premere il pulsante tact (funzionamento indotto)
Se si desidera interrompere l'esecuzione, premere nuovamente il
pulsante tact. Nel caso di ritorno della corrente dopo un'interruzione
nel modo funzionamento indotto, le condizioni di funzionamento
vengono impostate automaticamente come segue. Durante il
funzionamento indotto, il modo iniziale continua.
Nel caso di ritorno della corrente dopo un'interruzione, la funzione di Riavvio automatico del funzionamento è la funzione che
esegue le procedure automaticamente riportandole alle condizioni di funzionamento antecedenti all'interruzione.
1. Il filtro segno di lampada (LEC) è acceso.
2. Se ROSSO indicando il filtro di segno lampada è acceso, pulire il filtro.
3. Dopo pulisce il filtro, premere il pulsante Tempo è pulsante di telecomando a rete metallica nello stesso
tempo per 3 secondi, allora il filtro segno ROSSO è spento.
Modello con pompa calore
Modello Raffreddamento
Temperatura ambiente Temperatura ambiente
> Temp. impos. - 2°C > Temp. impos. - 2°C
Modo di funzionamento Raffreddamento Raffreddamento Riscaldamento:
Velocità del ventilatore interno
Alta Impos. disponibile Impos. disponibile
Impostazione temperatura
22°C Impos. disponibile Impos. disponibile
Page 47

Istruzioni per I'uso
Manuale di Istruzioni 11
ITALIANO
Funzionamento standard – Raffreddamento standard
h Intervallo di impostazione: 18°C~30°C (64°F~86°F)
Raffredda la stanza con un flusso dʼaria gradevole e pulito.
Premere il pulsante per
1
accendere l'unità interna.
Premere il pulsante pert
2
selezionare la modalità di
raffreddamento.
Selezionare la temperatura
3
desiderata premendo il pulsante
.
Premere il pulsante per
controllare la temperatura ambiente.
Quando si imposta una temperatura
desiderata più alta della temperatura ambiente, viene attivato il solo
flusso d'aria del ventilatore, invece
del flusso d'aria di raffreddamento.
Page 48

12 Unità Interna
Istruzioni per Iʼuso
Raffredda rapidamente l'ambiente usando un flusso dʼaria gradevole e fresco
Fornisce aria calda allʼinterno
Funzionamento standard - Modalità riscaldamento
Cos'è il raffreddamento potente?
• Temperatura desiderata: Po (18°C effettivi)
• Flusso d'aria: flusso potente
• Direzione del flusso: fisso nella posizione del raffreddamento d'aria
h
Lʼunità parziale non ha la funzione per il raffreddamento potente dellʼaria.
• Il motore per il riscaldamento funziona solo nel modello dotato di funzione di raffreddamento e
riscaldamento.
• Il riscaldamento non funziona nel modello dotato di sola funzione di raffreddamento.
Quando attivato, riduce
rapidamente la
temperatura ambientale.
}
Funzionamento standard – Raffreddamento potente
Premere il pulsante per
1
accendere l’unità interna.
Premere il pulsante per
2
selezionare la modalità di
raffreddamento.
Premere continuamente il pulsante
3
fino a quando non è visualizzato
'Po'.
Premere il pulsante per
1
accendere l'unità interna.
Premere il pulsante per seleziona-
2
re la modalità di riscaldamento
(per controllare la temperatura interna
premere il pulsante della temperatura
ambiente).
Selezionare la temperatura
3
desiderata premendo il pulsante
.
Quando si imposta una temperatura
desiderata più bassa di quella
ambiente, viene attivato solo il
flusso d'aria di ventilazione.
Page 49

Manuale di Istruzioni 13
Istruzioni per Iʼuso
Elimina lʼumidità mentre raffredda leggermente lʼaria.
• Nei periodi di pioggia o con clima a umidità elevata, è possibile utilizzare contemporaneamente le
modalità deumidificatore e raffreddamento per rimuovere lʼumidità in maniera efficace.
• La voce di menu per la potenza del flusso dʼaria potrebbe non essere selezionata parzialmente in
base al tipo di unità.
Funzionamento standard - Modalità deumidificatore
ITALIANO
Premere il pulsante per accendere
1
l'unità interna.
Premere il pulsante per selezionare
2
la modalità di deumidificazione. durante
il funzionamento in questa modalità non è
possibile impostare la temperatura.
Premere il pulsante per impostare
3
un flusso d’aria debole ’ leggero ’
medio ’ forte ’ automatico.
La potenza iniziale del flusso d’aria del motore
per la deumidificazione è su 'leggero'.
Page 50

14 Unità Interna
Istruzioni per Iʼuso
Premere il pulsante per accendere
l'unità interna.
1
Premere il pulsante per
selezionare la modalità ventilatore
2
A ogni pressione del pulsante , si
passa attraverso le modalità debole →
leggero → medio → forte → automatico.
Durante l’utilizzo del ventilatore, il
compressore dell’AHU (sistema di
condizionamento dell’aria) non funziona.
3
Funzionamento standard - Modalità ventilatore
Produce aria come allʼinterno, non aria fredda.
• Il motore del ventilatore non emette aria fredda, ma produce la normale circolazione d'aria di una ventola.
• Poiché la temperatura del flusso dʼaria non è diversa da quella ambientale, la sua funzione è quella di mettere
in circolo lʼaria.
• La voce di menu per la potenza del flusso dʼaria potrebbe non essere selezionata parzialmente in base al tipo
di unità.
Page 51

Manuale di Istruzioni 15
Istruzioni per Iʼuso
Premere il pulsante per accendere
l'unità interna.
1
Premere il pulsante per selezionare
la modalità Intelligenza artificiale.
2
Con il modello dotato
delle funzioni di
raffreddamento e
riscaldamento, è
possibile regolare la
temperatura come
nell'immagine a destra.
3
Per il modello dotato
solo di funzione di
raffreddamento, come
nell'immagine a
destra, è possibile
regolare la temperatura da caldo a freddo,
da ‘-2' a ‘2’ con valore
di base ‘00’.
4
Quando freddo
Quando fresco
Quando adeguato
Quando tiepido
Quando caldo
Funzionamento standard - Modalità funzionamento automatico
Durante il funzionamento in modalità automatica
• È possibile utilizzare il pulsante FAN SPEED (velocità ventola)
• È possibile passare manualmente a un'altra modalità di funzionamento.
ITALIANO
Page 52

16 Unità Interna
Istruzioni per Iʼuso
Funzionamento standard – Impostazione flusso dʼaria
Potenza del flusso d’aria: È possibile regolare in maniera
semplice la potenza desiderata del flusso d'aria.
Impostare la potenza del flusso d'aria
1
tramite il pulsante apposito.
• A ogni pressione del pulsante per la
potenza del flusso d’aria si passa
attraverso le modalità ‘debole → leggero → medio
leggero → medio → medio forte → forte → potente →
automatico’.
• La voce di menu potrebbe non essere selezionata
parzialmente in base alle funzioni dell’unità.
• Per ulteriori dettagli, fare riferimento al manuale
dell’unità.
Direzione del flusso: È possibile regolare in maniera
semplice la direzione desiderata del flusso d'aria.
Impostare la direzione desiderata del
1
flusso d’aria premendo il pulsante .
È possibile selezionare la direzione del
flusso (scegliendo tra confortevole
su/giù e destra/sinistra
→
su/giù) premendo il pulsante .
La voce parziale per la direzione del flusso d’aria
potrebbe non essere selezionata in base alle funzioni
dell’unità. Per ulteriori dettagli, fare riferimento al
manuale dell’unità.
→
→
destra/sinistra
Page 53

Manuale di Istruzioni 17
Istruzioni per Iʼuso
Funzionamento standard – Controllo impostazione temperatura/temperatura ambiente
• I valori impostabili sono da 18°C a 30°C per il motore di raffreddamento e da 16°… a 30°… per il motore di
riscaldamento.
• Il valore più adatto come differenza tra la temperatura della stanza e quella esterna è di 5°C.
• Temp. ambiente: indica la effettiva
temperatura ambiente.
• Imposta temperatura: indica la temperatura
che lʼutente desidera impostare.
h
A seconda del tipo di controller, la temperatura
desiderata può essere regolata di 0,5°C o 1°F.
ITALIANO
Impostazione temperatura
È possibile regolare in maniera semplice la
1
temperatura desiderata.
• Premere il pulsante per regolare la
temperatura desiderata.
: Ogni pressione incrementa la tempera
tura di 1C o 2F
: Ogni pressione riduce la temperatura di
1C o 2F
Raffreddamento
- La modalità di raffreddamento non funziona
se la temperatura desiderata è più alta della
temperatura ambiente. Abbassare la
temperatura desiderata.
Riscaldamento
- La modalità di riscaldamento non funziona
se la temperatura desiderata è più bassa
della temperatura ambiente. Aumentare la
temperatura desiderata.
Controllo della temperatura ambientale
Se si preme il pulsante , la temperatura
1
ambiente è visualizzata per 5 secondi.
Dopo circa 5 secondi, viene visualizzata di
nuovo la temperatura desiderata.
A seconda della posizione del telecomando,
la temperatura ambiente reale e quella
visualizzata potrebbero essere diverse.
Page 54

18 Unità Interna
Istruzioni per Iʼuso
• La funzione per la pulizia dellʼaria è aggiuntiva e potrebbe non essere indicata oppure non
funzionare sullʼunità parziale.
• La funzione per la pulizia dellʼaria è utilizzabile solo se lʼunità è in fase di funzionamento.
• Se si desidera un motore indipendente per la pulizia dell'aria, impostare la pulizia dellʼaria
premendo il pulsante del motore aggiuntivo sul motore del ventilatore.
Funzione secondaria – Depurazione plasma
Può essere utilizzata solo dai prodotti con la funzione di umidificatore.
Il metodo per impostare la pulizia dell’aria
Continuare a premere il pulsante fino
1
a quando l’icona non lampeggia.
Attiva o annulla la funzione Depurazione
2
plasma premendo il pulsante
(l’icona appare/scompare sul display
a seconda della
selezione).
Dopo l’impostazione, premere per
3
uscire.
❈ Dopo aver effettuato le impostazioni, se
non si preme alcun pulsante per 25 secondi,
si esce automaticamente dalla modalità di
configurazione.
❈ Se si esce senza premere il pulsante di
impostazione, il valore modificato non viene
preso in considerazione.
Page 55

Manuale di Istruzioni 19
Istruzioni per Iʼuso
Questa funzione serve per prevenire lʼutilizzo da parte di bambini o altri soggetti non autorizzati.
Impostazioni di funzionamento - Blocco di sicurezza
ITALIANO
Premere ripetutamente il pulsante
1
fino a quando l’icona non
lampeggia.
Spostandosi nell’area dell’icona
2
‘Configurazione’ usando il pulsante
, l’icona ‘Configurazione’
lampeggia; la funzione di blocco di
sicurezza viene configurata premendo
in quel momento il pulsante .
Quando si cancella la funzione di blocco,
3
spostandosi all’icona ‘Cancella’ premendo il
pulsante e poi il pulsante , si
annulla la funzione di blocco di sicurezza.
Premere il pulsante per uscire.
4
❈ Dopo aver effettuato le impostazioni, se non
si preme alcun pulsante per 25 secondi, si
esce automaticamente dalla modalità di
configurazione.
❈ Se si esce senza premere il pulsante di
impostazione, il valore modificato non viene
preso in considerazione.
Page 56

20 Unità Interna
Istruzioni per Iʼuso
Impostazioni di funzionamento – Modifica della temperatura
La funzione di cambio di temperatura consente di configurare il motore di raffreddamento e di riscaldamento
affinché cambi automaticamente la temperatura in base al valore definito dal motore dell'intelligenza artificiale.
Continuare a premere il pulsante
1
fino a quando l’icona
non lampeggia.
Premere il pulsante per modificare.
2
❈ Conversione del valore della
temperatura: 1~7
Premere il pulsante per
3
completare e attivare il processo di
configurazione
Premere il pulsante per uscire;
4
altrimenti, il sistema uscirà
automaticamente dopo 25 secondi
se non si preme alcun tasto.
❈ Se si esce senza premere il pulsante di
impostazione, il valore modificato non
viene preso in considerazione.
Page 57

Manuale dell'utente 21
ITALIANO
Istruzioni per Iʼuso
Questa funzione cancella lʼindicatore di pulizia del filtro interno.
Impostazioni di funzionamento – Cancellazione simbolo del filtro
• Quando il filtro è coperto di polvere, lʼefficienza raffreddamento/riscaldamento è ridotta ed è
necessario un maggiore consumo energetico. Pertanto, pulire il filtro ad ogni scadenza.
h Dopo un certo periodo di tempo, la segnalazione per la pulizia del filtro è cancellata
automaticamente senza che si debba eseguire l'apposita procedura.
Premere ripetutamente il pulsante
1
fino a quando l’icona non
lampeggia.
Quando lampeggia, premere
2
per annullare la visualizzazione.
Page 58

Istruzioni per Iʼuso
22 Unità Interna
Questa funzione regola lʼangolo di emissione del flusso dʼaria.
Impostazioni di funzionamento – Controllo angolo delle pale
Continuare a premere il pulsante
1
fino a quando l’icona non lampeggia.
Premere il pulsante per selezionare pala attiva:
2
1 / 2 / 3 / 4 / Tutte / Standard
Selezionare il numero di pale utilizzando i pulsanti
.
❈ Numero di pale: N. 1, 2, 3, 4, tutte, oppure standard
- La pala selezionata è in funzionamento.
- Verificare la pala in funzionamento.
- Per impostare l’angolo di tutte le pale, selezionare
'all' (tutte).
- Per tornare alle impostazioni di fabbrica, selezionare
‘standard’.
Selezionare l’angolo del flusso d’aria utilizzando il
3
pulsante , quindi premere il pulsante .
- I limiti dell'angolo del flusso d'aria possono essere
cambiati su 5 o 6 livelli in base al prodotto.
- Quando si seleziona 'standard’ come numero di pale,
l’angolo del flusso d’aria resta invariato.
Impostare gli angoli del flusso d'aria per le pale
4
restanti seguendo la stessa procedura.
❈ In base al tipo di prodotto, alcuni modelli
dispongono di 1 o 2 pale.
Premere il pulsante per uscire.
❈ Dopo aver effettuato le impostazioni, se
5
non si preme alcun pulsante per 60 secondi, si
esce automaticamente dalla modalità di configurazione.
❈ Se si esce senza premere il pulsante di impostazio-
ne, il valore modificato non viene preso in considerazione.
Premere il pulsante per completare e
6
attivare il processo di configurazione
(la funzione di direzione del flusso d’aria sarà
annullata indipendentemente dall’impostazione
dell’angolo delle pale).
Premere il pulsante per uscire;
7
altrimenti, il sistema uscirà automaticamente
dopo 25 secondi se non si preme alcun tasto.
Page 59

Istruzioni per Iʼuso
Manuale dell'utente 23
ITALIANO
Impostazioni di funzionamento – Modifica dellʼora corrente
Premere il pulsante di configurazio-
1
ne della funzione. Premendo
ripetutamente il pulsante di
configurazione della funzione,
ci si sposta al menu di configurazione
dell’orario. Viene visualizzata l’icona ‘Configurazione dell’orario' e data e orario
lampeggiano nell’area di visualizzazione
dell’orario.
Es.) cambiare l’orario corrente in ‘Lunedì
/10:20’.
Premere il tasto per regolare il giorno
2
corrente.
Premere il tasto per spostarsi alla
3
modalità di impostazione di AM/PM mattina/pomeriggio (il segmento ‘AM/PM’
lampeggia).
Impostare il valore AM/PM
4
(mattina/pomeriggio) premendo
il pulsante .
Premere il pulsante per spostarsi alla
5
modalità di impostazione delle ‘Ore’
(il segmento ‘Ore’ lampeggia).
Impostare l’ora premendo il pulsante
6
.
Page 60

Istruzioni per Iʼuso
24 Unità Interna
Premere il pulsante per spostarsi alla
7
modalità di impostazione dei ‘Minuti’ (il
segmento ‘Minuti’ lampeggia).
Selezionare i ‘minuti’ premendo il
8
pulsante .
Premere il pulsante per
9
terminare.
Durante la procedura, premere
10
per annullare e per uscire
dalla modalità di impostazione.
(in caso di uscita con informazioni
incomplete, si torna alle impostazioni
precedenti).
❈ Se si esce senza premere il pulsante di
impostazione, il valore modificato non
viene preso in considerazione.
Page 61

Istruzioni per Iʼuso
Manuale dell'utente 25
ITALIANO
Programmazione – Programmazione semplice
La pianificazione può essere impostata in unità di 1 ora, da 1 ora a 7 ore.
h Quando si configura la prenotazione semplice, il prodotto si avvia o si arresta automaticamente
allʼorario impostato.
Premere il pulsante per
1
accedere alla modalità di programmazione
(il segmento lampeggia).
Es.) Impostare l’ora di programmazione
Premere il pulsante per impostare
2
l'orario di prenotazione.
Premere il pulsante per terminare la
3
configurazione.
Premere il pulsante per uscire.
4
❈ Dopo aver effettuato le impostazioni, se
non si preme alcun pulsante per 25
secondi, si esce automaticamente dalla
modalità di configurazione.
❈ Se si esce senza premere il pulsante di
impostazione, il valore modificato non
viene preso in considerazione.
Page 62

Istruzioni per Iʼuso
26 Unità Interna
Programmazione: Prenotazione settimanale
È possibile impostare la programmazione quotidianamente su base settimanale.
La prenotazione settimanale resta attiva fin quando non viene cancellata.
Spostarsi alla modalità di prenotazione premendo ripetutamente il pulsante di pianificazione.
1
❈ È possibile configurare due pianificazioni settimanali al giorno, e fino a quattordici a settimana.
Ad esempio, per impostare (martedì mattina acceso alle 11:30 ~ spento alle 12:30 del
pomeriggio), bisogna seguire i passi descritti nel seguito.
Spostarsi su ‘Settimanale’ premendo
2
ripetutamente il pulsante di pianificazione.
‘Settimanale’ lampeggia.
Selezionare prenotazione settimanale ¿ o
3
prenotazione settimanale ¡ usando il
pulsante .
❈ È possibile impostare due pianificazioni
al giorno, la pianificazione settimanale 1
e la pianificazione settimanale 2.
Spostarsi alla sezione di configurazione
4
della ‘Data’ usando il pulsante .
Se ‘Data’ lampeggia, configurare la data.
Impostare la data da lunedì a domenica.
Spostarsi nella sezione di configurazione
5
‘AM/PM’ (mattina/pomeriggio) usando il
pulsante .
Spostarsi alla sezione di configurazione
6
dell’ora per l’accensione usando il pulsante
.
- Si tratta dell’orario in cui il condizionatore
d’aria verrà acceso.
Cambiare l’orario usando il pulsante .
7
È possibile impostare l’ora tra 0 e 12.
Spostarsi alla sezione di configurazione dei minuti per l'accensione usando il pulsante .
8
Se ‘Minuti’ lampeggia, configurare i minuti usando il pulsante .
9
Page 63

Istruzioni per Iʼuso
Manuale dell'utente 27
ITALIANO
Spostarsi nella sezione di configurazione
h L' unità interna è attivata alla temperatura desiderata se essa è configurara usando il pulsante alta/bassa durante l'impostazione
dell'ora di uso settimanale (campo scelta temperatura: 18℃~30℃).
- Quando la temperatura desiderata non è impostata, essa viene inserita automaticamente con la temperatura desiderata dell'utilizzo
precedente.
10
‘AM/PM’ (mattina/pomeriggio) per lo
spegnimento usando il pulsante .
- La configurazione di AM/PM
(mattina/pomeriggio) è uguale a quanto già
visto.
Spostarsi nella sezione di configurazione
11
delle ‘Ore’ per lo spegnimento usando il
pulsante Destra.
- Si tratta dell’orario in cui il
condizionatore d’aria verrà spento.
- Se ‘Ore’ lampeggia, configurare l’ora.
❈ Impostare le ore e i minuti in maniera
analoga a quanto già fatto per l’orario
di accensione.
Terminata la configurazione della pianificazione settimanale, premere il pulsante Configurazione/
12
cancellazione.
La configurazione della pianificazione settimanale per il giorno scelto è terminata.
Con lo stesso metodo indicato, è possibile configurare gli altri giorni della settimana.
13
Se l'orario di accensione e quello di spegnimento coincidono, la funzione di pianificazione non
funzionerà.
Spiegazione della pianificazione settimanale
Numero della
pianificazione
Orario di accensione
Barra di sottolineatura: indica che c’è una pianificazione settimanale
per il giorno corrispondente
Orario di spegnimento
Page 64

Istruzioni per Iʼuso
28 Unità Interna
Programmazione – Programmazione sleep
La pianificazione in modalità sleep consente di avviare e fermare il condizionatore dʼaria dopo un certo
periodo di tempo. Se collegato a un ventilatore ed è impostata la programmazione della modalità sleep,
quando il sistema entra in modalità sleep al raggiungimento dellʼorario prefissato, viene cancellata solo la
programmazione della modalità sleep.
È necessario programmare la funzione sleep a un orario adeguato (un raffreddamento eccessivo potrebbe
arrecare danni alla salute).
• Dal momento che la temperatura viene regolata automaticamente per garantire un raffreddamento dell'aria
confortevole, potrebbe esserci differenza tra la temperatura desiderata del telecomando e la temperatura
desiderata del corpo del condizionatore dʼaria.
• La pianificazione in modalità sleep funziona come spegnimento pianificato per quelle unità la cui temperatura
non può essere regolata per passi di 0,5°C.
AVVISO
Premere il pulsante per accedere alla
1
modalità di programmazione.
Es.) Impostare l’ora di sleep su ‘3’.
Premere ripetutamente il pulsante per accedere
2
alla modalità di impostazione della programmazione
SLEEP (il segmento lampeggia).
Premere il pulsante per impostare l'orario di
3
prenotazione.
La modalità Sleep è disponibile da 1 a 7 ore.
Premere il pulsante per terminare la
4
configurazione.
La prenotazione è conclusa.
Premere il pulsante per uscire.
5
❈ Dopo aver effettuato le impostazioni, se non si
preme alcun pulsante per 60 secondi, si esce
automaticamente dalla modalità di configurazione.
❈ Se si esce senza premere il pulsante di impostazio-
ne, il valore modificato non viene preso in
considerazione.
- Se la pianificazione è configurata, 'Sleep' viene
visualizzato nella parte più bassa dello schermo
LCD.
Terminata la configurazione della pianificazione in
6
modalità ‘Sleep’, il condizionatore d’aria si avvierà o si
fermerà all'orario indicato.
Page 65

Istruzioni per Iʼuso
Manuale dell'utente 29
ITALIANO
Programmazione – Programmazione ON (attiva)
Lʼunità è accesa automaticamente all'orario di pianificazione impostato.
Premere il pulsante .
1
Es.) Impostare l’ora prenotazione per
l’accensione su ‘10:20 AM’.
Premere il pulsante per
2
accedere alla modalità di impostazione della programmazione per
l’accensione
Premere il pulsante per impostare
3
AM/PM.
Premere il pulsante per la modalità di
4
impostazione delle ‘Ore’.
Quando l’icona delle ore lampeggia,
impostare l’orario.
L’intervallo consentito è 1~12.
Premere il pulsante per spostarsi alla
5
modalità di impostazione dei minuti.
Quando l’icona dei minuti lampeggia,
impostare i minuti. L’intervallo consentito
è 00~59.
Premere il pulsante per terminare la
6
configurazione.
Page 66

Istruzioni per Iʼuso
30 Unità Interna
Premere il pulsante per uscire.
7
❈ Dopo aver effettuato le impostazioni, se
non si preme alcun pulsante per 25
secondi, si esce automaticamente dalla
modalità di configurazione.
❈ Se si esce senza premere il pulsante di
impostazione, il valore modificato non
viene preso in considerazione.
- Se la pianificazione è impostata, nella
parte più bassa dello schermo LCD viene
visualizzato 'Acceso'; il condizionatore
d'aria si attiverà all'orario impostato.
- Se la pianificazione è cancellata,
l'indicazione 'Acceso' sparisce.
Page 67

Istruzioni per Iʼuso
Manuale dell'utente 31
ITALIANO
Programmazione – Programmazione OFF (disabilitata)
Lʼunità è spenta automaticamente all'orario di pianificazione impostato.
Premere il pulsante .
1
Es.) Impostare l’orario di spegnimento
alle ’10:20 AM’.
Premere ripetutamene il pulsante
2
per accedere alla modalità di
impostazione della programmazione
per lo spegnimento
(il segmento lampeggia).
Premere il pulsante per impostare
3
AM/PM.
Premere il pulsante per spostarsi alla
4
modalità di impostazione delle ore.
Quando l’icona delle ore lampeggia,
impostare l’orario.
L’intervallo consentito è 1~12.
Premere il pulsante per spostarsi alla
5
modalità di impostazione dei minuti.
Quando l’icona dei minuti lampeggia,
impostare i minuti. L’intervallo consentito è
00~59.
Premere il pulsante per terminare la
6
configurazione.
Page 68

Istruzioni per Iʼuso
32 Unità Interna
Premere il pulsante per uscire.
7
❈ Dopo aver effettuato le impostazioni, se
non si preme alcun pulsante per 25
secondi, si esce automaticamente dalla
modalità di configurazione.
❈ Se si esce senza premere il pulsante di
impostazione, il valore modificato non
viene preso in considerazione.
- Se la pianificazione è impostata, nella
parte più bassa dello schermo viene
visualizzato ‘Spento'; il condizionatore
d'aria si spegnerà all'orario impostato.
- Se la pianificazione è cancellata,
l'indicazione 'Spento' sparisce.
Page 69

Istruzioni per Iʼuso
Manuale dell'utente 33
ITALIANO
Programmazione: Impostazione vacanze
Si disattiva automaticamente nel giorno pianificato.
Premere il pulsante .
1
Si accede alla modalità di configurazione della pianificazione.
Spostarsi su ‘Festività’ premendo ripetuta-
2
mente il pulsante .
Spostarsi alla sezione di configurazione della
3
‘Data’ per cui si desidera impostare la festività
usando il pulsante .
Scegliere o cancellare la festività usando il
4
pulsante oppure il pulsante .
Ad esempio, quando si imposta
lunedì/venerdì come festività
- Le lettere ‘lunedì’, ‘venerdì’ spariscono.
Premere il pulsante per terminare la
5
configurazione delle festività.
❈ Quando si arriva a un giorno segnalato
come festività, il condizionatore d’aria si
ferma automaticamente. Fin quando resta
attiva l'indicazione della festività e non si
procede alla cancellazione, il condizionatore d'aria si spegnerà entro un'ora anche se
attivato manualmente.
Page 70

34 Unità Interna
Manutenzione e assistenza
Dispositivo di
regolazione
Uscita aria
Guida
Filtro aria
Ingresso aria
B
e
n
z
e
n
e
S
C
O
U
R
I
N
C
L
B
A
R
G
E
S
I
N
N
E
R
Re
m
ote
C
ont
r
o
ll
er
T
E
MP
filtro al plasma
1. Smontare i filtri aria.
p
Afferrare la linguetta e tirarla delicatamente
in avanti per smontare il filtro.
2. Rimuovere il filtro al plasma.
3. Pulire il filtro aria con un aspirapolvere
oppure lavarlo con acqua.
p Se è presente molto sporco, utilizzare
un detergente neutro in acqua tiepida.
p Il lavaggio con acqua calda (50°C o più)
può provocare deformazioni.
4. Dopo il lavaggio con acqua,
asciugare bene lʼunità allʼombra.
p
Non esporre il filtro aria alla luce del
sole diretta o a forti fonti di calore per
asciugarlo.
5. Installare il filtro dell'aria e al plasma.
p
Non utilizzare le seguenti sostanze per la pulizia:
• Acqua a una temperatura superiore a 40°C.
Ciò potrebbe
provocare
deformazioni e/o
scolorimenti.
• Sostanze volatili.
Ciò potrebbe
danneggiare le
superfici dl
condizionatore.
Filtri aria
I filtri aria dietro la griglia anteriore devono essere
controllati e puliti ogni 2 settimane, o più spesso, se
necessario.
Quando si smonta il filtro aria, non toccare
le parti metalliche dellʼunità interna.
Queste potrebbero infatti provocare lesioni fisiche.
AVVISO
Manutenzione e assistenza
Griglia, scatola e dispositivo di regolazione
p Prima di effettuare la pulizia dellʼunità, spegnere
lʼimpianto. Per la pulizia adoperare un panno morbido e
asciutto. Non usare candeggina o sostanze abrasive.
Prima di pulire lʼunità interna, staccare
lʼalimentazione.
NOTA
Spegnere l'unita prima di manovrare l'apparecchio.
AVVISO
Chassis TU: ripiano 4EA
Page 71

Manuale di Istruzioni 35
ITALIANO
Manutenzione e assistenza
AVVERTENZA
AVVERTENZA
Informazioni utili
Filtri aria e risparmio energetico.
Se i filtri aria si intasano, la capacità di
raffreddamento diminuisce, e il 6% dellʼenergia usata
per far funzionare il condizionatore verrà sprecata.
Disattivazione del condizionatore per un
lungo periodo di inattività.
Attivazione del condizionatore dopo un lungo
periodo di inattività.
Far funzionare il condizionatore nelle
seguenti modalità per 2-3 ore.
• Tipo di funzionamento: Funzionamento
ventola.
•
Questo permette di asciugare i meccanismi interni.
girare lʼinterruttore in posizione OFF.
Quando il condizionatore viene disattivato per un
lungo periodo, girare lʼinterruttore in posizione OFF.
Potrebbe accumularsi dello sporco con conseguente
rischio di incendi.
Pulire il filtro aria e montarlo sullʼunità
interna.
Verificare che la bocchetta di
aspirazione e di uscita aria dellʼunità
interna/esterna non siano ostruite.
Verificare che il filo di massa sia
collegato correttamente. Potrebbe
essere collegato al lato unità interna.
Non raffreddare
eccessivamente il locale
Può nuocere alla salute e
provoca sprechi di elettricità.
Tenere chiuse tapparelle e
tende
Non lasciare che la luce
diretta del sole entri nel locale
quando è in funzione il
condizionatore.
Mantenere una temperatura
ambiente uniforme.
Regolare la direzione
orizzontale e verticale del
flusso dʼaria per ottenere una
temperatura uniforme in tutto
il locale.
Assicurarsi che le porte
e le finestre siano ben chiuse.
Evitare di aprire porte e
finestre per mantenere lʼaria
fresca allʼinterno del locale.
Pulire il filtro aria
regolarmente
Lʼeventuale ostruzione del filtro
aria riduce il flusso dʼaria e
diminuisce la capacità di
raffreddamento e
deumidificazione. Pulire il filtro
almeno ogni tre settimane.
Aerare il locale di tanto in
tanto.
Dato che le finestre sono
chiuse quando è in funzione il
condizionatore, è buona
norma aerare il locale
aprendo le finestre ogni tanto.
Disattivazione del condizionatore per un lungo periodo di inattività.
Punti dei funzioni
Page 72

36 Unità Interna
Manutenzione e assistenza
?
Prima di richiedere lʼintervento di riparatori o manutentori, verificare le seguenti condizioni.
Se il problema persiste, contattare il rivenditore.
Suggerimenti per la soluzione dei problemi ed evitare inutili richieste di intervento.
• È stato commesso un
errore nella gestione
del timer?
• Ci sono fusibili
bruciati, oppure
lʼinterruttore si è
bloccato?
• Controllare che non
si tratti di odore di
muffa proveniente
dalle pareti, da
tappeti, mobili od
oggetti di stoffa
presenti nel locale.
• La condensa si forma
quando il flusso
dʼaria del
condizionatore
raffredda lʼaria calda
dellʼambiente.
• Si tratta di una
protezione speciale
del meccanismo.
• Attendere circa tre
minuti, dopodiché
lʼunità dovrebbe
riprendere a
funzionare.
Il condizionatore non
funziona.
Nel locale cʼè un
odore strano.
Sembra che ci siano
perdite di condensa
dal condizionatore.
Il condizionatore non
funziona per circa 3
minuti dopo averlo
acceso.
Lʼunità non raffredda
o non riscalda
efficacemente.
Il condizionatore è
rumoroso.
Si avvertono
scricchiolii.
Il display del dispositivo
di regolazione è poco
visibile o non funziona
affatto.
• Il filtro aria è
sporco?Consultare il
paragrafo sulla pulizia del
filtro.
• La temperatura ambiente
era probabilmente molto
alta quando è stato
acceso il condizionatore.
Lasciare che si raffreddi.
• La temperatura è stata
impostata in maniera
sbagliata?
• Le bocchette di
aspirazione o erogazione
dellʼaria dellʼunità interna
sono ostruite?
• Se si avverte un
rumore come
dellʼacqua che
scorre:
-è il rumore del freon
che scorre allʼinterno
dellʼunità
condizionatore.
• Se si avverte un
rumore di aria
compressa liberata
nellʼatmosfera:
-è il rumore
dellʼacqua di
deumidificazione
trattata allʼinterno
dellʼunità
condizionatore.
•
Gli scricchiolii sono
causati
dallʼespansione/restrizion
e del pannello anteriore,
ecc. dovuta agli sbalzi di
temperatura.
• Dopo aver pulito il filtro,
premere il pulsante del
timer e quello del dispositivo
di regolazione cablato
contemporaneamente per 3
secondi.
• Le batterie sono
esaurite?
• Le batterie sono
inserite con posizione
(+) e (-) invertita?
IMPERMEABILITÀ: Il lato esterno del condizionatore è IMPERMEABILE.
Il lato interno non è impermeabile e quindi non deve essere esposto a
eccessive infiltrazione dʼacqua.
NOTA
Il LED della spia
Filtro è acceso.
(Tipo a griglia)
Prima di chiamare lʼassistenza…
Page 73

www.lg.com
MANUAL DE PROPIETARIO
AIRE ACONDICIONADO
Antes de operar su producto, lea atentamente este manual
de instrucciones y guárdelo para futuras referencias.
TIPO: TIPO CASSETE-1 DRECCIÓN (TIPO ARTE)
ESPAÑOL
Page 74

Aire acondicionado de Tipo Cassete Manual de usuario
ÍNDICE
PARA SU REGISTRO
Escriba aquí el modo y los números de serie :
Nº modelo
Nº serie
Puede encontrarlos en la etiqueta de la parte lateral de
cada unidad.
Nombre del establecimiento
Fecha de compra
n
Grape su recibo a esta página en caso de que lo
necesite para demostrar la fecha de compra para
servicios de garantía.
LEA ESTE MANUAL
En el interior encontrará muchos consejos útiles sobre cómo
utilizar y mantener debidamente su aparato de aire
acondicionado. Sólo unos pequeños cuidados preventivos por
su parte le podrán ahorrar mucho tiempo y dinero a lo largo de
la vida útil de su aparato de aire acondicionado. Encontrará
muchas respuestas a problemas comunes en la tabla de
consejos para la resolución de pequeños problemas. Si revisa
primero nuestra tabla de Consejos para la resolución de
problemas, quizás no debe llamar al equipo de servicio.
PRECAUCIONES
• Contacte con el técnico de servicio autorizado para reparar o
mantener esta unidad.
• Póngase en contacto con el instalador para proceder a la
instalación de este aparato.
• Este aparato de aire acondicionado no está diseñado para ser
utilizado por niños de corta edad ni por personas disminuidas
sin supervisión.
• Deberían supervisarse a los niños de corta edad para asegurarse
de que no juegan con el aparato de aire acondicionado.
• Cuando ha de recambiarse el cable de alimentación, sólo
personal autorizado llevará a cabo las tareas de recambio y
utilizando únicamente piezas de recambio.
• Las tareas de instalación deben realizarse de acuerdo con el
Código Eléctrico Nacional y sólo puede llevarlas a cabo personal
cualificado y autorizado.
Precauciones de seguridad ..3
antes del funcionamiento......7
Instrucciones de manejo .......8
Mantenimiento y servicio ....34
Antes de llamar al servicio de
reparaciones.......................36
2 Unidad interior
Page 75

Precauciones de seguridad
Manuale di Istruzioni 3
ESPAÑOL
Para evitar lesiones al usuario o a otras personas y daños a la propiedad, siga estas
instrucciones.
n Una operaciʼon incorrecta por ignorar las instrucciones provocará lesiones o daños. La
seriedad se clasifica por las siguientes indicaciones.
n Significados de los símbolos utilizados en este manual.
ADVERTENCIA
PRECAUCIÓN
Este símbolo indica la posibilidad de muerte o de seria lesión.
Este símbolo indica sólo la posibilidad de lesión o daño a la propiedad.
Prohibido.
Recuerde seguir las instrucciones.
ADVERTENCIA
n Instalación
No utilice un interruptor automático
defectuoso o de valor nominal inferior
al correspondiente. Utilice un circuito
específico para este aparato.
• Existe riesgo de incendio o
descarga eléctrica.
Para trabajos eléctricos, póngase en
contacto con el distribuidor, vendedor,
técnico cualificado o centro de
asistencia técnica autorizado.
• No desmonte ni repare el
aparato. Existe riesgo de
incendio o descarga eléctrica.
Realice siempre la conexión
del aparato a tierra.
• Existe riesgo de incendio o
descarga eléctrica.
Instale correctamente el panel y
la cubierta de la caja de control.
• Existe riesgo de incendio o
descarga eléctrica.
Instale siempre un circuito y
un interruptor específico.
• Un cableado o instalación
inadecuados pueden provocar
un incendio o una descarga
eléctrica.
Utilice el interruptor o fusible
de valor nominal adecuado.
• Existe riesgo de incendio o
descarga eléctrica.
Precauciones de seguridad
No modifique ni extienda el
cable de alimentación.
• Existe riesgo de incendio o
descarga eléctrica.
No instale, retire ni vuelva a
instalar la unidad por sí
mismo (cliente).
• Existe riesgo de incendio,
descarga eléctrica , explosión o
lesiones.
Tenga cuidado al desembalar
e instalar el aparato.
•
Los bordes afilados podrían provocar
lesiones. Tenga especial cuidado con
los bordes de la caja y las aletas del
condensador y evaporador.
Page 76

n Operación
Para la instalación, póngase en
contacto siempre con su vendedor o
centro de asistencia técnica autorizado.
• Existe riesgo de incendio,
descarga eléctrica, explosión o
lesiones.
No instale el aparato en una
superficie de instalación
insegura.
• Podría causar lesiones,
accidentes o daños en el
aparato.
Asegúrese de que el soporte
de instalación no se deteriora
con el tiempo.
• Si el soporte cae, el aire
acondicionado también puede
caer, causando daños
materiales, avería del aparato y
lesiones personales.
No enchufe ni desenchufe la
clavija de alimentación
durante el funcionamiento
• Existe riesgo de incendio o
descarga eléctrica.
No toque (ni maneje) el
aparato con las manos
mojadas.
• Existe riesgo de incendio o
descarga eléctrica.
No coloque una estufa ni
otros aparatos cerca del
cable de alimentación.
• Existe riesgo de incendio y
descarga eléctrica.
No deje funcionando el aire
acondicionado durante mucho tiempo
cuando la humedad sea muy alta y haya
una puerta o ventana abierta.
• Podría condensarse la humedad
y mojar o dañar el mobiliario.
Asegúrese de que el cable de
alimentación no pueda estirarse
o dañarse durante el
funcionamiento.
• Existe riesgo de incendio o
descarga eléctrica.
No coloque nada sobre el
cable de alimentación.
• Existe riesgo de incendio o
descarga eléctrica.
No permita que entre agua
en las piezas elèctricas.
• Existe riesgo de incendio, avería
del aparato o descarga eléctrica.
No almacene ni utilice gas
inflamable o combustibles
cerca del aparato.
• Existe riesgo de incendio o avería
del aparato.
No utilice el aparato en un
espacio cerrado durante un
periodo prolongado de tiempo.
• Podría producirse una falta de
oxígeno.
Si hay fugas de gas, apague
el gas y abra una ventana
para ventilar antes de
encender el aparato.
• No utilice el teléfono ni encienda o
apague los interruptores.
Existe riesgo de explosión o
incendio.
Si oye algún ruido extraño, huele o ve
salir humo del aparato. Desconecte el
interruptor automático o desconecte el
cable de alimentación.
• Existe riesgo de incendio o
descarga eléctrica.
Detenga el funcionamiento y cierre la
ventana en caso de tormenta o huracán. Si
es posible, retire el aparato de la ventana
antes de que llegue el huracán.
• Existe riesgo de daños materiales,
avería del aparato o descarga
eléctrica.
Precauciones de seguridad
4 Unidad interior
Page 77

No abra la parrilla de entrada del aparato
mientras está en funcionamiento. (No
toque el filtro electrostático, si la unidad
dispone del mismo).
• Existe riesgo de lesiones
personales, descarga eléctrica o
avería del aparato.
Si el aparato se moja (inundado
o sumergido), póngase en
contacto con un centro de
asistencia técnica autorizado.
• Existe riesgo de incendio o
descarga eléctrica.
Tenga cuidado de que no
entre agua en el aparato.
• Existe riesgo de incendio,
descarga eléctrica o daños en el
aparato.
Ventile el aparato de vez en cuando si lo
utiliza junto con una estufa, etc.
• Existe riesgo de incendio o descarga eléctrica.
Desconecte la alimentación principal al limpiar o
realizar el mantenimiento del aparato.
• Existe riesgo de descarga eléctrica.
Cuando no vaya a utilizar el aparato durante
un largo periodo de tiempo, desenchufe la
clavija de alimentación o apague el
interruptor automático.
• Existe riesgo de daños en el aparato o avería, o
funcionamiento intempestivo.
Asegúrese de que nadie se siente o apoye
sobre la unidad exterior.
• Podrían producirse lesiones personales y daños en el
aparato.
n Instalación
PRECAUCIÓN
Compruebe siempre las fugas de
gas (refrigerante) después de la
instalación o reparación del aparato.
• Niveles bajos de refrigerante
pueden producir una avería del
aparato.
Instale la manguera de drenaje
para asegurarse de que el agua
se drena correctamente.
• Una mala conexión puede causar
fugas de agua.
Instale el aparato bien
nivelado.
• Para evitar las vibraciones o fugas
de agua.
No instale el aparato donde el ruido o el
aire caliente de la unidad exterior
pueda molestar a los vecinos.
• Podría tener problemas con los
vecinos.
Levante y transporte el
aparato entre dos o más
personas.
• Evite lesiones personales.
No instale el aparato donde
quede expuesto directamente al
viento del mar (rocío salino).
•
Podría causar corrosión en el aparato. La
corrosión, particularmente en las aletas del
condensador y del evaporador, podría
causar un funcionamiento defectuoso del
aparato o un funcionamiento ineficaz.
Manuale di Istruzioni 5
Precauciones de seguridad
ESPAÑOL
Page 78

Precauciones de seguridad
6 Unidad interior
n Operación
No se exponga directamente al aire frío
durante largos periodos de tiempo. (No se
siente en la corriente de aire).
• Podría ser perjudicial para su salud.
No utilice este aparato para fines específicos, como la conservación de
alimentos, obras de arte, etc. Se trata de un aire acondicionado de
consumo, no de un sistema de refrigeración de precisión.
• Existe riesgo de daños o pérdidas materiales.
No bloquee la entrada ni la
salida del flujo de aire.
• Podría causar una avería en el
aparato.
Utilice un paño suave para
limpiar. No utilice detergentes
abrasivos, disolventes, etc.
•
Existe riesgo de incendio, descarga eléctrica
o daños en las partes de plástico del aparato.
No toque las partes de metal del
aparato al sacar el filtro del aire.
¡Son muy afiladas!
• Existe riesgo de lesiones
personales.
No se suba ni coloque nada
sobre el aparato. (unidades
exteriores)
• Existe riesgo de lesiones
personales y avería del aparato.
Inserte siempre el filtro correctamente.
Limpie el filtro cada dos semanas o
más a menudo, si fuera necesario.
•
Un filtro sucio reduce la eficacia del aire
acondicionado y puede producir un
funcionamiento defectuoso o daños.
(Tipo de rejilla)
No introduzca las manos u otros objetos en la
entrada o salida del aire acondicionado
mientras el aparato esté en funcionamiento.
• Hay partes afiladas y móviles que
podrían producir lesiones
personales.
No beba el agua que drena
el aparato.
• No es potable y podría causar
graves problemas en la salud.
Utilice un taburete o
escalera firme cuando limpie
o realice el mantenimiento
del aparato.
• Tenga cuidado y evite lesiones
personales.
Sustituya todas las pilas del mando
a distancia por pilas nuevas del
mismo tipo. No mezcle pilas nuevas
y viejas o diferentes tipos de pilas.
• Existe riesgo de incendio o
explosión.
No cargue ni desmonte las
pilas. No tire las pilas al
fuego.
• Podrían arder o explotar.
Si entra líquido de las pilas en
contacto con la piel o ropa,
lávela inmediatamente con agua.
No utilice el mando a distancia si
las pilas tienen fugas.
• Los productos químicos de las
pilas podrían causar quemaduras
u otros perjuicios a la salud.
Si el líquido de las pilas alcanzara
su boca, cepille sus dientes y
consulte a un médico.No utilice el
mando a distancia si las pilas han
experimentado fugas.
•
Los productos químicos de las
pilas podrían causar quemaduras
u otros perjuicios a la salud.
Page 79

Manuale di Istruzioni 7
Antes del Funcionamiento
Antes del Funcionamiento
1. Para la instalación del aparato, póngase en contacto con un especialista.
2. Utilice un circuito específico.
1. Quedar expuesto al flujo directo del aire durante un prolongado espacio de tiempo puede resultar
perjudicial para su salud. Las personas (así como animales o plantas) no deben quedar
expuestas a ese flujo directo durante mucho tiempo.
2. Debido a la posibilidad de que se produzca una escasez de oxígeno, ventile la habitación cuando
se utilice el aparato al mismo tiempo que estufas u otros aparatos de calefacción.
3. No utilice este acondicionador de aire para otros fines distintos a los especificados (por ejemplo,
para el mantenimiento de dispositivos de precisión, para conservar alimentos, para animales o
plantas y objetos de arte). Tales usos podrían ser perjudiciales para todos ellos.
1. Cuando desmonte el filtro, no toque las partes metálicas de la unidad . Cuando se manipulan
cantos metálicos afilados se pueden provocar heridas.
2. No utilice agua para limpiar el interior del acondicionador de aire. La exposición al agua puede
destruir el aislamiento, lo que podría provocar descargas eléctricas.
3. Cuando limpie la unidad, asegúrese primero de que el aparato y el interruptor automático están
desconectados. El ventilador gira a velocidades muy altas durante el funcionamiento. Existe la
posibilidad de provocar lesiones si se pone en marcha la unidad accidentalmente mientras se
están limpiando las partes internas de la unidad.
Para trabajos de reparación y mantenimiento, póngase en contacto con su concesionario del
servicio técnico autorizado.
Preparación para el Funcionamiento
Utilización
Limpieza y Mantenimiento
Servicio Técnico
ESPAÑOL
Page 80

Instrucciones de manejo
Nombre y funciones del mando a distancia
Instrucciones de manejo
8 Unidad interior
※ Dependiendo del tipo de equipo, algunas funciones podrían no estar operativas ni mostrarse.
※ Mostrará un valor extraño de la temperatura de la habitación si no se ha conectado el mando a distancia.
Modelo : PQRCVSL0 (Color negro)
PQRCVSL0QW (Color blanco)
1. Pantalla de indicación de funcionamiento
2. Botón de ajuste de temperatura
• No selecciona la temperatura de la
habitación, sino la temperatura del aire de
salida.
3. Botón de velocidad del ventilador
• La velocidad del ventilador tiene 3 pasos.
• El paso intermedio y bajo es el mismo
4. BOTÓN ON/OFF (ENCENDIDO/APAGADO)
5. Botón de selección de modo de operación
6. Receptor del mando a distancia
•
Algunos productos no reciben señales inalámbricas.
7. Botón de caudal de aire
8. Botón de subfunciones
9. Botón de configuración de función
10. Botón de ventilación
11. Reserva
12. Botón arriba, abajo, izquierda, derecha
• Para comprobar la temperatura interior, pulse el
botón .
13. Botón de temperatura de la habitación
• Muestra sólo la temperatura de la habitación
detectada por el mando a distancia.
• No hay control de la temperatura de la habitación.
•
En el caso de la unidad de entrada de aire, muestra
sólo la temperatura alrededor del mando a distancia.
14. Botón ajuste/cancelar
15. Botón Salir
1
10
9
8
7
11
12
13
14
15
Coloque la etiqueta de información en el interior de la puerta.
Elija el idioma adecuado para su país.
2
3
4
5
6
Page 81

Instrucciones de manejo
Operación del mando a distancia
(Accesorios)
1. Botón de plasma (opcional)
Utilizado para configurar el inicio o cese de la
función de purificación por plasma.
2. Botón jet cool (enfriamiento rápido)
El enfriamiento rápido opera a alta velocidad del ventilador.
3. Botón de selección del modo de funcionamiento
Empleado para seleccionar el modo de funcionamiento.
4. Botón de configuración de funcionamiento
Utilizado para establecer o borrar la función de
limpieza automática o inteligente.
5. Botón luminosidad de la lcd (opcional)
Utilizado para configurar la luminosidad de la LCD.
6. Botón de limpieza inteligente (opcional)
Utilizado para comenzar o detener la función de
limpieza inteligente.
7. Botón borrar todo
Utilizado para borrar todos los temporizadores.
8. Botón de ajuste de la temperatura ambiente
Utilizado para configurar la temperatura ambiente.
9. Botón ON/OFF (de encendido/apagado)
Utilizado para encender/apagar la unidad.
10. Botón de selección de la velocidad del
ventilador interior
Utilizado para seleccionar la velocidad del ventilador
en cuatro pasos: bajo, medio, alto y CAOS.
11. Botón de giro automático
Empleado para iniciar o cesar el movimiento de las
rejillas y configurar la dirección arriba/abajo
deseada del flujo de aire.
12. Botón de control de dirección del flujo de aire
horizontal (opcional)
Utilizado para configurar la dirección horizontal
deseada del flujo de aire.
13. Temporizador y botón de ajuste temporal
Utilizados para configurar el tiempo de inicio o detener
el funcionamiento y activar el modo de reposo.
14. Botón de comprobación de temperatura
ambiente
Utilizado para comprobar la temperatura ambiente.
15. Botón alternador entre °C/°F
Utilizado para cambiar la lectura de temperatura de
Centígrados a Fahrenheit.
16. Botón reset
Utilizado para reiniciar el mando a distancia.
Manuale di Istruzioni 9
ESPAÑOL
8
1
2
3
4
5
6
7
9
10
11
12
13
14
15
16
PQWRHDF0 (Bomba de calor)
PQWRCDF0 (Sólo aire frío)
Modo funcionamiento
Modo enfriamiento
Modo de funcionamiento automático o cambio automático
Modo deshumidificación
Modelo calefacción
Modo ventilador
• Modelo enfriamiento ( ), modelo bomba
de calor ( )
Page 82

Instrucciones de manejo
Funcionamiento forzado
Función de reinicio automático
Consejos para el piloto de señal del filtro (Tipo de rejilla)
Funcionamiento forzado
(Interruptor táctil)
Si tras un apagón de electricidad el suministro eléctrico se restablece, la función de reinicio automático configura
de forma automática los parámetros de funcionamiento establecidos previamente.
1. El piloto (LED) de señal de filtro está encendido.
2. Si el piloto de señal de filtro está encendido, limpie el filtro.
3. Cuando haya limpiado el filtro, pulse al mismo tiempo el botón del temporizador y el del mando a distancia
cableado durante 3 segundos. A continuación se apagará el piloto de señal de filtro.
Procedimientos de manejo cuando no puede usarse el
mando a distancia.
Pulse el interruptor táctil (funcionamiento forzado)
durante 2 segundos. Si desea detener el funcionamiento,
pulse de nuevo el interruptor táctil.
Cuando la corriente eléctrica vuelva tras un corte del
suministro en el modo de funcionamiento forzado, las
condiciones de funcionamiento se configurarán como sigue:
Durante el funcionamiento forzado, continúa el modo inicial.
Modelo de bomba de calor
Modelo refrigeración
Temp. hab. Temp. hab.
> Temp. selecc. -2°C > Temp. selecc. -2°C
Modo operativo Refrigeración Refrigeración Calor
Velocidad FAN interior Alta Seleccionar disponible Seleccionar disponible
Selección de temperatura
22°C Seleccionar disponible Seleccionar disponible
10 Unidad interior
Page 83

Instrucciones de manejo
Manuale di Istruzioni 11
ESPAÑOL
Funcionamiento estándar – Refrigeración estándar
h Configuración de rango de temperatura: 18°C ~
30°C (64°F ~ 86°F)
Refresca la habitación con un aire limpio y agradable.
Pulse el botón para activar
1
la unidad interior.
Pulse el botón para
2
seleccionar el modo de
funcionamiento Refrigeración.
Ajuste la temperatura deseada
3
pulsando los botones .
Pulse el botón para
comprobar la temperatura
ambiente.
Cuando configure la
temperatura deseada en un
valor superior al de la
temperatura ambiente, sólo se
expulsará aire de ventilación en
vez de aire de refrigeración.
Page 84

12 Unidad interior
Instrucciones de manejo
Permite que la habitación se enfríe al aplicar aire fresco agradable con gran rapidez
Suministra aire templado a la habitación.
Funcionamiento estándar – Modo calefacción
¿Qué significa Máxima refrigeración?
• Temperatura deseada: Po (en realidad 18°C)
• Flujo de aire: aire potente
• Dirección del flujo de aire: fija en la posición de refrigeración de aire
h
Algunas partes del producto no disponen de la función de refrigeración rápida de aire.
• La unidad de calefacción sólo funciona con modelos de refrigeración y calefacción.
• La calefacción no funcionará en modelos exclusivamente de refrigeración.
Reducirá rápidamente la
temperatura ambiente.
}
Funcionamiento estándar – Máxima refrigeración
Pulse el botón para activar
1
la unidad interior.
Pulse el botón para
2
seleccionar el modo de
funcionamiento de refrigeración
Pulse el botón de forma
3
repetitiva hasta que se muestre
"Po".
Pulse el botón para activar
1
la unidad interior.
Pulse el botón para seleccionar
2
el modo Calefacción. (Para
comprobar la temperatura interior,
pulse el botón de temperatura ambiente).
Ajuste la temperatura deseada
3
pulsando los botones .
Cuando configure la temperatura
deseada en un valor inferior al de
la temperatura ambiente, sólo
saldrá aire de ventilación.
Page 85

Manuale di Istruzioni 13
Instrucciones de manejo
Elimina la humedad mientras refrigera ligeramente el aire.
• En la época de lluvias o de mucha humedad, es posible utilizar el deshumidificador y el modo de
refrigeración de forma simultánea para eliminar la humedad de forma eficaz.
• El elemento del menú de potencia de aire puede no ser seleccionable dependiendo del producto.
Funcionamiento estándar – Modo deshumidificación
ESPAÑOL
Pulse el botón para activar
1
la unidad interior.
Pulse el botón para seleccionar el
2
modo Deshumidificación. La configuración
de temperatura no se puede ajustar durante el
funcionamiento en este modo.
Pulse el botón para seleccionar
3
entre flujo de aire mínimo ’ débil ’
medio ’ fuerte ’ automático.
(La potencia inicial de la unidad de
eliminación de humedad es "débil").
Page 86

14 Unidad interior
Instrucciones de manejo
Pulse el botón para activar
la unidad interior.
1
Pulse el botón para
seleccionar el modo ventilador.
2
Cada vez que pulse el botón ,
puede seleccionar el flujo de aire
entre mínimo → débil → medio →
fuerte → automático.
Durante la ventilación, el compresor
AHU no funcionará.
3
Funcionamiento estándar – Modo ventilador
Expulsa aire como en el interior, y no el viento frío.
• La unidad de ventilación no producirá aire frío sino de ventilación.
• Al producir aire de ventilación, el viento no provocará diferencias en la temperatura ambiente sino
que hará circular el aire.
• El elemento del menú de potencia de aire puede no ser seleccionable dependiendo del producto.
Page 87

Manuale di Istruzioni 15
Instrucciones de manejo
Pulse el botón para activar
la unidad interior.
1
Pulse el botón para
seleccionar el modo de
inteligencia artificial.
2
Puede ajustar la
temperatura como se
muestra en la imagen de
la derecha para los
modelos de refrigeración
y calefacción.
3
En el caso de un
equipo sólo de
refrigeración, como el
de la imagen de la
derecha, puede
ajustar la temperatura
de caliente a fría, de
"-2" a "2" basándose
en "00".
4
Temperatura baja
Temperatura normal
Temperatura adecuada
Temperatura cálida
Temperatura alta
Funcionamiento estándar – Modo de funcionamiento automático
Durante el funcionamiento en el modo de funcionamiento automático:
• Podemos utilizar el botón de VELOCIDAD DEL VENTILADOR
• Podemos cambiar manualmente a otro modo de funcionamiento.
ESPAÑOL
Page 88

16 Unidad interior
Instrucciones de manejo
Funcionamiento estándar – Configuración de flujo de aire
Potencia de flujo de aire Puede ajustar
simplemente la potencia del aire que desee.
Configure la potencia de aire que
1
desee con el botón de selección de
potencia.
• Cada vez que pulsa el botón de
potencia de aire, puede seleccionar las
opciones en el orden mínimo → débil →
medio → medio → fuerte → fuerte → máximo
→ automático.
•
El elemento de menú puede no poder seleccionarse
parcialmente dependiendo de la función del producto.
• Consulte el manual para obtener más
información sobre la función del producto.
Dirección del flujo de aire: Puede ajustar
simplemente la dirección del flujo de aire.
Configure la dirección del flujo de
1
aire pulsando el botón .
Puede seleccionar la dirección del flujo
de aire entre las opciones (Brisa
agradable → Arriba/Abajo y Derecha/
Izquierda → Derecha/Izquierda → Arriba/Abajo)
pulsando el botón . Dependiendo de la función del
producto puede que no se pueda seleccionar una
dirección parcial. Consulte el manual para obtener
más información sobre la función del producto.
Page 89

Manuale di Istruzioni 17
Instrucciones de manejo
Funcionamiento estándar – Comprobación de temperatura ambiente/Configuración de temperatura
Puede ajustar simplemente la
temperatura que desee.
• Pulse los botones para ajustar la
temperatura deseada.
: Aumenta 1C o 2 F cada vez que
se pulsa.
: Disminuye 1C o 2 F cada vez que
se pulsa.
Funcionamiento de refrigeración:
- El modo de refrigeración no funciona si la
temperatura deseada es superior a la
temperatura ambiente. Por favor, baje la
temperatura deseada.
Funcionamiento de calefacción:
- El modo de calefacción no funciona si la
temperatura deseada es inferior a la
temperatura ambiente. Por favor, aumente
la temperatura deseada.
1
Siempre que pulse el botón , la
temperatura ambiente se mostrará en 5
segundos.
Después de 5 segundos, volverá a la
temperatura deseada.
Debido a la ubicación del controlador
remoto, la temperatura ambiente real y
el valor mostrado pueden no coincidir.
1
Configuración de temperatura
Comprobación de temperatura ambiente
• Puede seleccionar la temperatura para la unidad de refrigeración de aire, de 18°C a 30°C, y para
la unidad de calefacción, de 16°C a 30°C.
• Lo más adecuado es una diferencia de 5°C entre la temperatura de interior y la de exterior.
• Temp. ambiente: Indica la temperatura
ambiente actual.
• Conf. temp.: Indica la temperatura que el
usuario desea configurar.
h
Dependiendo de qué tipo de controlador, la
temperatura desea se puede ajustar en 0,5°C
o en 1°F.
ESPAÑOL
Page 90

Instrucciones de manejo
18 Unidad interior
• La función de limpieza de aire es una función adicional y podría no indicarse o funcionar en una
parte del producto.
• La función de limpieza de aire sólo puede utilizarse cuando el producto esté funcionando.
• Si desea una unidad de limpieza de aire independiente, configure la función pulsando el botón de
unidad adicional en la unidad de ventilación.
Función secundaria – Purificación de plasma
Sólo pueden utilizar esta función los productos con función de humidificación.
El método para configurar la limpieza de aire
Vuelva a pulsar el botón
1
hasta que el icono empiece
a parpadear.
Accionar o cancelar Plasma
2
Función de purificación al pulsar
el botón . (El icono
aparece/desaparece en la parte
superior de la pantalla
para permitir la selección).
Después de realizar el ajuste,
3
pulse el botón para salir.
❈
Después de la configuración, si no se pulsa ningún botón durante
25 segundos, saldrá automáticamente del modo de configuración.
❈
Si se sale sin pulsar el botón de ajuste, el valor
modificado no se reflejará.
Page 91

Instrucciones de manejo
Manuale di Istruzioni 19
Es la función que se utiliza para evitar que los niños u otras personas lo utilicen sin cuidado.
Configuración de función - Bloqueo para niños
ESPAÑOL
Pulse el botón varias veces
1
hasta que comience a
parpadear.
Si se desplaza hasta el área del icono
2
"configuración" utilizando el botón ,
el icono "configuración" parpadeará y se
configurará la función de secado
automático si se pulsa el botón .
Al cancelar la función de bloqueo, si se desplaza
3
hasta el icono "cancelar" pulsando el botón
y, a continuación, pulsa el botón , se
cancelará la función de secado automático.
Pulse el botón para salir.
4
❈
Después de la configuración, si no se pulsa
ningún botón durante 25 segundos, saldrá
automáticamente del modo de configuración.
❈
Si se sale sin pulsar el botón de ajuste, el
valor modificado no se reflejará.
Page 92

Instrucciones de manejo
20 Unidad interior
Configuración de función – Cambio de temperatura
El cambio de temperatura es la función de configuración automática de la refrigeración de aire y la
unidad de calefacción según la temperatura del modo de la unidad de inteligencia artificial.
Vuelva a pulsar el botón
1
hasta que el icono
empiece a parpadear.
Pulse el botón para cambiar.
2
❈ Conversión de valor de
temp.: 1~7
Pulse el botón para
3
completar y activar el proceso
de configuración.
Pulse el botón para salir o
4
el sistema saldrá de forma
automática después de 25
segundos de inactividad.
❈ Si se sale sin pulsar el botón
de ajuste, el valor modificado
no se reflejará.
Page 93

Manuale di Istruzioni 21
ESPAÑOL
Instrucciones de manejo
Esta función permite borrar el indicador de limpieza del filtro interior.
Configuración de función – Borrar señal de filtro
• Cuando el filtro tenga suciedad, reducirá su eficacia de refrigeración/calefacción y requerirá más
potencia eléctrica.
Por lo tanto, limpie el filtro siempre que se exceda el tiempo de limpieza.
h La indicación de limpieza de filtro se cancela automáticamente sin la cancelación independiente
tras cierto periodo de tiempo.
Pulse el botón varias veces
1
hasta que comience a
parpadear.
Cuando empiece a
2
parpadear, pulse para
borrar esta pantalla.
Page 94

22 Unidad interior
Instrucciones de manejo
Esta función permite ajustar el ángulo de salida del flujo de aire.
Configuración de función – Control de ángulo de rejilla
Vuelva a pulsar el botón hasta
1
que el icono empiece a parpadear.
Pulse el botón para seleccionar la rejilla activa:
2
1 / 2 / 3 / 4 / Todos / Estándar
Seleccione el número de rejilla con los botones .
❈ Número de rejilla: núm.1, 2, 3, 4, todas
o estándar
-
La rejilla seleccionada se pone en funcionamiento.
- Verifique la rejilla en funcionamiento.
- Para fijar el ángulo de todas las
rejillas, seleccione "todas".
-
Para fijar la configuración predeterminada
de fábrica, seleccione "estándar".
Seleccione el ángulo del viento con el
3
botón , y pulse el botón .
- El límite del ajuste del ángulo del
viento se puede modificar en 5 ó 6
niveles según el producto.
-
Al seleccionar "estándar" como número de
rejilla, el ángulo del viento no se mueve.
Ajuste los ángulos de las rejillas restantes del
4
modo indicado anteriormente.
❈ Dependiendo de los tipos de
productos, hay productos con rejillas
núm. 1 y núm. 2 exclusivamente.
Pulse el botón para salir.
Después de la configuración, si no
❈
5
se pulsa ningún botón durante 60
segundos, saldrá automáticamente del modo
de configuración.
❈ Si se sale sin pulsar el botón de ajuste,
el valor modificado no se reflejará.
Pulse el botón para completar y
6
activar el proceso de configuración. (La
función de dirección de flujo de aire se liberará
cuando se configure el ángulo de la rejilla).
Pulse el botón para salir o
7
el sistema saldrá de forma
automática después de 25
segundos de inactividad.
Page 95

Manuale di Istruzioni 23
ESPAÑOL
Instrucciones de manejo
Configuración de función - Cambio de hora actual
Pulse el botón de configuración de
1
función. Si pulsa el botón de función
repetidamente, entrará en el menú de
configuración de hora. El icono de
“configuración de hora” aparecerá en
ese momento y la fecha parpadeará en el área de
indicación de hora.
Ejemplo: cambio de hora actual, como
"Lunes/10:20 a.m."
Pulse la tecla para ajustar el día
2
actual.
Pulse la tecla para modificar el modo
3
de configuración a.m./p.m (el segmento
"a.m./p.m." empezará a parpadear).
Configuración del valor
4
a.m./p.m. al pulsar el
botón .
Pulse el botón para modificar el modo de
5
configuración de "Hora".
(el segmento "Hora" empezará a parpadear).
Configure el valor de Hora pulsando el
6
botón .
Page 96

24 Unidad interior
Instrucciones de manejo
Pulse el botón para modificar el modo de
7
configuración de "Minutos". (El segmento "Minutos"
empezará a parpadear).
Configure el valor de Minutos pulsando el
8
botón .
Pulse el botón para finalizar.
9
En el proceso, pulse el botón
10
para salir y abandonar el modo de
configuración.
(En caso de salir con información
incompleta, volverá a la configuración
previa).
❈ Si se sale sin pulsar el botón de
ajuste, el valor modificado no se
reflejará.
Page 97

Manuale di Istruzioni 25
ESPAÑOL
Instrucciones de manejo
Programación – Reserva sencilla
Puede configurar la reserva en las unidades de 1 hora, desde 1 hora hasta 7 horas.
h Cuando configure una reserva simple, el producto se iniciará o detendrá automáticamente
después del tiempo establecido.
Pulse el botón para acceder
1
al modo de programación.
(el segmento empezará a
parpadear).
Ejemplo: configuración del tiempo de
reserva en "3".
Pulse el botón para ajustar el
2
tiempo de reserva.
Pulse el botón para finalizar el
3
ajuste.
Pulse el botón para salir.
4
Después de la configuración, si no se pulsa
❈
ningún botón durante 25 segundos, saldrá
automáticamente del modo de configuración.
❈ Si se sale sin pulsar el botón de
ajuste, el valor modificado no se
reflejará.
Page 98

26 Unidad interior
Instrucciones de manejo
Programación: Reserva semanal
Puede configurar la reserva diaria de forma semanal.
La reserva semanal seguirá funcionando hasta que la cancele mediante la configuración.
Desplácese hasta el modo de configuración de reserva pulsando el botón de reserva.
1
❈ Puede configurar dos reservas semanales para un día y hasta catorce
reservas para una semana.
Por ejemplo, para configurar (Martes, 11:30 de la mañana, encendido - 12:30
apagado) debe configurarlo en el orden siguiente.
Desplácese hasta "semanal" pulsando
2
varias veces el botón de reserva. El
indicador "semanal" parpadeará.
Seleccione la reserva semanal ¿ o
3
la reserva semanal ¡ utilizando el
botón .
❈ YPuede configurar dos reservas,
reserva semanal 1 y reserva
semanal 2, para un día.
Desplácese hasta la parte de configuración
4
"fecha" utilizando el botón .
Si parpadea la opción "fecha", configure la
fecha. Puede configurar la fecha de lunes a
domingo.
Desplácese hasta la configuración
5
"a.m./p.m." activando la opción con
el botón .
Desplácese hasta la parte de configuración
6
"Hora" de encendido utilizando el botón .
-
Es la parte de configuración de Hora a la
que se encenderá el aire acondicionado.
Cambie la hora utilizando el botón .
7
- Puede configurar la Hora entre 0~12.
Desplácese hasta la parte de configuración "Minutos" de encendido utilizando el botón .
8
Si parpadea la indicación "Minutos", configure la opción "Minutos" utilizando el botón .
9
Page 99

Manuale di Istruzioni 27
ESPAÑOL
Instrucciones de manejo
Desplácese hasta la parte de configuración
h La unidad de interior se enciende a la temperatura deseada si se ha configurado mediante el botón arraba/abajo durante la
preselección del calendario de funcionamiento semanal (Intervalo de selección de temperatura: 18℃~30℃).
- Si la temperatura deseada no se ha seleccionado, se enciende automáticamente con la temperatura deseada del funcionamiento
anterior.
10
"a.m./p.m." desactivando la opción con el
botón Derecha.
- La configuración "a.m./p.m." es
idéntica a la configuración de hora
de encendido.
Desplácese hasta la parte de
11
configuración "Hora" desactivando
la opción con el botón Derecha.
- Es la parte de reserva de hora
a la que se apagará el aire
acondicionado.
- Si parpadea la opción "Hora",
configure la hora.
Configure la opción "Hora" y
❈
"Minutos" de forma idéntica con el
método de configuración de hora
de encendido.
Para terminar la configuración de la reserva semanal, pulse el botón de configuración/cancelación.
12
La configuración de reserva semanal para el día elegido se ha completado.
Si lo configura con el método idéntico al anterior seleccionando el día que desea
13
configurar, funcionará como reserva semanal.
Si configura el tiempo de activación y desactivación como el mismo, no funcionará la
unidad de reserva.
explicación de la reserva semanal
número de
reserva
tiempo de encendido
Barra inferior: la indicación de que existe una reserva semanal
para el día correspondiente
tiempo de apagado
Page 100

28 Unidad interior
Instrucciones de manejo
Programación – Reserva de sueño
La reserva de sueño es la función del aire acondicionado que enciende y apaga el equipo transcurrido un
periodo de tiempo en el modo sueño. Cuando está conectado a un producto de ventilación y configura la
reserva del modo sueño, sólo se cancela la reserva del modo sueño cuando transcurre el tiempo fijado.
Configure la reserva de tiempo adecuadamente para dormir. (Una refrigeración excesiva no es buena para la salud.)
• Dado que en el modo sueño se ajusta automáticamente la temperatura que desea para una
refrigeración agradable, podría haber una diferencia entre la temperatura del controlador remoto y
la temperatura seleccionada para el cuerpo.
• La reserva de sueño funciona como una reserva de apagado para los productos cuyo ajuste de
temperatura no esté controlado con unidades de 0,5°C.
PRECAUCIÓN
Pulse el botón para acceder
1
al modo de programación.
Ejemplo: configuración de reserva
de sueño en "3".
Pulse el botón para acceder al modo de
2
configuración de reserva de SUEÑO.
(El segmento empezará a parpadear).
Pulse el botón para ajustar el
3
tiempo de reserva.
El tiempo de reserva de SUEÑO está
comprendido entre 1 y 7 horas.
Pulse el botón para
4
finalizar el ajuste.
Siempre que se realice la reserva.
Pulse el botón para salir.
5
❈
Después de la configuración, si no se pulsa
ningún botón durante 60 segundos, saldrá
automáticamente del modo de configuración.
❈ Si se sale sin pulsar el botón de
ajuste, el valor modificado no se
reflejará.
- Si se configura la reserva, en la
parte inferior de la pantalla LCD se
mostrará el indicador "sueño".
Si se configura la reserva de sueño, el aire
6
acondicionado ejecutará el modo de sueño
transcurrido el tiempo configurado.
 Loading...