

LG MS429 Series Owner's Manual

OWNER’S MANUAL
MICROWAVE OVEN
Please read this owner’s manual thoroughly before operating.
www.lg.com
MS429
****
MFL70204001_02
Copyright © 2017 LG Electronics Inc. All Rights Reserved.

PREFACE
Thank you for choosing our microwave.
To use this appliance correctly and prevent any potential risk, read these instructions before using the
appliance.
Keep these instructions in a place where you can find them easily.
If you are unsure of any of the information contained in these instructions, please contact our customer care
centre.
The manufacturer shall not be responsible for any damages to persons or property caused by incorrect
installation or use of the appliance.
The appliance has been certified for use in countries other than those marked on the appliance.
The manufacturer also reserves the right to make any modifications to the products as may be considered
necessary or useful, also in the interests of the user, without jeopardising the main functional and safety features
of the products themselves.
The appliance is designed for a domestic environment and not a commercial one.
PREFACE
2
CONTENTS
Your Microwave oven, is one of the safest
of all home appliances. When the door
is opened, the oven automatically stops
producing microwaves. Microwave energy
is converted completely to heat when it
enters food, leaving no “left over” energy
to harm you when you eat your food.
CONTENTS
4
IMPORTANT SAFETY INSTRUCTIONS
BEFORE USE
10
Unpacking & Installing
12
Control Panel
12
Display Picture
13
Slide Touch Key
13
The Right Touch
13
The Wrong Touch
14
Setting Clock
14
Quick Start
14
More/Less
14
Energy Saving
15
HOW TO USE
15
Timed Cooking
15
Microwave Power Levels
16
Child Lock
16
Reheat
16
Reheat Menu Instructions
17
Home Made
17
Home Made Menu Instructions
20
Indian Cuisine
20
Indian Cuisine Menu Instructions
26
Breakfast
26
Breakfast Menu Instructions
29
Kids’ Delight
29
Kids’ Delight Menu Instructions
32
Cooking Aid
33
Inverter Defrost
33
Inverter Defrost Menu Instructions
34
MICROWAVE-SAFE UTENSILS
35
FOOD CHARACTERISTICS &
MICROWAVE COOKING
37
TO CLEAN YOUR OVEN
38
QUESTIONS & ANSWERS
39
TECHNICAL SPECIFICATIONS
37
USING THE SMART DIAGNOSIS™
FUNCTION
32
Cooking Aid Menu Instructions
40
WARRANTY
3
10
4

5

6
7

8
1
1

9

UNPACKING & INSTALLING
BEFORE USE
By following the basic steps on these two pages you will be able to quickly check that your oven is operating correctly.
Please pay particular attention to the guidelines on where to install your oven. When unpacking your oven make sure
you remove all accessories and packing materials. Check to make sure that your oven has not been damaged during
shipping.
1
2 Place the oven on the level location of your choice with more
than 85cm height but make sure there is at least 20 cm of space
on the top and 20 cm at the rear & left & right for proper
ventilation. The front of the oven should be at least 8 cm from
the edge of the surface to prevent tipping.
An exhaust outlet is located on bottom or side of the oven.
Blocking the outlet can damage the oven.
If you use the microwave oven in an enclosed space or cupboard,
lower performance and reduced service life. If possible, please use the
microwave oven in the counter top condition.
NOTE
t
THIS OVEN SHOULD NOT BE USED FOR COMMERCIAL CATERING PURPOSES.
3 Plug your oven into a standard household socket. Make sure your oven is the only appliance connected to the socket.
If your oven does not operate properly, unplug it from the electrical socket and then plug it back in.
4
Fill a microwave safe container with 300 ml (1/2 pint) of water.
Place on the glass tray and close the oven door.
If you have any doubts about what type of container to use
please refer to Microwave-safe utensils.
Open your oven door by pulling the door handle. Place the rotating
ring inside the oven and place the glass tray on top.
5
GLASS TRAY
ROTATING RING
TURNTABLE SHAFT
BEFORE USE
Mica Sheet
*Do Not Remove
Mica Sheet
NOTE
t
Do not remove the cavity Mica Sheet (silver plate) inside of oven.
The Mica Sheet is there to protect the microwave components from food spatters.
20 cm
20 cm
20 cm
20 cm
10
6 Press the STOP/CANCEL button, and press the START button
one time to set 30 seconds of cooking time.
7 The DISPLAY will count down from 30 seconds.
When it reaches 0 it will sound BEEPS. Open the oven door
and test the temperature of the water.
If your oven is operating the water should be warm.
Be careful when removing the container it may be hot.
YOUR OVEN IS NOW INSTALLED
8
The contents of feeding bottles and baby food jars shall be stirred or shaken and the temperature checked before
consumption in order to avoid burns.
9
Button recognition may be hampered in the following circumstances:
Only the outside area of the button is pressed.
10
NOTE
Do not use rubber gloves or disposable gloves.
The setting of the cooking time should be shorter than common microwave ovens (700 W, 800 W) due to
the relatively high output power of the product. Excessive heating with the product may cause moisture on the door.
BEFORE USE
11 When the voltage is not stable, products may not work.
11

CONTROL PANEL
Part
Reheat
See page 16 “Reheat”
Home Made
See page 17 “Home Made”
Indian Cuisine
See page 20 “Indian Cuisine”
Breakfast
See page 26
“Breakfast”
Kids’ Delight
See page 29 “Kids’ Delight”
Cooking Aid
See page 32 “Cooking Aid”
Power
See page 15 “Timed Cooking”
Inverter Defrost
See page 33 “Inverter Defrost”
Time / Weight
STOP / Clear
top ov
ries ex
ay
START / Enter
In order to star k ted
press button one time
tervals of HIGH po
k
t
rt butt
DISPLAY PICTURE
hen operate Mi ro ave Sho up
the i
on on the display
hen operate
Sho
up the i
on on the display
hen operate Inverter Defrost Sho
up the i
on on the display
hen you
an set More/Less
Sho
up the i
on on the display
hen you
an Cook Start Sho
up
the i on on the display
hen you
an set Output Po er
Sho up the i on on the display
hen you
an set eight Sho
up
the i
on on the display
Icon
BEFORE USE
SMART DIAGNOSIS
Hold the mouthpie
e of a phone up to this i on
hen dire ted to by servie entre personnel to
help diagnose problems
ith the mi ro
ave oven
hen alling for serv
12
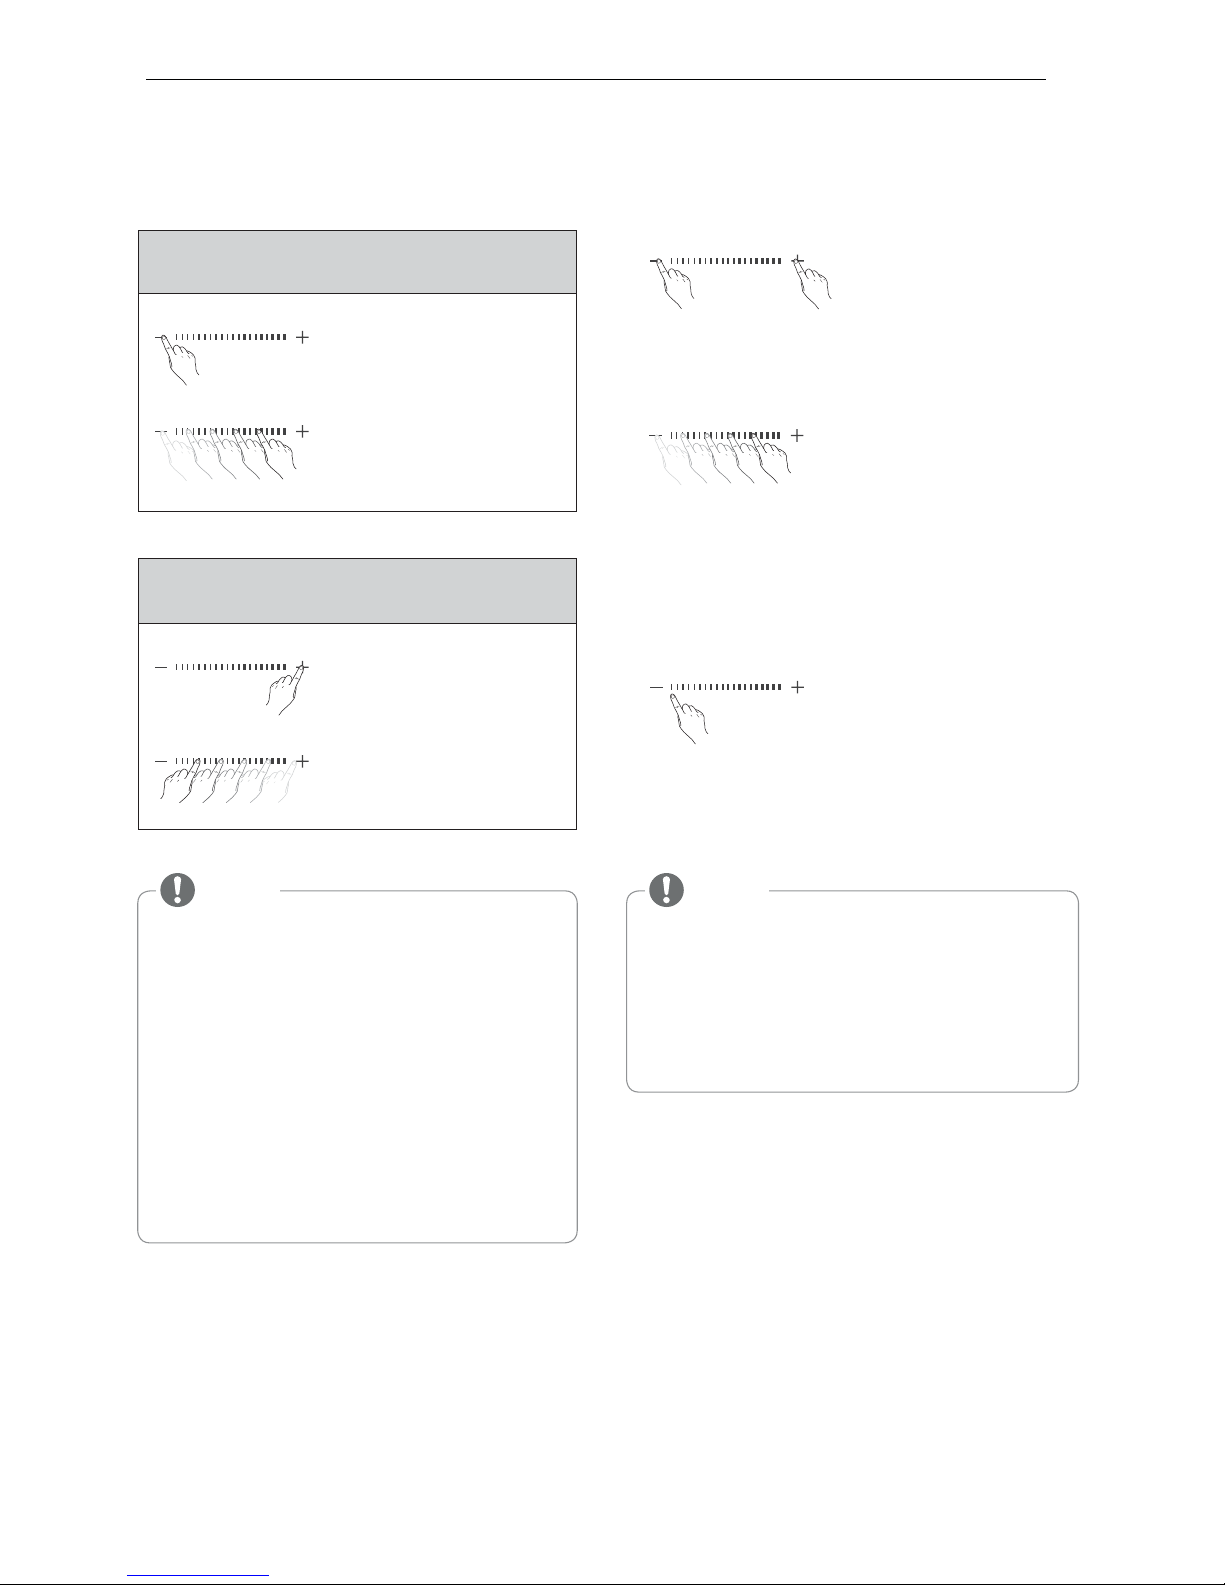
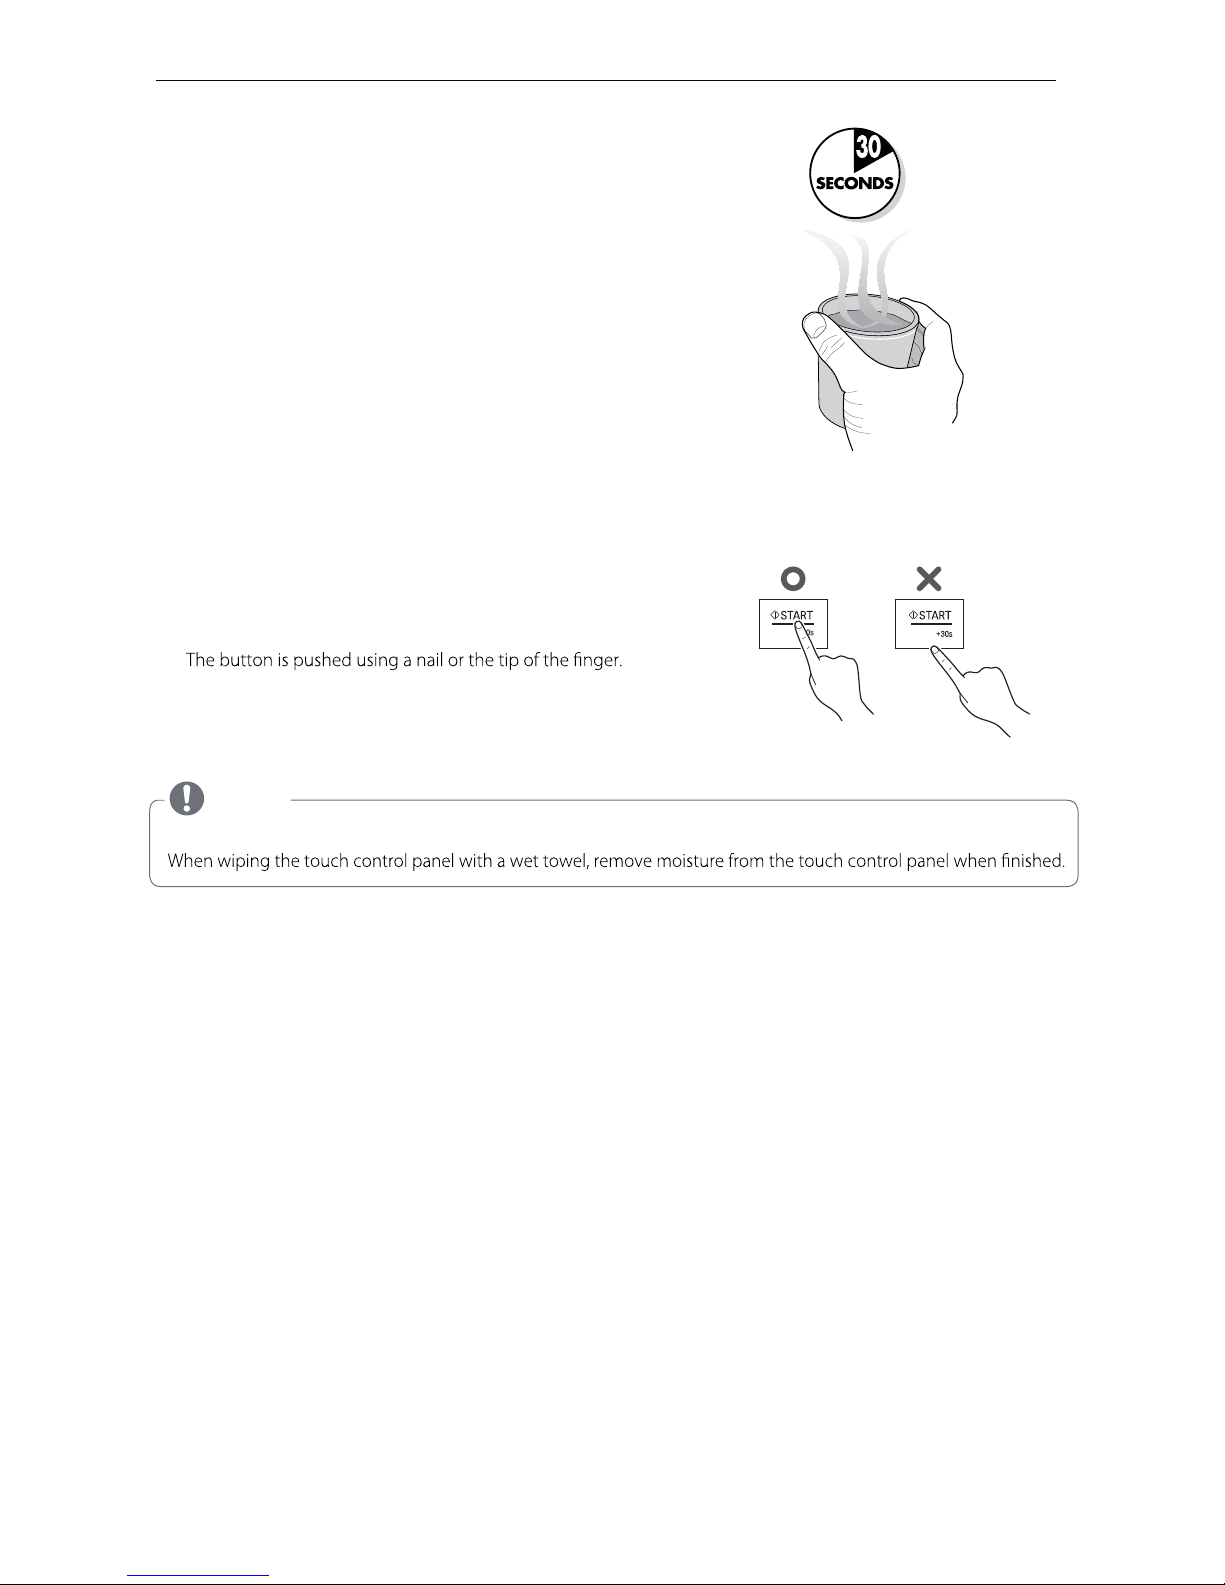
THE RIGHT TOUCH
THE WRONG TOUCH
Example: Add the cooking time, Slide touch
from left to right.
1. Touch the near ( - )
button of slide touch key
with your finger.
2. When slide your finger to
right, will add the time.
SLIDE TOUCH KEY
By using the slide touch, you can set up cooking
timer or Defrost weight.
Touch
Touch
1. (-), (+) keys at both ends of Slide Touch Key can
be used like the normal touch keys. When touch
the key once like the picture, you can set up
Cooking time or Defrost weight.
If you touch the key as follows, slide touch key
may or may not be recognition.
1. Touch the outside of the slide touch key.
2. Touch the slide touch key using the nail or the tip
of the finger.
3. Touch the slide touch key too fast.
2. Your finger adhere to the center of slide touch
key like the picture.
Example: Subtract the cooking time, Slide
touch from right to left.
1. Touch the near ( + )
button of slide touch key
with your finger.
2. When slide your finger to
left, will subtract the time.
1. Time setting
2. Defrost weight set the same way as the
cooking time. It will increase or decrease
by 0.1kg.
NOTE
decrease by 10 seconds.
decrease by 30 seconds.
!
decrease by 1 minutes.
"#$
increase or decrease by 10 seconds.
NOTE
Don't use the rubber glo#es or disposable glo#es.
When wipe the touch control panel with a wet
towel, remo#e moisture of touch control panel.
When a ( + ), ( - ) button on the touch control panel
is being pressed, stopped the increase or decrease
of number, touch again.
X
O
O
BEFORE USE
13
 Loading...