

LG MS1949TL User Manual

http://au.lge.com(AUSTRALIA)
http://nz.lge.com(NEW ZEALAND)
MICROWAVE OVEN
OWNER'S MANUAL & COOKING GUIDE
MODEL : MS1949TL
PLEASE READ THIS OWNER’S MANUAL
THOROUGHLY BEFORE OPERATING.

PRECAUTIONS
Precautions to avoid possible exposure to excessive microwave energy.
You cannot operate your oven with the door open due to the safety interlocks built into the door
mechanism. These safety interlocks automatically switch off any cooking activity when the door is opened;
which in the case of a microwave oven could result in harmful exposure to microwave energy.
It is important not to tamper with the safety interlocks.
Do not place any object between the oven front face and the door or allow food or cleaner residue to
accumulate on sealing surfaces.
Do not operate your oven if it is damaged. It is particularly important that the oven door closes properly and
that there is no damage to the: (1) door(bent), (2) hinges and latches (broken or loosened), (3) door seals
and sealing surfaces.
Your oven should not be adjusted or repaired by anyone except qualified service personnel.
Warning
Please ensure cooking times are correctly set as over cooking may result in the FOOD catching
fire and subsequent damage to your oven.
When heating liquids, e.g. soups, sauces and beverages in your microwave oven, overheating the liquid
beyond boiling point can occur without evidence of bubbling. This could result in a sudden boil over of the
hot liquid. To prevent this possibility the following steps should be taken:
1. Avoid using straight sided containers with narrow necks.
2. Do not overheat.
3. Stir the liquid before placing the container in the oven and again halfway through the heating time.
4. After heating, allow to stand in the oven for a short time, stir or shake them again carefully and check the
temperature of them before consumption to avoid burns (especially, contents of feeding bottles and baby
food jars).
Warning
Always allow food to stand after being cooked by microwaves and check the temperature of
them before consumption. Especially contents of feeding bottles and baby food jars.
How the Microwave Oven Works
Microwaves are a form of energy similar to radio and television waves and ordinary daylight. Normally,
microwaves spread outwards as they travel through the atmosphere and disappear without effect.
Microwave ovens, however, have a magnetron which is designed to make use of the energy in microwaves.
Electricity, supplied to the magnetron tube, is used to created microwave energy.
These microwaves enter the cooking area through openings inside the oven. A turntable or tray is located
at the bottom of the oven. Microwaves cannot pass through metal walls of the oven, but they can penetrate
such materials as glass, porcelain and paper, the materials out of which microwave-safe cooking dishes are
constructed.
Microwaves do not heat cookware, though cooking vessels will eventually get hot from the heat generated
by the food.
A very safe appliance
Your microwave oven is one of the safest of all home appliances. When the door is opened, the
oven automatically stops producing microwaves. Microwave energy is converted completely to
heat when it enters food, leaving no “left over” energy to harm you when you eat your food.
2

CONTENTS
PRECAUTIONS 2
CONTENTS 3
UNPACKING & INSTALLING 4-5
FEATURE DIAGRAM 6
CONTROL PANEL 6
OPERATING INSTRUCTIONS 7
TIMED COOKING 7
MICROWAVE POWER LEVELS 7
CHILD LOCK 8
ADD MINUTE 8
QUICK START 8
SETTING CLOCK 9
QUICK DEFROST 9
QUICK DEFROST MENU INSTRUCTIONS 9
ONE TOUCH AUTO MENU 10
ONE TOUCH AUTO MENU CHART
AUTO WEIGHT DEFROST
10
11
AUTO WEIGHT DEFROST SEQUENCE LIST
GROUND MEAT
GROUND MEAT COOKING CHART
POULTRY
POULTRY COOKING CHART
STEAKS/CHOPS 13
STEAKS/CHOPS COOKING CHART
HEATING OR REHEATING GUIDE 14
FRESH VEGETABLE GUIDE 15
MICROWAVE-SAFE UTENSILS 16
FOOD CHARACTERISTICS & MICROWAVE COOKING 17-18
SAFETY PRECAUTIONS 19-20
QUESTION & ANSWERS 21
PLUG WIRING INFORMATION/TECHNICAL SPECIFICATIONS
MANUFACTURER’S WARRANTY 23
11
12
12
12
12
13
22
3

UNPACKING & INSTALLING
By following the basic steps on these two pages you will be able to quickly check that your oven
is operating correctly. Please pay particular attention to the guidance on where to install your
oven. When unpacking your oven make sure you remove all accessories and packing.
Check to make sure that your oven has not been damaged during delivery.
Unpack your oven and place it on a flat level surface.
GLASS TRAY
ROTATING RING
Place your oven on a flat, level surface but make sure there is at least 10 cm of space on the
top, rear and sides so there is air flow for ventilation. Exhaust outlets are located in the back and
side of your oven. Blocking the outlets can damage your oven.
placed in a cabinet.
THIS OVEN SHOULD NOT BE USED FOR COMMERCIAL
CATERING PURPOSES
The microwave oven shall not be
4
5
UNPACKING & INSTALLING
Plug your oven into a standard household socket. Make sure your oven is the only appliance
connected to the socket. If your oven does not operate properly, unplug it from the
electrical socket and then plug it back in.
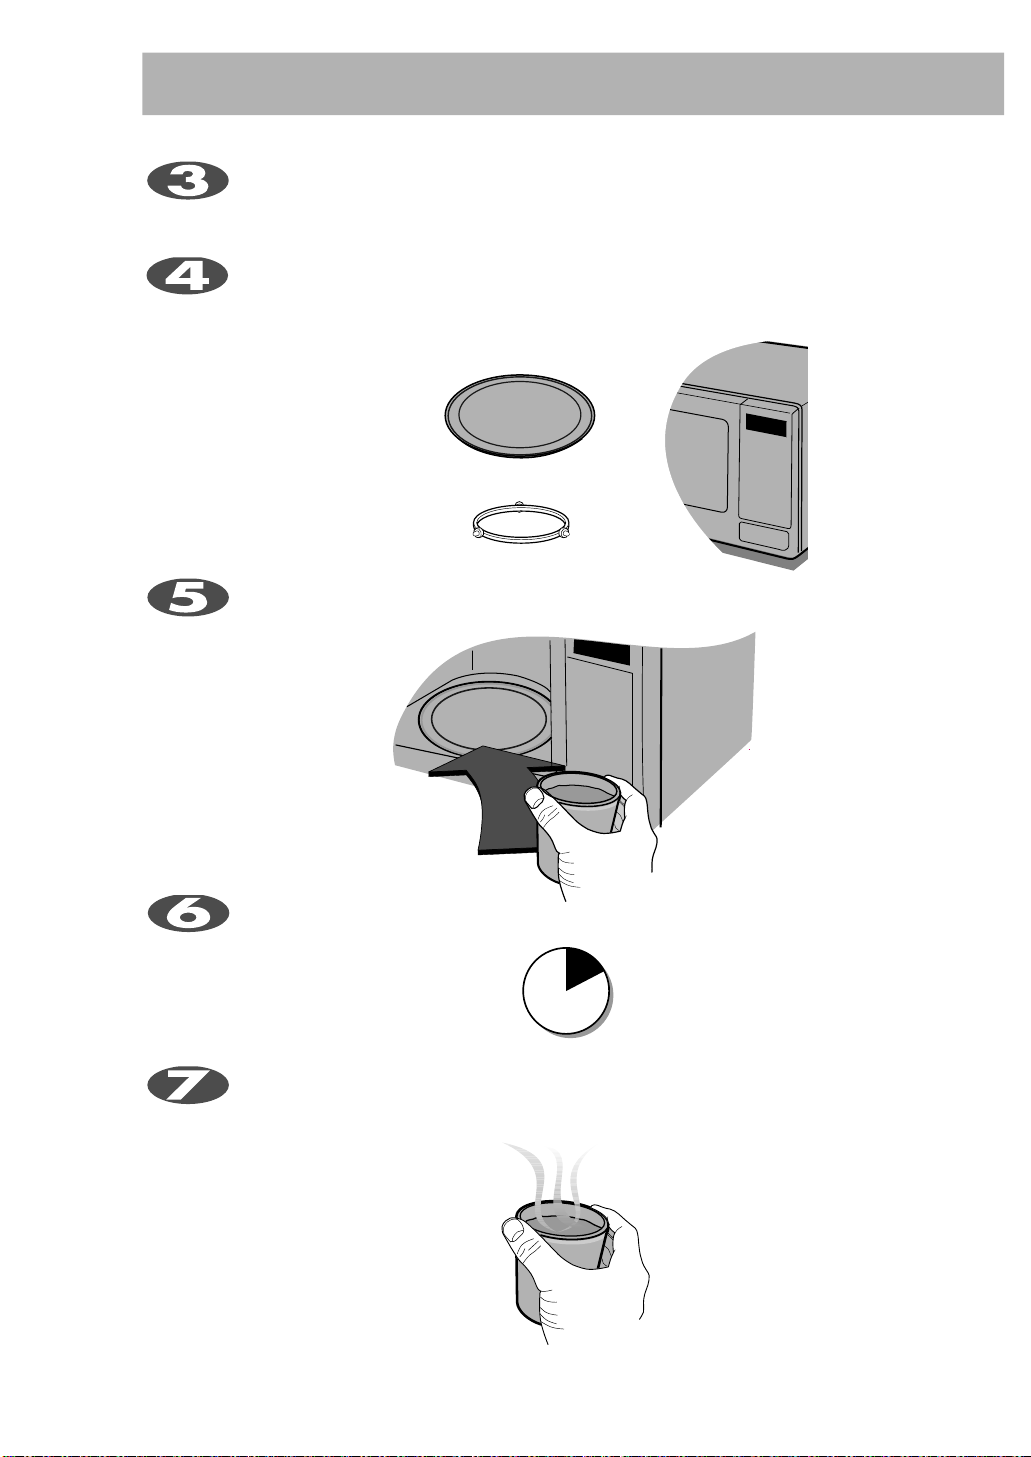
Open your oven door by pressing the DOOR OPEN button.
Place the ROTATING RING inside the oven and
place the GLASS TRAY on top.
Fill a microwave safe container with 300 ml (1/2 pint) of water. Place on the GLASS TRAY
and close the oven door. If you have any d
refer to page 16.
oubts about what type of container to use please
automatically.
Enter the time by touching [3] and [0].
And touch START.
30
SECONDS
The DISPLAY will count down from 30 seconds. When it reaches 0 it will sound three BEEPS.
Open the oven door and test the temperature of the water. If your oven is operating the water
should be HOT. Be careful when removing the container it may be hot.
YOUR OVEN IS NOW INSTALLED
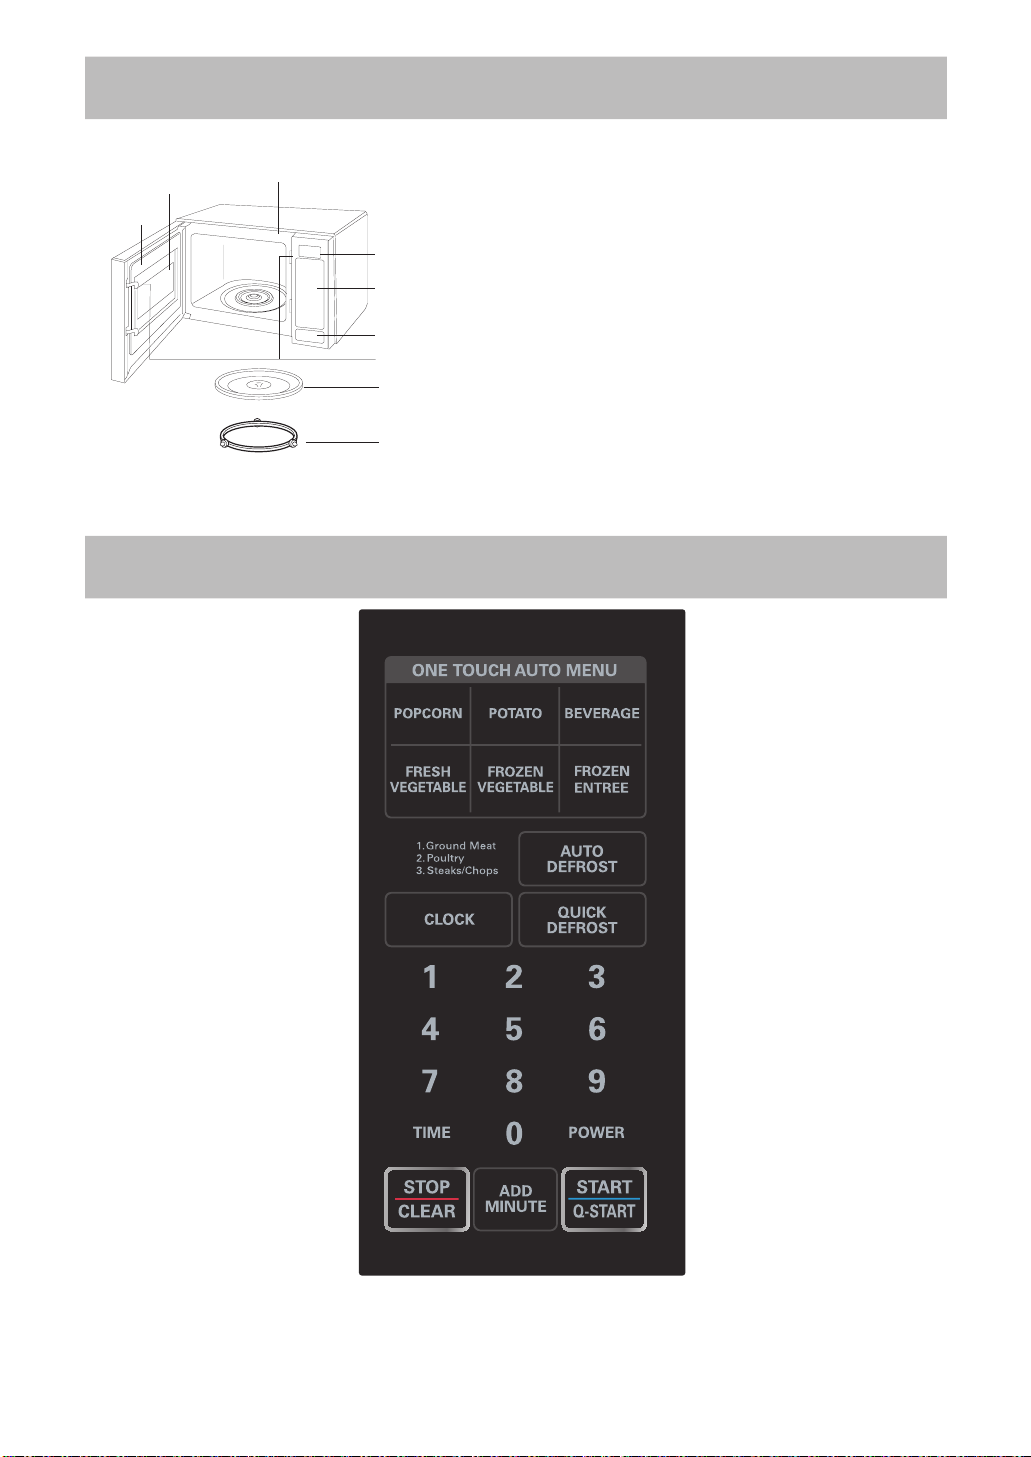
FEATURE DIAGRAM
Windo
Door Seal
w Door Screen
Oven Front Plate
Remove your Microwave Oven and all
material from the shipping carton.
Your oven will be packed with the
following materials:
Display Window
Control Panel
Door Open Button
Safety Door Lock System
Glass Turntable
Glass Turntabl
Owner's Manual
Rotating Ri
This microwave oven is designed
for household use only. It is not
Rotating Ring
recommended for commercial
purposes.
CONTROL PANEL
e .........................1 each
........................1 each
ng.............................1 each
NOTE: A beep sounds when a pad on the control panel
is touched to indicate setting has been entered.
6
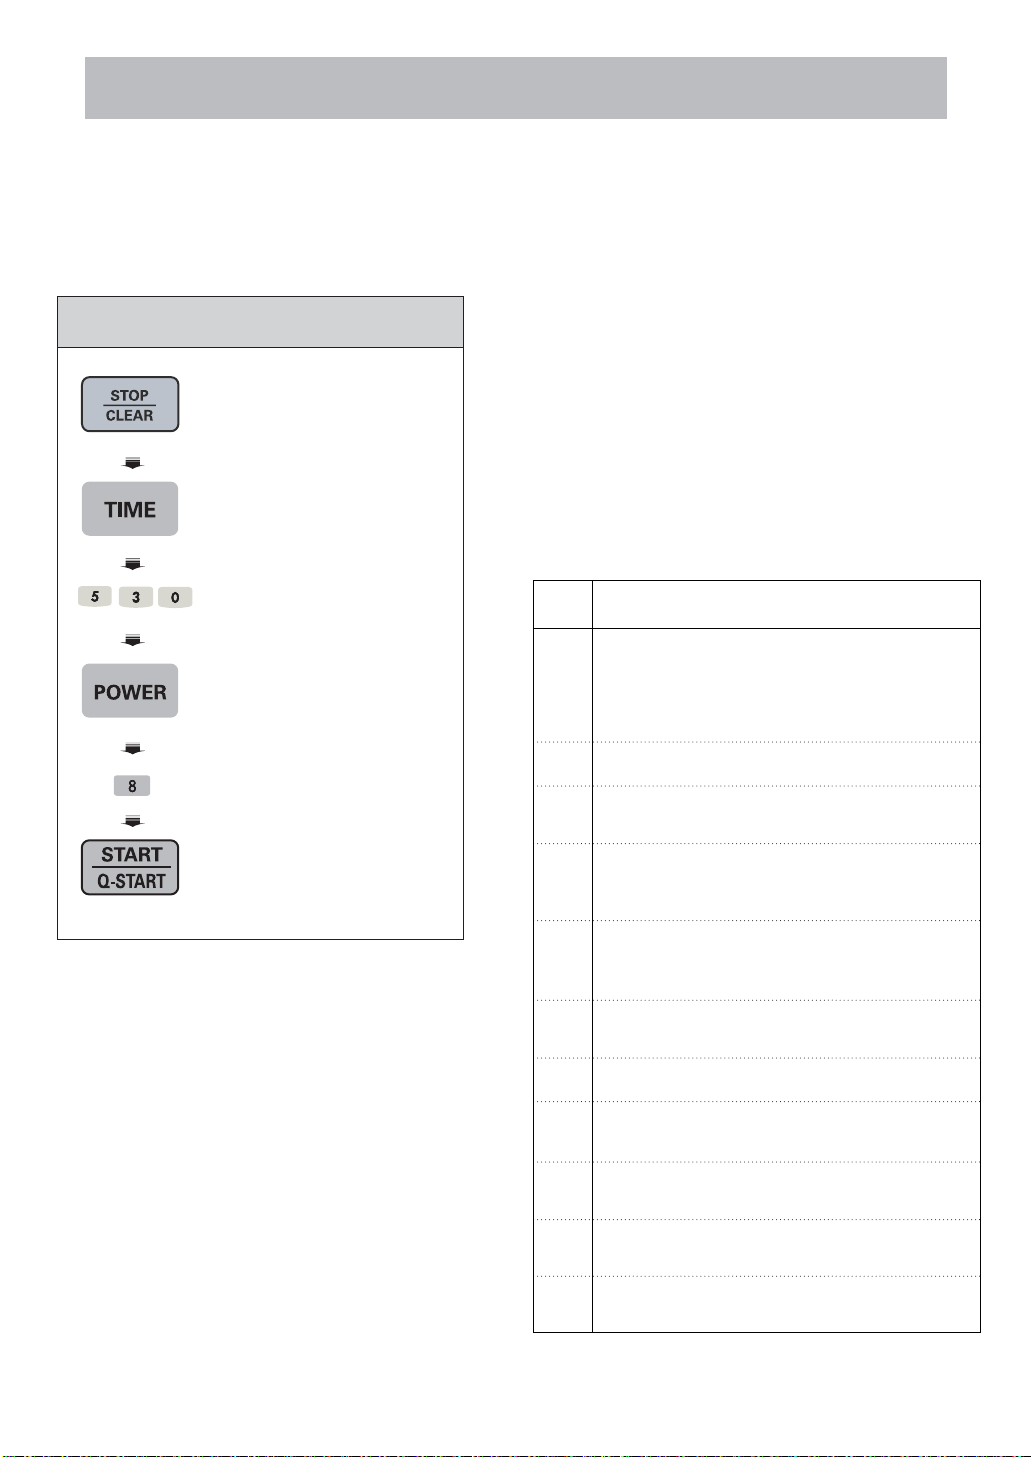
OPERATING INSTRUCTIONS
TIMED COOKING
This function allows you to cook food for a
desired time. And in order to give you the best
results, there are 10 power level settings in
addition to HI-POWER because many food need
slower cooking (at less than HI-POWER).
Example:To cook food on 80% Power(Power8)
for 5 minutes 30 seconds
1. Touch STOP/CLEAR.
2. Touch TIME.
3. Enter 5 minutes
30 seconds by touching
[5], [3],and [0].
4. Touch POWER.
P-HI appears in the
display. This is to tell you
that the oven is set on HI
unless a different power
setting is chosen.
5. Touch 8.
To select power level 80%.
Display shows P-80.
2 OR 3 STAGE TIMED COOKING
For Two Stage cooking, repeat timed cooking
steps 2 through 5 on the previous page before
touching the S
TART pad for additional Time and
Power program you want to add.
Auto
Weight Defrost can be programmed before
the first stage to defrost first and then cook.
MICROWAVE POWER LEVELS
Your microwave oven is equipped with ten power
levels to give you maximum flexibility and control
over cooking.
idea of which foods are prepared at each of the
various power levels.
*The table below shows the power level settings for
your oven.
Power
Level
10
(High)
9
8
The table below will give you some
MICROWAVE POWER LEVEL TABLE
Use
*Boiling water.
*Making candy.
*Cooking poultry pieces, fish, & vegetables.
*Cooking tender cuts of meat.
*Whole poultry.
*Reheating rice, pasta, & vegetables.
*Reheating prepared foods quickly.
*Reheating sandwiches.
6. Touch START.
When cooking is complete, four short tones will
sound. The word Endshows in the display window.
Then the oven shuts itself off.
NOTE:
If you do not select the power level, the oven will
operate at power HIGH. To set HI-POWER
cooking, skip steps 4 & 5 above.
*Cooking egg, milk and cheese dishes.
*Cooking cakes, breads.
7
*Melting chocolate.
*Cooking veal.
*Cooking whole fish.
6
*Cooking puddings and custard.
*Cooking ham, whole poultry, lamb.
5
*Cooking rib roast, sirloin tip.
4
*Thawing meat, poultry and seafood.
*Cooking less tender cuts of meat.
3
*Cooking pork chops, roast.
*Taking chill out of fruit.
2
*Softening butter.
*Keeping casseroles and main dishes warm.
1
*Softening butter and cream cheese.
* Standing time.
0
* Independent.
7

OPERATING INSTRUCTIONS (CONT’D)
OPERATING INSTRUCTIONS (CONT’D)
CHILD LOCK
This is a unique safety feature that prevents
unwanted oven operation such as used by
children. Once the CHILD LOCK is set, no
cooking can take place.
To set the child lock
1. Touch STOP/CLEAR.
2. Touch and hold 0,or
or
If the CHILD LOCK was already set and you
touched another cooking pad, the word L
shows in the display. Then you can cancel the
CHILD LOCK according to below procedure.
STOP/CLEAR
appears in the display
and two beeps are heard.
To cancel the child lock
until
L
ADD MINUTE
A time-saving pad, this simplified control lets
you quickly set and start microwave cooking
without the need to touch S
Example : To set ADD MINUTE cooking 2 minutes.
NOTE:
If you touch ADD MINUTE, it will add 1 minute up to
99 minutes 59 seconds.
TART.
1. Touch STOP/CLEAR.
Touch ADD MINUTE
2.
The oven begins
2 times.
cooking and display
shows time counting
down.
QUICK START
The QUICK START feature allows you to set 30 seconds
intervals of HIGH power cooking with a touch of the
START/Q-START.
Example: Set 2 minutes of cooking on high power.
1.
1.
Touch STOP/CLEAR.
or
After the CHILD LOCK is turned off, The oven
will operate normally.
Touch and hold 0 ,or
STOP/CLEAR
disappears in the display.
until L
2.
You oven will start before you have finished the
fouth press.
During QUICK START cooking,you can extend the
cooking time up to 10 minutes by repeatedly pressing
the START/Q-START key.
2. Touch START/Q-START
Four times on high power
8
 Loading...