


Easy Setup Guide
Digital Signage Media Player
MP500-F***
Please read this guide carefully before using this product and keep it for future reference.
Please record the model number and serial number of the product on this guide. You will
need to provide this information (if applicable) when you require service.
Safety Precautions
Please read these safety precautions carefully before using the product.
■ Make sure to connect the power cable a grounded outlet.
- You may be electrocuted or injured.
■ Use the rated voltage only.
- The product can be damaged, or you may be electrocuted.
■ During a thunder or lightning storm, unplug the power cable or signal cable.
- You may be electrocuted or a fire can break out.
■ Do not touch the power plug with wet hands. Additionally, if the cord pin is wet or covered
with dust, dry the power plug completely or wipe dust off.
- You may be electrocuted due to excess moisture.
■ Do not insert a conductor (like a metal chopstick) into one end of the power cable while
the other end is connected to the input terminal on the wall. Additionally, do not touch the
power cable right after plugging into the wall input terminal.
- You may be electrocuted.
■ The appliance coupler is used as the disconnect device.
■ Risk of explosion if battery is replaced by an incorrect type. Dispose of used batteries
according to the instructions.
Installation Environment of MP500-F*** Media Player
Leave at least 10 cm of space at each side of the player from an obstacle when installing
the player to ensure sufficient ventilation.
ENGLISH
10 cm
10 cm
< Install Media Player Attached to Monitor >
10 cm
10 cm
*MFL68930901*
10 cm
10 cm
< Install Media Player >
P/NO. : MFL68930901(1501-REV00)
10 cm
10 cm
Printed in Korea
1

Included in the Box
ENGLISH
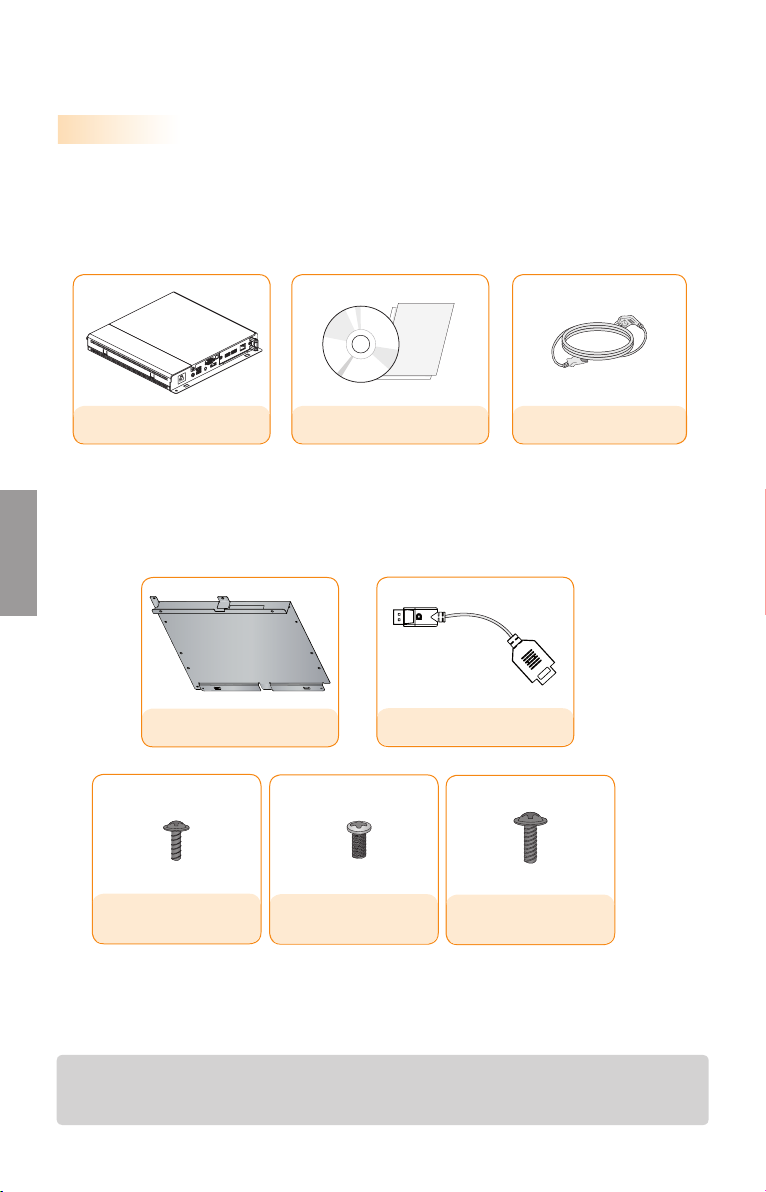
Basic Components
The MP500-F*** with the following components. Please check that these components have been
included prior to installation.
< Basic Components >
< Optional Components >
Guide Bracket
M3 L6 x 4 EA (fi xing
screws for MP500-F***)
User Manual / CardsMP500-F***
DP to HDMI Adapter
M3 L8 x 4 EA (fi xing screws
for metal back cover)
Power Cable
M3 L12 x 4 EA (fi xing
screws for plastic back
cover)
Weight
2.0 kg
● The specifications shown above may change
without prior notice for quality improvement.
2

Optional Items
The following items are supported by the MP500-F***, but are not provided with the product.
Please purchase optional items as needed.
● HDMI kit, HDMI cable, DP cable, LINE-OUT cable, LAN cable, mouse, keyboard.
Attention
● These illustrations may differ from your product and are subject to change.
● In some countries, a Y-type cable may be provided instead of the power cord.
● Always use genuine components to ensure safety and product life. Any damages or injuries by
misuse or using an improper accessory are not covered by the warranty.
● The guide bracket and The DP to HDMI adapter may not be provided depending on your region or
model.
● The DP to HDMI adapter may not be compatible with products other than MP500-F***.
● The DP to HDMI adapter does not provide the function of converting HDMI to DP.
Note
● SuperSign software and manual.
- Downloading from the LG Electronics website.
- Visit the LG Electronics website (http://www.lgecommercial.com/supersign) and download the
latest software for your model.
(Depending on the model, this feature may not be supported.)
ENGLISH
3

How to Install on Monitor
ENGLISH
**WS50, **LT55A Models
We recommend you to use the items provided with your MP500-F*** and follow our instructions for
integrating the product with your monitor in order to ensure the correct results.
Attention
● The illustrations shown are to guide your integration and may differ from your product.
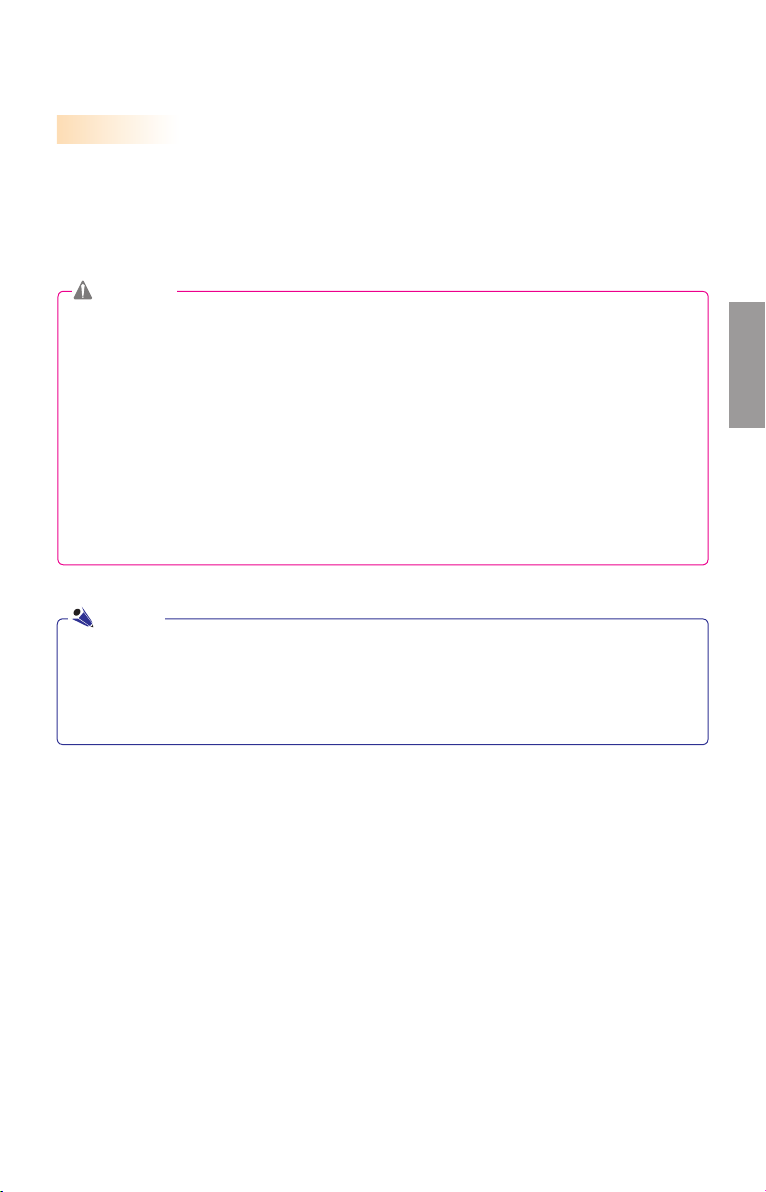
Place a soft cloth on the table and put the
product with the screen facing downward.
1
Push the MP500-F*** into the compartment
to mount it.
Attention
● Be careful of sharp edges on the rail and the
handle.
● Fixing the product with non-standard screws
may cause damage or the product to fall
down. LG Electronics is not liable for any
accidents relating to the use of non-standard
screws.
● Do not over tighten the screws as this may
cause damage to the product and void your
warranty.
4
Fix the MP500-F*** on the set using the four
2
screws provided.

**WX50MF Model
For proper use, it is recommended to use the basic components provided with the MP500-F*** to attach it
to a monitor.
Attention
● The picture shows an example connection and may look different to the product that you have.
ENGLISH
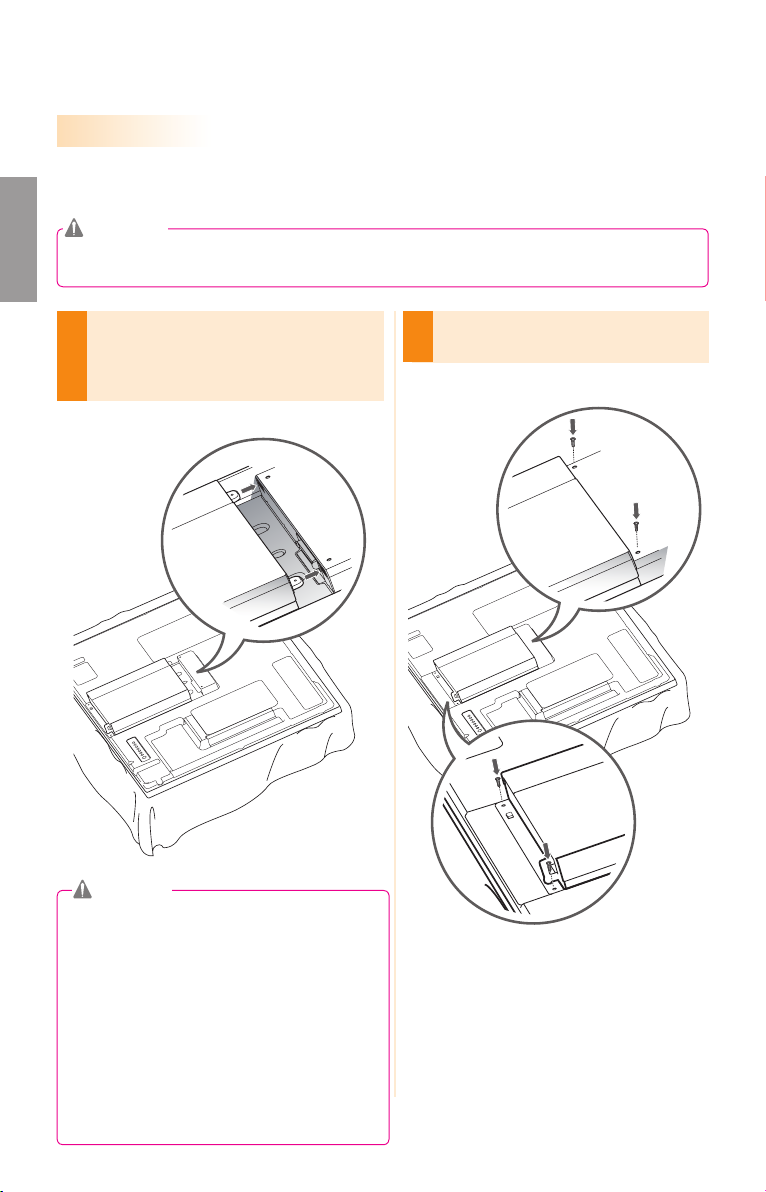
Place a soft cloth on the table and put the
product with the screen facing downward.
1
Remove the opening cover by unfastening two
screws as shown in the picture.
Push the MP500-F*** into the compartment
2
to mount it.
Fix the MP500-F*** on the product using the
3
two screws provided.
Attention
● Be careful of sharp edges on the rail and
the handle.
● Fixing the product with non-standard
screws may cause damage or the product
to fall down. LG Electronics is not liable for
any accidents relating to the use of non-
standard screws.
● Do not over tighten the screws as this may
cause damage to the product and void
your warranty.
5

In/Out Cable Connection
ENGLISH
Attention
● HDMI kit, HDMI, DP, LINE-OUT, and LAN cables are not included in the basic components. You
need to purchase a cable separately as it is not provided as an accessory.
● After cabling is complete, assign the SET ID of the monitor to be connected to MP500-F***.
● To configure the SET ID, please refer to the owner’s manual for your monitor.
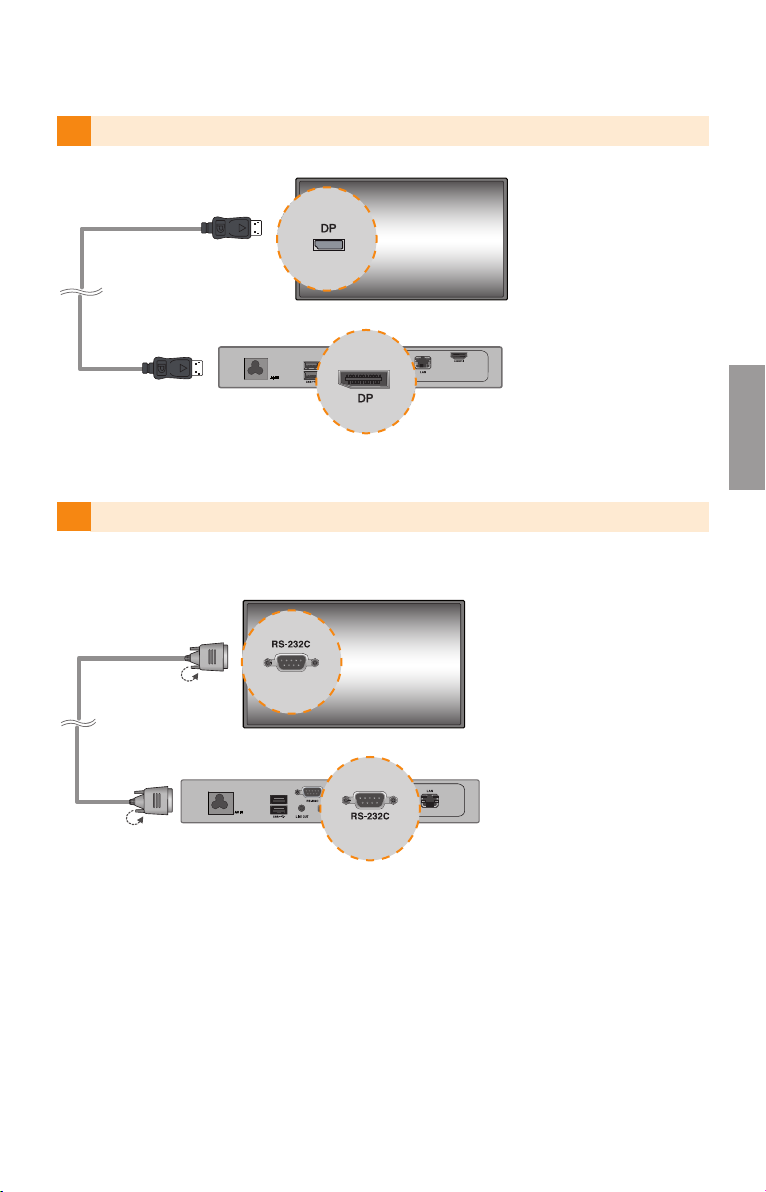
Connecting a Monitor with DP Cable
Attention
● To enable DP connection, the monitor that will be connected to MP500-F*** must support the DP
input port.
● When connecting the DP (DisplayPort) cable, use the standard cable. Using a non-standard
cable may cause a malfunction.
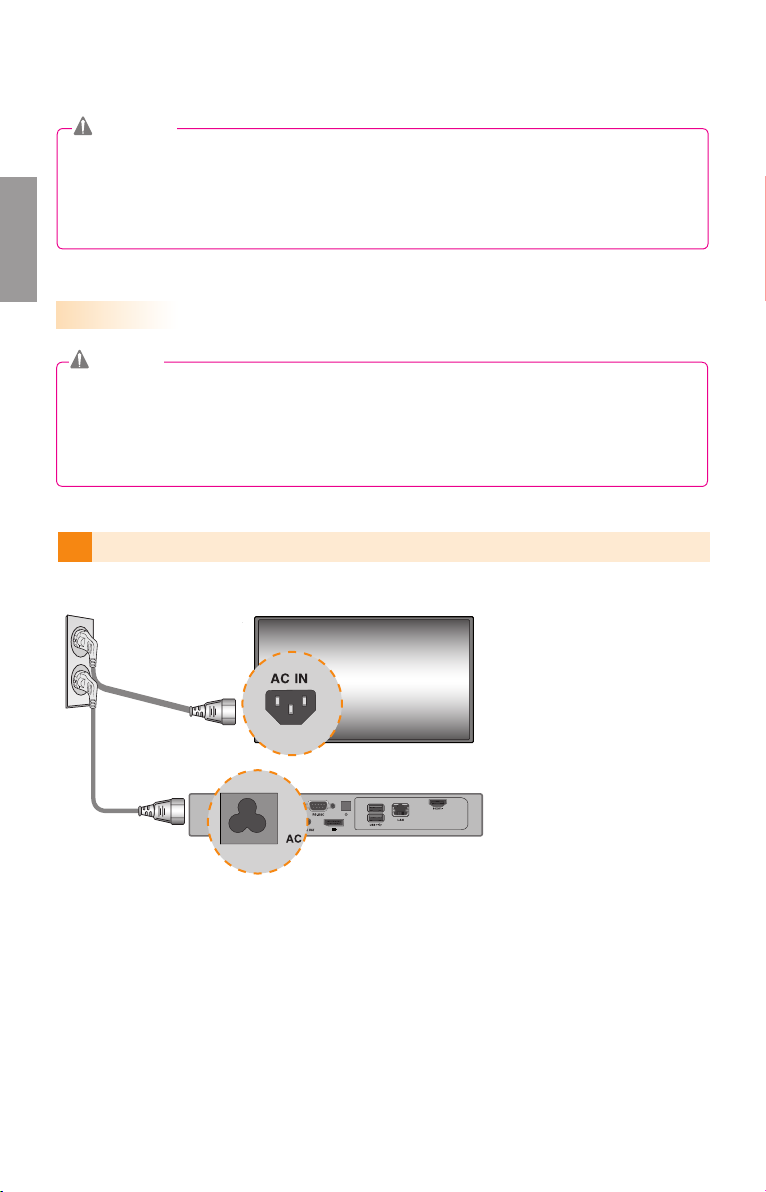
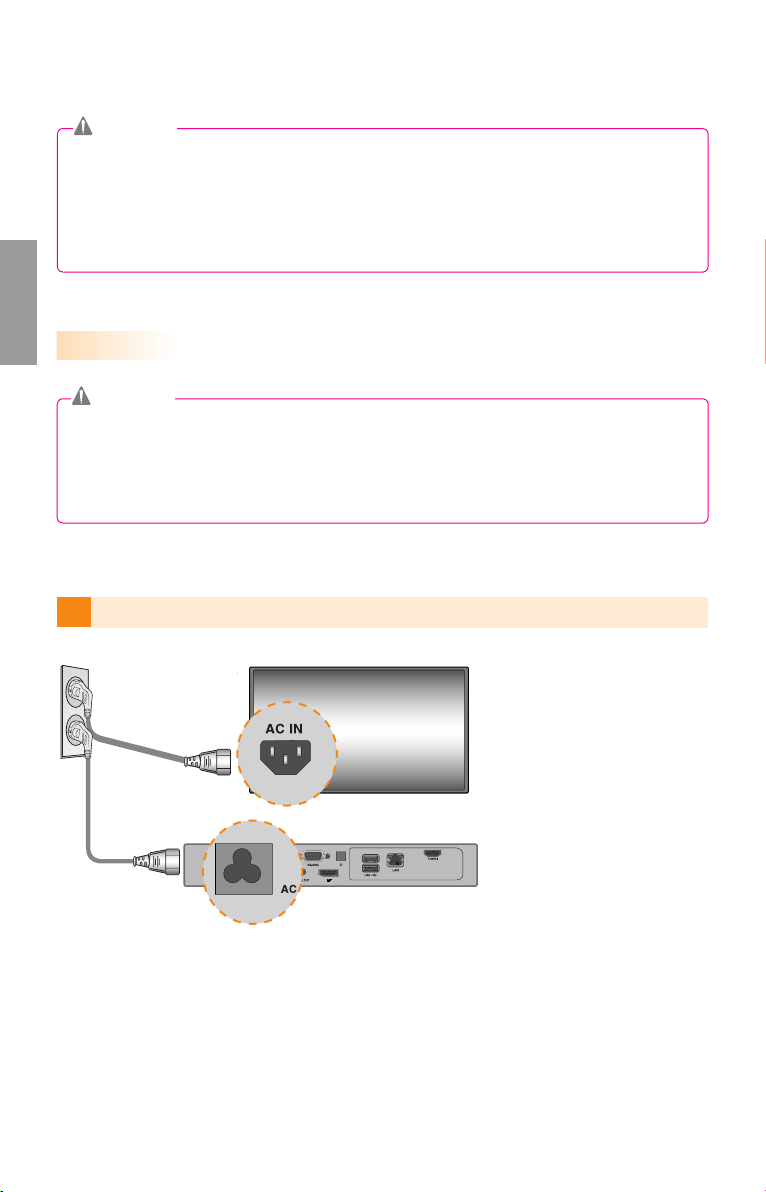
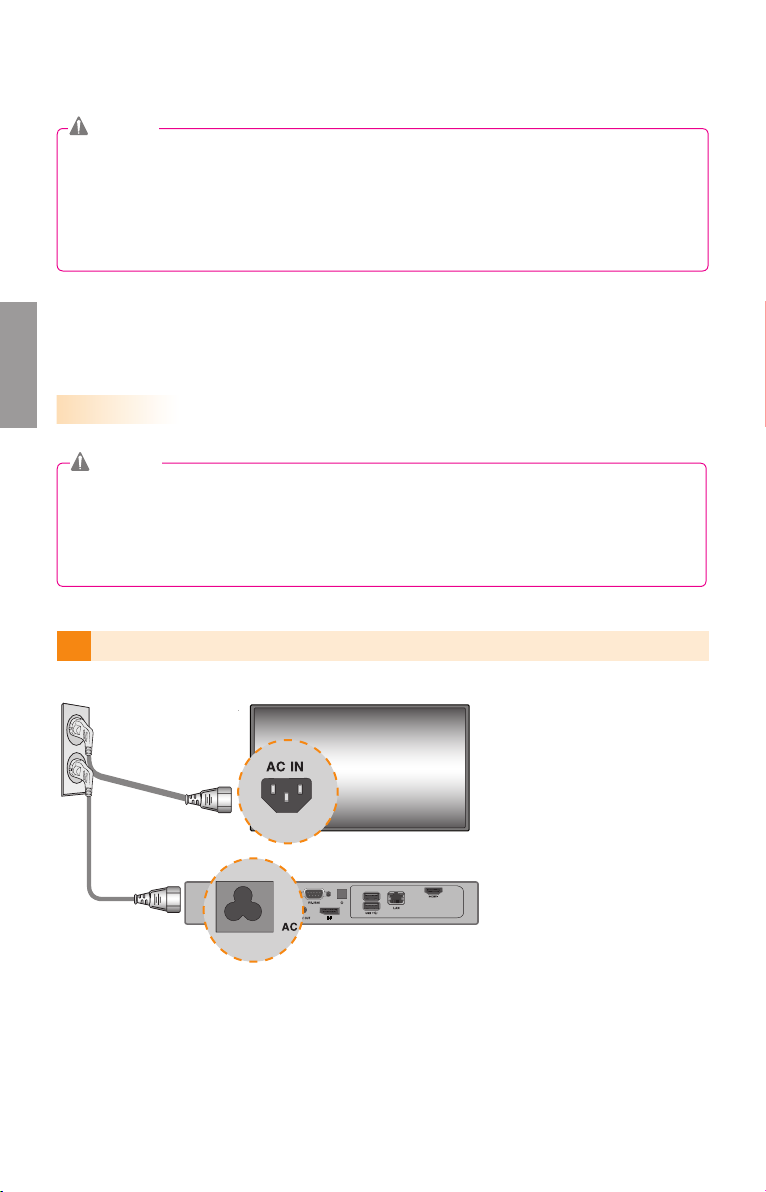
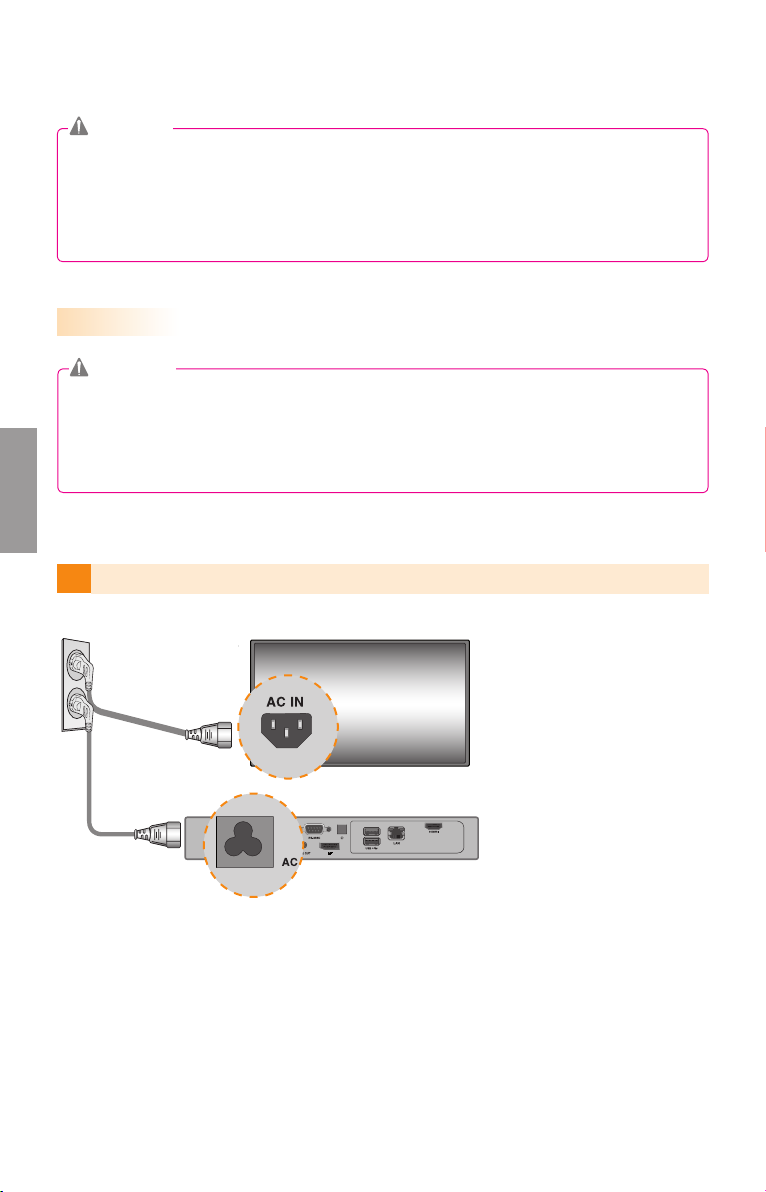
1
Connect the appropriate power cables to a monitor and MP500-F*** respectively.
6

ENGLISH
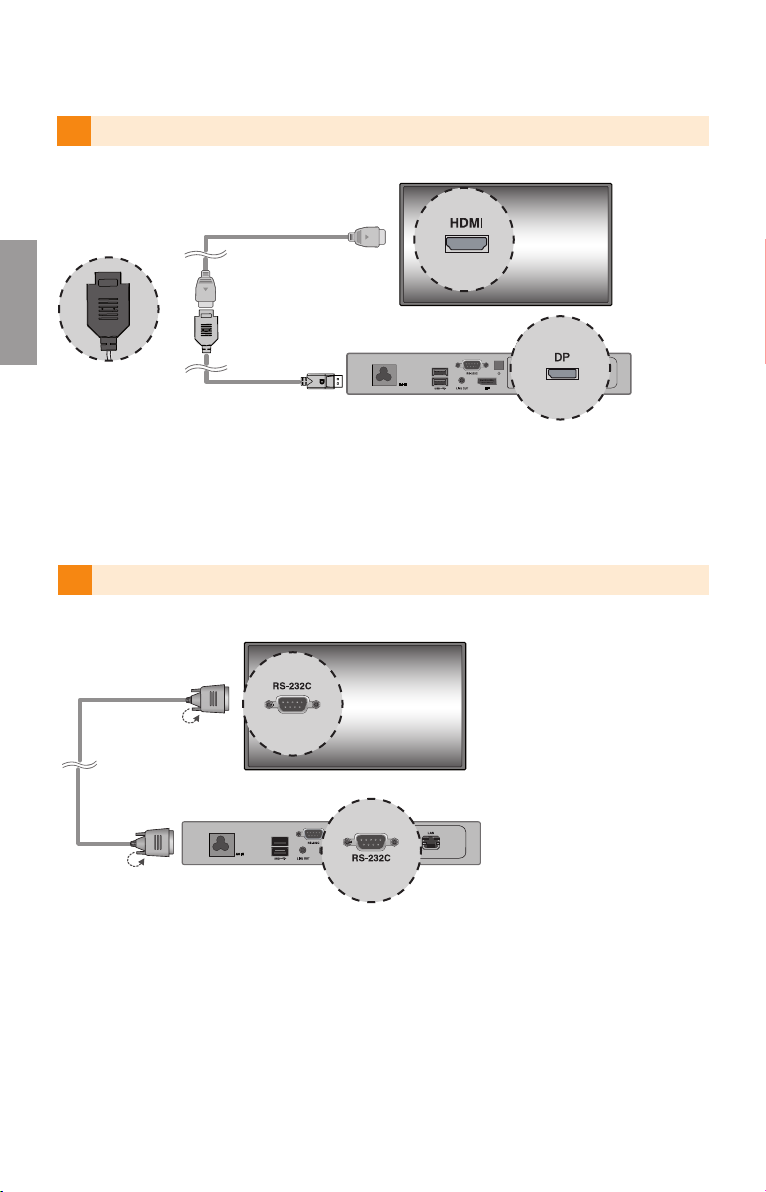
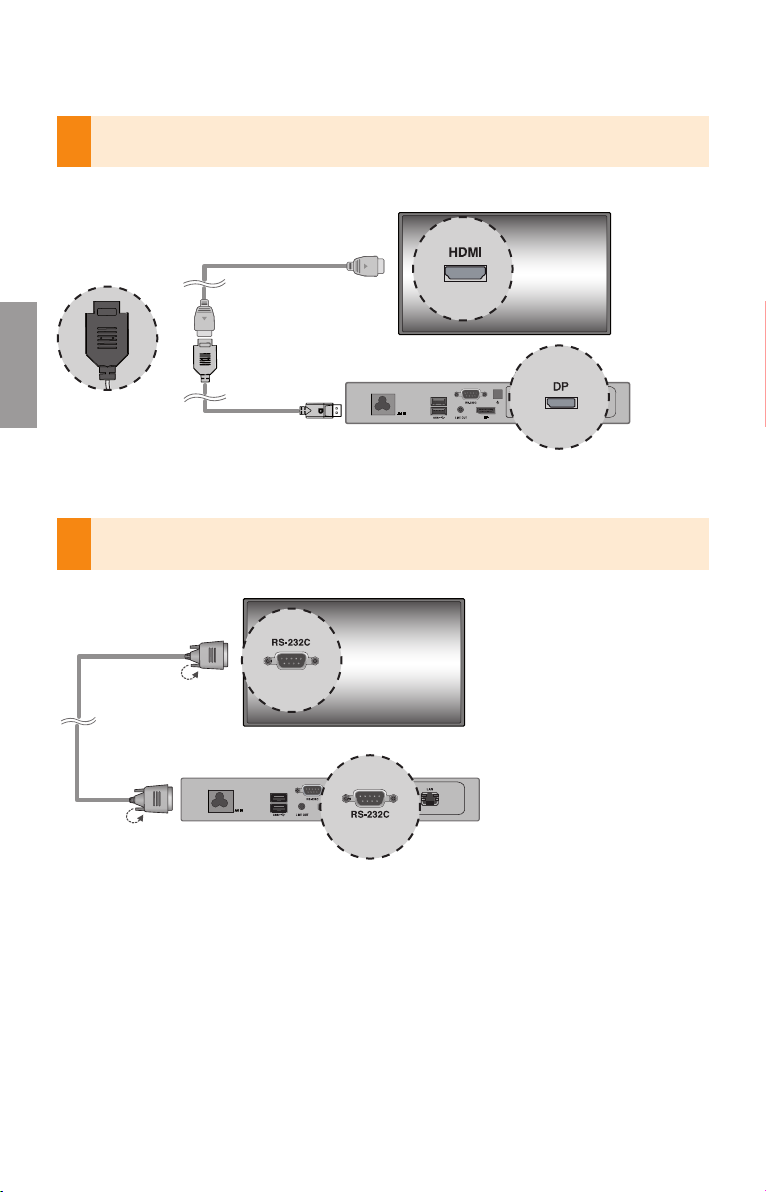
2 Connect
3 Connect
MP500-F***
MP500-F*** (OUT)
to the monitor via a DP cable.
to the monitor (IN) with an RS-232C cable.
7

ENGLISH
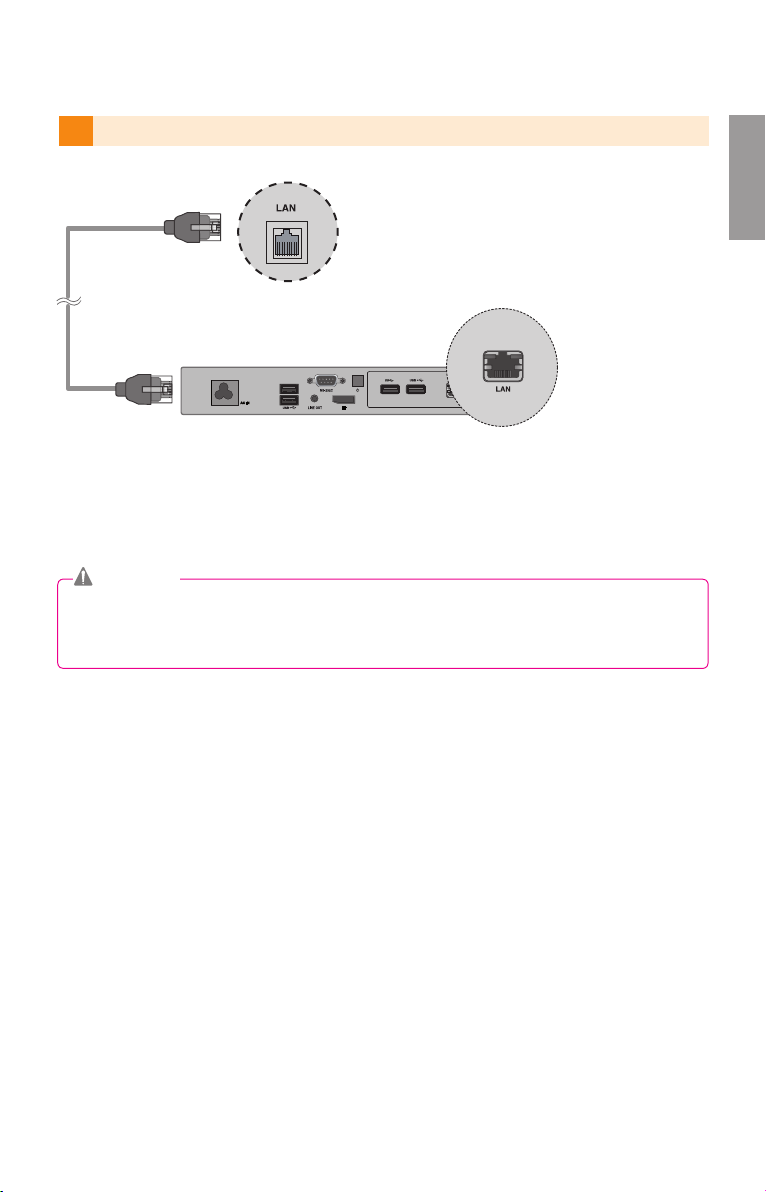
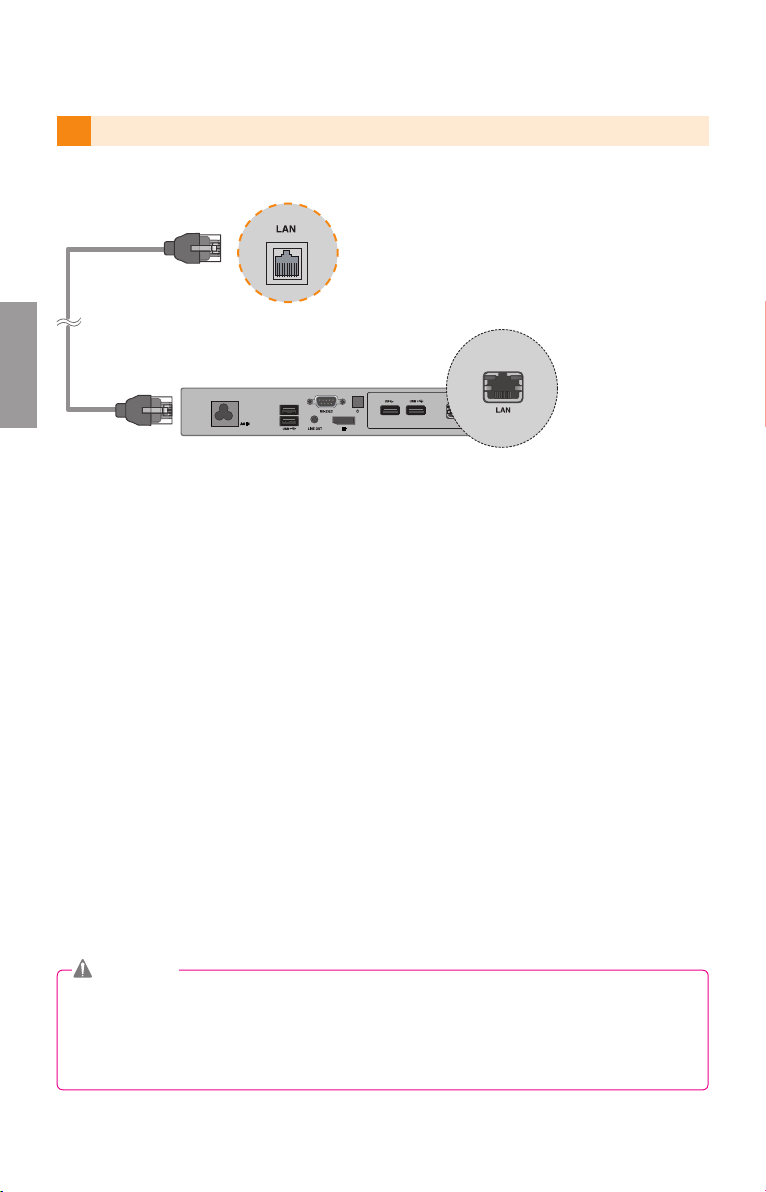
4 Connect a LAN cable to
MP500-F***.
Attention
● When the product is turned on after cable connection or the operating system is completely
booted, DP video output starts operating.
● The product does not support a dual mode where DP can be switched either to HDMI or
DVI. It is only for DP output.
8

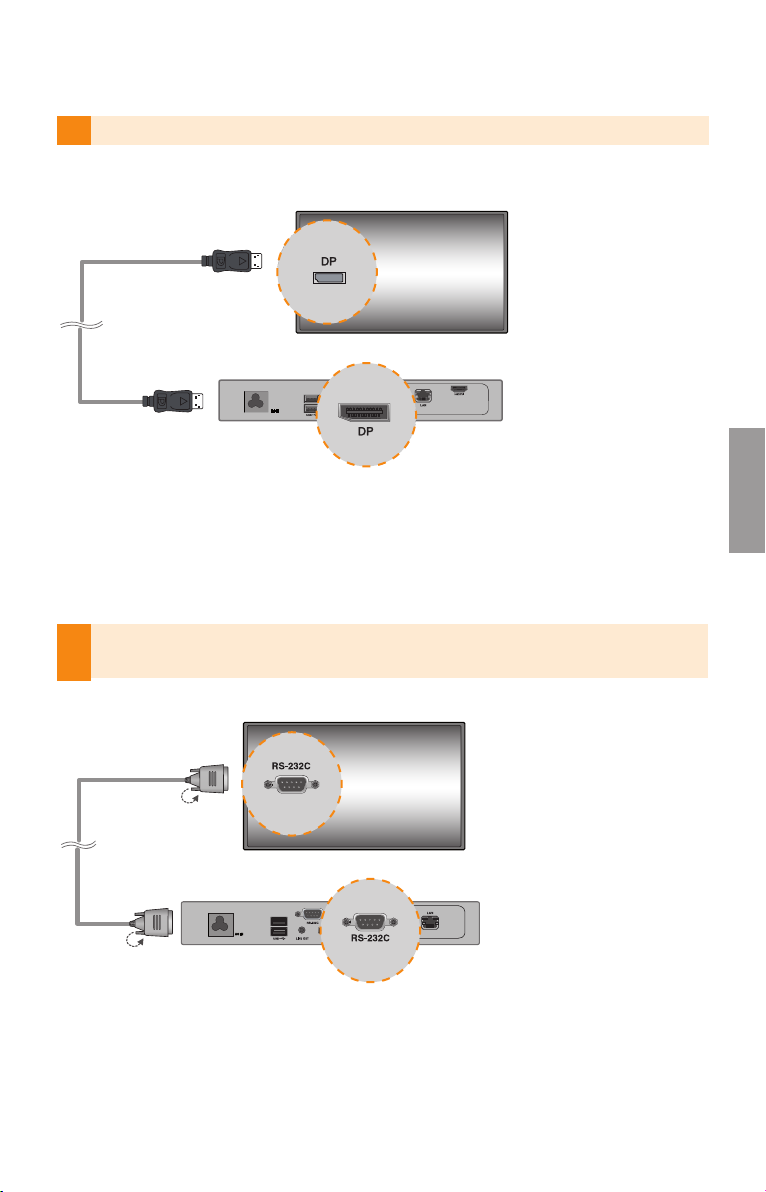
Connecting a Monitor with DP to HDMI Adapter
Note
●
Use a certifi ed cable with the HDMI logo attached. If you do not use a certifi ed HDMI
cable, the screen may not display or a connection error may occur.
●
Recommended HDMI cable types
-High-Speed HDMI®/™ Cable
-High-Speed HDMI®/™ Cable with Ethernet
Attention
● To enable DP to HDMI Adapter connection, the monitor that will be connected to MP500-F***
must support the DP input port.
● When connecting the DP (DisplayPort) to HDMI Adapter cable, use the standard cable. Using a
non-standard cable may cause a malfunction.
1 Connect the power cables to the monitor and to the MP500-F***.
ENGLISH
9

ENGLISH
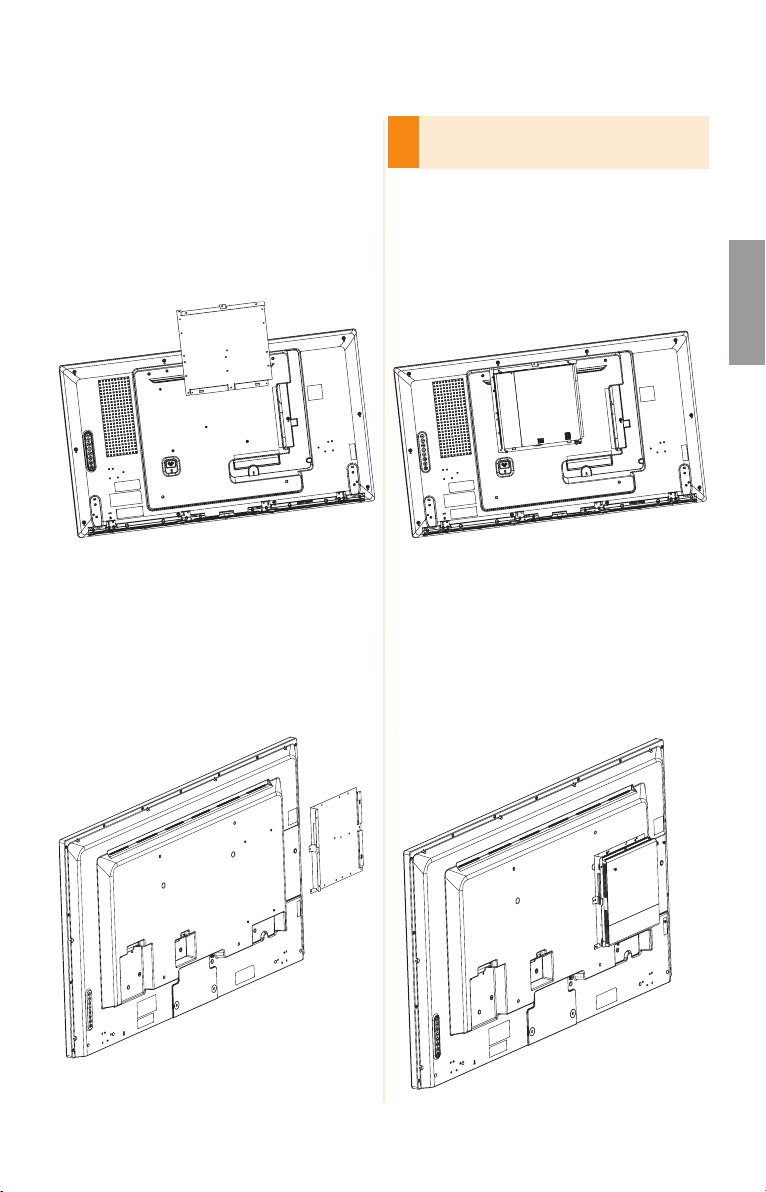
2 Connect the MP500-F*** to the monitor using the DP to HDMI adapter and the HDMI cable.
3 Connect MP500-F*** (OUT) to the monitor (IN) with an RS-232C cable.
10

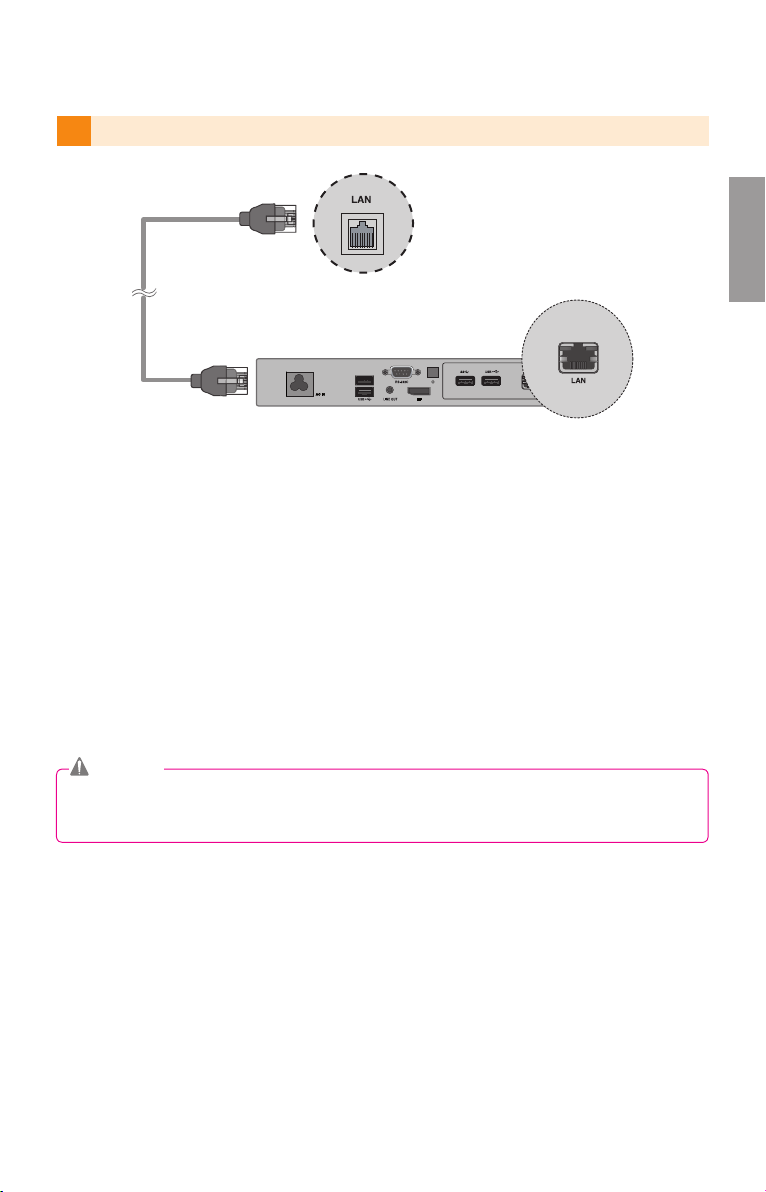
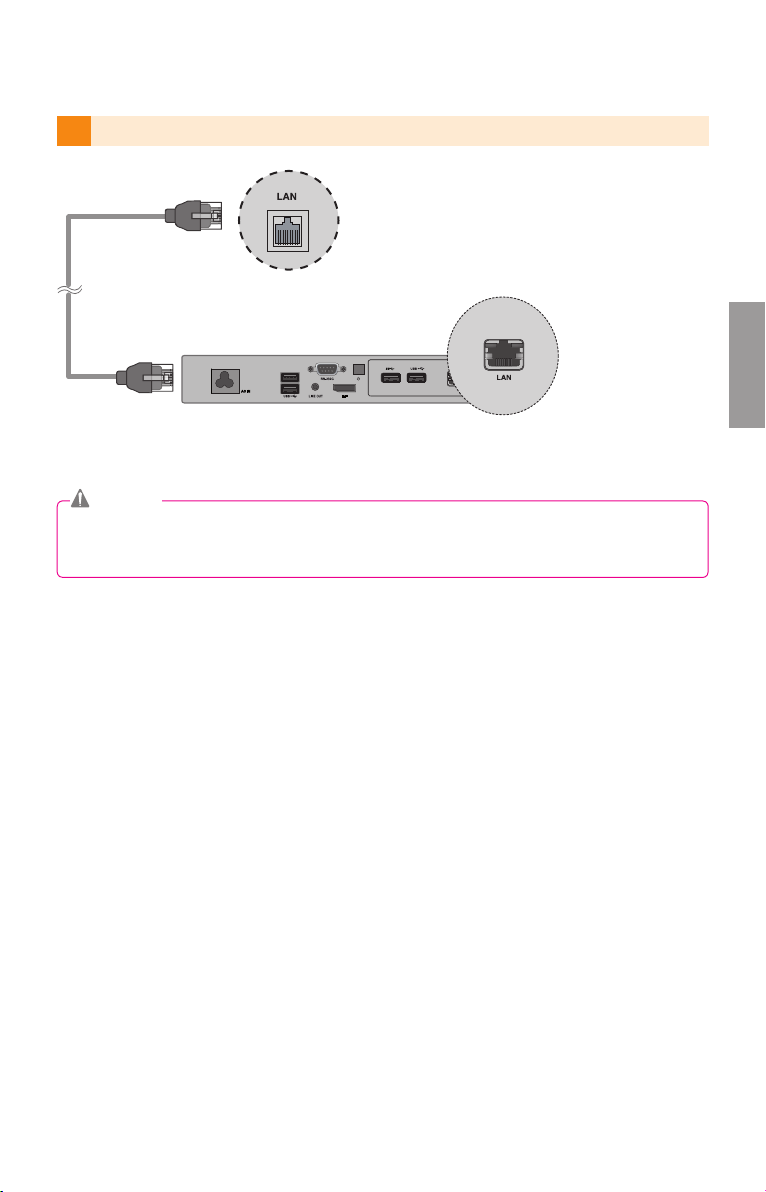
4 Connect a LAN cable to MP500-F***.
Attention
● The DP to HDMI adapter must be connected before the product is turned on or after
the operating system has completely loaded.
ENGLISH
11

How to Install the Guide Bracket
1
2
1
2
1
2
1
2
1
2
ENGLISH
Make sure to match the numbers carved
on the guide bracket and the numbers on
1
the back cover when assembling the guide
bracket.
Attach the guide bracket to the back of your
2
monitor. (3 or 4 screws are required depending on the model.)
<Model that requires 3 fi xing screws for
assembling the guide bracket>
<Model that requires 4 fi xing screws for
assembling the guide bracket>
12

Assemble the MP500-F*** to the guide
3
bracket with the fi xing screws.
ENGLISH
<Model that requires 3 fi xing screws for
assembling the guide bracket>
<Model that requires 4 fi xing screws for
assembling the guide bracket>
<Model that requires 3 fi xing screws for assembling the guide bracket>
Attach the MP500-F*** to the guide bracket with
4 fi xing screws.
<Model that requires 4 fi xing screws for assembling the guide bracket>
Attach the MP500-F*** to the guide bracket with
4 fi xing screws.
13


ČESKY
Příručka snadné instalace
Přehrávač digitálních reklam a prezentací (Digital Signage)
MP500-F***
Před uvedením tohoto produktu do provozu si pečlivě prostudujte tuto příručku a uložte ji
pro budoucí potřebu. Do této příručky si také poznamenejte si číslo modelu a sériové číslo
produktu. Tyto údaje bude třeba sdělit při žádosti o servisní zásah (je-li to možné).
Bezpečnostní opatření
Před použitím produktu si důkladně přečtěte tyto bezpečnostní pokyny.
■ Napájecí kabel musí být připojen k uzemněné zásuvce.
- Mohlo by dojít ke zranění elektrickým proudem nebo ke zranění.
■ Používejte pouze jmenovité napětí.
– Mohlo by dojít k poškození produktu nebo k usmrcení elektrickým proudem.
■ Při bouřce odpojte od produktu napájecí a signálový kabel.
– Mohlo by dojít k usmrcení elektrickým proudem nebo ke vzniku požáru.
■ Nedotýkejte se zástrčky mokrýma rukama. Pokud je kolík konektoru mokrý nebo zaprášený, vysušte
jej nebo otřete od prachu.
– Vysoká vlhkost by mohla způsobit zranění elektrickým proudem.
■ Pokud je zástrčka kabelu připojena do zásuvky ve zdi, nevkládejte do konektoru napájecího kabelu
žádné vodiče (například dráty). Nedotýkejte se ani napájecího kabelu ihned po jeho připojení do
zásuvky ve zdi.
– Mohlo by dojít ke zranění elektrickým proudem.
■ Napájecí kabel slouží jako hlavní prostředek pro odpojení z elektrické sítě. Zkontrolujte, zda je
zásuvka po instalaci snadno dostupná.
■ V případě náhrady baterie nevhodným typem hrozí nebezpečí výbuchu. Proveďte likvidaci použitých
baterií podle pokynů.
Instalační prostředí přehrávače médií MP500-F***
Při instalaci přehrávače nechte na každé straně přibližně 10 cm volného místa, abyste zajistili
dostatečnou ventilaci.
10 cm
10 cm
<
Nainstalujte přehrávač médií připojený
k monitoru>
10 cm
10 cm
10 cm
< Nainstalujte přehrávač médií >
10 cm
10 cm
10 cm
1

Součásti zařízení
ČESKY
Základní součásti
Zařízení MP500-F*** s uvedenými součástmi. Před instalací zařízení zkontrolujte, zda jsou dané součásti přiloženy.
< Základní součásti >
MP500-F*** Napájecí kabel
< Volitelné součásti >
M3 L6 x 4EA (používán při
připevnění přehrávače
médií MP500-F***)
Vodicí lišta
Uživatelská příručka / Karty
Adaptér DP na HDMI
M3 L8 x 4EA
(používán, když je zadní
kryt kovový)
M3 L12 x 4EA
(používán, když je zadní
kryt plastový)
2
Hmotnost
2,0 kg
● Výše uvedené technické údaje mohou být v rámci zvyšování kvality změněny bez předchozího upozornění.

Volitelné položky
Následující doplňky jsou zařízením MP500-F*** podporovány, nejsou ale součástí balení. Případné
volitelné položky zakupte podle potřeby.
● Sada HDMI, Kabel HDMI, kabel DP, kabel LINE-OUT, kabel LAN, myš, klávesnice.
Upozornění
● Obrázek se může od výrobku lišit. Některé položky se mohou v závislosti na okolnostech lišit.
● V některých zemích může být místo napájecího kabelu přiložen kabel typu Y.
● Používejte pouze originální součásti, jinak není zaručena bezpečnost a životnost výrobku.
Záruka se nevztahuje na poškození a zranění způsobená nesprávným použitím nebo nevhodným příslušenstvím.
● Vodicí lišta a adaptér DP na HDMI nemusí být v závislosti na oblasti nebo modelu součástí pro-
duktu.
● Adaptér DP na HDMI nemusí být kompatibilní s jinými produkty než se zařízením MP500-F***.
● Adaptér DP na HDMI nepřevádí HDMI na DP.
Poznámka
● Software SuperSign a příručka
- Stahování z webu společnosti LG Electronics.
- Navštivte webovou stránku společnosti LG Electronics(
a stáhněte si nejnovější software pro svůj model.
(Tato funkce nemusí být v závislosti na režimu podporována.)
www.lgecommercial.com/supersign
)
ČESKY
3

Instalace k monitoru
Model **WS50, Model **LT55A
ČESKY
Aby zařízení fungovalo dle uvedených specifi kací uváděných výrobcem, tak je nutné používat originální komponenty a dodržovat pokyny v této uživatelské příručce.
Upozornění
● Monitor znázorněný na obrázcích výše v návodu k přimontování se může od vašeho výrobku lišit.
Připojte zařízení MP500-F*** k produktu
Umístěte na stůl měkkou látku a položte
1
produkt obrazovkou dolů. Zatlačte zařízení
MP500-F*** do prostoru a upevněte je.
2
pomocí dvou poskytnutých šroubů.
Upozornění
● Dejte pozor na ostré hrany kolejnic a držadel.
● Pokud produkt upevníte jinými šrouby než je
doporučeno, může dojít k jeho poškození nebo
pádu. Společnost LG Electronics nenese odpovědnost za žádné škody způsobené použitím
nesprávných upevňovacích šroubů.
● Šrouby neutahujte příliš velkou silou, jinak se
výrobek poškodí a záruka pozbude platnosti.
4

Model **WX50MF
Pro zajištění správné funkce doporučujeme použít pro připojení zařízení MP500-F*** k monitoru základní prvky, které jsou součástí balení.
Upozornění
● Monitor znázorněný na obrázcích výše v návodu k přimontování se může od vašeho výrobku lišit.
Připojte zařízení MP500-F*** k produktu
Umístěte na stůl měkkou látku a položte
1
produkt obrazovkou dolů. Odstraňte otevírací
kryt uvolněním dvou šroubů podle obrázku.
3
pomocí dvou poskytnutých šroubů.
ČESKY
Zatlačte zařízení MP500-F*** do prostoru a
2
upevněte je.
Upozornění
● Dejte pozor na ostré hrany kolejnic a držadel.
● Pokud produkt upevníte jinými šrouby než
je doporučeno, může dojít k jeho poškození
nebo pádu. Společnost LG Electronics
nenese odpovědnost za žádné škody způsobené použitím nesprávných upevňovacích šroubů.
● Šrouby neutahujte příliš velkou silou, jinak
se výrobek poškodí a záruka pozbude platnosti.
5

Připojení vstupních a výstupních kabelů
ČESKY
Upozornění
● Sada HDMI, kabely HDMI, DP, LINE-OUT a LAN nepatří mezi základní prvky, které jsou součástí balení. Jednotlivé kabely je nutné zakoupit zvlášť.
● Po dokončení kabeláže přiřaďte možnost SET ID (ID PRODUKTU) monitoru, který bude připojen
k zařízení MP500-F***.
● Chcete-li nakonfigurovat nastavení SET ID, vyhledejte si informace v uživatelské příručce monitoru.
Připojení monitoru pomocí kabelu DP
Upozornění
● Pokud chcete zapnout připojení DP, musí monitor, který bude připojený k zařízení MP500-F***, podporovat vstup DP.
● Při připojování kabelu DP (DisplayPort) použijte standardní kabel. Použití nestandardního typu
kabelu by mohlo způsobit poškození produktu.
1
Připojte odpovídající napájecí kabely k monitoru a zařízení MP500-F***.
6

2 Připojte zařízení MP500-F*** k monitoru pomocí kabelu DP.
3 Připojte zařízení MP500-F***(OUT) ke vstupu monitoru (IN) pomocí kabelu rozhraní RS-232C.
ČESKY
7

4 Připojte k zařízení MP500-F*** kabel sítě LAN.
ČESKY
Upozornění
● Pokud zapnete produkt po připojení kabelu nebo po kompletním nastartování operačního
systému, videovýstup DP začne fungovat.
● Produkt nepodporuje duální režim, kde je možné DP přepnout buď na HDMI nebo DVI. Slouží
pouze pro výstup DP.
8

Připojení monitoru pomocí adaptéru DP na HDMI
Poznámka
● Použijte certifikovaný kabel s logem HDMI. Pokud nepoužijete certifikovaný kabel HDMI,
obrazovka nemusí zobrazovat nebo může dojít k chybě připojení.
● Doporučené typy kabelů HDMI
-Vysokorychlostní kabel HDMI®/
- Vysokorychlostní kabel HDMI®/™se sítí Ethernet
Upozornění
● Pokud chcete zapnout připojení DP, musí monitor, který bude připojený k zařízení MP500-F***,
podporovat vstup DP.
● Při připojování kabelu DP (DisplayPort) použijte standardní kabel. Použití nestandardního typu
kabelu by mohlo způsobit poškození produktu.
1
Připojte napájecí kabely k monitoru a zařízení MP500-F***.
™
ČESKY
9

2 Připojte zařízení MP500-F*** k monitoru pomocí adaptéru DP na HDMI a kabelu HDMI.
ČESKY
Připojte výstup zařízení MP500-F*** (OUT) ke vstupu monitoru (IN) pomocí kabelu rozhraní
3
RS-232C.
10
4 Připojte k zařízení MP500-F*** kabel sítě LAN.
Upozornění
● Adaptér DP na HDMI musí být připojen před zapnutím produktu nebo po úplném spuštění
operačního systému.
ČESKY
11

1
2
1
2
1
2
1
2
1
2
Postup pro namontování vodicích lišt
ČESKY
Při připevňování vodicí lišty dbejte na to, aby
1
čísla uvedená na vodicí liště odpovídala číslům na zadním krytu.
Připevněte vodicí lištu na zadní stranu moni-
2
toru. (V závislosti na modelu jsou potřeba 3
nebo 4 upevňovací šrouby.)
<Model, u kterého jsou pro připevnění vodicí lišty
potřeba 3 upevňovací šrouby>
<Model, u kterého jsou pro připevnění vodicí lišty
potřeba 4 upevňovací šrouby>
12

Připevněte přehrávač médií MP500-F*** k vodicí
3
liště pomocí upevňovacích šroubů.
ČESKY
<Model, u kterého jsou pro připevnění vodicí lišty
potřeba 3 upevňovací šrouby>
<Model, u kterého jsou pro připevnění vodicí lišty
potřeba 4 upevňovací šrouby>
<Model, u kterého jsou pro připevnění vodicí lišty potřeba 3 upevňovací šrouby>
Připevněte přehrávač médií MP500-F*** k vodicí
liště pomocí 4 upevňovacích šroubů.
<Model, u kterého jsou pro připevnění vodicí lišty potřeba 4 upevňovací šrouby>
Připevněte přehrávač médií MP500-F*** k vodicí liště pomocí 4 upevňovacích šroubů.
13


Guía de instalación sencilla
ESPAÑOL
Digital Signage Media Player
MP500-F***
Antes de utilizar el producto, lea esta guía con atención y consérvela para consultarla
cuando lo necesite. Anote el número de serie y el modelo del producto dentro de la guía. Se
le solicitará esta información (si corresponde) cuando llame al servicio de atención al cliente.
Precauciones de seguridad
Lea detenidamente estas instrucciones de seguridad antes de utilizar el producto.
■ Asegúrese de conectar el cable de alimentación a una toma de corriente con toma de tierra.
- De lo contrario, podría electrocutarse o sufrir daños personales.
■ Utilice únicamente la tensión nominal.
- El producto podría sufrir daños o el usuario podría electrocutarse.
■ En caso de tormenta eléctrica, desenchufe el cable de alimentación o de señal.
- Puede electrocutarse o se puede provocar un incendio.
■ No toque el enchufe de alimentación con las manos húmedas. Si las clavijas están húmedas o
cubiertas de polvo, séquelas o límpielas.
- Si hay un exceso de humedad, podría sufrir una descarga.
■ No introduzca materiales conductores (como una varilla de metal) en el extremo del cable de
alimentación mientras el otro extremo está conectado a la toma de corriente. Tampoco toque el
cable de alimentación justo después de enchufarlo a la toma de corriente.
- Podría electrocutarse.
■ El cable de alimentación se utiliza como dispositivo de desconexión principal. Compruebe que
puede acceder fácilmente al enchufe después de la instalación.
■ Existe riesgo de explosión si la batería se sustituye por una del tipo incorrecto. Deshágase de las
baterías según las instrucciones.
Entorno de instalación del reproductor multimedia MP500-F***
Cuando instale el reproductor, deje como mínimo unos 10 cm de espacio en cada lado para
permitir una ventilación adecuada.
10 cm
10 cm
< Instale el reproductor multimedia
junto al monitor >
10 cm
10 cm
10 cm
10 cm
< Instale el reproductor multimedia >
10 cm
10 cm
1

Componentes
Componentes básicos
El MP500-F*** con los siguientes componentes. Compruebe que se incluyen estos componentes
antes de realizar la instalación.
ESPAÑOL
< Componentes básicos >
MP500-F*** Guía de usuario / Tarjetas Cable de alimentación
< Componentes opcionales >
Adaptador de DP a HDMI
metálica)
4 tornillos M3 L12 (se
utilizan cuando la
cubierta posterior es
de plástico)
Peso
Soporte de montaje
4 tornillos M3 L6 (se
utilizan para fi jar el
MP500-F***)
2,0 kg
4 tornillos M3 L8 (se
utilizan cuando la
cubierta posterior es
● Las especificaciones mostradas anteriormente pueden
cambiar sin previo aviso para mejorar la calidad.
2

Elementos opcionales
El MP500-F*** es compatible con los siguientes elementos, pero no se incluyen con el producto.
Adquiera cualquier elemento opcional según sea necesario.
● Kit HDMI, Cable HDMI, cable DP, cable LINE-OUT, cable LAN, ratón y teclado.
Atención
● La ilustración puede variar con respecto al producto real. Algunos de estos elementos pueden
cambiar en determinadas circunstancias.
● En algunos países, podría incluirse un cable tipo Y en lugar del cable de alimentación.
● Use siempre componentes originales para garantizar su seguridad y la vida útil del producto. La
garantía no cubre los daños ni lesiones físicas causados por el mal uso o por emplear un acce-
sorio inadecuado.
● Puede que no se suministren el soporte de montaje y el adaptador de DP a HDMI en función de
la región o del modelo.
● Puede que el adaptador de DP a HDMI no sea compatible con productos distintos al
MP500-F***.
● El adaptador de DP a HDMI no ofrece la función de conversión de HDMI a DP.
Nota
● Software y manual de SuperSign
- Descarga desde el sitio Web de LG Electronics.
- Visite el sitio Web de LG Electronics (
última versión del software para su modelo.
(Dependiendo del modelo, esta función podría no estar disponible).
www.lgecommercial.com/supersign
) y descargue la
ESPAÑOL
3
Instalación del monitor
Modelos **WS50, **LT55A
Le aconsejamos que use los elementos proporcionados con el MP500-F*** y que siga las instrucciones para integrar el producto en el monitor, para garantizar así unos resultados óptimos.
ESPAÑOL
Atención
● Las ilustraciones del monitor que se muestran más arriba como referencia para llevar a cabo la
integración pueden diferir según el producto.
Coloque un paño suave en la mesa y sitúe el
producto con la pantalla hacia abajo. Empuje
1
el MP500-F*** hacia el interior del comparti-
mento para montarlo.
Atención
● Tenga cuidado con los bordes afilados de los
raíles y el soporte.
● Si se sujeta el producto con tornillos de
tamaño no estándar, podría sufrir daños o
caerse. LG Electronics no se hace
responsable de ningún accidente provocado
por no haber usado tornillos estándar.
● No apriete los tornillos en exceso, ya que esto
podría ocasionar daños en el producto y anu-
4
lar la garantía.
Fije el MP500-F*** en el producto con los
2
dos tornillos proporcionados.

**Modelo WX50MF
Para un uso adecuado del mismo, se recomienda utilizar los componentes básicos suministrados
con el MP500-F*** para fi jarlo a un monitor.
Atención
● Las ilustraciones del monitor que se muestran más arriba como referencia para llevar a cabo la
integración pueden diferir según el producto.
ESPAÑOL
Coloque un paño suave en la mesa y sitúe el
producto con la pantalla hacia abajo. Retire la
1
cubierta de apertura desatornillando dos tornil-
los como se muestra en la imagen.
Empuje el MP500-F*** hacia el interior del
2
compartimento para montarlo.
Fije el MP500-F*** en el producto con los dos
3
tornillos proporcionados.
Atención
● Tenga cuidado con los bordes afilados de
los raíles y el soporte.
● Si se sujeta el producto con tornillos de
tamaño no estándar, podría sufrir daños o
caerse. LG Electronics no se hace
responsable de ningún accidente
provocado por no haber usado tornillos
estándar.
● No apriete los tornillos en exceso, ya que
esto podría ocasionar daños en el pro-
ducto y anular la garantía.
5
Conexión de los cables de entrada y salida
Atención
● El kit HDMI y los cables HDMI, DP, salida en línea y LAN no están incluidos entre los componentes básicos. Debe adquirirlos por separado, ya que no se proporcionan como accesorio.
● Una vez completado el cableado, asigne el identificador de equipo del monitor que debe conec-
ESPAÑOL
tarse al MP500-F***.
● Para ajustar el valor de Configuración de identificación, consulte el manual del usuario del monitor.
Conexión de un monitor con un cable DP
Atención
● Para habilitar la conexión DP, el monitor que se va a conectar al MP500-F*** debe ser compati-
ble con el puerto de entrada DP.
● Al conectar el cable DP (DisplayPort), utilice el cable estándar. El uso de un cable no estándar
podría provocar fallos de funcionamiento.
1
Conecte los cables de alimentación correspondientes a un monitor y al MP500-F*** respectivamente.
6

2
Conecte el MP500-F*** al monitor con un cable DP.
3 Use un cable RS-232C (IN) para conectar el MP500-F*** (OUT) a la entrada del monitor.
ESPAÑOL
7

4 Conecte un cable de LAN al MP500-F***.
ESPAÑOL
Atención
● Cuando se enciende el producto tras haber conectado los cables o haber reiniciado por completo el
sistema operativo, la salida de vídeo DP empieza a funcionar.
● Este producto no es compatible con el modo dual que permite que DP alterne entre HDMI o DVI. Sólo
admite salida DP.
8

Conectar un monitor mediante un adaptador de DP a HDMI
Nota
●
Utilice un cable certificado con el logotipo HDMI. Si no utiliza un cable HDMI certificado, es posible
que la pantalla no se muestre o que se produzca un error de conexión.
●
Tipos de cable HDMI recomendados
- Cable HDMI®/TM de alta velocidad
- Cable HDMI®/TM de alta velocidad con Ethernet
Atención
● Para habilitar la conexión del adaptador de DP a HDMI, el monitor que se va a conectar al
MP500-F*** debe ser compatible con el puerto de entrada DP.
● Utilice un cable estándar para conectar el cable adaptador de DP (DisplayPort) a HDMI. El uso
de un cable no estándar podría provocar fallos de funcionamiento.
1
Conecte los cables de alimentación al monitor y al MP500-F***.
ESPAÑOL
9

2
Conecte el MP500-F*** al monitor con el adaptador de DP a HDMI y el cable HDMI.
ESPAÑOL
3 Use un cable RS-232C para conectar la salida del MP500-F*** a la entrada del monitor.
10
4 Conecte un cable LAN al MP500-F***.
ESPAÑOL
Atención
● El adaptador de DP a HDMI debe estar conectado antes de encender el producto o después de
que el sistema operativo se haya cargado por completo.
11

1
2
1
2
1
2
1
2
1
2
Cómo instalar el soporte de montaje
ESPAÑOL
Al fi jar el soporte de montaje, asegúrese de
1
que los números grabados en él coincidan
con los números de la cubierta posterior.
Fije el soporte de montaje a la parte posterior
2
del monitor (se requieren 3 o 4 tornillos en
función del modelo).
<Modelo que requiere 3 tornillos de sujeción para
instalar el soporte de montaje>
<Modelo que requiere 4 tornillos de sujeción para
instalar el soporte de montaje>
12

Fije el MP500-F*** al soporte de montaje con
3
los tornillos de fi jación.
ESPAÑOL
<Modelo que requiere 3 tornillos de sujeción para
instalar el soporte de montaje>
<Modelo que requiere 4 tornillos de sujeción para
instalar el soporte de montaje>
<Modelo que requiere 3 tornillos de sujeción
para instalar el soporte de montaje>
Fije el MP500-F*** al soporte de montaje con 4
tornillos de fi jación.
<Modelo que requiere 4 tornillos de sujeción
para instalar el soporte de montaje>
Fije el MP500-F*** al soporte de montaje con 4
tornillos de fi jación.
13


Guide de configuration rapide
Digital Signage Media Player
MP500-F***
Lisez ce guide soigneusement avant d'utiliser ce produit et conservez-le pour un usage ultérieur.
Prenez quelques instants pour inscrire sur ce guide la référence du modèle le numéro de série du
produit. Ces informations seront nécessaires, le cas échéant, si de l'assistance s'avère nécessaire.
Consignes de sécurité
Veuillez lire attentivement ces consignes de sécurité avant l'utilisation du produit.
Assurez-vous de raccorder le câble d'alimentation à un courant mis à la terre.
- Vous encourez sinon un risque d'électrocution ou de blessure.
Utilisez uniquement la tension nominale.
- Le produit peut être endommagé ou vous encourez un risque d'électrocution.
Pendant une tempête ou un orage, débranchez le câble d'alimentation ou le câble d'écran.
- Vous encourez un risque d'électrocution ou un incendie peut se déclarer.
Ne touchez pas la prise d'alimentation avec des mains mouillées. De plus, si les ergots de la prise
sont mouillés ou couverts de poussière, séchez intégralement la prise d'alimentation ou essuyez la
poussière.
- Vous encourez sinon un risque d'électrocution en raison d'une trop grande humidité.
N'insérez pas de conducteur (tel qu'une baguette métallique) dans une des extrémités du câble
d'alimentation pendant que l'autre extrémité est raccordée à la borne d'entrée du mur. De plus, ne
touchez pas le câble d'alimentation juste après l'avoir branché dans la borne d'entrée du mur.
- Vous encourez sinon un risque d'électrocution.
Le coupleur d’appareil est utilisé comme support de déconnexion.
La batterie risque d'exploser si vous la remplacez par un modèle inadéquat. Jetez la batterie en
suivant les instructions.
FRANÇAIS
Environnement d'installation du lecteur multimédia MP500-F***
Au moment de l'installation, laissez au moins 10 cm d'espace entre chaque bord du lecteur et tout
autre objet afin d'assurer une ventilation suffisante.
10 cm
10 cm
< Installer le lecteur multimédia fixé au
moniteur >
10 cm
10 cm
10 cm
< Installer le lecteur multimédia >
10 cm
10 cm
10 cm
1

Composants
Composants de base
Le MP500-F*** avec les composants suivants. Merci de vérifi er que vous disposez des composants
suivants avant l'installation.
< Composants de base >
FRANÇAIS
MP500-F*** Câble d’alimentation
< Composants en option >
Plaque de guidage
M3 L6 x 4EA
(utilisés lors de la fi xation du
MP500-F***)
Manuel / fi ches d’utilisation
Adaptateur DP vers HDMI
M3 L8 x 4EA (utilisés lor-
sque le cache arrière
est en métal)
M3 L12 x 4EA (utilisés
lorsque le cache ar-
rière est en plastique)
●
Net
2,0 kg
2
Afin d’améliorer la qualité de ce produit, les
spécifications ci-dessus sont sujettes à des
modifications sans préavis.

Accessoires
Les éléments suivants sont pris en charge par le MP500-F*** mais ne sont pas fournis avec le
produit.
Veuillez acheter les articles en option, le cas échéant.
● Kit HDMI, Câble HDMI, câble DP, câble LINE-OUT, câble LAN, souris, clavier.
Attention
● L’illustration peut ne pas être identique à votre produit. Certains de ces éléments peuvent varier
selon les circonstantes.
● Dans certains pays, le cordon d'alimentation est remplacé par un câble type Y.
● Afin d'optimiser la sécurité et la durée de vie du produit, n'utilisez pas d'éléments non agréés.
La garantie ne couvre pas les dommages ou les blessures dus à une mauvaise utilisation ou à
l'utilisation d'accessoires non agréés.
● En fonction de votre région ou du modèle, la plaque de guidage et l'adaptateur DP-HDMI peu-
vent ne pas être fournis.
● L'adaptateur DP-HDMI peut ne pas être compatible avec les produits autres que MP500-F***.
● L'adaptateur DP-HDMI ne fonctionne pas dans le sens HDMI-DP.
Remarque
● Logiciel et manuel SuperSign
- Téléchargement sur le site Web de LG Electronics.
- Rendez-vous sur le site Web de LG Electronics (
télécharger la dernière version logicielle pour votre modèle.
(Selon le modèle, cette fonctionnalité ne sera pas prise en charge.)
www.lgecommercial.com/supersign
) et
FRANÇAIS
3

Procédure d'installation sur le moniteur
Modèles **WS50, **LT55A
Il est recommandé d’utiliser les éléments fournis avec votre MP500-F*** et de suivre les instructions
relatives à l’intégration du produit à votre moniteur afi n d’être certain d’obtenir les bons résultats.
FRANÇAIS
Attention
● Les illustrations du moniteur présentées ci-dessus pour faciliter votre installation peuvent différ-
er de votre moniteur.
Placez un chiffon doux sur la table et posez le
produit dessus, avec l'écran face vers le bas.
1
Placez le MP500-F*** dans le compartiment
pour l'installer.
Fixez le MP500-F*** sur le produit grâce
2
aux quatre vis fournies.
Attention
● Attention, les bords du rail et de la poignée
peuvent être blessants.
● Utilisez des vis standard pour fi xer le produit ;
le non-respect de cette consigne pourrait
provoquer des dysfonctionnements ou une
chute du produit. LG Electronics n'est pas
responsable des accidents liés à l'utilisation de
vis non standard.
● Ne serrez pas trop les vis. Cela pourrait
endommager le moniteur et entraîner
l’annulation de votre garantie.
4

**Modèle WX50MF
Nous vous recommandons d'utiliser les composants de base fournis avec le MP500-F*** pour le
brancher à un moniteur.
Attention
● Les illustrations du moniteur présentées ci-dessus pour faciliter votre installation peuvent différer
de votre moniteur.
FRANÇAIS
Placez un chiffon doux sur la table et posez le
produit dessus, avec l'écran face vers le bas.
1
Retirez le couvercle en dévissant les deux vis
comme indiqué dans l'image.
Placez le MP500-F*** dans le compartiment
2
pour l'installer.
Fixez le MP500-F*** sur le produit grâce
3
aux deux vis fournies.
Attention
● Attention, les bords du rail et de la
poignée peuvent être blessants.
● Utilisez des vis standard pour fi xer le
produit ; le non-respect de cette consigne
pourrait provoquer des
dysfonctionnements ou une chute du
produit. LG Electronics n'est pas
responsable des accidents liés à
l'utilisation de vis non standard.
● Ne serrez pas trop les vis. Cela pourrait
endommager le moniteur et entraîner
l’annulation de votre garantie.
5
Connexion entrée/sortie par câble
Attention
● Les kit HDMI, les câbles HDMI, DP, LINE-OUT et LAN ne sont pas fournis avec le moniteur. Vous
devez acheter le câble séparément, celui-ci n’étant pas fourni avec les accessoires.
● Une fois tous les câble reliés, attribuez un SET ID au moniteur connecté au MP500-F***.
● Pour configurer l’identifiant de configuration, se reporter au manuel d’utilisation du moniteur et au
FRANÇAIS
menu de réglages concerné.
Connecter un moniteur avec un câble DP (DisplayPort)
Attention
● Pour que la connexion DP soit activée, le moniteur connecté au MP500-F*** doit prendre en
charge le port d'entrée DP.
● Utilisez un câble standard pour connecter le câble DP (DisplayPort). L'utilisation d'un câble
non-standard est susceptible de provoquer un dysfonctionnement.
1
Connectez les câbles d'alimentation appropriés au moniteur et au MP500-F***.
6

2 Connectez le
MP500-F***
au moniteur via un câble DP.
FRANÇAIS
3 Connectez le
MP500-F*** (OUT)
au moniteur (IN) à l'aide d'un câble RS-232C.
7

4 Branchez un câble LAN au
FRANÇAIS
MP500-F***.
Attention
● La sortie vidéo DP est activée une fois que le produit est sous tension et que les câbles
sont connectés ou que le système d'exploitation a été redémarré.
● Le produit ne prend pas en charge le mode double dans lequel le DP peut être remplacé
par le HDMI ou le DVI. Il est réservé à la sortie DP.
8

Connecter un moniteur avec un adaptateur DP vers HDMI
Remarque
●
Utilisez un câble certifié sur lequel est apposé le logo HDMI. Si vous utilisez un câble non certifié
HDMI, l’écran peut ne pas s’afficher ou une erreur de connexion peut survenir.
●
Types de câbles HDMI recommandés
- Câble HDMI®/TM haute vitesse
- Câble HDMI®/TM haute vitesse avec Ethernet
Attention
● Pour que la connexion de l'adaptateur DP-HDMI soit activée, le moniteur connecté au
MP500-F*** doit prendre en charge le port d'entrée DP.
● Lors de la connexion du DP (DisplayPort) au câble adaptateur HDMI, veuillez utiliser le câble
standard. L'utilisation d'un câble non-standard est susceptible de provoquer un dysfonctionne-
ment.
1
Connectez les câbles d'alimentation au moniteur et au MP500-F***.
FRANÇAIS
9
FRANÇAIS
3 Connectez le MMP500-F*** (OUT) au moniteur (IN) à l'aide d'un câble RS-232C.
10

4 Branchez un câble LAN au MP500-F***.2 Connectez le MP500-F*** au moniteur à l'aide de l'adaptateur DP-HDMI et du câble HDMI.
FRANÇAIS
Attention
● L'adaptateur DP-HDMI doit être connecté avant que le produit soit sous tension ou une fois
que le système d'exploitation est complètement chargé.
11

1
2
1
2
1
2
1
2
1
2
Comment installer la plaque de guidage
1
FRANÇAIS
Assurez-vous de bien faire correspondre les
numéros gravés sur la plaque de guidage
et les numéros sur le cache arrière lors de
l'assemblage de la plaque de guidage.
<Modèle nécessitant 3 vis de fi xation pour
l'assemblage de la plaque de guidage>
<Modèle nécessitant 4 vis de fi xation pour
l'assemblage de la plaque de guidage>
Fixez la plaque de guidage à l'arrière du
2
moniteur. (Selon le modèle, 3 ou 4 vis sont
nécessaires.)
12
Fixez le MP500-F*** à la plaque de guidage
3
à l'aide des vis de fi xation.
<Modèle nécessitant 3 vis de fi xation pour
l'assemblage de la plaque de guidage>
<Modèle nécessitant 4 vis de fi xation pour
l'assemblage de la plaque de guidage>
<Modèle nécessitant 3 vis de fi xation pour
l'assemblage de la plaque de guidage>
Fixez le MP500-F*** à la plaque de guidage à
l'aide de 4 vis de fi xation.
<Modèle nécessitant 4 vis de fi xation pour
l'assemblage de la plaque de guidage>
Fixez le MP500-F*** à la plaque de guidage à
l'aide de 4 vis de fi xation.
FRANÇAIS
13


Leitfaden für die Einrichtung
Digital Signage Media Player
MP500-F***
Bitte lesen Sie diesen Leitfaden sorgfältig durch, bevor Sie das Produkt zum ersten Mal verwenden.
Bewahren Sie das Dokument auf, um es auch später noch einmal zu Rate ziehen zu können.
Notieren Sie sich die Modellnummer und die Seriennummer des Geräts. Im Wartungsfall benötigen
Sie diese Informationen.
Sicherheitsvorkehrungen
Bevor Sie das Produkt zum ersten Mal verwenden, lesen Sie diese
Sicherheitshinweise bitte aufmerksam durch.
■ Stellen Sie sicher, dass das Stromkabel geerdet ist.
- Bei Nichtbeachtung besteht die Gefahr von Verletzungen oder eines tödlichen Stromschlags.
■ Verwenden Sie nur die Nennspannung.
– Es besteht Stromschlaggefahr. Außerdem kann das Produkt beschädigt werden.
■ Ziehen Sie bei Gewitter das Netzkabel oder Signalkabel.
– Es besteht Stromschlag- und Brandgefahr.
■ Berühren Sie den Netzstecker nicht mit nassen Händen. Wenn die Kontaktstifte nass oder verstaubt
sind, trocknen Sie den Netzstecker vollständig ab bzw. befreien Sie ihn von Staub.
- Feuchtigkeit erhöht die Gefahr eines tödlichen Stromschlags.
■ Berühren Sie das Ende des Netzkabels nicht mit einem leitenden Gegenstand (wie einer Gabel),
während das Netzkabel mit der Steckdose verbunden ist. Berühren Sie das Netzkabel nicht kurz
nachdem Sie es mit der Steckdose verbunden haben.
- Es besteht die Gefahr eines tödlichen Stromschlags.
■ Das Stromkabel wird als Hauptmaßnahme zur Netztrennung verwendet. Achten Sie bei der
Installation darauf, dass die Steckdose leicht zugänglich ist.
■ Bei Verwendung nicht geeigneter Batterien besteht Explosionsgefahr. Entsorgen Sie benutzte
Batterien nach Anweisung.
Installationsumgebung der Media Player MP500-F***
Achten Sie bei der Installation auf einen Mindestabstand von 10 cm zwischen dem Media Player
und anderen Gegenständen, um eine ausreichende Belüftung zu gewährleisten.
DEUTSCH
10 cm
10 cm
< Installation des Media Players auf dem
Monitor >
10 cm
10 cm
10 cm
10 cm
< Installation des Media Players >
10 cm
10 cm
1

Bestandteile
Grundbestandteile
MP500-F*** mit folgenden Komponenten. Überprüfen Sie vor der Installation, ob diese Komponenten
vorhanden sind.
< Grundbestandteile >
DEUTSCH
MP500-F*** Netzkabel
< Optionale Bestandteile >
Führungshalterung
M3 L6 x 4EA (zum Befesti-
gen des MP500-F***)
Benutzerhandbuch / Karten
DP-zu-HDMI-Adapter
M3 L8 x 4EA (für Rück-
seite aus Metall)
M3 L12 x 4EA (für Rück-
seite aus Kunststoff)
2
Gewicht
2,0 kg
● Die oben aufgeführten Spezifikationen können sich aus Gründen der
Qualitätsverbesserung ohne Vorankündigung ändern.
Optionale Bestandteile
Folgende Komponenten werden vom MP500-F*** unterstützt, sind jedoch nicht im Lieferumfang des
Produkts enthalten.
Sie können diese optionalen Bestandteile je nach Bedarf zusätzlich erwerben.
● HDMI-Kit, HDMI-Kabel, DP-Kabel, LINE-OUT-Kabel, LAN-Kabel, Maus, Tastatur.
Achtung
● Die Abbildungen können vom Produkt abweichen. Einige dieser Bestandteile können unter
Umständen variieren.
● In einigen Ländern wird Ihnen anstelle des Netzkabels ein Y-Kabel mitgeliefert.
● Um die Sicherheit und Lebensdauer des Produkts sicherzustellen, verwenden Sie keine
Fälschungen. Schäden oder Verletzungen, die durch unsachgemäße Nutzung oder die
Verwendung von ungeeignetem Zubehör verursacht werden, fallen nicht unter die Garantie.
● Die Führungshalterung und der DP-zu-HDMI-Adapter sind je nach Region oder Modell mögli-
cherweise nicht im Lieferumfang enthalten.
● Der DP-zu-HDMI-Adapter ist möglicherweise nicht mit anderen Produkten als dem MP500-F***
kompatibel.
● Der DP-zu-HDMI-Adapter bietet nicht die Funktion, HDMI in DP zu konvertieren.
Hinweis
● SuperSign SW und Benutzerhandbuch
- Herunterladen von der Website von LG Electronics:
- Besuchen Sie die Website von LG Electronics (
Sie die neueste Software für Ihr Modell herunter.
(Bei manchen Modellen wird diese Funktion möglicherweise nicht unterstützt.)
www.lgecommercial.com/supersign
), und laden
DEUTSCH
3

Installation an einem Monitor
Modelle **WS50, **LT55A
Zur Gewährleistung der ordnungsgemäßen Funktionsweise wird empfohlen, die im Lieferumfang des
MP500-F*** enthaltenen Teile zu verwenden und die Anweisungen zum Anbringen des Produkts an Ihren
Monitor zu befolgen.
Achtung
● Die Abbildungen des Monitors in den Anweisungen zum Anbringen des Produkts am Monitor
können von Ihrem Produkt abweichen.
DEUTSCH
1
Legen Sie ein weiches Tuch auf den Tisch,
und legen Sie das Gerät dann mit dem Bild-
schirm nach unten darauf. Schieben Sie das
MP500-F*** zum Einsetzen in das Fach.
Befestigen Sie das MP500-F*** mithilfe der
2
zwei Schrauben auf dem Produkt.
Achtung
● Vorsicht vor scharfen Kanten an der Schiene
und den Bügeln.
● Durch die Befestigung des Produkts mit nicht
standardmäßigen Schrauben kann das Produkt
beschädigt werden oder herunterfallen. LG
Electronics übernimmt keine Haftung für Unfälle,
die durch die Verwendung von nicht standardmäßigen Schrauben verursacht werden.
● Ziehen Sie die Schrauben nicht zu fest an, da
dies Beschädigungen am Produkt hervorrufen
und zum Erlöschen Ihrer Garantie führen könnte.
4

Modell **WX50MF
Per un uso corretto, si consiglia di utilizzare i componenti di base forniti con il dispositivo MP500-F***
per il collegamento a un monitor.
Achtung
● Die Abbildungen des Monitors in den Anweisungen zum Anbringen des Produkts am Monitor
können von Ihrem Produkt abweichen.
Legen Sie ein weiches Tuch auf den Tisch,
und legen Sie das Gerät dann mit dem
1
Bildschirm nach unten darauf. Entfernen Sie
die Abdeckung, indem Sie die zwei Schrauben
(siehe Abbildung) lösen.
Schieben Sie das MP500-F*** zum Einsetzen
2
in das Fach.
Befestigen Sie das MP500-F*** mithilfe der
3
zwei Schrauben auf dem Produkt.
Achtung
● Vorsicht vor scharfen Kanten an der Schiene
und den Bügeln.
●
Durch die Befestigung des Produkts mit nicht
standardmäßigen Schrauben kann das
Produkt beschädigt werden oder herunterfallen. LG Electronics übernimmt keine Haftung
für Unfälle, die durch die Verwendung von
nicht standardmäßigen Schrauben verursacht
werden.
●
Ziehen Sie die Schrauben nicht zu fest an, da dies
Beschädigungen am Produkt hervorrufen und zum
Erlöschen Ihrer Garantie führen könnte.
DEUTSCH
5
In/Out-Kabelverbindungen
Achtung
● HDMI-Kit, HDMI-, DP-, LINE-OUT- und LAN-Kabel gehören nicht zu den Grundbestandteilen.
Sie müssen das Kabel separat erwerben, da dieses nicht zum Lieferumfang gehört.
● Weisen Sie dem Monitor, der an den MP500-F*** angeschlossen werden soll, nach der
Verkabelung eine Kennung (Set ID) zu.
● Anweisungen zum Vergeben der KENNUNG finden Sie im Benutzerhandbuch Ihres Monitors.
DEUTSCH
Anschließen des Monitors mit einem DP-Kabel
Achtung
● Um den DP-Anschluss nutzen zu können, muss der Monitor, der an den MP500-F*** angeschlossen werden soll, den DP-Eingang unterstützen.
● Verwenden Sie zum Anschließen des DP-Kabels (DisplayPort) ein Standardkabel. Wird kein
Standardkabel verwendet, kann es zu Fehlfunktionen kommen.
1
Schließen Sie die entsprechenden Netzkabel an den Monitor und den MP500-F*** an.
6

2 Schließen Sie den
MP500-F***
per DP-Kabel an den Monitor an.
DEUTSCH
Verbinden Sie den Ausgang des
3
Monitors (IN).
MP500-F***
(OUT) über ein RS-232C-Kabel mit dem Eingang des
7
4 Anschließen eines LAN-Kabels an den
DEUTSCH
MP500-F***.
Achtung
● Wenn Sie das Gerät nach dem Anschließen eines Kabels einschalten, oder wenn das
Betriebssystem vollständig gestartet wurde, sind die DP-Ausgänge betriebsbereit.
● Das Produkt unterstützt nicht den Dualmodus, bei dem von DP auf HDMI oder DVI umgestellt
werden kann. Es ist nur für den DP-Ausgang geeignet.
8

Anschluss eines Monitors über einen DP-zu-HDMI-Adapter
Hinweis
●
Verwenden Sie ein zertifiziertes Kabel mit HDMI-Logo. Wenn Sie kein zertifiziertes HDMI-Kabel verwenden, zeigt der Bildschirm eventuell nichts an, oder ein Verbindungsfehler tritt auf.
●
Empfohlene Typen von HDMI-Kabeln
- High-Speed-HDMI®/™-Kabel
- High-Speed-HDMI®/™-Kabel mit Ethernet
Achtung
Um die Verbindung über den DP-zu-HDMI-Adapter nutzen zu können, muss der Monitor, der an den
●
MP500-F*** angeschlossen werden soll, den DP-Eingang unterstützen.
●
Verwenden Sie das Standardkabel, wenn Sie den DP (Display Port)-zu-HDMI-Adapter anschließen.
Wird kein Standardkabel verwendet, kann es zu Fehlfunktionen kommen.
1 Verbinden Sie die Netzkabel mit dem Monitor und dem MP500-F***.
DEUTSCH
9
2
DEUTSCH
3
Verbinden Sie den MP500-F*** mit dem Monitor. Verwenden Sie dazu den DP-zu-HDMIAdapter und das HDMI-Kabel.
Verbinden Sie den Ausgang des MP500-F*** (OUT) über ein RS-232C-Kabel mit dem
Eingang des Monitors (IN).
10
4 Schließen Sie ein LAN-Kabel an den MP500-F*** an.
Achtung
Der DP-zu-HDMI-Adapter muss angeschlossen werden, bevor das Produkt eingeschaltet wird oder
●
nachdem das Betriebssystem vollständig geladen wurde.
DEUTSCH
11

1
2
1
2
1
2
1
2
1
2
Aufbau der Führungshalterung
1
DEUTSCH
Stellen Sie sicher, dass die eingravierten
Zahlen auf der Führungshalterung und die
2
Nummern auf der Rückseite übereinstimmen,
wenn Sie die Führungshalterung montieren.
<Modell, das 3 Befestigungsschrauben für die
Montage der Führungshalterung benötigt>
<Modell, das 4 Befestigungsschrauben für die
Montage der Führungshalterung benötigt>
Befestigen Sie die Führungshalterung an
der Rückseite des Monitors. (Je nach Modell
werden 3 oder 4 Schrauben benötigt.)
12

Montieren Sie den MP500-F*** mit den
3
Befestigungsschrauben an der Führungshalterung.
<Modell, das 3 Befestigungsschrauben für die
Montage der Führungshalterung benötigt>
<Modell, das 4 Befestigungsschrauben für die
Montage der Führungshalterung benötigt>
<Modell, das 3 Befestigungsschrauben für die
Montage der Führungshalterung benötigt>
Befestigen Sie den MP500-F*** mit 4 Schrauben
an der Führungshalterung.
DEUTSCH
<Modell, das 4 Befestigungsschrauben für die
Montage der Führungshalterung benötigt>
Befestigen Sie den MP500-F*** mit 4 Schrauben an der Führungshalterung.
13


Οδηγός εύκολης εγκατάστασης
Συσκευή αναπαραγωγής πολυμέσων με ψηφιακό σήμα
MP500-F***
Πριν χρησιμοποιήσετε τη συσκευή, διαβάστε προσεκτικά τον οδηγό και φυλάξτε τον για μελλοντική
αναφορά. Καταγράψτε τον αριθμό μοντέλου και τον αριθμό σειράς της συσκευής που παρουσιάζεται
στον οδηγό. Όταν χρειαστείτε επισκευή, θα πρέπει να δώσετε αυτές τις πληροφορίες (αν ισχύουν).
Οδηγίες ασφάλειας
Πριν χρησιμοποιήσετε τη συσκευή, διαβάστε προσεκτικά τις οδηγίες ασφάλειας.
■ Βεβαιωθείτε ότι έχετε συνδέσει το καλώδιο τροφοδοσίας σε γειωμένη πρίζα.
- Υπάρχει κίνδυνος ηλεκτροπληξίας ή τραυματισμού.
■ Χρησιμοποιήστε μόνο την ονομαστική τάση.
- Υπάρχει κίνδυνος να καταστρέψετε το προϊόν ή να πάθετε ηλεκτροπληξία.
■ Σε περίπτωση αστραπής ή κεραυνού, αποσυνδέστε το καλώδιο τροφοδοσίας ή το καλώδιο σήματος.
- Υπάρχει κίνδυνος ηλεκτροπληξίας ή πυρκαγιάς.
■ Μην αγγίζετε την πρίζα με βρεγμένα χέρια. Επιπλέον, αν ο ακροδέκτης του καλωδίου είναι υγρός ή
καλυμμένος με σκόνη, στεγνώστε τον τελείως ή αφαιρέστε τη σκόνη αντίστοιχα.
- Υπάρχει κίνδυνος ηλεκτροπληξίας λόγω υπερβολικής υγρασίας.
■ Μην τοποθετείτε αγωγό (π.χ. μεταλλικό ραβδί) στο ένα άκρο του καλωδίου τροφοδοσίας, όταν το
άλλο άκρο έχει συνδεθεί σε πρίζα στον τοίχο. Επιπλέον, μόλις συνδέσετε το καλώδιο τροφοδοσίας
στην πρίζα, μην το αγγίξετε.
- Υπάρχει κίνδυνος ηλεκτροπληξίας.
■ Ο σύνδεσμος των συσκευών χρησιμεύει ως συσκευή αποσύνδεσης.
■ Σε περίπτωση αντικατάστασης της μπαταρίας με νέα μπαταρία ακατάλληλου τύπου, υπάρχει κίνδυνος έκρηξης. Απορρίψτε τις χρησιμοποιημένες μπαταρίες, σύμφωνα με τις οδηγίες.
Περιβάλλον εγκατάστασης της συσκευής αναπαραγωγής
πολυμέσων MP500-F***
Κατά την εγκατάσταση της συσκευής αναπαραγωγής πολυμέσων, αφήστε χώρο τουλάχιστον 10 εκ σε
κάθε πλευρά από οποιοδήποτε αντικείμενο θα μπορούσε να εμποδίσει τον επαρκή αερισμό της συσκευής.
ΕΛΛΗΝΙΚΑ
10 cm
10 cm
< Εγκατάσταση συσκευής αναπαραγωγής
πολυμέσων συνδεδεμένης στην οθόνη >
10 cm
10 cm
10 cm
10 cm
< Εγκατάσταση συσκευής αναπαρα-
γωγής πολυμέσων >
10 cm
10 cm
1

Περιεχόμενα συσκευασίας
Βασικά εξαρτήματα
Το MP500-F*** με τα παρακάτω εξαρτήματα. Πριν από την εγκατάσταση, βεβαιωθείτε ότι αυτά τα
εξαρτήματα περιλαμβάνονται στη συσκευασία.
< Βασικά εξαρτήματα >
ΕΛΛΗΝΙΚΑ
MP500-F***
< Προαιρετικά εξαρτήματα >
Οδηγός στήριξης
M3 L6 x 4EA (χρησιμοποιείται
κατά την προσαρμογή του
MP500-F***)
Πρόγραμμα εγκατάστασης/
Εγχειρίδιο χρήστη
Προσαρμογέας DP σε HDMI
M3 L8 x 4EA (χρησιμοποιείται
όταν το πίσω κάλυμμα είναι
μεταλλικό)
Καλώδιο τροφοδοσίας
M3 L12 x 4EA (χρησιμοποιείται
όταν το πίσω κάλυμμα είναι
πλαστικό)
Βάρος
2,0 kg
● Οι παραπάνω προδιαγραφές μπορεί να αλλάξουν χωρίς
προειδοποίηση, με στόχο τη βελτίωση της ποιότητας.
2

Προαιρετικά εξαρτήματα
Τα ακόλουθα εξαρτήματα υποστηρίζονται από το MP500-F***, αλλά δεν παρέχονται μαζί με το προϊόν. Αγοράστε τα προαιρετικά εξαρτήματα, εφόσον σας είναι απαραίτητα.
● Κιτ HDMI, Καλώδιο HDMI, καλώδιο DP, καλώδιο LINE-OUT, καλώδιο LAN, ποντίκι, πληκτρολόγιο.
Προσοχή
● Οι εικόνες αυτές μπορεί να διαφέρουν από το προϊόν. Ορισμένες από αυτές υπόκεινται σε αλλαγές.
● Σε ορισμένες χώρες, ενδέχεται να παρέχεται καλώδιο τύπου Y αντί για το καλώδιο ηλεκτρικής
τροφοδοσίας.
● Για λόγους προστασίας, αλλά και για να επιμηκύνετε τη διάρκεια ζωής του προϊόντος, χρησιμοποιείτε πάντοτε γνήσια εξαρτήματα. Η εγγύηση δεν καλύπτει ζημιές ή τραυματισμούς που οφείλονται σε κακή χρήση ή στη χρήση ακατάλληλων εξαρτημάτων.
● Ο οδηγός στήριξης και ο προσαρμογέας DP σε HDMI ενδέχεται να μην παρέχεται ανάλογα με
την περιοχή ή το μοντέλο.
● Ο προσαρμογέας DP σε HDMI ενδέχεται να μην είναι συμβατός σε άλλα προϊόντα εκτός του
MP500-F***.
● Ο προσαρμογέας DP σε HDMI δεν παρέχει τη λειτουργία μετατροπής HDMI σε DP.
Σημείωση
● Λογισμικό SuperSign και Εγχειρίδιο
- Λήψη από την τοποθεσία web της LG Electronics
- Επισκεφτείτε την τοποθεσία web της LG Electronics (
κάντε λήψη του πιο πρόσφατου λογισμικού για το μοντέλο σας.
(Ανάλογα με το μοντέλο, αυτή η λειτουργία μπορεί να μην υποστηρίζεται.)
www.lgecommercial.com/supersign
) και
ΕΛΛΗΝΙΚΑ
3

Εγκατάσταση στην οθόνη
Μοντέλα **WS50, **LT55A
Για τη διασφάλιση των σωστών αποτελεσμάτων, σας συνιστούμε να χρησιμοποιήσετε τα παρεχόμενα
εξαρτήματα του MP500-F***σύμφωνα τις οδηγίες που αναφέρονται σε αυτό το εγχειρίδιο.
Προσοχή
● Οι εικόνες της οθόνης παρέχονται ως αναφορά για τη σύνδεση και ενδέχεται να περιλαμβάνουν
στοιχεία που διαφέρουν από το προϊόν σας.
Τοποθετήστε ένα μαλακό πανί στο τραπέζι
και ακουμπήστε τη συσκευή με την οθόνη
1
ΕΛΛΗΝΙΚΑ
4
στραμμένη προς τα κάτω. Πιέστε το MP500F*** μέσα στη θήκη για να το τοποθετήσετε.
Προσοχή
● Προσέξτε τις αιχμηρές άκρες της τροχιάς και
της λαβής.
● Η στερέωση του προϊόντος με μη τυποποιημένες βίδες μπορεί να προκαλέσει ζημιά ή πτώση
του προϊόντος. Η LG Electronics δεν ευθύνεται
για τυχόν ατυχήματα που σχετίζονται με τη
χρήση μη τυποποιημένων βιδών.
● Μην σφίγγετε υπερβολικά τις βίδες. Ενδέχεται
να προκληθεί ζημιά στο προϊόν και να ακυρωθεί η εγγύηση.
Στερεώστε το MP500-F*** στη συσκευή με τις
2
δύο παρεχόμενες βίδες.

Μοντέλο **WX50MF
Για τη σωστή λειτουργία της συσκευής, συνιστάται η χρήση των βασικών εξαρτημάτων που παρέχονται
μαζί με το MP500-F*** για τη σύνδεση σε μια οθόνη.
Προσοχή
● Οι εικόνες της οθόνης παρέχονται ως αναφορά για τη σύνδεση και ενδέχεται να περιλαμβάνουν
στοιχεία που διαφέρουν από το προϊόν σας.
Τοποθετήστε ένα μαλακό πανί στο τραπέζι
και ακουμπήστε τη συσκευή με την οθόνη
στραμμένη προς τα κάτω. Αφαιρέστε το
1
κάλυμμα ανοίγματος, ξεβιδώνοντας τις δύο
βίδες όπως φαίνεται στην εικόνα.
Πιέστε το MP500-F*** μέσα στη θήκη για να το
2
τοποθετήσετε.
Στερεώστε το MP500-F*** στη συσκευή με τις
3
δύο παρεχόμενες βίδες.
Προσοχή
● Προσέξτε τις αιχμηρές άκρες της τροχιάς
και της λαβής.
● Η στερέωση του προϊόντος με μη τυποποιημένες βίδες μπορεί να προκαλέσει ζημιά ή
πτώση του προϊόντος. Η LG Electronics δεν
ευθύνεται για τυχόν ατυχήματα που σχετίζονται με τη χρήση μη τυποποιημένων βιδών.
● Μην σφίγγετε υπερβολικά τις βίδες.
Ενδέχεται να προκληθεί ζημιά στο προϊόν
και να ακυρωθεί η εγγύηση.
ΕΛΛΗΝΙΚΑ
5

Σύνδεση καλωδίων εισόδου/εξόδου
Προσοχή
● Το κιτ HDMI και τα καλώδια HDMI, DP, LINE-OUT και LAN δεν περιλαμβάνονται στα βασικά εξαρτήματα. Θα πρέπει να αγοράσετε ένα καλώδιο ξεχωριστά, καθώς δεν παρέχεται ως αξεσουάρ.
● Αφού συνδέσετε τα καλώδια, ορίστε το SET ID (Αναγνωριστικό συσκευής) της οθόνης που θα συν-
δέσετε στο MP500-F***.
● Για οδηγίες σχετικά με την επιλογή SET ID (Ρύθμιση αναγνωριστικού), ανατρέξτε στο εγχειρίδιο χρήστη της
οθόνης σας.
Σύνδεση οθόνης με καλώδιο DP
ΕΛΛΗΝΙΚΑ
Προσοχή
● Για να ενεργοποιήσετε τη σύνδεση DP, η οθόνη που θα συνδέσετε στο MP500-F*** πρέπει να
υποστηρίζει τη θύρα εισόδου DP.
● Κατά τη σύνδεση του καλωδίου DP (DisplayPort), χρησιμοποιήστε τυπικό καλώδιο. Η χρήση μη
τυπικού καλωδίου ενδέχεται να προκαλέσει δυσλειτουργία.
Συνδέστε τα κατάλληλα καλώδια ηλεκτρικής τροφοδοσίας σε μια οθόνη και στο MP500-F***
1
αντίστοιχα.
6
2 Συνδέστε
το MP500-F***
στην οθόνη με ένα καλώδιο DP.
ΕΛΛΗΝΙΚΑ
3 Συνδέστε
το MP500-F***
(OUT) στην είσοδο (IN) της οθόνης με ένα καλώδιο RS-232C.
7

4 Συνδέστε ένα καλώδιο LAN στο
ΕΛΛΗΝΙΚΑ
MP500-F***.
Προσοχή
● Όταν το προϊόν ενεργοποιείται μετά τη σύνδεση των καλωδίων ή την πλήρη εκκίνηση του
λειτουργικού συστήματος, η έξοδος εικόνας DP αρχίζει να λειτουργεί.
● Το προϊόν δεν υποστηρίζει διπλή λειτουργία σε περίπτωση εναλλαγής μεταξύ DP και
HDMI ή μεταξύ DP και DVI. Προορίζεται μόνο για έξοδο DP.
8

Σύνδεση οθόνης με προσαρμογέα DP σε HDMI
Σημείωση
●
Χρησιμοποιήστε πιστοποιημένο καλώδιο που φέρει το λογότυπο HDMI. Αν δεν χρησιμοποιήσετε πιστοποιημένο καλώδιο HDMI, η οθόνη ενδέχεται να μην προβάλλει εικόνα ή μπορεί να
προκύψει σφάλμα σύνδεσης.
●
Συνιστώμενοι τύποι καλωδίου HDMI
- Καλώδιο HDMI®/TM υψηλής ταχύτητας
- Καλώδιο HDMI®/TM υψηλής ταχύτητας με Ethernet
Προσοχή
●
Για να ενεργοποιήσετε τη σύνδεση προσαρμογέα DP σε HDMI, η οθόνη που θα συνδεθεί στο
MP500-F*** πρέπει να υποστηρίζει τη θύρα εισόδου DP.
●
Κατά τη σύνδεση του καλωδίου προσαρμογέα DP (DisplayPort) σε HDMI, χρησιμοποιήστε
τυπικό καλώδιο. Η χρήση μη τυπικού καλωδίου ενδέχεται να προκαλέσει δυσλειτουργία.
1 Συνδέστε τα καλώδια τροφοδοσίας στην οθόνη και στο MP500-F***.
ΕΛΛΗΝΙΚΑ
9

2
ΕΛΛΗΝΙΚΑ
3
Συνδέστε το MP500-F*** στην οθόνη χρησιμοποιώντας τον προσαρμογέα DP σε HDMI και
το καλώδιο HDMI.
Συνδέστε την έξοδο (OUT) του MP500-F*** στην είσοδο (IN) της οθόνης με ένα καλώδιο
RS-232C.
10

4 Συνδέστε ένα καλώδιο LAN στο MP500-F***.
Προσοχή
● Ο προσαρμογέας DP σε HDMI πρέπει να συνδεθεί πριν την ενεργοποίηση του προϊόντος ή μετά την πλήρη φόρτωση του λειτουργικού συστήματος.
ΕΛΛΗΝΙΚΑ
11

1
2
1
2
1
2
1
2
1
2
Τρόπος εγκατάστασης του οδηγού βραχίονα
1
ΕΛΛΗΝΙΚΑ
Κατά τη συναρμολόγηση του οδηγού βραχίονα, φροντίστε να αντιστοιχίσετε τους αριθμούς που είναι χαραγμένοι στον οδηγό βραχίονα με τους αριθμούς στο πίσω κάλυμμα.
Τοποθετήστε τον οδηγό βραχίονα στο πίσω
2
μέρος της οθόνης. (Χρειάζονται 3 ή 4 βίδες,
ανάλογα με το μοντέλο.)
<Μοντέλο που χρειάζεται 3 βίδες για τη συναρμολόγηση του οδηγού βραχίονα>
<Μοντέλο που χρειάζεται 4 βίδες για τη συναρμολόγηση του οδηγού βραχίονα>
12

Συναρμολογήστε το MP500-F*** στον οδηγό
3
βραχίονα χρησιμοποιώντας τις βίδες.
<Μοντέλο που χρειάζεται 3 βίδες για τη συναρμολόγηση του οδηγού βραχίονα>
<Μοντέλο που χρειάζεται 4 βίδες για τη συναρμολόγηση του οδηγού βραχίονα>
<Μοντέλο που χρειάζεται 3 βίδες για τη συναρμολόγηση του οδηγού βραχίονα>
Τοποθετήστε το MP500-F*** στον οδηγό βραχίονα με 4 βίδες.
ΕΛΛΗΝΙΚΑ
<Μοντέλο που χρειάζεται 4 βίδες για τη συναρμολόγηση του οδηγού βραχίονα>
Τοποθετήστε το MP500-F*** στον οδηγό βραχίονα με 4 βίδες.
13


Guida all'installazione rapida
Digital Signage Media Player
MP500-F***
Leggere attentamente la presente guida prima di utilizzare il prodotto e conservarla come
riferimento per il futuro. Registrare il numero del modello e il numero di serie del prodotto
descritto in questa guida. Tali informazioni dovranno essere fornite (se applicabili) per
richiedere assistenza.
Precauzioni di sicurezza
Leggere attentamente queste istruzioni di sicurezza prima di utilizzare il prodotto.
■ Collegare il cavo di alimentazione alla messa a terra.
- Si potrebbero ricevere scosse elettriche o provocare lesioni fisiche.
■ Utilizzare soltanto la tensione nominale.
- Il prodotto potrebbe subire danni oppure si potrebbero ricevere scosse elettriche.
■ Durante un temporale, scollegare il cavo di alimentazione o il cavo del segnale.
- Si potrebbero ricevere scosse elettriche o potrebbe scoppiare un incendio.
■ Non toccare la presa di corrente con le mani bagnate. Inoltre, se il terminale del cavo è bagnato o
ricoperto di polvere, asciugarlo completamente o rimuovere la polvere.
- Si potrebbero ricevere scosse elettriche a causa dell'eccessiva umidità.
■ Non inserire un conduttore (ad esempio un bastoncino metallico) su una delle estremità del cavo di
alimentazione mentre l'altra estremità è inserita nella presa a muro. Inoltre, non toccare il cavo di
alimentazione subito dopo averlo inserito nella presa a muro.
- Si potrebbero ricevere scosse elettriche.
■ Il cavo di alimentazione viene utilizzato come dispositivo di scollegamento principale. Accertarsi che
la presa a muro sia facilmente accessibile dopo l'installazione.
■ L'uso di un tipo di batteria errato può comportare il rischio di esplosioni. Attenersi alle istruzioni per
lo smaltimento delle batterie usate.
Ambiente di installazione del lettore multimediale MP500-F***
Lasciare uno spazio minimo di 10 cm su ogni lato del lettore per garantire una ventilazione adeguata.
ITALIANO
10 cm
10 cm
< Installazione del lettore multimediale
fissato al monitor >
10 cm
10 cm
10 cm
10 cm
<Installazione del lettore multimediale>
10 cm
10 cm
1

Componenti
Componenti di base
Il dispositivo MP500-F*** viene fornito insieme ai componenti seguenti. Verifi care la presenza di
questi componenti prima dell'installazione.
< Componenti di base >
ITALIANO
MP500-F*** Cavo di alimentazione
< Componenti opzionali >
M3 L6 x 4EA (per il fi ssag-
Staffa guida
gio del MP500-F***)
Guida per l'utente / Schede
Adattatore da DP a HDMI
M3 L8 x 4EA (per il pan-
nello posteriore in
metallo)
M3 L12 x 4EA (per il
pannello posteriore in
plastica)
Peso
2,0 kg
2
● Le specifiche sopra riportate possono subire modifiche senza
preavviso per migliorare la qualità del prodotto.

Componenti opzionali
I seguenti elementi sono supportati dal dispositivo MP500-F*** ma non vengono forniti insieme al
prodotto. Acquistare i componenti opzionali se necessario.
● Kit HDMI, Cavo HDMI, cavo DP, cavo LINE-OUT, cavo LAN, mouse, tastiera.
Attenzione
● L'illustrazione potrebbe non corrispondere al prodotto. Alcuni componenti potrebbero essere
diversi a seconda delle circostanze.
● In alcuni Paesi potrebbe venire fornito un cavo a Y al posto del cavo di alimentazione.
● Per garantire la sicurezza e la durata del prodotto, non utilizzare prodotti pirata. Gli eventuali
danni o lesioni causati dall'uso errato o dall'utilizzo di un accessorio non compatibile non
sono coperti dalla garanzia.
● La staffa guida e l'adattatore da DP a HDMI potrebbero non essere forniti in dotazione in
alcune regioni o per alcuni modelli.
● L'adattatore da DP a HDMI potrebbe non essere compatibile con prodotti diversi da
MP500-F***.
● L'adattatore da DP a HDMI non fornisce la funzione di conversione da HDMI a DP.
Nota
● Manuale e software SuperSign
- Download dal sito Web di LG Electronics.
- Visitare il sito Web LG Electronics (
più recente per il modello in uso.
(A seconda del modello, questa funzione potrebbe non essere supportata.)
www.lgecommercial.com/supersign
) e scaricare il software
ITALIANO
3

Installazione su un monitor
Modelli **WS50, **LT55A
Per ottenere i risultati corretti, si consiglia di utilizzare i componenti in dotazione con il dispositivo
MP500-F*** e di attenersi alle istruzioni fornite per integrare il prodotto con il monitor.
Attenzione
●
Le illustrazioni relative all'integrazione con il monitor potrebbero non corrispondere al prodotto.
ITALIANO
Posizionare il prodotto con lo schermo rivolto
verso il basso sopra un panno morbido ap-
1
poggiato sul tavolo. Per montare MP500-F***,
spingerlo nel comparto.
Fissare l'MP500-F*** al prodotto utilizzando le
2
quattro viti in dotazione.
Attenzione
● Prestare attenzione ai bordi taglienti dei binari
e delle staffe.
● Il prodotto potrebbe danneggiarsi o cadere se
non si utilizzano viti standard per il fi ssaggio.
LG Electronics non è responsabile per incidenti
dovuti all'utilizzo di viti non standard.
● Non serrare eccessivamente le viti per evitare
danni al prodotto e rendere nulla la garanzia.
4

Modello **WX50MF
Per un uso corretto, si consiglia di utilizzare i componenti di base forniti con il dispositivo MP500-F***
per il collegamento a un monitor.
Attenzione
●
Le illustrazioni relative all'integrazione con il monitor potrebbero non corrispondere al prodotto.
Posizionare il prodotto con lo schermo rivolto
verso il basso sopra un panno morbido ap-
1
poggiato sul tavolo. Rimuovere il coperchio svitando le due viti, come mostrato
nell'immagine.
Per montare MP500-F***, spingerlo nel
2
comparto.
Fissare MP500-F*** sul prodotto utilizzando le
3
due viti fornite.
Attenzione
● Prestare attenzione ai bordi taglienti dei
binari e delle staffe.
● Il prodotto potrebbe danneggiarsi o cadere
se non si utilizzano viti standard per il
fi ssaggio. LG Electronics non è
responsabile per incidenti dovuti all'utilizzo
di viti non standard.
● Non serrare eccessivamente le viti per evi-
tare danni al prodotto e rendere nulla la
garanzia.
ITALIANO
5
Collegamento con cavo di ingresso/uscita
Attenzione
● Il kit HDMI e i cavi HDMI, DP, LINE-OUT e LAN non sono inclusi nei componenti di base. È
necessario acquistare separatamente i cavi non inclusi come accessori.
● Una volta completato il cablaggio, assegnare il SET ID del monitor da collegare al dispositivo
MP500-F***.
● Per configurare il SET ID, consultare il manuale per l'utente relativo al monitor.
Collegamento di un monitor con un cavo DP
Attenzione
● Per attivare il collegamento DP, il monitor da collegare al dispositivo MP500-F*** deve supportare la porta di ingresso DP.
● Utilizzare un cavo standard durante il collegamento del cavo DP (DisplayPort). L'utilizzo di un
ITALIANO
cavo non standard potrebbe essere causa di malfunzionamenti.
1
Collegare i cavi di alimentazione appropriati rispettivamente al monitor e al dispositivo MP500-F***.
6
2 Collegare il dispositivo MP500-F*** al monitor tramite un cavo DP.
Collegare l'uscita del dispositivo MP500-F*** (OUT) all'ingresso del monitor (IN) con un cavo
3
RS-232C.
ITALIANO
7

4 Collegare un cavo LAN al dispositivo MP500-F***.
ITALIANO
Attenzione
● Quando il prodotto viene acceso dopo il collegamento con cavo o al termine dell'avvio del
sistema operativo, l'uscita video DP inizia a funzionare.
● Quando il prodotto viene acceso dopo il collegamento con cavo o al termine dell'avvio del
sistema operativo, l'uscita video DP e HDMI inizia a funzionare.
8

Collegamento di un monitor con un adattatore da DP a HDMI
Nota
●
Utilizzare un cavo certificato con il logo HDMI. In caso contrario, lo schermo potrebbe non vis-
ualizzare l’immagine o esserci problemi di collegamento.
●
Tipi di cavi HDMI consigliati
- Cavo HDMI®/™ ad alta velocità
- Cavo HDMI®/™ ad alta velocità con Ethernet
Attenzione
● Per attivare la connessione dell'adattatore da DP a HDMI, il monitor collegato al
dispositivo MP500-F*** deve supportare la porta di ingresso DP.
● Quando si collega il cavo dell'adattatore da DP (DisplayPort) a HDMI, utilizzare un cavo
standard. L'utilizzo di un cavo non standard potrebbe essere causa di malfunzionamenti.
1 Collegare i cavi di alimentazione al monitor e al dispositivo MP500-F***.
ITALIANO
9

ITALIANO
Collegare il dispositivo MP500-F*** al monitor utilizzando l'adattatore da DP a HDMI e il
2
cavo HDMI.
Collegare l'uscita del dispositivo MP500-F*** (OUT) all'ingresso del monitor (IN) con un
3
cavo RS-232C.
10

4 Collegare un cavo LAN al dispositivo MP500-F***.
Attenzione
● L'adattatore da DP a HDMI deve essere connesso prima di accendere il prodotto o dopo
che si è completato il caricamento del sistema operativo.
ITALIANO
11

1
2
1
2
1
2
1
2
1
2
Istruzioni di installazione della staffa guida
ITALIANO
Durante il montaggio della staffa guida, as-
sicurarsi di abbinare correttamente i numeri
1
incisi sulla staffa guida ai numeri riportati sul
pannello posteriore.
Fissare la staffa guida alla parte posteriore
2
del monitor (sono richieste 3 o 4 viti di fi ssaggio a seconda del modello).
<Modello che richiede 3 viti di fi ssaggio per il
montaggio della staffa guida>
<Modello che richiede 4 viti di fi ssaggio per il
montaggio della staffa guida>
12

Montare l'MP500-F*** sulla staffa guida utiliz-
3
zando le viti di fi ssaggio.
<Modello che richiede 3 viti di fi ssaggio per il
montaggio della staffa guida>
<Modello che richiede 4 viti di fi ssaggio per il
montaggio della staffa guida>
<Modello che richiede 3 viti di fi ssaggio per il
montaggio della staffa guida>
Collegare l'MP500-F*** alla staffa guida con 4
viti di fi ssaggio.
ITALIANO
<Modello che richiede 4 viti di fi ssaggio per il
montaggio della staffa guida>
Collegare l'MP500-F*** alla staffa guida con 4
viti di fi ssaggio.
13


Eenvoudige installatiegids
Digital Signage-mediaspeler
MP500-F***
Lees deze gids zorgvuldig door voordat u het product gebruikt en bewaar de gids om deze
in de toekomst te kunnen raadplegen. Noteer het modelnummer en het serienummer van
het product op deze gids. U hebt deze informatie (indien van toepassing) nodig als u
service nodig hebt.
Veiligheidsmaatregelen
Lees deze veiligheidsmaatregelen goed door voordat u het product gaat gebruiken.
■ Steek de stekker van het netsnoer in een geaard stopcontact.
- Bij gebruik van een onveilige aansluiting kunt u geëlektrocuteerd worden of gewond raken.
■ Gebruik alleen het aangegeven voltage.
- Het product kan beschadigd raken, of u kunt worden geëlektrocuteerd.
■ Haal het netsnoer of de signaalkabel tijdens onweer uit het stopcontact.
- U kunt worden geëlektrocuteerd, of er kan brand uitbreken.
■ Raak de stekker niet met natte handen aan. U dient de stekker volledig te laten drogen als deze nat
is en u dient de stekker schoon te maken als hier stof op zit.
- U kunt geëlektrocuteerd worden als gevolg van te veel vocht.
■ Houd geen geleider (zoals een metalen pen) bij een van de uiteinden van het netsnoer terwijl het
andere uiteinde is aangesloten op het stopcontact. Ook dient u het netsnoer niet aan te raken net
nadat u het hebt aangesloten op het stopcontact.
- U kunt geëlektrocuteerd worden.
■ Het netsnoer is de belangrijkste manier van aansluiten. Zorg dat u na de installatie goed bij het
stopcontact kunt.
■ Als u de batterij vervangt door een batterij van een incorrect type, dan verhoogt u het risico op een
explosie. Verwijder de gebruikte batterij volgens de instructies.
Installatieomgeving van MP500-F*** Media Player
Zorg voor ten minste 10 cm vrije ruimte aan beide kanten van de speler wanneer u de speler
installeert. Dit zorgt voor voldoende ventilatieruimte.
NEDERLANDS
10 cm
10 cm
< Media Player die op de monitor is
aangesloten installeren >
10 cm
10 cm
10 cm
10 cm
10 cm
< Media Player installeren >
10 cm
1
Onderdelen
Basisonderdelen
De MP500-F*** wordt geleverd met de volgende componenten. Controleer voor installatie of deze
componenten zijn meegeleverd.
< Standaardcomponenten >
MP500-F*** Netsnoer
NEDERLANDS
< Optionele componenten >
M3 L6 x 4EA
(wanneer u de
MP500-F*** bevestigt)
Geleidebeugel
(wanneer de achterzijde
Gebruiksaanwijzing /
Kaarten
DP-naar-HDMI-adapter
M3 L8 x 4EA
van metaal is)
(wanneer de achterzijde
M3 L12 x 4EA
van plastic is)
2
Gewicht
2,0 kg
● De genoemde specificaties kunnen zonder voorafgaande
kennisgeving worden gewijzigd in verband met
kwaliteitsverbeteringen.
 Loading...