


ENGLISH
FRANÇAIS
PORTUGUÊS
OWNER’S MANUAL
MICROWAVE OVEN
Please read this owner’s manual thoroughly before operating.
MH653
(optional, please check model specification)
****
MFL69799803_03
MH633
****
www.lg.com
Copyright © 2017 LG Electronics Inc. All Rights Reserved

CONTENTS
How the Microwave Function Works
Microwaves are a form of energy similar to radio,
television waves, and ordinary daylight. Normally,
microwaves spread outwards as they travel through the
This oven, however, has a magnetron that is designed
to make use of the energy in microwaves. Electricity,
supplied to the magnetron tube, is used to create
microwave energy.
These microwaves enter the cooking area through
openings inside the oven. A tray is located inside the
oven. Microwaves cannot pass through metal walls
of the oven, but they can penetrate such materials as
glass, porcelain and paper, the materials out of which
microwave-safe cooking dishes are constructed.
Microwaves do not heat cookware, though cooking
vessels will eventually get hot from the heat generated
by the food.
A very safe appliance
Your Microwave oven, is one of the safest
of all home appliances. When the door
is opened, the oven automatically stops
producing microwaves. Microwave energy
is converted completely to heat when it
enters food, leaving no “left over” energy
to harm you when you eat your food.
CONTENTS
3
IMPORTANT SAFETY INSTRUCTIONS
8
BEFORE USE
8
Unpacking & Installing
10
Control Panel
10
Display Picto
11
Setting Clock
11
Quick Start
11
More/Less
11
Energy Saving
12
HOW TO USE
12
Timed Cooking
12
Microwave Power Levels
13
Grill Cooking
13
Grill Combi. Cooking
14
Child Lock
Roast
14
Roast Menu Instructions
15
Soften & Melt
16
Soften & Melt Menu Instructions
16
Defrost & Cook
17
18
Defrost & Cook Menu Instructions
Yogurt
19
Yogurt Menu Instructions
19
Keep Warm
0
2
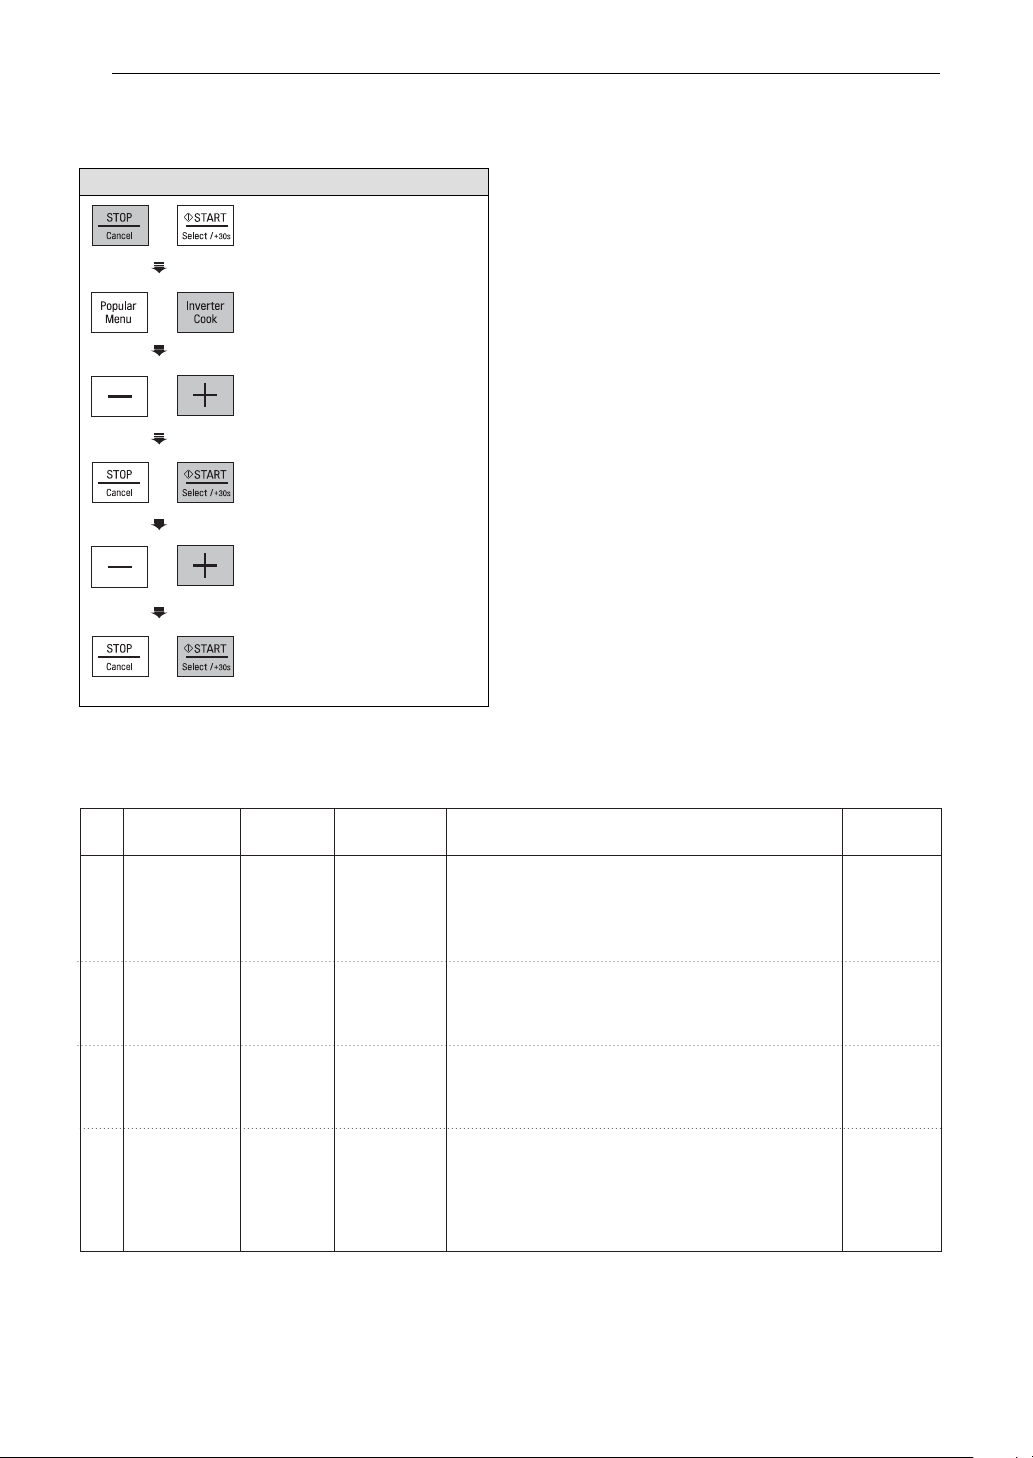
Popular Menu
2
0
Popular Menu Instructions
21
Inverter Defrost
28
Inverter Defrost Menu Instructions
28
29
MICROWAVE-SAFE UTENSILS
30
FOOD CHARACTERISTICS &
MICROWAVE COOKING
32
TO CLEAN YOUR OVEN
32
USING THE SMART DIAGNOSIS™
FUNCTION
33
QUESTIONS & ANSWERS
34
TECHNICAL SPECIFICATIONS
IMPORTANT SAFETY INSTRUCTIONS
READ CAREFULLY AND KEEP FOR FUTURE REFERENCE
ENGLISH
4
5
ENGLISH
-
6
his model doesn't provide a temperature probe.
T
S
Farm houses;
By clients in hotels, motels and other residential environments;
Bed and breakfast type environments.
7
ENGLISH
36
Caution, hot surface
When the symbol is used, It means that the surfaces are liable to get hot during use.
37
Do not place an object(a book, a box, etc.) on the product. The product may overheat or catch fire or the
object may fall, causing injury to persons.
BEFORE USE
8
BEFORE USE
UNPACKING & INSTALLING
By following the basic steps on these two pages you will be able to quickly check that your oven is operating correctly.
Please pay particular attention to the guidelines on where to install your oven. When unpacking your oven make sure
you remove all accessories and packing materials. Check to make sure that your oven has not been damaged during
shipping.
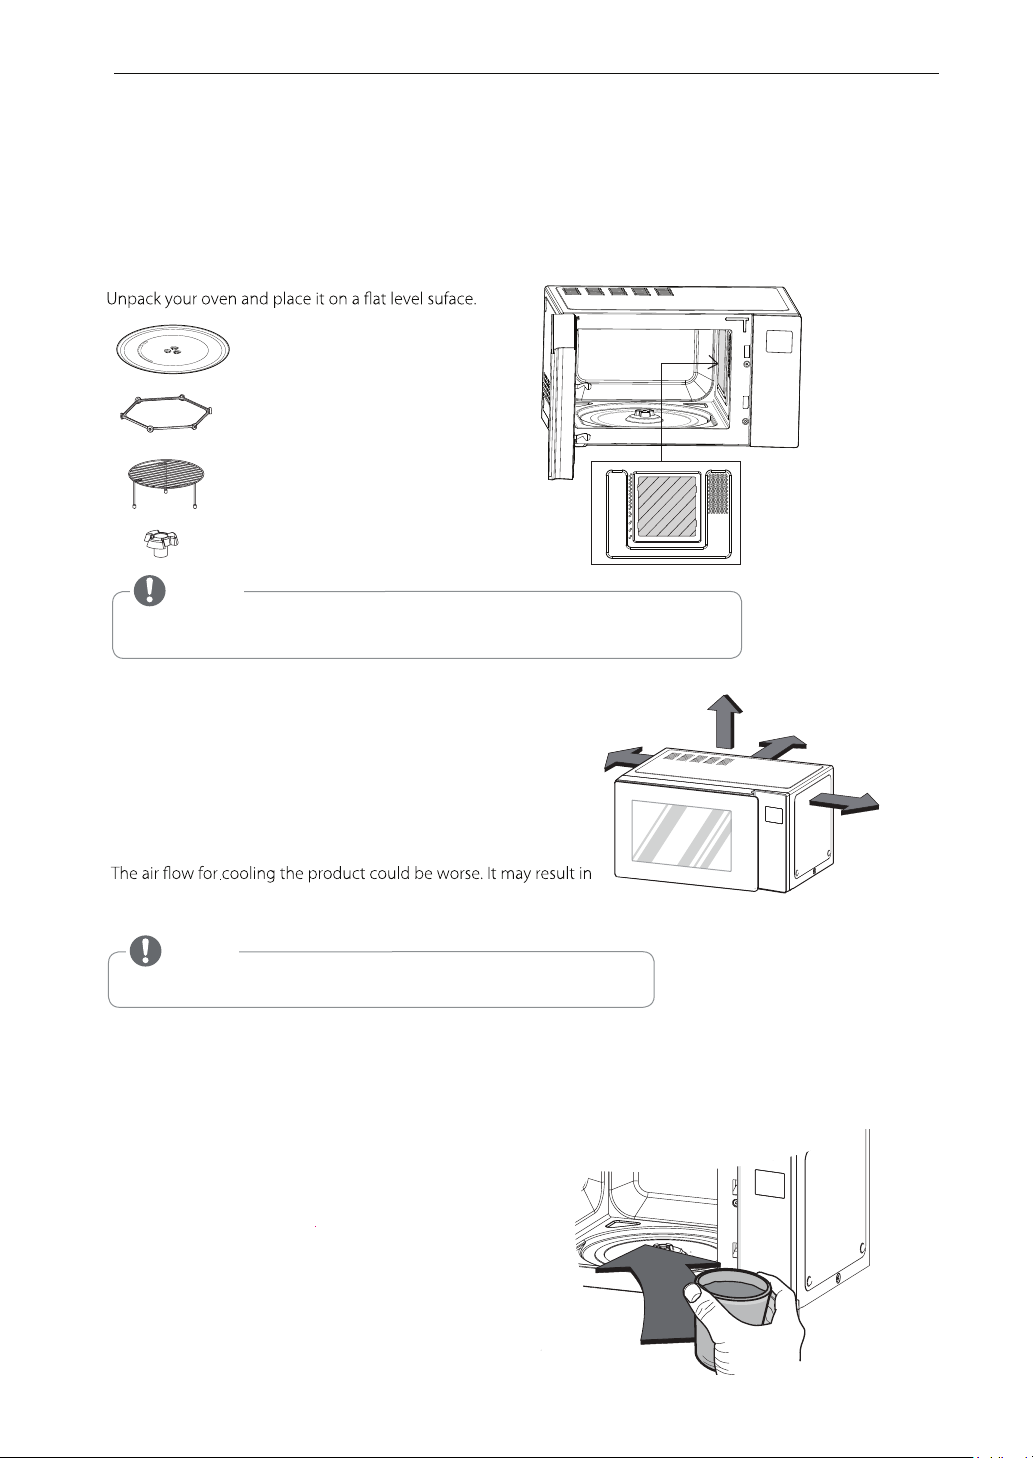
1
GLASS TRAY
ROTATING RING
RACK
Mica Sheet
TURNTABLE SHAFT
*Do Not Remove
Mica Sheet
NOTE
Do not remove the cavity Mica Sheet (silver plate) inside of oven.
•
The Mica plate is there to protect the microwave components from food spatters.
2 Place the oven on the level location of your choice with more
than 85 cm height but make sure there is at least 20 cm of space
on the top and 20 cm at the rear & left & right for proper
ventilation. The front of the oven should be at least 8 cm from
the edge of the surface to prevent tipping.
An exhaust outlet is located on bottom or side of the oven.
Blocking the outlet can damage the oven.
If you use the microwave oven in an enclosed space or cupboard,
lower performance and reduced service life. If possible, please use the
microwave oven in the counter top condition.
20 cm
20 cm
20 cm
20 cm
NOTE
•
THIS OVEN SHOULD NOT BE USED FOR COMMERCIAL CATERING PURPOSES.
3 Plug your oven into a standard household socket. Make sure your oven is the only appliance connected to the socket.
If your oven does not operate properly, unplug it from the electrical socket and then plug it back in.
4
Open your oven door by pulling the door handle. Place the rotating ring inside the oven and place the glass tray on top.
Fill a microwave safe container with 300 ml (1/2 pint) of water.
5
Place on the glass tray and close the oven door.
If you have any doubts about what type of container to use
please refer to Microwave-safe utensils.
BEFORE USE
6 Press the STOP/CANCEL button, and press the START button
one time to set 30 seconds of cooking time.
7 The DISPLAY will count down from 30 seconds.
When it reaches 0 it will sound BEEP. Open the oven door
and test the temperature of the water.
If your oven is operating the water should be warm.
Be careful when removing the container it may be hot.
YOUR OVEN IS NOW INSTALLED
8
The contents of feeding bottles and baby food jars shall be stirred or shaken and the temperature checked before
consumption in order to avoid burns.
Button recognition may be hampered in the following circumstances:
9
• Only the outside area of the button is pressed.
•
9
ENGLISH
NOTE
Do not use rubber gloves or disposable gloves.
When wiping the touch control panel with a wet towel, remove moisture from the touch
The setting of the cooking time should be shorter than common microwave ovens (700 W, 800 W) due to
10
the relatively high output power of the product. Excessive heating with the product may cause moisture on the door.
BEFORE USE
10
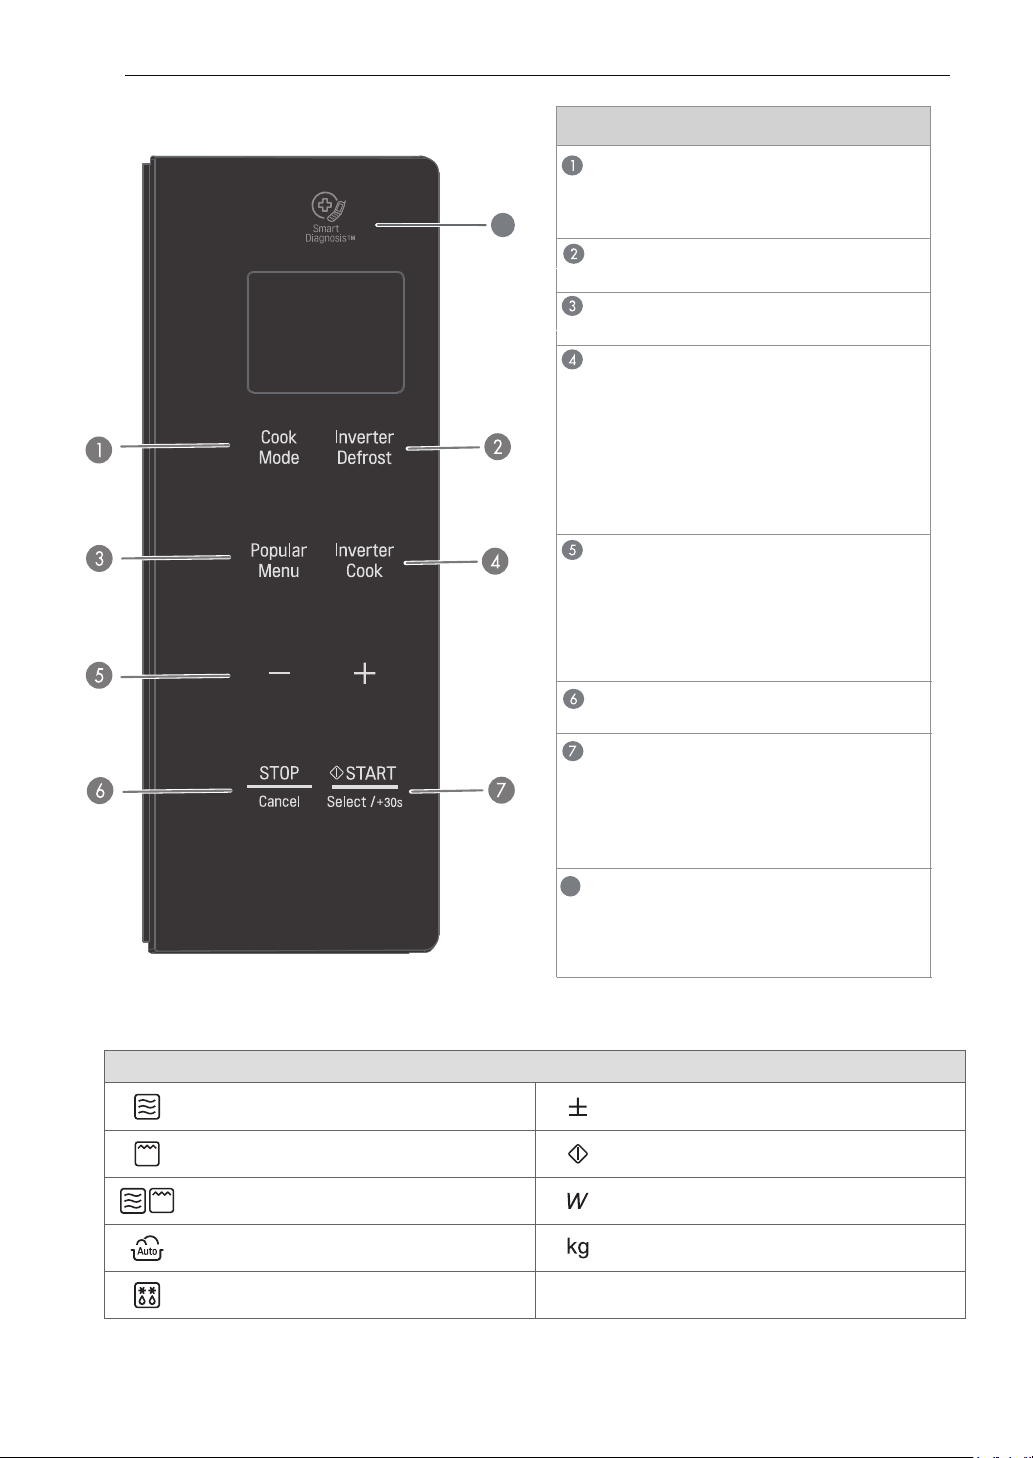
CONTROL PANEL
Part
COOK MODE
See page 12 "Timed Cooking"
See page 13 "Grill Cooking"
8
See page 13 "Grill Combi. Cooking"
INVERTER DEFROST
See page 28 "Inverter Defrost"
POPULAR MENU
See page 20 "Popular Menu"
INVERTER COOK
Inverter Cook allows you to cook most of your
favorite food by selecting the food type and the
weight of the food.
See page 14 "Roast"
See page 16 " Soften & Melt"
See page "Defrost & Cook"
See page "Yogurt"
See page "Keep Warm"
MORE / LESS
•
Choose the cooking menu.
•
Set cooking time and weight.
•
While cooking with auto and manual function,
you can increase or decrease the cooking time
at any point by pressing the button (except
defrost mode).
STOP / CANCEL
• S
START
• In order to start cooking which is selected,
press button one time.
• The quick start feature allows you to set
30 seconds intervals of HIGH power cooking with a
press of the START button.
17
19
20
top over and clear all entries except time of day.
DISPLAY PICTO
When operate Microwave, Show up
the icon on the display.
When oporate Grill, Show up the icon
on the display.
When oporate Grill Combi, Show up the icon
on the display.
When operate Inverter Cook / Steam Cook,
Show up the icon on the display.
When operate Inverter Defrost,
Show up the icon on the display.
Icon
8
SMART DIAGNOSIS
Hold the mouthpiece of a phone up to this icon
when directed to by service centre personnel, to
help diagnose problems with the microwave oven
when calling for service.
When you can set More/Less,
Show up the icon on the display.
When you can Cook Start,
Show up the icon on the display.
When you can set Output Power,
Show up the icon on the display.
When you can set Weight,
Show up the icon on the display.
BEFORE USE
11
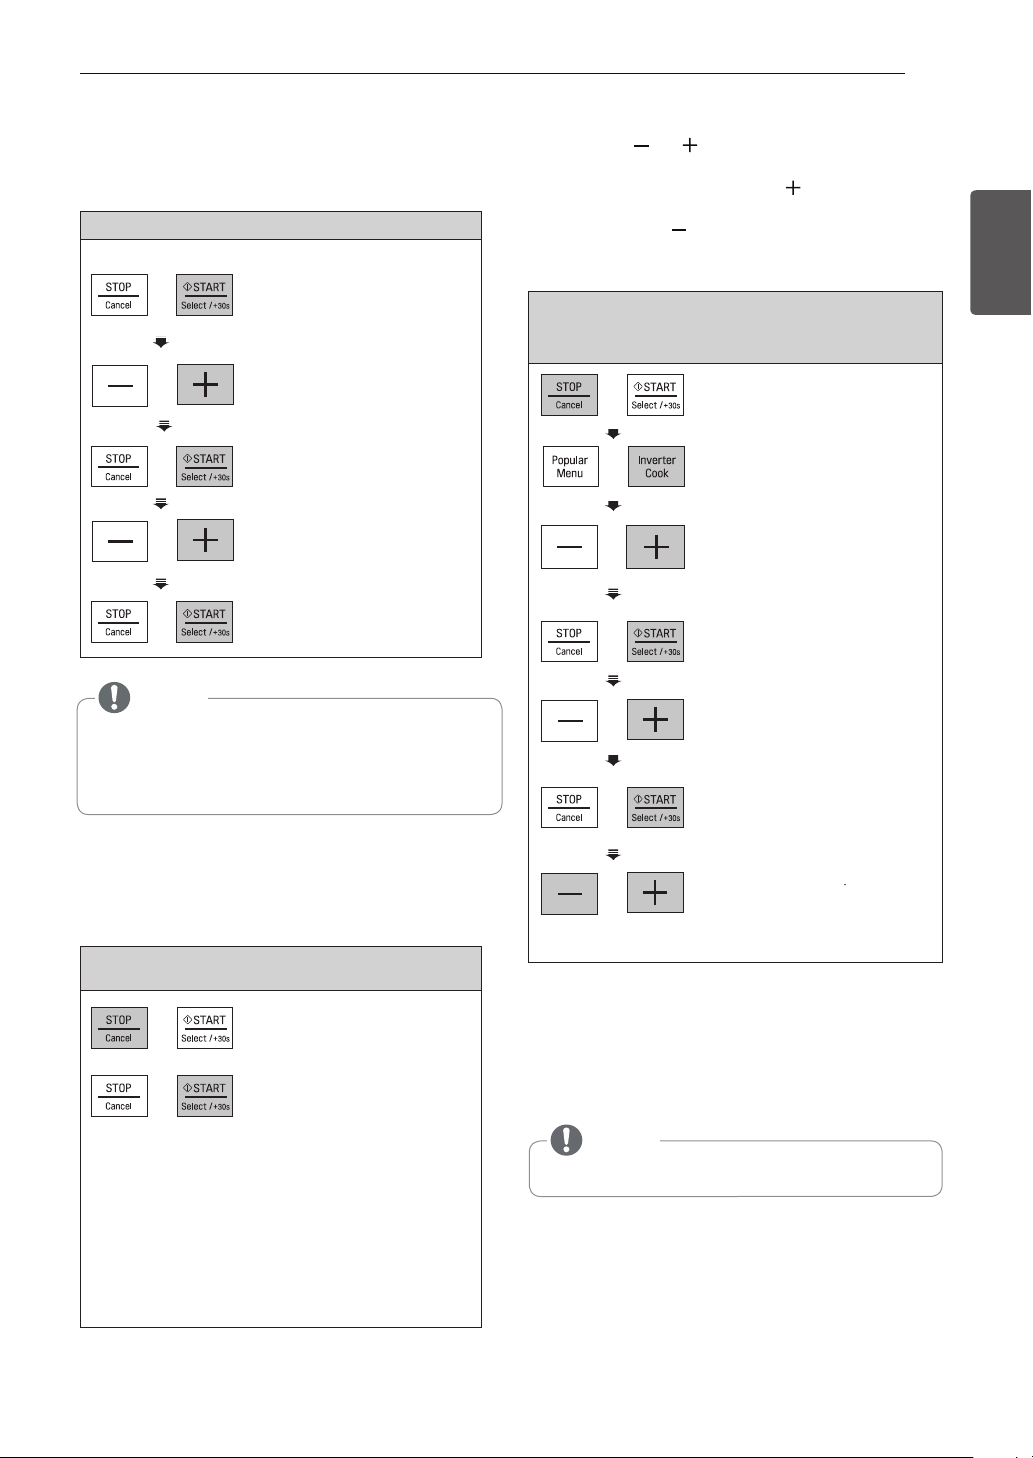
SETTING CLOCK
When your oven is plugged in for the first time or
when power resumes after a power interruption,
the numbers in the display reset to '12H
Example: To set 11:11
1. Press START to
confirm the 12H clock
display. (You can press +
to select for 24Hour mode)
2. Press +
‘11:’.
3. Press START.
Press + until display shows
4.
5. Press
until display shows
‘11:11’.
START.
'.
MORE / LESS
By using the or buttons, TIMED COOK
program can be adjusted to cook food for a
longer or shorter time. Pressing will increase
10 seconds to the cooking time each time you
press it. Pressing will decrease 10 seconds
of cooking time each time you press it. The max
time possible will be 99 minutes 59 seconds.
Example: To adjust the Inverter Cook
Roast Chicken) cooking time for
(ex.
a longer time, or for a shorter time
1. Press STOP/CANCEL.
2. Press INVERTER COOK
until display shows ‘1’.
3. Press + until display
shows ‘1-3’.
4.Press START.
ENGLISH
NOTE
•
If you want to set clock again or change options,
you need to unplug and reconnect.
If you don’t want to use clock mode,
•
Press STOP/CANCEL button, after plugging in your oven.
QUICK START
The QUICK START feature allows you to set 30
seconds intervals of HIGH power cooking with
a touch of the START.
Example: Set 2 minutes of cooking on high
power
Press STOP/CANCEL.
1.
2.
Select 2 minutes
high power.
on
Press the START button four times
The oven will start before you have finished
the fourth press.
During QUICK START cooking, you can extend
the cooking time up to 99 minutes 59 seconds by
repeatedly pressing the START button.
5. Press +
shows ‘1.0 kg’
6.Press START.
.
Press
7
Remaining time will
increase or decrease
by 10 seconds.
until display
-
or
+
ENERGY SAVING
Energy saving means save energy by turning off
the display. This feature only operates when the
Microwave Oven standby and the display will go out.
NOTE
•
When using clock mode, the display will remain on.
HOW TO USE
12
HOW TO USE
TIMED COOKING
(MANUAL COOKING)
This function allows you to cook food for a
desired time. There are
The example below shows how to set power
800 W for the desired time.
Example: To cook food on Power 800 W
for 5 minutes 30 seconds
5 power levels available.
Press STOP/CANCEL.
1.
2. Press COOK MODE until
display shows '1000 W’.
(
This is to tell you that the
oven is set on 1000 W
unless a different power
setting is chosen.)
3. Press + until display
shows ‘800 W’.
4. Press
START.
MICROWAVE POWER LEVELS
Your microwave oven is equipped with five power
levels to give you maximum flexibility and control
over cooking. The adjacent table will give you
some idea of which foods are prepared at each of
the various power levels.
• The adjacent chart shows the power level settings
for your oven.
MICROWAVE POWER LEVEL CHART
Power
Level
High
1000 W
800 W
600 W
•
Boiling water.
Browning ground beef.
•
Making candy.
•
Cooking poultry pieces,
•
fish & vegetables.
•
Cooking tender cuts of meat.
•
Reheating rice, pasta & vegetables.
•
Reheating prepared foods quickly.
•
Reheating sandwiches.
Cooking egg, milk and cheese dishes.
•
•
Cooking cakes and breads.
Melting chocolate.
•
Cooking veal.
•
•
Cooking whole fish.
Cooking puddings and custard.
•
Use
5. Enter 5 minutes 30 seconds
by pressing + until display
'5:30'.swohs
6. Press
When cooking is complete, Tip will sound. The word
End shows in the display window. 'End' remains in
the display and Tip will sound every minute until the
door is opened, or any button is pressed.
START.
NOTE
•
If you do not select the power level, the oven
will operate at power HIGH. To set HI-POWER
cooking, skip step 3 above.
400 W
200 W
Thawing meat, poultry and seafood.
•
Cooking less tender cuts of meat.
•
•
Taking chill out of fruit.
•
Keeping casseroles and main
dishes warm.
Softening butter and cream cheese.
•
HOW TO USE
13
GRILL COOKING
This feature will allow you to brown and crisp food
quickly. There is no need for preheating.
Always use gloves when removing food and
accessories after cooking as the oven & accessories
will be very hot.
Example: Use Grill to cook food for 5 minutes
30 seconds
Press STOP/CANCEL.
1.
2. Press EDOM KOOC
until display shows ‘GrIL’
3. Press START.
Enter 5 minutes 30 seconds
4.
by pressing + until display
shows '
5:30 '.
GRILL COMBI. COOKING
Your oven has a combination cooking feature which
allows you to cook food with heater and microwave.
Example: Programme your oven with micro
power 300 W and combi for a cooking time of
25 minutes
Press STOP/CANCEL.
1.
2. Press EDOM KOOC
until display shows ‘Co-1’
3. Press once,
display shows ‘Co-2’ .
4. Press START.
5.
shows ‘25:00’.
+
Press + until display
ENGLISH
5. Press START.
CAUTION
Always use oven gloves when removing the
food and accessories after cooking as the
oven & accessories will be very hot.
NOTE
•
This feature will allow you to brown and crisp
food quickly.
•
For the best result use
the following accessories.
Rack
6. Press START.
When cooking you can
+ / - to increase or
press
decrease the cooking time.
Be careful when removing
your food as the container
will be hot!
NOTE
• Your oven has a combination cooking
feature which allows you to cook food with
Heater and Microwave.
This generally means it takes less time to
cook your food.
•
You can set three kinds of micro power level
(Co-1 : 200 W, Co-2 : 300 W, Co-3 : 400 W)
in grill combi mode.
This feature will allow you to brown and
•
crispy food quickly.
•
For the best result use
the following accessories.
Rack
HOW TO USE
14
CHILD LOCK
This is a unique safety feature that prevents
unwanted oven operations. Once the CHILD
LOCK is set, no cooking can take place.
Example: To set the CHILD LOCK
Press STOP/CANCEL.
1.
2. Press and hold
until 'L
oc' appears in the
display and tip are heard.
If the time of day was already set, the time of
day will appear on
the display window after 1 second.
STOP/CANCEL
If the CHILD LOCK was already set and you
touch another pad, the word L oc shows in
the display. You can cancel the CHILD LOCK
according to below procedure.
Example: To cancel the CHILD LOCK
Press and hold
After the CHILD LOCK is turned off, the oven
will operate normally.
STOP/CANCEL until 'Loc'
disappears in the display.
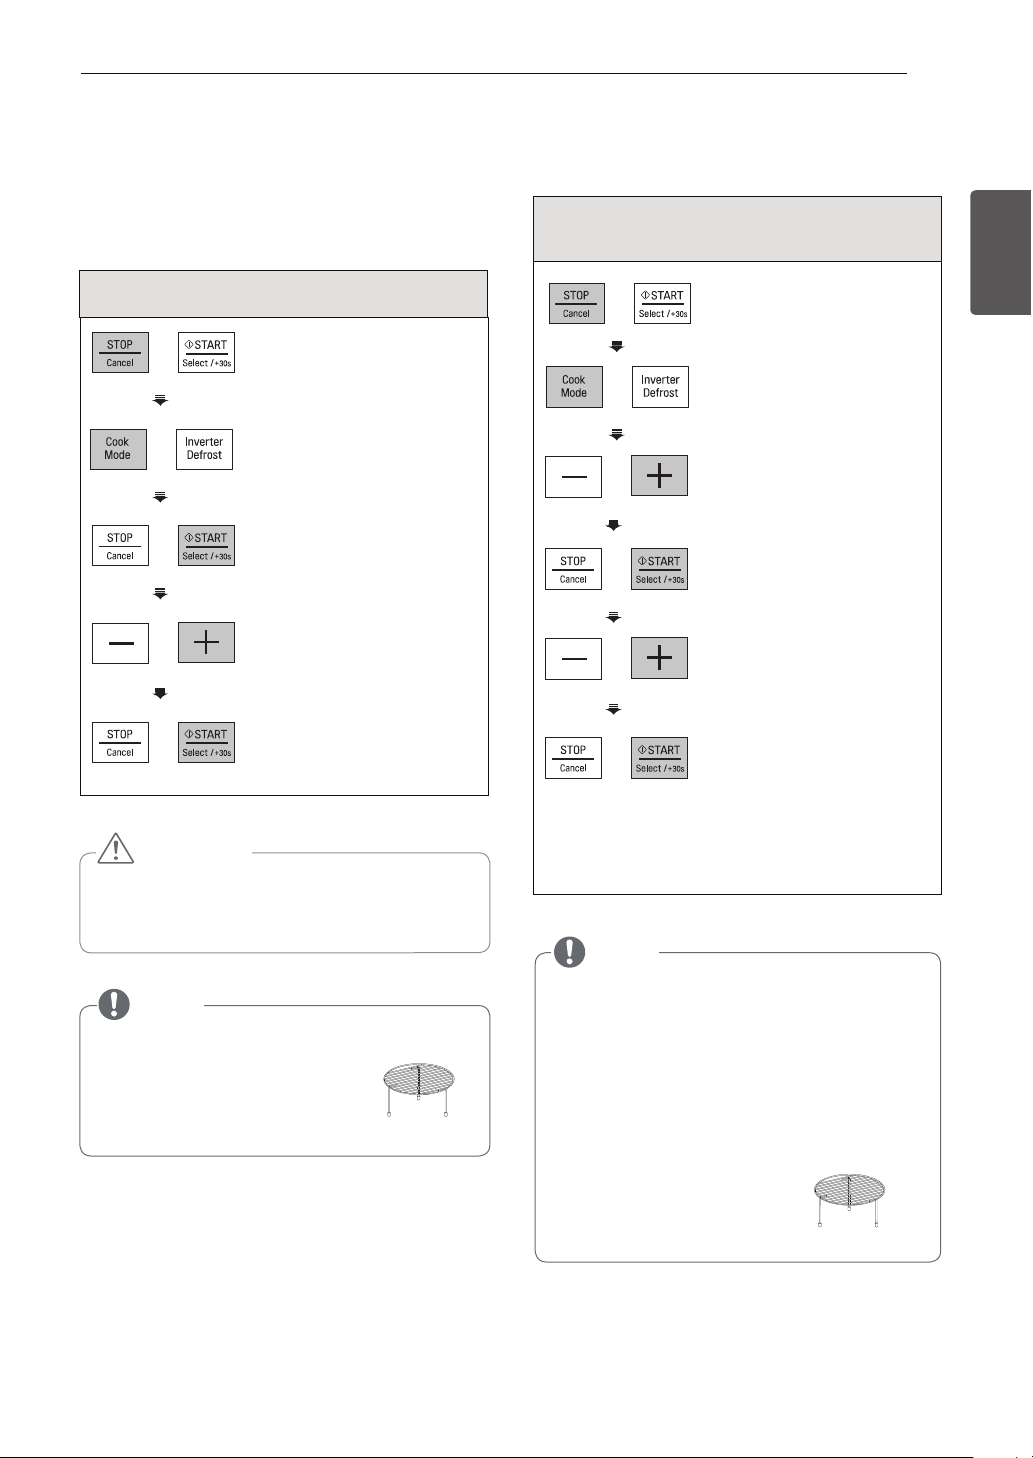
ROAST
Your oven’s menu has been preprogrammed to automatically roast food. Tell the oven what you want
and how many items there are. Then let your microwave oven roast your selections.
Example: To cook 0.3 kg Roast Vegetables
Press
1.
STOP/CANCEL.
2. Press KOOC RETREVNI
until display shows ‘1’.
3. Press + until display
shows ‘1-5’.
4.
5. Press +
shows ‘0.3 kg’.
6.
Press
Press
START.
until display
START.

ROAST MENU INSTRUCTIONS
Code
1-1
Jacket Potatoes
1-2
Roast Beef
1-3
Roast Chicken
1-4
1-5
Menu
Roast Lamb
Roast
Vegetables
Weight
Limit
0.2 - 1.0 kg
(180 - 220 g
/ each)
0.5 - 1.5 kg
0.8 - 1.8 kg
0.5 - 1.5 kg
0.2 - 0.3 kg
Initial
Temperature
Room
Refrigerated
Refrigerated
Refrigerated
Room
1. Wash potatoes and dry with a paper towel.
2. Pierce each potato 8 times with a fork.
3. Place food on the Rack. Choose the menu and
weight, press START.
4. After cooking, stand for 3 minutes.
1. Brush beef with melted butter or oil and season
as desired.
2. Place food on a glass dish. Choose the menu
and weight, press START.
3. When BEEP, drain juices and turn food over
immediately. And then press START
to continue cooking.
4. After cooking, stand covered with foil for
1. Brush whole chicken with melted butter or oil
and season as desired.
2. Place food on a glass dish. Choose the menu
3. When BEEP, drain juices and turn food over
immediately. And then press START
to continue cooking.
4. After cooking, stand covered with foil for 10
minutes.
1. Brush lamb with melted butter or oil and season
as desired.
2. Place food on a glass dish.
Choose the menu and weight, press START.
3. When BEEP, drain juices and turn food over
immediately. And then press START
to continue cooking.
4. After cooking, stand covered with foil for
HOW TO USE
Instructions
10 minutes.
and weight, press START.
10 minutes.
Ingredients
Eggplants, cut into 1 - 2 cm thickness
Zucchinis, cut into 1 - 2 cm thickness
Onions, cut into wedges
Sweet peppers, cut in half lengthwise and
discard seeds
Whole cherry tomatoes
Mushrooms, cut in half
1. Brush vegetables with melted butter or oil and
season as desired.
2. Place food on a glass dish on the Rack.
Choose the menu and weight, press START.
3. When BEEP, drain juices and turn food over
immediately. And then press START to
continue cooking.
15
Utensil
Rack
Heat-proof
glass dish
Heat-proof
glass dish
Heat-proof
glass dish
Heat-proof
glass dish
on the Rack
ENGLISH
NOTE
When cooking a roast, use a roasting rack if you have it.
HOW TO USE
16
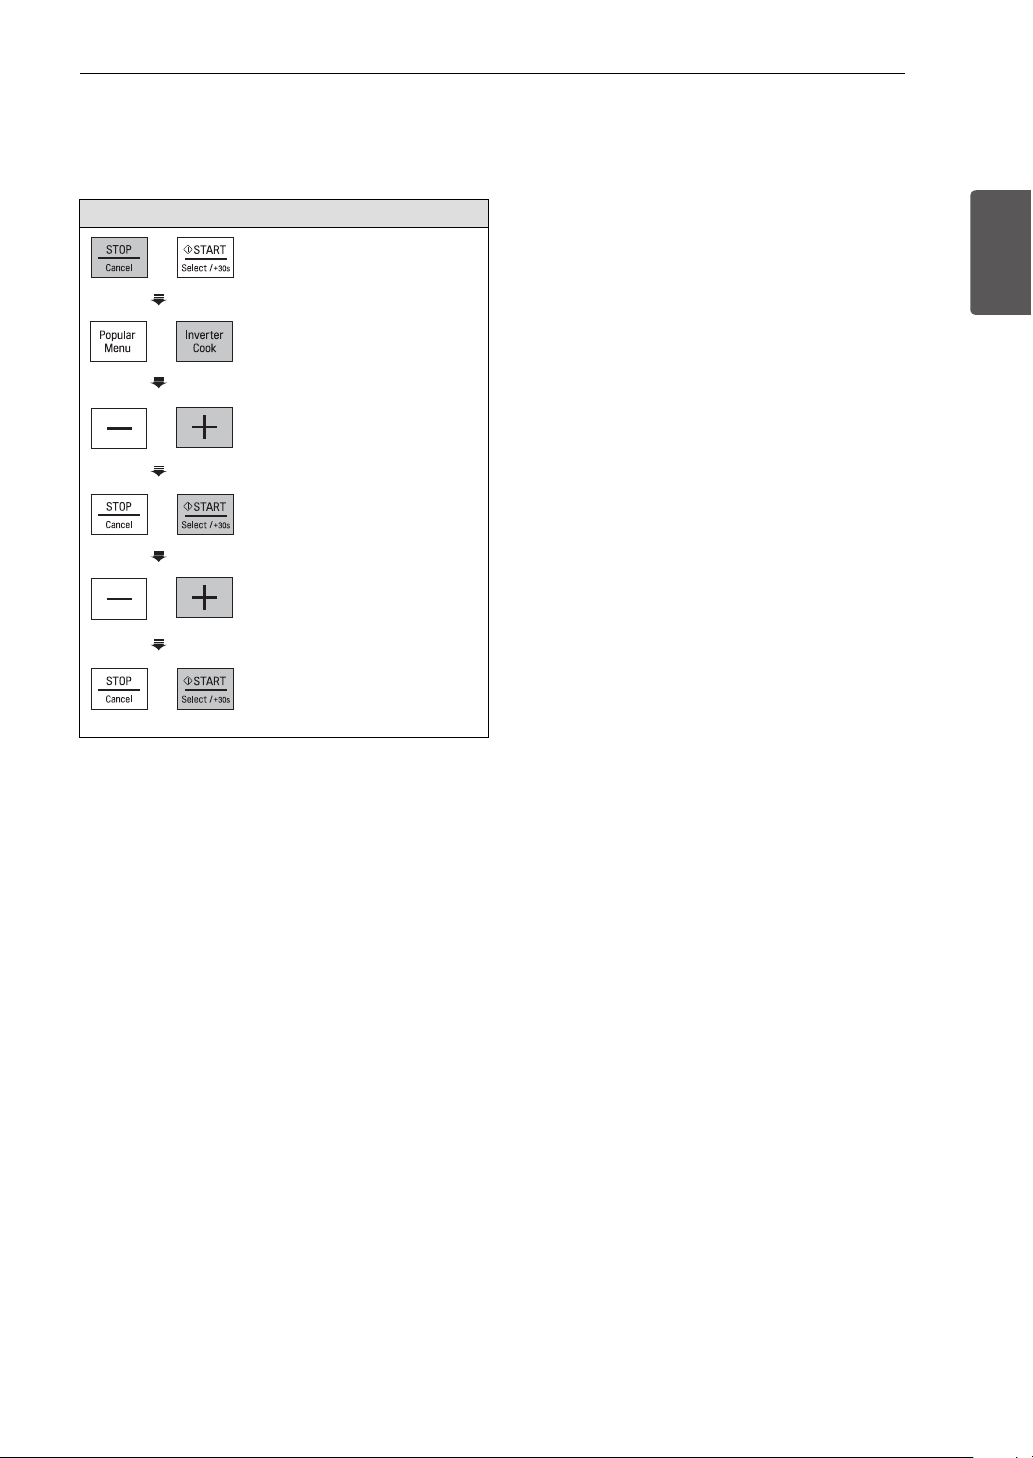
SOFTEN & MELT
The oven uses low power to soften & melt foods,
Example: To Melt 0.2kg Chocolate
1.
Press
STOP/CANCEL.
See the following table.
2. Press
INVERTER COOK
until display shows ‘2’.
+
3. Press
until display
shows ‘2-4’.
4.
5. Press+
Press
START.
until display
shows ‘0.2 kg’.
6.
Press
START.
SOFTEN & MELT MENU INSTRUCTIONS
Code Menu Instructions Utensil
Soften
2-1
Cream
Cheese
2-2
Soften
Ice Cream
2-3
Melt Butter
2-4
Melt
Chocolate
Weight
Limit
0.1 - 0.3 kg Refrigerated
2 / 4 cups
1 - 3 ea
(100 - 150 g
/ each)
0.1 - 0.3 kg
Initial
Temperature
Frozen
Refrigerated
Room
1. Unwrap and place on a dish.
2. Place food in the oven.
Choose the menu and weight, press START.
3. Cream cheese will be at room temperature and
ready for use in a recipe.
1. Remove lid and cover.
2. Place food in the oven.
Choose the menu and weight, press START.
3. Ice cream will be soft enough to make scooping easier.
1. Place food on a bowl.
2. Place food in the oven.
Choose the menu and weight, press START.
3. After cooking, stir to complete melting.
1. Chocolate chips or squares of baking chocolate
may be used.
2. Unwrap and place food on a bowl.
3. Place food in the oven.
Choose the menu and weight, press START.
4. After cooking, stir to complete melting.
Microwavesafe bowl
Microwavesafe dish
-
Microwavesafe bowl
HOW TO USE
17
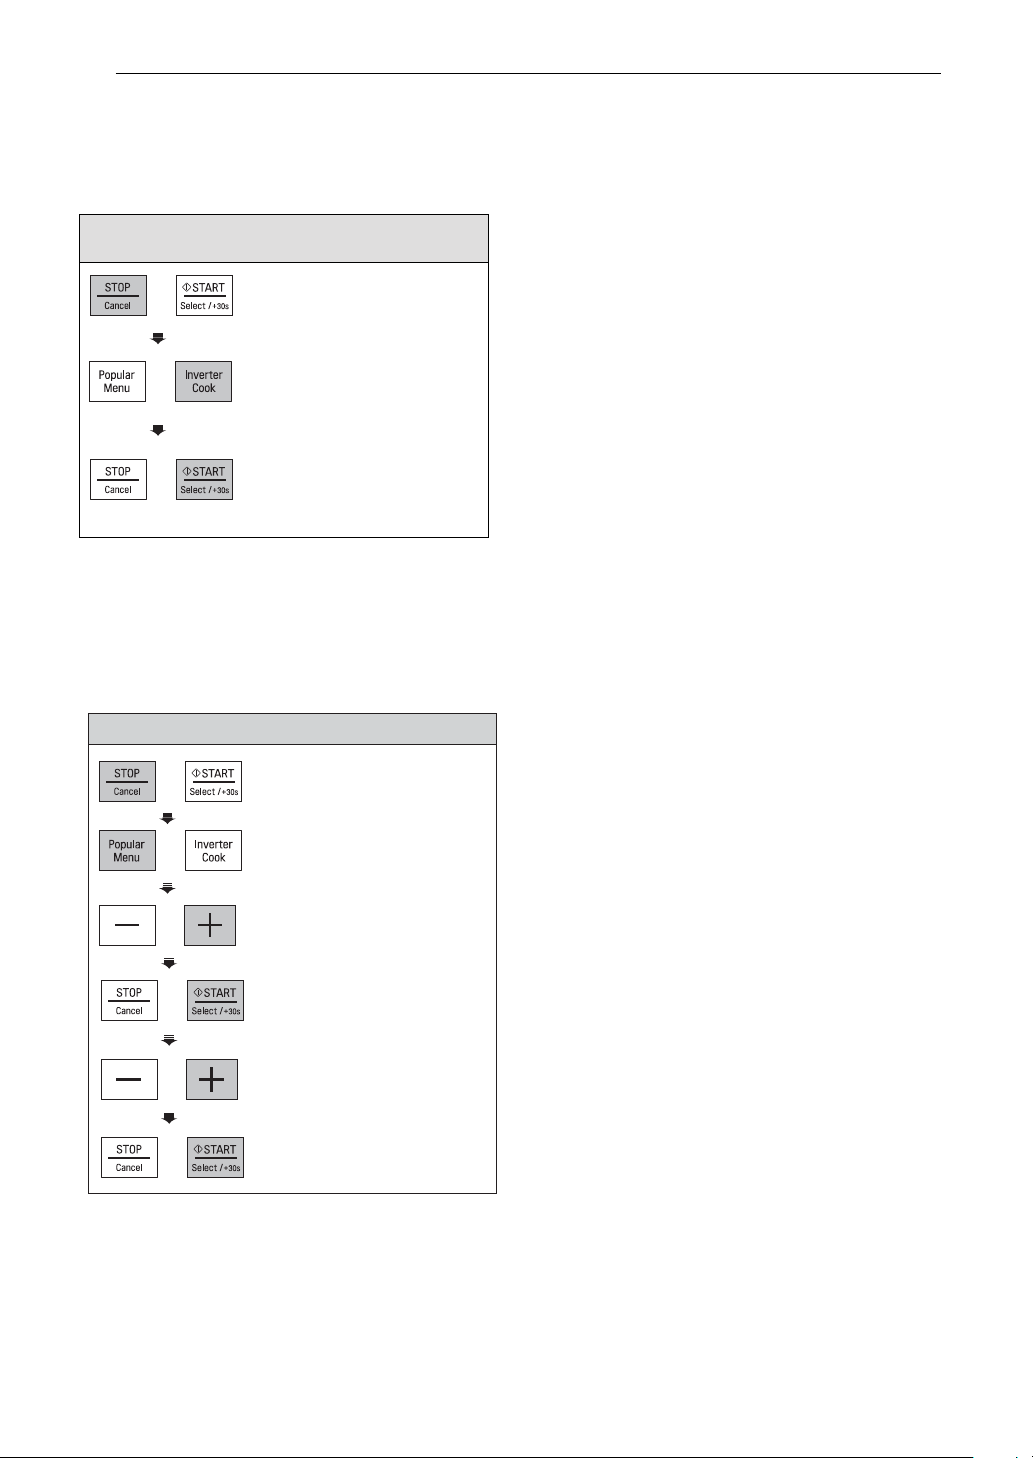
DEFROST & COOK
Your oven’s menu has been preprogrammed to automatically cook food. Tell the oven what you want
and how many items there are. Then let your microwave oven cook your selections.
Example: To Cook 0.3 kg Chicken Nuggets
1.
2. Press
3. Press
shows ‘3-3’.
4.
5. Press+
shows ‘0.3 kg’.
6.
Press STOP/CLEAR.
INVERTER COOK
until display shows ‘3’.
+
until display
START.
Press
until display
Press
START.
ENGLISH

HOW TO USE
18
DEFROST & COOK MENU INSTRUCTIONS
Code Menu Instructions Utensil
3-1
Baguette/
Croissant
Cheese
3-2
Sticks
Chicken
3-3
Nuggets
Frozen
3-4
Lasagna
Frozen Pizza
3-5
(Thick)
3-6
Frozen Pizza
(Thin)
Salmon
3-7
Fillets
Weight
Limit
gk 3.0 - 1.0
0.2 - 0.4 kg
0.2 - 0.3 kg
0.3 kg Frozen
0.5 kg Frozen
0.2 - 0.4 kg Frozen
0.2 - 0.6 kg
(180 - 220 g,
2.5 cm
thickness
/each)
Initial
Temperature
Frozen
Frozen
Frozen
Frozen
1. Remove frozen baguette/croissant from wrap.
2. Place food on a glass dish.
Choose the menu and weight, press START.
1. Remove cheese sticks from all packaging.
2. Place food on the Rack.
Choose the menu and weight, press START.
3. When BEEP, turn food over immediately.
And then press START to continue cooking.
1. Remove chicken nuggets from all packaging.
2. Place food on the Rack.
Choose the menu and weight, press START.
3. When BEEP, turn food over immediately.
And then press START to continue cooking.
1. Remove lasagna from box packages and
remove cover.
2. Place food in the oven. Choose the menu,
press START.
1. Remove thick-crust pizza from all packaging.
2. Place food on a glass dish.
Choose the menu, press START.
1. Remove thin-crust pizza from all packaging.
2. Place food on the Rack.
Choose the menu and weight, press START.
1. Brush frozen salmon with melted butter or oil and
season as desired.
2. Place food on the Rack on a drip dish.
Choose the menu and weight, press START.
3. When BEEP, turn food over immediately.
And then press START to continue cooking.
Heat-proof
glass dish
Rack
Rack
-
Heat-proof
glass dish
Rack
Rack
on a drip
dish
Frozen Pizza
(Thin)
0.2 - 0.4 kg Frozen
1. Remove thin-crust pizza from all packaging.
2. Place food on the Rack.
Choose the menu and weight, press START/ENTER.
Salmon
Fillets
0.2 - 0.6 kg
(180 - 220 g,
2.5 cm
thickness
/each)
Frozen
1. Brush frozen salmon with melted butter or oil and
season as desired.
2. Place food on the Rack on a drip dish.
Choose the menu and weight, press START/ENTER.
3. When BEEP, turn food over immediately.
And then press START/ENTER to continue cooking.
Rack
on a drip
dish
Rack
3-7
18
HOW TO USE
YOGURT
This feature allows you to
cook Yogurt by pressing INVERTER COOK button.
HOW TO USE
19
Example: To Cook 0.6 kg Yogurt
1.
Press
STOP/CANCEL.
2. Press
3.
INVERTER COOK
until display shows ‘4’.
Press START.
‘5h00’ will show in the display.
YOGURT MENU INSTRUCTIONS
Code Menu Instructions Utensil
4
Yogurt
Weight
Limit
0.6 kg
Initial
Temperature
Lukewarm
Ingredients
500 ml pasteurized whole milk
100 g natural plain yogurt
1. Thoroughly wash the proper sized microwave-safe
bowl with hot water.
2. Pour 500 ml milk into the bowl.
3. Heat it about 1 minute 30 seconds - 2 minutes 30
seconds on high microwave power until 40 - 50 °C
temperature.
4. Add 100 ml yogurt into the bowl and stir well.
5. Cover with plastic wrap or lid and place foodin the
oven. Choose the menu, press START.
6. After proofing, stand in the refrigerator for about 5
hours.
7. Taste nice with jam, sugar or fruits.
Note:
The following types of milk and yogurt may be used :
•
Do use
Milk
Pasteurized
whole milk
Yogurt
Natural
plain
yogurt
•
•
•
•
•
Thoroughly wash all utensils with hot water and dry
•
before proofing yogurt.
•
Make sure that the milk is lukewarm(40 - 50 °C)
before proofing.
•
Don’t shake or mix yogurt during proofingas this will
affect the firmness of the yogurt.
•
If the amount of ingredients are greater than
suggested, increase the proofing time.
Do not use
Milk
2 %, 1 % or
fat-free milk
High calcium milk
Soy milk
Leftover milk
Expired milk
Yogurt
Leftover
••
yogurt
•
Expired
yogurt
Microwave-
safe bowl
ENGLISH
HOW TO USE
20
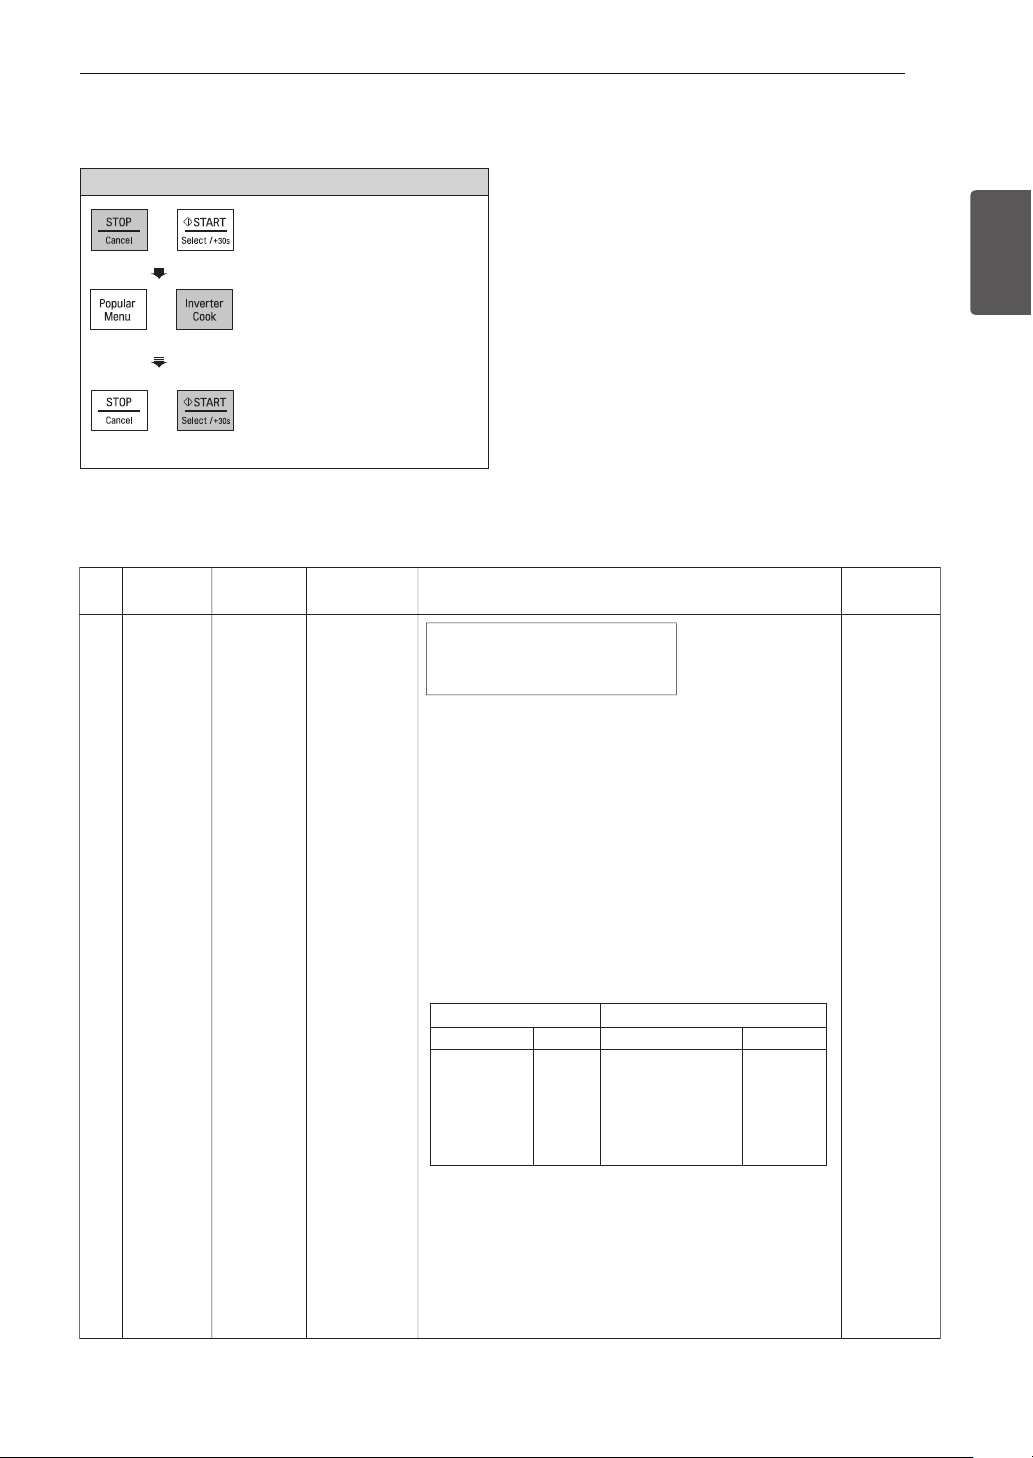
KEEP WARM
The Keep Warm function will keep hot, cooked food at serving temperature. Always start with hot food.
Use microwave-safe utensils.
Example: Keep warm manually
To warm food at high level in 90 minutes.
1.
Press
STOP/CANCEL.
2. Press
3.
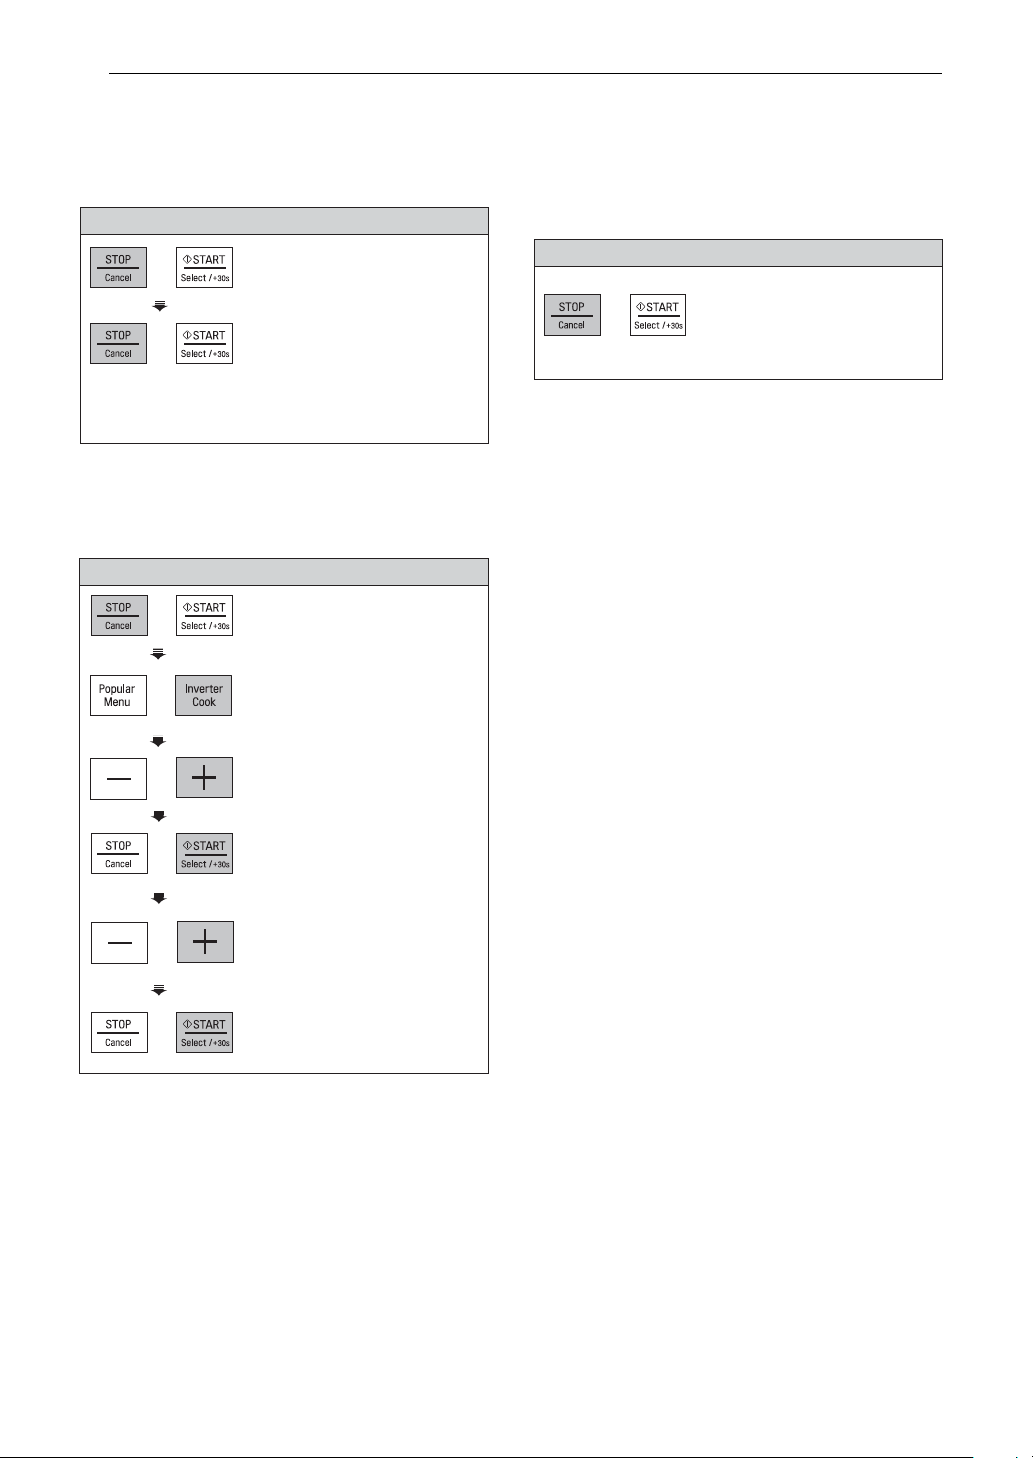
POPULAR MENU
Your oven’s menu has been preprogrammed to automatically cook food. Tell the oven what you want
and how many items there are. Then let your microwave oven cook your selections.
Example: To cook 0.3 kg Kafta
1.
2. Press POPULAR MENU
3. Press +
shows ‘1-3’.
INVERTER COOK
until display shows ‘5’.
Press START.
'1h30' will show in the
display.
Press
STOP/CANCEL.
until display
shows ‘1’.
until display
Notes :
Crisp foods (pastry, pies, turnovers, etc)
should be uncovered during keep warm.
Moist foods should be covered with plastic
wrap or microwave-safe lid.
The amount of keep warm food is suitable
for 1-3 servings.
4.
Press START.
5. Press +
shows ‘0.3 kg’.
Press
6.
until display
START
.

28
HOW TO USE
season as desired.
POPULAR MENU INSTRUCTIONS
HOW TO USE
21
Code
1-1
1-2
Menu
Grape Leaf
Kabsa
Weight
Limit
1.0 kg
2.0 kg
Initial
Temperature
Room
Room
Instructions
Ingredients
1 pot of grape leaves
2 large onions, finely chopped
½ cup olive oil
1 garlic clove, crushed
1 tomato, chopped
1 cup lemon juice
1 tablespoon tomato paste
Kosher salt
Freshly ground black pepper
1 cup white rice
½ cup water
¼ cup chopped dill
1. Cook onions, garlic, tomato, tomato paste, and
lemon juice in a lightly oiled frying pan until lightly
browned.
2. Add cooked rice, vegetable mixture, salt and pepper
in a bowl and mix well.
3. Place grape leaf on a flat surface and place 1 ½
spoonfuls of the rice mixture in the center of the leaf.
Wrap rice mixture with leaf.
4. Put all wrapped leaves in rows into a deep and large
microwave-safe bowl and add water. Cover with
plastic wrap.
5. Place food in the oven. Choose the menu, press start.
6. After cooking, serve with sour cream or as desired.
Ingredients
¼ cup butter
1.2 kg chicken, cut into 8-10 pieces
1 large onion, finely chopped
3 garlic cloves, minced
¼ cup tomato puree
1 tomato, chopped
2 medium carrots, chopped
1 pinch grated nutmeg
1 pinch ground cumin
1 pinch ground coriander
Salt & freshly ground black pepper
2 cups hot water
1 chicken stock cube
200 g long grain rice(don't rinse or soak this)
¼ cup raisins
¼ cup slivered almond, toasted
1. Cook chicken, carrots, tomato, tomato puree, garlic,
onion and butter in a lightly oiled frying pan until
lightly browned.
2. Place the cooked chicken mixture into a deep and
large microwave-safe bowl and add rice, spices,
raisins, almond and water. Cover with plastic wrap
and vent.
3. Place food in the oven. Choose the menu, press start.
Stir at least twice during cooking.
Utensil
Microwave-
safe bowl
Microwave-
safe bowl
ENGLISH

28
HOW TO USE
season as desired.
2. Place food on the Rack on a drip dish.
18
HOW TO USE
22
Code
1-3
1-4
Menu
Kafta
Rice
Pudding
Weight
Limit
0.2 - 0.4 kg
0.7 kg
Initial
Temperature
Room
Room
Instructions
Ingredients
500 g beef minced
1 cup parsley chopped or grated
1 onion chopped
2 breads sliced
½ teaspoon all-spices
¼ teaspoon paprika powder
¼ teaspoon cinnamon powder
Salt and pepper as per taste
1. Combine all ingredients in a large bowl, and mix well.
2. Divide and shape into small sausages(100 g/ each
one, about 1.5 cm ).
3. Place food on a heat-proof glass dish on the Rack.
Choose menu and weight, press start.
4.When BEEP, turn food over and press start to
continue cooking.
5.After cooking, remove from the oven and stand.
Ingredients
½ cups short grain rice
600 g milk
Pinch of salt
¼ cup granulated sugar
3 teaspoons rose water
½ teaspoon ground cardamom
Honey for serving, optional
Utensil
Heat-proof
glass dish
on the Rack
Microwavesafe bowl
(deep glass
pot)
2-1
Potato Gratin
1.5 kg
Room
1. Mix all ingredients in a deep and large microwave safe bowl. Cover with plastic wrap and vent.
2. Place food in the oven. Choose the menu, press start.
3. When BEEP, stir then cover with lid. Press start to
continue cooking.
4.After cooking, stir and stand covered for 5 minutes.
Ingredients
1 kg potatoes
1 clove garlic
20 g butter
300 g cream
100 g grated cheese
Nutmeg, salt and pepper to taste
1. Peel and wash potatoes then cut into 5 mm slices.
Rub inside of dish with garlic clove and butter.
2. Place half of potatoes in a baking dish and season.
Fill with remaining potatoes and season then pour
cream and cheese over the top.
3. Place the baking dish in the oven. Choose the
menu, press start.
20 x 20 cm
Baking dish

HOW TO USE
18
HOW TO USE
23
Code Menu Instructions Utensil
Ratatouille
2-2
Weight
Limit
gk 5.1
Initial
Temperature
Room
Ingredients
1 onion, cut into chunks
1 eggplant, cut into chunks
1 zucchini, cut into chunks
Microwavesafe bowl
1 colored sweet pepper, cut into chunks
3 tomatoes, chopped
1 tablespoon tomato paste
2 garlic cloves, crushed
1 tablespoon fresh greens, chopped
2 tablespoons vinegar
1 teaspoon sugar
Salt and pepper to taste
1. Add all ingredients in a deep and large
microwave-safe bowl and mix well. Cover with
plastic wrap and vent.
2. Place food in the oven. Choose the menu, press
start. Stir at least twice during cooking.
2-3
Stuffed
Tomatoes
1.2 kg Room
Ingredients
4 medium tomatoes
Salt and pepper to taste
300 g ground beef
Microwavesafe dish
½ cup breadcrumbs
2 garlic cloves, crushed
1 tablespoon Dijon mustard
1 tablespoon dried greens
1 tablespoon parmesan cheese
3-7
2-4
Frozen Pizza
(Thin)
Salmon
Fillets
Stuffed
Zucchini
0.2 - 0.4 kg Frozen
0.2 - 0.6 kg
(180 - 220 g,
2.5 cm
thickness
/each)
Frozen
1.2 kg Room
1. Remove thin-crust pizza from all packaging.
2. Place food on the Rack.
1. Cut tops off tomatoes to form hats and remove
Choose the menu and weight, press START/ENTER.
seeds, taking care not to pierce flesh or skin.
Then sprinkle each tomato with salt and pepper.
1. Brush frozen salmon with melted butter or oil and
season as desired.
2. Add the rest of the ingredients in a bowl, mix well.
3. Stuff tomatoes with beef mixture and replace hats.
2. Place food on the Rack on a drip dish.
4. Place stuffed tomatoes on a microwave-safe dish
Choose the menu and weight, press START/ENTER.
and cover with plastic wrap.
3. When BEEP, turn food over immediately.
5. Place food in the oven. Choose the menu, press start.
And then press START/ENTER to continue cooking.
Ingredients
4 round zucchinis(200 g/each)
500 g ground beef
2 tablespoons olive oil
Rack
Rack
on a drip
dish
Heat-proof
glass dish
Salt and pepper to taste
ENGLISH
1. Cut tops off zucchini to form hats and seed them,
taking care not to pierce flesh or skin. Then sprinkle
each zucchini with salt and pepper.
2. Stuff zucchinis with ground beef and replace hats.
3. Place food on a heat-proof glass dish and drizzle
with olive oil. Choose the menu, press start.

HOW TO USE
HOW TO USE
24
Code
3-1
3-2
Menu
Bobotie
Braai-Lamb
Chops
Weight
Limit
1.3 kg
0.2 - 0.6 kg
Initial
Temperature
Room
Refrigerated
Instructions
Ingredients
200 ml milk
2 slices of bread
750 g minced beef
1 chopped onion(medium size)
2 tablespoons grated fresh ginger
3 garlic cloves grated
1 tablespoon apricot jam
30 ml lemon juice
¼ cup of blanched almonds
2 teaspoons medium(or hot) curry powder
1 teaspoon turmeric
2 teaspoons salt
4 bay or lemon leaves
3 eggs
1. Soak the bread in 100 ml milk. Mix it with the minced
beef.
2. Mix all the other ingredients except remaining milk,
oil, eggs and bay leaves.
3. Heat oil in a pan and cook mixture until turn lightly
browned. Put them into a 1.5 L casserole and set aside.
4. Beat eggs with remaining milk and pour over meat.
5. Place casserole in the oven. Choose the menu,
press start.
6. After cooking, remove from the oven.
Serve with plain or saffron rice.
1. Choose lamb chops of 100-150 g weight and
1.5-2.0 cm thickness each. Season with salt and
pepper or as desired.
2. Place food on the Rack on a drip dish. Choose the
menu and weight, press start. When BEEP, turn
food over and press start to continue cooking.
Utensil
1.5 L
casserole
Rack
on a drip
dish
3-3
Braai-Steak
0.2 - 0.6 kg
Refrigerated
1. Choose steak of 200 g weight and 2.5 cm thickness
each. Season with salt and pepper or as desired.
2. Place food on the Rack on a drip dish. Choose the
menu and weight, press start. When BEEP, turn
food over and press start to continue cooking.
Rack
on a drip
dish

HOW TO USE
25
Code Menu Instructions Utensil
3-4
Couscous
Weight
Limit
0.1 - 0.4 kg
Initial
Temperature
Room
Ingredients
Couscous 0.1 kg 0.2 kg 0.3 kg
Water 120 ml 240 ml 360 ml
Butter 1 tbsp 2 tbsps
Vegetable mixture
1. Put couscous, water and butter in a large
microwave-safe bowl and mix well. Cover with
plastic wrap and vent.
2. Place food in the oven. Choose the menu and
weight, press start.
3. After cooking, stand for 15~20 minutes.
4. With a fork, fluff the couscous and mix the
couscous with some of the vegetable sauce.
※ Vegetable mixture
15 pealed pearl onions or 2 cups sliced onions
15 oz can chick peas
2 large boiled potatoes cubed
1 sliced carrots
½ cup chopped cilantro
¼ cup chopped parsley
2 tablespoons minced garlic
1 teaspoon paprika
¼ teaspoon nutmeg
½ teaspoon salt
½ teaspoon black pepper
2 cans tomato sauce
1 chicken broth
1 ½ cups water
2 tablespoons butter
0.4 kg
480 ml
3 tbsps
Microwave-
safe bowl
ENGLISH
1. Cook onions and butter for 5 minutes until
caramelized.
2. Add carrots and garbanzo beans and cook for
another 5 minutes, and add garlic, cilantro,
parsley, potatoes and ½ tsp salt and mix
vegetables.
3. In a large 4 quart sauce pan bring tomato sauce
and 1 ½ cup of water to a simmer.
4. Add seasonings and spices to the sauce then
add vegetable mixture to tomato sauce and
simmer for 10-12 minutes.

26
HOW TO USE
Code
4-1
4-2
Menu
Chicken
Tikka
Curry
Chicken
Weight
Limit
0.2 - 0.4 kg
1.5 kg
Initial
Temperature
Room
Room
Instructions
Ingredients
4 chicken breasts, cut into cubes
1 cup natural yogurt
1 tablespoon ground cumin
1 tablespoon garam masala powder
1 teaspoon ground coriander
1 lemon juice
8 garlic cloves, finely chopped
1 inch grated ginger, finely chopped
¼ teaspoon red food color
1 lemon
Salt and pepper to taste
1. Mix the spices, coloring, lemon juice, ginger and
garlic up into a paste with a little water.
2. Stir in well with the yogurt to make a tandoori
marinade.
3. Marinate the chicken in the marinade for 2~3 hours.
4. Skewer the pieces of chicken using wooden
skewers. Note that the skewers pass the center of
pieces.
5. Place skewers on the Rack on a drip dish.
6. Choose the menu and weight, press start.
7. When BEEP, turn food over and press start to
continue cooking.
8. After cooking, remove from the oven and stand.
Ingredients
400 g chicken breasts, cut into chunks
¼ cup olive oil
2 onions, chopped
4 garlic cloves, crushed
1 ginger root, peeled
1 cinnamon stick
2 dried red chilies
1 teaspoon turmeric powder
400 g tomato sauce
½ cup water or stock
½ cup plain yogurt
1 tablespoon lemon juice
Salt and pepper to taste
Utensil
Rack
on a drip
dish
Microwavesafe bowl
1. Add all ingredients in a deep and large
microwave-safe bowl and mix well. Cover with
plastic wrap and vent.
2. Place food in the oven. Choose the menu,
press start.
3. Stir at least twice during cooking.

HOW TO USE
27
Code Menu Instructions Utensil
4-3 Dal Tadka
Weight Initial
Limit Temperature
0.2 - 0.4 kg Room
Ingredients
Dal
(soaked for
2 hours)
Water
Oil
Salt
0.2 kg 0.3 kg 0.4 kg
400 ml 600 ml 800 ml
2 Tablespoons
2½ Tablespoons
3 Tablespoons
To taste
Microwavesafe bowl
Spices
Cumin seed
Chili powder
Turmeric powder
Curry leaves
1. Combine all ingredients in a microwave-safe bowl
and add spices to your preference.
2. Place food in the oven. Choose menu and weight,
press start. Stir at least twice during cooking.
Veg. Biryani
4-4
1.0 kg Room
Ingredients
1 ½ cups Basmati rice
400 g water
2 cups chopped onions
Microwavesafe bowl
1 tomato, chopped
1 cup vegetables(carrot, beans, peas, potato),
chopped
2 green chilies, chopped
1 teaspoon ginger garlic paste
1 ½ teaspoon red chili powder
1 teaspoon coriander powder
1 teaspoon cumin powder
1 tablespoon biryani masala
1 cinnamon
2 cardamoms
2 cloves
2 small bay leaves
1 teaspoon fennel seeds
A bunch of finely chopped coriander leaves(cilantro)
and mint leaves
1 tablespoon oil
2 tablespoons ghee or clarified butter
Salt to taste
ENGLISH
1. Cook all vegetables and spices in a lightly oiled frying
pan until lightly browned.
2. Place the cooked vegetable mixture into a deep and
large microwave-safe bowl and add rice and water.
Cover with plastic wrap and vent.
3. Place food in the oven. Choose the menu, press start.
Stir at least twice during cooking.
28
HOW TO USE
INVERTER
Four defrost sequences are preset in the oven.
The INVERTER DEFROST feature provides you
with the best defrosting method for frozen foods.
The cooking guide will show you which defrost
sequence is recommended for the food you are
defrosting.
For added convenience, the INVERTER DEFROST
includes a built-in beep mechanism that reminds
you to check, turn over, separate, or rearrange
to getthe best defrost results. Four defrosting
leve is are provided.
(MEAT / POULTRY / FISH / BREAD)
At beep, open the door and remove any portions
that have thawed and turn.
START
•
• Place foods in a shallow container or on a
• Food should still be somewhat icy in the center
t
Remove fish, meat,
its original wrapping paper or plastic package.
Otherwise, the wrap will hold steam and juice
close to the foods, which can cause the outer
surface of the foods to cook.
microwave roasting rack to catch drippings.
when removed from the oven.
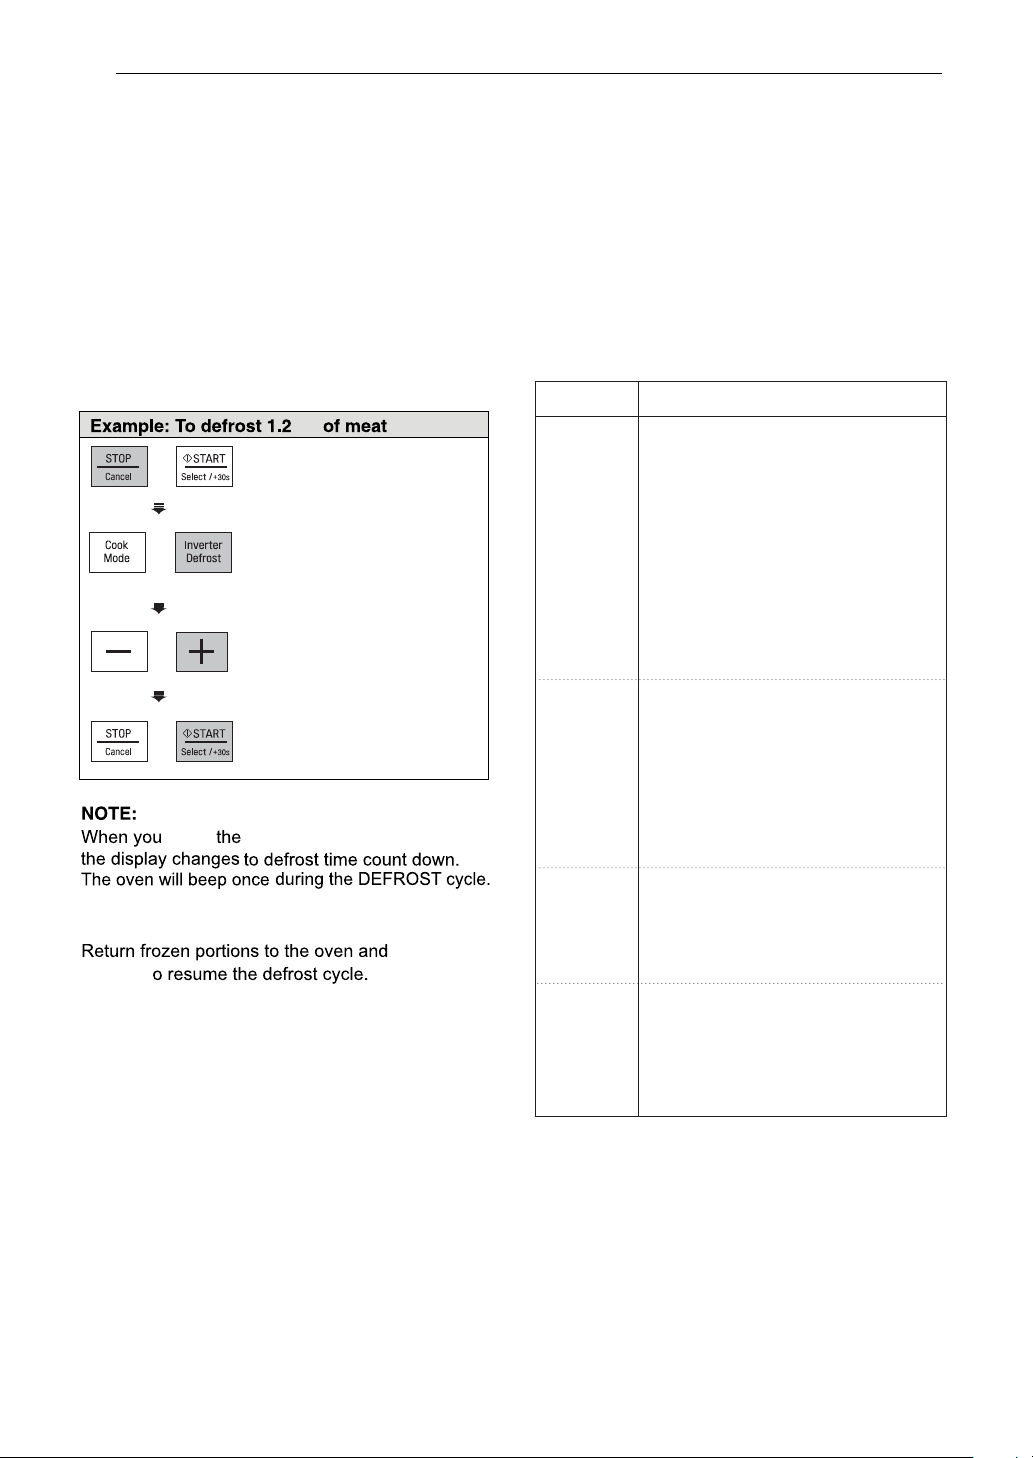
DEFROST
press
kg
1.
Press STOP /CANCEL.
2. Press
3. Press + until display shows
4.
START
and poultry from
INVERTER DEFROST
until display shows ‘dEF1’.
‘1.2 kg’.
Press
START .
button,
press
• The length of defrosting time varies according to
how solidly the food is frozen.
• The shape of the package affects how quickly
food will defrost. Shallow packages will defrost
more quickly than a deep block.
• Depending on the shape of the food can be
defrosted more or less.
INVERTER DEFROST
MENU INSTRUCTIONS
Category
MEAT
)dEF1(
0.1 - 4.0 kg
POULTRY
)2dEF(
0.1 - 4.0 kg
FISH
)3dEF(
0.1 - 4.0 kg
BREAD
)4dEF(
0.1 - 0.5 kg
Beef
Ground beef, Round steak,
Cubes for stew, Tenderloin steak,
Pot roast, Rib roast, Rump roast,
Chuck roast, Hamburger patty
Lamb
Chops, Rolled roast
Veal
Cutlets (0.5 kg, 20 mm thick)
Turn food over at BEEP.
After defrosting, let stand for 5 - 15
minutes.
Poultry
Whole, Cut-up, Breast (boneless)
Cornish Hens
Whole
Turkey
Breast
Turn food over at BEEP.
After defrosting, let stand for 30 - 60
minutes.
Fish
Fillets, Whole Steaks
Turn food over at BEEP.
After defrosting, let stand for 5 - 10
minutes.
Sliced bread, Buns, Baguette, etc.
Separate slices and place between
paper towel or flat plate.
Turn food over at BEEP.
After defrosting, let stand for
1 - 2 minutes.
Food to be Defrosted
MICROWAVE-SAFE UTENSILS
MICROWAVE-SAFE UTENSILS
29
ENGLISH
30
 Loading...