

Page 1

DIGITAL MUSIC PLAYER
OWNER’S MANUAL
MODEL: MF-FD141
MF-FD142
MF-FD145
Before connecting, operating or adjusting this product,
please read this instruction booklet carefully and completely.
Designs and specifications are subject to change
without notice for improvement.
The working life of this product is 7 years since the date
of purchase.
Page 2

Contents
2
Feature . . . . . . . . . . . . . . . . . . . . . . . . . . . . . . . . . . . . . . .3
Precaution . . . . . . . . . . . . . . . . . . . . . . . . . . . . . . . . . . . .4
Name of Each part . . . . . . . . . . . . . . . . . . . . . . . . . . . . .5
❏ Front / Rear Panel . . . . . . . . . . . . . . . . . . . . . . . . . . . .5
❏ Left / Right / Bottom Panel . . . . . . . . . . . . . . . . . . . . . .5
Display Window . . . . . . . . . . . . . . . . . . . . . . . . . . . . . . . .8
❏ LCD Display . . . . . . . . . . . . . . . . . . . . . . . . . . . . . . . .8
Installing Software . . . . . . . . . . . . . . . . . . . . . . . . . . .7-10
❏ Operation Circumstances . . . . . . . . . . . . . . . . . . . . . . .7
❏ Installing the device Software . . . . . . . . . . . . . . . . . .7-8
❏ Firmware Upgrade . . . . . . . . . . . . . . . . . . . . . . . . . . . .9
❏ Recovery Mode . . . . . . . . . . . . . . . . . . . . . . . . . . . . .10
Connecting Devices . . . . . . . . . . . . . . . . . . . . . . . . .11-12
❏ Connecting USB Cable . . . . . . . . . . . . . . . . . . . . . . .11
❏ Disconnecting USB Cable . . . . . . . . . . . . . . . . . . . . .11
❏ Installing Battery . . . . . . . . . . . . . . . . . . . . . . . . . . . .12
❏ Connecting Earphone . . . . . . . . . . . . . . . . . . . . . . . .12
Before Operation . . . . . . . . . . . . . . . . . . . . . . . . . . .13-14
❏ Downloading Files . . . . . . . . . . . . . . . . . . . . . . . . . . .13
❏ Power On . . . . . . . . . . . . . . . . . . . . . . . . . . . . . . . . . .14
❏ Power Off . . . . . . . . . . . . . . . . . . . . . . . . . . . . . . . . . .14
❏ Adjust Volume . . . . . . . . . . . . . . . . . . . . . . . . . . . . . .14
❏ Hold Function . . . . . . . . . . . . . . . . . . . . . . . . . . . . . . .14
MENU Operation . . . . . . . . . . . . . . . . . . . . . . . . . . .15-26
❏ MENU Mode . . . . . . . . . . . . . . . . . . . . . . . . . . . . . . . .15
❏ Music Mode . . . . . . . . . . . . . . . . . . . . . . . . . . . . . . . .15
❏ To Play Files . . . . . . . . . . . . . . . . . . . . . . . . . . . . . . . .15
❏ To pause Files . . . . . . . . . . . . . . . . . . . . . . . . . . . . . .15
❏ To Skip the Files . . . . . . . . . . . . . . . . . . . . . . . . . . . .16
❏ To Search the Files . . . . . . . . . . . . . . . . . . . . . . . . . .16
❏ Local Repeat Function . . . . . . . . . . . . . . . . . . . . . . . .16
❏ Record Mode . . . . . . . . . . . . . . . . . . . . . . . . . . . . . . .17
❏ Voice Mode . . . . . . . . . . . . . . . . . . . . . . . . . . . . . . . .17
❏ FM Mode . . . . . . . . . . . . . . . . . . . . . . . . . . . . . . . . . .18
❏ Add to Preset . . . . . . . . . . . . . . . . . . . . . . . . . . . . . . .18
❏ Load Preset . . . . . . . . . . . . . . . . . . . . . . . . . . . . . . . .19
❏ Auto Scan . . . . . . . . . . . . . . . . . . . . . . . . . . . . . . . . .19
❏ Exit to MUSIC mode from FM mode . . . . . . . . . . . . .19
❏ Delete One FM Radio Stations . . . . . . . . . . . . . . . . .20
❏ Delete All FM Radio Stations . . . . . . . . . . . . . . . . . . .20
❏ FM Radio Recording . . . . . . . . . . . . . . . . . . . . . . . . .21
❏ Playback FM Radio record . . . . . . . . . . . . . . . . . . . . .21
❏ Navigation Mode . . . . . . . . . . . . . . . . . . . . . . . . . . . .21
❏ Setting Mode . . . . . . . . . . . . . . . . . . . . . . . . . . . . . . .22
❏ Equalizer Function . . . . . . . . . . . . . . . . . . . . . . . . . . .22
❏ Repeat Function . . . . . . . . . . . . . . . . . . . . . . . . . . . . .23
❏ Contrast Function . . . . . . . . . . . . . . . . . . . . . . . . . . . .23
❏ Backlight Function . . . . . . . . . . . . . . . . . . . . . . . . . . .23
❏ Power Savings Function . . . . . . . . . . . . . . . . . . . . . .24
❏ Record Settings Function . . . . . . . . . . . . . . . . . . .24-25
❏ Load default Function . . . . . . . . . . . . . . . . . . . . . . . .25
❏ Exit Function . . . . . . . . . . . . . . . . . . . . . . . . . . . . . . .25
❏ Erasing Files . . . . . . . . . . . . . . . . . . . . . . . . . . . . . . .26
❏ About . . . . . . . . . . . . . . . . . . . . . . . . . . . . . . . . . . . . .26
Page 3

Feature
3
Removable Storage Device
You can easily copy and paste files to the player using
Windows Explorer
USB 2.0 Support
USB 2.0 transmits data with a speed of 480Mbps that is 40
times faster than USB1.1.
Voice Recording
You can make high quality voice recordings.
FM Reception
Listening to an FM program is made easy with Auto Search
and Frequency.
Upgrading Firmwares
It can become the continuous improvement of the function
and the various setting up this product.
MP3, WMA, Playback
• MP3 is MPEG1 Layer3 audio format.
MP3 is a well known, high quality digital audio format.
MP3 files can be compressed up to 12 times the original
wave file size.
• WMA (Windows Media Audio code) is the highest quality
in terms of a sound and music. WMA provides all type of
the best sounds from 8kHz to 48 kHz.
• The appliance is not intended for use by young children or infirm
persons without supervision.
• Young Children should be supervised to ensure that they do not
play with appliance.
• If the appliance is supplied from a cord extension set or an
electrical portable outlet device, the cord extension set on
electrical portable outlet device must be positioned so that it is not
subject to splashing or ingress of moisture.
Page 4

Precaution
4
Never attempt to disjoin or repair the product
yourself.
Never use the product for other purposes
than those described in this guide.
Note that malfunctions may occur if you use
the product in places where static electricity
occurs frequently.
Avoid to leave the product in hot or humid
place.
Take special attention when touching the
product box, owners manual and accessories
to avoid cuts.
If the product emits an unusual odor or
excessive heat, or you notice anything else
that seems unusual, do not use the product
and contact our Customer Service Center.
Pay attention to the USB cable direction
when connecting the product to PC.
The PC or the product may be damaged if
you connect the USB cable in the wrong
direction.
Never use damaged or worn USB cable.
Do not use the product near water.
Do not touch this product with wet hands.
Be sure to back up your data files.
The files on the player may be deleted while
using the product.
We are not responsible for any damaged or
lost files that are not saved on your PC.
Customer Service Center does not back up
your data while servicing.
Avoid to use headphone or earphone while
driving a vehicle, motorcycle, riding a
bicycle, getting exercise or working in
dangerous areas.
Not only is it dangerous, but also illegal in
some areas.
Page 5

Left / Right / Bottom Panel
Name of Each part
5
1
PLAY / PAUSE BX button
Power ON
2
USB Port
3
USB Port Cover
4
Battery Cover
Front / Rear Panel
1 2 3
4
1
2
7 8
1
STOP/OFF x button
RETURN button
2
MENU button
A-B Repeat button
3
SKIP / SEARCH .> button
FM radio frequency . > button
4
Earphone jack
5
Necklace connector
6
Microphone (MIC)
7
Hold switch (HOLD)
8
Volume (-/+) button
3
4 5 6
Page 6

Display Window
6
LCD Display
1 2 3
4
5
6
7
8
9
1
Track Number / Total Track
2
Repeat indicator
3
Equalizer indicator
4
Battery indicator
5
Elapsed Time / Track Time
6
File information
7
PLAY / PAUSE / STOP / REC indicator
8
A-B Repeat indicator
9
Music Mode / Voice Mode indicator
10
Music Type indicator
11
Volume indicator
10
11
Page 7

Installing Software
7
Operation Circumstances
Your MP3 Player needs the following minimal system
requirements for your computer.
• OS : Windows 98SE / ME / 2000 / XP
• CPU : At least Pentium - 133MHz
• Memory : At least 32MB
• HDD Space : At least 100MB
• Video Card : 640 x 480 Mode, At least High Color(16bit)
• USB Port
• CD-ROM Drive
You can update the install software for Windows
98SE/ME/2000/XP available etc. from an internet website by LG
Electronics Inc.
Refer to the following sample contact procedure;
http://www.lge.com Service Site
Select Your COUNTRY
Product Support Device Driver
Notes
•
Windows ME, Windows 2000, and Windows XP operating
systems support USB 2.0 storage without additional setup.
Windows Explorer may be employed to use the product as a
portable storage device without installing any other information.
Installing the device Software
1
Insert the software CD into drive D:\ (CD ROM drive).
The install will run automatically.
3
Click the "Next" button in the installation window.
4
Read about the license agreement and select “Yes”
22
Click the "Installation Driver" button in the
installation window.
Page 8
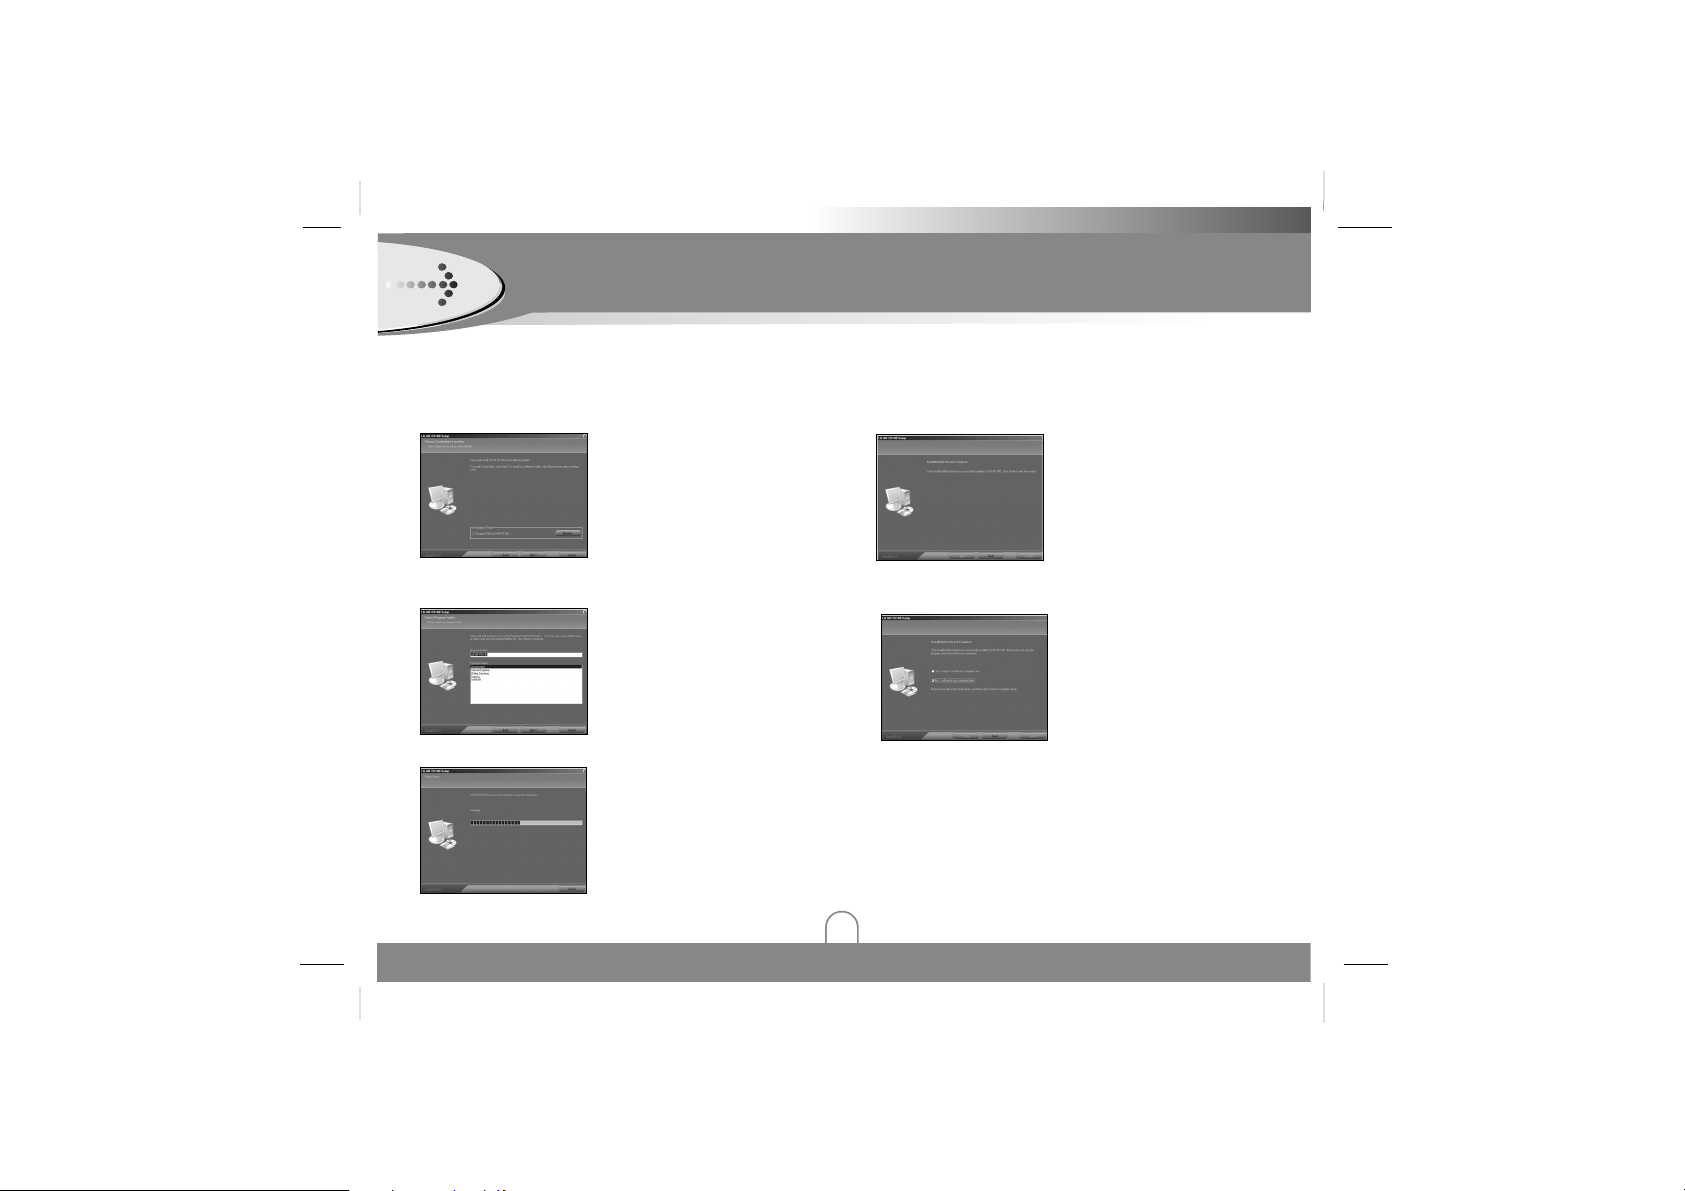
Installing Software (Continued)
8
5
Select the installation folder and click the "Next"
button.
66
Set the path of program folder and then click the
"Next" button.
77
Installation is progressing.
8
Click the "Finish" button when the installation
complete screen is displayed.
9
You must reboot your computer to complete the
install.
Page 9

Installing Software (Continued)
9
Firmware Upgrade
4
The utility will start to search the MP3 player. Please
wait until the Firmware Download window appears.
You can upgrade FIRMWARE to add, change or
improve the functions of the player, in which the
Firmware means its Operating System.
1
Visit the company website (www.lge.com) to check if
there is an upgraded version available for the player.
22
Plug the MP3 player into the USB port of your
computer.
3
Choose Program -> LG -> MF-FD140 -> Firmware
Update in the "Start" menu to start the firmware
upgrade process
66
The firmware will be transferred to the player. Please
wait until it has finished.
5
Click the "Start" button to start.
77
Click the "Close" button to exit.
Note
If the utility can not find the MP3 player
even after searching for several
minutes, please cancel the searching, and
redo the steps from step 1 and make sure
that the MP3 player is put into Recovery
mode.
Note
Format Data Area option:
When not selected : Updates the firmware
only.
If selected : Updates the firmware and
formats the storage space.
Page 10

Installing Software (Continued)
10
Recovery Mode
77
The utility will start to search the MP3 player. Please
wait until the Firmware Download window appears.
1
Take out the battery from battery compartment
22
Press and hold the play button. Do not release it
until step 4.
3
Plug the MP3 player into the USB port of your
computer.
4
Hold for 5 seconds and release the play button.
5
Leave the MP3 player in the USB port for the next
step.
66
Choose Program -> LG -> MF-FD140 -> Firmware
Update in the "Start" menu to start the firmware
upgrade process
9
The firmware will be transferred to the player. Please
wait until it has finished.
8
Click the "Start" button to start.
100
Click the "Close" button to exit.
Notes
• If you check “Format Data Area”
option, all the data stored in the
flash memory is deleted.
Page 11

Connecting Devices
11
Connecting USB Cable
1
Remove the USB port cover.
22
Plug the MP3 player into the USB port of your
computer.
4
The following screen is displayed in the product
LCD.
3
The icon is displayed in the PC tray if successfully
connected.
Disconnecting USB Cable
Wait until you get a message saying that you can safely
unplug the device before disconnecting the USB cable.
1
The safe remove icon is in the system tray next to
the clock.
22
Click on the icon to eject the player from the
computer and select the ‘Safely remove’ message.
3
There will be a message indicating that it is now safe
to disconnect the player.
4
You can now go ahead and unplug the USB cable
from the player.
Page 12

Connecting Earphone
Connect the earphones to the earphone socket of the
player.
Connecting Devices (Continued)
12
Installing Battery
1
Open the battery cover.
22
Insert the battery.
Make sure to match the + and - on the batteries to the
marks inside the battery compartment.
Note
• Improper use of batteries may cause battery leakage and
corrosion.
• If battery leakage occurs, wipe the battery liquid from the
battery compartment, then insert new battery.
Page 13

Before Operation
13
1
Plug the MP3 player into the USB port of your
computer.
22
Open Windows Explorer on PC.
Removable Disk is displayed in Window Explorer.
3
Select the file you want to save, then drag and drop
it to the removable disk.
The saved files will be played in the order of file
name as they appear.
Downloading Files
Notes
• Don’t remove the USB port while uploading or
downloading a files.
Page 14

Before Operation (Continued)
14
To turn on, press the BX button.
Power On
To turn off, press the x button for more than
2 seconds on the pause mode.
Power Off
This function locks the main unit to prevent it from
operating when you accidentally press a button.
Hold Function
You can adjust the volume by pressing volume +/buttons.
• The volume level can be adjusted by 32 steps.
(Min, 1~30, Max)
• The volume changes by 1 level when you press the
button briefly, and it changes rapidly when you press and
hold the button.
Adjust Volume
UNLOCK
LOCK
• The word "Holding …." display for 2 seconds and
disappears whenever pressing the operation button.
• Power automatically turns off after the
"Holding …." display appears for about
a second if powering on in the holding
position.
Page 15

To Play Files
1
Press BXbutton to turn on.
22
Press . > button to select a file you want.
3
Press BXbutton to play a file.
Note
• Time display appearing on the display part when playing
VBR file may vary and there may be some difference
from actual time (both progress time and VBR are
displayed at the same time when playing file).
To Pause Files
Press BXbutton during file playing.
To resume playback, press this button again.
MENU Operation
15
MENU Mode
1
Press the MENU(M) button for more than 2 seconds
to enter menu.
22
Press . > button to select a menu you want.
Music Mode
A mode to listen to the music files stored in the MUSIC
memory
Select “Music” in the menu.
• If there is no music file existed, a message saying ‘No
Files!’ will appear in the display.
3
Press MENU(M) button.
The selected menu will be appeared.
Note
• To cancel mode switching and return to the previous
mode, press x button.
• If you don’t press any buttons within about 5 seconds
in the menu, it will return to the main screen.
Page 16

MENU Operation (Continued)
16
Press left or right for more than 2 seconds the . >
button during file playing.
Note
• When you player the low bit rate(under 64kbps)files,
operations can be late or song can be mute.
To Skip the Files
To skip the next file
Press briefly the > button on the main unit to select the
next file.
To skip the previous file
Press briefly the . button on the main unit within 5
seconds of playing time.
To return the beginning of the current file
Press briefly the . button on the main unit after 5
seconds of playing time.
To Search the Files
Local Repeat Function
You can set local repeat by pressing the MENU button.
1
To select the local repeat starting point you want
during file playing, press the MENU(M) button briefly
once.
“A” appears in the LCD.
22
To select the local repeat ending point you want
during file playing, press the button again.
“
A-B
” appears in the LCD.
3
To cancel local repeat function, press the MENU(M)
button.
“
A-B
” disappears in the LCD.
Notes
• The Local Repeat Function is not available in FM TUNER
mode.
• After marking a start point, press MENU(M) button again
within 3 seconds, then a ending point is not marked.
• The A-B section repeat is available in a same song
Page 17

MENU Operation (Continued)
17
Record Mode
Note
•The recorded files are stored V001.WAV, V002.WAV,
V003.WAV.... in order.
• If the “MEMORY FULL” appears in the LCD, delete file to
make space.
• Configure the audio file Bit rate before recording.
(Record Settings > Mic > Rate)
• If you want to pause recording, press the BX button.
22
Press . > button to select.
YesNo: To record the voice.
: To give up the record
3
Start the voice recording to the Microphone (MIC) on
the main unit.
4
If you want to stop recording, press the x button.
Voice Mode
Select “Voice” in the menu.
• The recorded files are stored in the VOICE folder in the
following format: V001.WAV or V002.WAV...
• This operation is similar to the playback of music.
A mode to listen to the voice files stored in the VOICE
memory
1
Select “Record” in the menu.
Page 18

MENU Operation (Continued)
18
FM Mode
The MP3 Player allows you to listen to FM radio
with the built-in digital FM tuner.
• Manual Tuning
Press the . > button repeatedly.
• Auto Tuning
Press and hold the . > button.
Automatically scans and turns to the next available
station.
Add to Preset
The MP3 Player tuner allows user to save a FM
radio station to preset. After you have tuned to
FM radio station.
1
Select “Add to Preset” in the FM menu.
Select “FM” in the menu.
YesNo: To save the preset
: To give up the save
66
Press . > button to select.
77
Press the MENU(M) button.
4
Press the MENU(M) button to save.
5
A dialogues box will pop-up to register if you make
sure to do the operation.
22
Press MENU(M) button.
3
Press . > button to select one FM radio station
in the preset list.
Note
• When using the MP3 Player tuner at the first time, the
MP3 Payer will autoatically start to seek all availble FM
radio stations and save them into preset list. Please wait
until the “Search” disappears from the display.
• FM Tuner reception may vary in different areas.
• If you are in the area of low sensitivity, radio receiving
may not be good.
Page 19

Auto Scan
To re-scan all FM radio stations save them to the
preset list automatically.
1
Select “Auto Scan” in the FM menu.
MENU Operation (Continued)
19
Load Preset
To select a FM radio station from the list to
listen.
1
Select “Load Preset” in the FM menu.
4
Press the MENU(M) button to load.
22
Press MENU(M) button.
3
Press . > button to select one FM radio station
in the preset list.
22
Press MENU(M) button.
3
The MP3 Player tuner starts to seek and save the FM
stations automatically.
Exit to MUSIC mode from FM mode
Press and hold the MENU(M) button for a while and
release it. The MP3 player will exit FM mode and go
back to MUSIC mode.
Note
Searching Preset
If you press the BX, x button short while listening to FM
radio, the saved preset is searched.
BX : Move the the next preset.
x : Move the previous preset.
Note
• If you listen to FM radio, insert the earphone into
earphone jack.
The earphones play the part of the antenna.
Page 20

MENU Operation (Continued)
20
Delete One FM Radio Stations
1
Select “Delete One” in the FM menu.
YesNo: To delete the FM radio
: To give up the delete
3
Press MENU(M) button.
4
A dialogues box will pop-up to register if you make
sure to do the operation.
22
Select FM radio station from the preset list.
5
Press . > button to select.
66
Press the MENU(M) button.
Delete All FM Radio Stations
1
Select “Delete All” in the FM menu.
YesNo: To delete the FM radio
: To give up the delete
3
Press MENU(M) button.
4
A dialogues box will pop-up to register if you make
sure to do the operation.
22
Select FM radio station from the preset list.
5
Press . > button to select.
66
Press the MENU(M) button.
Page 21

MENU Operation (Continued)
21
FM Radio Recording
1
When listening to a FM radio, press and hold the
BX
button for a while and release it.
Playback FM Radio record
The recorded files are stored in the FM folder in the
following format: F001.WAV or F001.WAV...
This operation is similar to the playback of
music.
22
The MP3 Player starts to record the FM radio.
3
Press the x or MENU(M) button to stop the
recording and continue to listen the FM radio.
Navigation Mode
You can search music file while listening to music.
1
Select “Navigation” in the menu.
Note
• When a folder is selected in the navigation mode, press
the MENU button, a sub-menu window will pop-up.
• When a file is selected in the navigation mode, press the
MENU button, a sub-menu window will pop-up.
Play
Enter
Cancel
: To play music located in the folder.
: To enter the folder
: To cancel
Play
Delete
Cancel
: To play this file.
: To erase
: To cancel
22
Press MENU(M) button.
3
Use . > button to select the desire folder or file.
4
Press the u button to play.
Note
• In area with weak signals, some channels may not saved.
•Amaximum of 20 channels can be saved.
Page 22

Equalizer Function
You can choose between 6 fixed repeat mode
Notes
• If you don’t press any buttons within about 7 seconds in
the menu, it will return to the previous screen.
• The Equalizer Function is not available to the FM TUNER
mode.
Normal
XBass
Rock
: For Standard mode.
: For Ultra bass mode.
: For Rock mode.
Jazz : For Jazz mode.
Classical : For Classical mode.
Pop : For Pop mode.
MENU Operation (Continued)
22
Settings Mode
You can change the configuration to the device.
1
Select “Settings” in the menu.
22
Press MENU(M) button.
3
Use . > button to select the desire setting
mode.
4
Press the MENU(M) button to select that setting.
5
After setting is finished, press and hold MENU
button for a while and release it to exit the menu.
Page 23

MENU Operation (Continued)
23
Repeat Function
You can choose between 5 fixed repeat mode.
Notes
•
The REPEAT Function is not available to the FM TUNER
mode.
Normal
Repeat One
Repeat All
: Repeat mode is cancelled.
:
Plays
repeatedly the current selected file.
:
Plays
repeatedly all file.
Random :
Plays
randomly once.
Random All :
Plays
randomly continuously.
Contrast Function
This function can adjust lightening or darkening
the LCD.
Adjust the LCD’s contrast level.
(between -5 and 5)
Backlight Function
Whenever any button is pressed, the LCD bright.
This function can set the time of brightness
displayed in the LCD.
Adjust the LCD’s Backlight level.
(Off, 3sec, 5sec, 10sec, 15sec, Always on)
Page 24

Power Savings Function
Use the Power Saving function to automatically
turn the MP3 Player off after a predetermined
length of inactivity.
Record Settings Function
Adjust the Power off time.
(Off, 1min, 2mins, 3mins,5mins 10mins,
15mins)
Notes
•
Select “Off” would never turn off the MP3 Player
automatically.
A function to adjust the bit rate of recording.
MENU Operation (Continued)
24
1
Select “Record Settings” in the menu.
22
Press MENU(M) button.
3
Press . > button to select “Mic” or “FM
4
Press MENU(M) button.
5
Use . > button to select the desire setting
mode.
8000 Hz
11025 Hz
16000 Hz
22050 Hz
32000 Hz
Page 25

Load default Function
To reset all setting to factory default setting.
Exit Function
To move to previous menu.
MENU Operation (Continued)
25
Notes
•Ahigher Bit Rate increases the quality but reduces
recording time.
• The recording format options in “Format” are only a bit
different. User need to change this setting.
•
Mic :
Record mode for microphone .
•
FM
: Record mode for FM recording.
•
Format
: you can select format to record.
•
Rate
: you can select one of the following bit rates.
Bit Rate
800 Hz
1105 Hz
: Recording Time per 128M
: 8 hours
: 5.8 hours
16000 Hz : 4 hours
22050 Hz : 2.9 hours
32000 Hz : 2 hours
Page 26

Note
• When “Delete All” is selected in the menu.
• When “Delete One” is selected in the menu.
MENU Operation (Continued)
26
Erasing Files
3
Press MENU(M) button.
4
Press . > button to select “Delete All” or
“Delete One”.
5
Press MENU(M) button to enter submenu.
66
Press . > button to select “Music” or “Voice ”.
77
Press MENU(M) button to enter submenu.
About
Information is available regarding the firmware
version, built-in memory size and free memory
size.
1
Stop playback or recording before attempting to
erase files.
22
Select “Delete” in the menu.
YesNo: To delete all files
: To give up the delete
YesNo: To delete the current select file
: To give up the delete
Page 27

Specifications
27
MP3 PLAYER SECTION
Memory Capacity MF-FD141; 128MB
MF-FD142; 256MB
MF-FD145; 512MB
Battery AAA Battery
Dimensions 31x88x20 mm
Weight 30g
Operating Voltage 1.5V DC
Dynamic Range 65/70 dB (No Filter / JIS-A Filter )
Earphone Output Power 5mW+5mW (1kHZ, 0dB / 16Ω )
S/N Ratio 80/85 dB (No Filter / JIS-A Filter )
Channel Separation 30/30 dB (1kHZ / 10kHZ )
Frequency Range 87.5~108 MHz
S/N Ratio 38 dB
Channel Separation 25 dB
Antenna Earphone Antenna
File Support MPEG1/2/2,5 Layer3, WMA
Equalizer Normal, Xbass, Rock, Jazz,
Classical, Pop
Accessories Earphone, USB cable, Manual,
CD, Necklace
Page 28

P/NO:3834RL0015L
Disposal of your old appliance
1. When this crossed-out wheeled bin symbol is attached to a product it means the product is
covered by the European Directive 2002/96/EC.
2. All electrical and electronic products should be disposed of separately from the municipal
waste stream via designated collection facilities appointed by the government or the local
authorities.
3. The correct disposal of your old appliance will help prevent potential negative consequences
for the environment and human health.
4. For more detailed information about disposal of your old appliance, please contact your city
office, waste disposal service or the shop where you purchased the product.
 Loading...