

LG MD-0953ATL Owner’s Manual
website: http://www.lg.ca
LMF9060TS
P/NO. MFL32768401
Printed in China

TABLE OF CONTENTS
SAFETY ............................................................ |
3-5 |
Auto Cook Table ............................................... |
12 |
Precautions To Avoid Possible Exposure |
|
Popcorn ........................................................... |
12 |
To Excessive Microwave Energy ........................ |
3 |
Time Cooking.................................................... |
13 |
Grounding Instructions........................................ |
3 |
Multi-Stage Cooking ......................................... |
14 |
Important Safety Instructions........................... |
4-5 |
Microwave Power Levels................................... |
14 |
UNDERSTANDING YOUR |
|
Auto Defrost ........... ......................................... |
14 |
TOASTER COMBO .......................................... |
6-8 |
Auto Defrost Sequence List ............................. |
15 |
Specifications...................................................... |
6 |
Auto Defrost Table........................................ |
16-17 |
Installation........................................................... |
6 |
USING YOUR TOASTER.............................. |
18-20 |
Parts And Accessories........................................ |
7 |
Tips For Toaster ................................................. |
18 |
Control Panel ...................................................... |
8 |
Cleaning the Toaster ......................................... |
18 |
USING YOUR MICROWAVE OVEN ............... |
9-17 |
Cooking Tips ..................................................... |
18 |
Cookware Guide ................................................. |
9 |
Operating Instruction ........................................ |
19 |
Tips For Microwave Cooking ............................. |
10 |
Toast ................................................................. |
19 |
Cleaning ............................................................ |
10 |
Bagel................................................................. |
20 |
Clock ................................................................. |
11 |
TROUBLESHOOTING .................................. |
21-23 |
Kitchen Timer .................................................... |
11 |
Questions And Answers .............................. |
21-22 |
Child Lock ......................................................... |
11 |
Before Calling For Service................................ |
23 |
Ez on................................................................. |
11 |
WARRANTY........................................................ |
24 |
Auto Cook ........................................................ |
12 |
|
|
The serial number is found on the back of this unit. This number is unique to this unit and not available to others. You should record requested information here and retain this guide as a permanent record of your purchase.
Date of Purchase:
Dealer Purchase From:
Dealer Address:
Dealer Phone No.:
Model No.:
Serial No.:
Important Notes:
DO NOT remove the wave guide cover inside the oven.
The wave guide cover
2
SAFETY
PRECAUTIONS TO AVOID POSSIBLE EXPOSURE TO EXCESSIVE MICROWAVE ENERGY
•Do not attempt to operate this oven with the door open, since open-door operation can result in harmful exposure to microwave energy. It is important not to defeat or tamper with the safety interlocks.
•Do not place any object between the oven front face and the door, or allow soil or cleaner residue to accumulate on sealing surfaces.
•Do not operate the oven if it is damaged.
It is particularly important that the oven door closes properly and that there is no damage to the:
-door (bent),
-hinges and latches (broken or loosened),
-door seals and sealing surfaces.
•The oven should not be adjusted or repaired by anyone except properly qualified service personnel.
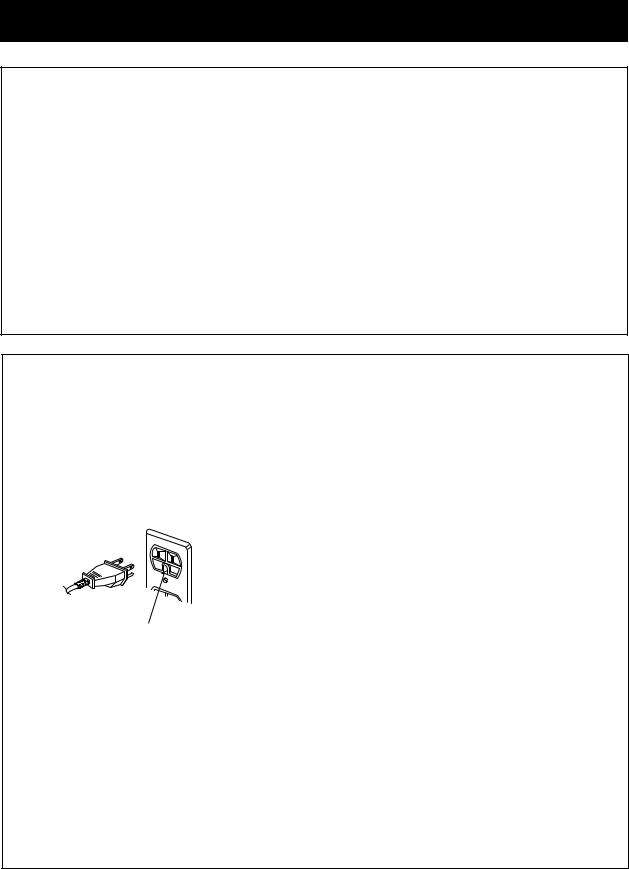
GROUNDING INSTRUCTIONS
This appliance must be grounded. In the event of an electrical short circuit, grounding reduces the risk of electric shock by providing an escape wire for the electric current. This appliance is equipped with a cord having a grounding wire and a grounding plug. The plug must be plugged into an outlet that is properly installed and grounded.
Ensure proper ground exists before use
 WARNING
Improper grounding can result in a risk of electric shock. Consult a qualified electrician if the grounding instructions are not completely understood, or if doubt exists as to whether the appliance is properly grounded, and either:
1. If it is necessary to use an extension cord, use only a 3-wire extension cord that has a 3-blade grounding plug, and a 3-slot receptacle that will accept the plug on the appliance.
The marked rating of the extension cord shall
be equal to or greater than the electrical rating of the appliance, or. . . .
2.Do not use an extension cord. If the power supply cord is too short, have a qualified electrician or serviceman install an outlet near the appliance.
NOTES:
1.A short power-supply cord is provided to reduce the risks resulting from becoming entangled in or tripping over a longer cord.
2.Longer cord sets or extension cords are available and may be used if care is exercised in their use.
3.If a long cord or extension cord is used, (1) the marked electrical rating of the cord set or extension cord should be at least as great as the electrical rating of the appliance, (2) the extension cord must be a grounding-type 3-wire cord, and (3) the longer cord should be arranged so that it will not drape over the countertop or tabletop where it can be pulled on by children or tripped over accidentally.
3

SAFETY - MICROWAVE
IMPORTANT SAFETY INSTRUCTIONS
The safety instructions below will tell you how to use your oven to avoid harm to yourself or damage to your oven.
WARNING - To reduce the risk of burns, electric shock, fire, injury to persons, or exposure to excessive microwave energy:
1.Read all instructions before using the appliance.
2.Read and follow the specific PRECAUTIONS TO AVOID POSSIBLE EXPOSURE TO EXCESSIVE
MICROWAVE ENERGY found on page 3 of this manual.
3. This appliance must be grounded. Connect only to properly grounded outlet. See GROUNDING INSTRUCTIONS found on page 3 of this manual .
4. Install or locate this appliance only in accordance with the provided installation instructions.
5. Some products, such as whole eggs and sealed containers – for example, closed glass jars are able to explode and should not be heated in this oven.
6.Use this appliance only for its intended use as described in the manual. Do not use corrosive chemicals or vapors in this appliance. This type of oven is specifically designed to heat, cook, or dry food. It is not designed for industrial or laboratory use.
7.As with any appliance, close supervision is necessary when used by children.
8.Do not operate this appliance if it has a damaged cord or plug, if it is not working properly, or if it has been damaged or dropped.
9. This appliance should be serviced only by qualified service personnel. Contact the nearest authorized service facility for examination, repair, or adjustment.
10. Do not cover or block any openings on the appliance.
11. Do not store this appliance outdoors. Do not use this product near water – for example, near a kitchen sink, in a wet basement, near a swimming pool, or similar location.
12. Do not immerse cord or plug in water. 13. Keep cord away from heated surfaces.
14. Do not let cord hang over the edge of a table or counter.
15. When cleaning surfaces of door and oven that come together on closing the door, use only mild, nonabrasive soaps or detergents applied with a sponge or soft cloth.
16. To reduce the risk of fire in the oven cavity:
a.Do not overcook food. Carefully attend appliance when paper, plastic, or other combustible materials are placed inside the oven to facilitate cooking.
b.Remove wire twist-ties from paper or plastic bags before placing bag in oven.
c.If materials inside the oven ignite, KEEP OVEN DOOR CLOSED, turn oven off, and disconnect the power cord or shut off power at the fuse or circuit breaker panel.
d.Do not use the cavity for storage purposes. Do not leave paper products, cooking utensils, or food in the cavity when not in use.
17.Liquids such as water, coffee, or tea are able to be overheated beyond the boiling point without appearing to be boiling. Visible bubbling or boiling when the container is removed from the microwave oven is not always present. THIS COULD RESULT IN VERY HOT LIQUIDS SUDDENLY BOILING OVER WHEN THE CONTAINER IS DISTURBED OR A SPOON OR OTHER UTENSIL IS INSERTED INTO THE LIQUID. To reduce the risk of injury to persons; 1) Do not overheat the liquid. 2) Stir the liquid both before and halfway through heating it. 3) Do not use straight-sided containers with narrow necks. 4) After heating, allow the container to stand in the microwave oven for a short time before removing the container. 5) Use extreme care when inserting a spoon or other utensil into the container.
18.Avoid heating small-necked containers such as syrup bottles.
19.Avoid using corrosive and vapors, such as sulfide and chloride.
20.Liquids heated in certain shaped containers (especially cylindrical-shaped containers) may become overheated. The liquid may splash out with a loud noise during or after heating or when adding ingredients (instant coffee, etc.), resulting in harm to the oven and possible injury. In all containers, for best results, stir the liquid several times before heating. Always stir liquid several times between reheatings.
SAVE THESE INSTRUCTIONS
4

SAFETY - TOASTER
IMPORTANT SAFETY INSTRUCTIONS
When using electrical appliances, especially when children are present, basic safety precautions should always be followed, including the following:
1.Read all instructions before using your toaster.
2.Do not touch hot surfaces.
3.To protect against electrical hazards, do not immerse cord, plug, or the appliance in water or other liquid.
4.Close supervision is necessary when any appliance is used by or near children.
5.Unplug from outlet when not in use and before cleaning. Allow to cool before putting on or taking off parts and before cleaning.
6.Do not operate any appliance with a damaged cord or plug or after the appliance malfunctions or has been dropped or damaged in any manner. Return appliance to the nearest authorized service center for examination, repair or electrical or mechanical adjustment.
7.The use of attachments not recommended by the manufacturer may cause hazards.
8.Keep the cord away from heated surfaces. Do not let the cord hang over the edge of table or counter, as it could be pulled off.
9.Do not use outdoors.
10.Do not place on or near a hot gas or electric burner or in a heated oven.
11.Do not use the appliance for other than its intended use.
12.Oversized foods, metal foil packages or utensils must not be inserted in this appliance, as they may create a fire or electrical hazards.
13.A fire may occur if this toaster is covered or touching flammable material, including curtains, draperies, walls, etc., when in operation.
14.Do not attempt to dislodge food when this appliance is plugged in.
15.Toast Door must be closed before attaching or disconnecting the plug from wall outlet.
16.Do not close with metal scouring pads. Pieces can burn off the pad and touch electrical parts involving a risk of electric shock.
17.Do not use paper products when appliance is operated in the toaster mode.
18.Do not store any materials, other than manufacturer’s recommended accessories, in this oven when not in use.
19.Do not cover crumb tray or any other part of the oven with metal foil. This will cause overheating of this appliance.
20.Extreme caution must be used when moving an appliance containing hot oil or other hot liquids.
21.Do not toast oversized bagel. Because thick bagel’s surface may become closer to the heater, this may cause overdone of surface and smoke.
SAVE THESE INSTRUCTIONS!
5
UNDERSTANDING YOUR TOASTER COMBO
SPECIFICATIONS
Power Supply |
|
120 V AC, 60 Hz |
Rated Power Consumption |
1,350 W |
|
Output |
Microwave |
*900 W |
|
Toaster |
800W |
Overall Dimensions (WxHxD) |
215/16” x 123/16” x 169/16” |
|
Oven Cavity Dimensions (WxHxD) |
131/2” x 811/16” x 143/16” |
|
Capacity of Oven Cavity |
0.9 Cu. Ft. |
|
|
|
|
*IEC 60705 RATING STANDARD
Specifications subject to change without prior notice.
INSTALLATION
A. Circuits
For safety purposes this oven must be plugged into a 20 Amp circuit. No other electrical appliances or lighting circuits should be on this line. If in doubt, consult a licensed electrician.
B. Voltage Warning
The voltage used at the wall receptacle must be the same as specified on the oven name plate located on the back or on the side of the control panel of the oven. Use of a higher voltage is dangerous and may result in a fire or other type of accident causing oven damage. Low voltage will cause slow cooking. In case your microwave oven does not perform normally in spite of proper voltage, remove and reinsert the plug.
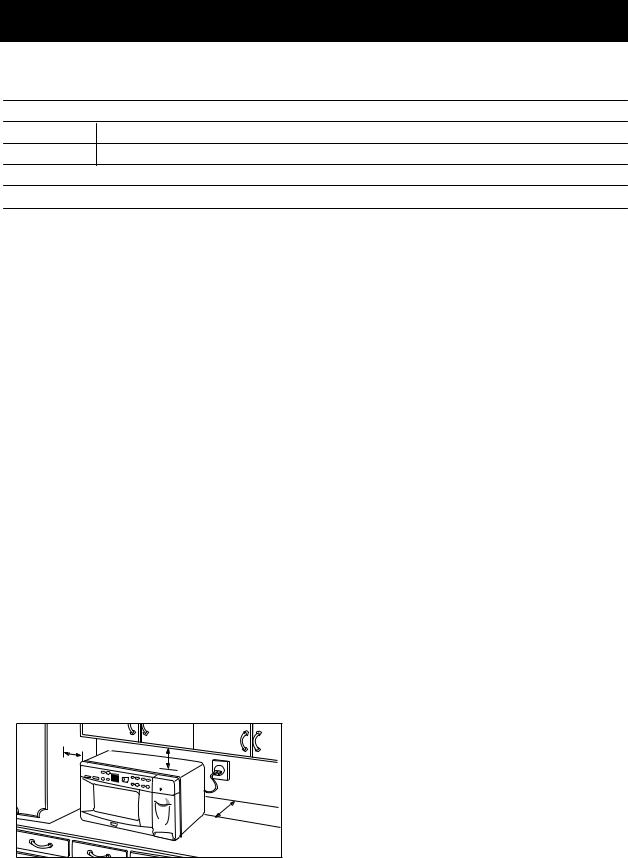
C. Placement of the Oven
Your microwave oven can be placed easily in your kitchen, family room, or anywhere else in your home. Place the oven on a flat surface such as a kitchen countertop or a specially designed microwave oven cart at least 100cm (39.4 inches) from floor. Do not place oven above a gas range. Free air flow around the oven is important. Allow at least 4 inches
of space at the top, sides, and back of the oven for proper ventilation.
4 |
inches |
|
|
|
|
|
|
|
4 |
inches |
|
|
|
|
|
|
|
4 |
inc hes |
NOTES:
• Never place the turntable in the oven upside down.
D. Do not block the air vents
All air vents should be kept clear during cooking. If air vents are covered during oven operation the oven may overheat. In this case, a sensitive thermal safety device automatically turns the oven off. The oven will be inoperable until it has cooled sufficiently.
E. Radio interference
1.Microwave oven operation may interfere with TV or radio reception.
2.When there is interference, it may be reduced or eliminated by taking the following measures:
a.Clean the door and the sealing surfaces of the oven.
b.Reorient the receiving antenna of radio or TV.
c.Relocate the microwave oven in relation to the TV or radio.
d.Move the microwave oven away from the receiver.
e.Plug the microwave oven into a different outlet so that microwave oven and receiver are on different branch circuits.
6
UNDERSTANDING YOUR TOASTER COMBO
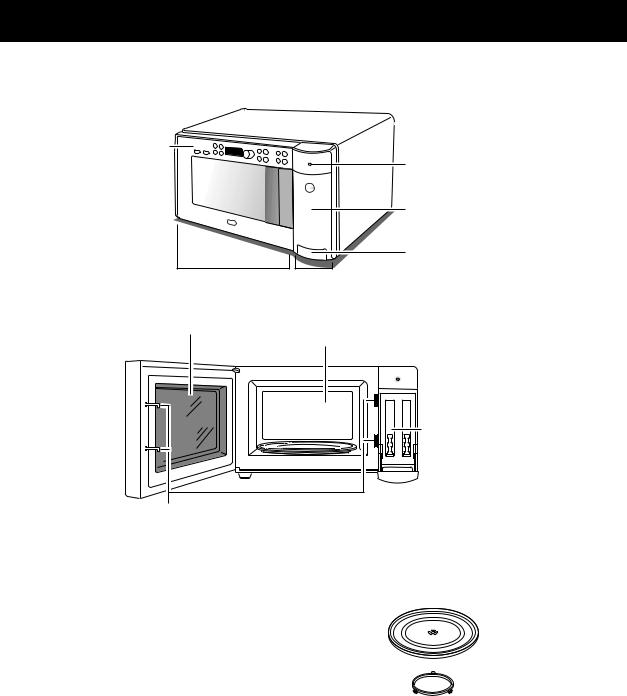
PARTS AND ACCESSORIES
Control |
Toaster |
|
Panel |
||
Indicator |
||
|
||
|
Light |
|
|
Toaster |
|
|
Door |
|
|
Crumb |
|
|
Tray |
|
Microwave Oven |
Toaster |
|
See-Through Door |
Easy-Clean |
|
|
Oven Cavity |
 Slots
Slots
Safety Interlock System
Your oven comes with the following accessories: |
Glass Turntable |
|
1 |
Owner’s Manual and Cooking Guide |
|
1 |
Glass Turntable |
|
1 |
Rotating Ring |
|
Rotating Ring
7

UNDERSTANDING YOUR TOASTER COMBO
CONTROL PANEL
MICROWAVE CONTROL AREA
2 |
3 |
4 |
5 |
1 |
8 |
9 |
10 |
6 |
7 |
11 |
12 |
1.DISPLAY. The Display includes a clock and indicators that tell you time of day, cooking time settings, and cooking functions selected.
2.AUTO COOK. Touch this button and turn the dial knob to select programmed food items.
3.AUTO DEFROST. This button is an accurate defrosting method for frozen meat, poultry, fish up to 6.0 lbs. and Bread up to 1.0 lbs.. Touch this button and turn the dial knob to defrost.
4.POPCORN. Touch this button to pop a bag of microwave popcorn without entering a cook power or time.
5.CLOCK. Touch this button to set the time of day.
6.KITCHEN TIMER. Touch this button to use your microwave oven as a kitchen timer.
7.COOK TIME. Touch this button to set a cooking time.
8.DIAL KNOB. Turn the dial knob to set clock, kitchen timer, cook time, power level, food quantity and toast/bagel baking level.
9.EZ ON. Touch this button to cook at 100% cook power for 1 minute to 99 minutes 59 seconds.
10.STOP/CLEAR. Touch this button to stop the oven or clear entries.
11.POWER. Touch this button to set a cooking power.
12.START. Touch this button to start all entries (except Auto Cook, Popcorn and Ez on function which start automatically) and to turn Child Lock on or off.
TOASTER CONTROL AREA
1 3
2 |
4 |
5 |
1.Toast. Touch this button and turn the dial knob to bake toast bread.
2.Bagel. Touch this button and turn the dial knob to bake bagel.
3.Stop/Clear. Touch this button to stop the toaster or clear entries.
4.Start. Touch this button to start the toasting process.
5.Indicator Light. When operating toaster with door closed, this will be illuminated. If you open the door during toasting, this will blink.
8
 Loading...