


OWNER’S MANUAL
MICROWAVE/GRILL/CONVECTION
CAUTION
Please read this owner's manual thoroughly before operating. The manufacturers are not
liable for any problems caused by the user's failure to observe these instructions.
MC2881SUS
P/No.: MFL63289512 (00)
www.lg.com
Precautions
Precautions to avoid possible exposure to excessive microwave energy.
You cannot operate your oven with the door open due to the safety interlocks
built into the door mechanism. These safety interlocks automatically switch off
any cooking activity when the door is opened; which in the case of a
microwave oven could result in harmful exposure to microwave energy.
It is important not to tamper with the safety interlocks.
Do not place any object between the oven front face and the door or allow
food or cleaner residue to accumulate on sealing surfaces.
Do not operate your oven if it is damaged. It is particularly important that the
oven door closes properly and that there is no damage to the: (1) door(bent),
(2) hinges and latches (broken or loosened), (3) door seals and sealing
surfaces.
Your oven should not be adjusted or repaired by anyone except qualified
service personnel.
When heating liquids, e.g. soups, sauces and beverages in your microwave
oven, delayed eruptive boiling can occur without evidence of bubbling. This
could result in a sudden boil over of the hot liquid. To prevent this possibility
the following steps should be taken:
1 Avoid using straight sided containers with narrow necks.
2 Do not overheat.
3 Stir the liquid before placing the container in the oven and again halfway
through the heating time.
4 After heating, allow to stand in the oven for a short time, stir or shake
them(especially the contents of feeding bottles and baby food jars) again
carefully and check the temperature of them before consumption to avoid
burns (especially, contents of feeding bottles and baby food jars).
Be careful when handling the container.
WARNING WARNING
Please ensure cooking times are correctly set as
over cooking may result in the FOOD catching fire
and subsequent damage to your oven.
Always allow food to stand after being cooked by
microwaves and check the temperature of them
before consumption. Especially contents of feeding
bottles and baby food jars.
2

Contents
How the Microwave Function Works
Microwaves are a form of energy similar to radio and television waves and
ordinary daylight. Normally, microwaves spread outwards as they travel
through the atmosphere and disappear without effect. Microwave ovens,
however, have a magnetron which is designed to make use of the energy in
microwaves. Electricity, supplied to the magnetron tube, is used to created
microwave energy.
These microwaves enter the cooking area through openings inside the oven.
A turntable or tray is located at the bottom of the oven. Microwaves cannot
pass through metal walls of the oven, but they can penetrate such materials
as glass, porcelain and paper, the materials out of which microwave-safe
cooking dishes are constructed.
Microwaves do not heat cookware, though cooking vessels will eventually
get hot from the heat generated by the food.
A very safe appliance
Your microwave oven is one of the safest of all home
appliances. When the door is opened, the oven
automatically stops producing microwaves. Microwave
energy is converted completely to heat when it enters
food, leaving no “left over” energy to harm you when
you eat your food.
Precautions ............................................................................2
Contents ...............................................................................3
Unpacking & Installing ............................................................4 ~ 5
Method To Use Accessories As Per Mode ..................................6
Child Lock .............................................................................7
Quick Start ............................................................................8
Micro Power Cooking .............................................................9
Micro Power Level ..................................................................10
Grill Cooking.........................................................................11
Grill Combination Cooking .....................................................12
Convection Preheat ................................................................13
Convection Cooking ...............................................................14
Convection Combination Cooking ............................................15
Various Cook Functions ..........................................................16
Indian Rasoi ..........................................................................17
Nutri Care ............................................................................18
24 Hours ..............................................................................19
Baker’s Basket .......................................................................20
Just 4 U .................................................................................21
Utility Corner .........................................................................22
Rotisserie Installation ..............................................................23
Important safety instructions
Read carefully and keep for future reference ..............................24 ~ 25
Microwave-safe Utensils ..........................................................26
Food characteristics & Microwave cooking ...............................27 ~ 28
Questions & Answers ..............................................................29
Plug wiring information/Technical Specifications .......................30
3
Unpacking &
Installing
By following the basic steps on these two pages you will be able to quickly check that your oven is
operating correctly. Please pay particular attention to the guidance on where to install your oven. When
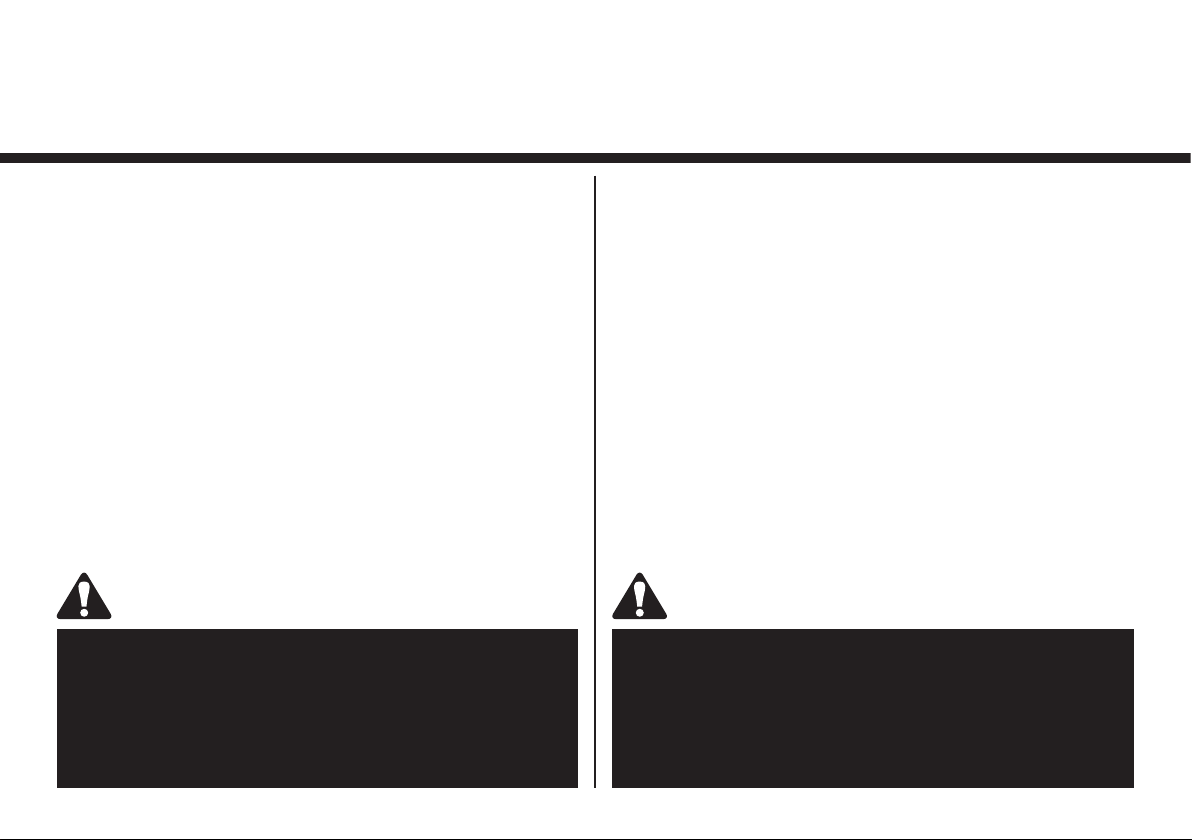
unpacking your oven make sure you remove all accessories and packing. Check to make sure that your
oven has not been damaged during delivery.
Unpack your oven and place it on a flat level surface.
ROTISSERIE BAR
HANDLE
GRILL RACK
(HIGH RACK)
CONVECTION RACK
(LOW RACK)
GLASS TRAY
ROTISSERIE BAR
MULTICOOK TAWA ROTATING RING
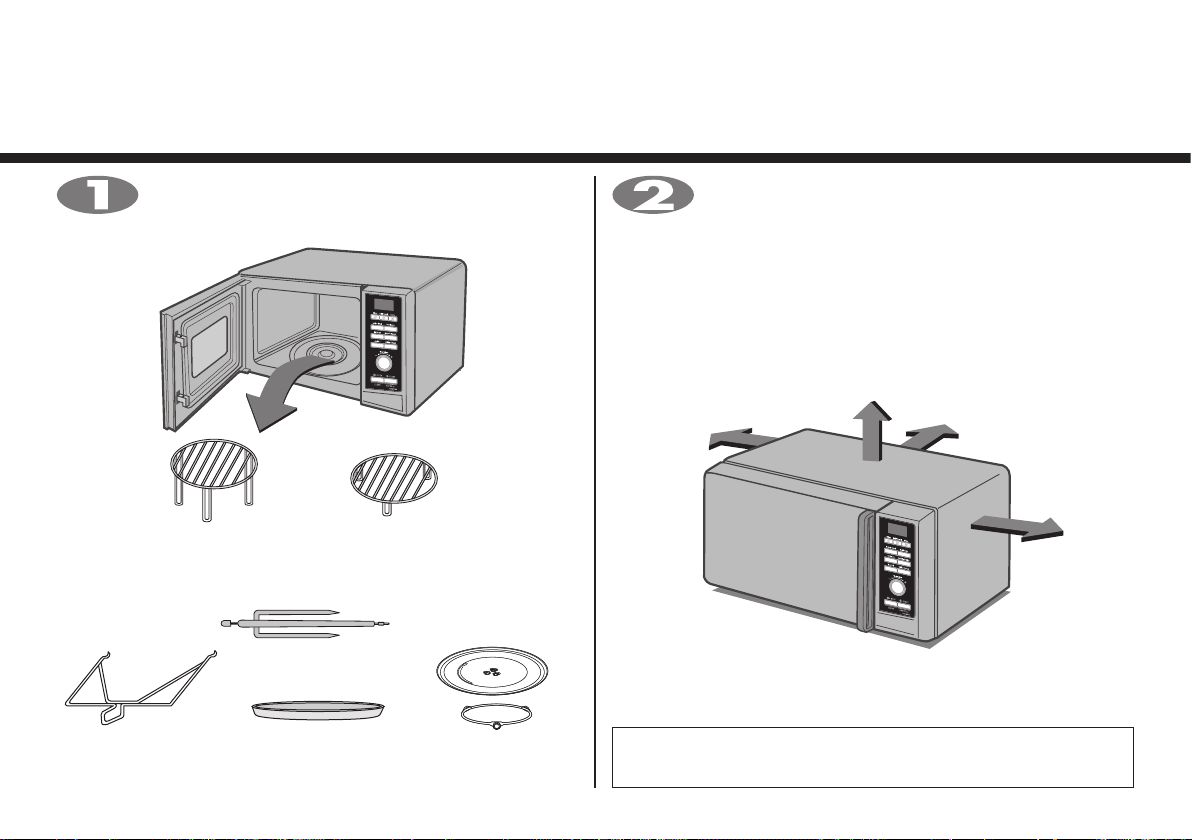
Place the oven in the level location of your choice with
more than 85cm height but make sure there is at least
20cm of space on the top and 10cm at the rear for proper
ventilation. The front of the oven should be at least 8cm from the
edge of the surface to prevent tipping.
An exhaust outlet is located on top or side of the oven. Blocking
the outlet can damage the oven.
* THIS OVEN SHOULD NOT BE USED FOR COMMERCIAL
CATERING PURPOSES
4
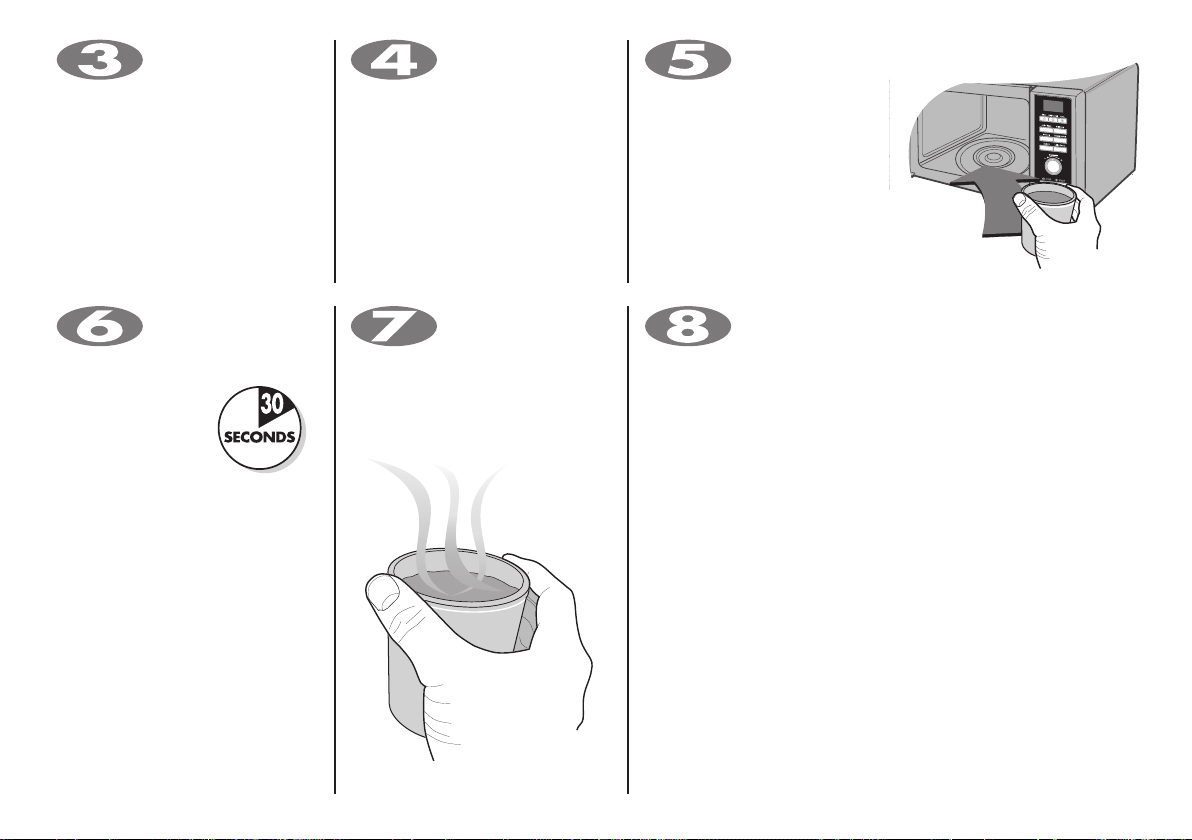
Plug your oven into a
standard household
socket. Make sure your
oven is the only appliance
connected to the socket. If your
oven does not operate properly,
unplug it from the electrical
socket and then plug it back in.
Open your oven door
by pulling the DOOR
HANDLE.
Place the ROTATING RING inside
the oven and place the GLASS
TRAY on top.
Fill a microwave safe
container with 300 ml
1
/2 pint) of water.
(
Place on the GLASS TRAY and
close the oven door. If you have
any doubts about what type of
container to use please refer to
page 26.
Press the STOP/
CLEAR button, and
press the START/Add 30 secs
button one time to
set 30 seconds of
cooking time.
You will hear a
BEEP each time you
press the button. Your oven will
start before you have finished
the sixth press; don’t worry this is
normal.
The DISPLAY will
count down from 30
seconds. When it reaches 0 it
will sound BEEPS. Open the oven
door and test the temperature of
the water.
If your oven is operating the
water should be warm. Be careful
when removing the container it
may be hot.
YOUR OVEN IS NOW INSTALLED
5
The contents of feeding bottles and baby food
jars shall be stirred or shaken and the temperature
checked before consumption, in order to avoid burns.
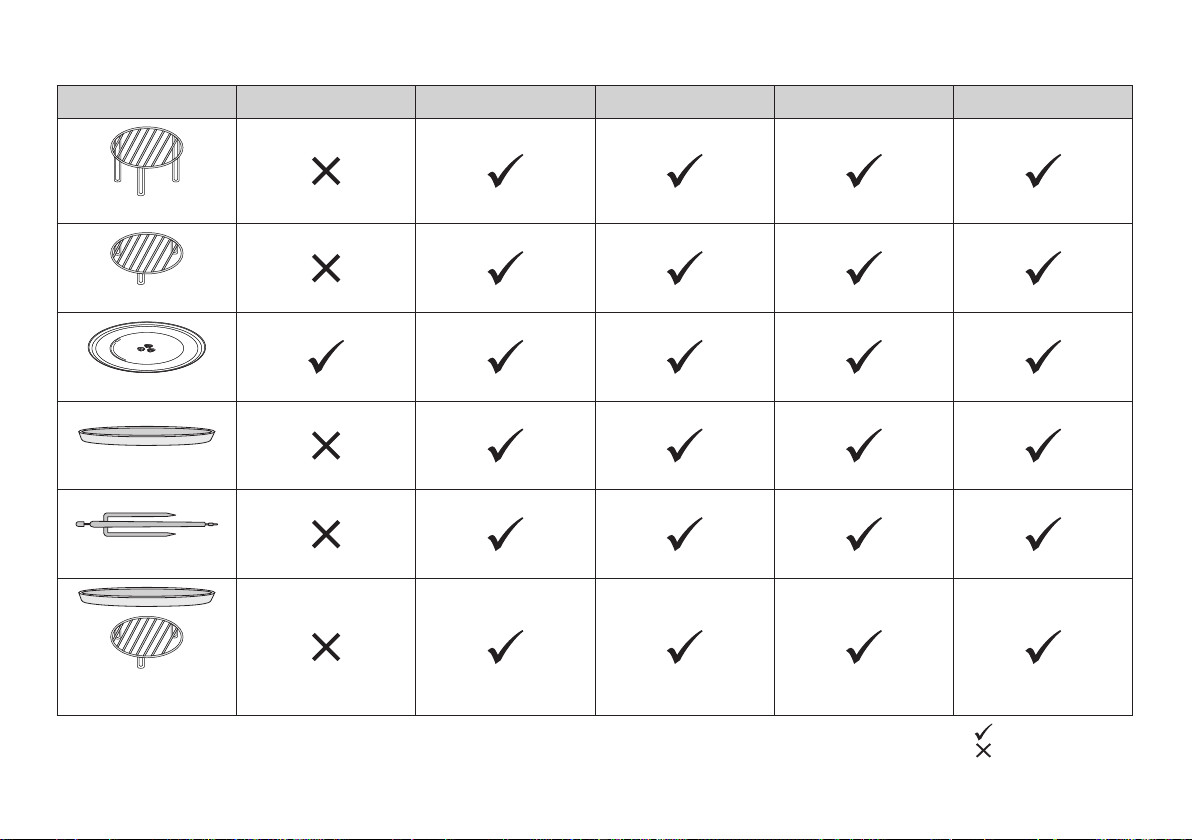
Method To Use Accessories As Per Mode
Microwave Grill Convection Grill Combi Conv combi
High rack
Low rack
Glass tray
Multi Cook Tawa
Rotisserie Bar
Multi cook Tawa
& Rack
Caution : Do not operate Multicook tawa + Rack empty and Rotisserie bar (without food) in combi mode.
Caution : Use accessories in accordance with cooking guides!
Caution : Do not wash the multi cook tawa with rough or sharp material.
6
Acceptable
Not Acceptable

Press STOP/CLEAR.
Child
Lock
Your oven has a safety feature that
prevents accidental running of the oven.
Once the child lock is set, you will be
unable to use any functions and no
cooking can take place.
However your child can still open the
oven door.
Press and hold STOP/CLEAR until "L" appears on the display and BEEP
sounds.
The CHILD LOCK is now set.
To cancel CHILD LOCK press and hold STOP/CLEAR until "L" disappears.
You will hear BEEP when it’s released.
7
Quick
Start
In the following example I will show you how to set 2 minutes of cooking on 900 W power.
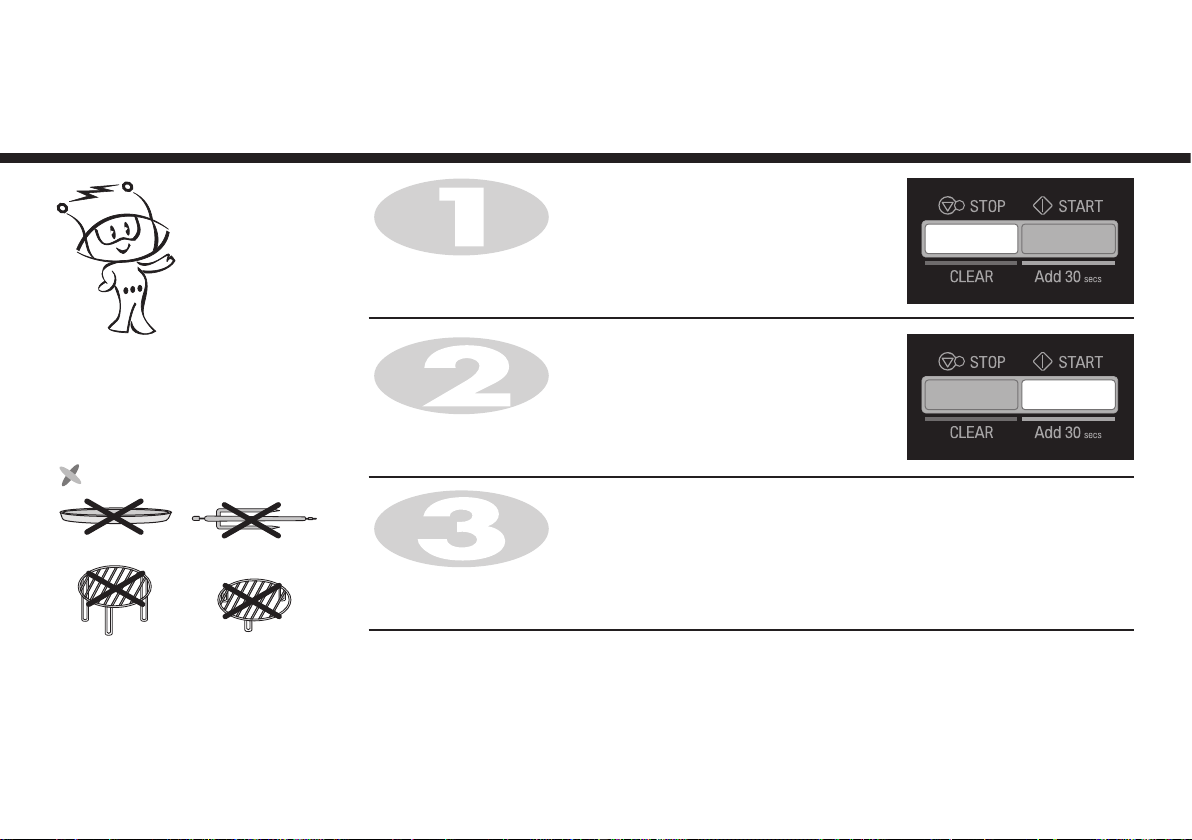
Press STOP/CLEAR.
The QUICK START feature allows you to
set 30 seconds intervals of HIGH power
cooking with a touch of the
START/Add 30 secs button.
Don't Use
MULTICOOK TAWA
GRILL RACK
(HIGH RACK)
ROTISSERIE
CONVECTION RACK
(LOW RACK)
Press START/Add 30 secs four times to select 2 minutes on 900W power.
Your oven will start before you have finished the fourth press.
During QUICK START cooking, you can extend the cooking time up to
99 minutes 59 seconds by turning the
Time/Weight dial.
8
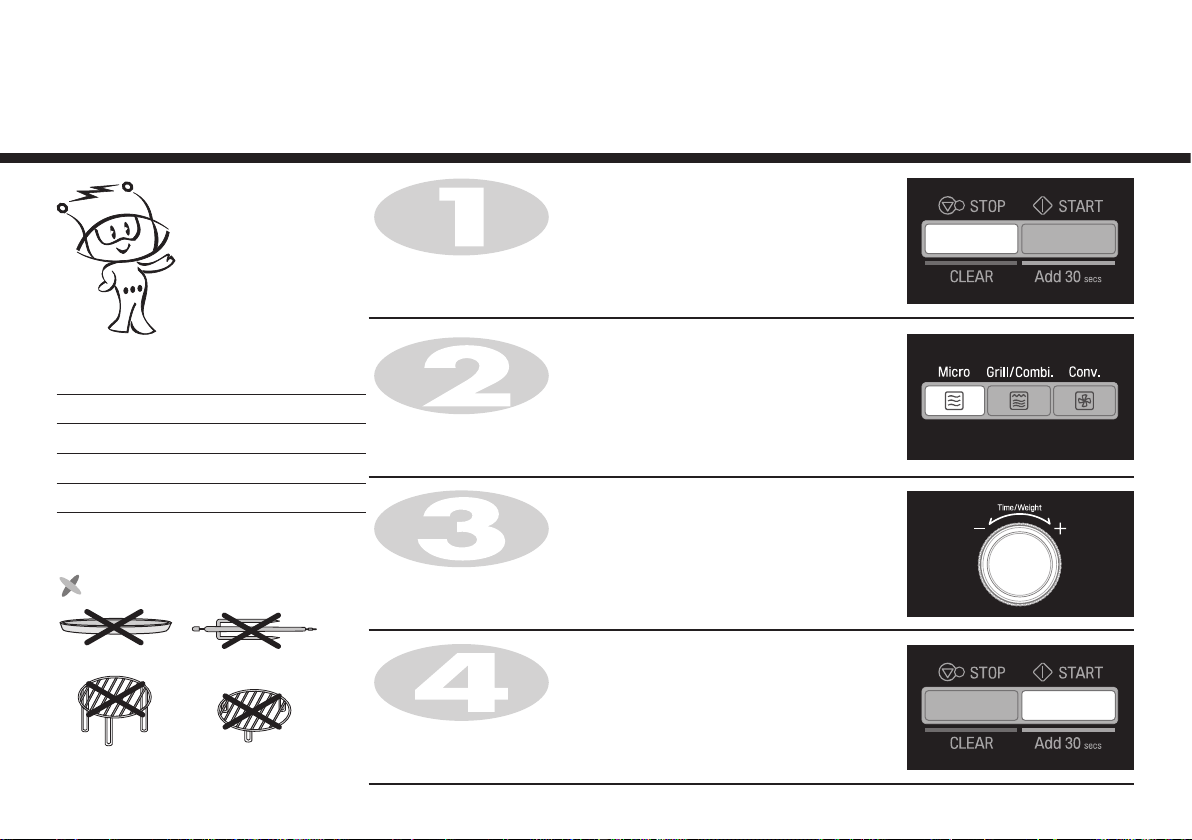
In the following example I will show you how to cook some food on 80 % power for 5 minutes and 30 seconds.
Make sure that you have correctly installed your oven as described
earlier in this book.
Press STOP/CLEAR.
Micro Power
Cooking
Your oven has five microwave Power settings.
POWER
HIGH
MEDIUM HIGH
MEDIUM
MEDIUM LOW
LOW
Don't Use
MULTICOOK TAWA
GRILL RACK
(HIGH RACK)
% Power Output
100 % 900 W
80 % 720 W
60 % 540 W
40 % 360 W
20 % 180 W
ROTISSERIE
CONVECTION RACK
(LOW RACK)
Press Micro two times.
It will show 720 .
Turn Time/Weight dial until display shows “5:30”.
Press START/Add 30 secs.
When cooking you can increase or decrease cooking time by turning
Time/Weight dial.
9

Micro Power
Level
Your microwave oven is equipped with 5 power levels to give you maximum flexibility and control
over cooking.
The table below shows the examples of food and their recommended cooking power levels for use
with this microwave oven.
POWER LEVEL USE
HIGH
MEDIUM HIGH
MEDIUM
MEDIUM LOW
LOW
* Boil Water
* Brown minced beef
* Cook poultry pieces, fish, vegetables
* Cook tender cuts of meat
* All reheating
* Roast meat and poultry
* Cook mushrooms and shellfish
* Cook foods containing cheese and eggs
* Bake cakes and scones
* Prepare eggs
* Cook custard
* Prepare rice, soup
* All thawing
* Melt butter and chocolate
* Cook less tender cuts of meat
* Soften butter & cheese
* Soften ice cream
* Raise yeast-based dough
POWER LEVEL (%)
100 % 900 W
80 % 720 W
60 % 540 W
40 % 360 W
20 % 180 W
POWER OUTPUT
10

In the following example I will show you how to use the grill to cook some food for 12 minutes and 30 seconds.
Press STOP/CLEAR.
Grill
Cooking
This model is fitted with a QUARTZ
GRILL, so preheating is not needed.
This feature will allow you to brown and
crisp food quickly.
The Multi cook Tawa is placed between
a glass tray and a grill rack at the grill
mode.
The grill rack(high rack) must be used
during grill cooking.
Press Grill/Combi.
The following indication is displayed: “
Turn Time/Weight dial until display shows “12:30”.
Press START/Add 30 secs.
When cooking you can increase or decrease cooking time by turning
Time/Weight dial.
Be careful when removing your food because the container will be hot!
11
“
Grill Combination
Cooking
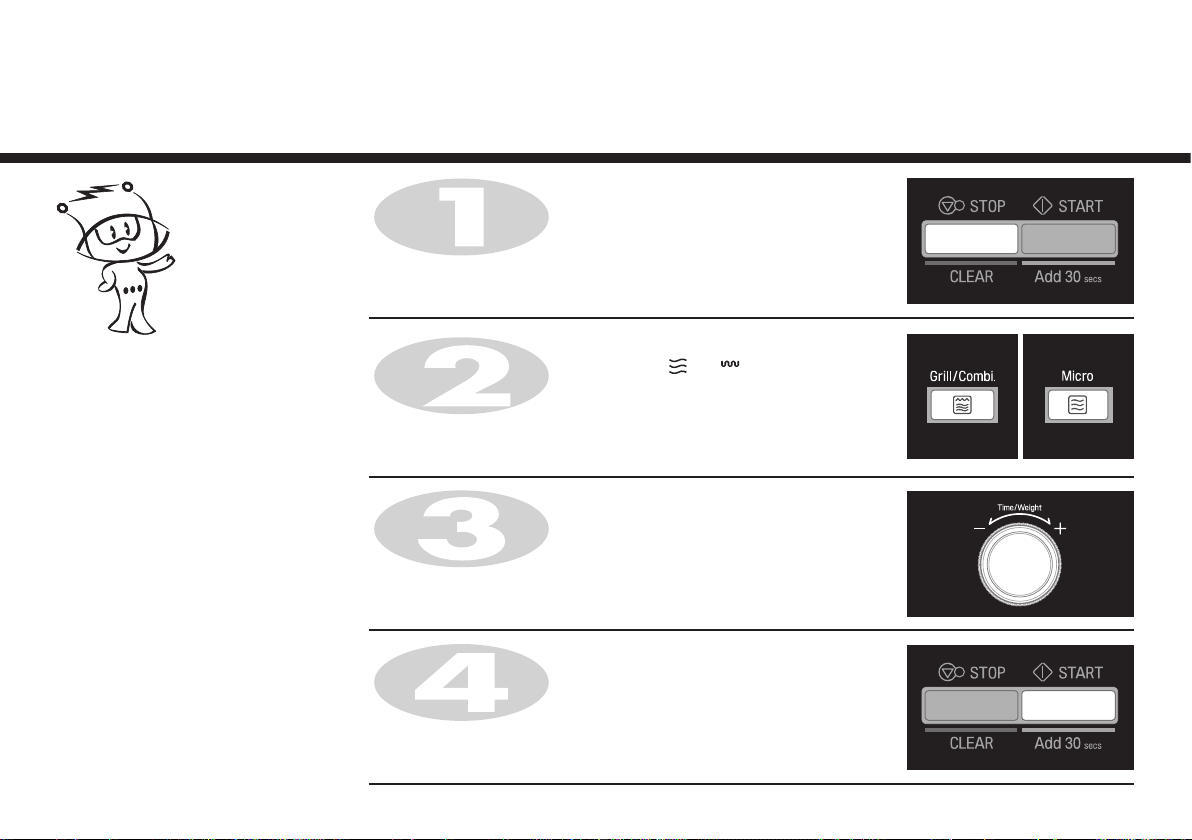
In the following example I will show you how to programme your oven with micro power 360 W
and grill for a cooking time of 25 minutes.
Press STOP/CLEAR.
Your oven has a combination cooking
feature which allows you to cook food
with heater and microwave at the same
time or alternately. This generally means
it takes less time to cook your food.
You can set three kinds of micro power
level(180 W, 270 W and 360 W) in
combi mode.
Press Grill/Combi. three times.
The following indications are displayed: “
Press Micro three times.
The following indications are displayed: "360"
Turn Time/Weight dial until display shows “25:00”.
Press START/Add 30 secs.
When cooking you can increase or decrease cooking time by turning
Time/Weight dial.
Be careful when removing your food because the container will be hot!
12
“, “ “

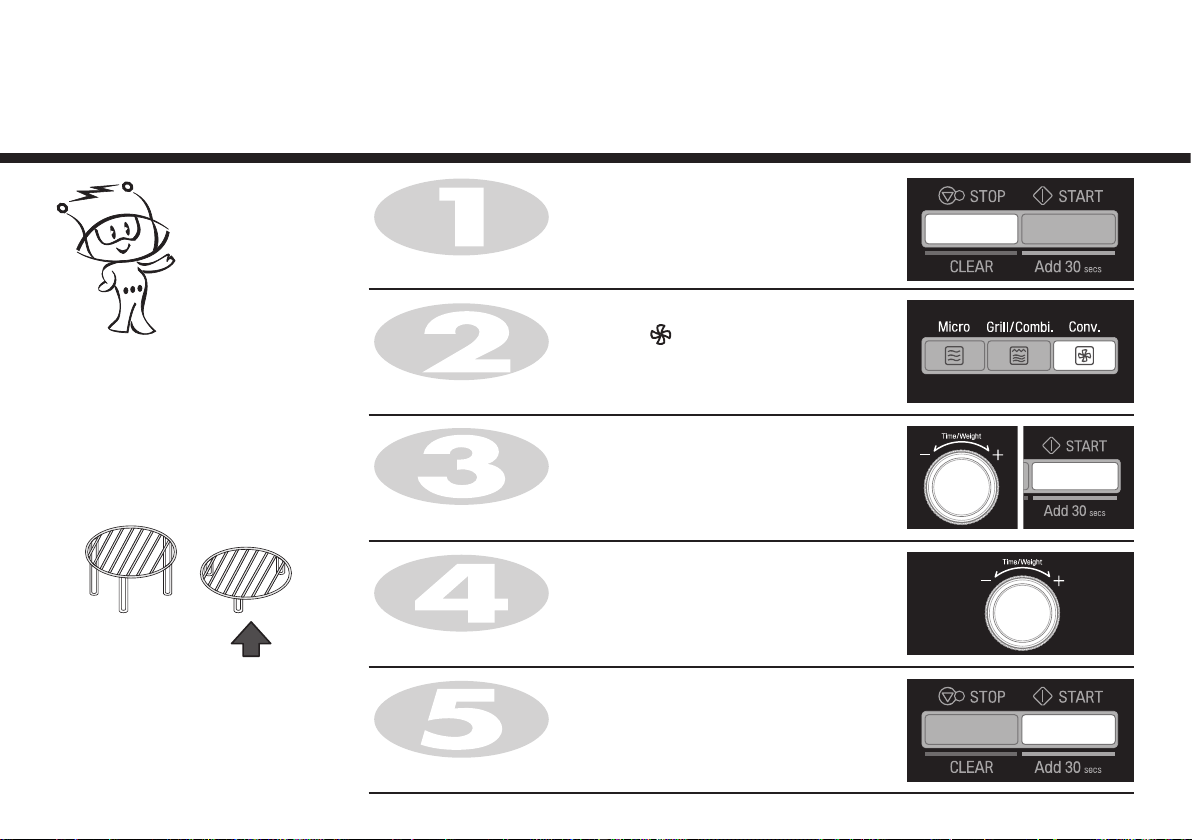
In the following example I will show you how to preheat the oven at a temperature of 230°C.
Convection
The convection oven has a temperature
range of 40°C and 100°C~230°C
(180°C is automatically available when
convection mode is selected).
The oven has a ferment function at the
oven temperature of 40°C. You may wait
until the oven is cool because you cannot
use a ferment function if the oven
temperature is over 40°C.
Your oven will take a few minutes to reach
the selected temperature.
Once it has reached correct temperature,
your oven will BEEP to let you know that it
has reached the correct temperature.
Then place your food in your oven: then
tell your oven to start cooking.
Press STOP/CLEAR.
Press Conv.
The following indication is displayed: “
Turn Time/Weight dial until display shows “230°C”.
Press START/Add 30 secs for temperature confirmation.
Press START/Add 30 secs.
Preheating will be started with displaying “Pr-H”.
“
Preheat
13
Convection
Cooking
If you do not set a temperature your
oven will automatically select 180°C,
the cooking temperature can be
changed by turning DIAL.
The convection rack(low rack) must be
used during convection cooking.
In the following example I will show you how to preheat the oven first, then cook some food at a
temperature of 230°C for 50 minutes.
Press STOP/CLEAR.
Press Conv.
The following indication is displayed: “
Turn Time/Weight dial until display shows “230°C”.
Press START/Add 30 secs for temperature confirmation.
Turn Time/Weight dial until display shows “50:00”.
“
Press START/Add 30 secs.
When cooking you can increase or decrease cooking time by turning
Time/Weight dial.
Be careful when removing your food because the container will be hot!
14
In the following example I will show you how to programme your oven with micro
power 270 W and at a convection temperature 200°C for a cooking time of 25
minutes.
Press STOP/CLEAR.
Press Grill/Combi. two times.
You can set three kinds of micro power
level(180 W, 270 W and 360 W) in
combi mode.
The following indications are displayed: “
Press Conv.
The following indications are displayed: “
Turn Time/Weight dial until display shows “200°C”.
Press Micro two times.
The following indications are displayed: "270"
Turn Time/Weight dial until display shows “25:00”.
Convection Combination
Cooking
“, “ “
“, “ “
Press START/Add 30 secs.
When cooking you can increase or decrease cooking time by turning
Time/Weight dial.
Be careful when removing your food because the container will be hot!
15

Various Cook
Functions
Please follow the given steps to operate cook functions (Indian Rasoi, Nutri Care, 24 Hours, Baker’s Basket, Just 4 U, Utility Corner) in your Microwave.
Cook Functions Indian Rasoi Nutri Care 24 Hours Baker’s Basket Just 4 U Utility corner
STEP-1 Press STOP/CLEAR Press STOP/CLEAR Press STOP/CLEAR Press STOP/CLEAR Press STOP/CLEAR Press STOP/CLEAR
STEP-2 Press Indian Rasoi Press Nutri Care Press 24 Hours Press Baker’s Basket Press Just 4 U Press Utility corner
STEP-3 Press the button dial
to select any of IC,
SC, rd, tS menu
(IC1-17), (SC1-8),
(rd1~5), (tS1~7)
STEP-4 Turn Dial to set
Weight
STEP-5 Press START / Add
30 secs
Press the button dial
to select any of St,
HP, So, Co, SA
menu (St1~8), (HP1-
8), (So1~7), (Co1
-6), (SA1-4)
Turn Dial to set
Weight
Press START/ Add
30 secs
Press the button dial
to select any of bF,
Sn, CF menu
(bF1~7), (Sn1~8),
(CF1-7)
Turn Dial to set
Weight
Press START / Add
30 secs
16
Press the button dial
to select bt menu
(bt1~12)
Turn Dial to set
Weight
Press START / Add
30 secs
Press the button dial
to select any of SF,
bb, oC, HF menu
(SF1-4), (bb1~4),
(oC1 ~4), (HF1-4)
Turn Dial to set
Weight
Press START / Add
30 secs
Press the button dial
to select any of UC,
bC, FE, menu (UC1-
6), (bC1), (FE1-4)
Turn Dial to set
Weight
Press START / Add
30 secs
In the following example I will show you how to cook 0.5 kg Dum Aloo.
Press STOP/CLEAR.
Press Indian Rasoi.
Indian Rasoi menus are programmed.
Indian Rasoi cook allows you to cook
most of your favourite food by selecting
the food type and the weight of the
food.
Turn Time/Weight dial until display shows “IC5” (DUM ALOO).
Press START/Add 30 secs.
Turn Time/Weight dial until display shows “0.5 kg”.
Indian
Rasoi
Press START/Add 30 secs.
When cooking you can increase or decrease cooking time by turning
Time/Weight dial.
17
Nutri
Care
Nutri Care cook menus are programmed.
Nutri Care cook allows you to cook most
of your favourite food by selecting the
food type and the weight of the food.
In the following example I will show you how to cook 0.3 kg Lemon Chicken.
Press STOP/CLEAR.
Press Nutri Care.
Turn Time/Weight dial until display shows “HP3” (LEMON CHICKEN).
Press START/Add 30 secs.
Turn Time/Weight dial until display shows “0.3 kg”.
Press START/Add 30 secs.
When cooking you can increase or decrease cooking time by turning
Time/Weight dial.
18

In the following example I will show you how to cook 0.3 kg Peanuts.
Press STOP/CLEAR.
Press 24 Hours.
24 Hours cook menus are programmed.
24 Hours cook allows you to cook most
of your favourite food by selecting the
food type and the weight of the food.
Turn Time/Weight dial until display shows “Sn3” (PEANUTS).
Press START/Add 30 secs.
Turn Time/Weight dial until display shows “0.3 kg”.
24
Hours
Press START/Add 30 secs.
When cooking you can increase or decrease cooking time by turning
Time/Weight dial.
19

Baker’s
Basket
Baker's Basket cook menus are
programmed.
Baker's Basket cook allows you to cook
most of your favourite food by selecting
the food type and the weight of the
food.
In the following example I will show you how to cook 0.2 kg Patties.
Press STOP/CLEAR.
Press Baker's Basket.
Turn Time/Weight dial until display shows “bt3” (PATTIES).
Press START/Add 30 secs.
Turn Time/Weight dial until display shows “0.2 kg”.
Press START/Add 30 secs.
When cooking you can increase or decrease cooking time by turning
Time/Weight dial.
20

In the following example I will show you how to cook 0.3 kg Hakka Noodles.
Press STOP/CLEAR.
Press Just 4 U.
Just 4 U menus are programmed.
Just 4 U cook allows you to cook most of
your favourite food by selecting the food
type and the weight of the food.
Turn Time/Weight dial until display shows “oC2” (HAKKA NOODLES).
Press START/Add 30 secs.
Turn Time/Weight dial until display shows “0.3 kg”.
Just
4 U
Press START/Add 30 secs.
When cooking you can increase or decrease cooking time by turning
Time/Weight dial.
21

Utility
Corner
Utility Corner menus are programmed.
Utility Corner cook allows you to cook
most of your favourite food by selecting
the food type and the weight of the
food.
In the following example I will show you how to cook 0.5 kg Masala Paneer.
Press STOP/CLEAR.
Press Utility Corner.
Turn Time/Weight dial until display shows “FE3” (MASALA PANEER).
Press START/Add 30 secs.
Turn Time/Weight dial until display shows “0.5 kg”.
Press START/Add 30 secs.
When cooking you can increase or decrease cooking time by turning
Time/Weight dial.
22

Never operate the oven at combination mode with rotisserie bar (without food). Do not use rotisserie bar
in micro mode.
Position the food on the spit, ensuring that the rotisserie bar runs centrally through the food. And tie the food
with thread to the bar if necessary.
Insert the end of the rotisserie bar (C) into the rotisserie jaw (A) on the left hand of the oven wall. Push it to
the left, rotating the rotisserie bar slightly until the rotisserie-bar fits into the rotisserie jaw (A).
Support the other end of the rotisserie bar (D) on the hollow of the rotisserie holder (B).
Rotisserie
Installation
23
Rotisserie-Jaw
Rotisserie-Holder

Important safety instructions
Read carefully and keep for future reference
WARNING
Please ensure cooking times are correctly
set as over cooking may result in FIRE and
subsequent DAMAGE to the OVEN.
1 Do not attempt to tamper with, or make any adjustments or repairs to the
door, control panel, safety interlock switches or any other part of the oven.
It is hazardous for anyone to carry out any service or repair operation
which involves the removal of any cover which gives protection against
exposure to microwave energy. Repairs should only be undertaken by a
qualified service technician.
2 Do not operate the oven when empty. It is best to leave a glass of water
in the oven when not in use. The water will safely absorb all microwave
energy, if the oven is accidentally started.
3 Do not use the oven for the purpose of dehumidification. It can be the cause
of serious damage of safety. (ex. Operating the microwave oven with the
wet newspapers, clothes, toys, pet or portable electric devices, etc.)
4 Do not cook food wrapped in paper towels, unless your cook book contains
instructions, for the food you are cooking.
5 Do not use newspaper in place of paper towels for cooking.
6 Do not use wooden containers. They may heat-up and char. Do not use
ceramic containers which have metallic (e.g. gold or silver) inlays. Always
remove metal twist ties. Metal objects in the oven may arc, which can cause
serious damage.
7 Do not operate the oven with a kitchen towel, a napkin or any other
obstruction between the door and the front edges of the oven, which may
cause microwave energy leakage.
8 Do not use recycled paper products since they may contain impurities which
may cause sparks and/or fires when used in cooking.
9 Do not rinse the turntable by placing it in water just after cooking. This may
cause breakage or damage.
10 Small amounts of food require shorter cooking or heating time. If normal
times are allowed they may overheat and burn.
11 Be certain to place the oven so the front of the door is 8 cm or more
behind the edge of the surface on which it is placed, to avoid accidental
tipping of the appliance.
24
12 Before cooking, pierce the skin of potatoes, apples or any such fruit or
vegetable.
13 Do not cook eggs in their shell. Pressure will build up inside the egg which
will burst.
14 Do not attempt deep fat frying in your oven.
15 Remove the plastic wrapping from food before cooking or defrosting.
Note though that in some cases food should be covered with plastic film,
for heating or cooking.
16 If the oven door or door seals are damaged, the oven must not be
operated until it has been repaired by a qualified service technician.
17 If smoke is observed, switch off or disconnect the oven from the power
supply and keep the oven door closed in order to stifle any flames.
18 When food is heated or cooked in disposable containers of plastic, paper
or other combustible materials, check the oven frequently due to the
possibility of the food container is deteriorating.
19 Only allow children to use the oven without supervision when adequate
instructions have been given so that the child is able to use the oven in a
safe way and understands the hazards of improper use.
20 Liquids or other foods must not be heated in sealed containers since they
are liable to explode.
21 Do not operate the oven, if the door seals and adjacent parts of the
microwave oven are faulty, until the oven has been repaired by a qualified
service technician.
22 Check the utensils are suitable for use in microwave ovens before use.
23 Do not touch the oven door, outer cabinet, rear cabinet, oven cavity,
accessories and dishes during grill mode, convection mode and auto cook
operations, unless wearing thick oven gloves, as they will become hot.
Before clearing make sure they are not hot.

Important safety instructions
Read carefully and keep for future reference
24 Only use utensils that are suitable for use in microwave ovens.
25 When heating food in plastic or paper containers, keep an eye on the
oven due to the possibility of ignition.
26 If smoke is observed, switch off or unplug the appliance and keep the door
closed in order to stifle any flames.
27 Microwave heating of beverages can result in delayed eruptive boiling,
therefore care must be taken when handing the container.
28 The contents of feeding bottles and baby food jars shall be stirred or
shaken and the temperature checked before consumption, in order to
avoid burns.
29 Eggs in their shell and whole hard-boiled eggs should not be heated in
microwave ovens since they may explode, even after microwave heating
has ended.
30 Details for cleaning door seals, cavities and adjacent parts.
31 The oven should be cleaned regularly and any food deposits removed.
32 Failure to maintain the oven in a clean condition could lead to
deterioration of the surface that could adversely affect the life of the
appliance and possibly result in a hazardous situation.
33 Only use the temperature probe recommended for this oven (for
appliances having a facility to use a temperature-sensing probe).
34 If heating elements are provided, during use the appliance becomes hot.
Care should be taken to avoid touching heating elements inside the oven.
35 The appliance is not intended for use by young children or infirm
persons without supervision.
36 The microwave oven must be operated with the decorative door open.
37 This connection may be achieved by having the plug accessible or by
incorporation a switch in the fixed wiring in accordance with the wiring
rules.
38 Do not use harsh abrasive cleaners or sharp metal scrapers to clean the
oven door glass since they can scratch the surface, which may result in
shattering of the glass.
WARNING: If the door or door seals are damaged, the oven
must not be operated until it has been repaired by a
competent person.
WARNING: It is hazardous for anyone other than a competent
person to carry out any service or repair operation that
involves the removal of a cover which gives protection
against exposure to microwave energy.
WARNING: Liquids and other foods must not be heated in sealed
containers since they are liable to explode.
WARNING: Only allow children to use the oven without supervision
when adequate instructions have been given so that
the child is able to use the oven in a safe way and
understands the hazards of improper use.
WARNING: Accessible parts may become hot during use. Young
children should be kept away.
WARNING: This appliance is not intended for use by persons
(including children) with reduced physical, sensory
or mental capabilities, or lack of experience and
knowledge, unless they have been given supervision
or instruction concerning use of the appliance by a
person responsible for their safety.
25

Microwave-safe
Utensils
Never use metal or metal trimmed utensils in using microwave function
Microwaves cannot penetrate metal. They will bounce off any metal object in the
oven and cause arcing, an alarming phenomenon that resembles lightning. Most
heat resistant non metallic cooking utensils are safe for use in your oven. However,
some may contain materials that render them unsuitable as microwave cookware.
If you have any doubts about a particular utensil, there’s a simple way to find out if
it can be used in using microwave function.
Place the utensil in question next to a glass bowl filled with water in using
microwave function. Microwave at power HIGH for 1 minute. If the water heats up
but the utensil remains cool to the touch, the utensil is microwave~safe. However, if
the water does not change temperature but the utensil becomes warm, microwaves
are being absorbed by the utensil and it is not safe for use in using microwave
function. You probably have many items on hand in your kitchen right now that
can be used as cooking equipment in using microwave function. Just read through
the following checklist.
Dinner plates
Many kinds of dinner-ware are microwave-safe. If in doubt consult the
manufacturer’s literature or perform the microwave test.
Glassware
Glassware that is heat-resistant is microwave-safe. This would include all brands of
oven tempered glass cookware. However, do not use delicate glassware, such as
tumblers or wine glasses, as these might shatter as the food warms.
Plastic storage containers
These can be used to hold foods that are to be quickly reheated. However, they
should not be used to hold foods that will need considerable time in the oven as
hot foods will eventually warp or melt plastic containers.
Paper
Paper plates and containers are convenient and safe to use in using microwave
function, provided that the cooking time is short and foods to be cooked are low
in fat and moisture. Paper towels are also very useful for wrapping foods and for
lining baking trays in which greasy foods such as bacon are cooked. In general,
avoid coloured paper products as the colour may run. Some recycled paper
products may contain impurities which could cause arcing or fires when used in
using microwave function.
Plastic cooking bags
Provided they are made specially for cooking, cooking bags are microwave safe.
However, be sure to make a slit in the bag so that steam can escape. Never use
ordinary plastic bags for cooking in using microwave function, as they will melt
and rupture.
Plastic microwave cookware
A variety of shapes and sizes of microwave cookware are available. For the most
part, you can probably use items you already have on hand rather than investing
in new kitchen equipment.
Pottery, stoneware and ceramic
Containers made of these materials are usually fine for use in using microwave
function, but they should be tested to be sure.
CAUTION
Some items with high lead or iron content are not suitable for cooking
utensils.
Utensils should be checked to ensure that they are suitable for use in
using microwave function.
26

Food characteristics &
Microwave cooking
Keeping an eye on things
The recipes in the book have been formulated with great care, but your success in
preparing them depends on how much attention you pay to the food as it cooks.
Always watch your food while it cooks. Your microwave function is equipped with a
light that turns on automatically when the oven is in operation so that you can see
inside and check the progress of your food. Directions given in recipes to elevate,
stir, and the like should be thought of as the minimum steps recommended. If the
food seems to be cooking unevenly, simply make the necessary adjustments you
think appropriate to correct the problem.
Factors affecting microwave cooking times
Many factors affect cooking times. The temperature of ingredients used in a recipe
makes a big difference in cooking times. For example, a cake made with ice-cold
butter, milk, and eggs will take considerably longer to bake than one made with
ingredients that are at room temperature. All of the recipes in this book give a range
of cooking times. In general, you will find that the food remains undercooked at the
lower end of the time range, and you may sometimes want to cook your food
beyond the maximum time given, according to personal preference. The governing
philosophy of this book is that it is best for a recipe to be conservative in giving
cooking times. While overcooked food is ruined for good. Some of the recipes,
particularly those for bread, cake, and custards, recommend that food be removed
from the oven when they are slightly undercooked. This is not a mistake.
When allowed to stand, usually covered, these foods will continue to cook outside
of the oven as the heat trapped within the outer portions of the food gradually
travels inward. If the food is left in the oven until it is cooked all the way through,
the outer portions will become overcooked or even burnt. You will become
increasingly skilful in estimating both cooking and standing times for various foods.
Density of food
Light, porous food such as cakes and breads cook more quickly than heavy, dense
foods such as roasts and casseroles. You must take care when microwaving porous
food that the outer edges do not become dry and brittle.
Height of food
The upper portion of tall food, particularly roasts, will cook more quickly than the
lower portion. Therefore, it is wise to turn tall food during cooking, sometimes
several times.
Moisture content of food
Since the heat generated from microwaves tends to evaporate moisture, relatively
dry food such as roasts and some vegetables should either be sprinkled with water
prior to cooking or covered to retain moisture.
Bone and fat content of food
Bones conduct heat and fat cooks more quickly than meat. Care must be taken
when cooking bony or fatty cuts of meat that they do not cook unevenly and do not
become overcooked.
Quantity of food
The number of microwaves in your oven remains constant regardless of how much
food is being cooked. Therefore, the more food you place in the oven, the longer
the cooking time.
Remember to decrease cooking times by at least one third when halving a recipe.
Shape of food
Microwaves penetrate only about 2.cm into food, the interior portion of thick foods
are cooked as the heat generated on the outside travels inward. Only the outer
edge of food in cooked by microwave energy; the rest is cooked by conduction.
The worst possible shape for a food that is to be microwaved is a thick square. The
corners will burn long before the centre is even warm . Round thin foods and ring
shaped foods cook successfully in the microwave.
Covering
A cover traps heat and steam which causes food to cook more quickly. Use a lid or
microwave cling film with a corner folded back to prevent splitting.
Browning
Meats and poultry that are cooked fifteen minutes or longer will brown lightly in
their own fat. Food that are cooked for a shorter period of time may be brushed
with a browning sauce such as worcestershire sauce, soy sauce or barbecue sauce
to achieve an appetizing colour. Since relatively small amounts of browning sauces
are added to food the original flavour of the recipe is not altered.
Covering with greaseproof paper
Greaseproofing effectively prevents spattering and helps food retain some heat. But
because it makes a looser cover than a lid or clingfilm, it allows the food to dry out slightly.
Arranging and spacing
Individual foods such as baked potatoes, small cakes and hors d’oeuvres will heat
more evenly if placed in the oven an equal distance apart, preferably in a circular
pattern. Never stack foods on top of one another.
27

Food characteristics &
Microwave cooking
Stirring
Stirring is one of the most important of all microwaving techniques. In conventional
cooking, food is stirred for the purpose of blending. Microwaved food, however, is
stirred in order to spread and redistribute heat. Always stir from the outside towards
the centre as the outside of the food heats first.
Turning over
Large, tall foods such as roasts and whole chickens should be turned so that the top
and bottom will cook evenly. It is also a good idea to turn cut up chicken and chops.
Placing thicker portions facing outwards
Since microwaves are attracted to the outside portion of food, it makes sense to place
thicker portions of meat, poultry and fish to the outer edge of the baking dish. This way,
thicker portions will receive the most microwave energy and the food will cook evenly.
Shielding
Strips of aluminium foil (which block microwaves) can be placed over the corners or
edges of square and rectangular foods to prevent those portions from overcooking.
Never use too much foil and make sure the foil is secured to the dish or it may cause
‘arcing’ in the oven.
Elevating
Thick or dense foods can be elevated so that microwaves can be absorbed by the
underside and centre of the foods.
Piercing
Foods enclosed in a shell, skin or membrane are likely to burst in the oven unless they
are pierced prior to cooking. Such foods include yolks and whites of eggs, clams and
oysters and whole vegetables and fruits.
Testing if cooked
Food cooks so quickly in a oven, it is necessary to test it frequently. Some foods are left
in the microwave until completely cooked, but most foods, including meats and poultry,
are removed from the oven while still slightly undercooked and allowed to finish
cooking during standing time. The internal temperature of foods will rise between 5°F
(3°C) and 15°F (8°C) during standing time.
Standing time
Foods are often allowed to stand for 3 to 10 minutes after being removed from the oven.
Usually the foods are covered during standing time to retain heat unless they are
supposed to be dry in texture (some cakes and biscuits, for example). Standing allows
foods to finish cooking and also helps flavour blend and develop.
28
To Clean Your Oven
1. Keep the inside of the oven clean
Food spatters or spilled liquids stick to oven walls and between seal and
door surface. It is best to wipe up spillovers with a damp cloth right away.
Crumbs and spillovers will absorb microwave energy and lengthen cooking
times. Use a damp cloth to wipe out crumbs that fall between the door and
the frame. It is important to keep this area clean to assure a tight seal.
Remove greasy spatters with a soapy cloth then rinse and dry. Do not use
harsh detergent or abrasive cleaners. The Metal tray can be washed by hand
or in the dishwasher.
2. Keep the outside of the oven clean
Clean the outside of your oven with soap and water then with clean water
and dry with a soft cloth or paper towel. To prevent damage to the operating
parts inside the oven, the water should not be allowed to seep into the
ventilation openings. To clean control panel, open the door to prevent oven
from accidentally starting, and wipe a damp cloth followed immediately by a
dry cloth. Press Stop/Clear after cleaning.
3. If steam accumulates inside or around the outside of the oven door, wipe the
panels with a soft cloth. This may occur when the oven is operated under high
humidity conditions and in no way indicates a malfunction of the unit.
4. The door and door seals should be kept clean. Use only warm, soapy water,
rinse then dry thoroughly.
DO NOT USE ABRASIVE MATERIALS, SUCH AS CLEANING POWDERS OR
STEEL AND PLASTIC PADS.
Metal parts will be easier to maintain if wiped frequently with a damp cloth.
5. Do not use any steam cleaner.
6. Unplug your oven from the electrical socket when you clean control panel
with wet cloth or spray water on control glass to clean. If it’s not, this product
can be operated by touching Quick Start button.

Questions &
Answers
Q What’s wrong when the oven light will not glow?
A There may be several reasons why the oven light will not glow.
Light bulb has blown.
Door is not closed
Q Does microwave energy pass through the viewing screen in the door?
A No. The holes, or ports, are made to allow light to pass; they do not let
microwave energy through.
Q Why does the beep tone sound when a pad on the Control Panel is
touched?
A The beep tone sounds to assure that the setting is being properly
entered.
Q Will the microwave oven be damaged if it operates empty?
A Yes Never run it empty or without the glass tray.
Q Why do eggs sometimes pop?
A When baking, frying, or poaching eggs, the yolk may pop due to
steam build up inside the yolk membrane. To prevent this, simply pierce
the yolk before cooking. Never microwave eggs in the shell.
Q Why is standing time recommended after microwave cooking is over?
A After microwave cooking is finished, food keeps on cooking during
standing time. This standing time finishes cooking evenly throughout the
food. The amount of standing time depends on the density of the food.
Q Is it possible to pop corn in a microwave oven?
A Yes, if using one of the two methods described below
1. Popcorn-popping utensils designed specifically for microwave
cooking.
2. Prepackaged commercial microwave popcorn that contains specific
times and power outputs needed for an acceptable final product.
FOLLOW EXACT DIRECTIONS GIVEN BY EACH MANUFACTURER FOR
THEIR POPCORN PRODUCT. DO NOT LEAVE THE OVEN UNATTENDED
WHILE THE CORN IS BEING POPPED. IF CORN FAILS TO POP AFTER
THE SUGGESTED TIMES, DISCONTINUE COOKING. OVERCOOKING
COULD RESULT IN THE CORN CATCHING FIRE.
CAUTION
NEVER USE A BROWN PAPER BAG FOR POPPING CORN. NEVER
ATTEMPT TO POP LEFTOVER KERNELS.
Q Why doesn’t my oven always cook as fast as the cooking guide says?
A Check your cooking guide again to make sure you’ve followed
directions correctly, and to see what might cause variations in cooking
time. Cooking guide times and heat settings are suggestions, chosen
to help prevent overcooking, the most common problem in getting
used to a microwave oven. Variations in the size, shape, weight and
dimensions of the food require longer cooking time. Use your own
judgement along with the cooking guide suggestions to test food
condition, lust as you would do with a conventional cooker.
Q Why is the Cooling fan operated after some cooking?
Is the oven wrong?
A When the oven inside is hot, the cooling fan is automatically operating
to cool down the oven for short time. This is not fault.
29

Plug wiring information/
Technical Specifications
WARNING
This appliance must be earthed
The wires in this mains lead are colored in accordance with the
following codes
BLUE ~ Neutral
BROWN ~ Live
GREEN & YELLOW ~ Earth
As the colours of the wires in the mains lead of this appliance may
not correspond with the coloured markings identifying the terminals
in your plug proceed as follows:
The wire which is colored BLUE must be connected to the terminal
which is marked with the letter N or Colored BLACK.
The wire which is colored BROWN must be connected to the
terminal which is marked with the letter L or colored RED.
The wire which is colored GREEN & YELLOW or GREEN must be
connected to the terminal which is marked with the letter E or
If the supply cord is damaged, it must be replaced by the
manufacturer or its service agent or a similarly qualified person in
order to avoid a hazard;
.
Technical Specification
MC2881SUS
Power Input 230 V~ 50 Hz
Output 900 W (IEC60705 rating standard)
Microwave Frequency 2450 MHz
Outside Dimension 510 mm(W) X 305 mm(H) X 495 mm(D)
Power Consumption
Microwave 1350 watts
Grill 1100 watts
Combination max. 3100 watts
Convection 750 watts (max. 1900 watts)
30

مﺪﺨﺘﺴﳌا ﻞﻴﻟد
ﻲﻌﻤﺠﻟا نﺮﻔﻟا/ﺔﯾاﻮﺸﻟا/ﻒﯾووﺮﻜﯾﺎﻤﻟا نﺮﻓ
MC2881SUS
www.lg.com
P/No.: MFL63289512 (00)

.طﺮﻔﻤﻟا ﻒﯾووﺮﻜﯾﺎﻤﻟا ﺔﻗﺎﻄﻟ ضﺮﻌﺘﻟا ﺔﯿﻟﺎﻤﺘﺣا ﺐﻨﺠﺘﻟ ﺔﯾﺎﻗﻮﻟا
ﺔﻳﺎﻗﻮﻟا
نﺮﻓ ﻲﻓ تﺎﺑوﺮﺸﻤﻟاو ﺔﺑرﻮﺸﻟاو ءﺎﺴﺤﻟﺎﻛ ﻞﺋاﻮﺴﻟا ﻦﯿﺨﺴﺗ ﺪﻨﻋ
ﺔﺟرد قﻮﻓ ﻞﺋاﻮﺴﻟا هﺬﮬ ﻦﯿﺨﺴﺗ ةدﺎﯾز ﺎﻧﺎﯿﺣا ثﺪﺤﯾ ﺪﻗ ﻒﯾووﺮﻜﯾﺎﻤﻟا
ﻞﺋﺎﺴﻟا بﺎﻜﺴﻧا ﻰﻟا يدﺆﯾ ﺪﻗ اﺬﮬ .ﻊﯿﻗﺎﻘﻔﻟا ةﺪﮬﺎﺸﻣ نود نﺎﯿﻠﻐﻟا
ﺔﯿﻟﺎﺘﻟا تاﻮﻄﺨﻟا ﻊﺒﺗا ﻚﻟاذ ثوﺪﺣ ﺐﻨﺠﺘﻟ .ءﺎﻋﻮﻟا ﻦﻣ
:
.ﺔﻘﯿﺿ ﺔﯿﻗﺮﺑ فاﺮﻃﻷا ﺔﻤﯿﻘﺘﺴﻣ ﻲﻧاوأ ماﺪﺨﺘﺳا ﺐﻨﺠﺗ .١
.ﺔﻠﯾﻮﻃ ةﺮﺘﻓ ﺎﻬﻨﺨﺴﺗ ﻻ .٢
ﺪﻨﻋ ىﺮﺧأ ةﺮﻣ ﺎﻬﻛﺮﺣو نﺮﻔﻟا ﻲﻓ ءﺎﻧﻷا ﻊﺿو ﻞﺒﻗ ﻞﺋاﻮﺴﻟا كّﺮﺣ .٣
.ﻦﯿﺨﺴﺘﻟا ةﺮﺘﻓ ﻒﺼﺘﻨﻣ
ىﺮﺧا ةﺮﻣ ﻪﻛّﺮﺣ ﻢﺛ نﺮﻔﻟا ﻲﻓ ﻼﯿﻠﻗ دﺮﺒﯾ ﻪﻋد ﻦﯿﺨﺴﺘﻟا ﺪﻌﺑ .٤
تﺎﺟﺎﺟز ﺔﺻﺎﺧ) ﺔﻌﺴﻟا ﺐﻨﺠﺘﻟ ﻞﻛﻷا ﻞﺒﻗ ةراﺮﺣ ﺔﺟرد ﺺﺤﻓاو
.(لﺎﻔﻃﻷا ﺔﯾﺬﻏأ تﺎﺒﻃﺮﻣو ﺔﻋﺎﺿﺮﻟا
.ءﺎﻋﻮﻟا لوﺎﻨﺗ ﺪﻨﻋ ﺔﯾﺎﻨﻋ ﺬﺧ
نﺮﻔﻟا ﻞﺧاد ﻼﯿﻠﻗ دﺮﺒﯾ مﺎﻌﻄﻟا كﺮﺗا ﺎﻤﺋاد
ﻞﺒﻗ ﺔﺗراﺮﺣ ﺔﺟرد ﺺﺤﻓاو ﻪﺨﺒﻃ ﺪﻌﺑ
ﺔﻋﺎﺿﺮﻟا تﺎﺟﺎﺟز تﺎﯾﻮﺘﺤﻣ ﺔﺻﺎﺧ ﻪﻛﻼﻬﺘﺳا
.لﺎﻔﻃﻷا ﺔﯾﺬﻏأ تﺎﺗﺎﺒﻃﺮﻣو
نﺎﻣأ ﻞﻔﻗ دﻮﺟو ﺐﺒﺴﺑ ﺎﺣﻮﺘﻔﻣ بﺎﺒﻟاو نﺮﻔﻟا ﻞﯿﻐﺸﺗ ﻚﻨﻜﻤﯾ ﻻ
نﺮﻔﻟا ﻞﻤﻋ ﻒﻗﻮﯾ ﻲﻜﺑﺎﺸﺘﻟا نﺎﻣأ ﻞﻔﻗ .بﺎﺒﻟا مﺎﻈﻧ ﻲﻓ ﻲﻜﺑﺎﺸﺗ
ﻞﻔﻘﺑ ﺐﻋﻼﺘﻟا مﺪﻋ ﺐﺠﯾ ﻚﻟﺬﻟ .بﺎﺒﻟا ﺢﺘﻓ ﻦﻋ ﺎﯿﺋﺎﻘﻠﺗ ﺦﺒﻄﻟا ﺔﯿﻠﻤﻋو
نﺮﻓ ﻦﻋ ﺔﺠﺗﺎﻨﻟا ﺔﻗﺎﻄﻠﻟ يذﺆﻣ ضﺮﻌﺗ ﺞﺘﻨﯾ ﻻ ﻰﺘﺣ ﻲﻜﺑﺎﺸﺘﻟا نﺎﻣأ
.ﻒﯾووﺮﻛﺎﻤﻟا
.ﻲﻜﺑﺎﺸﺘﻟا نﺎﻣأ ﻞﻔﻘﺑ ﺚﺒﻌﻟا مﺪﻋ ﻢﻬﻤﻟا ﻦﻣ
داﻮﻣ ﺎﯾﺎﻘﺒﻟ ﺢﻤﺴﺗ ﻻ ﻚﻟﺬﻛ بﺎﺒﻟاو نﺮﻔﻟا ﺔﻣﺪﻘﻣ ﻦﯿﺑ ةدﺎﻣ يأ ﻊﻀﺗ ﻻ
.نﺮﻔﻟا بﺎﺑ قﻼﻏإ ﺢﻄﺳ ﺪﻨﻋ ﻢﻛاﺮﺘﻟﺎﺑ مﺎﻌﻄﻟا وأ ﻒﯿﻈﻨﺘﻟا
ﻖﻠﻐﺘﯾ نأ يروﺮﻀﻟا ﻦﻣو .ﻼﻄﻌﺘﻣ وأ ﺎﻔﻟﺎﺗ نﺎﻛ اذا نﺮﻔﻟا ﻞﻐﺸﺗ ﻻ
،(يﻮﻠﻟا) بﺎﺒﻟا (١) :ﻞﻠﺧ وأ ﻒﻠﺗ يأ ﺪﺟﻮﯾ ﻻو مﺎﺗ مﺎﻜﺣﺎﺑ نﺮﻔﻟا بﺎﺑ
بﺎﺒﻟا مﺎﺘﺧأ (٣) ،(كﻮﻜﻔﻣ وأ رﻮﺴﻜﻣ) جﻻﺰﻤﻟاو تﻼﺼﻔﻤﻟا (٢)
(
.ﺎﻬﺤﻄﺳأو
.ﺺﺼﺨﻣ ﻲﻨﻓ ﺮﯿﺒﺧ ﺔﻄﺳاﻮﺑ ﻻإ نﺮﻔﻟا ﺢﯿﻠﺼﺗ وأ ﻞﯾﺪﻌﺗ مﺪﻋ ﺐﺠﯾ
ﺮﻳﺬﲢﺮﻳﺬﲢ
اﺪﯿﺟ ﺦﺒﻄﻠﻟ دﺪﺤﻤﻟا ﺖﻗﻮﻟا ﻦﻣ ﺪﻛﺄﺘﻟا ءﺎﺟﺮﻟا
مﺎﻌﻄﻟا قاﺮﺘﺣا ﻰﻟا يدﺆﯾ ﺪﻗ ﺦﺒﻄﻟا ةدﺎﯾز نﻷ
.نﺮﻔﻟا فﻼﺗإ ﻲﻟﺎﺘﻟﺎﺑو
2

تﺎﯾﻮﺘﺤﻤﻟا
٢
��������������������������������������������������������������������������������������������������
٣
����������������������������������������������������������������������������������������������
٥-٤
����������������������������������������������������������
٦
����������������������������������������������������
٧
������������������������������������������������������������������������������������������
٨
�������������������������������������������������������������������������������������������
٩
������������������������������������������������������������������������������
۱۰
����������������������������������������������������������������������������
١۱
��������������������������������������������������������������������������������������
١٢
�����������������������������������������������������������������������
١٣
��������������������������������������������������������������������������
١٤
������������������������������������������������������������������������������
١٥
�������������������������������������������������������������������
١٦
�����������������������������������������������������������������������������
١٧
��������������������������������������������������������������������������������������
١٨
��������������������������������������������������������������������������������������
١٩
��������������������������������������������������������������������������������������������
٢۰
�������������������������������������������������������������������������������������������
٢١
��������������������������������������������������������������������������
٢٢
��������������������������������������������������������������������������������
٢٣
��������������������������������������������������������������������������������������
٢٥-٢٤
����������������
٢٦
��������������������������������������������������������������
٢٨-٢٧
��������������������������������������������
٢٩
����������������������������������������������������������������������������������������
٣۰
���������������������������������������������������������
ﻞﺒﻘﺘﺴﳌا ﻲﻓ ﺔﻌﺟاﺮﻤﻠﻟ ﺎﻬﺑ ﻆﻔﺘﺣاو ﺔﻳﺎﻨﻌﺑ ﺎﻫأﺮﻗا ﺔﻣﻼﺴﻟا ﻞﺟأ ﻦﻣ تاﺮﻳﺬﲢ
نﺮﻔﻟا ﺐﯿﻛﺮﺗو نﻮﺗﺮﻜﻟا ﻦﻣ نﺮﻔﻟا جاﺮﺧإ
ﻞﯿﻐﺸﺘﻟا ﻊﺿو ﺐﺴﺣ تﺎﻘﺤﻠﻤﻟا ماﺪﺨﺘﺳا ﺔﻘﯾﺮﻃ
لﺎﻔﻃﻻا قﻼﻏإ
ﻒﻳووﺮﻜﻳﺎﳌا ﺔﻗﺎﻄﺑ ﺦﺒﻄﻟا
ﻒﻳووﺮﻜﻳﺎﳌا ﺔﻗﺎﻃ ىﻮﺘﺴﻣ
ﺔﯾاﻮﺸﻟﺎﺑ ﺦﺒﻄﻟا
ﺔﯾاﻮﺸﻟا ﺔﻋﻮﻤﺠﻣ ﻰﻠﻋ ﻲﻬﻄﻟا
يراﺮﺤﻟا ﻞﻤﺤﻟﺎﺑ ﻦﯿﺨﺴﺘﻟا
يراﺮﳊا ﻞﻤﺤﻟﺎﺑ ﺦﺒﻄﻟا
يراﺮﺤﻟا ﻞﻤﺤﻟا ﺔﻋﻮﻤﺠﻤﺑ ﻲﻬﻄﻟا
ةدﺪﻌﺘﻤﻟا ﻲﻬﻄﻟا ﻒﺋﺎﻇو
يﺪﻨﻬﻟا يوزاﺮﻟا
ﺔﯿﺋاﺬﻐﻟا ﺔﯾﺎﻋﺮﻟا
صﻮﺼﺨﻤﻟا ﻞﻛﻷا تﺎﻔﺻو
Utility corner
ةاﻮﺸﻤﻟا ﺐﯿﻛﺮﺗ
ﻒﻳووﺮﻜﻳﺎﳌا نﺮﻔﺑ ﺔﻨﻣﻵا ﺦﺒﻄﻟا ﻲﻧاوأ
ﻒﻳووﺮﻜﻳﺎﳌا نﺮﻔﺑ ﺦﺒﻄﻟاو ﺔﻴﺋاﺬﻐﻟا داﻮﳌا ﺺﺋﺎﺼﺧ
ﺔﺑﻮﺟأو ﺔﻠﺌﺳأ
ﺔﻴﻨﻔﻟا تﺎﻔﺻاﻮﳌا/ﺲﺑﺎﻘﻟا ﻞﻴﺻﻮﺗ تﺎﻤﻴﻠﻌﺗ
ﺔﻳﺎﻗﻮﻟا
تﺎﯾﻮﺘﺤﻤﻟا
ﻊﻳﺮّﺴﻟا ءﺪﺒﻟا
ﺔﻋﺎﺳ
24
زﺎﺒﺨﻟا ﺔﻠﺳ
ﻢﺋاﻮﻗ
ﻒﯾووﺮﻜﯾﺎﻤﻟا نﺮﻓ ﻞﻤﻌﯾ ﻒﯿﻛ
نﻮﯾﺰﻔﻠﺘﻟاو ﻮﯾداﺮﻟا تﺎﺟﻮﻣ ﻞﺜﻣ ﺔﻗﺎﻄﻟا عاﻮﻧأ ﻦﻣ عﻮﻧ ﻒﯾووﺮﻜﯾﺎﻤﻟا
هﺎﺠﺗﻻا ﻲﻓ ةدﺎﻋ وﺮﻜﯾﺎﻤﻟا تﺎﺟﻮﻣ ﺮﺸﺘﻨﺗ .رﺎﻬﻨﻟا ﻲﻓ ةءﺎﺿﻹا ﺔﻌﺷأو
ناﺮﻓأ نأ ﺮﯿﻏ .اﺮﺛأ كﺮﺘﺗ نأ نود ﻮﺠﻟا ﻲﻓ ﺮﺸﺘﻨﺗو ﻲﺟرﺎﺨﻟا
ﻲﻓ ﺔﻗﺎﻄﻟا هﺬﮬ لﻼﻐﺘﺳﻻ ﻢﻤﺼﻣ نوﺮﺘﯿﻨﺟﺎﻣ ﺎﻬﯿﻓ ﻒﯾووﺮﻜﯾﺎﻤﻟا
نوﺮﺘﯿﻨﺟﺎﻤﻟا ةﺪﻋﺎﻘﻟ ﻊﻀﺨﺗ ﺎﻀﯾأ ءﺎﺑﺮﻬﻜﻟا .ﻒﯾووﺮﻜﯾﺎﻤﻟا ناﺮﻓأ
.ﻒﯾووﺮﻜﯾﺎﻤﻟا ﺔﻗﺎﻃ جﺎﺘﻧﻹ ﺔﻣﺪﺨﺘﺴﻣ
.نﺮﻔﻟا تﺎﺤﺘﻓ لﻼﺧ ﻦﻣ ﺦﺒﻄﻟا ﺔﻘﻄﻨﻣ ﻞﺧﺪﺗ وﺮﻜﯾﺎﻤﻟا تﺎﺟﻮﻣ
ﺎﻬﻨﻜﻤﯾ ﻻ وﺮﻜﯾﺎﻤﻟا تﺎﺟﻮﻣ .نﺮﻔﻟا ﻞﻔﺳأ ﻲﻓ ةدﻮﺟﻮﻣ ةراود ﺔﯿﻨﯿﺻ
جﺎﺟﺰﻟﺎﻛ ىﺮﺧﻷا داﻮﻤﻟا قﺮﺘﺨﺗ ﺎﻬﻨﻜﻟ نﺮﻔﻠﻟ ﺔﯿﻧﺪﻌﻤﻟا نارﺪﺠﻟا قاﺮﺘﺧا
ﻲﻓ ﺦﺒﻄﻟا قﺎﺒﻃأ ﺎﻬﻨﻣ عﻮﻨﺼﻣ داﻮﻣ ﻲﮬو ﺦﺒﻄﻟا قﺮﻋو نﻼﯿﺴﯾﻮﺒﻟاو
.ﻒﯾووﺮﻜﯾﺎﻤﻟا نﺮﻓ
ﻲﻓ ﻲﻋاﻮﻧﻻا هﺬﮬ نأ ﻊﻣ ﺦﺒﻄﻟا ﻲﻧاوأ ﻦﺨﺴﺗ ﻻ وﺮﻜﯾﺎﻤﻟا تﺎﺟﻮﻣ
.خﻮﺒﻄﻤﻟا مﺎﻌﻄﻟا ﻦﻋ ﺔﺠﺗﺎﻨﻟا ةراﺮﺤﻟا ﻞﻌﻔﺑ ﻦﺨﺴﺘﺳ ﺔﯾﺎﻬﻨﻟا
مﺎﺗ نﺎﻣأ زﺎﻬﺟ
نﺮﻔﻟا ﻞﺧاد ﻼﯿﻠﻗ دﺮﺒﯾ مﺎﻌﻄﻟا كﺮﺗا ﺎﻤﺋاد
ﻞﺒﻗ ﺔﺗراﺮﺣ ﺔﺟرد ﺺﺤﻓاو ﻪﺨﺒﻃ ﺪﻌﺑ
ﺔﻋﺎﺿﺮﻟا تﺎﺟﺎﺟز تﺎﯾﻮﺘﺤﻣ ﺔﺻﺎﺧ ﻪﻛﻼﻬﺘﺳا
.لﺎﻔﻃﻷا ﺔﯾﺬﻏأ تﺎﺗﺎﺒﻃﺮﻣو
3

ﻞﻜﺸﻟﺎﺑ نﺮﻔﻟا ﻞﯿﻐﺸﺗ رﺎﺒﺘﺧا ﻦﻣ ﻦﻜﻤﺘﺘﺳ ﺔﯿﻟﺎﺘﻟا ﺔﯿﺳﺎﺳﻷا تاﻮﻄﺨﻟا عﺎﺒﺗا ﺪﻨﻋ
ﺢﺘﻓ ﺪﻨﻋ .نﺮﻔﻟا ﺐﯿﻛﺮﺗ نﺎﻜﻣ تﺎﻤﯿﻠﻌﺘﺑ اﺪﯿﺟ مﺎﻤﺘﮬﻷا ءﺎﺟﺮﻟا .ﺢﯿﺤﺼﻟا
نﺮﻔﻟا نأ ﺪﻛﺄﺗ .ﺎﮬﺮﯿﻏو نﺮﻔﻟﺎﺑ ﺔﻘﺤﻠﻤﻟا ﻊﻄﻘﻟا ﺔﻓﺎﻛ ﻊﻓر ﻦﻣ ﺪﻛﺄﺗ نﻮﺗﺮﻜﻟا قوﺪﻨﺻ
.ﻞﯿﻤﺤﺘﻟاو ﻦﺤﺸﻟا ﺔﺠﯿﺘﻧ روﺮﻀﻣ وأ رﻮﺴﻜﻣ ﺮﯿﻏ
نﻮﺗﺮﻜﻟا ﻦﻣ نﺮﻔﻟا جاﺮﺧإ
نﺮﻔﻟا ﺐﯿﻛﺮﺗو
عﺎﻔﺗرﺎﺑ هﺪﯾﺮﺗ يﺬﻟا نﺎﻜﻤﻟاو ىﻮﺘﺴﻤﻟا ﻲﻓ نﺮﻔﻟا ﻊﺿ
ﻢﺳ ٢٠ ﻞﻗﻷا ﻰﻠﻋ دﻮﺟو ﻦﻣ ﺪﻛﺄﺗ ﻦﻜﻟو ﻢﺳ ٨٥ ﻦﻋ ﺪﯾﺰﯾ
ﺔﯾﻮﻬﺘﻟا ﻞﺟأ ﻦﻣ هءارو غاﺮﻓ ﻢﺳ ١٠ ﻲﻟاﻮﺣو ﻪﻗﻮﻓ غاﺮﻓ
ﻦﻋ ﻢﺳ ١٠ ﻞﻗﻷا ﻰﻠﻋ ﻪﻠﺧاد نﻮﻜﺗ نأ ﺐﺠﯾ نﺮﻔﻟا ﺔﻣﺪﻘﻣ .ﺔﺒﺳﺎﻨﻤﻟا
دﻮﺟﻮﻣ تازﺎﻐﻟا ةراﺮﺣ جﺮﺨﻣ .ﻊﻘﯾ ﻻ ﻰﺘﺣ ﻪﻗﻮﻓ عﻮﺿﻮﻤﻟ ﺢﻄﺴﻟا ﺔﻓﺎﺣ
.ﻪﯿﻠﻋ ءﻲﺷ يأ ﻊﺿو وأ ﻪﻗﻼﻏإ مﺪﻋ ﺐﺠﯾ نﺮﻔﻟا ﺐﻧﺎﺟو ﺢﻄﺴﻟا ﻰﻠﻋ
ﺔﯾرﺎﺠﺘﻟا ضاﺮﻏﻸﻟ ﻪﻣاﺪﺨﺘﺳا مﺪﻋ ﺐﺠﯾ نﺮﻔﻟا اﺬﮬ
ﺢﻄﺳ ﻰﻠﻋ ﻪﻌﺿو نﻮﺗﺮﻜﻟا قوﺪﻨﺻ ﻦﻣ نﺮﻔﻟا جﺮﺧا
ﺔﯾاﻮﺸﻟا فر
ﻊﻔﺗﺮﻣ فر
(
)
*
ةاﻮﺸﻤﻟا ﺦﯿﺳ ﺾﺒﻘﻣ ةدﺪﻌﺘﻣ ﺔﯿﻨﯿﺻ
يراﺮﺤﻟا ﻞﻤﺤﻟا فر
ﺾﻔﺨﻨﻣ فر
(
ةاﻮﺸﻤﻟا
ﻲﻬﻄﻟا ﻒﺋﺎﻇو
.يﻮﺘﺴﻣ
)
ﺔﻴﺟﺎﺟز ﺔﻴﻨﻴﺻ
ﺔﯿﻧارود ﺔﻘﻠﺣ
4

٢٦
ﻦﻋ نﺮﻔﻟا بﺎﺑ ﺢﺘﻓا
ﺾﺒﻘﻣ ﺐﺤﺳ ﻖﯾﺮﻃ
.بﺎﺒﻟا
نﺮﻔﻟا ﻞﺧاد ةراوﺪﻟا ﺔﻘﻠﺤﻟا ﻊﺿ
.ﺎﻬﻗﻮﻓ ﺔﯿﺟﺎﺟﺰﻟا ﺔﯿﻨﯿﺼﻟا ﻊﺿو
رز ﻰﻠﻋ ﻂﻐﺿا
STOP/CLEAR
رز ﻰﻠﻋ ﻂﻐﺿاو
START/Add 30 secs
ﻂﺒﻀﻟ ةﺪﺣاو ةﺮﻣ
ﻰﻠﻋ ﻲﻬﻄﻟا ةﺪﻣ
.ﺔﯿﻧﺎﺛ ٣٠
ﻞﻛ ﻲﻓ ةﺮﻓﺎﺻ تﻮﺻ ﻊﻤﺴﺘﺳ
.رﺰﻟا ﻚﻟذ ﻰﻠﻋ ﺎﻬﯿﻓ ﻂﻐﻀﺗ ةﺮﻣ
نأ ﻞﺒﻗ نﺮﻔﻟا ﻞﯿﻐﺸﺗ أﺪﺒﯿﺳ
؛ﺔﺳدﺎﺴﻟا ﺔﻄﻐﻀﻟا ﻦﻣ ﻲﻬﺘﻨﺗ
.ﻲﻌﯿﺒﻃ ﺮﻣأ اﺬﻫ نﻷ ﻖﻠﻘﺗ ﻻو
5

ﻞﯿﻐﺸﺘﻟا ﻊﺿو ﺐﺴﺣ تﺎﻘﺤﻠﻤﻟا ماﺪﺨﺘﺳا ﺔﻘﯾﺮﻃ
يراﺮﺤﻟا ﻞﻘﻨﻟا ﺔﻋﻮﻤﺠﻣ ﺔﯾاﻮﺸﻟا ﺔﻋﻮﻤﺠﻣ يراﺮﺤﻟا ﻞﻘﻨﻟا ﺔﯾاﻮﺸﻟا ﻒﯾووﺮﻜﯿﻤﻟا
ﻊﻔﺗﺮﻣ فر
ﺾﻔﺨﻨﻣ فر
ﺔﻴﺟﺎﺟز ﺔﻴﻨﻴﺻ
ةدﺪﻌﺘﻣ ﺔﯿﻨﯿﺻ
ﻲﻬﻄﻟا ﻒﺋﺎﻇو
ةاﻮﺸﻤﻟا
لﻮﺒﻘﻣ
لﻮﺒﻘﻣ ﺮﯿﻏ
ةدﺪﻌﺘﻣ ﺔﯿﻨﯿﺼﻟا
ﺔﻟﺎﻤﺤﻟاو ﻲﻬﻄﻟا ﻒﺋﺎﻇو
.ﻊﻤﺠﻣ ﻲﻠﯿﻐﺸﺗ ﻊﺿو ﻲﻓ (مﺎﻌﻃ دﻮﺟو نود) ةاﻮﺸﻤﻟا ﺦﯿﺳ ﻞﯿﻐﺸﺘﺑ مﻮﻘﺗ وأ ﻦﯿﻏرﺎﻓ ﺎﻤﻫو ﺔﻟﺎﻤﺤﻟاو ﻲﻬﻄﻟا ﻒﺋﺎﻇو ةدﺪﻌﺘﻣ ﺔﯿﻨﯿﺼﻟا ﻞﯿﻐﺸﺘﺑ ﻢﻘﺗ ﻻ : ﻪﯿﺒﻨﺗ
!ﻲﻬﻄﻟا تﺎﻔﺻو تﺎﺒﯿﺘﻛ ﺐﺴﺣ تﺎﻘﺤﻠﻤﻟا مﺪﺨﺘﺳا : ﻪﯿﺒﻨﺗ
.ةدﺎﺣ وأ ﺔﻨﺸﺧ داﻮﻣ ماﺪﺨﺘﺳﺎﺑ ﻲﻬﻄﻟا ﻒﺋﺎﻇو ةدﺪﻌﺘﻣ ﺔﯿﻨﯿﺼﻟا ﻞﺴﻐﺗ ﻻ : ﻪﯿﺒﻨﺗ
6

قﻼﻏإ
لﺎﻔﻃﻻا
ﻖﻠﻄﻨﻳو ضﺮﻌﻟا ﻰﻠﻋ
STOP/CLEAR
ﻰﺘﺣ
STOP/CLEAR
.
“L”
ﺮﻬﻈﻳ ﻰﺘﺣ
رز ﻰﻠﻋ ﺎﻄﻏﺎﺿ ﻖﺑا ،لﺎﻔﻃﻻا قﻼﻏإ ﺔﻔﻴﻇو ءﺎﻐﻟﻹ
.ةرﺎﻔﺻ ﻖﻠﻄﻨﺗ رﺰﻟا ﻦﻣ ﺪﻴﻟا ﻊﻓر ﺪﻨﻋو ،
STOP/CLEAR
.ﻲﻠﺋﺎﻌﻟا فاﺮﺷﻹا ﺔﻔﻴﻇو ﻂﺒﺿ ﻢﺘﻳ ﺎﻫﺪﻨﻋو
رز ﻰﻠﻋ ﻂﻐﺿا
رز ﻰﻠﻋ ﺎﻄﻏﺎﺿ ﻖﺑا
.ةﺪﺣاو ةﺮﻣ ةرﺎﻔﺻ
“L”
ﻰﺷﻼﺘﻳ
ﺔﻣﻼﺴﻟا ةﺰﯿﻣ ﻪﻟ ﻒﻳووﺮﻜﻳﺎﳌا نﺮﻓ
.ﺊﺟﺎﻔﳌا نﺮﻔﻟا ﻞﻴﻐﺸﺗ ﻊﻨﲤ ﻲﺘﻟا
ﻻ ،لﺎﻔﻃﻻا قﻼﻏإ ﻂﺒﺿ ﺔﻟﺎﺣ ﻲﻓ
ﻻ و نﺮﻔﻠﻟ ﺔﻔﻴﻇو ﺔﻳا ﻞﻴﻐﺸﺗ ﻚﻨﻜﳝ
.ﺦﺒﻃ يأ ﻚﻨﻜﳝ
.نﺮﻔﻟا بﺎﺑ ﺢﺘﻓ لﺎﻔﻃﻼﻟ ﻦﻜﳝ ﻦﻜﻟو
7

.ﻦﯿﺘﻘﯿﻗد ةﺪﻤﻟ ﺔﯿﻟﺎﻌﻟا ﺔﻗﺎﻄﻟا ﻰﻠﻋ ﺦﺒﻄﻟا ﺔﯿﻔﯿﻛ فﺮﻌﺗ نا ﻚﻨﻜﻤﯾ ،ﻲﻟﺎﺘﻟا لﺎﺜﻤﻟا ﻲﻓ
STOP/CLEAR
.
رز ﻰﻠﻋ ﻂﻐﺿا
ﺀﺪﺒﻟﺍ
ﻊﻳﺮّﺴﻟﺍ
ةﺪﳌ ﺦﺒﻄﻟا رﺎﻴﺘﺧﻻ تاﺮﻣ ﻊﺑرا
.ﻊﺑاﺮﻟا ﻂﻐﻀﻟا ءﺎﻬﺘﻧا ﻞﺒﻗ ﺦﺒﻄﻟﺎﺑ أﺪﺒﻳ نﺮﻔﻟا
ﻖﯾﺮﻃ ﻦﻋ ﺔﯿﻧﺎﺛ 59 و ﺔﻘﯿﻗد 99 ﻰﻟإ ﺦﺒﻄﻟا ﺖﻗو ﺪﻣ ﻚﻨﻜﻤﯾ ،(ﻊﯾﺮﺴﻟا ءﺪﺒﻟا)
START/Add 30 secs
.ﺔﻴﻟﺎﻌﻟا ﺔﻗﺎﻄﻟا ﻰﻠﻋ ﲔﺘﻘﻴﻗد
QUICK START
ماﺪﺨﺘﺳﺎﺑ ﺦﺒﻄﻟا ءﺎﻨﺛأ
Time/Weight
.
8
رز ﻰﻠﻋﻂﻐﺿا
صﺮﻗ ةرادإ
ﻚﻨﻜﻤﯾ ،ﻊﯾﺮﺴﻟا ﻊﯾﺮﺳ ﻞﯿﻐﺸﺗ ﻞﻀﻔﺑ
ﻰﻠﻋ ﺔﯿﻟﺎﻌﻟا ﺔﻗﺎﻄﻟا ﻰﻠﻋ ﺦﺒﻄﻟا ﻂﺒﺿ
رز ﺲﻤﻟ ﻊﻣ ﺔﯿﻧﺎﺛ ٣٠ ةﺪﻤﻟ تاﺮﺘﻓ
ﻲﻬﻄﻟا ﻒﺋﺎﻇو ةدﺪﻌﺘﻣ ﺔﯿﻨﯿﺻ
ﺔﯾاﻮﺸﻟا فر
ﻊﻔﺗﺮﻣ فر
(
يراﺮﺤﻟا ﻞﻤﺤﻟا فر
)
ﺾﻔﺨﻨﻣ فر
(
.ﻊﯾﺮﺳ ﻞﯿﻐﺸﺗ
مﺪﺨﺘﺴﺗ ﻻ
ةاﻮﺸﳌا
)

ﺔﻗﺎﻄﺑ ﺦﺒﻄﻟا
ﻒﻳووﺮﻜﻳﺎﳌا
ﺔﯿﻧﺎﺛ ٣٠ ﻖﺋﺎﻗد ٥ ﺲﻤﺧ ةﺪﻤﻟ ﺔﻗﺎﻄﻟا ﻦﻣ %٨٠ ﻰﻠﻋ ﺔﻤﻌﻃﻻا ﺾﻌﺑ ﺦﺒﻃ ﺔﯿﻔﯿﻛ فﺮﻌﺗ نا ﻚﻨﻜﻤﯾ ﻲﻟﺎﺘﻟا لﺎﺜﻤﻟا ﻲﻓ
ﻲﻓ ﻦﯿﺒﻣ ﻮﮬ ﺎﻤﻛ ﺢﯿﺤﺻ ﻞﻜﺸﺑ ﻒﯾووﺮﻜﯾﺎﻤﻟا نﺮﻓ ﺐﯿﻛﺮﺗ نا ﻦﻣ ﺪﻛﺄﺗ
.ﻞﯿﻟﺪﻟا اﺬﮬ ﻦﻣ ﻖﺑﺎﺴﻟا ءﺰﺠﻟا
STOP/CLEAR
.
.ﲔﺗﺮﻣ
.ضﺮﻌﻟا ﺔﺷﺎﺷ ﻰﻠﻋ
صﺮﻗ ةرادإ ﻖﻳﺮﻃ ﻦﻋ ﺦﺒﻄﻟا ﺖﻗو ﺾﻔﺧ وأ ةدﺎﻳز ﻚﻨﻜﳝ ﺦﺒﻄﻟا ءﺎﻨﺛأ
“5:30”
ضﺮﻋ ﻢﺘﻳ ﻰﺘﺣ
START/Add 30 secs
.
Time/Weight
رز ﻰﻠﻋ ﻂﻐﺿا
Micro
ﻰﻠﻋ ﻂﻐﺿا
720
.
ضﺮﻌﻳ فﻮﺳ
صﺮﻘﻟا ردأ
رز ﻰﻠﻋ ﻂﻐﺿا
.Time/Weight
9
ﺔﻗﺎﻃ ﻦﻣ تﺎﯾﻮﺘﺴﻣ ﺔﺴﻤﺧ ﻪﻟ ﻒﯾووﺮﻜﯾﺎﻤﻟا نﺮﻓ
ﺔﯿﻟﺎﻌﻟا ﺔﻗﺎﻄﻟا ىﻮﺘﺴﻣ رﺎﯿﺘﺧا ﻢﺘﯾو .ﻒﯾووﺮﻜﯾﺎﻤﻟا
ﻦﻣ ﺔﻔﻠﺘﺨﻣ تﺎﯾﻮﺘﺴﻣ رﺎﯿﺘﺧا ﻚﻨﻜﻤﯾو ﺎﯿﺋﺎﻘﻠﺗ
.تاﺮﻣ ةﺪﻋ ﻒﯾووﺮﻜﯾﺎﻣ رز ﻰﻠﻋ ﻂﻐﻀﻟﺎﺑ ﺔﻗﺎﻄﻟا
ﺔﻴﺘﻟﻮﻔﻟا
طاو ٩٠٠
طاو ٧٢٠
طاو ٥٤٠
%
١٠٠
%
%
%
٨٠
٦٠
ﻲﻟﺎﻌﻟا ﻂﺳﻮﺘﳌا
ﺔﻗﺎﻄﻟا
ﻲﻟﺎﻌﻟا
ﻂﺳﻮﺘﳌا
ﺔﺑاذﻻا
طاو ٣٦٠
طاو ١٨٠
٤٠
ﺾﻔﺨﻨﳌا ﻂﺳﻮﺘﳌا
%
٢٠
%
ﺾﻔﺨﻨﳌا
مﺪﺨﺘﺴﺗ ﻻ
ﻲﻬﻄﻟا ﻒﺋﺎﻇو ةدﺪﻌﺘﻣ ﺔﯿﻨﯿﺻ
ﻊﻔﺗﺮﻣ فر) ﺔﯾاﻮﺸﻟا فر
(
ةاﻮﺸﳌا
ﺾﻔﺨﻨﻣ فر) يراﺮﺤﻟا ﻞﻤﺤﻟا فر
(

.ﺦﺒﻄﻟا ﺔﯿﻠﻤﻋو ﻪﻠﯿﻐﺸﺘﺑ ﻢﻜﺤﺘﻟا ﻲﻓ ﺔﻧوﺮﻤﻟاو رﺎﯿﺨﻟا ﻚﺤﻨﻤﻟ ﻒﯾووﺮﻜﯾﺎﻤﻟا ﺔﻗﺎﻄﻟ تﺎﯾﻮﺘﺴﻣ ﺲﻤﺨﺑ دوﺰﻣ ﻒﯾووﺮﻜﯾﺎﻤﻟا نﺮﻓ
.نﺮﻔﻟا اﺬﮬ ماﺪﺨﺘﺳا ﺪﻨﻋ ﺎﻬﺑ ﻰﺻﻮﻤﻟا ﺦﺒﻄﻟا ﺔﻗﺎﻃ ىﻮﺘﺴﻣو ﺔﻤﻌﻃﻷا ﺾﻌﺑ ﻰﻠﻋ ىﻮﺘﺤﯾ هﺎﻧدﺄﺑ لوﺪﺠﻟا
ﺔﻗﺎﻃ ىﻮﺘﺴﻣ
ﻒﻳووﺮﻜﻳﺎﳌا
٩٠٠
٧٢٠
٥٤٠
٣٦٠
۱٨٠
ﻲﻠﻏ
يﺮﻘﺒﻟا ﻢﺤﻠﻟا
ﻞﻜﻟا ﻦﯿﺨﺴﺗ ةدﺎﻋإ
يﻮﺷ
موﺮﺸﻤﻟا
ﺢﻄﺴﻤﻟا ﻚﻌﻜﻟاو ﻚﯿﻜﻟا ﺰﺒﺧ
ﺾﯿﺒﻟا
ةﺮﯿﻤﺨﻟا ماﺪﺨﺘﺳﺎﺑ ﻦﯿﺠﻌﻟا ﺮﯿﻤﺨﺗ
10

ﺦﺒﻄﻟا
ﺔﯾاﻮﺸﻟﺎﺑ
.ﺔﻴﻧﺎﺛ ٣٠و ﺔﻘﻴﻗد ١٢ ةﺪﳌ ﺔﻤﻌﻃﻷا ﺾﻌﺑ ﺦﺒﻄﻟ ﺔﻳاﻮﺸﻟﺎﺑ ﺦﺒﻄﻟا ﺔﻴﻔﻴﻛ فﺮﻌﺗ نا ﻚﻨﻜﳝ ،ﻲﻟﺎﺘﻟا لﺎﺜﳌا ﻲﻓ
STOP/CLEAR
.
Grill/Combi.
.
“
”
:
.ضﺮﻌﻟا ﺔﺷﺎﺷ ﻰﻠﻋ
صﺮﻗ ةرادإ ﻖﻳﺮﻃ ﻦﻋ ﺦﺒﻄﻟا ﺖﻗو ﺾﻔﺧ وأ ةدﺎﻳز ﻚﻨﻜﳝ ﺦﺒﻄﻟا ءﺎﻨﺛأ
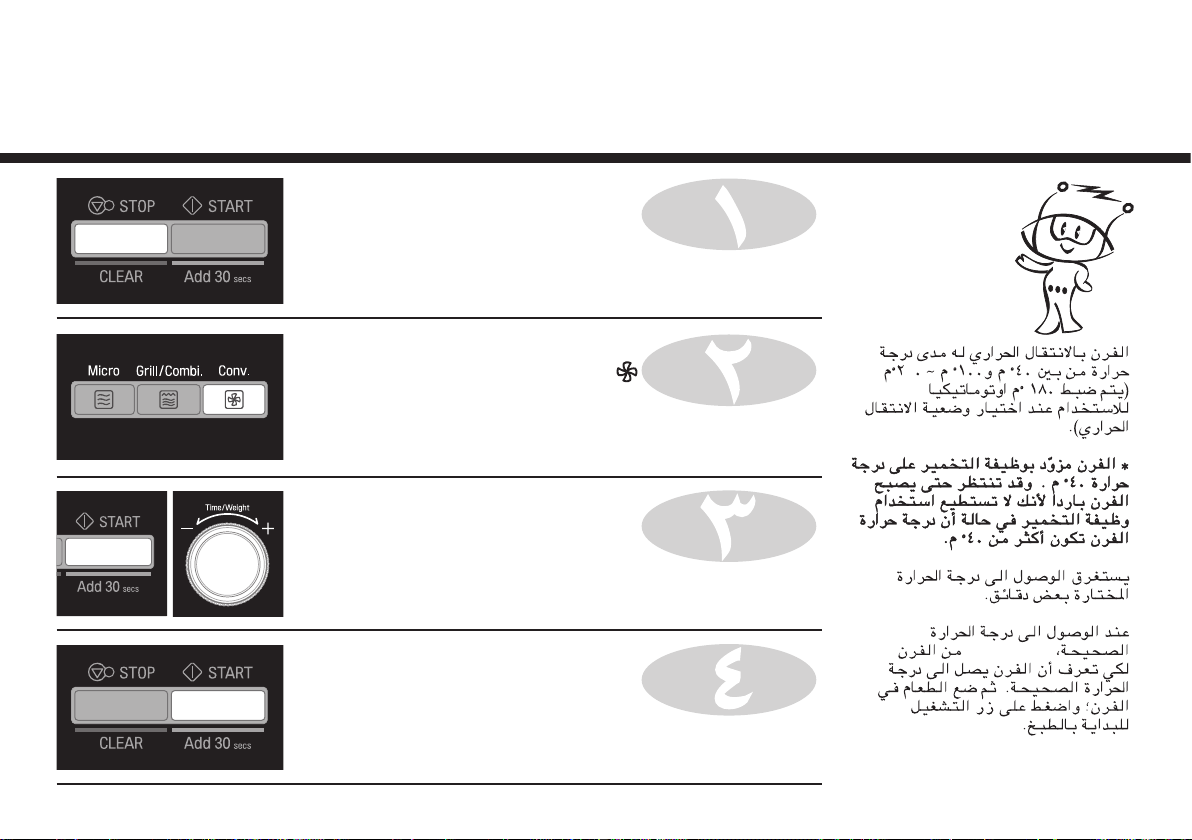
ﺎﻨﺧﺎﺳ نﻮﻜﻴﺳ ءﺎﻋﻮﻟا نﻷ نﺮﻔﻟا ﻦﻣ مﺎﻌﻄﻟا جاﺮﺧإ ﺪﻨﻋ سﺮﺘﺣا
!
“12:30”
ضﺮﻋ ﻢﺘﻳ ﻰﺘﺣ
START/Add 30 secs
.
Time/Weight
رز ﻰﻠﻋ ﻂﻐﺿا
رز ﻰﻠﻋ ﻂﻐﺿا
ﻲﻟﺎﺘﻟا ﺰﻣﺮﻟا ضﺮﻋ ﻢﺘﻳ
صﺮﻘﻟا ردأ
رز ﻰﻠﻋ ﻂﻐﺿا
Time/Weight
.
ﻼﻓ ،ﺔﻌﺑﺮﳌا ﺔﻳاﻮﺸﻠﻟ ﺐﺳﺎﻨﻣ ﻞﻳدﻮﳌا اﺬﻫ
.ﻖﺒﺴﳌا ﲔﺨﺴﺘﻟا ﻰﻟا جﺎﺘﺤﻳ
مﺎﻌﻄﻟا ﺮﻴﻤﺤﺘﺑ ﻚﻟ ﺢﻤﺴﻳ ةﺰﻴﳌا هﺬﻫ
.ﺔﻋﺮﺴﺑ ﻪﻘﻴﻗﺮﺗو
ﻲﻬﻄﻟا ﻒﺋﺎﻇو ةدﺪﻌﺘﻣ ﺔﯿﻨﯿﺼﻟا ﻊﺿو ﻢﺘﯾ
ﺔﯾا ﻮﺸﻟا ﻞﻣﺎﺣو ﺔﯿﺟﺎﺟﺰﻟا ﺔﯿﻨﯿﺼﻟا ﻦﯿﺑ
.ﺔﯾاﻮﺸﻟا ﻞﯿﻐﺸﺗ ﻊﺿو ﻲﻓ
فر) ﺔﻳاﻮﺸﻟا فر ماﺪﺨﺘﺳا ﻦﻣ ﺪﺑ ﻻ
.ﺔﻳاﻮﺸﻟﺎﺑ ﺦﺒﻄﻟا ءﺎﻨﺛأ (ﻊﻔﺗﺮﻣ
11

STOP/CLEAR
.
ﻲﻬﻄﻟا
ﺔﯾاﻮﺸﻟا ﺔﻋﻮﻤﺠﻣ ﻰﻠﻋ
رز ﻰﻠﻋ ﻂﻐﺿا
.تاﺮﻣ ثﻼﺛ
“
.ضﺮﻌﻟا ﺔﺷﺎﺷ ﻰﻠﻋ
صﺮﻗ ةرادإ ﻖﻳﺮﻃ ﻦﻋ ﺦﺒﻄﻟا ﺖﻗو ﺾﻔﺧ وأ ةدﺎﻳز ﻚﻨﻜﳝ ﺦﺒﻄﻟا ءﺎﻨﺛأ
ﺎﻨﺧﺎﺳ نﻮﻜﻴﺳ ءﺎﻋﻮﻟا نﻷ نﺮﻔﻟا ﻦﻣ مﺎﻌﻄﻟا جاﺮﺧإ ﺪﻨﻋ سﺮﺘﺣا
!
“25:00”
ضﺮﻋ ﻢﺘﻳ ﻰﺘﺣ
Grill/Combi.
”, “
” :
.تاﺮﻣ ثﻼﺛ
“360” :
Time/Weight
START/Add 30 secs
.
رز ﻰﻠﻋ ﻂﻐﺿا
ﻲﻟﺎﺘﻟا ﺰﻣﺮﻟا ضﺮﻋ ﻢﺘﻳ
Micro
رز ﻰﻠﻋ ﻂﻐﺿا
ﻲﻟﺎﺘﻟا ﺰﻣﺮﻟا ضﺮﻋ ﻢﺘﻳ
صﺮﻘﻟا ردأ
رز ﻰﻠﻋ ﻂﻐﺿا
Time/Weight
.
12
يﺬﻟا ﻲﻌﻤﳉا ﺦﺒﻄﻟا ةﺰﻴﻣ نﺮﻔﻠﻟ
ﻦّﺨﺴﳌﺎﺑ مﺎﻌﻄﻟا ﺦﺒﻄﺑ ﻚﻟ ﺢﻤﺴﻳ
ﻰﻠﻋوأ ﺖﻗﻮﻟا ﺲﻔﻧﻲﻓ ﻒﻳووﺮﻜﻳﺎﳌاو
ﻲﻨﻌﻳاﺬﻫ ﺔﻣﺎﻋ ﺔﻔﺼﺑ .ﻲﻟاﻮﺘﻟا
.مﺎﻌﻄﻟا ﺦﺒﻄﻟ ﻞﻗﻷا ﺖﻗﻮﻟا قاﺮﻐﺘﺳا
ﺔﻗﺎﻃ ﻦﻣ تﺎﻳﻮﺘﺴﻣ ﺔﺛﻼﺛ ﻂﺒﺿ ﻚﻨﻜﳝ
طاو ٢٧٠و طاو ١٨٠) ﻒﻳووﺮﻜﻳﺎﳌا
.ﻲﻌﻤﳉا ﺦﺒﻄﻟا ﺔﻴﻌﺿو ﻲﻓ (طاو ٣٦٠و
ﻦﯿﺨﺴﺘﻟا
يراﺮﺤﻟا ﻞﻤﺤﻟﺎﺑ
.م ْ ٢٣٠ ـﺑ ةرا ﺮﳊا ﺔﺟرد ﻰﻠﻋ ﺎﻘﺒﺴﻣ نﺮﻔﻟا ﲔﺨﺴﺗ ﺔﻴﻔﻴﻛ فﺮﻌﺗ ،ﻲﻟﺎﺘﻟا لﺎﺜﳌا ﻞﻴﺒﺳ ﻰﻠﻋ
.ضﺮﻌﻟا ﺔﺷﺎﺷ ﻰﻠﻋ
.ةراﺮﳊا رﺎﺘا ﺘﻟ
“230˚C”
.
STOP/CLEAR
.
“
” :
ضﺮﻋ ﻢﺘﻳ ﻰﺘﺣ
START/Add 30 secs
START/Add 30 secs
.
“Pr-H”
ضﺮﻋ ﻊﻣ ﻖﺒﺴﳌا ﲔﺨﺴﺘﻟﺎﺑ نﺮﻔﻟا أﺪﺒﻳ
Time/Weight
رز ﻰﻠﻋ ﻂﻐﺿا
Conv.
رز ﻰﻠﻋ ﻂﻐﺿا
.
ﻲﻟﺎﺘﻟا ﺰﻣﺮﻟا ضﺮﻋ ﻢﺘﻳ
رز ﻰﻠﻋ ﻂﻐﺿا
رز ﻰﻠﻋ ﻂﻐﺿا
صﺮﻘﻟا ردأ
٣
ةﺮﻓﺎﺼﻟا ﻖﻠﻄﻨﺗ
13

ﺦﺒﻃ ﺔﻴﻔﻴﻛﻢﺛ ،ﻻوأ ﺎﻘﺒﺴﻣ ﺎﻨﻴﺨﺴﺗ نﺮﻔﻟا ﲔﺨﺴﺗ ﺔﻴﻔﻴﻛ فﺮﻌﺗ نأ ﻚﻨﻜﳝ ،ﻲﻟﺎﺘﻟا لﺎﺜﳌا ﻲﻓ
.ﺔﻘﻴﻗد ٥٠ ةﺪﳌ م ْ ٢٣٠ ةراﺮﺣ ﺔﺟرد ﻰﻠﻋ ﺔﻤﻌﻃﻷا ﺾﻌﺑ
ﺦﺒﻄﻟا
يراﺮﳊا ﻞﻤﺤﻟﺎﺑ
STOP/CLEAR
.
“
” :
.ضﺮﻌﻟا ﺔﺷﺎﺷ ﻰﻠﻋ
.ضﺮﻌﻟا ﺔﺷﺎﺷ ﻰﻠﻋ
صﺮﻗ ةرادإ ﻖﻳﺮﻃ ﻦﻋ ﺦﺒﻄﻟا ﺖﻗو ﺾﻔﺧ وأ ةدﺎﻳز ﻚﻨﻜﳝ ﺦﺒﻄﻟا ءﺎﻨﺛأ
ﺎﻨﺧﺎﺳ نﻮﻜﻴﺳ ءﺎﻋﻮﻟا نﻷ نﺮﻔﻟا ﻦﻣ مﺎﻌﻄﻟا جاﺮﺧإ ﺪﻨﻋ سﺮﺘﺣا
!
“230˚C”
.ةراﺮﳊا رﺎﺘا ﺘﻟ
“50:00”
ضﺮﻋ ﻢﺘﻳ ﻰﺘﺣ
START/Add 30 secs
ضﺮﻋ ﻢﺘﻳ ﻰﺘﺣ
START/Add 30 secs
.
Time/Weight
Time/Weight
رز ﻰﻠﻋ ﻂﻐﺿا
Conv.
رز ﻰﻠﻋ ﻂﻐﺿا
.
ﻲﻟﺎﺘﻟا ﺰﻣﺮﻟا ضﺮﻋ ﻢﺘﻳ
صﺮﻘﻟا ردأ
رز ﻰﻠﻋ ﻂﻐﺿا
صﺮﻘﻟا ردأ
رز ﻰﻠﻋ ﻂﻐﺿا
Time/Weight
.
رﺎﺘﺨﻳ ،ةراﺮﳊا ﺔﺟرد ﻂﺒﻀﺗ ﻢﻟ اذا
م ْ ١٨٠ ةراﺮﺣ ﺔﺟرد نﺮﻔﻟا
.ﺎﻴﻜﻴﺗﺎﻣﻮﺗوا
ﺦﺒﻄﻠﻟ ةراﺮﳊا ﺔﺟرد ﺮﻴﻴﻐﺗ ﻚﻨﻜﳝ
.ﺔﻘﻠﳊا رّوﺪﻳ رز ﻰﻠﻋ ﻂﻐﻀﻟﺎﺑ
ﺾﻔﺨﻨﻣ فر)يراﺮﳊا لﺎﻘﺘﻧﻻا فر
(
ﺦﺒﻄﻟا ءﺎﻨﺛأ ﻪﻣاﺪﺨﺘﺳا ﻦﻣﺪﺑ ﻻ
.يراﺮﳊا لﺎﻘﺘﻧﻻﺎﺑ
14

ﻲﻬﻄﻟا
يراﺮﺤﻟا ﻞﻤﺤﻟا ﺔﻋﻮﻤﺠﻤﺑ
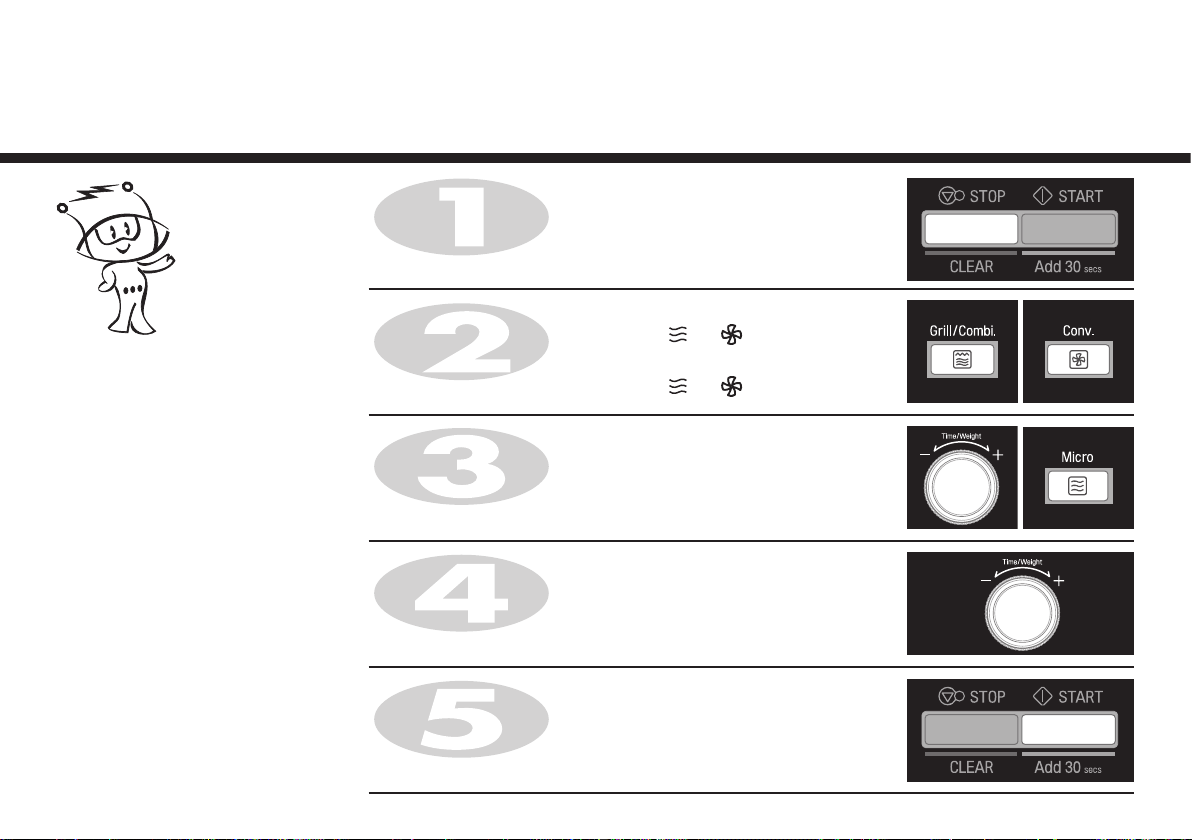
ﻪﺗﺪﺷ ﻞﺼﺗ ﺾﻔﺨﻨﻣ ﻲﺑﺮﻬﻛ رﺎﯿﺗ ماﺪﺨﺘﺳﺎﺑ نﺮﻔﻟا ﺔﺠﻣﺮﺑ ﺔﯿﻔﯿﻛ ﻚﻟ ﺢﺿوﺄﺳ ،ﻲﻟﺎﺘﻟا لﺎﺜﻤﻟا ﻲﻓ
.ﺔﻘﯿﻗد ٢٥ ﻰﻟإ ﻞﺼﺗ ﻲﻬﻃ ةﺪﻤﻟ ﺔﯾﻮﺌﻣ ﺔﺟرد ٢٠٠ ﻰﻟإ ﻞﺼﺗ يراﺮﺣ ﻞﻘﻧ ةراﺮﺣ ﺔﺟرد ﺪﻨﻋ تاو ٢٧۰ ﻰﻟإ
STOP/CLEAR
.
رز ﻰﻠﻋ ﻂﻐﺿا
.ضﺮﻌﻟا ﺔﺷﺎﺷ ﻰﻠﻋ
.ضﺮﻌﻟا ﺔﺷﺎﺷ ﻰﻠﻋ
“200˚C”
“25:00”
Grill/Combi.
.ﻦﯿﺗﺮﻣ
“
”, “
“
”, “
ضﺮﻋ ﻢﺘﻳ ﻰﺘﺣ
.ﻦﯿﺗﺮﻣ
“270” :
ضﺮﻋ ﻢﺘﻳ ﻰﺘﺣ
START/Add 30 secs
.
” :
” :
Time/Weight
Time/Weight
رز ﻰﻠﻋ ﻂﻐﺿا
ﻲﻟﺎﺘﻟا ﺰﻣﺮﻟا ضﺮﻋ ﻢﺘﻳ
Conv.
رز ﻰﻠﻋ ﻂﻐﺿا
.
ﻲﻟﺎﺘﻟا ﺰﻣﺮﻟا ضﺮﻋ ﻢﺘﻳ
صﺮﻘﻟا ردأ
Micro
رز ﻰﻠﻋ ﻂﻐﺿا
ﻲﻟﺎﺘﻟا ﺰﻣﺮﻟا ضﺮﻋ ﻢﺘﻳ
صﺮﻘﻟا ردأ
رز ﻰﻠﻋ ﻂﻐﺿا
صﺮﻗ ةرادإ ﻖﻳﺮﻃ ﻦﻋ ﺦﺒﻄﻟا ﺖﻗو ﺾﻔﺧ وأ ةدﺎﻳز ﻚﻨﻜﳝ ﺦﺒﻄﻟا ءﺎﻨﺛأ
Time/Weight
.
ﺎﻨﺧﺎﺳ نﻮﻜﻴﺳ ءﺎﻋﻮﻟا نﻷ نﺮﻔﻟا ﻦﻣ مﺎﻌﻄﻟا جاﺮﺧإ ﺪﻨﻋ سﺮﺘﺣا
!
15
ﺔﻗﺎﻃ ﻦﻣت ﺎﻳﻮﺘﺴﻣ ﺔﺛﻼﺛ ﻂﺒﺿ ﻚﻨﻜﳝ
طاو ٢٧٠و طاو ١٨٠) ﻒﻳووﺮﻜﻳﺎﳌا
.ﻲﻌﻤﳉا ﺦﺒﻄﻟا ﺔﻴﻌﺿو ﻲﻓ (طاو ٣٦٠و

ﻲﻬﻄﻟا ﻒﺋﺎﻇو
ةدﺪﻌﺘﻤﻟا
صﻮﺼﺨﻤﻟا ﻞﻛﻷا تﺎﻔﺻوو ،زﺎﺒﺨﻟا ﺔﻠﺳو ،ﺔﻋﺎﺳ 24و ،ﺔﯿﺋاﺬﻐﻟا ﺔﯾﺎﻋﺮﻟاو ،يﺪﻨﻬﻟا يوزاﺮﻟا) ﻲﻬﻄﻟا ﻒﺋﺎﻇو ﻞﯿﻐﺸﺘﻟ ةدﺪﺤﻤﻟا تاﻮﻄﺨﻟا عﺎﺒﺗا ءﺎﺟﺮﻟا
.ﻒﯾووﺮﻜﯿﻤﻟا نﺮﻓ ﻲﻓ (Utility Corner ﻢﺋاﻮﻗو ،”Just 4 U“
ﻢﺋاﻮﻗ
Utility corner
رﺰﻟا ﻰﻠﻋ ﻂﻐﺿا
�STOP/CLEAR
رﺰﻟا ﻰﻠﻋ ﻂﻐﺿا
�Utility corner
رﺰﻟا ﻰﻠﻋ ﻂﻐﺿا
ﺔﻤﺋﺎﻗ ﺪﯾﺪﺤﺘﻟ روﺪﻤﻟا
FE
وأ bC وأ
(UC1-6), (bC1),
UC
(FE1-4)
روﺪﻤﻟا رﺰﻟا ردأ
نزﻮﻟا ﻂﺒﻀﻟ
رﺰﻟا ﻰﻠﻋ ﻂﻐﺿا
�START/Add 30 secs
صﻮﺼﺨﻤﻟا ﻞﻛﻷا تﺎﻔﺻو
”Just 4 U”
رﺰﻟا ﻰﻠﻋ ﻂﻐﺿا
�STOP/CLEAR
رﺰﻟا ﻰﻠﻋ ﻂﻐﺿا
”Baker’s Basket”
�Just 4 U
رﺰﻟا ﻰﻠﻋ ﻂﻐﺿا
ﺔﻤﺋﺎﻗ ﺪﯾﺪﺤﺘﻟ روﺪﻤﻟا
HF وأ oC وأ bb وأ SF
(SF1-4), (bb1~4),
(oC1 ~4), (HF1-4)
ﺔﻤﺋﺎﻗ ﺪﯾﺪﺤﺘﻟ روﺪﻤﻟا
روﺪﻤﻟا رﺰﻟا ردأ
نزﻮﻟا ﻂﺒﻀﻟ
رﺰﻟا ﻰﻠﻋ ﻂﻐﺿا
�START/Add 30 secs
�START/Add 30 secs
زﺎﺒﺨﻟا ﺔﻠﺳ
رﺰﻟا ﻰﻠﻋ ﻂﻐﺿا
�STOP/CLEAR
رﺰﻟا ﻰﻠﻋ ﻂﻐﺿا
�Baker’s Basket
ﺰﻟا ﻰﻠﻋ ﻂﻐﺿا
(bt1~12) bt
روﺪﻤﻟا رﺰﻟا ردأ
نزﻮﻟا ﻂﺒﻀﻟ
رﺰﻟا ﻰﻠﻋ ﻂﻐﺿا
ﺔﻋﺎﺳ 24
”24 Hours”
رﺰﻟا ﻰﻠﻋ ﻂﻐﺿا
�STOP/CLEAR
رﺰﻟا ﻰﻠﻋ ﻂﻐﺿا
�24 Hours
رﺰﻟا ﻰﻠﻋ ﻂﻐﺿا
ﺔﻤﺋﺎﻗ ﺪﯾﺪﺤﺘﻟ روﺪﻤﻟا
CF وأ Sn وأ bF
(bF1~7), (Sn1~8),
(CF1-7)
روﺪﻤﻟا رﺰﻟا ردأ
نزﻮﻟا ﻂﺒﻀﻟ
رﺰﻟا ﻰﻠﻋ ﻂﻐﺿا
�START/Add 30 secs
16
ﺔﯿﺋاﺬﻐﻟا ﺔﯾﺎﻋﺮﻟا
”Nutri Care”
رﺰﻟا ﻰﻠﻋ ﻂﻐﺿا
�STOP/CLEAR
رﺰﻟا ﻰﻠﻋ ﻂﻐﺿا
�Nutri Care
رﺰﻟا ﻰﻠﻋ ﻂﻐﺿا
ﺔﻤﺋﺎﻗ ﺪﯾﺪﺤﺘﻟ روﺪﻤﻟا
So وأ HP وأ St
SA وأ Co وأ
(St1~8), (HP1-8),
(So1~7), (Co1 -6),
(SA1-4)
روﺪﻤﻟا رﺰﻟا ردأ
نزﻮﻟا ﻂﺒﻀﻟ
رﺰﻟا ﻰﻠﻋ ﻂﻐﺿا
�START/Add 30 secs
يﺪﻨﻬﻟا يوزاﺮﻟا
”Indian Rasoi“
رﺰﻟا ﻰﻠﻋ ﻂﻐﺿا
�STOP/CLEAR
رﺰﻟا ﻰﻠﻋ ﻂﻐﺿا
�Indian Rasoi
رﺰﻟا ﻰﻠﻋ ﻂﻐﺿا
ﺔﻤﺋﺎﻗ ﺪﯾﺪﺤﺘﻟ روﺪﻤﻟا
tS وأ rd وأ SCوأ IC
(IC1-17), (SC1-8),
(rd1~5), (tS1~7)
روﺪﻤﻟا رﺰﻟا ردأ
نزﻮﻟا ﻂﺒﻀﻟ
رﺰﻟا ﻰﻠﻋ ﻂﻐﺿا
�START/Add 30 secs
ﻲﻬﻄﻟا ﻒﺋﺎﻇو
١ ةﻮﻄﺨﻟا
٢ ةﻮﻄﺨﻟا
٣ ةﻮﻄﺨﻟا
٤ ةﻮﻄﺨﻟا
٥ ةﻮﻄﺨﻟا

يوزاﺮﻟا
يﺪﻨﻬﻟا
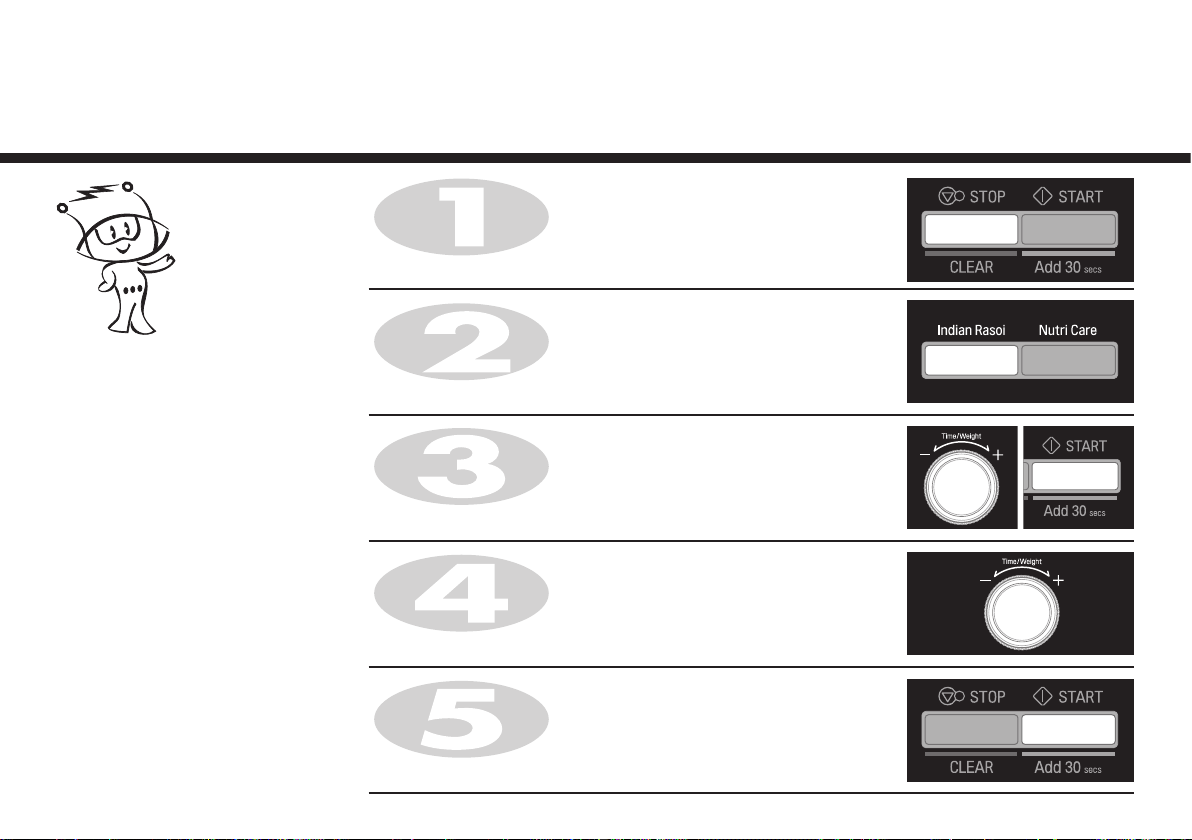
.ﻮﻟآ مود ﺔﻠﻛأ ﻦﻣ ماﺮﺟ ﻮﻠﯿﻛ ﻒﺼﻧ ﻲﻬﻃ ﺔﯿﻔﯿﻛ ﻲﻟﺎﺘﻟا لﺎﺜﻤﻟا ﻲﻓ ﻚﻟ ﺢﺿوﺄﺳ
STOP/CLEAR
.
Indian Rasoi
.
ضﺮﻌﻟا ﺔﺷﺎﺷ ﻰﻠﻋ
.ضﺮﻌﻟا ﺔﺷﺎﺷ ﻰﻠﻋ
صﺮﻗ ةرادإ ﻖﻳﺮﻃ ﻦﻋ ﺦﺒﻄﻟا ﺖﻗو ﺾﻔﺧ وأ ةدﺎﻳز ﻚﻨﻜﳝ ﺦﺒﻄﻟا ءﺎﻨﺛأ
“IC5”
“0�5 kg”
ضﺮﻋ ﻢﺘﻳ ﻰﺘﺣ
START/Add 30 secs
.
ضﺮﻋ ﻢﺘﻳ ﻰﺘﺣ
START/Add 30 secs
.
Time/Weight
Time/Weight
رز ﻰﻠﻋ ﻂﻐﺿا
رز ﻰﻠﻋ ﻂﻐﺿا
صﺮﻘﻟا ردأ
رز ﻰﻠﻋ ﻂﻐﺿا
صﺮﻘﻟا ردأ
رز ﻰﻠﻋ ﻂﻐﺿا
Time/Weight
.
.(ﻮﻟآ مود
.يﺪﻨﻬﻟا يوزاﺮﻟا ﻢﺋاﻮﻗ ﺔﺠﻣﺮﺑ ﻢﺘﺗ
يﺪﻨﻬﻟا يوزاﺮﻟا ﻲﻬﻃ ﺔﻔﯿﻇو ﺢﯿﺘﺗ
ﻢﻈﻌﻣ ﻮﻬﻄﺗ نأ ﻚﻟ
عﻮﻧ ﺪﯾﺪﺤﺗ ﻖﯾﺮﻃ ﻦﻋ ﺔﻠﻀﻔﻤﻟا ﻚﺘﻤﻌﻃأ
)
”Indian Rasoi“
.ﻪﻧزوو مﺎﻌﻄﻟا
17

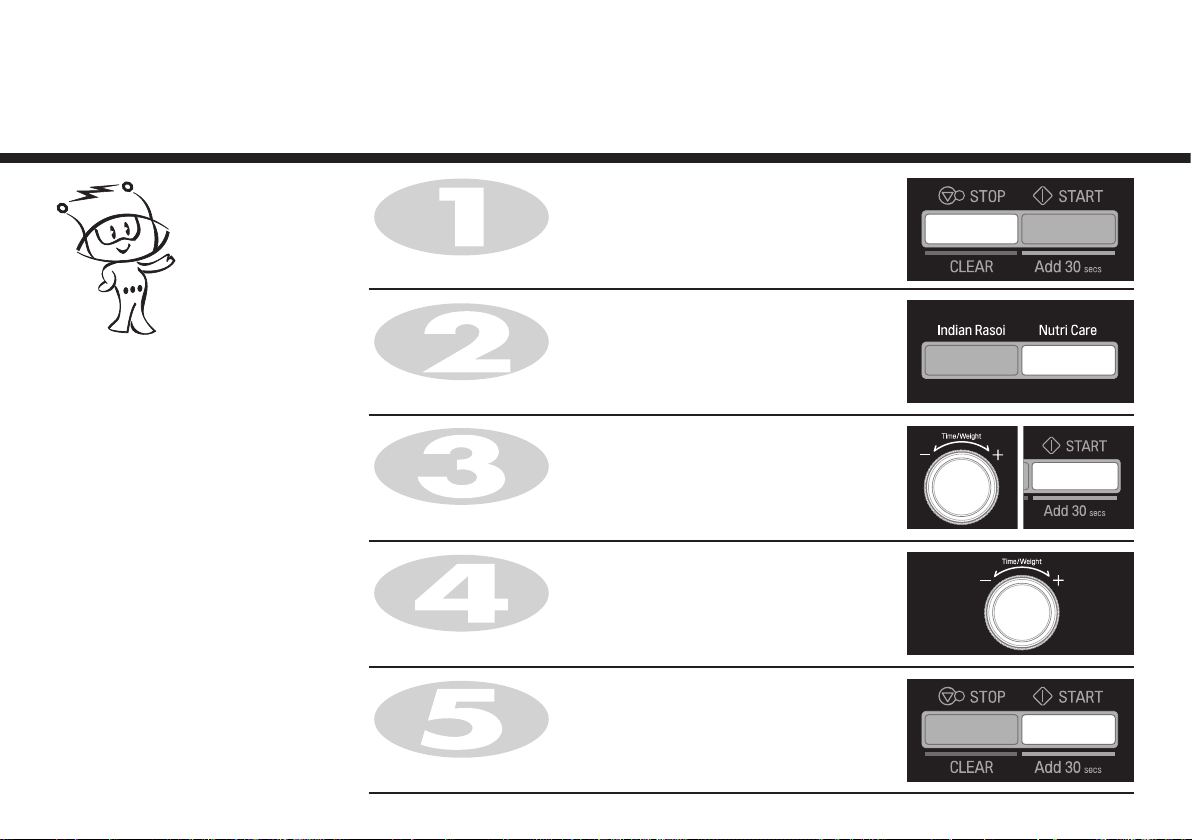
.نﻮﻤﯿﻠﻟا صﻮﺼﺑ جﺎﺟﺪﻟا ﻦﻣ ﻢﺠﻛ ٠.٣ ﻒﺼﻧ ﻲﻬﻃ ﺔﯿﻔﯿﻛ ﻲﻟﺎﺘﻟا لﺎﺜﻤﻟا ﻲﻓ ﻚﻟ ﺢﺿوﺄﺳ
ﺔﯾﺎﻋﺮﻟا
ﺔﯿﺋاﺬﻐﻟا
STOP/CLEAR
.
Nutri Care
.
ضﺮﻌﻟا ﺔﺷﺎﺷ ﻰﻠﻋ
.ضﺮﻌﻟا ﺔﺷﺎﺷ ﻰﻠﻋ
صﺮﻗ ةرادإ ﻖﻳﺮﻃ ﻦﻋ ﺦﺒﻄﻟا ﺖﻗو ﺾﻔﺧ وأ ةدﺎﻳز ﻚﻨﻜﳝ ﺦﺒﻄﻟا ءﺎﻨﺛأ
“HP3”
“0�3 kg”
ضﺮﻋ ﻢﺘﻳ ﻰﺘﺣ
START/Add 30 secs
.
ضﺮﻋ ﻢﺘﻳ ﻰﺘﺣ
START/Add 30 secs
.
Time/Weight
.(نﻮﻤﯿﻠﻟا صﻮﺼﺑ جﺎﺟﺪﻟا
Time/Weight
رز ﻰﻠﻋ ﻂﻐﺿا
رز ﻰﻠﻋ ﻂﻐﺿا
صﺮﻘﻟا ردأ
رز ﻰﻠﻋ ﻂﻐﺿا
صﺮﻘﻟا ردأ
رز ﻰﻠﻋ ﻂﻐﺿا
Time/Weight
.
ﺔﯾﺎﻋﺮﻟا ﺔﻔﯿﻇﻮﺑ ﻲﻬﻄﻟا ﻢﺋاﻮﻗ ﺔﺠﻣﺮﺑ ﻢﺘﺗ
”Nutri Care“
.
”Nutri Care“
)
ﺔﯿﺋاﺬﻐﻟا ﺔﯾﺎﻋﺮﻟا ﺔﻔﯿﻇو ﺢﯿﺘﺗ
ﺔﻠﻀﻔﻤﻟا ﻚﺘﻤﻌﻃأ ﻢﻈﻌﻣ ﻮﻬﻄﺗ نأ ﻚﻟ
.ﻪﻧزوو مﺎﻌﻄﻟا عﻮﻧ ﺪﯾﺪﺤﺗ ﻖﯾﺮﻃ ﻦﻋ
ﺔﯿﺋاﺬﻐﻟا
18

24
ﺔﻋﺎﺳ
.ﻲﻧادﻮﺴﻟا لﻮﻔﻟا ﻦﻣ ﻢﺠﻛ ٠.٣ ﻒﺼﻧ ﻲﻬﻃ ﺔﯿﻔﯿﻛ ﻲﻟﺎﺘﻟا لﺎﺜﻤﻟا ﻲﻓ ﻚﻟ ﺢﺿوﺄﺳ
STOP/CLEAR
.
24 Hours
.
ضﺮﻌﻟا ﺔﺷﺎﺷ ﻰﻠﻋ
.ضﺮﻌﻟا ﺔﺷﺎﺷ ﻰﻠﻋ
صﺮﻗ ةرادإ ﻖﻳﺮﻃ ﻦﻋ ﺦﺒﻄﻟا ﺖﻗو ﺾﻔﺧ وأ ةدﺎﻳز ﻚﻨﻜﳝ ﺦﺒﻄﻟا ءﺎﻨﺛأ
“Sn3”
“0�3 kg”
ضﺮﻋ ﻢﺘﻳ ﻰﺘﺣ
START/Add 30 secs
.
ضﺮﻋ ﻢﺘﻳ ﻰﺘﺣ
START/Add 30 secs
.
Time/Weight
Time/Weight
رز ﻰﻠﻋ ﻂﻐﺿا
رز ﻰﻠﻋ ﻂﻐﺿا
صﺮﻘﻟا ردأ
.(ﻲﻧادﻮﺴﻟا لﻮﻔﻟا
رز ﻰﻠﻋ ﻂﻐﺿا
صﺮﻘﻟا ردأ
رز ﻰﻠﻋ ﻂﻐﺿا
Time/Weight
.
Hours 24
.
ﻢﻈﻌﻣ ﻮﻬﻄﺗ نأ ﻚﻟ
عﻮﻧ ﺪﯾﺪﺤﺗ ﻖﯾﺮﻃ ﻦﻋ ﺔﻠﻀﻔﻤﻟا ﻚﺘﻤﻌﻃأ
)
ﺔﻔﯿﻇﻮﺑ ﻲﻬﻄﻟا ﻢﺋاﻮﻗ ﺔﺠﻣﺮﺑ ﻢﺘﺗ
Hours 24
ﺔﻔﯿﻇو ﺢﯿﺘﺗ
.ﻪﻧزوو مﺎﻌﻄﻟا
19

.ﻪﯿﺗﺎﺒﻟا ﻦﻣ ماﺮﺟ ﻮﻠﯿﻛ ٠.٢ ﻒﺼﻧ ﻲﻬﻃ ﺔﯿﻔﯿﻛ ﻲﻟﺎﺘﻟا لﺎﺜﻤﻟا ﻲﻓ ﻚﻟ ﺢﺿوﺄﺳ
ﺔﻠﺳ
زﺎﺒﺨﻟا
STOP/CLEAR
.
Baker's Basket
.
ضﺮﻌﻟا ﺔﺷﺎﺷ ﻰﻠﻋ
.ضﺮﻌﻟا ﺔﺷﺎﺷ ﻰﻠﻋ
صﺮﻗ ةرادإ ﻖﻳﺮﻃ ﻦﻋ ﺦﺒﻄﻟا ﺖﻗو ﺾﻔﺧ وأ ةدﺎﻳز ﻚﻨﻜﳝ ﺦﺒﻄﻟا ءﺎﻨﺛأ
“bt3”
“0�2 kg”
ضﺮﻋ ﻢﺘﻳ ﻰﺘﺣ
START/Add 30 secs
.
ضﺮﻋ ﻢﺘﻳ ﻰﺘﺣ
START/Add 30 secs
.
Time/Weight
Time/Weight
رز ﻰﻠﻋ ﻂﻐﺿا
رز ﻰﻠﻋ ﻂﻐﺿا
صﺮﻘﻟا ردأ
رز ﻰﻠﻋ ﻂﻐﺿا
صﺮﻘﻟا ردأ
رز ﻰﻠﻋ ﻂﻐﺿا
Time/Weight
.
.(ﻪﯿﺗﺎﺒﻟا
ﺔﻠﺳ ﺔﻔﯿﻇﻮﺑ ﻲﻬﻄﻟا ﻢﺋاﻮﻗ ﺔﺠﻣﺮﺑ ﻢﺘﺗ
”Baker’s Basket“
.
”Baker’s Basket“
ﻦﻋ ﺔﻠﻀﻔﻤﻟا ﻚﺘﻤﻌﻃأ ﻢﻈﻌﻣ ﻮﻬﻄﺗ نأ ﻚﻟ
)
زﺎﺒﺨﻟا ﺔﻠﺳ ﺔﻔﯿﻇو ﺢﯿﺘﺗ
.ﻪﻧزوو مﺎﻌﻄﻟا عﻮﻧ ﺪﯾﺪﺤﺗ ﻖﯾﺮﻃ
زﺎﺒﺨﻟا
20

ﻞﻛﻷا تﺎﻔﺻو
صﻮﺼﺨﻤﻟا
.ﺎﻛﺎﻬﻟا ﺔﻧوﺮﻜﻌﻣ ﻦﻣ ﻢﺠﻛ ٠.٣ ﻒﺼﻧ ﻲﻬﻃ ﺔﯿﻔﯿﻛ ﻲﻟﺎﺘﻟا لﺎﺜﻤﻟا ﻲﻓ ﻚﻟ ﺢﺿوﺄﺳ
STOP/CLEAR
.
.
ضﺮﻌﻟا ﺔﺷﺎﺷ ﻰﻠﻋ
.ضﺮﻌﻟا ﺔﺷﺎﺷ ﻰﻠﻋ
صﺮﻗ ةرادإ ﻖﻳﺮﻃ ﻦﻋ ﺦﺒﻄﻟا ﺖﻗو ﺾﻔﺧ وأ ةدﺎﻳز ﻚﻨﻜﳝ ﺦﺒﻄﻟا ءﺎﻨﺛأ
“oC2”
“0�3 kg”
ضﺮﻋ ﻢﺘﻳ ﻰﺘﺣ
START/Add 30 secs
.
ضﺮﻋ ﻢﺘﻳ ﻰﺘﺣ
START/Add 30 secs
.
Time/Weight
Time/Weight
Just 4 U
.(ﺎﻛﺎﻬﻟا ﺔﻧﻮﻛﺮﻌﻣ
رز ﻰﻠﻋ ﻂﻐﺿا
رز ﻰﻠﻋ ﻂﻐﺿا
صﺮﻘﻟا ردأ
رز ﻰﻠﻋ ﻂﻐﺿا
صﺮﻘﻟا ردأ
رز ﻰﻠﻋ ﻂﻐﺿا
Time/Weight
.
ﻢﻈﻌﻣ ﻮﻬﻄﺗ نأ ﻚﻟ
عﻮﻧ ﺪﯾﺪﺤﺗ ﻖﯾﺮﻃ ﻦﻋ ﺔﻠﻀﻔﻤﻟا ﻚﺘﻤﻌﻃأ
)
Just 4 U
.
ﻢﺋاﻮﻗ ﺔﺠﻣﺮﺑ ﻢﺘﺗ
Just 4 U
ﺔﻔﯿﻇو ﺢﯿﺘﺗ
.ﻪﻧزوو مﺎﻌﻄﻟا
21

.ﺮﯿﻧﺎﺑ ﻻﺎﺴﻣ ﺔﻠﻛأ ﻦﻣ ماﺮﺟ ﻮﻠﯿﻛ ﻒﺼﻧ ﻲﻬﻃ ﺔﯿﻔﯿﻛ ﻲﻟﺎﺘﻟا لﺎﺜﻤﻟا ﻲﻓ ﻚﻟ ﺢﺿوﺄﺳ
STOP/CLEAR
ضﺮﻌﻟا ﺔﺷﺎﺷ ﻰﻠﻋ
“FE3”
ضﺮﻋ ﻢﺘﻳ ﻰﺘﺣ
.
Utility Corner
.
Time/Weight
رز ﻰﻠﻋ ﻂﻐﺿا
رز ﻰﻠﻋ ﻂﻐﺿا
صﺮﻘﻟا ردأ
.(ﺮﯿﻧﺎﺑ ﻻﺎﺴﻣ
Utility Corner
Utility Corner
.
”Utility Corner“
ﻦﻋ ﺔﻠﻀﻔﻤﻟا ﻚﺘﻤﻌﻃأ ﻢﻈﻌﻣ ﻮﻬﻄﺗ نأ ﻚﻟ
)
زﺎﺒﺨﻟا ﺔﻠﺳ ﺔﻔﯿﻇو ﺢﯿﺘﺗ
.ﻪﻧزوو مﺎﻌﻄﻟا عﻮﻧ ﺪﯾﺪﺤﺗ ﻖﯾﺮﻃ
ﻢﺋاﻮﻗ
ﻢﺋاﻮﻗ ﺔﺠﻣﺮﺑ ﻢﺘﺗ
START/Add 30 secs
.
.ضﺮﻌﻟا ﺔﺷﺎﺷ ﻰﻠﻋ
صﺮﻗ ةرادإ ﻖﻳﺮﻃ ﻦﻋ ﺦﺒﻄﻟا ﺖﻗو ﺾﻔﺧ وأ ةدﺎﻳز ﻚﻨﻜﳝ ﺦﺒﻄﻟا ءﺎﻨﺛأ
“0�5 kg”
ضﺮﻋ ﻢﺘﻳ ﻰﺘﺣ
START/Add 30 secs
.
Time/Weight
رز ﻰﻠﻋ ﻂﻐﺿا
صﺮﻘﻟا ردأ
رز ﻰﻠﻋ ﻂﻐﺿا
Time/Weight
.
22

ﺐﯿﻛﺮﺗ
ةاﻮﺸﻤﻟا
ﻲﻓ ﻂﯿﺨﻟﺎﺑ مﺎﻌﻄﻟا ﻂﺑراو .مﺎﻌﻄﻟا ﻂﺳو ﻲﻓ ﺔﯾاﻮﺸﻟا ﺦﯿﺳ نارود ﻦﻣ ﺪﻛﺄﺘﻟا ﻊﻣ ﺦﯿﺴﻟا ﻲﻓ مﺎﻌﻄﻟا ﻊﺿ
.(مﺎﻌﻃ نوﺪﺑ) ﺔﯾاﻮﺸﻟا ﺦﯿﺳ ماﺪﺨﺘﺳﺎﺑ ﻊﻤﺠﻤﻟا ﻲﻠﯿﻐﺸﺘﻟا ﻊﺿﻮﻟا ﻲﻓ نﺮﻔﻟا ﻞﯿﻐﺸﺘﺑ ﻢﻘﺗ ﻻ
.ﻒﯾووﺮﻜﯿﻤﻟا ﻊﺿو ﻲﻓ ﺔﯾاﻮﺸﻟا ﺦﯿﺳ مﺪﺨﺘﺴﺗ ﻻ
.ﺮﻣﻷا مﺰﻟ اذإ ﺦﯿﺴﻟا
ةاﻮﺸﻤﻟا ﻚﻓ
.نﺮﻔﻟا راﺪﺟ ﻦﻣ ﺮﺴﯾﻷا ﺐﻧﺎﺠﻟا ﻲﻓ
.(A) ةاﻮﺸﻤﻟا ﻚﻓ ﻲﻓ ةاﻮﺸﻤﻟا ﺦﯿﺳ ﺮﻘﺘﺴﯾ ﻰﺘﺣ ًﻼﯿﻠﻗ ﺔﯾاﻮﺸﻟا ﺦﯿﺳ ردأو رﺎﺴﯿﻟا ﺔﯿﺣﺎﻧ ﻪﻌﻓدا
.(B) ةاﻮﺸﻤﻟا ﻞﻣﺎﺣ ﻒﯾﻮﺠﺗ ﻲﻓ (D) ﺔﯾاﻮﺸﻟا ﺦﯿﺳ ﻦﻣ ﺮﺧﻵا فﺮﻄﻟا ﻢﻋدا
ةاﻮﺸﻤﻟا ﻞﻣﺎﺣ
(A) ةاﻮﺸﻤﻟا ﻚﻓ ﻲﻓ (C) ﺔﯾاﻮﺸﻟا ﺦﯿﺳ فﺮﻃ ﻞﺧدأ
23

ﻪﻴﺒﻨﺗ
اﺪﻴﺟ ﺦﺒﻄﻠﻟ ﺔﺼﺼﺨﳌا تﺎﻗو ﻻا ﻦﻣ ﺪﻛﺄﺗ
يذﺆﺗ دﺪﶈا ﺖﻗﻮﻟا ﻦﻋ ﺦﺒﻄﻟا ةدﺎﻳز نﻻ
.نﺮﻔﻟا فﻼﺗإو ﻖﺋا ﺮﳊا ثاﺪﺣإ ﻰﻟا
ﺔﻣﻼﺴﻟا ﻞﺟأ ﻦﻣ تاﺮﻳﺬﲢ
ﻞﺒﻘﺘﺴﳌا ﻲﻓ ﺎﻬﯿﻟإ عﻮﺟﺮﻠﻟ ﺎﻬﺑ ﻆﻔﺘﺣاو ﺔﻳﺎﻨﻌﺑ ﺎﻫأﺮﻗا
ءاﺮﺟإ
نﺎﻣﻷا
هﺮﺸﻘﺑ ﺾﯿﺒﻟا ﻮﻬﻄﺗ ﻻ
ءﺎﺸﻐﺑ
ﺚﯿﺣ
.تﺎﻤﯿﻠﻌﺘﻟا ﻚﻠﺗ
ﺔﻌﺻﺮﻣ
ﻪﻓاﺮﻃآو نﺮﻔﻟا بﺎﺑ ﻦﯿﺑ ءﻲﺷ
اﻮﻤﻠﻌﯾو
ﺔﻠﻣﺎﺤﻟا
24

ﺔﻣﻼﺴﻟا ﻞﺟأ ﻦﻣ تاﺮﻳﺬﲢ
ﺔﺒﺳﺎﻨﻤﻟا
ﻞﺒﻘﺘﺴﳌا ﻲﻓ ﺎﻬﯿﻟإ عﻮﺟﺮﻠﻟ ﺎﻬﺑ ﻆﻔﺘﺣاو ﺔﻳﺎﻨﻌﺑ ﺎﻫأﺮﻗا
لﺎﻔﻗأ
لﻮﻔﻘﻤﻟا
ﺔﻨﻣآ
ةادأ
ﻪﯿﻠﻏ ﺪﻌﺑ وأ هﺮﺸﻘﺑ ﺾﯿﺒﻟا ﻦﯿﺨﺴﺗ مﺪﻋ ﺐﺠﯾ
لﺎﻔﻗأ ﻒﯿﻈﻨﺗ ﻞﯿﺻﺎﻔﺗ ﻰﻠﻋ ﻊﻠﻃا
ﺔﻔﯿﻈﻧ ﺔﻟﺎﺣ ﻲﻓ نﺮﻔﻟا ﻰﻠﻋ ﺔﻈﻓﺎﺤﻤﻟا
.ةﺮﯿﻄﺧ ﺔﻟﺎﺣ
25
ساﺮﺘﺣﻻا
.ﻲﻓﺎﺿﻹا

مﺰﺘﻌﯾ ﻲﺘﻟا
ﺎﻬﯿﻓ ﺦﺒﻄﻟا مﺰﺘﻌﯾ ﻲﺘﻟا
ﺔﻨﻣﻵا ﺦﺒﻄﻟا ﻲﻧاوأ
ﻒﻳووﺮﻜﻳﺎﳌا نﺮﻔﺑ
ﻒﺷﺎﻨﻤﻟا
ﻖﺷ ﻞﻤﻌﺑ مﻮﻘﺗ
ﻦﻣآ
ﺔﯿﺟﺎﺟﺰﻟا
26

ﺔﻴﺋاﺬﻐﻟا داﻮﳌا ﺺﺋﺎﺼﺧ
ﻒﻳووﺮﻜﻳﺎﳌا نﺮﻔﺑ ﺦﺒﻄﻟاو
داﺪﻋﻹ
ءﻲﻀﯾ يﺬﻟا ةءﺎﺿﻺﻟ
تادﺎﺷرﻹا
ﻲﻬﻄﻟا ﻲﻓ ﺪﯾﺰﺗ وأ ﻲﻬﻄﻟا
ىﺪﺑ
ﺐﯿﺘﻜﻟا
ﺪﻨﻋ وأ ﻞﻔﺳﻷا ﻲﻓ ﺦﺒﻄﻟا ﻞﻤﺘﻜﻣ
ﺔﯾﺎﻬﻨﻟا
مزﻼﻟا
ﺐﯿﻠﻘﺗ
27

ﺪﻌﺑ فﺎﻘﯾﻹا
ﺔﻴﺋاﺬﻐﻟا داﻮﳌا ﺺﺋﺎﺼﺧ
ﻒﻳووﺮﻜﻳﺎﳌا نﺮﻔﺑ ﺦﺒﻄﻟاو
ﻞﺋاﻮﺴﻟاو ﻊﻘﺒﻟاو .ﺔﻟﻮﻠﺒﻣ
ﻢﻜﺤﺘﻟاﻞﯿﻐﺸﺘﻟا
ﺔﺒﺴﻧ
.ﻢﻜﺤﺘﻟا
ﻊﻗاﻮﻘﻟاو
ﺮﺠﻔﻨﺗ ﺪﻗ ءﺎﺸﻐﻟا وأ ﺪﻠﺠﻟا وأ ﺮﺸﻘﻟا تاذ
ﻰﻟإ
28
ﺔﻠﺌﺳأ
ﺔﺑﻮﺟأو
ﻮﻬﻄﯾ
ﺾﯿﺒﻟا ﺮﺠﻔﻨﯾ
نﺎﻨﺳﺄﺑ
مﺎﻌﻄﻟا ﺞﻀﻧ ﺔﯿﻠﻤﻋ ﺮﻤﺘﺴﺗ
29

ﺔﻴﻨﻔﻟا تﺎﻔﺻاﻮﳌا
MC2881SUS
ﺰﺗﺮﻫ ٥٠ ددﺮﺘﻣ رﺎﻴﺗ ﺖﻟﻮﻓ ٢٣٠ ﺔﻗﺎﻄﻟا رﺪﺼﻣ
(60705
ﻖﻤﻋ)ﻢﻠﻣ ٤٩٥ × (عﺎﻔﺗرا)ﻢﻠﻣ ٣٠٥ × (ضﺮﻋ)ﻢﻠﻣ ٥١٠
(
ﺲﻴﻳﺎﻘﻣو ﺮﻴﻳﺎﻌﻣ ﺮﻳﺪﻘﺗ) طاو ٩٠٠ ﺔﻴﺘﻟﻮﻔﻟا
ﺰﺗﺮﻫﺎﻐﻴﻣ ٢٤٥٠ ﻒﻳووﺮﻜﻳﺎﳌا ددﺮﺗ
طاو ١٣٥٠ ﻒﻳووﺮﻜﻳﺎﳌا
طاو ١١٠٠ ﺔﻳاﻮﺸﻟا
ﻰﺼﻓأ ﺪﺤﺑ طاو ٣١٠٠ ﻲﻌﻤﳉا
ﻰﺼﻓأ ﺪﺤﺑ طاو
(
١٩٠٠) طاو ٧٥٠ يراﺮﳊا لﺎﻘﺘﻧﻻا
ﺔﻴﺟرﺎﳋا دﺎﻌﺑﻷا
ﺔﻗﺎﻄﻟا كﻼﻬﺘﺳا
ﺲﺑﺎﻘﻟا ﻞﻴﺻﻮﺗ تﺎﻤﻴﻠﻌﺗ
/
ﺔﻴﻨﻔﻟا تﺎﻔﺻاﻮﳌا
كﻼﺳأ ناﻮﻟأ
30
 Loading...