


Test Report No.: GETEC-E3-07-099
FCC Class B Certification
APPENDIX H
: USER’S MANUAL
EUT Type: LCD Monitor
FCC ID: BEJM5201CE

User’s Guide
M5201C
Make sure to read the Important Precautions before using the product.
Keep the User's Guide(CD) in an accessible place for future reference.
See the label attached on the product and give the information to your dealer when you ask
for service.
Safety Precautions
Please read these safety precautions carefully before using the product.
Warning
Caution
If you ignore the warning message, you may be seriously injured or there is a possibility of
accident or death.
If you ignore the caution message, you may be slightly injured or the product may be damaged
Precautions in installing the Product
Warning
Keep away from heat sources like electrical heaters.
- Electrical shock, fire, malfunction or deformation may occur.
Keep the packing anti-moisture material or vinyl packing out of the reach of children.
- Anti-moisture material is harmful if swallowed. If swallowed by mistake, force the patient to vomit and visit the
nearest hospital. Additionally, vinyl packing can cause suffocation. Keep it out of the reach of children.
Do not put heavy objects on the product or sit upon it.
- If the product collapses or is dropped, you may be injured. Children must pay particular attention.
Do not leave the power or signal cable unattended on the pathway.
- The passerby can falter, which can cause electrical shock, fire, product breakdown or injury.
Install the product in a neat and dry place.
- Dust or moisture can cause electrical shock, fire or product damage.
If you can smell smoke or other odors or hear a strange sound unplug the power cord and contact the
service center.
- If you continue to use without taking proper measures, electrical shock or fire can occur.
If you dropped the product or the case is broken, turn off the product and unplug the power cord.
- If you continue to use without taking proper measures, electrical shock or fire can occur. Contact the service
center.
Do not drop an object on or apply impact to the product. Do not throw any toys or objects on the product
screen.
- It can cause injury to human, problem to product and damage the display.
Caution
Make sure the product ventilation hole is not blocked. Install the product in a suitably wide place (more
than 10cm from the wall)
- If you install the product too close to the wall, it may be deformed or fire can break out due to internal heat.
Do not block the ventilation hole of the product by a tablecloth or curtain.
- The product can be deformed or fire can break out due to overheating inside the product.
Install the product on a flat and stable place that has no risk of dropping the product.
- If the product is dropped, you may be injured or the product may be broken.
Install the product where no EMI occurs.
Keep the product away from direct sunlight.
- The product can be damaged.
1
Safety Precautions
Electrical Power Related Precautions
Warning
Make sure to connect the power cable to the grounded current.
- You may be electrocuted or injured.
Use the rated voltage only.
- The product can be damaged, or you may be electrocuted.
In the presence of thunder and lightning, never touch the power cord and signal cable because it can be
very dangerous.
- It can cause electric shock.
Do not connect several extension cords, electrical appliances or electrical heaters to a single outlet.
Use a power bar with a grounding terminal designed for exclusive use with the computer.
- A fire can break out due to overheating.
Do not touch the power plug with wet hands. Additionally, if the cord pin is wet or covered with dust, dry
the power plug completely or wipe dust off.
- You may be electrocuted due to excess moisture.
If you don’t intend to use the product for a long time, unplug the power cable from the product.
- Covering dust can cause a fire, or insulation deterioration can cause electric leakage, electric shock or fire.
Fix the power cable completely.
- If the power cable is not fixed completely, a fire can break out.
Hold the plug when pulling out the power cable. Do not bend the power cord with excessive force or put
heavy objects on the power cord.
- The power line can be damaged, which may cause electric shock or fire.
Do not insert a conductor (like a metal chopstick) into one end of the power cable while the other end is
connected to the input terminal on the wall. Additionally, do not touch the power cable right after
plugging into the wall input terminal.
- You may be electrocuted.
The power supply cord is used as the main disconnection device. Ensure that the socket-outlet is easily
accessible after installation.
Main power breaker is the power cord and this breaking device must be located at a location where it is easy
to operate.
Caution
Do not unplug the power cord while the product is in use.
- Electrical shock can damage the product.
Precautions in Moving the Product
Warning
Make sure to turn off the product.
- You may be electrocuted or the product can be damaged.
Make sure to remove all cables before moving the product.
- You may be electrocuted or the product can be damaged.
2
2
Safety Precautions
Caution
Do not shock the product when moving it.
- You may be electrocuted or the product can be damaged.
Do not dispose the product-packing box. Use it when you move.
Make the panel face forward and hold it with both hands to move.
- If you drop the product, the damaged product can cause electric shock or fire. Contact with the service center
for repair.
Precautions in Using the Product
Warning
Do not disassemble, repair or modify the product at your own discretion.
- Fire or electric shock accident can occur.
- Contact the service center for check, calibration or repair.
When cleaning the brown tube surface, unplug the power cord and scrub with soft cloth to prevent
scratching. Do not clean with a wet cloth.
Keep the product away from water.
- Fire or electric shock accident can occur.
Caution
Do not put or store inflammable substances near the product.
- There is a danger of explosion or fire due to careless handling of the inflammable substances.
When cleaning the brown tube surface, unplug the power cord and scrub with soft cloth to prevent
scratching. Do not clean with a wet cloth.
- The water can sink into the product, which can cause electric shock or serious malfunction.
Take a rest from time to time to protect your vision.
Keep the product clean at all times.
Take a comfortable and natural position when working with a product to relax the muscles.
Take a regular break when working with a product for a long time.
Do not press strongly upon the panel with a hand or sharp object such as nail, pencil or pen, or make
a scratch on it.
Keep the proper distance from the product.
- Your vision may be impaired if you look at the product too closely.
Set the appropriate resolution and clock by referring to the User’s Guide.
- Your vision can be impaired.
Use authorized detergent only when cleaning the product. (Do not use benzene, thinner or alcohol.)
- Product can be deformed.
On Disposal
The fluorescent lamp used in this product contains a small amount of mercury.
Do not dispose of this product with general household waste.
Disposal of this product must be carried out in accordance to the regulations of your local authority.
3
Using the Remote Control
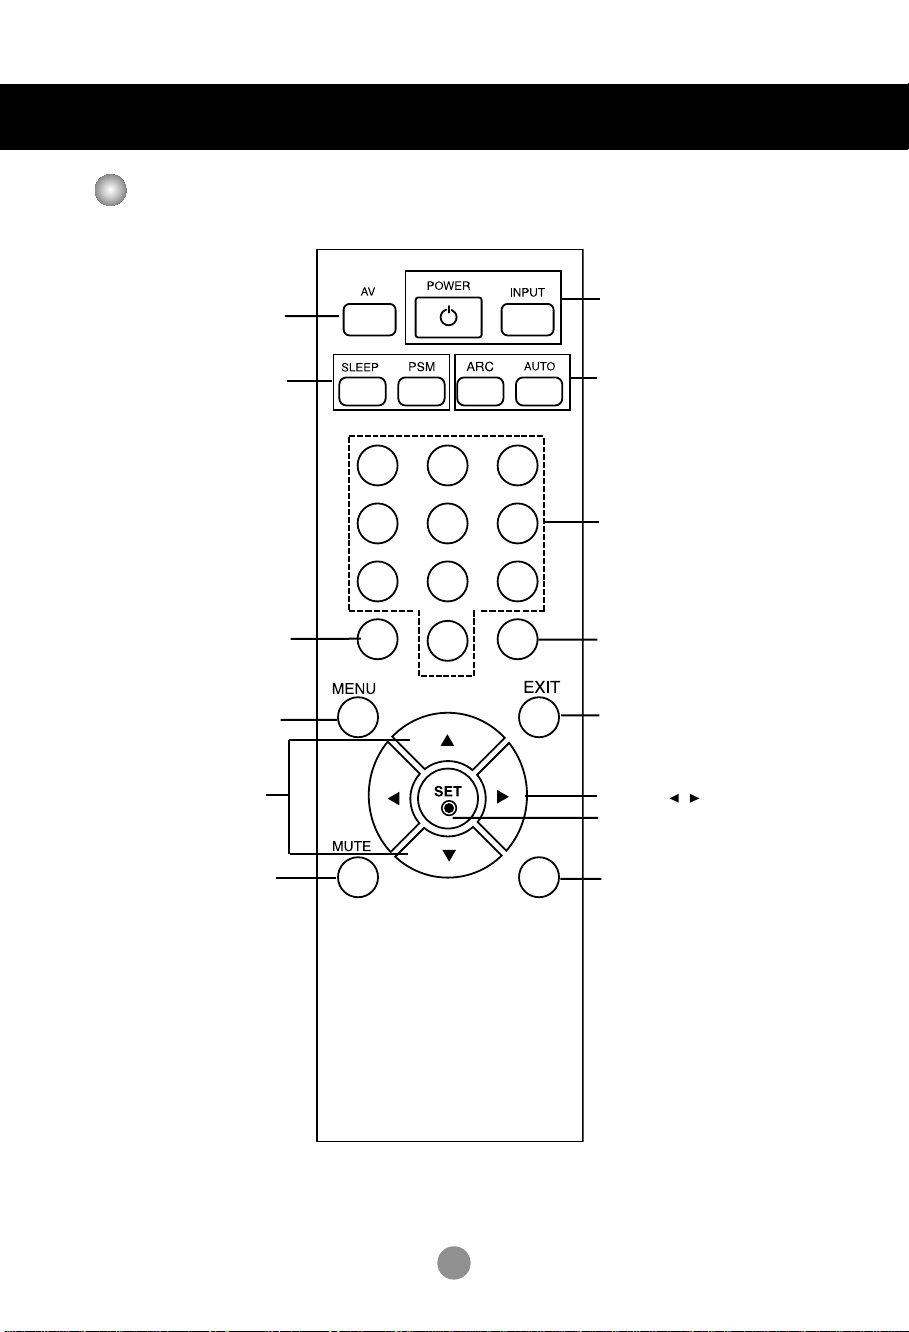
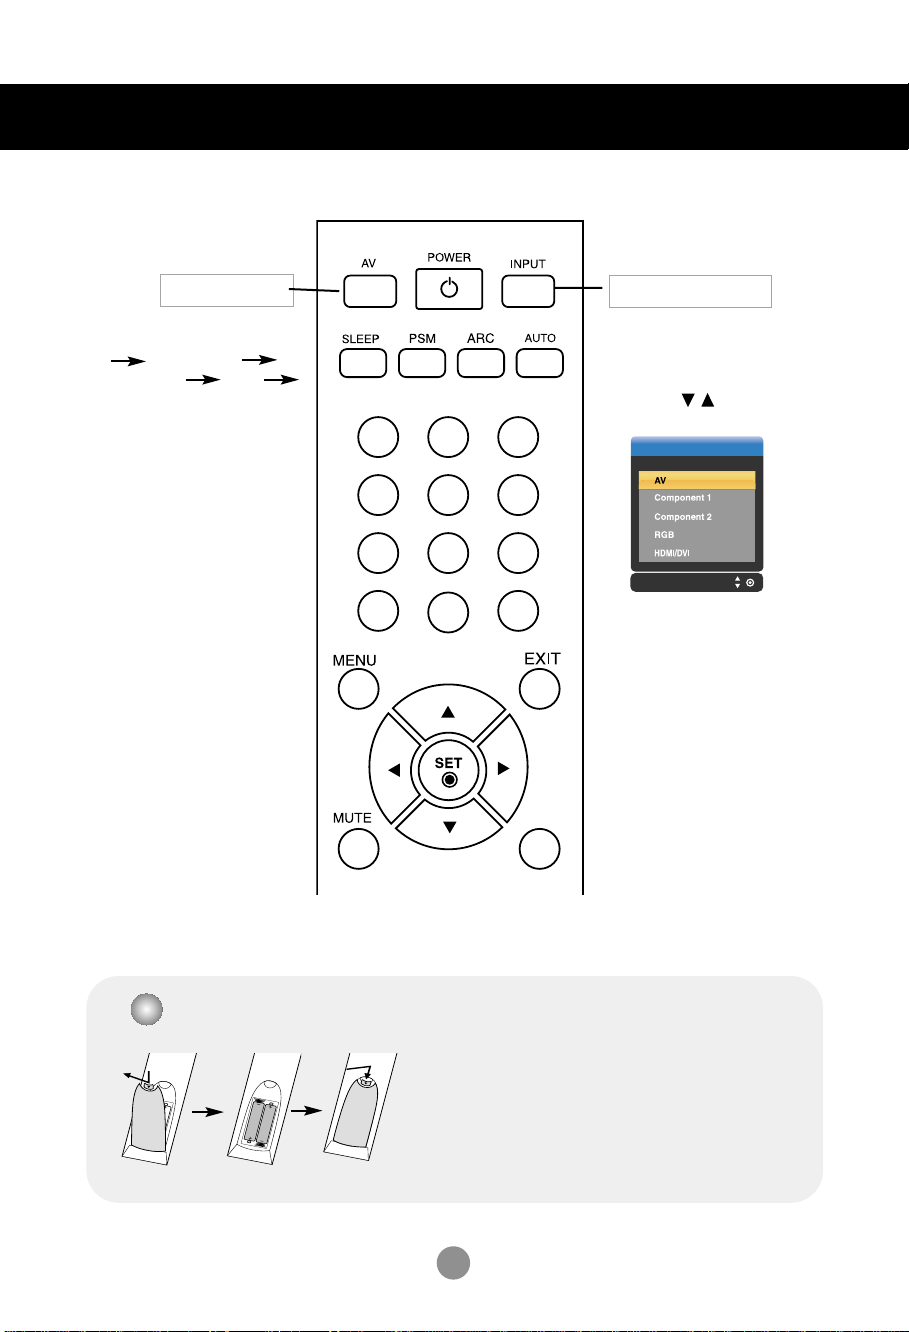
Name of the Remote Control Buttons
•
AV Button
•
When watching AV/S-Video/RGB/HDMI
/
Component1/ Component2
The product will be automatically turned
off after a certain period of time.
Press this button repetitively to
select an appropriate time duration
- Automatically adjusts the image.
Press this button repetitively to set
Sleep Button
•
PSM Button
the intended screen.
1 2 3
4 5 6
7 8
•
Power On/Off Button
•
Input Select Button
(See next page)
•
ARC button
To select the image size of the
screen.
•
Auto Button
Automatic adjustment function
(Operational for the analog signal only)
There is not a function
which is supported
9
There is not a function
which is supported
•
Menu Button
•
UP and Down buttons
Bring up and down direction
adjustment.
•
Mute button
0
There is not a function
which is supported
•
Exit Button
•
Volume Button
•
Check Button
*
There is not a function
which is supported
4
Using the Remote Control
1 2 3
4 5 6
7 8
0
9
*
•
AV Button
Each time you press the Input
button it will change to
AV Component1
Component2 RGB
HDMI/DVI
•
Input Select Button
If you press the button once,
the following Input Signal
Window will appear. Select
the signal type you want
using the button.
Input
Inserting batteries into remote control.
1. Take out the battery cap.
2. Insert the batteries with correct polarity (+/-).
3. Close the battery cap.
• Dispose of used batteries in the recycle bin to prevent
environmental pollution.
5
Name and Function of the Parts
OUT
IN
VIDEO
L-AUDIO-R
VIDEO
YP
B
P
R
RGB IN
RGB OUT
HDMI/DVI IN
L-AUDIO-R
COMPONENT IN
AV
OUT
AV IN
REMOTE
CONTROL IN
RS-232C
(CONTROL&
SERVICE)
1
2
AUDIO
(RGB/DVI)
S-VIDEO
OUT
IN
VIDEO
L-AUDIO-R
VIDEO
YP BP
R
RGB IN
RGB OUT
HDMI/DVI IN
L-AUDIO-R
COMPONENT IN
AV
OUT
AV IN
REMOTE
CONTROL IN
RS-232C
(CONTROL&
SERVICE)
1
2
AUDI O
(RGB/DVI)
S-VIDEO
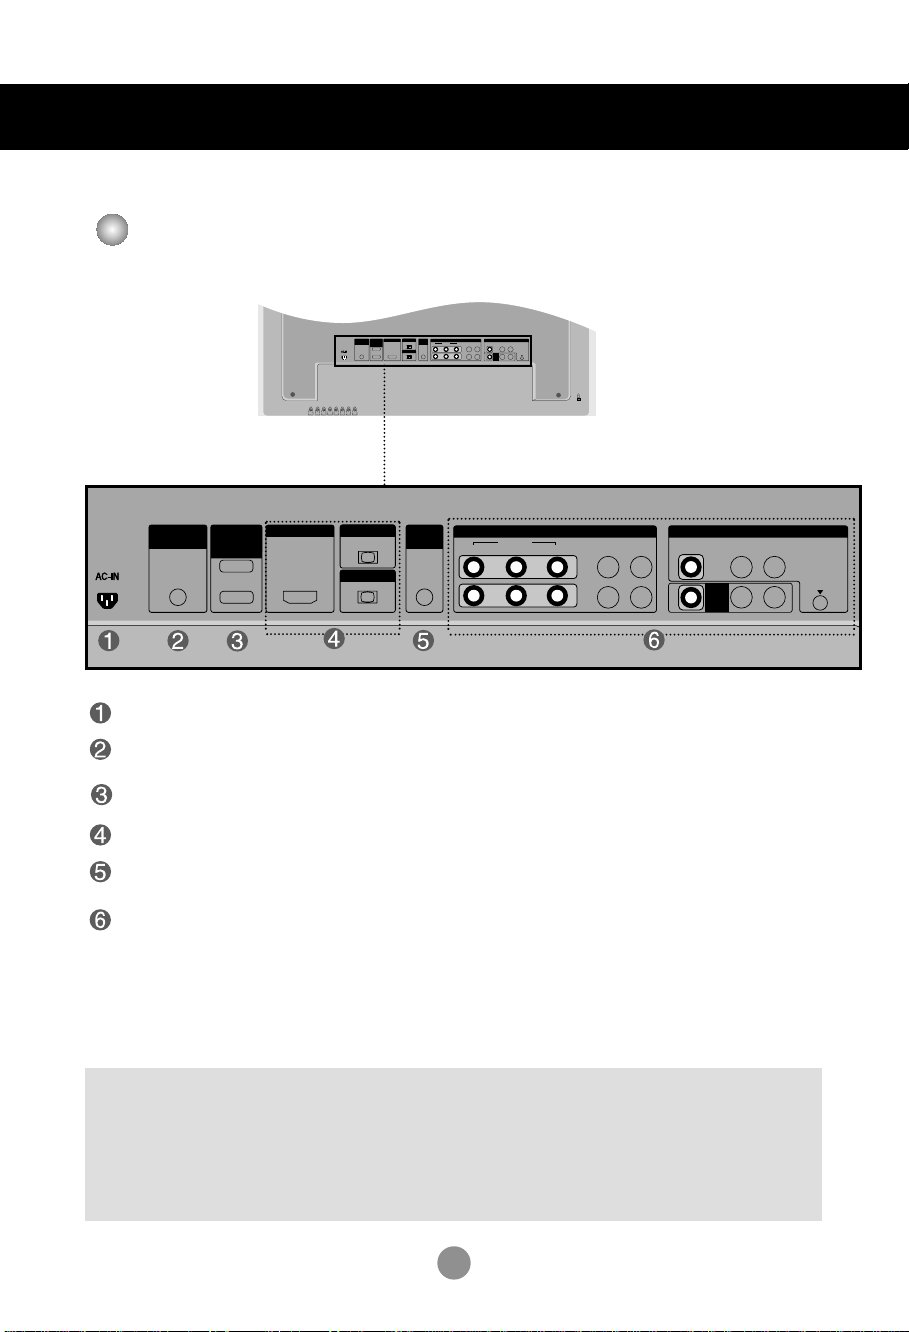
* The product image in the user’s guide could be different from the actual image.
Rear View
Power Connector : Connect the power cord
Wired Remote Control Port
RS-232C Serial Ports
RGB, HDMI/DVI Ports
PC Sound Jack
: Connect the audio cable to the *LINE OUT jack of the PC sound card.
AV Ports
*LINE OUT
A terminal used to connect to the speaker including a built-in amplifier (Amp). Make sure that
the connecting terminal of the PC sound card is checked before connecting. If the Audio Out of
PC sound card has only Speaker Out, reduce the PC volume.
If the Audio Out of the PC sound card supports both Speaker Out and Line Out, convert to Line Out using
the card jumper of the program (Refer to the Sound Card Manual).
6
OUT
IN
VIDEO
L-AUDIO-R
VIDEO
YP
B
P
R
RGB IN
RGB OUT
HDMI/DVI IN
L-AUDIO-R
COMPONENT IN
AV
OUT
AV IN
REMOTE
CONTROL IN
RS-232C
(CONTROL&
SERVICE)
1
2
AUDIO
(RGB/DVI)
S-VIDEO
Connecting to External Devices
AUDIO
(RGB/DVI)
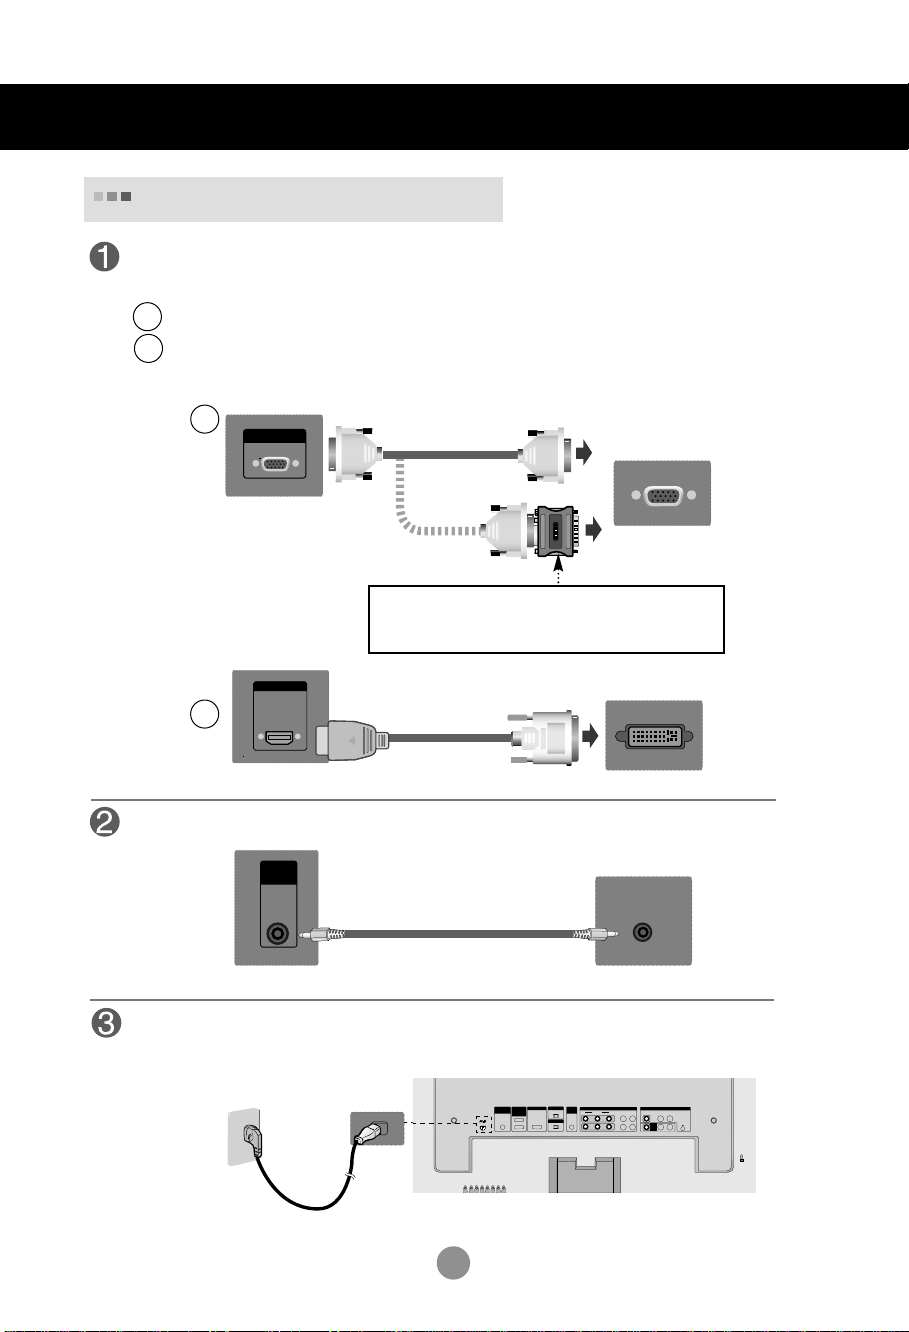
When Connecting to your PC
First of all, see if the computer, product and the peripherals are turned off.
Then, connect the signal input cable.
When connecting with the D-Sub signal input cable.
A
When connecting with the HDMI to DVI signal input cable (not included).
B
A
RGB IN
Rear side of the product.
HDMI/DVI IN
B
Rear side of the product.
Connect the Audio cable.
Rear side of the product.
PC
PC/
MAC
MAC
Macintosh Adapter (not included)
Use the standard Macintosh adapter since an incompatible
adapter is available in the market. (Different signaling system)
(not included)
PC
PC
Connect the power cord.
Rear side of the product.
7
INPUT SET
SOURCE
AUTO/SET
Connecting to External Devices
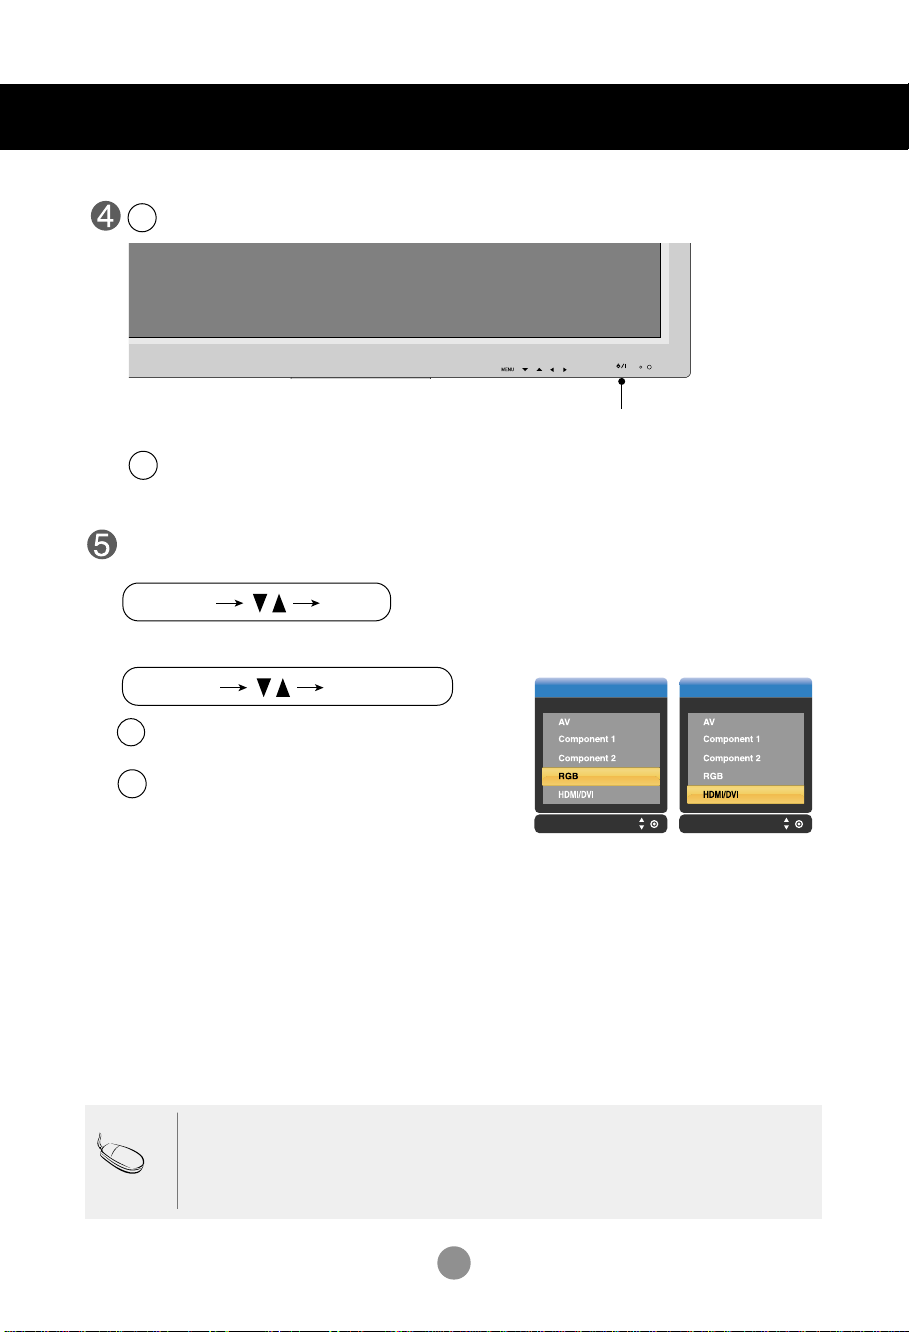
Turn on power by pressing the power button on the product.
1
Turn on the PC.
2
SOURCE
AUTO/SET
ON/OFF
Power button
Select an input signal.
Press the INPUT button on the remote control to select the input signal.
Or, press the SOURCE button on the back of the product.
Input Input
When connecting with a D-Sub signal input cable.
A
• Select RGB : 15-pin
When connecting with a
B
• Select HDMI/DVI :
D-Sub
analog signal.
HDMI to DVI
HDMI to DVI
signal input cable.
Digital signal.
Note
•
How to connect to two computers.
Connect the signal cables (
Press the INPUT button on the remote control to select the computer to use.
•
Directly connect to a grounded power outlet on the wall or a power bar with a ground
wire.
HDMI to DVI
8
and D-Sub) to each computer.
RGB IN
RGB OUT
RGB IN
RGB OUT
RGB IN
RGB OUT
RGB IN
RGB OUT
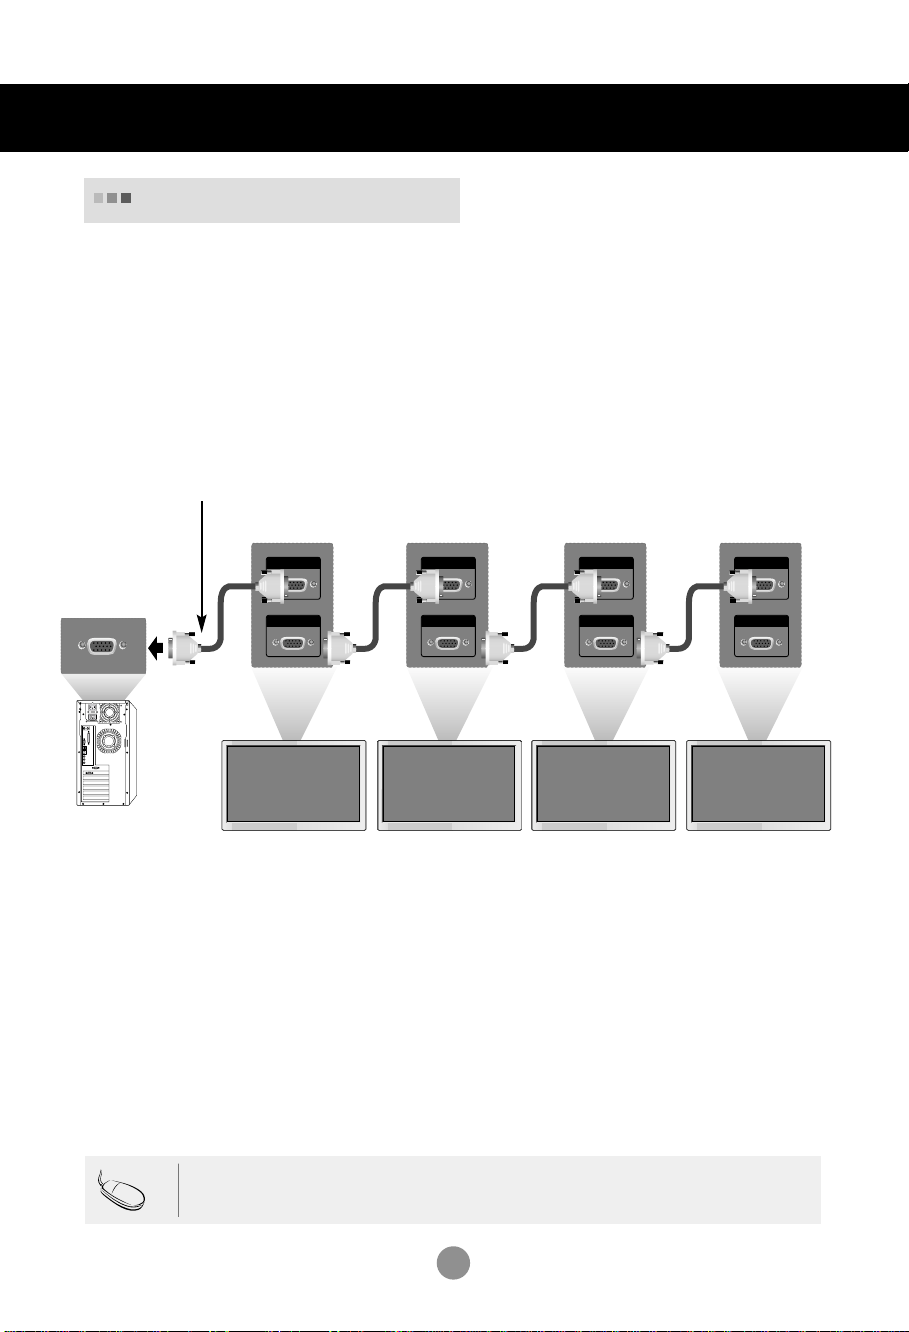
Connecting to External Devices
Watching RGB Outputs
Use this function when displaying ANALOG RGB inputs of a PC to the other product.
•
To use different products connected to each other
Connect one end of the signal input cable(15-pin D-Sub Signal Cable) to the RGB OUT
connector of product 1 and connect the other end to the RGB IN connector of other
products.
15-pin D-Sub Signal Cable
PC
PC
Note
Product 1
Product 2
• When multi-connecting in/out cascade format, no loss cables are recommended.
Product 3
Product 4
We recommend that you should use cable distributor.
9
Connecting to External Devices
L-AUDIO-R
VIDEO
AV
OUT
AV IN
S-VIDEO
Input
INPUT SET
SOURCE
AUTO/SET
L-AUDIO-R
VIDEO
AV
OUT
AV IN
S-VIDEO
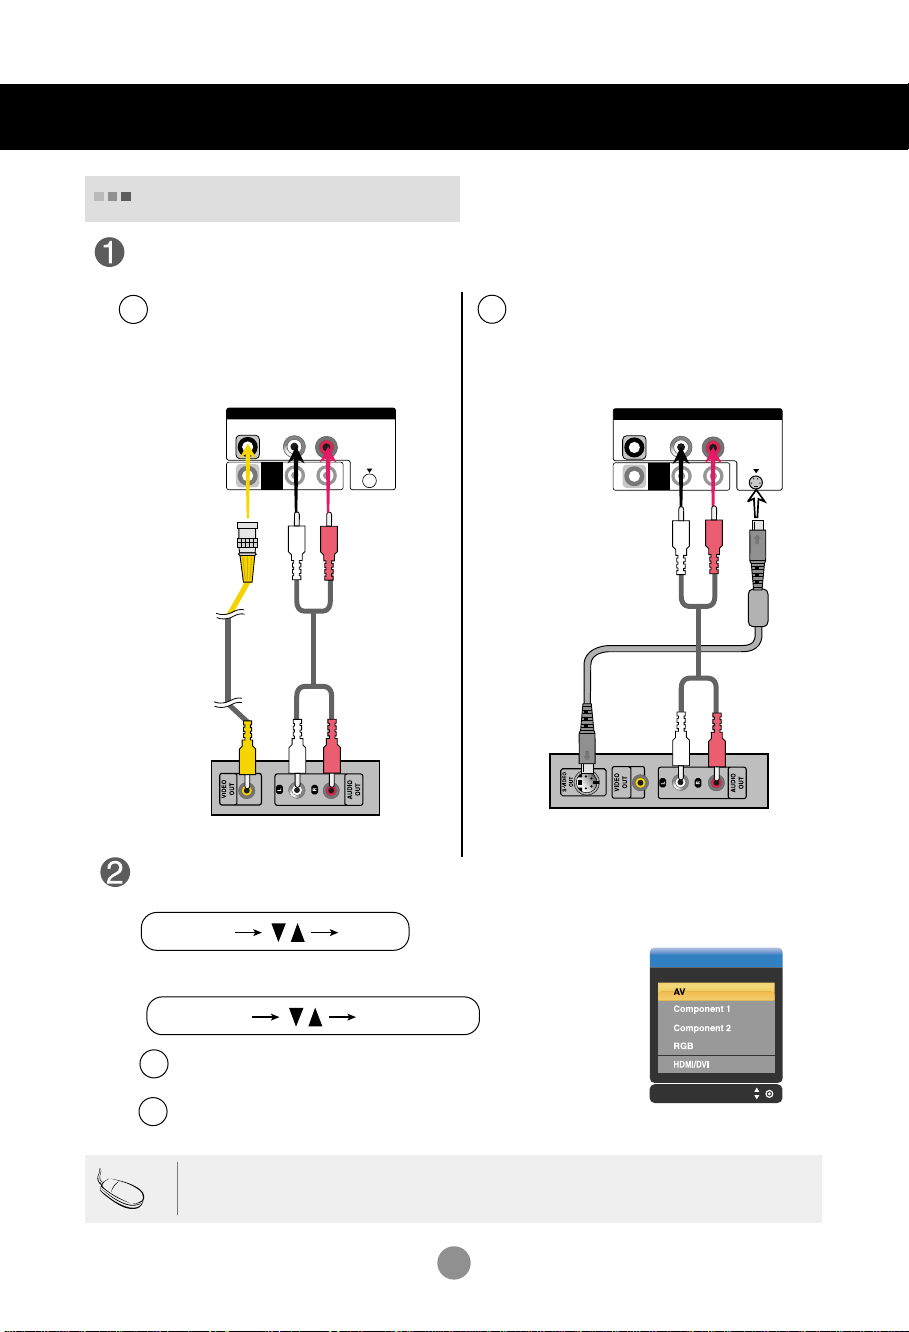
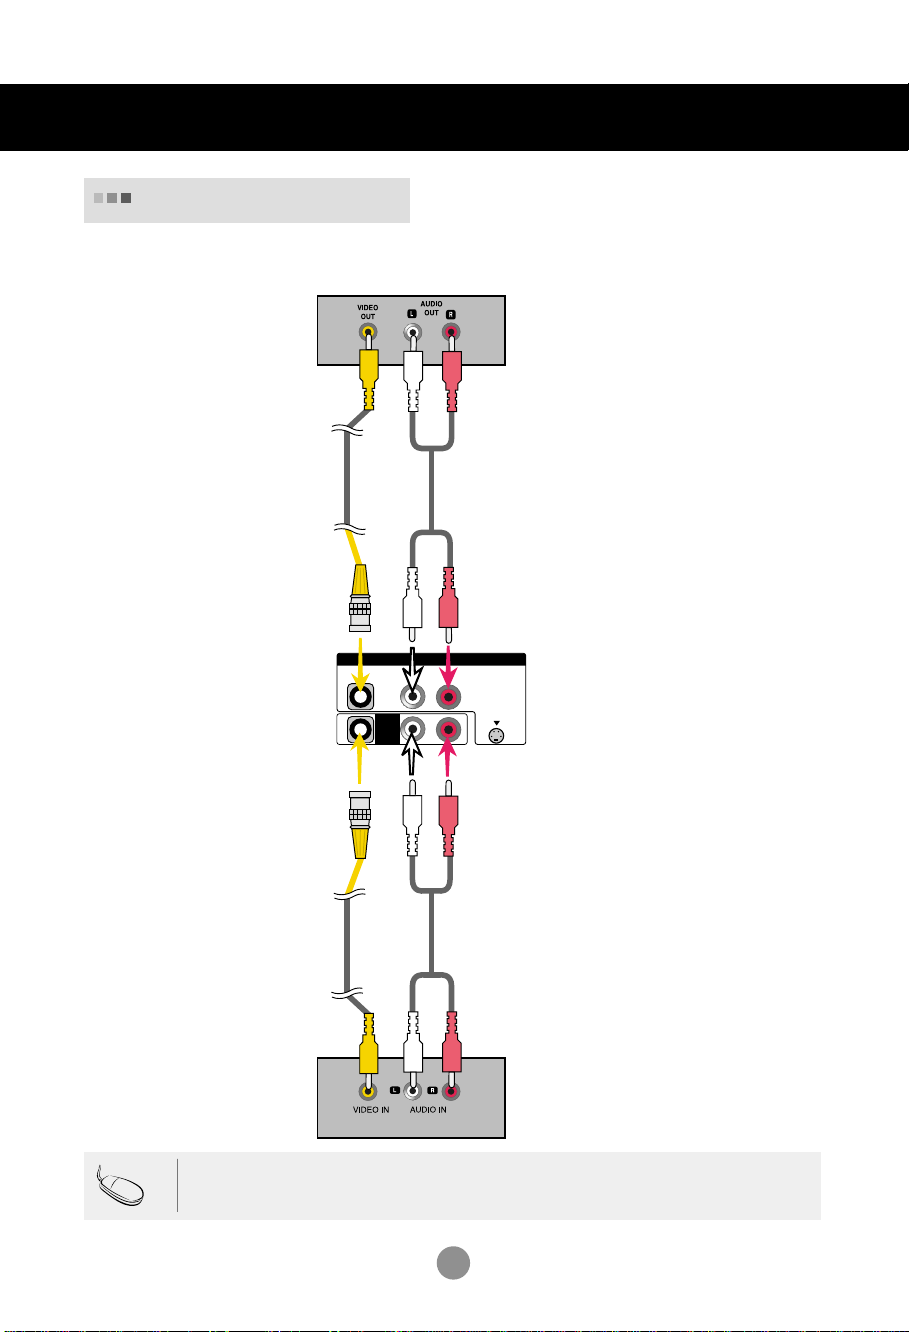
When watching VCR / DVD
Connect the video cable as shown in the below figure and then connect the power
cord (See page 7).
When connecting with a BNC cable.
A
•
Connect the input terminal with a
proper color match.
When connecting with a S-Video cable.
B
•
Connect to the S-Video input terminal to
watch high image quality movies.
Audio Cable
Product
S-Video Cable
(not included)
BNC Cable
(not included)
Product
Audio Cable
(not included)
VCR/DVD Receiver
(not included)
VCR/DVD Receiver
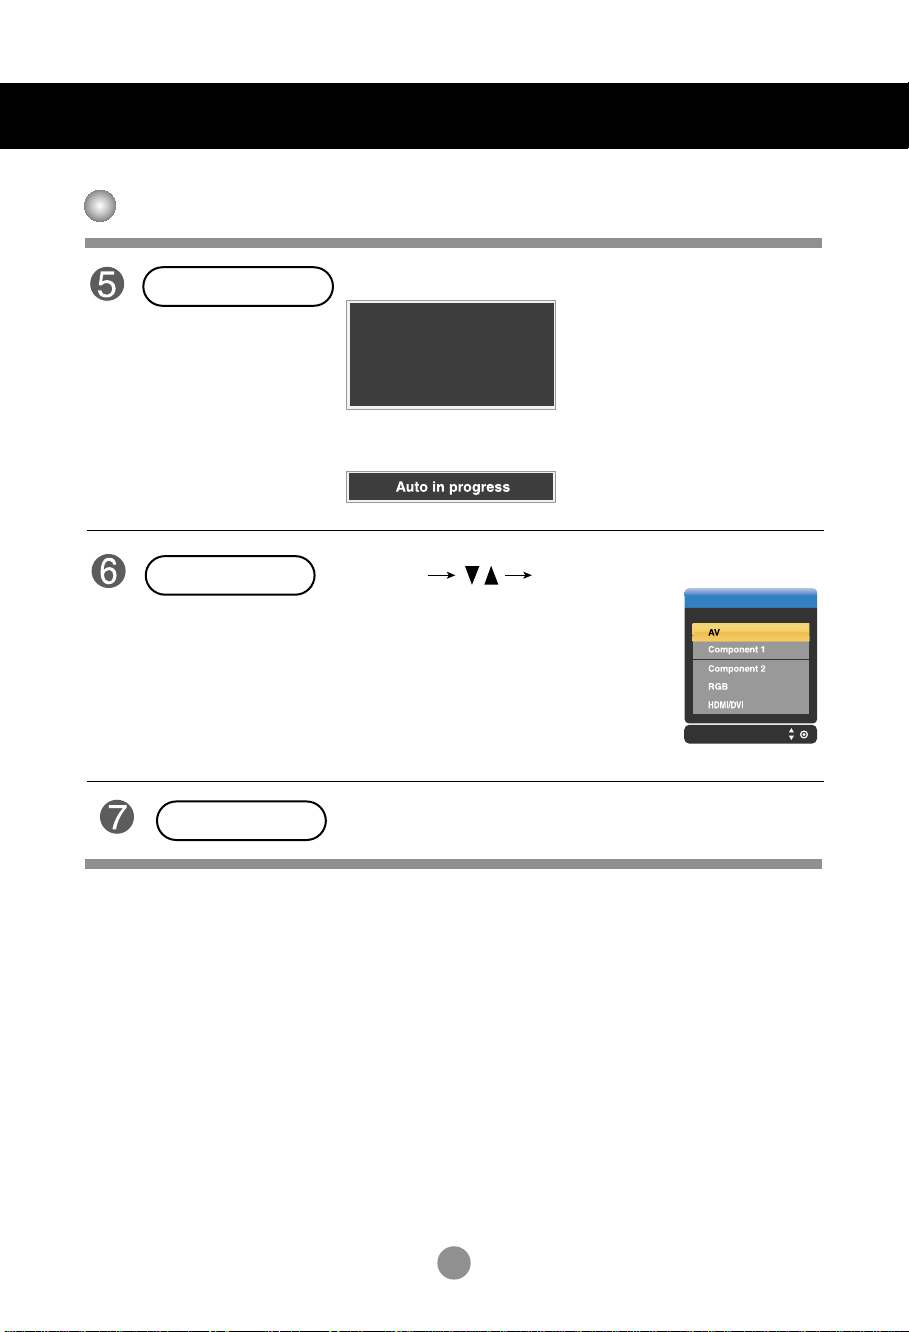
Select an input signal.
Press the INPUT button on the remote control to select the input signal.
Or, press the SOURCE button on the back of the product.
A
When connecting with an S-Video cable.
B
Note
When connecting with an BNC cable.
•
Select AV.
•
Select AV.
• When the BNC cable is connected simultaneously with S-Video cable, S-Video input has a priority.
10
VIDEO
YP
B
P
R
L-AUDIO-R
COMPONENT IN
1
2
Input Input
INPUT SET
SOURCE
AUTO/SET
VIDEO
YP
B
P
R
L-AUDIO-R
COMPONENT IN
1
2
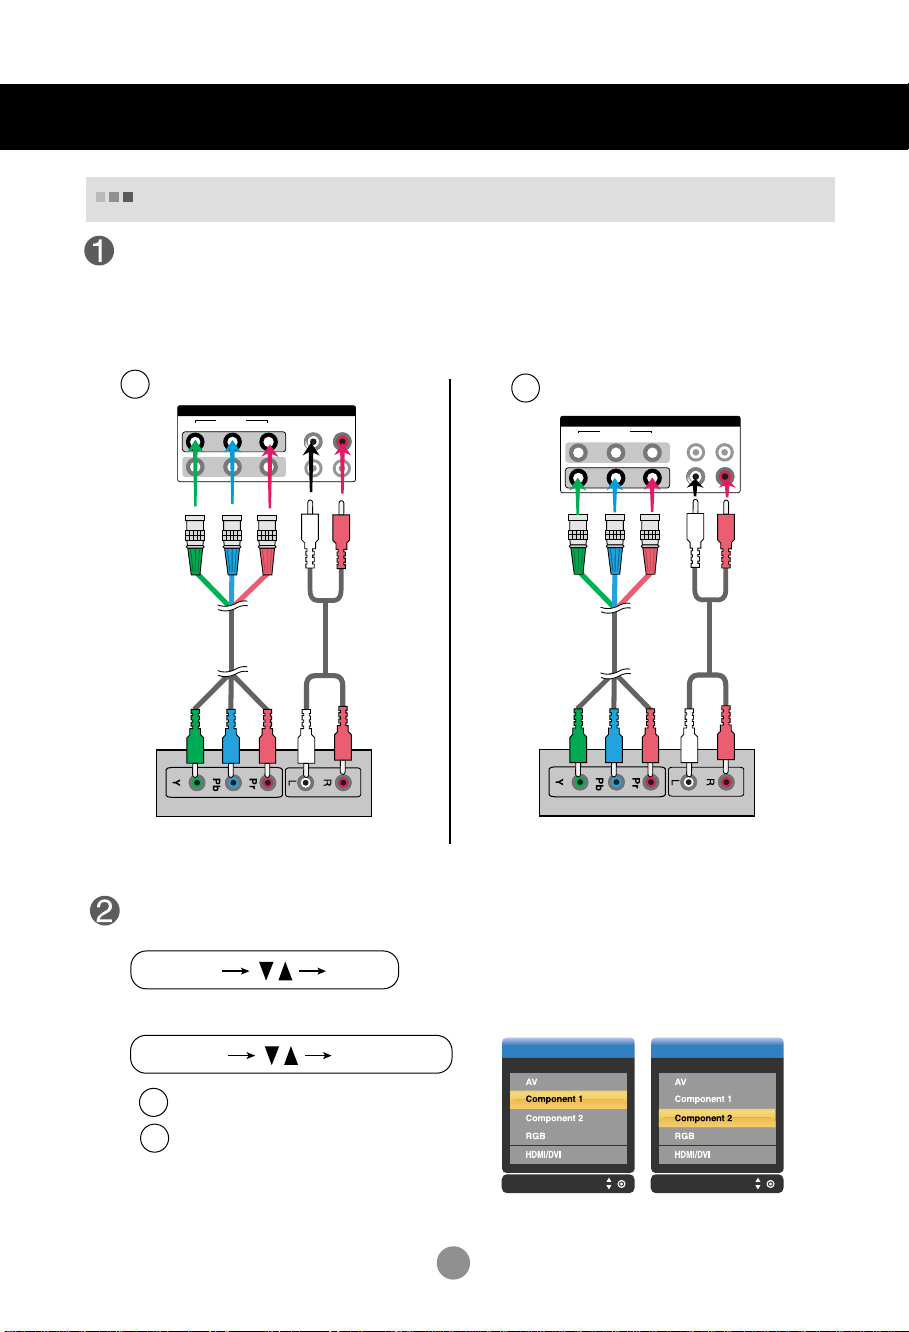
Connecting to External Devices
When watching HDTV/DVD(480p/576p/720p/1080p/1080i/480i/576i)
Connect the video/audio cable as shown in the below figure and then, connect the
power cord (See page 7).
•
Connect the input terminal with a proper color match.
A
BNC Cable
(not included)
Product
Audio Cable
(not included)
HDTV Receiver
Select an input signal.
Press the INPUT button on the remote control to select the input signal.
B
BNC Cable
(not included)
HDTV Receiver
Or, press the SOURCE button on the back of the product.
Product
Audio Cable
(not included)
•
A
•
B
Select Component 1
Select Component 2
11
Input Input
INPUT SET
SOURCE
AUTO/SET
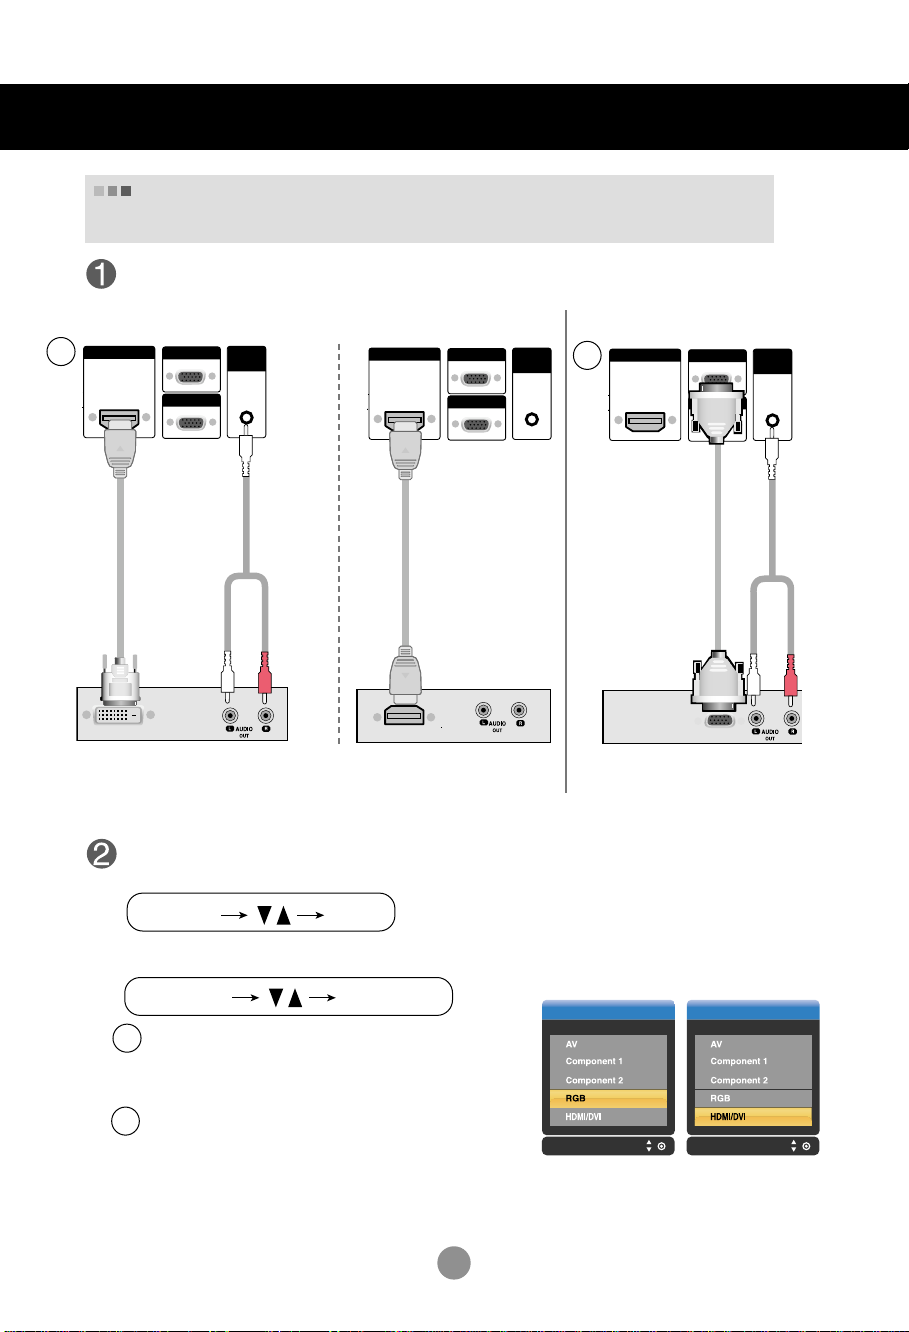
Connecting to External Devices
RGB IN
RGB OUT
HDMI/DVI IN
AUDI O
(RGB/DVI)
When watching
(480p/576p/720p/1080p/1080i)
Connect the video/audio cable as shown in the below figure and then connect the
power cord (See page 7).
HDMI/DVI IN
A
HDMI to DVI
Signal Cable
(not included)
VCR/DVD/Set-top Box
Product
RGB IN
RGB OUT
HDMI/DVI/RGB
AUDIO
(RGB/DVI)
RCA-PC
Audio Cable
from the VCR/DVD/Set-top Box
Product
HDMI/DVI IN
VCR/DVD/Set-top Box
RGB IN
AUDI O
(RGB/DVI)
RGB OUT
HDMI Signal Cable
(not included)
B
D-Sub Signal
Cable
VCR/DVD/Set-top Box
Product
RCA-PC
Audio Cable
Select an input signal.
Press the INPUT button on the remote control to select the input signal.
Or, press the SOURCE button on the back of the product.
A
When connecting with a
When connecting with a
• Select HDMI/DVI
When connecting with a D-Sub signal input cable.
B
• Select RGB
HDMI to DVI
HDMI
signal input cable.
signal input cable.
12
L-AUDIO-R
VIDEO
AV
OUT
AV IN
S-VIDEO
Connecting to External Devices
Watching
•
When you set the input signal of the main screen as 'AV (CVBS)', you can transmit the signal that
you're watching to the AV output terminal.
AV Outputs
Video/TV
BNC Cable
(not included)
Audio Cable
(not included)
Product
Note
BNC Cable
(not included)
Audio Cable
(not included)
Video/TV
• When multi-connecting in/out cascade format, no loss cables are recommended.
We recommend that you should use cable distributor.
13

ON/OFF
AUTO/SET
SOURCE
Selecting and Adjusting the Screen
Name of the Buttons in the Screen Adjustment Unit
Power Button
Power Indicator
MENU Button
OSD Select /
Adjust Button
SOURCE
• Press this button to turn on the power. Press this button again to
turn it off.
• This Indicator lights up blue when the display operates normally(on
mode). If the display is in sleep (Energy Saving) mode, this indicator
colour changes to amber.
• Use this button to show/hide the OSD (On Screen Display) menu
screen.
• Use
this
button to select an icon or adjust the setting in the OSD screen.
• Adjust the up and down.
AUTO/SET
ON/OFF
• Adjust the volume.
14
Input
SOURCE
AUTO/SET
Auto in progress
For opimal display change
resolution to 1920 X 1080
Selecting and Adjusting the Screen
Name of the Buttons in the Screen Adjustment Unit
AUTO/SET Button
SOURCE Button
IR Receiver
[For PC Analog signal]
[When Full HD Mode is active
and 1920 X1080 is selected]
• Select the input signal
AV Composite Video, Separate Video
Component 1 HDTV, DVD
Component 2 HDTV, DVD
RGB 15-pin D-Sub analog signal
HDMI/DVI Digital signal
• The unit that receives the signal from the remote control.
15
Selecting and Adjusting the Screen
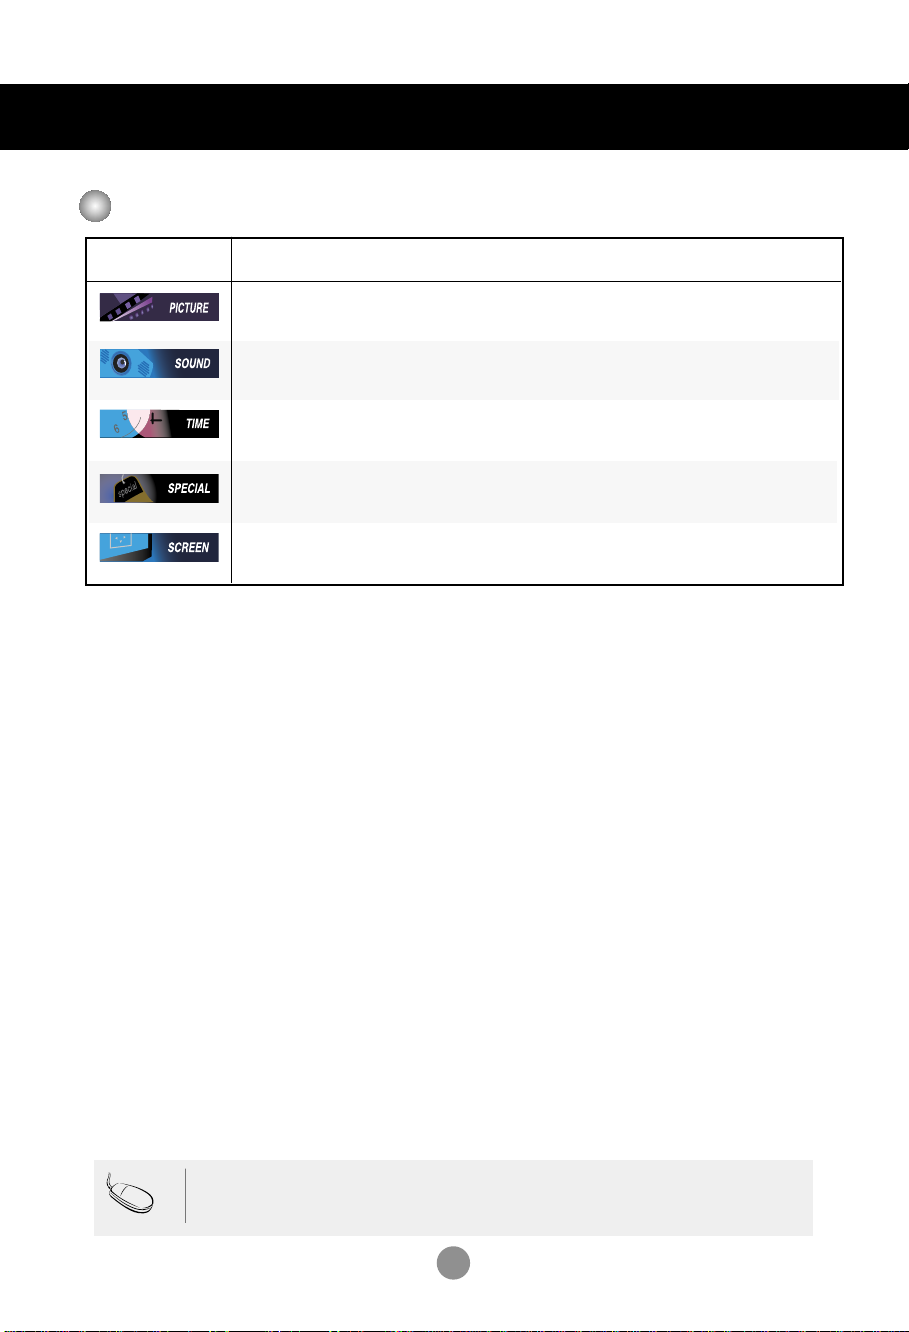
OSD Menu
Icon Function Description
Adjusts screen brightness, contrast and color that you prefer.
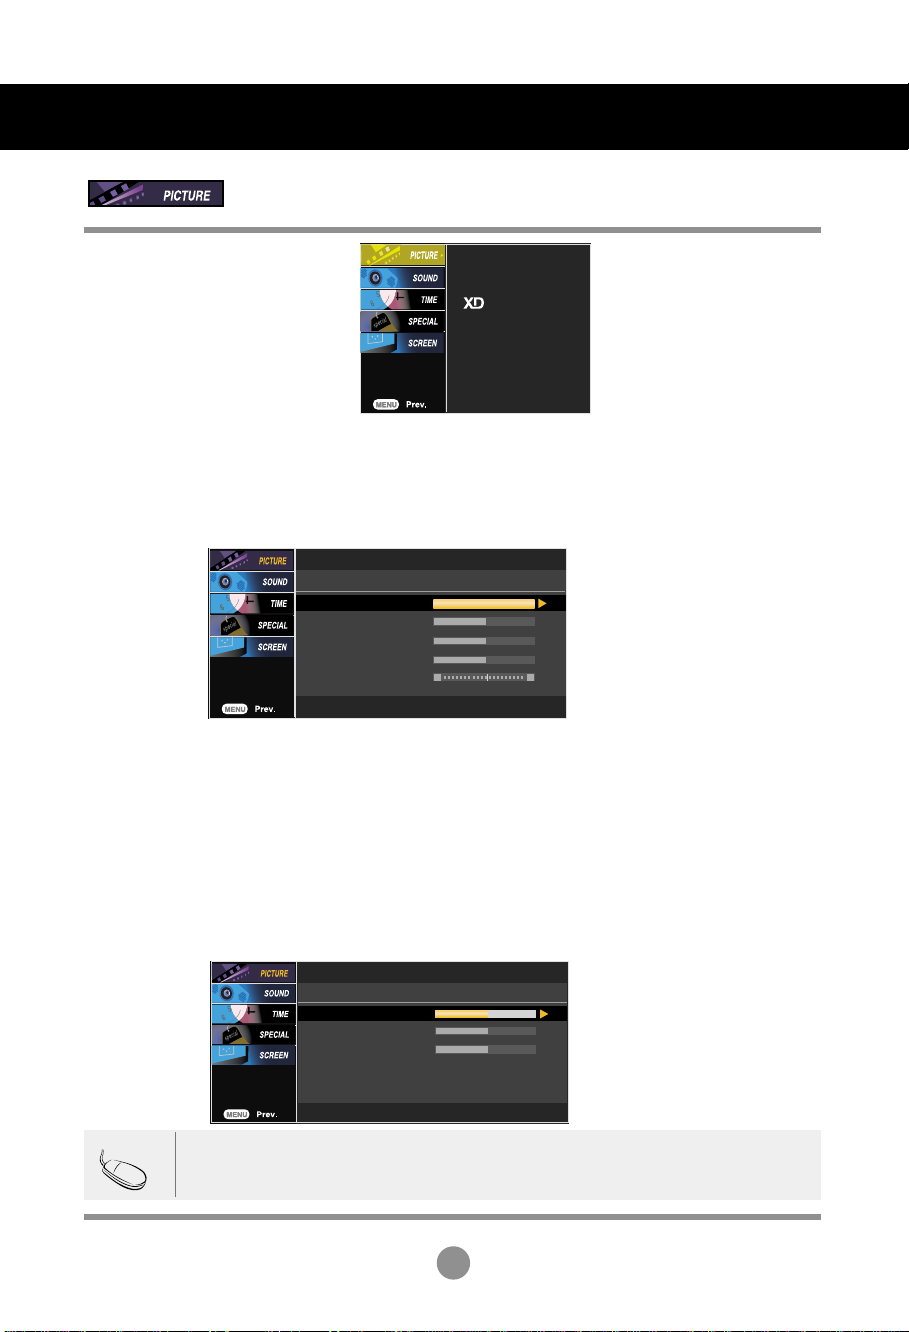
PICTURE
SOUND
TIMER
SPECIAL
SCREEN
Adjusts the audio function.
Adjusts the timer function.
Adjusts the screen status according to the circumstances.
Adjusts the screen video.
Note
OSD(On Screen Display)
The OSD function enables you to adjust the screen status conveniently since it provides
graphical presentation.
16
Selecting and Adjusting the Screen
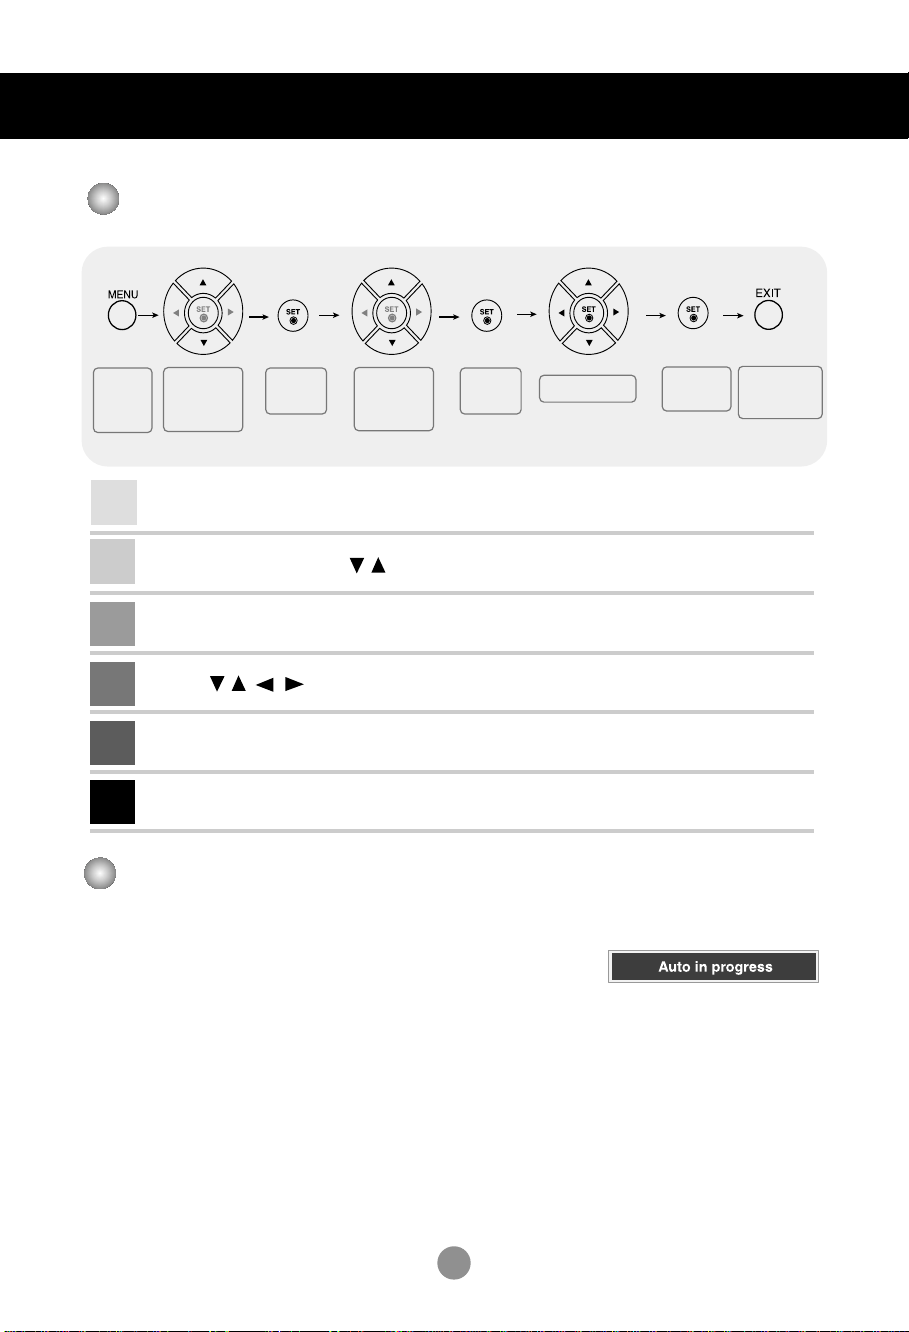
How to adjust the OSD (On Screen Display) screen
Pops up
the menu
screen
1
2
3
4
5
6
Move where
you want to
adjust
Press the MENU Button, then the main menu of the OSD appears.
To access a control, use the Buttons.
When the icon you want becomes highlighted, press the SET Button.
Use the Buttons to adjust the item to the desired level.
Accept the changes by pressing the SET Button.
Exit the OSD by pressing the EXIT Button.
Select a
menu icon
Move where
you want to
adjust
Select a
menu icon
•
Use the remote control to adjust the OSD screen.
Adjust the status
How to adjust the screen automatically
You need to adjust the screen display when connecting the product to
a new computer or changing the mode. Refer to the following section to
set an optimal product screen.
Press the AUTO/SET button (AUTO button in a remote Control) in the
PC analog signal. Then, an optimal screen status will be selected that
fits into the current mode.
If adjustment is not satisfactory, you need to adjust screen position,
clock and phase in the OSD menu.
Save
adjustment
[When Full HD Mode is active
and 1920 X1080 is selected]
Exit from the
menu screen.
17
Selecting and Adjusting the Screen
PSM
CSM
Advanced
Reset
User
0
0
0
Red
Green
Blue
User1
100
50
50
50
0
Contrast
Brightness
Colour
Sharpness
Tint
R G
Adjusting Screen Color
PSM
CSM
The PSM function automatically adjusts the screen image quality
depending on the AV usage environment.
• Dynamic : Select this option to display with a sharp image.
• Standard : The most general and natural screen display status.
• Mild : Select this option to display with a mild image.
• User1,2 : Select this option to use the user-defined settings.
Contrast : Adjust the difference between the light and dark levels in the picture.
Brightness : To adjust the brightness of the screen.
Colour : To adjust the color to desired level.
Sharpness : To adjust the clearness of the screen.
Tint :To adjust the tint to desired level.
Selecting a factory setting color set.
• Warm : Slightly reddish white.
• Normal : Slightly bluish white.
• Cool : Slightly purplish white.
• User : Select this option to use the user-defined settings.
Red / Green / Blue
Set your own color levels.
Note
If the 'PSM' setting in the PICTURE menu is set to Dynamic, Standard or Mild the
subsequent menus will be automatically set.
18
 Loading...