

Page 1

Please read this manual carefully before operating
your set.
Retain it for future reference.
Record model number and serial number of the set.
See the label attached on the back cover and quote
this information to your dealer when you require
service.
OWNER’S MANUAL
MM222288WWDD
Trade Mark of the DVB Digital Video
Broadcasting Project (1991 to 1996)
IIDD NNuummbbeerr(( ss))::
4984: M228WD
Page 2

2
SAFETY PRECAUTIONS
Please read these safety precautions carefully before using the product.
WWaarrnniinngg
If you ignore the warning message, you may be seriously injured or there is a possibility of ccident or death.
CCaauuttiioonn
If you ignore the caution message, you may be slightly injured or the product may be damaged
PPrree ccaauuttiioonnss iinn iinnssttaalllliinngg tthhee PPrroodduucctt
WWaarrnniinn gg
KKeeeepp aawwaayy ffrroomm hheeaatt ssoouurrcc ee ss lliikk ee eelleecctt rriiccaall hheeaatteerrss..
- Electrical shock, fire, malfunction or deformation may occur.
KKeeeepp tthhee ppaacc kkiinn gg aannttii-- mmooiissttuurr ee mmaatteerr iiaa ll oorr vviinnyy ll ppaacckkiinn gg oouu tt ooff tthhee rreeaacchh ooff cchhiillddrreenn ..
- Anti-moisture material is harmful if swallowed. If swallowed by mistake, force the patient to vomit and visit the
nearest hospital. Additionally, vinyl packing can cause suffocation. Keep it out of the reach of children.
DDoo nnoott ppuutt hh ee aavv yy oobbjjeecc ttss oonn tthhee pprroodduucctt oorr ssiitt uuppoonn iitt..
- If the product collapses or is dropped, you may be injured. Children must pay particular attention.
DDoo nnoott lleeaavvee tthhee ppoowweerr oorr ssii ggnnaall ccaa bbllee uunnaatttt ee nnddeedd oonn tthhee ppaatthhwwaayy..
- The passerby can falter, which can cause electrical shock, fire, product breakdown or injury.
IInnssttaa llll tthhee pprroodduucctt iinn aa nneeaatt aanndd ddrryy ppll aaccee..
- Dust or moisture can cause electrical shock, fire or product damage.
II ff yyoouu ccaann ssmmeellll ssmmookk ee oorr ootthheerr ooddoorrss oorr hheeaarr aa ssttrraann ggee ssoouunndd uunnpplluugg tthhee ppoowweerr ccoorrdd aann dd
ccoonn
ttaacctt tthhee ssee rrvviiccee cc ee nntt eerr ..
- If you continue to use without taking proper measures, electrical shock or fire can occur.
II ff yyoouu ddrrooppppeedd tthhee pprr oodduucctt oorr tthh ee ccaassee iiss bbrrookkeenn,, ttuurr nn ooff ff tthhee pprr oodduucctt aanndd uunnpplluugg tthhee ppoowweerr
ccoorrdd..
- If you continue to use without taking proper measures, electrical shock or fire can occur. Contact the service
center.
DDoo nnoott ddrroopp aann oobbjjeecc tt oonn oorr aappppllyy iimmppaacctt ttoo tt hhee pprroodduu cctt .. DDoo nnoott tthh rrooww aannyy ttooyyss oorr oobbjjeecc ttss
oonn tthhee pprroodduucctt ssccrreeeenn..
- It can cause injury to human, problem to product and damage the display.
DDoo nnoott lleett tt hhee pprroodduu cctt ffaallll oorr ddrroopp wwhheenn ccoonnnneeccttiinngg ii tt wwiitthh aann eexxtteerr nnaall ddeevviiccee..
- This may cause injury and/or damage to the product.
WWhheenn ccoonnnneeccttiinn gg iitt wwiitt hh aa gg aammee ddeevviiccee,, kkeeeepp aa ddiissttaannccee ooff ffoouurr ttiimmeess aass lloonn gg aass tt hhee ddiiaaggoonnaall
mmeeaassuu rreemmeenn tt ooff tthhee ssccrreeeenn ffrroomm tthh ee ddee vviicc ee..
- If the product falls because of the short cable, this may cause injury and/or damage to the product.
LLeeaavviinn gg aa ffii xx ee dd iimmaaggee oonn tthhee ss ccrreeeenn ffoorr aa ll oonngg ttiimmee mmaayy ccaauussee ddaammaagg ee ttoo tthhee ssccrreeeenn aanndd
ccaauussee iimmaagg ee bbuurrnn --iinn .. MMaakkee ssuurree tt oo uussee aa ss ccrreeeenn ssaavvee rr oonn tthhee pprroodduucctt.. BBuurrnn--iinn aa nndd rreell aatteedd
pprroobblleemmss aa rree nnoott ccoovveerreedd bbyy tthh ee ww aarrrr aannttyy oonn tthhiiss pprroodduu cctt ..
CCaa uu ttiioonn
MMaakkee ssuurree tthhee pprr oodduucctt vveennttiillaattii oonn hhoollee iiss nnoott bblloocc kkeedd.. IInnssttaallll tthhee pprroodduucctt iinn aa ss uuiitt aabbllyy wwii ddee
ppllaa ccee ((mmoorr ee tthhaa nn 1100ccmm ffrroomm tthh ee ww aallll))
- If you install the product too close to the wall, it may be deformed or fire can break out due to internal heat.
DDoo nnoott bblloocc kk tthhee vvee nnttiillaattii oonn hhoollee ooff tthhee pprroodduucctt bbyy aa tt aabblleecclloott hh oorr ccuurr ttaaiinn ..
- The product can be deformed or fire can break out due to overheating inside the product.
II nnssttaa llll tthhee pprr oodduucctt oonn aa ff llaa tt aann dd ss ttaabbllee ppllaaccee tthhaatt hhaass nnoo rriisskk ooff ddrr ooppppiinngg tthhee pprroodduucctt..
- If the product is dropped, you may be injured or the product may be broken.
II nnssttaa llll tthhee pprroodduucctt wwhheerree nnoo EEMMII ooccccuurr ss..
KKeeeepp tthhee pprr oodduucctt aaww aayy ffrroomm ddiirreecctt ssuunnlliigg hhtt ..
- The product can be damaged.
Page 3

3
SAFETY PRECAUTIONS
EElleeccttrriiccaall PPoowweerr RReellaatteedd PPrreeccaauuttiioonnss
WWaarrnniinngg
MMaakkee ssuurree ttoo ccoonnnneecctt tthhee ppoowweerr ccaabbllee ttoo tthhee ggrroouunnddeedd ccuurrrreenntt..
- You may be electrocuted or injured.
UUssee tthhee rraatteedd vvoollttaaggee oonnllyy..
- The product can be damaged, or you may be electrocuted.
IInn tthhee pprreesseennccee ooff tthhuunnddeerr aanndd lliigghhttnniinngg,, nneevveerr ttoouucchh tthhee ppoowweerr ccoorrdd aanndd ssiiggnnaall ccaabbllee bbeeccaauussee iitt
ccaann bbee vveerryy ddaannggeerroouuss..
- It can cause electric shock.
DDoo nnoott ccoonnnneecctt sseevveerraall eexxtteennssiioonn ccoorrddss,, eelleeccttrriiccaall aapppplliiaanncceess oorr eelleeccttrriiccaall hheeaatteerrss ttoo aa ssiinnggllee oouuttlleett..
UUssee aa ppoowweerr bbaarr wwiitthh aa ggrroouunnddiinngg tteerrmmiinnaall ddeessiiggnneedd ffoorr eexxcclluussiivvee uussee wwiitthh tthhee ccoommppuutteerr..
- A fire can break out due to overheating.
DDoo nnoott ttoouucchh tthhee ppoowweerr pplluugg wwiitthh wweett hhaannddss.. AAddddiittiioonnaallllyy,, iiff tthhee ccoorrdd ppiinn iiss wweett oorr ccoovveerreedd wwiitthh
dduusstt,, ddrryy tthhee ppoowweerr pplluugg ccoommpplleetteellyy oorr wwiippee dduusstt ooffff..
- You may be electrocuted due to excess moisture.
IIff yyoouu ddoonn’’tt iinntteenndd ttoo uussee tthhee pprroodduucctt ffoorr aa lloonngg ttiimmee,, uunnpplluugg tthhee ppoowweerr ccaabbllee ffrroomm tthhee pprroodduucctt..
- Covering dust can cause a fire, or insulation deterioration can cause electric leakage, electric shock or fire.
FFiixx tthhee ppoowweerr ccaabbllee ccoommpplleetteellyy..
- If the power cable is not fixed completely, a fire can break out.
HHoolldd tthhee pplluugg wwhheenn ppuulllliinngg oouutt tthhee ppoowweerr ccaabbllee.. DDoo nnoott bbeenndd tthhee ppoowweerr ccoorrdd wwiitthh eexxcceessssiivvee ffoorrccee
oorr ppuutt hheeaavvyy oobbjjeeccttss oonn tthhee ppoowweerr ccoorrdd..
- The power line can be damaged, which may cause electric shock or fire.
DDoo nnoott iinnsseerrtt aa ccoonndduuccttoorr ((lliikkee aa mmeettaall cchhooppssttiicckk)) iinnttoo oonnee eenndd ooff tthhee ppoowweerr ccaabbllee wwhhiillee tthhee ootthheerr
eenndd iiss ccoonnnneecctteedd ttoo tthhee iinnppuutt tteerrmmiinnaall oonn tthhee wwaallll.. AAddddiittiioonnaallllyy,, ddoo nnoott ttoouucchh tthhee ppoowweerr ccaabbllee rriigghhtt
aafftteerr pplluuggggiinngg iinnttoo tthhee wwaallll iinnppuutt tteerrmmiinnaall..
- You may be electrocuted.
TThhee ppoowweerr ssuuppppllyy ccoorrdd iiss uusseedd aass tthhee mmaaiinn ddiissccoonnnneeccttiioonn ddeevviiccee.. EEnnssuurree tthhaatt tthhee ssoocckkeett--oouuttlleett iiss
eeaassiillyy aacccceessssiibbllee aafftteerr iinnssttaallllaattiioonn
.
MMaaiinn ppoowweerr bbrreeaakkeerr iiss tthhee ppoowweerr ccoorrdd aanndd tthhiiss bbrreeaakkiinngg ddeevviiccee mmuusstt bbee llooccaatteedd aatt aa llooccaattiioonn wwhheerree
iitt iiss eeaassyy ttoo ooppeerraattee..
CCaauuttiioonn
DDoo nnoott uunnpplluugg tthhee ppoowweerr ccoorrdd wwhhiillee tthhee pprroodduucctt iiss iinn uussee..
- Electrical shock can damage the product.
PPrreeccaauuttiioonnss iinn MMoovviinngg tthhee PPrroodduucctt
WWaarrnniinngg
MMaakkee ssuurree ttoo ttuurrnn ooffff tthhee pprroodduucctt..
- You may be electrocuted or the product can be damaged.
MMaakkee ssuurree ttoo rreemmoovvee aallll ccaabblleess bbeeffoorree mmoovviinngg tthhee pprroodduucctt..
- You may be electrocuted or the product can be damaged.
Page 4

4
SAFETY PRECAUTIONS
CCaauuttiioonn
DDoo nnoott sshhoocckk tthhee pprroodduucctt wwhheenn mmoovviinngg iitt..
- You may be electrocuted or the product can be damaged.
DDoo nnoott ddiissppoossee tthhee pprroodduucctt--ppaacckkiinngg bbooxx.. UUssee iitt wwhheenn yyoouu mmoovvee..
MMaakkee tthhee ppaanneell ffaaccee ffoorrwwaarrdd aanndd hhoolldd iitt wwiitthh bbootthh hhaannddss ttoo mmoovvee..
- If you drop the product, the damaged product can cause electric shock or fire. Contact with the service center
for repair.
PPrreeccaauuttiioonnss iinn UUssiinngg tthhee PPrroodduucctt
WWaarrnniinngg
DDoo nnoott ddiissaasssseemmbbllee,, rreeppaaiirr oorr mmooddiiffyy tthhee pprroodduucctt aatt yyoouurr oowwnn ddiissccrreettiioonn..
- Fire or electric shock accident can occur.
- Contact the service center for check, calibration or repair.
WWhheenn tthhee ddiissppllaayy iiss ttoo bbee lleefftt uunnaatttteennddeedd ffoorr aann eexxtteennddeedd ppeerriioodd ooff ttiimmee,, uunnpplluugg iitt ffrroomm tthhee wwaallll
oouuttlleett..
KKeeeepp tthhee pprroodduucctt aawwaayy ffrroomm wwaatteerr..
- Fire or electric shock accident can occur.
CCaauuttiioonn
DDoo nnoott ppuutt oorr ssttoorree iinnffllaammmmaabbllee ssuubbssttaanncceess nneeaarr tthhee pprroodduucctt..
- There is a danger of explosion or fire due to careless handling of the inflammable substances.
WWhheenn cclleeaanniinngg tthhee bbrroowwnn ttuubbee ssuurrffaaccee,, uunnpplluugg tthhee ppoowweerr ccoorrdd aanndd ssccrruubb wwiitthh ssoofftt ccllootthh ttoo pprree
vveenntt ssccrraattcchhiinngg.. DDoo nnoott cclleeaann wwiitthh aa wweett ccllootthh..
- The water can sink into the product, which can cause electric shock or serious malfunction.
TTaakkee aa rreesstt ffrroomm ttiimmee ttoo ttiimmee ttoo pprrootteecctt yyoouurr vviissiioonn..
KKeeeepp tthhee pprroodduucctt cclleeaann aatt aallll ttiimmeess..
TTaakkee aa ccoommffoorrttaabbllee aanndd nnaattuurraall ppoossiittiioonn wwhheenn wwoorrkkiinngg wwiitthh aa pprroodduucctt ttoo rreellaaxx tthhee mmuusscclleess..
TTaakkee aa rreegguullaarr bbrreeaakk wwhheenn wwoorrkkiinngg wwiitthh aa pprroodduucctt ffoorr aa lloonngg ttiimmee..
DDoo nnoott pprreessss ssttrroonnggllyy uuppoonn tthhee ppaanneell wwiitthh aa hhaanndd oorr sshhaarrpp oobbjjeecctt ssuucchh aass nnaaiill,, ppeenncciill oorr ppeenn,, oorr
mmaakkee aa ssccrraattcchh oonn iitt..
KKeeeepp tthhee pprrooppeerr ddiissttaannccee ffrroomm tthhee pprroodduucctt..
- Your vision may be impaired if you look at the product too closely.
SSeett tthhee aapppprroopprriiaattee rreessoolluuttiioonn aanndd cclloocckk bbyy rreeffeerrrriinngg ttoo tthhee UUsseerr’’ss GGuuiiddee..
- Your vision can be impaired.
UUssee aauutthhoorriizzeedd ddeetteerrggeenntt oonnllyy wwhheenn cclleeaanniinngg tthhee pprroodduucctt.. ((DDoo nnoott uussee bbeennzzeennee,, tthhiinnnneerr oorr aallccoohhooll..))
- Product can be deformed.
OOnn DDiissppoossaall
TThhee fflluuoorreesscceenntt llaammpp uusseedd iinn tthhiiss pprroodduucctt ccoonnttaaiinnss aa ssmmaallll aammoouunntt ooff mmeerrccuurryy..
DDoo nnoott ddiissppoossee ooff tthhiiss pprroodduucctt wwiitthh ggeenneerraall hhoouusseehhoolldd wwaassttee..
DDiissppoossaall ooff tthhiiss pprroodduucctt mmuusstt bbee ccaarrrriieedd oouutt iinn aaccccoorrddaannccee ttoo tthhee rreegguullaattiioonnss ooff yyoouurr llooccaall
aauutthhoorriittyy..
Page 5

5
PREPARATION
FRONT PANEL CONTROLS
■
This is a simplified representation of the front panel. Here shown may be somewhat different from your set.
• Remote Control Sensor
• Power Indicator
• Power Sensor
INPUT
MENU
VOL
PROK
PROGRAMME
Buttons
VOLUME
Buttons
MENU
Button
OK
Button
INPUT
Button
Page 6
6
PREPARATION
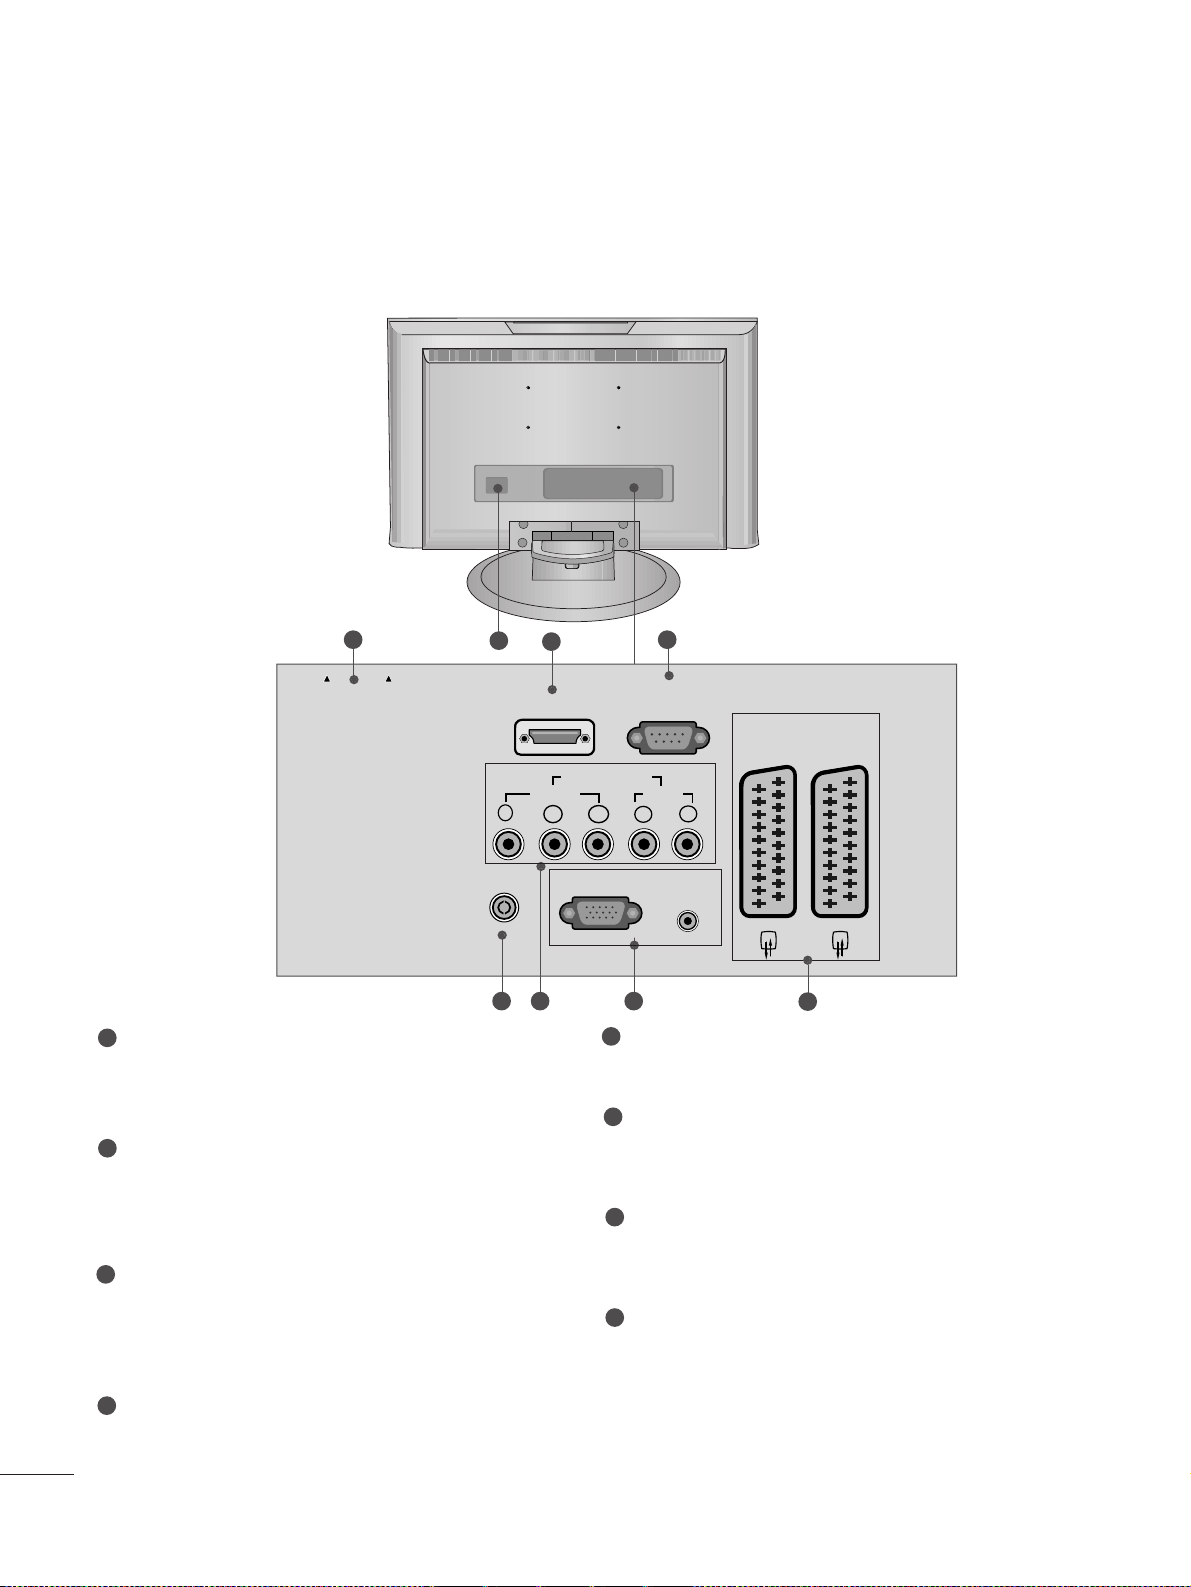
BACK PANEL INFORMATION
PCMCIA (Personal Computer Memory Card
International Association) Card Slot
(This feature is not available in all countries.)
Power Cord Socket
This set operates on an AC power. The voltage is
indicated on the Specifications page. Never
attempt to operate the set on DC power.
HDMI Input
Connect a HDMI signal to HDMI IN.
Or DVI(VIDEO)signal to HDMI/DVI port with DVI
to HDMI cable.
RS-232C IN (CONTROL & SERVICE) PORT
Connect to the RS-232C port on a PC.
Antenna Input
Connect over-the-air signals to this jack.
Component Input
Connect a component video/audio device to
these jacks.
RGB/DVI Audio Input
Connect the monitor output from a PC to the
appropriate input port.
Euro Scart Socket (AV1/AV2)
Connect scart socket input or output from an
external device to these jacks.
1
2
3
4
5
6
7
8
A
This is a simplified representation of the back panel. Here shown may be somewhat different from your set.
V 1
V 2
1
3
4
6 75
8
2
CARD SLOT
EJECT PCMCIA
ANTENNA IN
Y
HDMI/DVI IN
COMPONENT IN
VIDEO
PB
RGB (PC) IN
RS-232C IN
(CONTROL & SERVICE)
AUDIO
PR
LR
AUDIO IN
(RGB/DVI)
AV 1
AV 2
Page 7

7
PREPARATION
STAND INSTALLATION
■
Here shown may be somewhat different from your set.
1
2
3
4
Carefully place the product screen side down on a
cushioned surface that will protect product and
screen from damage.
Hold the
hhiinn ggee bbooddyy
and bend it upward.
Hinge Body
Insert the
ssttaanndd bb oo dd yy
into the product until
clicking sound.
Stand Body
Assemble the parts of the
ssttaanndd bb oo dd yy
with
ccoovveerr bb aa ssee
of the product.
Cover Base
Page 8

8
PREPARATION
DETACHING STAND
1
2
3
Place the set with its front facing downward on a
cushion or soft cloth.
Pull cover base backward during pressing botton
on stand body.
Hold cover base and pull with shake it backward
to separate from stand body.
4
Hold the stand and bend it upward.
5
Pull stand body to separate from set during
pressing 2 latches.
■
Here shown may be somewhat different from your set.
Page 9

9
PREPARATION
BACK COVER FOR WIRE ARRANGEMENT
Connect the cables as necessary.
To connect an additional equipment, see the
EExxtteerrnnaall EEqquuiippmmeenntt SSeettuupp
section.
1
Install the
CC AABBLLEE MM AANNAAGGEE MM EENNTT
as shown.
2
First, press the cable management. Hold the
CC AABBLLEE MM AANNAAGGEE MM EENNTT
with both hands and pull it upward.
NOTE
!
GG
Do not hold the
CC AABBLLEE MM AANNAAGGEE MM EENNTT
when moving the product.
- If the product is dropped, you may be injured or the product may be broken.
How to remove the cable management
■
Here shown may be somewhat different from your set.
Page 10

10
PREPARATION
WALL MOUNT: HORIZONTAL INSTALLATION
DESKTOP PEDESTAL INSTALLATION
For proper ventilation, allow a clearance of 4inches on each side from the wall.
For proper ventilation, allow a clearance of 4" on each side and from the wall. Detailed installation
instructions are available from your dealer, see the optional Tilt Wall Mounting Bracket Installation and
Setup Guide.
4 inches
4 inches
4 inches 4 inches
4 inches
4 inches
4 inches4 inches
4 inches
Page 11

11
PREPARATION
POSITIONING YOUR DISPLAY
■
Here shown may be somewhat different from your set.
Adjust the position of the panel in various ways for maximum comfort.
•• TTiilltt rraann ggee
LOCATION
Position your set so that no bright light or sunlight falls directly onto the screen. Care should be taken
not to expose the set to any unnecessary vibration, moisture, dust or heat. Also ensure that the set is
placed in a position to allow a free flow of air. Do not cover the ventilation openings on the back cover.
If you intend to mount the set to a wall, attach VESA standard mounting interface (optional parts) to the
back of the set.
When you install the set to use the wall mounting bracket (optional parts), fix it carefully so as not to drop.
0
°
~ 3
°
12
°~8°
Page 12

12
PREPARATION
KENSINGTON SECURITY SYSTEM
- The product is equipped with a Kensington Security System connector on the back panel. Connect the
Kensington Security System cable as shown below.
- For the detailed installation and use of the Kensington Security System, refer to the user’s guide provided
with the Kensington Security System.
For further information, contact
hh tt tt pp::////wwwwww..kkeenn ssii nnggttoonn.. ccoomm
, the internet homepage of the
Kensington company. Kensington sells security systems for expensive electronic equipment such as notebook PCs and LCD projectors.
NOTE
- The Kensington Security System is an optional accessory.
NOTES
a. If the product feels cold to the touch, there may be a small “flicker” when when it is turned on.
This is normal, there is nothing wrong with product.
b. Some minute dot defects may be visible on the screen, appearing as tiny red, green, or blue spots.
However, they have no adverse effect on the monitor's performance.
c. Avoid touching the LCD screen or holding your finger(s) against it for long periods of time.
Doing so may produce some temporary distortion effects on the screen.
Page 13

13
PREPARATION
AV 3
L/ MONO
R
AUDIO
VIDEO
S-VIDEO
AUDIO
VIDEO
AV 1 AV 2
ANTENNA
IN
EJECT
HDMI/DVI IN 1 HDMI IN 2
AV 3
L/ MONO
R
AUDIO
VIDEO
S-VIDEO
AUDIO
VIDEO
AV 1 AV 2
ANTENNA
IN
EJECT
HDMI/DVI IN 1 HDMI IN 2
■
For optimum picture quality, adjust antenna direction.
■
An antenna cable and converter are not supplied.
■
To prevent the equipment damage, never plug in any power cords until you have finished connecting all equipment.
Multi-family Dwellings/Apartments
(Connect to wall antenna socket)
Single-family Dwellings /Houses
(Connect to wall jack for outdoor antenna)
Outdoor
Antenna
(VHF, UHF)
Wall
Antenna
Socket
RF Coaxial Wire (75 ohm)
ANTENNA CONNECTION
Antenna
UHF
Signal
Amplifier
VHF
■
In poor signal areas,to get better picture quality, install a signal amplifier to the antenna as shown to the right.
■
If signal needs to be split for two TVs,use an antenna signal splitter for connection.
- Be careful not to bend the bronze
wire when connecting to an antenna
port.
- 5V antenna power works In Digital
mode only. (Refer to p. 37)
Page 14

14
EXTERNAL EQUIPMENT SETUP
Connect the SET TOP outputs to the
CC OOMMPPOONN EENNTT II NN
VVII DDEEOO
sockets (YP
B P
R
) on the set.
Connect the audio cable from the SET TOP to
CC OOMMPP OO--
NNEE NNTT IINN AA UU DDIIOO
sockets of the set.
Press the
II NN PPUUTT
button to select Component
(480i/576i/480p/576p/720p/1080i).
2
3
1
HD RECEIVER SETUP
■
To prevent the equipment damage, never plug in any power cords until you have finished connecting all equipment.
■
Here shown may be somewhat different from your set.
When connecting with a component cable
Y
PBPRLR
VIDEO
COMPONENT IN
AUDIO
1
2
Signal
480i/576i
480p/576p
720p/1080i
10 8 0 p
Component
Yes
Yes
Yes
Yes
(only 60Hz)
HDMI
No
Yes
Yes
Yes
Page 15
15
EXTERNAL EQUIPMENT SETUP
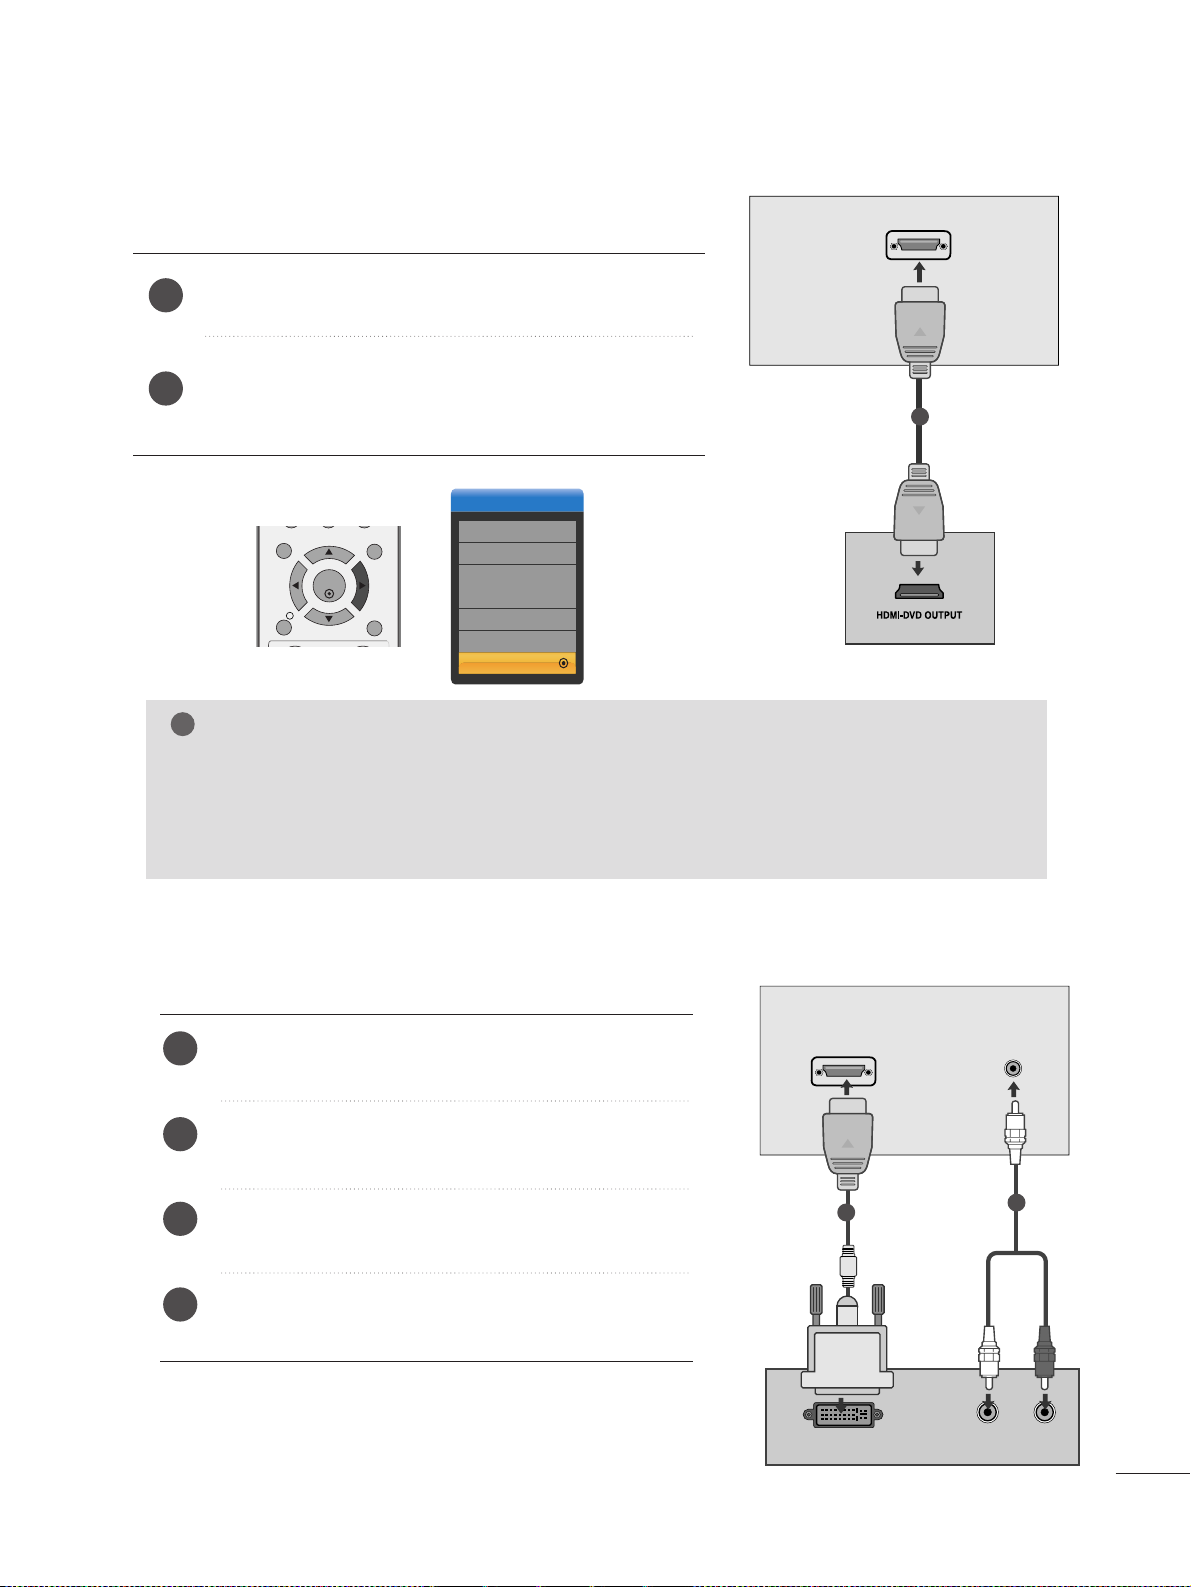
When connecting with a HDMI
Connect the HDMI output of the digital set-top box to the
HHDD MM II//DDVV II IINN
jack on the set.
Select HDMI/DVI (DTV) input source with using the
IINN PPUUTT
button on the remote control.
2
1
HDMI/DVI IN
1
Connect the digital set-top box to
HHDD MM II//DD VVII IINN
jack on the set.
Connect the audio output of the digital set-top box to
the
AAUUDDII OO II NN ((RRGGBB//DDVVII))
jack on the set.
Turn on the digital set-top box. (Refer to the owner’s
manual for the digital set-top box.
)
Select
HDMI/DVI input source with using the
IINN PPUU TT
button on the remote control.
2
3
4
1
When connecting with a HDMI to DVI cable
DVI OUTPUT
AUDIO
RL
HDMI/DVI IN
AUDIO IN
(RGB/DVI)
1
2
Input
DTV
TV
AV1
AV2
Component
RGB
HDMI GGDTV
NOTE
!
GG
When the output device is HDMI / DVI Settop box or DVD.
GG
If the output device does not meet the selected HDMI mode, the abnormal or black screen may
be displayed.
GG
In this case, select the HDMI mode appropriate for the output device, and turn off the DC power
and then turn on it again.
MENU EXIT
INFO
OK
i
GUIDE
Page 16

16
EXTERNAL EQUIPMENT SETUP
DVD SETUP
When connecting with a component cable
AV 1 AV 2
Y
PBPRLR
VIDEO
COMPONENT IN
AUDIO
Component Input ports
To get better picture quality, connect a DVD player to the component input ports as shown below.
Component ports on the set
YPBP
R
Video output ports
on DVD player
Y
Y
Y
Y
P
B
B-Y
Cb
Pb
P
R
R-Y
Cr
Pr
Connect the video output sockets (YP
B PR
) of the DVD to
the
CC OOMMPPOO NNEENNTT IINN VVIIDD EEOO
sockets (YP
B PR
) of the
set.
Connect the audio cable from the DVD to
CC OOMMPPOONNEENN TT
IINN AAUUDD IIOO
sockets of the set.
Press the
IINN PPUUTT
button to select
Component.
Press the
PPLLAA YY
button on the DVD.
The DVD playback picture appears on the screen.
2
3
4
1
1 2
Page 17

17
EXTERNAL EQUIPMENT SETUP
HDMI/DVI IN
AV 1 AV 2
(R) AUDIO (L)
AUDIO/
VIDEO
AV 1 AV 2
When connecting with a Euro Scart
Connect the Euro scart socket of the DVD to the Euro scart
socket of the set.
Press the
IINN PPUUTT
button to select
AV 1.
Press the
PPLLAA YY
button on the DVD.
The DVD playback picture appears on the screen.
2
3
1
1
NOTE
!
GG
Please use the shield scart cable.
When connecting HDMI cable
Connect the HDMI output of the DVD to the
HHDD MM II//DDVV II IINN
jack on the set.
Select HDMI/DVI (DTV) input source with using
the
IINN PPUUTT
button on the remote control.
2
1
1
GG
Set can receive the video and audio signal simultaneously with using a HDMI cable.
GG
If the DVD supports Auto HDMI function, the output resolution of the source device will be automatically set to 1280x720p.
GG
If the DVD player does not support Auto HDMI, you need to set the DVD output resolution appropriately.
To get the best picture quality, adjust the output resolution of the source device to 1280x720p.
GG
When the output device is HDMI / DVI Settop box or DVD.
GG
If the output device does not meet the selected HDMI mode, the abnormal or black screen may be displayed.
GG
In this case, select the HDMI mode appropriate for the output device, and turn off the DC power and then turn on it again.
NOTE
!
Input
DTV
TV
AV1
AV2
Component
RGB
HDMI GGDTV
MENU EXIT
OK
INFO
i
GUIDE
Page 18

18
EXTERNAL EQUIPMENT SETUP
VCR SETUP
■
To avoid picture noise (interference), leave an adequate distance between the VCR and set.
■
Typically a frozen still picture from a VCR. If the 4:3 picture format is used; the fixed images on the sides of
the screen may remain visible on the screen.
OUTPUT
SWITCH
ANT IN
R
S-VIDEO VIDEO
ANT OUT
L
ANTENNA IN
Wall Jack
Antenna
1
2
When connecting with an antenna
Connect the RF out socket of the VCR to the aerial socket of the set.
Connect the aerial cable to the RF aerial in socket of the VCR.
Store the VCR channel on a desired programme number using the ‘Manual
programme tuning’ section.
Select the programme number where the VCR channel is stored.
Press the
PPLLAAYY
button on the VCR.
1
2
3
4
5
Page 19

19
EXTERNAL EQUIPMENT SETUP
(R) AUDIO (L)
AUDIO/
VIDEO
AV 1V 1 AV 2V 2
When connecting with a Euro Scart
Connect the Euro scart socket of the VCR to the Euro scart
socket of the set.
Press the
PPLLAA YY
button on the VCR.
If your VCR outputs an AV switching signal via the Scart
lead the set will auto switch to
AV 1 mode on start of
playback, but if you want to keep on watching in TV
mode, press the
DD
//
EE
or NUMBER buttons.
Otherwise press the
IINN PPUU TT
button on the remote control
handset to select
AV 1 . The VCR play back picture appears
on the screen.
You can also record programmes received by the set on
video tape.
2
1
1
NOTE
!
GG
Signal type RGB, i.e. the signals red, green and blue can only be selected for the Euro scart and the AV1
can be received. These signals are transmitted, for example, by a pay TV decoder, game machine or
photo CD unit, etc.
GG
Please use shielded scart cable.
Insert the CI Module to
PPCC MM CC IIAA
(Personal Computer
Memory Card International Association)
CC AARR DD SS LLOOTT
of set as shown.
For further information, see p.40.
1
INSERTION OF CI MODULE
PCMCIA
CARD SLOT
TVTVTV
-- TToo vviieeww tt hhee ssccrr aa mm bbll eedd ((ppaayy)) ssee rrvviicceess iinn ddiigg ii tt aa ll TTVV
mm oo dd ee ..
-- TThhiiss ffeeaa tt uurr ee ii ss nn oott aa vvaaiillaa bb ll ee ii nn aallll ccoouunn tt rriieess..
1
Page 20

20
EXTERNAL EQUIPMENT SETUP
PC SETUP
This product provides Plug and Play capability, meaning that the PC adjusts automatically to the set's settings.
When connecting with a D-sub 15 pin cable
RGB OUTPUT
AUDIO
AUDIO IN
(RGB/DVI)
RGB (PC) IN
1
2
4
Connect the signal cable from the monitor output socket of
the PERSONAL COMPUTER to the PC input socket of the set.
Connect the audio cable from the PC to the
AAUU DDIIOO IINN
((RRGGBB//DDVVII ))
sock-ets of the set.
Press the INPUT button to select RGB.
Switch on the PC, and the PC screen appears on the set.
The set can be operated as the PC monitor.
2
3
1
Page 21

21
EXTERNAL EQUIPMENT SETUP
AUDIO
DVI OUTPUT
HDMI/DVI IN
AUDIO IN
(RGB/DVI)
When connecting with a HDMI to DVI cable
Connect the DVI output of the PC to the
HHDD MM II//DD VVII
IINN
jack on the set.
Connect the audio cable from the PC to the
AAUU DDIIOO
IINN ((RRGGBB//DDVV II))
sockets of the set.
Select
HDMI/DVI (PC) input source with using the
IINN PPUU TT
button on the remote control.
2
3
1
1
2
Input
DTV
TV
AV1
AV2
Component
RGB
HDMI GGPC
NOTE
!
GG
If the set is cold, there may be a small “flicker”
when the set is switched on. This is normal, there
is nothing wrong with the set.
GG
If possible, use the, 1680x1050@60Hz video
mode to obtain the best image quality for your
LCD monitor. If used under the other resolutions,
some scaled or processed pictures may appear
on the screen. The set has been preadjusted to
the mode 1680x1050@60Hz.
GG
Some dot defects may appear on the screen, like
Red, Green or Blue spots. However, this will have
no impact or effect on the monitor performance.
GG
Do not press the LCD screen with your finger for
a long time as this may produce some temporary
distortion effects on the screen.
GG
When the PC screen appears on the set, a message may appear on the screen, and the message
will differ according to the Window system version. If a message appears click “Next” until the
message finishes.
GG
When the output device is HDMI / DVI PC.
GG
If the output device does not meet the selected
HDMI mode, the abnormal or black screen may
be displayed.
GG
In this case, select the HDMI mode appropriate
for the output device, and turn off the DC power
and then turn on it again.
MENU EXIT
INFO
OK
i
GUIDE
Page 22

22
EXTERNAL EQUIPMENT SETUP
When connecting with a HDMI to HDMI cable
Connect the HDMI output of the PC to the
HHDD MM II//DD VVII IINN
jack on the set.
Select
HDMI (PC) input source with using the
IINN PPUU TT
button on the remote control.
2
1
Input
DTV
TV
AV1
AV2
Component
RGB
HDMI GGPC
AV 1 AV 2
1
NOTE
!
GG
If the set is cold, there may be a small “flicker”
when the set is switched on. This is normal, there
is nothing wrong with the set.
GG
If possible, use the, 1680x1050@60Hz video
mode to obtain the best image quality for your
LCD monitor. If used under the other resolutions,
some scaled or processed pictures may appear
on the screen. The set has been preadjusted to
the mode 1680x1050@60Hz.
GG
Some dot defects may appear on the screen, like
Red, Green or Blue spots. However, this will have
no impact or effect on the monitor performance.
GG
Do not press the LCD screen with your finger for
a long time as this may produce some temporary
distortion effects on the screen.
GG
When the PC screen appears on the set, a message may appear on the screen, and the message
will differ according to the Window system version. If a message appears click “Next” until the
message finishes.
GG
When the output device is HDMI / DVI PC.
GG
If the output device does not meet the selected
HDMI mode, the abnormal or black screen may
be displayed.
GG
In this case, select the HDMI mode appropriate
for the output device, and turn off the DC power
and then turn on it again.
MENU EXIT
OK
INFO
i
GUIDE
HDMI/DVI IN
Page 23

23
EXTERNAL EQUIPMENT SETUP
RGB, HDMI/DVI-PC Preset mode
Resolution
640x480
800x600
720x400
1024x768
Horizontal
Frequency(kHz)
Vertical
Frequency(Hz)
70
60
75
60
75
60
75
75
60
75
60
60
31.468
31.469
37. 500
37. 879
46.875
48.363
60.123
67. 500
63.981
79.976
64.674
65.290
1280x1024
1152x864
HDMI/DVI-DTV supported mode
59.94
60
59.94
60
59.64
60
50.00
50.00
59.94
60
50.00
59.94
60
24
50.00
59.94
60
31.47
31.50
31.50
31.50
31.47
31.47
31.25
45.00
44.96
44.96
28.13
33.72
33.75
27
56.25
67. 43
67. 50
Resolution
720x480
640x480
720x576
720x480
Horizontal
Frequency(kHz)
Vertical
Frequency(Hz)
1280x720
1920x1080
1680x1050
*You have to select directly HDMI-PC or HDMI-DTV
when using the PC or Set-top box.
Page 24

24
EXTERNAL EQUIPMENT SETUP
Screen Setup for PC mode
Automatically adjusts picture position and minimizes image
shaking.After adjustment, if the image is still not correct,
your set is functioning properly but needs further adjustment.
AAuu tt oo ccoonnffiigg uurree
This function is for the automatic adjustment of the screen
position, clock, and phase. The displayed image will unstable
for a few seconds while the auto configuration is in progress.
Press the
MM EENN UU
button and then use
D
or
E
button
to select the SCREEN menu.
Press the
G
button and then use
D
or
E
button to
select Auto Config..
Press the
G
button to start Auto Config..
• When Auto Config. has finished, OK will be shown
on screen.
• If the position of the image is still not correct, try
Auto adjustment again.
• If picture needs to be adjusted more after Auto adjustment in RGB, you can adjust the Manual Config..
Press the EXIT button to disappear the menu window.
Auto Configure (RGB mode only)
Auto Config. G
Manual Config.
SXGA Mode
Aspect Ratio
Reset
To Set
1
3
2
1
2
3
4
Auto Config.
Manual Config.
SXGA Mode
Aspect Ratio
Reset
SETUP
O
PICTURE
O
Prev.
MENU
Move
AUDIO
O
TIME
O
OPTION
O
SCREEN
O
Page 25

25
EXTERNAL EQUIPMENT SETUP
If the picture isn’t clear after auto adjustment and especially if characters are still trembling, adjust the picture
phase manually.
To correct the screen size, adjust
CC ll oo cckk
.
This function works in the following mode : RGB.
CC ll oo cckk
This function is to minimize any vertical bars or
stripes visible on the screen background. And the
horizontal screen size will also change.
PPhhaassee
This function allows you to remove any horizontal
noise and clear or sharpen the image of characters.
Press the MENU button and then use
D
or
E
button
to select the SCREEN menu.
Press the
G
button and then
D
or
E
button to select
Manual Config..
Press the
G
button and then
D
or
E
button to select
Phase, Clock, H-Position or V-Position.
Press the
F
or
G
button to make appropriate adjust-
ments.
Press the EXIT button to disappear the menu window.
Adjustment for screen Phase, Clock, Position
Auto Config.
Manual Config.
G
SXGA Mode
Aspect Ratio
Reset
Phase
Clock
H-Position
V-Position
0
0
0
0
1
1
2
3
4
5
Auto Config.
Manual Config.
SXGA Mode
Aspect Ratio
Reset
SETUP
O
PICTURE
O
Prev.
MENU
Move
AUDIO
O
TIME
O
OPTION
O
SCREEN
O
3 4
2
Page 26

26
EXTERNAL EQUIPMENT SETUP
To see a normal picture, match the resolution of RGB mode
and selection of SXGA mode.
This function works in the following mode: RGB mode
Press the MENU button and then use
D
or
E
button
to select the SCREEN menu.
Press the
G
button and then use
D
or
E
button to
select SXGA Mode.
Press the
G
button and then use
D
or
E
button to
select the desired SXGA resolution.
Press the EXIT button to disappear the menu window.
Selecting Wide SXGA mode
Auto Config.
Manual Config.
SXGA Mode
G
Aspect Ratio
Reset
1400 X 1050
1680 X 1050
1
1
2
3
4
Auto Config.
Manual Config.
SXGA Mode
Aspect Ratio
Reset
SETUP
O
PICTURE
O
Prev.
MENU
Move
AUDIO
O
TIME
O
OPTION
O
SCREEN
O
3
2
Page 27

27
EXTERNAL EQUIPMENT SETUP
This function operates in current mode.
To initialize the adjusted value.
Press the MENU button and then
D
or
E
button to
select the OPTION menu.
Press the
G
button and then
D
or
E
button to select
Factory Mode.
Press the
G
button and then
D
or
E
button to select
Factory Reset.
Press the
G
button.
The message “If you enter a password, all user
setting will be reset” will appear.
Use NUMBER buttons to input a 4-digit password.
Initializing
(Reset to original factory settings)
1
2
3
4
5
Language
Country
Lock System
Parental Control
Input Label
Factory Mode
G
Set ID
Factory Reset
1
2
Language
Country
Lock System
Parental Control
Input Label
Factory Mode
SETUP
O
PICTURE
O
SCREEN
O
Prev.
MENU
Move
AUDIO
O
TIME
O
OPTION
O
Language
Country
Lock System
Parental Control
Input Label
Factory Mode
Set ID
Factory Reset
OK
4
3
OK
1
1
Page 28

28
WATCHING TV /PROGRAMME CONTROL
REMOTE CONTROL KEY FUNCTIONS
When using the remote control, aim it at the remote control sensor on the set.
OK
MENU EXIT
GUIDE
RATIO
123
456
789
0
Q.VIEW
LIST
TV INPUT
D/A
POWER
VOL PR
INDEX
SLEEP
HOLD
REVEAL
SUBTITLE
UPDATE
I/II
MUTE
TEXT
BACK
FAV
TIME
INFO
i
TV/RADIO
*
?
POWER
D/A INPUT
INPUT
Switches the set on from off or off to on.
Selects digital or analogue mode.
Switches the set on from off.
External input mode rotate in regular sequence.
Switches the set on from off.
TV/RADIO
I/II
MUTE
Selects Radio or TV channel in digital mode.
Selects the sound output.
Switches the sound on or off.
0~9 number
button
LIST
Q.VIEW
Selects a programme.
Selects numbered items in a menu.
Displays the programme table.
Returns to the previously viewed programme.
MENU
EXIT
INFO i
GUIDE
THUMBSTICK
(Up/Down/Left
Right)
OK
Selects a menu.
Clears all on-screen displays.
Shows the present screen information.
Shows programme schedule.
Allows you to navigate the on-screen menus and adjust
the system settings to your preference.
Accepts your selection or displays the current mode.
VOLUME UP
/DOWN
BACK
*
FAV
Programme
UP/DOWN
Adjusts the volume.
Allow the user to move back one step in an interactive
application, EPG or other user interaction function.
No function
Displays the selected favourite programme.
Selects a programme.
Page 29

29
WATCHING TV /PROGRAMME CONTROL
Installing Batteries
■
Open the battery compartment cover on the back side and install
the batteries matching correct polarity (+with +,-with -).
■
Install two batteries. Don’t mix old or used batteries with new ones.
■
Close cover.
OK
MENU EXIT
GUIDE
RATIO
123
456
789
0
Q.VIEW
LIST
TV INPUT
D/A
POWER
VOL PR
INDEX
SLEEP
HOLD
REVEAL
SUBTITLE
UPDATE
I/II
MUTE
TEXT
BACK
FAV
TIME
INFO
i
TV/RADIO
*
?
Coloured
buttons
These buttons are used for teletext (only
TTEE LLEETTEEXXTT
models) or
PPrroogg rraammmmee ee ddiitt
.
TELETEXT
BUTTONS
These buttons are used for teletext.
For further details, see the ‘Teletext’ section.
1
1
1
RATIO
SLEEP
SUBTITLE
Selects your desired picture format.
Sets the sleep timer.
Recalls your preferred subtitle in digital mode.
Page 30

30
First, connect power cord correctly.
Turn on power by pressing the power button on the product.
Press the TV button on the remote control.
Set the channel by using the PR+ / - buttons or number
buttons on the remote control. .
2
1
TURNING ON THE TV
Initializing setup
Note:
a. It will automatically disappear after approx. 40 seconds
unless a button is pressed.
b. Press the
BBAA CC KK
button to change current OSD into
previous OSD.
If the OSD (On Screen Display) is displayed on the screen
as figure after turning on the set, you can adjust the
Language, Country, Time Zone, Auto programme tuning.
- If your TV will be turned on, you will be able to use its features.
WATCHING TV /PROGRAMME CONTROL
4
3
POWER
TV INPUT
D/A
I/II
TEXT
TV/RADIO
MUTE
123
456
789
0
OK
BACK
*
FAV
Q.VIEW
SUBTITLE
HOLD
UPDATE
REVEAL
LIST
MENU EXIT
INFO
i
VOL PR
RATIO
SLEEP
INDEX
TIME
GUIDE
?
Page 31

31
WATCHING TV /PROGRAMME CONTROL
PROGRAMME SELECTION
Press the
PPRR ++ or--
or NUMBER buttons to select a pro-
gramme number.
1
VOLUME ADJUSTMENT
Press the VOL
++ or--
button to adjust the volume.
If you want to switch the sound off, press the MUTE
button.
You can cancel this function by pressing the MUTE,
VOL
++ or--
, or I/II button.
OK
MENU EXIT
GUIDE
RATIO
123
456
789
0
Q.VIEW
LIST
TV INPUT
D/A
POWER
VOL PR
INDEX
SLEEP
HOLD
REVEAL
SUBTITLE
UPDATE
I/II
MUTE
TEXT
BACK
FAV
TIME
INFO
i
TV/RADIO
*
?
1
Page 32

32
WATCHING TV /PROGRAMME CONTROL
ON SCREEN MENUS SELECTION AND ADJUSTMENT
Press the
MM EENN UU
button and thenDDor EEbutton to display each menu.
Press the
GG
button and thenDDor EEbutton to select a menu item.
Change the setting of an item in the sub or pull-down menu with
F or G button.
You can move to the higher level menu by pressing the
OO KK
or
MM EENN UU
button.
Your set's OSD (On Screen Display)may differ slightly from what is shown in this manual.
2
3
1
NOTE
!
G
In Analogue mode, 5V Antenna Power, CI Information, Software Update and Diagnostics
will not display.
Auto Tuning
Manual Tuning
Programme Edit
5V Antenna Power
Software Update
Diagnostics
CI Information
PICTURE
O
AUDIO
O
TIME
O
OPTION
O
SCREEN
O
Prev.
MENU
Move
Picture Mode
Colour Temperature
Advanced
Picture Reset
Demo
SETUP
O
AUDIO
O
TIME
O
OPTION
O
SCREEN
O
Prev.
MENU
Move
Sound Mode
Auto Volume
Balance 0
SETUP
O
PICTURE
O
TIME
O
OPTION
O
SCREEN
O
Prev.
MENU
Move
SETUP
O
PICTURE
O
AUDIO
O
Clock
Off time
On time
Auto Sleep
Time Zone
SETUP
O
PICTURE
O
OPTION
O
SCREEN
O
Prev.
MENU
Move
AUDIO
O
TIME
O
Auto Config.
Manual Config.
SXGA Mode
Aspect Ratio
Reset
SETUP
O
PICTURE
O
Prev.
MENU
Move
AUDIO
O
TIME
O
OPTION
O
SCREEN
O
* : This feature is not available
in all countries.
Language
Country
Lock System
Parental Control
Input Label
Factory Mode
SETUP
O
PICTURE
O
SCREEN
O
Prev.
MENU
Move
AUDIO
O
TIME
O
OPTION
O
Page 33

33
WATCHING TV /PROGRAMME CONTROL
Use it to automatically find and store all of the programmes.
When you start auto programming in digital mode, all the
stored service information will be deleted.
AUTO PROGRAMME TUNING (IN DIGITAL MODE)
1
Auto Tuning G
Manual Tuning
Programme Edit
5V Antenna Power
Software Update
Diagnostics
CI Information
Start
2
3
Press the MENU button and then
D
or
E
button to
select the SETUP menu.
Press the
G
button and then
D
or
E
button to select
Auto Tuning.
Press the
G
button to begin auto tuning.
Use NUMBER buttons to input a 4-digit password in
Lock System ‘On’.
The message “All service-information will be
updated. Continue?” will appear.
If you want to keep on auto tuning select YES with
using the
F
or
G
button. Then, press the OK button.
Otherwise select NO.
To stop auto tuning, press the MENU button.
Press the EXIT button to disappear the menu window.
2
3
4
1
Auto Tuning
Manual Tuning
Programme Edit
5V Antenna Power
Software Update
Diagnostics
CI Information
PICTURE
O
AUDIO
O
TIME
O
OPTION
O
SCREEN
O
Prev.
MENU
Move
SETUP
O
Auto Tuning
MENU
Stop
24 %
UHF CH.
14
0 Programme(s)
0 Programme(s)
Page 34

34
WATCHING TV /PROGRAMME CONTROL
Auto Tuning
Manual Tuning
G
Programme Edit
5V Antenna Power
Software Update
Diagnostics
CI Information
Your receiver will
add this channel to
your channel list.
UHF CH.
35
Manual Tuning lets you manually add a programme to your
programme list.
MANUAL PROGRAMME TUNING (IN DIGITAL MODE)
1
2
Auto Tuning
Manual Tuning
Programme Edit
5V Antenna Power
Software Update
Diagnostics
CI Information
Your receiver will
add this channel to
your channel list.
UHF CH
35
43
Press the MENU button and then
D
or
E
button to
select the SETUP menu.
Press the
G
button and then
D
or
E
button to select
Manual Tuning.
Press the
G
button and then
D
or
E
button or NUMBER buttons to select the desired channel number.
Use NUMBER buttons to input a 4-digit password in
Lock System ‘On’.
Press the OK button to save.
When the channel number you want to add is already
added in programme list, the massage “Setup infor-
mation for the channel will be updated.
Continue?” will appear.
If you want to keep on manual tuning, select YES
with using the
F
or
G
button.
Then, press the OK button. Otherwise select NO.
Press the EXIT button to disappear the menu window.
2
3
4
5
1
D
E
Auto Tuning
Manual Tuning
Programme Edit
5V Antenna Power
Software Update
Diagnostics
CI Information
PICTURE
O
AUDIO
O
TIME
O
OPTION
O
SCREEN
O
Prev.
MENU
Move
SETUP
O
Search
Page 35

35
WATCHING TV /PROGRAMME CONTROL
Auto Tuning
Manual Tuning
Programme Edit
G
5V Antenna Power
Software Update
Diagnostics
CI Information
To Set
When a programme number is skipped, it means that you will be
unable to select it using PR + or - button during TV viewing.
If you want to select the skipped programme, directly enter the
programme number with the NUMBER buttons or select it in the
Programme edit menu.
This function enables you to skip the stored programmes.
It’s available in some countries only to move a programme number by YELLOW button.
PROGRAMME EDIT (IN DIGITAL MODE)
1
32
Press the MENU button and then
D
or
E
button to
select the SETUP menu.
Press the
G
button and then
D
or
E
button to select
Programme Edit menu.
Press the
G
button to enter the Programme Edit
menu.
Use NUMBER buttons to input a 4-digit password in
Lock System ‘On’.
Select a programme to be stored or skipped with the
D
or
E
or
F
or
G
button.
Press the BLUE button repeatedly to have the pro-
gramme skipped or stored.
In case of programmes to be skipped, skipped programme shows in blue colour and these programmes
will not be selected by the PR + or - buttons during
TV viewing.
Press the EXIT button to disappear the menu window.
2
3
4
5
6
1
Auto Tuning
Manual Tuning
Programme Edit
5V Antenna Power
Software Update
Diagnostics
CI Information
PICTURE
O
AUDIO
O
TIME
O
OPTION
O
SCREEN
O
Prev.
MENU
Move
SETUP
O
Page 36

36
WATCHING TV /PROGRAMME CONTROL
A Skipping a programme number
Select a programme number to be skipped with the
D
or
E
or
F
or
G
button.
Press the BLUE button. The skipped programme number turns to blue.
Press the BLUE button again to release the skipped programme.
When a programme number is skipped it means that you will be unable to select it using the PR + or - button during normal TV viewing.
If you want to select the skipped programme, directly enter the programme number with the NUMBER buttons or select it in the programme edit or EPG.
Press the EXIT button to disappear the menu window.
A Locking a programme (In Lock System On mode only)
Select a programme to be locked with the
D
or
E
or
F
or
G
button.
Press the GREEN button. The lock mark will appear in front of that programme number.
Press the GREEN button again to release this function.
Note :
G
To watch a locked programme, input a 4-digit password in Lock system. Be sure to remember this number!
G
If you forgot your password, press ‘7’, ‘7’, ‘7’, ‘7’ on the remote control handset.
G
If you select other programme after releasing a locked programme and then return to the locked programme
within 1 minute, you needn’t input a password to select the locked programme.
A Selecting favourite programme
Select your favourite programme number by pressing
D
or
E
or
F
or
G
button and then press the FAV but-
ton on your remote control handset.
It will automatically include the selected programme into your favourite programme list and heart-mark will
appear in front of that programme number.
Displayed when the DTV Programme.
Displayed when the Favourite Programme.
Displayed when the Locked Programme.
Displayed when the Radio Programme.
Displayed when the MHEG Programme.
Displayed when the Teletext Programme.
Displayed when the Subtitle Programme.
Displayed when the Scramble Programme.
Displayed when the Dolby Programme.
Mini Glossary
TEXT
1
2
3
4
1
2
3
1
Page 37

37
WATCHING TV /PROGRAMME CONTROL
Even if there isn’t a special 5V adapter power in the external
antenna, this function can output 5V in the set.
Press the MENU button and then
D
or
E
button to
select the SETUP menu.
Press the
G
button and then use
D
or
E
button to
select
5V Antenna Power
.
Press the
G
button and then use
D
or
E
button to
select
On
or
Off
.
In
5V Antenna Power On
, if the set is short-cir-
cuit, it will automatically return to
Off
.
The message “Antenna feed overloaded.
Automatically switched off.” will appear.
Press the EXIT button to disappear the menu window.
5V ANTENNA POWER (IN DIGITAL MODE ONLY)
Auto Tuning
Manual Tuning
Programme Edit
5V Antenna Power
G
Software Update
Diagnostics
CI Information
Off
On
1
32
1
2
3
4
Auto Tuning
Manual Tuning
Programme Edit
5V Antenna Power
Software Update
Diagnostics
CI Information
PICTURE
O
AUDIO
O
TIME
O
OPTION
O
SCREEN
O
Prev.
MENU
Move
SETUP
O
Page 38

38
WATCHING TV /PROGRAMME CONTROL
Auto Tuning
Manual Tuning
Programme Edit
5V Antenna Power
Software Update
G
Diagnostics
CI Information
Off
On
1
32
Auto Tuning
Manual Tuning
Programme Edit
5V Antenna Power
Software Update
Diagnostics
CI Information
PICTURE
O
AUDIO
O
TIME
O
OPTION
O
SCREEN
O
Prev.
MENU
Move
SETUP
O
Software Update means software can be downloaded through
the digital terrestrial broadcasting system.
SOFTWARE UPDATE (IN DIGITAL MODE ONLY)
Press the MENU button and then
D
or
E
button to
select the SETUP menu.
Press the
G
button and then
D
or
E
button to select
Software update.
Press the
G
button and then
D
or
E
button to select
Off or On.
• If you select On, a user confirm message box will be
displayed to notify that new software is found.
Press the EXIT button to disappear the menu window.
* When setting “Software Update”
Occasionally, a transmission of updated digital
software information will
result in the following
menu on the TV screen.
Select the YES using the
F
or
G
button and when
you see the following
picture.
After Software Update is
completed, the System
takes about one minute to
restart.
- During Progress of Software Update,
please note the following:
• The power of the set must not be interrupted.
• The set must not be switched off.
• The antenna must not be disconnected.
• During this time, you should not switch off
the power to the set.
• At this time, you should not work power
On/Off.
• After Software Update, you can confirm the
updated software version in Diagnostics
menu.
1
2
3
4
Page 39

39
WATCHING TV /PROGRAMME CONTROL
This function enables you to watch Manufacturer,
Model/Type, Serial Number and Software Version.
It’s displayed the information and signal strength of the
tuned MUX.
It’s displayed the signal information and service name of the
selected MUX.
Press the
MM EENN UU
button and then
D
or
E
button to
select the SETUP menu.
Press the
G
button and then use
D
or
E
button to
select Diagnostics.
Press the
G
button to display Manufacturer,
Model/Type, Serial Number and Software Version.
Press the EXIT button to disappear the menu window.
DIAGNOSTICS (IN DIGITAL MODE ONLY)
Auto Tuning
Manual Tuning
Programme Edit
5V Antenna Power
Software Update
Diagnostics
G
CI Information
To Set
1
2
3
1
2
3
4
Auto Tuning
Manual Tuning
Programme Edit
5V Antenna Power
Software Update
Diagnostics
CI Information
PICTURE
O
AUDIO
O
TIME
O
OPTION
O
SCREEN
O
Prev.
MENU
Move
SETUP
O
Engineering Diagnostics
Menu
Prev.
Manufacturer : LG Electronics Inc.
Model / Type : 37LC2D-EC
Serial No. : 604KG0000006
Software version : 1.1.0
CH 30
CH 34
Select
Transmitter : Teracom_Mux_2
Signal strength 53%
Signal quality 100%
1 YLE PEU 1 YLE TV1
3 YLE TV2 4 YLEQ
5 YLE FST
6 YLEN KLASS
7 YLE FSR+ 8 YLE24
Back
i Channel 30
Page 40

40
WATCHING TV /PROGRAMME CONTROL
This function enables you to watch some scrambled services (pay services). If you remove the CI Module, you can’t watch the pay services.
When the module is inserted to CI slot, you can access the module menu.
To purchase a module and smart card, contact your supplying dealer. Do
not often insert or remove a CAM module from the set. It may cause a
trouble. When the set turned on after inserting the CI Module, you often
can’t hear the sound.
There might be unnatural picture according to CI module and smart card.
CI (Common Interface) function may not be applied based on country
broadcasting circumstance.
Press the MENU button and then
D
or
E
button to
select the SETUP menu.
Press the
G
button and then
D
or
E
button to select
CI Information.
Press the
G
button and then OK button.
Press the
D
or
E
button to select the desired item:
Module information, smart card information, language, or software download etc.
Press the OK button.
Press the EXIT button to disappear the menu window.
• This OSD is only for illustration and the menu
options and screen format will vary according to
the Digital pay services provider.
• It’s possible for you to change CI (Common
Interface) menu screen and service by your dealer.
Viaccess Module
Select the item
Consultations
Authorizations
Module information
CI [COMMON INTERFACE] INFORMATION (IN DIGITAL MODE ONLY)
Auto Tuning
Manual Tuning
Programme Edit
5V Antenna Power
Software Update
Diagnostics
CI Information
G
Module
1
2
3
4
5
6
32
54
1
Auto Tuning
Manual Tuning
Programme Edit
5V Antenna Power
Software Update
Diagnostics
CI Information
PICTURE
O
AUDIO
O
TIME
O
OPTION
O
SCREEN
O
Prev.
MENU
Move
SETUP
O
Page 41

41
WATCHING TV /PROGRAMME CONTROL
1
5432
All stations that can be received are stored by this method.
It is recommended that you use Auto tuning during installation of this set.
AUTO PROGRAMME TUNING (IN ANALOGUE MODE)
Press the
MM EENN UU
button and then
D
or
E
button to
select the SETUP menu.
Press the
G
button and then
D
or
E
button to select
Auto Tuning.
Press the
G
button to select System. Select a TV
system with the
F
or
G
button;
L : SECAM L/L’ (France)
BG : PAL B/G, SECAM B/G (Europe / East Europe /
Asia / New Zealand / M.East / Africa / Australia)
I : PAL I/II (U.K. / Ireland / Hong Kong / South
Africa)
DK : PAL D/K, SECAM D/K (East Europe / China /
Africa / CIS)
Press the
E
button to select Storage From.
Select the beginning programme number with the
F
or
G
button or NUMBER buttons on the Storage
From menu.
Press the
E
button to select Start.
The station name is stored for stations which broadcast VPS (Video Programme Service), PDC
(Programme Delivery Control) or TELETEXT data.
If no station name can be assigned to a station, the
channel number is assigned and stored as C (V/UHF
01-69) or S (Cable 01-47), followed by a number.
To stop auto tuning, press the MENU button.
When auto tuning is completed, the Programme
Edit menu appears on the screen.
See the ‘Programme Edit’ section to edit the
stored programme.
Auto Tuning G
Manual Tuning
Programme Edit
System
Storage From
Start
BG
2
1
2
3
4
5
Auto Tuning
Manual Tuning
Programme Edit
PICTURE
O
AUDIO
O
TIME
O
OPTION
O
SCREEN
O
Prev.
MENU
Move
SETUP
O
Page 42

42
WATCHING TV /PROGRAMME CONTROL
Manual Tuning lets you manually tune and arrange the stations in whatever order you desire.
MANUAL PROGRAMME TUNING (IN ANALOGUE MODE)
Press the MENU button and then
D
or
E
button to
select the SETUP menu.
Press the
G
button and then
D
or
E
button to select
Manual Tuning.
Press the
G
button to select Storage.
Select the desired programme number with the
F
or
G
button or NUMBER buttons on the Storage menu.
Press the
E
button to select System. Select a TV
system with the
F
or
G
button;
L : SECAM L/L’ (France)
BG : PAL B/G, SECAM B/G (Europe / East Europe /
Asia / New Zealand / M.East / Africa / Australia)
I : PAL I/II (U.K. / Ireland / Hong Kong / South
Africa)
DK : PAL D/K, SECAM D/K (East Europe / China /
Africa / CIS)
Press the
E
button to select Band. Press the
F
or
G
button to select V/UHF or Cable as required.
Press the
E
button to select Channel. You can
select the desired channel number with the
F
or
G
button or NUMBER buttons.
If possible, select the channel number directly with
the NUMBER buttons.
Press the
E
button to select Search. Press the
F
or
G
button to commence searching. If a station is
found the search will stop.
Press the OK button to store it.
To store another station, repeat steps 3 to 8.
Press the EXIT button to disappear the menu window.
Auto Tuning
Manual Tuning
G
Programme Edit
Storage
System
Band
Channel
Fine
Search
Name
1
1
C 01
BG
V/UHF
1
5
432
9
876
1
2
3
4
5
6
7
8
9
10
Auto Tuning
Manual Tuning
Programme Edit
PICTURE
O
AUDIO
O
TIME
O
OPTION
O
SCREEN
O
Prev.
MENU
Move
SETUP
O
Page 43

43
WATCHING TV /PROGRAMME CONTROL
Press the MENU button and then
D
or
E
button to
select the SETUP menu.
Press the
G
button and then
D
or
E
button to select
Manual Tuning.
Press the
G
button and then
D
or
E
button to select
Name.
Press the
G
button and then
D
or
E
button. You can
use a the alphabet A to Z, the number 0 to 9, +/ -,
and blank.
Press the
F
or
G
button to select the position and
make your choice of the second character, and so on.
Press the OK button to store it.
Press the EXIT button to disappear the menu window.
Normally fine tuning is only necessary if reception is poor.
Press the MENU button and then
D
or
E
button to
select the SETUP menu.
Press the
G
button and then
D
or
E
button to select
Manual Tuning.
Press the
G
button and then
D
or
E
button to select
Fine.
Press the
G
button and then
F
or
G
button to fine
tune for the best picture and sound.
Press the OK button to store it.
Press the EXIT button to disappear the menu window.
FINE TUNING (IN ANALOGUE MODE)
ASSIGNING A STATION NAME (IN ANALOGUE MODE)
You can assign a station name with five characters to each
programme number.
Auto Tuning
Manual Tuning
Programme Edit
FG
Store
Storage
System
Band
Channel
Fine
Search
Name
1
1
C 01
BG
V/UHF
Auto Tuning
Manual Tuning
Programme Edit
Storage
System
Band
Channel
Fine
Search
Name
1
1
C 01
BG
V/UHF
FG
D
E
1
1
2
3
4
5
6
1
2
3
4
5
6
7
Auto Tuning
Manual Tuning
Programme Edit
PICTURE
O
AUDIO
O
TIME
O
OPTION
O
SCREEN
O
Prev.
MENU
Move
SETUP
O
5
432
5
432 6
Page 44

44
WATCHING TV /PROGRAMME CONTROL
Press the MENU button and then
D
or
E
button to
select the SETUP menu.
Press the
G
button and then
D
or
E
button to select
Programme Edit.
Press the
G
button to display the Programme Edit menu.
A Deleting a programme
Select a programme to be deleted with the
D
or
E
or
F
or
G
button.
Press the RED button twice. The selected programme
is deleted, all the following programmes are shifted
up one position.
A Copying a programme
Select a programme to be copied with the
D
or
E
or
F
or
G
button.
Press the GREEN button. All the following programmes
are shifted down one position.
This function enables you to delete or skip the stored programmes.
Also you can move some stations to other programme numbers or
copy a blank station data into the selected programme number.
PROGRAMME EDIT (IN ANALOGUE MODE)
1
2
Auto Tuning
Manual Tuning
Programme Edit
G
To Set
1
2
3
a
b
a
b
Auto Tuning
Manual Tuning
Programme Edit
PICTURE
O
AUDIO
O
TIME
O
OPTION
O
SCREEN
O
Prev.
MENU
Move
SETUP
O
Page 45

45
WATCHING TV /PROGRAMME CONTROL
A Moving a programme
Select a programme to be moved with
D
or
E
or
F
or
G
button.
Press the YELLOW button.
Move the programme to the desired programme number with the
D
or
E
or
F
or
G
button.
Press the YELLOW button again to release this function.
A Skipping a programme number
Select a programme number to be skipped with
D
or
E
or
F
or
G
button.
Press the BLUE button. The skipped programme number turns to blue.
Press the BLUE button to release the skipped programme.
When a programme number is skipped it means that you will be unable to select it using the PR + or button during normal TV viewing.
If you want to select the skipped programme, directly enter the programme number with the NUMBER
buttons or select it in the programme edit or table menu.
A Selecting Favourite Programme
Select your favourite programme number with
D
or
E
or
F
or
G
button.
Press the FAV button.
The selected programme will be added to the favourite programme list and heart-mark will appear in front
of that programme number.
a
b
c
d
a
b
a
b
c
d
Page 46

46
A Displaying programme LIST
Press the LIST button to display the PROGRAMME
LIST menu.
The programme list appears on the screen.
• You may find some blue programmes.
They have been set up to be skipped by auto
programming or in the programme edit mode.
• Some programmes with the channel number shown
in the programme LIST indicate there is no station
name assigned.
A Selecting a programme in the programme list
Select a programme with the
D
or
E
or
F
or
G
button.
Press the OKbutton. The set switches to the chosen programme number.
A Paging through a programme list
There are programme LIST pages which total contain
100 programmes.
Press the
D
or
E
or
F
or
G
button repeatedly to turns
the pages.
Press the LIST button to return to normal TV viewing.
A
Displaying favourite programme table
Press the
FAV
button to display the Favourite
Programme table menu.
You can check the programmes stored in the memory by
displaying the programme table.
CALLING THE PROGRAMME TABLE
Displayed when the
Favourite Programme.
Displayed when the
Locked Programme.
Mini Glossary
< In Digital Mode >
< In Analogue Mode >
1
1
2
1
2
DTV List
D
801 YLE TV1
802 YLE TV2
803 YLE FST
804 YLE24
805
YLE Teema
806 TV4
WATCHING TV /PROGRAMME CONTROL
Programme List
D
0 BBC1
1C 01
2C 04
3C 05
4
BLN 2
5
C 05
Page 47

47
WATCHING TV /PROGRAMME CONTROL
Sets a label to each input source which is not in use.
Press the
MMEENNUU
button and then use
D
or
E
button to
select the OPTION menu.
Press the
G
button and then use
D
or
E
button to select
Input Label.
Press the
G
button and then use
D
or
E
button to select
the source: AV1, AV2, Comp., RGB or HDMI.
Press the
F
or
G
button to select the label.
Press the EXIT button to disappear the menu window.
INPUT SOURCE SELECTION
Language
Country
Lock System
Parental Control
Input Label
G
Factory Mode
AV1
AV2
Comp.
RGB
HDMI
1
1
2
3
4
5
Language
Country
Lock System
Parental Control
Input Label
Factory Mode
SETUP
O
PICTURE
O
SCREEN
O
Prev.
MENU
Move
AUDIO
O
TIME
O
OPTION
O
3 42
Page 48

48
EPG (ELECTRONIC PROGRAMME GUIDE) (IN DIGITAL MODE)
Press the GUIDE button to switch on EPG.
Press the GUIDE or EXIT button again to switch off EPG and return to normal TV viewing.
Press the
D
or E, F or G, PR + or - button to
select desired programme, then press the OK button
to display the selected programme.
This system has an Electronic Programme Guide (EPG) to help your navigation through all the
possible viewing options.
The EPG supplies information such as programme listings, start and end times for all available
services. In addition, detailed information about the programme is often available in the EPG (the
availability and amount of these programme details will vary, depending on the particular
broadcaster).
This function can be used only when the EPG information is broadcasted by broadcasting
companies.
The EPG displays the programme description for next 8 days.
Switch on/off EPG
Select a programme
1
2
1
Page 49

49
EPG (ELECTRONIC PROGRAMME GUIDE) (IN DIGITAL MODE)
Remote Control Buttons
Function
RED Change EPG mode
YELLOW Enter Timer Record/Remind setting mode
BLUE Enter Timer Record/Remind list mode
Change to the selected channel
F
or
G
Select NOW or NEXT Programme
D
or
E
Select the Broadcasting Programme
PR + or - Page Up/Down
GUIDE/EXIT Switch off EPG
TV/RADIO Select TV or RADIO Programme
INFO i The detail information on or off
Remote Control Buttons
Function
RED Change EPG mode
GREEN Enter Date setting mode
YELLOW Enter Timer Record/Remind setting mode
BLUE Enter Timer Record/Remind list mode
Change to the selected channel
F
or
G
Select NOW or NEXT Programme
D
or
E
Select the Broadcasting Programme
PR + or - Page Up/Down
GUIDE/EXIT Switch off EPG
TV/RADIO Select TV or RADIO Programme
INFO i The detail information on or off
Button Function in NOW/NEXT Guide Mode
Button Function in 8 Days Guide Mode
Button Function in Date Change Mode
Remote Control Buttons
Function
GREEN Switch off Date setting mode
Change to the selected date
F
or
G
Select a date
E
Switch off Date setting mode
GUIDE/EXIT Switch off EPG
Page 50

50
EPG (ELECTRONIC PROGRAMME GUIDE) (IN DIGITAL MODE)
Button Function in Extended Description Box
Remote Control Buttons
Function
D
or
E
Text Up/Down
YELLOW Enter Timer Record/Remind setting mode
INFO i The detail information on or off
GUIDE/EXIT Switch off EPG
- This function is available only when recording equipment that use pin8 recording signalling has
been connected to the DTV-OUT terminal, using a SCART cable.
Button Function in Record/Remind Setting Mode
Remote Control Buttons
Function
YELLOW Change to Guide or Timer list mode
Save Timer Record/Remind
F
or
G
Select Type, Service, Date or Start/End time
D
or
E
Function setting
Button Function in Timer List Mode
Remote Control Buttons
Function
YELLOW Add new Manual Timer setting mode
GREEN Enter Timer list editing mode
RED Delete the selected item
BLUE Change to Guide mode
D
or
E
Select Timer list
Page 51

51
PICTURE CONTROL
You can watch the screen in various picture formats;
1166:: 99, OOrr ii ggiinn aall
,
44:: 33, 1144:: 99
and
ZZoooomm11//22
.
If a fixed image is displayed on the screen for a long time, that fixed image
may become imprinted on the screen and remain visible.
There might be uncomfortable in full mode. Then change into other
mode.
You can adjust the enlarge proportion using
DDorEE
button.
This function works in the following signal.
PICTURE SIZE (ASPECT RATIO) CONTROL
•
1166::99
Following selection will lead you to adjust the picture
horizontally, in a linear proportion, to fill the entire
screen (useful for viewing 4:3 formatted DVDs).
•
44::33
Following selection will lead you to view a picture with
an original 4:3 aspect ratio, with gray bars appearing at
both the left and right sides.
.
•
OOrriiggiinnaall
When your TV receives the wide screen signal, it will be
automatically changed to the picture format to be sent.
•
1144::99
You can enjoy the picture format of 14:9 or general TV
programme through the 14:9 mode. The screen 14:9 is
viewed just like that the screen 4:3 is magnified to the
left / right.
Press the
RRAATTIIOO
button repeatedly to select the desired picture format.
You can also adjust
AAssppeecctt RRaattiioo
in the
SCREEN menu.
1
4:3
Original
14:9
DE
16:9
Page 52

52
PICTURE CONTROL
•
ZZoo oo mm 11
Following selection will lead you to view the
picture without any alternation, while filling
the entire screen. However, the top and bottom portions of the picture will be cropped.
•
ZZoo oo mm 22
Choose Zoom2 when you want the picture to
be altered, both horizontally extended and
vertically cropped. The picture taking a
halfway trade off between alteration and
screen coverage.
NOTE
!
GG
You can only select
44:: 33, 1166:: 99
(Wide), Zoom 1/2 in Component, HDMI mode.
GG
You can only select
44:: 33, 1166:: 99
(Wide) in RGB mode only.
Zoom1
DE
Zoom2
DE
Page 53

53
PICTURE CONTROL
Press the MENU button and then
D
or
E
button to
select the PICTURE menu.
Press the
G
button and then
D
or
E
button to select
Picture Mode.
Press the
G
button and then
D
or
E
button to select
Dynamic, Standard, Mild, User 1, or User 2.
Press the EXIT button to return to normal TV viewing.
Picture Mode adjusts the set for the best picture
appearance. Select the preset value in the Picture
Mode menu based on the programme category.
Dynamic, Standard and Mild are programmed for
optimum picture reproduction at the factory and cannot be changed.
DDyy nnaamm ii cc
Select this option to display with a sharp image.
SS tt aa nn dd aarrdd
The most general and natural screen display status.
MM ii ll dd
Select this option to display with a mild image.
UUss eerr 11//22
Select this option to use the user-defined setting.
PRESET PICTURE SETTINGS
Picture Mode-Preset
Picture Mode G
Colour Temperature
Advanced
Picture Reset
Demo
Dynamic
Standard
Mild
User 1
User 2
1
2
3
4
1
Picture Mode
Colour Temperature
Advanced
Picture Reset
Demo
SETUP
O
AUDIO
O
TIME
O
OPTION
O
SCREEN
O
Prev.
MENU
Move
PICTURE
O
32
Page 54

54
PICTURE CONTROL
Press the MENU button and then
D
or
E
button to
select the PICTURE menu.
Press the
G
button and then
D
or
E
button to select
Colour Temperature.
Press the
G
button and then
D
or
E
button to select
either Cool, Medium, War m, or User.
Press the EXIT button to disappear the menu window.
To initialize values (reset to default settings), select the Cool option.
It’s available DTV, TV, AV1, AV2, Component, HDMI-DTV mode.
Choose one of three automatic colour adjustments. Set to warm to
enhance hotter colours such as red, or set to cool to see less
intense colours with more blue.
It’s available to use this function in User mode.
Auto Colour Tone Control (Warm/Medium/Cool)
Picture Mode
Colour Temperature
G
Advanced
Picture Reset
Demo
Cool
Medium
Warm
User
1
1
2
3
4
Picture Mode
Colour Temperature
Advanced
Picture Reset
Demo
SETUP
O
AUDIO
O
TIME
O
OPTION
O
SCREEN
O
Prev.
MENU
Move
PICTURE
O
32
Page 55

55
PICTURE CONTROL
Press the MENU button and then
D
or
E
button to
select the PICTURE menu.
Press the
G
button and then
D
or
E
button to select
Colour Temperature.
Press the
G
button and then
D
or
E
button to select
either 9300K, 6500K, sRGB, or User.
Press the EXIT button to disappear the menu window.
To initialize values (reset to default settings), select the 9300K
option.
It’s available RGB, HDMI-PC mode.
Choose one of three automatic colour adjustments. Set to 6500K
to enhance hotter colours such as red, or set to 9300K to see less
intense colours with more blue.
It’s available to use this function in User mode.
Auto Colour Tone Control (9300K/6500K/sRGB)
Picture Mode
Colour Temperature
G
Advanced
Picture Reset
Demo
9300K
6500K
sRGB
User
1
1
2
3
4
Picture Mode
Colour Temperature
Advanced
Picture Reset
Demo
SETUP
O
AUDIO
O
TIME
O
OPTION
O
SCREEN
O
Prev.
MENU
Move
PICTURE
O
32
Page 56

56
PICTURE CONTROL
Contrast 80 G
Brightness 50
Colour 30
Sharpness 40
Tint 0
User 1
Picture Mode G
Colour Temperature
Advanced
Picture Reset
Demo
Dynamic
Standard
Mild
User 1
User 2
1
RG
Picture Mode
Colour Temperature
Advanced
Picture Reset
Demo
SETUP
O
AUDIO
O
TIME
O
OPTION
O
SCREEN
O
Prev.
MENU
Move
PICTURE
O
MANUAL PICTURE ADJUSTMENT
Press the
MM EENN UU
button and then
DD
or
EE
button to select
the
PICTURE menu.
Press the
GG
button and then
DD
or
EE
button to select
Picture Mode.
Press the
G button and then
D
or
E
button to select User 1
or User 2.
Press the
GG
button and then
DD
or
EE
button to select the
desired picture option (
Contrast, Brightness, Colour,
Sharpness and Tint).
Press the
FF
or
GG
button to make appropriate adjustments.
Press the EXIT button to disappear the menu window.
Picture Mode-User option
CC oonn ttrr aasstt
Adjusts the difference between the light and
dark levels in the picture.
BBrriigg hh tt nnee ssss
Increases or decreases amount of white in the
your picture.
CC oolloouu rr
Adjusts intensity of all colours.
SS hhaa rr ppnn eess ss
Adjusts the level of crispness in the edges
between the light and dark areas of the picture.
The lower the level, the softer the image.
TTiinn tt
Adjusts the balance between red and green levels.
NOTE
!
GG
You can’t adjust colour, sharpness and tint in the RGB,
HDMI-PC mode to the levels you prefer.
1
2
3
4
5
6
32
54
Page 57

57
PICTURE CONTROL
Picture Mode
Colour Temperature
G
Advanced
Picture Reset
Demo
Cool
Medium
Warm
User
Red 40 G
Green 0
Blue 0
User
1
Picture Mode
Colour Temperature
Advanced
Picture Reset
Demo
SETUP
O
AUDIO
O
TIME
O
OPTION
O
SCREEN
O
Prev.
MENU
Move
PICTURE
O
To adjust red, green, blue to any colour temperature you prefer.
Colour Tone - User option
Press the
MM EENN UU
button and then
DD
or
EE
button to select
the
PICTURE menu.
Press the
GG
button and then
DD
or
EE
button to select
Colour Temperature.
Press the
GG
button and then
DD
or
EE
button to select User.
Press the
GG
button and then
DD
or
EE
button to select Red,
Green or Blue.
Press the
FF
or
GG
button to make appropriate adjustments.
Press the EXIT button to disappear the menu window.
1
2
3
4
5
6
54
Picture Mode
Colour Temperature
G
Advanced
Picture Reset
Demo
9300K
6500K
sRGB
User
32
<DTV, TV, AV1, AV2, Component, HDMI-DTV>
<RGB, HDMI-PC>
Page 58

58
PICTURE CONTROL
AA
XXDD CCoonnttrraass tt ::
Optimizing the contrast automatically
according to the brightness of the reflection.
AA
XXDD CCoolloouu rr ::
Adjusting the colours of the reflection
automatically to reproduce as closely as possible to the
natural colors.
AA
XXDD NNRR
: Removing the noise up to the point where it
does not damage the original picture.
AA
MM PPEEGG NNRR
: To reduce the picture noise which may
appear on the screen during watching the TV.
Picture Mode
Colour Temperature
G
Advanced
Picture Reset
Demo
Auto
Manual
XD Contrast
XD Colour
XD NR
MPEG NR
0
On
On
Low
Picture Mode
Colour Temperature
Advanced
Picture Reset
Demo
1
2
Picture Mode
Colour Temperature
Advanced
Picture Reset
Demo
SETUP
O
AUDIO
O
TIME
O
OPTION
O
SCREEN
O
Prev.
MENU
Move
PICTURE
O
XD - PICTURE IMPROVEMENT TECHNOLOGY
3
Press the MENU button and then
DD
or
EE
button to select
the
PICTURE menu.
Press the
GG
button and then
DD
or
EE
button to select XD.
Press the
GG
button and then
DD
or
EE
button to select
Auto or Manual.
Press the EXIT button to disappear the menu window.
* Selecting the Manual
This menu is activated after selecting the
User1
or
User2
of
PPiiccttuurree
MMoodd ee
.
Press theGGbutton and then DDorEEbutton to select
XXDD
Contrast
, XD Colour, XD NR or MPEG NR.
Press the
GG
button and then DDorEEbutton to select On
or Off.
Press the EXIT button to disappear the menu window.
XD is LG electronic's unique picture improving technology to display a
real HD source through an advanced digital signal processing algorithm.
It’s not available to use this function in RGB, HDMI-PC mode.
1
2
3
4
1
2
3
Auto
Manual
G
XD Contrast
XD Colour
XD NR
MPEG NR
0
On
On
Low
Page 59

59
PICTURE CONTROL
DEMO
Use it to see the difference between XD Demo on and XD
Demo off.
It’s not available to use this function in RGB, HDMI[PC] mode.
Press the MENU button and then
DD
or
EE
button to select
the
PICTURE menu.
Press the MENU button and then
DD
or
EE
button to select
XD Demo.
Press the GGbutton to begin XD Demo.
To s t o p
XXDD DDeemm oo
, press the
MM EENN UU
or
EEXXII TT
button.
1
2
3
4
Picture Mode
Colour Temperature
Advanced
Picture Reset
Demo
G
To Start
1
Picture Mode
Colour Temperature
Advanced
Picture Reset
Demo
SETUP
O
AUDIO
O
TIME
O
OPTION
O
SCREEN
O
Prev.
MENU
Move
PICTURE
O
• XD Demo
XD™Off XD™ On
Exit
Menu
32
Page 60

60
PICTURE CONTROL
Picture Mode
Colour Temperature
Advanced
Picture Reset
Demo
Cinema
Black Level
Off
Low
Picture Mode
Colour Temperature
Advanced
Picture Reset
Demo
Cinema
Black Level
Low
1
Picture Mode
Colour Temperature
Advanced
Picture Reset
Demo
SETUP
O
AUDIO
O
TIME
O
OPTION
O
SCREEN
O
Prev.
MENU
Move
PICTURE
O
2
3
ADVANCED - CINEMA
Set up the product for the best picture appearance for
viewing movies.
This feature operates only in TV, AV and Component
480i/576i mode.
Press the
MM EE NNUU
button and then
DD
or
EE
button to select
the
PICTURE menu.
Press the
GG
button and then
DD
or
EE
button to select Advanced.
Press the
GG
button and then
DD
or
EE
button to select Cinema.
Press the
GG
button and then
FF
or
GG
button to select On or Off.
Press the EXIT button to disappear the menu window.
1
2
3
4
5
On
GF
Page 61

61
PICTURE CONTROL
ADVANCED - BLACK(DARKNESS) LEVEL
When you watch the movie, this function adjusts the set to the
best picture appearance. Adjusting the contrast and the brightness of the screen using the black level of the screen.
This function works in the following mode: AV (NTSC-M) or
HDMI.
Press the
MM EENN UU
button and then
DD
or
EE
button to select
the
PICTURE menu.
Press the
GG
button and then
DD
or
EE
button to select
Advanced.
Press the
GG
button and then
DD
or
EE
button to select Black
Level.
Press the
GG
button and then
FF
or
GG
button to select Low
or High.
AA
LLoo ww
::
The reflection of the screen gets darker.
AA
HHiigg hh
::
The reflection of the screen gets brighter.
Press the EXIT button to disappear the menu window.
1
2
3
4
5
Picture Mode
Colour Temperature
Advanced
Picture Reset
Demo
Cinema
Black Level
Off
Low
Picture Mode
Colour Temperature
Advanced
Picture Reset
Demo
Cinema
Black Level
1
Picture Mode
Colour Temperature
Advanced
Picture Reset
Demo
SETUP
O
AUDIO
O
TIME
O
OPTION
O
SCREEN
O
Prev.
MENU
Move
PICTURE
O
2
43
Off
Low
GF
Page 62

62
PICTURE CONTROL
PICTURE RESET
Press the
MM EENN UU
button and then
DD
or
EE
button to select
the
PICTURE menu.
Press the
GG
button and then
DD
or
EE
button to select
Picture Reset.
Press the
GG
button to initialize the adjusted value.
Returns to the default settings Picture Mode, Colour
Temperature, XD, Advanced at the factory.
1
2
3
Picture Mode
Colour Temperature
Advanced
Picture Reset
G
Demo
To Set
1
Picture Mode
Colour Temperature
Advanced
Picture Reset
Demo
SETUP
O
AUDIO
O
TIME
O
OPTION
O
SCREEN
O
Prev.
MENU
Move
PICTURE
O
32
Page 63

63
SOUND & LANGUAGE CONTROL
1
AVL automatically keeps on an equal volume level even if
you change programmes.
Press the MENU button and then
D
or
E
button to
select the AUDIO menu.
Press the
G
button and then
D
or
E
button to select
Auto Volume.
Press the
G
button and then
D
or
E
button to select
Off or On.
Press the EXIT button to disappear the menu window.
AUTO VOLUME LEVELER
Sound Mode
Auto Volume
G
Balance 0
Off
On
1
2
3
4
Sound Mode
Auto Volume
Balance 0
SETUP
O
PICTURE
O
TIME
O
OPTION
O
SCREEN
O
Prev.
MENU
Move
AUDIO
O
32
Page 64

64
SOUND &LANGUAGE CONTROL
Sound Mode G
Auto Volume
Balance 0
Surround MAX
Standard
Music
Movie
Sports
User
1
Sound Mode
Auto Volume
Balance 0
SETUP
O
PICTURE
O
TIME
O
OPTION
O
SCREEN
O
Prev.
MENU
Move
AUDIO
O
PRESET SOUND SETTINGS-SOUND MODE
You can select your preferred sound setting; Surround MAX,
Standard, Music, Movie or Sports and you can also adjust the
sound frequency of the equalizer.
Sound Mode lets you enjoy the best sound without any Special
adjustment because the TV sets the appropriate sound options
based on the programme content.
SS uurrrr oo uunndd MMAAXX, SS tt aa nn dd aarrdd, MM uuss ii cc, MM oo vv ii ee
, and
SS pp oorrttss
are
preset for good sound quality at the factory and are not
adjustable.
SS uurr rr oouu nndd MM AAXX
Select this option to sound realistic.
SS tt aa nn dd aarrdd
The most commanding and natural audio.
MM uuss ii cc
Select this option to enjoy the original sound when
listening to the music.
MM oo vv ii ee
Select this option to enjoy sublime sound.
SS pp oorrtt ss
Select this option to watch sports broadcasting.
UUss ee rr
Select this option to use the user-defined audio settings.
Press the
MM EENN UU
button and then
DDorEE
button to select
the
AUDIO menu.
Press the
GG
button and then DDorEEbutton to select
Sound Mode.
Press the
GG
button and then DDorEEbutton to select
Surround MAX, Standard, Music, Movie, Sports or
User
.
Press the EXIT button to disappear the menu window.
1
2
3
4
32
Page 65

65
SOUND &LANGUAGE CONTROL
Sound Mode G
Auto Volume
Balance 0
Surround MAX
Standard
Music
Movie
Sports
User
120Hz FG
200Hz
500Hz
1.2KHz
3KHz
7.5KHz
12KHz
User
1
Sound Mode
Auto Volume
Balance 0
SETUP
O
PICTURE
O
TIME
O
OPTION
O
SCREEN
O
Prev.
MENU
Move
AUDIO
O
SOUND SETTING ADJUSTMENT -USER MODE
Press the
MM EENN UU
button and then DDorEEbutton to select
the
AUDIO menu.
Press the
GG
button and then DDorEEbutton to select
Sound Mode.
Press the
GG
button and then DDorEEbutton to select User.
Press the
GG
button.
Select a sound band by pressing the
FForGG
button.
Make appropriate sound level with the
DDorEE
button.
Press the EXIT button to disappear the menu window.
Adjust the sound equalizer.
1
2
3
4
5
6
32
54
Page 66

66
SOUND &LANGUAGE CONTROL
1
Press the MENU button and then
D
or
E
button to
select the AUDIO menu.
Press the
G
button and then
D
or
E
button to select
Balance.
Press the
G
button and then
F
or
G
button to make
desired adjustment.
Press the EXIT button to disappear the menu window.
You can adjust the sound balance of speaker to the levels you
prefer.
BALANCE
Sound Mode
Auto Volume
Balance 0
G
LR
1
2
3
4
Sound Mode
Auto Volume
Balance 0
SETUP
O
PICTURE
O
TIME
O
OPTION
O
SCREEN
O
Prev.
MENU
Move
AUDIO
O
32
Page 67

67
SOUND &LANGUAGE CONTROL
I/II
AA
MM oonnoo ssoouunn dd ssee ll eeccttiioonn
If the stereo signal is weak in stereo reception, you can switch to mono by pressing
the
II//II II
button twice. In mono reception, the depth of sound is improved. To switch
back to stereo, press the
II//II II
button twice again.
AA
LL aa nn gguuaaggee ssee ll eeccttii oonn ff oorr dduuaall llaanngguu aagg ee bbrrooaa dd ccaasstt
If a programme received two languages (dual language), you can switch to
DUAL I,
DUAL II or DUAL I+II by pressing the
II//II II
button repeatedly.
DUAL I Sends the primary broadcast language to the loudspeakers.
DUAL II Sends the secondary broadcast language to the loudspeakers.
DUAL I+II Sends a separate language to each loudspeaker.
Broadcast
Mono
Stereo
Dual
On Screen Display
MONO
STEREO
DUAL I
Stereo/Dual Reception (In Analogue Mode Only)
When a programme is selected, the sound information for the station appears after
the programme number and station name disappear.
Page 68

68
NICAM Reception (In Analogue Mode Only)
When
NNII CC AAMM mm oo nnoo
is received, you can select
NNII CC AAMM MM OONNOO
or
FF MM MMOONNOO
.
When
NNII CCAA MM
stereo is received, you can select
NNIICC AAMM SSTTEE RREEOO
or
FF MM MMOONNOO
.
If the stereo signal is weak, switch to
FF MM mm oo nnoo
.
When NICAM dual is received, you can select
NNIICC AAMM DDUUAALL II, NNIICCAAMM DD UUAA LL IIII
or
NNIICCAAMM DD UUAALL II++II II
or
MM OONN OO
.
If the set is equipped with the receiver for NICAM reception, the high quality NICAM (Near
Instantaneous Companding Audio Multiplex) digital sound can be received.
Sound output can be selected according to the type of received broadcast as follows by pressing the I/II button repeatedly.
Speaker Sound Output Selection
In AV, Component, RGB and HDMI mode, you can select output sound for the left and right loudspeakers.
Repeatedly press the
II//II II
button to select the sound output.
L+R: Audio signal from audio L input is sent to the left loud speaker and audio signal from audio
R input is sent to the right loud speaker.
L+L: Audio signal from audio L input is sent to left and right loud speakers.
R+R: Audio signal from audio R input is sent to left and right loud speakers.
1
2
3
SOUND &LANGUAGE CONTROL
Page 69

69
SOUND &LANGUAGE CONTROL
ON-SCREEN MENU LANGUAGE /
COUNTRY SELECTION
Press the
MMEENNUU
button and then use
DD
or
EE
button
to select the OPTION menu.
Press the G button and then use DDor EEbutton to
select
Language. The menus can be shown on the
screen in the selected language.
Or, Press the
G button and then use
DD
or EEbutton
to select
Country.
Press the
G button and then use
FF
or GGbutton to
select your desired language or country.
Press the
OOKK
button.
Press the EXIT button to disappear the menu window.
1
2
3
4
5
Installation guide menu appears on TV screen when it is turned
on for the first time.
Press the
DD
or EEor F or G button and then,
OO KK
button to select your desired language.
Press the
DD
or
EE
button and then,
OO KK
button to
select your country.
1
2
** IIff yyoouu wwaanntt ttoo cchhaannggee LLaanngguuaaggee// CCoouunnttrryy sseelleeccttiioonn
NOTE
!
GG
If you don’t finish set up
IInnssttaallll aa tt iioonn GG uuiiddee
by pressing
EEXXIITT
button or time out of OSD (On
Screen Display) display, it will continuously appear until completing set up whenever the set is
turned on.
GG
If you turn the power on without setting the Installation Guide, the screen in TV mode will display
the Installation Guide setting. Please make sure that Installation Guide is set before you use the
product.
GG
If you select wrong local country, the teletext may not appear correctly on the screen and some
problem may happen during teletext operation.
GG
CI (Common Interface) function may not be applied based on country broadcasting circumstance.
GG
DTV mode control buttons may not be working based on country broadcasting circumstance.
OK
MENU EXIT
GUIDE
RATIO
123
456
789
0
Q.VIEW
LIST
TV INPUT
D/A
POWER
VOL PR
INDEX
SLEEP
HOLD
REVEAL
SUBTITLE
UPDATE
I/II
MUTE
TEXT
BACK
FAV
TIME
INFO
i
TV/RADIO
*
?
Page 70

70
Press the
MMEENNUU
button and then use
D
or
E
button to select
the
OPTION menu.
Press the G button and then use Dor Ebutton to select
LLaa nngg uuaagg ee
.
Press the
G button and then use
D
or Ebutton to select
AAuu dd iioo, SSuubb tt ii ttllee
or
SSuubbttiitt llee HHaarrdd ooff hheeaarriinngg
.
Press the
G button and then use
F
or Gbutton to select
your desired language.
Press the EXIT button to disappear the menu window.
AAuu dd iioo
function lets you select your preferred language for audio. If
the audio data in selected language is not broadcasted, default language audio will be played.
Use
SSuubb tt ii ttllee
function when two or more subtitle languages are
broadcasted. If the subtitle data in selected language is not broadcasted, default language subtitle will be displayed.
LANGUAGE SELECTION
(IN DIGITAL MODE ONLY)
1
2
3
4
5
SOUND &LANGUAGE CONTROL
NOTE
!
< Audio Language Selection >
GG
When two or more audio languages are broadcasted, you
can select audio language with the I/II button on the
remote control.
GG
Press the
D
or
E
button to select an audio language.
GG
Press the
F
or
G
button to select L+R, L+L or R+R.
- The audio/subtitle can be displayed simpler form with 1 to 3 characters which is broadcast by service provider.
- When you select supplementary Audio (Audio for “Visual/Hearing Impaired”) it may speak out a part of Main audio.
Audio Language OSD Information
Status
Not Available
MPEG Audio
Dolby Digital Audio
Audio for “Visual Impaired”
Audio for “Hearing Impaired”
Display
N.A
TEXT
< Subtitle Language Selection >
GG
When two or more subtitle languages are broadcasted, you
can select subtitle language with the SUBTITLE button on
the remote control.
GG
Press the
D
or
E
button to select a subtitle language.
Subtitle Language OSD Information
Status
Not Available
Teletext Subtitle
Subtitle for “Hard of Hearing”
Display
N.A
OK
MENU EXIT
GUIDE
123
456
789
0
Q.VIEW
LIST
I/II
MUTE
TEXT
INFO
i
TV/RADIO
RATIO
INDEX
SLEEP
HOLD
REVEAL
SUBTITLE
UPDATE
TIME
?
Page 71

71
TIME SETTING
Press the MENU button and then
D
or
E
button to
select the TIME menu.
Press the
G
button and then
D
or
E
button to select
Clock.
Press the
G
button and then
F
or
G
button to select
either the year, date, or time option.
Once selected, use the
D
or
E
button to set the year,
date, and time options.
Press the EXIT button to disappear the menu window.
The clock is set automatically when receiving the digital signal.
(You can set the clock if the set has no DTV signal.)
You must set to the time correctly before using on/off time
function.
CLOCK SETUP
Clock G
Off time
On time
Auto Sleep
Time Zone
Time
Date
Year
12
2007
Apr
20 14
1
1
2
3
4
Clock
Off time
On time
Auto Sleep
Time Zone
SETUP
O
PICTURE
O
OPTION
O
SCREEN
O
Prev.
MENU
Move
AUDIO
O
TIME
O
32
Page 72

72
Press the MENU button and then
D
or
E
button to
select the TIME menu.
Press the
G
button and then
D
or
E
button to select
Off time/On time.
Press the
G
button and then
D
or
E
button to select
On.
• To cancel On/Off time function, select Off.
Press the
G
button and then
D
or
E
button to set the
hour.
Press the
G
button and then
D
or
E
button to set the
minutes.
For only On time function
• Programme: Press the
G
button and then
D
or
E
button to select TV, DTV or Radio in the Mode menu.
And then, Press the
G
button and then
D
or
E
button to
select the programme.
• Volume: Press the
G
button and then
D
or
E
but-
ton to adjust volume level at turn-on.
Press the EXIT button to disappear the menu window.
The Off time automatically switches the set to standby at the
preset time.
Two hours after the set is switched on by the on time function it
will automatically switch back to standby mode unless a button
has been pressed.
Once the on time/off time is set, these functions operate daily
at the preset time.
Off time function overrides On timer function if they are set
both to the same time.
The set must be in standby mode for the On timer to work.
AUTO ON/OFF TIMER SETTING
Clock
Off time
On time
G
Auto Sleep
Time Zone
Off
On
:
Volume
Mode
PR
18 00
3
TV
0
1
1
2
3
4
5
6
7
Clock
Off time
On time
Auto Sleep
Time Zone
SETUP
O
PICTURE
O
OPTION
O
SCREEN
O
Prev.
MENU
Move
AUDIO
O
TIME
O
5 6432
TIME SETTING
Page 73

73
TIME SETTING
1
If set to on and there is no input signal, the set turns off automatically after 10 minutes.
Press the MENU button and then
D
or
E
button to
select the TIME menu.
Press the
G
button and then
D
or
E
button to select
Auto Sleep.
Press the
G
button and then
D
or
E
button to select
Off or On.
Press the EXIT button to disappear the menu window.
AUTO SHUT-OFF SETTING
Clock
Off time
On time
Auto Sleep
G
Time Zone
Off
On
1
2
3
4
Clock
Off time
On time
Auto Sleep
Time Zone
SETUP
O
PICTURE
O
OPTION
O
SCREEN
O
Prev.
MENU
Move
AUDIO
O
TIME
O
32
Page 74

74
You don’t have to remember to switch the set off before you
go to sleep.
The sleep timer automatically switches the set to standby
after the preset time has elapsed.
SLEEP TIMER SETTING
Press the SLEEP button repeatedly to select the number of minutes.
The display ‘
- - - Min.
’ will appear on the screen, fol-
lowed by 10, 20, 30, 60, 90, 120, 180 and 240.
When the number of minutes you want is displayed on
the screen, the timer begins to count down from the
number of minutes selected.
To view the remaining sleep time, press the SLEEP button once.
To cancel the sleep time, repeatedly press the SLEEP
button until the display ‘
- - - Min.
’ appears.
When you switch the set off, the set releases the preset sleep time.
a
b
c
d
e
1
When you select a Time Zone city, TV time is set by the time
offset information based on Time Zone and GMT (Greenwich
Mean Time) information which is received to broadcasting
signal when time is set automatically by a digital signal.
Press the MENU button and then
D
or
E
button to
select the TIME menu.
Press the
G
button and then
D
or
E
button to select
Time Zone.
Press the
G button and then F or G button to select
your viewing area time zone.
Press the EXIT button to disappear the menu window.
TIME ZONE SETUP
Clock
Off time
On time
Auto Sleep
Time Zone
G
1
2
3
4
Clock
Off time
On time
Auto Sleep
Time Zone
SETUP
O
PICTURE
O
OPTION
O
SCREEN
O
Prev.
MENU
Move
AUDIO
O
TIME
O
32
TIME SETTING
Time Zone
London GMT
Page 75

75
PARENTAL CONTROL / RATINGS
SET PASSWORD & LOCK SYSTEM
Language
Country
Lock System
G
Parental Control
Input Label
Factory Mode
Lock
Set Password
New
Confirm
Off
If you first enter the password, press ‘0’, ‘0’, ‘0’, ‘0’ on the
remote control handset.
1
Press the MENU button and then
D
or
E
button to
select the OPTION menu.
Press the
G
button and then
D
or
E
button to select
Lock System.
Press the
G
button and then
F
or
G
button to select
On.
To set the password
Press the
G
button and then use NUMBER buttons to
input a 4-digit password.
Be sure to remember this number!
Re-enter new password for confirm.
If you forgot your password, press ‘7’, ‘7’, ‘7’, ‘7’ on the
remote control handset.
Press the EXIT button to disappear the menu window.
1
2
3
4
Language
Country
Lock System
Parental Control
Input Label
Factory Mode
SETUP
O
PICTURE
O
SCREEN
O
Prev.
MENU
Move
AUDIO
O
TIME
O
OPTION
O
32
Page 76

76
This function operates according to information
from the broadcasting station. Therefore if the
signal has wrong information, this function dose
not operates.
Lets you set up blocking schemes to block specific channels, ratings, and external viewing sources.
A password is required to gain access to this menu.
This set is programmed to remember which option
it was last set to even if you turn the set off.
Press the MENU button and then
D
or
E
button to
select the OPTION menu.
Press the
G
button and then
D
or
E
button to select
Parental Control.
Then, press the
G
button to enter the password as
requested.
The set is set up with the initial password “0-0-0-0”.
Press the
G
button and then
F
or
G
button to select
Parental Guidance or Key Lock.
PPaarree nnttaall GG uuiiddaannccee
(In Digital mode only)
Prevents children from watching certain adult’s TV programmes, according to the ratings limit set.
KKee yy LLoo cckk
The set can be set so that the remote control is
needed to control it. This feature can be used to prevent unauthorized viewing.
Press the
D
or
E
button to make appropriate adjust-
ments.
Press the EXIT button to disappear the menu window.
PARENTAL CONTROL
Language
Country
Lock System
Parental Control
G
Input Label
Factory Mode
1
1
2
3
4
5
Language
Country
Lock System
Parental Control
Input Label
Factory Mode
SETUP
O
PICTURE
O
SCREEN
O
Prev.
MENU
Move
AUDIO
O
TIME
O
OPTION
O
In
Key Lock‘On
’, if the set is turned off, press the r / I, INPUT, PR
D
or
E
button on the set or POWER, INPUT, D/A TV, PR + or - or NUMBER buttons
on the remote control.
With the
Key Lock On
, the display ‘
Key Lock On
’ appears on the
screen if any button on the front panel is pressed while viewing the set.
Parental Guidance
Key Lock
Off
Off
3 42
PARENTAL CONTROL / RATINGS
Page 77

77
TELETEXT
TOP TEXT
The user guide displays four fields-red, green, yellow and blue at the bottom of the screen. The yellow field
denotes the next group and the blue field indicates the next block.
AA
Block / group / page selection
With the blue button you can progress from block to block.
Use the yellow button to proceed to the next group with automatic overflow to the next block.
With the green button you can proceed to the next existing page with automatic overflow to the next group.
Alternatively the PR+ button can be used.
The red button permits to return to previous selection. Alternatively the PR- button can be used.
AA
Direct page selection
Corresponding to the SIMPLE teletext mode, you can select a page by entering it as a three digit number using
the NUMBER buttons in TOP mode.
44
1
2
3
TThhiiss ffee aa ttuurree ii ss nnoo tt aa vvaaiillaabb llee iinn aallll cc oouu nnttrriieess..
Press the
TTEE XXTT
button to switch to teletext. The initial page or last page appears on the screen.
Two page numbers, TV station name, date and time are displayed on the screen headline. The first page number
indicates your selection, while the second shows the current page displayed.
Press the
TTEE XXTT
or
EEXXIITT
button to switch off teletext. The previous mode reappears.
SWITCH ON/OFF
AA
Page selection
Enter the desired page number as a three digit number with the NUMBER buttons. If during selection you
press a wrong number, you must complete the three digit number and then re-enter the correct page number.
The PR+ or - button can be used to select the preceding or following page.
SIMPLE TEXT
1
2
Teletext is a free service broadcast by most TV stations which gives up-to-the-minute information on news,
weather, television programmes, share prices and many other topics.
The teletext decoder of this set can support the SIMPLE, TOP and FASTEXT systems. SIMPLE (standard teletext) consists of a number of pages which are selected by directly entering the corresponding page number.
TOP and FASTEXT are more modern methods allowing quick and easy selection of teletext information.
Page 78

78
SPECIAL TELETEXT FUNCTIONS
AA
RREEVVEEAALL
Press this button to display concealed information, such as solutions of riddles or puzzles.
Press this button again to remove the information from the display.
AA
UUPP DDAA TTEE
Displays the TV picture on the screen while waiting for the new teletext page. The display will appear at the top
left hand corner of the screen. When the updated page is available then display will change to the page number.
Press this button to view the updated teletext page.
AA
TTII MMEE
When viewing a TV programme, press this button to display the time at the top right hand corner of the screen.
Press this button again to remove the display. In the teletext mode, press this button to select a sub page number. The sub page number is displayed at the bottom of the screen. To hold or change the sub page, press the
RED/GREEN, PR+ or - or NUMBER buttons.
Press again to exit this function.
AA
HHOO LLDD
Stops the automatic page change which will occur if a teletext page consists of 2 or more sub pages. The num-
ber of sub pages and the sub page displayed is, usually, shown on the screen below the time. When this button
is pressed the stop symbol is displayed at the top left-hand corner of the screen and the automatic page change
is inhibited. To continue press this button again.
?
FASTEXT
The teletext pages are colour coded along the bottom of the screen and are selected by pressing the corresponding coloured button.
AA
Page selection
Press the button to select the index page.
You can select the pages which are colour coded along the bottom line with the same coloured buttons.
Corresponding to the SIMPLE teletext mode, you can select a page by entering its three digit page number
with the NUMBER buttons in FASTEXT mode.
The PR+ or - button can be used to select the preceding or following page.
i
44
1
2
3
TELETEXT
Page 79

79
DIGITAL TELETEXT
Press the numeric or PR + or - button to select a digital
service which broadcasts digital teletext.
To know which are digital teletext services, refer to the
EPG service list.
Follow the indications on digital teletext and move onto the
next step by pressing TEXT, OK,
D
or E, F or G, RED,
GREEN, YELLOW, BLUE or NUMBER buttons and so on.
To change digital teletext service, just select a different
service by the numeric or PR + or - button.
If pressing the MENU, GUIDE or INFO i button, the
teletext service disappear temporarily. When pressing
these buttons again, the teletext service is appeared.
Press the numeric or PR + or - button to select a certain
service which broadcasts digital teletext.
Press the TEXT or colour button to switch on teletext.
Follow the indications on digital teletext and move onto
the next step by pressing OK,
D
or E, F or G, RED,
GREEN, YELLOW, BLUE or NUMBER buttons and so on.
Press the TEXT or colour button to switch off digital teletext and return to TV viewing.
Some services may allow you to access text services by
pressing the RED button.
If pressing the MENU, GUIDE or INFO i button, the
teletext service disappear temporarily. When pressing
these buttons again, the teletext service is appeared.
*This function works in UK only.
The set gives you access to a digital teletext which is greatly improved in various aspects such as text,
graphics and so on.
This digital teletext can be accessed by special digital teletext services and specific services which
broadcast digital teletext.
You should select off from the subtitle language to display teletext by pressing SUBTITLE button.
TELETEXT WITHIN DIGITAL SERVICE
TELETEXT IN DIGITAL SERVICE
1
2
3
1
2
3
4
Page 80

80
No picture &No sound
No or poor colour
or poor picture
Poor reception on
some channels
Lines or streaks
in pictures
Horizontal/vertical bars
or picture shaking
Picture appears slowly
after switching on
A
Check whether the product is turned on.
A
Try another channel. The problem may be with the broadcast.
A
Is the power cord inserted into wall power outlet?
A
Check your antenna direction and/or location.
A
Test the wall power outlet, plug another product’s power cord into the outlet
where the product’s power cord was plugged in.
A
This is normal, the image is muted during the product startup process. Please
contact your service centre, if the picture has not appeared after five minutes.
A
Adjust Colour in menu option.
A
Keep a sufficient distance between the product and the VCR.
A
Try another channel. The problem may be with the broadcast.
A
Are the video cables installed properly?
A
Activate any function to restore the brightness of the picture.
A
Check for local interference such as an electrical appliance or power tool.
A
Station or cable product experiencing problems, tune to another station.
A
Station signal is weak, reorient antenna to receive weaker station.
A
Check for sources of possible interference.
A
Check antenna (Change the direction of the antenna).
TROUBLESHOOTING
TThhee ooppeerraattiioonn ddooeess nnoott wwoorrkk nnoorrmmaallllyy..
The remote control
doesn’t work
Power is suddenly
turned off
A
Check to see if there is any object between the product and the remote control causing obstruction. Ensure you are pointing the remote control directly at the set.
A
Ensure that the batteries are installed with correct polarity (+ to +, - to -).
A
Ensure that the correct remote operating mode is set: TV, VCR etc.
A
Install new batteries.
A
Is the sleep timer set?
A
Check the power control settings. Power interrupted.
A
No broadcast on station tuned with Auto sleep activated.
TThhee vviiddeeoo ffuunnccttiioonn ddooeess nnoott wwoorrkk..
APPENDIX
Page 81

81
APPENDIX
TThhee aauuddiioo ffuunnccttiioonn ddooeess nnoott wwoorrkk..
A
Press the VOL
++ or--
button.
A
Sound muted? Press MUTE button.
A
Try another channel. The problem may be with the broadcast.
A
Are the audio cables installed properly?
A
Adjust Balance in menu option.
A
A change in ambient humidity or temperature may result in an unusual noise
when the product is turned on or off and does not indicate a fault with the
product.
Picture OK & No sound
Unusual sound from
inside
the product
No output from one
of the speakers
NNoo iimmaaggee iiss ddiissppllaayyeedd..
A
Adjust brightness and contrast again.
A
If the product is in power saving mode, move the mouse or press any key.
A
In DVD Player or Settop Box, check the power status of connected device.
A
The signal from the PC (Video card) is out of the vertical or horizontal
frequency range of the product.
Adjust the frequency range by referring to the Specifications in this user’s guide.
* Maximum resolution
1680 X 1050 @ 60Hz
A
The signal cable between PC and product is not connected. Check the signal cable.
A
Press the ‘INPUT’ button in the remote control to check the input signal.
Power is on, power indic-
tor is blue but the screen
appears extremely dark.
Does the ‘Out of
range’message appear?
Does the power indica-
tor look amber?
OOnnllyy RRGGBB mmooddee aapppplliieedd
Does the ‘Check signal
cable’message appear?
Page 82

82
APPENDIX
‘‘UUnnkknnoowwnn PPrroodduucctt’’ mmeessssaaggee aappppeeaarrss wwhheenn tthhee pprroodduucctt iiss ccoonnnneecctteedd..
A
Install the product driver, which is provided with the product, or download it
from the web sige.
(http://www.lge.com)
A
See if the plug&play function is supported by referring to the video card
user’s guide.
Did you install the driver?
TThhee ssccrreeeenn iimmaaggee llooookkss aabbnnoorrmmaall..
A
Adjust the Position menu in OSD.
A
See if the video card resolution and frequency are supported by the product.
If the frequency is out of range, set to the recommended resolution in the
Control Panel-Display-Setting menu.
A
Adjust the Clock menu in OSD.
A
Adjust the Phase menu in OSD.
Is the screen position
wrong?
Horizontal noise appear
or the characters look
blurred.
Do thin lines appear on
the background screen?
SSccrreeeenn ccoolloorr iiss aabbnnoorrmmaall..
A
Screen color resolution to more than 24 bits (true color)
Select control Panel-Display-Settings-Color Table menu in Windows.
A
Check the connection status of the signal cable.
A
Several pixels (red, green, white or black color) may appear on the screen,
which can be attributable to the unique characteristics of the LCD panel.
It is not a malfunction of the LCD.
Screen has poor color res-
oluion (16colors).
Do back spots appear on
the screen?
Screen color is unstable
or mono color.
AAfftteerr--iimmaaggee aappppeeaarrss oonn tthhee pprroodduucctt..
A
If you use a fixed image for a long time, the pixels may be damaged quickly.
Use the screen saver function.
After-image appears when
the product is turned off.
OOnnllyy RRGGBB mmooddee aapppplliieedd
Page 83

83
MAINTENANCE
Early malfunctions can be prevented. Careful and regular cleaning can extend the amount of time you can
enjoy your new set.
Caution: Be sure to turn the power off and unplug the power cord before you begin any cleaning.
Cleaning the Screen
Here’s a great way to keep the dust off your screen for a while. Wet a soft cloth in a mixture of lukewarm
water and a little fabric softener or dish washing detergent. Wring the cloth until it’s almost dry, and then
use it to wipe the screen.
Make sure the excess water is off the screen, and then let it air-dry before you turn on your set.
Cleaning the Cabinet
A
To remove dirt or dust, wipe the cabinet with a soft, dry, lint-free cloth.
A
Please be sure not to use a wet cloth.
Extended Absence
G
If you expect to leave your set dormant for a long time (such as a vacation), it’s a good idea to unplug
the power cord to protect against possible damage from lightning or power surges.
CAUTION
2
1
APPENDIX
Page 84

84
APPENDIX
PRODUCT SPECIFICATIONS
■
The specifications shown above may be changed without prior notice for quality improvement.
Dimensions
(Width x Height x Depth)
Weight
Operating Temperature
Operating Humidity
Storage Temperature
Storage Humidity
Environment condition
Powe r
10 ~ 35°C
20 ~ 80%
-10 ~ 60°C
5 ~ 90%
AC100-240V~ 50/60Hz 1.0A
On Mode : 60W (typ.)
Sleep Mode 1W
Off Mode 1W
LCD Panel
Screen Type
Pixel Pich
22 inches Wide (55.868 cm) TFT (Thin Film Transistor)
LCD (Liquid Crystal Display) Panel
Visible diagonal size : 55.868 cm
0.282 mm
Max. Resolution
Recommecded Resolution
Horizontal Frequency
Vertical Frequency
Synchronization Type
Video Signal
1680 X 1050 @60 Hz
1680 X 1050 @60 Hz
30 - 83 kHz
56 - 75 Hz
Separate Sync, Digital
Input Connector
TV, D-Sub Analog, HDMI, SCART*2, PC Audio In, component
Rated Voltage
Power Consumption
456.8 x 396.6 x 172.0mm (18.0 x 15.6 x 6.8 inches)
5.1 kg / 11.3 lbs
Tilt
Tilt Range
Swivel
-3
~ 8
°
350
°
Page 85

85
PROGRAMMING CODE
APPENDIX
PROGRAMMING THE REMOTE CONTROL
Programming a code into a remote mode
Test your remote control.
To find out whether your remote control can operate the component without programming, turn on the
component such as a VCR and press the corresponding mode button (such as a
DDVVDD
or
VVCCRR
) on the
remote control, while pointing at the component. Test the
PPOOWW EERR
and
PPRR ++ // --
buttons to see if the
component responds properly. If not, the remote requires programming to operate the device.
Turn on the component to be programmed, then press the corresponding mode button (such as a
DDVVDD
or
VVCCRR
) on the remote control. The remote control button of desired device is lighted.
Press the
MM EENN UU
and
MM UU TTEE
buttons simultaneously, the remote control is ready to be programmed for
the code.
Enter a code number using the number buttons on the remote control. Programming code numbers for the
corresponding component can be found on the following pages. Again, if the code is correct, the device
will turn off.
Press the
MM EENN UU
button to store the code.
Test the remote control functions to see if the component responds properly. If not, repeat from step 2.
The remote is a multi-brand or a universal remote. It can be programmed to operate most remotecontrollable devices of other manufacturers.
Note that the remote may not control all models of other brands.
1
2
3
4
5
6
Brand Codes Brand Codes Brand Codes
DVD
APEX DIGITAL 022
DENON 020 014
GE 005 006
HARMAN KARDON 027
JVC 012
LG 001 010 016 025
MAGNAVOX 013
MARANTZ 024
MITSUBISHI 002
NAD 023
ONKYO 008 017
PANASONIC 003 009
PHILIPS 013
PIONEER 004 026
PROCEED 021
PROSCAN 005 006
RCA 005 006
SAMSUNG 011 015
SONY 007
THOMPSON 005 006
TOSHIBA 019 008
YAMAHA 009 018
ZENITH 010 016 025
Page 86

86
APPENDIX
Brand Codes Brand Codes Brand Codes
AIWA 034
AKAI 016 043 046 124
12 5 14 6
AMPRO 072
ANAM 031 033 103
AUDIO DYNAMICS
012 023 0 39 0 43
BROKSONIC 035 037 129
CANON 028 031 033
CAPEHART 108
CRAIG 003 040 135
CURTIS MATHES 031 033 041
DAEWOO 005 007 010 064
0 6 5 1 0 8 110 111
112 116 11 7 119
DAYTRON 108
DBX 012 023 039 043
DYNATECH 034 053
ELECTROHOME 059
EMERSON 006 017 025 027
029 031 034 035
036 037 046 101
12 9 13 1 13 8 15 3
FISHER 003 008 009 010
FUNAI 034
GE 031 033 063 072
10 7 10 9 144 14 7
GO VIDEO 132 136
HARMAN KARDON 012 045
HITACHI 004 018 026 034
043 063 137 150
INSTANTREPLAY 031 033
JCL 031 033
JCPENNY 012 013 015 033
040 066 101
JENSEN 043
JVC 012 031 033 043
048 050 055 060
13 0 15 0 15 2
KENWOOD 014 034 039 043
047 048
LG (GOLDSTAR) 001 012 013 020
101 10 6 114 123
LLOYD 034
LXI 003 009 013 014
017 034 101 106
MAGIN 040
MAGNAVOX 031 033 034 041
067 068
MARANTZ 012 031 033 067
069
MARTA 101
MATSUI 027 030
MEI 031 033
MEMOREX 003 010 014 031
033 034 053 072
101 102 13 4 13 9
MGA 0 45 046 059
MINOLTA 013 020
MITSUBISHI 013 020 045 046
049 051 059 061
151
MTC 034 040
MULTITECH 024 034
NEC 012 023 039 043
048
NORDMENDE 043
OPTONICA 053 054
PANASONIC 066 070 074 083
13 3 14 0 14 5
PENTAX 013 020 031 033
063
PHILCO 031 034 067
PHILIPS 031 033 034 054
067 071 101
PILOT 101
PIONEER 013 021 048
PORTLAND 108
PULSAR 072
QUARTZ 011 014
QUASAR 033 066 075 145
RCA 013 020 033 034
040 041 062 063
107 109 140 144
14 5 14 7
REALISTIC 003 008 010 014
031 033 034 040
053 054 101
RICO 058
RUNCO 148
SALORA 014
SAMSUNG 032 040 102 104
10 5 107 10 9 112
113 115 12 0 122
12 5
SANSUI 022 043 048 135
SANYO 003 007 010 014
10 2 134
SCOTT 017 037 112 129
131
SEARS 003 008 009 010
013 014 017 0 20
031 042 073 081
101
SHARP 031 054 149
SHINTOM 024
SONY 003 009 031 052
056 057 058 076
077 078 149
SOUNDESIGN 034
STS 013
SYLVANIA 031 033 034 059
067
SYMPHONIC 034
TANDY 010 034
TATUNG 039 043
TEAC 034 039 043
TECHNICS 031 033 070
TEKNIKA 019 031 033 034
101
THOMAS 034
TMK 006
TOSHIBA 008 013 042 047
059 082 112 131
TOTEVISION 040 101
UNITECH 040
VECTOR RESEARCH
012
VICTOR 048
VIDEO CONCEPTS
012 034 0 46
VIDEOSONIC 040
WARDS 003 013 017 024
031 033 034 040
053 054 131
YAM AH A 012 034 039 043
ZENITH 034 048 056
058 072 0 80 101
VCR
Page 87

87
APPENDIX
IR CODES
A
Configuration of frame
1st frame
Repeat frame
A
Lead code
A
Repeat code
A
BBiitt dd eessccrriippttiioo nn
A
FF rraamm ee iinntteerrvvaall:: TTff
The waveform is transmitted as long as a key is depressed.
C0
C1 C2 C3 C4 C5 C6 C7 C0 C1 C2 C3 C4 C5 C6 C7 D0 D1 D2 D3 D4 D5 D6 D7 D0 D1 D2 D3 D4 D5 D6 D7
Lead code Low custom code High custom code Data code Data code
Repeat code
Tf
4.5 ms
9 ms
2.25 ms
9 ms
0.55 ms
0.56
ms
1.12 ms
0.56 ms
2.24 ms
Tf Tf
Tf=108ms @455KHz
Bit ”0” Bit ”1”
1. How to Connect
A
Connect your wired remote control to the Remote Control port on the set.
2. Remote Control IR Codes
A
Output waveform
Single pulse, modulated with 37.917KHz signal at 455KHz
T1
Tc
Carrier frequency
FCAR = 1/TC = fOSC/12
Duty ratio = T1/TC = 1/3
Page 88

88
APPENDIX
CCoo ddee ((HHeexxaa)) FFuunncc ttiioo nn NNoottee
PR
++
PR
--
VOL
++
VOL
--
Up (
D
)
Down (
E
)
Right (
G)
Left (
F)
POWER
MUTE
Number Key 0
Number Key 1
Number Key 2
Number Key 3
Number Key 4
Number Key 5
Number Key 6
Number Key 7
Number Key 8
Number Key 9
INPUT
INFO i
GUIDE
SUBTITLE
EXIT
FAV
Q.VIEW
D/A TV
TV/RADIO
I/II
SLEEP
MENU
OK( )
LIST
TEXT
REVEAL
TIME
BACK
UPDATE
INDEX
HOLD
BLUE Key
YELLOW Key
GREEN Key
RED Key
RATIO
R/C BUTTON
R/C BUTTON
R/C BUTTON
R/C BUTTON
R/C BUTTON
R/C BUTTON
R/C BUTTON
R/C BUTTON
R/C BUTTON (POWER ON/OFF)
R/C BUTTON
R/C BUTTON
R/C BUTTON
R/C BUTTON
R/C BUTTON
R/C BUTTON
R/C BUTTON
R/C BUTTON
R/C BUTTON
R/C BUTTON
R/C BUTTON
R/C BUTTON
R/C BUTTON
R/C BUTTON
R/C BUTTON
R/C BUTTON
R/C BUTTON
R/C BUTTON
R/C BUTTON
R/C BUTTON
R/C BUTTON
R/C BUTTON
R/C BUTTON
R/C BUTTON
R/C BUTTON
R/C BUTTON
R/C BUTTON
R/C BUTTON
R/C BUTTON
R/C BUTTON
R/C BUTTON
R/C BUTTON
R/C BUTTON
R/C BUTTON
R/C BUTTON
R/C BUTTON
R/C BUTTON
00
01
02
03
40
41
06
07
08
09
10
11
12
13
14
15
16
17
18
19
0B
AA
AB
56
5B
1E
1A
50
F0
0A
0E
43
44
53
20
2A
26
28
62
70
65
61
63
71
72
79
Page 89

89
APPENDIX
EXTERNAL CONTROL DEVICE SETUP
RS-232C Setup
Connect the RS-232C (serial port) input jack to an
external control device (such as a computer or an A/V
control system) to control the product’s functions
externally.
Connect the serial port of the control device to the
RS-232C jack on the product back panel.
Note: RS-232C connection cables are not supplied
with the product.
Type of Connector; D-Sub 9-Pin Male
No. Pin Name
1 No connection
2 RXD (Receive data
)
3 TXD (Transmit data
)
4 DTR (DTE side ready
)
5 GND
6 DSR (DCE side ready
)
7 RTS (Ready to send
)
8 CTS (Clear to send
)
9 No Connection
1 5
6 9
RS-232C Configurations
7-Wire Configurations (Standard RS-232C cable
)
PC TV
RXD 2 3 TXD
TXD 3 2 RXD
GND 5 5 GND
DTR 4 6 DSR
DSR 6 4 DTR
RTS 7 8 CTS
CTS 8 7 RTS
D-Sub 9 D-Sub 9
3-Wire Configurations(Not standard
)
PC TV
RXD 2 3 TXD
TXD 3 2 RXD
GND 5 5 GND
DTR 4 6 DTR
DSR 6 4 DSR
RTS 7 7 RTS
CTS 8 8 CTS
D-Sub 9 D-Sub 9
RS-232C IN
(CONTROL & SERVICE)
Page 90

90
APPENDIX
Press the
MMEENNUU
button and then useD or Ebutton
to select the
OOPPTTIIOONN
menu.
Press the
G
button and then useD or Ebutton to
select
FFaaccttoorryy MMooddee
.
Press the G button and then useD or Ebutton to
select
SSeett IIDD
.
Press the
G
button and then useF or Gbutton to
adjust
SSeett IIDD
to choose the desired TV ID number.
The adjustment range of SET ID is 1~99.
Press the EXIT button to disappear the menu window.
Use this function to specify a set ID number.
Refer to ‘Real Data Mapping’.
G
pp..9922
Set ID
2
3
4
5
1
Language
Country
Lock System
Parental Control
Input Label
Factory Mode
G
Set ID
Factory Reset
1
2
Language
Country
Lock System
Parental Control
Input Label
Factory Mode
SETUP
O
PICTURE
O
SCREEN
O
Prev.
MENU
Move
AUDIO
O
TIME
O
OPTION
O
Language
Country
Lock System
Parental Control
Input Label
Factory Mode
Set ID
Factory Reset
1
GF
3 4
OK
1
OK
Page 91

91
APPENDIX
01. Power k a 0 ~ 1
02. Input Select k b Refer to p. 89
03. Aspect Ratio k c Refer to p. 89
04. Screen Mute k d 0 ~ 1
05. Volume Mute k e 0 ~ 1
06. Volume Control k f 0 ~ 64
07. Contrast k g 0 ~ 64
08. Brightness k h 0 ~ 64
09. Colour k i 0 ~ 64
10. Tint k j 0 ~ 64
11. Sharpness k k 0 ~ 64
12. OSD Select k l 0 ~ 1
13.
Remote control lock mode
k m 0 ~ 1
14. Balance k t 0 ~ 64
15.
Colour Temperature
k u 0 ~ 3
16. Red Adjustment k v 0 ~ 50
17. Green Adjustment k w 0 ~ 50
18. Blue Adjustment k $ 0 ~ 50
19. Abnormal Status k z 0 ~ 9
20. Auto Configure j u 1
21.
Channel Select Command
m a Refer to p. 92
22. Send IR Code m c Key Code
23. Input select (Main) x b Refer to p. 92
Communication Parameters
A
Baud rate : 9600 bps (UART
)
A
Data length : 8 bits
A
Parity : None
A
Stop bit : 1 bit
A
Communication code : ASCII code
A
Use a crossed (reverse) cable.
Transmission
*
[Command 1] : First command to control the set.
(j, k, m or x)
*
[Command 2] : Second command to control the set.
*
[Set ID] : You can adjust the set ID to choose
desired monitor ID number in option
menu.
Adjustment range is 1 ~ 99.
When selecting Set ID ‘0’, every
connected the set is controlled.
Set ID is indicated as decimal (1~99) on
menu and as Hexa decimal (0x0~0x63)
on transmission/receiving protocol.
*
[DATA] : To transmit command data.
Transmit ‘FF’ data to read status of
command.
*
[Cr] : Carriage Return
ASCII code ‘0x0D’
*
[ ] : ASCII code ‘space (0x20)’
[Command1][Command2][ ][Set ID][ ][Data][Cr]
OK Acknowledgement
* The set transmits ACK (acknowledgement) based on
this format when receiving normal data. At this time, if
the data is data read mode, it indicates present status
data. If the data is data write mode, it returns the
data of the PC computer.
[Command2][ ][Set ID][ ][OK][Data][x]
Error Acknowledgement
* The set transmits ACK (acknowledgement) based on
this format when receiving abnormal data from
non-viable functions or communication errors.
[Command2][ ][Set ID][ ][NG][Data][x]
Transmission / Receiving ProtocolCommand Reference List
*
When setting the 19 ~ 23, a menu doesn’t display on screen.
Data 1: Illegal Code
2: not support function
3: Wait more time
COMMAND1COMMAND2DATA
(Hexadecimal)
Page 92

92
APPENDIX
0055.. VVoo lluummee MM uutt ee ((CC oommmmaanndd 22 :: ee))
G To control volume mute on/off.
You can also adjust mute using the MUTE button on
remote control.
Transmission
Data 0 : Volume mute off (Volume on)
1 : Volume mute on (Volume off)
[k][e][ ][Set ID][ ][Data][Cr]
Ack
[e][ ][Set ID][ ][OK][Data][x]
0033.. AAssppeecctt RRaattiioo ((CCoommmmaanndd 22 :: cc)) ((MMaaiinn PPiiccttuurree SSiizzee))
G To adjust the screen format. (Main picture format)
You can also adjust the screen format using the ARC
(Aspect Ratio Control) button on remote control or in
the SCREEN menu.
Transmission
Data 1 : Normal screen (4:3)
2 : Wide screen (16:9)
4 : Zoom1
5 : Zoom2
6 : Original
7 : 14:9
[k][c][ ][Set ID][ ][Data][Cr]
Ack
* Using the PC input, you select either 16:9 or 4:3
screen aspect ratio.
[c][ ][Set ID][ ][OK][Data][x]
0044.. SS ccrr eeeenn MMuuttee ((CCoommmmaanndd 22 :: dd))
G To select screen mute on/off.
Transmission
Data 0 : Screen mute off (Picture on)
1 : Screen mute on (Picture off)
[k][d][ ][Set ID][ ][Data][Cr]
Ack
[d][ ][Set ID][ ][OK][Data][x]
0066.. VVoolluummee CCoo nn ttrrooll ((CCoo mm mmaanndd 22 :: ff))
G To adjust volume.
You can also adjust volume with the VOLUME buttons on
remote control.
Transmission
Data Min : 0 ~ Max : 64
*
Refer to ‘Real data mapping 1’. See page 91.
[k][f][ ][Set ID][ ][Data][Cr]
Ack
[f][ ][Set ID][ ][OK][Data][x]
0077.. CCoo nntt rraasstt ((CC oommmm aa nn dd 22 :: gg))
G To adjust screen contrast.
You can also adjust contrast in the PICTURE menu.
Transmission
Data Min : 0 ~ Max : 64
*
Refer to ‘Real data mapping 1’. See page 91.
[k][g][ ][Set ID][ ][Data][Cr]
Ack
[g][ ][Set ID][ ][OK][Data][x]
0088.. BBrriigghhtt nn eessss ((CCoo mm mmaanndd 22 :: hh ))
G To adjust screen brightness.
You can also adjust brightness in the PICTURE menu.
Transmission
Data Min : 0 ~ Max : 64
*
Refer to ‘Real data mapping 1’. See page 91.
[k][h][ ][Set ID][ ][Data][Cr]
Ack
[h][ ][Set ID][ ][OK][Data][x]
0022.. II nn ppuu tt SSeelleecc tt ((CCoo mm mmaanndd 22 :: bb))
G To select input source for the set.
You can also select an input source using the INPUT
button on the set's remote control.
Transmission
Data 0 : DTV
1 : ATV
2 : AV1
3 : AV2
5 : Component
6 : RGB
7 : HDMI
[k][b][ ][Set ID][ ][Data][Cr]
Ack
[b][ ][Set ID][ ][OK][Data][x]
0011.. PP ooww eerr ((CCoo mm mmaanndd 22 :: aa))
G To control Power On/Off of the set.
Transmission
Data 0 : Power Off 1 : Power On
[k][a][ ][Set ID][ ][Data][Cr]
Ack
[a][ ][Set ID][ ][OK][Data][x]
G To show Power On/Off.
Transmission
[k][a][ ][Set ID][ ][FF][Cr]
Ack
* In like manner, if other functions transmit ‘0xFF’ data
based on this format, Acknowledgement data feed back
presents status about each function.
[a][ ][Set ID][ ][OK][Data][x]
Page 93

93
APPENDIX
1166.. RReedd AAdd jjuussttmm eenntt ((CCoommmmaanndd 22 :: vv))
G To adjust red in colour temperature.
Transmission
Data Min : 0 ~ Max : 50
*
Refer to ‘Real data mapping 2’. See page 91.
[k][v][ ][Set ID][ ][Data][Cr]
Ack
[v][ ][Set ID][ ][OK][Data][x]
1177.. GGrreeeenn AAddjjuusstt mm ee nntt ((CCoommmmaanndd 22 :: ww))
G To adjust green in colour temperature.
Transmission
Data Min : 0 ~ Max : 50
*
Refer to ‘Real data mapping 2’. See page 91.
[k][w][ ][Set ID][ ][Data][Cr]
Ack
[w][ ][Set ID][ ][OK][Data][x]
1188.. BBlluuee AAdd jjuuss ttmm eenntt ((CC oommmmaanndd 22 :: $$ ))
G To adjust blue in colour temperature.
Transmission
Data Min : 0 ~ Max : 50
*
Refer to ‘Real data mapping 2’. See page 91.
[k][$][ ][Set ID][ ][Data][Cr]
Ack
[$][ ][Set ID][ ][OK][Data][x]
11 33.. RReemmoottee ccoonnttrrooll lloocckk mmooddee ((CC oommmm aann dd 22 :: mm ))
G To lock the front panel controls on the monitor and
remote control.
Transmission
[k][m][ ][Set ID][ ][Data][Cr]
Ack
Data 0 : Lock off 1 : Lock on
* If you’re not using the remote control, use this mode.
When main power is on/off, external control lock is
released.
[m][ ][Set ID][ ][OK][Data][x]
1122.. OOSSDD SS eelleecctt ((CCoommmmaann dd 22 :: ll))
G To select OSD (On Screen Display) on/off when con-
trolling remotely.
Transmission
[k][l][ ][Set ID][ ][Data][Cr]
Ack
Data 0 : OSD off 1 : OSD on
[l][ ][Set ID][ ][OK][Data][x]
0099.. CCoo lloo uu rr ((CCoommmmaanndd 22 :: ii))
G To adjust the screen colour.
You can also adjust colour in the PICTURE menu.
Transmission
Data Min : 0 ~ Max : 64
*
Refer to ‘Real data mapping 1’. See page 91.
[k][i][ ][Set ID][ ][Data][Cr]
Ack
[i][ ][Set ID][ ][OK][Data][x]
1100.. TTiinntt ((CCoo mm mmaanndd 22 :: jj))
G To adjust the screen tint.
You can also adjust tint in the PICTURE menu.
Transmission
Data Red : 0 ~ Green : 64
*
Refer to ‘Real data mapping 1’. See page 91.
[k][j][ ][Set ID][ ][Data][Cr]
Ack
[j][ ][Set ID][ ][OK][Data][x]
G To adjust the screen sharpness.
You can also adjust sharpness in the PICTURE menu.
Transmission
1111.. SS hh aa rrppnneess ss ((CC oommmm aa nn dd 22 :: kk))
Data Min : 0 ~ Max : 64
*
Refer to ‘Real data mapping 1’. See page 91.
[k][k][ ][Set ID][ ][Data][Cr]
Ack
[k][ ][Set ID][ ][OK][Data][x]
1144.. BBaallaa nn ccee ((CC oommmm aann dd 22 :: tt))
G To adjust balance.
You can also adjust balance in the AUDIO menu.
Transmission
Data Min : 0 ~ Max : 64
*
Refer to ‘Real data mapping 1’. See page 91.
[k][t][ ][Set ID][ ][Data][Cr]
Ack
[t][ ][Set ID][ ][OK][Data][x]
1155.. CCoo lloo uurr TTeemmpp eerraattuurree (( CCoommmmaanndd 22 :: uu))
G To adjust colour temperature. You can also adjust Colour
Temperature in the PICTURE menu.
Transmission
Data 0: Cool 1: Medium 2: Warm 3: User
[k][u][ ][Set ID][ ][Data][Cr]
Ack
[u][ ][Set ID][ ][OK][Data][x]
Page 94

94
APPENDIX
1199.. AAbbnnoorrmmaall SSttaattee ((CCoommmmaa nn dd 22 :: zz))
G To recognize an abnormal state.
Transmission
Data FF : Read
Data 0: Normal (Power on and signal exist)
1: No signal (Power on)
2: Turn the monitor off by remote control
3: Turn the monitor off by sleep time function
4: Turn the monitor off by RS-232C function
5: 5V down
6: AC down
7: Turn the monitor off by Fan Alarm function
8: Turn the monitor off by Off time function
9: Turn the monitor off by Auto sleep function
* This function is “read only”.
[k][z][ ][Set ID][ ][FF][ ][Cr]
Ack
[z][ ][Set ID][ ][OK][Data][x]
**
RReeaall ddaattaa mmaappppiinngg 11
0 : Step 0
A : Step 10 (Set ID 10)
F : Step 15 (Set ID 15)
10 : Step 16 (Set ID 16)
64: Step 100
6E : Step 110
73 : Step 115
74 : Step 116
C7: Step 199
FE : Step 254
FF : Step 255
**
RReeaall ddaattaa mmaappppiinngg 22
0:-40
1:-39
2:-38
28 : 0
4E : +38
4F : +39
50 : +40
2200.. AAuuttoo CCoo nn ffiigguurr ee
((CCoo mm mmaanndd 11 :: jj,, CCoo mm mmaanndd 22 :: uu))
G To adjust picture position and minimize image shaking
automatically. It works only in RGB mode.
Transmission
Data 1: To set
[j][u][ ][Set ID][ ][Data][Cr]
Ack
[u][ ][Set ID][ ][OK/NG][Data][x]
2211.. CChhaa nn nneell SS eelleecctt CCoo mm mmaanndd
((CCoo mm mmaanndd 11 :: mm ,, CC oommmmaa nndd 22 :: aa))
G Select channel to following physical number.
Transmission
Data0 :High channel data
Data1 :Low channel data
ex. No. 47 -> 00 2F (2FH)
No. 394 -> 01 88 (188H),
DTV No. 0 -> Don’t care
Data2 0x00 : ATV Main
0x10 : DTV Main
Channel data range
Analogue - Min: 00 ~ Max: 63 (0~99)
Digital - Min: 00 ~ Max: 3E7 (0~999)
[m][a][ ][Set ID][ ][Data0][ ][Data1][ ][Data2][Cr]
Ack
[a][ ][Set ID][ ][OK/NG][Data][x]
Data Min: 00 ~ Max: 7D
2222.. SS eenndd II RR CC oodd ee
((CCoo mm mmaanndd 11 :: mm ,, CC oommmmaa nn dd 22 :: cc))
G To send IR remote key code.
Transmission
Data Key code - Refer to page 85.
[m][c][ ][Set ID][ ][Data][Cr]
Ack
[c][ ][Set ID][ ][OK/NG][Data][x]
Page 95

95
APPENDIX
2233.. IInnppuutt ss eelleecctt (( CCoommmmaanndd 11 :: xx ,, CCoo mmmm aa nndd 22 :: bb))
((MM aa iinn PP iicctt uu rree IInnppuutt))
G To select input source for main picture.
Transmission
Data Structure
MSB LSB
0
[x][b][ ][Set ID][ ][Data][Cr]
Ack
[b][ ][Set ID][ ][OK/NG][Data][x]
0 0 0 0 0 0 0
External Input Data
0 0 0 1 Analogue
0000 DTV
0010 AV
0 0 1 1 Component
0100 RGB
0 1 0 1 HDMI
External Input Input Number
Input Number Data
0 0 0 0 Input1
0 0 1 1 Input4
0 0 1 0 Input3
0 0 0 1 Input2
Page 96

 Loading...