

LG M1950D-PU Owner's Manual

ENGLISH
OWNER’S MANUAL
LED LCD TV/
CINEMA 3D TV
Please read this manual carefully before operating the
your TV and retain it for future reference.
LED LCD TV MODEL CINEMA 3D TV MODEL
TV
DM2350DM1950D
3D TV
www.lg.com

TABLE OF CONTENTS
2
ENGLISH
CONTENTS
4 ASSEMBLING AND PREPARING
4 Unpacking
6 Parts and buttons
7 Lifting and moving the TV
7 Setting up the TV
7 - Attaching the Stand Base
8 - Detaching the Stand Base and Body
8 - Mounting on a table
10 - Tidying cables
10 - Mounting on a wall
12 REMOTE CONTROL
15 WATCHING TV
15 Connecting an antenna or cable
15 - Connecting an antenna or basic cable
15 - Connecting with a cable box
16 Accessing the TV for the first time
17 Watching TV
17 Managing channels
17 - Setting up channels
18 - Using favorite channels
19 - Checking current program info
20 Using additional options
20 - Adjusting aspect ratio
21 - Using the input list
22 - Locking the buttons on the TV (Child
22 Using the Quick menu
23 CONNECTING TO A PC
23 HDMI connection
24 DVI to HDMI connection
24 DVI connection
24 RGB connection
25 Adjusting the screen
25 - Selecting an image mode
Lock)
26 - Customizing image options
26 - Customizing PC display options
27 Adjusting the sound
27 - Selecting an sound mode
27 - Customizing sound options
28 ENTERTAINMENT
28 Using integrated media features
28 - Connecting USB storage devices
30 - Browsing files
31 - Viewing Photos
32 - Listening to Music
33 - Viewing Movies
36 - DivX® VOD Guide
37 3D IMAGING(ONLY 3D MODEL)
37 3D Technology
37 Precautions to take when viewing 3D
images
38 When using 3D Glasses
38 3D Imaging Viewing Range
39 Viewing 3D Imaging
40 3D Mode Setting Option
41 CUSTOMIZING SETTINGS
41 Accessing main menus
42 Customizing settings
42 - CHANNEL settings
43 - PICTURE settings
46 - AUDIO settings
47 - TIME settings
48 - OPTION settings
50 - LOCK settings
52 - INPUT settings
52 - USB settings

TABLE OF CONTENTS
3
ENGLISH
53 MAKING CONNECTIONS
53 Connection overview
55 Connecting to a Camcorder, Camera,
HD receiver, DVD, VCR player or Gaming
device
55 - HDMI connection
55 - DVI to HDMI connection
56 - DVI connection
56 - Component connection
56 Connecting to an audio system
56 - Digital optical audio connection
57 - Headphone connection
57 Connecting to a USB
58 MAINTENANCE
58 Screen and frame
58 Cabinet and stand
58 Power cord
69 EXTERNAL CONTROL DEVICE
SETUP
69 RS-232C Setup
69 Type of connector; D-Sub 9-Pin Male
69 Communication Parameters
70 RS-232C configurations
71 Command reference list
72 Transmission / Receiving protocol
78 LICENSES
59 TROUBLESHOOTING
59 General
60 PC mode
62 TROUBLESHOOTING WHEN
USING 3D MODE
63 SPECIFICATIONS
68 IR CODES

ASSEMBLING AND PREPARING
4
ENGLISH
ASSEMBLING AND PREPARING
Unpacking
Check your product box for the following items. If there are any missing accessories, contact the local
dealer where you purchased your product. The illustrations in this manual may differ from the actual
product and accessories.
NOTE
TV
: LED LCD TV
y
3D TV
: Cinema 3D TV
y
3D TV
TV
Power Cord
AC-DC Adapter
Remote control and Batteries
Cable Tie
Audio Cable
CD (Owner's Manual) /
Card
RGB Cable
Stand Base

3D TV
ASSEMBLING AND PREPARING
5
ENGLISH
TriDef 3D Game Software CD /
Quick Installation Guide
3D Glasses
(Normal type)
3D Glasses
(Clip type)
CAUTION
Do not use any pirated items to ensure the safety and product life span.
y
Any damages or injuries by using pirated items are not covered by the warranty.
y
NOTE
The accessories supplied with your product may vary depending on the model.
y
Product specifications or contents in this manual may be changed without prior notice due to
y
upgrade of product functions.

6
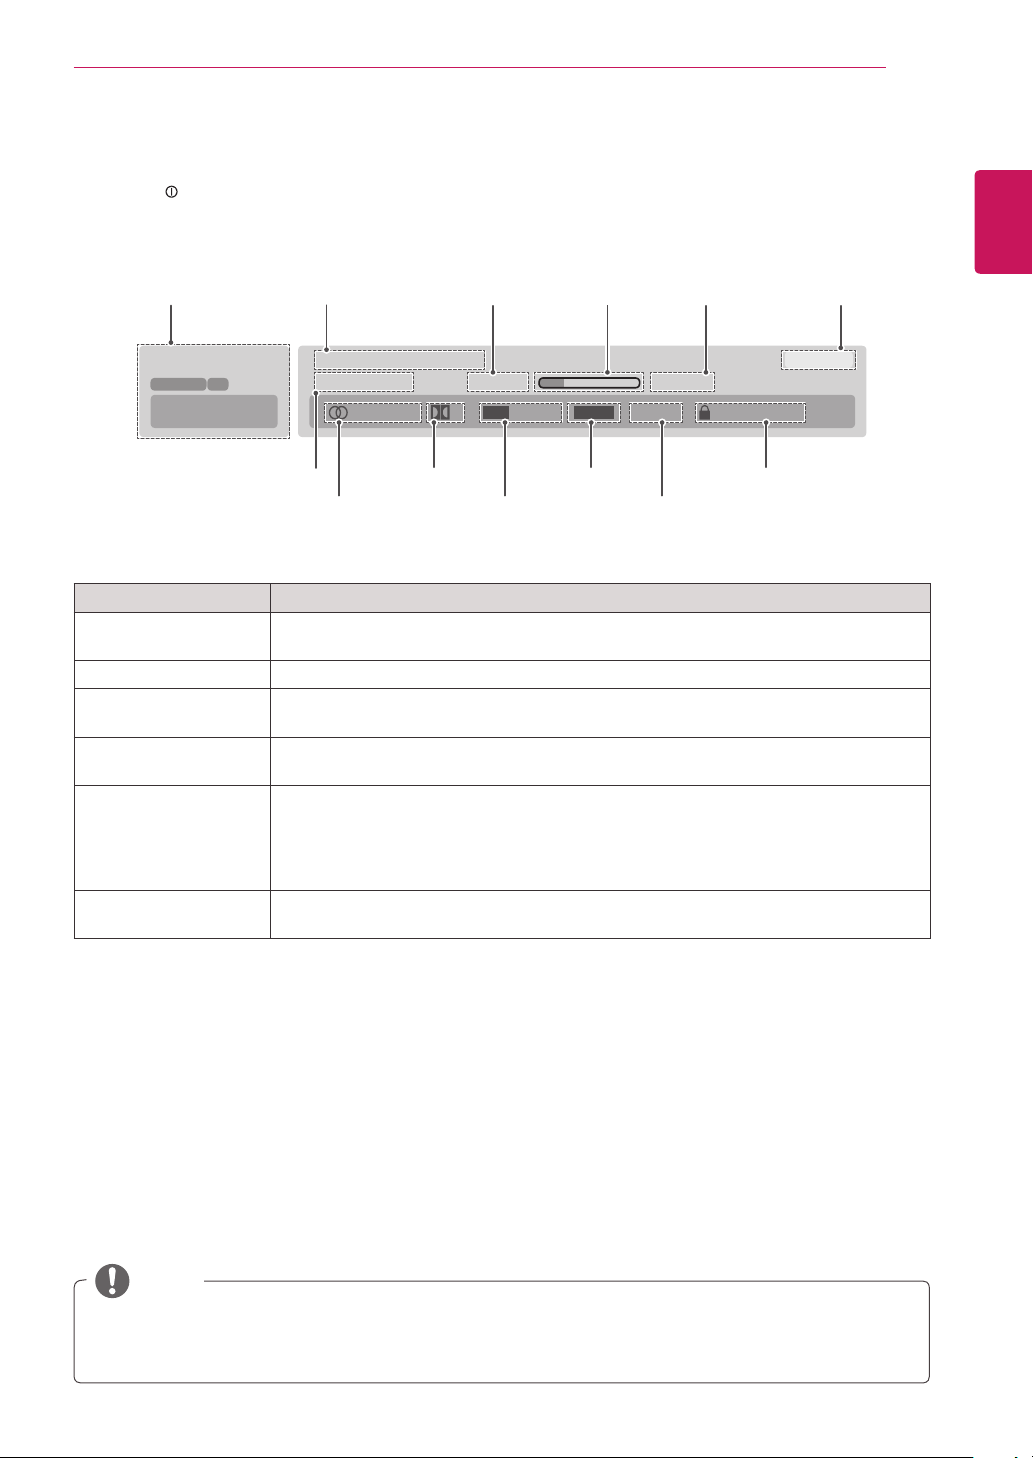
Parts and buttons
ENGLISH
ASSEMBLING AND PREPARING
Remote Control Sensor
Power Indicator
Lighting On: Turned on
y
Lighting Off: Turned off
y
Touch Buttons
Connection panel (See p.53)
Touch button Description
INPUT Changes the input source.
MENU Accesses the main menus, or saves your input and exits the menus.
ENTER Selects the highlighted menu option or confirms an input.
VOL Adjusts the volume level.
CH Scrolls through the saved channels
/
I
Turns the power on or off.
All of the buttons are touch sensitive and can be operated through simple touch with your finger.
NOTE
You can set the Power indicator to on or off by selecting
OPTION
in the main menus.

ASSEMBLING AND PREPARING
7
Lifting and moving the TV
When moving or lifting the TV, read the following
to prevent the TV from being scratched or
damaged and for save transportation regardless of
its type and size.
CAUTION
Avoid touching the screen at all times, as this
may result in damage to the screen or some
of the pixels used to create images.
It is recommended to move the TV in the
y
box or packing material that the TV originally
came in.
Before moving or lifting the TV, disconnect
y
the power cord and all cables.
Hold the top and bottom of the TV frame
y
firmly. Make sure not to hold the transparent
part, speaker, or speaker grill area.
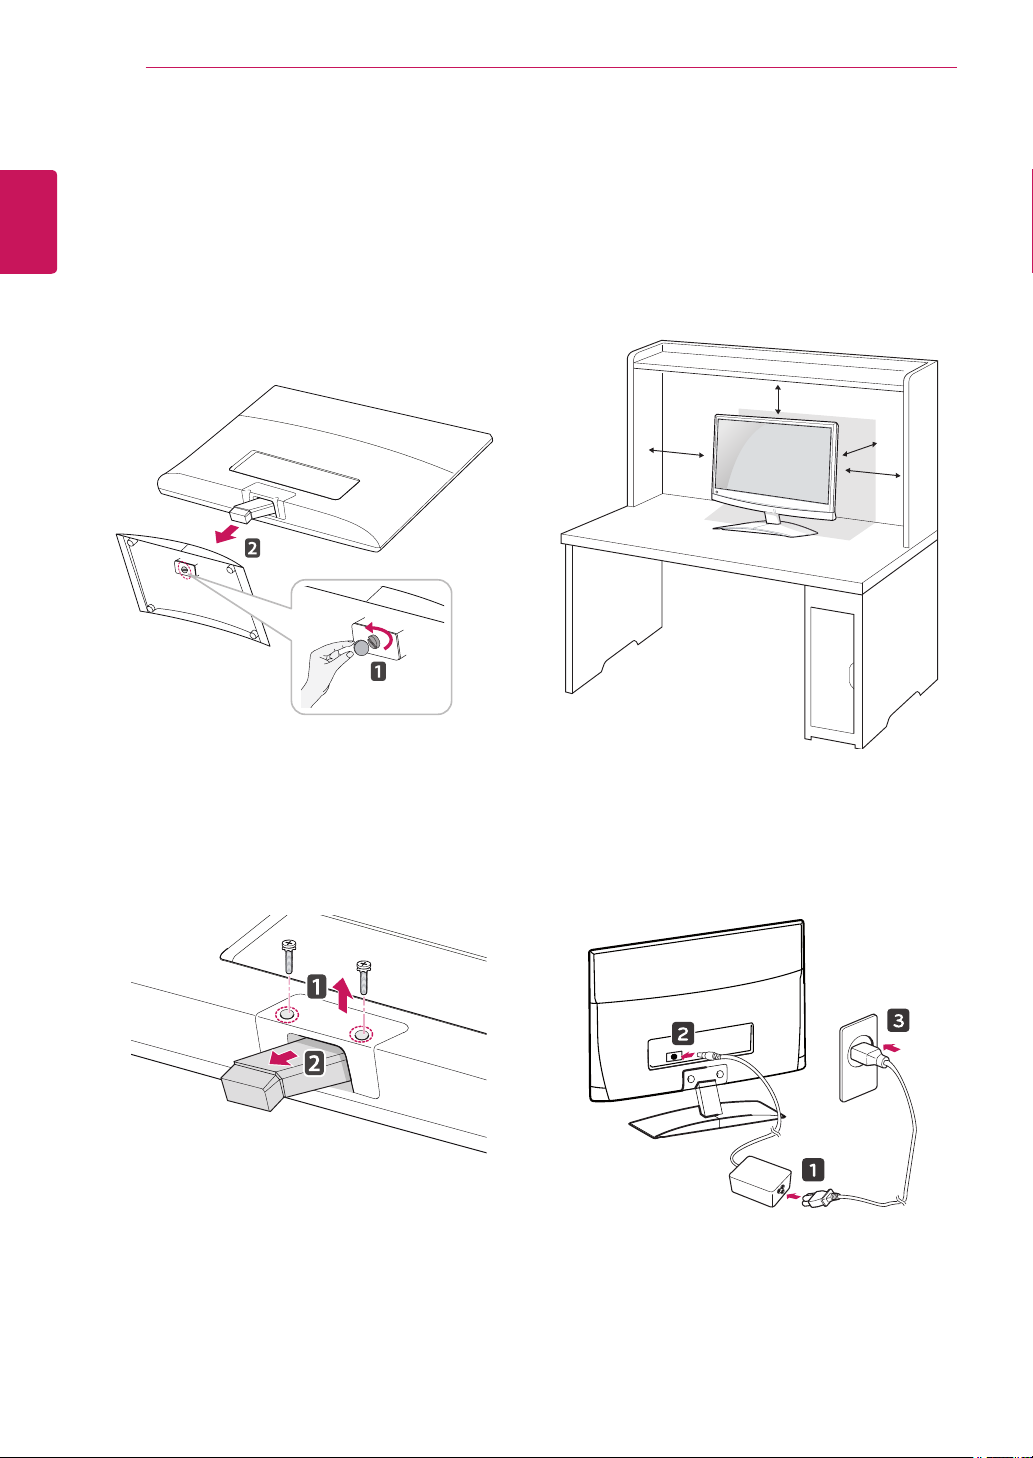
Setting up the TV
Attaching the Stand Base
Place the TV with the screen side down on a
1
flat and cushioned surface.
CAUTION
Lay a foam mat or soft protective cloth
on the surface to protect the screen from
damage.
Attach the
2
the screw to the right with a
Stand Base
from the TV by turning
.
Coin
ENGLISH
When holding the TV, the screen should face
y
away from you to prevent the screen from
scratches.
When transporting the TV, do not expose the
y
TV to jolts or excessive vibration.
When transporting the TV, keep the TV
y
upright, never turn the TV on its side, or tilt
towards the left or right.
ASSEMBLING AND PREPARING
8
Detaching the Stand Base and Body
ENGLISH
1
2
Place the TV with the screen side down on a
flat and cushioned surface.
Turn the screw to the left, and then pull out
the
Stand Base
from the
Stand Body
.
Mounting on a table
Lift and tilt the TV into its upright position on a
1
table.
Leave a 10 cm (minimum) space from the wall
for proper ventilation.
10 cm
10 cm
10 cm
10 cm
Remove 2 screws and pull out the
3
from the TV.
Stand Body
Connect the
2
to a wall outlet.
AC-DC Adapter
and
Power Cord

ASSEMBLING AND PREPARING
9
WARNING
When you adjust the angle, do not hold the
buttom of the TV frame as shown on the
following illustration, it may injure your fingers.
CAUTION
Disconnect the power cord first, and then
move or install the TV. Otherwise electric
shock may occur.
Using the Kensington security system
The Kensington security system connector is
located at the back of the TV. For more information
of installation and using, refer to the manual
supplied with the Kensington security system or
visit
http://www.kensington.com
Connect the Kensington security system cable
between the TV and a table.
.
ENGLISH
NOTE
Tilt from +10 or +18 to -5 degrees up or down
to adjust the angle of the TV to suit your view
BA
Front Rear
Model
Tilt Range Front (A) - 5 °
Rear (B) 10° 18°
M1950D DM2350D
NOTE
The Kensington security system is optional.
You can obtain additional accessories from
most electronics stores.

ASSEMBLING AND PREPARING
10
Tidying cables
ENGLISH
Gather and bind the cables with the supplied
cable tie.
Mounting on a wall
For proper ventilation, allow a clearance of 10
cm on each side and from the wall. Detailed
installation instructions are available from your
dealer, see the optional Tilt Wall Mounting
Bracket Installation and Setup Guide.
10 cm
10 cm
10 cm
10 cm
If you intend to mount the TV to a wall, attach
the Wall mounting interface (optional parts) to the
back of the TV.
When you install the TV using the wall mounting
interface (optional parts), attach it carefully so it
will not drop.
Please use a wall mount interface in
1
accordance with VESA Standards.
If you use screws longer than standard, the TV
2
might be damaged internally.
If you use improper screws, the product might be
3
damaged and drop from the mounted position.
In this case, LG Electronics is not responsible for
damage.
VESA compatible only with respect to screw
4
mounting interface dimensions and mounting
screw specifications.
Please use VESA standard as below.
5
784.8 mm (30.9 inch) and under
y
* Wall Mount Pad Thickness : 2.6 mm
* Screw : Φ 4.0 mm x Pitch 0.7 mm x
Length 10 mm
787.4 mm (31.0 inch) and above
y
* Please use VESA standard wall mount pad
and screws.
Model
VESA
(A x B)
Standard screw M4
Number of screws 4
Wall mount bracket (optional) RW120
M1950D
75 x 75
DM2350D
ASSEMBLING AND PREPARING
CAUTION
Disconnect the power cord first, and then
y
move or install the TV. Otherwise electric
shock may occur.
If you install the TV on a ceiling or slanted
y
wall, it may fall and result in severe injury.
Use an authorized LG wall mount and
y
contact the local dealer or qualified
personnel.
Do not over tighten the screws as this may
y
cause damage to the TV and void your
warranty.
Use screws and a wall mount that complies
y
with the VESA standard. Any damages or
injuries by misuse or using an improper
accessory are not covered by the warranty.
11
ENGLISH
VESA (A x B)
y
NOTE
Use the screws that are listed on the VESA
y
standard screw specifications.
The wall mount kit includes an installation
y
A
B
manual and necessary parts.
The wall mount bracket is optional. You can
y
obtain additional accessories from your local
dealer.
The length of screws may differ depending
y
on the wall mount. Be sure to use the proper
length.
For more information, refer to the
y
instructions supplied with the wall mount.
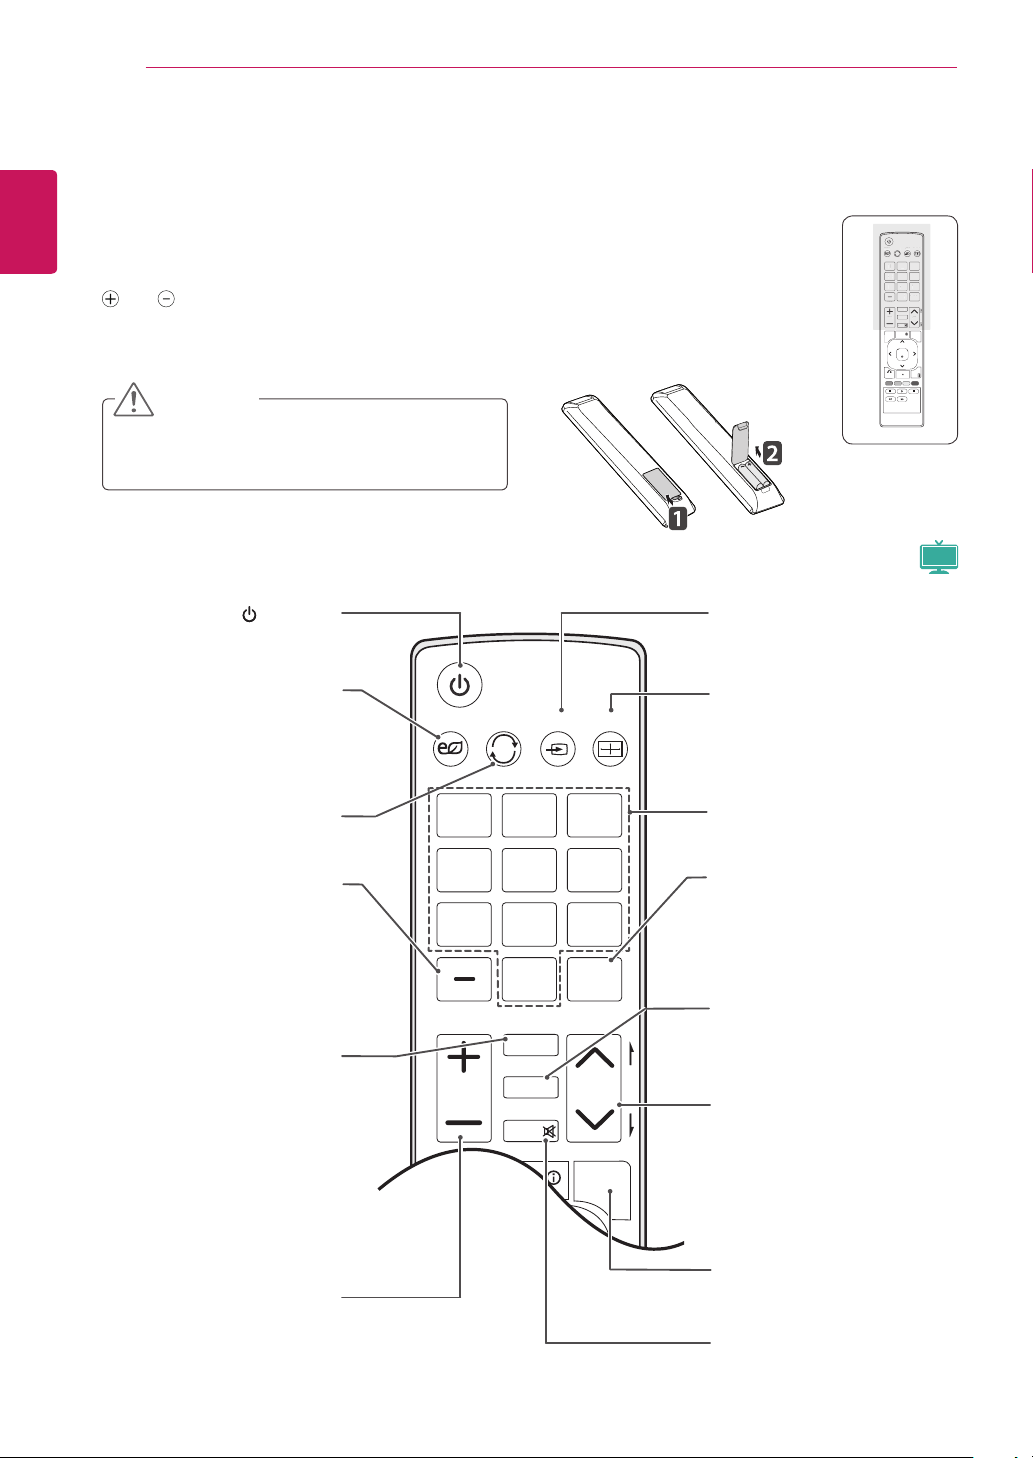
REMOTE CONTROL
P
2
3
4
506
7
8
9
LIS
FLAS
TV / PC
INPU
GY
G
FAV
12
ENGLISH
REMOTE CONTROL
The descriptions in this manual are based on the buttons of the remote control.
Please read this manual carefully and use the TV correctly.
To replace batteries, open the battery cover, replace batteries (1.5 V AAA) matching
To remove the batteries, perform the installation actions in reverse.
Make sure to point the remote control to the remote control sensor on the TV.
and ends to the label inside the compartment, and close the battery cover.
CAUTION
Do not mix old and new batteries, as this may
damage the remote control.
(POWER)
Turns the TV on or off.
ENERGY SAVING
Adjusts the brightness of
the screen to reduce energy
(See p.43)
TV / PC INPUT Auto Config.ENERGY
consumption.
SAVING
TV / PC INPUT Auto Config.ENERGY
TAuto Config.ENER
SAVIN
SAVING
1 2 3
1
4 506
7 8 9
FLASHBK
HBK
LIST
T
MARK
MARK
FAV
P
A
A
RATIO
RATIO
VOL CH
VOLCH
G
G
E
E
MUTE
MUTE
INFO
Q.MENU
MENU
ENTER
EXIT
BACK
(See p.21)
INPUT
Selects the input mode.
Auto Config.
Automatically adjusts picture
position and minimizes
image instability.
TV
Selects TV or PC mode.
TV/PC
(See p.18)
LIST
Displays the channel table.
- (Dash)
Inserts a dash between
numbers such as 2-1 and 2-2.
MARK
Selects a menu or option.
FAV
Accesses your favorite
channel list.
VOLUME
Adjusts the volume level.
1 2 3
4 5
7 8 9
FLASHBK
0
LIST
VOL CH
MENU
MARK
FAV
RATIO
MUTE
INFO
6
Q.MENU
Number buttons
Enters numbers.
FLASHBK
Alternates between the
two last channels selected
(pressing repeatedly).
(See p.20)
RATIO
Resizes an image.
P
A
G
E
CH
Scrolls through the saved
channels.
PAGE
Moves to the previous or next
screen.
Q.MENU
(See p.22)
Accesses the quick menus.
MUTE
Mutes all sounds.

REMOTE CONTROL
P
A
G
E
1
3
4
506
7
8
9
FLAS
MARK
FAV
3D
MENU
O
Q
U
3D S
G
13
ENGLISH
TV / PC INPUT Auto Config.ENERGY
TV / PC INPUT Auto Config.ENERGY
SAVING
SAVING
1 2 3
4 506
7 8 9
FLASHBK
HBK
LIST
LIST
MARK
FAV
P
A
3D
VOL CH
VOL CH
G
E
MUTE
MUTE
3D SETTING
ETTIN
INFO
INF
Q.MENU
.MEN
MENU
ENTER
EXIT
BACK
(POWER)
Turns the TV on or off.
ENERGY SAVING
(See p.43)
Adjusts the brightness of
the screen to reduce energy
consumption.
TV/PC
Selects TV or PC mode.
(See p.18)
LIST
Displays the channel table.
- (Dash)
Inserts a dash between
numbers such as 2-1 and 2-2.
MARK
Selects a menu or option.
FAV
Accesses your favorite
channel list.
TV / PC INPUT Auto Config.ENERGY
SAVING
1 2 3
4 5
7 8 9
0
LIST
VOL CH
MENU
MARK
FAV
3D
MUTE
INFO
6
FLASHBK
3D SETTING
Q.MENU
3D TV
(See p.21)
INPUT
Selects the input mode.
Auto Config.
Automatically adjusts picture
position and minimizes
image instability.
Number buttons
Enters numbers.
FLASHBK
Alternates between the
two last channels selected
(pressing repeatedly).
3D (See p.37)
Uses for viewing 3D video.
P
A
G
E
CH
Scrolls through the saved
channels.
PAGE
Moves to the previous or next
screen.
ENTER
Q.MENU
Accesses the quick menus.
(See p.22)
3D SETTING(Only 3D Mode)
(See p.40)
VOLUME
View for 3D Mode setting
.
Adjusts the volume level.
MUTE
Mutes all sounds.

14
P
A
1 2 3
4 5
0
6
7 8 9
LIST
FLASHBK
TV / PC INPUT Auto Config.ENERGY
SAVING
MARK
FAV
MENU
Q
K
XIT
ENGLISH
REMOTE CONTROL
TV / PC INPUT Auto Config.ENERGY
SAVING
1 2 3
4 506
7 8 9
FLASHBK
LIST
MARK
FAV
P
A
RATIO
VOL CH
G
E
MUTE
INFO
Q.MENU
MENU
ENTER
ENTER
EXIT
E
BACK
BAC
MENU
(See p.41)
Accesses the main menus
or saves your input and exit
menus.
ENTER
Selects menus or options and
confirms your input.
VOL CH
MENU
RATIO
MUTE
INFO
Q.MENU
ENTER
3D TV
TV
INFO
Views the information of the
G
E
currently program and the
screen.
Navigation buttons
Scrolls through menus or
options.
Allows the user to move
return one step in an
interactive application, EPG
or other user interaction
USB Menu control
buttons
(See p.28)
USB menu(Photo List and
Music List or Movie List).
BACK
function.
BACK
EXIT
EXIT
Clears all on-screen displays
and returns to TV viewing
from any menu.
Colored buttons
These access special
functions in some menus.
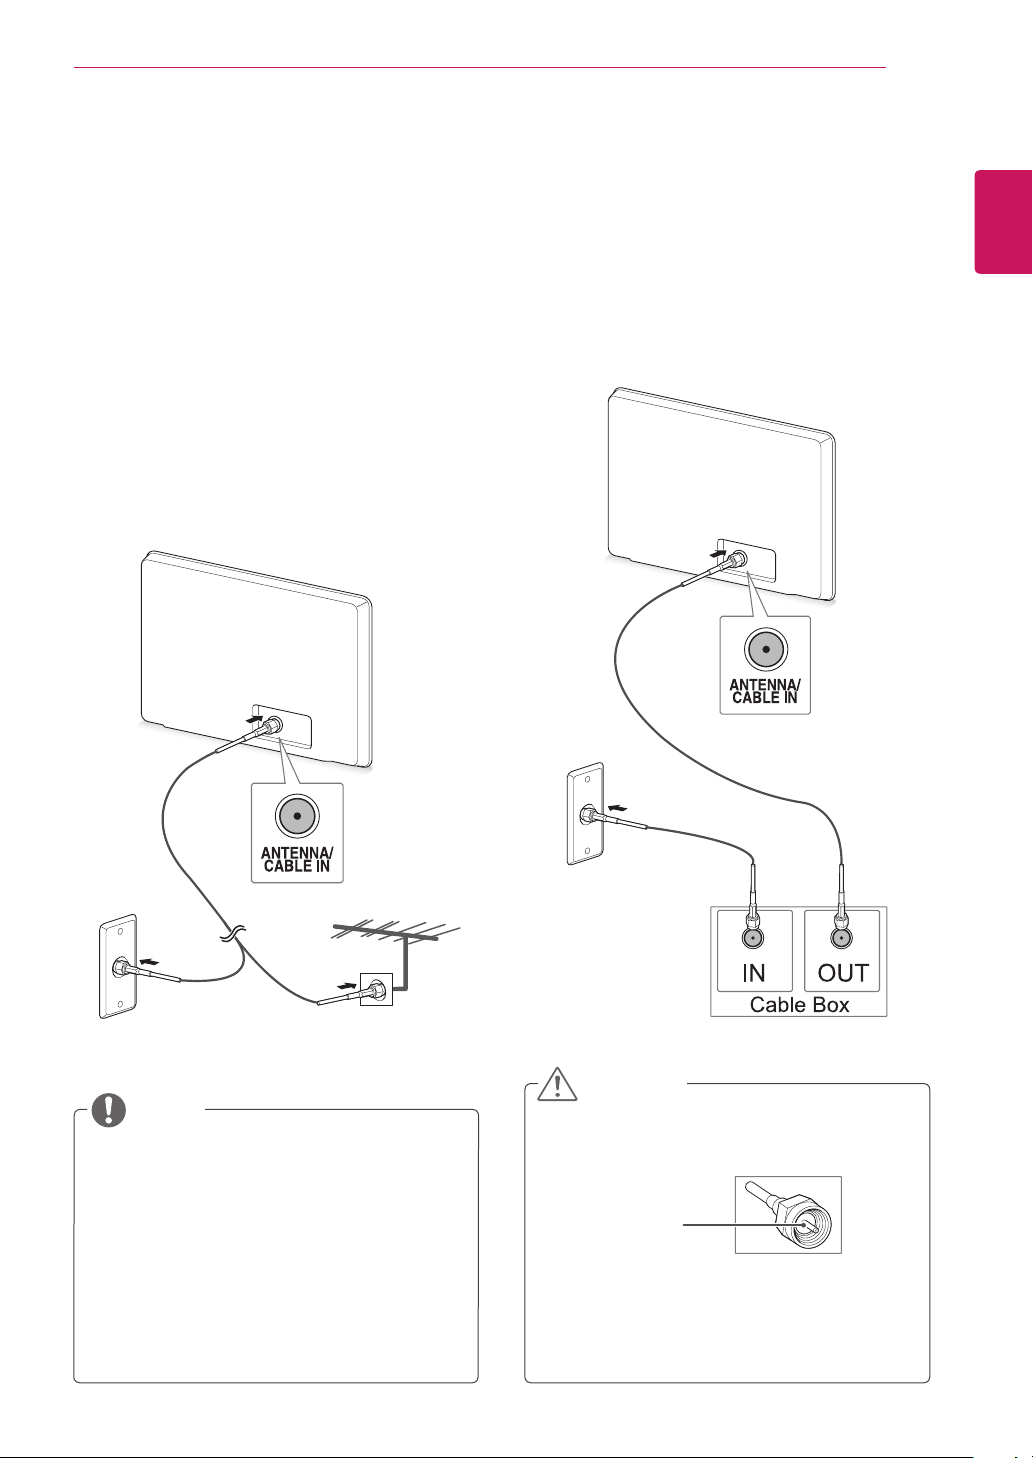
WATCHING TV
15
WATCHING TV
Connecting an antenna or cable
Connect an antenna, cable, or cable box to watch
TV referring to the following. The illustrations may
differ from the actual accessories and an RF cable
is optional.
Connecting an antenna or basic cable
Connect the TV to a wall antenna socket with an
RF cable (75 ohm).
ENGLISH
Connecting with a cable box
Connect the TV to a cable box and the cable box to
a wall antenna socket with 2 RF cables (75 ohm).
Wall Antenna
Socket
Outdoor
Antenna
NOTE
Use a signal splitter to use more than 2 TVs.
y
If the image quality is poor, install a signal
y
amplifier properly to improve the image
quality.
If the image quality is poor with an antenna
y
connected, aim the antenna to the proper
direction.
Visit
http://AntennaWeb.org
y
information about the antenna and cable
connection.
for more
CAUTION
Make sure not to bend the copper wire of
y
the RF cable.
Copper wire
Complete all connections instructions
y
between devices, and then connect the
power cord to the power outlet to prevent
damages to your TV.

16
Accessing the TV for the first
ENGLISH
time
WATCHING TV
Follow the on-screen instructions to customize
4
your TV according to your preferences.
When you access the TV for the first time, the
initial setting screen appears. Select a language
and customize the basic settings.
Connect the power cord to a power outlet.
1
Press on the TV to turn the TV on.
2
The Power indicator lighting is turned on.
NOTE
When the TV is in Power saving mode, the
Power indicator lighting blinks.
Language
Selects a language for
the display.
Selects
Mode Setting
Home Use
the home environment.
Time Setting
Selects the time zone
and daylight saving.
Auto Tuning
NOTE
To display images in the best quality for
y
your home environment, select
mode.
Use
Store Demo
y
retail environment.
If you select
y
previously customized settings will
switch to the default settings of
Demo
mode is suitable for the
Store Demo
mode in 2 minutes.
Scans and saves available
channels automatically.
Home
mode, the
Store
for
The initial setting screen appears if you access
3
the TV for the first time.
NOTE
You can also switch the TV from PC
y
mode to TV mode, press
You can also access
y
accessing
If you do not operate the TV within
y
40 seconds when the setting menu
screen appears, the setting menus will
disappear.
OPTION
Initial Setting
in the main menus.
TV/PC
.
by
When the basic settings are complete, press
5
.
ENTER
NOTE
If you do not complete the initial setting, it
will appear whenever you access the TV.
To turn the TV off, press on the TV.
6
The Power Indicator turns off.
CAUTION
Disconnect the power cord from the power
outlet when you do not use the TV for a
long period of time.
WATCHING TV
17
Watching TV
Press on the Remote control or on the
1
TV to turn the TV on.
Press
2
Control the TV using the following buttons and
3
menus while you are watching TV.
Button / Menu Description
CH( ) or
CH (
Numbers Selects a channel by entering
VOL (+ , -) or
VOL
MUTE Mutes all sounds
PICTURE Selects one of the preset
AUDIO Selects one of the preset audio
RATIO (Except
3D Model)
To turn the TV off, Press on the Remote
4
control or on the TV.
INPUT
(
)
)
and select TV.
Scrolls through the saved
channels
numbers
Adjusts the volume level
image modes (See p.43)
modes. (See p.46)
Resizes an image (See p.20)
Managing channels
Setting up channels
Storing channels
To store channels Automatically,
Press
1
Press the Navigation buttons to scroll to
2
CHANNEL
Press the Navigation buttons to scroll to
3
Auto Tuning
Select
4
The TV scans and saves available channels
automatically.
When you are finished, press
5
When you return to the previous menu, press
BACK
To store channels Manually,
Press
1
Press the Navigation buttons to scroll to
2
CHANNEL
to access the main menus.
MENU
and press
and press
to start automatic tuning.
Yes
.
to access the main menus.
MENU
and press
ENTER
ENTER
ENTER
.
.
.
EXIT
.
ENGLISH
Press the Navigation buttons to scroll to
3
Manual Tuning
Scroll through the channel types, and then add
4
or delete channels.
When you are finished, press
5
When you return to the previous menu, press
.
BACK
and press
ENTER
EXIT
.
.
NOTE
The TV will ask for a password if parental
y
control has been activated (LOCK Menu).
Use the password you set up in the LOCK
Menu to allow a channel search.
When setting the Auto tuning or Manual
y
tuning, the number of maximum channel you
can store is 1,000. This number is subject to
change depending on the broadcasting signal
environment.

WATCHING TV
18
ENGLISH
1
2
3
4
5
Editing your channel list
Press
Press the Navigation buttons to scroll to
CHANNEL
Press the Navigation buttons to scroll to
Channel Edit
Edit programs using the following buttons.
Button Description
Navigation Scrolls through program types or
ENTER Selects a program to view
CH ( )
Blue Key Adds or deletes a channel. The
When you are finished, press
When you return to the previous menu, press
BACK
to access the main menus.
MENU
and press
and press
.
ENTER
ENTER
Highlights the program type
programs
Moves to the previous or next
page
deleted channel displays in gray.
.
EXIT
.
.
Using favorite channels
Add the channels that you watch frequently to the
favorite list.
To set up your favorite list,
Select a channel to add to the favorite list.
1
Press
2
Press Navigation buttons to scroll to
3
Press Navigation buttons to scroll to
4
Press
5
To select a favorite channel, press
until the channel you want displays.
Q. MENU
.
Fav
ENTER
the favorite list.
.
Del/Add/
Favorite
to add the selected channel to
repeatedly
FAV
.
Selecting a channel on the channel list
Press LIST to access the channel list.
1
Button Description
Navigation Scrolls through channel.
ENTER Selects a program to view
CH ( )
Moves to the previous or next
page
Checking current program info
INFO
Press
information appears at the top of the screen.
to view the information of the currently program while you are watching. The following
WATCHING TV
19
ENGLISH
Banner information
DTV
DOLBY DIGITAL
HD
CNN
Current date
Program title Start time Progress bar End time Current time
11-1
Brief Info Title Test.
Fri, Jul 01, 2011 09:45 PM 10:45 PM
Multilingual Caption TV-PG D L S VD
CC 16 : 9
1080p
09:45 PM
Dolby Digital Aspect ratio V-Chip
Multilingual Caption Resolution
Menu Description
Multilingual The program contains two or more audio language services. You can select an audio
Dolby Digital The program contains a Dolby Digital audio signal in TV and HDMI input sources.
Caption The program contains one or more language caption services. You can select a closed
Aspect ratio yThe original aspect ratio of the video is 4:3.
Resolution
V-Chip The program contains V-Chip information.
language you want by using the quick menu.
caption you want by using the quick menu.
yThe original aspect ratio of the video is 16:9 (wide).
: The video resolution is 720 x 480i.
y480 i
: The video resolution is 720 x 480p.
y480 p
: The video resolution is 1280 x 720p.
y720 p
: The video resolution is 1920 x 1080i.
y1080 i
: The video resolution is 1920 x 1080p.
y1080 p
"
TV Rating
" See p.50
NOTE
When viewing cable channels, some information will not show if the cable company does not provide
the data in the signal.
20
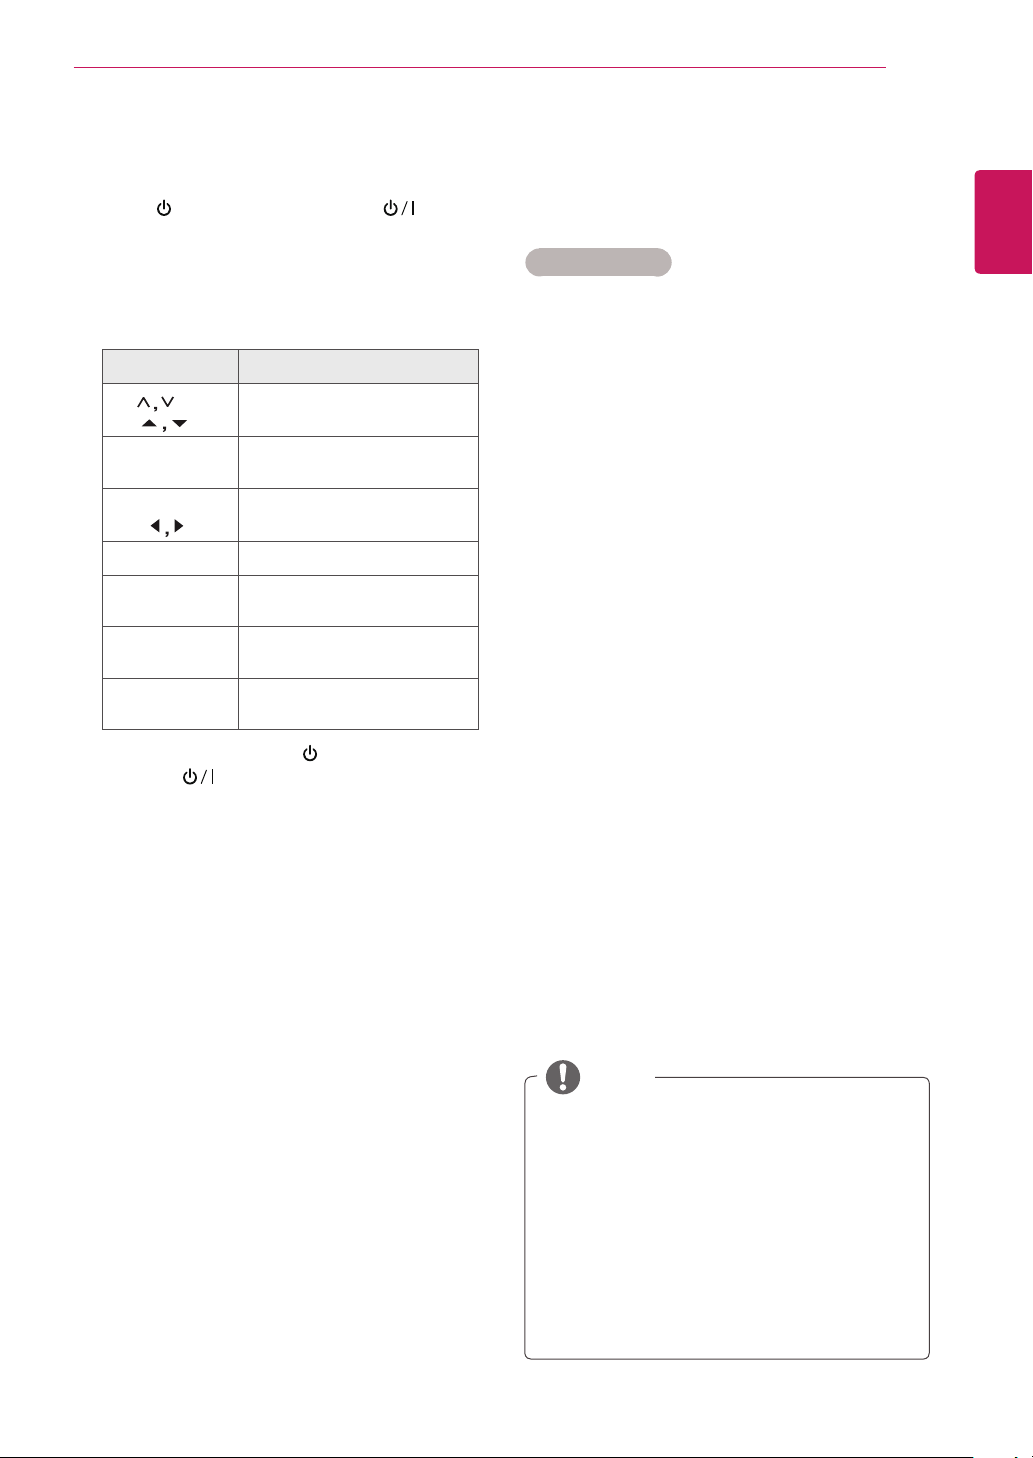
Using additional options
ENGLISH
Adjusting aspect ratio
Resize the image to view the image at its optimal
size by pressing
Q.MENU
WATCHING TV
RATIO(Except 3D Model)
while you are watching TV.
or
-
: Resizes images at the standard 4:3 without
4:3
distortion.
CAUTION
If a fixed image displays on the screen for a
y
long period of time, it will be imprinted and
become a permanent disfigurement on the
screen. This is “image burn” or “burn-in”
and not covered by the warranty.
If the aspect ratio is set to 4:3 for a long
y
period of time, image burn may occur on
the letterboxed area of the screen.
NOTE
You can also change the image size by
pressing
in the
-
16:9
Q. MENU
PICTURE
: Resizes images to fit the screen width.
or accessing
menu.
Aspect Ratio
-
-
Note: When enlarging or reducing the picture,
: Enlarges an image to fit the screen
Zoom
width. The top and bottom of the image may
not appear.
< or >
y
button: Adjust enlarge proportion of
Zoom.
or
button: Move the screen.
y
Cinema Zoom
want to enlarge the picture in correct proportion.
the image may become distorted.
: Choose Cinema Zoom when you
-
Just Scan
reproduced images in high resolution without
image distortion.
: Displays the most accurately
Just Scan
-
Set By Program
aspect ratio with the original image.
: Displays images in the same
< or >
y
button: Adjust enlarge proportion of
Cinema Zoom. The adjustment range is 1 to
16.
or
button: Move the screen.
y
NOTE
If an original image has noise, you may find
y
the noise at the edge of the image.
The input sources:
y
HDMI-DTV
support
, and
Just Scan
DTV, CADTV, Component,
DVI-DTV
(720p/1080i/1080p),
.
WATCHING TV
21
Using the input list
Selecting an input source
Press
1
- The connected device displays on each input
source.
Press the Navigation buttons to scroll to one of
2
the input sources and press
Input source Description
TV Watch TV over the air, cable, and
RGB-PC View a PC display on the screen
Component Watch the contents in a DVD or
HDMI Watch contents in a PC, DVD
DVI View a PC display on the screen
The connected input sources display in black
and the disconnected input sources in grey.
- If you add an input label to each input
sources, you can easily identify a device
connected to each input source.
to access the input source list.
INPUT
ENTER
digital cable broadcast
other external devices, or through
a digital set-top box
or Digital settop box other high
definition devices
.
Adding an Input label
Press
1
Press the Navigation buttons to scroll to
2
OPTION
Press the Navigation buttons to scroll to
3
Input Label
Press the Navigation buttons to scroll to one of
4
the input sources.
Press the Navigation buttons to scroll to one of
5
the input label and press
When you are finished, press
6
When you return to the previous menu, press
BACK
to access the main menus.
MENU
and press
and press
.
ENTER
ENTER
.
.
ENTER
EXIT
.
.
NOTE
If you want to use HDMI-PC mode, you
must set the input label to PC mode.
ENGLISH
WATCHING TV
22
Locking the buttons on the TV
ENGLISH
(Child Lock)
Lock the buttons on the TV to prevent
any unwanted operations or accidents by children.
1
2
3
4
5
Press
Press the Navigation buttons to scroll to
OPTION
Press the Navigation buttons to scroll to
Key Lock
Press the Navigation buttons to scroll to On
and press
feature.
- To deactivate the Key lock feature, select
When you are finished, press
When you return to the previous menu, press
BACK
to access the main menus.
MENU
and press
and press
ENTER
.
ENTER
ENTER
to activate the Key lock
.
.
.
EXIT
NOTE
The TV is programed to remember the last
y
setting after you turn the TV off.
If you turn the TV off with the Key lock
y
feature activated, press
▲,▼
on the TV or
(
)
▲,▼
or Number buttons on the remote
(
)
control.
If you press any button on the TV with the
y
Key lock feature activated,
appears on the screen.
POWER, INPUT, CH
INPUT, CH
Key Lock
Off
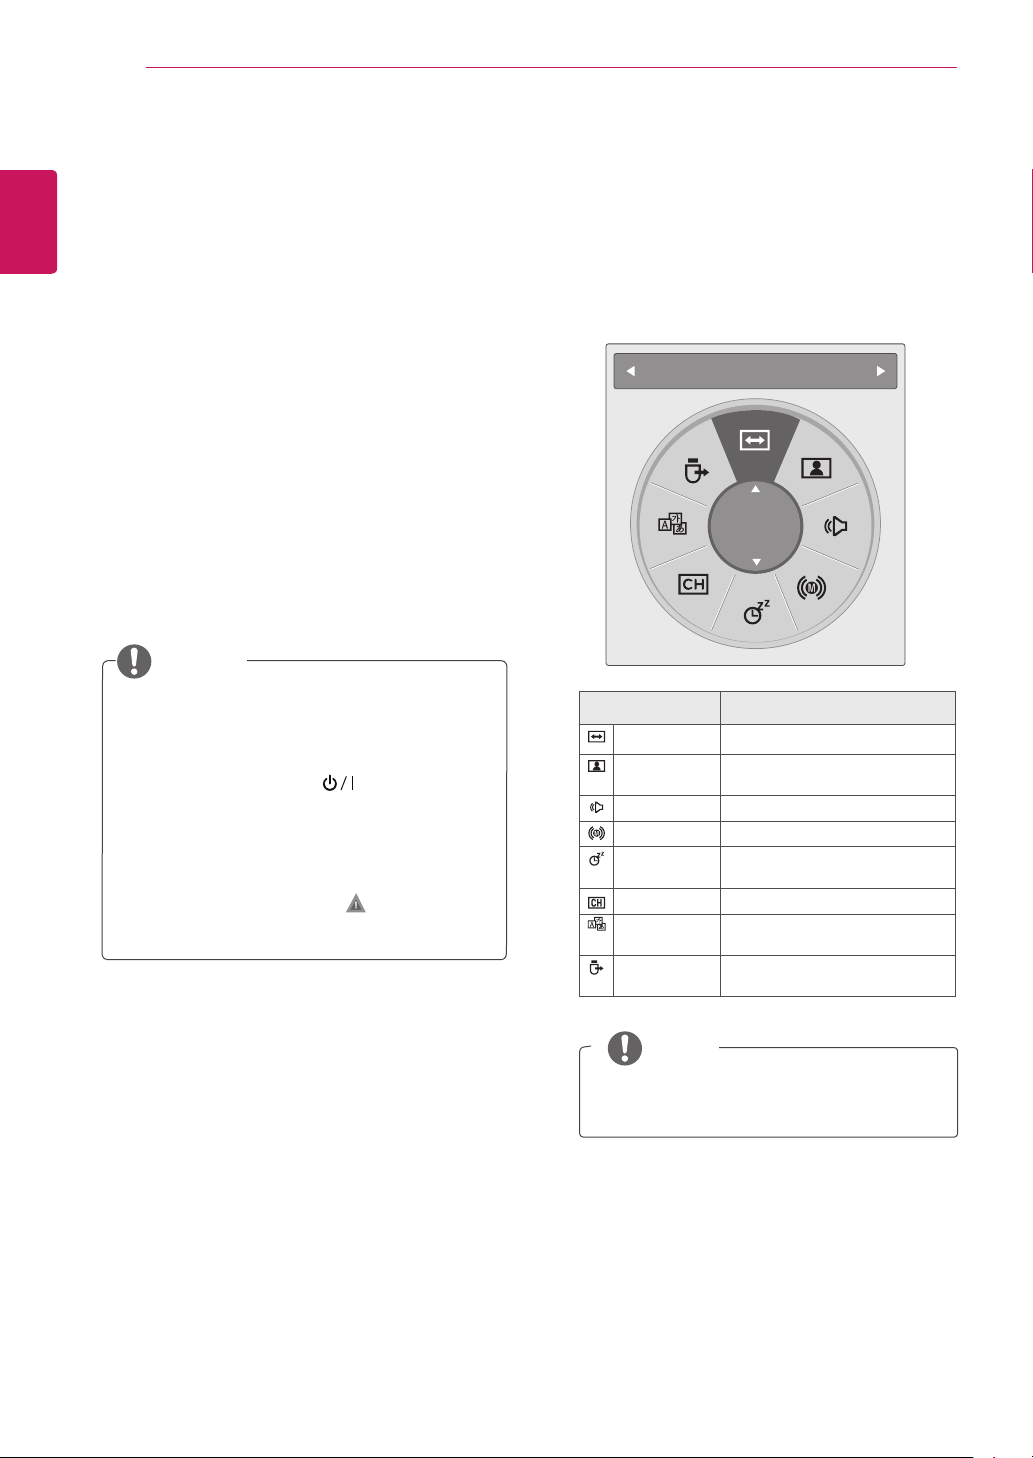
Using the Quick menu
Customize the frequently using menus.
Press
1
Press the Navigation buttons to scroll through
2
.
Q.MENU
the following menus.
Menu Description
Aspect Ratio
Picture Mode
Sound Mode
Audio
Sleep Timer
Del/Add/Fav
Caption
USB Device
to access the quick menu.
Aspect Ratio
16:9
Resizes an image.
Selects one of the preset image
modes.
Selects one of the sound modes
Selects the sound output.
Sets the length of time until the
TV to turns off
Selects the favorite channels.
Activates or deactivate the
subtitles
Selects
USB device.
“Eject”
in order to eject
NOTE
The available menus and options may differ
from the input source that you are using.
Press the Navigation buttons to scroll to an
3
option you want and press
When you are finished, press
4
ENTER
Q. MENU
.
.

CONNECTING TO A PC
23
CONNECTING TO A PC
Your TV supports the Plug & Play* feature and
has the built-in speakers with Surround X that
reproduces sound clearly with rich bass.
* Plug & Play: This is the function that allows a PC
to use the TV without installing a driver.
NOTE
It is recommended to use the TV with the
y
HDMI connection for the best image quality.
If you want to use an optional external
y
speaker instead of the built-in speaker, set
the TV speaker feature to off
(See p.46).
HDMI connection
Transmits the digital video and audio signals from
your PC to the TV. Connect the PC and the TV
with the HDMI cable as shown in the following
illustrations. You should set PC as an input
label to connect the PC to the TV with an HDMI
connection. To add an input label, see Adding an
Input label on See p.21.
NOTE
The
OSD (On Screen Display)
y
on the screen as shown below.
»When turning the product on in
»When switching to
»When connecting an
signal.
Is the input connected to your PC?
Yes No
Do not show message again.
If you select
y
are optimised for your PC.
If you select
y
are optimised for the AV
set-top box, gaming device)
If you select
y
this message does not appear until the TV is
reset. You can change the set value in
OPTION Input Label
"Yes"
"No"
"Do not show message again"
HDMI
the size and image quality
the size and image quality
is displayed
input.
HDMI
input.
cable with no
HDMI
device (DVD player,
.
Menu
.
NOTE
ENGLISH
HDMI OUT
PC
Use a High Speed HDMI™ Cable.
y
Please check the PC environment if you
y
cannot hear the sound in HDMI mode.
If you want to use HDMI-PC mode, you must
y
set the input label to PC mode.

CONNECTING TO A PC
24
DVI to HDMI connection
ENGLISH
Transmits the digital video signal from your PC to
the TV. Connect the PC and the TV with the DVI to
HDMI cable as shown the following illustrations.
DVI connection
DVI OUT
RGB connection
Transmits the analog video signal from your PC to
the TV. Connect the PC and the TV with the D-sub
15 pin cable as shown the following illustrations.
AUDIO OUT
PC
RGB OUT (PC) AUDIO OUT
PC
Transmits the digital video signal from your PC to
the TV. Connect the PC and the TV with the DVI
cable as shown the following illustrations.
DVI OUT
AUDIO OUT
PC
 Loading...