

Page 1
www.lg.com
OWNER’S MANUAL
AIR CONDITIONER
Please read this manual carefully before operating
your set and retain it for future reference.
TYPE : VENTILATOR
P/NO : MFL67870401
ITALIANO
ESPAÑOL
FRANÇAIS
DEUTSCH
ΕΛΛΗΝΙΚΆ
ČEŠTINA
NEDERLANDS
POLSKI
LIMBA ROMÂNĂ
ENGLISH
PORTUGUESE
MAGYAR
БЪЛГАРСKN
SRPSKI
HRVATSKI SVENDKA
NORSK SUOMI
DANSK
Page 2

2 Ventilator
Ventilator Ownerʼs Manual
TABLE OF CONTENTS
FOR YOUR RECORDS
Write the model and serial numbers here:
Model #
Serial #
You can find them on a label on the side of each unit.
Dealer's Name
Date Purchased
n Staple your receipt to this page in the event you need
it to prove date of purchase or for warranty issues.
READ THIS MANUAL
Inside you will find many helpful hints on how to use
and maintain your ventilator properly. Just a little preventive care on your part can save you a great deal of
time and money over the life of your Ventilator.
You'll find many answers to common problems in the
chart of check item prior to notify a failure. If you review
our chart of
Check item prior to notify a failure, you may not
need to call for service at all.
PRECAUTION
• Contact the authorized service technician for
repair or maintenance of this unit.
• Contact the installer for installation of this unit.
• The ventilator is not intended for use by young
children or invalids without supervision.
• Young children should be supervised to ensure
that they do not play with the ventilator.
• When the power cord is to be replaced, replacement work shall be performed by authorized personnel only using only genuine replacement
parts.
• Installation work must be performed in accordance with the National Electric Code by qualified
and authorized personnel only.
Safety Precautions.........................3
Prior to Operation ..........................6
Introduction ....................................7
Operating Instructions
(Accessory) ..................................10
Electrical Safety ...........................14
Characteristics .............................15
Maintenance and Service ............17
Check Item prior to notify
a failure .........................................22
Page 3

Owner's Manual 3
Safety Precautions
ENGLISH
Safety Precautions
To prevent injury to the user or other people and property damage, the following instructions
must be followed.
n Incorrect operation due to ignoring instruction will cause harm or damage. The seriousness is
classified by the following indications.
n Meanings of symbols used in this manual are as shown below.
WARNING
CAUTION
This symbol indicates the possibility of death or serious injury.
This symbol indicates the possibility of injury or damage.
Be sure not to do.
Be sure to follow the instruction.
WARNING
n Installation
Do not use a defective or
underrated circuit breaker.
Use this appliance on a
dedicated circuit.
• There is risk of fire or electric
shock.
For electrical work, contact
the dealer, seller, a qualified
electrician, or an Authorized Service Center.
• Do not disassemble or repair
the product. There is risk of fire
or electric shock.
Always ground the product.
• There is risk of fire or electric
shock.
Install the panel and the
cover of control box securely.
• There is risk of fire or electric
shock.
Always install a dedicated
circuit and breaker.
• Improper wiring or installation
may cause fire or electric shock
Use the correctly rated
breaker or fuse.
• There is risk of fire or electric
shock.
Do not modify or extend the
power cable.
• There is risk of fire or electric
shock.
Do not install, remove, or
re-install the unit by yourself (customer).
• There is risk of fire, electric
shock, explosion, or injury.
Be cautious when unpacking
and installing the product.
• Sharp edges could cause injury.
Be especially careful of the
case edges and the fins on the
condenser and evaporator.
For installation, always contact the dealer or an Authorized Service Center.
• There is risk of fire, electric
shock, explosion, or injury.
Do not install the product
on a defective installation
stand.
• It may cause injury, accident, or
damage to the product.
Do not let the ventilator run
for a long time when the
humidity is very high and a
door or a window is left open.
• Moisture may condense and
wet or damage furniture.
Page 4
4 Ventilator
Safety Precautions
n Operation
Do not touch(operate) the
product with wet hands.
• There is risk of fire or electrical
shock.
Do not place a heater or
other appliances near the
power cable.
• There is risk of fire and electric
shock.
Do not allow water to run
into electric parts.
• It may cause There is risk of fire,
failure of the product, or electric
shock.
For re-installation of the
installed product, always
contact the dealer or an
Authorized Service Center.
• There is risk of fire, electric
shock, explosion or injury.
Do not open the maintenance cover of the main
body during operation.
• Otherwise, it may cause electrical shock.
Use the outdoor air suction
hole with the net installed
to ensure that birds could
not come in.
• Remove estrange things like
the bird’s nest. Otherwise, it
may cause scarcity of indoor
oxygen.
Install the air intake where polluted air can not
be directly sucked in.
• It may cause various accidents, including suffocation, due to the suction of harmful gasses(CO,
etc.)
Install the product a place that can support
its weight.
• Otherwise, it may cause accident due to falling
of the product.
Take care to ensure that power
cable could not be pulled out
or damaged during operation.
• There is risk of fire or electric
shock.
Do not place anything on
the power cable.
• There is risk of fire or electric
shock.
Do not plug or unplug the
power supply plug during
operation.
• There is risk of fire or electric
shock.
Do not store or use flammable gas or combustibles
near the product.
• There is risk of fire or failure of
product.
When flammable gas leaks,
turn off the gas and open a
window for ventilation
before turn the product on.
• Do not use the telephone or turn
switches on or off.
There is risk of explosion or fire
If strange sounds, or small
or smoke comes from product. Turn the breaker off
• There is risk of electric shock or
fire.
Stop operation and close
the window in storm or hurricane. If possible, remove
the product from the window before the hurricane
arrives.
• There is risk of property damage,
failure of product, or electric
shock.
When the product is soaked
(flooded or submerged),
contact an Authorized Service Center.
• There is risk of fire or electric
shock.
Be cautious that water
could not enter the product.
• There is risk of fire, electric shock,
or product damage.
Page 5
Owner's Manual 5
Safety Precautions
ENGLISH
Turn the breaker off when
cleaning or maintaining the
product.
• There is risk of electric shock.
When the product is not be
used for a long time, disconnect the power supply
plug or turn off the breaker.
• There is risk of product damage
or failure, or unintended operation.
Avoid fire equipment
• There is risk of fire.
Donʼt touch a dedicated circuit or breaker
with wet hands.
• There is risk of electric shock.
Use a firm stool or ladder when cleaning or
maintaining the roduct.
• Be careful and avoid personal injury.
n Installation
Use two or more people to lift and transport
the product.
• Avoid personal injury.
Do not install the product where it will be
exposed to sea wind (salt spray) directly.
• It may cause corrosion on the product. Corrosion, particularly on the condenser and evaporator fins, could cause product malfunction or
inefficient operation.
CAUTION
n Operation
Do not expose the skin
directly to cool air for long
periods of time.
(Don't sit in the draft.)
• This could harm to your health.
Do not use the product for
special purposes, such as
preserving foods, works of
art, etc. It is a consumer
ventilator, not a precision
refrigeration system.
• There is risk of damage or
loss of property.
Use a soft cloth to clean.
Do not use harsh detergents, solvents, etc.
• There is risk of fire, electric shock,
or damage to the plastic parts of
the product.
Do not step on or put anyting on the product. (outdoor units)
• There is risk of personal injury and failure of product.
Use a firm stool or ladder when cleaning or
maintaining the product.
• Be careful and avoid personal injury.
Page 6

6 Ventilator
Prior to Operation
Prior to Operation
1. Contact an installation specialist for installation.
2. Plug in the power plug properly.
3. Use a dedicated circuit.
4. Do not use an extension cord.
5. Do not start/stop operation by plugging/unplugging the power cord.
6. If the cord/plug is damaged, replace it with only an authorized replacement part.
1. Being exposed to direct airflow for an extended period of time could be hazardous to
your health. Do not expose occupants, pets, or plants to direct airflow for extended
periods of time.
2. Due to the possibility of oxygen deficiency, ventilate the room when used together
with stoves or other heating devices.
3. Do not use this ventilator for non-specified special purposes (e.g. preserving precision devices, food, pets, plants, and art objects). Such usage could damage the
items.
1. Do not touch the metal parts of the unit when removing the filter. Injuries can occur
when handling sharp metal edges.
2. Do not use water to clean inside the ventilator. Exposure to water can destroy the
insulation, leading to possible electric shock.
3. When cleaning the unit, first make sure that the power and breaker are turned off.
The fan rotates at a very high speed during operation. There is a possibility of injury if
the unitʼs power is accidentally triggered on while cleaning inner parts of the unit.
For repair and maintenance, contact your authorized service dealer.
Preparing for operation
Usage
Cleaning and maintenance
Service
Page 7
Owner's Manual 7
ENGLISH
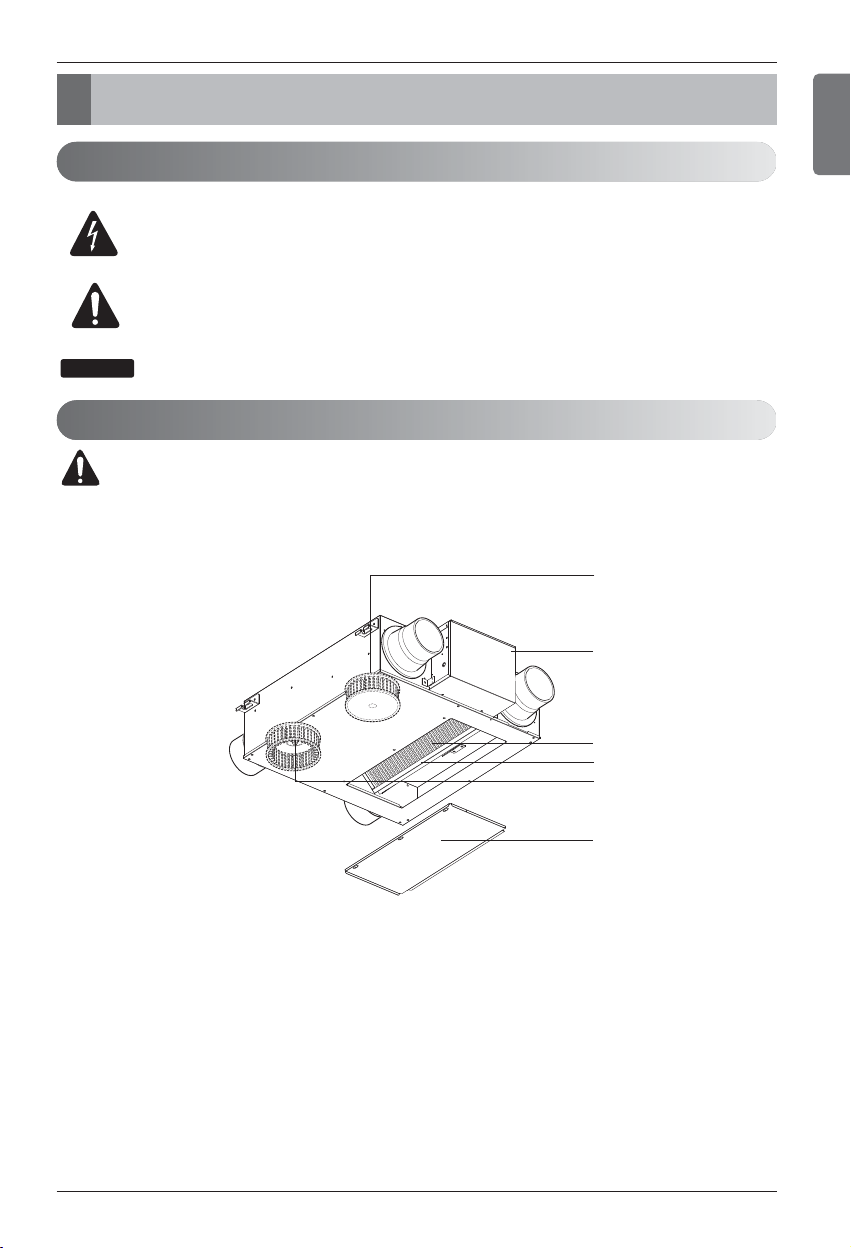
Introduction
Introduction
This symbol alerts you to the risk of electric shock.
This symbol alerts you to hazards that could cause harm to the
ventilator.
This symbol indicates special notes.
Features
Symbols used in this Manual
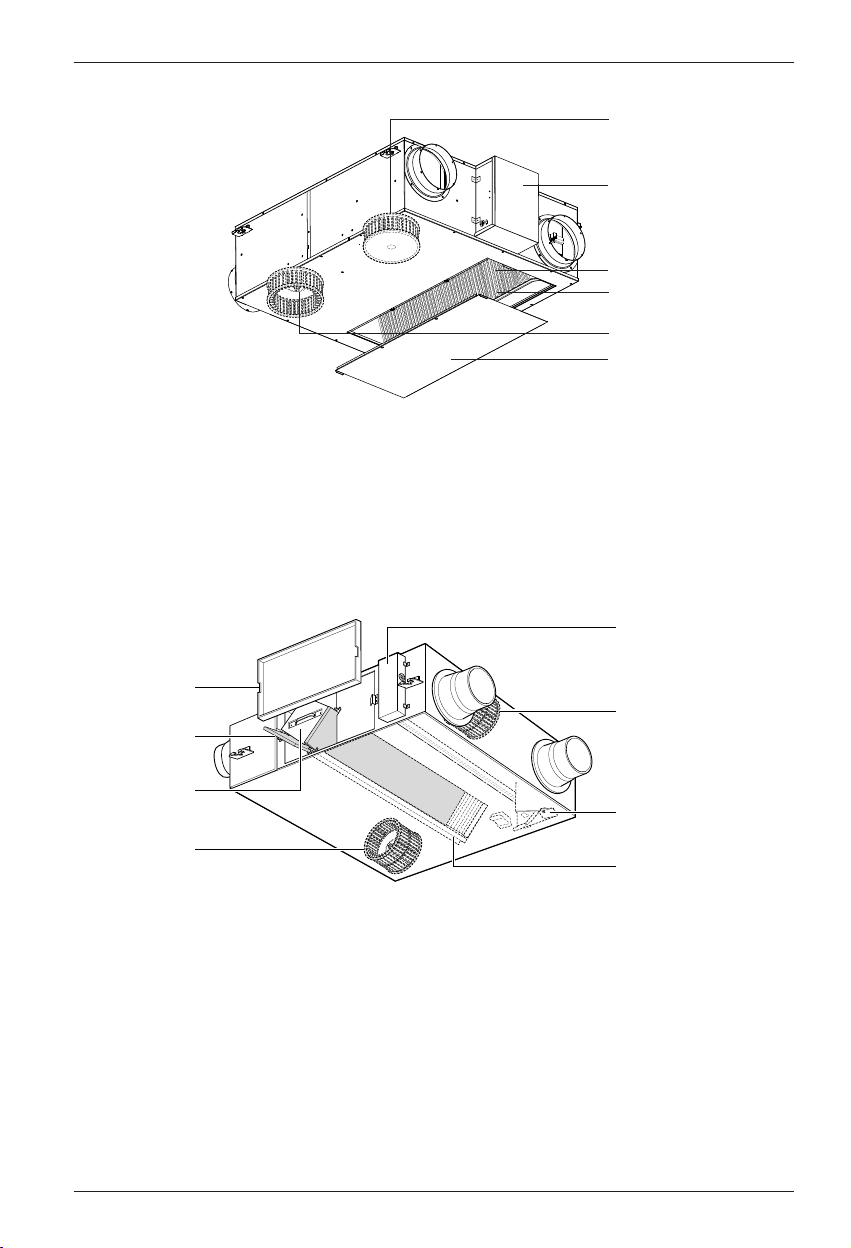
WARNING: This appliance should be installed in accordance with national wiring regulations. This guide acts as a guide to help to explain product features.
1. Blower for Supply Air
A blower for sucking outside air.
2. Control Box
3. Blower for Exhaust Air
A blower for draining polluted air outside.
4. Maintenance cover
5. Total Heat Exchanger
Exchanges temperature and moisture
between air supply air and exhaust air.
6. Air Filter
Prevents clogging of the Total heat
exchanger due to dust.
h The figure of Total Heat Exchanger can be different by the product model.
Models: LZ-H015GBA2
NOTICE
1
2
5
6
3
4
Page 8
8 Ventilator
Introduction
1
5
6
7
8
2
3
4
Models: LZ-H025GBA2 / LZ-H035GBA2
1. Blower for Supply Air
A blower for sucking outside air.
2. Control Box
3. Blower for Exhaust Air
A blower for draining polluted air outside.
4. Maintenance cover
5. Total Heat Exchanger
Exchanges temperature and moisture
between air supply air and exhaust air.
6. Air Filter
Prevents clogging of the Total heat
exchanger due to dust.
h The figure of Total heat Exchanger can be different by the Product Model.
Models: LZ-H050GBA2
1. Maintenance Cover
2. Air Filter
It prevents dust from clogging in Total Heat
Exchanger.
3. Total Heat Exchanger
It changes temperature and humidity
between Supplying Air and exhausted air.
4. Blower for Exhaust Air
It is a fan for discharging the contaminated
air to outdoor.
5. Control box
6. Blower for Supply Air
It is a fan for inhaling exterior air into an
indoor space.
7. Damper plate(board)
It converts exchanging mode between total
heat ventilation and general ventilation.
8. Total Heat Exchanger holder
It is used in guiding for the installation of
Total Heat Exchanger.
h The figure of Total heat Exchanger can be different by the Product Model.
1
2
5
6
3
4
Page 9

Owner's Manual 9
ENGLISH
Introduction
1
5
6
7
8
2
3
4
Models: LZ-H080GBA2 / LZ-H100GBA2
1. Maintenance Cover
2. Air Filter
It prevents dust from clogging in Total Heat
Exchanger.
3. Total Heat Exchanger
It changes temperature and humidity between
Supplying Air and exhausted air.
4. Blower for Exhaust Air
It is a fan for discharging the contaminated air
to outdoor.
5. Control box
6. Blower for Supply Air
It is a fan for inhaling exterior air into an indoor
space.
7. Damper plate(board)
It converts exchanging mode between total
heat ventilation and general ventilation.
8. Total Heat Exchanger holder
It is used in guiding for the installation of Total
Heat Exchanger.
h The form of Total Heat Exchanger varies according to models.
h The form of Total Heat Exchanger varies according to models.
Models: LZ-H150GBA2 / LZ-H200GBA2
1. Maintenance Cover
2. Air Filter
It prevents dust from clogging in Total Heat Exchanger.
3. Total Heat Exchanger
It changes temperature and humidity between Supplying Air and exhausted air.
4. Blower for Exhaust Air
It is a fan for discharging the contaminated air to outdoor.
5. Control box
6. Blower for Supply Air
It is a fan for inhaling exterior air into an indoor space.
7. Damper plate(board)
It converts exchanging mode between total heat ventilation and general ventilation.
8. Total Heat Exchanger holder
It is used in guiding for the installation of Total Heat
Exchanger.
1
2
3
4
5
6
7
8
Page 10

10 Ventilator
Operating Instructions (Accessory)
Operating Instructions (Accessory)
LCD Remote Controller (PQRCVSL0 / PQRCVSL0QW)
OPERATION INDICATION
SCREEN
SET TEMPERATURE BUTTON
FAN SPEED BUTTON
ON/OFF BUTTON
OPERATION MODE SELECTION
BUTTON
WIRELESS REMOTE CONTROLLER RECEIVER
• Some products don't receive the
wireless signals.
AIR FLOW BUTTON
SUBFUNCTION BUTTON
FUNCTION SETTING BUTTON
VENTILATION BUTTON
RESERVATION
UP, DOWN, LEFT, RIGHT BUTTON
• To check the indoor temperature,
press button.
ROOM TEMPERATURE BUTTON
SETTING/CANCEL BUTTON
EXIT BUTTON
1
2
3
4
5
6
7
8
9
10
11
12
13
14
15
h Some functions may not be operated and displayed depending on the product type.
1
10
9
8
7
11
12
13
14
15
Please attach the inform label inside of the door.
Please choose proper language depend on your
country.
2
3
4
5
6
Page 11

Owner's Manual 11
Operating Instructions (Accessory)
ENGLISH
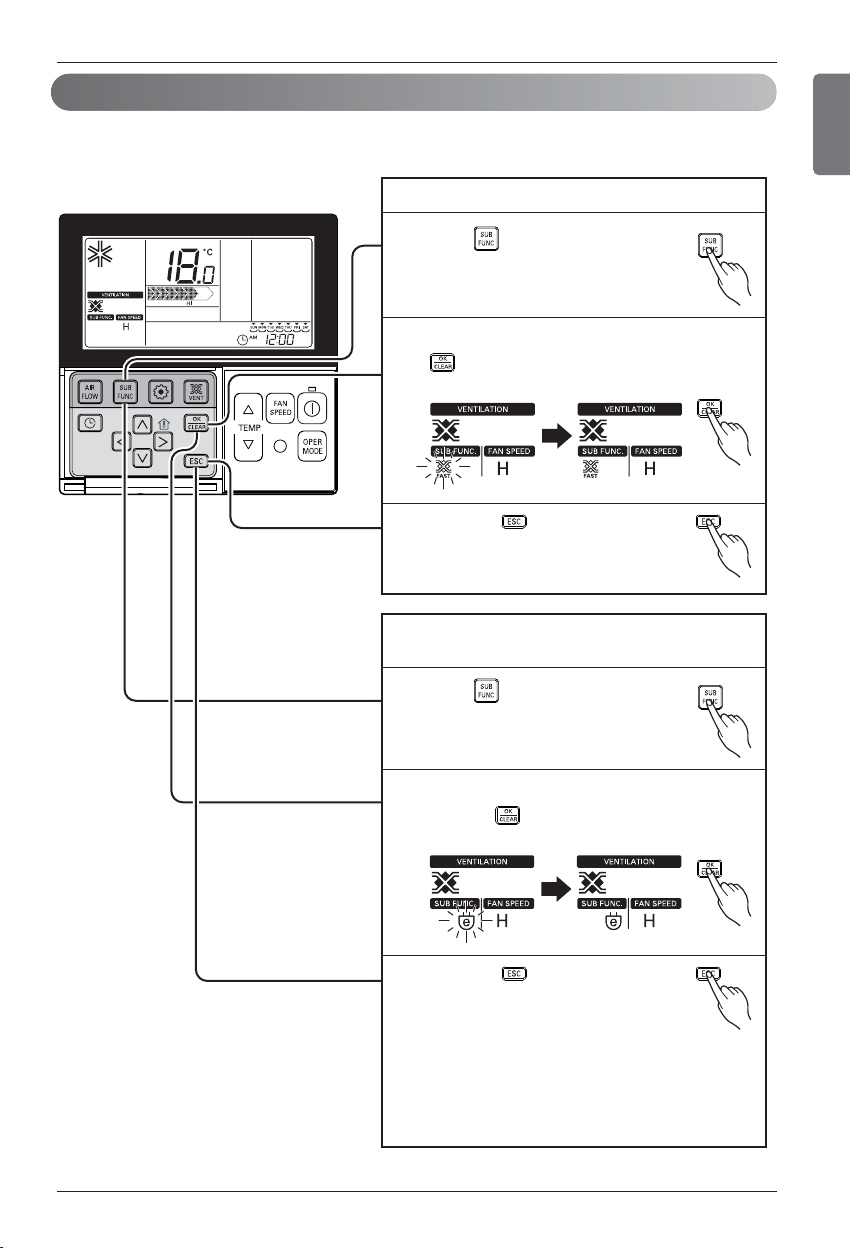
It is used when air conditioner is interlinked with ventilation product.
It is a function that cools and refreshes indoor air using the ventilation product at the same time oper-
ating the air conditioning function.
Method to Operate and Select Air Volume – Interlinked Operation with Ventilation.
Ventilation interlinked operation
Press button on the remote
1
controller control panel.
- It is only used when air conditioner
and general ventilation is
interlinked.
Pressing 'Start/Stop' button at ventilation
2
mode will start ventilation.
Pressing button will change the
3
ventilation operation mode.
Pressing operation selection button
will change the mode in the order of
'Heat exchange → normal → automatic'
❈ It only displays on the remote controller
display when it is in ventilation mode, and it
displays the desired temperature when it
returns to air condition mode.
Pressing button in general
4
ventilation mode will change airflow
speed.
Pressing airflow speed button will
change the mode in the order of 'weak
strong → extra strong'.
If CO2 sensor is installed, it can select from
'weak
→
strong → very strong → automatic'.
Changing back to air conditioner mode
5
1)Automatic Conversion : when no button is
pressed for 15 seconds or longer, it
automatically converts back to air
conditioner mode.
2) Manual Conversion : Pressing button
in ventilation mode will manually convert.
→
Page 12

12 Ventilator
Operating Instructions (Accessory)
Method to Operate and Select Air Volume –Ventilation Single Operation
It is a function to cool and refresh the indoor air using general ventilation product..
Ventilation single operation
Press button on the remote
1
controller.
Pressing button will change
2
the ventilation mode.
Ventilation
Remote Controller
mode
Heat
exchange
Normal
Automatic
3
Display
Circulate indoor air without loss of heat
Directly circulate indoor air without going
through heat exchanger
Circulate indoor air with automatically
comparing indoor and outdoor air
Pressing button will change
the strength of the wind
- Pressing the button can select
→
from 'weak
strong'.
- If CO
→
strong → very strong → automatic'.
strong → very
2
sensor is installed, it can select from
Contents
Page 13
Owner's Manual 13
Operating Instructions (Accessory)
ENGLISH
Fast/Energy saving ventilation mode
It is a function to operate ventilation function more efficiently through the ventilation additional functions, fast / power saving settings.
Fast : ventilates fast
Press button in ventilation mode.
1
- It converts in the order of 'fast →
power saving' in ventilation mode.
'Fast' is blinking on the display, and pressing
2
button will stabilize 'fast' icon, and the
function is set.
Pressing button will exit the
3
settings.
Power Saving : efficiently ventilates and performs
power savings.
Press button in ventilation mode.
1
- It converts in the order of 'fast →
power saving' in ventilation mode.
'Power Saving' is blinking on the display, and
2
pressing button will stabilize 'Power
Saving' icon, and the function is set.
Pressing button will exit the
3
settings.
❈ General ventilation and direct expansion
ventilation have the same additional
functions.
❈ Ventilation/Heater/Humidifier additional
function settings are the same as air
conditioner.
Page 14

14 Ventilator
Electrical Safety
Electrical Safety
WARNING: This appliance must be properly grounded.
To minimize the risk of electric shock, you must alway plug into a grounded outlet.
WARNING: Do not cut or remove the grounding prong from the
power wire.
WARNING: Attaching the adapter ground terminal to the wall receptacle cover screw does not ground the appliance unless the cover
screw is metal and not insulated, and the wall receptacle is grounded through the house wiring.
WARNING: If you have any doubt whether the ventilator is properly
grounded, have the wall receptacle and circuit checked by a qualified electrician.
Preferred method
Ensure proper ground
exists before use
Page 15

Owner's Manual 15
ENGLISH
Characteristics
Characteristics
Exhausts indoor air via the Total Heat Exchanger outdoor.
• The outdoor air heat exchanged is supplied to indoor. Operate the ventilator in the
Ventilation via Total heat exchanger in summer/winter when cool/heat operation is done.
Ventilation via Total Heat Exchanger
Total Heat Exchanger
Outdoor air
Return Air
Exhaust air
Supply Air
Page 16

16 Ventilator
Characteristics
Exhaust air
Outdoor air
Total Heat Exchanger
Damper
Return Air
Supply Air
Exhaust air
Outdoor air
Total Heat Exchanger
Damper
Return Air
Supply Air
Exhausts indoor air via the Total Heat Exchanger outdoor.
• The outdoor air heat exchanged is supplied to indoor. Operate the ventilator in the
Ventilation via Total heat exchanger in summer/winter when cool/heat operation is done.
Ventilation via Total Heat Exchanger
Exhausts the polluted indoor-air directly without via the Total Heat
Exchanger.
• Operate the ventilator in the Normal Ventilation in spring/autumn when the Total heat exchanger
is not required.
Normal Ventilation
CAUTION: In case of high outdoor pollution degree like yellow sand please pause the
ventilator.
Page 17

Owner's Manual 17
Handling and Cleaning
Maintenance and Service
Maintenance and Service
Maintenance
cover
Total Heat
Exchanger
To prevent function of the ventilator deteriorating, clean dust adhered to the air filter and total heat
exchanger regularly.
Cleaning Cycle
- Air filter: More than once every 6 months.
- Total heat exchanger: More than once every 2 years (Cleaning cycle may increase according to
pollution degree.)
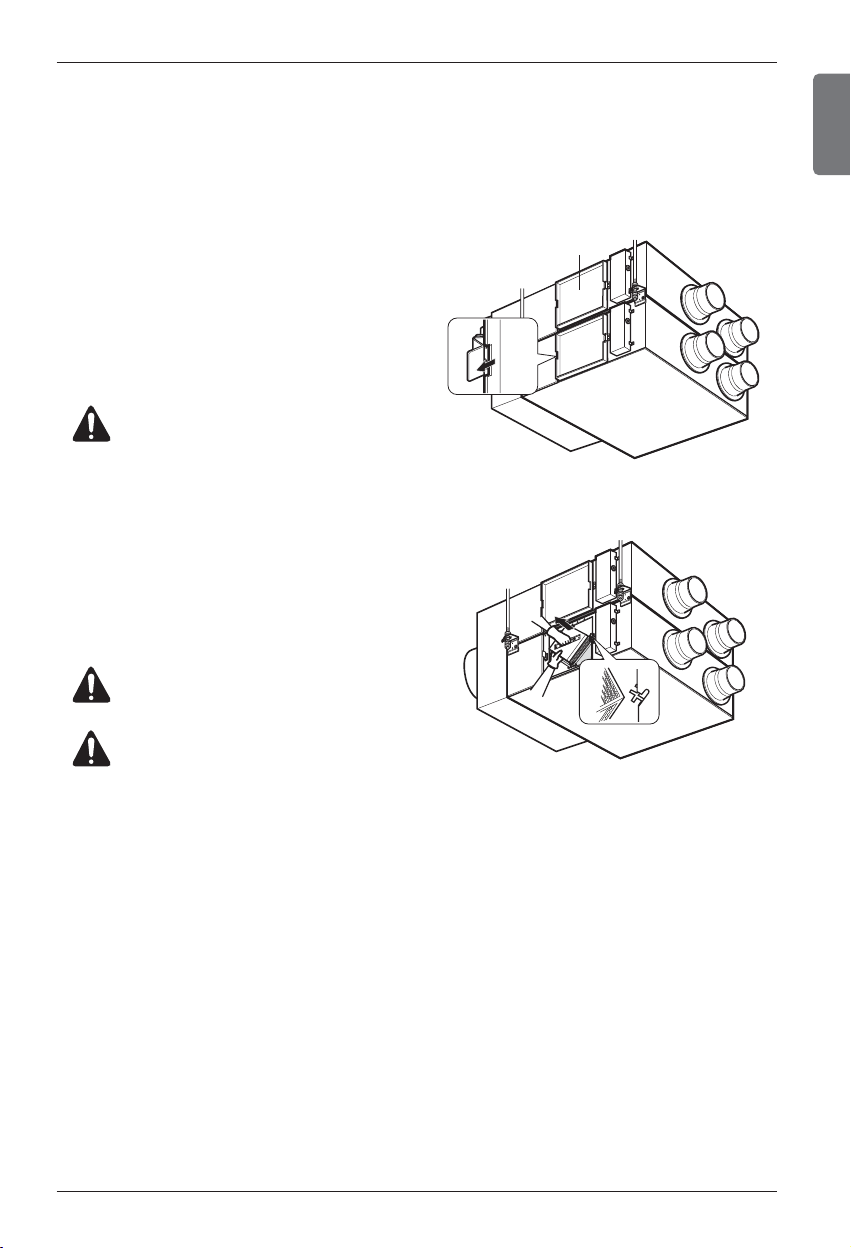
Method to take each part out
Model: LZ-H015GBA2 / LZ-H025GBA2 / LZ-H035GBA2
1. Remove the maintenance cover.
Put the hands inside of the ceiling from the maintenance cover, and pull the maintenance cover up.
(Looser the hinge and detach the maintenance cover.)
2. Take the air filter out.
Take the air filter with each contained to the
left/right downside of the Total heat exchanger.
h If it adheres to the ceiling in reverse, it is equal
to the left/right topside of the Total heat exchanger.
3. Take the Total heat exchanger out.
Catch the handle and then take the Total heat
exchanger out from the main body. (2 units)
CAUTION: Take care to ensure that you
could not damage when taking the air filter out since there is a sharp part on it.
WARNING: Turn the breaker off when
cleaning the product.
CAUTION: Gloves should be worn when
doing the maintenance work.
ENGLISH
Page 18

18 Ventilator
Maintenance and Service
Model: LZ-H050GBA2 / LZ-H080GBA2 / LZ-H100GBA2
1. Remove the maintenance cover.
Put the hands inside of the ceiling from the maintenance cover, and pull the maintenance
cover up.
(Looser the hinge and detach the maintenance
cover.)
2. Take the air filter out.
Take the air filter with each contained to the
left/right downside of the Total heat exchanger.
h If it adheres to the ceiling in reverse, it is
equal to the left/right topside of the Total heat
exchanger.
3. Take the Total heat exchanger out.
Catch the handle and then take the Total heat
exchanger out from the main body. (2 units)
CAUTION: Take care to ensure that you
could not damage when taking the air filter out since there is a sharp part on it.
WARNING: Turn the breaker off when
cleaning the product.
CAUTION: Gloves should be worn when
doing the maintenance work.
Main Body
Handle
Main Body
Air Filter
Main Body
Page 19
Owner's Manual 19
ENGLISH
Maintenance and Service
Model: LZ-H150GBA2 / LZ-H200GBA2
1. Remove the maintenance cover.
Put the hands inside of the ceiling from the maintenance cover, and pull the maintenance cover up.
(Looser the hinge and detach the maintenance cover.)
2. Take the air filter out.
Take the air filter with each contained to the
left/right downside of the Total heat exchanger.
h If it adheres to the ceiling in reverse, it is
equal to the left/right topside of the Total heat
exchanger.
3. Take the Total heat exchanger out.
Catch the handle and then take the Total heat
exchanger out from the main body. (2 units)
CAUTION: Take care to ensure that you
could not damage when taking the air filter out since there is a sharp part on it.
WARNING: Turn the breaker off when
cleaning the product.
CAUTION: Gloves should be worn when
doing the maintenance work.
Maintenance Cover
Main body
Main body
Page 20

20 Ventilator
Cleaner
Air Filter
Total Heat ExchngerAir Filter
Maintenance and Service
Method to Clean and Replace Each Part
1. Cleaning of Air Filter
Clean once every 6 months.
• Clean dirt from the air filter using a vacuum cleaner or
washing with water.
(if dirt is conspicuous, wash with a neutral detergent in
lukewarm water)
• After washing with water, dry well in the shade.
(Do not expose the air filter to direct sunlight or heat
from a fire when drying it)
• If the air filter is damaged, purchase it from the service
center or professional agent.
2. Cleaning of Total Heat Exchanger
Suck dusts adhered to the surface of the Total heat
exchanger with a cleaner.
• Use the cleaner that attached to brush at its nozzle, and
use a soft brush.
• Do not use a hard nozzle on the cleaner.
(Otherwise, surface of the Total heat exchanger may be
damaged.)
• Never wash the Total heat exchanger with water.
• Replacement expenses are for a consideration after 2
years from the purchasing date.
• Expenses are for a consideration when you will contact
the service center even within 2 years from the purchasing date.
• For service, always contact the dealer or an Authorized
Service Center.
Page 21
Owner's Manual 21
ENGLISH
Main Body
Main Body
Assemble the
air filter into the
holder structure.
Holder for
Total Heat Exchanger
Air Filter
Total Heat
Exchanger
Hinge
Main Body
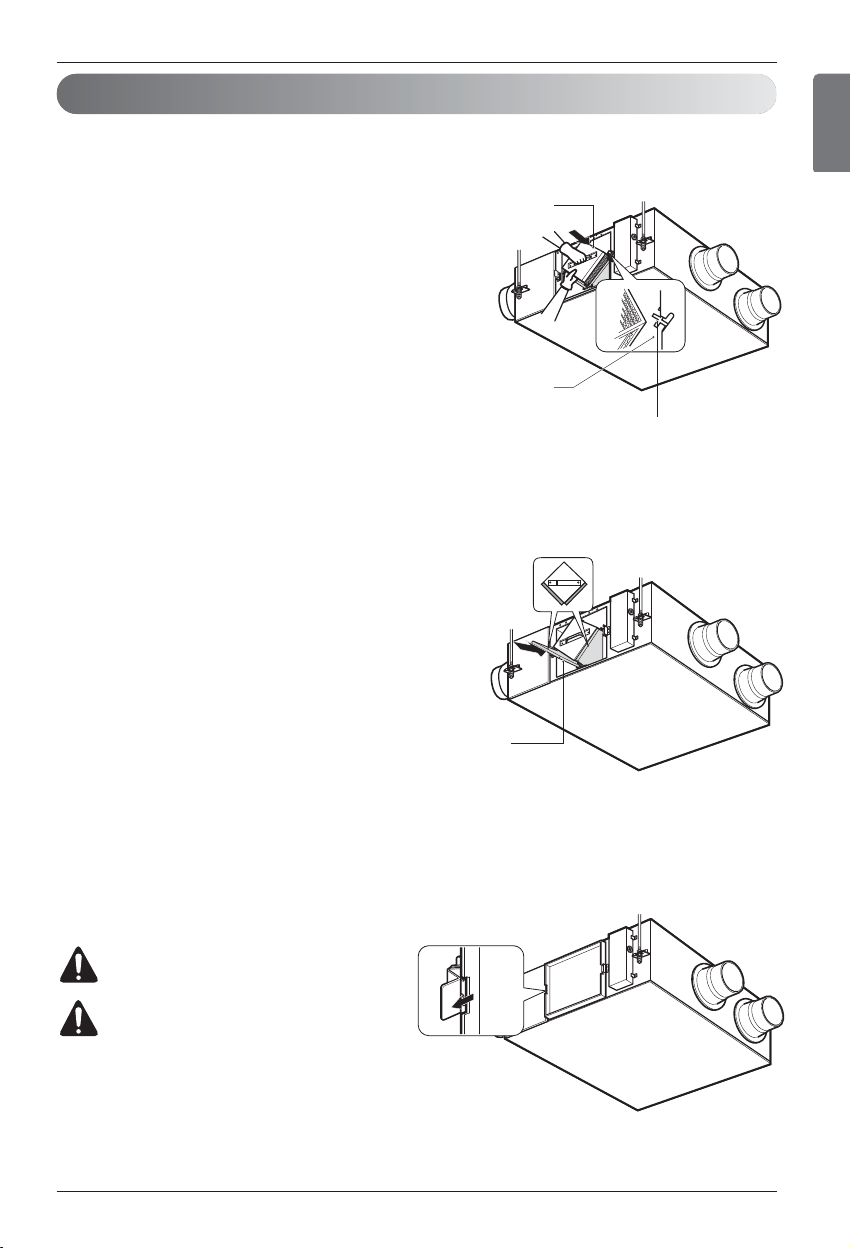
Assembly and Check after Maintenance
Maintenance and Service
1. Assembly of Total heat exchanger
Securely put the corner parts (4 or 6 parts) of
the Total heat exchanger into the
holder for assembly and slide them into the
inside of the main body.
2. Assembly of air filter
Assemble the air filter into the holder structure
of the Total heat exchanger.
• Take care to ensure that surface of the Total
heat exchanger could not be damaged.
• Dusts adhered to the Total heat exchanger
may cause deterioration of Air volume.
3. Assembly of maintenance cover
Fix the cover to the right hinge and fix it to the
left side. (A nameplate is adhered toward the
reading direction).
WARNING: Turn the breaker off when
cleaning the product.
CAUTION: Gloves should be worn
when doing the maintenance work.
Page 22

22 Ventilator
Check Item prior to notify a failure
Check Item prior to notify a failure
The Product doesn't work
The Product doesn't work
through you press the 'ON'
switch
Even though you change the
fan speed, the operation mode
doesn't change and it changes
to 'Auto or Low'
Is power not supplied?
Is Air Filter, Total heat
exchanger clogged severely?
Is the Indoor temperature less
than -10°c or more than 45°C?
Is the Indoor temperature less
than -10°C or more than 45°C?
Supply Power
Follow cleaning and changing
method.
It's standby mode for protecting Total Heat Exchanger.
It's operation mode to protect
Total Heat Exchanger.
Symptom Check Item Counter-measure
Page 23

www.lg.com
MANUALE DI ISTRUZIONI
CLIMATIZZATORE
Leggere con attenzione questo manuale prima di usare l’unità e
conservare per uso futuro.
TYPE : Aeratore
ITALIANO
Page 24
2 Aeratore
Manuale per l'utente dell'aeratore
SOMMARIO
DATI DA RICORDARE
Annotare qui il numero di serie e il modello:
N. modello
N. di serie
I numeri sono riportati sull'etichetta a lato di ogni unità.
Nome del rivenditore
Data di acquisto
n Spillare la ricevuta su questa pagina, qualora fosse
necessaria per provare la data di acquisto o per motivi di
garanzia.
LEGGERE IL MANUALE
All'interno sono contenuti suggerimenti utili sulle modalità di
utilizzo e manutenzione corrette dell'aeratore. Grazie a poche
cure preventive è possibile risparmiare molto tempo e denaro
durante tutta la vita utile dell'aeratore.
Nella tabella dedicata alla risoluzione dei problemi sono
presenti molte risposte ai problemi più comuni. Consultando
la tabella Risoluzione dei problemi potrebbe non essere
necessario contattare il servizio di assistenza.
AVVERTENZA
• Contattare un tecnico dell'assistenza autorizzato per la
riparazione o la manutenzione dellʼunità.
• Contattare lʼinstallatore per eseguire lʼinstallazione
dellʼunità.
• L'aeratore non deve essere utilizzato da bambini o
persone disabili senza supervisione.
• I bambini devono essere sotto la supervisione di un
adulto, affinché non giochino con l'aeratore.
• Se il cavo di alimentazione deve essere sostituito,
l'operazione deve essere eseguita solo da personale
autorizzato, utilizzando parti di ricambio originali.
• L'installazione deve essere eseguita in rispetto delle
normative elettriche nazionali solo da un tecnico
qualificato autorizzato.
Precaizioni di sicurezza.................3
Prima del funzionamento ..............6
Introduzione ...................................7
Operating Instructions
(Accessory) ..................................10
Sicurezza elettrica .......................14
Istruzioni operative ......................15
Manutenzione e assistenza ........17
Controllare l'elemento prima di
notificare un guasto.....................22
Page 25

Manuale per l'utente 3
Precauzioni di sicurezza
ITALIANO
Precauzioni di sicurezza
È necessario seguire le seguenti istruzioni per prevenire lesioni alle persone o danni alla
proprietà.
n Lʼutilizzo errato causato dalla mancata osservanza delle istruzioni può causare danni o
lesioni. La gravità viene classificata nel modo seguente.
n
Il significato dei simboli utilizzati in questo manuale è spiegato di seguito.
AVVERTENZA
ATTENZIONE
Questo simbolo indica la possibilità di lesioni gravi o decesso.
Questo simbolo indica il rischio di lesioni alla persona o di danni alla proprietà.
Non fare assolutamente.
Seguire attentamente le istruzioni.
AVVERTENZA
n Installazione
Non utilizzare interruttori di circuito
difettosi o di potenza inferiore.
Utilizzare questa apparecchiatura
su un circuito dedicato.
• C'è il rischio di scossa elettrica o incendio.
Per i collegamenti elettrici,
rivolgersi al rivenditore, a un
elettricista qualificato o a un centro
di assistenza autorizzato.
• Non smontare o riparare il prodotto.
C'è il rischio di scossa elettrica o incendio.
Eseguire sempre la messa a terra
del prodotto.
• C'è il rischio di scossa elettrica o incendio.
Installare il pannello e il coperchio
della centralinain modo sicuro.
• C'è il rischio di scossa elettrica o incendio.
Installare sempre un circuito e un
interruttore dedicati.
• Il cablaggio o l'installazione non corretti
possono provocare incendi o scosse
elettriche
Usare fusibili o interruttore di
circuito della potenza nominale
corretta.
• C'è il rischio di scossa elettrica o incendio.
Non modificare o prolungare il cavo
di alimentazione.
• C'è il rischio di scossa elettrica o incendio.
Non installare, rimuovere o
reinstallare l'unità (rivolto al
cliente).
• C'è il rischio di scossa elettrica, incendio,
esplosione o lesioni.
Disimballare e installare il prodotto
con attenzione.
• I bordi taglienti possono causare infortuni.
Prestare particolare attenzione in caso di
bordi e alette sul condensatore e
sull'evaporatore.
Per l'installazione, contattare
sempre il concessionario o un
centro di assistenza autorizzato.
• C'è il rischio di scossa elettrica, incendio,
esplosione o lesioni.
Non montare il prodotto su un
supporto difettoso.
• Può provocare lesioni, incidenti o danni al
prodotto.
Non lasciare l'aeratore in funzione
per periodi molto lunghi, se il tasso
di umidità è molto elevato e se una
porta o una finestra sono aperte.
• Lʼumidità può condensarsi e bagnare o
danneggiare i mobili.
Page 26

4 Aeratore
Precauzioni di sicurezza
n Funzionamento
Non toccare (utilizzare) il proodotto
con le mani bagnate.
• C'è il rischio di incendio o scosse elettriche.
Non sistemare un riscaldatore o
altre apparecchiature accanto al
cavo di alimentazione.
• C'è il rischio di scossa elettrica e incendio.
Evitare lʼingresso di acqua nelle
parti elettriche.
• C'è il rischio di incendio o di guasti al
prodotto o scosse elettriche.
Per la reinstallazione del prodotto
già installato, contattare sempre il
concessionario o un centro di
assistenza autorizzato.
• C'è il rischio di incendi, scosse elettriche,
esplosioni o lesioni.
Non aprire il coperchio di
manutenzione del corpo principale
durante il funzionamento.
• Lʼerrata connessione può causare scosse
elettriche.
Utilizzare il foro di aspirazione
dell'aria esterna con la retina, per
impedire l'ingresso di uccelli.
• Rimuovere i corpi estranei, ad esempio i nidi
di uccelli. In caso contrario, l'ossigeno
all'interno può risultare scarso.
Installare l'ingresso dell'aria in un luogo in cui non venga
aspirata direttamente aria inquinata.
• Può provocare incidenti tra l'asfissia, dovuta dell'aspirazione di gas
dannosi (CO, ecc.).
Installare il prodotto in un punto in grado di sostenerne il
peso.
• In caso contrario, la sua caduta può provocare incidenti.
Avere cura di non tirare o
danneggiare il cavo di alimentazione
durante il funzionamento.
• C'è il rischio di scossa elettrica o incendio.
Non coprire in alcun modo il cavo
di alimentazione.
• C'è il rischio di scossa elettrica o incendio.
Non collegare o scollegare la spina
durante il funzionamento.
• C'è il rischio di scossa elettrica o incendio.
Non conservare o utilizzare gas
infiammabili o combustibili accanto
al prodotto.
• C'è il rischio di incendio o di guasti al
prodotto.
In caso di perdite di gas
infiammabile, spengere il gas e
aprire una finestra per far cambiare
aria prima di accendere il prodotto.
• Non utilizzare il telefono o accendere o
spegnere gli interruttori.
C'è il rischio di esplosioni o incendi
In caso di rumori strani o piccole
fuoriuscite di fumo dal prodotto.
Spegnere l'interruttore.
• C'è il rischio di scosse elettriche o incendio.
Arrestarlo e chiudere la finestra
durante tempeste o uragani.
Se possibile, rimuovere il prodotto
dalla finestra prima dell'arrivo di
uragani.
• C'è il rischio di incendio, guasti al prodotto o
scosse elettriche.
Quando il prodotto è bagnato
(immerso nell'acqua o coperto
d'acqua), rivolgersi a un centro di
assistenza autorizzato.
• C'è il rischio di scossa elettrica o incendio.
Fare attenzione che lʼacqua non
penetri nel prodotto.
• C'è il rischio di scossa elettrica, incendio o
danni al prodotto.
Page 27

Manuale per l'utente 5
Precauzioni di sicurezza
ITALIANO
Spegnere l'interruttore durante le
operazioni di manutenzione o
pulizia del prodotto.
• C'è il rischio di scosse elettriche.
Quando il prodotto non verrà
utilizzato per un lungo periodo,
scollegare la presa di alimentazione
o spegnere l'interruttore.
• C'è il rischio di guasti al prodotto o
attivazione accidentale.
Evitare dispostivi antincendio
• C'è il rischio di un incendio.
Non toccare il circuito dedicato con le mani bagnate.
• C'è il rischio di scosse elettriche.
Utilizzare uno scaletto o uno sgabello durante la pulizia o
la manutenzione del prodotto.
• Fare attenzione a non procurarsi lesioni personali.
n Installazione
Per sollevare e trasportare il prodotto sono
necessarie almeno due persone.
• Evitare lesioni personali.
Non installare il prodotto in luoghi esposti
direttamente al vento di mare (spruzzi di sale).
• Può provocare la corrosione del prodotto.
La corrosione, particolarmente sulle alette del
condensatore e dell'evaporatore può provocare guasti
del prodotto o un funzionamento inefficiente.
ATTENZIONE
n Funzionamento
Non esporre la pelle direttamente
all'aria fredda per periodi
prolungati (non sedersi esposti
alle correnti d'aria).
• Ciò potrebbe causare danni alla salute.
Non utilizzare il prodotto per
scopi speciali, quali la
conservazione dei cibi, di opere
d'arte, ecc., è un aeratore e non
un sistema di refrigerazione di
precisione.
• C'è il rischio di danni o perdita di
proprietà.
Utilizzare un panno morbido per
la pulizia.
• C'è il rischio di scosse elettriche,
incendio o danni alle parti in plastica del
prodotto.
Non calpestare o sistemare oggetti sul prodotto
(unità esterne)
• C'è il rischio di infortuni alle persone e guasti al prodotto.
Utilizzare uno scaletto o uno sgabello durante la
pulizia o la manutenzione del prodotto.
• Fare attenzione a non procurarsi lesioni personali.
Page 28

6 Aeratore
Prima del funzionamento
Prima del funzionamento
1. Contattare un installatore specializzato.
2. Collegare la presa di alimentazione.
3. Utilizzare un circuito dedicato.
4. Non utilizzare prolunghe.
5. Non avviare/arrestare collegando o scollegando il cavo di alimentazione.
6. Se il cavo/la spina è danneggiato, sostituirlo solo con pezzi di ricambio autorizzati.
1. L'esposizione prolungata alle correnti d'aria dirette può risultare dannoso per la salute.
Non esporre prolungatamente persone, animali o piante alle correnti d'aria dirette.
2. A causa della possibilità di scarsità di ossigeno, aerare la stanza se utilizzato insieme a stufe o
altri dispositivi di riscaldamento.
3. Non utilizzare l'aeratore per scopi speciali non specificati (ad es., conservazione di dispositivi di
precisione, alimenti, animali, piante e opere d'arte). Tale utilizzo può danneggiare gli elementi.
1. Non toccare le parti metalliche dell'unità durante la rimozione del filtro.
C'è il rischio di lesioni quando si maneggiano bordi metallici.
2. Non utilizzare acqua per la pulizia della parte interna dell'aeratore.
L'esposizione all'acqua può distruggere l'isolamento, provocando possibili scosse elettriche.
3. Durante la pulizia dell'unità, verificare prima che l'alimentazione e l'interruttore siano disattivati.
Durante il funzionamento la ventola ruota a velocità molto alta.
È possibile ferirsi se si attiva l'alimentazione dell'unità durante la pulizia delle parti interne.
Per le operazioni di riparazione e manutenzione, contattare il concessionario autorizzato.
Preparazione del funzionamento
Utilizzo
Pulizia e manutenzione
Assistenza
Page 29

Manuale per l'utente 7
ITALIANO
Introduzione
Introduzione
Questo simbolo indica il pericolo di scosse elettriche.
Questo simbolo avvisa sui rischi che possono provocare danni
all'aeratore.
Questo simbolo indica avvisi particolari.
Caratteristiche
Simboli utilizzati nel manuale
AVVERTENZA : l'apparecchio deve essere installato secondo le normative nazionali in
tema di cablaggio. Questa guida ha lo scopo di illustrare le funzionalità del prodotto.
1. Soffiante per l'aria di alimentazione
Soffiante per aspirare l'aria esterna.
2. Centralina
3. Soffiante per lo scarico
Soffiante per scaricare l'aria inquinata
all'esterno.
4. Coperchio manutenzione
5. Scambiatore di calore totale
Scambia la temperatura e l'umidità tra l'aria di
alimentazione e l'aria di scarico.
6. Filtro dell'aria
Previene l'intasamento dello scambiatore di
calore totale a causa della polvere.
h
La figura dello scambiatore di calore totale può risultare diversa in base al modello del prodotto.
modelli : LZ-H015GBA2
AVVISO
1
2
5
6
3
4
Page 30

8 Aeratore
Introduzione
1
5
6
7
8
2
3
4
modelli : LZ-H025GBA2 / LZ-H035GBA2
1. Soffiante per l'aria di alimentazione
Soffiante per aspirare l'aria esterna.
2. Centralina
3. Soffiante per lo scarico
Soffiante per scaricare l'aria inquinata
all'esterno.
4. Coperchio manutenzione
5. Scambiatore di calore totale
Scambia la temperatura e l'umidità tra l'aria
di alimentazione e l'aria di scarico.
6. Filtro dell'aria
Previene l'intasamento dello scambiatore di
calore totale a causa della polvere.
h
La figura dello scambiatore di calore totale può risultare diversa in base al modello del prodotto.
modelli : LZ-H050GBA2
1. Soffiante per l'aria di alimentazione
Soffiante per aspirare l'aria esterna.
2. Centralina
3. Soffiante per lo scarico
Soffiante per scaricare l'aria inquinata
all'esterno.
4. Coperchio manutenzione
5. Scambiatore di calore totale
Scambia la temperatura e l'umidità tra l'aria
di alimentazione e l'aria di scarico.
6. Filtro dell'aria
Previene l'intasamento dello scambiatore di
calore totale a causa della polvere.
7. Piastra dell'umidificatore
Converte l'areazione tramite lo scambiatore
totale di calore ad areazione normale.
8. Supporto dello scambiatore di calore totale
Utilizzato per la guida di installazione della
guida dello scambiatore.
h
La figura dello scambiatore di calore totale può risultare diversa in base al modello del prodotto.
1
2
5
6
3
4
Page 31

Manuale per l'utente 9
Introduzione
ITALIANO
1
5
6
7
8
2
3
4
modelli : LZ-H080GBA2 / LZ-H100GBA2
1. Soffiante per l'aria di alimentazione
Soffiante per aspirare l'aria esterna.
2. Centralina
3. Soffiante per lo scarico
Soffiante per scaricare l'aria inquinata
all'esterno.
4. Coperchio manutenzione
5. Scambiatore di calore totale
Scambia la temperatura e l'umidità tra l'aria
di alimentazione e l'aria di scarico.
6. Filtro dell'aria
Previene l'intasamento dello scambiatore di
calore totale a causa della polvere.
7. Piastra dell'umidificatore
Converte l'areazione tramite lo scambiatore
totale di calore ad areazione normale.
8. Supporto dello scambiatore di calore totale
Utilizzato per la guida di installazione della
guida dello scambiatore.
h
La figura dello scambiatore di calore totale può risultare diversa in base al modello del prodotto.
modelli : LZ-H150GBA2 / LZ-H200GBA2
1. Soffiante per l'aria di alimentazione
Soffiante per aspirare l'aria esterna.
2. Centralina
3. Soffiante per lo scarico
Soffiante per scaricare l'aria inquinata
all'esterno.
4. Coperchio manutenzione
5. Scambiatore di calore totale
Scambia la temperatura e l'umidità tra l'aria
di alimentazione e l'aria di scarico.
6. Filtro dell'aria
Previene l'intasamento dello scambiatore di
calore totale a causa della polvere.
7. Piastra dell'umidificatore
Converte l'areazione tramite lo scambiatore
totale di calore ad areazione normale.
8. Supporto dello scambiatore di calore totale
Utilizzato per la guida di installazione della
guida dello scambiatore.
h
La figura dello scambiatore di calore totale può risultare diversa in base al modello del prodotto.
1
2
3
4
5
6
7
8
Page 32

10 Aeratore
Istruzioni per il funzionamento (Accessori)
Istruzioni per il funzionamento (Accessori)
Comando a distanza LCD (PQRCVSL0 / PQRCVSL0QW)
SCHERMO INDICATORE
OPERAZIONE
TASTO DI IMPOSTAZIONE
DELLA TEMPERATURA
TASTO VELOCITA VENTOLA
TASTO ON/OFF (ACCESO / SPENTO)
TASTO DI SELEZIONE DELLA
MODALITA DI FUNZIONAMENTO
RICEVITORE DEL
TELECOMANDO WIRELESS
• Alcuni prodotti non ricevono i segnali
wireless.
TASTO DEL FLUSSO D'ARIA(*)
TASTO DELLA FUNZIONE
SECONDARIA
TASTO DI IMPOSTAZIONE
DELLA FUNZIONE
TASTO DEL VENTILATORE
PRENOTAZIONE
TASTO SU, GIU, SINISTRA,
DESTRA
• Per controllare la temperatura
interna premere il pulsante .
TASTO PER LA TEMPERATURA
AMBIENTE
TASTO DI IMPOSTAZIONE
/ANNULLAMENTO
TASTO USCITA
1
2
3
4
5
6
7
8
9
10
11
12
13
14
15
h
Alcune funzioni potrebbero non essere disponibili e visualizzate in base al tipo di prodotto.
1
10
9
8
7
11
12
13
14
15
Attaccare l’etichetta informativa all’interno del
coperchio. Scegliere la lingua corretta in base
al proprio paese.
2
3
4
5
6
Page 33

Manuale per l'utente 11
Istruzioni per il funzionamento (Accessori)
ITALIANO
Metodo di funzionamento e selezione del volume aria funzionamento
interconnesso con tipo ad ventilazione
È utilizzato quando il condizionatore dʼaria è interconnesso con il prodotto di ventilazione.
La funzione raffredda e rinfresca l'aria interna utilizzando il prodotto di ventilazione insieme alla funzione di
condizionamento d'aria.
Funzionamento interconnesso della ventilazione
Premere il pulsante sul pannello di
1
controllo del telecomando.
- È utilizzato solo quando il condizionatore
d’aria e la ventilazione generale sono
interconnessi.
La ventilazione si avvia premendo il pulsante
2
‘Start/Stop’ (avvia/interrompi) in modalità ventilazione.
Premere il pulsante per cambiare la
3
modalità di ventilazione.
Premere il pulsante di selezione
dell'operazione per cambiare la modalità
nell’ordine: ‘riscaldamento → normale → automatico’.
❈ Viene visualizzato sul display del telecomando solo in
modalità di ventilazione e visualizza la temperatura
desiderata quando torna alla modalità di condizionamento dell’aria.
Premere il pulsante in modalità di
4
ventilazione generale per cambiare la
velocità del flusso dell’aria.
Premere il pulsante della velocità del flusso
dell’aria per cambiare la modalità nell’ordine: ‘debole
→
extra forte’.
forte
Se è installato il sensore di CO2, si può passare tra le
seguenti scelte: ‘debole
automatico’.
Tornare alla modalità condizionatore d'aria
5
1) Conversione automatica: se non è premuto nessun
pulsante per almeno 15 secondi, si torna automaticamente alla modalità condizionatore d’aria.
2) Conversione manuale: premere il pulsante in
modalità ventilazione per effettuare la conversione
manuale.
→
forte → molto forte _
→
Page 34

12 Aeratore
Istruzioni per il funzionamento (Accessori)
Metodo di funzionamento e selezione del volume aria-singola
ventilazione a espansione diretta
Premere il pulsante sul
telecomando.
1
Premere il pulsante per
cambiare la modalità di
ventilazione.
2
Premere il pulsante per
cambiarne la potenza del flusso
d’aria.
- Premere il pulsante per passare
tra le seguenti scelte: ‘debole → forte →
molto forte’.
- Se è installato il sensore di CO2, si può
passare tra le seguenti scelte: ‘debole →
forte → molto forte → automatico’.
3
Funzionamento della ventilazione singola
Modalità di
ventilazione
Scambio
di calore
Normale
Automa-
tico
Display del
telecomando
Sommario
Fa circolare l’aria interna senza perdita di calore.
Fa circolare l'aria interna senza dover utilizzare
lo scambiatore di calore
Fa circolare l’aria interna confrontando
automaticamente quella interna e quella esterna
Questa funzione raffredda e rinfresca lʼaria interna usando un prodotto di ventilazione generale.
Page 35

Manuale per l'utente 13
Istruzioni per il funzionamento (Accessori)
ITALIANO
Modalità di ventilazione veloce/risparmio energetico
Questa modalità consente di utilizzare la funzione di ventilazione in maniera più efficiente tramite le
funzioni aggiuntive di ventilazione veloce/risparmio energetico.
Veloce: ventilazione veloce
Premere il pulsante in modalità di
1
ventilazione.
Si passa tra le modalità di ventilazione 'fast
power saving' (veloce → risparmio energetico).
‘Fast’ (veloce) lampeggia sul display; premendo il
2
pulsante l'icona 'fast' (veloce) si stabilizza e la
funzione risulta impostata.
Premere il pulsante per uscire dalle
3
impostazioni.
Risparmio energetico: effettua la ventilazione in
maniera efficiente risparmiando energia.
Premere il pulsante in modalità di
1
ventilazione.
- Si passa tra le modalità di ventilazione 'fast
power saving' (veloce → risparmio energetico).
‘Power saving’ (risparmio energetico) lampeggia sul
2
display; premendo il pulsante , l'icona 'Power
saving' (risparmio energetico) si stabilizza e la
funzione risulta impostata.
→
→
Premere il pulsante per uscire dalla
3
modalità di impostazione.
❈ La ventilazione generale e la ventilazione a
espansione diretta hanno le stesse funzioni
aggiuntive.
❈ Le impostazioni delle funzioni aggiuntive per
ventilazione/riscaldamento/umidificatore sono le
stesse del condizionatore d’aria.
Page 36

14 Aeratore
Sicurezza elettrica
Sicurezza elettrica
AVVERTENZA: l'apparecchio deve essere dotato di corretta messa a terra.
Per ridurre al minimo il rischio di scosse elettriche collegare sempre a una presa con messa a terra.
AVVERTENZA: Non rimuovere il dente di terra dal cavo di
alimentazione.
AVVERTENZA: il collegamento del terminale di messa a terra
dell'adattatore alla vite del coperchio della presa a muro non
consente di dotare l'apparecchio di adeguata messa a terra, a meno
che le vite del coperchio non sia di metallo e non isolata, e che la
presa a muro non sia dotata di messa a terra mediante il cablaggio
della casa.
AVVERTENZA: In caso di dubbi sulla messa a terra dell'aeratore, far
controllare la presa sulla parete e il circuito da un elettricista
qualificato.
Metodo preferito
Prima dell'utilizzo verificare
l'esistenza di una messa a
terra adeguata
Page 37

Manuale per l'utente 15
ITALIANO
Caratteristiche
Caratteristiche
L'aria interna viene scaricata all'esterno tramite lo scambiatore di calore totale.
• L'aria esterna sottoposta allo scambio di calore viene erogata all'interno. Azionare l'aeratore in
modalità the Ventilation via Total heat exchanger (areazione tramite lo scambiatore di calore
totale) in estate/inverno quando si eseguire l'operazione caldo/freddo.
Areazione tramite lo scambiatore di calore totale
Scambiatore di calore totale
Aria esterna
Aria di ritorno
Aria di
scarico
Aria di
alimentazione
Page 38

16 Aeratore
Caratteristiche
Aria di scarico
Aria esterna
Scambiatore di calore totale
Umidificatore
Aria di ritorno
Aria di alimentazione
Aria di scarico
Aria esterna
Scambiatore di calore totale
Umidificatore
Aria di ritorno
Aria di alimentazione
L'aria interna viene scaricata all'esterno tramite lo scambiatore di calore totale.
• L'aria esterna sottoposta allo scambio di calore viene erogata all'interno. Azionare l'aeratore in
modalità the Ventilation via Total heat exchanger (areazione tramite lo scambiatore di calore
totale) in estate/inverno quando si eseguire l'operazione caldo/freddo.
Areazione tramite lo scambiatore di calore totale
Scarica aria interna inquinata viene scaricata direttamente tramite lo
scambiatore di calore totale.
• Azionare l'aeratore in Normal Ventilation (Aerazione normale) in primavera/autunno quando lo
scambiatore di calore non è necessario.
Aerazione normale
ATTENZIONE: In caso di alto tasso di inquinamento esterno, ad esempio sabbia gialla,
mettere in pausa l'aeratore.
Page 39

Manuale per l'utente 17
Gestione e pulizia
Manutenzione e assistenza
Manutenzione e assistenza
Coperchio
manutenzione
Scambiatore di
calore generale
Per impedire la riduzione delle funzionalità dell'aeratore, ripulire regolarmente la polvere che si
attacca al filtro dell'aria e allo scambiatore di calore.
Ciclo di pulizia
- Filtro dell'aria: Più di una volta ogni 6 mesi.
- Scambiatore di calore totale: più di una volta ogni due anni (il ciclo di pulizia può variare a seconda
del grado di inquinamento).
Metodo di estrazione delle parti
Modelli : LZ-H015GBA2 / LZ-H025GBA2 / LZ-H035GBA2
1. Rimuovere il coperchio di manutenzione.
Mettere le mani all'interno della parte superiore dal coperchio di manutenzione, tirando il coperchio
verso l'alto
(allentare la cerniera staccando il coperchio di manutenzione).
2. Estrarre il filtro dell'aria.
Prendere il filtro dell'aria e gli elementi a
destra/sinistra nel lato inferiore dello scambiatore
di calore.
h Se aderisce al soffitto al contrario, è uguale alla
parte superiore destra/sinistra dello scambiatore
di calore totale.
3. Estrarre lo scambiatore di calore totale.
Afferrare l'impugnatura ed estrarre lo scambiatore di
calore dal corpo principale. (2 unità)
ATTENZIONE: Verificare di non
provocare danni durante l'estrazione del
filtro dell'aria poiché contiene parti
taglienti.
AVVERTENZA: Spegnere l'interruttore durante
le operazioni di pulizia del prodotto.
ATTENZIONE: Durante le operazioni di
manutenzione indossare i guanti.
ITALIANO
Page 40

18 Aeratore
Corpo principale
Filtro dell'aria
Corpo principale
Corpo principale
Maniglia
Manutenzione e assistenza
Modelli : LZ-H050GBA2 / LZ-H080GBA2 / LZ-H100GBA2
1. Rimuovere il coperchio di
manutenzione.
Mettere le mani all'interno della parte superiore
dal coperchio di manutenzione, tirando il
coperchio verso l'alto
(allentare la cerniera staccando il coperchio di
manutenzione).
2. Estrarre il filtro dell'aria.
Prendere il filtro dell'aria e gli elementi a
destra/sinistra nel lato inferiore dello scambiatore
di calore.
h Se aderisce al soffitto al contrario, è uguale alla
parte superiore destra/sinistra dello scambiatore
di calore totale.
3. Estrarre lo scambiatore di calore totale.
Afferrare l'impugnatura ed estrarre lo scambiatore di
calore dal corpo principale. (2 unità)
ATTENZIONE: Verificare di non
provocare danni durante l'estrazione del
filtro dell'aria poiché contiene parti
taglienti.
AVVERTENZA: Spegnere l'interruttore durante
le operazioni di pulizia del prodotto.
ATTENZIONE: Durante le operazioni di
manutenzione indossare i guanti.
Page 41

Manuale per l'utente 19
Manutenzione e assistenza
ITALIANO
modelli : LZ-H150GBA2 / LZ-H200GBA2
1. Rimuovere il coperchio di manutenzione.
Mettere le mani all'interno della parte superiore dal coperchio di manutenzione, tirando il coperchio
verso l'alto
(allentare la cerniera staccando il coperchio di manutenzione).
2. Estrarre il filtro dell'aria.
Prendere il filtro dell'aria e gli elementi a
destra/sinistra nel lato inferiore dello scambiatore
di calore.
h Se aderisce al soffitto al contrario, è uguale alla
parte superiore destra/sinistra dello scambiatore
di calore totale.
3. Estrarre lo scambiatore di calore totale.
Afferrare l'impugnatura ed estrarre lo scambiatore di
calore dal corpo principale. (2 unità)
ATTENZIONE: Verificare di non
provocare danni durante l'estrazione del
filtro dell'aria poiché contiene parti
taglienti.
AVVERTENZA: Spegnere l'interruttore durante
le operazioni di pulizia del prodotto.
ATTENZIONE: Durante le operazioni di
manutenzione indossare i guanti.
Coperchio manutenzione
Corpo principale
Corpo principale
Page 42

20 Aeratore
Aspirapolvere
Filtro dell'aria
Scambiatore di calore totaleFiltro dell'aria
Manutenzione e assistenza
Metodo di pulizia e sostituzione delle parti
1. Pulizia del filtro dell'aria
Pulire una volta ogni 6 mesi.
• Rimuovere lo sporco dal filtro dell''aria con un aspirapolvere o
lavandolo con acqua
(se la quantità di sporco è elevata, lavarlo con un detergente
neutro in acqua tiepida)
• Dopo il lavaggio con acqua lasciar asciugare all'ombra
(non esporre il filtro dell'aria alla luce diretta del sole a fonti di
calore, come fiamme, durante l'asciugatura)
• Se il filtro dell'aria è danneggiato, acquistarlo presso il centro di
assistenza o un agente professionista.
2. Pulizia dello scambiatore di calore totale
Aspirare la polvere attaccata alla superficie dello scambiatore di
calore con un aspirapolvere.
• Utilizzare un aspirapolvere con una spazzola alla sommità e
utilizzare una spazzola morbida.
• Non utilizzare beccucci duri sull'aspirapolvere(la superficie dello
scambiatore di calore totale potrebbe danneggiarsi).
• Non lavare lo scambiatore di calore totale con acqua.
• Le spese di sostituzione sono a discrezione trascorsi due anni
dalla data di acquisto.
• Le spese sono a discrezione anche quando si contatta il centro
di assistenza entro i due anni dalla data di acquisto.
• Per l'assistenza, contattare sempre il concessionario o un
centro di assistenza autorizzato.
Page 43

Corpo principale
Corpo
principale
Montare il filtro
dell'aria all'interno
della struttura del supporto.
Supporto dello
scambiatore di calore totale
Filtro dell'aria
Scambiatore
di calore totale
Cerniera
Corpo principale
Manuale per l'utente 21
ITALIANO
Montaggio e controllo dopo la manutenzione
Manutenzione e assistenza
1. Montaggio dello scambiatore di calore
totale
Sistemare le parti angolari (6 parti) dello
scambiatore di calore totale nel supporto per il
montaggio e farle scorrere all'interno del corpo
principale.
2. Montaggio del filtro dell'aria
Montare il filtro dell'aria all'interno della struttura
del supporto dello scambiatore di calore totale.
• Assicurarsi che la superficie dello scambiatore di
calore totale non si danneggi.
• La polvere che aderisce allo scambiatore di
calore totale può diminuire il volume dell'aria.
3. Montaggio del coperchio di
manutenzione
Fissare il coperchio alla cerniera destra e fissarlo a
sinistra (nella direzione di lettura è attaccata una
piastrina).
AVVERTENZA: Spegnere
l'interruttore durante le operazioni di
pulizia del prodotto.
ATTENZIONE: Durante le operazioni
di manutenzione indossare i guanti.
Page 44

22 Aeratore
Controllare l'elemento prima di notificare un guasto
Controllare l'elemento prima di notificare un guasto
Il prodotto non funziona
Il prodotto non si attiva, anche se
si preme l'interruttore "ON".
Anche se si modifica il volume
dell'aria interna, la modalità
operativa non cambia e passa a
"automatico" o "basso"
Se non arriva la corrente?
Il filtro dell'aria e lo scambiatore di
calore sono molto intasati?
La temperatura interna è inferiore
a -10 °C o superiore 45 °C?
La temperatura interna è inferiore
a -10 °C o superiore 45 °C?
Alimentazione
Seguire il metodo di modifica e di
pulizia.
Si tratta della modalità di standby
per la protezione dello
scambiatore di calore totale.
Si tratta della modalità di
funzionamento per la protezione
dello scambiatore di calore totale.
Sintomo Controllare l'elemento Soluzione
Page 45

www.lg.com
MANUAL DE PROPIETARIO
AIRE ACONDICIONADO
Antes de operar su producto, lea atentamente este manual
de instrucciones y guárdelo para futuras referencias.
TIPO: VENTILADOR
ESPAÑOL
Page 46

2 Ventilador
Manual de propietario del ventilador
ÍNDICE
PARA SU REGISTRO
Escriba el número de serie y de modelo aquí:
Nº de modelo
Nº de serie
Puede encontrarlos en la etiqueta situada en el lateral de
cada unidad.
Nombre del distribuidor
Fecha de compra
n Grape el recibo a esta página por si tiene necesidad de
probar la fecha de compra por problemas con la garantía.
LEA ESTE MANUAL
En el interior encontrará muchos útiles consejos acerca de
cómo usar y mantener el ventilador correctamente.
Un poco de cuidado preventivo de su parte puede ahorrarle
una gran cantidad de dinero en toda la vida útil del ventilador.
Encontrará muchas respuestas a problemas comunes en el
diagrama de sugerencias de solución de problemas.
Si consulta nuestro gráfico de Sugerencias de solución de
problemas primero, puede que no necesite llamar al servicio
técnico.
PRECAUCIÓN
• Póngase en contacto con el servicio técnico autorizado
para reparar o mantener esta unidad.
• Póngase en contacto con el instalador para instalar la
unidad.
• El ventilador no está destinado para ser usado con
niños pequeños o inválidos sin supervisión.
• Los niños pequeños deben supervisarse para
asegurarse de que no juegan con el ventilador.
• Si es necesario sustituir el cable de alimentación, el
trabajo deberá ser realizado por personal autorizado
usando solamente recambios originales.
• El trabajo de instalación debe realizarse de acuerdo con
la Normativa eléctrica nacional solamente por personal
autorizado.
Precauciones de seguridad..................3
Antes de la puesta en marcha..............6
Introducción ..........................................7
Instrucciones de funcionamiento
(Accesorios )........................................10
Seguridad eléctrica ............................14
Características.....................................15
Mantenimiento y reparación ..............17
Revise el aparato antes de observar
una avería.............................................22
Page 47

Manual de propietario 3
Precauciones de seguridad
ESPAÑOL
Precauciones de seguridad
Para evitar daños en el usuario u otras personas y daños materiales, deben seguirse las
siguientes instrucciones.
n Un funcionamiento incorrecto causado por ignorar las instrucciones causará daños
personales o materiales. La seriedad se clasifica según las siguientes indicaciones.
n
El significado de los símbolos de este manual se muestra a continuación.
ADVERTENCIA
PRECAUCIÓN
Este símbolo indica la posibilidad de muerte o heridas serias.
Este símbolo indica la posibilidad de heridas o daños materiales.
Asegúrese de no hacer.
Asegúrese de seguir las instrucciones.
ADVERTENCIA
n Instalación
No utilice un cortacircuitos
defectuoso o con una capacidad
nominal inferior a la necesaria.
Utilice este dispositivo en un
circuito dedicado.
• Existe el riesgo de fuego o descargas
eléctricas.
Para los trabajos eléctricos,
póngase en contacto con el
distribuidor, el vendedor, un
electricista cualificado o un
Servicio técnico autorizado.
• No desmonte ni repare el producto. Existe
el riesgo de fuego o descargas eléctricas.
Incluya siempre una toma de tierra
con la conexión del producto.
• Existe el riesgo de fuego o descargas
eléctricas.
Instale el panel y la cubierta de la
caja de control con seguridad.
• Existe el riesgo de fuego o descargas
eléctricas.
Instálela siempre en un circuito y
cortacircuitos dedicado.
• Un cableado o instalación inadecuada
puede causar fuego o descargas eléctricas
Utilice un cortacircuitos o fusible
con la clasificación adecuada.
• Existe el riesgo de fuego o descargas
eléctricas.
No modifique ni alargue el cable de
alimentación.
• Existe el riesgo de fuego o descargas
eléctricas.
No instale, retire ni vuelva a instalar
la unidad usted mismo (cliente).
• Existe el riesgo de fuego, descargas
eléctricas, explosion o heridas.
Tenga cuidado al desembalar e
instalar el producto.
• Los bordes afilados podrían causar heridas.
Tenga un cuidado especial con los bordes
de la caja y las aletas del condensador y el
evaporador.
Para la instalación, póngase siempre
en contacto con el distribuidor o un
Servicio técnico autorizado.
• Existe el riesgo de fuego, descargas
eléctricas, explosion o heridas.
No instale el producto en una base de
instalación defectuosa.
• Esto podría causar daños personales,
accidentes o daños al producto.
Evite que el ventilador funcione
durante un largo periodo de tiempo
cuando la humedad sea muy alta y se
haya dejado una puerta o ventana
abierta.
• La humedad puede condensarse y mojar o
dañar los muebles.
Page 48

4 Ventilador
Precauciones de seguridad
n Funcionamiento
No toque (utilice) el producto con las
manos mojadas.
• Existe el riesgo de fuego o descargas
eléctricas.
No coloque un calefactor u otros
dispositivos cerca del cable de
alimentación.
• Existe riesgo de fuego o descargas
eléctricas.
Evite que entre agua en las partes
eléctricas.
• Podría causar fuego, averías en el producto
o descargas eléctricas.
Para volver a instalar un producto ya
instalado, póngase en contacto con
un distribuidor o Centro de servicio
técnico autorizado.
• Existe el riesgo de fuego, descargas
eléctricas, explosion o heridas.
No abra la cubierta de mantenimiento
del cuerpo principal durante el
funcionamiento.
• En caso contrario podría causar descargas
eléctricas.
Utilice el orificio de succión de aire
de exterior con la red instalada para
asegurar que los pájaros no puedan
entrar.
• Retire los elementos extraños, como por
ejemplo, un nido de pájaros. En caso
contrario, podría agotarse el oxígeno del
interior.
Instale la entrada de aire en un lugar en el que no absorba
aire contaminado.
• Podría causar varios accidentes, incluyendo la asfixia, debido a la
succión de gases perjudiciales (CO, etc.)
Instale el producto en un lugar que pueda soportar su
peso.
• En caso contrario, podría causar accidentes por la caída del
producto.
Tenga cuidado para asegurarse de
que el cable no pueda desenchufarse
de un tirón ni resultar dañado durante
el funcionamiento.
• Existe el riesgo de fuego o descargas
eléctricas.
No coloque nada sobre el cable de
alimentación.
• Existe el riesgo de fuego o descargas
eléctricas.
No enchufe ni desenchufe el cable de
alimentación durante el
funcionamiento.
• Existe el riesgo de fuego o descargas
eléctricas.
No guarde ni use gas inflamable o
combustibles cerca del producto.
• Existe riesgo de fuego o averías en el
producto.
Cuando haya fugas de gas
inflamable, corte el circuito de gas y
abra una ventana para ventilar la sala
antes de encender el producto.
• No utilice el teléfono ni encienda o apague
interruptores. Existe riesgo de explosión o
fuego.
Si el producto emite ruidos, olores o
humo extraños.
Apague el interruptor.
• Existe riesgo de descargas eléctricas o
fuego.
Detenga la operación y cierre la
ventana en caso de tormentas o
huracanes. Si es posible, retire el
producto de la ventana antes de que
llegue el huracán.
• Existe riesgo de fuego, daños materiales,
averías en el producto o descargas
eléctricas.
Si el producto se moja (se inunda o
sumerge), póngase en contacto con
un Servicio técnico autorizado.
• Existe el riesgo de fuego o descargas
eléctricas.
Tenga cuidado para que no entre
agua en el producto.
• Existe el riesgo de fuego, descargas
eléctricas o daños al producto.
Page 49

Manual de propietario 5
Precauciones de seguridad
ESPAÑOL
Al limpiar o reparar el producto,
desconecte la alimentación.
• Existe riesgo de descarga eléctrica.
Cuando no se vaya a usar el producto
durante un largo periodo de tiempo,
desenchufe el cable de alimentación
o interrumpa la alimentación con el
cortacircuitos.
• Existe riesgo de daños o averías en el
producto o de un funcionamiento no
deseado.
Evite el equipo de incendios
• Existe riesgo de fuego.
No toque el circuito o cortacircuitos con las manos
mojadas.
• Existe riesgo de descarga eléctrica.
Use una banqueta o escalera sólida al limpiar o mantener el
producto.
• Tenga cuidado para evitar daños personales.
n Instalación
Para mover y transportar el producto son necesarias
dos personas.
• Evitará daños personales.
No instale el producto en un lugar donde pueda estar
expuesto al viento marino (viento salado) directamente.
• Podría causar corrosión en el producto. La corrosión, en
particular en las aletas del condensador y el evaporador,
podrían causar averías en el producto o un
funcionamiento ineficaz.
PRECAUCIÓN
n Funcionamiento
No exponga la piel directamente al
aire frío durante largos periodos de
tiempo. (No se siente en la
corriente de aire.)
• Podría dañar su salud.
No use el producto con fines
especiales, como conservar
comida, obras de arte, etc… es un
ventilador doméstico, no un
sistema de refrigeración de
precisión.
• Existe riesgo de daños o pérdidas de
propiedad.
Utilice un paño suave para
limpiarlo. No use detergentes
agresivos, disolventes, etc.
• Existe riesgo de fuego, descargas
eléctricas o daños en las partes de
plástico del producto.
No pise ni coloque nada sobre el producto.
(unidades de exterior)
• Existe riesgo de daños personales y de avería del producto.
Use una banqueta o escalera sólida al limpiar o
mantener el producto.
• Tenga cuidado para evitar daños personales.
Page 50

6 Ventilador
Antes de la puesta en marcha
Antes de la puesta en marcha
1. Póngase en contacto con un especialista para la instalación.
2. Conecte el enchufe correctamente.
3. Utilice un circuito exclusivo.
4. No use un alargador.
5. No encienda y apague el equipo desenchufando o desenchufando el cable de alimentación.
6. Si el cable de alimentación o el enchufe resulta dañado, sustitúyalo solamente con un recambio
autorizado.
1. Estar expuesto al flujo de aire directo durante un periodo largo de tiempo podría ser peligroso
para su salud. No exponga a los ocupantes, las mascotas o las plantas al flujo de aire directo
durante largos periodos de tiempo.
2. Debido a la posibilidad de la deficiencia de oxígeno, ventile la habitación cuando use el equipo
junto a estufas u otros dispositivos de calefacción.
3. No use este ventilador para fines especiales para los que no está diseñado (por ejemplo, la
conservación de dispositivos de precisión, alimentación, mascotas, plantas u objetos de aire).
Un uso así podría dañar los artículos.
1. Nunca toque las partes metálicas de la unidad al retirar el filtro. Al manipular bordes de metal
afilados podrían causarse heridas.
2. No use agua para limpiar el interior del ventilador. La exposición al agua puede destruir el
aislante y derivar en descargas eléctricas.
3. Al limpiar la unidad, primero asegúrese de que la alimentación está desconectada y el
interruptor está apagado. El ventilador gira a gran velocidad durante el funcionamiento.
Existe la posibilidad de daños si se activa accidentalmente la unidad mientras se limpian las
partes internas de la unidad.
Para reparaciones y mantenimiento, póngase en contacto con un servicio técnico autorizado.
Preparación para el funcionamiento
Utilización
Limpieza y mantenimiento
Reparación
Page 51

Manual de propietario 7
ESPAÑOL
Introducción
Introducción
Este símbolo le alerta del riesgo de descargas eléctricas.
Este símbolo le alerta de riesgos que pueden causar daños al
ventilador.
Este símbolo indica que existen comentarios especiales.
Característica
Símbolos usados en este manual
Este dispositivo debe instalarse según las regulaciones de cableado nacionales. Esta
guía actúa como guía de ayuda para explicarle las características del producto.
1. Ventilador de suministro de aire
Un ventilador que absorbe el aire del exterior.
2. Caja de control
3. Ventilador de salida
Un ventilador que drena el aire contaminado
hacia fuera.
4. Cubierta de mantenimiento
5. Intercambiador de calor total
Intercambia la temperatura y la humedad
entre el aire de entrada y el de salida.
6. Filtro de aire
Previene los atascos de polvo del
intercambiador de calor total.
h La figura del intercambiador de calor total puede ser diferente dependiendo del modelo
de producto.
Modelos : LZ-H015GBA2
AVISO
1
2
5
6
3
4
Page 52

8 Ventilador
Introducción
1
5
6
7
8
2
3
4
Modelos : LZ-H025GBA2 / LZ-H035GBA2
1. Ventilador de suministro de aire
Un ventilador que absorbe el aire del
exterior.
2. Caja de control
3. Ventilador de salida
Un ventilador que drena el aire contaminado
hacia fuera.
4. Cubierta de mantenimiento
5. Intercambiador de calor total
Intercambia la temperatura y la humedad
entre el aire de entrada y el de salida.
6. Filtro de aire
Previene los atascos de polvo del
intercambiador de calor total.
h La figura del intercambiador de calor total puede ser diferente dependiendo del modelo de producto.
Modelos : LZ-H050GBA2
1. Ventilador de suministro de aire
Un ventilador que absorbe el aire del
exterior.
2. Caja de control
3. Ventilador de salida
Un ventilador que drena el aire contaminado
hacia fuera.
4. Cubierta de mantenimiento
5. Intercambiador de calor total
Intercambia la temperatura y la humedad
entre el aire de entrada y el de salida.
6. Filtro de aire
Previene los atascos de polvo del
intercambiador de calor total.
7. Placa de tiro
Convierte la ventilación mediante el
intercambiador de calor total en ventilación normal.
8.
Soporte para el intercambiador de calor total
Se utiliza como guía de instalación de la guía
de calor total.
h La figura del intercambiador de calor total puede ser diferente dependiendo del modelo de producto.
1
2
5
6
3
4
Page 53

Manual de propietario 9
Introducción
ESPAÑOL
1
5
6
7
8
2
3
4
Modelos : LZ-H080GBA2 / LZ-H100GBA2
1. Ventilador de suministro de aire
Un ventilador que absorbe el aire del exterior.
2. Caja de control
3. Ventilador de salida
Un ventilador que drena el aire contaminado
hacia fuera.
4. Cubierta de mantenimiento
5. Intercambiador de calor total
Intercambia la temperatura y la humedad
entre el aire de entrada y el de salida.
6. Filtro de aire
Previene los atascos de polvo del
intercambiador de calor total.
7. Placa de tiro
Convierte la ventilación mediante el intercambiador
de calor total en ventilación normal.
8.
Soporte para el intercambiador de calor total
Se utiliza como guía de instalación de la guía
de calor total.
h La figura del intercambiador de calor total puede ser diferente dependiendo del modelo de producto.
h La figura del intercambiador de calor total puede ser diferente dependiendo del modelo de producto.
Modelos : LZ-H150GBA2 / LZ-H200GBA2
1. Ventilador de suministro de aire
Un ventilador que absorbe el aire del exterior.
2. Caja de control
3. Ventilador de salida
Un ventilador que drena el aire contaminado hacia fuera.
4. Cubierta de mantenimiento
5. Intercambiador de calor total
Intercambia la temperatura y la humedad entre el aire de
entrada y el de salida.
6. Filtro de aire
Previene los atascos de polvo del intercambiador de
calor total.
7. Placa de tiro
Convierte la ventilación mediante el intercambiador de calor total
en ventilación normal.
8.
Soporte para el intercambiador de calor total
Se utiliza como guía de instalación de la guía de calor total.
5
1
2
3
4
6
7
8
Page 54

10 Ventilador
Instrucciones de funcionamiento(Accesorios)
Instrucciones de funcionamiento(Accesorios)
Control remoto LCD (PQRCVSL0 / PQRCVSL0QW)
PANTALLA DE INDICACIÓN DE
FUNCIONAMIENTO
BOTÓN DE AJUSTE DE TEMPERATURA
BOTÓN DE VELOCIDAD DEL
VENTILADOR
BOTÓN ENCENDIDO/APAGADO
BOTÓN DE SELECCIÓN DEL
MODO DE OPERACIÓN
RECEPTOR DEL CONTROL
REMOTO INALÁMBRICO
• Algunos aparatos no reciben las
señales inalámbricas.
BOTÓN DEL FLUJO DE AIRE
BOTÓN DE SUBFUNCIÓN
BOTÓN DE AJUSTE DE FUNCIÓN
BOTÓN DE VENTILACIÓN
TEMPORIZADOR
BOTÓN ARRIBA, ABAJO,
IZQUIERDA, DERECHA
• Para comprobar la temperatura
interior, pulse el botón.
BOTÓN DE LA TEMPERATURA
DE LA SALA
BOTÓN AJUSTAR/CANCELAR
BOTÓN SALIDA
1
2
3
4
5
6
7
8
9
10
11
12
13
14
15
h Es posible que algunas funciones no estén operativas ni se muestren dependiendo del
tipo de producto.
1
10
9
8
7
11
12
13
14
15
Fije la etiqueta de información en la parte
interior de la puerta. Elija el idioma adecuado
según su país.
2
3
4
5
6
Page 55

Manual de propietario 11
Instrucciones de funcionamiento(Accesorios)
ESPAÑOL
Método para funcionar y Seleccione volumen de aire Funcionamiento interconectado con ventilación
Se utiliza cuando el aire acondicionado está entrelazado con el producto de ventilación.
Es una función que enfría y refresca el aire interior mediante el empleo simultáneo del producto de
ventilación y de la función de aire acondicionado.
Funcionamiento entrelazado de la ventilación
Pulse el botón en el panel de
1
control del controlador remoto.
-
Sólo se utiliza cuando el aire
acondicionado y la ventilación general
están entrelazados.
Pulse el botón ‘Inicio/Parada’ en el modo de
2
ventilación para poner en marcha la ventilación.
Al pulsar el botón se cambiará el modo
3
de funcionamiento de la ventilación.
Al pulsar el botón de selección del modo
operativo, el modo cambiará en el siguiente
orden: ‘intercambiador de calor
❈
Sólo se muestra en la pantalla del controlador remoto
cuando se encuentra en el modo de ventilación,
además de indicar la temperatura deseada cuando se
vuelve al modo de aire acondicionado.
Al pulsar el botón en el modo de
4
ventilación general, se cambiará la
velocidad del flujo de aire.
Al pulsar el botón de velocidad del
flujo de aire, el modo se cambiará en el siguiente
orden: ‘suave→intenso→muy intenso’.
Si se ha instalado el sensor de CO
entre ‘suave
→
intenso→muy intenso→automático’.
→
normal→automático’.
2
, se puede seleccionar
Cambiar al modo de aire acondicionado
5
1)Conversión automática: si no se pulsa
ningún botón durante 15 segundos o más,
el sistema vuelve automáticamente al modo
de aire acondicionado.
2)
Conversión manual: pulse el botón en el modo
de ventilación para realizar la conversión manual.
Page 56

12 Ventilador
Instrucciones de funcionamiento(Accesorios)
Método para funcionar y Seleccione volumen de aireoperación de ventilación única
Es una función que permite enfriar y refrescar el aire interior con el producto de ventilación general.
Funcionamiento sencillo de la ventilación
Pulse el botón en el
1
controlador remoto.
Al pulsar el botón , se
2
cambiará al modo de ventilación.
Modo de
ventilación
Intercambiador
Normal
Automático
3
Pantalla de
controlador remoto
de calor
Pulse el botón para cambiar la
intensidad del flujo de aire
-
Pulse el botón para seleccionar entre
(suave → intenso → muy intenso)
- Si se ha instalado el sensor de CO2, se
puede seleccionar entre (suave →
muy intenso →
Hacer circular el aire interior sin pérdida de calor
Hacer circular directamente el aire interior
sin pasar por el intercambiador de calor
Hacer circular el aire interior realizando una
comparación automática del aire interior y exterior
automático
Contenido
)
intenso
→
Page 57

Manual de propietario 13
Instrucciones de funcionamiento(Accesorios)
ESPAÑOL
Modo de ventilación Rápido/Ahorro de energía
Es una función que permite utilizar la función de ventilación de una forma más eficaz mediante el
empleo de funciones adicionales de la ventilación, como la alta velocidad y el ahorro de energía.
Rápida: ventilación rápida
Pulse el botón en el modo de ventilación.
1
-
Cambia entre los modos de ventilación
‘rápida→ahorro de energía’.
‘Rápida’ parpadea en la pantalla y al pulsar
2
el botón el icono ‘Rápida’ permanecerá
encendido y se ajustará la función.
Pulse el botón para salir del
3
modo de configuración.
Ahorro de energía: Ventila de forma eficaz y
permite ahorrar energía.
Pulse el botón en el modo de ventilación.
1
-
Cambia entre los modos de ventilación
‘rápida→ahorro de energía’.
‘Ahorro de energía’ parpadea en la pantalla; y al
2
pulsar el botón , el icono ‘Ahorro de energía’
permanecerá encendido y se ajustará la función.
Pulse el botón para salir del
3
modo de configuración.
❈ La ventilación general y la ventilación
de expansión directa tienen las mismas
funciones secundarias.
❈
La configuración de las funciones secundarias
de ventilación/calefactor/humidificador son las
mismas que en el aire acondicionado.
Page 58

14 Ventilador
Seguridad eléctrica
Seguridad eléctrica
ADVERTENCIA: Este dispositivo debe incluir toma de tierra adecuada.
Para minimizar el riesgo de descargas eléctricas debe conectar el equipo en un enchufe con toma de
tierra.
ADVERTENCIA: No corte ni retire el polo de toma de tierra del cable de
alimentación.
ADVERTENCIA: Conectar el terminal de toma de tierra del adaptador al
tornillo de la cubierta de la caja de pared no proveerá una toma de tierra
adecuada a menos que el tornillo de la cubierta sea de metal no aislado
y la caja de la pared disponga de toma de tierra por el cableado.
ADVERTENCIA: Si tiene alguna duda de si el ventilador tiene una toma
de tierra adecuada, haga que un electricista cualificado revise la caja de
pared y el circuito.
Método preferido
Antes de usarlo asegúrese
de que tiene una toma de
tierra adecuada
Page 59

Manual de propietario 15
ESPAÑOL
Características
Características
Expulsa el aire de interior mediante el intercambiador de calor total del exterior.
• El aire del exterior con el calor intercambiado se suministra al interior. Utilice el ventilador del Ventilation via
Total heat exchanger (Ventilación mediante el intercambiador de calor total) en verano/invierno cuando se
haya realizado la operación del frío/calor.
Ventilación mediante el Intercambiador de calor total
Intercambiador de calor total
Aire de exterior
Aire de
retorno
Aire de salida
Suministro
de aire
Page 60

16 Ventilador
Características
Aire de salida
Aire de exterior
Intercambiador de calor total
Tiro
Aire de retorno
Suministro de aire
Aire de salida
Aire de exterior
Intercambiador de calor total
Tiro
Aire de retorno
Suministro de aire
Expulsa el aire de interior mediante el intercambiador de calor total del exterior.
• El aire del exterior con el calor intercambiado se suministra al interior. Utilice el ventilador del Ventilation via
Total heat exchanger (Ventilación mediante el intercambiador de calor total) en verano/invierno cuando se
haya realizado la operación del frío/calor.
Ventilación mediante el Intercambiador de calor total
Expulsa el aire contaminado del interior directamente sin el intercambiador de calor
total.
• Utilice el ventilador de Normal Ventilation (Ventilación normal) en primavera/otoño cuando no sea necesario
el intercambiador de calor total.
Ventilación normal
PRECAUCIÓN: En caso de alta contaminación del aire en el exterior, como por
ejemplo, arena amarilla, detendrá el ventilador.
Page 61

Manual de propietario 17
Manipulación y limpieza
Mantenimiento y reparación
Mantenimiento y reparación
Para evitar que se deteriore la función del ventilador, limpie regularmente el polvo adherido al filtro
de aire y el intercambiador de calor total.
Ciclo de limpieza
- Filtro de aire: Más de una vez cada 6 meses.
- Intercambiador de calor total: Más de una vez cada 2 años (El ciclo de limpieza puede aumentarse
según el grado de contaminación.)
Método para extraer las partes
Modelos : LZ-H015GBA2 / LZ-H025GBA2 / LZ-H035GBA2
1. Retire la cubierta de mantenimiento.
Coloque las manos en el interior del techo desde la cubierta de mantenimiento y tire hacia arriba de ella.
(Afloje la bisagra y desenganche la cubierta de mantenimiento.)
2. Extracción del filtro de aire.
Extraiga el filtro de aire situado a la derecha e
izquierda bajo el intercambiador de calor total.
h Si se adhiere al techo de forma invertida,
será igual a la parte superior izquierda y
derecha del intercambiador de calor total.
3. Extraiga el intercambiador de calor
total.
Agarre el mango y, a continuación, extraiga el
intercambiador de calor total del cuerpo
principal. (2 unidades)
PRECAUCIÓN: Tenga cuidado para
asegurarse de no dañarse al extraer el
filtro de aire ya que tiene un parte afilada.
ADVERTENCIA: Al limpiar el producto,
desconecte la alimentación.
PRECAUCIÓN: Debe utilizar siempre guantes
en los trabajos de mantenimiento.
Tapa de
mantenimiento
Intercambiador
de calor total
ESPAÑOL
Page 62

18 Ventilador
Mantenimiento y reparación
Cuerpo principal
Filtro de aire
Cuerpo principal
Cuerpo
principal
Mango
Modelos : LZ-H050GBA2 / LZ-H080GBA2 / LZ-H100GBA2
1. Retire la cubierta de
mantenimiento.
Coloque las manos en el interior del techo desde
la cubierta de mantenimiento y tire hacia arriba de
ella.
(Afloje la bisagra y desenganche la cubierta de
mantenimiento.)
2. Extracción del filtro de aire.
Extraiga el filtro de aire situado a la derecha e
izquierda bajo el intercambiador de calor total.
h Si se adhiere al techo de forma invertida,
será igual a la parte superior izquierda y
derecha del intercambiador de calor total.
3. Extraiga el intercambiador de calor
total.
Agarre el mango y, a continuación, extraiga el
intercambiador de calor total del cuerpo
principal. (2 unidades)
PRECAUCIÓN: Tenga cuidado para
asegurarse de no dañarse al extraer el
filtro de aire ya que tiene un parte afilada.
ADVERTENCIA: Al limpiar el producto,
desconecte la alimentación.
PRECAUCIÓN: Debe utilizar siempre guantes
en los trabajos de mantenimiento.
Page 63

Manual de propietario 19
Mantenimiento y reparación
ESPAÑOL
Modelos : LZ-H150GBA2 / LZ-H200GBA2
1. Retire la cubierta de mantenimiento.
Coloque las manos en el interior del techo desde la cubierta de mantenimiento y tire hacia arriba de ella.
(Afloje la bisagra y desenganche la cubierta de mantenimiento.)
2. Extracción del filtro de aire.
Extraiga el filtro de aire situado a la derecha e
izquierda bajo el intercambiador de calor total.
h Si se adhiere al techo de forma invertida,
será igual a la parte superior izquierda y
derecha del intercambiador de calor total.
3. Extraiga el intercambiador de calor
total.
Agarre el mango y, a continuación, extraiga el
intercambiador de calor total del cuerpo
principal. (2 unidades)
PRECAUCIÓN: Tenga cuidado para
asegurarse de no dañarse al extraer el
filtro de aire ya que tiene un parte afilada.
ADVERTENCIA: Al limpiar el producto,
desconecte la alimentación.
PRECAUCIÓN: Debe utilizar siempre guantes
en los trabajos de mantenimiento.
Tapa de mantenimiento
Cuerpo principal
Cuerpo principal
Page 64

20 Ventilador
Limpiador
Filtro de aire
Intercambiador de calor totalFiltro de aire
Mantenimiento y reparación
Método de limpieza y sustitución de cada parte
1. Limpieza del filtro de aire
Límpielo una vez cada 6 meses.
• Limpie la suciedad del filtro de aire usando una
aspiradora o lávelo con agua. (Si la suciedad es
resistente, lávela con un detergente neutro en agua
templada)
• Tras lavarlo con agua, séquelo bien a la sombra.
(Al secarlo, no exponga el filtro de aire a la luz solar
directa o al calor del fuego)
• Si el filtro de aire resulta dañado, compre uno nuevo en
el Servicio técnico o un agente profesional.
2. Limpieza del intercambiador de calor total
Aspire el polvo adherido a la superficie del intercambiador
de calor total con un limpiador.
• Utilice el limpiador de cepillo que se conecta a la
boquilla y utilice un cepillo suave.
• No utilice una boquilla dura con el limpiador. (En caso
de hacerlo, la superficie del intercambiador de calor total
podría resultar dañado.)
• Nunca lave el intercambiador de calor total con agua.
• Deben considerarse los gastos de sustitución
transcurridos 2 años a partir de la fecha de compra.
• Los gastos deben tenerse en cuenta cuando se ponga
en contacto con un servicio técnico cada 2 años a partir
de la fecha de compra.
• Para las reparaciones, póngase siempre en contacto
con el distribuidor o un Servicio técnico autorizado.
Page 65

Cuerpo principal
Cuerpo
principal
Monte el filtro de
aire en la estructura
de soporte.
Soporte para el
intercambiador de calor total
Filtro de aire
Intercambiador
de calor total
Bisagra
Cuerpo principal
Manual de propietario 21
ESPAÑOL
Montaje y comprobación tras labores de mantenimiento
Mantenimiento y reparación
1. Montaje del intercambiador de calor
total
Coloque con seguridad las partes de las esquinas
(6 partes) del intercambiador de calor total en el
soporte para montarlo y deslícelos en el interior
del cuerpo principal.
2. Montaje del filtro de aire
Monte el filtro de aire en la estructura de soporte
del intercambiador de calor total.
• Tenga cuidado de asegurarse que la superficie
del intercambiador de calor total no resulta
dañada.
• El polvo que se adhiere al intercambiador de
calor total puede deteriorar el volumen de aire.
3. Montaje de la cubierta de
mantenimiento
Fije la cubierta a la bisagra de la derecha y fíjela a
la izquierda. (Se ha adherido una placa de nombre
hacia la dirección de lectura).
ADVERTENCIA: Al limpiar el
producto, desconecte la
alimentación.
PRECAUCIÓN: Debe utilizar siempre
guantes en los trabajos de
mantenimiento.
Page 66

22 Ventilador
Revise el aparato antes de observar una avería
Revise el aparato antes de observar una avería
El producto no funciona
El producto no funciona aunque
pulse el interruptor de encendido.
Aunque cambie la opción Indoor
Air Volume (Volumen de aire de
interior), el modo de
funcionamiento no cambia y
cambia a “Auto” o “Low” (Bajo).
No está recibiendo alimentación?
Está atascado el filtro de aire o el
intercambiador de calor total?
Es la temperatura de interior
inferior a -10°C o superior a 45°C?
Es la temperatura de interior
inferior a -10°C o superior a 45°C?
Fuente de alimentación
Siga el método de limpieza y
cambio.
Es el modo espera de protección
del intercambiador de calor total.
Es el modo de funcionamiento
para proteger el intercambiador de
calor total.
Síntoma Compruebe el elemento Contramedida
Page 67

www.lg.com
MODE D’EMPLOI
CLIMATISEUR
Veuillez lire attentivement ce manuel avant d’utiliser votre
appareil, et le conserver pour toute consultation ultérieure.
TYPE : VENTILATEUR
FRANÇAIS
Page 68

2 Ventilateur
Manuel dʼutilisation du ventilateur
TABLE DES MATIÈRES
INFORMATIONS À
CONSERVER
Spécifiez la référence du modèle et le numéro de série :
Modèle
N° de série
Ils sont mentionnés sur lʼétiquette apposée sur la face latérale de lʼunité.
Nom du revendeur
Date dʼachat
n Agrafez votre facture à cette page afin de la retrouver facilement si
vous devez, le cas échéant, prouver la date dʼachat ou vous prévaloir
de la garantie.
LISEZ CE MANUEL
DʼUTILISATION
Il contient de nombreuses astuces utiles sur la manière dʼutiliser et
dʼassurer lʼentretien de votre ventilateur. Prenez un minimum de
mesures de précaution afin dʼéviter de perdre beaucoup de temps et
dʼargent pendant la durée de vie de votre ventilateur.
Vous trouverez de nombreuses réponses aux problèmes fréquents dans
le tableau de « Vérifications à effectuer avant de signaler un
dysfonctionnement ». La consultation du tableau de « Vérifications à
effectuer avant de signaler un dysfonctionnement » peut vous éviter de
faire appel à nos services.
PRÉCAUTIONS DʼUSAGE
• Pour toute réparation ou maintenance de cette unité, contactez le
service après-vente agréé.
• Pour toute installation de cette unité, contactez lʼinstallateur agréé.
• Ce ventilateur ne doit pas être mis en marche par des enfants ou
des personnes infirmes, sans surveillance.
• Veillez à ce que les enfants ne jouent en aucun cas avec le
ventilateur.
• Si le câble dʼalimentation doit être remplacé, il convient de confier
cette tâche à un technicien agréé qui utilisera uniquement des
pièces de rechange dʼorigine.
• Lʼinstallation de votre ventilateur doit être effectuée uniquement
par un technicien qualifié agréé, conformément aux
réglementations en vigueur en matière de produits électriques.
Consignes de sécurité ..........................3
Consignes avant utilisation..................6
Introduction ...........................................7
Mode d'emploi (accessoires) .............10
Sécurité électrique .............................14
Caractéristiques ..................................15
Maintenance et entretien ...................17
Vérifications à effectuer avant de
signaler un dysfonctionnement .........22
Page 69

Manuel d'utilisation 3
Consignes de sécurité
FRANÇAIS
Consignes de sécurité
Pour éviter tout risque de blessure pour l'utilisateur ou des tiers, ainsi que tout dégât matériel, respectez les
consignes ci-dessous.
n
Toute utilisation incorrecte de l’appareil, découlant d'un non-respect des instructions, peut entraîner des risques de
blessures corporelles ou d’endommagement matériel. Leur niveau de gravité est indiqué par les libellés ci-dessous.
n
Les symboles ci-dessous utilisés dans ce manuel ont la signification suivante :
AVERTISSEMENT
ATTENTION
Ce symbole indique un danger de mort ou de blessure grave.
Ce signe indique un risque de blessure corporelle ou de dégât matériel.
À ne pas faire
Instructions à respecter
AVERTISSEMENT
n Installation
Évitez d'utiliser un disjoncteur
défectueux ou de capacité
insuffisante. Utilisez cet appareil sur
un circuit dédié.
• Il existe un risque d’incendie ou
d’électrocution.
Pour toute réparation électrique,
contactez le concessionnaire, le
revendeur, un électricien qualifié ou
un service après-vente agréé.
• Ne tentez pas de démonter ou de
réparer vous-même l'appareil. Il existe un
risque d’incendie ou d’électrocution.
Raccordez systématiquement
l'appareil à la terre.
• Il existe un risque d’incendie ou
d’électrocution.
Installez le coffret électrique et fixez
soigneusement le cache.
• Il existe un risque d’incendie ou
d’électrocution.
Installez dans tous les cas un circuit
dédié et un disjoncteur.
• Tout câblage ou installation incorrect
peut être à l’origine d’un incendie ou
d’une décharge électrique.
Utilisez un disjoncteur ou un fusible
de puissance adéquate.
• Il existe un risque d’incendie ou
d’électrocution.
Ne changez pas le câble
d'alimentation et n'utilisez pas de
rallonge.
• Il existe un risque d’incendie ou
d’électrocution.
Ne tentez pas d’installer, de déplacer
ou de ré-installer l’unité vous-même.
• Il existe un risque d’incendie,
d'électrocution, d’explosion ou de
blessure.
Déballez et installez le produit avec
prudence.
• Il comporte des arêtes vives présentant
un risque de coupure. Soyez très
prudent, en particulier avec les rebords
et les ailettes du condensateur et de
l'évaporateur.
Pour effectuer l'installation,
contactez le revendeur ou un service
après-vente agréé.
• Il existe un risque d’incendie,
d'électrocution, d’explosion ou de
blessure.
N'installez pas l’appareil sur un
support défectueux.
• Vous risquez sinon de vous blesser, de
provoquer un accident ou d’endommager
l’appareil.
Ne laissez pas le ventilateur
fonctionner longtemps dans un
environnement très humide ou
lorsqu’une porte ou une fenêtre est
ouverte.
• L'humidité risque alors de se condenser
et de mouiller ou d'endommager le
mobilier.
Page 70

4 Ventilateur
Consignes de sécurité
n Fonctionnement
Ne mettez pas l’appareil en marche
avec les mains mouillées.
• Vous risquez sinon de provoquer un
incendie ou un choc électrique.
Ne placez pas un radiateur ou
d’autres appareils à proximité du
câble d’alimentation.
• Il existe un risque d’incendie ou
d’électrocution.
Assurez-vous que les pièces
électriques ne soient pas au contact
de l’eau.
• Sinon, vous risquez de provoquer un
incendie, un choc électrique ou un
dysfonctionnement de l’appareil.
Si vous souhaitez modifier
l'installation de l'appareil, contactez
votre revendeur ou un service aprèsvente agréé.
• Il existe un risque d'incendie,
d’électrocution, d'explosion ou de
blessures.
N’ouvrez pas le capot d’entretien de
l’unité principale lorsque le
ventilateur est en marche.
• Sinon, il existe un risque d’électrocution.
Disposez un filet sur la bouche
d’aspiration de l’unité extérieure afin
d’éviter que des oiseaux ne viennent
s’y nicher.
• Retirez tous les éléments étrangers tels
que des nids d’oiseaux. Sinon, cela peut
provoquer un manque d’oxygène dans
l’unité.
Installez une prise d’air lorsque l’air pollué ne peut être
directement aspiré.
• Cela peut provoquer des accidents tels que la suffocation, à
cause de l’aspiration de gaz nocifs (monoxyde de carbone,
etc.).
Installez le ventilateur à un endroit suffisamment solide
pour supporter le poids de l’appareil.
• Sinon, l'appareil risque de tomber et entraîner un accident.
Veillez à ce qu’il soit impossible de
tirer sur le câble d’alimentation ou de
l’endommager pendant le
fonctionnement de l’appareil.
• Il existe un risque d’incendie ou
d’électrocution.
Ne placez AUCUN objet sur le câble
d’alimentation.
• Il existe un risque d’incendie ou
d’électrocution.
Ne branchez pas ou ne débranchez
pas l’alimentation électrique lorsque
l’appareil fonctionne.
• Il existe un risque d’incendie ou
d’électrocution.
N'entreposez pas et n'utilisez pas de
gaz inflammables ou de
combustibles à proximité de
l'appareil.
• Cela pourrait provoquer un incendie ou
un dysfonctionnement de l’appareil.
En cas de fuite d’un gaz inflammable,
fermez l’arrivée de gaz et ouvrez une
fenêtre afin d’aérer la pièce avant de
mettre en marche l’appareil.
• N’utilisez pas de téléphone et ne mettez
pas en marche ou n’éteignez pas
l’appareil. Vous risqueriez de provoquer
une explosion ou un incendie.
En cas de bruit anormal , d'odeur ou
de fumée, coupez le disjoncteur.
• Il existe un risque d’incendie ou
d’électrocution.
Éteignez l'appareil et fermez la
fenêtre en cas de tempête ou
d’ouragan. Dans la mesure du
possible, éloignez l’appareil de la
fenêtre avant l’arrivée de l'ouragan.
• Il existe un risque d’endommagement, de
dysfonctionnement de l'appareil ou
d'électrocution.
Si de l’eau pénètre dans l’appareil,
contactez un service après-vente
agréé.
• Il existe un risque d’incendie ou
d’électrocution.
Veillez à ce que de l'eau ne puisse
pas pénétrer dans l'appareil.
• Dans le cas contraire, il existe un risque
d’incendie, d’électrocution ou
d’endommagement de l'appareil.
Page 71

Manuel d'utilisation 5
Consignes de sécurité
FRANÇAIS
Coupez le disjoncteur lors des
opérations de nettoyage ou de
maintenance de lʼappareil.
• Il existe un risque d'électrocution.
Si lʼappareil reste inutilisé pendant
une période prolongée, coupez
lʼalimentation ou arrêtez le
disjoncteur.
• Il existe un risque de dommage ou de
panne ou un fonctionnement inattendu.
Tenez éloigné de lʼappareil tout
élément susceptible de déclencher
un incendie.
• Sinon, vous risquez de provoquer un
incendie.
Ne touchez pas un circuit dédié ou le disjoncteur si vous
avez les mains mouillées.
• Il existe un risque d'électrocution.
Utilisez un escabeau ou une échelle stable pour nettoyer
ou réparer lʼappareil situé en hauteur.
• Faites attention de ne pas vous blesser.
n Installation
Faites appel à au moins deux personnes pour soulever
et transporter lʼappareil.
• Attention de ne pas vous blesser.
Nʼexposez pas lʼappareil directement à l'action du vent
marin (vent salé).
• Vous éviterez tout risque de corrosion. La corrosion,
notamment sur les ailettes du condenseur et de
l'évaporateur, peut entraîner un dysfonctionnement ou
ralentir les performances de l'appareil.
ATTENTION
n Fonctionnement
Nʼexposez pas directement votre
peau à de lʼair ventilé pendant des
périodes prolongées.(Ne vous
asseyez pas dans le courant dʼair).
• Sinon, vous mettez en danger votre
santé.
Nʼutilisez pas lʼappareil à des fins
particulières comme la
conservation dʼaliments, dʼœuvres
dʼart, etc. Cʼest un ventilateur
grand public, non un système de
refroidissement de précision.
• Sinon, vous risquez dʼendommager ou
dʼaltérer les propriétés de votre
appareil.
Utilisez un chiffon doux pour le
nettoyage. Nʼutilisez pas de
détergents agressifs ni de solvants
ou autres produits de ce type.
• Sinon, vous risquez de provoquer un
incendie ou un choc électrique, ou
dʼendommager les composants en
plastique.
Ne montez pas sur lʼappareil et ne posez rien dessus
(unités extérieures).
• Vous risqueriez de provoquer un incendie ou dʼaltérer le
fonctionnement de lʼappareil.
Utilisez un escabeau ou une échelle stable pour
nettoyer ou réparer lʼappareil situé en hauteur.
• Faites attention de ne pas vous blesser.
Page 72

6 Ventilateur
Consignes avant utilisation
Consignes avant utilisation
1. Contactez un technicien spécialiste de lʼinstallation de ventilateurs.
2. Branchez correctement le câble dʼalimentation.
3. Utilisez un circuit dédié.
4. Nʼutilisez pas de rallonge.
5. Pour mettre en marche ou arrêter le ventilateur, ne branchez ou ne débranchez pas le câble
d'alimentation.
6. Si le câble ou la fiche est endommagé, remplacez-les par une pièce de rechange agréée.
1. Le fait de sʼexposer directement à de lʼair ventilé pendant des périodes prolongées peut
entraîner des risques pour la santé. Nʼexposez pas directement des personnes, des animaux
domestiques ou des plantes à de lʼair ventilé pendant des périodes prolongées.
2. En raison de la possibilité dʼun manque dʼoxygène, aérez la pièce si le ventilateur est utilisé en
même temps que des poêles ou dʼautres appareils de chauffage.
3. Nʼutilisez pas ce ventilateur à des fins autres que celles spécifiées par le fabricant (par exemple,
pour conserver des appareils de précision, de la nourriture, des animaux domestiques, des
plantes ou des objets d'art). De telles utilisations pourraient endommager lʼappareil.
1. Ne touchez jamais les parties métalliques de lʼunité pendant le retrait du filtre.
Vous pourriez vous blesser en manipulant les arêtes métalliques.
2. Nʼutilisez pas dʼeau pour nettoyer lʼintérieur du ventilateur.
Si de lʼeau pénètre dans le ventilateur, cela peut endommager lʼisolation et entraîner un risque
dʼélectrocution.
3. Avant de nettoyer votre appareil, assurez-vous que lʼalimentation et le disjoncteur ont bien été
coupés. Les hélices du ventilateur tournent à une vitesse très rapide. Si le ventilateur est
accidentellement mis en marche lors du nettoyage de composants internes, il existe un risque
de blessures.
Contactez un service après-vente agréé pour toute réparation ou opération d'entretien.
Avant de faire fonctionner votre ventilateur
Utilisation
Nettoyage et entretien
Entretien
Page 73

Manuel d'utilisation 7
FRANÇAIS
Introduction
Introduction
Ce symbole signale un risque dʼélectrocution.
Ce symbole signale un risque dʼendommagement de lʼappareil.
Ce symbole attire votre attention sur des remarques particulières.
Caractéristiques
Symboles utilisés dans le manuel
AVERTISSEMENT : Cet appareil doit être installé conformément aux réglementations électriques
nationales en vigueur. Le présent manuel donne des indications concernant les caractéristiques
de l'appareil.
1. Ventilateur dʼair fourni
Ventilateur aspirant lʼair extérieur.
2. Coffret électrique
3. Ventilateur dʼair évacué
Ventilateur évacuant lʼair pollué vers lʼextérieur.
4. Capot de maintenance
5. Échangeur de chaleur total
Régule la température et l'humidité entre l'air fourni
et lʼair évacué.
6. Filtre à air
Empêche lʼaccumulation de poussière dans
l'échangeur de chaleur total.
h
Le schéma de lʼéchangeur de chaleur total peut varier selon les modèles.
Modèles: LZ-H015GBA2
REMARQUE
1
2
5
6
3
4
Page 74

8 Ventilateur
Introduction
1
5
6
7
8
2
3
4
Modèles: LZ-H025GBA2 / LZ-H035GBA2
1. Ventilateur dʼair fourni
Ventilateur aspirant lʼair extérieur.
2. Coffret électrique
3. Ventilateur dʼair évacué
Ventilateur évacuant lʼair pollué vers lʼextérieur.
4. Capot de maintenance
5. Échangeur de chaleur total
Régule la température et l'humidité entre l'air fourni
et lʼair évacué.
6. Filtre à air
Empêche lʼaccumulation de poussière dans
l'échangeur de chaleur total.
h
Le schéma de lʼéchangeur de chaleur total peut varier selon les modèles.
Modèles: LZ-H050GBA2
1. Ventilateur dʼair fourni
Ventilateur aspirant lʼair extérieur.
2. Coffret électrique
3. Ventilateur dʼair évacué
Ventilateur évacuant lʼair pollué vers lʼextérieur.
4. Capot de maintenance
5. Échangeur de chaleur total
Régule la température et l'humidité entre l'air fourni
et lʼair évacué.
6. Filtre à air
Empêche lʼaccumulation de poussière dans
l'échangeur de chaleur total.
7. Volet motorisé
Convertit la ventilation via lʼéchangeur de chaleur
total en ventilation normale.
8. Support de lʼéchangeur de chaleur total
Sert à lʼinstallation de lʼéchangeur de chaleur total.
h
Le schéma de lʼéchangeur de chaleur total peut varier selon les modèles.
1
2
5
6
3
4
Page 75

Manuel d'utilisation 9
Introduction
FRANÇAIS
1
5
6
7
8
2
3
4
Modèles: LZ-H080GBA2 / LZ-H100GBA2
1. Ventilateur dʼair fourni
Ventilateur aspirant lʼair extérieur.
2. Coffret électrique
3. Ventilateur dʼair évacué
Ventilateur évacuant lʼair pollué vers lʼextérieur.
4. Capot de maintenance
5. Échangeur de chaleur total
Régule la température et l'humidité entre l'air fourni
et lʼair évacué.
6. Filtre à air
Empêche lʼaccumulation de poussière dans
l'échangeur de chaleur total.
7. Volet motorisé
Convertit la ventilation via lʼéchangeur de chaleur
total en ventilation normale.
8. Support de lʼéchangeur de chaleur total
Sert à lʼinstallation de lʼéchangeur de chaleur total.
h
Le schéma de lʼéchangeur de chaleur total peut varier selon les modèles.
h
Le schéma de lʼéchangeur de chaleur total peut varier selon les modèles.
Modèles: LZ-H150GBA2 / LZ-H200GBA2
1. Ventilateur dʼair fourni
Ventilateur aspirant lʼair extérieur.
2. Coffret électrique
3. Ventilateur dʼair évacué
Ventilateur évacuant lʼair pollué vers lʼextérieur.
4. Capot de maintenance
5. Échangeur de chaleur total
Régule la température et l'humidité entre l'air fourni
et lʼair évacué.
6. Filtre à air
Empêche lʼaccumulation de poussière dans
l'échangeur de chaleur total.
7. Volet motorisé
Convertit la ventilation via lʼéchangeur de chaleur
total en ventilation normale.
8. Support de lʼéchangeur de chaleur total
Sert à lʼinstallation de lʼéchangeur de chaleur total.
1
2
3
4
5
6
7
8
Page 76

10 Ventilateur
Mode d'emploi (accessoires)
Mode d'emploi (accessoires)
Télécommande à affichage LCD (PQRCVSL0 / PQRCVSL0QW)
ÉCRAN D'INDICATION DE
FONCTIONNEMENT
TOUCHE DE RÉGLAGE DE
TEMPÉRATURE
TOUCHE VITESSE DE
VENTILATION
TOUCHE ON/OFF (Marche/Arrêt)
TOUCHE DE SÉLECTION DU
MODE DE FONCTIONNEMENT
RÉCEPTEUR SANS FIL DU
DISPOSITIF DE RÉGULATION À
DISTANCE
• Certains produits ne reçoivent pas
les signaux sans-fil.
TOUCHE DE DÉBIT D'AIR
TOUCHE SOUS-FONCTION
TOUCHE DE RÉGLAGE DES
FONCTIONS
TOUCHE DE VENTILATION
PROGRAMMATION
TOUCHE HAUT, BAS, GAUCHE,
DROITE
• Pour contrôler la température
intérieure, appuyez sur la touche.
TOUCHE DE TEMPÉRATURE
AMBIANTE
TOUCHE RÉGLAGE/ANNULER
TOUCHE QUITTER
1
2
3
4
5
6
7
8
9
10
11
12
13
14
15
h Certaines fonctions ne sont peut-être pas disponibles selon le modèle.
1
10
9
8
7
11
12
13
14
15
Posez la fiche d'instructions à l'intérieur de la
porte. Choisissez la langue appropriée à votre
pays.
2
3
4
5
6
Page 77

Manuel d'utilisation 11
Mode d'emploi (accessoires)
FRANÇAIS
Méthode de fonctionnent et SélectionnezFonctionnement Interconnecté avec ventilation
Est utilisé lorsque le climatiseur est interconnecté avec lʼappareil de ventilation.
Il sʼagit dʼune fonction qui refroidit et rafraîchit lʼair intérieur au moyen de lʼappareil de ventilation tout
en faisant fonctionner la fonction de climatisation en même temps.
Fonctionnement interconnecté de la ventilation
Appuyez sur la touche sur le panneau de
1
commande de la commande à distance.
- N’est utilisé que lorsque le climatiseur et la
ventilation générale sont interconnectés.
Appuyez sur la touche ‘Démarrer/Arrêter’ dans le mode
2
ventilation pour démarrer la ventilation.
Le fait d'appuyer sur la touche modifie le
3
mode ventilation.
La touche de sélection du mode de
fonctionnement permet de passer dans l'ordre
aux modes ‘échange thermique
❈ Ne s'affiche à l'écran de la commande à distance qu’en
mode ventilation, et affiche la température souhaitée en
repassant en mode climatisation.
→
normal → automatique’.
Le fait d'appuyer sur la touche en mode
4
ventilation générale modifie la vitesse du débit
d'air.
La touche de vitesse du débit d'air permet de
passer dans l'ordre aux débits faible ‘faible → fort →
extra-fort’.
Si la sonde de CO2 est installée, il est possible de passer
de ‘faible → fort → très fort → automatique’.
Retour dans le mode climatiseur
5
1)Conversion Automatique : lorsque vous n’appuyez sur
aucun bouton pendant 15 secondes ou plus, il revient
automatiquement en mode climatiseur.
2) Conversion Manuelle : Appuyez sur la touche en
mode ventilation pour la conversion manuelle.
Page 78

12 Ventilateur
Mode d'emploi (accessoires)
Méthode de fonctionnent et SélectionnezFonctionnement unique de ventilation
Il s’agit d’une fonction pour refroidir et rafraîchir l’air intérieur au moyen de l’unité de ventilation
générale.
Fonctionnement simple de la ventilation
Appuyez sur la touche de la commande
1
à distance.
Appuyez sur la touche pour changer le
2
mode ventilation.
Mode
Affichage commande
Ventilation
Échange
thermique
Normal
Automatique
3
à distance
Circulation de l’air intérieur sans perte de chaleur
Circulation directe de l’air intérieur sans passer
par l’échangeur thermique
Circulation de l’air intérieur en comparant
automatiquement l’air intérieur et l’air extérieur
Appuyez sur la touche pour changer la
puissance de la ventilation
- Appuyez sur le bouton pour passer de ‘faible
→
fort → très fort’.
- Si la sonde de CO
de ‘faible
2
est installée, il est possible de passer
→
fort → très fort → automatique’.
Opérations
Page 79

Manuel d'utilisation 13
Mode d'emploi (accessoires)
FRANÇAIS
Mode Ventilation rapide/économie d'énergie
Il sʼagit dʼune fonction permettant de faire fonctionner plus efficacement la ventilation grâce aux
fonctions supplémentaires de la ventilation, réglages à économie dʼénergie / rapides.
Rapide : ventilation rapide
Appuyez sur la touche dans le mode
1
ventilation.
- Permet de passer dans l’ordre ‘rapide
économie d’énergie’ en mode ventilation.
Lorsque ‘Rapide’ clignote à l’écran, appuyez sur la touche
2
pour stabiliser l’icône ‘rapide’ et la fonction est alors
réglée.
Appuyez sur la touche pour quitter le
3
mode Réglages.
Économie d’énergie : ventilation efficace en réalisant des
économies d’énergie.
→
Appuyez sur la touche en mode
1
ventilation.
- Permet de passer dans l’ordre ‘rapide
économie d’énergie’ en mode ventilation.
Lorsque ‘Économie d’énergie’ clignote à l’écran, appuyez
2
sur la touche pour stabiliser l’icône ‘Économie
d’énergie’, la fonction est alors réglée.
Appuyez sur la touche pour quitter le
3
mode Réglages.
❈ La ventilation générale et la ventilation à détente directe
ont les mêmes fonctions supplémentaires.
❈ Les réglages des fonctions supplémentaires
Ventilation/Chauffage/Humidification sont les mêmes
que pour le climatiseur.
→
Page 80

14 Ventilateur
Sécurité électrique
Sécurité électrique
AVERTISSEMENT : Cet appareil doit être correctement mis à la terre.
Pour limiter le risque d'électrocution, vous devez toujours relier la fiche à une prise de terre.
AVERTISSEMENT : Ne coupez ou ne retirez pas la broche de terre du
câble dʼalimentation.
AVERTISSEMENT : Le fait de relier le fil de terre de lʼadaptateur à la
vis du boîtier de la prise murale ne suffit pas à mettre lʼappareil à la
terre, sauf si la vis est métallique et non isolée et si la prise murale
est reliée à la terre par le câblage général.
AVERTISSEMENT : En cas de doute sur la mise à la terre du
ventilateur, faites vérifier lʼinstallation par un électricien qualifié.
Méthode recommandée
Assurez-vous que
l’installation électrique est
bien mise à la terre.
Page 81

Manuel d'utilisation 15
FRANÇAIS
Caractéristiques
Caractéristiques
Évacue lʼair intérieur vers lʼextérieur à lʼaide de lʼéchangeur de chaleur total.
• Lʼair extérieur échangé est aspiré vers lʼintérieur.
Le ventilateur fonctionne en mode Ventilation via lʼéchangeur de chaleur total en été/hiver lorsquʼil est
nécessaire de refroidir/chauffer lʼair.
Ventilation via lʼéchangeur de chaleur total
Echangeur de chaleur total
Air exterieur
Air evacue
Air repris
Air fourni
Page 82

16 Ventilateur
Caractéristiques
Air évacué
Air extérieur
Échangeur de chaleur total
Volet
Air repris
Air fourni
Air évacué
Air extérieur
Échangeur de chaleur total
Volet
Air repris
Air fourni
Évacue lʼair intérieur vers lʼextérieur à lʼaide de lʼéchangeur de chaleur total.
• Lʼair extérieur échangé est aspiré vers lʼintérieur.
Le ventilateur fonctionne en mode Ventilation via lʼéchangeur de chaleur total en été/hiver lorsquʼil est
nécessaire de refroidir/chauffer lʼair.
Ventilation via lʼéchangeur de chaleur total
Évacue directement lʼair intérieur pollué, sans avoir recours à lʼéchangeur de
chaleur total.
• Le ventilateur fonctionne en mode Ventilation normale au printemps/à l'automne lorsque l'échangeur de
chaleur total n'est pas nécessaire.
Ventilation normale
ATTENTION : En cas de pollution de lʼair extérieur élevée, par exemple en cas de
nuages de sable jaune, n'utilisez pas le ventilateur.
Page 83

Manuel d'utilisation 17
Manipulation et nettoyage
Maintenance et entretien
Maintenance et entretien
Capot de
maintenance
Échangeur
thermique total
Pour éviter que le ventilateur ne se détériore, enlevez régulièrement la poussière accumulée sur le
filtre à air et sur lʼéchangeur de chaleur total.
Cycle de nettoyage
- Filtre à air : plus dʼune fois tous les 6 mois.
- Échangeur de chaleur total : plus d'une fois tous les 2 ans (plus fréquemment en fonction du
niveau de pollution).
Démontage
Modèles: LZ-H015GBA2 / LZ-H025GBA2 / LZ-H035GBA2
1. Retrait du capot de maintenance
Ouvrez la trappe pour accéder au plafond puis tirez le capot de maintenance.
(Relâchez la charnière et retirez le capot de maintenance).
2. Retrait du filtre
Retirez les filtres à air placés en bas à droite et
à gauche de lʼéchangeur de chaleur total.
h Lorsquʼils pendent du plafond, les filtres à air
sont alors situés sur les côtés droit et
gauche de la partie supérieure de
lʼéchangeur.
3. Retrait de lʼéchangeur de chaleur
total
Saisissez la poignée puis tirez sur lʼéchangeur
de chaleur total pour le retirer de lʼunité
principale (2 unités).
ATTENTION : Prenez garde de ne pas
vous blesser en retirant le filtre à air car
ses arêtes sont coupantes.
AVERTISSEMENT : Coupez le disjoncteur
lorsque vous nettoyez le ventilateur.
ATTENTION : Vous devez porter des gants
lors de lʼentretien du ventilateur.
FRANÇAIS
Page 84

18 Ventilateur
Maintenance et entretien
Unité principale
Filtre à air
Unité principale
Unité principale
Poignée
Modèles: LZ-H050GBA2 / LZ-H080GBA2 / LZ-H100GBA2
1. Retrait du capot de maintenance
Ouvrez la trappe pour accéder au plafond puis
tirez le capot de maintenance.
(Relâchez la charnière et retirez le capot de
maintenance).
2. Retrait du filtre
Retirez les filtres à air placés en bas à droite et à
gauche de lʼéchangeur de chaleur total.
h Lorsquʼils pendent du plafond, les filtres à air
sont alors situés sur les côtés droit et gauche de
la partie supérieure de lʼéchangeur.
3. Retrait de lʼéchangeur de chaleur
total
Saisissez la poignée puis tirez sur lʼéchangeur
de chaleur total pour le retirer de lʼunité
principale (2 unités).
ATTENTION : Prenez garde de ne pas
vous blesser en retirant le filtre à air car
ses arêtes sont coupantes.
AVERTISSEMENT : Coupez le disjoncteur
lorsque vous nettoyez le ventilateur.
ATTENTION : Vous devez porter des gants
lors de lʼentretien du ventilateur.
Page 85

Manuel d'utilisation 19
FRANÇAIS
Maintenance et entretien
Modèles: LZ-H150GBA2 / LZ-H200GBA2
1. Retrait du capot de maintenance
Ouvrez la trappe pour accéder au plafond puis tirez le capot de maintenance.
(Relâchez la charnière et retirez le capot de maintenance).
2. Retrait du filtre
Retirez les filtres à air placés en bas à droite et à
gauche de lʼéchangeur de chaleur total.
h Lorsquʼils pendent du plafond, les filtres à air
sont alors situés sur les côtés droit et gauche de
la partie supérieure de lʼéchangeur.
3. Retrait de lʼéchangeur de chaleur
total
Saisissez la poignée puis tirez sur lʼéchangeur
de chaleur total pour le retirer de lʼunité
principale (2 unités).
ATTENTION : Prenez garde de ne pas
vous blesser en retirant le filtre à air car
ses arêtes sont coupantes.
AVERTISSEMENT : Coupez le disjoncteur
lorsque vous nettoyez le ventilateur.
ATTENTION : Vous devez porter des gants
lors de lʼentretien du ventilateur.
Capot de maintenance
Unité principale
Unité principale
Page 86

20 Ventilateur
Aspirateur
Filtre à air
Échangeur de chaleur totalFiltre à air
Maintenance et entretien
Nettoyage et remontage
1. Nettoyage du filtre à air
Nettoyez le filtre à air tous les 6 mois.
• Retirez la poussière accumulée sur le filtre à air à lʼaide
dʼun aspirateur ou en le nettoyant à lʼeau
(si le filtre à air est visiblement très sale, nettoyez-le à
lʼaide dʼun détergent neutre dans de lʼeau tiède).
• Une fois nettoyé à lʼeau, séchez-le bien à lʼombre
(nʼexposez pas le filtre à air directement au soleil ou à la
chaleur dʼun feu pour le faire sécher).
• Si le filtre à air est endommagé, remplacez-le par un
filtre acheté auprès du service après-vente ou d'un
professionnel.
2. Nettoyage de lʼéchangeur de chaleur total
Retirez la poussière accumulée sur l'échangeur de
chaleur total à lʼaide dʼun aspirateur.
• Utilisez une brosse douce ou un aspirateur équipé d'une
brosse.
• Nʼutilisez pas un aspirateur équipé dʼun suceur dur,
• vous risqueriez dʼendommager lʼéchangeur de chaleur
total.
• Ne nettoyez jamais à lʼeau lʼéchangeur de chaleur total.
• Après deux ans dʼutilisation, il peut être nécessaire de
songer à remplacer l'échangeur de chaleur total.
• Si vous devez remplacer lʼéchangeur avant deux ans
dʼutilisation, contactez le service après-vente.
• Pour toute opération dʼentretien, contactez votre
revendeur ou un service après-vente agréé.
Page 87

Unité principale
Unité
principale
Insérez le filtre à
air dans le support.
Support de l’échangeur
de chaleur total
Filtre à air
Échangeur de
chaleur total
Charnière
Unité principale
Manuel d'utilisation 21
FRANÇAIS
Montage et vérification après maintenance
Maintenance et entretien
1. Montage de lʼéchangeur de chaleur
total
Mettez soigneusement en place les 4 ou 6
pièces dʼangle de lʼéchangeur sur le support
pour le montage et faites-les glisser à lʼintérieur
de lʼunité.
2. Montage du filtre à air
Insérez le filtre à air dans le support de
lʼéchangeur de chaleur total.
• Assurez-vous de ne pas endommager
l'échangeur de chaleur total.
• La poussière accumulée sur lʼéchangeur de
chaleur total pourrait réduire le volume d'air.
3. Montage du capot de maintenance
Fixez dʼabord le capot sur la charnière droite
puis fixez-le à gauche. (une plaque indique la
direction dʼinstallation).
AVERTISSEMENT : Coupez le
disjoncteur lorsque vous nettoyez le
ventilateur.
ATTENTION : Vous devez porter des
gants lors de lʼentretien du
ventilateur.
Page 88

22 Ventilateur
Vérifications à effectuer avant de signaler un dysfonctionnement
Vérifications à effectuer avant de signaler un dysfonctionnement
Lʼappareil ne fonctionne pas.
Lʼappareil ne fonctionne pas
même lorsque vous appuyez sur le
bouton « ON ».
Lorsque vous modifiez le volume
dʼair intérieur, le mode ne change
pas ou il se met sur « Auto » ou «
Bas ».
Lʼappareil est-il branché ?
Le filtre à air ou lʼéchangeur de
chaleur total est-il obstrué ?
La température intérieure est-elle
inférieure à -10°C ou supérieure à
45°C ?
La température intérieure est-elle
inférieure à -10°C ou supérieure à
45°C ?
Branchez lʼappareil.
Suivez les instructions de
nettoyage et de remplacement.
Lʼappareil est en mode Standby
afin de protéger lʼéchangeur de
chaleur total.
Lʼappareil est en mode de
fonctionnement afin de protéger
lʼéchangeur de chaleur total.
Symptôme Vérification Solution
Page 89

www.lg.com
BENUTZERHANDBUCH
KLIMAANLAGE
Bitte lesen Sie diese Bedienungsanleitung vor dem Betrieb des Gerätes
aufmerksam durch und bewahren Sie es zum späteren Nachschlagen auf.
TYPE : LÜFTER
DEUTSCH
Page 90

2 Lüfter
Lüfter - Benutzerhandbuch
INHALTSVERZEICHNIS
FÜR IHRE UNTERLAGEN
Notieren Sie hier die Modell- und Seriennummer des Gerätes:
Modellnr.:
Seriennr.:
Diese Nummern finden Sie auf einem Etikett auf der Seite jedes
Gerätes.
Händler
Kaufdatum
n Heften Sie Ihren Beleg als Nachweis über das Kaufdatum bzw. zur
Vorlage im Garantiefall an diese Seite.
LESEN SIE DIESES
HANDBUCH
Hier finden Sie eine Reihe nützlicher Hinweise zur richtigen
Bedienung und zur Wartung des Lüfters. Ein sorgsamer Umgang mit
dem Gerät kann Ihnen während der Betriebsdauer des Lüfters viel
Zeit und Geld ersparen.
Suchen Sie bei einer Störung zunächst in den Tipps zur
Störungsbehebung nach einer Lösung. Die Tipps zur
Störungsbehebung ersparen Ihnen u. U. einen Anruf beim
Kundendienst.
VORSICHTSHINWEISE
• Reparaturen und Wartungsarbeiten sollten nur von einem
ausgebildeten Service-Techniker ausgeführt werden.
• Lassen Sie das Gerät von einem Monteur anbringen.
• Der Lüfter sollte ohne Aufsicht nicht von Kindern oder
gebrechlichen Personen bedient werden.
• Kinder sollten stets beaufsichtigt werden, damit der Lüfter
nicht als Spielzeug gebraucht wird.
• Das Netzkabel sollte, falls nötig, nur von Fachpersonal und
ausschließlich durch Original-Ersatzteile ausgetauscht werden.
• Die Montage darf nur durch qualifiziertes und zugelassenes
Personal und muss gemäß den nationalen Bestimmungen für
elektrische Anschlüsse erfolgen.
Sicherheitshinweise.......................3
Vorbereitungen ..............................6
Einführung .....................................7
Bedienungsanleitung
(Zubehör) .....................................10
Sicherheit bei der Elektrik ..........14
Merkmale .....................................15
Wartung und Pflege .....................17
Störungsbehebung vor einem
Anruf beim Kundendienst ...........22
Page 91

Benutzerhandbuch 3
Sicherheitshinweise
DEUTSCH
Sicherheitshinweise
Um Verletzungen des Benutzers oder anderer Personen sowie Sachschäden zu vermeiden, müssen die
folgenden Anleitungen befolgt werden.
n
Ein unsachgemäßer Betrieb unter Missachtung der Anleitungen kann zu Verletzungen oder
Beschädigungen führen. Die Schweregrade werden durch folgende Symbole gekennzeichnet.
n
Die Bedeutung von Symbolen in diesem Handbuch lauten wie folgt.
ACHTUNG
VORSICHT
Dieses Symbol bedeutet Lebensgefahr oder Gefahr schwerer Verletzungen.
Dieses Symbol bedeutet Verletzungsgefahr oder Gefahr von Sachschäden.
Darf nicht ausgeführt werden.
Die Anleitung sollte befolgt werden.
ACHTUNG
n Montage
Verwenden Sie niemals einen defekten
Überlastungsschalter oder einen mit zu
geringer Nennleistung. Dieses Gerät
sollte möglichst an eine eigene
Steckdose angeschlossen werden.
• Ansonsten besteht Brand- oder
Stromschlaggefahr.
Elektrische Anschlüsse sollten nur
vom Händler, Verkäufer, einem
qualifizierten Elektriker oder
zugelassenen Servicebetrieb
vorgenommen werden.
•
Das Gerät nicht selbst auseinandernehmen
oder reparieren. Ansonsten besteht Brandoder Stromschlaggefahr.
Das Gerät muss immer geerdet
werden.
• Ansonsten besteht Brand- oder
Stromschlaggefahr.
Die Frontblende sowie die Abdeckung
der Reglerkastens müssen gut
befestigt werden.
• Ansonsten besteht Brand- oder
Stromschlaggefahr.
Das Gerät stets an einen separaten
Stromkreis mit Überlastungsschalter
anschließen.
• Unsachgemäße Anschlüsse oder
Montage bergen Brand- und
Stromschlaggefahr.
Nur Überlastungsschalter und
Sicherungen mit geeigneter
Nennleistung verwenden.
• Ansonsten besteht Brand- oder
Stromschlaggefahr.
Das Netzkabel niemals verändern oder
verlängern.
• Ansonsten besteht Brand- oder
Stromschlaggefahr.
Das Gerät darf niemals selbst (vom
Kunden) montiert, demontiert oder
neu montiert werden.
• Ansonsten besteht Brand-, Stromschlag-,
Explosions- oder Verletzungsgefahr.
Gehen Sie beim Auspacken und bei
der Montage sorgsam vor.
•
Scharfe Kanten bergen Verletzungsgefahren.
Achten Sie im Besonderen auf die Kanten des
Gehäuses sowie auf die Lamellen am
Kondensator und Verdampfer.
Die Montage sollte nur vom Händler
oder einem zugelassenen
Servicebetrieb vorgenommen werden.
• Ansonsten besteht Brand-, Stromschlag-,
Explosions- oder Verletzungsgefahr.
Das Gerät nicht auf einem defekten
Montagestandfuß anbringen.
• Es besteht die Gefahr von Verletzungen,
Unfällen oder Schäden am Gerät.
Das Gerät nicht über einen längeren
Zeitraum bei sehr hoher
Luftfeuchtigkeit oder bei geöffneten
Türen und Fenstern betreiben.
• Die Feuchtigkeit kann kondensieren und
die Einrichtung beschädigen.
Page 92

4 Lüfter
Sicherheitshinweise
n Betrieb
Das Gerät niemals mit feuchten
Händen berühren.
• Es besteht Brand- oder
Stromschlaggefahr.
Das Netzkabel nicht in der Nähe von
Heizgeräten oder sonstigen
Wärmequellen verlegen.
• Es besteht Brand- und
Stromschlaggefahr.
Es darf kein Wasser in die
elektrischen Bauteile eindringen.
• Ansonsten besteht die Gefahr von
Bränden, Geräteausfällen oder
Stromschlägen.
Zur Neumontage immer den Händler
oder einen qualifizierten
Servicebetrieb verständigen.
• Ansonsten besteht Brand-, Stromschlag-,
Explosions- oder Verletzungsgefahr.
Die Serviceabdeckung des
Hauptgehäuses nicht während des
Betriebs öffnen.
• Ansonsten besteht Stromschlaggefahr.
Über der Ansaugöffnung des
Außengerätes sollte ein Netz
angebracht werden, um zu verhindern,
dass Vögel in die Öffnung gelangen.
• Hindernisse, wie Vogelnester, sollten
beseitigt werden. Ansonsten besteht die
Gefahr von Sauerstoffmangel im
Innenbereich.
Der Lufteinlass sollte an einem Ort montiert werden, an dem
keine verschmutzte Luft angesaugt werden kann.
• Ansonsten bestehen verschiedene Unfallgefahren,
einschließlich Erstickungen durch Ansaugen
gesundheitsschädlicher Gase (z. B. Kohlenmonoxid).
Wählen Sie einen Standort, an dem das Gewicht des
Gerätes getragen werden kann.
• Ansonsten besteht die Gefahr von Unfällen durch ein
herunterfallendes Gerät.
Es muss gewährleistet werden, dass
das Netzkabel während des Betriebs
nicht abgezogen oder beschädigt
werden kann.
• Ansonsten besteht Brand- oder
Stromschlaggefahr.
Es dürfen keine Gegenstände auf das
Netzkabel gestellt werden.
• Ansonsten besteht Brand- oder
Stromschlaggefahr.
Den Netzstecker niemals während des
Betriebs anschließen oder abziehen.
• Ansonsten besteht Brand- oder
Stromschlaggefahr.
Keine brennbaren Gase oder
Flüssigkeiten in Gerätenähe lagern
oder verwenden.
• Es besteht die Gefahr von Bränden oder
Geräteausfällen.
Bei austretendem brennbaren Gas
sofort die Gaszufuhr trennen und vor
dem Einschalten zum Lüften die
Fenster öffnen.
• Benutzen Sie nicht das Telefon und
schalten Sie keine Geräte ein oder aus.
Es besteht Explosions- oder
Brandgefahr.
Bei ungewöhnlichen Geräuschen oder
Gerüchen, die vom Gerät ausgehen.
Unterbrechen Sie den
Überlastungsschalter
• Es besteht Brand- oder
Stromschlaggefahr.
Halten Sie das Gerät an und schließen
Sie bei Sturm oder Unwetter die
Fenster. Falls möglich, nehmen Sie
das Gerät vom Fenster, bevor ein
Unwetter beginnt.
• Es besteht die Gefahr von Sachschäden,
Geräteausfällen und Stromschlägen.
Falls das Gerät mit Wasser in
Berührung gekommen ist (überflutet
oder eingetaucht), verständigen einem
zugelassenen Servicebetrieb.
• Ansonsten besteht Brand- oder
Stromschlaggefahr.
Es darf kein Wasser in das Gerät
eindringen.
• Ansonsten besteht die Gefahr von
Bränden, Stromschlägen oder Schäden
am Gerät.
Page 93

Benutzerhandbuch 5
Sicherheitshinweise
DEUTSCH
Vor der Reinigung oder Wartung des
Gerätes den Überlastungsschalter
unterbrechen.
• Es besteht die Gefahr von
Stromschlägen.
Falls das Gerät über einen längeren
Zeitraum nicht betrieben wird, ziehen
Sie den Netzstecker ab oder schalten
Sie den Überlastungsschalter aus.
• Es besteht die Gefahr von
Beschädigungen, Ausfällen oder
unbeabsichtigtem Einschalten des
Gerätes.
Keine brennbaren Materialien
verwenden
• Es besteht Brandgefahr.
Einen Schaltkreis oder Überlastungsschalter niemals mit
feuchten Händen berühren.
• Es besteht die Gefahr von Stromschlägen.
Bei der Reinigung oder Wartung des Gerätes einen festen
Stuhl oder eine Leiter verwenden.
• Achten Sie auf mögliche Verletzungsgefahren.
n Montage
Das Gerät sollte nur von mindestens zwei Personen
angehoben oder getragen werden.
• Ansonsten besteht Verletzungsgefahr.
Das Gerät nicht an einem Ort mit direktem Seewind
montieren (salzhaltige Luft).
• Es besteht Korrosionsgefahr.
Korrosion, kann, besonders an den Lamellen des Kondensators
und Verdampfers, zu Fehlfunktionen oder verminderter Leistung
führen.
VORSICHT
n Betrieb
Halten Sie den Körper nicht lange Zeit
direkt in den kalten Luftstrom. (Nicht
im Luftzug sitzen.)
• Es besteht die Gefahr von
Gesundheitsschäden.
Das Gerät nicht für besondere Zwecke
verwenden, z. B. zur Kühlung von
Lebensmitteln oder
Kunstgegenständen. Bei diesem Gerät
handelt es sich um ein HaushaltsKlimagerät und nicht um ein
Präzisions-Kühlsystem.
• Es besteht die Gefahr von Sachschäden
oder -verlusten.
Verwenden Sie zur Reinigung nur ein
weiches Tuch. Keine starken Reiniger
oder Lösemittel verwenden.
• Es besteht die Gefahr von Bränden,
Stromschlägen oder Schäden an den
Kunststoffteilen des Gerätes.
Nicht auf das Gerät treten oder Gegenstände
daraufstellen. (Außengeräte)
• Es besteht Verletzungsgefahr sowie die Gefahr von
Fehlfunktionen.
Bei der Reinigung oder Wartung des Klimagerätes eine
stabile Fensterbank oder Leiter verwenden.
• Achten Sie auf mögliche Verletzungsgefahren.
Page 94

6 Lüfter
Vorbereitungen
Vorbereitungen
1. Wenden Sie sich zur Montage dieser Anlage an einen Monteur.
2. Schließen Sie den Netzstecker fest an die Steckdose an.
3. Verwenden Sie einen separaten Stromkreis.
4. Keine Verlängerungskabel verwenden.
5. Das Gerät nicht durch Anschließen/Abziehen des Netzsteckers ein- und ausschalten.
6. Falls Kabel oder Netzstecker beschädigt sind, dürfen sie nur durch ein zugelassenes
Ersatzkabel ausgetauscht werden.
1. Ein längerer Aufenthalt im direkten Luftstrom kann gesundheitsschädlich sein.
Personen, Haustiere oder Pflanzen sollten nicht über einen längeren Zeitraum dem direkten
Luftstrom ausgesetzt sein.
2. Wenn das Gerät in einem Raum mit Herd oder Heizkörpern betrieben wird, muss der Raum gut
belüftet werden.
3. Das Gerät darf nicht für besondere Zwecke verwendet werden (z. B. für Präzisionsgeräte,
Lebensmittel, Haustiere, Pflanzen oder Kunstgegenstände). Ansonsten könnten solche Objekte
Schaden nehmen.
1. Beim Herausnehmen des Luftfilters keine Metallteile am Gerät berühren. Beim Berühren von
scharfen Gegenständen besteht Verletzungsgefahr.
2. Das Innere des Lüfters nicht mit Wasser reinigen. Wasser kann die elektrische Isolierung
beschädigen, so dass die Gefahr von Stromschlägen besteht.
3. Vor dem Reinigen des Gerätes muss zuerst sichergestellt werden, dass Stromversorgung und
Sicherung abgeschaltet sind. Der Lüfter dreht sich während des Betriebs mit sehr hoher
Geschwindigkeit. Wenn das Gerät während der Reinigung der inneren Bauteile versehentlich
eingeschaltet wird, besteht Verletzungsgefahr.
Wenden Sie sich zur Reparatur und Wartung an einen zugelassenen Händler.
Vorbereitung auf den Betrieb
Betrieb
Wartung und Pflege
Kundendienst
Page 95

Benutzerhandbuch 7
DEUTSCH
Einführung
Einführung
Dieses Symbol weist auf die mögliche Gefahr von Stromschlägen hin.
Dieses Symbol weist auf die mögliche Gefahr von Beschädigungen
des Lüfters hin.
Dieses Symbol verweist auf besondere Hinweise.
Funktionen
In diesem Handbuch verwendete Symbole
ACHTUNG: Der Anschluss des Gerätes muss gemäß den gesetzlichen Vorschriften erfolgen.
Diese Bedienungsanleitung dient als hinweisende Beschreibung der Produktfunktionen.
1. Lüfter für Luftzufuhr
Lüfter zum Ansaugen von Frischluft von
Außen.
2. Reglerkasten
3. Lüfter für Abluft
Lüfter zum Abführen verbrauchter Raumluft
nach Außen.
4. Serviceabdeckung
5. Gesamt-Wärmetauscher
Temperatur- und Feuchtigkeitsaustausch
zwischen Zuluft und Abluft.
6. Luftfilter
Verhindert ein Verstopfen des GesamtWärmetauschers durch Staub.
h
Die Abbildung des Gesamt-Wärmetauschers kann sich vom tatsächlichen Modell unterscheiden.
Modellen: LZ-H015GBA2
ANMERKUNG
1
2
5
6
3
4
Page 96

8 Lüfter
Einführung
1
5
6
7
8
2
3
4
Modellen: LZ-H025GBA2 / LZ-H035GBA2
1. Lüfter für Luftzufuhr
Lüfter zum Ansaugen von Frischluft von Außen.
2. Reglerkasten
3. Lüfter für Abluft
Lüfter zum Abführen verbrauchter Raumluft
nach Außen.
4. Serviceabdeckung
5. Gesamt-Wärmetauscher
Temperatur- und Feuchtigkeitsaustausch
zwischen Zuluft und Abluft.
6. Luftfilter
Verhindert ein Verstopfen des GesamtWärmetauschers durch Staub.
h
Die Abbildung des Gesamt-Wärmetauschers kann sich vom tatsächlichen Modell unterscheiden.
Modellen: LZ-H050GBA2
1. Lüfter für Luftzufuhr
Lüfter zum Ansaugen von Frischluft von Außen.
2. Reglerkasten
3. Lüfter für Abluft
Lüfter zum Abführen verbrauchter Raumluft
nach Außen.4. Serviceabdeckung
5. Gesamt-Wärmetauscher
Temperatur- und Feuchtigkeitsaustausch
zwischen Zuluft und Abluft.
6. Luftfilter
Verhindert ein Verstopfen des GesamtWärmetauschers durch Staub.
7. Dämpferplatte
Sorgt für eine normale Belüftung über den
Gesamt-Wärmetauscher.
8. Halterung für Gesamt-Wärmetauscher
Dient als Montagehilfe für den GesamtWärmetauscher.
h
Die Abbildung des Gesamt-Wärmetauschers kann sich vom tatsächlichen Modell unterscheiden.
1
2
5
6
3
4
Page 97

Benutzerhandbuch 9
Einführung
DEUTSCH
1
5
6
7
8
2
3
4
Modellen: LZ-H080GBA2 / LZ-H100GBA2
1. Lüfter für Luftzufuhr
Lüfter zum Ansaugen von Frischluft von Außen.
2. Reglerkasten
3. Lüfter für Abluft
Lüfter zum Abführen verbrauchter Raumluft
nach Außen.4. Serviceabdeckung
5. Gesamt-Wärmetauscher
Temperatur- und Feuchtigkeitsaustausch
zwischen Zuluft und Abluft.
6. Luftfilter
Verhindert ein Verstopfen des GesamtWärmetauschers durch Staub.
7. Dämpferplatte
Sorgt für eine normale Belüftung über den
Gesamt-Wärmetauscher.
8. Halterung für Gesamt-Wärmetauscher
Dient als Montagehilfe für den GesamtWärmetauscher.
h
Die Abbildung des Gesamt-Wärmetauschers kann sich vom tatsächlichen Modell unterscheiden.
h
Die Abbildung des Gesamt-Wärmetauschers kann sich vom tatsächlichen Modell unterscheiden.
Modellen: LZ-H150GBA2 / LZ-H200GBA2
1. Lüfter für Luftzufuhr
Lüfter zum Ansaugen von Frischluft von Außen.
2. Reglerkasten
3. Lüfter für Abluft
Lüfter zum Abführen verbrauchter Raumluft
nach Außen.4. Serviceabdeckung
5. Gesamt-Wärmetauscher
Temperatur- und Feuchtigkeitsaustausch
zwischen Zuluft und Abluft.
6. Luftfilter
Verhindert ein Verstopfen des GesamtWärmetauschers durch Staub.
7. Dämpferplatte
Sorgt für eine normale Belüftung über den
Gesamt-Wärmetauscher.
8. Halterung für Gesamt-Wärmetauscher
Dient als Montagehilfe für den GesamtWärmetauscher.
1
2
3
4
5
6
7
8
Page 98

10 Lüfter
Bedienungsanleitung (Zubehör)
Bedienungsanleitung (Zubehör)
LCD Fernbedienung (PQRCVSL0 / PQRCVSL0QW)
ANZEIGEBILDSCHIRM
TEMPERATUR-
EINSTELLTASTE
TASTE FÜR
LÜFTERGESCHWINDIGKEIT
NETZSCHALTER
BETRIEBSWAHLTASTE
EMPFANGSSENSOR FÜR
KABELLOSE FERNBEDIENUNG
•
Mit bestimmten Geräten können keine
Funksignale empfangen werden.
LUFTSTROM-TASTE
TASTE FÜR ZUSATZFUNKTIONEN
FUNKTIONSWAHLTASTE
BELÜFTUNGSTASTE
ZEITSCHALTUHR
TASTEN FÜR AUF, AB, LINKS,
RECHTS
• Drücken Sie zur Anzeige der
Raumtemperatur die Taste.
TASTE FÜR
RAUMTEMPERATUR
TASTE EINSTELLEN/ABBRECHEN
TASTE BEENDEN
1
2
3
4
5
6
7
8
9
10
11
12
13
14
15
h Bestimmte angezeigte Funktionen sind je nach Produktmodell u. U. nicht möglich.
1
10
9
8
7
11
12
13
14
15
Bitte bringen Sie das Hinweisetikett an der
Innenseite der Gehäuseklappe an.
Wählen Sie die Sprache Ihres Landes aus.
2
3
4
5
6
Page 99

Benutzerhandbuch 11
Bedienungsanleitung (Zubehör)
DEUTSCH
Methode zu auszuwählen und betreiben Luftvolumen Verbindungsbetrieb mit Belüftungs
Diese Betriebsart ist nur möglich, wenn Klimagerät und Belüftungsgerät miteinander verbunden sind.
Diese Funktion dient zum gleichzeitigen Betrieb des Klimagerätes und des Belüftungsgerätes für
eine kühle und frische Raumluft.
Verbundener Belüftungsbetrieb
Drücken Sie die Taste auf der
1
Fernbedienung.
- Diese Betriebsart ist nur möglich, wenn
Klimagerät und allgemeines Belüftungsgerät miteinander
verbunden sind.
Drücken Sie im Belüftungsmodus die Taste ‘Start/Stop’, um
2
den Belüftungsbetrieb zu starten.
Beim Drücken der Taste wird der
3
Belüftungsmodus geändert.
Beim Drücken der Betriebswahltaste wird die
Betriebsart in der Reihenfolge ‘Wärmetauscher
→
Normal → Automatisch’ gewechselt.
❈ Die Anzeige erscheint auf der Fernbedienung nur im
Belüftungsmodus. Beim Zurückkehren in den
Klimagerätebetrieb wird die gewünschte Temperatur
angezeigt.
Beim Drücken der Taste im allgemeinen
4
Belüftungsbetrieb wird die Luftstromrate
geändert. Beim Drücken der Taste für die
Luftstromrate wird der Luftstrom in der
Reihenfolge ‘Gering → Stark → Extra stark→geändert.
Falls ein CO
in der Reihenfolge ‘Gering
Automatisch’ geändert werden.
Umschalten in den Klimagerätebetrieb
5
1)Automatisches Umschalten: Falls 15 Sekunden lang
2) Manuelles Umschalten: Manuelles Umschalten - Über
2
-Sensor vorhanden ist, kann die Luftstromrate
→
Stark → Sehr stark →
keine Taste gedrückt wird, kehrt das Gerät automatisch
zum Klimagerätebetrieb zurück.
die Taste kann der Belüftungsmodus manuell
umgeschaltet werden.
Page 100

12 Lüfter
Bedienungsanleitung (Zubehör)
Methode zu auszuwählen und betreiben Luftvolumen Belüftungs-Einzelbetrieb
Diese Funktion sorgt für eine frische Raumluft unter Einsatz eines allgemeinen Belüftungsgerätes.
Belüftungs-Einzelbetrieb
Drücken Sie die Taste auf der
1
Fernbedienung.
Beim Drücken der Taste wird der
2
Belüftungsmodus geändert.
Belüftungsmodus
Wärmetauscher
Normal
Automatisch
3
Anzeige der
Fernbedienung
Raumluft ohne Wärmeverlust im Raum umwälzen
Die Raumluft wird umgewälzt, ohne durch den
Wärmetauscher geleitet zu werden
Die Luft wird durch automatisches Vergleichen
der Innen- und Außentemperatur umgewälzt.
Durch Drücken der Taste kann die
Luftstromrate geändert werden.
- Beim Drücken der Taste wird die
Luftstromrate in der Reihenfolge ‘Gering
Stark → Sehr stark → geändert.
- Falls ein CO
Luftstromrate in der Reihenfolge ‘Gering
stark
2
-Sensor vorhanden ist, kann die
→
Automatisch → geändert werden.
Inhalt
→
→
Stark → Sehr
 Loading...