

LG LWD3081ST/00 Owner’s Manual
To contact LG Electronics
24 hours a day, 7 days a week:
1-800-243-0000 (U.S.A.)
1-888-542-2623 (Canada)
Or visit us on the Web at:
us.lge.com (U.S.A) or ca.lge.com (Canada)
ELECTRIC:CONVECilON
BUI[FINOVEN
USER'SGUIDE&
cOOKINGGUIDE
Please read this guide thoroughlv before operating
and keep Jt handy for reference at aJJtimes.
HORNOE[iqRICODE
¢ONvECCIONEMPOjRADO
GUjADEUSUARIOY
DECOCCION
Lea esta guJa con detenimiento antes de utJJJzar el
aparato V mantengaJa a mano para referenda en
todo momento.
Para comunicarse con LG Electronics
24 horas al dfa, 7 dfas a lasemana:
1-800-243-0000 (EE.UU.)
1-888=542=2623(Canada)
O visRenos en ia Web en:
us.lge.com (EE.UU.) o ca.lge.com (Canada)
Pour contacter LG Electronics
24h/24 et 7jours/7 :
1-800-243-0000 (U,S.A.)
1-888-542-2623 (Canada)
Ou consultez notre site Internet au :
us.lge.com (U.S.A) ou ca.lge.com (Canada)
.A
FOUR[[ECIRIQUEA
CONVECIIONENCASTRAB/E
MANUElD'UTI[ISATIONEj
MANUElDECUISSON
Veuillez lire ce manuel avecattention avant
d'utJlJsercet appareJlet gardez-b aportee de main
pour route reference en casde besoJn.
Model/Modelo/Modele
LWDS081 ST
P/NO. MFL51224501
Printed in Korea
Impreso en Korea
Imprime en Coree
INTRODUCTION
IMPORTANT SAFETY INFORMATION
Safety Precautions ....................................................... 3-4
Electrical Safety .............................................................. 4
Safety During Use ........................................................... 5
Child Safety .................................................................... 5
Safety When Cleaning .................................................... 6
PARTS AND FEATURES
Parts And Features ......................................................... 7
Control Panel Features ................................................... 8
OPERATING INSTRUCTIONS
InitialSet Up .................................................................... 9
Time and Temperature Settings ..................................... 9
Language Selection ..................................................... 10
Temperature Unit.......................................................... 10
Display Brightness ........................................................ 10
Sound Volume ............................................................... 11
Convection Auto Conversion ......................................... 11
Temperature Adjustment ............................................... 12
Clock Time .................................................................... 12
Reset ............................................................................. 12
Timer On/Off ................................................................. 13
Telescopic Rack............................................................ 14
Bake .............................................................................. 15
Baking Layer Cakes ...................................................... 15
Timed Bake ................................................................... 16
Delayed Timed Bake ..................................................... 17
Broil ............................................................................... 18
Recommended Broiling Guide ................................. 18-19
Roast ............................................................................. 20
Convection Bake ........................................................... 21
Crisp Convection ........................................................... 22
Convection Roast .......................................................... 23
Recipe Bank .................................................................. 24
Proof .............................................................................. 25
Warm ............................................................................. 25
Healthier Roast ............................................................. 26
My Menu ....................................................................... 27
Cook & Warm ................................................................ 28
Meat Probe .............................................................. 28-29
Control Lock Feature ..................................................... 29
To Turn On/Off the Oven Light ...................................... 29
Self-Clean ................................................................ 30-32
f
THANK YOU!
Congratulations on your
purchase and welcome to the
LG family. Your new LG Built-In
Oven combines precision
cooking features with simple
operation and stylish design.
Follow the operating and care
instructions in this manual and
your oven will provide you with
many years of reliable service.
MAINTENANCE
Care & Cleaning ....................................................... 33-34
Removing & Replacing theLift-Off Oven Door .............35
Door Care Instructions .................................................. 35
TROUBLESHOOTING
Before Calling for Service ........................................ 36-38
WARRANTY
Warranty for customers in the U.S.A ............................ 39
Warranty for customers in Canada ............................... 40
Product Registration information
Model:
Serial Number:
Date of Purchase:
IMPORTANTSAFETYINFORMA|ION
READ ALL INSTRUCTIONS BEFORE USE
I This symbol will alert you to hazards or unsafe practices which
could cause serious bodily harm or death.
",., CAUTION This symbol will alert you to hazards or unsafe practices which could
cause bodily injury or property damage.
SAFETYPRECAUTIONS
• Be certain your appliance is properly installed and
grounded by a qualified technician.
,, Do not repair or replace any part of the appliance
unless specifically recommended in the manual.
,,All other servicing should be referred to a
qualified technician.
,,Always disconnect power to appliance before
servicing by unplugging, removing the fuse or
switching off the circuit breaker.
, DO NOT TOUCH HEATING ELEMENTS OR
iNTERiOR SURFACES OF OVEN.
Heating elements may be hot even though they
are dark in color. Interior surfaces of an oven
become hot enough to cause burns. During and
after use, do not touch or let clothing or other
flammable materials contact heating elements or
interior surfaces of oven until they have had
sufficient time to cool. Other surfaces of the
appliance may become hot enough to cause
burns. Among these surfaces are oven vent
openings and surfaces near these openings, oven
doors, and windows of oven doors.
. Use Care When Opening Door.
Let hot air or steam escape before you remove or
replace food in the oven
, Do Not Heat Unopened Food Containers.
Build-up of pressure may cause container to burst
and result in injury.
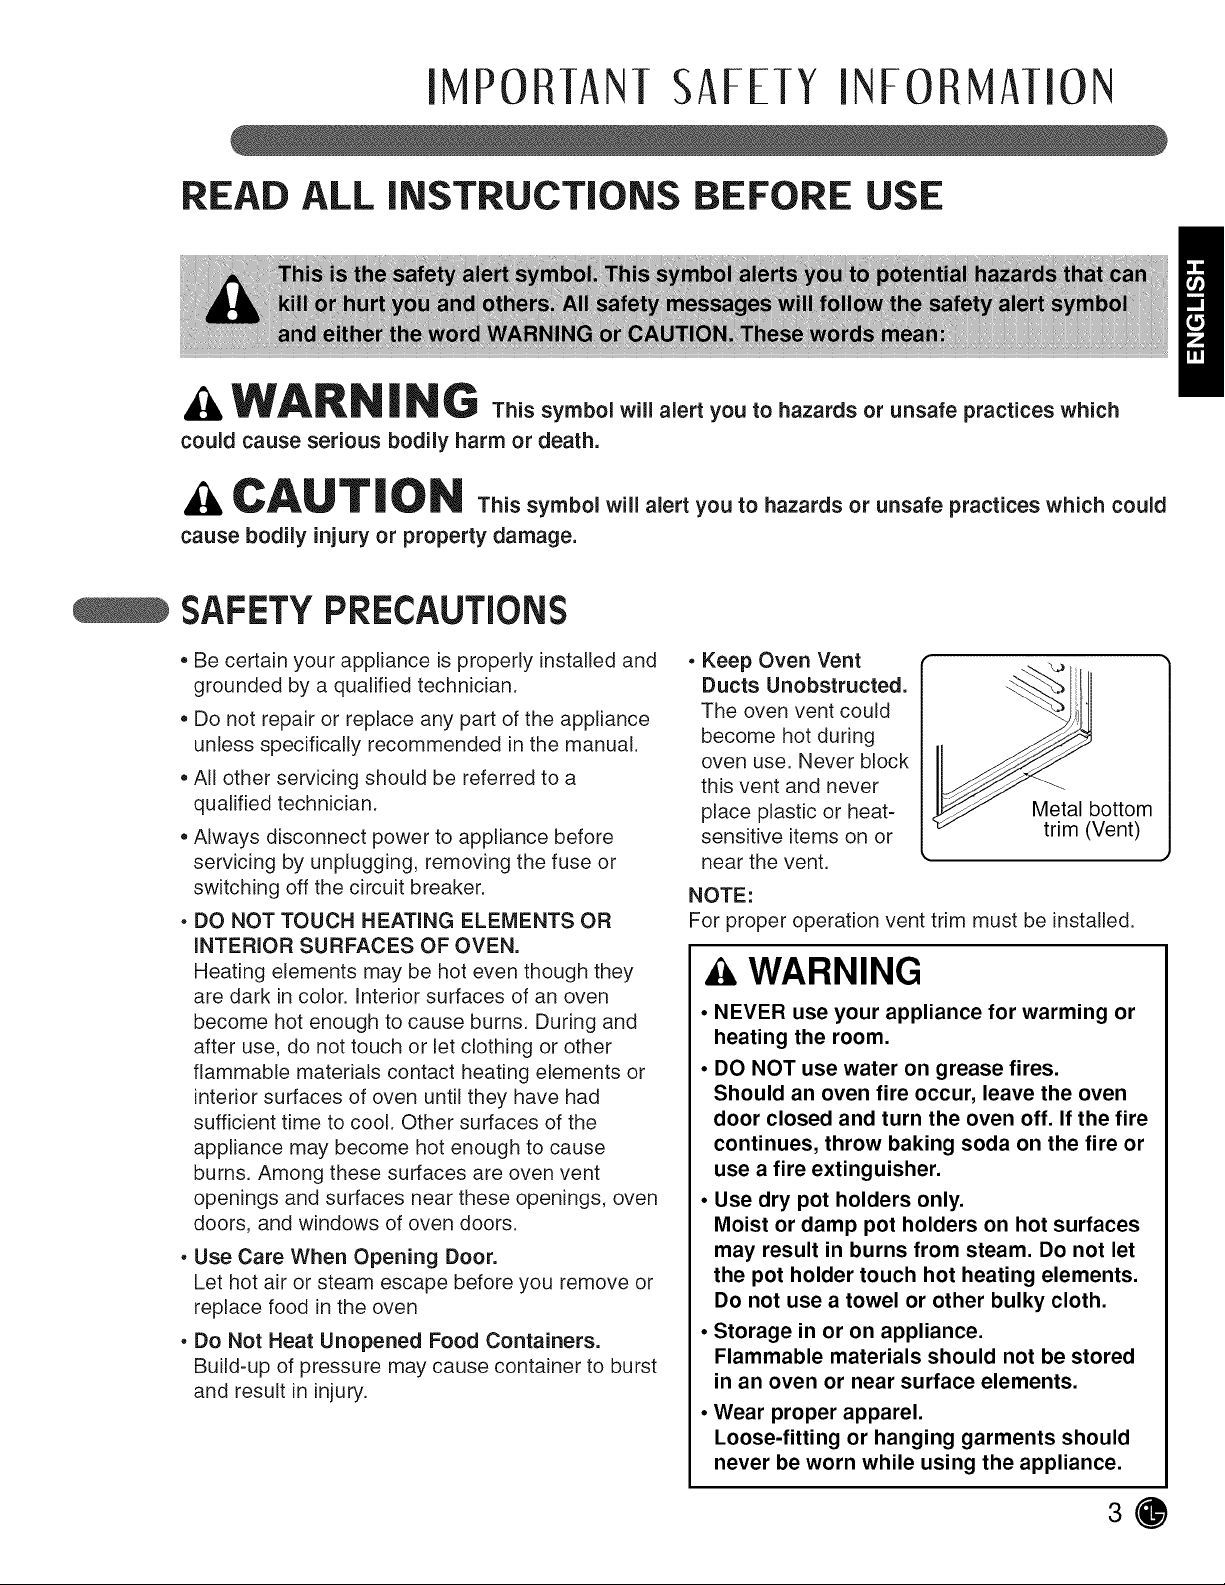
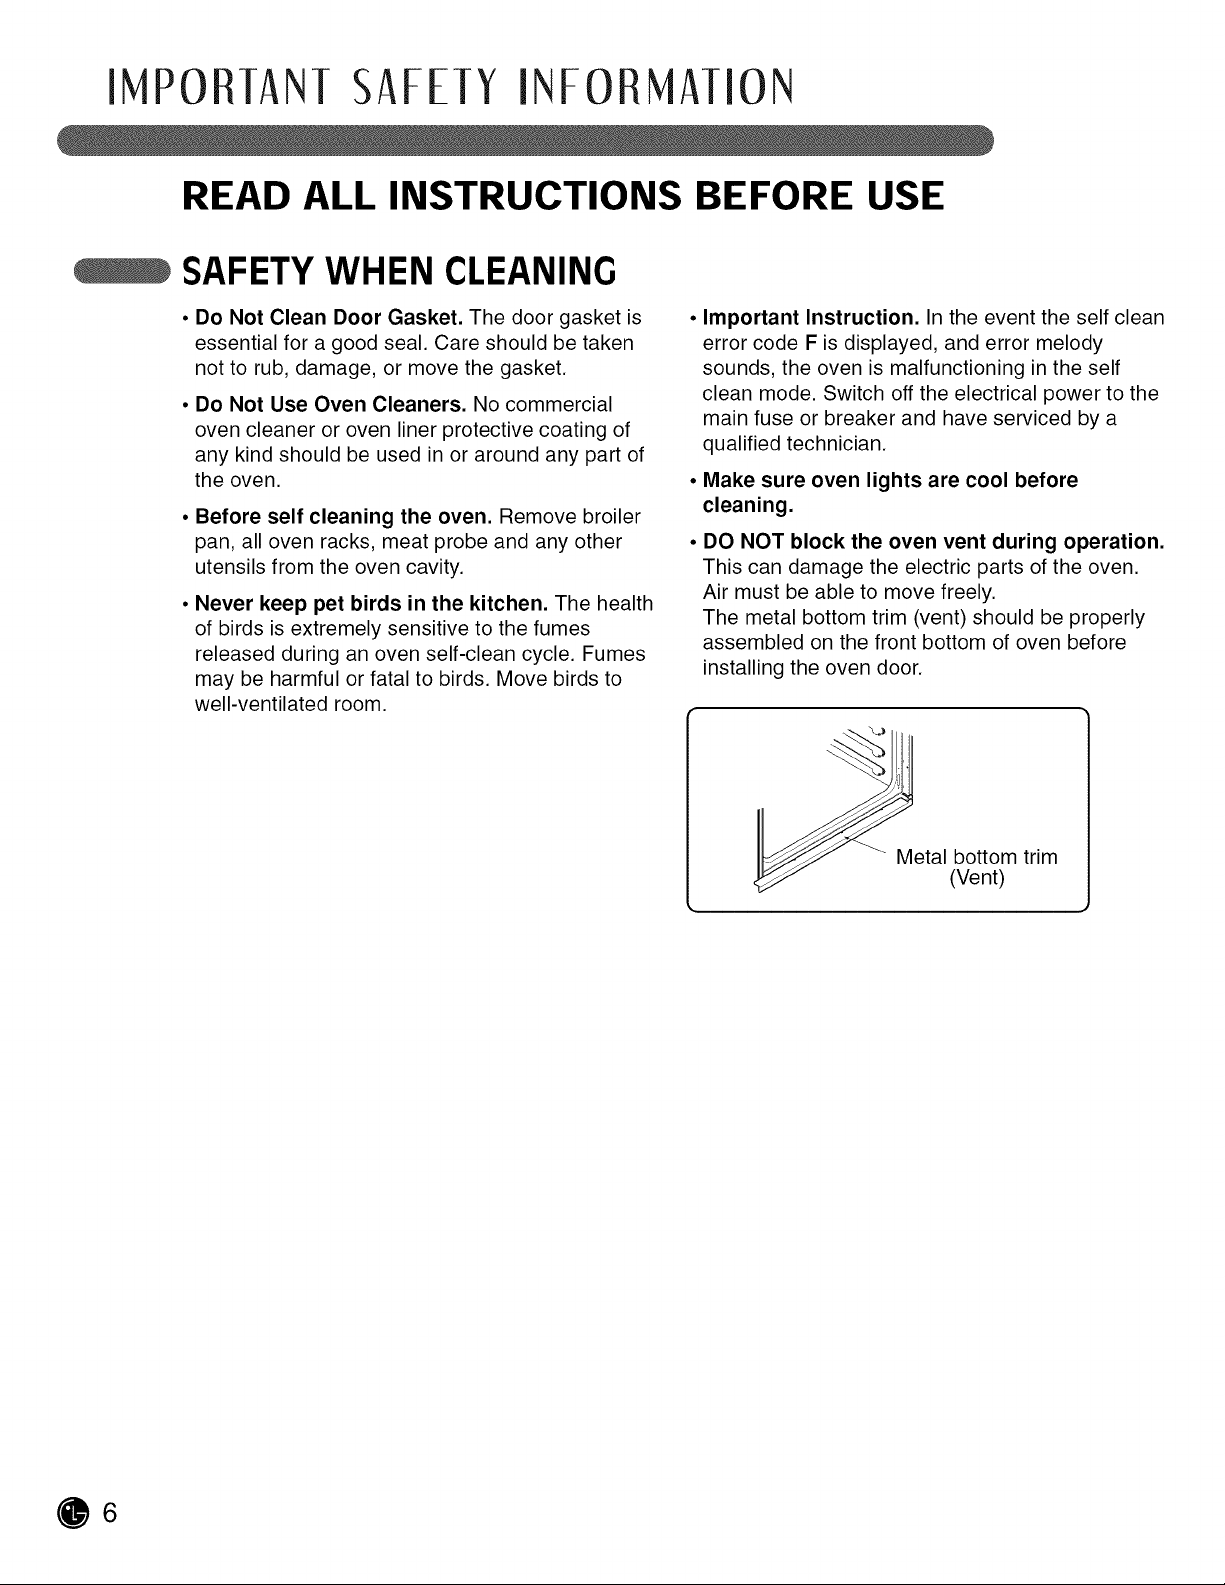
. Keep Oven Vent
Ducts Unobstructed.
The oven vent could
become hot during
oven use. Never block
this vent and never
place plastic or heat-
sensitive items on or
near the vent.
NOTE:
For proper operation vent trim must be installed,
Metal bottom
trim (Vent)
WARNING
• NEVER use your appliance for warming or
heating the room.
• DO NOT use water on grease fires.
Should an oven fire occur, leave the oven
door closed and turn the oven off. If the fire
continues, throw baking soda on the fire or
use a fire extinguisher.
• Use dry pot holders only.
Moist or damp pot holders on hot surfaces
may result in burns from steam. Do not let
the pot holder touch hot heating elements.
Do not use a towel or other bulky cloth.
• Storage in or on appliance.
Flammable materials should not be stored
in an oven or near surface elements.
• Wear proper apparel.
Loose-fitting or hanging garments should
never be worn while using the appliance.
iMPORTANTSAFETYiNFORMATiON
READ ALL INSTRUCTIONS BEFORE USE
SAFETYPRECAUTIONS(cont.)
Be certain all packing materials are removed •
from the appliance before operating.
Keep plastics, clothes, and paper away from parts .
of the appliance that may become hot.
DO NOT force the door open.
This can damage the automatic door locking
system. Use care when opening the oven door
after the self-cleaning cycle. Stand to the side of
the oven when opening the door to allow hot air or
steam to escape. The oven may still be VERY
HOT.
ELECTRICALSAFETY
• Protective Liners. Do not use aluminum foil or
any other material to line the oven bottoms.
Improper installation of these liners may result in
a risk of electric shock or fire.
• Do Not allow aluminum foil or meat probe to
contact heating elements.
WARNING
DO NOT use a steel-wool pad.
It will SCRATCH the surface.
DO NOT use harsh etching, abrasive cleaners
or sharp metal scrapers to clean the oven
door glass since they can scratch the surface.
It may result in shattering of the glass.
Be careful when removing and lifting the door.
DO NOT lift the door by the handle.
The door is very heavy.
DO NOT step or sit on oven door.
Be sure to follow proper installation instructions.
• Before replacing your oven light bulb, switch
off the electrical power to the oven at the main
fuse or circuit breaker panel.
Failure to do so can result in severe personal
injury, death, or electrical shock.
DO NOT line the oven walls, racks, bottom, or
any other part of the oven with aluminum foil
or any other material.
Doing so will disrupt heat distribution, produce
poor baking results and cause permanent
damage to the oven interior (aluminum foil will
melt to the interior surface of the oven.)
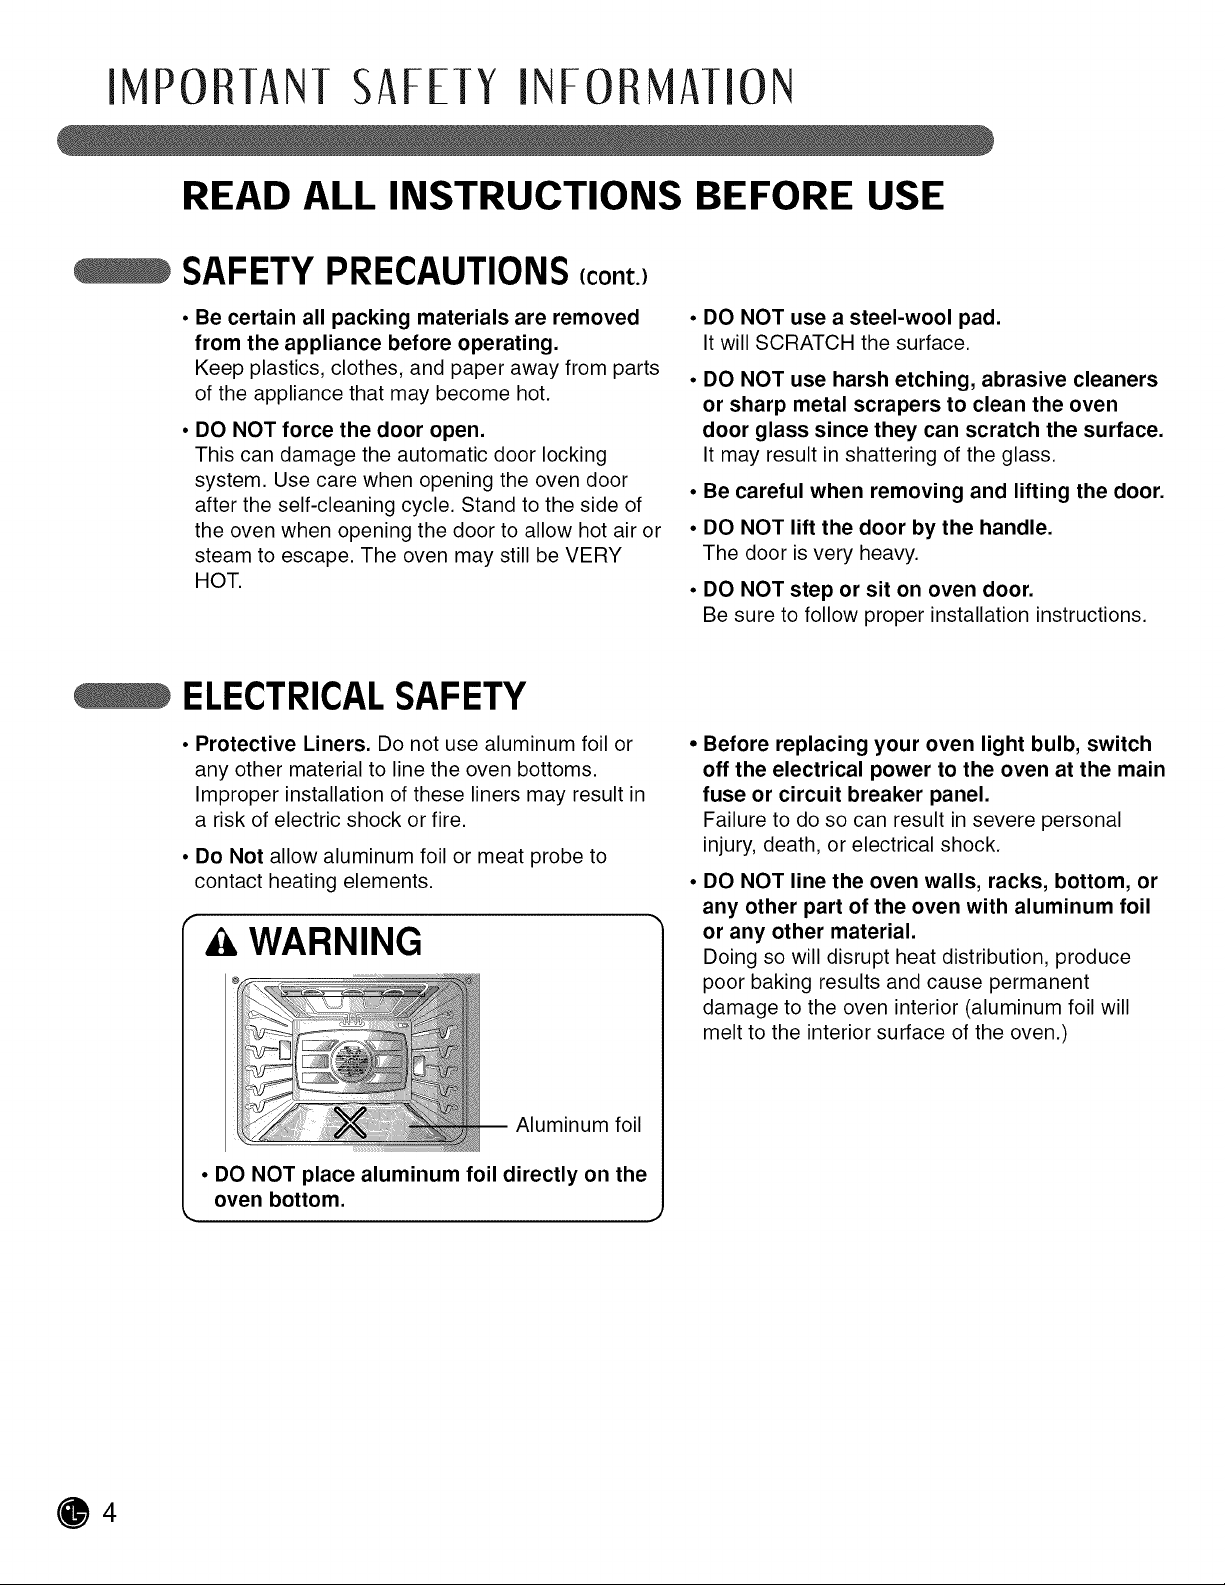
04
Aluminum foil
• DO NOT place aluminum foil directly on the
oven bottom.
J
IMPORTANTSAFETYINFORMA|ION
READ ALL INSTRUCTIONS BEFORE uSE
SAFETY DURING USE
oven Racks. Always place oven racks in
desired position while oven is cool.
Always use pot holders or oven mitts when
removing food from the oven.
You can be burned because cookware and plates
will be hot.
Use caution with the TIMED BAKE or
DELAYED TIMED BAKE features. Use the
automatic timer when cooking cured or frozen
meats and most fruits and vegetables. Foods
that can easily spoil, such as milk, eggs, fish,
meat or poultry, should be chilled in the
refrigerator first. Even when chilled, they
should not stand in the oven for more than 1
hour before cooking begins, and should be
removed promptly when cooking is
completed.
Eating spoiled food can result in sickness from
food poisoning.
• Should an oven fire occur, leave the oven door
closed and turn the oven off. If the fire
continues, throw baking soda on the fire or
use a fire extinguisher.
• DO NOT put water or flour on the fire.
Flour may be explosive and water can cause a
grease fire to spread and cause personal injury.
• DO NOT use the broiler pan without the grid.
DO NOT cover the grid with aluminum foil.
CHILD SAFETY
WARNING
• Children should be kept away from the
oven.
• Accessory parts will become hot when the
broiler is in use.
CAUTION
• Children should not be left alone or
unattended in area where appliance is in
use. Children should never be allowed to sit
or stand on any part of the appliance.
CAUTION
• DO NOT leave small children unattended
near the appliance.
During the self-cleaning cycle, the outside of
the oven can become very hot to the touch.
iMPORTANTSAFETYINFOP MATION
READ ALL INSTRUCTIONS BEFORE uSE
SAFETY WHEN CLEANING
DO Not clean Door Gasket. The door gasket is
essential for a good seal. Care should be taken
not to rub, damage, or move the gasket.
Do Not Use Oven Cleaners. No commercial
oven cleaner or oven liner protective coating of
any kind should be used in or around any part of
the oven.
Before self cleaning the oven. Remove broiler
pan, all oven racks, meat probe and any other
utensils from the oven cavity.
Never keep pet birds in the kitchen. The health
of birds is extremely sensitive to the fumes
released during an oven self-clean cycle. Fumes
may be harmful or fatal to birds. Move birds to
well-ventilated room.
Important Instruction. In the event the self clean
error code F is displayed, and error melody
sounds, the oven is malfunctioning in the self
clean mode. Switch off the electrical power to the
main fuse or breaker and have serviced by a
qualified technician.
Make sure oven lights are cool before
cleaning.
DO NOT block the oven vent during operation.
This can damage the electric parts of the oven.
Air must be able to move freely.
The metal bottom trim (vent) should be properly
assembled on the front bottom of oven before
installing the oven door.
06
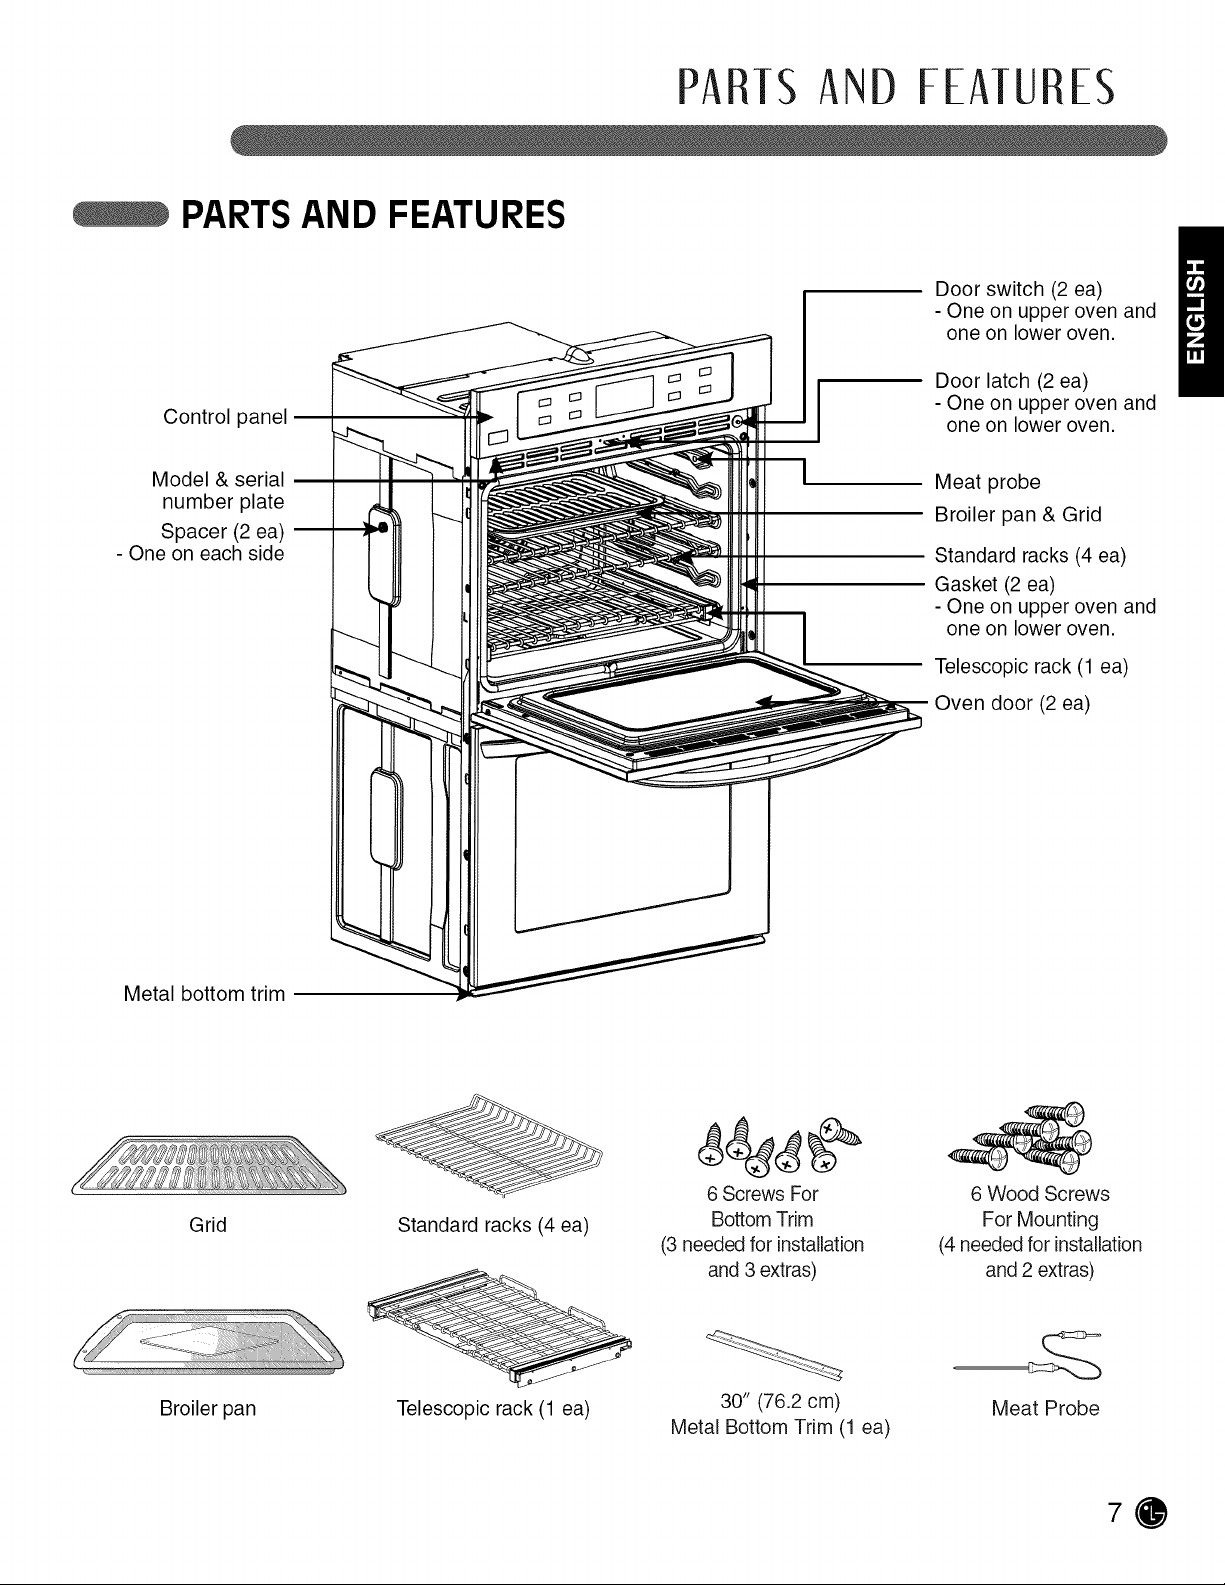
PARTSAND FEATURES
Control panel
PARTSANDFEATURES
Door switch (2 ea)
- One on upper oven and
one on lower oven.
Door latch (2 ea)
- One on upper oven and
one on lower oven.
Model & serial
number plate
Spacer (2 ea)
- One on each side
Metal bottom trim
Meat probe
Broiler pan & Grid
Standard racks (4 ea)
Gasket (2 ea)
- One on upper oven and
one on lower oven.
Telescopic rack (1 ea)
Oven door (2 ea)
Grid
Broiler pan
Standard racks (4 ea)
Telescopic rack (1 ea)
6 Screws For
Bottom Trim
(3 needed for installation
and 3 extras)
30" (76.2 cm)
Metal Bottom Trim (1 ea)
6 Wood Screws
For Mounting
(4 needed for installation
and 2 extras)
Meat Probe
PARTSANDFEATURES
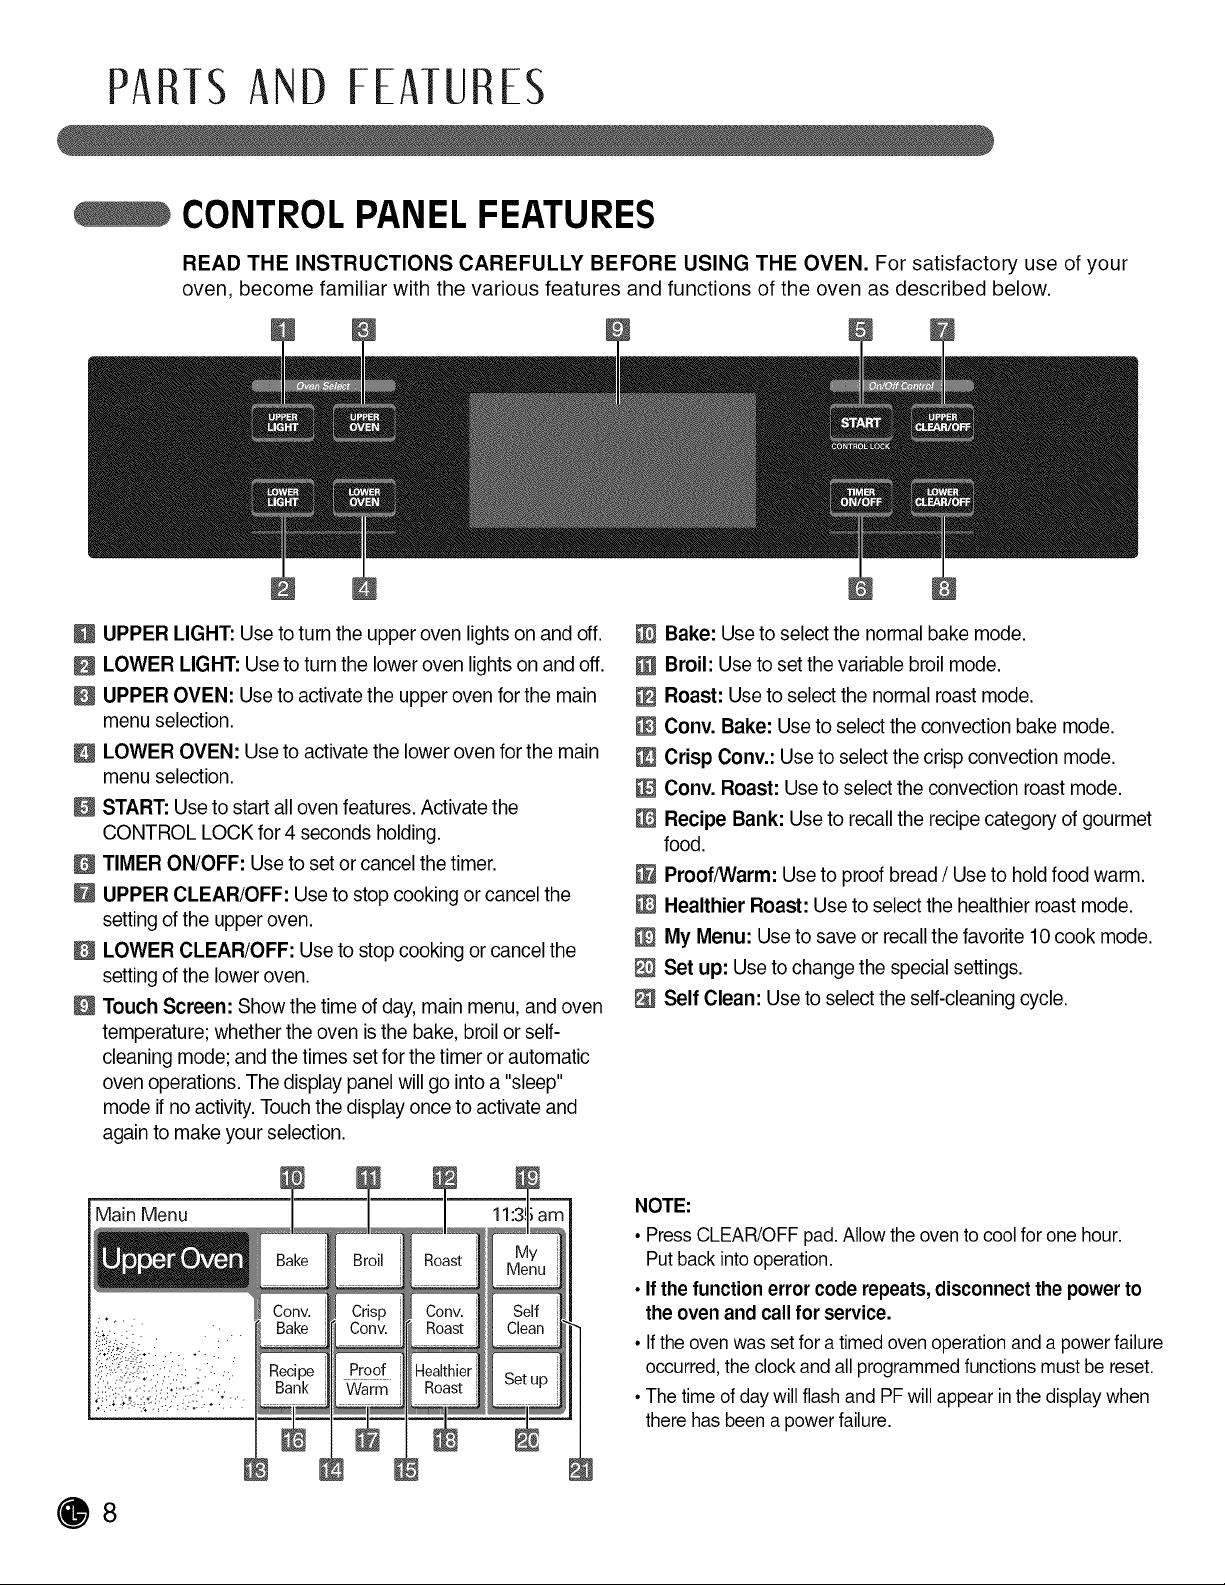
CONTROLPANEL FEATURES
READ THE INSTRUCTIONS CAREFULLY BEFORE USING THE OVEN. For satisfactory use of your
oven, become familiar with the various features and functions of the oven as described below.
@
UPPER LIGHT: Use to turn the upper oven lights on and off.
LOWER LIGHT: Use to turn the lower oven lights on and off.
B
UPPER OVEN: Useto activate the upper oven for the main
menu selection.
LOWER OVEN: Use to activate the lower oven for the main
D
menu selection.
START: Use to start all oven features. Activate the
D
CONTROL LOCKfor 4 seconds holding.
TIMER ON/OFF: Use to set or cancel the timer.
B
@
UPPER CLEAR/OFF: Use to stop cooking or cancel the
setting of the upper oven.
D
LOWER CLEAR/OFF: Useto stop cooking or cancel the
setting of the lower oven.
D
Touch Screen: Show the time of day, main menu, and oven
temperature; whether the oven is the bake, broil or self-
cleaning mode; and the times setfor the timer or automatic
oven operations. The display panel will go into a "sleep"
mode ifno activity. Touch the display once to activate and
again to make your selection.
Main Menu 11:3!
Conv. Crisp Conv. Self
: . i Recipe Proof Healthier Set upi.: : ' Bank Warm Roast
_1_ _i_ _,_!_i i_
Bake: Use to select the normal bake mode.
m Broil: Use to set the variable broil mode.
Roast: Use to select the normal roast mode.
Conv. Bake: Use to select the convection bake mode.
Crisp Conv.: Use to select the crisp convection mode.
m Conv. Roast: Use to select the convection roast mode.
Recipe Bank: Use to recall the recipe category of gourmet
food.
m Proof/Warm: Use to proof bread / Use to hold food warm.
Healthier Roast: Use to select the healthier roast mode.
m My Menu: Use to save or recall the favorite 10 cook mode.
Set up: Use to change the special settings.
Self Clean: Use to select the self-cleaning cycle.
NOTE:
• Press CLEAR/OFF pad.Allow the oven to cool forone hour.
Putback into operation.
•If the function error code repeats, disconnect the power to
the oven and call for service.
• Ifthe oven was set for a timedoven operation and a powerfailure
occurred, the clockand all programmed functions mustbe reset.
•The time ofday will flash and PFwill appearinthe display when
there has been a power failure.
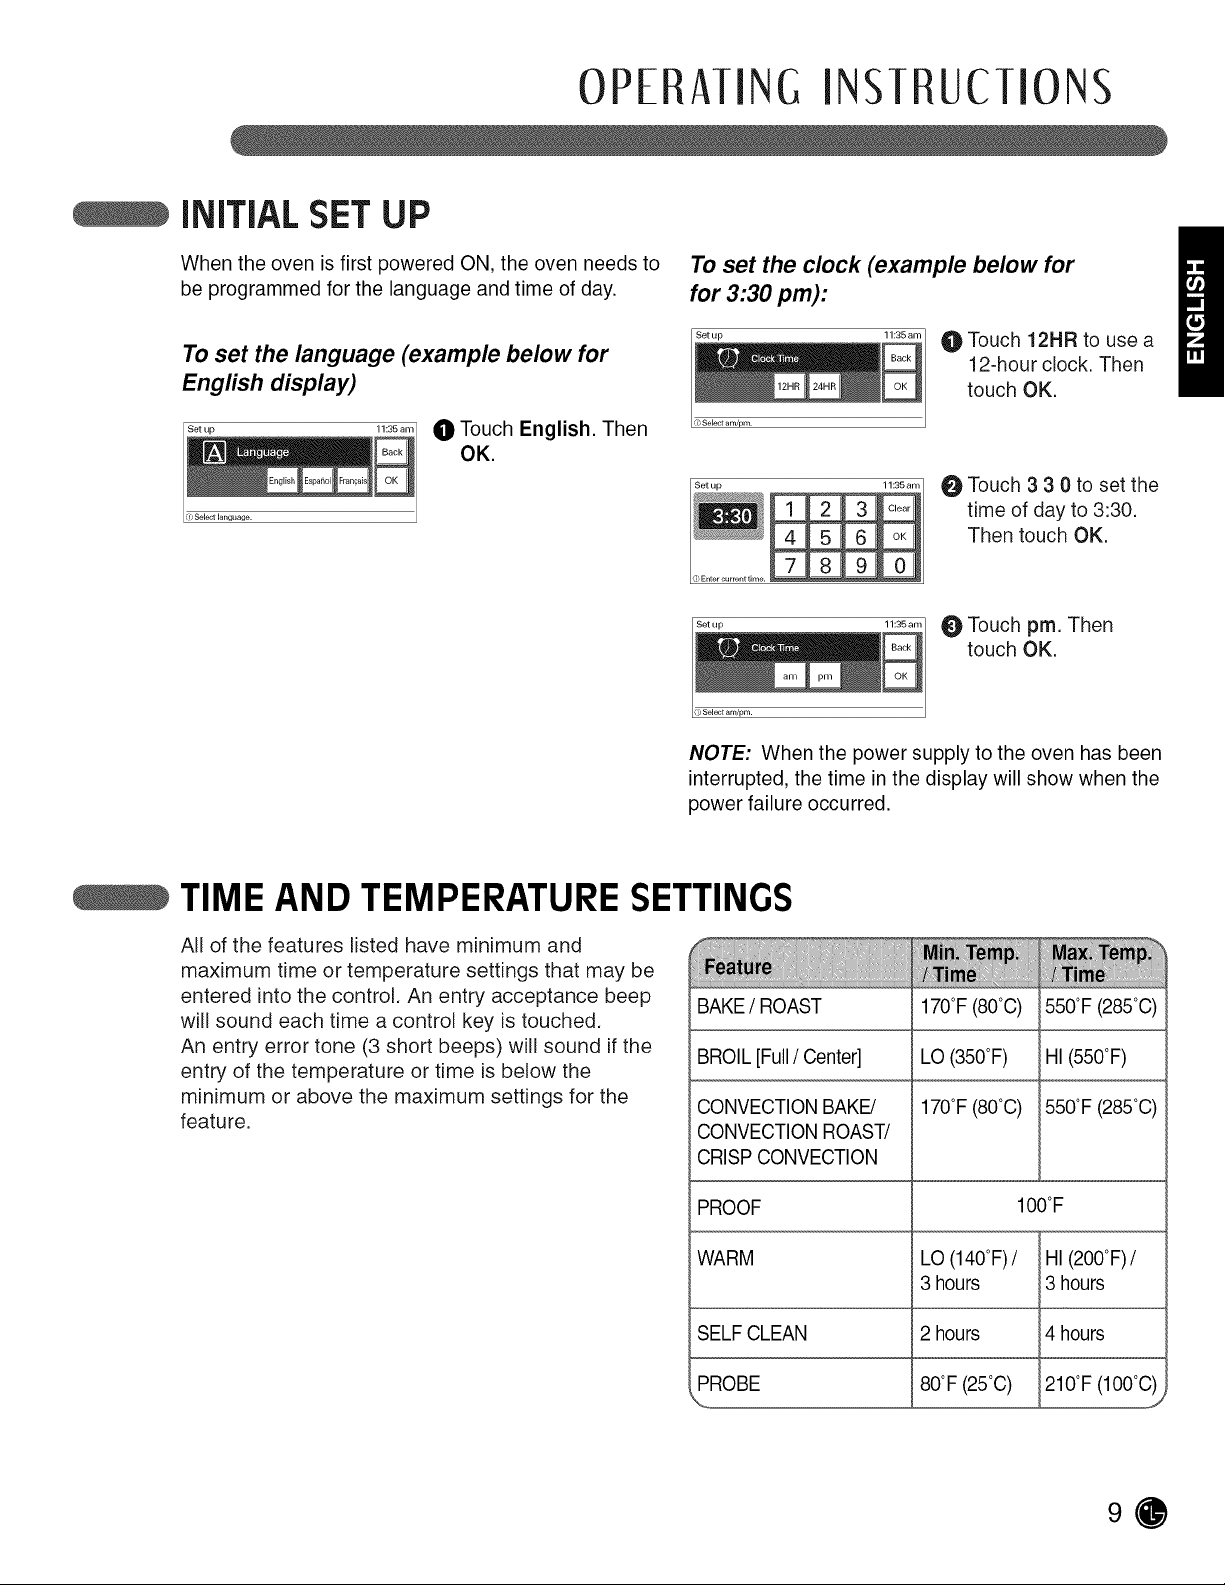
INITIALSET UP
OPERATING INSTRUCTIONS
When theoven isfirstpowered ON, theoven needs to
be programmed forthelanguageand timeofday.
To set the language (example below for
English display)
Set up
X>Selectlanguage.
0 Touch English. Then
OK.
To set the clock (example below for
for 3:30 pm):
Set u p
') Select am/pro.
Set u p
# Sel_t an_pm.
NOTE: When the power supply to the oven has been
interrupted, the time in the display will show when the
power failure occurred.
Touch 12HR to use a
12-hour clock. Then
touch OK.
Touch 3 3 0 to set the
time of day to 3:30.
Then touch OK.
O Touch prn. Then
touch OK.
TIME AND TEMPERATURE SETTINGS
All of the features listed have minimum and
maximum time or temperature settings that may be
entered into the control. An entry acceptance beep
will sound each time a control key is touched.
An entry error tone (3 short beeps) will sound if the
entry of the temperature or time is below the
minimum or above the maximum settings for the
feature,
BAKE / ROAST 170°F (80°C) 550°F(285°C)
BROIL [Full/Center] LO (350°F) HI (550°F)
CONVECTION BAKE/ 170°F (80°C) 550°F (285°C)
CONVECTION ROAST/
CRISP CONVECTION
PROOF 100°F
WARM LO (140°F)/ HI (200°F)/
SELF CLEAN 2 hours 4hours
PROBE 80°F(25°C)
3 hours 3hours
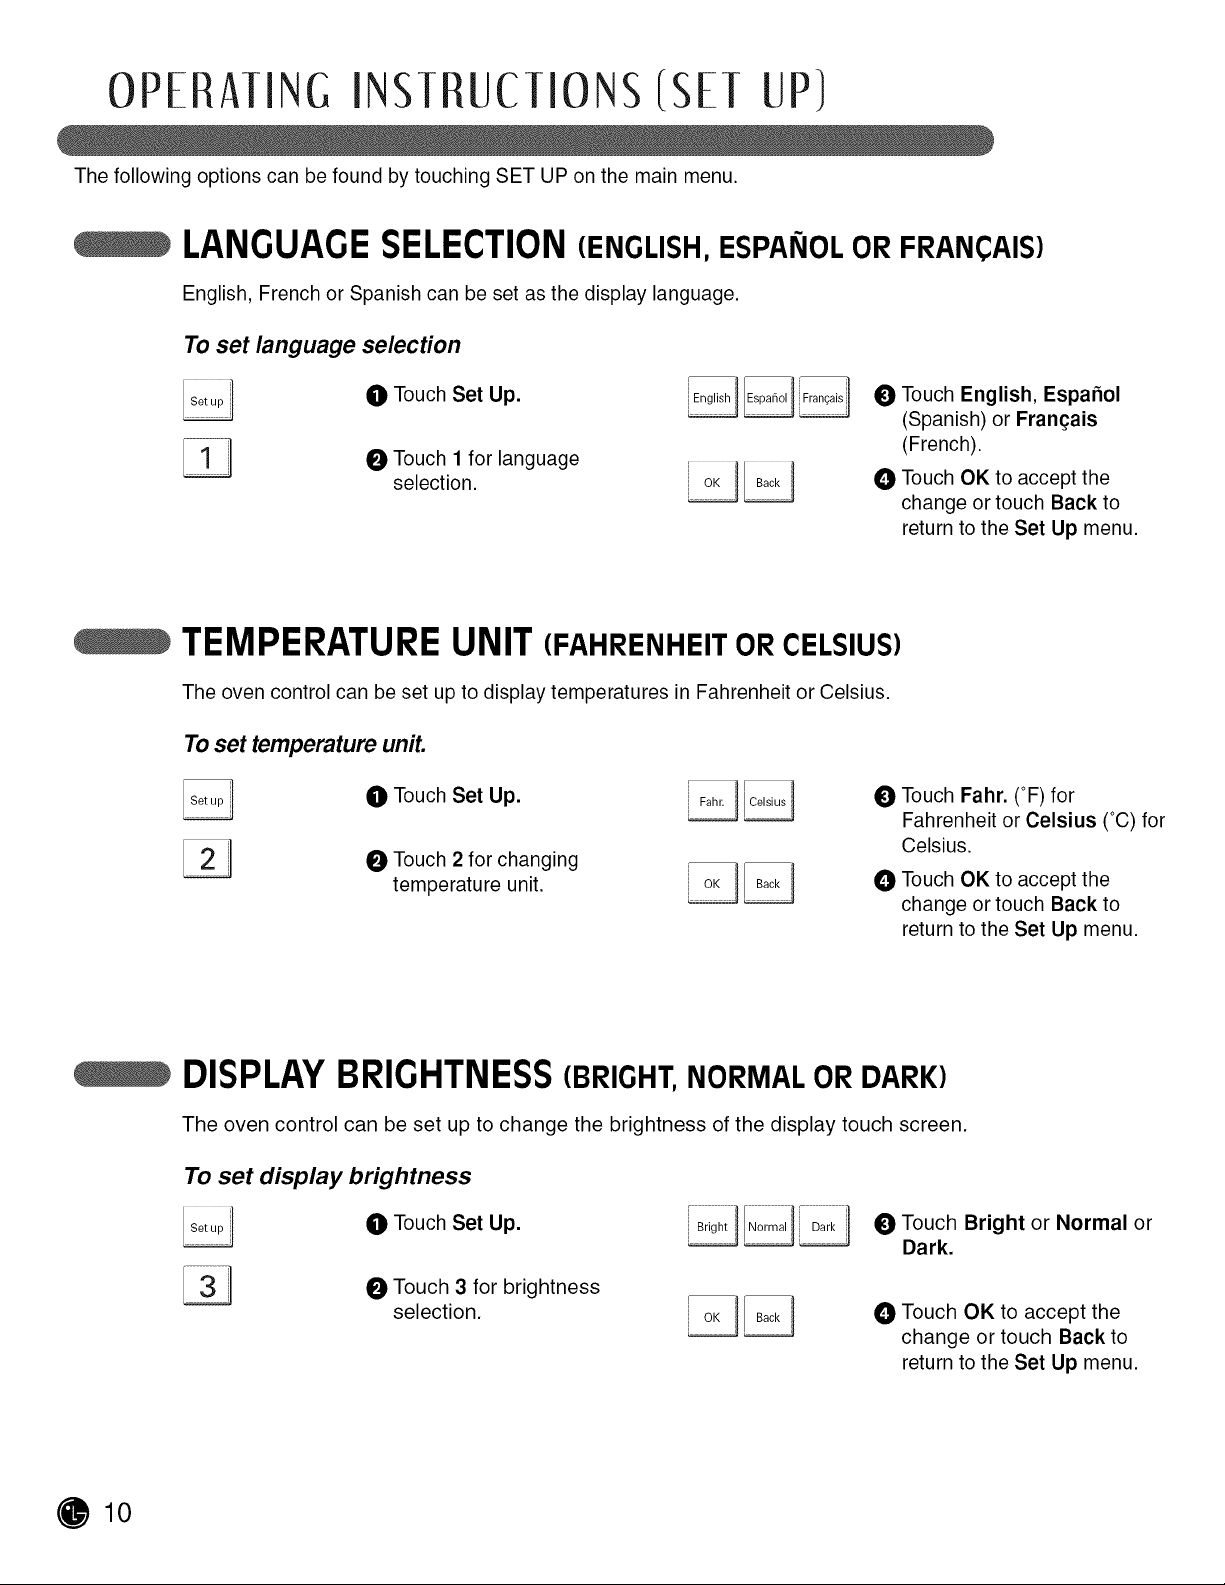
OPERAIINc INSIRUclIONS/S[! UP)
The following options can be found by touching SET UP on the main menu.
LANGUAGESELECTION(ENGLISH, ESPANOL OR FRANCAIS)
English, French or Spanish can be set as the display language.
To set language selection
0 Touch Set Up. ___
1_ O Touch 1 for language
selection. __
O Touch English, Espafiol
(Spanish) or Franqais
(French).
O Touch OK to accept the
change or touch Back to
return to the Set Up menu.
TEMPERATURE UNIT (FAHRENHEITORCELSIUS)
The oven control can be set up to display temperatures in Fahrenheit or Celsius.
To set temperature unit.
0 Touch Set Up.
Touch 2 for changing
temperature unit.
O Touch Fahr. (°F) for
Fahrenheit or Celsius (°C) for
Celsius.
O Touch OK to accept the
change or touch Back to
return to the Set Up menu.
O10
DISPLAYBRIGHTNESS(BRIGHT, NORMAL OR DARK)
The oven control can be set up to change the brightness of the display touch screen.
To set display brightness
0 Touch Set Up.
_ Touch 3 for brightness
selection.
_) Touch Bright or Normal or
Dark.
Touch OK to accept the
change or touch Back to
return to the Set Up menu.
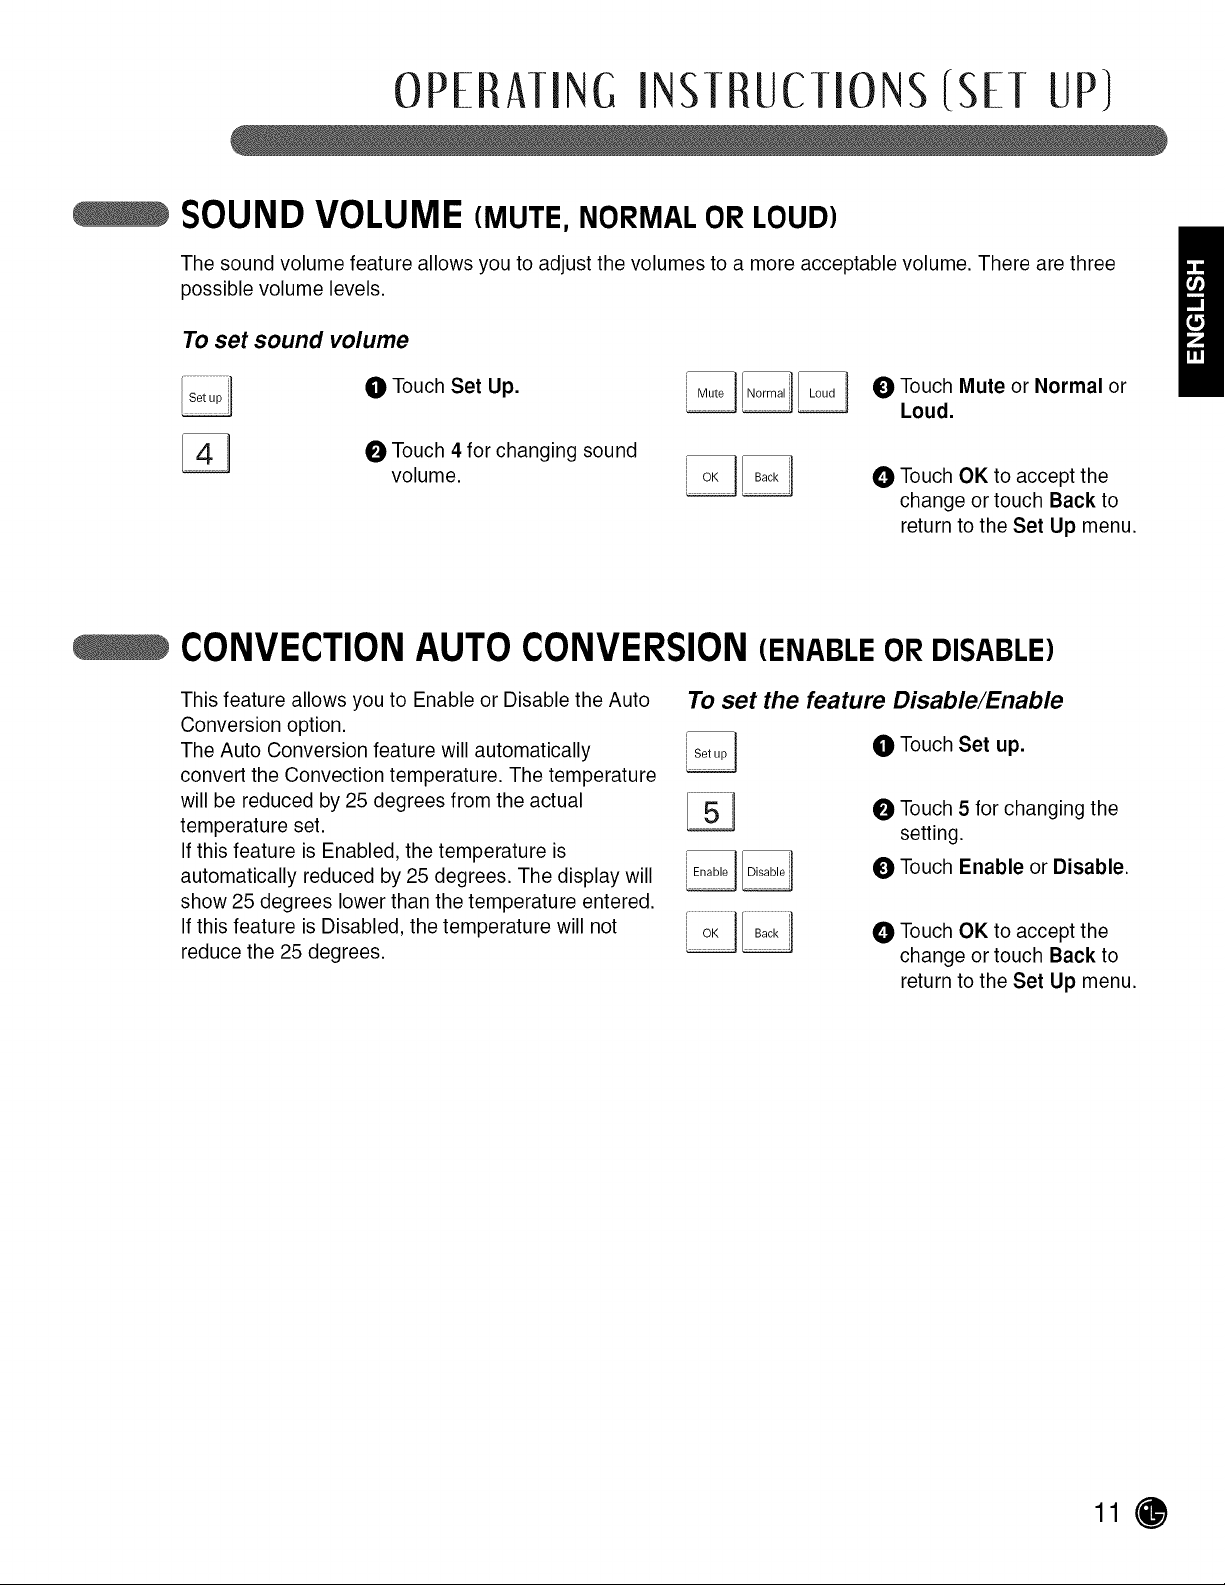
OPEtAjinc inSjtucjiOnS ISE! UP1
SOUND VOLUME (MUTE, NORMAL OR LOUD)
The sound volume feature allows you to adjust the volumes to a more acceptable volume. There are three
possible volume levels.
To set sound volume
e Set Up.
Touch
O Touch 4 for changing sound
volume.
0 Touch Mute or Normal or
Loud.
O Touch OK to accept the
change or touch Back to
return to the Set Up menu.
CONVECTION AUTO CONVERSION(ENABLEORDISABLE)
This feature allows you to Enable or Disable the Auto
Conversion option.
The Auto Conversion feature will automatically
convert the Convection temperature. The temperature
will be reduced by 25 degrees from the actual
temperature set.
If this feature is Enabled, the temperature is
automatically reduced by 25 degrees. The display will
show 25 degrees lower than the temperature entered.
If this feature is Disabled, the temperature will not
reduce the 25 degrees.
To set the feature Disable/Enable
J
Touch Set up.
Touch 5 for changing the
setting.
Touch Enable or Disable.
Touch OK to accept the
change or touch Back to
return to the Set Up menu.

OP[RA|ING INS|RUC|IONS (S[| UP)
TEMPERATURE ADJUSTMENT
The oven cavity temperature can be adjusted if it is
running too hot or too cool.
If needed, the temperature can be adjusted +/- 35
degrees.
The Upper and Lower oven temperature can be
independently adjusted.
NOTE: The temperature adjustments made with this
feature will change Bake, Convection Bake,
Convection Roast, and Crisp Convection temperature.
To adjust the oven temperature
Upper or Lower
Touch UPPER OVEN for
0
changing the upper oven
temperature or LOWER
OVEN for changing the lower
oven temperature.
CLOCKTIME (12 HR, 24 HR)
This feature allows you to choose between a 12 and 24
hour clock. Once the clock has been reset for a 12 or 24
hour clock, the time of day needs to be reset.
Touch Set Up.
Touch 6 for temperature
adjustment.
O To increase the temperature,
touch + until the display
shows the desired change.
To decrease the temperature,
touch - until the display shows
the desired change.
O Touch OK to accept the
change or touch Back to
return to the Set Up menu.
O Touch number pads to set the
current time of day.
O12
To change between
j o
12 or 24 hour time of day
O TouchSet Up.
Touch 7 for setting clock time.
Touch 12HR for 12-hour or
24HR for 24-hour.
Touch OK to accept the change
e
or touch Back to return to the
Set Up menu.
ii]I i r/
_an_ipmi
............1.............I
O Touch OK to accept the change
or touch Clear to reset the time.
Touch am for setting the time
before noon or touch pm for
setting the time after noon.
NOTE: am and pm selection can
be set only for the 12-hour clock.
O Touch OK to accept the change
or touch Back to return to the
Set Up menu.
RESET
The Reset feature allows you to restore changes made in the SET UP menu to the original factory settings.
To reset the control to factory setting
O TouchSet Up.
O Touch 8 for reset the control
setting.
Touch Yes to reset the control
or touch No to keep the
current setting.
Touch OK to accept the
change or touch Back to
return to the Set Up menu.
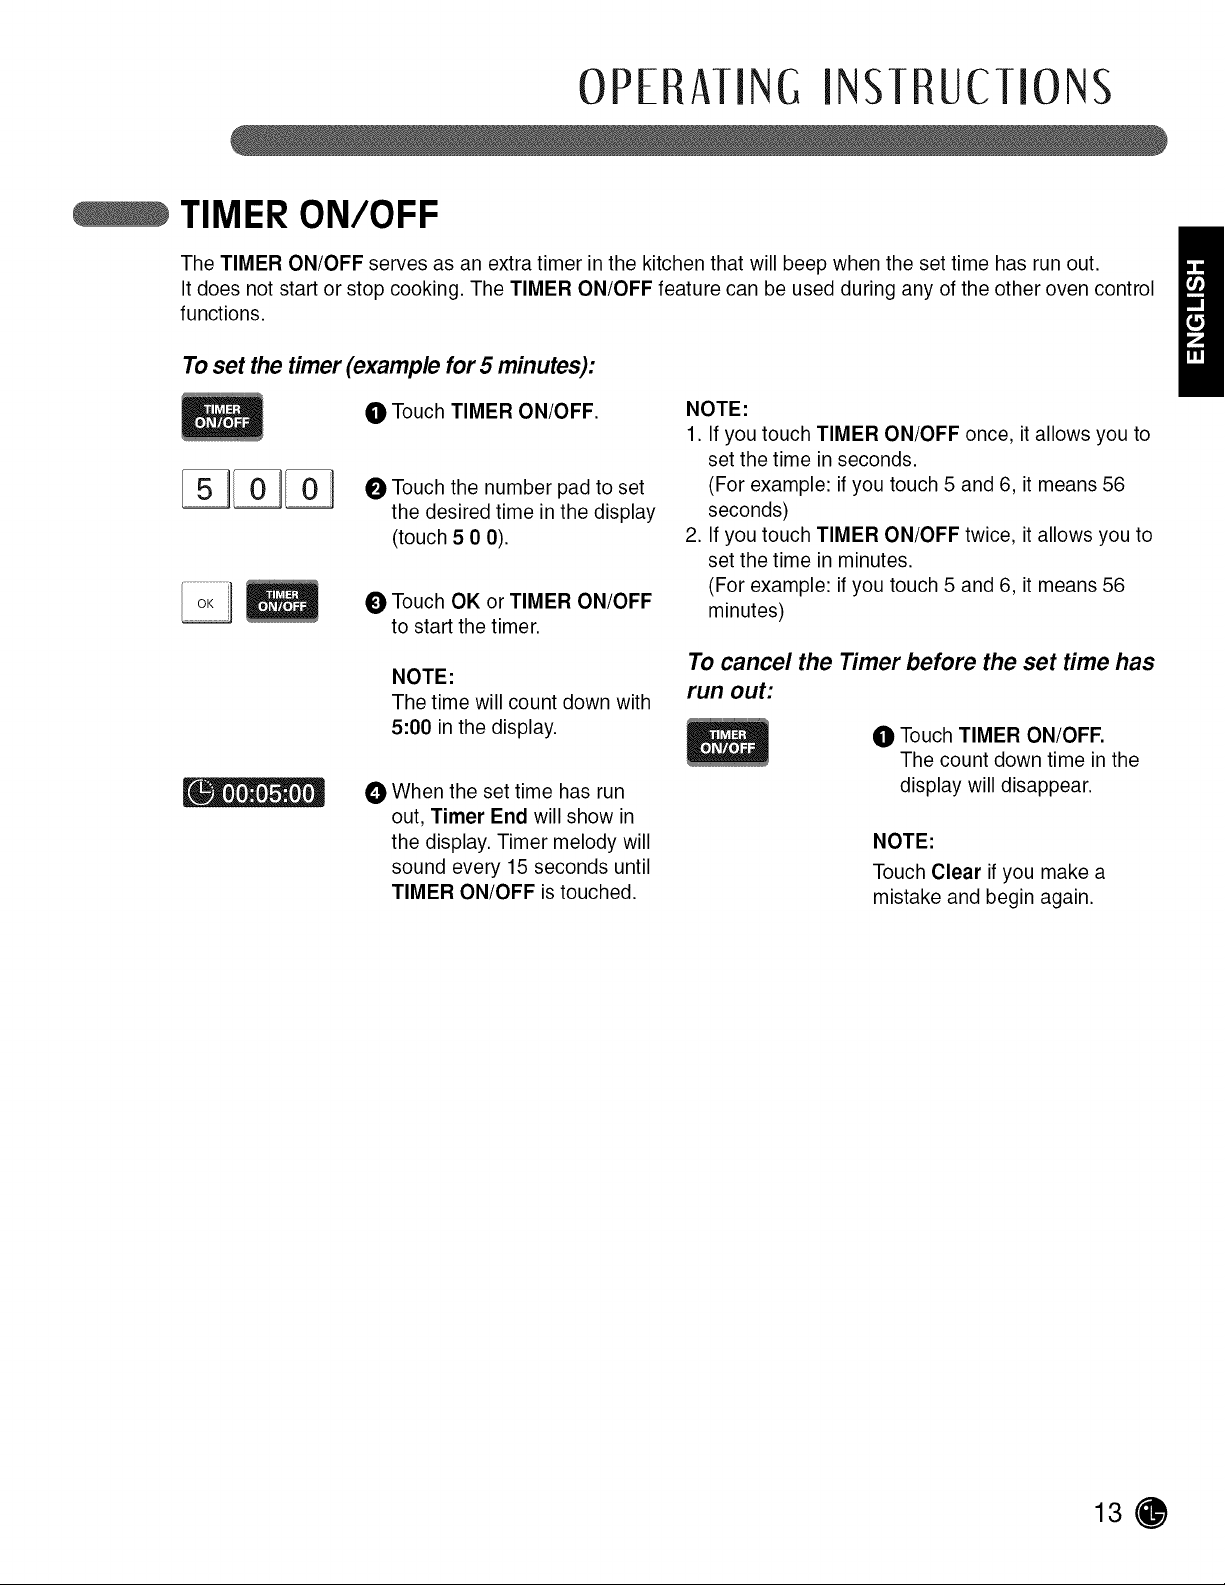
OPERATING INSTRUCTIONS
TIMER ON/OFF
The TIMER ON/OFF serves as an extra timer inthe kitchen that will beep when the set time has run out.
It does not start or stop cooking. The TIMER ON/OFF feature can be used during any of the other oven control
functions.
To set the timer (example for 5 minutes):
O TouchTIMER ON/OFF.
O Touch the number pad to set
the desired time inthe display
(touch 5 0 0).
Touch OK or TIMER ON/OFF
to start the timer.
NOTE:
The time will count down with
5:00 inthe display.
O When the set time has run
out, Timer End will show in
the display. Timer melody will
sound every 15 seconds until
TIMER ON/OFF is touched.
NOTE:
1. If you touch TIMER ON/OFF once, it allows you to
set the time in seconds.
(For example: if you touch 5 and 6, it means 56
seconds)
2. If you touch TIMER ON/OFF twice, itallows you to
set the time in minutes.
(For example: if you touch 5 and 6, it means 56
minutes)
To cancel the Timer before the set time has
run out:
O Touch TIMER ON/OFF.
The count down time in the
display will disappear.
NOTE:
Touch Clear if you make a
mistake and begin again.
13(0
 Loading...