

Page 1

OWNER’S MANUAL
COMbiNAtiON
ENGLISH ESPAÑOL
WALL OvEN
Read this owner’s manual thoroughly before operating the appliance
and keep it handy for reference at all times.
LWC3063**
MFL70581901_01
www.lg.com
Copyright © 2018 LG Electronics Inc. All Rights Reserved.
Page 2

2
TABLE OF CONTENTS
TABLE OF CONTENTS
IMPORTANT SAFETY
3
INSTRUCTIONS
PRODUCT OVERVIEW
11
11 Parts
11 Accessories
OPERATION
12
12 Control Panel Overview
14 Changing Oven Settings
14 Clock
14 Timer On/Off
15 Settings
-Setting the Hour Mode
-Setting Convection Auto Conversion
-Adjusting the Oven Temperature
-Selecting the Display Language
-Turning the Preheat Alarm Light On/Off
-Adjusting the Beeper Volume
-Selecting Fahrenheit or Celsius
16 Demo Mode
16 Lockout
17 Start Time (Delayed Timed Cook)
17 Cook Time (Timed Cook)
18 Using the Upper Oven
18 Before Using the Upper Oven
18 Upper Oven Light
18 Microwave Cookware Guide
19 Microwave Cooking Tips
20 Microwave Power Levels
21 +30 seconds
21 Defrost
23 Sensor Operation
23 Using Sensor Cook
25 Convection Bake
25 Broil
26 Speed Cook
26 Auto Cook
30 Soften
31 Melt
32 Warm
32 Proof
32 Popcorn
33 Using the Lower Oven
33 Before Using the Lower Oven
33 Lower Oven Light
33 Minimum & Maximum Default Settings
34 Using Oven Racks
34 Bake
35 Multi-Rack Baking
35 Oven Vent
36 Convection Mode
37 Broil
38 Recommended Broiling Guide
39 Steam Function
40 Warm
41 Proof
41 Probe
43 Favorite
43 Sabbath Mode
44 Wi-Fi
44 Remote Start
SMART FUNCTIONS
45
45 LG SmartThinQ Application
46 Smart Diagnosis™ Function
48 FCC Notice
48 FCC RF Radiation Exposure Statement
MAINTENANCE
49
49 Caring for the Upper Oven
49 Cleaning the Interior
49 Cleaning the Exterior
50 Caring for the Lower Oven
50 EasyClean
52 Steam Feeder Tank
52 Cleaning Scale on Oven Bottom
52 Descaling
53 Drying
53 Self Clean
55 Changing the Oven Light
55 Cleaning the Exterior
57 Removing and Replacing the Lift-Off Oven
Doors
57 Door Care Instructions
TROUBLESHOOTING
58
58 FAQs
61 Before Calling for Service
LIMITED WARRANTY
65
®
Page 3
IMPORTANT SAFETY INSTRUCTIONS
3
IMPORTANT SAFETY INSTRUCTIONS
Read and follow all instructions when using the oven to prevent the risk of fire, electric
shock, personal injury, or damage. This guide does not cover all possible conditions that
may occur. Always contact your service agent or manufacturer about problems that you do
not understand.
Download this owner's manual at: http://www.lg.com
This is the safety alert symbol. This symbol alerts you to potential hazards that
can result in property damage and/or serious bodily harm or death.
All safety messages will follow the safety alert symbol and either the word
WARNING or CAUTION. These words mean:
WARNING
CAUTION
- Indicates a hazardous situation which, if not avoided, could result
in death or serious injury.
- Indicates a hazardous situation which, if not avoided, could result in
minor or moderate injury.
ENGLISH
Page 4

4
IMPORTANT SAFETY INSTRUCTIONS
IMPORTANT SAFETY INSTRUCTIONS (UPPER OVEN)
When using electrical appliances basic safety precautions should be followed, including the
following:
WARNING
•To reduce the risk of burns, electric shock, fire, injury to persons or exposure
to excessive microwave energy when using the upper oven, follow basic safety
precautions, including the following.
•Read all the instructions before using the oven.
•As with any appliance, close supervision is necessary when used by children.
•Read and follow the specific PRECAUTIONS TO AVOID POSSIBLE EXPOSURE TO
EXCESSIVE MICROWAVE ENERGY. Needs reference to location on Page 7.
•Use this appliance only for its intended purpose, as described in the manual.
Do not use corrosive chemicals or vapors, such as sulfide and chloride, in this
appliance. This type of oven is specifically designed to heat, cook, or dry food. It is not
designed for industrial or laboratory use.
•Do not store this appliance outdoors. Do not use this product near water - for example,
near a kitchen sink, in a wet basement, near a swimming pool, or similar location.
•Do not use this oven for commercial purposes. It is made for household use only.
•When cleaning surfaces of door and oven that come together on closing the
door, use only mild, nonabrasive soaps, or detergents applied with a sponge or
soft cloth.
•If your oven is dropped or damaged, have it thoroughly checked by a qualified
service technician before using it.
•To reduce the risk of fire in the oven cavity:
- Do not overcook food. Carefully attend to the upper oven when paper, plastic or
other combustible materials are placed inside the oven to facilitate cooking.
- Do not use the cavity for storage purposes.
Do not leave paper products, cooking utensils or food in the cavity when not in use.
- Remove wire twist-ties from paper or plastic bags before placing bags in oven.
•If materials inside the oven ignite:
- Keep oven door closed
- Turn the oven off
- Disconnect the power cord or shut off power at the fuse or circuit breaker
panel.
•To avoid electric shock:
- This appliance must be grounded. Connect only to a properly grounded outlet. See
the Installation Guide.
- Do not operate this appliance if it has a damaged cord or plug, if it is not working
properly or if it has been damaged or dropped.
- Do not immerse the electrical cord or plug in water.
- Keep cord away from heated surfaces.
- Do not let cord hang over edge of table or counter.
•Take care when the door is opened to avoid injury.
•To avoid improperly cooking some foods:
- Do not heat any type of baby bottle or baby food. Uneven heating may occur and
possibly cause personal injury.
- Do not heat small-necked containers, such as syrup bottles.
- Do not deep-fat fry in the upper oven.
- Do not attempt home canning in the upper oven.
- Some products such as whole eggs and sealed containers – for example,
closed glass jars – are able to explode and should not be heated in this oven.
Page 5
IMPORTANT SAFETY INSTRUCTIONS
5
WARNING
•Do not cover or block any openings on the appliance.
•Do not run the oven empty.
•Install or locate this appliance only in accordance with the provided installation
instructions.
•This appliance should be serviced only by qualified service personnel. Contact the
nearest authorized service facility for examination, repair, or adjustment.
•Liquids, such as water, coffee, or tea can be overheated beyond the boiling point
without appearing to be boiling due to surface tension of the liquid. Visible bubbling or
boiling when the container is removed from the upper oven is not always present.
THIS COULD RESULT IN VERY HOT LIQUIDS SUDDENLY BOILING OVER WHEN
THE CONTAINER IS DISTURBED OR A SPOON OR OTHER UTENSIL IS INSERTED
INTO THE LIQUID.
•To reduce the risk of injury to persons;
- Do not overheat the liquid.
- Stir the liquid both before and halfway through heating it.
- Do not use straight-sided containers with narrow necks.
- After heating, allow the container to stand in the upper oven for a short time before
removing the container.
- Use extreme care when inserting a spoon or other utensil into the container.
•Do not use the oven for the purpose of dehumidification (for example, operating the
upper oven with wet newspapers, clothes, toys, electric devices, plants, soil, pets or
any other living matter inside it). The oven must only be used for heating or cooking
food.
- The results of misuse can include safety risks such as fire, burns, or death due to
electric shock.
•This appliance is not intended for use by persons (Including children) with reduced
physical, sensory or mental capabilities, or lack of experience and knowledge, unless
they have been given supervision or instruction concerning use of the appliance by a
person responsible for their safety. Children should be supervised to ensure that they
do not play with the appliance.
- Improper use may cause damage such as a fire, electric shock or burn.
•Accessible parts may become hot during use. Young children should be kept away to
keep them from touching hot surfaces and being burned.
•Children must not be allowed to play with accessories or hang down from the door or
any part of the oven.
- Doing so can cause serious injury and damage.
•If the door or door seals are damaged, the oven must not be operated until it has been
repaired by a competent person.
•The appliance and its accessible parts become hot during use. Care should be taken
to avoid touching heating elements. Children shall be kept away unless continuously
supervised.
•Do not use recycled paper products.
- They may contain impurities which may cause sparks and/or fires when used in
cooking.
•Do not rinse trays and racks by placing them in water just after cooking. This may
cause breakage or damage.
- Improper use could result in damage to the oven.
ENGLISH
Page 6

6
IMPORTANT SAFETY INSTRUCTIONS
WARNING
•The oven should be cleaned regularly and any food deposits should be removed.
- Failure to maintain the oven in a clean condition could lead to deterioration of the
surface that could adversely affect the life of the appliance and possibly result in a
hazardous situation.
•The door or the outer surface may get hot when the appliance is operating.
•Liquids heated in certain shaped containers (especially cylindrical-shaped containers)
may become overheated. The liquid may splash out with a loud noise during or after
heating or when adding ingredients (instant coffee. etc.), resulting in harm to the oven
and possible injury. In all containers, for best results, stir the liquid several times before
heating. Always stir liquid several times between reheatings.
•Arcing can occur during both Speed Cook and Microwave cooking. If arcing occur,
press the Clear/Off pad and correct the problem.
•Do not use coverings, containers or cooking bags made of foil, plastic, wax or paper
when speed cooking.
•Place food directly on the trays when cooking unless prompted by the oven to do
otherwise.
•Not all plastic wrap is suitable for use in upper ovens.
•Make sure to use suitable cookware during microwave cooking.
- Use microwave-safe plastics only and use them in strict compliance with the
cookware manufacturer’s recommendations.
- Do not microwave empty containers.
- Do not permit children to use plastic cookware without complete supervision.
FEDERAL COMMUNICATIONS COMMISSION RADIO FREQUENCY
INTERFERENCE STATEMENT (U.S.A. ONLY)
This equipment generates and uses ISM frequency energy and if not installed and used
properly, that is in strict accordance with the manufacturer's instructions, may cause
interference to radio and television reception. It has been type tested and found to comply
with limits for ISM Equipment pursuant to part 18 of FCC Rules, which are designed to
provide reasonable protection against such interference in a residential installation.
However, there is no guarantee that interference will not occur in a particular installation.
If this equipment does cause interference to radio or television reception, which can be
determined by turning the equipment off and on, the user is encouraged to try to correct the
interference by one or more of the following:
•Reorient the receiving antenna of the radio or television.
•Relocate the upper oven with respect to the receiver.
•Move the upper oven away from the receiver.
•Plug the upper oven into a different outlet so that the upper oven and the receiver are on
different branch circuits.
The manufacturer is not responsible for any radio or TV interference caused by
unauthorized modification to this upper oven. It is the responsibility of the user to correct
such interference.
Page 7

IMPORTANT SAFETY INSTRUCTIONS
7
PRECAUTIONS TO AVOID POSSIBLE EXPOSURE TO EXCESSIVE
MICROWAVE ENERGY
•Do not attempt to operate this oven with the door open since open-door operation can
result in harmful exposure to microwave energy. It is important not to defeat or tamper with
the safety interlocks.
•Do not place any object between the oven front face and the door or allow soil or cleaner
residue to accumulate on sealing surfaces.
•Do not operate the oven if it is damaged.
It is particularly important that the oven door closes properly and that there is no damage to the:
(1) door (bent),
(2) hinges and latches (broken or loosened),
(3) door seals and sealing surfaces.
•The oven should not be adjusted or repaired by anyone except properly qualified service
personnel.
SAFETY PRECAUTIONS (LOWER OVEN)
•DO NOT TOUCH HEATING ELEMENTS OR INTERIOR SURFACES OF OVEN. Heating
elements may be hot even though they are dark in color. Interior surfaces of an oven
become hot enough to cause burns. During and after use, do not touch or let clothing or
other flammable materials contact heating elements or interior surfaces of oven until they
have had sufficient time to cool. Other surfaces, such as oven vent openings and surfaces
near these openings, oven doors, and windows of oven doors, also get hot and may cause
burns if not allowed to cool.
•Use care when opening door. The hot air and steam that escape can cause burns to
hands, face and eyes. Let hot air or steam escape from the oven before removing or
replacing food in the oven.
•Be sure your appliance is properly installed and grounded by a qualified technician.
•Do not repair or replace any part of the appliance unless specifically recommended in the
manual. All other servicing should be performed by a qualified technician.
•Do not use harsh etching, abrasive cleaners or sharp metal scrapers to clean the oven
door glass since they can scratch the surface. Scratches may cause the glass to shatter.
•Do not leave items such as paper, cookware or food in the oven when not in use.
•Do not use this oven for purposes other than cooking.
•Never use paper products in the convection oven.
•Do not open the door when the oven is operating.
•Use oven gloves when removing the food and accessories after cooking as the oven &
accessories will be very hot.
•Scratching, hitting, jarring, or stressing the glass may weaken its structure causing an
increased risk of breakage at a later time.
ENGLISH
WARNING
If the door glass or oven heating unit of the oven are damaged, discontinue use of the
oven and call for service.
•Do not use plastic to cover food. Use foil or oven-safe lids only.
•Do not allow anyone to climb, stand or hang on the oven door. They could damage the
oven and even tip it over, causing severe personal injury.
•Do not line the oven walls, racks, bottom, or any other part of the oven with aluminum foil
or any other material. Doing so will disrupt heat distribution, produce poor baking results
and cause permanent damage to the oven interior (aluminum foil will melt to the interior
surface of the oven)
Page 8
8
IMPORTANT SAFETY INSTRUCTIONS
•Never attempt to dry a pet in the oven.
•Never use your appliance for warming or heating the room.
•Always use pot holders or oven mitts when removing food from the oven. Cookware will
be hot. Use only dry pot holders. Moist or damp pot holders on hot surfaces may result
in burns from steam. Do not let the pot holder touch hot heating elements. Do not use a
towel or other bulky cloth to remove food.
•Do not heat unopened food containers. Pressure in the containers may cause them to
burst which may result in injury.
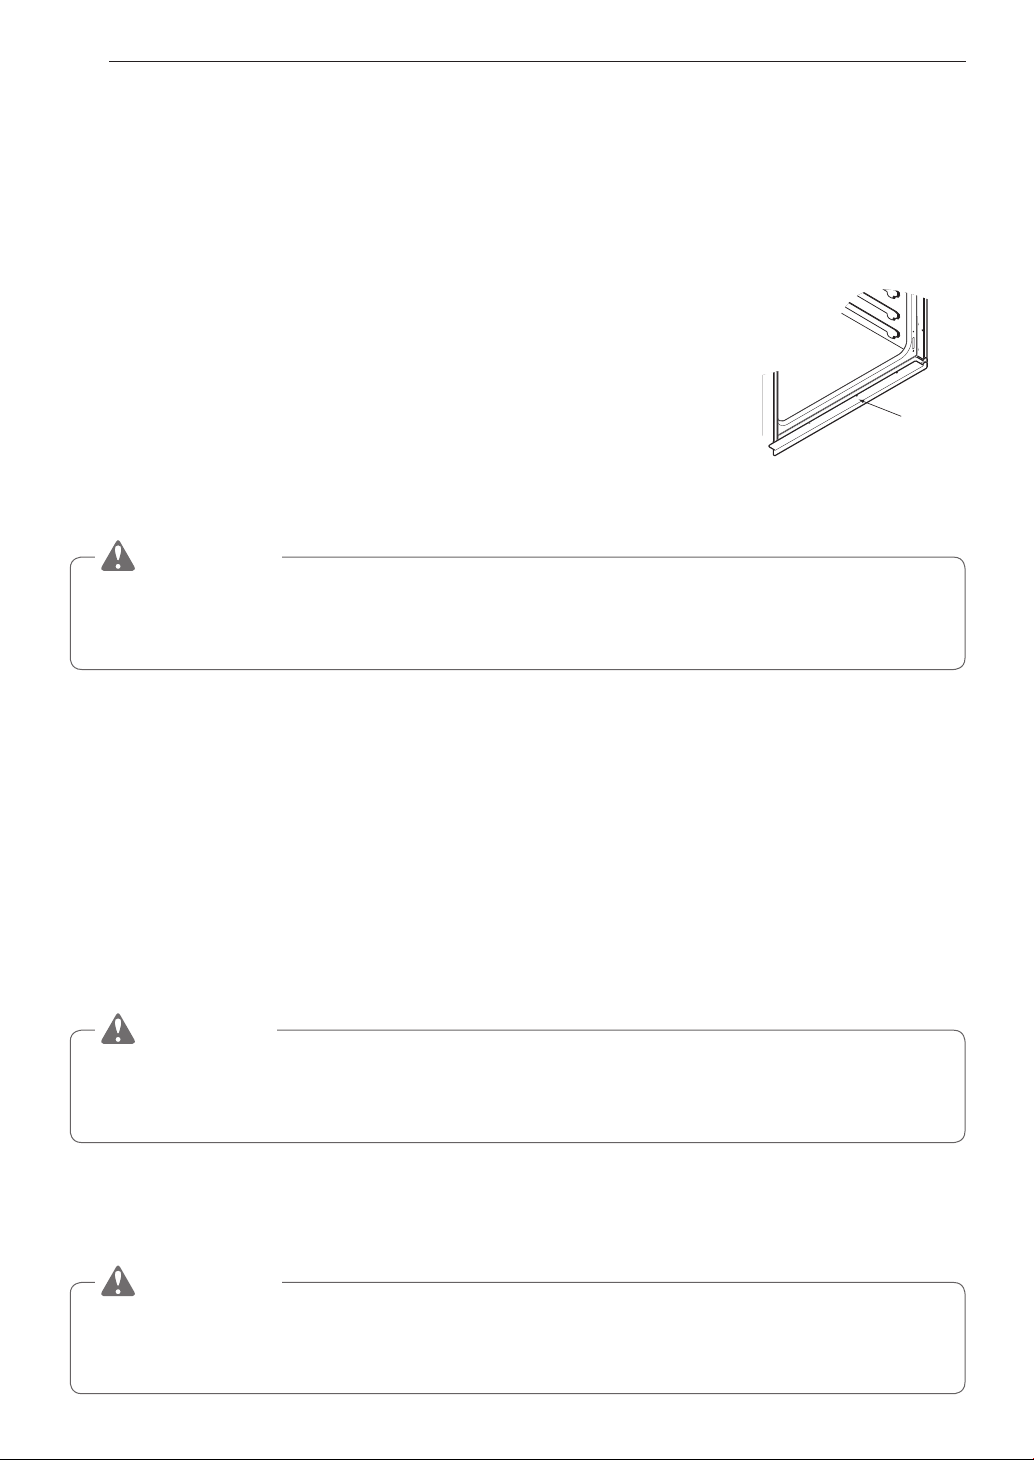
•Keep Oven Vent Ducts Unobstructed.
The oven vent could become hot during oven use. Never block
this vent and never place plastic or heat-sensitive items on or near
the vent.
Metal bottom
trim (Vent)
FLAMMABLE MATERIALS
WARNING
Be certain that all packing materials are removed from the appliance before operating.
Keep plastic, clothes, paper, and other flammable materials away from parts of the
appliance that may become hot.
•Do not store or use flammable material in the oven. Flammable materials include paper,
plastic, pot holders, linens, wall coverings, curtains, and gasoline or other flammable
vapors and liquids such as grease or cooking oil. These materials can be ignited when the
oven is in use.
•Wear proper apparel. Do not wear loose-fitting or hanging garments, which may ignite if
they contact hot surfaces, and cause severe burns.
•Do not use the oven for drying clothes. Only use the oven for its intended purpose.
•If a cabinet storage is provided directly above the ovens, place items that are not
frequently used and can be safely stored in an area subjected to heat. Temperatures may
be unsafe for volatile items such as flammable liquids, cleaners or aerosol sprays.
ELECTRICAL SAFETY
CAUTION
Be certain that all packing materials are removed from the appliance before operating.
Keep plastic, clothes, paper, and other flammable materials away from parts of the
appliance that may become hot.
•Always disconnect power from the appliance before servicing.
•Do not use aluminum foil or any other material to line the oven bottom.
Improper installation of these liners may result in a risk of electric shock or fire.
•Do not allow aluminum foil or the temperature probe to contact heating elements.
WARNING
Before replacing the oven light bulb, switch off the electrical power to the oven at the
main fuse or circuit breaker panel. Failure to do so can result in severe personal injury,
death, or electrical shock.
Page 9

IMPORTANT SAFETY INSTRUCTIONS
9
CHILD SAFETY
•Do not touch the hot surface between the upper oven door and the lower oven door on the
front of the oven while the oven is in operation. The surface becomes hot and can cause
burns and other injury.
•Do not leave small children unattended near the oven.
WARNING
Do not leave children alone or unsupervised near the appliance when it is in use or is
still hot. Children should never be allowed to sit or stand on any part of the appliance as
they could be injured or burned.
•Never let a child hang on the oven door.
•Do not allow children to crawl into the oven.
•Let hot utensils cool in a safe place, out of reach of small children.
•Children should not be allowed to play with controls or other parts of the appliance.
ENERGY SAVING TIPS
•Multiple-rack cooking saves time and energy. Whenever possible, cook foods requiring the
same cooking temperature together in one oven.
•For optimal performance and energy savings, follow the guides for proper rack and pan
placements.
•Reduce energy use by cleaning light oven soils with the EasyClean
self-clean.
•Avoid opening the oven door more than necessary during use. This helps the oven
maintain temperature, prevents unnecessary heat loss, and saves on energy use.
®
feature instead of
ENGLISH
SAFETY DURING USE
•Do not touch the oven racks while they are hot.
•Always place oven racks in desired location while oven is cool. If a rack must be moved
while the oven is hot, do not let the pot holder contact the hot heating element in the oven.
•Use caution with the Timed Cook or Delayed Timed Cook features. Use the automatic
timer when cooking cured or frozen meats and most fruits and vegetables. Foods that can
easily spoil, such as milk, eggs, fish, meat or poultry, should be chilled in the refrigerator
first. Even when chilled, they should not stand in the oven for more than 1 hour before
cooking begins, and should be removed promptly when cooking is complete. Eating
spoiled food can result in sickness from food poisoning.
•Accessible parts may become hot when the grill is in use.
•Do not place food or cookware on the bottom of the oven cavity. Doing so will cause
permanent damage to the oven bottom finish.
•Do not use water on grease fires. Should an oven fire occur, leave the oven door closed
and turn the oven off. If the fire continues, throw baking soda on the fire or use a fire
extinguisher. Do not put water or flour on the fire. Flour may be explosive and water can
spread a grease fire and cause personal injury.
•Pull the oven rack to the stop-lock position when loading and unloading food from the
oven. This helps prevent burns caused by touching hot surfaces of the door and oven
walls.
•Do not put your hand under the controller or between the door and metal bottom trim (vent)
during operation.
The outside of the oven can become very hot to the touch.
Page 10

10
IMPORTANT SAFETY INSTRUCTIONS
•Do not use the oven if a heating element develops a glowing spot during use or shows
other signs of damage. A glowing spot indicates the heating element may fail and present
a potential burn, fire, or shock hazard. Turn the oven off immediately and have the heating
element replaced by a qualified service technician.
•When using cooking or roasting bags in the oven, follow the manufacturer’s directions.
SAFETY WHEN CLEANING
•Open a window or turn on a ventilation fan or hood before self-cleaning.
•If the oven is heavily soiled with oil, self-clean the oven before using the oven again. The
oil could cause a fire.
•Wipe up heavy soil on the bottom of the oven before using the Self Clean function.
•Do not use oven cleaners. Commercial oven cleaner or oven liner protective coating of
any kind should not be used in or around any part of the oven.
•Never keep pet birds in the kitchen. The health of birds is extremely sensitive to the fumes
released during an oven self-clean cycle. Fumes may be harmful or fatal to birds. Move
birds to a well-ventilated room.
•Clean in the self-clean cycle only parts listed in this manual. Before self-cleaning the oven,
remove the broiler pan, all oven racks, the meat probe and any utensils or food from the
oven.
•Important Instruction. The oven displays an F error code and sounds three long beeps
during the self-cleaning process if it malfunctions in the self-clean mode. Switch off the
electrical power to the main fuse or breaker and have the oven serviced by a qualified
technician.
•Never pour cold water over a hot oven for cleaning. Doing so may cause the oven to
malfunction.
•Make sure oven lights are cool before cleaning.
•Do not clean door gasket. The door gasket is essential for a good seal. Care should be
taken not to rub, damage, or move the gasket.
•If there is a fire in the oven during self-clean, turn the oven off and wait for the fire to go
out. Do not force the door open. Introduction of fresh air at self-clean temperatures may
lead to a burst of flame from the oven. Failure to follow this instruction may result in severe
burns.
•DO NOT block the oven vent during operation. This can
damage the electric parts of the oven. Air must be able to
move freely. The metal bottom trim (vent) should be properly
assembled on the front bottom of oven before installing the oven
door.
Metal bottom trim
(Vent)
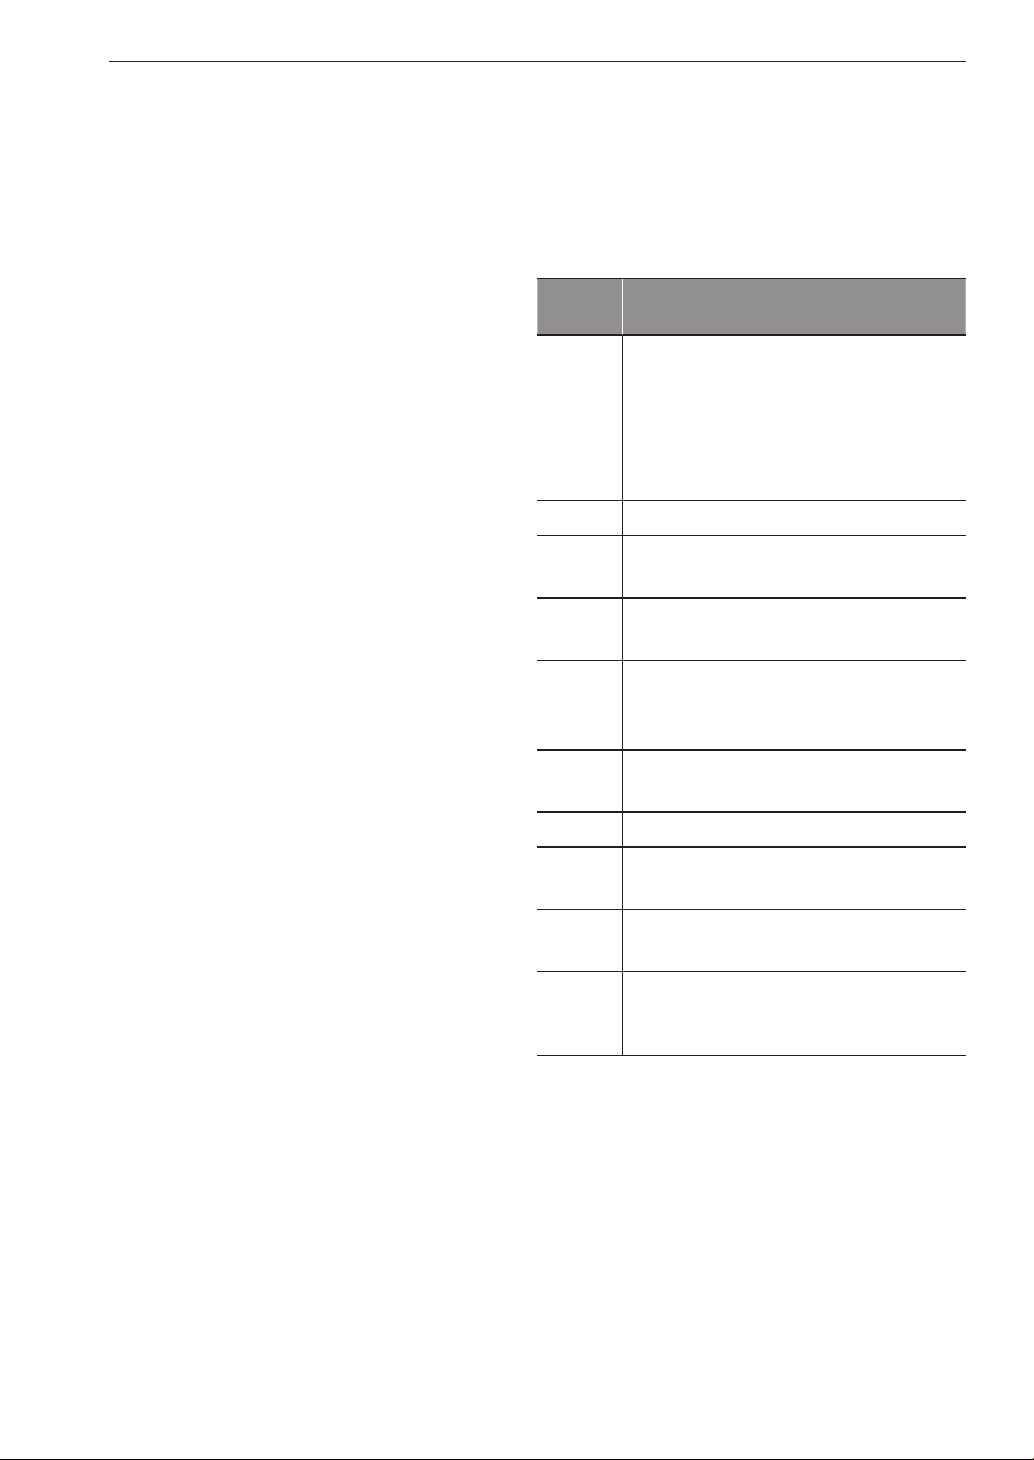
COOK MEAT AND POULTRY THOROUGHLY
•To protect against food-borne illnesses, cook meat and poultry thoroughly. The USDA has
indicated the following as safe minimum internal temperatures for consumption:
•Ground beef: 160 °F
•Poultry: 165 °F
•Beef, veal, pork, or lamb: 145 °F
•Fish/seafood: 145 °F
Page 11

PRODUCT OVERVIEW
11
PRODUCT OVERVIEW
Parts
Oven
controller
Upper
oven door
Lower
oven door
Accessories
Accessories for Upper Oven
The turntable rotates in both directions to help food cook more evenly. Do not operate the microwave oven
without the glass tray in place.
Model & serial
number plate
Gasket
Rack
ENGLISH
(For the Convection Bake, Broil
Rack
and Speed Cook function)
(For the Convection Bake, Broil
Metal Tray
and Speed Cook function)
Glass Tray
(For the Microwave and
Defrost function)
Shaft Rotating Ring
Accessories for Lower Oven
Included Accessories
Standard rack (2ea) Gliding rack (1ea) Grid (1ea) Broiler Pan (1ea)
Non-scratch scouring pad (1ea) Meat probe (1ea)
Accessories for Installation
Wood Screws - Black (4X14) (6ea)
For Lower Mounting
(4 needed for installation and 2 extra’s)
NOTE
•Contact LG Customer Service at 1-800-243-0000 if any accessories are missing.
•For your safety and for extended product life, only use authorized components.
•The manufacturer is not responsible for product malfunction or accidents caused by the use of separately
purchased, unauthorized components or parts.
•The images in this guide may be different from the actual components and accessories, which are subject
to change by the manufacturer without prior notice for product improvement purposes.
Wood Screws - Silver (4X14) (6ea)
For Upper Mounting
(4 needed for installation and 2 extra’s)
Page 12
12
OPERATION
OPERATION
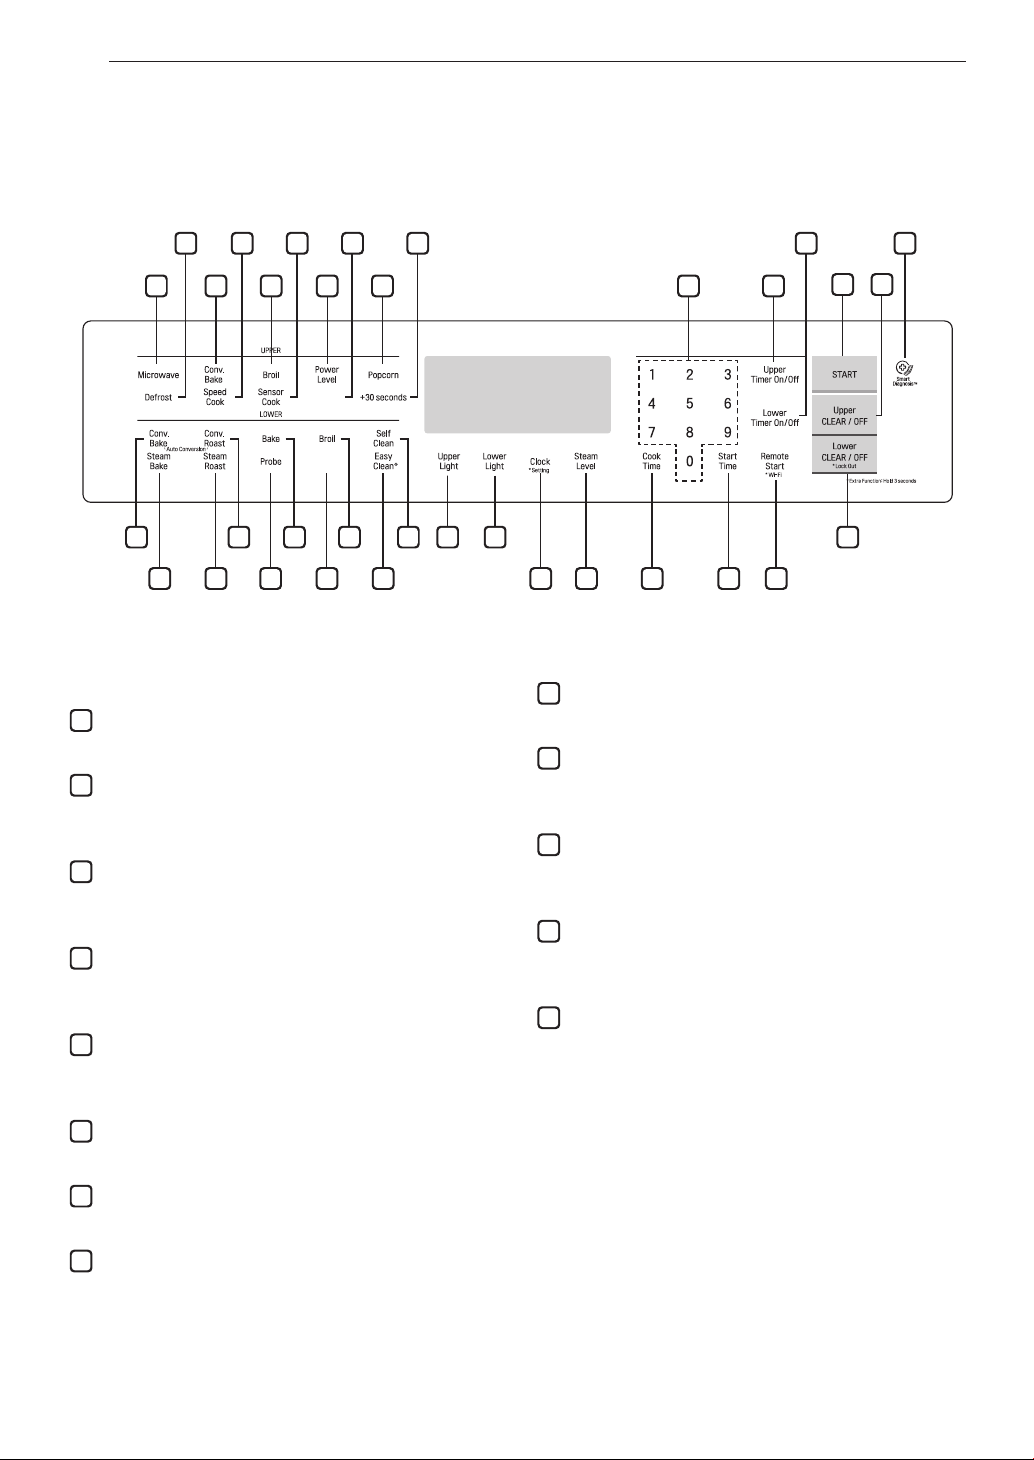
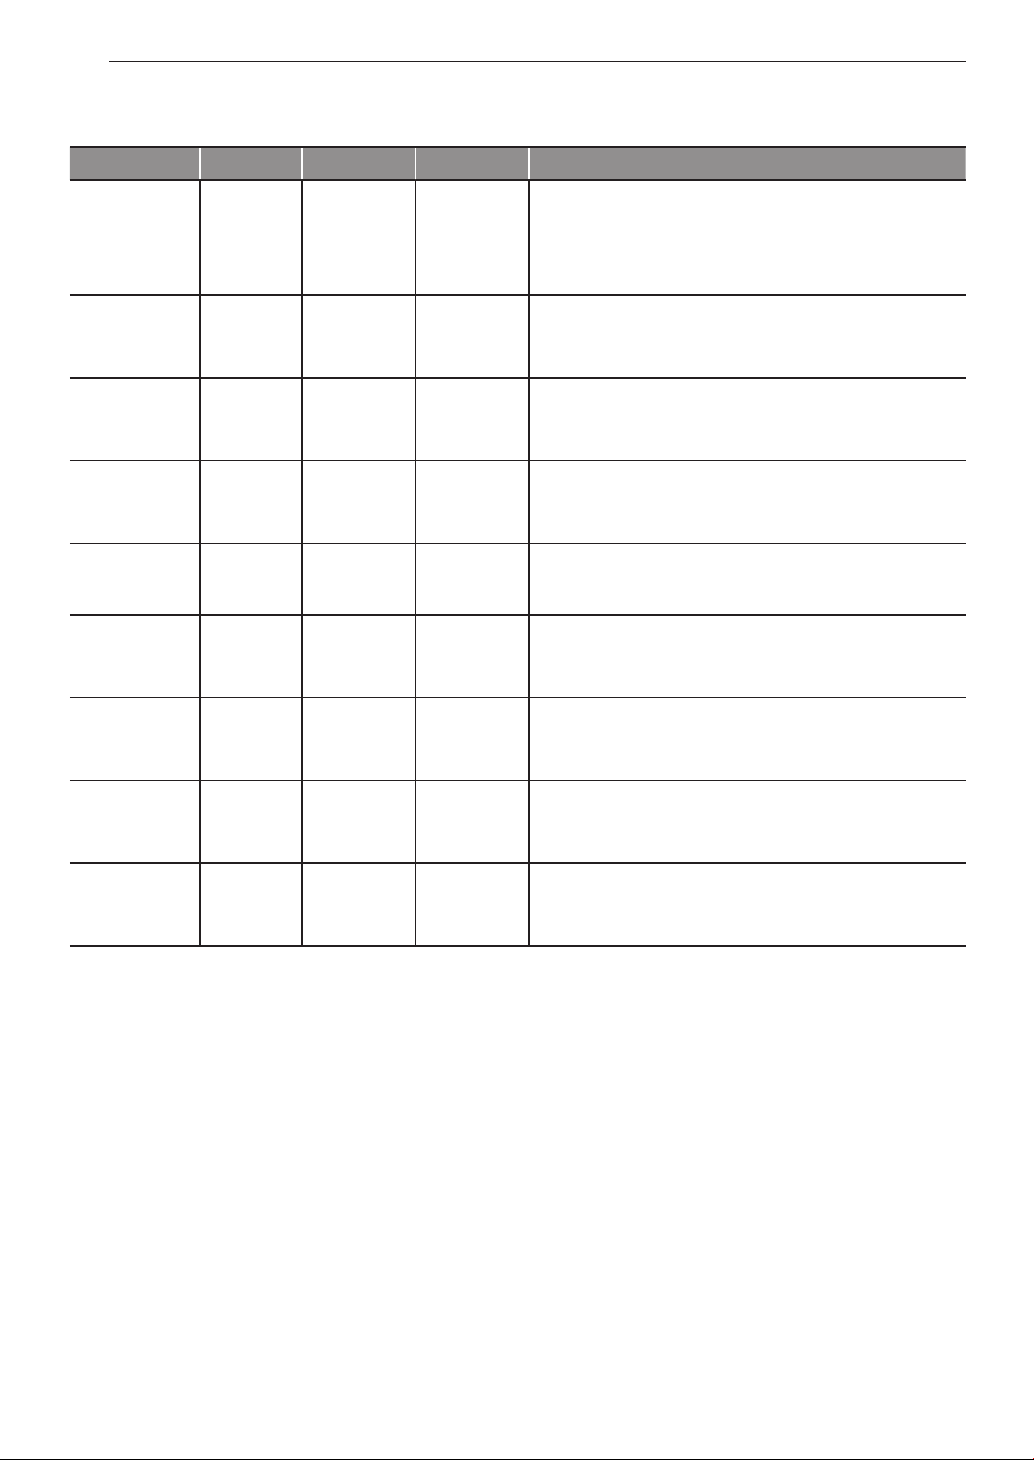
Control Panel Overview
9 10 11 12 13 14 34
6 7 8
More
Mode
More
Mode
22 23 24 25 26 27 28 29 30 32
UPPER OVEN
1
Upper Timer On/Off
Use to set or cancel the timer of the upper oven.
2
Upper Light
Use to turn the oven lights of the upper oven on and
off.
3
Upper Clear/Off
Use to stop cooking, cancel settings of the upper
oven.
4
Microwave
Use to select the Microwave function of the upper
oven.
5
Conv. Bake
Use to select the Convection Bake function of the
upper oven.
6
Broil
Use to select the Broil function of the upper oven.
7
Power Level
Use to select a cooking power level.
8
Popcorn
Use to select the Popcorn function of the upper oven.
314 5 1
1517 18 19 20 21
9
Defrost
Use to select the Defrost function of the upper oven.
10
Speed Cook
Use to select the Speed Cook function of the upper
oven.
11
Sensor Cook
Use to select the Sensor Cook function of the upper
oven.
12
More Mode
Use to select the More Mode function of the upper
oven.
13
+30 seconds
Use to add 30 seconds of cooking time each time you
touch it.
33 3
162
Page 13

OPERATION
13
LOWER OVEN
14
Lower Timer On/Off
Use to set or cancel the timer of the lower oven.
15
Lower Light
Use to turn the oven lights of the lower oven on and
off.
16
Lower Clear/Off
Use to stop cooking, cancel settings of the lower
oven. Press and hold button for three seconds to
activate LOCKOUT.
17
Conv. Bake
Use to select the Convection Bake function of the
lower oven.
18
Conv. Roast
Use to select the Convection Roast function of the
lower oven.
19
Bake
Use to select the Bake function of the lower oven.
20
Broil
Use to select the Broil function of the lower oven.
21
Self Clean
Use to select the Self Clean function of the lower
oven.
22
Steam Bake
Use to select the Steam Bake function of the lower
oven.
23
Steam Roast
Use to select the Steam Roast function of the lower
oven.
24
Probe
Use to select the Probe function of the lower oven.
25
More Mode
Use to select the More Mode function of the lower
oven.
26
EasyClean®
Use to select the Easy Clean function of the lower
oven.
COMMON
27
Clock
Use to set the time of day. Press and hold button for
three seconds to select and adjust oven settings.
28
Steam Level
Use to select and adjust steam level.
29
Cook Time
Use to set the length of the cook time. (Bake, Conv.
Bake/Roast only)
30
Start Time
Use to set delay time. (Bake, Conv. Bake/Roast, Self
Clean only)
31
Number Pads
Use to enter a temperature and all times.
32
Remote Start
Use to select the Remote Start function. Press and
hold button for three seconds to connect it to a Wi-Fi
network.
33
Start
Use to START all functions in the oven.
34
Smart Diagnosis™
Use with the Smart Diagnosis feature.
ENGLISH
Flashing Time
If your oven displays a flashing clock, touch Clock and reset the time, or touch any key to stop the flashing.
Page 14

14
OPERATION
Changing Oven Settings
Clock
The clock must be set to the correct time of day in
order for the automatic oven timing functions to work
properly.
Touch Clock. The display shows CLO in red.
1
Touch the numbers to enter the time. For
2
example, to set the clock for 10:30, touch the
numbers: 1, 0, 3 and 0.
Touch Start.
3
NOTE
•The time of day cannot be changed during a
timed baking or self-clean cycle.
•To check the time of day when the display is
showing other information, touch Clock.
•If no other keys are touched within 25 seconds
of touching Clock, the display reverts to the
original setting.
•If the display time is blinking, you may have
experienced a power failure. Reset the time.
Timer On/Off
The Upper or Lower Timer On/Off serves as an extra
timer in the kitchen that beeps when the set time has
run out. It does not start or stop cooking.
The Upper or Lower Timer On/Off feature can be
used during any of the other oven control functions.
The Upper and Lower Timer can be operated
independently of each other.
Setting the Timer
For example, to set 5 minutes
Touch Upper Timer On/Off or Lower Timer On/
1
Off once.
0:00 appears and Timer flashes in the display.
Touch 5.
2
0:05 appears in the display.
Touch Timer On/Off to start the Timer. The
3
remaining time countdown appears in the
display.
NOTE
If Upper Timer On/Off or Lower Timer On/Off is
not touched, the timer returns to the time of day.
When the set time runs out, End shows in the
4
display. The indicator tones sound every 15
seconds until Upper Timer On/Off or
Lower Timer On/Off is touched.
NOTE
•If the remaining time is not in the display, recall
the remaining time by touching Upper Timer
On/Off or Lower Timer On/Off.
•Touch Upper Timer On/Off or Lower Timer
On/Off twice to set the time in minutes and
seconds.
•Touch Upper Timer On/Off or Lower Timer
On/Off once to set the time in hours and
minutes.
Canceling the Timer
Touch Upper Timer On/Off or Lower Timer
1
On/Off once.
The display returns to the time of day.
Page 15

OPERATION
15
Settings
Press and hold Clock key for three seconds to select
and adjust oven settings.
The Setting key allows you to:
•set the hour mode on the clock (12 or 24 hours)
•enable/disable convection auto conversion
•adjust the oven temperature
•select display language
•activate/deactivate the preheating alarm light
•set the beeper volume
•switch the temperature scale between Fahrenheit
and Celsius
•disable/enable demo mode
Setting the Hour Mode
The control is set to use a 12-hour clock. To reset the
clock to 24-hour mode, follow the steps below.
Touch and hold Clock until CLO appears in the
1
display.
Touch 1 to select a 12-hour clock, or 2 to select
2
a 24-hour clock.
Touch Start to accept the change.
3
Setting Convection Auto Conversion
(Only for Lower Oven)
When Conv. Bake and Conv. Roast are selected,
Convection Auto Conversion automatically converts the
standard recipe temperature entered to a convection
temperature by subtracting 25 °F / 14 °C. This
auto-converted temperature shows on the display. For
example, select Conv. Bake, enter 350 °F, and 325 °F
shows on the display after preheat.
Convection Auto Conversion is enabled by default. To
change the setting, follow these instructions.
Touch and hold Clock until CLO appears in the
1
display. Then touch Clock repeatedly until Auto
appears in the display.
Touch 1 to enable or 2 to disable auto
2
conversion.
Touch Start to accept the change.
3
Adjusting the Oven Temperature
(Only for Lower Oven)
Your new oven may cook differently from the one
it replaced. Use your new oven for a few weeks to
become more familiar with it before changing the
temperature settings. If after familiarizing yourself with
the new oven, you still think that it is too hot or too
cold, you can adjust the oven temperature yourself.
NOTE
To begin, either raise or lower the thermostat
15 °F (8 °C). Try the oven with the new setting. If
the oven still needs adjustment, raise or lower the
thermostat again, using the first adjustment as a
gauge. For example, if the adjustment was too
much, raise or lower the thermostat 10 °F (5 °C).
If the adjustment was not enough, raise or lower
the thermostat 20 °F (12 °C). Proceed in this way
until the oven is adjusted to your satisfaction.
Touch and hold Clock until CLO appears in the
1
display. Then touch Clock repeatedly until L_AJ
appears in the display.
Use the number keys to enter the number
2
of degrees you want to adjust the oven
temperature.
Adjust the temperature either up or down by
3
touching Clock repeatedly to toggle between
plus (+) or minus (-).
Touch Start to accept the change.
4
NOTE
•This adjustment does not affect the broiling
or Self Clean temperatures. The adjustment
is retained in memory after a power failure.
The oven temperature can be increased (+) or
decreased (-) as much as 35 °F or 19 °C.
•Once the temperature is increased or
decreased, the display shows the adjusted
temperature until it readjusts.
Selecting the Display Language
The oven control is set to display in English but can
be changed to display in Spanish or French.
Touch and hold Clock until CLO appears in the
1
display. Then touch Clock repeatedly until Lng
appears in the display.
ENGLISH
Touch 1 for English, 2 for Spansh, or 3 for
2
French.
Touch Start to accept the change.
3
Page 16

16
OPERATION
Turning the Preheat Alarm Light On/Off
(Only for Lower Oven)
When the oven reaches its set-temperature, the
preheating alarm light flashes 5 times or until the
oven door is opened.
You can activate or deactivate the preheating alarm
light.
Touch and hold Clock until CLO appears in the
1
display. Then touch Clock repeatedly until PrE
appears in the display.
Touch 1 to turn on and 2 to turn off the alarm.
2
Touch Start to accept the change.
3
Adjusting the Beeper Volume
Touch and hold Clock until CLO appears in the
1
display. Then touch Clock repeatedly until BEEP
appears in the display.
Touch 1 for Loud, 2 for Low, and 3 for Mute.
2
Touch Start to accept the change.
3
Selecting Fahrenheit or Celsius
Set the oven temperature display to show either
Fahrenheit (°F) or Celsius (°C) units. The oven
defaults to Fahrenheit unless changed by the user.
Touch and hold Clock until CLO appears in the
1
display. Then touch Clock repeatedly until Unit
appears in the display.
Demo Mode
Demo Mode for showroom use only. The oven will not
heat up.
Touch and hold Clock until CLO appears in the
1
display. Then touch Clock repeatedly to select
demo mode.
Touch 1 to enable and 2 to disable the demo
2
mode.
Touch Start to accept the change.
3
NOTE
•When Demo Mode is on, the appliance will not
heat up.
•The oven Demo Mode icon appears in the
display if the Demo Mode is on.
Lockout
The Lockout feature automatically locks the lower
oven door and prevents most oven controls on both
ovens from being turned on. It does not disable the
clock, timer or the interior oven light.
Touch and hold Lower Clear/Off for three
1
seconds.
The lock melody sounds, OVEN LOCKOUT
2
appears in the display and the lock
the display.
blinks in
Touch 1 for °F (Fahrenheit) or 2 for °C (Celsius).
2
Touch Start to accept the change.
3
Once the oven door is locked, the lock
3
indicator stops blinking and remains on.
To deactivate the Lockout feature, touch and
4
hold Lower Clear/Off for three seconds. The
unlock melody sounds and the door and the
controls unlock.
Page 17

OPERATION
17
Start Time (Delayed Timed Cook)
The automatic timer of the Delayed Timed Cook
function turns the oven on and off at the time you
select. This feature can be used with the Bake, Conv.
Bake and Conv. Roast modes.
Setting a Delayed Timed Cook
For example, to bake at 300 °F and delay the start
of baking until 4:30, first set the clock for the correct
time of day.
Touch Bake. 350 °F appears in the display.
1
Set the temperature: touch 3, 0 and 0.
2
Touch Cook Time and set the baking time.
3
Touch Start Time.
4
Set the start time: touch 4, 3 and 0 for 4:30.
5
Touch Start. A short beep sounds and Delay
6
Timed and the start time appear in the display.
The oven begins baking at the set start time.
NOTE
•To cancel the Delayed Timed Cook function,
touch Clear/Off at any time.
•To change the cooking time, repeat step 3 and
touch Start.
•If the oven clock is set as a 12-hour clock, you
can delay the cook time for 12 hours. If the
oven clock is set as a 24-hour clock, you can
delay the cook time for 24 hours.
The oven will continue to cook for the set amount
of time and then turn off automatically. When the
cooking time has elapsed:
•End and the time of day show in the display.
•The cook end indicator tone sounds every 60
seconds until Clear/Off is touched.
Cook Time (Timed Cook)
Set the oven to cook for a specific length of time
using the Timed Cook feature. This feature can only
be used with the Speed Cook, Bake, Conv.Bake
and Conv.Roast modes.
Setting the Cook Time Function
For example, to bake at 300 °F for 30 minutes, first
set the clock to the correct time of day.
Touch Bake. 350 °F appears in the display.
1
Set the temperature.
2
Touch 3, 0 and 0.
Touch Cook Time. Timed flashes in the display.
3
Bake, 0:00 and 300 °F appear in the display.
Set the baking time: touch 3 and 0 (for 30
4
minutes). The baking time can be set for any
amount of time between 1 minute and 11 hours
and 59 minutes.
Touch Start.
5
The oven will continue to cook for the set amount
of time and then turn off automatically. When the
cooking time has elapsed:
•END OF CYCLE and the time of day show in the
display.
•The cook end indicator tone sounds every 60
seconds until Clear/Off is touched.
Changing the Cook Time during Cooking
For example, to change the cook time from 30
minutes to 1 hour and 30 minutes, do the following.
Touch Cook Time.
1
Change the baking time: touch 1, 3, 0.
2
Touch Start to accept the change.
3
ENGLISH
CAUTION
•Use the automatic timer when cooking cured or
frozen meats and most fruits and vegetables.
Foods that can easily spoil, such as milk, eggs,
fish, meat or poultry, should be chilled in the
refrigerator. Even when chilled, they should
not stand in the oven for more than 1 hour
before cooking begins, and should be removed
promptly when cooking is completed.
•Eating spoiled food can result in sickness from
food poisoning.
Page 18

18
OPERATION
Using the Upper Oven
Before Using the Upper Oven
NOTE
•To avoid risk of personal injury or property
damage, do not use stoneware, metal cookware,
or metal rimmed cookware in the oven.
•To program the oven, make sure you touch
the center of each key firmly since the areas
between the keys will not activate the oven.
A tone will sound each time a key is touched
correctly. Don’t touch several keys at once.
•Do not strike the control panel with silverware,
cookware, etc. Breakage may occur.
•Always use caution when taking cookware out
of the oven. Some dishes absorb heat from the
cooked food and may be hot. See Cookware
Guide earlier in this section for more information.
Microwave Cookware Guide
NOTE
•Do not rinse containers by placing them in water
immediately after cooking. This may cause
breakage. Also, always allow the turntable to
cool before removing it from the oven.
•Never operate the oven when it is empty. Food
or water should always be in the oven during
operation to absorb the microwave energy.
•Do not use the oven to dry newspapers or
clothes. They may catch fire.
•Use thermometers that have been approved for
microwave oven cooking.
•The turntable must always be in place when
you operate the oven.
•Do not use your microwave oven to cook eggs
in the shell. Pressure can build up inside the
shell, causing it to burst.
Upper Oven Light
Touch Upper Light to turn the upper oven light
1
on or off.
Use Do Not Use
OVENPROOF GLASS
(treated for high intensity heat):
utility dishes, loaf dishes, pie plates, cake
plates, liquid measuring cups, casseroles and
bowls without metallic trim.
CHINA:
bowls, cups, serving plates, and platters
without metallic rims.
PLASTIC:
Plastic wrap (as a cover)- lay the plastic wrap
loosely over the dish and press it to the sides.
Vent plastic wrap by turning back one edge
slightly to allow excess steam to escape. The
dish should be deep enough so that the plastic
wrap will not touch the food. As the food heats
it may melt the plastic wrap wherever the wrap
touches the food.
Use plastic dishes, cups, semi-rigid freezer
containers and plastic bags only for short
cooking time. Use these with care because the
plastic may soften from the heat of the food.
PAPER:
Paper towels, waxed paper, paper napkins,
and paper plates with no metallic rim or design.
Check the manufacturer's label before using in
the microwave oven.
NOTE:
Do not use recycled paper products in the
microwave oven. They sometimes contain
impurities that cause arcing and sparking.
METAL CONTAINERS:
Metal shields the food from microwave energy and produces
uneven cooking. Also avoid metal skewers, thermometers, or foil
trays. Metal containers can cause arcing, which can damage the
microwave oven.
METAL DECORATION:
Metal-rimmed or metal-banded dinnerware, casserole dishes, etc.
The metal rim interferes with normal cooking and may damage the
oven.
ALUMINUM FOIL:
Avoid large sheets of aluminum foil because they hinder cooking
and may cause harmful arcing. Use small pieces of foil to shield
poultry legs and wings. Keep ALL aluminum foil at least 1 inch from
the side walls and door of the oven.
WOOD:
Wooden bowls and boards will dry out and may split or crack when
you use them in the microwave oven. Baskets react in the same way.
TIGHTLY COVERED COOKWARE:
Be sure to leave openings for steam to escape from covered
containers. Pierce plastic pouches of vegetables or other food
items before cooking. Tightly closed pouches could explode.
BROWN PAPER:
Avoid using brown paper bags.
They absorb too much heat and could burn.
FLAWED OR CHIPPED COOKWARE:
Any container that is cracked, flawed, or chipped may break in the
oven.
METAL TWIST TIES:
Remove metal twist ties from plastic or paper bags.
They become hot and could cause a fire.
Page 19

OPERATION
19
Microwave Cooking Tips
Keeping an Eye on Things
Always watch your food while it cooks. The light
inside the upper oven turns on automatically when
the oven is cooking so you can monitor the cooking
process. Directions given in recipes to elevate, stir,
and the like should be thought of as the minimum
steps recommended. If the food seems to be cooking
unevenly, simply make the necessary adjustments
you think appropriate to correct the problem.
Factors Affecting Microwave Cooking Times
Many factors affect cooking times. The temperature
of ingredients used in a recipe makes a big difference
in cooking times. For example, a cake made with
ice-cold butter, milk, and eggs will take considerably
longer to bake than one made with ingredients that
are at room temperature. Some recipes, particularly
those for bread, cake, and custards, recommend that
food be removed from the oven when they are slightly
undercooked.
This is not a mistake. When allowed to stand, usually
covered, these foods will continue to cook outside of
the oven as the heat trapped within the outer portions
of the food gradually travels inward. If the food is left
in the oven until it is cooked all the way through, the
outer portions will become overcooked or even burnt.
Practice will improve your ability to estimate both
cooking and standing times for various foods.
Density of Food
Light, porous food such as cakes and breads cook
more quickly than heavy, dense foods such as
roasts and casseroles. You must take care when
microwaving porous food so that the outer edges do
not become dry and brittle.
Height of Food
The upper portion of tall foods, particularly roasts, will
cook more quickly than the lower portion.
Therefore, it is wise to turn tall food several times
during cooking.
Moisture Content of Food
Because the heat generated from microwaves
causes moisture to evaporate, relatively dry food
such as roasts and some vegetables should either
be sprinkled with water prior to cooking or covered to
retain moisture.
Bone and Fat Content of Food
Bones conduct heat and fat cooks more quickly than
meat. Care must be taken when cooking bony or fatty
cuts of meat in order to prevent unevenly cooked or
overcooked meat.
Quantity of Food
The number of microwaves in your oven remains
constant regardless of how much food is being
cooked. Therefore, the more food you place in the
oven, the longer the required cooking time.
Remember to decrease cooking times by at least one
third when halving a recipe.
Shape of Food
Microwaves penetrate only about 3/4 of an inch
(2 cm) into food. The interior portion of thick foods is
cooked as the heat generated on the outside travels
inward. Only the outer edge of food is cooked by
microwave energy; the rest is cooked by conduction.
The worst possible shape for a food that is to be
microwaved is a thick square.
The corners will burn long before the center is even
warm. Round thin foods and ring-shaped foods cook
most successfully in the microwave.
Covering
A cover traps heat and steam which causes food to
cook more quickly. Use a lid or microwave cling film
with a corner folded back to prevent splitting.
Covering with Parchment Paper
Parchment paper (not waxed paper) is microwave
safe. Because it makes a looser cover than a lid or
clingfilm, greaseproof paper allows the food to dry out
slightly.
Stirring
Stirring is one of the most important of all microwaving
techniques. In conventional cooking, food is stirred for
the purpose of blending. Microwaved food, however,
is stirred in order to spread and redistribute heat.
Always stir from the outside towards the centre as the
outside of the food heats first.
Placing Thicker Portions Facing Outward
Place thicker cuts or portions of meat, poultry, and
fish toward the outer edge of the baking dish so they
absorb the most microwave energy and the food
cooks more evenly.
ENGLISH Using the Upper Oven
Page 20
20
OPERATION
Shielding
Strips of aluminium foil (which block microwaves)
can be placed over the corners or edges of square
and rectangular foods to prevent those portions from
overcooking. Never use too much foil and make sure
the foil is secured to the dish or it may cause arcing
in the oven, especially if the foil passes too closely to
the walls of the oven during rotation.
Elevating
Thick or dense foods can be elevated so that
microwaves can be absorbed by the underside and
center of the foods.
Piercing
Foods enclosed in a shell, skin or membrane are
likely to burst in the oven unless they are pierced
prior to cooking. Such foods include yolks and whites
of eggs, clams, oysters, potatoes, and other whole
vegetables and fruits.
Testing if Cooked
Microwaves cook food quickly, so test food for
doneness frequently. Some foods are left in the
microwave until completely cooked, but most foods,
including meats and poultry, should be removed from
the oven while still slightly undercooked and allowed
to finish cooking during standing time. The internal
temperature of foods will rise between 5 °F (3 °C) and
15 °F (8 °C) during standing time.
Microwave Power Levels
This upper oven is equipped with 10 power levels to
give you maximum flexibility and control over cooking.
See the table for suggested power levels for various
foods.
Microwave Power Levels Chart
Power
Level
P-HI
(100 %)
P-90 •Reheating rice, pasta, & vegetables.
P-80 •Reheating prepared foods quickly.
P-70 •Cooking egg, milk and cheese dishes.
P-60 •Cooking veal.
P-50 •Cooking ham, whole poultry and lamb.
P-40 •Thawing meat, poultry and seafood.
•Boiling water.
•Browning ground beef.
•Making candy.
•Cooking poultry pieces, fish, &
vegetables.
•Cooking tender cuts of meat.
•Reheating sandwiches.
•Melting chocolate.
•Cooking whole fish.
•Cooking puddings and custard.
•Cooking rib roast and sirloin tip.
Use
P-30 •Cooking less tender cuts of meat.
•Cooking pork chops and roasts.
P-20 •Taking chill out of fruit.
•Softening butter.
P-10 •Keeping casseroles and main dishes
warm.
•Softening butter and cream cheese.
Page 21

OPERATION
21
Cooking at High Power Level
Example: To cook food for 8 minutes 30 seconds.
Touch Microwave.
1
Set the cook time: Touch 8, 3 and 0.
2
Touch Start to start cooking.
3
•When the cook time is over a melody sounds
and END OF CYCLE displays.
Cooking at Lower Power Levels
HIGH power cooking does not always give the best
results with foods that need slower cooking, such as
roasts, baked goods, or custards. The oven has 9
power settings in addition to HIGH.
Example: To cook food for 7 minutes 30 seconds
at 70% power.
Touch Microwave.
1
Set the cook time: Touch 7, 3 and 0.
2
Set the power level: Touch Power Level and 7.
3
Touch Start to start cooking.
4
•When the cook time is over a melody sounds
and END OF CYCLE displays.
+30 seconds
Use this to quickly add 30 seconds to microwave
cooking time.
Press the button when the oven is off to
1
immediately start the microwave function for 30
seconds at High power.
Defrost
The oven has 4 preset defrost cycles. The defrost
feature provides the best defrosting method for frozen
foods. The Defrost Table shows the suggested defrost
cycle for various foods.
The Defrost function conveniently chimes partway
through the defrost cycle to remind you to check, turn
over, separate, or rearrange the food for best results.
1 Meat
2 Poultry
3 Fish
4 Bread
Setting the Defrost Function
Example: To defrost 1.2 pounds of meat.
Touch Defrost.
1
Touch 1 to select MEAT.
2
Set the weight : Touch 1, 2. (for 1.2 lbs)
3
Touch Start to start cooking.
4
When cooking is complete, touch Clear/Off.
5
NOTE
•The countdown appears in the display after
START is pressed. The oven chimes once,
partway through the defrost cycle.
•At the chime, open the oven door and turn the
food over. Remove any food that has thawed.
Return the still frozen items to the oven and
touch Start to complete the defrost cycle.
ENGLISH Using the Upper Oven
Press Upper Clear/Off to pause the oven. Press
2
it again to cancel cooking.
Page 22

22
OPERATION
Weight Conversion Table
Most food weights are given in pounds and ounces.
If using pounds, food weights must be entered
into Auto Defrost in pounds and tenths of pounds
(decimals).
Use the following table if necessary to convert food
weights to decimals.
Equivalent Weight
OUNCES
1.6
3.2
4.8
6.4
8.0
9.6
11.2
12.8
14.4
16.0
DECIMAL WEIGHT
.10
.20
.30
.40
.50 One-Half Pound
.60
.70
.80
.90
1.00 One Pound
Defrost Table
Category Food to be Defrosted
Meat
(dEF1)
0.1 - 6.0 lbs
Poultry
(dEF2)
0.1 - 6.0 lbs
Beef
Ground beef, round steak, stew
cubes, tenderloin steak, pot roast,
rib roast, rump roast, chuck roast,
hamburger patties
Lamb
Chops, rolled roast
Pork
Chops, hotdogs, spareribs,
country-style ribs, rolled roast,
sausage
Veal
Cutlets (1 lb, ½ inch thick)
When BEEP, turn food over.
After defrosting, let stand for 5 - 15
minutes.
Poultry
Whole, cut-up, breast (boneless).
Rinse chicken cavity with tap
water and let stand for 60 minutes
after cooking for better results.
Cornish Hens
Whole
Turkey
Breast
Fish
(dEF3)
0.1 - 4.0 lbs
Bread
(dEF4)
0.1 - 2.0 lbs
When BEEP, turn food over.
After defrosting , let stand for 60
minutes.
Fish
Fillets, whole steaks
Shellfish
Crab meat, lobster tails, shrimp,
scallops
When BEEP, turn food over.
After defrosting, let stand for 5 - 10
minutes.
Sliced bread, buns, baguettes, etc.
Separate slices and place between
paper towels or on flat plate.
When BEEP, turn food over.
After defrosting, let stand for 1 - 2
minutes.
Page 23

OPERATION
23
Defrosting Tips
•When using Defrost, the weight to be entered is
the net weight in pounds and tenths of pounds (the
weight of the food minus the container).
•Before starting, remove the metal twist-ties which
often come with frozen food bags, and replace
them with strings or elastic bands.
•Open containers such as cartons before they are
placed in the oven.
•Remove fish, shellfish, meat, and poultry from
its original wrapping paper or plastic package.
Otherwise, the wrap will hold steam and juice close
to the foods, which can cause the outer surface of
the foods to cook.
•If food is foil wrapped, remove foil and place the
food in a suitable container.
•Slit the skins, if any, of frozen food such as
sausage.
•Bend plastic pouches of food to ensure even
defrosting.
•Place foods in a shallow container or in a
microwave roasting dish to catch the drippings.
•Always underestimate defrosting time. Food
should still be somewhat icy in the center when
removed from the oven. If defrosted food is still icy
in the center, return it to the upper oven for more
defrosting.
•The length of defrosting time varies according to
how solidly the food is frozen.
•Depending on the shape of the food, some areas
may defrost more quickly than others.
•The shape of the package affects how quickly food
will defrost. Shallow packages will defrost more
quickly than a deep block.
•As food begins to defrost, separate the pieces to
defrost them more easily.
•Turn over food during defrosting or standing time.
Break apart and remove food as required.
•For best results, shape ground meat into the form
of a doughnut before freezing. When defrosting,
scrape off thawed meat when the beep sounds and
continue defrosting.
•Use small pieces of aluminum foil to shield parts
of food such as chicken wings, leg tips, fish tails,
or areas that start to get warm. Make sure the foil
does not touch the sides, top, or bottom of the
oven. The foil can damage the oven lining.
•For better results, let food stand after defrosting.
Sensor Operation
Sensor Cook reheats favorite foods without selecting
cooking times and power levels.
The oven automatically determines required cooking
time for each food item. When the internal sensor
detects a certain amount of humidity coming from
the food, it tells the oven how much longer to heat.
The display shows the remaining heating time. For
best results when sensor cooking, follow these
recommendations.
•Food cooked with the sensor system should be at
normal storage temperature.
•The glass tray and the outside of the container
should be dry to assure best cooking results.
•Foods should always be covered loosely with
microwavable plastic wrap, waxed paper, or a lid.
•Do not open the door or touch Clear/Off during the
sensing time. When sensing time is over, the oven
beeps and the remaining cooking time will appear
in the display window.
At this time you can open the door to stir, turn, or
rearrange the food.
Appropriate containers and coverings help assure
good sensor cooking results.
•Always use microwavable containers and cover
them with lids or vented plastic wrap.
•Never use tight-sealing plastic covers. They can
prevent steam from escaping and cause food to
overcook.
•Match the amount to the size of the container.
Fill containers at least half full for best results.
•Be sure the outside of the cooking container and
the inside of the upper oven are dry before placing
food in the oven. Beads of moisture turning into
steam can mislead the sensor.
Using Sensor Cook
Use Sensor Cook to heat common microwaveprepared foods without needing to program times and
power levels. Sensor Cook has preset programs for 9
food categories. See the Sensor Cook table for more
information.
Setting the Sensor Cook Function
Example: To sensor cook rice
Touch Sensor Cook.
1
ENGLISH Using the Upper Oven
Touch 7 to select RICE.
2
Touch Start.
3
•When the cook time is over a melody sounds
and END OF CYCLE displays.
Page 24
24
OPERATION
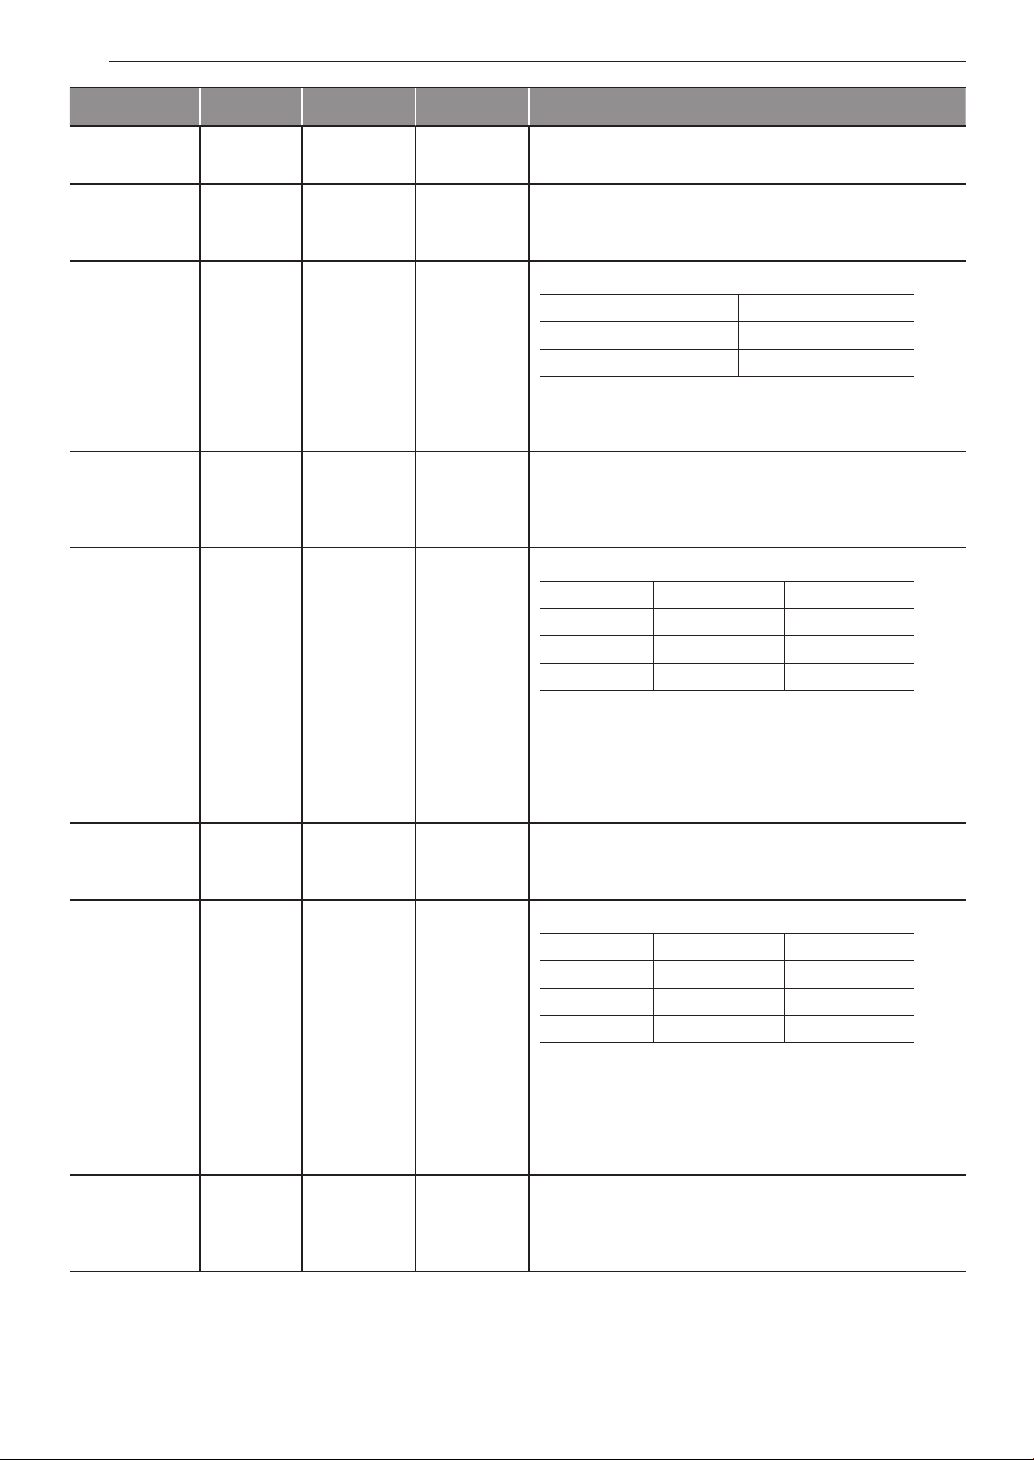
Sensor Cook Table
•The Sensor Cook function has preprogrammed settings to automatically sensor reheat certain foods.
Category Weight Cookware Food Temp. Instructions
1. Beverage 1-2 cups
(240 ml per
2. Casserole 10-20 oz Microwave-
3. Chicken 16-20 oz Microwave-
4. Pasta ½-2 cups Microwave-
5. Pizza 1-3 slices Microwave-
6. Plate of food 1 serving Microwave-
7. Rice ½-2 cups Microwave-
8. Soup 1-4 cups Microwave-
9. Vegetable 1-4 cups Microwave-
cup)
microwavesafe cup on
the glass tray
safe bowl on
the glass tray
safe bowl on
the glass tray
safe bowl on
the glass tray
safe plate on
the glass tray
safe plate on
the glass tray
safe bowl on
the glass tray
safe bowl on
the glass tray
safe bowl on
the glass tray
Mug or
Room
Refrigerated Use microwave safe bowl.
Refrigerated Use microwave safe bowl.
Refrigerated Use microwave safe bowl.
Refrigerated This is a reheat function for leftover pizza.
Refrigerated Use microwave safe plate.
Refrigerated Use microwave safe bowl.
Room Use microwave safe bowl.
Refrigerated Use microwave safe bowl.
Use microwave safe mug or cup without covering.
After cooking, stir to complete reheating.
(Be careful! The beverage will be very hot. Sometimes
liquids heated in cylindrical containers will splash out
unexpectedly when the cup is moved.)
Cover container with vented plastic wrap.
After cooking, let stand for 3 minutes.
Cover container with vented plastic wrap.
After cooking, let stand for 3 minutes.
Cover container with vented plastic wrap.
After cooking, let stand for 3 minutes.
Use microwave safe plate without covering.
Cover container with vented plastic wrap.
After cooking, let stand for 3 minutes.
Cover container with vented plastic wrap.
After cooking, let stand for 3 minutes.
Cover container with vented plastic wrap.
After cooking, let stand for 3 minutes.
Cover container with vented plastic wrap.
After cooking, let stand for 3 minutes.
Page 25

OPERATION
25
Convection Bake
During Convection Bake, a heating element is used
to raise the temperature of the air inside the oven.
Convection cooking temperature ranges from 100 °F
to 450 °F.
It is best to preheat the oven when convection cooking.
NOTE
Reduce oven temperature by 25 °F from the
temperature recommended on packaged foods.
The baking time may vary according to the food
condition or individual preference.
Setting the Convection Bake Function
Example: 45 minutes at 375°F with preheating
Touch Conv.Bake. The display flashes 350 °F.
1
Set the oven temperature: touch 3, 7 and 5.
2
Touch Start. The oven starts to preheat and
3
display shows Conv.Bake and the oven
temperature. (Do not enter the time.)
When the melody sounds, Place the food in the
4
oven.
Broil
This feature will allow you to brown and crisp food
quickly. There is no need for preheating.
Setting the Broil Function
Example: Broiling for 1 minute 30 seconds
Touch Broil.
1
Set the cook time: touch 1, 3 and 0.
2
Touch Start. The oven begins to heat.
3
Touch Clear/Off to cancel at any time or when
4
cooking is complete.
CAUTION
Always use oven gloves when removing the food
and accessories after cooking as the oven &
accessories will be very hot.
NOTE
For best results, use the rack when broiling in the
upper oven.
ENGLISH Using the Upper Oven
Set the cook time: touch 4, 5.
5
Touch Start.
6
When cooking is complete, touch Clear/Off.
7
Example: 30 minutes at 375°F without preheating
Touch Conv. Bake. The display flashes 350 °F.
1
Set the oven temperature: touch 3, 7 and 5.
2
Touch Cook Time.
3
Set the cook time: touch 3, 0.
4
Touch Start.
5
When cooking is complete, touch Clear/Off.
6
NOTE
•When the oven reaches the set preheat
temperature, a melody will sound and the
display scrolls the message PREHEAT END.
The oven automatically holds that temperature
for 30 minutes.
•The oven temperature drops very quickly when
the door is opened; however, this should not
prevent food from being fully cooked during
normal cooking time.
Rack
Page 26

26
OPERATION
Speed Cook
This feature uses power from a halogen light, heaters,
and microwaves simultaneously to allow quick
cooking.
NOTE
Power levels only can be selected from 10 to
40 %. Each power level gives you heater power
and microwave energy for a certain percentage of
the time.
CAUTION
When using Speed Cook function, remember that
the oven, door and dishes will be very hot.
Setting the Speed Convection Function
Use this mode for roast meat, roast chicken, roast
vegetables, frozen pizza, cake, pies and breads.
Example: Cooking for 1 minute 30 seconds at
40 % power and 375 °F
Touch Speed Cook.
1
Touch 1 to select SPEED CONVECTION.
2
Setting the Speed Broil Function
Use this mode for steaks, chicken fillets, fish or
seafood.
Example: Cooking for 1 minute 30 seconds at
20 % power
Touch Speed Cook.
1
Touch 2 to select SPEED BROIL.
2
Set the power level: touch 2.
3
Set the cook time : touch 1, 3 and 0.
4
Touch Start. The oven begins to heat.
5
When cooking has finished or to cancel, touch
6
Clear/Off.
Auto Cook
Use Auto Cook to heat common prepared foods
without selecting cooking times and power levels.
Auto Cook has preset programs for 28 food functions.
Set the power level: touch 4.
3
Set the oven temperature: touch 3, 7, 5 and
4
Start.
Set the cook time : touch 1, 3 and 0.
5
Touch Start. The oven begins to heat.
6
When cooking has finished or to cancel, touch
7
Clear/Off.
Setting the Auto Cook Function
Example: To auto cook 4 slices of bacon
Touch More Mode.
1
Touch 1 to select AUTO COOK.
2
Select the food item: touch 1 for BACON.
3
Touch Start to enter choice.
4
Set the weight or amount: touch 1 to select 3-4
5
slices of bacon.
Touch Start to begin cooking.
6
Page 27

OPERATION
27
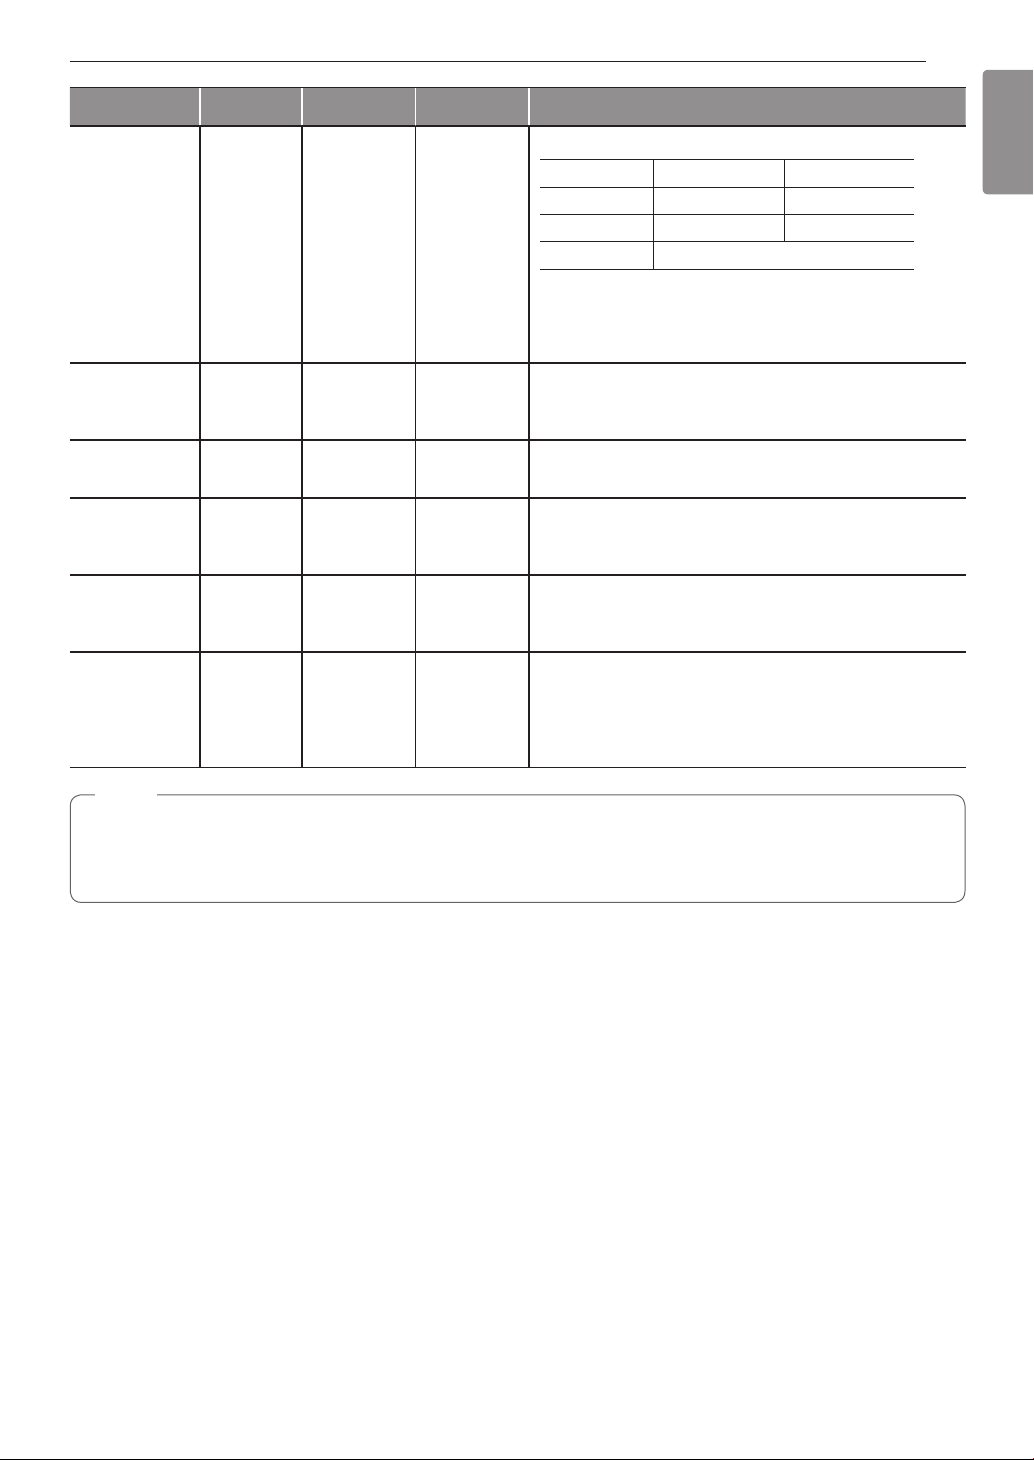
Auto Cook Table
Category Weight Cookware Food Temp. Instructions
1. Bacon
(regular
sliced)
2. Bagels
(frozen)
3. Baked
potatoes
(7-9 oz/ea)
4. Brownie 8″ X 8″
5. Cod fillets
(1 lb)
6. Corn dog
(frozen)
7. Fresh
vegetable
3-4
5-6
slices
1, 2-3 bagels Metal tray Frozen Press 1 or 2 according to how many bagels need defrosting.
1, 2, 3-4
potatoes
9″ X 13″
- Metal tray Refrigerated Brush with oil and season with salt and pepper.
1-2, 3-4 Metal tray Frozen Press 1 for 1-2 corn dogs. Press 2 for 3-4 corn dogs.
4-6, 7-9,
10-12, 13-15,
16-20 oz
Microwave-
safe bacon
rack or plate
on the glass
tray.
Metal tray Room Pierce each potato several times with a fork.
Microwave-
safe bowl on
the glass tray
Microwave-
safe bowl on
the glass tray
Refrigerated Place bacon slices on a microwave rack for best results.
Use a plate lined with paper towels if rack is not available.
Press 1 for 3-4 slices. Press 2 for 5-6 slices.
Press 1 for 1 potato, 2 for 2 potatoes, and 3 for 3-4 potatoes.
Room Spray microwave-safe glass or silicone bakeware with cooking
spray.
Pour batter into bakeware, spreading it evenly.
Press 1 for an 8"x8" pan. Press 2 for a 9"x13" pan.
After cooking, Allow to rest for a few minutes.
Turn food over at the beep.
Refrigerated Add water according to the quantity.
•4-12 oz : add 2 tbsp water
•13-20 oz : add 4 tbsp water
Cover with vented plastic wrap.
After cooking, stir and let stand for 3 minutes.
ENGLISH Using the Upper Oven
8. Frozen
chicken
nuggets
9. Frozen
chicken
wings
10. Frozen fries 1-2, 3-4
11. Frozen pizza
(regular
crust)
12. Frozen soft
pretzels
13. Frozen
vegetable
14. Garlic bread
(sliced,
frozen)
1-2, 3-4
servings
(3.5 oz/100 g
per serving)
1-2, 3-4
servings
(3.5 oz/100 g
per serving)
servings
(3.5 oz/100 g
per serving)
Individual (6″)
Regular (12″)
1, 2, 3-4
pretzels
4-6, 7-9,
10-12, 13-15,
16-20 oz
1-2, 3-4, 5-6
pieces
Metal tray Frozen Press 1 for 1-2 servings. Press 2 for 3-4 servings.
Metal tray Frozen Press 1 for 1-2 servings. Press 2 for 3-4 servings
Metal tray Frozen Press 1 for 1-2 servings. Press 2 for 3-4 servings
Metal tray Frozen Press 1 for 6" pizza. Press 2 for 12" pizza.
Metal tray Frozen Press 1 for 1 pretzel, 2 for 2 pretzels, or 3 for 3-4 pretzels.
Microwave-
safe bowl on
the glass tray
Metal tray Frozen Press 1 for 1-2 pieces, 2 for 3-4 pieces, or 3 for 5-6 pieces.
Frozen Add water according to the quantity.
Turn food over at the beep.
Turn food over at the beep.
Turn food over at the beep.
•4-12 oz : add 2 tbsp water
•13-20 oz : add 4 tbsp water
Cover with vented plastic wrap.
After cooking, stir and let stand for 3minutes.
Turn food over at the beep.
Page 28
28
OPERATION
Category Weight Cookware Food Temp. Instructions
15. Hamburger
(1/2″ thick)
16. Lamb chops
(1/2″ thick,
6-7 oz)
17. Meat loaf
(9″ X 5″)
18. Nachos 1-3, 4-6
19. Oatmeal 1, 2 servings Large
2, 3-4, 5-6
patties
1, 2, 3-4
chops
- Microwave-
servings
(8 ea /
1 serving)
Metal tray Refrigerated Press 1 for 2 burgers, 2 for 3-4 burgers, or 3 for 5-6 burgers.
Metal tray Refrigerated Brush with oil and season with salt and pepper.
safe glass
or silicone
bakeware on
the glass tray
Metal tray Room Press 1 for 1-3 servings. Press 2 for 4-6 servings.
microwave-
safe bowl on
the glass tray
Turn food over at the beep.
Press 1 for 1 chop, 2 for 2 chops, or 3 for 3-4 chops.
Turn food over at the beep.
Refrigerated Ingredients
Ground meat 800 g
Egg (refrigerating temp.) 115 g
Salt 2 g
Cooking
Place meat mixture into microwave-safe 9"x5" glass or silicone
bakeware.
Room Ingredients
1 serving 2 servings
Oats ½ cup (40 g) 1 cup(80 g)
Water or Milk 1 cup (230 g) 1 ½ cups (345 g)
Salt (Optional) Dash 1/8 tsp
Cooking
Combine water or milk, salt and oats in a large microwavesafe bowl.
Cover with vented plastic wrap.
Press 1 for 1 serving. Press 2 for 2 servings.
After cooking, let stand for 3 minutes.
20. Pork chops
(1/2″ thick,
6-7 oz)
21. Quinoa 1, 2 servings Large
22. Ribeye
steak
(1″ thick,
14-15 oz)
1, 2, 3-4
chops
1, 2 steaks Metal tray Refrigerated Brush with oil and season with salt and pepper.
Metal tray Refrigerated Brush with oil and season with salt and pepper.
microwave-
safe bowl on
the glass tray
Press 1 for 1 chop, 2 for 2 chops, or 3 for 3-4 chops.
Turn food over at the beep.
Room Ingredients
1 serving 2 servings
Quinoa ½ cup (40 g) 1 cup (80 g)
Water or Milk 1 cup (230 g) 1 ½ cups (345 g)
Salt (Optional) Dash 1/8 tsp
Cooking
Combine water or milk, salt and quinoa in a large microwavesafe bowl.
Cover with vented plastic wrap.
Press 1 for 1 serving. Press 2 for 2 servings.
After cooking, let stand for 3 minutes.
Press 1 for 1 steak or 2 for 2 steaks.
Turn food over at the beep.
Page 29
OPERATION
29
Category Weight Cookware Food Temp. Instructions
23. Rice ½, 1 cup Deep and large
24. Salmon
25. Sausage 1-6 , 7-14
26. Sirloin steak
27. Tenderloin ¾ , 1 ½ lb Metal tray Refrigerated Brush with oil and season with salt and pepper.
steak
(1″ thick)
(1″ thick,
18-21 oz)
1, 2, 3-4
steaks
links
1, 2 steaks Metal tray Refrigerated Brush with oil and season with salt and pepper.
microwave-
safe bowl on
the glass tray
Metal tray Refrigerated Brush with oil and season with salt and pepper.
Metal tray Refrigerated Press 1 for 1-6 links. Press 2 for 7-14 links.
Room Ingredients
½ cup 1 cup
Rice ½ cup (96 g) 1 cup (192 g)
Water 1 cup (230 g) 2 cups (460 g)
Salt Optional
Cooking
Cover with vented plastic wrap.
Press 1 for ½ cup of dried rice or 2 for 1 cup of dried rice.
After cooking, let stand for 5-10 minutes.
Press 1 for 1 steak, 2 for 2 steaks, or 3 for 3-4 steaks.
Turn food over at the beep.
Turn food over at the beep.
Press 1 for 1 steak, 2 for 2 steaks.
Turn food over at the beep.
Press 1 for ¾ lb, 2 for 1 ½ lb.
Turn food over at the beep.
ENGLISH Using the Upper Oven
28. Vegetablecanned
4-6, 7-9,
10-12, 13-15,
16-20 oz
Microwave-
safe bowl on
the glass tray
Room Transfer canned vegetables to microwave-safe bowl.
Cover with vented plastic wrap.
Press 1 for 4-6 oz, 2 for 7-9 oz, 3 for 10-12 oz, 4 for 13-15 oz,
or 5 for 16-20 oz.
After cooking, stir and let stand for 3 minutes.
NOTE
•Do not use recycled paper products in the upper oven.
They sometimes contain impurities that cause arcing and sparking.
•NEVER use paper products in the convection oven.
Page 30
30
OPERATION
Soften
The oven uses low power to soften foods such as
butter, cream cheese, frosting, and ice cream.
See the following table.
Setting the Soften Function
Example, 1 pint of ice cream
Touch More Mode.
1
Touch 2 to select SOFTEN.
2
Set the Menu: touch 4 to select ICE CREAM and
3
touch Start.
Set the amount: touch 1 to select 1 pint.
4
Touch Start.
5
•When the cook time is over a melody sounds
and END OF CYCLE displays.
Soften Table
Category Weight Cookware Food Temp. Instructions
1. Butter ½ , 1, 2
2. Cream
cheese
3. Frosting
(16 oz)
4. Ice cream 1 pint,
sticks
3, 8 oz Microwave-
- Microwave-
1 quart
Microwave-
safe dish on
the glass tray
safe dish on
the glass tray
safe bowl on
the glass tray
Glass tray Frozen Remove lid and cover.
Refrigerated Press 1 for
Butter will be at room temperature and ready for use in a
recipe.
Refrigerated Press 1 for 3 oz. or 2 for 8 oz.
Cream cheese will be at room temperature and ready for use
in a recipe.
Refrigerated Frosting will be at room temperature and ready for use in a
recipe.
Press 1 for 1 pint or 2 for 1 quart.
Ice cream will be soft enough to make scooping easier.
1
/2 stick, 2 for 1 stick, or 3 for 2 sticks.
Page 31

OPERATION
31
Melt
The oven uses low power to melt foods such
as butter, caramel, cheese, chocolate, and
marshmallows.
See the following table.
Setting the Melt Function
Example, 8 oz of chocolate.
Touch More Mode.
1
Touch 4 to select MELT.
2
Set the Menu: touch 4 to select CHOCOLATE
3
and touch Start.
Set the amount: touch 2 to select 8 oz.
4
Touch Start.
5
•When the cook time is over a melody sounds
and END OF CYCLE displays.
Melt Table
ENGLISH Using the Upper Oven
Category Weight Cookware Food Temp. Instructions
1. Butter ½, 1, 2 sticks Microwave-
safe bowl on
the glass tray
2. Caramel 4, 8, 12 oz Microwave-
safe bowl on
the glass tray
3. Cheese 4, 8, 12 oz Microwave-
safe bowl on
the glass tray
4. Chocolate 4, 8, 12 oz Microwave-
safe bowl on
the glass tray
5. Marshmallow 5, 10 oz Microwave-
safe bowl on
the glass tray
Refrigerated Press 1 for
After cooking, stir to complete melting.
Room Press 1 for 4 oz., 2 for 8 oz., or 3 for 12 oz.
After cooking, stir to complete melting.
Refrigerated Use processed cheese food only. Cut into cubes.
Press 1 for 4 oz., 2 for 8 oz., or 3 for 12 oz.
After cooking, stir to complete melting.
Room Chocolate chips or squares of baking chocolate may be used.
Press 1 for 4 oz., 2 for 8 oz., or 3 for 12 oz.
After cooking, stir to complete melting.
Room Press 1 for 5 oz. or 2 for 10 oz.
After cooking, stir to complete melting.
1
/2 stick, 2 for 1 stick, or 3 for 2 sticks.
Page 32

32
OPERATION
Warm
The WARM function maintains an oven temperature
of less than 230°F. This function should not be used to
reheat cold food. The Warm function keeps cooked food
warm for serving up to 3 hours after cooking has finished.
After 3 hours the WARM function shuts the oven OFF
automatically.
Setting the Warm Function
Touch More Mode.
1
Touch 4 to select WARM.
2
Select the temperature level: touch 1 for low, 2
3
for medium, or 3 for high.
Touch Start.
4
Select the type: touch 1 for moist, 2 for crisp.
5
Touch Start to start warming.
6
Touch Clear/Off at any time to cancel.
7
NOTE
•Low = 140°-160°F (60°-71°C)
Medium = 160°-195°F (71°-91°C)
High = 195°-230°F (91°-110°C)
•The Warm function is intended to keep food
warm. Do not use it to cool food down.
•It is normal for the fan to operate during the
Warm function.
Proof
This feature maintains a warm oven for rising yeast
leavened products before baking.
Setting the Proof Function
Touch More Mode.
1
Touch 5 to select PROOF.
2
Touch Start to start proofing.
3
Touch Clear/Off at any time to cancel.
4
NOTE
•To avoid lowering the oven temperature and
lengthening proofing time, do not open the oven
door unnecessarily.
•Check bread products early to avoid over-proofing.
•Do not use the proofing mode for warming
food or keeping food hot. The proofing oven
temperature is not hot enough to hold foods at
safe temperatures. Use the WARM feature to
keep food warm.
•Proofing will not operate if the oven is too hot.
Allow the oven to cool before proofing.
Popcorn
Setting the Popcorn Function
Touch Popcorn.
1
Touch Start.
2
The Popcorn function starts.
Touch Clear/Off to cancel Popcorn at any time.
3
NOTE
•Only pop popcorn in a microwave-safe
container or commercial packages designed for
microwave ovens.
•Never try to pop popcorn in a paper bag that is
not microwave-approved.
•If popcorn bag size is not known, follow
manufacturers' instructions and do not use this
feature.
•Prepare only one bag at a time.
•Do not use popcorn popping devices in upper
oven with this feature.
•Do not leave oven unattended while popping
corn.
•Do not use POPCORN key pad in combination
with any other feature key pads.
•Do not attempt to reheat or cook any unpopped
kernels.
•Do not reuse bag. Overcooking can result in an
oven fire.
CAUTION
Never use a brown paper bag for popping corn.
When popping prepackaged popcorn, place the bag
carefully in the oven so it does not touch the walls as
it rotates. Fold the ends of the bag up and toward the
center of the bag as shown.
Page 33

OPERATION
33
Using the Lower Oven
Before Using the Lower Oven
NOTE
•Because the oven temperature cycles, an oven
thermometer placed in the oven cavity may not
show the same temperature that is set on the
oven.
•It is normal for the convection fan to run while
preheating during a regular bake cycle.
•The convection fan motor may run periodically
during a regular bake cycle.
•The heat turns off if the door is left open during
baking. If the door is left open for longer than
30 seconds during baking, the heat turns off.
The heat turns back on automatically once the
door is closed.
Lower Oven Light
The interior oven light automatically turns on when
the door is opened. Touch Lower Light to manually
turn the lower oven light on. The lamp of the lower
oven will turn off after 2 minutes and 30 seconds to
save power.
NOTE
The oven light cannot be turned on if the Self
Clean function is active.
Minimum & Maximum Default
Settings
All of the features listed have a minimum and a
maximum time or temperature setting that may be
entered into the control. An entry acceptance beep
sounds each time a control key is touched.
An entry error tone (two short tones) sounds if the
entry of the temperature or time is below the minimum
or above the maximum setting for the feature.
Min.
Feature
12 Hr.
Clock
24 Hr.
12 Hr. 0:01 min.
Timer
24 Hr. 0:01 min.
12 Hr. 0:01 min.
Cook Time
24 Hr. 0:01 min.
Conv. Bake
Conv. Roast
Broil
Bake
Proof 12 Hr.
Warm 3 Hr.
Self Clean 3 Hr. 5 Hr. 4 Hr.
EasyClean
®
Temp. /
Time
1:00
Hr. / min.
0:00
Hr. / min.
300 °F /
150 °C
300 °F /
150 °C
Lo
400 °F
170 °F /
80 °C
Max
Temp. /
Time
12:59
Hr. / min.
23:59
Hr. / min.
11:59
Hr. / min.
11:59
Hr. / min.
11:59
Hr. / min.
11:59
Hr. / min.
550 °F /
285 °C
550 °F /
285 °C
Hi
500 °F
550 °F /
285 °C
Default
350 °F
(*325 °F)/
12 Hr.
350 °F
(*325 °F)/
12 Hr.
Hi /
3 Hr.
350 °F /
12 Hr.
10 min.
ENGLISH Using the Lower Oven
* Using Auto Conversion
•Default cook mode times are without setting cook time.
Page 34

34
OPERATION
Using Oven Racks
The racks have a turned-up back edge that prevents
them from being pulled out of the oven cavity.
Removing Racks
Pull the rack straight out until it stops.
1
Lift up the front of the rack and pull it out.
2
Replacing Racks
Place the end of the rack on the support.
1
Tilt the front end up and push the rack in.
2
CAUTION
•Replace oven racks before turning the oven on
to prevent burns.
•Do not cover the racks with aluminum foil, or
any other material, or place anything on the
bottom of the oven. Doing so will result in poor
baking and may damage the oven bottom.
•Only arrange oven racks when the oven is cool.
Bake
Bake is used to prepare foods such as pastries,
breads and casseroles. The oven can be programmed
to bake at any temperature from 170 °F (80 °C) to
550 °F (285 °C). The default temperature is 350 °F
(175 °C).
Setting the Bake Function
Example: To bake at 375 °F
Touch Bake.
1
Set the oven temperature: touch 3, 7 and 5.
2
Touch Start. The oven starts to preheat.
3
As the oven preheats, the temperature is displayed
and rises in 5-degree increments. Once the oven
reaches the set temperature, a tone sounds and the
oven light blinks on and off.
PREHEATING
Place the food in the oven after preheating.
Preheating is necessary for better cooking results.
When cooking is complete, touch Clear/Off.
4
Remove food from the oven.
5
Changing Bake Temperature while Cooking
Example: changing from 375 °F to 425 °F
Touch Bake.
1
Set the oven temperature: touch 4, 2 and 5.
2
Touch Start.
3
NOTE
It is normal for the convection fan to operate
periodically throughout a normal bake cycle in the
lower oven. This is to ensure even baking results.
Page 35

OPERATION
35
Baking Tips
•Baking time and temperature will vary depending
on the characteristics, size, and shape of the
baking pan used.
•Check for food doneness at the minimum recipe
time.
•Use metal bakeware (with or without a nonstick
finish), heatproof glass-ceramic, ceramic or other
bakeware recommended for oven use.
•Dark metal pans or nonstick coatings will cook food
faster with more browning. Insulated bakeware will
slightly lengthen the cooking time for most foods.
NOTE
The oven bottom has a porcelain-enamel finish.
To make cleaning easier, protect the oven bottom
from excessive spillovers by placing a cookie
sheet on the rack below the rack you are cooking
on. This is particularly important when baking a
fruit pie or other foods with a high acid content.
Hot fruit fillings or other foods that are highly
acidic may cause pitting and damage to the
porcelain-enamel surface and should be wiped up
immediately.
Multi-Rack Baking
•The oven has 5 rack positions.
Baking results will be better if baking pans are
centered in the oven as much as possible. If baking
with more than one pan, place the pans so each has
at least 1" to 1
If cooking on multiple racks, place the oven racks in
positions 2 and 4 (for two racks). Place the cookware
as shown.
1
/2" of air space around it.
Multiple rack
(Position 4) (Position 2)
Single rack
(Position 3)
NOTE
•Preheating is necessary for good results
when baking cakes, cookies, pastries and
breads. After the oven has reached the desired
temperature, the preheat melody sounds once.
•The heating elements turn off immediately
when the door is opened. They will turn on
again approximately 5 seconds after the door
is closed. If the oven door is left open for more
than 30 minutes, all settings are canceled.
•Touch Lower Clear/Off to cancel Bake at any
time.
Type of Food Rack Position
Angel food cake, frozen pies 1
Bundt or pound cakes 2
Biscuits, muffins, brownies,
cookies, cupcakes, layer cakes,
pies
Casseroles 3
ENGLISH Using the Lower Oven
3
Turkey, roasts, or ham 1
5
4
3
2
1
Frozen pizza 3
Roast chicken 2
Oven Vent
•Areas near the vent may become hot during
operation and may cause burns.
•Do not block the vent opening at the bottom of the
oven.
•Avoid placing plastics near the vent as heat may
distort or melt the plastic.
•It is normal for steam to be visible when cooking
foods with high moisture.
Page 36

36
OPERATION
Convection Mode
5
4
3
2
1
The convection system uses a fan to circulate
the heat evenly within the oven. Improved heat
distribution allows for even cooking and excellent
results while cooking with single or multiple racks.
The lower oven uses convection auto conversion
to automatically subtract 25°F/14°C from the
temperature you enter. To disable convection
auto conversion, see "Setting Convection Auto
Conversion."
Setting the Convection Function
Example: To cook at 350°F (auto-converted)
Touch Conv. Bake or Conv. Roast. The display
1
flashes 350 °F.
Set the oven temperature: touch 3, 7 and 5.
2
Touch Start. The display shows Conv. Bake or
3
Conv. Roast and the oven temperature starting
at 100 °F.
As the oven preheats, the display shows increasing
temperatures in 5-degree increments. Once the oven
reaches the set adjusted temperature, a tone sounds
and the oven light flashes on and off. The display
shows the auto converted oven temperature, 350 °F,
and the fan icon.
Tips for Convection Baking
•Use Convection Bake for faster and more even
multiple-rack cooking of pastries, cookies, muffins,
biscuits, and breads of all kinds.
•Bake cookies and biscuits on pans with no sides
or very low sides to allow heated air to circulate
around the food. Food baked on pans with a dark
finish will cook faster.
•When using Convection Bake with a single rack,
place oven rack in position 3. If cooking on multiple
racks, place the oven racks in positions 2 and 4 (for
two racks).
•Multiple oven rack cooking may slightly increase
cook times for some foods.
•Cakes, cookies and muffins have better results
when using multiple racks.
The Convection Roast feature is designed to give
optimum roasting performance. Convection Roast
combines cooking with the convection fan to roast
meats and poultry. The heated air circulates around
the food from all sides, sealing in juices and flavors.
Foods are crispy brown on the outside while staying
moist on the inside. Convection roasting is especially
good for large tender cuts of meat, uncovered.
Tips for Convection Roasting
Use a broiler pan and grid when preparing meats for
convection roasting. The broiler pan catches grease
spills and the grid helps prevent grease splatters.
Place the oven rack in position 1.
1
Place the grid in the broiler pan.
2
Place the broiler pan on the oven rack.
3
When cooking has finished or to cancel, touch
4
Clear/Off.
NOTE
The oven fan runs while convection baking.
The fan stops when the door is open. In some
cases, the fan may shut off during a convection
bake cycle. It turns on again approximately 1
second after the door is closed. Touch Lower
Clear/Off to cancel Convection Bake at any time.
Grid
Broiler pan
CAUTION
•Do not use a broiler pan without a grid.
•Do not cover the grid with aluminum foil.
•Position food (fat side up) on the grid.
Page 37

OPERATION
37
Broil
Broiling uses an intense, radiant heat to cook food.
Both the inner and outer broil elements heat during
full broiling. Only the inner broil element heats during
center broiling. The element(s) cycle on and off at
intervals to maintain the oven temperature. The meat
probe cannot be used with this mode.
CAUTION
•Do not use a broiler pan without a grid. Oil can
cause a grease fire.
•Do not cover the grid and broiler pan with
aluminum foil. Doing so will cause a fire.
•Always use a broiler pan and grid for excess fat
and grease drainage. This will help to reduce
splatter, smoke, and flare-ups.
NOTE
This oven is designed for closed-door broiling.
Close the door to set the Broil function. If the door
is open, the Broil function cannot be set and door
appears on the display. Close the door and reset
the Broil function. Opening the door turns off the
broil burner during broiling. If the door is opened
during broiling, the broil burner turns off after five
seconds. The broiler turns back on automatically
once the door is closed.
Setting the Oven to Broil
Place the food on the broiler pan grid.
1
Touch Broil.
2
Touch 1 for full broiling or 2 for center broiling.
3
Touch 1 for High, 2 for Medium or 3 for Low broil.
4
Smoking
Due to the intense heat associated with broiling, it
is normal to experience smoke during the cooking
process. This smoke is a natural byproduct of
searing and should not cause you to worry. If you are
experiencing more smoke than you are comfortable
with, use the following tips to reduce the amount of
smoke in your oven.
Always use a broiler pan. Do not use saute pans
1
or regular baking sheets for safety reasons.
The broiler pan should always be thoroughly
2
cleaned and at room temperature at the
beginning of cooking.
Keep the interior of your oven as clean as
3
possible. Leftover debris from prior meals can
burn or catch fire.
Avoid fatty marinades and sugary glazes. Both
4
of these will increase the amount of smoke you
experience. If you would like to use a glaze,
apply it at the very end of cooking.
If you are experiencing significant smoke with
5
any food item, consider:
•Lowering the broiler to the Lo setting.
•Lowering the rack position to cook the food
further away from the broiler.
•Using the Hi broil setting to achieve the level of
searing you desire, and then either switching
to the Lo broil setting, or switching to the Bake
function.
As a rule, fattier cuts of meat and fish will
6
produce more smoke than leaner items.
Adhere to the recommended broil settings and
7
cooking guidelines in the chart on the following
page whenever possible.
ENGLISH Using the Lower Oven
Touch Start. The oven begins to broil.
5
Broil on one side until food is browned ; turn and
6
cook on the other side.
NOTE
Always pull the rack out to the stop position
before turning or removing food.
When broiling is finished, touch Lower Clear/
7
Off. Touch Clear/Off to cancel this function at
any time.
Page 38

38
OPERATION
Recommended Broiling Guide
The size, weight, thickness, starting temperature, and
your preference of doneness will affect broiling times.
This guide is based on meats at refrigerator
temperature. For best results when broiling, use a
pan designed for broiling.
Food
Quantity and/ or
Thickness
Ground Beef 1 lb. (4 patties)
1
/2 to 3/4" thick
Beef Steaks
Rare
Medium
1" thick
1 to 1
1
/2 lbs.
Well Done
Rare
Medium
1
1
/2" thick
2 to 2
1
/2 lbs.
Well Done
Chicken 1 whole cut up
2 to 21/2 lbs.,
split lengthwise
2 Breasts
Lobster Tails 2–4
10 to 12 oz. each
1
Fish Fillets
Ham Slices
/4 to 1/2" thick 4 or 5 5-6 3–4 Handle and turn very carefully. Brush
1
/2" thick 4 5 3–5 Increase time 5 to 10 minutes per
(precooked)
1
Pork Chops
Well Done
2 (1” thick) about 1 lb.
2 (
/2" thick)
Lamb Chops
Medium
Well Done
Medium
Well Done
2 (1" thick) about
10 to 12 oz.
1
2 (1
/2" thick)
about 1 lb.
Salmon Steaks 2 (1" thick)
4 (1" thick) about 1 lb.
Shelf
Position
First Side
Time (min.)
Second Side
Time (min.)
Comments
5 4-6 3-4 Space evenly. Up to 8 patties may
be broiled at once.
Steaks less than 1" thick cook
4
4
4
4
4
4
3
3
10
12
14
20
20
6
7
8
2–3
2–3
3–4
4–6
6–8
8–10
6–8
6–10
3 12-14 Do not turn
over.
through before browning.
Pan frying is recommended. Remove
fat.
Broil skin-side-down first.
Cut through back of shell. Spread
open.
Brush with melted butter before
broiling and after half of broiling time.
with lemon butter before and during
cooking, if desired.
1
side for 1
/2" thick or home-cured
ham.
4 or 5
4 or 5
7
9-10
6–8
7–9
Remove fat.
Remove fat.
4
4
4
4
4 or 5
4 or 5
11
13
6
8
4–6
7–9
9
9–11
8
9
3–4
4–6
Grease pan. Brush steaks with
melted butter.
•This guide is only for reference. Adjust cook time according to your preference.
NOTE
The USDA advises that consuming raw or undercooked fish, meat, or poultry can increase your risk of foodborne illness.
The USDA has indicated the following as safe minimum internal temperatures for consumption:
•Ground beef: 160 °F (71.1 °C)
•Poultry: 165 °F (73.9 °C)
•Beef, veal, pork, or lamb: 145 °F (62.8 °C)
•Fish / Seafood: 145 °F (62.8 °C)
Page 39

OPERATION
0D[
39
Tips for Broiling
Beef
•Steaks and chops should always be allowed to rest
for five minutes before being cut into and eaten.
This allows the heat to distribute evenly through the
food and creates a more tender and juicy result.
•Pieces of meat that are thicker than two inches
should be removed from the refrigerator 30 minutes
prior to cooking. This will help them cook more
quickly and evenly, and will produce less smoke
when broiling. Cooking times will likely be shorter
than the times indicated in the Broiling Chart.
•For bone-in steaks or chops that have been
frenched (all meat removed from around the bone),
wrap the exposed sections of bone in foil to reduce
burning.
Seafood
•When broiling skin-on fish, always use the Lo broil
setting and always broil the skin side last.
•Seafood is best consumed immediately after
cooking. Allowing seafood to rest after cooking can
cause the food to dry out.
•It is a good idea to rub a thin coating of oil on the
surface of the broiling pan before cooking to reduce
sticking, especially with fish and seafood. You can
also use a light coating of non-stick pan spray.
Using the Steam Feeder Tank
The steam feeder tank is located over the oven cavity.
Gently push the front of the steam feeder tank to
1
slide it out.
CAUTION
•During operation, the steam feeder tank can
become very hot to the touch.
Always use oven gloves when removing the
tank during or after cooking.
Remove the tank and place it on a flat surface.
2
Remove the tank cover or flip open the fill lid at
3
the front of the tank cover.
Fill the tank to the max line located at the front of
4
the tank. Use softened, filtered water, if possible.
Hard water may clog the steam generator more
quickly with scale buildup.
ENGLISH Using the Lower Oven
Vegetables
•Toss your vegetables lightly in oil before cooking to
improve browning.
Steam Function
The Steam mode heats food gradually, using the
oven heating elements and moist steam heat.
This is an ideal cooking method for delicate food
items such as seafood, which can lose nutrients when
boiled.
The oven provides 2 methods of steam cooking:
Steam Bake, and Steam Roast.
CAUTION
•Take care when opening the oven door during
or after steam cooking. Hot steam can cause
scalding.
MAX LINE
Assemble the cover or snap closed the fill lid.
5
Tank Cover
Fill lid
CAUTION
•Make sure the tank cover and fill lid are closed
before putting in the oven.
Carefully insert the tank into the steam feeder
6
slot, making sure to keep the tank level while
carrying it. If the tank is not kept level, water will
drain out of the tubes in the back.
Slide the tank into the slot until it clicks into
7
place.
Page 40

40
OPERATION
Setting Steam Function
Example: To steam cook at 375 °F
Touch Steam Bake or Steam Roast.
1
Touch Steam Level repeatedly until desired
2
steam level appears in the display: Low, Med, or
High.
Touch Start. The display shows 350 °F.
3
Set the oven temperature: touch 3, 7 and 5.
4
If desired, set the cook time and delayed start
time.
Touch Start. The display shows Steam Bake or
5
Steam Roast and the oven temperature starting
at 100 °F.
Once cooking is finished, allow oven to cool
6
completely, then wipe up any water left on oven
interior.
Once Steam function is started, an indicator on the
display shows the status of the steam function. Make
sure the steam feeder tank is filled with water before
starting the Steam Bake or Steam Roast function. If
the water in the tank runs out during cooking, a chime
sounds and Fill the water shows in the display. The
oven continues to cook without steam.
Warm
The WARM function maintains an oven temperature
of less than 230°F. This function should not be used
to reheat cold food. The Warm function keeps cooked
food warm for serving up to 3 hours after cooking has
finished.
After 3 hours the WARM function shuts the oven OFF
automatically.
Setting the Warm Function
Touch More Mode.
1
Touch 2 to select WARM.
2
Select the temperature level: touch 1 for high, 2
3
for medium, or 3 for low.
Touch Start to start warming.
4
Touch Clear/Off at any time to cancel.
5
NOTE
•The Warm function is intended to keep food
warm. Do not use it to cool food down.
•It is normal for the fan to operate during the
Warm function.
NOTE
•Remember to drain the steam feeder tank after
use.
•It is normal to hear the sound of boiling water
from the steam generator while running the
steam functions.
•If mineral deposits remain on the oven bottom
after steam mode, use a cloth or sponge
soaked in vinegar or a weak citric acid solution
to remove them before using the steam mode
again. See the Maintenance section under
Descaling for more info. To remove stubborn
hard water scale, use the Descaling function.
•Wipe away excess water left over after cooling.
•To avoid damage and extent product life,
descale the steam feeder after every 10 hours
of use, or more often if needed.
•After the steam mode is used for 8 hours, a
reminder to descale the product appears in
the display the next time the steam mode is
selected. You will not be able to use the steam
mode until the Descaling function is run. To
avoid this delay, run the Descaling function
after every 2-3 uses of the steam mode.
•If the descaling reminder appears, touch start
to run the Descaling function.
Page 41

OPERATION
41
Proof
This feature maintains a warm oven for rising yeast
leavened products before baking.
Setting the Proof Function
Use rack position 2 or 3 for proofing.
1
Touch More Mode.
2
Touch 3 to select PROOF.
3
Enter the proofing time, if desired, and touch
4
Start.
Touch Clear/Off at any time to cancel.
5
NOTE
•To avoid lowering the oven temperature and
lengthening proofing time, do not open the oven
door unnecessarily. Check bread products early
to avoid over proofing.
•Do not use the proofing mode for warming
food or keeping food hot. The proofing oven
temperature is not hot enough to keep foods
at safe temperatures. Use the Warm feature
to keep food warm. Proofing does not operate
when the oven is above 125 °F. OVEN IS HOT
shows in the display.
•It is normal for the fan to operate during the
Proof function.
Probe
The probe accurately measures the internal
temperature of meat, poultry and casseroles. It should
not be used during broiling, self clean, warming or
proofing. Always unplug and remove the probe from
the oven when removing food. Before using, insert
the probe into the center of the thickest part of the
meat or into the inner thigh or breast of poultry, away
from fat or bones. Place the food in the oven and
connect the probe to the jack. Keep the probe as far
away from heat sources as possible.
•The probe cannot be used in Broil, Self Clean,
Easy Clean
•For thin cuts of meat, insert probe in thickest side
of meat.
Recommended Probe Placement Chart
Category
Ground
Meat & Meat
Mixtures
Fresh Beef,
Veal, Lamb
Poultry
Pork & Ham
Leftovers &
Casseroles
Seafood
®
, Warm or Proof modes.
Examples of
Food
Meatloaf
Meatballs
Steaks, Roasts,
Chops
Whole Chicken
or Turkey
Poultry Breasts
or Roasts
Duck, Goose,
Pheasant
Stuffing (Alone
or in Bird)
Fresh Pork
Fresh Ham
(Raw)
Precooked
Ham (Reheat &
Serve)
Leftovers Insert in the
Casseroles
Whole Fish
Fish Fillet (Side
of Fish)
Fish Steaks or
Portions
Probe Placement
Insert in the
thickest part
Insert in the
thickest part, away
from bone, fat and
gristle
Insert in the
thickest part of
thigh, avoiding
bone
Insert in the
thickest part of the
dish
Insert in the
thickest part, away
from bone, fat and
gristle
thickest part of the
dish
Insert in the
thickest part of the
fish
ENGLISH Using the Lower Oven
Page 42

42
OPERATION
Using the Probe
Insert the probe into the food.
1
Connect the probe to the jack in the oven.
2
Touch an appropriate cooking mode.
3
Touch the numbers to set the oven temperature.
4
Touch Start or Probe. PRESS START OR
5
ENTER PROBE TEMP / 80F – 210F appears in
the display.
Touch numbers to set the probe temperature.
6
The default probe temperature is 150 °F (65 °C),
but can be changed to any temperature between
80 °F (27 °C) and 210 °F (100 °C)
Touch Start. The display shows the changing
7
probe temperature.
When the set probe temperature is reached, the
8
oven shuts off automatically.
Touch Clear/Off at any time to stop cooking.
9
Changing the Probe Temperature while Cooking
Touch Probe.
1
Set the probe temperature.
2
Touch Start.
3
CAUTION
•Always use an oven mitt to remove the
temperature probe. Do not touch the broil
element. Failure to obey this caution can result
in severe personal injury.
•To avoid damage to the meat probe, do not use
tongs to pull on the probe when removing it.
•Do not store the meat probe in the oven.
•To avoid breaking the probe, make sure food is
completely defrosted before inserting.
Recommended Probe Temperature Chart
Category Examples of Food
Ground Meat &
Meat Mixtures
Fresh Beef, Veal,
Lamb
Poultry
Pork & Ham
Leftovers &
Casseroles
Seafood
Meatloaf 160 °F (71 °C)
Meatballs 165 °F (74 °C)
Steaks, Roasts, Chops 145 °F (63 °C)
Whole Chicken or Turkey
Poultry Breasts or Roasts
Duck, Goose, Pheasant
Stuffing (Alone or in Bird)
Fresh Pork
Fresh Ham (Raw) Well Done: 160 °F (71 °C)
Precooked Ham (Reheat & Serve) 140 °F (60 °C)
Leftovers
Casseroles
Whole Fish
Fish Steaks or Portions Well Done: 160 °F (71 °C)
Target Internal
Temp.
165 °F (74 °C)
145 °F (63 °C)
165 °F (74 °C)
145 °F (63 °C)Fish Fillet (Side of Fish)
Desired Doneness
Rare: 130 °F (54 °C)
Medium Rare: 140 °F (60 °C)
Medium: 150 °F (66 °C)
Well Done: 160 °F (71 °C)
Well Done: 170 °F (77 °C)
Page 43

OPERATION
43
Favorite
The Favorite feature is used to record and recall favorite
recipe settings. This feature can store and recall up to
3 different settings. The Favorite feature can be used
with the Cook Time mode. It will not work with any other
function including the Start Time (delayed cook) mode.
Place the food in the oven.
1
Touch More Mode.
2
Touch 1 to select FAVORITE.
3
Touch More Mode repeatedly until desired
4
recipe appears in the display: Bread, Meat or
Chicken.
Touch the numbers to set the desired oven
5
temperature. This temperature is stored and
recalled when next used.
Touch Start. The preheat indicator beeps 3 times
6
when the oven reaches the set temperature.
Default Temp.
Category
1. Bread 375 °F BAKE
2. Meat 325 °F Convection Roast
3. Chicken 350 °F Convection Roast
NOTE
•Only the selected temperature is stored, not the
cooking time.
•If the oven temperature is changed, the
changed temperature is stored.
(may be changed
and recalled)
Operating Feature
Sabbath Mode
Sabbath mode is used on the Jewish Sabbath and
Holidays.
While the oven is in Sabbath mode, the temperature
cannot be changed and the timer, light, and alarm
functions are disabled. If the oven light is on when the
oven is put in Sabbath mode, it will remain on.
Sabbath mode is only available when upper oven
is not operating and lower oven is in Bake mode.
All function buttons, except for the CLEAR/OFF is
inactive.
Setting Sabbath Mode
Disconnect the probe. The Probe function is not
1
available in Sabbath mode.
Touch Bake and set the desired temperature
2
and cook time. Any cook time can be set from 1
minute to 73 hours 59 minutes.
Touch Start.
3
Touch and hold More Mode for three seconds.
4
SB and □ appears in the display when the
Sabbath mode is activated.
To stop Sabbath mode, touch and hold More
5
Mode for three seconds. To cancel the Bake
function, touch Clear/Off at any time.
NOTE
•If a cook time is set, the oven turns off
automatically at the end of the cook time,
without chiming. The oven remains in Sabbath
mode, but is turned off.
•If no cook time is set, the oven will not
automatically turn off.
•After a power failure, the display will turn back
on in Sabbath mode, but the oven will be off.
•During Sabbath mode, the upper oven functions
are blocked and Wi-Fi network cannot be
connected.
ENGLISH Using the Lower Oven
Page 44

44
OPERATION
Wi-Fi
Connect the appliance to a home Wi-Fi network to
use Remote Start and other smart functions. See the
Smart Functions section for more details.
Setting Up Wi-Fi
Touch and hold Remote Start key for three
1
seconds.
The Wi-Fi icon appears at the bottom of the
display.
Remote Start
If the appliance is registered on a home Wi-Fi network,
the preheating function of the oven can be started or
stopped using the LG SmartThinQ Application.
Preparing the Oven for a Remote Start
Touch Remote Start. REMOTE READY and
1
Wi-Fi icon show in the display. In this mode,
the controls for both ovens are locked.
Follow the instructions in the LG SmartThinQ
2
application for using the Remote Start function.
NOTE
•Remote Start is disconnected in the following
situations:
−Remote Start is never set up in the smart
phone app.
−The Remote Start status is “ready”.
−Remote Start experiences a problem during
operation.
•The Wi-Fi icon on the display shows the status
of the appliance's network connection. If the
Wi-Fi icon is not lit, use the smart phone app to
select the Wi-Fi network or register the product
again.
•A faulty Wi-Fi connection could delay the
Remote Start function.
•Disconnect the probe if attached.
Page 45

SMART FUNCTIONS
45
SMART FUNCTIONS
LG SmartThinQ Application
The LG SmartThinQ application allows you to
communicate with the appliance using a smartphone.
Before Using LG SmartThinQ
•For appliances with the or logo
Use a smartphone to check the strength of
1
the wireless router (Wi-Fi network) near the
appliance.
•If the distance between the appliance and the
wireless router is too far, the signal strength
becomes weak. It may take a long time to
register or installation may fail.
Turn off the Mobile data or Cellular Data on
2
your smartphone.
•For iPhones, turn data off by going to Settings
→ Cellular → Cellular Data.
NOTE
•If the appliance is having trouble connecting
to the Wi-Fi network, it may be too far from
the router. Purchase a Wi-Fi repeater (range
extender) to improve the Wi-Fi signal strength.
•The network connection may not work properly
depending on the Internet service provider.
•The Wi-Fi connection may not connect or may
be interrupted because of the home network
environment.
•If the appliance cannot be registered due to
problems with the wireless signal transmission,
unplug the appliance and wait about a minute
before trying again.
•If the firewall on your wireless router is enabled,
disable the firewall or add an exception to it.
•The wireless network name (SSID) should be a
combination of English letters and numbers. (Do
not use special characters.)
•Smartphone user interface (UI) may vary
dependingon the mobile operating system (OS)
and the manufacturer.
•If the security protocol of the router is set to
WEP, network setup may fail. Change the
security protocol (WPA2 is recommended), and
register the product again.
ENGLISH
Connect your smartphone to the wireless router.
3
NOTE
•To verify the Wi-Fi connection, check that Wi-Fi
icon on the control panel is lit.
•The appliance supports 2.4 GHz Wi-Fi networks
only. To check your network frequency, contact
your Internet service provider or refer to your
wireless router manual.
•LG SmartThinQ is not responsible for any
network connection problems or any faults,
malfunctions, or errors caused by network
connection.
•The surrounding wireless environment can
make the wireless network service run slowly.
Installing the LG SmartThinQ
Application
Search for the LG SmartThinQ application from the
Google Play Store or Apple App Store on a smart
phone. Follow instructions to download and install the
application.
Page 46

46
SMART FUNCTIONS
LG SmartThinQ Application Features
•For appliances with the or logo
EasyClean
Allows you to set EasyClean® alerts, read the
instruction guide, and simulate and compare energy
consumption when using EasyClean® versus
selfclean cycles.
Smart Diagnosis™
This function provides useful information for
diagnosing and solving issues with the appliance
based on the pattern of use.
Settings
Allows you to set various options on the oven and in
the Application.
Monitoring
This function shows the current status, remaining
time, cook settings and end time on one screen.
®
Smart Diagnosis™ Function
Should you experience any problems with the
appliance, it has the capability of transmitting data
via your telephone to the LG Customer Information
Center. NFC or Wi-Fi equipped models can also
transmit data to a smartphone using the LG
SmartThinQ application.
Smart Diagnosis™ through the
Customer Information Center
•For appliances with the or logo
This method allows you to speak directly to our
trained specialists. The specialist records the data
transmitted from the appliance and uses it to analyze
the issue, providing a fast and effective diagnosis.
Push Alerts
Turn on the Push Alerts to receive appliance status
notifications.
The notifications are triggered even if the
LG SmartThinQ application is off.
Timer
You can set the timer from the application.
Firmware Update
Keep the appliance updated.
NOTE
•If you change your wireless router, Internet
service provider, or password, delete the
registered appliance from the LG SmartThinQ
application and register it again.
•This information is current at the time of
publication. The application is subject to change
for product improvement purposes without
notice to users.
Call the LG Customer Information Center at
1
1-800-243-0000.
When instructed to do so by the call center
2
agent, hold the mouthpiece of your phone over
the Smart Diagnosis™ logo on the machine.
Hold the phone no more than one inch from (but
not touching) the machine.
NOTE
Do not touch any other buttons or icons on the
display screen.
Touch and hold the Start button for three
3
seconds.
Keep the phone in place until the tone
4
transmission has finished. This takes about 6
seconds and the display will count down the
time.
Once the countdown is over and the tones have
5
stopped, resume your conversation with the call
center agent, who will then be able to assist you
in using the information transmitted for analysis.
NOTE
•For best results, do not move the phone while
the tones are being transmitted.
•If the call center agent is not able to get an
accurate recording of the data, you may be
asked to try again.
Page 47

SMART FUNCTIONS
47
LG SmartThinQ Smart Diagnosis™
•For appliances with the or logo
Use the Smart Diagnosis feature in the LG
SmartThinQ application for help diagnosing issues
with the appliance without the assistance of the LG
Customer Information Center.
Follow the instructions in the LG SmartThinQ
application to perform a Smart Diagnosis using your
smartphone.
Open the LG SmartThinQ application on the
1
smart phone.
In the application, select the appliance from your
2
list of connected appliances and then touch the
dots at the upper right of the screen.
Select Smart Diagnosis, then touch the Start
3
Smart Diagnosis button.
NOTE
If the diagnosis fails several times, use the
following instructions.
Select the Audible Diagnosis.
4
Open Source Software Notice
Information
To obtain the source code under GPL, LGPL, MPL,
and other open source licenses, that is contained in
this product, please visit http://opensource.lge.com.
In addition to the source code, all referred license
terms, warranty disclaimers and copyright notices are
available for download.
LG Electronics will also provide open source code
to you on CD-ROM for a charge covering the cost
of performing such distribution (such as the cost of
media, shipping, and handling) upon email request
to opensource@lge.com. This offer is valid for a
period of three years after our last shipment of this
product. This offer is valid to anyone in receipt of this
information.
Wireless module (LCW-004) Specifications
Frequency Range 2412~2462 MHz
IEEE 802.11 b : 22.44 dBm
Output Power (max.)
IEEE 802.11 g : 24.68 dBm
IEEE 802.11 n : 24.11 dBm
ENGLISH
Follow the instructions on the smart phone.
5
Keep the phone in place until the tone
6
transmission has finished. View the diagnosis on
the phone.
NOTE
•Smart Diagnosis™ cannot be activated unless
the appliance can be turned on using the
Power button. If the appliance cannot be turned
on, troubleshooting must be done without using
Smart Diagnosis™.
•The Smart Diagnosis™ function depends on
the local call quality.
•A landline phone may result in clearer
transmission and more accurate diagnosis.
•If the Smart Diagnosis™ data transfer is poor
due to poor call quality, you may not receive an
accurate Smart Diagnosis result.
Page 48

48
SMART FUNCTIONS
FCC Notice
(For transmitter module
contained in this product)
The following notice covers the transmitter module
contained in this product.
This equipment has been tested and found to comply
with the limits for a Class B digital device, pursuant
to Part 15 of the FCC Rules and also Part 18 of the
FCC Rules. These limits are designed to provide
reasonable protection against harmful interference in
a residential installation. This equipment generates,
uses, and can radiate radio frequency energy and,
if not installed and used in accordance with the
instructions, may cause harmful interference to radio
communications. However, there is no guarantee that
interference will not occur in a particular installation.
If this equipment does cause harmful interference to
radio or television reception, which can be determined
by turning the equipment off and on, the user is
encouraged to try to correct the interference by one
or more of the following measures:
•Reorient or relocate the receiving antenna.
•Increase the separation between the equipment
and the receiver.
•Connect the equipment to an outlet on a circuit
different from that to which the receiver is
connected.
•Consult the dealer or an experienced radio/TV
technician for help.
This device complies with Part 15, Part 18 of the
FCC Rules. Operation is subject to the following two
conditions:
1) this device may not cause harmful interference
and
2) this device must accept any interference received,
including interference that may cause undesired
operation of the device.
Any changes or modifications in construction of this
device which are not expressly approved by the party
responsible for compliance could void the user’s
authority to operate the equipment.
FCC RF Radiation Exposure
Statement
This equipment complies with FCC radiation exposure
limits set forth for an uncontrolled environment. This
transmitter must not be co-located or operating in
conjunction with any other antenna or transmitter.
This equipment should be installed and operated with
a minimum distance of 20 cm (7.8 inches) between
the antenna and your body. Users must follow the
specific operating instructions for satisfying RF
exposure compliance.
Page 49

MAINTENANCE
49
MAINTENANCE
Caring for the Upper Oven
To make sure the microwave oven looks good and
works well for a long time, maintain it properly. For
proper care, follow these instructions carefully.
Cleaning the Interior
Wash often with warm, sudsy water and a sponge or
soft cloth. Use only mild, nonabrasive soaps or a mild
detergent. Keep the areas clean where the door
and oven frame touch when closed.
Wipe well with a clean cloth. Over time, stains can
occur on the surfaces as the result of food particles
spattering during cooking. This is normal.
Cleaning the Exterior
Use a soft cloth sprayed with glass cleaner.
Apply the glass cleaner to the soft cloth; do not spray
directly on the oven.
NOTE
Abrasive cleansers, steel wool pads, gritty
wash cloths, some paper towels, etc., can
damage the control panel and the interior and
exterior oven surfaces.
To clean the glass tray and rotating ring, wash in
mild, sudsy water.
For heavily soiled areas use a mild cleanser and
scouring sponge.
The glass tray and rotating ring are dishwasher safe.
Glass Tray
Rotating Ring
Shaft
ENGLISH
For stubborn soil, boil a cup of water in the oven for 2
to 3 minutes. Steam will soften the soil. To get rid of
odors inside the oven, boil a cup of water with some
lemon juice or vinegar in it.
Page 50

50
MAINTENANCE
Caring for the Lower Oven
EasyClean
LG’s EasyClean® enamel technology provides two
cleaning options for the inside of the lower oven. The
EasyClean
enamel to help lift soils without harsh chemicals, and
it runs using ONLY WATER for just 10 minutes in low
temperatures to help loosen LIGHT soils before handcleaning.
While EasyClean
and LIGHT soils, the Self Clean feature can be
used to remove HEAVY, built up soils. The intensity
and high heat of the Self Clean cycle may result in
smoke which will require the opening up of windows
to provide ventilation. Compared to the more intense
Self Clean process, your LG oven gives you the
option of cleaning with LESS HEAT, LESS TIME, and
virtually NO SMOKE OR FUMES.
When needed, the oven still provides the Self Clean
option for longer, more thorough oven cleaning for
heavier, built up soils.
When to Use EasyClean
®
®
feature takes advantage of LG’s new
®
is quick and effective for small
®
Benefits of EasyClean
•Helps loosen light soils before hand-cleaning
•EasyClean
•Makes for a better self-clean experience
- Delays the need for a self-clean cycle
- Minimizes smoke and odors
- Can allow shorter self-clean time
®
only uses water; no chemical cleaners
®
Suggested
Cleaning Method
EasyClean
Self Clean*
* The Self Clean cycle can be used for soil that has been built up over time.
®
Example of Oven Soiling Soil Pattern
Small drops or
spots
Light splatter Fat/grease
Medium to
heavy splatter
Drops or spots
Types of
ingredients
Fat/grease
Filling or
sugar based
Cream or
Soils
Cheese
or other
soils
tomato
sauce
Common Food Items
That Can Soil Your Oven
Pizza
Steaks, broiled
Fish, broiled
Meat roasted at low
temperatures
Meat roasted at high
temperatures
Pies
Casseroles
Page 51

MAINTENANCE
51
Cleaning Tips
•Allow the oven to cool to room temperature before
using the EasyClean® cycle. If your oven cavity is
above 150 °F (65 °C), OVEN IS HOT will appear in
the display, and the EasyClean® cycle will not be
activated until the oven cavity cools down.
•A plastic spatula can be used as a scraper to
scrape off any chunks or debris before and during
oven cleaning.
•Using the rough side of a non-scratch scouring pad
may help to take off burnt-on stains better than a
soft sponge or towel.
•Certain non-scratch scrubbing sponges, such as
those made of melamine foam, available at your
local stores, can also help improve cleaning.
•The Oven must be level to ensure that the lower
surface of the oven cavity is completely covered
with water at the beginning of the EasyClean
cycle.
•For best results, use distilled or filtered water. Tap
water may leave mineral deposits on the oven
bottom.
•Soil baked on through several cooking cycles will
be more difficult to remove with the EasyClean
cycle.
•Do not open the oven door during the EasyClean
cycle. Water will not get hot enough if the door is
opened during the cycle.
•For hard to reach areas such as the back surface
of the oven, it is better to use the Self Clean cycle.
®
®
EasyClean® Instruction Guide
Remove oven racks and accessories from the
1
oven.
Scrape off and remove any burnt-on debris with
2
a plastic scraper.
Suggested plastic scrapers:
•Hard plastic spatula
•Plastic pan scraper
•Plastic paint scraper
•Old credit card
Fill the steam feeder tank with water to the
3
maximum fill line (34 oz/1000 cc).
Close the oven door.
4
Touch EasyClean®.
Touch Start.
ENGLISH
CAUTION
•Some surfaces may be hot after the
EasyClean® cycle. Wear rubber gloves while
®
cleaning to prevent burns.
•During the EasyClean
becomes hot enough to cause burns.
After the cycle ends, open the oven door and
wait a minute to let the steam run out before
wiping the inside surface of the oven. Failure to
do so may result in burns.
•Avoid leaning or resting on the oven door glass
while cleaning the oven cavity.
®
cycle, the oven
A tone will sound at the end of the 10 minute
5
cycle. Touch Clear/Off to clear the display and
end the tone.
After the cleaning cycle and during hand-
6
cleaning, enough water should remain on the
oven bottom to completely submerge all soils.
Add water if necessary. Place a towel on the
floor in front of the oven to capture any water
that may spill out during hand-cleaning.
Clean the oven cavity immediately after the
7
EasyClean® cycle by scrubbing with a wet,
non-scratch scouring sponge or pad. (The
scouring side will not scratch the finish.) Some
water may spill into the bottom vents while
cleaning, but it will be captured
in a pan under the oven cavity
and will not hurt the burner.
NOTE
Do not use any steel scouring pads, abrasive
pads or cleaners as these materials can
permanently damage the oven surface.
Page 52

52
MAINTENANCE
Once the oven cavity is cleaned, wipe any
8
excess water with a clean dry towel. Replace
racks and any other accessories.
If some light soils remain, repeat the above
9
steps, making sure to thoroughly soak the soiled
areas.
If stubborn soils remain after multiple
EasyClean
sure that the oven cavity is empty of oven racks
and other accessories, and that the oven cavity
surface is dry before running the Self Clean
cycle. Consult the Self Clean section of your
owner’s manual for further details.
NOTE
•The cavity gasket may be wet when the
EasyClean
not clean the gasket.
•If mineral deposits remain on the oven bottom
after cleaning, use a cloth or sponge soaked in
vinegar to remove them.
•It is normal for the fan to operate during the
EasyClean
•It is normal to hear the sound of boiling water
from the steam generator while running the
EasyClean
®
cycles, run the Self Clean cycle. Be
®
cycle finishes. This is normal. Do
®
cycle.
®
cycle.
Cleaning Scale on Oven Bottom
To remove mineral deposits that remain on the oven
bottom after using the steam mode, use a cloth
or sponge soaked in vinegar or a weak citric acid
solution. For more stubborn or extensive scaling, use
the Descaling function.
Descaling
Use this function to remove the white deposits that
form after the steam generator is used for a long
period.
The Descaling function runs for 65 minutes. Water
will come out of the steam generator while it is being
cleaned.
For instructions on removing and filling the steam
feeder tank, see "Using the Steam Feeder Tank."
Using Descaling
Fill the steam feeder tank with a 20:1 mixture of
1
water and citric acid. For example, use 4 tsp of
citric acid in 41/4 cups water (20 g citric acid in
1000 ml water).
Insert the steam feeder tank into the slot over
2
the oven cavity and push it in until it clicks into
place.
Steam Feeder Tank
The steam feeder tank is used during the steam
cooking functions. Use filtered, softened water if
possible.
NOTE
•After using the steam function, the steam feeder
tank should be drained. To avoid bacteria or
odors, clean and dry the steam feeder tank
after every use.
•Do not clean in a dishwasher.
Hard Water Scale
If hard water is used in the steam feeder tank,
the steam generator may become clogged with
hard water scale. In areas with hard water, run the
Descaling function frequently or use softened water.
Touch More Mode.
3
Touch 4 to select DESCALING.
4
After a few minutes of descaling, Insert the
5
water tank will appear in the display. Following
the instructions, drain the tank and fill it with
clean water.
Insert the tank and start the Rinsing function.
6
Once the Rinsing function is complete, dry the
7
inside of the oven with a soft cloth.
NOTE
The Rinsing function must be completed even if
the Descaling function is canceled.
Page 53

MAINTENANCE
53
Drying
The Drying function removes residual water inside
the steam generator. The function takes a little over
1 minute and runs automatically after any steam
cooking cycle. The Drying function can also be
started manually, if needed.
Using Drying
Check whether there is water in the steam
1
feeder tank. The remaining water in the tank
must be drained.
Touch More Mode.
2
Touch 5 to select DRYING.
3
Touch Start to begin Drying. The remaining time
4
appears in the display.
Self Clean
The Self Clean cycle uses extremely hot temperatures
to clean the oven cavity. While running the Self Clean
cycle, you may notice smoking or an odor. This is
normal; especially if the oven is heavily soiled.
During Self Clean, the kitchen should be well
ventilated to minimize the odors from cleaning.
Before Starting Self Clean
•Remove the oven racks, broiler pan, broiler grid, all
cookware, aluminum foil or any other material from
the oven.
•The kitchen should be well ventilated to minimize
the odors from cleaning.
•Wipe any heavy spillovers on the bottom of the
oven.
•Make sure that the oven light bulb cover is in place
and the oven light is off.
•The oven light cannot be turned on during a Self
Clean cycle. The oven light cannot be turned on
until the oven temperature has cooled below
500 ˚F (260 ˚C) after a Self Clean cycle is complete.
CAUTION
ENGLISH
•Do not leave small children unattended near
the appliance. During the Self Clean cycle, the
outside of the oven can become very hot to the
touch.
•If you have pet birds, move them to another
well-ventilated room. The health of some birds
is extremely sensitive to the fumes given off
during the Self Clean cycle of any oven.
•Do not line the oven walls, racks, bottom or
any other part of the oven with aluminum foil or
any other material. Doing so will destroy heat
distribution, produce poor baking results and
cause permanent damage to the oven interior
(aluminum foil will melt to the interior surface of
the oven).
•Do not force the door open. This can damage
the automatic door locking system. Use care
when opening the oven door after the Self
Clean cycle. Stand to the side of the oven when
opening the door to allow hot air or steam to
escape. The oven may still be VERY HOT.
NOTE
•Remove oven racks and accessories before
starting the Self Clean cycle.
•If oven racks are left in the oven cavity during
the Self Clean cycle, they will discolor and
become difficult to slide in and out.
•Clean the frame of the oven and door with hot
soapy water. Rinse well.
•Do not clean the gasket. The fiberglass material
of the oven door gasket cannot withstand
abrasion. It is essential for the gasket to remain
intact. If you notice it becoming worn or frayed,
replace it.
•Wipe up any heavy spillovers on the oven
bottom.
•Make sure that the oven light bulb cover is in
place and the oven light is off.
•It is normal for the fan to operate during the Self
Clean cycle.
Page 54

54
MAINTENANCE
Setting Self Clean
The Self Clean function has cycle times of 3, 4, or 5
hours.
Self Clean Soil Guide
Soil Level Cycle Setting
Lightly Soiled Oven Cavity 3-Hour Self Clean
Moderately Soiled Oven Cavity 4-Hour Self Clean
Heavily Soiled Oven Cavity 5-Hour Self Clean
Remove all racks and accessories from the oven.
1
Touch Self Clean. The oven defaults to the
2
recommended four-hour self clean for a
moderately soiled oven. Touch twice for a fivehour self clean or three times for a three-hour
self clean.
Touch Start.
3
Once the self-clean cycle is set, the oven door
4
locks automatically and the lock icon displays.
You will not be able to open the oven door
until the oven has cooled. The lock releases
automatically when the oven has cooled.
CAUTION
Do not force the oven door open when the lock
icon is displayed. The oven door remains locked
until the oven temperature has cooled. Forcing
the door open will damage the door.
Setting Self Clean with a Delayed Start
Remove all racks and accessories from the
1
oven.
Touch Self Clean. The oven defaults to the
2
recommended four-hour self clean for a
moderately soiled oven. Touch twice for a
five-hour self clean or three times for a
three-hour self clean.
Touch Start Time.
3
Use the number keys to enter the time of day
4
you would like the Self Clean to start.
Touch Start.
5
During Self Clean
•The Self Clean cycle uses extremely hot
temperatures to clean the oven cavity. While
running the Self Clean cycle, you may notice
smoking or an odor. This is normal, especially if the
oven is heavily soiled.
•As the oven heats, you may hear sounds of metal
parts expanding and contracting. This is normal
and will not damage the oven.
•Do not force the oven door open when the lock
is displayed. The oven door remains locked until
the oven temperature has cooled. Forcing the door
open will damage the door.
•Do not remove the steam feeder tank from the oven
during the self-clean cycle. Doing so, could result in
product damage.
After the Self Clean Cycle
•The oven door remains locked until the oven
temperature has cooled.
•You may notice some white ash in the oven. Wipe
it off with a damp cloth or a soap-filled pad after the
oven cools. If the oven is not clean after one selfclean cycle, repeat the cycle.
•If oven racks were left in the oven and do not slide
smoothly after a self-clean cycle, wipe racks and
rack supports with a small amount of vegetable oil
to make them glide more easily.
•Fine lines may appear in the porcelain because it
went through heating and cooling. This is normal
and will not affect performance.
NOTE
•The Self Clean cycle cannot be started if the
Lockout feature is active.
•Once the Self Clean cycle is set, the oven door
locks automatically. You will not be able to open
the oven door until the oven is cooled. The lock
releases automatically.
•Once the door has been locked, the lock
indicator light stops flashing and remains on.
Allow about 15 seconds for the oven door lock
to activate.
•If the clock is set for a 12-hour display (default)
the Delayed Self Clean can never be set to
start more than 12 hours in advance.
•After the oven is turned off, the convection
fan keeps operating until the oven has cooled
down.
NOTE
It may become necessary to cancel or interrupt a
Self Clean cycle due to excessive smoke or fire in
the oven. To cancel the Self Clean function, touch
Clear/Off.
Page 55

MAINTENANCE
55
Changing the Oven Light
The oven light is a standard 50-watt appliance bulb. It
turns on when the oven door is open. When the oven
door is closed, touch Light to turn it on or off.
Replacing Lamp on Side Wall
Unplug oven or disconnect power.
1
Remove oven racks.
2
Slide a flat blade screwdriver between the
3
housing and the glass light cover.
Support the glass light cover with two fingers to
4
prevent the cover from falling to the bottom of
the oven.
Glass Light Cover
Flat blade screwdriver
Gently twist the screwdriver blade to loosen the
5
glass light cover.
Housing
Cleaning the Exterior
Painted and Decorative Trim
For general cleaning, use a cloth with hot soapy
water. For more difficult soils and built-up grease,
apply a liquid detergent directly onto the soil. Leave it
on for 30 to 60 minutes. Rinse with a damp cloth and
dry. Do not use abrasive cleaners.
Stainless Steel Surfaces
To avoid scratches, do not use steel wool pads.
Place a small amount of stainless steel
1
appliance cleaner or polish on a damp cloth or
paper towel.
Clean a small area, rubbing with the grain of the
2
stainless steel if applicable.
Dry and buff with a clean, dry paper towel or soft
3
cloth.
Repeat as necessary.
4
NOTE
•Do not use a steel wool pad. it will scratch the
surface.
•To clean the stainless steel surface, use warm
sudsy water or a stainless steel cleaner or
polish.
•Always wipe in the direction of the metal
surface finish.
•To purchase stainless steel appliance cleaner
or polish, or to locate a dealer near you, call our
toll-free customer service number:
1-800-243-0000 (USA),
or visit our website at: www.lg.com
ENGLISH
Remove bulb from socket.
6
Replace bulb, replace light cover by snapping
7
back into place.
Plug in oven or reconnect power.
8
WARNING
•Make sure that the oven and bulb are cool.
•Disconnect the electrical power to the oven at
the main fuse or circuit breaker panel. Failure
to do so can result in severe personal injury,
death, or electrical shock.
•Wear gloves while changing the oven light.
Glass fragments from broken bulbs can cause
risk of injury.
Page 56

56
MAINTENANCE
Oven Door
•Use soapy water to thoroughly clean the oven door.
Rinse well. Do not immerse the door in water.
•You may use a glass cleaner on the outside glass
of the oven door. Do not spray water or glass
cleaner on the door vents.
•Do not use oven cleaners, cleaning powders, or
harsh abrasive cleaning materials on the outside of
the oven door.
•Do not clean the oven door gasket. The oven door
gasket is made of a woven material that is essential
for a good seal. Care should be taken not to rub,
damage, or remove this gasket.
CAUTION
Do not use harsh cleaners or harsh abrasive
cleaning materials on the outside of the oven
door. Doing so can cause damage.
Don’t hand
clean oven
door gasket
Remove
any debris
from door
Broiler Pan and Grid
•Do not store a soiled broiler pan or grid anywhere
in the oven.
•Do not clean the broiler pan or grid in a selfcleaning mode.
•Remove the grid from the pan. Carefully pour out
the grease from the pan into a proper container.
•Wash and rinse the broiler pan and grid in hot water
with a soap-filled or plastic scouring pad.
•If food has burned on, sprinkle the grid with cleaner
while hot and cover with wet paper towels or a
dishcloth. Soaking the pan will remove burned-on
foods.
•Both the broiler pan and grid may be cleaned with a
commercial oven cleaner or in the dishwasher.
Oven Racks
Remove the oven racks before operating the self
clean cycle.
Food spilled into the tracks could cause the
1
racks to become stuck. Clean racks with a mild,
abrasive cleaner.
Rinse with clean water and dry.
2
NOTE
If the racks are cleaned using the self clean cycle
(not recommended), the color will turn slightly
blue and the finish will become dull. After the self
clean cycle is complete, and the oven has cooled,
rub the sides of the racks with wax paper or a
cloth containing a small amount of vegetable oil.
This will make the racks glide more easily into the
rack tracks.
Page 57

MAINTENANCE
57
Removing and Replacing the Lift-Off
Oven Doors
CAUTION
•Be careful when removing and lifting the door.
•Do not lift the door by the handle. The door is
very heavy.
Removing the Door
Open the door fully.
1
Pull the hinge locks down toward the door frame
2
to the unlocked position.
Slot
Hinge
lock
Hinge
arm
Hinge lock open
Firmly grasp both sides of the door at the top.
3
Close door to the door removal position, which is
4
approximately 5 degrees.
Lock
Unlock
about 5°
Replacing the Door
Firmly grasp both sides of the door at the top.
1
With the door at the same angle as the removal
2
position, seat the indentation of the hinge arm
into the bottom edge of the hinge slot. The notch
in the hinge arm must be fully seated into the
bottom of the slot.
Hinge arm
Bottom
edge of slot
Indentation
Open the door fully. If the door will not open fully,
3
the indentation is not seated correctly in the
bottom edge of the slot.
Push the hinge locks up against the front frame
4
of the oven cavity to the locked position.
Hinge lock
Hinge arm
ENGLISH
Lift door up and out until the hinge arm is clear
5
of the slot.
Hinge locked
Close the oven door.
5
Door Care Instructions
Most oven doors contain glass that can break.
CAUTION
•Do not close the oven door until all the oven
racks are fully in place.
•Do not hit the glass with pots, pans, or any
other object.
•Scratching, hitting, jarring, or stressing the
glass may weaken its structure causing an
increased risk of breakage at a later time.
Page 58

58
TROUBLESHOOTING
TROUBLESHOOTING
FAQs
Can I use a rack in my upper oven to reheat or
cook on two levels at once?
Only use the rack that is supplied with your upper
oven. Use of any other rack can result in poor cooking
performance and/or arcing and may damage your
oven.
Will the upper oven be damaged if it operates
empty?
Yes. Never operate the oven empty or without the
glass tray.
Does microwave energy pass through the viewing
screen in the door?
No. The metal screen bounces the energy back to
the oven cavity. The holes (or ports) allow only light to
pass through. They do not let microwave energy pass
through.
Why do I see light reflection around the outer
case?
This light is from the upper oven light which is located
between the oven cavity and the outer wall of the
oven.
What are the various sounds I hear when the
upper oven is operating?
The clicking sound is caused by a mechanical switch
turning the microwave oven's magnetron ON and
OFF.
The heavy hum and clunk is from the change in
power the magnetron draws as it is turned ON and
OFF by a mechanical switch. The change in blower
speed is from the change in line voltage caused by
the magnetron being turned ON and OFF.
Can my upper oven be damaged if food is cooked
for too long?
Like any other cooking appliance, it is possible to
overcook food to the point that the food creates
smoke and even possibly fire, and damage to the
inside of the oven. It is always best to be near the
oven while you are cooking.
Why is a standing time recommended after
microwave cooking time is over?
Standing time allows foods to continue cooking
evenly for a few minutes after the actual microwave
oven cooking cycle. The amount of standing time
depends upon the density of the foods.
Why is additional time required for cooking food
stored in the refrigerator?
As in conventional cooking, the initial temperature of
food affects total cooking time. You need more time to
cook food taken out of a refrigerator than for food at
room temperature.
Can I use either metal or aluminum pans in my
upper oven?
Usable metal includes aluminum foil for shielding (use
small, flat pieces), and shallow foil trays (if tray is ¾
inch deep and filled with food to absorb microwave
energy). Never allow metal to touch walls or door.
Sometimes the door of my upper oven appears
wavy. Is this normal?
This appearance is normal and does not affect the
operation of your oven.
The glass tray does not move.
The glass tray is not correctly in place. It should be
correct-side up and sitting firmly on the center hub.
The support is not operating correctly. Remove the
glass tray and restart the oven. Cooking without the
glass tray can give you poor results.
Why does the dish become hot when I microwave
food in it? I thought that this should not happen.
As the food becomes hot it will conduct the heat to
the dish. Use hot pads to remove food after cooking.
What does standing time mean?
Standing time means that food should be taken out
of the oven and covered for additional time after
cooking. This process allows the cooking to finish,
saves energy, and frees the oven for other purposes.
Page 59

TROUBLESHOOTING
59
Can I pop popcorn in my upper oven?
How do I get the best results?
Yes. Pop packaged microwave popcorn following
manufacturer’s guidelines or use the preprogrammed
Popcorn key.
Do not use regular paper bags. Use the listening test
by stopping the oven as soon as the popping slows
to a pop every one or two seconds. Do not try to
repop unpopped kernels. You can also use special
microwave poppers. When using a popper, be sure to
follow manufacturer’s directions. Do not pop popcorn
in glass utensils.
Why does steam come out of the air exhaust
vent?
Steam is normally produced during cooking. The
upper oven has been designed to vent steam out of
the top vent.
The Lower oven doesn’t cook like my old one.
Is there something wrong with the temperature
settings?
No, your oven has been factory tested and calibrated.
For the first few uses, follow your recipe times and
temperatures carefully. If you still think your new
oven is too hot or too cold, you can adjust the oven
temperature yourself to meet your specific cooking
needs. Refer to the Oven Temperature Adjustment
section in this manual for easy instructions on how to
adjust your thermostat.
Can I use aluminum foil to catch drippings in the
lower oven cavity?
Never use aluminum foil to line the bottom or sides
of the oven. The foil will melt and stick to the bottom
surface of the oven and will not be removable. Use
a sheet pan placed on a lower oven rack to catch
drippings instead. (If foil has already melted onto the
bottom of the oven, it will not interfere with the oven's
performance.)
Can I use aluminum foil on the racks?
Do not cover racks with aluminum foil. Covering
entire racks with foil restricts air flow, leading to poor
cooking results. Use a sheet pan lined with foil under
fruit pies or other acidic or sugary foods to prevent
spillovers from damaging the oven finish.
CAUTION
Foil may be used to wrap food in the lower oven,
but do not allow the foil to come into contact with
the exposed heating/broiling elements in the
oven. The foil could melt or ignite, causing smoke,
fire, or injury.
Can I leave my racks in the oven when running a
Self Clean cycle?
No. Although it will not damage the racks, it will
discolor them and may make them hard to slide in
and out during use. Remove all items from the oven
before starting a Self Clean cycle.
ENGLISH
Is it normal to hear a clicking noise coming from
the back of the lower oven when I am using it?
Your new oven is designed to maintain a tighter
control over your oven’s temperature. You may hear
your oven’s heating elements click on and off more
frequently on your new oven. This is NORMAL.
Why is the time flashing?
This means that the product has just been plugged
in, or that it has experienced a power interruption. To
clear the flashing time, touch any button and reset the
clock if needed.
During convection cooking the fan stops when I
open the door. Is that normal?
Yes, this is normal. When the door is opened, the
convection fan will stop until the door is closed.
What should I do if my racks are sticky and have
become hard to slide in and out?
Over time, the racks may become hard to slide in
and out. Apply a small amount of olive oil to the ends
of the racks. This will work as a lubricant for easier
gliding.
Why aren't the function buttons working?
Make sure that the oven is not in Lockout mode. The
will show in the display if Lockout is activated.
lock
To deactivate Lockout, touch and hold Lower Clear/
Off for three seconds. The unlock melody sounds
and Loc appears in the display until the controls are
unlocked.
My oven is still dirty after running the EasyClean
cycle. What else should I do?
®
The EasyClean
in your oven to assist in hand-cleaning of your oven.
It does not automatically remove all soils after the
cycle. Some scrubbing of your oven is required after
running the EasyClean® cycle.
cycle only helps to loosen light soils
®
Page 60

60
TROUBLESHOOTING
I tried scrubbing my oven after running
EasyClean®, but some soils still remain. What can
I do?
®
The EasyClean
feature works best when the soils
are fully soaked and submerged in water before
running the cycle and during hand-cleaning. If soils
are not sufficiently soaked in water, it can negatively
affect the cleaning performance. Repeat the
®
EasyClean
process using sufficient water.
Sugar-based and certain greasy soils are especially
hard to clean. If some stubborn soils remain, use the
Self Clean feature to thoroughly clean your oven.
Soil on the oven walls is not coming off. How can
I clean the oven walls?
Soils on the side and rear walls of your oven may be
more difficult to fully soak with water. Try repeating
®
the EasyClean
process with more than the ¼ cup
(2 oz or 60 ml).
®
Will EasyClean
get all of the soils and stains out
completely?
It depends on the soil type. Sugar-based and certain
grease stains are especially hard to clean. Also, if
stains are not sufficiently soaked in water, this can
negatively affect cleaning performance. If stubborn
or built-up stains remain, use the Self Clean feature.
Refer to the Self Clean section of your owner's
manual.
I see smoke coming out of my oven's vents
®
during EasyClean
. Is this normal?
This is normal. This is not smoke. It is actually water
vapor (steam) from the water in the oven cavity. As
®
the oven heats briefly during EasyClean
, the water
in the cavity evaporates and escapes through the
oven vents.
®
How often should I use EasyClean
®
EasyClean
can be performed as often as you wish.
?
EasyClean® works best when your oven is LIGHTLY
soiled from such things as LIGHT grease splatter
and small drops of cheese. Please refer to the
EasyClean® section in your owner's manual for more
information.
®
What is required for EasyClean
?
A plastic scraper, a non-scratch scrubbing pad and a
towel. You should not use abrasive scrubbers such as
heavy-duty scouring pads or steel wool. Except for a
towel, all of the materials you need are included in a
special cleaning kit with your new oven.
Are there any tricks to getting some of the
stubborn soils out?
Scraping the soils with a plastic scraper before
and during hand-cleaning is recommended. Fully
saturating soils with water is also recommended.
However, certain types of soils are harder to clean
than others. For these stubborn soils, the Self Clean
cycle is recommended. Consult the Self Clean section
of your owner's manual for details.
Is it safe for my convection fan, broil burner or
®
heater element to get wet during EasyClean
?
Yes. The convection fan, broiler burner or heater
element may get a little wet during cleaning. However,
direct spray onto the broil burner and heater elements
is not necessary because these are self-cleaning
during regular use.
Page 61

TROUBLESHOOTING
61
Before Calling for Service
Before you call for service, review this list. It may save you time and expense. The list includes common
occurrences that are not the result of defective workmanship or materials in this appliance.
Symptoms Possible Causes / Solutions
Oven control beeps
and displays any F
code error
Oven will not work
Arcing or Sparking
(Upper Oven)
•Electronic control has detected a
fault condition. Touch Clear/Off to
clear the display and stop beeping.
Reprogram oven. If fault recurs,
record fault number. Touch Clear/Off
and contact a Service agent.
•Plug on range is not completely inserted in the electrical outlet.
- Make sure electrical plug is plugged into a live, properly grounded outlet.
•A fuse in your home may be blown or the circuit breaker tripped.
- Replace the fuse or reset the circuit breaker.
•Oven controls improperly set.
- See the Using the Oven section.
•Oven too hot.
- Allow the oven to cool to below locking temperature.
•Cookware is not microwave safe. When in doubt, test cookware before use.
•Do not operate oven while empty.
CODE CAUSE
F-3 Touch key error
F-19
Oven not heating
(Lower oven)
ENGLISH
Unevenly Cooked
Foods (Upper Oven)
Overcooked Foods
(Upper Oven)
Undercooked Foods
(Upper Oven)
Improper Defrosting
(Upper Oven)
If the display shows
a time counting down
but the oven is not
cooking
Steam is exhausted
through the oven vent
•Test cookware to make sure it is microwave safe.
•Do not cook without the glass tray.
•Turn or stir food while cooking.
•Defrost food completely before cooking.
•Use correct cook time and power level.
•Change cook time or power level.
•Test that cookware is microwave safe.
•Defrost food completely before cooking.
•Change cook time or power level.
•Make sure ventilation ports are not blocked.
•Test that cookware is microwave safe.
•Change defrost time or weight.
•Turn or stir food during defrost cycle.
•Check that door is firmly closed.
•Check that timer wasn't started instead of a cooking function.
•Cooking foods with high moisture produces steam. This is normal.
Page 62

62
TROUBLESHOOTING
Symptoms Possible Causes / Solutions
Appliance does not
operate
•Make sure cord is plugged correctly into outlet. Check circuit breakers.
•Service wiring is not complete. Contact your electrician for assistance.
•Power outage. Check house lights to be sure. Call your local electric company
for service.
Oven light does not
work
Oven smokes
excessively during
broiling
Food does not bake
or roast properly
•Replace or tighten bulb. See Changing the Oven Light section in this Owner’s
Manual.
•Control not set properly. Follow instructions under Setting Oven Controls.
•Meat too close to the element. Reposition the rack to provide proper clearance
between the meat and the element. Preheat broil element for searing.
•Meat not properly prepared. Remove excess fat from meat. Cut remaining fatty
edges to prevent curling.
•Insert on broiler pan wrong side up and grease not draining. Always place grid
on the broiler pan with ribs up and slots down to allow grease to drip into pan.
•Grease has built up on oven surfaces. Regular cleaning is necessary when
broiling frequently.
- Old grease or food spatters cause excessive smoking.
•Oven controls improperly set.
- See the Using the Oven section.
•Rack position is incorrect or the rack is not level.
- See the Using the Oven section.
•Incorrect cookware or cookware of improper size being used.
- See the Using the Oven section.
•Oven sensor needs to be adjusted.
- See Oven Temperature Adjustment in the Features section.
Food does not broil
properly
Oven temperature too
hot or too cold
•Oven controls improperly set.
- Make sure you touch Broil.
•Improper rack position being used.
- See the Broiling Guide.
•Cookware not suited for broiling.
- Use broiling pan and grid.
•Aluminum foil used on the broiling pan and grid has not been fitted properly and
slit as recommended.
- See the Using the Oven section.
•In some areas the power voltage may be low.
- Preheat the broil element for 5-7 minutes.
- See the Broiling Guide.
•Oven sensor needs to be adjusted.
- See Oven Temperature Adjustment in the Features section.
Page 63

TROUBLESHOOTING
63
Symptoms Possible Causes / Solutions
•The oven temperature is too high to set a Self Clean operation.
- Allow the oven to cool and reset the controls.
Oven will not Self
Clean
“Crackling” or
“popping” sound
Fan noise
Convection Fan stops
Displayed Time is
flashing
Excessive smoking
during a Self Clean
cycle
•Oven controls improperly set.
- See the Self Clean section.
•A Self Clean cycle cannot be started if the oven lockout feature is active.
•Make sure to slide the tank into the slot until it clicks into place.
•This is the sound of the metal heating and cooling during both the cooking and
Self Clean functions.
- This is normal.
•A convection fan may automatically turn on and off.
- This is normal.
•Convection fan stops during a convection bake cycle.
- This is normal and is done to allow for more even heating during the cycle.
This is not a failure of the oven and should be considered normal operation.
•This is normal. This means that the product has just been plugged in, or that it
has experienced a power interruption. Touch the Clock key and reset the time,
or touch any key to stop the flashing.
•Excessive soil.
- Touch the Clear/Off button. Open the windows to rid the room of smoke. Wait
until the Self Clean mode is cancelled. Wipe up the excess soil and reset the
clean.
ENGLISH
Oven door does not
open after a Self
Clean cycle
The oven does not
clean after a Self
Clean cycle
CLEAN and door flash
in the display
LOCKED is on in the
display when you
want to cook
Burning or oily odor
emitting from the vent
Oven racks are
difficult to slide
•Oven is too hot.
- Allow the oven to cool below locking temperature.
•Allow about one hour for the oven to cool after the completion of a Self Clean
cycle. The door can be opened when the lock
•The control and door may be locked.
•Oven controls not properly set.
- See the Self Clean section.
•Oven was heavily soiled.
- Clean up heavy spillovers before starting the clean cycle. Heavily soiled ovens
may need to Self Clean again or for a longer period of time.
•The Self Clean cycle has been selected, but the door is not closed.
- Close the oven door.
•The oven door is locked because the temperature inside the oven has not
dropped below the locking temperature.
- Touch the Clear/Off button. Allow the oven to cool.
•This is normal in a new oven and will disappear in time.
- To speed the process, set a Self Clean cycle for a minimum of 3 hours. See
the Self Clean section.
•The shiny, silver-colored racks were cleaned in a Self Clean cycle.
- Apply a small amount of vegetable oil to a paper towel and wipe the edges of
the oven racks with the paper towel.
is no longer displayed.
Page 64

64
TROUBLESHOOTING
Symptoms Possible Causes / Solutions
Moisture collects on
oven window or steam
comes from oven vent
Oven will not Steam
cook
Water pools in the
bottom of the oven
during or after steam
cooking
White residue appears
on the oven bottom
after steam cooking
Trouble connecting
appliance and
smartphone to Wi-Fi
network
•This is normal when cooking foods high in moisture.
•Excessive moisture was used when cleaning the window.
•Make sure to slide the tank into the slot until it clicks into place.
•The drain in the steam feeder tank may be clogged with hard water scale. If this
happens, the descaling function must be run before the steam function can be
used.
•During steam cooking, the water in the steam feeder is transferred to the bottom
of the oven. It is normal for water to fill the bottom of the oven during or after the
Steam mode.
•If the water leaves mineral deposits on the oven bottom, remove the deposits
with a cloth or sponge soaked in vinegar.
•Using hard water in the steam feeder can result in hard water scale on the oven
bottom.
•To remove mineral deposits that remain on the oven bottom, use a cloth or
sponge soaked in vinegar or a weak citric acid solution.
•The password for the Wi-Fi network was entered incorrectly.
- Delete your home Wi-Fi network and begin the registration process again.
•Mobile data for your smartphone is turned on.
- Turn off the Mobile data on your smartphone before registering the appliance.
•The wireless network name (SSID) is set incorrectly.
- The wireless network name (SSID) should be a combination of English letters
and numbers. (Do not use special characters.)
•The router frequency is not 2.4 GHz.
- Only a 2.4 GHz router frequency is supported. Set the wireless router to
2.4 GHz and connect the appliance to the wireless router. To check the router
frequency, check with your Internet service provider or the router manufacturer.
•The distance between the appliance and the router is too far.
- If the appliance is too far from the router, the signal may be weak and the
connection may not be configured correctly. Move the router closer to the
appliance or purchase and install a Wi-Fi repeater.
Page 65

LIMITED WARRANTY
65
LIMITED WARRANTY (USA)
ARBITRATION NOTICE: THIS LIMITED WARRANTY CONTAINS AN ARBITRATION PROVISION THAT
REQUIRES YOU AND LG TO RESOLVE DISPUTES BY BINDING ARBITRATION INSTEAD OF IN COURT,
UNLESS YOU CHOOSE TO OPT OUT. IN ARBITRATION, CLASS ACTIONS AND JURY TRIALS ARE NOT
PERMITTED. PLEASE SEE THE SECTION TITLED “PROCEDURE FOR RESOLVING DISPUTES” BELOW.
Should your LG Electric Oven ("Product") fail due to a defect in materials or workmanship under normal and
proper use, during the warranty period set forth below, LG Electronics (“LG”) will, at its option, repair or replace
the Product. This limited warranty is valid only to the original retail purchaser of the Product and applies only
when purchased and used within the United States including U.S. Territories.
Warranty Period Scope of Warranty HOW SERVICE IS HANDLED
One (1) year from date of
original retail purchase
Five (5) years from the date
of original retail purchase
Ten (10) years from the date
of original retail purchase
•Replacement products and parts are warranted for the remaining portion of the original warranty period or
ninety (90) days, whichever is greater.
•Replacement products and parts may be new, reconditioned, refurbished, or otherwise factory remanufactured.
•Proof of original retail purchase specifying the Product model and date of purchase is required to obtain
warranty service under this limited warranty.
EXCEPT TO THE EXTENT PROHIBTED BY APPLICABLE LAW, ANY IMPLIED WARRANTY OF
MERCHANTABILITY OR FITNESS FOR A PARTICULAR PURPOSE ON THE PRODUCT IS LIMITED IN
DURATION TO THE DURATION OF THE ABOVE LIMITED WARRANTY. UNDER NO CIRCUMSTANCES
SHALL LG OR ITS U.S. DISTRIBUTORS/DEALERS BE LIABLE FOR ANY INDIRECT, INCIDENTAL,
CONSEQUENTIAL, SPECIAL, OR PUNITIVE DAMAGES, INCLUDING, WITHOUT LIMITATION, LOST
GOODWILL, LOST REVENUES OR PROFITS, WORK STOPPAGE, IMPAIRMENT OF OTHER GOODS, COST
OF REMOVAL AND REINSTALLATION OF THE PRODUCT, LOSS OF USE, OR ANY OTHER DAMAGES
WHETHER BASED IN CONTRACT, TORT, OR OTHERWISE. LG’S TOTAL LIABILITY, IF ANY, SHALL NOT
EXCEED THE PURCHASE PRICE PAID BY YOU FOR THE PRODUCT.
Some states do not allow the exclusion or limitation of incidental or consequential damages or limitations on how
long an implied warranty lasts, so the above exclusions or limitations may not apply to you. This limited warranty
gives you specific legal rights and you may also have other rights that vary from state to state.
Parts and Labor
(internal / functional parts only)
Magnetron Only
Inverter Magnetron Only
LG will provide, free of charge, all labor
and in-home service to replace defective
part(s).
ENGLISH
THIS LIMITED WARRANTY DOES NOT COVER:
•Service trips to deliver, pick up, or install, educate how to operate, correct wiring, or correct unauthorized
repairs.
•Damage or failure of the Product to perform during power failures and interrupted or inadequate electrical
service.
•Damage or failure resulting from operating the Product in a corrosive atmosphere or contrary to the Product
owner’s manual.
•Damage or failure to the Product caused by accidents, pests and vermin, lightning, wind, fire, floods, acts of
God, or any other causes beyond the control of LG.
•Damage or failure caused by unauthorized modification or alteration, or if used for other than the intended
purpose.
•Damage or failure resulting from misuse, abuse, improper installation, repair, or maintenance. Improper repair
includes use of parts not authorized by LG. Improper installation or maintenance includes installation or
maintenance contrary to the Product owner’s manual.
•Damage or failure caused by incorrect electrical current, voltage, or ventilation/plumbing codes.
Page 66

66
LIMITED WARRANTY
•Damage or failure caused by transportation and handling, including scratches, dents, chips, and/or other
damage to the finish of the Product, unless such damage is reported within one (1) week of delivery.
•Damage or missing items to any display, open box, or discounted Product.
•Refurbished Product or any Product sold “As Is”, “Where Is”, “With all Faults”, or similar disclaimer.
•Products with original serial numbers that have been removed, altered, or cannot be readily determined.
•Increases in utility costs and additional utility expenses.
•Any noises associated with normal operation.
•Use of accessories, components, or consumable cleaning products that are not authorized by LG.
•Replacement of light bulbs, filters, or any consumable parts.
•When Product is used for other than normal and proper household use (e.g. commercial or industrial use,
offices, and recreational facilities or vehicles) or contrary to the Product’s owner’s manual.
•Costs associated with removal and reinstallation of your Product for repairs.
•Shelves, drawers and accessories, except for internal/functional parts covered under this limited warranty.
Not Covered by this Limited Warranty
Problem Cause Prevention
•Spark / Arcing Aluminum foil or metal utensil used in microwave
mode.
•Unit has no power 1. House power turned off (power supply)
2. Tripped breaker
3. The power cord is not installed properly
•Oven or racks are
Aluminum foil has melted in the oven •Never cover the oven bottom
stained after using
aluminum foil
•Unit has no power 1. House power turned off (power supply)
2. Tripped breaker
3. The power cord is not installed properly.
3-WIRE HOOK UP
White White
Black Black
Red Red
4-WIRE HOOK UP
•DO NOT use aluminum foil or
metal utensils in microwave
mode.
- Check user instructions
1. Check house power supply
2. Check proper power cord
connection
3. Check extension cord
or cover an entire rack with
materials such as aluminum
foil.
•If the foil has already melted
onto the oven, it will not affect
the performance of the oven.
•Check power at main board
before calling for service.
•Match power cord type and
outlet type
OUTER WIRE
CENTER WIRE
GROUND
STRAP
(NEUTRAL)
OUTER WIRE
<NEMA 10-50> <NEMA 14-50>
BLACK WIRE
REMOVE
GROUND
STRAP
(NEUTRAL)
WHITE WIRE
RED WIRE
GREEN GROUND WIRE
Page 67

LIMITED WARRANTY
67
Problem Cause Prevention
•Surface is not level
•Oven is tipping
Oven not leveled •Check with installer first
Use carpenter’s level to
check level.
2
1
The cost of repair or replacement under the above excluded circumstances shall be borne by the
consumer.
TO OBTAIN WARRANTY SERVICE AND ADDITIONAL INFORMATION
Call 1-800-243-0000 and select the appropriate option from the menu.
Or visit our website at http://www.lg.com
Or by mail: LG Electronics Customer Service P.O. Box 240007 Huntsville, AL 35813 ATTN: CIC
PROCEDURE FOR RESOLVING DISPUTES:
ALL DISPUTES BETWEEN YOU AND LG ARISING OUT OF OR RELATING IN ANY WAY TO THIS LIMITED
WARRANTY OR THE PRODUCT SHALL BE RESOLVED EXCLUSIVELY THROUGH BINDING ARBITRATION,
AND NOT IN A COURT OF GENERAL JURISDICTION. BINDING ARBITRATION MEANS THAT YOU AND LG
ARE EACH WAIVING THE RIGHT TO A JURY TRIAL AND TO BRING OR PARTICIPATE IN A CLASS ACTION.
Definitions. For the purposes of this section, references to “LG” mean LG Electronics U.S.A., Inc., its parents,
subsidiaries and affiliates, and each of their officers, directors, employees, agents, beneficiaries, predecessors
in interest, successors, assigns and suppliers; references to “dispute” or “claim” shall include any dispute,
claim or controversy of any kind whatsoever (whether based in contract, tort, statute, regulation, ordinance,
fraud, misrepresentation or any other legal or equitable theory) arising out of or relating in any way to the sale,
condition or performance of the product or this Limited Warranty.
Notice of Dispute. In the event you intend to commence an arbitration proceeding, you must first notify LG in
writing at least 30 days in advance of initiating the arbitration by sending a letter to LG at LG Electronics, USA,
Inc. Attn: Legal Department- Arbitration 1000 Sylvan Ave, Englewood Cliffs 07632. You and LG agree to engage
in good faith discussions in an attempt to amicably resolve your claim. The notice must provide your name,
address, and telephone number; identify the product that is the subject of the claim; and describe the nature of
the claim and the relief being sought. If you and LG are unable to resolve the dispute within 30 days, either party
may proceed to file a claim for arbitration.
Agreement to Binding Arbitration and Class Action Waiver. Upon failure to resolve the dispute during the
30 day period after sending written notice to LG, you and LG agree to resolve any claims between us only by
binding arbitration on an individual basis, unless you opt out as provided below. Any dispute between you and
LG shall not be combined or consolidated with a dispute involving any other person’s or entity’s product or
claim. More specifically, without limitation of the foregoing, any dispute between you and LG shall not under any
circumstances proceed as part of a class or representative action. Instead of arbitration, either party may bring
an individual action in small claims court, but that small claims court action may not be brought on a class or
representative basis.
ENGLISH
Page 68

68
LIMITED WARRANTY
Arbitration Rules and Procedures. To begin arbitration of a claim, either you or LG must make a written
demand for arbitration. The arbitration will be administered by the American Arbitration Association (“AAA”)
and will be conducted before a single arbitrator under the AAA’s Consumer Arbitration Rules that are in effect
at the time the arbitration is initiated (referred to as the “AAA Rules”) and under the procedures set forth in this
section. The AAA Rules are available online at www.adr.org/consumer. Send a copy of your written demand for
arbitration, as well as a copy of this provision, to the AAA in the manner described in the AAA Rules. You must
also send a copy of your written demand to LG at LG Electronics, USA, Inc. Attn: Legal Department- Arbitration
1000 Sylvan Avenue Englewood Cliffs, NJ 07632. If there is a conflict between the AAA Rules and the rules set
forth in this section, the rules set forth in this section will govern. This arbitration provision is governed by the
Federal Arbitration Act. Judgment may be entered on the arbitrator’s award in any court of competent jurisdiction.
All issues are for the arbitrator to decide, except that issues relating to the scope and enforceability of the
arbitration provision and to the arbitrability of the dispute are for the court to decide. The arbitrator is bound by
the terms of this provision.
Governing Law. The law of the state of your residence shall govern this Limited Warranty and any disputes
between us except to the extent that such law is preempted by or inconsistent with applicable federal law.
Fees/Costs. You do not need to pay any fee to begin an arbitration. Upon receipt of your written demand for
arbitration, LG will promptly pay all arbitration filing fees to the AAA unless you seek more than $25,000 in
damages, in which case the payment of these fees will be governed by the AAA Rules. Except as otherwise
provided for herein, LG will pay all AAA filing, administration and arbitrator fees for any arbitration initiated in
accordance with the AAA Rules and this arbitration provision. If you prevail in the arbitration, LG will pay your
attorneys’ fees and expenses as long as they are reasonable, by considering factors including, but not limited to,
the purchase amount and claim amount. Notwithstanding the foregoing, if applicable law allows for an award of
reasonable attorneys’ fees and expenses, an arbitrator can award them to the same extent that a court would. If
the arbitrator finds either the substance of your claim or the relief sought in the demand is frivolous or brought for
an improper purpose (as measured by the standards set forth in Federal Rule of Civil Procedure 11(b)), then the
payment of all arbitration fees will be governed by the AAA Rules. In such a situation, you agree to reimburse LG
for all monies previously disbursed by it that are otherwise your obligation to pay under the AAA Rules. Except
as otherwise provided for, LG waives any rights it may have to seek attorneys’ fees and expenses from you if LG
prevails in the arbitration.
Hearings and Location. If your claim is for $25,000 or less, you may choose to have the arbitration conducted
solely on the basis of (1) documents submitted to the arbitrator, (2) through a telephonic hearing, or (3) by
an in-person hearing as established by the AAA Rules. If your claim exceeds $25,000, the right to a hearing
will be determined by the AAA Rules. Any in-person arbitration hearings will be held at a location within the
federal judicial district in which you reside unless we both agree to another location or we agree to a telephonic
arbitration.
Opt Out. You may opt out of this dispute resolution procedure. If you opt out, neither you nor LG can require the
other to participate in an arbitration proceeding. To opt out, you must send notice to LG no later than 30 calendar
days from the date of the first consumer purchaser’s purchase of the product by either: (i) sending an e-mail to
optout@lge.com, with the subject line: “Arbitration Opt Out” or (ii) calling 1-800-980-2973. You must include in
the opt out e-mail or provide by telephone: (a) your name and address; (b) the date on which the product was
purchased; (c) the product model name or model number; and (d) the serial number (the serial number can be
found (i) on the product; or (ii) online by accessing https://www.lg.com/us/support/repair-service/schedule-repaircontinued and clicking on “Find My Model & Serial Number”).
You may only opt out of the dispute resolution procedure in the manner described above (that is, by e-mail or
telephone); no other form of notice will be effective to opt out of this dispute resolution procedure. Opting out of
this dispute resolution procedure will not affect the coverage of the Limited Warranty in any way, and you will
continue to enjoy the full benefits of the Limited Warranty. If you keep this product and do not opt out, then you
accept all terms and conditions of the arbitration provision described above.
Page 69

MANUAL DEL PROPIETARIO
HORNO
DE PARED
ESPAÑOL
COMBINADO
Lea atentamente este manual del propietario antes de poner el electrodoméstico en
funcionamiento y téngalo a mano en todo momento para su referencia.
LWC3063**
MFL70581901_01
Copyright © 2018 LG Electronics Inc. Todos los Derechos Reservados.
www.lg.com
Page 70

2
ÍNDICE
ÍNDICE
ÍNDICE
2
INSTRUCCIONES IMPORTANTES
3
DE SEGURIDAD
DESCRIPCIÓN GENERAL DEL
11
PRODUCTO
11 Piezas
11 Accesorios
FUNCIONAMIENTO
12
12 Descripción general del panel de control
14 Cambio de las configuraciones del horno
14 Clock (Reloj)
14 Timer On/Off (Temporizador encendido/
apagado)
15 Settings (Ajustes)
-Configuración del modo de hora
- Configuración del modo de conversión
automática a convección
-Ajuste de temperatura del horno
-Cómo seleccionar el idioma
- Encendido/apagado de la luz de alarma de
precalentamiento
-Ajuste del volumen del indicador sonoro
-Selección de grados Fahrenheit o Celsius
16 Modo Demo
16 Lockout (Bloqueo)
17 Start Time [Delayed Timed Cook] (Hora de inicio
[Cocción temporizada retardada])
17 Cook Time [Timed Cook] (Tiempo de cocción
[Cocción temporizada])
18 Uso del Horno Superior
18 Antes de usar el Horno Superior
18 Luz del Horno Superior
18 Guía de Batería de Cocina para Microondas
19 Consejos de Cocina en Microondas
20 Niveles de Potencia de Microondas
21 +30 seconds
21 Defrost
23 Funcionamiento del sensor
23 Uso de la función Cocción con Sensor
25 Horneado por Convección
25 Broil (Asar)
26 Cocción Rápida
26 Cocción Automática
30 Ablandar
31 Derretir
32 Warm (Calentar)
32 Proof (Leudar)
32 Palomitas de Maíz
33 Uso del Horno Inferior
33 Antes de usar el Horno Inferior
33 Luz del Horno Inferior
33 Configuraciones mínimas y máximas
predeterminadas
34 Uso de los estantes del horno
34 Bake (Hornear)
35 Horneado de pasteles de capas
35 Ventilación del horno
36 Modo de convección
37 Broil (Asar)
38 Guía de recomendaciones para asar
39 Función Vapor
40 Warm (Calentar)
41 Proof (Leudar)
41 Sonda
43 Favorito
43 Modo Sabbat
44 Wi-Fi
44 Remote Start (Inicio remoto)
FUNCIONES INTELIGENTES
45
45 Aplicación LG SmartThinQ
46 Función Smart Diagnosis™ (Diagnóstico Inteligente)
48 Aviso de la FCC
48 Declaración sobre exposición a la radiación de RF de
la FCC
MANTENIMIENTO
49
49 Cuidado del Horno Superior
49 Limpieza del Interior
49 Limpieza del exterior
50 Cuidado del Horno Inferior
50 EasyClean
52 Depósito de suministro de vapor
52 Limpieza de la cal del fondo del horno
52 Descaling
53 Drying
53 Self Clean (Autolimpieza)
55 Cambio de la luz del horno
55 Limpieza del exterior
57 Remoción y reemplazo de la puerta removible
del horno
57 Instrucciones para el cuidado de la puerta
SOLUCIÓN DE PROBLEMAS
58
58 PREGUNTAS FRECUENTES
61 Antes de llamar al servicio técnico
GARANTÍA LIMITADA
65
®
Page 71

INSTRUCCIONES IMPORTANTES DE SEGURIDAD
3
INSTRUCCIONES IMPORTANTES DE
SEGURIDAD
Lea y siga todas las instrucciones cuando utilice la cocina para evitar riesgos de incendios, descargas
eléctricas, lesiones personales o daños. Esta guía no incluye todas las situaciones posibles que
podrían ocurrir. Siempre comuníquese con su agente de servicio técnico o con el fabricante cuando
haya problemas que no comprenda.
Descargue este manual del propietario en: http://www.lg.com
Este es el símbolo de alerta de seguridad. Este símbolo le advierte sobre posibles riesgos
que pueden ocasionar daños materiales, lesiones personales graves o la muerte.
El símbolo de alerta de seguridad siempre estará acompañado de las palabras
"ADVERTENCIA" o "PRECAUCIÓN". Estos términos significan lo siguiente:
Indica una situación peligrosa que, de no evitarse, podría
ADVERTENCIA
PRECAUCIÓN
-
causar lesiones graves o la muerte.
Indica una situación peligrosa que, de no evitarse, podría causar
-
lesiones menores o moderadas.
ESPAÑOL
Page 72

4
INSTRUCCIONES IMPORTANTES DE SEGURIDAD
INSTRUCCIONES IMPORTANTES DE SEGURIDAD (HORNO SUPERIOR)
Al utilizar aparatos eléctricos, deben seguirse precauciones de seguridad básicas, incluidas las siguientes:
ADVERTENCIA
•Para reducir el riesgo de quemaduras, descargas eléctricas, incendios, lesiones personales, o
la exposición a una dosis excesiva de energía de microondas al usar el horno superior, siga las
precauciones de seguridad básicas, incluidas las siguientes.
•Lea todas las instrucciones antes de usar el horno.
•Al igual que con cualquier electrodoméstico, es necesaria la estrecha supervisión de un
adulto cuando sea utilizado por niños.
•Lea y siga las PRECAUCIONES específicas PARA EVITAR LA POSIBLE EXPOSICIÓN A
EXCESIVA ENERGÍA DE MICROONDAS. Necesita referencia a la ubicación en la Página 7.
•Use este aparato solo para su propósito previsto, como se describe en el manual.
No use vapores o productos químicos corrosivos, como sulfuro y cloruro, en este
electrodoméstico. Este tipo de horno está específicamente diseñado para calentar, cocinar o
secar alimentos. No está diseñado para uso industrial o de laboratorio.
•No guarde este aparato al aire libre. No utilice este producto cerca del agua, por ejemplo, cerca
del fregadero de la cocina, en un sótano húmedo, cerca de una piscina o en un lugar similar.
•No utilice este horno para fines comerciales. Está hecho solo para uso doméstico.
•Para limpiar las superficies de la puerta y el horno que se juntan al cerrar la puerta, utilice
únicamente detergentes o jabones suaves no abrasivos, aplicados con una esponja o un
paño suave.
•Si su horno sufre daños o una caída, hágalo revisar a fondo por un técnico calificado antes de
usarlo.
•Para reducir el riesgo de incendio en la cavidad del horno:
- No cocine en exceso la comida. Preste especial atención al horno superior cuando se coloca
en su interior papel, plástico u otros materiales combustibles para facilitar la cocción.
- No utilice la cavidad para guardar objetos.
No deje productos de papel, recipientes de cocina o alimentos en la cavidad cuando no use el horno.
- Retire las ataduras de alambre de las bolsas de plástico o papel antes de colocarlas en el horno.
•Si los materiales dentro del horno ardieran:
- Mantenga cerrada la puerta del horno
- Apague los controles
- Desconecte el cable de alimentación o corte la alimentación en el panel de interruptores
de circuito o fusibles.
•Para evitar descargas eléctricas:
- Este aparato debe estar conectado a tierra. Conéctelo solo a una toma de corriente
conectada a tierra. Consulte la Guía de Instalación.
- No utilice este electrodoméstico si tiene un cable o enchufe dañado, si no funciona
correctamente o si se ha caído o dañado.
- No sumerja el enchufe ni el cable eléctrico en el agua.
- Mantenga el cable alejado de las superficies calientes.
- No permita que el cable cuelgue del borde de la mesa o encimera.
•Tenga cuidado cuando la puerta está abierta para evitar lesiones.
•Para evitar la cocción incorrecta de algunos alimentos:
- No caliente ningún tipo de biberón o comida para bebés. Podría producirse un
calentamiento desparejo y causar lesiones personales.
- No caliente recipientes de cuello pequeño, como por ejemplo, botellas de jarabe.
- No realice frituras de inmersión en el horno superior.
- No realice envasado de conservas caseras en el horno superior.
- Algunos productos, como huevos enteros y recipientes sellados —por ejemplo, botes
de vidrio cerrados— pueden explotar, por lo que no deben calentarse en este horno.
Page 73

INSTRUCCIONES IMPORTANTES DE SEGURIDAD
5
ADVERTENCIA
•No cubra ni bloquee ninguna abertura del artefacto.
•No ponga en funcionamiento el horno vacío.
•Instale o ubique este electrodoméstico solo en conformidad con las instrucciones de instalación
proporcionadas.
•El servicio técnico de este artefacto solo debe ser realizado por personal calificado. Para que lo
revisen, reparen o ajusten, comuníquese con el centro de servicio autorizado más cercano.
•Los líquidos —como agua, café o té— pueden sobrecalentarse más allá del punto de ebullición
sin que se note que están hirviendo. Esto es debido a la tensión superficial del líquido. No
siempre puede observarse un burbujeo o ebullición cuando el recipiente se saca del horno
superior.
ESTO PODRÍA RESULTAR EN LÍQUIDOS MUY CALIENTES QUE HACEN EBULLICIÓN
REPENTINAMENTE AL PERTURBARSE DE ALGÚN MODO EL RECIPIENTE O CUANDO SE
INSTRODUCE UNA CUCHARA U OTRO UTENSILIO EN EL LÍQUIDO.
•Para reducir el riesgo de lesiones personales:
- No sobrecaliente los líquidos.
- Revuelva el líquido antes de calentarlo y en la mitad del proceso de calentado.
- No use recipientes de lados rectos con cuellos estrechos.
- Después de calentar, deje el recipiente en el horno superior por un tiempo breve antes de
retirarlo.
- Tenga mucho cuidado al introducir una cuchara u otro utensilio en el recipiente.
•No use el horno para realizar deshumidificaciones (es decir, no opere el horno superior con
ropa, juguetes, dispositivos eléctricos, tierra o periódicos húmedos, ni con plantas, mascotas
o cualquier otra materia viva en su interior). El horno solo debe usarse para calentar o cocinar
alimentos.
- Los resultados del uso indebido pueden incluir riesgos de seguridad tales como incendios,
quemaduras o muerte debida a descarga eléctrica.
•Este artefacto no ha sido diseñado para ser utilizado por personas con capacidades físicas,
sensoriales o mentales disminuidas (incluidos niños) o que no cuenten con la experiencia o los
conocimientos necesarios para operarlo, salvo que una persona responsable de su seguridad
les brinde la supervisión o la instrucción pertinente en cuanto al uso del artefacto. Los niños
deben ser supervisados para asegurarse de que no jueguen con el aparato.
- El uso incorrecto puede causar daños como incendios, descargas eléctricas o quemaduras.
•Las piezas accesibles pueden calentarse durante el uso. Los niños pequeños deben mantenerse
alejados para evitar que toquen superficies calientes y sufran quemaduras.
•No debe permitirse que los niños jueguen con los accesorios o se cuelguen de la puerta ni de
ninguna pieza del horno.
- Si lo hacen, pueden sufrir lesiones y daños graves.
•Si los sellos de la puerta o la puerta en sí presentan daños, el horno no debe utilizarse hasta que
haya sido reparado por una persona competente.
•El artefacto y sus piezas accesibles se calientan durante el uso. Tenga cuidado de no tocar
los elementos calentadores. Debe mantenerse alejados a los niños salvo que se los supervise
continuamente.
•No use productos de papel reciclado.
- Pueden contener impurezas que podrían causar chispas o incendios en la cocción.
•No coloque las bandejas y los estantes en agua para enjuagarlos inmediatamente después de la
cocción. Podrían romperse o dañarse.
- El uso incorrecto puede causarle daños al horno.
ESPAÑOL
Page 74

6
INSTRUCCIONES IMPORTANTES DE SEGURIDAD
ADVERTENCIA
•El horno debe limpiarse regularmente y debe eliminarse cualquier resto de alimentos.
- Si el horno no se mantiene bien limpio, su superficie podría deteriorarse, lo que podría afectar
negativamente la vida útil del electrodoméstico y provocar una situación peligrosa.
•La puerta o la superficie exterior pueden calentarse cuando el electrodoméstico está en
funcionamiento.
•Los líquidos que se calientan en recipientes de cierta forma (especialmente en los de forma
cilíndrica) pueden sobrecalentarse. El líquido puede salpicar con un fuerte ruido durante o
después del proceso de calentado, o bien cuando se le agreguen ingredientes (café instantáneo,
etc.), provocando daños al horno y posibles lesiones. Para obtener los mejores resultados, en
todos los recipientes debe revolverse el líquido varias veces antes de calentar. Siempre revuelva
el líquido varias veces entre un proceso de calentado y otro.
•Pueden producirse arcos eléctricos durante la Cocción Rápida y la Cocción en Microondas. Si
se producen arcos eléctricos, presione la tecla Borrar/Apagado y corrija el problema.
•No utilice cubiertas, recipientes o bolsas de cocina hechas de papel de aluminio, plástico, cera o
papel en la cocción rápida.
•Al cocinar, coloque los alimentos directamente sobre las bandejas, a menos que el horno indique
que debe hacerse de otra manera.
•No todas las envolturas de plástico son aptas para su uso en hornos superiores.
•Asegúrese de utilizar recipientes de cocina adecuados para cocción en microondas.
- Utilice únicamente plásticos aptos para microondas, y úselos en estricto cumplimiento de las
recomendaciones del fabricante de los recipientes.
- No cocine recipientes vacíos en el microondas.
- No permita que los niños usen recipientes para cocinar de plástico sin total supervisión.
DECLARACIÓN DE INTERFERENCIA DE RADIOFRECUENCIA DE
LA COMISIÓN FEDERAL DE COMUNICACIONES (ÚNICAMENTE
PARA LOS EE. UU.)
Este equipo genera y emplea energía de frecuencia ISM y, si no se lo instala y usa correctamente,
esto es, estrictamente de acuerdo con las instrucciones del fabricante, puede causar interferencia
a la recepción de radio y televisión. Ha sido examinado y se determinó que cumple con los límites
para un Equipo ISM de conformidad con la Parte 18 de las Reglas de la FCC. Estas reglas han sido
diseñadas para proporcionar una protección razonable contra la mencionada interferencia en una
instalación residencial.
De cualquier manera, no existe garantía de que no ocurrirá interferencia en una instalación
particular. Si este equipo causara interferencia a la recepción de radio o televisión, lo cual puede
ser determinado al encenderlo y apagarlo, se alienta al usuario a intentar corregir la interferencia
mediante una o más de las siguientes acciones:
•Reorientar la antena de recepción de la radio o televisión.
•Reubicar el horno superior con respecto al receptor.
•Alejar el horno superior del receptor.
•Conectar el horno superior en una toma de corriente diferente, para que el horno superior y el
receptor estén en distintos circuitos derivados.
El fabricante no se hace responsable de ninguna interferencia en la radio o TV causada por una
modificación no autorizada a este equipo. Corregir dicha interferencia es responsabilidad del usuario.
Page 75

INSTRUCCIONES IMPORTANTES DE SEGURIDAD
7
PRECAUCIONES PARA EVITAR LA POSIBLE EXPOSICIÓN A
EXCESIVA ENERGÍA DE MICROONDAS
•No intente operar este horno con la puerta abierta ya que, de hacerlo, puede producirse una
exposición dañina a la energía de microondas. Es importante no vencer o alterar las trabas de
seguridad.
•No coloque ningún objeto entre la cara frontal del horno y la puerta, ni permita que se acumule
suciedad o residuos de limpiador en las superficies de sellado.
•Si el horno se encuentra dañado, no lo ponga en funcionamiento.
Es de particular importancia que la puerta del horno se cierre correctamente y que no haya daños
en: (1) la puerta (doblada), (2) bisagras y pestillos (rotos o sueltos), (3) sellos de la puerta y
superficies de sellado.
•El horno no debe ser ajustado ni reparado por nadie que no sea personal técnico debidamente
calificado.
ESPAÑOL
PRECAUCIONES DE SEGURIDAD (HORNO INFERIOR)
•NO TOQUE LAS HORNALLAS NI LAS SUPERFICIES INTERIORES DEL HORNO. Las hornallas
podrían estar calientes incluso cuando presenten un color oscuro. Las superficies interiores del
horno se calientan lo suficiente como para causar quemaduras. Durante y después del uso, no
toque ni permita que la vestimenta u otro material inflamable entren en contacto con las hornallas o
las superficies interiores del horno, hasta que hayan tenido tiempo suficiente para enfriarse. Otras
superficies, como los orificios de venteo del horno y las superficies cercanas a estos orificios, las
puertas del horno y las ventanas de las puertas del horno también se calientan y podrían causar
quemaduras si no se han enfriado.
•Abra la puerta del horno con cuidado. El aire caliente y el vapor que salen del horno pueden
causar quemaduras en las manos, el rostro y los ojos. Permita que el aire caliente o el vapor salgan
del horno antes de sacar o colocar nuevamente la comida en el horno.
•Asegúrese de que el artefacto sea correctamente instalado y conectado a tierra por un técnico
calificado.
•No repare ni reemplace ninguna parte del electrodoméstico, excepto en caso de que haya
recomendaciones específicas en el manual. Un técnico calificado debe estar a cargo de todas las
demás tareas de mantenimiento.
•No utilice limpiadores ásperos, abrasivos ni espátulas de metal para limpiar el vidrio de la puerta del
horno, ya que podrían rayar la superficie. Los arañazos podrían hacer que el vidrio se quiebre..
•No deje en el horno elementos como papel, recipientes de cocina o alimentos cuando no lo esté
utilizando.
•No use este horno para otro propósito que no sea cocinar.
•Nunca use productos de papel en el horno de convección.
•No abra la puerta cuando el horno esté en funcionamiento.
•Utilice agarraderas para retirar la comida y los accesorios después de cocinar, ya que estos estarán
muy calientes.
•Si se raya, golpea, hace vibrar o fuerza el vidrio, puede debilitarse su estructura, lo que aumenta el
riesgo de rotura más adelante.
ADVERTENCIA
Si el vidrio de la puerta, la superficie o la resistencia del horno están dañados, deje de usar el
horno y solicite servicio técnico.
•No utilice plástico para cubrir los alimentos. Utilice únicamente papel de aluminio o tapas seguras
para horno.
•No permita que nadie se suba, se pare o se cuelgue de la puerta, del cajón de almacenamiento
ni de la placa de cocción. Podrían causar daños a la cocina e incluso volcarla, lo que generaría
lesiones personales graves.
Page 76

8
INSTRUCCIONES IMPORTANTES DE SEGURIDAD
•No recubra las paredes del horno, los estantes, el fondo ni ninguna otra parte del horno con
papel de aluminio ni ningún otro material. Hacer esto interrumpe la distribución de calor, produce
resultados de horneado deficientes y causa daños permanentes al interior del horno (el papel de
aluminio se fundiría en la superficie interior del horno).
•Nunca intente secar a una mascota en el horno.
•Nunca utilice su electrodoméstico para calefaccionar el ambiente.
•Utilice siempre agarraderas o guantes para horno cuando retire alimentos del horno o de las
hornallas. La batería de cocina estará caliente. Utilice solo agarraderas secas. Las agarraderas
húmedas o mojadas sobre superficies calientes podrían producir quemaduras por vapor. No permita
que la agarradera toque las hornallas calientes. No utilice una toalla u otra tela gruesa para retirar
alimentos.
•No caliente recipientes cerrados de alimentos. La presión podría causar una explosión que
podría generar lesiones.
•Mantenga despejados los conductos de ventilación del horno.
La ventilación del horno puede calentarse durante el uso del horno.
Nunca obstruya esta ventilación y nunca coloque elementos de plástico o
sensibles al calor sobre o cerca de la ventilación.
Reborde inferior de
metal (ventilacion)
MATERIALES INFLAMABLES
ADVERTENCIA
Asegúrese de retirar todos los materiales del embalaje antes de la puesta en funcionamiento.
Mantenga el plástico, telas, papel y otros materiales inflamables lejos de las partes del
electrodoméstico que se podrían calentar.
•No almacene ni utilice material inflamable en el horno de cocción. Los materiales inflamables
incluyen papel, plástico, agarraderas, telas, recubrimientos para paredes, cortinas y gasolina u otros
vapores inflamables y líquidos como grasa o aceite de cocina. Estos materiales pueden prenderse
fuego cuando el horno de cocción están en uso.
•Use vestimenta adecuada. No use prendas holgadas o que cuelguen, ya que podría prenderse
fuego en contacto con superficies calientes y causar quemaduras graves.
•No utilice el horno para secar ropa. Solo use el horno para el propósito para el que fue diseñado.
•Si posee gabinetes de almacenamiento directamente sobre la superficie de cocción, guarde en
estos los objetos que use con poca frecuencia y que puedan almacenarse de manera segura en un
lugar expuesto al calor. Las altas temperaturas pueden ser peligrosas para objetos volátiles como
líquidos inflamables, limpiadores o aerosoles.
SEGURIDAD ELÉCTRICA
PRECAUCIÓN
Asegúrese de retirar todos los materiales del embalaje antes de la puesta en funcionamiento.
Mantenga el plástico, telas, papel y otros materiales inflamables lejos de las partes del
electrodoméstico que se podrían calentar.
•Desconecte siempre la energía del electrodoméstico antes de que se efectúen tareas de mantenimiento.
•No utilice papel de aluminio ni ningún otro material para revestir la base del horno. La instalación
inadecuada de estos revestimientos podría causar riesgo de descarga eléctrica o incendio.
•No permita que el papel de aluminio ni la sonda de temperatura entren en contacto con las hornallas.
Page 77

INSTRUCCIONES IMPORTANTES DE SEGURIDAD
9
ADVERTENCIA
Antes de reemplazar la bombilla de horno, desconecte la energía eléctrica del horno desde el
fusible principal o el panel disyuntor. El no hacerlo podría causar lesiones graves, descargas
eléctricas o la muerte.
ESPAÑOL
SEGURIDAD DE LOS NIÑOS
•No toque la superficie caliente entre la parte inferior de la puerta del horno y la parte superior del
cajón, en el frente del horno, mientras está en funcionamiento. La superficie se calienta y puede
causar quemaduras y otras lesiones.
•No deje a los niños sin supervisión cerca del horno.
ADVERTENCIA
No deje solos a los niños o sin supervisión cerca del electrodoméstico cuando está en
funcionamiento o aún caliente. Nunca debe permitir que los niños se sienten o paren en ninguna
parte del electrodoméstico, ya que podrían sufrir lesiones o quemaduras.
•Nunca permita que un niño se cuelgue de la puerta del horno.
•No permita que los niños se metan dentro del horno.
•Deje que los utensilios calientes se enfríen en un lugar seguro, fuera del alcance de los niños.
•No debe permitir que los niños jueguen con los controles ni con ninguna otra parte del electrodoméstico.
SUGERENCIAS PARA AHORRAR ENERGÍA
•Cocinar en varios estantes ahorra tiempo y energía. Siempre que sea posible, cocine alimentos que
requieran la misma temperatura de cocción en un único horno.
•Para un desempeño óptimo y ahorro de energía, siga las pautas colocar correctamente los estantes
y las bandejas.
•Reduzca el uso de energía al limpiar la suciedad ligera del horno con la función EasyClean
lugar del autolimpiante.
•Evite abrir la puerta del horno más de lo necesario durante el uso. Esto ayuda a que el horno
mantenga la temperatura, evita la pérdida innecesaria de calor y ahorra el consumo de energía.
®
, en
SEGURIDAD DURANTE EL USO
•No toque los estantes del horno mientras están calientes.
•Siempre acomode los estantes del horno en la posición deseada mientras el horno esté frío. Si debe
moverse un estante mientras el horno está caliente, evite que la agarradera toque el quemador del horno.
•Utilice con precaución las funciones Cocción temporizada o Cocción temporizada retardada. Utilice
el reloj temporizador automático al cocinar carnes curadas o congeladas y la mayoría de las frutas
y los vegetales. Los alimentos que pueden echarse a perder fácilmente como la leche, huevos,
pescado, carne o aves se deben enfriar primero en el refrigerador. Incluso cuando se hayan
enfriado, no deben permanecer en el horno durante más de 1 hora antes de iniciar la cocción y
se los debe retirar rápidamente una vez que la cocción haya terminado. Ingerir alimentos en mal
estado puede producir intoxicaciones alimentarias.
•Las partes accesibles podrían calentarse cuando se utiliza la parrilla.
•No coloque alimentos ni batería de cocina en el fondo de la cavidad del horno. Hacerlo podría
causar daños permanentes al acabado de la base del horno.
•No utilice agua para apagar incendios provocados por grasa. Si se produce un incendio en
el horno, mantenga la puerta del horno cerrada y apague el horno. Si el fuego continúa, arroje
bicarbonato de sodio sobre el fuego o utilice un extinguidor. No arroje agua ni harina sobre el
fuego. La harina podría ser explosiva y el agua podría hacer que un incendio causado por grasa se
propague y genere lesiones personales.
Page 78

10
INSTRUCCIONES IMPORTANTES DE SEGURIDAD
•Tire del estante del horno hasta llegar a la posición de bloqueo al cargar y descargar alimentos del
horno. Esto ayuda a prevenir quemaduras causadas al tocar superficies calientes de la puerta y las
paredes del horno.
•No coloque su mano bajo el controlador ni entre la puerta y la rejilla metálica del fondo (ventilación)
mientras el artefacto está en funcionamiento.
El exterior del horno puede estar muy caliente al tacto.
•No utilice el horno si el quemador desarrolla un punto de brillo durante el uso o si muestra otros
signos de daño. Un punto de brillo indica que el quemador podría fallar y representar un peligro
potencial de quemadura, incendio o descarga eléctrica. Apague el horno de inmediato y solicite que
un técnico calificado reemplace el quemador.
•Al usar bolsas para hornear o asar en el horno, siga las instrucciones del fabricante.
SEGURIDAD AL LIMPIAR
•Abra una ventana y encienda un ventilador o campana extractora antes de realizar la autolimpieza.
•Si el horno está muy sucio con aceite, realice la autolimpieza antes de volver a utilizarlo. El aceite
podría causar un incendio.
•Limpie la suciedad difícil de la base del horno antes de usar la función Self Clean.
•No utilice limpiadores para hornos. No debe utilizarse ningún limpiador de hornos comercial ni
ningún tipo de revestimiento de protección dentro o alrededor de ninguna parte del horno.
•Nunca deje aves domésticas en la cocina. La salud de las aves es sumamente sensible a los gases
liberados durante un ciclo de autolimpieza del horno. Los gases podrían ser nocivos o fatales para
las aves. Traslade las aves a un ambiente bien ventilado.
•Limpie con el ciclo de autolimpieza solo las partes indicadas en este manual. Antes de realizar
la autolimpieza del horno, retire la asadera, todos los estantes del horno, la sonda para carne y
cualquier otro utensilio o alimento del horno.
•Instrucción Importante. El horno muestra el código de error F y se escuchan tres tonos largos durante
el proceso de autolimpieza si está funcionando mal. Desconecte la energía eléctrica del horno desde
el fusible principal o el panel disyuntor y solicite reparación a cargo de un técnico calificado.
•Nunca derrame agua fría sobre el horno caliente para limpiarlo. Hacerlo podría provocar el mal
funcionamiento del horno.
•Asegúrese de que las luces del horno estén frías antes de limpiar.
•No limpie las juntas de la puerta del horno. Las juntas de la puerta del horno son esenciales para
lograr un buen sellado. No debe frotar, dañar ni mover la junta.
•Si se produce un incendio durante la limpieza automática, apague el horno y espere que se
apague el incendio. No fuerce la puerta del horno para abrirla. La introducción de aire fresco a
las temperaturas de autolimpieza podría ocasionar una explosión con llamas desde el horno. El
incumplimiento de esta instrucción podría tener como consecuencia quemaduras graves.
•NO BLOQUEE la ventilación del horno durante su funcionamiento.
Esto podría provocar daños en las partes eléctricas del horno. El
aire debe poder pasar sin obstrucciones. La rejilla metálica del fondo
(ventilación) debe encontrarse correctamente ensamblada en la parte
inferior delantera del horno antes de que se instale la puerta del mismo.
Reborde inferior de
metal (ventilacion)
MODO CORRECTO DE COCINAR CARNES Y AVES
•Para evitar enfermedades transmitidas por los alimentos, cocine bien las carnes rojas y aves. La USDA
ha indicado las siguientes como las temperaturas internas mínimas de seguridad para el consumo:
•Carne molida de vaca: 160 °F
•Aves: 165 °F
•Carne de vaca, ternera, cerdo o cordero: 145 °F
•Pescado/mariscos: 145 °F
Page 79

DESCRIPCIÓN GENERAL DEL PRODUCTO
DESCRIPCIÓN GENERAL DEL PRODUCTO
Piezas
11
Controlador
del horno
Puerta del
horno superior
Puerta del
horno inferior
Placa de modelo y
número de serie
Junta
Estante
ESPAÑOL
Accesorios
Accesorios para el Horno superior
La plataforma giratoria se mueve en ambas direcciones para contribuir a que los alimentos se cocinen de modo más uniforme. No
ponga en funcionamiento el horno de microondas si la bandeja de vidrio no se encuentra en su lugar.
(Para la función de Horneado por
Estante
Convección, Asado y Cocción Rápida)
Bandeja de metal
(Para la función de Horneado por
Convección, Asado y Cocción Rápida)
Bandeja de vidrio
(Para la función de Microondas y
Descongelamiento)
Eje Anillo giratorio
Accesorios para el horno inferior
Accesorios incluidos
Estante estándar (2 c/u) Estante deslizante (1 c/u) Rejilla (1 c/u) Asadera (1 c/u)
Esponja limpiadora que no raya (1 c/u) Sonda para carne (1 c/u)
Accesorios para la instalación
Tornillos de madera - Negro (4X14) (6 c/u)
Para el montaje inferior
(4 necesarios para la instalación y 2 extra)
NOTA
•Comuníquese con el Servicio de atención al cliente de LG al 1-800-243-0000 si faltara algún accesorio.
•Para su seguridad y para extender la vida útil del producto, solo debe utilizar componentes autorizados.
•El fabricante no es responsable del mal funcionamiento del producto ni de accidentes causados por el uso de componentes
o piezas no autorizados y comprados por separado.
•Las imágenes de esta guía podrían ser diferentes a los componentes y accesorios reales, que están sujetos a cambios a
discreción del fabricante, sin previo aviso, con fines de mejorar el producto.
Tornillos de madera - Plata (4X14) (6 c/u)
Para el montaje superior
(4 necesarios para la instalación y 2 extra)
Page 80

12
FUNCIONAMIENTO
FUNCIONAMIENTO
Descripción general del panel de control
9 10 11 12 13 14 34
6 7 8
More
Mode
More
Mode
1517 18 19 20 21
22 23 24 25 26 27 28 29 30 32
HORNO SUPERIOR
1
Upper Timer On/Off
(Temporizador encendido / apagado)
Se utiliza para seleccionar o cancelar el temporizador del
horno superior
2
Upper Light (Luz superior)
Se utiliza para encender y apagar las luces del horno superior.
3
Upper Clear/Off (Borrar apagado superior)
Se utiliza para detener la coccion, cancelar los ajustes del
horno superior.
4
Microwave
Utilícelo para seleccionar la función Microondas del horno
superior.
5
Conv. Bake (Conveccion para hornear)
Se utiliza para seleccionar la función de convección para
hornear del horno superior.
6
Broil (Asar)
Se utiliza para seleccionar la funcion de asado del horno
superior.
7
Power Level
Utilícelo para seleccionar un nivel de potencia de cocción.
8
Popcorn
Utilícelo para seleccionar la función Palomitas de Maíz del
horno superior.
314 5 1
9
Defrost
Utilícelo para seleccionar la función Descongelar del horno
superior.
10
Speed Cook
Utilícelo para seleccionar la función Cocción Rápida del horno
superior.
11
Sensor Cook
Utilícelo para seleccionar la función Cocción con Sensor del
horno superior.
12
More Mode
Utilícelo para seleccionar la función Más modos del horno
superior.
13
+30 seconds
Utilícelo para agregar 30 segundos de cocción cada vez que lo
toque.
33 3
162
Page 81

FUNCIONAMIENTO
13
HORNO INFERIOR
14
Lower Timer On/Off
(Temporizador encendido / apagado)
Se utiliza para seleccionar o cancelar el temporizador del
horno inferior.
15
Lower Light (Luz inferior)
Se utiliza para encender y apagar las luces del horno inferior.
16
Lower Clear/Off (Borrar apagado inferior)
Se utiliza para detener la coccion, cancelar los ajustes del
horno inferior. Mantenga presionado el boton por 3 segundos
para activar la funcion LOCKOUT.
17
Conv. Bake (Conveccion para hornear)
Se utiliza para seleccionar la función de convección para
hornear del horno inferior.
18
Conv. Roast (Rostizado por conveccion)
Se usa para seleccionar el modo de rostizado por convección
del horno inferior.
19
Bake (Hornear)
Se utiliza para seleccionar la función de horneado del horno
inferior.
20
Broil (Asar)
Se utiliza para seleccionar la función de asado del horno
inferior.
21
Self Clean (Autolimpieza)
Se utiliza para seleccionar la función de autolimpieza del horno
inferior.
22
Steam Bake
Utilícelo para seleccionar la función Cocción al Vapor del horno
inferior.
23
Steam Roast
Utilícelo para seleccionar la función Rostizado al Vapor del
horno inferior.
24
Probe
Utilícelo para seleccionar la función Sonda del horno inferior.
25
More Mode
Utilícelo para seleccionar la función Más Modos del horno
inferior.
26
EasyClean
Se utiliza para seleccionar la función de Easy Clean del horno
inferior.
®
COMUNES
27
Clock (Reloj)
Se utiliza para ponel en hora el reloj. Mantenga presionado el
botón durante tres segundos para seleccionar y configurar los
ajustes del horno.
28
Steam Level
Utilícelo para seleccionar y configurar un nivel de vapor.
29
Cook Time
Se utiliza para seleccionar el tiempo de cocción. (Hornear,
Conv. Hornear/Rostizar por Convección únicamente)
30
Start Time (Tiempo de inicio)
Se utiliza para seleccionar el tiempo de inicio diferido. (Hornear,
Conv. Hornear/Rostizar por Convección, Autolimpieza
únicamente)
31
Number Pads (Botones numericos)
Se utiliza para introducir una temperatura y todos los tiempos.
32
Remote Start
Utilícelo para seleccionar la función de Inicio Remoto.
Mantenga presionado el boton por 3 segundos para conectarlo
a una red Wi-Fi.
33
Start (Inicio)
Se utiliza para iniciar todas las funciones del horno.
34
Smart Diagnosis™ (Diagnóstico inteligente)
Uso durante la función de Smart Diagnosis.
ESPAÑOL
Temporizador intermitente
Si el horno muestra un reloj intermitente, toque Clock y restablezca la hora o presione cualquier tecla para detener el indicador
intermitente.
Page 82

14
FUNCIONAMIENTO
Cambio de las configuraciones
del horno
Clock (Reloj)
El reloj se debe configurar en la hora correcta del día para
que las funciones automáticas del temporizador del horno
funcionen de manera adecuada.
Toque Clock. La pantalla muestra CLO en rojo.
1
Toque los números para ingresar la hora. Por ejemplo,
2
para configurar el reloj a las 10:30, toque los números: 1,
0, 3 y 0.
Toque Start.
3
NOTA
•No se puede cambiar la hora del día durante un
proceso de horneado con temporizador o un ciclo de
autolimpieza.
•Para verificar la hora del día cuando la pantalla muestra
otra información, toque Clock.
•Si no se toca ninguna otra tecla en el lapso de 25
segundos después de haber tocado Clock, la pantalla
volverá a la configuración original.
•Si la hora en pantalla parpadea, podría haber un fallo
en el suministro eléctrico. Restablezca la hora.
Timer On/Off (Temporizador
encendido/apagado)
La función Temporizador superior encendido/apagado o
Temporizador inferior encendido/apagado es un temporizador
adicional en la cocina que suena cuando ha transcurrido el
tiempo configurado. No inicia ni detiene la cocción.
La función Temporizador superior encendido/apagado o
Temporizador inferior encendido/apagado se puede utilizar
mientras está activada cualquier otra función de control del
horno. El Temporizador superior y el Temporizador inferior
pueden funcionar de manera independiente uno del otro.
Configuración de la Temporizador
Por ejemplo, para 5 minutos
Toque Upper Timer On/Off o Lower Timer On/Off una
1
vez.
Aparece 00:00 y el Timer parpadea en la pantalla.
Toque 5.
2
En la pantalla, aparece 0:05.
Toque Timer On/Off para iniciar el temporizador. La
3
cuenta regresiva del tiempo restante aparece en pantalla.
NOTA
Si no se toca Upper Timer On/Off o Lower Timer On/
Off, el temporizador regresa a la hora del día.
Cuando el tiempo configurado termina, aparece End
4
en la pantalla. Los tonos indicadores suenan cada 15
segundos hasta que se toca Upper Timer On/Off o
Lower Timer On/Off.
NOTA
•Si el tiempo restante no aparece en la pantalla, toque
Upper Timer On/Off o Lower Timer On/Off para volver
a verlo.
•Toque Upper Timer On/Off o Lower Timer On/Off dos
veces para configurar el tiempo en minutos y segundos.
•Toque Upper Timer On/Off o Lower Timer On/Off una
vez para configurar el tiempo en horas y minutos.
Cancelación del Temporizador antes de que se
haya agotado el tiempo establecido
Toque Upper Timer On/Off o Lower Timer On/Off una
1
vez.
La pantalla vuelve a la hora del día.
Page 83

FUNCIONAMIENTO
15
Settings (Ajustes)
Matenga presionada la tecla Clock durante tres segundos para
seleccionar y configurar los ajustes del horno.
La tecla Setting le permite
•configure el modo de horas en el reloj (12 o 24 horas)
•habilitar/inhabilitar la conversión automática a convección
•ajustar la temperatura del horno
•seleccionar idioma de visualización
•activar/desactivar la luz de alarma de precalentamiento
•configurar el volumen del indicador sonoro
•cambiar la escala de temperatura entre Fahrenheit y Celsius
•desactivar/activar el modo demo
Configuración del modo de hora
El control está configurado para usar un reloj de 12 horas.
Para restablecer el reloj al modo de 24 horas, siga los pasos a
continuación.
Mantenga presionado Clock hasta que aparezca CLO
1
en la pantalla.
Toque 1 para seleccionar un reloj de 12 horas o 2 para
2
seleccionar un reloj de 24 horas.
Toque Start para aceptar el cambio.
3
Ajuste de temperatura del horno
(Solo para el Horno Inferior)
El horno nuevo podría cocinar de manera diferente su horno
anterior. Use el horno nuevo durante algunas semanas
para familiarizarse con él antes de cambiar los ajustes de
temperatura. Si, después de familiarizarse con el horno, sigue
pensando que la temperatura es muy elevada o muy baja,
puede ajustarla.
NOTA
Para comenzar, suba o baje el termostato 15 °F (8 °C).
Pruebe el horno con la nueva configuración. Si el
horno aún necesita ajuste, suba o baje nuevamente el
termostato, y utilice el primer ajuste como referencia
medidora. Por ejemplo, si el ajuste fue excesivo, suba
o baje el termostato 10 °F (5 °C). Si el ajuste no fue
suficiente, suba o baje el termostato 20 °F (12 °C).
Proceda de esta manera hasta que el horno quede
ajustado para su satisfacción.
Mantenga presionado Clock hasta que aparezca CLO
1
en la pantalla. Luego toque Clock repetidamente hasta
que aparezca L_AJ en la pantalla.
Use las teclas numéricas para ingresar el número de
2
grados a los que desea ajustar la temperatura del horno.
Ajuste la temperatura hacia arriba o hacia abajo tocando
3
Clock varias veces para alternar entre más (+) o menos
(-).
ESPAÑOL
Configuración del modo de conversión automática a
convección
(Solo para el Horno Inferior)
Cuando selecciona Conv. Bake y Conv. Roast, la función de
conversión automática a convección modifica la temperatura
estándar de la receta ingresada en una temperatura de
convección al sustraer 25 °F / 14 °C. Esta temperatura
convertida automáticamente aparece en la pantalla. Por
ejemplo, seleccione Conv. Bake, ingrese 350 °F y aparecerá
325 °F en la pantalla después de precalentar.
La función de conversión automática a convección está
habilitada en forma predeterminada. Para cambiar la
configuración, siga estas instrucciones.
Mantenga presionado Clock hasta que aparezca CLO
1
en la pantalla. Luego toque Reloj repetidamente hasta
que aparezca Automático en la pantalla.
Toque 1 para activar o 2 para desactivar la conversión
2
automática.
Toque Start para aceptar el cambio.
3
Toque Start para aceptar el cambio.
4
NOTA
•Este ajuste no afecta a las temperaturas de asar o
Autolimpieza. El ajuste se retiene en la memoria
después de un fallo eléctrico. Es posible subir (+)
o bajar (-) la temperatura del horno tanto como sea
necesario, entre 35 °F o 19 °C.
•Cuando haya subido o bajado temperatura, la pantalla
muestra la temperatura ajustada hasta que se reajuste.
Cómo seleccionar el idioma
El control del horno se encuentra configurado para verse
en inglés, pero usted puedo cambiarlo para visualizarlo en
español o francés.
Mantenga presionado Clock hasta que aparezca CLO
1
en la pantalla. Luego toque Clock repetidamente hasta
que aparezca Lng en la pantalla.
Toque 1 para Inglés, 2 para Español o 3 para Francés.
2
Toque Start para aceptar el cambio.
3
Page 84

16
FUNCIONAMIENTO
Encendido/apagado de la luz de alarma de precalentamiento
(Solo para el Horno Inferior)
Cuando el horno alcanza la temperatura programada, la luz de
alarma de recalentamiento titila 5 veces o hasta que se abra la
puerta del horno.
Puede activar o desactivar la luz de alarma de
precalentamiento.
Mantenga presionado Clock hasta que aparezca CLO
1
en la pantalla. Luego toque Clock repetidamente hasta
que aparezca PrE en la pantalla.
Toque 1 para encender la alarma y 2 para apagarla.
2
Toque Start para aceptar el cambio.
3
Ajuste del volumen del indicador sonoro
Mantenga presionado Clock hasta que aparezca CLO
1
en la pantalla. Luego toque Clock repetidamente hasta
que aparezca BEEP en la pantalla.
Toque 1 para Volumen Alto, 2 para Bajo y 3 para
2
Silencio.
Toque Start para aceptar el cambio.
3
Modo Demo
El Modo Demo es solo para su uso en sala de exposición.
Mantenga presionado Clock hasta que aparezca CLO
1
en la pantalla. Luego toque Clock repetidamente para
seleccionar el modo demo.
Toque 1 para activar o 2 para desactivar el modo demo.
2
Toque Start para aceptar el cambio.
3
NOTA
•Cuando el Modo Demo está activado, el
electrodoméstico no se calentará.
•El icono de Modo Demo aparece en la pantalla si el
Modo Demo está ON.
Lockout (Bloqueo)
La función Bloqueo bloquea automáticamente la puerta del
horno inferior y evita que se encienda la mayoría de los
controles del horno y la placa de cocción. No inhabilita el reloj,
el temporizador ni la luz interior del horno.
Selección de grados Fahrenheit o Celsius
Configure la pantalla de temperatura del horno para que
muestre unidades Fahrenheit (°F) o Celsius (°C). El ajuste
predeterminado del horno es en unidades Fahrenheit, a menos
que lo cambie el usuario.
Mantenga presionado Clock hasta que aparezca CLO
1
en la pantalla. Luego toque Clock repetidamente hasta
que aparezca Unit en la pantalla.
Toque 1 para °F (Fahrenheit) o 2 para °C (Celsius).
2
Toque Start para aceptar el cambio.
3
Toque y mantenga presionado Lower Clear/Off durante
1
tres segundos.
Suena la melodía de bloqueo, aparece OVEN LOCKOUT
2
en la pantalla y el candado
Cuando se haya bloqueado la puerta del horno, el
3
indicador de bloqueo
encendido.
Para desactivar la función de bloqueo, toque y mantenga
4
presionado Lower Clear/Off durante tres segundos.
Suena la melodía de desbloqueo y la puerta ylos
controles se desbloquean.
titila.
deja de titilar y permanece
Page 85

FUNCIONAMIENTO
17
Start Time [Delayed Timed Cook]
(Hora de inicio [Cocción temporizada
retardada])
El temporizador automático de la función Cocción temporizada
retardada enciende y apaga el horno a la hora que usted
seleccione. Esta función puede usarse junto con los modos
Bake, Conv. Bake y Conv. Roast.
Configuración de la Cocción temporizada retardada
Por ejemplo, para hornear a 300 °F y retardar el inicio del
proceso de horneado hasta las 4:30, primero debe configurar
el reloj para la hora correcta del día.
Toque Bake. 350 °F aparece en la pantalla.
1
Configure la temperatura: toque 3, 0 y 0.
2
Toque Cook Time y configure el tiempo de horneado.
3
Toque Start Time.
4
Configure la hora de inicio: toque 4, 3 y 0 para 4:30.
5
Toque Start. Suena un tono corto y Delay Timed y la
6
hora de inicio aparecen en la pantalla. El horno comienza
a funcionar a la hora de inicio configurada.
NOTA
•Para cancelar la función Cocción temporizada
retardada, toque Clear/Off en cualquier momento.
•Para cambiar el tiempo de cocción, repita los paso 3 y
toque Start.
•Si el reloj de horno está configurado para 12 horas,
puede retardar la hora de inicio de la cocción por 12
horas. Si el reloj de horno está configurado para 24
horas, puede retardar la hora de inicio de la cocción por
24 horas.
Cook Time [Timed Cook] (Tiempo de
cocción [Cocción temporizada])
Configure el horno para cocinar durante una cantidad
específica de tiempo con la función Cocción temporizada. Esta
función solo se puede utilizar con los modos Speed Cook,
Bake, Conv. Bake y Conv. Roast.
Configuración de la función Tiempo de cocción
Por ejemplo, para hornear a 300 °F durante 30 minutos,
primero debe configurar el reloj en la hora correcta del día.
Toque Bake. 350 °F aparece en la pantalla.
1
Configure la temperatura.
2
Toque 3, 0 y 0.
Toque Cook Time. Timed titila en pantalla.
3
Bake(Hornear), 0:00 y 300 °F aparecen en pantalla.
Configure el tiempo de horneado: Toque 3 y 0 (para 30
4
minutos). El tiempo de horneado se puede configurar
para cualquier cantidad de tiempo entre 1 minuto y 11
horas y 59 minutos.
Toque Start.
5
El horno seguirá cocinando durante la cantidad de tiempo
configurada y luego se apagará automáticamente. Cuando
haya transcurrido el tiempo de cocción:
•END OF CYCLE y la hora del día aparecen en la pantalla.
•El tono indicador de fin de cocción suena cada 60 segundos
hasta que toque Clear/Off.
Cambio de Tiempo de cocción durante la cocción
Por ejemplo, para cambiar el tiempo de cocción de 30 minutos
a 1 hora y 30 minutos, haga lo siguiente.
Toque Cook Time.
1
ESPAÑOL
El horno seguirá cocinando durante la cantidad de tiempo
configurada y luego se apagará automáticamente. Cuando
haya transcurrido el tiempo de cocción:
•End y la hora del día aparecen en la pantalla.
•El tono indicador de fin de cocción suena cada 60 segundos
hasta que toque Clear/Off.
PRECAUCIÓN
•Utilice el reloj temporizador automático al cocinar
carnes curadas o congeladas y la mayoría de las
frutas y vegetales. Los alimentos que pueden echarse
a perder fácilmente como la leche, huevos, pescado,
carne o aves se deben enfriar en el refrigerador. Incluso
cuando se hayan enfriado, no deben permanecer en
el horno durante más de 1 hora antes de iniciar la
cocción y se los debe retirar rápidamente una vez que
la cocción haya terminado.
•Ingerir alimentos en mal estado puede producir
intoxicaciones alimentarias.
Cambie el tiempo de horneado: toque 1, 3, 0.
2
Toque Start para aceptar el cambio.
3
Page 86

18
FUNCIONAMIENTO
Uso del Horno Superior
Antes de usar el Horno Superior
NOTA
•Para evitar el riesgo de lesiones personales o daños a
la propiedad, no use piezas de cerámica o recipientes
de cocina de metal o con bordes metálicos en el horno.
•Para programar el horno, asegúrese de tocar
firmemente el centro de cada tecla, ya que las áreas
entre las mismas no lo activarán. Cada vez que se
toque una tecla correctamente sonará un tono. No
toque varias teclas al mismo tiempo.
•No golpee el panel de control con cubiertos, recipientes
de cocina, etc., ya que podría romperse.
•Siempre tenga cuidado cuando saque los recipientes
de cocina del horno. Algunos recipientes absorben calor
de los alimentos cocinados y pueden estar calientes.
Consulte la Guía de Batería de Cocina que figura más
atrás en esta sección para obtener más información.
Luz del Horno Superior
1
Guía de Batería de Cocina para Microondas
Utilice No use
VIDRIO APTO PARA HORNOS
(tratado para calor de alta intensidad):
platos de uso general, platos de postre, tarteras,
charolas para pastel, vasos de medición de líquidos,
cazuelas y tazones sin molduras metálicas.
PORCELANA:
tazones, tazas, fuentes y bandejas sin bordes metálicos.
PLÁSTICO:
envoltura plástica (como cubierta). Coloque la
envoltura plástica suelta sobre el plato y presiónela
en los costados.
Permita la ventilación en la envoltura plástica plegando
un borde ligeramente hacia atrás, para que pueda
escapar el exceso de vapor. El plato debe ser lo
suficientemente profundo como para que la envoltura
plástica no toque la comida. A medida que la comida
se caliente, es posible que derrita la envoltura plástica
en donde esta entra en contacto con la comida.
Use vasos y platos plásticos, envases semirrígidos
para congelador y bolsas de plástico solo para
tiempos de cocción cortos. Úselos con precaución
porque el plástico puede reblandecerse con el calor
de la comida.
PAPEL:
Toallas de papel, papel encerado, servilletas de
papel y platos de papel sin diseños ni bordes
metálicos. Verifique la etiqueta del fabricante antes
de usar en el horno de microondas.
NOTA:
No use productos de papel reciclado en el horno de
microondas. En ocasiones contienen impurezas que
causan arcos eléctricos y chispas.
RECIPIENTES METÁLICOS:
El metal evita que la energía de microondas alcance los alimentos, por
lo que se produce una cocción despareja. También deben evitarse las
bandejas de papel de aluminio, los termómetros y los pinchos metálicos.
Los recipientes de metal pueden provocar un arco eléctrico que dañe el
horno de microondas.
DECORACIONES METÁLICAS:
Cazuelas, vajilla, etc. con detalles de metal o con bordes metálicos. Los
bordes de metal interfieren con la cocción normal y podrían dañar el horno.
PAPEL DE ALUMINIO:
Evite utilizar hojas grandes de papel de aluminio porque dificultan la
cocción y pueden provocar arcos eléctricos dañinos. Use pequeños trozos
de papel de aluminio para proteger las patas y alas de las aves. Mantenga
TODO el papel de aluminio al menos a 1 pulgada de las paredes laterales
y la puerta del horno.
MADERA:
Los tazones y las tablas de madera se resecan y pueden romperse o
agrietarse cuando se los usa en el horno de microondas. Los cestos
reaccionan de la misma manera.
RECIPIENTES DE COCINA FIRMEMENTE CUBIERTOS:
Asegúrese de dejar aberturas para que pueda salir el vapor de los recipientes
cubiertos. Pinche las bolsas de plástico que contengan vegetales u otros
alimentos antes de cocinarlos. Las bolsas totalmente cerradas pueden explotar.
PAPEL KRAFT:
Evite utilizar bolsas de papel kraft.
Absorben mucho calor y pueden quemarse.
BATERÍA DE COCINA DEFECTUOSA O DESCASCARADA:
Cualquier recipiente defectuoso, descascarado o que tenga grietas puede
romperse en el horno.
ATADURAS METÁLICAS:
Retire las ataduras metálicas de las bolsas de papel o plástico.
Se calientan y pueden provocar un incendio.
NOTA
•No enjuague los recipientes colocándolos en agua
inmediatamente después de la cocción. Podrían
romperse. Además, siempre deje que la plataforma
giratoria se enfríe antes de sacarla del horno.
•Nunca haga funcionar el horno estando vacío. Siempre
debe haber comida o agua en el horno durante su
funcionamiento para absorber la energía de microondas.
•No utilice el horno para secar periódicos o ropa.
Podrían incendiarse.
•Utilice termómetros que hayan sido aprobados para ser
usados en cocción con hornos de microondas.
•La plataforma giratoria siempre debe estar colocada en
su lugar cuando se hace funcionar el horno.
•No use el horno de microondas para cocinar huevos
con cáscara. Puede acumularse presión dentro de la
cáscara del huevo y hacer que este estalle.
Toque Upper Light para encender o apagar la luz del
horno superior.
Page 87

FUNCIONAMIENTO
19
Consejos de Cocina en Microondas
Vigilar la Cocción
Siempre mire la comida mientras la cocina. La luz del interior
del horno de superior se enciende automáticamente cuando
este está funcionando para que usted pueda vigilar el proceso
de cocción. Las instrucciones de las recetas de revolver,
elevar y acciones similares deben considerarse como los
pasos mínimos recomendados. Si la comida parece estar
cocinándose en forma despareja, simplemente realice los
ajustes que considere necesarios para corregir el problema.
Factores que Influyen en los Tiempos de
Cocción en Microondas
Muchos factores influyen en los tiempos de cocción. La
temperatura de los ingredientes que se emplean en una receta
hace una gran diferencia en los tiempos de cocción. Por
ejemplo, un pastel elaborado con mantequilla, leche y huevos
muy fríos va a tardar bastante más tiempo en hornearse que
uno hecho con ingredientes que se encuentran a temperatura
ambiente. Algunas recetas, especialmente las de panes,
pasteles y postres de crema, recomiendan que estos platos
sean retirados del horno cuando aún parece faltarles un poco
de cocción.
No se trata de un error. Cuando se los deja reposar,
generalmente cubiertos, estos alimentos continúan
cocinándose fuera del horno, ya que el calor atrapado dentro
de las partes externas de los mismos se trasmite gradualmente
hacia el interior. Si estos platos quedaran en el horno hasta
que se cocinaran por completo, las partes externas quedarían
cocidas de más o incluso quemadas. La práctica mejorará su
habilidad de calcular los tiempos, tanto de cocción como de
reposo, para varios platos.
Densidad de las Comidas
Las comidas livianas y porosas, como los pasteles y los panes,
se cocinan más rápido que las comidas densas o pesadas,
como los estofados y los guisados. Cuando cocine con
microondas alimentos porosos, debe tener cuidado para que
los bordes exteriores no se resequen y queden quebradizos.
Altura de las Comidas
La parte superior de las comidas que tienen cierta altura y,
particularmente la de los estofados, se cocinará más rápido
que la parte inferior.
Por lo tanto, se recomienda dar vuelta varias veces durante la
cocción la comida que presenta una altura considerable.
Contenido de Humedad de la Comida
Como el calor generado por las microondas provoca que la
humedad se evapore, los alimentos relativamente secos, como
los estofados y algunos vegetales, deben rociarse con agua
antes de la cocción o cubrirse para que puedan conservar la
humedad.
Contenido de Grasa y Hueso en la Comida
Los huesos conducen el calor y la grasa se cocina más rápido
que la carne. Debe tenerse precaución cuando se utilizan
cortes de carne grasosos o con hueso para evitar que se
cocinen de forma despareja o que se cocine de más la carne.
ESPAÑOL Uso del Horno Superior
Cantidad de Comida
La cantidad de microondas del horno es siempre el mismo, no
importa cuánta comida se cocine en él. Por lo tanto, cuanta
más comida coloque en el horno, más prolongados serán los
tiempos de cocción necesarios.
Recuerde disminuir los tiempos de cocción por al menos un
tercio al reducir a la mitad una receta.
Forma de la Comida
Las microondas penetran solo unos 3/4 de pulgada (2 cm)
en la comida. Las partes internas de los alimentos gruesos
se cocinan debido a que el calor que se genera en el exterior
se transmite al interior. Solamente el borde externo de los
alimentos se cocina por la energía de las microondas, el resto
se cocina por conducción. La peor forma posible que puede
tener un alimento que vaya a cocinarse en un microondas es
la de un cuadrado grueso.
Los ángulos se quemarán mucho antes de que el centro llegue
a calentarse siquiera. Los alimentos con forma de anillo y
los delgados y redondos son los que se cocinan mejor en el
microondas.
Cubrir
Las cubiertas mantienen atrapado el calor y el vapor, haciendo
que los alimentos se cocinen más rápido. Utilice una tapa o un
papel film apto para microondas con una orilla plegada hacia
atrás para evitar rajaduras.
Cubrir con Papel Vegetal
El papel vegetal o sulfurizado (no el papel encerado) es apto
para la cocción en horno de microondas. Como crea una
cobertura más suelta que la de una tapa o un papel film, el
papel sulfurizado permite que la comida se seque ligeramente.
Revolver
Revolver es una de las más importantes de todas las técnicas
de cocción por microondas. En la cocina convencional,
los alimentos se revuelven con el propósito de mezclarlos.
La comida que se cocina en microondas, sin embargo, se
revuelve para propagar y redistribuir el calor. Siempre revuelva
desde el exterior hacia el centro, ya que la parte externa de la
comida se calienta primero.
Colocar las Porciones más Gruesas sobre los
Bordes
Coloque los cortes o las porciones más gruesas de carnes,
aves y pescados hacia el borde exterior de la fuente para que
absorban la mayor parte de la energía de microondas y la
comida se cocine de manera más uniforme.
Page 88

20
FUNCIONAMIENTO
Protección de la Comida
Pueden colocarse tiras de papel de aluminio (que bloquean las
microondas) sobre las esquinas o los bordes de los alimentos
cuadrados y rectangulares para evitar que esas porciones
se cocinen demasiado. Nunca utilice demasiado papel de
aluminio y asegúrese de que la lámina esté asegurada al plato
o puede provocar un arco eléctrico en el horno, especialmente
si la lámina pasa demasiado cerca de las paredes del horno
durante la rotación.
Elevar
Los alimentos espesos o densos pueden elevarse para que las
microondas sean absorbidas por la parte inferior y el centro de
los alimentos.
Perforar
Es probable que los alimentos encerrados en una cáscara,
caparazón, piel o membrana se rompan en el horno a menos
que se los perfore antes de cocinarlos. Entre estos alimentos
se incluyen yemas y claras de huevos, almejas, ostras, patatas
y otras frutas y verduras enteras.
Probar si está cocido
Las microondas cocinan los alimentos rápidamente, por lo
tanto, debe probarse cómo va la cocción con frecuencia.
Algunos alimentos se dejan en el microondas hasta que están
completamente cocidos, pero la mayoría de los alimentos,
incluidas las carnes y las aves, deben retirarse del horno
mientras aún les falta un poco de cocción, ya que se terminan
de cocinar durante el tiempo de reposo. La temperatura interna
de los alimentos aumentará entre 5 °F (3 °C) y 15 °F (8 °C)
durante el tiempo de reposo.
Niveles de Potencia de Microondas
Este horno superior cuenta con 10 niveles de potencia para
brindarle máxima flexibilidad y control de la cocción. Consulte
la tabla para conocer los niveles de potencia sugeridos para
varios alimentos.
Tabla de niveles de potencia de microondas
Niveles
de
Potencia
P-HI
(100 %)
P-90 •Recalentar arroz, pasta y vegetales.
P-80 •Recalentar rápido alimentos preparados.
P-70 •Cocinar platos con huevo, leche y queso.
P-60 •Cocinar ternera.
P-50 •Cocinar jamón, aves enteras y cordero.
P-40 •Descongelar carne, aves y mariscos.
P-30 •Cocinar cortes de carne menos tiernos.
P-20 •Quitar el frío de la fruta.
P-10 •Mantener calientes las cazuelas y platos
•Hervir agua.
•Dorar carne molida.
•Hacer caramelo.
•Cocinar trozos de ave, pescado y vegetales.
•Cocinar cortes de carne tiernos.
•Recalentar sándwiches.
•Derretir chocolate.
•Cocinar pescado entero.
•Cocinar pudines y postres de crema.
•Cocinar costillar y punta de solomillo.
•Cocinar chuletas de cerdo y estofados.
•Ablandar mantequilla.
principales.
•Ablandar mantequilla y queso crema.
Utilice
Page 89

FUNCIONAMIENTO
21
Cocinar a Nivel de Potencia Alto
Ejemplo: para cocinar alimentos durante 8 minutos y 30
segundos.
Toque Microwave.
1
Ajuste el tiempo de cocción: toque 8, 3 y 0.
2
Toque Start para comenzar la cocción.
3
•Cuando termina el tiempo de cocción, suena una
melodía y en la pantalla aparece END OF CYCLE.
Cocinar a Niveles de Potencia Inferiores
La cocción con nivel de potencia ALTO no siempre da los
mejores resultados con alimentos que requieren una cocción
más lenta, como estofados, productos horneados o postres de
crema. El horno tiene 9 configuraciones de potencia además
de HIGH.
Ejemplo: para cocinar alimentos durante 7 minutos y 30
segundos a una potencia de 70 %.
Toque Microwave.
1
Ajuste el tiempo de cocción: toque 7, 3 y 0.
2
Defrost
El horno tiene 4 ciclos para descongelar predeterminados.
Esta función proporciona el mejor método para descongelar
alimentos congelados. La Tabla de Descongelado muestra los
ciclos de descongelado sugeridos para varios alimentos.
La función Descongelar cuenta con una conveniente alarma
que suena a la mitad del ciclo de descongelado para recordarle
que revise, dé vuelta, separe o reacomode los alimentos a fin
de obtener mejores resultados.
1 Carne
2 Aves
3 Pescado
4 Pan
Configuración de la Función Descongelar
Ejemplo: para descongelar 1.2 libras de carne.
Toque Defrost.
1
Toque 1 para seleccionar MEAT.
2
Configure el peso: toque 1, 2 (para 1.2 libras)
3
Toque Start para comenzar la cocción.
4
ESPAÑOL Uso del Horno Superior
Configure el nivel de potencia: toque Power Level y 7.
3
Toque Start para comenzar la cocción.
4
•Cuando termina el tiempo de cocción, suena una
melodía y en la pantalla aparece END OF CYCLE.
+30 seconds
Use esta función para agregar rápidamente 30 segundos al
tiempo de cocción en el microondas.
Presione el botón con el horno apagado para iniciar
1
de inmediato la función de microondas a Alta Potencia
durante 30 segundos.
Presione Upper Clear/Off para dejar el horno en pausa.
2
Presiónelo nuevamente para cancelar la cocción.
Cuando la cocción esté completa, toque Clear/Off.
5
NOTA
•La cuenta regresiva aparece en la pantalla luego de
que se presiona START. La alarma del horno suena
una vez, en la mitad del ciclo de descongelado.
•Cuando suene la alarma, abra la puerta del horno y
dé vuelta la comida. Retire la comida que se haya
descongelado. Vuelva a colocar los artículos que aún
están congelados en el horno y toque el botón Start
para completar el ciclo de descongelado.
Page 90

22
FUNCIONAMIENTO
Tabla de Conversión de Unidades de Peso.
La mayoría de los pesos de los alimentos están expresados en
libras y onzas.
Si utiliza la libra como unidad de peso, el peso de los alimentos
debe ingresarse en Descongelado Automático en libras y
décimas de libras (decimales).
Si es necesario, use la siguiente tabla para convertir el peso
de los alimentos a decimales.
Peso Equivalente
ONZAS
1.6
3.2
4.8
6.4
8.0
9.6
11.2
12.8
14.4
16.0
PESO EN DECIMALES
.10
.20
.30
.40
.50 Media libra
.60
.70
.80
.90
1.00 Una libra
Tabla de Descongelado
Categoría Alimento a Descongelar
Carne
Filete
(dEF1)
0.1 - 6.0 lbs
Aves
(dEF2)
0.1 - 6.0 lbs
Carne molida, bistec, dados de carne
para guisado, bistec de solomillo,
estofado, costillar, cuadril, aguja,
hamburguesas
Cordero
Chuletas, arrollado de carne
Cerdo
Chuletas, perros calientes, costillas
esternales, costillas sin hueso, arrollado
de carne, salchicha
Ternera
Costillitas (1 libra, ½ pulgada de grosor)
Cuando suene el BEEP, dé vuelta la
comida.
Después de descongelar, deje reposar de
5 a 15 minutos.
Aves
Pechugas (deshuesadas) enteras,
trozadas. Enjuague la cavidad del pollo
con agua del grifo y deje reposar durante
60 minutos después de la cocción para
obtener mejores resultados.
Gallinas "Cornish"
Enteras
Pavo
Pechuga
Pescado
0.1 - 4.0 lbs
0.1 - 2.0 lbs
(dEF3)
Pan
(dEF4)
Cuando suene el BEEP, dé vuelta la
comida.
Después de descongelar, deje reposar
por 60 minutos.
Pescado
Filetes, corte transversal del filete
Mariscos
Carne de cangrejo, colas de langosta,
camarones, vieiras
Cuando suene el BEEP, dé vuelta la
comida.
Después de descongelar, deje reposar de
5 a 10 minutos.
Rebanadas de pan, bollos, baguettes, etc.
Separe las rebanadas y coloque entre
toallas de papel o en una placa plana.
Cuando suene el BEEP, dé vuelta la
comida.
Después de descongelar, deje reposar de
1 a 2 minutos.
Page 91

FUNCIONAMIENTO
23
Consejos para el descongelado
•Cuando use la función Defrost, el peso que debe ingresar
es el peso neto en libras y décimas de libras (el peso de la
comida menos el del recipiente).
•Antes de comenzar, quite las ataduras metálicas que a
menudo vienen en las bolsas de alimentos congelados y
reemplácelas con cuerdas o bandas elásticas.
•Abra los envases, por ejemplo, las cajas de cartón, antes de
colocarlos en el horno.
•Retire el pescado, los mariscos, la carne y las aves de su
envoltorio original o paquete de plástico. De lo contrario,
la envoltura mantendrá el vapor y el jugo cerca de los
alimentos, lo que puede causar que la superficie externa de
los alimentos se cocine.
•Si los alimentos están envueltos en papel de aluminio,
retírelo y coloque la comida en un recipiente adecuado.
•Corte la piel, si las hubiera, de alimentos congelados como,
por ejemplo, salchichas.
•Pliegue las bolsas de plástico de los alimentos para
garantizar un descongelado uniforme.
•Coloque los alimentos en un recipiente poco profundo o en
una bandeja para asar en microondas para que contenga el
líquido que se libera.
•Siempre introduzca un tiempo menor que el que calcule
para el descongelado. La comida todavía debe estar un
poco congelada en el centro cuando se retira del horno. Si
la comida descongelada todavía está helada en el centro,
devuélvala al horno superior para descongelarla más.
•El tiempo de descongelación varía de acuerdo con la solidez
de la comida congelada.
•Algunas áreas pueden descongelarse más rápido que otras;
eso depende de la forma de los alimentos.
•La forma del envase afecta la rapidez con que la comida se
descongela. Los envases poco profundos se descongelan
con más rapidez que los de gran profundidad.
•A medida que la comida comienza a descongelarse,
sepárelos para descongelar fácilmente.
•Dé vuelta los alimentos durante el descongelado o el tiempo
de reposo. Separe y vaya retirando alimentos según sea
necesario.
•Para obtener mejores resultados, moldee la carne molida en
forma de rosquilla antes de congelarla. Cuando descongele,
quite la carne descongelada cuando suene la alarma y luego
continúe descongelando.
•Use pequeños trozos de papel de aluminio para proteger
ciertas partes de alimentos, como por ejemplo, alitas de
pollo, puntas de patas, colas de pescado o áreas que
comiencen a calentarse. Asegúrese de que el papel de
aluminio no toque los lados ni la parte superior o inferior del
horno. El papel de aluminio puede dañar el revestimiento del
horno.
•Para obtener mejores resultados, deje reposar la comida
después de descongelarla.
Funcionamiento del sensor
La función Cocción con sensor recalienta sus alimentos favoritos
sin que tenga que seleccionar tiempos de cocción y niveles de
potencia.
El horno determina automáticamente el tiempo de cocción que
requiere cada tipo de comida. Cuando el sensor interno detecta
una cierta cantidad de humedad proveniente de los alimentos,
le indica al horno cuánto tiempo más debe calentarlos. La
pantalla muestra el tiempo que resta calentar. Para obtener
mejores resultados cuando se cocina con el sensor, siga estas
recomendaciones.
•Los alimentos que se cocinan con el sistema sensor deben
estar a temperatura normal de almacenamiento.
•La bandeja de vidrio y el exterior del recipiente deben estar
secos para garantizar los mejores resultados de cocción.
•Los alimentos siempre deben cubrirse de forma holgada, sin
apretar, con envoltura plástica apta para microondas, papel
encerado o una tapa.
•No abra la puerta ni toque el botón Clear/Off durante el tiempo
en que trabaja el sensor. Cuando el sensor termina de detectar
la humedad, el horno emite una alarma y el tiempo de cocción
restante aparece en la pantalla. Este es el momento en que
usted puede abrir la puerta para remover, girar o reorganizar la
comida.
Utilizar recipientes apropiados y cubrir los alimentos como se
indica ayuda a asegurar buenos resultados de cocción con sensor.
•Siempre use recipientes aptos para microondas y cúbralos con
tapas o envoltura plástica ventilada.
•Nunca use cubiertas plásticas herméticas. Pueden evitar que el
vapor escape y hacer que los alimentos se cocinen demasiado.
•Haga coincidir la cantidad de alimento con el tamaño del
recipiente. Llene los recipientes como mínimo hasta la mitad
para obtener mejores resultados.
•Asegúrese de que la parte exterior del recipiente de cocción y
el interior del horno superior estén secos antes de colocar los
alimentos en el horno. Las gotas de humedad que se convierten
en vapor pueden confundir al sensor.
ESPAÑOL Uso del Horno Superior
Uso de la función Cocción con Sensor
Use la Cocción con Sensor para calentar comidas comunes
preparadas en microondas sin necesidad de programar
tiempos de cocción y niveles de potencia. La función
Cocción con Sensor tiene programas predeterminados para
9 categorías de alimentos. Consulte la tabla de Cocción con
Sensor para más información.
Configuración de la función Cocción con Sensor
Ejemplo: para cocinar arroz con la función cocción con sensor
Toque Sensor Cook.
1
Toque 7 para seleccionar ARROZ.
2
Toque Start.
3
•Cuando termina el tiempo de cocción, suena una
melodía y en la pantalla aparece END OF CYCLE.
Page 92

24
FUNCIONAMIENTO
Tabla de Cocción con Sensor
•La función Cocción con Sensor cuenta con ajustes predeterminados para recalentar ciertos alimentos automáticamente con
ayuda del sensor.
Categoría Peso
1. Bebidas 1-2 tazas
2. Cazuelas 10-20 oz Tazón apto para
3. Pollo 16-20 oz Tazón apto para
4. Pastas ½-2 tazas Tazón apto para
5. Pizza 1-3 rebanadas Placa para
6. Plato de
comida
7. Arroz ½-2 tazas Tazón apto para
8. Sopa 1-4 tazas Tazón apto para
9. Vegetales 1-4 tazas Tazón apto para
(240 ml por taza)
1 porción Placa para
Batería de
Cocina
Jarro o taza aptos
para microondas
en la bandeja de
vidrio
microondas sobre
la bandeja de
vidrio
microondas sobre
la bandeja de
vidrio
microondas sobre
la bandeja de
vidrio
microondas en la
bandeja de vidrio
microondas en la
bandeja de vidrio
microondas sobre
la bandeja de
vidrio
microondas sobre
la bandeja de
vidrio
microondas sobre
la bandeja de
vidrio
Temp. de los
Alimentos
Ambiente Utilice un jarro o una taza aptos para microondas sin
cubrir.
Luego de cocinar, revuelva para completar el recalentado.
(¡Tenga cuidado! La bebida va a estar muy caliente.
Algunas veces los líquidos que se calientan en recipientes
cilíndricos salpican inesperadamente cuando se los
mueve.)
Refrigerada Utilice un recipiente apto para microondas.
Cubra el recipiente con envoltura plástica ventilada.
Después de cocinar, deje reposar por 3 minutos.
Refrigerada Utilice un recipiente apto para microondas.
Cubra el recipiente con envoltura plástica ventilada.
Después de cocinar, deje reposar por 3 minutos.
Refrigerada Utilice un recipiente apto para microondas.
Cubra el recipiente con envoltura plástica ventilada.
Después de cocinar, deje reposar por 3 minutos.
Refrigerada Esta es una función de recalentado para pizza sobrante.
Use un plato apto para microondas sin cubrir.
Refrigerada Utilice un recipiente apto para microondas.
Cubra el recipiente con envoltura plástica ventilada.
Después de cocinar, deje reposar por 3 minutos.
Refrigerada Utilice un recipiente apto para microondas.
Cubra el recipiente con envoltura plástica ventilada.
Después de cocinar, deje reposar por 3 minutos.
Ambiente Utilice un recipiente apto para microondas.
Cubra el recipiente con envoltura plástica ventilada.
Después de cocinar, deje reposar por 3 minutos.
Refrigerada Utilice un recipiente apto para microondas.
Cubra el recipiente con envoltura plástica ventilada.
Después de cocinar, deje reposar por 3 minutos.
Instrucciones
Page 93

FUNCIONAMIENTO
25
Horneado por Convección
Durante el Horneado por Convección, se utiliza un quemador
para elevar la temperatura del aire dentro del horno.
Las temperaturas de cocción por convección oscilan entre
100 °F y 450 °F.
Para cocinar por convección, es mejor precalentar el horno.
NOTA
La temperatura del horno debe ser 25 °F menos que la
temperatura recomendada en los alimentos envasados. El
tiempo de cocción puede variar según la condición de la
comida o las preferencias individuales.
Configuración de la función Horneado por
convección
Ejemplo: 45 minutos a 375 °F con precalentado
Toque Conv.Bake. La pantalla muestra 350 °F titilando.
1
Ajuste la temperatura del horno: toque 3, 7 y 5.
2
Toque Start. El horno comienza a precalentarse y la
3
pantalla muestra Conv.Bake, la temperatura del horno.
(No ingrese el tiempo.)
Cuando suene la melodía, coloque la comida en el horno.
4
Broil (Asar)
Esta función le permitirá dejar la comida dorada y crujiente
rápidamente. No es necesario precalentar.
Configuración de la función Asar
Ejemplo: asar durante 1 minuto 30 segundos
Toque Broil.
1
Ajuste el tiempo de cocción: toque 1, 3 y 0.
2
Toque Start. El horno comienza a calentar.
3
Toque Clear/Off para cancelar la cocción en cualquier
4
momento o cuando haya terminado de cocinar.
PRECAUCIÓN
Siempre utilice agarraderas para retirar la comida y los
accesorios después de cocinar, ya que tanto estos como
el horno estarán muy calientes.
NOTA
Para obtener mejores resultados, use el estante cuando
ase comidas en el horno superior.
ESPAÑOL Uso del Horno Superior
Ajuste el tiempo de cocción: toque 4, 5.
5
Toque Start.
6
Cuando la cocción esté completa, toque Clear/Off.
7
Ejemplo: 30 minutos a 375 °F sin precalentado
Toque Conv. Bake. La pantalla muestra 350 °F titilando.
1
Ajuste la temperatura del horno: toque 3, 7 y 5.
2
Toque Cook Time.
3
Ajuste el tiempo de cocción: toque 3, 0.
4
Toque Start.
5
Cuando la cocción esté completa, toque Clear/Off.
6
NOTA
•Cuando el horno alcance la temperatura de
precalentado programada, sonará una melodía y la
pantalla mostrará el mensaje PREHEAT END. El horno
automáticamente mantiene esa temperatura durante 30
minutos.
•La temperatura del horno disminuye con mucha rapidez
cuando se abre la puerta; sin embargo, esto no debería
evitar que los alimentos se cocinen completamente
durante el tiempo normal de cocción.
Estante
Page 94

26
FUNCIONAMIENTO
Cocción Rápida
Esta función usa simultáneamente la energía de una luz
halógena, los quemadores y las microondas para posibilitar
una cocción rápida.
NOTA
Los niveles de potencia solo se pueden seleccionar de
10 a 40 %. Cada nivel de potencia le brinda potencia de
calentamiento y energía de microondas durante un cierto
porcentaje del tiempo.
PRECAUCIÓN
Cuando use la función Cocción Rápida, recuerde que el
horno, la puerta y los platos estarán muy calientes.
Configuración de la función Convección
Rápida
Utilice este modo para asar carne, pollo asado, verduras
asadas, pizza congelada, pasteles, tartas y panes.
Ejemplo: cocinar durante 1 minuto 30 segundos a 40 % de
potencia y 375 °F
Toque Speed Cook.
1
Toque 1 para seleccionar CONVECCIÓN RÁPIDA.
2
Configure el nivel de potencia: toque 4.
3
Ajuste la temperatura del horno: toque 3, 7, 5 y Start.
4
Ajuste el tiempo de cocción: toque 1, 3 y 0.
5
Configuración de la función Asar Rápido
Use este modo para Los bistecs, filetes de pollo o pescado y
mariscos.
Ejemplo: cocinar durante 1 minuto 30 segundos a 20 % de
potencia
Toque Speed Cook.
1
Toque 2 para seleccionar CONVECCIÓN RÁPIDA
2
Configure el nivel de potencia: toque 2.
3
Ajuste el tiempo de cocción: toque 1, 3 y 0.
4
Toque Start. El horno comienza a calentar.
5
Cuando se completa o cancela la cocción, toque Clear/
6
Off.
Cocción Automática
Use la Cocción Automática para calentar comidas comunes
preparadas sin necesidad de seleccionar tiempos de cocción y
niveles de potencia.
La función Cocción Automática tiene programas
predeterminados para 28 funciones de alimentos.
Configuración de la función Cocción
Automática
Ejemplo: para cocinar automáticamente 4 rebanadas de
tocino
Toque More Mode.
1
Toque Start. El horno comienza a calentar.
6
Cuando se completa o cancela la cocción, toque Clear/
7
Off.
Toque 1 para seleccionar COCCIÓN AUTOMÁTICA
2
Seleccione el alimento: toque 1 para TOCINO.
3
Toque Start para ingresar la opción.
4
Ajuste el peso o la cantidad: toque 1 para seleccionar 3-4
5
rebanadas de tocino.
Toque Start para comenzar la cocción.
6
Page 95

Tabla de Cocción Automática
FUNCIONAMIENTO
27
Categoría Peso
1. Tocino
(cortado
regular)
2. Bagel
(congelado)
3. Patatas al
horno
(7-9 oz c/u)
4. Brownie 8″ X 8″
5. Filetes de
bacalao
(1 libra)
6. Perro caliente
con maíz
(congelado)
3-4
5-6
rebanadas
1, 2-3 bagels Bandeja de
1, 2, 3-4
patatas
9″ X 13″
- Bandeja de
1-2, 3-4 Bandeja de
Batería de
Cocina
Plato o estante
para tocino apto
para microondas
sobre la bandeja
de vidrio
metal
Bandeja de
metal
Tazón apto para
microondas
sobre la bandeja
de vidrio
metal
metal
Temp. de los
Alimentos
Refrigerada Coloque las rebanadas de tocino en una parrilla de microondas
para obtener mejores resultados.
Si no tiene una parrilla, use un plato forrado con toallas de papel.
Presione 1 para 3-4 rebanadas. Presione 2 para 5-6 rebanadas.
Congelada Presione 1 o 2 según cuántos bagels necesite descongelar.
Ambiente Perfore cada patata varias veces con un tenedor.
Presione 1 para 1 patata, 2 para 2 patatas y 3 para 3-4 patatas.
Ambiente Rocíe los recipientes para hornear de silicona o vidrio apto para
microondas con aceite en aerosol.
Vierta la mezcla en los recipientes para hornear, extendiéndola
uniformemente.
Presione 1 para una bandeja de 8 x 8 pulgadas. Presione 2 para
una bandeja de 9 x 13 pulgadas.
Después de la cocción, deje reposar por unos minutos.
Refrigerada Pincele con aceite y condimente con sal y pimienta.
Dé vuelta la comida cuando suene la alarma.
Congelada Presione 1 para 1-2 perros calientes con maíz. Presione 2 para
3-4 perros calientes con maíz.
Instrucciones
ESPAÑOL Uso del Horno Superior
7. Vegetales
frescos
8. Nuggets
de pollo
congelados
9. Alitas de pollo
congeladas
10. Patatas fritas
congeladas
11. Pizza
congelada
(masa
regular)
12. Pretzels
suaves
congelados
13. Vegetales
congelados
4-6, 7-9,
16-20 oz
1-2, 3-4
1-2, 3-4
1-2, 3-4
1, 2, 3-4
pretzels
4-6, 7-9,
16-20 oz
10-12, 13-15,
porciones
(3.5 oz / 100 g
por porción)
porciones
(3.5 oz / 100 g
por porción)
porciones
(3.5 oz / 100 g
por porción)
Individual (6″)
Regular (12″)
10-12, 13-15,
Tazón apto para
microondas
sobre la bandeja
de vidrio
Bandeja de
metal
Bandeja de
metal
Bandeja de
metal
Bandeja de
metal
Bandeja de
metal
Tazón apto para
microondas
sobre la bandeja
de vidrio
Refrigerada Agregue agua según la cantidad.
•4-12 oz: agregue 2 cucharadas de agua
•13-20 oz: agregue 4 cucharadas de agua
Cubra con envoltura plástica ventilada.
Después de cocinar, revuelva y deje reposar por 3 minutos.
Congelada Presione 1 para 1-2 porciones. Presione 2 para 3-4 porciones.
Dé vuelta la comida cuando suene la alarma.
Congelada Presione 1 para 1-2 porciones. Presione 2 para 3-4 porciones.
Dé vuelta la comida cuando suene la alarma.
Congelada Presione 1 para 1-2 porciones. Presione 2 para 3-4 porciones.
Dé vuelta la comida cuando suene la alarma.
Congelada Presione 1 para una pizza de 6 pulgadas. Presione 2 para una
pizza de 12 pulgadas.
Congelada Presione 1 para 1 pretzel, 2 para 2 pretzels, o 3 para 3-4 pretzels.
Congelada Agregue agua según la cantidad.
•4-12 oz: agregue 2 cucharadas de agua
•13-20 oz: agregue 4 cucharadas de agua
Cubra con envoltura plástica ventilada.
Después de cocinar, revuelva y deje reposar por 3 minutos.
Page 96

28
FUNCIONAMIENTO
Categoría Peso
14. Pan de ajo
(rebanado,
congelado)
15. Hamburguesa
(1/2 pulgada
de espesor)
16. Chuletas de
cordero
(1/2 pulgada
de espesor,
6-7 oz)
17. Pastel de
carne
(9 x 5
pulgadas)
18. Nachos 1-3, 4-6
1-2, 3-4, 5-6
trozos
2, 3-4, 5-6
hamburguesas
1, 2, 3-4
chuletas
-
porciones
(8 c/u -1
porción)
Batería de
Cocina
Bandeja de
metal
Bandeja de
metal
Bandeja de
metal
Recipiente para
hornear de vidrio
o silicona apto
para microondas
sobre la bandeja
de vidrio
Bandeja de
metal
Temp. de los
Alimentos
Congelada Presione 1 para 1-2 trozos, 2 para 3-4 trozos, o 3 para 5-6 trozos.
Dé vuelta la comida cuando suene la alarma.
Refrigerada Presione 1 para 2 hamburguesas, 2 para 3-4 hamburguesas, o 3
para 5-6 hamburguesas.
Dé vuelta la comida cuando suene la alarma.
Refrigerada Pincele con aceite y condimente con sal y pimienta.
Presione 1 para 1 chuleta, 2 para 2 chuletas, o 3 para 3-4
chuletas.
Dé vuelta la comida cuando suene la alarma.
Refrigerada Ingredientes
Carne molida 800 g
Huevo (temp. del refrigerador) 115 g
Cocción
Coloque la mezcla de carne en un recipiente para hornear de
silicona o vidrio apto para microondas de 9 x 5 pulgadas.
Ambiente Presione 1 para 1-3 porciones. Presione 2 para 4-6 porciones.
Instrucciones
Sal 2 g
19. Avena 1, 2 porciones
20. Chuletas de
cerdo
(1/2 pulgada
de espesor,
6-7 oz)
21. Quinoa 1, 2 porciones
1, 2, 3-4
chuletas
Tazón grande
apto para
microondas
sobre la bandeja
de vidrio
Bandeja de
metal
Tazón grande
apto para
microondas
sobre la bandeja
de vidrio
Ambiente Ingredientes
1 poción 2 porciones
Avena ½ taza (40 g) 1 taza (80 g)
Agua o leche 1 taza (230 g) 1 ½ tazas (345 g)
Sal (Opcional) Pequeña cantidad 1/8 de cucharada
Cocción
Combine agua o leche, sal y avena en un tazón grande apto para
microondas.
Cubra con envoltura plástica ventilada.
Presione 1 para 1 porción. Presione 2 para 2 porciones.
Después de cocinar, deje reposar por 3 minutos.
Refrigerada Pincele con aceite y condimente con sal y pimienta.
Presione 1 para 1 chuleta, 2 para 2 chuletas, o 3 para 3-4
chuletas.
Dé vuelta la comida cuando suene la alarma.
Ambiente Ingredientes
1 poción 2 porciones
Quinoa ½ taza (40 g) 1 taza (80 g)
Agua o leche 1 taza (230 g) 1 ½ tazas (345 g)
Sal (Opcional) Pequeña cantidad 1/8 de cucharada
Cocción
Combine agua o leche, sal y quinoa en un tazón grande apto
para microondas.
Cubra con envoltura plástica ventilada.
Presione 1 para 1 porción. Presione 2 para 2 porciones.
Después de cocinar, deje reposar por 3 minutos.
Page 97

FUNCIONAMIENTO
29
Categoría Peso
22. Filete de
entrecot
(1 pulgada de
espesor,
14-15 oz)
23. Arroz ½, 1 taza
24. Filete de
salmón
(1 pulgada de
espesor)
25. Salchicha 1-6 , 7-14
26. Filete de
solomillo
(1 pulgada de
espesor,
18-21 oz)
1, 2 filetes Bandeja de
1, 2, 3-4
filetes
salchichas
1, 2 filetes Bandeja de
Batería de
Cocina
metal
Tazón grande y
profundo, apto
para microondas
sobre la bandeja
de vidrio
Bandeja de
metal
Bandeja de
metal
metal
Temp. de los
Alimentos
Refrigerada Pincele con aceite y condimente con sal y pimienta.
Presione 1 para 1 filete o 2 para 2 filetes.
Dé vuelta la comida cuando suene la alarma.
Ambiente Ingredientes
Arroz ½ taza (96 g) 1 taza (192 g)
Agua 1 taza (230 g) 2 tazas (460 g)
Sal Opcional
Cocción
Cubra con envoltura plástica ventilada.
Presione 1 para ½ taza de arroz seco o 2 para 1 taza de arroz
seco.
Después de cocinar, deje reposar por 5-10 minutos.
Refrigerada Pincele con aceite y condimente con sal y pimienta.
Presione 1 para 1 filete, 2 para 2 filetes, o 3 para 3-4 filetes.
Dé vuelta la comida cuando suene la alarma.
Refrigerada Presione 1 para 1-6 salchichas. Presione 2 para 7-14 salchichas.
Dé vuelta la comida cuando suene la alarma.
Refrigerada Pincele con aceite y condimente con sal y pimienta.
Presione 1 para 1 filete, 2 para 2 filetes.
Dé vuelta la comida cuando suene la alarma.
Instrucciones
½ taza 1 taza
ESPAÑOL Uso del Horno Superior
27. Lomo ¾ , 1 ½ lb Bandeja de
28. Verduras
enlatadas
4-6, 7-9,
10-12, 13-15,
16-20 oz
metal
Tazón apto para
microondas
sobre la bandeja
de vidrio
Refrigerada Pincele con aceite y condimente con sal y pimienta.
Presione 1 para ¾ de libra, 2 para 1 ½ libras.
Dé vuelta la comida cuando suene la alarma.
Ambiente Traspase los vegetales enlatados a un tazón apto para
microondas.
Cubra con envoltura plástica ventilada.
Presione 1 para 4-6 oz, 2 para 7-9 oz, 3 para 10-12 oz, 4 para
13-15 oz, o 5 para 16-20 oz.
Después de cocinar, revuelva y deje reposar por 3 minutos.
NOTA
•No use productos de papel reciclado en el horno superior.
En ocasiones contienen impurezas que causan arcos eléctricos y chispas.
•NUNCA use productos de papel en el horno de convección.
Page 98

30
FUNCIONAMIENTO
Ablandar
El horno utiliza poca potencia para ablandar alimentos como
mantequilla, queso crema, glaseado y helado.
Consulte la siguiente tabla.
Configuración de la función Ablandar
Ejemplo: 1 pinta de helado
Toque More Mode.
1
Toque 2 para seleccionar ABLANDAR.
2
Configure el Menú: toque 4 para seleccionar HELADO y
3
toque Start.
Establezca la cantidad: toque 1 para seleccionar 1 pinta.
4
Toque Start.
5
•Cuando termina el tiempo de cocción, suena una
melodía y en la pantalla aparece END OF CYCLE.
Tabla para Ablandar
Categoría Peso
1. Mantequilla ½, 1, 2
2. Queso crema 3, 8 oz Plato para
3. Glaseado
(16 oz)
4. Helado 1 pinta,
barras
-
1 cuarto
Batería de
Cocina
Plato para
microondas en
la bandeja de
vidrio
microondas en
la bandeja de
vidrio
Tazón apto para
microondas
sobre la bandeja
de vidrio
Bandeja de
vidrio
Temp. de los
Alimentos
Refrigerada
Refrigerada
Refrigerada
Congelada
Instrucciones
Presione 1 para 1/2 barra, 2 para 1 barra o 3 para 2 barras.
La mantequilla estará a temperatura ambiente y lista para ser
usada en una receta.
Presione 1 para 3 oz. o 2 para 8 oz.
El queso crema estará a temperatura ambiente y listo para
ser usado en una receta.
El glaseado estará a temperatura ambiente y listo para ser
usado en una receta.
Retire la tapa y la cobertura.
Presione 1 para 1 pinta o 2 para 1 cuarto.
El helado será lo suficientemente blando como para que
resulte fácil servirlo.
Page 99

Derretir
El horno utiliza poca potencia para derretir alimentos como
mantequilla, caramelo, queso, chocolate, y malvaviscos.
Consulte la siguiente tabla.
FUNCIONAMIENTO
31
Configuración de la función Derretir
Ejemplo: 8 oz de chocolate.
Toque More Mode.
1
Toque 4 para seleccionar DERRETIR.
2
Configure el Menú: toque 4 para seleccionar
3
CHOCOLATE y toque Start.
Establezca la cantidad: toque 2 para seleccionar 8 oz.
4
Toque Start.
5
•Cuando termina el tiempo de cocción, suena una
melodía y en la pantalla aparece END OF CYCLE.
Tabla para Derretir
Categoría Peso
1. Mantequilla ½, 1, 2
barras
2. Caramelo 4, 8, 12 oz
3. Queso 4, 8, 12 oz
4. Chocolate 4, 8, 12 oz
5. Malvavisco 5, 10 oz
Batería de
Cocina
Tazón apto para
microondas
sobre la bandeja
de vidrio
Tazón apto para
microondas
sobre la bandeja
de vidrio
Tazón apto para
microondas
sobre la bandeja
de vidrio
Tazón apto para
microondas
sobre la bandeja
de vidrio
Tazón apto para
microondas
sobre la bandeja
de vidrio
Temp. de los
Alimentos
Refrigerada
Ambiente Presione 1 para 4 oz, 2 para 8 oz o 3 para 12 oz.
Refrigerada
Ambiente Pueden usarse chips de chocolate o cuadrados de chocolate
Ambiente Presione 1 para 5 oz. o 2 para 10 oz.
Presione 1 para 1/2 barra, 2 para 1 barra o 3 para 2 barras.
Luego de cocinar, revuelva para que se termine de derretir.
Luego de cocinar, revuelva para que se termine de derretir.
Use solo queso procesado. Córtelo en cubos.
Presione 1 para 4 oz, 2 para 8 oz o 3 para 12 oz.
Luego de cocinar, revuelva para que se termine de derretir.
para hornear.
Presione 1 para 4 oz, 2 para 8 oz o 3 para 12 oz.
Luego de cocinar, revuelva para que se termine de derretir.
Luego de cocinar, revuelva para que se termine de derretir.
Instrucciones
ESPAÑOL Uso del Horno Superior
Page 100

32
FUNCIONAMIENTO
Warm (Calentar)
La función CALENTAR mantiene una temperatura del
horno de menos de 230 °F. Esta función no debe usarse
para recalentar alimentos fríos. Esta función mantiene
caliente la comida cocida para servir hasta 3 horas después
de realizada la cocción. Luego de 3 horas la función
CALENTAR automáticamente APAGA el horno.
Configuración de la función Calentar:
Toque More Mode.
1
Toque 4 para seleccionar CALENTAR.
2
Seleccione el nivel de temperatura: toque 1 para bajo, 2
3
para medio o 3 para alto.
Toque Start.
4
Seleccione el tipo: toque 1 para húmedo, 2 para crujiente.
5
Toque Start para comenzar a calentar.
6
Toque Clear/Off en cualquier momento para cancelar.
7
NOTA
•Bajo = 140° - 160 °F (60° - 71 °C)
Medio = 160° - 195 °F (71° - 91 °C)
Alto = 195° - 230 °F (91° - 110 °C)
•La función Calentar está diseñada para mantener
caliente a los alimentos. No la utilice para bajar la
temperatura de los alimentos.
•Es normal que el ventilador funcione durante la función
Calentar.
Proof (Leudar)
Esta característica mantiene el horno tibio para leudar
productos con levadura antes de hornearlos.
Configuración de la función Leudar:
Toque More Mode.
1
Toque 5 para seleccionar LEUDAR.
2
Toque Start para comenzar con el leudado.
3
Toque Clear/Off en cualquier momento para cancelar.
4
NOTA
•Para evitar que la temperatura del horno baje y que se
prolongue el tiempo de leudado, no abra la puerta del
horno, si no fuera necesario.
•Revise los alimentos panificados con tiempo para evitar
un leudado excesivo.
•No utilice el modo de leudado para calentar comida ni
para mantener calientes los alimentos. La temperatura
del horno para el leudado no es lo suficientemente alta
para mantener alimentos a temperaturas seguras. Use la
función LEUDAR para mantener calientes los alimentos.
•Si el horno está demasiado caliente, no funcionará el
leudado. Deje que el horno se enfríe antes de leudar.
Palomitas de Maíz
Configuración de la función Palomitas de Maíz
Toque Popcorn.
1
Toque Start.
2
La función Palomitas de Maíz se inicia.
Toque Clear/Off para cancelar la función Palomitas de
3
Maíz en cualquier momento.
NOTA
•Solo haga palomitas en un recipiente apto para
microondas o paquetes comerciales diseñados para
hornos de microondas.
•Nunca intente hacer palomitas de maíz en una bolsa
de papel que no esté aprobada para ser usada en
microondas.
•Si no se conoce el tamaño de la bolsa de palomitas de
maíz, siga las instrucciones del fabricante y no use esta
función.
•Prepare solo una bolsa a la vez.
•No utilice dispositivos para hacer palomitas de maíz en
el horno superior con esta función.
•No deje el horno desatendido mientras se revienta el
maíz.
•No use las teclas de la función POPCORN en
combinación con ninguna otra tecla de función.
•No intente recalentar ni cocinar ningún grano que no
hay reventado.
•No reutilice la bolsa. La cocción excesiva podría
provocar un incendio en el horno.
PRECAUCIÓN
Nunca use una bolsa de papel kraft para hacer palomitas
de maíz.
Cuando ponga a hacer palomitas de maíz de las que vienen
empaquetadas, coloque la bolsa con cuidado en el horno para
que no toque las paredes mientras gira. Pliegue los extremos
de la bolsa hacia arriba y hacia el centro de la misma, como se
muestra.
 Loading...