

Page 1
12
OPERATION
OPERATION
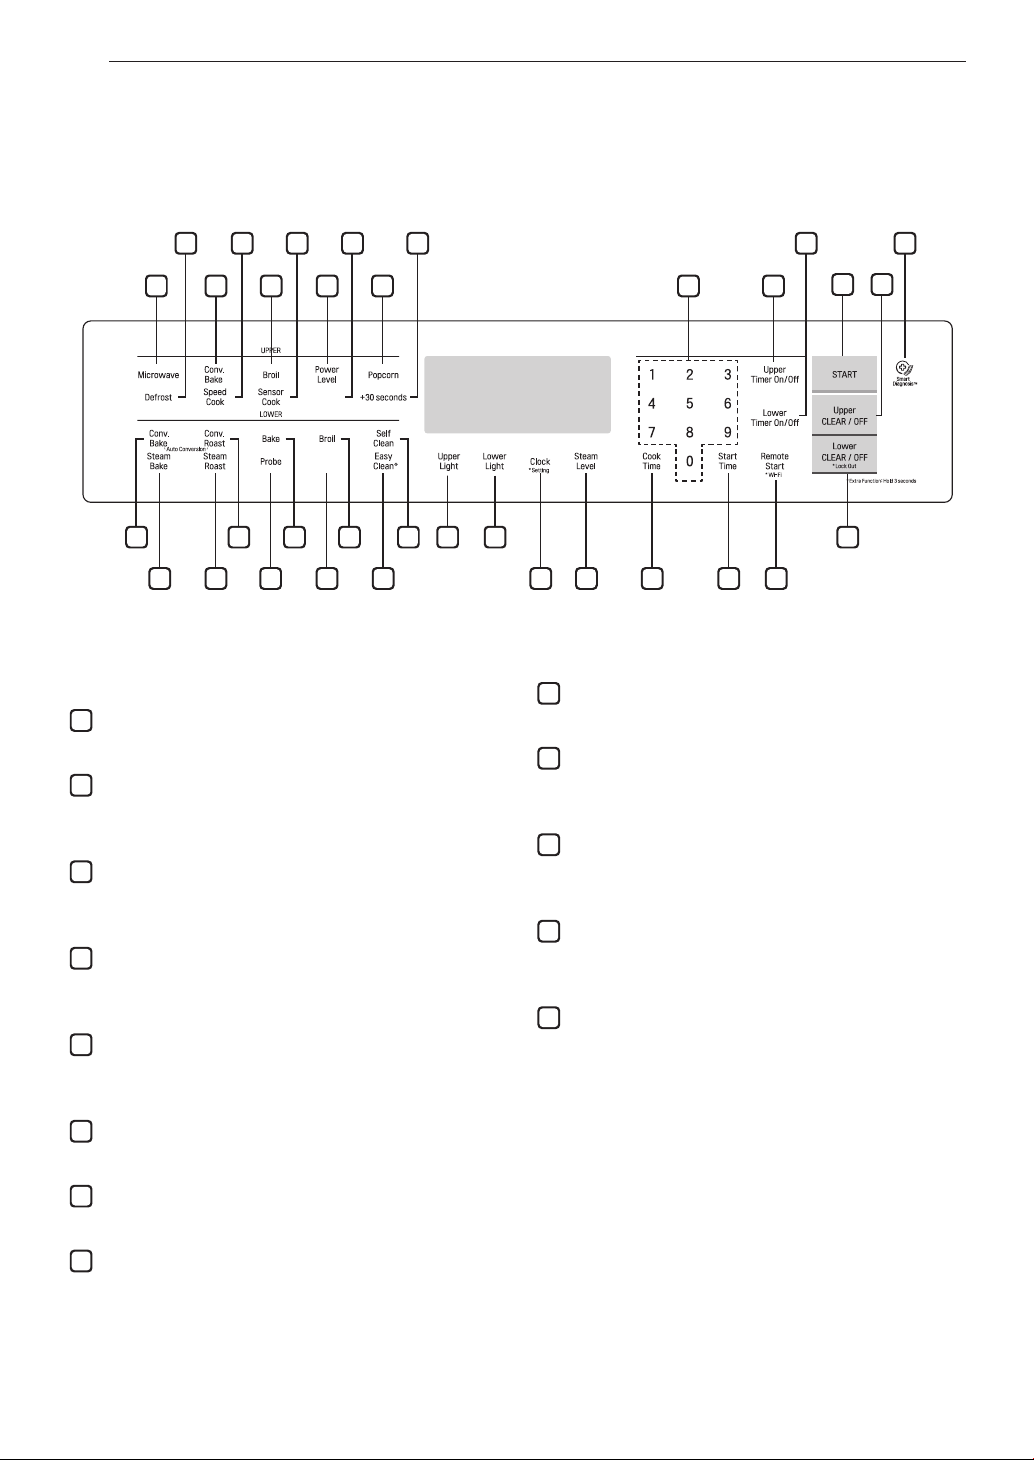
Control Panel Overview
9 10 11 12 13 14 34
6 7 8
More
Mode
More
Mode
22 23 24 25 26 27 28 29 30 32
UPPER OVEN
1
Upper Timer On/Off
Use to set or cancel the timer of the upper oven.
2
Upper Light
Use to turn the oven lights of the upper oven on and
off.
3
Upper Clear/Off
Use to stop cooking, cancel settings of the upper
oven.
4
Microwave
Use to select the Microwave function of the upper
oven.
5
Conv. Bake
Use to select the Convection Bake function of the
upper oven.
6
Broil
Use to select the Broil function of the upper oven.
7
Power Level
Use to select a cooking power level.
8
Popcorn
Use to select the Popcorn function of the upper oven.
314 5 1
1517 18 19 20 21
9
Defrost
Use to select the Defrost function of the upper oven.
10
Speed Cook
Use to select the Speed Cook function of the upper
oven.
11
Sensor Cook
Use to select the Sensor Cook function of the upper
oven.
12
More Mode
Use to select the More Mode function of the upper
oven.
13
+30 seconds
Use to add 30 seconds of cooking time each time you
touch it.
33 3
162
Page 2

OPERATION
13
LOWER OVEN
14
Lower Timer On/Off
Use to set or cancel the timer of the lower oven.
15
Lower Light
Use to turn the oven lights of the lower oven on and
off.
16
Lower Clear/Off
Use to stop cooking, cancel settings of the lower
oven. Press and hold button for three seconds to
activate LOCKOUT.
17
Conv. Bake
Use to select the Convection Bake function of the
lower oven.
18
Conv. Roast
Use to select the Convection Roast function of the
lower oven.
19
Bake
Use to select the Bake function of the lower oven.
20
Broil
Use to select the Broil function of the lower oven.
21
Self Clean
Use to select the Self Clean function of the lower
oven.
22
Steam Bake
Use to select the Steam Bake function of the lower
oven.
23
Steam Roast
Use to select the Steam Roast function of the lower
oven.
24
Probe
Use to select the Probe function of the lower oven.
25
More Mode
Use to select the More Mode function of the lower
oven.
26
EasyClean®
Use to select the Easy Clean function of the lower
oven.
COMMON
27
Clock
Use to set the time of day. Press and hold button for
three seconds to select and adjust oven settings.
28
Steam Level
Use to select and adjust steam level.
29
Cook Time
Use to set the length of the cook time. (Bake, Conv.
Bake/Roast only)
30
Start Time
Use to set delay time. (Bake, Conv. Bake/Roast, Self
Clean only)
31
Number Pads
Use to enter a temperature and all times.
32
Remote Start
Use to select the Remote Start function. Press and
hold button for three seconds to connect it to a Wi-Fi
network.
33
Start
Use to START all functions in the oven.
34
Smart Diagnosis™
Use with the Smart Diagnosis feature.
ENGLISH
Flashing Time
If your oven displays a flashing clock, touch Clock and reset the time, or touch any key to stop the flashing.
Page 3

14
OPERATION
Changing Oven Settings
Clock
The clock must be set to the correct time of day in
order for the automatic oven timing functions to work
properly.
Touch Clock. The display shows CLO in red.
1
Touch the numbers to enter the time. For
2
example, to set the clock for 10:30, touch the
numbers: 1, 0, 3 and 0.
Touch Start.
3
NOTE
•The time of day cannot be changed during a
timed baking or self-clean cycle.
•To check the time of day when the display is
showing other information, touch Clock.
•If no other keys are touched within 25 seconds
of touching Clock, the display reverts to the
original setting.
•If the display time is blinking, you may have
experienced a power failure. Reset the time.
Timer On/Off
The Upper or Lower Timer On/Off serves as an extra
timer in the kitchen that beeps when the set time has
run out. It does not start or stop cooking.
The Upper or Lower Timer On/Off feature can be
used during any of the other oven control functions.
The Upper and Lower Timer can be operated
independently of each other.
Setting the Timer
For example, to set 5 minutes
Touch Upper Timer On/Off or Lower Timer On/
1
Off once.
0:00 appears and Timer flashes in the display.
Touch 5.
2
0:05 appears in the display.
Touch Timer On/Off to start the Timer. The
3
remaining time countdown appears in the
display.
NOTE
If Upper Timer On/Off or Lower Timer On/Off is
not touched, the timer returns to the time of day.
When the set time runs out, End shows in the
4
display. The indicator tones sound every 15
seconds until Upper Timer On/Off or
Lower Timer On/Off is touched.
NOTE
•If the remaining time is not in the display, recall
the remaining time by touching Upper Timer
On/Off or Lower Timer On/Off.
•Touch Upper Timer On/Off or Lower Timer
On/Off twice to set the time in minutes and
seconds.
•Touch Upper Timer On/Off or Lower Timer
On/Off once to set the time in hours and
minutes.
Canceling the Timer
Touch Upper Timer On/Off or Lower Timer
1
On/Off once.
The display returns to the time of day.
Page 4

OPERATION
15
Settings
Press and hold Clock key for three seconds to select
and adjust oven settings.
The Setting key allows you to:
•set the hour mode on the clock (12 or 24 hours)
•enable/disable convection auto conversion
•adjust the oven temperature
•select display language
•activate/deactivate the preheating alarm light
•set the beeper volume
•switch the temperature scale between Fahrenheit
and Celsius
•disable/enable demo mode
Setting the Hour Mode
The control is set to use a 12-hour clock. To reset the
clock to 24-hour mode, follow the steps below.
Touch and hold Clock until CLO appears in the
1
display.
Touch 1 to select a 12-hour clock, or 2 to select
2
a 24-hour clock.
Touch Start to accept the change.
3
Setting Convection Auto Conversion
(Only for Lower Oven)
When Conv. Bake and Conv. Roast are selected,
Convection Auto Conversion automatically converts the
standard recipe temperature entered to a convection
temperature by subtracting 25 °F / 14 °C. This
auto-converted temperature shows on the display. For
example, select Conv. Bake, enter 350 °F, and 325 °F
shows on the display after preheat.
Convection Auto Conversion is enabled by default. To
change the setting, follow these instructions.
Touch and hold Clock until CLO appears in the
1
display. Then touch Clock repeatedly until Auto
appears in the display.
Touch 1 to enable or 2 to disable auto
2
conversion.
Touch Start to accept the change.
3
Adjusting the Oven Temperature
(Only for Lower Oven)
Your new oven may cook differently from the one
it replaced. Use your new oven for a few weeks to
become more familiar with it before changing the
temperature settings. If after familiarizing yourself with
the new oven, you still think that it is too hot or too
cold, you can adjust the oven temperature yourself.
NOTE
To begin, either raise or lower the thermostat
15 °F (8 °C). Try the oven with the new setting. If
the oven still needs adjustment, raise or lower the
thermostat again, using the first adjustment as a
gauge. For example, if the adjustment was too
much, raise or lower the thermostat 10 °F (5 °C).
If the adjustment was not enough, raise or lower
the thermostat 20 °F (12 °C). Proceed in this way
until the oven is adjusted to your satisfaction.
Touch and hold Clock until CLO appears in the
1
display. Then touch Clock repeatedly until L_AJ
appears in the display.
Use the number keys to enter the number
2
of degrees you want to adjust the oven
temperature.
Adjust the temperature either up or down by
3
touching Clock repeatedly to toggle between
plus (+) or minus (-).
Touch Start to accept the change.
4
NOTE
•This adjustment does not affect the broiling
or Self Clean temperatures. The adjustment
is retained in memory after a power failure.
The oven temperature can be increased (+) or
decreased (-) as much as 35 °F or 19 °C.
•Once the temperature is increased or
decreased, the display shows the adjusted
temperature until it readjusts.
Selecting the Display Language
The oven control is set to display in English but can
be changed to display in Spanish or French.
Touch and hold Clock until CLO appears in the
1
display. Then touch Clock repeatedly until Lng
appears in the display.
ENGLISH
Touch 1 for English, 2 for Spansh, or 3 for
2
French.
Touch Start to accept the change.
3
Page 5

16
OPERATION
Turning the Preheat Alarm Light On/Off
(Only for Lower Oven)
When the oven reaches its set-temperature, the
preheating alarm light flashes 5 times or until the
oven door is opened.
You can activate or deactivate the preheating alarm
light.
Touch and hold Clock until CLO appears in the
1
display. Then touch Clock repeatedly until PrE
appears in the display.
Touch 1 to turn on and 2 to turn off the alarm.
2
Touch Start to accept the change.
3
Adjusting the Beeper Volume
Touch and hold Clock until CLO appears in the
1
display. Then touch Clock repeatedly until BEEP
appears in the display.
Touch 1 for Loud, 2 for Low, and 3 for Mute.
2
Touch Start to accept the change.
3
Selecting Fahrenheit or Celsius
Set the oven temperature display to show either
Fahrenheit (°F) or Celsius (°C) units. The oven
defaults to Fahrenheit unless changed by the user.
Touch and hold Clock until CLO appears in the
1
display. Then touch Clock repeatedly until Unit
appears in the display.
Demo Mode
Demo Mode for showroom use only. The oven will not
heat up.
Touch and hold Clock until CLO appears in the
1
display. Then touch Clock repeatedly to select
demo mode.
Touch 1 to enable and 2 to disable the demo
2
mode.
Touch Start to accept the change.
3
NOTE
•When Demo Mode is on, the appliance will not
heat up.
•The oven Demo Mode icon appears in the
display if the Demo Mode is on.
Lockout
The Lockout feature automatically locks the lower
oven door and prevents most oven controls on both
ovens from being turned on. It does not disable the
clock, timer or the interior oven light.
Touch and hold Lower Clear/Off for three
1
seconds.
The lock melody sounds, OVEN LOCKOUT
2
appears in the display and the lock
the display.
blinks in
Touch 1 for °F (Fahrenheit) or 2 for °C (Celsius).
2
Touch Start to accept the change.
3
Once the oven door is locked, the lock
3
indicator stops blinking and remains on.
To deactivate the Lockout feature, touch and
4
hold Lower Clear/Off for three seconds. The
unlock melody sounds and the door and the
controls unlock.
Page 6

OPERATION
17
Start Time (Delayed Timed Cook)
The automatic timer of the Delayed Timed Cook
function turns the oven on and off at the time you
select. This feature can be used with the Bake, Conv.
Bake and Conv. Roast modes.
Setting a Delayed Timed Cook
For example, to bake at 300 °F and delay the start
of baking until 4:30, first set the clock for the correct
time of day.
Touch Bake. 350 °F appears in the display.
1
Set the temperature: touch 3, 0 and 0.
2
Touch Cook Time and set the baking time.
3
Touch Start Time.
4
Set the start time: touch 4, 3 and 0 for 4:30.
5
Touch Start. A short beep sounds and Delay
6
Timed and the start time appear in the display.
The oven begins baking at the set start time.
NOTE
•To cancel the Delayed Timed Cook function,
touch Clear/Off at any time.
•To change the cooking time, repeat step 3 and
touch Start.
•If the oven clock is set as a 12-hour clock, you
can delay the cook time for 12 hours. If the
oven clock is set as a 24-hour clock, you can
delay the cook time for 24 hours.
The oven will continue to cook for the set amount
of time and then turn off automatically. When the
cooking time has elapsed:
•End and the time of day show in the display.
•The cook end indicator tone sounds every 60
seconds until Clear/Off is touched.
Cook Time (Timed Cook)
Set the oven to cook for a specific length of time
using the Timed Cook feature. This feature can only
be used with the Speed Cook, Bake, Conv.Bake
and Conv.Roast modes.
Setting the Cook Time Function
For example, to bake at 300 °F for 30 minutes, first
set the clock to the correct time of day.
Touch Bake. 350 °F appears in the display.
1
Set the temperature.
2
Touch 3, 0 and 0.
Touch Cook Time. Timed flashes in the display.
3
Bake, 0:00 and 300 °F appear in the display.
Set the baking time: touch 3 and 0 (for 30
4
minutes). The baking time can be set for any
amount of time between 1 minute and 11 hours
and 59 minutes.
Touch Start.
5
The oven will continue to cook for the set amount
of time and then turn off automatically. When the
cooking time has elapsed:
•END OF CYCLE and the time of day show in the
display.
•The cook end indicator tone sounds every 60
seconds until Clear/Off is touched.
Changing the Cook Time during Cooking
For example, to change the cook time from 30
minutes to 1 hour and 30 minutes, do the following.
Touch Cook Time.
1
Change the baking time: touch 1, 3, 0.
2
Touch Start to accept the change.
3
ENGLISH
CAUTION
•Use the automatic timer when cooking cured or
frozen meats and most fruits and vegetables.
Foods that can easily spoil, such as milk, eggs,
fish, meat or poultry, should be chilled in the
refrigerator. Even when chilled, they should
not stand in the oven for more than 1 hour
before cooking begins, and should be removed
promptly when cooking is completed.
•Eating spoiled food can result in sickness from
food poisoning.
Page 7

18
OPERATION
Using the Upper Oven
Before Using the Upper Oven
NOTE
•To avoid risk of personal injury or property
damage, do not use stoneware, metal cookware,
or metal rimmed cookware in the oven.
•To program the oven, make sure you touch
the center of each key firmly since the areas
between the keys will not activate the oven.
A tone will sound each time a key is touched
correctly. Don’t touch several keys at once.
•Do not strike the control panel with silverware,
cookware, etc. Breakage may occur.
•Always use caution when taking cookware out
of the oven. Some dishes absorb heat from the
cooked food and may be hot. See Cookware
Guide earlier in this section for more information.
Microwave Cookware Guide
NOTE
•Do not rinse containers by placing them in water
immediately after cooking. This may cause
breakage. Also, always allow the turntable to
cool before removing it from the oven.
•Never operate the oven when it is empty. Food
or water should always be in the oven during
operation to absorb the microwave energy.
•Do not use the oven to dry newspapers or
clothes. They may catch fire.
•Use thermometers that have been approved for
microwave oven cooking.
•The turntable must always be in place when
you operate the oven.
•Do not use your microwave oven to cook eggs
in the shell. Pressure can build up inside the
shell, causing it to burst.
Upper Oven Light
Touch Upper Light to turn the upper oven light
1
on or off.
Use Do Not Use
OVENPROOF GLASS
(treated for high intensity heat):
utility dishes, loaf dishes, pie plates, cake
plates, liquid measuring cups, casseroles and
bowls without metallic trim.
CHINA:
bowls, cups, serving plates, and platters
without metallic rims.
PLASTIC:
Plastic wrap (as a cover)- lay the plastic wrap
loosely over the dish and press it to the sides.
Vent plastic wrap by turning back one edge
slightly to allow excess steam to escape. The
dish should be deep enough so that the plastic
wrap will not touch the food. As the food heats
it may melt the plastic wrap wherever the wrap
touches the food.
Use plastic dishes, cups, semi-rigid freezer
containers and plastic bags only for short
cooking time. Use these with care because the
plastic may soften from the heat of the food.
PAPER:
Paper towels, waxed paper, paper napkins,
and paper plates with no metallic rim or design.
Check the manufacturer's label before using in
the microwave oven.
NOTE:
Do not use recycled paper products in the
microwave oven. They sometimes contain
impurities that cause arcing and sparking.
METAL CONTAINERS:
Metal shields the food from microwave energy and produces
uneven cooking. Also avoid metal skewers, thermometers, or foil
trays. Metal containers can cause arcing, which can damage the
microwave oven.
METAL DECORATION:
Metal-rimmed or metal-banded dinnerware, casserole dishes, etc.
The metal rim interferes with normal cooking and may damage the
oven.
ALUMINUM FOIL:
Avoid large sheets of aluminum foil because they hinder cooking
and may cause harmful arcing. Use small pieces of foil to shield
poultry legs and wings. Keep ALL aluminum foil at least 1 inch from
the side walls and door of the oven.
WOOD:
Wooden bowls and boards will dry out and may split or crack when
you use them in the microwave oven. Baskets react in the same way.
TIGHTLY COVERED COOKWARE:
Be sure to leave openings for steam to escape from covered
containers. Pierce plastic pouches of vegetables or other food
items before cooking. Tightly closed pouches could explode.
BROWN PAPER:
Avoid using brown paper bags.
They absorb too much heat and could burn.
FLAWED OR CHIPPED COOKWARE:
Any container that is cracked, flawed, or chipped may break in the
oven.
METAL TWIST TIES:
Remove metal twist ties from plastic or paper bags.
They become hot and could cause a fire.
Page 8

OPERATION
19
Microwave Cooking Tips
Keeping an Eye on Things
Always watch your food while it cooks. The light
inside the upper oven turns on automatically when
the oven is cooking so you can monitor the cooking
process. Directions given in recipes to elevate, stir,
and the like should be thought of as the minimum
steps recommended. If the food seems to be cooking
unevenly, simply make the necessary adjustments
you think appropriate to correct the problem.
Factors Affecting Microwave Cooking Times
Many factors affect cooking times. The temperature
of ingredients used in a recipe makes a big difference
in cooking times. For example, a cake made with
ice-cold butter, milk, and eggs will take considerably
longer to bake than one made with ingredients that
are at room temperature. Some recipes, particularly
those for bread, cake, and custards, recommend that
food be removed from the oven when they are slightly
undercooked.
This is not a mistake. When allowed to stand, usually
covered, these foods will continue to cook outside of
the oven as the heat trapped within the outer portions
of the food gradually travels inward. If the food is left
in the oven until it is cooked all the way through, the
outer portions will become overcooked or even burnt.
Practice will improve your ability to estimate both
cooking and standing times for various foods.
Density of Food
Light, porous food such as cakes and breads cook
more quickly than heavy, dense foods such as
roasts and casseroles. You must take care when
microwaving porous food so that the outer edges do
not become dry and brittle.
Height of Food
The upper portion of tall foods, particularly roasts, will
cook more quickly than the lower portion.
Therefore, it is wise to turn tall food several times
during cooking.
Moisture Content of Food
Because the heat generated from microwaves
causes moisture to evaporate, relatively dry food
such as roasts and some vegetables should either
be sprinkled with water prior to cooking or covered to
retain moisture.
Bone and Fat Content of Food
Bones conduct heat and fat cooks more quickly than
meat. Care must be taken when cooking bony or fatty
cuts of meat in order to prevent unevenly cooked or
overcooked meat.
Quantity of Food
The number of microwaves in your oven remains
constant regardless of how much food is being
cooked. Therefore, the more food you place in the
oven, the longer the required cooking time.
Remember to decrease cooking times by at least one
third when halving a recipe.
Shape of Food
Microwaves penetrate only about 3/4 of an inch
(2 cm) into food. The interior portion of thick foods is
cooked as the heat generated on the outside travels
inward. Only the outer edge of food is cooked by
microwave energy; the rest is cooked by conduction.
The worst possible shape for a food that is to be
microwaved is a thick square.
The corners will burn long before the center is even
warm. Round thin foods and ring-shaped foods cook
most successfully in the microwave.
Covering
A cover traps heat and steam which causes food to
cook more quickly. Use a lid or microwave cling film
with a corner folded back to prevent splitting.
Covering with Parchment Paper
Parchment paper (not waxed paper) is microwave
safe. Because it makes a looser cover than a lid or
clingfilm, greaseproof paper allows the food to dry out
slightly.
Stirring
Stirring is one of the most important of all microwaving
techniques. In conventional cooking, food is stirred for
the purpose of blending. Microwaved food, however,
is stirred in order to spread and redistribute heat.
Always stir from the outside towards the centre as the
outside of the food heats first.
Placing Thicker Portions Facing Outward
Place thicker cuts or portions of meat, poultry, and
fish toward the outer edge of the baking dish so they
absorb the most microwave energy and the food
cooks more evenly.
ENGLISH Using the Upper Oven
Page 9

20
OPERATION
Shielding
Strips of aluminium foil (which block microwaves)
can be placed over the corners or edges of square
and rectangular foods to prevent those portions from
overcooking. Never use too much foil and make sure
the foil is secured to the dish or it may cause arcing
in the oven, especially if the foil passes too closely to
the walls of the oven during rotation.
Elevating
Thick or dense foods can be elevated so that
microwaves can be absorbed by the underside and
center of the foods.
Piercing
Foods enclosed in a shell, skin or membrane are
likely to burst in the oven unless they are pierced
prior to cooking. Such foods include yolks and whites
of eggs, clams, oysters, potatoes, and other whole
vegetables and fruits.
Testing if Cooked
Microwaves cook food quickly, so test food for
doneness frequently. Some foods are left in the
microwave until completely cooked, but most foods,
including meats and poultry, should be removed from
the oven while still slightly undercooked and allowed
to finish cooking during standing time. The internal
temperature of foods will rise between 5 °F (3 °C) and
15 °F (8 °C) during standing time.
Microwave Power Levels
This upper oven is equipped with 10 power levels to
give you maximum flexibility and control over cooking.
See the table for suggested power levels for various
foods.
Microwave Power Levels Chart
Power
Level
P-HI
(100 %)
P-90 •Reheating rice, pasta, & vegetables.
P-80 •Reheating prepared foods quickly.
P-70 •Cooking egg, milk and cheese dishes.
P-60 •Cooking veal.
P-50 •Cooking ham, whole poultry and lamb.
P-40 •Thawing meat, poultry and seafood.
•Boiling water.
•Browning ground beef.
•Making candy.
•Cooking poultry pieces, fish, &
vegetables.
•Cooking tender cuts of meat.
•Reheating sandwiches.
•Melting chocolate.
•Cooking whole fish.
•Cooking puddings and custard.
•Cooking rib roast and sirloin tip.
Use
P-30 •Cooking less tender cuts of meat.
•Cooking pork chops and roasts.
P-20 •Taking chill out of fruit.
•Softening butter.
P-10 •Keeping casseroles and main dishes
warm.
•Softening butter and cream cheese.
Page 10

OPERATION
21
Cooking at High Power Level
Example: To cook food for 8 minutes 30 seconds.
Touch Microwave.
1
Set the cook time: Touch 8, 3 and 0.
2
Touch Start to start cooking.
3
•When the cook time is over a melody sounds
and END OF CYCLE displays.
Cooking at Lower Power Levels
HIGH power cooking does not always give the best
results with foods that need slower cooking, such as
roasts, baked goods, or custards. The oven has 9
power settings in addition to HIGH.
Example: To cook food for 7 minutes 30 seconds
at 70% power.
Touch Microwave.
1
Set the cook time: Touch 7, 3 and 0.
2
Set the power level: Touch Power Level and 7.
3
Touch Start to start cooking.
4
•When the cook time is over a melody sounds
and END OF CYCLE displays.
+30 seconds
Use this to quickly add 30 seconds to microwave
cooking time.
Press the button when the oven is off to
1
immediately start the microwave function for 30
seconds at High power.
Defrost
The oven has 4 preset defrost cycles. The defrost
feature provides the best defrosting method for frozen
foods. The Defrost Table shows the suggested defrost
cycle for various foods.
The Defrost function conveniently chimes partway
through the defrost cycle to remind you to check, turn
over, separate, or rearrange the food for best results.
1 Meat
2 Poultry
3 Fish
4 Bread
Setting the Defrost Function
Example: To defrost 1.2 pounds of meat.
Touch Defrost.
1
Touch 1 to select MEAT.
2
Set the weight : Touch 1, 2. (for 1.2 lbs)
3
Touch Start to start cooking.
4
When cooking is complete, touch Clear/Off.
5
NOTE
•The countdown appears in the display after
START is pressed. The oven chimes once,
partway through the defrost cycle.
•At the chime, open the oven door and turn the
food over. Remove any food that has thawed.
Return the still frozen items to the oven and
touch Start to complete the defrost cycle.
ENGLISH Using the Upper Oven
Press Upper Clear/Off to pause the oven. Press
2
it again to cancel cooking.
Page 11

22
OPERATION
Weight Conversion Table
Most food weights are given in pounds and ounces.
If using pounds, food weights must be entered
into Auto Defrost in pounds and tenths of pounds
(decimals).
Use the following table if necessary to convert food
weights to decimals.
Equivalent Weight
OUNCES
1.6
3.2
4.8
6.4
8.0
9.6
11.2
12.8
14.4
16.0
DECIMAL WEIGHT
.10
.20
.30
.40
.50 One-Half Pound
.60
.70
.80
.90
1.00 One Pound
Defrost Table
Category Food to be Defrosted
Meat
(dEF1)
0.1 - 6.0 lbs
Poultry
(dEF2)
0.1 - 6.0 lbs
Beef
Ground beef, round steak, stew
cubes, tenderloin steak, pot roast,
rib roast, rump roast, chuck roast,
hamburger patties
Lamb
Chops, rolled roast
Pork
Chops, hotdogs, spareribs,
country-style ribs, rolled roast,
sausage
Veal
Cutlets (1 lb, ½ inch thick)
When BEEP, turn food over.
After defrosting, let stand for 5 - 15
minutes.
Poultry
Whole, cut-up, breast (boneless).
Rinse chicken cavity with tap
water and let stand for 60 minutes
after cooking for better results.
Cornish Hens
Whole
Turkey
Breast
Fish
(dEF3)
0.1 - 4.0 lbs
Bread
(dEF4)
0.1 - 2.0 lbs
When BEEP, turn food over.
After defrosting , let stand for 60
minutes.
Fish
Fillets, whole steaks
Shellfish
Crab meat, lobster tails, shrimp,
scallops
When BEEP, turn food over.
After defrosting, let stand for 5 - 10
minutes.
Sliced bread, buns, baguettes, etc.
Separate slices and place between
paper towels or on flat plate.
When BEEP, turn food over.
After defrosting, let stand for 1 - 2
minutes.
Page 12

OPERATION
23
Defrosting Tips
•When using Defrost, the weight to be entered is
the net weight in pounds and tenths of pounds (the
weight of the food minus the container).
•Before starting, remove the metal twist-ties which
often come with frozen food bags, and replace
them with strings or elastic bands.
•Open containers such as cartons before they are
placed in the oven.
•Remove fish, shellfish, meat, and poultry from
its original wrapping paper or plastic package.
Otherwise, the wrap will hold steam and juice close
to the foods, which can cause the outer surface of
the foods to cook.
•If food is foil wrapped, remove foil and place the
food in a suitable container.
•Slit the skins, if any, of frozen food such as
sausage.
•Bend plastic pouches of food to ensure even
defrosting.
•Place foods in a shallow container or in a
microwave roasting dish to catch the drippings.
•Always underestimate defrosting time. Food
should still be somewhat icy in the center when
removed from the oven. If defrosted food is still icy
in the center, return it to the upper oven for more
defrosting.
•The length of defrosting time varies according to
how solidly the food is frozen.
•Depending on the shape of the food, some areas
may defrost more quickly than others.
•The shape of the package affects how quickly food
will defrost. Shallow packages will defrost more
quickly than a deep block.
•As food begins to defrost, separate the pieces to
defrost them more easily.
•Turn over food during defrosting or standing time.
Break apart and remove food as required.
•For best results, shape ground meat into the form
of a doughnut before freezing. When defrosting,
scrape off thawed meat when the beep sounds and
continue defrosting.
•Use small pieces of aluminum foil to shield parts
of food such as chicken wings, leg tips, fish tails,
or areas that start to get warm. Make sure the foil
does not touch the sides, top, or bottom of the
oven. The foil can damage the oven lining.
•For better results, let food stand after defrosting.
Sensor Operation
Sensor Cook reheats favorite foods without selecting
cooking times and power levels.
The oven automatically determines required cooking
time for each food item. When the internal sensor
detects a certain amount of humidity coming from
the food, it tells the oven how much longer to heat.
The display shows the remaining heating time. For
best results when sensor cooking, follow these
recommendations.
•Food cooked with the sensor system should be at
normal storage temperature.
•The glass tray and the outside of the container
should be dry to assure best cooking results.
•Foods should always be covered loosely with
microwavable plastic wrap, waxed paper, or a lid.
•Do not open the door or touch Clear/Off during the
sensing time. When sensing time is over, the oven
beeps and the remaining cooking time will appear
in the display window.
At this time you can open the door to stir, turn, or
rearrange the food.
Appropriate containers and coverings help assure
good sensor cooking results.
•Always use microwavable containers and cover
them with lids or vented plastic wrap.
•Never use tight-sealing plastic covers. They can
prevent steam from escaping and cause food to
overcook.
•Match the amount to the size of the container.
Fill containers at least half full for best results.
•Be sure the outside of the cooking container and
the inside of the upper oven are dry before placing
food in the oven. Beads of moisture turning into
steam can mislead the sensor.
Using Sensor Cook
Use Sensor Cook to heat common microwaveprepared foods without needing to program times and
power levels. Sensor Cook has preset programs for 9
food categories. See the Sensor Cook table for more
information.
Setting the Sensor Cook Function
Example: To sensor cook rice
Touch Sensor Cook.
1
ENGLISH Using the Upper Oven
Touch 7 to select RICE.
2
Touch Start.
3
•When the cook time is over a melody sounds
and END OF CYCLE displays.
Page 13

24
OPERATION
Sensor Cook Table
•The Sensor Cook function has preprogrammed settings to automatically sensor reheat certain foods.
Category Weight Cookware Food Temp. Instructions
1. Beverage 1-2 cups
(240 ml per
2. Casserole 10-20 oz Microwave-
3. Chicken 16-20 oz Microwave-
4. Pasta ½-2 cups Microwave-
5. Pizza 1-3 slices Microwave-
6. Plate of food 1 serving Microwave-
7. Rice ½-2 cups Microwave-
8. Soup 1-4 cups Microwave-
9. Vegetable 1-4 cups Microwave-
cup)
microwavesafe cup on
the glass tray
safe bowl on
the glass tray
safe bowl on
the glass tray
safe bowl on
the glass tray
safe plate on
the glass tray
safe plate on
the glass tray
safe bowl on
the glass tray
safe bowl on
the glass tray
safe bowl on
the glass tray
Mug or
Room
Refrigerated Use microwave safe bowl.
Refrigerated Use microwave safe bowl.
Refrigerated Use microwave safe bowl.
Refrigerated This is a reheat function for leftover pizza.
Refrigerated Use microwave safe plate.
Refrigerated Use microwave safe bowl.
Room Use microwave safe bowl.
Refrigerated Use microwave safe bowl.
Use microwave safe mug or cup without covering.
After cooking, stir to complete reheating.
(Be careful! The beverage will be very hot. Sometimes
liquids heated in cylindrical containers will splash out
unexpectedly when the cup is moved.)
Cover container with vented plastic wrap.
After cooking, let stand for 3 minutes.
Cover container with vented plastic wrap.
After cooking, let stand for 3 minutes.
Cover container with vented plastic wrap.
After cooking, let stand for 3 minutes.
Use microwave safe plate without covering.
Cover container with vented plastic wrap.
After cooking, let stand for 3 minutes.
Cover container with vented plastic wrap.
After cooking, let stand for 3 minutes.
Cover container with vented plastic wrap.
After cooking, let stand for 3 minutes.
Cover container with vented plastic wrap.
After cooking, let stand for 3 minutes.
Page 14
OPERATION
25
Convection Bake
During Convection Bake, a heating element is used
to raise the temperature of the air inside the oven.
Convection cooking temperature ranges from 100 °F
to 450 °F.
It is best to preheat the oven when convection cooking.
NOTE
Reduce oven temperature by 25 °F from the
temperature recommended on packaged foods.
The baking time may vary according to the food
condition or individual preference.
Setting the Convection Bake Function
Example: 45 minutes at 375°F with preheating
Touch Conv.Bake. The display flashes 350 °F.
1
Set the oven temperature: touch 3, 7 and 5.
2
Touch Start. The oven starts to preheat and
3
display shows Conv.Bake and the oven
temperature. (Do not enter the time.)
When the melody sounds, Place the food in the
4
oven.
Broil
This feature will allow you to brown and crisp food
quickly. There is no need for preheating.
Setting the Broil Function
Example: Broiling for 1 minute 30 seconds
Touch Broil.
1
Set the cook time: touch 1, 3 and 0.
2
Touch Start. The oven begins to heat.
3
Touch Clear/Off to cancel at any time or when
4
cooking is complete.
CAUTION
Always use oven gloves when removing the food
and accessories after cooking as the oven &
accessories will be very hot.
NOTE
For best results, use the rack when broiling in the
upper oven.
ENGLISH Using the Upper Oven
Set the cook time: touch 4, 5.
5
Touch Start.
6
When cooking is complete, touch Clear/Off.
7
Example: 30 minutes at 375°F without preheating
Touch Conv. Bake. The display flashes 350 °F.
1
Set the oven temperature: touch 3, 7 and 5.
2
Touch Cook Time.
3
Set the cook time: touch 3, 0.
4
Touch Start.
5
When cooking is complete, touch Clear/Off.
6
NOTE
•When the oven reaches the set preheat
temperature, a melody will sound and the
display scrolls the message PREHEAT END.
The oven automatically holds that temperature
for 30 minutes.
•The oven temperature drops very quickly when
the door is opened; however, this should not
prevent food from being fully cooked during
normal cooking time.
Rack
Page 15

26
OPERATION
Speed Cook
This feature uses power from a halogen light, heaters,
and microwaves simultaneously to allow quick
cooking.
NOTE
Power levels only can be selected from 10 to
40 %. Each power level gives you heater power
and microwave energy for a certain percentage of
the time.
CAUTION
When using Speed Cook function, remember that
the oven, door and dishes will be very hot.
Setting the Speed Convection Function
Use this mode for roast meat, roast chicken, roast
vegetables, frozen pizza, cake, pies and breads.
Example: Cooking for 1 minute 30 seconds at
40 % power and 375 °F
Touch Speed Cook.
1
Touch 1 to select SPEED CONVECTION.
2
Setting the Speed Broil Function
Use this mode for steaks, chicken fillets, fish or
seafood.
Example: Cooking for 1 minute 30 seconds at
20 % power
Touch Speed Cook.
1
Touch 2 to select SPEED BROIL.
2
Set the power level: touch 2.
3
Set the cook time : touch 1, 3 and 0.
4
Touch Start. The oven begins to heat.
5
When cooking has finished or to cancel, touch
6
Clear/Off.
Auto Cook
Use Auto Cook to heat common prepared foods
without selecting cooking times and power levels.
Auto Cook has preset programs for 28 food functions.
Set the power level: touch 4.
3
Set the oven temperature: touch 3, 7, 5 and
4
Start.
Set the cook time : touch 1, 3 and 0.
5
Touch Start. The oven begins to heat.
6
When cooking has finished or to cancel, touch
7
Clear/Off.
Setting the Auto Cook Function
Example: To auto cook 4 slices of bacon
Touch More Mode.
1
Touch 1 to select AUTO COOK.
2
Select the food item: touch 1 for BACON.
3
Touch Start to enter choice.
4
Set the weight or amount: touch 1 to select 3-4
5
slices of bacon.
Touch Start to begin cooking.
6
Page 16

OPERATION
27
Auto Cook Table
Category Weight Cookware Food Temp. Instructions
1. Bacon
(regular
sliced)
2. Bagels
(frozen)
3. Baked
potatoes
(7-9 oz/ea)
4. Brownie 8″ X 8″
5. Cod fillets
(1 lb)
6. Corn dog
(frozen)
7. Fresh
vegetable
3-4
5-6
slices
1, 2-3 bagels Metal tray Frozen Press 1 or 2 according to how many bagels need defrosting.
1, 2, 3-4
potatoes
9″ X 13″
- Metal tray Refrigerated Brush with oil and season with salt and pepper.
1-2, 3-4 Metal tray Frozen Press 1 for 1-2 corn dogs. Press 2 for 3-4 corn dogs.
4-6, 7-9,
10-12, 13-15,
16-20 oz
Microwave-
safe bacon
rack or plate
on the glass
tray.
Metal tray Room Pierce each potato several times with a fork.
Microwave-
safe bowl on
the glass tray
Microwave-
safe bowl on
the glass tray
Refrigerated Place bacon slices on a microwave rack for best results.
Use a plate lined with paper towels if rack is not available.
Press 1 for 3-4 slices. Press 2 for 5-6 slices.
Press 1 for 1 potato, 2 for 2 potatoes, and 3 for 3-4 potatoes.
Room Spray microwave-safe glass or silicone bakeware with cooking
spray.
Pour batter into bakeware, spreading it evenly.
Press 1 for an 8"x8" pan. Press 2 for a 9"x13" pan.
After cooking, Allow to rest for a few minutes.
Turn food over at the beep.
Refrigerated Add water according to the quantity.
•4-12 oz : add 2 tbsp water
•13-20 oz : add 4 tbsp water
Cover with vented plastic wrap.
After cooking, stir and let stand for 3 minutes.
ENGLISH Using the Upper Oven
8. Frozen
chicken
nuggets
9. Frozen
chicken
wings
10. Frozen fries 1-2, 3-4
11. Frozen pizza
(regular
crust)
12. Frozen soft
pretzels
13. Frozen
vegetable
14. Garlic bread
(sliced,
frozen)
1-2, 3-4
servings
(3.5 oz/100 g
per serving)
1-2, 3-4
servings
(3.5 oz/100 g
per serving)
servings
(3.5 oz/100 g
per serving)
Individual (6″)
Regular (12″)
1, 2, 3-4
pretzels
4-6, 7-9,
10-12, 13-15,
16-20 oz
1-2, 3-4, 5-6
pieces
Metal tray Frozen Press 1 for 1-2 servings. Press 2 for 3-4 servings.
Metal tray Frozen Press 1 for 1-2 servings. Press 2 for 3-4 servings
Metal tray Frozen Press 1 for 1-2 servings. Press 2 for 3-4 servings
Metal tray Frozen Press 1 for 6" pizza. Press 2 for 12" pizza.
Metal tray Frozen Press 1 for 1 pretzel, 2 for 2 pretzels, or 3 for 3-4 pretzels.
Microwave-
safe bowl on
the glass tray
Metal tray Frozen Press 1 for 1-2 pieces, 2 for 3-4 pieces, or 3 for 5-6 pieces.
Frozen Add water according to the quantity.
Turn food over at the beep.
Turn food over at the beep.
Turn food over at the beep.
•4-12 oz : add 2 tbsp water
•13-20 oz : add 4 tbsp water
Cover with vented plastic wrap.
After cooking, stir and let stand for 3minutes.
Turn food over at the beep.
Page 17

28
OPERATION
Category Weight Cookware Food Temp. Instructions
15. Hamburger
(1/2″ thick)
16. Lamb chops
(1/2″ thick,
6-7 oz)
17. Meat loaf
(9″ X 5″)
18. Nachos 1-3, 4-6
19. Oatmeal 1, 2 servings Large
2, 3-4, 5-6
patties
1, 2, 3-4
chops
- Microwave-
servings
(8 ea /
1 serving)
Metal tray Refrigerated Press 1 for 2 burgers, 2 for 3-4 burgers, or 3 for 5-6 burgers.
Metal tray Refrigerated Brush with oil and season with salt and pepper.
safe glass
or silicone
bakeware on
the glass tray
Metal tray Room Press 1 for 1-3 servings. Press 2 for 4-6 servings.
microwave-
safe bowl on
the glass tray
Turn food over at the beep.
Press 1 for 1 chop, 2 for 2 chops, or 3 for 3-4 chops.
Turn food over at the beep.
Refrigerated Ingredients
Ground meat 800 g
Egg (refrigerating temp.) 115 g
Salt 2 g
Cooking
Place meat mixture into microwave-safe 9"x5" glass or silicone
bakeware.
Room Ingredients
1 serving 2 servings
Oats ½ cup (40 g) 1 cup(80 g)
Water or Milk 1 cup (230 g) 1 ½ cups (345 g)
Salt (Optional) Dash 1/8 tsp
Cooking
Combine water or milk, salt and oats in a large microwavesafe bowl.
Cover with vented plastic wrap.
Press 1 for 1 serving. Press 2 for 2 servings.
After cooking, let stand for 3 minutes.
20. Pork chops
(1/2″ thick,
6-7 oz)
21. Quinoa 1, 2 servings Large
22. Ribeye
steak
(1″ thick,
14-15 oz)
1, 2, 3-4
chops
1, 2 steaks Metal tray Refrigerated Brush with oil and season with salt and pepper.
Metal tray Refrigerated Brush with oil and season with salt and pepper.
microwave-
safe bowl on
the glass tray
Press 1 for 1 chop, 2 for 2 chops, or 3 for 3-4 chops.
Turn food over at the beep.
Room Ingredients
1 serving 2 servings
Quinoa ½ cup (40 g) 1 cup (80 g)
Water or Milk 1 cup (230 g) 1 ½ cups (345 g)
Salt (Optional) Dash 1/8 tsp
Cooking
Combine water or milk, salt and quinoa in a large microwavesafe bowl.
Cover with vented plastic wrap.
Press 1 for 1 serving. Press 2 for 2 servings.
After cooking, let stand for 3 minutes.
Press 1 for 1 steak or 2 for 2 steaks.
Turn food over at the beep.
Page 18

OPERATION
29
Category Weight Cookware Food Temp. Instructions
23. Rice ½, 1 cup Deep and large
24. Salmon
25. Sausage 1-6 , 7-14
26. Sirloin steak
27. Tenderloin ¾ , 1 ½ lb Metal tray Refrigerated Brush with oil and season with salt and pepper.
steak
(1″ thick)
(1″ thick,
18-21 oz)
1, 2, 3-4
steaks
links
1, 2 steaks Metal tray Refrigerated Brush with oil and season with salt and pepper.
microwave-
safe bowl on
the glass tray
Metal tray Refrigerated Brush with oil and season with salt and pepper.
Metal tray Refrigerated Press 1 for 1-6 links. Press 2 for 7-14 links.
Room Ingredients
½ cup 1 cup
Rice ½ cup (96 g) 1 cup (192 g)
Water 1 cup (230 g) 2 cups (460 g)
Salt Optional
Cooking
Cover with vented plastic wrap.
Press 1 for ½ cup of dried rice or 2 for 1 cup of dried rice.
After cooking, let stand for 5-10 minutes.
Press 1 for 1 steak, 2 for 2 steaks, or 3 for 3-4 steaks.
Turn food over at the beep.
Turn food over at the beep.
Press 1 for 1 steak, 2 for 2 steaks.
Turn food over at the beep.
Press 1 for ¾ lb, 2 for 1 ½ lb.
Turn food over at the beep.
ENGLISH Using the Upper Oven
28. Vegetablecanned
4-6, 7-9,
10-12, 13-15,
16-20 oz
Microwave-
safe bowl on
the glass tray
Room Transfer canned vegetables to microwave-safe bowl.
Cover with vented plastic wrap.
Press 1 for 4-6 oz, 2 for 7-9 oz, 3 for 10-12 oz, 4 for 13-15 oz,
or 5 for 16-20 oz.
After cooking, stir and let stand for 3 minutes.
NOTE
•Do not use recycled paper products in the upper oven.
They sometimes contain impurities that cause arcing and sparking.
•NEVER use paper products in the convection oven.
Page 19

30
OPERATION
Soften
The oven uses low power to soften foods such as
butter, cream cheese, frosting, and ice cream.
See the following table.
Setting the Soften Function
Example, 1 pint of ice cream
Touch More Mode.
1
Touch 2 to select SOFTEN.
2
Set the Menu: touch 4 to select ICE CREAM and
3
touch Start.
Set the amount: touch 1 to select 1 pint.
4
Touch Start.
5
•When the cook time is over a melody sounds
and END OF CYCLE displays.
Soften Table
Category Weight Cookware Food Temp. Instructions
1. Butter ½ , 1, 2
2. Cream
cheese
3. Frosting
(16 oz)
4. Ice cream 1 pint,
sticks
3, 8 oz Microwave-
- Microwave-
1 quart
Microwave-
safe dish on
the glass tray
safe dish on
the glass tray
safe bowl on
the glass tray
Glass tray Frozen Remove lid and cover.
Refrigerated Press 1 for
Butter will be at room temperature and ready for use in a
recipe.
Refrigerated Press 1 for 3 oz. or 2 for 8 oz.
Cream cheese will be at room temperature and ready for use
in a recipe.
Refrigerated Frosting will be at room temperature and ready for use in a
recipe.
Press 1 for 1 pint or 2 for 1 quart.
Ice cream will be soft enough to make scooping easier.
1
/2 stick, 2 for 1 stick, or 3 for 2 sticks.
Page 20

OPERATION
31
Melt
The oven uses low power to melt foods such
as butter, caramel, cheese, chocolate, and
marshmallows.
See the following table.
Setting the Melt Function
Example, 8 oz of chocolate.
Touch More Mode.
1
Touch 4 to select MELT.
2
Set the Menu: touch 4 to select CHOCOLATE
3
and touch Start.
Set the amount: touch 2 to select 8 oz.
4
Touch Start.
5
•When the cook time is over a melody sounds
and END OF CYCLE displays.
Melt Table
ENGLISH Using the Upper Oven
Category Weight Cookware Food Temp. Instructions
1. Butter ½, 1, 2 sticks Microwave-
safe bowl on
the glass tray
2. Caramel 4, 8, 12 oz Microwave-
safe bowl on
the glass tray
3. Cheese 4, 8, 12 oz Microwave-
safe bowl on
the glass tray
4. Chocolate 4, 8, 12 oz Microwave-
safe bowl on
the glass tray
5. Marshmallow 5, 10 oz Microwave-
safe bowl on
the glass tray
Refrigerated Press 1 for
After cooking, stir to complete melting.
Room Press 1 for 4 oz., 2 for 8 oz., or 3 for 12 oz.
After cooking, stir to complete melting.
Refrigerated Use processed cheese food only. Cut into cubes.
Press 1 for 4 oz., 2 for 8 oz., or 3 for 12 oz.
After cooking, stir to complete melting.
Room Chocolate chips or squares of baking chocolate may be used.
Press 1 for 4 oz., 2 for 8 oz., or 3 for 12 oz.
After cooking, stir to complete melting.
Room Press 1 for 5 oz. or 2 for 10 oz.
After cooking, stir to complete melting.
1
/2 stick, 2 for 1 stick, or 3 for 2 sticks.
Page 21

32
OPERATION
Warm
The WARM function maintains an oven temperature
of less than 230°F. This function should not be used to
reheat cold food. The Warm function keeps cooked food
warm for serving up to 3 hours after cooking has finished.
After 3 hours the WARM function shuts the oven OFF
automatically.
Setting the Warm Function
Touch More Mode.
1
Touch 4 to select WARM.
2
Select the temperature level: touch 1 for low, 2
3
for medium, or 3 for high.
Touch Start.
4
Select the type: touch 1 for moist, 2 for crisp.
5
Touch Start to start warming.
6
Touch Clear/Off at any time to cancel.
7
NOTE
•Low = 140°-160°F (60°-71°C)
Medium = 160°-195°F (71°-91°C)
High = 195°-230°F (91°-110°C)
•The Warm function is intended to keep food
warm. Do not use it to cool food down.
•It is normal for the fan to operate during the
Warm function.
Proof
This feature maintains a warm oven for rising yeast
leavened products before baking.
Setting the Proof Function
Touch More Mode.
1
Touch 5 to select PROOF.
2
Touch Start to start proofing.
3
Touch Clear/Off at any time to cancel.
4
NOTE
•To avoid lowering the oven temperature and
lengthening proofing time, do not open the oven
door unnecessarily.
•Check bread products early to avoid over-proofing.
•Do not use the proofing mode for warming
food or keeping food hot. The proofing oven
temperature is not hot enough to hold foods at
safe temperatures. Use the WARM feature to
keep food warm.
•Proofing will not operate if the oven is too hot.
Allow the oven to cool before proofing.
Popcorn
Setting the Popcorn Function
Touch Popcorn.
1
Touch Start.
2
The Popcorn function starts.
Touch Clear/Off to cancel Popcorn at any time.
3
NOTE
•Only pop popcorn in a microwave-safe
container or commercial packages designed for
microwave ovens.
•Never try to pop popcorn in a paper bag that is
not microwave-approved.
•If popcorn bag size is not known, follow
manufacturers' instructions and do not use this
feature.
•Prepare only one bag at a time.
•Do not use popcorn popping devices in upper
oven with this feature.
•Do not leave oven unattended while popping
corn.
•Do not use POPCORN key pad in combination
with any other feature key pads.
•Do not attempt to reheat or cook any unpopped
kernels.
•Do not reuse bag. Overcooking can result in an
oven fire.
CAUTION
Never use a brown paper bag for popping corn.
When popping prepackaged popcorn, place the bag
carefully in the oven so it does not touch the walls as
it rotates. Fold the ends of the bag up and toward the
center of the bag as shown.
Page 22

OPERATION
33
Using the Lower Oven
Before Using the Lower Oven
NOTE
•Because the oven temperature cycles, an oven
thermometer placed in the oven cavity may not
show the same temperature that is set on the
oven.
•It is normal for the convection fan to run while
preheating during a regular bake cycle.
•The convection fan motor may run periodically
during a regular bake cycle.
•The heat turns off if the door is left open during
baking. If the door is left open for longer than
30 seconds during baking, the heat turns off.
The heat turns back on automatically once the
door is closed.
Lower Oven Light
The interior oven light automatically turns on when
the door is opened. Touch Lower Light to manually
turn the lower oven light on. The lamp of the lower
oven will turn off after 2 minutes and 30 seconds to
save power.
NOTE
The oven light cannot be turned on if the Self
Clean function is active.
Minimum & Maximum Default
Settings
All of the features listed have a minimum and a
maximum time or temperature setting that may be
entered into the control. An entry acceptance beep
sounds each time a control key is touched.
An entry error tone (two short tones) sounds if the
entry of the temperature or time is below the minimum
or above the maximum setting for the feature.
Min.
Feature
12 Hr.
Clock
24 Hr.
12 Hr. 0:01 min.
Timer
24 Hr. 0:01 min.
12 Hr. 0:01 min.
Cook Time
24 Hr. 0:01 min.
Conv. Bake
Conv. Roast
Broil
Bake
Proof 12 Hr.
Warm 3 Hr.
Self Clean 3 Hr. 5 Hr. 4 Hr.
EasyClean
®
Temp. /
Time
1:00
Hr. / min.
0:00
Hr. / min.
300 °F /
150 °C
300 °F /
150 °C
Lo
400 °F
170 °F /
80 °C
Max
Temp. /
Time
12:59
Hr. / min.
23:59
Hr. / min.
11:59
Hr. / min.
11:59
Hr. / min.
11:59
Hr. / min.
11:59
Hr. / min.
550 °F /
285 °C
550 °F /
285 °C
Hi
500 °F
550 °F /
285 °C
Default
350 °F
(*325 °F)/
12 Hr.
350 °F
(*325 °F)/
12 Hr.
Hi /
3 Hr.
350 °F /
12 Hr.
10 min.
ENGLISH Using the Lower Oven
* Using Auto Conversion
•Default cook mode times are without setting cook time.
Page 23

34
OPERATION
Using Oven Racks
The racks have a turned-up back edge that prevents
them from being pulled out of the oven cavity.
Removing Racks
Pull the rack straight out until it stops.
1
Lift up the front of the rack and pull it out.
2
Replacing Racks
Place the end of the rack on the support.
1
Tilt the front end up and push the rack in.
2
CAUTION
•Replace oven racks before turning the oven on
to prevent burns.
•Do not cover the racks with aluminum foil, or
any other material, or place anything on the
bottom of the oven. Doing so will result in poor
baking and may damage the oven bottom.
•Only arrange oven racks when the oven is cool.
Bake
Bake is used to prepare foods such as pastries,
breads and casseroles. The oven can be programmed
to bake at any temperature from 170 °F (80 °C) to
550 °F (285 °C). The default temperature is 350 °F
(175 °C).
Setting the Bake Function
Example: To bake at 375 °F
Touch Bake.
1
Set the oven temperature: touch 3, 7 and 5.
2
Touch Start. The oven starts to preheat.
3
As the oven preheats, the temperature is displayed
and rises in 5-degree increments. Once the oven
reaches the set temperature, a tone sounds and the
oven light blinks on and off.
PREHEATING
Place the food in the oven after preheating.
Preheating is necessary for better cooking results.
When cooking is complete, touch Clear/Off.
4
Remove food from the oven.
5
Changing Bake Temperature while Cooking
Example: changing from 375 °F to 425 °F
Touch Bake.
1
Set the oven temperature: touch 4, 2 and 5.
2
Touch Start.
3
NOTE
It is normal for the convection fan to operate
periodically throughout a normal bake cycle in the
lower oven. This is to ensure even baking results.
Page 24

OPERATION
35
Baking Tips
•Baking time and temperature will vary depending
on the characteristics, size, and shape of the
baking pan used.
•Check for food doneness at the minimum recipe
time.
•Use metal bakeware (with or without a nonstick
finish), heatproof glass-ceramic, ceramic or other
bakeware recommended for oven use.
•Dark metal pans or nonstick coatings will cook food
faster with more browning. Insulated bakeware will
slightly lengthen the cooking time for most foods.
NOTE
The oven bottom has a porcelain-enamel finish.
To make cleaning easier, protect the oven bottom
from excessive spillovers by placing a cookie
sheet on the rack below the rack you are cooking
on. This is particularly important when baking a
fruit pie or other foods with a high acid content.
Hot fruit fillings or other foods that are highly
acidic may cause pitting and damage to the
porcelain-enamel surface and should be wiped up
immediately.
Multi-Rack Baking
•The oven has 5 rack positions.
Baking results will be better if baking pans are
centered in the oven as much as possible. If baking
with more than one pan, place the pans so each has
at least 1" to 1
If cooking on multiple racks, place the oven racks in
positions 2 and 4 (for two racks). Place the cookware
as shown.
1
/2" of air space around it.
Multiple rack
(Position 4) (Position 2)
Single rack
(Position 3)
NOTE
•Preheating is necessary for good results
when baking cakes, cookies, pastries and
breads. After the oven has reached the desired
temperature, the preheat melody sounds once.
•The heating elements turn off immediately
when the door is opened. They will turn on
again approximately 5 seconds after the door
is closed. If the oven door is left open for more
than 30 minutes, all settings are canceled.
•Touch Lower Clear/Off to cancel Bake at any
time.
Type of Food Rack Position
Angel food cake, frozen pies 1
Bundt or pound cakes 2
Biscuits, muffins, brownies,
cookies, cupcakes, layer cakes,
pies
Casseroles 3
ENGLISH Using the Lower Oven
3
Turkey, roasts, or ham 1
5
4
3
2
1
Frozen pizza 3
Roast chicken 2
Oven Vent
•Areas near the vent may become hot during
operation and may cause burns.
•Do not block the vent opening at the bottom of the
oven.
•Avoid placing plastics near the vent as heat may
distort or melt the plastic.
•It is normal for steam to be visible when cooking
foods with high moisture.
Page 25

36
OPERATION
Convection Mode
5
4
3
2
1
The convection system uses a fan to circulate
the heat evenly within the oven. Improved heat
distribution allows for even cooking and excellent
results while cooking with single or multiple racks.
The lower oven uses convection auto conversion
to automatically subtract 25°F/14°C from the
temperature you enter. To disable convection
auto conversion, see "Setting Convection Auto
Conversion."
Setting the Convection Function
Example: To cook at 350°F (auto-converted)
Touch Conv. Bake or Conv. Roast. The display
1
flashes 350 °F.
Set the oven temperature: touch 3, 7 and 5.
2
Touch Start. The display shows Conv. Bake or
3
Conv. Roast and the oven temperature starting
at 100 °F.
As the oven preheats, the display shows increasing
temperatures in 5-degree increments. Once the oven
reaches the set adjusted temperature, a tone sounds
and the oven light flashes on and off. The display
shows the auto converted oven temperature, 350 °F,
and the fan icon.
Tips for Convection Baking
•Use Convection Bake for faster and more even
multiple-rack cooking of pastries, cookies, muffins,
biscuits, and breads of all kinds.
•Bake cookies and biscuits on pans with no sides
or very low sides to allow heated air to circulate
around the food. Food baked on pans with a dark
finish will cook faster.
•When using Convection Bake with a single rack,
place oven rack in position 3. If cooking on multiple
racks, place the oven racks in positions 2 and 4 (for
two racks).
•Multiple oven rack cooking may slightly increase
cook times for some foods.
•Cakes, cookies and muffins have better results
when using multiple racks.
The Convection Roast feature is designed to give
optimum roasting performance. Convection Roast
combines cooking with the convection fan to roast
meats and poultry. The heated air circulates around
the food from all sides, sealing in juices and flavors.
Foods are crispy brown on the outside while staying
moist on the inside. Convection roasting is especially
good for large tender cuts of meat, uncovered.
Tips for Convection Roasting
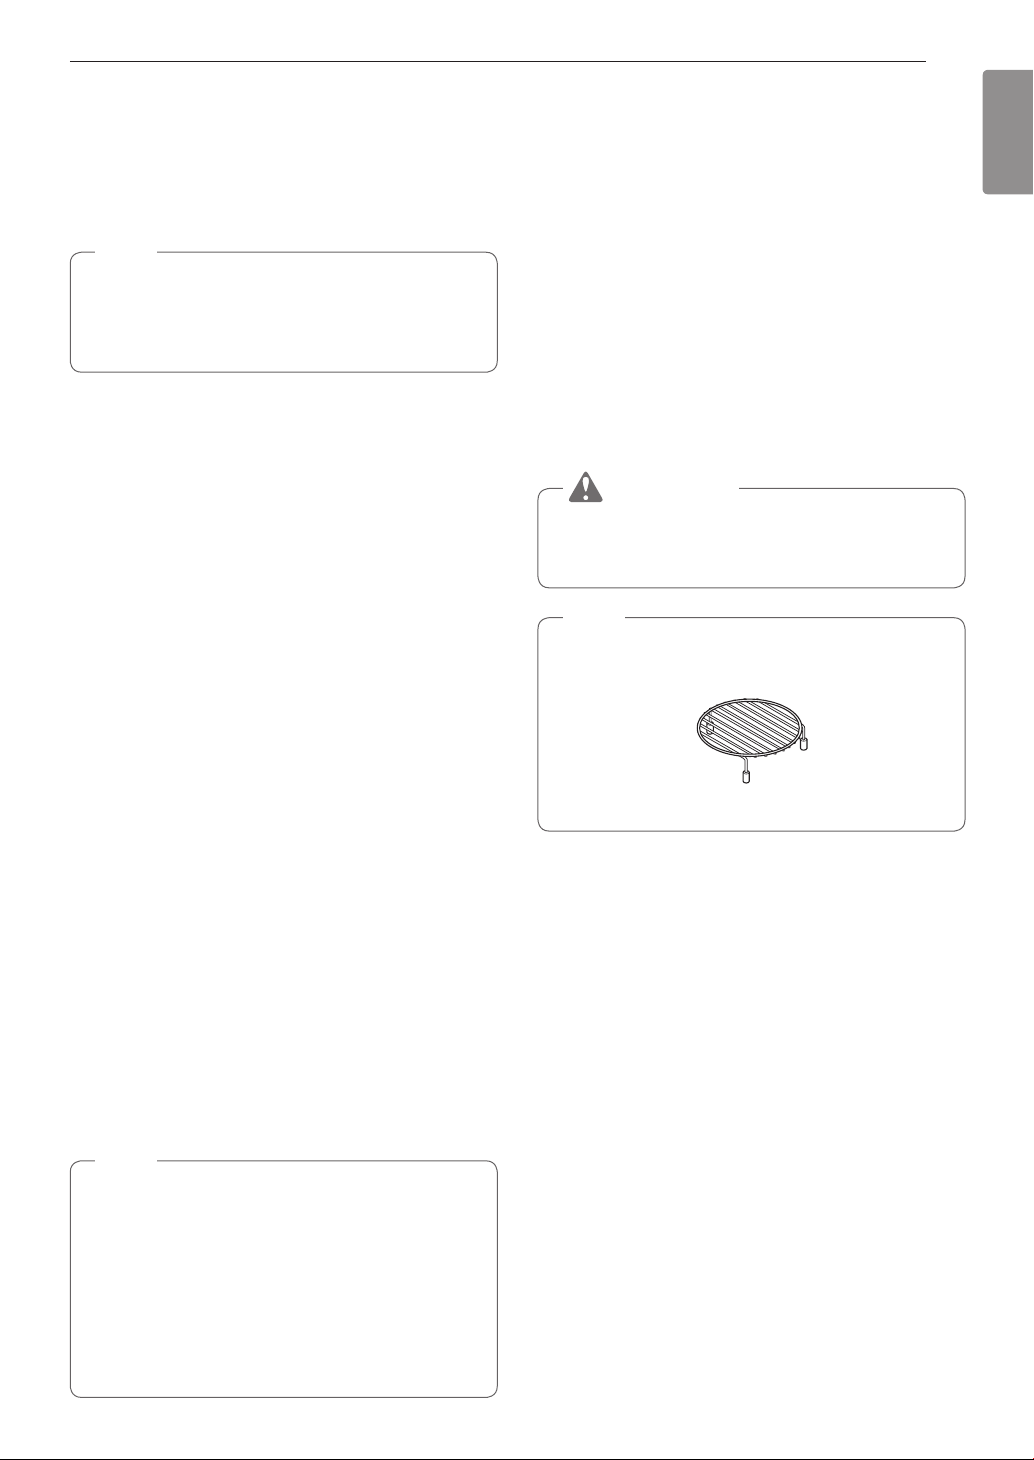
Use a broiler pan and grid when preparing meats for
convection roasting. The broiler pan catches grease
spills and the grid helps prevent grease splatters.
Place the oven rack in position 1.
1
Place the grid in the broiler pan.
2
Place the broiler pan on the oven rack.
3
When cooking has finished or to cancel, touch
4
Clear/Off.
NOTE
The oven fan runs while convection baking.
The fan stops when the door is open. In some
cases, the fan may shut off during a convection
bake cycle. It turns on again approximately 1
second after the door is closed. Touch Lower
Clear/Off to cancel Convection Bake at any time.
Grid
Broiler pan
CAUTION
•Do not use a broiler pan without a grid.
•Do not cover the grid with aluminum foil.
•Position food (fat side up) on the grid.
Page 26

OPERATION
37
Broil
Broiling uses an intense, radiant heat to cook food.
Both the inner and outer broil elements heat during
full broiling. Only the inner broil element heats during
center broiling. The element(s) cycle on and off at
intervals to maintain the oven temperature. The meat
probe cannot be used with this mode.
CAUTION
•Do not use a broiler pan without a grid. Oil can
cause a grease fire.
•Do not cover the grid and broiler pan with
aluminum foil. Doing so will cause a fire.
•Always use a broiler pan and grid for excess fat
and grease drainage. This will help to reduce
splatter, smoke, and flare-ups.
NOTE
This oven is designed for closed-door broiling.
Close the door to set the Broil function. If the door
is open, the Broil function cannot be set and door
appears on the display. Close the door and reset
the Broil function. Opening the door turns off the
broil burner during broiling. If the door is opened
during broiling, the broil burner turns off after five
seconds. The broiler turns back on automatically
once the door is closed.
Setting the Oven to Broil
Place the food on the broiler pan grid.
1
Touch Broil.
2
Touch 1 for full broiling or 2 for center broiling.
3
Touch 1 for High, 2 for Medium or 3 for Low broil.
4
Smoking
Due to the intense heat associated with broiling, it
is normal to experience smoke during the cooking
process. This smoke is a natural byproduct of
searing and should not cause you to worry. If you are
experiencing more smoke than you are comfortable
with, use the following tips to reduce the amount of
smoke in your oven.
Always use a broiler pan. Do not use saute pans
1
or regular baking sheets for safety reasons.
The broiler pan should always be thoroughly
2
cleaned and at room temperature at the
beginning of cooking.
Keep the interior of your oven as clean as
3
possible. Leftover debris from prior meals can
burn or catch fire.
Avoid fatty marinades and sugary glazes. Both
4
of these will increase the amount of smoke you
experience. If you would like to use a glaze,
apply it at the very end of cooking.
If you are experiencing significant smoke with
5
any food item, consider:
•Lowering the broiler to the Lo setting.
•Lowering the rack position to cook the food
further away from the broiler.
•Using the Hi broil setting to achieve the level of
searing you desire, and then either switching
to the Lo broil setting, or switching to the Bake
function.
As a rule, fattier cuts of meat and fish will
6
produce more smoke than leaner items.
Adhere to the recommended broil settings and
7
cooking guidelines in the chart on the following
page whenever possible.
ENGLISH Using the Lower Oven
Touch Start. The oven begins to broil.
5
Broil on one side until food is browned ; turn and
6
cook on the other side.
NOTE
Always pull the rack out to the stop position
before turning or removing food.
When broiling is finished, touch Lower Clear/
7
Off. Touch Clear/Off to cancel this function at
any time.
Page 27

38
OPERATION
Recommended Broiling Guide
The size, weight, thickness, starting temperature, and
your preference of doneness will affect broiling times.
This guide is based on meats at refrigerator
temperature. For best results when broiling, use a
pan designed for broiling.
Food
Quantity and/ or
Thickness
Ground Beef 1 lb. (4 patties)
1
/2 to 3/4" thick
Beef Steaks
Rare
Medium
1" thick
1 to 1
1
/2 lbs.
Well Done
Rare
Medium
1
1
/2" thick
2 to 2
1
/2 lbs.
Well Done
Chicken 1 whole cut up
2 to 21/2 lbs.,
split lengthwise
2 Breasts
Lobster Tails 2–4
10 to 12 oz. each
1
Fish Fillets
Ham Slices
/4 to 1/2" thick 4 or 5 5-6 3–4 Handle and turn very carefully. Brush
1
/2" thick 4 5 3–5 Increase time 5 to 10 minutes per
(precooked)
1
Pork Chops
Well Done
2 (1” thick) about 1 lb.
2 (
/2" thick)
Lamb Chops
Medium
Well Done
Medium
Well Done
2 (1" thick) about
10 to 12 oz.
1
2 (1
/2" thick)
about 1 lb.
Salmon Steaks 2 (1" thick)
4 (1" thick) about 1 lb.
Shelf
Position
First Side
Time (min.)
Second Side
Time (min.)
Comments
5 4-6 3-4 Space evenly. Up to 8 patties may
be broiled at once.
Steaks less than 1" thick cook
4
4
4
4
4
4
3
3
10
12
14
20
20
6
7
8
2–3
2–3
3–4
4–6
6–8
8–10
6–8
6–10
3 12-14 Do not turn
over.
through before browning.
Pan frying is recommended. Remove
fat.
Broil skin-side-down first.
Cut through back of shell. Spread
open.
Brush with melted butter before
broiling and after half of broiling time.
with lemon butter before and during
cooking, if desired.
1
side for 1
/2" thick or home-cured
ham.
4 or 5
4 or 5
7
9-10
6–8
7–9
Remove fat.
Remove fat.
4
4
4
4
4 or 5
4 or 5
11
13
6
8
4–6
7–9
9
9–11
8
9
3–4
4–6
Grease pan. Brush steaks with
melted butter.
•This guide is only for reference. Adjust cook time according to your preference.
NOTE
The USDA advises that consuming raw or undercooked fish, meat, or poultry can increase your risk of foodborne illness.
The USDA has indicated the following as safe minimum internal temperatures for consumption:
•Ground beef: 160 °F (71.1 °C)
•Poultry: 165 °F (73.9 °C)
•Beef, veal, pork, or lamb: 145 °F (62.8 °C)
•Fish / Seafood: 145 °F (62.8 °C)
Page 28

OPERATION
0D[
39
Tips for Broiling
Beef
•Steaks and chops should always be allowed to rest
for five minutes before being cut into and eaten.
This allows the heat to distribute evenly through the
food and creates a more tender and juicy result.
•Pieces of meat that are thicker than two inches
should be removed from the refrigerator 30 minutes
prior to cooking. This will help them cook more
quickly and evenly, and will produce less smoke
when broiling. Cooking times will likely be shorter
than the times indicated in the Broiling Chart.
•For bone-in steaks or chops that have been
frenched (all meat removed from around the bone),
wrap the exposed sections of bone in foil to reduce
burning.
Seafood
•When broiling skin-on fish, always use the Lo broil
setting and always broil the skin side last.
•Seafood is best consumed immediately after
cooking. Allowing seafood to rest after cooking can
cause the food to dry out.
•It is a good idea to rub a thin coating of oil on the
surface of the broiling pan before cooking to reduce
sticking, especially with fish and seafood. You can
also use a light coating of non-stick pan spray.
Using the Steam Feeder Tank
The steam feeder tank is located over the oven cavity.
Gently push the front of the steam feeder tank to
1
slide it out.
CAUTION
•During operation, the steam feeder tank can
become very hot to the touch.
Always use oven gloves when removing the
tank during or after cooking.
Remove the tank and place it on a flat surface.
2
Remove the tank cover or flip open the fill lid at
3
the front of the tank cover.
Fill the tank to the max line located at the front of
4
the tank. Use softened, filtered water, if possible.
Hard water may clog the steam generator more
quickly with scale buildup.
ENGLISH Using the Lower Oven
Vegetables
•Toss your vegetables lightly in oil before cooking to
improve browning.
Steam Function
The Steam mode heats food gradually, using the
oven heating elements and moist steam heat.
This is an ideal cooking method for delicate food
items such as seafood, which can lose nutrients when
boiled.
The oven provides 2 methods of steam cooking:
Steam Bake, and Steam Roast.
CAUTION
•Take care when opening the oven door during
or after steam cooking. Hot steam can cause
scalding.
MAX LINE
Assemble the cover or snap closed the fill lid.
5
Tank Cover
Fill lid
CAUTION
•Make sure the tank cover and fill lid are closed
before putting in the oven.
Carefully insert the tank into the steam feeder
6
slot, making sure to keep the tank level while
carrying it. If the tank is not kept level, water will
drain out of the tubes in the back.
Slide the tank into the slot until it clicks into
7
place.
Page 29

40
OPERATION
Setting Steam Function
Example: To steam cook at 375 °F
Touch Steam Bake or Steam Roast.
1
Touch Steam Level repeatedly until desired
2
steam level appears in the display: Low, Med, or
High.
Touch Start. The display shows 350 °F.
3
Set the oven temperature: touch 3, 7 and 5.
4
If desired, set the cook time and delayed start
time.
Touch Start. The display shows Steam Bake or
5
Steam Roast and the oven temperature starting
at 100 °F.
Once cooking is finished, allow oven to cool
6
completely, then wipe up any water left on oven
interior.
Once Steam function is started, an indicator on the
display shows the status of the steam function. Make
sure the steam feeder tank is filled with water before
starting the Steam Bake or Steam Roast function. If
the water in the tank runs out during cooking, a chime
sounds and Fill the water shows in the display. The
oven continues to cook without steam.
Warm
The WARM function maintains an oven temperature
of less than 230°F. This function should not be used
to reheat cold food. The Warm function keeps cooked
food warm for serving up to 3 hours after cooking has
finished.
After 3 hours the WARM function shuts the oven OFF
automatically.
Setting the Warm Function
Touch More Mode.
1
Touch 2 to select WARM.
2
Select the temperature level: touch 1 for high, 2
3
for medium, or 3 for low.
Touch Start to start warming.
4
Touch Clear/Off at any time to cancel.
5
NOTE
•The Warm function is intended to keep food
warm. Do not use it to cool food down.
•It is normal for the fan to operate during the
Warm function.
NOTE
•Remember to drain the steam feeder tank after
use.
•It is normal to hear the sound of boiling water
from the steam generator while running the
steam functions.
•If mineral deposits remain on the oven bottom
after steam mode, use a cloth or sponge
soaked in vinegar or a weak citric acid solution
to remove them before using the steam mode
again. See the Maintenance section under
Descaling for more info. To remove stubborn
hard water scale, use the Descaling function.
•Wipe away excess water left over after cooling.
•To avoid damage and extent product life,
descale the steam feeder after every 10 hours
of use, or more often if needed.
•After the steam mode is used for 8 hours, a
reminder to descale the product appears in
the display the next time the steam mode is
selected. You will not be able to use the steam
mode until the Descaling function is run. To
avoid this delay, run the Descaling function
after every 2-3 uses of the steam mode.
•If the descaling reminder appears, touch start
to run the Descaling function.
Page 30

OPERATION
41
Proof
This feature maintains a warm oven for rising yeast
leavened products before baking.
Setting the Proof Function
Use rack position 2 or 3 for proofing.
1
Touch More Mode.
2
Touch 3 to select PROOF.
3
Enter the proofing time, if desired, and touch
4
Start.
Touch Clear/Off at any time to cancel.
5
NOTE
•To avoid lowering the oven temperature and
lengthening proofing time, do not open the oven
door unnecessarily. Check bread products early
to avoid over proofing.
•Do not use the proofing mode for warming
food or keeping food hot. The proofing oven
temperature is not hot enough to keep foods
at safe temperatures. Use the Warm feature
to keep food warm. Proofing does not operate
when the oven is above 125 °F. OVEN IS HOT
shows in the display.
•It is normal for the fan to operate during the
Proof function.
Probe
The probe accurately measures the internal
temperature of meat, poultry and casseroles. It should
not be used during broiling, self clean, warming or
proofing. Always unplug and remove the probe from
the oven when removing food. Before using, insert
the probe into the center of the thickest part of the
meat or into the inner thigh or breast of poultry, away
from fat or bones. Place the food in the oven and
connect the probe to the jack. Keep the probe as far
away from heat sources as possible.
•The probe cannot be used in Broil, Self Clean,
Easy Clean
•For thin cuts of meat, insert probe in thickest side
of meat.
Recommended Probe Placement Chart
Category
Ground
Meat & Meat
Mixtures
Fresh Beef,
Veal, Lamb
Poultry
Pork & Ham
Leftovers &
Casseroles
Seafood
®
, Warm or Proof modes.
Examples of
Food
Meatloaf
Meatballs
Steaks, Roasts,
Chops
Whole Chicken
or Turkey
Poultry Breasts
or Roasts
Duck, Goose,
Pheasant
Stuffing (Alone
or in Bird)
Fresh Pork
Fresh Ham
(Raw)
Precooked
Ham (Reheat &
Serve)
Leftovers Insert in the
Casseroles
Whole Fish
Fish Fillet (Side
of Fish)
Fish Steaks or
Portions
Probe Placement
Insert in the
thickest part
Insert in the
thickest part, away
from bone, fat and
gristle
Insert in the
thickest part of
thigh, avoiding
bone
Insert in the
thickest part of the
dish
Insert in the
thickest part, away
from bone, fat and
gristle
thickest part of the
dish
Insert in the
thickest part of the
fish
ENGLISH Using the Lower Oven
Page 31

42
OPERATION
Using the Probe
Insert the probe into the food.
1
Connect the probe to the jack in the oven.
2
Touch an appropriate cooking mode.
3
Touch the numbers to set the oven temperature.
4
Touch Start or Probe. PRESS START OR
5
ENTER PROBE TEMP / 80F – 210F appears in
the display.
Touch numbers to set the probe temperature.
6
The default probe temperature is 150 °F (65 °C),
but can be changed to any temperature between
80 °F (27 °C) and 210 °F (100 °C)
Touch Start. The display shows the changing
7
probe temperature.
When the set probe temperature is reached, the
8
oven shuts off automatically.
Touch Clear/Off at any time to stop cooking.
9
Changing the Probe Temperature while Cooking
Touch Probe.
1
Set the probe temperature.
2
Touch Start.
3
CAUTION
•Always use an oven mitt to remove the
temperature probe. Do not touch the broil
element. Failure to obey this caution can result
in severe personal injury.
•To avoid damage to the meat probe, do not use
tongs to pull on the probe when removing it.
•Do not store the meat probe in the oven.
•To avoid breaking the probe, make sure food is
completely defrosted before inserting.
Recommended Probe Temperature Chart
Category Examples of Food
Ground Meat &
Meat Mixtures
Fresh Beef, Veal,
Lamb
Poultry
Pork & Ham
Leftovers &
Casseroles
Seafood
Meatloaf 160 °F (71 °C)
Meatballs 165 °F (74 °C)
Steaks, Roasts, Chops 145 °F (63 °C)
Whole Chicken or Turkey
Poultry Breasts or Roasts
Duck, Goose, Pheasant
Stuffing (Alone or in Bird)
Fresh Pork
Fresh Ham (Raw) Well Done: 160 °F (71 °C)
Precooked Ham (Reheat & Serve) 140 °F (60 °C)
Leftovers
Casseroles
Whole Fish
Fish Steaks or Portions Well Done: 160 °F (71 °C)
Target Internal
Temp.
165 °F (74 °C)
145 °F (63 °C)
165 °F (74 °C)
145 °F (63 °C)Fish Fillet (Side of Fish)
Desired Doneness
Rare: 130 °F (54 °C)
Medium Rare: 140 °F (60 °C)
Medium: 150 °F (66 °C)
Well Done: 160 °F (71 °C)
Well Done: 170 °F (77 °C)
Page 32

OPERATION
43
Favorite
The Favorite feature is used to record and recall favorite
recipe settings. This feature can store and recall up to
3 different settings. The Favorite feature can be used
with the Cook Time mode. It will not work with any other
function including the Start Time (delayed cook) mode.
Place the food in the oven.
1
Touch More Mode.
2
Touch 1 to select FAVORITE.
3
Touch More Mode repeatedly until desired
4
recipe appears in the display: Bread, Meat or
Chicken.
Touch the numbers to set the desired oven
5
temperature. This temperature is stored and
recalled when next used.
Touch Start. The preheat indicator beeps 3 times
6
when the oven reaches the set temperature.
Default Temp.
Category
1. Bread 375 °F BAKE
2. Meat 325 °F Convection Roast
3. Chicken 350 °F Convection Roast
NOTE
•Only the selected temperature is stored, not the
cooking time.
•If the oven temperature is changed, the
changed temperature is stored.
(may be changed
and recalled)
Operating Feature
Sabbath Mode
Sabbath mode is used on the Jewish Sabbath and
Holidays.
While the oven is in Sabbath mode, the temperature
cannot be changed and the timer, light, and alarm
functions are disabled. If the oven light is on when the
oven is put in Sabbath mode, it will remain on.
Sabbath mode is only available when upper oven
is not operating and lower oven is in Bake mode.
All function buttons, except for the CLEAR/OFF is
inactive.
Setting Sabbath Mode
Disconnect the probe. The Probe function is not
1
available in Sabbath mode.
Touch Bake and set the desired temperature
2
and cook time. Any cook time can be set from 1
minute to 73 hours 59 minutes.
Touch Start.
3
Touch and hold More Mode for three seconds.
4
SB and □ appears in the display when the
Sabbath mode is activated.
To stop Sabbath mode, touch and hold More
5
Mode for three seconds. To cancel the Bake
function, touch Clear/Off at any time.
NOTE
•If a cook time is set, the oven turns off
automatically at the end of the cook time,
without chiming. The oven remains in Sabbath
mode, but is turned off.
•If no cook time is set, the oven will not
automatically turn off.
•After a power failure, the display will turn back
on in Sabbath mode, but the oven will be off.
•During Sabbath mode, the upper oven functions
are blocked and Wi-Fi network cannot be
connected.
ENGLISH Using the Lower Oven
Page 33

44
OPERATION
Wi-Fi
Connect the appliance to a home Wi-Fi network to
use Remote Start and other smart functions. See the
Smart Functions section for more details.
Setting Up Wi-Fi
Touch and hold Remote Start key for three
1
seconds.
The Wi-Fi icon appears at the bottom of the
display.
Remote Start
If the appliance is registered on a home Wi-Fi network,
the preheating function of the oven can be started or
stopped using the LG SmartThinQ Application.
Preparing the Oven for a Remote Start
Touch Remote Start. REMOTE READY and
1
Wi-Fi icon show in the display. In this mode,
the controls for both ovens are locked.
Follow the instructions in the LG SmartThinQ
2
application for using the Remote Start function.
NOTE
•Remote Start is disconnected in the following
situations:
−Remote Start is never set up in the smart
phone app.
−The Remote Start status is “ready”.
−Remote Start experiences a problem during
operation.
•The Wi-Fi icon on the display shows the status
of the appliance's network connection. If the
Wi-Fi icon is not lit, use the smart phone app to
select the Wi-Fi network or register the product
again.
•A faulty Wi-Fi connection could delay the
Remote Start function.
•Disconnect the probe if attached.
Page 34

SMART FUNCTIONS
45
SMART FUNCTIONS
LG SmartThinQ Application
The LG SmartThinQ application allows you to
communicate with the appliance using a smartphone.
Before Using LG SmartThinQ
•For appliances with the or logo
Use a smartphone to check the strength of
1
the wireless router (Wi-Fi network) near the
appliance.
•If the distance between the appliance and the
wireless router is too far, the signal strength
becomes weak. It may take a long time to
register or installation may fail.
Turn off the Mobile data or Cellular Data on
2
your smartphone.
•For iPhones, turn data off by going to Settings
→ Cellular → Cellular Data.
NOTE
•If the appliance is having trouble connecting
to the Wi-Fi network, it may be too far from
the router. Purchase a Wi-Fi repeater (range
extender) to improve the Wi-Fi signal strength.
•The network connection may not work properly
depending on the Internet service provider.
•The Wi-Fi connection may not connect or may
be interrupted because of the home network
environment.
•If the appliance cannot be registered due to
problems with the wireless signal transmission,
unplug the appliance and wait about a minute
before trying again.
•If the firewall on your wireless router is enabled,
disable the firewall or add an exception to it.
•The wireless network name (SSID) should be a
combination of English letters and numbers. (Do
not use special characters.)
•Smartphone user interface (UI) may vary
dependingon the mobile operating system (OS)
and the manufacturer.
•If the security protocol of the router is set to
WEP, network setup may fail. Change the
security protocol (WPA2 is recommended), and
register the product again.
ENGLISH
Connect your smartphone to the wireless router.
3
NOTE
•To verify the Wi-Fi connection, check that Wi-Fi
icon on the control panel is lit.
•The appliance supports 2.4 GHz Wi-Fi networks
only. To check your network frequency, contact
your Internet service provider or refer to your
wireless router manual.
•LG SmartThinQ is not responsible for any
network connection problems or any faults,
malfunctions, or errors caused by network
connection.
•The surrounding wireless environment can
make the wireless network service run slowly.
Installing the LG SmartThinQ
Application
Search for the LG SmartThinQ application from the
Google Play Store or Apple App Store on a smart
phone. Follow instructions to download and install the
application.
Page 35

46
SMART FUNCTIONS
LG SmartThinQ Application Features
•For appliances with the or logo
EasyClean
Allows you to set EasyClean® alerts, read the
instruction guide, and simulate and compare energy
consumption when using EasyClean® versus
selfclean cycles.
Smart Diagnosis™
This function provides useful information for
diagnosing and solving issues with the appliance
based on the pattern of use.
Settings
Allows you to set various options on the oven and in
the Application.
Monitoring
This function shows the current status, remaining
time, cook settings and end time on one screen.
®
Smart Diagnosis™ Function
Should you experience any problems with the
appliance, it has the capability of transmitting data
via your telephone to the LG Customer Information
Center. NFC or Wi-Fi equipped models can also
transmit data to a smartphone using the LG
SmartThinQ application.
Smart Diagnosis™ through the
Customer Information Center
•For appliances with the or logo
This method allows you to speak directly to our
trained specialists. The specialist records the data
transmitted from the appliance and uses it to analyze
the issue, providing a fast and effective diagnosis.
Push Alerts
Turn on the Push Alerts to receive appliance status
notifications.
The notifications are triggered even if the
LG SmartThinQ application is off.
Timer
You can set the timer from the application.
Firmware Update
Keep the appliance updated.
NOTE
•If you change your wireless router, Internet
service provider, or password, delete the
registered appliance from the LG SmartThinQ
application and register it again.
•This information is current at the time of
publication. The application is subject to change
for product improvement purposes without
notice to users.
Call the LG Customer Information Center at
1
1-800-243-0000.
When instructed to do so by the call center
2
agent, hold the mouthpiece of your phone over
the Smart Diagnosis™ logo on the machine.
Hold the phone no more than one inch from (but
not touching) the machine.
NOTE
Do not touch any other buttons or icons on the
display screen.
Touch and hold the Start button for three
3
seconds.
Keep the phone in place until the tone
4
transmission has finished. This takes about 6
seconds and the display will count down the
time.
Once the countdown is over and the tones have
5
stopped, resume your conversation with the call
center agent, who will then be able to assist you
in using the information transmitted for analysis.
NOTE
•For best results, do not move the phone while
the tones are being transmitted.
•If the call center agent is not able to get an
accurate recording of the data, you may be
asked to try again.
Page 36

SMART FUNCTIONS
47
LG SmartThinQ Smart Diagnosis™
•For appliances with the or logo
Use the Smart Diagnosis feature in the LG
SmartThinQ application for help diagnosing issues
with the appliance without the assistance of the LG
Customer Information Center.
Follow the instructions in the LG SmartThinQ
application to perform a Smart Diagnosis using your
smartphone.
Open the LG SmartThinQ application on the
1
smart phone.
In the application, select the appliance from your
2
list of connected appliances and then touch the
dots at the upper right of the screen.
Select Smart Diagnosis, then touch the Start
3
Smart Diagnosis button.
NOTE
If the diagnosis fails several times, use the
following instructions.
Select the Audible Diagnosis.
4
Open Source Software Notice
Information
To obtain the source code under GPL, LGPL, MPL,
and other open source licenses, that is contained in
this product, please visit http://opensource.lge.com.
In addition to the source code, all referred license
terms, warranty disclaimers and copyright notices are
available for download.
LG Electronics will also provide open source code
to you on CD-ROM for a charge covering the cost
of performing such distribution (such as the cost of
media, shipping, and handling) upon email request
to opensource@lge.com. This offer is valid for a
period of three years after our last shipment of this
product. This offer is valid to anyone in receipt of this
information.
Wireless module (LCW-004) Specifications
Frequency Range 2412~2462 MHz
IEEE 802.11 b : 22.44 dBm
Output Power (max.)
IEEE 802.11 g : 24.68 dBm
IEEE 802.11 n : 24.11 dBm
ENGLISH
Follow the instructions on the smart phone.
5
Keep the phone in place until the tone
6
transmission has finished. View the diagnosis on
the phone.
NOTE
•Smart Diagnosis™ cannot be activated unless
the appliance can be turned on using the
Power button. If the appliance cannot be turned
on, troubleshooting must be done without using
Smart Diagnosis™.
•The Smart Diagnosis™ function depends on
the local call quality.
•A landline phone may result in clearer
transmission and more accurate diagnosis.
•If the Smart Diagnosis™ data transfer is poor
due to poor call quality, you may not receive an
accurate Smart Diagnosis result.
Page 37

48
SMART FUNCTIONS
FCC Notice
(For transmitter module
contained in this product)
The following notice covers the transmitter module
contained in this product.
This equipment has been tested and found to comply
with the limits for a Class B digital device, pursuant
to Part 15 of the FCC Rules and also Part 18 of the
FCC Rules. These limits are designed to provide
reasonable protection against harmful interference in
a residential installation. This equipment generates,
uses, and can radiate radio frequency energy and,
if not installed and used in accordance with the
instructions, may cause harmful interference to radio
communications. However, there is no guarantee that
interference will not occur in a particular installation.
If this equipment does cause harmful interference to
radio or television reception, which can be determined
by turning the equipment off and on, the user is
encouraged to try to correct the interference by one
or more of the following measures:
•Reorient or relocate the receiving antenna.
•Increase the separation between the equipment
and the receiver.
•Connect the equipment to an outlet on a circuit
different from that to which the receiver is
connected.
•Consult the dealer or an experienced radio/TV
technician for help.
This device complies with Part 15, Part 18 of the
FCC Rules. Operation is subject to the following two
conditions:
1) this device may not cause harmful interference
and
2) this device must accept any interference received,
including interference that may cause undesired
operation of the device.
Any changes or modifications in construction of this
device which are not expressly approved by the party
responsible for compliance could void the user’s
authority to operate the equipment.
FCC RF Radiation Exposure
Statement
This equipment complies with FCC radiation exposure
limits set forth for an uncontrolled environment. This
transmitter must not be co-located or operating in
conjunction with any other antenna or transmitter.
This equipment should be installed and operated with
a minimum distance of 20 cm (7.8 inches) between
the antenna and your body. Users must follow the
specific operating instructions for satisfying RF
exposure compliance.
Page 38

MAINTENANCE
49
MAINTENANCE
Caring for the Upper Oven
To make sure the microwave oven looks good and
works well for a long time, maintain it properly. For
proper care, follow these instructions carefully.
Cleaning the Interior
Wash often with warm, sudsy water and a sponge or
soft cloth. Use only mild, nonabrasive soaps or a mild
detergent. Keep the areas clean where the door
and oven frame touch when closed.
Wipe well with a clean cloth. Over time, stains can
occur on the surfaces as the result of food particles
spattering during cooking. This is normal.
Cleaning the Exterior
Use a soft cloth sprayed with glass cleaner.
Apply the glass cleaner to the soft cloth; do not spray
directly on the oven.
NOTE
Abrasive cleansers, steel wool pads, gritty
wash cloths, some paper towels, etc., can
damage the control panel and the interior and
exterior oven surfaces.
To clean the glass tray and rotating ring, wash in
mild, sudsy water.
For heavily soiled areas use a mild cleanser and
scouring sponge.
The glass tray and rotating ring are dishwasher safe.
Glass Tray
Rotating Ring
Shaft
ENGLISH
For stubborn soil, boil a cup of water in the oven for 2
to 3 minutes. Steam will soften the soil. To get rid of
odors inside the oven, boil a cup of water with some
lemon juice or vinegar in it.
Page 39

50
MAINTENANCE
Caring for the Lower Oven
EasyClean
LG’s EasyClean® enamel technology provides two
cleaning options for the inside of the lower oven. The
EasyClean
enamel to help lift soils without harsh chemicals, and
it runs using ONLY WATER for just 10 minutes in low
temperatures to help loosen LIGHT soils before handcleaning.
While EasyClean
and LIGHT soils, the Self Clean feature can be
used to remove HEAVY, built up soils. The intensity
and high heat of the Self Clean cycle may result in
smoke which will require the opening up of windows
to provide ventilation. Compared to the more intense
Self Clean process, your LG oven gives you the
option of cleaning with LESS HEAT, LESS TIME, and
virtually NO SMOKE OR FUMES.
When needed, the oven still provides the Self Clean
option for longer, more thorough oven cleaning for
heavier, built up soils.
When to Use EasyClean
®
®
feature takes advantage of LG’s new
®
is quick and effective for small
®
Benefits of EasyClean
•Helps loosen light soils before hand-cleaning
•EasyClean
•Makes for a better self-clean experience
- Delays the need for a self-clean cycle
- Minimizes smoke and odors
- Can allow shorter self-clean time
®
only uses water; no chemical cleaners
®
Suggested
Cleaning Method
EasyClean
Self Clean*
* The Self Clean cycle can be used for soil that has been built up over time.
®
Example of Oven Soiling Soil Pattern
Small drops or
spots
Light splatter Fat/grease
Medium to
heavy splatter
Drops or spots
Types of
ingredients
Fat/grease
Filling or
sugar based
Cream or
Soils
Cheese
or other
soils
tomato
sauce
Common Food Items
That Can Soil Your Oven
Pizza
Steaks, broiled
Fish, broiled
Meat roasted at low
temperatures
Meat roasted at high
temperatures
Pies
Casseroles
Page 40

MAINTENANCE
51
Cleaning Tips
•Allow the oven to cool to room temperature before
using the EasyClean® cycle. If your oven cavity is
above 150 °F (65 °C), OVEN IS HOT will appear in
the display, and the EasyClean® cycle will not be
activated until the oven cavity cools down.
•A plastic spatula can be used as a scraper to
scrape off any chunks or debris before and during
oven cleaning.
•Using the rough side of a non-scratch scouring pad
may help to take off burnt-on stains better than a
soft sponge or towel.
•Certain non-scratch scrubbing sponges, such as
those made of melamine foam, available at your
local stores, can also help improve cleaning.
•The Oven must be level to ensure that the lower
surface of the oven cavity is completely covered
with water at the beginning of the EasyClean
cycle.
•For best results, use distilled or filtered water. Tap
water may leave mineral deposits on the oven
bottom.
•Soil baked on through several cooking cycles will
be more difficult to remove with the EasyClean
cycle.
•Do not open the oven door during the EasyClean
cycle. Water will not get hot enough if the door is
opened during the cycle.
•For hard to reach areas such as the back surface
of the oven, it is better to use the Self Clean cycle.
®
®
EasyClean® Instruction Guide
Remove oven racks and accessories from the
1
oven.
Scrape off and remove any burnt-on debris with
2
a plastic scraper.
Suggested plastic scrapers:
•Hard plastic spatula
•Plastic pan scraper
•Plastic paint scraper
•Old credit card
Fill the steam feeder tank with water to the
3
maximum fill line (34 oz/1000 cc).
Close the oven door.
4
Touch EasyClean®.
Touch Start.
ENGLISH
CAUTION
•Some surfaces may be hot after the
EasyClean® cycle. Wear rubber gloves while
®
cleaning to prevent burns.
•During the EasyClean
becomes hot enough to cause burns.
After the cycle ends, open the oven door and
wait a minute to let the steam run out before
wiping the inside surface of the oven. Failure to
do so may result in burns.
•Avoid leaning or resting on the oven door glass
while cleaning the oven cavity.
®
cycle, the oven
A tone will sound at the end of the 10 minute
5
cycle. Touch Clear/Off to clear the display and
end the tone.
After the cleaning cycle and during hand-
6
cleaning, enough water should remain on the
oven bottom to completely submerge all soils.
Add water if necessary. Place a towel on the
floor in front of the oven to capture any water
that may spill out during hand-cleaning.
Clean the oven cavity immediately after the
7
EasyClean® cycle by scrubbing with a wet,
non-scratch scouring sponge or pad. (The
scouring side will not scratch the finish.) Some
water may spill into the bottom vents while
cleaning, but it will be captured
in a pan under the oven cavity
and will not hurt the burner.
NOTE
Do not use any steel scouring pads, abrasive
pads or cleaners as these materials can
permanently damage the oven surface.
Page 41

52
MAINTENANCE
Once the oven cavity is cleaned, wipe any
8
excess water with a clean dry towel. Replace
racks and any other accessories.
If some light soils remain, repeat the above
9
steps, making sure to thoroughly soak the soiled
areas.
If stubborn soils remain after multiple
EasyClean
sure that the oven cavity is empty of oven racks
and other accessories, and that the oven cavity
surface is dry before running the Self Clean
cycle. Consult the Self Clean section of your
owner’s manual for further details.
NOTE
•The cavity gasket may be wet when the
EasyClean
not clean the gasket.
•If mineral deposits remain on the oven bottom
after cleaning, use a cloth or sponge soaked in
vinegar to remove them.
•It is normal for the fan to operate during the
EasyClean
•It is normal to hear the sound of boiling water
from the steam generator while running the
EasyClean
®
cycles, run the Self Clean cycle. Be
®
cycle finishes. This is normal. Do
®
cycle.
®
cycle.
Cleaning Scale on Oven Bottom
To remove mineral deposits that remain on the oven
bottom after using the steam mode, use a cloth
or sponge soaked in vinegar or a weak citric acid
solution. For more stubborn or extensive scaling, use
the Descaling function.
Descaling
Use this function to remove the white deposits that
form after the steam generator is used for a long
period.
The Descaling function runs for 65 minutes. Water
will come out of the steam generator while it is being
cleaned.
For instructions on removing and filling the steam
feeder tank, see "Using the Steam Feeder Tank."
Using Descaling
Fill the steam feeder tank with a 20:1 mixture of
1
water and citric acid. For example, use 4 tsp of
citric acid in 41/4 cups water (20 g citric acid in
1000 ml water).
Insert the steam feeder tank into the slot over
2
the oven cavity and push it in until it clicks into
place.
Steam Feeder Tank
The steam feeder tank is used during the steam
cooking functions. Use filtered, softened water if
possible.
NOTE
•After using the steam function, the steam feeder
tank should be drained. To avoid bacteria or
odors, clean and dry the steam feeder tank
after every use.
•Do not clean in a dishwasher.
Hard Water Scale
If hard water is used in the steam feeder tank,
the steam generator may become clogged with
hard water scale. In areas with hard water, run the
Descaling function frequently or use softened water.
Touch More Mode.
3
Touch 4 to select DESCALING.
4
After a few minutes of descaling, Insert the
5
water tank will appear in the display. Following
the instructions, drain the tank and fill it with
clean water.
Insert the tank and start the Rinsing function.
6
Once the Rinsing function is complete, dry the
7
inside of the oven with a soft cloth.
NOTE
The Rinsing function must be completed even if
the Descaling function is canceled.
Page 42

MAINTENANCE
53
Drying
The Drying function removes residual water inside
the steam generator. The function takes a little over
1 minute and runs automatically after any steam
cooking cycle. The Drying function can also be
started manually, if needed.
Using Drying
Check whether there is water in the steam
1
feeder tank. The remaining water in the tank
must be drained.
Touch More Mode.
2
Touch 5 to select DRYING.
3
Touch Start to begin Drying. The remaining time
4
appears in the display.
Self Clean
The Self Clean cycle uses extremely hot temperatures
to clean the oven cavity. While running the Self Clean
cycle, you may notice smoking or an odor. This is
normal; especially if the oven is heavily soiled.
During Self Clean, the kitchen should be well
ventilated to minimize the odors from cleaning.
Before Starting Self Clean
•Remove the oven racks, broiler pan, broiler grid, all
cookware, aluminum foil or any other material from
the oven.
•The kitchen should be well ventilated to minimize
the odors from cleaning.
•Wipe any heavy spillovers on the bottom of the
oven.
•Make sure that the oven light bulb cover is in place
and the oven light is off.
•The oven light cannot be turned on during a Self
Clean cycle. The oven light cannot be turned on
until the oven temperature has cooled below
500 ˚F (260 ˚C) after a Self Clean cycle is complete.
CAUTION
ENGLISH
•Do not leave small children unattended near
the appliance. During the Self Clean cycle, the
outside of the oven can become very hot to the
touch.
•If you have pet birds, move them to another
well-ventilated room. The health of some birds
is extremely sensitive to the fumes given off
during the Self Clean cycle of any oven.
•Do not line the oven walls, racks, bottom or
any other part of the oven with aluminum foil or
any other material. Doing so will destroy heat
distribution, produce poor baking results and
cause permanent damage to the oven interior
(aluminum foil will melt to the interior surface of
the oven).
•Do not force the door open. This can damage
the automatic door locking system. Use care
when opening the oven door after the Self
Clean cycle. Stand to the side of the oven when
opening the door to allow hot air or steam to
escape. The oven may still be VERY HOT.
NOTE
•Remove oven racks and accessories before
starting the Self Clean cycle.
•If oven racks are left in the oven cavity during
the Self Clean cycle, they will discolor and
become difficult to slide in and out.
•Clean the frame of the oven and door with hot
soapy water. Rinse well.
•Do not clean the gasket. The fiberglass material
of the oven door gasket cannot withstand
abrasion. It is essential for the gasket to remain
intact. If you notice it becoming worn or frayed,
replace it.
•Wipe up any heavy spillovers on the oven
bottom.
•Make sure that the oven light bulb cover is in
place and the oven light is off.
•It is normal for the fan to operate during the Self
Clean cycle.
Page 43

54
MAINTENANCE
Setting Self Clean
The Self Clean function has cycle times of 3, 4, or 5
hours.
Self Clean Soil Guide
Soil Level Cycle Setting
Lightly Soiled Oven Cavity 3-Hour Self Clean
Moderately Soiled Oven Cavity 4-Hour Self Clean
Heavily Soiled Oven Cavity 5-Hour Self Clean
Remove all racks and accessories from the oven.
1
Touch Self Clean. The oven defaults to the
2
recommended four-hour self clean for a
moderately soiled oven. Touch twice for a fivehour self clean or three times for a three-hour
self clean.
Touch Start.
3
Once the self-clean cycle is set, the oven door
4
locks automatically and the lock icon displays.
You will not be able to open the oven door
until the oven has cooled. The lock releases
automatically when the oven has cooled.
CAUTION
Do not force the oven door open when the lock
icon is displayed. The oven door remains locked
until the oven temperature has cooled. Forcing
the door open will damage the door.
Setting Self Clean with a Delayed Start
Remove all racks and accessories from the
1
oven.
Touch Self Clean. The oven defaults to the
2
recommended four-hour self clean for a
moderately soiled oven. Touch twice for a
five-hour self clean or three times for a
three-hour self clean.
Touch Start Time.
3
Use the number keys to enter the time of day
4
you would like the Self Clean to start.
Touch Start.
5
During Self Clean
•The Self Clean cycle uses extremely hot
temperatures to clean the oven cavity. While
running the Self Clean cycle, you may notice
smoking or an odor. This is normal, especially if the
oven is heavily soiled.
•As the oven heats, you may hear sounds of metal
parts expanding and contracting. This is normal
and will not damage the oven.
•Do not force the oven door open when the lock
is displayed. The oven door remains locked until
the oven temperature has cooled. Forcing the door
open will damage the door.
•Do not remove the steam feeder tank from the oven
during the self-clean cycle. Doing so, could result in
product damage.
After the Self Clean Cycle
•The oven door remains locked until the oven
temperature has cooled.
•You may notice some white ash in the oven. Wipe
it off with a damp cloth or a soap-filled pad after the
oven cools. If the oven is not clean after one selfclean cycle, repeat the cycle.
•If oven racks were left in the oven and do not slide
smoothly after a self-clean cycle, wipe racks and
rack supports with a small amount of vegetable oil
to make them glide more easily.
•Fine lines may appear in the porcelain because it
went through heating and cooling. This is normal
and will not affect performance.
NOTE
•The Self Clean cycle cannot be started if the
Lockout feature is active.
•Once the Self Clean cycle is set, the oven door
locks automatically. You will not be able to open
the oven door until the oven is cooled. The lock
releases automatically.
•Once the door has been locked, the lock
indicator light stops flashing and remains on.
Allow about 15 seconds for the oven door lock
to activate.
•If the clock is set for a 12-hour display (default)
the Delayed Self Clean can never be set to
start more than 12 hours in advance.
•After the oven is turned off, the convection
fan keeps operating until the oven has cooled
down.
NOTE
It may become necessary to cancel or interrupt a
Self Clean cycle due to excessive smoke or fire in
the oven. To cancel the Self Clean function, touch
Clear/Off.
Page 44

MAINTENANCE
55
Changing the Oven Light
The oven light is a standard 50-watt appliance bulb. It
turns on when the oven door is open. When the oven
door is closed, touch Light to turn it on or off.
Replacing Lamp on Side Wall
Unplug oven or disconnect power.
1
Remove oven racks.
2
Slide a flat blade screwdriver between the
3
housing and the glass light cover.
Support the glass light cover with two fingers to
4
prevent the cover from falling to the bottom of
the oven.
Glass Light Cover
Flat blade screwdriver
Gently twist the screwdriver blade to loosen the
5
glass light cover.
Housing
Cleaning the Exterior
Painted and Decorative Trim
For general cleaning, use a cloth with hot soapy
water. For more difficult soils and built-up grease,
apply a liquid detergent directly onto the soil. Leave it
on for 30 to 60 minutes. Rinse with a damp cloth and
dry. Do not use abrasive cleaners.
Stainless Steel Surfaces
To avoid scratches, do not use steel wool pads.
Place a small amount of stainless steel
1
appliance cleaner or polish on a damp cloth or
paper towel.
Clean a small area, rubbing with the grain of the
2
stainless steel if applicable.
Dry and buff with a clean, dry paper towel or soft
3
cloth.
Repeat as necessary.
4
NOTE
•Do not use a steel wool pad. it will scratch the
surface.
•To clean the stainless steel surface, use warm
sudsy water or a stainless steel cleaner or
polish.
•Always wipe in the direction of the metal
surface finish.
•To purchase stainless steel appliance cleaner
or polish, or to locate a dealer near you, call our
toll-free customer service number:
1-800-243-0000 (USA),
or visit our website at: www.lg.com
ENGLISH
Remove bulb from socket.
6
Replace bulb, replace light cover by snapping
7
back into place.
Plug in oven or reconnect power.
8
WARNING
•Make sure that the oven and bulb are cool.
•Disconnect the electrical power to the oven at
the main fuse or circuit breaker panel. Failure
to do so can result in severe personal injury,
death, or electrical shock.
•Wear gloves while changing the oven light.
Glass fragments from broken bulbs can cause
risk of injury.
Page 45

56
MAINTENANCE
Oven Door
•Use soapy water to thoroughly clean the oven door.
Rinse well. Do not immerse the door in water.
•You may use a glass cleaner on the outside glass
of the oven door. Do not spray water or glass
cleaner on the door vents.
•Do not use oven cleaners, cleaning powders, or
harsh abrasive cleaning materials on the outside of
the oven door.
•Do not clean the oven door gasket. The oven door
gasket is made of a woven material that is essential
for a good seal. Care should be taken not to rub,
damage, or remove this gasket.
CAUTION
Do not use harsh cleaners or harsh abrasive
cleaning materials on the outside of the oven
door. Doing so can cause damage.
Don’t hand
clean oven
door gasket
Remove
any debris
from door
Broiler Pan and Grid
•Do not store a soiled broiler pan or grid anywhere
in the oven.
•Do not clean the broiler pan or grid in a selfcleaning mode.
•Remove the grid from the pan. Carefully pour out
the grease from the pan into a proper container.
•Wash and rinse the broiler pan and grid in hot water
with a soap-filled or plastic scouring pad.
•If food has burned on, sprinkle the grid with cleaner
while hot and cover with wet paper towels or a
dishcloth. Soaking the pan will remove burned-on
foods.
•Both the broiler pan and grid may be cleaned with a
commercial oven cleaner or in the dishwasher.
Oven Racks
Remove the oven racks before operating the self
clean cycle.
Food spilled into the tracks could cause the
1
racks to become stuck. Clean racks with a mild,
abrasive cleaner.
Rinse with clean water and dry.
2
NOTE
If the racks are cleaned using the self clean cycle
(not recommended), the color will turn slightly
blue and the finish will become dull. After the self
clean cycle is complete, and the oven has cooled,
rub the sides of the racks with wax paper or a
cloth containing a small amount of vegetable oil.
This will make the racks glide more easily into the
rack tracks.
Page 46

MAINTENANCE
57
Removing and Replacing the Lift-Off
Oven Doors
CAUTION
•Be careful when removing and lifting the door.
•Do not lift the door by the handle. The door is
very heavy.
Removing the Door
Open the door fully.
1
Pull the hinge locks down toward the door frame
2
to the unlocked position.
Slot
Hinge
lock
Hinge
arm
Hinge lock open
Firmly grasp both sides of the door at the top.
3
Close door to the door removal position, which is
4
approximately 5 degrees.
Lock
Unlock
about 5°
Replacing the Door
Firmly grasp both sides of the door at the top.
1
With the door at the same angle as the removal
2
position, seat the indentation of the hinge arm
into the bottom edge of the hinge slot. The notch
in the hinge arm must be fully seated into the
bottom of the slot.
Hinge arm
Bottom
edge of slot
Indentation
Open the door fully. If the door will not open fully,
3
the indentation is not seated correctly in the
bottom edge of the slot.
Push the hinge locks up against the front frame
4
of the oven cavity to the locked position.
Hinge lock
Hinge arm
ENGLISH
Lift door up and out until the hinge arm is clear
5
of the slot.
Hinge locked
Close the oven door.
5
Door Care Instructions
Most oven doors contain glass that can break.
CAUTION
•Do not close the oven door until all the oven
racks are fully in place.
•Do not hit the glass with pots, pans, or any
other object.
•Scratching, hitting, jarring, or stressing the
glass may weaken its structure causing an
increased risk of breakage at a later time.
 Loading...