

LG LW1010CR Owner’s Manual
Window-TypeAir
'S
MODEL& MODELOS: LWHDIOOOCR
www lgappliances.com
_s valuable
proper air
_pmper use.
order to p_vent
isuse or improper
for any damages
tioner.
may

FOR YOUR RECORDS
Write the model and serial numbers here:
Mode| #
_rial #
You can fi_:t them on a _abe] on the side ol eaoh [Jn_.
D_er's Nlame
D_e Purchased
I Staple your receipt to this page in the event you _c_! it
to prove date of purchase or for warranty iSSL_o
,o
READ THIS MANUAL
Inside you will find many helpful hints on h_to use and
maintain your air conditio,ne{ prosily. Just: a Ilittle pre_®n_ve
care on _ur _[t can _ve y_J a great deal of time and
meney over '[he life of your air condi_onero
You'lll find many answers to, common pro,b_ems in the ce_rt
of troub_ho_ing tips if you review our ch_t of
Troebleshooting Tips firsL you may not _ to carl for
servbe at all
• Contact the authorized service t_hnician for repair
or maintenance of this unit.
• Con_ct 'the install_ for installation ,0f !his unff,
• The air conditioner is not inlend_d for u_ by young
children or invalids without supervlsion
• Youn,g chi|dren sh,ou|d be. su_rvis_ to ensure that
th,_ do not play wffh the air conditioner,
• When the power cord _s to be replaced, replacement
work shah be porfotmed by authoriz_ per_nnel only
using only genuine replacement parts.
• Installation work must be performed in _r_n_
w|th the N_ional E|e_ric Code Iby q_|i[fie_ and
authot_zedl personne| on|y_
2 Room Air Conditioner
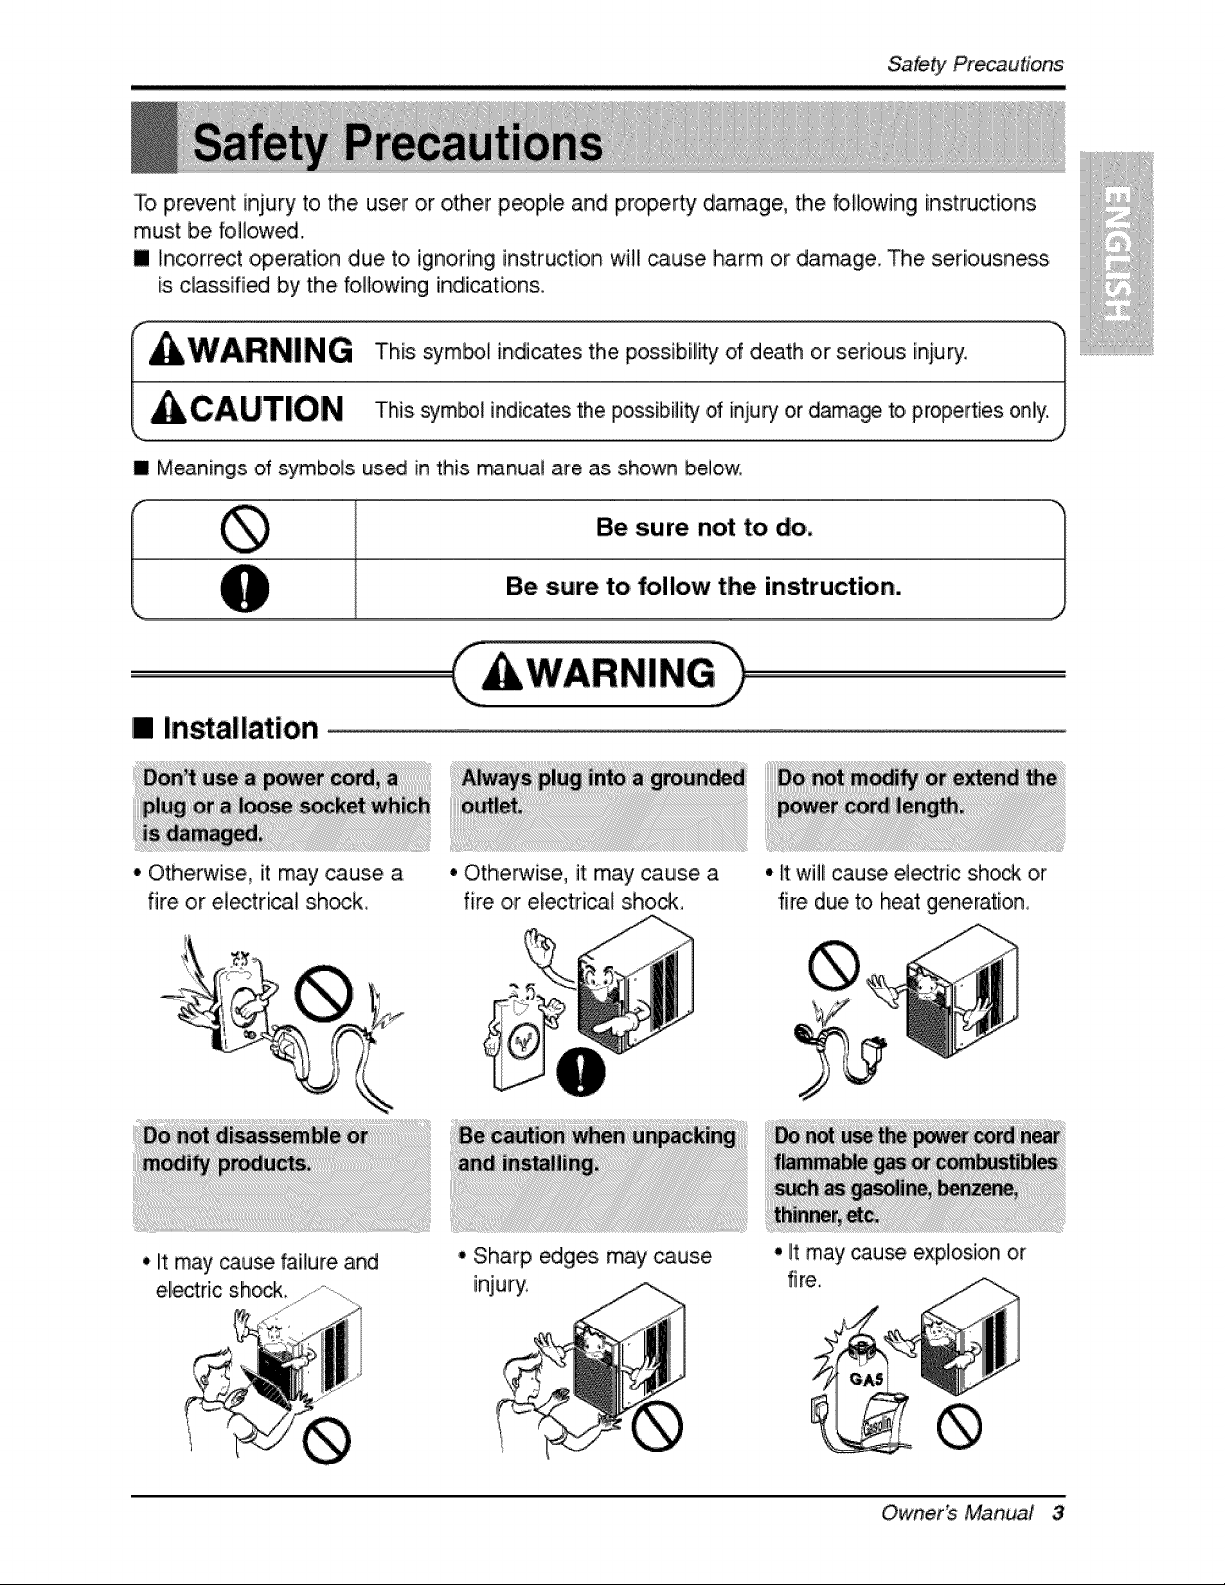
To prevent iniury to the user or other p_p, le and property damage, the bllowing instructions
must be foil,owed.
[] incorrect operation due to ignoring instruction will ,_use harm or damage. The seriousness
is cliassifi_ by the folloiwing indications.
B Meanings of symbols us,_ in this manua_ are as shown below,
I Be sure not to do. 1Be sure to follow the instruction.
[] Installation
° Otherwise, iitmay cause a
fire or electrical shock.
• It may cause failure and
electric sh_k.
° O,therwiise, it may cause a
fire or electrical sho_,
i' Sharp _ges may cause
injury.
° It will cause e_ectdc shock or
fire due to heat generation,
° It may _use explosion or
fire.
Owner_ Manual 3
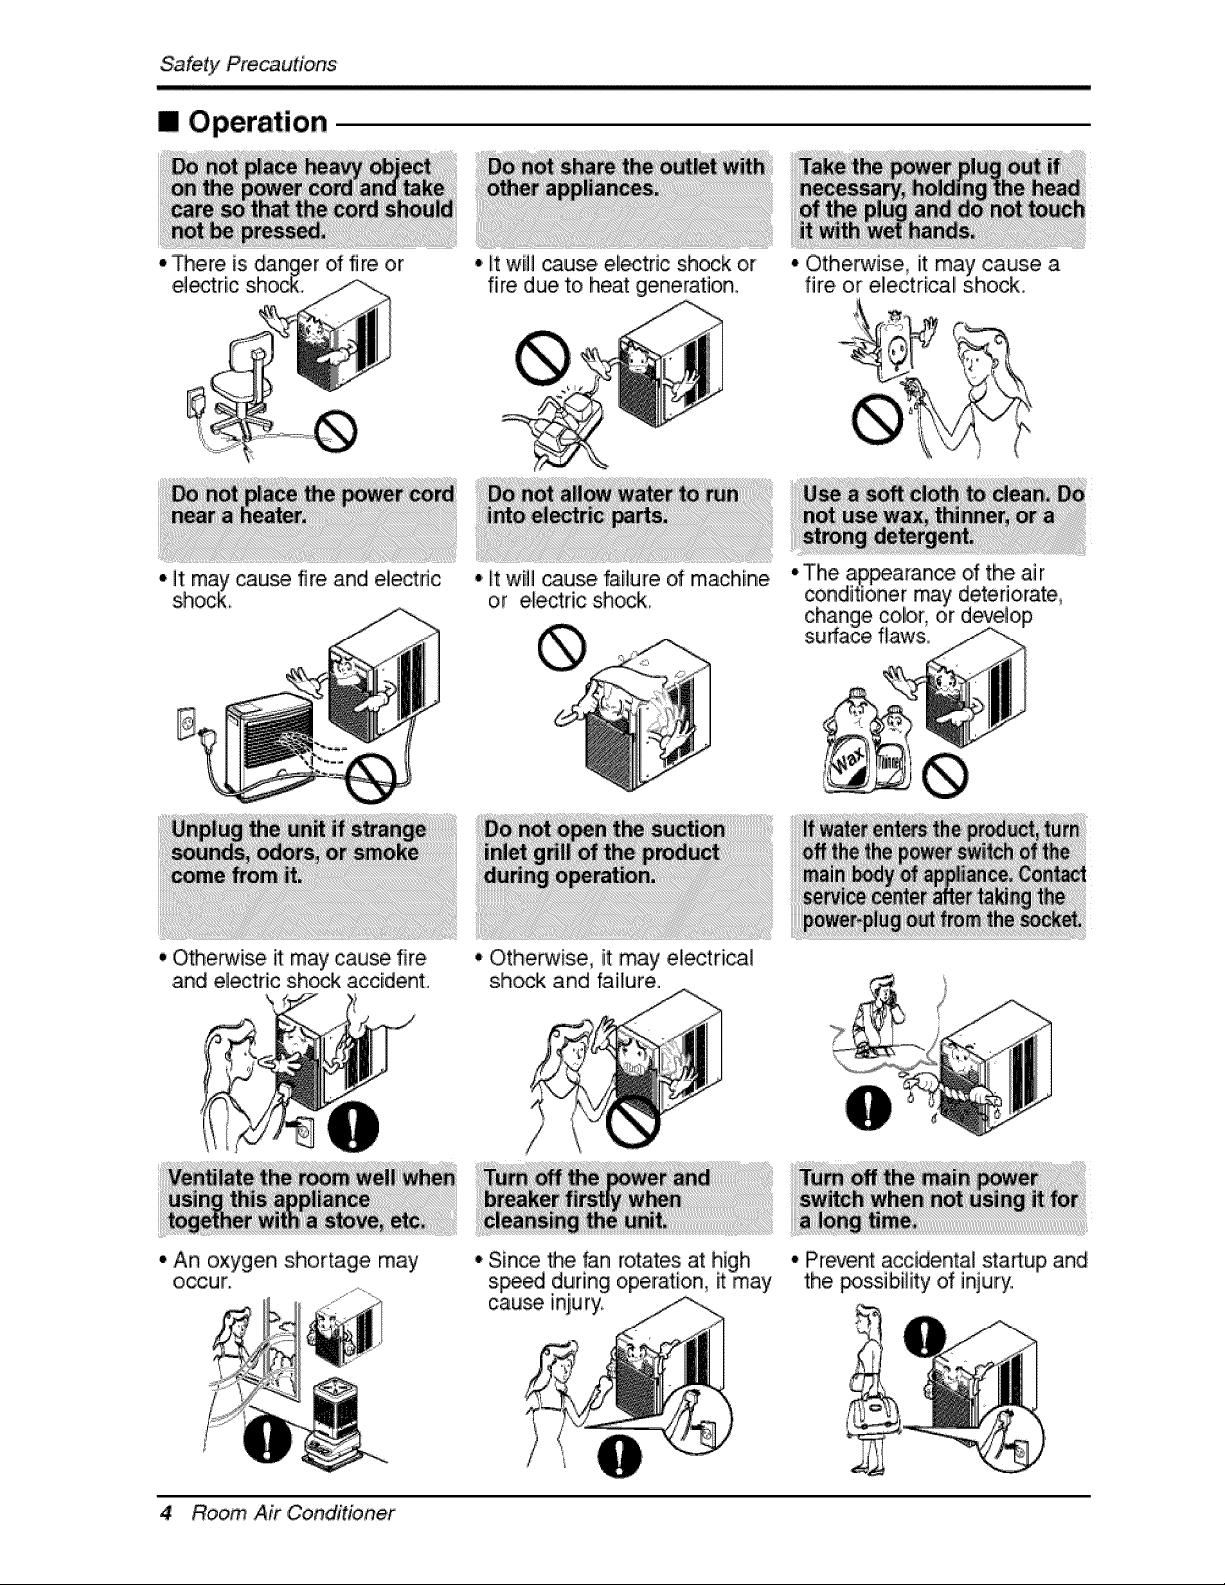
!I Operation
• There is of fire or • It will cause el_tdc shock or
fire due to heat gen,eration,
• it may cau_ fire and electric
shoc£
• it will _use failure of machine
or e,iectric shocL
• Otherwise it may cause a
fire, or electrical shock_
• The ap_arance of the air
_nditioner manydeteriorate,
Csh_nage__i_ or develop
• _herwise it may cause fire
,andelectric sh_k accident
° An oxygen shortage may
OCCUr.
4 Room Air Conditioner
, Otherwise, it may electrical
shock and failure.
° Since _e fan rotates ,athigh,
s,_ during operation, _ may
cau_ m_ury,
° Pr_ent accidental staAup and
the po_ibility of i_uPy'.
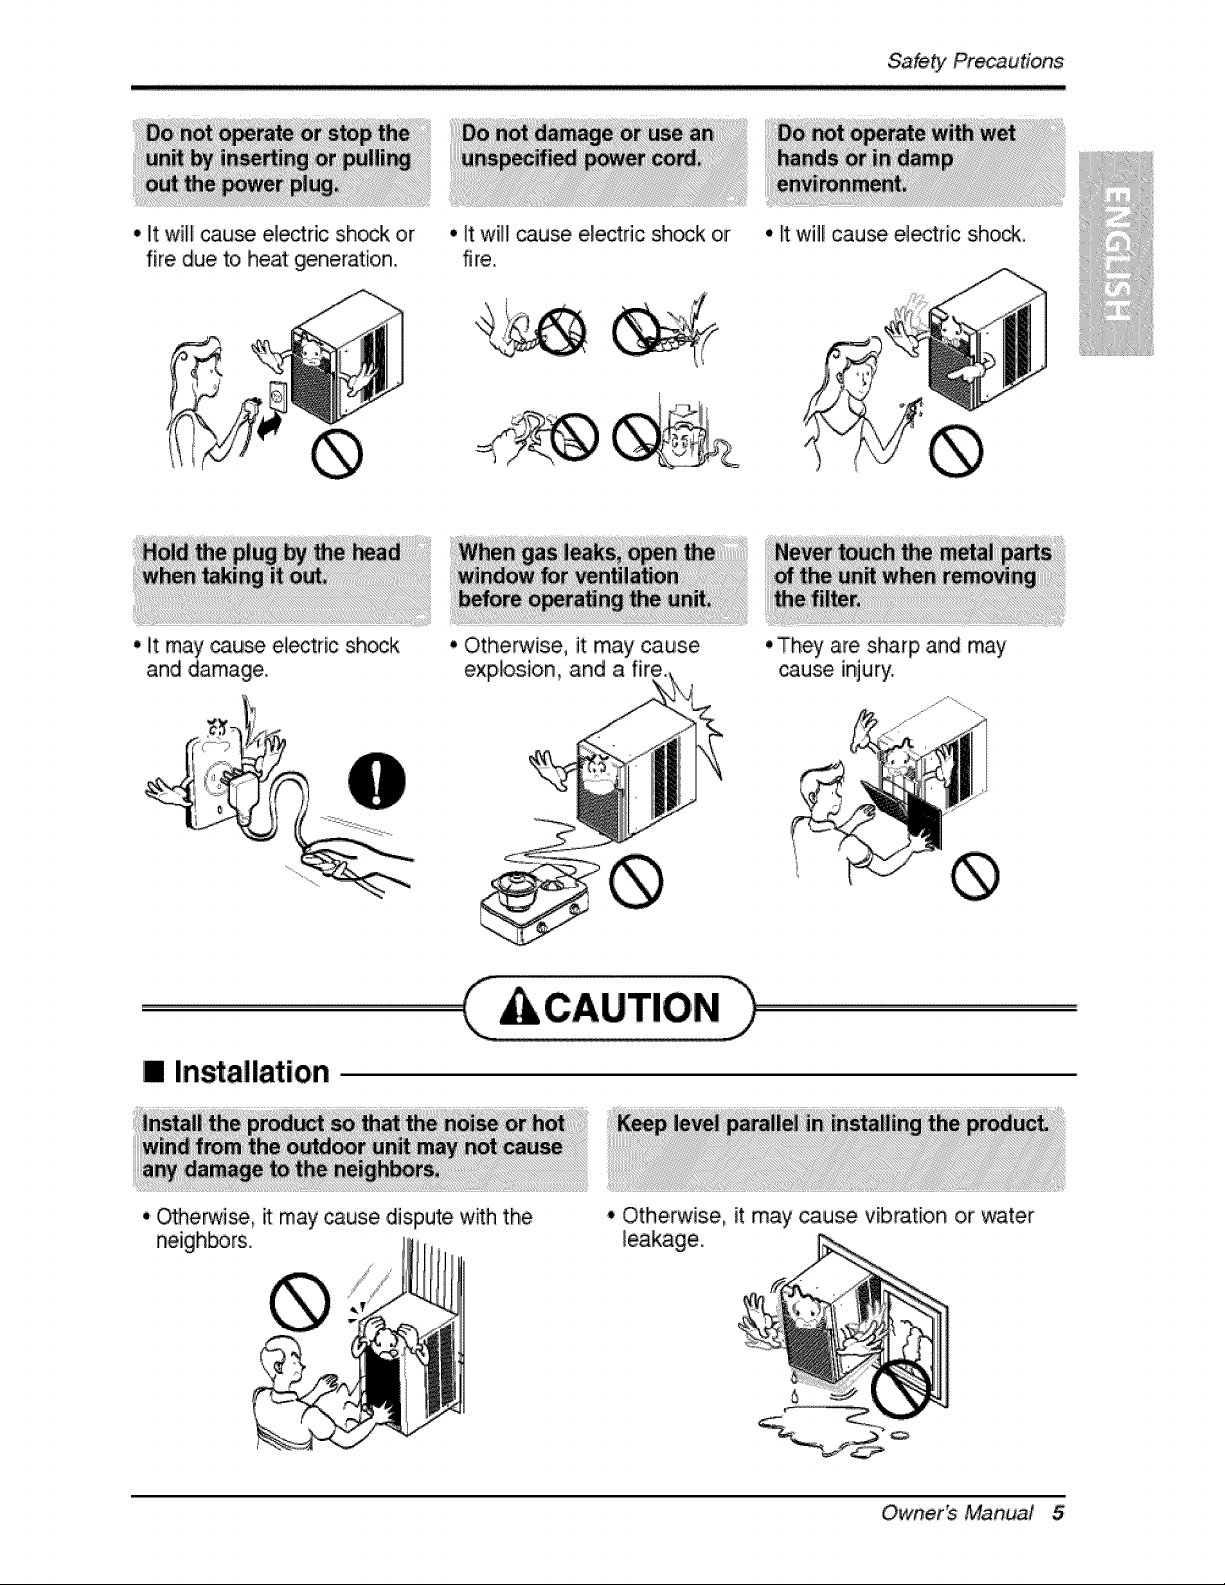
• It willcau_ electricsh_k or
fireduetoheatgeneratio,n.
• ]t w[Hcause e_ectficshock or
fire.
,.It will cause e_tric sho_,
• It may cau_ eiectric sh_k
and damage,.
• Othep,_ise, it may cause
explosion, and a
C.......................................
[] Installation
• O_erwi_ it may cause dispute w_h the
neighbors.
• They are sharp and may
_use injury,
Otheirwise, it may cause vibration or ,water
leakage.
Owner_ Manual 5
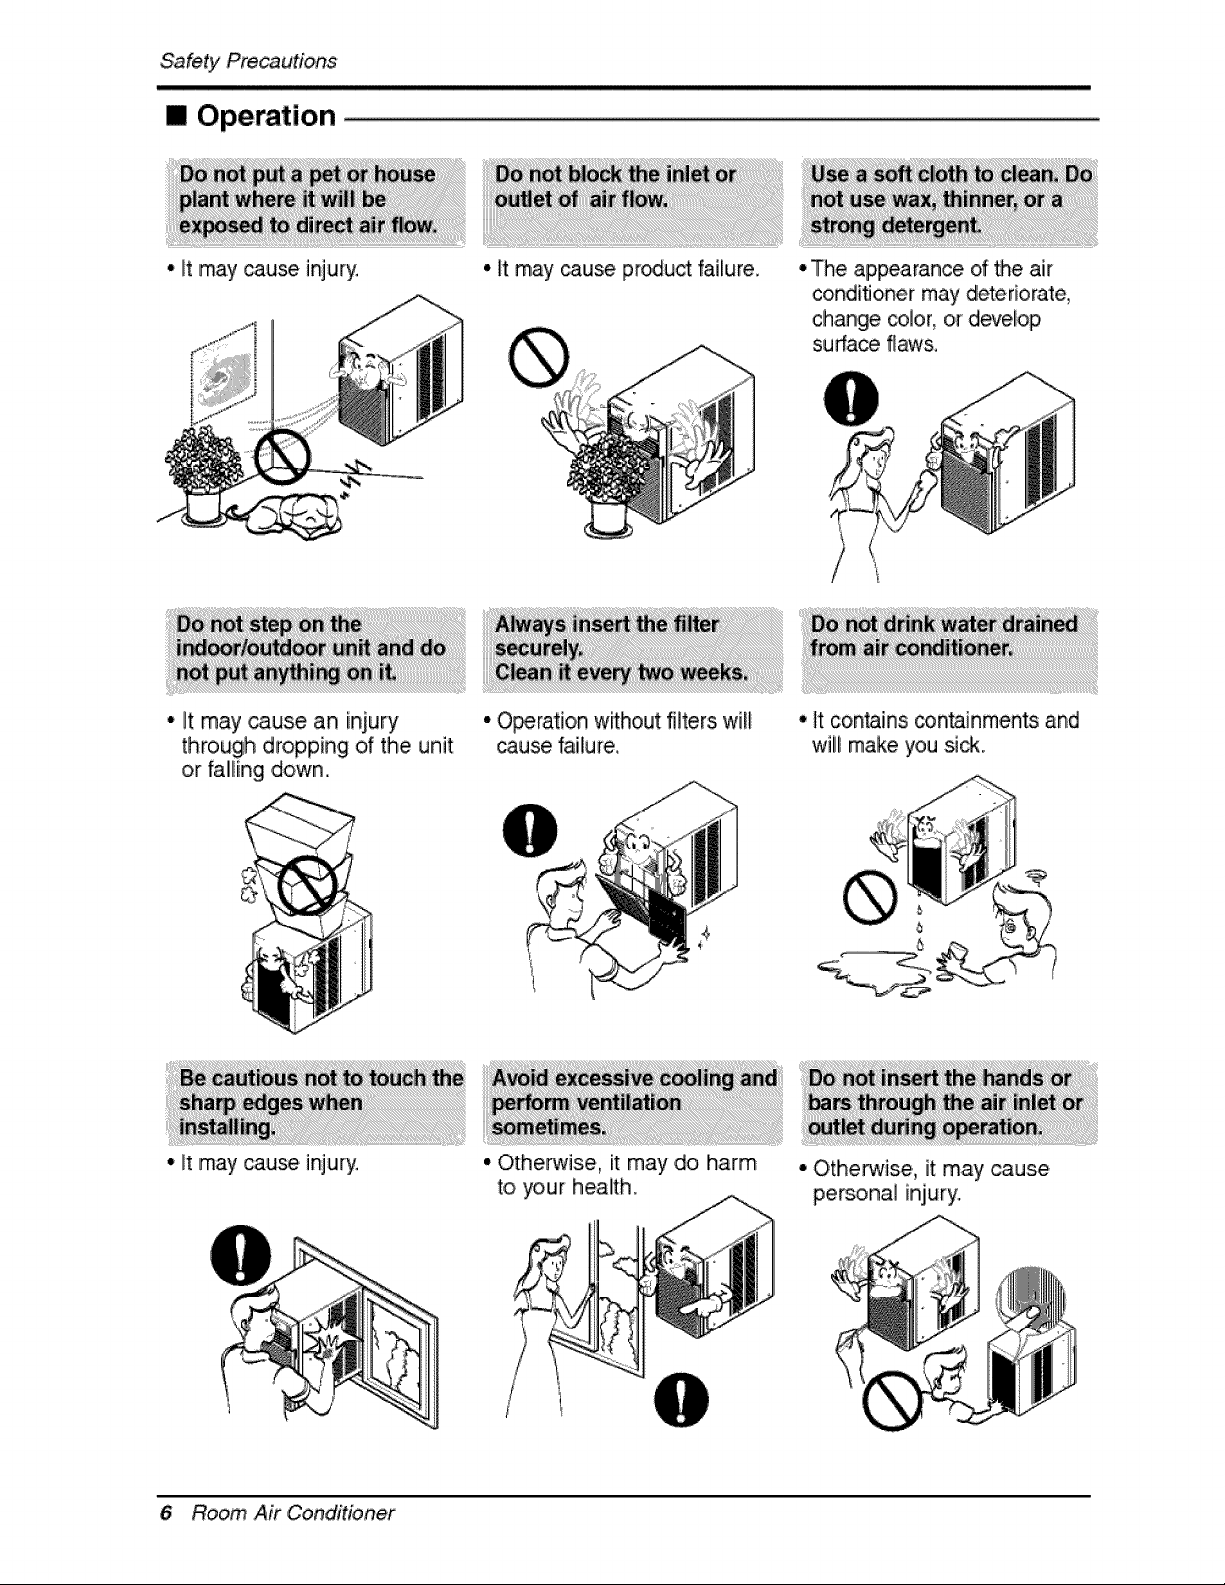
[] Operation
• it may cause injuPj.
° It may cause an injury
through dropping o.f the unit
or falii[ng down.
• It may cause pr_uct failure.
• Operation without filters wilt
cause failure.
° The appearance of the air
conditioner may deteriorate,
change _lor, or develiop,
sudace flaws,
• It contains _ntainments and
wiil make you si_.
* It may _use injury.
6 Room Air Conditioner
° Otherwise, it may doi harm
to _ur health.
° Otherwise, it may cause
personal injury.
Prior to Operation
Contact an installation specialist for installation,
Plug in the power pllug properly.
Use a d_icated circuit.
Do not use an extension cord.
Do not start/stop operation by plugging/unplugging the power cord.
if the cord/plug is damaged, replace i it with only an authorized replacement
_rt.
1i, Being ex_s,_ to direct ai#!ow for an extended period of time could be
hazardous to your health. Do not ex_se _cupants, pets, or plants to,direct
airflow for extended perils of time.
2i, Due to the possibility of oxygen deficiency, ventilate the r_m when used
together with stoves or other heating devices,
3 Do not use this air conditioner for nonosp_ifi_ special pur_ses (e,g.
preserving precision devices, food, pets, plants, and art objects). Such usage
could damage the items.
i_ _iii_iiiii!_iii!_!iii_I!
1 Do not touch the metal parts of the unit when removing the fiiter. Injuries can
eocur when handling sharp metal edges.
2. Do not use water to clean inside the air oonditioner. Ex_sure to water _n
destroy the insulation, leading to possible electric sh_k.
3, When ,cleaning the unit, fi_t make sure that the _wer and breaker are turn,_
off. The fan rotates at a very high spe_ during operation. There is a
_ssibilit-y of iniury if the unirs _wer is a_identallly triggered on whille
cleaning inner parts of the unit,
For repair and maintenance, _ntact your authorized se_ice denier,
Owner_ Manual 7
introduction
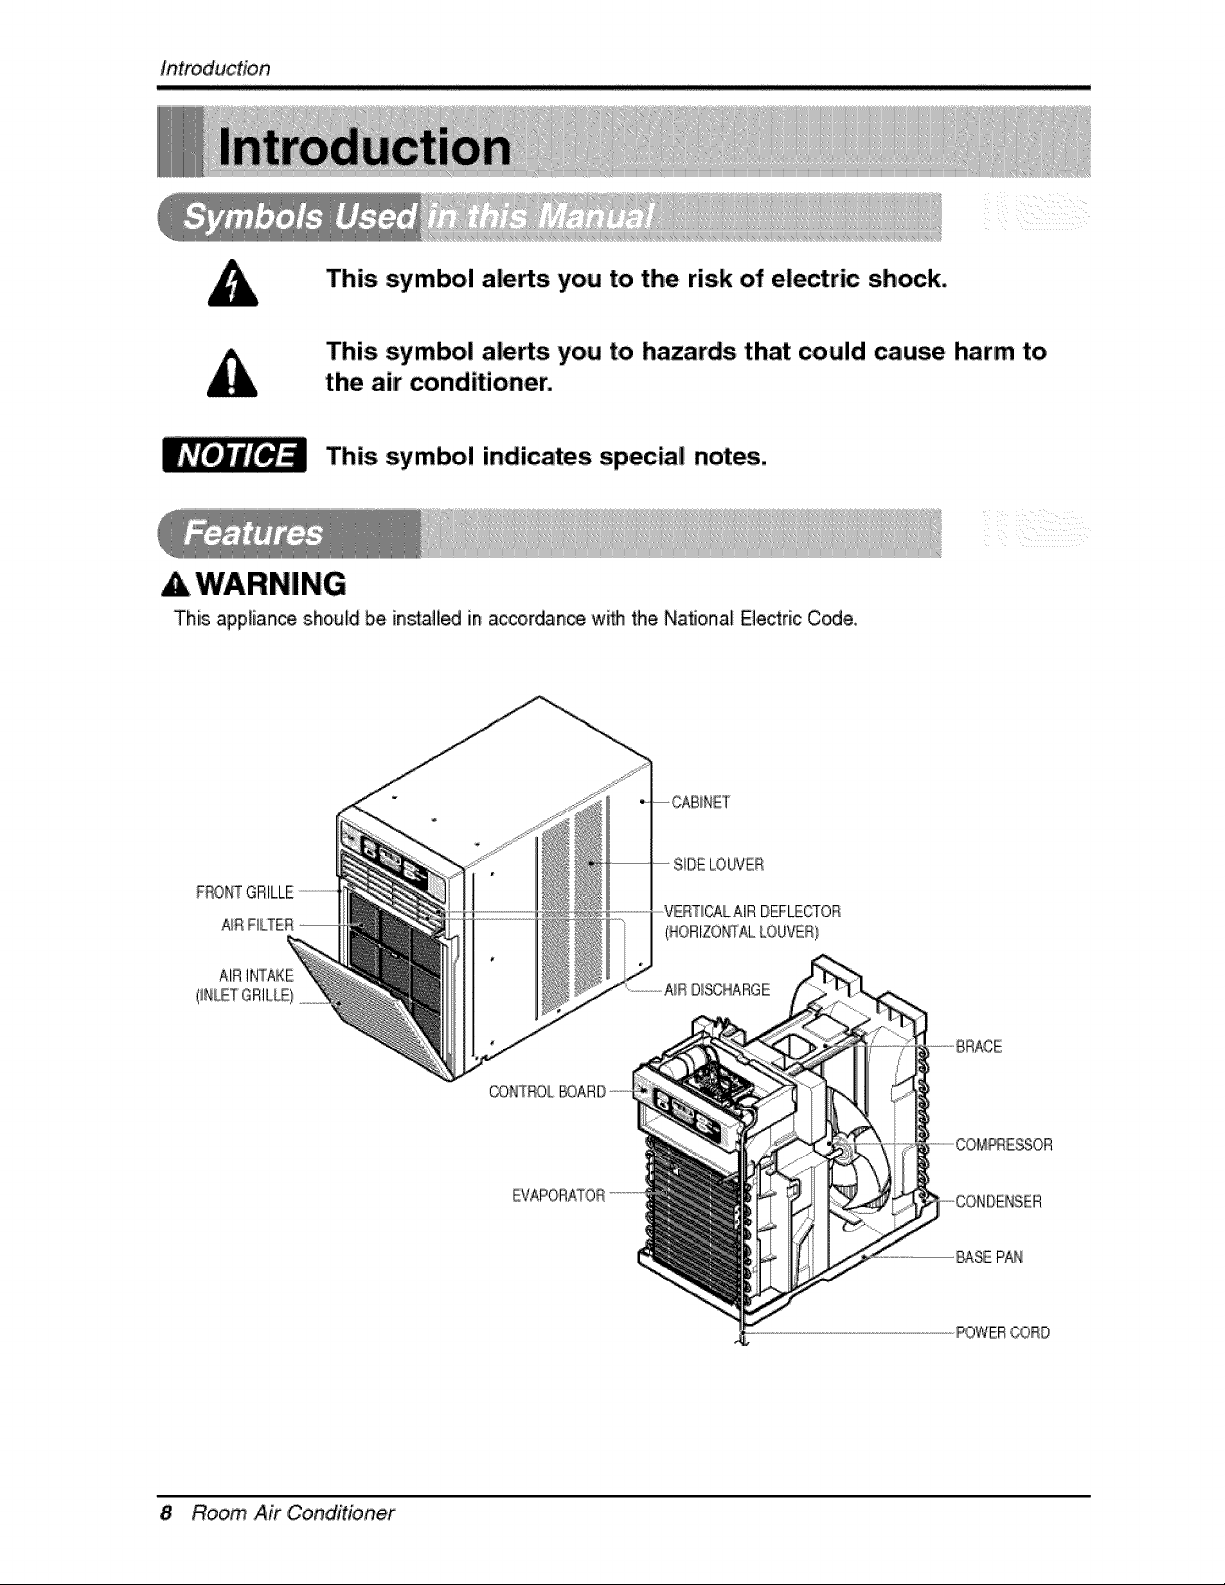
This symbol alerts you to the risk of electric shock.
This symbol alerts you to hazards that could cause harm to
the air conditioner.
This symbol indicates specia! notes.
This appliance should be install_ in accoi[dance w_ the Na_,onal Electric C_e,
ii _iI_ _! i
F£©NT
AIRINTAKE
-- CABINET
-- SIDE LOUVER
VI_TIC_LAIR DEFLECTOR
(HORIZOt,_ALLOUVER!
8 Room Air Conditioner
El_trica,lSafe_y
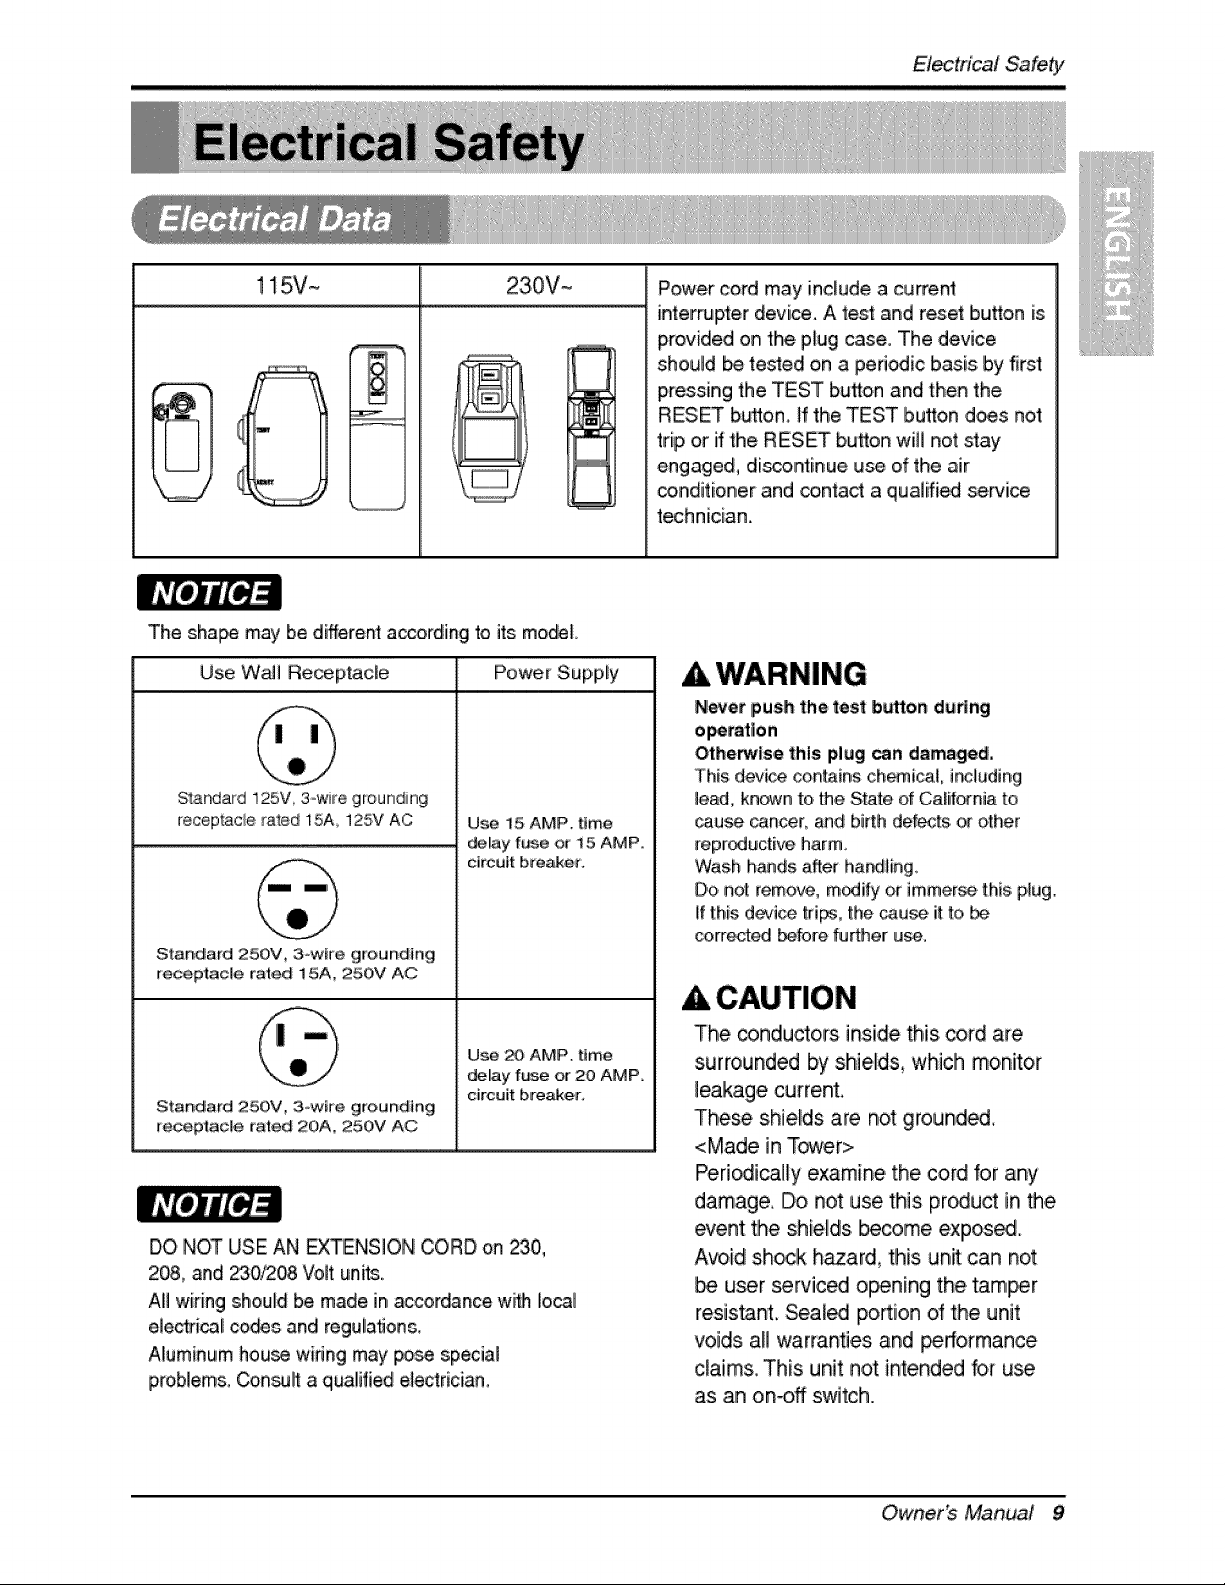
! !5V~ 230V-
w
The sha_ may be different a_ordingi to its mo_L
Use Wall Re_ptac[e Power Supply
Slandard i25V 3owire grounding
recep'_ac_eraled 15A 125V AC
Standard 25OV,, 3w[_e ground_n_g
receptacle rated 15,A, 250V AC
Standard 250V, 3-w_te grou#dtng
receptacle rated 20A,, 250,V AC
DO NOT USE AN EXTENSION CORD on 230,,
208, and 230_2_ Volt uni_.
AHwiring should be made in accordance w_ Io_1
elect_i_li co_s and regula_on&
A!uminum hou_ wiring may p_e special
problem& Con_ a qualified e_ectrician.
Use i5 AMP, time
del!ay f_e or 15 AMP,,
c_rcuit breaker°
Use #_ AMP_ time
dellay f_e or :20 AMP,
circuit brewer,
Power cord may include a current
interrupter device. A test and reset button is
provided on the plug case, The device
should _ tested on a periodic basis by first
pressing the TEST button and then the
RESET b_ton, ff the TEST button does not
trip or if the RESET bu'_on will not stay
engaged, di_ntinue u_ of the air
conditiioner and contact a qualifi_ _rvice
technician.
A WARNING
N_et push the test button during
@herwise this pilug[_n damaged,
This devi_ contlains ch_i_3,L including
lead, kn_n to,the S_te of California to
cause cancer; and birth def_;ts or other
reproductive harm,
Wash han_Js a_er hatching,
Do no[ remove, m_i_y or immerse this, p_ug,
ff this d_ice tri_0 the _use it:to, &_
corrected _[ore further u_,
CAUTION
The _nductors inside this co_d are
surrounded Ibyshields, whiclh monitor
leakage current,
These shields are not grounded,,
<Made in Tower>
Peri_ica_ly examine the cord Dr any
damage, Do not use this pr_u_ in the
event the shields, become expose.
Avoid sh_k hazard, this unit: can not
u_r servicedi o_ning the tamer
resistant, Sea[_ potion of the unit
voids aN warranties and performance
claim& This unit not intended for u_
as an on-off switch.
Owner_ Manual 9
(PLEASE READ CAREFULLY)
FOR THE USER'S PERSONAL SAFET_ HIS
APPLIANCE MUST BE PROPERLY GROUNOED
Thei _#er cord _ _is appliance is equip_d with a
threo-pror_ (grounding) _ug, U_ this with a standard
thr_os|ot (gr¢_nding) wail _er out_et to minimize the
h_a[d of el[_tdc sh_;ko The c_tomer sho,ul!d have the
wall receptac# and circuit checked by a quaiif[_J
electrician to make sure the r_eptade is pro_dy
DO NOT CUT OR REMOVE THE THIRD (GROUND)
PRONG FROM THE P_ER PLUG,
A. SI_ATIONS WHEN'_E APPLIANCE WILL BE
DISCONNECTED OCCASIONALLY:
Because, _ I_tentia_ safety hazards, we stronglly
discourage the use of an adia_ _ug_ H_ever, if you
wish to u_ an adapter, a TEMPORARY CONNECTION
may _ made. Use UL-iisted ada_er, availab_ from
most ]_al h_dvva_e stores,
....[he _arges]oi in the adapter must #_ a]k3ne{l w_h the
large slot in the te_ptade to assure a _oper _larity
conni_ti®_
: Attachi_ _e adapter g_o,undterminallto _e wa_|
receptac{e_v_ isc_ do_ not ground the applian_
unless _e covet screwis _1, and not Insu|a_ed,and
_e wa|| t_p_cle is groundedthroughthe house
wiring,The custom_ she,e_ h_e the cir¢aitchoked
bya qua|ifi_ ele_ician to make sum_e receptacle
is proper_groun_e_,
Di_o=nn_t '|he _er _rd from the a_3,pter, using ,one
hand _ each. Otl°_M_, the a_pter grou_ t_mir_]
m_ht break. DO NOT USE the ap#i_ce with a broken
adapter p_ugi.
8, SiI"rLIIATI[ONSWHEN'THE APPLIANCE WILL BE
DISCONNECTED, OFTEN,i
C_ not _se an ad@ter pi_ in thee, situation&
Unplugging the power oord frequently can lead to an
ev_tua_ breakage of the ground terminal The waB
power outlet should _ replaced by a thr_-sIot
(g_ounding) o_iet instead,
USE OF EXTENSION CORDS
Because _ _t_tia_ _|ety hazards, we strongly
discoarrage the use of an ext_sion cord. H_#_._er, if
you wish to use an extension cord, _e, a CSA
certified_JL4isted 3-v_re (grou_ing) extensbn cord,
rated at i 5,A, 125V,
10 Ro,_m, Air Conditioner
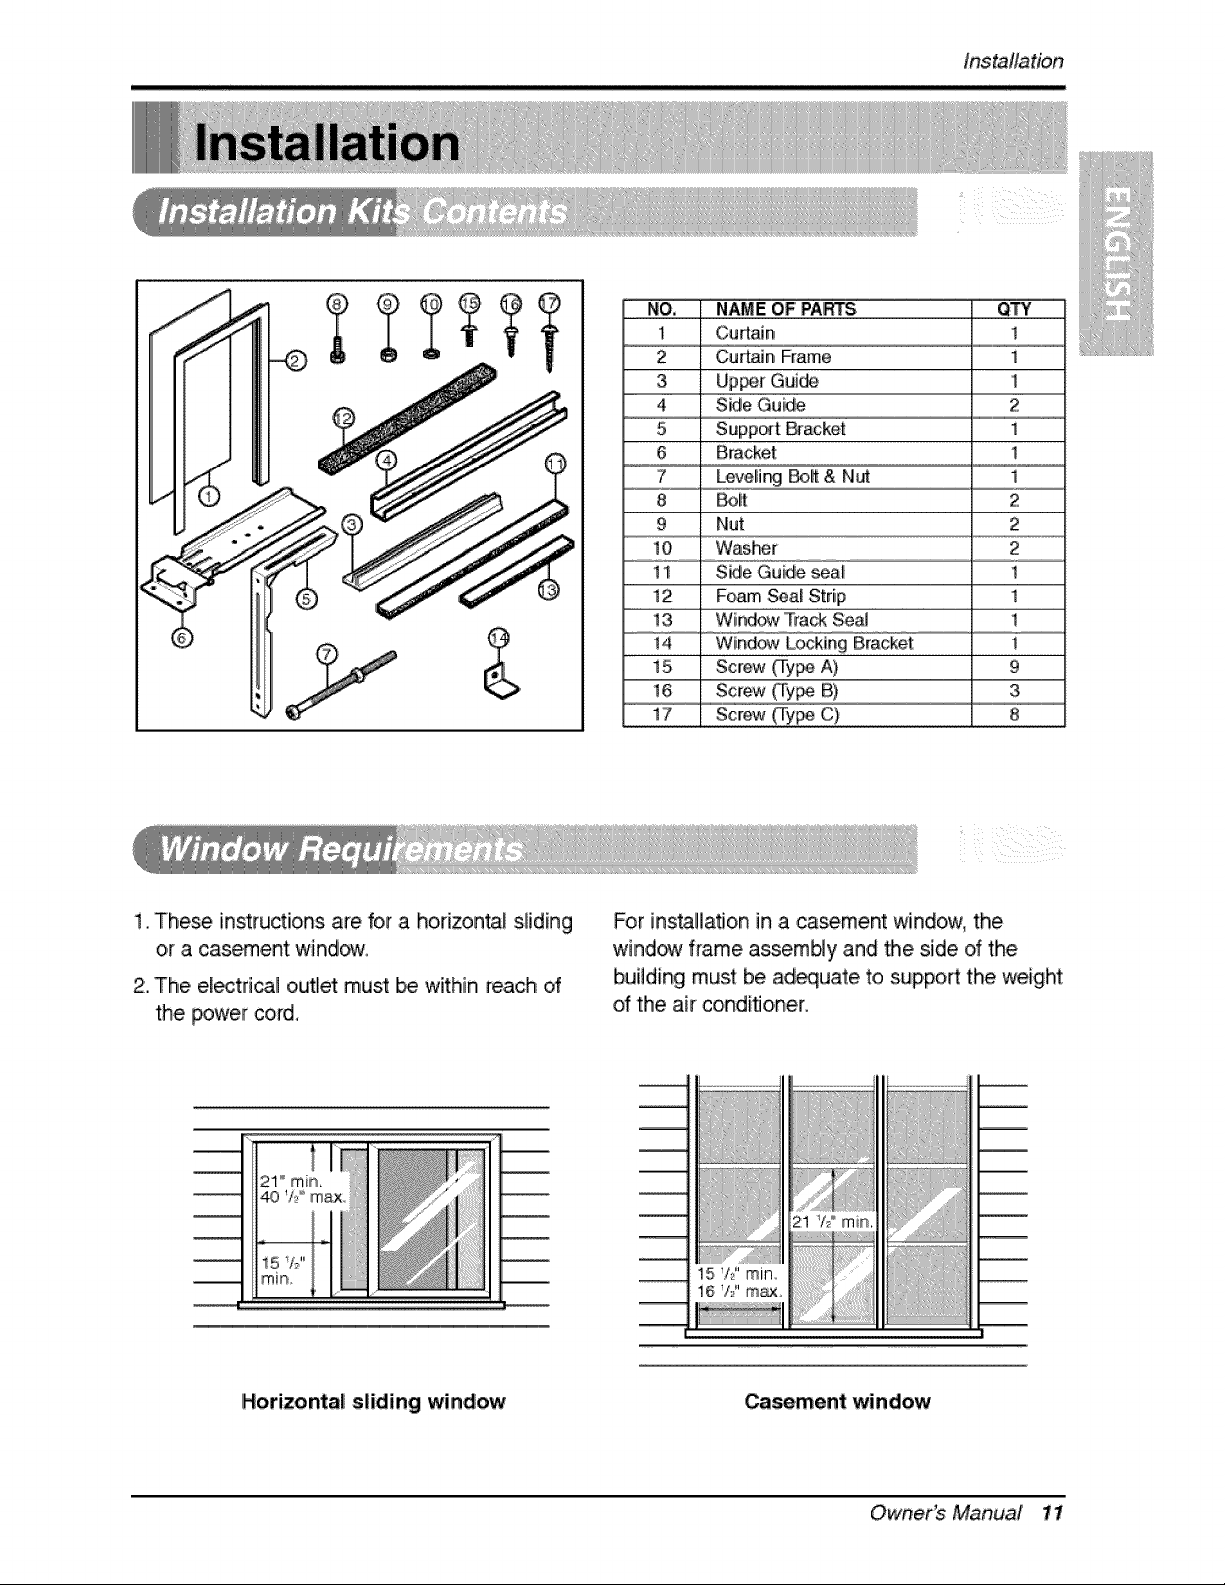
INO. NAME:OF' PARTS
1 Cud:ain
2 Curt:_n Frame
3
4 S_e Gu_e
5 Suppod B_acket
6 Bracket
7 Leveli_ Bolt & Nut
8 _Jlt
9 Nut
10 Was_r
11 Side Gu#e seal
12 Foam Seal Strip
t3 W[nd_ l"irack Sea_
4 W[nd_ Lo_[ng Bracket
15 Screw (Ty_ A)
16 Screw _lry_ B)
17 Screw (Ty_ C)
tns_llation
1, These instructions are for a ho,r[zontal sliiding
o,ra casement win,d_.
2. The el_trica_ outlet must _ withh _ach ,of
the power cord_
Horizontal sliding window
For ins_!laflon in a ,casement window, the
win,d_ frame asse,mb]y and _e side d the
building must be ad_uate to support the weight
of the air conditioner.
Ca_,ment window
Owner_ Manual 11
Installation
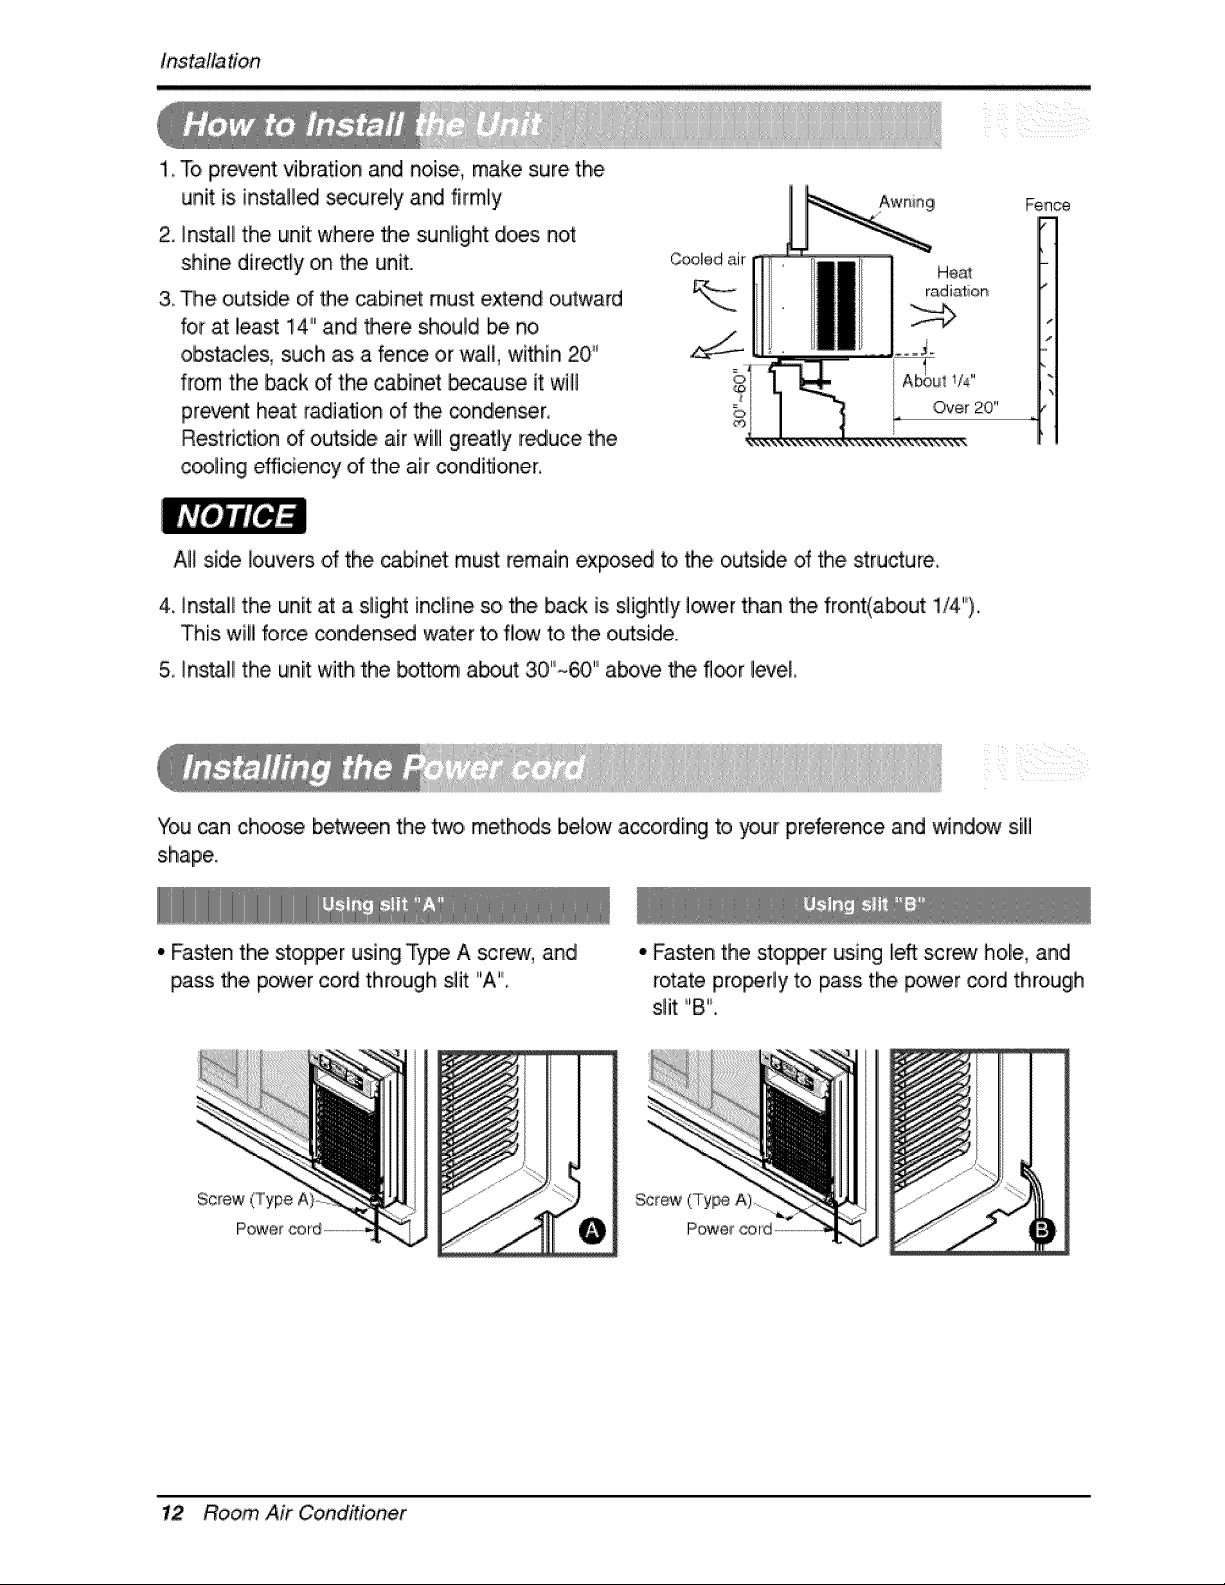
1_To prevent vibration and noise,, make sure the
unit is insta!l_ securely and firmly
2. install the unit where the sunlight does not
shine directly on the unit..
Coolodair
& The outside of the cabinet must extend onward
for at least 14" and there should be no,
obstacles, such as a fence or wall, within, 20''
from the back ol_the cabinet because it will
prevent heat radiation of the _ndenser,
Over 20"
Restriction o# outside air wilii greatiy rediuce the
cooling efficiency of the air conditioner.
All side buvers of the _binet must remain expos_ to,the outside of the structure,
4. instil the unit at a slight incline so the ba_ is sHglht_yi_er than the front(about 1/4'%
This will force condensed water to fl_ to the o_side.
Fence
m
#
5, Install the unit with the b,offom a_ut 30"_" above the fl_r leve!
You can ch_ between the twoimeth_s below according to your preference and _t_qndowsill
shape.
• Fasten the stop_r using Ty_ A _rew, and
pass the power cord through slit "A"
Screw (Type
Power
° Fasten the stopper using fe_ screw hole, and
rotate pro_dy to pass the power cord through
slit: "B '_.
Screw' (Ty_ A)
Power
12 Room, Air Conditioner
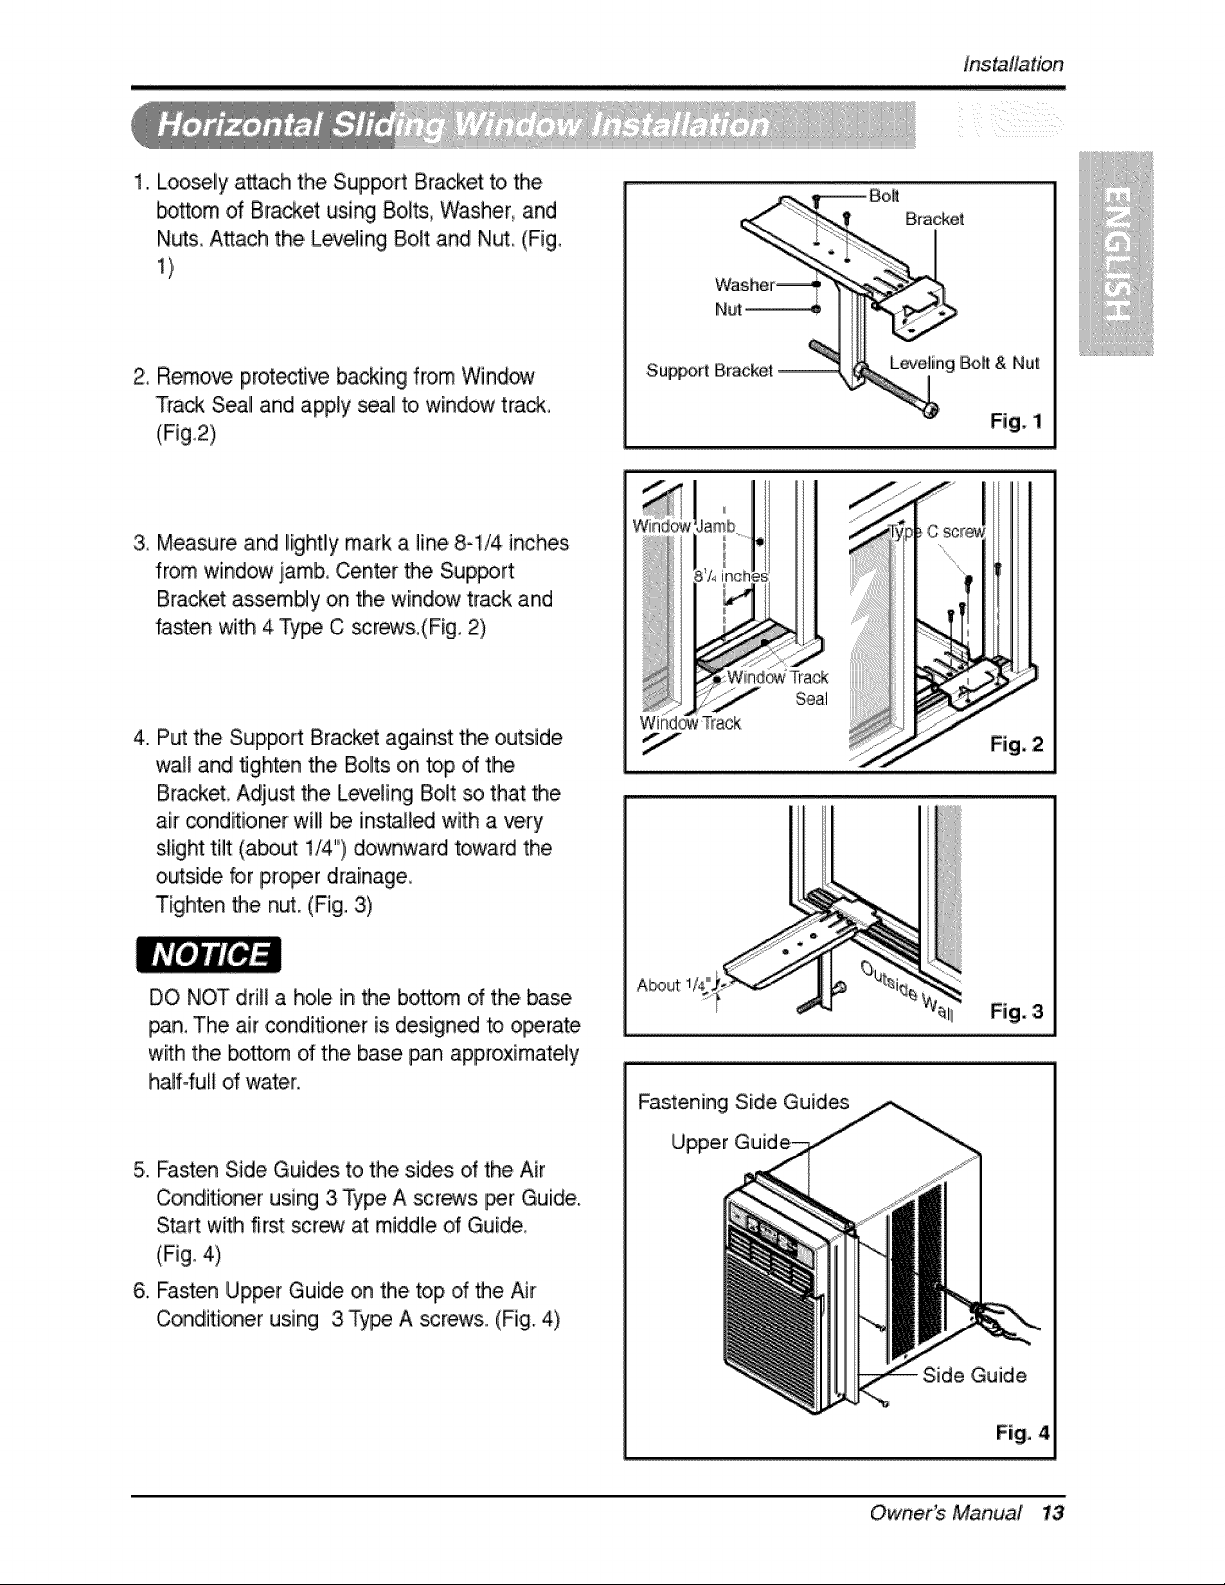
1. Loosely attach the Support Bracket to the
bottom of Bracket using Bolts, Washer, and
Nuts Attach the. Leveling Bolt and Nu¢ (Fig.
1)
Ins_llation
Bra_et
2_ Remove prot_ive backing from Window
Track Seall and apply seal to window track,
(Fig,2)
3, Measure and ffghtly mark a fine 8-1/4 inches
from window jamb, Center the Sup_rt
Bracket assem_y on the window track and
fasten with 4 Type C _r_s,(Fig, 2)
4. Put the Support Bracket against the outside
wall and tighten the Bolts on top of the
Bracket, Adjust the Leveling Bolt so that the
ak ,cond_ioner will be [nstaff_ with a very
slight tilt (about 1/4') downward toward the
outside for pro_r drainage,
Tighten the n_. (Fig. 3)
Sup_rt
i ....
}Z_inch
):Wii_
iTrack
dTrack
Seal
Fig. 1
s
Fig, 2
DO NOT drift a hole in the bottom d the base
pan, The air conditioner is designed to operate
with the bottom o# the base pan approximately
halfofuff of water,
5. Fasten Side ,Guides to the sides ,d the Air
Conditioner using 3 l_ype A screws per Guide,
Start with first screw at middle of Guide,
,(Fig. 4)
6, Fasten Upper Guide on the top d the Air
Conditioner using 3 Type A _rews. (Fiig. 4)
A_ut:
Fig. 3
Fastening Side Guides
Upper Guid_
Side Guide
Fig, 4
Owner_ Manual 13
Installation
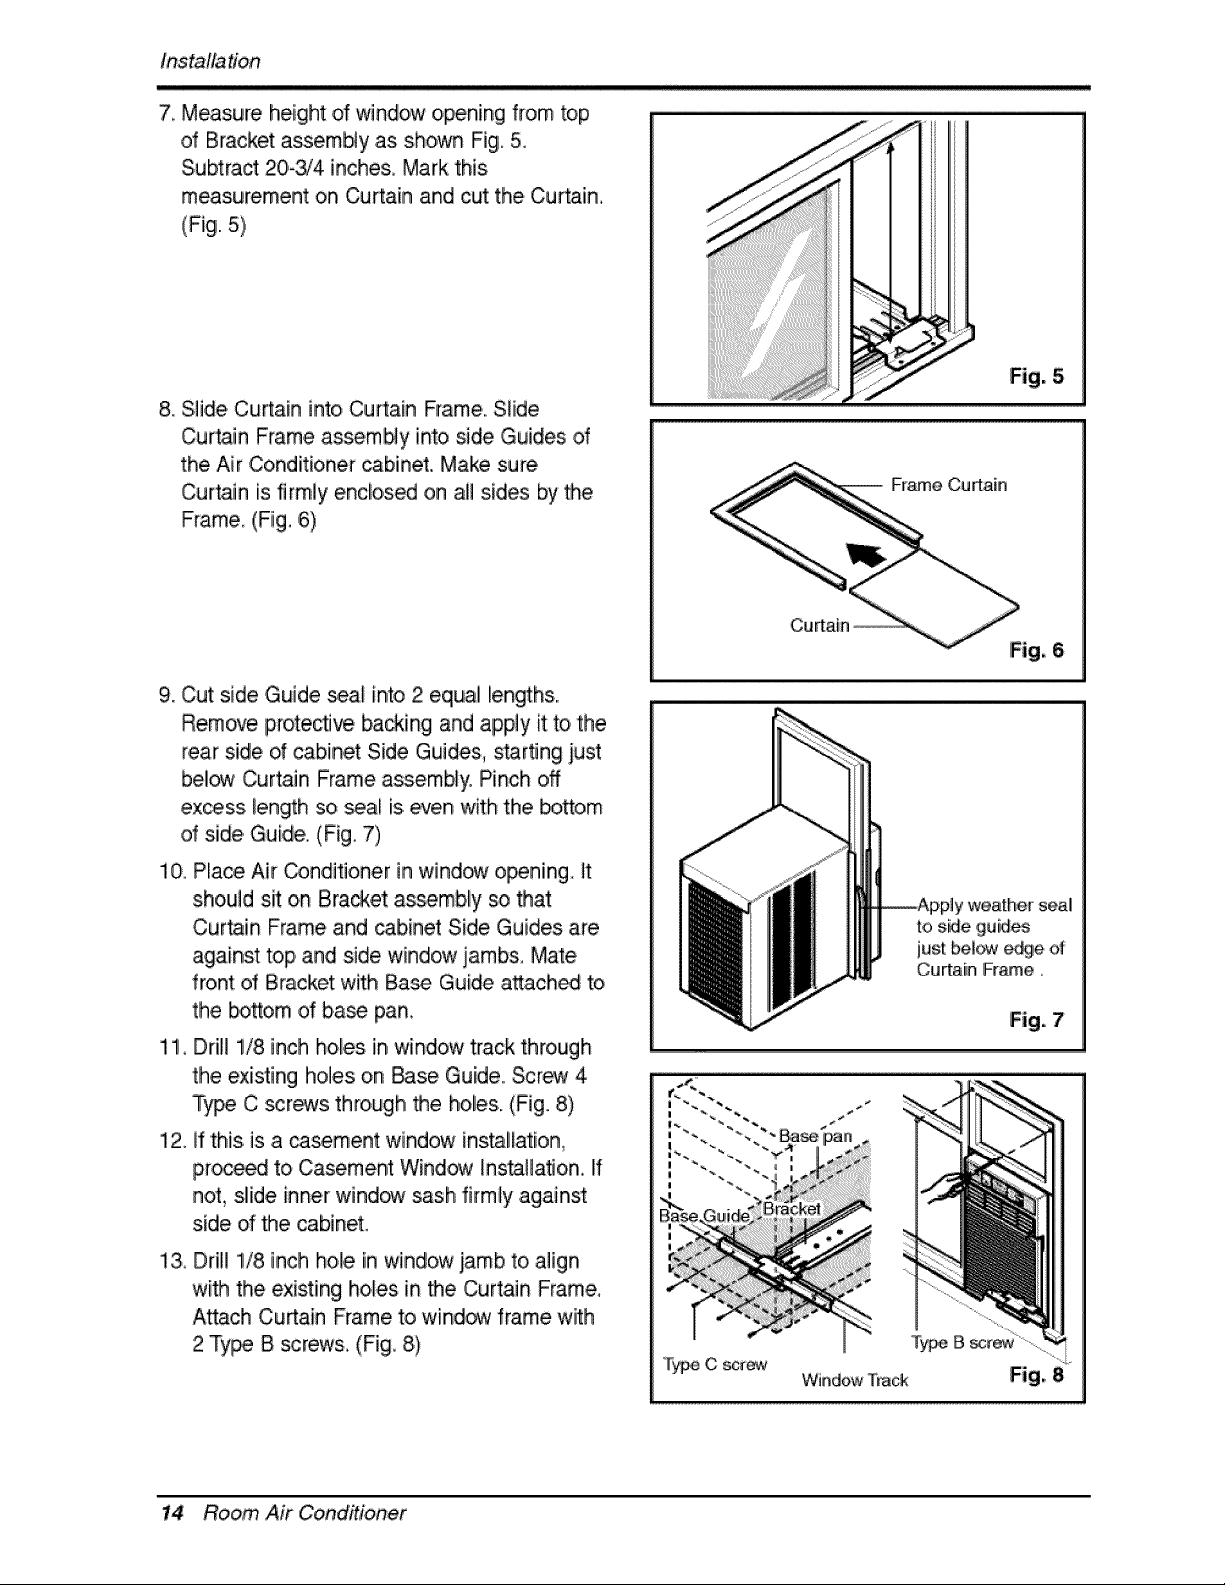
7_Measure height of window opening from top
of Bracket assembly as shown Fig, 5.
Subtract 20-3/4 inches, Mark this
measurement on Cu_ain and cut the Curtain,
(Fig. 5)
8. Slide Curtain into Curtain Frame. Slide
Curtain Frame assem_y into side Guides d
the Air Conditioner cabinet. Make sure
Curtain is firmly encbsed on alil sides by the
Frame, (Fig, ,6)
" Fig, 5
-- Frame Curtain
Curtain
Fig, 6
9. Cut side Guide sea_ into 2 equal lengths,.
Remove protective backing and apply it to the
rear side of cabinet Side Guides, s_rflng just
below Curtain Frame assembl_: Pinch off
excess, length so _al is,even with the _ttom
d side, Guide,, (Fig. 7)
1O,Place Air Conditioner in window opening,, it
should sit on Brad_et assemb,ty so that
Cut.in Frame and cabinet Side Guides are
against top, and side windlow jambs, Mate
front d Bracket with Ba_ Guide attach_ to
the bottom d base pan,
11, Drill 1/8 inch ho_es in window track through
the existing holes on _se Guide., Screw 4
T_ C screws through the holes,. (Fig. 8)
12. if this, is a ca_ment window installation,
proce_ to Casement Windi_ _nstaHafloin, If
not,, slide inner window sash firrnly against
side d the cabinet.
13, Drill 1/8 inch hole in window jamb to align
with the existing holes in the Curtain Frame,
Attach Cu_ain Frame to window frame with
2 Ty_ B screw& (Fig_ 8)
T_ C screw
weather seall
to side guid_
jusl: be,l_ e_e of
Curtain Frame,
Fig, 8
14 Ro,_m, Air Conditioner
Ins_llation
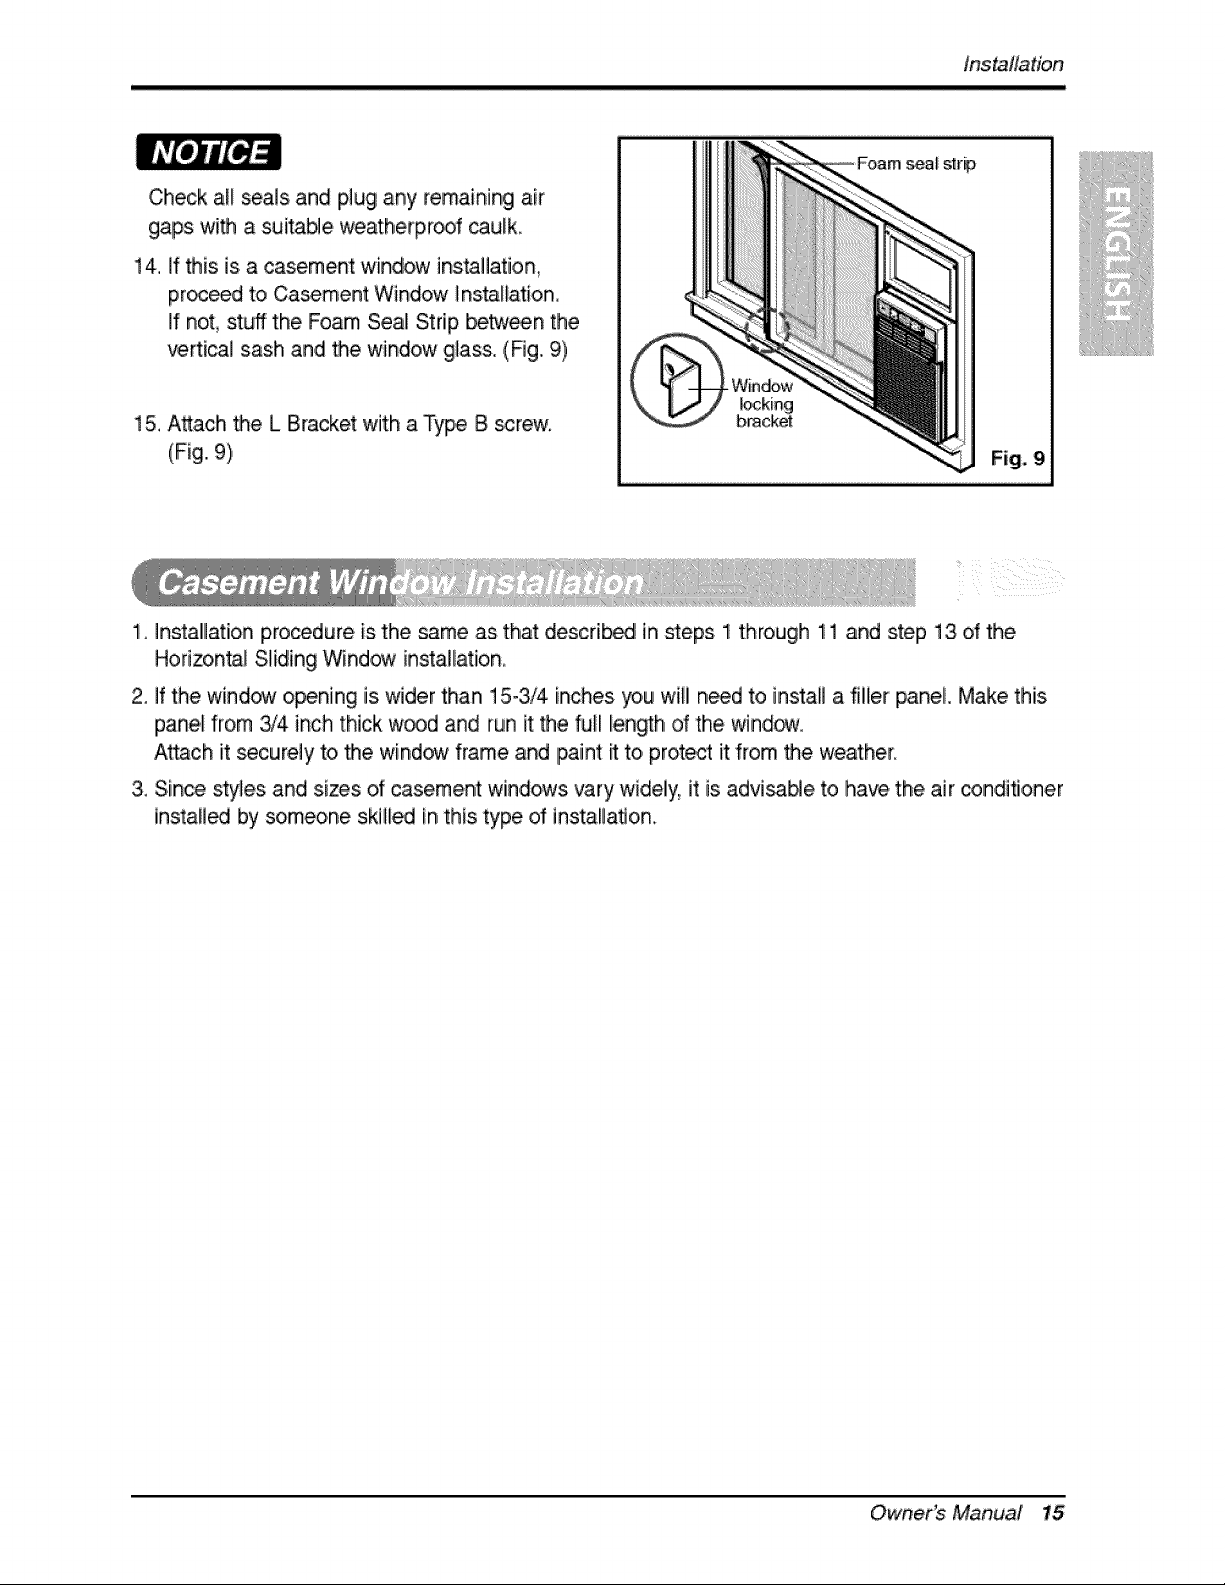
Check all seals and plug any remaining air
gaps with a suitable weatherp_f _ulk.
14. If this is a casement window installation.,
pr_eed to ,Ca_ment Window Installation,
If not, stuff the Foam Seal Strip betw_n the
verti_l sash and the window glass. (Rg. 9)
bcking
15. Attach the L Bracket with a Type B screw.
(Figi. 9),
1. Installllation procedure is the same as that descdb_ in steps 1 through 11 and step 13 ,of the
Horizontal S!iding Window installatiion.
bracket:
Fig. 9
2. If the window opening is wider than 15-3/4 inches you will n_d to install a filler panel. Make this
panel from &i4 inch thick w_d .and run it the NH len_h d the window.
Attach it _curely to the window frame and paint _ to, protect it from the weather.
3. Since st_es and sizes d ,casement windows vary widely, it is advi_e to have the air conditioner
install_ by someone skilled in this type of instaBatJon.
Owner_ Manual 15
 Loading...