

Page 1

1
ENGLISH
ENGLISH ESPAÑOL
FRANÇAIS
OWNER’S MANUAL
TOP MOUNT
REFRIGERATOR
Please read this owner’s manual thoroughly before
operating and keep it handy for reference at all times.
Model Name
LTNS16121V
AFN73165211
P/No.: MFL62423831-2
www.lg.com
Page 2

1 TABLE OF CONTENTS
ENGLISH
TABLE OF CONTENTS
2 PRODUCT FEATURES
3 IMPORTANT SAFETY
INSTRUCTIONS
4
5
6 PRODUCT OVERVIEW
6 Refrigerator Exterior
7
8 INSTALLATION
8 Installation Overview
8
9
9
9
9
9
10 Removing / Assembling the Doors
1111Assembling the Refrigerator Door
12 Turning on the Power
12 Leveling
Important safety instructions
Important safety instructions
Refrigerator Interior
Specifi cations
Unpacking the Refrigerator
Choosing the Proper Location
- Flooring
- Ambient Temperature
- Measuring the Clearances
Assembling the Freezer Door
13 NOITAREPO
13 Before Use
Control Panel
14
15 Storing Food
- Food Preservation Location
15
16 - Food Storage Tips
16 - Storing Frozen Food
Adjusting the Refrigerator Shelves
16
Removing the Shelf
17
Assembling the Shelf
17
Humidity Controlled Crisper
17
18 Assembling/Disassembling Door Bin
18 Icemaker
19 MAINTENANCE
19 Cleaning
20 TROUBLESHOOTING
21 Troubleshooting
22 Troubleshooting
23 Troubleshooting
24 SMART DIAGNOSIS
24 Using Smart Diagnosis
25
WARRANTY
26 Warranty
TM
TM
27
NOTES
Page 3
PRODUCT FEATURES
ENGLISH
Depending on the model, some of the following functions may not be available.
PRODUCT FEATURES
2
ENGLISH
SMART DIAGNOSIS
Use this function to contact the LG Customer Information Center and
receive precise diagnosis when the refrigerator malfunctions or fails.
This is used only for troubleshooting purposes and not during normal
operation.
TM
HUMIDITY CONTROLLED CRISPERS
The Humidity Controlled Crispers are designed to help keep your fruits and
vegetables fresh and crisp.
ICEMAKER
To suit your individual storage needs your icemaker can be moved from one side
to another.
WARNING
Fill with potable water only.
Page 4

READ ALL INSTRUCTIONS BEFORE USING THE APPLIANCE.
3 IMPORTANT SAFETY INSTRUCTIONS
ENGLISH
This guide contains many important safety messages. Always read and obey all safety messages.
Power
Installation
Use
IMPORTANT SAFETY INSTRUCTIONS
This is the safety alert symbol. It alerts you to safety messages that inform you of hazards that
can kill or hurt you or others, or cause damage to the product.
All safety messages will be preceded by the safety alert symbol and the hazard signal word
WARNING or CAUTION. These words mean:
WARNING
CAUTION
WARNING
To reduce the risk of fire, electric shock, or personal injury when using your product, basic safety
precautions should be followed, including the following:
NEVER unplug your refrigerator by pulling on the power cord. Always grip the plug firmly and pull it
straight out from the outlet.
If the supply cord is damaged, it must be replaced by the manufacturer or its service agent or a similar
qualified person in order to avoid a safety hazard. Do not use a cord that shows cracks or abrasion
damage along its length or at either the plug or connector end.
Do not use an uncertified power outlet.
Unplug the power plug immediately in the event of a blackout or thunderstorm.
Plug in the power plug with the power cord facing downward.
Do not use extension cords or ungrounded (two prong) adapters.
Contact an authorized service center when you install or relocate the refrigerator.
When moving your refrigerator away from the wall, be careful not to roll over or damage the power
cord.
Prior to use, ensure that you are connecting this product to a dedicated grounded electrical outlet rated
for use with this product (115V~ 60Hz, AC only). It is the user’s responsibility to replace a standard
2-prong wall outlet with a standard 3-prong wall outlet.
Do not install the refrigerator where there may be a danger of the unit falling.
DO NOT allow children to climb, stand, or hang on the refrigerator doors or on the shelves in the
refrigerator. They could damage the refrigerator and seriously injure themselves.
Do not hang on to or place heavy objects on the refrigerator’s dispenser.
Do not place heavy or dangerous objects (bottles with liquid) on the refrigerator.
Do not put live animals inside the refrigerator.
Do not allow children to climb into the product when it is in use.
In the event of a gas leak (propane/LPG), ensure adequate ventilation and contact an authorized service
center before resuming use. Do not touch or disassemble the electrical outlet of the refrigerator.
In the event of a refrigerant leak, move flammable objects away from the refrigerator. Ensure adequate
ventilation and contact an authorized service center.
Do not use or place flammable substances (chemicals, medicine, cosmetics, etc) near the refrigerator
or store them inside the refrigerator. Do not place the refrigerator in the vicinity of flammable gas.
Do not store explosive substances such as aerosol cans with a flammable propellant in this appliance.
You can be killed or seriously injured if you do not follow instructions.
Indicates an imminently hazardous situation which, if not avoided, may result in
minor or moderate injury, or product damage.
Page 5

READ ALL INSTRUCTIONS BEFORE USING THE APPLIANCE.
IMPORTANT SAFETY INSTRUCTIONS
4
To reduce the risk of fire, electric shock, or personal injury when using your product, basic safety
precautions should be followed, including the following:
This product is not to be used for special purposes such as the storage of medicine or test materials or
for use on ships, etc.
Unplug the power plug before cleaning or repairing the refrigerator.
Do not modify or extend the power cord.
Do not use a dryer to dry the interior. Do not light a candle to remove interior odors.
For your safety, this appliance must be properly grounded. Have the wall outlet and the circuit checked
by a qualified electrician to make sure the outlet is properly grounded.
Do not use an outlet that can be turned off with a switch. Do not use an extension cord. It is the user’s
responsibility to replace a standard 2-prong wall outlet with a standard 3-prong wall outlet.
Do not, under any circumstances, cut or remove the third (ground) prong from the power cord.
Do not use an adapter plug and plug the power plug into a multi-outlet extension cord.
Disconnect the power cord immediately if you hear a noise, smell a strange odor or detect smoke coming
from the appliance.
Turn the power off if water or dust penetrates into the refrigerator. Call a service agent.
Do not disassemble or modify the refrigerator.
Do not put hands, feet, or metal objects below or behind the refrigerator.
Do not touch the cold surfaces in the freezer compartment with wet or damp hands, when your
refrigerator is in operation.
Do not put glass containers, glass bottles or soda in the freezer.
This appliance is not intended for use by persons (including children) with reduced physical, sensory or
mental capabilities, or lack of experience and knowledge, unless they have been given supervision or
instruction concerning the use of the appliance by a person responsible for their safety. Children should
be supervised to assure that they do not play with the appliance.
Do not refreeze frozen food that has thawed completely. Doing so may result in a serious health issue.
If you are throwing away your old refrigerator , make sure the CFC or HCFC coolant is removed for proper
disposal by a qualified servicer. If you release CFC/HCFC coolant, you may be fined or imprisoned in
accordance with the relevant environmental law.
Junked or abandoned refrigerators are dangerous, even if they are sitting for only a few days. When
disposing of the refrigerator, remove the packing materials from the door or take off the doors but leave
the shelves in place so that children may not easily climb inside.
If the refrigerator is connected to a circuit protected by fuses, use time delay fuses.
This product contains flammable insulation blowing agents. If this unit is no longer in use, contact local
authorities for information on safely disposing of this product as it contains flammable cyclopentane or a
pentane-like blowing agent for insulation. Insulation blowing agents require a special disposal process.
Do not damage the refrigerant circuit.
ENGLISH
Page 6

READ ALL INSTRUCTIONS BEFORE USING THE APPLIANCE.
5 IMPORTANT SAFETY INSTRUCTIONS
ENGLISH
To reduce the risk of fire, electric shock, or personal injury when using your product, basic safety
precautions should be followed, including the following:
CAUTION
Installation
The refrigerator must be properly installed in accordance with the Installer Instructions that were taped
to the front of the refrigerator.
Be careful when you unpack and install the refrigerator. Immediately dispose of plastic and other
packing materials out of the reach of children.
The appliance must be positioned for easy access to a power source.
Use
Close the door carefully when children are around.
Keep fingers out of pinch point areas; clearances between the doors and cabinets are necessarily small.
Be careful closing doors when children are nearby.
If you store food improperly, be aware that it may fall and cause injury.
Do not use aerosols near the refrigerator.
Do not store articles on the top of the appliance.
Maintenance
Do not use strong detergents like wax or thinners for cleaning. Clean with a soft cloth.
Wipe foreign objects (such as dust and water) off the prongs of the power plug and contact areas
regularly.
Do not store, disassemble or repair the refrigerator by yourself.
Remove any dust or foreign matter from the power plug pins.
Do not use a wet or damp cloth when cleaning the plug.
If the refrigerator is disconnected from the power supply, wait for at least five minutes before plugging
it back in.
If you notice a chemical or burning plastic smell or see smoke, unplug the refrigerator immediately and
contact your LG Electronics Service Center.
WARNING
This product contains chemicals known to the State of California to cause cancer and birth defects or other
reproductive harm. Wash hands after handling.
WARNING
Do not use Mechanical Devices
Do not use mechanical devices or other
means to acelerate the defrosting process,
only those recommended by the
manufacturer.
WARNING
Do not store Electrical
Do not use electrical appliances inside the
food storage compartment, unless they are
recommended by the manufacturer.
Appliances
SAVE THESE INSTRUCTIONS
Page 7
PRODUCT OVERVIEW
6
PRODUCT OVERVIEW
Use this section to become more familiar with the parts and features of your refrigerator.
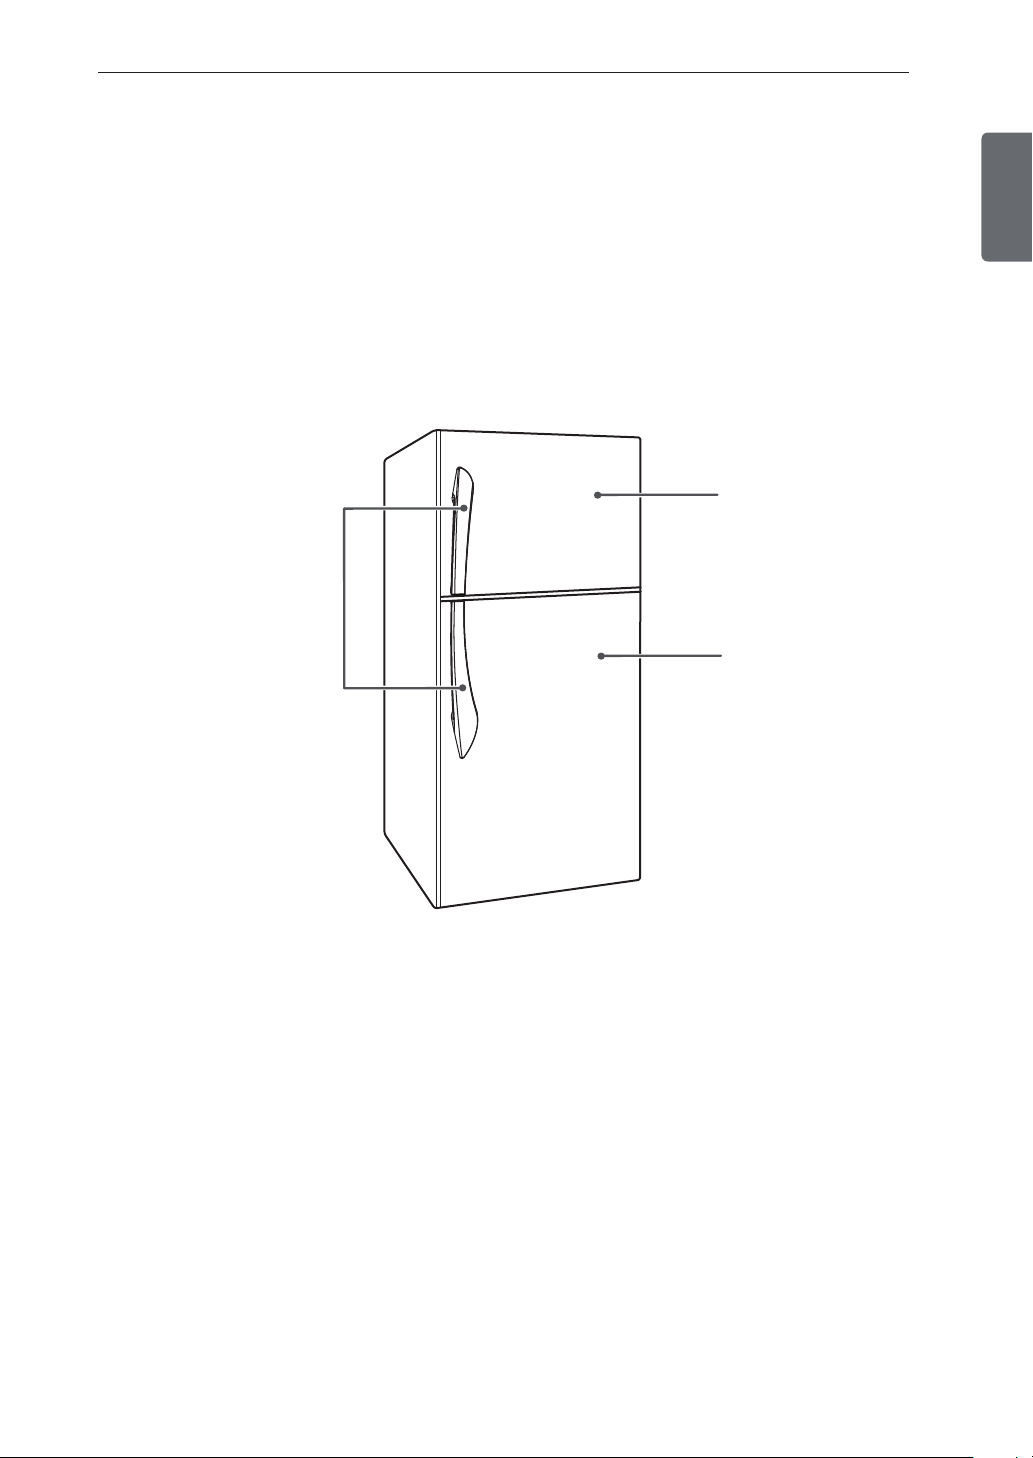
Refrigerator Exterior
Handles
Open and close
the doors.
Freezer
Preserves frozen food.
Refrigerator
Preserves food.
ENGLISH
Page 8
7 PRODUCT OVERVIEW
ENGLISH
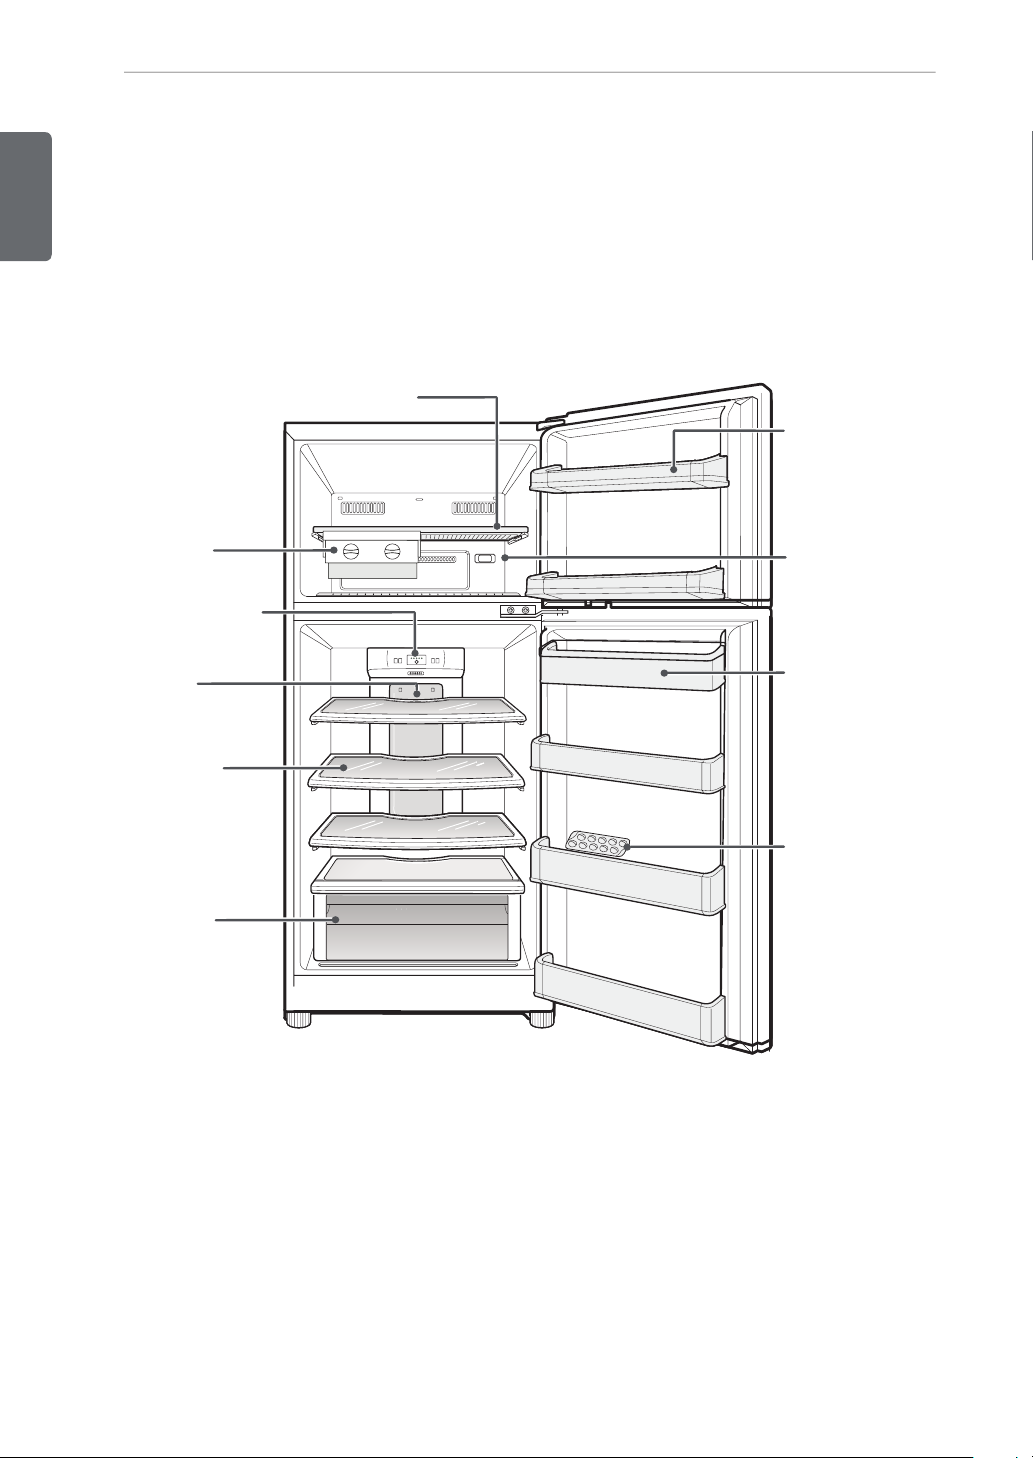
Refrigerator Interior
Icemaker
Refrigerator Control Panel
Controls the temperature of
the refrigerator compartment.
LED Interior Lamp
The interior lamps light up
the inside of the refrigerator.
Refrigerator Shelf
The shelves in your
refrigerator are adjustable
to meet your individual
storage needs.
Freezer Shelf
Freezer Door Bins
The door bins are
removable for
easy cleaning.
Freezer Control
Panel
Controls the flow of cold
air from the freezer into
the refrigerator.
Refrigerator Door Bins
Adjust the door bins as
necessary to easily
store items.
Egg Tray
Crisper
Helps fruits and
vegetables to stay
crisp.
Page 9
8INSTALLATION
INSTALLATION
Installation Overview
Please read the following installation instructions first after purchasing this product or transporting it to
another location.
1 Unpacking your
refrigerator
This appliance is intended to be used in household and similar applications such as:
- Staff kitchen areas in shops, offices and other working environments; farm houses and by clients in hotels,
motels and other residential environments.
- Bed and breakfast like environments; catering and similar non-retail applications.
2 Choosing the proper
location
3 Leveling and Door
Alignment
ENGLISH
Specifications
The appearance and specifications listed in this manual may vary due to constant product improvements.
Dimensions
Net Weight
Width
31 in
(787 mm)
Depth
29 in
(737 mm)
182,98 lb. (83 kg)
Height
71 in
(1803 mm)
Page 10
9 INSTALLATION
Unpacking the Refrigerator
ENGLISH
WARNING
Use two or more people to move and install
the refrigerator. Failure to do so can result in
back or other injury.
The refrigerator is heavy. When moving the
refrigerator for cleaning or service, be sure to
protect the floor. Always pull the refrigerator
straight out when moving it. Do not wiggle or
walk the refrigerator when trying to move it,
as floor damage could occur.
Keep flammable materials and vapors, such as
gasoline, away from the refrigerator. Failure to
do so can result in fire, explosion, or death.
Remove tape and any temporary labels from your
refrigerator before using. Do not remove any
warning-type labels or the model and serial number
labels.
To remove any remaining tape or glue, rub the area
briskly with your thumb. Tape or glue residue can
also be easily removed by rubbing a small amount of
liquid dish soap over the adhesive with your fingers.
Wipe with warm water and dry.
Do not use sharp instruments, rubbing alcohol,
flammable fluids, or abrasive cleaners to remove
tape or glue. These products can damage the
surface of your refrigerator.
WARNING
To reduce the risk of electric shock, do not install
the refrigerator in a wet or damp area.
Flooring
To avoid noise and vibration, the unit must be
leveled and installed on a solidly constructed floor.
If required, adjust the leveling legs to compensate
for unevenness of the floor. The front should be
slightly higher than the rear to aid in door closing.
Leveling legs can be turned easily by tipping the
cabinet slightly. Turn the leveling legs to the left to
raise the unit or to the right to lower it (See Leveling
section).
NOTE
Installing on carpeting, soft tile surfaces, a
platform or weakly supported structure is not
recommended.
Ambient Temperature
Install this appliance in an area where the
temperature is between 55 °F (13 °C) and 110 °F
(43 °C). If the temperature around the appliance is
too low or high, cooling ability may be adversely
affected.
Refrigerator shelves are installed in the shipping
position. Please reinstall shelves according to your
individual storage needs.
Choosing the Proper Location
The refrigerator should always be plugged into
its own individual properly grounded electrical
outlet rated for 115 V~60 Hz, AC only, and fused
at 15 A.
This provides the best performance and also
prevents overloading house wiring circuits
which could cause a fire hazard from overheated
wires. It is recommended that a separate circuit
serving only this appliance be provided.
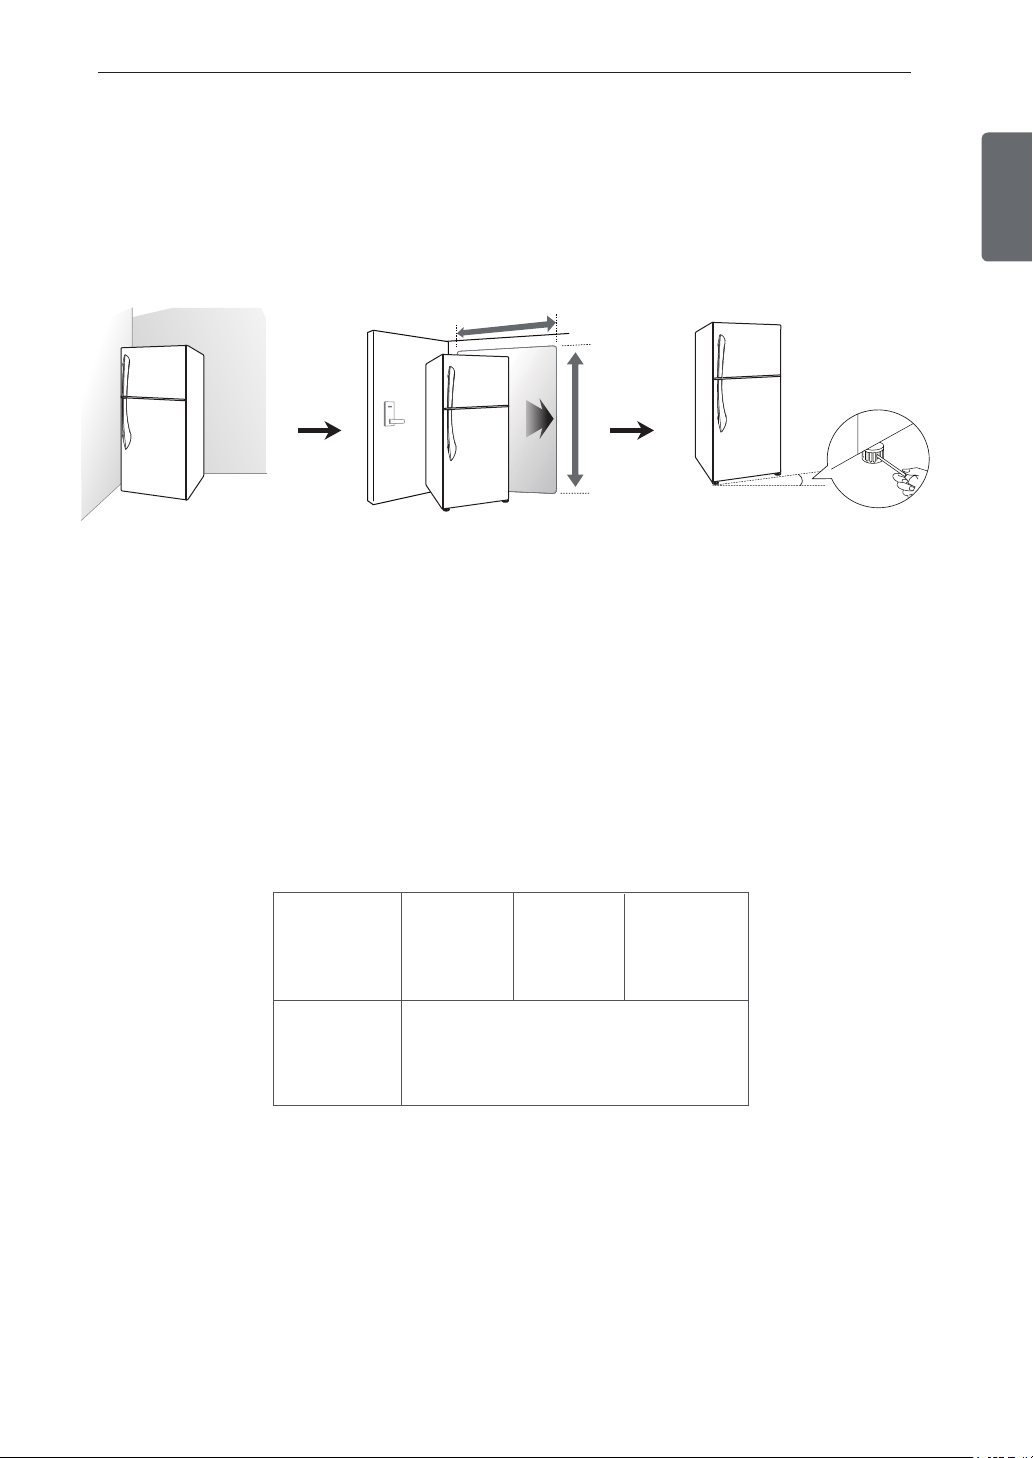
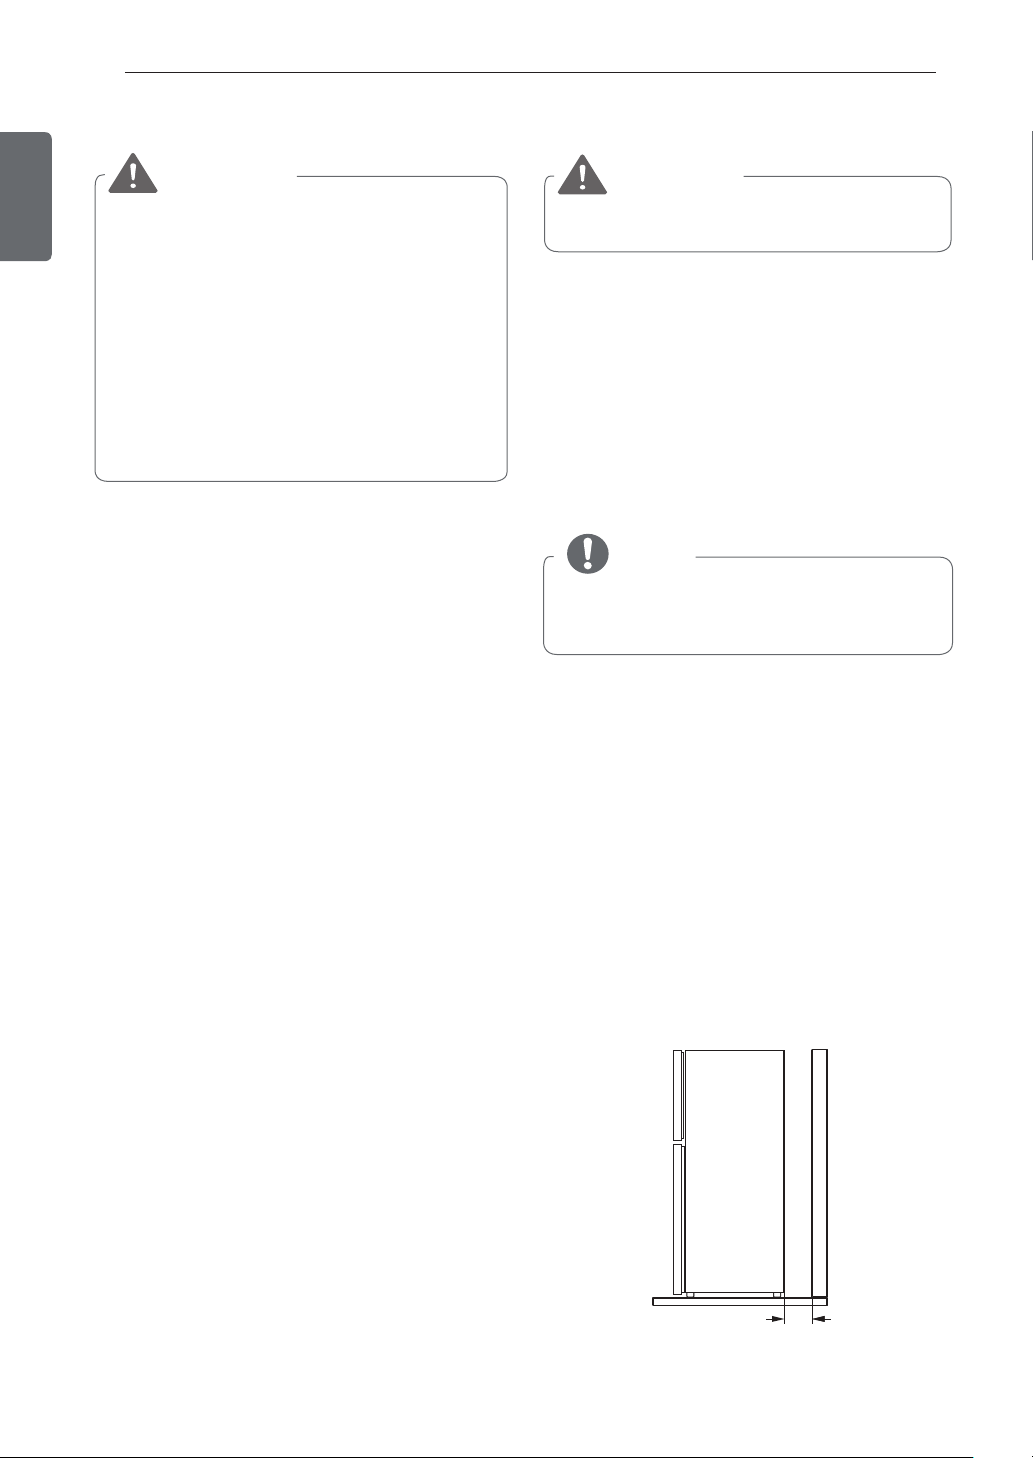
Measuring the Clearances
Too small of a distance from adjacent items may
result in lowered freezing capability and increased
electricity consumption charges. Allow at least 24
inches (61 cm) in front of the refrigerator to open
the doors, and at least 2 inches (5.08 cm) between
the back of the refrigerator and the wall.
24” (61 cm)
2” (5.08 cm)
Page 11
Removing / Assembling the Doors
Hinge Pin
Middle Hinge Bracket
When it is necessary to move the refrigerator
through a narrow opening, removing the doors is the
recommended procedure.
WARNING
If your entrance door is too narrow for the
refrigerator to pass through, remove the
refrigerator doors and move the refrigerator
sideways through the doorway.
Use two or more people to remove and install
the refrigerator doors. Failure to do so can result
in back or other injury.
Disconnect the electrical supply to the
refrigerator before installation. Failure to do so
could result in serious injury or death.
Do not put hands, feet or other objects into the
air vents or bottom of the refrigerator. You may
be injured or receive an electrical shock.
Be careful when handling the hinge and stopper.
You may be injured.
Remove food and bins before detaching the
doors and drawers.
INSTALLATION
2.
Remove the three bolts with either a 10 mm or
3/8 in. socket wrench, and lift off the top hinge.
Set the parts aside.
3.
Carefully lift up the freezer door from the middle
hinge bracket. Place the door on a non-scratching
surface.
Top Hinge
10
ENGLISH
Tools Needed
10 mm or 3/8 inch socket wrench.
No. 2 Phillips head screwdriver.
Flat-head screwdriver.
Adjustable wrench.
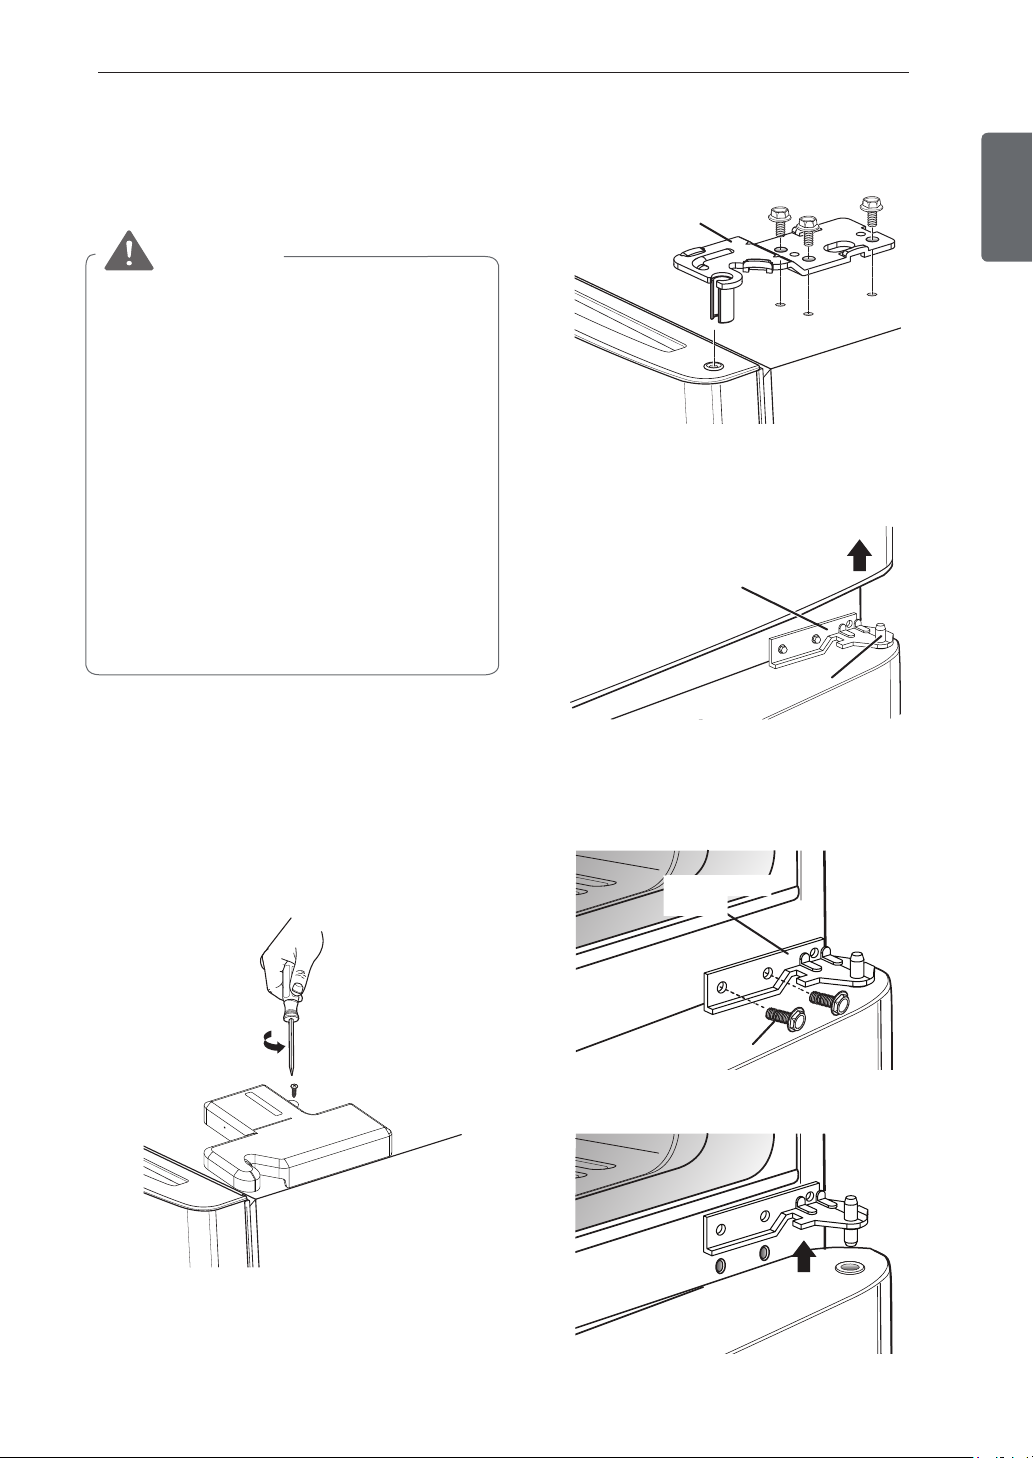
Removing the Freezer Door
1.
Remove the top-hinge cover using a Phillips
screwdriver.
Counterclockwise
to remove
Removing the Refrigerator Door
1.
Loosen and remove the two bolts with the socket
wrench.
Middle Hinge
Bracket
Bolt
2.
Remove the middle hinge bracket.
NOTE: Place the top hinge cover on the cabinet
and make sure not to damage the wires
assembled to it.
Page 12
11 INSTALLATION
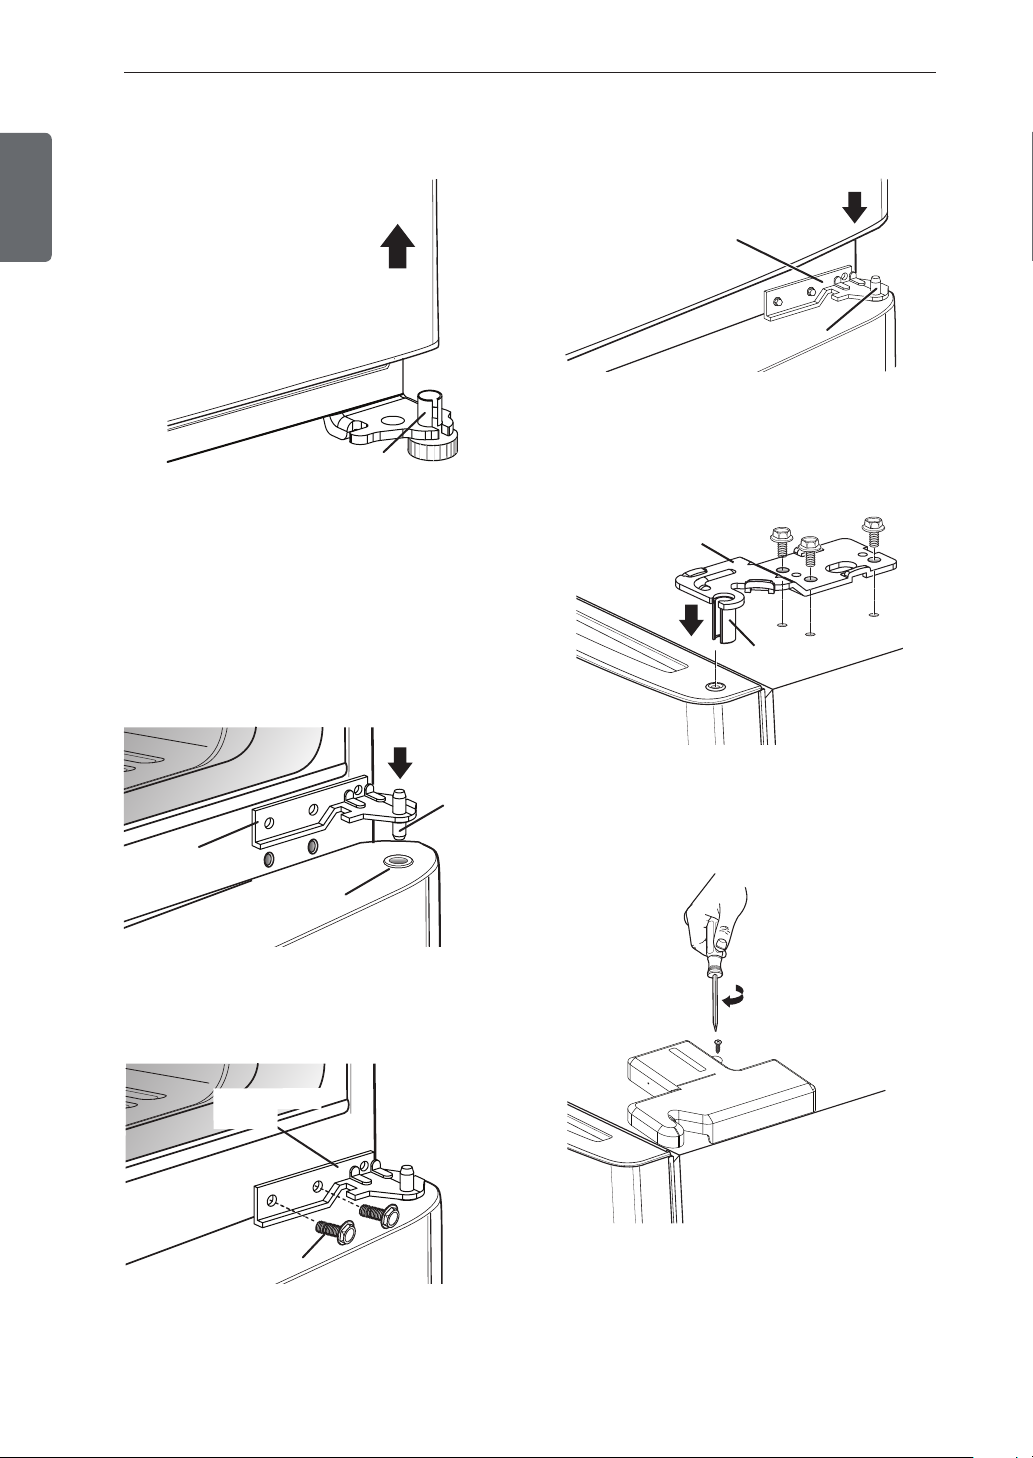
Hinge Pin
Middle Hinge Bracket
3.
ENGLISH
Carefully lift up the refrigerator door from the
bottom hinge pin. Place it on a non-scratching
surface.
Bottom Hinge
Pin
Assembling the Freezer Door
1.
2.
Set the freezer door onto the middle hinge pin.
Place the top hinge pin in the top of the freezer
door and line up the upper hinge with the holes
on top of the refrigerator. Use the three bolts to
replace the hinge.
Assembling the Refrigerator Door
1.
Lower the refrigerator door onto the bottom
hinge pin.
2.
Place the hinge pin of the middle hinge bracket
inside of the hinge pin insert on top of the door.
Hold the door in place and line the middle hinge
bracket with the holes in the refrigerator housing.
Hinge
Pin
Middle Hinge
Bracket
3.
Insert and tighten the two bolts with the socket
wrench to refasten the middle hinge bracket to
the refrigerator housing.
Hinge Pin
Insert
Middle Hinge
Bracket
Top Hinge
Top Hinge Pin
3.
Carefully place the top hinge cover back into
place over the hinge and use the screw to replace
it.
Clockwise to replace
Bolt
NOTE: Before place the top hinge cover make
sure that all wires are not being pressed by the
cover hinge.
Page 13

INSTALLATION
12
Turning on the Power
1. Plug in the refrigerator.
CAUTION
Connect to a rated power outlet.
Have a certified electrician check the wall
outlet and wiring for proper grounding.
Do not damage or cut off the ground terminal
of the power plug.
NOTE
Having someone push backward against the top
of the refrigerator takes some weight off the
leveling legs. This makes it easier to adjust the
legs.
2.
Open both doors again and check to make sure
that they close easily. If the doors do not close
easily, tilt the refrigerator slightly more to the rear
by turning both leveling legs counterclockwise. It
may take several more turns, and you should turn
both leveling legs the same amount.
ENGLISH
Leveling
After installing, plug the refrigerator’s power cord
into a 3-prong grounded outlet and push the
refrigerator into the final position.
Your refrigerator has two front leveling legs (one on
the right side and one on the left). Adjust the legs to
alter the tilt from front-to-front or side-to-side. If the
refrigerator seems unsteady, or you want the doors
to close more easily, adjust the refrigerator’s tilt
using the instructions below:
1.
Turn the leveling legs by inserting a flat blade
screwdriver in the holes located in the leveling
screws. Turn the leg clockwise ( ) to raise that
side of the refrigerator or counterclockwise ( )
to lower it. It may take several turns of the
leveling leg to adjust the tilt of the refrigerator.
Leveling
Screw
Screwdriver
Page 14
13 OPERATION
ENGLISH
Before use
NOITAREPO
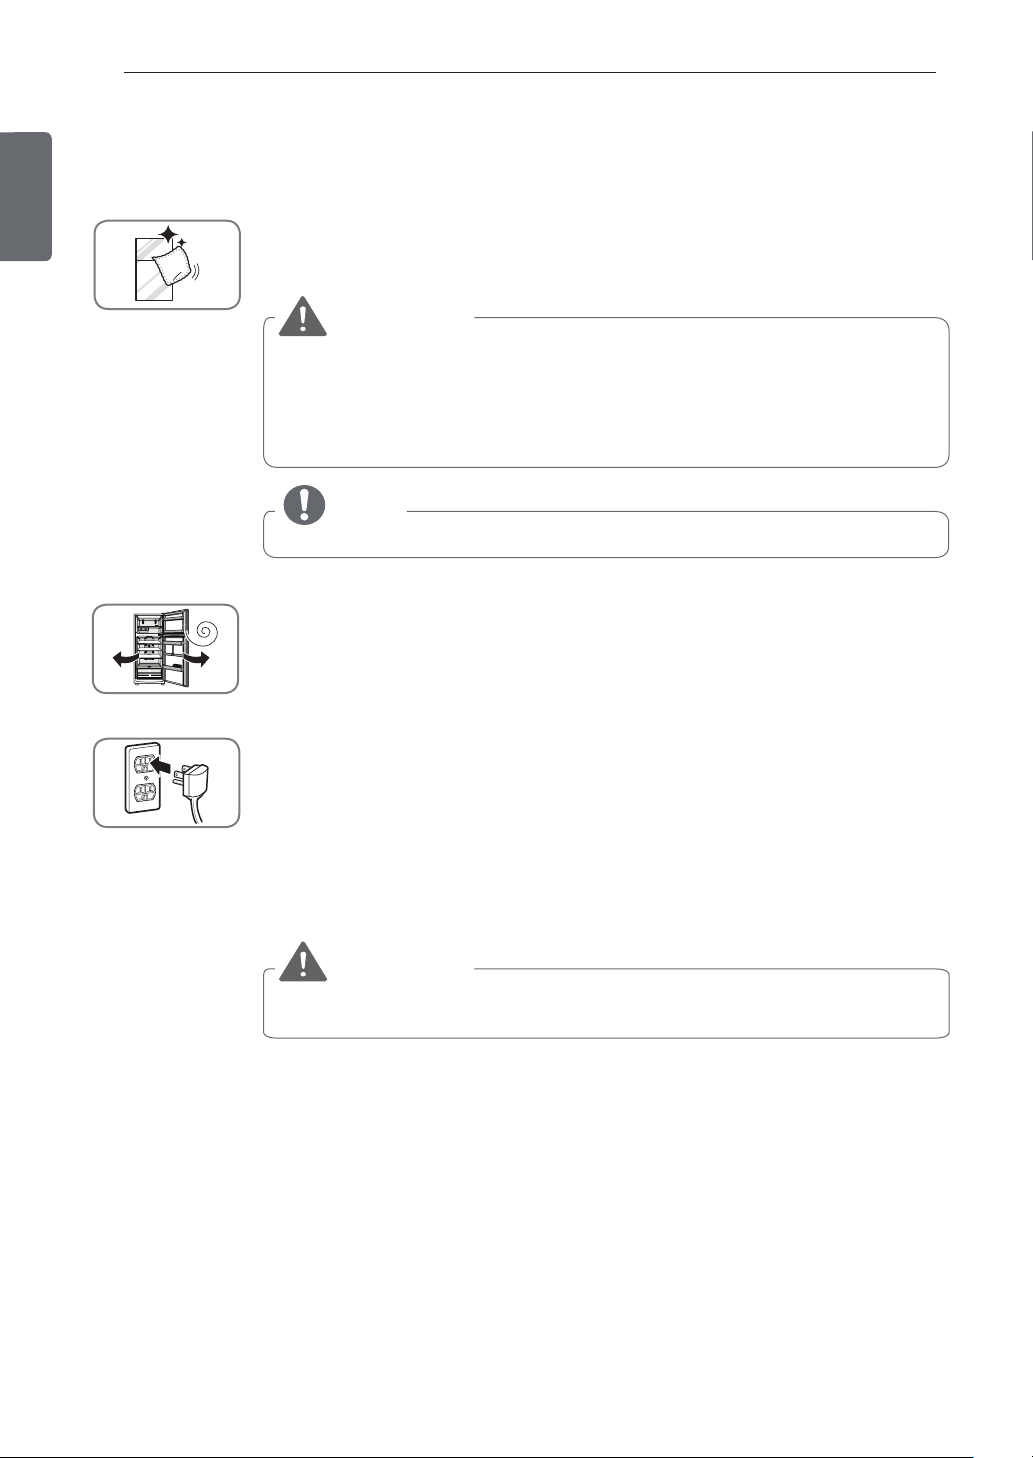
Clean the refrigerator.
Clean your refrigerator thoroughly and wipe off all dust that accumulated
during shipping.
CAUTION
Do not scratch the refrigerator with a sharp object or use a detergent that
contains alcohol, a flammable liquid or an abrasive when removing any tape or
adhesive from the refrigerator.
Do not peel off the model or serial number label or the technical information on
the rear surface of the refrigerator.
NOTE
Remove adhesive residue by wiping it off with your thumb or dish detergent.
Open refrigerator doors to ventilate the interior.
Pull-out Tray
The inside of the refrigerator may smell like plastic at first. Remove any adhesive tape
from inside the refrigerator and open the refrigerator doors for ventilation.
Connect the power supply.
Check if the power supply is connected before use.
Read the “Turning On The Power” section.
Wait for the refrigerator to cool.
Allow your refrigerator to run for at least two to three hours before putting food in it.
Check the flow of cold air in the freezer compartment to ensure proper cooling.
CAUTION
Putting food in the refrigerator before it has cooled could cause the food to spoil, or
a bad odor could remain inside the refrigerator.
The refrigerator makes a loud noise after initial operation.
This is normal. The volume will decrease as the temperature lowers.
Page 15
OPERATION
14
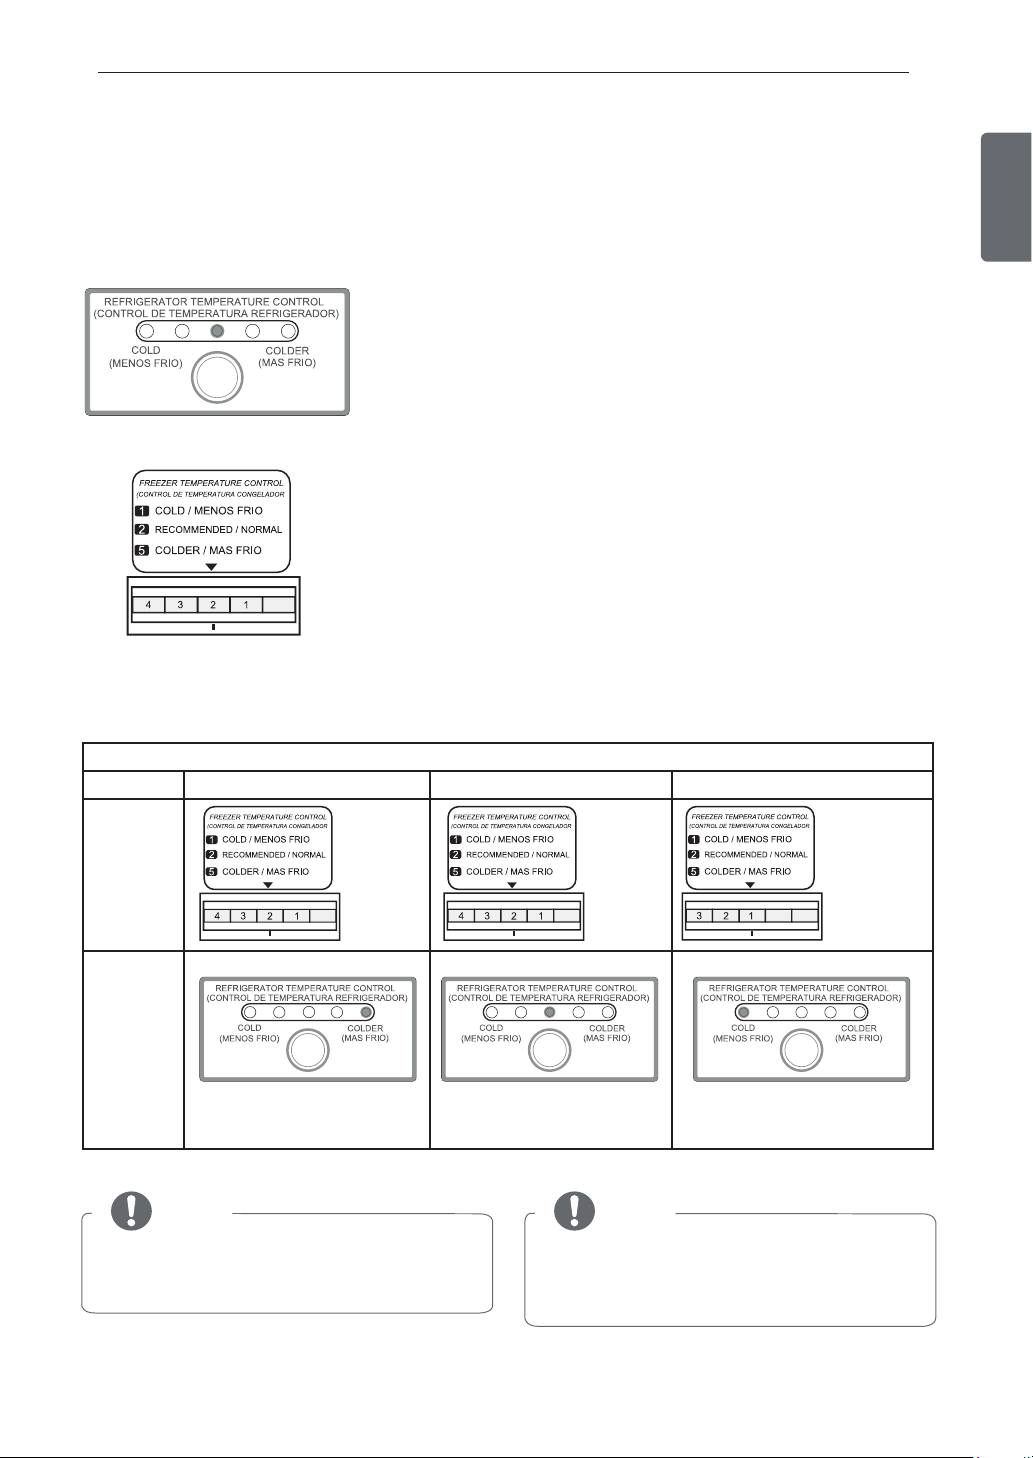
Control Panel
Control Panel Features
Refrigerator Control Panel
Controls the temperature of the refrigerator compartment. Press the
button to the desired setting (from 1 to 5).
)
Adjust the temperature controls depending on the amount of stored food, using the suggested settings
below:
Control of: Large Amount Regular Amount Small Amount
Freezer Control Panel
Controls the flow of cold air from the freezer into the refrigerator.
Change the control by gently sliding it. The arrow indicates
the setting selected (from 1 to 5).
Amount of Stored Food
ENGLISH
)
Set to 2 Set to 2
Freezer
Refrigerator
Press until the fifth
NOTE
light is on
Keep the temperature controls clear of food
packages, which might knock into them and
change the temperature settings.
Press until the third
light is on
Setting the freezer temperature control to 5 may
result in a warmer than expected refrigerator
compartment, especially on a hot day or if the
refrigerator is very full.
)
NOTE
Press until the first
light is on
)
Set to 1
Page 16
15 OPERATION
ENGLISH
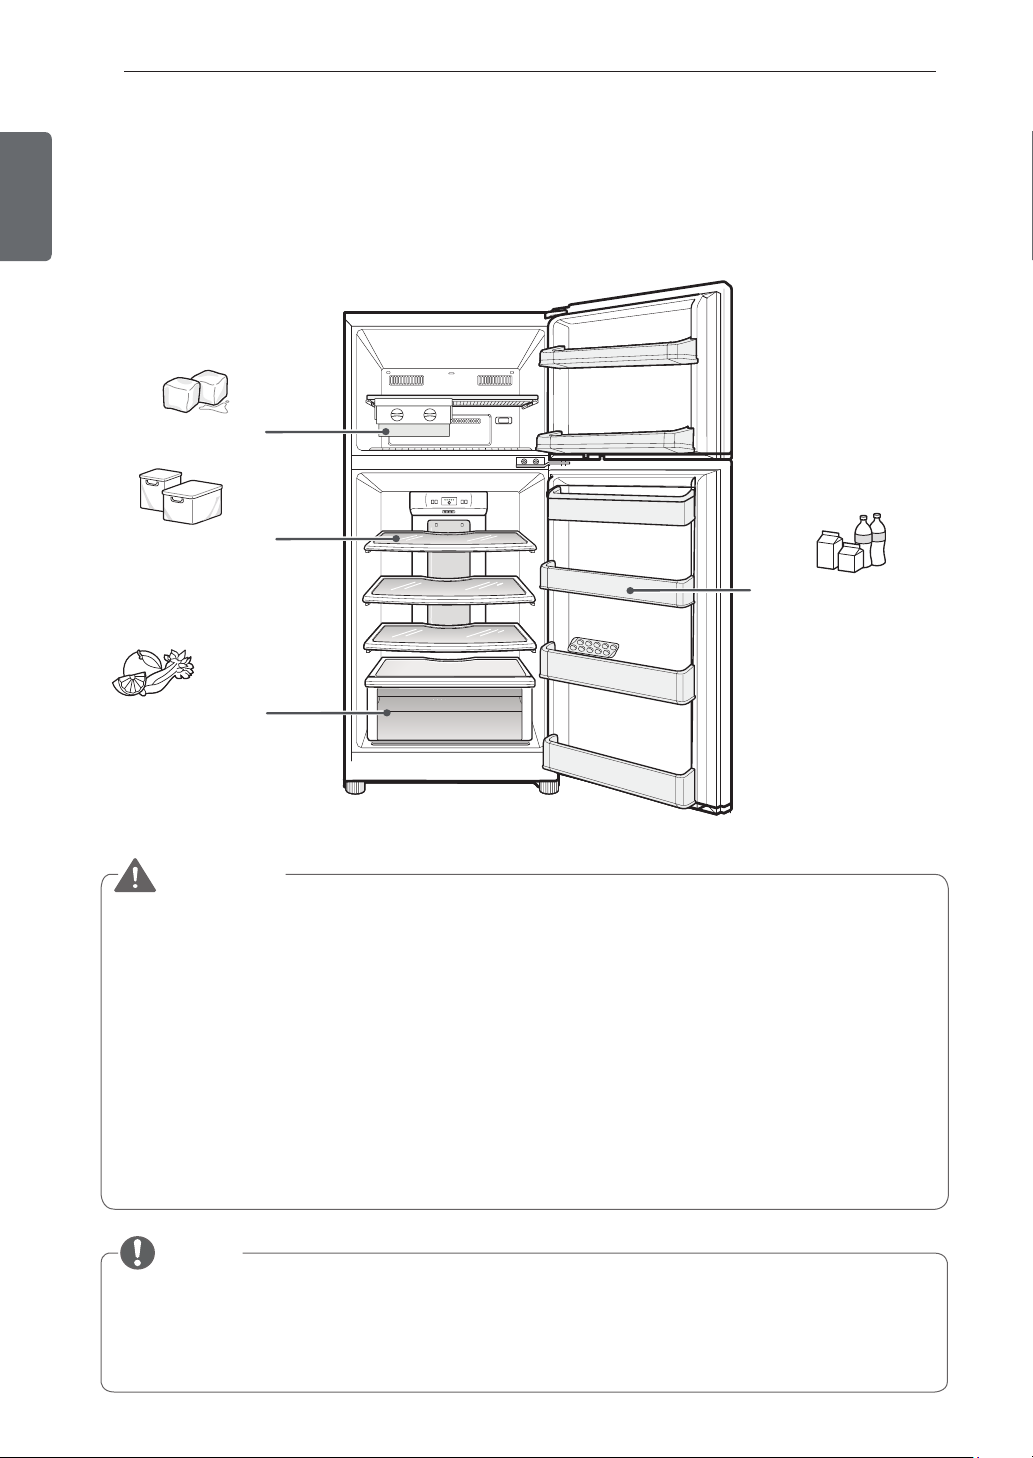
Storing Food
Food Preservation Location
Each compartment inside the refrigerator is designed to store different types of food. Store your food
in the optimal space to enjoy the freshest taste.
Ice Container
Stores ice.
Refrigerator Shelf
Adjustable shelves to
meet your individual
storage needs.
Vegetable Store (Crisper)
Preserve vegetables
and fruits.
Refrigerator Door Bins
Store drinks such as juice
and soda, as well as
condiments, salad dressing
and other food items.
CAUTION
.
Do not store food with high moisture content towards the top of the refrigerator. The moisture could
come in direct contact with the cold air and freeze.
.
Wash food before storing it in the refrigerator. If necessary, rinse and thoroughly pat dry vegetables
and fruit to remove obvious soil, juice, or blemished areas, and wipe down food packaging to prevent
adjacent foods from being contaminated.
.
If the refrigerator is kept in a hot and humid place, frequent opening of the door or storing a lot of
vegetables in the refrigerator may cause condensation to form. Wipe off the condensation with a
clean cloth or a paper towel.
.
If the refrigerator door or freezer door is opened too often, warm air may penetrate the refrigerator
and raise its temperature. This can increase the running costs of the unit.
.
Do not overfill or pack items too tightly into door bins. Doing so may cause damage to the bin or
personal injury if items are removed with excessive force.
.
Do not store glass containers in the freezer. Contents may expand when frozen and break the
container, causing risk of injury.
NOTE
.
If you are leaving home for a short period of time, like a short vacation, the refrigerator should be left
on. Refrigerated foods that are able to be frozen will stay preserved longer if stored in the freezer.
.
If you are leaving the refrigerator turned off for an extended period of time, remove all food and
unplug the power cord. Clean the interior, and leave the door open to prevent fungi from growing in
the refrigerator.
Page 17
OPERATION
16
Food Storage Tips
The following tips may not be applicable depending
on the model.
Wrap or store food in the refrigerator in airtight and
moisture-proof material unless otherwise noted.
This prevents food odor and taste transfer
throughout the refrigerator. For dated products,
check date code to ensure freshness.
Food How To
Butter or
Margarine
Cheese
Milk
Eggs
Fruit
Leafy
Vegetables
Vegetables
with skin
(carrots,
peppers)
Fish
Leftovers
Keep opened butter in a covered dish
or closed compartment. When
storing an extra supply, wrap in a
freezer packaging and freeze.
Store in the original wrapping until
you are ready to use it. Once
opened, rewrap tightly in plastic
wrap or aluminum foil.
Wipe milk cartons. For coldest milk,
place containers on an interior shelf.
Store in original carton on interior
shelf, not on door bin.
Do not wash or hull the fruit until it is
ready to be used. Sort and keep fruit
in its original container, in a crisper,
or store in a completely closed paper
bag on a refrigerator shelf.
Remove store wrapping and trim or
tear off bruised and discolored areas.
Wash in cold water and drain. Place
in plastic bag or plastic container and
store in crisper.
Place in plastic bags or plastic
container and store in crisper.
Store fresh fish and shellfish in the
freezer section if they are not being
consumed the same day of
purchase. It is recommended to
consume fresh fish and shellfish the
same day purchased.
Cover leftovers with plastic wrap or
aluminum foil, or store in plastic
containers with tight lids.
Storing Frozen Food
NOTE
Check a freezer guide or a reliable cookbook for
further information about preparing food for
freezing or food storage times.
Freezing
Your freezer will not quick-freeze a large quantity of
food. Do not put more unfrozen food into the freezer
than will freeze within 24 hours [no more than 2 lbs
(0,9 kg) to 3 lbs (1,3 kg) of food per cubic foot of
freezer space]. Leave enough space in the freezer
for air to circulate around packages. Be careful to
leave enough room at the front so the door can close
tightly.
Storage times will vary according to the quality and
type of food, the type of packaging or wrap used
(how airtight and moisture-proof) and the storage
temperature. Ice crystals inside a sealed package
are normal. This simply means that moisture in the
food and air inside the package have condensed,
creating ice crystals.
NOTE
Allow hot foods to cool at room temperature for
30 minutes, then package and freeze. Cooling hot
foods before freezing saves energy.
Packaging
Successful freezing depends on correct packaging.
When you close and seal the package, it must not
allow air or moisture in or out. If it does, you could
have food odor and taste transfer throughout the
refrigerator and could also dry out frozen food.
Packaging Recommendations:
Rigid plastic containers with tight-fitting lids.
Straight-sided canning/freezing jars.
Heavy-duty aluminum foil.
Plastic-coated paper.
Non-permeable plastic wraps.
Specified freezer-grade self-sealing plastic bags.
Follow package or container instructions for proper
freezing methods.
Do not use:
Bread wrappers.
Non-polyethylene plastic containers.
Containers without tight lids.
Wax paper or wax-coated freezer wrap.
Thin, semi-permeable wrap.
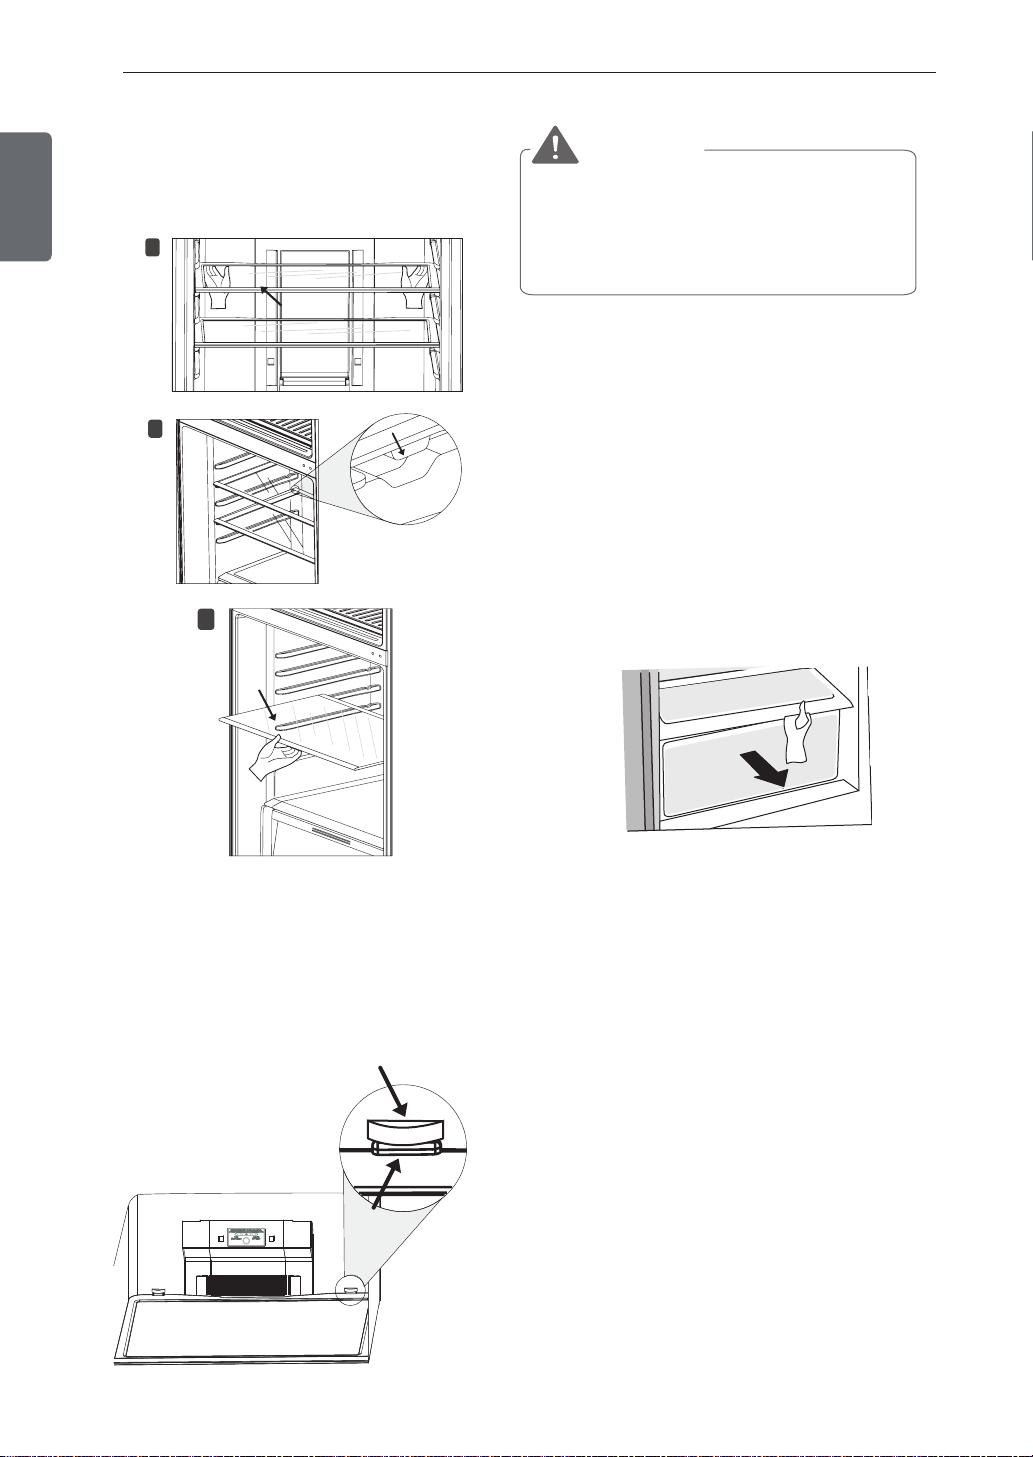
Adjusting the Refrigerator Shelves
The shelves in your refrigerator are adjustable to
meet your individual storage needs.
Adjusting the shelves to fit items of different heights
will make finding the exact item you want easier.
Doing so will also reduce the amount of time the
refrigerator door is open which will save energy.
ENGLISH
Page 18
17 OPERATION
ENGLISH
1. Lift the back of the shelf from below.
2. Use enough force to lift the shelf and release it
from the holders.
3. Slide the shelf forward to remove it completely.
Removing the shelf
1
2
CAUTION
Do not clean glass shelves with warm water
Shelf
Holder
3
Shelf
while they are cold. Shelves may break if they´re
exposed to sudden temperature changes or
impact.
Glass shelves are heavy. Use special care when
removing them.
Humidity Controlled Crisper
The crispers provide fresher tasting fruit and
vegetables inside the drawer.
Removing/Replacing the Crisper:
1. To remove the crisper, pull it out to full extension,
lift the front, and pull straight out.
2. To replace the crisper, slightly tilt up the front,
insert the drawer into the frame, and push it
back into place.
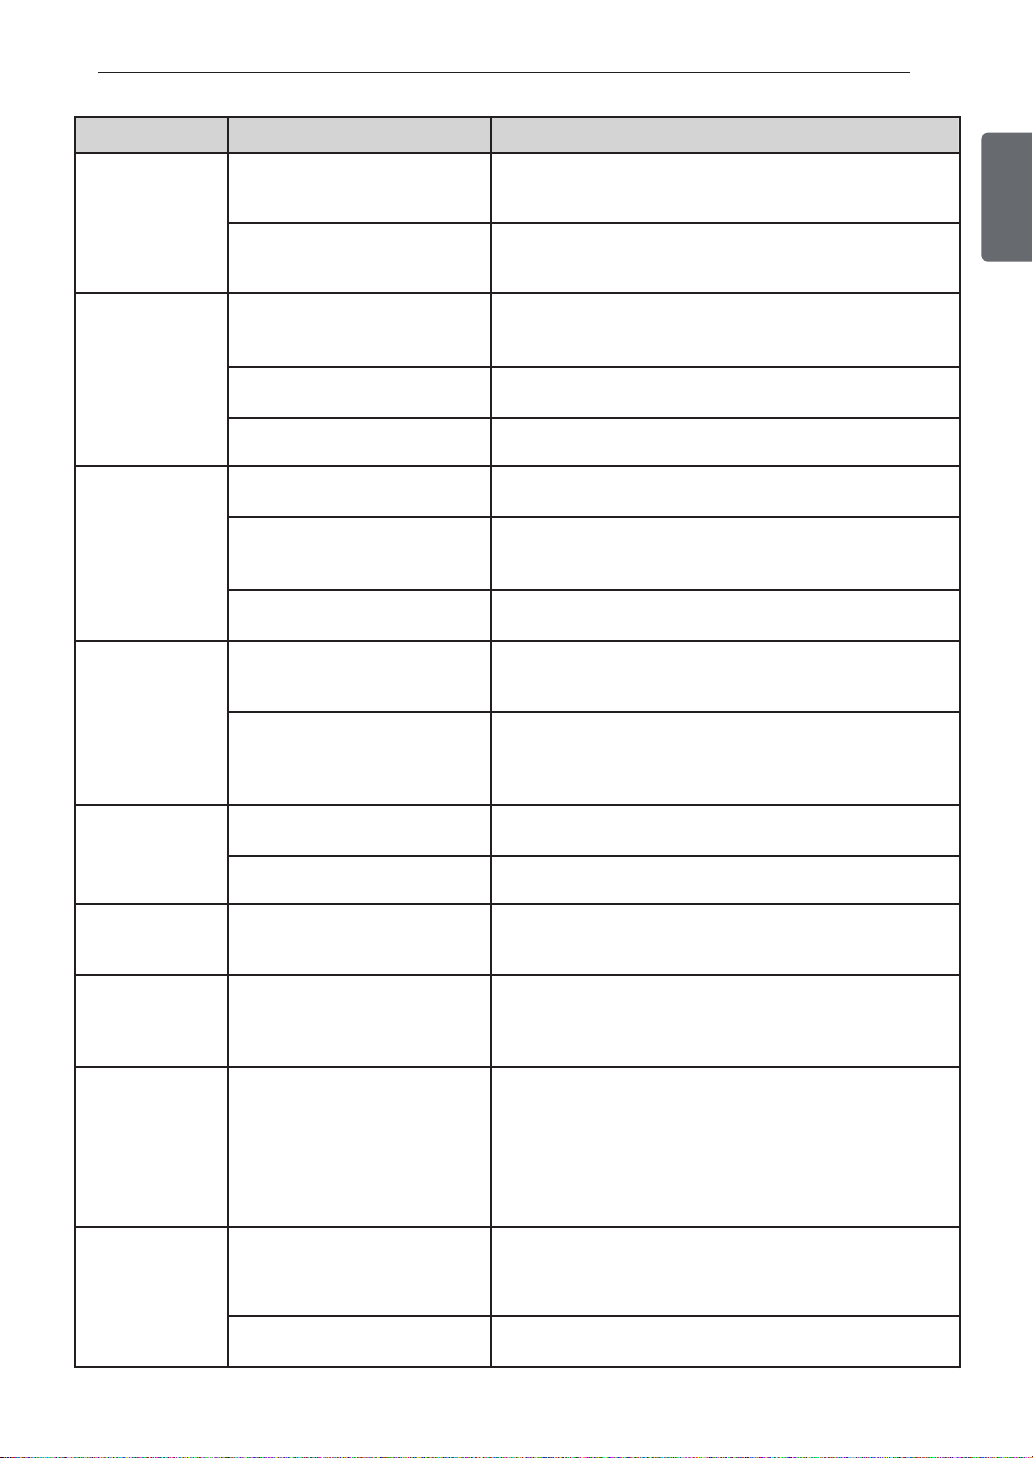
Assembling the Shelf
Slide shelf into rails until it stops.
1.
2.
Gently push down on back of shelf to tuck
flanges under ribs on rear cabinet wall.
Make sure flanges are tucked completely
3.
under ribs to assure stability of shelf.
Rib
Flange
Page 19
OPERATION
18
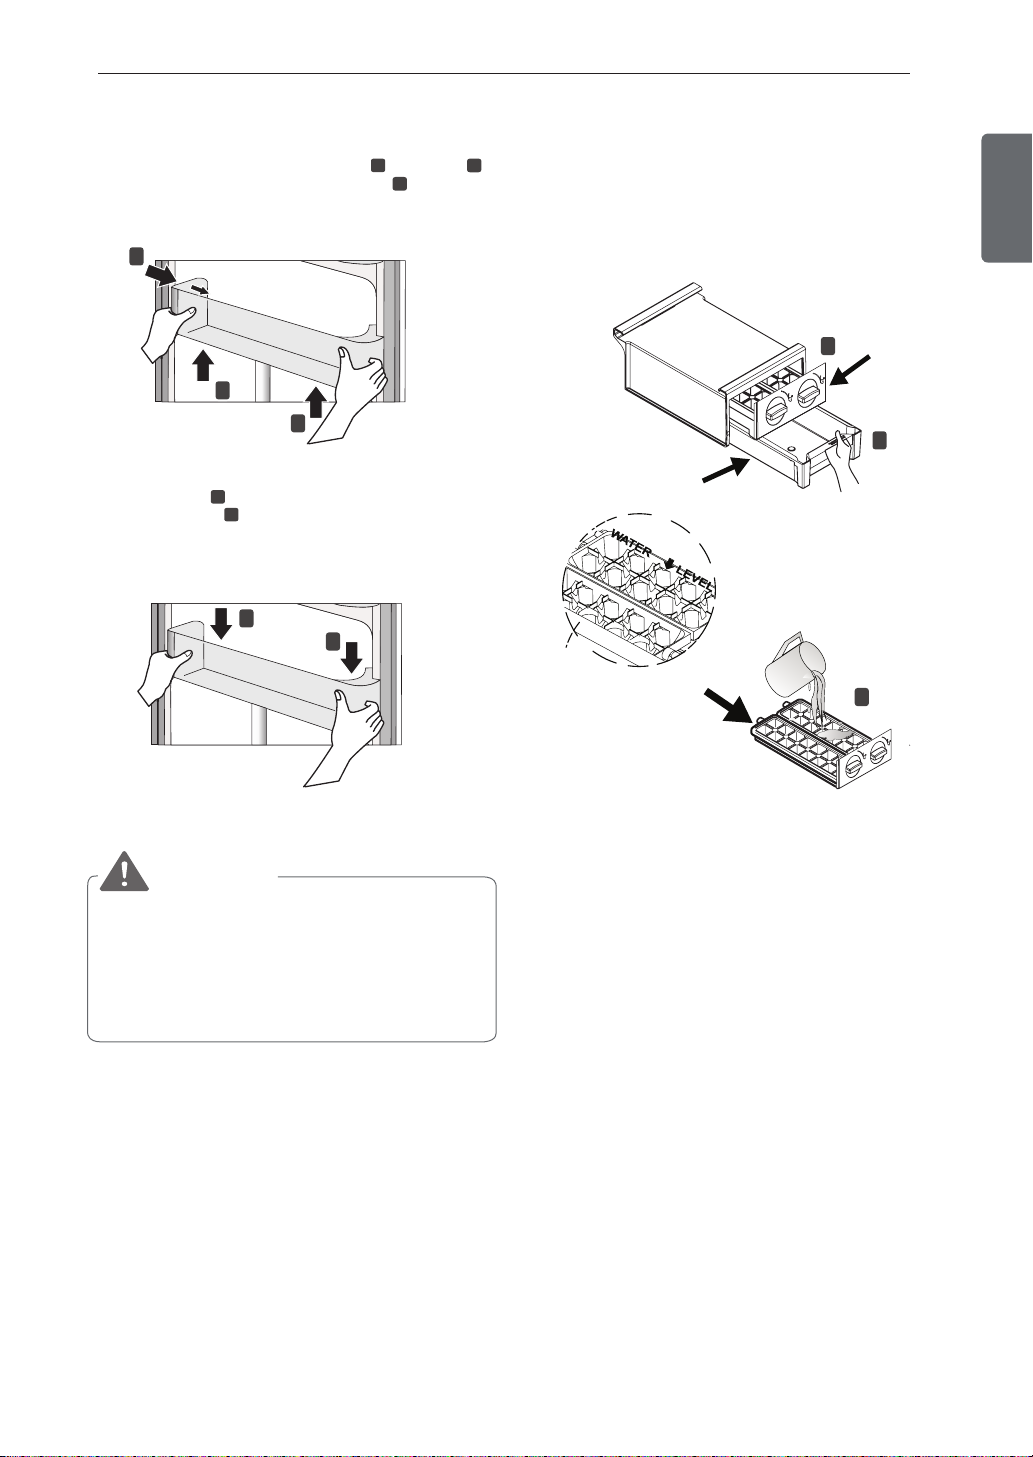
Assembling/Disassembling Door Bin
To disassemble,
then lift up the right side to remove the bin .
1
To assemble,
guide on the door , then slide the left side down until the
bin clicks into place .
push in on the left side and lift up ,
Disassembly
2
2
slide the right side of the bin down along the
1
2
3
Assembly
2
1
3
2
1
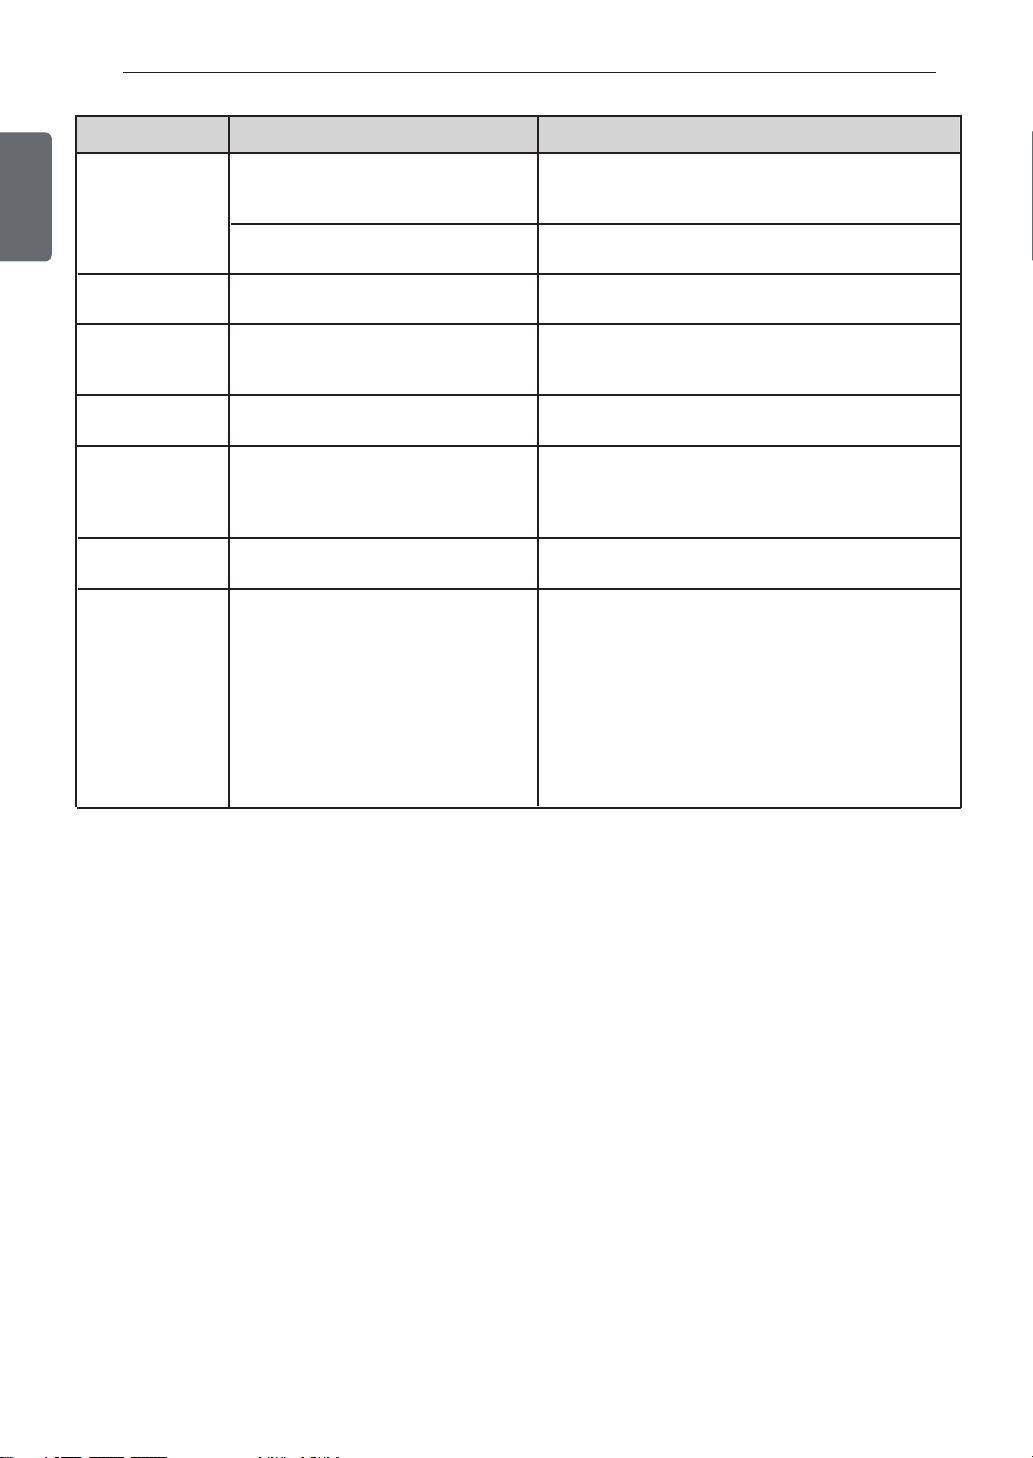
Icemaker
1. Ice bin must be removed in order to remove ice
trays.
2. Once ice bin is removed, pull out ice trays.
3. Fill ice trays to the indicated level.
2
Ice Trays
1
Ice Bin
3
ENGLISH
CAUTION
Do not apply excessive force while detaching or
assembling the storage bins.
Do not use the dishwasher to clean the storage
bins and shelves.
Regularly detach and wash the bins and shelves,
they can become easily contaminated by the
food.
4. Place ice bin and ice trays back in the icemaker
and wait for ice cubes to freeze.
5. Twist knobs clockwise to move ice cubes into
ice bin.
6. Icemaker can be moved from one side to the
other to suit individual storage needs.
Page 20
19 MAINTENANCE
MAINTENANCE
ENGLISH
Cleaning
Both the refrigerator and freezer sections defrost automatically; however clean both sections about once
a month to prevent odors.
Wipe up spills immediately.
Always unplug the refrigerator before cleaning.
General Cleaning Tips
Unplug refrigerator or disconnect power.
Remove all removable parts, such as shelves,
crispers, etc.
Use a clean sponge or soft cloth and a mild
detergent in warm water. Do not use abrasive
or harsh cleaners.
Hand wash, rinse and dry all surfaces
thoroughly.
Exterior
Waxing external painted metal surfaces helps
provide rust protection. Do not wax plastic parts.
Wax painted metal surfaces at least twice a year
using appliance wax (or auto paste wax). Apply wax
with a clean, soft cloth.
For products with a stainless steel exterior, use a
clean sponge or soft cloth and a mild detergent in
warm water. Do not use abrasive or harsh cleaners.
Dry thoroughly with a soft cloth.
CAUTION
Do not use a rough cloth or sponge when
cleaning the interior and exterior of the
refrigerator.
Do not place your hand on the bottom surface
of the refrigerator when opening and closing.
Door Liners and Gaskets
Use a clean sponge or soft cloth and a mild detergent
in warm water. Do
concentrated detergents, bleaches, or cleaners
containing petroleum on plastic refrigerator parts.
not use cleaning waxes,
Plastic Parts (covers and panels)
Use a clean sponge or soft cloth and a mild detergent
in warm water. Do not use glass cleaners, abrasive
cleansers, or flammable fluids. These can scratch or
damage the material.
Light (LED) replacement
NOTE: Do not remove the LED, it is only to be
removed by a qualified technician.
WARNING
In case of replacement, the new LED should be
same specification as the original.
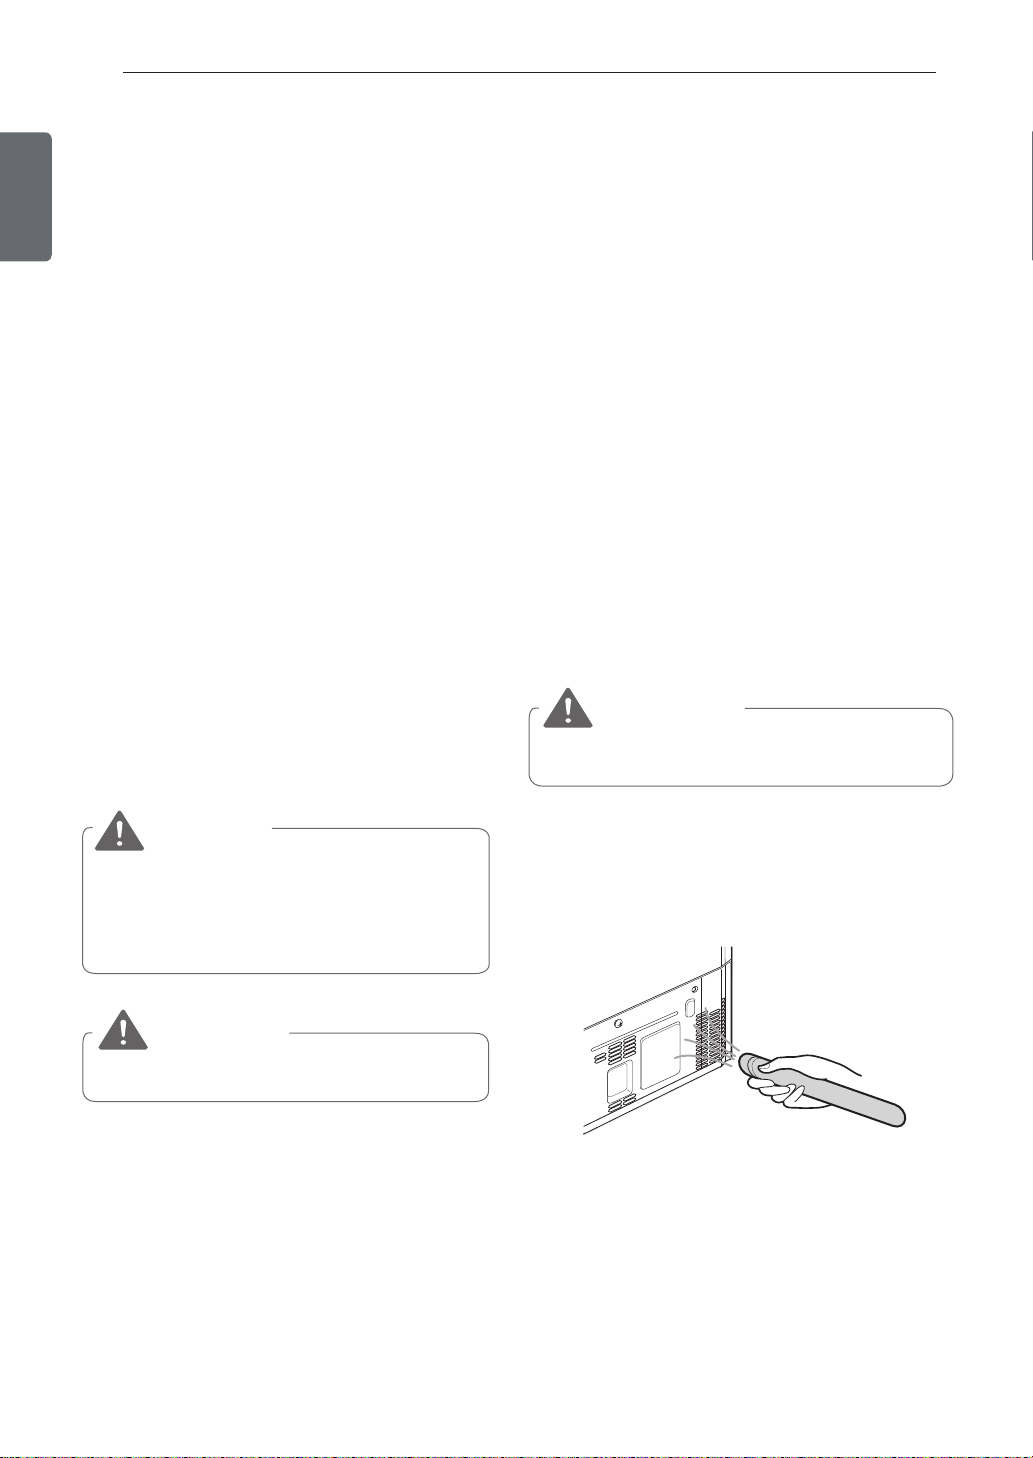
Condenser Coils
Use a vacuum cleaner with an attachment to clean
the condenser cover and vents. Do not remove the
panel covering the condenser coil area.
WARNING
Use non-flammable cleaner. Failure to do so can
result in fire, explosion, or death.
Inside Walls (allow freezer to warm
up so the cloth will not stick)
To help remove odors, you can wash the inside of
the refrigerator with a mixture of baking soda and
warm water. Mix 2 tablespoons of baking soda to 1
quart of water (26 g soda to 1 liter water). Be sure
the baking soda is completely dissolved so it does
not scratch the surfaces of the refrigerator.
Page 21
TROUBLESHOOTING
TROUBLESHOOTING
ENGLISH
Review the Troubleshooting section before calling for service; doing so will save you both time and money.
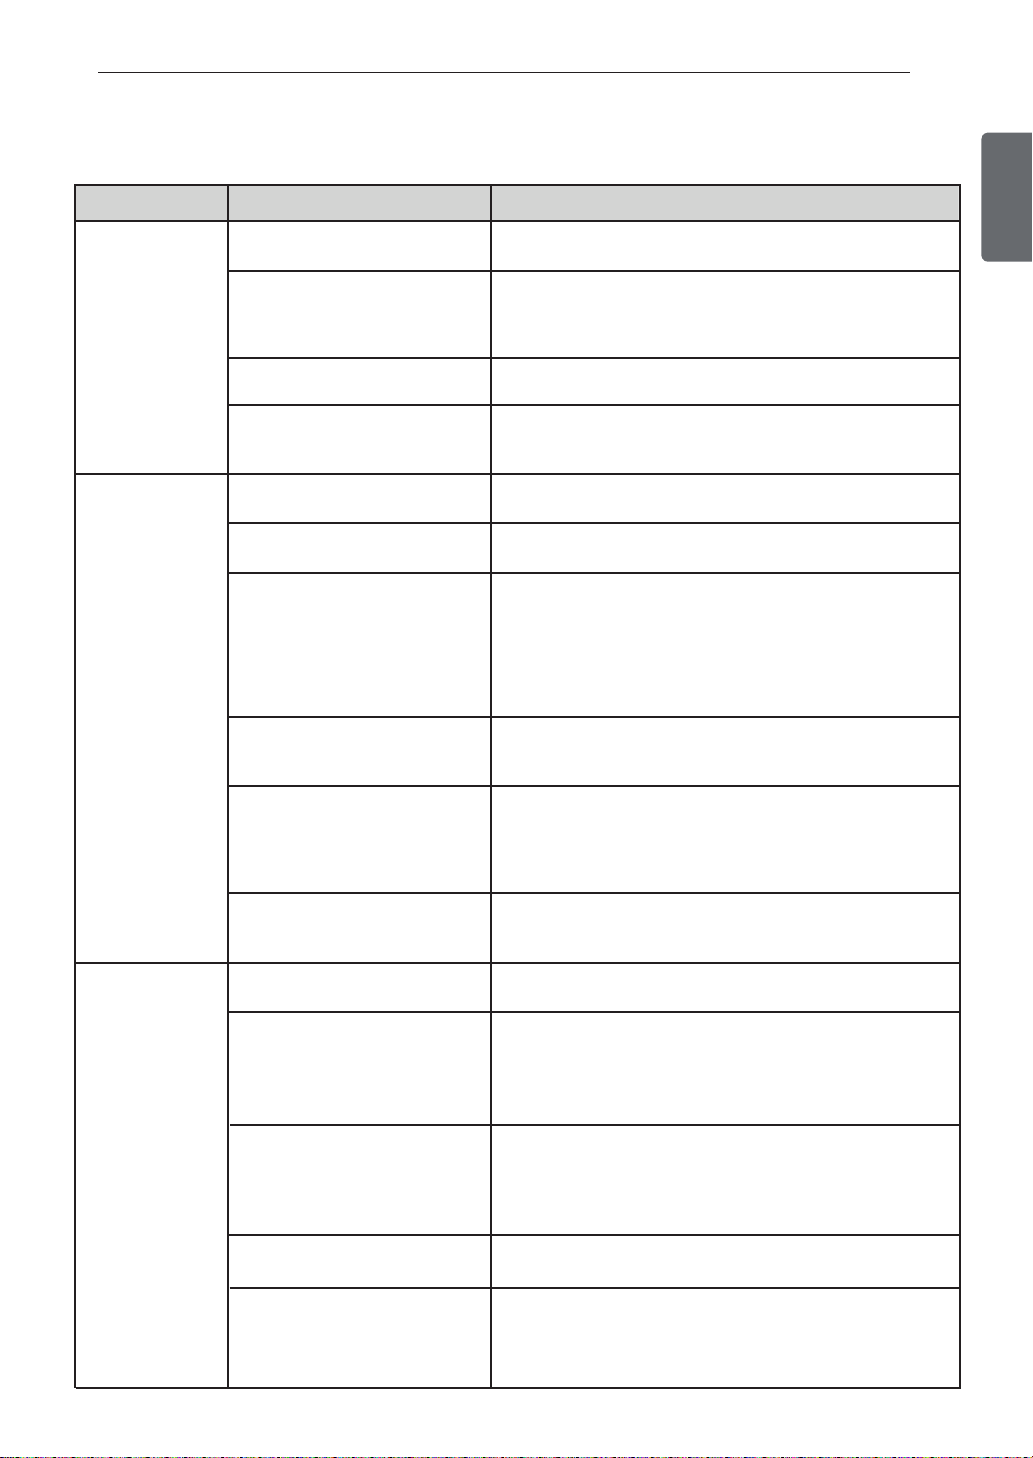
Problem Possible Causes Solutions
20
ENGLISH
Refrigerator and
Freezer section
are not cooling.
Cooling System
runs too much.
Refrigerator or
Freezer section is
too warm.
The refrigerator control is set to
OFF (some models).
Refrigerator is in the defrost
cycle.
Refrigerator was recently
installed.
Refrigerator was recently
relocated.
Refrigerator is replacing an
older model.
Refrigerator was recently
plugged in or power restored.
The door is opened often or a
large amount of food / hot food
was added.
Doors are not closed
completely.
Refrigerator is installed in a hot
location.
Condenser / back cover is
clogged.
Refrigerator was recently
installed.
The air vents are blocked. Cold
air circulates from the freezer to
the fresh food section and back
again through air vents in the
wall dividing the two sections.
Doors are opened often or
for long periods of time.
Unit is installed in a hot
location.
Turn the control ON. Refer to the Control Panel section for
proper temperature settings.
During the defrost cycle, the temperature of each
compartment may rise slightly. Wait 30 minutes and
confirm the proper temperature has been restored once
the defrost cycle has completed.
It may take up to 24 hours for each compartment to reach
the desired temperature.
If the refrigerator was stored for a long period of time or
moved on its side, it is necessary for the refrigerator to
stand upright for 24 hours before connecting it to power.
Modern refrigerators require more operating time but use
less energy due to more efficient technology.
The refrigerator will take up to 24 hours to cool
completely.
Adding food and opening the door warms
refrigerator, requiring the compressor to run longer in
order to cool the refrigerator back down. In order to
conserve energy, try to get everything you need out of the
refrigerator at once, keep food organized so it is easy to
find, and close the door as soon as the food is removed.
(Refer to the Storing Food section).
Firmly push the doors shut. If they will not shut all the way,
see the Doors will not close completely or pop open
section in Troubleshooting.
The compressor will run longer under warm conditions. At
normal room temperatures 70 °F (21 °C) expect your
compressor to run about 40% to 80% of the time. Under
warmer conditions, expect it to run even more often. The
refrigerator should not be operated above 110 °F (43 °C).
Use a vacuum cleaner with an attachment to clean the
condenser cover and vents. Do not remove the panel
covering the condenser coil area.
It may take up to 24 hours for each compartment to reach
the desired temperature.
Locate air vents by using your hand to sense airflow and
move all packages that block vents and restrict airflow.
Rearrange items to allow air to flow throughout the
compartment.
When the doors are opened often or for long periods of
time, warm, humid air enters the compartment. This
raises the temperature and moisture level within the
compartment. To lessen the effect, reduce the frequency
and duration of door openings.
The refrigerator should not be operated in temperatures
above 110 °F (43 °C).
the
A large amount of food or hot
food was added to either
compartment.
food warms the compartment requiring the cooling
Adding
system to run. Allowing hot food to cool to room
temperature before putting it in the refrigerator will reduce
this effect.
Page 22
21 TROUBLESHOOTING
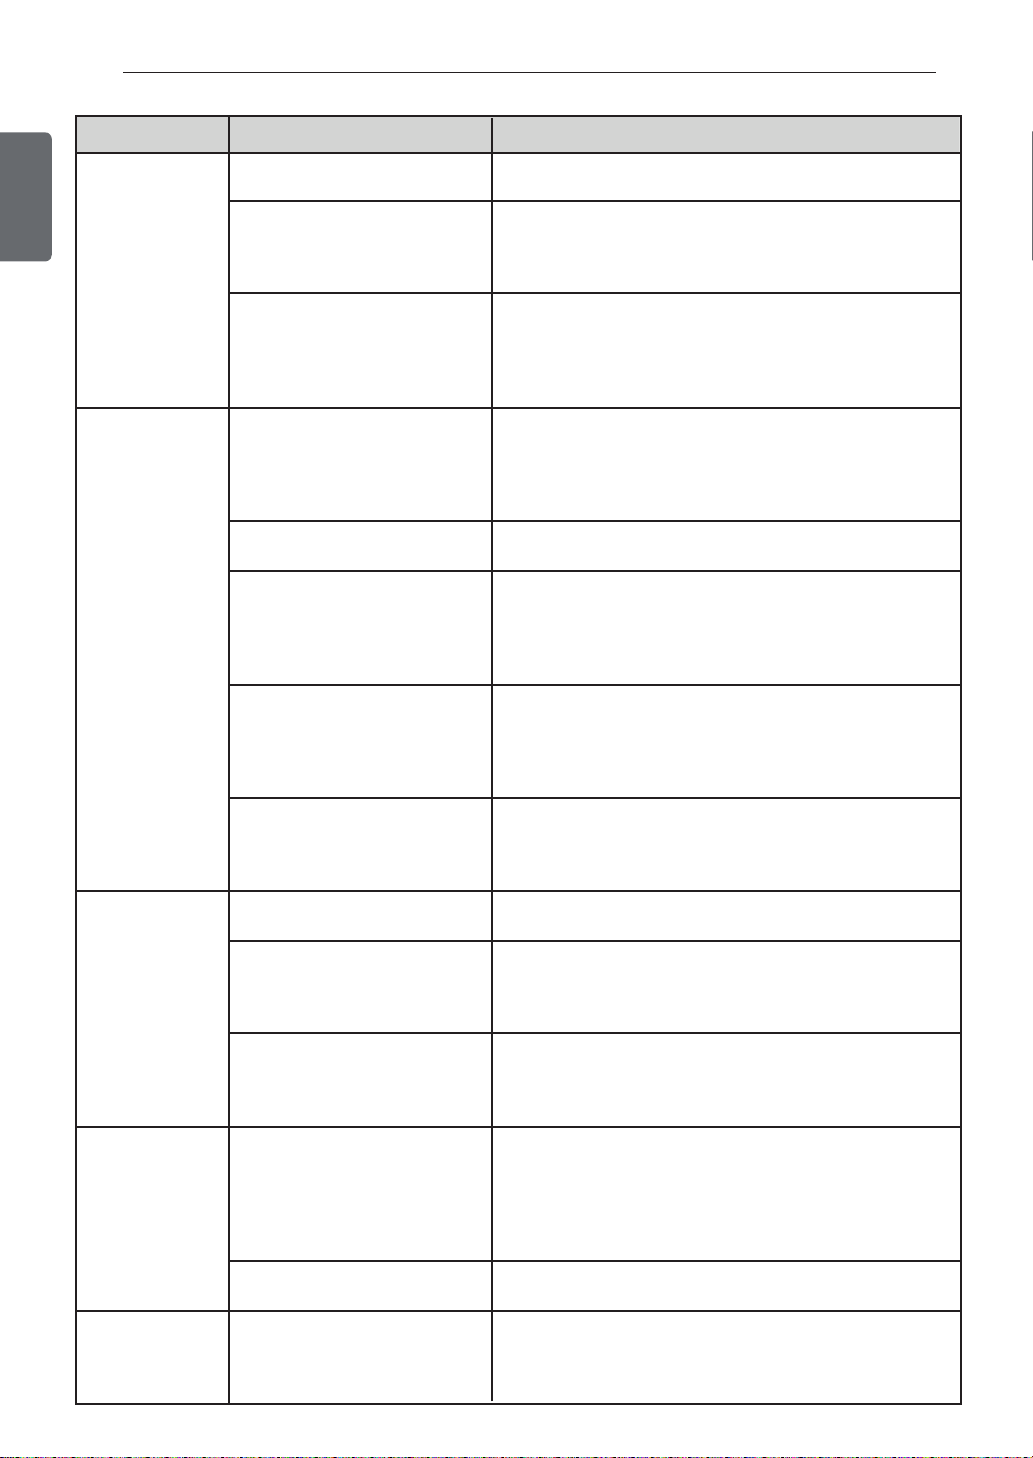
Problem Possible Causes Solutions
ENGLISH
ENGLISH
Refrigerator or
Freezer section is
too warm.
Interior moisture
buildup.
Food is freezing
in the refrigerator
compartment.
Frost or ice
crystals form on
frozen food
(outside of
package).
Refrigerator or
Freezer section
is too cold.
Doors not closed correctly.
Temperature control is not set
correctly.
Defrost cycle has recently
completed.
Doors are opened often or for
long periods of time.
Doors are not closed correctly.
Weather is humid.
Defrost cycle recently
completed.
Food is not packaged correctly.
Food with high water content
was placed near an air vent.
Refrigerator temperature
control is set incorrectly.
Refrigerator is installed in a cold
location.
Door is opened frequently or
for long periods of time.
Door is not closing properly.
Incorrect temperature control
settings.
See the Doors will not close correctly or pop open in
Troubleshooting section.
If the temperature is too warm, adjust the control one
increment at a time and wait for the temperature to
stabilize. Refer to the Control Panel section for more
information.
During the defrost cycle, the temperature of each
compartment may rise slightly and condensation may
form on the back wall. Wait 30 minutes and confirm the
proper temperature has been restored once the defrost
cycle has completed.
When the doors are opened often or for long periods of
time, warm, humid air enters the compartment. This
raises the temperature and moisture level within the
compartment. To lessen the effect, reduce the frequency
and duration of door openings.
See the Doors will not close correctly or pop open in
Troubleshooting section.
Humid weather allows additional moisture to enter the
compartments when the doors are opened leading to
condensation or frost. Maintaining a reasonable level of
humidity in the home will help to control the amount of
moisture that can enter the compartments.
During the defrost cycle, the temperature of each
compartment may raise slightly and condensation may
form on the back wall. Wait 30
the proper temperature has been restored once the
defrost cycle has completed.
Food stored uncovered or unwrapped, and damp
containers can lead to moisture accumulation within each
compartment. Wipe all containers dry and store food in
sealed packaging to prevent condensation and frost.
Rearrange items with high water content away from air
vents.
If the temperature is too cold, adjust the control one
increment at a time and wait for the temperature to
stabilize. Refer to the Control Panel section for more
information.
When the refrigerator is operated in temperatures below
that 41 °F (5 °C), food can freeze inside the
compartment. The refrigerator should not be operated in
temperatures below 55 °F (13 °C).
When the doors are opened often or for long periods of
time, warm, humid air enters the compartment. This
raises the temperature and moisture level within the
compartment. Increased moisture will lead to frost and
condensation. To lessen the effect, reduce the frequency
and duration of door openings.
See the Doors will not close correctly or pop open in
Troubleshooting section.
If the temperature is too cold, adjust the control one
increment at a time and wait for the temperature to
stabilize. Refer to the Control Panel section for more
information.
ENGLISH
minutes and confirm that
refrigerator
Page 23
TROUBLESHOOTING
22
Problem Possible Causes Solutions
Frost or ice
crystals on frozen
food (inside of
sealed package).
Ice has bad taste
or odor.
Doors will not
close correctly or
pop open.
Doors are difficult
to open.
Refrigerator
wobbles or
seems unstable.
Lights do not
work.
The interior of
the refrigerator is
covered with
dust or soot.
Clicking
Rattling
Condensation from food with a
high water content has frozen
inside of the food package.
Food has been left in the
freezer for a long period of
time.
The food has not been stored
properly in either compartment.
The interior of the refrigerator
needs to be cleaned.
The ice storage bin needs to be
cleaned.
Food packages are blocking the
door open.
Ice bin, crisper cover, pans,
shelves, door bins, or baskets
are out of position.
Refrigerator is not leveled
properly.
The gaskets are dirty or sticky.
Door was recently closed.
Leveling legs are not adjusted
properly.
Floor is not level.
LED interior lighting failure.
The refrigerator is located near
a fire source, such as a
fireplace, chimney, or candle.
The defrost control will click
when the automatic defrost
cycle begins and ends. The
thermostat control (or
refrigerator control on some
models) will also click when
cycling on and off.
Rattling noises may come from
the flow of refrigerant or items
stored on top of or around the
refrigerator.
Refrigerator is not resting
solidly on the floor.
This is normal for food items with a high water content.
Do not store food items with high water content in the
freezer for a long period of time.
Rewrap the food. Odors may migrate to the ice if food is
not wrapped properly.
See the Maintenance section for more information.
Empty and wash the bin (discard old cubes). Make sure
that the bin is completely dry before reinstalling it.
Rearrange food containers to clear the door and door
shelves.
Push bins all the way in and put crisper cover, pans,
shelves and baskets into their correct positions. See
Operation section for more information.
See Leveling in the Installation section to level refrigerator.
Clean the gaskets and the surfaces that they touch. Rub a
thin coat of appliance polish or kitchen wax on the gaskets
after cleaning.
When you open the door, warmer air
refrigerator. As the warm air cools, it can create a vacuum.
If the door is hard to open, wait one minute to allow the air
pressure to equalize, then see if it opens more easily.
Refer to the Leveling section.
It may be necessary to add shims under the leveling legs
or rollers to complete installation.
The refrigerator compartment lamp is LED interior lighting,
and service should be performed by a qualified technician.
Refer to the Light (LED) Replacement section.
Make sure that the refrigerator is not located near a fire
source, such as a fireplace, chimney or candle.
Normal Operation.
Normal Operation.
Floor is weak or uneven or leveling legs need to be
adjusted. See the Leveling section.
ENGLISH
enters
the
Page 24
23 TROUBLESHOOTING
Problem Possible Causes Solutions
ENGLISH
Whooshing
Gurgling
Popping
Sizzling
Vibrating
Dripping
Pulsating or
High-Pitched
Sound
Evaporator fan motor is circulating air
through the refrigerator and freezer
compartments.
Air is being forced over the
condenser by the condenser fan.
Refrigerant flowing through the
cooling system.
Contraction and expansion of the
inside walls due to changes in
temperature.
Water dripping on the defrost heater
during a defrost cycle.
If the side or back of the refrigerator
is touching a cabinet or wall, some of
the normal vibrations may make an
audible sound.
Water running into the drain pan
during the defrost cycle.
Your refrigerator is designed to run
more efficiently to keep your food
items at the desired temperature.
The high efficiency compressor may
cause your new refrigerator to run
longer than your old one, but it is still
more energy efficient than previous
models. While the refrigerator is
running, it is normal to hear a
pulsating or high-pitched sound.
Normal Operation.
Normal Operation.
Normal Operation.
Normal Operation.
Normal Operation.
To eliminate the noise, make sure that the sides and
back cannot vibrate against any wall or cabinet.
Normal Operation.
Normal Operation.
Page 25

SMART DIAGNOSIS
TM
24
SMART DIAGNOSISTM
Should you experience any problems with your
refrigerator, it has the capability of transmitting data
via your telephone to the LG service center. This
gives you the capability of speaking directly to our
trained specialists. The specialist records the data
transmitted from your machine and uses it to
analyze the issue, providing a fast and effective
diagnosis.
If you experience problems with your refrigerator,
call 1-800-243-0000 in USA (1-888-542-2623 in
Canada). Only use this feature when is instructed to
do so by the LG call center agent. The transmission
sounds that you will hear are normal and sound
similar to a fax machine.
TM
TM
cannot be activated unless your
.
TM
TM
feature
Smart Diagnosis
refrigerator is connected to power. If your
refrigerator is unable to turn on, then
troubleshooting must be done without using Smart
Diagnosis
Using Smart Diagnosis
First, call 1-800-243-0000 in USA (1-888-542-2623
in Canada). Only use the Smart Diagnosis
when is instructed to do so by the LG call center
agent.
1.
Open and close the refrigerator door once. Then
open the refrigerator door 5 times within 8
seconds to activate the SMART DIAGNOSIS™
feature.
For best results, do not move the phone while
the tones are being transmitted.
If the call center agent is not able to get an
accurate recording of the data, you may be
asked to try again.
Call quality differences by region may affect the
function.
Use the home telephone for
communication performance, resulting in better
service.
Bad call quality may result in poor data
transmission from your phone to the machine,
which could cause Smart Diagnosis
malfunction.
NOTE
ENGLISH
better
TM
to
2.
Immediately place the telephone near to the
speaker placed in the top right , confirm that the
microphone is towards the speaker, then 4 short
tones will be heard and the speaker will emit a
sound no longer than 8 seconds.
3.
Keep the phone in place until
transmission has finished. Once the data
transmission is completed and the tones have
stopped, resume your conversation with the
specialist, who will then be able to assist you in
using the information transmitted for analysis.
the tone
Page 26

25 WARRANTY
ENGLISH
Should your LG Refrigerator (“Product”) fail due to a defect in materials or workmanship under normal home use, during
the warranty period set forth below, LG will at its option repair or replace the product. This limited warranty is valid only to
the original retail purchaser of the product and applies only when purchased and used within the United States including
U.S. Territories. Proof of original retail purchase is required to obtain warranty service under this limited warranty.
Refrigerator
One (1) year from the date
of original retail purchase.
Parts and Labor
(internal/functional parts
only)
Noises associated with normal operation and failure to follow instructions found in the use and care and installation guides or
operating the unit in an unsuitable environment will not be covered under this warranty.
Replacement products and parts are warranted for the remaining portion of the original warranty period or ninety (90) days,
whichever is greater.
Replacement products and parts may be new or remanufactured.
THIS WARRANTY IS IN LIEU OF ANY OTHER WARRANTY, EXPRESS OR IMPLIED, INCLUDING WITHOUT LIMITATION,
ANY WARRANTY OF MERCHANTABILITY OR FITNESS FOR A PARTICULAR PURPOSE. TO THE EXTENT ANY IMPLIED
WARRANTY IS REQUIRED BY LAW, IT IS LIMITED IN DURATION TO THE EXPRESS WARRANTY PERIOD ABOVE. NEITHER
THE MANUFACTURER NOR ITS U.S. DISTRIBUTOR SHALL BE LIABLE FOR ANY INCIDENTAL, CONSEQUENTIAL, INDIRECT,
SPECIAL, OR PUNITIVE DAMAGES OF ANY NATURE, INCLUDING WITHOUT LIMITATION, LOST REVENUES OR PROFITS,
OR ANY OTHER DAMAGE WHETHER BASED IN CONTRACT, TORT, OR OTHERWISE. Some states do not allow the exclusion
or limitation of incidental or consequential damages or limitations on how long an implied warranty lasts, so the above exclusion
or limitation may not apply to you. This warranty gives you specific legal rights and you may also have other rights that vary from
state to state.
THIS LIMITED WARRANTY DOES NOT COVER:
1. Service trips to deliver, pick up, install, or repair the
product; instruct the customer on operation of the
product; repair or replace fuses or correct wiring or
plumbing, or correction of unauthorized repairs/
installation.
2. Failure of product to perform during power failures and
interruptions or inadequate electrical service.
3. Damage caused by leaky or broken water pipes, frozen
water pipes, restricted drain lines, inadequate or
interrupted water supply or inadequate supply of air.
4. Damage resulting from operating the product in a
corrosive atmosphere or contrary to the instructions
outlined in the product owner’s manual.
5. Damage to the product caused by accidents, pests and
vermin, lightning, wind, fire, floods, or acts of God.
6. Damage resulting from misuse, abuse, improper
installation, repair, or maintenance. Improper repair
includes use of parts not approved or specified by LG.
7. Damage or failure caused by unauthorized modification
or alteration, or if it is used for other than the intended
purpose, or any water leakage where the unit was not
properly installed.
8. Damage or failure caused by incorrect electrical current,
voltage, or plumbing codes, commercial or industrial
use, or use of accessories, components, or consumable
cleaning products that are not approved by LG.
LG REFRIGERATOR LIMITED WARRANTY - U.S.A.
(Condenser, Dryer, Connecting Tube, Refrigerant and
One (1) year from the date
of original retail purchase.
Parts and Labor Parts only
LG ELECTRONICS U.S.A., INC.
WARRANTY PERIOD
Sealed System
Evaporator)
Seven (7) years from
the date of original retail
purchase.
(Consumer will be charged
for labor)
9. Damage caused by transportation and handling,
including scratches, dents, chips, and/or other damage
to the finish of your product, unless such damage
results from defects in materials or workmanship and
is reported within one (1) week of delivery.
10. Damage or missing items to any display, open box,
discounted, or refurbished product.
11. Products with original serial numbers that have been
removed, altered, or can not be readily determined.
Model and Serial numbers, along with original retail
sales receipt, are required for warranty validation.
12. Increases in utility costs and additional utility
expenses.
13. Replacement of light bulbs, filters, or any consumable
parts.
14. Repairs when your product is used in other than normal
and usual household use (e.g. commercial use, offices,
and recreational facilities) or contrary to the instructions
outlined in the product owner’s manual.
15. Costs associated with removal of your product from your
home for repairs.
16. The removal and reinstallation of the product if it is
installed in an inaccessible location or is not installed
in accordance with published installation instructions,
including LG’s owner’s and installation manuals.
17. Shelves, door bins, drawers, handles, accessories, and
other parts besides those that were originally included
with this particular model.
Inverter Compressor
Ten (10) years from the date of
original retail purchase.
Part only
(Consumer will be charged for
labor)
ENGLISH
The cost of repair or replacement under these excluded circumstances shall be borne by the consumer.
For complete warranty details and customer assistance,
please call or visit our website:
Call 1-800-243-0000 (24 hours a day, 365 days a year) and
select the appropriate option from the menu, or visit our website
at www.lg.com
Or by mail: LG Customer Information Center:
P. O. Box 240007, 201 James Record Road Huntsville, Alabama
35813
ATTN: CIC
Write your warranty information below:
Product Registration Information:
Model:
Serial Number:
Date of Purchase:
Page 27

WARRANTY
26
LG REFRIGERATOR LIMITED WARRANTY - Canada
LG ELECTRONICS CANADA, INC.
WARRANTY: Should your LG Refrigerator (“Product”) fail due to a defect in material or workmanship under normal home use during
the warranty period set forth below, LG Canada will at its option repair or replace the Product upon receipt of proof of original retail
purchase.
This warranty is valid only to the original retail purchaser of the product and applies only to a Product distributed in Canada by LG
Canada or an authorized Canadian distributor thereof. The warranty only applies to Products located and used within Canada.
WARRANTY PERIOD: (Note: If the original date of purchase can not be verified,
the warranty will begin sixty (60) days from the date of manufacture)
Sealed System
Refrigerator/Freezer
(Condenser, Dryer, Connecting Tube, Refrigerant and
Inverter Compressor
Evaporator)
One (1) year from the date of
original retail purchase.
Parts and Labor
(internal/functional parts
only)
One (1) year from the date
of original retail purchase.
Seven (7) years from the date
of original retail purchase.
Parts and Labor Parts only
(Consumer will be charged
for labor)
Ten (10) years from the date of
original retail purchase.
Part only
(Consumer will be charged for
labor)
Noises associated with normal operation and failure to follow instructions found in the use and care and installation guides or
operating the unit in an unsuitable environment will not be covered under this warranty.
Replacement products and parts are warranted for the remaining portion of the original warranty period or ninety (90) days,
whichever is greater.
Replacement products and parts may be new or remanufactured.
LG Authorized Service Center warranties their repair work for thirty (30) days.
LG CANADA’S SOLE LIABILITY IS LIMITED TO THE WARRANTY SET OUT ABOVE. EXCEPT AS EXPRESSLY PROVIDED
ABOVE, LG CANADA MAKES NO AND HEREBY DISCLAIMS ALL OTHER WARRANTIES AND CONDITIONS RESPECTING THE
PRODUCT, WHETHER EXPRESS OR IMPLIED, INCLUDING, BUT NOT LIMITED TO, ANY IMPLIED WARRANTY OR CONDITION
OF MERCHANTABILITY OR FITNESS FOR A PARTICULAR PURPOSE, AND NO REPRESENTATIONS SHALL BE BINDING ON
LG CANADA. LG CANADA DOES NOT AUTHORIZE ANY PERSON TO CREATE OR ASSUME FOR IT ANY OTHER WARRANTY
OBLIGATION OR LIABILITY IN CONNECTION WITH THE PRODUCT. TO THE EXTENT THAT ANY WARRANTY OR CONDITION
IS IMPLIED BY LAW, IT IS LIMITED TO THE EXPRESS WARRANTY PERIOD ABOVE. LG CANADA, THE MANUFACTURER OR
DISTRIBUTOR SHALL NOT BE LIABLE FOR ANY INCIDENTAL, CONSEQUENTIAL, SPECIAL, DIRECT OR INDIRECT DAMAGES,
LOSS OF GOODWILL, LOST PROFITS, PUNITIVE OR EXEMPLARY DAMAGES OR ANY OTHER DAMAGE, WHETHER ARISING
DIRECTLY OR INDIRECTLY FROM ANY CONTRACTUAL BREACH, FUNDAMENTAL OR OTHERWISE, OR FROM ANY ACTS OR
OMISSIONS, TORT, OR OTHERWISE. This warranty gives you specific legal rights. You may have other rights which may vary
from province to province depending on applicable provincial laws. Any term of this warranty that negates or varies any implied
condition or warranty under provincial law is severable where it conflicts with provincial law without affecting the remainder of
this warranty’s terms.
THIS LIMITED WARRANTY DOES NOT COVER:
1. Service trips to deliver, pick up, install, or repair the product;
instruct the customer on operation of the product; repair or
replace fuses or correct wiring or plumbing, or correction of
unauthorized repairs/installation.
2. Failure of product to perform during power failures and
interruptions or inadequate electrical service.
3. Damage caused by leaky or broken water pipes, frozen water
pipes, restricted drain lines, inadequate or interrupted water
supply or inadequate supply of air.
4. Damage resulting from operating the product in a corrosive
atmosphere or contrary to the instructions outlined in the
product owner’s manual.
5. Damage to the product caused by accidents, pests and vermin,
lightning, wind, fire, floods, or acts of God.
6. Damage resulting from misuse, abuse, improper installation,
repair, or maintenanc
approved or specified by LG.
7. Damage or failure caused by unauthorized modification or
alteration, or if it is used for other than the intended purpose, or
any water leakage where the unit was not properly installed.
8. Damage or failure caused by incorrect electrical current, voltage,
or plumbing codes, commercial or industrial use, or use of
accessories, components, or consumable cleaning products that
are not approved by LG.
e. Improper repair includes use of parts not
9. Damage caused by transportation and handling, including
scratches, dents, chips, and/or other damage to the finish
of your product, unless such damage results from defects in
materials or workmanship and is reported within one (1) week of
delivery.
10. Damage or missing items to any display, open box, discounted,
or refurbished product.
11. Products with original serial numbers that hav
altered, or can not be readily determined. Model and Serial
numbers, along with original retail sales receipt, are required for
warranty validation.
12. Increases in utility costs and additional utility expenses.
13. Replacement of light bulbs, filters, or any consumable parts.
14. Repairs when your product is used in other than normal
and usual household use (e.g. commercial use, offices, and
recreational facilities) or contrary to the instructions outlined in
the product owner’s manual.
15. Costs associated with removal of your product from your home
for repairs.
16. The removal and reinstallation of the product if it is installed in
an inaccessible location or is not installed in accordance with
published installation instructions, including LG’s owner’s and
installation manuals.
17. Shelves, door bins,
parts besides those that were originally included with this
particular model.
drawers, handles, accessories, and other
e been removed,
The cost of repair or replacement under these excluded circumstances shall be borne by the consumer.
For complete warranty details and customer assistance,
please call or visit our website:
Call 1-888-542-2623 (24 hours a day, 365 days a year)
and select the appropiate option from the menu, or visit
our website at www.lg.com
Write your warranty information below:
Product Registration Information:
Model:
Serial Number:
Date of Purchase:
ENGLISH
Page 28

27 NOTES
ENGLISH
ENGLISH
Page 29

1
ENGLISH
ESPAÑOL
MANUAL DE USUARIO
REFRIGERADOR CON
CONGELADOR SUPERIOR
Lea cuidadosamente este manual de usuario antes de poner en
funcionamiento el refrigerador, y téngalo a la mando de referencia en todo
momento.
Nombre de Modelo
LTNS16121V
www.lg.com
Page 30

29 TABLA DE CONTENIDO
TABLA DE CONTENIDO
30 FUNCIONES DEL PRODUCTO
ESPAÑOL
31
32 Instrucciones importantes de seguridad
33
34 DESCRIPCIÓN DEL
34 Parte Exterior del Refrigerador
35
36 INSTALACIÓN
36 Instrucciones Generales de Instalación
36
37
37
37
37
37
38 Quitar / Ensamblar las puertas
39 Ensamblar la Puerta del Refrigerador
39
40 Encendido
40 Nivelación
INSTRUCCIONES
IMPORTANTES DE SEGURIDAD
Instrucciones importantes de seguridad
PRODUCTO
Parte Interior del Refrigerador
Especificaciones
Desempaque del Refrigerador
Como elegir la ubicación más adecuada
- Tipo de Piso
- Temperatura Ambiente
- Como medir la distancia de separación
mínima
Ensamblar la Puerta del Congelador
41 INSTRUCCIONES DE USO
41 Antes de Usar
Panel de Control
42
43 Almacenamiento de Alimentos
43
44
44 - Almacenamiento de Alimentos
44
45
45
45 Cajón para Control de Humedad
46
46
- Lugar de Conservación de Alimentos
- Sugerencias para el Almacenamiento
de Alimentos
Congelados
Ajuste de los Estantes
Desensamble de los estantes
Ensamble del estante
Ensamble y Desensamble de los
compartimientos de la puerta
Fábrica de Hielos
47 MANTENIMIENTO
47 Limpieza
48
SOLUCIÓN DE PROBLEMAS
49
Solución de problemas
50
Solución de problemas
Solución de problemas
51
52 SMART DIAGNOSIS
52 Uso de Smart Diagnosis
53
GARANTÍA
MR
MR
54
NOTAS
Page 31

FUNCIONES DEL PRODUCTO
ENGLISH
Dependiendo del modelo, algunas de las siguientes funciones pueden no estar disponibles.
SMART DIAGNOSIS (Diagnóstico Inteligente)
Use la función para contactar a su Centro de Servicio LG y recibir un diagnóstico
preciso cuando el refrigerador no funciona correctamente o falla. Su uso es
exclusivo para consultas, no la use durante el funcionamiento normal.
CAJONES CON CONTROL DE HUMEDAD
Los cajones con control de humedad están diseñados para ayudar a mantener
las frutas y las verduras frescas.
MR
FUNCIONES DEL PRODUCTO
30
ESPAÑOL
FÁBRICA DE HIELOS
Para cumplir con sus necesidades de espacio su fábrica de hielos puede ser
movida de un lado a otro.
ADVERTENCIA
Sólo llene con agua potable.
Page 32

LEA TODAS LAS INSTRUCCIONES ANTES DE UTILIZAR EL ELECTRODOMÉSTICO.
31 INSTRUCCIONES IMPORTANTES DE SEGURIDAD
INSTRUCCIONES IMPORTANTES DE SEGURIDAD
Este manual contiene muchos mensajes de seguridad importantes. Lea y cumpla siempre todos los
mensajes de seguridad.
Este es el símbolo de alerta de seguridad. Le avisa de mensajes de seguridad que le informan
ESPAÑOL
de peligros de muerte o lesiones para usted o los demás, o que puedan dañar el producto.
Todos los mensajes de seguridad estarán precedidos del símbolo de alerta de seguridad y de
las palabras de señal de peligro ADVERTENCIA o PRECAUCIÓN. Estas palabras significan:
ADVERTENCIA
PRECAUCIÓN
ADVERTENCIA
Para reducir el riesgo de incendio, descarga eléctrica o lesiones personales al utilizar el producto, se
deben respetar una serie de precauciones básicas de seguridad, entre las que se incluyen las
siguientes:
Si no respeta las instrucciones, podría morir o sufrir lesiones graves.
Indica una situación de peligro inminente que, si no se evita, podría producir
una lesión menor o moderada, o daño al producto.
Alimentación Eléctrica
Nunca desenchufe el refrigerador tirando del cable de alimentación. Agarre siempre el enchufe
firmemente y tire del mismo para retirarlo de la toma de corriente.
Si el cable de alimentación está dañado, deberá ser sustituido por el fabricante, su agente de servicio
o personal calificado para evitar peligros. No use un cable con grietas o abrasiones sobre su extensión
o en los extremos del enchufe o conector.
No utilice una toma de corriente no certificada.
Desenchufe el refrigerador de inmediato en caso de corte de energía o tormenta.
Enchufe el refrigerador con el cable de alimentación ubicado hacia abajo.
No utilizar extensiones o adaptadores (de dos terminales) sin puesta a tierra.
Instalación
Comuníquese con un centro de servicios autorizado cuando instale o cambie de lugar el refrigerador.
Cuando separe el refrigerador de la pared, tenga cuidado de no torcer o dañar el cable de alimentación.
Antes de usar el producto, asegúrese de conectarlo a una toma de corriente eléctrica con conexión a
tierra adecuada calificada para usar con este producto (115 V~ 60Hz, sólo CA). Es responsabilidad del
usuario reemplazar una tomacorriente de 2 clavijas estándar por una tomacorriente de 3 clavijas
estándar.
No instale el refrigerador donde pueda haber peligro de que la unidad se caiga.
Uso
NO permita que los niños escalen, se paren o se cuelguen de las puertas o de los estantes del
refrigerador. Podrían dañar el refrigerador o sufrir lesiones graves.
No cuelgue ni coloque objetos pesados en el dispensador del refrigerador (si le aplica).
No coloque objetos pesados o peligrosos (botellas con líquido) en el refrigerador.
No meta animales vivos dentro del refrigerador.
No permita que los niños se metan en el refrigerador.
En caso de una fuga de gas (propano/LP), asegúrese de ventilar adecuadamente el ambiente y
póngase en contacto con un centro de servicios autorizado antes de reanudar el uso del refrigerador.
No toque ni desenchufe la toma de corriente eléctrica del refrigerador.
En caso de una pérdida de refrigerante, aleje cualquier
de ventilar adecuadamente el ambiente y póngase en contacto con un centro de servicios autorizado.
No use ni coloque sustancias inflamables (productos químicos, medicamentos, productos cosméticos,
etc.) cerca del refrigerador ni los almacene dentro del mismo. No ubique el refrigerador cerca de gases
inflamables.
No guarde sustancias explosivas, tales como latas de aerosol con un propelente inflamable en este
aparato.
objeto inflamable del refrigerador. Asegúrese
Page 33

LEA TODAS LAS INSTRUCCIONES ANTES DE UTILIZAR EL ELECTRODOMÉSTICO.
INSTRUCCIONES IMPORTANTES DE SEGURIDAD
32
Para reducir el riesgo de incendio, descarga eléctrica o lesiones personales al utilizar el producto, se deben
de respertar una serie de precauciones básicas de seguridad, entre las que se incluyen las siguientes:
Este producto no debe ser utilizado para fines especiales, como ser para almacenar medicamentos o
materiales de prueba, usar en barcos, etc.
Desenchufe el refrigerador antes de limpiarlo o repararlo.
No modifique ni alargue el cable de alimentación.
No use un secador para secar el interior del refrigerador. No encienda velas para eliminar olores en el
interior.
Por su seguridad, este electrodoméstico debe estar conectado a tierra adecuadamente. Solicite a un
electricista calificado que compruebe la toma de corriente y el circuito eléctrico para asegurarse de que
la toma de corriente está correctamente conectada a tierra.
No use una toma de corriente que pueda cortarse con interruptor. No utilice un cable alargador de
corriente. Es responsabilidad del usuario reemplazar una toma de corriente de 2 clavijas estándar por una
toma de corriente de 3 clavijas estándar.
Bajo ninguna circunstancia corte o quite la tercera clavija (de puesta a tierra) del cable de alimentación.
No utilice enchufes adaptadores; ni conecte el enchufe de alimentación a una extensión de toma
corriente múltiple.
Desenchufe el cable de alimentación de inmediato si escucha un ruido, huele un olor extraño o detecta
humo proveniente del electrodoméstico.
Corte la corriente eléctrica si entra agua o polvo al refrigerador. Póngase en contacto con un agente de
servicios.
No desmonte ni modifique el refrigerador.
No ponga las manos, pies u objetos metálicos debajo ni detrás del refrigerador.
No opere el refrigerador ni toque el cable de alimentación con las manos húmedas.
No toque las superficies frías del compartimento del congelador con las manos húmedas o mojadas
cuando el refrigerador esté en funcionamiento.
No introduzca contenedores de vidrio, botellas de vidrio o gaseosas en el congelador, ya que pueden
quebrarse.
Este electrodoméstico no fue diseñado para ser utilizado por personas con capacidades físicas,
sensoriales o mentales reducidas (incluidos los niños), o
menos que lo hagan bajo la supervisión o instrucciones de uso de una persona responsable por su
seguridad. Los niños deben ser supervisados para asegurar que no jueguen con el aparato.
No vuelva a congelar alimentos congelados que se hayan descongelado completamente. Hacerlo puede
causar un grave problema de salud.
Si va a desechar su antiguo refrigerador, asegúrese que un técnico calificado se encargue de retirar el
refrigerante de CFC (clorofluorocarbono) o HCFC (hidroclorofluorocarbono) para su adecuada eliminación.
Si libera refrigerante de CFC o HCFC, podrá ser sujeto a una multa o pena de prisión de acuerdo a las
leyes ambientales pertinentes a su país.
Los refrigeradores desechados o abandonados son peligrosos, incluso si sólo es por unos pocos días.
Cuando deseche el refrigerador, retire los empaques de las puertas o desensamble las puertas, pero deje
los estantes en su lugar para que los niños no puedan meterse fácilmente dentro del refrigerador.
Si el refrigerador está conectado a un circuito protegido por fusibles, utilice fusibles retardantes.
Si ya no requiere del uso de esta unidad, contacte a las autoridades locales para deshacerse de este
producto de forma segura ya que usa Ciclo-Pentano o Pentano como gases inflamables espumantes para
el aislamiento. Los gases del material de aislamiento requieren un proceso especial de eliminación. Este
producto contiene gases aislantes inflamables.
No dañe el circuito refrigerante.
con falta de experiencia y conocimiento, a
ESPAÑOL
Page 34

LEA TODAS LAS INSTRUCCIONES ANTES DE UTILIZAR EL ELECTRODOMÉSTICO.
INSTRUCCIONES IMPORTANTES DE SEGURIDAD
33
Para reducir el riesgo de incendio, descarga eléctrica o lesiones personales al utilizar el producto, se deben
de respetar una seria de precauciones básicas de seguridad, entra las que se incluyen las siguientes:
ESPAÑOL
PRECAUCIÓN
Instalación
El refrigerador se debe instalar correctamente de acuerdo con las instrucciones para el instalador
incluidas en la hoja que fue pegada al frente del refrigerador.
Tenga cuidado al desempacar e instalar el refrigerador. Deseche inmediatamente los materiales
plásticos y otros materiales de empaque fuera del alcance de los niños.
El electrodoméstico debe ubicarse con un fácil acceso a una fuente de energía.
Uso
Cierre la puerta con cuidado cuando haya niños alrededor.
Mantenga los dedos lejos de los puntos de riesgo de agarre; las distancias de separación entre las
puertas y los gabinetes son necesariamente pequeñas. Tenga especial cuidado al cerrar las puertas
cuando haya niños cerca.
Si almacena los alimentos de manera inadecuada, éstos podrían caerse y causar lesiones.
No utilice aerosoles cerca del refrigerador.
No deje artículos en la parte superior del electrodoméstico.
Mantenimiento
No utilice detergentes fuertes tales como ceras o disolventes para limpiar el refrigerador. Límpielo con
un trapo suave.
Limpie regularmente todo objetos extraño (como polvo y agua) de las clavijas del enchufe de
alimentación y de las áreas de contacto.
No almacene, desmonte ni repare el refrigerador usted mismo.
Quite cualquier resto de polvo o sustancia extraña de las clavijas del enchufe de alimentación.
No use trapos húmedos o mojados para limpiar el enchufe.
Si el refrigerador está desconectado del suministro de energía eléctrica, espere al menos cinco
minutos antes de volver a enchufarlo.
Si nota olor de un producto químico, plástico quemado o si ve humo, desenchufe el refrigerador de
inmediato y póngase en contacto con su Centro de Servicios de LG Electronics.
ADVERTENCIA
Este producto contiene químicos que el Estado de California sabe que causan cáncer y defectos de
nacimiento u otros daños reproductivos.
ADVERTENCIA
No usar Dispositivos Mecánicos
No use dispositivos mecánicos u otros
medios para acelerar el proceso de
descongelamiento, solo aquellos que han
sido recomendados por el fabricante.
Lávese las manos después de su uso.
ADVERTENCIA
No guardar Aparatos Eléctricos
No use aparatos eléctricos en el interior del
compartimento para almacenar comida, al
menos que estos sean del tipo recomendado
por el fabricante.
CONSERVE ESTAS INSTRUCCIONES
Page 35

DESCRIPCIÓN DEL PRODUCTO
DESCRIPCIÓN DEL PRODUCTO
Use esta sección para familiarizarse con los componentes y funciones del refrigerador.
Parte Exterior del Refrigerador
34
ESPAÑOL
Manijas
Abren y cierran
las puertas.
Congelador
Conserva los alimentos
congelados.
Refrigerador
Conserva los alimentos.
Page 36

35 DESCRIPCIÓN DEL PRODUCTO
ENGLISH
Parte Interior del Refrigerador
ESPAÑOL
Fábrica de Hielos
Panel de Control del
Refrigerador
Controla la temperatura
del compartimento del
refrigerador
Lámpara Interior LED
La lámpara ilumina el
interior del refrigerador.
Estantes del
Refrigerador
Ajuste los estantes de
acuerdo a sus necesidades
de espacio.
Estante del Congelador
Compartimentos del
Congelador
Los compartimentos
son removibles para
una fácil limpieza.
Panel de Control
del Congelador
Controla el flujo de aire
frío del congelador al
refrigerador
Compartimentos del
Refrigerador
Ajústelos en base a
sus necesidades para
almacenar comida
fácilmente.
Charola para Huevos
Cajón
Ayuda a mantener
frescas las frutas y
verduras.
Page 37

INSTALACIÓN
INSTALACIÓN
Instrucciones Generales de Instalación
Luego de comprar este producto o trasladarlo a otro lugar, lea primero las siguientes instrucciones de
instalación.
36
ESPAÑOL
1 Desempaque el
refrigerador
Este aparato está destinado a ser usado en aplicaciones domésticas o similares, tales como:
- Áreas de personal de cocina en tiendas, oficinas y otros ambientes de trabajo; casas de campo y por clientes
en hoteles, moteles y otros ambientes de tipo residencial.
- Entornos de alojamiento y desayuno de tipo hostelería y similares aplicaciones no comerciales.
nóicacibu al rigele omóC 2
más adecuada
3 Nivelación y Alineación
de Puertas
Especificaciones
La apariencia y especificaciones indicadas en este manual pueden variar debido a las constantes mejoras en
el producto.
Dimensiones
Peso Neto
Ancho
31 pulgadas
(787 mm)
Fondo
29 pulgadas
(737 mm)
182,98 libras (83 kg)
Altura
71 pulgadas
(1803 mm)
Page 38

37 INSTALACIÓN
Desempaque del Refrigerador
ESPAÑOL
Antes de su uso, retire la cinta adhesiva y todas las
etiquetas temporales del refrigerador. No retire las
etiquetas que indican advertencias, la etiqueta del
modelo y del número de serie, hojas de instalación o
diagrama de circuito, ubicado en la parte posterior
del refrigerador.
Para retirar los restos de pegamento o cinta
adhesiva, frote enérgicamente el área con el pulgar.
Los residuos de pegamento o cinta adhesiva
también se pueden retirar fácilmente frotando con
los dedos una pequeña cantidad de jabón lavavajillas
líquido sobre el adhesivo. Limpie con agua templada
y seque el área.
No utilice instrumentos afilados, alcohol desinfectante, líquidos inflamables ni limpiadores abrasivos
para retirar la cinta adhesiva o el pegamento.
productos pueden dañar la superficie del refrigerador.
Los estantes del refrigerador están instalados en la
posición de transporte. Coloque los estantes de
acuerdo con sus necesidades personales de almacenamiento.
Como elegir la ubicación más
adecuada
ADVERTENCIA
El desplazamiento e instalación del refrigerador deben de realizarse entre dos o más
personas. Si no se respeta esta advertencia,
podrá sufrir lesiones en la espalda o de otro
tipo.
Su refrigerador es pesado. Al desplazarlo para
su limpieza o mantenimiento, asegúrese de
proteger el suelo. Siempre debe de tirar del
refrigerador en línea recta cuando lo desplace.
No menee ni mueva en ‘zig zag’ el refrigerador
al tratar de desplazarlo, ya que esto puede
dañar el suelo.
Mantenga los materiales o vapores inflamables, como la gasolina, lejos del refrigerador.
Si no se cumple con esto, se podrá producir
una explosión, incendio o muerte.
Estos
El refrigerador debe estar siempre enchufado a
su toma de corriente individual conectada a
tierra adecuadamente con una tensión nominal
de 115V ~ 60 Hz, sólo CA, y protegida mediante
fusibles de 15 A.
Esta configuración proporciona el mejor
rendimiento y, al mismo tiempo, evita la sobrecarga de la instalación eléctrica de la casa que
podría provocar un peligro de incendio debido a
un sobrecalentamiento de los cables. Se
recomienda disponer de un circuito independiente para la exclusiva alimentación de este
electrodoméstico.
ADVERTENCIA
Para reducir el riesgo de descarga eléctrica, no
instale el refrigerador en un área húmeda o
mojada.
Tipo de Piso
Para evitar el ruido y la vibración, es necesario
nivelar la unidad e instalarla en un suelo sólidamente construido. Si es necesario, ajuste las patas
de nivelación para compensar los desniveles del
suelo. La parte delantera debe estar ligeramente
más elevada que la posterior para ayudar al cierre
de la puerta. Las patas de nivelación se pueden
girar con facilidad inclinando ligeramente el aparato.
Gire las patas de nivelación hacia la izquierda para
levantar la unidad, o hacia la derecha para bajarla
(Consulte la sección Nivelación).
NOTA
No se recomienda
alfombra, superficies de baldosas flexibles,
plataformas o estructuras con soporte inestable.
realizar la instalación sobre
Temperatura Ambiente
Instale este electrodoméstico en una zona donde la
temperatura esté entre los 13 °C (55 °F) y 43 °C
(110 °F). Si la temperatura alrededor del electrodoméstico es demasiado baja o demasiado alta, la
capacidad de refrigeración se verá gravemente
afectada.
Como medir la Distancia de Separación
Mínima
Una distancia demasiado pequeña con los elementos adyacentes puede dar como resultado una
reducción de la capacidad de congelación y un
aumento del consumo eléctrico. Deje al menos
61 cm (24 pulgadas) en el frente del refrigerador
para abrir la puertas y al menos 5,08
(2 pulgadas) entre la parte posterior del refrigerador
y la pared.
24” (61 cm)
2” (5.08 cm)
cm
Page 39

Quitar / Ensamblar las Puertas
Pivote de
la Bisagra
Soporte de la Bisagra Central
Quitar las puertas es recomendado cuando se
mueve el refrigerador a través de una abertura
estrecha.
ADVERTENCIA
Si la puerta de entrada es demasiado estrecha
para que el refrigerador pase, quite las puertas
del refrigerador y muévalo de lado a lado a
traves de la puerta.
Use la ayuda de dos o más personas para mover
e instalar el refrigerador. No seguir esta instrucción puede ocasionar lesiones en la espalda u
otras partes del cuerpo.
Desconecte la fuente de energía eléctrica del
refrigerador antes de la instalación. No seguir
esta instrucción puede ocasionar lesiones
graves o la muerte.
No coloque sus manos, pies u otros objetos
dentro de las ventilas de aire o en la parte
inferior del refrigerador. Usted puede resultar
herido o recibir una descarga eléctrica.
Sea cuidadoso cuando maneje las bisagras y
tapones. Usted puede resultar herido.
Quite la comida y los contenedores antes de
remover las puertas y cajones.
INSTALACIÓN
2.
Quite los tres tornillos con la llave tubular de 10
mm o 3/8 de pulgada, levante la bisagra superior
y colóquela a un lado.
3.
Levante cuidadosamente la puerta del congelador
del soporte de la bisagra central. Coloque la
puerta sobre una superficie donde no se pueda
rayar.
Bisagra Superior
38
ESPAÑOL
Herramientas Necesarias
Llave tubular de cabeza hexagonal de 10 mm o 3/8
de pulgada.
Destornillador Phillips.
Destornillador Plano.
Llave Inglesa ajustable.
Quitar la Puerta del Congelador
1.
Remueva la cubierta de la bisagra superior
usando un destornillador Phillips.
Gire en sentido contrario
a las manecillas del reloj
para remover
Quitar la Puerta del Refrigerador
1.
Afloje y remueva los dos tornillos usando la llave
tubular de cabeza hexagonal.
Soporte de la
Bisagra Central
Tornillo
2.
Quite el soporte de la bisagra central.
NOTA: Coloque la cubierta de la bisagra superior
sobre el gabinete, asegúrese de no dañar los
cables ensamblados en ella.
Page 40

Soporte de la
Bisagra Central
Pivote de la
Bisagra Central
39 INSTALACIÓN
3.
Levante cuidadosamente la puerta del refrigerador del pivote de la bisagra inferior. Coloque la
puerta sobre una superficie donde no se pueda
rayar.
ESPAÑOL
Pivote de la
Bisagra Inferior
Ensamblar la Puerta del Refrigerador
1.
Coloque la puerta del refrigerador sobre el pivote
de la bisagra inferior.
2.
Coloque el pivote de la bisagra central dentro del
pivote de inserción localizado en la parte superior
de la puerta del refrigerador. Sostenga la puerta
en su lugar y alinee el soporte de la bisagra
central con los orificios en el gabinete del
refrigerador.
Ensamblar la Puerta del Congelador
1.
2.
Coloque la puerta del congelador sobre el pivote
de la bisagra central.
Coloque el pivote de la bisagra superior en la
parte superior de la puerta del congelador, hay
que alinear la bisagra superior con los tres agujeros colocados en la parte superior del refrigerador. Use los tres tornillos para ajustar la bisagra.
Bisagra Superior
Pivote de la
Bisagra Superior
Soporte de la
Bisagra Central
3.
Para reajustar el soporte de la bisagra central con
el gabinete del refrigerador, coloque y ajuste los
dos tornillos con ayuda de la llave tubular de
cabeza hexagonal.
Pivote de
Inserción
Soporte de la
Bisagra Central
Tornillo
Pivote de
la Bisagra
3.
Cuidadosamente coloque la cubierta de la bisagra
superior en su posicion original, use el tornillo
para ajustarla.
Gire en sentido de las
manecillas del reloj para
ajustar
NOTA: Antes de colocar la cubierta de la bisagra
superior asegúrese de que los cables ensamblados a ella no estén siendo presionados.
Page 41

INSTALACIÓN
40
Encendido
1. Enchufe el refrigerador.
PRECAUCIÓN
Conecte a una toma de corriente adecuada.
Haga que un electricista certificado verifique la
toma de corriente y cableado para una
conexión a tierra adecuada.
No dañe ni corte la terminal del enchufe de
alimentación con conexión a tierra.
Nivelación
Tras la instalación, enchufe el cable de alimentación
del refrigerador en una toma de corriente de 3
clavijas con conexión a tierra y empuje el refrigerador hasta su posición definitiva.
Su refrigerador tiene dos patas de nivelación
delanteras: uno a la derecha y otro a la izquierda.
Ajuste las patas para modificar la inclinación de
delante hacia atrás o de lado a lado. Si el refrigerador
parece inestable o si desea que las puertas se
cierren más fácilmente, ajuste la inclinación del
refrigerador mediante las siguientes instrucciones:
1.
Gire la pata de nivelación insertando un desarmador plano en las ranuras que están en las patas
niveladoras. Gira la pata en sentido de las manecillas del reloj ( ) para levantar el refrigerador o
en contra de las manecillas del reloj ( ) para
bajar. Es posible que sean necesarios varios giros
para ajustar la inclinación.
NOTA
Hacer que alguien empuje contra la parte
superior del refrigerador quita algo de peso
aplicado a las patas niveladoras, esto hace más
fácil ajustarlas.
2.
Vuelva a abrir ambas puertas y compruebe que se
cierran con facilidad. Si no es así, incline el refrigerador ligeramente hacia atrás girando ambas
patas de nivelación hacia la izquierda. Es posible
que sean necesarios más giros; deberá girar
ambas patas de nivelación la misma cantidad de
veces.
ESPAÑOL
Niveladora
Desarmador
Pata
Page 42

41 INSTRUCCIONES DE USO
INSTRUCCIONES DE USO
Antes de usar
ESPAÑOL
Pull-out Tray
Limpie el refrigerador.
Limpie bien el refrigerador y quite todo el polvo acumulado durante el transporte.
PRECAUCIÓN
No raye el refrigerador con un objeto punzante ni utilice un detergente que
contenga alcohol, un líquido inflamable o un abrasivo cuando retire cualquier cinta
adhesiva o pegamento del mismo.
No retire la etiqueta de número de modelo ni de serie ni de la información técnica
sobre la superficie posterior del refrigerador.
NOTA
Quite el residuo adhesivo limpiándolo con su dedo pulgar o con detergente de vajilla.
.roiretni le ralitnev arap rodaregirfer led satreup sal arbA
El interior del refrigerador puede oler a plástico al principio. Extraiga cualquier cinta
adhesiva del interior del refrigerador y abra las puertas del refrigerador para ventilar.
Conecte el suministro de energía.
Verifique que el suministro de energía esté conectado antes de usar el refrigerador.
Consulte la sección "Encendido".
Espere a que el refrigerador enfríe.
Deje que el refrigerador esté en funcionamiento durante al menos dos o tres horas
antes de almacenar alimentos dentro del mismo. Compruebe el flujo de aire frío en el
compartimento del congelador para asegurarse de que la refrigeración sea la adecuada.
PRECAUCIÓN
Colocar alimentos en el refrigerador antes de que se haya enfriado podría hacer que
se echen a perder los alimentos o que el mal olor permanezca dentro
refrigerador.
del
El refrigerador hace un ruido fuerte luego del funcionamiento
inicial.
Esto es normal. El ruido irá disminuyendo a medida que disminuya la temperatura.
Page 43

lortnoC ed lenaP
Funciones del Panel de Control
Panel de Control del Refrigerador
Controla la temperatura del compartimento del refrigerador.
Presione el botón hasta la configuración deseada (de 1 a 5).
INSTRUCCIONES DE USO
42
ESPAÑOL
)
Panel de Control del Congelador
Controla el flujo de aire frío que va del congelador al refrigerador.
Para cambiar de posición el control, impúlselo hacia los lados para
que gire. La flecha le indica el nivel de temperatura en que se
encuentra su congelador (de 1 a 5).
Ajuste sus controles de temperatura dependiendo de la cantidad de comida almacenada, use la tabla de
abajo como referencia:
Cantidad de Comida Almacenada
Control de: Muchos Alimentos ralugeR daditnaC Pocos Alimentos
)
Ajuste
en 1
Congelador
)
Ajuste
en 2
)
Ajuste
en 2
Refrigerador
Presione hasta que la quinta
NOTA
Tenga cuidado de no obstruir o mover con los
alimentos los controles de temperatura, ya que
podría cambiar o desconocer el nivel de
temperatura al cual se encuentra su refrigerador.
luz se encienda
Presione hasta que la tercera
Presione hasta que la primera
luz se encienda
NOTA
luz se encienda
Si el control de temperatura del congelador se
posiciona en el número 5 puede generar que el
compartimento del refrigerador no enfríe como
quisiera el cliente, especialmente si está muy
cargado de alimentos o es un día caluroso.
Page 44

43 INSTRUCCIONES DE USO
ENGLISH
Almacenamiento de Alimentos
Lugar de Conservación de Alimentos
Cada compartimento del refrigerador está diseñado para almacenar diferentes tipos de alimentos.
Almacene sus alimentos en el espacio óptimo para disfrutar de los sabores más frescos.
ESPAÑOL
Depósito de Hielo
Almacena hielo.
Almacenamiento de
Vegetales (Cajón)
Conserva los vegetales
y las frutas.
Estantes
Ajuste los estantes
de acuerdo a sus
necesidades de espacio.
Compartimentos de
las puertas
Almacene bebidas tales
como jugos y gaseosas,
así como aderezos,
condimentos de ensalada
y otros alimentos.
PRECAUCIÓN
.
No almacene alimentos con alto contenido de humedad en la parte superior del refrigerador. La
humedad podría entrar en contacto directo con el aire frío y congelarse.
.
Lave los alimentos antes de guardarlos en el refrigerador. Si es necesario enjuague y frote a fondo
las verduras secas y frutas para eliminar la suciedad como jugo o áreas manchadas, además limpiar
el envasado de alimentos ayuda a evitar que los demás alimentos se contaminen.
.
Si el refrigerador se encuentra en un lugar húmedo y de mucho calor, abrir la puerta constantemente
o almacenar muchos vegetales en el refrigerador puede dar lugar a condensación. Limpie la condensación con un paño limpio o una toalla de papel.
.
Si la puerta del refrigerador se abre demasiadas veces, el aire caliente puede entrar en el refrigerador
y subir su temperatura. Esto puede aumentar los costos de funcionamiento del aparato.
.
No sobrecargue o acomode los articulos demasiado apretados en los compartimentos de las
puertas. El hacerlo puede causar daño al compartimento o a Usted si son removidos con fuerza
excesiva.
.
No almacene contenedores de vidrio en el compartimento del congelador. El contenido se puede
expander cuando esté congelado y quebrar el contenedor causando riesgo de alguna lesión.
NOTA
.
Si va a abandonar su hogar por un período corto de tiempo, como unas pequeñas vacaciones, el
refrigerador debe quedar encendido. Los alimentos refrigerados que se pueden congelar se preservarán por más tiempo si se almacenan en el congelador.
.
Si va a dejar el refrigerador apagado durante un período de tiempo prolongado, retire todos los
alimentos y desenchufe el cable de alimentación. Limpie el interior y deje la puerta abierta para evitar
la formación de hongos en el refrigerador.
Page 45

INSTRUCCIONES DE USO
44
Sugerencias para el Almacenamiento
de Alimentos
Las siguientes sugerencias podrían no ser de
aplicación en su caso dependiendo del modelo del
refrigerador.
Envuelva o almacene los alimentos en el refrigerador dentro de materiales herméticos y antihumedad,
a menos que se indique lo contrario. Esto evitará
que el olor y sabor de los alimentos se transfiera por
todo el refrigerador. Para productos con fecha de
caducidad, verifique el código de fecha para garantizar la frescura.
Alimento Como almacenar
Mantequilla o
margarina
Queso
Leche
Huevos
Fruta
Verduras con
Hojas
Vegetales
con piel
(zanahorias,
pimientos)
Pescado
Sobras
Almacenamiento de Alimentos
Congelados
Conserve la mantequilla abierta en
un plato cubierto o en un compartimento cerrado. Cuando almacene
una cantidad extra, envuélvala en
una bolsa para congelar y congélela.
Almacene en el envoltorio original
hasta que esté listo para consumirlo.
Una vez abierto, vuelva a envolverlo
herméticamente en un envoltorio
plástico o en papel de aluminio.
Limpie los cartones de leche. Para
que la leche se conserve más fría,
coloque el envase en un estante
interior.
Almacénelos en el cartón original en
un estante interior, no en un compartimento de la puerta.
No lave ni pele la fruta hasta justo
antes de su consumo. Organice y
mantenga la fruta en su contenedor
original, en el cajón para la verdura, o
almacénela en una bolsa de papel
completamente cerrada en un
estante del refrigerador.
Retire el envoltorio comercial y corte
o arranque las zonas mallugadas o
decoloradas. Lave en agua fría y deje
escurrir. Colóquela en una bolsa o un
contenedor de plástico y almacénela
en el cajón para verduras.
Colóquelos
contenedor de plástico y almacénelos en el cajón para verduras.
Almacene el pescado y marisco
fresco en la sección del congelador si
no los va a consumir el mismo día
que los compró. Se recomienda
consumir el pescado y marisco el
mismo día de su adquisición.
Cubra las sobras con un envoltorio
plástico, papel de aluminio o dentro
de contenedores de plástico con
tapas herméticas.
en una bolsa o un
NOTA
Consulte una guía de congelación o un libro de
cocina confiable para obtener más información
sobre la forma de preparar los alimentos para su
congelación o sobre los tiempos de almacenamiento de los alimentos congelados.
Congelación
El congelador no congelará rápidamente una gran
cantidad de alimentos. No coloque más alimentos
sin congelar en el congelador de los que puedan
congelarse en 24 horas [no más de 2 libras (0,9 kg) a
3 libras (1,3 kg) de comida por pie cúbico o espacio
del congelador]. Deje suficiente espacio para que el
aire pueda circular entre los paquetes. Tenga
cuidado de dejar suficiente espacio en la parte
delantera para que se pueda cerrar la puerta herméticamente. Los tiempos de almacenamiento variarán
en función de la calidad y tipo de alimento, el tipo de
envase o envoltorio utilizado (si son herméticos y
antihumedad) y temperatura de almacenamiento. La
aparición de cristales de hielo dentro de un paquete
sellado es normal. Esto solo significa que la humedad del alimento y del aire del interior del paquete se
ha condensado, creando cristales de hielo.
NOTA
Deje que los alimentos calientes se enfríen a
temperatura ambiente durante 30 minutos y
después empaquételos y congélelos. Enfriar
alimentos calientes antes de congelarlos ahorra
energía.
Empaque
Una congelación correcta depende de un empaque
adecuado. Cuando se cierra y sella el paquete, no
debe dejar que entre ni salga aire ni humedad. Si eso
sucede, es posible que el olor y el sabor de los
alimentos se transfieran por todo el refrigerador y
también se podrían resecar los alimentos congelados.
Recomendaciones de Empaque:
Contenedores de plástico rígido con tapas
herméticas.
Tarros de congelación o latas.
Papel de aluminio grueso.
Papel con revestimiento plástico.
Envoltorios plásticos no permeables.
Bolsas de plástico con autosellado y calidad
específica apta para congelador.
Siga las instrucciones del contenedor o paquete para
métodos de congelación adecuados.
No use:
Envolturas de pan.
Contenedores de plástico que no sean de
polietileno.
Contenedores sin tapas herméticas.
Papel de cera o envoltura para congelador con
revestimiento de cera.
Envolturas finas y semipermeables.
Ajuste de los Estantes
Los estantes del refrigerador son ajustables para
satisfacer sus necesidades personales de almacenamiento.
Organizar los estantes para que se ajusten a las
diferentes alturas de los artículos hará que le
resulte más fácil encontrar lo que busca. Con ello
también reducirá el tiempo que permanece la
puerta del refrigerador abierta y ahorrará energía.
ESPAÑOL
Page 46

45 INSTRUCCIONES DE USO
Desensamble de los Estantes
1. Tome el estante de la parte de atrás.
2. Use la fuerza necesaria para levantar el estante
y liberar los seguros.
3. Deslice el estante hacia afuera.
1
ESPAÑOL
Estante
PRECAUCIÓN
No limpie los estantes de vidrio con agua templada mientras aún están fríos. Los estantes
podrían romperse si se ven expuestos a cambios repentinos de temperatura o impactos.
Los estantes de vidrio son pesados. Tenga
especial cuidado al momento de retirarlos.
2
Seguro
3
Estante
Ensamble del Estante
Deslice el estante sobre los rieles hasta que se
1.
detenga.
Suavemente presione hacia abajo la parte tra-
2.
sera del estante para colocarlo debajo de la
guía.
Compruebe que la pestaña se encuentra posi-
3.
cionada por debajo de la guía para asegurar el
ensamble del estante.
Guía
Cajón para Control de Humedad
Los cajones para verduras mantienen el sabor
y frescura de frutas y verduras.
Para remover y/o reemplazar el cajón:
1. Para remover, deslice el cajón hacia afuera hasta
que tope y levántelo para sacarlo en su totalidad.
2. Para instalar el cajón, deslícelo hacia adento hasta
pasar los topes.
Pestaña
Page 47
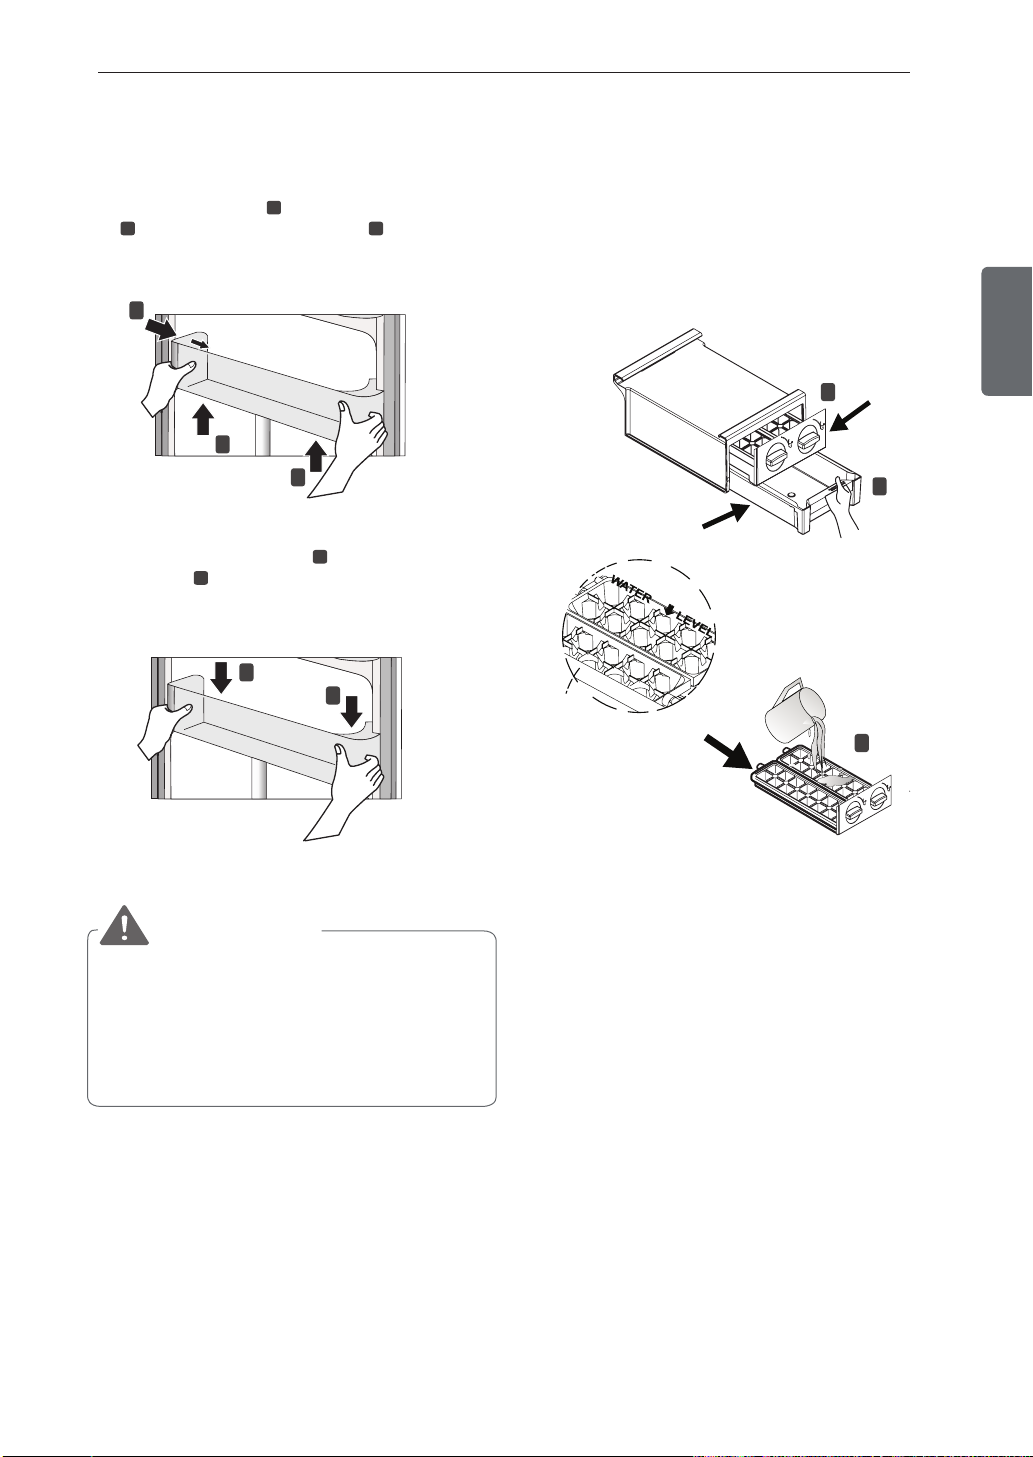
INSTRUCCIONES DE USO
46
Ensamble y Desensamble de los
Compartimentos de la puerta
Para desensamblar, primero ejerza presión sobre
la cara lateral izquierda , empuje hacia arriba ese
2
lado , prosiga con el lado derecho , para remover por completo.
1
Para ensamblar, primero coloque el lado derecho
sobre la guía del refrigerador y proceda con el
lado izquierdo para ensamblar por completo.
2
1
Desensamble
2
2
3
Ensamble
2
1
3
1
Fábrica de Hielos
1. La bandeja de hielos debe de ser removida para
poder quitar la charola para hielos.
2. Una vez que la bandeja fue removida, jale la
charola para hielos.
3. Llene la charola para hielos hasta el nivel
indicado.
2
Bandejas
de hielo
1
Charola
para hielos
ESPAÑOL
PRECAUCIÓN
No aplique fuerza excesiva al quitar o desmon-
tar los compartimentos.
No use el lava vajillas para limpiar los estantes
ni los compartimentos.
Regularmente remueva y lave los estantes y los
compartimentos, se pueden ensuciar fácilmente con la comida.
3
4. Coloque la charola y la bandeja para hielos en su
posición original y espere a que los cubos de hielo
estén listos.
5. Gire las perillas en sentido de las manecillas del
reloj para que los hielos caigan dentro de la bandeja.
6. La fábrica de hielos puede ser movida de un lado
a otro de acuerdo a sus necesidades de espacio.
Page 48

47 MANTENIMIENTO
MANTENIMIENTO
Limpieza
Tanto las secciones del refrigerador como del congelador se descongelan de forma automática, sin
ESPAÑOL
embargo, se recomienda limpiar ambas secciones una vez al mes para evitar la formación de
olores.
Seque los derrames inmediatamente.
Siempre desenchufe el refrigerador antes de limpiarlo.
Sugerencias Generales de Limpieza
Desenchufe el refrigerador o desconecte la
alimentación.
Retire todos los componentes extraíbles como
estantes, cajones, etc.
Use una esponja limpia o un trapo suave, junto
con un detergente suave en agua templada. No
utilice limpiadores abrasivos o agresivos.
Lave a mano, enjuague y se que todas las super-
ficies a fondo.
Exterior
El encerado de las superficies externas metálicas
pintadas proporciona una protección contra el
óxido. No encere las piezas de plástico. Encere las
superficies metálicas
al año con cera para electrodomésticos (o cera en
pasta para coches). Aplique la cera con un trapo
suave y limpio.
Para productos con un exterior en acero
inoxidable, use una esponja limpia que no genere
rayones o un trapo suave, junto con un detergente
suave en agua tibia. No utilice limpiadores abrasivos
o muy fuertes.
PRECAUCIÓN
No use una esponja o paño áspero al limpiar el
interior y el exterior del refrigerador.
No coloque su mano sobre la superficie
inferior del refrigerador al abrir y cerrarlo.
pintadas al menos dos veces
Revestimiento y empaque de las puertas
Use una esponja limpia o un trapo suave, junto con un
detergente suave en agua templada. No utilice ceras
de limpieza, detergentes concentrados, blanqueadores ni limpiadores que contengan petróleo en las
piezas del refrigerador que son de plástico.
Piezas Plásticas (cubiertas y paneles)
Use una esponja limpia o un trapo suave, junto con un
detergente suave en agua templada. No utilice
líquidos para limpiar ventanas, limpiadores abrasivos
o fluidos flamables ya que pueden rayar o dañar las
piezas.
Reemplazo de Luz (LED)
NOTA: No remueva la luz (LED), sólo debe de ser
removido por un técnico calificado.
ADVERTENCIA
En caso de reemplazo, la nueva lámpara debe ser
de la misma especificación que la original.
Tubería del Condensador
Use una aspiradora con accesorio para limpiar la
tubería del condensador y las rejillas de ventilación.
No retire la cubierta trasera que protege a la tubería.
ADVERTENCIA
Use un limpiador no inflamable. Si no se
cumple con esto se podrá producir una
explosión, incendio o muerte.
Paredes Interiores (deje que el conge-
lador se caliente para que el trapo no
se pegue)
Para ayudarle a eliminar los olores, puede lavar el
interior del refrigerador con una mezcla de
bicarbonato sódico y agua templada. Mezcle 2
cucharadas soperas de bicarbonato sódico (unos 26
gramos) en 1 litro de agua (un cuarto de galón).
Asegúrese de que el bicarbonato sódico esté
completamente disuelto para que no raye las
superficies del refrigerador.
Page 49

SOLUCIÓN DE PROBLEMAS
SOLUCIÓN DE PROBLEMAS
Consulte la sección Solución de problemas antes de llamar al centro de servicio, hacerlo le hará ahorrar
tiempo y dinero.
Problema Posibles Causas Soluciones
48
El refrigerador y
sección del congelador no están
refrigerando.
El sistema de
refrigeración
funciona
demasiasdo
tiempo.
La sección del
refrigerador o del
congelador está
demasiado cálida.
El control del refrigerador está
en posición OFF (apagado),
algunos modelos.
El refrigerador está en el ciclo
de descongelamiento.
El refrigerador se instaló
recientemente.
El refrigerador se cambió de
lugar recientemente.
El refrigerador está reemplazando un modelo anterior.
El refrigerador se conectó
recientemente o se restauró la
energía hace poco.
Se abrió la puerta a menudo o
se agregó una gran cantidad de
alimentos/comida caliente.
Las puertas no están cerradas
del todo.
El refrigerador está instalado en
un lugar caluroso.
El condensador / cubierta
trasera están obstruidos.
El refrigerador se instaló
recientemente.
Las ventilaciones de aire están
bloqueadas. Circula aire frío
desde el congelador hasta la
sección de alimentos frescos y
de vuelta, por las ventilaciones
de aire que hay en la pared que
dividen las dos secciones.
Las puertas se abren a menudo
o durante mucho tiempo.
Ponga el control en posición ON (encendido). Consulte la
sección Panel de Control para ver los ajustes de temperatura apropiados.
Durante el ciclo de descongelamiento, es posible que la
temperatura de cada compartimento suba un poco.
Espere 30 minutos y compruebe que se haya restaurado la
temperatura apropiada una vez completo el ciclo de
descongelamiento.
Puede tomar hasta 24 horas para que cada compartimento
alcance la temperatura deseada.
Si el refrigerador estuvo almacenado durante mucho
tiempo o se movió sobre su costado, es necesario que el
refrigerador esté en posición vertical durante 24 horas
antes de conectarlo a una fuente de energía.
Los refrigeradores modernos requieren más tiempo de
operación pero usan
tecnología más eficiente.
Tomará hasta 24 horas para que el refrigerador se enfríe
completamente.
Agregar comida y abrir la puerta aumenta la temperatura
del refrigerador, lo que obliga al compresor a funcionar
durante más tiempo para poder volver a enfriar el refrigerador. Para ahorrar
necesite del refrigerador de una sola vez, mantenga los
alimentos organizados para que resulte fácil encontrarlos y
cierre la puerta en cuanto haya sacado los alimentos
(Consulte la sección Sugerencias para el Almacenamiento
de Alimentos).
Empuje las puertas
cierran del todo, consulte la sección Las puertas no se
cierran completamente o se abren en la sección Solución
de Problemas.
El compresor funcionará durante más tiempo en condiciones calurosas. A temperaturas ambiente normales 21°C
(70 °F), el compresor debería funcionar entre el 40% y el
80% del tiempo. En condiciones más calurosas, sería
esperable que funcionara aún más a menudo. No se debe
operar el refrigerador a temperaturas que superen los
43 °C (110 °F).
Use una aspiradora con accesorio para limpiar la cubierta
del condensador y ventilas. No remueva la cubierta que
protege al condensador.
Puede tomar hasta 24 horas para que cada compartimento
alcance la temperatura deseada.
Localice las ventilaciones de aire usando su mano para
sentir el flujo de aire y mueva todos los envases que
bloqueen las ventilaciones y restrinjan el flujo de aire.
Reordene los artículos
el compartimento.
Cuando las puertas se abren a menudo o durante mucho
tiempo, el aire cálido y húmedo ingresa en el compartimento. Esto aumenta la temperatura y el nivel de humedad dentro del compartimento. Para disminuir el efecto,
reduzca la frecuencia y duración de la apertura de las
puertas.
menos energía debido a que existe
energía,
firmemente
intente sacar todo lo que
para cerrarlas. Si no se
para permitir que el aire circule por
ESPAÑOL
ENGLISH
Page 50

49 SOLUCIÓN DE PROBLEMAS
Problema Posibles Causas Soluciones
La sección del
refrigerador o del
congelador está
demasiado cálida.
ESPAÑOL
Acumulación de
humedad en el
interior.
Los alimentos se
están congelando
en el comparti-
mento del
refrigerador.
La unidad está instalada en un
lugar cálido.
Se agregó gran cantidad de
alimentos o alimentos calientes
a cualquiera de los compartimentos.
Las puertas no están correctamente cerradas.
El control de temperatura no
está en la configuración
correcta.
El ciclo de descongelamiento
se completó recientemente.
Las puertas se abren a menudo
o durante mucho tiempo.
Las puertas no están correctamente cerradas.
El clima es húmedo.
El ciclo de descongelamiento
se completó recientemente.
Los alimentos no están
correctamente envasados.
Se ubicaron alimentos con alto
contenido de agua cerca de una
ventilación de aire.
El control de temperatura del
refrigerador está mal configu-
rado.
El refrigerador está instalado en
un lugar frío.
No se debe operar el refrigerador a temperaturas por
encima de los 43 °C (110 °F).
Agregar muchos alimentos calientes al compartimento
hace que se sea necesario que opere el sistema de
refrigeración. Permitir que los alimentos calientes se
enfríen hasta estar a temperatura ambiente antes de
guardarlos en el refrigerador reducirá este efecto.
Consulte la sección Las puertas no se cierran correctamente o se abren en la sección Solución de Problemas.
Si la temperatura es demasiado cálida, ajuste el control de
a un incremento y espere a que se estabilice la temperatura. Consulte la sección Panel de Control para obtener
más información.
Durante el ciclo de descongelamiento, es posible que la
temperatura de cada compartimento aumente levemente
y que se forme condensación en la pared trasera. Espere
30 minutos y compruebe que se haya restaurado la
temperatura apropiada una vez completo el ciclo de
descongelación.
Cuando las puertas se abren a menudo o durante mucho
el aire cálido y húmedo ingresa en el comparti-
tiempo,
mento. Esto aumenta la temperatura y el nivel de humedad dentro del compartimento. Para disminuir el efecto,
reduzca la frecuencia y duración de la apertura de las
puertas.
Consulte la sección Las puertas no se cierran correctamente o se abren en la sección Solución de Problemas.
El clima húmedo permite que ingrese humedad adicional
en los compartimentos cuando se abren las puertas, lo
que resulta en condensación o escarcha. Mantener un
nivel razonable de humedad en el hogar ayudará a controlar la cantidad de humedad que puede ingresar en los
compartimentos.
Durante el ciclo de descongelamiento, es posible que la
temperatura de cada compartimento aumente levemente
y que se forme condensación en la pared trasera. Espere
30 minutos y compruebe que se haya restaurado la
temperatura apropiada una vez completo el ciclo de
descongelamiento.
Los alimentos que se guardan sin tapar o envolver y los
contenedores húmedos pueden resultar en la acumulación
de humedad en cada compartimento. Seque todos los
contenedores con un trapo y guarde los alimentos en
envases sellados para evitar que se forme condensación
y escarcha.
Reordene los artículos de manera que aquellos que tienen
alto contenido de agua estén lejos de las ventilaciones de
aire.
Si la temperatura es demasiado fría, ajuste el control
incrementando una posición y
temperatura. Consulte la sección Panel de Control para
obtener mas información.
Cuando el refrigerador opera a temperaturas por debajo de
los 5 °C (41 °F), los alimentos se pueden congelar en el
compartimento del refrigerador. No se debe operar el
refrigerador a temperaturas por debajo de los 13 °C (55 °F).
espere a que se estabilice la
Page 51

SOLUCIÓN DE PROBLEMAS
Problema Posibles Causas Soluciones
Se forma escarcha
o cristales de hielo
sobre los alimentos congelados
(fuera del envase).
La sección del
refrigerador o del
congelador está
demasiado fría.
Se forma escarcha
o cristales de hielo
sobre los alimentos congelados
(dentro del envase
sellado).
El hielo huele o
sabe mal.
Las puertas
no cierran
correctamente
o se abren.
Las puertas son
dificiles de abrir.
El refrigerador se
tambalea o parece
inestable.
Las luces no
funcionan.
El interior del
refrigerador está
cubierto con
polvo u hollín.
Las puertas se abren a menudo
o durante mucho tiempo.
La puerta no se cierra bien.
Configuración incorrecta del
control de temperatura.
La condensación de los alimentos con alto contenido de agua
se congeló dentro del envase.
El alimento ha estado en el
congelador durante mucho
tiempo.
Los alimentos no están bien
guardados en los compartimentos.
Es necesario limpiar el contenedor en donde se almacena el
hielo.
Hay envases de alimentos
impidiendo que la puerta se
cierre.
El contenedor de hielo, la tapa
del cajón para verduras, las
bandejas, los estantes, los
contenedores de las puertas o
los compartimentos no están
en su posición.
El refrigerador no está bien
nivelado.
Los empaques están sucios o
pegajosos.
La puerta se cerró recientemente.
Las patas de nivelación no
están bien ajustadas.
El suelo no está nivelado.
Avería de la iluminación LED
El refrigerador está ubicado
cerca de una fuente de calor,
como por ejemplo una
chimenea o una vela.
Cuando las puertas se abren a menudo o durante mucho
tiempo, el aire cálido y húmedo ingresa en el
compartimiento. Esto aumenta la temperatura y el nivel de
humedad dentro del compartimiento. Una mayor humedad
resultara en escarcha y condensación. Para disminuir el
efecto, reduzca la frecuencia y duración de la apertura de las
puertas.
Consulte la sección Las puertas no se cierran correctamente o se abren en la sección Solución de Problemas.
Si la temperatura es demasiado fría, ajuste el control de a
un incremento y espere a que se estabilice la temperatura.
Consulte la sección Panel de Control para obtener más
información.
Esto es normal para aquellos alimentos que tienen alto
contenido de agua.
No almacene alimentos con alto contenido de agua en el
congelador durante largos períodos de tiempo.
Vuelva a envolver los alimentos. Es posible que los olores
se trasladen al hielo si los alimentos no están bien
envueltos.
Vacíe y lave el contenedor (deseche los cubitos viejos).
Asegúrese de que el
seco antes de volver a instalarlo.
Reordene los contenedores de alimento para dejar libre la
puerta y los estantes.
Empuje todos los contenedores hacia adentro y ponga la
tapa del cajón para verduras, las bandejas, los estantes y
los compartimentos en su posición correcta. Consulte la
sección Instrucciones de Uso.
Consulte la sección Nivelación como guía para nivelar el
refrigerador.
Limpie los empaques y las superficies de contacto.
Aplique
cos o cera de cocina en los empaques después de limpiar-
las.
Cuando abre la puerta, ingresa aire más caliente al
refrigerador. Al enfriarse ese aire caliente, puede crear un
vacío. Si le cuesta abrir la puerta, espere un minuto para
permitir que la presión del aire se equilibre, y luego pruebe
para ver si se abre con más facilidad.
Consulte la sección Nivelación.
Es posible que sea necesario agregar cuñas debajo de las
patas de nivelación o rodillos para completar la instalación.
La lámpara del compartimento del refrigerador es
iluminación LED interior, por lo que el mantenimiento
deberá ser realizado por un técnico calificado.
Asegúrese de que el refrigerador no esté ubicado cerca de
una fuente de calor, como por ejemplo una chimenea o
una vela.
contenedor esté completamente
una fina
capa de abrillantador para electrodomésti-
50
ESPAÑOL
ENGLISH
Page 52

51 SOLUCIÓN DE PROBLEMAS
Problema Posibles Causas Soluciones
ENGLISH
Clics.
ESPAÑOL
Traqueteo.
Silbido.
Gorgoteo.
Chasquidos.
Chisporroteos.
Vibración.
Goteo.
Sonido pulsante o
agudo.
El control de descongelamiento hará
un chasquido cuando comience y
finalice el
descongelamiento. El control del
termostato (o del refrigerador en
algunos modelos) también hará un
chasquido al encenderse y apagarse.
Es posible que el traqueteo provenga
del
refrigerador.
El refrigerador no descansa sólidamente sobre el suelo.
El motor del ventilador evaporador
está circulando aire por los compartimentos del refrigerador y congelador.
El ventilador del condensador está
forzando el aire por encima del
condensador.
El refrigerante fluye por el sistema de
refrigeración.
Contracción y expansión de las
paredes interiores debido a los
cambios de temperatura.
Agua que gotea sobre el calentador
de descongelamiento durante un
ciclo de descongelamiento.
Si los laterales o la parte trasera del
refrigerador están tocando un
mueble o pared, es posible que
algunas de las vibraciones normales
produzcan un sonido audible.
Agua que fluye a la bandeja de
drenaje durante el ciclo de descongelamiento.
Su refrigerador está diseñado para
funcionar más eficiente para
conservar los alimentos a la temperatura deseada. Es posible que el
compresor de alta eficiencia haga
que su refrigerador funcione durante
más tiempo que su refrigerador
anterior, pero sigue ahorrando más
energía que los modelos anteriores.
Mientras el refrigerador está en
funcionamiento, es normal escuchar
un sonido pulsante o agudo.
ciclo automático de
de refrigerante o del
flujo
Funcionamiento Normal.
Funcionamiento Normal.
El suelo es débil o irregular o es necesario ajustar las
patas de nivelación. Consulte la sección Nivelación.
Funcionamiento Normal.
Funcionamiento Normal.
Funcionamiento Normal.
Funcionamiento Normal.
Funcionamiento Normal.
Para eliminar el ruido, asegúrese de que los laterales
y la parte trasera no vibren contra ningún mueble o
pared.
Funcionamiento Normal.
Funcionamiento Normal.
Page 53

SMART DIAGNOSISMR
(Diagnóstico Inteligente)
Si tiene algún problema con su refrigerador, puede
transmitir datos a través de su teléfono al centro de
de servicios LG. Esto le otorga la capacidad de hablar
directamente con nuestros especialistas capacitados. El especialista registra los datos transmitidos
desde su máquina y los utiliza
analizar el problema,
rápido y efectivo.
Si experimenta problema con su refrigerador, llame
al 1-800-243-0000 para los Estados Unidos
(1-888-542-2623 para Canadá). Únicamente utilice
esta función cuando el representante del centro de
atención al cliente de LG le indique hacerlo. Los
sonidos de transmisión que escuchará son
normales y suenan de forma parecida a un equipo
de fax.
No se puede activar la función Smart Diagnosis
(Diagnóstico Inteligente) a menos que su refrigerador esté enchufado. Si su refrigerador no enciende,
entonces el problema debe solucionarse sin utilizar
Smart Diagnosis
brindándole
MR
.
Uso de Smart Diagnosis
para analizar el
un
diagnóstico
MR
MR
(Diagnóstico Inteligente)
Primero, comuníquese al 1-800-243-0000 para
Estados Unidos (1-888-542-2623 para Canadá).
Únicamente utilice la función Smart Diagnosis
(Diagnóstico Inteligente) cuando el representante
del centro de atención al cliente de LG le indique
hacerlo.
1.
Abra la puerta del refrigerador y cierrela una vez,
después abrala 5 veces durante un período de 8
segundos, ahora la función SMART DIAGNOSIS
está activa.
2.
Inmediatamente coloque el teléfono cerca del
altavoz localizado en la parte superior derecha,
confirme que
se encuentra
escucharán 4 sonidos cortos y la bocina emitirá
un sonido no mayor a 8 segundos.
la bocina (micrófono) del teléfono
en dirección hacia el altavoz, se
MR
TM
SMART DIAGNOSIS
MR
NOTA
Para obtener mejores resultados, no mueva el
teléfono mientras se transmiten los tonos.
Si el representante del Centro de Atención al
Cliente no puede grabar con precisión los datos,
quizá le pida que lo intente de nuevo.
Las diferencias de la calidad de la llamada por
región pueden afectar la función.
Use el teléfono de línea para una mejor comunicación, resultando en un mejor servicio.
Una mala calidad de la llamada puede resultar en
una muy mala transmisión de datos desde su
teléfono a la máquina, lo que podría causar que
Smart Diagnosis
funcione correctamente.
MR
(Diagnóstico Inteligente) no
52
ESPAÑOL
ENGLISH
Sostenga el teléfono en el lugar hasta que
3.
finalice el tono de transmisión. Una vez que la
transmisión ha finalizado y los tonos se hayan
detenido, continúe su conversación con el
especialista, quien podrá entonces ayudarlo
utilizando la información que se transmitió para
analizar.
Page 54

53 GARANTÍA
En caso de que su Frigorífico LG (“Producto”) falle por defectos de material o mano de obra bajo circunstancias de uso
doméstico normal durante el período de garantía descrito a continuación, LG, a su criterio, reparará o reemplazará el
producto. Esta garantía limitada es sólo válida para el comprador original del producto y se aplicará sólo cuando la compra
y el uso se haya realizado dentro de los Estados Unidos, incluyendo los territorios de EE.UU. Para solicitar un servicio
cubierto por esta garantía limitada, será necesario presentar el comprobante de compra original.
ESPAÑOL
Un (1) año a partir de la
fecha original de compra.
Piezas y mano de obra
(sólo piezas internas/
funcionales)
Ruidos asociados con operaciones y fallas normales encontradas en las instrucciones de uso y cuidado y las guias de instalacion u
operacion de la unidad en un ambiente inapropiado no seran cubiertas bajo esta garantia.
Los productos y piezas reemplazados están garantizados por la parte que reste del período original de la garantía o por noventa
(90) días, el período que sea más largo de los dos.
Los productos y piezas reemplazados pueden ser nuevos o reacondicionados.
ESTA GARANTÍA SUSTITUYE A CUALQUIER OTRA GARANTÍA, EXPRESA O IMPLÍCITA, INCLUYENDO, SIN LIMITACIONES,
CUALQUIER GARANTÍA DE COMERCIABILIDAD O ADECUACIÓN A UN FIN PARTICULAR. HASTA EL EXTREMO PERMITIDO
POR LA LEY PARA UNA GARANTÍA IMPLÍCITA, LA DURACIÓN SE LIMITA AL PERIODO DE GARANTÍA EXPRESA INDICADO
ANTERIORMENTE. NI EL FABRICANTE NI EL DISTRIBUIDOR DE EE.UU. SERÁN RESPONSABLES DE CUALQUIER DAÑO
EXTRAORDINARIO POR MOTIVOS AJENOS, INDIRECTOS, ESPECIALES, O DAÑOS PUNITIVOS DE CUALQUIER NATURALEZA,
INCLUYENDO SIN LIMITACIONES, PÉRDIDAS DE BENEFICIOS, O CUALQUIER OTRO DAÑO YA SEA MENCIONADO EN EL
CONTRATO, ACUERDO, O CUALQUIER OTRO SUPUESTO. Algunos estados no permiten la exclusión o limitación de daños
extraordinarios o ajenos o limitaciones sobre la duración de una garantía implícita, por lo tan
arriba puede que no se le aplique a usted. Esta garantía le otorga derechos legales específicos y podría tener otros derechos que
variarán dependiendo del estado.
ESTA GARANTÍA LIMITADA NO CUBRE:
1. Desplazamientosdel servicio para entregar, recoger, instalar
o reparar el producto, instruir al cliente en el funcionamiento
del producto , repararo reemplazar fusibles o corregir
cableados o fontanería o para realizar correcciones de
reparaciones o instalaciones no autorizadas.
2. Averías de funcionamiento del producto durante cortes
eléctricos e interrupciones del servicio eléctrico.
3. Daños causados por tuberías de agua con fugas o rotas,
tuberías de agua congeladas, conductos de drenaje
bloqueados, suministros de agua inapropiados
interrumpidos o suministros de aire inadecuados.
4. Daños provocados por un uso del producto en una atmósfera
corrosiva o contraria a las instrucciones enmarcadas en
manual del propietario del producto.
5. Daños al producto provocados por accidentes, plagas y
parásitos, rayos, viento, fuego, inundaciones o actos de la
Naturaleza.
6. Daños provocados por un uso indebido, abuso, instalación,
reparación o mantenimiento inadecuados. Una reparación
inadecuada que incluya piezas no aprobadas o especificadas
por LG.
7. Daños o fallos provocados por una modificación o alteración
no autorizada, o por un uso más allá de su propósito
o cualquier fuga de agua causada por una incorrecta
instalación de la unidad.
8. Daños o fallos prov
eléctrica, voltaje, normativas de fontanería, uso comercial o
industrial, o uso de accesorios, componentes, o productos
de limpieza desechables que no estén aprobados por
LG.
Para obtener una información más detallada de la garantía y
asistencia al cliente, Por favor llame o visite nuestra página web:
Llame al 1-800-243-0000 (24 horas al día, 365 días al año) y
seleccione la opción apropiada del menú o visite nuestra página
web en: ww w .lg.com
O por correo: Centro de información al cliente LG:
P. O. Box 240007, 201 James Record Road Huntsville, Alabama
35813
ATTN: CIC
FRIGORÍFICO LG GARANTÍA LIMITADA - U.S.A.
LG ELECTRONICS U.S.A., INC.
PERÍODO DE GARANTÍA
Frigorífico
(Condensador, Filtro desecante, Tubo conector,
Refrigerante y Evaporador)
Un (1) año a partir de la
fecha original de compra.
Siete (7) años a partir de la
fecha original de compra.
Piezas y mano de obra Sólo piezas (Se le cobrará
mano de obra al
Compresor Inverter
Diez (10) años a partir de la fecha
original de compra.
Sólo piezas (Se le cobrará mano
de obra al consumidor)
consumidor)
to la exclusión o limitación citada
9.
Daños provocados por transporte y manipulación,
incluyendo arañazos, limaduras, astillados y/o cualquier
otro daño al acabado de su producto, a menos que tales
daños sean producto de defectos en los materiales o en la
fabricación y sea informado en el plazo de una (1) semana
desde su entrega.
10. Daños u objetos desaparecidos de cualquier producto de
presentación, con la caja abierta o productos rebajados o
reacondicionados.
11. Productos cuyo número de serie original haya sido retirado
ocados por una incorrecta corriente
alterado o no s
la garantía serán necesarios el recibo de c
número de serie y el número
el
12. Incrementos de los costes de utilidad y gastos de utilidad
adicionales.
13. Sustitución de bombillas, filtros o cualquier ot
desechable.
14. Reparaciones cuando su producto haya sido usado de forma
diferente al uso doméstico normal ( p.ej. uso comercial, en
oficinas y lugares de ocio) o contrario a las instrucciones
enmarcadas en el manual del
15. Costes asociados a la retirada del producto de su hogar
para reparaciones.
16. La retirada y reinstalación del producto si se encuentra
instalado en un lugar inaccesible o no está instalado de
acuerdo con lo publicado en el manual de instalación del
producto, incluyendo los manuales LG del propietario y de
instalación.
17. Las estanterías, cestas de las puertas, cajones, manillas, y
otras piezas a parte de aquellas que venían incluidas con
este modelo en
ea legible con claridad. Para la validación de
del modelo
particular
.
ompra original, el
.
propietario del producto.
El costo de la reparación o sustitución bajo estas circunstancias excluidas será asumido por el cliente.
Escriba la información de su garantía debajo:
Información de registro del producto:
Modelo:
Número de serie:
Fecha de la compra:
ra pieza
Page 55

NOTAS
54
ESPAÑOL
Page 56

55 NOTAS
ESPAÑOL
Page 57

1
FRANÇAIS
FRANÇAIS
MANUEL DU PROPRIÉTAIRE
RÉFRIGÉRATEUR
AVEC COMPARTIMENT
CONGÉLATEUR SUPÉRIEUR
Veuillez lire ce manuel attentivement avant utilisation et le garder
à portée de main pour pouvoir le consulter à tout moment.
Nom du Modèle
LTNS16121V
www.lg.com
Page 58

57 SOMMAIRE
SOMMAIRE
58
59
60
61
FRANÇAIS
62
62
63
64
64
64
65
65
65
65
65
66
67 Montage de la porte du réfrigérateur
67
68
68
CARACTÉRISTIQUES DU
PRODUIT
CONSIGNES IMPORTANTES
DE SÉCURITÉ
Consignes importantes de sécurité
Consignes importantes de sécurité
COMPOSANTS
Extérieur du réfrigérateur
Intérieur du réfrigérateur
INSTALLATION
Vue d'ensemble de l'installation
Spécifications
Déballage de votre réfrigérateur
Choisir le bon emplacement
- Mise au sol
- Température ambiante
- Mesure des espaces
Retrait / Montage des portes
Montage de la porte du réfrigérateur
Mise sous tension
Nivellement
69 MODE D’EMPLOI
69 Avant l'utilisation
Panneau de commande
70
71
Stockage des aliments
71
72 - Conseils de stockage des aliments
72 - Stockage d'aliments congelés
72 Réglage des étagères
73 Retrait de l'étagère
73 L’assemblage de la grill
73 Bacs à légume
74 Montage et le démontage de la Porte
74 Machine à glaçons
- Lieu de conservation des aliments
75 ENTRETIEN
Nettoyage
75
76 DÉPANNAGE
Dépannage
77
Dépannage
78
79
Dépannage
80 SMART DIAGNOSIS
80 Utiliser Smart Diagnosis
81
GARANTIE
82
NOTES
MC
MC
Page 59

CARACTÉRISTIQUES DU PRODUIT
ENGLISH
Selon le modèle, certaines des fonctionnalités suivantes peuvent être indisponibles.
CARACTÉRISTIQUES DU PRODUIT
58
SMART DIAGNOSIS (Diagnostic Intelligent)
Utilisez la fonction de contacter le centre de service et recevoir un diagnostic
précis lorsque le réfrigérateur ne fonctionne pas correctement ou échoue. Son
utilisation est exclusivement pour la consultation, ne utiliser pas pendant la
fonctionnement normal.
TM
BACS À LÉGUME À HUMIDITÉ CONTRÔLÉE
Les bacs à légume à humidité contrôlée sont conçus pour maintenir vos fruits et
légumes frais et croquants.
MACHINE À GLAÇONS
Pour répondre à son espace a besoin de votre machine à glaçons peut se
déplacer d'un côté à l'autre.
AVERTISSEMENT
Connectez à une source d’eau potable uniquement.
FRANÇAIS
Page 60

LIRE TOUTES LES INSTRUCTIONS AVANT D’UTILISER L’APPAREIL.
59 CONSIGNES IMPORTANTES DE SÉCURITÉ
CONSIGNES IMPORTANTES DE SÉCURITÉ
Ce guide contient de nombreux messages de sécurité importants. Lisez et respectez toujours
l'ensemble des messages de sécurité.
Ceci est le symbole d’alerte de sécurité. Il vous alerte de messages de sécurité qui vous
informent de dangers qui peuvent vous tuer ou vous blesser, blesser autrui ou causer des
dommages au produit.
Tous les messages de sécurité seront précédés par le symbole d’alerte de sécurité et d’un
mot:
Vous pouvez être tué ou gravement blessé si vous ne suivez pas ces
instructions.
Indique une situation extrêmement dangereuse qui, si elle n’est pas évitée,
peut entraîner des blessures mineures ou modérées, ou endommager le
produit.
FRANÇAIS
Alimentation
Installation
Utilisation
AVERTISSEMENT
ATTENTION
AVERTISSEMENT
Pour réduire le risque d’incendie, d’électrocution ou de blessures lors de l’utilisation de votre
produit, suivre les précautions de sécurité de base, y compris ce qui suit:
NE JAMAIS débrancher le réfrigérateur en tirant sur le cordon d’alimentation. Toujours tenir
fermement la fiche et la retirer de la prise.
Si le cordon d’alimentation est abîmé, il doit être remplacé par le fabriquant, par son service aprèsvente
ou par une personne également qualifiée afin d’éviter tout danger. Ne utiliser pas un cordon qui
présente des fissures ou des traces de frottement sur sa longueur ou à l’extrémité de la fiche ou du
connecteur.
Ne utiliser pas une prise de courant non certifiée.
Débranchez immédiatement le cordon d'alimentation en cas de panne ou d'orage.
Brancher dans la prise d’alimentation avec le cordon d’alimentation vers le bas.
Ne utiliser pas de rallonges ou des adaptateurs (deux bornes) infondées.
Contactez un centre de service après-vente agréé avant d’installer ou de déplacer le réfrigérateur.
Lorsque vous déplacez votre réfrigérateur loin du mur, faites attention de ne rouler pas au-dessus ou
endommager le cordon d’alimentation.
Avant l’utilisation, veillez à brancher ce réfrigérateur à une prise électrique dédiée et mise à la terre de
115 V, 60 Hz, CA uniquement. Il
standard à 2-broches avec une prise murale standard à 3 broches.
N’installez pas le réfrigérateur à un endroit où il risque de tomber.
NE LAISSEZ PAS les enfants grimper, se tenir debout ou se suspendre aux portes ou aux clayettes du
réfrigérateur. Ils pourraient endommager le réfrigérateur et se blesser gravement.
Ne placez pas d’objets lourds sur le distributeur du réfrigérateur et ne vous y suspendez pas.
Ne placer pas d’objets lourds ou dangereux (bouteilles de liquide) sur le réfrigérateur.
Ne mettre pas d’animaux vivants à l’intérieur du réfrigérateur.
Ne laisser pas les enfants monter dans le produit lorsqu’il est en cours d’utilisation.
En cas de fuite de gaz (propane, GPL), aérez suffisamment la pièce et contactez un centre de service
après-vente agréé avant de reprendre l’utilisation. Ne toucher pas ni démonter la prise électrique du
réfrigérateur.
Dans le cas d'une fuite de fluide réfrigérant, déplacer les objets inflammables loin du réfrigérateur.
Aérez suffisamment la pièce et contactez un centre de service après-vente agréé.
Ne utiliser pas ni mettre des substances inflammables (produits chimiques, médicaments,
cosmétiques, etc.) près du réfrigérateur et ne pas les stocker à l’intérieur du réfrigérateur. Ne placer
pas le réfrigérateur à proximité de gaz inflammables.
Ne stockez pas de substances explosives telles que les aérosols avec un propulseur inflammable dans
cet appareil.
est de la responsabilité de l'utilisateur de remplacer une prise murale
Page 61

LIRE TOUTES LES INSTRUCTIONS AVANT D’UTILISER L’APPAREIL.
CONSIGNES IMPORTANTES DE SÉCURITÉ
Pour réduire le risque d’incendie, de choc électrique ou de blessure corporelle, les précautions de sécurité
élémentaires doivent être respectées, notamment les suivantes:
N’utilisez pas ce réfrigérateur à des fins spécifiques telles que stockage de médicaments ou de matériaux
d’essai, utilisation sur un bateau, etc.
Débranchez le cordon d'alimentation avant de nettoyer ou de réparer le réfrigérateur.
Ne modifier pas ou étendre le cordon d’alimentation.
Ne utiliser pas de séchoir pour sécher l’intérieur. Ne allumer pas une bougie pour enlever l’odeur à
l’intérieur.
Pour votre sécurité, cet appareil doit être correctement mis à la terre. Faites vérifier la prise murale et le
circuit électrique par un électricien qualifié pour vous assurer que la prise est correctement mise à la
terre.
Ne utiliser pas une prise qui puisse être éteinte avec un interrupteur. Ne utiliser pas de rallonge. Il
incombe à l’utilisateur de remplacer une prise murale standard à 2 broches avec une prise murale
standard à 3 broches.
Ne couper pas ou enlever la troisième broche (terre) du cordon d’alimentation, en aucune circonstance.
Ne utiliser pas une prise d’adaptateur et brancher le cordon d’alimentation à une rallonge multi-prise.
Débranchez immédiatement le cordon d’alimentation si vous entendez un bruit curieux, sentez une odeur
étrange ou détectez de la fumée en provenance du réfrigérateur.
Couper l’alimentation si de l’eau ou de la poussière pénètre dans le réfrigérateur. Appeler un agent de
service.
Ne démonter pas ou modifier le réfrigérateur.
Ne mettre pas les mains, les pieds ou des objets métalliques en-dessous ou derrière le réfrigérateur.
Ne utiliser pas le réfrigérateur ni toucher le cordon d'alimentation avec des mains mouillées.
Ne toucher pas les surfaces froides dans le compartiment du congélateur avec les mains mouillées ou
humides, quand votre réfrigérateur est en marche.
Ne mettre pas de récipients en verre, de bouteilles en verre ou de sodas dans le congélateur.
Cet appareil n’est pas destiné à être utilisé par des personnes (enfants compris) avec des capacités
physiques, sensorielles ou mentales limitées, ou un manque d’expérience et de connaissances, à moins
qu’elles n’aient été encadrées ou aient reçu des instructions concernant l’utilisation de l’appareil par une
personne responsable de leur sécurité.
Ne recongelez pas des aliments complètement décongelés. Vous risqueriez de graves problèmes de
santé.
Si vous vous débarrassez de votre
soit retiré pour une élimination appropriée par un réparateur qualifié. Si vous versez du réfrigérant CFC,
vous pouvez être condamné à une amende ou à l’emprisonnement en conformité avec la législation
pertinente sur l’environnement.
Les réfrigérateurs jetés ou abandonnés sont dangereux, même s’ils sont déposés pour seulement
quelques jours. Lors de l’élimination du réfrigérateur, retirer les matériaux d’emballage de la porte ou
décoller les portes, mais laisser les étagères en place afin que les enfants ne puissent pas y pénétrer
facilement.
En cas de branchement sur un circuit protégé par des fusibles, utilisez un fusible temporisé.
Si vous désirez plus de l'utilisation de cet appareil, contacter les autorités locales de disposer de ce
produit en toute sécurité et en utilisant Cycle-pentane pentane comme mousse ou des gaz inflammables
pour l'isolation. Les gaz dans le matériau d'isolation nécessitent procédé d'élimination particulier. Ce
produit contient des gaz isolants inflammables.
Ne endommager pas le circuit frigorifique.
vieux réfrigérateur, assurez-vous que le liquide de refroidissement CFC
60
FRANÇAIS
Page 62

LIRE TOUTES LES INSTRUCTIONS AVANT D’UTILISER L’APPAREIL.
61 CONSIGNES IMPORTANTES DE SÉCURITÉ
Pour réduire le risque d’incendie, de choc électrique ou de blessure corporelle, les précautions de sécurité
élémentaires doivent être respectées, notamment les suivantes:
Installation
Le réfrigérateur doit être installé conformément aux instructions d'installation qui ont été collées à
FRANÇAIS
l’avant du réfrigérateur.
Soyez prudent lorsque vous déballez et installez le réfrigérateur. Débarrassez-vous immédiatement des
emballages (en plastique ou autres) pour qu’ils soient hors de portée des enfants.
L'appareil doit être placé de sorte à pouvoir accéder facilement à la prise murale.
Utilisation
ATTENTION
Fermer soigneusement la porte lorsque les enfants sont à proximité.
Éloignez vos doigts des zones de coincement; les espaces entre les portes et les armoires sont
inévitablement réduits. Faites attention lorsque vous fermez les portes et que des enfants sont à
proximité.
Veillez à ranger soigneusement les aliments afin qu’ils ne puissent pas tomber et provoquer des
blessures.
Ne utiliser pas d’aérosols à proximité du réfrigérateur.
Éviter de poser des objets sur le réfrigérateur.
Entretien
Ne utiliser pas de détergents puissants comme de la cire ou des diluants de nettoyage. Nettoyez
avec un chiffon doux.
Nettoyez régulièrement les corps étrangers (tels que poussière et eau) sur les broches de la fiche
d’alimentation et les zones de contact.
N’essayez pas d’entreposer, de démonter ou de réparer le réfrigérateur vous-même.
Retirer la poussière et les corps étrangers des broches.
Utiliser un chiffon sec pour nettoyer la fiche d’alimentation.
Si le réfrigérateur est débranché, attendez cinq minutes au moins avant de le rebrancher.
Si vous remarquez une odeur de produit chimique, de plastique brûlé ou que vous voyez de la fumée,
débranchez immédiatement le réfrigérateur et contactez votre service après-vente LG Electronics.
AVERTISSEMENT
Ce produit contient des produits chimiques pouvant, d’après l’État de Californie, causer le cancer ou des
malformations congénitales ou autres troubles de la reproduction.
AVERTISSEMENT
Ne utiliser pas dispositifs mécaniques
Ne utiliser pas de dispositifs mécaniques ou
autres des moyens d'accélérer le processus
de dégivrage, que ceux recommandés par le
fabricant.
Lavez-vous les mains après usage.
AVERTISSEMENT
Ne stocker pas les appareils électriques
Ne utiliser pas d'appareils électriques à
l'intérieur du compartiment de stockage des
aliments, à moins qu'ils soient du type
recommandé par le fabricant.
CONSERVEZ CES INSTRUCTIONS
Page 63

COMPOSANTS
COMPOSANTS
Utilisez cette page pour vous familiariser davantage avec les parties et les caractéristiques de votre
réfrigérateur.
Extérieur du réfrigérateur
62
FRANÇAIS
Poignée
Ouvre et ferme
la porte.
Congélateur
Congèle les aliments.
Réfrigérateur
Conserve les aliments.
Page 64

63 COMPOSANTS
ENGLISH
Intérieur du réfrigérateur
FRANÇAIS
Machine à glaçons
Panneau de commande
du réfrigérateur
Contrôle de la température
du réfrigérateur.
Éclairage (LED)
Les lampes intérieures
éclairent l’intérieur du
réfrigérateur.
Étagère du congélateur
Bacs de porte
(Congélateur)
Les bacs de porte sont
amovibles pour faciliter
le nettoyage.
Panneau de commande
du congélateur
Commande l’écoulement
d’air froid du congélateur
au réfrigérateur.
Bacs de porte
(Réfrigérateur)
Bacs interchangeables
pouvant être disposés
en fonction de vos
besoins de stockage.
Étagère du
réfrigérateur
Les étagères de votre
réfrigérateur sont réglables
pour répondre à vos besoins
Bac à légume
Contrôle l'humidité et
maintient les fruits et
légumes croquants.
Plateau à oeufs
.
Page 65

INSTALLATION
INSTALLATION
Vue d'ensemble de l'installation
Veuillez d'abord lire les instructions d'installation après l'achat de ce produit ou son transport vers un autre
emplacement.
64
FRANÇAIS
1 Déballez votre
réfrigérateur
Cet appareil est destiné à être utilisé à la maison et autres applications similaires, tels que:
- Cuisine -Personnel dans les magasins, bureaux et autres des milieux de travail; les maisons de ferme et les
clients dans les hôtels, motels et environnements résidentiels.
- Environnements et hébergements type de petit-déjeuner; et batisse applications non-détail similaires.
nu zessisiohC 2
emplacement approprié
3 Nivellement et
alignement de la porte
Spécifications
L’apparence et les spécifications énumérées dans ce manuel peuvent varier à cause des améliorations
constantes du produit.
Dimensions
Poids net
Largeur
31 pouces
(787 milimètres)
182,98 livres (83 kilogrammes)
Profondeur
29 pouces
(737 milimètres)
Hauteur
71 pouces
(1803 milimètres)
Page 66

65 INSTALLATION
Déballage de votre réfrigérateur
FRANÇAIS
Enlever le ruban adhésif et toute étiquette
temporaire de votre réfrigérateur avant de l’utiliser.
Ne enlever pas les étiquettes d’avertissement,
l’étiquette du numéro de modèle et de série, ou la
fiche technique qui est située à l’arrière du
réfrigérateur.
Pour supprimer toute bande adhésive ou colle
restante, frotter la surface vivement avec le pouce.
Les résidus de ruban adhésif ou de colle peuvent
également être enlevés en frottant une petite
quantité de savon à vaisselle liquide sur l’adhésif
avec les doigts. Essuyez-les avec de l’eau chaude et
séchez.
Ne utiliser pas d’instruments tranchants, d’alcool à
friction, de liquides inflammables ou de nettoyants
abrasifs pour enlever le ruban adhésif ou de la colle.
Ces produits peuvent endommager la surface de
votre réfrigérateur.
Les étagères des
la position de transport. Veuillez réinstaller les
étagères selon vos besoins individuels.
AVERTISSEMENT
Utiliser deux ou plusieurs personnes pour
déplacer et installer le réfrigérateur. Si cet
avertissement ne sont pas suivies, vous
risquez de vous blesser au dos ou autrement.
Votre réfrigérateur est lourd. Lors du
déplacement du réfrigérateur pour le
nettoyage ou le service, veiller à protéger le
plancher. Toujours déplacer le réfrigérateur en
position verticale. Ne remuer pas ou faire
marcher le réfrigérateur lorsque vous essayez
de le déplacer car le plancher pourrait être
endommagé.
Maintenir les produits inflammables et les
vapeurs, tels que l’essence, loin du
réfrigérateur. L’incapacité à le faire pourrait
provoquer un démembrement, une
électrocution, ou une blessure mortelle.
Pour réduire le risque de choc électrique, ne
installer pas le réfrigérateur dans un endroit
mouillé ou humide.
Mise au sol
Pour éviter le bruit et les vibrations, l’appareil doit
être mis à niveau et installé sur un plancher stable.
Si nécessaire, ajuster les pieds de nivellement pour
compenser les inégalités du sol. La face avant
devrait être légèrement plus élevée que l’arrière
pour faciliter la fermeture de la porte. Les pieds de
nivellement peuvent être facilement tournés en
inclinant légèrement le boîtier. Tourner les pieds de
nivellement vers la droite pour soulever l’unité ou
vers la gauche pour l’abaisser. (Voir Nivellement et
alignement des portes).
Il n'est pas recommandé d'installer
réfrigérateur sur de la moquette, une surface
avec dalles souples, une plateforme ou une
structure faiblement soutenue.
Température ambiante
Installer cet appareil dans un endroit où la
température est comprise entre 55 °F (13 °C) et
110 °F (43 °C). Si la température autour de l’appareil
est trop basse ou trop élevée, la capacité de
refroidissement peut être affectée.
Mesure des espaces
Une distance trop réduite des éléments adjacents
peut réduire la capacité de congélation et
augmenter les charges de consommation
réfrigérateurs sont installées dans
d’électricité. Laisser au moins 24 pouces (61 cm) à
l’avant du réfrigérateur pour ouvrir les portes et au
moins 2 pouces (5,08 cm) entre l’arrière du
réfrigérateur et le mur.
AVERTISSEMENT
REMARQUE
le
Choisir le bon emplacement
Le réfrigérateur devrait toujours être branché sur
sa propre prise individuelle correctement mise à
la terre, d’une valeur nominale de 115 Volts,
60 Hz, C.A. uniquement, et fusionnée à 15 ou 20
ampères.
Cela offre les meilleures performances et évite
de surcharger les circuits électriques qui
pourraient provoquer un incendie par surchauffe
des fils. Il est recommandé de prévoir un circuit
distinct pour alimenter uniquement pour cet
appareil.
24” (61 cm)
2” (5.08 cm)
Page 67

Retrait / Montage des portes
Support de la
charnière centrale
Quand il est nécessaire de déplacer le réfrigérateur
par une étroite ouverture, en démontant les portes
est la procédure recommandée.
AVERTISSEMENT
Si votre porte d'entrée est trop étroite pour le
réfrigérateur de passer à travers, retirez les
portes de réfrigérateur et de déplacer le
réfrigérateur latéralement à travers la porte.
Utilisez deux ou plusieurs personnes pour
enlever et installer les portes de réfrigérateur.
Ne pas le faire peut conduire à dos ou d'autres
blessures.
Débrancher l'alimentation électrique du
réfrigérateur avant l'installation. Ne pas le faire
pourrait entraîner des blessures graves ou la
mort.
Ne pas mettre les mains, les pieds ou d'autres
objets dans les orifices d'aération ou le fond du
réfrigérateur. Vous pourriez vous blesser ou de
recevoir un choc électrique.
Soyez prudent lorsque vous manipulez la
charnière et le bouchon. Vous pourriez vous
blesser.
Retirer les aliments et les bacs avant de
détacher les portes et les tiroirs.
INSTALLATION
2.
Retirez les trois boulons avec soit un 10 mm ou
clé à douille 3/8 pouces, et soulever la charnière
supérieure. Définissez les pièces de côté.
Charnière supérieure
3.
Soulevez délicatement la porte du congélateur du
support de la charnière centrale. Placer la porte
sur une surface non-grattage.
L'axe de la
charnière centrale
66
FRANÇAIS
Outils nécessaires
Clé à douille (10 mm ou 3/8 pouces).
Tournevis Phillips.
Tournevis à tête plate.
Clé à molette.
Retrait de la porte du congélateur
1.
Retirez le couvercle de la charnière supérieure en
utilisant un tournevis (Phillips).
Antihoraire pour
le retirer
REMARQUE: Placez le couvercle de la charnière
supérieure sur le coffret et assurez-vous de ne
pas endommager les fils assemblés à elle.
Retrait de la porte du réfrigérateur
1.
Desserrer et retirer les deux vis avec la clé à
douille.
Support de la
charnière centrale
Vis
2.
Retirez le support de la charnière centrale.
Page 68

L'axe de la
charnière centrale
Support de la
charnière centrale
67 INSTALLATION
3.
Soulevez délicatement la porte du réfrigérateur
de l'axe de la charnière inférieure. Placez-le sur
une surface non-gratter.
Montage de la porte du congélateur
1.
Réglez la porte du congélateur dans l’axe de la
charnière centrale.
FRANÇAIS
L'axe de la charnière
inférieure
Montage de la porte du réfrigérateur
1.
Abaissez la porte du réfrigérateur sur l'axe de la
charnière inférieure.
2.
Placer l'axe d'articulation de l'étrier de charnière
centrale à l'intérieur de l'insert de cheville de
charnière au-dessus de la porte. Tenir la porte en
place et aligner le support de la charnière centrale
avec les trous dans le boîtier du réfrigérateur.
Support de la
charnière centrale
L'insert de cheville
de charnière
L'axe
d'articulation
2.
Placez la charnière supérieure dans le haut de la
porte du congélateur et aligner la charnière
supérieure avec les trous sur le dessus du
réfrigérateur. Utilisez les trois boulons pour
remplacer la charnière.
Charnière supérieure
L'axe de la
charnière supérieure
3.
Placez délicatement le couvercle de la charnière
supérieure en place sur la charnière et utiliser la
vis pour le remplacer.
3.
Insérez et serrez les deux boulons avec la clé à
douille pour resserrer le support de la charnière
centrale sur le boîtier du réfrigérateur.
Dans le sens horaire
pour remplacer
Support de la
charnière centrale
Vis
REMARQUE: Avant lieu le couvercle de la
charnière supérieure assurez-vous que tous les
fils ne sont pas pressés par la charnière du
couvercle.
Page 69

INSTALLATION
68
Mise sous tension
1. Brancher le réfrigérateur.
ATTENTION
Connectez-vous à une sortie de puissance
nominale.
Demandez à un électricien certifié de vérifier
la prise murale et que le câblage soit
correctement mis à la terre.
Ne endommager pas ni couper la borne de
terre de la prise de courant.
REMARQUE
Avoir quelqu'un pousse le haut du réfrigérateur
prend un peu de poids appliqué sur les pieds de
nivellement, ce qui rend plus facile à régler.
2.
Re-ouvert les deux portes et vérifier qu'ils erment
facilement. Sinon, incliner légèrement le
réfrigérateur vers l'arrière en tournant les deux
pieds de nivellement vers la gauche. Ils peuvent
être nécessaires plus de tours; devrait tourner les
deux pieds réglables autant de fois.
FRANÇAIS
Nivellement
Après l’installation, branchez le cordon
d’alimentation du réfrigérateur dans une prise à 3
broches mise à la terre et poussez le réfrigérateur
dans sa position finale.
Votre réfrigérateur a deux pieds de nivellement à
l’avant - un sur la droite et un sur la gauche. Ajuster
les pieds pour modifier l’inclinaison de l’avant vers
l’arrière ou côte-à-côte. Si votre réfrigérateur semble
instable, ou si vous voulez que les portes se ferment
plus facilement, ajuster le l’inclinaison du
réfrigérateur en utilisant les instructions ci-dessous :
1.
Tourner le pied de nivellement vers la gauche
pour soulever ce côté du réfrigérateur ( ) ou
vers la droite pour le baisser ( ). Cela peut
prendre plusieurs tours du pied de nivellement
pour ajuster l’inclinaison du réfrigérateur.
Pied de
Nivellement
Tournevis
Page 70

69 MODE D’EMPLOI
MODE D’EMPLOI
Avant l'utilisation
FRANÇAIS
Nettoyer le réfrigérateur.
Nettoyez votre réfrigérateur à fond et enlevez toute la poussière qui s’est accumulée
pendant le transport.
ATTENTION
Ne gratter pas le réfrigérateur avec un objet pointu et ne utiliser pas un détergent
qui contienne de l’alcool, du liquide inflammable ou une substance abrasive pour
retirer le ruban adhésif ou la colle du réfrigérateur.
Ne retirer pas le modèle ou le numéro de série ou les informations techniques sur
la surface arrière du réfrigérateur.
REMARQUE
Enlever les résidus de colle frottant avec le pouce ou de détergent à vaisselle.
. rueirétni’l relitnev ruop ruetarégirfér ud setrop sel rirvuO
Pull-out Tray
L’intérieur du réfrigérateur peut dégager une odeur de plastique au début. Enlever tout
ruban adhésif de l’intérieur du réfrigérateur et ouvrir les portes du réfrigérateur et les
tiroirs du congélateur pour la ventilation.
Brancher l’alimentation.
Vérifier que l’alimentation soit connectée avant l’utilisation.
Lire la section “Mise sous tension”.
Attendre que le réfrigérateur refroidisse.
Laissez votre réfrigérateur en marche pendant au moins deux à trois heures avant d’y
mettre des aliments. Vérifiez le flux d’air froid dans le compartiment congélateur pour
assurer un refroidissement correct.
ATTENTION
Attendez que les aliments aient refroidi avant de les placer dans le réfrigérateur,
sinon ils pourraient se gâter ou laisser une mauvaise odeur tenace à l’intérieur du
réfrigérateur.
Le réfrigérateur émet un bruit fort après la mise en marche
initiale.
Ceci est normal. Le volume diminue à mesure que la température baisse.
Page 71

Panneau de commande
Caractéristiques du panneau de commande
Panneau de commande du réfrigérateur
Contrôle de la température du compartiment de réfrigération.
Appuyez sur le bouton jusqu'à ce que la configuration désirée
(1-5).
MODE D’EMPLOI
70
FRANÇAIS
)
Panneau de commande du congélateur
Contrôle le flux d'air froid à la congélation du réfrigérateur. Pour
repositionner le contrôle, impúlselo côté pour tourner. La flèche
indique le niveau de température qui est votre congélateur (1-5).
Réglez les contrôles de température en fonction de la quantité de nourriture stockée, utilisez le tableau
ci-dessous pour référence:
Quantité de nourriture stockée
Contrôle: étitnauQ ednarG étitnauQ réilugeR Petite Quantité
)
Congélateur
Refrigérateur
)
Set 2 Set 2 Set 1
)
Appuyez sur jusqu'à la
cinquième lumière vient sur
REMARQUE
Appuyez jusqu'à ce que la
troisième lumière est allumée
Veillez à ne pas entraver ou de déplacer les
contrôles de température de la nourriture, car
cela peut modifier ou ignorer le niveau de
température qui est son réfrigérateur.
Appuyez jusqu'à ce que la
première lumière vient sur
REMARQUE
Lorsque la commande de température du
congélateur est positionné au numéro 5, vous
pouvez générer le compartiment réfrigérateur
ne refroidit pas que le client veut, surtout si elle
est lourdement chargé avec de la nourriture ou
une journée chaude.
Page 72

MODE D’EMPLOI
71
Stockage des aliments
Lieu de conservation des aliments
Chaque compartiment à l'intérieur du réfrigérateur est conçu pour stocker différents types de nourriture.
Rangez vos aliments dans l’espace optimal pour profiter d’un goût plus frais.
FRANÇAIS
Le bac à glaçons
Stockage de la glace.
Stockage des
légumes (Tiroir)
Il conserve la fraîcheur des
légumes et des fruits.
.
.
.
.
.
.
`
Etagères
Réglez étagères
en fonction de leur
les besoins en espace.
Compartiments
Aardez les boissons
telles que jus et
sodas, ainsi que des
assaisonnements,
des condiments et
autres salade de
nourriture.
ATTENTION
Ne stockez pas d'aliments avec une haute teneur en eau vers le haut du réfrigérateur. L'humidité
pourrait entrer en contact direct avec l'air froid et geler.
Lavez les aliments avant de les stocker dans le réfrigérateur. Les fruits et légumes doivent être
lavés, et les emballages alimentaires doivent être essuyés pour empêcher les aliments voisins d'être
contaminés.
Si le réfrigérateur est rangé dans un lieu chaud et humide, l'ouverture fréquente de la porte ou le
stockage d'un grand nombre de légumes dans le réfrigérateur peut provoquer la formation de
condensation. Essuyez la condensation avec un chiffon propre ou une serviette en papier.
Si la porte du réfrigérateur est ouvert ou fermé trop souvent, l'air chaud peut pénétrer dans le
réfrigérateur et en élever la température. Ceci peut augmenter les coûts de fonctionnement de
l'unité.
Ne trop pas remplir ou emballer les articles trop serré dans des bacs de porte. Cela peut causer des
dommages à la poubelle ou de blessures si les articles sont enlevés avec une force excessive.
Ne entreposer pas les contenants de verre dans le congélateur. Le contenu peut étendre en cas de
gel et de briser le récipient, provoquant risque de blessure.
REMARQUE
.
Si vous vous absentez pour une courte période, comme pour de petites vacances, il est conseillé de
laisser le réfrigérateur allumé. Les aliments réfrigérés pouvant être congelés resteront conservés
plus longtemps s'ils sont stockés dans le congélateur.
.
Si vous laisser le réfrigérateur éteint pendant une longue période de
aliments et débranchez le cordon d’alimentation. Nettoyez l’intérieur, et laissez la porte ouverte pour
empêcher les moisissures de se développer dans le réfrigérateur.
temps, enlevez tous les
Page 73

MODE D’EMPLOI
72
Conseils de stockage des aliments
Les conseils suivants peuvent ne pas s'appliquer à
tous les modèles.
Emballez ou stockez les aliments dans le
réfrigérateur dans des emballages étanches à l'air et
à l'humidité sauf indication contraire. Cela
empêchera la propagation des odeurs et des goûts à
l'ensemble du réfrigérateur. Pour les produits
possédant une date de péremption, vérifiez le code
de date pour en garantir la fraîcheur.
noitavresnoCstnemilA
Beurre ou
margarine
Fromage
Lait
Oeufs
Fruits
Légumes à
feuilles
Légumes à
peau
(carottes,
poivrons)
Poisson
Restes
Stockage d'aliments congelés
Gardez le beurre ouvert dans un plat
couvert ou un compartiment fermé.
Emballez et congelez les mottes
supplémentaires.
Conservez dans son emballage
original jusqu'à consommation. Une
fois ouvert, remballez dans un
emballage en plastique ou dans une
feuille d'aluminium.
Essuyez les cartons de lait. Pour que
le lait soit plus froid, placez-le sur une
étagère intérieure.
Pour une meilleure conservation,
placez-les dans leur boîte d'origine
sur l'étagère à l'intérieur et non
contre la porte.
Consommez les fruits
immédiatement après les avoir lavés
ou pelés. Triez et conservez-les dans
leur emballage d'origine, dans un bac
à légumes, ou dans un sac en papier
bien fermé sur une étagère du
réfrigérateur.
Retirez l'emballage du magasin et
coupez ou retirez les zones abîmées
ou décolorées. Lavez à l'eau froide et
égouttez. Rangez dans un sac ou un
récipient en plastique et placez-le
dans le bac à légumes.
Rangez dans un sac ou un récipient
en plastique et placez-le dans le bac
à légumes.
Conservez le poisson
coquillages dans le compartiment
congélateur s'ils ne peuvent être
consommés le jour de l'achat.
Recouvrez les restes de film
plastique ou d'aluminium, ou
rangez-les dans des récipients en
plastique avec couvercle
hermétique.
frais et les
REMARQUE
Consultez un guide de congélateur ou un livre de
cuisine fiable pour plus d'informations sur la
préparation des aliments à la congélation ou les
temps de stockage des aliments.
Congélation
Votre congélateur ne congèlera pas rapidement une
grande quantité d'aliments. Ne placez pas plus
d'aliments dans le congélateur que celui-ci peut
congeler en 24h (pas plus de 1 à 2 kg d’aliments
pour 30 L d’espace). Laissez suffisamment d’espace
pour que l’air circule autor des paquets, et pour que
la porte ferme bien.
Les temps de stockage varieront en fonction de la
qualité et du type de nourriture, du type d'emballage
ou de sachet utilisé (protection contre l'air et
l'humidité) et la température de stockage. Les
cristaux de glace qui se forment à l'intérieur d'un
paquet scellé sont normaux. Cela signifie
simplement que l'humidité contenue dans les
aliments et dans l'air à l'intérieur du paquet s'est
condensée, formant des cristaux de glace.
Laissez les aliments chauds refroidir à
température ambiante pendant 30 minutes, puis
emballez-les avant de les congeler. Cela permet
d'économiser de l'énergie.
Emballage
La réussite de la congélation dépend de l'emballage
correct. Lorsque vous fermez et scellez le paquet,
celui-ci doit être étanche à l'air et à l'humidité. Dans
le cas contraire, les odeurs et les goûts se
propageront dans le réfrigérateur et les aliments
peuvent sécher.
Recommandations d'emballage:
Récipients en plastique rigide avec couvercles
hermétiques.
Pots de conserve/congélation aux bords droits.
Feuille d'aluminium extra-résistante.
Papier plastifié.
Sachets plastique imperméables.
Sacs plastiques auto adhésifs pour congélation.
Suivez les consignes sur l'emballage ou le récipient
pour réussir la congélation.
Ne utiliser pas:
Poches à pain.
Récipients en plastique autre que le polyéthylène.
Récipients sans couvercle hermétique.
Papier ciré ou sachet de congélation ciré.
Sachet fin semi-perméable.
Réglage des étagères
Les étagères de votre réfrigérateur sont réglables
pour répondre à vos besoins. Ajustez les étagères
en fonction de la taille des éléments pour retrouver
vos aliments plus facilement. Cela permettra de
réduire le temps pendant lequel la porte du réfrigérateur reste ouverte, ce qui vous fera économiser de
l'énergie.
FRANÇAIS
REMARQUE
Page 74

73 DÉPANNAGE
Retrait de l' étagère
1. Soulevez l'arrière de l'étagère par dessous.
2. Appliquez une force suffisante pour soulever
l'étagère et la dégager des supports.
3. Glissez l'étagère vers l'avant pour la retirer
complètement.
FRANÇAIS
1
2
3
Étagère
Étagère
Supports
AVERTISSEMENT
Ne lavez pas les étagères en verre encore froides
avec de l’eau chaude. Celles-ci pourraient se
briser si elles sont exposées à des changements
soudains de température ou à des impacts.
Les étagères en verre sont lourdes. Prenez des
précautions lorsque vous les retirez.
Bacs à légume
Les bacs à légume permettent de conserver le goût
des fruits et des légumes.
Pour retirer le bac à légumes:
1. Pour enlever le bac, tirez sur l'extension
complète, soulever l'avant et tirer tout droit.
2. Pour remplacer le bac, inclinez légèrement le
front, insérez le tiroir dans le cadre, et poussez-le
en place.
L’assemblage de la grill
. Glissez le grill sur les rails jusqu'à ce qu'il
1
arrête.
2
.
Appuyez doucement sur le dos de la
crémaillère de le placer sous le guide.
3
. Vérifiez que l'onglet est positionné en
dessous du guide pour fixer le support de
assemblage.
Guide
L'onglet
2
1
Page 75

ENTRETIEN
74
Montage et le démontage de la Porte
du Cmpartiment
Pour démonter,première met la pression sur la face
latérale gauche pousser vers le haut de ce côté ,
1
passez à côté droit de supprimer complètement .
Démontage
1
2
3
Pour assembler, placer d'abord votre main droite
sur le réfrigérateur de guidag et de procéder à
la gauche de rejoindre complètement .
1
2
Montage
2
1
2
3
Machine à glaçons
1. Le bac à glaçons doit être enlevé afin de retirer
des plateaux de glace.
2. Une fois le bac à glaçons est retiré, retirez les
plateaux de glace.
3. Remplir des bacs à glaçons jusqu'au niveau
indiqué.
2
Ice Trays
1
Ice Bin
FRANÇAIS
AVERTISSEMENT
Ne forcez pas trop pour retirer ou installer les
bacs de stockage.
Ne passez pas les bacs de stockage et étagères
au lave-vaisselle.
Retirez régulièrement les bacs de stockage et
les étagères pour les laver, car les aliments
peuvent facilement les contaminer.
3
4. Placez le bac à glaçons et des bacs à glaçons
de retour dans la machine à glaçons et attendre
cubes de glace pour geler.
5. Boutons de tourner vers la droite pour
déplacer les cubes de glace dans le bac à glaçons.
6. Machine à glaçons peut être déplacé d'un côté
à l'autre en fonction des besoins de
stockage individuels.
Page 76

75 ENTRETIEN
ENTRETIEN
Nettoyage
Les compartiments réfrigérateur et congélateur dégivrent automatiquement; cependant, nettoyez les deux
compartiments environ une fois par mois pour éviter les odeurs.
Essuyez immédiatement en cas de déversement.
Débranchez toujours le réfrigérateur avant le nettoyage.
Conseils généraux de nettoyage
Débranchez le réfrigérateur ou coupez
l'alimentation.
Retirez toutes les pièces amovibles, telles que
FRANÇAIS
les étagères, bacs à légumes, etc.
Utilisez une éponge propre ou un chiffon doux
et un détergent léger avec de l'eau chaude.
N'utilisez pas de paille de fer ou de nettoyants
abrasifs.
Lavez à la main, rincez et séchez toutes les
surfaces consciencieusement.
Extérieur
Le cirage des surfaces métalliques extérieures
peintes permet de fournir une protection contre la
rouille. Ne cirez pas les pièces en plastique. Cirez
les surfaces métalliques peintes au moins deux fois
par an avec de la cire pour appareils (ou de la cire à
application automatique). Appliquez la cire avec un
chiffon propre et doux.
Pour les appareils dont l'extérieur est en acier
inoxydable, utilisez une éponge propre ou un
chiffon doux et un détergent léger avec de l'eau
chaude. N'utilisez pas de paille de fer ou de
nettoyants abrasifs. Séchez consciencieusement
avec un chiffon doux.
ATTENTION
N'utilisez pas de chiffon rugueux ou d'éponge
lors du nettoyage de l'intérieur et l’exterieur
du réfrigérateur.
Ne placez pas vos mains sur la surface
inférieure du réfrigérateur lorsque vous
l'ouvrez ou le fermez.
Revêtement et joints de la porte
Utilisez une éponge propre ou un chiffon doux et un
détergent léger avec de l'eau chaude. N'utilisez pas
les cires de nettoyage, les détergents concentrés,
l'eau de Javel ou les produits nettoyants contenant
des dérivés de pétrole sur les pièces en plastique du
réfrigérateur.
Pièces en plastique
Utilisez une éponge propre ou un chiffon doux et un
détergent léger avec de l'eau chaude. N'utilisez pas
de spray pour fenêtres, de nettoyants abrasifs ou de
liquides inflammables. Ceux-ci peuvent rayer ou
endommager le matériel.
Changement de la lampe (LED)
REMARQUE: Retirez pas la lampe, ne peuvent être
enlevés par un technicien qualifié.
AVERTISSEMENT
En cas de remplacement, la nouvelle lampe doit
être le même cahier des charges que l'original.
Serpentins du condenseur
Utiliser un aspirateur avec un accessoire pour
nettoyer le couvercle du condenseur et ses évents.
Ne retirer pas le panneau qui recouvre la zone du
condenseur.
AVERTISSEMENT
Utilisez un produit nettoyant non inflammable.
Risque de mort, d’explosion ou d’incendie.
Parois intérieures (laissez le congélateur
réchauffer pour que le chiffon ne reste
pas collé)
Pour éliminer les odeurs, vous pouvez laver
l'intérieur du réfrigérateur avec un mélange de
bicarbonate de sodium et d'eau chaude.
Mélangez-en 2 cuillères à soupe (26 g) à un litre
d'eau. Assurez-vous qu'il soit
dissous pour ne rayer pas les surfaces.
complètement
Page 77

DÉPANNAGE
76
DÉPANNAGE
Consultez la section Dépannage avant d'appeler le dépannage, vous économiserez ainsi du temps et de
l'argent.
Problème Causes possibles Solutions
Les
compartiments
réfrigérateur et
congélateur ne
refroidissent pas.
Le système de
refroidissement
fonctionne trop
souvent.
Le compartiment
réfrigérateur ou
congélateur est
trop chaud.
Le mode du réfrigérateur est
sur OFF (certains modèles).
Le réfrigérateur est en mode
dégivrage.
Le réfrigérateur vient d'être
installé.
Le réfrigérateur vient d'être
déménagé.
Le réfrigérateur remplace un
ancien modèle.
Le réfrigérateur vient juste
d'être branché ou le courant
vient de revenir.
Portes ouvertes fréquemment
ou une grande quantité
d'aliments ou des aliments
chauds ont été ajoutés.
Les portes ne sont pas
complètement fermées.
Le réfrigérateur est installé
dans un lieu chaud.
Le condensateur / couvercle
arrière est obstrué.
Le réfrigérateur vient d'être
installé.
Les aérations sont bouchées.
De l'air froid circule du
congélateur vers la section des
aliments frais et revient en
passant par les aérations dans
la paroi divisant les deux
sections.
Les portes sont ouvertes
souvent ou pendant longtemps.
Basculez le mode sur ON. Référez-vous à la section
Panneau de commande pour consulter les réglages de
température corrects.
Pendant le cycle de dégivrage, la température des
compartiment peut augmenter légèrement. Attendez 30
minutes et vérifiez que la température correcte est
revenue à la fin du cycle de dégivrage.
Chaque compartiment peut nécessiter jusqu'à 24h pour
atteindre la température souhaitée.
Si le réfrigérateur était stocké depuis longtemps ou a été
transporté sur le côté, laissez-le debout pendant 24h avant
le branchement de la prise.
Les réfrigérateurs modernes nécessitent plus de temps
de fonctionnement mais consomment moins d'énergie
car la technologie est plus efficace.
Le réfrigérateur prendra jusqu'à 24h pour refroidir
correctement.
L'ajout d'aliments ou l'ouverture de la porte réchauffe le
réfrigérateur, prolongeant le temps de fonctionnement
compresseur pour refroidir le compartiment. Afin de
conserver l'énergie, essayez de récupérer tout ce qu'il
vous faut en même temps, maintenez les aliments organisés pour qu'il soit plus facile de les retrouver et refermez
les portes dès que vous avez retiré les aliments (Référezvous au Stockage des aliments).
Poussez fermement les portes pour les fermer. Si elles ne
se ferment pas complètement, consultez la partie Les
portes ne ferment pas correctement ou s'ouvrent
d'elles-mêmes dans la partie Dépannage.
Le compresseur est actif plus longtemps lorsque le temps
est chaud. À température ambiante normale 21 °C (70 °F),
votre compresseur fonctionnera entre 40% et 80% du
temps. S'il fait plus chaud, il fonctionnera encore plus
fréquemment. Ne le mettez pas en marche lorsque la
température dépasse 43 °C (110 °F).
Utilisez un aspirateur muni d’un embout pour nettoyer la
protection du condensateur et la ventilation. Ne ôter pas
le panneau recouvrant la bobine du condensateur.
Chaque compartiment peut nécessiter jusqu'à 24h pour
atteindre la température souhaitée.
Localisez les aérations en utilisant vos mains pour sentir le
flux d'air et déplacez les paquets bloquant les aérations et
bloquant le flux. Réorganisez les aliments pour laisser
passer l'air dans l'ensemble du compartiment.
Lorsque les portes sont ouvertes fréquemment ou
pendant longtemps, de l'air chaud et humide pénètre dans
le compartiment. Cela augmente la température et le
niveau d'humidité dans le compartiment. Pour diminuer
l'effet, limitez la fréquence et la durée des ouvertures
porte.
FRANÇAIS
du
de
Page 78

77 DÉPANNAGE
Problème Causes possibles Solutions
Le compartiment
réfrigérateur ou
congélateur est
trop chaud.
FRANÇAIS
Accumulation
d'humidité à
l'intérieur.
Les aliments
congèlent dans le
compartiment
réfrigérateur.
Du givre ou des
cristaux de glace
se forment sur
les aliments
congelés (à
l'extérieur des
paquets).
L'appareil est installé dans un
lieu chaud.
Une grande quantité d'aliments
ou des aliments chauds ont été
introduits dans l'un des
compartiments.
Les portes ne sont pas
correctement fermées.
Le contrôle de température
n'est pas réglé correctement.
Le cycle de dégivrage vient de
se terminer.
Les portes sont ouvertes
souvent ou pendant
longtemps.
Les portes ne sont pas
correctement fermées.
Le temps est humide.
Le cycle de dégivrage vient de
se terminer.
Les aliments ne sont pas
emballés correctement.
Des aliments possédant un
niveau d'eau élevé sont rangés
près d'une aération.
Le réglage de la température du
réfrigérateur n'est pas effectué
correctement.
Le réfrigérateur est installé
dans un lieu froid.
Les portes sont ouvertes
souvent ou pendant longtemps.
La porte n'est pas
correctement fermée.
Le réfrigérateur ne doit pas être mis en marche lorsque la
température est au-dessus de 43 °C (110 °F).
L'ajout d'aliments réchauffe le compartiment, et active le
système de refroidissement. L'effet sera réduit si vous
laissez les aliments chauds refroidir à température
ambiante avant de les mettre au réfrigérateur.
Voir la section Les portes ne ferment pas correctement ou
s'ouvrent d'elles-mêmes dans la partie Dépannage.
Si la température est trop chaude, ajustez le contrôle un
pas à la fois et attendez que la température se stabilise.
Référez-vous à la section Panneau de commande pour
plus d'informations.
Pendant le cycle de dégivrage, la température de chaque
compartiment peut augmenter légèrement et de la
condensation peut se former sur la paroi arrière. Attendez
30 minutes et vérifiez que la température correcte est
revenue à la fin du cycle de dégivrage.
Lorsque les portes sont ouvertes fréquemment ou
pendant longtemps, de l'air chaud et humide pénètre dans
le compartiment et augmente la température et
d'humidité dans le compartiment. Pour diminuer l'effet,
limitez la fréquence et la durée des ouvertures de porte.
Voir la section Les portes ne ferment pas correctement ou
s'ouvrent d'elles-mêmes dans la partie Dépannage.
Le temps humide facilite la formation de condensation ou
de givre dans les compartiments lorsque les portes sont
ouvertes. En maintenant un niveau raisonnable d'humidité
dans votre logement, vous pourrez contrôler le degré
d'humidité pouvant entrer.
Pendant le cycle de dégivrage, la température des
compartiments peut augmenter légèrement et de la
condensation peut se former sur la paroi arrière. Attendez
30 minutes et vérifiez que la température correcte est
revenue à la fin du cycle de dégivrage.
Les aliments sont stockés sans couvercle ni emballage, et
les récipients mouillés peuvent entraîner l'accumulation
d'humidité dans les compartiments. Essuyez les
récipients et rangez les aliments dans des emballages
fermés pour éviter la condensation et le givre.
Réorganisez les éléments à forte teneur en eau loin des
aérations.
Si la température est trop froide, ajustez le contrôle un pas
à la fois et attendez que la température se stabilise.
Référez-vous à la section Panneau de commande pour
plus d'informations.
Lorsque le réfrigérateur est mis en marche dans des
températures en-dessous de 5 °C (41 °F), les aliments
peuvent congeler dans le compartiment réfrigérateur. Ne
le mettez pas en marche lorsque la température est
en-dessous de 13 °C (55 °F).
Lorsque les portes sont ouvertes fréquemment ou
pendant longtemps, de l'air chaud et humide pénètre dans
le compartiment et entraine la formation
condensation. Pour diminuer l'effet, limitez la fréquence et
la durée des ouvertures de porte.
Voir la section Les portes ne ferment pas correctement ou
s'ouvrent d'elles-mêmes dans la partie Dépannage.
le niveau
de givre et de
Page 79

Problème Causes possibles Solutions
DÉPANNAGE
78
Le compartiment
réfrigérateur ou
congélateur est
trop froid.
Du givre ou des
cristaux de glace
se forment sur les
aliments congelés
(à l'intérieur de
paquets fermés).
Les glaçons ont
un mauvais goût
ou une mauvaise
odeur.
Les portes ne
ferment pas
correctement ou
s'ouvrent
d'elles-mêmes.
Les portes sont
difficiles à ouvrir.
Le réfrigérateur
oscille ou semble
instable.
L'éclairage ne
fonctionne pas.
L'intérieur du
réfrigérateur est
couvert de
poussière ou de
suie.
Cliquetis
Réglage incorrect de la
commande de température.
La condensation issue des
aliments à forte teneur en eau a
gelé à l'intérieur du paquet.
Des aliments sont restés trop
longtemps au congélateur.
Les aliments ne sont pas
correctement rangés dans les
compartiments.
Le bac de stockage des glaçons
doit être nettoyé.
Des paquets d'aliments
bloquent la fermeture de la
porte.
Le bac à glaçons, le couvercle
du bac à légume, les plateaux,
les étagères ou les paniers sont
mal positionnés.
Le réfrigérateur n'est pas
correctement nivelé.
Les joints sont sales ou
collants.
La porte vient d'être fermée.
Les pieds de nivellement ne
sont pas.
Le sol n'est pas régulier.
Panne des diodes d'éclairage
de l'intérieur.
Le réfrigérateur est situé près
d'une source de feu, comme un
foyer, une cheminée ou une
bougie.
Le contrôle du dégivrage
émettra un clic lorsque le cycle
de dégivrage automatique
commence et prend fin. Le
contrôle du thermostat (ou le
contrôle du réfrigérateur, selon
le modèle) cliquera aussi lors
des changements de cycle.
Si la température est trop froide, ajustez le contrôle un pas
à la fois et attendez que la température se stabilise.
Référez-vous à la section Panneau de commande pour
plus d’informations.
Ceci est normal pour ce type d'aliments.
Ne conservez pas des aliments à niveau d'eau important
pendant de longues périodes au congélateur.
Remballez les aliments. Les odeurs peuvent se propager
vers les glaçons si les aliments ne sont pas correctement
emballés.
Videz et lavez le bac (jetez les vieux glaçons). Assurezvous que le bac est complètement sec avant de le
réinstaller.
Réorganisez les récipients alimentaires pour dégager la
porte et les étagères.
Poussez les bacs jusqu'au bout et placez les couvercles du
bac à ux, les légumes, les platea étagères et les paniers en
position correcte. Voir la section Mode d’emploi pour plus
d'informations.
Voir Nivellement dans la section Installation pour le niveler.
Nettoyez les joints et les surfaces qu'ils touchent. Frottez
une fine couche de vernis pour appareils ou de cire de
cuisine sur les joints après nettoyage.
Lorsque vous ouvrez la porte, de l'air chaud entre dans le
réfrigérateur. À mesure que l'air chaud se refroidit, cela
peut créer un vide. SI la porte est difficile à ouvrir, attendez
une minute pour laisser la pression de l'air s'équilibrer,
puis tentez de nouveau.
Référez-vous à la section Nivellement.
Il peut être nécessaire d'ajouter des cales sous les pieds
de nivellement ou des roues pour compléter l'installation.
L'éclairage du compartiment réfrigérateur est composé de
diodes internes, et le dépannage doit être réalisé par un
technicien qualifié.
Assurez-vous que le réfrigérateur n'est pas situé près
d'une source de feu, comme un foyer, une cheminée ou
une.
Fonctionnement normal.
FRANÇAIS
Page 80

79 DÉPANNAGE
Problème Causes possibles Solutions
ENGLISH
Craquements.
Grincement.
FRANÇAIS
Gargouillis.
Pop.
Grésillement.
Vibrations.
Bruit de goutte.
Bruit de pulsation
ou strident.
Des bruits de vibration peuvent provenir
du flux de liquide réfrigérant ou des
éléments stockés au-dessus ou à côté
du réfrigérateur.
Le réfrigérateur ne repose pas
fermement sur le sol.
Moteur du ventilateur de l’évaporateur
faisant circuler l’air entre les compartiments réfrigérateur et congélateur.
Air forcé vers le condensateur par le
ventilateur.
Liquide de réfrigération circulant à
travers le système de refroidissement.
Contraction et expansion des parois
internes en raison des changements de
température.
Eau qui goutte sur le radiateur lors d’un
cycle de dégivrage.
Si le côté ou l’arrière du réfrigérateur
touche un placard ou un mur, certaines
des vibrations normales créeront un son
audible.
Eau en cours d’évacuation pendant le
cycle de dégivrage.
Votre réfrigérateur est conçu pour
fonctionner plus efficacement pour
conserver vos aliments à la température
souhaitée. Le compresseur à haute
performance peut améliorer la longévité
de votre réfrigérateur, mais il a aussi
besoin de plus d’énergie que les anciens
modèles. Lors du fonctionnement du
réfrigérateur, il est normal d’entendre
des bruits de pulsations ou des bruits
stridents.
Fonctionnement normal.
Le sol est faible ou irrégulier, ou les pieds de
nivellement doivent être ajustés. Voir la section
Nivellement.
Fonctionnement normal.
Fonctionnement normal.
Fonctionnement normal.
Fonctionnement normal.
Fonctionnement normal.
Pour éliminer le bruit, assurez-vous que les côtés
et l’arrière ne peuvent pas vibrer contre un mur ou
un placard.
Fonctionnement normal.
Fonctionnement normal.
Page 81

SMART DIAGNOSISMC
(Diagnostic Intelligent)
SMART DIAGNOSIS
MC
80
Si vous rencontrez des difficultés techniques avec
votre réfrigérateur, celui-ci à la capacité de
transmettre des données à travers votre téléphone
Centre de dépannage LG. Cela vous donne la
possibilité de parler directement à l'un de nos
techniciens spécialisés. Le technicien enregistre
les données transmises depuis votre machine et
s'en servira pour analyser le problème et fournir un
diagnostic rapide et efficace.
Si vous rencontrez des problèmes avec votre
réfrigérateur, appelez le 1-800-243-0000 pour les
USA (1-888-542-2623 pour le Canada). N'utilisez la
fonctionnalité Smart Diagnosis
Intelligent) que sur instruction de l'agent du centre
d'appel LG. Les bruits de transmission que vous
entendrez sont normaux et ressemblent à ceux
d'un fax.
Smart Diagnosis
être activé que lorsque votre réfrigérateur est
branché à l'alimentation. Si votre réfrigérateur ne
peut pas s'allumer, le dépannage devra être réalisé
sans la fonction Smart Diagnosis
Intelligent).
MC
(Diagnostic Intelligent) ne peut
Utiliser Smart Diagnosis
MC
(Diagnostic
MC
(Diagnostic
MC
(Diagnostic Intelligent)
Appelez tout d'abord, appelez le 1-800-243-0000
pour les USA (1-888-542-2623 pour le Canada).
N'utilisez la fonctionnalité Smart Diagnosis
(Diagnostic Intelligent) quesur instruction de l'agent
du centre d'appel LG.
1.
Ouvrez la porte du réfrigérateur et fermer une
fois, puis ouvrez 5 fois sur une période de 8
secondes, maintenant la fonction SMART
DIAGNOSIS
MC
est actif.
MC
REMARQUE
Pour de meilleurs résultats, ne bougez pas le
téléphone lors de la transmission des tonalités.
Si l'agent du centre d'appel ne réussit pas à
obtenir un enregistrement précis des données,
vous devrez recommencer.
Les différences de qualité d'appel entre les
régions peuvent affecter cette fonctionnalité.
Utilisez un téléphone fixe pour permettre une
meilleure communication et obtenir un meilleur
dépannage.
La mauvaise qualité des appels peut entraîner
une mauvaise transmission des données de
votre téléphone vers la machine et causer un
dysfonctionnement du Smart Diagnosis
MC
.
FRANÇAIS
2.
Immédiatement placer le téléphone près de la
situé dans le haut-parleur en haut à droite,
confirmer le haut-parleur (microphone) est le
téléphone vers le haut-parleur, 4 bips courts
retentissent et l'avertisseur sonore ne doit pas
plus de 8 secondes.
Tenez le téléphone en place jusqu'à la fin de la
3.
tonalité d'émission. Une fois que la transmission
est terminée et les tons ont cessé, continuer
votre conversation avec le spécialiste, qui peut
ensuite aider en utilisant les informations
transmises pour analyse.
Page 82

81 GARANTIE
GARANTIE : Si, au cours de la période de garantie indiquée ci-dessous, votre réfrigérateur LG (“Produit”) tombe en panne suite à un
défaut de fabrication ou de main d’oeuvre dans le cadre d’une utilisation normale, LG Canada s’engage à réparer ou à remplacer le
Produit à sa discrétion, sur présentation d’une preuve d’achat d’origine. Cette garantie ne s’applique qu’à l’acheteur initial du Produit et
uniquement si celui-ci a été acheté au Canada auprès de LG Canada ou d’un distributeur agréé au Canada. La garantie ne s’applique
GARANTIE LIMITÉE DES RÉFRIGÉRATEURS LG - Canada
que si le Produit est situé et utilisé au Canada.
PÉRIODE DE GARANTIE : (Remarque : dans le cas où la date d’achat initial ne peut pas être vérifiée,
la garantie commence soixante (60) jours après la date de fabrication).
Réfrigérateur/Congélateur
Un (1) an à compter de la date
d’achat initial
Pièces et main-d’oeuvre
(condensateur, sèche-linge, tuyau de raccordement,
Un (1) an à compter de la date
d’achat initial
Pièces et main-d’oeuvre Pièces uniquement
(pièces internes/
FRANÇAIS
fonctionnelles uniquement)
Le bruit lié au fonctionnement normal, ne respecter pas les instructions dans le Guide d'utilisation et d’entretien et la panne
fonctionnelle de cet appareil pour une utilisation dans un environnement inadapté, ne être pas couvertes par cette garantie.
Les pièces et Produits de rechange sont garantis pour la durée restante de la garantie initiale ou quatre-vingt-dix (90) jours, la durée
la plus longue prévalant.
Les pièces et Produits de rechange peuvent être neufs ou réusinés.
Le centre de réparation agréé LG garantit ses travaux de réparation trente (30) jours.
LA RESPONSABILITÉ DE LG CANADA SE LIMITE EXCLUSIVEMENT À LA GARANTIE EXPOSÉE CI-DESSUS. À L’EXCEPTION DE CE QUI EST
EXPRESSÉMENT STIPULÉ CI-DESSUS, LG CANADA DÉCLINE TOUTE AUTRE GARANTIE ET CONDITION CONCERNANT LE PRODUIT,
EXPLICITE OU IMPLICITE, Y COMPRIS, MAIS SANS S’ Y LIMITER, TOUTE GARANTIE OU CONDITION IMPLICITE DE VALEUR COMMERCIALE OU DE COMPATIBILITÉ POUR UN BUT OU USAGE PARTICULIER. EN OUTRE, AUCUNE DÉCLARATION NE PEUT ENGAGER LG
CANADA.
LG CANADA N’AUTORISE AUCUNE PERSONNE À CRÉER OU ENDOSSER À SA PLACE AUCUNE AUTRE OBLIGATION DE GARANTIE OU DE
RESPONSABILITÉ LIÉE AU PRODUIT. SAUF GARANTIE OU CONDITION RENDUE IMPLICITE PAR LA LOI, LA PÉRIODE DE GARANTIE EST
LIMITÉE À LA PÉRIODE INDIQUÉE CI-DESSUS. LG CANADA, LE FABRICANT OU
SABLES EN CAS DE DOMMAGE ACCESSOIRE, IMMATÉRIEL, PARTICULIER, DIRECT OU INDIRECT, DE PERTE INCORPORELLE, DE PERTE
DE PROFIT, DE DOMMAGE PUNITIF OU EXEMPLAIRE, OU TOUT AUTRE DOMMAGE, RÉSULTANT DIRECTEMENT OU INDIRECTEMENT
D’UNE VIOLATION CONTRACTUELLE, FONDAMENTALE OU AUTRE, OU DE TOUT AUTRE ACTE OU OMISSION, DÉLICTUEL OU AUTRE.
Cette garantie vous donne des droits juridiques spécifiques. Vous pouvez avoir d’autres droits, selon la législation provinciale qui s’applique pour
la province concernée. Tout terme de cette garantie qui nierait ou modifierait une condition ou une garantie implicite selon la législation
provinciale est séparable lorsqu’il contredit la législation provinciale sans affecter le reste des termes de cette garantie.
CETTE GARANTIE LIMITÉE NE COUVRE PAS:
1. Les déplacements des techniciens pour livrer, reprendre, ou installer le
Produit, expliquer au
les fusibles, corriger les branchements d’électricité ou de plomberie, ou
corriger les réparations et installations non autorisées.
2. Le non-fonctionnement du Produit en cas de pannes ou coupures
d’électricité, ou encore d’installation électrique inadaptée.
3. Les dégâts causés par une fuite, une rupture ou un gel des tuyaux d’arrivée
d’eau, un encombrement du circuit d’évacuation, une alimentation en eau
interrompue ou inadéquate, ou une arrivée d’air inadaptée.
4. Les dégâts résultant de l’utilisation du Produit dans une atmosphère
corrosive ou contraire aux instructions détaillées dans le manuel
d’utilisation du Produit.
5. Les dégâts causés au Produit par des accidents, des insectes nuisibles,
des orages, des tempêtes, des incendies, des
catastrophes naturelles.
6. Les dégâts résultant d’une utilisation inappropriée, d’un usage abusif,
ou d’une installation, réparation ou maintenance inadaptée du Produit.
La réparation inadaptée inclut l’utilisation de pièces non approuvées ou
spécifiées par LG Canada.
7. Les dégâts ou les pannes provoquées par une modification ou altération
non autorisée, par une utilisation autre que pour l’objet prévu, ou par une
fuite d’eau due à une mauvaise installation de l’appareil.
8. Les dégâts ou les pannes provoqués par un courant électrique, une
tension ou des codes de plomberie incorrects, une utilisation commerciale
ou industrielle, ou l’utilisa
Produits de nettoyage consommables qui ne sont pas approuvés par LG
Canada.
client l’utilisation du Produit ; réparer ou remplacer
tion d’accessoires, de composants ou de
Tous les coûts associés aux circonstances exclues ci-dessus seront assumés par le consommateur.
Pour obtenir tous les détails sur la garantie et accéder au service à
la clientèle, téléphonez-nous visitez notre site Web:
Composez le 1-888-542-2623 (24 h sur 24, 365 jours par année)
et sélectionnez l’option de menu appropriée, ou visitez notre site
LG ELECTRONICS CANADA, INC.
Système scellé
réfrigérant et évaporateur)
Sept (7) ans à compter de la
date d’achat initial.
(la main-d’oeuvre sera
facturée au client)
dégâts provoqués par le transport et la manipulation, notamment les
9. Les
éraflures, bosses, entailles et/ou tout autre dommage causé à la finition
du Produit, sauf si ces dommages sont dus à un défaut de fabrication
ou de main-d’oeuvre et sont signalés dans un délai d’une (1) semaine
suivant la livraison.
10. Les dégâts ou pièces manquantes en cas de Produit d’exposition, déjà
ouvert, faisant l’objet d’une remise ou réusiné.
11. Les Produits dont le numéro de série d’origine a été enlevé, modifié ou est
illisible. Les numéros de modèle et de série, ainsi que la facture d’origine
du Produit sont nécessaires pour valider la garantie.
12. L’augmentation du coût des services publics et des frais supplémentaires
liés à ces derniers.
13. Le remplacement des ampoules, filtres ou de tout
inondations ou des
consommable.
14. Les réparations lorsque votre Produit est utilisé dans des conditions autres
qu’une utilisation domestique normale et habituelle (y compris, mais
sans se limiter à, une utilisation dans des commerces, des bureaux et
des structures d’accueil) ou contraires aux instructions décrites dans le
manuel d’utilisation du Produit.
15. Les coûts associés à l’enlèvement du Produit de votre domicile à des fins
de réparation.
16. L’enlèvement et la réinstallation du Produit s’il est installé dans un endroit
inaccessible ou s’il n’est pas installé conformément aux
d’installation publiées, notamment dans les manuels d’installation et
d’utilisation.
17. Les clayettes, bacs, tiroirs, poignées, et accessoires du Produit. Sont
également exclues le
le Produit.
Écrivez vos renseignements de garantie ci-dessous:
Renseignements sur l’enregistrement du produit:
Modèle:
Web au www.lg.com
Numéro de série:
Date d’achat:
Compresseur inverseur
Dix (10) ans à compter de la date
d’achat initial.
Pièces uniquement
(la main-d’oeuvre sera facturée au
client)
LE DISTRIBUTEUR NE SAURONT ÊTRE TENUS RESPON-
s pièces autres que celles fournies d’origine avec
autre élément
instructions
Page 83

ENGLISH
NOTES
82
FRANÇAIS
Page 84

LG Customer Information Center
1-800-243-0000
CANADA
1-888-542-2623
Register your Product Online!
USA, Consumer User
www.lg.com
 Loading...