

LG LTNH286FLC2, LTUH286FLC0 Owner’s Manual

Cassette Type
Air Conditioner
OWNER'S MANUAL
• Please read carefully and thoroughly this
manual before operating this unit.
• Contact the authorized SVC man for repair or
maintenance of this unit.
• Contact the installer for installation of this unit.
• The appliance is not intended for use by young
children or infirm persons without supervision.
• Young children should be supervised to ensure
that they do not play with the appliance.
Prior to installation, this air-conditioning
unit must be submitted for approval by the
utility service which provides electricity
(EN 61000-3 Norm).
e-mail http://www.lge.com
2
Safety PrecautionsOperating InstructionsCare and MaintenanceTroubleshooting Tips
WARNING
WARNING
WARNING
WARNING
CAUTION
CAUTION
WARNING
WARNING
Safety precautions
Safety Precautions
Warning ................................2
Caution .................................3
Operating Instructions
Indoor Unit, Outdoor Unit......4
Name and Function of
Remote Controller ................5
Wireless Remote Controller
(optional)...............................6
Set the Current Time and
a day of the Week.................7
Weekly Program Setting.......8
Holiday Setting .....................9
Timer Setting ........................9
Self-diagnosis Function ........9
Operation Mode..................10
Operation Procedure ..........10
Care and Maintenance
Indoor unit...........................23
Outdoor unit........................23
Not used for a long time .....24
Troubleshooting tips
Before You
Call For Service...............25
To prevent injury to the user or other people and property damage, the
following instructions must be followed.
■ Incorrect operation due to ignoring of instruction will cause harm or
damage. The seriousness is classified by the following indications.
This symbol indicates the possibility of death or serious injury.
This symbol indicates the possibility of injury or damage to
properties only.
Do not damage or use an
unspecified power cord.
•
It will cause electrical shock or fire.
• If the supply cord is damaged, it
must be replaced by the
manufacturer or its service agent or
a similarly qualified person in order
to avoid a hazard.
Do not operate switches with wet
hands.
• It may cause electrical shock.
Plug in the power cord
properly.
• Otherwise, it will cause
electrical shock or fire due
to heat generation.
Do not operate or stop the
unit by inserting or pulling
out the power plug.
• It will cause electrical shock
or fire due to heat
generation.
Do not insert your finger or
stick, etc. into the air inlet/air
outlet.
• Since the fan rotates at high
speed, this may cause an
injury or damage the unit.
Do not expose the skin to
cool air directly for a long
time.
• This could damage your
health.
When an abnormality (smell of burning, etc)
occurs, stop the air conditioner, and
turn off the breaker.
• If the unit continues to be operated in an
abnormal condition, it may cause a fire,
trouble, etc. In this case, consult your dealer.
Repair or relocation should not be done by
the customer.
• If this is done in correctly, it may cause a fire,
electric shock, injury by dropping of the unit,
water leakage, etc. Consult your dealer.
■
Do not install, remove and reinstall the unit by yourself.
• Improper installation will cause water leakage, electrical
shock, or fire. Please consult authorized dealer or specialist
for the installation work. Please note fault caused by
improper installation is not covered by warranty.
• Unit must be installed in an easily accessible area. Any
additional cost required to hire a special equipment to
service the unit will be the responsibility of the customer.
Installation precautions
3
Safety Precautions Operating Instructions Care and Maintenance Troubleshooting Tips
CAUTION
CAUTION
Do not clean the air
conditioner with water.
• Water may enter the unit and
degrade the insulation. It may
cause an electric shock.
Ventilate well when used
together with a stove, etc.
• An oxygen shortage may
occur.
When the unit is to be
cleaned, switch off, and turn
off the breaker.
• Since the fan rotates at high
speed during operation, it may
cause an injury.
• Contact the authorized Service technician for repair or maintenance of this unit.
• Contact the installer for installation of this unit.
• The air conditioner is not intended for use by young children or infirm persons
without supervision.
• Young children should be supervised to ensure that they do not play with the air
conditioner.
CAUTION
Do not put a pet or house
plant where will be exposed to
direct air flow.
• This could injure the pet or
plant.
Do not apply an insecticide
or flammable spray.
• It may cause a fire or
deformation of the cabinet.
Do not leave on installation
stand which is damaged.
• The unit may drop or fall down
and cause an injury.
Do not put a stove, etc. where
is exposed to direct air flow.
• It may cause imperfect
combustion.
When the unit is not going to
be used for a long time, turn
off the breaker.
• It may cause an injury.
Do not step on the outdoor
unit and do not put anything
on it.
• It may cause an injury through
dropping or falling down.
Do not operate for a long time
in high humidity, e.g. leaving
a door or window open.
• In the cooling mode, if it is
operated in a room with high
humidity (80%r.h. or more) for a
long time, water condensed in
the air conditioner may drop and
may wet and spoil furniture, etc.
Do not step onto an unstable
bench when
attaching/detaching the panel.
• It may case an injury, etc. by
falling down.
Do not use for special
purposes.
• Do not use this air conditioner
to preserve precision devices,
food, animal, plants and art
objects.
It may cause deterioration of
quality, etc.
If the supply cord is damaged, it must be
replaced by a special cord or assembly availible
from the manufacturer of its service agent.
• If will cause electrical shock or
fire.
When the air filter is to be
removed, do not touch the
metal parts of the indoor unit.
• It may cause an injury.
Do not insert hands through
vanes when the air conditioner
is operating.
• It will cause an injury by the
rotating blower.
Anti-bacteriaAnti-bacteriaAnti-bacteria
Heat Pump Model
Cooling Model
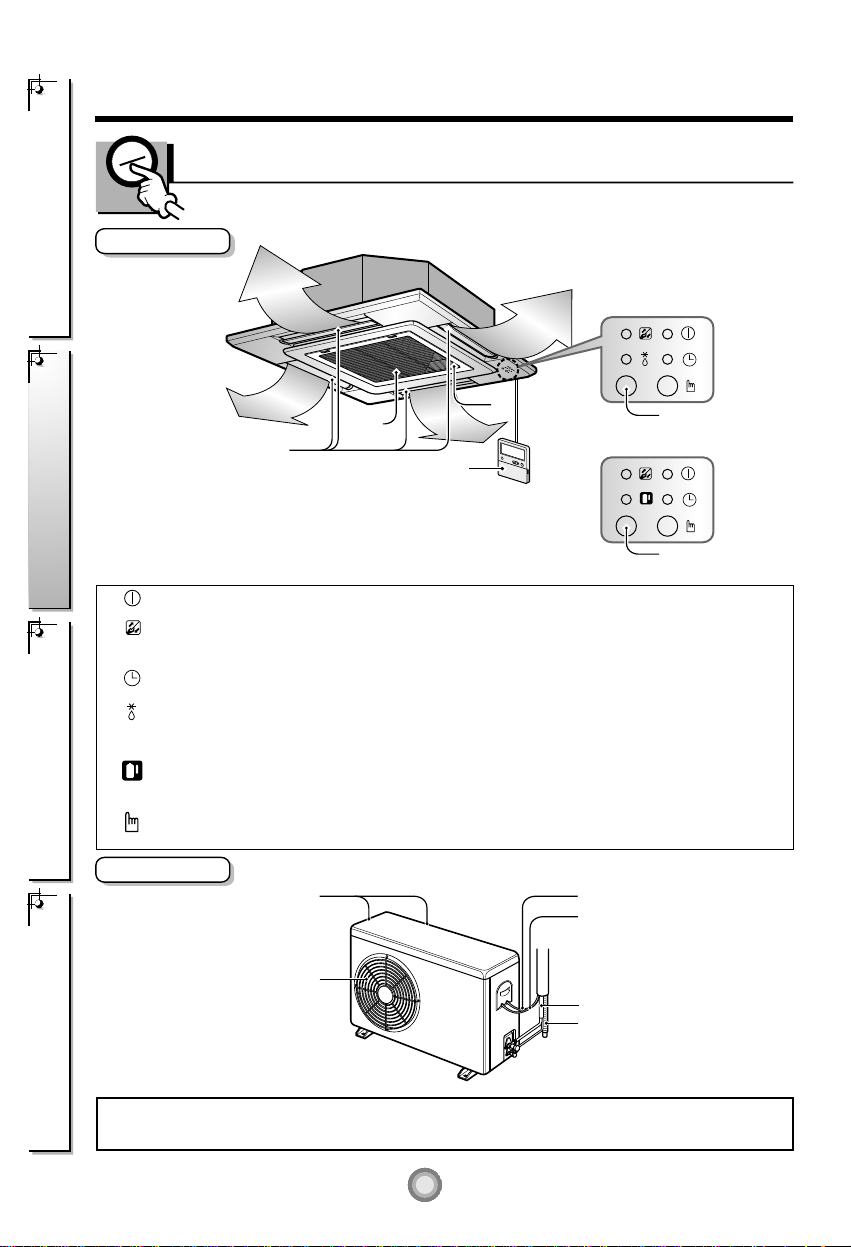
Outdoor Unit
Remote
Controller
Indoor Unit
Air Outlet
4
Safety PrecautionsOperating InstructionsCare and MaintenanceTroubleshooting Tips
Air
Intake
Air Intake
(side, rear)
Connecting Wire
Drain Hose
Power Wire
Connection Tube
Air Outlet
Vents
Signal Receptor
Signal Receptor
Operating Instructions
Signal Receptor
Receives the signals from the remote control.
(Signal receiving sound: two short beeps or one long beep.)
Operation Indication Lamps
On/Off : Lights up during the system operation.
Filter Sign : Lights up after 2400 hours from the time of first
operating unit. (Refer to page 23.)
Timer : Lights up during Timer operation.
Defrost Mode : Lights up during Defrost Mode or Hot Start operation.
(Heat pump model only)
Outdoor Unit : Lights up during outdoor unit operation.
Operation (Cooling model only)
Forced : Operation procedures when the remote control
Operation can't be used.
Indoor Unit, Outdoor Unit
Heat pump model: Cassette Type Air Conditioner for cooling and heating
Cooling model: Cassette Type Air Conditioner for cooling
Timer Cancel
Program Week
Hour Min
Holiday
Set/Clr
RESET
Plasma
ZONE
1234
Operation unit
Humidify
JET
AUTO
AUTO SWING OPERATION
FAN SPEED
Program set
SUB FUNCTION
SET TEMP
Room Temp
HI
MED
LO
Heater
Defrost
Filter
Preheat
Out door
Time
Timer
On
Set no. Time
Off
01 03 05 07 09 11 13 15 17 19 21 23
Remote Controller
5
Safety Precautions Operating Instructions Care and Maintenance Troubleshooting Tips
3
10
12
14
15
11
13
18
16
2
1
Heat Pump Model
Cooling Model
5
4
6
8
9
7
17
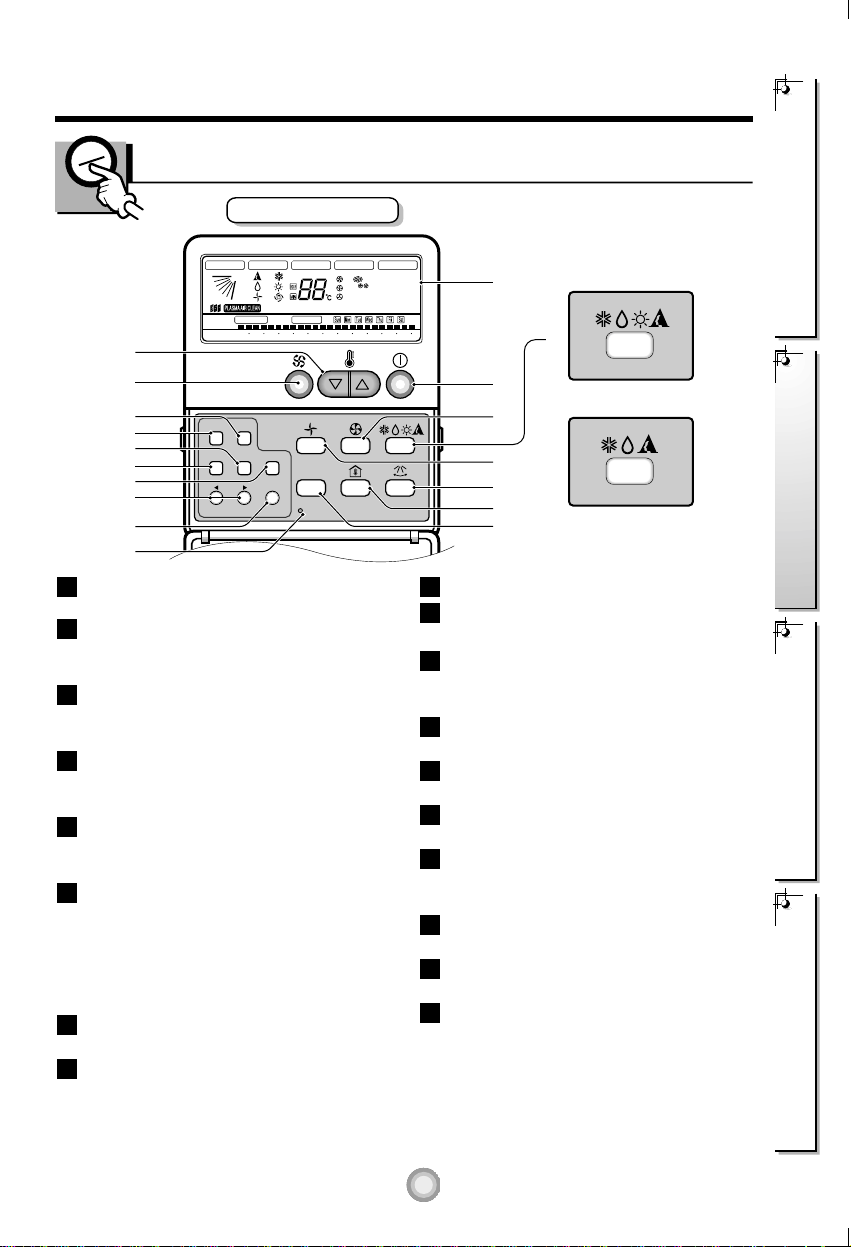
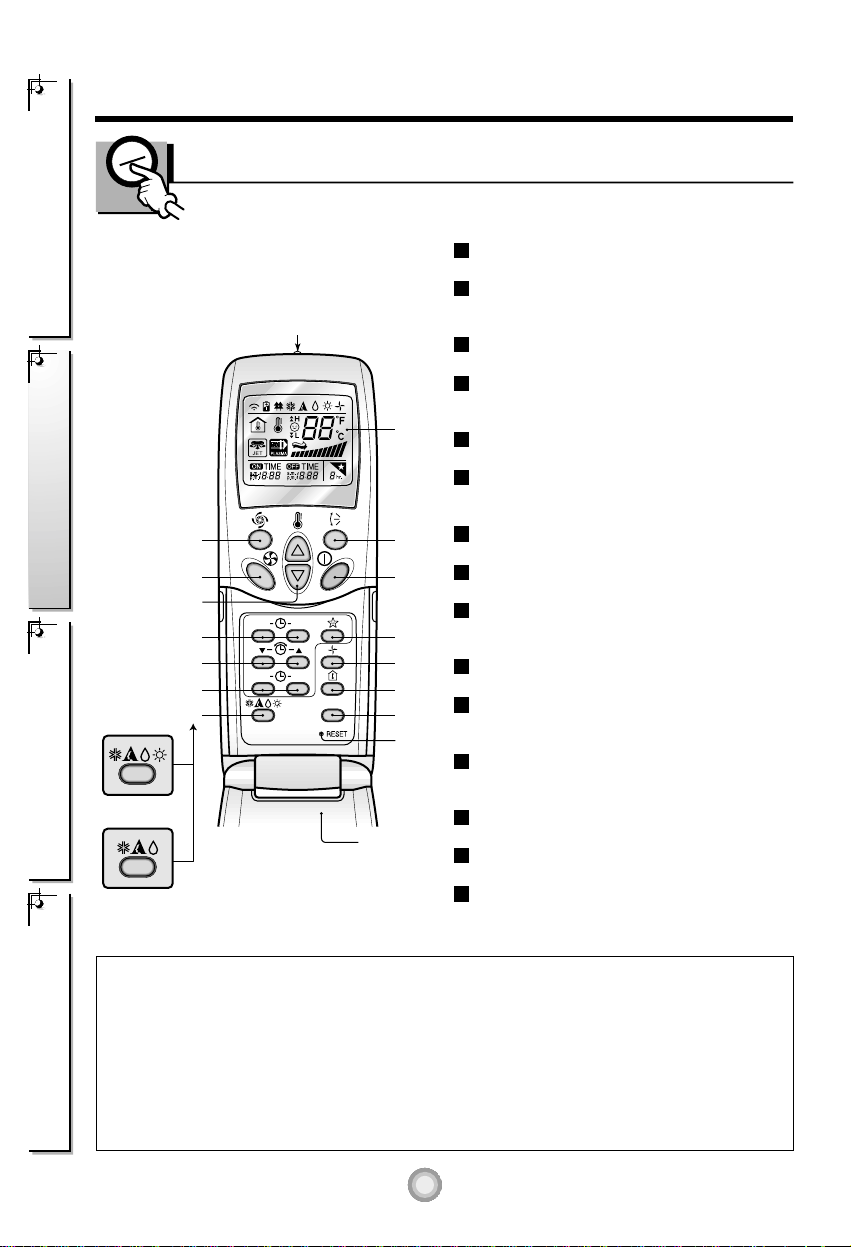
Name and Function of Remote Controller
Operation display
Displays the operation conditions.
On/Off Button
Operation starts when this button is pressed,
and stops when the button is pressed again.
Set Temperature Button
Used to set the temperature when the desired
temperature is obtained.
FAN Operation Button
Used to circulate room air without cooling or
heating.
Fan Speed & Jet Cool Button
Used to set the desired fan speed and select
Jet cool mode.
Operation Mode Selection Button
Used to select the operation mode.
• Cooling Operation Mode
• Soft Dry Operation Mode
• Heating Operation Mode
(except cooling model)
• Auto Operation Mode
Auto Swing Button
Used to swing up and down.
Room Temperature Checking Button
Used to check the room temperature.
Plasma Air Clean Button (optional)
Timer Cancel Button
Used to cancel the timer.
Timer Set Button
Used to set the timer when the desired time is
obtained.
Week Button
Used to set a day of the week.
Program Button
Used to set the weekly timer.
Holiday Button
Used to set a holiday of the week.
Time Set Button
Used to set the time of the day and change the
time in the weekly timer Function.
Set and Clear Button
Used to set and clear the weekly timer.
Swirl Button
Used to select swirl mode.
Reset Button
Used to set the current time and clear the setting time.
18
17
16
15
14
13
12
11
10
9
8
7
6
5
4
3
2
1
❈
Display temperature can be different from actual room temperature if the remote controller is
installed at the place where sun-rays are falling directly or the place nearby heat source.
ON OFF
SET
CANCEL
PLASMA
Signal transmitter
(Transmits the signals to the signal receptor)
1
2
7
8
9
10
15
11
4
5
6
14
3
12
13
6
Safety PrecautionsOperating InstructionsCare and MaintenanceTroubleshooting Tips
Heat Pump
Model
Cooling Model
Flip-up door
(opened)
Wireless Remote Controller (optional)
OPERATION DISPLAY
Displays the operation conditions.
ON/OFF BUTTON
Operation starts when this button is pressed and
stops when the button is pressed again.
JET COOL BUTTON
Used to select jet cool mode.
ON/OFF TIMER BUTTONS
Used to set the time of starting and stopping
operation.
TIME SETTING BUTTONS
Used to adjust the time.
TIMER SET/CANCEL BUTTONS
Used to set the timer when the desired time is
obtained and to cancel the Timer operation.
AUTO SWING BUTTON
Used to swing up and down.
SLEEP MODE BUTTON
Used to set Sleep Mode operation.
AIR CIRCULATION BUTTON
Used to circulate the room air without cooling or
heating (turns indoor fan on/off).
ROOM TEMPERATURE CHECKING BUTTON
Used to check the room temperature.
RESET BUTTON
Used prior to resetting time or after replacing
batteries.
INDOOR FAN SPEED SELECTOR
Used to select fan speed in four steps-low, medium,
high, or auto.
ROOM TEMPERATURE SETTING BUTTONS
Used to select the room temperature.
OPERATION MODE SELECTION BUTTON
Used to select the operation mode.
PLASMA AIR CLEAN BUTTON(OPTIONAL)
15
14
13
12
11
10
9
8
7
6
5
4
3
2
1
This air-conditioner is equipped with wired remote controller basically. But if you want to be
available with wireless remote controller, you pay for it.
CAUTION
of handling the wireless remote controller
• Aim at the signal receptor on the air conditioner so as to operate.
• The remote control signal can be received at a distance of up to about 7m.
• Be sure that there are no obstructions between the remote controller and the signal receptor.
• Do not drop or throw the remote controller.
• Do not place the remote controller in a location exposed to direct sunlight, or near the heating unit, or any
other heat source.
• Block a strong light over the signal receptor with a curtain or etc. so as to prevent the abnormal operation.
(ex:electronic quick start, ELBA, inverter type fluorescent lamp)
❈ The wireless remote controller do not operate the swirl mode.
HI
ZONE
Operation unit Program set
Room Temp
MED
LO
AUTO
JET
Heater
Defrost
Filter
Preheat
Humidify
Out door
Timer
On
Set no. Time
Off
01 03 05 07 09 11 13 15 17 19 21 23
1234
OPERATION
FAN SPEED
SUB FUNCTION
SET TEMP
Time
AUTO SWING
HI
ZONE
Operation unit Program set
Room Temp
MED
LO
AUTO
JET
Heater
Defrost
Filter
Preheat
Humidify
Out door
Timer
On
Set no. Time
Off
01 03 05 07 09 11 13 15 17 19 21 23
1234
OPERATION
FAN SPEED
SUB FUNCTION
SET TEMP
Time
AUTO SWING
HI
ZONE
Operation unit Program set
Room Temp
MED
LO
AUTO
JET
Heater
Defrost
Filter
Preheat
Humidify
Out door
Timer
On
Set no. Time
Off
01 03 05 07 09 11 13 15 17 19 21 23
1234
OPERATION
FAN SPEED
SUB FUNCTION
SET TEMP
Time
AUTO SWING
HI
ZONE
Operation unit Program set
Room Temp
MED
LO
AUTO
JET
Heater
Defrost
Filter
Preheat
Humidify
Out door
Time
Timer
On
Set no. Time
Off
01 03 05 07 09 11 13 15 17 19 21 23
1234
OPERATION
FAN SPEED
SUB FUNCTION
SET TEMP
AUTO SWING
Hour
Min
Week
RESET
7
Safety Precautions Operating Instructions Care and Maintenance Troubleshooting Tips
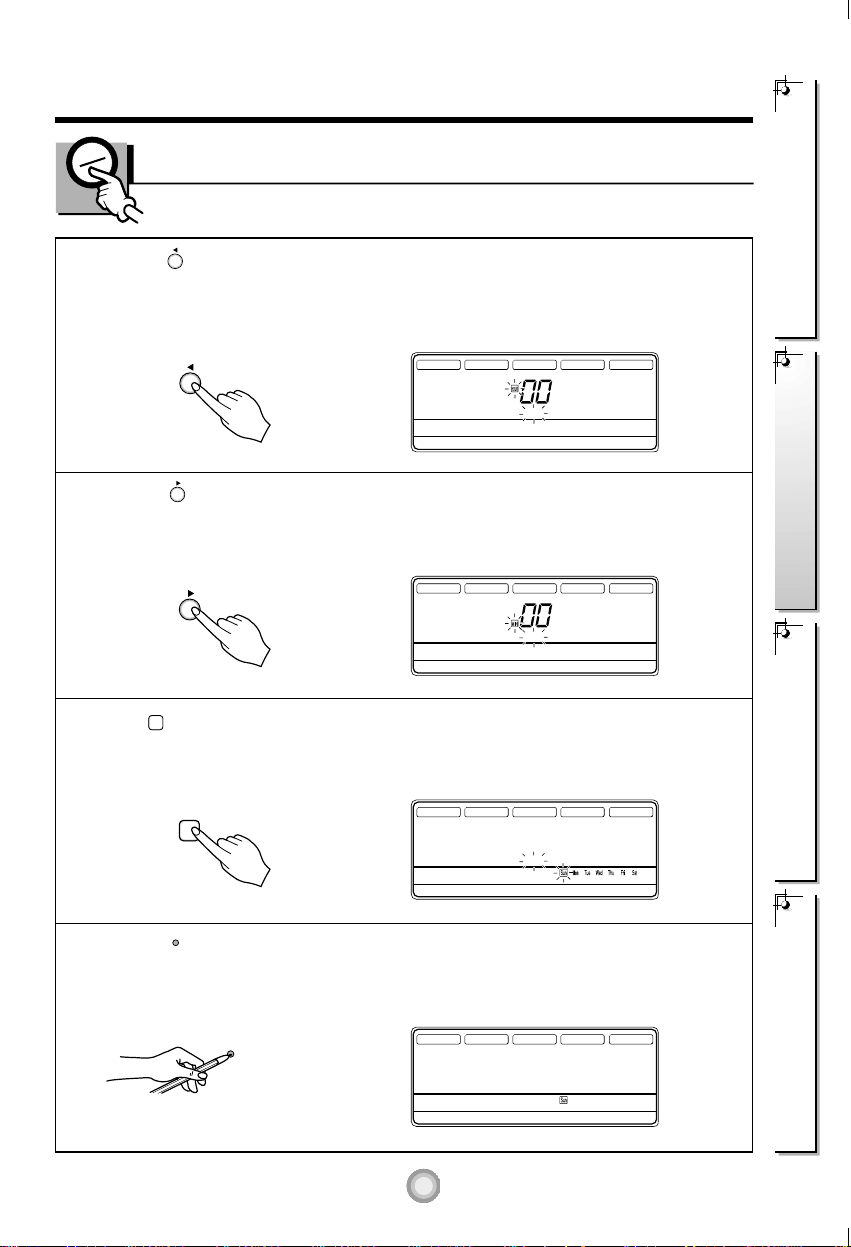
Set the Current Time and a day of the Week
1
Press the ' ' button.
Each time the button is pressed, the number is changed from 00 to 23.
You can set the number of the current hour.
2
Press the ' ' button.
Each time the button is pressed, the number is increased from 00 to 59.
You can set the number of the current minute.
3
Press ' ' button.
Each time the button is pressed, a day of the week is shifted from sunday to saturday.
You can set the day of the week.
4
Press the ' ' button.
If you want to reset the current time and a day of the week, click the Reset button.
Hour
Min
Week
RESET
Program
SET/CLR
MinHour
Time
HI
ZONE
Operation unit
Room Temp
MED
LO
AUTO
JET
Heater
Defrost
Filter
Preheat
Humidify
Out door
Timer
On
Set no.
Off
1234
OPERATION
FAN SPEED
SUB FUNCTION
SET TEMP
Program set
01 03 05 07 09 11 13 15 17 19 21 23
Time
AUTO SWING
Week
Time
HI
ZONE
Operation unit
Room Temp
MED
LO
AUTO
JET
Heater
Defrost
Filter
Preheat
Humidify
Out door
Timer
On
Set no.
Off
1234
OPERATION
FAN SPEED
SUB FUNCTION
SET TEMP
01 03 05 07 09 11 13 15 17 19 21 23
Time
AUTO SWING
Program set
Program set
Time
HI
ZONE
Operation unit
Room Temp
MED
LO
AUTO
JET
Heater
Defrost
Filter
Preheat
Humidify
Out door
Timer
On
Set no.
Off
1234
OPERATION
FAN SPEED
SUB FUNCTION
SET TEMP
01 03 05 07 09 11 13 15 17 19 21 23
Time
AUTO SWING
01 03 05 07 09 11 13 15 17 19 21 23
Time
Program set
Time
HI
ZONE
Operation unit
Room Temp
MED
LO
AUTO
JET
Heater
Defrost
Filter
Preheat
Humidify
Out door
Timer
On
Set no.
Off
1234
OPERATION
FAN SPEED
SUB FUNCTION
SET TEMP
AUTO SWING
01 03 05 07 09 11 13 15 17 19 21 23
Time
Program set
Time
HI
ZONE
Operation unit
Room Temp
MED
LO
AUTO
JET
Heater
Defrost
Filter
Preheat
Humidify
Out door
Timer
On
Set no.
Off
1234
OPERATION
FAN SPEED
SUB FUNCTION
SET TEMP
AUTO SWING
8
Safety PrecautionsOperating InstructionsCare and MaintenanceTroubleshooting Tips
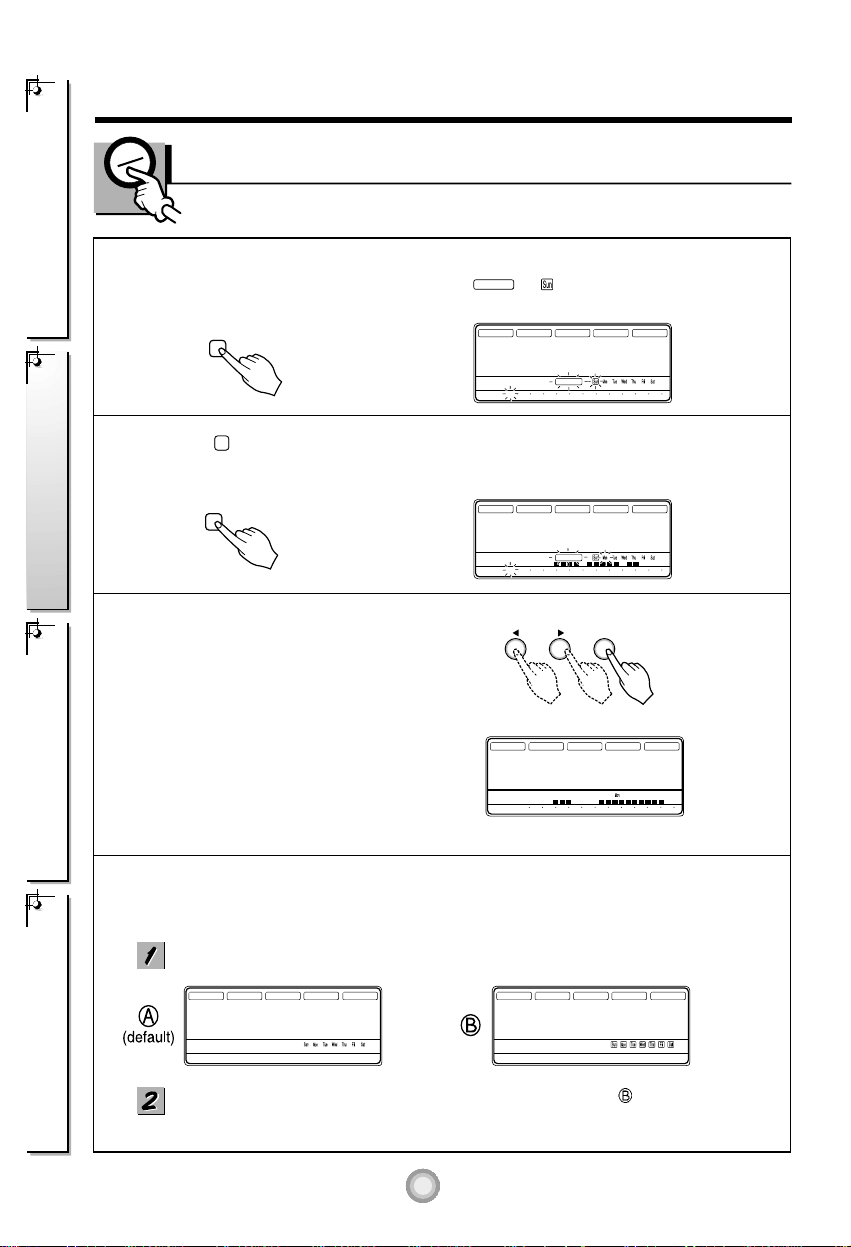
Weekly Program Setting
1
Press the Program button.
The remote controller is displayed like below. Then ' ', ' ' and '01' is blinked.
2
Press the ' ' button.
Select the Monday.
Program set
Week
3
Change the timer setting until the desired time is set.
After you select a time, push the SET/CLR button once
or one more time.
For Example if the air-conditioner is turned on from
6 to 8 and from 13 to 22 and turned off at other time
monday, display is as follows. (black bar indicates
turn-on, white bar indicates turn-off.)
If you follow the above procedure, you can set timer
for turning or and off in all of the week.
4
If you don't set the weekly program again after setting the weekly program, it is same the previous
setting. If you want to keep the weekly program for only a week follow the next procedure.
Press the "CANCEL" button and "SET/CLR" button simultaneously. Then the display will be
toggled like befor.
Detach your finger from buttons at the moment that it is displayed the figure.
Then the weekly program is kept for only one week.
9
Safety Precautions Operating Instructions Care and Maintenance Troubleshooting Tips
Time
HI
ZONE
Operation unit
Room Temp
MED
LO
AUTO
JET
Heater
Defrost
Filter
Preheat
Humidify
Out door
Timer
On
Set no.
Off
1234
OPERATION
FAN SPEED
SUB FUNCTION
SET TEMP
Program set
01 03 05 07 09 11 13 15 17 19 21 23
Time
AUTO SWING
Time
HI
ZONE
Operation unit
Room Temp
MED
LO
AUTO
JET
Heater
Defrost
Filter
Preheat
Humidify
Out door
Timer
On
Set no.
Off
1234
OPERATION
FAN SPEED
SUB FUNCTION
SET TEMP
01 03 05 07 09 11 13 15 17 19 21 23
Time
AUTO SWING
Program set
Program set
Time
HI
ZONE
Operation unit
Room Temp
MED
LO
AUTO
JET
Heater
Defrost
Filter
Preheat
Humidify
Out door
Timer
On
Set no.
Off
1234
OPERATION
FAN SPEED
SUB FUNCTION
SET TEMP
01 03 05 07 09 11 13 15 17 19 21 23
Time
AUTO SWING
Program set
Time
HI
ZONE
Operation unit
Room Temp
MED
LO
AUTO
JET
Heater
Defrost
Filter
Preheat
Humidify
Out door
Set no.
Off
1234
OPERATION
FAN SPEED
SUB FUNCTION
SET TEMP
01 03 05 07 09 11 13 15 17 19 21 23
Time
AUTO SWING
Timer
On
Program set
Time
HI
ZONE
Operation unit
Room Temp
MED
LO
AUTO
JET
Heater
Defrost
Filter
Preheat
Humidify
Out door
On
Set no.
1234
OPERATION
FAN SPEED
SUB FUNCTION
SET TEMP
01 03 05 07 09 11 13 15 17 19 21 23
Time
AUTO SWING
Timer
Off
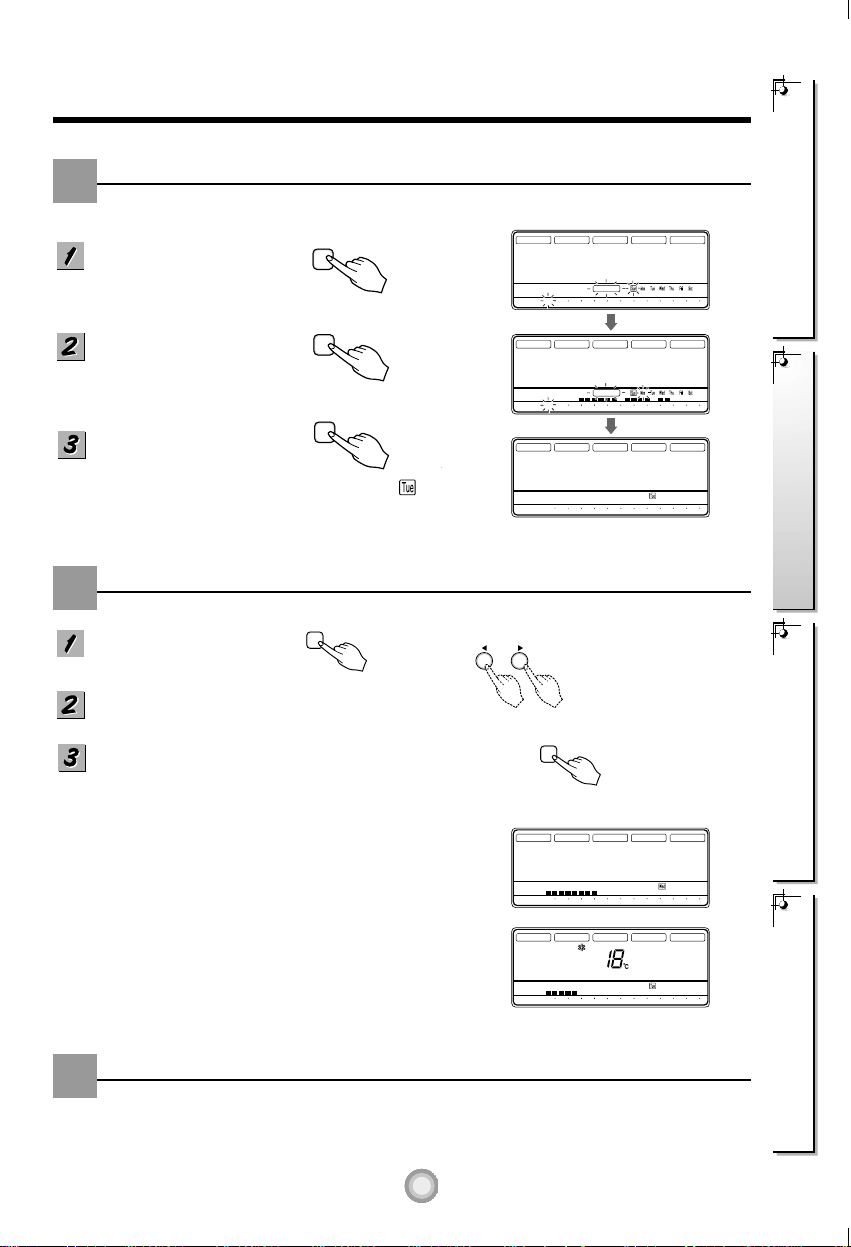
Holiday Setting
Timer Setting (Delay start/Pre-set stop)
If Tuesday is a holiday in this week, you may set a holiday.
Press the Program button.
Press the Week button.
Select the Tuesday.
Press the Holiday button.
Then the remote controller will be displayed ' '.
The outside rectangular means holiday.
❈ You cannot set the weekly program for a holiday.
Program
Press the Timer button
to turn Timer on or off.
Cancel
Change the timer setting until the desired time is set.
MinHour
If you want to cancel the timer setting, press the Cancel button.
• When the air conditioner is turned off, the air conditioner
is turned on after 8 hours.
• When the air conditioner is turned on, the air conditioner
is turned off after 5 hours.
Cancel
Week
Holiday
' CH' will flash in the remote controller display when a problem occurs.
Then please contact your dealer.
Self-diagnosis Function
This function is used to turn on or turn off after several hours.
 Loading...