

LG LSU5NP5A Owner's Manual
ROOM AIR
CONDITIONER
For Split AC Domestic Models
TYPE : WALL MOUNTED
P/No. MFL39754865_V3
MFL39754865
Regd. Office: LG Electronics India Pvt. Ltd., A Wing (3rd Floor), D-3, District Center, Saket, New Delhi - 110017
Please read this manual carefully before operating
your set and retain it for future reference.
BEFORE
– Prior to operation
– Components
– Electrical Safety
– Using the remote control
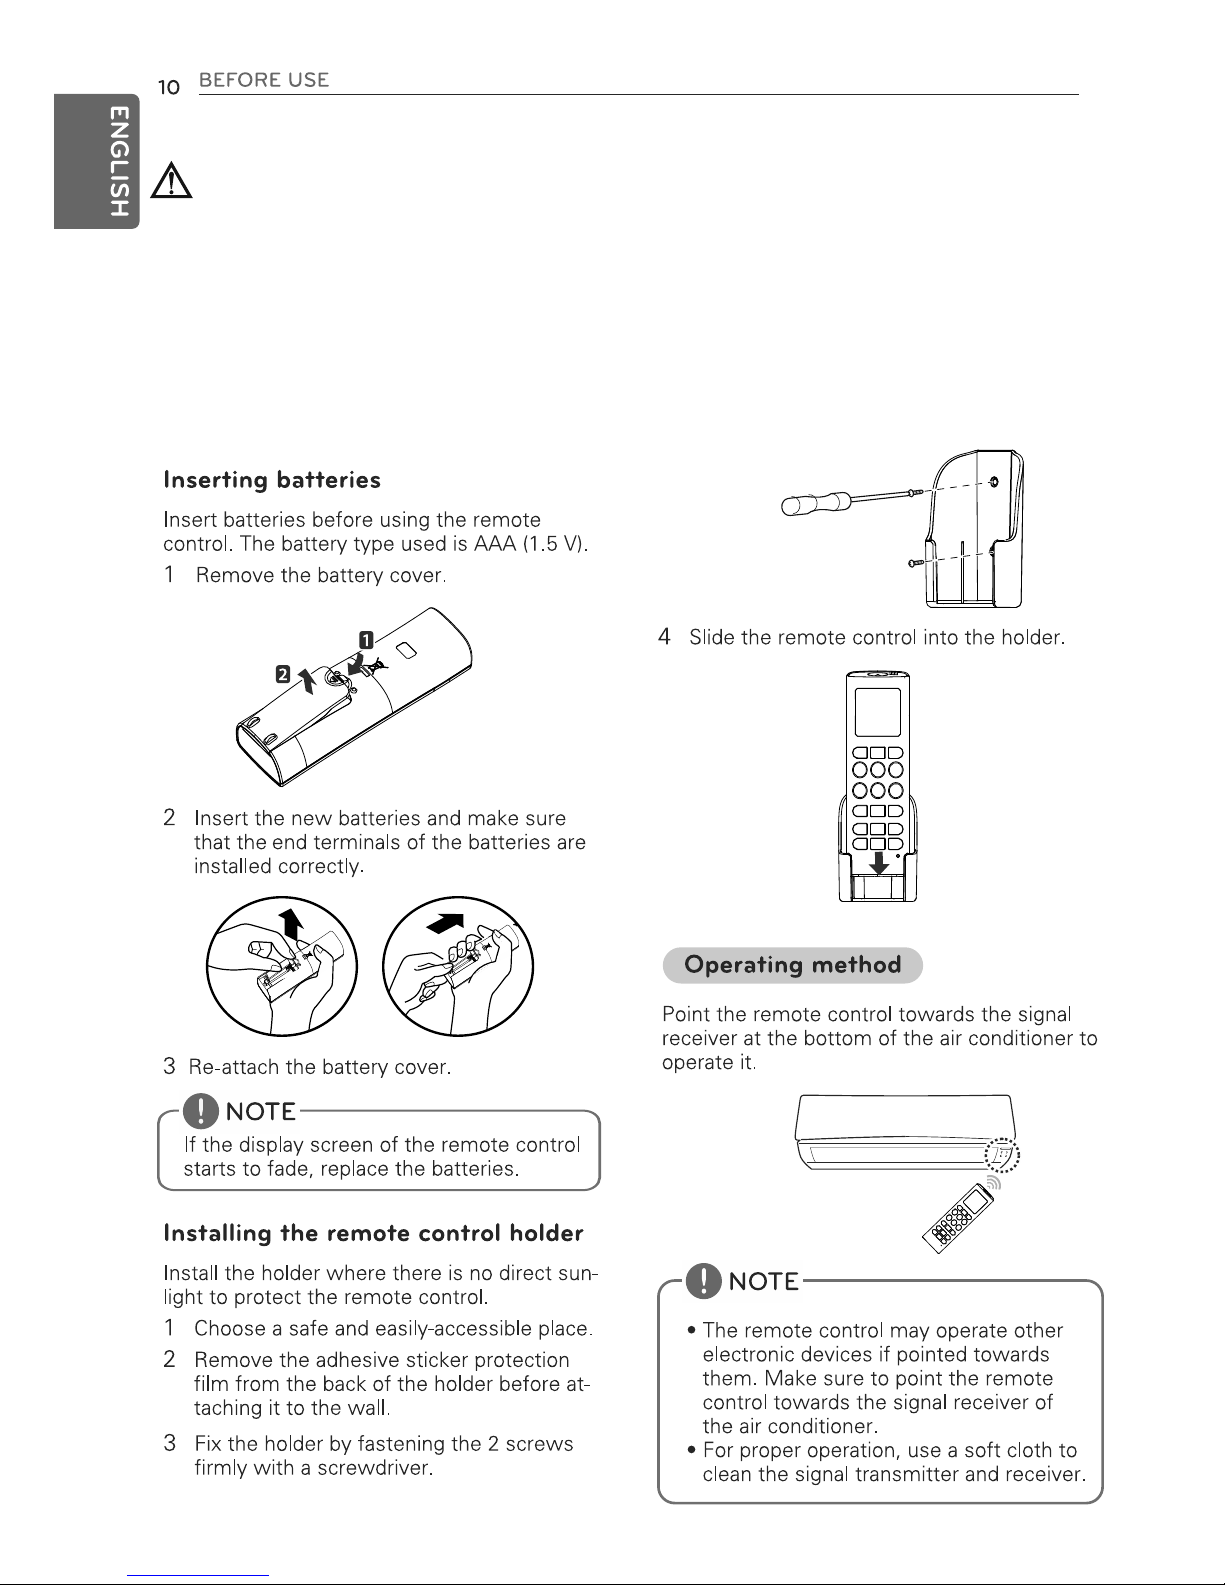
Inserting Batteries
Installing the remote control holder
Wireless Remote Control
BASIC FUNCTIONS
Cooling your room
Heating your room
Removing humidity
Airing your room
Adjusting the fan speed
Adjusting the air flow direction
Setting the timer
– Setting the current time
– Turning ON the air conditioner
automatically at a set time
– Turning OFF the air conditioner
automatically at a set time
– Cancelling the timer setting
- Setting sleep mode
ADVANCED FUNCTIONS
Changing room temperature quickly
Indoor air purification
– Auto Clean operation
Energy saving cooling mode
Auto operation
Dimmer
Auto Changeover
Mosquito away operation
Operating the air conditioner without the
remote control
Restarting the air conditioner automatically
MAINTENANCE
– Cleaning the air filter
– Cleaning the anti-allergy filter
– Cleaning the plasma filter
TROUBLESHOOTING
– Self-diagnosis function
– Before requesting service
• Contact the authorized service technician for repair or
maintenance of this unit.
• Please install your air-conditioner by company
authorized service franchisee / authorized service
and sales dealer.
• The air conditioner is not intended for use by young
children or invalids without supervision.
• Young children should be supervised to ensure that
they do not play with the air conditioner.
• When the power cord is to be replaced, replacement
work shall be performed by authorized personnel only,
using only genuine replacement parts.
We recommend usage of voltage stabilizer with
high / low voltage cut off in areas having voltage
fluctuations.
AC TONNAGE STABILIZER KVA
(3-STEP STABILIZER)
1.0
1.5
2.0
3
4
5
CAUTION
Cleaning the Micro Protection filter.
Outdoor Unit
–
2
SAFETY INSTRUCTION
3
4
8
12
15
18
21
–
3
reduce the cooling / dehumidification functions.
Avoid excessive cooling
(Refer page no. 19 and 20 details of owner's manual).
4
SAFETY INSTRUCTIONS
5
Be sure to use only those parts which are listed in the service parts list. Never attempt to modify
the equipment. It may result in death, serious injury, effect on product performance or product failure.
Only use the refrigerant specified on the air conditioner label. Failure to do so may result in explosion
or fire.
SAFETY INSTRUCTIONS
Dos and Don’ts
Do not install the air conditioner on an unstable surface or where there may be a danger of unit falling
It may result in death, serious injury, or product failure.
Only use components that are approved by the manufacturer and do not repair or modify them.
Failure to do so may result in electric shock, effect on product performance or product failure.
enter
For inner cleaning, contact an Authorized Service Center or a dealer. Do not use harsh detergent that
causes corrosion or damage on the unit. Harsh detergent that causes failure or product, fire or
electronic shock
6
SAFETY INSTRUCTIONS
Dos & Don'ts
ON OFF
When there is a gas leak, before using air conditioner again contact authorized service person for
verification and repair. Failure to do so may result in explosion or fire.
Do not block the inlet or outlet of air flow. It may effect product performance.
or serious injury.
or health complications.
effect product performance.
water leakage or product failure.
to
not cause
,
neighbours. neighbours.
It may effect product performance.
Disposal of your old appliance (as per e-waste Rules)
1. When this crossed out wheeled bin symbol is depicted on
the product and its operator’s manual, it means the product
is covered by the e-waste Management and Handling
Rules, 2011 and are meant to be recycled, dismantled,
refurbished or disposed off.
2. Dos
a. The product is required to be handed over only to the
authorized recycler for disposal.
b. Keep the product in isolated area, after it becomes non-functional/un-
repairable so as to prevent its accidental breakage.
Don’t
a. The product should not be opened by the user himself/herself, but only by
authorized service p e rsonnel.
b. The product is not meant for re-sale to any unauthorized agencies/scrap
dealer/ kabariwalah.
c. The product is not meant for mixing into household waste stream.
d. Do not keep any replaced spare part(s) from the product in exposed area.
3. Any disposal through unauthorized agencies/person will attract action
under Environment (Protection) Act 1986 .
4. Hazards of improper handling or accidental breakage
a. If batteries are disposed incorrectly, it can greatly harm the environment.
The chemical by-products are hazardous.T he metals and chemicals
found in batteries can mix into soil which may be hazardous to humans,
plants and animals. If thrown in fire, they can cause blast and release
toxic gases which may be harmful for health.
b. The refrigerant (R-22) used can be combustible at low pressure. The
potential health effects of over exposure is dizziness, headache and
heart irregularities.
5. To locate a nearest collection centre or call for pick-up (limited area only) for
disposal of this appliance, please contact Toll Free No.1800-180-9999 for
details. All collection centre and pick up facilities are done by third parties
with LG Electronics India Pvt. Ltd. merely as a facilitator.
For more detailed information , please visit : http://www.lg.com
vius iqjkus midj.k dk fuiVku ¼bZ&vif’k"V fu;e ds vuqlkj½
1- tc bl dkVs x;s ifg;s okys fcu dk fpº+u fdlh midj.k vkSj
blds vksisjVj dh iqfLrdk ds lkFk layXu gksrk gSa rks bldk eryc
gS fd bls "bZ&vif'k"V" ¼izca/ku vkSj gFkkyu½ fu;e 2011 ds
vUrxZr lfEefyr fd;k x;k gS] vkSj bls uohuhdj.k] fo?kVu vkSj
fuiVku ds fy, cuk;k x;k gSA
2- djsa&
d& midj.k dks flQZ vf/kd`r iqu% uohuhdj.kdrkZ dks gh fuiVkj.k
djus gsrq gLrkarfjr djsaA
[k& tc midj.k dk;Zjr u gks bls vyx {ks= esa j[kas rkfd midj.k ls gksus okyh
nq?kZVukvks ls cpk tk ldsA
uk djsa&
d& bl midj.k dks Lo;a/[kqn ugha [kksyuk pkfg, midj.k dks dsoy vf/kd`r
!
vf/kdkjh ds }kjk gh [kksyk tkuk pkfg,A
[k&bl midj.k dks iqu% fcØh ds fy, fdlh Hkh dckM+hokyk@Hkaxkj okyk@vukf/kd`r
laLFkk dks u nsaA
x& bl midj.k dks fdlh ?kjsyw vif'k"V lkeku ds lkFk feykdj u j[ksaA
?k& midj.k ds cnys gq, ;k vkrafjd iqjtks dks [kqys {ks= esa u j[ksaA
3- ;fn fdlh vukf/kd`r foHkkx ;k O;fDr ds }kjk fuiVkj.k fd;k tkrk gS rks ;g i;kZoj.k
¼lqj{kk½ /kkjk 1986 ds vUrxZr vkrk gSA
4- nq?kZVukxzLr VwV@QwV rFkk vO;ofLFkr j[k&j[kko ls cps A
d& ;fn cSVfj;ksa dk fuiVkj.k v'kq) :i ls dj jgs gaS] rks ;g okrkoj.k dks cgqr
uqdlku igqqWpk ldrk gSaA jklk;fud midj.k [krjukd gksrs gaSA tks jlk;u vkSj /kkrq
cSVfj;ksa esa ik, tkrs gaS] bls feV~Vh esa feykus ij ;g euq";ksa] ikS/kksa vkSj i'kqvksa ds fy,
[krjukd gks ldrh gaSA ;fn bls vkx esa Qsadrs gaS rks ;s foLQksV dj ldrh gaS vkSj ;s
tgjhyh xSlsa ns ldrk gS tks LokLF; ds fy, gkfudkjd gaSA
[k& jsÝhtjsaV ¼R-22½ de ncko ij ngu'khy gks ldrh gaS rFkk blls LokLF; ij
nqLizHkko iM+ ldrk gS tSls pDdj vkuk] flj nnZ vkSj g`n; xfr :dukA
5- mijksDr inkFkksZ ds fuiVkju ds fy, utnhdh fuiVkju laLFkku ¼ladh.kZ {ks=½ esa dkWy
djsaA vf/kd tkudkjh ds fy, gekjs Vksy Ýh uEcj 1800-180-9999 ij dkWy djsaA
lHkh laxzg.k dsUnz o fid&vi dh lqfo/kk,a FkMZ&ikVhZ ls tks "LG Electronics
India Pvt. Ltd" dks viuh lsok,a iznku dj jgh gksa] ls djok,aA
vf/kd tkudkjh ds fy, ns[ksa osclkbV % http://www.lg.com
7
SAFETY INSTRUCTIONS
remote
may effect product performance or
electric shock or serious injury.
Prior to Operation
Preparing for Operation
1. Contact an installation specialist for
installation.
2. Plug in the power plug properly.
3. Use a dedicated circuit breaker.
4. Do not use an extension cord.
5. Do not start/stop operation by plugging/
unplugging the power cord.
6. If the cord/plug is damaged, replace it with
only an authorized replacement part.
Usage
1. Being exposed to direct airflow for a long
time may be hazardous to your health. Do
not expose occupants, pets, or plants to
direct airflow for a long time.
2. Due to the possibility of oxygen deficiency,
ventilate the room when using the
appliance together with stoves or other
heating devices.
3. Do not use this air conditioner for nonspecified special purpose (e.g. preserving
precision devices, food, pets, plants, or art
objects). Such use may damage your
properties.
Cleaning and Maintenance
1. Do not touch the metal parts of the unit
when removing the filter. Injury can occur.
2. Do not use water to clean inside the air
conditioner. Exposure to water can
destroy the insulation, leading to electric
shock or effect product performance.
3. When cleaning the unit, first make sure
that the power and breaker are turned off.
The fan rotates at a very high speed during
operation. There is a possibility of injury if
the unit’s power is triggered while cleaning
inner parts of the unit.
Service
For repair and maintenance, contact your
authorized service dealer.
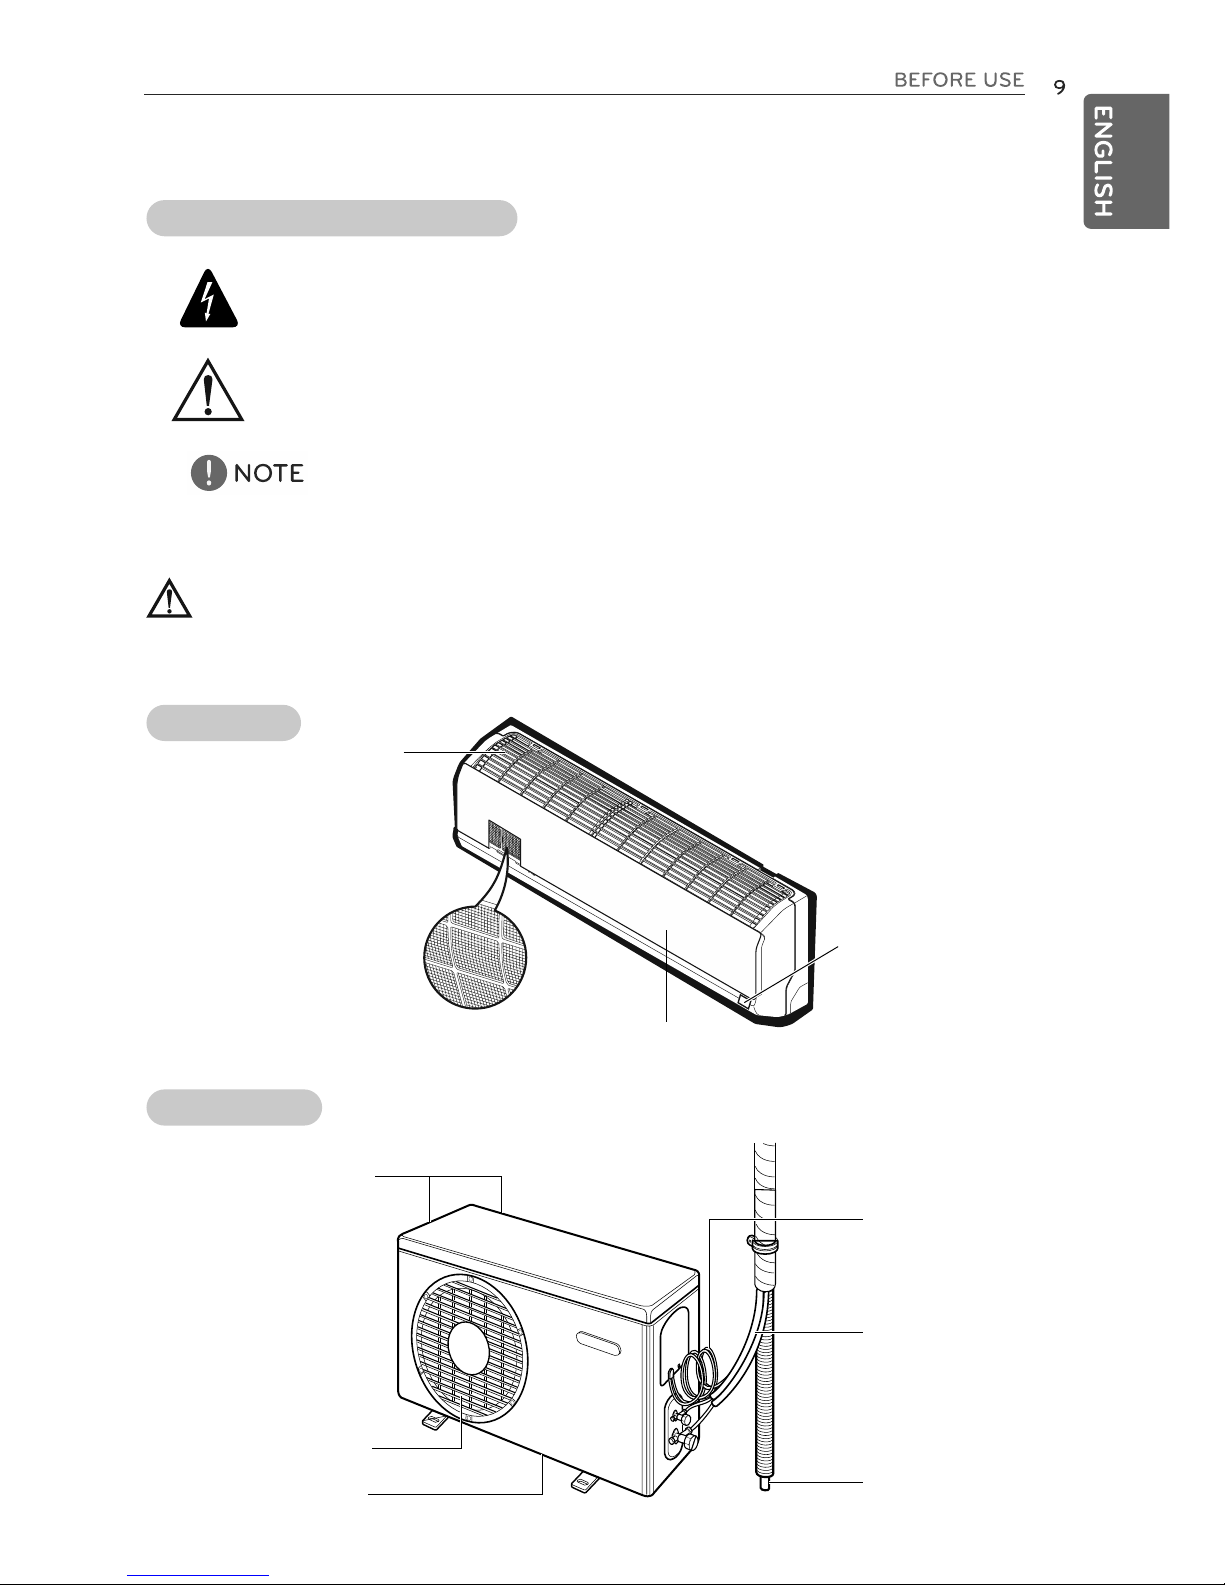
Components
Symbols used in this Manual
This symbol alerts you to the risk of electric shock.
This symbol alerts you to hazards that may cause harm to the
air conditioner.
This symbol indicates special notes.
Air Intake Vents
Air Outlet Vents
Connecting
Wires
Piping
Drain Hose
Base Plate
Indoor unit
Outdoor unit
This appliance should be installed in accordance with national wiring regulations. This guide acts as a
guide to help to explain product features.
Front Panel
Air Filter
Air Inlet
Signal Receiver
WARNING
Features
Electrical Safety
•
This appliance must be properly grounded.
To minimize the risk of electric shock, you must always plug into a grounded outlet.
•
Do not cut or remove the grounding.
•
Attaching the adapter ground terminal to the wall receptacle cover screw does not ground the
appliance unless the cover screw is metal and not insulated, and the wall receptacle is grounded
through the house wiring.
•
If you have any doubt whether the air conditioner is properly grounded, check the wall receptacle
and circuit checked by a qualified electrician.
WARNING
Using the remote control
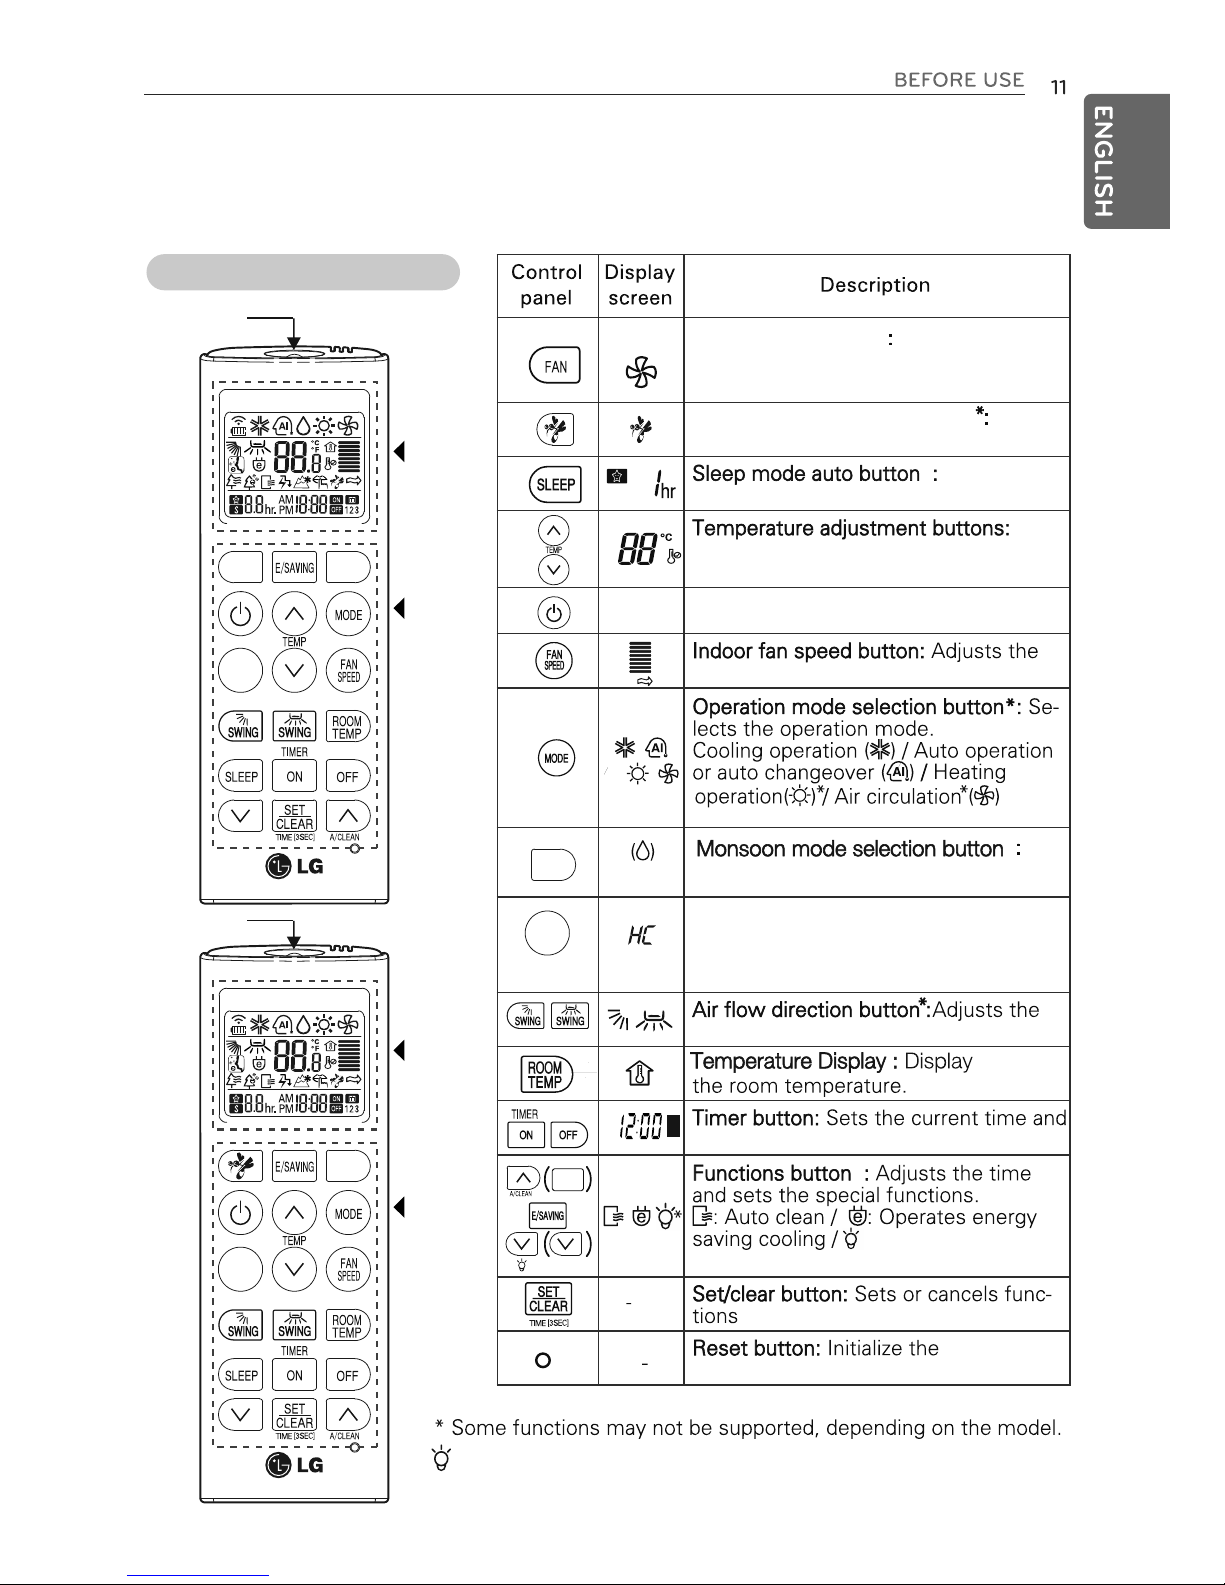
Using the remote control
You can operate the air conditioner more conveniently with the remote control.
Wireless remote control
Used to circu-
Air Circulation button
late the room air without cooling or
heating.
Sets the
sleep mode auto operation.
Ad-
justs the desired temperature when cooling and heating.
fan speed.
air flow direction.
-
-
Use to remove excess moisture.
M’SOON
H’COOL button : Cools down the
indoor temperature within a short
period of time
the start / end time
display ON or OFF.
AM
ON
OFF
A/CLEAN
Turn indoor unit
controller settings.
remote
LIGHT
H’COOL
Used to
start or stop Mosquito Away operation
Mosquito Away operation button
Display
Screen
Control
Panel
M’SOON
FAN
2
H’COOL
M
M
LIGHT
Display
Screen
Control
Panel
2
H’COOL
M’SOON
M
LIGHT
Symbol is for indoor unit display ON/OFF not remote controller.
Signal Transmitter
Signal Transmitter
Turns the air conditioner ON/OFF
ON/OFF button :
and set current time.
12
BASIC FUNCTIONS
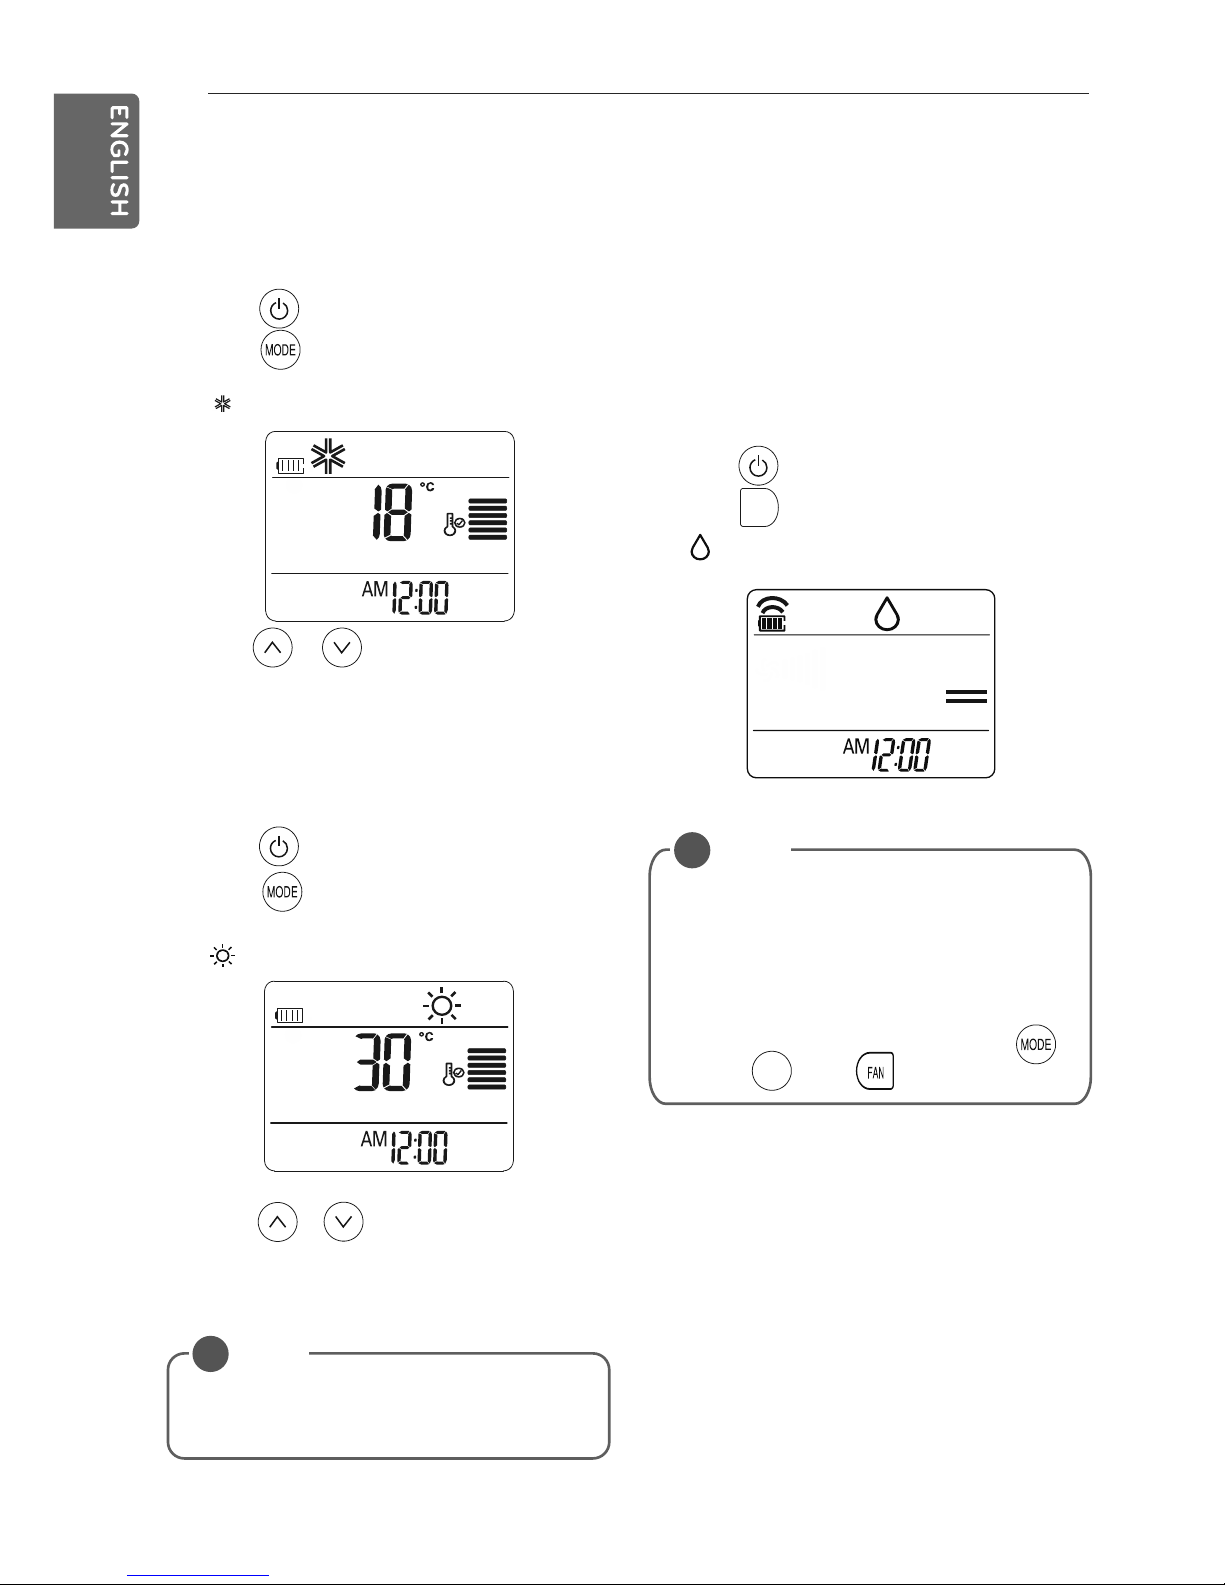
Cooling your room
(Cooling operation)
1
Press to turn on the
power.
2
Press repeatedly to select the cooling
operation.
-
is displayed on the display screen.
3
Press or to set the desired
- The temperature range is 18°C 30°C
Heating your room
(Heating operation)
1 Press to turn on the power.
2
Press repeatedly to select the heating
operation.
-
is displayed on the display screen.
3
Press or to set the desired temperature.
- The temperature range is 16°C -
30°C
Removing humidity (Cooling Mode Only)
(Monsoon operation)
This mode removes excess moisture from
environment with high humidity or in the rainy
season, in order to prevent mold from setting
in. This mode adjusts the room temperature
and the fan speed automatically to maintain
the optimal level of humidity.
1
Press to turn on the power.
2
Press to select the
monsoon operation.
- is displayed on the display screen.
NOTE
!
Cooling-only models do not support this
function.
M’SOON
NOTE
!
• In this mode you cannot adjust the room
temperature, as it is adjusted automatically. Also, the room temperature is not
displayed on the display screen.
• In this mode indoor unit fan and outdoor
unit will be OFF intermittently.
• To Exit from Monsoon mode press
key or key or key
BASIC FUNCTIONS
temperature.
H’COOL
M
M
13
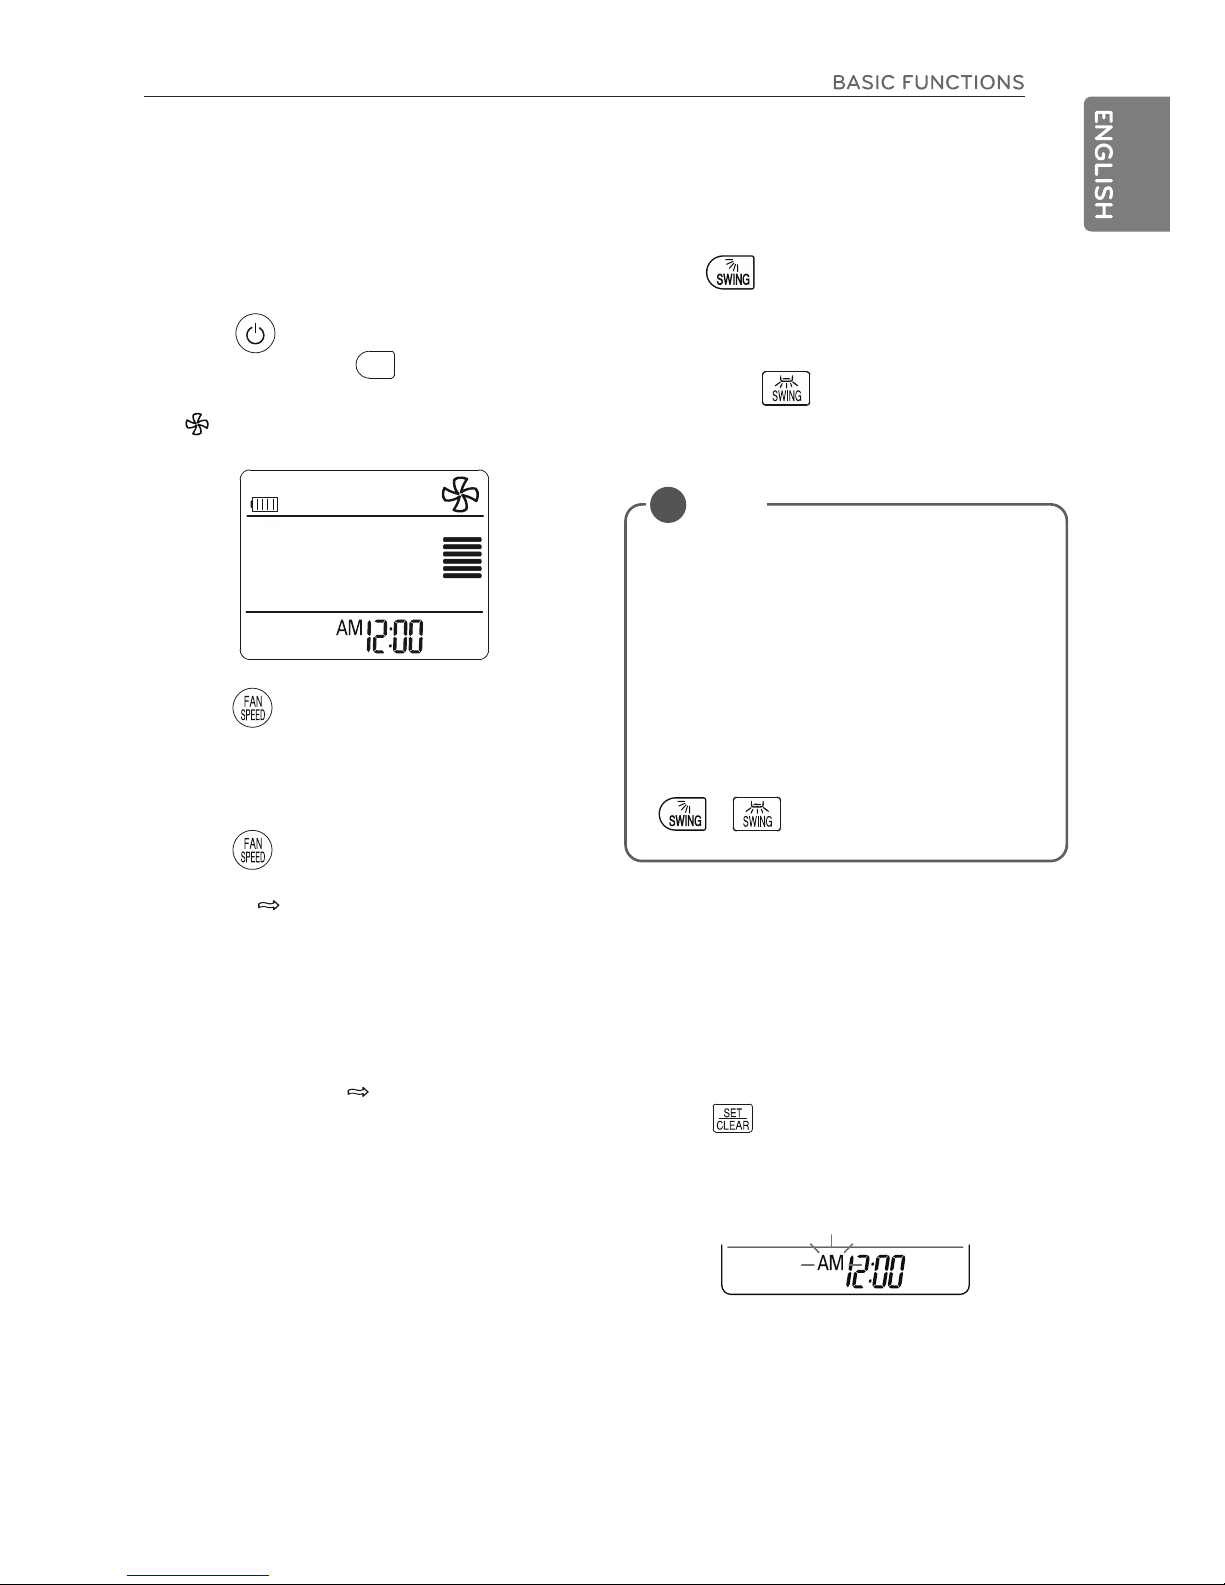
Adjusting the air flow direction
1
To adjust the direction of the flow vertically, press change the air flow direction automatically.
- This function is apply for only turn SWING On/Off.
2
To adjust the direction of the flow horizontally, press change the air flow direc-
tion automatically.
- This function is apply for only turn SWING On/Off.
Setting the timer
You can use the timer function to save energy
and to use the air conditioner more efficiently.
Setting the current time
1 Press and hold it for longer than 3 sec-
onds.
- The AM/PM icon flickers at the bottom of
the display screen.
NOTE
!
• Adjusting the air flow direction horizontally may not be supported, depending
on the model.
• Adjusting the air deflector arbitrarily may
cause product failure.
• If you restart the air conditioner, it starts
to operate with the previously set direction of air flow, so the air deflector may
not match the icon displayed on the remote control. When this occurs, press
or
to adjust the direction of
the air flow again.
Airing your room
(Air Circulation operation)
This mode only circulates the indoor air
without changing the room temperature.
3
Press to adjust the fan speed.
Adjusting the fan speed
1 Press repeatedly to adjust the fan
speed.
- Select if you want natural air.
The fan speed adjusts automatically.
Natural wind (CHAOS Logic)
For fresher feeling, press the INDOOR FAN
SPEED SELECTION BUTTON and set to
Natural wind mode ( ).
In this mode, the wind blows like a natural
breeze by automatically changing fan speed.
is displayed on the display screen.
1
Press to turn on the power.
2
Fan button : Press
turn on the air
circulation operation.
-
FAN
14
2 Press or to select .
3
Press to finish.
Turning ON the air conditioner automatically at a set time
1 Press
- The icon below flickers at the bottom of
the display screen.
2
Press
or to select
3
Press to finish.
4
When setting the timer, current time and
times.
ON icon are displayed on the display
screen indicating that the ON TIMER is
set.
Turning OFF the air conditioner automatically at a set time
1 Press
- The icon below flickers at the bottom of
the display screen.
2
Press
or to select
3
Press to finish.
4
When setting the timer, current time and
the times.
OFF icon are displayed on the display
screen indicating that the OFF TIMER is
set.
Canceling the timer setting
1 Press or to select the timer setting
to cancel.
2
Press
- To cancel all timer settings, press
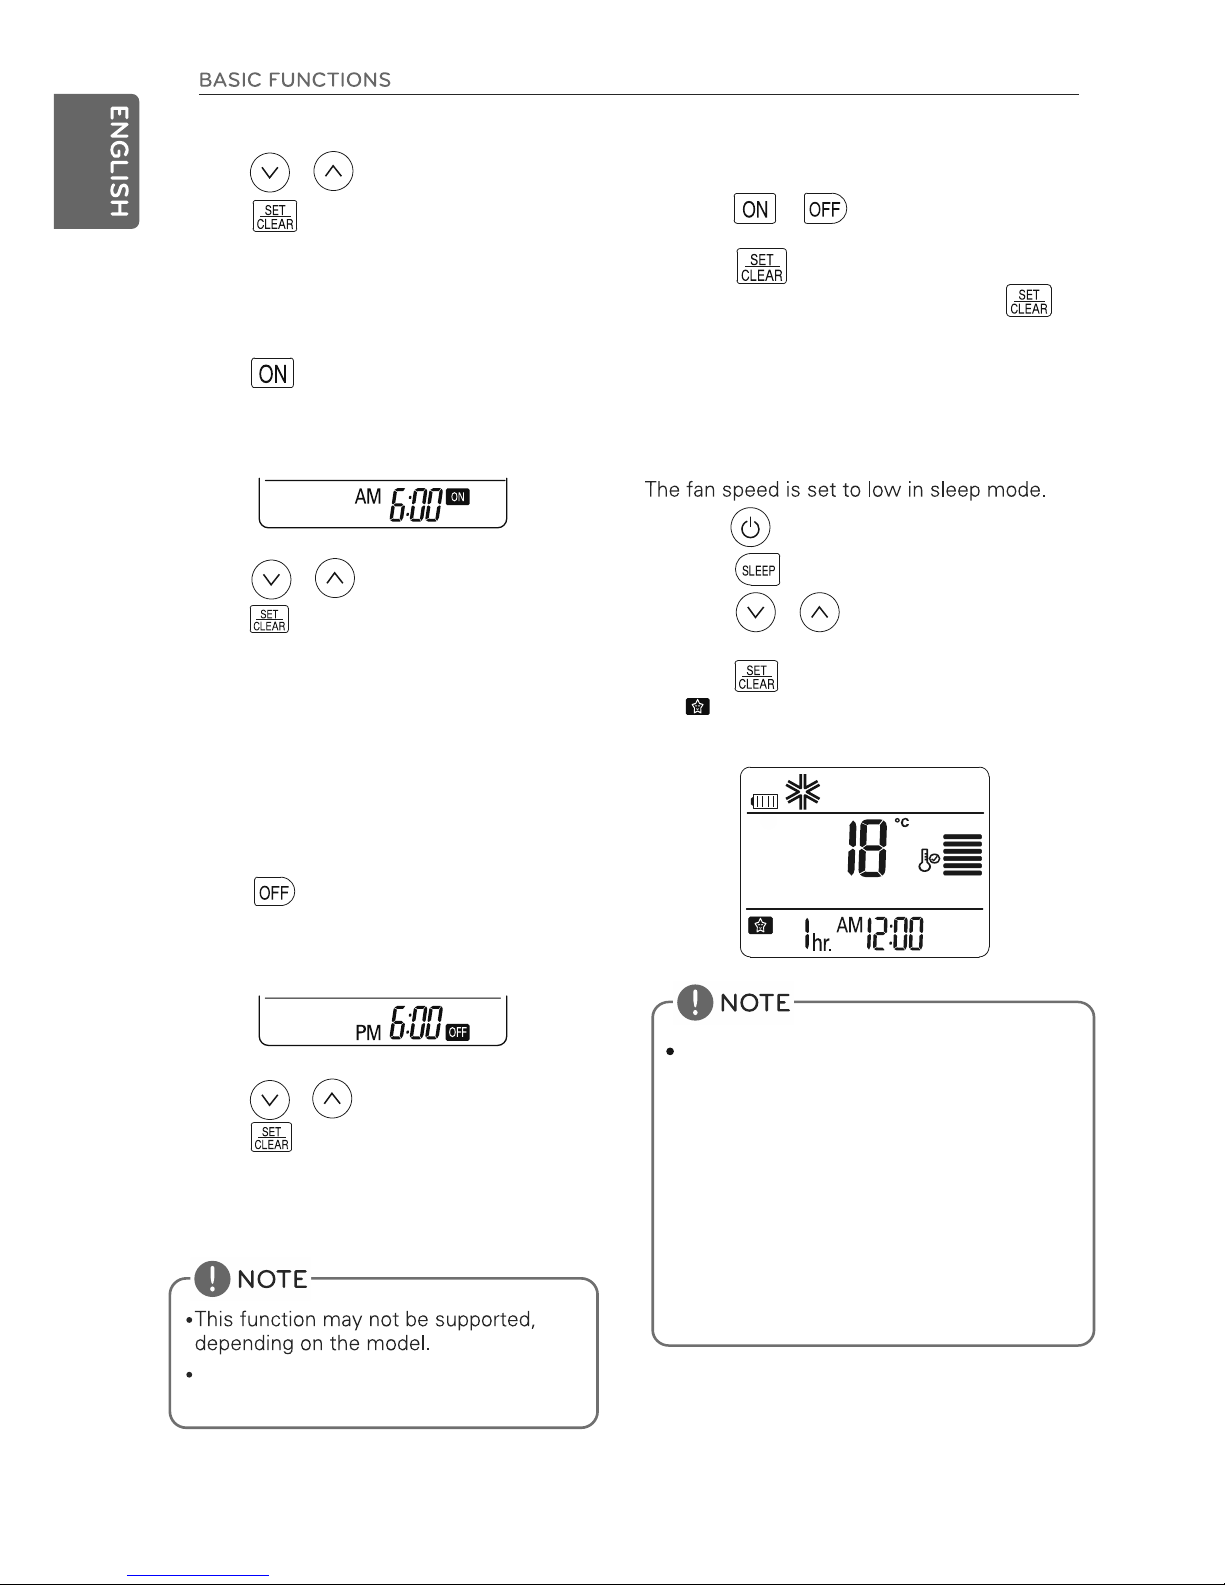
Setting sleep mode
Use the sleep mode to turn OFF the air conditioner automatically when you go to sleep.
1
Press to turn on the power.
2
Press
3
Press
or to select the hour
(up to 7 hours).
4
Press to finish.
- is displayed on the display screen in
sleep mode.
desired time.
desired time.
desired time.
This mode does not have auto restart
feature.
(The timer lamp on the air conditioner and
the display will go off.)
The sleep mode will operate indoor fan at
super low speed in cooling mode and at low
speed in heating mode for pleasant sleep
In cooling mode or Monsoon mode:
The setting temperature will rise automatically
two times by 1°C over next consecutive 30
minutes (Maximum 2°C) for a comfortable
sleep.
This will be the final setting temperature as
long as sleep mode is functioning.
After completion of set time unit will switch
OFF automatically.
 Loading...