

Page 1
FRANÇAIS ESPAÑOLENGLISH
OWNER'S MANUAL
AIR
CONDITIONER
Read this owner's manual thoroughly before operating the appliance and
keep it handy for reference at all times.
TYPE: WALL MOUNTED
MFL69491103
Rev.05_062819
Copyright © 2018 - 2019 LG Electronics Inc. All Rights Reserved.
www.lg.com
Page 2
TABLE OF CONTENTS
2 TABLE OF CONTENTS
3 SAFETY INSTRUCTIONS
3 IMPORTANT SAFETY INSTRUCTIONS
7 OPERATION
7 Notes for Operation
7 Parts and Functions
8 Wireless Remote Control
13 Restarting the Air Conditioner Automatically
13 Using the Mode Function
15 Using the Jet Mode Function
16 Using the Fan Speed Function
16 Using the Air Flow Direction Function
17 Setting the On/Off Timer
18 Using the Sleep Function (Optional)
18 Using the Simple Timer Function (Optional)
19 Using the Energy Display Function (Optional)
19 Using the Light Off Function (Optional)
19 Using the Comfort Air Function (Optional)
20 Using the Energy Saving Function (Optional)
20 Using the Energy Control Function (Optional)
21 Using Special Functions
24 SMART FUNCTIONS
24 Using LG SmartThinQ Application
27 MAINTENANCE
29 Clean the Air Filter
30 Clean the Micro Dust and Triple Filter (Optional)
31 TROUBLESHOOTING
35 WARRANTY (USA)
37 WARRANTY (CANADA)
Page 3
ENGLISH
SAFETY INSTRUCTIONS
READ ALL INSTRUCTIONS BEFORE USE
Your safety and the safety of others are very important.
We have provided many important safety messages in this manual and on your appliance. Always
read and follow all safety messages.
This is the safety alert symbol.
This symbol alerts you to potential hazards that can kill or injure you and others.
All safety messages will follow the safety alert symbol and either the word WARNING, or
CAUTION.
WARNING
If you do not follow instructions, it could result in death or serious injury.
CAUTION
If you do not follow instructions, it could result in minor or moderate injury or damage to the
product.
All safety messages will tell you what the potential hazard is, tell you how to reduce the chance of
injury, and tell you what may happen if the instructions are not followed.
3SAFETY INSTRUCTIONS
IMPORTANT SAFETY INSTRUCTIONS
WARNING
To reduce the risk of explosion, fire, death, electric shock, injury or scalding to persons
when using this product, follow basic precautions, including the following:
• Installation or repairs made by unauthorized persons can pose hazards to you and others.
• Installation MUST conform to the local building codes or, in the absence of local codes, the
National Electrical Code NFPA 70/ANSI C1-1003 or current edition and Canadian Electrical Code
Part1 CSA C.22. 1.
• The information contained in the manual is intended for use by a qualified service technician who
is familiar with the safety procedures and equipped with the proper tools and test instruments.
• Failure to read and follow all instructions in this manual can result in equipment malfunction,
property damage, personal injury and/or death.
• When the power cord is to be replaced, the replacement work shall be performed by authorized
personnel using only genuine replacement parts.
• This appliance is not intended for use by persons (including children) with reduced physical,
sensory or mental capabilities, or lack of experience and knowledge, unless they have been given
supervision or instruction concerning use of the appliance by a person responsible for their safety.
Children should be supervised to ensure that they do not play with the appliance.
Page 4
4 SAFETY INSTRUCTIONS
Installation
• Do not install the air conditioner on an unstable surface or in a place where there is danger of it
falling.
• Contact an authorized service center when installing or relocating the air conditioner.
• Install the panel and the cover of the control box safely.
• Do not install the air conditioner in a place where flammable liquids or gases such as gasoline,
propane, paint thinner, etc., are stored.
• Make sure that the pipe and the power cable connecting the indoor and outdoor units are not
pulled too tight when installing the air conditioner.
• Use standard circuit breaker and fuse that conform to the rating of the air conditioner.
• Do not input air or gas into the system except with the specific refrigerant.
• Use non-flammable gas (nitrogen) to check for leak and to purge air; using compressed air or
flammable gas may cause fire or explosion.
• The indoor/outdoor wiring connections must be secured tightly, and the cable should be routed
properly so that there is no force pulling the cable from the connection terminals. Improper or
loose connections can cause heat generation or fire.
• Install dedicated electric outlet and circuit breaker before using the air conditioner.
• Do not connect the ground wire to a gas pipe, a lightning rod, or a telephone ground wire.
• If the supply cord is damaged, it must be replaced by the manufacturer, its service agent or
similarly qualified person in order to avoid a hazard.
Operation
• Be sure to use only those parts listed in the service parts list. Never attempt to modify the
equipment.
• Make sure that children do not climb on or hit the outdoor unit.
• Dispose of the batteries in a place where there is no danger of fire.
• Use only the refrigerant specified on the air conditioner label.
• Cut off the power supply if there is any noise, smell, or smoke coming from the air conditioner.
• Do not leave flammable substances such as gasoline, benzene, or thinner near the air conditioner.
• Contact an authorized service center when the air conditioner is submerged by flood waters.
• Do not use the air conditioner for an extended period of time in a small place without proper
ventilation.
• In the event of a gas leak (such as Freon, propane gas, LP gas, etc.) ventilate sufficiently before
using the air conditioner again.
• To clean the interior, contact an authorized service center or dealer. Using harsh detergents may
cause corrosion or damage to the unit.
Page 5
5SAFETY INSTRUCTIONS
ENGLISH
• Be sure to ventilate sufficiently when the air conditioner and a heating appliance such as a heater
are used simultaneously.
• Do not block the inlet or outlet of air flow.
• Do not insert hands or other objects through the air inlet or outlet while the air conditioner is
operating.
• Make sure that the power cable is neither dirty, loose, nor broken.
• Never touch, operate, or repair the air conditioner with wet hands.
• Do not place any objects on the power cable.
• Do not place a heater or other heating appliances near the power cable.
• Do not modify or extend the power cable. Scratches or peeling insulation on the power cables
may result in fire or electric shock, and should be replaced.
• Cut off the power supply immediately in the event of a blackout or a thunderstorm.
• Take care to ensure that power cable could not be pulled out or damaged during operation.
• Do not touch refrigerant pipe, water pipe and any internal parts while the unit is operating or
immediately after operation.
Maintenance
• Do not clean the appliance by spraying water directly onto the product.
• Before cleaning or performing maintenance, disconnect the power supply and wait until the fan
stops.
CAUTION
To reduce the risk of minor injury to persons, malfunction, or damage to the product or
property when using this product, follow basic precautions, including the following:
Installation
• Do not install the air conditioner in an area where it is directly exposed to sea wind (salt spray).
• Install the drain hose properly for the smooth drainage of water condensation.
• Exercise caution when unpacking or installing the air conditioner.
• Do not touch the leaking refrigerant during installation or repair.
• Transport the air conditioner with two or more people or use a forklift.
• Install the outdoor unit such that it is protected from direct sunlight. Do not place the indoor unit in
a place where it is directly exposed to sunlight via the windows.
• Safely dispose of packing materials such as screws, nails or batteries using proper packaging
after installation or repair.
• Install the air conditioner in a place where the noise from the outdoor unit or the exhaust fumes will
not inconvenience the neighbors. Failure to do so may result in conflict with the neighbors.
Page 6
6 SAFETY INSTRUCTIONS
Operation
• Remove the batteries if the remote control is not to be used for an extended period of time.
• Make sure that the filter is installed before operating the air conditioner.
• Be sure to check if there is a refrigerant leak after installing or repairing the air conditioner.
• Follow the standards of the corresponding region or country for handling the refrigerant and the air
conditioner and for disassembling the air conditioner.
• Do not place any object on the air conditioner.
• Never mix different types of batteries, or old and new batteries for the remote control.
• Do not let the air conditioner run for a long time when humidity is very high or when a door or a
window has been left open.
• Stop using the remote control if there is a fluid leak in the battery. If your clothes or skin are
exposed to the leaking battery fluid, wash off with clean water.
• Do not expose people, animals, or plants to the cold or hot wind from the air conditioner for
extended periods of time.
• If the leaking battery fluid has been swallowed, rinse the inside of the mouth thoroughly and
consult a doctor.
• Do not drink the water drained from the air conditioner.
• Do not use the product for special purposes, such as preserving foods, works of art, and etc. It
is an air conditioner for consumer purposes, not a precision refrigeration system. There is risk of
damage or loss of property.
• Do not recharge or disassemble the batteries.
Maintenance
• Never touch the metal parts of the air conditioner when removing the air filter.
• Use a sturdy stool or ladder when cleaning, maintaining, or repairing the air conditioner at a
height.
• Never use strong cleaning agents or solvents when cleaning the air conditioner or spray water.
Use a smooth cloth.
Page 7
ENGLISH
OPERATION
5
6
7
Notes for Operation
Suggestion for Energy Saving
• Do not over-cool the space. This may be harmful for your health and may consume more electricity.
• Block sunlight with blinds or curtains while you are operating the air conditioner.
• Keep doors or windows closed tightly while you are operating the air conditioner.
• Adjust the direction of the air flow vertically or horizontally to circulate indoor air.
• Speed up the fan to cool or warm indoor air quickly, within a short period of time.
• Open windows regularly for ventilation. The indoor air quality may deteriorate if the air conditioner is used for
long durations.
• Clean the air filter once every 2 weeks. Dust and impurities collected in the air filter may block the air flow or
reduce the unit performance.
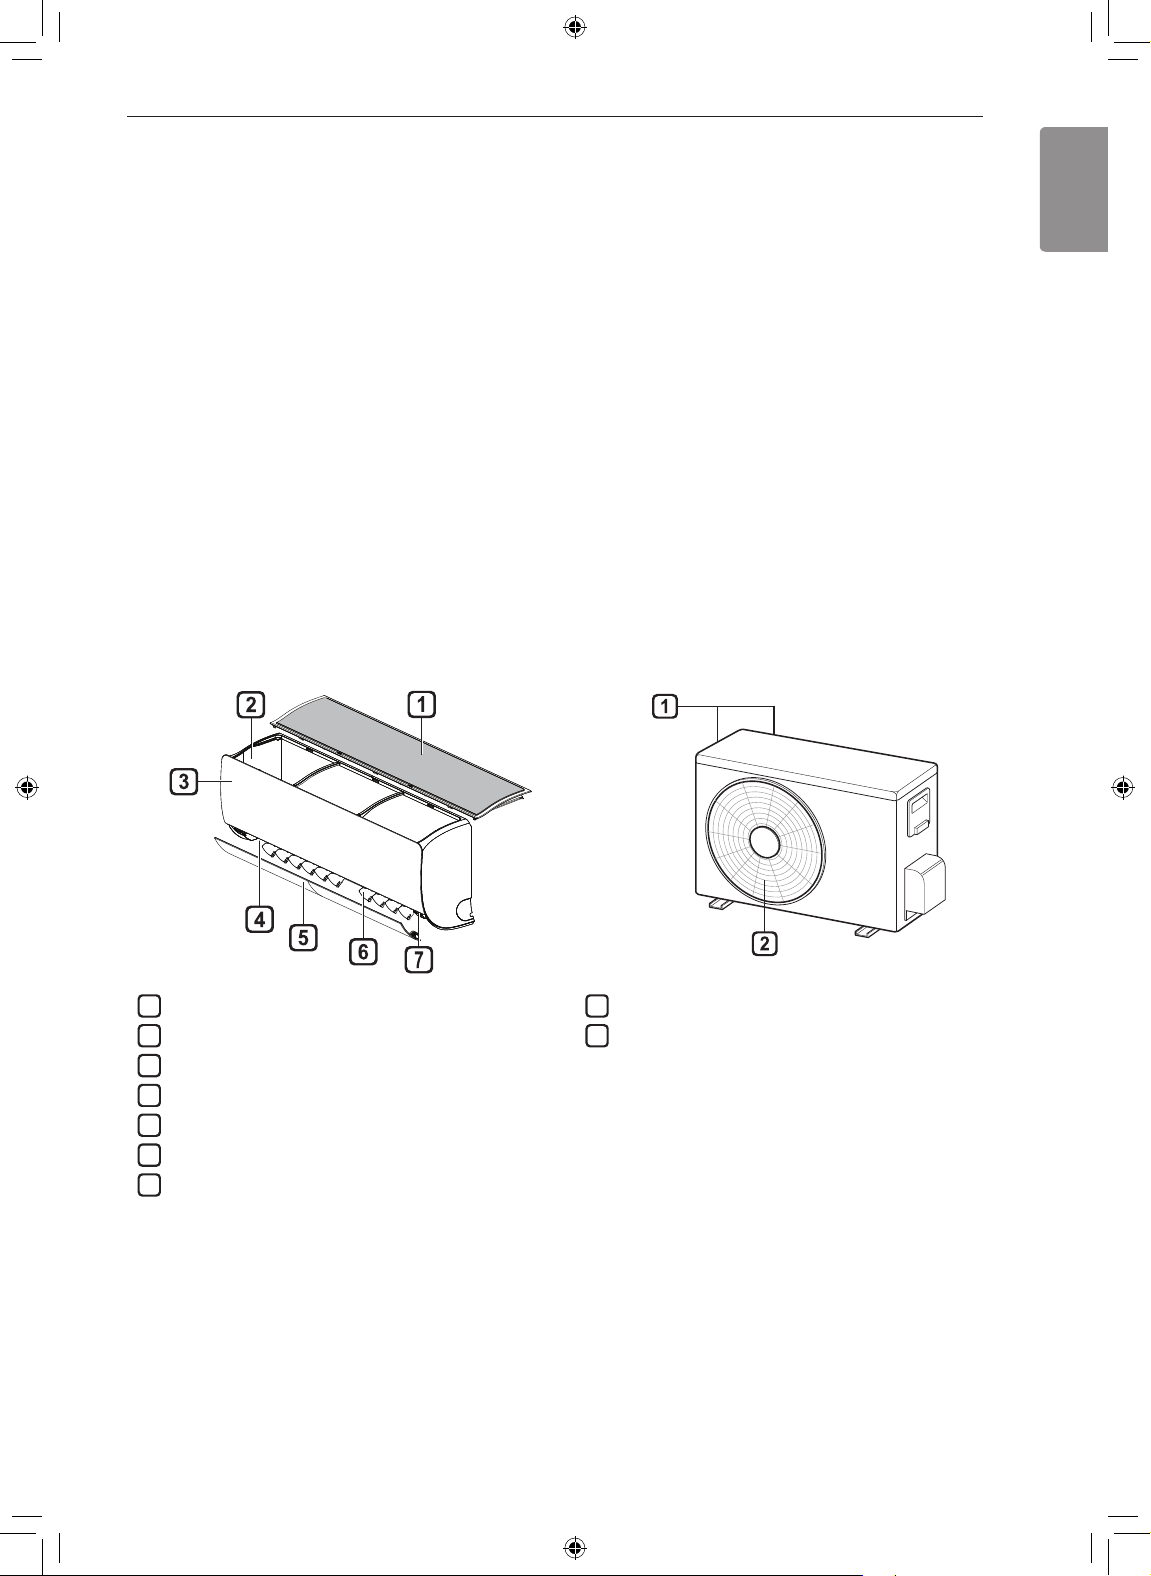
Parts and Functions
Indoor Unit Outdoor Unit
7OPERATION
Air Filter
1
Air Intake
2
Front Cover
3
Air Outlet
4
Air Deflector (Horizontal Vane)
Air Deflector (Vertical Louver)
On/Off Button
NOTE
• The number and location of operation lamps may vary according to the model of the air conditioner.
• The feature may be changed according to the type of model.
Air Intake Vents
1
Air Outlet Vents
2
Page 8
8 OPERATION
SWING
kW [3 s]
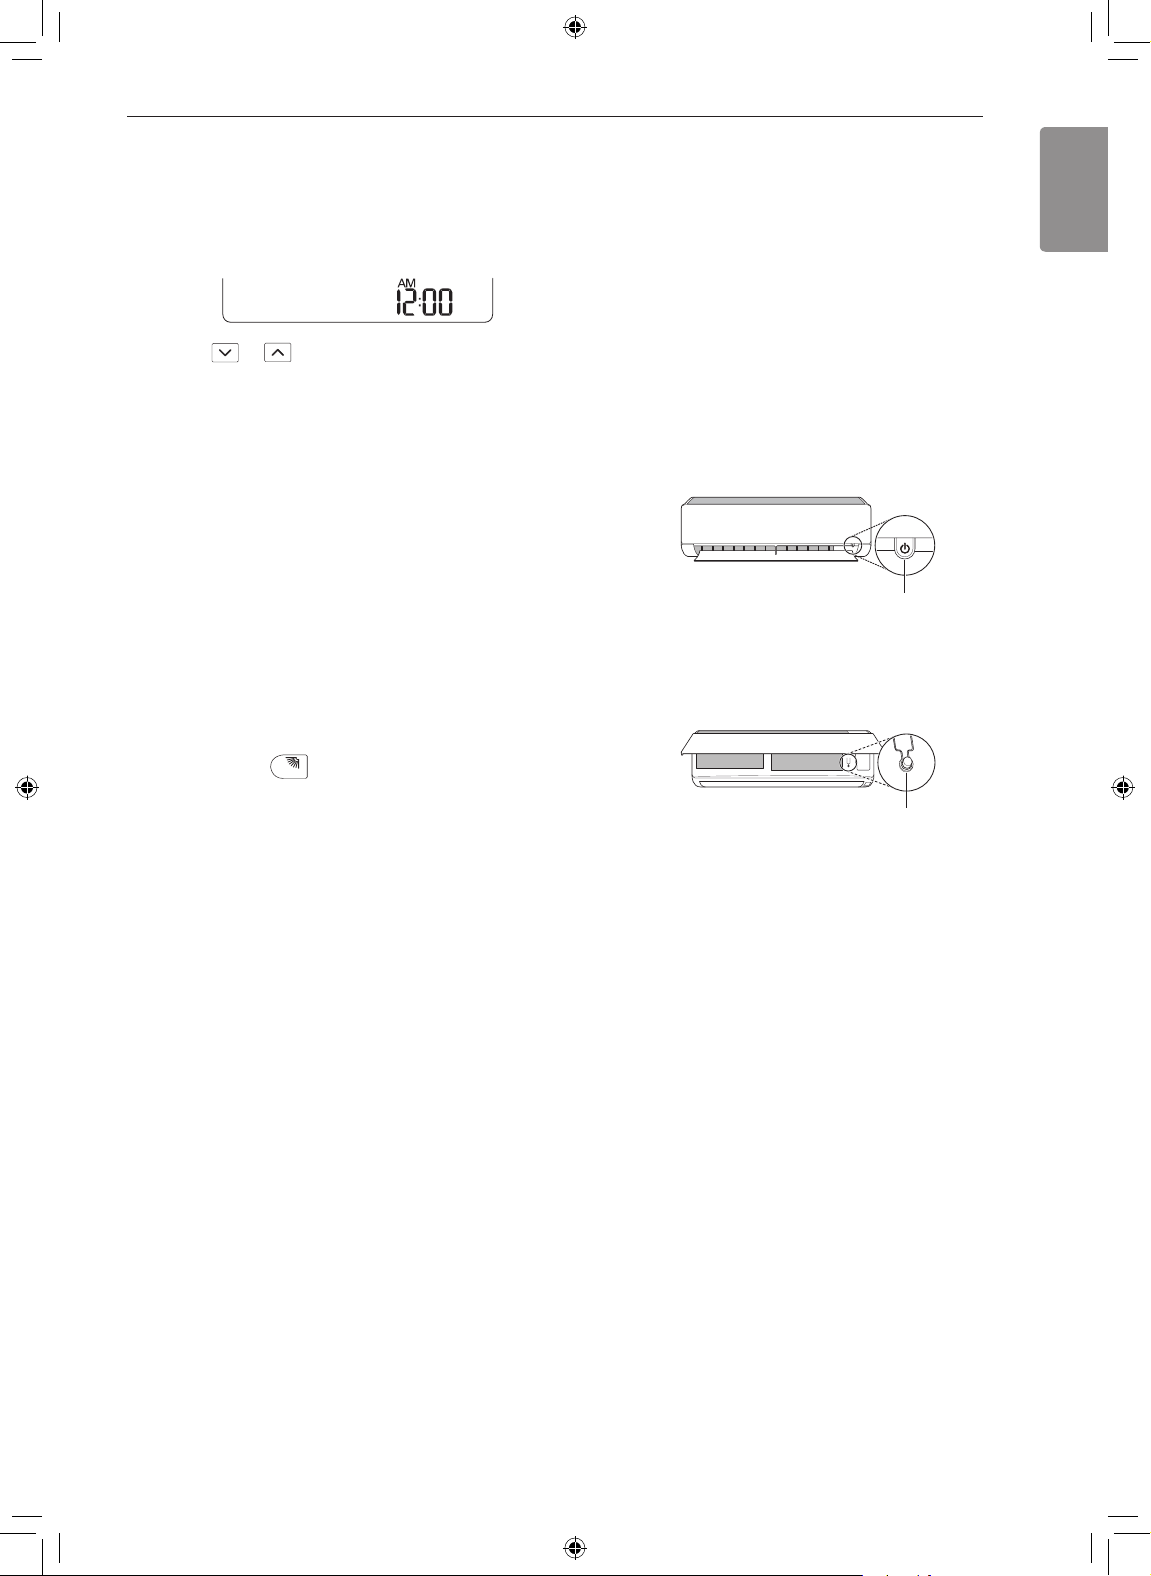
Wireless Remote Control
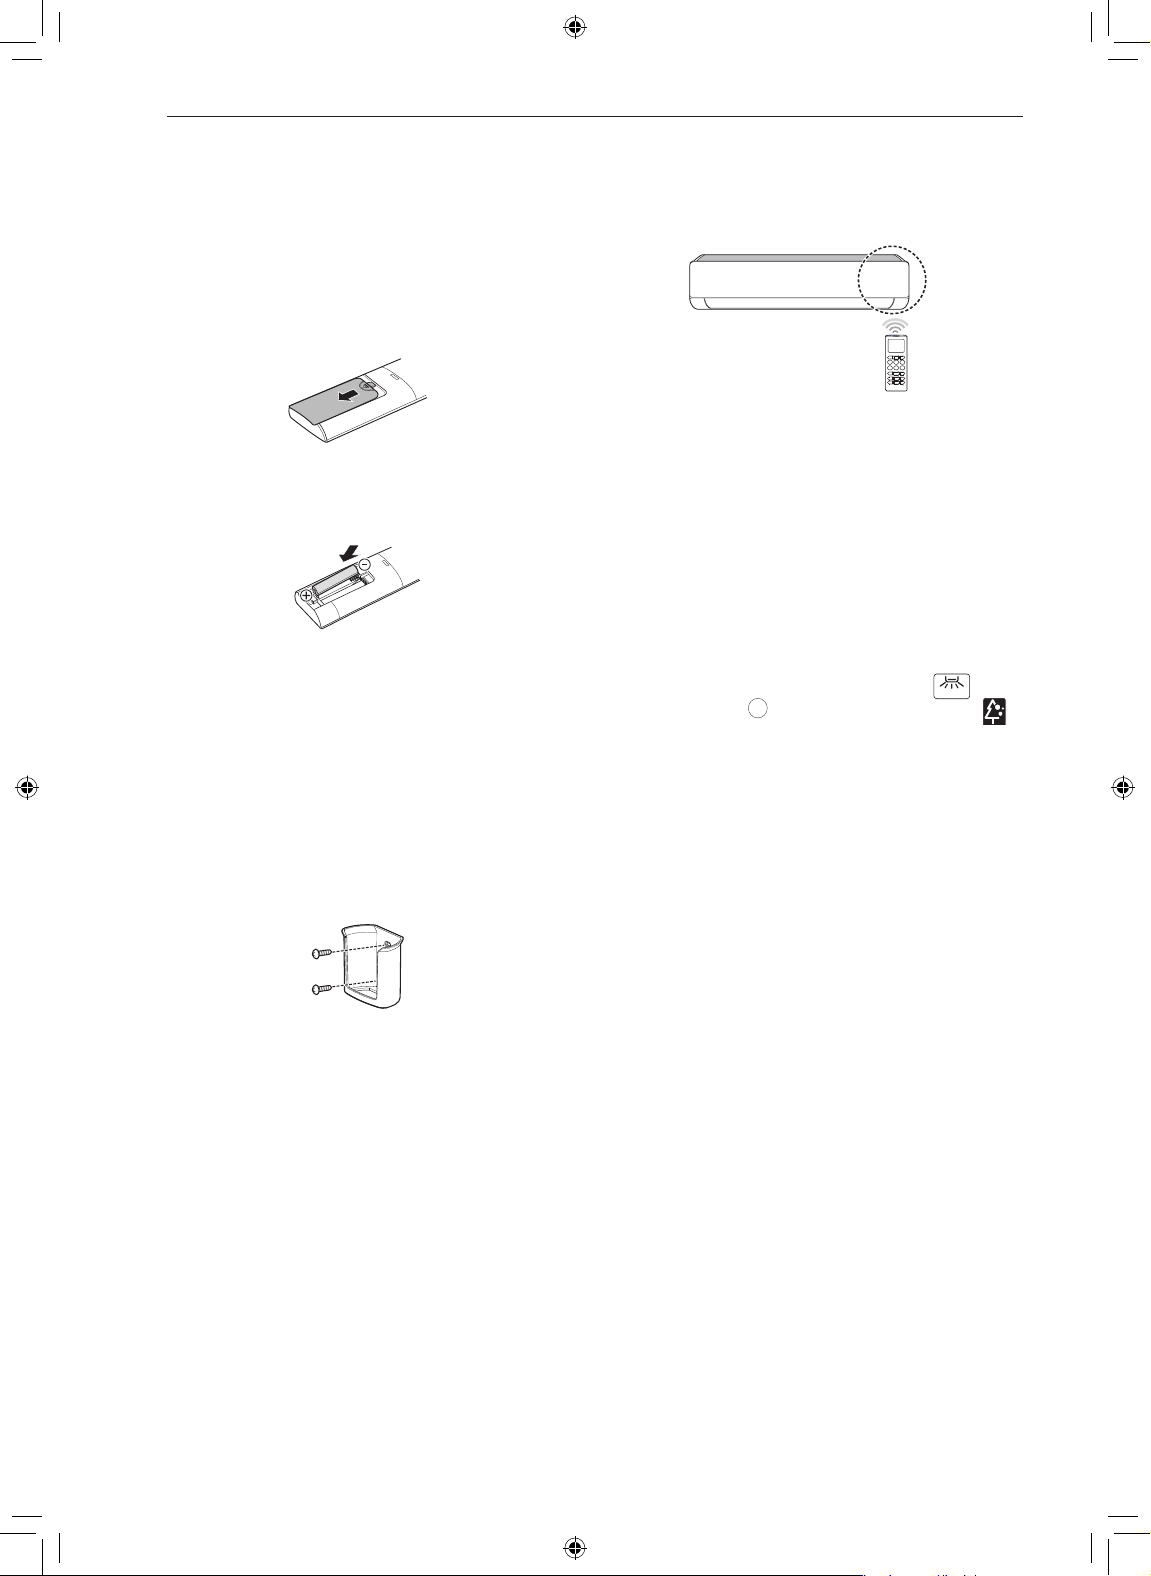
Inserting Batteries
If the display screen of the remote control begins
to fade, replace the batteries. Insert AAA (1.5 V)
batteries before using the remote control.
Remove the battery cover.
1
Insert the new batteries and make sure that the
2
+ and - terminals of the batteries are installed
correctly.
Installing the Remote Control Holder
To protect the remote control, install the holder where
there is no direct sunlight.
Operating Method
Point the remote control towards the signal receiver
at the right side of the air conditioner to operate it.
NOTE
• The remote control may operate other electronic
devices if it is directed towards them. Make sure to
point the remote control towards the air conditioner
signal receiver.
• For proper operation, use a soft cloth to clean the
signal transmitter and receiver.
• In case of a function not provided in the product,
no buzzer sound occurs from the product when
a button for such function on the remote control
is pressed except for Air Flow Direction (
Energy Display (
), Air Purification function ( ).
),
Choose a safe and easily accessible location.
1
Fix the holder by fastening 2 screws firmly with a
2
screwdriver.
Page 9
9OPERATION
ENGLISH
℃↔℉ [5 s]
SWING
ON/OFF
Setting the Current Time
Insert batteries.
1
• The icon below blinks at the bottom of the
display screen.
Press or button to select the minutes.
2
Press SET/CANCEL button to finish.
3
NOTE
• The On/Off Timer is available after setting the
current time.
Using the °C/°F Conversion Function
(Optional)
This function changes unit between °C and °F
Operating the Air Conditioner without
the Remote Control
You can use the ON/OFF button of the indoor unit to
operate the air conditioner when the remote control is
unavailable.
Open the front cover (Type2) or horizontal vane
1
(Type1).
Press the ON/OFF button.
2
Type1
ON/OFF
Type2
• Press and hold
button about 5 seconds.
NOTE
• The stepping motor may be broken, if the horizontal
vane opens rapidly.
• The fan speed is set to high.
• The feature may be changed according to the type
of model.
• The temperature cannot be altered when using this
emergency ON/OFF button.
• For cooling-only models, the temperature is set to
22 °C
• For cooling & heating models, the temperature is
set from 22 °C to 24 °C
Page 10
10 OPERATION
SWING
SWING
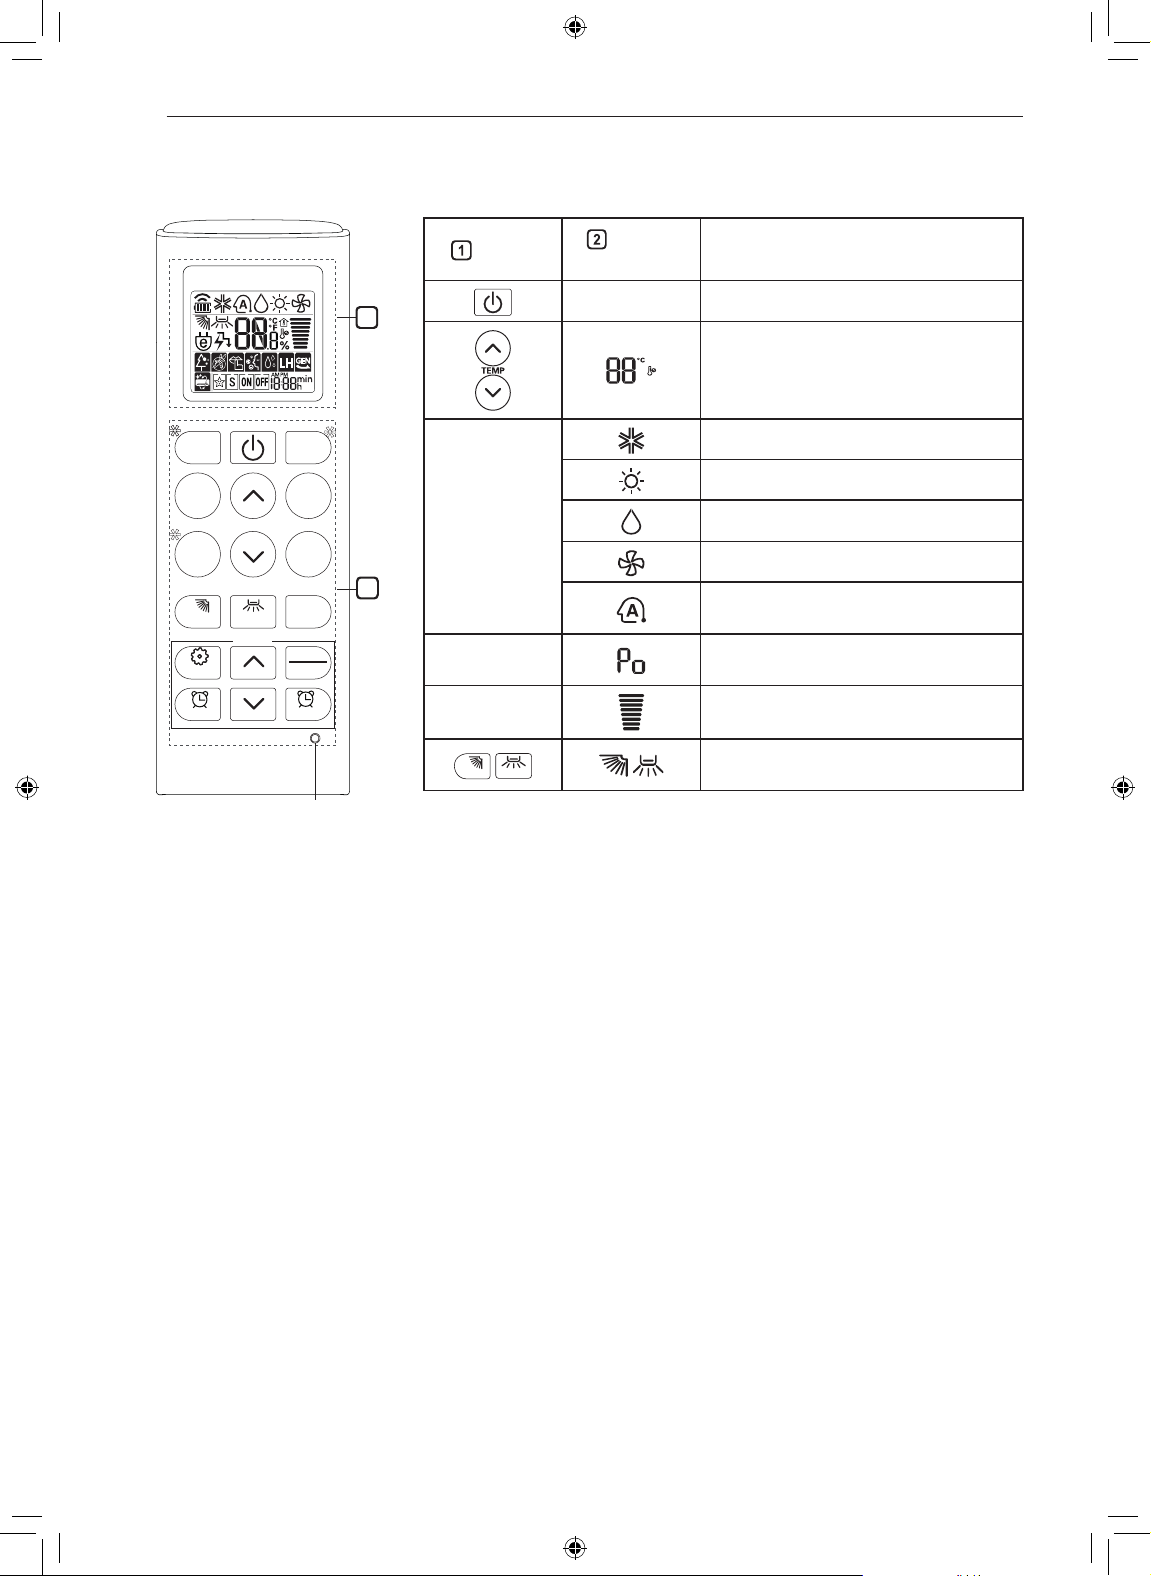
Using Wireless Remote Control
You can operate the air conditioner more conveniently with the remote control.
*
MODE
TEMP
*
kW [3 s]
SWING
SWING
℃↔℉ [5 s]
SET UP
FUNC.
TIMER CANCEL
FAN
SPEED
JET
MODE
ROOM
TEMP
DIAGNOSIS [5 s]
SET
CANCEL
RESET
Button
Display
Screen
Description
- To turn on/off the air conditioner.
2
To adjust the desired room
temperature in cooling, heating or
auto changeover mode.
*
To select the cooling mode.
To select the heating mode.
MODE
To select the dehumidification mode.
To select the fan mode.
1
To select the auto changeover/auto
operation mode.
JET
MODE
FAN
SPEED
To change room temperature quickly.
To adjust the fan speed.
To adjust the air flow direction
vertically or horizontally.
NOTE
• * buttons may be changed according to the type of model.
Page 11
11OPERATION
ENGLISH
RESET
TIMER
CANCEL
*
MODE
TEMP
*
kW [3 s]
SWING
SWING
℃↔℉ [5 s]
SET UP
FUNC.
TIMER CANCEL
FAN
SPEED
JET
MODE
ROOM
TEMP
DIAGNOSIS [5 s]
SET
CANCEL
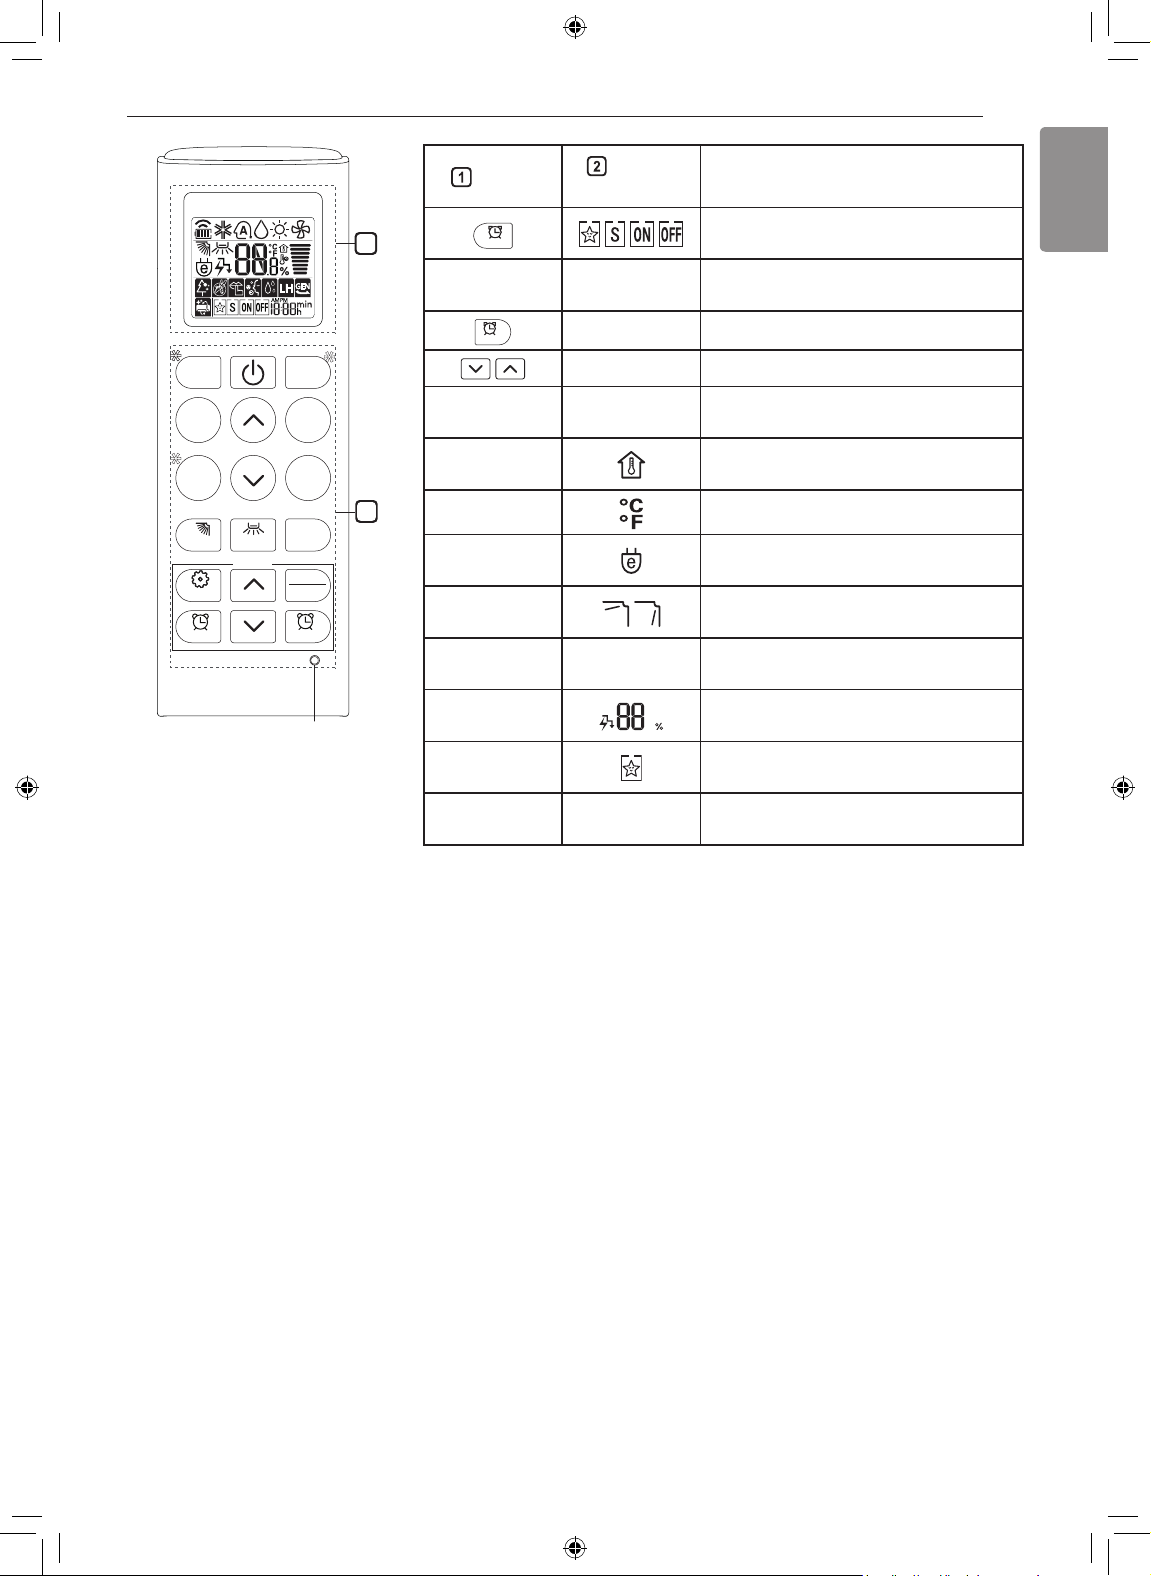
Button
2
SET/
CANCEL
Display
Screen
-
To turn on/off air conditioner
automatically at desired time.
To set/cancel the special functions
and timer.
Description
- To cancel the timer settings.
*
*LIGHT
OFF
ROOM
TEMP
1
°C↔°F [5 s]
*ENERGY
SAVING
*COMFORT
AIR
kW [3 s] -
*ENERGY
CTRL
*COMFORT
SLEEP
DIAGNOSIS
[5 s]
- To adjust time.
-
To set the brightness of the display on
the indoor unit.
To display the room temperature.
To change unit between °C and °F
To minimize power consumption.
To adjust the air flow to deflect wind.
To set whether or not to display
information regarding energy.
To bring the effect of the power
saving.
To make a comfortable sleeping
environment.
-
To conveniently check maintenance
information of a product.
Page 12
12 OPERATION
RESET
FUNC.
*
MODE
TEMP
*
kW [3 s]
SWING
SWING
℃↔℉ [5 s]
SET UP
FUNC.
TIMER CANCEL
FAN
SPEED
JET
MODE
ROOM
TEMP
DIAGNOSIS [5 s]
SET
CANCEL
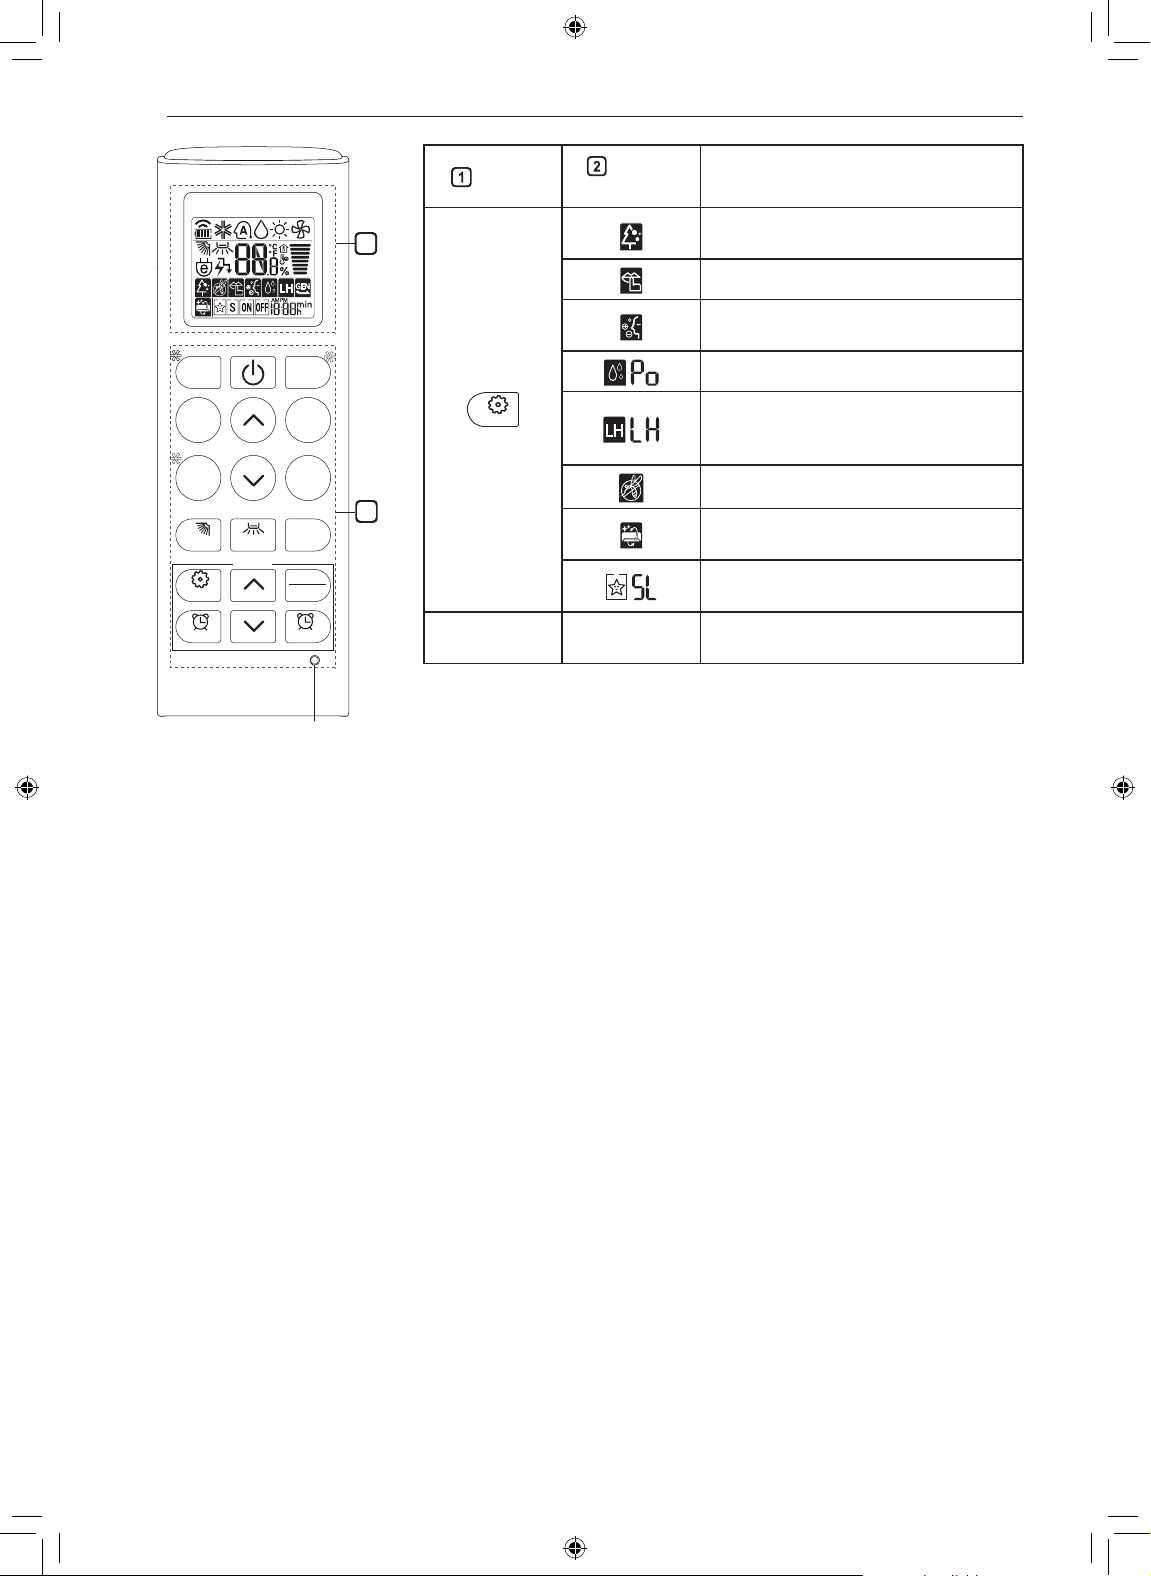
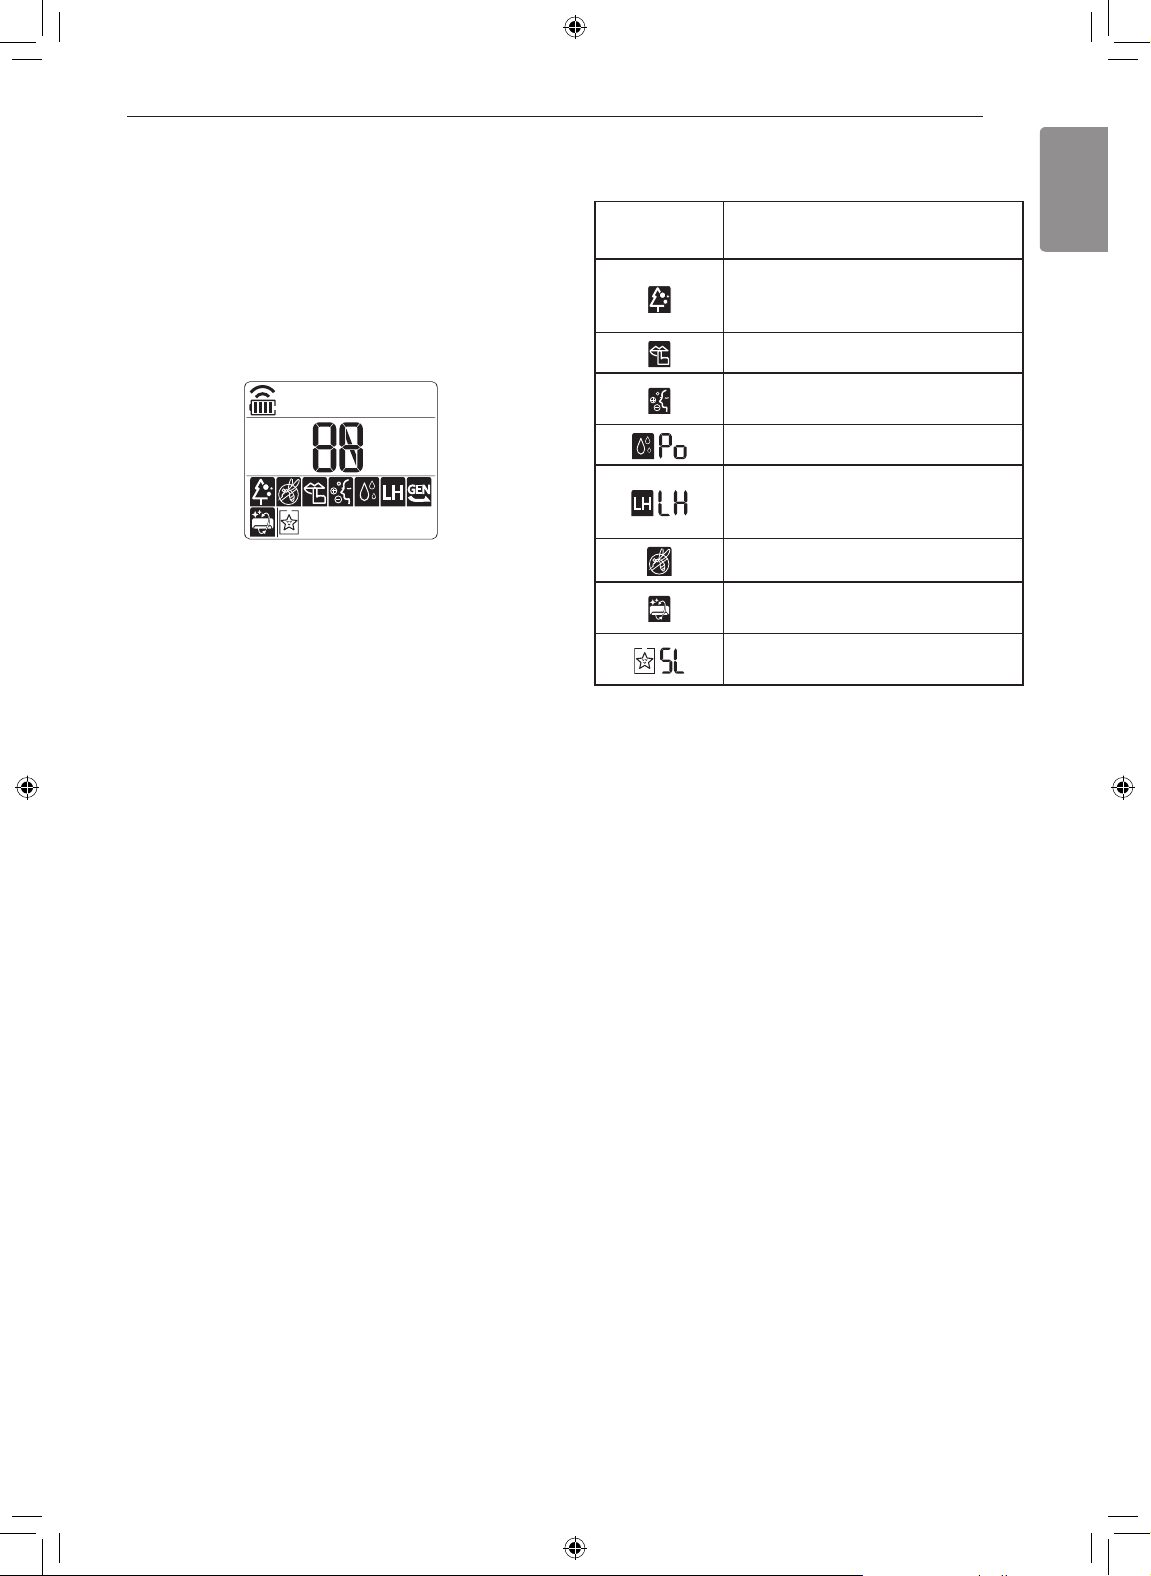
Button
Display
Screen
Description
The Ion generator uses millions of
2
ions to help improve indoor air quality.
To reduce noise from outdoor units.
To keep your skin moisturized by
generating ion clusters.
*
To lower indoor humidity quickly.
To maintain a minimum room
temperature and prevent objects in
the room from freezing.
To scare away a mosquito.
1
To remove moisture generated inside
the indoor unit.
RESET -
To make a comfortable sleeping
environment.
To initialize the remote control
settings.
NOTE
• Some functions may not be supported, depending on the model.
• * buttons may be changed according to the type of model.
• Press the SET/CANCEL button to operate the selected FUNC.
Page 13
13OPERATION
ENGLISH
ON/OFF
Restarting the Air Conditioner
Automatically
When the air conditioner is turned on again after
a power failure, this function restores the previous
settings.
Disabling Auto Restart
Open the front cover (Type2) or horizontal vane
1
(Type1).
Press the ON/OFF button and hold it for 6
2
seconds, then the unit will beep twice and the
lamp will blink twice 4 times.
• To re-enable the function, press the ON/OFF
button and hold it for 6 seconds. The unit will
beep twice and the lamp will blink 4 times.
Type1
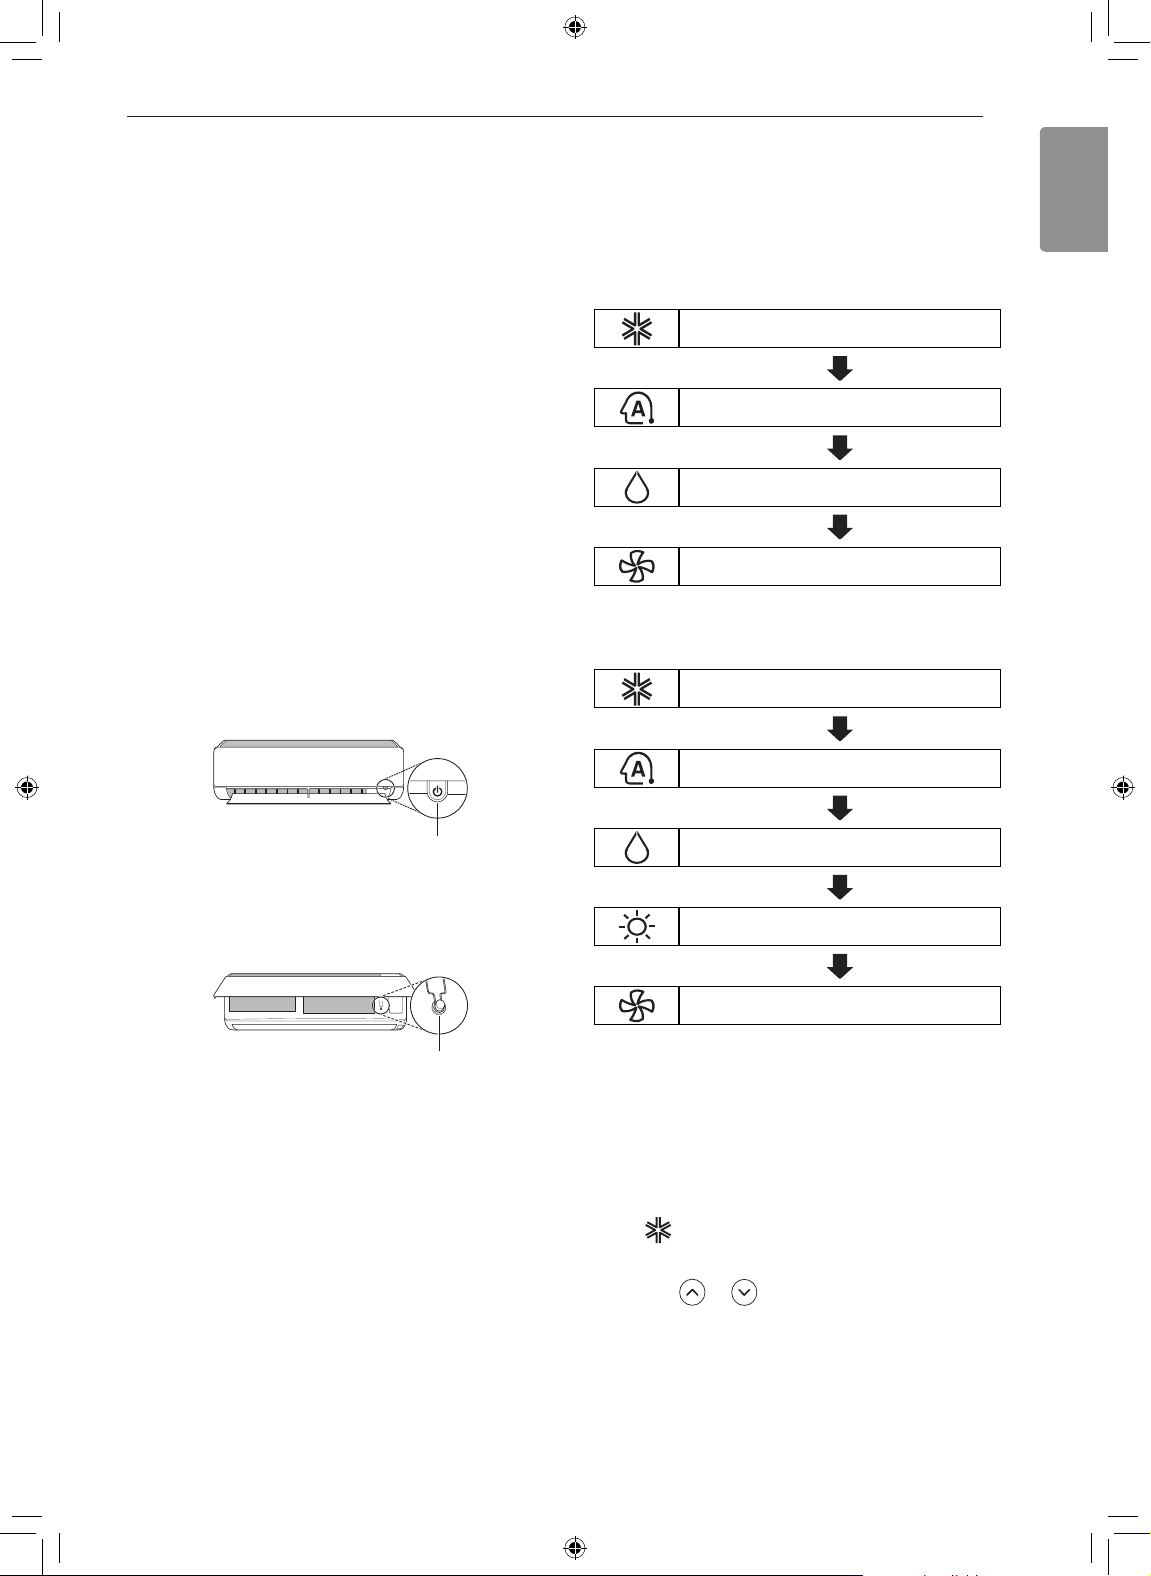
Using the Mode Function
This function allows you to select the desired
function.
Cooling Only Model
Cooling Mode
Auto Operation(AI) Mode
Dehumidification Mode
Fan Mode
Cooling & Heating Model
Cooling Mode
ON/OFF
Type2
NOTE
• The feature may be changed according to the type
of model.
• If you press and hold the ON/OFF button for 3 – 5
seconds, instead of 6 seconds, the unit will switch
to the test operation. In the test operation, the unit
blows out strong cooling air for 18 minutes and
then returns to factory default settings.
Auto Changeover Mode
Dehumidification Mode
Heating Mode
Fan Mode
Cooling Mode
Turn the appliance on.
1
Press MODE button repeatedly to select the
2
Cooling Mode.
is displayed on the display screen.
•
Press or button to set the desired
3
temperature.
Page 14
14 OPERATION
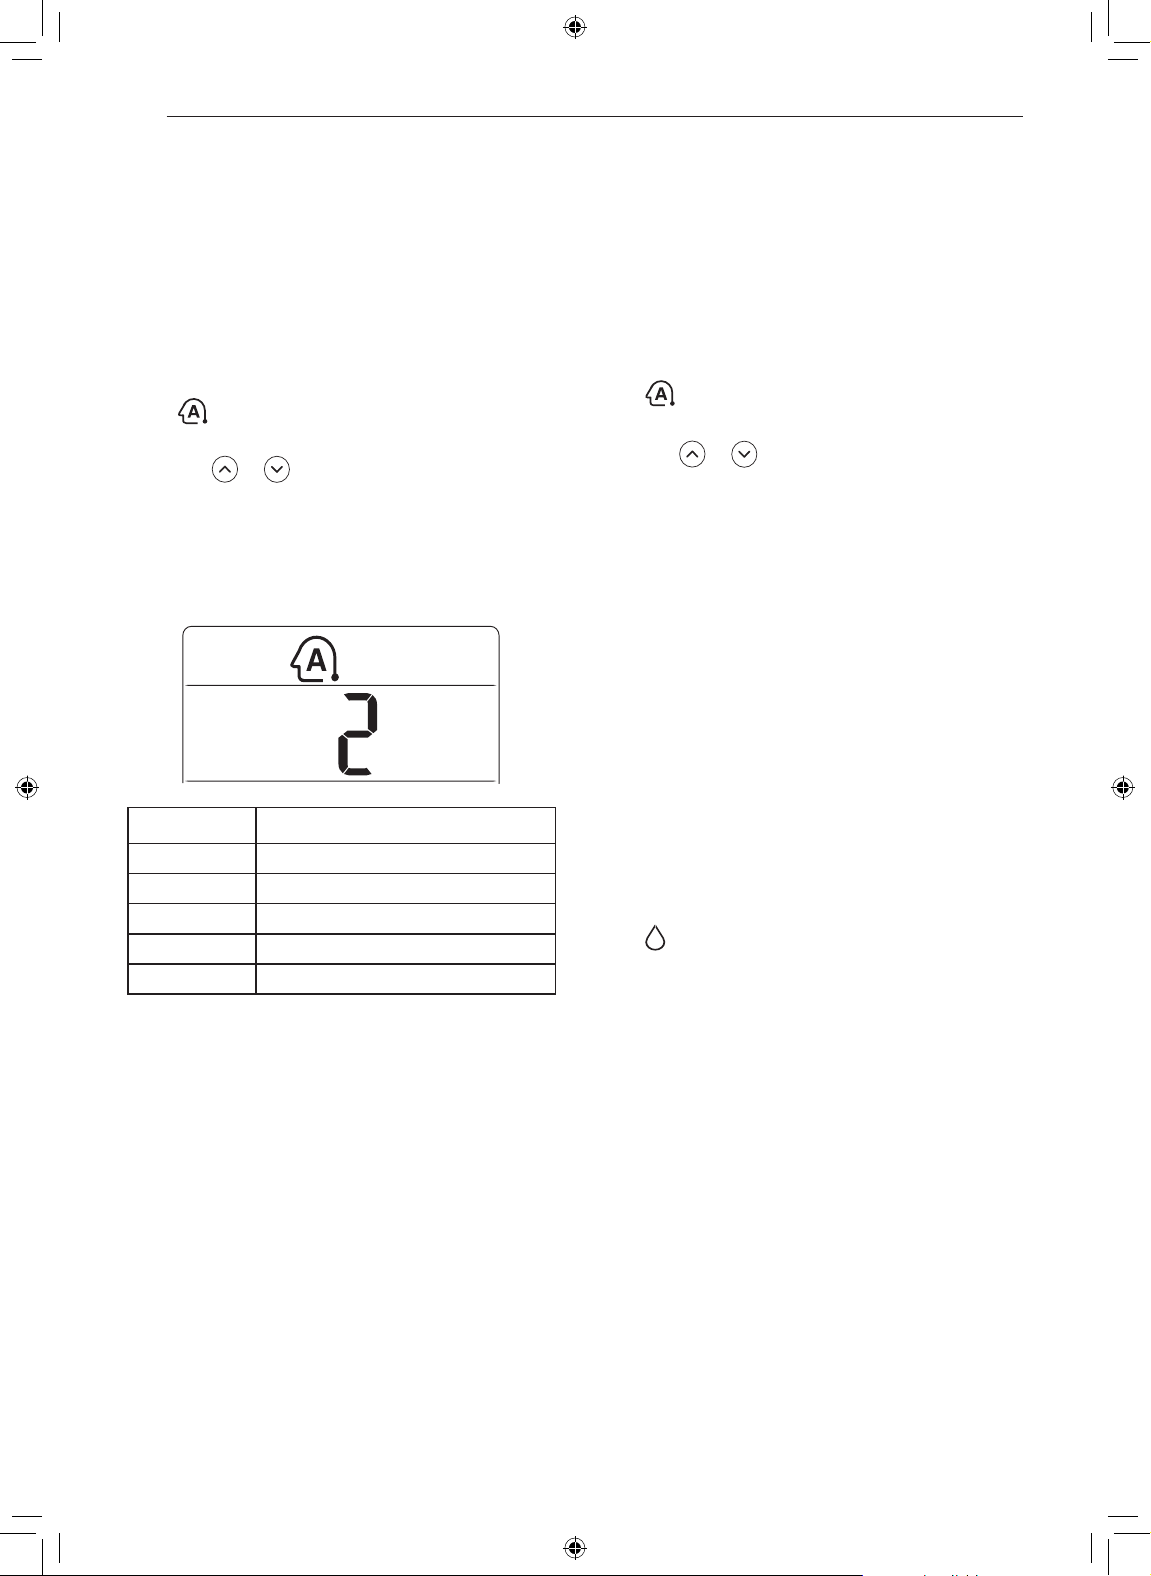
Auto Operation (Artificial
Intelligence)
Cooling Only Model
This mode automatically sets the fan speed and
temperature depending on the room temperature.
Turn the appliance on.
1
Press MODE button repeatedly to select the Auto
2
Operation.
•
is displayed on the display screen.
Press or button to select the desired
3
operation code if the temperature is higher or
lower than the desired temperature.
Code Description
2 Cold
1 A little cold
0 Maintain room temperature
-1 A little hot
-2 Hot
Auto Changeover Mode
Cooling & Heating Model
This mode changes the mode automatically to
maintain the set temperature at ±2 °C
Turn the appliance on.
1
Press MODE button repeatedly to select the Auto
2
Changeover Mode.
is displayed on the display screen.
•
Press or button to set the desired
3
temperature.
Press FAN SPEED button to adjust the fan
4
speed.
Dehumidification Mode
This mode removes excess moisture from a highly
humid environment or during the rainy season,
in order to prevent mildew from setting in. This
mode adjusts the room temperature and the fan
speed automatically to maintain the optimal level of
humidity.
Turn the appliance on.
1
Press MODE button repeatedly to select the
2
Dehumidification Mode.
is displayed on the display screen.
•
NOTE
• In this mode, you cannot adjust the fan speed, but
you can set the air deflector to rotate automatically.
NOTE
• In this mode you cannot adjust the room
temperature, it is adjusted automatically.
• The room temperature is not displayed on the
display screen.
• In the dehumidification mode, compressor
and indoor fan will not operate when the room
temperature is below 24 °C
Page 15
15OPERATION
ENGLISH
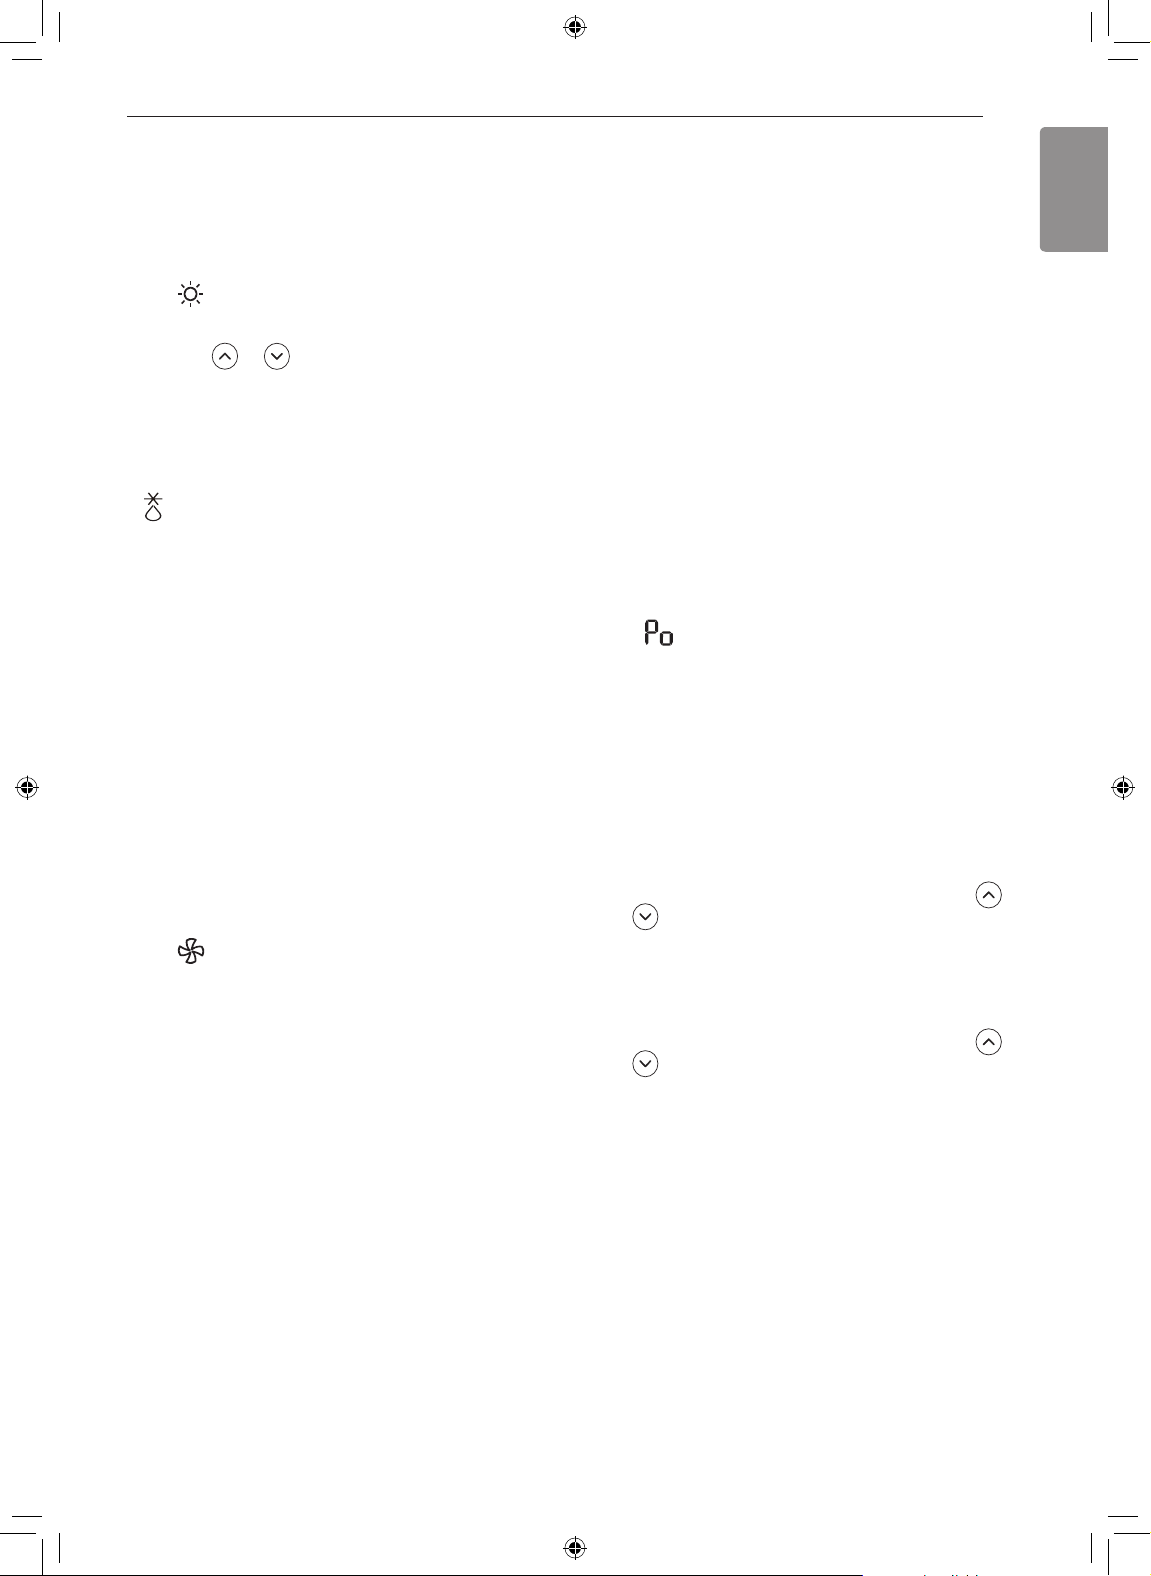
Heating Mode
Turn the appliance on.
1
Press MODE button repeatedly to select the
2
Heating Mode.
is displayed on the display screen.
•
Press or button to set the desired
3
temperature.
NOTE
•
will be displayed on the indoor unit when
defrosting is operating.
• Furthermore, this indication will be displayed on the
indoor unit:
− When preheating is operating.
− When the room temperature has been reached
to the set temperature.
Using the Jet Mode Function
Changing Room Temperature
Quickly
This function allows you to cool indoor air quickly
during the summer or warm it quickly during winter.
• Cooling & Heating model : The Jet Mode
function is available with Cooling, Heating and
Dehumidification Mode.
• Cooling Only model : The Jet Mode function is
available with Cooling, Dehumidification, Fan, Auto
Operation Mode and Air Purification function.
Turn the appliance on.
1
Press MODE button repeatedly to select the
2
desired mode.
Press JET MODE button.
3
is displayed on the display screen.
•
Fan Mode
This mode only circulates the indoor air without
changing the room temperature.
Turn the appliance on.
1
Press MODE button repeatedly to select the Fan
2
Mode.
is displayed on the display screen.
•
Press FAN SPEED button to adjust the fan
3
speed.
NOTE
• Jet Heating Mode is not available on some models.
• In Jet Cooling Mode, strong air blows out for 30
minutes.
• After 30 minutes later, setting temperature is
maintaining 18 °C
If you want to change the temperature, Press
button to set the desired temperature.
or
• In Jet Heating Mode, strong air blows out for 30
minutes.
• After 30 minutes later, setting temperature is
maintaining 30 °C
If you want to change the temperature, Press
button to set the desired temperature.
or
• This function may operate differently from the
remote control display.
Page 16
16 OPERATION
→ →
→ → → →
SWING
SWING
SWING
SWING
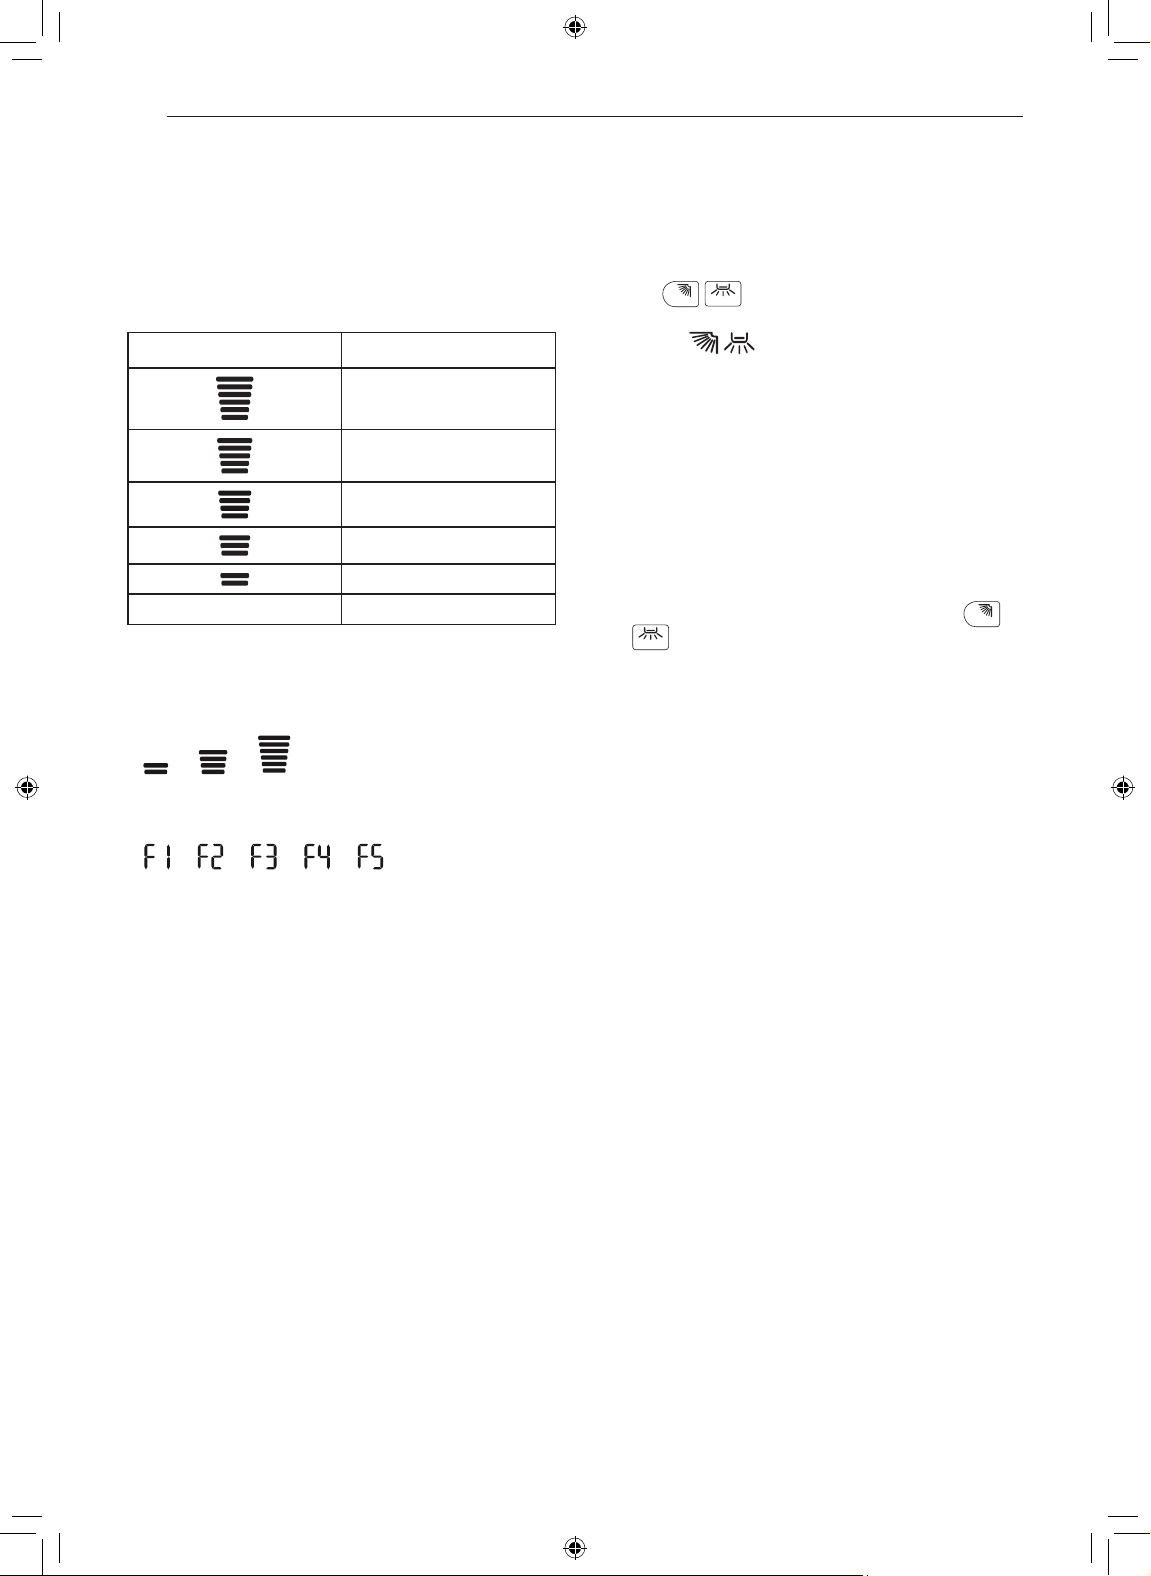
Using the Fan Speed
Function
Adjusting the Fan Speed
• Press FAN SPEED button repeatedly to adjust the
fan speed.
Display Screen Speed
High
Medium - High
Medium
Medium - Low
Low
- Natural Wind
NOTE
• The fan speed of Natural Wind adjusts
automatically.
Using the Air Flow Direction
Function
This function adjusts the direction of the air flow
vertically (horizontally).
(
• Press
desired direction.
− Select
flow automatically.
NOTE
• Adjusting the air flow direction horizontally may not
be supported, depending on the model.
• Adjusting the air deflector arbitrarily may cause
product failure.
• If you restart the air conditioner, it starts to operate
with the previously set direction of air flow, so the
air deflector may not match the icon displayed on
the remote control. When this occurs, press
button to adjust the direction of the air flow
or
again.
• This function may operate differently from the
remote control display.
) button repeatedly and select the
( ) to adjust the direction of the air
• The fan speed icons are displayed on some indoor
units.
• Indoor unit display is displayed only 5 seconds and
return to the setting temperature on some models.
Page 17
17OPERATION
ENGLISH
TIMER
TIMER
TIMER
TIMER
CANCEL
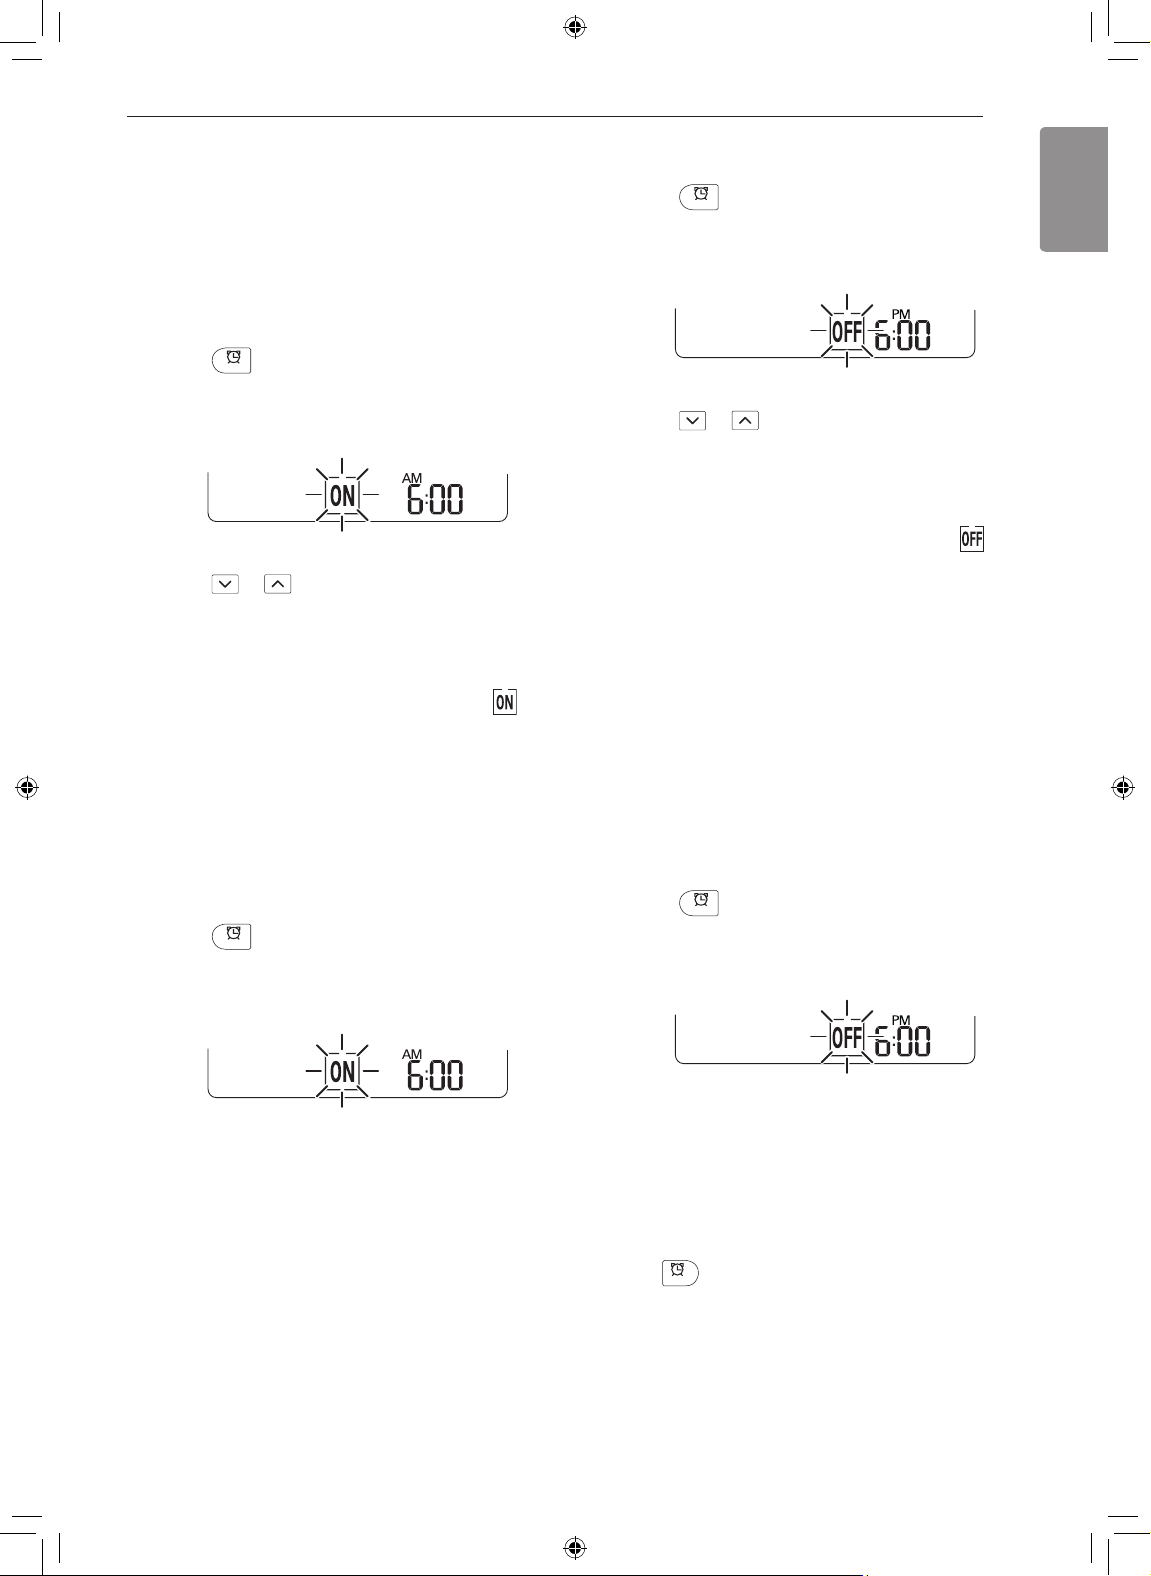
Setting the On/Off Timer
This function sets the air conditioner to turn on/off
automatically at desired time.
On/Off Timer can be set together.
Setting the On Timer
Press
1
• The icon below blinks at the bottom of the
display screen.
Press or button to select the minutes.
2
Press SET/CANCEL button to finish.
3
• After setting the timer, current time and
are displayed on the display screen indicating
that the desired time is set.
button repeatedly.
icon
Setting the Off Timer
Press
1
• The icon below blinks at the bottom of the
display screen.
Press or button to select the minutes.
2
Press SET/CANCEL button to finish.
3
• After setting the timer, current time and
are displayed on the display screen indicating
that the desired time is set.
NOTE
• This function is disabled when you set Simple
Timer.
button repeatedly.
icon
Canceling the On Timer
Press
1
• The icon below blinks at the bottom of the
display screen.
Press SET/CANCEL button to cancel the setting.
2
button repeatedly.
Canceling the Off Timer
Press
1
• The icon below blinks at the bottom of the
display screen.
Press SET/CANCEL button to cancel the setting.
2
button repeatedly.
Canceling the Timer Setting
• Press
button to cancel all timer settings.
Page 18
18 OPERATION
TIMER
TIMER
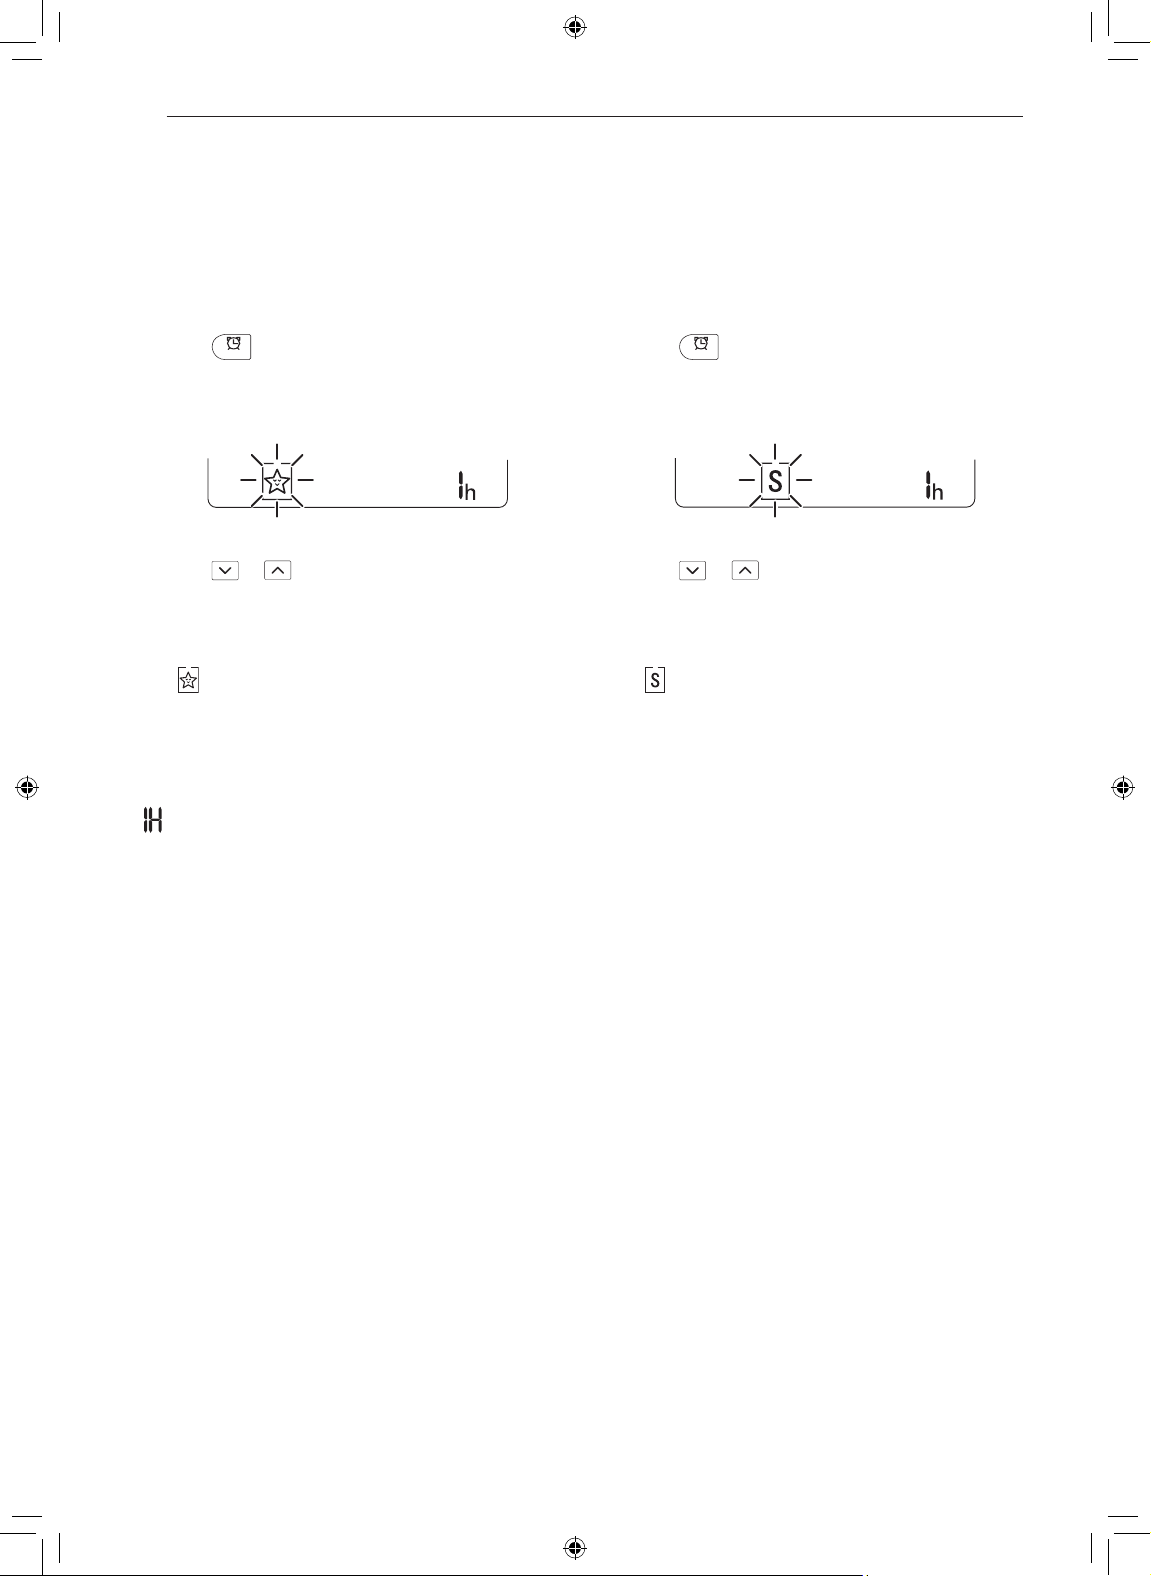
Using the Sleep Function
(Optional)
This function turns off the air conditioner
automatically when you go to sleep.
Turn the appliance on.
1
Press
2
• The icon below blinks at the bottom of the
display screen.
Press or button to select the hour (up to
3
7 hours).
Press SET/CANCEL button to finish.
4
•
button repeatedly.
is displayed on the display screen.
Using the Simple Timer
Function (Optional)
This function turns off the air conditioner
automatically when you go to sleep.
Turn the appliance on.
1
Press
2
• The icon below blinks at the bottom of the
display screen.
Press or button to select the hour (up to
3
7 hours).
Press SET/CANCEL button to finish.
4
•
button repeatedly.
is displayed on the display screen.
NOTE
•
is displayed on some indoor units.
• Indoor unit display is displayed from 1H to 7H
which is displayed only 5 seconds and then return
to the setting temperature.
• In the Cooling and Dehumidification Mode, the
temperature increases by 1 °C after 30 minutes
and additional 1 °C after another 30 minutes for a
more comfortable sleep.
• The temperature increases up to 2 °C from the
preset temperature.
• Although the remark for fan speed on the display
screen may be changed, the fan speed is adjusted
automatically.
NOTE
• This function is disabled when you set Off Timer.
Page 19
19OPERATION
ENGLISH
kW [3 s]
kW
kWh
kW [3 s]
kW
kWh
SWING
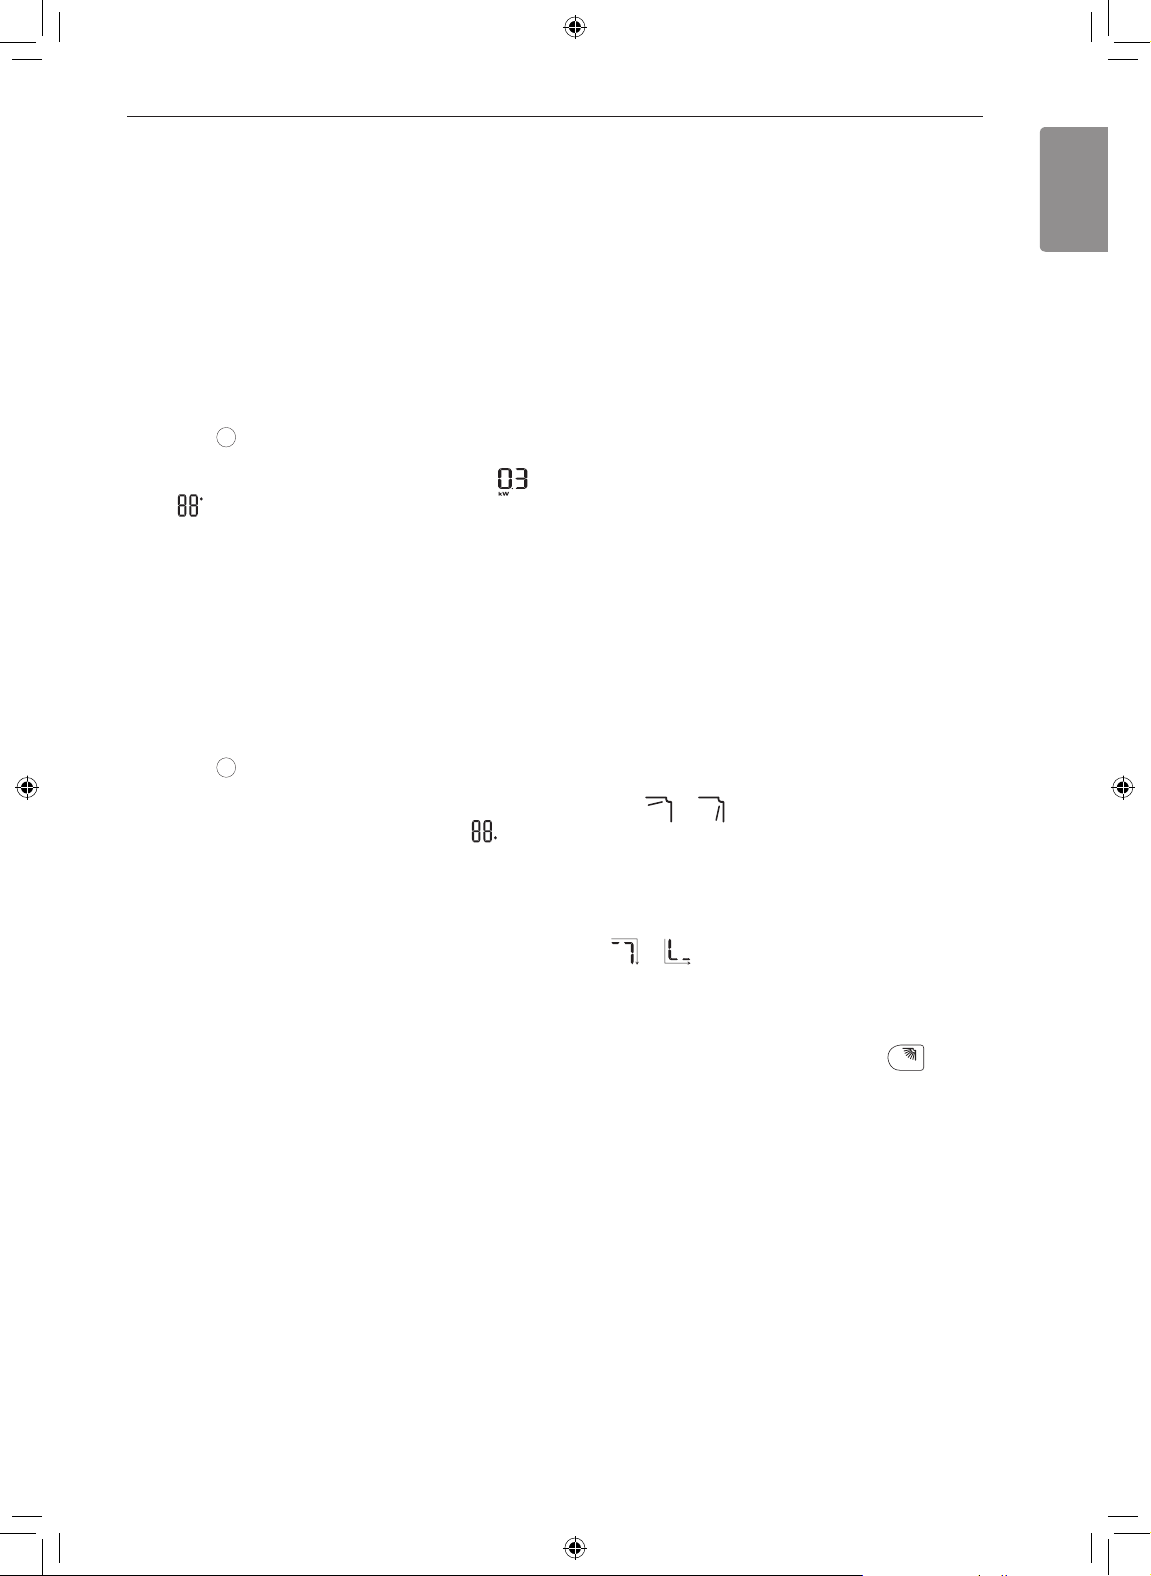
Using the Energy Display
Function (Optional)
This function displays the amount of electricity
generated on the indoor display as the product
operates.
Display the Current Energy Usage
Turn the appliance on.
1
Press
2
• The instantaneous power consumption (
units.
Display the Cumulative Energy
Usage (Optional)
Turn the appliance on.
1
Press
2
twice.
• The cumulative power consumption (
displayed for a while on some indoor units.
button and hold it about 3 seconds.
) is displayed for a while on some indoor
button and hold it about 3 seconds
) is
or
Using the Light Off Function
(Optional)
Display Screen Brightness
You can set the brightness of the indoor unit display
screen.
• Press LIGHT OFF button.
NOTE
• Turn on/off the Display screen.
Using the Comfort Air
Function (Optional)
Comfort Vane Operation
This function conveniently sets the vane to a preset
position to deflect the supply air away from blowing
directly onto the occupants in the room.
Turn the appliance on.
1
Press COMFORT AIR button repeatedly and
2
select the desired direction.
or is displayed on the display screen.
•
NOTE
• It is not displayed on the wireless remote control.
• kW refers to instantaneous power consumption.
• kWh refers to cumulative power consumption.
• If it is more than 99 kWh, which is the range of
expression, maintain it as 99 kWh.
• Power off resets its value.
• Display wattage under 10 kW(h) with 0.1 kW(h)
unit, and display one over 10 kW(h) with 1 kW(h)
unit.
• The actual power may differ from the power
displayed.
NOTE
•
or is displayed on some indoor units.
• This function is disabled when you press MODE or
JET MODE button.
• This function is disabled and auto swing of vertical
direction is set up when you press
• When this function is off, the horizontal vane
operates automatically depending on the set mode.
button.
Page 20
20 OPERATION
Using the Energy Saving
Function (Optional)
This function minimizes power consumption during
Cooling and increases the set temperature to the
optimal level for a more comfortable environment.
The temperature automatically settles at 22 °C if
desired temperature is below 22 °C The temperature
remains constant if it is above 22 °C
Turn the appliance on.
1
Press MODE button repeatedly to select the
2
Cooling Mode.
Press ENERGY SAVING button.
3
•
is displayed on the display screen.
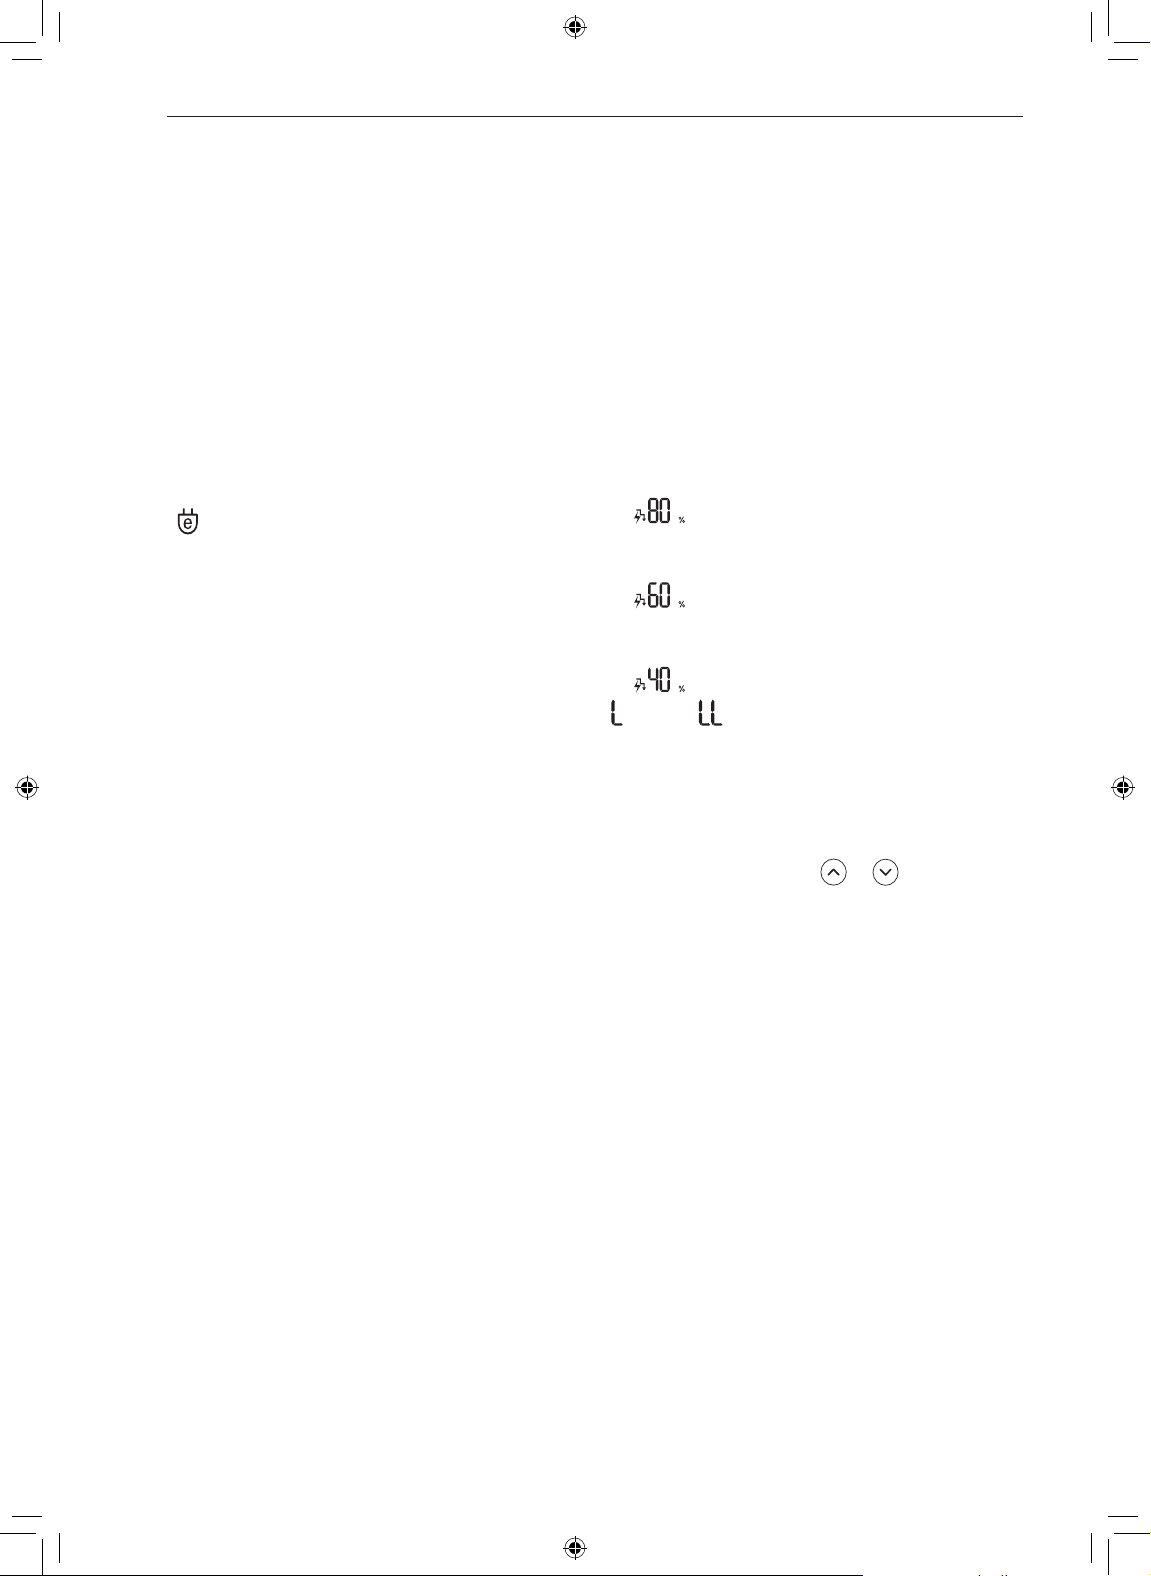
Using the Energy Control
Function (Optional)
Turn the appliance on.
1
Press ENERGY CTRL button.
2
• Press ENERGY CTRL button repeatedly to
select each step.
NOTE
• 1 step : The power Input is decreased by 20 %
compared to rated power input.
−
• 2 step : The power Input is decreased by 40 %
compared to rated power input.
−
• 3 step (Optional) : The power Input is decreased by
60 % compared to rated power input.
−
•
(1 step), (2 step) is displayed on some indoor
units.
• This function is available with Cooling Mode.
• Capacity may decrease when Energy Control mode
is selected.
• Desired temperature is displayed about 5 seconds
if you press FAN SPEED,
• Room temperature is displayed about 5 seconds if
you press ROOM TEMP button.
is displayed on the display screen.
is displayed on the display screen.
is displayed on the display screen.
or button.
Page 21
ENGLISH
Using Special Functions
Turn the appliance on.
1
Press FUNC button repeatedly to select the
2
desired function.
Press SET/CANCEL button to finish.
3
Display
Screen
21OPERATION
Description
The Ion generator uses millions
of ions to help improve indoor air
quality.
To reduce noise from outdoor units.
To keep your skin moisturized by
generating ion clusters.
NOTE
• Some functions may not be supported, depending
on the model.
• Some functions may operate differently from the
remote control display.
To lower indoor humidity quickly.
To maintain a minimum room
temperature and prevent objects in
the room from freezing.
To scare away a mosquito.
To remove moisture generated
inside the indoor unit.
To make a comfortable sleeping
environment.
Page 22
22 OPERATION
Canceling Special Functions
Press FUNC button repeatedly to select the
1
desired function.
Press SET/CANCEL button to cancel the
2
function.
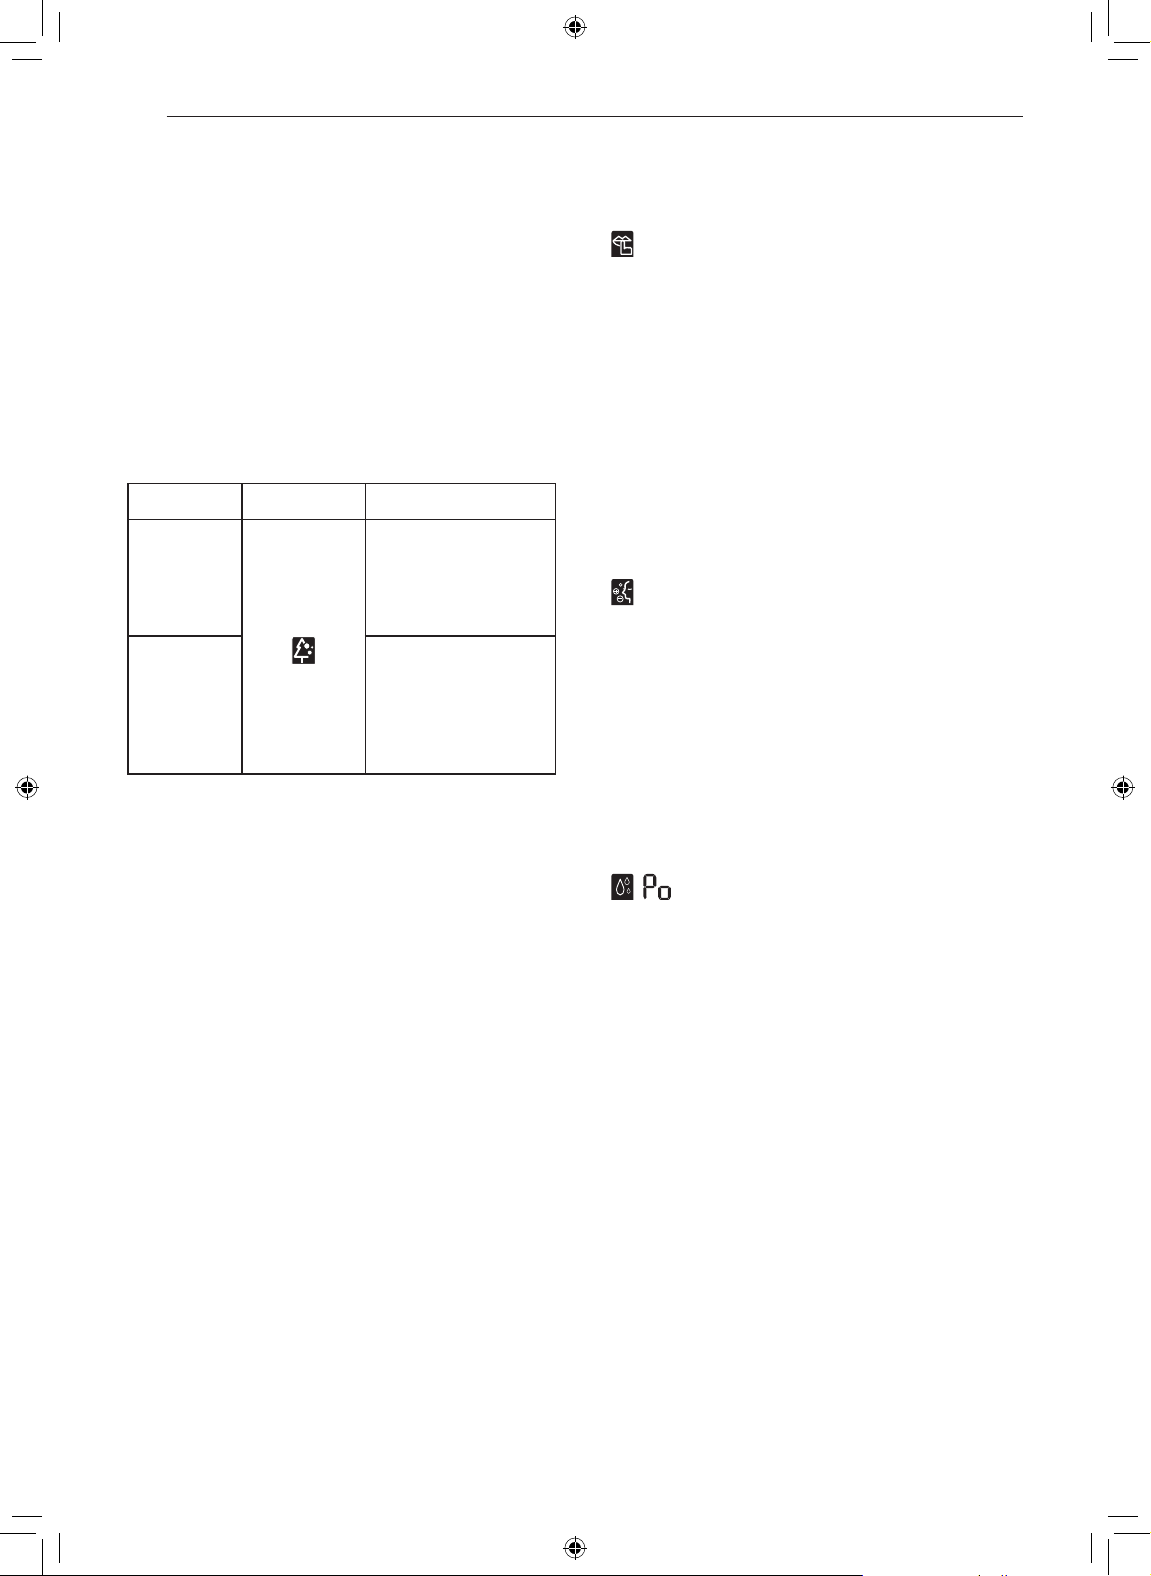
Using the Air Purification Function
These functions supply clean and fresh air by ion
particles and the filter.
Function Display Description
Ion particles from
Ionizer sterilize
Ionizer
Plasma
the aerial bacteria
and other harmful
substances.
It removes
microscopic
contaminants
from the intake air
completely to supply
clean and fresh air.
Using the Silent Function
This function prevents potential claims by neighbors,
reducing noise from outdoor units.
is displayed on the display screen.
•
NOTE
• This function is disabled when you press MODE or
ENERGY CTRL or JET MODE button.
• This function is available with Cooling, Heating,
Auto Changeover, Auto Operation Mode.
Using the Ion Care Function
This function keeps your skin moisturized by
generating ion clusters which is absorbed into the
surface of skin.
is displayed on the display screen about 3
•
seconds.
NOTE
• This function is available with Cooling, Fan Mode
and Air Purification function.
NOTE
• You can use this function without turning the air
conditioner on.
• Both the plasma lamp and the cooling lamp light up
while Smoke Away/Plasma is in operation on some
models.
• Do not touch ionizer during operation.
• This function may operate differently from the
remote control display.
Using the Jet Dry Function
This function maximizes the performance of
dehumidification.
, are displayed on the display screen.
•
NOTE
• This function is available with Cooling,
Dehumidification, Auto Operation, Fan Mode and
Air Purification function.
• This function is not available with Sleep function.
• This function is disabled when you press MODE
button.
Page 23
23OPERATION
ENGLISH
SWING
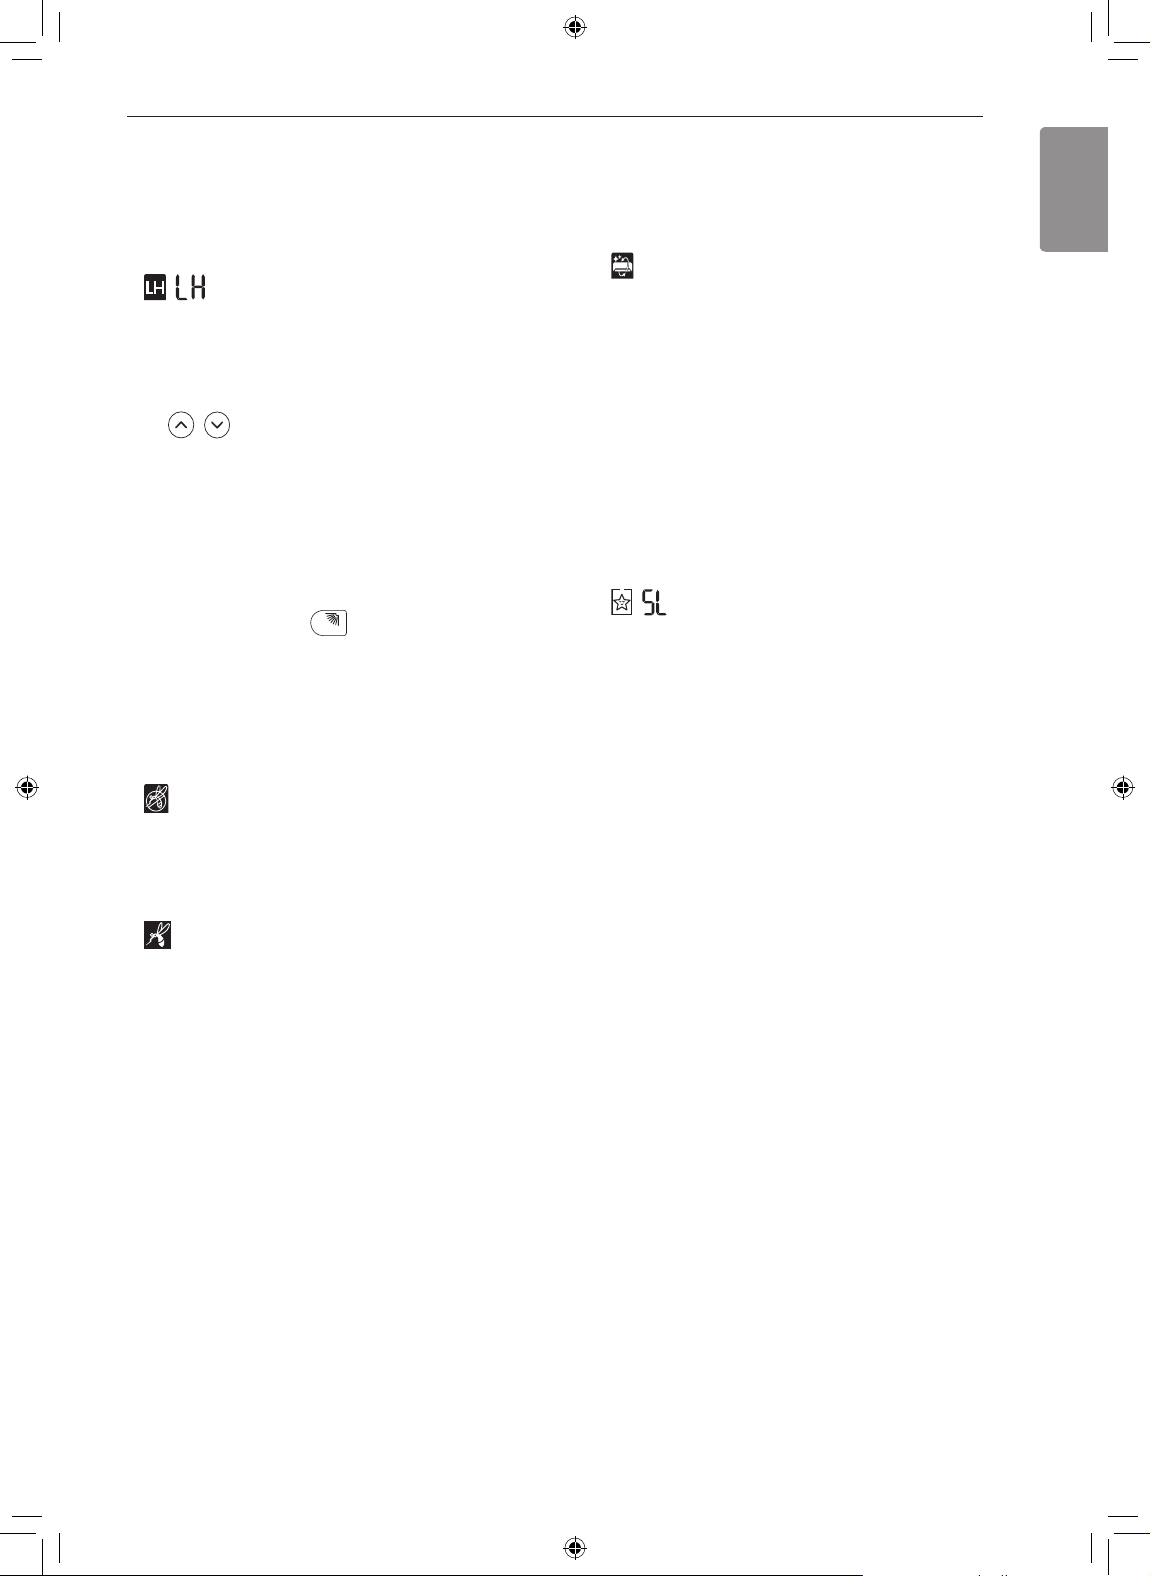
Using the Low Heating Function
This function operates the heating system to maintain
a minimum room temperature and prevent objects in
the room from freezing where there is no permanent
resident, such as a vacation.
, are displayed on the display screen.
•
NOTE
• This function is available with Heating Mode.
• During LH operation, when you press buttons such
as
, , MODE, FAN SPEED, and then return
to Heating Mode, 30 °C high speed.
• If JET MODE button is pressed during LH
operation, this function is disabled and Power
Heating Mode is operated immediately. (only for
power heating model)
• In case an error occurred, operation can be
interrupted for the protection of the product.
• COMFORT AIR and
while the LH function is in operation.
button cannot be used
Using the Mosquito Away Function
This function fans away mosquitos by generating a
high-frequency wave.
is displayed on the display screen.
•
NOTE
• You can use this function without turning the air
conditioner on.
Using the Auto Clean Function
In the Cooling and Dehumidification Mode, moisture
is generated inside the indoor unit. This function
removes such moisture.
is displayed on the display screen.
•
NOTE
• Some functions cannot be used while the Auto
Clean function is in operation.
• If you turn off the unit, the fan continues to run for
30 minutes and cleans the inside of the indoor unit.
Using the Comfort Sleep Function
This function operates the air conditioner
automatically to make the comfortable sleep
environment.
, are displayed on the display screen.
•
NOTE
• This function is available with Cooling Mode.
• The vane stops swing and sets indirect airflow
angle, after 30 minutes from start even though
the room temperature doesn’t decrease to optimal
temperature to sleep.
• It is possible that a comfortable sleep environment
is different according to the people.
is displayed on some indoor units.
•
Page 24
24 SMART FUNCTIONS
SMART FUNCTIONS
Using LG SmartThinQ
Application
Things to check before using LG
SmartThinQ
• For appliances with the logo
Check the distance between the appliance and
1
the wireless router (Wi-Fi network).
• If the distance between the appliance and the
wireless router is too far, the signal strength
becomes weak. It may take a long time to
register or installation may fail.
Turn off the Mobile data or Cellular Data on
2
your smartphone.
• For iPhones, turn data off by going to Settings
→ Cellular → Cellular Data.
Connect your smartphone to the wireless router.
3
NOTE
• To verify the Wi-Fi connection, check that Wi-Fi
icon on the control panel is lit.
• The appliance supports 2.4 GHz Wi-Fi networks
only. To check your network frequency, contact your
Internet service provider or refer to your wireless
router manual.
• LG SmartThinQ is not responsible for any network
connection problems or any faults, malfunctions, or
errors caused by network connection.
• If the appliance is having trouble connecting to the
Wi-Fi network, it may be too far from the router.
Purchase a Wi-Fi repeater (range extender) to
improve the Wi-Fi signal strength.
• The Wi-Fi connection may not connect or may
be interrupted because of the home network
environment.
• The network connection may not work properly
depending on the Internet service provider.
• The surrounding wireless environment can make
the wireless network service run slowly.
• The appliance cannot be registered due to
problems with the wireless signal transmission.
Unplug the appliance and wait about a minute
before trying again.
• If the firewall on your wireless router is enabled,
disable the firewall or add an exception to it.
• The wireless network name (SSID) should be a
combination of English letters and numbers. (Do
not use special characters.)
• Smartphone user interface (UI) may vary
depending on the mobile operating system (OS)
and the manufacturer.
• If the security protocol of the router is set to
WEP, you may fail to set up the network. Please
change it to other security protocols (WPA2 is
recommended) and register the product again.
Page 25
25SMART FUNCTIONS
ENGLISH
Installing LG SmartThinQ
Search for the LG SmartThinQ application from the
Google Play Store or Apple App Store on a smart
phone. Follow instructions to download and install the
application.
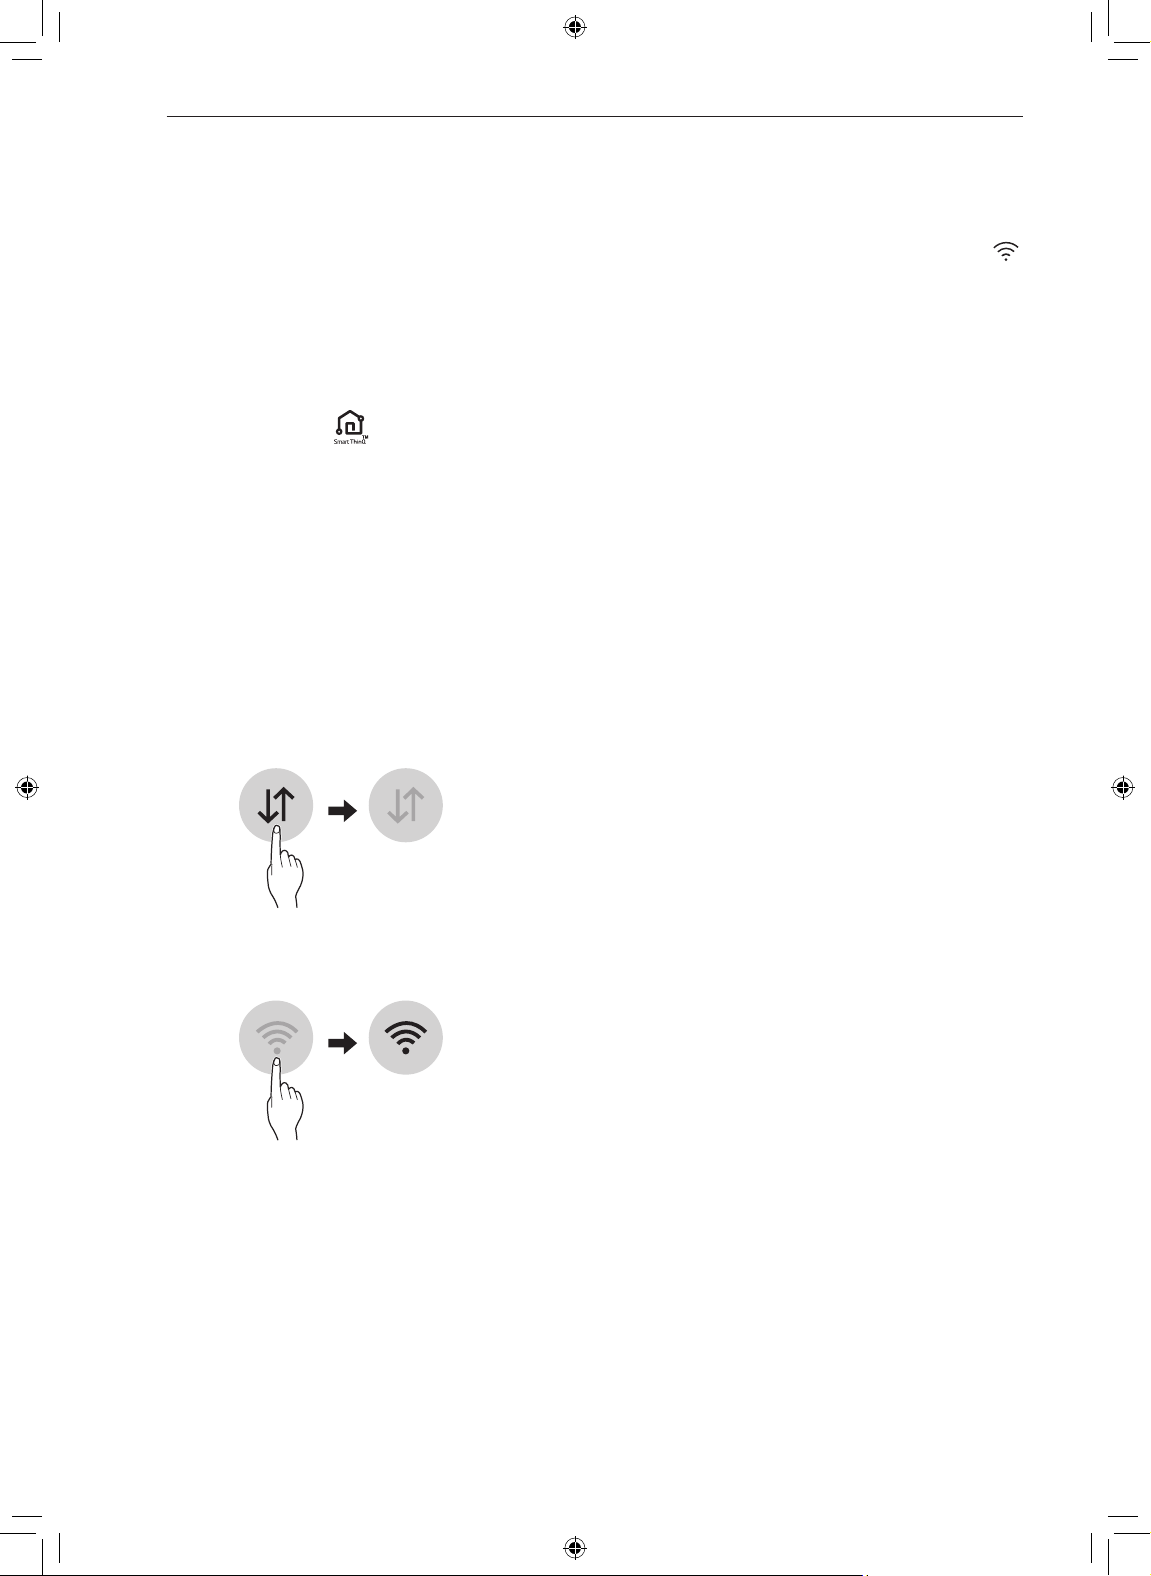
Wi-Fi Function
• For appliances with the logo
Communicate with the appliance from a smart phone
using the convenient smart features.
Smart Diagnosis™
If you use the Smart Diagnosis function, you will be
provided with the useful information such as a correct
way of using the appliance based on the pattern of
use.
Settings
Allows you to set various options on the appliance
and in the application.
NOTE
• If you change your wireless router, Internet service
provider, or password, delete the registered
appliance from the LG SmartThinQ application and
register it again.
• The application is subject to change for appliance
improvement purposes without notice to users.
• Functions may vary by model.
Open Source Software Notice
Information
To obtain the source code under GPL, LGPL, MPL,
and other open source licenses, that is contained in
this product, please visit http://opensource.lge.com.
In addition to the source code, all referred license
terms, warranty disclaimers and copyright notices are
available for download.
LG Electronics will also provide open source code
to you on CD-ROM for a charge covering the cost
of performing such distribution (such as the cost of
media, shipping, and handling) upon email request
to opensource@lge.com. This offer is valid for a
period of three years after our last shipment of this
product. This offer is valid to anyone in receipt of this
information.
Page 26
26 SMART FUNCTIONS
Smart Diagnosis™ Using a Smart
Phone
• For appliances with the or logo
Use this function if you need an accurate diagnosis
by an LG Electronics customer information centre
when the appliance malfunctions or fails.
Smart Diagnosis™ can not be activated unless the
appliance is connected to power. If the appliance is
unable to turn on, then troubleshooting must be done
without using Smart Diagnosis™.
NOTE
• Be sure to keep ambient noise to a minimum or the
phone may not correctly receive the buzzer beeps
from the indoor unit.
Page 27
ENGLISH
MAINTENANCE
WARNING
• Before cleaning or performing maintenance, disconnect the power supply and wait until the fan
stops.
If the air conditioner will not be used for an extended period of time, dry the air conditioner to maintain it in best
condition. Clean the product regularly to maintain optimal performance and to prevent possible breakdown.
• Dry the air conditioner in Fan mode for 3 to 4 hours and disconnect the power. There may be internal damage
if moisture is left in its components.
• Before using the air conditioner again, dry the inner components of the air conditioner in Fan mode for 3 to 4
hours. This will help to remove the odor generated from moisture.
Air Filter
• The feature may be changed according to the type of model.
27MAINTENANCE
Page 28
28 MAINTENANCE
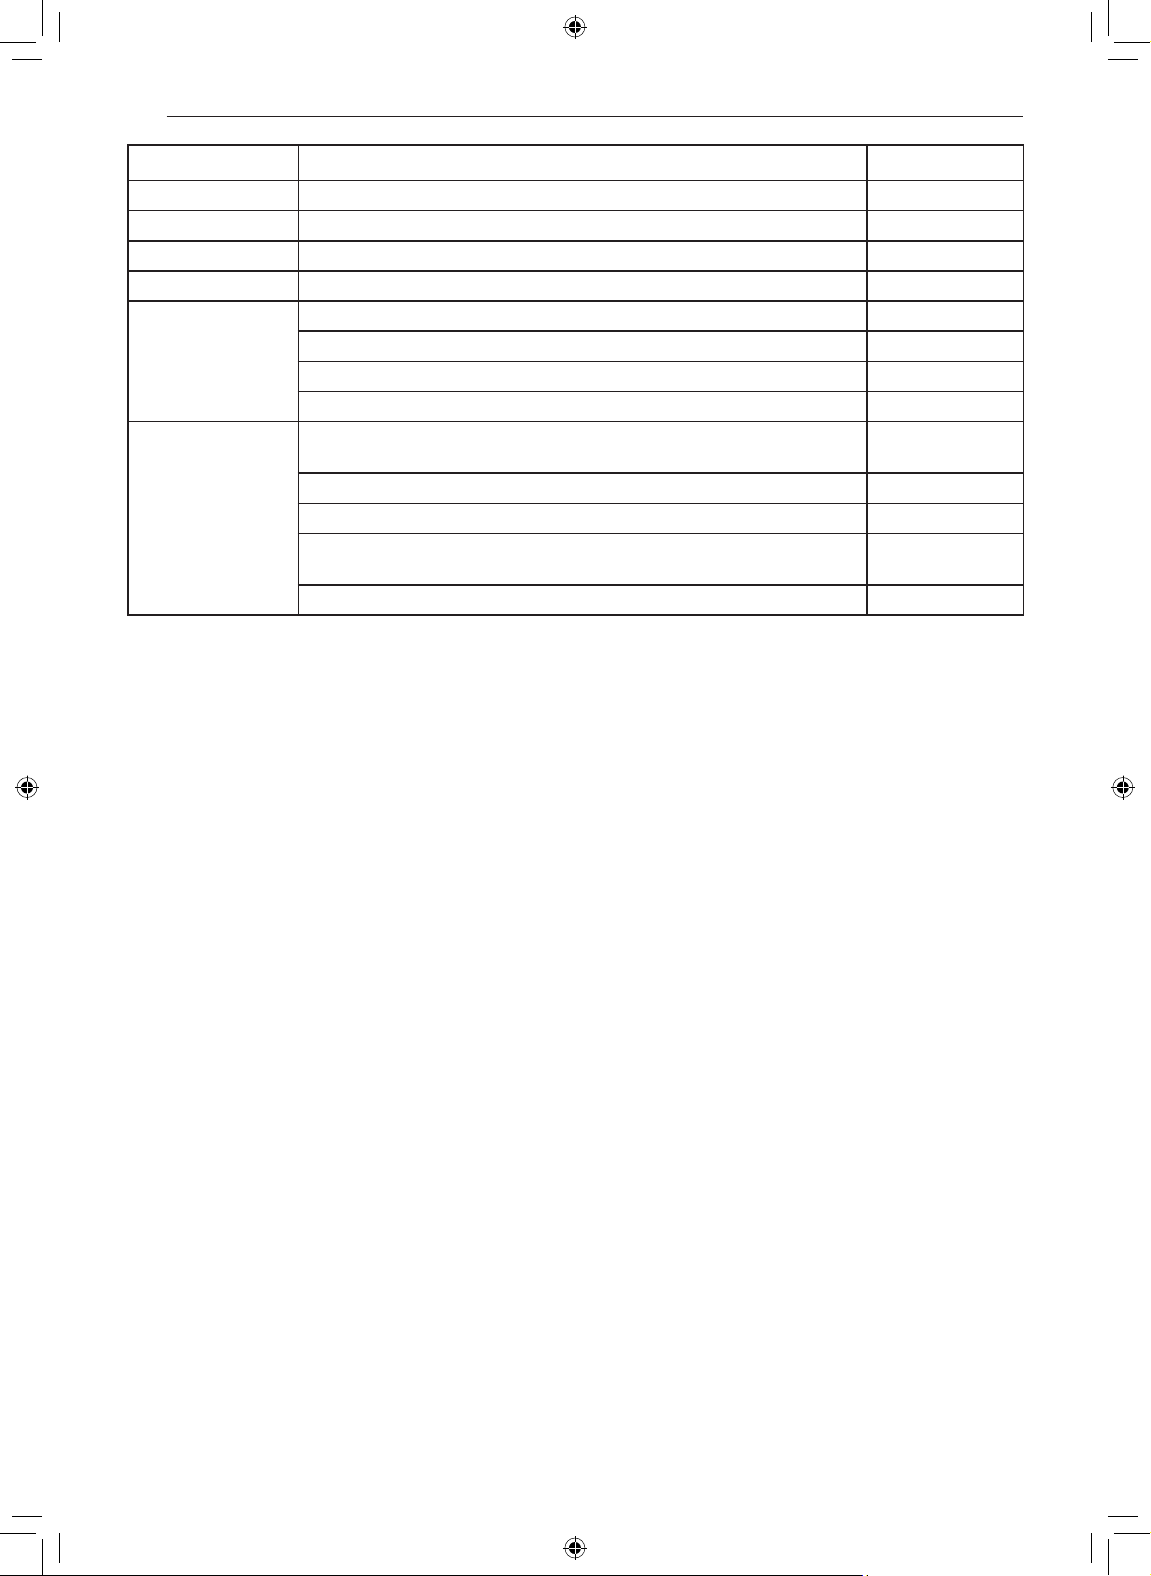
Type Description Interval
Air filter Clean with a vacuum or hand wash. 2 weeks
Triple filter Clean with a vacuum or brush. Every 3 months
Micro dust filter Clean with a vacuum or brush. Every 6 months
Ionizer (Optional) Use dry cotton bud to remove any dust. Every 6 months
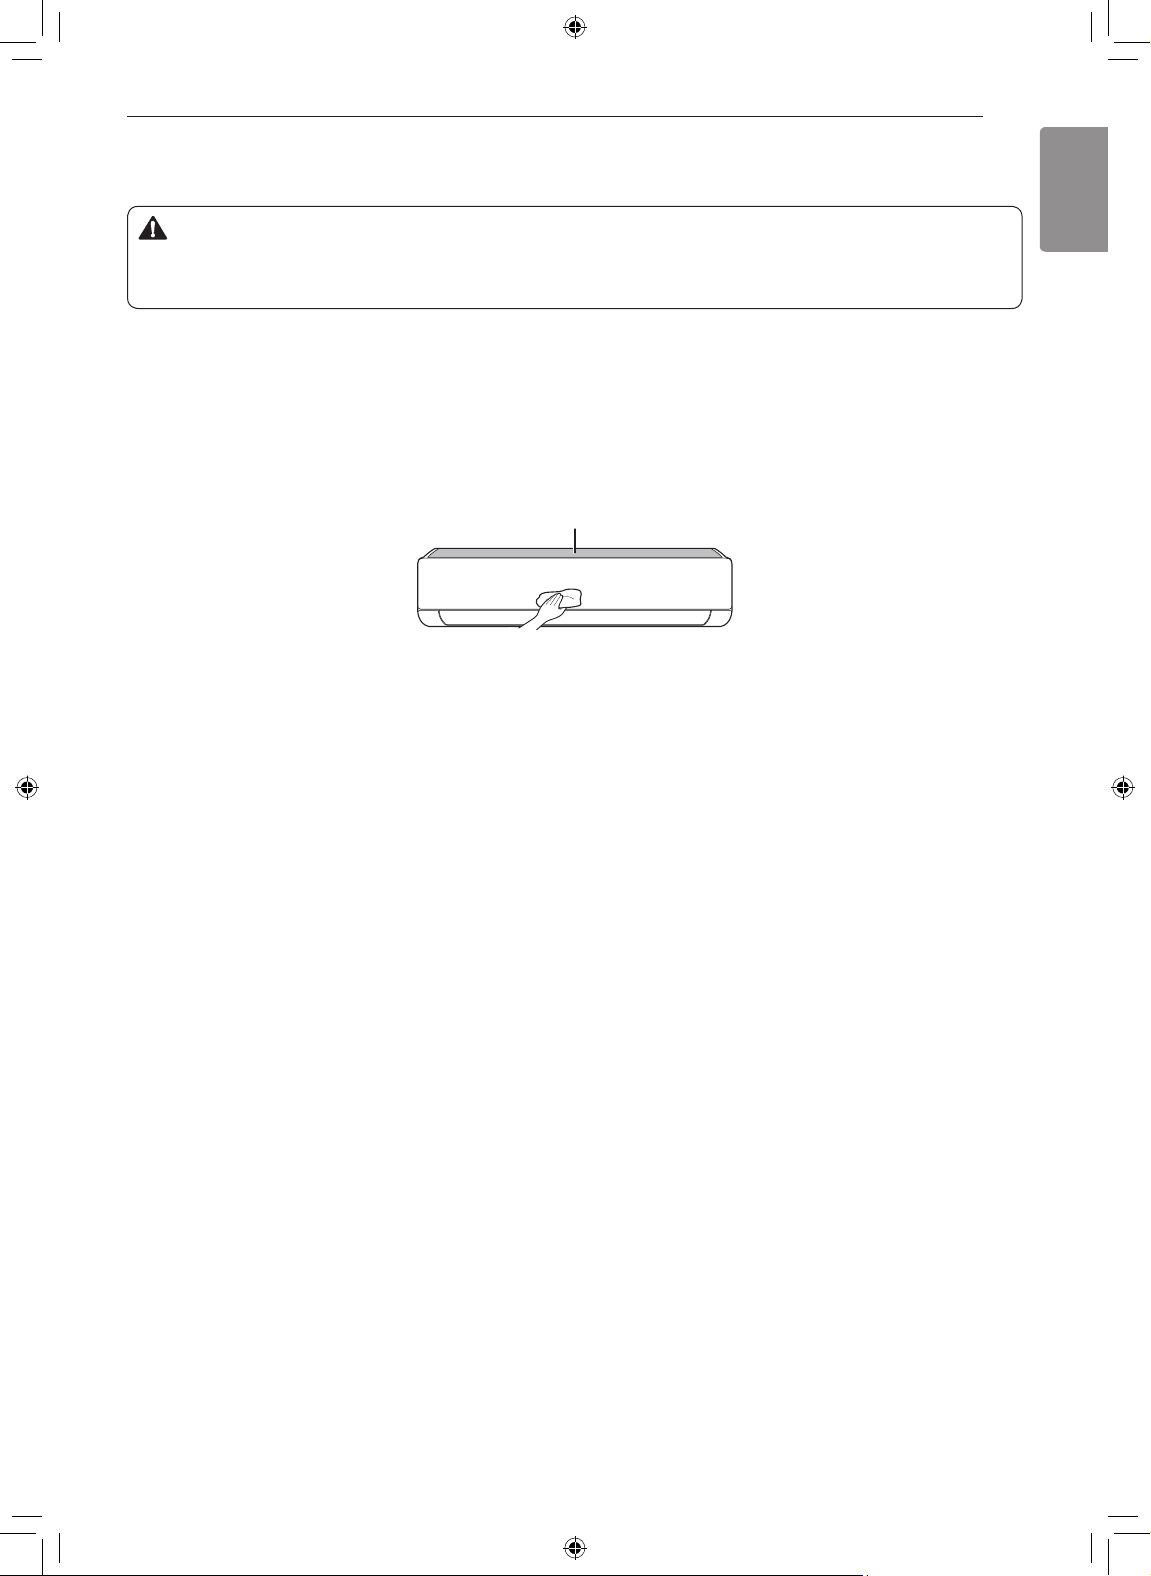
Clean the Indoor unit surface by using a soft, dry cloth. Regularly
Indoor unit
Outdoor unit
NOTE
• Never use water that is higher than 40 °C when you clean the filters. It may cause deformation or
discoloration.
• Never use volatile substances when you clean the filters. They may damage the surface of the product.
• Do not wash the Micro dust filter with water, because the filter can be damaged (Optional).
• Do not wash the Triple filter with water, because the filter can be damaged (Optional).
Have a professional clean the condensate drain pan. Once a year
Have a professional clean the condensate drain pipe. Every 4 months
Replace the remote control batteries. Once a year
Have a professional clean the heat exchanger coils and the panel
vents. (Consult with technician.)
Have a professional clean the fan. Once a year
Have a professional clean the condensate drain pan. Once a year
Have a professional verify that all the fan assembly is firmly
tightened.
Clean the electric components with air. Once a year
Once a year
Once a year
Page 29
29MAINTENANCE
ENGLISH
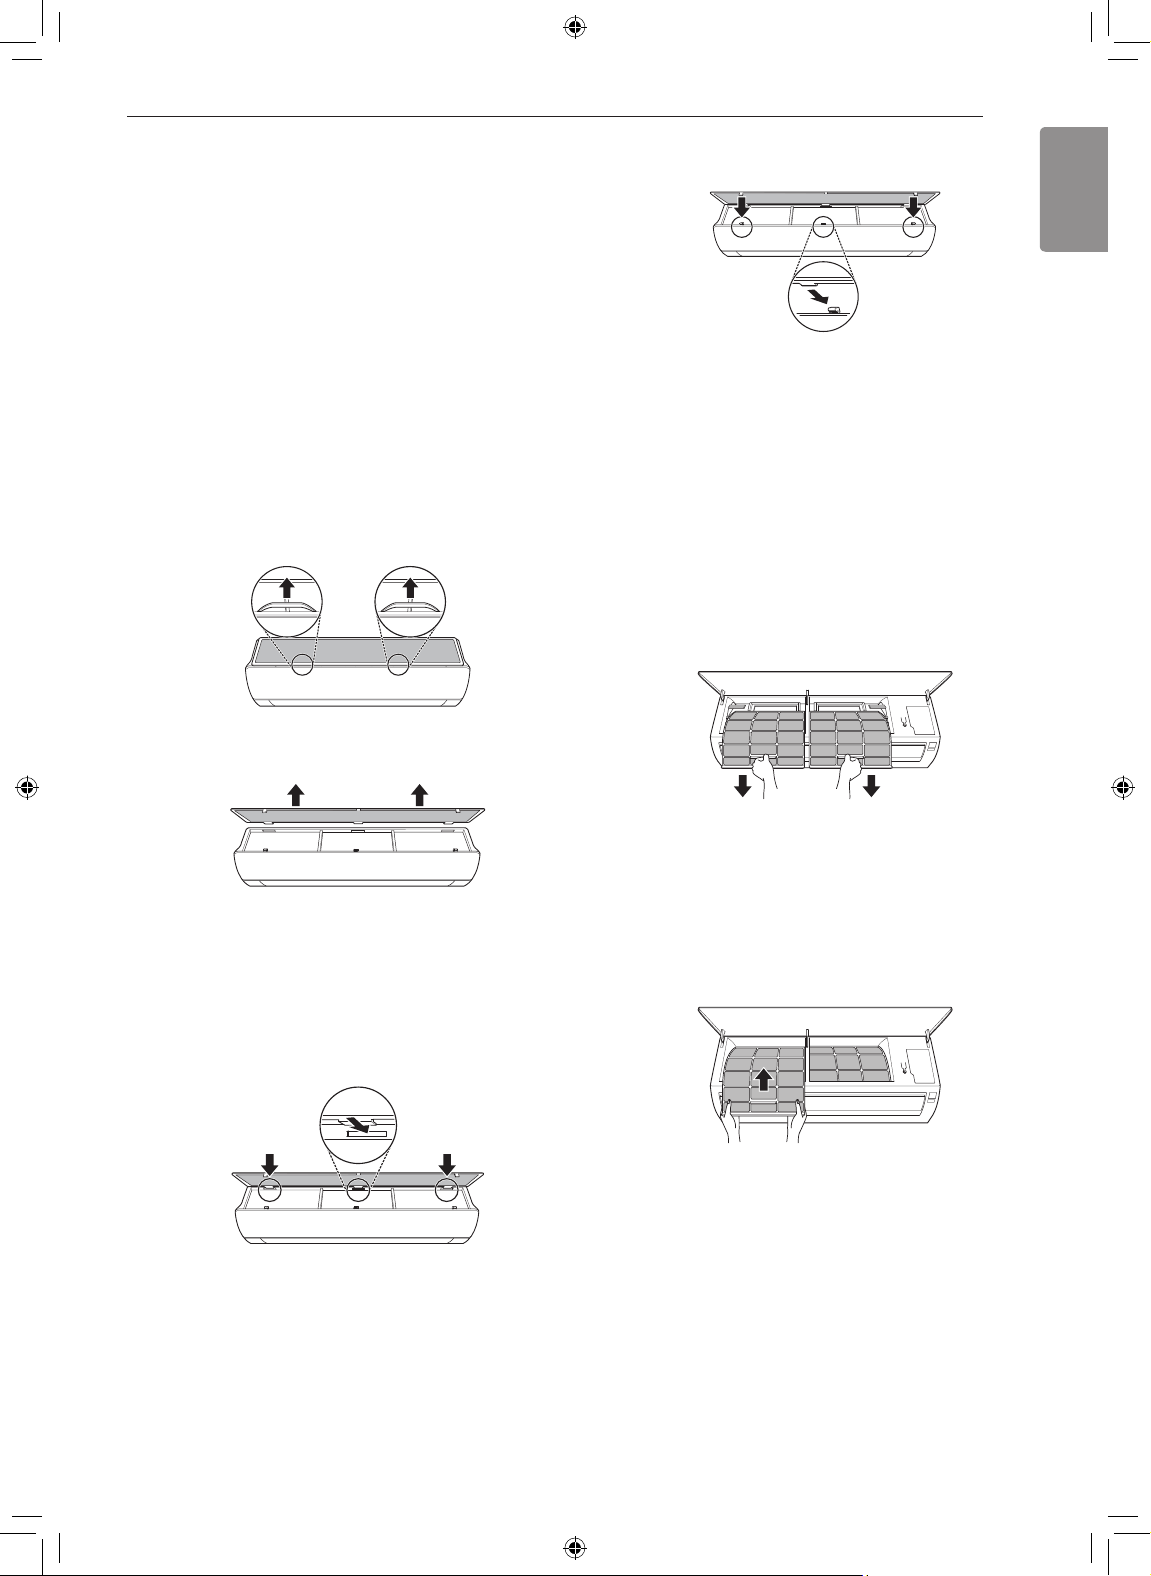
Clean the Air Filter
Clean the air filters once every 2 weeks, or more, if
necessary.
NOTE
• The air filter can be broken when it is bent.
• When the air filter is not assembled correctly, dust
and other substances can enter into the indoor unit.
Type1
If you look at the indoor unit from above it, can
assemble the top filter easily.
Turn off the power to the unit.
1
Hold the knobs of the air filter, lift it up slightly.
2
Push down hooks to assemble the air filter.
7
Check the side of the front cover for correct
8
assembly of the air filter.
Type2
Turn off the power to the unit.
1
Open the front cover.
2
• Lift up both sides of the cover slightly.
Hold the knobs of the air filters, pull them down
3
slightly and remove them from the indoor unit.
Remove it from the indoor unit.
3
Clean the filter with a vacuum cleaner or with
4
lukewarm water with neutral detergent.
Dry the filter in the shade.
5
Insert the hooks of the air filter into the front
6
cover.
Clean the filters with a vacuum cleaner or with
4
lukewarm water with neutral detergent.
Dry the filters in the shade.
5
Insert the hooks of the air filters into the front
6
cover.
Check the side of the front cover for correct
7
assembly of the air filters.
Page 30
30 MAINTENANCE
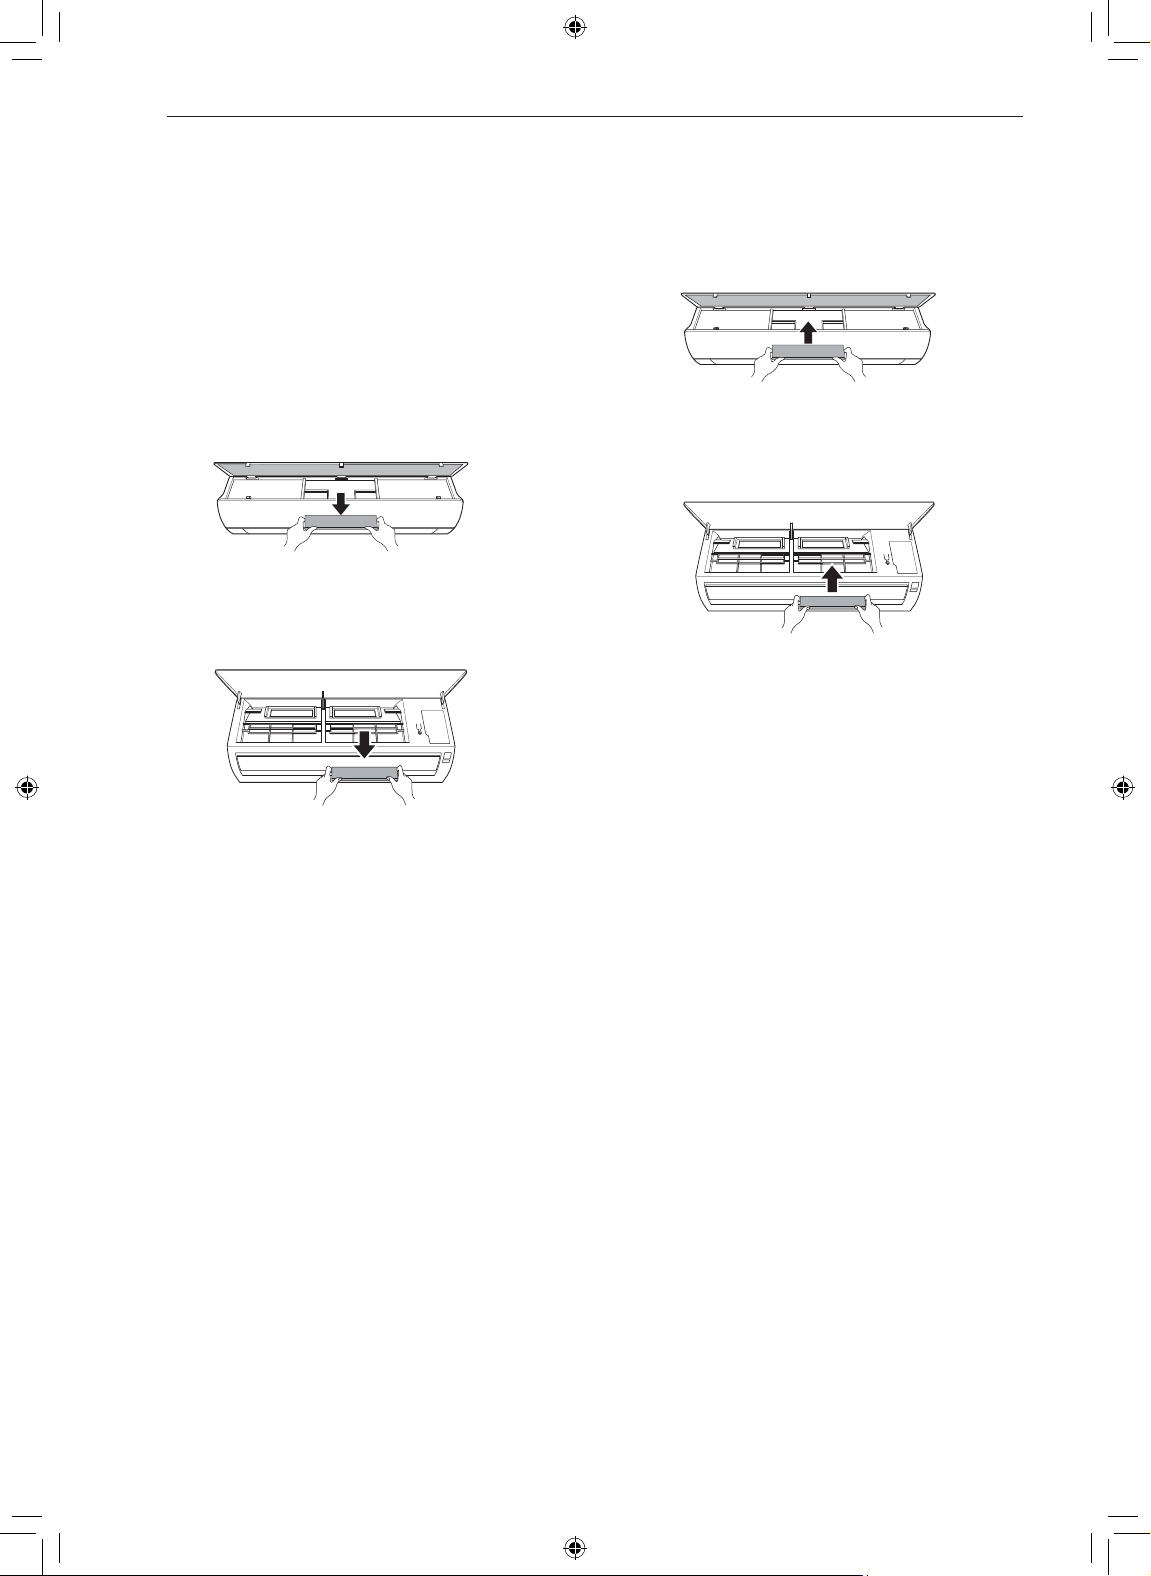
Clean the Micro Dust and
Triple Filter (Optional)
Turn off the power to the unit.
1
Remove the air filters from the indoor unit.
2
Remove the Micro dust and Triple filter from the
3
indoor unit.
Type1
Type2
Insert the Micro dust and Triple filter.
5
Type1
Type2
Assemble the air filters.
6
Check the side of the front cover for correct
7
assembly of the air filters.
Clean the filter with a vacuum cleaner.
4
NOTE
• The feature and location of Micro dust and Triple
filter may vary according to the type of model.
Page 31

ENGLISH
TROUBLESHOOTING
Self-diagnosis Function
This product has a built-in self-diagnosis function. If an error occurs, the lamp of the indoor unit will blink in 2
second intervals. If this occurs, contact your local dealer or service center.
Before Calling for Service
Please check the following before you contact the service center. If the problem persists, contact your local
service center.
Problem Possible Causes Corrective Action
Burning smell and strange
sounds are coming from the
unit.
Water leaks from the indoor
unit even when the humidity
The air conditioner
does not work
normally.
The air conditioner
does not work.
level is low.
The power cable is damaged
or it is generating excessive
heat.
A switch, a circuit breaker
(safety, ground), or a fuse is
not operated properly.
The unit generates an error
code from its self-diagnosis.
The air conditioner is
unplugged.
A fuse exploded, or the power
supply is blocked.
A power failure has occurred.
The voltage is too high or too
low.
The air conditioner was turned
off automatically at a preset
time.
The battery setting in the
remote controller is incorrect.
• Turn off the air conditioner, switch OFF, or
disconnect the power supply, and contact the
service center.
• Check whether the power cord is plugged into
the outlet or the power isolators are switched
on.
• Replace the fuse or check if the circuit breaker
has tripped.
• Turn off the air conditioner when a power failure
occurs.
• When the power is restored, wait 3 minutes,
and then turn on the air conditioner.
• Check if the circuit breaker has tripped.
• Turn the air conditioner on.
• Make sure that the batteries are inserted
correctly in your remote controller.
• If the batteries are placed correctly, but the air
conditioner still does not operate, replace the
batteries and try again.
31TROUBLESHOOTING
Page 32

32 TROUBLESHOOTING
Problem Possible Causes Corrective Action
Air is not circulating properly.
The air filter is dirty.
The room temperature is too
high.
Cold air is escaping from the
The air conditioner
does not emit cool
air.
The fan speed
cannot be adjusted.
The temperature
cannot be adjusted.
The air conditioner
stops during
operation.
room.
The desired temperature
is higher than the current
temperature.
There is a heating source
nearby.
Fan Mode is selected.
Outside temperature is too
high.
The Jet Mode, or Auto
Operation Mode is selected.
The Fan Mode or Jet Mode is
selected.
The air conditioner is
suddenly turned off.
A power failure has occurred
during operation.
• Make sure that there are no curtains, blinds, or
pieces of furniture blocking the front of the air
conditioner.
• Clean the air filter once every 2 weeks.
• See “Clean the Air Filter” for more information.
• In summer, cooling the indoor air fully may take
some time. In this case, select the Jet Mode to
cool the indoor air quickly.
• Make sure that no cold air is escaping through
the ventilation points in the room.
• Set the desired temperature to a level lower
than the current temperature.
• Avoid using heat generators like electric ovens
or gas burners while the air conditioner is in
operation.
• During Fan Mode, air blows from the air
conditioner without cooling or heating the
indoor air.
• Switch the operation mode to cooling operation.
• The cooling effect may not be sufficient.
• In some operation modes, you cannot adjust
the fan speed. Select an operation mode in
which you can adjust the fan speed.
• In some operation modes, you cannot adjust
the temperature. Select an operation mode in
which you can adjust the temperature.
• The Timer Function may have timed out, which
turns the unit off. Check the timer settings.
• Wait for the power to come back. If you have
the Auto Restart function enabled, your unit will
resume its last operation several minutes after
power is restored.
Page 33

ENGLISH
Problem Possible Causes Corrective Action
The indoor unit is
still operating even
when the unit has
been turned off.
The air outlet on
the indoor unit is
discharging mist.
Water leaks from the
outdoor unit.
There is noise or
vibration.
The indoor unit gives
off an odor.
The air conditioner
does not emit warm
air.
The Auto Clean function is
being operated.
The cooled air from the air
conditioner makes mist.
In the heating operations,
condensed water drops from
the heat exchanger.
A clicking sound can be
heard when the unit starts or
stops due to movement of the
reversing valve.
Creaking sound: The plastic
parts of the indoor unit creak
when they shrink or expand
due to sudden temperature
changes.
Flowing or Blowing sound:
This is the flow of refrigerant
through the air conditioner.
Odors (such as cigarette
smoke) may be absorbed into
the indoor unit and discharged
with airflow.
When Heating Mode starts, the
vane is almost closed, and no
air comes out, even though
the outdoor unit is operating.
The outdoor unit is in
Defrosting Mode.
Outside temperature is too
low.
• Allow the Auto Clean function to continue since
it removes any remaining moisture inside the
indoor unit. If you do not want this feature, you
can turn the unit off.
• When the room temperature decreases, this
phenomenon will disappear.
• This symptom requires installing a drain hose
under the base pan. Contact the installer.
• These are normal symptoms. The noise will
stop.
• If the smell does not disappear, you need to
wash the filter. If this does not work, contact the
service center to clean your heat exchanger.
• This symptom is normal. Please wait until the
unit has generated enough warm air to blow
through the indoor unit.
• In Heating Mode, ice/frost is built up on the
coils when the outside temperature falls.
This function removes a layer of frost on the
coil, and it should finish in approximately 15
minutes.
• The heating effect may not be sufficient.
33TROUBLESHOOTING
Page 34

34 TROUBLESHOOTING
Problem Possible Causes Corrective Action
The password for the Wi-Fi
that you are trying to connect
to is incorrect.
Mobile data for your
smartphone is turned on.
The wireless network name
Your home appliance
and smartphone is
not connected to the
Wi-Fi network.
NOTE
• Some functions may not be supported, depending on the model.
(SSID) is set incorrectly.
The router frequency is not 2.4
GHz.
The distance between the
appliance and the router is too
far.
• Find the Wi-Fi network connected to your
smartphone and remove it, then register your
appliance on LG SmartThinQ.
• Turn off the Mobile data of your smartphone
and register the appliance using the Wi-Fi
network.
• The wireless network name (SSID) should be
a combination of English letters and numbers.
(Do not use special characters.)
• Only a 2.4 GHz router frequency is supported.
Set the wireless router to 2.4 GHz and connect
the appliance to the wireless router. To check
the router frequency, check with your Internet
service provider or the router manufacturer.
• If the distance between the appliance and the
router is too far, the signal may be weak and
the connection may not be configured correctly.
Move the location of the router so that it is
closer to the appliance.
Page 35

35WARRANTY (USA)
ENGLISH
WARRANTY (USA)
ARBITRATION NOTICE: THIS LIMITED WARRANTY CONTAINS AN ARBITRATION PROVISION THAT
REQUIRES YOU AND LG TO RESOLVE DISPUTES BY BINDING ARBITRATION INSTEAD OF IN COURT,
UNLESS YOU CHOOSE TO OPT OUT. IN ARBITRATION, CLASS ACTIONS AND JURY TRIALS ARE NOT
PERMITTED. PLEASE SEE THE SECTION TITLED “PROCEDURE FOR RESOLVING DISPUTES” BELOW.
PROCEDURE FOR RESOLVING DISPUTES:
ALL DISPUTES BETWEEN YOU AND LG ARISING OUT OF OR RELATING IN ANY WAY TO THIS LIMITED
WARRANTY OR THE PRODUCT SHALL BE RESOLVED EXCLUSIVELY THROUGH BINDING ARBITRATION,
AND NOT IN A COURT OF GENERAL JURISDICTION. BINDING ARBITRATION MEANS THAT YOU AND LG
ARE EACH WAIVING THE RIGHT TO A JURY TRIAL AND TO BRING OR PARTICIPATE IN A CLASS ACTION.
Definitions. For the purposes of this section, references to “LG” mean LG Electronics U.S.A., Inc., its parents,
subsidiaries and affiliates, and each of their officers, directors, employees, agents, beneficiaries, predecessors
in interest, successors, assigns and suppliers; references to “dispute” or “claim” shall include any dispute,
claim or controversy of any kind whatsoever (whether based in contract, tort, statute, regulation, ordinance,
fraud, misrepresentation or any other legal or equitable theory) arising out of or relating in any way to the sale,
condition or performance of the product or this Limited Warranty.
Notice of Dispute. In the event you intend to commence an arbitration proceeding, you must first notify LG in
writing at least 30 days in advance of initiating the arbitration by sending a letter to LG at LG Electronics, USA,
Inc. Attn: Legal Department- Arbitration 1000 Sylvan Ave, Englewood Cliffs 07632. You and LG agree to engage
in good faith discussions in an attempt to amicably resolve your claim. The notice must provide your name,
address, and telephone number; identify the product that is the subject of the claim; and describe the nature of
the claim and the relief being sought. If you and LG are unable to resolve the dispute within 30 days, either party
may proceed to file a claim for arbitration.
Agreement to Binding Arbitration and Class Action Waiver. Upon failure to resolve the dispute during the
30 day period after sending written notice to LG, you and LG agree to resolve any claims between us only by
binding arbitration on an individual basis, unless you opt out as provided below. Any dispute between you and
LG shall not be combined or consolidated with a dispute involving any other person’s or entity’s product or
claim. More specifically, without limitation of the foregoing, any dispute between you and LG shall not under any
circumstances proceed as part of a class or representative action. Instead of arbitration, either party may bring
an individual action in small claims court, but that small claims court action may not be brought on a class or
representative basis.
Arbitration Rules and Procedures. To begin arbitration of a claim, either you or LG must make a written
demand for arbitration. The arbitration will be administered by the American Arbitration Association (“AAA”)
and will be conducted before a single arbitrator under the AAA’s Consumer Arbitration Rules that are in effect
at the time the arbitration is initiated (referred to as the “AAA Rules”) and under the procedures set forth in this
section. The AAA Rules are available online at www.adr.org/consumer. Send a copy of your written demand for
arbitration, as well as a copy of this provision, to the AAA in the manner described in the AAA Rules. You must
also send a copy of your written demand to LG at LG Electronics, USA, Inc. Attn: Legal Department- Arbitration
1000 Sylvan Avenue Englewood Cliffs, NJ 07632. If there is a conflict between the AAA Rules and the rules
set forth in this section, the rules set forth in this section will govern. This arbitration provision is governed
by the Federal Arbitration Act. Judgment may be entered on the arbitrator’s award in any court of competent
jurisdiction. All issues are for the arbitrator to decide, except that issues relating to the scope and enforceability
of the arbitration provision and to the arbitrability of the dispute are for the court to decide. The arbitrator is
bound by the terms of this provision.
Page 36

36 WARRANTY (USA)
Governing Law. The law of the state of your residence shall govern this Limited Warranty and any disputes
between us except to the extent that such law is preempted by or inconsistent with applicable federal law.
Fees/Costs. You do not need to pay any fee to begin an arbitration. Upon receipt of your written demand for
arbitration, LG will promptly pay all arbitration filing fees to the AAA unless you seek more than $25,000 in
damages, in which case the payment of these fees will be governed by the AAA Rules. Except as otherwise
provided for herein, LG will pay all AAA filing, administration and arbitrator fees for any arbitration initiated in
accordance with the AAA Rules and this arbitration provision. If you prevail in the arbitration, LG will pay your
attorneys’ fees and expenses as long as they are reasonable, by considering factors including, but not limited to,
the purchase amount and claim amount. Notwithstanding the foregoing, if applicable law allows for an award of
reasonable attorneys’ fees and expenses, an arbitrator can award them to the same extent that a court would. If
the arbitrator finds either the substance of your claim or the relief sought in the demand is frivolous or brought for
an improper purpose (as measured by the standards set forth in Federal Rule of Civil Procedure 11(b)), then the
payment of all arbitration fees will be governed by the AAA Rules. In such a situation, you agree to reimburse LG
for all monies previously disbursed by it that are otherwise your obligation to pay under the AAA Rules. Except
as otherwise provided for, LG waives any rights it may have to seek attorneys’ fees and expenses from you if LG
prevails in the arbitration.
Hearings and Location. If your claim is for $25,000 or less, you may choose to have the arbitration conducted
solely on the basis of (1) documents submitted to the arbitrator, (2) through a telephonic hearing, or (3) by
an in-person hearing as established by the AAA Rules. If your claim exceeds $25,000, the right to a hearing
will be determined by the AAA Rules. Any in-person arbitration hearings will be held at a location within the
federal judicial district in which you reside unless we both agree to another location or we agree to a telephonic
arbitration.
Opt Out. You may opt out of this dispute resolution procedure. If you opt out, neither you nor LG can require the
other to participate in an arbitration proceeding. To opt out, you must send notice to LG no later than 30 calendar
days from the date of the first consumer purchaser’s purchase of the product by either: (i) sending an e-mail to
optout@lge.com, with the subject line: “Arbitration Opt Out” or (ii) calling 1-800-980-2973. You must include in
the opt out e-mail or provide by telephone: (a) your name and address; (b) the date on which the product was
purchased; (c) the product model name or model number; and (d) the serial number (the serial number can be
found (i) on the product; or (ii) online by accessing https://www.lg.com/us/support/repair-service/schedule-repaircontinued and clicking on “Find My Model & Serial Number”).
You may only opt out of the dispute resolution procedure in the manner described above (that is, by e-mail or
telephone); no other form of notice will be effective to opt out of this dispute resolution procedure. Opting out of
this dispute resolution procedure will not affect the coverage of the Limited Warranty in any way, and you will
continue to enjoy the full benefits of the Limited Warranty. If you keep this product and do not opt out, then you
accept all terms and conditions of the arbitration provision described above.
Page 37

37WARRANTY (CANADA)
ENGLISH
WARRANTY (CANADA)
ARBITRATION NOTICE: THIS LIMITED WARRANTY CONTAINS AN ARBITRATION PROVISION THAT
REQUIRES YOU AND LG TO RESOLVE DISPUTES BY BINDING ARBITRATION INSTEAD OF IN COURT,
UNLESS THE LAWS OF YOUR PROVINCE OR TERRITORY DO NOT PERMIT THAT, OR, IN OTHER
JURISDICTIONS, IF YOU CHOOSE TO OPT OUT. IN ARBITRATION, CLASS ACTIONS AND JURY TRIALS
ARE NOT PERMITTED. PLEASE SEE THE SECTION TITLED “PROCEDURE FOR RESOLVING DISPUTES”
BELOW.
PROCEDURE FOR RESOLVING DISPUTES(FOR CANADIAN PRODUCTS):
EXCEPT WHERE PROHIBITED AT LAW, ALL DISPUTES BETWEEN YOU AND LG ARISING OUT OF
OR RELATING IN ANY WAY TO THIS LIMITED WARRANTY OR THE PRODUCT SHALL BE RESOLVED
EXCLUSIVELY THROUGH BINDING ARBITRATION, AND NOT IN A COURT OF GENERAL JURISDICTION.
EXCEPT WHERE PROHIBITED AT LAW, YOU AND LG BOTH IRREVOCABLY AGREE TO WAIVE THE RIGHT
TO A JURY TRIAL AND TO BRING OR PARTICIPATE IN A CLASS ACTION.
Definitions. For the purposes of this section, references to “LG” mean LG Electronics Canada, Inc., its parents,
subsidiaries and affiliates, and each of their officers, directors, employees, agents, beneficiaries, predecessors
in interest, successors, assigns and suppliers; references to “dispute” or “claim” shall include any dispute,
claim or controversy of any kind whatsoever (whether based in contract, tort, statute, regulation, ordinance,
fraud, misrepresentation or any other legal or equitable theory) arising out of or relating in any way to the sale,
condition or performance of the product or this Limited Warranty.
Notice of Dispute. In the event you intend to commence an arbitration proceeding, you must first notify LG in
writing at least 30 days in advance of initiating the arbitration by sending a letter to LGECI Legal Team at 20
Norelco Drive, North York, Ontario, Canada M9L 2X6 (the “Notice of Dispute”). You and LG agree to engage
in good faith discussions in an attempt to amicably resolve your claim. The notice must provide your name,
address, and telephone number; identify the product that is the subject of the claim; and describe the nature
of the claim and the relief being sought. If you and LG are unable to resolve the dispute within 30 days of LG’s
receipt of the Notice of Dispute, the dispute shall be resolved by binding arbitration in accordance with the
procedure set out herein. You and LG both agree that, during the arbitration proceeding, the terms (including any
amount) of any settlement offer made by either you or LG will not be disclosed to the arbitrator until the arbitrator
determines the dispute.
Agreement to Binding Arbitration and Class Action Waiver. Upon failure to resolve the dispute during the
30 day period after LG’s receipt of the Notice of Dispute, you and LG agree to resolve any claims between you
and LG only by binding arbitration on an individual basis, unless you opt out as provided below, or you reside
in a jurisdiction that prevents full application of this clause in the circumstances of the claims at issue (in which
case if you are a consumer, this clause will only apply if you expressly agree to the arbitration). To the extent
permitted by applicable law, any dispute between you and LG shall not be combined or consolidated with a
dispute involving any other person’s or entity’s product or claim. More specifically, without limitation of the
foregoing, except to the extent such a prohibition is not permitted at law, any dispute between you and LG shall
not under any circumstances proceed as part of a class or representative action. Instead of arbitration, either
party may bring an individual action in small claims court, but that small claims court action may not be brought
on a class or representative basis except to the extent this prohibition is not permitted at law in your province or
territory of jurisdiction as it relates to the claims at issue between you and LG.
Arbitration Rules and Procedures. To begin arbitration of a claim, either you or LG must make a written
demand for arbitration. The arbitration will be private and confidential, and conducted on a simplified and
expedited basis before a single arbitrator chosen by the parties under the provincial or territorial commercial
arbitration law and rules of the province or territory of your residence. You must also send a copy of your
written demand to LG at LG Electronics, Canada, Inc., Attn: Legal Department- Arbitration, 20 Norelco Drive,
North York, Ontario M9L 2X6. This arbitration provision is governed by your applicable provincial or territorial
commercial arbitration legislation. Judgment may be entered on the arbitrator’s award in any court of competent
jurisdiction. All issues are for the arbitrator to decide, except that, issues relating to the scope and enforceability
of the arbitration provision and to the arbitrability of the dispute are for the court to decide. The arbitrator is
bound by the terms of this provision.
Page 38

38 WARRANTY (CANADA)
Governing Law. The law of the province or territory of your purchase shall govern this Limited Warranty and
any disputes between you and LG except to the extent that such law is preempted by or inconsistent with
applicable federal or provincial/territorial law. Should arbitration not be permitted for any claim, action, dispute or
controversy between you and LG, you and LG attorn to the exclusive jurisdiction of the courts of the province or
territory of your purchase for the resolution of the claim, action, dispute or controversy between you and LG.
Fees/Costs. You do not need to pay any fee to begin an arbitration. Upon receipt of your written demand for
arbitration, LG will promptly pay all arbitration filing fees unless you seek more than $25,000 in damages, in
which case the payment of these fees will be governed by the applicable arbitration rules. Except as otherwise
provided for herein, LG will pay all filing, administration and arbitrator fees for any arbitration initiated in
accordance with the applicable arbitration rules and this arbitration provision. If you prevail in the arbitration, LG
will pay your attorneys’ fees and expenses as long as they are reasonable, by considering factors including, but
not limited to, the purchase amount and claim amount. Notwithstanding the foregoing, if applicable law allows
for an award of reasonable attorneys’ fees and expenses, an arbitrator can award them to the same extent
that a court would. If the arbitrator finds either the substance of your claim or the relief sought in the demand
is frivolous or brought for an improper purpose (as measured by the applicable laws), then the payment of all
arbitration fees will be governed by the applicable arbitration rules. In such a situation, you agree to reimburse
LG for all monies previously disbursed by it that are otherwise your obligation to pay under the applicable
arbitration rules. Except as otherwise provided for, LG waives any rights it may have to seek attorneys’ fees and
expenses from you if LG prevails in the arbitration.
Hearings and Location. If your claim is for $25,000 or less, you may choose to have the arbitration conducted
solely (1) on the basis of documents submitted to the arbitrator, (2) through a telephonic hearing, or (3) by an
in-person hearing as established by the applicable arbitration rules. If your claim exceeds $25,000, the right to
a hearing will be determined by the applicable arbitration rules. Any in-person arbitration hearings will be held at
the nearest, most mutually-convenient arbitration location available within the province or territory in which you
reside unless you and LG both agree to another location or agree to a telephonic arbitration.
Severability and Waiver. If any portion of this Limited Warranty (including these arbitration procedures) is
unenforceable, the remaining provisions will continue in full force and effect to the maximum extent permitted by
applicable law. Should LG fail to enforce strict performance of any provision of this Limited Warranty (including
these arbitration procedures), it does not mean that LG intends to waive or has waived any provision or part of
this Limited Warranty.
Opt Out. You may opt out of this dispute resolution procedure. If you opt out, neither you nor LG can require the
other to participate in an arbitration proceeding. To opt out, you must send notice to LG no later than 30 calendar
days from the date of the first consumer purchaser’s purchase of the product by either (i) sending an e-mail to
optout@lge.com, with the subject line: “Arbitration Opt Out;” or (ii) calling 1-800-980-2973. You must include in
the opt out e-mail or provide by telephone: (a) your name and address; (b) the date on which the product was
purchased; (c) the product model name or model number; and (d) the serial number (the serial number can be
found (i) on the product; or (ii) online by accessing https://www.lg.com/ca_en/support/repair-service/schedulerepair and clicking on “Find My Model & Serial Number”).
In the event that you “Opt Out”, the law of the province or territory of your residence shall govern this Limited
Warranty and any disputes between you and LG except to the extent that such law is preempted by or
inconsistent with applicable federal or provincial/territorial law. Should arbitration not be permitted for any claim,
action, dispute or controversy between you and LG, you and LG agree to attorn to the exclusive jurisdiction
of the courts of the province or territory of your residence for the resolution of the claim, action, dispute or
controversy between you and LG.
You may only opt out of the dispute resolution procedure in the manner described above (that is, by e-mail or
telephone); no other form of notice will be effective to opt out of this dispute resolution procedure. Opting out of
this dispute resolution procedure will not affect the coverage of the Limited Warranty in any way, and you will
continue to enjoy the full benefits of the Limited Warranty. If you keep this product and do not opt out, then you
accept all terms and conditions of the arbitration provision described above.
Conflict of Terms. In the event of a conflict or inconsistency between the terms of this Limited Warranty and the
End User License Agreement (“EULA”) in regards to dispute resolution, the terms of this Limited Warranty shall
control and govern the rights and obligations of the parties and shall take precedence over the EULA.
Page 39

FRANÇAIS
MANUEL D’UTILISATION
CLIMATISEUR
Veuillez lire attentivement le présent manuel de l'utilisateur avant de
faire fonctionner l'appareil et conservez-le à portée de la main pour le
consulter en tout temps.
TYPE: MURAL
Copyright © 2018 - 2019 LG Electronics Inc. Tous droits réservés.
www.lg.com
Page 40

TABLE DES MATIÈRES
2 TABLE DES MATIÈRES
3 CONSIGNES DE SÉCURITÉ
3 CONSIGNES DE SÉCURITÉ IMPORTANTES
7 FONCTIONNEMENT
7 Remarques concernant le fonctionnement
7 Pièces et fonctions
8 Télécommande sans fil
13 Redémarrage automatique du climatiseur
13 Utilisation de la fonction de mode
15 Utilisation de la fonction Jet Mode (jets d’air)
16 Utilisation de la fonction de vitesse de ventilation
16 Réglage de la direction du débit d'air
17 Réglage de la minuterie de marche/d’arrêt
18 Utilisation du mode Veille (facultatif)
18 Utilisation de la fonction Veille simple (facultatif)
19 Utilisation de la fonction d’affichage de la consommation énergétique (facultatif)
19 Utilisation de la fonction de désactivation de l'éclairage (facultatif)
19 Utilisation de la fonction Comfort Air (débit d’air confortable) (facultatif)
20 Utilisation de la fonction d'économie de l'énergie (facultatif)
20 Utilisation de la fonction de contrôle de l'énergie (facultatif)
21 Utilisation de fonctions spéciales
24 FONCTIONS INTELLIGENTES
24 Utilisation de l’application LG SmartThinQ
27 ENTRETIEN
29 Nettoyage du filtre à air
30 Nettoyez le filtre à micropoussières et le filtre triple (facultatif)
31 DÉPANNAGE
35 GARANTIE (CANADA)
Page 41

FRANÇAIS
CONSIGNES DE SÉCURITÉ
LISEZ TOUTES LES CONSIGNES AVANT UTILISATION
Votre sécurité et celle des autres sont très importantes.
Nous fournissons de nombreux conseils de sécurité importants dans ce manuel et sur votre
appareil. Lisez toujours l'ensemble des messages de sécurité et respectez-les.
Cela est le symbole d’alerte de sécurité.
Ce symbole est destiné à vous alerter de dangers potentiels pouvant entraîner la mort ou
des blessures.
Tous les messages de sécurité suivent le symbole d'alerte de sécurité et le mot
AVERTISSEMENT ou ATTENTION.
AVERTISSEMENT
Ne pas suivre les instructions pourrait entraîner la mort ou des blessures graves.
MISE EN GARDE
Si vous ne suivez pas les consignes, cela pourrait entraîner des blessures mineures ou
modéréesou endommager le produit.
Tous les messages de sécurité vous avertissent d'un danger potentiel et vous disent comment
réduire le risque de blessure, ainsi que ce qui peut arriver si les instructions ne sont pas suivies.
3CONSIGNES DE SÉCURITÉ
CONSIGNES DE SÉCURITÉ IMPORTANTES
AVERTISSEMENT
Pour réduire le risque d'explosion, d'incendie, de décès, de choc électrique, de blessures
ou de brûlures des personnes utilisant ce produit, suivez les précautions de base, dont les
suivantes :
• L'installation ou la réparation effectuée par des personnes non autorisées peut présenter des
risques pour vous et pour les autres.
• L'installation doit être conforme aux codes du bâtiment locaux ou, en l'absence de codes locaux,
le National Electrical Code NFPA 70/ANSI C1-1003 ou l'édition en vigueur du Code canadien de
l'électricité CSA C.22 partie 1. 1.
• Les renseignements contenus dans le manuel doivent être utilisés par un technicien qualifié qui
connaît bien les procédures de sécurité et équipé des outils et des instruments d'essai appropriés.
• Ne pas lire ou ne pas suivre toutes les instructions du présent manuel peut entraîner des
dysfonctionnements de l'équipement, des dégâts matériels, des blessures ou la mort.
• Le remplacement du câble d’alimentation doit être effectué par un service d'entretien autorisé à
l’aide de pièces d'origine uniquement.
• Cet appareil ne doit pas être utilisé par des personnes (y compris des enfants) dont les capacités
physiques, sensorielles ou mentales sont réduites, ou dont l’expérience et les connaissances
sont insuffisantes, sauf sous surveillance ou si des instructions d’utilisation leur ont été données
par une personne responsable de leur sécurité. Les enfants doivent être surveillés pour s'assurer
qu'ils ne jouent pas avec l'appareil.
Page 42

4 CONSIGNES DE SÉCURITÉ
Installation
• Ne pas installer le climatiseur sur une surface instable ou dans un endroit où il pourrait tomber.
• Communiquer avec un centre de service agréé lors de l'installation ou du déplacement du
climatiseur.
• Installer le panneau et le couvercle de la boîte de commande de façon sécuritaire.
• Ne pas installer le climatiseur dans un endroit où des liquides inflammables ou des gaz tels que
l'essence, le propane, du diluant pour peinture, etc., sont entreposés.
• S'assurer que le tuyau et le câble d'alimentation reliant les unités intérieures et extérieures ne sont
pas trop serrés lors de l'installation du climatiseur.
• Utiliser un disjoncteur et un fusible standards conformes au calibre prescrit pour le climatiseur.
• Ne pas faire entrer d'air ou de gaz dans le système, sauf le réfrigérant indiqué.
• Utiliser un gaz ininflammable (azote) pour vérifier les fuites et purger l'air; utiliser de l'air comprimé
ou un gaz inflammable peut causer un incendie ou une explosion.
• Les raccords de câblage extérieurs/intérieurs doivent être fixés solidement, et le câble doit être
acheminé correctement de sorte qu'il n'y a aucune force de traction du câble aux bornes de
connexion. Des raccords incorrects ou lâches peuvent entraîner une production de chaleur ou un
incendie.
• Installer la prise électrique et le disjoncteur dédié avant d'utiliser le climatiseur.
• Ne pas connecter le fil de terre à un tuyau de gaz, un paratonnerre ou un fil de terre téléphonique.
• Si le câble d’alimentation électrique est endommagé, il doit être remplacé par le fabricant ou un de
ces agents de service ou encore une personne qualifiée possédant ce type de compétences pour
éviter un risque.
Fonctionnement
• Utiliser uniquement les pièces indiquées dans la liste des pièces de rechange. Ne jamais tenter de
modifier l'appareil.
• S'assurer que les enfants ne grimpent pas sur l'unité extérieure et ne la frappent pas.
• Jeter les piles dans un endroit où il n'y a pas de danger d'incendie.
• Utiliser uniquement le réfrigérant indiqué sur l'étiquette du climatiseur.
• Couper l'alimentation s'il n'y a aucun bruit, ni odeur, ni fumée provenant du climatiseur.
• Ne pas laisser de substances inflammables comme de l'essence, du benzène ou du diluant à
proximité du climatiseur.
• Communiquer avec un centre de service agréé lorsque le climatiseur est submergé par des eaux
de crue.
• Ne pas utiliser le climatiseur pendant une longue période dans un petit endroit sans ventilation
adéquate.
• Dans le cas d'une fuite de gaz (fréon, gaz propane, GPL, etc.), ventiler suffisamment avant
d'utiliser à nouveau le climatiseur.
• Pour nettoyer l'intérieur, communiquer avec un centre de service ou un détaillant agréé.
L'utilisation de détergents agressifs peut provoquer de la corrosion ou des dommages à l'unité.
Page 43

FRANÇAIS
• S'assurer de ventiler suffisamment lorsque le climatiseur et un appareil de chauffage tel qu'un
radiateur sont utilisés simultanément.
• Ne pas obstruer l'entrée ou la sortie du flux d'air.
• Ne pas mettre les mains ou d'autres objets dans l'entrée ou de la sortie d'air tandis que le
climatiseur fonctionne.
• S'assurer que le câble d'alimentation n'est ni sale, ni lâche, ni cassé.
• Ne jamais toucher, utiliser ou réparer le climatiseur avec les mains mouillées.
• Ne pas placer d'objets sur le câble d'alimentation.
• Ne pas placer de radiateur ou d'autres appareils de chauffage à proximité du câble d'alimentation.
• Ne pas modifier ou allonger le câble d'alimentation. Si l'isolation des câbles d'alimentation est
rayée ou pèle, cela peut provoquer un incendie ou un choc électrique. Il faut la remplacer.
• Couper immédiatement l'alimentation électrique en cas de panne ou d'orage.
• Veillez à ce qu'il soit impossible de retirer le cordon d'alimentation ou de l'endommager pendant le
fonctionnement de l'appareil.
• Ne touchez ni à la tuyauterie du frigorigène ou de l'eau ni à aucune pièce interne pendant le
fonctionnement ou juste après l'arrêt de l'unité.
Entretien
• Ne pas nettoyer l'appareil en vaporisant de l'eau directement dessus.
• Avant de nettoyer ou d'effectuer l'entretien, débrancher l'alimentation électrique et attendre l'arrêt
du ventilateur.
5CONSIGNES DE SÉCURITÉ
MISE EN GARDE
Afin de réduire le risque de blessures légères, de dysfonctionnement ou de dommages au
produit ou à la propriété lors de l'utilisation de ce produit, suivre les précautions de base,
dont les suivantes :
Installation
• N’installez pas le climatiseur dans un endroit où il sera exposé directement au vent de mer
(embrun salé).
• Installer le tuyau de vidange correctement pour assurer un bon drainage de l'eau de
condensation.
• Rester prudent lors du déballage et de l'installation du climatiseur.
• Ne pas toucher le réfrigérant qui fuit pendant l'installation ou la réparation.
• Se mettre à deux personnes ou plus pour transporter le climatiseur ou utiliser un chariot élévateur.
• Installer l'unité extérieure de façon à la protéger des rayons directs du soleil. Ne pas placer l'unité
intérieure dans un endroit où elle est directement exposée aux rayons du soleil à travers les
fenêtres.
• Mettre au rebut les matériaux d'emballage tels que les vis, clous ou piles en utilisant un emballage
approprié après l'installation ou la réparation.
• Installer le climatiseur dans un endroit où le bruit de l'unité extérieure ou les gaz d'échappement
ne dérangeront pas les voisins. Ne pas le faire peut entraîner des conflits de voisinage.
Page 44

6 CONSIGNES DE SÉCURITÉ
Fonctionnement
• Retirer les piles si la télécommande ne doit pas être utilisée pendant une longue période.
• S'assurer que le filtre est installé avant de faire fonctionner le climatiseur.
• Assurez-vous de vérifier s'il y une fuite de frigorigène après avoir installé ou réparé le climatiseur.
• Suivre les normes de la région ou du pays pour la manipulation du réfrigérant et l'air climatisé et
pour le démontage du climatiseur.
• Ne placer aucun objet sur le climatiseur.
• Ne jamais mélanger différents types de piles ou des piles neuves et usagées pour la
télécommande.
• Ne pas laisser le climatiseur fonctionner longtemps lorsque l'humidité est très élevée ou quand
une porte ou une fenêtre a été laissée ouverte.
• Arrêter d'utiliser la télécommande si la batterie présente une fuite de liquide. Si vos vêtements ou
votre peau sont exposés au liquide qui fuit d'une pile, les rincer à l'eau propre.
• Ne pas exposer les personnes, les animaux ou les plantes à l'air froid ou chaud du climatiseur
pour des périodes de temps prolongées.
• Si une personne a avalé le liquide qui fuit de la pile, bien rincer l'intérieur de sa bouche et
consulter un médecin.
• Ne pas boire l'eau de vidange du climatiseur.
• Ne pas utiliser le produit à des fins particulières, telles que la conservation des aliments, des
œuvres d'art, etc. Il s'agit d'un climatiseur aux fins de consommation, pas d'un système de
refroidissement de précision. Il existe des risques de dommage ou de perte de propriété.
• Ne pas recharger ou démonter les piles.
Entretien
• Ne jamais toucher les parties métalliques du climatiseur en retirant le filtre à air.
• Utiliser un tabouret ou une échelle solide lors du nettoyage, de l'entretien ou de la réparation du
climatiseur monté en hauteur.
• Ne jamais utiliser d'agents nettoyants puissants ni de solvants lors du nettoyage du climatiseur ni
pulvériser de l'eau. Utiliser un chiffon doux.
Page 45

FRANÇAIS
FONCTIONNEMENT
7
Remarques concernant le fonctionnement
Astuces pour économiser l’énergie
• Évitez un refroidissement excessif des espaces intérieurs. Une telle utilisation pourrait représenter un danger
pour votre santé et entraîner une plus grande consommation électrique.
• Évitez d'exposer le climatiseur aux rayons solaires à l’aide de rideaux ou de persiennes lorsqu’il est en
marche.
• Maintenez les portes et les fenêtres complètement fermées lorsque vous utilisez le climatiseur.
• Réglez la direction du débit d’air verticalement ou horizontalement pour permettre la circulation de l’air
intérieur.
• Accélérez le ventilateur pour refroidir ou réchauffer rapidement l’air intérieur en peu de temps.
• Ouvrez régulièrement des fenêtres pour des besoins d’aération étant donné que la qualité de l'air intérieur
peut se détériorer si vous utilisez le climatiseur pendant des périodes prolongées.
• Nettoyez le filtre à air toutes les deux semaines. La poussière et les impuretés accumulées dans le filtre à
air peuvent bloquer la circulation de l’air et diminuer les capacités de refroidissement et d’assèchement de
l’appareil.
7FONCTIONNEMENT
Pièces et fonctions
Unité intérieure Unité extérieure
Filtre à air
1
Entrée d’air
2
Couvercle avant
3
Sortie d’air
4
Déflecteur d’air (volet horizontal)
5
Déflecteur d’air (volet vertical)
6
Bouton de mise en marche et d’arrêt
Évents d’entrée d’air
1
Évents de sortie d’air
2
REMARQUE
• Le nombre de témoins de fonctionnement et leurs positions peuvent varier en fonction du modèle de
climatiseur.
• L’élément peut varier selon le modèle.
Page 46

8 FONCTIONNEMENT
SWING
kW [3 s]
Télécommande sans fil
Insertion des piles
Si l’écran d’affichage de la télécommande commence
à s’éteindre, remplacez les piles. Insérez des piles
AAA (1,5 V) avant d’utiliser la télécommande.
Enlevez le couvercle du compartiment à piles.
1
Insérez les nouvelles piles et assurez-vous que
2
les bornes + et - sont orientées correctement.
Installation du support de la
télécommande
Afin de protéger la télécommande, installez le
support à l’abri du contact direct avec les rayons du
soleil.
Méthode de fonctionnement
Orientez la télécommande vers le récepteur au bas
du climatiseur pour le mettre en marche.
REMARQUE
• La télécommande peut mettre d’autres appareils
électroniques en marche si vous la pointez
vers ces appareils. Assurez-vous d’orienter la
télécommande vers le récepteur de signaux du
climatiseur.
• Pour un bon fonctionnement, utilisez un tissu doux
pour nettoyer l’émetteur et le récepteur.
• Si la fonction n'est pas offerte avec le produit,
aucune alarme sonore n'est émise par le produit
lorsque le bouton d'une telle fonction est enfoncé
sur la télécommande, sauf pour la direction de la
circulation de l'air (
), la fonction de purification de l'air ( ).
), l'affichage d'énergie (
Choisissez un endroit sécurisé et facilement
1
accessible.
Installez le support en fixant solidement les 2 vis
2
à l’aide d’un tournevis.
Page 47

9FONCTIONNEMENT
FRANÇAIS
℃↔℉ [5 s]
SWING
ON/OFF
Réglage de l’heure actuelle
Insérez les piles.
1
• L’icône ci-dessous clignote au bas de l'écran.
Appuyez sur ou pour régler les minutes.
2
Appuyez sur le bouton SET/CANCEL pour
3
terminer.
REMARQUE
• La minuterie de marche/arrêt est disponible après
le réglage de l’heure actuelle.
Utilisation de la fonction de
conversion °C/°F (facultatif)
Cette fonction permet de convertir les températures
en °C ou en °F
Fonctionnement du climatiseur sans
télécommande
Vous pouvez utiliser le bouton ON/OFF de l’unité
intérieure pour mettre le climatiseur en marche
lorsque la télécommande est indisponible.
Ouvrez le couvercle avant (Type 2) ou volet
1
horizontal (Type 1).
Appuyez sur le bouton ON/OFF.
2
Type 1
ON/OFF
Type 2
• Maintenez enfoncé le bouton
5 secondes.
pendant environ
REMARQUE
• Le moteur pas-à-pas peut être endommagé si le
volet horizontal est ouvert rapidement.
• La vitesse de ventilation est réglée au niveau
maximal.
• L’élément peut varier selon le modèle.
• La température ne peut pas être réglée lorsque le
bouton de mise en ON/OFF d’urgence est utilisé.
• Pour les modèles à refroidissement uniquement, la
température est réglée à 22 °C
• Pour les modèles à refroidissement et à chauffage,
la température est réglée entre 22 °C et 24 °C
Page 48

10 FONCTIONNEMENT
SWING
SWING
Utilisation de la télécommande sans fil
Vous pouvez utiliser la télécommande pour accéder à plus de fonctions du climatiseur.
*
MODE
TEMP
*
kW [3 s]
SWING
SWING
℃↔℉ [5 s]
SET UP
FUNC.
TIMER CANCEL
FAN
SPEED
JET
MODE
ROOM
TEMP
DIAGNOSIS [5 s]
SET
CANCEL
RESET
Bouton
Écran
d’affichage
Description
- Pour allumer/éteindre le climatiseur.
2
Pour régler la température de la pièce
avec les modes Refroidissement,
Chauffage ou Changement
automatique.
*
Pour sélectionner le mode
Refroidissement.
Pour sélectionner le mode Chauffage.
Pour sélectionner le mode
MODE
1
Déshumidification.
Pour sélectionner le mode Ventilation.
Pour sélectionner le mode
Changement automatique ou de
fonctionnement automatique.
JET
MODE
FAN
SPEED
Pour changer rapidement la
température de la pièce.
Pour régler la vitesse de ventilation.
Pour régler la direction du débit d’air
verticalement ou horizontalement.
REMARQUE
• * Les boutons peuvent varier selon le modèle.
Page 49

11FONCTIONNEMENT
FRANÇAIS
RESET
TIMER
CANCEL
*
MODE
TEMP
*
kW [3 s]
SWING
SWING
℃↔℉ [5 s]
SET UP
FUNC.
TIMER CANCEL
FAN
SPEED
JET
MODE
ROOM
TEMP
DIAGNOSIS [5 s]
SET
CANCEL
Bouton
Écran
d’affichage
Description
Pour allumer/éteindre le climatiseur
2
automatiquement à une heure
précise.
SET/
CANCEL
*
*LIGHT
OFF
-
-
- Pour régler l’heure.
-
ROOM
1
TEMP
°C↔°F [5 s]
*ENERGY
SAVING
*COMFORT
AIR
Pour régler/annuler les fonctions
spéciales et la minuterie.
Pour annuler les réglages de la
minuterie.
Pour régler la luminosité de l’écran
d’affichage de l’unité intérieure.
Pour afficher la température de la
pièce.
Pour convertir les températures en °C
ou en °F
Pour réduire la consommation
énergétique.
Pour faire dévier la direction du débit
d’air.
Pour afficher ou non l’information
kW [3 s] -
concernant la consommation
énergétique.
*ENERGY
CTRL
*COMFORT
SLEEP
DIAGNOSIS
[5 s]
-
Pour activer la fonction d'économie de
l’énergie.
Pour créer un environnement de
sommeil confortable.
Pour vérifier aisément des
renseignements sur la maintenance
du produit.
Page 50

12 FONCTIONNEMENT
RESET
FUNC.
*
MODE
TEMP
*
kW [3 s]
SWING
SWING
℃↔℉ [5 s]
SET UP
FUNC.
TIMER CANCEL
FAN
SPEED
JET
MODE
ROOM
TEMP
DIAGNOSIS [5 s]
SET
CANCEL
Bouton
Écran
d’affichage
Description
Le générateur d’ions utilise des
2
millions d’ions pour aider à améliorer
la qualité de l’air intérieur.
Pour réduire le bruit des unités
extérieures.
Pour favoriser l’hydratation de la peau
*
en générant des nuages d’ions.
Pour réduire l’humidité intérieure
rapidement.
Pour conserver la température
minimale de la pièce et empêcher les
objets qui s'y trouvent de geler.
1
Pour éloigner les moustiques.
Pour éliminer l’humidité dans l’unité
intérieure.
RESET -
Pour créer un environnement de
sommeil confortable.
Pour réinitialiser les réglages de la
télécommande.
REMARQUE
• Certaines fonctions ne sont pas prises en charge selon le modèle.
• * Les boutons peuvent varier selon le modèle.
• Appuyez sur le bouton SET/CANCEL pour activer la FUNC sélectionnée.
Page 51

13FONCTIONNEMENT
FRANÇAIS
ON/OFF
Redémarrage automatique du
climatiseur
Lorsque le climatiseur est remis en marche après
une coupure électrique, cette fonction permet de
restaurer les réglages précédents.
Désactivation de la fonction de
redémarrage automatique
Ouvrez le couvercle avant (Type 2) ou volet
1
horizontal (Type 1).
Maintenez le bouton ON/OFF enfoncé pendant
2
6 secondes; le climatiseur va émettre deux bips
et le témoin va clignoter 4 fois.
• Pour réactiver cette fonction, maintenez le
bouton ON/OFF enfoncé pendant 6 secondes.
Le climatiseur va émettre deux bips et le
voyant va clignoter 4 fois.
Type 1
Utilisation de la fonction de
mode
Cette fonction permet de sélectionner un mode de
fonctionnement.
Modèle à refroidissement
uniquement
Mode Refroidissement
Mode de fonctionnement automatique
(IA)
Mode Déshumidification
Mode Ventilation
Modèle à refroidissement et à
chauffage
ON/OFF
Type 2
REMARQUE
• L’élément peut varier selon le modèle.
• Si vous maintenez le bouton ON/OFF enfoncé
pendant 3 à 5 secondes au lieu de 6 secondes,
l'unité va basculer en mode test. En mode
test, le climatiseur émet un air intense pour le
refroidissement pendant 18 minutes avant de
retourner aux réglages par défaut.
Mode Refroidissement
Mode Changement automatique
Mode Déshumidification
Mode Chauffage
Mode Ventilation
Mode Refroidissement
Allumez l’appareil.
1
Appuyez plusieurs fois sur le bouton MODE pour
2
sélectionner le mode Refroidissement.
est affiché à l’écran.
•
Appuyez sur ou pour régler la
3
température.
Page 52

14 FONCTIONNEMENT
Fonctionnement automatique
(intelligence artificielle)
Modèle à refroidissement uniquement
Dans ce mode, la vitesse de ventilation et la
température sont réglées automatiquement, en
fonction de la température ambiante.
Allumez l’appareil.
1
Appuyez plusieurs fois sur le bouton MODE
2
pour sélectionner le mode de fonctionnement
automatique.
•
est affiché à l’écran.
Appuyez sur ou pour sélectionner le code
3
de fonctionnement souhaité si la température
est supérieure ou inférieure à la température
souhaitée.
Code Description
2 Froid
1 Un peu froid
0
-1 Un peu chaud
-2 Chaud
Maintenir la température de la
pièce
Mode Changement automatique
Modèle à refroidissement et à chauffage
Ce mode permet de changer automatiquement
le mode de fonctionnement pour maintenir la
température réglée à ±2 °C
Allumez l’appareil.
1
Appuyez plusieurs fois sur le bouton MODE pour
2
sélectionner le mode Changement automatique.
est affiché à l’écran.
•
Appuyez sur ou pour régler la
3
température.
Appuyez sur le bouton FAN SPEED pour
4
sélectionner la vitesse du ventilateur.
Mode Déshumidification
Ce mode permet d’éliminer une humidité excessive
dans un milieu caractérisé par un niveau d'humidité
élevé ou pendant la saison des pluies, afin
d’empêcher que la moisissure ne s'installe dans
le système. Ce mode permet également d’ajuster
automatiquement la température ambiante et la
vitesse de ventilation pour maintenir un niveau
d’humidité optimal.
Allumez l’appareil.
1
Appuyez plusieurs fois sur le bouton MODE pour
2
sélectionner le mode Déshumidification.
est affiché à l’écran.
•
REMARQUE
• Dans ce mode, vous ne pouvez pas régler la
vitesse du ventilateur, mais vous pouvez régler le
déflecteur d’air pour qu’il tourne automatiquement.
REMARQUE
• Dans ce mode, vous ne pouvez pas régler
la température ambiante; elle est réglée
automatiquement.
• De plus, la température ambiante ne s’affiche pas
à l’écran.
• En mode Déshumidification, le compresseur et le
ventilateur intérieur ne fonctionnent pas lorsque la
température ambiante est inférieure à 24 °C
Page 53

15FONCTIONNEMENT
FRANÇAIS
Mode Chauffage
Allumez l’appareil.
1
Appuyez plusieurs fois sur le bouton MODE pour
2
sélectionner le mode Chauffage.
est affiché à l’écran.
•
Appuyez sur ou pour régler la
3
température.
REMARQUE
• L’indication
lorsque la décongélation est en marche.
• De plus, cette indication s’affichera sur l’unité
intérieure:
− lorsque le préchauffage est en marche.
− lorsque la température ambiante a atteint la
température réglée.
s’affichera sur l’unité intérieure
Mode Ventilation
Ce mode fait seulement circuler l'air intérieur sans
modifier la température de la pièce.
Allumez l’appareil.
1
Appuyez plusieurs fois sur le bouton MODE pour
2
sélectionner le mode Ventilation.
est affiché à l’écran.
•
Appuyez sur le bouton FAN SPEED pour
3
sélectionner la vitesse du ventilateur.
Utilisation de la fonction Jet
Mode (jets d’air)
Modification rapide de la température
ambiante
Ce mode vous permet de refroidir l’air intérieur
rapidement en été ou de le réchauffer rapidement en
hiver.
• Modèle à refroidissement et à chauffage :
La fonction Jet Mode (jets d’air) est offerte
conjointement avec les modes Refroidissement,
Chauffage et Déshumidification.
• Modèle à refroidissement uniquement : la fonction
Jet mode est offerte conjointement avec les modes
Refroidissement, Déshumidification, Ventilation ,
Fonctionnement automatique et Purification de l'air.
Allumez l’appareil.
1
Appuyez plusieurs fois sur le bouton MODE pour
2
sélectionner le mode souhaité.
Appuyez sur le bouton JET MODE.
3
est affiché à l’écran.
•
REMARQUE
• Le mode Jet Heating n'est pas offert sur certains
modèles.
• En mode de refroidissement par jets d’air, un fort
courant d’air souffle pendant 30 minutes.
• Au bout de 30 minutes, la température est définie
sur 18 °C
Si vous souhaitez modifier la température, appuyez
sur le bouton
• En mode chauffage, un fort courant d’air souffle
pendant 30 minutes.
• Au bout de 30 minutes, la température est définie
sur 30 °C
Si vous souhaitez modifier la température, appuyez
sur le bouton
• Il est possible que l’information soit présentée
différemment sur la télécommande.
ou .
ou .
Page 54

16 FONCTIONNEMENT
→ →
→ → → →
SWING
SWING
SWING
SWING
Utilisation de la fonction de
vitesse de ventilation
Réglage de la vitesse de ventilation
• Appuyez plusieurs fois sur le bouton FAN SPEED
pour sélectionner la vitesse du ventilateur.
Écran Vitesse
Haute
Moyenne - haute
Moyenne
Moyenne - basse
Basse
- Ventilation naturelle
REMARQUE
• La vitesse du ventilateur en mode ventilation
naturelle s’ajuste automatiquement.
Réglage de la direction du
débit d'air
Cette fonction permet de régler la direction du débit
d’air verticalement ou horizontalement.
(
• Appuyez plusieurs fois
la direction souhaitée.
− Sélectionnez
automatiquement la direction du débit d’air.
REMARQUE
• Il est possible que le réglage de la direction du
débit d’air sur le plan horizontal ne soit pas pris en
charge en fonction du modèle.
• Un réglage arbitraire du déflecteur d’air peut causer
la défaillance du produit.
• Si vous redémarrez le climatiseur, il commencera
à fonctionner avec la direction de débit d’air réglée
précédemment; par conséquent, il est possible que
le déflecteur d’air ne corresponde pas à l’icône
affichée sur la télécommande. Dans un tel cas,
appuyez sur
du débit d’air à nouveau.
• Il est possible que l’information soit présentée
différemment sur la télécommande.
( ) pour régler
ou
) et sélectionnez
pour régler la direction
• Les icônes de vitesse de ventilation sont affichées
sur certaines unités intérieures.
• L'écran affiche l’information pendant seulement
5 secondes sur certains modèles avant de
retourner à l’affichage de la température.
Page 55

17FONCTIONNEMENT
FRANÇAIS
TIMER
TIMER
TIMER
TIMER
CANCEL
Réglage de la minuterie de
marche/d’arrêt
Cette fonction permet de mettre en marche/d’arrêter
le climatiseur automatiquement à une heure précise.
Les minuteurs Marche et Arrêt peuvent être réglés
ensemble.
Réglage de la minuterie de mise en
marche
Appuyez plusieurs fois sur
1
• L’icône ci-dessous clignote au bas de l'écran.
Appuyez sur ou pour régler les minutes.
2
Appuyez sur le bouton SET/CANCEL pour
3
terminer.
.
Réglage de la minuterie d’arrêt
Appuyez plusieurs fois sur
1
• L’icône ci-dessous clignote au bas de l'écran.
Appuyez sur ou pour régler les minutes.
2
Appuyez sur le bouton SET/CANCEL pour
3
terminer.
• Une fois la minuterie réglée, l’écran affiche
l’heure actuelle et l’icône
l’heure d’arrêt souhaitée a été réglée.
REMARQUE
• Cette fonction est désactivée lorsque vous utilisez
le réglage simple de minuterie.
.
pour indiquer que
• Une fois la minuterie réglée, l’écran affiche
l’heure actuelle et l’icône
l’heure d’arrêt souhaitée a été réglée.
pour indiquer que
Annulation de la minuterie de mise
en marche
Appuyez plusieurs fois sur
1
• L’icône ci-dessous clignote au bas de l'écran.
Appuyez sur le bouton SET/CANCEL pour
2
annuler la minuterie.
.
Annulation de la minuterie d’arrêt
Appuyez plusieurs fois sur
1
• L’icône ci-dessous clignote au bas de l'écran.
Appuyez sur le bouton SET/CANCEL pour
2
annuler la minuterie.
.
Annulation du réglage de minuterie
• Appuyez sur
de la minuterie.
pour annuler tous les réglages
Page 56

18 FONCTIONNEMENT
TIMER
TIMER
Utilisation du mode Veille
(facultatif)
Utilisez le mode Veille pour arrêter le climatiseur
automatiquement lorsque vous allez vous coucher.
Allumez l’appareil.
1
Appuyez plusieurs fois sur
2
• L’icône ci-dessous clignote au bas de l'écran.
Appuyez sur ou pour régler l’heure
3
(jusqu’à 7 heures).
Appuyez sur le bouton SET/CANCEL pour
4
terminer.
•
est affiché à l’écran.
.
Utilisation de la fonction
Veille simple (facultatif)
Utilisez le mode Veille pour arrêter le climatiseur
automatiquement lorsque vous allez vous coucher.
Allumez l’appareil.
1
Appuyez plusieurs fois sur
2
• L’icône ci-dessous clignote au bas de l'écran.
Appuyez sur ou pour régler l’heure
3
(jusqu’à 7 heures).
Appuyez sur le bouton SET/CANCEL pour
4
terminer.
•
est affiché à l’écran.
.
REMARQUE
•
est affiché à l’écran.
• L’unité intérieure affiche le réglage de 1 à 7 heures
pendant 5 secondes seulement, puis retourne à
l’affichage de la température réglée.
• En mode Refroidissement ou Déshumidification, la
température augmente à hauteur de 1 °C (1,8 °F)
après 30 minutes et de 1 °C (1,8 °F) encore après
30 autres minutes pour vous permettre de dormir
plus confortablement.
• La température augmente jusqu’à 2 °C (3,6 °F) à
partir de la température prédéfinie.
• Même s’il est possible de changer le symbole
correspondant à la vitesse du ventilateur sur
l’écran, la vitesse est réglée automatiquement.
REMARQUE
• Cette fonction est désactivée lorsque vous réglez
la minuterie d’arrêt.
Page 57

19FONCTIONNEMENT
FRANÇAIS
kW [3 s]
kW
kWh
kW [3 s]
kW
kWh
SWING
Utilisation de la fonction
d’affichage de la
consommation énergétique
(facultatif)
Cette fonction affiche la consommation énergétique
de l’appareil pendant qu’il fonctionne.
Affichage de la consommation
énergétique actuelle
Allumez l’appareil.
1
Maintenez le bouton
2
environ 3 secondes.
• La consommation d'énergie instantanée (
ou
certains appareils intérieurs.
) s'affiche pendant un moment sur
Affichage de la consommation
énergétique cumulative (facultatif)
Allumez l’appareil.
1
Maintenez le bouton
2
environ 3 secondes.
• La consommation d'énergie cumulative (
) s'affiche pendant un moment sur certains
appareils intérieurs.
enfoncé pendant
enfoncé pendant
Utilisation de la fonction de
désactivation de l'éclairage
(facultatif)
Luminosité de l’écran d’affichage
Vous pouvez régler la luminosité de l’écran
d’affichage de l’unité intérieure.
• Appuyez sur le bouton LIGHT OFF.
REMARQUE
• Allumer/Éteindre l’écran de l’Affichage.
Utilisation de la fonction
Comfort Air (débit d’air
confortable) (facultatif)
Utilisation du volet de confort
Cette fonction commode redirige le volet selon des
réglages pour empêcher l'air de souffler directement
sur les occupants de la pièce.
Allumez l’appareil.
1
Appuyez plusieurs fois sur COMFORT AIR pour
2
sélectionner la direction souhaitée.
ou est affiché à l’écran.
•
REMARQUE
•
ou est affiché à l’écran de certaines unités
REMARQUE
• La télécommande n’affiche pas cette information.
• kW fait référence à la consommation énergétique
instantanée.
• kWh fait référence à la consommation énergétique
cumulative.
• Si la puissance est de plus de 99 kWh, qui
représente la plage d'expression, maintenez-la à
99 kWh.
• Éteindre l’appareil réinitialise cette valeur.
• Afficher une puissance sous 10 kW(h) avec une
unité de 0,1 kW(h), et afficher une puissance audessus de 10 kW(h) avec une unité de 1 kW(h).
• La puissance réelle peut différer de la puissance
affichée.
intérieures.
• Cette fonction est désactivée lorsque vous appuyez
sur MODE ou JET MODE.
• Cette fonction est désactivée et l’oscillation
verticale est activée lorsque vous appuyez sur
.
• Si cette fonction est éteinte, le volet horizontal
fonctionne de façon automatique selon le mode
choisi.
Page 58

20 FONCTIONNEMENT
Utilisation de la fonction
d'économie de l'énergie
(facultatif)
Cette fonction réduit la consommation énergétique en
mode Refroidissement et augmente la température
à un niveau optimal pour créer un environnement
plus confortable. La température s’ajuste
automatiquement à 22 °C si la température désirée
est inférieure à 22 °C et demeure constante si la
température ambiante est supérieure à 22 °C
Allumez l’appareil.
1
Appuyez plusieurs fois sur le bouton MODE pour
2
sélectionner le mode Refroidissement.
Appuyez sur le bouton ENERGY SAVING.
3
•
est affiché à l’écran.
Utilisation de la fonction
de contrôle de l'énergie
(facultatif)
Allumez l’appareil.
1
Appuyez sur le bouton ENERGY CTRL.
2
• Appuyez plusieurs fois sur ENERGY CTRL
pour sélectionner chaque étape.
REMARQUE
• Étape 1 : La puissance absorbée est réduite
de 20 % par rapport à la puissance absorbée
nominale.
−
• Étape 2 : La puissance absorbée est réduite de 40
% par rapport à la puissance absorbée nominale.
−
• Étape 3 (facultatif) : La puissance absorbée
est réduite de 60 % par rapport à la puissance
absorbée nominale.
est affiché à l’écran.
est affiché à l’écran.
−
•
(étape 1) ou (étape 2) est affiché à l’écran de
certaines unités intérieures.
• Cette fonction est offerte avec le mode
Refroidissement.
• La capacité peut être réduite lorsque le mode de
contrôle de l’énergie est sélectionné.
• La température souhaitée est affichée pendant
environ 5 secondes si vous appuyez sur FAN
SPEED,
• La température ambiante est affichée pendant
environ 5 secondes si vous appuyez sur ROOM
TEMP.
est affiché à l’écran.
ou .
Page 59

FRANÇAIS
Utilisation de fonctions
spéciales
Allumez l’appareil.
1
Appuyez plusieurs fois sur le bouton FUNC pour
2
sélectionner la fonction souhaitée.
Appuyez sur le bouton SET/CANCEL pour
3
terminer.
Écran Description
Le générateur d’ions utilise
des millions d’ions pour aider
à améliorer la qualité de l’air
intérieur.
Pour réduire le bruit des unités
extérieures.
Pour favoriser l’hydratation de la
peau en générant des nuages
d’ions.
Pour réduire l’humidité intérieure
rapidement.
Pour conserver la température
minimale de la pièce et empêcher
les objets qui s'y trouvent de geler.
Pour éloigner les moustiques.
Pour éliminer l’humidité dans
l’unité intérieure.
Pour créer un environnement de
sommeil confortable.
21FONCTIONNEMENT
REMARQUE
• Certaines fonctions ne sont pas prises en charge
selon le modèle.
• Il est possible que l’information soit présentée
différemment sur la télécommande.
Page 60

22 FONCTIONNEMENT
Annulation de fonctions spéciales
Appuyez plusieurs fois sur le bouton FUNC pour
1
sélectionner la fonction souhaitée.
Appuyez sur le bouton SET/CANCEL pour
2
annuler la fonction.
Utilisation de la fonction Purification
d’air
Ces fonctions permettent de purifier l’air au moyen
d’un filtre à air et de particules ioniques.
Fonction Affichage Description
Les particules
ioniques émises par
Ioniseur
Plasma
l’ioniseur stérilisent
les bactéries
aériennes et autres
substances nuisibles.
Cette fonction élimine
les contaminants
microscopiques dans
l’air entrant pour
fournir de l’air propre
et frais.
Utilisation du mode Silencieux
Cette fonction permet d'éviter des plaintes des
voisins en réduisant le bruit émis par les unités
extérieures.
est affiché à l’écran.
•
REMARQUE
• Cette fonction est désactivée lorsque vous appuyez
sur MODE, ENERGY CTRL ou JET MODE.
• Cette fonction est offerte conjointement avec les
modes Refroidissement, Chauffage, Changement
automatique et Fonctionnement automatique.
Utilisation de la fonction Ion Care
(soins par ionisation)
Cette fonction hydrate votre peau en générant des
nuages d’ions qui sont absorbés par la surface de la
peau.
est affiché à l’écran pendant environ
•
3 secondes.
REMARQUE
• Cette fonction est offerte avec les modes
Refroidissement, Ventilation et Purification de l'air.
REMARQUE
• Vous pouvez utiliser cette fonction sans allumer le
climatiseur.
• Le voyant des fonctions Plasma et Refroidissement
s’allument lorsque le mode Élimination de la fumée/
Plasma est utilisé sur certains modèles.
• Ne touchez pas à l’ioniseur lorsqu’il est en marche.
• Il est possible que l’information soit présentée
différemment sur la télécommande.
Utilisation de la fonction Jet Dry (jets
d’assèchement)
Cette fonction maximise le rendement de la
déshumidification.
et sont affichés à l’écran.
•
REMARQUE
• Cette fonction est offerte avec les modes
Refroidissement, Déhumidification, Fonctionnement
automatique, Ventilation et Purification de l'air.
• Cette fonction est offerte avec le mode Veille.
• Cette fonction est désactivée lorsque vous appuyez
sur le bouton MODE.
Page 61

23FONCTIONNEMENT
FRANÇAIS
SWING
Utilisation du mode Low Heating
(chauffage à faible puissance)
Cette fonction de chauffage assure le maintien de
la température minimale de la pièce et empêche
les objets qui s'y trouvent de geler, comme dans
une maison de vacances qui n'est pas occupée en
permanence.
et sont affichés à l’écran.
•
REMARQUE
• Cette fonction est offerte avec le mode Chauffage.
• En utilisant le mode LH, appuyez sur les boutons
, , MODE, FAN SPEED, l’appareil retourne
au mode Chauffage avec les réglages 30 °C et
haute vitesse.
• Si vous appuyez sur JET MODE en utilisant le
mode de chauffage à faible puissance, cette
fonction est désactivée et le mode de chauffage
rapide est activé immédiatement. (Uniquement sur
les modèles avec mode Chauffage.)
• En cas d’erreur, le fonctionnement peut être
interrompu pour protéger l'appareil.
• Les boutons COMFORT AIR et
pas être utilisés lorsque la fonction LH est activée.
ne peuvent
Utilisation de la fonction Anti
Mosquito (antimoustique)
Cette fonction éloigne les moustiques en générant
des ondes à haute fréquence.
est affiché à l’écran.
•
REMARQUE
• Vous pouvez utiliser cette fonction sans allumer le
climatiseur.
Utilisation du mode Nettoyage
automatique
De l’humidité s’accumule à l’intérieur de l’unité
intérieure en utilisant les modes Refroidissement et
Déshumidification. Cette fonction élimine une telle
humidité.
est affiché à l’écran.
•
REMARQUE
• Certaines fonctions ne peuvent pas être utilisées
lorsque la fonction Nettoyage automatique est
activée.
• Si vous éteignez l’appareil, le ventilateur tourne
pendant 30 minutes afin de nettoyer l’intérieur de
l’unité intérieure.
Utilisation de la fonction Comfort
Sleep (sommeil confortable)
Cette fonction règle le climatiseur automatiquement
afin de créer un environnement propice au sommeil.
et sont affichés à l’écran.
•
REMARQUE
• Cette fonction est offerte avec le mode
Refroidissement.
• Le volet arrête d’osciller et se replace à un angle
indirect après 30 minutes, même si la pièce
n’est pas encore à la température idéale pour le
sommeil.
• La notion d’environnement de sommeil confortable
diffère d’une personne à l’autre.
est affiché à l’écran de certaines unités
•
intérieures.
Page 62

24 FONCTIONS INTELLIGENTES
FONCTIONS INTELLIGENTES
Utilisation de l’application LG
SmartThinQ
Choses à vérifier avant d'utiliser
l'application SmartThinQ de LG.
• Pour les électroménagers portant le logo .
Vérifiez la distance entre l’appareil et le routeur
1
sans fil (réseau Wi-Fi).
• S’il y a une trop grande distance entre
l’appareil et le routeur sans fil, l’intensité du
signal s’affaiblit. L’enregistrement peut prendre
du temps ou l’installation peut échouer.
Désactivez les Données Mobiles ou les
2
Données cellulaires sur votre téléphone
intelligent.
• Pour les iPhone, désactivez les données en
vous rendant dans Paramètres → Réseau
cellulaire → Données cellulaires.
Connectez votre téléphone intelligent au routeur
3
sans fil.
REMARQUE
• Pour vérifier l’état de la connexion Wi-Fi, assurez-
vous que l’icône Wi-Fi
panneau de commande, est allumée.
• L’appareil prend seulement en charge les réseaux
Wi-Fi de 2,4 GHz. Pour vérifier la fréquence de
votre réseau, contactez votre fournisseur de
services Internet ou référez-vous au manuel de
votre routeur sans fil.
• LG SmartThinQ n’est pas responsable des
problèmes de connexion au réseau ni des pannes,
défaillances ou erreurs causées par la connexion
au réseau.
• Un appareil qui ne parvient pas à se connecter au
réseau Wi-Fi est peut-être trop éloigné du routeur.
Achetez un répéteur Wi-Fi (amplificateur de
fréquences) pour accroître la force du signal Wi-Fi.
• La connexion Wi-Fi n’est peut-être pas établie
ou elle peut avoir été interrompue en raison de
l’environnement du réseau domestique.
• Selon votre fournisseur d’accès Internet, il est
possible que la connexion réseau ne fonctionne
pas correctement.
• L’environnement sans fil peut causer un
ralentissement du fonctionnement du réseau sans
fil.
• L’appareil ne peut pas être enregistré en raison
de problèmes avec la transmission du signal sans
fil. Débranchez l’appareil et attendez environ une
minute avant de réessayer.
• Si le pare-feu de votre routeur sans fil est activé,
désactivez-le ou ajoutez-y une exception.
• Le nom du réseau sans fil (SSID) doit être une
combinaison de lettres et de chiffres anglais.
(N’utilisez pas de caractères spéciaux.)
• L’interface utilisateur (IU) du téléphone intelligent
peut varier en fonction du système d’exploitation
(SE) mobile et du fabricant.
• Si le protocole de sécurité du routeur est configuré
sur WEP, vous ne pourrez peut-être pas configurer
le réseau. Veuillez le configurer à l’aide d’autres
protocoles de sécurité (nous recommandons
WPA2) et enregistrez le produit à nouveau.
, qui se trouve sur le
Page 63

25FONCTIONS INTELLIGENTES
FRANÇAIS
Installation de l’application LG
SmartThinQ
À partir d’un téléphone intelligent, cherchez
l’application LG SmartThinQ dans la boutique Google
Play ou l’App Store d’Apple. Suivez les directives
pour télécharger et installer l’application.
Fonction Wi-Fi
• Pour les électroménagers portant le logo .
Grâce aux fonctions intelligentes pratiques, vous
pouvez établir une connexion avec l’appareil à partir
d’un téléphone intelligent.
Smart Diagnosis
Si vous utilisez la fonction Smart Diagnosis, vous
recevrez des renseignements utiles, tels que la
bonne façon de vous servir de l’appareil en fonction
de l’utilisation habituelle qui en est faite.
Réglages
Cette fonction vous permet de régler différentes
options de l'appareil et de l'application.
REMARQUE
• Si vous changez le routeur sans fil, le fournisseur
de service Internet ou le mot de passe, vous devez
supprimer l’appareil enregistré depuis l’application
LG SmartThinQ et l’enregistrer à nouveau.
• L’application est sujette à des modifications à des
fins d’amélioration de l’appareil, et ce, sans que
l’utilisateur en soit avisé.
• Les fonctions offertes peuvent varier selon le
modèle.
MC
Informations sur les logiciels libres
Pour obtenir le code source conformément aux
dispositions de la licence publique générale, de
la licence publique générale limitée, de la licence
publique Mozilla et de toute autre licence régissant
les logiciels à code source libre contenus dans cet
appareil, visitez le site http://opensource.lge.com.
En plus du code source, toutes les dispositions de
licence, les exonérations de garantie et les avis de
droits d’auteurs peuvent aussi être téléchargés.
LG Electronics mettra également à votre disposition
le code source libre sur CD-ROM pour un prix
couvrant le coût de la distribution (coût du support,
de l'expédition et de la manutention) sur simple
demande par courriel à l'adresse
opensource@lge.com. Cette offre est valable
pendant une période de trois ans à compter de
la date de la dernière distribution de ce produit.
Cette offre est valide pour quiconque possède cette
information.
Page 64

26 FONCTIONS INTELLIGENTES
Utilisation de la fonction Smart
Diagnosis
MC
sur un téléphone
intelligent
• Pour les électroménagers portant le logo ou
Utilisez cette fonction si vous avez besoin d’un
diagnostic précis réalisé par le centre d’information à
la clientèle de LG lorsque l’appareil ne fonctionne pas
correctement ou ne fonctionne plus.
MC
La fonction Smart Diagnosis
que lorsque l’appareil est mis sous tension. Si
l’appareil ne peut pas être mis sous tension, le
dépannage doit être effectué sans la fonction Smart
DiagnosisMC.
REMARQUE
• Assurez-vous que la pièce est silencieuse afin
que votre téléphone soit en mesure de capter
correctement les bips émis par l’unité intérieure.
ne peut être activée
Page 65

FRANÇAIS
ENTRETIEN
AVERTISSEMENT
• Avant de nettoyer ou d'effectuer l'entretien, débrancher l'alimentation électrique et attendre l'arrêt du
ventilateur.
Si le climatiseur ne va pas être utilisé pendant une période prolongée, séchez-le pour le maintenir dans un état
optimal. Nettoyez régulièrement le produit pour maintenir une performance optimale et prévenir une panne
éventuelle.
• Séchez le climatiseur à fond en activant le mode Fan (ventilation) pendant 3 à 4 heures puis débranchez
l'alimentation. Il se peut que l'intérieur soit endommagé si de l'humidité subsiste dans les composants.
• Avant d'utiliser le climatiseur à nouveau, séchez une fois de plus les composants internes du climatiseur
en activant le mode Fan (ventilation) pendant 3 à 4 heures. Cette opération aide à supprimer les odeurs
éventuelles résultant de l'humidité.
Filtre à air
27ENTRETIEN
• L’élément peut varier selon le modèle.
Page 66

28 ENTRETIEN
Type Description Intervalle
Filtre à air Nettoyez avec un aspirateur ou les mains.
Filtre triple Nettoyez avec un aspirateur ou une brosse. Tous les 3 mois
Filtre à
micropoussières
Ioniseur
(facultatif)
Unité intérieure
Unité extérieure
Nettoyez avec un aspirateur ou une brosse. Tous les 6 mois
Utilisez un coton-tige sec pour éliminer toute poussière. Tous les 6 mois
Nettoyez la surface de l'unité intérieure à l'aide d'un chiffon sec et
doux.
Demandez à un professionnel de nettoyer le bac de récupération. Une fois par an
Demandez à un professionnel de nettoyer le tuyau du bac de
récupération.
Remplacer les piles de la télécommande. Une fois par an
Demandez à un professionnel de nettoyer les serpentins de
l'échangeur thermique et les orifices de ventilation du panneau.
(consultez un technicien.)
Demandez à un professionnel de nettoyer le ventilateur. Une fois par an
Demandez à un professionnel de nettoyer le bac de récupération. Une fois par an
Demandez à un professionnel de vérifier que l'assemblage du
ventilateur soit bien serré.
Nettoyez les composants électriques avec des jets d'air. Une fois par an
Toutes les
2 semaines
Régulièrement
Tous les 4 mois
Une fois par an
Une fois par an
REMARQUE
• N’utilisez jamais une eau qui chauffe à plus de 40 °C pour nettoyer les filtres. Elle pourrait causer une
déformation ou une décoloration des composants.
• N’utilisez jamais des substances volatiles lorsque vous nettoyez les filtres. Ces produits peuvent endommager
la surface du produit.
• Ne lavez pas le filtre à micropoussières avec de l’eau; cela pourrait l’endommager (facultatif).
• Ne lavez pas le filtre de protection triple avec de l'eau, car le filtre risquerait d'être endommagé (facultatif).
Page 67

29ENTRETIEN
FRANÇAIS
Nettoyage du filtre à air
Nettoyez le filtre à air toutes les deux semaines ou
plus souvent, si nécessaire.
REMARQUE
• Le filtre à air peut être endommagé s’il est plié.
• Si le filtre à air est installé incorrectement, la
poussière et d’autres substances pénètrent à
l’intérieur de l’appareil.
Type 1
Se placer au-dessus de l’unité intérieure permet de
retirer le filtre supérieur plus aisément.
Mettez le système hors tension et débranchez le
1
cordon d’alimentation.
Tenez le bouton du filtre à air et soulevez ce
2
dernier légèrement pour le retirer de l’unité.
Appuyez sur les crochets pour installer le filtre
7
dans l’unité.
Consultez les instructions sur le côté du
8
couvercle avant pour installer correctement le
filtre.
Type 2
Mettez le système hors tension et débranchez le
1
cordon d’alimentation.
Ouvrez le couvercle avant.
2
• Soulevez légèrement les deux côtés du
couvercle.
Tenez les boutons des filtres à air et tirez
3
légèrement vers le bas pour les retirer de l’unité
intérieure.
Retirez-le de l’unité intérieure.
3
Nettoyez le filtre avec un aspirateur ou avec de
4
l'eau tiède et un détergent neutre.
Laissez sécher le filtre à l’ombre.
5
Insérez les crochets du filtre à air dans le
6
couvercle avant.
Nettoyez le filtre avec un aspirateur ou avec de
4
l'eau tiède et un détergent neutre.
Laissez sécher les filtres à l’ombre.
5
Insérez les crochets des filtres à air dans le
6
couvercle avant.
Consultez les instructions sur le côté du
7
couvercle avant pour installer correctement les
filtres à air.
Page 68

30 ENTRETIEN
Nettoyez le filtre à
micropoussières et le filtre
triple (facultatif)
Mettez le système hors tension et débranchez le
1
cordon d’alimentation.
Retirez les filtres à air de l’unité intérieure.
2
Retirez le filtre à micropoussières et le filtre triple
3
de l’appareil intérieur.
Type 1
Type 2
Insérez le filtre à micropoussières et le filtre
5
triple.
Type 1
Type 2
Installez les filtres à air.
6
Consultez les instructions sur le côté du
7
couvercle avant pour installer correctement les
filtres à air.
Nettoyez les filtres à l'aide d'un aspirateur.
4
REMARQUE
• Les caractéristiques et l’emplacement du filtre à
micropoussières et du filtre triple peuvent varier
selon le type de modèle.
Page 69

31DÉPANNAGE
FRANÇAIS
DÉPANNAGE
Fonction de diagnostic automatique
Ce produit comporte une fonction intégrée de diagnostic automatique. En cas d’erreur, le voyant de l’unité
intérieure clignote à des intervalles de 2 secondes. Le cas échéant, communiquez avec votre concessionnaire
ou un centre de service local.
Avant d'appeler le réparateur
Veuillez vérifier les éléments suivants avant de communiquer avec le centre de service. Si le problème persiste,
communiquez avec votre centre de service local.
Problème Causes possibles Mesures correctives
Une odeur de roussi ou un
bruit étrange provient du
climatiseur.
De l’eau fuit de l’unité
intérieure même si le niveau
d’humidité est faible.
Le câble d’alimentation est
Le climatiseur ne
fonctionne pas
correctement.
Le climatiseur ne
fonctionne pas.
endommagé ou produit une
chaleur excessive.
Un commutateur, un
disjoncteur (sécurité,
mise à la masse) ou un
fusible ne fonctionnent pas
correctement.
La fonction de diagnostic
automatique génère un code
d’erreur.
Le climatiseur est débranché.
Un fusible est grillé ou
l’alimentation est coupée.
Il y a une coupure électrique.
La tension est très élevée ou
très faible.
Le climatiseur s'est arrêté
automatiquement à une heure
prédéfinie.
Le réglage des piles dans la
télécommande est incorrect.
• Mettez le climatiseur hors tension ou
débranchez le câble d’alimentation, et
communiquez avec le centre de service.
• Vérifiez que le câble d’alimentation est branché
sur la prise et que les isolateurs de courant
sont activés.
• Remplacez le fusible ou vérifiez si le
disjoncteur a sauté.
• Mettez le climatiseur hors tension lorsque
survient une coupure électrique.
• Lorsque l’alimentation est restaurée, patientez
pendant 3 minutes, puis remettez le climatiseur
en marche.
• Vérifiez si le disjoncteur a sauté.
• Appuyez sur le bouton de mise en marche.
• Assurez-vous que les piles sont insérées
correctement dans la télécommande.
• Si les piles sont installées correctement, et
que le climatiseur ne fonctionne toujours pas,
remplacez les piles et essayez à nouveau.
Page 70

32 DÉPANNAGE
Problème Causes possibles Mesures correctives
• Assurez-vous que des rideaux, des persiennes
ou de meubles ne bloquent pas l’avant du
climatiseur.
• Nettoyez le filtre à air toutes les deux
semaines.
• Consultez la rubrique « Nettoyage du filtre à
air » pour plus de renseignements.
• En été, le refroidissement de l’air intérieur
peut prendre plus de temps. Dans ce cas,
sélectionnez le mode refroidissement par jets
d’air pour refroidir l’air intérieur rapidement.
• Assurez-vous qu’il n’y a pas de fuite d’air au
niveau des points de ventilation de la pièce.
• Réglez la température souhaitée à un niveau
inférieur à la température actuelle.
• Évitez d’utiliser un générateur de chaleur
comme un four électrique ou un brûleur à gaz
lorsque le climatiseur est en marche.
• En mode Ventilateur, l’air est soufflé du
climatiseur sans refroidir ou chauffer l'air
intérieur.
• Changez le mode de fonctionnement pour
passer au mode Refroidissement.
• L’effet de refroidissement pourrait être
insuffisant.
• Certains modes de fonctionnement ne
permettent pas de régler la vitesse de
ventilation. Sélectionnez un mode de
fonctionnement qui vous permet de le faire.
• Certains modes de fonctionnement ne
permettent pas de régler la température.
Sélectionnez un mode de fonctionnement qui
vous permet de le faire.
• La fonction de minuterie était peut-être activée,
et a arrêté l’appareil. Vérifiez les réglages de la
minuterie.
• Attendez que le courant soit rétabli. Si la
fonction de redémarrage automatique est
activée, votre unité se remettra en marche
quelques minutes après le rétablissement du
courant.
Le climatiseur ne
génère pas d’air
frais.
La vitesse de
ventilation ne peut
pas être réglée.
Il est impossible
de régler la
température.
Le climatiseur cesse
de fonctionner alors
qu’il est allumé.
L’air ne circule pas
normalement.
Le filtre à air est encrassé.
La température ambiante est
très élevée.
L’air froid s’échappe de la
pièce.
La température souhaitée est
supérieure à la température
actuelle.
Il existe une source de
chauffage à proximité du
climatiseur.
Le mode Ventilateur est
sélectionné.
La température extérieure est
trop élevée.
La fonction Jet mode ou
Fonctionnement automatique
est sélectionnée.
Le mode de ventilation ou
de refroidissement par jets
d’air ou de ventilation est
sélectionné.
Le climatiseur cesse de
fonctionner subitement.
Il y a eu une coupure
électrique durant le
fonctionnement de l’appareil.
Page 71

FRANÇAIS
Problème Causes possibles Mesures correctives
L’unité intérieure
continue de
fonctionner même
après avoir été
éteinte.
La sortie d’air de
l’unité intérieure
dégage de la vapeur.
De l’eau fuit de
l’unité intérieure.
L’appareil est
bruyant ou vibre en
fonctionnant.
Une odeur émane de
l’unité intérieure.
Le climatiseur ne
génère pas d’air
chaud.
La fonction de nettoyage
automatique est en marche.
L’air refroidi sortant du
climatiseur crée de la vapeur.
En mode Chauffage, de l’eau
de condensation coule de
l’échangeur thermique.
On peut entendre un son de
clic lorsque l’appareil se met
en marche ou s’arrête en
raison du mouvement de la
vanne d’inversion.
Crépitements : Les pièces
de plastique à l’intérieur de
l’appareil émettent des bruits
lorsqu’elles se contractent
ou se dilatent lors de
changements soudains de
température.
Bruit de souffle ou
d’écoulement : Le frigorigène
circule dans les tuyaux du
climatiseur.
Des substances odorantes
(comme la fumée de cigarette)
peuvent être absorbées par
l’unité et ressortir avec l’air
sortant.
Lorsque le mode Chauffage
est activé, le volet est presque
entièrement fermé et aucun air
ne sort de l’appareil, même si
ce dernier est en marche.
L’unité extérieure est réglée au
mode Dégel.
La température extérieure est
trop basse.
• Laissez le nettoyage automatique se terminer,
car il élimine l’humidité restante à l’intérieur de
l'appareil. Si vous ne voulez pas utiliser cette
fonction, vous pouvez éteindre l’appareil.
• Lorsque la température de la pièce descend, ce
phénomène cesse.
• Dans ce cas, il faut installer un tuyau de
vidange sous le bac de récupération.
Communiquez avec l'installateur.
• Ces symptômes sont normaux. Le bruit
cessera.
• Si l’odeur persiste, vous devez nettoyer le
filtre. Si ce n’est pas suffisant, Communiquez
avec le centre de service pour faire nettoyer
l'échangeur thermique.
• Cette situation est normale. Veuillez attendre
jusqu’à ce que l’unité ait généré suffisamment
d’air chaud pour qu’il sorte de l’appareil.
• En mode Chauffage, de la glace/du givre
s’accumule sur les serpentins lorsque la
température diminue. Cette fonction élimine
une couche de givre sur les serpentins; le
processus prend environ 15 minutes.
• L’effet de chauffage pourrait être insuffisant.
33DÉPANNAGE
Page 72

34 DÉPANNAGE
Problème Causes possibles Mesures correctives
Votre appareil
domestique et votre
téléphone intelligent
ne sont pas
connectés au réseau
Wi-Fi.
Le mot de passe donnant
accès au réseau Wi-Fi auquel
vous essayez de vous
connecter est incorrect.
Les Données Mobiles de votre
téléphone intelligent sont
activées.
Le nom du réseau sans fil
(SSID) est erroné.
La fréquence du routeur n’est
pas de 2,4 GHz.
La distance entre l’appareil et
le routeur est trop grande.
• Cherchez le réseau Wi-Fi connecté à votre
téléphone intelligent et supprimez-le, puis
enregistrez votre appareil sur l’application
SmartThinQ de LG.
• Désactivez les Données Mobiles de votre
téléphone intelligent et enregistrez l’appareil en
utilisant le réseau Wi-Fi.
• Le nom du réseau sans fil (SSID) doit être une
combinaison de lettres et de chiffres anglais.
(N’utilisez pas de caractères spéciaux.)
• Seule une fréquence de routeur de 2,4 GHz
est prise en charge. Réglez le routeur sans
fil à 2,4 GHz et connectez-y l’appareil. Pour
connaître la fréquence du routeur, informezvous auprès de votre fournisseur de services
Internet ou du fabricant du routeur.
• Si la distance entre l’appareil et le routeur
est trop grande, le signal peut être faible et
la connexion peut ne pas être configurée
correctement. Déplacez le routeur afin qu’il soit
plus près de l’appareil.
REMARQUE
• Certaines fonctions ne sont pas prises en charge selon le modèle.
Page 73

35GARANTIE (CANADA)
FRANÇAIS
GARANTIE (CANADA)
AVIS D'ARBITRAGE: LA PRÉSENTE GARANTIE LIMITÉE CONTIENT UNE DISPOSITION SUR L'ARBITRAGE
QUI EXIGE QUE LE RÈGLEMENT DES DIFFÉRENDS ENTRE VOUS ET LG S’EFFECTUE PAR ARBITRAGE
EXÉCUTOIRE PLUTÔT QUE DEVANT UN TRIBUNAL, À MOINS QUE LES LOIS DE VOTRE PROVINCE
OU TERRITOIRE L'INTERDISENT OU QUE, DANS UN AUTRE TERRITOIRE DE COMPÉTENCE, VOUS
VOUS PRÉVALIEZ D'UNE OPTION DE RETRAIT. LES RECOURS COLLECTIFS ET LES PROCÈS DEVANT
JURY NE SONT PAS AUTORISÉS PAR LE PROCESSUS D'ARBITRAGE. VEUILLEZ VOUS RÉFÉRER CIDESSOUS À L'ARTICLE « PROCÉDURE DE RÈGLEMENT DE DIFFÉREND ».
PROCÉDURE DE RÈGLEMENT DE DIFFÉREND :
SAUF LA OÙ LA LOI L'INTERDIT, TOUT DIFFÉREND ENTRE VOUS ET LG ASSOCIÉ DE QUELQUE FAÇON
QUE CE SOIT À LA PRÉSENTE GARANTIE LIMITÉE SE RÈGLE EXCLUSIVEMENT PAR ARBITRAGE
EXÉCUTOIRE PLUTÔT QUE DEVANT UN TRIBUNAL DE DROIT COMMUN. SAUF LA OÙ LA LOI L'INTERDIT,
VOUS ET LG RENONCEZ IRRÉVOCABLEMENT À TOUT DROIT À UN PROCÈS DEVANT JURY, AINSI QU'À
EXERCER UN RECOURS COLLECTIF OU À Y PARTICIPER.
Définitions. Aux fins du présent article, « LG » désigne LG Electronics Canada Inc., ses sociétés mères,
ses filiales et ses sociétés affiliées et tous leurs dirigeants, administrateurs, employés, agents, bénéficiaires,
détenteurs précédents des mêmes droits, successeurs, cessionnaires et fournisseurs; « différend » et «
réclamation » englobent tout différend, réclamation ou litige de quelque sorte que ce soit (fondés sur une
responsabilité contractuelle, délictuelle, légale, réglementaire ou découlant d'une ordonnance, par fraude,
fausse représentation ou sous quelque régime de responsabilité que ce soit) découlant de quelque façon que ce
soit de la vente, des conditions ou de l'exécution du produit ou de la présente Garantie limitée.
Avis de différend. Si vous prévoyez engager une procédure d’arbitrage, vous devez d’abord envoyer à LG
un préavis écrit d’au moins 30 jours à l’adresse suivante : Équipe juridique LGECI, Norelco Drive, North York,
Ontario, Canada M9L 2X6 (l’ « avis de différend »). Vous et LG convenez de discuter en toute bonne foi pour
tenter de régler le différend à l’amiable. L’avis doit mentionner votre nom, votre adresse, votre numéro de
téléphone, le produit faisant l’objet de la réclamation, la nature de la réclamation et la réparation demandée.
Si vous et LG ne parvenez pas à régler le différend dans les 30 jours suivant la réception de l’avis de différend
par LG, le différend doit être réglé par arbitrage exécutoire conformément à la procédure établie aux présentes.
Vous et LG convenez que, tout au long du processus d’arbitrage, les modalités (y compris les montants)
de toute offre de règlement formulée par vous ou par LG ne seront pas divulguées à l’arbitre et resteront
confidentielles à moins d’accord contraire entre les deux parties ou que l’arbitre règle le différend.
Entente d’arbitrage exécutoire et renonciation à un recours collectif. Si la réclamation n’a pu être réglée dans
les 30 jours suivant la réception de l’avis de différend par LG, vous et LG convenez de ne régler les réclamations
vous opposant que par arbitrage exécutoire au cas par cas, à moins que vous vous prévaliez de l'option de retrait
évoquée plus haut ou que vous résidiez dans un territoire de compétences qui interdit la pleine application de
cette clause dans le cas de réclamations de ce type (dans lequel cas, si vous êtes un consommateur, cette clause
ne s'appliquera que si vous acceptez expressément l'arbitrage). Dans la mesure où la loi en vigueur le permet,
aucun différend entre vous et LG ne peut être combiné ou regroupé avec un différend faisant intervenir le produit
ou la réclamation d'une personne ou entité tierce. Plus précisément et sans limiter la portée de ce qui précède,
sauf dans la mesure où une telle interdiction n'est pas autorisée en droit, en aucun cas un différend entre vous et
LG ne peut être traité dans le cadre d'un recours collectif. Au lieu de l'arbitrage, les parties peuvent intenter une
action individuelle devant une cour des petites créances, mais cette action ne peut pas être intentée dans le cadre
d'un recours collectif, sauf dans la mesure où une telle interdiction n'est pas autorisée en droit dans votre province
ou territoire de compétences pour une réclamation en cause qui nous oppose.
Règles et procédures d’arbitrage. Pour soumettre une réclamation à un arbitrage, l'une des deux parties, soit
vous ou LG, doit déposer une demande écrite à cet effet. L'arbitrage est privé et confidentiel et s'effectue selon
une procédure simplifiée et accélérée devant un arbitre unique choisi par les parties conformément aux lois
et règlements en vigueur portant sur l'arbitrage commercial de votre province ou territoire de résidence. Vous
devez également envoyer une copie de votre demande écrite à LG Electronics Canada Inc., Legal Department
- Arbitration, 20 Norelco Drive, North York, Ontario M9L 2X6. La présente disposition sur l'arbitrage est régie
par les lois et règlements sur l'arbitrage commercial applicables de votre province ou territoire. La sentence
arbitrale peut donner lieu à un jugement de n'importe quel tribunal compétent. Toutes les décisions relèvent de
l'arbitre, à l'exception des questions associées à la portée et à l'applicabilité de la disposition sur l'arbitrage et
à l'arbitrabilité du différend, qui sont du ressort du tribunal. L'arbitre est tenu de respecter les modalités de la
présente disposition.
Page 74

36 GARANTIE (CANADA)
Droit applicable. Les lois de votre province ou territoire de’achat régissent la présente Garantie limitée et tout
différend entre nous, sauf dans la mesure où de telles lois sont supplantées par des lois fédérales, provinciales
ou territoriales applicables ou sont incompatibles avec ces dernières. Si l’arbitrage n’est pas autorisé pour
régler une réclamation, une poursuite, un différend ou un litige nous opposant, nous nous en remettrons à la
compétence exclusive des tribunaux de votre province ou territoire de’achat compétence pour le règlement de la
réclamation, de la poursuite, du différend ou du litige nous opposant.
Frais et coûts. Aucuns frais ne sont exigibles pour entamer une procédure d'arbitrage. À la réception de votre
demande d'arbitrage écrite, LG réglera rapidement la totalité des frais de dépôt de la demande d'arbitrage, sauf
si vous réclamez des dommages-intérêts supérieurs à 25 000 $. Dans ce cas, le paiement de ces frais sera
régi par les règles d'arbitrage applicables. Sauf disposition contraire aux présentes, LG paiera tous les frais de
dépôt de demande et d'administration ainsi que les honoraires de l'arbitre conformément aux règles d'arbitrage
applicables et à la présente disposition sur l'arbitrage. Si vous remportez l'arbitrage, LG règlera vos frais et
honoraires juridiques après avoir déterminé s’ils sont raisonnables en se fondant sur des facteurs comme, entre
autres, le montant de l’achat et le montant de la réclamation. Si l'arbitre juge que le motif de la réclamation ou
les réparations demandées sont futiles ou se fondent sur des motifs déplacés (au regard des lois applicables),
le paiement de tous les frais d'arbitrage sera régi par les règles d'arbitrage applicables. Dans un tel cas, vous
acceptez de rembourser à LG la totalité des montants versés qu'il vous revient autrement de payer en vertu des
règles d'arbitrage applicables. Sauf disposition contraire et si elle remporte l'arbitrage, LG renonce à tous ses
droits de vous réclamer des frais et horaires juridiques.
Audience et lieu de l’arbitrage. Si votre réclamation est égale ou inférieure à 25 000 $, vous pouvez opter
pour un arbitrage conduit selon l'une des modalités suivantes uniquement : 1) sur examen des documents
remis à l'arbitre, 2) par audience téléphonique ou 3) par audience en personne selon les dispositions des règles
d'arbitrage applicables. Si votre réclamation dépasse 25 000 $, le droit à une audience sera défini par les règles
d'arbitrage applicables. Les audiences arbitrales en personne se tiendront à l'endroit le plus proche et le plus
pratique pour les deux parties situé dans votre province ou votre territoire de résidence, sauf si nous convenons
mutuellement d'un autre lieu ou d'un arbitrage par téléphone.
Dissociabilité et renonciation. Si une partie de la présente Garantie limitée (y compris les présentes
procédures d'arbitrage) n'est pas applicable, les dispositions restantes demeurent en vigueur dans la mesure
permise par la loi applicable. Le fait de ne pas exiger la stricte exécution d'une disposition de la présente
Garantie limitée (y compris les présentes procédures d'arbitrage) ne signifie pas que nous ayons renoncé ni que
nous ayons l'intention de renoncer à toute disposition ou partie de la présente Garantie limitée.
Option de retrait. Vous pouvez vous retirer de la présente procédure de règlement de différend. Dans ce cas,
ni vous ni LG ne pouvez imposer à l'autre partie de participer à une procédure d'arbitrage. Pour vous prévaloir
de l'option de retrait, vous devez envoyer un préavis à LG dans les trente (30) jours civils à compter de la date
de l'achat du produit par le premier acheteur i) dans un courriel adressé à optout@lge.com et dont la ligne
d'objet porte la mention « Retrait de l'arbitrage » ou ii) en composant le 1-800-980-2973. Que ce soit par courriel
ou par téléphone, vous devrez donner a) votre nom et votre adresse; b) la date d'achat du produit; c) le nom ou
le numéro de modèle du produit et d) le numéro de série [qu’il est possible de trouver i) sur le produit ou ii) en
liqne au https://www.lg.com/ca_fr/soutien/reparation-garantie/demande-reparation, Trouver mes numéros de
modèle et de série].
Si vous vous prévalez de l'option de retrait, les lois de votre province ou territoire de résidence régissent la
présente Garantie limitée et tout différend entre nous, sauf dans la mesure où de telles lois sont supplantées
par des lois fédérales, provinciales ou territoriales applicables ou sont incompatibles avec ces dernières. Si
l'arbitrage n'est pas autorisé pour régler une réclamation, une poursuite, un différend ou un litige nous opposant,
nous nous en remettrons à la compétence exclusive des tribunaux de votre province ou territoire de compétence
pour le règlement de la réclamation, de la poursuite, du différend ou du litige nous opposant.
Vous ne pouvez vous prévaloir de l'option de retrait que de la manière décrite plus haut (c'est-à-dire par courriel
ou par téléphone). Aucun autre type d'avis ne sera pris en compte pour le retrait de la présente procédure de
règlement de différend. Le fait de se retirer de la présente procédure de règlement de différend ne compromet
d'aucune façon la protection accordée en vertu de la Garantie limitée, et vous continuerez à jouir de tous les
avantages prévus par la Garantie limitée. Si vous conservez ce produit sans vous prévaloir de l'option de retrait,
vous acceptez les conditions générales de la disposition sur l'arbitrage énoncée ci-dessus.
Conflit de modalités. En cas de conflit ou d'incompatibilité entre les modalités de la présente garantie limitée
et le contrat de licence d'utilisation (CLU) en ce qui concerne le règlement des différends, les modalités de la
présente garantie limitée contrôlent et régissent les droits et obligations des parties et ont préséance sur le CLU.
Page 75

ESPAÑOL
MANUAL DEL PROPIETARIO
AIRE
ACONDICIONADO
Lea este manual del propietario detenidamente antes de operar el
aparato y consérvelo a su alcance para consultarlo en cualquier
momento.
TIPO: DE MONTAJE EN PARED
Copyright © 2018 - 2019 LG Electronics Inc. Todos los derechos reservados.
www.lg.com
Page 76

ÍNDICE
2 ÍNDICE
3 INSTRUCCIONES DE SEGURIDAD
3 INSTRUCCIONES IMPORTANTES DE SEGURIDAD
7 FUNCIONAMIENTO
7 Notas para la operación
7 Piezas y funciones
8 Control remoto inalámbrico
13 Reinicio automático del aire acondicionado
13 Uso de la Función Modo
15 Uso de la función de Modo Jet
16 Uso de la función de Velocidad del ventilador
16 Uso de la función de Dirección del flujo de aire
17 Configuración del temporizador de Encendido/Apagado
18 Uso de la función Sleep (opcional)
18 Uso de la función Temporizador simple (opcional)
19 Uso de la función Visualización de energía (opcional)
19 Uso de la función de Luz apagada (opcional)
19 Uso de la función Aire confortable (opcional)
20 Uso de la función Ahorro de energía (opcional)
20 Uso de la función Control de energía (opcional)
21 Uso de funciones especiales
24 FUNCIONES INTELIGENTES
24 Cómo usar la aplicación LG SmartThinQ
27 MANTENIMIENTO
29 Limpieza del filtro de aire
30 Limpieza del micro filtro para polvo y el filtro Triple (opcional)
31 RESOLUCIÓN DE PROBLEMAS
35 GARANTÍA (USA)
Page 77

ESPAÑOL
INSTRUCCIONES DE SEGURIDAD
LEA TODAS LAS INSTRUCCIONES ANTES DE USAR
Su seguridad y la seguridad de los demás son muy importantes.
Hemos incluido muchos mensajes importantes de seguridad en este manual y en el artefacto.
Siempre lea y siga las indicaciones de todos los mensajes de seguridad.
Este es el símbolo de alerta de seguridad.
Este símbolo alerta sobre peligros potenciales que pueden ocasionarle la muerte o
lesiones a usted y a otras personas.
Todos los mensajes de seguridad aparecerán a continuación del símbolo de advertencia
de seguridad y de la palabra ADVERTENCIA o PRECAUCIÓN.
ADVERTENCIA
Si no sigue las instrucciones, podría ocasionar lesiones graves o la muerte.
PRECAUCIÓN
El incumplimiento de estas instrucciones puede causar lesiones leves, moderadas o daño
alproducto.
Todos los mensajes de seguridad le dirán cuál es el peligro potencial, cómo reducir el riesgo de
lesiones y lo que puede ocurrir en el caso de que no se sigan las instrucciones.
3INSTRUCCIONES DE SEGURIDAD
INSTRUCCIONES IMPORTANTES DE SEGURIDAD
ADVERTENCIA
Para reducir el riesgo de explosión, incendio, muerte, descargas eléctricas, lesiones
o quemaduras a las personas al utilizar este producto, siga las precauciones básicas,
incluidas las siguientes:
• La instalación o las reparaciones realizadas por personas no autorizadas pueden generar riesgos
para usted y los demás.
• La instalación DEBE cumplir con los códigos locales de construcción o, en ausencia de códigos
locales, el National Electrical Code NFPA 70/ANSI C1-1003 o la edición actual y el Canadian
Electrical Code, Parte 1 CSA C.22. 1.
• La información contenida en este manual está destinada a ser utilizada por un técnico calificado,
familiarizado con los procedimientos de seguridad y equipado con las herramientas y los
instrumentos de prueba adecuados.
• Si no se leen y siguen todas las instrucciones de este manual, es posible que se produzcan
daños a la propiedad, mal funcionamiento del equipo, lesiones personales o la muerte.
• Cuando se deba reemplazar el cable de alimentación, el trabajo de sustitución deberá ser
realizado por personal autorizado y utilizando solo piezas de repuesto originales.
• Este aparato no está diseñado para ser utilizado por personas (incluidos niños) con capacidades
físicas, sensoriales o mentales disminuidas o con falta de experiencia y conocimiento, a menos
que una persona responsable de su seguridad los supervise o los instruya acerca del uso del
mismo. Se debe supervisar a los niños para asegurar que no jueguen con el artefacto.
Page 78

4 INSTRUCCIONES DE SEGURIDAD
Instalación
• No instale el aparato de aire acondicionado en una superficie inestable o en un lugar donde exista
peligro de que se caiga.
• Comuníquese con un centro de servicio autorizado cuando instale o desee reubicar el aire
acondicionado.
• Instale el panel y la cubierta de la caja de control de manera segura.
• No instale el aire acondicionado en un lugar donde se almacenen líquidos o gases inflamables
tales como gasolina, propano, diluyente de pintura, etc.
• Asegúrese de que el tubo y el cable de alimentación que conecta las unidades del interior y el
exterior no estén demasiado tensos al instalar el aire acondicionado.
• Utilice un fusible y un disyuntor estándar que correspondan a la calificación del aire
acondicionado.
• No introduzca aire o gas al sistema, salvo que este tenga el refrigerante específico.
• Utilice gas no inflamable (nitrógeno) para comprobar si hay fugas y para purgar el aire; usar aire
comprimido o gas inflamable puede provocar incendios o explosiones.
• Las conexiones del cableado interior/exterior deben estar firmemente aseguradas y el cable
debe conducirse correctamente de manera que ninguna fuerza jale el cable de los terminales de
conexión. Las conexiones sueltas o mal realizadas pueden generar calor o provocar incendios.
• Instale un disyuntor y un tomacorriente exclusivos para el artefacto antes de usar el aire
acondicionado.
• No conecte el cable de puesta a tierra a una tubería de gas, un pararrayos o un cable telefónico
subterráneo.
• Si el cable de alimentación está dañado, debe ser reemplazado por el fabricante, un
representante de servicio o por una persona igualmente calificada a fin de evitar riesgos.
Operación
• Asegúrese de utilizar solo las piezas que figuran en la lista de piezas de servicio. Nunca intente
modificar el equipo.
• Asegúrese de que los niños no se suban sobre la unidad exterior ni la golpeen.
• Deseche las baterías en un sitio donde no exista peligro de incendio.
• Utilice únicamente el refrigerante que se especifica en la etiqueta del aire acondicionado.
• Corte el suministro eléctrico si percibe algún ruido, olor o humo que provenga del aire
acondicionado.
• No deje sustancias inflamables, como gasolina, benceno o solvente cerca del aire acondicionado.
• Comuníquese con un centro de servicio autorizado en caso de que el aire acondicionado haya
estado sumergido por las aguas en una inundación.
• No utilice el aire acondicionado durante un período prolongado en un lugar pequeño y sin la
adecuada ventilación.
• En caso de una fuga de gas (como gas freón, gas propano, gas LP, etc.) ventile bien antes de
utilizar el aire acondicionado de nuevo.
• Para limpiar el interior, comuníquese con un distribuidor o centro de servicio autorizado. El uso de
detergentes fuertes puede causar corrosión o daños en la unidad.
Page 79

ESPAÑOL
• Asegúrese de ventilar bien el ambiente cuando el aire acondicionado y un artefacto calentador
(como, por ejemplo, un calefactor) se utilicen simultáneamente.
• No bloquee la entrada ni la salida del flujo de aire.
• No introduzca las manos u otros objetos a través de la entrada o salida de aire mientras el aire
acondicionado se encuentra funcionando.
• Asegúrese de que el cable de alimentación no esté sucio, flojo o roto.
• Nunca toque, opere o repare el artefacto de aire acondicionado con las manos húmedas.
• No coloque ningún objeto sobre el cable de alimentación.
• No coloque un calefactor u otros artefactos calentadores cerca del cable de alimentación.
• No modifique ni prolongue el cable de alimentación. Los cables eléctricos con rasguños o a los
que se les haya salido el material aislante podrían ocasionar incendios o descargas eléctricas y
deben reemplazarse.
• Interrumpa el suministro de electricidad inmediatamente en caso de corte de energía o tormenta
eléctrica.
• Asegúrese de que el cable no pueda desenchufarse de un tirón ni resultar dañado durante el
funcionamiento.
• No toque el tubo de refrigerante o el tubo del agua o cualquier parte interna con la unidad en
operación o inmediatamente después de su parada.
Mantenimiento
• No limpie el artefacto rociando agua directamente sobre el mismo.
• Antes de limpiar o realizar el mantenimiento, desconecte el suministro de electricidad y espere
que el ventilador se detenga.
5INSTRUCCIONES DE SEGURIDAD
PRECAUCIÓN
Para reducir el riesgo de lesiones personales leves, mal funcionamiento o daños al
producto o la propiedad al usar este artefacto, siga las precauciones básicas de seguridad,
incluidas las siguientes:
Instalación
• No instale el aparato de aire acondicionado en una zona en la que se encuentre expuesto
directamente a la brisa marina (rocío salino).
• Instale la manguera de desagüe de forma adecuada para que el agua de la condensación drene
suavemente.
• Tenga cuidado al desembalar e instalar el aire acondicionado.
• No toque el refrigerante que se filtre durante la instalación o la reparación del artefacto.
• Transporte el aire acondicionado con la ayuda de dos o más personas o utilice un montacargas.
• Instale la unidad exterior de modo que quede protegida de la luz solar directa. No coloque la
unidad interior en un lugar donde quede expuesta directamente a la luz solar a través de las
ventanas.
• Después de la instalación o reparación del artefacto, deseche los materiales de embalaje, tales
como tornillos, clavos o baterías utilizando los embalajes adecuados.
• Instale el aire acondicionado en un lugar donde el ruido proveniente de la unidad exterior o los
gases de escape no incomoden a los vecinos. Si no lo hace, puede tener conflictos con sus
vecinos.
Page 80

6 INSTRUCCIONES DE SEGURIDAD
Operación
• Retire las pilas del control remoto si no lo va a utilizar durante un período prolongado.
• Asegúrese de que el filtro esté instalado antes de utilizar el aire acondicionado.
• Asegúrese de verificar si hay una fuga de refrigerante después de instalar o reparar el aire
acondicionado.
• Respete las normas de la región o país que corresponda relativas a la manipulación del
refrigerante y del aire acondicionado y para el desguace del artefacto.
• No coloque ningún objeto sobre el aire acondicionado.
• Nunca mezcle diferentes tipos de baterías o baterías viejas y nuevas en el control remoto.
• No haga funcionar el aire acondicionado durante mucho tiempo cuando la humedad sea muy alta
o cuando se haya dejado abierta una puerta o una ventana.
• Deje de usar el control remoto si existe una pérdida de líquido de las baterías. Si su ropa o su piel
entran en contacto con el líquido proveniente de la batería, lave con agua limpia.
• No exponga a personas, animales o plantas a la corriente fría o caliente del aire acondicionado
durante períodos prolongados.
• Ante la ingesta de líquido proveniente de una batería que gotea, lave el interior de la boca a fondo
y consulte a un médico.
• No beba el agua del desagüe del aire acondicionado.
• No utilice este producto para fines especiales, como la conservación de alimentos, obras de arte,
etc. Este es un aire acondicionado para fines de consumo, no un sistema de refrigeración de
precisión. Existe riesgo de daño o pérdida de bienes.
• No recargue ni desarme las baterías.
Mantenimiento
• Nunca toque las partes metálicas del aire acondicionado cuando retire el filtro de aire.
• Utilice un banco resistente o una escalera para limpiar, mantener o reparar el aire acondicionado
ubicado en lo alto.
• Nunca utilice solventes o productos de limpieza fuertes para limpiar el aire acondicionado ni lo
rocíe con agua. Utilice un paño suave.
Page 81

ESPAÑOL
FUNCIONAMIENTO
Notas para la operación
Sugerencias para el ahorro de energía
• No enfríe excesivamente el interior. Esto puede ser perjudicial para su salud y consumir más electricidad.
• Bloquee la luz del sol con persianas o cortinas mientras el aire acondicionado se encuentre en
funcionamiento.
• Mantenga las puertas y las ventanas cerradas herméticamente mientras el aire acondicionado se encuentre
en funcionamiento.
• Ajuste la dirección del flujo de aire de manera vertical u horizontal para hacer circular el aire del interior.
• Aumente la velocidad del ventilador para enfriar o calentar el aire del interior rápidamente, en un breve
período.
• Abra las ventanas con regularidad para ventilar, ya que la calidad del aire del interior puede deteriorarse si el
aire acondicionado se usa por períodos muy largos.
• Limpie el filtro de aire cada 2 semanas. El polvo y las impurezas recogidas en el filtro de aire pueden bloquear
el flujo de aire o debilitar las funciones de enfriamiento/deshumidificación.
Piezas y funciones
7FUNCIONAMIENTO
Unidad interior Unidad exterior
Filtro de aire
1
Entrada de aire
2
Cubierta delantera
3
Salida de aire
4
Deflector de aire (aleta horizontal)
5
Deflector de aire (rejilla vertical)
6
Botón de Encendido/Apagado (On/Off)
7
Conductos de entrada de aire
1
Conductos de salida de aire
2
NOTA
• El número y la ubicación de las luces de operación pueden variar según el modelo de aire acondicionado.
• La función puede cambiar según el tipo de modelo.
Page 82

8 FUNCIONAMIENTO
SWING
kW [3 s]
Control remoto inalámbrico
Inserción de las baterías
Si la pantalla del control remoto comienza a hacerse
tenue, cambie las baterías. Coloque baterías AAA
(1.5 V) antes de utilizar el control remoto.
Retire la tapa de las baterías.
1
Coloque las baterías nuevas y asegúrese de que
2
los polos + y - estén ubicados correctamente.
Instalación del soporte del control
remoto
Para proteger el control remoto, instale el soporte
donde no quede expuesto a la luz solar directa.
Elija un lugar seguro y de fácil acceso.
1
Método de operación
Apunte el control remoto hacia el receptor de señal,
ubicado en el lado derecho del aire acondicionado,
para operarlo.
NOTA
• El control remoto puede hacer funcionar otros
dispositivos electrónicos si lo dirige en su dirección.
Asegúrese de apuntar el control remoto hacia el
receptor de señal del aire acondicionado.
• Para un funcionamiento adecuado, limpie el
transmisor y el receptor de señal utilizando un
paño suave.
• En caso de que una función no esté incluida en
el producto, el zumbador no producirá ningún
sonido en el producto cuando se toque el botón
para dicha función en el control remoto, excepto
para las funciones Dirección del flujo de aire (
), Visualización de energía (
aire (
).
) y Purificación de
Fije el soporte ajustando los 2 tornillos
2
firmemente con un destornillador.
Page 83

9FUNCIONAMIENTO
ESPAÑOL
℃↔℉ [5 s]
SWING
ON/OFF
Configuración de la hora actual
Inserte las baterías.
1
• El siguiente ícono parpadea en la parte inferior
de la pantalla de visualización.
Presione los botones o para seleccionar
2
los minutos.
Presione el botón SET/CANCEL para finalizar.
3
NOTA
• El temporizador de Encendido/Apagado está
disponible después de que se ajusta la hora actual.
Utilización de la función de
conversión °C /°F (opcional)
Esta función cambia la unidad entre °C y °F
Operación del aire acondicionado sin
el control remoto
Puede utilizar el botón ON/OFF de la unidad interior
para operar el aire acondicionado cuando no
disponga del control remoto.
Abra la cubierta delantera (Tipo 2) o aleta
1
horizontal (Tipo 1).
Presione el botón ON/OFF.
2
Tipo 1
ON/OFF
Tipo 2
• Mantenga presionado el botón
5 segundos.
durante unos
NOTA
• El motor por pasos puede romperse si la aleta
horizontal se abre rápidamente.
• La velocidad del ventilador se encuentra
configurada en alta.
• La función puede cambiar según el tipo de modelo.
• La temperatura no puede alterarse cuando se
utiliza este botón de ON/OFF de emergencia.
• En los modelos solo frío, la temperatura está
configurada en 22 °C
• En los modelos frío-calor, la temperatura está
configurada en 22 °C a 24 °C
Page 84

10 FUNCIONAMIENTO
SWING
SWING
Uso del control remoto inalámbrico
Puede operar el aire acondicionado con mayor comodidad utilizando el control remoto.
*
MODE
TEMP
*
kW [3 s]
SWING
SWING
℃↔℉ [5 s]
SET UP
FUNC.
TIMER CANCEL
FAN
SPEED
JET
MODE
ROOM
TEMP
DIAGNOSIS [5 s]
SET
CANCEL
RESET
Pantalla
Botón
de
Descripción
visualización
2
-
Para encender/apagar el aire
acondicionado.
Para ajustar la temperatura ambiente
deseada en modo de enfriamiento,
*
calefacción o cambio automático.
Para seleccionar el modo de
enfriamiento.
Para seleccionar el modo de
calefacción.
1
MODE
Para seleccionar el modo de
deshumidificación.
Para seleccionar el modo de
ventilador.
Para seleccionar el modo de cambio
automático/operación automática.
JET
MODE
FAN
SPEED
Para cambiar la temperatura
ambiente con rapidez.
Para configurar la velocidad del
ventilador.
Para ajustar la dirección del flujo de
aire en sentido vertical u horizontal.
NOTA
• * Los botones pueden variar según el tipo de modelo.
Page 85

11FUNCIONAMIENTO
ESPAÑOL
RESET
TIMER
CANCEL
*
MODE
TEMP
*
kW [3 s]
SWING
SWING
℃↔℉ [5 s]
SET UP
FUNC.
TIMER CANCEL
FAN
SPEED
JET
MODE
ROOM
TEMP
DIAGNOSIS [5 s]
SET
CANCEL
Pantalla
Botón
de
Descripción
visualización
2
Para que el aire acondicionado se
encienda/apague automáticamente
en el momento deseado.
SET/
*
CANCEL
-
-
*LIGHT
1
OFF
- Para configurar la hora.
-
ROOM
TEMP
°C↔°F [5 s]
*ENERGY
SAVING
*COMFORT
AIR
kW [3 s] -
*ENERGY
CTRL
*COMFORT
SLEEP
DIAGNOSIS
[5 s]
-
Para establecer/cancelar las
funciones especiales y el
temporizador.
Para cancelar las configuraciones del
temporizador.
Para configurar el brillo de la pantalla
de la unidad interior.
Para mostrar la temperatura
ambiente.
Para cambiar las unidades entre °C
y °F
Para minimizar el consumo de
energía.
Para ajustar el flujo de aire,
direccionando la corriente.
Para establecer si se muestra
información relativa a la energía.
Para activar el ahorro de energía.
Para crear un ambiente confortable
para dormir.
Para verificar de manera conveniente
la información de mantenimiento del
producto.
Page 86

12 FUNCIONAMIENTO
RESET
FUNC.
*
MODE
TEMP
*
kW [3 s]
SWING
SWING
℃↔℉ [5 s]
SET UP
FUNC.
TIMER CANCEL
FAN
SPEED
JET
MODE
ROOM
TEMP
DIAGNOSIS [5 s]
SET
CANCEL
Pantalla
Botón
de
Descripción
visualización
2
El generador de iones utiliza millones
de ellos para ayudar a mejorar la
calidad del aire interior.
Para reducir el sonido de las unidades
exteriores.
*
Para mantener su piel hidratada
mediante la generación de grupos de
iones.
Para reducir la humedad interior
rápidamente.
Para mantener una temperatura
1
mínima en el ambiente y evitar
que los objetos de la habitación se
congelen.
Para ahuyentar a los mosquitos.
Para eliminar la humedad generada
dentro de la unidad interior.
RESET -
Para crear un ambiente confortable
para dormir.
Para iniciar las configuraciones del
control remoto.
NOTA
• Dependiendo del modelo, algunas funciones pueden no admitirse.
• * Los botones pueden variar según el tipo de modelo.
• Presione el botón SET/CANCEL para operar la FUNC seleccionada.
Page 87

13FUNCIONAMIENTO
ESPAÑOL
ON/OFF
Reinicio automático del aire
acondicionado
Cuando el aire acondicionado se enciende
nuevamente después de un corte de energía, esta
función restaura la configuración previa.
Desactivación del reinicio
automático
Abra la cubierta delantera (Tipo 2) o aleta
1
horizontal (Tipo 1).
Mantenga presionado el botón ON/OFF durante
2
6 segundos; luego, la unidad emitirá dos veces
un pitido y la luz parpadeará 4 veces.
• Para volver a activar la función, mantenga
presionado el botón ON/OFF durante 6
segundos. La unidad emitirá dos veces un
pitido y la luz parpadeará 4 veces.
Tipo 1
Uso de la Función Modo
Esta función le permite seleccionar la función
deseada.
Modelo solo frío
Modo Enfriamiento
Modo Operación automática (IA)
Modo Deshumidificación
Modo Ventilador
Modelo frío-calor
Modo Enfriamiento
ON/OFF
Tipo 2
NOTA
• La función puede cambiar según el tipo de modelo.
• Si mantiene presionado el botón ON/OFF de 3 a
5 segundos, en lugar de 6 segundos, la unidad
comenzará a funcionar en el modo de prueba.
En el modo de prueba, la unidad sopla aire frío
fuertemente durante 18 minutos y luego regresa a
las configuraciones predeterminadas de fábrica.
Modo Cambio automático
Modo Deshumidificación
Modo Calefacción
Modo Ventilador
Modo Enfriamiento
Encienda el aparato.
1
Presione el botón MODE repetidamente para
2
seleccionar el modo Enfriamiento.
• En la pantalla de visualización, aparece
Presione el botón o para configurar la
3
temperatura deseada.
.
Page 88

14 FUNCIONAMIENTO
Operación automática (Inteligencia
artificial, IA)
Modelo solo frío
En este modo, la velocidad del ventilador y la
temperatura se ajustan automáticamente, según la
temperatura ambiente.
Encienda el aparato.
1
Presione el botón MODE repetidamente para
2
seleccionar el modo Operación automática.
• En la pantalla de visualización, aparece
Presione el botón o para seleccionar el
3
código de operación deseada si la temperatura
es superior o inferior a la temperatura deseada.
Modo Cambio automático
Modelo frío-calor
Este modo cambia el modo automáticamente para
mantener la temperatura en ± 2 °C
Encienda el aparato.
1
Presione el botón MODE repetidamente para
2
seleccionar el modo Cambio automático.
• En la pantalla de visualización, aparece
.
Presione el botón o para configurar la
3
temperatura deseada.
Presione el botón FAN SPEED para ajustar la
4
velocidad del ventilador.
.
Modo Deshumidificación
Este modo elimina el exceso de humedad de un
ambiente muy húmedo o durante una temporada de
lluvias, a fin de evitar que se forme moho. Este modo
ajusta la temperatura ambiente y la velocidad del
ventilador automáticamente para mantener el nivel
óptimo de humedad.
Código Descripción
2 Fría
1 Poco fría
0 Mantener temperatura ambiente
-1 Poco caliente
-2 Caliente
NOTA
• En este modo, no es posible ajustar la velocidad
del ventilador, pero se puede ajustar el deflector de
aire para que rote automáticamente.
Encienda el aparato.
1
Presione el botón MODE repetidamente para
2
seleccionar el modo Deshumidificación.
• En la pantalla de visualización, aparece
NOTA
• En este modo, no es posible ajustar la temperatura
ambiente; se ajusta automáticamente.
• La temperatura ambiente no aparece en la pantalla
de visualización.
• En el modo de deshumidificación, el compresor
y el ventilador interno no operarán cuando la
temperatura ambiente del sitio sea menor a 24 °C
.
Page 89

15FUNCIONAMIENTO
ESPAÑOL
Modo Calefacción
Encienda el aparato.
1
Presione el botón MODE repetidamente para
2
seleccionar el modo Calefacción.
• En la pantalla de visualización, aparece
Presione el botón o para configurar la
3
temperatura deseada.
NOTA
•
se mostrará en la unidad interior mientras el
proceso de descongelado está en operación.
• Además, esta indicación se mostrará en la unidad
interior:
− Cuando el precalentado esté en operación.
− Cuando la temperatura ambiente haya
alcanzado la temperatura configurada.
Uso de la función de Modo
Jet
Cambio rápido de la temperatura
.
ambiente
Esta función le permite enfriar el aire del interior
rápidamente durante el verano o calentarlo
rápidamente durante el invierno.
• Modelo frío-calor: La función de Modo Jet está
disponible en los modos Enfriamiento, Calefacción
y Deshumidificación.
• Modelo solo frío: La función de Modo Jet está
disponible en las funciones de Enfriamiento,
Deshumidificación, Ventilador, modo Operación
automática y Purificación de aire.
Encienda el aparato.
1
Presione el botón MODE repetidamente para
2
seleccionar el modo deseado.
Presione el botón JET MODE.
3
• En la pantalla de visualización, aparece
.
Modo Ventilador
Este modo solo recircula el aire del interior sin
cambiar la temperatura del ambiente.
Encienda el aparato.
1
Presione el botón MODE repetidamente para
2
seleccionar el modo Ventilador.
• En la pantalla de visualización, aparece
Presione el botón FAN SPEED para ajustar la
3
velocidad del ventilador.
NOTA
• El modo Jet Heating (Calefacción rápida) no está
disponible en algunos modelos.
• En el modo Jet Cooling (Enfriamiento rápido),
fuerte aire sopla por 30 minutos.
.
• Después de 30 minutos, el ajuste de la
temperatura se mantiene en 18 °C
Si desea cambiar la temperatura, presione el botón
o para seleccionar la temperatura deseada.
• En el modo Jet Heating (Calefacción rápida), fuerte
aire sopla por 30 minutos.
• Después de 30 minutos, el ajuste de la
temperatura se mantiene en 30 °C
Si desea cambiar la temperatura, presione el botón
o para seleccionar la temperatura deseada.
• Esta función puede operar en forma diferente
desde la pantalla del control remoto.
Page 90

16 FUNCIONAMIENTO
→ →
→ → → →
SWING
SWING
SWING
SWING
Uso de la función de
Velocidad del ventilador
Configuración de la velocidad del
ventilador
• Presione el botón FAN SPEED repetidamente para
ajustar la velocidad del ventilador.
Pantalla de
visualización
- Viento natural
NOTA
• La velocidad del viento natural del ventilador se
ajusta automáticamente.
Velocidad
Alta
Media - Alta
Media
Media - Baja
Baja
Uso de la función de
Dirección del flujo de aire
Esta función ajusta la dirección del flujo de aire de
manera vertical (horizontal).
(
• Presione el botón
seleccione la dirección deseada.
− Seleccione
del flujo de aire automáticamente.
NOTA
• Dependiendo del modelo, puede no ser posible
ajustar la dirección del flujo de aire de manera
horizontal.
• Ajustar el deflector de aire de forma arbitraria
puede ocasionar que el producto falle.
• Si reinicia el aire acondicionado, el aparato
comienza a operar con la dirección del flujo de aire
establecida previamente, por lo que el deflector de
aire puede no coincidir con el icono que aparece
en el control remoto. Cuando esto ocurra, presione
el botón
flujo de aire de nuevo.
• Esta función puede operar en forma diferente
desde la pantalla del control remoto.
( ) para ajustar la dirección
o
para ajustar la dirección del
) repetidamente y
• En algunas unidades interiores, se muestran los
iconos de la velocidad del ventilador.
• En algunos modelos, la pantalla de la unidad
interior aparece solamente durante 5 segundos y
vuelve a mostrarse la temperatura configurada.
Page 91

17FUNCIONAMIENTO
ESPAÑOL
TIMER
TIMER
TIMER
TIMER
CANCEL
Configuración del
temporizador de Encendido/
Apagado
Esta función configura el aire acondicionado para
que se encienda/apague automáticamente en el
momento deseado.
Temporizador Encendido/Apagado puede ajustarse
a la vez.
Configuración del temporizador en
encendido
Presione el botón
1
• El siguiente ícono parpadea en la parte inferior
de la pantalla de visualización.
Presione los botones o para seleccionar
2
los minutos.
repetidamente.
Configuración del temporizador de
apagado
Presione el botón
1
• El siguiente ícono parpadea en la parte inferior
de la pantalla de visualización.
Presione los botones o para seleccionar
2
los minutos.
Presione el botón SET/CANCEL para finalizar.
3
• Después de ajustar el temporizador, la hora
actual y el ícono
de visualización, indicando que se configuró la
hora deseada.
NOTA
• Esta función se desactiva cuando se configura el
Temporizador simple.
repetidamente.
aparecen en la pantalla
Presione el botón SET/CANCEL para finalizar.
3
• Después de ajustar el temporizador, la hora
actual y el ícono
de visualización, indicando que se configuró la
hora deseada.
aparecen en la pantalla
Cancelación del temporizador de
encendido
Presione el botón
1
• El siguiente ícono parpadea en la parte inferior
de la pantalla de visualización.
Presione el botón SET/CANCEL para cancelar la
2
configuración.
repetidamente.
Cancelación del temporizador de
apagado
Presione el botón
1
• El siguiente ícono parpadea en la parte inferior
de la pantalla de visualización.
Presione el botón SET/CANCEL para cancelar la
2
configuración.
repetidamente.
Cancelación de la configuración del
temporizador
• Presione el botón
configuraciones del temporizador.
para cancelar todas las
Page 92

18 FUNCIONAMIENTO
TIMER
TIMER
Uso de la función Sleep
(opcional)
Esta función apaga el aire acondicionado de forma
automática cuando usted se va a dormir.
Encienda el aparato.
1
Presione el botón
2
• El siguiente ícono parpadea en la parte inferior
de la pantalla de visualización.
Presione el botón o para seleccionar la
3
hora (hasta un máximo de 7 horas).
Presione el botón SET/CANCEL para finalizar.
4
• En la pantalla de visualización, aparece
repetidamente.
.
Uso de la función
Temporizador simple
(opcional)
Esta función apaga el aire acondicionado de forma
automática cuando usted se va a dormir.
Encienda el aparato.
1
Presione el botón
2
• El siguiente ícono parpadea en la parte inferior
de la pantalla de visualización.
Presione el botón o para seleccionar la
3
hora (hasta un máximo de 7 horas).
Presione el botón SET/CANCEL para finalizar.
4
• En la pantalla de visualización, aparece
repetidamente.
.
NOTA
• En algunas unidades interiores, se muestra
• La pantalla de la unidad interior muestra de 1 h a
7 h Este número aparece solo durante 5 segundos
y luego vuelve a mostrarse la temperatura
configurada.
• En los modos de Enfriamiento y Deshumidificación,
la temperatura se incrementa en 1 °C después de
30 minutos y otro 1 °C adicional luego de otros 30
minutos para brindarle un sueño más confortable.
• La temperatura se incrementa en hasta 2 °C a
partir de la temperatura preestablecida.
• Aunque la señal de la velocidad del ventilador
en la pantalla puede cambiarse, la velocidad del
ventilador se ajusta automáticamente.
.
NOTA
• Esta función se desactiva cuando se configura el
temporizador de apagado.
Page 93

19FUNCIONAMIENTO
ESPAÑOL
kW [3 s]
kW
kWh
kW [3 s]
kW
kWh
SWING
Uso de la función
Visualización de energía
(opcional)
Esta función muestra en la pantalla de la unidad
interior la cantidad de electricidad generada mientras
funciona el producto.
Visualización del consumo de
energía actual
Encienda el aparato.
1
Mantenga presionado el botón
2
segundos.
• El consumo inmediato de energía (
) se muestra durante unos momentos en
algunas unidades interiores.
Visualización del consumo
acumulado de energía (opcional)
Encienda el aparato.
1
Mantenga presionado el botón
2
segundos dos veces.
• El consumo acumulado de energía (
muestra durante unos momentos en algunas
unidades interiores.
durante 3
o
durante 3
) se
Uso de la función de Luz
apagada (opcional)
Brillo de la pantalla de visualización
Puede configurar el brillo de la pantalla de
visualización de la unidad interior
• Presione el botón LIGHT OFF.
NOTA
• Activar / desactivar la pantalla de visualización.
Uso de la función Aire
confortable (opcional)
Funcionamiento de la aleta de
confort
Esta función fija la aleta convenientemente en
una posición preestablecida para desviar el aire
suministrado y que no dé directamente sobre los
ocupantes de la habitación.
Encienda el aparato.
1
Presione el botón COMFORT AIR repetidamente
2
para seleccionar la dirección deseada.
• En la pantalla de visualización, aparece
.
NOTA
o
• En algunas unidades interiores, se muestra
NOTA
• No se visualiza en el control remoto inalámbrico.
• kW se refiere al consumo inmediato de energía.
• kWh se refiere al consumo acumulado de energía.
• Si es mayor de 99 kWh, que es el rango de la
expresión, manténgalo en 99 kWh.
• Si el aparato se apaga, se restablece el valor.
• Muestra la potencia menor a 10 kW(h) con
unidades de 0.1 kW(h), y la mayor a 10 kW(h) con
unidades de 1 kW(h).
• La energía real puede diferir de la mostrada.
.
• Esta función se desactiva cuando se presiona el
botón MODE o JET MODE.
• Si se presiona el botón
desactiva y se configura la oscilación automática
en dirección vertical.
• Cuando esta función está desactivada, la aleta
horizontal funciona automáticamente según el
modo configurado.
, esta función se
o
Page 94

20 FUNCIONAMIENTO
Uso de la función Ahorro de
energía (opcional)
Esta función minimiza el consumo de energía
durante el enfriamiento y aumenta al nivel óptimo la
temperatura establecida, para así crear un ambiente
más confortable. La temperatura se establece
automáticamente en 22 °C si la temperatura deseada
es menor a 22 °C La temperatura permanece
constante si está por encima de los 22 °C
Encienda el aparato.
1
Presione el botón MODE repetidamente para
2
seleccionar el modo Enfriamiento.
Presione el botón ENERGY SAVING.
3
• En la pantalla de visualización, aparece
.
Uso de la función Control de
energía (opcional)
Encienda el aparato.
1
Presione el botón ENERGY CTRL.
2
• Presione el botón ENERGY CTRL
repetidamente para seleccionar cada paso.
NOTA
• 1 paso: La potencia de entrada se reduce en un
20 % en comparación con la potencia nominal de
entrada.
− En la pantalla de visualización, aparece
• 2 pasos: La potencia de entrada se reduce en un
40 % en comparación con la potencia nominal de
entrada.
− En la pantalla de visualización, aparece
• 3 pasos (opcional): La potencia de entrada se
reduce en un 60 % en comparación con la potencia
nominal de entrada.
.
.
− En la pantalla de visualización, aparece
• En algunas unidades interiores, se muestra
paso),
• Esta función está disponible en el modo
Enfriamiento.
• La capacidad puede verse disminuida cuando se
selecciona el modo Control de energía.
• La temperatura deseada aparece durante 5
segundos si presiona el botón FAN SPEED,
• La temperatura ambiente aparece durante 5
segundos si presiona el botón ROOM TEMP.
(2 pasos).
.
(1
.
o
Page 95

ESPAÑOL
Uso de funciones especiales
Encienda el aparato.
1
Presione el botón FUNC repetidamente para
2
seleccionar la función deseada.
Presione el botón SET/CANCEL para finalizar.
3
Pantalla de
visualización
21FUNCIONAMIENTO
Descripción
El generador de iones utiliza
millones de ellos para ayudar a
mejorar la calidad del aire interior.
Para reducir el sonido de las
unidades exteriores.
Para mantener su piel hidratada
mediante la generación de grupos
de iones.
Para reducir la humedad interior
rápidamente.
Para mantener una temperatura
mínima en el ambiente y evitar
que los objetos de la habitación se
congelen.
Para ahuyentar a los mosquitos.
Para eliminar la humedad
generada dentro de la unidad
interior.
Para crear un ambiente confortable
para dormir.
NOTA
• Dependiendo del modelo, algunas funciones
pueden no admitirse.
• Algunas funciones pueden operar en forma
diferente desde la pantalla del control remoto.
Page 96

22 FUNCIONAMIENTO
Cancelación de funciones especiales
Presione el botón FUNC repetidamente para
1
seleccionar la función deseada.
Presione el botón SET/CANCEL para cancelar
2
la función.
Uso de la función Purificación de aire
Estas funciones suministran aire limpio y fresco
mediante la utilización de partículas de iones y
filtrado.
Función
Ionizador
Plasma
NOTA
• Para utilizar esta función no es necesario que esté
encendido el aire acondicionado.
• En algunos modelos, la luz del plasma y la luz
del enfriamiento se encienden mientras están
operando Fuera humo/Plasma
• No toque el ionizador durante su funcionamiento.
• Esta función puede operar en forma diferente
desde la pantalla del control remoto.
Visualización
Descripción
Las partículas de
iones del ionizador
esterilizan el
aire eliminando
bacterias aéreas
y otras sustancias
perjudiciales.
Elimina los
contaminantes
microscópicos de
la entrada de aire
por completo para
suministrar aire
limpio y fresco.
Uso de la función de Silencio
Esta función evita posibles quejas por parte de los
vecinos al reducir el ruido de las unidades exteriores.
• En la pantalla de visualización, aparece
NOTA
• Esta función se desactiva presionando el botón
MODE o ENERGY CTRL o JET MODE.
• Esta función está disponible en los modos
Enfriamiento, Calefacción, Cambio automático y
Operación automática.
.
Uso de la función Cuidado iónico
Esta función mantiene la piel hidratada mediante la
generación de grupos de iones que son absorbidos
por la superficie de la piel.
• En la pantalla de visualización, aparece
unos 3 segundos.
NOTA
• Esta función está disponible en los modos
Enfriamiento, Ventilador y en la función Purificación
de Aire
durante
Uso de la función Jet Dry (Secado
rápido)
Esta función maximiza el rendimiento de la
deshumidificación.
• En la pantalla de visualización, aparecen
NOTA
• Esta función está disponible en los modos
Enfriamiento, Deshumidificación, Operación
automática, en modo Ventilador y en la función
Purificación de aire.
• Esta función no está disponible en la función
Sleep.
• Esta función se desactiva cuando se presiona el
botón MODE.
, .
Page 97

23FUNCIONAMIENTO
ESPAÑOL
SWING
Uso de la función Baja calefacción
Esta función activa el sistema de calefacción para
mantener una temperatura mínima en el ambiente y
evitar que los objetos de la habitación se congelen
en una situación donde no haya residentes
permanentes, como en vacaciones.
• En la pantalla de visualización, aparecen
NOTA
• Esta función está disponible en el modo
Calefacción.
• Durante el funcionamiento de LH, cuando presione
botones tales como
y luego vuelva al modo Calefacción, 30 °C alta
velocidad.
• Si se presiona el botón JET MODE cuando está
funcionando LH, esta función se desactiva e
inmediatamente se inicia el modo Power Heating
(Potencia de calefacción). (Solo en modelos con
potencia de calefacción).
• En caso de que se produzca un error, la operación
puede interrumpirse para proteger el producto.
• Los botones COMFORT AIR y
usarse mientras está operando la función de LH.
, , MODE, FAN SPEED,
no pueden
, .
Uso de la función Antimosquitos
Esta función genera una onda de alta frecuencia que
ahuyenta los mosquitos.
• En la pantalla de visualización, aparece
NOTA
• Para utilizar esta función no es necesario que esté
encendido el aire acondicionado.
.
Uso de la función Autolimpieza
En los modos Enfriamiento y Deshumidificación, se
genera humedad dentro de la unidad interior. Esta
función elimina esa humedad.
• En la pantalla de visualización, aparece
NOTA
• Algunas funciones no se pueden utilizar mientras
el aparato está operando en la función de
Autolimpieza.
• Si apaga el aparato, el ventilador funciona durante
30 minutos y limpia la parte interna de la unidad
interior.
.
Uso de la función Sueño confortable
Esta función opera el aire acondicionado de forma
automática para crear un ambiente confortable para
dormir.
• En la pantalla de visualización, aparecen
NOTA
• Esta función está disponible en el modo
Enfriamiento.
• Después de 30 minutos de haberse iniciado la
función, la aleta deja de oscilar y se fija en un
ángulo de flujo de aire indirecto, incluso si la
temperatura ambiente no disminuye hasta alcanzar
la temperatura óptima para dormir.
• Es posible que el ambiente para un sueño
confortable varíe según las personas.
, .
• En algunas unidades interiores, se muestra
.
Page 98

24 FUNCIONES INTELIGENTES
FUNCIONES INTELIGENTES
Cómo usar la aplicación LG
SmartThinQ
Cosas a verificar previo a utilizar LG
SmartThinQ
• Para electrodomésticos con el logo
Revise la distancia entre el electrodoméstico y el
1
enrutador inalámbrico (Red Wi-Fi).
• Si la distancia entre el electrodoméstico y el
enrutador inalámbrico es muy grande, la señal
será débil. Puede que le tome más tiempo
registrarse o que falle la instalación.
Desactive los Datos Móviles o Datos Celulares
2
en su teléfono inteligente.
• Para Iphones, apague la red al dirigirse a
Configuración → Datos Celulares → Datos
Celulares
Conecte su teléfono inteligente al enrutador
3
inalámbrico.
NOTA
• Para verificar la conexión Wi-Fi, revise que
el ícono Wi-Fi
encendido.
• El electrodoméstico funciona únicamente con
redes Wi-Fi de 2.4 GHz. Contacte a su proveedor
de servicios de internet o verifique el manual del
enrutador inalámbrico para revisar la frecuencia de
su red.
• LG SmartThinQ no es responsable de ningún
problema de conexión de red ni de errores, fallos o
anomalías causadas por la misma.
• Si el electrodoméstico está teniendo problemas
para conectarse a la red Wi-Fi, puede que éste
se encuentre muy lejos del enrutador. Compre
un amplificador Wi-Fi (extensión de rango) para
mejorar la fuerza de la señal Wi-Fi.
• La conexión Wi-Fi puede no llevarse a cabo o
puede ser interrumpida debido al entorno de la red
de casa.
• La conexión de red puede no funcionar
apropiadamente dependiendo del servicio del
proveedor de internet.
• El entorno inalambrico circundante puede hacer
que el servicio de red inalámbrica se ejecute
lentamente.
• El electrodoméstico no puede registrarse debido
a problemas con la transmisión de la señal
inalámbrica. Desconecte el electrodoméstico y
espere alrededor de un minuto previo a intentarlo
de nuevo.
• Si el cortafuegos de su enrutador inalámbrico está
activado, desactivelo o añada una excepción a
éste.
• El nombre de la red inalámbrica (SSID) debe ser
una combinación de letras y números. (No utilice
caracteres especiales)
• La interfaz de usuario (IU) del teléfono inteligente
puede variar dependiendo del sistema operativo
(OS) del móvil y del fabricante.
• Puede que no logre configurar la red si el protocolo
de seguridad del router está en WEP. Por favor
cambie este protocolo por otro (es recomendado el
WPA2) y registre el producto de nuevo.
en el panel de control esté
Page 99

25FUNCIONES INTELIGENTES
ESPAÑOL
Cómo instalar LG SmartThinQ
Busque la aplicación LG SmartThinQ en la tienda
Google Play Store & Apple App Store desde un
teléfono inteligente. Sigue las instrucciones para
descargar e instalar la aplicación.
Wi-Fi Function
• Para electrodomésticos con el logo
Comuniquese desde un Smartphone usando las
caracteristica mas convenientes.
Smart Diagnosis™ (Diagnóstico Inteligente)
Si usa la función Smart Diagnosis (Diagnóstico
Inteligente), se le proveerá información útil, como
la relacionada a la forma correcta de utilizar el
electrodoméstico basada en el patrón de uso.
Configuración
Le permite configurar varias opciones en el
electrodoméstico y en la aplicación.
NOTA
• Si cambia el router inalámbrico, el proveedor de
servicios de Internet o la contraseña, elimine el
aparato registrado de la aplicación LG SmartThinQ
y regístrelo de nuevo.
• La aplicación está sujeta a cambios con propósito
de mejoras en el electrodoméstico sin previo aviso
a los usuarios.
• Algunas características pueden variar dependiendo
del modelo.
Información del aviso de software de
código abierto
Para obtener el código fuente bajo GPL, LGPL, MPL
y otras licencias de código abierto que contiene este
producto, visite http://opensource.lge.com.
Además del código fuente, se pueden descargar los
términos de la licencia, las anulaciones de la garantía
y los avisos de derechos de autor.
LG Electronics también le proporcionará el código
abierto en un CD-ROM por un costo que cubra
los gastos de dicha distribución (como el costo
del medio, del envío y de la manipulación) una
vez realizado el pedido por correo electrónico a la
dirección opensource@lge.com. Esta oferta es válida
solo durante un período de tres años después de
que se envíe el último cargamento de este producto.
Esta oferta es válida para todo aquel que reciba esta
información.
Page 100

26 FUNCIONES INTELIGENTES
Smart Diagnosis™ (Diagnóstico
Inteligente) Usando un Teléfono
Inteligente
• Para electrodomésticos con el o el logo
Utilice esta función si desea un diagnóstico efectivo
por parte del centro de información al cliente de LG
Electrónicos cuando el electrodoméstico falle.
Smart Diagnosis™ (Diagnóstico Inteligente) no
puede ser activado a menos que el electrodoméstico
esté conectado a la electricidad. Si no es posible
encender el electrodoméstico, entonces la resolución
de problemas debe llevarse a cabo sin usar Smart
Diagnosis™.
NOTA
• Asegúrese de mantener el ruido ambiental
al mínimo o el teléfono no podrá recibir
correctamente las señales sonoras de la unidad
interior.
 Loading...