

Page 1
24 HOURS A DAY, 7 DAYS A WEEK FOR LG CUSTOMER SERVICE
para el Servicio LG (Atencin al Cliente) 24 horas al da, 7 das a la semana
LSC27990TT
Page 2
2
Entry
Important safety instructions
Identification of parts
Where to install
Door removal
Install the freezer and refrigerator compartment doors
Water supply installation
Water connection instruction guide
Height adjustment
External Equipment Connections
Setup
Adjusting the temperatures and functions
Temperature
Dispenser
Menu
Shelf
Humidity control in the vegetable compartment
OptiFresh temperature bin
OptiFresh
Location of foods
Storing foods
How to remove and replace parts
General information
Cleaning
Troubleshooting
Warranty
Zip code
Table of Contents
Introduction
Installation
Operation
Suggestion on
food storage
Care and
maintenance
3
3
4
5
6
7
7
8
11
12
13
13
16
37
14
15
37
38
38
39
40
41
44
44
45
50
151
Page 3
Entry
The model and serial numbers are found on the inner case or back of refrigerator
compartment of this unit. These numbers are unique to this unit and not
available to others. You should record requested information here and retain
this guide as a permanent record of your purchase. Staple your receipt here.
Date of purchase
Dealer
Dealer address
Dealer phone
Model
Serial
Before use, this refrigerator must be properly installed and located in accordance with
the installation instructions in this manual.
Never unplug your refrigerator by pulling on the power cord. Always grip the plug firmly
and pull it straight out from the outlet.
When moving your appliance away from the wall, be careful not to roll over the power
cord or to damage it in any way. Do not crush or damage the water line.
After your refrigerator is in operation, do not touch the cold surfaces in the freezer
compartment, particularly when your hands are damp or wet. Skin could adhere to
these extremely cold surfaces.
Unplug the power cord from the power outlet for cleaning or other requirements. Never
touch it with wet hands because you can get an electric shock or be injured.
Never damage, bend, kink, pull out, or twist the power cord because damage to the
power cord can cause product failure, fire, or electric shock. If you have doubts the
appliance is properly grounded, consult a qualified electrician.
Never place glass products in the freezer because they may be broken from expansion
when their contents are frozen.
Never put your hands within the ice storage bin of the automatic icemaker. You can be
injured by the operation of the automatic icemaker.
The appliance is not intended for use by young children without supervision.
Young children should be supervised to ensure that they do not play with the appliance.
Never allow anyone to climb, sit, stand, or hang on the door. These actions may
damage the refrigerator and even tip it over, causing severe personal injury.
Before you move your refrigerator into its final location, it is
important to make sure you have the proper electrical connection.
A 115 Volt, 60 Hz., AC only, 15 or 20 amp, fused and grounded
single-outlet circuit is required. Use an outlet that cannot be turned
off by a switch. Do not use an extension cord.
The refrigerator-freezer should be so positioned that the supply
plug is accessible for quick disconnection in the event of an
emergency.
If the supply cord is damaged, it must be replaced by the manufacturer or its service
agent or a similarly qualified person in order to avoid any hazard.
Do not modify or extend the Power Cord length.
It may cause electric shock or fire.
Introduction
3
Important safety instructions
Recommended
grounding
method
Accessibility of
supply plug
Supply cord
replacement
Warning
Page 4
4
DANGER: Risk of child entrapment.
Before you throw away your old refrigerator or freezer take off the doors but leave the
shelves in place so that children may not easily climb inside.
The appliance is not intended for use by young children without supervision.
Young children should be supervised to ensure that they do not play with the appliance.
Don’t store or use gasoline or other flammable vapor and liquids in the vicinity of this or
any other appliance.
In the event of an electric short circuit, grounding (earthing) reduces the risk of electric
shock by providing an escape wire for the electric current.
In order to prevent possible electric shock, this appliance must be grounded.
Improper use of the grounding plug can result in an electric shock. Consult a qualified
electrician or service person if the grounding instructions are not completely
understood, or if you have doubts on whether the appliance is properly grounded.
Child entrapment
warning
Don’t store
Grounding
Introduction
•
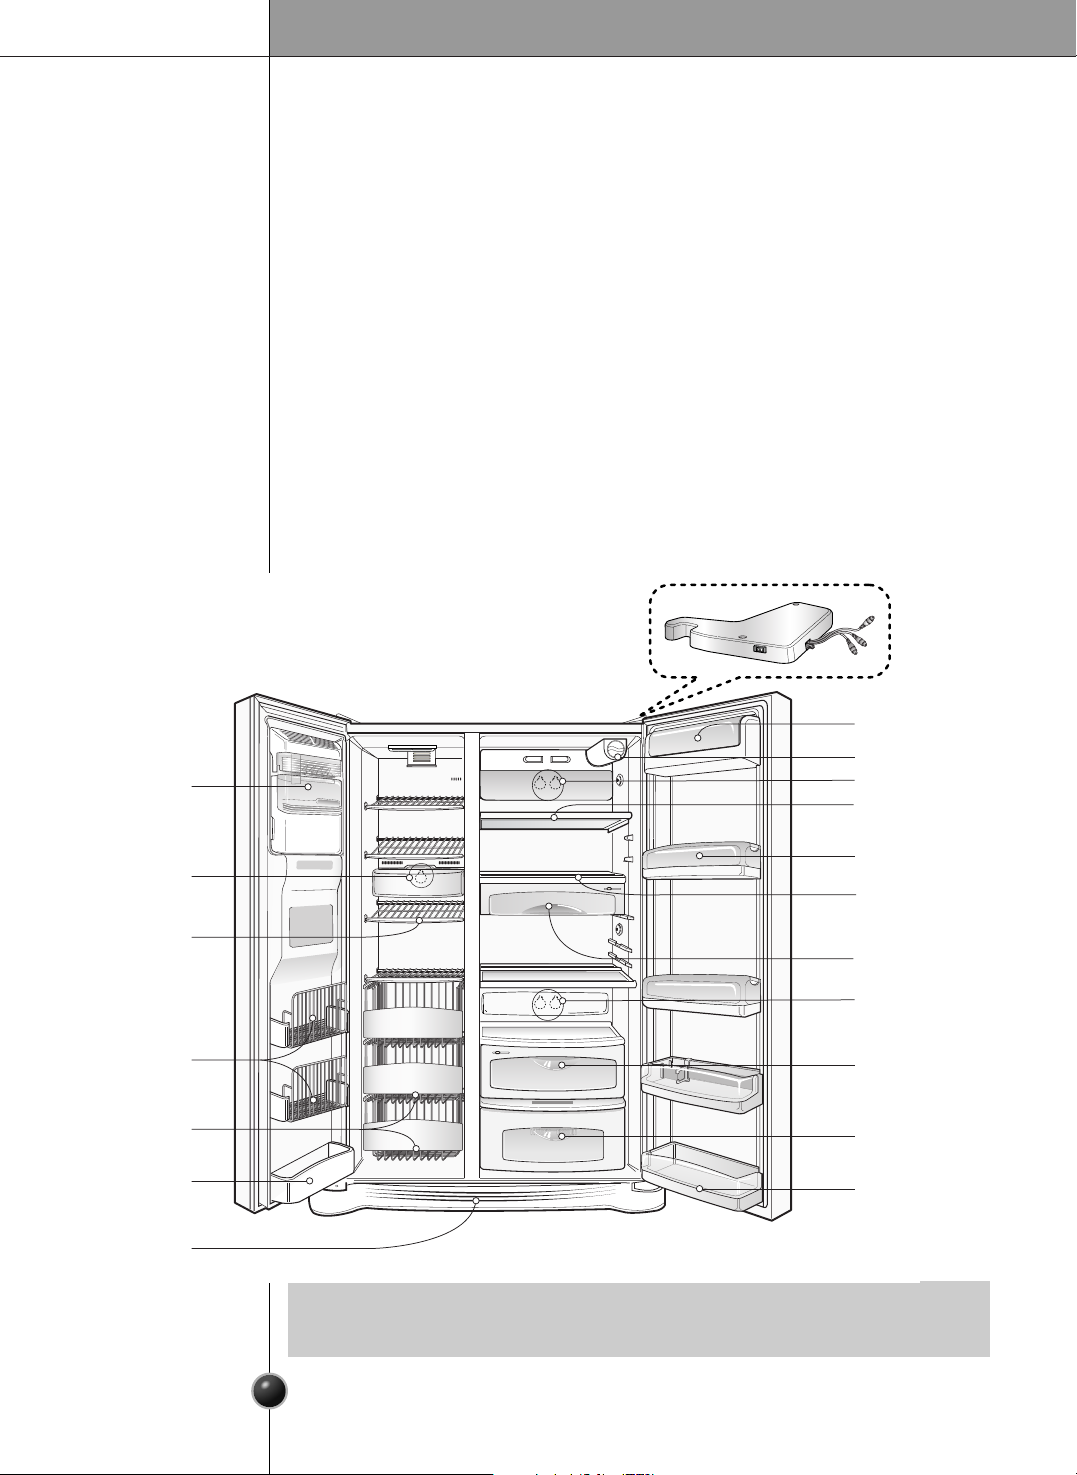
Parts, features, and options vary by model. Your model may not include every option.
NOTE
Freezer
Compartment
Refrigerator
Compartment
Dairy Corner
Water Filter
Lamp
Lamp
Automatic
Icemaker
Shelf
Door Rack
Drawer
Door Rack
Lower Cover
Shelf
Shelf
Snack Drawer
Lamp
Vegetable Drawer
Door Rack
Door Rack
OptiFresh Room
Model LSC27990TT
Identification of parts
Page 5
Installation
5
Strong
and even floor
A proper
distance from
adjacent items
Where water
supply can be
easily connected
in a dry place
Where it is free
from heat
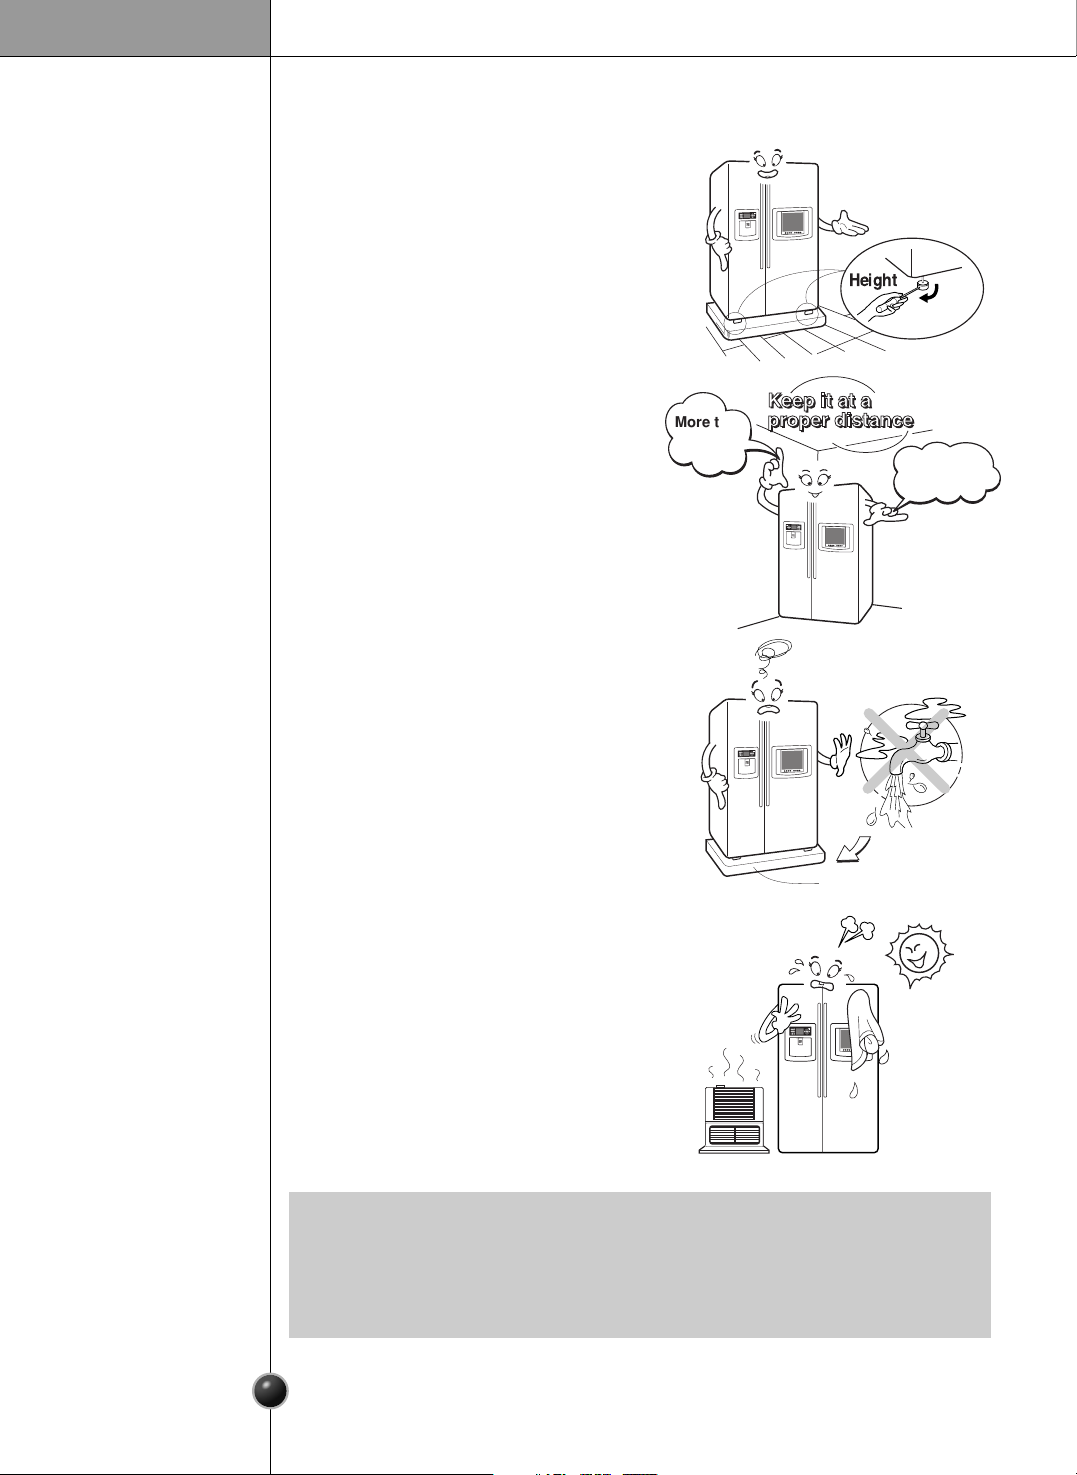
Please keep the refrigerator at a proper
distance from other things. Too small a
distance from adjacent items may result in
lowered freezing capability and increased
electricity charges consumption.
Select a place where a water supply can be
easily connected between the automatic ice
maker and dispenser.
Installing the refrigerator in a wet or damp
area may cause rust and may be an electrical
hazard.
If this refrigerator is installed where the
ambient temperature is high, the freezing
capacity is deteriorated and the cost of
electricity used increases.
Where to install
Unstable installation may cause vibration and
noise. If the floor to install the refrigerator on
is not even, make the refrigerator level by
rotating the height adjusting screw.
•
Install the refrigerator at a place where the ambient temperature is 5˚C ~ 43˚C
(41˚F~110˚F).
Ambient temperature outside this range may cause product malfunction. Also, the
tube between the dispenser and automatic ice maker may freeze.
NOTE
Bottom Pad
More than
4"(10 cm)
to top
Height
More than
2"(5 cm)
to back
Page 6
Door removal
Electric Shock Hazard
Disconnect electrical supply to refrigerator before installing.
Failure to do so could result in death or serious injury.
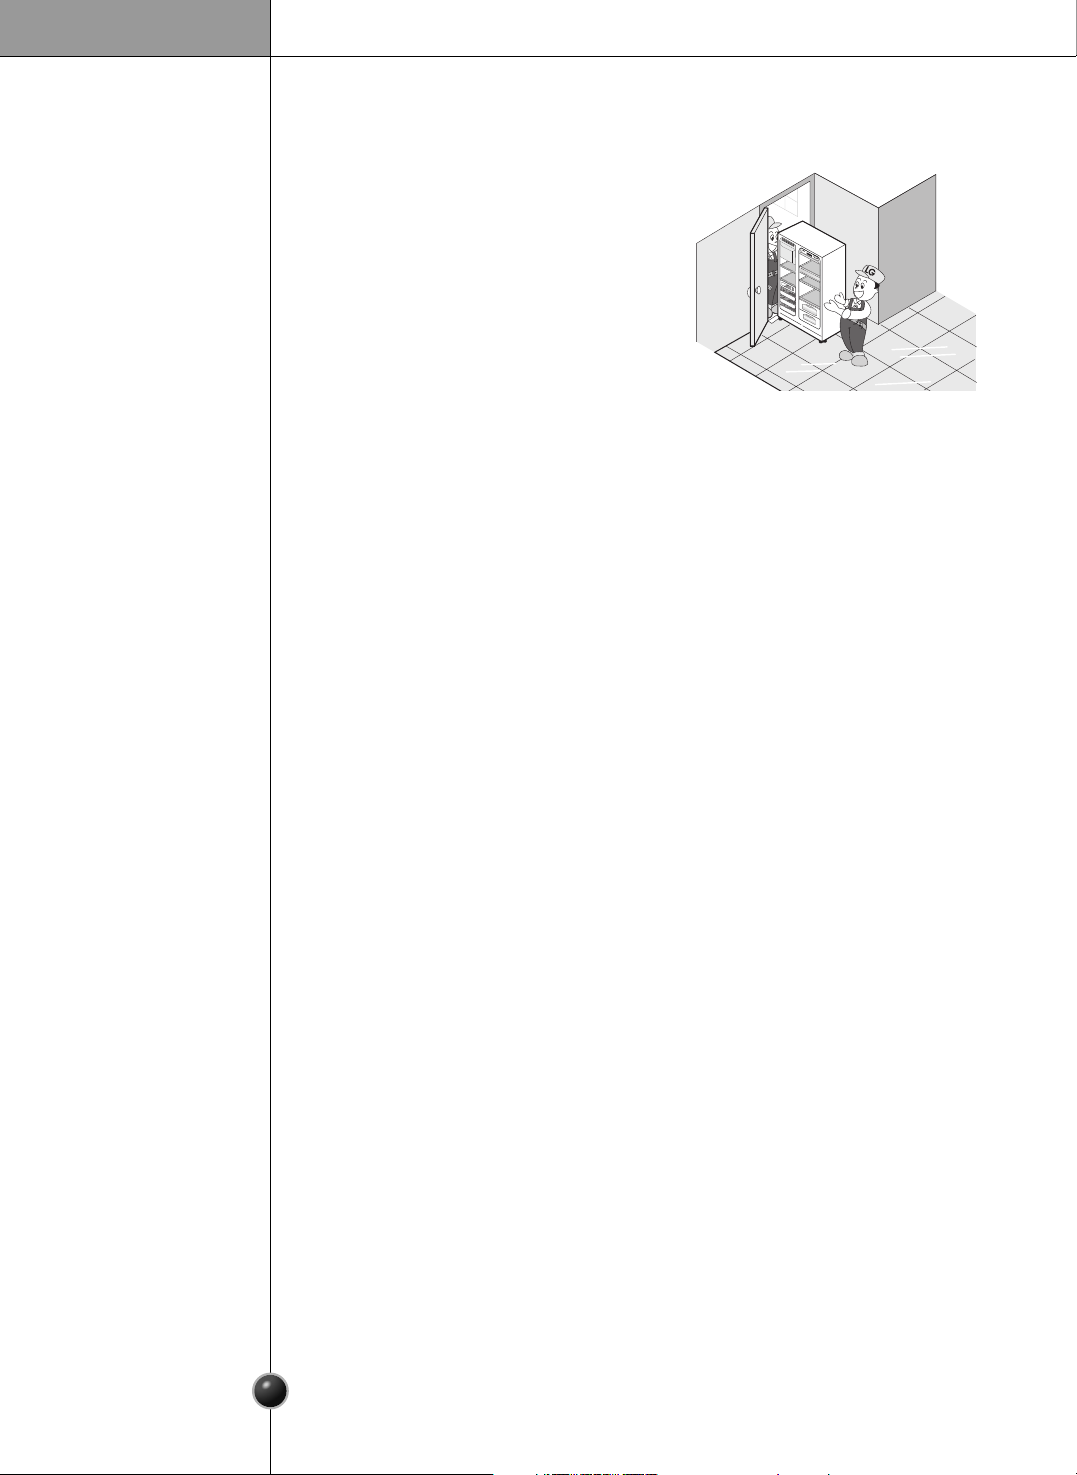
If your entrance door is too narrow for the
refrigerator to pass through, remove the refrigerator
door and pass the refrigerator laterally.
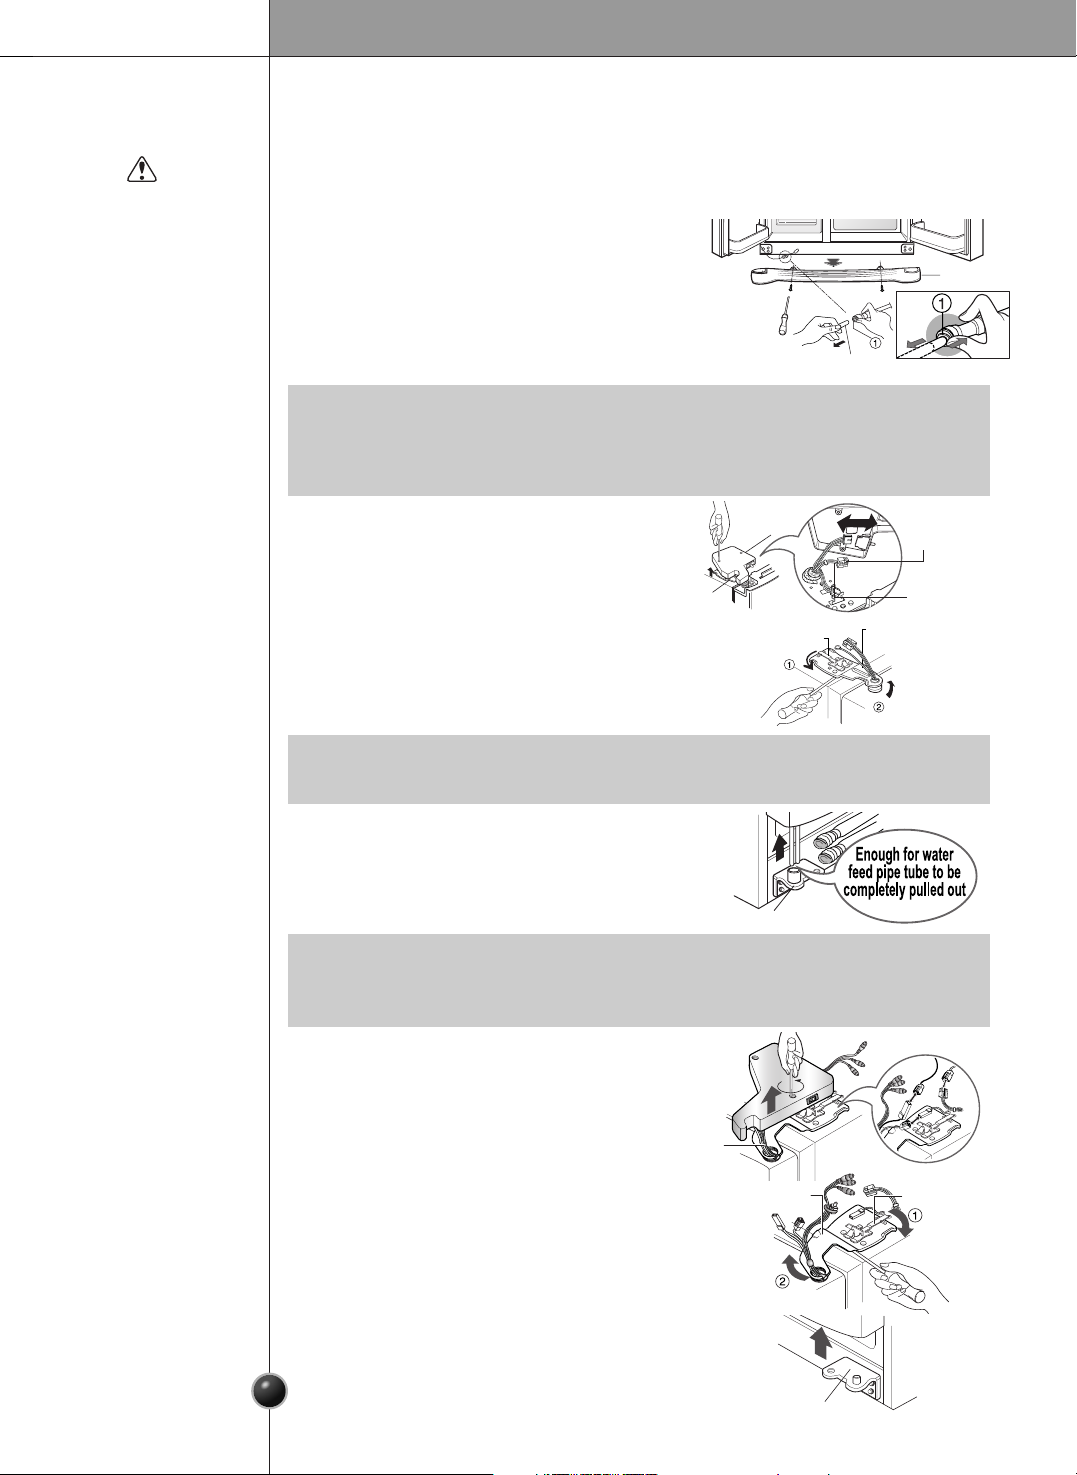
Remove the lower cover by lifting upward, and then pull
up the water feed tube while pressing the release ring
shown in the figure to the right.
Remove lower
cover and
water feed tube
Warning
Remove the
freezer
compartment
door
Remove the
refrigerator
door
Installation
6
1) Remove the hinge cover by loosening the
screws. Disconnect all connections except
the ground line.
2) Remove the keeper by rotating it counter
clockwise and then lifting the upper
hinge up
.
3) Remove the freezer compartment door by
lifting it upward. This time, the door should
be lifted enough for the water feed tube to
be completely pulled out.
1) Loosen the hinge cover screws and remove
the cover. Remove connection wire, if any,
except for the ground line.
2) Remove keeper by rotating it clockwise ()
and then remove the upper hinge by lifting
it up ().
3) Remove the refrigerator compartment door
by lifting it up.
•
If a tube end is deformed or abraded, trim the part away.
Disconnecting the tube under the door causes about
1
/
2
gallon (2 liters) water to flow
out. Please put up a big container to prevent it.
NOTE
•
When removing the upper hinge, be careful that the door does not fall forward .
NOTE
•
After removing the door, take it into the kitchen where you are installing the refrigerator.
Lay it down on a blanket and be careful to avoid damaging the water feed tube.
NOTE
Lower Cover
Lower hinge
Lower Hinge
Keeper
Water Feed Tube
Connection
Wires
Connection
Wires
Hinge
Cover
Upper Hinge
Upper Hinge
Keeper
Upper Hinge
Ground Line
Page 7
7
Installation
Install the freezer and refrigerator
compartment doors
Water supply installation
Pass the refrigerator laterally through the access
door as shown in the right figure.
Automatic icemaker operation needs water pressure of 21~121 psi (1.5~8.5
kgf/cm2) (That is, an instant paper cup (6 oz. or 180 cc) will be fully filled within
3 seconds.)
If water pressure is less than 21 psi (1.5 kgf/cm2). It is necessary to purchase a
separate pressure pump for normal automatic icemaking and cool water feed.
Keep the total length of the feed water pipe tube within 26’ (8 m). Be careful for the
tube to avoid being kinked. If the tube is longer than 26’ (8 m), the pressure may
drop to an unacceptable level.
Install the water supply line where it will not be affected by heat.
Connect to potable water supply only.
Mount them in the reverse sequence of removal after they pass through the access
door.
Pass the
refrigerator
Before
installation
Warning
This appliance contains fluids (refrigerant and lubricant) and is made of parts and
materials which are reusable and/or recyclable.
All the important materials should be sent to the collection center of waste material
and can be reused after rework (recycling). For recycling, please contact the local
agency.
Disposal of the
old appliance
1
2
3
4
5
Max
F
R
Z
T
EMP
REF
T
E
M
P
Min
5
4
3
2
1
M
a
x
Page 8
8
Water connection instruction guide
Read all directions carefully before you begin.
Connecting
the refrigerator
to a water source
Connect to potable water supply only.
Warning
•
If operating the refrigerator before installing the water connection, turn the icemaker
to the OFF position to prevent operation without water.
•
All installations must be in accordance with local plumbing code requirements.
•
Use copper tubing and check for leaks.
•
Install copper tubing only in areas where temperatures will remain above freezing.
•
It may take up to 24 hours for your icemaker to begin producing ice.
IMPORTANT
The icemaker water valve contains a flow washer which is used as a water
pressure regulator.
The icemaker needs to be connected to a cold water line with water pressure
21 psi (lb/inch2)
Cold water supply
Standard screwdriver
7
/
16
-inch and
1
/
2
-inch open-end wrenches or two adjustable wrenches
1
/
4
-inch nut driver
1
/
4
-inch drill bit
Hand drill or electric drill (properly grounded)
Tools required
•
Your refrigerator dealer has a kit available with a 1/4-inch saddle-type shut-off valve,
a union, and copper tubing. Before purchasing, make sure a saddle-type valve
complies with your local plumbing codes. Do not use a piercing-type or 3/16-inch
saddle valve which reduces water flow and clogs more easily.
NOTE
Installation
Page 9
9
1. Unplug the refrigerator or disconnect power.
2. Turn OFF the main water supply. Turn on the nearest faucet to relieve the
pressure on the line. It may help to open an outside faucet to allow the water to
drain from the line in the house.
3. Find a
1
/
2
-inch vertical COLD water pipe near the refrigerator.
Connect
the tubing to
water line
•
Horizontal pipe will work, but the following precaution must be taken: Drill on the top of
the pipe, not the bottom. This will help keep water away from the drill. This also keeps
normal sediment from collecting in the valve.
NOTE
4. To determine the length of copper tubing you will need, measure from the
connection on the lower left rear of the refrigerator to the water pipe. Add 7
feet (2.1m) to allow for moving refrigerator for cleaning. Use
1
/
4
-inch O.D.
(outside diameter) copper tubing. Be sure both ends of copper tubing are cut
square.
5. Using a drill, drill a
1
/
4
-inch hole in the cold water pipe you have selected.
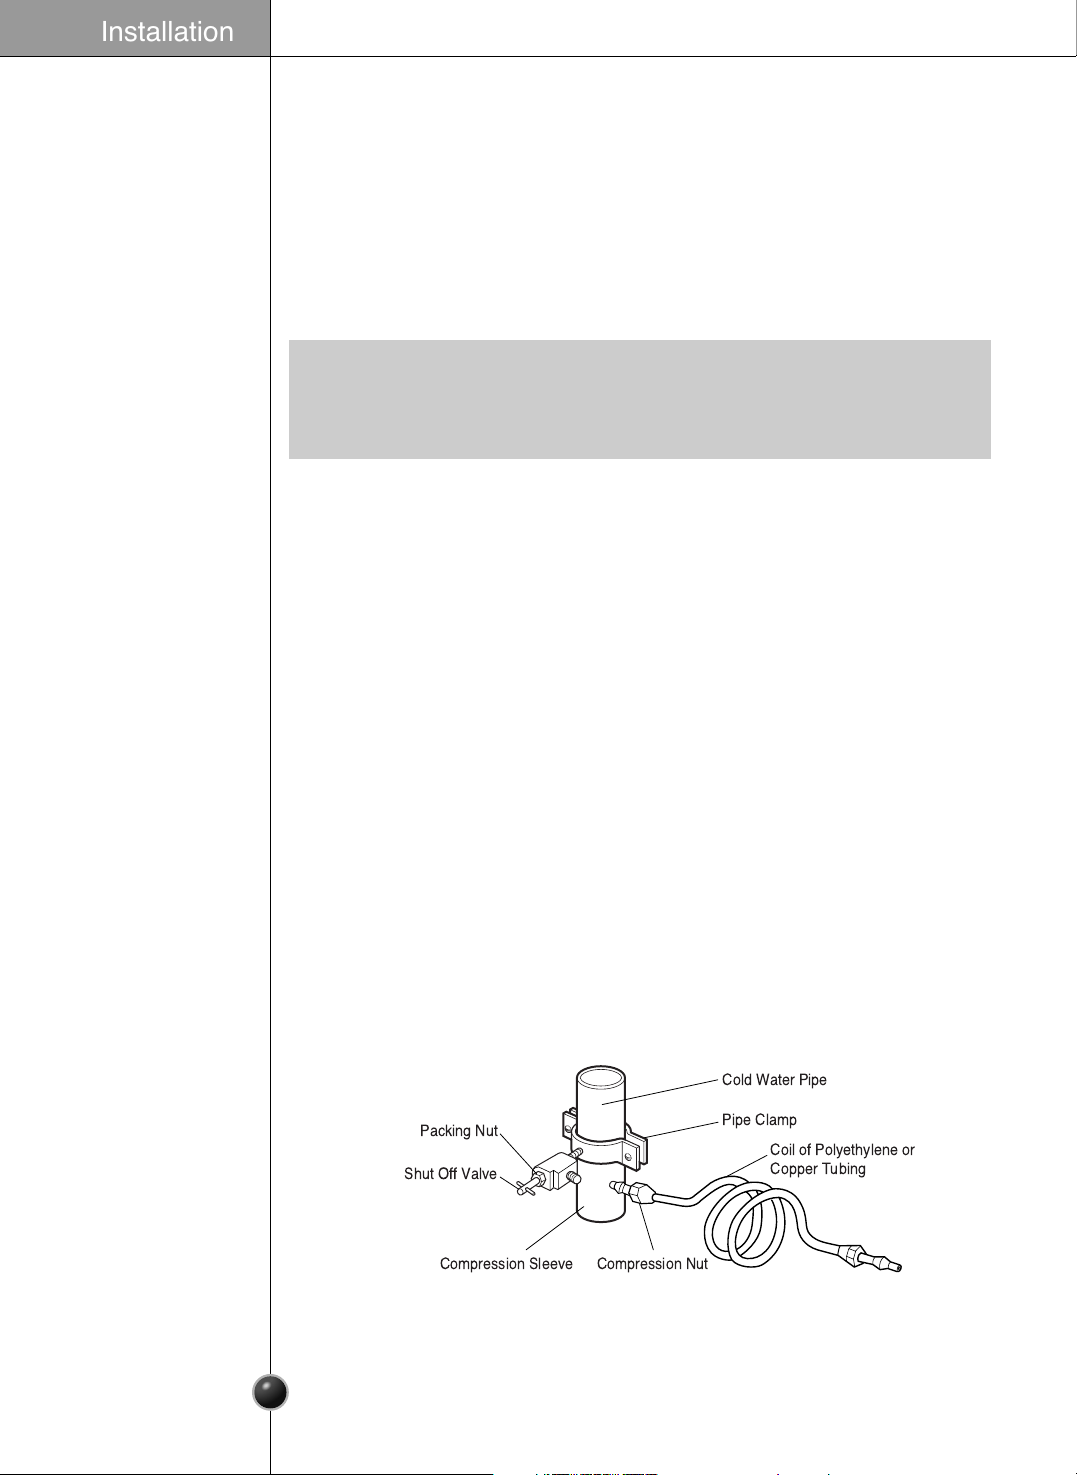
6. Fasten shut-off valve to cold water pipe with pipe clamp. Be sure the outlet
end is solidly in the
1
/
4
" drilled hole in the water pipe and the washer is under
the pipe clamp. Tighten the packing nut. Tighten the pipe clamp screws
carefully and evenly so the washer makes a watertight seal. Do not
overtighten or you may crush the copper tubing, especially if soft (coiled)
copper tubing is used. Now you are ready to connect the copper tubing.
7. Slip the compression sleeve and the compression nut onto the copper tubing
as shown. Insert the end of the tubing into the outlet end squarely as far as it
will go. Tighten the compression nut onto the outlet end with a wrench. A flare
nut wrench works best, but an open end wrench will suffice. Do not
overtighten.
8. Place the free end of the tubing into a container or sink, and turn on the main
water supply. Flush out the tubing until the water is clear. Turn off the shutoff
valve on the water pipe. Coil the copper tubing as shown below.
Cold Water Pipe
Pipe Clamp
Coil of Polyethylene or
Copper Tubing
Compression NutCompression Sleeve
Shut Off Valve
Packing Nut
Installation
Page 10
10
Before making the connection to the refrigerator, be sure the refrigerator
power cord is not plugged into the wall outlet.
• If your refrigerator does not have a water filter, we recommend installing
one. If your water supply has sand or particles, that could clog the screen of
the refrigerator’s water valve. Install the filter in the water line near the
refrigerator.
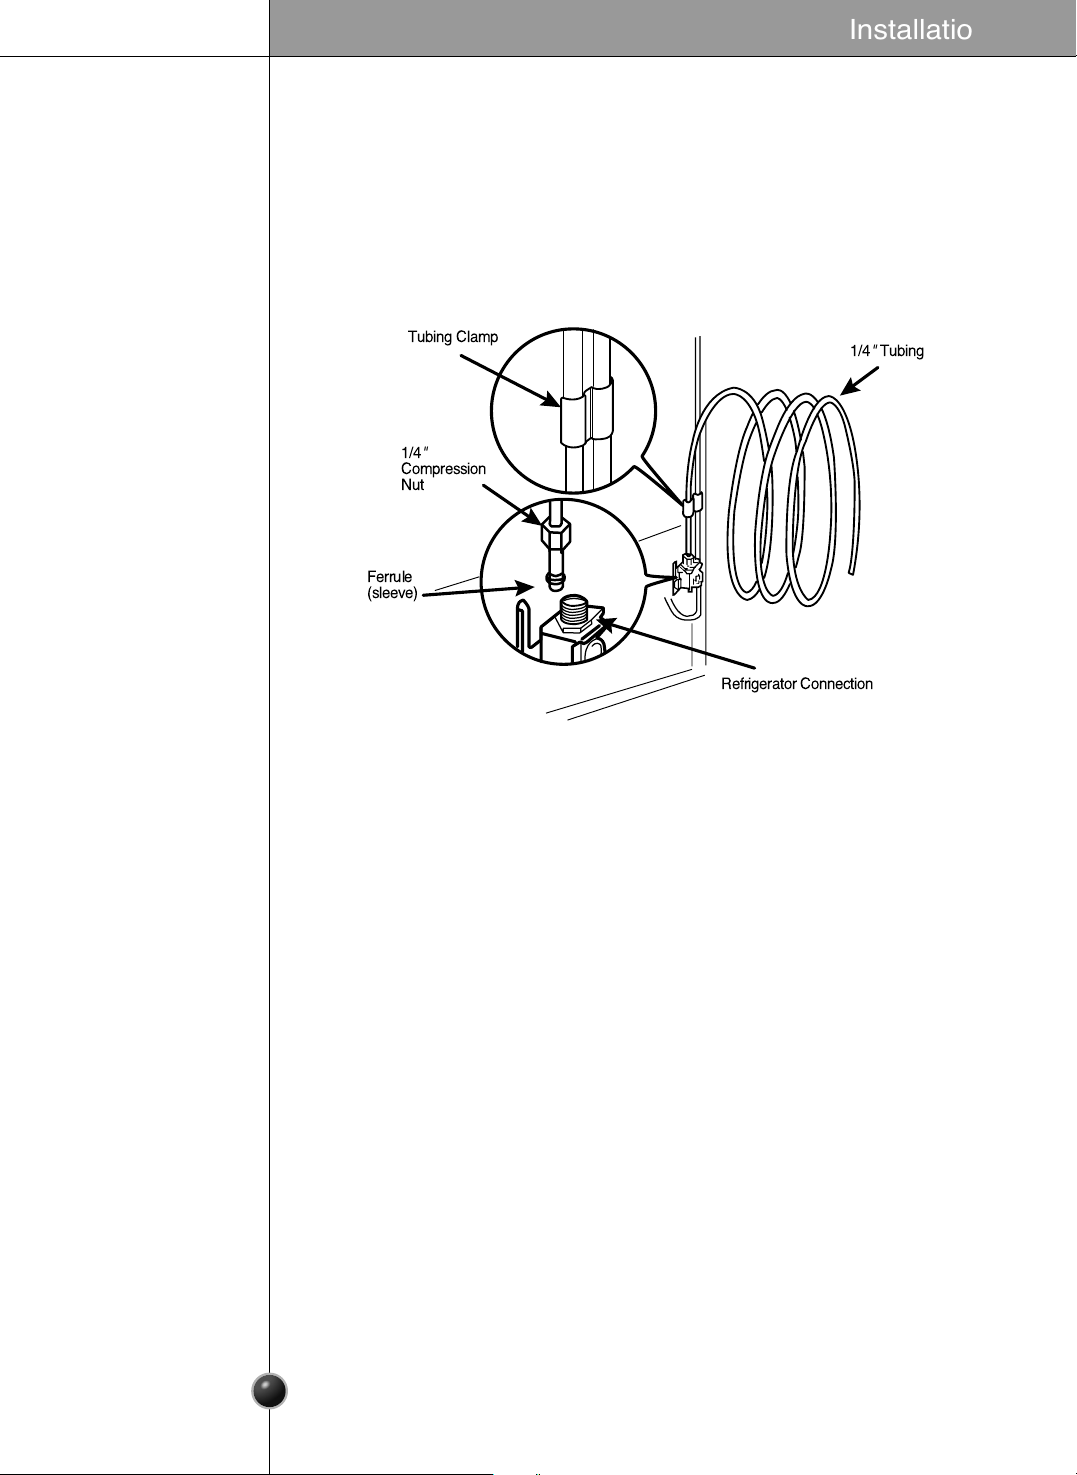
1. Remove the plastic flexible cap from the water valve.
2. Place the compression nut and ferrule (sleeve) onto the end of the tubing as
shown.
3. Insert the end of the copper tubing into the connection as far as possible. While
holding the tubing, tighten the fitting.
Connect the tubing to
the refrigerator
Tighten any connections that leak.
Plug In the Refrigerator
Arrange the coil of copper tubing behind the refrigerator so it does not vibrate
against the back of the refrigerator or against the wall. Push the refrigerator
back to the wall.
Start the lcemaker
Set the icemaker switch to the ON position The icemaker will not begin to
operate until it reaches its operating temperature of 15 °F (-9 °C). It will then
begin operation automatically.
Turn the water on at
the shutoff valve
Tubing Clamp
1/4
"
Compression
Nut
Ferrule
(sleeve)
Refrigerator Connection
1/4
"
Tubing
Installation
Page 11
11
Height adjustment
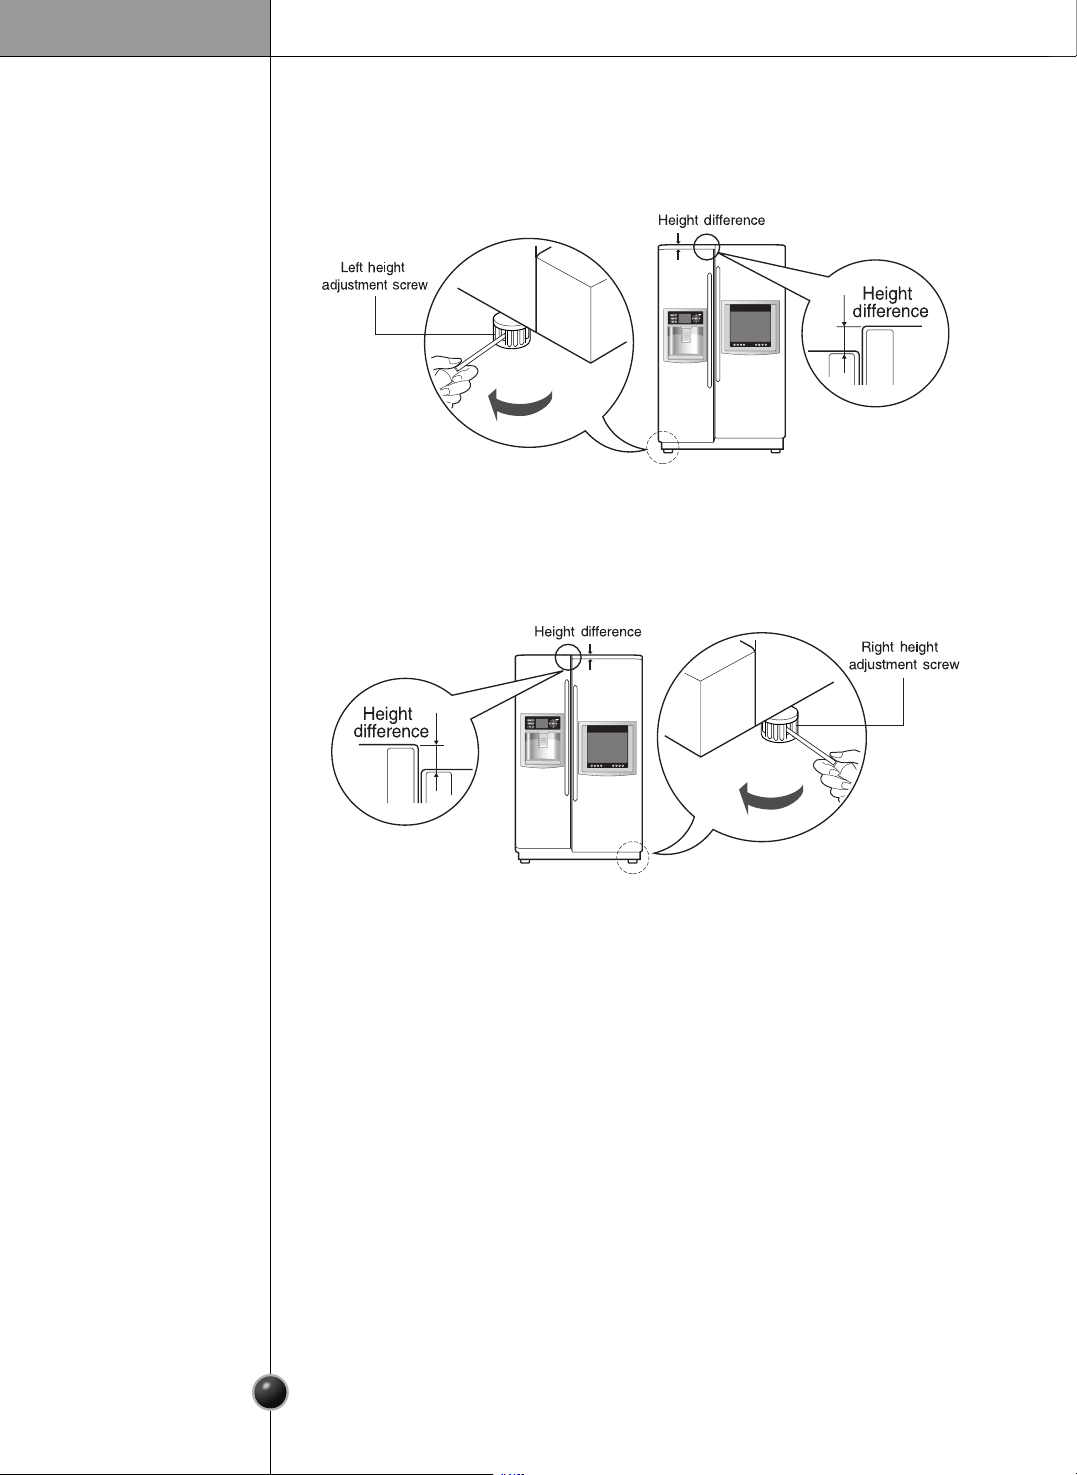
Level them by inserting a flat (
-
type) driver into the groove of the left height adjusting
screw and rotating it clockwise ().
Level them by inserting a flat (
-
type) driver into the groove of the right height
adjusting screw and rotating it clockwise ().
The refrigerator door will close smoothly by raising the front side by adjusting the
height adjusting screw. If the door does not close properly because it is improperly
adjusted, the performance of the refrigerator will be affected.
If the freezer
compartment door
is lower than the
refrigerator
compartment door
If the freezer
compartment door
is higher than the
refrigerator
compartment door
After leveling the
door height
Installation
Page 12
12
Installation
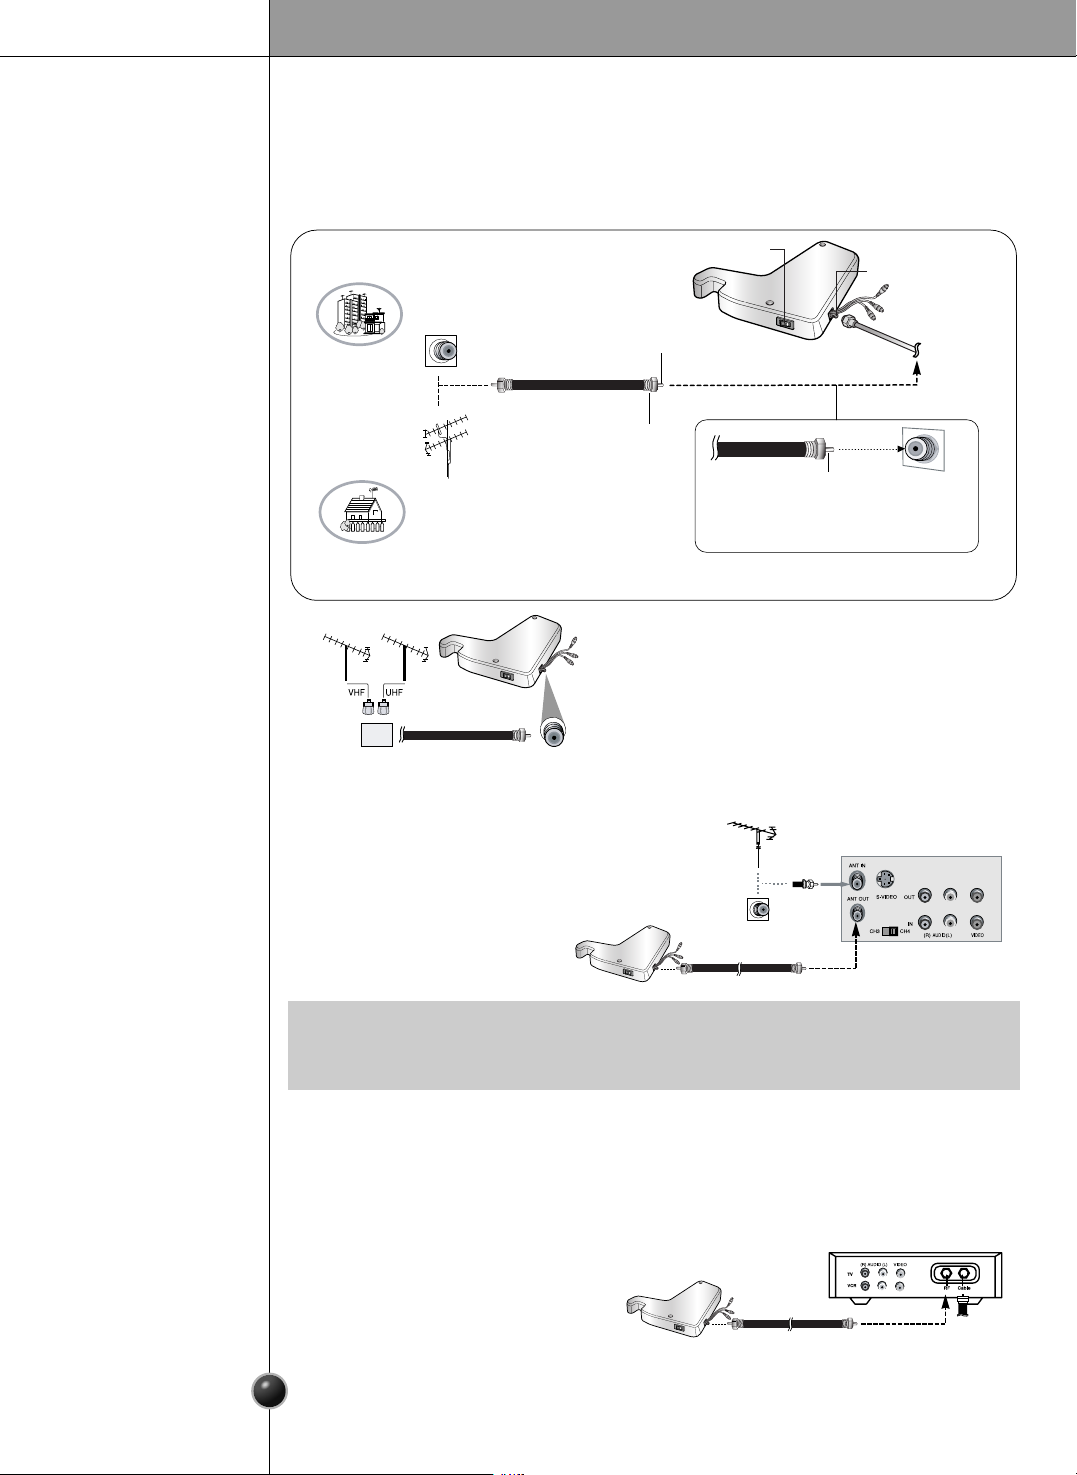
Antenna or Cable Service without a Cable Box Connections
For optimum picture quality, adjust antenna direction if needed.
Antenna Connection
External Equipment Connections
wall antenna
socket
VHF antenna
UHF antenna
outdoor
antenna
Single-family Dwellings /Houses
(Connect to wall jack for outdoor antenna)
Be careful not to bend the bronze wire
when connecting the antenna.
Bronze Wire
Main Power
Antenna jack
Bronze Wire
RF coaxial wire (75 ohm)
Turn clockwise to tighten.
Multi-family Dwellings/Apartments
(Connect to wall antenna socket)
Typical
Antennas
Direct
Connection
VCR
Connection Panel
Cable Box Connection Panel
Connection
1. Connect the audio/video out sockets of the
VCR to audio/video in sockets of the set.
2. Press the TV/AV/RADIO button to select AV.
3. Press the PLAY button on the VCR.
The VCR playback picture
appears on the screen.
Connection
1. Use the TV/AV/RADIO button on
the remote control to select TV.
2. Tune to cable service provided
channels using the cable box.
- After subscribing to a local cable TV service and installing a converter, you can
watch cable TV programming.
- For further cable TV information, contact a local cable service provider.
In a poor signal area to improve picture quality,
purchase and install a signal amplifier.
If the antenna is not installed properly, contact
your dealer for assistance.
Connecting
a VCR / DVD
Cable TV
Connections
• If you have a mono VCR, connect the audio cable from the VCR to the AUDIO
L/MONO socket of the set.
NOTE
Page 13
13
Operation
Setup
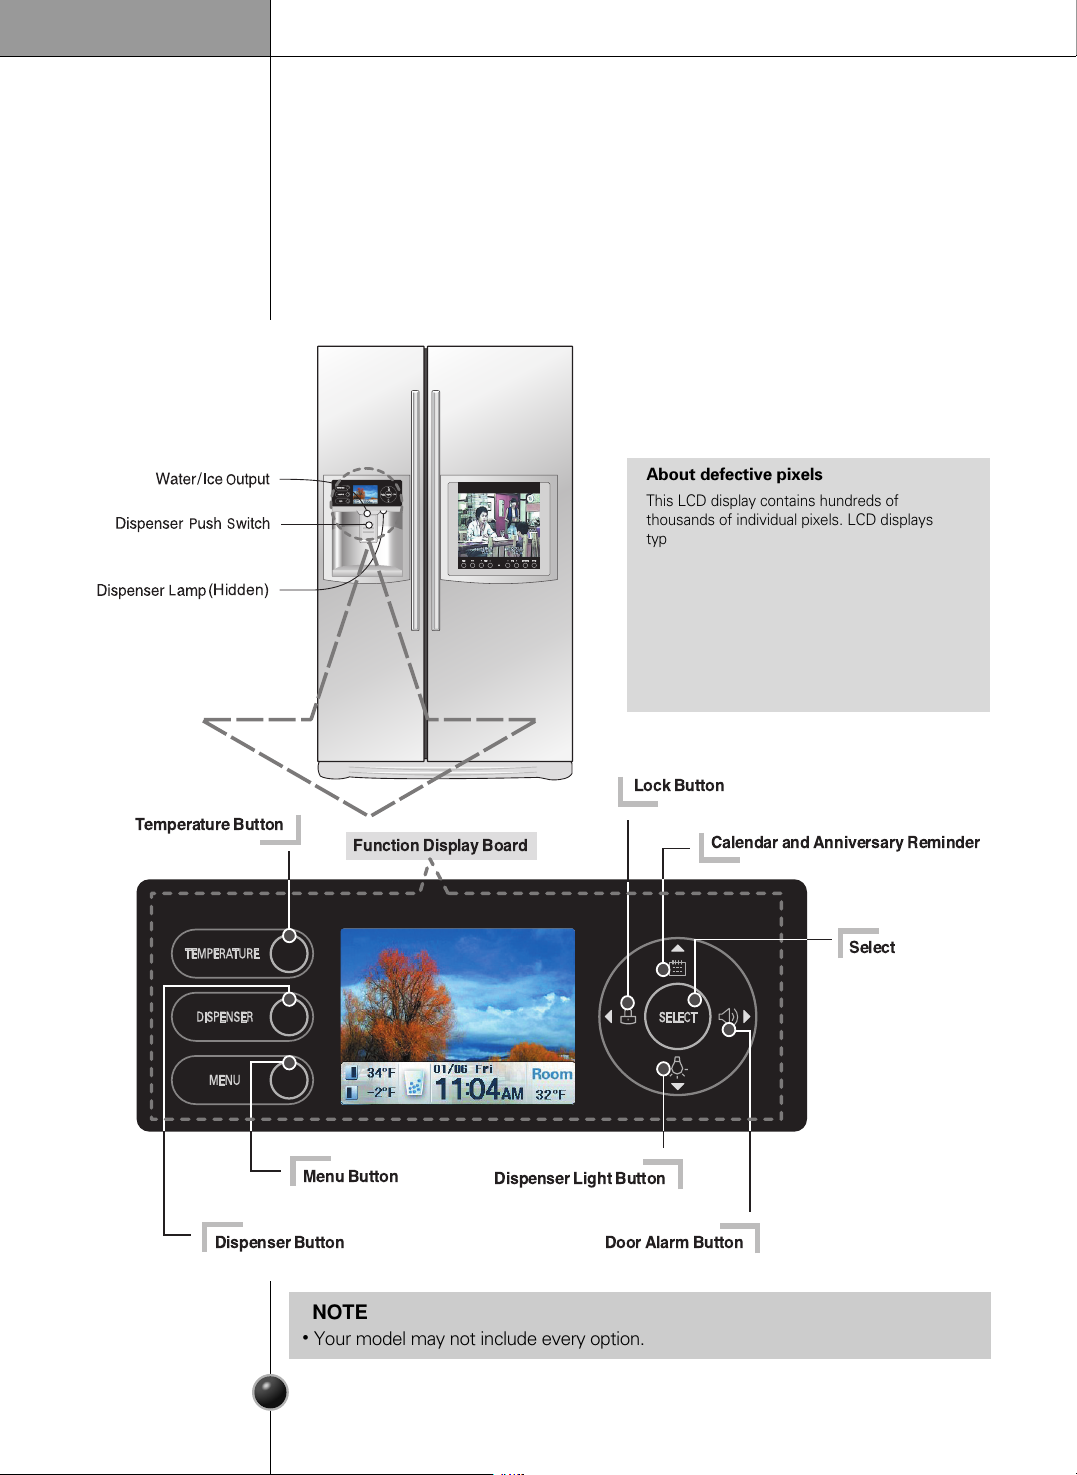
Adjusting the temperatures and functions
When your refrigerator is first installed, allow it to stabilize at normal operating
temperatures 2~3 hours prior to filling it with fresh or frozen foods.
If operation is interrupted, wait 5 minutes before restarting.
(Hidden)
Menu Button
Dispenser Light Button
Door Alarm Button
Dispenser Button
Temperature Button
Calendar and Anniversary Reminder
Lock Button
Function Display Board
Select
•
Your model may not include every option.
NOTE
About defective pixels
This LCD display contains hundreds of
thousands of individual pixels. LCD displays
typically contain a small number of pixels that do
not function normally. Your display has been
inspected and is in compliance with
manufacturer’s specifications, indicating that any
pixel defects do not affect the operation or use
of your display. On a display of this size, 4 or
fewer defective pixels are considered to be
normal and are not grounds for exchange or
refund.
Page 14
Operation
14
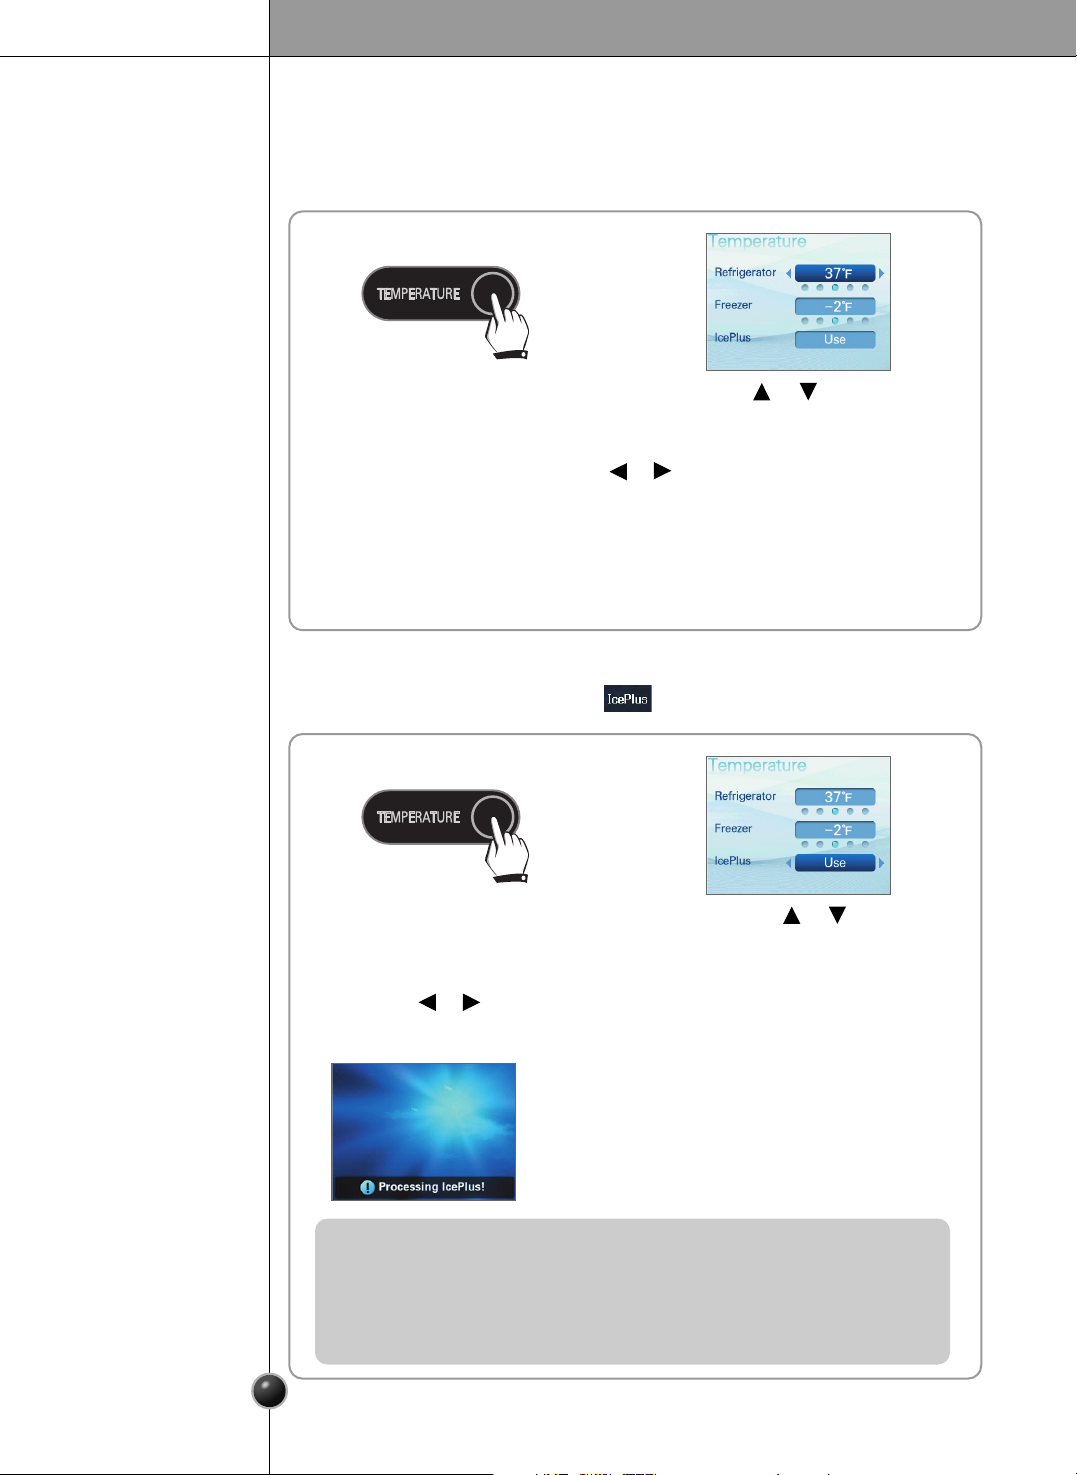
Temperature
- You can adjust the freezer and refrigerator temperature.
1 2
Press the TEMPERATURE button.
Using the or button, select
the desired refrigerator.
3
Select the temperature using the or button.
Refrigerator temperature options: 46, 41, 37, 34, or 32˚F
Freezer temperature options: 7, 1, -2, -5, or -8˚F
4
Press the SELECT button.
5
Return to the standby screen.
Refrigerator/Freezer
12
Press the TEMPERATURE button.
Press the or button
to select IcePlus.
- For quick freezing.
- The standby screen is shown during IcePlus operation.
3
Press the or button to select Use.
[ Use ] <--> [ Not in Use ]
4
Press the SELECT button.
5 6
Return to the standby screen.
IcePlus
- The indicated set temperature is not the actual temperature within the
refrigerator but the target temperature. The actual internal temperature can
differ, especially if the door is opened and warm food was recently stored.
- Initially the refrigeration is weak. Adjust the temperature as mentioned
above after using the refrigerator for at least 2 to 3 days.
Page 15
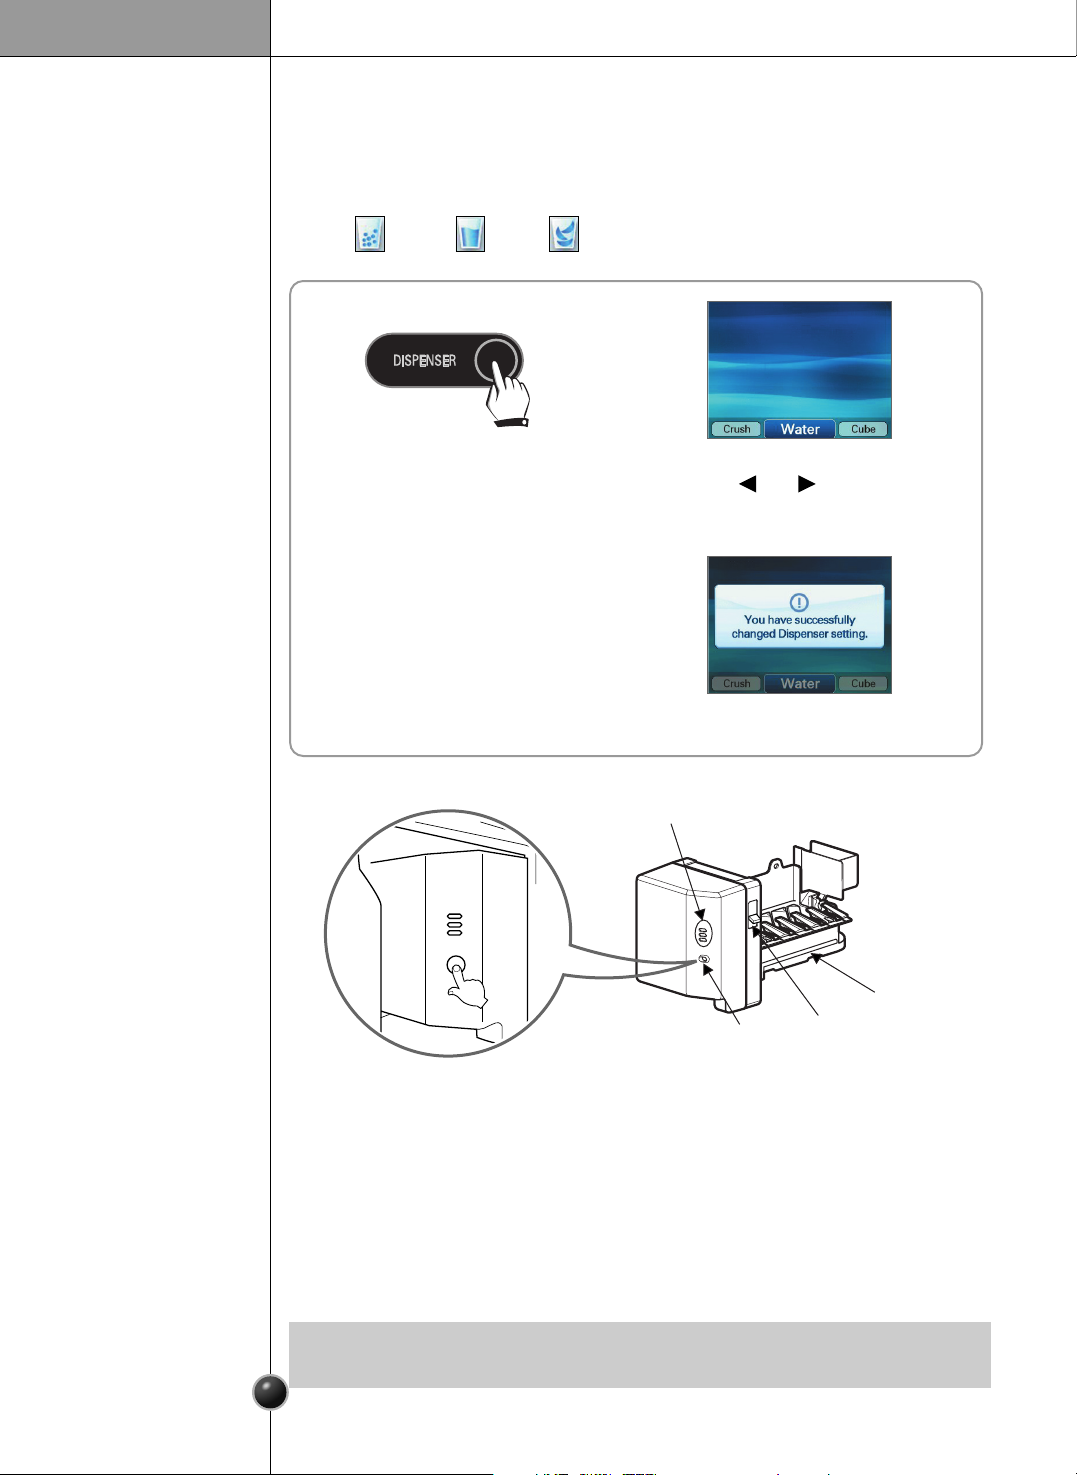
- You can select from Crush, Water or Cube options.
- When the dispenser is in use, the active option is indicated in the standby screen.
- Crush , Water , Cube .
15
Operation
Dispenser
Crush/Water/Cube
12
Press the DISPENSER button.
Select the desired option using
the and buttons.
[ Crush ] <--> [ Water ] <--> [ Cube ]
4
3
Press the SELECT button.
5
Return to the standby screen.
The automatic icemaker can automatically make 6 cubes at a time, 70~120 pieces
per day. This quantity may vary by circumstance, including ambient temperature,
door opening, freezer load. etc.
Icemaking stops when the ice storage bin is full.
If you don't want to use the automatic icemaker, turn the icemaker switch to OFF.
If you want to use automatic icemaker again, change the switch to ON.
The water amount will vary depending on the water amount selection button.
Setting, as well as the water pressure of the connected water line.
Automatic
icemaker
•
It is normal that a noise is produced when ice drops into the ice storage bin.
NOTE
Water Amount
Indicator Light
Power
Switch
Water Amount
Selection Button
Feeler Arm
Page 16
16
Operation
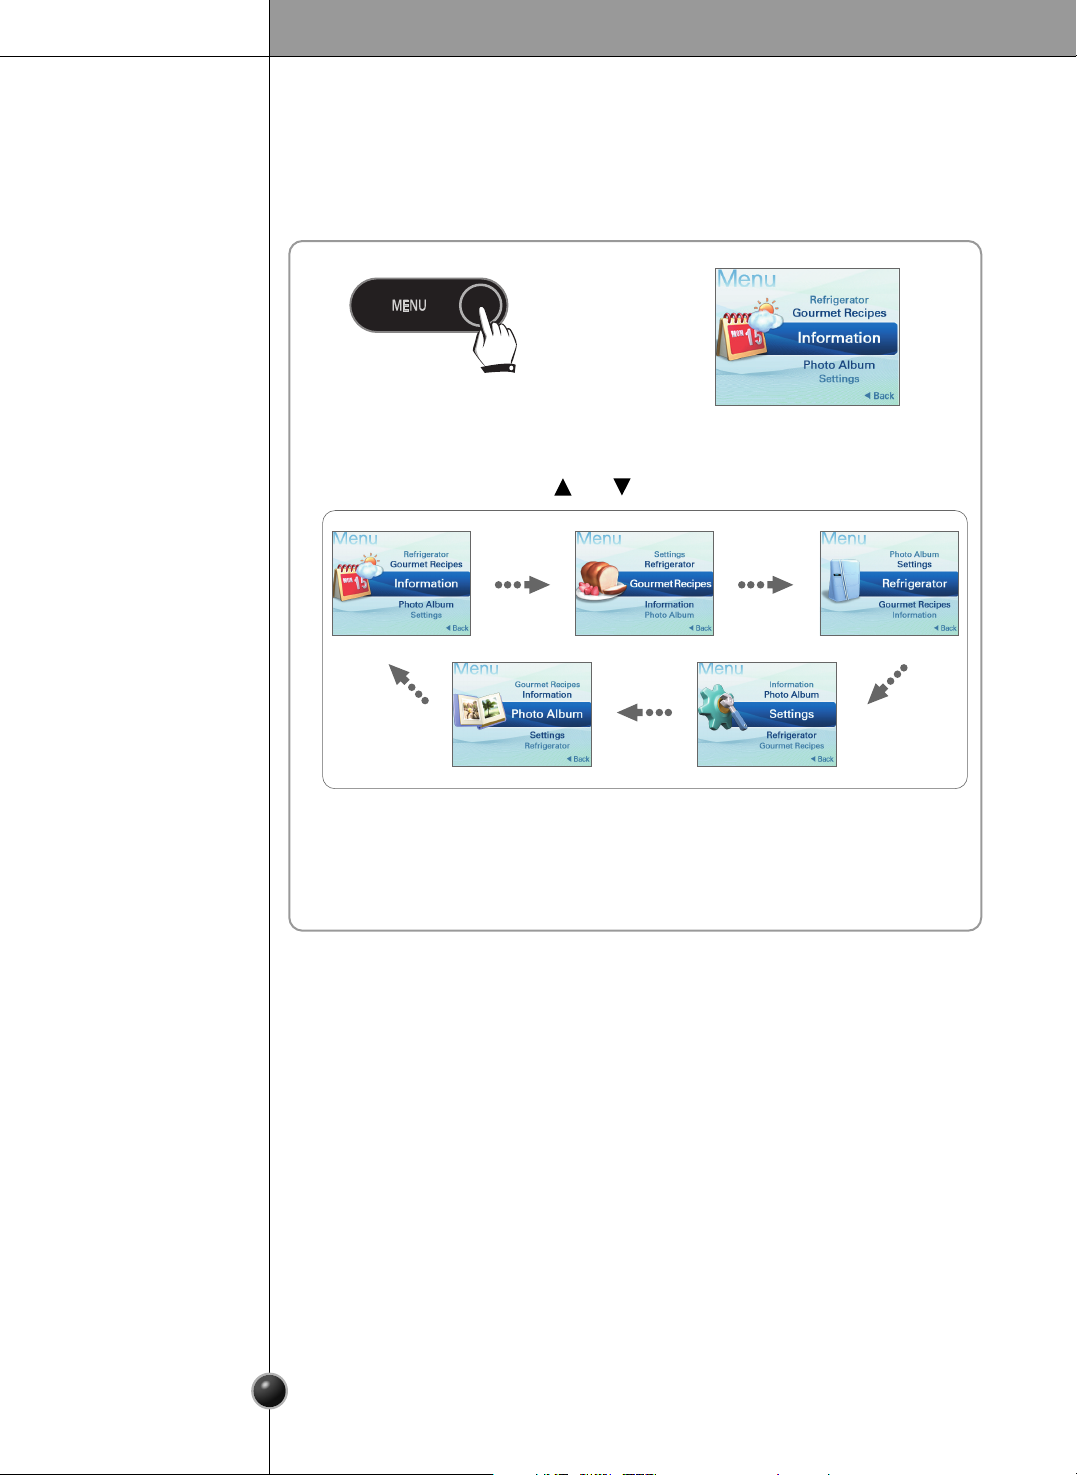
Menu
You can select from Information, Gourmet Recipes, Refrigerator, Settings, and
Photo Album function.
1
Press the MENU button.
2
4
Press the SELECT button.
5
You will see the detail menu.
3
Select the menu using the and buttons.
Page 17
17
Operation
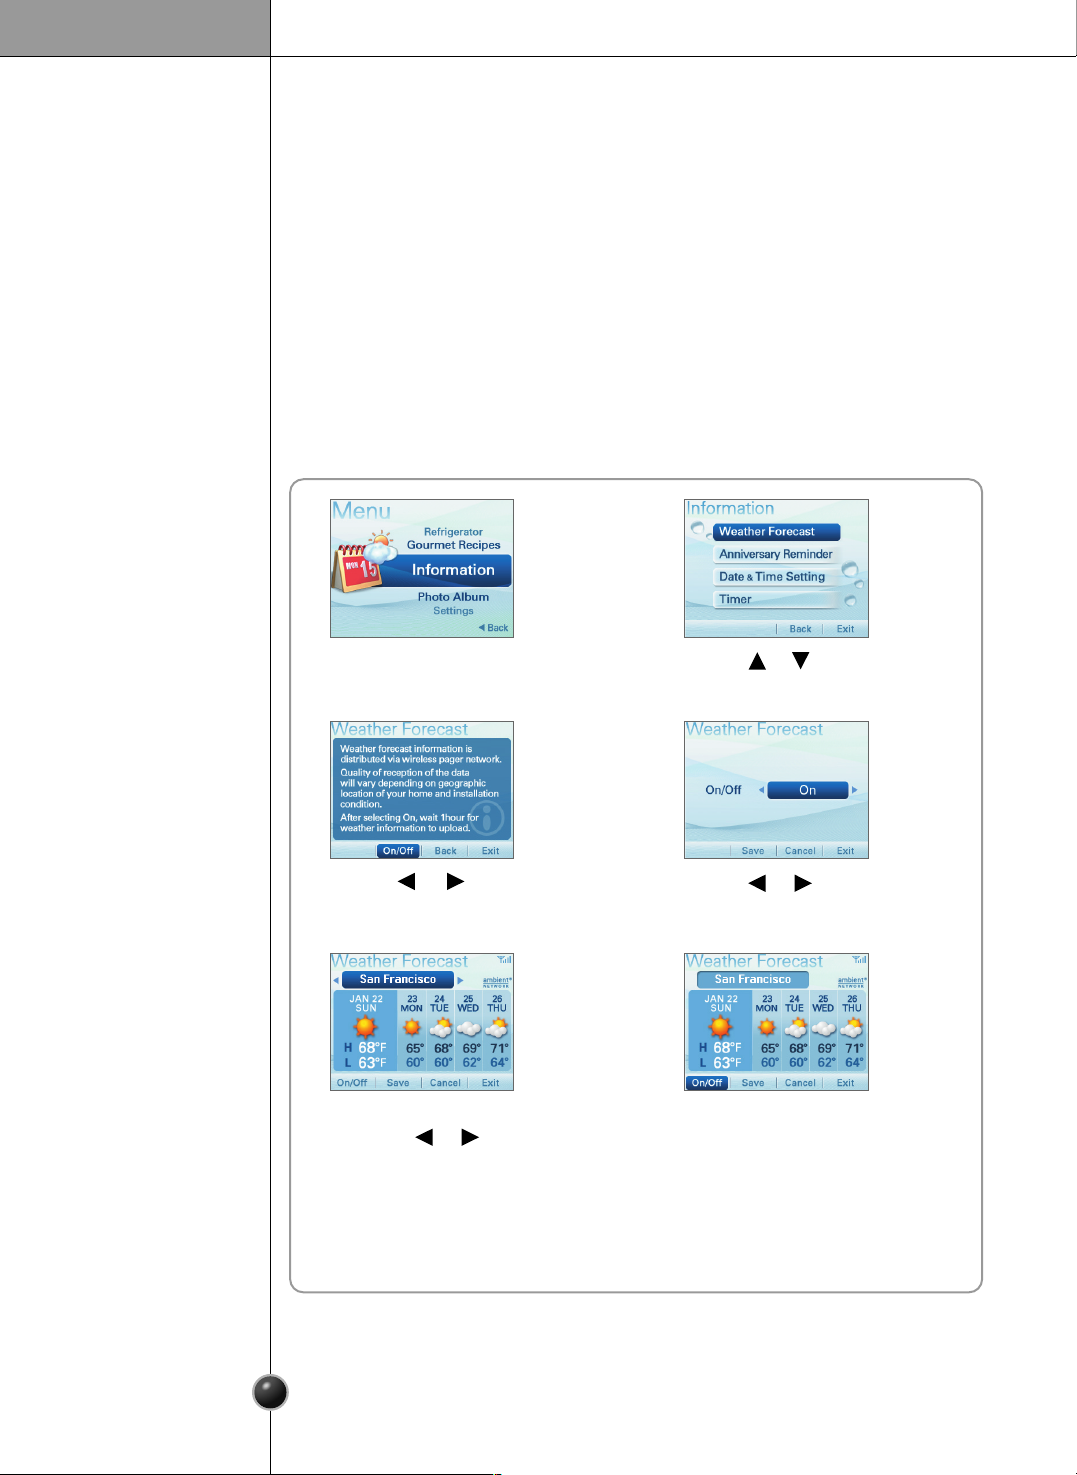
Press the or button to
select On.
Press the or button
to select On/Off.
Select the desired region
using the or button.
Press the or button to
select Weather Forecast.
You can select from Weather Forecast, Anniversary Reminder,
Date and Time Setting, or Timer function.
Information
- Receives and displays the weather and temperature for 5 days, including the
current day.
- Reception of weather forecast information received and displayed on the screen
is subject to vary depending on your region and location of refrigerator.
- Thereby LG does not guarantee and will not be held responsible for accuracy of
the weather information.
- Weather forecast information is only available in U.S.A
❐ Weather Forecast
1 2
3 4
56
7
Return to the Information menu.
Page 18
18
Operation
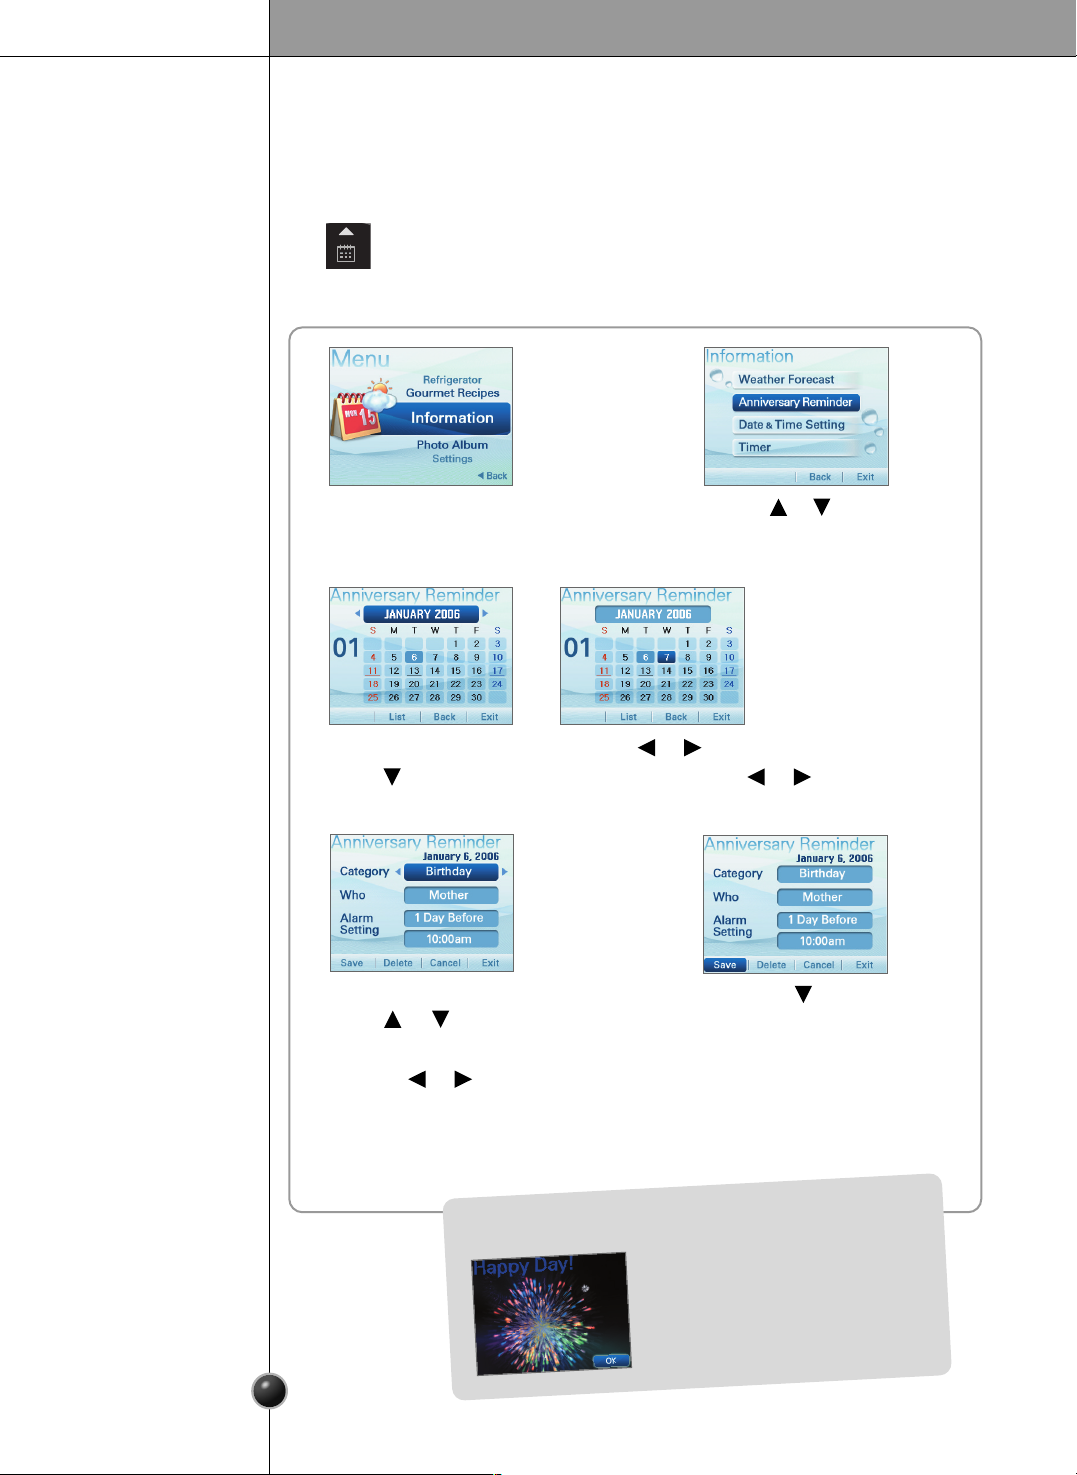
Select the menu using
the or button.
Select the advance time
using the or button.
Select the month using the or button.
Press the button and then select the date using the or button.
Press the or button to
select Anniversary Reminder.
- Register the anniversary date.
- Select the Anniversary reminder using the button.
❐ Anniversary Reminder
< To set a new date >
1 2
3
4
6
Return to the Information menu.
Press the button
to select Save.
5
The anniversary reminder alarm goes off
The alarm will go off at the set date
and time, and the anniversary will be
displayed in the screen.
Page 19
19
Operation
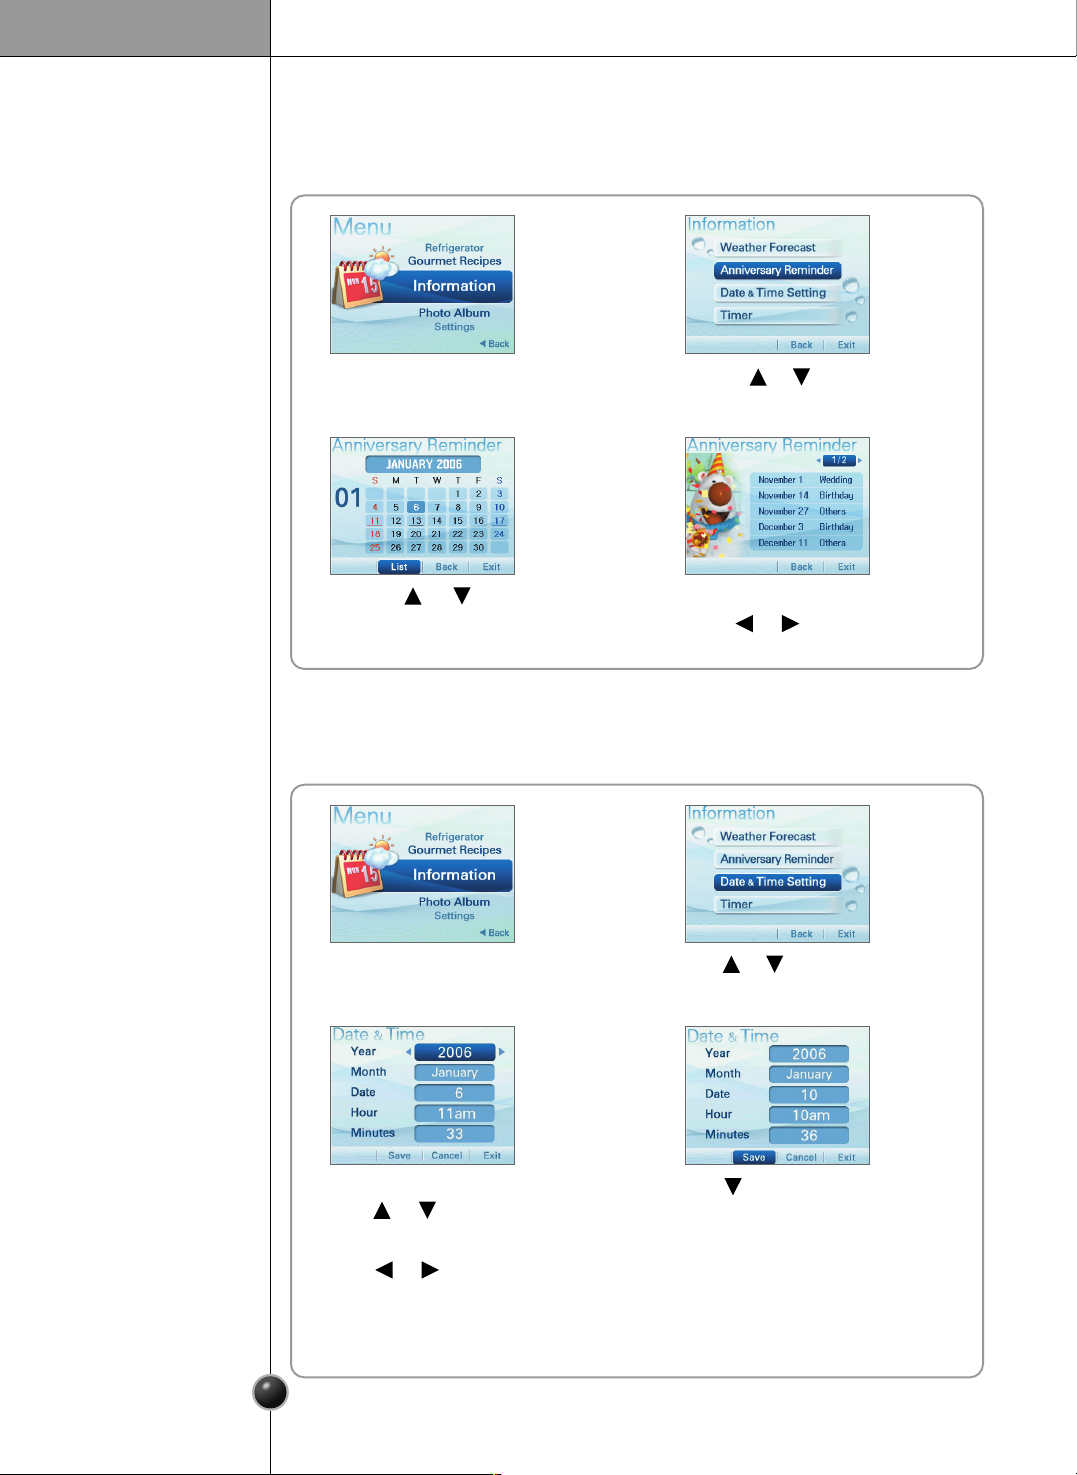
You can check the detail menu using
the or button.
Press the or button
to select List.
Press the or button to
select Anniversary Reminder.
< To view the anniversary list >
1
2
3 4
Press the button to select Save.
Select the menu using
the or button.
Select the value using
the or button.
Press the or button to select
Data & Time Setting.
To set the date and time.
❐ Data & Time Setting
1 2
3 4
5
Return to the Information menu.
Page 20
20
Operation
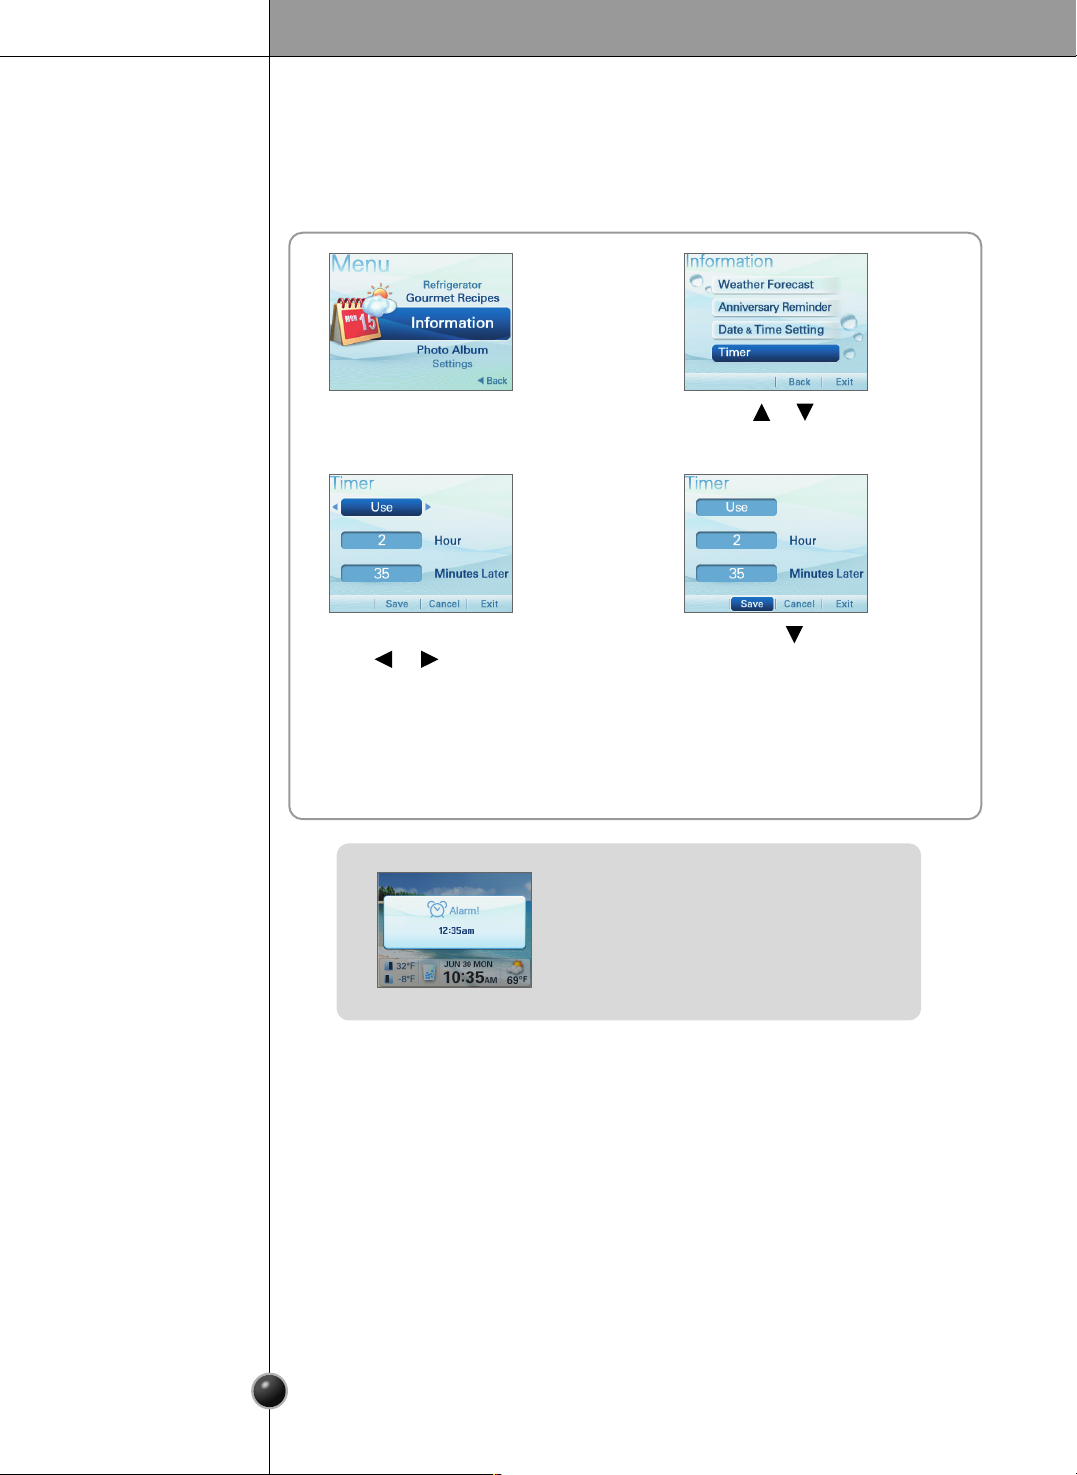
To set the alarm.
❐ Timer
Press the button
to select Save.
Select the time using
the or button.
Press the or button
to select Timer.
1 2
3 4
5
Return to the Information menu.
- The alarm will go off at the set time, and
the timer image will be displayed in the
screen.
Page 21
21
Operation
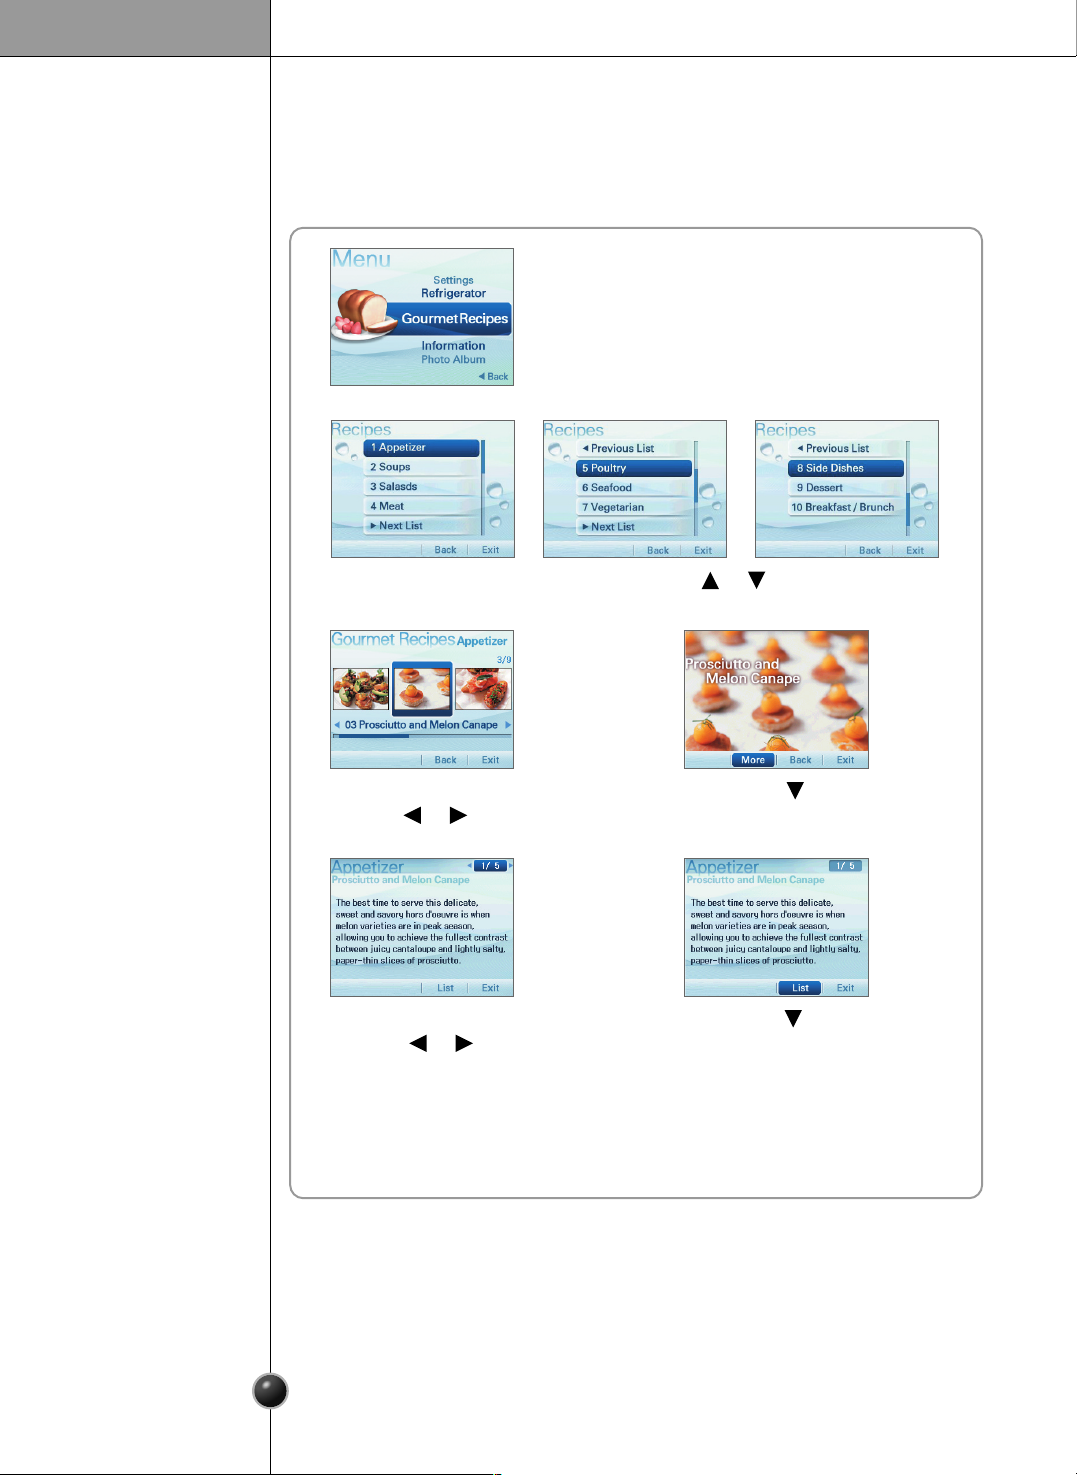
Select the recipe after selecting the menu category of dish.
Gourmet Recipes
1
2
Select the menu category using the or button.
Press the button
to select More.
You can select the dish
using the or button.
3 4
Press the button
to select List.
You can select the detail menu
using the or button.
56
7
Return to the Gourmet Recipes menu.
Page 22
Operation
22
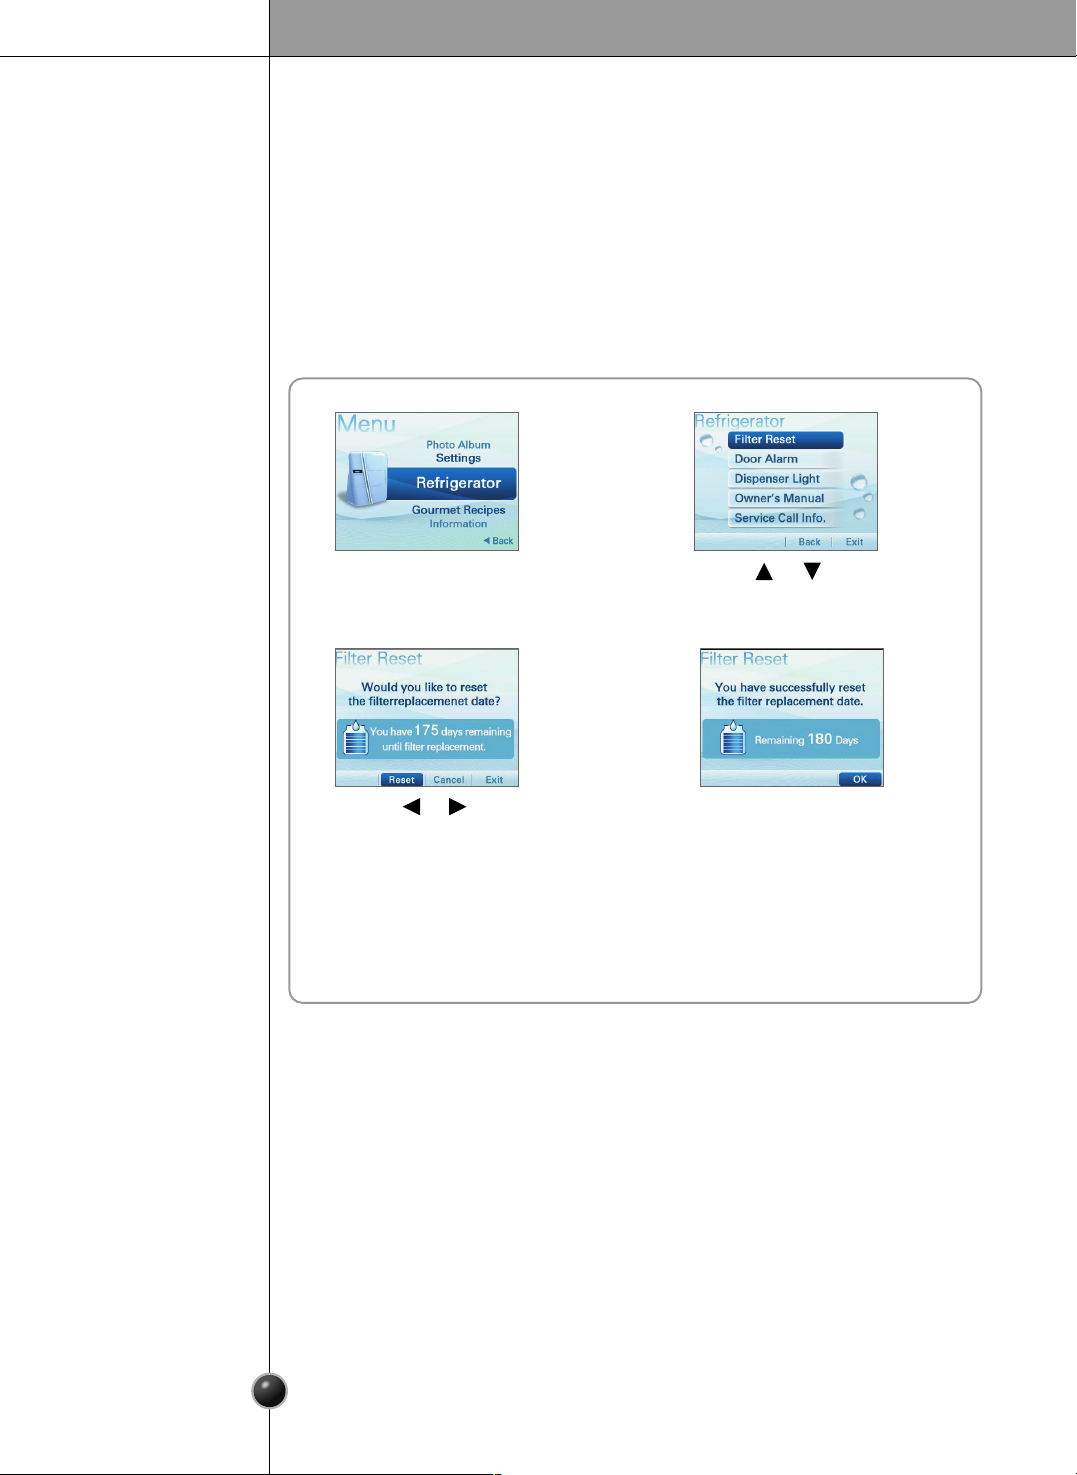
You can select from Filter reset, Door alarm, Dispenser light, Manual, and Service Call
functions.
< When the filter exchange date is still not due. >
Reminds you when to replace the filter.
1
Refrigerator
2
❐ Filter Reset
Press the or button
to select Filter Reset.
4
Press the SELECT button.
3
Press the or button to
select Reset.
5
Return to Refrigerator menu.
Page 23
23
Operation
1 2
Press the or button
to select Filter Reset.
4
Press the SELECT button.
3
Press the or button
to select Reset.
5
Return to Refrigerator menu.
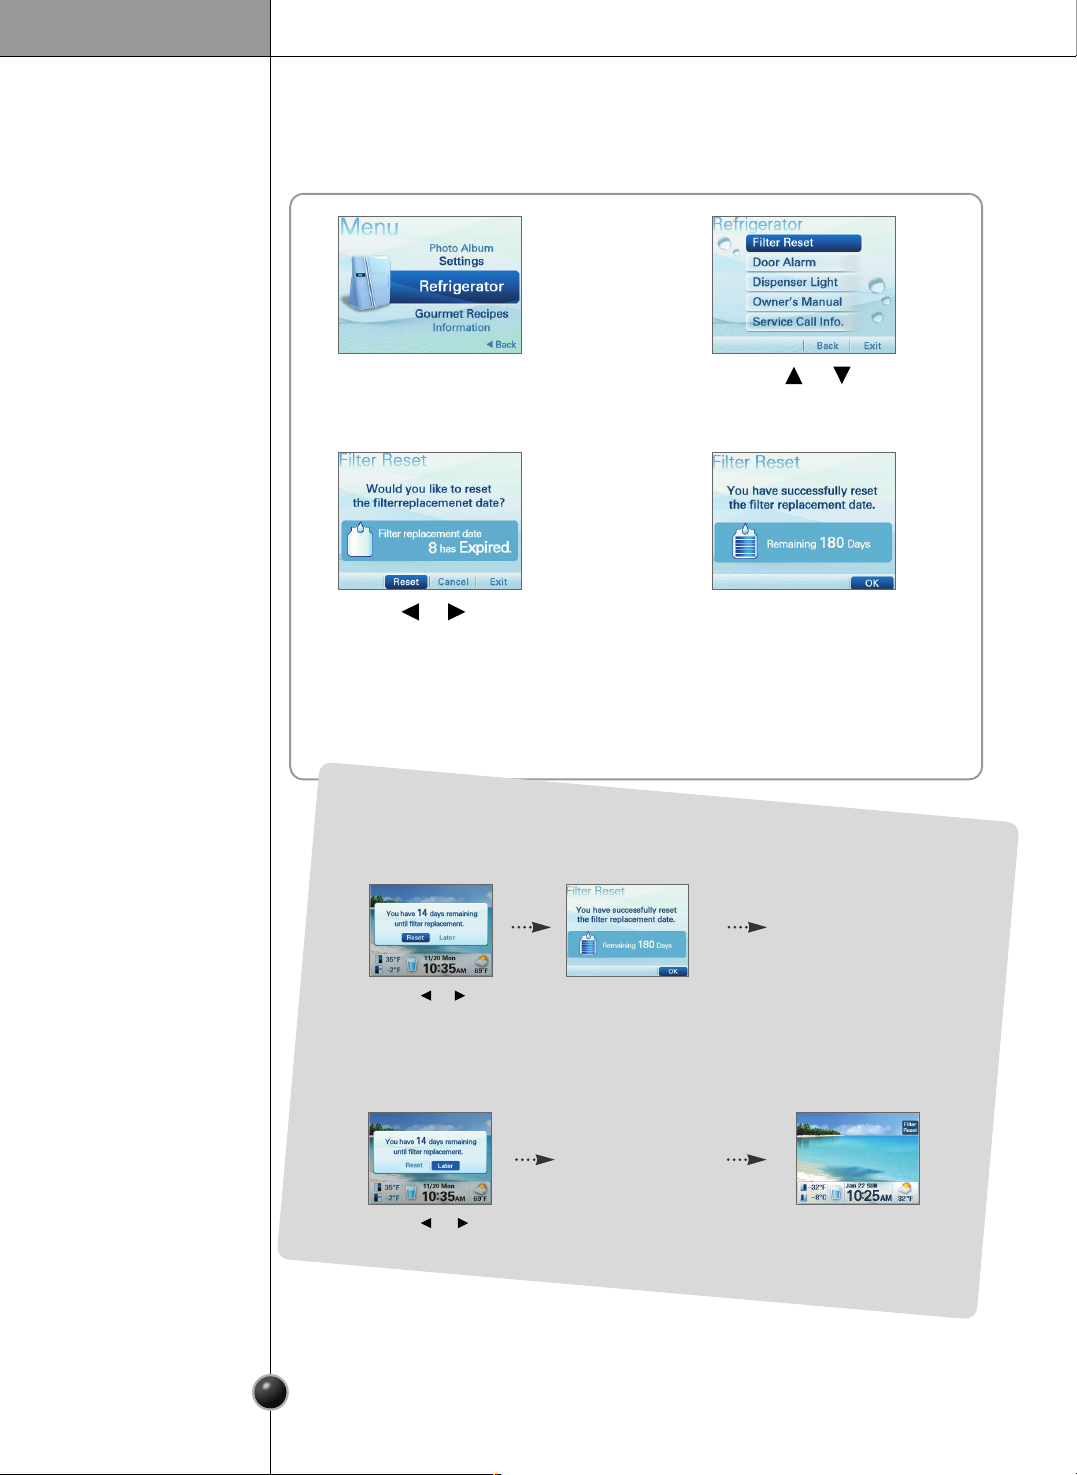
< When the filter exchange date is overdue. >
- You will see a message notifying you how long it will be before you need
to change the filter.
Return to the
standby screen.
- If you choose to cancel filter exchange setting.
Press the or button
to select Later.
You will see the filter exchange
sign in the standby screen.
Press
the SELECT button.
Press the or
button to select Reset.
Press
the SELECT button.
Page 24
24
Operation
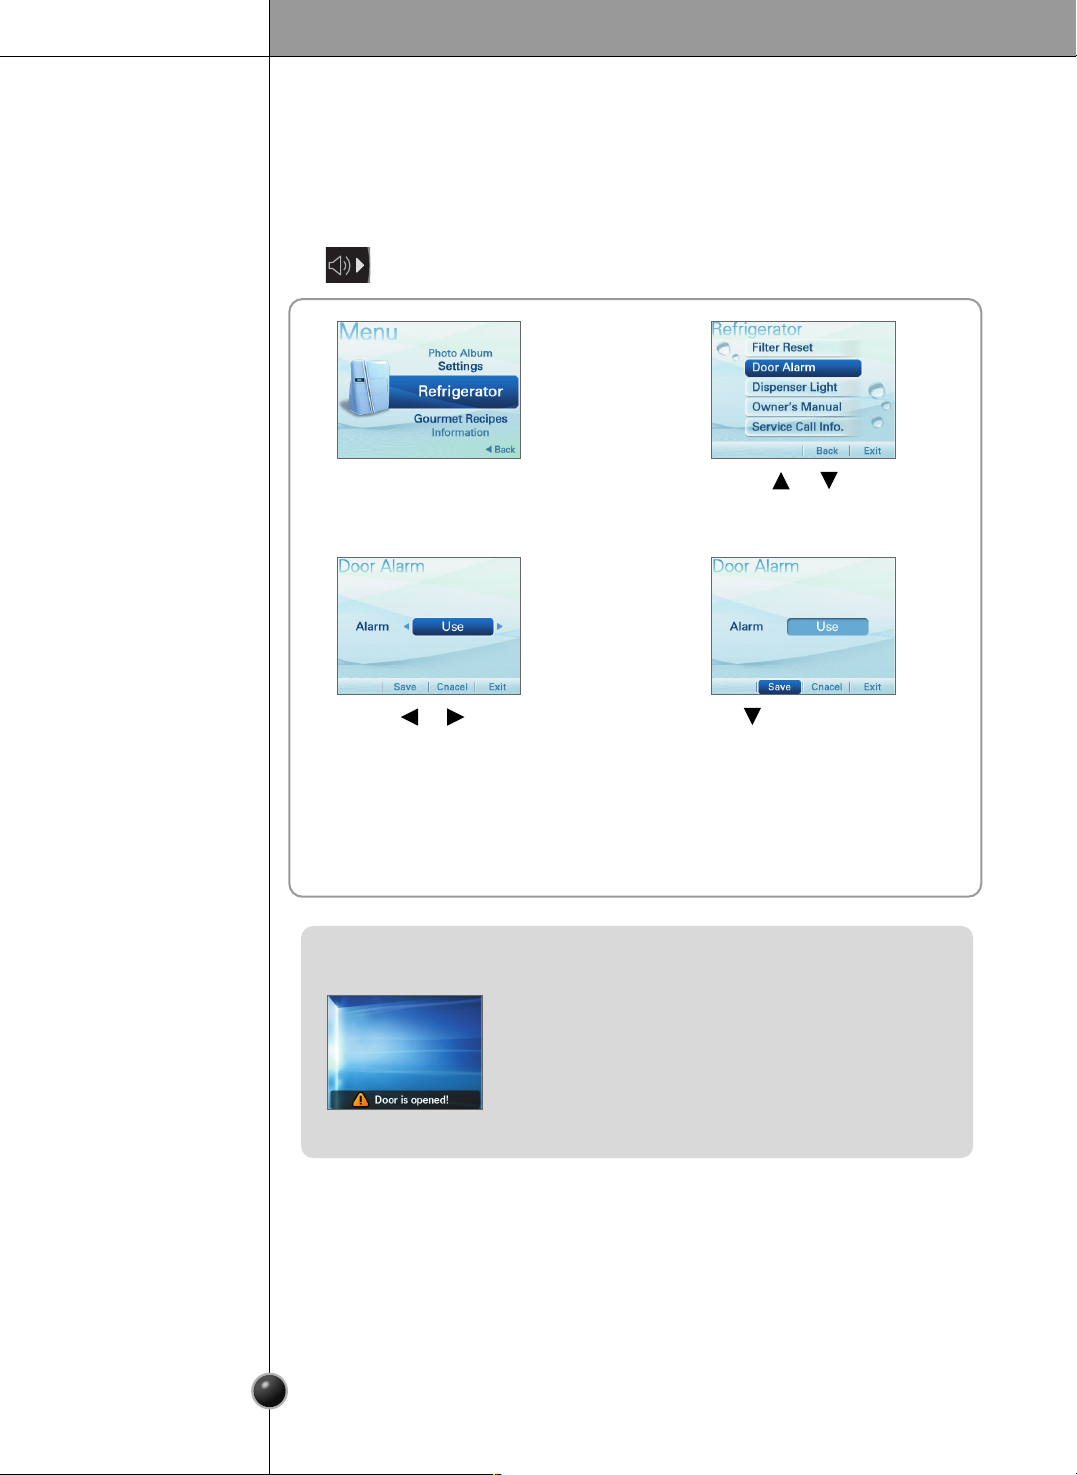
This is the function of notifying you every 30 seconds that the refrigerator door is
open for more than 1 minute.
- You can turn the door alarm on or off.
❐ Door Alarm
1 2
Press the or button to
select Door Alarm.
4
Press the button to select Save.
3
Press the or button
to select Use or Not in Use.
5
Return to the Refrigerator menu.
- You will see the door alarm message.
- When using the Door Alarm
This notifies you every 30 seconds that the
refrigerator door is open for more than 1 minute.
- When not using the Door Alarm
The alarm will not go off even when the refrigerator
door is open.
Page 25
25
Operation
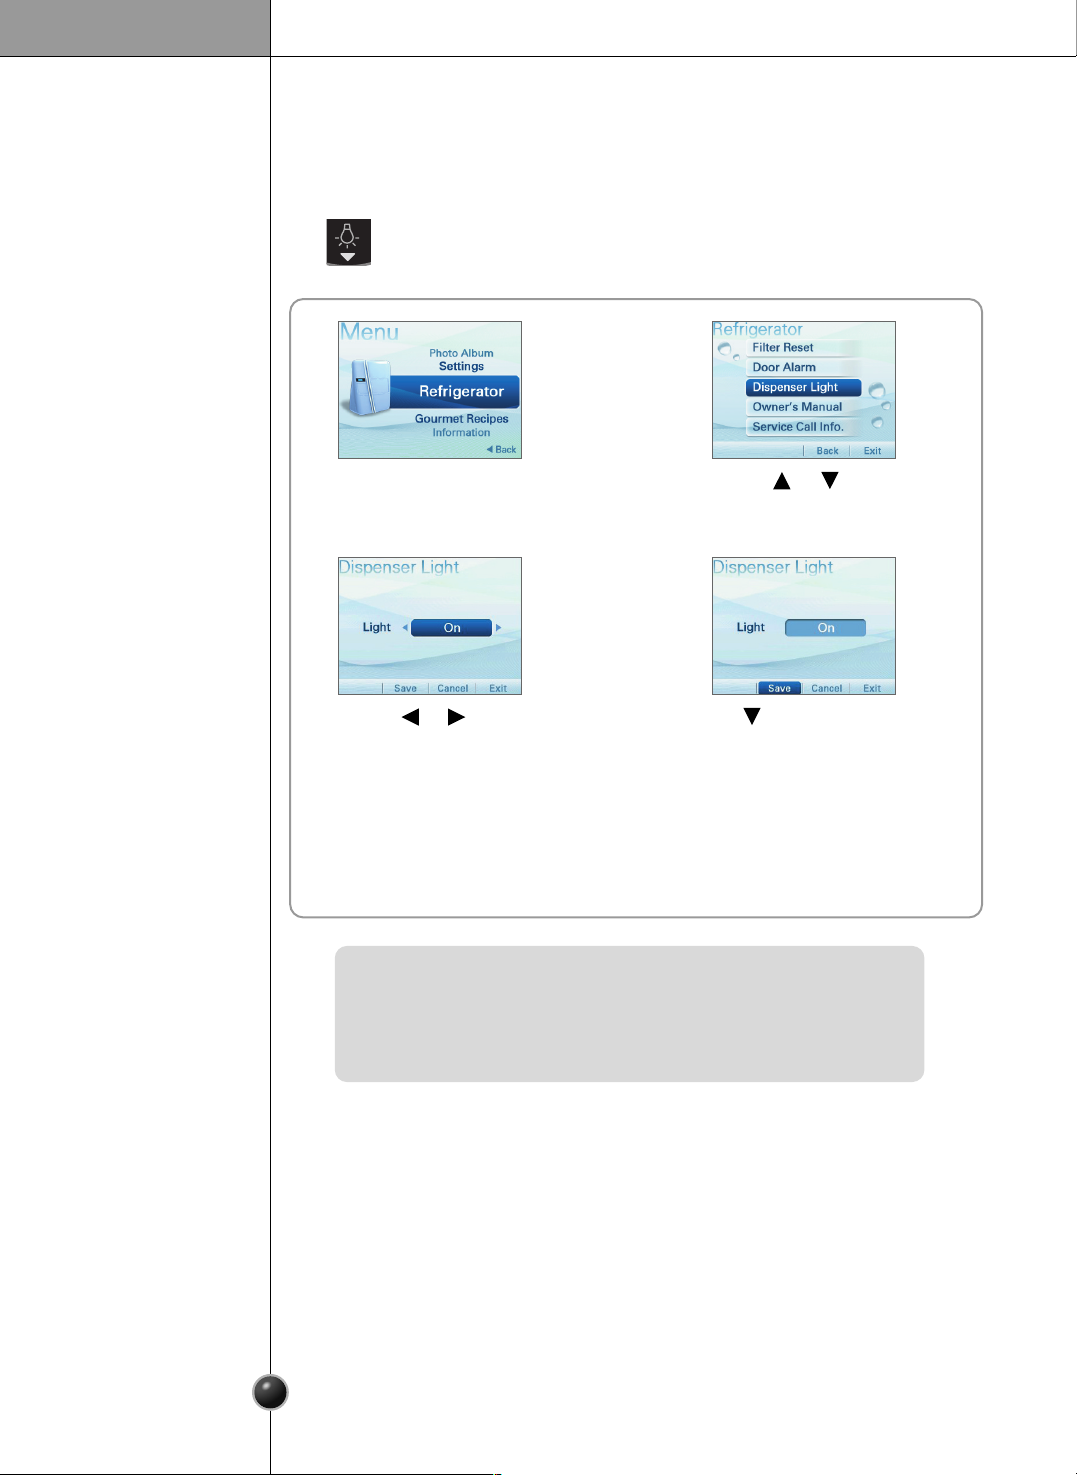
This function controls the LED lamp located on the dispenser.
- Press this icon turn the dispenser light on or off.
❐ Dispenser Light
- When On is selected, the dispenser light is always on.
- When Off is selected, the dispenser light is turned on only when the
dispenser lever is pressed.
1 2
Press the or button to
select Dispenser Light.
4
Press the button to select Save.
3
Press the or button
to select On.
[ On ] <--> [ Off ]
5
Return to the Refrigerator menu.
Page 26
26
Operation
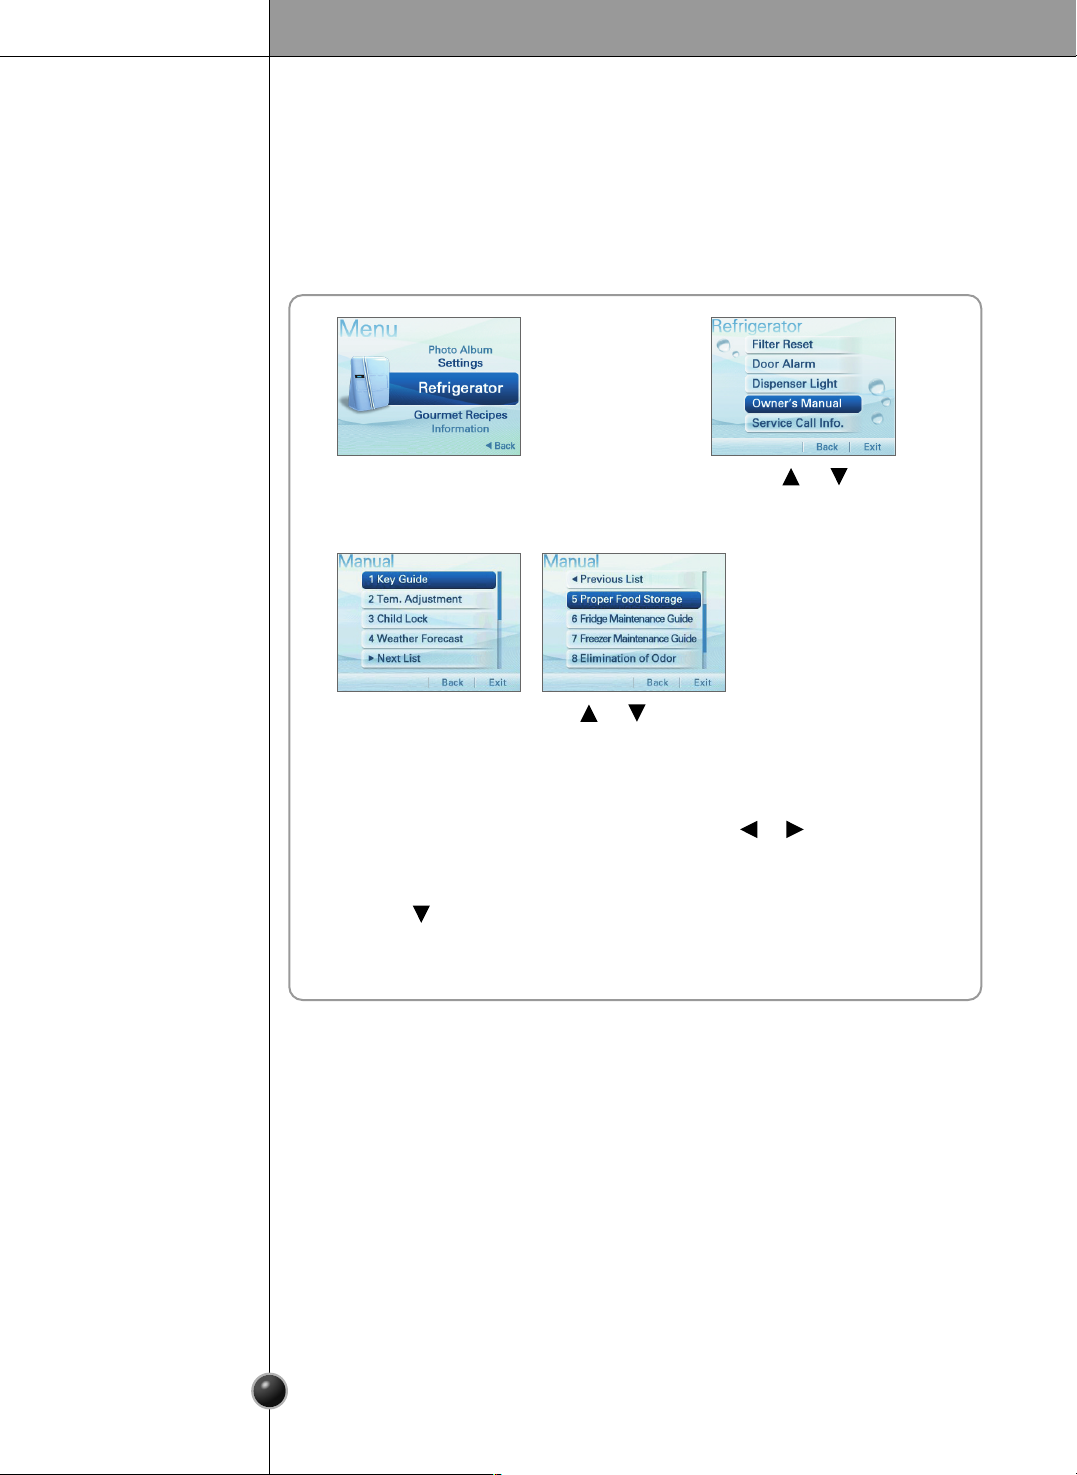
You can select from Key Guide, Tem. Adjustment, Child Lock, Weather Forecast,
Proper Food Storage, Fridge Maintenance Guide, Freezer Maintenance Guide or
Elimination of Odor function.
❐ Owner’s Manual
1 2
Press the or button
to select Owner’s Manual .
7
Return to Refrigerator menu.
3
4
Press the SELECT button.
6
Press the button to select List.
5
Select the detail menu using
the or button.
Select the menu using the or button.
Page 27
27
Operation
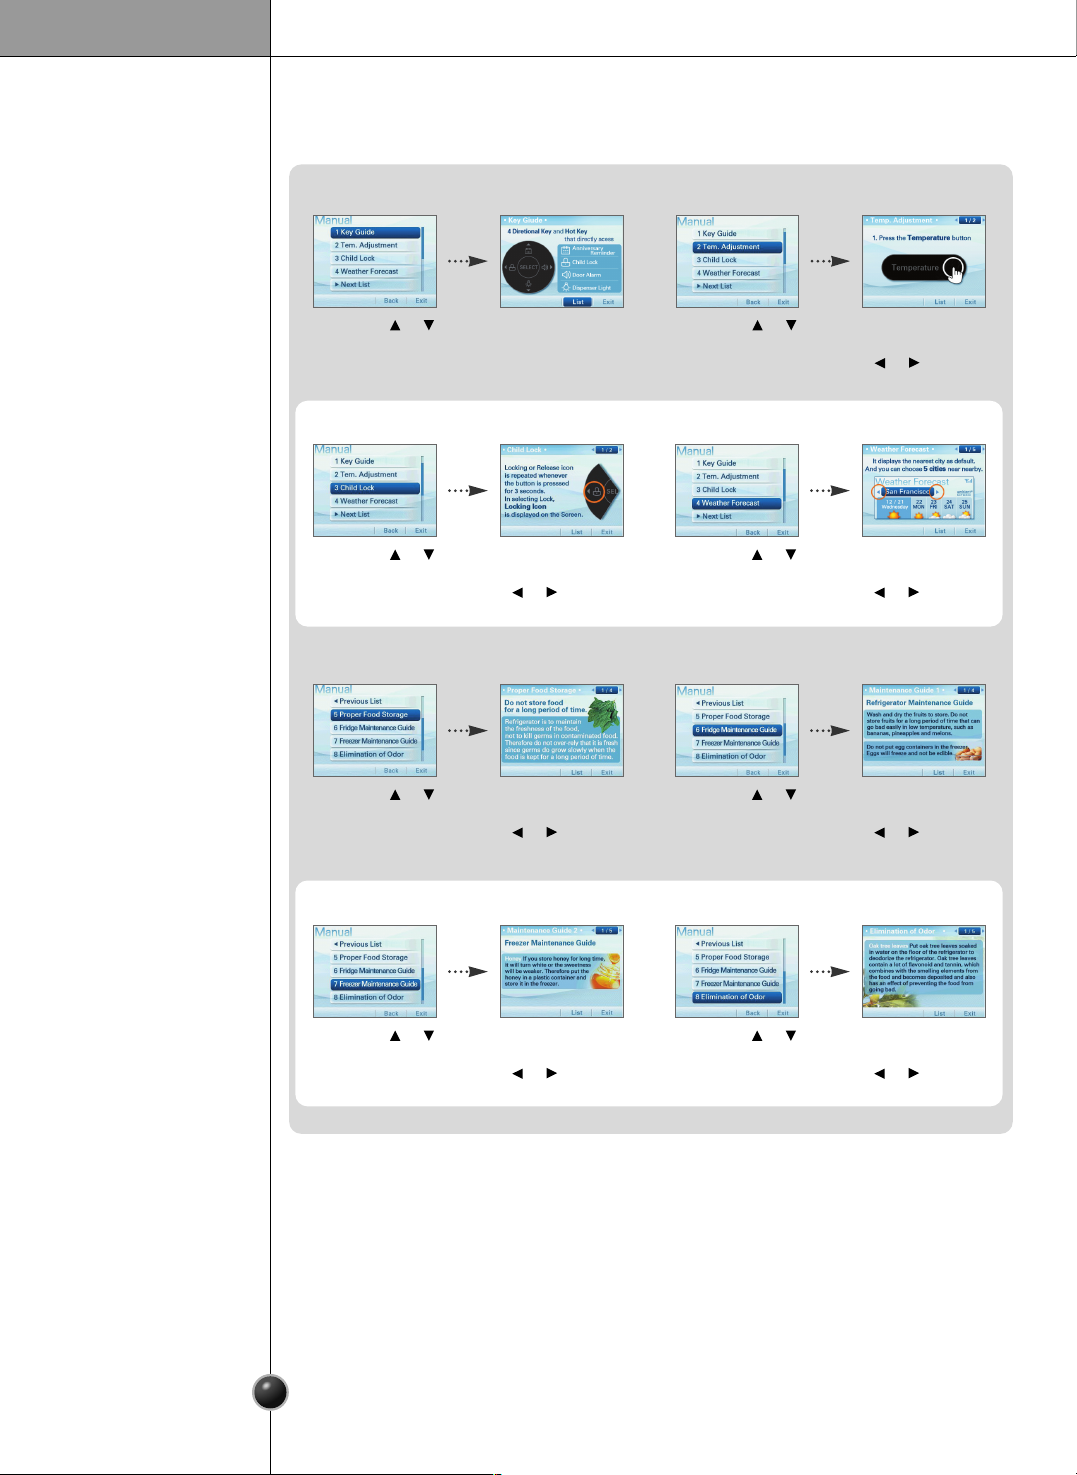
1. Key Guide
Press the or
button to select
Key Guide.
You will see the detail
menu.
2. Tem. Adjustment
Press the or
button to select
Tem. Adjustment.
You can check the
detail menu using the
or button.
3. Child Lock
Press the or
button to select
Child Lock.
You can check the
detail menu using the
or button.
4. Weather Forecast
Press the or
button to select
Weather Forecast.
You can check the
detail menu using the
or button.
5. Proper Food Storage
Press the or
button to select
Proper Food Storage.
You can check the
detail menu using the
or button.
6. Fridge Maintenance Guide
Press the or
button to select
Fridge Maintenance
Guide.
You can check the
detail menu using the
or button.
7. Freezer Maintenance Guide
Press the or
button to select
Freezer Maintenance
Guide.
You can check the
detail menu using the
or button.
8. Elimination of Oder
Press the or
button to select
Elimination of Odor.
You can check the
detail menu using the
or button.
Page 28
28
Operation
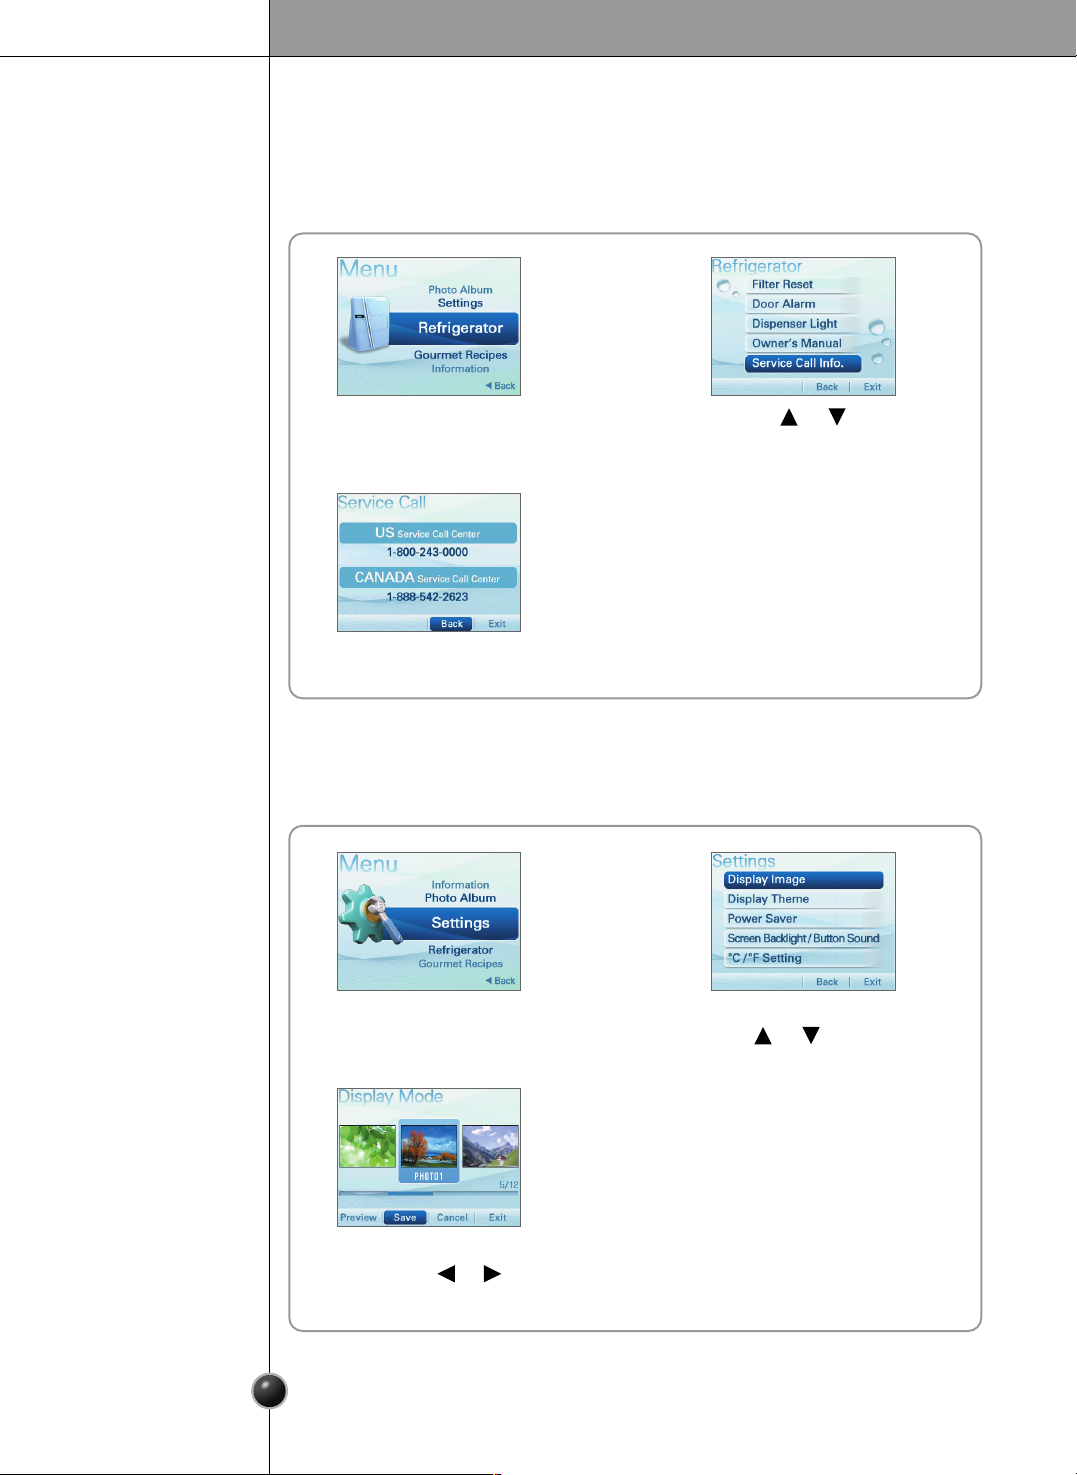
You can select from Display Image, Display Theme, Power Saver,
Screen Backlight/Button Sound, or ˚C/˚F Setting function.
Settings
1 2
Select the menu using
the or button.
3
Select and Save the menu you
want using the or button.
4
Return to the Settings
list menu.
This shows the number to call for service in the US or Canada.
❐ Service Call Info.
1 2
Press the or button
to select Service Call Info.
3
You will see the detail menu.
Page 29

29
Operation
You can select the standby screen setting.
❐ Display Image
1 2
Select the desired photo using
the or button.
Press the button to select Preview.
Press the or button
to select Display Image.
3 4
Press the button to select Save.You can preview other
standby screens using
the or button.
5
You can select the screen theme setting.
1 2
❐ Display Theme
Select the menu using the or button.
Press the button to select Save.
[ Character ] <--> [ Motion ]
Press the or button to
select the Display Theme.
Page 30

30
Operation
1 2
Press the or button to select Use.
Press the or button
to select Power Saver.
3
4
The Power Saver turns the display off at the preset time.
Select the desired time using the or button.
[ 1min ] <--> [ 3min ] <--> [ 5min ]
You can select the Power Saver function.
- When selecting [Use of Power Saver], the LCD screen backlight turns off after
eclipse of designated time.
- When selecting [Not in Use of Power Saver], the LCD screen is converted to
Screen Protector after a minute.
❐ Power Saver
1 2
Press the or button
to select Not in Use.
Press the or button
to select Power Saver.
3
Select the menu using
the or button.
When selecting Not in Use, the current
standby screen is saved as Screen Saver.
[ Clock ] [ Photo ] [ Not in Use ]
< When Power Saver function is selected >
< When Power Saver function is not selected >
Page 31

31
Operation
Select the brightness value using
the or button.
Press the button to select Save.
[ 1 <--> 2 <--> 3 <--> 4 <--> 5 ]
1 2
❐ ˚C/˚F Setting
Select the menu you want
using the or button.
[ Centigrade] <--> [ Fahrenheit ]
Press the button to select Save.
Press the or button
to select ˚C/˚F Setting.
- You can adjust the screen brightness.
- When selecting the button sound, you can turn the button sound on or off.
1
❐ Screen Backlight/Button Sound
Press the or button to select
Screen Backlight/Button Sound.
2
Select and Save the menu you want
using the or button.
[ On ] <--> [ Off ]
Page 32

32
Operation
1 2
Select the desired photo using
the or button.
3 4
Press the or button to
select Save.
Press the button
to select Display Image.
Press the or button
to select Preview.
5 6
Return to the standby screen.
You can register a photo or setup the standby screen.
Photo Album
< When setting to the standby screen >
Page 33

33
Operation
1 2
Select the desired photo using
the or button.
3 4
Press the or button to
select Save.
Press the button to select
Delete.
Press the or button to
select Yes.
5
Return to the standby screen.
< When deleting >
1 2
Press the button to select
Delete All.
3
4
Return to the standby screen.
Press the or button
to select Yes.
< When deleting all>
Page 34

34
Operation
< When registering the photo >
1 2 3
When you connect the USB to the USB port, it reads the photo data and
adds the album list.
1 2
When selecting Photo Album and then
connecting the USB port, Import item is
activated.
3 4
After setting up desired photo from
data read, select Import.
When selecting Import, it
reads data from the USB port.
The Pop-up screen appears to
inform progress process
during reading.
5
After Import Check popup
screen appears, you can
check photo from the photo
album list.
< When using USB >
- Position of USB port for refrigerator.
- If desiring to use the USB port,
firstly select the photo album
item and then insert the USB port.
- It takes several seconds if reading photo
from the USB port.
- Your USB port may not be compatible from time to time.
- Use the product where photo is saved in the USB. If any
photo are not saved, firstly save photo in the USB port.
USB
USB
Page 35

Operation
35
Lock can be used to disable the buttons and prevent tamperng with the settings.
- Select Lock using the buttons.
- Lock or unlock buttons and dispenser by pressing down the button for 3seconds.
- When lock is selected, the dispenser and buttons will be locked and will not operate.
- When lock is selected, the lock icon will appear on the screen.
Lock
< To set the Lock >
< To cancel the Lock >
Pressing the Refrigerator
button when the Lock is
set will display this
message.
When you see this message, press
the Lock button for 3 seconds.
1 2
4
Return to the standby screen.
You will see this message.
3
When you see this message, press
the Lock button for 3 seconds.
1 2
4
Return to the standby screen.
You will see this message.
3
Page 36

36
Operation
Throw away the ice (about 20 pieces) and water (about 7 glasses) first made after
refrigerator installation.
This is also necessary when the refrigerator has not been used for a long time.
Keep children away from the dispenser.
Children may play with or damage the controls.
Be careful that food does not block the ice passage.
If foods are placed at the entrance of ice passage, the
dispenser may malfunction. The passage may also
become blocked with frost if only crushed ice is used.
Remove the frost that accumulates.
Storing cans or other items in the ice bin may damage
the icemaker or the container may burst.
Never use thin crystal glass or crockery to collect ice.
Such glasses or containers may be broken, and glass fragments could be in the ice.
Put ice first into a glass before filling water or other beverages.
Water may be splashed if ice is added to existing liquid in a glass.
Keep your hands out of the ice door and passage.
You might break something or injure yourself.
Never remove the ice maker cover.
Shake the ice bin occasionally to level the ice in it.
Sometimes the ice piles up near the icemaker, causing the icemaker to misinterpret the
bin level and stop producing ice.
If you find ice or water dispensed unexpectedly, contact an Authorized Service
Center. (Call 1-800-243-0000 24/7 and select the option to locate an authorized
servicer.)
Never use too narrow or deep glass.
Ice may be jammed in the ice passage and, thus, the refrigerator may fail.
Keep the glass at a proper distance from ice outlet.
A glass too close to the outlet may prevent ice from coming out.
Cautions
Other functions
Diagnostic (failure detection) function
The diagnostic function automatically detects failure when failure is found in product
during the use of refrigerator.
If your refrigerator fails, do not turn off the power. Call 1-800-243-0000 24/7 and select
the option to locate an authorized servicer or call our support line for assistance.
Turning off the appliance will make it more difficult for the service technician to
determine the problem.
Water is cooled while stored in the water tank in freezer door, and then sent to the
dispenser.
Ice is made in the automatic icemaker and sent to the dispenser.
How ice/cold
water is supplied
Ambient Temperature Display Window.
Temperature is displayed only between 16°F ~ 120°F (-9°C ~ 49°C).
Temperature less than 15°F (-9°C) is indicated with LO and
temperature more than 121°F (49°C) is indicated with HI.
Page 37

Operation
37
1
3
2
1
2
3
Shelf
The refrigerator compartment shelves are adjustable so you can locate them according
to your needs.
Slide Shelf
Pull the shelf ahead and take off it while
lifting both front and rear part.
Fixed Shelf, Folding Shelf
Lightly lift up the front part of shelf to pull it
ahead and then take off it while lifting the
rear part of shelf.
Shelf height
adjustment
•
Make sure the shelf is horizontal. If not, it may drop.
NOTE
Slide-Under
Shelf
You can store taller items such as
a gallon container or bottles by
simply pushing in front half of
shelf underneath back half of
shelf. Pull toward you to return to
a full shelf.
Humidity control in the vegetable compartment
The humidity can be controlled by adjusting the humidity control switch to the left
or right when storing vegetables or fruits.
High
Low
High Low
Humidity Control
High Low
Humidity Control
High humidity
Low humidity
Page 38

38
Operation
OptiFresh temperature bin
OptiFresh
You can select the optimum temperature to store some
types of foods.
- Vegetables, fruits, cold storage items requiring humidity
maintenance can be stored under optimal condition by pressing the button.
Activate
OptiFresh Crisper
First, remove the vegetable bin.
After holding both ends of the OptiFresh and
pull it outward.
If you open the refrigerator door, an indicator lamp shows the status of the
OptiFresh. The lamp goes off when the door is closed.
Press the button to cycle between ON and OFF.
When removing
OptiFresh
Method to use
Fit the OptiFresh case on to the ledge and gently
slide it in .
If forced, the connecting parts can be damaged.
When installing
OptiFresh
Page 39

Suggestion on Food Storage
39
Location of foods
(Refer to Identification of Parts, page 4.)
Store small foods such as bread, snacks, etc.
Store various frozen foods such as meat, fish,
ice cream, frozen snacks, etc.
Store small packed frozen food.
Items stored in the door racks don’t stay
quite as cold as in the rest of the freezer.
Store ice cream and similar items on a
shelf in the freezer instead.
Snack
drawer
Freezer
compartment
shelf
Freezer
compartment
door rack
Freezer
compartment
drawer
Milk product
corner
Refreshment
center
Refrigerator
compartment
shelf
Refrigerator
compartment
door rack
Vegetable drawer
Store meat, fish, chicken, etc. after
wrapping them with thin foil.
Store dry
.
Store milk products such as butter,
cheese, etc.
Store foods of frequent use such as
beverages, etc.
Do not pack the freezer or refrigerator
tightly. Allow a little room for proper air
circulation to aid cooling.
Store small packed food or beverages such
as milk, juice, etc.
Store vegetables or fruits.
Page 40

40
Suggestion on Food Storage
Storing foods
Store fresh food in the refrigerator compartment. How food is frozen and thawed is an
important factor in maintaining its freshness and flavor.
Do not store food which spoils easily at low temperatures, such as bananas and
melons.
Allow hot food to cool prior to storing, placing hot food in the refrigerator could spoil
other food, and lead to higher energy consumption.
When storing the food, cover it with vinyl wrap or store in a container with a lid. This
prevents moisture from evaporating, and helps food to keep its flavor and nutrition.
Do not block air vents with food. Smooth circulation of chilled air keeps refrigerator
temperatures even.
Do not open the door frequently. Opening the door lets warm air enter the refrigerator,
and cause temperatures to rise.
Never overload the door racks because they may push against by inner racks so that
the door cannot be fully closed.
Do not store bottles in the freezer compartment, they may break when frozen.
Do not refreeze food that has been thawed. This causes loss of flavor and nutrition.
When storing frozen food like ice cream for a long period, place it on the freezer
shelf, not in the door rack.
Do not touch the cold foods or containers, especially made of metal, with wet
hands and place glass products in the freezer compartment.
- Damp skin can freeze and stick to cold surfaces, causing frostbite and other serious
injuries.
Avoid placing moist food in top refrigerator shelves, it could freeze from direct
contact with chilled air.
Always clean food prior to refrigeration. Vegetables and fruits should be washed and
wiped, and packed food should be wiped, to prevent adjacent food from spoiling.
When storing eggs in their storage rack or box, ensure that they are fresh, and always
store them in an upright position to keep them fresh longer.
Freezer
compartment
Refrigerator
compartment
•
If you keep the refrigerator in a hot and humid place, frequent opening of the door or
storing a lot of vegetables in it may cause condensation to form. Wipe the
condensation with a clean cloth or a paper towel.
NOTE
Page 41

41
Care and Maintenance
How to remove and replace parts
Freezer
compartment
lamp
Freezer
compartment
shelf
Door rack and
support
Ice storage bin
After dispenser
is used
To remove a shelf, push the shelf to the left ,
lift the left part of the shelf a bit , lift the right
part up ➂ , and take it out.
Lift the door rack holding both sides and
pull it out .
Hold the ice storage bin as shown in the right
figure and pull it out while slightly lifting it .
Do not dismantle the ice storage bin unless
it is necessary.
Use both hands to remove the ice bin to avoid
dropping it.
The water collector has no self-draining
function. It should be cleaned regularly.
Remove the cover by pulling the front side of
water collector cover and dry it with a cloth.
2
1
3
2
1
•
Dismantling is done in the reverse sequence of assembly.
Be sure to unplug the power plug before dismantling and assembly.
Never apply severe force to dismantle parts. Parts may be damaged.
NOTE
To remove the lamp cover, separate the shelf
over the lamp cover and pull the lamp cover
forwards ➁ while pressing the bottom side of
the lamp cover upwards ➀. Turn the bulb
counterclockwise.
Use a 40-watt bulb (max.) which
can be purchased
at a service center.
1
2
Page 42

42
Care and Maintenance
To remove the vegetable compartment
cover, pull out the vegetable compartment
a bit to the front , lift the front part of the
vegetable compartment cover as shown by
, and take it out.
Vegetable
compartment
cover
1
2
•
Be sure to remove the necessary door racks and other parts to allow clearance to
remove the vegetable compartment, snack, drawer, and home bar cover.
NOTE
To remove the lamp cover, pull the lamp
cover forward while pressing the bottom
side of the lamp cover upward. Turn the
bulb counterclockwise.
Use a 40-watt bulb (max.) which
can be
purchased at a service center.
Upper lamp in
refrigerator
compartment
Separate the lamp cover by holding both
lower sides of it and pulling it it forwards.
Turn the bulb counterclockwise.
Use a 40-watt bulb (max.) which
can be
purchased at a service center.
Lower lamp in
refrigerator
compartment
Page 43

43
Care and Maintenance
Filter
replacement
•
Replacing filter causes small amount of water (around 1 oz or 25 cc) to flow out.
Please put up a cup under the hole to prevent it.
NOTE
We recommend replacing the filter when the
water filter indicator light turns on or your water
dispenser or ice maker decreases noticeably.
After changing the water filter cartridge, reset the
water filter status display and indicator light by
pressing and holding the BUTTON for 3 seconds.
1) Remove the old cartridge.
Rotate the knob of the cartridge counter clockwise.
When the cartridge is removed, you will feel it click
out of place.
Pull out the cartridge.
3) Flushing the Water System After Replacing Filter.
Dispense water through the water dispenser for 3
minutes to purge the system.
2) Replace with a new cartridge.
Take the new cartridge out of its packaging and remove
protective cover from the o-rings. With cartridge knob in
the vertical position, push the new filter cartridge into
the cover until it stops.
If you can’t turn the filter from side to side, it isn’t fully
inserted. Push it in firmly and twist it into place. You will
hear the snap when it clicks into place. Using its handle,
twist the cartridge clockwise about
1
/
4
turn. You will hear
the snap when it clicks into place.
Page 44

44
Care and Maintenance
General information
Cleaning
During average length vacations, you will probably find it best to leave the refrigerator
in operation. Place freezable items in freezer for longer life.
When you plan to store the refrigerator, remove all food, disconnect the power cord,
clean the interior thoroughly, and block the doors open to prevent mold and mildew.
Be certain the stored refrigerator does not present a child entrapment danger.
Vacation time
Power failure
If you move
Anti-
condensation
pipe
Most power failures that are corrected in an hour or two will not affect your
refrigerator temperatures. However, you should minimize the number of door
openings while the power is off.
Unload the refrigerator to relocate it. (This is probably not necessary to pull it out for
cleaning behind it.) Be sure to let the refrigerator warm up to room temperature, and
dry the inside before closing the doors to pack it for moving.
To avoid damaging the height adjusting screws, turn them all the way into the base.
The outside wall of the refrigerator cabinet may sometimes get warm, especially just
after installation. Don’t be alarmed. This is due to the anti-condensation pipe, which
pumps hot refrigerant to prevent sweating on the outer cabinet wall.
Regular cleaning is recommended. Wash all compartments with a baking soda
solution or a mild detergent and warm water. Rinse and dry. Be sure to allow the soda
to dissolve completely so it will not act as an abrasive compound.
Please verify that the power cord is not damaged, power plug is not overheated, or
power plug is well inserted into the power consent.
Always remove the power cord from the wall outlet prior to cleaning in the vicinity of
electrical parts (lamps, switches, controls, etc.).
Wipe up excess moisture with a sponge or cloth to prevent water or liquid from
getting into any electrical part and causing an electric shock.
Never use metallic scouring pads, brushes, coarse abrasive cleaners, strong alkaline
solutions, or flammable or toxic cleaning liquids on any surface.
Do not touch frozen surfaces with wet or damp hands, because damp objects will
stick to extremely cold surfaces.
It is important that your refrigerator be kept clean to prevent undesirable odors. Spilled
food should be wiped up immediately, since it may acidify and stain plastic surfaces if
allowed to settle.
Use a lukewarm solution of mild soap or detergent to clean the durable finish of your
refrigerator. Wipe with a clean damp cloth and then dry.
Exterior
Interior
After cleaning
Warning
Page 45

Care and Maintenance
Troubleshooting
Before calling for service, review this list. It may save you both time and expense.
This list includes common occurrences that are not the result of defective
workmanship or materials in this appliance.
45
Possible Cause
Refrigerator control is off.
Refrigerator is in defrost cycle.
Plug at wall outlet is disconnected.
Power outage. Check house lights.
Refrigerator is larger than the previous
one you owned.
Room or outside weather is hot.
Refrigerator has recently been
disconnected for a period of time.
Automatic icemaker is operating.
Large amounts of warm or hot food
may have been stored recently.
Doors are opened too frequently or too
long.
Refrigerator or freezer door may be
slightly open.
Refrigerator control is set too cold.
Refrigerator or freezer gasket is dirty,
worn, cracked, or poorly fitted.
Solution
Set refrigerator control.
This is normal for a fully automatic
defrosting refrigerator. The defrost
cycle occurs periodically.
Make sure plug is tightly pushed into
outlet.
Call local electric company.
This is normal. Larger, more efficient
units run longer.
It is normal for the refrigerator to work
longer under these conditions.
It takes a few hours for the refrigerator
refrigerator to come down to room
temperature completely.
Operation of the ice maker causes the
refrigerator to run slightly longer.
Warm food will cause the refrigerator
to run longer until the desired
temperature is reached.
Warm air entering the refrigerator
causes it to run more. Open the door
less often.
Make sure the refrigerator is level.
Keep food and containers from
blocking the door. See problem section
OPENING/CLOSING of doors, page 11.
Adjust the refrigerator control to a
warmer setting until the refrigerator
temperature is satisfactory.
Clean or change gasket. Leaks in the
door seal will cause the refrigerator to
run longer in order to maintain desired
temperatures.
Normal Operations
Refrigerator
Refrigerator
compressor
does not run.
Refrigerator
runs too much
or too long
Occurrence
Page 46

Care and Maintenance
46
Refrigerator
compressor
does not run.
Occurrence
Temperatures are
too cold
Temperature in the
freezer is too cold
but the Refrigerator
Temperature is
Satisfactory.
Temperature in the
refrigerator
is too warm but
the freezer
temperature is
satisfactory.
Temperatures in
the refrigerator
or freezer are
too warm.
Temperatures
are too warm
Meat stored in
fresh meat
drawer freezes.
Food stored in
drawers freezes.
Possible Cause
Thermostat is keeping the refrigerator
at a constant temperature.
Freezer control is set too cold
Doors are opened too frequently or too
long.
Door is slightly open.
Large amounts of warm or hot food
may have been stored recently.
Refrigerator has recently been
disconnected for a period of time.
Refrigerator control is set too warm.
Refrigerator control is set too warm.
Refrigerator control has some effect on
freezer temperature.
Freezer control is set too warm.
Refrigerator control is set too cold.
Refrigerator control is set too cold.
Meat should be stored at a temperature
just below the freezing point of water ( 32˚F,
0˚C) for maximum fresh storage time.
Solution
This is normal. The Refrigerator goes on
and off to keep the temperature constant.
Adjust the refrigerator control to a
colder setting.
A refrigerator requires several hours to
cool down completely.
Wait until the refrigerator or freezer
has had a chance to reach its selected
temperature.
Warm air enters the refrigerator/ freezer
whenever the door is opened.
Open the door less often.
Adjust the freezer or refrigerator control
to a colder setting until the freezer or
refrigerator temperature is satisfactory.
Adjust the freezer or refrigerator control
to a colder setting until the freezer or
refrigerator temperature is satisfactory.
It is normal for ice crystals to form due
to the moisture content of meat.
Adjust the refrigerator control to a
warmer setting
Adjust the refrigerator to a warmer setting.
Adjust the freezer control to a warmer
setting until the freezer temperature is
satisfactory.
Close the door completely.
Temperature in the
refrigerator is too
cold and the
freezer
temperature
is satisfactory.
Page 47

Care and Maintenance
47
Sound and Noise
Occurrence
Louder sound
levels when
Refrigerator is on.
Louder sound
levels when
compressor
comes on.
Moisture collects
on the inside walls
of the refrigerator.
Water/Moisture/Ice
Outside
Refrigerator
Moisture forms
on the outside of
the refrigerator
or between doors.
Vibrating or
rattling noise.
Water/Moisture
/Ice Inside
Refrigerator
Possible Cause
Today’s refrigerators have increased
storage capacity and maintain more
even temperatures.
Refrigerator is touching wall or cabinets.
The weather is hot and humid which
increases the rate of frost buildup
and internal sweating.
Door is slightly open.
Door is opened too often or too long.
Weather is humid.
Door is slightly open,causing cold air
from the inside the refrigerator to meet
warm air from the outside.
Floor is uneven or weak.
Refrigerator rocks on the floor when it is
moved slightly.
Refrigerator operates at higher pressures
during the start of the ON cycle.
Items placed on the top of the refrigerator
are vibrating.
Dishes are vibrating on the shelves in
the refrigerator.
Solution
Close the door completely.
This is normal in humid weather.
When humidity is lower, the moisture
should disappear.
See problem section Opening/Closing of
doors, page 11.
Move refrigerator so that it does not
touch the wall or refrigerator.
This is normal.
It is normal for dishes to vibrate slightly.
Move dishes slightly.
Make sure refrigerator is level and firmly
set on floor.
Be sure floor is level and solid and can
adequately support refrigerator.
Remove items.
It is normal for sound levels to be higher.
This is normal. The sound will level off as
the refrigerator continues to run.
Open the door less often.
Moisture forms
on the dispenser
or refreshment
center
Moisture may be formed in high
temperature and high humidity since
heater turns off if not opening the
doors for a long time.
Wipe the moisture and open the doors
again.
Page 48

Care and Maintenance
48
Odors in Refrigerator
Occurrence
Door(s) will not
close.
Door(s) will not
close.
Drawers are
difficult to move.
Dispenser
Dispenser will not
dispense ice
Opening/Closing of
Doors/Drawers
Possible Cause
Food is touching shelf on top of the
drawer
Track that drawer slides on is dirty.
Ice storage bin is empty.
Freezer temperature is set too warm.
Household water line valve is not open.
Refrigerator or freezer door is not
closed.
Refrigerator is not level. It rocks on the
floor when it is moved slightly.
Floor is uneven or weak.
Refrigerator rocks on the floor when it
is moved slightly.
Refrigerator is touching wall or cabinets.
Interior needs to be cleaned.
Food with strong odor is in the refrigerator.
Some containers and wrapping materials
produce odors.
Food package is keeping door open.
Door was closed too hard, causing other
door to open slightly.
Solution
Be sure both doors are closed.
Open household water line valve and
allow sufficient time for ice to be made.
When ice is made, dispenser should
operate.
Turn the freezer control to a higher
setting so that ice cubes will be made.
When the first supply of ice is made,
the dispenser should operate.
Clean drawer and track.
Be sure floor is level and can adequately
support refrigerator.
Contact carpenter to correct sagging or
sloping floor.
Move refrigerator.
Keep less food in drawer.
Adjust the height adjusting screw.
Use a different container or brand of
wrapping
materials
.
Move packages that keep door from
closing.
Close both doors gently.
Cover food completely.
Clean interior with sponge, warm water,
and baking soda. Be sure the soda is
completely dissolved so it will not act as
an abrasive compound.
When the first supply of ice is dropped
into the bin, the dispenser should operate.
Page 49

Care and Maintenance
CUSTOMER ASSISTANCE NUMBERS:
To Prove Warranty Coverage
Retain your sales receipt to prove date of purchase.
A copy of your sales receipt must be submitted at the time warranty service is provided.
To Obtain Product, Customer, or Service Assistance
Call Toll-free for Customer Service
Tel : 1-800-243-0000
To Obtain Nearest Authorized Service Center
Call 1-800-243-0000, push option #1, 24 hours a day, 7 days per week.
Please have your product type (Refrigerator), model number, serial number, and postcode ready.
http://www.lgservice.com
49
Dispenser will
not
dispense
ice.
Ice dispenser
is jammed.
Occurrence
Water has an
odd taste
and/or odor.
Dispenser will
not dispense
water.
Possible Cause
Water has been in the tank for too long.
Unit not properly connected to cold
water line.
This sound is normally made when automatically made ice is dropped into
ice storage bin. Volume may vary according to refrigerator’s location.
This sound is normally made when ice maker is supplied with water after
dropping the automatically made ice.
Please thoroughly read Automatic Icemaker and Dispenser in this manual
on pages 15.
Ice cubes are frozen together.
Ice has melted and frozen around auger
due to infrequent use, temperature
fluctuations, and/or power outrages.
Ice cubes are jammed between the ice
maker arm and back of the bin.
Ice cubes that have been purchased or
made in some other way have been
used in the dispenser.
Household water line valve is not open.
Refrigerator or freezer door is not closed.
Solution
Be sure both doors are closed.
Draw and discard 7 glasses of water
to freshen the supply. Draw and discard
an additional 7 glasses to
completely rinse out tank.
Connect unit to cold water line which
supplies water to kitchen faucet.
Open household water line valve.
Use the dispenser often so that cubes do
not freeze together.
Only the ice cubes made by the ice
maker should be used with the
dispenser.
Remove the ice cubes that are jamming
the dispenser.
Remove ice storage bin, and thaw and the
contents. Clean bin, wipe dry, and replace
in proper position. When new ice is made,
dispenser should operate.
Sound of ice
dropping
Sound of water
supply
Reception of weather forecast information received and displayed on the screen is
subject to vary depending on your region and location of refrigerator.
Check your zip code in this manual pages 151 or
www.ambientdevices.com/cat/device/coverage.html
Weather Forecast
Function is not
operate
Other
Page 50

LG ELECTRONICS, INC.
LG REFRIGERATOR LIMITED WARRANTY - USA
Your LG Refrigerator will be will repaired or replaced, at LG’s option, if it proves to be defective in material or workmanship
under normal use, during the warranty period (Warranty Period) set forth below, effective from the date ("Date of Purchase")
of original consumer purchase of the product. This warranty is good only to the original purchaser of the product and effective
only when used in the United States, including Alaska, Hawaii, and U.S. Territories.
THIS WARRANTY IS IN LIEU OF ANY OTHER WARRANTY, EXPRESS OR IMPLIED, INCLUDING WITHOUT
LIMITATION, ANY WARRANTY OF MERCHANTABILITY OR FITNESS FOR A PARTICULAR PURPOSE. TO
THE EXTENT ANY IMPLIED WARRANTY IS REQUIRED BY LAW, IT IS LIMITED IN DURATION TO THE
EXPRESS WARRANTY PERIOD ABOVE. NEITHER THE MANUFACTURER NOR ITS U.S. DISTRIBUTOR
SHALL BE LIABLE FOR ANY INCIDENTAL, CONSEQUENTIAL, INDIRECT, SPECIAL, OR PUNITIVE
DAMAGES OF ANY NATURE, INCLUDING WITHOUT LIMITATION, LOST REVENUES OR PROFITS, OR ANY
OTHER DAMAGE WHETHER BASED IN CONTRACT, TORT, OR OTHERWISE. Some states do not allow the
exclusion or limitation of incidental or consequential damages or limitations on how long an implied warranty lasts, so
the above exclusion or limitation may not apply to you. This warranty gives you specific legal rights and you may also
have other rights that vary from state to state.
Reception of weather forecast information received and displayed on the screen is subject to vary depending on
your region and location of refrigerator. Thereby LG does not guarantee and will not be held responsible for
accuracy of the weather information. Weather forecast information is only available in U.S.A
THIS LIMITED WARRANTY DOES NOT APPLY TO:
• Service trips to your home to deliver, pick up, and/or install the product, instruct, or replace house fuses or
correct wiring, or correction of unauthorized repairs.
• Damages or operating problems that result from misuse, abuse, operation outside environmental
specifications or contrary to the requirements of precautions in the Operating Guide, accident, vermin, fire,
flood, improper installation, acts of God, unauthorized modification or alteration, incorrect electrical current or
voltage, or commercial use, or use for other than intended purpose.
• Repairs when your LG refrigerator is used in other than normal, single-family household use.
The cost of repair or replacement under these excluded circumstances shall be borne by the consumer.
CUSTOMER INTERACTIVE CENTER NUMBERS
TO CONTACT LG ELECTRONICS BY MAIL:
LG Customer Interactive Center
P. O. Box 240007
201 James Record Road
Huntsville, Alabama 35824
ATTN: CIC
WARRANTY PERIOD:
REFRIGERATOR/FREEZER
LABOR: One Year from the Date of Purchase.
PARTS: One Year from the Date of Purchase.
SEALED SYSTEM (Compressor, Condenser, and
Evaporator)
LABOR: One Year from the Date of Purchase.
PARTS: Seven years from the Date of Purchase.
Replacement Units and Repair Parts are warranted for the
remaining portion of the original unit’s warranty period.
HOW SERVICE IS HANDLED:
In-Home Service (Except Model GR051):
Please retain dealer’s dated bill of sale or delivery
ticket as evidence of the Date of Purchase for proof of
warranty, and submit a copy of the bill of sale to the
service person at the time warranty service is
provided.
Please call 1-800-243-0000 and choose the
appropriate option to locate your nearest LG
Authorized Service Center. (Phones are answered
24 hours a day, 365 days per year.)
Or visit our website at: http://www.lgservice.com
To obtain Customer Assistance, Product
Information, or Dealer or Authorized Service Center
location:
Call 1-800-243-0000
(24 hours a day, 365 days per
year) and select the appropriate option from the menu.
Or visit our website at: http://www.lgservice.com
Page 51

- 151 -
00027 Full Coveraged
00042 Mostly Coveraged
00063 Mostly Coveraged
00083 Full Coveraged
00084 Mostly Coveraged
00157 Full Coveraged
00501 Full Coveraged
00544 Full Coveraged
00601 Full Coveraged
00602 Full Coveraged
00603 Mostly Coveraged
00604 Full Coveraged
00605 Mostly Coveraged
00606 Full Coveraged
00610 Full Coveraged
00612 Full Coveraged
00613 Full Coveraged
00614 Full Coveraged
00616 Full Coveraged
00617 Full Coveraged
00622 Mostly Coveraged
00624 Full Coveraged
00627 Full Coveraged
00631 Mostly Coveraged
00636 Mostly Coveraged
00637 Full Coveraged
00638 Mostly Coveraged
00646 Mostly Coveraged
00647 Mostly Coveraged
00650 Full Coveraged
00652 Full Coveraged
00653 Mostly Coveraged
00656 Full Coveraged
00659 Full Coveraged
00660 Mostly Coveraged
00667 Mostly Coveraged
00670 Full Coveraged
00674 Full Coveraged
00676 Full Coveraged
00677 Full Coveraged
00678 Mostly Coveraged
00680 Mostly Coveraged
00681 Mostly Coveraged
00682 Full Coveraged
00683 Full Coveraged
00685 Mostly Coveraged
00687 Mostly Coveraged
00688 Full Coveraged
00692 Full Coveraged
00693 Full Coveraged
00694 Full Coveraged
00698 Full Coveraged
00703 Full Coveraged
00705 Mostly Coveraged
00707 Mostly Coveraged
00714 Mostly Coveraged
00715 Full Coveraged
00716 Full Coveraged
00717 Full Coveraged
00718 Full Coveraged
00719 Full Coveraged
00720 Mostly Coveraged
00721 Full Coveraged
00723 Mostly Coveraged
00725 Full Coveraged
00726 Full Coveraged
00727 Full Coveraged
00728 Full Coveraged
00729 Full Coveraged
00730 Full Coveraged
00731 Full Coveraged
00732 Full Coveraged
00733 Full Coveraged
00734 Full Coveraged
00735 Full Coveraged
00736 Full Coveraged
00737 Full Coveraged
00738 Full Coveraged
00739 Full Coveraged
00740 Full Coveraged
00741 Full Coveraged
00742 Full Coveraged
00744 Full Coveraged
00745 Full Coveraged
00754 Full Coveraged
00757 Full Coveraged
00766 Full Coveraged
00767 Full Coveraged
00769 Full Coveraged
00771 Full Coveraged
00772 Mostly Coveraged
00773 Full Coveraged
00777 Full Coveraged
00778 Full Coveraged
00780 Full Coveraged
00782 Full Coveraged
00783 Mostly Coveraged
00784 Mostly Coveraged
00785 Mostly Coveraged
00786 Mostly Coveraged
00791 Full Coveraged
00792 Full Coveraged
00794 Mostly Coveraged
00795 Full Coveraged
00901 Full Coveraged
00902 Full Coveraged
00906 Full Coveraged
00907 Full Coveraged
00908 Full Coveraged
00909 Full Coveraged
00910 Full Coveraged
00911 Full Coveraged
00912 Full Coveraged
00913 Full Coveraged
00914 Full Coveraged
00915 Full Coveraged
00916 Full Coveraged
00917 Full Coveraged
00918 Full Coveraged
00919 Full Coveraged
00920 Full Coveraged
00921 Full Coveraged
00922 Full Coveraged
00923 Full Coveraged
00924 Full Coveraged
00925 Full Coveraged
00926 Full Coveraged
00927 Full Coveraged
00928 Full Coveraged
00929 Full Coveraged
00930 Full Coveraged
00931 Full Coveraged
00933 Full Coveraged
00934 Full Coveraged
00935 Full Coveraged
00936 Full Coveraged
00937 Full Coveraged
00939 Full Coveraged
00940 Full Coveraged
00949 Mostly Coveraged
00950 Mostly Coveraged
00951 Mostly Coveraged
00952 Full Coveraged
00953 Full Coveraged
00954 Full Coveraged
00955 Full Coveraged
00956 Full Coveraged
00957 Full Coveraged
00958 Full Coveraged
00959 Full Coveraged
00960 Full Coveraged
00961 Full Coveraged
00962 Full Coveraged
00963 Full Coveraged
00965 Full Coveraged
00966 Full Coveraged
00968 Full Coveraged
00969 Full Coveraged
00970 Full Coveraged
00971 Full Coveraged
00975 Full Coveraged
00976 Full Coveraged
00977 Full Coveraged
00978 Full Coveraged
00979 Full Coveraged
00981 Full Coveraged
00982 Full Coveraged
00983 Full Coveraged
00984 Full Coveraged
00985 Full Coveraged
00986 Full Coveraged
00987 Full Coveraged
00988 Full Coveraged
01001 Full Coveraged
01003 Mostly Coveraged
01004 Mostly Coveraged
01012 Mostly Coveraged
01013 Full Coveraged
01014 Full Coveraged
01020 Full Coveraged
01021 Full Coveraged
01022 Full Coveraged
01027 Full Coveraged
01028 Full Coveraged
01030 Full Coveraged
01032 Mostly Coveraged
01033 Mostly Coveraged
01035 Full Coveraged
01036 Mostly Coveraged
01038 Full Coveraged
01039 Full Coveraged
01040 Mostly Coveraged
01041 Full Coveraged
01053 Full Coveraged
01056 Mostly Coveraged
01059 Mostly Coveraged
01060 Full Coveraged
01061 Full Coveraged
01062 Full Coveraged
01063 Full Coveraged
01066 Full Coveraged
01068 Mostly Coveraged
01073 Mostly Coveraged
01075 Mostly Coveraged
01085 Mostly Coveraged
01086 Mostly Coveraged
01088 Full Coveraged
01089 Full Coveraged
01090 Full Coveraged
01093 Full Coveraged
01095 Mostly Coveraged
01096 Full Coveraged
01101 Full Coveraged
01102 Full Coveraged
01103 Full Coveraged
01104 Full Coveraged
01105 Full Coveraged
01106 Full Coveraged
01107 Full Coveraged
01108 Full Coveraged
01109 Full Coveraged
01111 Full Coveraged
01114 Full Coveraged
01115 Full Coveraged
01116 Full Coveraged
01118 Full Coveraged
01119 Full Coveraged
01128 Full Coveraged
01129 Full Coveraged
01133 Full Coveraged
01138 Full Coveraged
01139 Full Coveraged
01144 Full Coveraged
01151 Full Coveraged
01152 Full Coveraged
01199 Full Coveraged
01341 Mostly Coveraged
01373 Full Coveraged
01375 Mostly Coveraged
01420 Full Coveraged
01432 Full Coveraged
01450 Mostly Coveraged
01451 Full Coveraged
01453 Full Coveraged
01460 Full Coveraged
01462 Mostly Coveraged
01464 Mostly Coveraged
01467 Full Coveraged
01471 Mostly Coveraged
01472 Mostly Coveraged
01473 Mostly Coveraged
01501 Full Coveraged
01503 Full Coveraged
01504 Full Coveraged
01505 Full Coveraged
01507 Mostly Coveraged
01508 Mostly Coveraged
01509 Mostly Coveraged
01510 Full Coveraged
01515 Mostly Coveraged
01517 Full Coveraged
01519 Mostly Coveraged
01520 Full Coveraged
01522 Full Coveraged
01523 Full Coveraged
01524 Full Coveraged
01526 Mostly Coveraged
01527 Full Coveraged
01529 Mostly Coveraged
01532 Full Coveraged
01534 Mostly Coveraged
01536 Full Coveraged
01537 Mostly Coveraged
01540 Mostly Coveraged
01541 Full Coveraged
01542 Full Coveraged
01543 Full Coveraged
01545 Full Coveraged
01546 Full Coveraged
01560 Mostly Coveraged
01561 Full Coveraged
01562 Full Coveraged
01564 Full Coveraged
01568 Full Coveraged
01580 Full Coveraged
01581 Full Coveraged
01582 Full Coveraged
01583 Full Coveraged
01586 Full Coveraged
01590 Mostly Coveraged
01601 Full Coveraged
01602 Full Coveraged
01603 Full Coveraged
01604 Full Coveraged
01605 Full Coveraged
01606 Full Coveraged
01607 Full Coveraged
01608 Full Coveraged
01609 Full Coveraged
01610 Full Coveraged
01611 Full Coveraged
01612 Full Coveraged
01613 Full Coveraged
01614 Full Coveraged
01615 Full Coveraged
01653 Full Coveraged
01654 Full Coveraged
01655 Full Coveraged
01701 Full Coveraged
01702 Full Coveraged
01703 Full Coveraged
01704 Full Coveraged
01705 Full Coveraged
01718 Full Coveraged
01719 Full Coveraged
01720 Full Coveraged
01721 Full Coveraged
01730 Full Coveraged
01731 Full Coveraged
01740 Full Coveraged
01741 Full Coveraged
01742 Full Coveraged
01745 Full Coveraged
01746 Full Coveraged
01747 Mostly Coveraged
01748 Full Coveraged
01749 Full Coveraged
01752 Full Coveraged
01754 Full Coveraged
01756 Mostly Coveraged
01757 Mostly Coveraged
01760 Full Coveraged
01770 Full Coveraged
01772 Full Coveraged
01773 Full Coveraged
01775 Full Coveraged
01776 Full Coveraged
01778 Full Coveraged
01784 Full Coveraged
01801 Full Coveraged
01803 Full Coveraged
01805 Full Coveraged
01806 Full Coveraged
01807 Full Coveraged
01808 Full Coveraged
01810 Full Coveraged
01812 Full Coveraged
01813 Full Coveraged
01815 Full Coveraged
01821 Full Coveraged
01822 Full Coveraged
01824 Full Coveraged
01826 Full Coveraged
01827 Mostly Coveraged
01830 Mostly Coveraged
01831 Mostly Coveraged
01832 Mostly Coveraged
01833 Full Coveraged
01834 Mostly Coveraged
01835 Mostly Coveraged
01840 Full Coveraged
01841 Full Coveraged
01842 Full Coveraged
01843 Full Coveraged
01844 Full Coveraged
01845 Mostly Coveraged
01850 Full Coveraged
01851 Mostly Coveraged
01852 Full Coveraged
01853 Full Coveraged
01854 Full Coveraged
01860 Full Coveraged
01862 Full Coveraged
01863 Full Coveraged
01864 Full Coveraged
01865 Full Coveraged
01866 Full Coveraged
01867 Full Coveraged
01876 Full Coveraged
01879 Full Coveraged
01880 Full Coveraged
01885 Mostly Coveraged
01886 Full Coveraged
01887 Full Coveraged
01888 Full Coveraged
01889 Full Coveraged
01890 Full Coveraged
01899 Full Coveraged
01901 Full Coveraged
01902 Full Coveraged
01903 Full Coveraged
01904 Full Coveraged
01905 Full Coveraged
01906 Full Coveraged
01907 Full Coveraged
01908 Full Coveraged
01910 Full Coveraged
01913 Full Coveraged
01915 Full Coveraged
01921 Full Coveraged
01922 Full Coveraged
01923 Full Coveraged
01929 Full Coveraged
01930 Full Coveraged
01931 Full Coveraged
01936 Full Coveraged
01937 Full Coveraged
01938 Full Coveraged
01940 Full Coveraged
01944 Full Coveraged
01945 Mostly Coveraged
01949 Full Coveraged
01950 Full Coveraged
01951 Full Coveraged
01952 Full Coveraged
01960 Full Coveraged
01961 Full Coveraged
01965 Full Coveraged
01966 Mostly Coveraged
01969 Full Coveraged
01970 Full Coveraged
01971 Full Coveraged
01982 Full Coveraged
01983 Full Coveraged
01984 Full Coveraged
01985 Full Coveraged
02018 Full Coveraged
02019 Full Coveraged
02020 Mostly Coveraged
02021 Full Coveraged
02025 Full Coveraged
02026 Full Coveraged
02027 Full Coveraged
02030 Full Coveraged
02032 Full Coveraged
02035 Full Coveraged
02038 Full Coveraged
02040 Mostly Coveraged
02041 Mostly Coveraged
02043 Full Coveraged
02044 Full Coveraged
02045 Full Coveraged
02048 Full Coveraged
02050 Mostly Coveraged
02051 Mostly Coveraged
02052 Full Coveraged
02053 Full Coveraged
02054 Full Coveraged
02055 Full Coveraged
02056 Full Coveraged
02059 Mostly Coveraged
02060 Full Coveraged
02061 Full Coveraged
02062 Full Coveraged
02065 Mostly Coveraged
02066 Full Coveraged
02067 Full Coveraged
02070 Full Coveraged
02071 Full Coveraged
02072 Full Coveraged
02081 Full Coveraged
02090 Full Coveraged
02093 Full Coveraged
02101 Full Coveraged
02102 Full Coveraged
02103 Full Coveraged
02104 Full Coveraged
02105 Full Coveraged
02106 Full Coveraged
02107 Full Coveraged
02108 Full Coveraged
02109 Full Coveraged
02110 Full Coveraged
02111 Full Coveraged
02112 Full Coveraged
02113 Full Coveraged
02114 Full Coveraged
02115 Full Coveraged
02116 Full Coveraged
02117 Full Coveraged
02118 Full Coveraged
02119 Full Coveraged
02120 Full Coveraged
02121 Full Coveraged
02122 Full Coveraged
02123 Full Coveraged
02124 Full Coveraged
02125 Full Coveraged
02126 Full Coveraged
02127 Full Coveraged
02128 Full Coveraged
02129 Full Coveraged
02130 Full Coveraged
02131 Full Coveraged
02132 Full Coveraged
02133 Full Coveraged
02134 Full Coveraged
02135 Full Coveraged
02136 Full Coveraged
02137 Full Coveraged
02138 Full Coveraged
02139 Full Coveraged
02140 Full Coveraged
02141 Full Coveraged
Zip Code Coverage Level Zip Code Coverage Level Zip Code Coverage Level Zip Code Coverage Level Zip Code Coverage Level Zip Code Coverage Level
Below zip code list does not include "the zip code of Not Coveraged"
Page 52

- 152 -
02142 Full Coveraged
02143 Full Coveraged
02144 Full Coveraged
02145 Full Coveraged
02148 Full Coveraged
02149 Full Coveraged
02150 Full Coveraged
02151 Full Coveraged
02152 Full Coveraged
02153 Full Coveraged
02155 Full Coveraged
02156 Full Coveraged
02163 Full Coveraged
02169 Full Coveraged
02170 Full Coveraged
02171 Full Coveraged
02176 Full Coveraged
02180 Full Coveraged
02184 Full Coveraged
02185 Full Coveraged
02186 Full Coveraged
02187 Full Coveraged
02188 Full Coveraged
02189 Full Coveraged
02190 Full Coveraged
02191 Full Coveraged
02196 Full Coveraged
02199 Full Coveraged
02201 Full Coveraged
02203 Full Coveraged
02204 Full Coveraged
02205 Full Coveraged
02206 Full Coveraged
02207 Full Coveraged
02208 Full Coveraged
02209 Full Coveraged
02210 Full Coveraged
02211 Full Coveraged
02212 Full Coveraged
02215 Full Coveraged
02216 Full Coveraged
02217 Full Coveraged
02222 Full Coveraged
02228 Full Coveraged
02238 Full Coveraged
02239 Full Coveraged
02241 Full Coveraged
02266 Full Coveraged
02269 Full Coveraged
02283 Full Coveraged
02284 Full Coveraged
02293 Full Coveraged
02295 Full Coveraged
02297 Full Coveraged
02301 Full Coveraged
02302 Full Coveraged
02303 Full Coveraged
02304 Full Coveraged
02305 Full Coveraged
02322 Full Coveraged
02324 Mostly Coveraged
02325 Mostly Coveraged
02327 Mostly Coveraged
02330 Full Coveraged
02331 Full Coveraged
02332 Full Coveraged
02333 Full Coveraged
02334 Full Coveraged
02337 Full Coveraged
02338 Mostly Coveraged
02339 Full Coveraged
02340 Mostly Coveraged
02341 Mostly Coveraged
02343 Full Coveraged
02345 Mostly Coveraged
02346 Mostly Coveraged
02347 Mostly Coveraged
02350 Mostly Coveraged
02351 Full Coveraged
02355 Full Coveraged
02356 Full Coveraged
02357 Full Coveraged
02358 Mostly Coveraged
02359 Mostly Coveraged
02360 Full Coveraged
02361 Full Coveraged
02362 Full Coveraged
02364 Full Coveraged
02366 Full Coveraged
02367 Full Coveraged
02368 Full Coveraged
02370 Full Coveraged
02375 Mostly Coveraged
02379 Full Coveraged
02381 Mostly Coveraged
02382 Full Coveraged
02420 Full Coveraged
02421 Full Coveraged
02445 Full Coveraged
02446 Full Coveraged
02447 Full Coveraged
02451 Full Coveraged
02452 Full Coveraged
02453 Full Coveraged
02454 Full Coveraged
02455 Full Coveraged
02456 Full Coveraged
02457 Full Coveraged
02458 Full Coveraged
02459 Full Coveraged
02460 Full Coveraged
02461 Full Coveraged
02462 Full Coveraged
02464 Full Coveraged
02465 Full Coveraged
02466 Full Coveraged
02467 Full Coveraged
02468 Full Coveraged
02471 Full Coveraged
02472 Full Coveraged
02474 Full Coveraged
02475 Full Coveraged
02476 Full Coveraged
02477 Full Coveraged
02478 Full Coveraged
02479 Full Coveraged
02481 Full Coveraged
02482 Full Coveraged
02492 Full Coveraged
02493 Full Coveraged
02494 Full Coveraged
02495 Full Coveraged
02532 Mostly Coveraged
02534 Full Coveraged
02536 Full Coveraged
02537 Full Coveraged
02539 Mostly Coveraged
02540 Full Coveraged
02541 Full Coveraged
02542 Full Coveraged
02543 Full Coveraged
02553 Mostly Coveraged
02556 Full Coveraged
02557 Full Coveraged
02559 Mostly Coveraged
02563 Mostly Coveraged
02565 Full Coveraged
02568 Mostly Coveraged
02571 Mostly Coveraged
02573 Full Coveraged
02574 Full Coveraged
02575 Mostly Coveraged
02576 Mostly Coveraged
02601 Full Coveraged
02630 Full Coveraged
02631 Full Coveraged
02632 Full Coveraged
02633 Full Coveraged
02634 Full Coveraged
02635 Full Coveraged
02637 Full Coveraged
02638 Mostly Coveraged
02639 Mostly Coveraged
02641 Mostly Coveraged
02642 Full Coveraged
02643 Full Coveraged
02644 Mostly Coveraged
02645 Full Coveraged
02646 Full Coveraged
02647 Full Coveraged
02648 Full Coveraged
02649 Mostly Coveraged
02650 Full Coveraged
02651 Full Coveraged
02653 Full Coveraged
02655 Full Coveraged
02659 Full Coveraged
02660 Mostly Coveraged
02661 Full Coveraged
02662 Full Coveraged
02663 Mostly Coveraged
02664 Mostly Coveraged
02667 Mostly Coveraged
02668 Full Coveraged
02669 Full Coveraged
02670 Mostly Coveraged
02671 Mostly Coveraged
02672 Full Coveraged
02673 Full Coveraged
02675 Full Coveraged
02702 Full Coveraged
02703 Mostly Coveraged
02712 Full Coveraged
02714 Full Coveraged
02715 Full Coveraged
02717 Full Coveraged
02718 Mostly Coveraged
02719 Full Coveraged
02720 Full Coveraged
02721 Full Coveraged
02722 Full Coveraged
02723 Full Coveraged
02724 Mostly Coveraged
02725 Full Coveraged
02726 Full Coveraged
02738 Mostly Coveraged
02739 Full Coveraged
02740 Full Coveraged
02741 Full Coveraged
02742 Full Coveraged
02743 Full Coveraged
02744 Full Coveraged
02745 Full Coveraged
02746 Full Coveraged
02747 Full Coveraged
02748 Full Coveraged
02760 Full Coveraged
02761 Full Coveraged
02762 Mostly Coveraged
02763 Mostly Coveraged
02764 Full Coveraged
02766 Full Coveraged
02767 Mostly Coveraged
02768 Mostly Coveraged
02769 Full Coveraged
02770 Mostly Coveraged
02771 Full Coveraged
02777 Mostly Coveraged
02779 Full Coveraged
02780 Full Coveraged
02783 Full Coveraged
02790 Full Coveraged
02801 Mostly Coveraged
02802 Full Coveraged
02804 Mostly Coveraged
02806 Mostly Coveraged
02809 Mostly Coveraged
02815 Mostly Coveraged
02816 Mostly Coveraged
02818 Mostly Coveraged
02823 Full Coveraged
02824 Full Coveraged
02825 Mostly Coveraged
02828 Full Coveraged
02829 Full Coveraged
02831 Full Coveraged
02833 Mostly Coveraged
02835 Full Coveraged
02837 Mostly Coveraged
02838 Full Coveraged
02839 Mostly Coveraged
02840 Full Coveraged
02841 Full Coveraged
02842 Full Coveraged
02852 Mostly Coveraged
02857 Full Coveraged
02860 Full Coveraged
02861 Full Coveraged
02862 Full Coveraged
02863 Full Coveraged
02864 Full Coveraged
02865 Full Coveraged
02871 Full Coveraged
02872 Full Coveraged
02873 Mostly Coveraged
02876 Mostly Coveraged
02878 Mostly Coveraged
02885 Mostly Coveraged
02886 Mostly Coveraged
02887 Full Coveraged
02888 Full Coveraged
02889 Full Coveraged
02891 Mostly Coveraged
02893 Full Coveraged
02895 Full Coveraged
02896 Full Coveraged
02901 Full Coveraged
02902 Full Coveraged
02903 Full Coveraged
02904 Full Coveraged
02905 Full Coveraged
02906 Full Coveraged
02907 Full Coveraged
02908 Full Coveraged
02909 Full Coveraged
02910 Full Coveraged
02911 Full Coveraged
02912 Full Coveraged
02914 Full Coveraged
02915 Full Coveraged
02916 Full Coveraged
02917 Full Coveraged
02918 Full Coveraged
02919 Full Coveraged
02920 Full Coveraged
02921 Full Coveraged
02940 Full Coveraged
03031 Full Coveraged
03032 Full Coveraged
03034 Mostly Coveraged
03036 Full Coveraged
03038 Full Coveraged
03040 Full Coveraged
03041 Full Coveraged
03044 Mostly Coveraged
03045 Full Coveraged
03046 Full Coveraged
03051 Full Coveraged
03052 Mostly Coveraged
03053 Mostly Coveraged
03054 Mostly Coveraged
03057 Full Coveraged
03060 Full Coveraged
03061 Full Coveraged
03062 Full Coveraged
03063 Mostly Coveraged
03064 Full Coveraged
03070 Full Coveraged
03073 Full Coveraged
03076 Full Coveraged
03077 Full Coveraged
03079 Full Coveraged
03087 Full Coveraged
03101 Full Coveraged
03102 Full Coveraged
03103 Mostly Coveraged
03104 Mostly Coveraged
03105 Mostly Coveraged
03106 Mostly Coveraged
03108 Mostly Coveraged
03109 Mostly Coveraged
03110 Full Coveraged
03218 Full Coveraged
03224 Mostly Coveraged
03225 Full Coveraged
03234 Full Coveraged
03258 Full Coveraged
03263 Mostly Coveraged
03275 Full Coveraged
03281 Mostly Coveraged
03301 Full Coveraged
03302 Full Coveraged
03304 Mostly Coveraged
03307 Full Coveraged
03801 Full Coveraged
03802 Full Coveraged
03804 Full Coveraged
03805 Full Coveraged
03809 Full Coveraged
03810 Full Coveraged
03811 Full Coveraged
03815 Mostly Coveraged
03819 Mostly Coveraged
03820 Full Coveraged
03821 Full Coveraged
03822 Full Coveraged
03824 Full Coveraged
03825 Mostly Coveraged
03826 Mostly Coveraged
03827 Full Coveraged
03833 Full Coveraged
03835 Mostly Coveraged
03837 Mostly Coveraged
03839 Mostly Coveraged
03840 Full Coveraged
03841 Full Coveraged
03842 Full Coveraged
03843 Full Coveraged
03844 Full Coveraged
03848 Mostly Coveraged
03851 Mostly Coveraged
03854 Full Coveraged
03855 Full Coveraged
03856 Full Coveraged
03857 Full Coveraged
03858 Full Coveraged
03859 Mostly Coveraged
03862 Full Coveraged
03865 Mostly Coveraged
03866 Mostly Coveraged
03867 Mostly Coveraged
03868 Mostly Coveraged
03869 Full Coveraged
03870 Full Coveraged
03871 Full Coveraged
03873 Full Coveraged
03874 Full Coveraged
03878 Full Coveraged
03884 Mostly Coveraged
03885 Full Coveraged
03887 Mostly Coveraged
03901 Full Coveraged
03903 Full Coveraged
03904 Full Coveraged
03905 Full Coveraged
03906 Full Coveraged
03908 Mostly Coveraged
03909 Mostly Coveraged
03910 Mostly Coveraged
03911 Mostly Coveraged
04001 Mostly Coveraged
04002 Mostly Coveraged
04003 Mostly Coveraged
04004 Mostly Coveraged
04005 Full Coveraged
04006 Full Coveraged
04007 Full Coveraged
04011 Full Coveraged
04013 Full Coveraged
04014 Mostly Coveraged
04021 Full Coveraged
04027 Full Coveraged
04032 Full Coveraged
04033 Full Coveraged
04034 Full Coveraged
04038 Mostly Coveraged
04039 Mostly Coveraged
04046 Mostly Coveraged
04050 Mostly Coveraged
04053 Full Coveraged
04062 Full Coveraged
04063 Full Coveraged
04064 Full Coveraged
04066 Mostly Coveraged
04069 Mostly Coveraged
04070 Full Coveraged
04072 Full Coveraged
04073 Full Coveraged
04074 Full Coveraged
04076 Mostly Coveraged
04078 Full Coveraged
04079 Mostly Coveraged
04082 Full Coveraged
04083 Full Coveraged
04086 Full Coveraged
04087 Mostly Coveraged
04092 Full Coveraged
04093 Mostly Coveraged
04096 Mostly Coveraged
04097 Mostly Coveraged
04098 Full Coveraged
04101 Full Coveraged
04102 Full Coveraged
04103 Full Coveraged
04104 Full Coveraged
04105 Full Coveraged
04106 Full Coveraged
04107 Mostly Coveraged
04108 Mostly Coveraged
04109 Mostly Coveraged
04110 Mostly Coveraged
04112 Full Coveraged
04116 Full Coveraged
04122 Full Coveraged
04123 Full Coveraged
04124 Full Coveraged
04222 Full Coveraged
04250 Mostly Coveraged
04252 Mostly Coveraged
04287 Mostly Coveraged
04330 Full Coveraged
04332 Full Coveraged
04333 Full Coveraged
04336 Full Coveraged
04338 Full Coveraged
04343 Full Coveraged
04344 Full Coveraged
04345 Full Coveraged
04346 Mostly Coveraged
04347 Full Coveraged
04350 Mostly Coveraged
04351 Full Coveraged
04355 Mostly Coveraged
04357 Mostly Coveraged
04359 Mostly Coveraged
04364 Mostly Coveraged
04917 Mostly Coveraged
05501 Full Coveraged
05544 Full Coveraged
06001 Full Coveraged
06002 Full Coveraged
06006 Mostly Coveraged
06010 Full Coveraged
06011 Full Coveraged
06013 Mostly Coveraged
06016 Mostly Coveraged
06019 Mostly Coveraged
06020 Mostly Coveraged
06022 Mostly Coveraged
06023 Full Coveraged
06025 Full Coveraged
06028 Mostly Coveraged
06029 Full Coveraged
06030 Full Coveraged
06032 Full Coveraged
06033 Full Coveraged
06034 Full Coveraged
06037 Full Coveraged
06040 Full Coveraged
06041 Full Coveraged
06043 Full Coveraged
06045 Full Coveraged
06050 Full Coveraged
06051 Full Coveraged
Zip Code Coverage Level Zip Code Coverage Level Zip Code Coverage Level Zip Code Coverage Level Zip Code Coverage Level Zip Code Coverage Level
Page 53

- 153 -
06052 Full Coveraged
06053 Full Coveraged
06057 Mostly Coveraged
06058 Mostly Coveraged
06062 Full Coveraged
06064 Mostly Coveraged
06066 Full Coveraged
06067 Full Coveraged
06070 Full Coveraged
06071 Mostly Coveraged
06072 Mostly Coveraged
06073 Full Coveraged
06074 Mostly Coveraged
06078 Mostly Coveraged
06080 Mostly Coveraged
06081 Mostly Coveraged
06082 Mostly Coveraged
06083 Full Coveraged
06084 Full Coveraged
06085 Full Coveraged
06087 Full Coveraged
06088 Mostly Coveraged
06089 Full Coveraged
06092 Mostly Coveraged
06093 Mostly Coveraged
06094 Full Coveraged
06095 Full Coveraged
06096 Mostly Coveraged
06098 Mostly Coveraged
06101 Full Coveraged
06102 Full Coveraged
06103 Full Coveraged
06104 Full Coveraged
06105 Full Coveraged
06106 Full Coveraged
06107 Full Coveraged
06108 Full Coveraged
06109 Full Coveraged
06110 Full Coveraged
06111 Full Coveraged
06112 Full Coveraged
06114 Full Coveraged
06115 Full Coveraged
06117 Full Coveraged
06118 Full Coveraged
06119 Full Coveraged
06120 Full Coveraged
06123 Full Coveraged
06126 Full Coveraged
06127 Full Coveraged
06128 Full Coveraged
06129 Full Coveraged
06131 Full Coveraged
06132 Full Coveraged
06133 Full Coveraged
06134 Full Coveraged
06137 Full Coveraged
06138 Full Coveraged
06140 Full Coveraged
06141 Full Coveraged
06142 Full Coveraged
06143 Full Coveraged
06144 Full Coveraged
06145 Full Coveraged
06146 Full Coveraged
06147 Full Coveraged
06150 Full Coveraged
06151 Full Coveraged
06152 Full Coveraged
06153 Full Coveraged
06154 Full Coveraged
06155 Full Coveraged
06156 Full Coveraged
06160 Full Coveraged
06161 Full Coveraged
06176 Full Coveraged
06180 Full Coveraged
06183 Full Coveraged
06199 Mostly Coveraged
06231 Mostly Coveraged
06232 Full Coveraged
06237 Mostly Coveraged
06238 Full Coveraged
06248 Full Coveraged
06249 Mostly Coveraged
06251 Mostly Coveraged
06254 Full Coveraged
06265 Mostly Coveraged
06266 Mostly Coveraged
06280 Mostly Coveraged
06320 Full Coveraged
06330 Mostly Coveraged
06333 Full Coveraged
06334 Full Coveraged
06335 Full Coveraged
06336 Full Coveraged
06338 Full Coveraged
06339 Full Coveraged
06340 Full Coveraged
06349 Full Coveraged
06350 Mostly Coveraged
06351 Mostly Coveraged
06353 Full Coveraged
06355 Full Coveraged
06357 Full Coveraged
06359 Full Coveraged
06360 Full Coveraged
06365 Full Coveraged
06370 Full Coveraged
06371 Mostly Coveraged
06372 Full Coveraged
06375 Full Coveraged
06376 Mostly Coveraged
06378 Full Coveraged
06379 Full Coveraged
06380 Mostly Coveraged
06382 Full Coveraged
06383 Mostly Coveraged
06384 Mostly Coveraged
06385 Full Coveraged
06388 Full Coveraged
06389 Full Coveraged
06390 Mostly Coveraged
06401 Full Coveraged
06403 Full Coveraged
06404 Full Coveraged
06405 Full Coveraged
06408 Full Coveraged
06409 Mostly Coveraged
06410 Full Coveraged
06411 Full Coveraged
06412 Full Coveraged
06413 Full Coveraged
06414 Mostly Coveraged
06415 Mostly Coveraged
06416 Full Coveraged
06417 Full Coveraged
06418 Full Coveraged
06419 Full Coveraged
06420 Full Coveraged
06422 Full Coveraged
06424 Mostly Coveraged
06426 Mostly Coveraged
06437 Full Coveraged
06438 Mostly Coveraged
06439 Mostly Coveraged
06440 Full Coveraged
06441 Full Coveraged
06442 Full Coveraged
06443 Full Coveraged
06444 Full Coveraged
06447 Full Coveraged
06450 Full Coveraged
06451 Full Coveraged
06454 Full Coveraged
06455 Full Coveraged
06456 Mostly Coveraged
06457 Mostly Coveraged
06459 Mostly Coveraged
06460 Full Coveraged
06467 Full Coveraged
06468 Full Coveraged
06470 Full Coveraged
06471 Full Coveraged
06472 Full Coveraged
06473 Full Coveraged
06474 Mostly Coveraged
06475 Mostly Coveraged
06477 Full Coveraged
06478 Mostly Coveraged
06479 Full Coveraged
06480 Mostly Coveraged
06481 Full Coveraged
06482 Mostly Coveraged
06483 Full Coveraged
06484 Full Coveraged
06489 Full Coveraged
06491 Full Coveraged
06492 Full Coveraged
06493 Full Coveraged
06494 Full Coveraged
06495 Full Coveraged
06498 Full Coveraged
06501 Full Coveraged
06502 Full Coveraged
06503 Full Coveraged
06504 Full Coveraged
06505 Full Coveraged
06506 Full Coveraged
06507 Full Coveraged
06508 Full Coveraged
06509 Full Coveraged
06510 Full Coveraged
06511 Full Coveraged
06512 Full Coveraged
06513 Full Coveraged
06514 Full Coveraged
06515 Full Coveraged
06516 Full Coveraged
06517 Full Coveraged
06518 Mostly Coveraged
06519 Full Coveraged
06520 Full Coveraged
06521 Full Coveraged
06524 Mostly Coveraged
06525 Full Coveraged
06530 Full Coveraged
06531 Full Coveraged
06532 Full Coveraged
06533 Full Coveraged
06534 Full Coveraged
06535 Full Coveraged
06536 Full Coveraged
06537 Full Coveraged
06538 Full Coveraged
06540 Full Coveraged
06601 Full Coveraged
06602 Full Coveraged
06604 Full Coveraged
06605 Full Coveraged
06606 Full Coveraged
06607 Full Coveraged
06608 Full Coveraged
06610 Full Coveraged
06611 Full Coveraged
06612 Full Coveraged
06614 Full Coveraged
06615 Full Coveraged
06673 Full Coveraged
06699 Full Coveraged
06701 Full Coveraged
06702 Full Coveraged
06703 Full Coveraged
06704 Full Coveraged
06705 Full Coveraged
06706 Full Coveraged
06708 Full Coveraged
06710 Full Coveraged
06712 Full Coveraged
06716 Full Coveraged
06720 Full Coveraged
06721 Full Coveraged
06722 Full Coveraged
06723 Full Coveraged
06724 Full Coveraged
06725 Full Coveraged
06726 Full Coveraged
06750 Mostly Coveraged
06751 Mostly Coveraged
06752 Mostly Coveraged
06753 Mostly Coveraged
06756 Full Coveraged
06758 Mostly Coveraged
06759 Full Coveraged
06762 Mostly Coveraged
06763 Mostly Coveraged
06770 Mostly Coveraged
06778 Full Coveraged
06779 Full Coveraged
06781 Full Coveraged
06782 Full Coveraged
06784 Mostly Coveraged
06786 Full Coveraged
06787 Mostly Coveraged
06790 Full Coveraged
06791 Full Coveraged
06795 Mostly Coveraged
06796 Mostly Coveraged
06801 Full Coveraged
06804 Full Coveraged
06807 Full Coveraged
06810 Full Coveraged
06811 Full Coveraged
06812 Mostly Coveraged
06813 Full Coveraged
06814 Full Coveraged
06816 Full Coveraged
06817 Full Coveraged
06820 Full Coveraged
06824 Full Coveraged
06825 Full Coveraged
06828 Full Coveraged
06829 Full Coveraged
06830 Full Coveraged
06831 Full Coveraged
06832 Full Coveraged
06836 Full Coveraged
06838 Full Coveraged
06840 Full Coveraged
06842 Full Coveraged
06850 Full Coveraged
06851 Full Coveraged
06852 Full Coveraged
06853 Full Coveraged
06854 Full Coveraged
06855 Full Coveraged
06856 Full Coveraged
06857 Full Coveraged
06858 Full Coveraged
06859 Full Coveraged
06860 Full Coveraged
06870 Full Coveraged
06875 Full Coveraged
06876 Full Coveraged
06877 Full Coveraged
06878 Full Coveraged
06879 Mostly Coveraged
06880 Full Coveraged
06881 Full Coveraged
06883 Full Coveraged
06888 Full Coveraged
06889 Full Coveraged
06890 Full Coveraged
06896 Full Coveraged
06897 Full Coveraged
06901 Full Coveraged
06902 Full Coveraged
06903 Full Coveraged
06904 Full Coveraged
06905 Full Coveraged
06906 Full Coveraged
06907 Full Coveraged
06910 Full Coveraged
06911 Full Coveraged
06912 Full Coveraged
06913 Full Coveraged
06920 Full Coveraged
06921 Full Coveraged
06922 Full Coveraged
06925 Full Coveraged
06926 Full Coveraged
06927 Full Coveraged
06928 Full Coveraged
07001 Full Coveraged
07002 Full Coveraged
07003 Full Coveraged
07004 Full Coveraged
07005 Full Coveraged
07006 Full Coveraged
07007 Full Coveraged
07008 Full Coveraged
07009 Full Coveraged
07010 Full Coveraged
07011 Full Coveraged
07012 Full Coveraged
07013 Full Coveraged
07014 Full Coveraged
07015 Full Coveraged
07016 Full Coveraged
07017 Full Coveraged
07018 Full Coveraged
07019 Full Coveraged
07020 Full Coveraged
07021 Full Coveraged
07022 Full Coveraged
07023 Full Coveraged
07024 Full Coveraged
07026 Full Coveraged
07027 Full Coveraged
07028 Full Coveraged
07029 Full Coveraged
07030 Full Coveraged
07031 Full Coveraged
07032 Full Coveraged
07033 Full Coveraged
07034 Full Coveraged
07035 Full Coveraged
07036 Full Coveraged
07039 Full Coveraged
07040 Full Coveraged
07041 Full Coveraged
07042 Full Coveraged
07043 Full Coveraged
07044 Full Coveraged
07045 Full Coveraged
07046 Full Coveraged
07047 Full Coveraged
07050 Full Coveraged
07051 Full Coveraged
07052 Full Coveraged
07054 Full Coveraged
07055 Full Coveraged
07057 Full Coveraged
07058 Full Coveraged
07059 Full Coveraged
07060 Full Coveraged
07061 Full Coveraged
07062 Full Coveraged
07063 Full Coveraged
07064 Full Coveraged
07065 Full Coveraged
07066 Full Coveraged
07067 Full Coveraged
07068 Full Coveraged
07069 Full Coveraged
07070 Full Coveraged
07071 Full Coveraged
07072 Full Coveraged
07073 Full Coveraged
07074 Full Coveraged
07075 Full Coveraged
07076 Full Coveraged
07077 Full Coveraged
07078 Full Coveraged
07079 Full Coveraged
07080 Full Coveraged
07081 Full Coveraged
07082 Full Coveraged
07083 Full Coveraged
07086 Full Coveraged
07087 Full Coveraged
07088 Full Coveraged
07090 Full Coveraged
07091 Full Coveraged
07092 Full Coveraged
07093 Full Coveraged
07094 Full Coveraged
07095 Full Coveraged
07096 Full Coveraged
07097 Full Coveraged
07099 Full Coveraged
07101 Full Coveraged
07102 Full Coveraged
07103 Full Coveraged
07104 Full Coveraged
07105 Full Coveraged
07106 Full Coveraged
07107 Full Coveraged
07108 Full Coveraged
07109 Full Coveraged
07110 Full Coveraged
07111 Full Coveraged
07112 Full Coveraged
07114 Full Coveraged
07175 Full Coveraged
07182 Full Coveraged
07184 Full Coveraged
07188 Full Coveraged
07189 Full Coveraged
07191 Full Coveraged
07192 Full Coveraged
07193 Full Coveraged
07194 Full Coveraged
07195 Full Coveraged
07197 Full Coveraged
07198 Full Coveraged
07199 Full Coveraged
07201 Full Coveraged
07202 Full Coveraged
07203 Full Coveraged
07204 Full Coveraged
07205 Full Coveraged
07206 Full Coveraged
07207 Full Coveraged
07208 Full Coveraged
07302 Full Coveraged
07303 Full Coveraged
07304 Full Coveraged
07305 Full Coveraged
07306 Full Coveraged
07307 Full Coveraged
07308 Full Coveraged
07309 Full Coveraged
07310 Full Coveraged
07311 Full Coveraged
07390 Full Coveraged
07399 Full Coveraged
07401 Full Coveraged
07403 Full Coveraged
07405 Full Coveraged
07407 Full Coveraged
07410 Full Coveraged
07416 Mostly Coveraged
07417 Full Coveraged
07420 Full Coveraged
07421 Mostly Coveraged
07423 Full Coveraged
07424 Full Coveraged
07430 Full Coveraged
07432 Full Coveraged
07435 Mostly Coveraged
07436 Full Coveraged
07438 Full Coveraged
07439 Mostly Coveraged
07440 Full Coveraged
07442 Full Coveraged
07444 Full Coveraged
07446 Full Coveraged
07450 Full Coveraged
07451 Full Coveraged
07452 Full Coveraged
07456 Full Coveraged
07457 Full Coveraged
07458 Full Coveraged
07460 Mostly Coveraged
07463 Full Coveraged
07465 Full Coveraged
07470 Full Coveraged
07474 Full Coveraged
07477 Full Coveraged
07480 Mostly Coveraged
07481 Full Coveraged
07495 Full Coveraged
07498 Full Coveraged
Zip Code Coverage Level Zip Code Coverage Level Zip Code Coverage Level Zip Code Coverage Level Zip Code Coverage Level Zip Code Coverage Level
Page 54

- 154 -
07501 Full Coveraged
07502 Full Coveraged
07503 Full Coveraged
07504 Full Coveraged
07505 Full Coveraged
07506 Full Coveraged
07507 Full Coveraged
07508 Full Coveraged
07509 Full Coveraged
07510 Full Coveraged
07511 Full Coveraged
07512 Full Coveraged
07513 Full Coveraged
07514 Full Coveraged
07522 Full Coveraged
07524 Full Coveraged
07533 Full Coveraged
07538 Full Coveraged
07543 Full Coveraged
07544 Full Coveraged
07601 Full Coveraged
07602 Full Coveraged
07603 Full Coveraged
07604 Full Coveraged
07605 Full Coveraged
07606 Full Coveraged
07607 Full Coveraged
07608 Full Coveraged
07620 Full Coveraged
07621 Full Coveraged
07624 Full Coveraged
07626 Full Coveraged
07627 Full Coveraged
07628 Full Coveraged
07630 Full Coveraged
07631 Full Coveraged
07632 Full Coveraged
07640 Full Coveraged
07641 Full Coveraged
07642 Full Coveraged
07643 Full Coveraged
07644 Full Coveraged
07645 Full Coveraged
07646 Full Coveraged
07647 Full Coveraged
07648 Full Coveraged
07649 Full Coveraged
07650 Full Coveraged
07652 Full Coveraged
07653 Full Coveraged
07656 Full Coveraged
07657 Full Coveraged
07660 Full Coveraged
07661 Full Coveraged
07662 Full Coveraged
07663 Full Coveraged
07666 Full Coveraged
07670 Full Coveraged
07675 Full Coveraged
07676 Full Coveraged
07677 Full Coveraged
07699 Full Coveraged
07701 Full Coveraged
07702 Full Coveraged
07703 Full Coveraged
07704 Full Coveraged
07709 Full Coveraged
07710 Full Coveraged
07711 Full Coveraged
07712 Full Coveraged
07715 Full Coveraged
07716 Mostly Coveraged
07717 Full Coveraged
07718 Full Coveraged
07719 Full Coveraged
07720 Full Coveraged
07721 Full Coveraged
07722 Full Coveraged
07723 Full Coveraged
07724 Full Coveraged
07726 Mostly Coveraged
07727 Full Coveraged
07728 Full Coveraged
07730 Full Coveraged
07731 Full Coveraged
07732 Mostly Coveraged
07733 Full Coveraged
07734 Full Coveraged
07735 Full Coveraged
07737 Full Coveraged
07738 Full Coveraged
07739 Full Coveraged
07740 Full Coveraged
07746 Full Coveraged
07747 Full Coveraged
07748 Full Coveraged
07750 Full Coveraged
07751 Full Coveraged
07752 Mostly Coveraged
07753 Full Coveraged
07754 Full Coveraged
07755 Full Coveraged
07756 Full Coveraged
07757 Full Coveraged
07758 Full Coveraged
07760 Mostly Coveraged
07762 Mostly Coveraged
07763 Mostly Coveraged
07764 Full Coveraged
07765 Full Coveraged
07777 Full Coveraged
07799 Full Coveraged
07801 Full Coveraged
07802 Full Coveraged
07803 Full Coveraged
07806 Full Coveraged
07820 Full Coveraged
07821 Full Coveraged
07822 Full Coveraged
07826 Mostly Coveraged
07828 Full Coveraged
07830 Mostly Coveraged
07834 Full Coveraged
07836 Full Coveraged
07837 Full Coveraged
07838 Mostly Coveraged
07839 Full Coveraged
07840 Full Coveraged
07842 Full Coveraged
07843 Full Coveraged
07845 Full Coveraged
07846 Mostly Coveraged
07847 Full Coveraged
07848 Full Coveraged
07849 Full Coveraged
07850 Full Coveraged
07851 Mostly Coveraged
07852 Full Coveraged
07853 Full Coveraged
07855 Full Coveraged
07856 Full Coveraged
07857 Full Coveraged
07860 Full Coveraged
07865 Mostly Coveraged
07866 Full Coveraged
07869 Full Coveraged
07870 Full Coveraged
07871 Full Coveraged
07874 Full Coveraged
07875 Full Coveraged
07876 Full Coveraged
07877 Full Coveraged
07878 Full Coveraged
07879 Full Coveraged
07880 Full Coveraged
07881 Mostly Coveraged
07885 Full Coveraged
07890 Mostly Coveraged
07901 Full Coveraged
07902 Full Coveraged
07920 Full Coveraged
07921 Full Coveraged
07922 Full Coveraged
07924 Full Coveraged
07926 Full Coveraged
07927 Full Coveraged
07928 Full Coveraged
07930 Full Coveraged
07931 Full Coveraged
07932 Full Coveraged
07933 Full Coveraged
07934 Full Coveraged
07935 Full Coveraged
07936 Full Coveraged
07938 Full Coveraged
07939 Full Coveraged
07940 Full Coveraged
07945 Full Coveraged
07946 Full Coveraged
07950 Full Coveraged
07960 Full Coveraged
07961 Full Coveraged
07962 Full Coveraged
07963 Full Coveraged
07970 Full Coveraged
07974 Full Coveraged
07976 Full Coveraged
07977 Full Coveraged
07978 Full Coveraged
07979 Mostly Coveraged
07980 Full Coveraged
07981 Full Coveraged
07983 Full Coveraged
07999 Full Coveraged
08001 Mostly Coveraged
08002 Full Coveraged
08003 Full Coveraged
08004 Full Coveraged
08007 Full Coveraged
08009 Full Coveraged
08010 Full Coveraged
08012 Full Coveraged
08014 Mostly Coveraged
08016 Full Coveraged
08018 Full Coveraged
08020 Full Coveraged
08021 Full Coveraged
08022 Mostly Coveraged
08023 Full Coveraged
08025 Full Coveraged
08026 Full Coveraged
08027 Full Coveraged
08028 Full Coveraged
08029 Full Coveraged
08030 Full Coveraged
08031 Full Coveraged
08032 Full Coveraged
08033 Full Coveraged
08034 Full Coveraged
08035 Full Coveraged
08036 Full Coveraged
08037 Mostly Coveraged
08039 Full Coveraged
08043 Full Coveraged
08045 Full Coveraged
08046 Full Coveraged
08048 Full Coveraged
08049 Full Coveraged
08051 Full Coveraged
08052 Full Coveraged
08053 Full Coveraged
08054 Full Coveraged
08055 Mostly Coveraged
08056 Full Coveraged
08057 Full Coveraged
08059 Full Coveraged
08060 Mostly Coveraged
08061 Full Coveraged
08062 Full Coveraged
08063 Full Coveraged
08065 Full Coveraged
08066 Full Coveraged
08067 Mostly Coveraged
08069 Full Coveraged
08070 Full Coveraged
08071 Full Coveraged
08072 Mostly Coveraged
08073 Full Coveraged
08074 Full Coveraged
08075 Full Coveraged
08076 Full Coveraged
08077 Full Coveraged
08078 Full Coveraged
08080 Full Coveraged
08081 Full Coveraged
08083 Full Coveraged
08084 Full Coveraged
08085 Full Coveraged
08086 Full Coveraged
08089 Full Coveraged
08090 Full Coveraged
08091 Full Coveraged
08093 Full Coveraged
08094 Full Coveraged
08095 Full Coveraged
08096 Full Coveraged
08097 Full Coveraged
08098 Full Coveraged
08099 Full Coveraged
08101 Full Coveraged
08102 Full Coveraged
08103 Full Coveraged
08104 Full Coveraged
08105 Full Coveraged
08106 Full Coveraged
08107 Full Coveraged
08108 Full Coveraged
08109 Full Coveraged
08110 Full Coveraged
08201 Full Coveraged
08202 Mostly Coveraged
08203 Full Coveraged
08204 Full Coveraged
08205 Mostly Coveraged
08210 Full Coveraged
08212 Mostly Coveraged
08213 Full Coveraged
08214 Mostly Coveraged
08215 Full Coveraged
08217 Full Coveraged
08218 Full Coveraged
08219 Full Coveraged
08220 Mostly Coveraged
08221 Mostly Coveraged
08223 Full Coveraged
08225 Mostly Coveraged
08226 Full Coveraged
08230 Full Coveraged
08231 Full Coveraged
08232 Full Coveraged
08234 Mostly Coveraged
08240 Full Coveraged
08241 Mostly Coveraged
08242 Full Coveraged
08243 Full Coveraged
08244 Mostly Coveraged
08245 Mostly Coveraged
08246 Full Coveraged
08247 Full Coveraged
08248 Full Coveraged
08250 Mostly Coveraged
08251 Full Coveraged
08252 Full Coveraged
08260 Full Coveraged
08270 Mostly Coveraged
08310 Full Coveraged
08312 Full Coveraged
08313 Mostly Coveraged
08317 Full Coveraged
08318 Mostly Coveraged
08319 Full Coveraged
08322 Full Coveraged
08326 Full Coveraged
08328 Full Coveraged
08330 Mostly Coveraged
08332 Mostly Coveraged
08340 Full Coveraged
08341 Full Coveraged
08342 Full Coveraged
08343 Mostly Coveraged
08344 Full Coveraged
08346 Mostly Coveraged
08348 Mostly Coveraged
08350 Full Coveraged
08360 Mostly Coveraged
08361 Full Coveraged
08362 Mostly Coveraged
08401 Full Coveraged
08402 Full Coveraged
08403 Full Coveraged
08404 Full Coveraged
08406 Full Coveraged
08502 Full Coveraged
08504 Full Coveraged
08505 Full Coveraged
08512 Full Coveraged
08515 Mostly Coveraged
08518 Full Coveraged
08520 Full Coveraged
08525 Mostly Coveraged
08527 Mostly Coveraged
08528 Full Coveraged
08530 Mostly Coveraged
08534 Mostly Coveraged
08536 Full Coveraged
08540 Full Coveraged
08541 Full Coveraged
08542 Full Coveraged
08543 Full Coveraged
08544 Full Coveraged
08550 Full Coveraged
08551 Mostly Coveraged
08553 Full Coveraged
08554 Full Coveraged
08555 Mostly Coveraged
08556 Mostly Coveraged
08557 Full Coveraged
08558 Full Coveraged
08559 Mostly Coveraged
08560 Mostly Coveraged
08561 Full Coveraged
08570 Full Coveraged
08601 Full Coveraged
08602 Full Coveraged
08603 Full Coveraged
08604 Full Coveraged
08605 Full Coveraged
08606 Full Coveraged
08607 Full Coveraged
08608 Full Coveraged
08609 Full Coveraged
08610 Full Coveraged
08611 Full Coveraged
08618 Full Coveraged
08619 Full Coveraged
08620 Mostly Coveraged
08625 Full Coveraged
08628 Full Coveraged
08629 Full Coveraged
08638 Full Coveraged
08645 Full Coveraged
08646 Full Coveraged
08647 Full Coveraged
08648 Full Coveraged
08650 Full Coveraged
08666 Full Coveraged
08677 Full Coveraged
08690 Full Coveraged
08691 Mostly Coveraged
08695 Full Coveraged
08701 Full Coveraged
08720 Mostly Coveraged
08721 Full Coveraged
08722 Full Coveraged
08723 Full Coveraged
08724 Full Coveraged
08730 Mostly Coveraged
08731 Full Coveraged
08732 Full Coveraged
08734 Full Coveraged
08735 Mostly Coveraged
08736 Mostly Coveraged
08738 Mostly Coveraged
08739 Mostly Coveraged
08740 Full Coveraged
08741 Full Coveraged
08742 Mostly Coveraged
08750 Mostly Coveraged
08751 Full Coveraged
08752 Mostly Coveraged
08753 Full Coveraged
08754 Full Coveraged
08755 Full Coveraged
08756 Full Coveraged
08757 Full Coveraged
08758 Mostly Coveraged
08759 Mostly Coveraged
08801 Full Coveraged
08802 Mostly Coveraged
08803 Full Coveraged
08805 Full Coveraged
08807 Full Coveraged
08809 Full Coveraged
08810 Full Coveraged
08812 Full Coveraged
08816 Full Coveraged
08817 Full Coveraged
08818 Full Coveraged
08820 Full Coveraged
08821 Mostly Coveraged
08822 Full Coveraged
08823 Full Coveraged
08824 Full Coveraged
08825 Mostly Coveraged
08826 Mostly Coveraged
08827 Mostly Coveraged
08828 Full Coveraged
08829 Full Coveraged
08830 Full Coveraged
08831 Mostly Coveraged
08832 Full Coveraged
08833 Full Coveraged
08834 Mostly Coveraged
08835 Full Coveraged
08836 Full Coveraged
08837 Full Coveraged
08840 Full Coveraged
08844 Mostly Coveraged
08846 Full Coveraged
08850 Full Coveraged
08852 Full Coveraged
08853 Mostly Coveraged
08854 Full Coveraged
08855 Full Coveraged
08857 Full Coveraged
08858 Mostly Coveraged
08859 Full Coveraged
08861 Full Coveraged
08862 Full Coveraged
08863 Full Coveraged
08867 Full Coveraged
08868 Full Coveraged
08869 Full Coveraged
08870 Mostly Coveraged
08871 Full Coveraged
08872 Full Coveraged
08873 Full Coveraged
08875 Full Coveraged
08876 Full Coveraged
08878 Full Coveraged
08879 Full Coveraged
08880 Full Coveraged
08882 Full Coveraged
08884 Full Coveraged
08885 Full Coveraged
08887 Mostly Coveraged
08888 Mostly Coveraged
08889 Mostly Coveraged
08890 Full Coveraged
08896 Full Coveraged
08899 Full Coveraged
08901 Full Coveraged
08902 Full Coveraged
08903 Full Coveraged
08904 Full Coveraged
08905 Full Coveraged
08906 Full Coveraged
08922 Full Coveraged
08933 Full Coveraged
08988 Full Coveraged
08989 Full Coveraged
10001 Full Coveraged
10002 Full Coveraged
10003 Full Coveraged
Zip Code Coverage Level Zip Code Coverage Level Zip Code Coverage Level Zip Code Coverage Level Zip Code Coverage Level Zip Code Coverage Level
Page 55

- 155 -
10004 Full Coveraged
10005 Full Coveraged
10006 Full Coveraged
10007 Full Coveraged
10008 Full Coveraged
10009 Full Coveraged
10010 Full Coveraged
10011 Full Coveraged
10012 Full Coveraged
10013 Full Coveraged
10014 Full Coveraged
10016 Full Coveraged
10017 Full Coveraged
10018 Full Coveraged
10019 Full Coveraged
10020 Full Coveraged
10021 Full Coveraged
10022 Full Coveraged
10023 Full Coveraged
10024 Full Coveraged
10025 Full Coveraged
10026 Full Coveraged
10027 Full Coveraged
10028 Full Coveraged
10029 Full Coveraged
10030 Full Coveraged
10031 Full Coveraged
10032 Full Coveraged
10033 Full Coveraged
10034 Full Coveraged
10035 Full Coveraged
10036 Full Coveraged
10037 Full Coveraged
10038 Full Coveraged
10039 Full Coveraged
10040 Full Coveraged
10041 Full Coveraged
10043 Full Coveraged
10044 Full Coveraged
10045 Full Coveraged
10047 Full Coveraged
10048 Full Coveraged
10055 Full Coveraged
10069 Full Coveraged
10072 Full Coveraged
10080 Full Coveraged
10081 Full Coveraged
10082 Full Coveraged
10087 Full Coveraged
10095 Full Coveraged
10098 Full Coveraged
10101 Full Coveraged
10102 Full Coveraged
10103 Full Coveraged
10104 Full Coveraged
10105 Full Coveraged
10106 Full Coveraged
10107 Full Coveraged
10108 Full Coveraged
10109 Full Coveraged
10110 Full Coveraged
10111 Full Coveraged
10112 Full Coveraged
10113 Full Coveraged
10114 Full Coveraged
10115 Full Coveraged
10116 Full Coveraged
10117 Full Coveraged
10118 Full Coveraged
10119 Full Coveraged
10120 Full Coveraged
10121 Full Coveraged
10122 Full Coveraged
10123 Full Coveraged
10124 Full Coveraged
10125 Full Coveraged
10126 Full Coveraged
10128 Full Coveraged
10129 Full Coveraged
10130 Full Coveraged
10131 Full Coveraged
10132 Full Coveraged
10133 Full Coveraged
10138 Full Coveraged
10149 Full Coveraged
10150 Full Coveraged
10151 Full Coveraged
10152 Full Coveraged
10153 Full Coveraged
10154 Full Coveraged
10155 Full Coveraged
10156 Full Coveraged
10157 Full Coveraged
10158 Full Coveraged
10159 Full Coveraged
10160 Full Coveraged
10161 Full Coveraged
10162 Full Coveraged
10163 Full Coveraged
10164 Full Coveraged
10165 Full Coveraged
10166 Full Coveraged
10167 Full Coveraged
10168 Full Coveraged
10169 Full Coveraged
10170 Full Coveraged
10171 Full Coveraged
10172 Full Coveraged
10173 Full Coveraged
10174 Full Coveraged
10175 Full Coveraged
10176 Full Coveraged
10177 Full Coveraged
10178 Full Coveraged
10179 Full Coveraged
10185 Full Coveraged
10197 Full Coveraged
10199 Full Coveraged
10213 Full Coveraged
10242 Full Coveraged
10249 Full Coveraged
10256 Full Coveraged
10259 Full Coveraged
10260 Full Coveraged
10261 Full Coveraged
10265 Full Coveraged
10268 Full Coveraged
10269 Full Coveraged
10270 Full Coveraged
10271 Full Coveraged
10272 Full Coveraged
10273 Full Coveraged
10274 Full Coveraged
10275 Full Coveraged
10276 Full Coveraged
10277 Full Coveraged
10278 Full Coveraged
10279 Full Coveraged
10280 Full Coveraged
10281 Full Coveraged
10282 Full Coveraged
10285 Full Coveraged
10286 Full Coveraged
10292 Full Coveraged
10301 Full Coveraged
10302 Full Coveraged
10303 Full Coveraged
10304 Full Coveraged
10305 Full Coveraged
10306 Full Coveraged
10307 Full Coveraged
10308 Full Coveraged
10309 Full Coveraged
10310 Full Coveraged
10311 Full Coveraged
10312 Full Coveraged
10313 Full Coveraged
10314 Full Coveraged
10451 Full Coveraged
10452 Full Coveraged
10453 Full Coveraged
10454 Full Coveraged
10455 Full Coveraged
10456 Full Coveraged
10457 Full Coveraged
10458 Full Coveraged
10459 Full Coveraged
10460 Full Coveraged
10461 Full Coveraged
10462 Full Coveraged
10463 Full Coveraged
10464 Full Coveraged
10465 Full Coveraged
10466 Full Coveraged
10467 Full Coveraged
10468 Full Coveraged
10469 Full Coveraged
10470 Full Coveraged
10471 Full Coveraged
10472 Full Coveraged
10473 Full Coveraged
10474 Full Coveraged
10475 Full Coveraged
10499 Full Coveraged
10501 Full Coveraged
10502 Full Coveraged
10503 Full Coveraged
10504 Full Coveraged
10505 Full Coveraged
10506 Mostly Coveraged
10507 Mostly Coveraged
10509 Full Coveraged
10510 Full Coveraged
10511 Mostly Coveraged
10512 Full Coveraged
10514 Full Coveraged
10516 Full Coveraged
10517 Full Coveraged
10518 Mostly Coveraged
10519 Full Coveraged
10520 Mostly Coveraged
10521 Mostly Coveraged
10522 Full Coveraged
10523 Full Coveraged
10524 Full Coveraged
10526 Full Coveraged
10527 Full Coveraged
10528 Full Coveraged
10530 Full Coveraged
10532 Full Coveraged
10533 Full Coveraged
10535 Full Coveraged
10536 Full Coveraged
10537 Full Coveraged
10538 Full Coveraged
10540 Full Coveraged
10541 Full Coveraged
10542 Full Coveraged
10543 Full Coveraged
10545 Mostly Coveraged
10546 Mostly Coveraged
10547 Full Coveraged
10548 Mostly Coveraged
10549 Mostly Coveraged
10550 Full Coveraged
10551 Full Coveraged
10552 Full Coveraged
10553 Full Coveraged
10557 Full Coveraged
10558 Full Coveraged
10560 Mostly Coveraged
10562 Mostly Coveraged
10566 Mostly Coveraged
10567 Full Coveraged
10570 Full Coveraged
10571 Mostly Coveraged
10572 Full Coveraged
10573 Full Coveraged
10576 Mostly Coveraged
10577 Full Coveraged
10578 Full Coveraged
10579 Full Coveraged
10580 Full Coveraged
10583 Full Coveraged
10587 Full Coveraged
10588 Full Coveraged
10589 Full Coveraged
10590 Mostly Coveraged
10591 Full Coveraged
10594 Full Coveraged
10595 Full Coveraged
10596 Mostly Coveraged
10597 Mostly Coveraged
10598 Full Coveraged
10601 Full Coveraged
10602 Full Coveraged
10603 Full Coveraged
10604 Full Coveraged
10605 Full Coveraged
10606 Full Coveraged
10607 Full Coveraged
10610 Full Coveraged
10650 Full Coveraged
10701 Full Coveraged
10702 Full Coveraged
10703 Full Coveraged
10704 Full Coveraged
10705 Full Coveraged
10706 Full Coveraged
10707 Full Coveraged
10708 Full Coveraged
10709 Full Coveraged
10710 Full Coveraged
10801 Full Coveraged
10802 Full Coveraged
10803 Full Coveraged
10804 Full Coveraged
10805 Full Coveraged
10901 Full Coveraged
10910 Mostly Coveraged
10911 Mostly Coveraged
10912 Mostly Coveraged
10913 Mostly Coveraged
10915 Mostly Coveraged
10916 Mostly Coveraged
10918 Mostly Coveraged
10919 Full Coveraged
10920 Mostly Coveraged
10921 Mostly Coveraged
10922 Mostly Coveraged
10923 Mostly Coveraged
10924 Full Coveraged
10925 Mostly Coveraged
10927 Mostly Coveraged
10931 Full Coveraged
10932 Full Coveraged
10933 Full Coveraged
10940 Full Coveraged
10941 Full Coveraged
10943 Full Coveraged
10952 Full Coveraged
10953 Mostly Coveraged
10954 Full Coveraged
10956 Full Coveraged
10958 Full Coveraged
10960 Mostly Coveraged
10962 Full Coveraged
10963 Mostly Coveraged
10964 Full Coveraged
10965 Full Coveraged
10968 Full Coveraged
10969 Mostly Coveraged
10970 Full Coveraged
10973 Full Coveraged
10974 Full Coveraged
10975 Mostly Coveraged
10976 Full Coveraged
10977 Full Coveraged
10979 Mostly Coveraged
10980 Mostly Coveraged
10981 Mostly Coveraged
10982 Full Coveraged
10983 Full Coveraged
10984 Mostly Coveraged
10985 Mostly Coveraged
10987 Full Coveraged
10989 Mostly Coveraged
10990 Mostly Coveraged
10993 Mostly Coveraged
10994 Full Coveraged
10996 Full Coveraged
10997 Full Coveraged
10998 Mostly Coveraged
11001 Full Coveraged
11002 Full Coveraged
11003 Full Coveraged
11004 Full Coveraged
11005 Full Coveraged
11010 Full Coveraged
11020 Full Coveraged
11021 Full Coveraged
11022 Full Coveraged
11023 Full Coveraged
11024 Full Coveraged
11030 Full Coveraged
11040 Full Coveraged
11041 Full Coveraged
11042 Full Coveraged
11050 Full Coveraged
11051 Full Coveraged
11052 Full Coveraged
11053 Full Coveraged
11054 Full Coveraged
11055 Full Coveraged
11096 Full Coveraged
11101 Full Coveraged
11102 Full Coveraged
11103 Full Coveraged
11104 Full Coveraged
11105 Full Coveraged
11106 Full Coveraged
11109 Full Coveraged
11201 Full Coveraged
11202 Full Coveraged
11203 Full Coveraged
11204 Full Coveraged
11205 Full Coveraged
11206 Full Coveraged
11207 Full Coveraged
11208 Full Coveraged
11209 Full Coveraged
11210 Full Coveraged
11211 Full Coveraged
11212 Full Coveraged
11213 Full Coveraged
11214 Full Coveraged
11215 Full Coveraged
11216 Full Coveraged
11217 Full Coveraged
11218 Full Coveraged
11219 Full Coveraged
11220 Full Coveraged
11221 Full Coveraged
11222 Full Coveraged
11223 Full Coveraged
11224 Full Coveraged
11225 Full Coveraged
11226 Full Coveraged
11228 Full Coveraged
11229 Full Coveraged
11230 Full Coveraged
11231 Full Coveraged
11232 Full Coveraged
11233 Full Coveraged
11234 Full Coveraged
11235 Full Coveraged
11236 Full Coveraged
11237 Full Coveraged
11238 Full Coveraged
11239 Full Coveraged
11241 Full Coveraged
11242 Full Coveraged
11243 Full Coveraged
11245 Full Coveraged
11247 Full Coveraged
11248 Full Coveraged
11249 Full Coveraged
11251 Full Coveraged
11252 Full Coveraged
11256 Full Coveraged
11351 Full Coveraged
11352 Full Coveraged
11354 Full Coveraged
11355 Full Coveraged
11356 Full Coveraged
11357 Full Coveraged
11358 Full Coveraged
11359 Full Coveraged
11360 Full Coveraged
11361 Full Coveraged
11362 Full Coveraged
11363 Full Coveraged
11364 Full Coveraged
11365 Full Coveraged
11366 Full Coveraged
11367 Full Coveraged
11368 Full Coveraged
11369 Full Coveraged
11370 Full Coveraged
11371 Full Coveraged
11372 Full Coveraged
11373 Full Coveraged
11374 Full Coveraged
11375 Full Coveraged
11377 Full Coveraged
11378 Full Coveraged
11379 Full Coveraged
11380 Full Coveraged
11381 Full Coveraged
11385 Full Coveraged
11386 Full Coveraged
11390 Full Coveraged
11405 Full Coveraged
11411 Full Coveraged
11412 Full Coveraged
11413 Full Coveraged
11414 Full Coveraged
11415 Full Coveraged
11416 Full Coveraged
11417 Full Coveraged
11418 Full Coveraged
11419 Full Coveraged
11420 Full Coveraged
11421 Full Coveraged
11422 Full Coveraged
11423 Full Coveraged
11424 Full Coveraged
11425 Full Coveraged
11426 Full Coveraged
11427 Full Coveraged
11428 Full Coveraged
11429 Full Coveraged
11430 Full Coveraged
11431 Full Coveraged
11432 Full Coveraged
11433 Full Coveraged
11434 Full Coveraged
11435 Full Coveraged
11436 Full Coveraged
11439 Full Coveraged
11451 Full Coveraged
11484 Full Coveraged
11499 Full Coveraged
11501 Full Coveraged
11507 Full Coveraged
11509 Full Coveraged
11510 Full Coveraged
11514 Full Coveraged
11516 Full Coveraged
11518 Full Coveraged
11520 Full Coveraged
11530 Full Coveraged
11531 Full Coveraged
11535 Full Coveraged
11536 Full Coveraged
11542 Full Coveraged
11545 Full Coveraged
11547 Full Coveraged
11548 Full Coveraged
11549 Full Coveraged
11550 Full Coveraged
11551 Full Coveraged
11552 Full Coveraged
11553 Full Coveraged
11554 Full Coveraged
11555 Full Coveraged
11556 Full Coveraged
11557 Full Coveraged
11558 Full Coveraged
11559 Full Coveraged
11560 Full Coveraged
11561 Full Coveraged
11563 Full Coveraged
11564 Full Coveraged
Zip Code Coverage Level Zip Code Coverage Level Zip Code Coverage Level Zip Code Coverage Level Zip Code Coverage Level Zip Code Coverage Level
Page 56

- 156 -
11565 Full Coveraged
11566 Full Coveraged
11568 Full Coveraged
11569 Full Coveraged
11570 Full Coveraged
11571 Full Coveraged
11572 Full Coveraged
11575 Full Coveraged
11576 Full Coveraged
11577 Full Coveraged
11579 Full Coveraged
11580 Full Coveraged
11581 Full Coveraged
11582 Full Coveraged
11583 Full Coveraged
11588 Full Coveraged
11590 Full Coveraged
11592 Full Coveraged
11593 Mostly Coveraged
11594 Full Coveraged
11595 Full Coveraged
11596 Full Coveraged
11597 Full Coveraged
11598 Full Coveraged
11599 Full Coveraged
11690 Full Coveraged
11691 Full Coveraged
11692 Full Coveraged
11693 Full Coveraged
11694 Full Coveraged
11695 Full Coveraged
11697 Full Coveraged
11701 Full Coveraged
11702 Mostly Coveraged
11703 Full Coveraged
11704 Full Coveraged
11705 Full Coveraged
11706 Full Coveraged
11707 Full Coveraged
11708 Full Coveraged
11709 Full Coveraged
11710 Full Coveraged
11713 Full Coveraged
11714 Full Coveraged
11715 Full Coveraged
11716 Full Coveraged
11717 Full Coveraged
11718 Full Coveraged
11719 Mostly Coveraged
11720 Full Coveraged
11721 Mostly Coveraged
11722 Full Coveraged
11724 Full Coveraged
11725 Full Coveraged
11726 Full Coveraged
11727 Full Coveraged
11729 Full Coveraged
11730 Full Coveraged
11731 Full Coveraged
11732 Full Coveraged
11733 Mostly Coveraged
11735 Full Coveraged
11736 Full Coveraged
11737 Full Coveraged
11738 Full Coveraged
11739 Full Coveraged
11740 Full Coveraged
11741 Full Coveraged
11742 Full Coveraged
11743 Full Coveraged
11745 Full Coveraged
11746 Full Coveraged
11747 Full Coveraged
11749 Full Coveraged
11750 Full Coveraged
11751 Full Coveraged
11752 Full Coveraged
11753 Full Coveraged
11754 Full Coveraged
11755 Full Coveraged
11756 Full Coveraged
11757 Full Coveraged
11758 Full Coveraged
11760 Full Coveraged
11762 Full Coveraged
11763 Full Coveraged
11764 Full Coveraged
11765 Full Coveraged
11766 Full Coveraged
11767 Full Coveraged
11768 Mostly Coveraged
11769 Full Coveraged
11770 Mostly Coveraged
11771 Full Coveraged
11772 Full Coveraged
11773 Full Coveraged
11774 Full Coveraged
11775 Full Coveraged
11776 Full Coveraged
11777 Mostly Coveraged
11778 Mostly Coveraged
11779 Full Coveraged
11780 Full Coveraged
11782 Full Coveraged
11783 Mostly Coveraged
11784 Full Coveraged
11786 Mostly Coveraged
11787 Full Coveraged
11788 Full Coveraged
11789 Mostly Coveraged
11790 Full Coveraged
11791 Full Coveraged
11792 Full Coveraged
11793 Full Coveraged
11794 Mostly Coveraged
11795 Full Coveraged
11796 Full Coveraged
11797 Full Coveraged
11798 Full Coveraged
11801 Full Coveraged
11802 Full Coveraged
11803 Full Coveraged
11804 Full Coveraged
11805 Full Coveraged
11815 Full Coveraged
11819 Full Coveraged
11854 Full Coveraged
11855 Full Coveraged
11901 Full Coveraged
11931 Full Coveraged
11932 Full Coveraged
11933 Full Coveraged
11934 Full Coveraged
11935 Mostly Coveraged
11937 Mostly Coveraged
11939 Mostly Coveraged
11940 Full Coveraged
11941 Full Coveraged
11942 Full Coveraged
11944 Mostly Coveraged
11946 Mostly Coveraged
11947 Full Coveraged
11948 Mostly Coveraged
11949 Full Coveraged
11950 Full Coveraged
11951 Full Coveraged
11952 Mostly Coveraged
11953 Full Coveraged
11955 Full Coveraged
11956 Mostly Coveraged
11958 Mostly Coveraged
11959 Mostly Coveraged
11960 Full Coveraged
11961 Full Coveraged
11962 Full Coveraged
11963 Full Coveraged
11964 Full Coveraged
11965 Full Coveraged
11967 Full Coveraged
11968 Full Coveraged
11969 Full Coveraged
11970 Full Coveraged
11971 Full Coveraged
11972 Full Coveraged
11973 Full Coveraged
11975 Full Coveraged
11976 Full Coveraged
11977 Full Coveraged
11978 Full Coveraged
11980 Full Coveraged
12007 Full Coveraged
12008 Full Coveraged
12009 Full Coveraged
12010 Mostly Coveraged
12015 Mostly Coveraged
12018 Mostly Coveraged
12019 Full Coveraged
12020 Full Coveraged
12023 Mostly Coveraged
12027 Full Coveraged
12031 Mostly Coveraged
12033 Full Coveraged
12041 Full Coveraged
12042 Full Coveraged
12045 Full Coveraged
12046 Full Coveraged
12047 Mostly Coveraged
12050 Mostly Coveraged
12051 Mostly Coveraged
12053 Mostly Coveraged
12054 Full Coveraged
12055 Full Coveraged
12056 Full Coveraged
12058 Mostly Coveraged
12059 Full Coveraged
12061 Full Coveraged
12063 Full Coveraged
12065 Full Coveraged
12067 Full Coveraged
12077 Full Coveraged
12084 Mostly Coveraged
12085 Full Coveraged
12086 Mostly Coveraged
12087 Full Coveraged
12106 Mostly Coveraged
12107 Full Coveraged
12110 Mostly Coveraged
12118 Full Coveraged
12121 Mostly Coveraged
12123 Mostly Coveraged
12124 Full Coveraged
12128 Full Coveraged
12130 Mostly Coveraged
12137 Full Coveraged
12140 Full Coveraged
12141 Mostly Coveraged
12143 Full Coveraged
12144 Full Coveraged
12147 Mostly Coveraged
12148 Full Coveraged
12150 Full Coveraged
12151 Full Coveraged
12156 Full Coveraged
12158 Full Coveraged
12159 Mostly Coveraged
12161 Full Coveraged
12166 Mostly Coveraged
12170 Mostly Coveraged
12173 Full Coveraged
12174 Mostly Coveraged
12176 Mostly Coveraged
12180 Full Coveraged
12181 Full Coveraged
12182 Mostly Coveraged
12183 Full Coveraged
12184 Mostly Coveraged
12186 Full Coveraged
12188 Mostly Coveraged
12189 Full Coveraged
12192 Full Coveraged
12193 Full Coveraged
12196 Full Coveraged
12198 Full Coveraged
12201 Mostly Coveraged
12202 Full Coveraged
12203 Full Coveraged
12204 Full Coveraged
12205 Full Coveraged
12206 Full Coveraged
12207 Full Coveraged
12208 Full Coveraged
12209 Full Coveraged
12210 Full Coveraged
12211 Full Coveraged
12212 Mostly Coveraged
12220 Full Coveraged
12222 Full Coveraged
12223 Full Coveraged
12224 Full Coveraged
12225 Full Coveraged
12226 Full Coveraged
12227 Full Coveraged
12228 Full Coveraged
12229 Full Coveraged
12230 Full Coveraged
12231 Full Coveraged
12232 Full Coveraged
12233 Full Coveraged
12234 Full Coveraged
12235 Full Coveraged
12236 Full Coveraged
12237 Full Coveraged
12238 Full Coveraged
12239 Full Coveraged
12240 Full Coveraged
12241 Full Coveraged
12242 Full Coveraged
12243 Full Coveraged
12244 Full Coveraged
12245 Full Coveraged
12246 Full Coveraged
12247 Full Coveraged
12248 Full Coveraged
12249 Full Coveraged
12250 Full Coveraged
12252 Full Coveraged
12255 Full Coveraged
12256 Full Coveraged
12257 Full Coveraged
12260 Full Coveraged
12261 Full Coveraged
12288 Mostly Coveraged
12301 Full Coveraged
12302 Full Coveraged
12303 Mostly Coveraged
12304 Full Coveraged
12305 Full Coveraged
12306 Full Coveraged
12307 Full Coveraged
12308 Full Coveraged
12309 Full Coveraged
12325 Full Coveraged
12345 Full Coveraged
12411 Mostly Coveraged
12419 Mostly Coveraged
12429 Full Coveraged
12440 Mostly Coveraged
12466 Mostly Coveraged
12471 Mostly Coveraged
12472 Mostly Coveraged
12486 Mostly Coveraged
12487 Mostly Coveraged
12493 Full Coveraged
12508 Full Coveraged
12511 Full Coveraged
12512 Full Coveraged
12515 Full Coveraged
12518 Full Coveraged
12520 Full Coveraged
12524 Full Coveraged
12527 Full Coveraged
12528 Full Coveraged
12531 Full Coveraged
12533 Mostly Coveraged
12537 Full Coveraged
12538 Mostly Coveraged
12540 Mostly Coveraged
12542 Full Coveraged
12547 Full Coveraged
12548 Mostly Coveraged
12550 Full Coveraged
12551 Full Coveraged
12552 Full Coveraged
12553 Mostly Coveraged
12555 Mostly Coveraged
12561 Full Coveraged
12563 Full Coveraged
12564 Full Coveraged
12568 Mostly Coveraged
12570 Full Coveraged
12577 Mostly Coveraged
12580 Mostly Coveraged
12582 Full Coveraged
12584 Full Coveraged
12590 Mostly Coveraged
12594 Mostly Coveraged
12601 Full Coveraged
12602 Full Coveraged
12603 Mostly Coveraged
12604 Full Coveraged
12721 Mostly Coveraged
12722 Mostly Coveraged
12785 Mostly Coveraged
12790 Mostly Coveraged
12801 Full Coveraged
12803 Full Coveraged
12804 Full Coveraged
12820 Mostly Coveraged
12828 Mostly Coveraged
12831 Full Coveraged
12833 Mostly Coveraged
12839 Mostly Coveraged
12845 Mostly Coveraged
12846 Mostly Coveraged
12863 Mostly Coveraged
12866 Full Coveraged
12901 Mostly Coveraged
12910 Full Coveraged
12918 Full Coveraged
12929 Full Coveraged
12962 Full Coveraged
12992 Full Coveraged
13020 Mostly Coveraged
13021 Full Coveraged
13022 Full Coveraged
13024 Full Coveraged
13027 Full Coveraged
13029 Full Coveraged
13031 Full Coveraged
13032 Full Coveraged
13033 Mostly Coveraged
13034 Mostly Coveraged
13039 Mostly Coveraged
13041 Full Coveraged
13043 Full Coveraged
13045 Full Coveraged
13051 Mostly Coveraged
13054 Mostly Coveraged
13056 Full Coveraged
13057 Full Coveraged
13060 Full Coveraged
13062 Mostly Coveraged
13063 Full Coveraged
13066 Full Coveraged
13068 Mostly Coveraged
13069 Full Coveraged
13074 Full Coveraged
13077 Full Coveraged
13078 Full Coveraged
13080 Full Coveraged
13084 Full Coveraged
13087 Full Coveraged
13088 Full Coveraged
13089 Full Coveraged
13090 Full Coveraged
13093 Mostly Coveraged
13101 Mostly Coveraged
13102 Mostly Coveraged
13104 Full Coveraged
13108 Mostly Coveraged
13112 Full Coveraged
13113 Mostly Coveraged
13115 Full Coveraged
13116 Mostly Coveraged
13117 Mostly Coveraged
13119 Full Coveraged
13120 Full Coveraged
13121 Mostly Coveraged
13126 Full Coveraged
13132 Mostly Coveraged
13134 Full Coveraged
13135 Full Coveraged
13137 Full Coveraged
13138 Full Coveraged
13140 Mostly Coveraged
13141 Full Coveraged
13152 Mostly Coveraged
13153 Full Coveraged
13159 Mostly Coveraged
13160 Mostly Coveraged
13162 Mostly Coveraged
13163 Full Coveraged
13164 Full Coveraged
13166 Full Coveraged
13201 Full Coveraged
13202 Full Coveraged
13203 Full Coveraged
13204 Full Coveraged
13205 Full Coveraged
13206 Full Coveraged
13207 Full Coveraged
13208 Full Coveraged
13209 Full Coveraged
13210 Full Coveraged
13211 Full Coveraged
13212 Full Coveraged
13214 Full Coveraged
13215 Full Coveraged
13217 Full Coveraged
13218 Full Coveraged
13219 Full Coveraged
13220 Full Coveraged
13221 Full Coveraged
13224 Full Coveraged
13225 Full Coveraged
13235 Full Coveraged
13244 Full Coveraged
13250 Full Coveraged
13251 Full Coveraged
13252 Full Coveraged
13261 Full Coveraged
13290 Full Coveraged
13303 Full Coveraged
13304 Full Coveraged
13309 Mostly Coveraged
13310 Mostly Coveraged
13317 Full Coveraged
13319 Mostly Coveraged
13320 Mostly Coveraged
13322 Mostly Coveraged
13339 Full Coveraged
13340 Full Coveraged
13350 Full Coveraged
13354 Mostly Coveraged
13357 Mostly Coveraged
13361 Mostly Coveraged
13362 Mostly Coveraged
13363 Full Coveraged
13365 Mostly Coveraged
13403 Full Coveraged
13406 Mostly Coveraged
13407 Full Coveraged
13408 Full Coveraged
13409 Full Coveraged
13410 Full Coveraged
13413 Mostly Coveraged
13417 Mostly Coveraged
13421 Full Coveraged
13428 Full Coveraged
13431 Mostly Coveraged
13435 Mostly Coveraged
13439 Mostly Coveraged
13440 Mostly Coveraged
13441 Full Coveraged
13442 Full Coveraged
13452 Mostly Coveraged
13456 Mostly Coveraged
13459 Full Coveraged
13461 Full Coveraged
13468 Mostly Coveraged
13469 Mostly Coveraged
13475 Mostly Coveraged
13476 Mostly Coveraged
13477 Mostly Coveraged
Zip Code Coverage Level Zip Code Coverage Level Zip Code Coverage Level Zip Code Coverage Level Zip Code Coverage Level Zip Code Coverage Level
Page 57

- 157 -
13478 Mostly Coveraged
13479 Mostly Coveraged
13484 Mostly Coveraged
13486 Full Coveraged
13489 Mostly Coveraged
13492 Mostly Coveraged
13495 Full Coveraged
13501 Full Coveraged
13502 Full Coveraged
13503 Full Coveraged
13504 Full Coveraged
13505 Full Coveraged
13599 Full Coveraged
13601 Full Coveraged
13603 Mostly Coveraged
13606 Mostly Coveraged
13612 Mostly Coveraged
13615 Full Coveraged
13616 Full Coveraged
13634 Mostly Coveraged
13637 Full Coveraged
13638 Mostly Coveraged
13656 Mostly Coveraged
13657 Mostly Coveraged
13682 Mostly Coveraged
13732 Full Coveraged
13737 Full Coveraged
13738 Mostly Coveraged
13745 Mostly Coveraged
13748 Mostly Coveraged
13749 Mostly Coveraged
13760 Mostly Coveraged
13761 Full Coveraged
13762 Full Coveraged
13763 Full Coveraged
13790 Mostly Coveraged
13795 Mostly Coveraged
13812 Mostly Coveraged
13827 Full Coveraged
13845 Mostly Coveraged
13850 Full Coveraged
13851 Full Coveraged
13864 Mostly Coveraged
13901 Mostly Coveraged
13902 Full Coveraged
13903 Full Coveraged
13904 Mostly Coveraged
13905 Mostly Coveraged
14001 Full Coveraged
14004 Full Coveraged
14005 Full Coveraged
14010 Full Coveraged
14011 Mostly Coveraged
14013 Mostly Coveraged
14020 Full Coveraged
14021 Full Coveraged
14025 Full Coveraged
14026 Full Coveraged
14028 Mostly Coveraged
14031 Full Coveraged
14032 Mostly Coveraged
14033 Full Coveraged
14036 Full Coveraged
14037 Full Coveraged
14038 Full Coveraged
14039 Mostly Coveraged
14040 Mostly Coveraged
14043 Full Coveraged
14048 Mostly Coveraged
14051 Full Coveraged
14052 Full Coveraged
14054 Full Coveraged
14056 Mostly Coveraged
14057 Mostly Coveraged
14058 Full Coveraged
14059 Mostly Coveraged
14063 Full Coveraged
14068 Full Coveraged
14069 Mostly Coveraged
14072 Full Coveraged
14075 Full Coveraged
14080 Mostly Coveraged
14082 Mostly Coveraged
14083 Full Coveraged
14085 Mostly Coveraged
14086 Mostly Coveraged
14092 Mostly Coveraged
14094 Full Coveraged
14095 Full Coveraged
14102 Full Coveraged
14107 Mostly Coveraged
14108 Full Coveraged
14109 Full Coveraged
14110 Full Coveraged
14111 Mostly Coveraged
14113 Mostly Coveraged
14120 Full Coveraged
14125 Mostly Coveraged
14127 Full Coveraged
14131 Mostly Coveraged
14132 Full Coveraged
14139 Full Coveraged
14140 Mostly Coveraged
14141 Mostly Coveraged
14143 Full Coveraged
14144 Mostly Coveraged
14145 Full Coveraged
14150 Full Coveraged
14151 Full Coveraged
14166 Full Coveraged
14167 Mostly Coveraged
14169 Full Coveraged
14170 Full Coveraged
14172 Mostly Coveraged
14201 Full Coveraged
14202 Full Coveraged
14203 Full Coveraged
14204 Full Coveraged
14205 Full Coveraged
14206 Full Coveraged
14207 Full Coveraged
14208 Full Coveraged
14209 Full Coveraged
14210 Full Coveraged
14211 Full Coveraged
14212 Full Coveraged
14213 Full Coveraged
14214 Full Coveraged
14215 Full Coveraged
14216 Full Coveraged
14217 Full Coveraged
14218 Full Coveraged
14219 Full Coveraged
14220 Full Coveraged
14221 Full Coveraged
14222 Full Coveraged
14223 Full Coveraged
14224 Full Coveraged
14225 Full Coveraged
14226 Full Coveraged
14227 Full Coveraged
14228 Full Coveraged
14231 Full Coveraged
14233 Full Coveraged
14240 Full Coveraged
14241 Full Coveraged
14260 Full Coveraged
14261 Full Coveraged
14263 Full Coveraged
14264 Full Coveraged
14265 Full Coveraged
14267 Full Coveraged
14269 Full Coveraged
14270 Full Coveraged
14272 Full Coveraged
14273 Full Coveraged
14276 Full Coveraged
14280 Full Coveraged
14301 Full Coveraged
14302 Full Coveraged
14303 Full Coveraged
14304 Full Coveraged
14305 Full Coveraged
14410 Full Coveraged
14413 Mostly Coveraged
14414 Mostly Coveraged
14416 Mostly Coveraged
14420 Full Coveraged
14422 Mostly Coveraged
14424 Full Coveraged
14425 Full Coveraged
14428 Mostly Coveraged
14429 Mostly Coveraged
14430 Full Coveraged
14432 Full Coveraged
14435 Full Coveraged
14437 Mostly Coveraged
14443 Mostly Coveraged
14445 Full Coveraged
14449 Mostly Coveraged
14450 Full Coveraged
14452 Mostly Coveraged
14453 Full Coveraged
14454 Full Coveraged
14461 Full Coveraged
14462 Full Coveraged
14463 Mostly Coveraged
14464 Full Coveraged
14466 Mostly Coveraged
14467 Full Coveraged
14468 Mostly Coveraged
14469 Mostly Coveraged
14470 Full Coveraged
14472 Full Coveraged
14475 Mostly Coveraged
14476 Mostly Coveraged
14480 Mostly Coveraged
14485 Mostly Coveraged
14487 Mostly Coveraged
14488 Mostly Coveraged
14489 Full Coveraged
14502 Full Coveraged
14504 Full Coveraged
14505 Mostly Coveraged
14506 Full Coveraged
14508 Mostly Coveraged
14510 Mostly Coveraged
14513 Full Coveraged
14514 Full Coveraged
14515 Full Coveraged
14518 Mostly Coveraged
14519 Full Coveraged
14520 Full Coveraged
14522 Full Coveraged
14526 Full Coveraged
14529 Full Coveraged
14532 Mostly Coveraged
14534 Full Coveraged
14537 Full Coveraged
14538 Mostly Coveraged
14542 Full Coveraged
14543 Full Coveraged
14544 Full Coveraged
14545 Full Coveraged
14546 Mostly Coveraged
14547 Full Coveraged
14548 Mostly Coveraged
14551 Mostly Coveraged
14556 Full Coveraged
14557 Full Coveraged
14558 Mostly Coveraged
14559 Full Coveraged
14560 Mostly Coveraged
14561 Full Coveraged
14563 Full Coveraged
14564 Full Coveraged
14568 Full Coveraged
14572 Full Coveraged
14580 Full Coveraged
14585 Mostly Coveraged
14586 Full Coveraged
14591 Mostly Coveraged
14602 Full Coveraged
14603 Full Coveraged
14604 Full Coveraged
14605 Full Coveraged
14606 Full Coveraged
14607 Full Coveraged
14608 Full Coveraged
14609 Full Coveraged
14610 Full Coveraged
14611 Full Coveraged
14612 Full Coveraged
14613 Full Coveraged
14614 Full Coveraged
14615 Full Coveraged
14616 Full Coveraged
14617 Full Coveraged
14618 Full Coveraged
14619 Full Coveraged
14620 Full Coveraged
14621 Full Coveraged
14622 Full Coveraged
14623 Full Coveraged
14624 Full Coveraged
14625 Full Coveraged
14626 Full Coveraged
14627 Full Coveraged
14638 Full Coveraged
14639 Full Coveraged
14642 Full Coveraged
14643 Full Coveraged
14644 Full Coveraged
14645 Full Coveraged
14646 Full Coveraged
14647 Full Coveraged
14649 Full Coveraged
14650 Full Coveraged
14651 Full Coveraged
14652 Full Coveraged
14653 Full Coveraged
14664 Full Coveraged
14673 Full Coveraged
14683 Full Coveraged
14692 Full Coveraged
14694 Full Coveraged
14701 Full Coveraged
14702 Full Coveraged
14703 Full Coveraged
14704 Full Coveraged
14712 Mostly Coveraged
14716 Full Coveraged
14718 Full Coveraged
14720 Full Coveraged
14722 Mostly Coveraged
14728 Full Coveraged
14732 Mostly Coveraged
14733 Full Coveraged
14738 Mostly Coveraged
14740 Full Coveraged
14742 Full Coveraged
14747 Mostly Coveraged
14750 Full Coveraged
14752 Full Coveraged
14756 Mostly Coveraged
14757 Mostly Coveraged
14769 Full Coveraged
14782 Mostly Coveraged
14784 Full Coveraged
14807 Full Coveraged
14808 Mostly Coveraged
14816 Mostly Coveraged
14817 Mostly Coveraged
14825 Mostly Coveraged
14826 Mostly Coveraged
14843 Mostly Coveraged
14844 Mostly Coveraged
14850 Full Coveraged
14851 Full Coveraged
14852 Full Coveraged
14853 Full Coveraged
14854 Mostly Coveraged
14861 Mostly Coveraged
14867 Mostly Coveraged
14871 Mostly Coveraged
14881 Mostly Coveraged
14882 Mostly Coveraged
14883 Mostly Coveraged
14894 Full Coveraged
14901 Full Coveraged
14902 Full Coveraged
14903 Mostly Coveraged
14904 Full Coveraged
14905 Full Coveraged
14925 Full Coveraged
15001 Full Coveraged
15003 Full Coveraged
15005 Full Coveraged
15006 Full Coveraged
15007 Full Coveraged
15009 Full Coveraged
15010 Mostly Coveraged
15012 Full Coveraged
15014 Full Coveraged
15015 Full Coveraged
15017 Full Coveraged
15018 Full Coveraged
15019 Full Coveraged
15020 Full Coveraged
15021 Mostly Coveraged
15022 Full Coveraged
15024 Full Coveraged
15025 Full Coveraged
15026 Full Coveraged
15027 Full Coveraged
15028 Full Coveraged
15030 Full Coveraged
15031 Full Coveraged
15032 Full Coveraged
15033 Full Coveraged
15034 Full Coveraged
15035 Full Coveraged
15036 Full Coveraged
15037 Full Coveraged
15038 Full Coveraged
15042 Full Coveraged
15044 Full Coveraged
15045 Full Coveraged
15046 Full Coveraged
15047 Full Coveraged
15049 Full Coveraged
15050 Mostly Coveraged
15051 Full Coveraged
15052 Mostly Coveraged
15053 Mostly Coveraged
15054 Mostly Coveraged
15055 Full Coveraged
15056 Full Coveraged
15057 Full Coveraged
15060 Full Coveraged
15061 Full Coveraged
15062 Full Coveraged
15063 Mostly Coveraged
15064 Full Coveraged
15065 Mostly Coveraged
15066 Full Coveraged
15067 Full Coveraged
15068 Full Coveraged
15069 Full Coveraged
15071 Full Coveraged
15072 Full Coveraged
15074 Full Coveraged
15075 Full Coveraged
15076 Full Coveraged
15077 Mostly Coveraged
15081 Full Coveraged
15082 Full Coveraged
15083 Full Coveraged
15084 Full Coveraged
15085 Full Coveraged
15086 Full Coveraged
15087 Full Coveraged
15088 Full Coveraged
15089 Full Coveraged
15090 Full Coveraged
15091 Full Coveraged
15095 Full Coveraged
15096 Full Coveraged
15101 Full Coveraged
15102 Full Coveraged
15104 Full Coveraged
15106 Full Coveraged
15108 Full Coveraged
15110 Full Coveraged
15112 Full Coveraged
15116 Full Coveraged
15120 Full Coveraged
15122 Full Coveraged
15123 Full Coveraged
15126 Full Coveraged
15127 Full Coveraged
15129 Full Coveraged
15130 Full Coveraged
15131 Full Coveraged
15132 Full Coveraged
15133 Full Coveraged
15134 Full Coveraged
15135 Full Coveraged
15136 Full Coveraged
15137 Full Coveraged
15139 Full Coveraged
15140 Full Coveraged
15142 Full Coveraged
15143 Full Coveraged
15144 Full Coveraged
15145 Full Coveraged
15146 Full Coveraged
15147 Full Coveraged
15148 Full Coveraged
15201 Full Coveraged
15202 Full Coveraged
15203 Full Coveraged
15204 Full Coveraged
15205 Full Coveraged
15206 Full Coveraged
15207 Full Coveraged
15208 Full Coveraged
15209 Full Coveraged
15210 Full Coveraged
15211 Full Coveraged
15212 Full Coveraged
15213 Full Coveraged
15214 Full Coveraged
15215 Full Coveraged
15216 Full Coveraged
15217 Full Coveraged
15218 Full Coveraged
15219 Full Coveraged
15220 Full Coveraged
15221 Full Coveraged
15222 Full Coveraged
15223 Full Coveraged
15224 Full Coveraged
15225 Full Coveraged
15226 Full Coveraged
15227 Full Coveraged
15228 Full Coveraged
15229 Full Coveraged
15230 Full Coveraged
15231 Full Coveraged
15232 Full Coveraged
15233 Full Coveraged
15234 Full Coveraged
15235 Full Coveraged
15236 Full Coveraged
15237 Full Coveraged
15238 Full Coveraged
15239 Full Coveraged
15240 Full Coveraged
15241 Full Coveraged
15242 Full Coveraged
15243 Full Coveraged
15244 Full Coveraged
15250 Full Coveraged
15251 Full Coveraged
15252 Full Coveraged
15253 Full Coveraged
15254 Full Coveraged
15255 Full Coveraged
15257 Full Coveraged
15258 Full Coveraged
15259 Full Coveraged
15260 Full Coveraged
15261 Full Coveraged
15262 Full Coveraged
15263 Full Coveraged
15264 Full Coveraged
15265 Full Coveraged
15267 Full Coveraged
15268 Full Coveraged
15270 Full Coveraged
15272 Full Coveraged
15274 Full Coveraged
15275 Full Coveraged
Zip Code Coverage Level Zip Code Coverage Level Zip Code Coverage Level Zip Code Coverage Level Zip Code Coverage Level Zip Code Coverage Level
Page 58

- 158 -
15276 Full Coveraged
15277 Full Coveraged
15278 Full Coveraged
15279 Full Coveraged
15281 Full Coveraged
15282 Full Coveraged
15283 Full Coveraged
15285 Full Coveraged
15286 Full Coveraged
15289 Full Coveraged
15290 Full Coveraged
15295 Full Coveraged
15301 Full Coveraged
15311 Mostly Coveraged
15312 Mostly Coveraged
15314 Mostly Coveraged
15317 Full Coveraged
15321 Full Coveraged
15323 Full Coveraged
15324 Mostly Coveraged
15329 Mostly Coveraged
15330 Full Coveraged
15331 Mostly Coveraged
15332 Full Coveraged
15336 Full Coveraged
15337 Mostly Coveraged
15339 Full Coveraged
15340 Mostly Coveraged
15342 Full Coveraged
15347 Full Coveraged
15350 Full Coveraged
15353 Mostly Coveraged
15360 Mostly Coveraged
15361 Full Coveraged
15363 Full Coveraged
15365 Full Coveraged
15366 Full Coveraged
15367 Full Coveraged
15376 Full Coveraged
15377 Mostly Coveraged
15378 Full Coveraged
15379 Mostly Coveraged
15412 Full Coveraged
15413 Mostly Coveraged
15415 Mostly Coveraged
15417 Mostly Coveraged
15419 Mostly Coveraged
15422 Mostly Coveraged
15423 Mostly Coveraged
15427 Mostly Coveraged
15428 Mostly Coveraged
15432 Full Coveraged
15434 Full Coveraged
15438 Full Coveraged
15442 Mostly Coveraged
15444 Mostly Coveraged
15448 Full Coveraged
15466 Full Coveraged
15473 Full Coveraged
15477 Full Coveraged
15479 Full Coveraged
15480 Mostly Coveraged
15482 Full Coveraged
15483 Full Coveraged
15486 Mostly Coveraged
15492 Full Coveraged
15501 Full Coveraged
15502 Full Coveraged
15510 Full Coveraged
15520 Full Coveraged
15530 Mostly Coveraged
15541 Full Coveraged
15542 Mostly Coveraged
15544 Mostly Coveraged
15546 Mostly Coveraged
15547 Mostly Coveraged
15548 Mostly Coveraged
15549 Full Coveraged
15555 Full Coveraged
15560 Mostly Coveraged
15561 Full Coveraged
15563 Mostly Coveraged
15601 Full Coveraged
15605 Full Coveraged
15606 Full Coveraged
15611 Full Coveraged
15612 Mostly Coveraged
15615 Full Coveraged
15616 Full Coveraged
15617 Full Coveraged
15619 Full Coveraged
15621 Mostly Coveraged
15623 Full Coveraged
15624 Full Coveraged
15625 Full Coveraged
15626 Full Coveraged
15632 Mostly Coveraged
15633 Full Coveraged
15634 Full Coveraged
15635 Full Coveraged
15636 Full Coveraged
15637 Mostly Coveraged
15639 Full Coveraged
15640 Mostly Coveraged
15642 Mostly Coveraged
15644 Full Coveraged
15647 Full Coveraged
15650 Mostly Coveraged
15660 Mostly Coveraged
15662 Full Coveraged
15663 Full Coveraged
15664 Mostly Coveraged
15665 Full Coveraged
15666 Mostly Coveraged
15668 Full Coveraged
15672 Full Coveraged
15674 Mostly Coveraged
15675 Full Coveraged
15676 Mostly Coveraged
15678 Mostly Coveraged
15679 Mostly Coveraged
15684 Mostly Coveraged
15685 Mostly Coveraged
15688 Mostly Coveraged
15689 Mostly Coveraged
15691 Full Coveraged
15692 Full Coveraged
15695 Full Coveraged
15697 Full Coveraged
15698 Mostly Coveraged
15701 Full Coveraged
15705 Full Coveraged
15713 Full Coveraged
15716 Mostly Coveraged
15717 Mostly Coveraged
15720 Mostly Coveraged
15723 Full Coveraged
15725 Mostly Coveraged
15727 Full Coveraged
15731 Full Coveraged
15732 Full Coveraged
15736 Mostly Coveraged
15747 Mostly Coveraged
15748 Mostly Coveraged
15752 Full Coveraged
15754 Full Coveraged
15756 Full Coveraged
15774 Mostly Coveraged
15783 Mostly Coveraged
15901 Full Coveraged
15902 Full Coveraged
15904 Full Coveraged
15905 Full Coveraged
15906 Full Coveraged
15907 Full Coveraged
15909 Full Coveraged
15920 Mostly Coveraged
15922 Mostly Coveraged
15928 Full Coveraged
15929 Full Coveraged
15930 Mostly Coveraged
15934 Full Coveraged
15935 Mostly Coveraged
15936 Mostly Coveraged
15937 Mostly Coveraged
15942 Full Coveraged
15943 Mostly Coveraged
15944 Full Coveraged
15945 Full Coveraged
15949 Mostly Coveraged
15951 Mostly Coveraged
15952 Mostly Coveraged
15953 Full Coveraged
15954 Full Coveraged
15956 Full Coveraged
15958 Mostly Coveraged
15959 Full Coveraged
15960 Mostly Coveraged
15961 Mostly Coveraged
15963 Mostly Coveraged
16001 Full Coveraged
16002 Full Coveraged
16003 Full Coveraged
16023 Mostly Coveraged
16024 Full Coveraged
16025 Mostly Coveraged
16027 Full Coveraged
16029 Full Coveraged
16033 Full Coveraged
16034 Mostly Coveraged
16037 Mostly Coveraged
16039 Full Coveraged
16045 Full Coveraged
16046 Full Coveraged
16051 Mostly Coveraged
16053 Mostly Coveraged
16056 Mostly Coveraged
16059 Mostly Coveraged
16061 Mostly Coveraged
16063 Full Coveraged
16066 Full Coveraged
16101 Full Coveraged
16102 Full Coveraged
16103 Full Coveraged
16105 Full Coveraged
16107 Full Coveraged
16108 Full Coveraged
16112 Full Coveraged
16116 Full Coveraged
16117 Mostly Coveraged
16120 Mostly Coveraged
16123 Mostly Coveraged
16132 Full Coveraged
16136 Full Coveraged
16140 Full Coveraged
16141 Mostly Coveraged
16142 Mostly Coveraged
16143 Mostly Coveraged
16155 Full Coveraged
16156 Mostly Coveraged
16157 Full Coveraged
16160 Full Coveraged
16172 Mostly Coveraged
16211 Mostly Coveraged
16246 Mostly Coveraged
16249 Mostly Coveraged
16250 Mostly Coveraged
16403 Full Coveraged
16412 Full Coveraged
16415 Mostly Coveraged
16421 Mostly Coveraged
16426 Full Coveraged
16427 Full Coveraged
16433 Mostly Coveraged
16440 Full Coveraged
16441 Full Coveraged
16444 Full Coveraged
16501 Full Coveraged
16502 Full Coveraged
16503 Full Coveraged
16504 Full Coveraged
16505 Full Coveraged
16506 Full Coveraged
16507 Full Coveraged
16508 Full Coveraged
16509 Full Coveraged
16510 Full Coveraged
16511 Full Coveraged
16512 Full Coveraged
16514 Full Coveraged
16515 Full Coveraged
16522 Full Coveraged
16530 Full Coveraged
16531 Full Coveraged
16532 Full Coveraged
16533 Full Coveraged
16534 Full Coveraged
16538 Full Coveraged
16541 Full Coveraged
16544 Full Coveraged
16546 Full Coveraged
16550 Full Coveraged
16553 Full Coveraged
16554 Full Coveraged
16563 Full Coveraged
16565 Full Coveraged
16601 Full Coveraged
16602 Full Coveraged
16603 Full Coveraged
16613 Full Coveraged
16617 Full Coveraged
16619 Mostly Coveraged
16624 Mostly Coveraged
16629 Full Coveraged
16630 Mostly Coveraged
16635 Mostly Coveraged
16636 Full Coveraged
16639 Mostly Coveraged
16641 Mostly Coveraged
16644 Mostly Coveraged
16648 Mostly Coveraged
16652 Mostly Coveraged
16665 Mostly Coveraged
16669 Mostly Coveraged
16684 Mostly Coveraged
16699 Mostly Coveraged
16801 Full Coveraged
16802 Full Coveraged
16803 Full Coveraged
16804 Full Coveraged
16805 Full Coveraged
16827 Mostly Coveraged
16851 Full Coveraged
16865 Full Coveraged
16868 Full Coveraged
16870 Mostly Coveraged
16914 Mostly Coveraged
16925 Full Coveraged
17001 Full Coveraged
17008 Mostly Coveraged
17011 Full Coveraged
17012 Mostly Coveraged
17013 Full Coveraged
17016 Mostly Coveraged
17018 Full Coveraged
17019 Mostly Coveraged
17024 Mostly Coveraged
17025 Mostly Coveraged
17027 Mostly Coveraged
17028 Mostly Coveraged
17032 Mostly Coveraged
17034 Full Coveraged
17036 Mostly Coveraged
17039 Mostly Coveraged
17040 Full Coveraged
17041 Mostly Coveraged
17042 Full Coveraged
17043 Full Coveraged
17046 Mostly Coveraged
17050 Mostly Coveraged
17053 Mostly Coveraged
17055 Mostly Coveraged
17057 Mostly Coveraged
17064 Mostly Coveraged
17065 Mostly Coveraged
17067 Mostly Coveraged
17068 Mostly Coveraged
17070 Full Coveraged
17073 Mostly Coveraged
17077 Mostly Coveraged
17081 Full Coveraged
17083 Mostly Coveraged
17085 Mostly Coveraged
17088 Full Coveraged
17089 Full Coveraged
17090 Full Coveraged
17091 Full Coveraged
17093 Full Coveraged
17101 Full Coveraged
17102 Full Coveraged
17103 Full Coveraged
17104 Full Coveraged
17105 Full Coveraged
17106 Full Coveraged
17107 Full Coveraged
17108 Full Coveraged
17109 Full Coveraged
17110 Full Coveraged
17111 Full Coveraged
17112 Full Coveraged
17113 Full Coveraged
17120 Full Coveraged
17121 Full Coveraged
17122 Full Coveraged
17123 Full Coveraged
17124 Full Coveraged
17125 Full Coveraged
17126 Full Coveraged
17127 Full Coveraged
17128 Full Coveraged
17129 Full Coveraged
17130 Full Coveraged
17140 Full Coveraged
17177 Full Coveraged
17225 Mostly Coveraged
17241 Mostly Coveraged
17256 Mostly Coveraged
17263 Full Coveraged
17272 Mostly Coveraged
17313 Full Coveraged
17315 Full Coveraged
17316 Mostly Coveraged
17317 Mostly Coveraged
17318 Full Coveraged
17319 Full Coveraged
17323 Mostly Coveraged
17339 Full Coveraged
17342 Mostly Coveraged
17345 Full Coveraged
17347 Full Coveraged
17356 Mostly Coveraged
17358 Full Coveraged
17360 Mostly Coveraged
17364 Mostly Coveraged
17365 Full Coveraged
17366 Mostly Coveraged
17368 Mostly Coveraged
17370 Full Coveraged
17371 Full Coveraged
17401 Full Coveraged
17402 Full Coveraged
17403 Full Coveraged
17404 Full Coveraged
17405 Full Coveraged
17406 Full Coveraged
17407 Full Coveraged
17415 Full Coveraged
17501 Mostly Coveraged
17502 Mostly Coveraged
17504 Full Coveraged
17505 Full Coveraged
17508 Mostly Coveraged
17512 Mostly Coveraged
17516 Full Coveraged
17520 Full Coveraged
17521 Full Coveraged
17527 Mostly Coveraged
17532 Mostly Coveraged
17533 Full Coveraged
17537 Full Coveraged
17538 Mostly Coveraged
17540 Mostly Coveraged
17543 Full Coveraged
17545 Full Coveraged
17547 Mostly Coveraged
17550 Mostly Coveraged
17551 Full Coveraged
17554 Full Coveraged
17560 Mostly Coveraged
17564 Full Coveraged
17565 Mostly Coveraged
17568 Full Coveraged
17572 Mostly Coveraged
17573 Mostly Coveraged
17575 Mostly Coveraged
17576 Full Coveraged
17579 Mostly Coveraged
17580 Full Coveraged
17582 Mostly Coveraged
17583 Full Coveraged
17584 Full Coveraged
17585 Full Coveraged
17601 Full Coveraged
17602 Full Coveraged
17603 Full Coveraged
17604 Full Coveraged
17605 Full Coveraged
17606 Full Coveraged
17607 Full Coveraged
17608 Full Coveraged
18001 Full Coveraged
18002 Mostly Coveraged
18015 Full Coveraged
18016 Full Coveraged
18017 Mostly Coveraged
18018 Full Coveraged
18020 Mostly Coveraged
18025 Full Coveraged
18032 Full Coveraged
18034 Full Coveraged
18036 Full Coveraged
18037 Mostly Coveraged
18041 Mostly Coveraged
18046 Mostly Coveraged
18049 Full Coveraged
18052 Mostly Coveraged
18054 Full Coveraged
18055 Mostly Coveraged
18056 Mostly Coveraged
18060 Full Coveraged
18062 Mostly Coveraged
18065 Mostly Coveraged
18067 Mostly Coveraged
18068 Full Coveraged
18070 Mostly Coveraged
18073 Mostly Coveraged
18074 Mostly Coveraged
18076 Mostly Coveraged
18077 Mostly Coveraged
18081 Mostly Coveraged
18084 Mostly Coveraged
18087 Mostly Coveraged
18092 Full Coveraged
18098 Full Coveraged
18099 Full Coveraged
18101 Full Coveraged
18102 Full Coveraged
18103 Full Coveraged
18104 Mostly Coveraged
18105 Full Coveraged
18106 Mostly Coveraged
18109 Full Coveraged
18175 Mostly Coveraged
18195 Mostly Coveraged
18221 Mostly Coveraged
18222 Mostly Coveraged
18224 Mostly Coveraged
18410 Full Coveraged
18411 Full Coveraged
18414 Full Coveraged
18416 Mostly Coveraged
18419 Mostly Coveraged
18420 Mostly Coveraged
18434 Mostly Coveraged
18440 Mostly Coveraged
18447 Mostly Coveraged
18448 Mostly Coveraged
18452 Mostly Coveraged
18471 Full Coveraged
18501 Full Coveraged
18502 Full Coveraged
18503 Full Coveraged
18504 Full Coveraged
18505 Full Coveraged
Zip Code Coverage Level Zip Code Coverage Level Zip Code Coverage Level Zip Code Coverage Level Zip Code Coverage Level Zip Code Coverage Level
Page 59

- 159 -
18507 Full Coveraged
18508 Full Coveraged
18509 Full Coveraged
18510 Full Coveraged
18512 Mostly Coveraged
18514 Full Coveraged
18515 Full Coveraged
18517 Full Coveraged
18518 Full Coveraged
18519 Full Coveraged
18522 Full Coveraged
18577 Full Coveraged
18602 Full Coveraged
18615 Mostly Coveraged
18625 Mostly Coveraged
18634 Mostly Coveraged
18640 Mostly Coveraged
18641 Full Coveraged
18642 Full Coveraged
18643 Mostly Coveraged
18644 Mostly Coveraged
18651 Mostly Coveraged
18653 Full Coveraged
18661 Mostly Coveraged
18701 Full Coveraged
18702 Full Coveraged
18703 Full Coveraged
18704 Full Coveraged
18705 Full Coveraged
18706 Full Coveraged
18707 Full Coveraged
18708 Mostly Coveraged
18709 Mostly Coveraged
18710 Full Coveraged
18711 Full Coveraged
18761 Full Coveraged
18762 Full Coveraged
18763 Full Coveraged
18764 Full Coveraged
18765 Full Coveraged
18766 Full Coveraged
18767 Full Coveraged
18769 Full Coveraged
18773 Full Coveraged
18774 Full Coveraged
18812 Full Coveraged
18818 Mostly Coveraged
18822 Mostly Coveraged
18829 Mostly Coveraged
18830 Mostly Coveraged
18837 Mostly Coveraged
18851 Full Coveraged
18901 Full Coveraged
18910 Mostly Coveraged
18911 Full Coveraged
18912 Full Coveraged
18913 Full Coveraged
18914 Full Coveraged
18915 Mostly Coveraged
18916 Full Coveraged
18917 Full Coveraged
18918 Full Coveraged
18922 Full Coveraged
18923 Full Coveraged
18924 Full Coveraged
18925 Full Coveraged
18926 Full Coveraged
18927 Full Coveraged
18928 Full Coveraged
18929 Full Coveraged
18930 Mostly Coveraged
18931 Full Coveraged
18932 Mostly Coveraged
18933 Mostly Coveraged
18934 Full Coveraged
18935 Full Coveraged
18936 Mostly Coveraged
18938 Mostly Coveraged
18940 Full Coveraged
18942 Mostly Coveraged
18943 Mostly Coveraged
18944 Full Coveraged
18946 Full Coveraged
18947 Mostly Coveraged
18949 Full Coveraged
18950 Mostly Coveraged
18951 Full Coveraged
18954 Full Coveraged
18955 Full Coveraged
18956 Full Coveraged
18957 Mostly Coveraged
18958 Full Coveraged
18960 Full Coveraged
18962 Full Coveraged
18963 Mostly Coveraged
18964 Full Coveraged
18966 Full Coveraged
18968 Full Coveraged
18969 Full Coveraged
18970 Full Coveraged
18971 Full Coveraged
18974 Full Coveraged
18976 Full Coveraged
18977 Mostly Coveraged
18979 Mostly Coveraged
18980 Full Coveraged
18981 Full Coveraged
18991 Full Coveraged
19001 Full Coveraged
19002 Full Coveraged
19003 Full Coveraged
19004 Full Coveraged
19006 Full Coveraged
19007 Full Coveraged
19008 Full Coveraged
19009 Full Coveraged
19010 Full Coveraged
19012 Full Coveraged
19013 Full Coveraged
19014 Full Coveraged
19015 Full Coveraged
19016 Full Coveraged
19017 Full Coveraged
19018 Full Coveraged
19019 Full Coveraged
19020 Full Coveraged
19021 Full Coveraged
19022 Full Coveraged
19023 Full Coveraged
19025 Full Coveraged
19026 Full Coveraged
19027 Full Coveraged
19028 Full Coveraged
19029 Full Coveraged
19030 Full Coveraged
19031 Full Coveraged
19032 Full Coveraged
19033 Full Coveraged
19034 Full Coveraged
19035 Full Coveraged
19036 Full Coveraged
19037 Full Coveraged
19038 Full Coveraged
19039 Full Coveraged
19040 Full Coveraged
19041 Full Coveraged
19043 Full Coveraged
19044 Full Coveraged
19046 Full Coveraged
19047 Full Coveraged
19048 Full Coveraged
19049 Full Coveraged
19050 Full Coveraged
19052 Full Coveraged
19053 Full Coveraged
19054 Full Coveraged
19055 Full Coveraged
19056 Full Coveraged
19057 Full Coveraged
19058 Full Coveraged
19059 Full Coveraged
19061 Full Coveraged
19063 Full Coveraged
19064 Full Coveraged
19065 Full Coveraged
19066 Full Coveraged
19067 Full Coveraged
19070 Full Coveraged
19072 Full Coveraged
19073 Full Coveraged
19074 Full Coveraged
19075 Full Coveraged
19076 Full Coveraged
19078 Full Coveraged
19079 Full Coveraged
19080 Full Coveraged
19081 Full Coveraged
19082 Full Coveraged
19083 Full Coveraged
19085 Full Coveraged
19086 Full Coveraged
19087 Full Coveraged
19088 Full Coveraged
19089 Full Coveraged
19090 Full Coveraged
19091 Full Coveraged
19092 Full Coveraged
19093 Full Coveraged
19094 Full Coveraged
19095 Full Coveraged
19096 Full Coveraged
19098 Full Coveraged
19101 Full Coveraged
19102 Full Coveraged
19103 Full Coveraged
19104 Full Coveraged
19105 Full Coveraged
19106 Full Coveraged
19107 Full Coveraged
19108 Full Coveraged
19109 Full Coveraged
19110 Full Coveraged
19111 Full Coveraged
19112 Full Coveraged
19113 Full Coveraged
19114 Full Coveraged
19115 Full Coveraged
19116 Full Coveraged
19118 Full Coveraged
19119 Full Coveraged
19120 Full Coveraged
19121 Full Coveraged
19122 Full Coveraged
19123 Full Coveraged
19124 Full Coveraged
19125 Full Coveraged
19126 Full Coveraged
19127 Full Coveraged
19128 Full Coveraged
19129 Full Coveraged
19130 Full Coveraged
19131 Full Coveraged
19132 Full Coveraged
19133 Full Coveraged
19134 Full Coveraged
19135 Mostly Coveraged
19136 Full Coveraged
19137 Full Coveraged
19138 Full Coveraged
19139 Full Coveraged
19140 Full Coveraged
19141 Full Coveraged
19142 Full Coveraged
19143 Full Coveraged
19144 Full Coveraged
19145 Full Coveraged
19146 Full Coveraged
19147 Full Coveraged
19148 Full Coveraged
19149 Mostly Coveraged
19150 Full Coveraged
19151 Full Coveraged
19152 Full Coveraged
19153 Full Coveraged
19154 Full Coveraged
19155 Full Coveraged
19160 Full Coveraged
19161 Full Coveraged
19162 Full Coveraged
19170 Full Coveraged
19171 Full Coveraged
19172 Full Coveraged
19173 Full Coveraged
19175 Full Coveraged
19177 Full Coveraged
19178 Full Coveraged
19181 Full Coveraged
19182 Full Coveraged
19184 Full Coveraged
19185 Full Coveraged
19187 Full Coveraged
19188 Full Coveraged
19191 Full Coveraged
19192 Full Coveraged
19193 Full Coveraged
19194 Full Coveraged
19195 Full Coveraged
19196 Full Coveraged
19197 Full Coveraged
19244 Full Coveraged
19255 Full Coveraged
19301 Full Coveraged
19310 Mostly Coveraged
19311 Mostly Coveraged
19312 Full Coveraged
19316 Full Coveraged
19317 Full Coveraged
19318 Mostly Coveraged
19319 Full Coveraged
19320 Full Coveraged
19330 Mostly Coveraged
19331 Full Coveraged
19333 Full Coveraged
19335 Full Coveraged
19339 Full Coveraged
19341 Full Coveraged
19342 Full Coveraged
19343 Mostly Coveraged
19344 Mostly Coveraged
19345 Full Coveraged
19346 Mostly Coveraged
19347 Full Coveraged
19348 Mostly Coveraged
19350 Full Coveraged
19351 Mostly Coveraged
19352 Mostly Coveraged
19353 Full Coveraged
19354 Full Coveraged
19355 Full Coveraged
19357 Mostly Coveraged
19358 Full Coveraged
19365 Full Coveraged
19366 Full Coveraged
19367 Full Coveraged
19369 Full Coveraged
19371 Mostly Coveraged
19372 Full Coveraged
19373 Full Coveraged
19374 Mostly Coveraged
19375 Mostly Coveraged
19376 Full Coveraged
19380 Full Coveraged
19381 Full Coveraged
19382 Full Coveraged
19383 Full Coveraged
19390 Mostly Coveraged
19395 Full Coveraged
19397 Full Coveraged
19398 Full Coveraged
19399 Full Coveraged
19401 Full Coveraged
19403 Full Coveraged
19404 Full Coveraged
19405 Full Coveraged
19406 Full Coveraged
19407 Full Coveraged
19408 Full Coveraged
19409 Full Coveraged
19415 Full Coveraged
19420 Full Coveraged
19421 Full Coveraged
19422 Full Coveraged
19423 Full Coveraged
19424 Full Coveraged
19425 Full Coveraged
19426 Full Coveraged
19428 Full Coveraged
19429 Full Coveraged
19430 Mostly Coveraged
19432 Full Coveraged
19435 Mostly Coveraged
19436 Full Coveraged
19437 Full Coveraged
19438 Mostly Coveraged
19440 Full Coveraged
19441 Full Coveraged
19442 Full Coveraged
19443 Mostly Coveraged
19444 Full Coveraged
19446 Full Coveraged
19450 Full Coveraged
19451 Mostly Coveraged
19453 Full Coveraged
19454 Full Coveraged
19455 Mostly Coveraged
19456 Full Coveraged
19457 Full Coveraged
19460 Full Coveraged
19462 Full Coveraged
19464 Full Coveraged
19465 Full Coveraged
19468 Mostly Coveraged
19470 Full Coveraged
19472 Full Coveraged
19473 Mostly Coveraged
19474 Mostly Coveraged
19475 Full Coveraged
19477 Full Coveraged
19478 Mostly Coveraged
19480 Full Coveraged
19481 Full Coveraged
19482 Full Coveraged
19483 Full Coveraged
19484 Full Coveraged
19485 Full Coveraged
19486 Full Coveraged
19487 Full Coveraged
19489 Full Coveraged
19490 Full Coveraged
19492 Mostly Coveraged
19493 Full Coveraged
19494 Full Coveraged
19495 Full Coveraged
19496 Full Coveraged
19503 Mostly Coveraged
19504 Mostly Coveraged
19505 Mostly Coveraged
19508 Full Coveraged
19510 Full Coveraged
19512 Full Coveraged
19516 Mostly Coveraged
19518 Full Coveraged
19519 Full Coveraged
19520 Mostly Coveraged
19522 Mostly Coveraged
19523 Mostly Coveraged
19525 Full Coveraged
19533 Full Coveraged
19535 Full Coveraged
19540 Mostly Coveraged
19541 Mostly Coveraged
19542 Full Coveraged
19543 Mostly Coveraged
19545 Full Coveraged
19547 Mostly Coveraged
19548 Full Coveraged
19555 Mostly Coveraged
19560 Full Coveraged
19564 Mostly Coveraged
19601 Full Coveraged
19602 Full Coveraged
19603 Full Coveraged
19604 Full Coveraged
19605 Full Coveraged
19606 Full Coveraged
19607 Full Coveraged
19608 Mostly Coveraged
19609 Full Coveraged
19610 Full Coveraged
19611 Full Coveraged
19612 Full Coveraged
19640 Full Coveraged
19701 Full Coveraged
19702 Full Coveraged
19703 Full Coveraged
19706 Full Coveraged
19707 Full Coveraged
19708 Full Coveraged
19709 Mostly Coveraged
19710 Full Coveraged
19711 Full Coveraged
19712 Full Coveraged
19713 Full Coveraged
19714 Full Coveraged
19715 Full Coveraged
19716 Full Coveraged
19717 Full Coveraged
19718 Full Coveraged
19720 Full Coveraged
19721 Full Coveraged
19725 Full Coveraged
19726 Full Coveraged
19732 Full Coveraged
19733 Mostly Coveraged
19735 Full Coveraged
19736 Full Coveraged
19801 Full Coveraged
19802 Full Coveraged
19803 Full Coveraged
19804 Full Coveraged
19805 Full Coveraged
19806 Full Coveraged
19807 Full Coveraged
19808 Full Coveraged
19809 Full Coveraged
19810 Full Coveraged
19850 Full Coveraged
19880 Full Coveraged
19884 Full Coveraged
19885 Full Coveraged
19886 Full Coveraged
19887 Full Coveraged
19889 Full Coveraged
19890 Full Coveraged
19891 Full Coveraged
19892 Full Coveraged
19893 Full Coveraged
19894 Full Coveraged
19895 Full Coveraged
19896 Full Coveraged
19897 Full Coveraged
19898 Full Coveraged
19899 Full Coveraged
19901 Mostly Coveraged
19902 Full Coveraged
19903 Full Coveraged
19904 Full Coveraged
19905 Full Coveraged
19906 Full Coveraged
19934 Full Coveraged
19936 Full Coveraged
19940 Mostly Coveraged
19943 Full Coveraged
19944 Mostly Coveraged
19945 Mostly Coveraged
19946 Full Coveraged
19952 Mostly Coveraged
19953 Mostly Coveraged
19954 Mostly Coveraged
19961 Mostly Coveraged
19962 Full Coveraged
19964 Mostly Coveraged
19975 Full Coveraged
19979 Full Coveraged
19980 Full Coveraged
20001 Full Coveraged
20002 Full Coveraged
20003 Full Coveraged
20004 Full Coveraged
20005 Full Coveraged
20006 Full Coveraged
20007 Full Coveraged
20008 Full Coveraged
20009 Full Coveraged
Zip Code Coverage Level Zip Code Coverage Level Zip Code Coverage Level Zip Code Coverage Level Zip Code Coverage Level Zip Code Coverage Level
Page 60

- 160 -
20010 Full Coveraged
20011 Full Coveraged
20012 Full Coveraged
20013 Full Coveraged
20015 Full Coveraged
20016 Full Coveraged
20017 Full Coveraged
20018 Full Coveraged
20019 Full Coveraged
20020 Full Coveraged
20022 Full Coveraged
20023 Full Coveraged
20024 Full Coveraged
20026 Full Coveraged
20027 Full Coveraged
20029 Full Coveraged
20030 Full Coveraged
20032 Full Coveraged
20033 Full Coveraged
20035 Full Coveraged
20036 Full Coveraged
20037 Full Coveraged
20038 Full Coveraged
20039 Full Coveraged
20040 Full Coveraged
20041 Full Coveraged
20042 Full Coveraged
20043 Full Coveraged
20044 Full Coveraged
20045 Full Coveraged
20046 Full Coveraged
20047 Full Coveraged
20049 Full Coveraged
20050 Full Coveraged
20051 Full Coveraged
20052 Full Coveraged
20053 Full Coveraged
20055 Full Coveraged
20056 Full Coveraged
20057 Full Coveraged
20058 Full Coveraged
20059 Full Coveraged
20060 Full Coveraged
20061 Full Coveraged
20062 Full Coveraged
20064 Full Coveraged
20065 Full Coveraged
20066 Full Coveraged
20067 Full Coveraged
20068 Full Coveraged
20069 Full Coveraged
20070 Full Coveraged
20071 Full Coveraged
20073 Full Coveraged
20074 Full Coveraged
20075 Full Coveraged
20076 Full Coveraged
20080 Full Coveraged
20081 Full Coveraged
20088 Full Coveraged
20090 Full Coveraged
20091 Full Coveraged
20098 Full Coveraged
20099 Full Coveraged
20101 Full Coveraged
20102 Full Coveraged
20103 Full Coveraged
20104 Full Coveraged
20105 Full Coveraged
20107 Full Coveraged
20108 Full Coveraged
20109 Full Coveraged
20110 Full Coveraged
20111 Full Coveraged
20112 Mostly Coveraged
20113 Full Coveraged
20115 Mostly Coveraged
20117 Full Coveraged
20118 Full Coveraged
20119 Mostly Coveraged
20120 Full Coveraged
20121 Full Coveraged
20122 Full Coveraged
20124 Full Coveraged
20129 Full Coveraged
20130 Full Coveraged
20131 Mostly Coveraged
20132 Mostly Coveraged
20134 Mostly Coveraged
20135 Full Coveraged
20136 Full Coveraged
20137 Full Coveraged
20138 Mostly Coveraged
20139 Full Coveraged
20140 Mostly Coveraged
20141 Full Coveraged
20142 Full Coveraged
20143 Full Coveraged
20144 Mostly Coveraged
20146 Full Coveraged
20147 Full Coveraged
20148 Full Coveraged
20151 Full Coveraged
20152 Full Coveraged
20153 Full Coveraged
20155 Full Coveraged
20156 Full Coveraged
20158 Full Coveraged
20159 Full Coveraged
20160 Mostly Coveraged
20163 Full Coveraged
20164 Full Coveraged
20165 Full Coveraged
20166 Full Coveraged
20167 Full Coveraged
20168 Full Coveraged
20169 Full Coveraged
20170 Full Coveraged
20171 Full Coveraged
20172 Full Coveraged
20175 Full Coveraged
20176 Full Coveraged
20177 Full Coveraged
20178 Full Coveraged
20180 Mostly Coveraged
20181 Full Coveraged
20182 Full Coveraged
20184 Full Coveraged
20185 Full Coveraged
20186 Full Coveraged
20187 Full Coveraged
20188 Full Coveraged
20189 Full Coveraged
20190 Full Coveraged
20191 Full Coveraged
20192 Full Coveraged
20193 Full Coveraged
20194 Full Coveraged
20195 Full Coveraged
20196 Full Coveraged
20197 Full Coveraged
20198 Full Coveraged
20199 Full Coveraged
20201 Full Coveraged
20202 Full Coveraged
20203 Full Coveraged
20204 Full Coveraged
20206 Full Coveraged
20207 Full Coveraged
20208 Full Coveraged
20210 Full Coveraged
20211 Full Coveraged
20212 Full Coveraged
20213 Full Coveraged
20215 Full Coveraged
20216 Full Coveraged
20217 Full Coveraged
20218 Full Coveraged
20219 Full Coveraged
20220 Full Coveraged
20221 Full Coveraged
20222 Full Coveraged
20223 Full Coveraged
20224 Full Coveraged
20226 Full Coveraged
20227 Full Coveraged
20228 Full Coveraged
20229 Full Coveraged
20230 Full Coveraged
20231 Full Coveraged
20232 Full Coveraged
20233 Full Coveraged
20235 Full Coveraged
20237 Full Coveraged
20238 Full Coveraged
20239 Full Coveraged
20240 Full Coveraged
20241 Full Coveraged
20242 Full Coveraged
20244 Full Coveraged
20245 Full Coveraged
20250 Full Coveraged
20251 Full Coveraged
20254 Full Coveraged
20260 Full Coveraged
20261 Full Coveraged
20262 Full Coveraged
20265 Full Coveraged
20266 Full Coveraged
20268 Full Coveraged
20270 Full Coveraged
20289 Full Coveraged
20299 Full Coveraged
20301 Full Coveraged
20303 Full Coveraged
20306 Full Coveraged
20307 Full Coveraged
20310 Full Coveraged
20314 Full Coveraged
20315 Full Coveraged
20317 Full Coveraged
20318 Full Coveraged
20319 Full Coveraged
20330 Full Coveraged
20340 Full Coveraged
20350 Full Coveraged
20355 Full Coveraged
20370 Full Coveraged
20372 Full Coveraged
20373 Full Coveraged
20374 Full Coveraged
20375 Full Coveraged
20376 Full Coveraged
20380 Full Coveraged
20388 Full Coveraged
20389 Full Coveraged
20390 Full Coveraged
20391 Full Coveraged
20392 Full Coveraged
20393 Full Coveraged
20394 Full Coveraged
20395 Full Coveraged
20398 Full Coveraged
20401 Full Coveraged
20402 Full Coveraged
20403 Full Coveraged
20404 Full Coveraged
20405 Full Coveraged
20406 Full Coveraged
20407 Full Coveraged
20408 Full Coveraged
20409 Full Coveraged
20410 Full Coveraged
20411 Full Coveraged
20412 Full Coveraged
20413 Full Coveraged
20414 Full Coveraged
20415 Full Coveraged
20416 Full Coveraged
20418 Full Coveraged
20419 Full Coveraged
20420 Full Coveraged
20421 Full Coveraged
20422 Full Coveraged
20423 Full Coveraged
20424 Full Coveraged
20425 Full Coveraged
20426 Full Coveraged
20427 Full Coveraged
20428 Full Coveraged
20429 Full Coveraged
20431 Full Coveraged
20433 Full Coveraged
20434 Full Coveraged
20435 Full Coveraged
20436 Full Coveraged
20437 Full Coveraged
20439 Full Coveraged
20440 Full Coveraged
20441 Full Coveraged
20442 Full Coveraged
20444 Full Coveraged
20447 Full Coveraged
20451 Full Coveraged
20453 Full Coveraged
20456 Full Coveraged
20460 Full Coveraged
20463 Full Coveraged
20469 Full Coveraged
20472 Full Coveraged
20500 Full Coveraged
20502 Full Coveraged
20503 Full Coveraged
20505 Full Coveraged
20506 Full Coveraged
20507 Full Coveraged
20508 Full Coveraged
20509 Full Coveraged
20510 Full Coveraged
20515 Full Coveraged
20520 Full Coveraged
20521 Full Coveraged
20522 Full Coveraged
20523 Full Coveraged
20524 Full Coveraged
20525 Full Coveraged
20526 Full Coveraged
20527 Full Coveraged
20528 Full Coveraged
20530 Full Coveraged
20531 Full Coveraged
20532 Full Coveraged
20533 Full Coveraged
20534 Full Coveraged
20535 Full Coveraged
20536 Full Coveraged
20538 Full Coveraged
20539 Full Coveraged
20540 Full Coveraged
20541 Full Coveraged
20542 Full Coveraged
20543 Full Coveraged
20544 Full Coveraged
20546 Full Coveraged
20547 Full Coveraged
20548 Full Coveraged
20549 Full Coveraged
20551 Full Coveraged
20552 Full Coveraged
20553 Full Coveraged
20554 Full Coveraged
20555 Full Coveraged
20557 Full Coveraged
20559 Full Coveraged
20560 Full Coveraged
20565 Full Coveraged
20566 Full Coveraged
20570 Full Coveraged
20571 Full Coveraged
20573 Full Coveraged
20575 Full Coveraged
20576 Full Coveraged
20577 Full Coveraged
20578 Full Coveraged
20579 Full Coveraged
20580 Full Coveraged
20581 Full Coveraged
20585 Full Coveraged
20586 Full Coveraged
20590 Full Coveraged
20591 Full Coveraged
20593 Full Coveraged
20594 Full Coveraged
20597 Full Coveraged
20599 Full Coveraged
20601 Full Coveraged
20602 Full Coveraged
20603 Full Coveraged
20604 Full Coveraged
20607 Full Coveraged
20608 Full Coveraged
20610 Mostly Coveraged
20611 Full Coveraged
20612 Full Coveraged
20613 Full Coveraged
20616 Full Coveraged
20617 Full Coveraged
20621 Mostly Coveraged
20622 Full Coveraged
20623 Mostly Coveraged
20624 Mostly Coveraged
20632 Full Coveraged
20635 Full Coveraged
20637 Full Coveraged
20640 Mostly Coveraged
20643 Mostly Coveraged
20646 Full Coveraged
20656 Mostly Coveraged
20658 Mostly Coveraged
20659 Full Coveraged
20660 Mostly Coveraged
20661 Mostly Coveraged
20662 Mostly Coveraged
20664 Mostly Coveraged
20675 Full Coveraged
20677 Full Coveraged
20678 Mostly Coveraged
20693 Full Coveraged
20695 Full Coveraged
20701 Full Coveraged
20703 Full Coveraged
20704 Full Coveraged
20705 Full Coveraged
20706 Full Coveraged
20707 Full Coveraged
20708 Full Coveraged
20709 Full Coveraged
20710 Full Coveraged
20711 Full Coveraged
20712 Full Coveraged
20715 Full Coveraged
20716 Full Coveraged
20717 Full Coveraged
20718 Full Coveraged
20719 Full Coveraged
20720 Full Coveraged
20721 Full Coveraged
20722 Full Coveraged
20723 Full Coveraged
20724 Full Coveraged
20725 Full Coveraged
20726 Full Coveraged
20731 Full Coveraged
20733 Mostly Coveraged
20735 Full Coveraged
20736 Mostly Coveraged
20737 Full Coveraged
20738 Full Coveraged
20740 Full Coveraged
20741 Full Coveraged
20742 Full Coveraged
20743 Full Coveraged
20744 Full Coveraged
20745 Full Coveraged
20746 Full Coveraged
20747 Full Coveraged
20748 Full Coveraged
20749 Full Coveraged
20750 Full Coveraged
20751 Mostly Coveraged
20752 Full Coveraged
20753 Full Coveraged
20754 Full Coveraged
20755 Full Coveraged
20757 Full Coveraged
20758 Mostly Coveraged
20759 Full Coveraged
20762 Full Coveraged
20763 Full Coveraged
20764 Mostly Coveraged
20765 Mostly Coveraged
20768 Full Coveraged
20769 Full Coveraged
20770 Full Coveraged
20771 Full Coveraged
20772 Full Coveraged
20773 Full Coveraged
20774 Full Coveraged
20775 Full Coveraged
20776 Mostly Coveraged
20777 Full Coveraged
20778 Mostly Coveraged
20779 Mostly Coveraged
20781 Full Coveraged
20782 Full Coveraged
20783 Full Coveraged
20784 Full Coveraged
20785 Full Coveraged
20787 Full Coveraged
20788 Full Coveraged
20790 Full Coveraged
20791 Full Coveraged
20792 Full Coveraged
20794 Full Coveraged
20799 Full Coveraged
20810 Full Coveraged
20811 Full Coveraged
20812 Full Coveraged
20813 Full Coveraged
20814 Full Coveraged
20815 Full Coveraged
20816 Full Coveraged
20817 Full Coveraged
20818 Full Coveraged
20824 Full Coveraged
20825 Full Coveraged
20827 Full Coveraged
20830 Full Coveraged
20832 Full Coveraged
20833 Full Coveraged
20837 Full Coveraged
20838 Full Coveraged
20839 Full Coveraged
20841 Full Coveraged
20842 Full Coveraged
20847 Full Coveraged
20848 Full Coveraged
20849 Full Coveraged
20850 Full Coveraged
20851 Full Coveraged
20852 Full Coveraged
20853 Full Coveraged
20854 Full Coveraged
20855 Full Coveraged
20857 Full Coveraged
20859 Full Coveraged
20860 Full Coveraged
20861 Full Coveraged
20862 Full Coveraged
20866 Full Coveraged
20868 Full Coveraged
20871 Full Coveraged
20872 Full Coveraged
20874 Full Coveraged
20875 Full Coveraged
20876 Full Coveraged
20877 Full Coveraged
20878 Full Coveraged
20879 Full Coveraged
20880 Full Coveraged
20882 Full Coveraged
20883 Full Coveraged
20884 Full Coveraged
20885 Full Coveraged
20886 Full Coveraged
20889 Full Coveraged
20891 Full Coveraged
20892 Full Coveraged
20894 Full Coveraged
20895 Full Coveraged
20896 Full Coveraged
20898 Full Coveraged
20899 Full Coveraged
20901 Full Coveraged
Zip Code Coverage Level Zip Code Coverage Level Zip Code Coverage Level Zip Code Coverage Level Zip Code Coverage Level Zip Code Coverage Level
Page 61

- 161 -
20902 Full Coveraged
20903 Full Coveraged
20904 Full Coveraged
20905 Full Coveraged
20906 Full Coveraged
20907 Full Coveraged
20908 Full Coveraged
20910 Full Coveraged
20911 Full Coveraged
20912 Full Coveraged
20913 Full Coveraged
20914 Full Coveraged
20915 Full Coveraged
20916 Full Coveraged
20918 Full Coveraged
20997 Full Coveraged
21001 Full Coveraged
21005 Full Coveraged
21009 Full Coveraged
21010 Full Coveraged
21012 Full Coveraged
21013 Mostly Coveraged
21014 Full Coveraged
21015 Full Coveraged
21017 Full Coveraged
21018 Full Coveraged
21020 Full Coveraged
21022 Full Coveraged
21023 Full Coveraged
21027 Full Coveraged
21028 Full Coveraged
21029 Full Coveraged
21030 Full Coveraged
21031 Full Coveraged
21032 Full Coveraged
21034 Mostly Coveraged
21035 Full Coveraged
21036 Full Coveraged
21037 Full Coveraged
21040 Full Coveraged
21041 Full Coveraged
21042 Full Coveraged
21043 Full Coveraged
21044 Full Coveraged
21045 Full Coveraged
21046 Full Coveraged
21047 Mostly Coveraged
21048 Full Coveraged
21050 Mostly Coveraged
21051 Mostly Coveraged
21052 Mostly Coveraged
21054 Full Coveraged
21055 Full Coveraged
21056 Mostly Coveraged
21057 Full Coveraged
21060 Full Coveraged
21061 Full Coveraged
21062 Full Coveraged
21065 Full Coveraged
21071 Full Coveraged
21074 Mostly Coveraged
21075 Full Coveraged
21076 Full Coveraged
21077 Full Coveraged
21078 Full Coveraged
21082 Mostly Coveraged
21085 Full Coveraged
21087 Full Coveraged
21088 Mostly Coveraged
21090 Full Coveraged
21092 Full Coveraged
21093 Full Coveraged
21094 Full Coveraged
21098 Full Coveraged
21102 Mostly Coveraged
21104 Mostly Coveraged
21106 Full Coveraged
21108 Full Coveraged
21111 Mostly Coveraged
21113 Full Coveraged
21114 Full Coveraged
21117 Full Coveraged
21120 Mostly Coveraged
21122 Full Coveraged
21123 Full Coveraged
21128 Full Coveraged
21130 Full Coveraged
21131 Full Coveraged
21133 Full Coveraged
21136 Full Coveraged
21139 Full Coveraged
21140 Full Coveraged
21144 Full Coveraged
21146 Full Coveraged
21150 Full Coveraged
21152 Full Coveraged
21153 Full Coveraged
21154 Mostly Coveraged
21155 Mostly Coveraged
21156 Full Coveraged
21157 Full Coveraged
21158 Full Coveraged
21162 Full Coveraged
21163 Full Coveraged
21201 Full Coveraged
21202 Full Coveraged
21203 Full Coveraged
21204 Full Coveraged
21205 Full Coveraged
21206 Full Coveraged
21207 Full Coveraged
21208 Full Coveraged
21209 Full Coveraged
21210 Full Coveraged
21211 Full Coveraged
21212 Full Coveraged
21213 Full Coveraged
21214 Full Coveraged
21215 Full Coveraged
21216 Full Coveraged
21217 Full Coveraged
21218 Full Coveraged
21219 Mostly Coveraged
21220 Full Coveraged
21221 Full Coveraged
21222 Full Coveraged
21223 Full Coveraged
21224 Full Coveraged
21225 Full Coveraged
21226 Full Coveraged
21227 Full Coveraged
21228 Full Coveraged
21229 Full Coveraged
21230 Full Coveraged
21231 Full Coveraged
21233 Full Coveraged
21234 Full Coveraged
21235 Full Coveraged
21236 Full Coveraged
21237 Full Coveraged
21239 Full Coveraged
21240 Full Coveraged
21241 Full Coveraged
21244 Full Coveraged
21250 Full Coveraged
21251 Full Coveraged
21252 Full Coveraged
21263 Full Coveraged
21264 Full Coveraged
21265 Full Coveraged
21268 Full Coveraged
21270 Full Coveraged
21273 Full Coveraged
21274 Full Coveraged
21275 Full Coveraged
21278 Full Coveraged
21279 Full Coveraged
21280 Full Coveraged
21281 Full Coveraged
21282 Full Coveraged
21283 Full Coveraged
21284 Full Coveraged
21285 Full Coveraged
21286 Full Coveraged
21287 Full Coveraged
21288 Full Coveraged
21289 Full Coveraged
21290 Full Coveraged
21297 Full Coveraged
21298 Full Coveraged
21401 Full Coveraged
21402 Full Coveraged
21403 Full Coveraged
21404 Full Coveraged
21405 Full Coveraged
21411 Full Coveraged
21412 Full Coveraged
21601 Full Coveraged
21606 Full Coveraged
21609 Full Coveraged
21613 Mostly Coveraged
21617 Full Coveraged
21625 Full Coveraged
21631 Full Coveraged
21638 Full Coveraged
21643 Mostly Coveraged
21654 Mostly Coveraged
21655 Mostly Coveraged
21657 Full Coveraged
21658 Full Coveraged
21659 Mostly Coveraged
21664 Full Coveraged
21673 Mostly Coveraged
21679 Full Coveraged
21701 Mostly Coveraged
21702 Full Coveraged
21703 Full Coveraged
21704 Mostly Coveraged
21705 Full Coveraged
21709 Full Coveraged
21710 Full Coveraged
21713 Full Coveraged
21714 Full Coveraged
21715 Mostly Coveraged
21716 Full Coveraged
21717 Full Coveraged
21718 Mostly Coveraged
21720 Mostly Coveraged
21721 Full Coveraged
21723 Full Coveraged
21733 Full Coveraged
21734 Full Coveraged
21737 Full Coveraged
21738 Full Coveraged
21740 Full Coveraged
21741 Full Coveraged
21742 Full Coveraged
21746 Full Coveraged
21747 Full Coveraged
21748 Full Coveraged
21749 Full Coveraged
21754 Mostly Coveraged
21755 Full Coveraged
21756 Mostly Coveraged
21758 Mostly Coveraged
21762 Mostly Coveraged
21765 Full Coveraged
21767 Full Coveraged
21769 Full Coveraged
21770 Full Coveraged
21771 Full Coveraged
21773 Full Coveraged
21774 Full Coveraged
21776 Mostly Coveraged
21777 Full Coveraged
21779 Mostly Coveraged
21780 Mostly Coveraged
21781 Full Coveraged
21782 Mostly Coveraged
21783 Mostly Coveraged
21784 Mostly Coveraged
21788 Mostly Coveraged
21790 Full Coveraged
21792 Mostly Coveraged
21793 Mostly Coveraged
21794 Full Coveraged
21795 Mostly Coveraged
21797 Full Coveraged
21801 Full Coveraged
21802 Full Coveraged
21803 Full Coveraged
21804 Full Coveraged
21810 Full Coveraged
21811 Full Coveraged
21813 Full Coveraged
21822 Full Coveraged
21826 Full Coveraged
21830 Mostly Coveraged
21835 Full Coveraged
21841 Mostly Coveraged
21842 Full Coveraged
21843 Full Coveraged
21849 Mostly Coveraged
21853 Mostly Coveraged
21856 Mostly Coveraged
21862 Full Coveraged
21869 Mostly Coveraged
21872 Mostly Coveraged
21874 Mostly Coveraged
21875 Full Coveraged
21901 Mostly Coveraged
21902 Full Coveraged
21903 Full Coveraged
21904 Full Coveraged
21911 Mostly Coveraged
21914 Mostly Coveraged
21916 Mostly Coveraged
21917 Full Coveraged
21918 Mostly Coveraged
21920 Full Coveraged
21921 Full Coveraged
21922 Full Coveraged
22003 Full Coveraged
22009 Full Coveraged
22015 Full Coveraged
22026 Full Coveraged
22027 Full Coveraged
22030 Full Coveraged
22031 Full Coveraged
22032 Full Coveraged
22033 Full Coveraged
22035 Full Coveraged
22037 Full Coveraged
22038 Full Coveraged
22039 Full Coveraged
22040 Full Coveraged
22041 Full Coveraged
22042 Full Coveraged
22043 Full Coveraged
22044 Full Coveraged
22046 Full Coveraged
22060 Full Coveraged
22066 Full Coveraged
22067 Full Coveraged
22079 Full Coveraged
22081 Full Coveraged
22082 Full Coveraged
22101 Full Coveraged
22102 Full Coveraged
22103 Full Coveraged
22106 Full Coveraged
22107 Full Coveraged
22108 Full Coveraged
22116 Full Coveraged
22118 Full Coveraged
22119 Full Coveraged
22121 Full Coveraged
22122 Full Coveraged
22124 Full Coveraged
22125 Full Coveraged
22134 Mostly Coveraged
22135 Full Coveraged
22150 Full Coveraged
22151 Full Coveraged
22152 Full Coveraged
22153 Full Coveraged
22156 Full Coveraged
22158 Full Coveraged
22159 Full Coveraged
22160 Full Coveraged
22161 Full Coveraged
22172 Full Coveraged
22180 Full Coveraged
22181 Full Coveraged
22182 Full Coveraged
22183 Full Coveraged
22184 Full Coveraged
22185 Full Coveraged
22191 Full Coveraged
22192 Full Coveraged
22193 Full Coveraged
22194 Full Coveraged
22195 Full Coveraged
22199 Full Coveraged
22201 Full Coveraged
22202 Full Coveraged
22203 Full Coveraged
22204 Full Coveraged
22205 Full Coveraged
22206 Full Coveraged
22207 Full Coveraged
22209 Full Coveraged
22210 Full Coveraged
22211 Full Coveraged
22213 Full Coveraged
22214 Full Coveraged
22215 Full Coveraged
22216 Full Coveraged
22217 Full Coveraged
22219 Full Coveraged
22222 Full Coveraged
22226 Full Coveraged
22227 Full Coveraged
22229 Full Coveraged
22230 Full Coveraged
22234 Full Coveraged
22240 Full Coveraged
22242 Full Coveraged
22243 Full Coveraged
22244 Full Coveraged
22245 Full Coveraged
22246 Full Coveraged
22301 Full Coveraged
22302 Full Coveraged
22303 Full Coveraged
22304 Full Coveraged
22305 Full Coveraged
22306 Full Coveraged
22307 Full Coveraged
22308 Full Coveraged
22309 Full Coveraged
22310 Full Coveraged
22311 Full Coveraged
22312 Full Coveraged
22313 Full Coveraged
22314 Full Coveraged
22315 Full Coveraged
22320 Full Coveraged
22331 Full Coveraged
22332 Full Coveraged
22333 Full Coveraged
22334 Full Coveraged
22336 Full Coveraged
22401 Full Coveraged
22402 Full Coveraged
22403 Full Coveraged
22404 Full Coveraged
22405 Full Coveraged
22406 Mostly Coveraged
22407 Full Coveraged
22408 Full Coveraged
22412 Full Coveraged
22430 Full Coveraged
22446 Full Coveraged
22448 Mostly Coveraged
22463 Mostly Coveraged
22471 Mostly Coveraged
22546 Mostly Coveraged
22547 Mostly Coveraged
22554 Full Coveraged
22555 Full Coveraged
22556 Mostly Coveraged
22565 Mostly Coveraged
22580 Mostly Coveraged
22611 Mostly Coveraged
22620 Mostly Coveraged
22646 Mostly Coveraged
22712 Full Coveraged
22714 Mostly Coveraged
22724 Mostly Coveraged
22728 Mostly Coveraged
22734 Mostly Coveraged
22801 Full Coveraged
22802 Full Coveraged
22803 Full Coveraged
22807 Full Coveraged
22812 Mostly Coveraged
22832 Mostly Coveraged
22833 Mostly Coveraged
22834 Mostly Coveraged
22840 Mostly Coveraged
22841 Full Coveraged
22846 Full Coveraged
22848 Full Coveraged
22850 Mostly Coveraged
22901 Mostly Coveraged
22902 Full Coveraged
22903 Mostly Coveraged
22904 Full Coveraged
22905 Full Coveraged
22906 Full Coveraged
22908 Full Coveraged
22909 Full Coveraged
22910 Full Coveraged
22911 Mostly Coveraged
22936 Mostly Coveraged
22945 Mostly Coveraged
22946 Mostly Coveraged
22947 Mostly Coveraged
22959 Mostly Coveraged
23001 Full Coveraged
23005 Mostly Coveraged
23009 Mostly Coveraged
23011 Full Coveraged
23017 Mostly Coveraged
23018 Full Coveraged
23021 Mostly Coveraged
23025 Mostly Coveraged
23030 Full Coveraged
23032 Mostly Coveraged
23039 Mostly Coveraged
23047 Mostly Coveraged
23058 Full Coveraged
23059 Full Coveraged
23060 Full Coveraged
23062 Full Coveraged
23069 Full Coveraged
23072 Full Coveraged
23075 Full Coveraged
23081 Full Coveraged
23089 Mostly Coveraged
23090 Full Coveraged
23091 Mostly Coveraged
23103 Full Coveraged
23106 Mostly Coveraged
23107 Full Coveraged
23108 Full Coveraged
23110 Full Coveraged
23111 Mostly Coveraged
23112 Full Coveraged
23113 Full Coveraged
23114 Full Coveraged
23116 Full Coveraged
23124 Full Coveraged
23127 Full Coveraged
23129 Mostly Coveraged
23131 Full Coveraged
23140 Full Coveraged
23141 Full Coveraged
23146 Full Coveraged
23147 Full Coveraged
23150 Mostly Coveraged
23154 Mostly Coveraged
23155 Mostly Coveraged
23156 Full Coveraged
23162 Full Coveraged
23168 Full Coveraged
23173 Full Coveraged
23178 Mostly Coveraged
23181 Full Coveraged
23183 Full Coveraged
23184 Full Coveraged
23185 Full Coveraged
23186 Full Coveraged
Zip Code Coverage Level Zip Code Coverage Level Zip Code Coverage Level Zip Code Coverage Level Zip Code Coverage Level Zip Code Coverage Level
Page 62

- 162 -
23187 Full Coveraged
23188 Full Coveraged
23190 Mostly Coveraged
23191 Mostly Coveraged
23192 Mostly Coveraged
23218 Full Coveraged
23219 Full Coveraged
23220 Full Coveraged
23221 Full Coveraged
23222 Full Coveraged
23223 Full Coveraged
23224 Full Coveraged
23225 Full Coveraged
23226 Full Coveraged
23227 Full Coveraged
23228 Full Coveraged
23229 Full Coveraged
23230 Full Coveraged
23231 Full Coveraged
23232 Full Coveraged
23233 Full Coveraged
23234 Full Coveraged
23235 Full Coveraged
23236 Full Coveraged
23237 Full Coveraged
23238 Full Coveraged
23240 Full Coveraged
23241 Full Coveraged
23242 Full Coveraged
23249 Full Coveraged
23250 Full Coveraged
23255 Full Coveraged
23260 Full Coveraged
23261 Full Coveraged
23269 Full Coveraged
23270 Full Coveraged
23272 Full Coveraged
23273 Full Coveraged
23274 Full Coveraged
23275 Full Coveraged
23276 Full Coveraged
23278 Full Coveraged
23279 Full Coveraged
23280 Full Coveraged
23282 Full Coveraged
23284 Full Coveraged
23285 Full Coveraged
23286 Full Coveraged
23288 Full Coveraged
23289 Full Coveraged
23290 Full Coveraged
23291 Full Coveraged
23292 Full Coveraged
23293 Full Coveraged
23294 Full Coveraged
23295 Full Coveraged
23297 Full Coveraged
23298 Full Coveraged
23304 Full Coveraged
23314 Full Coveraged
23320 Full Coveraged
23321 Full Coveraged
23322 Full Coveraged
23323 Mostly Coveraged
23324 Full Coveraged
23325 Full Coveraged
23326 Full Coveraged
23327 Full Coveraged
23328 Full Coveraged
23397 Mostly Coveraged
23424 Full Coveraged
23430 Full Coveraged
23431 Full Coveraged
23432 Full Coveraged
23433 Full Coveraged
23434 Full Coveraged
23435 Full Coveraged
23436 Full Coveraged
23437 Mostly Coveraged
23438 Mostly Coveraged
23439 Full Coveraged
23450 Full Coveraged
23451 Full Coveraged
23452 Full Coveraged
23453 Full Coveraged
23454 Full Coveraged
23455 Full Coveraged
23456 Mostly Coveraged
23458 Full Coveraged
23459 Full Coveraged
23460 Full Coveraged
23461 Full Coveraged
23462 Full Coveraged
23463 Full Coveraged
23464 Full Coveraged
23465 Full Coveraged
23466 Full Coveraged
23467 Full Coveraged
23471 Full Coveraged
23479 Full Coveraged
23487 Mostly Coveraged
23501 Full Coveraged
23502 Full Coveraged
23503 Full Coveraged
23504 Full Coveraged
23505 Full Coveraged
23506 Full Coveraged
23507 Full Coveraged
23508 Full Coveraged
23509 Full Coveraged
23510 Full Coveraged
23511 Full Coveraged
23512 Full Coveraged
23513 Full Coveraged
23514 Full Coveraged
23515 Full Coveraged
23517 Full Coveraged
23518 Full Coveraged
23519 Full Coveraged
23520 Full Coveraged
23521 Full Coveraged
23523 Full Coveraged
23529 Full Coveraged
23530 Full Coveraged
23541 Full Coveraged
23551 Full Coveraged
23601 Full Coveraged
23602 Full Coveraged
23603 Full Coveraged
23604 Full Coveraged
23605 Full Coveraged
23606 Full Coveraged
23607 Full Coveraged
23608 Full Coveraged
23609 Full Coveraged
23612 Full Coveraged
23628 Full Coveraged
23630 Full Coveraged
23631 Full Coveraged
23651 Full Coveraged
23653 Full Coveraged
23661 Full Coveraged
23662 Full Coveraged
23663 Full Coveraged
23664 Full Coveraged
23665 Full Coveraged
23666 Full Coveraged
23667 Full Coveraged
23668 Full Coveraged
23669 Full Coveraged
23670 Full Coveraged
23681 Full Coveraged
23690 Full Coveraged
23691 Full Coveraged
23692 Full Coveraged
23693 Full Coveraged
23694 Full Coveraged
23696 Full Coveraged
23701 Full Coveraged
23702 Full Coveraged
23703 Full Coveraged
23704 Full Coveraged
23705 Full Coveraged
23707 Full Coveraged
23708 Full Coveraged
23709 Full Coveraged
23801 Full Coveraged
23803 Full Coveraged
23804 Full Coveraged
23805 Full Coveraged
23806 Full Coveraged
23831 Full Coveraged
23832 Full Coveraged
23833 Mostly Coveraged
23834 Full Coveraged
23836 Full Coveraged
23838 Mostly Coveraged
23842 Full Coveraged
23860 Full Coveraged
23875 Full Coveraged
23883 Mostly Coveraged
23885 Full Coveraged
24001 Full Coveraged
24002 Full Coveraged
24003 Full Coveraged
24004 Full Coveraged
24005 Full Coveraged
24006 Full Coveraged
24007 Full Coveraged
24008 Full Coveraged
24009 Full Coveraged
24010 Full Coveraged
24011 Full Coveraged
24012 Full Coveraged
24013 Full Coveraged
24014 Full Coveraged
24015 Full Coveraged
24016 Full Coveraged
24017 Full Coveraged
24018 Mostly Coveraged
24019 Full Coveraged
24020 Full Coveraged
24022 Full Coveraged
24023 Full Coveraged
24024 Full Coveraged
24025 Full Coveraged
24026 Full Coveraged
24027 Full Coveraged
24028 Full Coveraged
24029 Full Coveraged
24030 Full Coveraged
24031 Full Coveraged
24032 Full Coveraged
24033 Full Coveraged
24034 Full Coveraged
24035 Full Coveraged
24036 Full Coveraged
24037 Full Coveraged
24038 Full Coveraged
24040 Full Coveraged
24042 Full Coveraged
24044 Full Coveraged
24048 Full Coveraged
24050 Full Coveraged
24064 Mostly Coveraged
24065 Mostly Coveraged
24077 Full Coveraged
24083 Full Coveraged
24084 Mostly Coveraged
24090 Mostly Coveraged
24101 Mostly Coveraged
24126 Full Coveraged
24153 Mostly Coveraged
24155 Mostly Coveraged
24156 Full Coveraged
24175 Full Coveraged
24178 Mostly Coveraged
24179 Mostly Coveraged
24201 Mostly Coveraged
24203 Mostly Coveraged
24209 Mostly Coveraged
24251 Mostly Coveraged
24290 Full Coveraged
24301 Full Coveraged
24313 Mostly Coveraged
24324 Full Coveraged
24347 Full Coveraged
24360 Mostly Coveraged
24467 Mostly Coveraged
24471 Mostly Coveraged
24486 Mostly Coveraged
24501 Full Coveraged
24502 Full Coveraged
24503 Mostly Coveraged
24504 Full Coveraged
24505 Full Coveraged
24506 Full Coveraged
24512 Full Coveraged
24513 Full Coveraged
24514 Full Coveraged
24515 Full Coveraged
24550 Mostly Coveraged
24551 Mostly Coveraged
24572 Mostly Coveraged
24588 Full Coveraged
25003 Mostly Coveraged
25009 Mostly Coveraged
25064 Full Coveraged
25112 Mostly Coveraged
25143 Mostly Coveraged
25156 Mostly Coveraged
25201 Mostly Coveraged
25301 Full Coveraged
25302 Full Coveraged
25303 Full Coveraged
25304 Full Coveraged
25305 Full Coveraged
25306 Mostly Coveraged
25309 Full Coveraged
25311 Full Coveraged
25312 Full Coveraged
25313 Full Coveraged
25314 Full Coveraged
25315 Mostly Coveraged
25317 Full Coveraged
25320 Mostly Coveraged
25321 Full Coveraged
25322 Full Coveraged
25323 Full Coveraged
25324 Full Coveraged
25325 Full Coveraged
25326 Full Coveraged
25327 Full Coveraged
25328 Full Coveraged
25329 Full Coveraged
25330 Full Coveraged
25331 Full Coveraged
25332 Full Coveraged
25333 Full Coveraged
25334 Full Coveraged
25335 Full Coveraged
25336 Full Coveraged
25337 Full Coveraged
25338 Full Coveraged
25339 Full Coveraged
25350 Full Coveraged
25356 Mostly Coveraged
25357 Full Coveraged
25358 Full Coveraged
25360 Full Coveraged
25361 Full Coveraged
25362 Mostly Coveraged
25364 Full Coveraged
25365 Mostly Coveraged
25375 Full Coveraged
25387 Full Coveraged
25389 Full Coveraged
25392 Full Coveraged
25396 Full Coveraged
25414 Mostly Coveraged
25419 Mostly Coveraged
25441 Mostly Coveraged
25507 Full Coveraged
25530 Full Coveraged
25535 Mostly Coveraged
25562 Full Coveraged
25701 Mostly Coveraged
25703 Full Coveraged
25704 Full Coveraged
25705 Mostly Coveraged
25706 Full Coveraged
25707 Full Coveraged
25708 Full Coveraged
25709 Full Coveraged
25710 Full Coveraged
25711 Full Coveraged
25712 Full Coveraged
25713 Full Coveraged
25714 Full Coveraged
25715 Full Coveraged
25716 Full Coveraged
25717 Full Coveraged
25718 Full Coveraged
25719 Full Coveraged
25720 Full Coveraged
25721 Full Coveraged
25722 Full Coveraged
25723 Full Coveraged
25724 Full Coveraged
25725 Full Coveraged
25726 Full Coveraged
25727 Full Coveraged
25728 Full Coveraged
25729 Full Coveraged
25755 Full Coveraged
25770 Full Coveraged
25771 Full Coveraged
25772 Full Coveraged
25773 Full Coveraged
25774 Full Coveraged
25775 Full Coveraged
25776 Full Coveraged
25777 Full Coveraged
25778 Full Coveraged
25779 Full Coveraged
26003 Full Coveraged
26030 Full Coveraged
26031 Full Coveraged
26032 Mostly Coveraged
26035 Full Coveraged
26036 Mostly Coveraged
26037 Full Coveraged
26038 Full Coveraged
26040 Full Coveraged
26041 Mostly Coveraged
26047 Mostly Coveraged
26058 Full Coveraged
26059 Mostly Coveraged
26060 Mostly Coveraged
26062 Full Coveraged
26070 Full Coveraged
26074 Mostly Coveraged
26075 Full Coveraged
26101 Mostly Coveraged
26102 Full Coveraged
26103 Full Coveraged
26104 Full Coveraged
26105 Full Coveraged
26106 Full Coveraged
26120 Mostly Coveraged
26121 Mostly Coveraged
26142 Mostly Coveraged
26150 Mostly Coveraged
26184 Mostly Coveraged
26187 Full Coveraged
27006 Mostly Coveraged
27009 Full Coveraged
27010 Mostly Coveraged
27012 Full Coveraged
27016 Mostly Coveraged
27019 Mostly Coveraged
27021 Full Coveraged
27025 Mostly Coveraged
27040 Mostly Coveraged
27041 Mostly Coveraged
27043 Full Coveraged
27045 Mostly Coveraged
27050 Mostly Coveraged
27051 Mostly Coveraged
27053 Full Coveraged
27094 Mostly Coveraged
27098 Mostly Coveraged
27099 Mostly Coveraged
27101 Full Coveraged
27102 Full Coveraged
27103 Full Coveraged
27104 Full Coveraged
27105 Full Coveraged
27106 Full Coveraged
27107 Full Coveraged
27108 Full Coveraged
27109 Full Coveraged
27110 Full Coveraged
27111 Full Coveraged
27113 Full Coveraged
27114 Full Coveraged
27115 Full Coveraged
27116 Full Coveraged
27117 Full Coveraged
27120 Full Coveraged
27127 Full Coveraged
27130 Full Coveraged
27150 Full Coveraged
27151 Full Coveraged
27155 Full Coveraged
27156 Full Coveraged
27157 Full Coveraged
27201 Full Coveraged
27202 Full Coveraged
27203 Full Coveraged
27204 Full Coveraged
27205 Full Coveraged
27214 Full Coveraged
27215 Full Coveraged
27216 Full Coveraged
27217 Mostly Coveraged
27228 Full Coveraged
27230 Full Coveraged
27231 Mostly Coveraged
27235 Full Coveraged
27243 Full Coveraged
27244 Mostly Coveraged
27248 Full Coveraged
27249 Full Coveraged
27253 Full Coveraged
27258 Full Coveraged
27260 Full Coveraged
27261 Full Coveraged
27262 Full Coveraged
27263 Full Coveraged
27264 Full Coveraged
27265 Full Coveraged
27278 Full Coveraged
27281 Mostly Coveraged
27282 Full Coveraged
27283 Mostly Coveraged
27284 Full Coveraged
27285 Full Coveraged
27288 Mostly Coveraged
27289 Mostly Coveraged
27293 Full Coveraged
27294 Full Coveraged
27295 Full Coveraged
27299 Mostly Coveraged
27301 Full Coveraged
27302 Mostly Coveraged
27310 Full Coveraged
27312 Mostly Coveraged
27313 Mostly Coveraged
27317 Full Coveraged
27320 Full Coveraged
27323 Full Coveraged
27326 Mostly Coveraged
27340 Full Coveraged
27342 Full Coveraged
27349 Mostly Coveraged
27350 Full Coveraged
27357 Full Coveraged
27358 Full Coveraged
27359 Full Coveraged
27360 Mostly Coveraged
27361 Mostly Coveraged
27370 Mostly Coveraged
27373 Mostly Coveraged
27374 Full Coveraged
27375 Full Coveraged
27376 Mostly Coveraged
27377 Full Coveraged
27401 Full Coveraged
27402 Full Coveraged
27403 Full Coveraged
27404 Full Coveraged
27405 Full Coveraged
27406 Full Coveraged
Zip Code Coverage Level Zip Code Coverage Level Zip Code Coverage Level Zip Code Coverage Level Zip Code Coverage Level Zip Code Coverage Level
Page 63

- 163 -
27407 Full Coveraged
27408 Full Coveraged
27409 Full Coveraged
27410 Full Coveraged
27411 Full Coveraged
27412 Full Coveraged
27413 Full Coveraged
27415 Full Coveraged
27416 Full Coveraged
27417 Full Coveraged
27419 Full Coveraged
27420 Full Coveraged
27425 Full Coveraged
27427 Full Coveraged
27429 Full Coveraged
27435 Full Coveraged
27438 Full Coveraged
27455 Full Coveraged
27495 Full Coveraged
27498 Full Coveraged
27501 Mostly Coveraged
27502 Full Coveraged
27503 Mostly Coveraged
27504 Mostly Coveraged
27506 Mostly Coveraged
27510 Full Coveraged
27511 Full Coveraged
27512 Full Coveraged
27513 Full Coveraged
27514 Full Coveraged
27515 Full Coveraged
27516 Full Coveraged
27517 Full Coveraged
27518 Full Coveraged
27519 Full Coveraged
27520 Mostly Coveraged
27521 Full Coveraged
27523 Mostly Coveraged
27524 Full Coveraged
27525 Mostly Coveraged
27526 Mostly Coveraged
27529 Mostly Coveraged
27530 Full Coveraged
27531 Full Coveraged
27532 Full Coveraged
27533 Full Coveraged
27534 Full Coveraged
27536 Mostly Coveraged
27537 Mostly Coveraged
27539 Full Coveraged
27540 Full Coveraged
27542 Mostly Coveraged
27543 Mostly Coveraged
27544 Full Coveraged
27545 Full Coveraged
27557 Full Coveraged
27560 Full Coveraged
27562 Mostly Coveraged
27569 Mostly Coveraged
27571 Full Coveraged
27576 Mostly Coveraged
27577 Full Coveraged
27587 Full Coveraged
27588 Full Coveraged
27591 Full Coveraged
27592 Full Coveraged
27593 Full Coveraged
27596 Full Coveraged
27597 Full Coveraged
27599 Full Coveraged
27601 Full Coveraged
27602 Full Coveraged
27603 Full Coveraged
27604 Full Coveraged
27605 Full Coveraged
27606 Full Coveraged
27607 Full Coveraged
27608 Full Coveraged
27609 Full Coveraged
27610 Full Coveraged
27611 Full Coveraged
27612 Full Coveraged
27613 Full Coveraged
27614 Full Coveraged
27615 Full Coveraged
27616 Full Coveraged
27617 Full Coveraged
27619 Full Coveraged
27620 Full Coveraged
27621 Full Coveraged
27622 Full Coveraged
27623 Full Coveraged
27624 Full Coveraged
27625 Full Coveraged
27626 Full Coveraged
27627 Full Coveraged
27628 Full Coveraged
27629 Full Coveraged
27634 Full Coveraged
27635 Full Coveraged
27636 Full Coveraged
27640 Full Coveraged
27650 Full Coveraged
27656 Full Coveraged
27658 Full Coveraged
27661 Full Coveraged
27668 Full Coveraged
27675 Full Coveraged
27676 Full Coveraged
27690 Full Coveraged
27695 Full Coveraged
27697 Full Coveraged
27698 Full Coveraged
27699 Full Coveraged
27701 Full Coveraged
27702 Full Coveraged
27703 Full Coveraged
27704 Full Coveraged
27705 Full Coveraged
27707 Full Coveraged
27708 Full Coveraged
27709 Full Coveraged
27710 Full Coveraged
27711 Full Coveraged
27712 Full Coveraged
27713 Full Coveraged
27715 Full Coveraged
27717 Full Coveraged
27722 Full Coveraged
27801 Full Coveraged
27802 Full Coveraged
27803 Full Coveraged
27804 Full Coveraged
27807 Full Coveraged
27809 Mostly Coveraged
27811 Full Coveraged
27813 Mostly Coveraged
27822 Full Coveraged
27827 Mostly Coveraged
27828 Mostly Coveraged
27833 Full Coveraged
27834 Full Coveraged
27835 Full Coveraged
27836 Full Coveraged
27858 Mostly Coveraged
27863 Full Coveraged
27864 Full Coveraged
27878 Full Coveraged
27879 Mostly Coveraged
27880 Full Coveraged
27883 Mostly Coveraged
27893 Full Coveraged
27894 Full Coveraged
27895 Full Coveraged
27896 Full Coveraged
27948 Mostly Coveraged
27954 Full Coveraged
27968 Full Coveraged
27981 Full Coveraged
28006 Mostly Coveraged
28010 Full Coveraged
28012 Full Coveraged
28016 Full Coveraged
28017 Mostly Coveraged
28018 Full Coveraged
28019 Mostly Coveraged
28020 Mostly Coveraged
28021 Mostly Coveraged
28023 Full Coveraged
28024 Mostly Coveraged
28025 Full Coveraged
28026 Full Coveraged
28027 Mostly Coveraged
28031 Full Coveraged
28032 Full Coveraged
28034 Full Coveraged
28035 Full Coveraged
28036 Full Coveraged
28037 Full Coveraged
28038 Full Coveraged
28039 Full Coveraged
28040 Full Coveraged
28041 Full Coveraged
28042 Mostly Coveraged
28043 Mostly Coveraged
28052 Full Coveraged
28053 Full Coveraged
28054 Full Coveraged
28055 Full Coveraged
28056 Full Coveraged
28070 Full Coveraged
28071 Mostly Coveraged
28072 Full Coveraged
28073 Full Coveraged
28075 Full Coveraged
28076 Mostly Coveraged
28077 Mostly Coveraged
28078 Full Coveraged
28079 Full Coveraged
28080 Full Coveraged
28081 Mostly Coveraged
28082 Full Coveraged
28083 Full Coveraged
28086 Full Coveraged
28088 Full Coveraged
28089 Mostly Coveraged
28090 Mostly Coveraged
28091 Mostly Coveraged
28098 Full Coveraged
28101 Full Coveraged
28104 Full Coveraged
28105 Full Coveraged
28106 Full Coveraged
28108 Mostly Coveraged
28110 Full Coveraged
28111 Full Coveraged
28112 Full Coveraged
28114 Mostly Coveraged
28115 Mostly Coveraged
28117 Mostly Coveraged
28120 Full Coveraged
28123 Full Coveraged
28124 Mostly Coveraged
28126 Full Coveraged
28130 Full Coveraged
28134 Full Coveraged
28136 Mostly Coveraged
28138 Full Coveraged
28144 Full Coveraged
28145 Full Coveraged
28146 Full Coveraged
28147 Mostly Coveraged
28150 Full Coveraged
28151 Full Coveraged
28152 Full Coveraged
28159 Full Coveraged
28160 Mostly Coveraged
28164 Mostly Coveraged
28166 Full Coveraged
28169 Full Coveraged
28173 Mostly Coveraged
28174 Full Coveraged
28201 Full Coveraged
28202 Full Coveraged
28203 Full Coveraged
28204 Full Coveraged
28205 Full Coveraged
28206 Full Coveraged
28207 Full Coveraged
28208 Full Coveraged
28209 Full Coveraged
28210 Full Coveraged
28211 Full Coveraged
28212 Full Coveraged
28213 Full Coveraged
28214 Full Coveraged
28215 Full Coveraged
28216 Full Coveraged
28217 Full Coveraged
28218 Full Coveraged
28219 Full Coveraged
28220 Full Coveraged
28221 Full Coveraged
28222 Full Coveraged
28223 Full Coveraged
28224 Full Coveraged
28226 Full Coveraged
28227 Full Coveraged
28228 Full Coveraged
28229 Full Coveraged
28230 Full Coveraged
28231 Full Coveraged
28232 Full Coveraged
28233 Full Coveraged
28234 Full Coveraged
28235 Full Coveraged
28236 Full Coveraged
28237 Full Coveraged
28240 Full Coveraged
28241 Full Coveraged
28242 Full Coveraged
28243 Full Coveraged
28244 Full Coveraged
28246 Full Coveraged
28247 Full Coveraged
28253 Full Coveraged
28254 Full Coveraged
28256 Full Coveraged
28258 Full Coveraged
28260 Full Coveraged
28261 Full Coveraged
28262 Full Coveraged
28265 Full Coveraged
28266 Full Coveraged
28269 Full Coveraged
28270 Full Coveraged
28271 Full Coveraged
28272 Full Coveraged
28273 Full Coveraged
28274 Full Coveraged
28275 Full Coveraged
28277 Full Coveraged
28278 Full Coveraged
28280 Full Coveraged
28281 Full Coveraged
28282 Full Coveraged
28283 Full Coveraged
28284 Full Coveraged
28285 Full Coveraged
28287 Full Coveraged
28289 Full Coveraged
28290 Full Coveraged
28296 Full Coveraged
28297 Full Coveraged
28299 Full Coveraged
28301 Full Coveraged
28302 Full Coveraged
28303 Full Coveraged
28304 Full Coveraged
28305 Full Coveraged
28306 Full Coveraged
28307 Full Coveraged
28308 Full Coveraged
28309 Full Coveraged
28311 Full Coveraged
28312 Full Coveraged
28314 Full Coveraged
28315 Full Coveraged
28330 Full Coveraged
28331 Full Coveraged
28333 Full Coveraged
28334 Full Coveraged
28335 Full Coveraged
28338 Mostly Coveraged
28339 Full Coveraged
28342 Full Coveraged
28343 Full Coveraged
28344 Mostly Coveraged
28345 Mostly Coveraged
28347 Mostly Coveraged
28348 Mostly Coveraged
28351 Mostly Coveraged
28352 Full Coveraged
28353 Full Coveraged
28356 Mostly Coveraged
28358 Full Coveraged
28359 Full Coveraged
28360 Full Coveraged
28361 Mostly Coveraged
28363 Mostly Coveraged
28364 Mostly Coveraged
28370 Full Coveraged
28371 Mostly Coveraged
28372 Mostly Coveraged
28373 Full Coveraged
28374 Full Coveraged
28379 Full Coveraged
28380 Full Coveraged
28384 Mostly Coveraged
28387 Full Coveraged
28388 Full Coveraged
28390 Mostly Coveraged
28391 Full Coveraged
28395 Mostly Coveraged
28396 Mostly Coveraged
28401 Full Coveraged
28402 Full Coveraged
28403 Full Coveraged
28404 Mostly Coveraged
28405 Full Coveraged
28406 Full Coveraged
28407 Full Coveraged
28408 Full Coveraged
28409 Full Coveraged
28412 Full Coveraged
28420 Mostly Coveraged
28428 Mostly Coveraged
28429 Mostly Coveraged
28459 Full Coveraged
28462 Full Coveraged
28468 Mostly Coveraged
28469 Full Coveraged
28470 Full Coveraged
28479 Mostly Coveraged
28480 Mostly Coveraged
28501 Full Coveraged
28502 Full Coveraged
28503 Full Coveraged
28504 Full Coveraged
28512 Full Coveraged
28513 Mostly Coveraged
28519 Full Coveraged
28525 Mostly Coveraged
28527 Mostly Coveraged
28538 Mostly Coveraged
28540 Full Coveraged
28541 Full Coveraged
28542 Mostly Coveraged
28543 Full Coveraged
28544 Mostly Coveraged
28545 Full Coveraged
28546 Full Coveraged
28547 Mostly Coveraged
28554 Mostly Coveraged
28557 Full Coveraged
28560 Full Coveraged
28561 Full Coveraged
28562 Full Coveraged
28563 Full Coveraged
28564 Full Coveraged
28575 Mostly Coveraged
28590 Full Coveraged
28601 Full Coveraged
28602 Full Coveraged
28603 Full Coveraged
28606 Mostly Coveraged
28609 Full Coveraged
28610 Mostly Coveraged
28613 Mostly Coveraged
28619 Mostly Coveraged
28625 Full Coveraged
28628 Full Coveraged
28630 Mostly Coveraged
28636 Full Coveraged
28637 Full Coveraged
28650 Full Coveraged
28654 Full Coveraged
28655 Full Coveraged
28656 Mostly Coveraged
28658 Full Coveraged
28659 Mostly Coveraged
28660 Mostly Coveraged
28666 Mostly Coveraged
28667 Full Coveraged
28673 Full Coveraged
28677 Full Coveraged
28678 Mostly Coveraged
28680 Mostly Coveraged
28681 Mostly Coveraged
28682 Mostly Coveraged
28687 Full Coveraged
28688 Mostly Coveraged
28689 Full Coveraged
28690 Mostly Coveraged
28697 Full Coveraged
28699 Full Coveraged
28701 Full Coveraged
28704 Mostly Coveraged
28712 Full Coveraged
28715 Full Coveraged
28716 Mostly Coveraged
28718 Full Coveraged
28720 Mostly Coveraged
28721 Full Coveraged
28722 Mostly Coveraged
28724 Full Coveraged
28725 Full Coveraged
28726 Full Coveraged
28727 Mostly Coveraged
28728 Full Coveraged
28729 Full Coveraged
28731 Full Coveraged
28732 Full Coveraged
28734 Mostly Coveraged
28738 Full Coveraged
28739 Full Coveraged
28742 Mostly Coveraged
28744 Mostly Coveraged
28745 Full Coveraged
28748 Full Coveraged
28750 Full Coveraged
28753 Mostly Coveraged
28756 Full Coveraged
28758 Full Coveraged
28760 Full Coveraged
28766 Full Coveraged
28768 Full Coveraged
28773 Full Coveraged
28776 Mostly Coveraged
28779 Mostly Coveraged
28782 Full Coveraged
28784 Mostly Coveraged
28785 Full Coveraged
28786 Mostly Coveraged
28787 Mostly Coveraged
28788 Mostly Coveraged
28789 Mostly Coveraged
28790 Mostly Coveraged
28791 Full Coveraged
28792 Mostly Coveraged
28793 Full Coveraged
28801 Full Coveraged
28802 Full Coveraged
28803 Mostly Coveraged
28804 Full Coveraged
28805 Mostly Coveraged
28806 Full Coveraged
28810 Full Coveraged
28813 Mostly Coveraged
28814 Full Coveraged
28815 Mostly Coveraged
28816 Full Coveraged
29002 Full Coveraged
29016 Full Coveraged
Zip Code Coverage Level Zip Code Coverage Level Zip Code Coverage Level Zip Code Coverage Level Zip Code Coverage Level Zip Code Coverage Level
Page 64

- 164 -
29018 Mostly Coveraged
29020 Mostly Coveraged
29033 Full Coveraged
29036 Mostly Coveraged
29038 Mostly Coveraged
29039 Full Coveraged
29045 Full Coveraged
29051 Mostly Coveraged
29053 Mostly Coveraged
29059 Mostly Coveraged
29061 Mostly Coveraged
29062 Mostly Coveraged
29063 Full Coveraged
29071 Full Coveraged
29072 Full Coveraged
29073 Mostly Coveraged
29078 Full Coveraged
29104 Mostly Coveraged
29115 Full Coveraged
29116 Full Coveraged
29117 Full Coveraged
29118 Full Coveraged
29130 Mostly Coveraged
29132 Full Coveraged
29133 Mostly Coveraged
29135 Full Coveraged
29147 Full Coveraged
29150 Full Coveraged
29151 Full Coveraged
29153 Full Coveraged
29154 Mostly Coveraged
29160 Mostly Coveraged
29169 Full Coveraged
29170 Full Coveraged
29171 Full Coveraged
29172 Full Coveraged
29177 Full Coveraged
29180 Full Coveraged
29201 Full Coveraged
29202 Full Coveraged
29203 Full Coveraged
29204 Full Coveraged
29205 Full Coveraged
29206 Full Coveraged
29207 Full Coveraged
29208 Full Coveraged
29209 Mostly Coveraged
29210 Full Coveraged
29211 Full Coveraged
29212 Full Coveraged
29214 Full Coveraged
29215 Full Coveraged
29216 Full Coveraged
29217 Full Coveraged
29218 Full Coveraged
29219 Full Coveraged
29220 Full Coveraged
29221 Full Coveraged
29222 Full Coveraged
29223 Full Coveraged
29224 Full Coveraged
29225 Full Coveraged
29226 Full Coveraged
29227 Full Coveraged
29228 Full Coveraged
29229 Full Coveraged
29230 Full Coveraged
29240 Full Coveraged
29250 Full Coveraged
29260 Full Coveraged
29290 Full Coveraged
29292 Full Coveraged
29301 Full Coveraged
29302 Full Coveraged
29303 Full Coveraged
29304 Full Coveraged
29305 Full Coveraged
29306 Full Coveraged
29307 Full Coveraged
29316 Full Coveraged
29318 Full Coveraged
29319 Full Coveraged
29320 Full Coveraged
29322 Mostly Coveraged
29324 Mostly Coveraged
29325 Full Coveraged
29329 Full Coveraged
29330 Mostly Coveraged
29331 Mostly Coveraged
29332 Mostly Coveraged
29333 Full Coveraged
29334 Full Coveraged
29335 Mostly Coveraged
29336 Full Coveraged
29340 Mostly Coveraged
29341 Full Coveraged
29342 Full Coveraged
29346 Full Coveraged
29348 Full Coveraged
29349 Full Coveraged
29351 Full Coveraged
29355 Mostly Coveraged
29356 Full Coveraged
29360 Mostly Coveraged
29365 Full Coveraged
29368 Mostly Coveraged
29369 Full Coveraged
29370 Mostly Coveraged
29374 Mostly Coveraged
29375 Mostly Coveraged
29376 Full Coveraged
29377 Full Coveraged
29378 Full Coveraged
29384 Mostly Coveraged
29385 Full Coveraged
29386 Mostly Coveraged
29390 Full Coveraged
29391 Full Coveraged
29401 Full Coveraged
29402 Full Coveraged
29403 Full Coveraged
29404 Full Coveraged
29405 Full Coveraged
29406 Full Coveraged
29407 Full Coveraged
29409 Full Coveraged
29410 Full Coveraged
29412 Full Coveraged
29413 Full Coveraged
29414 Full Coveraged
29415 Full Coveraged
29416 Full Coveraged
29417 Full Coveraged
29418 Full Coveraged
29419 Full Coveraged
29420 Full Coveraged
29422 Full Coveraged
29423 Full Coveraged
29424 Full Coveraged
29425 Full Coveraged
29431 Mostly Coveraged
29434 Mostly Coveraged
29435 Mostly Coveraged
29437 Mostly Coveraged
29439 Full Coveraged
29440 Full Coveraged
29442 Full Coveraged
29445 Full Coveraged
29447 Mostly Coveraged
29448 Full Coveraged
29451 Full Coveraged
29452 Full Coveraged
29455 Full Coveraged
29456 Full Coveraged
29457 Full Coveraged
29461 Full Coveraged
29464 Full Coveraged
29465 Full Coveraged
29466 Full Coveraged
29469 Full Coveraged
29470 Mostly Coveraged
29471 Mostly Coveraged
29472 Mostly Coveraged
29474 Full Coveraged
29477 Full Coveraged
29482 Full Coveraged
29483 Full Coveraged
29484 Full Coveraged
29485 Full Coveraged
29487 Full Coveraged
29488 Mostly Coveraged
29492 Full Coveraged
29501 Full Coveraged
29502 Full Coveraged
29503 Full Coveraged
29504 Full Coveraged
29505 Full Coveraged
29506 Mostly Coveraged
29526 Mostly Coveraged
29528 Mostly Coveraged
29530 Mostly Coveraged
29532 Mostly Coveraged
29541 Full Coveraged
29568 Mostly Coveraged
29570 Mostly Coveraged
29572 Full Coveraged
29575 Full Coveraged
29576 Full Coveraged
29577 Full Coveraged
29578 Full Coveraged
29579 Full Coveraged
29585 Mostly Coveraged
29588 Full Coveraged
29594 Mostly Coveraged
29598 Mostly Coveraged
29601 Full Coveraged
29602 Full Coveraged
29603 Full Coveraged
29604 Full Coveraged
29605 Full Coveraged
29606 Full Coveraged
29607 Full Coveraged
29608 Full Coveraged
29609 Full Coveraged
29610 Full Coveraged
29611 Full Coveraged
29612 Full Coveraged
29613 Full Coveraged
29614 Full Coveraged
29615 Full Coveraged
29616 Full Coveraged
29617 Full Coveraged
29621 Full Coveraged
29622 Full Coveraged
29623 Full Coveraged
29624 Full Coveraged
29625 Full Coveraged
29626 Mostly Coveraged
29627 Mostly Coveraged
29630 Mostly Coveraged
29631 Mostly Coveraged
29632 Mostly Coveraged
29633 Mostly Coveraged
29634 Mostly Coveraged
29635 Mostly Coveraged
29636 Full Coveraged
29640 Mostly Coveraged
29643 Mostly Coveraged
29644 Mostly Coveraged
29646 Full Coveraged
29647 Mostly Coveraged
29648 Full Coveraged
29649 Full Coveraged
29650 Full Coveraged
29651 Full Coveraged
29652 Full Coveraged
29656 Full Coveraged
29657 Mostly Coveraged
29661 Mostly Coveraged
29662 Full Coveraged
29665 Full Coveraged
29666 Full Coveraged
29667 Mostly Coveraged
29670 Full Coveraged
29672 Full Coveraged
29675 Full Coveraged
29677 Full Coveraged
29678 Full Coveraged
29679 Full Coveraged
29680 Full Coveraged
29681 Full Coveraged
29683 Mostly Coveraged
29684 Mostly Coveraged
29687 Full Coveraged
29688 Mostly Coveraged
29690 Mostly Coveraged
29691 Mostly Coveraged
29693 Mostly Coveraged
29695 Mostly Coveraged
29696 Full Coveraged
29697 Mostly Coveraged
29698 Full Coveraged
29702 Mostly Coveraged
29703 Full Coveraged
29704 Mostly Coveraged
29708 Full Coveraged
29710 Full Coveraged
29712 Mostly Coveraged
29715 Full Coveraged
29716 Full Coveraged
29724 Mostly Coveraged
29730 Full Coveraged
29731 Full Coveraged
29732 Full Coveraged
29734 Full Coveraged
29743 Mostly Coveraged
29745 Full Coveraged
29801 Full Coveraged
29802 Full Coveraged
29803 Mostly Coveraged
29804 Full Coveraged
29805 Full Coveraged
29809 Mostly Coveraged
29816 Full Coveraged
29822 Full Coveraged
29828 Full Coveraged
29829 Full Coveraged
29834 Full Coveraged
29839 Full Coveraged
29841 Full Coveraged
29842 Full Coveraged
29850 Full Coveraged
29851 Full Coveraged
29860 Mostly Coveraged
29861 Full Coveraged
29910 Mostly Coveraged
29915 Full Coveraged
29925 Full Coveraged
29926 Full Coveraged
29928 Full Coveraged
29938 Full Coveraged
30002 Full Coveraged
30003 Full Coveraged
30004 Full Coveraged
30005 Full Coveraged
30006 Full Coveraged
30007 Full Coveraged
30008 Full Coveraged
30009 Full Coveraged
30010 Full Coveraged
30011 Full Coveraged
30012 Mostly Coveraged
30013 Full Coveraged
30014 Full Coveraged
30015 Full Coveraged
30016 Full Coveraged
30017 Full Coveraged
30018 Full Coveraged
30019 Full Coveraged
30021 Full Coveraged
30022 Full Coveraged
30023 Full Coveraged
30024 Full Coveraged
30025 Full Coveraged
30026 Full Coveraged
30028 Full Coveraged
30029 Full Coveraged
30030 Full Coveraged
30031 Full Coveraged
30032 Full Coveraged
30033 Full Coveraged
30034 Full Coveraged
30035 Full Coveraged
30036 Full Coveraged
30037 Full Coveraged
30038 Mostly Coveraged
30039 Full Coveraged
30040 Full Coveraged
30041 Full Coveraged
30042 Full Coveraged
30043 Full Coveraged
30044 Full Coveraged
30045 Full Coveraged
30046 Full Coveraged
30047 Full Coveraged
30048 Full Coveraged
30049 Full Coveraged
30052 Mostly Coveraged
30054 Full Coveraged
30055 Mostly Coveraged
30058 Full Coveraged
30060 Full Coveraged
30061 Full Coveraged
30062 Full Coveraged
30064 Full Coveraged
30065 Full Coveraged
30066 Full Coveraged
30067 Full Coveraged
30068 Full Coveraged
30069 Full Coveraged
30070 Full Coveraged
30071 Full Coveraged
30072 Full Coveraged
30074 Full Coveraged
30075 Full Coveraged
30076 Full Coveraged
30077 Full Coveraged
30078 Full Coveraged
30079 Full Coveraged
30080 Full Coveraged
30081 Full Coveraged
30082 Full Coveraged
30083 Full Coveraged
30084 Full Coveraged
30085 Full Coveraged
30086 Full Coveraged
30087 Full Coveraged
30088 Full Coveraged
30090 Full Coveraged
30091 Full Coveraged
30092 Full Coveraged
30093 Full Coveraged
30094 Full Coveraged
30095 Full Coveraged
30096 Full Coveraged
30097 Full Coveraged
30098 Full Coveraged
30099 Full Coveraged
30101 Full Coveraged
30102 Full Coveraged
30106 Full Coveraged
30107 Mostly Coveraged
30109 Full Coveraged
30110 Mostly Coveraged
30111 Full Coveraged
30112 Full Coveraged
30114 Full Coveraged
30115 Mostly Coveraged
30116 Full Coveraged
30117 Full Coveraged
30118 Full Coveraged
30119 Full Coveraged
30120 Full Coveraged
30121 Full Coveraged
30122 Full Coveraged
30123 Full Coveraged
30124 Mostly Coveraged
30126 Full Coveraged
30127 Full Coveraged
30129 Full Coveraged
30132 Full Coveraged
30133 Full Coveraged
30134 Full Coveraged
30135 Full Coveraged
30137 Full Coveraged
30141 Full Coveraged
30142 Full Coveraged
30143 Mostly Coveraged
30144 Full Coveraged
30146 Full Coveraged
30147 Full Coveraged
30148 Full Coveraged
30149 Full Coveraged
30150 Mostly Coveraged
30151 Mostly Coveraged
30152 Full Coveraged
30154 Full Coveraged
30156 Full Coveraged
30157 Full Coveraged
30160 Full Coveraged
30161 Full Coveraged
30162 Full Coveraged
30163 Full Coveraged
30164 Full Coveraged
30165 Full Coveraged
30168 Full Coveraged
30169 Full Coveraged
30171 Mostly Coveraged
30173 Mostly Coveraged
30177 Full Coveraged
30180 Mostly Coveraged
30183 Full Coveraged
30184 Full Coveraged
30185 Full Coveraged
30187 Full Coveraged
30188 Full Coveraged
30189 Full Coveraged
30205 Mostly Coveraged
30212 Full Coveraged
30213 Full Coveraged
30214 Full Coveraged
30215 Mostly Coveraged
30220 Mostly Coveraged
30223 Full Coveraged
30224 Mostly Coveraged
30228 Full Coveraged
30229 Mostly Coveraged
30230 Mostly Coveraged
30232 Mostly Coveraged
30233 Mostly Coveraged
30234 Full Coveraged
30236 Full Coveraged
30237 Full Coveraged
30238 Full Coveraged
30240 Full Coveraged
30241 Full Coveraged
30248 Full Coveraged
30250 Full Coveraged
30252 Full Coveraged
30253 Full Coveraged
30257 Mostly Coveraged
30259 Mostly Coveraged
30260 Full Coveraged
30261 Mostly Coveraged
30263 Full Coveraged
30264 Full Coveraged
30265 Full Coveraged
30266 Mostly Coveraged
30268 Full Coveraged
30269 Full Coveraged
30270 Full Coveraged
30271 Full Coveraged
30272 Full Coveraged
30273 Full Coveraged
30274 Full Coveraged
30275 Full Coveraged
30276 Full Coveraged
30277 Full Coveraged
30281 Full Coveraged
30284 Full Coveraged
30287 Full Coveraged
30288 Full Coveraged
30289 Full Coveraged
30290 Full Coveraged
30291 Full Coveraged
30294 Full Coveraged
30296 Full Coveraged
30297 Full Coveraged
30298 Full Coveraged
30301 Full Coveraged
30302 Full Coveraged
30303 Full Coveraged
30304 Full Coveraged
30305 Full Coveraged
Zip Code Coverage Level Zip Code Coverage Level Zip Code Coverage Level Zip Code Coverage Level Zip Code Coverage Level Zip Code Coverage Level
Page 65

- 165 -
30306 Full Coveraged
30307 Full Coveraged
30308 Full Coveraged
30309 Full Coveraged
30310 Full Coveraged
30311 Full Coveraged
30312 Full Coveraged
30313 Full Coveraged
30314 Full Coveraged
30315 Full Coveraged
30316 Full Coveraged
30317 Full Coveraged
30318 Full Coveraged
30319 Full Coveraged
30320 Full Coveraged
30321 Full Coveraged
30322 Full Coveraged
30324 Full Coveraged
30325 Full Coveraged
30326 Full Coveraged
30327 Full Coveraged
30328 Full Coveraged
30329 Full Coveraged
30330 Full Coveraged
30331 Full Coveraged
30332 Full Coveraged
30333 Full Coveraged
30334 Full Coveraged
30336 Full Coveraged
30337 Full Coveraged
30338 Full Coveraged
30339 Full Coveraged
30340 Full Coveraged
30341 Full Coveraged
30342 Full Coveraged
30343 Full Coveraged
30344 Full Coveraged
30345 Full Coveraged
30346 Full Coveraged
30347 Full Coveraged
30348 Full Coveraged
30349 Full Coveraged
30350 Full Coveraged
30353 Full Coveraged
30354 Full Coveraged
30355 Full Coveraged
30356 Full Coveraged
30357 Full Coveraged
30358 Full Coveraged
30359 Full Coveraged
30360 Full Coveraged
30361 Full Coveraged
30362 Full Coveraged
30363 Full Coveraged
30364 Full Coveraged
30366 Full Coveraged
30368 Full Coveraged
30369 Full Coveraged
30370 Full Coveraged
30371 Full Coveraged
30374 Full Coveraged
30375 Full Coveraged
30376 Full Coveraged
30377 Full Coveraged
30378 Full Coveraged
30379 Full Coveraged
30380 Full Coveraged
30384 Full Coveraged
30385 Full Coveraged
30386 Full Coveraged
30387 Full Coveraged
30388 Full Coveraged
30389 Full Coveraged
30390 Full Coveraged
30392 Full Coveraged
30394 Full Coveraged
30396 Full Coveraged
30398 Full Coveraged
30399 Full Coveraged
30424 Mostly Coveraged
30451 Mostly Coveraged
30452 Mostly Coveraged
30458 Full Coveraged
30459 Full Coveraged
30460 Full Coveraged
30461 Full Coveraged
30501 Full Coveraged
30502 Full Coveraged
30503 Full Coveraged
30504 Full Coveraged
30506 Full Coveraged
30507 Full Coveraged
30515 Full Coveraged
30517 Full Coveraged
30518 Full Coveraged
30519 Full Coveraged
30527 Mostly Coveraged
30542 Full Coveraged
30543 Mostly Coveraged
30548 Full Coveraged
30554 Mostly Coveraged
30564 Mostly Coveraged
30565 Mostly Coveraged
30566 Mostly Coveraged
30567 Mostly Coveraged
30575 Mostly Coveraged
30601 Full Coveraged
30602 Full Coveraged
30603 Full Coveraged
30604 Full Coveraged
30605 Full Coveraged
30606 Full Coveraged
30607 Full Coveraged
30608 Full Coveraged
30609 Full Coveraged
30612 Full Coveraged
30619 Mostly Coveraged
30620 Mostly Coveraged
30621 Mostly Coveraged
30622 Full Coveraged
30625 Mostly Coveraged
30631 Full Coveraged
30641 Mostly Coveraged
30642 Full Coveraged
30645 Mostly Coveraged
30646 Mostly Coveraged
30655 Full Coveraged
30656 Mostly Coveraged
30663 Mostly Coveraged
30664 Full Coveraged
30665 Full Coveraged
30666 Mostly Coveraged
30669 Mostly Coveraged
30677 Mostly Coveraged
30678 Mostly Coveraged
30680 Full Coveraged
30683 Full Coveraged
30710 Mostly Coveraged
30719 Full Coveraged
30720 Full Coveraged
30721 Mostly Coveraged
30722 Full Coveraged
30725 Full Coveraged
30726 Full Coveraged
30735 Mostly Coveraged
30736 Full Coveraged
30740 Full Coveraged
30741 Full Coveraged
30742 Full Coveraged
30746 Mostly Coveraged
30750 Full Coveraged
30752 Full Coveraged
30755 Full Coveraged
30756 Mostly Coveraged
30757 Full Coveraged
30805 Mostly Coveraged
30809 Mostly Coveraged
30812 Full Coveraged
30813 Mostly Coveraged
30815 Mostly Coveraged
30821 Mostly Coveraged
30901 Full Coveraged
30903 Full Coveraged
30904 Full Coveraged
30905 Mostly Coveraged
30906 Mostly Coveraged
30907 Full Coveraged
30909 Full Coveraged
30911 Full Coveraged
30912 Full Coveraged
30914 Full Coveraged
30916 Full Coveraged
30917 Full Coveraged
30919 Full Coveraged
30999 Full Coveraged
31004 Full Coveraged
31005 Mostly Coveraged
31008 Mostly Coveraged
31019 Mostly Coveraged
31021 Full Coveraged
31022 Mostly Coveraged
31027 Mostly Coveraged
31028 Full Coveraged
31029 Full Coveraged
31034 Full Coveraged
31040 Full Coveraged
31046 Full Coveraged
31047 Mostly Coveraged
31054 Mostly Coveraged
31059 Full Coveraged
31061 Full Coveraged
31062 Full Coveraged
31069 Mostly Coveraged
31075 Mostly Coveraged
31086 Full Coveraged
31088 Full Coveraged
31093 Full Coveraged
31095 Full Coveraged
31098 Full Coveraged
31099 Full Coveraged
31106 Full Coveraged
31107 Full Coveraged
31119 Full Coveraged
31126 Full Coveraged
31131 Full Coveraged
31132 Full Coveraged
31139 Full Coveraged
31141 Full Coveraged
31145 Full Coveraged
31146 Full Coveraged
31150 Full Coveraged
31156 Full Coveraged
31191 Full Coveraged
31192 Full Coveraged
31193 Full Coveraged
31195 Full Coveraged
31196 Full Coveraged
31197 Full Coveraged
31198 Full Coveraged
31199 Full Coveraged
31201 Full Coveraged
31202 Full Coveraged
31203 Full Coveraged
31204 Full Coveraged
31205 Full Coveraged
31206 Full Coveraged
31207 Full Coveraged
31208 Full Coveraged
31209 Full Coveraged
31210 Full Coveraged
31211 Full Coveraged
31212 Full Coveraged
31213 Full Coveraged
31216 Full Coveraged
31217 Mostly Coveraged
31220 Mostly Coveraged
31221 Full Coveraged
31295 Full Coveraged
31296 Full Coveraged
31297 Full Coveraged
31322 Mostly Coveraged
31328 Mostly Coveraged
31401 Full Coveraged
31402 Full Coveraged
31403 Full Coveraged
31404 Full Coveraged
31405 Full Coveraged
31406 Full Coveraged
31407 Mostly Coveraged
31408 Full Coveraged
31409 Full Coveraged
31410 Mostly Coveraged
31411 Mostly Coveraged
31412 Full Coveraged
31414 Full Coveraged
31415 Full Coveraged
31416 Full Coveraged
31418 Full Coveraged
31419 Mostly Coveraged
31420 Full Coveraged
31421 Full Coveraged
31422 Full Coveraged
31501 Full Coveraged
31502 Full Coveraged
31503 Full Coveraged
31516 Mostly Coveraged
31520 Full Coveraged
31521 Full Coveraged
31522 Mostly Coveraged
31523 Mostly Coveraged
31524 Full Coveraged
31525 Mostly Coveraged
31527 Mostly Coveraged
31547 Full Coveraged
31548 Mostly Coveraged
31558 Full Coveraged
31561 Mostly Coveraged
31564 Mostly Coveraged
31565 Mostly Coveraged
31569 Mostly Coveraged
31601 Full Coveraged
31602 Full Coveraged
31603 Full Coveraged
31604 Full Coveraged
31605 Mostly Coveraged
31606 Mostly Coveraged
31632 Mostly Coveraged
31698 Full Coveraged
31701 Full Coveraged
31702 Full Coveraged
31703 Full Coveraged
31704 Mostly Coveraged
31706 Full Coveraged
31707 Full Coveraged
31708 Full Coveraged
31721 Mostly Coveraged
31727 Mostly Coveraged
31733 Mostly Coveraged
31757 Full Coveraged
31758 Full Coveraged
31763 Mostly Coveraged
31773 Mostly Coveraged
31775 Mostly Coveraged
31782 Mostly Coveraged
31789 Mostly Coveraged
31792 Full Coveraged
31793 Full Coveraged
31794 Full Coveraged
31795 Full Coveraged
31799 Full Coveraged
31820 Mostly Coveraged
31821 Mostly Coveraged
31833 Full Coveraged
31901 Full Coveraged
31902 Full Coveraged
31903 Full Coveraged
31904 Full Coveraged
31905 Full Coveraged
31906 Full Coveraged
31907 Full Coveraged
31908 Full Coveraged
31909 Full Coveraged
31914 Full Coveraged
31917 Full Coveraged
31995 Full Coveraged
31997 Full Coveraged
31999 Full Coveraged
32003 Full Coveraged
32004 Full Coveraged
32006 Full Coveraged
32007 Full Coveraged
32009 Mostly Coveraged
32024 Mostly Coveraged
32025 Full Coveraged
32030 Full Coveraged
32033 Mostly Coveraged
32034 Full Coveraged
32035 Full Coveraged
32040 Full Coveraged
32041 Full Coveraged
32042 Full Coveraged
32043 Full Coveraged
32044 Full Coveraged
32050 Full Coveraged
32056 Full Coveraged
32061 Mostly Coveraged
32063 Full Coveraged
32065 Full Coveraged
32067 Full Coveraged
32068 Full Coveraged
32073 Full Coveraged
32079 Full Coveraged
32080 Full Coveraged
32082 Mostly Coveraged
32084 Full Coveraged
32085 Full Coveraged
32086 Full Coveraged
32091 Mostly Coveraged
32097 Full Coveraged
32099 Full Coveraged
32110 Full Coveraged
32111 Full Coveraged
32114 Full Coveraged
32115 Full Coveraged
32116 Full Coveraged
32117 Full Coveraged
32118 Full Coveraged
32119 Full Coveraged
32120 Full Coveraged
32121 Full Coveraged
32122 Full Coveraged
32123 Full Coveraged
32124 Full Coveraged
32125 Full Coveraged
32126 Full Coveraged
32127 Mostly Coveraged
32128 Mostly Coveraged
32129 Full Coveraged
32130 Mostly Coveraged
32131 Full Coveraged
32132 Full Coveraged
32135 Mostly Coveraged
32136 Full Coveraged
32137 Mostly Coveraged
32141 Full Coveraged
32142 Mostly Coveraged
32145 Mostly Coveraged
32151 Full Coveraged
32158 Full Coveraged
32159 Full Coveraged
32162 Mostly Coveraged
32164 Full Coveraged
32168 Full Coveraged
32169 Full Coveraged
32170 Full Coveraged
32173 Full Coveraged
32174 Mostly Coveraged
32175 Full Coveraged
32176 Mostly Coveraged
32177 Full Coveraged
32178 Full Coveraged
32183 Mostly Coveraged
32187 Mostly Coveraged
32189 Mostly Coveraged
32192 Mostly Coveraged
32195 Mostly Coveraged
32198 Full Coveraged
32201 Full Coveraged
32202 Full Coveraged
32203 Full Coveraged
32204 Full Coveraged
32205 Full Coveraged
32206 Full Coveraged
32207 Full Coveraged
32208 Full Coveraged
32209 Full Coveraged
32210 Full Coveraged
32211 Full Coveraged
32212 Full Coveraged
32214 Full Coveraged
32215 Mostly Coveraged
32216 Full Coveraged
32217 Full Coveraged
32218 Full Coveraged
32219 Full Coveraged
32220 Full Coveraged
32221 Full Coveraged
32222 Mostly Coveraged
32223 Full Coveraged
32224 Full Coveraged
32225 Full Coveraged
32226 Full Coveraged
32227 Full Coveraged
32228 Full Coveraged
32229 Full Coveraged
32231 Full Coveraged
32232 Full Coveraged
32233 Full Coveraged
32234 Mostly Coveraged
32235 Full Coveraged
32236 Full Coveraged
32237 Full Coveraged
32238 Full Coveraged
32239 Full Coveraged
32240 Full Coveraged
32241 Full Coveraged
32244 Full Coveraged
32245 Full Coveraged
32246 Full Coveraged
32247 Full Coveraged
32250 Full Coveraged
32254 Full Coveraged
32255 Full Coveraged
32256 Full Coveraged
32257 Full Coveraged
32258 Full Coveraged
32259 Full Coveraged
32260 Full Coveraged
32266 Full Coveraged
32267 Full Coveraged
32276 Full Coveraged
32277 Full Coveraged
32290 Full Coveraged
32301 Full Coveraged
32302 Full Coveraged
32303 Full Coveraged
32304 Full Coveraged
32305 Mostly Coveraged
32306 Full Coveraged
32307 Full Coveraged
32308 Full Coveraged
32311 Mostly Coveraged
32312 Mostly Coveraged
32313 Full Coveraged
32314 Full Coveraged
32315 Full Coveraged
32316 Full Coveraged
32318 Full Coveraged
32330 Mostly Coveraged
32332 Full Coveraged
32333 Mostly Coveraged
32343 Mostly Coveraged
32351 Full Coveraged
32352 Full Coveraged
32353 Full Coveraged
32362 Mostly Coveraged
32395 Full Coveraged
32399 Full Coveraged
32401 Full Coveraged
32402 Full Coveraged
32404 Mostly Coveraged
32405 Full Coveraged
32406 Full Coveraged
32407 Mostly Coveraged
32408 Mostly Coveraged
32410 Full Coveraged
32411 Full Coveraged
32412 Full Coveraged
32417 Mostly Coveraged
32444 Full Coveraged
32501 Full Coveraged
32502 Full Coveraged
32503 Full Coveraged
32504 Full Coveraged
Zip Code Coverage Level Zip Code Coverage Level Zip Code Coverage Level Zip Code Coverage Level Zip Code Coverage Level Zip Code Coverage Level
Page 66

- 166 -
32505 Full Coveraged
32506 Mostly Coveraged
32507 Mostly Coveraged
32508 Full Coveraged
32509 Full Coveraged
32511 Full Coveraged
32512 Full Coveraged
32513 Full Coveraged
32514 Full Coveraged
32516 Full Coveraged
32520 Full Coveraged
32521 Full Coveraged
32522 Full Coveraged
32523 Full Coveraged
32524 Full Coveraged
32526 Full Coveraged
32530 Full Coveraged
32533 Mostly Coveraged
32534 Full Coveraged
32540 Full Coveraged
32541 Full Coveraged
32542 Mostly Coveraged
32544 Full Coveraged
32547 Full Coveraged
32548 Full Coveraged
32549 Full Coveraged
32550 Mostly Coveraged
32559 Full Coveraged
32560 Full Coveraged
32561 Mostly Coveraged
32562 Full Coveraged
32569 Full Coveraged
32571 Mostly Coveraged
32572 Full Coveraged
32578 Full Coveraged
32579 Full Coveraged
32580 Full Coveraged
32583 Full Coveraged
32588 Full Coveraged
32591 Full Coveraged
32601 Full Coveraged
32602 Full Coveraged
32603 Full Coveraged
32604 Full Coveraged
32605 Full Coveraged
32606 Full Coveraged
32607 Full Coveraged
32608 Full Coveraged
32609 Mostly Coveraged
32610 Full Coveraged
32611 Full Coveraged
32612 Full Coveraged
32614 Full Coveraged
32615 Full Coveraged
32616 Full Coveraged
32617 Mostly Coveraged
32618 Full Coveraged
32622 Full Coveraged
32627 Full Coveraged
32631 Mostly Coveraged
32633 Mostly Coveraged
32635 Full Coveraged
32641 Full Coveraged
32653 Full Coveraged
32658 Full Coveraged
32663 Mostly Coveraged
32667 Full Coveraged
32686 Mostly Coveraged
32694 Full Coveraged
32696 Mostly Coveraged
32697 Mostly Coveraged
32701 Full Coveraged
32702 Mostly Coveraged
32703 Full Coveraged
32704 Full Coveraged
32706 Full Coveraged
32707 Full Coveraged
32708 Full Coveraged
32710 Full Coveraged
32712 Full Coveraged
32713 Full Coveraged
32714 Full Coveraged
32715 Full Coveraged
32716 Full Coveraged
32718 Full Coveraged
32719 Full Coveraged
32720 Mostly Coveraged
32721 Full Coveraged
32722 Full Coveraged
32723 Full Coveraged
32724 Full Coveraged
32725 Full Coveraged
32726 Full Coveraged
32727 Full Coveraged
32728 Full Coveraged
32730 Full Coveraged
32733 Full Coveraged
32735 Full Coveraged
32736 Mostly Coveraged
32738 Full Coveraged
32739 Full Coveraged
32744 Full Coveraged
32745 Full Coveraged
32746 Full Coveraged
32747 Full Coveraged
32750 Full Coveraged
32751 Full Coveraged
32752 Full Coveraged
32753 Full Coveraged
32754 Mostly Coveraged
32756 Full Coveraged
32757 Full Coveraged
32759 Mostly Coveraged
32762 Full Coveraged
32763 Full Coveraged
32764 Mostly Coveraged
32765 Full Coveraged
32766 Mostly Coveraged
32767 Mostly Coveraged
32768 Full Coveraged
32771 Full Coveraged
32772 Full Coveraged
32773 Full Coveraged
32774 Full Coveraged
32776 Mostly Coveraged
32777 Full Coveraged
32778 Mostly Coveraged
32779 Full Coveraged
32780 Full Coveraged
32781 Full Coveraged
32782 Full Coveraged
32783 Full Coveraged
32784 Full Coveraged
32789 Full Coveraged
32790 Full Coveraged
32791 Full Coveraged
32792 Full Coveraged
32793 Full Coveraged
32794 Full Coveraged
32795 Full Coveraged
32796 Full Coveraged
32798 Full Coveraged
32799 Full Coveraged
32801 Full Coveraged
32802 Full Coveraged
32803 Full Coveraged
32804 Full Coveraged
32805 Full Coveraged
32806 Full Coveraged
32807 Full Coveraged
32808 Full Coveraged
32809 Full Coveraged
32810 Full Coveraged
32811 Full Coveraged
32812 Full Coveraged
32814 Full Coveraged
32815 Mostly Coveraged
32816 Full Coveraged
32817 Full Coveraged
32818 Full Coveraged
32819 Full Coveraged
32820 Mostly Coveraged
32821 Full Coveraged
32822 Full Coveraged
32824 Full Coveraged
32825 Full Coveraged
32826 Full Coveraged
32827 Full Coveraged
32828 Full Coveraged
32829 Full Coveraged
32830 Full Coveraged
32831 Mostly Coveraged
32832 Mostly Coveraged
32834 Full Coveraged
32835 Full Coveraged
32836 Full Coveraged
32837 Full Coveraged
32839 Full Coveraged
32853 Full Coveraged
32854 Full Coveraged
32855 Full Coveraged
32856 Full Coveraged
32857 Full Coveraged
32858 Full Coveraged
32859 Full Coveraged
32860 Full Coveraged
32861 Full Coveraged
32862 Full Coveraged
32867 Full Coveraged
32868 Full Coveraged
32869 Full Coveraged
32872 Full Coveraged
32877 Full Coveraged
32878 Full Coveraged
32885 Full Coveraged
32886 Full Coveraged
32887 Full Coveraged
32890 Full Coveraged
32891 Full Coveraged
32893 Full Coveraged
32896 Full Coveraged
32897 Full Coveraged
32898 Full Coveraged
32899 Full Coveraged
32901 Full Coveraged
32902 Full Coveraged
32903 Full Coveraged
32904 Full Coveraged
32905 Full Coveraged
32906 Full Coveraged
32907 Full Coveraged
32908 Mostly Coveraged
32909 Mostly Coveraged
32910 Full Coveraged
32911 Full Coveraged
32912 Full Coveraged
32919 Full Coveraged
32920 Full Coveraged
32922 Full Coveraged
32923 Full Coveraged
32924 Full Coveraged
32925 Full Coveraged
32926 Mostly Coveraged
32927 Full Coveraged
32931 Mostly Coveraged
32932 Mostly Coveraged
32934 Full Coveraged
32935 Full Coveraged
32936 Full Coveraged
32937 Full Coveraged
32940 Full Coveraged
32941 Full Coveraged
32948 Mostly Coveraged
32949 Mostly Coveraged
32950 Full Coveraged
32951 Full Coveraged
32952 Full Coveraged
32953 Full Coveraged
32954 Full Coveraged
32955 Full Coveraged
32956 Full Coveraged
32957 Mostly Coveraged
32958 Full Coveraged
32959 Full Coveraged
32960 Full Coveraged
32961 Full Coveraged
32962 Mostly Coveraged
32963 Full Coveraged
32964 Full Coveraged
32965 Full Coveraged
32967 Full Coveraged
32968 Mostly Coveraged
32969 Full Coveraged
32970 Full Coveraged
32971 Full Coveraged
32976 Mostly Coveraged
32978 Full Coveraged
33001 Mostly Coveraged
33002 Full Coveraged
33004 Full Coveraged
33008 Full Coveraged
33009 Full Coveraged
33010 Full Coveraged
33011 Full Coveraged
33012 Full Coveraged
33013 Full Coveraged
33014 Full Coveraged
33015 Full Coveraged
33016 Full Coveraged
33017 Full Coveraged
33018 Full Coveraged
33019 Full Coveraged
33020 Full Coveraged
33021 Full Coveraged
33022 Full Coveraged
33023 Full Coveraged
33024 Full Coveraged
33025 Full Coveraged
33026 Full Coveraged
33027 Full Coveraged
33028 Full Coveraged
33029 Full Coveraged
33030 Full Coveraged
33031 Full Coveraged
33032 Full Coveraged
33033 Full Coveraged
33034 Full Coveraged
33035 Mostly Coveraged
33036 Full Coveraged
33037 Mostly Coveraged
33039 Full Coveraged
33040 Full Coveraged
33041 Full Coveraged
33045 Full Coveraged
33050 Mostly Coveraged
33051 Full Coveraged
33052 Full Coveraged
33054 Full Coveraged
33055 Full Coveraged
33056 Full Coveraged
33060 Full Coveraged
33061 Full Coveraged
33062 Full Coveraged
33063 Full Coveraged
33064 Full Coveraged
33065 Full Coveraged
33066 Full Coveraged
33067 Full Coveraged
33068 Full Coveraged
33069 Full Coveraged
33070 Full Coveraged
33071 Full Coveraged
33072 Full Coveraged
33073 Full Coveraged
33074 Full Coveraged
33075 Full Coveraged
33076 Full Coveraged
33077 Full Coveraged
33081 Full Coveraged
33082 Full Coveraged
33083 Full Coveraged
33084 Full Coveraged
33090 Full Coveraged
33092 Full Coveraged
33093 Full Coveraged
33097 Full Coveraged
33101 Full Coveraged
33102 Full Coveraged
33107 Full Coveraged
33109 Full Coveraged
33110 Full Coveraged
33111 Full Coveraged
33112 Full Coveraged
33114 Full Coveraged
33116 Full Coveraged
33119 Full Coveraged
33121 Full Coveraged
33122 Full Coveraged
33124 Full Coveraged
33125 Full Coveraged
33126 Full Coveraged
33127 Full Coveraged
33128 Full Coveraged
33129 Full Coveraged
33130 Full Coveraged
33131 Full Coveraged
33132 Full Coveraged
33133 Full Coveraged
33134 Full Coveraged
33135 Full Coveraged
33136 Full Coveraged
33137 Full Coveraged
33138 Full Coveraged
33139 Full Coveraged
33140 Full Coveraged
33141 Full Coveraged
33142 Full Coveraged
33143 Full Coveraged
33144 Full Coveraged
33145 Full Coveraged
33146 Full Coveraged
33147 Full Coveraged
33148 Full Coveraged
33149 Full Coveraged
33150 Full Coveraged
33151 Full Coveraged
33152 Full Coveraged
33153 Full Coveraged
33154 Full Coveraged
33155 Full Coveraged
33156 Full Coveraged
33157 Full Coveraged
33158 Full Coveraged
33159 Full Coveraged
33160 Full Coveraged
33161 Full Coveraged
33162 Full Coveraged
33163 Full Coveraged
33164 Full Coveraged
33165 Full Coveraged
33166 Full Coveraged
33167 Full Coveraged
33168 Full Coveraged
33169 Full Coveraged
33170 Full Coveraged
33172 Full Coveraged
33173 Full Coveraged
33174 Full Coveraged
33175 Full Coveraged
33176 Full Coveraged
33177 Mostly Coveraged
33178 Full Coveraged
33179 Full Coveraged
33180 Full Coveraged
33181 Full Coveraged
33182 Full Coveraged
33183 Full Coveraged
33184 Full Coveraged
33185 Mostly Coveraged
33186 Full Coveraged
33187 Mostly Coveraged
33189 Full Coveraged
33190 Mostly Coveraged
33193 Mostly Coveraged
33194 Full Coveraged
33195 Full Coveraged
33197 Full Coveraged
33199 Full Coveraged
33231 Full Coveraged
33233 Full Coveraged
33234 Full Coveraged
33238 Full Coveraged
33239 Full Coveraged
33242 Full Coveraged
33243 Full Coveraged
33245 Full Coveraged
33247 Full Coveraged
33255 Full Coveraged
33256 Full Coveraged
33257 Full Coveraged
33261 Full Coveraged
33265 Full Coveraged
33266 Full Coveraged
33269 Full Coveraged
33280 Full Coveraged
33283 Full Coveraged
33296 Full Coveraged
33299 Full Coveraged
33301 Full Coveraged
33302 Full Coveraged
33303 Full Coveraged
33304 Full Coveraged
33305 Full Coveraged
33306 Full Coveraged
33307 Full Coveraged
33308 Full Coveraged
33309 Full Coveraged
33310 Full Coveraged
33311 Full Coveraged
33312 Full Coveraged
33313 Full Coveraged
33314 Full Coveraged
33315 Full Coveraged
33316 Full Coveraged
33317 Full Coveraged
33318 Full Coveraged
33319 Full Coveraged
33320 Full Coveraged
33321 Full Coveraged
33322 Full Coveraged
33323 Full Coveraged
33324 Full Coveraged
33325 Full Coveraged
33326 Full Coveraged
33327 Full Coveraged
33328 Full Coveraged
33329 Full Coveraged
33330 Full Coveraged
33331 Full Coveraged
33332 Full Coveraged
33334 Full Coveraged
33335 Full Coveraged
33336 Full Coveraged
33337 Full Coveraged
33338 Full Coveraged
33339 Full Coveraged
33340 Full Coveraged
33345 Full Coveraged
33346 Full Coveraged
33348 Full Coveraged
33349 Full Coveraged
33351 Full Coveraged
33355 Full Coveraged
33359 Full Coveraged
33388 Full Coveraged
33394 Full Coveraged
33401 Full Coveraged
33402 Full Coveraged
33403 Full Coveraged
33404 Full Coveraged
33405 Full Coveraged
33406 Full Coveraged
33407 Full Coveraged
33408 Full Coveraged
33409 Full Coveraged
33410 Full Coveraged
33411 Full Coveraged
33412 Full Coveraged
33413 Full Coveraged
33414 Full Coveraged
33415 Full Coveraged
33416 Full Coveraged
33417 Full Coveraged
33418 Full Coveraged
33419 Full Coveraged
33420 Full Coveraged
33421 Full Coveraged
33422 Full Coveraged
33424 Full Coveraged
33425 Full Coveraged
33426 Full Coveraged
33427 Full Coveraged
33428 Full Coveraged
33429 Full Coveraged
Zip Code Coverage Level Zip Code Coverage Level Zip Code Coverage Level Zip Code Coverage Level Zip Code Coverage Level Zip Code Coverage Level
Page 67

- 167 -
33431 Full Coveraged
33432 Full Coveraged
33433 Full Coveraged
33434 Full Coveraged
33435 Full Coveraged
33436 Full Coveraged
33437 Full Coveraged
33441 Full Coveraged
33442 Full Coveraged
33443 Full Coveraged
33444 Full Coveraged
33445 Full Coveraged
33446 Full Coveraged
33447 Full Coveraged
33448 Full Coveraged
33454 Full Coveraged
33455 Full Coveraged
33458 Full Coveraged
33460 Full Coveraged
33461 Full Coveraged
33462 Full Coveraged
33463 Full Coveraged
33464 Full Coveraged
33465 Full Coveraged
33466 Full Coveraged
33467 Full Coveraged
33468 Full Coveraged
33469 Full Coveraged
33474 Full Coveraged
33475 Full Coveraged
33477 Full Coveraged
33478 Mostly Coveraged
33480 Full Coveraged
33481 Full Coveraged
33482 Full Coveraged
33483 Full Coveraged
33484 Full Coveraged
33486 Full Coveraged
33487 Full Coveraged
33488 Full Coveraged
33496 Full Coveraged
33497 Full Coveraged
33498 Full Coveraged
33499 Full Coveraged
33503 Mostly Coveraged
33508 Full Coveraged
33509 Full Coveraged
33510 Full Coveraged
33511 Full Coveraged
33521 Mostly Coveraged
33523 Full Coveraged
33524 Mostly Coveraged
33525 Full Coveraged
33526 Full Coveraged
33527 Full Coveraged
33530 Mostly Coveraged
33534 Full Coveraged
33537 Full Coveraged
33539 Mostly Coveraged
33540 Mostly Coveraged
33541 Mostly Coveraged
33542 Mostly Coveraged
33543 Mostly Coveraged
33544 Mostly Coveraged
33548 Full Coveraged
33549 Full Coveraged
33550 Full Coveraged
33556 Mostly Coveraged
33558 Full Coveraged
33559 Full Coveraged
33563 Full Coveraged
33564 Full Coveraged
33565 Full Coveraged
33566 Full Coveraged
33567 Mostly Coveraged
33568 Full Coveraged
33569 Full Coveraged
33570 Full Coveraged
33571 Mostly Coveraged
33572 Mostly Coveraged
33573 Mostly Coveraged
33574 Full Coveraged
33575 Full Coveraged
33576 Mostly Coveraged
33583 Full Coveraged
33584 Full Coveraged
33585 Mostly Coveraged
33586 Full Coveraged
33587 Full Coveraged
33592 Full Coveraged
33593 Full Coveraged
33594 Full Coveraged
33595 Full Coveraged
33601 Full Coveraged
33602 Full Coveraged
33603 Full Coveraged
33604 Full Coveraged
33605 Full Coveraged
33606 Full Coveraged
33607 Full Coveraged
33608 Full Coveraged
33609 Full Coveraged
33610 Full Coveraged
33611 Full Coveraged
33612 Full Coveraged
33613 Full Coveraged
33614 Full Coveraged
33615 Full Coveraged
33616 Full Coveraged
33617 Full Coveraged
33618 Full Coveraged
33619 Full Coveraged
33620 Full Coveraged
33621 Full Coveraged
33622 Full Coveraged
33623 Full Coveraged
33624 Full Coveraged
33625 Full Coveraged
33626 Full Coveraged
33629 Full Coveraged
33630 Full Coveraged
33631 Full Coveraged
33633 Full Coveraged
33634 Full Coveraged
33635 Full Coveraged
33637 Full Coveraged
33647 Full Coveraged
33650 Full Coveraged
33655 Full Coveraged
33660 Full Coveraged
33661 Full Coveraged
33662 Full Coveraged
33663 Full Coveraged
33664 Full Coveraged
33672 Full Coveraged
33673 Full Coveraged
33674 Full Coveraged
33675 Full Coveraged
33677 Full Coveraged
33679 Full Coveraged
33680 Full Coveraged
33681 Full Coveraged
33682 Full Coveraged
33684 Full Coveraged
33685 Full Coveraged
33686 Full Coveraged
33687 Full Coveraged
33688 Full Coveraged
33689 Full Coveraged
33690 Full Coveraged
33694 Full Coveraged
33697 Full Coveraged
33701 Full Coveraged
33702 Full Coveraged
33703 Full Coveraged
33704 Full Coveraged
33705 Full Coveraged
33706 Full Coveraged
33707 Full Coveraged
33708 Full Coveraged
33709 Full Coveraged
33710 Full Coveraged
33711 Full Coveraged
33712 Full Coveraged
33713 Full Coveraged
33714 Full Coveraged
33715 Full Coveraged
33716 Full Coveraged
33728 Full Coveraged
33729 Full Coveraged
33730 Full Coveraged
33731 Full Coveraged
33732 Full Coveraged
33733 Full Coveraged
33734 Full Coveraged
33736 Full Coveraged
33737 Full Coveraged
33738 Full Coveraged
33740 Full Coveraged
33741 Full Coveraged
33742 Full Coveraged
33743 Full Coveraged
33744 Full Coveraged
33747 Full Coveraged
33755 Full Coveraged
33756 Full Coveraged
33757 Full Coveraged
33758 Full Coveraged
33759 Full Coveraged
33760 Full Coveraged
33761 Full Coveraged
33762 Full Coveraged
33763 Full Coveraged
33764 Full Coveraged
33765 Full Coveraged
33766 Full Coveraged
33767 Full Coveraged
33769 Full Coveraged
33770 Full Coveraged
33771 Full Coveraged
33772 Full Coveraged
33773 Full Coveraged
33774 Full Coveraged
33775 Full Coveraged
33776 Full Coveraged
33777 Full Coveraged
33778 Full Coveraged
33779 Full Coveraged
33780 Full Coveraged
33781 Full Coveraged
33782 Full Coveraged
33784 Full Coveraged
33785 Full Coveraged
33786 Full Coveraged
33801 Full Coveraged
33802 Full Coveraged
33803 Full Coveraged
33804 Full Coveraged
33805 Full Coveraged
33806 Full Coveraged
33807 Full Coveraged
33809 Mostly Coveraged
33810 Full Coveraged
33811 Full Coveraged
33813 Full Coveraged
33815 Full Coveraged
33820 Full Coveraged
33823 Full Coveraged
33827 Mostly Coveraged
33830 Full Coveraged
33831 Full Coveraged
33837 Mostly Coveraged
33838 Full Coveraged
33839 Full Coveraged
33840 Full Coveraged
33844 Mostly Coveraged
33845 Mostly Coveraged
33846 Full Coveraged
33847 Full Coveraged
33848 Full Coveraged
33849 Mostly Coveraged
33850 Full Coveraged
33851 Full Coveraged
33852 Mostly Coveraged
33853 Full Coveraged
33854 Full Coveraged
33855 Full Coveraged
33856 Full Coveraged
33858 Full Coveraged
33859 Full Coveraged
33862 Mostly Coveraged
33863 Mostly Coveraged
33867 Full Coveraged
33868 Mostly Coveraged
33870 Full Coveraged
33871 Full Coveraged
33872 Mostly Coveraged
33875 Full Coveraged
33876 Full Coveraged
33877 Full Coveraged
33880 Full Coveraged
33881 Full Coveraged
33882 Full Coveraged
33883 Full Coveraged
33884 Full Coveraged
33885 Full Coveraged
33888 Full Coveraged
33896 Full Coveraged
33897 Mostly Coveraged
33901 Full Coveraged
33902 Full Coveraged
33903 Full Coveraged
33904 Full Coveraged
33905 Mostly Coveraged
33906 Full Coveraged
33907 Full Coveraged
33908 Full Coveraged
33909 Full Coveraged
33910 Full Coveraged
33911 Full Coveraged
33912 Full Coveraged
33913 Mostly Coveraged
33914 Mostly Coveraged
33915 Full Coveraged
33916 Full Coveraged
33917 Full Coveraged
33918 Full Coveraged
33919 Full Coveraged
33927 Full Coveraged
33928 Mostly Coveraged
33931 Full Coveraged
33932 Full Coveraged
33938 Full Coveraged
33948 Full Coveraged
33949 Full Coveraged
33950 Full Coveraged
33951 Mostly Coveraged
33952 Full Coveraged
33953 Full Coveraged
33954 Full Coveraged
33955 Full Coveraged
33965 Full Coveraged
33980 Mostly Coveraged
33981 Mostly Coveraged
33983 Mostly Coveraged
33990 Full Coveraged
33991 Mostly Coveraged
33993 Mostly Coveraged
33994 Full Coveraged
34101 Full Coveraged
34102 Full Coveraged
34103 Full Coveraged
34104 Full Coveraged
34105 Full Coveraged
34106 Full Coveraged
34107 Full Coveraged
34108 Full Coveraged
34109 Full Coveraged
34110 Full Coveraged
34112 Full Coveraged
34113 Full Coveraged
34116 Full Coveraged
34119 Full Coveraged
34133 Mostly Coveraged
34134 Mostly Coveraged
34135 Mostly Coveraged
34136 Mostly Coveraged
34140 Full Coveraged
34145 Full Coveraged
34146 Full Coveraged
34201 Full Coveraged
34202 Full Coveraged
34203 Full Coveraged
34204 Full Coveraged
34205 Full Coveraged
34206 Full Coveraged
34207 Full Coveraged
34208 Full Coveraged
34209 Full Coveraged
34210 Full Coveraged
34211 Mostly Coveraged
34212 Mostly Coveraged
34215 Full Coveraged
34216 Mostly Coveraged
34217 Mostly Coveraged
34218 Mostly Coveraged
34220 Full Coveraged
34221 Full Coveraged
34222 Full Coveraged
34223 Mostly Coveraged
34224 Mostly Coveraged
34228 Full Coveraged
34229 Full Coveraged
34230 Full Coveraged
34231 Full Coveraged
34232 Full Coveraged
34233 Full Coveraged
34234 Full Coveraged
34235 Full Coveraged
34236 Full Coveraged
34237 Full Coveraged
34238 Full Coveraged
34239 Full Coveraged
34240 Full Coveraged
34241 Mostly Coveraged
34242 Full Coveraged
34243 Full Coveraged
34250 Full Coveraged
34260 Full Coveraged
34264 Full Coveraged
34265 Full Coveraged
34266 Full Coveraged
34267 Full Coveraged
34268 Full Coveraged
34269 Mostly Coveraged
34270 Full Coveraged
34272 Full Coveraged
34274 Full Coveraged
34275 Full Coveraged
34276 Full Coveraged
34277 Full Coveraged
34278 Full Coveraged
34280 Full Coveraged
34281 Full Coveraged
34282 Full Coveraged
34284 Full Coveraged
34285 Full Coveraged
34286 Full Coveraged
34287 Full Coveraged
34288 Full Coveraged
34289 Full Coveraged
34292 Full Coveraged
34293 Full Coveraged
34295 Mostly Coveraged
34420 Full Coveraged
34421 Full Coveraged
34423 Full Coveraged
34428 Mostly Coveraged
34429 Full Coveraged
34433 Full Coveraged
34434 Mostly Coveraged
34442 Mostly Coveraged
34445 Mostly Coveraged
34446 Mostly Coveraged
34447 Full Coveraged
34448 Mostly Coveraged
34452 Mostly Coveraged
34453 Mostly Coveraged
34460 Full Coveraged
34461 Full Coveraged
34464 Full Coveraged
34465 Full Coveraged
34470 Full Coveraged
34471 Full Coveraged
34472 Full Coveraged
34473 Full Coveraged
34474 Full Coveraged
34475 Full Coveraged
34476 Full Coveraged
34477 Full Coveraged
34478 Full Coveraged
34479 Full Coveraged
34480 Full Coveraged
34482 Mostly Coveraged
34483 Full Coveraged
34484 Mostly Coveraged
34487 Full Coveraged
34489 Full Coveraged
34491 Full Coveraged
34492 Full Coveraged
34601 Full Coveraged
34602 Full Coveraged
34603 Full Coveraged
34604 Full Coveraged
34605 Full Coveraged
34606 Full Coveraged
34607 Full Coveraged
34608 Full Coveraged
34609 Mostly Coveraged
34610 Full Coveraged
34611 Full Coveraged
34613 Mostly Coveraged
34636 Mostly Coveraged
34639 Full Coveraged
34652 Full Coveraged
34653 Full Coveraged
34654 Full Coveraged
34655 Full Coveraged
34656 Full Coveraged
34660 Full Coveraged
34661 Mostly Coveraged
34667 Full Coveraged
34668 Full Coveraged
34669 Full Coveraged
34673 Full Coveraged
34674 Full Coveraged
34677 Full Coveraged
34679 Full Coveraged
34680 Full Coveraged
34681 Full Coveraged
34682 Full Coveraged
34683 Full Coveraged
34684 Full Coveraged
34685 Full Coveraged
34688 Full Coveraged
34689 Full Coveraged
34690 Full Coveraged
34691 Full Coveraged
34695 Full Coveraged
34697 Full Coveraged
34698 Full Coveraged
34705 Full Coveraged
34711 Full Coveraged
34712 Full Coveraged
34713 Full Coveraged
34729 Mostly Coveraged
34731 Full Coveraged
34734 Full Coveraged
34737 Mostly Coveraged
34740 Full Coveraged
34741 Full Coveraged
34742 Full Coveraged
34743 Full Coveraged
34744 Full Coveraged
34745 Full Coveraged
34746 Mostly Coveraged
34747 Full Coveraged
34748 Full Coveraged
34749 Full Coveraged
34755 Full Coveraged
34756 Full Coveraged
34758 Mostly Coveraged
34760 Full Coveraged
34761 Full Coveraged
34762 Full Coveraged
34769 Full Coveraged
34770 Full Coveraged
34772 Mostly Coveraged
34777 Full Coveraged
34778 Full Coveraged
34785 Mostly Coveraged
34786 Full Coveraged
34787 Full Coveraged
34788 Mostly Coveraged
Zip Code Coverage Level Zip Code Coverage Level Zip Code Coverage Level Zip Code Coverage Level Zip Code Coverage Level Zip Code Coverage Level
Page 68

- 168 -
34789 Mostly Coveraged
34797 Full Coveraged
34945 Mostly Coveraged
34946 Full Coveraged
34947 Full Coveraged
34948 Full Coveraged
34949 Full Coveraged
34950 Full Coveraged
34951 Full Coveraged
34952 Mostly Coveraged
34954 Full Coveraged
34957 Mostly Coveraged
34958 Mostly Coveraged
34979 Full Coveraged
34981 Full Coveraged
34982 Full Coveraged
34983 Mostly Coveraged
34984 Mostly Coveraged
34985 Mostly Coveraged
34986 Full Coveraged
34990 Full Coveraged
34991 Full Coveraged
34992 Full Coveraged
34994 Full Coveraged
34995 Full Coveraged
34996 Full Coveraged
34997 Full Coveraged
35004 Full Coveraged
35005 Mostly Coveraged
35007 Full Coveraged
35010 Full Coveraged
35011 Full Coveraged
35014 Full Coveraged
35015 Full Coveraged
35020 Full Coveraged
35021 Full Coveraged
35022 Mostly Coveraged
35023 Full Coveraged
35036 Mostly Coveraged
35040 Mostly Coveraged
35041 Mostly Coveraged
35043 Full Coveraged
35048 Mostly Coveraged
35052 Full Coveraged
35054 Full Coveraged
35055 Full Coveraged
35056 Full Coveraged
35057 Full Coveraged
35058 Mostly Coveraged
35060 Mostly Coveraged
35061 Full Coveraged
35063 Mostly Coveraged
35064 Full Coveraged
35068 Full Coveraged
35071 Full Coveraged
35077 Mostly Coveraged
35079 Mostly Coveraged
35080 Full Coveraged
35089 Mostly Coveraged
35091 Full Coveraged
35094 Full Coveraged
35096 Mostly Coveraged
35098 Mostly Coveraged
35112 Mostly Coveraged
35114 Mostly Coveraged
35115 Full Coveraged
35116 Full Coveraged
35117 Mostly Coveraged
35118 Full Coveraged
35119 Full Coveraged
35120 Mostly Coveraged
35124 Full Coveraged
35125 Full Coveraged
35127 Full Coveraged
35128 Full Coveraged
35131 Mostly Coveraged
35135 Full Coveraged
35137 Full Coveraged
35139 Mostly Coveraged
35142 Full Coveraged
35144 Full Coveraged
35147 Mostly Coveraged
35149 Mostly Coveraged
35160 Mostly Coveraged
35161 Full Coveraged
35172 Mostly Coveraged
35173 Mostly Coveraged
35176 Full Coveraged
35178 Mostly Coveraged
35179 Mostly Coveraged
35180 Full Coveraged
35181 Mostly Coveraged
35182 Full Coveraged
35185 Mostly Coveraged
35187 Mostly Coveraged
35201 Full Coveraged
35202 Full Coveraged
35203 Full Coveraged
35204 Full Coveraged
35205 Full Coveraged
35206 Full Coveraged
35207 Full Coveraged
35208 Full Coveraged
35209 Full Coveraged
35210 Full Coveraged
35211 Full Coveraged
35212 Full Coveraged
35213 Full Coveraged
35214 Full Coveraged
35215 Full Coveraged
35216 Full Coveraged
35217 Full Coveraged
35218 Full Coveraged
35219 Full Coveraged
35220 Full Coveraged
35221 Full Coveraged
35222 Full Coveraged
35223 Full Coveraged
35224 Full Coveraged
35225 Full Coveraged
35226 Full Coveraged
35228 Full Coveraged
35229 Full Coveraged
35230 Full Coveraged
35231 Full Coveraged
35232 Full Coveraged
35233 Full Coveraged
35234 Full Coveraged
35235 Full Coveraged
35236 Full Coveraged
35237 Full Coveraged
35238 Full Coveraged
35240 Full Coveraged
35242 Full Coveraged
35243 Full Coveraged
35244 Full Coveraged
35245 Full Coveraged
35246 Full Coveraged
35249 Full Coveraged
35253 Full Coveraged
35254 Full Coveraged
35255 Full Coveraged
35259 Full Coveraged
35260 Full Coveraged
35261 Full Coveraged
35266 Full Coveraged
35277 Full Coveraged
35278 Full Coveraged
35279 Full Coveraged
35280 Full Coveraged
35281 Full Coveraged
35282 Full Coveraged
35283 Full Coveraged
35285 Full Coveraged
35286 Full Coveraged
35287 Full Coveraged
35288 Full Coveraged
35289 Full Coveraged
35290 Full Coveraged
35291 Full Coveraged
35292 Full Coveraged
35293 Full Coveraged
35294 Full Coveraged
35295 Full Coveraged
35296 Full Coveraged
35297 Full Coveraged
35298 Full Coveraged
35299 Full Coveraged
35401 Full Coveraged
35402 Full Coveraged
35403 Full Coveraged
35404 Full Coveraged
35405 Full Coveraged
35407 Full Coveraged
35449 Full Coveraged
35453 Full Coveraged
35456 Full Coveraged
35473 Mostly Coveraged
35476 Mostly Coveraged
35485 Full Coveraged
35486 Full Coveraged
35487 Full Coveraged
35501 Full Coveraged
35502 Full Coveraged
35503 Mostly Coveraged
35504 Mostly Coveraged
35542 Full Coveraged
35545 Mostly Coveraged
35550 Mostly Coveraged
35555 Full Coveraged
35560 Mostly Coveraged
35579 Mostly Coveraged
35580 Full Coveraged
35581 Mostly Coveraged
35585 Full Coveraged
35587 Mostly Coveraged
35601 Full Coveraged
35602 Full Coveraged
35603 Full Coveraged
35609 Full Coveraged
35610 Mostly Coveraged
35615 Mostly Coveraged
35622 Full Coveraged
35631 Mostly Coveraged
35632 Mostly Coveraged
35640 Full Coveraged
35645 Full Coveraged
35648 Full Coveraged
35649 Full Coveraged
35652 Full Coveraged
35653 Mostly Coveraged
35654 Mostly Coveraged
35660 Full Coveraged
35662 Mostly Coveraged
35671 Full Coveraged
35673 Mostly Coveraged
35674 Full Coveraged
35699 Full Coveraged
35740 Mostly Coveraged
35741 Full Coveraged
35742 Full Coveraged
35747 Mostly Coveraged
35748 Mostly Coveraged
35749 Full Coveraged
35750 Mostly Coveraged
35752 Mostly Coveraged
35754 Mostly Coveraged
35755 Mostly Coveraged
35756 Full Coveraged
35757 Full Coveraged
35758 Full Coveraged
35759 Full Coveraged
35760 Mostly Coveraged
35762 Full Coveraged
35763 Full Coveraged
35767 Full Coveraged
35768 Full Coveraged
35769 Full Coveraged
35771 Mostly Coveraged
35773 Mostly Coveraged
35775 Mostly Coveraged
35776 Mostly Coveraged
35801 Full Coveraged
35802 Full Coveraged
35803 Full Coveraged
35804 Full Coveraged
35805 Full Coveraged
35806 Full Coveraged
35807 Full Coveraged
35808 Full Coveraged
35809 Full Coveraged
35810 Full Coveraged
35811 Full Coveraged
35812 Full Coveraged
35813 Full Coveraged
35814 Full Coveraged
35815 Full Coveraged
35816 Full Coveraged
35824 Full Coveraged
35893 Full Coveraged
35894 Full Coveraged
35896 Full Coveraged
35897 Full Coveraged
35898 Full Coveraged
35899 Full Coveraged
35901 Full Coveraged
35902 Full Coveraged
35903 Mostly Coveraged
35904 Full Coveraged
35905 Mostly Coveraged
35906 Full Coveraged
35907 Mostly Coveraged
35950 Full Coveraged
35951 Full Coveraged
35954 Full Coveraged
35957 Mostly Coveraged
35958 Full Coveraged
35966 Mostly Coveraged
35976 Full Coveraged
35979 Mostly Coveraged
35980 Mostly Coveraged
36008 Full Coveraged
36020 Full Coveraged
36022 Mostly Coveraged
36025 Full Coveraged
36038 Mostly Coveraged
36054 Full Coveraged
36057 Mostly Coveraged
36064 Mostly Coveraged
36066 Full Coveraged
36067 Mostly Coveraged
36068 Full Coveraged
36093 Mostly Coveraged
36101 Full Coveraged
36102 Full Coveraged
36103 Full Coveraged
36104 Full Coveraged
36105 Full Coveraged
36106 Full Coveraged
36107 Full Coveraged
36108 Mostly Coveraged
36109 Full Coveraged
36110 Full Coveraged
36111 Full Coveraged
36112 Full Coveraged
36113 Full Coveraged
36114 Full Coveraged
36115 Full Coveraged
36116 Full Coveraged
36117 Full Coveraged
36118 Full Coveraged
36119 Full Coveraged
36120 Full Coveraged
36121 Full Coveraged
36123 Full Coveraged
36124 Full Coveraged
36125 Full Coveraged
36130 Full Coveraged
36131 Full Coveraged
36132 Full Coveraged
36133 Full Coveraged
36135 Full Coveraged
36140 Full Coveraged
36141 Full Coveraged
36142 Full Coveraged
36177 Full Coveraged
36191 Full Coveraged
36201 Full Coveraged
36202 Full Coveraged
36203 Full Coveraged
36204 Full Coveraged
36205 Mostly Coveraged
36206 Mostly Coveraged
36207 Mostly Coveraged
36250 Mostly Coveraged
36253 Full Coveraged
36254 Mostly Coveraged
36257 Full Coveraged
36258 Full Coveraged
36260 Mostly Coveraged
36262 Mostly Coveraged
36265 Full Coveraged
36266 Mostly Coveraged
36268 Full Coveraged
36272 Full Coveraged
36277 Full Coveraged
36279 Mostly Coveraged
36301 Full Coveraged
36302 Full Coveraged
36303 Full Coveraged
36304 Full Coveraged
36305 Mostly Coveraged
36312 Mostly Coveraged
36313 Mostly Coveraged
36316 Mostly Coveraged
36320 Mostly Coveraged
36321 Full Coveraged
36322 Full Coveraged
36330 Full Coveraged
36331 Full Coveraged
36345 Mostly Coveraged
36349 Mostly Coveraged
36351 Mostly Coveraged
36362 Mostly Coveraged
36376 Full Coveraged
36420 Full Coveraged
36474 Mostly Coveraged
36476 Full Coveraged
36507 Full Coveraged
36509 Mostly Coveraged
36511 Full Coveraged
36523 Mostly Coveraged
36526 Full Coveraged
36527 Full Coveraged
36530 Mostly Coveraged
36532 Full Coveraged
36533 Mostly Coveraged
36535 Full Coveraged
36536 Mostly Coveraged
36541 Mostly Coveraged
36542 Mostly Coveraged
36544 Full Coveraged
36547 Full Coveraged
36551 Full Coveraged
36555 Full Coveraged
36559 Full Coveraged
36561 Full Coveraged
36562 Mostly Coveraged
36564 Mostly Coveraged
36567 Mostly Coveraged
36568 Full Coveraged
36571 Mostly Coveraged
36572 Mostly Coveraged
36575 Mostly Coveraged
36576 Mostly Coveraged
36577 Full Coveraged
36578 Full Coveraged
36579 Mostly Coveraged
36580 Mostly Coveraged
36582 Full Coveraged
36590 Full Coveraged
36601 Full Coveraged
36602 Full Coveraged
36603 Full Coveraged
36604 Full Coveraged
36605 Full Coveraged
36606 Full Coveraged
36607 Full Coveraged
36608 Mostly Coveraged
36609 Full Coveraged
36610 Full Coveraged
36611 Full Coveraged
36612 Full Coveraged
36613 Full Coveraged
36615 Full Coveraged
36616 Full Coveraged
36617 Full Coveraged
36618 Full Coveraged
36619 Full Coveraged
36621 Full Coveraged
36622 Full Coveraged
36625 Full Coveraged
36628 Full Coveraged
36633 Full Coveraged
36640 Full Coveraged
36652 Full Coveraged
36660 Full Coveraged
36663 Full Coveraged
36670 Full Coveraged
36671 Full Coveraged
36675 Full Coveraged
36685 Full Coveraged
36688 Full Coveraged
36689 Full Coveraged
36691 Full Coveraged
36693 Full Coveraged
36695 Mostly Coveraged
36701 Full Coveraged
36702 Full Coveraged
36703 Mostly Coveraged
36775 Mostly Coveraged
36801 Full Coveraged
36802 Full Coveraged
36803 Full Coveraged
36804 Full Coveraged
36830 Full Coveraged
36831 Full Coveraged
36832 Full Coveraged
36849 Full Coveraged
36851 Full Coveraged
36852 Mostly Coveraged
36853 Mostly Coveraged
36854 Mostly Coveraged
36856 Full Coveraged
36859 Full Coveraged
36861 Full Coveraged
36863 Full Coveraged
36865 Full Coveraged
36867 Full Coveraged
36868 Full Coveraged
36869 Full Coveraged
36870 Full Coveraged
36871 Full Coveraged
36872 Full Coveraged
36874 Mostly Coveraged
36875 Mostly Coveraged
36877 Full Coveraged
36879 Mostly Coveraged
37011 Full Coveraged
37013 Full Coveraged
37014 Full Coveraged
37020 Mostly Coveraged
37022 Mostly Coveraged
37024 Full Coveraged
37025 Full Coveraged
37027 Full Coveraged
37029 Full Coveraged
37032 Mostly Coveraged
37037 Full Coveraged
37040 Full Coveraged
37041 Full Coveraged
37042 Full Coveraged
37043 Mostly Coveraged
37044 Full Coveraged
37046 Mostly Coveraged
37048 Full Coveraged
37049 Mostly Coveraged
37055 Full Coveraged
37056 Full Coveraged
37057 Full Coveraged
37059 Mostly Coveraged
37063 Full Coveraged
37064 Mostly Coveraged
37065 Full Coveraged
37066 Full Coveraged
37067 Full Coveraged
37068 Full Coveraged
37069 Full Coveraged
37070 Full Coveraged
37071 Full Coveraged
37072 Full Coveraged
37073 Full Coveraged
37074 Mostly Coveraged
37075 Full Coveraged
Zip Code Coverage Level Zip Code Coverage Level Zip Code Coverage Level Zip Code Coverage Level Zip Code Coverage Level Zip Code Coverage Level
Page 69

- 169 -
37076 Full Coveraged
37077 Full Coveraged
37080 Full Coveraged
37083 Full Coveraged
37086 Full Coveraged
37087 Mostly Coveraged
37088 Mostly Coveraged
37089 Full Coveraged
37090 Full Coveraged
37095 Mostly Coveraged
37098 Mostly Coveraged
37115 Full Coveraged
37116 Full Coveraged
37119 Mostly Coveraged
37121 Mostly Coveraged
37122 Full Coveraged
37127 Full Coveraged
37128 Full Coveraged
37129 Mostly Coveraged
37130 Mostly Coveraged
37131 Mostly Coveraged
37132 Full Coveraged
37133 Full Coveraged
37135 Full Coveraged
37136 Mostly Coveraged
37138 Full Coveraged
37143 Mostly Coveraged
37145 Mostly Coveraged
37146 Mostly Coveraged
37148 Full Coveraged
37150 Mostly Coveraged
37152 Full Coveraged
37153 Mostly Coveraged
37155 Full Coveraged
37160 Full Coveraged
37161 Full Coveraged
37162 Full Coveraged
37167 Full Coveraged
37172 Full Coveraged
37174 Full Coveraged
37179 Full Coveraged
37183 Full Coveraged
37187 Mostly Coveraged
37188 Full Coveraged
37189 Full Coveraged
37190 Full Coveraged
37201 Full Coveraged
37202 Full Coveraged
37203 Full Coveraged
37204 Full Coveraged
37205 Full Coveraged
37206 Full Coveraged
37207 Full Coveraged
37208 Full Coveraged
37209 Full Coveraged
37210 Full Coveraged
37211 Full Coveraged
37212 Full Coveraged
37213 Full Coveraged
37214 Full Coveraged
37215 Full Coveraged
37216 Full Coveraged
37217 Full Coveraged
37218 Full Coveraged
37219 Full Coveraged
37220 Full Coveraged
37221 Full Coveraged
37222 Full Coveraged
37224 Full Coveraged
37227 Full Coveraged
37228 Full Coveraged
37229 Full Coveraged
37230 Full Coveraged
37232 Full Coveraged
37234 Full Coveraged
37235 Full Coveraged
37236 Full Coveraged
37238 Full Coveraged
37239 Full Coveraged
37240 Full Coveraged
37241 Full Coveraged
37242 Full Coveraged
37243 Full Coveraged
37244 Full Coveraged
37245 Full Coveraged
37246 Full Coveraged
37247 Full Coveraged
37248 Full Coveraged
37249 Full Coveraged
37250 Full Coveraged
37302 Full Coveraged
37303 Full Coveraged
37309 Mostly Coveraged
37310 Full Coveraged
37311 Full Coveraged
37312 Full Coveraged
37315 Full Coveraged
37320 Full Coveraged
37321 Full Coveraged
37322 Mostly Coveraged
37323 Mostly Coveraged
37329 Mostly Coveraged
37330 Mostly Coveraged
37331 Mostly Coveraged
37332 Full Coveraged
37336 Mostly Coveraged
37340 Mostly Coveraged
37341 Full Coveraged
37342 Mostly Coveraged
37343 Full Coveraged
37347 Full Coveraged
37349 Full Coveraged
37350 Full Coveraged
37351 Full Coveraged
37353 Full Coveraged
37355 Full Coveraged
37360 Mostly Coveraged
37363 Full Coveraged
37364 Full Coveraged
37370 Mostly Coveraged
37371 Full Coveraged
37377 Full Coveraged
37379 Mostly Coveraged
37380 Mostly Coveraged
37381 Mostly Coveraged
37382 Full Coveraged
37384 Full Coveraged
37389 Full Coveraged
37396 Full Coveraged
37401 Mostly Coveraged
37402 Full Coveraged
37403 Full Coveraged
37404 Full Coveraged
37405 Mostly Coveraged
37406 Mostly Coveraged
37407 Full Coveraged
37408 Full Coveraged
37409 Full Coveraged
37410 Full Coveraged
37411 Full Coveraged
37412 Full Coveraged
37414 Full Coveraged
37415 Full Coveraged
37416 Mostly Coveraged
37419 Full Coveraged
37421 Full Coveraged
37422 Mostly Coveraged
37424 Mostly Coveraged
37450 Full Coveraged
37501 Full Coveraged
37618 Full Coveraged
37620 Mostly Coveraged
37621 Mostly Coveraged
37625 Mostly Coveraged
37640 Mostly Coveraged
37642 Mostly Coveraged
37643 Full Coveraged
37644 Mostly Coveraged
37645 Full Coveraged
37656 Mostly Coveraged
37657 Mostly Coveraged
37660 Full Coveraged
37662 Mostly Coveraged
37663 Mostly Coveraged
37664 Full Coveraged
37665 Full Coveraged
37694 Mostly Coveraged
37699 Mostly Coveraged
37701 Mostly Coveraged
37705 Mostly Coveraged
37708 Full Coveraged
37710 Full Coveraged
37714 Full Coveraged
37716 Full Coveraged
37717 Full Coveraged
37719 Mostly Coveraged
37722 Full Coveraged
37725 Mostly Coveraged
37737 Mostly Coveraged
37738 Full Coveraged
37742 Mostly Coveraged
37743 Mostly Coveraged
37748 Full Coveraged
37754 Full Coveraged
37757 Mostly Coveraged
37760 Mostly Coveraged
37763 Mostly Coveraged
37764 Mostly Coveraged
37769 Full Coveraged
37771 Full Coveraged
37772 Full Coveraged
37774 Full Coveraged
37777 Mostly Coveraged
37778 Full Coveraged
37801 Mostly Coveraged
37802 Mostly Coveraged
37803 Full Coveraged
37804 Mostly Coveraged
37813 Full Coveraged
37814 Full Coveraged
37815 Full Coveraged
37816 Full Coveraged
37821 Mostly Coveraged
37822 Mostly Coveraged
37826 Full Coveraged
37828 Mostly Coveraged
37829 Mostly Coveraged
37830 Full Coveraged
37831 Full Coveraged
37840 Full Coveraged
37845 Mostly Coveraged
37849 Full Coveraged
37854 Mostly Coveraged
37860 Mostly Coveraged
37862 Full Coveraged
37863 Full Coveraged
37864 Full Coveraged
37865 Full Coveraged
37868 Full Coveraged
37876 Mostly Coveraged
37877 Full Coveraged
37878 Full Coveraged
37881 Mostly Coveraged
37882 Mostly Coveraged
37886 Mostly Coveraged
37890 Mostly Coveraged
37901 Mostly Coveraged
37902 Mostly Coveraged
37909 Full Coveraged
37912 Full Coveraged
37915 Mostly Coveraged
37916 Mostly Coveraged
37917 Mostly Coveraged
37918 Full Coveraged
37919 Mostly Coveraged
37921 Full Coveraged
37922 Full Coveraged
37923 Full Coveraged
37927 Mostly Coveraged
37928 Full Coveraged
37929 Mostly Coveraged
37930 Full Coveraged
37931 Full Coveraged
37932 Full Coveraged
37933 Full Coveraged
37938 Full Coveraged
37939 Mostly Coveraged
37940 Mostly Coveraged
37950 Full Coveraged
37990 Full Coveraged
37995 Full Coveraged
37996 Mostly Coveraged
37997 Mostly Coveraged
37998 Mostly Coveraged
38002 Mostly Coveraged
38004 Mostly Coveraged
38007 Full Coveraged
38012 Full Coveraged
38014 Full Coveraged
38015 Mostly Coveraged
38016 Full Coveraged
38017 Full Coveraged
38018 Full Coveraged
38023 Full Coveraged
38024 Full Coveraged
38025 Full Coveraged
38027 Full Coveraged
38028 Full Coveraged
38029 Full Coveraged
38030 Mostly Coveraged
38047 Full Coveraged
38048 Full Coveraged
38053 Mostly Coveraged
38054 Mostly Coveraged
38055 Mostly Coveraged
38058 Mostly Coveraged
38060 Mostly Coveraged
38066 Full Coveraged
38069 Full Coveraged
38070 Mostly Coveraged
38071 Mostly Coveraged
38083 Mostly Coveraged
38088 Full Coveraged
38101 Full Coveraged
38103 Full Coveraged
38104 Full Coveraged
38105 Full Coveraged
38106 Full Coveraged
38107 Full Coveraged
38108 Full Coveraged
38109 Full Coveraged
38111 Full Coveraged
38112 Full Coveraged
38113 Full Coveraged
38114 Full Coveraged
38115 Full Coveraged
38116 Full Coveraged
38117 Full Coveraged
38118 Full Coveraged
38119 Full Coveraged
38120 Full Coveraged
38122 Full Coveraged
38124 Full Coveraged
38125 Full Coveraged
38126 Full Coveraged
38127 Full Coveraged
38128 Full Coveraged
38129 Full Coveraged
38130 Full Coveraged
38131 Full Coveraged
38132 Full Coveraged
38133 Full Coveraged
38134 Full Coveraged
38135 Full Coveraged
38136 Full Coveraged
38137 Full Coveraged
38138 Full Coveraged
38139 Full Coveraged
38141 Mostly Coveraged
38142 Full Coveraged
38145 Full Coveraged
38146 Full Coveraged
38147 Full Coveraged
38148 Full Coveraged
38151 Full Coveraged
38152 Full Coveraged
38157 Full Coveraged
38159 Full Coveraged
38161 Full Coveraged
38163 Full Coveraged
38165 Full Coveraged
38166 Full Coveraged
38167 Full Coveraged
38168 Full Coveraged
38173 Full Coveraged
38174 Full Coveraged
38175 Full Coveraged
38177 Full Coveraged
38181 Full Coveraged
38182 Full Coveraged
38183 Full Coveraged
38184 Full Coveraged
38186 Full Coveraged
38187 Full Coveraged
38188 Full Coveraged
38190 Full Coveraged
38193 Mostly Coveraged
38194 Full Coveraged
38195 Full Coveraged
38197 Full Coveraged
38301 Full Coveraged
38302 Full Coveraged
38303 Full Coveraged
38305 Full Coveraged
38308 Full Coveraged
38313 Mostly Coveraged
38314 Full Coveraged
38324 Mostly Coveraged
38328 Mostly Coveraged
38339 Mostly Coveraged
38351 Full Coveraged
38355 Mostly Coveraged
38357 Mostly Coveraged
38362 Full Coveraged
38366 Mostly Coveraged
38367 Mostly Coveraged
38378 Mostly Coveraged
38387 Mostly Coveraged
38388 Full Coveraged
38390 Mostly Coveraged
38393 Mostly Coveraged
38401 Full Coveraged
38402 Full Coveraged
38451 Mostly Coveraged
38501 Mostly Coveraged
38502 Full Coveraged
38503 Full Coveraged
38505 Full Coveraged
38506 Full Coveraged
38555 Full Coveraged
38557 Full Coveraged
38558 Mostly Coveraged
38571 Mostly Coveraged
38572 Mostly Coveraged
38583 Mostly Coveraged
38601 Mostly Coveraged
38602 Full Coveraged
38632 Mostly Coveraged
38637 Full Coveraged
38651 Full Coveraged
38654 Mostly Coveraged
38655 Full Coveraged
38665 Mostly Coveraged
38671 Full Coveraged
38672 Full Coveraged
38673 Full Coveraged
38675 Full Coveraged
38677 Full Coveraged
38680 Full Coveraged
38686 Mostly Coveraged
38701 Full Coveraged
38702 Full Coveraged
38703 Full Coveraged
38704 Full Coveraged
38723 Mostly Coveraged
38760 Full Coveraged
38776 Mostly Coveraged
38780 Full Coveraged
38782 Full Coveraged
38801 Full Coveraged
38802 Full Coveraged
38803 Full Coveraged
38804 Full Coveraged
38821 Mostly Coveraged
38825 Full Coveraged
38826 Mostly Coveraged
38834 Full Coveraged
38835 Full Coveraged
38846 Mostly Coveraged
38857 Mostly Coveraged
38858 Mostly Coveraged
38862 Full Coveraged
38865 Mostly Coveraged
38866 Mostly Coveraged
38868 Mostly Coveraged
38869 Mostly Coveraged
38879 Full Coveraged
38917 Mostly Coveraged
38930 Full Coveraged
38935 Full Coveraged
38945 Full Coveraged
38954 Full Coveraged
39041 Mostly Coveraged
39042 Mostly Coveraged
39043 Full Coveraged
39047 Full Coveraged
39056 Full Coveraged
39058 Full Coveraged
39059 Full Coveraged
39060 Full Coveraged
39077 Full Coveraged
39083 Full Coveraged
39110 Full Coveraged
39111 Full Coveraged
39112 Full Coveraged
39114 Full Coveraged
39119 Mostly Coveraged
39120 Full Coveraged
39121 Full Coveraged
39122 Full Coveraged
39130 Full Coveraged
39154 Mostly Coveraged
39157 Full Coveraged
39158 Full Coveraged
39161 Mostly Coveraged
39165 Mostly Coveraged
39170 Mostly Coveraged
39174 Full Coveraged
39180 Full Coveraged
39181 Full Coveraged
39182 Full Coveraged
39183 Mostly Coveraged
39190 Full Coveraged
39191 Full Coveraged
39193 Mostly Coveraged
39201 Full Coveraged
39202 Full Coveraged
39203 Full Coveraged
39204 Full Coveraged
39205 Full Coveraged
39206 Full Coveraged
39207 Full Coveraged
39208 Full Coveraged
39209 Full Coveraged
39210 Full Coveraged
39211 Full Coveraged
39212 Full Coveraged
39213 Full Coveraged
39215 Full Coveraged
39216 Full Coveraged
39217 Full Coveraged
39218 Full Coveraged
39225 Full Coveraged
39232 Full Coveraged
39235 Full Coveraged
39236 Full Coveraged
39269 Full Coveraged
39271 Full Coveraged
39272 Full Coveraged
39282 Full Coveraged
39283 Full Coveraged
39284 Full Coveraged
39286 Full Coveraged
39288 Full Coveraged
39289 Full Coveraged
39296 Full Coveraged
39298 Full Coveraged
39301 Full Coveraged
39302 Full Coveraged
39303 Full Coveraged
39304 Full Coveraged
39305 Mostly Coveraged
39307 Mostly Coveraged
39342 Mostly Coveraged
Zip Code Coverage Level Zip Code Coverage Level Zip Code Coverage Level Zip Code Coverage Level Zip Code Coverage Level Zip Code Coverage Level
Page 70

- 170 -
39401 Mostly Coveraged
39402 Full Coveraged
39403 Full Coveraged
39404 Full Coveraged
39406 Full Coveraged
39437 Mostly Coveraged
39440 Full Coveraged
39441 Full Coveraged
39442 Full Coveraged
39443 Full Coveraged
39460 Mostly Coveraged
39475 Mostly Coveraged
39477 Mostly Coveraged
39482 Mostly Coveraged
39501 Full Coveraged
39502 Full Coveraged
39503 Mostly Coveraged
39505 Full Coveraged
39506 Full Coveraged
39507 Full Coveraged
39530 Full Coveraged
39531 Mostly Coveraged
39532 Mostly Coveraged
39533 Full Coveraged
39534 Full Coveraged
39535 Full Coveraged
39540 Full Coveraged
39552 Full Coveraged
39553 Full Coveraged
39560 Full Coveraged
39563 Full Coveraged
39564 Full Coveraged
39565 Mostly Coveraged
39566 Full Coveraged
39567 Full Coveraged
39568 Full Coveraged
39569 Full Coveraged
39581 Full Coveraged
39595 Full Coveraged
39601 Full Coveraged
39602 Full Coveraged
39603 Full Coveraged
39701 Full Coveraged
39702 Full Coveraged
39703 Full Coveraged
39704 Full Coveraged
39705 Full Coveraged
39710 Mostly Coveraged
39730 Full Coveraged
39736 Full Coveraged
39753 Mostly Coveraged
39756 Mostly Coveraged
39759 Full Coveraged
39760 Full Coveraged
39762 Full Coveraged
39766 Mostly Coveraged
39815 Mostly Coveraged
39817 Full Coveraged
39818 Full Coveraged
39819 Mostly Coveraged
39825 Mostly Coveraged
39834 Mostly Coveraged
39852 Full Coveraged
39901 Full Coveraged
40003 Mostly Coveraged
40004 Full Coveraged
40006 Mostly Coveraged
40010 Full Coveraged
40013 Full Coveraged
40014 Full Coveraged
40018 Full Coveraged
40020 Mostly Coveraged
40022 Mostly Coveraged
40023 Full Coveraged
40025 Mostly Coveraged
40026 Full Coveraged
40027 Mostly Coveraged
40031 Full Coveraged
40032 Full Coveraged
40033 Full Coveraged
40037 Mostly Coveraged
40041 Full Coveraged
40046 Mostly Coveraged
40047 Full Coveraged
40048 Full Coveraged
40049 Mostly Coveraged
40055 Full Coveraged
40056 Mostly Coveraged
40060 Mostly Coveraged
40062 Mostly Coveraged
40063 Full Coveraged
40065 Full Coveraged
40066 Full Coveraged
40067 Mostly Coveraged
40068 Mostly Coveraged
40071 Mostly Coveraged
40076 Full Coveraged
40077 Full Coveraged
40107 Mostly Coveraged
40108 Full Coveraged
40109 Full Coveraged
40110 Mostly Coveraged
40115 Full Coveraged
40117 Full Coveraged
40118 Full Coveraged
40121 Full Coveraged
40129 Full Coveraged
40140 Full Coveraged
40142 Full Coveraged
40143 Mostly Coveraged
40144 Full Coveraged
40145 Mostly Coveraged
40146 Full Coveraged
40150 Mostly Coveraged
40152 Mostly Coveraged
40155 Mostly Coveraged
40159 Full Coveraged
40160 Full Coveraged
40162 Mostly Coveraged
40164 Mostly Coveraged
40165 Full Coveraged
40175 Mostly Coveraged
40176 Mostly Coveraged
40177 Full Coveraged
40178 Mostly Coveraged
40201 Full Coveraged
40202 Full Coveraged
40203 Full Coveraged
40204 Full Coveraged
40205 Full Coveraged
40206 Full Coveraged
40207 Full Coveraged
40208 Full Coveraged
40209 Full Coveraged
40210 Full Coveraged
40211 Full Coveraged
40212 Full Coveraged
40213 Full Coveraged
40214 Full Coveraged
40215 Full Coveraged
40216 Full Coveraged
40217 Full Coveraged
40218 Full Coveraged
40219 Full Coveraged
40220 Mostly Coveraged
40221 Full Coveraged
40222 Mostly Coveraged
40223 Mostly Coveraged
40224 Full Coveraged
40225 Full Coveraged
40228 Mostly Coveraged
40229 Mostly Coveraged
40231 Full Coveraged
40232 Full Coveraged
40233 Full Coveraged
40241 Mostly Coveraged
40242 Mostly Coveraged
40243 Full Coveraged
40245 Mostly Coveraged
40250 Mostly Coveraged
40251 Full Coveraged
40252 Mostly Coveraged
40253 Mostly Coveraged
40255 Full Coveraged
40256 Full Coveraged
40257 Full Coveraged
40258 Full Coveraged
40259 Mostly Coveraged
40261 Mostly Coveraged
40266 Full Coveraged
40268 Full Coveraged
40269 Full Coveraged
40270 Full Coveraged
40272 Full Coveraged
40280 Full Coveraged
40281 Full Coveraged
40282 Full Coveraged
40283 Full Coveraged
40285 Full Coveraged
40289 Full Coveraged
40290 Full Coveraged
40291 Full Coveraged
40292 Full Coveraged
40296 Full Coveraged
40297 Full Coveraged
40298 Full Coveraged
40299 Full Coveraged
40310 Mostly Coveraged
40312 Mostly Coveraged
40320 Mostly Coveraged
40324 Full Coveraged
40330 Mostly Coveraged
40336 Full Coveraged
40339 Full Coveraged
40340 Full Coveraged
40342 Full Coveraged
40356 Full Coveraged
40357 Mostly Coveraged
40372 Full Coveraged
40383 Mostly Coveraged
40384 Mostly Coveraged
40386 Mostly Coveraged
40390 Mostly Coveraged
40391 Full Coveraged
40392 Full Coveraged
40410 Mostly Coveraged
40422 Full Coveraged
40423 Full Coveraged
40440 Full Coveraged
40452 Mostly Coveraged
40464 Mostly Coveraged
40467 Mostly Coveraged
40472 Full Coveraged
40475 Full Coveraged
40476 Full Coveraged
40484 Mostly Coveraged
40495 Full Coveraged
40502 Full Coveraged
40503 Full Coveraged
40504 Full Coveraged
40505 Full Coveraged
40507 Full Coveraged
40508 Full Coveraged
40509 Full Coveraged
40510 Full Coveraged
40511 Full Coveraged
40512 Full Coveraged
40513 Full Coveraged
40514 Full Coveraged
40515 Full Coveraged
40516 Full Coveraged
40517 Full Coveraged
40522 Full Coveraged
40523 Full Coveraged
40524 Full Coveraged
40526 Full Coveraged
40533 Full Coveraged
40536 Full Coveraged
40544 Full Coveraged
40546 Full Coveraged
40555 Full Coveraged
40574 Full Coveraged
40575 Full Coveraged
40576 Full Coveraged
40577 Full Coveraged
40578 Full Coveraged
40579 Full Coveraged
40580 Full Coveraged
40581 Full Coveraged
40582 Full Coveraged
40583 Full Coveraged
40588 Full Coveraged
40591 Full Coveraged
40598 Full Coveraged
40601 Full Coveraged
40602 Full Coveraged
40603 Full Coveraged
40604 Full Coveraged
40618 Full Coveraged
40619 Full Coveraged
40620 Full Coveraged
40621 Full Coveraged
40622 Full Coveraged
40701 Full Coveraged
40702 Full Coveraged
40724 Mostly Coveraged
40729 Mostly Coveraged
40734 Mostly Coveraged
40737 Full Coveraged
40740 Full Coveraged
40741 Full Coveraged
40742 Full Coveraged
40743 Full Coveraged
40744 Full Coveraged
40745 Full Coveraged
40751 Mostly Coveraged
40755 Full Coveraged
40759 Mostly Coveraged
40771 Full Coveraged
40946 Mostly Coveraged
41001 Mostly Coveraged
41005 Full Coveraged
41007 Mostly Coveraged
41011 Full Coveraged
41012 Full Coveraged
41014 Full Coveraged
41015 Full Coveraged
41016 Full Coveraged
41017 Full Coveraged
41018 Full Coveraged
41019 Full Coveraged
41022 Full Coveraged
41030 Mostly Coveraged
41033 Mostly Coveraged
41042 Full Coveraged
41048 Full Coveraged
41051 Full Coveraged
41053 Full Coveraged
41059 Full Coveraged
41063 Full Coveraged
41071 Full Coveraged
41072 Full Coveraged
41073 Full Coveraged
41074 Full Coveraged
41075 Full Coveraged
41076 Full Coveraged
41080 Full Coveraged
41085 Full Coveraged
41091 Full Coveraged
41092 Mostly Coveraged
41094 Full Coveraged
41099 Full Coveraged
41101 Mostly Coveraged
41105 Mostly Coveraged
41114 Mostly Coveraged
41129 Mostly Coveraged
41137 Full Coveraged
41156 Mostly Coveraged
41166 Full Coveraged
41174 Full Coveraged
41175 Full Coveraged
41901 Full Coveraged
41902 Full Coveraged
41903 Full Coveraged
41904 Full Coveraged
41905 Full Coveraged
41906 Full Coveraged
42001 Full Coveraged
42002 Full Coveraged
42003 Full Coveraged
42024 Mostly Coveraged
42027 Full Coveraged
42051 Mostly Coveraged
42058 Mostly Coveraged
42069 Mostly Coveraged
42082 Mostly Coveraged
42086 Mostly Coveraged
42101 Full Coveraged
42102 Full Coveraged
42104 Mostly Coveraged
42120 Mostly Coveraged
42123 Mostly Coveraged
42124 Mostly Coveraged
42127 Full Coveraged
42128 Mostly Coveraged
42129 Full Coveraged
42130 Full Coveraged
42131 Mostly Coveraged
42134 Full Coveraged
42135 Full Coveraged
42141 Full Coveraged
42142 Full Coveraged
42150 Mostly Coveraged
42152 Mostly Coveraged
42153 Mostly Coveraged
42154 Mostly Coveraged
42156 Mostly Coveraged
42160 Full Coveraged
42163 Mostly Coveraged
42164 Full Coveraged
42166 Mostly Coveraged
42170 Full Coveraged
42201 Mostly Coveraged
42202 Mostly Coveraged
42206 Mostly Coveraged
42207 Mostly Coveraged
42209 Mostly Coveraged
42217 Mostly Coveraged
42219 Full Coveraged
42240 Full Coveraged
42241 Full Coveraged
42251 Full Coveraged
42252 Mostly Coveraged
42261 Full Coveraged
42262 Mostly Coveraged
42265 Mostly Coveraged
42266 Mostly Coveraged
42270 Full Coveraged
42274 Full Coveraged
42276 Full Coveraged
42283 Mostly Coveraged
42286 Mostly Coveraged
42288 Full Coveraged
42301 Mostly Coveraged
42302 Full Coveraged
42303 Full Coveraged
42304 Full Coveraged
42334 Mostly Coveraged
42355 Mostly Coveraged
42366 Mostly Coveraged
42376 Mostly Coveraged
42402 Mostly Coveraged
42410 Full Coveraged
42413 Mostly Coveraged
42419 Full Coveraged
42420 Full Coveraged
42431 Full Coveraged
42436 Mostly Coveraged
42440 Full Coveraged
42441 Mostly Coveraged
42442 Mostly Coveraged
42451 Full Coveraged
42457 Mostly Coveraged
42458 Full Coveraged
42501 Mostly Coveraged
42502 Full Coveraged
42503 Full Coveraged
42519 Mostly Coveraged
42528 Mostly Coveraged
42533 Full Coveraged
42553 Mostly Coveraged
42558 Full Coveraged
42564 Full Coveraged
42567 Mostly Coveraged
42629 Mostly Coveraged
42642 Full Coveraged
42701 Full Coveraged
42702 Full Coveraged
42711 Mostly Coveraged
42712 Mostly Coveraged
42713 Full Coveraged
42715 Mostly Coveraged
42716 Mostly Coveraged
42717 Full Coveraged
42718 Full Coveraged
42719 Full Coveraged
42720 Full Coveraged
42724 Mostly Coveraged
42726 Mostly Coveraged
42728 Full Coveraged
42729 Mostly Coveraged
42731 Full Coveraged
42733 Mostly Coveraged
42735 Full Coveraged
42740 Mostly Coveraged
42741 Mostly Coveraged
42742 Mostly Coveraged
42748 Full Coveraged
42749 Mostly Coveraged
42754 Full Coveraged
42755 Full Coveraged
42757 Mostly Coveraged
42758 Full Coveraged
42759 Full Coveraged
42762 Full Coveraged
42764 Mostly Coveraged
42765 Full Coveraged
42784 Mostly Coveraged
42786 Full Coveraged
43001 Full Coveraged
43002 Full Coveraged
43004 Full Coveraged
43007 Full Coveraged
43008 Mostly Coveraged
43013 Mostly Coveraged
43015 Mostly Coveraged
43016 Full Coveraged
43017 Full Coveraged
43018 Full Coveraged
43021 Full Coveraged
43023 Mostly Coveraged
43025 Mostly Coveraged
43026 Full Coveraged
43030 Full Coveraged
43031 Full Coveraged
43032 Full Coveraged
43033 Mostly Coveraged
43035 Full Coveraged
43036 Full Coveraged
43040 Full Coveraged
43041 Full Coveraged
43054 Full Coveraged
43055 Full Coveraged
43056 Full Coveraged
43058 Full Coveraged
43061 Mostly Coveraged
43062 Full Coveraged
43065 Full Coveraged
43067 Mostly Coveraged
43068 Full Coveraged
43071 Mostly Coveraged
43073 Full Coveraged
43074 Full Coveraged
43076 Mostly Coveraged
43077 Mostly Coveraged
43078 Mostly Coveraged
43081 Full Coveraged
43082 Full Coveraged
43083 Mostly Coveraged
43085 Full Coveraged
43086 Full Coveraged
43093 Full Coveraged
43098 Mostly Coveraged
43101 Mostly Coveraged
43102 Mostly Coveraged
43103 Mostly Coveraged
43105 Mostly Coveraged
43109 Full Coveraged
43110 Full Coveraged
43112 Full Coveraged
43113 Full Coveraged
43119 Full Coveraged
43123 Full Coveraged
43125 Full Coveraged
Zip Code Coverage Level Zip Code Coverage Level Zip Code Coverage Level Zip Code Coverage Level Zip Code Coverage Level Zip Code Coverage Level
Page 71

- 171 -
43126 Mostly Coveraged
43130 Full Coveraged
43136 Full Coveraged
43137 Mostly Coveraged
43140 Full Coveraged
43147 Full Coveraged
43148 Mostly Coveraged
43149 Mostly Coveraged
43151 Mostly Coveraged
43154 Full Coveraged
43155 Full Coveraged
43156 Full Coveraged
43157 Mostly Coveraged
43162 Mostly Coveraged
43163 Mostly Coveraged
43195 Full Coveraged
43196 Full Coveraged
43198 Mostly Coveraged
43199 Full Coveraged
43201 Full Coveraged
43202 Full Coveraged
43203 Full Coveraged
43204 Full Coveraged
43205 Full Coveraged
43206 Full Coveraged
43207 Full Coveraged
43209 Full Coveraged
43210 Full Coveraged
43211 Full Coveraged
43212 Full Coveraged
43213 Full Coveraged
43214 Full Coveraged
43215 Full Coveraged
43216 Full Coveraged
43217 Mostly Coveraged
43218 Full Coveraged
43219 Full Coveraged
43220 Full Coveraged
43221 Full Coveraged
43222 Full Coveraged
43223 Full Coveraged
43224 Full Coveraged
43226 Full Coveraged
43227 Full Coveraged
43228 Full Coveraged
43229 Full Coveraged
43230 Full Coveraged
43231 Full Coveraged
43232 Full Coveraged
43234 Full Coveraged
43235 Full Coveraged
43236 Full Coveraged
43240 Full Coveraged
43251 Full Coveraged
43260 Full Coveraged
43265 Full Coveraged
43268 Full Coveraged
43270 Full Coveraged
43271 Full Coveraged
43272 Full Coveraged
43279 Full Coveraged
43287 Full Coveraged
43291 Full Coveraged
43299 Full Coveraged
43301 Full Coveraged
43302 Full Coveraged
43306 Full Coveraged
43314 Mostly Coveraged
43322 Full Coveraged
43323 Mostly Coveraged
43332 Mostly Coveraged
43337 Full Coveraged
43341 Full Coveraged
43342 Mostly Coveraged
43344 Mostly Coveraged
43356 Mostly Coveraged
43402 Full Coveraged
43403 Full Coveraged
43406 Full Coveraged
43408 Mostly Coveraged
43410 Mostly Coveraged
43412 Full Coveraged
43414 Full Coveraged
43430 Mostly Coveraged
43434 Full Coveraged
43437 Mostly Coveraged
43440 Mostly Coveraged
43441 Full Coveraged
43443 Full Coveraged
43445 Mostly Coveraged
43447 Full Coveraged
43450 Full Coveraged
43451 Full Coveraged
43457 Mostly Coveraged
43460 Full Coveraged
43463 Full Coveraged
43464 Mostly Coveraged
43465 Full Coveraged
43466 Full Coveraged
43467 Mostly Coveraged
43468 Full Coveraged
43469 Mostly Coveraged
43504 Mostly Coveraged
43525 Mostly Coveraged
43528 Full Coveraged
43537 Full Coveraged
43542 Full Coveraged
43551 Mostly Coveraged
43552 Mostly Coveraged
43558 Mostly Coveraged
43560 Full Coveraged
43565 Mostly Coveraged
43566 Mostly Coveraged
43571 Mostly Coveraged
43601 Full Coveraged
43602 Full Coveraged
43603 Full Coveraged
43604 Full Coveraged
43605 Full Coveraged
43606 Full Coveraged
43607 Full Coveraged
43608 Full Coveraged
43609 Full Coveraged
43610 Full Coveraged
43611 Full Coveraged
43612 Full Coveraged
43613 Full Coveraged
43614 Full Coveraged
43615 Full Coveraged
43616 Full Coveraged
43617 Full Coveraged
43618 Full Coveraged
43619 Full Coveraged
43620 Full Coveraged
43623 Full Coveraged
43624 Full Coveraged
43635 Full Coveraged
43652 Full Coveraged
43654 Full Coveraged
43656 Full Coveraged
43657 Full Coveraged
43659 Full Coveraged
43660 Full Coveraged
43661 Full Coveraged
43666 Full Coveraged
43667 Full Coveraged
43681 Full Coveraged
43682 Full Coveraged
43697 Full Coveraged
43699 Full Coveraged
43721 Mostly Coveraged
43739 Mostly Coveraged
43740 Mostly Coveraged
43905 Full Coveraged
43906 Full Coveraged
43909 Full Coveraged
43912 Full Coveraged
43913 Full Coveraged
43916 Full Coveraged
43926 Full Coveraged
43934 Full Coveraged
43935 Full Coveraged
43937 Full Coveraged
43938 Full Coveraged
43939 Mostly Coveraged
43940 Full Coveraged
43943 Mostly Coveraged
43947 Mostly Coveraged
43952 Full Coveraged
43953 Full Coveraged
43961 Mostly Coveraged
43963 Mostly Coveraged
43964 Mostly Coveraged
43971 Full Coveraged
44001 Full Coveraged
44004 Full Coveraged
44005 Full Coveraged
44010 Mostly Coveraged
44011 Full Coveraged
44012 Full Coveraged
44017 Full Coveraged
44021 Mostly Coveraged
44022 Full Coveraged
44023 Full Coveraged
44024 Full Coveraged
44026 Full Coveraged
44028 Full Coveraged
44030 Mostly Coveraged
44033 Mostly Coveraged
44035 Full Coveraged
44036 Full Coveraged
44039 Full Coveraged
44040 Full Coveraged
44044 Mostly Coveraged
44045 Full Coveraged
44047 Full Coveraged
44048 Full Coveraged
44049 Full Coveraged
44050 Full Coveraged
44052 Full Coveraged
44053 Full Coveraged
44054 Full Coveraged
44055 Full Coveraged
44056 Full Coveraged
44060 Full Coveraged
44061 Full Coveraged
44065 Full Coveraged
44067 Full Coveraged
44068 Full Coveraged
44070 Full Coveraged
44072 Full Coveraged
44073 Full Coveraged
44074 Full Coveraged
44077 Full Coveraged
44081 Mostly Coveraged
44087 Full Coveraged
44089 Full Coveraged
44090 Full Coveraged
44092 Full Coveraged
44094 Full Coveraged
44095 Full Coveraged
44096 Full Coveraged
44097 Full Coveraged
44101 Full Coveraged
44102 Full Coveraged
44103 Full Coveraged
44104 Full Coveraged
44105 Full Coveraged
44106 Full Coveraged
44107 Full Coveraged
44108 Full Coveraged
44109 Full Coveraged
44110 Full Coveraged
44111 Full Coveraged
44112 Full Coveraged
44113 Full Coveraged
44114 Full Coveraged
44115 Full Coveraged
44116 Full Coveraged
44117 Full Coveraged
44118 Full Coveraged
44119 Full Coveraged
44120 Full Coveraged
44121 Full Coveraged
44122 Full Coveraged
44123 Full Coveraged
44124 Full Coveraged
44125 Full Coveraged
44126 Full Coveraged
44127 Full Coveraged
44128 Full Coveraged
44129 Full Coveraged
44130 Full Coveraged
44131 Full Coveraged
44132 Full Coveraged
44133 Full Coveraged
44134 Full Coveraged
44135 Full Coveraged
44136 Full Coveraged
44137 Full Coveraged
44138 Full Coveraged
44139 Full Coveraged
44140 Full Coveraged
44141 Full Coveraged
44142 Full Coveraged
44143 Full Coveraged
44144 Full Coveraged
44145 Full Coveraged
44146 Full Coveraged
44147 Full Coveraged
44149 Full Coveraged
44178 Full Coveraged
44181 Full Coveraged
44185 Full Coveraged
44188 Full Coveraged
44189 Full Coveraged
44190 Full Coveraged
44191 Full Coveraged
44192 Full Coveraged
44193 Full Coveraged
44194 Full Coveraged
44195 Full Coveraged
44198 Full Coveraged
44199 Full Coveraged
44201 Mostly Coveraged
44202 Mostly Coveraged
44203 Full Coveraged
44210 Full Coveraged
44211 Full Coveraged
44212 Full Coveraged
44215 Full Coveraged
44216 Full Coveraged
44217 Mostly Coveraged
44221 Full Coveraged
44222 Full Coveraged
44223 Full Coveraged
44224 Full Coveraged
44230 Mostly Coveraged
44232 Full Coveraged
44233 Full Coveraged
44234 Mostly Coveraged
44235 Full Coveraged
44236 Full Coveraged
44237 Full Coveraged
44240 Full Coveraged
44241 Mostly Coveraged
44242 Full Coveraged
44243 Full Coveraged
44250 Full Coveraged
44251 Full Coveraged
44253 Mostly Coveraged
44254 Mostly Coveraged
44255 Mostly Coveraged
44256 Full Coveraged
44258 Full Coveraged
44260 Full Coveraged
44262 Full Coveraged
44264 Full Coveraged
44265 Full Coveraged
44266 Full Coveraged
44270 Mostly Coveraged
44272 Full Coveraged
44273 Full Coveraged
44274 Mostly Coveraged
44275 Mostly Coveraged
44276 Mostly Coveraged
44278 Full Coveraged
44280 Full Coveraged
44281 Mostly Coveraged
44282 Mostly Coveraged
44285 Full Coveraged
44286 Full Coveraged
44287 Full Coveraged
44288 Mostly Coveraged
44301 Full Coveraged
44302 Full Coveraged
44303 Full Coveraged
44304 Full Coveraged
44305 Full Coveraged
44306 Full Coveraged
44307 Full Coveraged
44308 Full Coveraged
44309 Full Coveraged
44310 Full Coveraged
44311 Full Coveraged
44312 Full Coveraged
44313 Full Coveraged
44314 Full Coveraged
44315 Full Coveraged
44316 Full Coveraged
44317 Full Coveraged
44319 Full Coveraged
44320 Full Coveraged
44321 Full Coveraged
44322 Full Coveraged
44325 Full Coveraged
44326 Full Coveraged
44328 Full Coveraged
44333 Full Coveraged
44334 Full Coveraged
44372 Full Coveraged
44393 Full Coveraged
44396 Full Coveraged
44398 Full Coveraged
44399 Full Coveraged
44401 Mostly Coveraged
44402 Mostly Coveraged
44405 Full Coveraged
44406 Full Coveraged
44408 Mostly Coveraged
44410 Full Coveraged
44413 Mostly Coveraged
44416 Mostly Coveraged
44418 Mostly Coveraged
44420 Full Coveraged
44422 Full Coveraged
44423 Mostly Coveraged
44425 Mostly Coveraged
44430 Mostly Coveraged
44431 Mostly Coveraged
44436 Full Coveraged
44437 Full Coveraged
44440 Full Coveraged
44442 Full Coveraged
44443 Full Coveraged
44445 Mostly Coveraged
44446 Full Coveraged
44449 Mostly Coveraged
44451 Mostly Coveraged
44452 Mostly Coveraged
44454 Full Coveraged
44460 Full Coveraged
44471 Full Coveraged
44473 Full Coveraged
44481 Full Coveraged
44482 Full Coveraged
44483 Full Coveraged
44484 Full Coveraged
44485 Full Coveraged
44486 Full Coveraged
44490 Mostly Coveraged
44493 Full Coveraged
44501 Full Coveraged
44502 Full Coveraged
44503 Full Coveraged
44504 Full Coveraged
44505 Mostly Coveraged
44506 Full Coveraged
44507 Full Coveraged
44509 Full Coveraged
44510 Full Coveraged
44511 Full Coveraged
44512 Full Coveraged
44513 Full Coveraged
44514 Full Coveraged
44515 Full Coveraged
44555 Full Coveraged
44599 Full Coveraged
44606 Full Coveraged
44608 Mostly Coveraged
44609 Full Coveraged
44612 Full Coveraged
44613 Full Coveraged
44614 Mostly Coveraged
44618 Full Coveraged
44619 Full Coveraged
44622 Full Coveraged
44624 Mostly Coveraged
44625 Mostly Coveraged
44626 Full Coveraged
44627 Mostly Coveraged
44630 Full Coveraged
44632 Full Coveraged
44634 Mostly Coveraged
44636 Full Coveraged
44641 Mostly Coveraged
44643 Mostly Coveraged
44645 Mostly Coveraged
44646 Full Coveraged
44647 Full Coveraged
44648 Full Coveraged
44652 Mostly Coveraged
44653 Mostly Coveraged
44656 Mostly Coveraged
44659 Full Coveraged
44662 Full Coveraged
44663 Mostly Coveraged
44665 Full Coveraged
44666 Full Coveraged
44667 Full Coveraged
44671 Full Coveraged
44672 Full Coveraged
44677 Full Coveraged
44678 Full Coveraged
44680 Full Coveraged
44685 Full Coveraged
44688 Mostly Coveraged
44689 Mostly Coveraged
44690 Mostly Coveraged
44691 Full Coveraged
44697 Full Coveraged
44701 Full Coveraged
44702 Full Coveraged
44703 Full Coveraged
44704 Full Coveraged
44705 Full Coveraged
44706 Full Coveraged
44707 Full Coveraged
44708 Full Coveraged
44709 Full Coveraged
44710 Full Coveraged
44711 Full Coveraged
44712 Full Coveraged
44714 Full Coveraged
44718 Full Coveraged
44720 Full Coveraged
44721 Mostly Coveraged
44730 Full Coveraged
44735 Full Coveraged
44750 Full Coveraged
44760 Full Coveraged
44767 Full Coveraged
44798 Full Coveraged
44799 Full Coveraged
44805 Mostly Coveraged
44811 Mostly Coveraged
44813 Mostly Coveraged
44814 Full Coveraged
44816 Full Coveraged
44824 Full Coveraged
44826 Full Coveraged
44828 Mostly Coveraged
44839 Mostly Coveraged
44840 Mostly Coveraged
44843 Mostly Coveraged
44846 Mostly Coveraged
44847 Mostly Coveraged
44848 Full Coveraged
44851 Mostly Coveraged
44855 Mostly Coveraged
44857 Full Coveraged
44859 Mostly Coveraged
44862 Full Coveraged
44866 Full Coveraged
Zip Code Coverage Level Zip Code Coverage Level Zip Code Coverage Level Zip Code Coverage Level Zip Code Coverage Level Zip Code Coverage Level
Page 72

- 172 -
44870 Full Coveraged
44871 Full Coveraged
44874 Mostly Coveraged
44880 Full Coveraged
44889 Mostly Coveraged
44901 Full Coveraged
44902 Full Coveraged
44903 Full Coveraged
44904 Mostly Coveraged
44905 Full Coveraged
44906 Full Coveraged
44907 Full Coveraged
44999 Full Coveraged
45001 Full Coveraged
45002 Full Coveraged
45004 Full Coveraged
45005 Full Coveraged
45011 Mostly Coveraged
45012 Full Coveraged
45013 Full Coveraged
45014 Full Coveraged
45015 Full Coveraged
45018 Full Coveraged
45025 Full Coveraged
45026 Full Coveraged
45030 Full Coveraged
45032 Mostly Coveraged
45033 Full Coveraged
45034 Mostly Coveraged
45036 Full Coveraged
45039 Mostly Coveraged
45040 Full Coveraged
45041 Full Coveraged
45042 Full Coveraged
45043 Full Coveraged
45044 Full Coveraged
45050 Full Coveraged
45051 Full Coveraged
45052 Full Coveraged
45053 Full Coveraged
45054 Full Coveraged
45055 Full Coveraged
45056 Mostly Coveraged
45061 Full Coveraged
45062 Full Coveraged
45063 Full Coveraged
45064 Mostly Coveraged
45065 Full Coveraged
45066 Full Coveraged
45067 Mostly Coveraged
45068 Mostly Coveraged
45069 Full Coveraged
45071 Full Coveraged
45073 Full Coveraged
45099 Full Coveraged
45102 Full Coveraged
45103 Full Coveraged
45106 Full Coveraged
45111 Full Coveraged
45113 Mostly Coveraged
45122 Mostly Coveraged
45130 Mostly Coveraged
45140 Full Coveraged
45145 Full Coveraged
45147 Full Coveraged
45150 Mostly Coveraged
45152 Full Coveraged
45154 Mostly Coveraged
45157 Mostly Coveraged
45158 Mostly Coveraged
45160 Full Coveraged
45162 Mostly Coveraged
45174 Full Coveraged
45176 Full Coveraged
45201 Full Coveraged
45202 Full Coveraged
45203 Full Coveraged
45204 Full Coveraged
45205 Full Coveraged
45206 Full Coveraged
45207 Full Coveraged
45208 Full Coveraged
45209 Full Coveraged
45210 Full Coveraged
45211 Full Coveraged
45212 Full Coveraged
45213 Full Coveraged
45214 Full Coveraged
45215 Full Coveraged
45216 Full Coveraged
45217 Full Coveraged
45218 Full Coveraged
45219 Full Coveraged
45220 Full Coveraged
45221 Full Coveraged
45222 Full Coveraged
45223 Full Coveraged
45224 Full Coveraged
45225 Full Coveraged
45226 Full Coveraged
45227 Full Coveraged
45228 Full Coveraged
45229 Full Coveraged
45230 Full Coveraged
45231 Full Coveraged
45232 Full Coveraged
45233 Full Coveraged
45234 Full Coveraged
45235 Full Coveraged
45236 Full Coveraged
45237 Full Coveraged
45238 Full Coveraged
45239 Full Coveraged
45240 Full Coveraged
45241 Full Coveraged
45242 Full Coveraged
45243 Full Coveraged
45244 Full Coveraged
45245 Full Coveraged
45246 Full Coveraged
45247 Full Coveraged
45248 Full Coveraged
45249 Full Coveraged
45250 Full Coveraged
45251 Full Coveraged
45252 Full Coveraged
45253 Full Coveraged
45254 Full Coveraged
45255 Full Coveraged
45258 Full Coveraged
45262 Full Coveraged
45263 Full Coveraged
45264 Full Coveraged
45267 Full Coveraged
45268 Full Coveraged
45269 Full Coveraged
45270 Full Coveraged
45271 Full Coveraged
45273 Full Coveraged
45274 Full Coveraged
45275 Full Coveraged
45277 Full Coveraged
45280 Full Coveraged
45296 Full Coveraged
45298 Full Coveraged
45299 Full Coveraged
45301 Full Coveraged
45305 Full Coveraged
45311 Mostly Coveraged
45312 Full Coveraged
45314 Mostly Coveraged
45315 Mostly Coveraged
45316 Full Coveraged
45319 Full Coveraged
45320 Full Coveraged
45321 Mostly Coveraged
45323 Full Coveraged
45324 Full Coveraged
45325 Mostly Coveraged
45326 Mostly Coveraged
45327 Mostly Coveraged
45330 Mostly Coveraged
45332 Mostly Coveraged
45335 Mostly Coveraged
45338 Mostly Coveraged
45339 Mostly Coveraged
45341 Full Coveraged
45342 Full Coveraged
45343 Full Coveraged
45344 Mostly Coveraged
45345 Mostly Coveraged
45347 Mostly Coveraged
45349 Full Coveraged
45356 Mostly Coveraged
45359 Mostly Coveraged
45370 Full Coveraged
45371 Full Coveraged
45372 Full Coveraged
45373 Full Coveraged
45374 Full Coveraged
45377 Mostly Coveraged
45381 Full Coveraged
45382 Mostly Coveraged
45383 Mostly Coveraged
45384 Full Coveraged
45385 Full Coveraged
45387 Full Coveraged
45389 Mostly Coveraged
45401 Full Coveraged
45402 Full Coveraged
45403 Full Coveraged
45404 Full Coveraged
45405 Full Coveraged
45406 Full Coveraged
45407 Full Coveraged
45408 Full Coveraged
45409 Full Coveraged
45410 Full Coveraged
45412 Full Coveraged
45413 Mostly Coveraged
45414 Mostly Coveraged
45415 Full Coveraged
45416 Full Coveraged
45417 Full Coveraged
45418 Full Coveraged
45419 Full Coveraged
45420 Full Coveraged
45422 Full Coveraged
45423 Full Coveraged
45424 Full Coveraged
45426 Full Coveraged
45427 Full Coveraged
45428 Full Coveraged
45429 Full Coveraged
45430 Full Coveraged
45431 Full Coveraged
45432 Full Coveraged
45433 Full Coveraged
45434 Full Coveraged
45435 Full Coveraged
45437 Full Coveraged
45439 Full Coveraged
45440 Full Coveraged
45441 Full Coveraged
45448 Full Coveraged
45449 Full Coveraged
45454 Full Coveraged
45458 Full Coveraged
45459 Full Coveraged
45463 Full Coveraged
45469 Full Coveraged
45470 Full Coveraged
45475 Full Coveraged
45479 Full Coveraged
45481 Full Coveraged
45482 Full Coveraged
45490 Mostly Coveraged
45501 Full Coveraged
45502 Full Coveraged
45503 Full Coveraged
45504 Full Coveraged
45505 Full Coveraged
45506 Full Coveraged
45619 Full Coveraged
45621 Full Coveraged
45630 Full Coveraged
45633 Mostly Coveraged
45634 Mostly Coveraged
45640 Full Coveraged
45644 Mostly Coveraged
45645 Mostly Coveraged
45652 Mostly Coveraged
45662 Full Coveraged
45663 Full Coveraged
45672 Mostly Coveraged
45675 Full Coveraged
45680 Full Coveraged
45692 Full Coveraged
45699 Mostly Coveraged
45712 Mostly Coveraged
45714 Full Coveraged
45729 Mostly Coveraged
45750 Full Coveraged
45773 Mostly Coveraged
45801 Mostly Coveraged
45802 Full Coveraged
45804 Full Coveraged
45805 Full Coveraged
45806 Full Coveraged
45807 Full Coveraged
45809 Full Coveraged
45819 Mostly Coveraged
45820 Mostly Coveraged
45822 Full Coveraged
45826 Mostly Coveraged
45828 Full Coveraged
45830 Mostly Coveraged
45854 Full Coveraged
45860 Mostly Coveraged
45862 Mostly Coveraged
45866 Full Coveraged
45882 Mostly Coveraged
45883 Mostly Coveraged
45888 Mostly Coveraged
45893 Mostly Coveraged
45944 Full Coveraged
45950 Full Coveraged
45999 Full Coveraged
46001 Mostly Coveraged
46011 Full Coveraged
46012 Full Coveraged
46013 Full Coveraged
46014 Full Coveraged
46015 Full Coveraged
46016 Full Coveraged
46017 Full Coveraged
46018 Full Coveraged
46030 Mostly Coveraged
46032 Full Coveraged
46033 Full Coveraged
46034 Mostly Coveraged
46038 Full Coveraged
46040 Mostly Coveraged
46044 Mostly Coveraged
46045 Mostly Coveraged
46048 Mostly Coveraged
46049 Mostly Coveraged
46050 Mostly Coveraged
46051 Mostly Coveraged
46052 Full Coveraged
46055 Mostly Coveraged
46056 Mostly Coveraged
46060 Full Coveraged
46061 Full Coveraged
46063 Mostly Coveraged
46064 Mostly Coveraged
46068 Full Coveraged
46069 Full Coveraged
46072 Mostly Coveraged
46074 Full Coveraged
46075 Full Coveraged
46076 Mostly Coveraged
46077 Mostly Coveraged
46082 Full Coveraged
46104 Full Coveraged
46106 Mostly Coveraged
46107 Full Coveraged
46110 Mostly Coveraged
46111 Mostly Coveraged
46112 Mostly Coveraged
46113 Full Coveraged
46115 Mostly Coveraged
46123 Mostly Coveraged
46124 Full Coveraged
46126 Mostly Coveraged
46127 Mostly Coveraged
46129 Mostly Coveraged
46130 Mostly Coveraged
46131 Full Coveraged
46133 Full Coveraged
46142 Full Coveraged
46143 Mostly Coveraged
46144 Full Coveraged
46146 Full Coveraged
46150 Full Coveraged
46151 Full Coveraged
46157 Mostly Coveraged
46158 Mostly Coveraged
46160 Mostly Coveraged
46161 Full Coveraged
46162 Full Coveraged
46163 Mostly Coveraged
46164 Mostly Coveraged
46166 Mostly Coveraged
46167 Mostly Coveraged
46168 Full Coveraged
46173 Mostly Coveraged
46176 Full Coveraged
46181 Mostly Coveraged
46182 Mostly Coveraged
46183 Full Coveraged
46184 Full Coveraged
46201 Full Coveraged
46202 Full Coveraged
46203 Full Coveraged
46204 Full Coveraged
46205 Full Coveraged
46206 Full Coveraged
46207 Full Coveraged
46208 Full Coveraged
46209 Full Coveraged
46211 Full Coveraged
46214 Full Coveraged
46216 Full Coveraged
46217 Full Coveraged
46218 Full Coveraged
46219 Full Coveraged
46220 Full Coveraged
46221 Full Coveraged
46222 Full Coveraged
46224 Full Coveraged
46225 Full Coveraged
46226 Full Coveraged
46227 Full Coveraged
46228 Full Coveraged
46229 Full Coveraged
46230 Full Coveraged
46231 Full Coveraged
46234 Mostly Coveraged
46235 Full Coveraged
46236 Full Coveraged
46237 Full Coveraged
46239 Full Coveraged
46240 Full Coveraged
46241 Full Coveraged
46242 Full Coveraged
46244 Full Coveraged
46247 Full Coveraged
46249 Full Coveraged
46250 Full Coveraged
46251 Full Coveraged
46253 Full Coveraged
46254 Full Coveraged
46255 Full Coveraged
46256 Full Coveraged
46259 Full Coveraged
46260 Full Coveraged
46266 Full Coveraged
46268 Full Coveraged
46274 Full Coveraged
46275 Full Coveraged
46277 Full Coveraged
46278 Full Coveraged
46280 Full Coveraged
46282 Full Coveraged
46283 Full Coveraged
46285 Full Coveraged
46290 Full Coveraged
46291 Full Coveraged
46295 Full Coveraged
46296 Full Coveraged
46298 Full Coveraged
46301 Mostly Coveraged
46302 Mostly Coveraged
46303 Full Coveraged
46304 Full Coveraged
46307 Full Coveraged
46308 Full Coveraged
46311 Full Coveraged
46312 Full Coveraged
46319 Mostly Coveraged
46320 Full Coveraged
46321 Full Coveraged
46322 Full Coveraged
46323 Full Coveraged
46324 Full Coveraged
46325 Full Coveraged
46327 Full Coveraged
46341 Mostly Coveraged
46342 Full Coveraged
46345 Mostly Coveraged
46350 Full Coveraged
46352 Full Coveraged
46355 Mostly Coveraged
46356 Full Coveraged
46360 Full Coveraged
46361 Mostly Coveraged
46368 Full Coveraged
46373 Mostly Coveraged
46375 Mostly Coveraged
46376 Mostly Coveraged
46377 Mostly Coveraged
46382 Mostly Coveraged
46383 Full Coveraged
46384 Full Coveraged
46385 Full Coveraged
46390 Mostly Coveraged
46391 Full Coveraged
46393 Full Coveraged
46394 Full Coveraged
46401 Mostly Coveraged
46402 Mostly Coveraged
46403 Full Coveraged
46404 Mostly Coveraged
46405 Full Coveraged
46406 Full Coveraged
46407 Mostly Coveraged
46408 Mostly Coveraged
46409 Full Coveraged
46410 Mostly Coveraged
46411 Mostly Coveraged
46502 Full Coveraged
46506 Mostly Coveraged
46508 Full Coveraged
46510 Full Coveraged
46513 Mostly Coveraged
46514 Full Coveraged
46515 Full Coveraged
46516 Full Coveraged
46517 Full Coveraged
46524 Mostly Coveraged
46526 Mostly Coveraged
46527 Mostly Coveraged
46530 Mostly Coveraged
46536 Full Coveraged
46537 Full Coveraged
46538 Full Coveraged
46539 Mostly Coveraged
46542 Mostly Coveraged
46544 Mostly Coveraged
46545 Full Coveraged
46546 Full Coveraged
46554 Mostly Coveraged
46556 Full Coveraged
46561 Full Coveraged
46562 Mostly Coveraged
46563 Full Coveraged
46572 Full Coveraged
46573 Full Coveraged
46574 Mostly Coveraged
46580 Full Coveraged
46581 Full Coveraged
46582 Full Coveraged
46590 Full Coveraged
Zip Code Coverage Level Zip Code Coverage Level Zip Code Coverage Level Zip Code Coverage Level Zip Code Coverage Level Zip Code Coverage Level
Page 73

- 173 -
46595 Mostly Coveraged
46601 Full Coveraged
46604 Full Coveraged
46613 Full Coveraged
46614 Full Coveraged
46615 Full Coveraged
46616 Full Coveraged
46617 Full Coveraged
46619 Full Coveraged
46620 Full Coveraged
46624 Full Coveraged
46626 Full Coveraged
46628 Full Coveraged
46629 Full Coveraged
46634 Full Coveraged
46635 Full Coveraged
46637 Full Coveraged
46660 Full Coveraged
46680 Full Coveraged
46702 Mostly Coveraged
46703 Full Coveraged
46704 Mostly Coveraged
46705 Full Coveraged
46713 Mostly Coveraged
46723 Mostly Coveraged
46725 Full Coveraged
46737 Mostly Coveraged
46742 Mostly Coveraged
46745 Mostly Coveraged
46747 Mostly Coveraged
46750 Full Coveraged
46764 Mostly Coveraged
46770 Mostly Coveraged
46774 Mostly Coveraged
46776 Mostly Coveraged
46779 Full Coveraged
46783 Mostly Coveraged
46787 Mostly Coveraged
46789 Mostly Coveraged
46793 Mostly Coveraged
46798 Mostly Coveraged
46799 Mostly Coveraged
46801 Full Coveraged
46802 Full Coveraged
46803 Full Coveraged
46804 Full Coveraged
46805 Full Coveraged
46806 Full Coveraged
46807 Full Coveraged
46808 Full Coveraged
46809 Full Coveraged
46814 Mostly Coveraged
46815 Full Coveraged
46816 Full Coveraged
46818 Mostly Coveraged
46819 Full Coveraged
46825 Full Coveraged
46835 Full Coveraged
46845 Mostly Coveraged
46850 Full Coveraged
46851 Full Coveraged
46852 Full Coveraged
46853 Full Coveraged
46854 Full Coveraged
46855 Full Coveraged
46856 Full Coveraged
46857 Full Coveraged
46858 Full Coveraged
46859 Full Coveraged
46860 Full Coveraged
46861 Full Coveraged
46862 Full Coveraged
46863 Full Coveraged
46864 Full Coveraged
46865 Full Coveraged
46866 Full Coveraged
46867 Full Coveraged
46868 Full Coveraged
46869 Full Coveraged
46885 Full Coveraged
46895 Full Coveraged
46896 Full Coveraged
46897 Full Coveraged
46898 Full Coveraged
46899 Full Coveraged
46901 Full Coveraged
46902 Full Coveraged
46903 Full Coveraged
46904 Full Coveraged
46914 Mostly Coveraged
46928 Mostly Coveraged
46930 Full Coveraged
46933 Full Coveraged
46936 Mostly Coveraged
46937 Full Coveraged
46938 Mostly Coveraged
46940 Full Coveraged
46952 Full Coveraged
46953 Full Coveraged
46957 Full Coveraged
46959 Mostly Coveraged
46965 Full Coveraged
46982 Mostly Coveraged
46987 Full Coveraged
46989 Full Coveraged
46991 Mostly Coveraged
46995 Mostly Coveraged
47001 Full Coveraged
47006 Full Coveraged
47016 Mostly Coveraged
47022 Mostly Coveraged
47024 Mostly Coveraged
47025 Full Coveraged
47030 Mostly Coveraged
47031 Mostly Coveraged
47032 Mostly Coveraged
47033 Full Coveraged
47034 Mostly Coveraged
47035 Full Coveraged
47036 Full Coveraged
47037 Mostly Coveraged
47038 Mostly Coveraged
47039 Mostly Coveraged
47040 Mostly Coveraged
47041 Mostly Coveraged
47060 Full Coveraged
47102 Mostly Coveraged
47104 Full Coveraged
47106 Full Coveraged
47110 Mostly Coveraged
47112 Full Coveraged
47114 Full Coveraged
47115 Mostly Coveraged
47117 Full Coveraged
47119 Full Coveraged
47122 Mostly Coveraged
47124 Mostly Coveraged
47126 Full Coveraged
47129 Full Coveraged
47130 Full Coveraged
47131 Full Coveraged
47135 Full Coveraged
47136 Full Coveraged
47138 Mostly Coveraged
47141 Mostly Coveraged
47142 Full Coveraged
47143 Full Coveraged
47146 Full Coveraged
47147 Mostly Coveraged
47150 Full Coveraged
47151 Full Coveraged
47160 Full Coveraged
47161 Mostly Coveraged
47162 Full Coveraged
47163 Full Coveraged
47166 Full Coveraged
47170 Mostly Coveraged
47172 Full Coveraged
47177 Full Coveraged
47199 Full Coveraged
47202 Full Coveraged
47203 Full Coveraged
47225 Mostly Coveraged
47226 Full Coveraged
47228 Mostly Coveraged
47232 Full Coveraged
47234 Mostly Coveraged
47236 Full Coveraged
47240 Mostly Coveraged
47244 Mostly Coveraged
47245 Full Coveraged
47246 Mostly Coveraged
47247 Full Coveraged
47263 Full Coveraged
47265 Mostly Coveraged
47270 Mostly Coveraged
47272 Full Coveraged
47273 Full Coveraged
47274 Mostly Coveraged
47280 Mostly Coveraged
47283 Mostly Coveraged
47302 Full Coveraged
47303 Mostly Coveraged
47304 Full Coveraged
47305 Full Coveraged
47306 Full Coveraged
47307 Full Coveraged
47308 Full Coveraged
47322 Mostly Coveraged
47324 Full Coveraged
47325 Mostly Coveraged
47327 Mostly Coveraged
47330 Mostly Coveraged
47331 Full Coveraged
47334 Full Coveraged
47335 Mostly Coveraged
47337 Mostly Coveraged
47338 Mostly Coveraged
47341 Mostly Coveraged
47342 Full Coveraged
47344 Full Coveraged
47348 Mostly Coveraged
47351 Mostly Coveraged
47352 Mostly Coveraged
47356 Mostly Coveraged
47357 Full Coveraged
47360 Mostly Coveraged
47361 Full Coveraged
47362 Full Coveraged
47366 Mostly Coveraged
47367 Full Coveraged
47370 Mostly Coveraged
47374 Full Coveraged
47375 Full Coveraged
47383 Mostly Coveraged
47385 Mostly Coveraged
47386 Full Coveraged
47387 Mostly Coveraged
47388 Full Coveraged
47392 Full Coveraged
47396 Full Coveraged
47401 Full Coveraged
47402 Full Coveraged
47403 Mostly Coveraged
47404 Mostly Coveraged
47405 Full Coveraged
47406 Full Coveraged
47407 Full Coveraged
47408 Full Coveraged
47420 Full Coveraged
47421 Full Coveraged
47426 Full Coveraged
47434 Mostly Coveraged
47436 Mostly Coveraged
47446 Mostly Coveraged
47451 Full Coveraged
47458 Full Coveraged
47462 Mostly Coveraged
47467 Mostly Coveraged
47468 Mostly Coveraged
47470 Mostly Coveraged
47490 Full Coveraged
47501 Full Coveraged
47512 Mostly Coveraged
47516 Full Coveraged
47524 Mostly Coveraged
47532 Mostly Coveraged
47541 Mostly Coveraged
47542 Full Coveraged
47545 Full Coveraged
47546 Full Coveraged
47547 Full Coveraged
47549 Full Coveraged
47557 Mostly Coveraged
47558 Mostly Coveraged
47561 Mostly Coveraged
47564 Mostly Coveraged
47567 Full Coveraged
47568 Mostly Coveraged
47573 Mostly Coveraged
47575 Mostly Coveraged
47580 Mostly Coveraged
47584 Mostly Coveraged
47590 Mostly Coveraged
47591 Full Coveraged
47597 Mostly Coveraged
47598 Full Coveraged
47612 Mostly Coveraged
47616 Full Coveraged
47618 Full Coveraged
47629 Full Coveraged
47630 Mostly Coveraged
47631 Mostly Coveraged
47635 Mostly Coveraged
47638 Mostly Coveraged
47639 Full Coveraged
47640 Mostly Coveraged
47648 Full Coveraged
47649 Mostly Coveraged
47660 Mostly Coveraged
47665 Full Coveraged
47666 Full Coveraged
47670 Full Coveraged
47683 Mostly Coveraged
47701 Full Coveraged
47702 Full Coveraged
47703 Full Coveraged
47704 Full Coveraged
47705 Full Coveraged
47706 Full Coveraged
47708 Full Coveraged
47710 Full Coveraged
47711 Full Coveraged
47712 Full Coveraged
47713 Full Coveraged
47714 Full Coveraged
47715 Full Coveraged
47716 Full Coveraged
47719 Full Coveraged
47720 Full Coveraged
47721 Full Coveraged
47722 Full Coveraged
47724 Full Coveraged
47725 Full Coveraged
47727 Full Coveraged
47728 Full Coveraged
47730 Full Coveraged
47731 Full Coveraged
47732 Full Coveraged
47733 Full Coveraged
47734 Full Coveraged
47735 Full Coveraged
47736 Full Coveraged
47737 Full Coveraged
47739 Full Coveraged
47740 Full Coveraged
47741 Full Coveraged
47744 Full Coveraged
47747 Full Coveraged
47750 Full Coveraged
47801 Full Coveraged
47802 Full Coveraged
47803 Mostly Coveraged
47804 Full Coveraged
47805 Mostly Coveraged
47807 Full Coveraged
47808 Full Coveraged
47809 Full Coveraged
47811 Full Coveraged
47812 Full Coveraged
47842 Mostly Coveraged
47849 Mostly Coveraged
47850 Full Coveraged
47863 Full Coveraged
47866 Mostly Coveraged
47869 Full Coveraged
47870 Full Coveraged
47871 Mostly Coveraged
47876 Full Coveraged
47878 Mostly Coveraged
47879 Mostly Coveraged
47880 Full Coveraged
47884 Full Coveraged
47885 Full Coveraged
47901 Full Coveraged
47902 Full Coveraged
47903 Full Coveraged
47904 Full Coveraged
47905 Mostly Coveraged
47906 Full Coveraged
47907 Full Coveraged
47909 Mostly Coveraged
47920 Mostly Coveraged
47923 Mostly Coveraged
47924 Mostly Coveraged
47933 Full Coveraged
47934 Full Coveraged
47935 Full Coveraged
47936 Full Coveraged
47937 Full Coveraged
47938 Full Coveraged
47939 Full Coveraged
47940 Mostly Coveraged
47941 Mostly Coveraged
47955 Full Coveraged
47962 Full Coveraged
47965 Mostly Coveraged
47967 Full Coveraged
47981 Full Coveraged
47990 Mostly Coveraged
47992 Mostly Coveraged
47994 Mostly Coveraged
47996 Full Coveraged
48002 Mostly Coveraged
48003 Mostly Coveraged
48004 Mostly Coveraged
48005 Full Coveraged
48007 Full Coveraged
48009 Full Coveraged
48012 Full Coveraged
48015 Full Coveraged
48017 Full Coveraged
48021 Full Coveraged
48023 Mostly Coveraged
48025 Full Coveraged
48026 Full Coveraged
48027 Mostly Coveraged
48030 Full Coveraged
48034 Full Coveraged
48035 Full Coveraged
48036 Full Coveraged
48037 Full Coveraged
48038 Full Coveraged
48040 Full Coveraged
48041 Mostly Coveraged
48042 Full Coveraged
48043 Full Coveraged
48044 Full Coveraged
48045 Full Coveraged
48046 Full Coveraged
48047 Full Coveraged
48048 Full Coveraged
48049 Mostly Coveraged
48050 Full Coveraged
48051 Full Coveraged
48059 Mostly Coveraged
48060 Full Coveraged
48061 Full Coveraged
48062 Full Coveraged
48063 Full Coveraged
48064 Full Coveraged
48065 Full Coveraged
48066 Full Coveraged
48067 Full Coveraged
48068 Full Coveraged
48069 Full Coveraged
48070 Full Coveraged
48071 Full Coveraged
48072 Full Coveraged
48073 Full Coveraged
48074 Full Coveraged
48075 Full Coveraged
48076 Full Coveraged
48079 Mostly Coveraged
48080 Full Coveraged
48081 Full Coveraged
48082 Full Coveraged
48083 Full Coveraged
48084 Full Coveraged
48085 Full Coveraged
48086 Full Coveraged
48088 Full Coveraged
48089 Full Coveraged
48090 Full Coveraged
48091 Full Coveraged
48092 Full Coveraged
48093 Full Coveraged
48094 Full Coveraged
48095 Full Coveraged
48096 Full Coveraged
48098 Full Coveraged
48099 Full Coveraged
48101 Full Coveraged
48102 Full Coveraged
48103 Full Coveraged
48104 Full Coveraged
48105 Full Coveraged
48106 Full Coveraged
48107 Full Coveraged
48108 Full Coveraged
48109 Full Coveraged
48110 Full Coveraged
48111 Full Coveraged
48112 Full Coveraged
48113 Full Coveraged
48114 Full Coveraged
48115 Mostly Coveraged
48116 Full Coveraged
48117 Full Coveraged
48118 Full Coveraged
48120 Full Coveraged
48121 Full Coveraged
48122 Full Coveraged
48123 Full Coveraged
48124 Full Coveraged
48125 Full Coveraged
48126 Full Coveraged
48127 Full Coveraged
48128 Full Coveraged
48130 Mostly Coveraged
48131 Mostly Coveraged
48133 Mostly Coveraged
48134 Full Coveraged
48135 Full Coveraged
48136 Full Coveraged
48137 Mostly Coveraged
48138 Full Coveraged
48139 Mostly Coveraged
48141 Full Coveraged
48143 Mostly Coveraged
48144 Mostly Coveraged
48145 Mostly Coveraged
48146 Full Coveraged
48150 Full Coveraged
48151 Full Coveraged
48152 Full Coveraged
48153 Full Coveraged
48154 Full Coveraged
48157 Full Coveraged
48158 Mostly Coveraged
48159 Mostly Coveraged
48160 Full Coveraged
48161 Full Coveraged
48162 Full Coveraged
48164 Full Coveraged
48165 Full Coveraged
48166 Full Coveraged
48167 Full Coveraged
48169 Full Coveraged
48170 Full Coveraged
48173 Full Coveraged
48174 Full Coveraged
48175 Mostly Coveraged
48176 Full Coveraged
Zip Code Coverage Level Zip Code Coverage Level Zip Code Coverage Level Zip Code Coverage Level Zip Code Coverage Level Zip Code Coverage Level
Page 74

- 174 -
48177 Mostly Coveraged
48178 Full Coveraged
48179 Full Coveraged
48180 Full Coveraged
48182 Mostly Coveraged
48183 Full Coveraged
48184 Full Coveraged
48185 Full Coveraged
48186 Full Coveraged
48187 Full Coveraged
48188 Full Coveraged
48189 Mostly Coveraged
48190 Full Coveraged
48191 Full Coveraged
48192 Full Coveraged
48195 Full Coveraged
48197 Full Coveraged
48198 Full Coveraged
48201 Full Coveraged
48202 Full Coveraged
48203 Full Coveraged
48204 Full Coveraged
48205 Full Coveraged
48206 Full Coveraged
48207 Full Coveraged
48208 Full Coveraged
48209 Full Coveraged
48210 Full Coveraged
48211 Full Coveraged
48212 Full Coveraged
48213 Full Coveraged
48214 Full Coveraged
48215 Full Coveraged
48216 Full Coveraged
48217 Full Coveraged
48218 Full Coveraged
48219 Full Coveraged
48220 Full Coveraged
48221 Full Coveraged
48222 Full Coveraged
48223 Full Coveraged
48224 Full Coveraged
48225 Full Coveraged
48226 Full Coveraged
48227 Full Coveraged
48228 Full Coveraged
48229 Full Coveraged
48230 Full Coveraged
48231 Full Coveraged
48232 Full Coveraged
48233 Full Coveraged
48234 Full Coveraged
48235 Full Coveraged
48236 Full Coveraged
48237 Full Coveraged
48238 Full Coveraged
48239 Full Coveraged
48240 Full Coveraged
48242 Full Coveraged
48243 Full Coveraged
48244 Full Coveraged
48255 Full Coveraged
48260 Full Coveraged
48264 Full Coveraged
48265 Full Coveraged
48266 Full Coveraged
48267 Full Coveraged
48268 Full Coveraged
48269 Full Coveraged
48272 Full Coveraged
48275 Full Coveraged
48277 Full Coveraged
48278 Full Coveraged
48279 Full Coveraged
48288 Full Coveraged
48301 Full Coveraged
48302 Full Coveraged
48303 Full Coveraged
48304 Full Coveraged
48306 Full Coveraged
48307 Full Coveraged
48308 Full Coveraged
48309 Full Coveraged
48310 Full Coveraged
48311 Full Coveraged
48312 Full Coveraged
48313 Full Coveraged
48314 Full Coveraged
48315 Full Coveraged
48316 Full Coveraged
48317 Full Coveraged
48318 Full Coveraged
48320 Full Coveraged
48321 Full Coveraged
48322 Full Coveraged
48323 Full Coveraged
48324 Full Coveraged
48325 Full Coveraged
48326 Full Coveraged
48327 Full Coveraged
48328 Full Coveraged
48329 Full Coveraged
48330 Full Coveraged
48331 Full Coveraged
48332 Full Coveraged
48333 Full Coveraged
48334 Full Coveraged
48335 Full Coveraged
48336 Full Coveraged
48340 Full Coveraged
48341 Full Coveraged
48342 Full Coveraged
48343 Full Coveraged
48346 Full Coveraged
48347 Full Coveraged
48348 Full Coveraged
48350 Full Coveraged
48353 Full Coveraged
48356 Mostly Coveraged
48357 Full Coveraged
48359 Full Coveraged
48360 Full Coveraged
48361 Full Coveraged
48362 Full Coveraged
48363 Full Coveraged
48366 Mostly Coveraged
48367 Mostly Coveraged
48370 Mostly Coveraged
48371 Full Coveraged
48374 Full Coveraged
48375 Full Coveraged
48376 Full Coveraged
48377 Full Coveraged
48380 Full Coveraged
48381 Full Coveraged
48382 Full Coveraged
48383 Full Coveraged
48386 Full Coveraged
48387 Mostly Coveraged
48390 Full Coveraged
48391 Full Coveraged
48393 Full Coveraged
48397 Full Coveraged
48398 Full Coveraged
48411 Mostly Coveraged
48415 Full Coveraged
48417 Mostly Coveraged
48418 Mostly Coveraged
48420 Mostly Coveraged
48423 Mostly Coveraged
48428 Mostly Coveraged
48430 Full Coveraged
48433 Full Coveraged
48436 Full Coveraged
48437 Full Coveraged
48438 Mostly Coveraged
48439 Full Coveraged
48440 Full Coveraged
48442 Full Coveraged
48446 Mostly Coveraged
48451 Full Coveraged
48455 Full Coveraged
48457 Full Coveraged
48458 Mostly Coveraged
48460 Mostly Coveraged
48462 Full Coveraged
48473 Full Coveraged
48501 Full Coveraged
48502 Full Coveraged
48503 Full Coveraged
48504 Full Coveraged
48505 Full Coveraged
48506 Full Coveraged
48507 Full Coveraged
48509 Full Coveraged
48519 Full Coveraged
48529 Full Coveraged
48531 Full Coveraged
48532 Mostly Coveraged
48550 Full Coveraged
48551 Full Coveraged
48552 Full Coveraged
48553 Full Coveraged
48554 Full Coveraged
48555 Full Coveraged
48556 Full Coveraged
48557 Full Coveraged
48601 Full Coveraged
48602 Full Coveraged
48603 Mostly Coveraged
48604 Full Coveraged
48605 Full Coveraged
48606 Full Coveraged
48607 Full Coveraged
48608 Full Coveraged
48609 Mostly Coveraged
48611 Full Coveraged
48615 Mostly Coveraged
48623 Mostly Coveraged
48626 Mostly Coveraged
48631 Full Coveraged
48634 Full Coveraged
48637 Mostly Coveraged
48640 Full Coveraged
48641 Full Coveraged
48642 Mostly Coveraged
48650 Mostly Coveraged
48663 Full Coveraged
48667 Full Coveraged
48670 Full Coveraged
48674 Full Coveraged
48686 Full Coveraged
48706 Full Coveraged
48707 Full Coveraged
48708 Full Coveraged
48710 Mostly Coveraged
48722 Full Coveraged
48724 Full Coveraged
48732 Full Coveraged
48747 Mostly Coveraged
48787 Mostly Coveraged
48801 Full Coveraged
48802 Full Coveraged
48804 Full Coveraged
48805 Full Coveraged
48808 Mostly Coveraged
48809 Full Coveraged
48816 Mostly Coveraged
48819 Mostly Coveraged
48820 Mostly Coveraged
48821 Mostly Coveraged
48823 Full Coveraged
48824 Full Coveraged
48825 Full Coveraged
48826 Full Coveraged
48832 Mostly Coveraged
48836 Mostly Coveraged
48838 Full Coveraged
48840 Full Coveraged
48842 Full Coveraged
48843 Full Coveraged
48844 Full Coveraged
48847 Mostly Coveraged
48848 Mostly Coveraged
48854 Full Coveraged
48855 Mostly Coveraged
48858 Full Coveraged
48859 Full Coveraged
48862 Mostly Coveraged
48863 Mostly Coveraged
48864 Full Coveraged
48872 Mostly Coveraged
48878 Mostly Coveraged
48880 Full Coveraged
48882 Full Coveraged
48883 Full Coveraged
48885 Mostly Coveraged
48887 Full Coveraged
48895 Full Coveraged
48896 Mostly Coveraged
48901 Full Coveraged
48906 Full Coveraged
48908 Full Coveraged
48909 Full Coveraged
48910 Full Coveraged
48911 Full Coveraged
48912 Full Coveraged
48913 Mostly Coveraged
48915 Full Coveraged
48916 Full Coveraged
48917 Full Coveraged
48918 Mostly Coveraged
48919 Full Coveraged
48921 Full Coveraged
48922 Full Coveraged
48924 Full Coveraged
48929 Full Coveraged
48930 Full Coveraged
48933 Full Coveraged
48937 Full Coveraged
48950 Full Coveraged
48951 Full Coveraged
48956 Full Coveraged
48980 Mostly Coveraged
49001 Full Coveraged
49002 Full Coveraged
49003 Full Coveraged
49004 Full Coveraged
49005 Full Coveraged
49006 Full Coveraged
49007 Full Coveraged
49008 Full Coveraged
49009 Full Coveraged
49012 Full Coveraged
49014 Full Coveraged
49015 Full Coveraged
49016 Full Coveraged
49017 Full Coveraged
49018 Full Coveraged
49019 Full Coveraged
49020 Full Coveraged
49021 Mostly Coveraged
49022 Full Coveraged
49023 Full Coveraged
49024 Full Coveraged
49032 Mostly Coveraged
49033 Mostly Coveraged
49034 Mostly Coveraged
49038 Mostly Coveraged
49039 Mostly Coveraged
49041 Full Coveraged
49042 Full Coveraged
49048 Full Coveraged
49051 Mostly Coveraged
49053 Full Coveraged
49060 Full Coveraged
49061 Mostly Coveraged
49068 Full Coveraged
49069 Full Coveraged
49071 Mostly Coveraged
49074 Full Coveraged
49076 Mostly Coveraged
49077 Full Coveraged
49080 Mostly Coveraged
49081 Full Coveraged
49083 Full Coveraged
49084 Mostly Coveraged
49085 Full Coveraged
49087 Mostly Coveraged
49088 Mostly Coveraged
49092 Mostly Coveraged
49093 Full Coveraged
49098 Mostly Coveraged
49099 Mostly Coveraged
49101 Mostly Coveraged
49102 Mostly Coveraged
49103 Mostly Coveraged
49104 Full Coveraged
49111 Full Coveraged
49112 Mostly Coveraged
49117 Mostly Coveraged
49121 Mostly Coveraged
49126 Full Coveraged
49127 Mostly Coveraged
49201 Full Coveraged
49202 Full Coveraged
49203 Full Coveraged
49204 Full Coveraged
49221 Full Coveraged
49234 Mostly Coveraged
49235 Full Coveraged
49240 Mostly Coveraged
49245 Mostly Coveraged
49246 Mostly Coveraged
49251 Mostly Coveraged
49253 Mostly Coveraged
49254 Full Coveraged
49261 Full Coveraged
49265 Full Coveraged
49267 Mostly Coveraged
49272 Mostly Coveraged
49275 Mostly Coveraged
49276 Mostly Coveraged
49277 Mostly Coveraged
49279 Mostly Coveraged
49282 Mostly Coveraged
49283 Mostly Coveraged
49287 Full Coveraged
49289 Full Coveraged
49301 Full Coveraged
49302 Full Coveraged
49303 Mostly Coveraged
49306 Full Coveraged
49311 Full Coveraged
49314 Mostly Coveraged
49315 Full Coveraged
49316 Full Coveraged
49317 Mostly Coveraged
49319 Mostly Coveraged
49321 Full Coveraged
49323 Mostly Coveraged
49326 Full Coveraged
49327 Full Coveraged
49328 Mostly Coveraged
49331 Mostly Coveraged
49335 Full Coveraged
49337 Full Coveraged
49341 Full Coveraged
49345 Mostly Coveraged
49347 Mostly Coveraged
49348 Full Coveraged
49349 Mostly Coveraged
49351 Full Coveraged
49355 Full Coveraged
49356 Full Coveraged
49357 Full Coveraged
49401 Mostly Coveraged
49405 Mostly Coveraged
49409 Full Coveraged
49412 Full Coveraged
49413 Full Coveraged
49415 Full Coveraged
49417 Full Coveraged
49418 Mostly Coveraged
49419 Mostly Coveraged
49421 Mostly Coveraged
49422 Mostly Coveraged
49423 Mostly Coveraged
49424 Mostly Coveraged
49425 Mostly Coveraged
49426 Full Coveraged
49427 Full Coveraged
49428 Mostly Coveraged
49429 Mostly Coveraged
49431 Full Coveraged
49435 Mostly Coveraged
49440 Full Coveraged
49441 Full Coveraged
49442 Full Coveraged
49443 Full Coveraged
49444 Full Coveraged
49445 Full Coveraged
49448 Full Coveraged
49449 Mostly Coveraged
49454 Full Coveraged
49456 Full Coveraged
49457 Mostly Coveraged
49460 Mostly Coveraged
49464 Full Coveraged
49468 Full Coveraged
49501 Full Coveraged
49502 Full Coveraged
49503 Full Coveraged
49504 Full Coveraged
49505 Full Coveraged
49506 Full Coveraged
49507 Full Coveraged
49508 Full Coveraged
49509 Full Coveraged
49510 Full Coveraged
49512 Full Coveraged
49514 Full Coveraged
49515 Full Coveraged
49516 Full Coveraged
49518 Full Coveraged
49523 Full Coveraged
49525 Full Coveraged
49530 Full Coveraged
49544 Full Coveraged
49546 Full Coveraged
49548 Full Coveraged
49550 Full Coveraged
49555 Full Coveraged
49560 Full Coveraged
49588 Full Coveraged
49599 Full Coveraged
49610 Mostly Coveraged
49621 Mostly Coveraged
49637 Mostly Coveraged
49684 Full Coveraged
49685 Full Coveraged
49686 Mostly Coveraged
49696 Full Coveraged
49707 Full Coveraged
49766 Mostly Coveraged
50003 Full Coveraged
50007 Full Coveraged
50009 Full Coveraged
50010 Full Coveraged
50011 Full Coveraged
50012 Full Coveraged
50013 Full Coveraged
50014 Mostly Coveraged
50021 Full Coveraged
50028 Mostly Coveraged
50032 Full Coveraged
50033 Mostly Coveraged
50035 Mostly Coveraged
50038 Mostly Coveraged
50046 Full Coveraged
50047 Mostly Coveraged
50061 Full Coveraged
50063 Mostly Coveraged
50069 Full Coveraged
50072 Mostly Coveraged
50073 Full Coveraged
50105 Mostly Coveraged
50111 Mostly Coveraged
50124 Full Coveraged
50127 Mostly Coveraged
50131 Mostly Coveraged
50134 Mostly Coveraged
50135 Mostly Coveraged
50137 Mostly Coveraged
50167 Mostly Coveraged
50201 Full Coveraged
50208 Full Coveraged
50211 Mostly Coveraged
50226 Full Coveraged
50232 Mostly Coveraged
50233 Mostly Coveraged
50236 Mostly Coveraged
50237 Mostly Coveraged
50243 Full Coveraged
Zip Code Coverage Level Zip Code Coverage Level Zip Code Coverage Level Zip Code Coverage Level Zip Code Coverage Level Zip Code Coverage Level
Page 75

- 175 -
50244 Full Coveraged
50261 Mostly Coveraged
50263 Full Coveraged
50265 Full Coveraged
50266 Full Coveraged
50301 Full Coveraged
50302 Full Coveraged
50303 Full Coveraged
50304 Full Coveraged
50305 Full Coveraged
50306 Full Coveraged
50309 Full Coveraged
50310 Full Coveraged
50311 Full Coveraged
50312 Full Coveraged
50313 Full Coveraged
50314 Full Coveraged
50315 Full Coveraged
50316 Full Coveraged
50317 Full Coveraged
50318 Full Coveraged
50319 Full Coveraged
50320 Full Coveraged
50321 Full Coveraged
50322 Full Coveraged
50323 Full Coveraged
50325 Full Coveraged
50327 Full Coveraged
50328 Full Coveraged
50329 Full Coveraged
50330 Full Coveraged
50331 Full Coveraged
50332 Full Coveraged
50333 Full Coveraged
50334 Full Coveraged
50335 Full Coveraged
50336 Full Coveraged
50338 Full Coveraged
50339 Full Coveraged
50340 Full Coveraged
50347 Full Coveraged
50359 Full Coveraged
50360 Full Coveraged
50361 Full Coveraged
50362 Full Coveraged
50363 Full Coveraged
50364 Full Coveraged
50367 Full Coveraged
50368 Full Coveraged
50369 Full Coveraged
50380 Full Coveraged
50381 Full Coveraged
50391 Full Coveraged
50392 Full Coveraged
50393 Full Coveraged
50394 Full Coveraged
50395 Full Coveraged
50396 Full Coveraged
50397 Full Coveraged
50398 Full Coveraged
50501 Full Coveraged
50516 Mostly Coveraged
50532 Mostly Coveraged
50566 Mostly Coveraged
50569 Full Coveraged
50594 Mostly Coveraged
50936 Full Coveraged
50940 Full Coveraged
50947 Full Coveraged
50950 Full Coveraged
50980 Full Coveraged
50981 Full Coveraged
51054 Mostly Coveraged
51101 Full Coveraged
51102 Full Coveraged
51103 Full Coveraged
51104 Full Coveraged
51105 Full Coveraged
51106 Full Coveraged
51108 Full Coveraged
51109 Full Coveraged
51111 Full Coveraged
51501 Full Coveraged
51502 Full Coveraged
51503 Full Coveraged
51510 Full Coveraged
51526 Mostly Coveraged
51534 Full Coveraged
51542 Mostly Coveraged
51554 Full Coveraged
51561 Full Coveraged
51571 Mostly Coveraged
51576 Mostly Coveraged
52001 Full Coveraged
52002 Full Coveraged
52003 Full Coveraged
52004 Full Coveraged
52039 Mostly Coveraged
52068 Full Coveraged
52073 Mostly Coveraged
52099 Full Coveraged
52202 Mostly Coveraged
52227 Mostly Coveraged
52228 Full Coveraged
52233 Full Coveraged
52235 Mostly Coveraged
52240 Full Coveraged
52241 Full Coveraged
52242 Full Coveraged
52243 Full Coveraged
52244 Full Coveraged
52245 Full Coveraged
52246 Full Coveraged
52302 Full Coveraged
52317 Full Coveraged
52319 Full Coveraged
52324 Mostly Coveraged
52328 Full Coveraged
52333 Mostly Coveraged
52338 Mostly Coveraged
52340 Mostly Coveraged
52341 Mostly Coveraged
52351 Mostly Coveraged
52401 Full Coveraged
52402 Full Coveraged
52403 Full Coveraged
52404 Full Coveraged
52405 Full Coveraged
52406 Full Coveraged
52407 Full Coveraged
52408 Full Coveraged
52409 Full Coveraged
52410 Full Coveraged
52411 Full Coveraged
52497 Full Coveraged
52498 Full Coveraged
52499 Full Coveraged
52601 Full Coveraged
52624 Full Coveraged
52627 Full Coveraged
52638 Mostly Coveraged
52639 Mostly Coveraged
52650 Mostly Coveraged
52655 Full Coveraged
52656 Mostly Coveraged
52658 Mostly Coveraged
52722 Full Coveraged
52726 Full Coveraged
52727 Mostly Coveraged
52728 Full Coveraged
52730 Mostly Coveraged
52732 Full Coveraged
52733 Full Coveraged
52736 Full Coveraged
52745 Mostly Coveraged
52746 Mostly Coveraged
52747 Mostly Coveraged
52748 Mostly Coveraged
52749 Full Coveraged
52753 Full Coveraged
52758 Mostly Coveraged
52760 Mostly Coveraged
52761 Full Coveraged
52767 Full Coveraged
52768 Mostly Coveraged
52769 Mostly Coveraged
52771 Full Coveraged
52773 Full Coveraged
52778 Mostly Coveraged
52801 Full Coveraged
52802 Full Coveraged
52803 Full Coveraged
52804 Full Coveraged
52805 Full Coveraged
52806 Full Coveraged
52807 Full Coveraged
52808 Full Coveraged
52809 Full Coveraged
53003 Full Coveraged
53005 Full Coveraged
53006 Full Coveraged
53007 Full Coveraged
53008 Full Coveraged
53010 Mostly Coveraged
53012 Full Coveraged
53013 Mostly Coveraged
53015 Full Coveraged
53017 Mostly Coveraged
53018 Full Coveraged
53019 Mostly Coveraged
53022 Full Coveraged
53024 Full Coveraged
53029 Mostly Coveraged
53031 Full Coveraged
53036 Mostly Coveraged
53038 Full Coveraged
53044 Full Coveraged
53045 Full Coveraged
53046 Full Coveraged
53047 Full Coveraged
53048 Full Coveraged
53050 Mostly Coveraged
53051 Full Coveraged
53052 Full Coveraged
53056 Mostly Coveraged
53058 Full Coveraged
53063 Full Coveraged
53064 Mostly Coveraged
53065 Mostly Coveraged
53066 Full Coveraged
53069 Full Coveraged
53070 Full Coveraged
53072 Mostly Coveraged
53074 Mostly Coveraged
53076 Mostly Coveraged
53080 Full Coveraged
53081 Full Coveraged
53082 Full Coveraged
53083 Mostly Coveraged
53085 Full Coveraged
53089 Mostly Coveraged
53091 Mostly Coveraged
53092 Full Coveraged
53093 Mostly Coveraged
53094 Full Coveraged
53097 Full Coveraged
53098 Full Coveraged
53101 Mostly Coveraged
53103 Full Coveraged
53104 Mostly Coveraged
53105 Mostly Coveraged
53108 Full Coveraged
53110 Full Coveraged
53118 Full Coveraged
53119 Mostly Coveraged
53121 Mostly Coveraged
53122 Full Coveraged
53125 Mostly Coveraged
53126 Mostly Coveraged
53127 Full Coveraged
53128 Full Coveraged
53129 Mostly Coveraged
53130 Mostly Coveraged
53132 Mostly Coveraged
53138 Mostly Coveraged
53140 Full Coveraged
53141 Full Coveraged
53142 Full Coveraged
53143 Full Coveraged
53144 Full Coveraged
53146 Full Coveraged
53147 Full Coveraged
53148 Full Coveraged
53149 Mostly Coveraged
53150 Full Coveraged
53151 Full Coveraged
53153 Full Coveraged
53154 Full Coveraged
53157 Full Coveraged
53158 Full Coveraged
53159 Mostly Coveraged
53171 Full Coveraged
53172 Full Coveraged
53176 Full Coveraged
53177 Full Coveraged
53178 Mostly Coveraged
53183 Full Coveraged
53184 Mostly Coveraged
53185 Mostly Coveraged
53186 Full Coveraged
53187 Full Coveraged
53188 Mostly Coveraged
53189 Full Coveraged
53191 Full Coveraged
53194 Mostly Coveraged
53195 Full Coveraged
53201 Full Coveraged
53202 Full Coveraged
53203 Full Coveraged
53204 Full Coveraged
53205 Full Coveraged
53206 Full Coveraged
53207 Full Coveraged
53208 Full Coveraged
53209 Full Coveraged
53210 Full Coveraged
53211 Full Coveraged
53212 Full Coveraged
53213 Full Coveraged
53214 Full Coveraged
53215 Full Coveraged
53216 Full Coveraged
53217 Mostly Coveraged
53218 Full Coveraged
53219 Full Coveraged
53220 Full Coveraged
53221 Full Coveraged
53222 Full Coveraged
53223 Mostly Coveraged
53224 Full Coveraged
53225 Full Coveraged
53226 Full Coveraged
53227 Mostly Coveraged
53228 Mostly Coveraged
53233 Full Coveraged
53234 Full Coveraged
53235 Full Coveraged
53237 Full Coveraged
53263 Full Coveraged
53267 Full Coveraged
53268 Full Coveraged
53270 Full Coveraged
53274 Full Coveraged
53277 Full Coveraged
53278 Full Coveraged
53280 Full Coveraged
53281 Full Coveraged
53284 Full Coveraged
53285 Full Coveraged
53288 Full Coveraged
53290 Full Coveraged
53293 Full Coveraged
53295 Full Coveraged
53401 Mostly Coveraged
53402 Full Coveraged
53403 Full Coveraged
53404 Full Coveraged
53405 Mostly Coveraged
53406 Full Coveraged
53407 Mostly Coveraged
53408 Full Coveraged
53490 Full Coveraged
53501 Full Coveraged
53511 Mostly Coveraged
53512 Mostly Coveraged
53527 Full Coveraged
53528 Mostly Coveraged
53531 Mostly Coveraged
53532 Mostly Coveraged
53534 Mostly Coveraged
53536 Mostly Coveraged
53537 Mostly Coveraged
53542 Mostly Coveraged
53545 Mostly Coveraged
53547 Mostly Coveraged
53548 Full Coveraged
53555 Mostly Coveraged
53557 Mostly Coveraged
53558 Full Coveraged
53561 Full Coveraged
53562 Full Coveraged
53575 Mostly Coveraged
53576 Full Coveraged
53578 Mostly Coveraged
53579 Mostly Coveraged
53589 Mostly Coveraged
53590 Mostly Coveraged
53591 Full Coveraged
53593 Full Coveraged
53596 Full Coveraged
53597 Mostly Coveraged
53598 Mostly Coveraged
53701 Full Coveraged
53702 Full Coveraged
53703 Full Coveraged
53704 Full Coveraged
53705 Full Coveraged
53706 Full Coveraged
53707 Full Coveraged
53708 Full Coveraged
53711 Full Coveraged
53713 Full Coveraged
53714 Full Coveraged
53715 Full Coveraged
53716 Full Coveraged
53717 Full Coveraged
53718 Full Coveraged
53719 Full Coveraged
53725 Full Coveraged
53726 Full Coveraged
53744 Full Coveraged
53774 Full Coveraged
53777 Full Coveraged
53778 Full Coveraged
53779 Full Coveraged
53782 Full Coveraged
53783 Full Coveraged
53784 Full Coveraged
53785 Full Coveraged
53786 Full Coveraged
53788 Full Coveraged
53789 Full Coveraged
53790 Full Coveraged
53791 Full Coveraged
53792 Full Coveraged
53793 Full Coveraged
53794 Full Coveraged
53812 Mostly Coveraged
53913 Full Coveraged
53919 Full Coveraged
53931 Full Coveraged
53933 Mostly Coveraged
53940 Full Coveraged
53946 Mostly Coveraged
53963 Full Coveraged
54015 Mostly Coveraged
54016 Mostly Coveraged
54017 Full Coveraged
54023 Mostly Coveraged
54025 Mostly Coveraged
54026 Full Coveraged
54082 Full Coveraged
54113 Full Coveraged
54115 Mostly Coveraged
54126 Full Coveraged
54130 Mostly Coveraged
54131 Full Coveraged
54136 Full Coveraged
54140 Full Coveraged
54155 Mostly Coveraged
54169 Full Coveraged
54173 Mostly Coveraged
54214 Mostly Coveraged
54220 Mostly Coveraged
54221 Mostly Coveraged
54228 Mostly Coveraged
54232 Mostly Coveraged
54240 Mostly Coveraged
54241 Full Coveraged
54245 Mostly Coveraged
54301 Full Coveraged
54302 Full Coveraged
54303 Full Coveraged
54304 Full Coveraged
54305 Full Coveraged
54306 Full Coveraged
54307 Full Coveraged
54308 Full Coveraged
54311 Mostly Coveraged
54313 Mostly Coveraged
54324 Full Coveraged
54344 Mostly Coveraged
54401 Full Coveraged
54402 Full Coveraged
54403 Mostly Coveraged
54404 Full Coveraged
54409 Full Coveraged
54412 Mostly Coveraged
54414 Mostly Coveraged
54417 Full Coveraged
54441 Full Coveraged
54443 Full Coveraged
54448 Mostly Coveraged
54449 Full Coveraged
54450 Mostly Coveraged
54452 Full Coveraged
54455 Mostly Coveraged
54464 Mostly Coveraged
54467 Mostly Coveraged
54472 Full Coveraged
54474 Full Coveraged
54475 Mostly Coveraged
54476 Full Coveraged
54481 Full Coveraged
54484 Mostly Coveraged
54492 Mostly Coveraged
54501 Full Coveraged
54543 Full Coveraged
54601 Full Coveraged
54602 Full Coveraged
54603 Full Coveraged
54614 Mostly Coveraged
54620 Full Coveraged
54621 Mostly Coveraged
54623 Mostly Coveraged
54629 Mostly Coveraged
54650 Full Coveraged
54653 Mostly Coveraged
54656 Full Coveraged
54658 Mostly Coveraged
54669 Mostly Coveraged
54701 Mostly Coveraged
54702 Mostly Coveraged
54703 Mostly Coveraged
54720 Full Coveraged
54729 Full Coveraged
54730 Full Coveraged
54739 Full Coveraged
54742 Mostly Coveraged
54764 Mostly Coveraged
54774 Full Coveraged
54901 Full Coveraged
54902 Full Coveraged
54903 Full Coveraged
54904 Full Coveraged
54911 Full Coveraged
54912 Full Coveraged
54913 Full Coveraged
54914 Full Coveraged
54915 Full Coveraged
54919 Full Coveraged
54922 Mostly Coveraged
54931 Mostly Coveraged
54935 Mostly Coveraged
Zip Code Coverage Level Zip Code Coverage Level Zip Code Coverage Level Zip Code Coverage Level Zip Code Coverage Level Zip Code Coverage Level
Page 76

- 176 -
54936 Mostly Coveraged
54937 Mostly Coveraged
54941 Mostly Coveraged
54942 Mostly Coveraged
54949 Mostly Coveraged
54952 Full Coveraged
54956 Mostly Coveraged
54957 Full Coveraged
54961 Full Coveraged
54969 Mostly Coveraged
54971 Full Coveraged
54974 Mostly Coveraged
54975 Full Coveraged
54979 Mostly Coveraged
54983 Mostly Coveraged
54985 Full Coveraged
55001 Full Coveraged
55003 Full Coveraged
55010 Full Coveraged
55013 Full Coveraged
55014 Full Coveraged
55016 Full Coveraged
55019 Full Coveraged
55020 Full Coveraged
55024 Mostly Coveraged
55025 Full Coveraged
55032 Full Coveraged
55038 Full Coveraged
55042 Full Coveraged
55043 Full Coveraged
55044 Full Coveraged
55045 Mostly Coveraged
55046 Mostly Coveraged
55047 Mostly Coveraged
55053 Mostly Coveraged
55054 Full Coveraged
55055 Full Coveraged
55056 Full Coveraged
55057 Full Coveraged
55060 Mostly Coveraged
55068 Full Coveraged
55069 Mostly Coveraged
55071 Full Coveraged
55073 Mostly Coveraged
55075 Full Coveraged
55076 Full Coveraged
55077 Full Coveraged
55078 Full Coveraged
55079 Full Coveraged
55082 Full Coveraged
55083 Full Coveraged
55088 Full Coveraged
55090 Full Coveraged
55092 Mostly Coveraged
55101 Full Coveraged
55102 Full Coveraged
55103 Full Coveraged
55104 Full Coveraged
55105 Full Coveraged
55106 Full Coveraged
55107 Full Coveraged
55108 Full Coveraged
55109 Full Coveraged
55110 Full Coveraged
55111 Full Coveraged
55112 Full Coveraged
55113 Full Coveraged
55114 Full Coveraged
55115 Mostly Coveraged
55116 Full Coveraged
55117 Full Coveraged
55118 Full Coveraged
55119 Full Coveraged
55120 Full Coveraged
55121 Full Coveraged
55122 Full Coveraged
55123 Full Coveraged
55124 Full Coveraged
55125 Full Coveraged
55126 Full Coveraged
55127 Full Coveraged
55128 Full Coveraged
55129 Full Coveraged
55133 Full Coveraged
55144 Full Coveraged
55146 Full Coveraged
55150 Full Coveraged
55155 Full Coveraged
55161 Full Coveraged
55164 Full Coveraged
55165 Full Coveraged
55166 Full Coveraged
55168 Full Coveraged
55169 Full Coveraged
55170 Full Coveraged
55172 Full Coveraged
55175 Full Coveraged
55177 Full Coveraged
55182 Full Coveraged
55187 Full Coveraged
55188 Full Coveraged
55190 Full Coveraged
55191 Full Coveraged
55199 Full Coveraged
55301 Full Coveraged
55303 Full Coveraged
55304 Mostly Coveraged
55305 Full Coveraged
55306 Full Coveraged
55308 Mostly Coveraged
55309 Mostly Coveraged
55311 Full Coveraged
55312 Mostly Coveraged
55313 Full Coveraged
55315 Mostly Coveraged
55316 Full Coveraged
55317 Full Coveraged
55318 Full Coveraged
55322 Mostly Coveraged
55323 Full Coveraged
55327 Full Coveraged
55328 Mostly Coveraged
55330 Full Coveraged
55331 Full Coveraged
55337 Full Coveraged
55338 Mostly Coveraged
55340 Full Coveraged
55341 Mostly Coveraged
55343 Full Coveraged
55344 Full Coveraged
55345 Full Coveraged
55346 Full Coveraged
55347 Full Coveraged
55348 Full Coveraged
55350 Full Coveraged
55352 Mostly Coveraged
55356 Full Coveraged
55357 Full Coveraged
55358 Mostly Coveraged
55359 Mostly Coveraged
55361 Full Coveraged
55362 Full Coveraged
55363 Mostly Coveraged
55364 Full Coveraged
55365 Full Coveraged
55368 Mostly Coveraged
55369 Full Coveraged
55372 Mostly Coveraged
55373 Mostly Coveraged
55374 Full Coveraged
55375 Mostly Coveraged
55376 Full Coveraged
55378 Full Coveraged
55379 Full Coveraged
55381 Mostly Coveraged
55384 Full Coveraged
55386 Full Coveraged
55387 Mostly Coveraged
55390 Mostly Coveraged
55391 Full Coveraged
55392 Full Coveraged
55393 Full Coveraged
55398 Full Coveraged
55401 Full Coveraged
55402 Full Coveraged
55403 Full Coveraged
55404 Full Coveraged
55405 Full Coveraged
55406 Full Coveraged
55407 Full Coveraged
55408 Full Coveraged
55409 Full Coveraged
55410 Full Coveraged
55411 Full Coveraged
55412 Full Coveraged
55413 Full Coveraged
55414 Full Coveraged
55415 Full Coveraged
55416 Full Coveraged
55417 Full Coveraged
55418 Full Coveraged
55419 Full Coveraged
55420 Full Coveraged
55421 Full Coveraged
55422 Full Coveraged
55423 Full Coveraged
55424 Full Coveraged
55425 Full Coveraged
55426 Full Coveraged
55427 Full Coveraged
55428 Full Coveraged
55429 Full Coveraged
55430 Full Coveraged
55431 Full Coveraged
55432 Full Coveraged
55433 Full Coveraged
55434 Full Coveraged
55435 Full Coveraged
55436 Full Coveraged
55437 Full Coveraged
55438 Full Coveraged
55439 Full Coveraged
55440 Full Coveraged
55441 Full Coveraged
55442 Full Coveraged
55443 Full Coveraged
55444 Full Coveraged
55445 Full Coveraged
55446 Full Coveraged
55447 Full Coveraged
55448 Full Coveraged
55449 Full Coveraged
55450 Full Coveraged
55454 Full Coveraged
55455 Full Coveraged
55458 Full Coveraged
55459 Full Coveraged
55460 Full Coveraged
55470 Full Coveraged
55472 Full Coveraged
55474 Full Coveraged
55479 Full Coveraged
55480 Full Coveraged
55483 Full Coveraged
55484 Full Coveraged
55485 Full Coveraged
55486 Full Coveraged
55487 Full Coveraged
55488 Full Coveraged
55561 Full Coveraged
55563 Full Coveraged
55565 Full Coveraged
55569 Full Coveraged
55570 Full Coveraged
55571 Full Coveraged
55572 Full Coveraged
55574 Full Coveraged
55576 Full Coveraged
55577 Full Coveraged
55578 Full Coveraged
55579 Full Coveraged
55580 Full Coveraged
55581 Full Coveraged
55582 Full Coveraged
55584 Full Coveraged
55585 Full Coveraged
55586 Full Coveraged
55587 Full Coveraged
55588 Full Coveraged
55589 Full Coveraged
55590 Full Coveraged
55591 Full Coveraged
55592 Full Coveraged
55593 Full Coveraged
55595 Full Coveraged
55596 Full Coveraged
55597 Full Coveraged
55598 Full Coveraged
55599 Full Coveraged
55701 Mostly Coveraged
55708 Mostly Coveraged
55734 Mostly Coveraged
55741 Mostly Coveraged
55751 Mostly Coveraged
55768 Mostly Coveraged
55777 Full Coveraged
55792 Mostly Coveraged
55802 Full Coveraged
55805 Full Coveraged
55806 Full Coveraged
55807 Full Coveraged
55808 Mostly Coveraged
55810 Mostly Coveraged
55811 Full Coveraged
55812 Full Coveraged
55814 Full Coveraged
55815 Full Coveraged
55816 Full Coveraged
55901 Full Coveraged
55902 Full Coveraged
55903 Full Coveraged
55904 Mostly Coveraged
55905 Full Coveraged
55906 Mostly Coveraged
55912 Full Coveraged
55918 Mostly Coveraged
55920 Full Coveraged
55941 Mostly Coveraged
55942 Full Coveraged
55950 Full Coveraged
55953 Mostly Coveraged
55959 Full Coveraged
55960 Mostly Coveraged
55969 Mostly Coveraged
55970 Mostly Coveraged
55976 Mostly Coveraged
55987 Full Coveraged
55988 Full Coveraged
56001 Full Coveraged
56002 Full Coveraged
56003 Full Coveraged
56006 Full Coveraged
56011 Full Coveraged
56026 Mostly Coveraged
56034 Mostly Coveraged
56037 Mostly Coveraged
56044 Mostly Coveraged
56046 Full Coveraged
56058 Mostly Coveraged
56072 Mostly Coveraged
56080 Mostly Coveraged
56093 Mostly Coveraged
56201 Full Coveraged
56209 Mostly Coveraged
56251 Full Coveraged
56273 Mostly Coveraged
56288 Full Coveraged
56301 Mostly Coveraged
56302 Full Coveraged
56303 Full Coveraged
56304 Mostly Coveraged
56308 Full Coveraged
56319 Mostly Coveraged
56321 Mostly Coveraged
56355 Full Coveraged
56360 Mostly Coveraged
56367 Full Coveraged
56369 Full Coveraged
56372 Full Coveraged
56374 Mostly Coveraged
56375 Mostly Coveraged
56377 Full Coveraged
56379 Full Coveraged
56385 Mostly Coveraged
56387 Mostly Coveraged
56388 Full Coveraged
56393 Full Coveraged
56395 Full Coveraged
56396 Full Coveraged
56397 Full Coveraged
56398 Full Coveraged
56399 Full Coveraged
56401 Full Coveraged
56425 Mostly Coveraged
56449 Mostly Coveraged
56529 Full Coveraged
56560 Full Coveraged
56561 Full Coveraged
56562 Full Coveraged
56563 Full Coveraged
56721 Full Coveraged
57005 Full Coveraged
57032 Full Coveraged
57038 Full Coveraged
57049 Full Coveraged
57055 Mostly Coveraged
57056 Full Coveraged
57068 Mostly Coveraged
57101 Full Coveraged
57103 Full Coveraged
57104 Full Coveraged
57105 Full Coveraged
57106 Mostly Coveraged
57107 Mostly Coveraged
57108 Full Coveraged
57109 Full Coveraged
57110 Full Coveraged
57117 Full Coveraged
57118 Full Coveraged
57186 Full Coveraged
57188 Full Coveraged
57189 Full Coveraged
57192 Full Coveraged
57193 Full Coveraged
57194 Full Coveraged
57195 Full Coveraged
57196 Full Coveraged
57197 Full Coveraged
57701 Full Coveraged
57702 Mostly Coveraged
57703 Mostly Coveraged
57706 Mostly Coveraged
57709 Full Coveraged
57718 Mostly Coveraged
57769 Mostly Coveraged
58102 Full Coveraged
58103 Full Coveraged
58104 Mostly Coveraged
58105 Full Coveraged
58106 Full Coveraged
58107 Full Coveraged
58108 Full Coveraged
58109 Full Coveraged
58121 Full Coveraged
58122 Full Coveraged
58124 Full Coveraged
58125 Full Coveraged
58126 Full Coveraged
58201 Full Coveraged
58202 Full Coveraged
58203 Full Coveraged
58206 Full Coveraged
58208 Full Coveraged
58278 Mostly Coveraged
58501 Full Coveraged
58502 Full Coveraged
58503 Full Coveraged
58504 Mostly Coveraged
58505 Full Coveraged
58506 Full Coveraged
58507 Full Coveraged
58701 Mostly Coveraged
58702 Full Coveraged
58703 Full Coveraged
58707 Full Coveraged
59101 Mostly Coveraged
59102 Mostly Coveraged
59103 Full Coveraged
59104 Full Coveraged
59105 Mostly Coveraged
59107 Full Coveraged
59108 Full Coveraged
59114 Full Coveraged
59115 Full Coveraged
59116 Mostly Coveraged
59117 Full Coveraged
59401 Full Coveraged
59402 Full Coveraged
59403 Full Coveraged
59404 Full Coveraged
59406 Full Coveraged
59414 Full Coveraged
59472 Mostly Coveraged
59801 Full Coveraged
59803 Full Coveraged
59806 Full Coveraged
59807 Full Coveraged
59812 Full Coveraged
59851 Full Coveraged
60001 Mostly Coveraged
60004 Full Coveraged
60005 Full Coveraged
60006 Full Coveraged
60007 Full Coveraged
60008 Full Coveraged
60009 Full Coveraged
60010 Full Coveraged
60011 Full Coveraged
60012 Full Coveraged
60013 Full Coveraged
60014 Full Coveraged
60015 Full Coveraged
60016 Full Coveraged
60017 Full Coveraged
60018 Full Coveraged
60019 Full Coveraged
60021 Full Coveraged
60022 Full Coveraged
60025 Full Coveraged
60026 Full Coveraged
60029 Full Coveraged
60030 Full Coveraged
60031 Full Coveraged
60033 Mostly Coveraged
60034 Mostly Coveraged
60035 Full Coveraged
60037 Full Coveraged
60038 Full Coveraged
60039 Full Coveraged
60040 Full Coveraged
60041 Mostly Coveraged
60042 Mostly Coveraged
60043 Full Coveraged
60044 Full Coveraged
60045 Full Coveraged
60046 Mostly Coveraged
60047 Full Coveraged
60048 Full Coveraged
60049 Full Coveraged
60050 Mostly Coveraged
60051 Mostly Coveraged
60053 Full Coveraged
60055 Full Coveraged
60056 Full Coveraged
60060 Full Coveraged
60061 Full Coveraged
60062 Full Coveraged
60064 Full Coveraged
60065 Full Coveraged
60067 Full Coveraged
60068 Full Coveraged
60069 Full Coveraged
60070 Full Coveraged
60073 Mostly Coveraged
60074 Full Coveraged
60075 Mostly Coveraged
60076 Full Coveraged
60077 Full Coveraged
60078 Full Coveraged
60079 Full Coveraged
60082 Full Coveraged
60083 Mostly Coveraged
60084 Full Coveraged
60085 Full Coveraged
Zip Code Coverage Level Zip Code Coverage Level Zip Code Coverage Level Zip Code Coverage Level Zip Code Coverage Level Zip Code Coverage Level
Page 77

- 177 -
60086 Full Coveraged
60087 Full Coveraged
60088 Full Coveraged
60089 Full Coveraged
60090 Full Coveraged
60091 Full Coveraged
60092 Full Coveraged
60093 Full Coveraged
60094 Full Coveraged
60095 Full Coveraged
60096 Mostly Coveraged
60097 Mostly Coveraged
60098 Full Coveraged
60099 Full Coveraged
60101 Full Coveraged
60102 Full Coveraged
60103 Full Coveraged
60104 Full Coveraged
60106 Full Coveraged
60107 Full Coveraged
60108 Full Coveraged
60109 Full Coveraged
60110 Full Coveraged
60111 Mostly Coveraged
60112 Full Coveraged
60113 Full Coveraged
60115 Full Coveraged
60116 Full Coveraged
60117 Full Coveraged
60118 Full Coveraged
60119 Mostly Coveraged
60120 Mostly Coveraged
60121 Full Coveraged
60123 Full Coveraged
60125 Full Coveraged
60126 Full Coveraged
60128 Full Coveraged
60129 Full Coveraged
60130 Full Coveraged
60131 Full Coveraged
60132 Full Coveraged
60133 Full Coveraged
60134 Full Coveraged
60135 Mostly Coveraged
60136 Full Coveraged
60137 Full Coveraged
60138 Full Coveraged
60139 Full Coveraged
60140 Full Coveraged
60141 Full Coveraged
60142 Mostly Coveraged
60143 Full Coveraged
60145 Mostly Coveraged
60146 Mostly Coveraged
60147 Mostly Coveraged
60148 Full Coveraged
60150 Full Coveraged
60151 Mostly Coveraged
60152 Full Coveraged
60153 Full Coveraged
60154 Full Coveraged
60155 Full Coveraged
60156 Full Coveraged
60157 Full Coveraged
60159 Full Coveraged
60160 Full Coveraged
60161 Full Coveraged
60162 Full Coveraged
60163 Full Coveraged
60164 Full Coveraged
60165 Full Coveraged
60168 Full Coveraged
60170 Full Coveraged
60171 Full Coveraged
60172 Full Coveraged
60173 Full Coveraged
60174 Full Coveraged
60175 Full Coveraged
60176 Full Coveraged
60177 Full Coveraged
60178 Full Coveraged
60179 Full Coveraged
60180 Full Coveraged
60181 Full Coveraged
60183 Full Coveraged
60184 Mostly Coveraged
60185 Full Coveraged
60186 Full Coveraged
60187 Full Coveraged
60188 Full Coveraged
60189 Full Coveraged
60190 Full Coveraged
60191 Full Coveraged
60192 Full Coveraged
60193 Full Coveraged
60194 Full Coveraged
60195 Full Coveraged
60196 Full Coveraged
60197 Full Coveraged
60199 Full Coveraged
60201 Full Coveraged
60202 Full Coveraged
60203 Full Coveraged
60204 Full Coveraged
60208 Full Coveraged
60209 Full Coveraged
60301 Full Coveraged
60302 Full Coveraged
60303 Full Coveraged
60304 Full Coveraged
60305 Full Coveraged
60398 Full Coveraged
60399 Full Coveraged
60401 Full Coveraged
60402 Full Coveraged
60406 Full Coveraged
60407 Mostly Coveraged
60408 Mostly Coveraged
60409 Full Coveraged
60410 Full Coveraged
60411 Full Coveraged
60412 Full Coveraged
60415 Full Coveraged
60416 Full Coveraged
60417 Full Coveraged
60419 Full Coveraged
60421 Mostly Coveraged
60422 Full Coveraged
60423 Full Coveraged
60425 Full Coveraged
60426 Full Coveraged
60429 Full Coveraged
60430 Full Coveraged
60431 Mostly Coveraged
60432 Full Coveraged
60433 Full Coveraged
60434 Full Coveraged
60435 Full Coveraged
60436 Full Coveraged
60438 Full Coveraged
60439 Full Coveraged
60440 Full Coveraged
60441 Full Coveraged
60442 Mostly Coveraged
60443 Mostly Coveraged
60445 Full Coveraged
60446 Full Coveraged
60447 Full Coveraged
60448 Full Coveraged
60449 Mostly Coveraged
60450 Mostly Coveraged
60451 Full Coveraged
60452 Full Coveraged
60453 Full Coveraged
60454 Full Coveraged
60455 Full Coveraged
60456 Full Coveraged
60457 Full Coveraged
60458 Full Coveraged
60459 Full Coveraged
60461 Full Coveraged
60462 Full Coveraged
60463 Full Coveraged
60464 Full Coveraged
60465 Full Coveraged
60466 Full Coveraged
60467 Full Coveraged
60468 Mostly Coveraged
60469 Full Coveraged
60471 Full Coveraged
60472 Full Coveraged
60473 Full Coveraged
60475 Full Coveraged
60476 Full Coveraged
60477 Full Coveraged
60478 Full Coveraged
60480 Full Coveraged
60482 Full Coveraged
60490 Full Coveraged
60491 Full Coveraged
60499 Full Coveraged
60501 Full Coveraged
60504 Full Coveraged
60505 Full Coveraged
60506 Full Coveraged
60507 Full Coveraged
60510 Full Coveraged
60513 Full Coveraged
60514 Full Coveraged
60515 Full Coveraged
60516 Full Coveraged
60517 Full Coveraged
60519 Full Coveraged
60520 Mostly Coveraged
60521 Full Coveraged
60522 Full Coveraged
60523 Full Coveraged
60525 Full Coveraged
60526 Full Coveraged
60527 Full Coveraged
60530 Mostly Coveraged
60532 Full Coveraged
60534 Full Coveraged
60538 Full Coveraged
60539 Full Coveraged
60540 Full Coveraged
60542 Full Coveraged
60543 Mostly Coveraged
60544 Mostly Coveraged
60546 Full Coveraged
60550 Full Coveraged
60553 Mostly Coveraged
60555 Full Coveraged
60556 Mostly Coveraged
60558 Full Coveraged
60559 Full Coveraged
60561 Full Coveraged
60563 Full Coveraged
60564 Full Coveraged
60565 Full Coveraged
60566 Full Coveraged
60567 Full Coveraged
60568 Full Coveraged
60570 Full Coveraged
60572 Full Coveraged
60597 Full Coveraged
60598 Full Coveraged
60599 Full Coveraged
60601 Full Coveraged
60602 Full Coveraged
60603 Full Coveraged
60604 Full Coveraged
60605 Full Coveraged
60606 Full Coveraged
60607 Full Coveraged
60608 Full Coveraged
60609 Full Coveraged
60610 Full Coveraged
60611 Full Coveraged
60612 Full Coveraged
60613 Full Coveraged
60614 Full Coveraged
60615 Full Coveraged
60616 Full Coveraged
60617 Full Coveraged
60618 Full Coveraged
60619 Full Coveraged
60620 Full Coveraged
60621 Full Coveraged
60622 Full Coveraged
60623 Full Coveraged
60624 Full Coveraged
60625 Full Coveraged
60626 Full Coveraged
60628 Full Coveraged
60629 Full Coveraged
60630 Full Coveraged
60631 Full Coveraged
60632 Full Coveraged
60633 Full Coveraged
60634 Full Coveraged
60636 Full Coveraged
60637 Full Coveraged
60638 Full Coveraged
60639 Full Coveraged
60640 Full Coveraged
60641 Full Coveraged
60643 Full Coveraged
60644 Full Coveraged
60645 Full Coveraged
60646 Full Coveraged
60647 Full Coveraged
60649 Full Coveraged
60651 Full Coveraged
60652 Full Coveraged
60653 Full Coveraged
60654 Full Coveraged
60655 Full Coveraged
60656 Full Coveraged
60657 Full Coveraged
60659 Full Coveraged
60660 Full Coveraged
60661 Full Coveraged
60663 Full Coveraged
60664 Full Coveraged
60665 Full Coveraged
60666 Full Coveraged
60667 Full Coveraged
60668 Full Coveraged
60670 Full Coveraged
60671 Full Coveraged
60673 Full Coveraged
60674 Full Coveraged
60675 Full Coveraged
60677 Full Coveraged
60678 Full Coveraged
60679 Full Coveraged
60680 Full Coveraged
60681 Full Coveraged
60682 Full Coveraged
60683 Full Coveraged
60684 Full Coveraged
60685 Full Coveraged
60686 Full Coveraged
60687 Full Coveraged
60688 Full Coveraged
60689 Full Coveraged
60690 Full Coveraged
60691 Full Coveraged
60693 Full Coveraged
60694 Full Coveraged
60695 Full Coveraged
60696 Full Coveraged
60697 Full Coveraged
60701 Full Coveraged
60706 Full Coveraged
60707 Full Coveraged
60712 Full Coveraged
60714 Full Coveraged
60803 Full Coveraged
60804 Full Coveraged
60805 Full Coveraged
60827 Full Coveraged
60901 Full Coveraged
60902 Full Coveraged
60910 Full Coveraged
60914 Full Coveraged
60915 Full Coveraged
60922 Mostly Coveraged
60940 Mostly Coveraged
60950 Full Coveraged
61007 Mostly Coveraged
61008 Mostly Coveraged
61011 Full Coveraged
61013 Full Coveraged
61016 Full Coveraged
61018 Full Coveraged
61020 Mostly Coveraged
61024 Mostly Coveraged
61027 Mostly Coveraged
61032 Full Coveraged
61037 Full Coveraged
61038 Mostly Coveraged
61043 Full Coveraged
61049 Full Coveraged
61050 Mostly Coveraged
61052 Full Coveraged
61060 Mostly Coveraged
61065 Mostly Coveraged
61067 Mostly Coveraged
61068 Full Coveraged
61070 Mostly Coveraged
61071 Full Coveraged
61072 Full Coveraged
61073 Full Coveraged
61079 Full Coveraged
61080 Mostly Coveraged
61081 Full Coveraged
61084 Mostly Coveraged
61088 Mostly Coveraged
61101 Full Coveraged
61102 Full Coveraged
61103 Full Coveraged
61104 Full Coveraged
61105 Full Coveraged
61106 Full Coveraged
61107 Full Coveraged
61108 Full Coveraged
61109 Full Coveraged
61110 Full Coveraged
61111 Full Coveraged
61112 Full Coveraged
61114 Full Coveraged
61115 Full Coveraged
61125 Full Coveraged
61126 Full Coveraged
61130 Full Coveraged
61131 Full Coveraged
61132 Full Coveraged
61201 Full Coveraged
61204 Full Coveraged
61230 Full Coveraged
61232 Mostly Coveraged
61234 Mostly Coveraged
61235 Mostly Coveraged
61236 Full Coveraged
61239 Full Coveraged
61240 Mostly Coveraged
61241 Full Coveraged
61242 Mostly Coveraged
61243 Mostly Coveraged
61244 Full Coveraged
61252 Full Coveraged
61256 Full Coveraged
61257 Mostly Coveraged
61259 Full Coveraged
61261 Mostly Coveraged
61264 Mostly Coveraged
61265 Full Coveraged
61266 Full Coveraged
61273 Mostly Coveraged
61275 Full Coveraged
61278 Full Coveraged
61282 Full Coveraged
61283 Mostly Coveraged
61284 Mostly Coveraged
61299 Full Coveraged
61301 Mostly Coveraged
61311 Mostly Coveraged
61315 Mostly Coveraged
61316 Mostly Coveraged
61319 Full Coveraged
61323 Mostly Coveraged
61325 Mostly Coveraged
61328 Mostly Coveraged
61332 Full Coveraged
61333 Mostly Coveraged
61338 Mostly Coveraged
61344 Mostly Coveraged
61345 Full Coveraged
61348 Full Coveraged
61349 Mostly Coveraged
61350 Full Coveraged
61356 Full Coveraged
61368 Full Coveraged
61370 Mostly Coveraged
61373 Full Coveraged
61379 Full Coveraged
61417 Mostly Coveraged
61423 Full Coveraged
61425 Full Coveraged
61434 Mostly Coveraged
61435 Mostly Coveraged
61437 Mostly Coveraged
61443 Full Coveraged
61447 Mostly Coveraged
61449 Mostly Coveraged
61453 Mostly Coveraged
61454 Mostly Coveraged
61462 Full Coveraged
61480 Mostly Coveraged
61483 Mostly Coveraged
61517 Mostly Coveraged
61525 Full Coveraged
61528 Full Coveraged
61535 Full Coveraged
61536 Full Coveraged
61547 Mostly Coveraged
61550 Mostly Coveraged
61552 Mostly Coveraged
61554 Full Coveraged
61555 Full Coveraged
61558 Full Coveraged
61559 Mostly Coveraged
61564 Full Coveraged
61568 Mostly Coveraged
61569 Mostly Coveraged
61571 Mostly Coveraged
61601 Full Coveraged
61602 Full Coveraged
61603 Full Coveraged
61604 Full Coveraged
61605 Full Coveraged
61606 Full Coveraged
61607 Full Coveraged
61610 Full Coveraged
61611 Full Coveraged
61612 Mostly Coveraged
61613 Mostly Coveraged
61614 Mostly Coveraged
61615 Full Coveraged
61616 Mostly Coveraged
61625 Full Coveraged
61628 Full Coveraged
61629 Full Coveraged
61630 Full Coveraged
61632 Mostly Coveraged
61633 Full Coveraged
61634 Full Coveraged
61635 Full Coveraged
61636 Full Coveraged
61637 Full Coveraged
61638 Mostly Coveraged
61639 Full Coveraged
61640 Mostly Coveraged
61641 Full Coveraged
61643 Full Coveraged
61644 Mostly Coveraged
61650 Full Coveraged
61651 Full Coveraged
61652 Full Coveraged
61653 Full Coveraged
61654 Full Coveraged
61655 Full Coveraged
61656 Full Coveraged
61701 Full Coveraged
61702 Full Coveraged
61704 Full Coveraged
61709 Full Coveraged
61710 Full Coveraged
61725 Mostly Coveraged
61726 Mostly Coveraged
61736 Mostly Coveraged
61740 Mostly Coveraged
Zip Code Coverage Level Zip Code Coverage Level Zip Code Coverage Level Zip Code Coverage Level Zip Code Coverage Level Zip Code Coverage Level
Page 78

- 178 -
61743 Full Coveraged
61745 Full Coveraged
61748 Mostly Coveraged
61750 Mostly Coveraged
61756 Mostly Coveraged
61758 Mostly Coveraged
61761 Full Coveraged
61764 Full Coveraged
61772 Full Coveraged
61776 Mostly Coveraged
61790 Full Coveraged
61791 Full Coveraged
61799 Full Coveraged
61801 Full Coveraged
61802 Mostly Coveraged
61803 Full Coveraged
61811 Mostly Coveraged
61814 Mostly Coveraged
61815 Full Coveraged
61817 Full Coveraged
61818 Mostly Coveraged
61820 Full Coveraged
61821 Full Coveraged
61822 Full Coveraged
61824 Full Coveraged
61825 Full Coveraged
61826 Full Coveraged
61830 Full Coveraged
61831 Full Coveraged
61832 Full Coveraged
61833 Full Coveraged
61834 Full Coveraged
61840 Mostly Coveraged
61841 Mostly Coveraged
61843 Mostly Coveraged
61844 Mostly Coveraged
61848 Mostly Coveraged
61853 Mostly Coveraged
61855 Mostly Coveraged
61857 Mostly Coveraged
61858 Full Coveraged
61874 Mostly Coveraged
61875 Mostly Coveraged
61878 Mostly Coveraged
61882 Mostly Coveraged
61883 Mostly Coveraged
61936 Mostly Coveraged
61955 Mostly Coveraged
62002 Mostly Coveraged
62012 Mostly Coveraged
62018 Mostly Coveraged
62022 Full Coveraged
62024 Mostly Coveraged
62025 Full Coveraged
62026 Full Coveraged
62028 Full Coveraged
62034 Full Coveraged
62035 Full Coveraged
62036 Full Coveraged
62040 Mostly Coveraged
62048 Mostly Coveraged
62052 Mostly Coveraged
62059 Full Coveraged
62060 Full Coveraged
62061 Mostly Coveraged
62062 Full Coveraged
62071 Full Coveraged
62083 Mostly Coveraged
62084 Mostly Coveraged
62087 Mostly Coveraged
62090 Full Coveraged
62095 Mostly Coveraged
62201 Full Coveraged
62202 Full Coveraged
62203 Full Coveraged
62204 Full Coveraged
62205 Full Coveraged
62206 Full Coveraged
62207 Full Coveraged
62208 Full Coveraged
62220 Full Coveraged
62221 Mostly Coveraged
62222 Full Coveraged
62223 Full Coveraged
62225 Mostly Coveraged
62226 Full Coveraged
62232 Full Coveraged
62233 Mostly Coveraged
62234 Full Coveraged
62236 Full Coveraged
62237 Mostly Coveraged
62238 Mostly Coveraged
62239 Full Coveraged
62240 Full Coveraged
62243 Mostly Coveraged
62244 Mostly Coveraged
62256 Mostly Coveraged
62260 Full Coveraged
62263 Full Coveraged
62269 Full Coveraged
62272 Full Coveraged
62274 Mostly Coveraged
62281 Mostly Coveraged
62285 Full Coveraged
62286 Full Coveraged
62288 Full Coveraged
62292 Mostly Coveraged
62294 Full Coveraged
62295 Full Coveraged
62297 Mostly Coveraged
62301 Full Coveraged
62305 Full Coveraged
62306 Full Coveraged
62338 Full Coveraged
62354 Full Coveraged
62358 Full Coveraged
62359 Mostly Coveraged
62360 Mostly Coveraged
62410 Mostly Coveraged
62417 Mostly Coveraged
62419 Full Coveraged
62421 Mostly Coveraged
62423 Mostly Coveraged
62425 Mostly Coveraged
62427 Mostly Coveraged
62439 Full Coveraged
62450 Full Coveraged
62452 Full Coveraged
62460 Full Coveraged
62466 Mostly Coveraged
62476 Mostly Coveraged
62501 Full Coveraged
62514 Full Coveraged
62520 Mostly Coveraged
62521 Full Coveraged
62522 Full Coveraged
62523 Full Coveraged
62524 Full Coveraged
62525 Full Coveraged
62526 Full Coveraged
62532 Full Coveraged
62535 Full Coveraged
62536 Mostly Coveraged
62537 Full Coveraged
62543 Mostly Coveraged
62544 Mostly Coveraged
62549 Mostly Coveraged
62551 Mostly Coveraged
62554 Full Coveraged
62555 Full Coveraged
62556 Mostly Coveraged
62557 Mostly Coveraged
62561 Full Coveraged
62563 Full Coveraged
62567 Mostly Coveraged
62568 Full Coveraged
62573 Full Coveraged
62601 Mostly Coveraged
62625 Mostly Coveraged
62629 Mostly Coveraged
62638 Mostly Coveraged
62650 Full Coveraged
62651 Full Coveraged
62660 Mostly Coveraged
62668 Mostly Coveraged
62684 Mostly Coveraged
62695 Full Coveraged
62701 Full Coveraged
62702 Full Coveraged
62703 Full Coveraged
62704 Full Coveraged
62705 Full Coveraged
62706 Full Coveraged
62707 Full Coveraged
62708 Full Coveraged
62713 Full Coveraged
62715 Full Coveraged
62716 Full Coveraged
62719 Full Coveraged
62721 Full Coveraged
62722 Full Coveraged
62723 Full Coveraged
62726 Full Coveraged
62736 Full Coveraged
62739 Full Coveraged
62746 Full Coveraged
62756 Full Coveraged
62757 Full Coveraged
62761 Full Coveraged
62762 Full Coveraged
62763 Full Coveraged
62764 Full Coveraged
62765 Full Coveraged
62766 Full Coveraged
62767 Full Coveraged
62769 Full Coveraged
62776 Full Coveraged
62777 Full Coveraged
62781 Full Coveraged
62786 Full Coveraged
62791 Full Coveraged
62794 Full Coveraged
62796 Full Coveraged
62803 Full Coveraged
62805 Mostly Coveraged
62806 Mostly Coveraged
62808 Mostly Coveraged
62809 Full Coveraged
62810 Full Coveraged
62811 Full Coveraged
62812 Full Coveraged
62814 Mostly Coveraged
62816 Mostly Coveraged
62817 Mostly Coveraged
62818 Mostly Coveraged
62819 Full Coveraged
62820 Full Coveraged
62821 Full Coveraged
62822 Mostly Coveraged
62823 Full Coveraged
62824 Mostly Coveraged
62825 Mostly Coveraged
62827 Full Coveraged
62828 Mostly Coveraged
62829 Full Coveraged
62830 Full Coveraged
62831 Mostly Coveraged
62832 Full Coveraged
62833 Mostly Coveraged
62834 Mostly Coveraged
62835 Full Coveraged
62836 Mostly Coveraged
62837 Full Coveraged
62839 Full Coveraged
62840 Full Coveraged
62841 Full Coveraged
62842 Full Coveraged
62843 Mostly Coveraged
62844 Full Coveraged
62845 Full Coveraged
62850 Mostly Coveraged
62851 Full Coveraged
62852 Full Coveraged
62853 Mostly Coveraged
62855 Mostly Coveraged
62856 Full Coveraged
62858 Full Coveraged
62859 Full Coveraged
62860 Full Coveraged
62861 Full Coveraged
62862 Full Coveraged
62863 Full Coveraged
62864 Full Coveraged
62865 Mostly Coveraged
62868 Mostly Coveraged
62869 Full Coveraged
62871 Mostly Coveraged
62872 Full Coveraged
62874 Full Coveraged
62876 Mostly Coveraged
62877 Mostly Coveraged
62878 Full Coveraged
62879 Mostly Coveraged
62886 Mostly Coveraged
62887 Mostly Coveraged
62888 Full Coveraged
62889 Mostly Coveraged
62890 Mostly Coveraged
62891 Mostly Coveraged
62893 Mostly Coveraged
62894 Mostly Coveraged
62895 Mostly Coveraged
62896 Full Coveraged
62897 Mostly Coveraged
62898 Mostly Coveraged
62899 Mostly Coveraged
62901 Full Coveraged
62902 Full Coveraged
62903 Full Coveraged
62905 Mostly Coveraged
62906 Full Coveraged
62908 Mostly Coveraged
62909 Mostly Coveraged
62910 Mostly Coveraged
62912 Full Coveraged
62914 Mostly Coveraged
62915 Full Coveraged
62917 Full Coveraged
62918 Mostly Coveraged
62920 Full Coveraged
62921 Full Coveraged
62922 Mostly Coveraged
62924 Full Coveraged
62926 Mostly Coveraged
62927 Full Coveraged
62928 Mostly Coveraged
62930 Mostly Coveraged
62932 Full Coveraged
62933 Full Coveraged
62935 Mostly Coveraged
62939 Full Coveraged
62940 Mostly Coveraged
62943 Full Coveraged
62946 Full Coveraged
62947 Full Coveraged
62948 Full Coveraged
62949 Mostly Coveraged
62951 Full Coveraged
62952 Full Coveraged
62953 Full Coveraged
62955 Mostly Coveraged
62956 Mostly Coveraged
62957 Mostly Coveraged
62958 Mostly Coveraged
62959 Full Coveraged
62960 Mostly Coveraged
62961 Full Coveraged
62963 Full Coveraged
62964 Full Coveraged
62965 Full Coveraged
62966 Full Coveraged
62970 Full Coveraged
62971 Mostly Coveraged
62973 Mostly Coveraged
62974 Mostly Coveraged
62975 Mostly Coveraged
62976 Full Coveraged
62977 Mostly Coveraged
62982 Mostly Coveraged
62983 Mostly Coveraged
62985 Mostly Coveraged
62987 Mostly Coveraged
62988 Mostly Coveraged
62992 Full Coveraged
62993 Full Coveraged
62994 Full Coveraged
62995 Mostly Coveraged
62996 Full Coveraged
62997 Mostly Coveraged
62999 Mostly Coveraged
63001 Full Coveraged
63005 Full Coveraged
63006 Full Coveraged
63010 Full Coveraged
63011 Full Coveraged
63012 Full Coveraged
63015 Mostly Coveraged
63016 Mostly Coveraged
63017 Full Coveraged
63019 Full Coveraged
63021 Full Coveraged
63022 Full Coveraged
63024 Full Coveraged
63025 Full Coveraged
63026 Full Coveraged
63028 Full Coveraged
63031 Full Coveraged
63032 Full Coveraged
63033 Full Coveraged
63034 Full Coveraged
63038 Full Coveraged
63040 Full Coveraged
63042 Full Coveraged
63043 Full Coveraged
63044 Full Coveraged
63045 Full Coveraged
63047 Full Coveraged
63048 Full Coveraged
63049 Full Coveraged
63050 Mostly Coveraged
63051 Full Coveraged
63052 Full Coveraged
63053 Full Coveraged
63057 Full Coveraged
63065 Mostly Coveraged
63066 Mostly Coveraged
63069 Full Coveraged
63070 Full Coveraged
63073 Mostly Coveraged
63074 Full Coveraged
63088 Full Coveraged
63099 Full Coveraged
63101 Full Coveraged
63102 Full Coveraged
63103 Full Coveraged
63104 Full Coveraged
63105 Full Coveraged
63106 Full Coveraged
63107 Full Coveraged
63108 Full Coveraged
63109 Full Coveraged
63110 Full Coveraged
63111 Full Coveraged
63112 Full Coveraged
63113 Full Coveraged
63114 Full Coveraged
63115 Full Coveraged
63116 Full Coveraged
63117 Full Coveraged
63118 Full Coveraged
63119 Full Coveraged
63120 Full Coveraged
63121 Full Coveraged
63122 Full Coveraged
63123 Full Coveraged
63124 Full Coveraged
63125 Full Coveraged
63126 Full Coveraged
63127 Full Coveraged
63128 Full Coveraged
63129 Full Coveraged
63130 Full Coveraged
63131 Full Coveraged
63132 Full Coveraged
63133 Full Coveraged
63134 Full Coveraged
63135 Full Coveraged
63136 Full Coveraged
63137 Full Coveraged
63138 Full Coveraged
63139 Full Coveraged
63140 Full Coveraged
63141 Full Coveraged
63143 Full Coveraged
63144 Full Coveraged
63145 Full Coveraged
63146 Full Coveraged
63147 Full Coveraged
63150 Full Coveraged
63151 Full Coveraged
63155 Full Coveraged
63156 Full Coveraged
63157 Full Coveraged
63158 Full Coveraged
63160 Full Coveraged
63163 Full Coveraged
63164 Full Coveraged
63166 Full Coveraged
63167 Full Coveraged
63169 Full Coveraged
63171 Full Coveraged
63177 Full Coveraged
63178 Full Coveraged
63179 Full Coveraged
63180 Full Coveraged
63182 Full Coveraged
63188 Full Coveraged
63190 Full Coveraged
63195 Full Coveraged
63196 Full Coveraged
63197 Full Coveraged
63198 Full Coveraged
63199 Full Coveraged
63301 Full Coveraged
63302 Full Coveraged
63303 Full Coveraged
63304 Full Coveraged
63332 Mostly Coveraged
63338 Full Coveraged
63341 Full Coveraged
63342 Mostly Coveraged
63346 Full Coveraged
63348 Full Coveraged
63365 Full Coveraged
63366 Full Coveraged
63367 Full Coveraged
63369 Mostly Coveraged
63373 Mostly Coveraged
63376 Full Coveraged
63385 Full Coveraged
63386 Full Coveraged
63390 Mostly Coveraged
63701 Full Coveraged
63702 Full Coveraged
63703 Full Coveraged
63705 Full Coveraged
63745 Mostly Coveraged
63752 Full Coveraged
63755 Full Coveraged
63779 Mostly Coveraged
64011 Full Coveraged
64012 Mostly Coveraged
64013 Full Coveraged
64014 Mostly Coveraged
64015 Full Coveraged
64016 Mostly Coveraged
64018 Mostly Coveraged
64028 Full Coveraged
64029 Full Coveraged
64030 Full Coveraged
64034 Mostly Coveraged
64048 Mostly Coveraged
64050 Full Coveraged
64051 Full Coveraged
64052 Full Coveraged
64053 Full Coveraged
64054 Full Coveraged
64055 Full Coveraged
64056 Full Coveraged
64057 Full Coveraged
64058 Mostly Coveraged
64060 Full Coveraged
64061 Mostly Coveraged
64063 Full Coveraged
Zip Code Coverage Level Zip Code Coverage Level Zip Code Coverage Level Zip Code Coverage Level Zip Code Coverage Level Zip Code Coverage Level
Page 79

- 179 -
64064 Full Coveraged
64065 Full Coveraged
64066 Mostly Coveraged
64068 Full Coveraged
64069 Full Coveraged
64070 Full Coveraged
64072 Mostly Coveraged
64073 Mostly Coveraged
64074 Mostly Coveraged
64075 Full Coveraged
64076 Mostly Coveraged
64078 Full Coveraged
64079 Full Coveraged
64081 Full Coveraged
64082 Full Coveraged
64083 Full Coveraged
64086 Mostly Coveraged
64087 Full Coveraged
64089 Full Coveraged
64092 Full Coveraged
64098 Mostly Coveraged
64101 Full Coveraged
64102 Full Coveraged
64105 Full Coveraged
64106 Full Coveraged
64108 Full Coveraged
64109 Full Coveraged
64110 Full Coveraged
64111 Full Coveraged
64112 Full Coveraged
64113 Full Coveraged
64114 Full Coveraged
64116 Full Coveraged
64117 Full Coveraged
64118 Full Coveraged
64119 Full Coveraged
64120 Full Coveraged
64121 Full Coveraged
64123 Full Coveraged
64124 Full Coveraged
64125 Full Coveraged
64126 Full Coveraged
64127 Full Coveraged
64128 Full Coveraged
64129 Full Coveraged
64130 Full Coveraged
64131 Full Coveraged
64132 Full Coveraged
64133 Full Coveraged
64134 Full Coveraged
64136 Full Coveraged
64137 Full Coveraged
64138 Full Coveraged
64139 Full Coveraged
64141 Full Coveraged
64144 Full Coveraged
64145 Full Coveraged
64146 Full Coveraged
64147 Full Coveraged
64148 Full Coveraged
64149 Full Coveraged
64150 Full Coveraged
64151 Full Coveraged
64152 Full Coveraged
64153 Full Coveraged
64154 Full Coveraged
64155 Full Coveraged
64156 Full Coveraged
64157 Full Coveraged
64158 Full Coveraged
64160 Full Coveraged
64161 Full Coveraged
64163 Full Coveraged
64164 Full Coveraged
64165 Full Coveraged
64166 Full Coveraged
64167 Full Coveraged
64168 Full Coveraged
64170 Full Coveraged
64171 Full Coveraged
64172 Full Coveraged
64179 Full Coveraged
64180 Full Coveraged
64184 Full Coveraged
64185 Full Coveraged
64187 Full Coveraged
64188 Full Coveraged
64190 Full Coveraged
64191 Full Coveraged
64192 Full Coveraged
64193 Full Coveraged
64194 Full Coveraged
64195 Full Coveraged
64196 Full Coveraged
64197 Full Coveraged
64198 Full Coveraged
64199 Full Coveraged
64421 Mostly Coveraged
64436 Full Coveraged
64459 Mostly Coveraged
64485 Full Coveraged
64492 Mostly Coveraged
64501 Full Coveraged
64502 Full Coveraged
64503 Full Coveraged
64505 Full Coveraged
64506 Full Coveraged
64507 Mostly Coveraged
64508 Full Coveraged
64701 Mostly Coveraged
64734 Mostly Coveraged
64746 Mostly Coveraged
64801 Full Coveraged
64802 Full Coveraged
64803 Full Coveraged
64804 Full Coveraged
64834 Mostly Coveraged
64835 Mostly Coveraged
64841 Mostly Coveraged
64858 Mostly Coveraged
64864 Full Coveraged
64865 Mostly Coveraged
64870 Mostly Coveraged
64999 Full Coveraged
65017 Mostly Coveraged
65043 Full Coveraged
65047 Full Coveraged
65049 Full Coveraged
65052 Full Coveraged
65065 Full Coveraged
65072 Mostly Coveraged
65076 Mostly Coveraged
65079 Mostly Coveraged
65082 Mostly Coveraged
65083 Mostly Coveraged
65085 Mostly Coveraged
65101 Full Coveraged
65102 Full Coveraged
65103 Full Coveraged
65104 Full Coveraged
65105 Full Coveraged
65106 Full Coveraged
65107 Full Coveraged
65108 Full Coveraged
65109 Full Coveraged
65110 Full Coveraged
65111 Full Coveraged
65201 Full Coveraged
65202 Full Coveraged
65203 Full Coveraged
65205 Full Coveraged
65211 Full Coveraged
65212 Full Coveraged
65215 Full Coveraged
65216 Full Coveraged
65217 Full Coveraged
65218 Full Coveraged
65231 Mostly Coveraged
65232 Mostly Coveraged
65240 Full Coveraged
65255 Full Coveraged
65265 Full Coveraged
65284 Mostly Coveraged
65285 Mostly Coveraged
65299 Mostly Coveraged
65615 Full Coveraged
65616 Full Coveraged
65619 Full Coveraged
65630 Mostly Coveraged
65631 Mostly Coveraged
65648 Mostly Coveraged
65653 Full Coveraged
65672 Mostly Coveraged
65679 Mostly Coveraged
65680 Mostly Coveraged
65714 Full Coveraged
65726 Mostly Coveraged
65731 Full Coveraged
65738 Mostly Coveraged
65740 Full Coveraged
65754 Mostly Coveraged
65759 Mostly Coveraged
65765 Mostly Coveraged
65771 Full Coveraged
65781 Mostly Coveraged
65801 Full Coveraged
65802 Full Coveraged
65803 Full Coveraged
65804 Full Coveraged
65805 Full Coveraged
65806 Full Coveraged
65807 Full Coveraged
65808 Full Coveraged
65809 Full Coveraged
65810 Full Coveraged
65814 Full Coveraged
65817 Full Coveraged
65890 Full Coveraged
65898 Full Coveraged
65899 Full Coveraged
66006 Mostly Coveraged
66007 Mostly Coveraged
66012 Mostly Coveraged
66013 Mostly Coveraged
66018 Mostly Coveraged
66019 Mostly Coveraged
66020 Mostly Coveraged
66021 Mostly Coveraged
66024 Full Coveraged
66025 Mostly Coveraged
66027 Full Coveraged
66030 Full Coveraged
66031 Full Coveraged
66036 Full Coveraged
66043 Full Coveraged
66044 Full Coveraged
66045 Full Coveraged
66046 Full Coveraged
66047 Full Coveraged
66048 Full Coveraged
66049 Full Coveraged
66050 Full Coveraged
66051 Full Coveraged
66061 Full Coveraged
66062 Mostly Coveraged
66063 Full Coveraged
66070 Mostly Coveraged
66071 Mostly Coveraged
66073 Full Coveraged
66083 Full Coveraged
66085 Full Coveraged
66101 Full Coveraged
66102 Full Coveraged
66103 Full Coveraged
66104 Full Coveraged
66105 Full Coveraged
66106 Full Coveraged
66109 Full Coveraged
66110 Full Coveraged
66111 Full Coveraged
66112 Full Coveraged
66113 Full Coveraged
66115 Full Coveraged
66117 Full Coveraged
66118 Full Coveraged
66119 Full Coveraged
66160 Full Coveraged
66201 Full Coveraged
66202 Full Coveraged
66203 Full Coveraged
66204 Full Coveraged
66205 Full Coveraged
66206 Full Coveraged
66207 Full Coveraged
66208 Full Coveraged
66209 Full Coveraged
66210 Full Coveraged
66211 Full Coveraged
66212 Full Coveraged
66213 Full Coveraged
66214 Full Coveraged
66215 Full Coveraged
66216 Full Coveraged
66217 Full Coveraged
66218 Full Coveraged
66219 Full Coveraged
66220 Full Coveraged
66221 Full Coveraged
66222 Full Coveraged
66223 Full Coveraged
66224 Full Coveraged
66225 Full Coveraged
66226 Full Coveraged
66227 Full Coveraged
66250 Full Coveraged
66251 Full Coveraged
66276 Full Coveraged
66282 Full Coveraged
66283 Full Coveraged
66285 Full Coveraged
66286 Full Coveraged
66402 Full Coveraged
66409 Mostly Coveraged
66420 Full Coveraged
66429 Full Coveraged
66431 Mostly Coveraged
66502 Full Coveraged
66503 Full Coveraged
66505 Full Coveraged
66506 Full Coveraged
66507 Mostly Coveraged
66517 Mostly Coveraged
66535 Mostly Coveraged
66542 Full Coveraged
66546 Mostly Coveraged
66601 Full Coveraged
66603 Full Coveraged
66604 Full Coveraged
66605 Full Coveraged
66606 Full Coveraged
66607 Full Coveraged
66608 Full Coveraged
66609 Full Coveraged
66610 Full Coveraged
66611 Full Coveraged
66612 Full Coveraged
66614 Full Coveraged
66615 Full Coveraged
66616 Full Coveraged
66617 Full Coveraged
66618 Full Coveraged
66619 Full Coveraged
66620 Full Coveraged
66621 Full Coveraged
66622 Full Coveraged
66624 Full Coveraged
66625 Full Coveraged
66626 Full Coveraged
66628 Full Coveraged
66629 Full Coveraged
66636 Full Coveraged
66637 Full Coveraged
66647 Full Coveraged
66652 Full Coveraged
66653 Full Coveraged
66667 Full Coveraged
66675 Full Coveraged
66683 Full Coveraged
66686 Full Coveraged
66692 Full Coveraged
66699 Full Coveraged
66739 Mostly Coveraged
66770 Mostly Coveraged
66801 Full Coveraged
66864 Mostly Coveraged
66868 Mostly Coveraged
67001 Mostly Coveraged
67002 Full Coveraged
67016 Full Coveraged
67017 Full Coveraged
67026 Mostly Coveraged
67030 Full Coveraged
67037 Mostly Coveraged
67042 Mostly Coveraged
67052 Mostly Coveraged
67053 Mostly Coveraged
67055 Full Coveraged
67056 Mostly Coveraged
67060 Full Coveraged
67062 Full Coveraged
67067 Full Coveraged
67101 Full Coveraged
67108 Mostly Coveraged
67114 Full Coveraged
67117 Full Coveraged
67120 Mostly Coveraged
67123 Mostly Coveraged
67133 Mostly Coveraged
67135 Mostly Coveraged
67144 Full Coveraged
67147 Full Coveraged
67151 Mostly Coveraged
67201 Full Coveraged
67202 Full Coveraged
67203 Full Coveraged
67204 Full Coveraged
67205 Full Coveraged
67206 Full Coveraged
67207 Full Coveraged
67208 Full Coveraged
67209 Full Coveraged
67210 Full Coveraged
67211 Full Coveraged
67212 Full Coveraged
67213 Full Coveraged
67214 Full Coveraged
67215 Full Coveraged
67216 Full Coveraged
67217 Full Coveraged
67218 Full Coveraged
67219 Full Coveraged
67220 Full Coveraged
67221 Full Coveraged
67223 Full Coveraged
67226 Full Coveraged
67227 Mostly Coveraged
67228 Full Coveraged
67230 Full Coveraged
67232 Full Coveraged
67235 Full Coveraged
67260 Full Coveraged
67275 Full Coveraged
67276 Full Coveraged
67277 Full Coveraged
67278 Full Coveraged
67401 Full Coveraged
67402 Full Coveraged
67422 Full Coveraged
67470 Full Coveraged
67501 Mostly Coveraged
67502 Full Coveraged
67504 Full Coveraged
67505 Mostly Coveraged
67522 Mostly Coveraged
67546 Full Coveraged
67846 Full Coveraged
68005 Full Coveraged
68007 Mostly Coveraged
68008 Full Coveraged
68009 Full Coveraged
68010 Full Coveraged
68015 Full Coveraged
68016 Full Coveraged
68018 Mostly Coveraged
68022 Mostly Coveraged
68023 Mostly Coveraged
68025 Mostly Coveraged
68026 Mostly Coveraged
68028 Full Coveraged
68030 Mostly Coveraged
68034 Full Coveraged
68037 Full Coveraged
68044 Mostly Coveraged
68046 Mostly Coveraged
68056 Full Coveraged
68058 Full Coveraged
68059 Full Coveraged
68068 Mostly Coveraged
68101 Full Coveraged
68102 Full Coveraged
68103 Full Coveraged
68104 Full Coveraged
68105 Full Coveraged
68106 Full Coveraged
68107 Full Coveraged
68108 Full Coveraged
68109 Full Coveraged
68110 Full Coveraged
68111 Full Coveraged
68112 Mostly Coveraged
68113 Mostly Coveraged
68114 Full Coveraged
68116 Full Coveraged
68117 Full Coveraged
68118 Full Coveraged
68119 Full Coveraged
68120 Full Coveraged
68122 Mostly Coveraged
68123 Mostly Coveraged
68124 Full Coveraged
68127 Full Coveraged
68128 Full Coveraged
68130 Full Coveraged
68131 Full Coveraged
68132 Full Coveraged
68133 Mostly Coveraged
68134 Full Coveraged
68135 Full Coveraged
68136 Full Coveraged
68137 Full Coveraged
68138 Full Coveraged
68139 Full Coveraged
68142 Full Coveraged
68144 Full Coveraged
68145 Full Coveraged
68147 Full Coveraged
68152 Full Coveraged
68154 Full Coveraged
68155 Full Coveraged
68157 Full Coveraged
68164 Full Coveraged
68172 Full Coveraged
68175 Full Coveraged
68176 Full Coveraged
68178 Full Coveraged
68179 Full Coveraged
68180 Full Coveraged
68181 Full Coveraged
68182 Full Coveraged
68183 Full Coveraged
68197 Full Coveraged
68198 Full Coveraged
68304 Full Coveraged
68336 Mostly Coveraged
68339 Mostly Coveraged
68347 Full Coveraged
68366 Mostly Coveraged
68403 Mostly Coveraged
68407 Mostly Coveraged
68430 Mostly Coveraged
68438 Mostly Coveraged
68461 Full Coveraged
68462 Full Coveraged
68463 Mostly Coveraged
68501 Full Coveraged
68502 Full Coveraged
68503 Full Coveraged
68504 Full Coveraged
68505 Full Coveraged
68506 Full Coveraged
68507 Full Coveraged
68508 Full Coveraged
68509 Full Coveraged
68510 Full Coveraged
Zip Code Coverage Level Zip Code Coverage Level Zip Code Coverage Level Zip Code Coverage Level Zip Code Coverage Level Zip Code Coverage Level
Page 80

- 180 -
68512 Full Coveraged
68514 Mostly Coveraged
68516 Full Coveraged
68517 Full Coveraged
68520 Full Coveraged
68521 Full Coveraged
68522 Full Coveraged
68523 Full Coveraged
68524 Mostly Coveraged
68526 Mostly Coveraged
68527 Full Coveraged
68528 Mostly Coveraged
68529 Full Coveraged
68531 Full Coveraged
68532 Mostly Coveraged
68542 Full Coveraged
68583 Full Coveraged
68588 Full Coveraged
68621 Full Coveraged
68649 Mostly Coveraged
68701 Full Coveraged
68702 Full Coveraged
68731 Full Coveraged
68738 Full Coveraged
68740 Mostly Coveraged
68743 Mostly Coveraged
68776 Full Coveraged
68801 Mostly Coveraged
68802 Mostly Coveraged
68803 Mostly Coveraged
68810 Full Coveraged
68832 Full Coveraged
69341 Mostly Coveraged
69353 Full Coveraged
69355 Full Coveraged
69357 Mostly Coveraged
69361 Full Coveraged
69363 Full Coveraged
70001 Full Coveraged
70002 Full Coveraged
70003 Full Coveraged
70004 Full Coveraged
70005 Full Coveraged
70006 Full Coveraged
70009 Full Coveraged
70010 Full Coveraged
70011 Full Coveraged
70031 Mostly Coveraged
70032 Full Coveraged
70033 Full Coveraged
70039 Mostly Coveraged
70043 Full Coveraged
70044 Full Coveraged
70047 Full Coveraged
70049 Full Coveraged
70051 Full Coveraged
70052 Full Coveraged
70053 Full Coveraged
70054 Full Coveraged
70055 Full Coveraged
70056 Full Coveraged
70057 Full Coveraged
70058 Full Coveraged
70059 Full Coveraged
70060 Full Coveraged
70062 Full Coveraged
70063 Full Coveraged
70064 Full Coveraged
70065 Full Coveraged
70068 Full Coveraged
70069 Full Coveraged
70070 Mostly Coveraged
70071 Full Coveraged
70072 Full Coveraged
70073 Full Coveraged
70075 Full Coveraged
70076 Full Coveraged
70078 Full Coveraged
70079 Full Coveraged
70080 Mostly Coveraged
70084 Full Coveraged
70087 Full Coveraged
70090 Full Coveraged
70092 Mostly Coveraged
70094 Full Coveraged
70096 Full Coveraged
70112 Full Coveraged
70113 Full Coveraged
70114 Full Coveraged
70115 Full Coveraged
70116 Full Coveraged
70117 Full Coveraged
70118 Full Coveraged
70119 Full Coveraged
70121 Full Coveraged
70122 Full Coveraged
70123 Full Coveraged
70124 Full Coveraged
70125 Full Coveraged
70126 Full Coveraged
70127 Full Coveraged
70128 Full Coveraged
70129 Mostly Coveraged
70130 Full Coveraged
70131 Full Coveraged
70139 Full Coveraged
70140 Full Coveraged
70141 Full Coveraged
70142 Full Coveraged
70143 Mostly Coveraged
70145 Full Coveraged
70146 Full Coveraged
70148 Full Coveraged
70149 Full Coveraged
70150 Full Coveraged
70151 Full Coveraged
70152 Full Coveraged
70153 Full Coveraged
70154 Full Coveraged
70156 Full Coveraged
70157 Full Coveraged
70158 Full Coveraged
70159 Full Coveraged
70160 Full Coveraged
70161 Full Coveraged
70162 Full Coveraged
70163 Full Coveraged
70164 Full Coveraged
70165 Full Coveraged
70166 Full Coveraged
70167 Full Coveraged
70170 Full Coveraged
70172 Full Coveraged
70174 Full Coveraged
70175 Full Coveraged
70176 Full Coveraged
70177 Full Coveraged
70178 Full Coveraged
70179 Full Coveraged
70181 Full Coveraged
70182 Full Coveraged
70183 Full Coveraged
70184 Full Coveraged
70185 Full Coveraged
70186 Full Coveraged
70187 Full Coveraged
70189 Full Coveraged
70190 Full Coveraged
70195 Full Coveraged
70301 Full Coveraged
70302 Full Coveraged
70310 Full Coveraged
70341 Full Coveraged
70343 Mostly Coveraged
70344 Mostly Coveraged
70346 Full Coveraged
70352 Mostly Coveraged
70355 Mostly Coveraged
70359 Mostly Coveraged
70360 Full Coveraged
70361 Full Coveraged
70363 Full Coveraged
70364 Full Coveraged
70371 Mostly Coveraged
70372 Full Coveraged
70375 Full Coveraged
70390 Mostly Coveraged
70391 Full Coveraged
70393 Full Coveraged
70394 Full Coveraged
70395 Full Coveraged
70401 Full Coveraged
70402 Full Coveraged
70403 Full Coveraged
70404 Full Coveraged
70420 Full Coveraged
70421 Full Coveraged
70426 Mostly Coveraged
70427 Full Coveraged
70429 Full Coveraged
70431 Mostly Coveraged
70433 Full Coveraged
70434 Full Coveraged
70435 Mostly Coveraged
70443 Mostly Coveraged
70445 Mostly Coveraged
70447 Mostly Coveraged
70448 Full Coveraged
70451 Full Coveraged
70452 Mostly Coveraged
70454 Mostly Coveraged
70455 Mostly Coveraged
70457 Mostly Coveraged
70458 Full Coveraged
70459 Full Coveraged
70460 Full Coveraged
70461 Full Coveraged
70462 Mostly Coveraged
70463 Full Coveraged
70466 Full Coveraged
70469 Full Coveraged
70470 Full Coveraged
70471 Full Coveraged
70501 Full Coveraged
70502 Full Coveraged
70503 Full Coveraged
70504 Full Coveraged
70505 Full Coveraged
70506 Full Coveraged
70507 Full Coveraged
70508 Full Coveraged
70509 Full Coveraged
70511 Mostly Coveraged
70512 Full Coveraged
70513 Mostly Coveraged
70514 Full Coveraged
70517 Mostly Coveraged
70518 Mostly Coveraged
70519 Full Coveraged
70520 Full Coveraged
70521 Mostly Coveraged
70522 Full Coveraged
70523 Mostly Coveraged
70526 Full Coveraged
70527 Full Coveraged
70529 Full Coveraged
70531 Mostly Coveraged
70534 Full Coveraged
70538 Mostly Coveraged
70540 Full Coveraged
70541 Full Coveraged
70544 Mostly Coveraged
70550 Full Coveraged
70551 Full Coveraged
70552 Mostly Coveraged
70555 Full Coveraged
70558 Full Coveraged
70559 Mostly Coveraged
70560 Mostly Coveraged
70562 Full Coveraged
70563 Full Coveraged
70569 Full Coveraged
70570 Full Coveraged
70571 Full Coveraged
70578 Full Coveraged
70583 Full Coveraged
70584 Full Coveraged
70589 Mostly Coveraged
70592 Full Coveraged
70596 Full Coveraged
70598 Full Coveraged
70601 Mostly Coveraged
70602 Mostly Coveraged
70605 Full Coveraged
70606 Full Coveraged
70609 Mostly Coveraged
70611 Mostly Coveraged
70612 Mostly Coveraged
70615 Full Coveraged
70616 Full Coveraged
70629 Mostly Coveraged
70630 Mostly Coveraged
70647 Full Coveraged
70659 Mostly Coveraged
70663 Full Coveraged
70664 Full Coveraged
70665 Mostly Coveraged
70669 Full Coveraged
70704 Full Coveraged
70707 Full Coveraged
70710 Mostly Coveraged
70711 Full Coveraged
70714 Full Coveraged
70718 Full Coveraged
70719 Mostly Coveraged
70721 Mostly Coveraged
70723 Mostly Coveraged
70725 Full Coveraged
70726 Full Coveraged
70727 Full Coveraged
70728 Full Coveraged
70729 Full Coveraged
70733 Full Coveraged
70734 Mostly Coveraged
70736 Full Coveraged
70737 Full Coveraged
70738 Full Coveraged
70739 Full Coveraged
70743 Mostly Coveraged
70744 Mostly Coveraged
70749 Mostly Coveraged
70754 Mostly Coveraged
70763 Mostly Coveraged
70765 Mostly Coveraged
70767 Mostly Coveraged
70769 Full Coveraged
70773 Mostly Coveraged
70774 Mostly Coveraged
70776 Full Coveraged
70778 Mostly Coveraged
70780 Full Coveraged
70786 Mostly Coveraged
70788 Mostly Coveraged
70791 Full Coveraged
70792 Mostly Coveraged
70801 Full Coveraged
70802 Full Coveraged
70803 Full Coveraged
70804 Full Coveraged
70805 Full Coveraged
70806 Full Coveraged
70807 Full Coveraged
70808 Full Coveraged
70809 Full Coveraged
70810 Full Coveraged
70811 Full Coveraged
70812 Full Coveraged
70813 Full Coveraged
70814 Full Coveraged
70815 Full Coveraged
70816 Full Coveraged
70817 Full Coveraged
70818 Mostly Coveraged
70819 Full Coveraged
70820 Full Coveraged
70821 Full Coveraged
70822 Full Coveraged
70823 Full Coveraged
70825 Full Coveraged
70826 Full Coveraged
70827 Full Coveraged
70831 Full Coveraged
70833 Full Coveraged
70835 Full Coveraged
70836 Full Coveraged
70837 Full Coveraged
70874 Full Coveraged
70879 Full Coveraged
70883 Full Coveraged
70884 Full Coveraged
70892 Full Coveraged
70893 Full Coveraged
70894 Full Coveraged
70895 Full Coveraged
70896 Full Coveraged
70898 Full Coveraged
71007 Full Coveraged
71009 Mostly Coveraged
71023 Mostly Coveraged
71033 Full Coveraged
71037 Full Coveraged
71047 Mostly Coveraged
71067 Full Coveraged
71101 Full Coveraged
71102 Full Coveraged
71103 Full Coveraged
71104 Full Coveraged
71105 Full Coveraged
71106 Mostly Coveraged
71107 Mostly Coveraged
71108 Full Coveraged
71109 Full Coveraged
71110 Full Coveraged
71111 Full Coveraged
71112 Mostly Coveraged
71113 Full Coveraged
71118 Mostly Coveraged
71119 Full Coveraged
71120 Full Coveraged
71129 Full Coveraged
71130 Full Coveraged
71133 Full Coveraged
71134 Full Coveraged
71135 Full Coveraged
71136 Full Coveraged
71137 Full Coveraged
71138 Full Coveraged
71148 Full Coveraged
71149 Full Coveraged
71151 Full Coveraged
71152 Full Coveraged
71153 Full Coveraged
71154 Full Coveraged
71156 Full Coveraged
71161 Full Coveraged
71162 Full Coveraged
71163 Full Coveraged
71164 Full Coveraged
71165 Full Coveraged
71166 Full Coveraged
71171 Full Coveraged
71172 Full Coveraged
71201 Full Coveraged
71202 Mostly Coveraged
71207 Full Coveraged
71208 Full Coveraged
71209 Mostly Coveraged
71210 Full Coveraged
71211 Mostly Coveraged
71212 Mostly Coveraged
71213 Mostly Coveraged
71220 Full Coveraged
71221 Full Coveraged
71225 Mostly Coveraged
71229 Mostly Coveraged
71233 Full Coveraged
71235 Mostly Coveraged
71240 Mostly Coveraged
71245 Full Coveraged
71270 Full Coveraged
71272 Full Coveraged
71273 Full Coveraged
71275 Mostly Coveraged
71280 Mostly Coveraged
71281 Mostly Coveraged
71291 Full Coveraged
71292 Full Coveraged
71294 Full Coveraged
71301 Full Coveraged
71302 Full Coveraged
71303 Mostly Coveraged
71306 Full Coveraged
71307 Full Coveraged
71309 Full Coveraged
71315 Full Coveraged
71346 Mostly Coveraged
71348 Full Coveraged
71359 Full Coveraged
71360 Full Coveraged
71361 Full Coveraged
71373 Mostly Coveraged
71405 Full Coveraged
71446 Mostly Coveraged
71459 Full Coveraged
71461 Full Coveraged
71477 Full Coveraged
71496 Full Coveraged
71601 Full Coveraged
71602 Full Coveraged
71603 Full Coveraged
71611 Full Coveraged
71612 Full Coveraged
71613 Full Coveraged
71724 Mostly Coveraged
71730 Full Coveraged
71731 Full Coveraged
71751 Mostly Coveraged
71759 Full Coveraged
71762 Full Coveraged
71801 Full Coveraged
71802 Full Coveraged
71835 Mostly Coveraged
71837 Mostly Coveraged
71839 Mostly Coveraged
71840 Full Coveraged
71854 Full Coveraged
71901 Full Coveraged
71902 Full Coveraged
71903 Full Coveraged
71909 Mostly Coveraged
71910 Mostly Coveraged
71913 Full Coveraged
71914 Full Coveraged
71929 Full Coveraged
71956 Mostly Coveraged
71964 Mostly Coveraged
72002 Mostly Coveraged
72003 Mostly Coveraged
72015 Full Coveraged
72016 Mostly Coveraged
72018 Full Coveraged
72022 Mostly Coveraged
72023 Mostly Coveraged
72032 Full Coveraged
72033 Full Coveraged
72034 Full Coveraged
72035 Full Coveraged
72047 Mostly Coveraged
72052 Full Coveraged
72053 Full Coveraged
72058 Mostly Coveraged
72063 Mostly Coveraged
72068 Full Coveraged
72070 Full Coveraged
72073 Mostly Coveraged
72076 Full Coveraged
72078 Full Coveraged
72079 Full Coveraged
72081 Mostly Coveraged
72082 Full Coveraged
72085 Mostly Coveraged
72089 Mostly Coveraged
72099 Full Coveraged
72102 Full Coveraged
72103 Mostly Coveraged
72106 Full Coveraged
72107 Mostly Coveraged
72110 Full Coveraged
72113 Full Coveraged
72114 Full Coveraged
72115 Full Coveraged
72116 Full Coveraged
72117 Full Coveraged
72118 Full Coveraged
Zip Code Coverage Level Zip Code Coverage Level Zip Code Coverage Level Zip Code Coverage Level Zip Code Coverage Level Zip Code Coverage Level
Page 81

- 181 -
72119 Full Coveraged
72120 Full Coveraged
72124 Full Coveraged
72125 Mostly Coveraged
72127 Mostly Coveraged
72132 Full Coveraged
72135 Mostly Coveraged
72142 Mostly Coveraged
72143 Full Coveraged
72145 Full Coveraged
72149 Full Coveraged
72152 Full Coveraged
72156 Mostly Coveraged
72160 Mostly Coveraged
72164 Full Coveraged
72167 Full Coveraged
72170 Full Coveraged
72173 Mostly Coveraged
72178 Mostly Coveraged
72180 Mostly Coveraged
72181 Mostly Coveraged
72182 Mostly Coveraged
72183 Mostly Coveraged
72190 Full Coveraged
72198 Full Coveraged
72199 Mostly Coveraged
72201 Full Coveraged
72202 Full Coveraged
72203 Full Coveraged
72204 Full Coveraged
72205 Full Coveraged
72206 Full Coveraged
72207 Full Coveraged
72209 Full Coveraged
72210 Full Coveraged
72211 Full Coveraged
72212 Full Coveraged
72214 Full Coveraged
72215 Full Coveraged
72216 Full Coveraged
72217 Full Coveraged
72219 Full Coveraged
72221 Full Coveraged
72222 Full Coveraged
72223 Full Coveraged
72225 Full Coveraged
72227 Full Coveraged
72231 Full Coveraged
72260 Full Coveraged
72295 Full Coveraged
72301 Mostly Coveraged
72303 Mostly Coveraged
72329 Full Coveraged
72350 Mostly Coveraged
72364 Mostly Coveraged
72395 Full Coveraged
72401 Full Coveraged
72402 Full Coveraged
72403 Full Coveraged
72404 Full Coveraged
72411 Mostly Coveraged
72416 Mostly Coveraged
72439 Full Coveraged
72623 Mostly Coveraged
72626 Mostly Coveraged
72635 Full Coveraged
72642 Mostly Coveraged
72651 Full Coveraged
72653 Full Coveraged
72654 Full Coveraged
72701 Mostly Coveraged
72702 Full Coveraged
72703 Full Coveraged
72704 Full Coveraged
72711 Mostly Coveraged
72712 Full Coveraged
72714 Full Coveraged
72715 Mostly Coveraged
72716 Full Coveraged
72718 Full Coveraged
72719 Full Coveraged
72728 Full Coveraged
72730 Full Coveraged
72735 Mostly Coveraged
72737 Full Coveraged
72739 Mostly Coveraged
72741 Full Coveraged
72745 Full Coveraged
72751 Mostly Coveraged
72753 Mostly Coveraged
72756 Mostly Coveraged
72757 Full Coveraged
72758 Full Coveraged
72762 Full Coveraged
72764 Full Coveraged
72765 Full Coveraged
72766 Full Coveraged
72770 Full Coveraged
72774 Mostly Coveraged
72801 Mostly Coveraged
72811 Mostly Coveraged
72812 Mostly Coveraged
72829 Full Coveraged
72834 Full Coveraged
72835 Full Coveraged
72845 Mostly Coveraged
72847 Mostly Coveraged
72901 Full Coveraged
72902 Full Coveraged
72903 Full Coveraged
72904 Full Coveraged
72905 Mostly Coveraged
72906 Full Coveraged
72908 Full Coveraged
72913 Full Coveraged
72914 Full Coveraged
72916 Full Coveraged
72917 Full Coveraged
72918 Full Coveraged
72919 Full Coveraged
72921 Mostly Coveraged
72923 Full Coveraged
72932 Mostly Coveraged
72936 Mostly Coveraged
72937 Full Coveraged
72940 Mostly Coveraged
72945 Mostly Coveraged
72952 Mostly Coveraged
72956 Full Coveraged
72957 Full Coveraged
73003 Full Coveraged
73007 Mostly Coveraged
73008 Full Coveraged
73010 Full Coveraged
73013 Full Coveraged
73019 Full Coveraged
73020 Full Coveraged
73022 Full Coveraged
73026 Mostly Coveraged
73027 Mostly Coveraged
73030 Full Coveraged
73031 Mostly Coveraged
73032 Full Coveraged
73034 Full Coveraged
73036 Full Coveraged
73044 Full Coveraged
73045 Full Coveraged
73049 Mostly Coveraged
73050 Mostly Coveraged
73058 Mostly Coveraged
73063 Mostly Coveraged
73065 Full Coveraged
73066 Full Coveraged
73069 Full Coveraged
73070 Full Coveraged
73071 Full Coveraged
73072 Full Coveraged
73075 Full Coveraged
73077 Full Coveraged
73078 Mostly Coveraged
73083 Full Coveraged
73084 Mostly Coveraged
73086 Mostly Coveraged
73093 Full Coveraged
73097 Mostly Coveraged
73098 Full Coveraged
73099 Mostly Coveraged
73101 Full Coveraged
73102 Full Coveraged
73103 Full Coveraged
73104 Full Coveraged
73105 Full Coveraged
73106 Full Coveraged
73107 Full Coveraged
73108 Full Coveraged
73109 Full Coveraged
73110 Full Coveraged
73111 Full Coveraged
73112 Full Coveraged
73113 Full Coveraged
73114 Full Coveraged
73115 Full Coveraged
73116 Full Coveraged
73117 Full Coveraged
73118 Full Coveraged
73119 Full Coveraged
73120 Full Coveraged
73121 Full Coveraged
73122 Full Coveraged
73123 Full Coveraged
73124 Full Coveraged
73125 Full Coveraged
73126 Full Coveraged
73127 Mostly Coveraged
73128 Mostly Coveraged
73129 Full Coveraged
73130 Full Coveraged
73131 Full Coveraged
73132 Full Coveraged
73134 Full Coveraged
73135 Full Coveraged
73136 Full Coveraged
73137 Full Coveraged
73139 Full Coveraged
73140 Mostly Coveraged
73141 Full Coveraged
73142 Full Coveraged
73143 Full Coveraged
73144 Full Coveraged
73145 Full Coveraged
73146 Full Coveraged
73147 Full Coveraged
73148 Full Coveraged
73149 Full Coveraged
73150 Full Coveraged
73151 Full Coveraged
73152 Full Coveraged
73153 Full Coveraged
73154 Full Coveraged
73155 Full Coveraged
73156 Full Coveraged
73157 Full Coveraged
73159 Full Coveraged
73160 Full Coveraged
73162 Full Coveraged
73164 Full Coveraged
73165 Mostly Coveraged
73167 Full Coveraged
73169 Mostly Coveraged
73170 Full Coveraged
73172 Full Coveraged
73173 Mostly Coveraged
73178 Full Coveraged
73179 Mostly Coveraged
73184 Full Coveraged
73185 Full Coveraged
73189 Full Coveraged
73190 Full Coveraged
73194 Full Coveraged
73195 Full Coveraged
73196 Full Coveraged
73198 Full Coveraged
73301 Full Coveraged
73344 Full Coveraged
73401 Full Coveraged
73402 Full Coveraged
73403 Full Coveraged
73436 Mostly Coveraged
73453 Mostly Coveraged
73458 Full Coveraged
73501 Mostly Coveraged
73502 Full Coveraged
73503 Full Coveraged
73505 Full Coveraged
73506 Full Coveraged
73527 Mostly Coveraged
73540 Mostly Coveraged
73543 Mostly Coveraged
73557 Mostly Coveraged
73646 Full Coveraged
73658 Mostly Coveraged
73701 Full Coveraged
73702 Full Coveraged
73703 Full Coveraged
73705 Mostly Coveraged
73706 Full Coveraged
73724 Mostly Coveraged
73727 Mostly Coveraged
73734 Full Coveraged
73742 Mostly Coveraged
73743 Mostly Coveraged
73750 Full Coveraged
73753 Full Coveraged
73754 Mostly Coveraged
73756 Mostly Coveraged
73762 Mostly Coveraged
73772 Mostly Coveraged
74003 Mostly Coveraged
74004 Full Coveraged
74005 Full Coveraged
74006 Full Coveraged
74008 Mostly Coveraged
74010 Mostly Coveraged
74011 Mostly Coveraged
74012 Full Coveraged
74013 Mostly Coveraged
74014 Full Coveraged
74015 Full Coveraged
74017 Full Coveraged
74018 Full Coveraged
74019 Full Coveraged
74020 Mostly Coveraged
74028 Mostly Coveraged
74029 Full Coveraged
74030 Mostly Coveraged
74031 Mostly Coveraged
74032 Mostly Coveraged
74033 Full Coveraged
74035 Full Coveraged
74036 Mostly Coveraged
74037 Full Coveraged
74041 Mostly Coveraged
74046 Mostly Coveraged
74047 Mostly Coveraged
74050 Full Coveraged
74051 Mostly Coveraged
74054 Full Coveraged
74055 Full Coveraged
74059 Mostly Coveraged
74060 Mostly Coveraged
74062 Mostly Coveraged
74063 Full Coveraged
74067 Mostly Coveraged
74068 Mostly Coveraged
74073 Mostly Coveraged
74074 Full Coveraged
74075 Full Coveraged
74076 Full Coveraged
74077 Full Coveraged
74078 Full Coveraged
74081 Mostly Coveraged
74101 Full Coveraged
74102 Full Coveraged
74103 Full Coveraged
74104 Full Coveraged
74105 Full Coveraged
74106 Full Coveraged
74107 Full Coveraged
74108 Full Coveraged
74110 Full Coveraged
74112 Full Coveraged
74114 Full Coveraged
74115 Full Coveraged
74116 Full Coveraged
74117 Mostly Coveraged
74119 Full Coveraged
74120 Full Coveraged
74121 Full Coveraged
74126 Full Coveraged
74127 Full Coveraged
74128 Full Coveraged
74129 Full Coveraged
74130 Full Coveraged
74131 Full Coveraged
74132 Full Coveraged
74133 Full Coveraged
74134 Full Coveraged
74135 Full Coveraged
74136 Full Coveraged
74137 Full Coveraged
74141 Full Coveraged
74145 Full Coveraged
74146 Full Coveraged
74147 Full Coveraged
74148 Full Coveraged
74149 Full Coveraged
74150 Full Coveraged
74152 Full Coveraged
74153 Full Coveraged
74155 Full Coveraged
74156 Full Coveraged
74157 Full Coveraged
74158 Full Coveraged
74159 Full Coveraged
74169 Full Coveraged
74170 Full Coveraged
74171 Full Coveraged
74172 Full Coveraged
74182 Full Coveraged
74183 Full Coveraged
74184 Full Coveraged
74186 Full Coveraged
74187 Full Coveraged
74189 Full Coveraged
74192 Full Coveraged
74193 Full Coveraged
74194 Full Coveraged
74301 Mostly Coveraged
74331 Mostly Coveraged
74340 Full Coveraged
74342 Mostly Coveraged
74349 Full Coveraged
74350 Full Coveraged
74363 Mostly Coveraged
74366 Full Coveraged
74367 Full Coveraged
74421 Full Coveraged
74425 Mostly Coveraged
74429 Full Coveraged
74430 Mostly Coveraged
74442 Mostly Coveraged
74445 Mostly Coveraged
74447 Full Coveraged
74454 Mostly Coveraged
74456 Full Coveraged
74458 Full Coveraged
74501 Mostly Coveraged
74502 Full Coveraged
74522 Full Coveraged
74546 Mostly Coveraged
74554 Full Coveraged
74561 Mostly Coveraged
74565 Mostly Coveraged
74601 Full Coveraged
74602 Full Coveraged
74631 Mostly Coveraged
74644 Mostly Coveraged
74801 Full Coveraged
74802 Full Coveraged
74804 Mostly Coveraged
74820 Mostly Coveraged
74821 Mostly Coveraged
74842 Full Coveraged
74843 Full Coveraged
74851 Full Coveraged
74855 Mostly Coveraged
74857 Full Coveraged
74865 Full Coveraged
74872 Mostly Coveraged
74873 Mostly Coveraged
74901 Mostly Coveraged
74902 Full Coveraged
74932 Mostly Coveraged
74946 Full Coveraged
74954 Mostly Coveraged
75001 Full Coveraged
75002 Full Coveraged
75006 Full Coveraged
75007 Full Coveraged
75009 Mostly Coveraged
75010 Full Coveraged
75011 Full Coveraged
75013 Full Coveraged
75014 Full Coveraged
75015 Full Coveraged
75016 Full Coveraged
75017 Full Coveraged
75019 Full Coveraged
75020 Full Coveraged
75021 Mostly Coveraged
75022 Full Coveraged
75023 Full Coveraged
75024 Full Coveraged
75025 Full Coveraged
75026 Full Coveraged
75027 Full Coveraged
75028 Full Coveraged
75029 Full Coveraged
75030 Full Coveraged
75032 Full Coveraged
75034 Full Coveraged
75035 Full Coveraged
75037 Full Coveraged
75038 Full Coveraged
75039 Full Coveraged
75040 Full Coveraged
75041 Full Coveraged
75042 Full Coveraged
75043 Full Coveraged
75044 Full Coveraged
75045 Full Coveraged
75046 Full Coveraged
75047 Full Coveraged
75048 Full Coveraged
75049 Full Coveraged
75050 Full Coveraged
75051 Full Coveraged
75052 Full Coveraged
75053 Full Coveraged
75054 Full Coveraged
75056 Full Coveraged
75057 Full Coveraged
75058 Mostly Coveraged
75060 Full Coveraged
75061 Full Coveraged
75062 Full Coveraged
75063 Full Coveraged
75065 Full Coveraged
75067 Full Coveraged
75068 Full Coveraged
75069 Full Coveraged
75070 Full Coveraged
75071 Full Coveraged
75074 Full Coveraged
75075 Full Coveraged
75077 Full Coveraged
75078 Mostly Coveraged
75080 Full Coveraged
75081 Full Coveraged
75082 Full Coveraged
75083 Full Coveraged
75085 Full Coveraged
75086 Full Coveraged
75087 Full Coveraged
75088 Full Coveraged
75089 Full Coveraged
75090 Full Coveraged
75091 Full Coveraged
75092 Full Coveraged
75093 Full Coveraged
75094 Full Coveraged
75097 Full Coveraged
75098 Mostly Coveraged
75099 Full Coveraged
Zip Code Coverage Level Zip Code Coverage Level Zip Code Coverage Level Zip Code Coverage Level Zip Code Coverage Level Zip Code Coverage Level
Page 82

- 182 -
75101 Full Coveraged
75102 Mostly Coveraged
75104 Full Coveraged
75106 Full Coveraged
75109 Mostly Coveraged
75110 Full Coveraged
75115 Full Coveraged
75116 Full Coveraged
75118 Full Coveraged
75119 Mostly Coveraged
75120 Mostly Coveraged
75123 Full Coveraged
75126 Mostly Coveraged
75132 Full Coveraged
75134 Full Coveraged
75137 Full Coveraged
75138 Mostly Coveraged
75141 Full Coveraged
75146 Full Coveraged
75149 Full Coveraged
75150 Full Coveraged
75151 Full Coveraged
75152 Full Coveraged
75153 Mostly Coveraged
75154 Mostly Coveraged
75155 Mostly Coveraged
75159 Mostly Coveraged
75160 Full Coveraged
75161 Full Coveraged
75165 Full Coveraged
75166 Mostly Coveraged
75167 Mostly Coveraged
75168 Full Coveraged
75172 Full Coveraged
75173 Mostly Coveraged
75180 Full Coveraged
75181 Full Coveraged
75182 Full Coveraged
75185 Full Coveraged
75187 Full Coveraged
75189 Mostly Coveraged
75201 Full Coveraged
75202 Full Coveraged
75203 Full Coveraged
75204 Full Coveraged
75205 Full Coveraged
75206 Full Coveraged
75207 Full Coveraged
75208 Full Coveraged
75209 Full Coveraged
75210 Full Coveraged
75211 Full Coveraged
75212 Full Coveraged
75214 Full Coveraged
75215 Full Coveraged
75216 Full Coveraged
75217 Full Coveraged
75218 Full Coveraged
75219 Full Coveraged
75220 Full Coveraged
75221 Full Coveraged
75222 Full Coveraged
75223 Full Coveraged
75224 Full Coveraged
75225 Full Coveraged
75226 Full Coveraged
75227 Full Coveraged
75228 Full Coveraged
75229 Full Coveraged
75230 Full Coveraged
75231 Full Coveraged
75232 Full Coveraged
75233 Full Coveraged
75234 Full Coveraged
75235 Full Coveraged
75236 Full Coveraged
75237 Full Coveraged
75238 Full Coveraged
75240 Full Coveraged
75241 Full Coveraged
75242 Full Coveraged
75243 Full Coveraged
75244 Full Coveraged
75245 Full Coveraged
75246 Full Coveraged
75247 Full Coveraged
75248 Full Coveraged
75249 Full Coveraged
75250 Full Coveraged
75251 Full Coveraged
75252 Full Coveraged
75253 Full Coveraged
75254 Full Coveraged
75258 Full Coveraged
75260 Full Coveraged
75261 Full Coveraged
75262 Full Coveraged
75263 Full Coveraged
75264 Full Coveraged
75265 Full Coveraged
75266 Full Coveraged
75267 Full Coveraged
75270 Full Coveraged
75275 Full Coveraged
75277 Full Coveraged
75283 Full Coveraged
75284 Full Coveraged
75285 Full Coveraged
75286 Full Coveraged
75287 Full Coveraged
75301 Full Coveraged
75303 Full Coveraged
75310 Full Coveraged
75312 Full Coveraged
75313 Full Coveraged
75315 Full Coveraged
75320 Full Coveraged
75323 Full Coveraged
75326 Full Coveraged
75336 Full Coveraged
75339 Full Coveraged
75342 Full Coveraged
75353 Full Coveraged
75354 Full Coveraged
75355 Full Coveraged
75356 Full Coveraged
75357 Full Coveraged
75359 Full Coveraged
75360 Full Coveraged
75363 Full Coveraged
75364 Full Coveraged
75367 Full Coveraged
75368 Full Coveraged
75369 Full Coveraged
75370 Full Coveraged
75371 Full Coveraged
75372 Full Coveraged
75373 Full Coveraged
75374 Full Coveraged
75376 Full Coveraged
75378 Full Coveraged
75379 Full Coveraged
75380 Full Coveraged
75381 Full Coveraged
75382 Full Coveraged
75386 Full Coveraged
75387 Full Coveraged
75388 Full Coveraged
75389 Full Coveraged
75390 Full Coveraged
75391 Full Coveraged
75392 Full Coveraged
75393 Full Coveraged
75394 Full Coveraged
75395 Full Coveraged
75396 Full Coveraged
75397 Full Coveraged
75398 Full Coveraged
75401 Full Coveraged
75402 Full Coveraged
75403 Full Coveraged
75404 Full Coveraged
75407 Mostly Coveraged
75409 Full Coveraged
75414 Mostly Coveraged
75420 Mostly Coveraged
75422 Mostly Coveraged
75423 Mostly Coveraged
75428 Mostly Coveraged
75429 Mostly Coveraged
75437 Mostly Coveraged
75454 Full Coveraged
75455 Full Coveraged
75456 Full Coveraged
75459 Full Coveraged
75471 Mostly Coveraged
75474 Mostly Coveraged
75482 Full Coveraged
75483 Full Coveraged
75485 Mostly Coveraged
75487 Mostly Coveraged
75489 Full Coveraged
75491 Mostly Coveraged
75493 Full Coveraged
75495 Full Coveraged
75496 Mostly Coveraged
75501 Full Coveraged
75503 Full Coveraged
75504 Full Coveraged
75505 Full Coveraged
75507 Full Coveraged
75558 Mostly Coveraged
75561 Mostly Coveraged
75567 Full Coveraged
75569 Full Coveraged
75570 Full Coveraged
75573 Mostly Coveraged
75574 Mostly Coveraged
75599 Full Coveraged
75601 Full Coveraged
75602 Mostly Coveraged
75603 Full Coveraged
75604 Full Coveraged
75605 Mostly Coveraged
75606 Full Coveraged
75607 Full Coveraged
75608 Full Coveraged
75615 Full Coveraged
75636 Full Coveraged
75638 Full Coveraged
75647 Mostly Coveraged
75650 Full Coveraged
75651 Mostly Coveraged
75656 Mostly Coveraged
75659 Mostly Coveraged
75660 Mostly Coveraged
75662 Full Coveraged
75663 Full Coveraged
75666 Mostly Coveraged
75668 Full Coveraged
75670 Full Coveraged
75671 Full Coveraged
75685 Mostly Coveraged
75693 Full Coveraged
75694 Mostly Coveraged
75701 Full Coveraged
75702 Full Coveraged
75703 Mostly Coveraged
75704 Mostly Coveraged
75705 Mostly Coveraged
75706 Mostly Coveraged
75707 Full Coveraged
75708 Full Coveraged
75709 Mostly Coveraged
75710 Full Coveraged
75711 Full Coveraged
75712 Full Coveraged
75713 Full Coveraged
75791 Mostly Coveraged
75798 Full Coveraged
75799 Full Coveraged
75901 Full Coveraged
75902 Full Coveraged
75903 Full Coveraged
75904 Full Coveraged
75915 Full Coveraged
75941 Mostly Coveraged
75962 Full Coveraged
75963 Full Coveraged
75964 Full Coveraged
75965 Full Coveraged
75969 Mostly Coveraged
76001 Full Coveraged
76002 Full Coveraged
76003 Full Coveraged
76004 Full Coveraged
76005 Full Coveraged
76006 Full Coveraged
76007 Full Coveraged
76008 Full Coveraged
76009 Mostly Coveraged
76010 Full Coveraged
76011 Full Coveraged
76012 Full Coveraged
76013 Full Coveraged
76014 Full Coveraged
76015 Full Coveraged
76016 Full Coveraged
76017 Full Coveraged
76018 Full Coveraged
76019 Full Coveraged
76021 Full Coveraged
76022 Full Coveraged
76023 Mostly Coveraged
76028 Full Coveraged
76031 Full Coveraged
76033 Mostly Coveraged
76034 Full Coveraged
76036 Full Coveraged
76039 Full Coveraged
76040 Full Coveraged
76041 Mostly Coveraged
76044 Mostly Coveraged
76048 Full Coveraged
76049 Mostly Coveraged
76051 Full Coveraged
76052 Full Coveraged
76053 Full Coveraged
76054 Full Coveraged
76055 Mostly Coveraged
76058 Full Coveraged
76059 Full Coveraged
76060 Full Coveraged
76061 Full Coveraged
76063 Full Coveraged
76065 Full Coveraged
76067 Full Coveraged
76068 Full Coveraged
76071 Mostly Coveraged
76073 Mostly Coveraged
76078 Full Coveraged
76084 Mostly Coveraged
76085 Mostly Coveraged
76086 Full Coveraged
76087 Full Coveraged
76088 Mostly Coveraged
76092 Full Coveraged
76093 Mostly Coveraged
76094 Full Coveraged
76095 Full Coveraged
76096 Full Coveraged
76097 Full Coveraged
76099 Full Coveraged
76101 Full Coveraged
76102 Full Coveraged
76103 Full Coveraged
76104 Full Coveraged
76105 Full Coveraged
76106 Full Coveraged
76107 Full Coveraged
76108 Full Coveraged
76109 Full Coveraged
76110 Full Coveraged
76111 Full Coveraged
76112 Full Coveraged
76113 Full Coveraged
76114 Full Coveraged
76115 Full Coveraged
76116 Full Coveraged
76117 Full Coveraged
76118 Full Coveraged
76119 Full Coveraged
76120 Full Coveraged
76121 Full Coveraged
76122 Full Coveraged
76123 Full Coveraged
76124 Full Coveraged
76126 Full Coveraged
76127 Full Coveraged
76129 Full Coveraged
76130 Full Coveraged
76131 Full Coveraged
76132 Full Coveraged
76133 Full Coveraged
76134 Full Coveraged
76135 Mostly Coveraged
76136 Full Coveraged
76137 Full Coveraged
76140 Full Coveraged
76147 Full Coveraged
76148 Full Coveraged
76155 Full Coveraged
76161 Full Coveraged
76162 Full Coveraged
76163 Full Coveraged
76164 Full Coveraged
76177 Full Coveraged
76179 Full Coveraged
76180 Full Coveraged
76181 Full Coveraged
76182 Full Coveraged
76185 Full Coveraged
76191 Full Coveraged
76192 Mostly Coveraged
76193 Full Coveraged
76195 Full Coveraged
76196 Full Coveraged
76197 Full Coveraged
76198 Full Coveraged
76199 Full Coveraged
76201 Full Coveraged
76202 Full Coveraged
76203 Full Coveraged
76204 Full Coveraged
76205 Full Coveraged
76206 Full Coveraged
76207 Full Coveraged
76208 Full Coveraged
76209 Full Coveraged
76210 Full Coveraged
76226 Full Coveraged
76227 Mostly Coveraged
76234 Mostly Coveraged
76240 Full Coveraged
76241 Full Coveraged
76244 Full Coveraged
76247 Mostly Coveraged
76248 Full Coveraged
76249 Mostly Coveraged
76250 Mostly Coveraged
76259 Mostly Coveraged
76262 Full Coveraged
76266 Mostly Coveraged
76268 Mostly Coveraged
76272 Mostly Coveraged
76299 Full Coveraged
76301 Full Coveraged
76302 Full Coveraged
76305 Mostly Coveraged
76306 Full Coveraged
76307 Full Coveraged
76308 Full Coveraged
76309 Full Coveraged
76310 Full Coveraged
76311 Full Coveraged
76360 Full Coveraged
76364 Mostly Coveraged
76439 Mostly Coveraged
76467 Mostly Coveraged
76476 Full Coveraged
76484 Mostly Coveraged
76485 Mostly Coveraged
76501 Full Coveraged
76502 Full Coveraged
76503 Full Coveraged
76504 Full Coveraged
76505 Full Coveraged
76508 Full Coveraged
76513 Mostly Coveraged
76533 Full Coveraged
76537 Full Coveraged
76539 Full Coveraged
76540 Full Coveraged
76541 Full Coveraged
76542 Full Coveraged
76543 Full Coveraged
76544 Mostly Coveraged
76547 Full Coveraged
76548 Full Coveraged
76549 Full Coveraged
76550 Full Coveraged
76554 Full Coveraged
76559 Mostly Coveraged
76564 Full Coveraged
76569 Mostly Coveraged
76573 Mostly Coveraged
76579 Mostly Coveraged
76621 Mostly Coveraged
76623 Mostly Coveraged
76628 Full Coveraged
76631 Full Coveraged
76640 Mostly Coveraged
76643 Full Coveraged
76645 Full Coveraged
76655 Mostly Coveraged
76666 Mostly Coveraged
76670 Mostly Coveraged
76679 Mostly Coveraged
76684 Mostly Coveraged
76701 Full Coveraged
76702 Full Coveraged
76703 Full Coveraged
76704 Full Coveraged
76705 Full Coveraged
76706 Full Coveraged
76707 Full Coveraged
76708 Full Coveraged
76710 Full Coveraged
76711 Full Coveraged
76712 Mostly Coveraged
76714 Full Coveraged
76715 Full Coveraged
76716 Full Coveraged
76795 Full Coveraged
76797 Full Coveraged
76798 Full Coveraged
76799 Full Coveraged
76886 Mostly Coveraged
76901 Mostly Coveraged
76902 Full Coveraged
76903 Full Coveraged
76904 Full Coveraged
76905 Mostly Coveraged
76906 Full Coveraged
76908 Full Coveraged
76909 Full Coveraged
76939 Mostly Coveraged
77001 Full Coveraged
77002 Full Coveraged
77003 Full Coveraged
77004 Full Coveraged
77005 Full Coveraged
77006 Full Coveraged
77007 Full Coveraged
77008 Full Coveraged
77009 Full Coveraged
77010 Full Coveraged
77011 Full Coveraged
77012 Full Coveraged
77013 Full Coveraged
77014 Full Coveraged
77015 Full Coveraged
77016 Full Coveraged
77017 Full Coveraged
77018 Full Coveraged
77019 Full Coveraged
77020 Full Coveraged
77021 Full Coveraged
77022 Full Coveraged
77023 Full Coveraged
77024 Full Coveraged
77025 Full Coveraged
77026 Full Coveraged
77027 Full Coveraged
Zip Code Coverage Level Zip Code Coverage Level Zip Code Coverage Level Zip Code Coverage Level Zip Code Coverage Level Zip Code Coverage Level
Page 83

- 183 -
77028 Full Coveraged
77029 Full Coveraged
77030 Full Coveraged
77031 Full Coveraged
77032 Full Coveraged
77033 Full Coveraged
77034 Full Coveraged
77035 Full Coveraged
77036 Full Coveraged
77037 Full Coveraged
77038 Full Coveraged
77039 Full Coveraged
77040 Full Coveraged
77041 Full Coveraged
77042 Full Coveraged
77043 Full Coveraged
77044 Full Coveraged
77045 Full Coveraged
77046 Full Coveraged
77047 Full Coveraged
77048 Full Coveraged
77049 Full Coveraged
77050 Full Coveraged
77051 Full Coveraged
77052 Full Coveraged
77053 Full Coveraged
77054 Full Coveraged
77055 Full Coveraged
77056 Full Coveraged
77057 Full Coveraged
77058 Full Coveraged
77059 Full Coveraged
77060 Full Coveraged
77061 Full Coveraged
77062 Full Coveraged
77063 Full Coveraged
77064 Full Coveraged
77065 Full Coveraged
77066 Full Coveraged
77067 Full Coveraged
77068 Full Coveraged
77069 Full Coveraged
77070 Full Coveraged
77071 Full Coveraged
77072 Full Coveraged
77073 Full Coveraged
77074 Full Coveraged
77075 Full Coveraged
77076 Full Coveraged
77077 Mostly Coveraged
77078 Full Coveraged
77079 Mostly Coveraged
77080 Full Coveraged
77081 Full Coveraged
77082 Mostly Coveraged
77083 Mostly Coveraged
77084 Mostly Coveraged
77085 Full Coveraged
77086 Full Coveraged
77087 Full Coveraged
77088 Full Coveraged
77089 Full Coveraged
77090 Full Coveraged
77091 Full Coveraged
77092 Full Coveraged
77093 Full Coveraged
77094 Mostly Coveraged
77095 Full Coveraged
77096 Full Coveraged
77097 Full Coveraged
77098 Full Coveraged
77099 Full Coveraged
77201 Full Coveraged
77202 Full Coveraged
77203 Full Coveraged
77204 Full Coveraged
77205 Full Coveraged
77206 Full Coveraged
77207 Full Coveraged
77208 Full Coveraged
77209 Full Coveraged
77210 Full Coveraged
77212 Full Coveraged
77213 Full Coveraged
77215 Full Coveraged
77216 Full Coveraged
77217 Full Coveraged
77218 Mostly Coveraged
77219 Full Coveraged
77220 Full Coveraged
77221 Full Coveraged
77222 Full Coveraged
77223 Full Coveraged
77224 Mostly Coveraged
77225 Full Coveraged
77226 Full Coveraged
77227 Full Coveraged
77228 Full Coveraged
77229 Full Coveraged
77230 Full Coveraged
77231 Full Coveraged
77233 Full Coveraged
77234 Full Coveraged
77235 Full Coveraged
77236 Full Coveraged
77237 Full Coveraged
77238 Full Coveraged
77240 Full Coveraged
77241 Full Coveraged
77242 Full Coveraged
77243 Full Coveraged
77244 Full Coveraged
77245 Full Coveraged
77248 Full Coveraged
77249 Full Coveraged
77251 Full Coveraged
77252 Full Coveraged
77253 Full Coveraged
77254 Full Coveraged
77255 Full Coveraged
77256 Full Coveraged
77257 Full Coveraged
77258 Full Coveraged
77259 Full Coveraged
77261 Full Coveraged
77262 Full Coveraged
77263 Full Coveraged
77265 Full Coveraged
77266 Full Coveraged
77267 Full Coveraged
77268 Full Coveraged
77269 Full Coveraged
77270 Full Coveraged
77271 Full Coveraged
77272 Full Coveraged
77273 Full Coveraged
77274 Full Coveraged
77275 Full Coveraged
77277 Full Coveraged
77279 Mostly Coveraged
77280 Full Coveraged
77281 Full Coveraged
77282 Mostly Coveraged
77284 Full Coveraged
77287 Full Coveraged
77288 Full Coveraged
77289 Full Coveraged
77290 Full Coveraged
77291 Full Coveraged
77292 Full Coveraged
77293 Full Coveraged
77297 Full Coveraged
77298 Full Coveraged
77299 Full Coveraged
77301 Full Coveraged
77302 Full Coveraged
77303 Mostly Coveraged
77304 Full Coveraged
77305 Full Coveraged
77306 Mostly Coveraged
77315 Full Coveraged
77316 Mostly Coveraged
77318 Full Coveraged
77320 Mostly Coveraged
77325 Full Coveraged
77326 Mostly Coveraged
77328 Mostly Coveraged
77334 Full Coveraged
77335 Full Coveraged
77336 Mostly Coveraged
77338 Full Coveraged
77339 Full Coveraged
77340 Full Coveraged
77341 Full Coveraged
77342 Full Coveraged
77345 Full Coveraged
77346 Full Coveraged
77347 Full Coveraged
77348 Full Coveraged
77350 Mostly Coveraged
77351 Mostly Coveraged
77353 Mostly Coveraged
77354 Mostly Coveraged
77355 Full Coveraged
77357 Mostly Coveraged
77358 Mostly Coveraged
77362 Full Coveraged
77365 Full Coveraged
77367 Mostly Coveraged
77372 Full Coveraged
77373 Full Coveraged
77375 Mostly Coveraged
77377 Full Coveraged
77378 Mostly Coveraged
77379 Full Coveraged
77380 Full Coveraged
77381 Full Coveraged
77382 Full Coveraged
77383 Full Coveraged
77384 Full Coveraged
77385 Full Coveraged
77386 Full Coveraged
77387 Full Coveraged
77388 Full Coveraged
77389 Full Coveraged
77391 Full Coveraged
77393 Full Coveraged
77396 Full Coveraged
77401 Full Coveraged
77402 Full Coveraged
77404 Full Coveraged
77406 Full Coveraged
77410 Full Coveraged
77411 Full Coveraged
77413 Full Coveraged
77415 Mostly Coveraged
77417 Mostly Coveraged
77418 Mostly Coveraged
77420 Full Coveraged
77422 Full Coveraged
77423 Mostly Coveraged
77426 Mostly Coveraged
77429 Full Coveraged
77433 Mostly Coveraged
77441 Mostly Coveraged
77443 Mostly Coveraged
77445 Full Coveraged
77446 Mostly Coveraged
77447 Full Coveraged
77448 Mostly Coveraged
77449 Full Coveraged
77450 Full Coveraged
77452 Full Coveraged
77453 Full Coveraged
77456 Mostly Coveraged
77459 Full Coveraged
77463 Mostly Coveraged
77464 Mostly Coveraged
77466 Mostly Coveraged
77467 Mostly Coveraged
77468 Mostly Coveraged
77469 Full Coveraged
77471 Full Coveraged
77477 Full Coveraged
77478 Full Coveraged
77479 Full Coveraged
77480 Mostly Coveraged
77481 Full Coveraged
77482 Full Coveraged
77483 Mostly Coveraged
77484 Mostly Coveraged
77486 Mostly Coveraged
77487 Full Coveraged
77488 Full Coveraged
77489 Full Coveraged
77491 Full Coveraged
77492 Full Coveraged
77493 Full Coveraged
77494 Full Coveraged
77496 Full Coveraged
77497 Full Coveraged
77501 Full Coveraged
77502 Full Coveraged
77503 Full Coveraged
77504 Full Coveraged
77505 Full Coveraged
77506 Full Coveraged
77507 Full Coveraged
77508 Full Coveraged
77510 Mostly Coveraged
77511 Full Coveraged
77512 Full Coveraged
77515 Mostly Coveraged
77516 Mostly Coveraged
77517 Full Coveraged
77518 Full Coveraged
77520 Mostly Coveraged
77521 Full Coveraged
77522 Full Coveraged
77530 Full Coveraged
77531 Full Coveraged
77532 Mostly Coveraged
77533 Mostly Coveraged
77534 Mostly Coveraged
77535 Mostly Coveraged
77536 Full Coveraged
77538 Mostly Coveraged
77539 Full Coveraged
77541 Full Coveraged
77542 Full Coveraged
77545 Full Coveraged
77546 Full Coveraged
77547 Full Coveraged
77549 Full Coveraged
77550 Full Coveraged
77551 Full Coveraged
77552 Full Coveraged
77553 Full Coveraged
77554 Full Coveraged
77555 Full Coveraged
77560 Mostly Coveraged
77561 Mostly Coveraged
77562 Full Coveraged
77563 Mostly Coveraged
77564 Mostly Coveraged
77565 Full Coveraged
77566 Mostly Coveraged
77568 Full Coveraged
77571 Full Coveraged
77572 Full Coveraged
77573 Full Coveraged
77574 Full Coveraged
77575 Full Coveraged
77577 Mostly Coveraged
77578 Mostly Coveraged
77580 Mostly Coveraged
77581 Full Coveraged
77582 Full Coveraged
77583 Full Coveraged
77584 Full Coveraged
77586 Full Coveraged
77587 Full Coveraged
77588 Full Coveraged
77590 Mostly Coveraged
77591 Full Coveraged
77592 Full Coveraged
77597 Full Coveraged
77598 Full Coveraged
77611 Mostly Coveraged
77613 Full Coveraged
77614 Mostly Coveraged
77615 Mostly Coveraged
77619 Full Coveraged
77626 Full Coveraged
77627 Full Coveraged
77629 Full Coveraged
77630 Full Coveraged
77631 Full Coveraged
77632 Full Coveraged
77639 Full Coveraged
77641 Full Coveraged
77642 Full Coveraged
77643 Full Coveraged
77651 Full Coveraged
77656 Full Coveraged
77657 Full Coveraged
77659 Mostly Coveraged
77662 Full Coveraged
77670 Full Coveraged
77701 Full Coveraged
77702 Full Coveraged
77703 Full Coveraged
77704 Full Coveraged
77705 Mostly Coveraged
77706 Full Coveraged
77707 Full Coveraged
77708 Full Coveraged
77710 Full Coveraged
77713 Full Coveraged
77720 Full Coveraged
77725 Full Coveraged
77726 Full Coveraged
77801 Full Coveraged
77802 Full Coveraged
77803 Full Coveraged
77805 Full Coveraged
77806 Full Coveraged
77807 Full Coveraged
77808 Mostly Coveraged
77830 Mostly Coveraged
77833 Full Coveraged
77834 Full Coveraged
77840 Full Coveraged
77841 Full Coveraged
77842 Full Coveraged
77843 Full Coveraged
77844 Full Coveraged
77845 Full Coveraged
77862 Mostly Coveraged
77866 Mostly Coveraged
77868 Full Coveraged
77878 Mostly Coveraged
77880 Mostly Coveraged
77881 Full Coveraged
77901 Full Coveraged
77902 Full Coveraged
77903 Full Coveraged
77904 Mostly Coveraged
77905 Full Coveraged
77951 Mostly Coveraged
77968 Mostly Coveraged
77977 Mostly Coveraged
77988 Full Coveraged
78002 Mostly Coveraged
78012 Mostly Coveraged
78015 Mostly Coveraged
78023 Mostly Coveraged
78028 Full Coveraged
78029 Full Coveraged
78040 Full Coveraged
78042 Full Coveraged
78044 Full Coveraged
78045 Mostly Coveraged
78046 Mostly Coveraged
78049 Full Coveraged
78050 Full Coveraged
78054 Full Coveraged
78064 Full Coveraged
78108 Mostly Coveraged
78109 Full Coveraged
78115 Mostly Coveraged
78122 Mostly Coveraged
78123 Mostly Coveraged
78124 Mostly Coveraged
78130 Full Coveraged
78131 Full Coveraged
78132 Full Coveraged
78135 Full Coveraged
78140 Mostly Coveraged
78148 Full Coveraged
78150 Full Coveraged
78154 Full Coveraged
78155 Full Coveraged
78156 Mostly Coveraged
78163 Mostly Coveraged
78201 Full Coveraged
78202 Full Coveraged
78203 Full Coveraged
78204 Full Coveraged
78205 Full Coveraged
78206 Full Coveraged
78207 Full Coveraged
78208 Full Coveraged
78209 Full Coveraged
78210 Full Coveraged
78211 Full Coveraged
78212 Full Coveraged
78213 Full Coveraged
78214 Full Coveraged
78215 Full Coveraged
78216 Full Coveraged
78217 Full Coveraged
78218 Full Coveraged
78219 Full Coveraged
78220 Full Coveraged
78221 Mostly Coveraged
78222 Mostly Coveraged
78223 Mostly Coveraged
78224 Mostly Coveraged
78225 Full Coveraged
78226 Full Coveraged
78227 Full Coveraged
78228 Full Coveraged
78229 Full Coveraged
78230 Full Coveraged
78231 Full Coveraged
78232 Full Coveraged
78233 Full Coveraged
78234 Full Coveraged
78235 Full Coveraged
78236 Full Coveraged
78237 Full Coveraged
78238 Full Coveraged
78239 Full Coveraged
78240 Full Coveraged
78242 Mostly Coveraged
78243 Full Coveraged
78244 Full Coveraged
78245 Full Coveraged
78246 Full Coveraged
78247 Full Coveraged
78248 Full Coveraged
78249 Full Coveraged
78250 Full Coveraged
78251 Full Coveraged
78252 Full Coveraged
78253 Full Coveraged
78254 Full Coveraged
78255 Full Coveraged
78256 Full Coveraged
78257 Full Coveraged
78258 Full Coveraged
78259 Full Coveraged
78260 Mostly Coveraged
78261 Full Coveraged
78265 Full Coveraged
78266 Full Coveraged
78268 Full Coveraged
78269 Full Coveraged
78270 Full Coveraged
78275 Full Coveraged
78278 Full Coveraged
78279 Full Coveraged
78280 Full Coveraged
78283 Full Coveraged
78284 Full Coveraged
78285 Full Coveraged
78286 Full Coveraged
78287 Full Coveraged
78288 Full Coveraged
78289 Full Coveraged
78291 Full Coveraged
78292 Full Coveraged
78293 Full Coveraged
Zip Code Coverage Level Zip Code Coverage Level Zip Code Coverage Level Zip Code Coverage Level Zip Code Coverage Level Zip Code Coverage Level
Page 84

- 184 -
78294 Full Coveraged
78295 Full Coveraged
78296 Full Coveraged
78297 Full Coveraged
78298 Full Coveraged
78299 Full Coveraged
78332 Full Coveraged
78333 Full Coveraged
78342 Full Coveraged
78347 Mostly Coveraged
78359 Mostly Coveraged
78363 Mostly Coveraged
78364 Full Coveraged
78370 Full Coveraged
78374 Mostly Coveraged
78379 Mostly Coveraged
78401 Full Coveraged
78402 Full Coveraged
78403 Full Coveraged
78404 Full Coveraged
78405 Full Coveraged
78406 Full Coveraged
78407 Full Coveraged
78408 Full Coveraged
78409 Full Coveraged
78410 Full Coveraged
78411 Full Coveraged
78412 Full Coveraged
78413 Full Coveraged
78414 Full Coveraged
78415 Full Coveraged
78416 Full Coveraged
78417 Full Coveraged
78418 Mostly Coveraged
78419 Full Coveraged
78426 Full Coveraged
78427 Full Coveraged
78460 Full Coveraged
78463 Full Coveraged
78465 Full Coveraged
78466 Full Coveraged
78467 Full Coveraged
78468 Full Coveraged
78469 Full Coveraged
78470 Full Coveraged
78471 Full Coveraged
78472 Full Coveraged
78473 Full Coveraged
78474 Full Coveraged
78475 Full Coveraged
78476 Full Coveraged
78477 Full Coveraged
78478 Full Coveraged
78480 Full Coveraged
78501 Full Coveraged
78502 Full Coveraged
78503 Full Coveraged
78504 Full Coveraged
78505 Full Coveraged
78516 Full Coveraged
78520 Full Coveraged
78521 Full Coveraged
78522 Full Coveraged
78523 Full Coveraged
78526 Full Coveraged
78535 Full Coveraged
78537 Mostly Coveraged
78538 Full Coveraged
78539 Full Coveraged
78540 Full Coveraged
78541 Mostly Coveraged
78543 Full Coveraged
78547 Full Coveraged
78550 Full Coveraged
78551 Full Coveraged
78552 Full Coveraged
78553 Full Coveraged
78557 Mostly Coveraged
78558 Mostly Coveraged
78559 Full Coveraged
78560 Full Coveraged
78561 Mostly Coveraged
78562 Full Coveraged
78565 Mostly Coveraged
78566 Full Coveraged
78567 Full Coveraged
78568 Full Coveraged
78569 Full Coveraged
78570 Full Coveraged
78572 Full Coveraged
78573 Full Coveraged
78574 Mostly Coveraged
78575 Full Coveraged
78576 Full Coveraged
78577 Full Coveraged
78578 Mostly Coveraged
78579 Mostly Coveraged
78580 Full Coveraged
78582 Mostly Coveraged
78583 Mostly Coveraged
78586 Full Coveraged
78589 Full Coveraged
78592 Mostly Coveraged
78593 Full Coveraged
78594 Full Coveraged
78595 Mostly Coveraged
78596 Full Coveraged
78599 Full Coveraged
78602 Full Coveraged
78610 Full Coveraged
78612 Full Coveraged
78613 Full Coveraged
78617 Full Coveraged
78619 Full Coveraged
78620 Mostly Coveraged
78626 Full Coveraged
78627 Full Coveraged
78628 Full Coveraged
78630 Full Coveraged
78634 Full Coveraged
78640 Full Coveraged
78641 Full Coveraged
78645 Full Coveraged
78646 Full Coveraged
78651 Full Coveraged
78652 Full Coveraged
78653 Mostly Coveraged
78656 Mostly Coveraged
78660 Full Coveraged
78662 Mostly Coveraged
78664 Full Coveraged
78666 Full Coveraged
78667 Full Coveraged
78673 Full Coveraged
78674 Full Coveraged
78680 Full Coveraged
78681 Full Coveraged
78682 Full Coveraged
78683 Full Coveraged
78691 Full Coveraged
78701 Full Coveraged
78702 Full Coveraged
78703 Full Coveraged
78704 Full Coveraged
78705 Full Coveraged
78708 Full Coveraged
78709 Full Coveraged
78710 Full Coveraged
78711 Full Coveraged
78712 Full Coveraged
78713 Full Coveraged
78714 Full Coveraged
78715 Full Coveraged
78716 Full Coveraged
78717 Full Coveraged
78718 Full Coveraged
78719 Full Coveraged
78720 Full Coveraged
78721 Full Coveraged
78722 Full Coveraged
78723 Full Coveraged
78724 Full Coveraged
78725 Full Coveraged
78726 Full Coveraged
78727 Full Coveraged
78728 Full Coveraged
78729 Full Coveraged
78730 Full Coveraged
78731 Full Coveraged
78732 Full Coveraged
78733 Full Coveraged
78734 Mostly Coveraged
78735 Full Coveraged
78736 Full Coveraged
78737 Full Coveraged
78738 Mostly Coveraged
78739 Mostly Coveraged
78741 Full Coveraged
78742 Full Coveraged
78744 Full Coveraged
78745 Full Coveraged
78746 Full Coveraged
78747 Full Coveraged
78748 Full Coveraged
78749 Full Coveraged
78750 Full Coveraged
78751 Full Coveraged
78752 Full Coveraged
78753 Full Coveraged
78754 Full Coveraged
78755 Full Coveraged
78756 Full Coveraged
78757 Full Coveraged
78758 Full Coveraged
78759 Full Coveraged
78760 Full Coveraged
78761 Full Coveraged
78762 Full Coveraged
78763 Full Coveraged
78764 Full Coveraged
78765 Full Coveraged
78766 Full Coveraged
78767 Full Coveraged
78768 Full Coveraged
78769 Full Coveraged
78772 Full Coveraged
78773 Full Coveraged
78774 Full Coveraged
78778 Full Coveraged
78779 Full Coveraged
78780 Full Coveraged
78781 Full Coveraged
78783 Full Coveraged
78785 Full Coveraged
78786 Full Coveraged
78788 Full Coveraged
78789 Full Coveraged
78799 Full Coveraged
78841 Full Coveraged
78842 Full Coveraged
78843 Full Coveraged
78847 Full Coveraged
78931 Full Coveraged
78944 Mostly Coveraged
79016 Full Coveraged
79052 Mostly Coveraged
79068 Mostly Coveraged
79072 Full Coveraged
79073 Full Coveraged
79101 Full Coveraged
79102 Full Coveraged
79103 Full Coveraged
79104 Full Coveraged
79105 Full Coveraged
79106 Full Coveraged
79107 Full Coveraged
79109 Full Coveraged
79110 Full Coveraged
79111 Full Coveraged
79114 Full Coveraged
79116 Full Coveraged
79117 Full Coveraged
79118 Full Coveraged
79119 Mostly Coveraged
79120 Full Coveraged
79121 Full Coveraged
79123 Full Coveraged
79159 Full Coveraged
79165 Full Coveraged
79166 Full Coveraged
79168 Full Coveraged
79170 Full Coveraged
79171 Full Coveraged
79172 Full Coveraged
79174 Full Coveraged
79175 Full Coveraged
79178 Full Coveraged
79180 Full Coveraged
79181 Full Coveraged
79184 Full Coveraged
79185 Full Coveraged
79186 Full Coveraged
79187 Full Coveraged
79221 Mostly Coveraged
79356 Mostly Coveraged
79364 Mostly Coveraged
79366 Full Coveraged
79401 Full Coveraged
79402 Full Coveraged
79403 Mostly Coveraged
79404 Full Coveraged
79406 Full Coveraged
79408 Full Coveraged
79409 Full Coveraged
79410 Full Coveraged
79411 Full Coveraged
79412 Full Coveraged
79413 Full Coveraged
79414 Mostly Coveraged
79415 Mostly Coveraged
79423 Full Coveraged
79430 Mostly Coveraged
79452 Full Coveraged
79453 Full Coveraged
79457 Full Coveraged
79464 Mostly Coveraged
79490 Mostly Coveraged
79491 Full Coveraged
79493 Full Coveraged
79499 Mostly Coveraged
79508 Mostly Coveraged
79516 Mostly Coveraged
79525 Mostly Coveraged
79527 Mostly Coveraged
79530 Mostly Coveraged
79537 Full Coveraged
79541 Mostly Coveraged
79550 Full Coveraged
79556 Mostly Coveraged
79563 Mostly Coveraged
79601 Full Coveraged
79602 Full Coveraged
79604 Full Coveraged
79605 Full Coveraged
79606 Mostly Coveraged
79607 Mostly Coveraged
79608 Full Coveraged
79697 Full Coveraged
79698 Full Coveraged
79699 Full Coveraged
79701 Full Coveraged
79702 Full Coveraged
79703 Mostly Coveraged
79704 Full Coveraged
79705 Full Coveraged
79706 Mostly Coveraged
79708 Full Coveraged
79710 Full Coveraged
79712 Full Coveraged
79720 Full Coveraged
79721 Full Coveraged
79733 Full Coveraged
79760 Full Coveraged
79761 Mostly Coveraged
79762 Mostly Coveraged
79763 Full Coveraged
79764 Full Coveraged
79765 Mostly Coveraged
79766 Mostly Coveraged
79768 Mostly Coveraged
79769 Full Coveraged
79776 Mostly Coveraged
79821 Mostly Coveraged
79835 Mostly Coveraged
79901 Full Coveraged
79902 Full Coveraged
79903 Full Coveraged
79904 Full Coveraged
79905 Full Coveraged
79906 Full Coveraged
79907 Full Coveraged
79908 Full Coveraged
79910 Full Coveraged
79911 Full Coveraged
79912 Full Coveraged
79913 Full Coveraged
79914 Full Coveraged
79915 Full Coveraged
79917 Full Coveraged
79918 Full Coveraged
79920 Full Coveraged
79922 Full Coveraged
79923 Full Coveraged
79924 Full Coveraged
79925 Full Coveraged
79926 Full Coveraged
79927 Full Coveraged
79929 Full Coveraged
79930 Full Coveraged
79931 Full Coveraged
79932 Full Coveraged
79934 Mostly Coveraged
79935 Full Coveraged
79936 Full Coveraged
79937 Full Coveraged
79940 Full Coveraged
79941 Full Coveraged
79942 Full Coveraged
79943 Full Coveraged
79944 Full Coveraged
79945 Full Coveraged
79946 Full Coveraged
79947 Full Coveraged
79948 Full Coveraged
79949 Full Coveraged
79950 Full Coveraged
79951 Full Coveraged
79952 Full Coveraged
79953 Full Coveraged
79954 Full Coveraged
79955 Full Coveraged
79958 Full Coveraged
79960 Full Coveraged
79961 Full Coveraged
79966 Full Coveraged
79968 Full Coveraged
79973 Full Coveraged
79974 Full Coveraged
79975 Full Coveraged
79976 Full Coveraged
79977 Full Coveraged
79978 Full Coveraged
79980 Full Coveraged
79995 Full Coveraged
79996 Full Coveraged
79997 Full Coveraged
79998 Full Coveraged
79999 Full Coveraged
80001 Full Coveraged
80002 Full Coveraged
80003 Full Coveraged
80004 Full Coveraged
80005 Full Coveraged
80006 Full Coveraged
80007 Full Coveraged
80010 Full Coveraged
80011 Full Coveraged
80012 Full Coveraged
80013 Full Coveraged
80014 Full Coveraged
80015 Full Coveraged
80016 Mostly Coveraged
80017 Full Coveraged
80018 Mostly Coveraged
80019 Full Coveraged
80020 Full Coveraged
80021 Full Coveraged
80022 Full Coveraged
80024 Full Coveraged
80025 Full Coveraged
80026 Full Coveraged
80027 Full Coveraged
80028 Full Coveraged
80030 Full Coveraged
80031 Full Coveraged
80033 Full Coveraged
80034 Full Coveraged
80035 Full Coveraged
80036 Full Coveraged
80037 Full Coveraged
80038 Full Coveraged
80040 Full Coveraged
80041 Full Coveraged
80042 Full Coveraged
80044 Full Coveraged
80045 Full Coveraged
80046 Full Coveraged
80047 Full Coveraged
80104 Full Coveraged
80108 Full Coveraged
80109 Full Coveraged
80110 Full Coveraged
80111 Full Coveraged
80112 Full Coveraged
80113 Full Coveraged
80116 Mostly Coveraged
80120 Mostly Coveraged
80121 Full Coveraged
80122 Full Coveraged
80123 Mostly Coveraged
80124 Full Coveraged
80126 Full Coveraged
80127 Full Coveraged
80129 Mostly Coveraged
80130 Full Coveraged
80131 Mostly Coveraged
80132 Full Coveraged
80133 Mostly Coveraged
80134 Full Coveraged
80137 Full Coveraged
80150 Full Coveraged
80151 Full Coveraged
80155 Full Coveraged
80160 Mostly Coveraged
80161 Full Coveraged
80162 Mostly Coveraged
80163 Full Coveraged
80165 Mostly Coveraged
80166 Full Coveraged
80201 Full Coveraged
80202 Full Coveraged
80203 Full Coveraged
80204 Full Coveraged
80205 Full Coveraged
80206 Full Coveraged
80207 Full Coveraged
80208 Full Coveraged
80209 Full Coveraged
80210 Full Coveraged
80211 Full Coveraged
80212 Full Coveraged
80214 Full Coveraged
80215 Full Coveraged
80216 Full Coveraged
80217 Full Coveraged
80218 Full Coveraged
80219 Full Coveraged
80220 Full Coveraged
80221 Full Coveraged
80222 Full Coveraged
80223 Full Coveraged
80224 Full Coveraged
80225 Full Coveraged
80226 Full Coveraged
80227 Mostly Coveraged
80228 Full Coveraged
80229 Full Coveraged
80230 Full Coveraged
80231 Full Coveraged
80232 Full Coveraged
80233 Full Coveraged
80234 Full Coveraged
80235 Mostly Coveraged
80236 Full Coveraged
Zip Code Coverage Level Zip Code Coverage Level Zip Code Coverage Level Zip Code Coverage Level Zip Code Coverage Level Zip Code Coverage Level
Page 85

- 185 -
80237 Full Coveraged
80238 Full Coveraged
80239 Full Coveraged
80241 Full Coveraged
80243 Full Coveraged
80244 Full Coveraged
80246 Full Coveraged
80247 Full Coveraged
80248 Full Coveraged
80249 Full Coveraged
80250 Full Coveraged
80251 Full Coveraged
80252 Full Coveraged
80255 Full Coveraged
80256 Full Coveraged
80257 Full Coveraged
80259 Full Coveraged
80260 Full Coveraged
80261 Full Coveraged
80262 Full Coveraged
80263 Full Coveraged
80264 Full Coveraged
80265 Full Coveraged
80266 Full Coveraged
80270 Full Coveraged
80271 Full Coveraged
80273 Full Coveraged
80274 Full Coveraged
80275 Full Coveraged
80279 Full Coveraged
80280 Full Coveraged
80281 Full Coveraged
80285 Full Coveraged
80290 Full Coveraged
80291 Full Coveraged
80292 Full Coveraged
80293 Full Coveraged
80294 Full Coveraged
80295 Full Coveraged
80299 Full Coveraged
80301 Full Coveraged
80302 Full Coveraged
80303 Full Coveraged
80304 Full Coveraged
80305 Full Coveraged
80306 Full Coveraged
80307 Full Coveraged
80308 Full Coveraged
80309 Full Coveraged
80310 Full Coveraged
80314 Full Coveraged
80321 Full Coveraged
80322 Full Coveraged
80323 Full Coveraged
80328 Full Coveraged
80329 Full Coveraged
80401 Full Coveraged
80402 Full Coveraged
80403 Full Coveraged
80419 Full Coveraged
80422 Full Coveraged
80424 Mostly Coveraged
80425 Mostly Coveraged
80427 Full Coveraged
80433 Full Coveraged
80435 Full Coveraged
80436 Full Coveraged
80437 Mostly Coveraged
80439 Mostly Coveraged
80443 Mostly Coveraged
80453 Full Coveraged
80454 Full Coveraged
80455 Full Coveraged
80457 Full Coveraged
80465 Full Coveraged
80470 Mostly Coveraged
80471 Mostly Coveraged
80474 Mostly Coveraged
80477 Full Coveraged
80481 Mostly Coveraged
80487 Full Coveraged
80488 Full Coveraged
80497 Full Coveraged
80501 Full Coveraged
80502 Full Coveraged
80503 Mostly Coveraged
80504 Full Coveraged
80513 Full Coveraged
80514 Full Coveraged
80515 Mostly Coveraged
80516 Full Coveraged
80520 Full Coveraged
80521 Full Coveraged
80522 Mostly Coveraged
80523 Full Coveraged
80525 Mostly Coveraged
80526 Full Coveraged
80527 Full Coveraged
80530 Full Coveraged
80533 Mostly Coveraged
80534 Mostly Coveraged
80537 Mostly Coveraged
80538 Full Coveraged
80539 Mostly Coveraged
80540 Mostly Coveraged
80541 Mostly Coveraged
80542 Full Coveraged
80543 Mostly Coveraged
80544 Full Coveraged
80551 Mostly Coveraged
80553 Mostly Coveraged
80601 Mostly Coveraged
80602 Full Coveraged
80603 Mostly Coveraged
80614 Full Coveraged
80615 Mostly Coveraged
80620 Full Coveraged
80621 Full Coveraged
80622 Mostly Coveraged
80623 Full Coveraged
80631 Full Coveraged
80632 Full Coveraged
80633 Full Coveraged
80634 Full Coveraged
80638 Full Coveraged
80639 Full Coveraged
80640 Full Coveraged
80645 Mostly Coveraged
80646 Full Coveraged
80651 Mostly Coveraged
80701 Full Coveraged
80705 Full Coveraged
80722 Mostly Coveraged
80751 Full Coveraged
80809 Mostly Coveraged
80819 Mostly Coveraged
80829 Full Coveraged
80840 Full Coveraged
80841 Full Coveraged
80901 Full Coveraged
80903 Full Coveraged
80904 Full Coveraged
80905 Full Coveraged
80906 Full Coveraged
80907 Full Coveraged
80908 Full Coveraged
80909 Full Coveraged
80910 Full Coveraged
80911 Mostly Coveraged
80913 Mostly Coveraged
80914 Full Coveraged
80915 Mostly Coveraged
80916 Full Coveraged
80917 Full Coveraged
80918 Full Coveraged
80919 Full Coveraged
80920 Full Coveraged
80921 Mostly Coveraged
80922 Mostly Coveraged
80926 Full Coveraged
80931 Mostly Coveraged
80932 Full Coveraged
80933 Full Coveraged
80934 Full Coveraged
80935 Full Coveraged
80936 Full Coveraged
80937 Full Coveraged
80940 Full Coveraged
80941 Full Coveraged
80942 Full Coveraged
80943 Full Coveraged
80944 Full Coveraged
80945 Full Coveraged
80946 Full Coveraged
80947 Full Coveraged
80949 Full Coveraged
80950 Full Coveraged
80960 Full Coveraged
80962 Full Coveraged
80970 Full Coveraged
80977 Mostly Coveraged
80995 Full Coveraged
81001 Full Coveraged
81002 Full Coveraged
81003 Full Coveraged
81006 Mostly Coveraged
81008 Full Coveraged
81009 Full Coveraged
81010 Full Coveraged
81011 Full Coveraged
81012 Full Coveraged
81101 Full Coveraged
81102 Full Coveraged
81220 Mostly Coveraged
81302 Full Coveraged
81303 Mostly Coveraged
81501 Full Coveraged
81502 Full Coveraged
81503 Full Coveraged
81504 Full Coveraged
81505 Mostly Coveraged
81506 Full Coveraged
81520 Mostly Coveraged
81601 Full Coveraged
81602 Full Coveraged
81611 Full Coveraged
81612 Full Coveraged
81615 Mostly Coveraged
81620 Full Coveraged
81645 Full Coveraged
81649 Full Coveraged
81655 Full Coveraged
81656 Mostly Coveraged
81657 Full Coveraged
81658 Full Coveraged
82001 Full Coveraged
82003 Full Coveraged
82005 Mostly Coveraged
82006 Mostly Coveraged
82007 Mostly Coveraged
82008 Full Coveraged
82602 Full Coveraged
82605 Mostly Coveraged
82609 Full Coveraged
82615 Mostly Coveraged
82644 Mostly Coveraged
83303 Full Coveraged
83328 Full Coveraged
83341 Mostly Coveraged
83403 Full Coveraged
83404 Full Coveraged
83405 Full Coveraged
83406 Full Coveraged
83415 Full Coveraged
83427 Mostly Coveraged
83454 Full Coveraged
83701 Full Coveraged
83702 Full Coveraged
83703 Full Coveraged
83704 Mostly Coveraged
83705 Full Coveraged
83706 Full Coveraged
83707 Full Coveraged
83708 Full Coveraged
83709 Mostly Coveraged
83711 Mostly Coveraged
83712 Full Coveraged
83714 Mostly Coveraged
83715 Full Coveraged
83716 Mostly Coveraged
83717 Full Coveraged
83719 Full Coveraged
83720 Full Coveraged
83721 Full Coveraged
83722 Full Coveraged
83723 Full Coveraged
83724 Full Coveraged
83725 Full Coveraged
83726 Full Coveraged
83727 Full Coveraged
83728 Full Coveraged
83729 Full Coveraged
83730 Full Coveraged
83731 Full Coveraged
83732 Full Coveraged
83733 Full Coveraged
83735 Full Coveraged
83744 Mostly Coveraged
83756 Full Coveraged
83799 Mostly Coveraged
83814 Full Coveraged
83815 Full Coveraged
83816 Full Coveraged
83832 Full Coveraged
83833 Mostly Coveraged
83843 Full Coveraged
83844 Full Coveraged
83877 Mostly Coveraged
84003 Mostly Coveraged
84006 Mostly Coveraged
84011 Mostly Coveraged
84013 Mostly Coveraged
84014 Mostly Coveraged
84015 Full Coveraged
84016 Full Coveraged
84024 Mostly Coveraged
84025 Full Coveraged
84033 Mostly Coveraged
84037 Full Coveraged
84040 Full Coveraged
84041 Full Coveraged
84042 Mostly Coveraged
84043 Full Coveraged
84044 Mostly Coveraged
84056 Full Coveraged
84057 Full Coveraged
84058 Full Coveraged
84059 Full Coveraged
84062 Mostly Coveraged
84067 Full Coveraged
84075 Full Coveraged
84087 Mostly Coveraged
84089 Full Coveraged
84097 Full Coveraged
84098 Mostly Coveraged
84128 Mostly Coveraged
84201 Full Coveraged
84244 Mostly Coveraged
84301 Mostly Coveraged
84302 Full Coveraged
84314 Mostly Coveraged
84315 Full Coveraged
84318 Full Coveraged
84319 Mostly Coveraged
84321 Mostly Coveraged
84322 Full Coveraged
84323 Full Coveraged
84324 Full Coveraged
84326 Full Coveraged
84328 Mostly Coveraged
84332 Full Coveraged
84333 Mostly Coveraged
84335 Mostly Coveraged
84339 Mostly Coveraged
84340 Mostly Coveraged
84341 Full Coveraged
84401 Full Coveraged
84402 Full Coveraged
84403 Full Coveraged
84404 Full Coveraged
84405 Full Coveraged
84407 Full Coveraged
84408 Full Coveraged
84409 Full Coveraged
84412 Full Coveraged
84414 Mostly Coveraged
84415 Full Coveraged
84601 Full Coveraged
84602 Full Coveraged
84603 Full Coveraged
84604 Full Coveraged
84605 Full Coveraged
84606 Full Coveraged
84660 Mostly Coveraged
84663 Full Coveraged
84664 Mostly Coveraged
84765 Mostly Coveraged
84771 Full Coveraged
84780 Full Coveraged
84790 Full Coveraged
84791 Full Coveraged
85001 Full Coveraged
85002 Full Coveraged
85003 Full Coveraged
85004 Full Coveraged
85005 Full Coveraged
85006 Full Coveraged
85007 Full Coveraged
85008 Full Coveraged
85009 Full Coveraged
85010 Full Coveraged
85011 Full Coveraged
85012 Full Coveraged
85013 Full Coveraged
85014 Full Coveraged
85015 Full Coveraged
85016 Full Coveraged
85017 Full Coveraged
85018 Full Coveraged
85019 Full Coveraged
85020 Full Coveraged
85021 Full Coveraged
85022 Full Coveraged
85023 Full Coveraged
85024 Full Coveraged
85025 Full Coveraged
85026 Full Coveraged
85027 Full Coveraged
85028 Full Coveraged
85029 Full Coveraged
85030 Full Coveraged
85031 Full Coveraged
85032 Full Coveraged
85033 Mostly Coveraged
85034 Full Coveraged
85035 Mostly Coveraged
85036 Full Coveraged
85037 Full Coveraged
85038 Full Coveraged
85040 Full Coveraged
85041 Full Coveraged
85042 Full Coveraged
85043 Mostly Coveraged
85044 Full Coveraged
85045 Mostly Coveraged
85046 Full Coveraged
85048 Full Coveraged
85050 Full Coveraged
85051 Full Coveraged
85053 Full Coveraged
85054 Full Coveraged
85055 Full Coveraged
85060 Full Coveraged
85061 Full Coveraged
85062 Full Coveraged
85063 Full Coveraged
85064 Mostly Coveraged
85065 Full Coveraged
85066 Full Coveraged
85067 Full Coveraged
85068 Full Coveraged
85069 Full Coveraged
85070 Full Coveraged
85071 Full Coveraged
85072 Full Coveraged
85073 Full Coveraged
85074 Full Coveraged
85075 Mostly Coveraged
85076 Full Coveraged
85078 Full Coveraged
85079 Full Coveraged
85080 Full Coveraged
85082 Full Coveraged
85085 Full Coveraged
85086 Mostly Coveraged
85098 Full Coveraged
85099 Full Coveraged
85201 Full Coveraged
85202 Full Coveraged
85203 Full Coveraged
85204 Full Coveraged
85205 Full Coveraged
85206 Full Coveraged
85207 Full Coveraged
85208 Full Coveraged
85210 Full Coveraged
85211 Full Coveraged
85212 Full Coveraged
85213 Full Coveraged
85214 Full Coveraged
85215 Full Coveraged
85216 Full Coveraged
85217 Full Coveraged
85219 Full Coveraged
85220 Full Coveraged
85221 Full Coveraged
85223 Mostly Coveraged
85224 Full Coveraged
85225 Full Coveraged
85226 Full Coveraged
85228 Mostly Coveraged
85230 Mostly Coveraged
85233 Full Coveraged
85234 Full Coveraged
85236 Mostly Coveraged
85244 Full Coveraged
85245 Mostly Coveraged
85246 Full Coveraged
85247 Full Coveraged
85248 Full Coveraged
85249 Full Coveraged
85250 Full Coveraged
85251 Full Coveraged
85252 Full Coveraged
85253 Full Coveraged
85254 Full Coveraged
85255 Mostly Coveraged
85256 Mostly Coveraged
85257 Full Coveraged
85258 Full Coveraged
85259 Full Coveraged
85260 Full Coveraged
85261 Full Coveraged
85266 Full Coveraged
85267 Full Coveraged
85268 Mostly Coveraged
85271 Full Coveraged
85274 Full Coveraged
85275 Full Coveraged
85277 Full Coveraged
85278 Full Coveraged
85280 Full Coveraged
85281 Full Coveraged
85282 Full Coveraged
85283 Full Coveraged
85284 Full Coveraged
85285 Full Coveraged
85287 Full Coveraged
85296 Full Coveraged
85297 Mostly Coveraged
85299 Full Coveraged
85301 Full Coveraged
85302 Full Coveraged
85303 Full Coveraged
85304 Full Coveraged
85305 Full Coveraged
85306 Full Coveraged
85307 Full Coveraged
85308 Full Coveraged
85309 Full Coveraged
85310 Full Coveraged
85311 Full Coveraged
85312 Full Coveraged
85313 Full Coveraged
Zip Code Coverage Level Zip Code Coverage Level Zip Code Coverage Level Zip Code Coverage Level Zip Code Coverage Level Zip Code Coverage Level
Page 86

- 186 -
85318 Full Coveraged
85329 Mostly Coveraged
85335 Full Coveraged
85339 Mostly Coveraged
85340 Mostly Coveraged
85345 Full Coveraged
85350 Mostly Coveraged
85351 Full Coveraged
85355 Mostly Coveraged
85360 Full Coveraged
85361 Mostly Coveraged
85362 Full Coveraged
85363 Full Coveraged
85364 Full Coveraged
85365 Full Coveraged
85366 Full Coveraged
85369 Full Coveraged
85372 Full Coveraged
85374 Full Coveraged
85375 Full Coveraged
85376 Full Coveraged
85378 Full Coveraged
85379 Full Coveraged
85380 Full Coveraged
85381 Full Coveraged
85382 Full Coveraged
85383 Mostly Coveraged
85385 Full Coveraged
85387 Mostly Coveraged
85613 Full Coveraged
85615 Mostly Coveraged
85616 Mostly Coveraged
85621 Full Coveraged
85628 Full Coveraged
85635 Mostly Coveraged
85636 Full Coveraged
85641 Full Coveraged
85648 Mostly Coveraged
85650 Full Coveraged
85652 Full Coveraged
85654 Full Coveraged
85662 Full Coveraged
85670 Full Coveraged
85701 Full Coveraged
85702 Full Coveraged
85703 Full Coveraged
85704 Full Coveraged
85705 Full Coveraged
85706 Full Coveraged
85707 Full Coveraged
85708 Full Coveraged
85709 Full Coveraged
85710 Full Coveraged
85711 Full Coveraged
85712 Full Coveraged
85713 Full Coveraged
85714 Full Coveraged
85715 Full Coveraged
85716 Full Coveraged
85717 Full Coveraged
85718 Full Coveraged
85719 Full Coveraged
85721 Full Coveraged
85722 Full Coveraged
85723 Full Coveraged
85724 Full Coveraged
85725 Full Coveraged
85726 Full Coveraged
85728 Full Coveraged
85730 Mostly Coveraged
85731 Full Coveraged
85732 Full Coveraged
85733 Full Coveraged
85734 Full Coveraged
85737 Full Coveraged
85738 Full Coveraged
85740 Full Coveraged
85741 Mostly Coveraged
85742 Full Coveraged
85743 Full Coveraged
85744 Mostly Coveraged
85745 Full Coveraged
85746 Mostly Coveraged
85747 Mostly Coveraged
85750 Mostly Coveraged
85751 Full Coveraged
85752 Full Coveraged
85754 Full Coveraged
85775 Full Coveraged
86002 Full Coveraged
86003 Full Coveraged
86011 Full Coveraged
86301 Mostly Coveraged
86302 Full Coveraged
86303 Full Coveraged
86304 Full Coveraged
86313 Full Coveraged
86324 Mostly Coveraged
86326 Full Coveraged
86330 Full Coveraged
86331 Full Coveraged
86338 Mostly Coveraged
86402 Full Coveraged
86403 Mostly Coveraged
86404 Full Coveraged
86405 Mostly Coveraged
86411 Full Coveraged
86412 Full Coveraged
86426 Full Coveraged
86427 Full Coveraged
86429 Full Coveraged
86430 Full Coveraged
86431 Full Coveraged
86439 Full Coveraged
86446 Full Coveraged
87008 Full Coveraged
87021 Full Coveraged
87022 Mostly Coveraged
87031 Full Coveraged
87043 Full Coveraged
87047 Mostly Coveraged
87048 Mostly Coveraged
87051 Full Coveraged
87060 Full Coveraged
87068 Mostly Coveraged
87101 Mostly Coveraged
87102 Mostly Coveraged
87103 Mostly Coveraged
87104 Full Coveraged
87105 Mostly Coveraged
87106 Full Coveraged
87107 Mostly Coveraged
87108 Full Coveraged
87109 Full Coveraged
87110 Full Coveraged
87111 Full Coveraged
87112 Full Coveraged
87113 Mostly Coveraged
87114 Full Coveraged
87115 Mostly Coveraged
87116 Full Coveraged
87117 Full Coveraged
87118 Full Coveraged
87119 Mostly Coveraged
87120 Full Coveraged
87121 Full Coveraged
87122 Full Coveraged
87123 Full Coveraged
87125 Mostly Coveraged
87131 Full Coveraged
87151 Mostly Coveraged
87153 Full Coveraged
87154 Full Coveraged
87158 Mostly Coveraged
87176 Full Coveraged
87181 Full Coveraged
87184 Mostly Coveraged
87185 Full Coveraged
87187 Mostly Coveraged
87190 Full Coveraged
87191 Full Coveraged
87192 Full Coveraged
87193 Mostly Coveraged
87194 Full Coveraged
87195 Full Coveraged
87196 Full Coveraged
87197 Mostly Coveraged
87198 Full Coveraged
87199 Full Coveraged
87402 Mostly Coveraged
87417 Mostly Coveraged
87499 Full Coveraged
87502 Full Coveraged
87503 Full Coveraged
87504 Full Coveraged
87505 Full Coveraged
87506 Mostly Coveraged
87508 Mostly Coveraged
87509 Full Coveraged
87538 Full Coveraged
87544 Full Coveraged
87545 Full Coveraged
87574 Full Coveraged
87592 Full Coveraged
87594 Full Coveraged
87823 Full Coveraged
87828 Mostly Coveraged
87832 Mostly Coveraged
88001 Full Coveraged
88003 Mostly Coveraged
88004 Full Coveraged
88006 Full Coveraged
88007 Mostly Coveraged
88008 Mostly Coveraged
88011 Mostly Coveraged
88022 Full Coveraged
88026 Full Coveraged
88032 Mostly Coveraged
88033 Mostly Coveraged
88036 Full Coveraged
88041 Mostly Coveraged
88046 Mostly Coveraged
88052 Mostly Coveraged
88053 Full Coveraged
88061 Full Coveraged
88062 Full Coveraged
88063 Full Coveraged
88065 Mostly Coveraged
88201 Full Coveraged
88202 Mostly Coveraged
88210 Mostly Coveraged
88211 Full Coveraged
88221 Full Coveraged
88241 Full Coveraged
88242 Mostly Coveraged
88244 Full Coveraged
88253 Mostly Coveraged
88260 Mostly Coveraged
88311 Full Coveraged
88312 Full Coveraged
88323 Mostly Coveraged
88324 Mostly Coveraged
88325 Mostly Coveraged
88337 Mostly Coveraged
88341 Mostly Coveraged
88345 Full Coveraged
88346 Mostly Coveraged
88349 Full Coveraged
88355 Full Coveraged
88510 Full Coveraged
88511 Full Coveraged
88512 Full Coveraged
88513 Full Coveraged
88514 Full Coveraged
88515 Full Coveraged
88516 Full Coveraged
88517 Full Coveraged
88518 Full Coveraged
88519 Full Coveraged
88520 Full Coveraged
88521 Full Coveraged
88523 Full Coveraged
88524 Full Coveraged
88525 Full Coveraged
88526 Full Coveraged
88527 Full Coveraged
88528 Full Coveraged
88529 Full Coveraged
88530 Full Coveraged
88531 Full Coveraged
88532 Full Coveraged
88533 Full Coveraged
88534 Full Coveraged
88535 Full Coveraged
88536 Full Coveraged
88538 Full Coveraged
88539 Full Coveraged
88540 Full Coveraged
88541 Full Coveraged
88542 Full Coveraged
88543 Full Coveraged
88544 Full Coveraged
88545 Full Coveraged
88546 Full Coveraged
88547 Full Coveraged
88548 Full Coveraged
88549 Full Coveraged
88550 Full Coveraged
88553 Full Coveraged
88554 Full Coveraged
88555 Full Coveraged
88556 Full Coveraged
88557 Full Coveraged
88558 Full Coveraged
88559 Full Coveraged
88560 Full Coveraged
88561 Full Coveraged
88562 Full Coveraged
88563 Full Coveraged
88565 Full Coveraged
88566 Full Coveraged
88567 Full Coveraged
88568 Full Coveraged
88569 Full Coveraged
88570 Full Coveraged
88571 Full Coveraged
88572 Full Coveraged
88573 Full Coveraged
88574 Full Coveraged
88575 Full Coveraged
88576 Full Coveraged
88577 Full Coveraged
88578 Full Coveraged
88579 Full Coveraged
88580 Full Coveraged
88581 Full Coveraged
88582 Full Coveraged
88583 Full Coveraged
88584 Full Coveraged
88585 Full Coveraged
88586 Full Coveraged
88587 Full Coveraged
88588 Full Coveraged
88589 Full Coveraged
88590 Full Coveraged
88595 Full Coveraged
88901 Full Coveraged
88905 Full Coveraged
89004 Mostly Coveraged
89005 Full Coveraged
89006 Full Coveraged
89009 Mostly Coveraged
89011 Mostly Coveraged
89012 Full Coveraged
89014 Mostly Coveraged
89015 Mostly Coveraged
89016 Mostly Coveraged
89019 Mostly Coveraged
89020 Mostly Coveraged
89023 Full Coveraged
89028 Full Coveraged
89029 Mostly Coveraged
89030 Full Coveraged
89031 Full Coveraged
89032 Full Coveraged
89033 Full Coveraged
89036 Full Coveraged
89041 Full Coveraged
89048 Full Coveraged
89052 Full Coveraged
89053 Full Coveraged
89060 Full Coveraged
89061 Mostly Coveraged
89074 Full Coveraged
89077 Mostly Coveraged
89084 Full Coveraged
89086 Full Coveraged
89101 Full Coveraged
89102 Full Coveraged
89103 Full Coveraged
89104 Full Coveraged
89106 Full Coveraged
89107 Full Coveraged
89108 Full Coveraged
89109 Full Coveraged
89110 Full Coveraged
89111 Full Coveraged
89112 Full Coveraged
89113 Full Coveraged
89114 Full Coveraged
89115 Full Coveraged
89116 Full Coveraged
89117 Full Coveraged
89118 Full Coveraged
89119 Full Coveraged
89120 Full Coveraged
89121 Full Coveraged
89122 Mostly Coveraged
89123 Full Coveraged
89124 Full Coveraged
89125 Full Coveraged
89126 Full Coveraged
89127 Full Coveraged
89128 Full Coveraged
89129 Full Coveraged
89130 Full Coveraged
89131 Mostly Coveraged
89132 Full Coveraged
89133 Full Coveraged
89134 Full Coveraged
89135 Full Coveraged
89136 Full Coveraged
89137 Full Coveraged
89138 Full Coveraged
89139 Full Coveraged
89141 Full Coveraged
89142 Full Coveraged
89143 Mostly Coveraged
89144 Full Coveraged
89145 Full Coveraged
89146 Full Coveraged
89147 Full Coveraged
89148 Full Coveraged
89149 Full Coveraged
89150 Full Coveraged
89151 Full Coveraged
89152 Full Coveraged
89153 Full Coveraged
89154 Full Coveraged
89155 Full Coveraged
89156 Full Coveraged
89159 Full Coveraged
89160 Full Coveraged
89162 Full Coveraged
89163 Full Coveraged
89164 Full Coveraged
89170 Full Coveraged
89173 Full Coveraged
89177 Full Coveraged
89180 Full Coveraged
89185 Full Coveraged
89191 Full Coveraged
89193 Full Coveraged
89195 Full Coveraged
89199 Full Coveraged
89402 Mostly Coveraged
89411 Full Coveraged
89413 Full Coveraged
89428 Full Coveraged
89431 Full Coveraged
89432 Full Coveraged
89433 Full Coveraged
89434 Mostly Coveraged
89435 Full Coveraged
89436 Mostly Coveraged
89439 Mostly Coveraged
89448 Full Coveraged
89449 Full Coveraged
89460 Full Coveraged
89501 Full Coveraged
89502 Full Coveraged
89503 Full Coveraged
89504 Full Coveraged
89505 Full Coveraged
89506 Mostly Coveraged
89507 Full Coveraged
89509 Full Coveraged
89511 Mostly Coveraged
89512 Full Coveraged
89513 Full Coveraged
89515 Full Coveraged
89520 Full Coveraged
89521 Mostly Coveraged
89523 Mostly Coveraged
89533 Full Coveraged
89555 Full Coveraged
89557 Full Coveraged
89570 Full Coveraged
89595 Full Coveraged
89701 Mostly Coveraged
89702 Full Coveraged
89703 Mostly Coveraged
89704 Full Coveraged
89705 Mostly Coveraged
89706 Mostly Coveraged
89711 Full Coveraged
89712 Full Coveraged
89713 Full Coveraged
89714 Full Coveraged
89721 Full Coveraged
90001 Full Coveraged
90002 Full Coveraged
90003 Full Coveraged
90004 Full Coveraged
90005 Full Coveraged
90006 Full Coveraged
90007 Full Coveraged
90008 Full Coveraged
90009 Full Coveraged
90010 Full Coveraged
90011 Full Coveraged
90012 Full Coveraged
90013 Full Coveraged
90014 Full Coveraged
90015 Full Coveraged
90016 Full Coveraged
90017 Full Coveraged
90018 Full Coveraged
90019 Full Coveraged
90020 Full Coveraged
90021 Full Coveraged
90022 Full Coveraged
90023 Full Coveraged
90024 Full Coveraged
90025 Full Coveraged
90026 Full Coveraged
90027 Full Coveraged
90028 Full Coveraged
90029 Full Coveraged
90030 Full Coveraged
90031 Full Coveraged
90032 Full Coveraged
90033 Full Coveraged
90034 Full Coveraged
90035 Full Coveraged
90036 Full Coveraged
90037 Full Coveraged
90038 Full Coveraged
90039 Full Coveraged
90040 Full Coveraged
90041 Full Coveraged
90042 Full Coveraged
90043 Full Coveraged
90044 Full Coveraged
90045 Full Coveraged
90046 Full Coveraged
90047 Full Coveraged
90048 Full Coveraged
90049 Full Coveraged
90050 Full Coveraged
90051 Full Coveraged
90052 Full Coveraged
90053 Full Coveraged
90054 Full Coveraged
Zip Code Coverage Level Zip Code Coverage Level Zip Code Coverage Level Zip Code Coverage Level Zip Code Coverage Level Zip Code Coverage Level
Page 87

- 187 -
90055 Full Coveraged
90056 Full Coveraged
90057 Full Coveraged
90058 Full Coveraged
90059 Full Coveraged
90060 Full Coveraged
90061 Full Coveraged
90062 Full Coveraged
90063 Full Coveraged
90064 Full Coveraged
90065 Full Coveraged
90066 Full Coveraged
90067 Full Coveraged
90068 Full Coveraged
90069 Full Coveraged
90070 Full Coveraged
90071 Full Coveraged
90072 Full Coveraged
90073 Full Coveraged
90074 Full Coveraged
90075 Full Coveraged
90076 Full Coveraged
90077 Full Coveraged
90078 Full Coveraged
90079 Full Coveraged
90080 Full Coveraged
90081 Full Coveraged
90082 Full Coveraged
90083 Full Coveraged
90084 Full Coveraged
90086 Full Coveraged
90087 Full Coveraged
90088 Full Coveraged
90089 Full Coveraged
90091 Full Coveraged
90093 Full Coveraged
90094 Full Coveraged
90095 Full Coveraged
90096 Full Coveraged
90101 Full Coveraged
90102 Full Coveraged
90103 Full Coveraged
90174 Full Coveraged
90185 Full Coveraged
90189 Full Coveraged
90201 Full Coveraged
90202 Full Coveraged
90209 Full Coveraged
90210 Full Coveraged
90211 Full Coveraged
90212 Full Coveraged
90213 Full Coveraged
90220 Full Coveraged
90221 Full Coveraged
90222 Full Coveraged
90223 Full Coveraged
90224 Full Coveraged
90230 Full Coveraged
90231 Full Coveraged
90232 Full Coveraged
90233 Full Coveraged
90239 Full Coveraged
90240 Full Coveraged
90241 Full Coveraged
90242 Full Coveraged
90245 Full Coveraged
90247 Full Coveraged
90248 Full Coveraged
90249 Full Coveraged
90250 Full Coveraged
90251 Full Coveraged
90254 Full Coveraged
90255 Full Coveraged
90260 Full Coveraged
90261 Full Coveraged
90262 Full Coveraged
90263 Full Coveraged
90264 Full Coveraged
90265 Full Coveraged
90266 Full Coveraged
90267 Full Coveraged
90270 Full Coveraged
90272 Full Coveraged
90274 Full Coveraged
90275 Full Coveraged
90277 Full Coveraged
90278 Full Coveraged
90280 Full Coveraged
90290 Full Coveraged
90291 Full Coveraged
90292 Full Coveraged
90293 Full Coveraged
90294 Full Coveraged
90295 Full Coveraged
90296 Full Coveraged
90301 Full Coveraged
90302 Full Coveraged
90303 Full Coveraged
90304 Full Coveraged
90305 Full Coveraged
90306 Full Coveraged
90307 Full Coveraged
90308 Full Coveraged
90309 Full Coveraged
90310 Full Coveraged
90311 Full Coveraged
90312 Full Coveraged
90313 Full Coveraged
90397 Full Coveraged
90398 Full Coveraged
90401 Full Coveraged
90402 Full Coveraged
90403 Full Coveraged
90404 Full Coveraged
90405 Full Coveraged
90406 Full Coveraged
90407 Full Coveraged
90408 Full Coveraged
90409 Full Coveraged
90410 Full Coveraged
90411 Full Coveraged
90501 Full Coveraged
90502 Full Coveraged
90503 Full Coveraged
90504 Full Coveraged
90505 Full Coveraged
90506 Full Coveraged
90507 Full Coveraged
90508 Full Coveraged
90509 Full Coveraged
90510 Full Coveraged
90601 Full Coveraged
90602 Full Coveraged
90603 Full Coveraged
90604 Full Coveraged
90605 Full Coveraged
90606 Full Coveraged
90607 Full Coveraged
90608 Full Coveraged
90609 Full Coveraged
90610 Full Coveraged
90620 Full Coveraged
90621 Full Coveraged
90622 Full Coveraged
90623 Full Coveraged
90624 Full Coveraged
90630 Full Coveraged
90631 Full Coveraged
90632 Full Coveraged
90633 Full Coveraged
90637 Full Coveraged
90638 Full Coveraged
90639 Full Coveraged
90640 Full Coveraged
90650 Full Coveraged
90651 Full Coveraged
90652 Full Coveraged
90659 Full Coveraged
90660 Full Coveraged
90661 Full Coveraged
90662 Full Coveraged
90665 Full Coveraged
90670 Full Coveraged
90680 Full Coveraged
90701 Full Coveraged
90702 Full Coveraged
90703 Full Coveraged
90706 Full Coveraged
90707 Full Coveraged
90710 Full Coveraged
90711 Full Coveraged
90712 Full Coveraged
90713 Full Coveraged
90714 Full Coveraged
90715 Full Coveraged
90716 Full Coveraged
90717 Full Coveraged
90720 Full Coveraged
90721 Full Coveraged
90723 Full Coveraged
90731 Full Coveraged
90732 Full Coveraged
90733 Full Coveraged
90734 Full Coveraged
90740 Full Coveraged
90742 Full Coveraged
90743 Full Coveraged
90744 Full Coveraged
90745 Full Coveraged
90746 Full Coveraged
90747 Full Coveraged
90748 Full Coveraged
90749 Full Coveraged
90755 Full Coveraged
90801 Full Coveraged
90802 Full Coveraged
90803 Full Coveraged
90804 Full Coveraged
90805 Full Coveraged
90806 Full Coveraged
90807 Full Coveraged
90808 Full Coveraged
90809 Full Coveraged
90810 Full Coveraged
90813 Full Coveraged
90814 Full Coveraged
90815 Full Coveraged
90822 Full Coveraged
90831 Full Coveraged
90832 Full Coveraged
90833 Full Coveraged
90834 Full Coveraged
90835 Full Coveraged
90840 Full Coveraged
90842 Full Coveraged
90844 Full Coveraged
90845 Full Coveraged
90846 Full Coveraged
90847 Full Coveraged
90848 Full Coveraged
90853 Full Coveraged
90888 Full Coveraged
90899 Full Coveraged
91001 Full Coveraged
91003 Full Coveraged
91006 Full Coveraged
91007 Full Coveraged
91009 Full Coveraged
91010 Full Coveraged
91011 Full Coveraged
91012 Full Coveraged
91016 Mostly Coveraged
91017 Mostly Coveraged
91020 Full Coveraged
91021 Full Coveraged
91023 Mostly Coveraged
91024 Full Coveraged
91025 Full Coveraged
91030 Full Coveraged
91031 Full Coveraged
91040 Full Coveraged
91041 Full Coveraged
91042 Full Coveraged
91043 Full Coveraged
91046 Full Coveraged
91066 Mostly Coveraged
91077 Full Coveraged
91101 Full Coveraged
91102 Full Coveraged
91103 Full Coveraged
91104 Full Coveraged
91105 Full Coveraged
91106 Full Coveraged
91107 Full Coveraged
91108 Full Coveraged
91109 Full Coveraged
91110 Full Coveraged
91114 Full Coveraged
91115 Full Coveraged
91116 Full Coveraged
91117 Full Coveraged
91118 Full Coveraged
91121 Full Coveraged
91123 Full Coveraged
91124 Full Coveraged
91125 Full Coveraged
91126 Full Coveraged
91129 Full Coveraged
91131 Full Coveraged
91175 Full Coveraged
91182 Full Coveraged
91184 Full Coveraged
91185 Full Coveraged
91186 Full Coveraged
91187 Full Coveraged
91188 Full Coveraged
91189 Full Coveraged
91191 Full Coveraged
91201 Full Coveraged
91202 Full Coveraged
91203 Full Coveraged
91204 Full Coveraged
91205 Full Coveraged
91206 Full Coveraged
91207 Full Coveraged
91208 Full Coveraged
91209 Full Coveraged
91210 Full Coveraged
91214 Full Coveraged
91221 Full Coveraged
91222 Full Coveraged
91224 Full Coveraged
91225 Full Coveraged
91226 Full Coveraged
91301 Full Coveraged
91302 Full Coveraged
91303 Full Coveraged
91304 Full Coveraged
91305 Full Coveraged
91306 Full Coveraged
91307 Full Coveraged
91308 Full Coveraged
91309 Full Coveraged
91311 Full Coveraged
91312 Full Coveraged
91313 Full Coveraged
91316 Mostly Coveraged
91319 Full Coveraged
91320 Full Coveraged
91324 Full Coveraged
91325 Mostly Coveraged
91326 Mostly Coveraged
91327 Mostly Coveraged
91328 Mostly Coveraged
91329 Mostly Coveraged
91330 Mostly Coveraged
91331 Mostly Coveraged
91333 Mostly Coveraged
91334 Mostly Coveraged
91335 Mostly Coveraged
91337 Mostly Coveraged
91340 Mostly Coveraged
91341 Mostly Coveraged
91342 Mostly Coveraged
91343 Mostly Coveraged
91344 Mostly Coveraged
91345 Mostly Coveraged
91346 Mostly Coveraged
91352 Full Coveraged
91353 Full Coveraged
91356 Mostly Coveraged
91357 Mostly Coveraged
91358 Full Coveraged
91359 Full Coveraged
91360 Full Coveraged
91361 Full Coveraged
91362 Full Coveraged
91363 Full Coveraged
91364 Full Coveraged
91365 Full Coveraged
91367 Full Coveraged
91371 Full Coveraged
91372 Full Coveraged
91376 Full Coveraged
91377 Full Coveraged
91381 Mostly Coveraged
91388 Full Coveraged
91393 Mostly Coveraged
91394 Mostly Coveraged
91395 Mostly Coveraged
91396 Full Coveraged
91399 Full Coveraged
91401 Full Coveraged
91402 Mostly Coveraged
91403 Full Coveraged
91404 Full Coveraged
91405 Full Coveraged
91406 Mostly Coveraged
91407 Full Coveraged
91408 Full Coveraged
91409 Mostly Coveraged
91410 Mostly Coveraged
91411 Full Coveraged
91412 Mostly Coveraged
91413 Full Coveraged
91416 Mostly Coveraged
91423 Full Coveraged
91426 Mostly Coveraged
91436 Full Coveraged
91470 Mostly Coveraged
91482 Mostly Coveraged
91495 Full Coveraged
91496 Full Coveraged
91497 Full Coveraged
91499 Full Coveraged
91501 Full Coveraged
91502 Full Coveraged
91503 Full Coveraged
91504 Full Coveraged
91505 Full Coveraged
91506 Full Coveraged
91507 Full Coveraged
91508 Full Coveraged
91510 Full Coveraged
91521 Full Coveraged
91522 Full Coveraged
91523 Full Coveraged
91526 Full Coveraged
91601 Full Coveraged
91602 Full Coveraged
91603 Full Coveraged
91604 Full Coveraged
91605 Full Coveraged
91606 Full Coveraged
91607 Full Coveraged
91608 Full Coveraged
91609 Full Coveraged
91610 Full Coveraged
91611 Full Coveraged
91612 Full Coveraged
91614 Full Coveraged
91615 Full Coveraged
91616 Full Coveraged
91617 Full Coveraged
91618 Full Coveraged
91701 Full Coveraged
91702 Full Coveraged
91706 Full Coveraged
91708 Mostly Coveraged
91709 Mostly Coveraged
91710 Mostly Coveraged
91711 Full Coveraged
91715 Full Coveraged
91716 Full Coveraged
91722 Full Coveraged
91723 Full Coveraged
91724 Full Coveraged
91729 Mostly Coveraged
91730 Mostly Coveraged
91731 Full Coveraged
91732 Full Coveraged
91733 Full Coveraged
91734 Full Coveraged
91735 Full Coveraged
91737 Mostly Coveraged
91739 Mostly Coveraged
91740 Full Coveraged
91741 Full Coveraged
91743 Mostly Coveraged
91744 Full Coveraged
91745 Full Coveraged
91746 Full Coveraged
91747 Full Coveraged
91748 Full Coveraged
91749 Full Coveraged
91750 Full Coveraged
91754 Full Coveraged
91755 Full Coveraged
91756 Full Coveraged
91758 Mostly Coveraged
91759 Mostly Coveraged
91761 Mostly Coveraged
91762 Mostly Coveraged
91763 Full Coveraged
91764 Mostly Coveraged
91765 Full Coveraged
91766 Mostly Coveraged
91767 Full Coveraged
91768 Full Coveraged
91769 Full Coveraged
91770 Full Coveraged
91771 Full Coveraged
91772 Full Coveraged
91773 Full Coveraged
91775 Full Coveraged
91776 Full Coveraged
91778 Full Coveraged
91780 Full Coveraged
91784 Full Coveraged
91785 Full Coveraged
91786 Full Coveraged
91788 Full Coveraged
91789 Full Coveraged
91790 Full Coveraged
91791 Full Coveraged
91792 Full Coveraged
91793 Full Coveraged
91795 Full Coveraged
91798 Mostly Coveraged
91801 Full Coveraged
91802 Full Coveraged
91803 Full Coveraged
91804 Full Coveraged
91896 Full Coveraged
91902 Full Coveraged
91903 Mostly Coveraged
91908 Full Coveraged
91909 Full Coveraged
91910 Full Coveraged
91911 Full Coveraged
91912 Full Coveraged
91913 Full Coveraged
91914 Full Coveraged
91915 Full Coveraged
91917 Full Coveraged
91921 Full Coveraged
91932 Full Coveraged
91933 Full Coveraged
91935 Full Coveraged
91941 Full Coveraged
91942 Full Coveraged
91943 Full Coveraged
91944 Full Coveraged
91945 Full Coveraged
91946 Full Coveraged
91947 Full Coveraged
91950 Full Coveraged
91951 Full Coveraged
91976 Full Coveraged
91977 Full Coveraged
91978 Full Coveraged
91979 Full Coveraged
92003 Full Coveraged
92007 Full Coveraged
Zip Code Coverage Level Zip Code Coverage Level Zip Code Coverage Level Zip Code Coverage Level Zip Code Coverage Level Zip Code Coverage Level
Page 88

- 188 -
92008 Full Coveraged
92009 Full Coveraged
92013 Full Coveraged
92014 Full Coveraged
92018 Full Coveraged
92019 Full Coveraged
92020 Full Coveraged
92021 Full Coveraged
92022 Full Coveraged
92023 Full Coveraged
92024 Full Coveraged
92025 Full Coveraged
92026 Full Coveraged
92027 Mostly Coveraged
92028 Full Coveraged
92029 Full Coveraged
92030 Mostly Coveraged
92033 Full Coveraged
92037 Full Coveraged
92038 Full Coveraged
92039 Full Coveraged
92040 Full Coveraged
92046 Full Coveraged
92049 Full Coveraged
92051 Full Coveraged
92052 Full Coveraged
92054 Full Coveraged
92055 Mostly Coveraged
92056 Full Coveraged
92057 Full Coveraged
92058 Full Coveraged
92064 Full Coveraged
92065 Mostly Coveraged
92067 Full Coveraged
92068 Full Coveraged
92069 Full Coveraged
92071 Full Coveraged
92072 Full Coveraged
92074 Full Coveraged
92075 Full Coveraged
92078 Full Coveraged
92079 Full Coveraged
92081 Full Coveraged
92083 Full Coveraged
92084 Full Coveraged
92085 Full Coveraged
92088 Full Coveraged
92090 Full Coveraged
92091 Full Coveraged
92092 Full Coveraged
92093 Full Coveraged
92096 Full Coveraged
92101 Full Coveraged
92102 Full Coveraged
92103 Full Coveraged
92104 Full Coveraged
92105 Full Coveraged
92106 Full Coveraged
92107 Full Coveraged
92108 Full Coveraged
92109 Full Coveraged
92110 Full Coveraged
92111 Full Coveraged
92112 Full Coveraged
92113 Full Coveraged
92114 Full Coveraged
92115 Full Coveraged
92116 Full Coveraged
92117 Full Coveraged
92118 Full Coveraged
92119 Full Coveraged
92120 Full Coveraged
92121 Full Coveraged
92122 Full Coveraged
92123 Full Coveraged
92124 Full Coveraged
92126 Full Coveraged
92127 Full Coveraged
92128 Full Coveraged
92129 Full Coveraged
92130 Full Coveraged
92131 Full Coveraged
92132 Full Coveraged
92133 Full Coveraged
92134 Full Coveraged
92135 Full Coveraged
92136 Full Coveraged
92137 Full Coveraged
92138 Full Coveraged
92139 Full Coveraged
92140 Full Coveraged
92142 Full Coveraged
92143 Full Coveraged
92145 Full Coveraged
92147 Full Coveraged
92149 Full Coveraged
92150 Full Coveraged
92152 Full Coveraged
92153 Full Coveraged
92154 Full Coveraged
92155 Full Coveraged
92158 Full Coveraged
92159 Full Coveraged
92160 Full Coveraged
92161 Full Coveraged
92162 Full Coveraged
92163 Full Coveraged
92164 Full Coveraged
92165 Full Coveraged
92166 Full Coveraged
92167 Full Coveraged
92168 Full Coveraged
92169 Full Coveraged
92170 Full Coveraged
92171 Full Coveraged
92172 Full Coveraged
92173 Full Coveraged
92174 Full Coveraged
92175 Full Coveraged
92176 Full Coveraged
92177 Full Coveraged
92178 Full Coveraged
92179 Full Coveraged
92182 Full Coveraged
92184 Full Coveraged
92186 Full Coveraged
92187 Full Coveraged
92190 Full Coveraged
92191 Full Coveraged
92192 Full Coveraged
92193 Full Coveraged
92194 Full Coveraged
92195 Full Coveraged
92196 Full Coveraged
92197 Full Coveraged
92198 Full Coveraged
92199 Full Coveraged
92201 Full Coveraged
92202 Full Coveraged
92203 Full Coveraged
92210 Mostly Coveraged
92211 Full Coveraged
92220 Full Coveraged
92222 Mostly Coveraged
92223 Full Coveraged
92227 Full Coveraged
92230 Full Coveraged
92231 Mostly Coveraged
92232 Full Coveraged
92234 Full Coveraged
92235 Full Coveraged
92236 Mostly Coveraged
92240 Mostly Coveraged
92241 Full Coveraged
92243 Full Coveraged
92244 Full Coveraged
92249 Full Coveraged
92250 Mostly Coveraged
92251 Mostly Coveraged
92253 Mostly Coveraged
92255 Mostly Coveraged
92258 Full Coveraged
92260 Mostly Coveraged
92261 Mostly Coveraged
92262 Mostly Coveraged
92263 Mostly Coveraged
92264 Mostly Coveraged
92267 Full Coveraged
92270 Full Coveraged
92276 Full Coveraged
92292 Full Coveraged
92305 Full Coveraged
92307 Mostly Coveraged
92311 Mostly Coveraged
92312 Full Coveraged
92313 Full Coveraged
92314 Full Coveraged
92315 Full Coveraged
92316 Full Coveraged
92317 Full Coveraged
92318 Full Coveraged
92320 Mostly Coveraged
92321 Full Coveraged
92322 Full Coveraged
92324 Full Coveraged
92325 Full Coveraged
92326 Full Coveraged
92333 Full Coveraged
92334 Mostly Coveraged
92335 Mostly Coveraged
92337 Mostly Coveraged
92339 Mostly Coveraged
92340 Mostly Coveraged
92341 Mostly Coveraged
92346 Full Coveraged
92350 Full Coveraged
92352 Full Coveraged
92354 Full Coveraged
92357 Full Coveraged
92359 Mostly Coveraged
92368 Full Coveraged
92369 Full Coveraged
92373 Full Coveraged
92374 Full Coveraged
92375 Full Coveraged
92376 Full Coveraged
92377 Mostly Coveraged
92378 Full Coveraged
92382 Full Coveraged
92385 Full Coveraged
92386 Full Coveraged
92391 Full Coveraged
92392 Mostly Coveraged
92393 Full Coveraged
92394 Full Coveraged
92399 Mostly Coveraged
92401 Full Coveraged
92402 Full Coveraged
92403 Full Coveraged
92404 Full Coveraged
92405 Full Coveraged
92406 Full Coveraged
92407 Full Coveraged
92408 Full Coveraged
92410 Full Coveraged
92411 Full Coveraged
92412 Full Coveraged
92413 Full Coveraged
92414 Full Coveraged
92415 Full Coveraged
92418 Full Coveraged
92420 Full Coveraged
92423 Full Coveraged
92424 Full Coveraged
92427 Full Coveraged
92501 Full Coveraged
92502 Full Coveraged
92504 Mostly Coveraged
92505 Mostly Coveraged
92506 Full Coveraged
92507 Full Coveraged
92508 Full Coveraged
92509 Mostly Coveraged
92514 Mostly Coveraged
92516 Full Coveraged
92517 Full Coveraged
92518 Full Coveraged
92519 Mostly Coveraged
92521 Full Coveraged
92522 Full Coveraged
92530 Mostly Coveraged
92531 Mostly Coveraged
92532 Mostly Coveraged
92548 Mostly Coveraged
92549 Full Coveraged
92551 Full Coveraged
92552 Full Coveraged
92553 Full Coveraged
92554 Full Coveraged
92555 Full Coveraged
92556 Full Coveraged
92557 Full Coveraged
92562 Full Coveraged
92563 Full Coveraged
92564 Full Coveraged
92567 Mostly Coveraged
92571 Full Coveraged
92572 Mostly Coveraged
92581 Mostly Coveraged
92582 Mostly Coveraged
92583 Mostly Coveraged
92584 Full Coveraged
92585 Mostly Coveraged
92586 Full Coveraged
92587 Full Coveraged
92589 Full Coveraged
92590 Full Coveraged
92591 Full Coveraged
92593 Full Coveraged
92595 Full Coveraged
92596 Mostly Coveraged
92599 Full Coveraged
92602 Full Coveraged
92603 Full Coveraged
92604 Full Coveraged
92605 Full Coveraged
92606 Full Coveraged
92607 Full Coveraged
92609 Full Coveraged
92610 Full Coveraged
92612 Full Coveraged
92614 Full Coveraged
92615 Full Coveraged
92616 Full Coveraged
92618 Full Coveraged
92619 Full Coveraged
92620 Full Coveraged
92623 Full Coveraged
92624 Full Coveraged
92625 Full Coveraged
92626 Full Coveraged
92627 Full Coveraged
92628 Full Coveraged
92629 Mostly Coveraged
92630 Full Coveraged
92637 Full Coveraged
92646 Full Coveraged
92647 Full Coveraged
92648 Full Coveraged
92649 Full Coveraged
92650 Full Coveraged
92651 Full Coveraged
92652 Full Coveraged
92653 Full Coveraged
92654 Full Coveraged
92655 Full Coveraged
92656 Full Coveraged
92657 Full Coveraged
92658 Full Coveraged
92659 Full Coveraged
92660 Full Coveraged
92661 Full Coveraged
92662 Full Coveraged
92663 Full Coveraged
92672 Full Coveraged
92673 Full Coveraged
92674 Full Coveraged
92675 Mostly Coveraged
92676 Full Coveraged
92677 Full Coveraged
92678 Full Coveraged
92679 Full Coveraged
92683 Full Coveraged
92684 Full Coveraged
92685 Full Coveraged
92688 Full Coveraged
92690 Full Coveraged
92691 Full Coveraged
92692 Full Coveraged
92693 Full Coveraged
92694 Full Coveraged
92697 Full Coveraged
92698 Full Coveraged
92701 Full Coveraged
92702 Full Coveraged
92703 Full Coveraged
92704 Full Coveraged
92705 Full Coveraged
92706 Full Coveraged
92707 Full Coveraged
92708 Full Coveraged
92711 Full Coveraged
92712 Full Coveraged
92725 Full Coveraged
92728 Full Coveraged
92735 Full Coveraged
92780 Full Coveraged
92781 Full Coveraged
92782 Full Coveraged
92799 Full Coveraged
92801 Full Coveraged
92802 Full Coveraged
92803 Full Coveraged
92804 Full Coveraged
92805 Full Coveraged
92806 Full Coveraged
92807 Full Coveraged
92808 Full Coveraged
92809 Full Coveraged
92811 Full Coveraged
92812 Full Coveraged
92814 Full Coveraged
92815 Full Coveraged
92816 Full Coveraged
92817 Full Coveraged
92821 Full Coveraged
92822 Full Coveraged
92823 Mostly Coveraged
92825 Full Coveraged
92831 Full Coveraged
92832 Full Coveraged
92833 Full Coveraged
92834 Full Coveraged
92835 Full Coveraged
92836 Full Coveraged
92837 Full Coveraged
92838 Full Coveraged
92840 Full Coveraged
92841 Full Coveraged
92842 Full Coveraged
92843 Full Coveraged
92844 Full Coveraged
92845 Full Coveraged
92846 Full Coveraged
92850 Full Coveraged
92856 Full Coveraged
92857 Full Coveraged
92859 Full Coveraged
92860 Mostly Coveraged
92861 Full Coveraged
92862 Full Coveraged
92863 Full Coveraged
92864 Full Coveraged
92865 Full Coveraged
92866 Full Coveraged
92867 Full Coveraged
92868 Full Coveraged
92869 Full Coveraged
92870 Full Coveraged
92871 Full Coveraged
92877 Full Coveraged
92878 Full Coveraged
92879 Mostly Coveraged
92880 Full Coveraged
92881 Mostly Coveraged
92882 Full Coveraged
92883 Full Coveraged
92885 Mostly Coveraged
92886 Mostly Coveraged
92887 Full Coveraged
92899 Full Coveraged
93001 Full Coveraged
93002 Mostly Coveraged
93003 Mostly Coveraged
93004 Mostly Coveraged
93005 Mostly Coveraged
93006 Mostly Coveraged
93007 Mostly Coveraged
93009 Mostly Coveraged
93010 Full Coveraged
93011 Full Coveraged
93012 Full Coveraged
93013 Full Coveraged
93014 Full Coveraged
93016 Mostly Coveraged
93020 Mostly Coveraged
93021 Mostly Coveraged
93022 Mostly Coveraged
93030 Mostly Coveraged
93031 Mostly Coveraged
93032 Mostly Coveraged
93033 Full Coveraged
93034 Mostly Coveraged
93036 Mostly Coveraged
93040 Mostly Coveraged
93041 Mostly Coveraged
93042 Full Coveraged
93043 Mostly Coveraged
93044 Mostly Coveraged
93060 Full Coveraged
93061 Full Coveraged
93062 Full Coveraged
93063 Full Coveraged
93064 Full Coveraged
93065 Full Coveraged
93066 Full Coveraged
93067 Full Coveraged
93094 Mostly Coveraged
93099 Full Coveraged
93101 Full Coveraged
93102 Full Coveraged
93103 Full Coveraged
93105 Mostly Coveraged
93106 Mostly Coveraged
93107 Mostly Coveraged
93108 Full Coveraged
93109 Full Coveraged
93110 Full Coveraged
93111 Mostly Coveraged
93116 Mostly Coveraged
93117 Full Coveraged
93118 Mostly Coveraged
93120 Full Coveraged
93121 Full Coveraged
93130 Full Coveraged
93140 Full Coveraged
93150 Full Coveraged
93160 Mostly Coveraged
93190 Full Coveraged
93199 Mostly Coveraged
93202 Mostly Coveraged
93210 Full Coveraged
93220 Full Coveraged
93221 Mostly Coveraged
93223 Mostly Coveraged
93224 Mostly Coveraged
93227 Mostly Coveraged
93230 Mostly Coveraged
93232 Full Coveraged
93237 Full Coveraged
93241 Mostly Coveraged
93242 Full Coveraged
93244 Full Coveraged
93247 Mostly Coveraged
93252 Full Coveraged
93257 Full Coveraged
93258 Full Coveraged
93263 Full Coveraged
93267 Full Coveraged
93268 Full Coveraged
93270 Mostly Coveraged
93271 Mostly Coveraged
93272 Mostly Coveraged
93274 Full Coveraged
Zip Code Coverage Level Zip Code Coverage Level Zip Code Coverage Level Zip Code Coverage Level Zip Code Coverage Level Zip Code Coverage Level
Page 89

- 189 -
93275 Full Coveraged
93277 Full Coveraged
93278 Full Coveraged
93279 Full Coveraged
93290 Full Coveraged
93301 Full Coveraged
93302 Full Coveraged
93303 Full Coveraged
93304 Full Coveraged
93305 Full Coveraged
93306 Mostly Coveraged
93307 Mostly Coveraged
93309 Full Coveraged
93312 Full Coveraged
93314 Full Coveraged
93380 Full Coveraged
93383 Full Coveraged
93384 Full Coveraged
93385 Full Coveraged
93386 Full Coveraged
93387 Full Coveraged
93388 Full Coveraged
93389 Full Coveraged
93390 Full Coveraged
93401 Mostly Coveraged
93402 Mostly Coveraged
93403 Full Coveraged
93405 Full Coveraged
93406 Full Coveraged
93407 Full Coveraged
93408 Full Coveraged
93409 Full Coveraged
93410 Full Coveraged
93412 Mostly Coveraged
93420 Full Coveraged
93421 Full Coveraged
93422 Full Coveraged
93423 Full Coveraged
93424 Full Coveraged
93429 Mostly Coveraged
93433 Full Coveraged
93436 Mostly Coveraged
93437 Mostly Coveraged
93438 Full Coveraged
93440 Mostly Coveraged
93442 Mostly Coveraged
93444 Full Coveraged
93445 Full Coveraged
93448 Full Coveraged
93449 Mostly Coveraged
93454 Full Coveraged
93455 Full Coveraged
93457 Mostly Coveraged
93458 Mostly Coveraged
93460 Mostly Coveraged
93463 Mostly Coveraged
93464 Mostly Coveraged
93483 Full Coveraged
93501 Mostly Coveraged
93502 Mostly Coveraged
93504 Full Coveraged
93510 Full Coveraged
93522 Full Coveraged
93523 Mostly Coveraged
93529 Mostly Coveraged
93539 Mostly Coveraged
93546 Full Coveraged
93550 Mostly Coveraged
93551 Full Coveraged
93556 Full Coveraged
93558 Full Coveraged
93561 Full Coveraged
93581 Full Coveraged
93584 Mostly Coveraged
93586 Full Coveraged
93590 Mostly Coveraged
93599 Mostly Coveraged
93601 Full Coveraged
93604 Mostly Coveraged
93606 Mostly Coveraged
93612 Full Coveraged
93613 Full Coveraged
93614 Full Coveraged
93623 Mostly Coveraged
93625 Mostly Coveraged
93631 Full Coveraged
93635 Mostly Coveraged
93637 Full Coveraged
93639 Full Coveraged
93645 Mostly Coveraged
93646 Full Coveraged
93647 Mostly Coveraged
93650 Full Coveraged
93652 Mostly Coveraged
93654 Mostly Coveraged
93657 Mostly Coveraged
93662 Full Coveraged
93669 Mostly Coveraged
93673 Full Coveraged
93675 Full Coveraged
93701 Full Coveraged
93702 Full Coveraged
93703 Full Coveraged
93704 Full Coveraged
93705 Full Coveraged
93706 Mostly Coveraged
93707 Full Coveraged
93708 Full Coveraged
93709 Full Coveraged
93710 Full Coveraged
93711 Full Coveraged
93712 Full Coveraged
93714 Full Coveraged
93715 Full Coveraged
93716 Full Coveraged
93717 Full Coveraged
93718 Full Coveraged
93720 Mostly Coveraged
93721 Full Coveraged
93722 Mostly Coveraged
93724 Full Coveraged
93725 Mostly Coveraged
93726 Full Coveraged
93727 Full Coveraged
93728 Full Coveraged
93729 Full Coveraged
93740 Full Coveraged
93741 Full Coveraged
93744 Full Coveraged
93745 Full Coveraged
93747 Full Coveraged
93750 Full Coveraged
93755 Full Coveraged
93760 Full Coveraged
93761 Full Coveraged
93762 Full Coveraged
93764 Full Coveraged
93765 Full Coveraged
93771 Full Coveraged
93772 Full Coveraged
93773 Full Coveraged
93774 Full Coveraged
93775 Full Coveraged
93776 Full Coveraged
93777 Full Coveraged
93778 Full Coveraged
93779 Full Coveraged
93780 Full Coveraged
93784 Full Coveraged
93786 Full Coveraged
93790 Full Coveraged
93791 Full Coveraged
93792 Full Coveraged
93793 Full Coveraged
93794 Full Coveraged
93844 Full Coveraged
93888 Full Coveraged
93901 Mostly Coveraged
93902 Mostly Coveraged
93905 Mostly Coveraged
93906 Mostly Coveraged
93907 Mostly Coveraged
93908 Full Coveraged
93912 Mostly Coveraged
93915 Mostly Coveraged
93921 Full Coveraged
93922 Full Coveraged
93924 Mostly Coveraged
93930 Full Coveraged
93933 Mostly Coveraged
93940 Full Coveraged
93942 Full Coveraged
93943 Full Coveraged
93944 Full Coveraged
93950 Full Coveraged
93953 Full Coveraged
93954 Full Coveraged
93955 Full Coveraged
93962 Full Coveraged
94002 Full Coveraged
94003 Full Coveraged
94005 Full Coveraged
94010 Full Coveraged
94011 Full Coveraged
94012 Full Coveraged
94013 Full Coveraged
94014 Full Coveraged
94015 Full Coveraged
94016 Full Coveraged
94017 Full Coveraged
94018 Full Coveraged
94019 Full Coveraged
94020 Full Coveraged
94021 Mostly Coveraged
94022 Full Coveraged
94023 Full Coveraged
94024 Full Coveraged
94025 Full Coveraged
94026 Full Coveraged
94027 Full Coveraged
94028 Full Coveraged
94029 Full Coveraged
94030 Full Coveraged
94031 Full Coveraged
94035 Full Coveraged
94037 Full Coveraged
94038 Full Coveraged
94039 Full Coveraged
94040 Full Coveraged
94041 Full Coveraged
94042 Full Coveraged
94043 Full Coveraged
94044 Full Coveraged
94045 Full Coveraged
94059 Full Coveraged
94061 Full Coveraged
94062 Full Coveraged
94063 Full Coveraged
94064 Full Coveraged
94065 Full Coveraged
94066 Full Coveraged
94067 Full Coveraged
94070 Full Coveraged
94071 Full Coveraged
94080 Full Coveraged
94083 Full Coveraged
94085 Full Coveraged
94086 Full Coveraged
94087 Full Coveraged
94088 Full Coveraged
94089 Mostly Coveraged
94090 Full Coveraged
94099 Full Coveraged
94101 Full Coveraged
94102 Full Coveraged
94103 Full Coveraged
94104 Full Coveraged
94105 Full Coveraged
94106 Full Coveraged
94107 Full Coveraged
94108 Full Coveraged
94109 Full Coveraged
94110 Full Coveraged
94111 Full Coveraged
94112 Full Coveraged
94114 Full Coveraged
94115 Full Coveraged
94116 Full Coveraged
94117 Full Coveraged
94118 Full Coveraged
94119 Full Coveraged
94120 Full Coveraged
94121 Full Coveraged
94122 Full Coveraged
94123 Full Coveraged
94124 Full Coveraged
94125 Full Coveraged
94126 Full Coveraged
94127 Full Coveraged
94128 Full Coveraged
94129 Full Coveraged
94130 Full Coveraged
94131 Full Coveraged
94132 Full Coveraged
94133 Full Coveraged
94134 Full Coveraged
94135 Full Coveraged
94136 Full Coveraged
94137 Full Coveraged
94138 Full Coveraged
94139 Full Coveraged
94140 Full Coveraged
94141 Full Coveraged
94142 Full Coveraged
94143 Full Coveraged
94144 Full Coveraged
94145 Full Coveraged
94146 Full Coveraged
94147 Full Coveraged
94150 Full Coveraged
94151 Full Coveraged
94152 Full Coveraged
94155 Full Coveraged
94156 Full Coveraged
94158 Full Coveraged
94159 Full Coveraged
94160 Full Coveraged
94161 Full Coveraged
94162 Full Coveraged
94163 Full Coveraged
94164 Full Coveraged
94165 Full Coveraged
94166 Full Coveraged
94167 Full Coveraged
94168 Full Coveraged
94169 Full Coveraged
94170 Full Coveraged
94172 Full Coveraged
94175 Full Coveraged
94177 Full Coveraged
94188 Full Coveraged
94199 Full Coveraged
94203 Full Coveraged
94204 Full Coveraged
94205 Full Coveraged
94206 Full Coveraged
94207 Full Coveraged
94208 Full Coveraged
94209 Full Coveraged
94211 Full Coveraged
94229 Full Coveraged
94230 Full Coveraged
94232 Full Coveraged
94234 Full Coveraged
94235 Full Coveraged
94236 Full Coveraged
94237 Full Coveraged
94239 Full Coveraged
94240 Full Coveraged
94243 Full Coveraged
94244 Full Coveraged
94246 Full Coveraged
94247 Full Coveraged
94248 Full Coveraged
94249 Full Coveraged
94250 Full Coveraged
94252 Full Coveraged
94254 Full Coveraged
94256 Full Coveraged
94257 Full Coveraged
94258 Full Coveraged
94259 Full Coveraged
94261 Full Coveraged
94262 Full Coveraged
94263 Full Coveraged
94267 Full Coveraged
94268 Full Coveraged
94269 Full Coveraged
94271 Full Coveraged
94273 Full Coveraged
94274 Full Coveraged
94277 Full Coveraged
94278 Full Coveraged
94279 Full Coveraged
94280 Full Coveraged
94282 Full Coveraged
94283 Full Coveraged
94284 Full Coveraged
94285 Full Coveraged
94286 Full Coveraged
94287 Full Coveraged
94288 Full Coveraged
94289 Full Coveraged
94290 Full Coveraged
94291 Full Coveraged
94293 Full Coveraged
94294 Full Coveraged
94295 Full Coveraged
94296 Full Coveraged
94297 Full Coveraged
94298 Full Coveraged
94301 Full Coveraged
94302 Full Coveraged
94303 Full Coveraged
94304 Full Coveraged
94305 Full Coveraged
94306 Full Coveraged
94307 Full Coveraged
94308 Full Coveraged
94309 Full Coveraged
94310 Full Coveraged
94401 Full Coveraged
94402 Full Coveraged
94403 Full Coveraged
94404 Full Coveraged
94405 Full Coveraged
94406 Full Coveraged
94407 Full Coveraged
94408 Full Coveraged
94409 Full Coveraged
94497 Full Coveraged
94501 Full Coveraged
94502 Full Coveraged
94503 Full Coveraged
94506 Full Coveraged
94507 Full Coveraged
94508 Mostly Coveraged
94509 Full Coveraged
94510 Mostly Coveraged
94511 Mostly Coveraged
94512 Mostly Coveraged
94513 Full Coveraged
94514 Mostly Coveraged
94515 Full Coveraged
94516 Full Coveraged
94517 Full Coveraged
94518 Full Coveraged
94519 Full Coveraged
94520 Full Coveraged
94521 Full Coveraged
94522 Full Coveraged
94523 Full Coveraged
94524 Full Coveraged
94525 Full Coveraged
94526 Full Coveraged
94527 Full Coveraged
94528 Full Coveraged
94529 Full Coveraged
94530 Full Coveraged
94531 Full Coveraged
94533 Mostly Coveraged
94534 Full Coveraged
94536 Full Coveraged
94537 Full Coveraged
94538 Full Coveraged
94539 Full Coveraged
94540 Mostly Coveraged
94541 Full Coveraged
94542 Full Coveraged
94543 Full Coveraged
94544 Mostly Coveraged
94545 Mostly Coveraged
94546 Full Coveraged
94547 Full Coveraged
94548 Full Coveraged
94549 Full Coveraged
94550 Mostly Coveraged
94551 Full Coveraged
94552 Full Coveraged
94553 Mostly Coveraged
94555 Mostly Coveraged
94556 Full Coveraged
94557 Mostly Coveraged
94559 Full Coveraged
94560 Mostly Coveraged
94561 Full Coveraged
94562 Mostly Coveraged
94563 Full Coveraged
94564 Full Coveraged
94565 Full Coveraged
94566 Full Coveraged
94567 Mostly Coveraged
94568 Full Coveraged
94569 Full Coveraged
94570 Full Coveraged
94571 Full Coveraged
94572 Full Coveraged
94573 Mostly Coveraged
94575 Full Coveraged
94576 Mostly Coveraged
94577 Mostly Coveraged
94578 Mostly Coveraged
94579 Mostly Coveraged
94580 Mostly Coveraged
94581 Full Coveraged
94583 Full Coveraged
94585 Mostly Coveraged
94586 Full Coveraged
94587 Mostly Coveraged
94588 Full Coveraged
94589 Full Coveraged
94590 Full Coveraged
94591 Full Coveraged
94592 Full Coveraged
94595 Full Coveraged
94596 Full Coveraged
94597 Full Coveraged
94598 Full Coveraged
94599 Full Coveraged
94601 Full Coveraged
94602 Full Coveraged
94603 Full Coveraged
94604 Full Coveraged
94605 Full Coveraged
94606 Full Coveraged
94607 Full Coveraged
94608 Full Coveraged
94609 Full Coveraged
94610 Full Coveraged
94611 Full Coveraged
94612 Full Coveraged
94613 Full Coveraged
94614 Full Coveraged
94615 Full Coveraged
94617 Full Coveraged
94618 Full Coveraged
94619 Full Coveraged
94620 Full Coveraged
94621 Full Coveraged
94622 Mostly Coveraged
94623 Full Coveraged
94624 Full Coveraged
94625 Full Coveraged
94626 Full Coveraged
94643 Full Coveraged
94649 Full Coveraged
94659 Full Coveraged
94660 Full Coveraged
94661 Full Coveraged
94662 Full Coveraged
94666 Full Coveraged
94701 Full Coveraged
94702 Full Coveraged
94703 Full Coveraged
Zip Code Coverage Level Zip Code Coverage Level Zip Code Coverage Level Zip Code Coverage Level Zip Code Coverage Level Zip Code Coverage Level
Page 90

- 190 -
94704 Full Coveraged
94705 Full Coveraged
94706 Full Coveraged
94707 Full Coveraged
94708 Full Coveraged
94709 Full Coveraged
94710 Full Coveraged
94712 Full Coveraged
94720 Full Coveraged
94801 Full Coveraged
94802 Full Coveraged
94803 Full Coveraged
94804 Full Coveraged
94805 Full Coveraged
94806 Full Coveraged
94807 Full Coveraged
94808 Full Coveraged
94820 Full Coveraged
94850 Full Coveraged
94875 Full Coveraged
94901 Full Coveraged
94903 Full Coveraged
94904 Full Coveraged
94912 Full Coveraged
94913 Full Coveraged
94914 Full Coveraged
94915 Full Coveraged
94920 Full Coveraged
94922 Full Coveraged
94923 Mostly Coveraged
94924 Full Coveraged
94925 Full Coveraged
94926 Full Coveraged
94927 Mostly Coveraged
94928 Full Coveraged
94929 Mostly Coveraged
94930 Full Coveraged
94931 Full Coveraged
94933 Full Coveraged
94938 Full Coveraged
94939 Full Coveraged
94940 Mostly Coveraged
94941 Full Coveraged
94942 Full Coveraged
94945 Full Coveraged
94946 Full Coveraged
94947 Full Coveraged
94948 Full Coveraged
94949 Full Coveraged
94950 Full Coveraged
94951 Full Coveraged
94952 Mostly Coveraged
94953 Full Coveraged
94954 Full Coveraged
94955 Full Coveraged
94957 Full Coveraged
94960 Full Coveraged
94963 Full Coveraged
94964 Full Coveraged
94965 Full Coveraged
94966 Full Coveraged
94970 Full Coveraged
94971 Full Coveraged
94972 Full Coveraged
94973 Full Coveraged
94974 Full Coveraged
94975 Full Coveraged
94976 Full Coveraged
94977 Full Coveraged
94978 Full Coveraged
94979 Full Coveraged
94998 Full Coveraged
94999 Full Coveraged
95001 Mostly Coveraged
95002 Mostly Coveraged
95003 Full Coveraged
95005 Full Coveraged
95006 Full Coveraged
95007 Full Coveraged
95008 Full Coveraged
95009 Full Coveraged
95010 Full Coveraged
95011 Full Coveraged
95013 Mostly Coveraged
95014 Full Coveraged
95015 Full Coveraged
95018 Full Coveraged
95019 Mostly Coveraged
95024 Mostly Coveraged
95026 Mostly Coveraged
95030 Full Coveraged
95031 Full Coveraged
95032 Full Coveraged
95033 Mostly Coveraged
95035 Full Coveraged
95036 Full Coveraged
95041 Full Coveraged
95042 Full Coveraged
95044 Mostly Coveraged
95045 Full Coveraged
95050 Full Coveraged
95051 Full Coveraged
95052 Full Coveraged
95053 Full Coveraged
95054 Full Coveraged
95055 Full Coveraged
95056 Full Coveraged
95060 Mostly Coveraged
95061 Full Coveraged
95062 Full Coveraged
95063 Full Coveraged
95064 Full Coveraged
95065 Full Coveraged
95066 Full Coveraged
95067 Full Coveraged
95070 Full Coveraged
95071 Full Coveraged
95073 Full Coveraged
95075 Mostly Coveraged
95076 Mostly Coveraged
95101 Full Coveraged
95102 Full Coveraged
95103 Full Coveraged
95106 Full Coveraged
95108 Full Coveraged
95109 Full Coveraged
95110 Full Coveraged
95111 Full Coveraged
95112 Full Coveraged
95113 Full Coveraged
95114 Full Coveraged
95115 Full Coveraged
95116 Full Coveraged
95117 Full Coveraged
95118 Full Coveraged
95119 Mostly Coveraged
95120 Full Coveraged
95121 Full Coveraged
95122 Full Coveraged
95123 Full Coveraged
95124 Full Coveraged
95125 Full Coveraged
95126 Full Coveraged
95127 Full Coveraged
95128 Full Coveraged
95129 Full Coveraged
95130 Full Coveraged
95131 Full Coveraged
95132 Full Coveraged
95133 Full Coveraged
95134 Full Coveraged
95136 Full Coveraged
95137 Full Coveraged
95138 Mostly Coveraged
95139 Mostly Coveraged
95141 Full Coveraged
95142 Full Coveraged
95148 Full Coveraged
95150 Full Coveraged
95151 Full Coveraged
95152 Full Coveraged
95153 Full Coveraged
95154 Full Coveraged
95155 Full Coveraged
95156 Full Coveraged
95157 Full Coveraged
95158 Full Coveraged
95159 Full Coveraged
95160 Full Coveraged
95161 Full Coveraged
95164 Full Coveraged
95170 Full Coveraged
95172 Full Coveraged
95173 Full Coveraged
95190 Full Coveraged
95191 Full Coveraged
95192 Full Coveraged
95193 Full Coveraged
95194 Full Coveraged
95196 Full Coveraged
95201 Full Coveraged
95202 Full Coveraged
95203 Full Coveraged
95204 Full Coveraged
95205 Full Coveraged
95206 Mostly Coveraged
95207 Full Coveraged
95208 Full Coveraged
95209 Full Coveraged
95210 Full Coveraged
95211 Full Coveraged
95212 Full Coveraged
95213 Full Coveraged
95215 Mostly Coveraged
95219 Mostly Coveraged
95220 Full Coveraged
95229 Mostly Coveraged
95231 Full Coveraged
95234 Mostly Coveraged
95237 Mostly Coveraged
95240 Mostly Coveraged
95241 Full Coveraged
95242 Mostly Coveraged
95247 Mostly Coveraged
95251 Mostly Coveraged
95253 Full Coveraged
95258 Full Coveraged
95267 Full Coveraged
95269 Full Coveraged
95290 Full Coveraged
95296 Full Coveraged
95297 Full Coveraged
95298 Full Coveraged
95304 Full Coveraged
95307 Full Coveraged
95309 Full Coveraged
95310 Full Coveraged
95315 Mostly Coveraged
95316 Mostly Coveraged
95319 Full Coveraged
95320 Mostly Coveraged
95324 Mostly Coveraged
95325 Mostly Coveraged
95326 Full Coveraged
95327 Mostly Coveraged
95328 Full Coveraged
95330 Mostly Coveraged
95336 Full Coveraged
95337 Full Coveraged
95340 Mostly Coveraged
95341 Mostly Coveraged
95344 Full Coveraged
95347 Mostly Coveraged
95348 Full Coveraged
95350 Full Coveraged
95351 Full Coveraged
95352 Full Coveraged
95353 Full Coveraged
95354 Full Coveraged
95355 Full Coveraged
95356 Full Coveraged
95357 Full Coveraged
95358 Full Coveraged
95365 Mostly Coveraged
95366 Full Coveraged
95367 Full Coveraged
95368 Full Coveraged
95369 Full Coveraged
95370 Full Coveraged
95372 Mostly Coveraged
95373 Full Coveraged
95376 Mostly Coveraged
95377 Full Coveraged
95378 Mostly Coveraged
95379 Mostly Coveraged
95380 Full Coveraged
95381 Full Coveraged
95382 Full Coveraged
95385 Mostly Coveraged
95388 Full Coveraged
95401 Mostly Coveraged
95402 Full Coveraged
95403 Mostly Coveraged
95404 Full Coveraged
95405 Full Coveraged
95406 Mostly Coveraged
95407 Mostly Coveraged
95408 Mostly Coveraged
95409 Full Coveraged
95416 Full Coveraged
95418 Mostly Coveraged
95419 Full Coveraged
95426 Mostly Coveraged
95430 Full Coveraged
95431 Full Coveraged
95433 Full Coveraged
95435 Mostly Coveraged
95436 Mostly Coveraged
95439 Mostly Coveraged
95442 Full Coveraged
95444 Full Coveraged
95452 Full Coveraged
95453 Mostly Coveraged
95461 Full Coveraged
95465 Mostly Coveraged
95472 Full Coveraged
95473 Full Coveraged
95476 Full Coveraged
95481 Mostly Coveraged
95482 Mostly Coveraged
95485 Mostly Coveraged
95487 Full Coveraged
95493 Mostly Coveraged
95501 Full Coveraged
95502 Full Coveraged
95503 Full Coveraged
95518 Full Coveraged
95519 Mostly Coveraged
95521 Full Coveraged
95524 Full Coveraged
95534 Full Coveraged
95536 Mostly Coveraged
95537 Full Coveraged
95540 Mostly Coveraged
95547 Mostly Coveraged
95551 Mostly Coveraged
95558 Mostly Coveraged
95562 Full Coveraged
95564 Full Coveraged
95565 Full Coveraged
95602 Full Coveraged
95603 Full Coveraged
95604 Full Coveraged
95605 Full Coveraged
95606 Full Coveraged
95607 Full Coveraged
95608 Full Coveraged
95609 Full Coveraged
95610 Full Coveraged
95611 Full Coveraged
95612 Mostly Coveraged
95613 Full Coveraged
95614 Mostly Coveraged
95615 Full Coveraged
95616 Full Coveraged
95617 Full Coveraged
95618 Full Coveraged
95619 Full Coveraged
95620 Full Coveraged
95621 Full Coveraged
95623 Mostly Coveraged
95624 Full Coveraged
95625 Mostly Coveraged
95626 Full Coveraged
95627 Mostly Coveraged
95628 Full Coveraged
95630 Full Coveraged
95632 Full Coveraged
95633 Mostly Coveraged
95637 Full Coveraged
95639 Mostly Coveraged
95641 Full Coveraged
95648 Mostly Coveraged
95650 Full Coveraged
95651 Mostly Coveraged
95652 Full Coveraged
95653 Mostly Coveraged
95655 Full Coveraged
95656 Mostly Coveraged
95658 Full Coveraged
95659 Mostly Coveraged
95660 Full Coveraged
95661 Full Coveraged
95662 Full Coveraged
95663 Full Coveraged
95664 Full Coveraged
95667 Full Coveraged
95668 Full Coveraged
95670 Full Coveraged
95671 Full Coveraged
95672 Full Coveraged
95673 Full Coveraged
95677 Full Coveraged
95678 Full Coveraged
95680 Full Coveraged
95682 Full Coveraged
95683 Full Coveraged
95686 Full Coveraged
95687 Mostly Coveraged
95688 Full Coveraged
95690 Full Coveraged
95691 Full Coveraged
95693 Mostly Coveraged
95696 Full Coveraged
95703 Mostly Coveraged
95709 Mostly Coveraged
95712 Mostly Coveraged
95713 Mostly Coveraged
95722 Mostly Coveraged
95736 Mostly Coveraged
95741 Full Coveraged
95742 Full Coveraged
95746 Mostly Coveraged
95747 Full Coveraged
95758 Full Coveraged
95759 Full Coveraged
95762 Full Coveraged
95763 Full Coveraged
95765 Full Coveraged
95776 Mostly Coveraged
95798 Full Coveraged
95799 Full Coveraged
95812 Full Coveraged
95813 Full Coveraged
95814 Full Coveraged
95815 Full Coveraged
95816 Full Coveraged
95817 Full Coveraged
95818 Full Coveraged
95819 Full Coveraged
95820 Full Coveraged
95821 Full Coveraged
95822 Full Coveraged
95823 Full Coveraged
95824 Full Coveraged
95825 Full Coveraged
95826 Full Coveraged
95827 Full Coveraged
95828 Full Coveraged
95829 Full Coveraged
95830 Full Coveraged
95831 Full Coveraged
95832 Full Coveraged
95833 Full Coveraged
95834 Full Coveraged
95835 Full Coveraged
95836 Full Coveraged
95837 Full Coveraged
95838 Full Coveraged
95840 Full Coveraged
95841 Full Coveraged
95842 Full Coveraged
95843 Full Coveraged
95851 Full Coveraged
95852 Full Coveraged
95853 Full Coveraged
95860 Full Coveraged
95864 Full Coveraged
95865 Full Coveraged
95866 Full Coveraged
95867 Full Coveraged
95887 Full Coveraged
95894 Full Coveraged
95899 Full Coveraged
95916 Full Coveraged
95924 Full Coveraged
95926 Full Coveraged
95927 Full Coveraged
95928 Full Coveraged
95929 Full Coveraged
95937 Full Coveraged
95938 Full Coveraged
95940 Mostly Coveraged
95946 Mostly Coveraged
95948 Mostly Coveraged
95949 Full Coveraged
95950 Mostly Coveraged
95951 Mostly Coveraged
95953 Full Coveraged
95957 Mostly Coveraged
95958 Mostly Coveraged
95965 Mostly Coveraged
95966 Mostly Coveraged
95967 Full Coveraged
95969 Full Coveraged
95973 Mostly Coveraged
95975 Full Coveraged
95976 Full Coveraged
95982 Full Coveraged
96001 Full Coveraged
96002 Full Coveraged
96003 Full Coveraged
96007 Full Coveraged
96019 Full Coveraged
96022 Full Coveraged
96049 Full Coveraged
96073 Mostly Coveraged
96079 Full Coveraged
96087 Full Coveraged
96089 Full Coveraged
96095 Mostly Coveraged
96099 Full Coveraged
96140 Full Coveraged
96142 Mostly Coveraged
96143 Full Coveraged
96145 Full Coveraged
96146 Full Coveraged
96148 Full Coveraged
96150 Full Coveraged
96151 Full Coveraged
96152 Full Coveraged
96154 Full Coveraged
96156 Full Coveraged
96157 Full Coveraged
96158 Full Coveraged
96160 Full Coveraged
96161 Full Coveraged
96701 Full Coveraged
96703 Mostly Coveraged
96704 Full Coveraged
96705 Full Coveraged
96706 Full Coveraged
96707 Full Coveraged
96708 Full Coveraged
96709 Full Coveraged
96712 Full Coveraged
96713 Mostly Coveraged
96714 Full Coveraged
96715 Full Coveraged
96716 Full Coveraged
96717 Full Coveraged
96718 Mostly Coveraged
96719 Full Coveraged
96720 Mostly Coveraged
Zip Code Coverage Level Zip Code Coverage Level Zip Code Coverage Level Zip Code Coverage Level Zip Code Coverage Level Zip Code Coverage Level
Page 91

- 191 -
96721 Full Coveraged
96722 Full Coveraged
96725 Mostly Coveraged
96726 Full Coveraged
96727 Full Coveraged
96728 Mostly Coveraged
96729 Full Coveraged
96730 Full Coveraged
96731 Full Coveraged
96732 Full Coveraged
96733 Full Coveraged
96734 Full Coveraged
96738 Full Coveraged
96739 Full Coveraged
96740 Full Coveraged
96741 Full Coveraged
96743 Full Coveraged
96744 Full Coveraged
96745 Full Coveraged
96746 Full Coveraged
96747 Full Coveraged
96749 Full Coveraged
96750 Mostly Coveraged
96751 Full Coveraged
96752 Full Coveraged
96753 Mostly Coveraged
96754 Full Coveraged
96755 Full Coveraged
96756 Full Coveraged
96757 Mostly Coveraged
96759 Full Coveraged
96760 Full Coveraged
96761 Full Coveraged
96762 Full Coveraged
96765 Full Coveraged
96766 Full Coveraged
96767 Full Coveraged
96768 Full Coveraged
96770 Full Coveraged
96771 Mostly Coveraged
96772 Full Coveraged
96778 Full Coveraged
96779 Full Coveraged
96781 Mostly Coveraged
96782 Full Coveraged
96783 Mostly Coveraged
96784 Full Coveraged
96785 Full Coveraged
96786 Full Coveraged
96788 Full Coveraged
96789 Full Coveraged
96790 Full Coveraged
96791 Full Coveraged
96792 Full Coveraged
96793 Full Coveraged
96795 Full Coveraged
96796 Full Coveraged
96797 Full Coveraged
96801 Full Coveraged
96802 Full Coveraged
96803 Full Coveraged
96804 Full Coveraged
96805 Full Coveraged
96806 Full Coveraged
96807 Full Coveraged
96808 Full Coveraged
96809 Full Coveraged
96810 Full Coveraged
96811 Full Coveraged
96812 Full Coveraged
96813 Full Coveraged
96814 Full Coveraged
96815 Full Coveraged
96816 Full Coveraged
96817 Full Coveraged
96818 Full Coveraged
96819 Full Coveraged
96820 Full Coveraged
96821 Full Coveraged
96822 Full Coveraged
96823 Full Coveraged
96824 Full Coveraged
96825 Full Coveraged
96826 Full Coveraged
96827 Full Coveraged
96828 Full Coveraged
96830 Full Coveraged
96835 Full Coveraged
96836 Full Coveraged
96837 Full Coveraged
96838 Full Coveraged
96839 Full Coveraged
96840 Full Coveraged
96841 Full Coveraged
96842 Full Coveraged
96843 Full Coveraged
96844 Full Coveraged
96846 Full Coveraged
96847 Full Coveraged
96848 Full Coveraged
96849 Full Coveraged
96850 Full Coveraged
96853 Full Coveraged
96854 Full Coveraged
96857 Full Coveraged
96858 Full Coveraged
96859 Full Coveraged
96860 Full Coveraged
96861 Full Coveraged
96862 Full Coveraged
96863 Full Coveraged
96898 Full Coveraged
97002 Mostly Coveraged
97005 Full Coveraged
97006 Full Coveraged
97007 Mostly Coveraged
97008 Full Coveraged
97009 Full Coveraged
97013 Full Coveraged
97015 Full Coveraged
97024 Full Coveraged
97027 Full Coveraged
97030 Full Coveraged
97032 Mostly Coveraged
97034 Full Coveraged
97035 Full Coveraged
97036 Full Coveraged
97045 Mostly Coveraged
97048 Full Coveraged
97054 Full Coveraged
97058 Mostly Coveraged
97060 Full Coveraged
97062 Full Coveraged
97068 Full Coveraged
97070 Full Coveraged
97075 Full Coveraged
97076 Full Coveraged
97077 Full Coveraged
97078 Full Coveraged
97080 Full Coveraged
97102 Mostly Coveraged
97107 Full Coveraged
97110 Full Coveraged
97113 Mostly Coveraged
97115 Full Coveraged
97118 Full Coveraged
97123 Full Coveraged
97127 Mostly Coveraged
97132 Full Coveraged
97134 Full Coveraged
97137 Mostly Coveraged
97140 Full Coveraged
97143 Full Coveraged
97145 Full Coveraged
97146 Mostly Coveraged
97201 Full Coveraged
97202 Full Coveraged
97203 Full Coveraged
97204 Full Coveraged
97205 Full Coveraged
97206 Full Coveraged
97207 Full Coveraged
97208 Full Coveraged
97209 Full Coveraged
97210 Full Coveraged
97211 Full Coveraged
97212 Full Coveraged
97213 Full Coveraged
97214 Full Coveraged
97215 Full Coveraged
97216 Full Coveraged
97217 Full Coveraged
97218 Full Coveraged
97219 Full Coveraged
97220 Full Coveraged
97221 Full Coveraged
97222 Full Coveraged
97223 Full Coveraged
97224 Mostly Coveraged
97225 Full Coveraged
97227 Full Coveraged
97228 Full Coveraged
97229 Full Coveraged
97230 Full Coveraged
97231 Mostly Coveraged
97232 Full Coveraged
97233 Full Coveraged
97236 Full Coveraged
97238 Full Coveraged
97239 Full Coveraged
97240 Full Coveraged
97242 Full Coveraged
97251 Full Coveraged
97253 Full Coveraged
97254 Full Coveraged
97255 Full Coveraged
97258 Full Coveraged
97266 Full Coveraged
97267 Full Coveraged
97268 Full Coveraged
97269 Full Coveraged
97271 Full Coveraged
97280 Full Coveraged
97281 Full Coveraged
97282 Full Coveraged
97283 Full Coveraged
97286 Full Coveraged
97290 Full Coveraged
97291 Full Coveraged
97292 Full Coveraged
97293 Full Coveraged
97294 Full Coveraged
97296 Full Coveraged
97298 Full Coveraged
97299 Full Coveraged
97301 Full Coveraged
97302 Full Coveraged
97303 Mostly Coveraged
97304 Mostly Coveraged
97305 Full Coveraged
97306 Full Coveraged
97307 Full Coveraged
97308 Full Coveraged
97309 Full Coveraged
97310 Full Coveraged
97311 Full Coveraged
97312 Full Coveraged
97313 Full Coveraged
97314 Full Coveraged
97322 Mostly Coveraged
97325 Mostly Coveraged
97327 Mostly Coveraged
97335 Mostly Coveraged
97336 Mostly Coveraged
97351 Full Coveraged
97352 Full Coveraged
97355 Mostly Coveraged
97359 Mostly Coveraged
97365 Full Coveraged
97366 Full Coveraged
97369 Full Coveraged
97371 Mostly Coveraged
97376 Mostly Coveraged
97377 Mostly Coveraged
97389 Mostly Coveraged
97391 Mostly Coveraged
97392 Mostly Coveraged
97401 Full Coveraged
97402 Mostly Coveraged
97403 Full Coveraged
97404 Full Coveraged
97405 Full Coveraged
97408 Mostly Coveraged
97420 Mostly Coveraged
97426 Mostly Coveraged
97440 Full Coveraged
97455 Full Coveraged
97472 Mostly Coveraged
97477 Full Coveraged
97478 Mostly Coveraged
97482 Full Coveraged
97501 Full Coveraged
97502 Full Coveraged
97504 Mostly Coveraged
97525 Mostly Coveraged
97527 Mostly Coveraged
97528 Full Coveraged
97533 Mostly Coveraged
97535 Mostly Coveraged
97701 Full Coveraged
97702 Full Coveraged
97708 Full Coveraged
97709 Full Coveraged
98001 Full Coveraged
98002 Full Coveraged
98003 Full Coveraged
98004 Full Coveraged
98005 Full Coveraged
98006 Full Coveraged
98007 Full Coveraged
98008 Full Coveraged
98009 Full Coveraged
98010 Mostly Coveraged
98011 Full Coveraged
98012 Full Coveraged
98013 Mostly Coveraged
98014 Mostly Coveraged
98015 Full Coveraged
98020 Full Coveraged
98021 Full Coveraged
98023 Full Coveraged
98025 Full Coveraged
98026 Full Coveraged
98027 Full Coveraged
98028 Full Coveraged
98029 Full Coveraged
98030 Full Coveraged
98031 Full Coveraged
98032 Full Coveraged
98033 Full Coveraged
98034 Full Coveraged
98035 Full Coveraged
98036 Full Coveraged
98037 Full Coveraged
98038 Full Coveraged
98039 Full Coveraged
98040 Full Coveraged
98041 Full Coveraged
98042 Mostly Coveraged
98043 Full Coveraged
98046 Full Coveraged
98047 Full Coveraged
98050 Full Coveraged
98051 Mostly Coveraged
98052 Full Coveraged
98053 Full Coveraged
98054 Full Coveraged
98055 Full Coveraged
98056 Full Coveraged
98057 Full Coveraged
98058 Full Coveraged
98059 Full Coveraged
98061 Mostly Coveraged
98062 Full Coveraged
98063 Full Coveraged
98064 Full Coveraged
98070 Mostly Coveraged
98071 Full Coveraged
98072 Full Coveraged
98073 Full Coveraged
98074 Full Coveraged
98075 Full Coveraged
98077 Mostly Coveraged
98082 Full Coveraged
98083 Full Coveraged
98089 Full Coveraged
98092 Full Coveraged
98093 Full Coveraged
98101 Full Coveraged
98102 Full Coveraged
98103 Full Coveraged
98104 Full Coveraged
98105 Full Coveraged
98106 Full Coveraged
98107 Full Coveraged
98108 Full Coveraged
98109 Full Coveraged
98111 Full Coveraged
98112 Full Coveraged
98113 Full Coveraged
98114 Full Coveraged
98115 Full Coveraged
98116 Full Coveraged
98117 Full Coveraged
98118 Full Coveraged
98119 Full Coveraged
98121 Full Coveraged
98122 Full Coveraged
98124 Full Coveraged
98125 Full Coveraged
98126 Full Coveraged
98127 Full Coveraged
98129 Full Coveraged
98131 Full Coveraged
98132 Full Coveraged
98133 Mostly Coveraged
98134 Full Coveraged
98136 Full Coveraged
98138 Full Coveraged
98139 Full Coveraged
98141 Full Coveraged
98144 Full Coveraged
98145 Full Coveraged
98146 Full Coveraged
98148 Full Coveraged
98151 Full Coveraged
98154 Full Coveraged
98155 Full Coveraged
98158 Full Coveraged
98160 Mostly Coveraged
98161 Full Coveraged
98164 Full Coveraged
98165 Full Coveraged
98166 Full Coveraged
98168 Full Coveraged
98170 Full Coveraged
98171 Full Coveraged
98174 Full Coveraged
98175 Full Coveraged
98177 Mostly Coveraged
98178 Full Coveraged
98181 Full Coveraged
98184 Full Coveraged
98185 Full Coveraged
98188 Full Coveraged
98190 Full Coveraged
98191 Full Coveraged
98194 Full Coveraged
98195 Full Coveraged
98198 Full Coveraged
98199 Full Coveraged
98201 Full Coveraged
98203 Full Coveraged
98204 Full Coveraged
98205 Full Coveraged
98206 Full Coveraged
98207 Full Coveraged
98208 Full Coveraged
98213 Full Coveraged
98221 Mostly Coveraged
98222 Mostly Coveraged
98225 Full Coveraged
98226 Full Coveraged
98227 Full Coveraged
98228 Full Coveraged
98229 Full Coveraged
98230 Full Coveraged
98231 Full Coveraged
98232 Mostly Coveraged
98233 Full Coveraged
98235 Full Coveraged
98236 Full Coveraged
98238 Full Coveraged
98239 Mostly Coveraged
98240 Full Coveraged
98247 Mostly Coveraged
98248 Mostly Coveraged
98257 Mostly Coveraged
98258 Full Coveraged
98259 Full Coveraged
98260 Full Coveraged
98262 Full Coveraged
98264 Mostly Coveraged
98270 Full Coveraged
98271 Full Coveraged
98272 Full Coveraged
98273 Full Coveraged
98274 Full Coveraged
98275 Full Coveraged
98276 Mostly Coveraged
98277 Full Coveraged
98278 Full Coveraged
98279 Mostly Coveraged
98287 Full Coveraged
98290 Full Coveraged
98291 Full Coveraged
98292 Full Coveraged
98296 Full Coveraged
98303 Full Coveraged
98310 Mostly Coveraged
98311 Mostly Coveraged
98312 Full Coveraged
98314 Mostly Coveraged
98323 Mostly Coveraged
98325 Mostly Coveraged
98327 Full Coveraged
98328 Mostly Coveraged
98329 Mostly Coveraged
98333 Mostly Coveraged
98335 Mostly Coveraged
98337 Mostly Coveraged
98338 Mostly Coveraged
98344 Full Coveraged
98351 Mostly Coveraged
98352 Full Coveraged
98354 Full Coveraged
98360 Full Coveraged
98362 Mostly Coveraged
98367 Mostly Coveraged
98368 Full Coveraged
98371 Full Coveraged
98372 Full Coveraged
98373 Full Coveraged
98374 Mostly Coveraged
98375 Mostly Coveraged
98376 Mostly Coveraged
98378 Mostly Coveraged
98380 Mostly Coveraged
98382 Mostly Coveraged
98383 Mostly Coveraged
98385 Full Coveraged
98388 Full Coveraged
98390 Full Coveraged
98393 Mostly Coveraged
98396 Mostly Coveraged
98401 Full Coveraged
98402 Full Coveraged
98403 Full Coveraged
98404 Full Coveraged
98405 Full Coveraged
98406 Full Coveraged
98407 Full Coveraged
98408 Full Coveraged
98409 Full Coveraged
98411 Full Coveraged
98412 Full Coveraged
98413 Full Coveraged
98415 Full Coveraged
98416 Full Coveraged
98418 Full Coveraged
98421 Full Coveraged
98422 Full Coveraged
98424 Full Coveraged
98430 Full Coveraged
Zip Code Coverage Level Zip Code Coverage Level Zip Code Coverage Level Zip Code Coverage Level Zip Code Coverage Level Zip Code Coverage Level
Page 92

- 192 -
98431 Full Coveraged
98433 Full Coveraged
98438 Full Coveraged
98439 Mostly Coveraged
98442 Full Coveraged
98443 Full Coveraged
98444 Full Coveraged
98445 Full Coveraged
98446 Mostly Coveraged
98447 Full Coveraged
98450 Full Coveraged
98455 Full Coveraged
98460 Full Coveraged
98464 Full Coveraged
98465 Full Coveraged
98466 Full Coveraged
98467 Full Coveraged
98471 Full Coveraged
98477 Full Coveraged
98481 Full Coveraged
98492 Full Coveraged
98493 Full Coveraged
98497 Full Coveraged
98498 Full Coveraged
98499 Full Coveraged
98501 Full Coveraged
98502 Mostly Coveraged
98503 Full Coveraged
98504 Full Coveraged
98505 Full Coveraged
98506 Full Coveraged
98507 Full Coveraged
98508 Full Coveraged
98509 Full Coveraged
98511 Full Coveraged
98512 Full Coveraged
98513 Full Coveraged
98516 Full Coveraged
98522 Full Coveraged
98528 Mostly Coveraged
98532 Full Coveraged
98537 Mostly Coveraged
98538 Full Coveraged
98540 Full Coveraged
98556 Mostly Coveraged
98557 Mostly Coveraged
98558 Mostly Coveraged
98565 Mostly Coveraged
98579 Mostly Coveraged
98593 Mostly Coveraged
98596 Mostly Coveraged
98599 Full Coveraged
98604 Mostly Coveraged
98606 Full Coveraged
98607 Full Coveraged
98609 Full Coveraged
98613 Mostly Coveraged
98617 Full Coveraged
98625 Mostly Coveraged
98626 Mostly Coveraged
98628 Mostly Coveraged
98635 Full Coveraged
98660 Mostly Coveraged
98661 Mostly Coveraged
98662 Mostly Coveraged
98663 Mostly Coveraged
98664 Mostly Coveraged
98665 Mostly Coveraged
98666 Mostly Coveraged
98667 Full Coveraged
98668 Mostly Coveraged
98670 Full Coveraged
98671 Mostly Coveraged
98673 Mostly Coveraged
98675 Mostly Coveraged
98682 Full Coveraged
98683 Full Coveraged
98684 Full Coveraged
98687 Full Coveraged
98801 Full Coveraged
98802 Full Coveraged
98807 Full Coveraged
98828 Mostly Coveraged
98836 Mostly Coveraged
98902 Full Coveraged
98903 Mostly Coveraged
98904 Mostly Coveraged
98907 Full Coveraged
98908 Mostly Coveraged
98909 Full Coveraged
98920 Mostly Coveraged
98933 Mostly Coveraged
98939 Full Coveraged
98944 Mostly Coveraged
98951 Full Coveraged
99005 Mostly Coveraged
99021 Mostly Coveraged
99036 Mostly Coveraged
99037 Mostly Coveraged
99164 Mostly Coveraged
99201 Full Coveraged
99202 Full Coveraged
99203 Full Coveraged
99204 Full Coveraged
99205 Full Coveraged
99206 Full Coveraged
99207 Full Coveraged
99208 Mostly Coveraged
99209 Full Coveraged
99210 Full Coveraged
99211 Full Coveraged
99212 Full Coveraged
99213 Full Coveraged
99214 Full Coveraged
99215 Full Coveraged
99216 Mostly Coveraged
99217 Full Coveraged
99218 Full Coveraged
99220 Full Coveraged
99223 Full Coveraged
99228 Full Coveraged
99251 Full Coveraged
99252 Full Coveraged
99256 Full Coveraged
99258 Full Coveraged
99260 Full Coveraged
99299 Full Coveraged
99320 Mostly Coveraged
99324 Full Coveraged
99336 Mostly Coveraged
99352 Full Coveraged
99353 Full Coveraged
99362 Full Coveraged
99501 Full Coveraged
99502 Mostly Coveraged
99503 Full Coveraged
99504 Mostly Coveraged
99506 Full Coveraged
99507 Full Coveraged
99508 Full Coveraged
99509 Full Coveraged
99510 Full Coveraged
99511 Full Coveraged
99512 Full Coveraged
99513 Full Coveraged
99514 Full Coveraged
99515 Full Coveraged
99517 Full Coveraged
99518 Full Coveraged
99519 Full Coveraged
99520 Full Coveraged
99521 Mostly Coveraged
99522 Full Coveraged
99523 Full Coveraged
99524 Full Coveraged
99567 Mostly Coveraged
99599 Full Coveraged
99629 Full Coveraged
99654 Mostly Coveraged
99695 Full Coveraged
99703 Full Coveraged
99706 Mostly Coveraged
99707 Full Coveraged
99708 Full Coveraged
99710 Full Coveraged
99711 Mostly Coveraged
99716 Mostly Coveraged
99775 Mostly Coveraged
99802 Full Coveraged
99803 Mostly Coveraged
99811 Full Coveraged
99824 Full Coveraged
99850 Mostly Coveraged
Zip Code Coverage Level Zip Code Coverage Level Zip Code Coverage Level Zip Code Coverage Level Zip Code Coverage Level Zip Code Coverage Level
Page 93

P/NO : 3828JD8794F Printed in Korea
LG Twin Tower, 20, Yoido-Dong,
Youngdungpo-Gu, Seoul, 150-721, Korea.
http://www.lge.com
 Loading...