

Page 1
To contact LG Electronics, 24 hours a day,
7 days a week:
1-800-243-0000
Or visit us on the Web at: us.lge.com
Para comunicarse con LG Electronics,
24 horas al día, 7 días a la semana:
GAS RANGE
USER’S GUIDE
Please read this guide
thoroughly before
operating and keep it handy
for reference at all times.
COCINA DE GAZ
GUÍA PARA EL USO
Lea detenidamente estas
instrucciones antes utilizar y
guárdelas como referencia
para el futuro.
CUISINIÈRE À GAZ
1-800-243-0000
O visítenos en la Web en: us.lge.com
Si vous désirez contacter LG Electronics,
24 heures sur 24, 7 jours sur 7 :
1-800-243-0000
Ou visitez notre site Web : us.lge.com
GUIDE D'UTILISATION
Veuillez lire le manuel
d'utilisation avec soin avant
l'utilisation et gardez-le en lieu
sûr pour référence ultérieure.
Models/Modelos/Modèles
LRG30855ST
LRG30355ST
LRG30355SW
LRG30355SB
P/No. MFL33029601
Page 2
INTRODUCTION
IMPORTANT SAFETY INFORMATION
What to Do if You Smell Gas . . . . . . . . . . . . . . . . . . . 3
Anti-Tip Device . . . . . . . . . . . . . . . . . . . . . . . . . . . . . 3
asic Safety Precautions . . . . . . . . . . . . . . . . . . . 4-8
B
OPERATING INSTRUCTIONS
Using the Surface Burners . . . . . . . . . . . . . . . . . 9, 10
ontrol Panel—Convection Models . . . . . . . . . . . . 11
C
Control Panel—Non-Convection Models . . . . . . . . 12
Using the Oven . . . . . . . . . . . . . . . . . . . . . . . . . 13–16
Using the Clock and Timer . . . . . . . . . . . . . . . . . . . 17
Using the Timed Baking and
Roasting Featur
Using the Probe (on convection models) . . . . . 19, 20
Using the Convection Oven
(on some models) . . . . . . . . . . . . . . . . . . . . . . . 21–24
Using the Timed Convection Baking and
Roasting Features (on some models) . . . . . . . . 25, 26
Special Features of Your Oven Control. . . . . . . 26, 27
Using the Sabbath Feature . . . . . . . . . . . . . . . . 28, 29
How to Adjust the Oven Thermostat. . . . . . . . . . . . 30
Baking Tip . . . . . . . . . . . . . . . . . . . . . . . . . . . . . . . . 30
Using the Electric Warming Drawer . . . . . . . . . 31, 32
Using the Self-Cleaning Oven . . . . . . . . . . . . . . 33, 34
es . . . . . . . . . . . . . . . . . . . . . . . 18, 19
CARE AND CLEANING
Care and Cleaning . . . . . . . . . . . . . . . . . . . . . . . . . 35
Burner Caps and Heads . . . . . . . . . . . . . . . . . . . . . 36
Burner Grates . . . . . . . . . . . . . . . . . . . . . . . . . . . . . 37
Cooktop Surface . . . . . . . . . . . . . . . . . . . . . . . . . . . 37
Stainless Steel Surfaces . . . . . . . . . . . . . . . . . . . . . 38
Oven Air Vents . . . . . . . . . . . . . . . . . . . . . . . . . . . . . 38
Control Panel . . . . . . . . . . . . . . . . . . . . . . . . . . . . . . 38
ont Manifold Panel and Knobs. . . . . . . . . . . . . . . 38
Fr
Oven Door . . . . . . . . . . . . . . . . . . . . . . . . . . . . . . . . 39
Oven Bottom . . . . . . . . . . . . . . . . . . . . . . . . . . . . . . 39
Broiler Pan and Grid . . . . . . . . . . . . . . . . . . . . . . . . 40
Oven Shelves and Drawer Racks . . . . . . . . . . . . . . 40
Oven Light Replacement . . . . . . . . . . . . . . . . . . . . .
Removable Warming Drawer. . . . . . . . . . . . . . . . . . 41
40
THANK YOU!
Congratulations on your purchase
and welcome to the LG family.
Your new LG Gas Range
combines precision cooking
features with simple operation and
stylish design. By following the
operating and care instructions
in this manual, your range will
provide you with many years of
reliable service.
TROUBLESHOOTING
Befor
e Calling for Service. . . . . . . . . . . . . . . . . 42–45
WARRANTY
Product Registration Information . . . . . . . . . . . . . 47
2
Page 3
IMPORTANT SAFETY INFORMATION
READ ALL INSTRUCTIONS BEFORE USE
WARNING For your safety, the information in this manual must be
followed to minimize the risk of fire or explosion, electric shock, or to prevent
property damage, personal injury, or death.
WARNING:
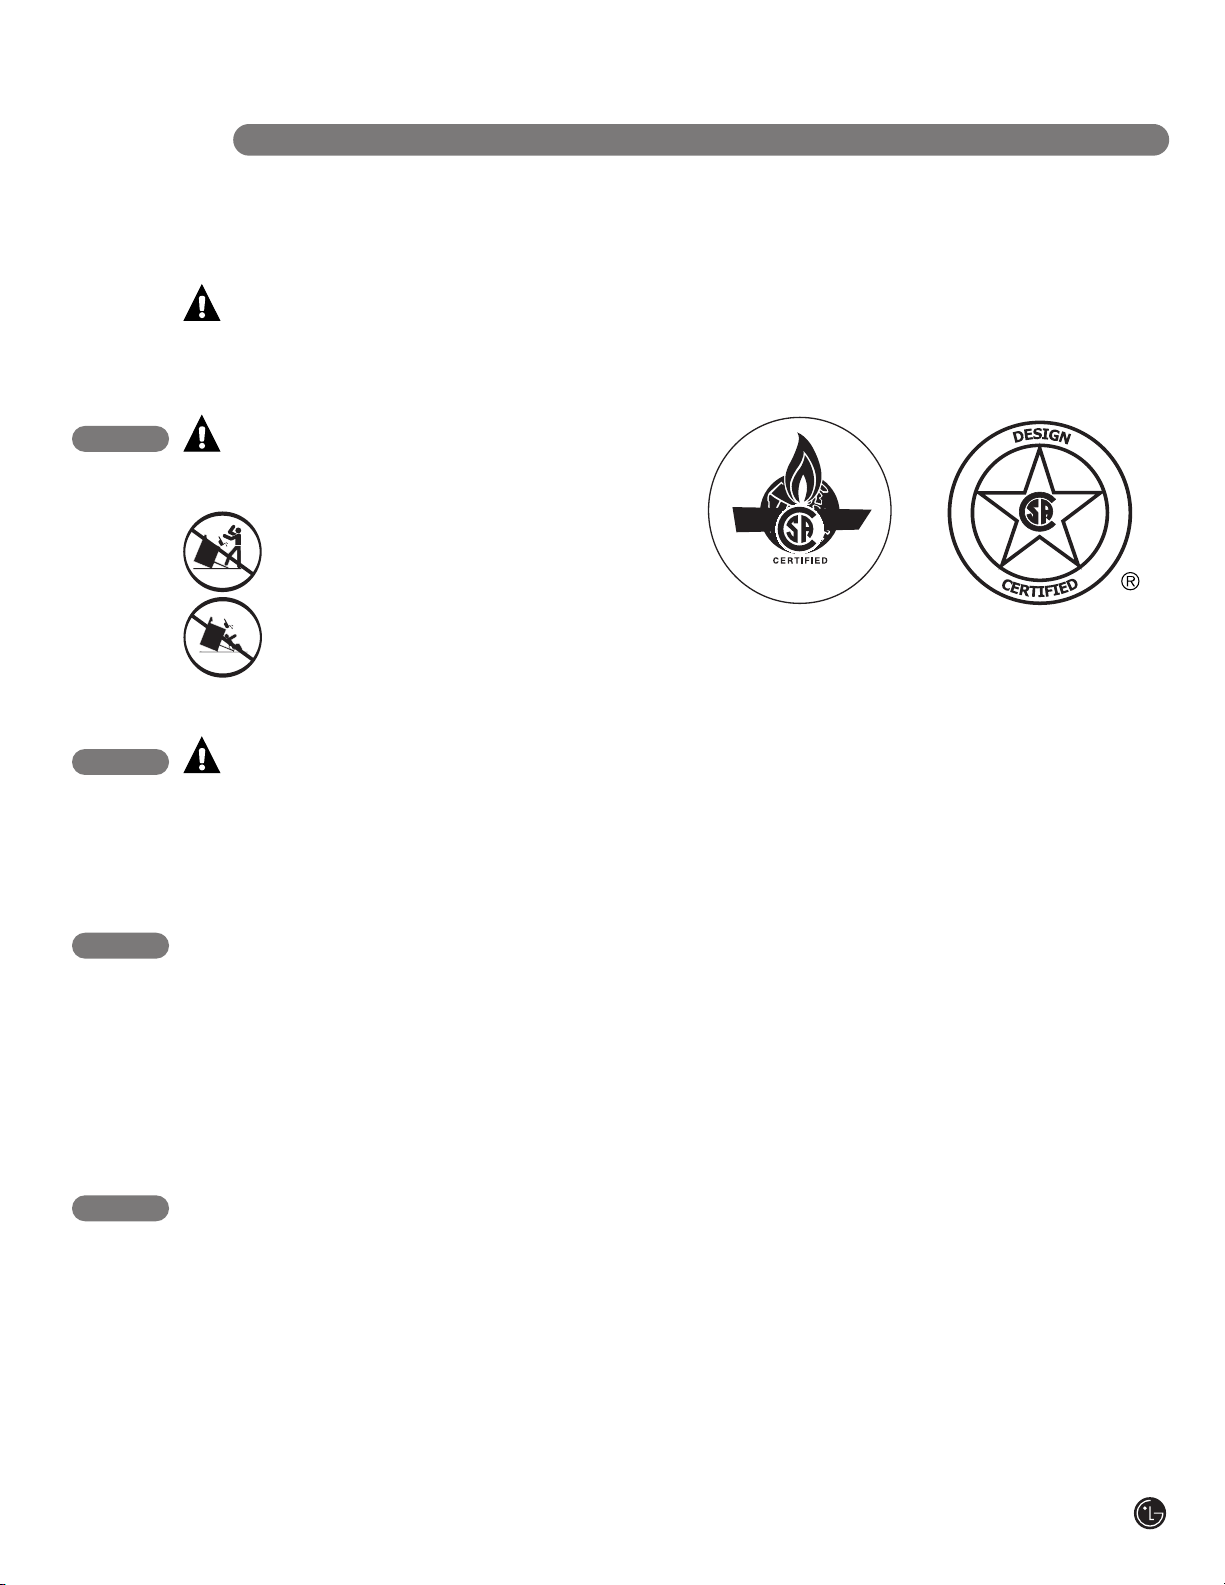
ANTI-TIP DEVICE
ALL RANGES CAN TIP
•
• INJURY TO PERSONS
COULD RESULT
• INSTALL ANTI-TIP DEVICES
PACKED WITH RANGE
• SEE INSTALLATION
INSTRUCTIONS
®
WARNING: If the information in this manual is not followed exactly, a fire
or explosion may result causing property damage, personal injury or death.
• Do not store or use gasoline or other flammable vapors and liquids in the
vicinity of this or any other appliance.
WHAT TO DO IF YOU SMELL GAS
• Do not try to light any appliance.
• Do not touch any electrical switch;
do not use any phone in your building.
• Immediately call your gas supplier
from a neighbor’s phone. Follow the
gas supplier’s instructions.
• If you cannot reach your gas supplier,
call the fir
Installation and service must be
performed by a qualified installer
service agency or the gas supplier.
e department.
ANTI-TIP DEVICE
All ranges can tip and injury could result.
To prevent accidental tipping of the range,
attach it to the wall by installing the supplied
Anti-Tip device.
To check if the device is installed and
engaged properly, carefully tip the range
forwar
and prevent the range from tipping over.
If you pull the range out from the wall for any
reason, make sure the device is properly
d. The Anti-Tip device should engage
engaged when you push the range back
against the wall. If it is not, ther
risk of the range tipping over and causing
injury if you or a child stand, sit or lean on an
open door
Please r
in this manual. Failure to take this precaution
could result in tipping of the range and injury.
.
efer to the Anti-Tip device information
e is a possible
,
3
Page 4

IMPORTANT SAFETY INFORMATION
READ ALL INSTRUCTIONS BEFORE USE
IMPORTANT SAFETY NOTICE
The California Safe Drinking Water and Toxic
Enforcement Act requires the Governor of
California to publish a list of substances known
to the state to cause birth defects or other
reproductive harm, and requires businesses to
warn customers of potential exposure to such
substances.
Gas appliances can cause minor exposure to
four of these substances, namely benzene,
carbon monoxide, formaldehyde and soot,
caused primarily by the incomplete combustion
of natural gas or LP fuels. Properly adjusted
burners, indicated by a bluish rather than a
yellow flame, will minimize incomplete
combustion. Exposure to these substances can
be minimized by venting with an open window
or using a ventilation fan or hood.
SAFETY PRECAUTIONS
Have the installer show you the location of the range gas shut-off valve and how to shut it
off if necessary.
• Have your range installed and properly
grounded by a qualified installer, in
accordance with the Installation Instructions.
Any adjustment and service should be
performed only by qualified gas range
installers or service technicians.
• Do not attempt to repair or replace any
part of your range unless it is specifically
recommended in this manual. All other service
should be referred to a qualified technician.
• Plug your range into a 120-volt grounded
outlet only. Do not remove the round
om the plug. If in doubt
ounding pr
gr
about the grounding of the home electrical
system, it is your personal r
obligation to have an ungr
replaced with a properly grounded,
ee-prong outlet in accordance with
thr
the National Electrical Code. Do not use
an extension cord with this appliance.
• Locate the range out of kitchen traffic path
and out of drafty locations to prevent poor
air circulation.
• Be sure all packaging materials are removed
from the range before operating it to prevent
fire or smoke damage should the packaging
material ignite.
• Be sur
a qualified service technician or installer for
the type of gas (natural or LP) that is to be
used. Y
4
with either type of gas. See the Installation
Instructions.
ong fr
esponsibility and
ounded outlet
e your range is corr
our range can be converted for use
ectly adjusted by
WARNING: These adjustments must
n
be made by a qualified service technician in
accordance with the manufacturer’s
instructions and all codes and r
the authority having jurisdiction. Failure to
follow these instructions could result in serious
injury or property damage. The qualified
agency performing this work assumes
responsibility for the conversion.
• After prolonged use of a range, high floor
temperatures may result and many floor
coverings will not withstand this kind of use.
Never install the range over vinyl tile or
linoleum that cannot withstand such type
of use. Never install it directly over interior
kitchen carpeting.
• Do not leave children alone or unattended
where a range is hot or in operation.
They could be seriously bur
Do not allow anyone to climb, stand or hang
•
on the oven door
cooktop. They could damage the range and
even tip it over
• CAUTION: Items of interest to
children should not be stored in cabinets
above a range or on the backsplash of a
range—children climbing on the range to
reach items could be seriously injured.
, warming drawer
, causing severe personal injury.
equirements of
ned.
, or
Page 5
IMPORTANT SAFETY INFORMATION
READ ALL INSTRUCTIONS BEFORE USE
SAFETY PRECAUTIONS
Flaming grease outside a pan can be put
WARNING: NEVER use this
appliance as a space heater to heat or warm
the room. Doing so may result in carbon
monoxide poisoning and overheating of
the oven.
• Never wear loose fitting or hanging garments
while using the appliance. Be careful when
reaching for items stored in cabinets over the
range. Flammable material could be ignited if
brought in contact with flame or hot oven
surfaces and may cause severe burns.
• Do not store flammable materials in an oven,
a warming drawer, or near a cooktop.
• Do not store or use combustible materials,
gasoline or other flammable vapors and liquids
in the vicinity of this or any other appliance.
• Do not let cooking grease or other flammable
materials accumulate in or near the range.
• Do not use water on grease fires. Never pick
up a flaming pan. Turn the controls off.
Smother a flaming pan on a surface burner
by covering the pan completely with a
well-fitting lid, cookie sheet or flat tray.
Use a multi-purpose dry chemical or
foam-type fire extinguisher.
out by covering it with baking soda or,
if available, by using a multi-purpose dry
chemical or foam-type fire extinguisher.
Flame in the upper oven or lower oven drawer
can be smothered completely by closing the
oven door or drawer and turning the control to
f or by using a multi-purpose dry chemical
of
or foam-type fir
• Let the burner grates and other surfaces cool
before touching them or leaving them where
children can reach them.
• Never block the vents (air openings) of the
range. They provide the air inlet and outlet that
are necessary for the range to operate
properly with correct combustion. Air openings
are located at the rear of the cooktop, at the
top and bottom of the oven door, and at the
bottom of the range under the warming
drawer, or kick panel.
• Large scratches or impacts to glass doors
can lead to broken or shattered glass.
e extinguisher.
SURFACE BURNERS
Use proper pan size—avoid pans that ar
bottoms large enough to cover burner grates. To avoid spillovers, make sure cookware is large enough
to contain the food properly. This will both save cleaning time and prevent hazardous accumulations of
food, since heavy spattering or spillovers left on range can ignite. Use pans with handles that can be
easily grasped and remain cool.
• Always use the LITE position when igniting
the top burners and make sure the burners
have ignited.
• Never leave the surface burners unattended at
high flame settings. Boilovers cause smoking
and greasy spillovers that may catch on fire.
e unstable or easily tipped. Select cookware having flat
• Adjust the top burner flame size so it
does not extend beyond the edge of the
cookware. Excessive flame is hazardous.
5
Page 6

IMPORTANT SAFETY INFORMATION
READ ALL INSTRUCTIONS BEFORE USE
SURFACE BURNERS (continued)
• Use only dry pot holders—moist or damp pot
holders on hot surfaces may result in burns
from steam. Do not let pot holders come near
open flames when lifting cookware. Do not use
a towel or other bulky cloth in place of a pot
holder.
• When using glass cookware, make sure it
is designed for top-of-range cooking.
• To minimize the possibility of burns, ignition
of flammable materials and spillage, turn
cookware handles toward the side or back
of the range without extending over adjacent
burners.
• Carefully watch foods being fried at a high
flame setting.
• Always heat fat slowly, and watch as it heats.
• Do not leave any items on the cooktop. The
hot air from the vent may ignite flammable
items and will increase pressure in closed
containers, which may cause them to burst.
• If a combination of oils or fats will be used
in frying, stir together before heating or
as fats melt slowly
Use a deep fat thermometer whenever
•
possible to prevent overheating fat beyond
the smoking point.
• Use the least possible amount of fat for
effective shallow or deep-fat frying. Filling the
pan too full of fat can cause spillovers when
food is added.
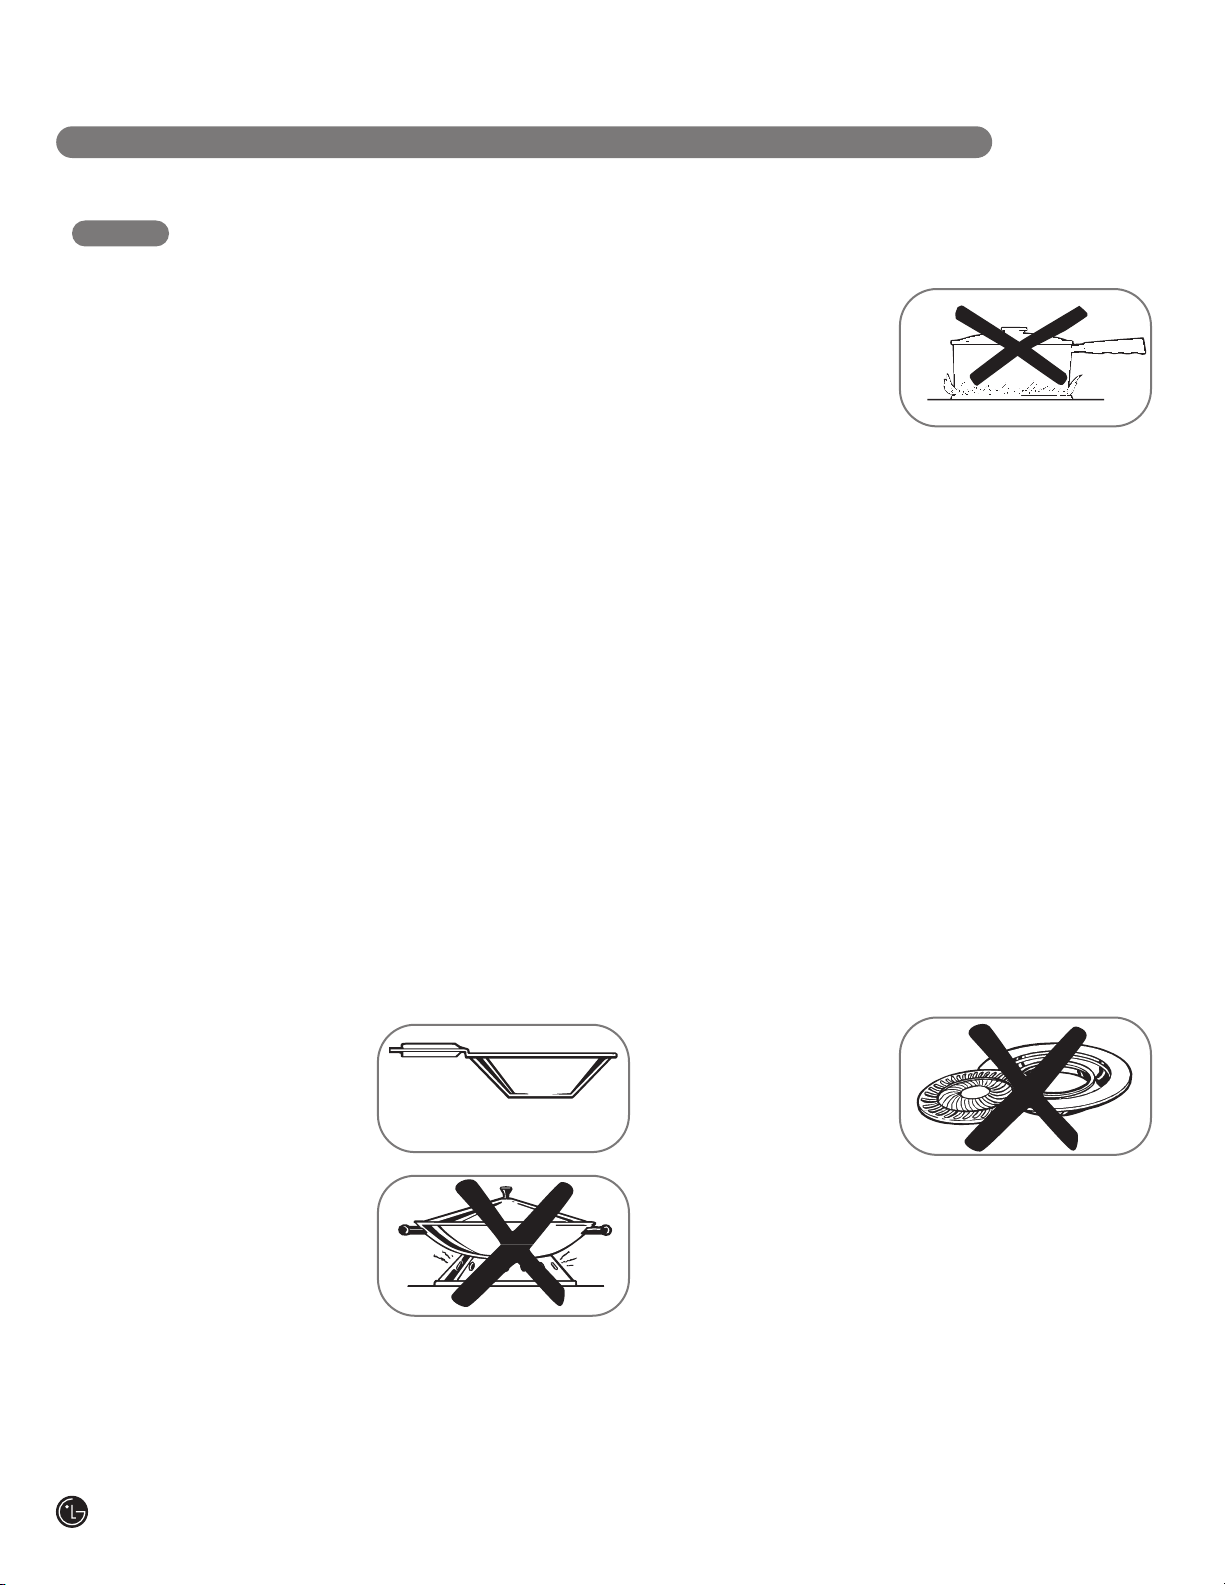
Do not flame foods on the cooktop. If you do
•
flame foods under the hood, turn the fan on.
.
Do not use a wok on the cooking surface if the
•
wok has a round metal ring that is placed over
the burner grate to support the wok. This ring
acts as a heat trap, which may damage the
burner grate and burner head. Also, it may
cause the burner to work improperly. This may
cause a carbon monoxide level above that
allowed by current standards, resulting in a
health hazard.
• Foods for frying should be as dry as possible.
Frost on frozen foods or moisture on fresh
foods can cause hot fat to bubble up and over
the sides of the pan.
• Never try to move a pan of hot fat, especially a
deep fat fryer. Wait until the fat is cool.
• Do not leave plastic items on the cooktop—
they may melt if left too close to the vent.
• Keep all plastics away from the surface
burners.
• To avoid the possibility of a burn, always be
certain that the controls for all burners are
OFF position and all grates are cool
at the
before attempting to remove them.
• If range is located near a window, do not hang
long curtains that could blow over the surface
burners and create a fire hazard.
f the gas to the range
If you smell gas, tur
•
and call a qualified service technician. Never
use an open flame to locate a leak.
• Always turn the surface burner controls off
before removing cookware.
• Do not lift the cooktop. Lifting the cooktop
can lead to damage and improper operation
of the range.
n of
COOK MEAT AND POULTRY THOROUGHLY
Cook meat and poultry thoroughly—meat to at
least an INTERNAL temperatur
poultry to at least an INTERNAL temperature of
180°F. Cooking to these temperatures usually
protects against foodborne illness.
6
e of 160°F and
Page 7

IMPORTANT SAFETY INFORMATION
READ ALL INSTRUCTIONS BEFORE USE
ELECTRIC WARMING DRAWER
• The purpose of the warming drawer is to hold
hot cooked foods at serving temperature.
Always start with hot food; cold food cannot
be heated or cooked in the warming drawer.
• Do not use the drawer to dry newspapers. If
overheated, they can catch on fire.
• Do not leave paper products, plastics, canned
food, or combustible materials in the drawer.
• Never leave jars or cans of fat drippings in or
near your drawer.
• Do not warm food in the drawer for more than
two hours.
•
Do not touch the heating element or the
interior surface of the drawer.
surfaces may be hot enough to burn.
REMEMBER: The inside surface of the drawer
may be hot when the drawer is opened.
• Use care when opening the drawer. Open the
drawer slightly and let hot air or steam escape
before removing or replacing food. Hot air or
steam which escapes can cause burns to
hands, face and/or eyes.
• Do not use aluminum foil to line the warming
drawer. Foil is an excellent heat insulator and
will trap heat beneath it. This will upset the
performance of the drawer and it could
damage the interior finish.
These
SELF-CLEANING OVEN
• Be sure to wipe off excess spillage before
self-cleaning operation.
• Before self-cleaning the oven, remove the
broiler pan, broiler grid, all cookware,
probe and any aluminum foil.
Nickel oven shelves should be removed from
•
the oven before beginning the self-clean cycle.
• Clean only parts listed in this User’s Guide.
• Do not clean the door gasket. The door gasket
is essential for a good seal. Car
taken not to rub, damage or move the gasket.
e should be
• If the self-cleaning mode malfunctions,
turn the oven off and disconnect the power
. Have it serviced by a qualified
supply
technician.
• Do not use oven cleaners. No commercial
oven cleaner or oven liner of any kind should
be used in or around any part of the oven.
Residue from oven cleaners will damage the
inside of the oven when the self-clean cycle
is used.
7
Page 8
IMPORTANT SAFETY INFORMATION
READ ALL INSTRUCTIONS BEFORE USE
OVEN
Stand away from the range when opening the door of a hot oven. The hot air and steam
that escape can cause burns to hands, face and eyes.
• Do not use the oven for a storage area.
Items stored in the oven can ignite.
• Keep the oven free from grease buildup.
• Place the oven shelves in the desired position
while the oven is cool.
• Pulling out the shelf to the stop-lock is a
convenience in lifting heavy foods. It is also
a precaution against burns from touching hot
surfaces of the door or oven walls. The lowest
position is not designed to slide.
WARNING: NEVER cover any
slots, holes or passages in the oven bottom
or cover an entire shelf with materials such
as aluminum foil. Doing so blocks air flow
through the oven and may cause carbon
monoxide poisoning. Aluminum foil linings
may also trap heat, causing a fire hazard.
• Do not heat unopened food containers.
Pressure could build up and the container
could burst, causing an injury.
Do not use aluminum foil anywher
•
oven except as described in this manual.
Misuse could r
to the range.
esult in a fir
e hazar
e in the
d or damage
• When using cooking or roasting bags in the
oven, follow the manufacturer’s directions.
• Do not use your oven to dry newspapers.
If overheated, they can catch fire.
• Use only glass cookware that is
recommended for use in gas ovens.
• Always remove the broiler pan from range
as soon as you finish broiling. Grease left
in the pan can catch fir
without removing the grease from the
broiler pan.
• When broiling, if meat is too close to the
flame, the fat may ignite. Trim excess fat to
prevent excessive flare-ups.
• Make sure the broiler pan is in place correctly
to reduce the possibility of grease fires.
• If you should have a grease fire in the broiler
pan, press the
the oven door closed to contain fire until
it burns out.
• For safety and proper cooking performance,
always bake and broil with the oven door
closed.
e if oven is used
CLEAR/OFF pad, and keep
READ AND FOLLOW THIS SAFETY INFORMATION CAREFULLY.
SAVE THESE INSTRUCTIONS
8
Page 9
OPERATING INSTRUCTIONS
USING THE GAS SURFACE BURNERS
Throughout this manual, features and appearance may vary from your model.
BEFORE LIGHTING A GAS BURNER
• Make sure all burners are in place.
• Make sure all grates on the range are properly
placed before using any burner.
AFTER LIGHTING A GAS BURNER
• Do not operate the burner for an extended
period of time without cookware on the grate.
The finish on the grate may chip without
cookware to absorb the heat.
HOW TO LIGHT A GAS SURFACE BURNER
• Make sure all the
surface burners are
placed in their
respective positions.
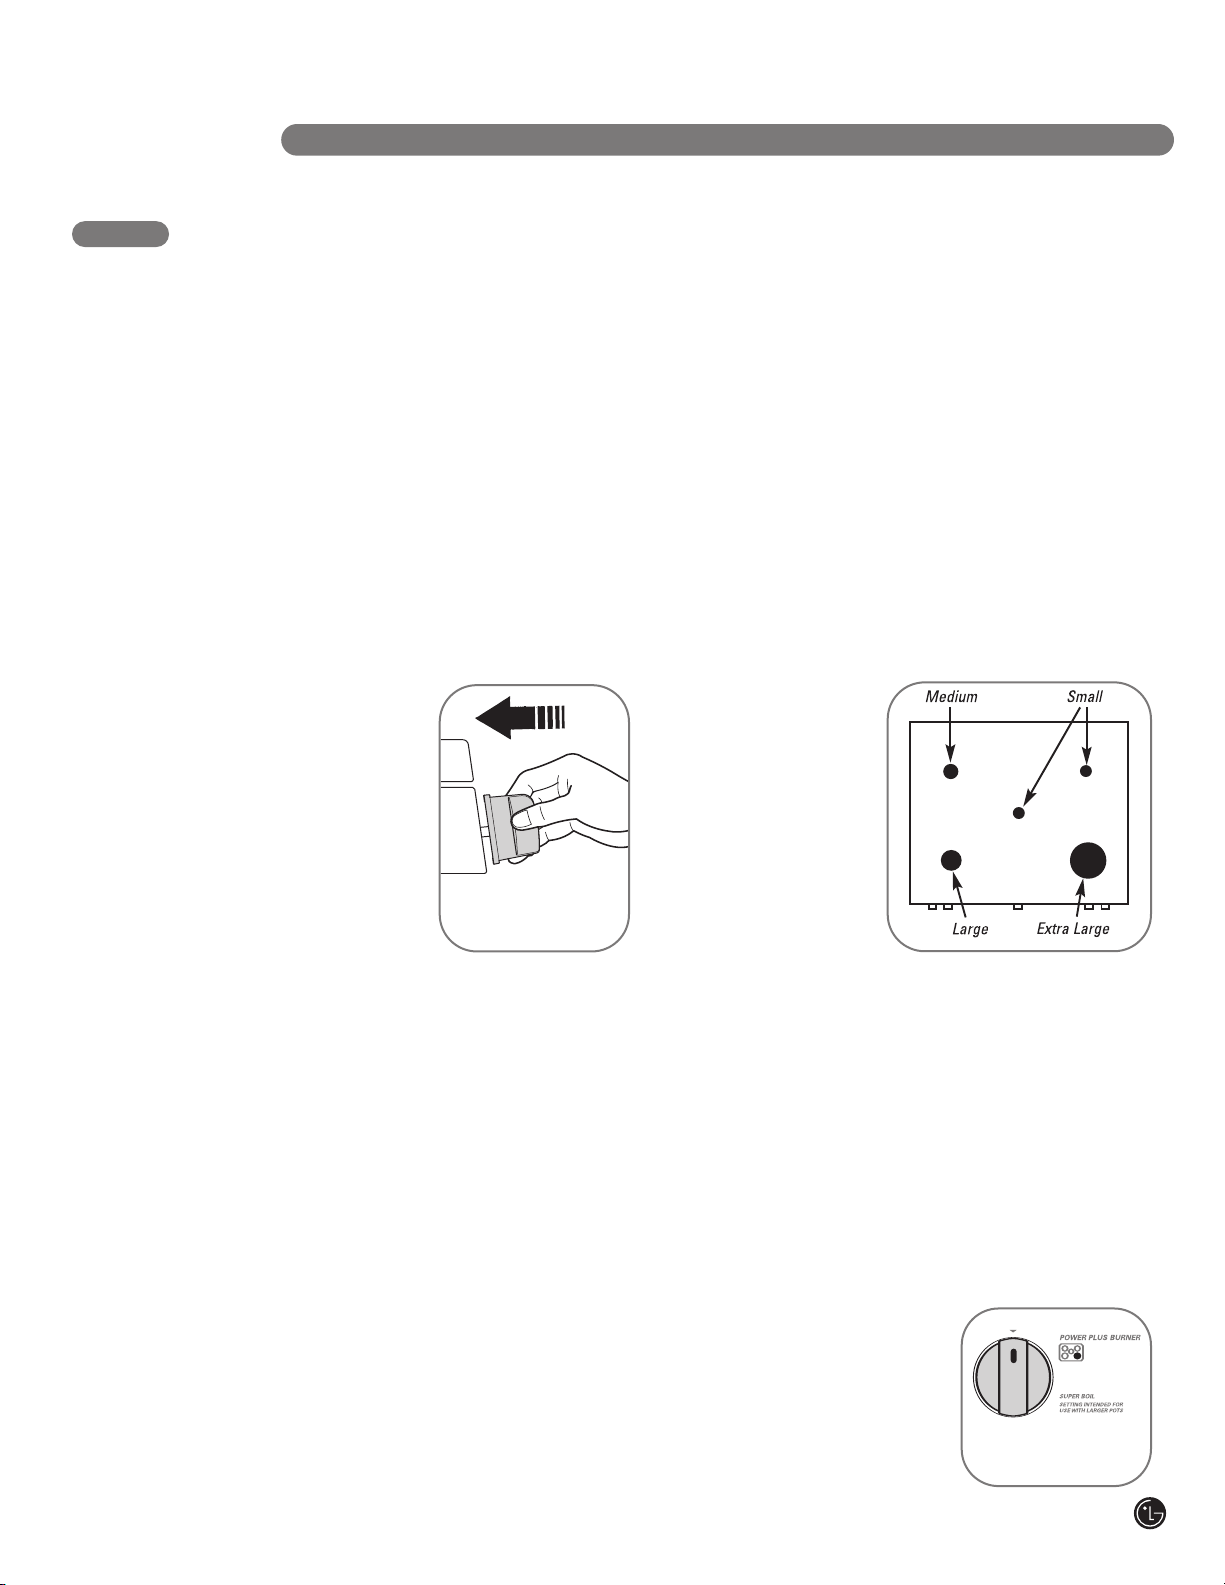
• Push the control knob
in and turn it to
LITE position.
the
• You will hear a little
clicking noise—
the sound of the
electric spark igniting
the burner.
• Turn the knob to adjust the flame size. If the
knob stays at
• When one burner is turned to
burners spark. Do not attempt to disassemble
or clean around any burner while another
burner is on. An electric shock may result,
which could cause you to knock over
hot cookwar
LITE, it will continue to click.
e.
Push the control knob
in and turn it to
the LITE position.
LITE, all the
• Be sure the burners and grates are cool before
you place your hand, a pot holder, cleaning
cloths or other materials on them.
IN CASE OF POWER FAILURE
In case of a power failure, you can light the gas
surface burners on your range with a match.
Hold a lit match to the bur
n the control knob to the
tur
extreme caution when lighting burners this way.
Surface burners in use when an electrical power
failure occurs will continue to operate normally.
ner, then push in and
LITE position. Use
SEALED GAS BURNERS
Your gas range
cooktop has five
sealed gas bur
They offer
convenience,
cleanability and
flexibility to be
used in a wide
range of cooking
applications.
The smallest burners
are in the right rear and
center positions. These bur
down to
provide precise cooking performance for delicate
foods such as sauces or foods that require low
heat for a long cooking time.
The medium (left r
burners are the primary burners for most cooking.
These general-purpose burners can be turned
down fr
cooking needs.
The extra lar
output bur
tur
cooking applications.
This burner is also designed
to quickly bring lar
amounts of liquid to
a boil. It has a special
SUPER BOIL™setting
designed to be used with
cookware 10 inches or
larger in diameter.
om
ned down fr
ners.
ners can be tur
LO for a very low simmer setting. They
ear) and the lar
HI to LO to suit a wide range of
ner (right fr
ge bur
ner. Like the other four burners, it can be
om
HI to LO for a wide range of
ge
ge (left fr
ont) is the maximum
ned
ont)
Extra-large
burners only
9
Page 10
OPERATING INSTRUCTIONS
USING THE GAS SURFACE BURNERS
HOW TO SELECT FLAME SIZE
For safe handling of cookware, never let the
flames extend up the sides of the cookware.
Watch the flame, not the knob, as you reduce
heat. When fast heating is desired, the flame
size on a gas burner should match the
cookware you are using.
TOP-OF-RANGE COOKWARE
Aluminum: Medium-weight cookware is
recommended because it heats quickly
and evenly. Most foods brown evenly in an
aluminum skillet. Use saucepans with tightfitting lids when cooking with minimum amounts
of water.
Cast-Iron: If heated slowly, most skillets will
give satisfactory results.
Enamelware: Under some conditions, the
enamel of some cookware may melt. Follow
cookware manufacturer’s recommendations
for cooking methods.
Flames larger than
the bottom of the
cookware will not
result in faster
heating of the
cookware and could be hazardous.
Glass: There are two types of glass cookware—
those for oven use only and those for top-ofrange cooking (saucepans, coffee and teapots).
Glass conducts heat very slowly.
Heatproof Glass Ceramic: Can be used for
either surface or oven cooking. It conducts heat
very slowly and cools very slowly. Check
cookware manufacturer’s directions to be sure
it can be used on gas ranges.
Stainless Steel: This metal alone has poor
heating properties and is usually combined with
copper, aluminum or other metals for improved
heat distribution. Combination metal skillets
usually work satisfactorily if they are used with
medium heat as the manufacturer recommends.
10
USING A WOK
We recommend that
you use a 14-inch
or smaller flatbottomed wok.
Make sur
bottom sits flat on
the grate. They are
available at your
local r
Only a flat-bottomed
wok should
be used.
Do not use a wok
support ring. Placing the ring over the burner or
grate may cause the burner to work improperly,
resulting in carbon monoxide levels above
allowable standards.
This can be hazardous to your health.
e the wok
etail stor
e.
Use a flat-bottomed wok
STOVE-TOP GRILLS
Do not use stove top
grills on your sealed
gas burners. If you
use the stove top
grill on the sealed
gas burner, it will
cause incomplete
combustion and can result in exposure to carbon
monoxide levels above allowable current
standards.
This can be hazardous to your health.
Page 11
1
9
8
2 3 4 5 6 7
15
12
13
11
16
10
14
OPERATING INSTRUCTIONS
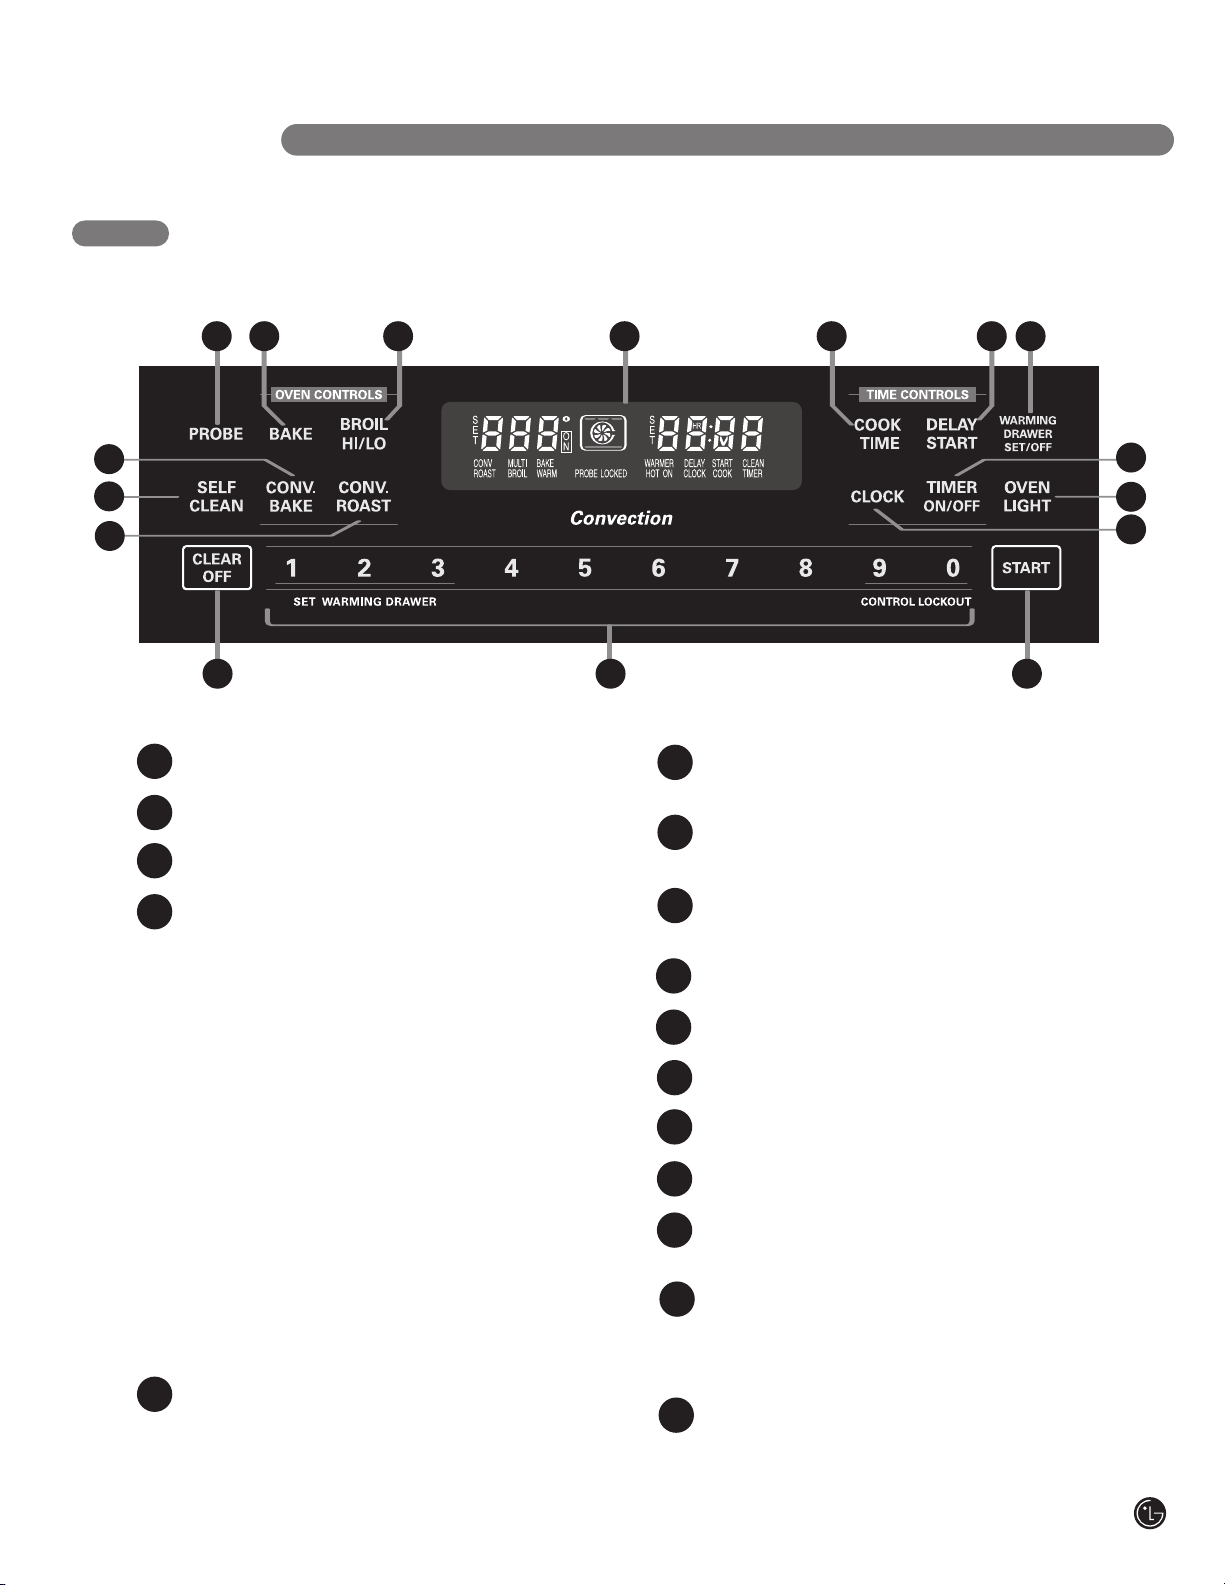
CONTROL PANEL—CONVECTION MODELS
Throughout this manual, features and appearance may vary from your model.
OVEN CONTROL, CLOCK, AND TIMER FEATURES
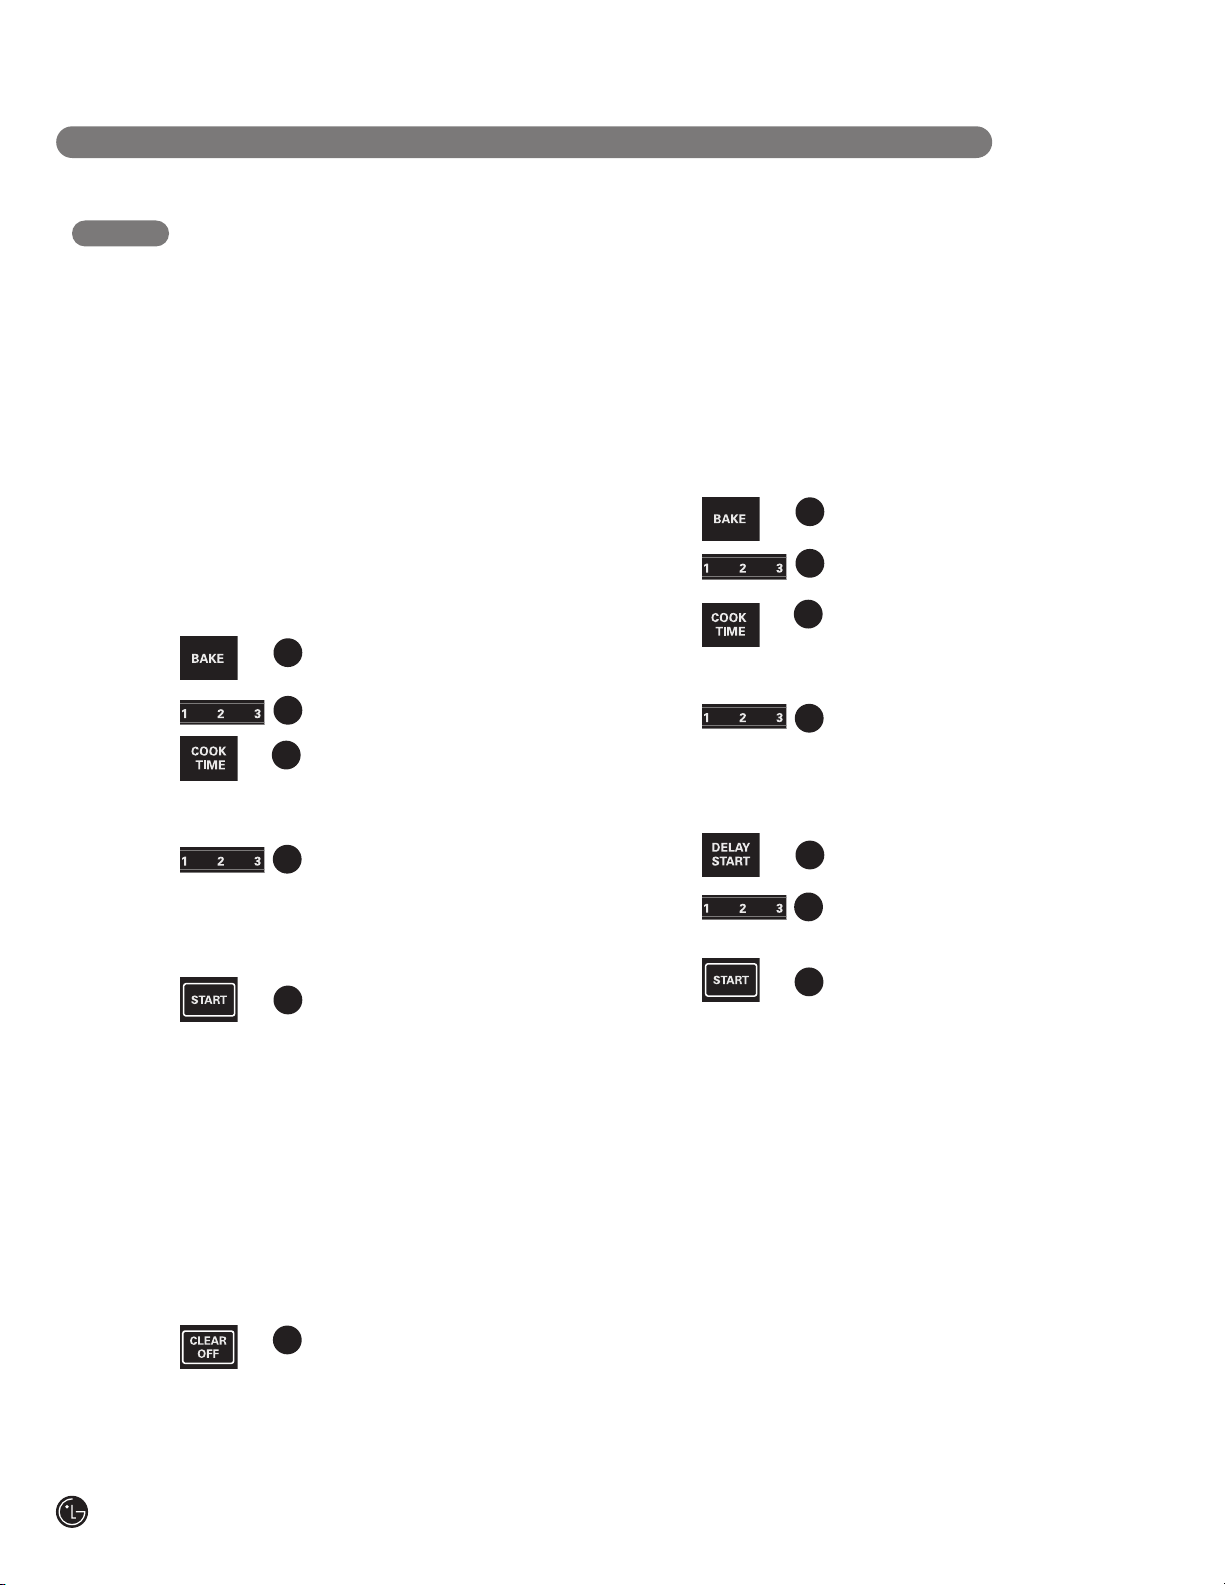
PROBE PAD: Touch this pad to select the probe
1
function.
BAKE PAD: Touch this pad to select the bake
2
function.
BROIL HI/LO PAD: Touch this pad to select the broil
3
function.
DISPLAY: Shows the time of day, oven temperature,
4
whether the oven is in the bake, broil or self-cleaning
mode and the times set for the timer or automatic
oven operations. It will also show warming drawer
settings.
NOTE: If “F– and a number or letter” flash in the
display and the oven control signals, this indicates
a function error code.
If your oven was set for a timed oven operation
and a power outage occurred, the clock and all
ogrammed functions must be r
pr
The time of day will flash in the display when there
has been a power outage. Reset the clock.
If “
Err” appears in the display, you have tried to set a
time or temperatur
Touch
CLEAR/OFF pad and enter a new setting.
Touch the CLEAR/OFF pad. Allow oven to cool for
one hour
error code repeats, disconnect power to range and
call for service.
COOK TIME P
5
the number pads to set the amount of time you want
your food to cook. The oven will shut off when the
cooking time has run out.
. Put oven back into operation. If function
e outside of the control’s limits.
AD:Touch this pad and then touch
eset.
DELAY START PAD: Use along with COOK TIME or
6
SELF CLEAN pads to set the oven to start and stop
automatically at a time you set.
WARMING DRAWER PAD: Touch this pad and then
7
touch number pads 1–3 to use the warming drawer.
See the Using the Electric Warming Drawer section.
SELF CLEAN PAD: Touch this pad to select
8
self-cleaning function. See the
Self-Cleaning Oven
9
CONVECTION BAKE PAD: Press to select baking
with the convection function.
CONVECTION ROAST PAD: Press to select roasting
10
with the convection function.
CLOCK PAD: Press before setting the time of day.
11
TIMER ON/OFF PAD: Press to select the timer
12
feature.
OVEN LIGHT P
13
light on or off.
CLEAR/OFF P
14
operations except the clock, timer and warming
drawer settings.
NUMBER PADS: Use to set any function requiring
15
numbers such as time of day on the clock, timer
oven temperature, internal food temperature, start
time and length of operation for timed baking and
self-cleaning.
START PAD: Must be touched to start any cooking or
16
cleaning function, and warming drawer settings.
AD:Touch this pad to cancel ALL oven
Using the
section.
AD:Touch this pad to tur
n the oven
,
11
Page 12

OPERATING INSTRUCTIONS
1 2 3 4 5 6 7
9
8
10
12
13
11
CONTROL PANEL—NON-CONVECTION MODELS
Throughout this manual, features and appearance may vary from your model.
OVEN CONTROL, CLOCK, AND TIMER FEATURES
SELF CLEAN PAD: Touch this pad to select
1
self-cleaning function. See the
Self-Cleaning Oven
BAKE PAD: Touch this pad to select the
2
bake function.
BROIL HI/LO PAD: Touch this pad to select the
3
broil function.
DISPLAY:Shows the time of day
4
whether the oven is in the bake, broil or self-cleaning
mode and the times set for the timer or automatic
oven operations. It will also show warming drawer
settings.
NOTE: If “F– and a number or letter” flash in the
display and the oven control signals, this indicates
a function error code.
If your oven was set for a timed oven operation
and a power outage occurred, the clock and all
ogrammed functions must be r
pr
The time of day will flash in the display when there
has been a power outage. Reset the clock.
If “
Err” appears in the display, you have tried to set a
time or temperature outside of the control’s limits.
ouch
T
CLEAR/OFF pad and enter a new setting.
Touch the CLEAR/OFF pad. Allow oven to cool for
one hour
error code repeats, disconnect power to range and
call for service.
5
COOK TIME PAD: Touch this pad and then touch
the number pads to set the amount of time you want
your food to cook. The oven will shut off when the
cooking time has run out.
. Put oven back into operation. If function
section.
Using the
, oven temperature,
eset.
DELAY START PAD: Use along with COOK TIME or
6
SELF CLEAN pads to set the oven to start and stop
automatically at a time you set.
WARMING DRAWER PAD: Touch this pad and then
7
touch number pads 1–3 to use the warming drawer.
See the Using the Electric Warming Drawer section.
CLOCK PAD: Press before setting the time of day.
8
TIMER ON/OFF PAD: Press to select the timer
9
feature.
OVEN LIGHT P
10
light on or of
CLEAR/OFF PAD: Touch this pad to cancel ALL oven
11
operations except the clock, timer and warming
drawer settings.
NUMBER P
12
numbers such as time of day on the clock, timer,
oven temperatur
time and length of operation for timed baking and
self-cleaning.
START PAD: Must be touched to start any cooking or
13
cleaning function, and warming drawer settings.
AD:Touch this pad to turn the oven
f.
ADS:
Use to set any function r
e, inter
equiring
nal food temperature, start
12
Page 13
USING THE OVEN
E
D
C
B
A
R
OPERATING INSTRUCTIONS
BEFORE YOU BEGIN
The shelves have
stop-locks, so that when
placed correctly on the
shelf supports (A through
E), they will stop before
coming completely out,
and will not tilt.
When placing and
removing cookware,
pull the shelf out to the
bump on the shelf support.
To remove a shelf, pull it
toward you, tilt the front
end up and pull it out.
To replace, place the end
of the shelf (stop-locks) on the
support, tilt up the front and push the shelf in.
NOTE: The shelf is not designed to slide out at
the special low shelf (R) position.
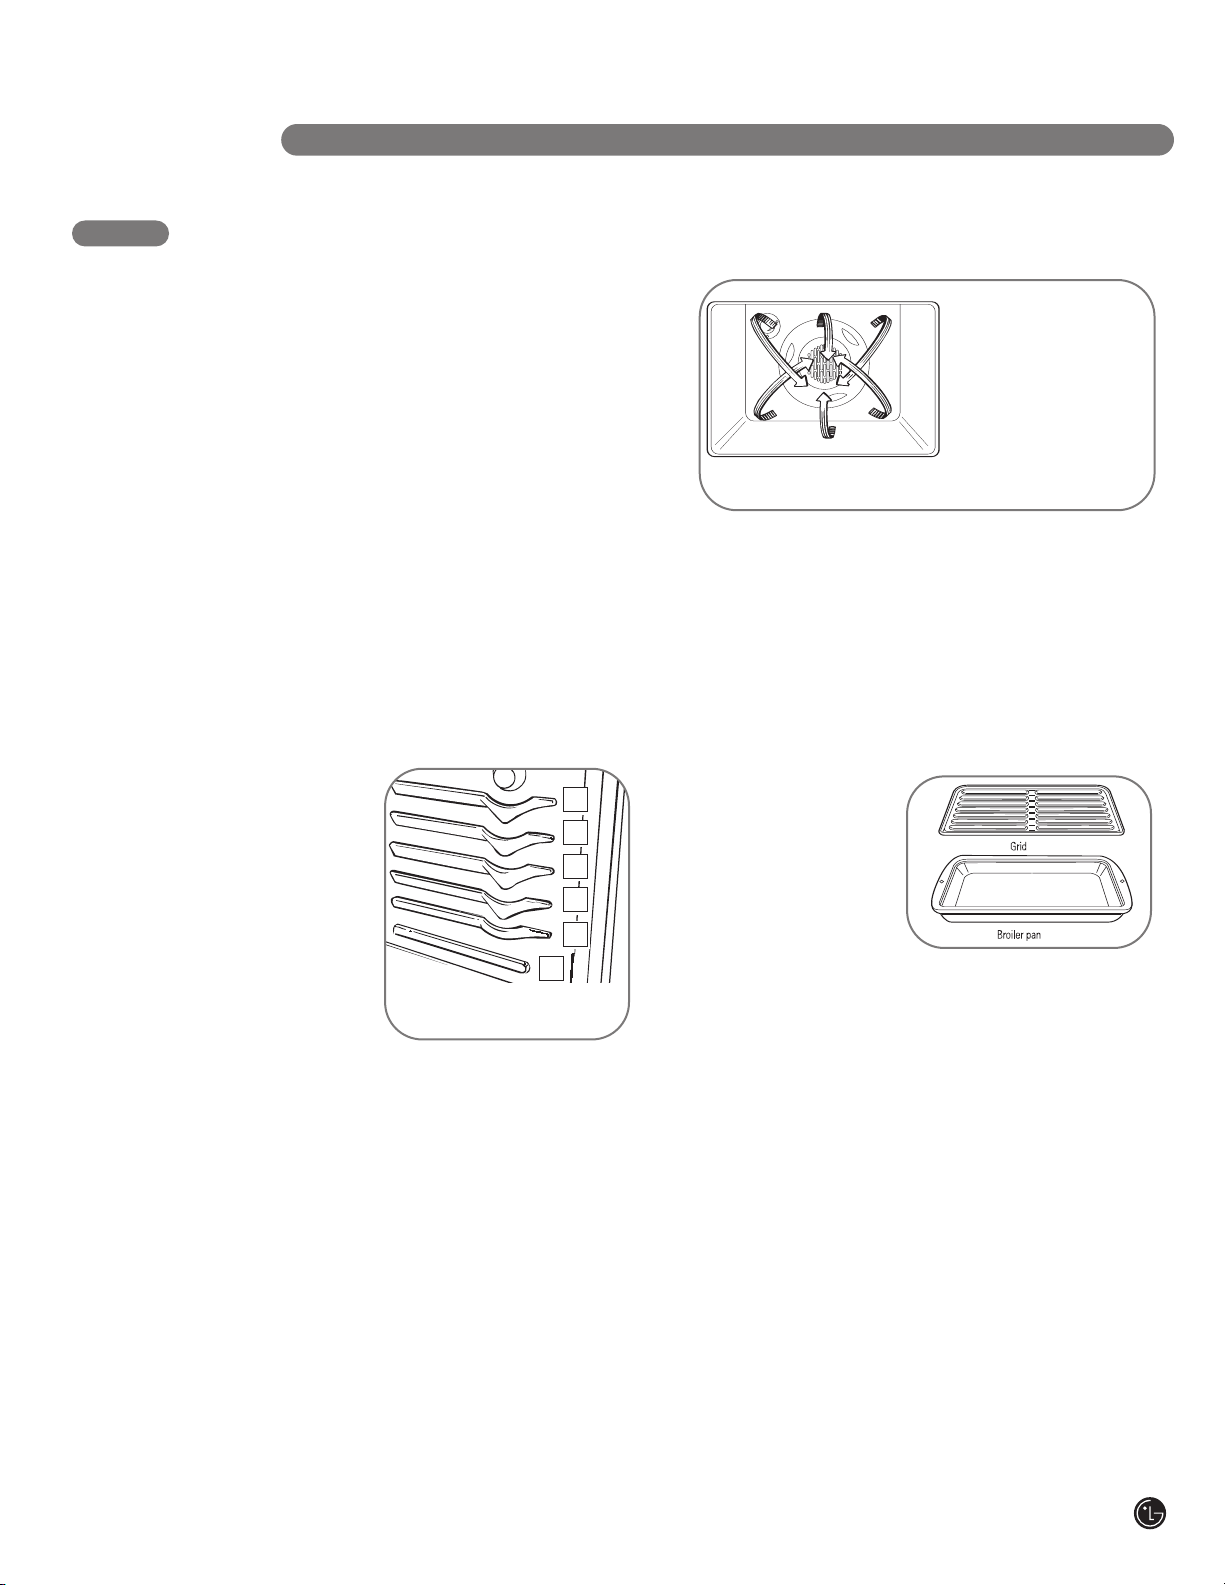
The oven has 6 shelf
positions, including a
special low shelf
position (R) for extra
large items such as a
large turkey.
OVEN VENT
Your oven is vented
through ducts at the rear
of the range. Do not block
these ducts when cooking
in the oven—it is important
that the flow of hot air fr
the oven and fresh air to
the oven burner be
uninterrupted. A
touching the vent
openings or nearby
surfaces during oven or
broiler operation—they may become hot.
Handles of pots and pans on the cooktop may
•
become hot if left too close to the vent.
• Do not leave plastic or flammable items on the
cooktop—they may melt or ignite if left too
close to the vent.
• Do not leave closed containers on the
cooktop. The pr
may incr
• Metal items will become very hot if they are
left on the cooktop, and could cause burns.
void
ease, which may cause them to burst.
om
Plastic items on the
cooktop may melt
if left too close to the
vent. V
and location vary
e in closed containers
essur
ent appearance
POWER OUTAGE
CAUTION: Do not make any
attempt to operate the electric ignition oven
during an electrical power failure.
The oven or broiler cannot be lit during a
power failure. Gas will not flow unless the
glow bar is hot.
If the oven is in use when a power failure
occurs, the oven burner shuts off and cannot be
re-lit until power is restored. This is because the
flow of gas is automatically stopped and will not
resume when power is restored until the glow
bar has reached operating temperature.
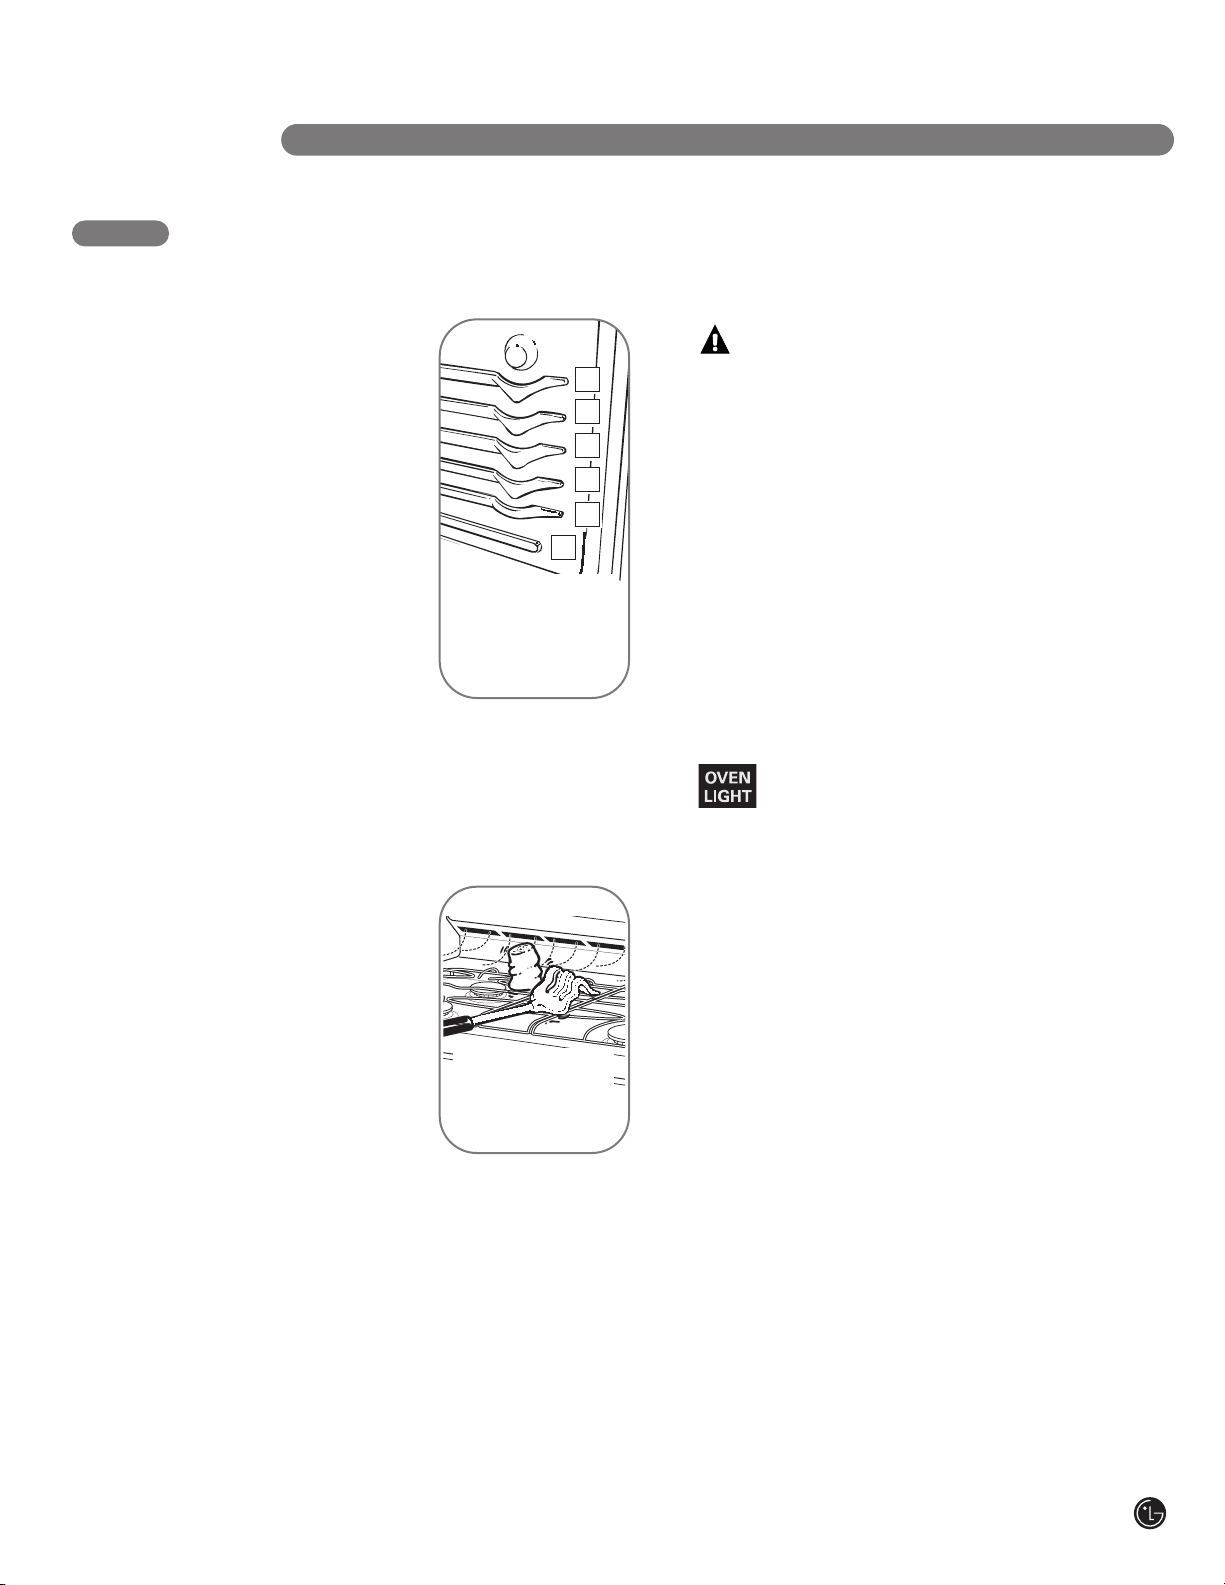
OVEN LIGHT
Touch the OVEN LIGHT pad on the
control panel to turn the light on or off.
.
13
Page 14

OPERATING INSTRUCTIONS
E
D
C
B
A
R
USING THE OVEN
To avoid possible burns, place the shelves in the desired position before you turn the oven on.
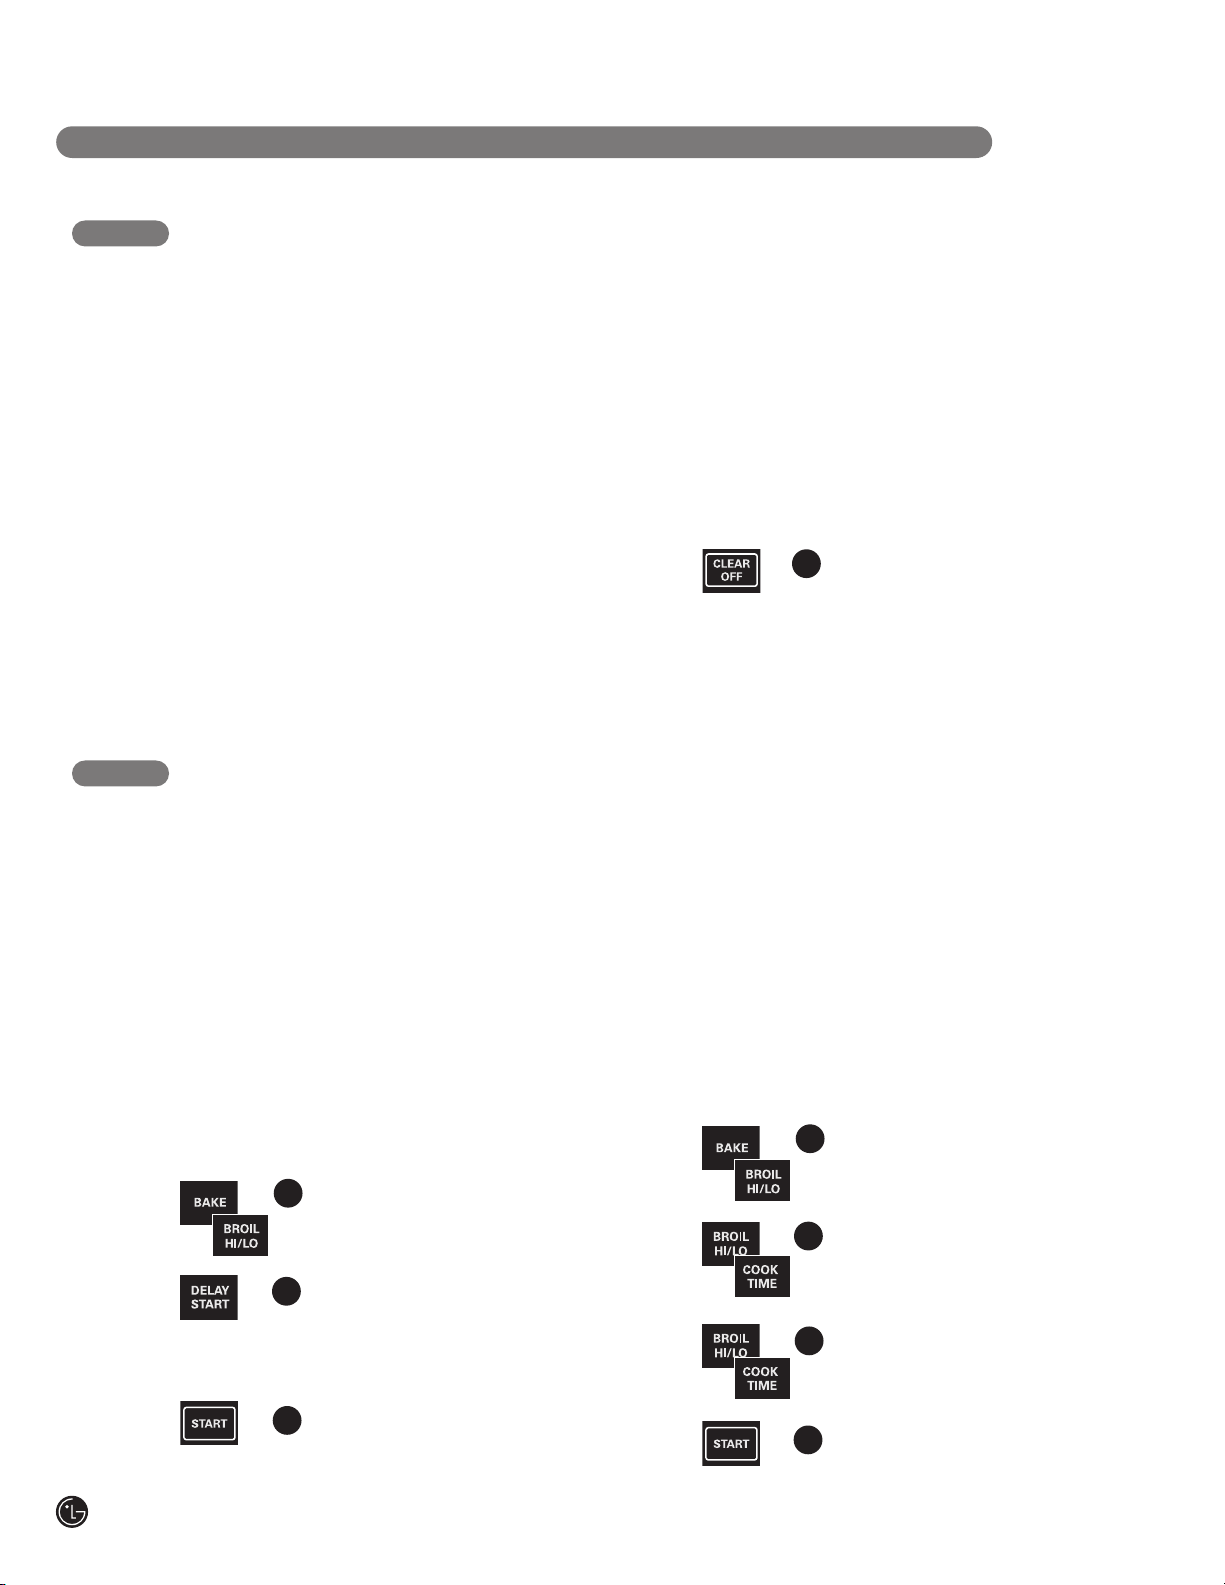
HOW TO SET THE OVEN FOR BAKING
OR ROASTING
Your oven is not designed for open-door cooking.
1
Touch the BAKE pad.
Touch the
2
desired temperature.
3
Touch the
The word
ON and 100° will be displayed.
As the oven heats up, the display will show the
changing temperatur
the temperature you set, a tone will sound.
To change the oven temperature during BAKE
cycle, press the BAKE pad and then the number
pads to get the new temperature.
Check food for doneness at
4
minimum time on recipe. Cook
longer if necessary.
5
Touch the
cooking is complete.
number pads to set the
START pad.
e. When the oven reaches
CLEAR/OFF pad when
PREHEATING AND PAN PLACEMENT
Preheat the oven if the recipe calls for it.
To preheat, set the oven at the correct
temperature. Preheating is necessary when
convection baking and for good results when
baking cakes, cookies, pastry and breads.
Baking results will be better if baking pans are
centered in the oven as much as possible. Pans
should not touch each other or the walls of the
oven. If you need to use two shelves, stagger
the pans so one is not directly above the other,
and leave approximately 1
from the front, back and sides of the wall.
Type of Food Shelf Position
Frozen pies (on cookie sheet) B or C
Angel food cake, bundt or pound cakes A
Biscuits, muffins, brownies, cookies, C
cupcakes, layer cakes, pies
Casseroles B or C
Roasting R or A
1
⁄2″ between pans,
14
The oven has a special
low shelf position (R)
just above the oven
bottom. Use it when
cooking extra large
items, such as a large
turkey. The shelf is
NOT designed to slide
out at this position.
OVEN MOISTURE
As your oven heats up, the temperature change
of the air in the oven may cause water droplets
to form on the door glass. These dr
harmless and will evaporate as the oven
oplets ar
e
continues to heat up.
ALUMINUM FOIL
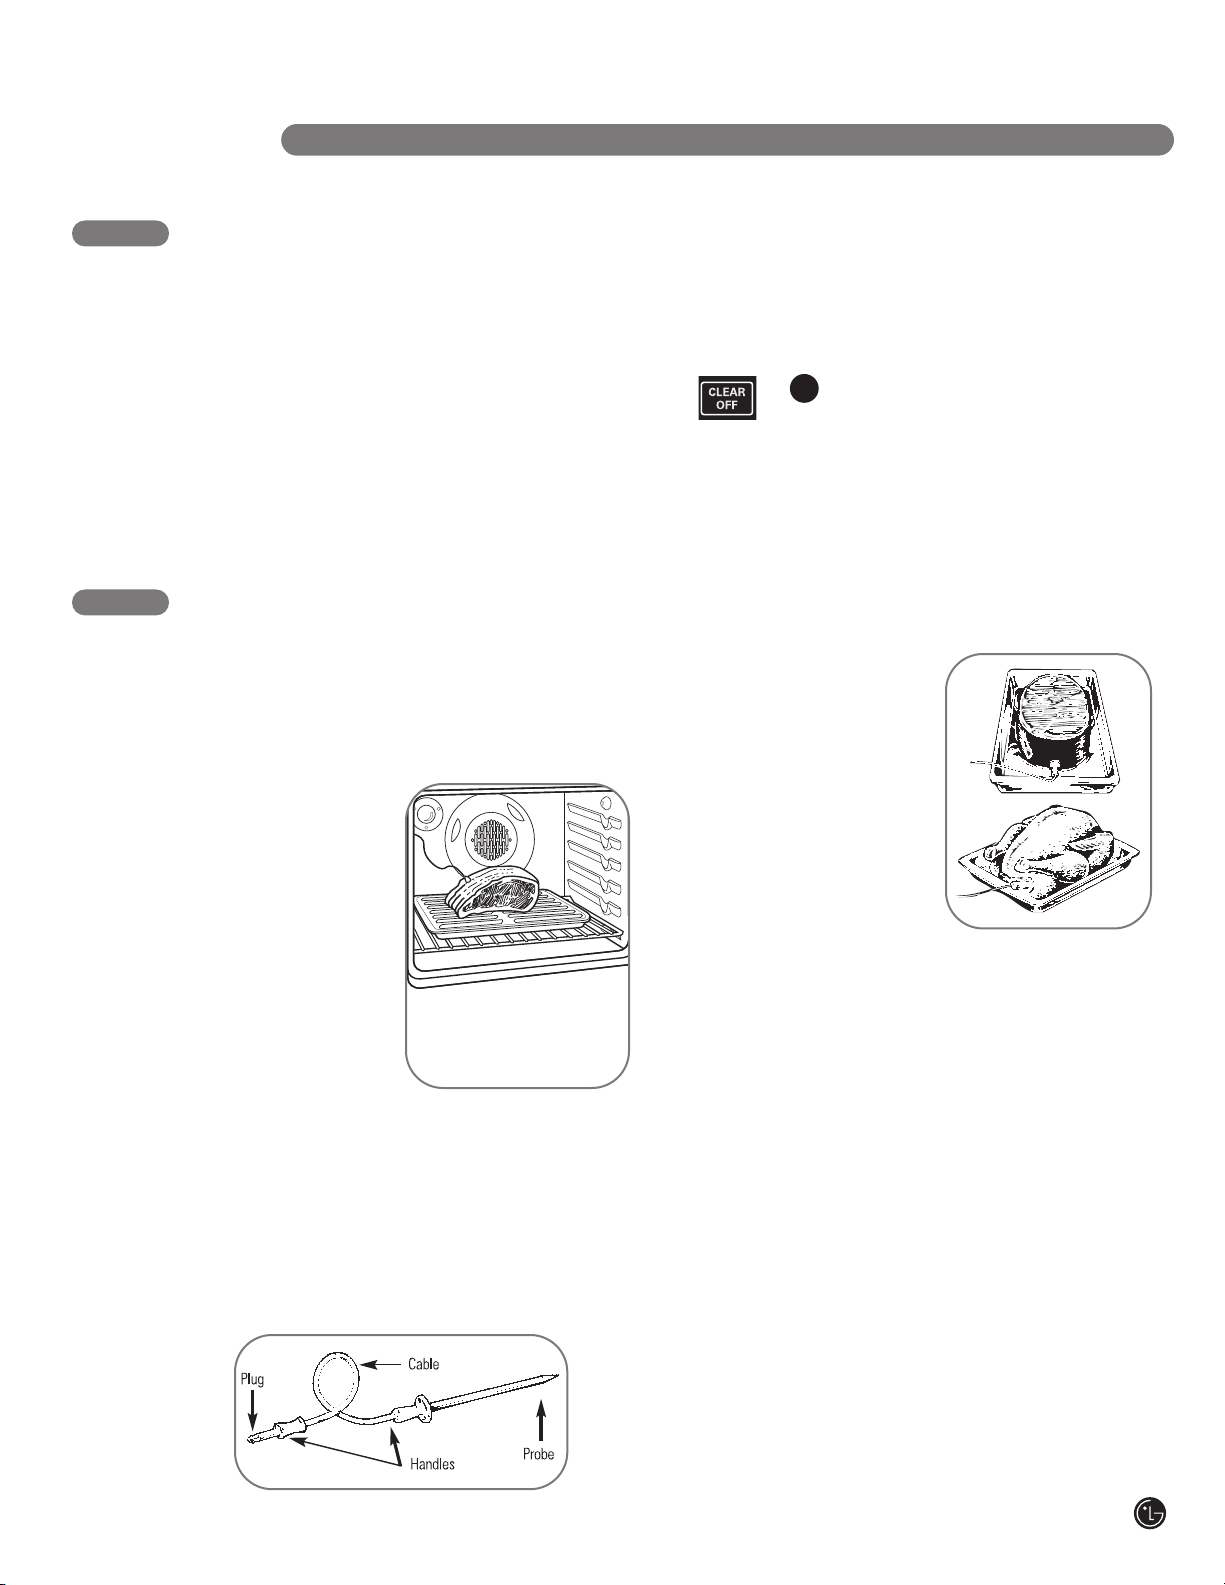
Never cover the oven
bottom with aluminum
foil.
You can use aluminum
foil to line the br
and broiler grid.
However, you must mold
the foil tightly to the grid
and cut slits in it just like the grid.
Aluminum foil may also be used to catch a
spillover. To do so, place a small sheet of foil
on a lower shelf several inches below the food.
Never entirely cover a shelf with aluminum foil.
This will disturb the heat cir
in poor baking.
oiler pan
Cut slits in the foil just
like in the grid
culation and r
esult
Page 15
OPERATING INSTRUCTIONS
USING THE OVEN
HOW TO SET THE OVEN FOR BROILING
Your oven is not designed for open-door cooking.
1
Place the meat or fish on the
broiler grid in the broiler pan.
Follow suggested shelf positions
2
Broiling Guide.
in the
3
The oven door must be closed
during broiling.
4
ouch the
T
for
Broil,
pad again.
Touch the
5
BROIL
HI Broil. T
touch the BROIL HI/LO
START pad.
HI/LO
o change to
pad once
LO
Serve the food
immediately, and leave
the pan outside the
oven to cool during the
meal for easiest
cleaning.
Use
LO Broil to cook
foods such as poultry
or thick cuts of meat
thoroughly without
over-browning them.
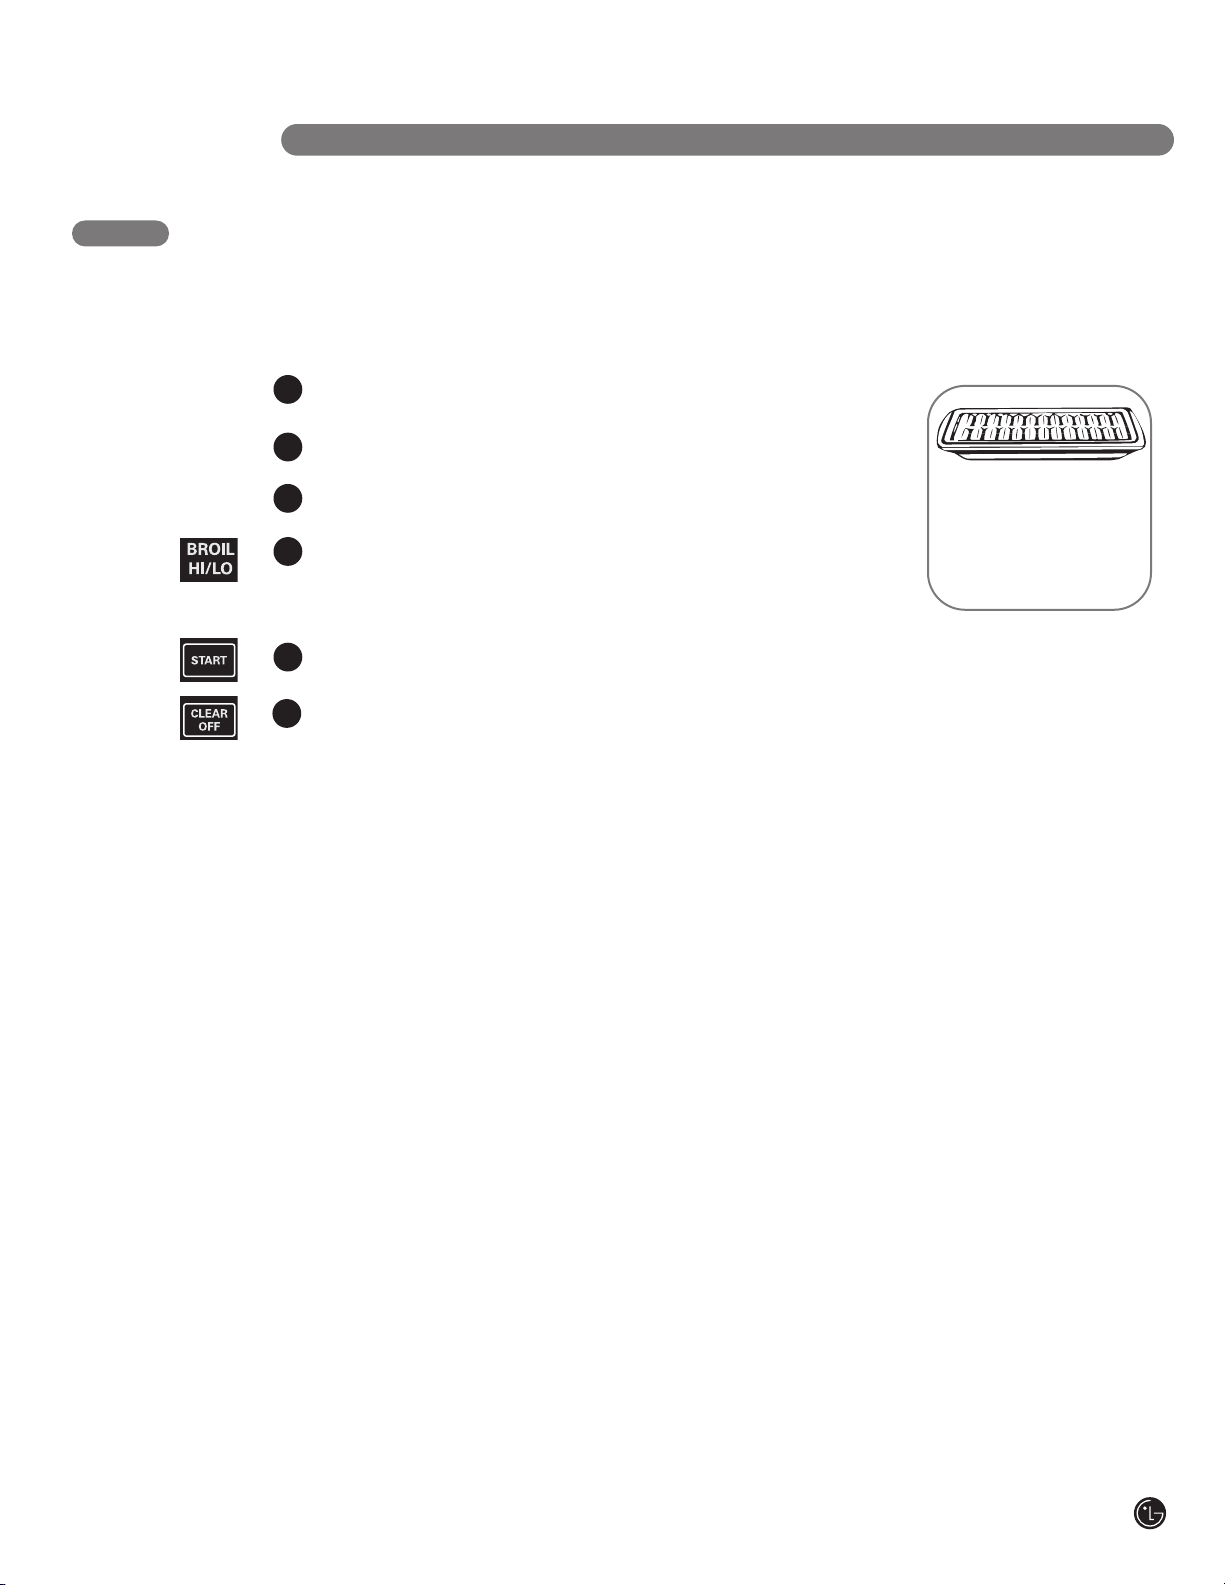
Always use the broiler pan
and grid that came with
your oven.
It is designed to minimize
smoking and spattering by
trapping juices in the shielded
lower part of the pan.
When broiling is finished, touch
6
the
CLEAR/OFF pad.
15
Page 16
OPERATING INSTRUCTIONS
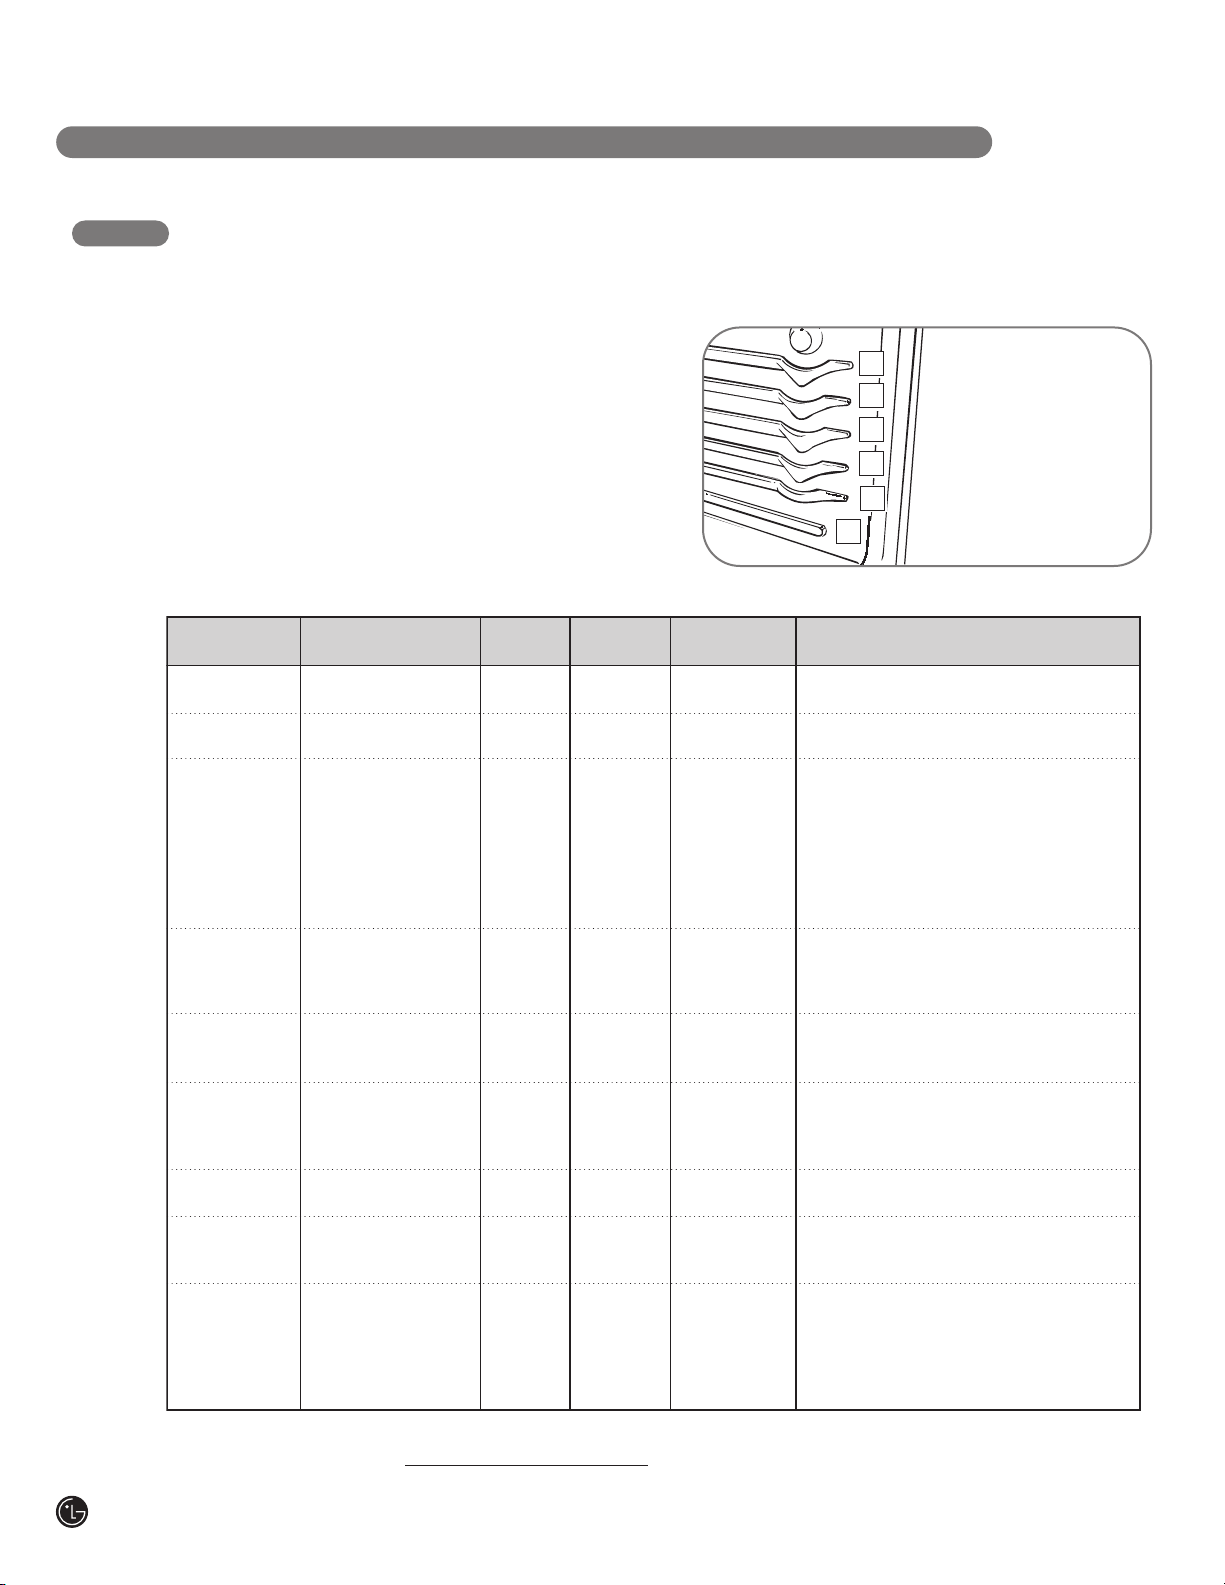
Food
Quantity and/or
Thickness
Shelf*
Position
First Side
Time (min.)
Second Side
Time (min.)
Comments
Bacon
Ground Beef
Well Done
Beef Steaks
Rare
Medium
Well Done
Rare
Medium
Well Done
Chicken
Lobster Tails
Fish Fillets
Ham Slices
(precooked)
Pork Chops
Well Done
Lamb Chops
Medium
Well Done
Medium
Well Done
Arrange in single layer.
Space evenly. Up to 8 patties take
about the same time.
Steaks less than 1” thick cook through
before browning.
Pan frying is recommended.
Remove fat.
Brush each side with melted butter.
Broil skin-side-down first.
Cut through back of shell. Spread open.
Brush with melted butter before
broiling and after half of broiling time.
Handle and turn very carefully. Brush
with lemon butter before and during
cooking, if desired. Preheat broiler to
increase browning.
Increase time 5 to 10 minutes per side
for 1
1
/2” thick or home-cured ham.
Remove fat.
Remove fat.
1
/2lb.
(about 8 thin slices)
1 lb. (4 patties)
1
/2to3/4” thick
1” thick
1 to 1
1
/2lbs.
1
1
/2” thick
2 to 2
1
/2lbs.
1 whole
2 to 2
1
/2lbs.,
split lengthwise
4 bone-in breasts
2–4
6 to 8 oz. each
1
/4to1/2” thick
1” thick
1
/2” thick
2 (
1
/2” thick)
2 (1” thick)
about 1 lb.
2 (1” thick) about
10 to 12 oz.
2 (1
1
/2” thick) about
1 lb.
C
C
C
C
C
C
C
C
B
B
C
D
C
D
D
D
D
D
D
D
4
10
9
12
13
10
12-15
25
30-35
25-30
13-16
6
8
6
10
15
6
10
10
17
3
7-10
7
5-6
8-9
6-7
10-12
16-18
15-20
10-15
Do not turn
over.
6
8
6
8
8
4-7
10
4-6
12-14
E
D
C
B
A
R
USING THE OVEN
BROILING GUIDE
The size, weight, thickness, starting temperature
and your preference of doneness will affect
broiling times. This guide is based on meats
at refrigerator temperature.
The oven has 6 shelf
positions.
16
† The U.S. Department of Agriculture says “Rare beef is popular, but you should know that cooking it to only 140°F. means some food poisoning
organisms may sur
* See illustration for description of shelf positions.
vive.”
(Source:
Safe F
ood Book,
Your Kitchen Guide, USDA Rev. June 1985.)
Page 17
OPERATING INSTRUCTIONS
USING THE CLOCK AND TIMER
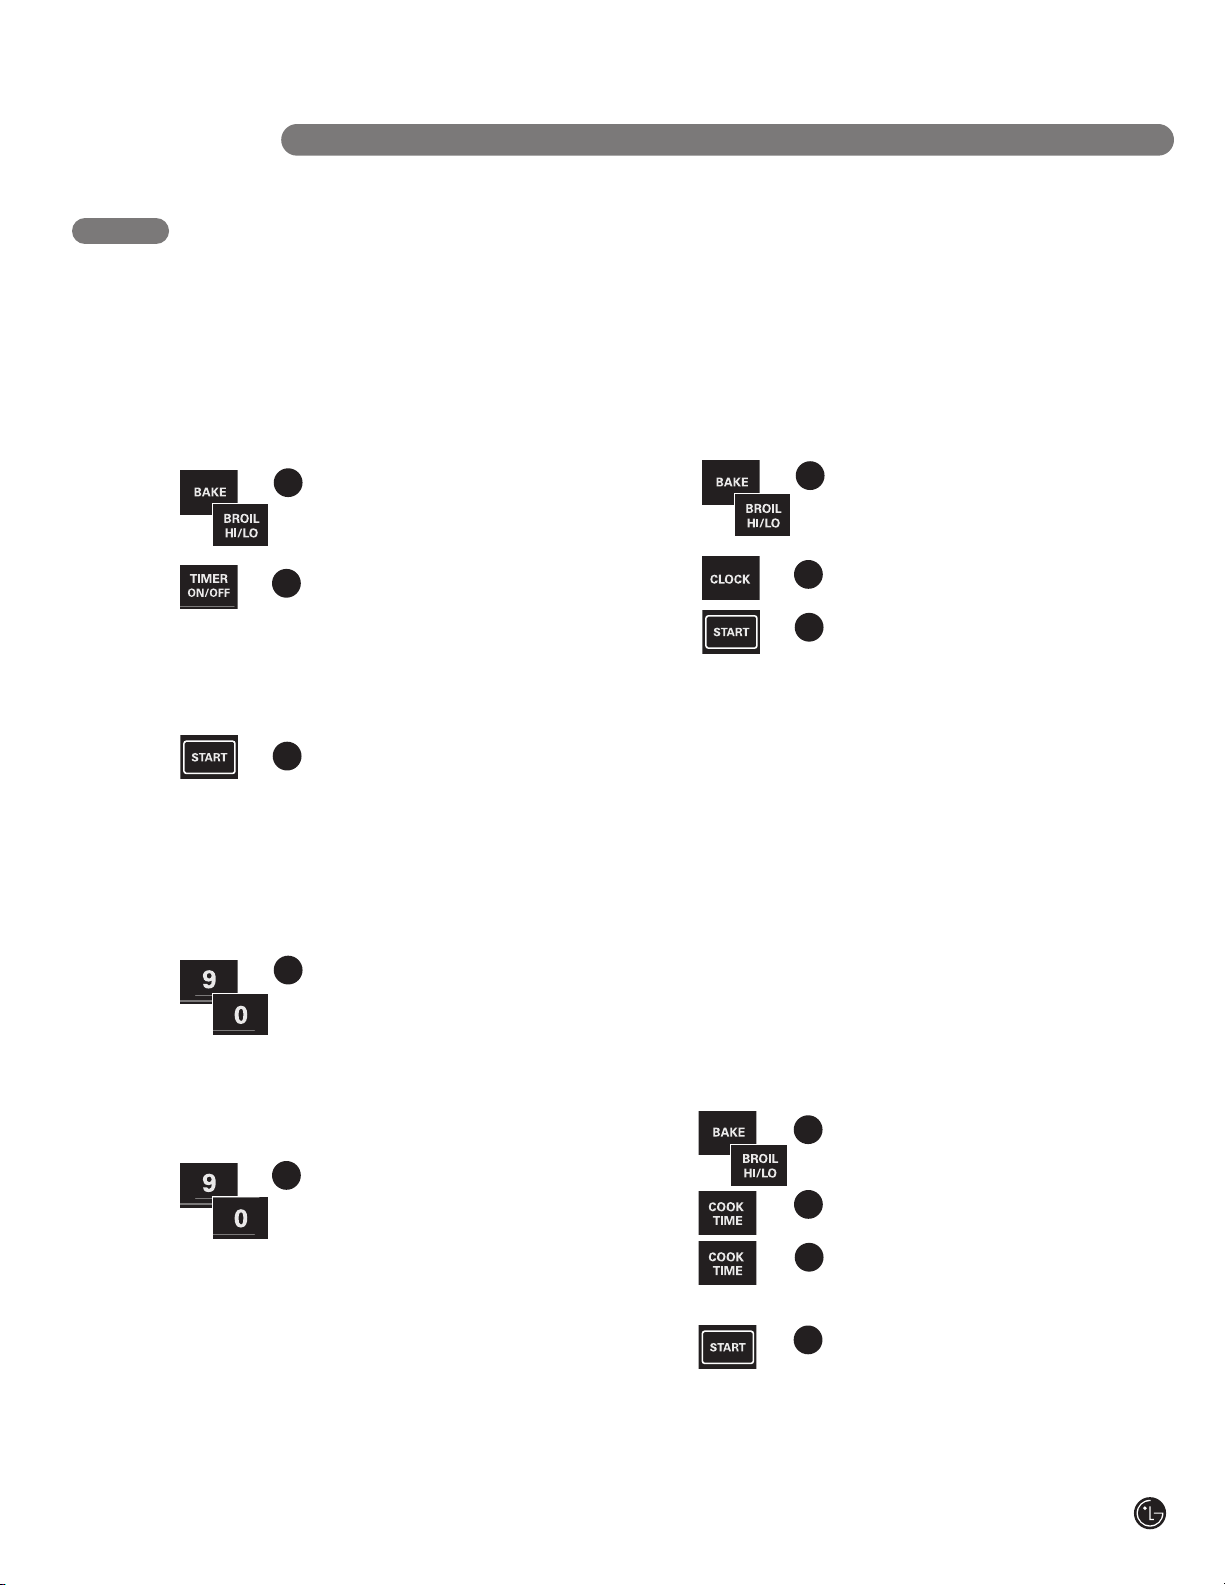
HOW TO SET THE CLOCK
The clock must be set to the correct time
of day for the automatic oven timing functions
to work properly. The time of day cannot
be changed during a timed baking or
self-cleaning cycle.
1
Touch the CLOCK pad once
to set.
Touch the
2
the time. Touch the number pads
the same way you read them. For
example, to set 12:34, touch the
number pads
that order.
If number pads are not touched
within one minute after you touch
CLOCK pad, the display
the
reverts to the original setting. If
this happens, touch the
pad and reenter the time of day.
3
Touch the
time of day shows in the display.
This enters the time and starts
the clock.
To check the time of day when the display is
showing other information, simply touch the
CLOCK pad.
number pads to enter
1, 2, 3, and 4 in
CLOCK
START pad until the
HOW TO SET THE TIMER
3
Touch the START pad. After
pressing the
disappears; this tells you the time
is counting down, although the
display does not change until one
minute has passed.
4
When the timer reaches
control will beep 3 times followed
by one beep every 6 seconds until
TIMER ON/OFF pad is
the
touched.
The 6 second tone can be canceled by following the
steps in the
section under Tones at the End of a Timed Cycle.
NOTE: The timer is a minute timer only. The
CLEAR/OFF pad does not affect the timer.
Special Features of Your Oven Control
START pad, SET
:00, the
HOW TO RESET THE TIMER
If the display is still showing the time remaining,
you may change it by touching the
ON/OFF
the time you want appears in the display.
If the r
delay start or cooking time are in the display),
recall the remaining time by touching the
ON/OFF
pads to enter the new time you want.
pad, then touch the number pads until
emaining time is not in the display (clock,
pad and then touching the number
TIMER
TIMER
The timer does not control oven operations.
The maximum setting on the timer is 9 hours
and 59 minutes.
1
Touch the
Touch the
2
amount of time you want shows in
the display
that can be entered in minutes is
59. Times more than 59 minutes
should be changed to hours and
minutes. For example, to enter 90
minutes as 1 hour 30 minutes,
touch
NOTE: If you make a mistake,
ess the
pr
and begin again.
TIMER ON/OFF pad.
number pads until the
. The maximum time
1, 3, and 0 in that order.
TIMER ON/OFF pad
HOW TO CANCEL THE TIMER
ouch the
T
TIMER ON/OFF pad twice.
POWER OUTAGE
If a flashing time is in the display
experienced a power failur
Touch the CLOCK pad once to reset. Enter the
correct time of day by touching the appropriate
number pads. Touch the
START pad.
, you have
e. Reset the clock.
17
Page 18
OPERATING INSTRUCTIONS
USING THE TIMED BAKING & ROASTING FEATURES
NOTE: Foods that spoil easily—such as milk,
eggs, fish, stuffings, poultry and pork—should
not be allowed to sit for more than 1 hour
before or after cooking. Room temperature
promotes the growth of harmful bacteria. Be
sure that the oven light is off because heat from
the bulb will speed harmful bacteria growth.
HOW TO SET AN IMMEDIATE START
AND AUTOMATIC STOP
The oven will turn on immediately and cook for a
selected length of time. At the end of the cooking
time, the oven will turn off automatically.
1
Touch the BAKE pad.
Touch the
2
desired oven temperature.
3
Touch the
NOTE: If your recipe requires preheating,
you may need to add additional time to the
length of the cooking time.
Touch the
4
desired length of cooking time.
The minimum cooking time you can
set is 1 minute. The entered oven
temperature and the cooking time
will be shown in the display.
Touch the
5
The oven will turn
the cooking time countdown and the changing
temperature starting at 100°F. (The temperature display
will start to change once the oven temperature reaches
100°F.) When the oven reaches the temperature you
set, 3 beeps will sound.
The oven will continue to cook for the set amount of
time, then turn off automatically, unless the
feature was set. See the Special Features of
Hold
Your Oven Control
After the oven turns off, the end-of-cycle tone
will sound.
ON, and the display will show
Touch the
6
the display if necessary. Remove
the food from the oven. Remember,
even though the oven turns off
automatically, food left in the oven
will continue cooking after the oven
turns off.
number pads to set the
COOK TIME pad.
number pads to set the
START pad.
Cook and
section.
CLEAR/OFF pad to clear
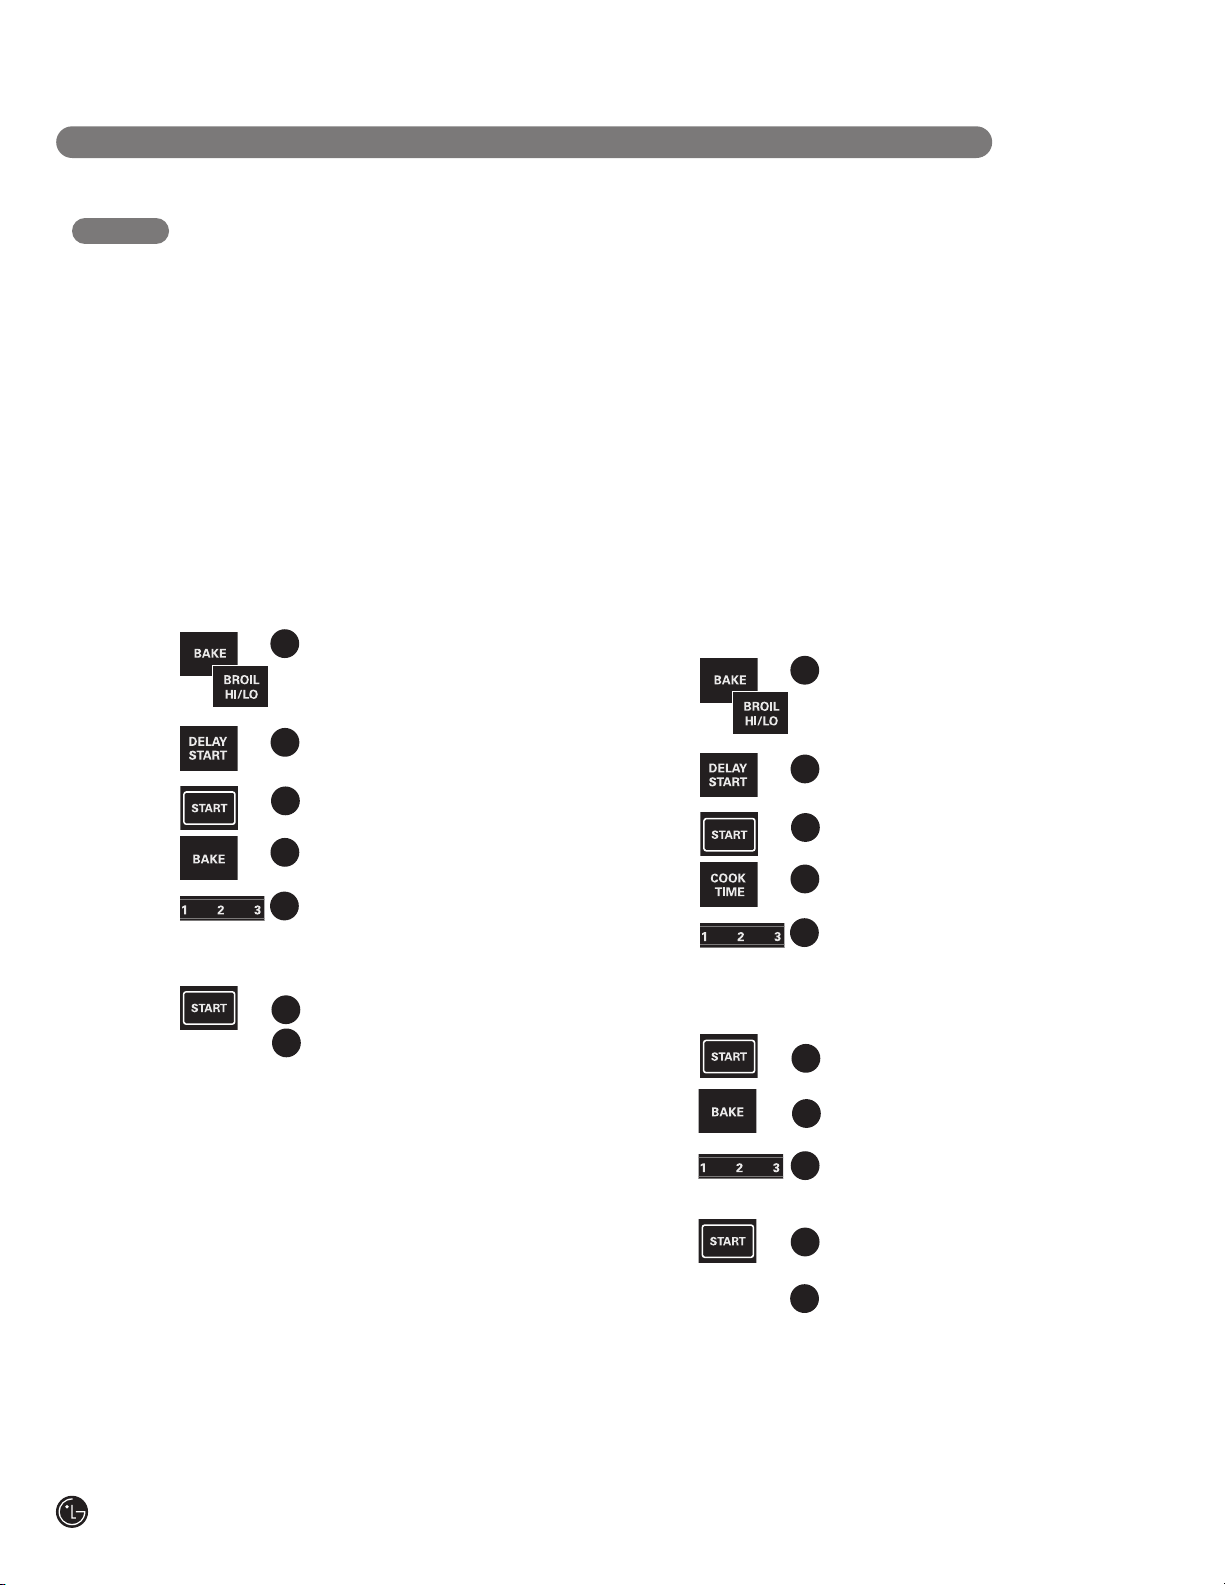
HOW TO SET A DELAYED START AND
AUTOMATIC STOP
The oven will turn on at the time of day you set,
cook for a specific length of time and then turn
off automatically.
Make sure the clock shows the correct time of day.
1
Touch the
Touch the
2
desired oven temperature.
Touch the
3
NOTE: If your recipe requires preheating,
you may need to add additional time to the
length of the cooking time.
Touch the
4
desired length of cooking time. The
minimum cooking time you can set
is 1 minute. The entered oven
temperature and the cooking time
will be shown in the display.
5
Touch the
6
Touch the
time of day you want the oven to turn
on and start cooking.
ouch the
T
7
NOTE: An attention tone will sound if you are using
timed baking and do not touch the
NOTE: If you would like to check the times you have
set, touch the
time you have set or touch the
check the length of cooking time you have set.
The oven will turn ON, and the display will
show the cooking time countdown and the
changing temperature starting at 100°F.
(The temperature display will start to change
once the oven temperature reaches 100°F.)
When the oven reaches the temperature you
set, 3 beeps will sound.
DELA
BAKE pad.
number pads to set the
COOK TIME pad.
number pads to set the
DELAY ST
number pads to set the
AR
ST
T
AR
Y ST
pad to check the start
(continued on next page)
ART
T
pad.
START pad.
COOK TIME pad to
pad.
18
Page 19
OPERATING INSTRUCTIONS
USING THE TIMED BAKING & ROASTING FEATURES
HOW TO SET A DELAYED START AND
AUTOMATIC STOP (CONTINUED)
The oven will continue to cook for the set amount of
time, then turn off automatically, unless the
feature was set. See the Special Features of
Hold
Your Oven Control
After the oven turns off, the end-of-cycle tone
will sound.
section.
Cook and
Touch the
8
the display if necessary. Remove
the food from the oven. Remember,
even though the oven turns off
automatically, food left in the oven
will continue cooking after the oven
turns off.
USING THE PROBE (on convection models)
For many foods, especially roasts and poultr
internal food temperature is the best test for
doneness. The temperature probe takes the
guesswork out of cooking foods to the exact
doneness you want.
Use of probes other
than the one provided
with this product may
result in damage to
the probe.
Use the handles of the
probe and plug when
inserting and removing
them from the food and
outlet.
To avoid damaging
•
your probe, do not
use tongs to pull on
the cable when removing it.
• To avoid breaking the probe, make sure food is
completely defrosted before inserting.
• To prevent possible burns, do not unplug the
om the outlet until the oven has cooled.
obe fr
pr
• Never leave your probe inside the oven during
a self-cleaning cycle.
• Do not store the probe in the oven.
The temperature probe has a
skewer-like probe at one end
and a plug at the other end
that goes into the outlet in
the oven.
y,
After preparing the meat
and placing it on a trivet
or on the broiler pan
grid, follow these
directions for proper
probe placement.
Insert the probe
completely into the meat.
It should not touch the
bone, fat or gristle.
For roasts with no bone,
insert the probe into the
meatiest part of the roast. For bone-in ham or
lamb, insert the pr
lowest large muscle.
Insert the probe into the center of dishes such
as meat loaf or casseroles.
Insert the pr
inner thigh from below and parallel to the leg of
a whole turkey.
obe into the meatiest part of the
CLEAR/OFF pad to clear
obe into the center of the
(continued on next page)
19
Page 20
OPERATING INSTRUCTIONS
USING THE PROBE (on convection models)
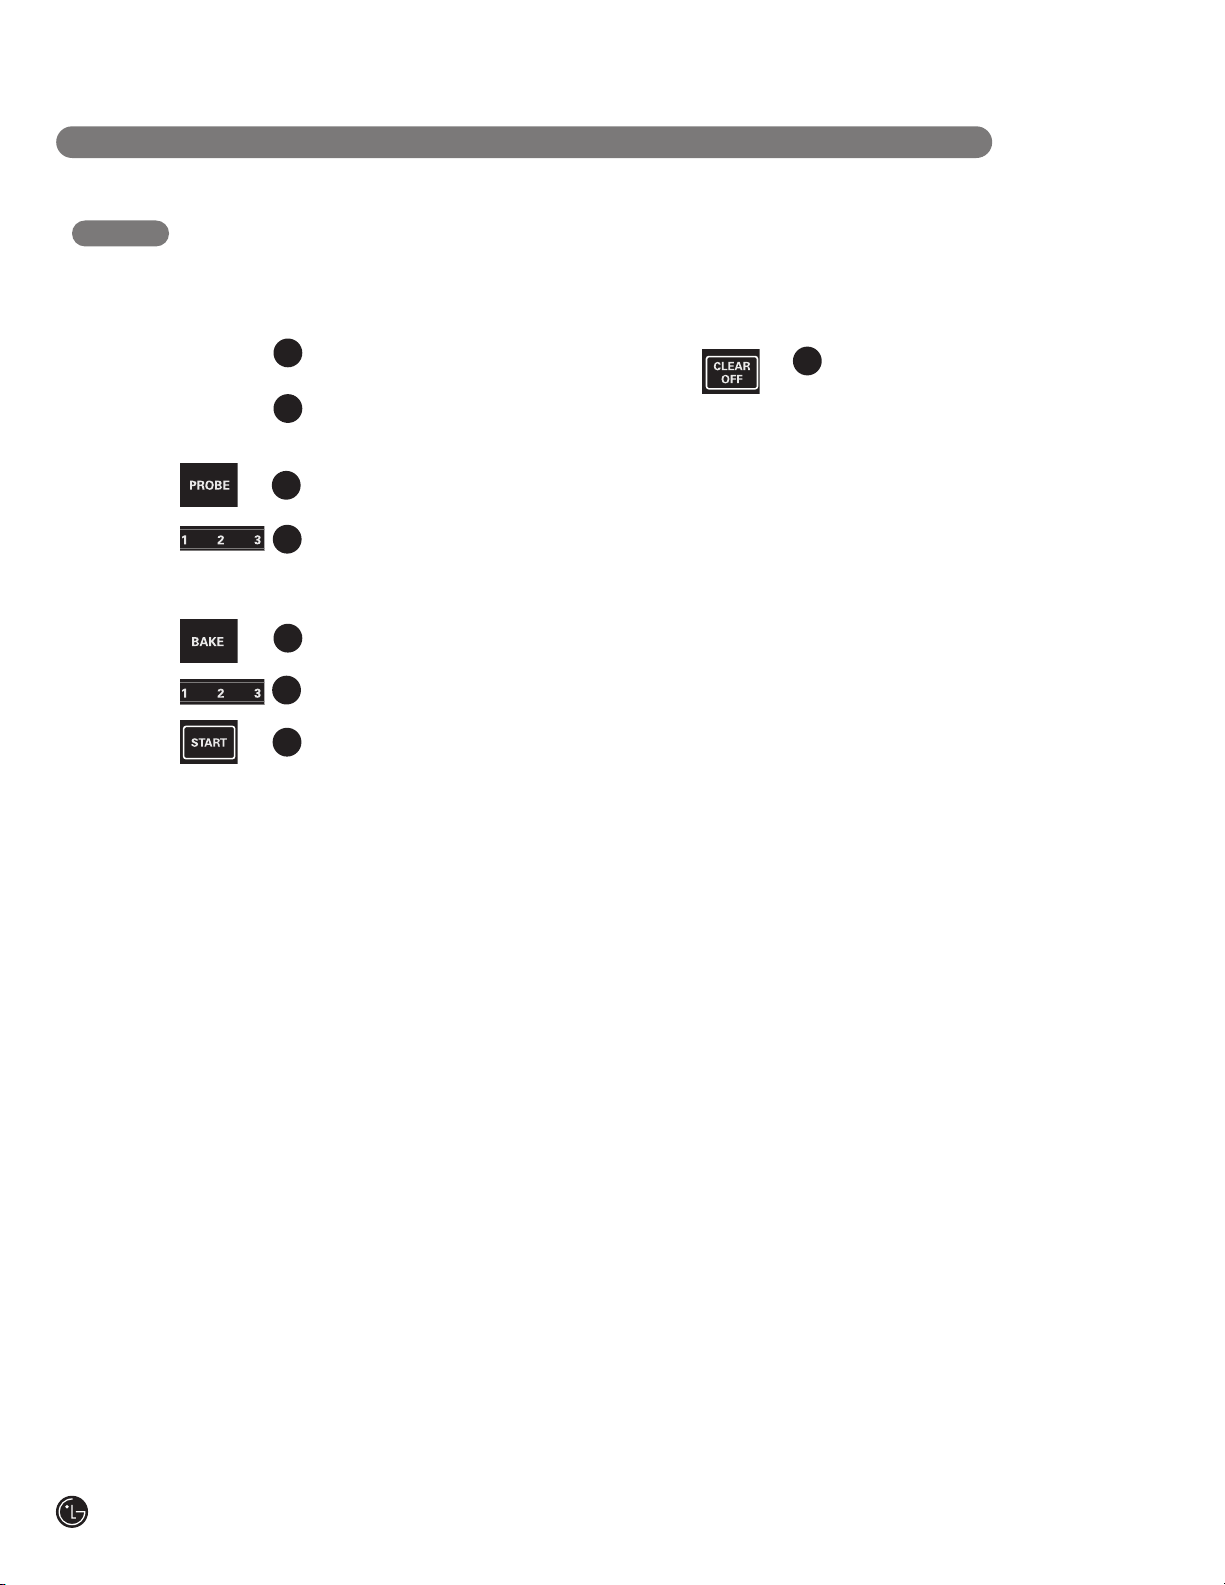
HOW TO SET THE OVEN FOR COOKING WHEN USING THE PROBE
1
Insert the probe into the food.
Plug the probe into the outlet in the
2
oven. Make sure it’s pushed all the
way in. Close the oven door.
3
Touch the
4
Touch the
the desired internal food or meat
temperature between 100°F
and 200°F.
5
Touch the BAKE pad.
6
Touch the
desired oven temperature.
7
Touch the
PROBE pad.
number pads to set
number pads to set the
START pad.
When the internal temperature of the
8
food reaches the number you have
set, the probe and the oven turn off
and the oven control signals. To stop
the signal, touch the
pad. Use hot pads to remove the
probe from the food. Do not use
tongs to pull on it—they might
damage it.
o change the oven temperature during probe
T
cooking, touch the
pads to set the new temperature.
•
If the probe is removed from the food before the
final temperatur
the display will flash until the probe is removed from
the oven.
• You can use the timer even though you cannot use
timed oven operations while using the probe.
BAKE pad and then the number
e is reached, a tone will sound and
CLEAR/OFF
20
Page 21
E
D
C
B
A
R
OPERATING INSTRUCTIONS
USING THE CONVECTION OVEN (on some models)
The convection oven fan shuts off when the
oven door is opened. DO NOT leave the door
open for long periods of time while using
convection cooking.
To help you understand the difference between
convection bake and roast and traditional bake
and roast, here are some general guidelines.
CONVECTION BAKE
• Preheat the oven. See the Using the Oven–
Preheating and Pan Placement section.
• Ideal for foods cooked on multiple shelves.
• Good for large quantities of baked foods.
CONVECTION ROAST
• Good for large
tender cuts of
meat, uncovered.
The convection fan
circulates the heated
air evenly over and
ound the food.
ar
Using the grid and
broiler pan provided,
heated air will be
circulated over and
around the food being
roasted. The heated air seals in juices quickly for
a moist and tender product while, at the same
time, creating a rich golden brown exterior.
Roasts or poultry should be cooked on shelf
position (A).
Roasts or poultry should be
cooked on shelf position (A).
In a convection oven, a fan
circulates hot air over,
under and around the food.
This circulating hot air is
evenly distributed
throughout the oven cavity.
As a result, foods are
evenly cooked and
browned—often in less
time than with regular heat.
• Good results with cookies, biscuits, brownies,
cupcakes, cream puffs, sweet rolls, angel food
cake and bread.
The convection fan circulates the heated
air evenly over and around the food.
When you are
convection roasting,
it is important that
you use the broiler
pan and grid for best
convection roasting
results. The pan is
used to catch grease
spills and the grid is used to prevent grease
spatters.
• Place the shelf in shelf position (A).
Place the grid on the br
•
oiler pan.
21
Page 22
OPERATING INSTRUCTIONS
USING THE CONVECTION OVEN (on some models)
AUTOMATIC RECIPE CONVERSION
You can use your favorite recipes in the
convection oven.
When using
oven will automatically convert the
oven temperature from regular baking
to Convection Bake temperatures.
1
Using the
temperature recommended in the
ecipe.
r
2
Touch the
The display will show the temperature
you entered from your recipe. The
oven will automatically convert it to
the convection cooking temperature.
CONVECTION BAKE, the
number pads, enter the
START pad.
COOKWARE FOR CONVECTION COOKING
Before using your convection oven, check
to see if your cookware leaves room for air
circulation in the oven. If you are baking with
several pans, leave space between them. Also,
be sure the pans do not touch each other or the
walls of the oven.
Paper and Plastic
Heat-resistant paper and plastic containers that
are recommended for use in regular ovens can
be used in convection ovens. Plastic cookware
that is heat-r
can also be used, when oven is below 400°F.
esistant to temperatur
es of 400°F
Touch the
baking is finished.
• Use pan size recommended in the recipe.
• Some package instructions for frozen
casseroles, main dishes or baked goods have
been developed using commercial convection
ovens. For best results in this oven, preheat the
oven and use the temperature, for regular
baking, on the package.
CLEAR/OFF pad when
Metal and Glass
Any type of cookware will work in your
convection oven. However, metal pans heat the
fastest and are recommended for convection
baking.
• Darkened or matte-finished pans will bake
faster than shiny pans.
• Glass or ceramic pans cook more slowly.
When baking cookies, you will get the best
results if you use a flat cookie sheet instead
of a pan with low sides.
ecipes like oven-baked chicken, use a pan
For r
with low sides. Hot air cannot circulate well
around food in a pan with high sides.
22
HOW TO SET THE OVEN FOR CONVECTION BAKING OR ROASTING
1
or
To change the oven temperature, touch the
CONVECTION BAKE or CONVECTION
ROAST
to set the new temperature.
Touch the CONVECTION BAKE
or CONVECTION ROAST pad.
Touch the
2
the desir
ouch the
T
3
pad and then the number pads
number pads to set
ed oven temperatur
T
AR
ST
pad.
e.
When the oven starts to heat, the changing
temperature, starting at 100°F, will be displayed.
When the oven reaches the temperature you set,
3 beeps will sound.
Touch the
4
finished.
NOTE:
ou will hear a fan while cooking with
Y
•
convection. The fan will stop when the door
is opened, but the heat will not turn off.
The fan will not start until the pr
•
temperature is reached.
CLEAR/OFF pad when
eheat
Page 23
E
D
C
B
A
R
OPERATING INSTRUCTIONS
USING THE CONVECTION OVEN (on some models)
MULTI-SHELF BAKING
Because heated air is circulated evenly
throughout the oven, foods can be baked with
excellent results using multiple shelves.
Multi-shelf baking may increase cook times
slightly for some foods but the overall result
is time saved. Cookies, muffins, biscuits and
other quick breads give very good results with
multi-shelf baking.
When baking larger
foods on 3 shelves,
place one shelf in
the 2nd (A) position,
one on the 4th (C)
position and the third
shelf in the 6th (E)
position.
When convection
baking with only 1
shelf, follow the
shelf positions
recommended in
the
Using the
section.
Oven
When baking cookies,
place the shelves in the
4th (C), 5th (D), and 6th (E) positions.
HOW TO SET THE OVEN FOR CONVECTION ROASTING WHEN USING THE PROBE
(on convection models)
For best results when
roasting large turkeys and
roasts, we recommend using
the probe included with the
convection oven.
The display will flash PROBE and the oven control
will signal if the probe is inserted into the outlet,
and you have not set a probe temperature and
touched the
START pad.
Place the shelf in the shelf position
1
(A). Insert the probe completely
into the food.
Plug the probe into the outlet in
2
the oven. Make sure it is pushed
all the way in. Close the oven
door.
ouch the
T
3
CONVECTION ROAST
pad.
Touch the
4
number pads to set the
desired oven temperature.
5
ouch the
T
T
6
ouch the
PROBEpad.
number pads to set the
desired internal food temperature.
To change the oven temperature during the
Convection Roast cycle, touch the
CONVECTION ROAST pad and then touch the
number pads to set the new desir
temperature.
7
Touch the
START pad.
ed
When the oven starts to heat, the word
LO will be in the display
.
After the internal temperature of the food
reaches 100°F, the changing internal
temperature will be shown in the display.
When the internal temperature of
8
the food reaches the number you
have set, the probe and the oven
turn off and the oven control
signals. To stop the signal, touch
CLEAR/OFF pad. Use hot
the
pads to remove the probe from
the food. Do not use tongs to pull
on it—they might damage it.
CAUTION: To prevent possible
burns, do not unplug the probe from the oven
outlet until the oven has cooled. Do not store
the probe in the oven.
NOTE:
• If the probe is removed from the food before
the final temperature is reached, a tone will
sound and the display will flash until the pr
is removed from the oven.
You will hear a fan while cooking with this
•
feature. The fan will stop when the door is
f.
opened, but the heat will not tur
n of
• You can use the timer even though you
cannot use timed oven operations while
using the pr
obe.
obe
23
Page 24
OPERATING INSTRUCTIONS
Whole Chicken (2 to 3 lbs.)
Meats
Minutes/Lb. Oven Temp.
Internal Temp.
Beef
Pork
Ham
Lamb
Seafood
Poultry
140°F
160°F
170°F
140°F
160°F
170°F
140°F
160°F
170°F
170°F
170°F
170°F
170°F
170°F
140°F
140°F
140°F
160°F
170°F
160°F
170°F
180–185°F
180–185°F
180–185°F
180–185°F
180–185°F
180–185°F
170°F
Rib (3 to 5 lbs.) Rare
†
Medium
Well
Boneless Rib, Top Sirloin Rare
†
Medium
Well
Beef Tenderloin Rare
†
Medium
Pot Roast (2
1
⁄
2
1
⁄
2
1
⁄
2
to 3 lbs.) chuck, rump
Bone-in (3 to 5 lbs.)
Boneless (3 to 5 lbs.)
Pork Chops (
1
⁄
2
1
⁄
2
1
⁄
2
to 1” thick)
4 chops
6 chops
Canned (3 lbs. fully cooked)
Butt (5 lbs. fully cooked)
Shank (5 lbs. fully cooked)
Bone-in (3 to 5 lbs.) Medium
Well
Boneless (3 to 5 lbs.) Medium
Well
Fish, whole (3 to 5 lbs.)
Lobster Tails (6 to 8 oz. each)
Cornish Hens Unstuffed (1 to 1 lbs.)
Cornish Hens Stuffed (1 to 1 lbs.)
Duckling (4 to 5 lbs.)
Turkey, whole*
Unstuffed (10 to 16 lbs.)
Unstuffed (18 to 24 lbs.)
Turkey Breast (4 to 6 lbs.)
20–24
24–28
28–32
20–24
24–28
28–32
10–14
14–18
35–45
23–27
23–27
30–35 total
35–40 total
40–45 total
14–18
14–18
14–18
17–20
20–24
17–20
20–24
30–40 total
20–25 total
24–26
50–55 total
55–60 total
24–26
8–11
7–10
16–19
325°F
325°F
325°F
325°F
325°F
325°F
325°F
325°F
300°F
325°F
325°F
325°F
325°F
325°F
325°F
325°F
325°F
325°F
325°F
325°F
325°F
400°F
350°F
350°F
350°F
350°F
325°F
325°F
325°F
325°F
2 chops
USING THE CONVECTION OVEN (on some models)
CONVECTION ROASTNG CHART
* Stuffed birds generally require 30–45 minutes additional roasting time. Shield legs and breast with foil to prevent overbrowning and drying of skin.
† The U.S. Department of Agriculture says “Rare beef is popular, but you should know that cooking it to only 140°F. means some food poisoning
organisms may survive.” (Source: Safe F
ood Book, Your Kitchen Guide, USDA Rev. June 1985.)
24
Page 25
OPERATING INSTRUCTIONS
USING THE TIMED CONVECTION BAKING AND
ROASTING FEATURES
You will hear a fan while cooking with this
feature. The fan will stop when the door is
opened, but the heat will not turn off.
NOTE: Foods that spoil easily—such as milk,
eggs, fish, stuffings, poultry and pork—should
(on some models)
not be allowed to sit for more than 1 hour
before or after cooking. Room temperature
promotes the growth of harmful bacteria. Be
sure that the oven light is off because heat from
the bulb will speed harmful bacteria growth.
HOW TO SET AN IMMEDIATE START AND AUTOMATIC STOP
The oven will turn on immediately and cook for a
selected length of time. At the end of the cooking
time, the oven will turn off automatically.
1
Touch the
Touch the
2
desired oven temperature.
3
Touch the
NOTE: If your recipe requires preheating, you may
need to add additional time to the length of the
cooking time.
Touch the
4
desired length of cooking time. The
minimum cooking time you can set is
1 minute.
The oven temperature that you set
and the cooking time that you enter
will be in the display.
5
Touch the
CONVECTION BAKE pad.
number pads to set the
COOK TIME pad.
number pads to set the
ed
START pad.
The oven will turn
the cooking time countdown and the changing
temperature starting at 100°F. (The temperature
display will start to change once the oven
temperature reaches 100°F.) When the oven reaches
the temperature you set, 3 beeps will sound.
The oven will continue to cook for the set amount of
time, then turn off automatically, unless the
e was set. See the
featur
Hold
Your Oven Control
After the oven turns off, the end-of-cycle tone will
sound.
6
ON, and the display will show
Cook and
Special Featur
section.
Touch the
the display if necessary. Remove
the food from the oven. Remember,
even though the oven turns off
automatically, food left in the oven
will continue cooking after the oven
turns off.
CLEAR/OFF pad to clear
es of
HOW TO SET A DELAYED START AND AUTOMATIC STOP
The oven will turn on at the time of day you set,
cook for a specific length of time and then turn
off automatically.
Make sur
NOTE: If your recipe requires preheating, you may need
to add additional time to the length of the cooking time.
e the clock shows the correct time of day.
1
ouch the
T
Touch the number pads to set the
2
desired oven temperature.
3
ouch the
T
CONVECTION BAKE pad.
COOK TIME pad.
ouch the
T
4
desired length of cooking time. The
minimum cooking time you can set is
1 minute. The oven temperature that
you set and the cooking time that you
enter
Touch the
5
Touch the
6
time of day you want the oven to turn
on and start cooking.
7
Touch the
number pads to set the
ed will be in the display
DELAY START pad.
number pads to set the
START pad.
(continued on next page)
.
25
Page 26
OPERATING INSTRUCTIONS
USING THE TIMED CONVECTION BAKING AND
ROASTING FEATURES
(on some models)
HOW TO SET A DELAYED START AND AUTOMATIC STOP (continued)
NOTE: If you would like to check the times you have
set, touch the
time you have set or touch the
check the length of cooking time you have set.
When the oven tur
the display will show the cooking time countdown
and the changing temperature starting at 100°F.
(The temperatur
the oven temperature reaches 100°F.) When the oven
reaches the temperature you set, 3 beeps will sound.
DELAY START pad to check the start
COOK TIME pad to
ns
ON at the time of day you set,
e display will start to change once
The oven will continue to cook for the set amount of
time, then turn off automatically, unless the
feature was set. See the Special Features of
Hold
Your Oven Control
After the oven turns off, the end-of-cycle tone will
sound.
8
section.
Touch the
the display if necessary. Remove
the food from the oven. Remember,
even though the oven turns off
automatically, food left in the oven
will continue cooking after the oven
turns off.
CLEAR/OFF pad to clear
SPECIAL FEATURES OF YOUR OVEN CONTROL
Your new touch pad control has additional
features that you may choose to use. The
following pages describe these features and
how you may activate them.
The special feature modes can only be
activated while the display is showing the time
of day. They remain in the control’s memory
until the steps are repeated.
When the display shows your choice, touch the
START pad. The special features will remain in
memory after a power failure.
Cook and
26
12 HOUR SHUT-OFF
With this featur
oven on, the control will automatically turn off the
oven after 12 hours during baking functions or
after 3 hours during a broil function.
If you wish to turn OFF this feature, follow the
steps below.
and
e, should you forget and leave the
ouch the
T
1
HI/LO
for 3 seconds until the display
shows
2
Touch the DELAY START pad.
The display will show
hour shut-off). Touch the
START
will show
Touch the
3
the no shut-off and leave the
contr
features mode.
BAKE and BROIL
pads at the same time
SF.
12 shdn (12
pad again and the display
no shdn (no shut-off).
START pad to activate
ol set in this special
DELAY
SELECT FAHRENHEIT OR CELSIUS
TEMPERATURE
Your oven control is set to use the Fahrenheit
temperature selections but you may change
this to use the Celsius selections.
ouch the
and
and
and
T
1
HI/LO
for 3 seconds until the display
shows
2
ouch the
T
COOK TIME pads at the same
time. The display will show
(Fahr
3
Touch the
COOK TIME pads again at the
same time. The display will
show
4
Touch the
BAKE and BROIL
pads at the same time
.
SF
BROIL HI/LO and
enheit).
BROIL HI/LO and
C (Celsius).
START pad.
F
Page 27
OPERATING INSTRUCTIONS
SPECIAL FEATURES OF YOUR OVEN CONTROL
TONES AT THE END OF A TIMED CYCLE
At the end of a timed cycle, 3 short beeps will
sound followed by one beep every 6 seconds
until the
continual 6-second beep may be cancelled.
To cancel the 6-second beep:
and
CLEAR/OFF pad is touched. This
Touch the BAKE and BROIL
1
HI/LO
3 seconds until the display shows
SF.
2
T
The display shows
(continual beep) and BEEP. Touch
the
The display shows
cancels the one beep every 6
seconds.)
3
Touch the
pads at the same time for
ouch the
TIMER ON/OFF pad again.
TIMER ON/OFF pad.
CON BEEP
BEEP. (This
START pad.
CONTROL LOCKOUT
Your control will allow you to lock out the touch
pads so they cannot be activated when touched
or cleaning the glass panel.
To lock the controls:
1
Touch the 9 and 0 touch pads at
the same time for 3 seconds until
and
NOTE: All cooking and timing functions will be
cancelled when locking out the control.
and
the control beeps twice. The
display will show
continuously and the time of day
if not blacked out.
o unlock the contr
T
2
9 and 0 touch pads at the same
time for 3 seconds until the control
beeps twice, and
emoved fr
r
om the display
LOC
ol, touch the
LOC will be
.
12-HOUR, 24-HOUR, OR CLOCK
BLACKOUT
Your control is set to use a 12-hour clock.
If you would prefer to have a 24-hour military
time clock or black out the clock display, follow
the steps below.
Touch the BAKE and BROIL
1
and
Touch the
24-hour military time clock. The display will
24 hr. If this is the choice you want, touch
show
START pad.
the
Touch the
clock display. The display will show
is the choice you want, touch the
NOTE: If the clock is in the black-out mode, you
will not be able to use the DELAY START function.
HI/LO
for 3 seconds until the display
shows
2
Touch the CLOCK pad once.
The display will show
3
If this is the choice you want,
touch the
CLOCK pad again to change to the
CLOCK pad again to black out the
pads at the same time
SF.
12 hr.
START pad.
OFF. If this
START pad.
COOK AND HOLD
Your new control has a cook and hold feature that
keeps cooked foods warm for up to 3 hours after
the cooking function is finished.
This feature can only be used when timed
cooking.
To activate this feature, follow the steps below.
Touch the BAKE and BROIL HI/LO
1
and
pads at the same time for 3
seconds until the display shows
2
Touch the COOK TIME pad. The
display will show
3
Touch the COOK TIME pad
again to activate the featur
display will show
ouch the STAR
T
4
the cook and hold featur
leave the
featur
contr
es mode.
Hld OFF.
Hld ON.
T
pad to activate
e and
ol set in this special
SF
e. The
.
27
Page 28
OPERATING INSTRUCTIONS
USING THE SABBATH FEATURE
(DESIGNED FOR USE ON THE JEWISH SABBATH AND HOLIDAYS)
The Sabbath feature can be used for
baking/roasting in the oven only. It cannot be
used for convection, broiling, self-cleaning or
Delay Start cooking.
HOW TO SET FOR REGULAR
BAKING/ROASTING (in Sabbath Mode)
Make sure the clock shows the correct time of
day and the oven is off.
Press and hold both the BAKE
1
and BROIL HI/LO pads, at the
and
o adjust the oven temperature, touch
T
the
BAKE pad, enter the new temperatur
the number pads, and touch the
NOTE: When the display shows ⊃ the oven is
set in Sabbath. When the display shows
oven is baking/roasting.
NOTE: The CLEAR/OFF and COOK TIME pads
are active during the Sabbath feature.
same time
shows
2
Tap the DELAY START pad until
SAb bAtH appears in the display
Touch the
3
appear in the display.
4
Touch the
will be given.
5
Using the
desired temperature between 170°
and 550°. No signal or temperature
will be given.
ouch the
T
6
After a random delay period of
7
approximately 30 seconds to 1
minute,
display indicating that the oven is
baking/r
appear in the display, start again
at Step 4.
, until the display
SF.
START pad and ⊃ will
BAKE pad. No signal
number pads, enter the
T
AR
ST
⊃ will appear in the
⊃
oasting.
pad.
If ⊃ doesn’
⊃
START pad.
.
t
e using
⊃ the
⊃
NOTE: The oven light comes on automatically
when the door is opened and goes off when the
door is closed. The bulb may be removed. See
the Oven Light Replacement section. On models
with a light switch on the control panel, the oven
light may be turned on and left on.
HOW TO SET FOR TIMED BAKING/
ROASTING WITH IMMEDIATE START AND
AUTOMATIC STOP (in Sabbath Mode)
Make sure the clock shows the correct time of
day and the oven is off.
Press and hold both the BAKE
1
and BROIL HI/LO pads, at the
and
same time
shows
2
Tap the DELAY START pad until
SAb bAtH appears in the display.
Touch the
3
appear in the display.
4
Touch the
5
Touch the
the desired length of cooking time
between 1 minute and 9 hours and
99 minutes. The cooking time that
you entered will be displayed.
6
Touch the
Touch the
7
will be given.
8
Using the
desired temperature. No signal or
temperature will be given.
9
Touch the
10
After a random delay period of
oximately 30 seconds to 1
appr
minute,
display indicating that the oven is
baking/r
in the display
, until the display
SF.
START pad and ⊃ will
COOK TIME pad.
number pads to set
START pad.
BAKE pad. No signal
number pads, enter the
START pad.
⊃ will appear in the
⊃
oasting.
If ⊃ doesn’
⊃
, start again at Step 7.
t appear
28
Page 29
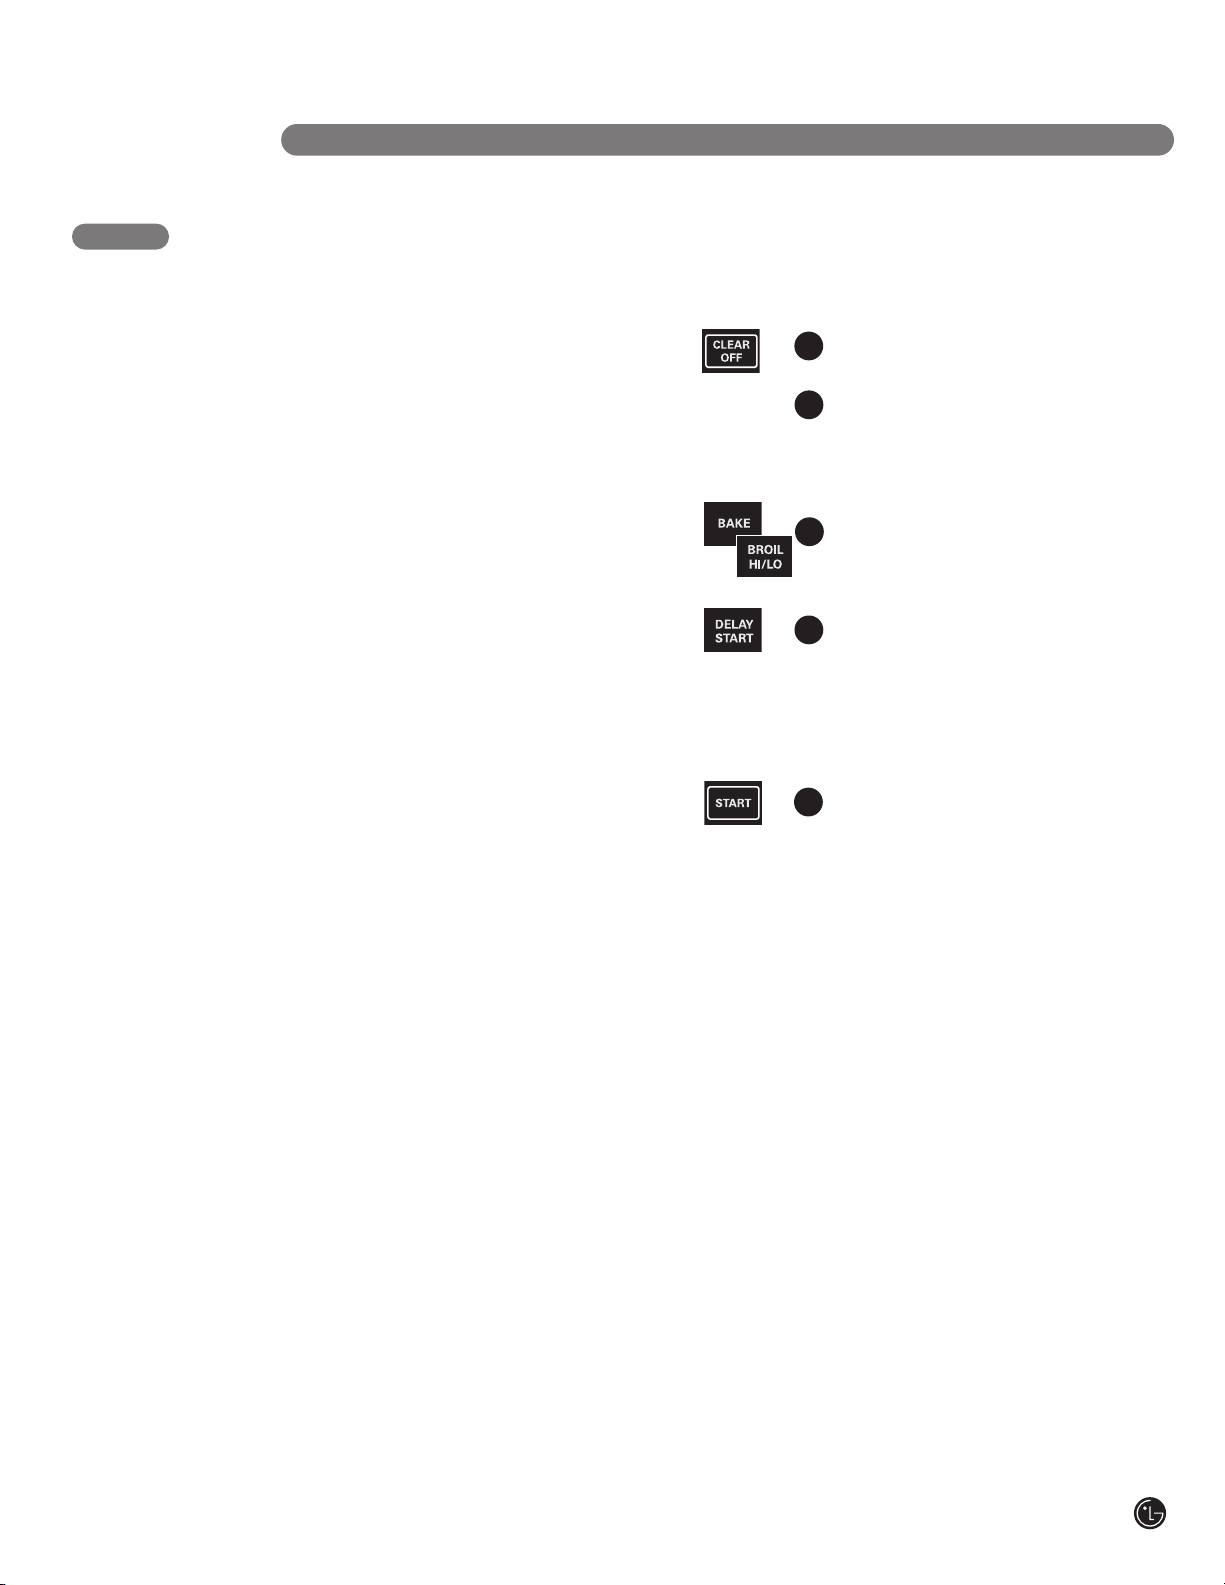
OPERATING INSTRUCTIONS
USING THE SABBATH FEATURE
HOW TO SET FOR TIMED BAKING/
ROASTING WITH IMMEDIATE START AND
AUTOMATIC STOP (continued)
NOTE: When the display shows ⊃ the oven is
set in Sabbath. When the display shows
oven is baking/roasting.
To adjust the oven temperature, touch the
pad, enter the new temperature using the
ART
number pads, and touch the
When cooking is finished, the display will
change from
indicating that the oven has tur
still set in Sabbath. Remove the cooked food.
⊃ to ⊃ and 0:00 will appear,
⊃
ST
ned
⊃ the
BAKE
pad.
OFF but is
⊃
HOW TO EXIT THE SABBATH FEATURE
1
Touch the CLEAR/OFF pad.
If the oven is cooking, wait
2
for a random delay period of
approximately 30 seconds to
and
1 minute, until only
display.
Press and hold
3
and BROIL HI/LO pads, at the
same time, until the display
shows
Tap the
4
12 shdn or no shdn appears in
the display.
the oven will automatically turn off
after 12 hours.
that the oven will not automatically
turn off.
5
Touch the
NOTE: If a power outage occurred
while the oven was in Sabbath, the
oven will automatically turn off and
stay off even when the power returns.
The oven control must be reset.
SF.
DELA
12 shdn indicates that
START pad.
⊃ is in the
both the BAKE
Y START
no shdn indicates
pad until
29
Page 30
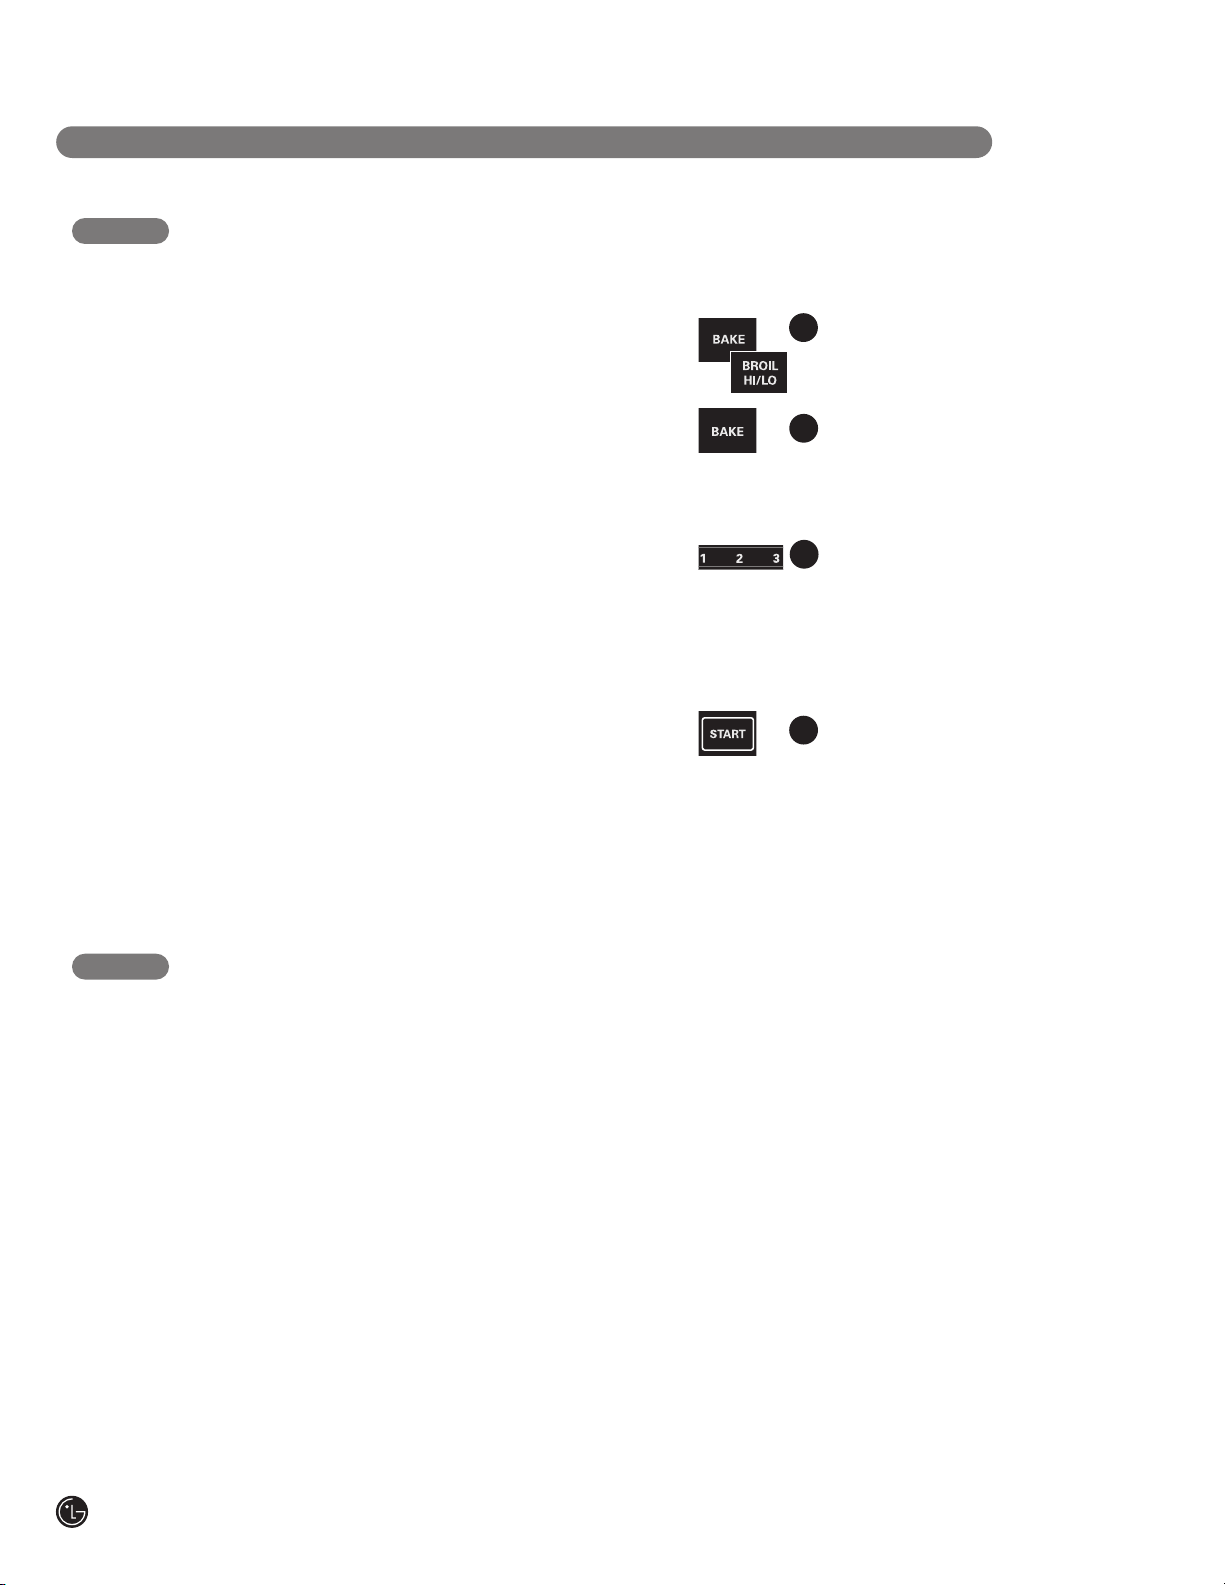
OPERATING INSTRUCTIONS
HOW TO ADJUST THE OVEN THERMOSTAT
ADJUSTING THE OVEN THERMOSTAT
You may find that your new oven cooks
differently than the one it replaced. Use your
new oven for a few weeks to become more
familiar with it. If you still think your new oven
is too hot or too cold, you can adjust the
thermostat yourself.
Do not use thermometers, such as those found
in grocery stores, to check the temperature
setting of your oven. These thermometers may
vary 20–40 degrees.
NOTE: This adjustment will not affect the
broiling or the self-cleaning temperatures. The
adjustment will be retained in memory after a
power failure.
Touch the
1
HI/LO
and
NOTE: The thermostat adjustment for Baking
will also affect Convection Baking or Convection
Roasting.
for 3 seconds until the display
shows
2
Touch the BAKE pad. A two digit
number shows in the display.
Touch
the oven temperature, or twice to
increase (+).
3
The oven temperature can be
adjusted up as much as 35°F. or
down as much as 35°F. Touch the
number pads the same way you
read them. For example, to change
the oven temperature 15°F, touch
1 and 5.
When you have made the
4
adjustment, touch the
to go back to the time of day
display. Use your oven as you
would normally.
BAKE and BROIL
pads at the same time
SF.
BAKE once to decrease (-)
START pad
30
BAKING TIP
THE TYPE OF MARGARINE WILL AFFECT BAKING PERFORMANCE
Most recipes for baking have been developed
using high fat products such as butter or
margarine (80% fat). If you decr
recipe may not give the same results as with a
higher fat product.
Recipe failure can result if cakes, pies, pastries,
cookies or candies ar
eads. The lower the fat content of a spr
spr
product, the more noticeable these differences
become.
e made with low fat
ease the fat, the
ead
Federal standards require products labeled
“margarine” to contain at least 80% fat by
weight. Low fat spr
contain less fat and more water. The high
moisture content of these spreads affects the
e and flavor of baked goods. For best
textur
results with your old favorite recipes, use
margarine, butter or stick spreads containing
at least 70% vegetable oil.
eads, on the other hand,
Page 31

OPERATING INSTRUCTIONS
USING THE ELECTRIC WARMING DRAWER
The warming drawer will keep hot, cooked
foods at serving temperature. Always start with
TO USE THE WARMING DRAWER
Touch the WARMING DRAWER
1
pad. “Hot” and “1” are lit on the
display and “Set” begins to blink.
On the number pad, press
2
3
To cancel, touch the
NOTE: Touching the CLEAR/OFF pad does not
turn the warming drawer off.
NOTES:
• The warming drawer cannot be used during
a self-clean cycle.
• The warming drawer has three settings:
1, 2 and 3. These settings maintain different
temperature levels in the warming drawer.
• On some models, if using the oven at the
same time as the warming drawer, only the
oven settings will be displayed.
Number Pad Setting
1 Lo (pies)
2 Med (casseroles)
3 Hi (meats)
2 for Medium or 3 for High.
Low,
The display “1” changes
esponding to the number
corr
pad selected.
Touch the
the number remain lit. “Set” stops
blinking.
START pad. “Hot” and
WARMING DRAWER pad.
1 for
hot food. Do not use to heat cold food other
than crisping crackers, chips or dry cereal.
WHEN USING THE WARMING DRAWER
The warming drawer will keep hot, cooked
foods at serving temperature. Always start with
hot food. Do not use to heat cold food other
than crisping crackers, chips or dry cereal.
Do not line the warming drawer or pan with
aluminum foil. Foil is an excellent heat
insulator and will trap heat beneath it. This
will upset the performance of the drawer and
could damage the interior finish.
Allow approximately 25 minutes for the
warming drawer to preheat.
• Do not put liquid or water in the
warming drawer.
• For moist foods, cover them with a lid
or aluminum foil.
• For crisp foods, leave them uncovered.
• Food should be kept hot in its cooking
container or transferred to a heat-safe
serving dish.
CAUTION: Plastic containers or
plastic wrap will melt if in direct contact with the
drawer, pan or a hot utensil. Melted plastic may
not be removable and is not covered under your
warranty
•
.
Remove serving spoons, etc., befor
containers in warming drawer
.
e placing
31
Page 32

OPERATING INSTRUCTIONS
USING THE ELECTRIC WARMING DRAWER
TEMPERATURE SELECTION CHART
To keep several different foods hot, set the
control to the food needing the highest setting.
• The temperature, type and amount of food,
and the time held will affect the quality of
the food.
• Food in heat-safe glass and glass-ceramic
utensils may need a higher control setting as
compared to food in metal utensils.
• Repeated opening of the drawer allows the hot
air to escape and the food to cool.
• Allow extra time for the temperature inside
the drawer to stabilize after adding items.
• With large loads it may be necessary to
use a higher warming drawer setting and
cover some of the cooked food items.
• Do not use plastic containers or plastic wrap.
Food Type Control Setting
Bacon 3
Breads 2
Casserole 2
Chicken, Fried 3
Eggs, Scrambled 2
Fish 3
Gravy and Sauces 3
Ham
Muffins 2
Onion Rings 3
PIes 1
Pizza
Potatoes, Baked 3
Mashed 2
toes,
ota
P
Tortilla Chips 1
3
3
TO CRISP STALE ITEMS
• Place food in low-sided dishes or pans.
• Preheat on 1 setting.
• Check crispness after 45 minutes. Add time
as needed.
TO WARM SERVING BOWLS
AND PLATES
To warm serving bowls and plates, set the
control on
• Use only heat-safe dishes.
• If you want to heat fine china, please check
with the manufacturer of the dishes for their
maximum heat tolerance.
• You may warm empty serving dishes while
preheating the drawer.
1.
CAUTION: Dishes will be hot.
Use pot holders or oven mitts when removing
hot dishes.
32
CAUTION: Do not keep food in the
warming drawer for more than two hours.
Page 33

OPERATING INSTRUCTIONS
USING THE SELF-CLEANING OVEN
BEFORE A CLEAN CYCLE
For the first
self-clean cycle,
we recommend
venting your
kitchen with an
open window
or using a
ventilation fan
or hood.
Remove the
broiler pan, broiler grid, all cookware, probe and
any aluminum foil from the oven—they cannot
withstand the high cleaning temperatures.
NOTE: If your oven is equipped with nickel
oven shelves, remove them before you begin
the self-clean cycle.
Soil on the front frame of the range and outside
the gasket on the door will need to be cleaned
by hand. Clean these areas with hot water,
soap-filled scouring pads or cleansers such
as Soft Scrub
and dry.
®
. Rinse well with clean water
Wipe up heavy soil on the
oven bottom.
Do not clean the gasket. The fiberglass material
of the oven door gasket cannot withstand
abrasion. It is essential for the gasket to remain
intact. If you notice it becoming worn or frayed,
replace it.
Wipe up any heavy spillovers on the oven
bottom.
Make sure the oven light bulb cover is in place
and the oven light is off.
IMPORTANT: The health of some birds
is extremely sensitive to the fumes given
off during the self-cleaning cycle of any range.
Move birds to another well ventilated room.
NOTE: Use caution when opening the oven
after the self-clean cycle has ended. The oven
may still be hot.
HOW TO SET THE OVEN FOR CLEANING
1
Touch the SELF CLEAN pad.
Using the number pads, enter the
2
desired clean time, if a time other
than 4 hours is needed.
Clean cycle time is normally 4
hours. You can change the clean
time to any time between 3 hours
and 5 hours, depending on how
dirty your oven is.
Touch the START pad.
3
The door locks automatically. The display will
show the clean time remaining. It will not be
possible to open the oven door until the
temperature drops below the lock temperature
and the
The oven shuts of
cycle is complete.
LOCKED DOOR light goes off.
f automatically when the clean
When the
4
door will unlock automatically.
• The wor
oven contr
cycle and forget to close the oven door.
• To stop a clean cycle, touch the CLEAR/OFF
pad. When the LOCKED DOOR light goes off
indicating the oven has cooled below the
locking temperature, open the door.
LOCKED DOOR light is off, the
ds
LOCK DOOR will flash and the
ol will signal if you set the clean
33
Page 34

OPERATING INSTRUCTIONS
USING THE SELF-CLEANING OVEN
The oven door must be closed and all controls set correctly for the cycle to work properly.
HOW TO DELAY THE START OF CLEANING
Make sure the clock shows the correct time
of day.
Touch the
1
Using the
2
desired clean time.
Touch the
3
The earliest start time you can set
will appear in the display.
Using the
4
time of day you want the clean
cycle to start.
5
Touch the
SELF CLEAN pad.
number pads, enter the
DELAY START pad.
number pads, enter the
START pad.
The oven shuts off automatically when the clean
cycle is complete.
When the
6
door will unlock automatically.
• The words LOCK DOOR will flash and the
oven control will signal if you set the clean
cycle and forget to close the oven door.
• To stop a clean cycle, touch the CLEAR/OFF
pad. When the LOCKED DOOR light goes off
indicating the oven has cooled below the
locking temperature, open the door.
LOCKED DOOR light is off, the
The door locks automatically. The display will
show the start time. It will not be possible to
open the oven door until the temperature drops
below the lock temperature and the
DOOR
light goes off.
LOCKED
AFTER A CLEAN CYCLE
You may notice some white ash in the oven.
Wipe it up with a damp cloth after the
oven cools.
If white spots remain, remove them with a
soap-filled scouring pad and rinse thor
with a vinegar and water mixture.
These deposits ar
that cannot be removed by the clean cycle.
If the oven is not clean after one clean cycle,
repeat the cycle.
e usually a salt r
oughly
esidue
• You cannot set the oven for cooking until the
oven is cool enough for the door to unlock.
• While the oven is self-cleaning, you can touch
the CLOCK pad to display the time of day.
To return to the clean countdown, touch the
COOK TIME pad.
• If the shelves become hard to slide, apply a
small amount of vegetable oil or cooking oil to
a paper towel and wipe the edges of the oven
shelves with the paper towel.
34
Page 35

CARE AND CLEANING OF THE RANGE
CARE AND CLEANING
Be sure electrical power is off and all
surfaces are cool before cleaning any
part of the range.
If your range is removed for
cleaning, servicing or any
reason, be sure the anti-tip
device is re-engaged properly
when the range is replaced.
Failure to take this precaution
could result in tipping of the
range and cause injury.
SEALED BURNER ASSEMBLIES
Turn all controls
OFF before
removing the
burner parts.
The burner
grates, caps,
and burner
heads can be
lifted off, making
them easy to
clean. The
odes are
electr
not removable.
Burner Grate
ner Cap
Bur
CAUTION: Do not operate the
cooktop without all burner parts and grates
in place.
The electrode of the spark igniter is exposed
when the burner head is removed. When one
burner is turned to
Do not attempt to disassemble or clean around
any burner while another burner is on. An
electric shock may result, which could cause
you to knock over hot cookware.
LITE, all the burners spark.
Burner Head
Electrode
Cooktop
35
Page 36

CARE AND CLEANING OF THE RANGE
BURNER CAPS AND HEADS
BURNER CAPS
Lift off when cool.
Wash burner caps
in hot, soapy
water and rinse
with clean water.
You may scour
with a plastic
scouring pad to
remove burned-on
food particles.
Burner cap is properly seated.
Burner cap is NOT
operly seated.
pr
BURNER HEADS
For proper ignition, make
sure the small hole in the
section that fits over the
electrode is kept open.
A sewing needle or wire
twist-tie works well to
unclog it.
The slits in the burner
heads must be kept clean
at all times for an even,
unhampered flame.
Clogged or dirty burner ports
or electrodes will not allow the burner to
operate properly.
Any spill on or around an electrode must be carefully
cleaned. Take care to not hit an electrode with
anything har
You should clean the burner caps and heads
routinely, especially after bad spillovers which could
clog the openings. Lift off when cool.
emove bur
o r
T
a solution of mild liquid detergent and hot water for
20–30 minutes. For more stubborn stains, use a
toothbrush.
d or it could be damaged.
ned-on food, soak the burner heads in
AFTER CLEANING
Before putting the burner caps and burner heads
back, shake out excess water and then dry them
thoroughly by setting in a warm oven for 30 minutes.
REPLACEMENT
Replace burner heads and caps over the electrodes
on the cooktop, in the correct locations according to
their size. There are two small burner heads and
caps, one medium, one large and one extra large
burner head and cap.
36
NOTES:
• Do not use steel wool or scouring powders to clean
the burners.
• Burners will not light if the cap is removed.
Page 37

CARE AND CLEANING OF THE RANGE
BURNER GRATES
Your range has three professional-style
grates. These grates are position-specific.
For maximum stability, these grates should only
be used in their proper position; they cannot be
interchanged left to right or front to back.
Make sure the front portion of both grates
is in front. The middle grate has a bow in front.
Make sure the bowed portion is toward the
front of the range.
CLEANING
Lift out when cool. Grates should be washed
regularly and, of course, after spillovers. Wash
them in hot, soapy water and rinse with clean
water. When replacing the grates, be sure they
e positioned securely over the burners.
ar
Replace the grates so that continuous arcs are
formed with the center ribs of all three grates.
The grates may be cleaned in a dishwasher.
Do not operate a burner for an extended period
of time without cookware on the grate. The
finish on the grate may chip without cookware
to absorb the heat.
To get rid of burned-on food, place the grates in
a cover
let them soak several hours or overnight. Wash,
rinse well and dry.
ed container. Add 1/4 cup ammonia and
COOKTOP SURFACE
To avoid damaging the porcelain enamel surface
of the cooktop and to prevent it from becoming
dull, clean up spills right away. Foods with a lot
of acid (tomatoes, sauerkraut, fruit juices, etc.)
or foods with high sugar content could cause a
dull spot if allowed to set. When the surface has
cooled, wash and rinse.
For other spills such as fat spatterings, etc.,
wash with soap and water once the surface has
cooled. Then rinse and polish with a dry cloth.
Appearance may vary. The
grates may be cleaned in a
dishwasher.
Although they are durable, the grates will
gradually lose their shine, regardless of the best
care you can give them. This is due to their
continual exposure to high temperatur
will notice this sooner with lighter color grates.
NOTE: Do not clean the grates in a
self-cleaning oven.
NOTE: Do not store
flammable materials in
an oven, drawer or near
the cooktop. Do not
store or use combustible
materials, gasoline or
other flammable vapors
and liquids in the vicinity
of this or any other appliance.
NOTE: Do not lift the cooktop. Lifting the cooktop
can lead to damage and improper operation of
the range.
es. You
37
Page 38

CARE AND CLEANING OF THE RANGE
STAINLESS STEEL SURFACES
Do not use a steel wool pad; it will scratch
the surface.
To clean the stainless steel surface, use warm
sudsy water or a stainless steel cleaner or
polish. Always wipe the surface in the direction
of the grain. Follow the cleaner instructions for
cleaning the stainless steel surface.
OVEN AIR VENTS
Never block the vents (air openings) of the
range. They provide the air inlet and outlet that
are necessary for the range to operate properly
with correct combustion.
Air openings are located at the rear of the
cooktop, at the top and bottom of the oven
door, and at the bottom of the range, under
the warming drawer.
CONTROL PANEL
To inquire about purchasing stainless steel
appliance cleaner or polish, or to find the
location of a dealer nearest you, please call our
toll-free customer service number:
1-800-243-0000
or visit our website at:
us.lgservice.com
Lock out the touch pads before
cleaning.
See the Control Lockout information in the
Special Featur
in this manual.
es of Your Oven Control
section
Clean up splatters with a damp cloth.
You may also use a glass cleaner.
Remove heavier soil with warm soapy water
Do not use abrasives of any kind.
Unlock the touch pads after cleaning.
FRONT MANIFOLD PANEL AND KNOBS
It’s a good idea to wipe the control panel after
each use of the oven. Use a damp cloth to
clean or rinse. For cleaning, use mild soap and
water or a 50/50 solution of vinegar and water.
For rinsing, use clean water. Polish dry with a
soft cloth.
Do not use abrasive cleansers, strong liquid
cleaners, plastic scouring pads or oven cleaners
on the control panel—they will damage the
finish.
Do not try to bend knobs by pulling them up or
down or by hanging a towel or other such loads.
This can damage the gas valve shaft.
The control knobs may
be removed for easier
cleaning.
Make sure the knobs
e in the
ar
positions and pull
them straight off the
stems for cleaning.
To reinstall the knobs, make sure the knob has
the
the knob directly onto the stem.
OFF
OFF position centered at the top and slide
Surface bur
.
ner knob
38
Page 39

OVEN DOOR
CARE AND CLEANING OF THE RANGE
The oven door is removable, but it is heavy. You
may need help removing and replacing the door.
TO REMOVE THE DOOR
To remove the door,
open it a few inches
to the special stop
position that will hold
the door open. Grasp
firmly on each side
and lift the door
straight up and off the
hinges.
NOTE: Be careful not
to place hands
between the hinge
and the oven door frame as the hinge could
snap back and pinch fingers.
Lift the door straight up
and off the hinges.
TO REPLACE THE DOOR
To replace the door, make sure the hinges are
in the special stop position. Position the slots in
the bottom of the door squarely over the hinges.
Then lower the door slowly and evenly over both
hinges at the same time. If the hinges snap back
against the oven frame, pull them back out.
TO CLEAN THE INSIDE OF THE DOOR
• Do not allow excess
water to run into
any holes or slots
in the door.
• Because the area
inside the gasket is
cleaned during the
self clean cycle, you
do not need to clean
this by hand. Any
soap left on the liner
causes additional
stains when the oven
is heated.
• The area outside
the gasket can be
cleaned with a
soap-filled plastic
scouring pad.
The gasket is designed with a
gap at the bottom to allow for
proper air circulation.
Do not rub or clean the door
gasket—it has an extremely
low resistance to abrasion.
If you notice the gasket
becoming worn, frayed or
damaged in any way or if it
has become displaced on the
door, you should have it
replaced.
TO CLEAN THE OUTSIDE OF THE DOOR
• Use soap and water to thoroughly clean the
top, sides and front of the oven door. Rinse
well. You may also use a glass cleaner to
clean the glass on the outside of the door.
• Spillage of marinades, fruit juices, tomato
sauces and basting materials containing acids
may cause discoloration and should be wiped
up immediately. When the surface is cool,
clean and rinse.
• Do not use oven cleaners, cleansing powders
or harsh abrasives on the outside of the door.
OVEN BOTTOM
The oven bottom has a porcelain enamel finish.
o make cleaning easier
T
bottom fr
cookie sheet on the shelf below the shelf you
e cooking on. This is particularly important
ar
when baking a fruit pie or other foods with a
high acid content. Hot fruit fillings or other foods
that are highly acidic (such as tomatoes,
sauerkraut and sauces with vinegar or lemon
juice) may cause pitting and damage to the
porcelain enamel surface and should be wiped
up immediately
om excessive spillovers by placing a
.
, protect the oven
We don’t recommend using aluminum foil on the
oven bottom. It can af
blocked and it can concentrate heat at the bottom
of the oven, r
o clean up spillovers, use soap and water,
T
an abrasive cleaner or soap-filled scouring
pad. Rinse well to remove any soap before
self-cleaning.
Always make sur
operly in place after cleaning.
pr
esulting in poor baking performance.
fect air flow if the holes ar
e that the oven bottom is
e
39
Page 40

CARE AND CLEANING OF THE RANGE
BROILER PAN AND GRID
After broiling, remove the
broiler pan from the
oven. Remove the grid
from the pan. Carefully
pour out grease from
the pan into a proper
container. Wash and
rinse the broiler pan and
grid in hot water with a
soap-filled or plastic scouring pad.
If food has burned on, sprinkle the grid with
detergent while hot and cover with wet paper
towels or a dishcloth. Soaking the pan will
remove burned-on foods.
The broiler pan and grid may be cleaned
with a commercial oven cleaner.
Both the broiler pan and grid can also be
cleaned in a dishwasher.
Do not store a soiled broiler pan and grid
anywhere in the range.
NOTICE: Do not clean the broiler pan or grid in
a self-cleaning oven.
OVEN SHELVES AND DRAWER RACKS
If your oven is
equipped with nickel
oven shelves, they
should be removed
from the oven before
beginning the self-clean cycle.
To clean the nickel shelves, use an abrasive
cleanser. After cleaning, rinse the shelves with
clean water and dry with a clean cloth. If the
shelves ever become hard to slide, wipe the
shelf edges or oven shelf supports with
vegetable oil.
40
OVEN LIGHT REPLACEMENT
eplacing your
CAUTION: Befor
oven light bulb, disconnect the electrical power
to the range at the main fuse or circuit breaker
panel. Be sur
cool completely.
The oven light bulb
is covered with a
emovable glass cover
r
that is held in place with
a bail-shaped wire.
Remove the oven door
if desir
cover easily.
To remove:
Disconnect electrical power from the range.
1
e to let the light cover and bulb
,
ed, to r
each
e r
e Cover Holder
Wir
Hold a hand under the cover so it doesn’t
2
fall when released. With fingers of the same
hand, firmly push back the wire cover holder.
Lift off the cover.
screws to remove the cover.
Do not touch hot bulb with a wet cloth.
3
Replace bulb with a 40-watt household
appliance bulb.
To replace cover:
Place it into the gr
1
receptacle. Pull the wire forward to the
center of the cover until it snaps into place.
When in place, the wir
firmly. Be certain the wire is in the
depression in the center of the cover.
2
Connect electrical power to the range.
Do not remove any
oove of the light
e holds the cover
Page 41

CARE AND CLEANING OF THE RANGE
REMOVABLE WARMING DRAWER
NOTE: Before performing any adjustments,
cleaning or service, disconnect the range
electrical power supply at the household
distribution panel by removing the fuse or
switching off the circuit breaker. Make sure
the warming drawer heating element is cool.
Most cleaning can be done with the drawer in
place. However, the drawer may be removed if
further cleaning is needed. Use soap and warm
water to thoroughly clean.
To remove the drawer:
1
Pull the drawer straight out until it stops.
2
Press the left
rail release
up and press
the right rail
release
down, while
pulling the
drawer
forward
and free.
To replace the drawer:
Place the left
1
drawer rail
around the
inner left rail
guide and
slide it in
slightly to
hook it.
Place the
2
right drawer
rail around the
inner right rail guide and slide it in slightly to
hook it.
3
Slide the drawer all the way in.
41
Page 42

TROUBLESHOOTING
BEFORE CALLING FOR SERVICE
Before you call for service, review this list. It may save you time and expense. This list includes common
occurrences that are not the result of a defect in workmanship or materials.
Problem Possible Causes Solutions
Top burners do not light
or do not burn evenly.
(The front right burner is
designed to have
slightly smaller flames
between the 6 and 9
o’clock positions. This
is normal.)
Burner flames very • Improper air to gas ratio. • If range is connected to LP gas, contact the person
large or yellow who installed your range or made the conversion.
• Plug on range is not • Make sure electrical plug is plugged into a
completely inserted in live, properly grounded outlet.
the electrical outlet.
• Burner slits on the side of the • Remove the burners and clean them. Check the
burner may be clogged. electrode area for burned-on food or grease. See
•
Improper burner assembly. • Make sure the burner parts are installed correctly.
the Care and Cleaning of the Range section.
See the Care and Cleaning of the Range section.
Surface burners light • The oven gas shut-off valve • To check the oven gas shut-off valve, remove the
but oven does not may have accidentally been warming drawer (see the Care and Cleaning of the
moved during cleaning or Range section) and look for the gas shut-off lever
moving. at the back of the range.
Lever is shown
closed.
PULL TO OPEN.
ou forgot to enter a bake • Touch the
Control signals after •
entering cooking time temperature or cleaning time. the SELF CLEAN pad and desired clean time.
or start time
Food does not bake or • Oven controls improperly set. • See the Using the Oven section.
roast properly in the
upper oven
Y
• Shelf position is incorrect. • See the Using the Oven section.
• Incorrect cookware or cookware • See the Using the Oven section.
of improper size being used.
• Oven thermostat needs • See the
adjustment.
Clock not set correctly
•
• Aluminum foil used improperly • See the Care and Cleaning of the Range section.
in the oven.
Oven bottom not securely
•
seated in position.
.
• See the
See the
•
BAKE pad and desired temperature or
Adjusting the Oven Thermostat section.
r
ime
Using the Clock and
tion Instructions
Installa
T
section.
.
42
Page 43

TROUBLESHOOTING
BEFORE CALLING FOR SERVICE
Problem Possible Causes Solutions
Food does not broil • Oven controls improperly set. • Make sure you touch the BROIL HI/LO pad.
properly in the oven
• Oven door not closed. • See the Using the Oven section.
• Improper shelf position • See the
being used.
• Food being cooked in a hot pan. • Use the broiling pan and grid that came with your
• Cookware not suited for broiling. • Use the broiling pan and grid that came with your range.
• Aluminum foil used on the • See the
broiling pan and grid has not
been fitted properly and
slit as recommended.
• Oven bottom not securely • See the
seated in position.
Broiling Guide.
range. Make sure it is cool.
Using the Oven section.
Installation Instructions.
Oven temperature • Oven thermostat • See the Adjusting the Oven Thermostat section.
too hot or too cold needs adjustment.
Clock and timer • Plug on range is not completely • Make sure electrical plug is plugged into a live, properly
do not work inserted in the electrical outlet. grounded outlet.
• A fuse in your home may be blown • Replace the fuse or reset the circuit breaker.
or the circuit breaker tripped.
• Oven controls improperly set. • See the Using the Clock and Timer section.
Oven light does not work • Light bulb is loose or defective. • Tighten or replace the bulb.
• Plug on range is not completely • Make sure electrical plug is plugged into a live, properly
inserted in the electrical outlet. grounded outlet.
Oven will not self-clean • The oven temperature is too • Allow the range to cool to room temperature and
high to set a self-clean operation. reset the controls.
• Oven controls improperly set. • See the Using the Self-Cleaning Oven section.
“Crackling” or This is the sound of the • This is normal.
“popping”
Excessive smoking • Excessive soil. • Touch the CLEAR/OFF pad. Open the windows to
sound
metal hea
during both the cooking and
leaning functions.
c
ting and cooling
rid the room of smoke. Wait until the LOCKED DOOR
light goes off. Wipe up the excess soil and reset the
clean cycle.
• This is normal in a new oven • To speed the process, set a self-clean cycle for a
and will disa
ppear in time.
minimum of 3 hours.
Oven section.
See the
Using the Self-Cleaning
43
Page 44

TROUBLESHOOTING
BEFORE CALLING FOR SERVICE
Problem Possible Causes Solutions
Oven door will not open • Oven too hot. • Allow the oven to cool below locking temperature.
after a clean cycle
Oven not clean after a • Oven controls not properly set. • See the Using the Self-Cleaning Oven section.
clean cycle
• Oven was heavily soiled. • Clean up heavy spillovers before starting the clean
“LOCK DOOR” flashes • The self-clean cycle has been • Close the oven door.
in the display selected but the door is not
closed.
LOCKED DOOR light • The oven door is locked • Touch the CLEAR/OFF pad. Allow the oven to cool.
is on when you want because the temperature
to cook inside the oven has not
dropped below the
locking temperature.
cycle. Heavily soiled ovens may need to self-clean
again or for a longer period of time.
“F—and a number or
letter” flash in the display
Oven shelves are • The nickel shelves (if so equipped) • Apply a small amount of vegetable oil to a paper
difficult to slide were cleaned in a self-clean cycle. towel and wipe the edges of the oven shelves with
“Probe” appears •
in the display probe temperature after plugging
(convection models) in the probe.
Display goes blank • A fuse in your home may be blown • Replace the fuse or reset the circuit breaker.
Display flashes • Power failure. • Reset the clock.
Unable to get the •
display to show “SF” not pressed properly. at the same time and held for 3 seconds.
Power outage, •
clock flashes reset it by touching the CLEAR/OFF pad, setting the
• You have a function error code. • Touch the CLEAR/OFF pad. Allow the oven to cool for
one hour. Put the oven back into operation.
• If the function code repeats. • Disconnect all power to the range for 5 minutes
and then reconnect power. If the function error
code repeats, call for service.
the paper towel. Do not spray with Pam®or other
lubricant sprays.
This is reminding you to enter a • Enter a probe temperature.
or the circuit breaker tripped.
• The clock is in the • See the Special Features of Your Oven Control
black-out mode. section.
Oven control pads were •
wer outa
o
P
ge or surge.
The
BAKE and BROIL HI/LO pads must be touched
• Reset the clock. If the oven was in use, you must
clock and resetting any cooking function.
44
Page 45

TROUBLESHOOTING
BEFORE CALLING FOR SERVICE
Problem Possible Causes Solutions
“Burning” or “oily” • This is normal in a new oven • To speed the process, set a self-clean cycle for a
odor emitting from and will disappear in time. minimum of 3 hours. See the Using the Self-Cleaning
the vent Oven section.
Strong odor • An odor from the insulation • This is temporary.
around the inside of the oven
is normal for the first few times
the oven is used.
Fan noise • The convection fan may turn on • This is normal. The convection fan will run until the
(convection models) and off automatically. function is over or the door is opened.
Convection fan not • Preheat temperature • Fan will start automatically once the preheat
working (convection not reached. temperature is reached.
models)
Drawer does not slide • The drawer is out of alignment. • Fully extend the drawer and push it all the way in.
smoothly or drags See the Care and Cleaning of the Range section.
• Drawer is over-loaded or load • Reduce weight. Redistribute drawer contents.
is unbalanced.
Warming drawer will • A fuse in your home may be blown • Replace the fuse or reset the circuit breaker.
not work or the circuit breaker tripped.
• The oven is self-cleaning. • Wait for the self-clean cycle to finish and the oven
to cool.
• Controls improperly set. • See the Using the Electric Warming Drawer section.
Excessive condensation •
in the dra
Food dries out in the • Moisture escaping. • Cover food with lid or aluminum foil.
lower oven drawer or
warming dra
wer
wer
Liquid in drawer. • Remove liquid.
Cover food with lid or aluminum foil.
Uncovered foods.
•
• Temperature setting too high. • Reduce temperature setting.
• Drawer not fully closed. • Push drawer in until latch engages.
•
45
Page 46

NOTES
46
Page 47

LG ELECTRONICS, INC.
LG GAS RANGE LIMITED WARRANTY — USA
LG Electronics Inc. will repair or replace your product, at LG’s option, if it proves to be defective in material or
workmanship under normal use, during the warranty period set forth below, effective from the date of original
consumer purchase of the product. This limited warranty is good only to the original purchaser of the product
and effective only when used in U.S.A.
WARRANTY PERIOD:
LABOR: One year from date of original purchase
PARTS: One year from date of original purchase
WHAT IS COVERED:
Any part of the range which fails due to a defect
in materials or workmanship. During this full
one-year warranty, LG will also provide, free of
charge
the defective part.
THIS WARRANTY IS IN LIEU OF ANY OTHER WARRANTIES, EXPRESS OR IMPLIED, INCLUDING WITHOUT
LIMITATION, ANY WARRANTY OF MERCHANTABILITY OR FITNESS FOR A PARTICULAR PURPOSE. TO THE
EXTENT ANY IMPLIED WARRANTY IS REQUIRED BY LAW, IT IS LIMITED IN DURATION TO THE EXPRESS
WARRANTY PERIOD ABOVE. LG WILL NOT BE LIABLE FOR ANY CONSEQUENTIAL, INDIRECT, OR
INCIDENTAL DAMAGES OF ANY KIND, INCLUDING LOST REVENUES OR PROFITS, IN CONNECTION WITH
THE PRODUCT. SOME STATES DO NOT ALLOW LIMITATION ON HOW LONG AN IMPLIED WARRANTY
LASTS OR THE EXCLUSION OF INCIDENTAL OR CONSEQUENTIAL DAMAGES, SO THE ABOVE LIMITATIONS
OR EXCLUSIONS MAY NOT APPLY TO YOU.
THIS LIMITED WARRANTY DOES NOT APPLY TO:
1.
Service calls to correct the installation of your appliance, to instruct you how to use your appliance, to replace
house fuses or correct house wiring, or to r
2. Repairs when your appliance is used in other than normal, single-family household use.
3. Pickup and delivery. Your appliance is designed to be repairable in the home.
4. Damage resulting from accident, alteration, misuse, abuse, fire, flood, improper installation, acts of God, or use of
products not approved by LG Corporation.
5. Repairs to parts or systems r
6. Replacement parts or r
7. Any labor costs during the limited warranty period.
, all labor and in-home service to replace
eplace owner-accessible light bulbs.
esulting from unauthorized modifications made to the appliance.
epair labor costs for units operated outside the United States.
HOW SERVICE IS HANDLED:
In-Home Service:
Please retain dealer’s dated bill of sale as evidence of the
Date of Purchase for proof of warranty, and submit a copy of
the bill of sale to the service person at the time warranty
service is provided.
Please call
option to locate your nearest LG Authorized Service Center.
Or visit our Web site at
1-800-243-0000 and choose the appropriate
www.lgservice.com.
This warranty is extended to the original purchaser and any subsequent owner for products purchased for home use
within the USA. In Alaska, the warranty excludes the cost of shipping or service calls to your home.
Some states do not allow the exclusion or limitation of incidental or consequential damages, so this exclusion or
limitation may not apply to you. This warranty gives you specific legal rights, and you may also have other rights
which vary fr
your state’s Attorney General.
TO CONTACT LG ELECTRONICS BY MAIL:
LG Customer Interactive Center
P. O. Box 240007
201 James Record Road
Huntsville, Alabama 35824
ATTN: CIC
om state to state. T
o know what your legal rights ar
e, consult your local or state consumer af
Product Registration Information
Model:
Serial Number:
Date of Pur
__________________________________________
__________________________________
chase:
________________________________
fairs or
47
Page 48

INTRODUCCIÓN
INFORMACIÓN IMPORTANTE DE SEGURIDAD
Que Hacer Si Detecta Olor a Gas. . . . . . . . . . . . . . . . . . . 49
Dispositivo Anti-Volcaduras . . . . . . . . . . . . . . . . . . . . . . . 49
recauciones de Seguridad . . . . . . . . . . . . . . . . . . . . 50–54
P
CÓMO UTILIZAR
Cómo Utilizar los Quemadores de Superficie. . . . . . . 55, 56
anel de Control—Modelos por Convección . . . . . . . . . . 57
P
Panel de Control—Modelos sin Convección . . . . . . . . . . 58
Cómo Utilizar el Horno . . . . . . . . . . . . . . . . . . . . . . . . 59–62
Cómo Utilizar el Reloj u Contador . . . . . . . . . . . . . . . . . . 63
Hornear y Asar por Tiempo . . . . . . . . . . . . . . . . . . . . 64, 65
Cómo Utilizar la Sonda (
en modelos por convección) . . . . . . . . . . . . . . . . . . . 66, 67
Cómo Utilizar el Horno por Convección
(en algunos modelos) . . . . . . . . . . . . . . . . . . . . . . . . . 68–70
Cómo Utilizar las Características de Horneado y Asado por
Convección Temporizados (en algunos modelos) . . . 71, 72
Funciones Especiales de su Control del Horno . . . . . 72, 73
Cómo Utilizar la Función Sabbath . . . . . . . . . . . . . . . 74, 75
Cómo Ajustar el Termostato del Horno . . . . . . . . . . . . . . 76
Consejo para Hornear. . . . . . . . . . . . . . . . . . . . . . . . . . . . 76
Cómo Utilizar el Cajón Calentador Eléctrico . . . . . . . 77, 78
Operación del Horno Auto Limpieza . . . . . . . . . . . . . 79, 80
CUIDADO Y LIMPIEZA
Cuidado y Limpieza . . . . . . . . . . . . . . . . . . . . . . . . . . . . . 81
Tapas y Cabezales de los Quemadores . . . . . . . . . . . . . . 82
Parrillas de los Quemadores. . . . . . . . . . . . . . . . . . . . . . . 83
Superficie de Cocción. . . . . . . . . . . . . . . . . . . . . . . . . . . . 83
Superficie en Acero Inoxydable . . . . . . . . . . . . . . . . . . . . 84
Los Respiradores del Horno . . . . . . . . . . . . . . . . . . . . . . . 84
Panel de Control del Horno . . . . . . . . . . . . . . . . . . . . . . . 84
Panel de Contr
Puerta del Horno . . . . . . . . . . . . . . . . . . . . . . . . . . . . . . . . 85
La Solera del Horno . . . . . . . . . . . . . . . . . . . . . . . . . . . . . 85
La Bandeja y la Rejilla del Asador . . . . . . . . . . . . . . . . . . 86
Las Parrillas del Horno y del Cajón . . . . . . . . . . . . . . . . . 86
Reemplazo de la Luz del Horno
Cajón Calentador Desmontable . . . . . . . . . . . . . . . . . . . . 87
ol Frontal . . . . . . . . . . . . . . . . . . . . . . . . . 84
. . . . . . . . . . . . . . . . . . . .
86
¡GRACIAS!
Felicitaciones por su compra y
bienvenido a la familia de LG.
Su nuevo Cocina de Gaz de LG
combina las caracteristícas para la
cocción precisa con un operación
fácil y un diseño con estilo.
Siguiendo las instrucciones de
funcionamiento y cuidado de este
manual, su cocina le brindará
muchos años de servicio confiable.
48
DETECCIÓN DE PROBLEMAS
Antes de Llamar al Servicio Técnico
. . . . . . . . . . . . . 88–91
GARANTÍA
Información Sobre Registro de Producto . . . . . . . . . . . . . 95
Page 49

INFORMACIÓN IMPORTANTE DE SEGURIDAD
LEA ESTAS INSTRUCCIONES ANTES DE USAR
ADVERTENCIA Si usted no sigue con exactitud la información de
esta guía, pudiera causar un incendio o una explosión que resultaría en daños a la
propiedad, lesiones personales o muerte.
ADVERTENCIA:
DISPOTIVO ANTI-VOLCADURAS
• TODAS LAS COCINAS SE PUEDEN VOLCAR
• LESIONES PERSONALES PUEDEN OCURRIR
• INSTALE LOS DISPOSITIVOS ANTIVOLCADURAS QUE VIENEN CON SU COCINA
• VEA LAS INSTRUCCIONES PARA LA
INSTALACION
®
ADVERTENCIA: Si usted no sigue con exactitud la información de esta
guía, pudiera causar un incendio o una explosión que resultaría en daños a la propiedad,
lesiones personales o muerte.
• No almacene o use gasolina u otros vapores y líquidos inflamables en proximidad a éste
o a cualquier otro aparato electrodoméstico.
QUE HACER SI DETECTA OLOR A GAS
• No trate de encender ningún aparato
electrodoméstico.
• No toque ningún interruptor eléctrico; no
use ningún teléfono en su edificio.
• Llame inmediatamente a la compañía
suministradora de gas desde el teléfono de
un vecino. Siga las instrucciones de la
compañía de gas.
• Si no pudiera comunicarse con la compañía
de gas, llame a la estación de bomberos.
La instalación y los servicios de reparación
deberán ser r
calificado, una agencia de servicios o la
compañía suministradora de gas.
ealizados por un instalador
DISPOSITIVO ANTI-VOLCADURAS
Todas las cocinas se pueden volcar y producìr heridas personales.
Para prevenir una volcadura accidental de la
cocina, engánchela a la pared instalando el
sistema contra volcaduras que se provee.
Para estar segur
enganchado adecuadamente, inclinado la cocina
cuidadosamente hacia adelante.
anti-volcaduras debe colocarse para evitar que la
cocina se caiga hacia adelante.
Si se separ
razón, asegúrese de que el dispositivo esté bien
o que el sistema está instalado y
El dispositivo
e la cocina de la par
ed por cualquier
conectado cuando vuelva a colocar la cocina
contra la pared. Si no lo está, hay riesgo posible
de que la cocina vuelque y cause daños si Ud. o
un niño se sube, se asienta o se inclina sobr
puerta abierta.
Favor de consultar la información sobr
dispositivo Anti-volcaduras en esta guía. No tomar
esta precaución podría resultar en el volcado de la
cocina y heridas personales.
e una
e el
49
Page 50

INFORMACIÓN IMPORTANTE DE SEGURIDAD
LEA ESTAS INSTRUCCIONES ANTES DE USAR
AVISO IMPORTANTE DE SEGURIDAD
El California Safe Drinking Water and Toxic
Enforcement Act (Ley sobre los productos tóxicos
y de agua potable de California) requiere que el
gobernador de California publique una lista de
sustancias que el estado sabe causan cáncer,
defectos de nacimiento u otros daños de
reproducción, y requiere que los negocios les avisen
a los clientes contra la exposición potencial a tales
sustancias.
PRECAUCIONES DE SEGURIDAD
Pida que el instalador le muestre el lugar de la válvula que corta el gas de la cocina y cómo
apagarla si fuera necesario.
Los aparatos de gas causan exposición mínima a
cuatro de estas sustancias, tales como el benceno,
el monóxido de carbono, el formaldehído y el hollín,
causados primordialmente por la combustión
incompleta de gas natural o gas LP (Propano). Los
quemadores bien ajustados, indicados por una
llama azul en vez de una llama amarilla, minimizarán
la combustión incompleta. La exposición a estas
sustancias puede minimizarse más, ventilando con
una ventana abierta o usando un ventilador o una
campana de ventilación.
• Haga que un instalador calificado instale y conecte
a tierra su cocina de acuerdo con las Instrucciones
para la instalación. Cualquier ajuste o servicio debe
ser completado sólo por instaladores de cocinas
de gas calificados o técnicos de servicio.
• No trate de reparar o reemplazar ninguna parte de
su cocina a menos que se recomiende
específicamente en este manual. Todo otro servicio
se debe remitir a un técnico de servicio calificado.
• Enchufe su cocina a una toma de corriente de
pared conectada a tierra de 120 voltios. No quite la
punta redonda con conexión a tierra del enchufe.
Si cabe duda de la conexión de tierra del sistema
eléctrico de la casa, es su responsabilidad personal
y su obligación reemplazarla por un contacto
adecuado para tres puntas con conexión a tierra
de acuer
eléctrico nacional). No use un cable de extensión
con este aparato.
• Sitúe la cocina fuera de las áreas muy transitadas
en la cocina y fuera de lugar
evitar circulación de aire inadecuada.
Asegúr
•
de la cocina antes de operarla para evitar incendio
o daños del humo, si los materiales de envase se
encendieran.
• Asegúrese de que su cocina esté ajustada
correctamente por un técnico de servicio o
instalador calificado para el tipo de gas [natural o
LP (Propano)], que se va a usar. Su cocina se
puede convertir para uso con cualquier tipo de gas.
Consulte las Instrucciones para la Instalación.
do con el National Electrical Code (Código
es ventilados para
ese de quitar todos los materiales de envase
ADVERTENCIA: Estos ajustes
deben ser completados por un técnico de servicio
calificado de acuerdo con las instrucciones del
fabricante y todos los códigos y requisitos de la
autoridad que tiene jurisdicción. No seguir estas
instrucciones podría resultar en heridas serias o
daños a la propiedad. La agencia calificada que
realice este trabajo asume la r
conversión.
• Después del uso prolongado de una cocina, se
pueden producir temperaturas altas del piso y
muchos r
este tipo de uso. Nunca instale la cocina sobre
baldosas de vinilo o linóleo porque no pueden
esistir este uso. Nunca la instale directamente
r
sobre la alfombra de cocina.
• No deje a los niños solos o desatendidos donde
hay una cocina caliente o en operación. Pueden
quemarse gravemente.
• No permita que nadie se suba, se pare o se
cuelgue de la puerta, del cajón de almacenamiento
o de la superficie de cocción de la cocina. Podría
dañarse la cocina o volcarla, causando daño
personal grave.
ecubrimientos del suelo no pueden r
• PRECAUCION: Los artículos que
sean de interés para los niños no deben guardarse
o de los gabinetes situados encima de una
dentr
cocina de gas ni sobre el tablero posterior de esa
cocina—los niños que se subieran a la cocina para
tratar de alcanzar estos artículos pudieran r
gravemente lesionados.
esponsabilidad de la
esistir
esultar
50
Page 51

INFORMACIÓN IMPORTANTE DE SEGURIDAD
LEA ESTAS INSTRUCCIONES ANTES DE USAR
PRECAUCIONES DE SEGURIDAD
• No use agua para fuegos causados por la grasa.
ADVERTENCIA: Por su
seguridad, NUNCA use su aparato para
calentar la habitación. Doing so may result
in carbon monoxide poisoning and
overheating of the oven.
• No lleve nunca vestidos desabrochados o caídos al
usar el aparato. Tenga cuidado al tomar los artículos
guardados en los armarios sobre la superficie de
cocción. Los materiales inflamables se podrían
encender si tuvieran contacto con llamas o superficies
calientes del hor
graves.
• No guarde los materiales inflamables dentro del
horno, cajón de almacenamiento o cerca de la
superficie de cocción.
• No guarde ni use materiales combustibles,
gasolina u otros vapores o líquidos cerca de
este o cualquier otro aparato.
• No deje que la grasa de cocina u otros materiales
inflamables se acumulen dentro o cerca de la cocina.
no y podrían causar quemaduras
Nunca recoja una sartén en llamas. Apague los
controles. Ahogue una sartén en llamas sobre un
quemador cubriendo completamente la sartén con
una tapa que ajuste, una hoja de hornear, o una
hoja plana. Use un extintor de sustancia química
seca de multi-uso o de tipo espuma.
La grasa en llamas fuera de una sartén se puede
extinguir cubriéndola con bicarbonato sódico, o si
está disponible, usando un extintor de sustancia
química seca de multi-uso o de tipo espuma.
Las llamas en el horno o cajón de almacenamiento
se pueden ahogar completamente cerrando la
puerta del horno o el cajón y apagando el horno o
usando un extintor de sustancia química seca de
multi-uso o de tipo espuma.
• Deje que las parrillas de los quemadores y otras
superficies se enfríen antes de tocarlas o dejarlas
donde los niños puedan tocarlas.
• Nunca obstruya los respiraderos (aberturas de aire)
de la cocina. Estas proporcionan la entrada y la
salida de aire necesarias para que la cocina
funcione adecuadamente con una combustión
correcta. Los respiraderos de aire se localizan en
en la parte posterior de la superficie de cocción de
la cocina, en las partes superior y inferior de la
puerta del horno, y debajo del cajón calentador.
• Las raspaduras o los impactos grandes en las
puertas de vidrio pueden causar que los vidrios
se rompan.
COCINANDO EN LA SUPERFICIE
Use el tamaño correcto de recipiente. Evite usar los recipientes que no son estables o se vuelcan fácilmente.
Seleccione los recipientes con fondo plano bastante grandes para contener el alimento y evitar las salpicaduras y
derrames, y lo bastante grandes para cubrir las parrillas de los quemador
impedirá la acumulación peligrosa de alimentos; las salpicaduras o los derrames dejados sobre la cocina pueden
arder. Use recipientes con mangos que se pueden agarrar fácilmente y que se mantengan fríos.
e use la posición
Siempr
•
encender los quemadores de superficie y
asegurarse de que hayan encendido los
quemadores.
• Nunca deje desatendidos los quemadores en las
posiciones de llamas altas. Las salpicaduras
pueden causar humo y derrames de grasa que
pueden encenderse.
LITE (encender) al
Ajuste el tamaño de la llama del quemador de
•
superficie para que no extienda sobre la
extr
son peligrosas.
es. Esto ahorrará el tiempo de limpieza e
emidad de la cacer
ola. Las llamas excesivas
51
Page 52

INFORMACIÓN IMPORTANTE DE SEGURIDAD
LEA ESTAS INSTRUCCIONES ANTES DE USAR
COCINANDO EN LA SUPERFICIE (continuación)
• Use sólo agarraderas secas—las agarraderas
húmedas o mojadas sobre superficies calientes
pueden resultar en quemaduras por el vapor. No
deje que las agarraderas se acerquena las llamas
al levantar una cacerola. No use una toalla u otro
trapo abultado en vez de usar una agarradera
• Al usar recipientes de vidrio, asegúrese de que
estén diseñados para la cocción sobre la cocina.
• Para minimizar la posibilidad de quemaduras, el
incendio de materiales inflamables y derrames,
coloque los mangos hacia la parte de atrás de la
cocina sin extenderlos sobre los quemadores.
• Vigile con atención los alimentos que se fríen en
llama alta.
• Siempre caliente la grasa lentamente y obsérvela
cuando se calienta.
• No deje artículos sobre la superficie de la cocina.
El aire caliente del respiradero puede hacer que
los objetos inflamables ardan y aumente la presión
de los recipientes cerrados, lo que puede originar
que estallen.
• Si una combinación de aceites o grasas se usara al
freír, revuelva antes de calentar o mientras la grasa
se derrite lentamente.
• Use un termómetro para freír con aceite cuando
sea posible para evitar sobre calentar la grasa y
que eche humo.
Use la cantidad mínima de grasa para fr
•
manera más eficaz. Llenar el recipiente de grasa
puede causar salpicaduras al añadir alimentos.
•
No queme alimentos sobre la cocina. Si quema
alimentos bajo la campana, enciende el ventilador.
No use ollas metálicas (tipo “wok”) en los modelos
•
con quemadores sellados si la olla metálica tiene
anillo metálico que se colca sobre la parrilla del
quemador para soportar la olla metálica. Este anillo
actúa como trampa de calor, lo cual puede dañar la
parrilla del quemador y la cabeza del quemador
eír de una
.
También, puede causar que el quemador funcione
de manera inadecuada. Esto puede causar que el
nivel de monóxido de carbono sea superior a los
estándar actuales permitidos, resultando en un
peligro para la salud.
• Los alimentos para freír deben estar tan secos
como sea posible. La escarcha sobre los alimentos
congelados o la humedad sobre los alimentos
frescos pueden provocar que la grasa caliente
burbujee y se salga por los lados del recipiente
• Nunca trate de mover una sartén de grasa caliente,
especialmente un freidor con bastante aceite.
Espere hasta que se enfríe el aceite.
• No deje artículos de plástico sobre la superficie—
se pueden derretir si se dejan muy cerca del
respiradero.
• Aleje todos los artículos de material plástico
de los quemadores de superficie.
• Para evitar la posibilidad de una quemadura,
siempre asegúrese de que los controles para todos
los quemadores estén apagados y que todas las
parrillas de los quemadores estén frías antes de
tratar de quitarlas.
• Si la cocina está localizada cerca de la ventana, no
cuelgue las cortinas largas que podrían ser llevadas
por el viento sobre los quemadores de superficie y
crear un peligr
• Si huele a gas, y se ha asegurado ya de que los
pilotos están encendidos, apague el gas de la
cocina y llame a un técnico calificado. Nunca use
una llama viva para encontrar una fuga.
• Siempre apague los quemadores de superficie
antes de quitar una cacerola.
• No levante la superficie de cocción. Levantar la
superficie de cocción puede pr
funcionamiento inadecuado de la cocina.
o de incendio.
ovocar daños y un
52
COCINE MUY BIEN TODAS LAS CARNES
Cocine muy bien todas las carnes, incluyendo las
carnes de aves; las car
deben cocinarse a una temperatura INTERNA de
por lo menos 160°F (71°C) y las carnes de aves
deben cocinarse a una temperatura interna de por
nes de r
es, por ejemplo,
lo menos 180°F (82°C). Por lo general, cocinar
a estas temperaturas pr
enfermedades que se transmiten a través
de los alimentos.
otege contra las
Page 53

INFORMACIÓN IMPORTANTE DE SEGURIDAD
LEA ESTAS INSTRUCCIONES ANTES DE USAR
CAJÓN CALENTADOR ELÉCTRICO
• El objeto del cajón calentador consiste en
mantener alimentos cocinados calientes a la
temperatura a la que se servirán. Siempre empiece
con alimentos calientes; ya que los alimentos fríos
no pueden calentarse o cocinarse en el cajón
calentador.
• Nunca seque periódicos mojados en el cajón
calentador. Si se calientan demasiado pudieran
incendiarse.
• Nunca deje productos de papel, utensilios de
cocina o alimentos en el cajón calentador.
• Nunca deje dentro o cerca de su cajón calentador
jarras o latas con escurrimiento de grasa.
• Nunca caliente alimentos en el cajón calentador
durante más de dos horas.
• Nunca toque el elemento calefactor o las
superficies interiores del cajón calentador.
Estas superficies pueden estar tan calientes
que produzcan quemaduras.
RECUERDE: Al abrir el cajón, las superficies
interiores del cajón calentador pueden estar
sumamente calientes.
• Siempre abra el cajón con mucho cuidado. Abra el
cajón un resquicio y deje que el aire caliente o el
vapor escapen antes de sacar o reemplazar algún
alimento. El escape de aire caliente o de vapor
puede quemar las manos, la cara y/o los ojos.
• Nunca forre el cajón con papel aluminio. El papel
aluminio actúa como un aislador excelente y
capturará el calor debajo de sí mismo. Esto va a
afectar el comportamiento del cajón y pudiera
dañar al acabado interior.
HORNO DE AUTO LIMPIEZA
• Asegúrese de limpiar las salpicaduras excesivas
antes de iniciar el ciclo de auto limpieza.
• Antes de usar auto limpieza, remueva la bandeja
del asador
cocción., la sonda y cualquier papel de aluminio
del horno.
Las parrillas del hor
•
horno antes de empezar el ciclo de limpieza
automática.
• Limpie sólo las partes enumeradas en este Guía
de uso.
• No limpie la junta de la puerta. La junta de la puerta
es esencial para un sello hermético. Tenga cuidado
de no frotar, dañar o mover la junta.
, la parrilla, todos los instrumentos de
no deberían ser r
emovidos del
• Si el ciclo de auto limpieza tuviera un fallo, apague
el horno y desconecte la corriente eléctrica. Haga
que un técnico calificado lo revise.
No use limpiador
•
comercial para hornos ni ningún revestimiento
protectivo de los bordes del horno de cualquier
tipo se debería usar dentro o alrededor de
cualquier parte del hor
limpiadores para hornos dañará el interior del
horno cuando se use el ciclo de auto limpieza.
es para hor
nos. Ningún limpiador
esiduo de los
no. El r
53
Page 54

INFORMACIÓN IMPORTANTE DE SEGURIDAD
LEA ESTAS INSTRUCCIONES ANTES DE USAR
COCINANDO EN EL HORNO
Permanezca lejos de la cocina al abrir la puerta de un horno caliente. El aire caliente y el
vapor que escapan pueden causar quemaduras en las manos, la cara y los ojos.
• No use el horno para guardar cosas. Los artículos
guardados en el horno se pueden quemar.
• Mantenga el horno limpio de la grasa que se
acumula.
• Coloque las parrillas del horno en las posiciones
deseadas mientras que el horno esté frío.
• Sacando la parrilla hasta la posición en que se
detiene podrá levantar fácilmente los alimentos
pesados. Es también una precaución contra
quemaduras al tocar las superficies calientes de la
puerta o las paredes del horno. La posición más
baja no está diseñada para deslizarse.
ADVERTENCIA: NUNCA
cubra ranuras, orificios o conductos en la
parte inferior del horno o cubra una parrilla
entera con materiales como papel metálico.
Al hacerlo, se bloquea la corriente de aire
a través del horno y puede provocar
envenenamiento por monóxido de carbono.
El revestimiento de papel metálico también
puede concentrar calor, generando un peligro
de incendio.
• No caliente los recipientes sellados que contienen
comida. La presión podría aumentar y el recipiente
podría estallar, causando daños.
• No use papel aluminio en ningún sitio del horno
excepto como se describe en este manual. El mal
manejo podría resultar en un peligro de incendio o
daño a la cocina.
• Al usar las bolsas de cocción o de asar en el
horno, siga las instrucciones del fabricante.
• Nunca seque periódicos mojados en el horno.
Si se calientan demasiado pudieran incendiarse.
• Use sólo los recipientes de vidrio que se
recomiendan para uso en los hornos de gas.
• Siempre quite la bandeja del asador del horno tan
pronto como termine de asar. La grasa dejada en
la bandeja se puede encender si se usa el horno
sin quitar la grasa de la bandeja del asador.
• Al asar al fuego directo, si la carne está demasiado
cerca de la llama, la grasa puede encenderse.
Corte la grasa excesiva para evitar llamas altas.
• Asegúrese de que la bandeja del asador esté
colocada correctamente para reducir la posibilidad
de incendios causados por la grasa.
• Si hubiera un incendio causado por la grasa en la
bandeja del asador, apague el botón
y mantenga cerrado la puerta del horno para
contener el fuego hasta que se apague.
• Para seguridad y un desempeño de cocción
adecuado, siempre hornee y ase con la puerta
del horno cerrada.
CLEAR/OFF
54
LEA Y SIGUE CUIDADOSAMENTE ESTA INFORMACION
DE SEGURIDAD.
GUARDE ESTAS INSTRUCCIONES
Page 55

CÓMO UTILIZAR
CÓMO UTILIZAR LOS QUEMADORES DE SUPERFICIE
A lo largo de este manual, las características y apariencia pueden ser diferentes a las de su modelo.
ANTES DE ENCENDER UN QUEMADOR
DE SUPERFICIE
• Asegúrese de que todas los quemadores de la
cocina estén en su lugar.
• Asegúrese de que todas las parrillas de los
quemadores de la cocina estén en su lugar antes
de usar cualquier quemador.
DESPUÉS DE ENCENDER UN QUEMADOR
• No deje un quemador funcionando por un período
largo de tiempo sin poner un recipiente sobre la
parrilla. El acabado de la parrilla pudiera astillarse
si no tiene algún recipiente disponible para
absorber el calor.
• Asegúrese de que los quemadores y las parrillas
estén fríos antes de tocarlos con las manos,
agarraderas, paños para limpiar u otros materiales.
INTERRUPCIÓN DEL SUMINISTRO
ELÉCTRICO
En caso de una interrupción del suministro eléctrico,
puede encender los quemadores de su cocina con
un cerillo. Acerque un cerillo encendido al
quemador, y luego haga girar el botón del quemador
hasta la posición
precauciones extremas cuando encienda los
quemadores de este modo.
Los quemadores de superficie que se estén usando
cuando haya una interrupción de la ignición
eléctrica continuarán operando de manera normal.
PARA ENCENDER UN QUEMADOR DE SUPERFICIE
• Asegúrese de que todas
los quemadores de la
cocina estén en su lugar.
• Empuje el botón de
control hacia adentro y
hágalo girar para la
posición de
(encender).
• Usted oirá un chasquido
ligero (“clic”), que es
el sonido de la chispa
eléctrica encendiendo
el quemador.
LITE
Empuje el botón de control
hacia adentro y hágalo girar
para la posición de LITE
(encender).
• Gire la perilla para ajustar el tamaño de la llama.
Si la perilla permanece en
“clic”.
• Cuando se gira un quemador a
quemadores comienzan a chispear. No intente
desarmar o limpiar un quemador mientras otro se
encuentre encendido. Puede producirse una
descarga eléctrica, lo que puede provocar que
usted tire recipientes de cocina calientes.
LITE (encender). Tome
LITE, seguirá haciendo
LITE, todos los
QUEMADORES A GAS SELLADOS
Su cocina cuenta con
cinco quemadores a
gas sellados. Ofrecen
comodidad, facilidad
de limpieza y
flexibilidad para
utilizar en una amplia
gama de aplicaciones
de cocina.
Los quemadores más
pequeños están
ubicados en las
posiciones trasera
derecha y central.
Estos quemador
una configuración de cocción a fuego muy lento.
Ofrece un desempeño de cocción preciso para
alimentos delicados, tales como salsas o alimentos
que requier
de cocción.
es pueden bajarse a
en fuego bajo durante un período lar
Mediano
Grande
Pequeño
Extra Grande
LO (bajo) para
go
Los quemador
(frontal izquierdo) son los quemadores principales para
la mayor parte de las cocciones. Estos quemadores
de uso general pueden bajarse de
para ajustarse a una amplia gama de necesidades
de cocción.
El quemador extra grande
ontal der
(fr
mayor potencia. Al igual que
los otros quemadores, puede
bajarse de
para una amplia gama de
aplicaciones de cocción; sin
embargo, este quemador está
diseñado para llevar a hervor
grandes cantidades de líquido.
Cuenta con una configuración especial
SUPER BOIL™(súper hervor) diseñada para
utilizarse con elementos de cocción de un
diámetr
es mediano (trasero izquierdo) y grande
HI (alto) a LO (bajo)
echo) es el de
HI (alto) a LO (bajo)
Quemador extra-
grande solamente
o de 10 pulgadas o más.
55
Page 56

CÓMO UTILIZAR
COMO UTILIZAR LOS QUEMADORES DE SUPERFICIE
CÓMO SELECCIONAR EL TAMAÑO DE LA LLAMA
Para usar con seguridad los utensilos de cocción,
nunca deje que la llama se extienda por fuera de los
bordes de los mismos.
Observe la llama, no el botón de control, al reducir
el calor. Calentar rápido, el tamaño de la llama de
un quemador de gas deberá equipararse con el
utensilio que esté usando.
UTENSILIOS DE COCCIÓN PARA LA SUPERFICIE
Aluminio: Se recomienda el uso de utensilios de
peso mediano, ya que éstos distribuyen el calor
rápidamente y de manera uniforme. La mayoría de
los alimentos se dorarán de manera uniforme en
una sartén de aluminio. Use una cazuela con tapa
ajustada cuando cocine con una pequeña cantidad
de agua.
Hierro fundido: La mayoría de las sartenes
producirán resultados satisfactorios si éstas se
calientan con lentitud.
Utensilios de esmalte: El esmalte de algunos
utensilios pudiera derretirse bajo ciertas
condiciones. Siga las recomendaciones del
fabricante de estos utensilios en cuanto a los
métodos de cocción.
Utilizar llamas de
mayor tamaño que
el fondo de los
recipientes no los
calentará más rápido
y puede ser peligroso.
Vidrio: Hay dos tipos de utensilios de cocción de
vidrio, aquéllos que se usan solamente en el horno y
aquéllos para cocinar sobre la superficie de cocción
(cazuelas, cafeteras y teteras). Los conductores de
vidrio se calientan con mucha lentitud.
Cerámica de vidrio resistente al calor: Puede
usarse para cocinar en la superficie o en el horno.
Conduce el calor muy lentamente y enfría también
muy lentamente. Consulte las instrucciones del
fabricante para asegurarse de que se puede usar
en las cocinas de gas.
Acero inoxidable: Este metal por sí mismo no es
un buen conductor del calor y generalmente se
combina con cobre, aluminio u otros metales para
mejorar la distribución del calor. Por lo general, las
sartenes hechas de metal combinado funcionan
satisfactoriamente si se usan sobre una llama de
tamaño mediano como lo recomienda el fabricante.
56
COCINANDO CON OLLAS METÁLICAS
(TIPO “WOK”)
Recomendamos que
use un wok de fondo
plano de 14 pulgadas
o menor. Cerciórese
de que el fondo del
wok se fije en la rejilla.
Estas se pueden
comprar en su tienda
minorista local.
Sólo se debe usar un
wok de fondo plano.
No utilice un wok de
fondo plano en un aro
de soporte. El colocar el aro sobre la parrilla
delquemador pudiera causar que el quemador
funcionara inapropiadamente y esto causaría niveles
de monóxido de carbono más altos que los
permitidos por las normas actuales.
Esto podría ser peligroso para su salud.
Usar un wok de fondo plano
ASADORES A LA PARRILLA
No use los asadores
a la parrilla sobr
quemadores sellados
de su cocina de gas.
Si lo hiciera, esto
causaría una
combustión
incompleta del gas, exponiéndolo a usted a niveles
de monóxido de carbono más altos que los
permitidos por las normas.
Esto podría ser peligroso para su salud.
e los
Page 57

1
9
8
2 3 4 5 6 7
15
12
13
11
16
10
14
CÓMO UTILIZAR
PANEL DE CONTROL (MODELOS POR CONVECCIÓN)
A lo largo de este manual, las características y apariencia pueden ser diferentes a las de su modelo.
CARACTERÍSTICAS DE CONTROL DEL HORNO, RELOJ Y TEMPORIZADOR
BOTÓN PROBE (sonda): Presione este botón para
1
seleccionar la función probe (sonda).
BOTÓN BAKE (hornear): Presione este botón para
2
seleccionar la función bake (hornear).
BOTÓN BROIL HI/LO (asar alto/bajo): Presione este
3
botón para seleccionar la función broil (asar).
PANTALLA: Muestra la hora, la temperatura del horno,
4
si el horno se encuentra en los modos bake (hornear),
broil (asar) o self-cleaning (auto limpieza) y los tiempos
establecidos para las operaciones de temporizador, horno
automático u horneado por convección; también mostrará
las configuraciones del cajón calentador.
NOTA: Si “F– y un número o letra” destellan en la pantalla
y el contr
de función.
Si su horno fue configurado para una operación de horno
temporizada y ocurre un corte de energía eléctrica, el reloj y
todas las funciones programadas deberán reconfigurarse.
La hora destellará en la pantalla cuando haya ocurrido un
corte de energía. Reconfigure el reloj.
Si apar
configurar una hora o temperatura fuera de los límites del
control. Presione la botón
e ingrese una nueva configuración.
Presione la botón
que el hor
el horno. Si se repite el código de error de función,
desconecte la energía de la cocina y llame al servicio
de reparación.
BOTÓN COOK TIME (tiempo de cocción): Presione este
5
botón y luego presione las almohadillas numéricas para
configurar el tiempo de cocción que desea para sus
alimentos. El hor
tiempo de cocción.
BOTÓN DELAY START (inicio retardado): Utilícelas junto
6
a las almohadillas
SELF CLEAN (auto-limpieza) para configurar el inicio y
apagado automático en el tiempo establecido.
ol del horno, esto señala un código de error
or) en la pantalla, usted ha intentado
Err” (err
ece “
CLEAR/OFF (borrar/apagado)
CLEAR/OFF (borrar/apagado). Permita
no se enfríe durante una hora. Vuelva a encender
no se apagará cuando haya finalizado el
COOK TIME (tiempo de cocción) o
BOTÓN WARMING DRAWER (cajón calentador):
7
Presione este botón y luego las almohadillas numéricas de
1–3 para utilizar el cajón calentador. Ver la sección
utilizar el cajón calentador eléctrico
BOTÓN SELF CLEAN (auto-limpieza): Presione
8
este botón para seleccionar la función self-cleaning
(auto-limpieza). Ver la sección
auto-limpieza
9
BOTÓN CONVECTION BAKE (hornear por convección):
Presione para seleccionar horneado con la función
convección.
BOTÓN CONVECTION ROAST (asar por convección):
10
Presione para seleccionar asado con la función
convección.
11
BOTÓN CLOCK (reloj): Presione antes de configurar
la hora.
BOTÓN TIMER ON/OFF (temporizador apagado/
12
encendido):
temporizador
BOTÓN OVEN LIGHT (luz del horno): Toque este botón
13
para apagar o encender la luz.
BOTÓN CLEAR/OFF (borrar/apagado): T
14
para cancelar TODAS las operaciones del horno excepto
las configuraciones del reloj, temporizador y cajón
calentador.
BOTÓNES NUMÉRICAS: Utilícelos para configurar
15
cualquier función que requiera números, tales cómo hora,
temporizador, temperatura del horno, temperatura interna
de los alimentos, horario de inicio y tiempo de operación
para horneado temporizado y auto-limpieza.
16
BOTÓN START (inicio): Debe presionarse para comenzar
cualquier función de cocción o limpieza, y configuraciones
de cajón calentador
Cómo
.
Cómo utilizar el horno
.
Presione para seleccionar la característica
.
oque este botón
.
57
Page 58

CÓMO UTILIZAR
1 2 3 4 5 6 7
9
8
10
12
13
11
PANEL DE CONTROL (MODELOS SIN CONVECCIÓN)
A lo largo de este manual, las características y apariencia pueden ser diferentes a las de su modelo.
CARACTERÍSTICAS DE CONTROL DEL HORNO, RELOJ Y TEMPORIZADOR
BOTÓN SELF CLEAN (auto-limpieza): Presione
1
este botón para seleccionar la función self-cleaning
(auto-limpieza). Ver la sección
auto-limpieza
BOTÓN BAKE (hornear): Presione este botón para
2
seleccionar la función bake (hornear).
BOTÓN BROIL HI/LO (asar alto/bajo): Presione este
3
botón para seleccionar la función broil (asar).
PANTALLA: Muestra la hora, la temperatura del horno,
4
si el horno se encuentra en los modos bake (hornear), broil
(asar) o self-cleaning (auto-limpiante) y los tiempos
establecidos para las operaciones de temporizador, horno
automático u horneado por convección; también mostrará
las configuraciones del cajón calentador.
NOTA: Si “F– y un número o letra” destellan en la pantalla
y el control del horno, esto señala un código de error
de función.
Si su horno fue configurado para una operación de horno
temporizada y ocurre un corte de energía eléctrica, el reloj y
todas las funciones programadas deberán reconfigurarse.
La hora destellará en la pantalla cuando haya ocurrido un
corte de energía. Reconfigure el reloj.
Si apar
configurar una hora o temperatura fuera de los límites del
control. Presione la botón
e ingr
esione la botón
Pr
que el horno se enfríe durante una hora. Vuelva a encender
el horno. Si se repite el código de error de función,
desconecte la ener
de reparación.
BOTÓN COOK TIME (tiempo de cocción): Presione este
5
botón y luego presione las almohadillas numéricas para
configurar el tiempo de cocción que desea para sus
alimentos. El hor
el tiempo de cocción.
.
ece “
ese una nueva configuración.
or) en la pantalla, usted ha intentado
Err” (err
CLEAR/OFF (borrar/apagado). Permita
gía de la estufa y llame al servicio
no se apagará cuando haya finalizado
Cómo utilizar el horno
CLEAR/OFF (borrar/apagado)
BOTÓN DELAY START (inicio retardado): Utilícelas junto
6
a las almohadillas
SELF CLEAN (auto-limpieza) para configurar el inicio y
apagado automático en el tiempo establecido.
BOTÓN WARMING DRAWER (cajón calentador):
7
Presione este botón y luego las almohadillas numéricas de
1–3 para utilizar el cajón calentador. Ver la sección
utilizar el cajón calentador eléctrico
BOTÓN CLOCK (reloj): Presione antes de configurar
8
la hora.
BOTÓN TIMER ON/OFF (temporizador apagado/
9
encendido):
temporizador.
BOTÓN OVEN LIGHT (luz del horno): Toque este botón
10
para apagar o encender la luz.
BOTÓN CLEAR/OFF (borrar/apagado): Toque este botón
11
para cancelar TODAS las operaciones del horno excepto
las configuraciones del reloj, temporizador y cajón
calentador.
BOTÓNES NUMÉRICAS: Utilícelos para configurar
12
cualquier función que requiera números, tales como hora,
temporizador, temperatura del horno, temperatura interna
de los alimentos, horario de inicio y tiempo de operación
para horneado temporizado y auto-limpieza.
BOTÓN START (inicio): Debe presionarse para comenzar
13
cualquier función de cocción o limpieza, y configuraciones
de cajón calentador.
COOK TIME (tiempo de cocción) o
Cómo
.
Presione para seleccionar la característica
58
Page 59

COMO UTILIZAR EL HORNO
E
D
C
B
A
R
CÓMO UTILIZAR
ANTES DE COMENZAR
Las parrillas tienen frenos
de manera que cuando se
coloquen correctamente en
los soportes de las parrillas
(desde A hasta E), frenarán
antes de salirse
completamente; no se
inclinarán. Al colocar y
retirar el recipiente de
cocina, saque la parrilla
hasta la protuberancia en
el soporte de la parrilla.
Para retirar una parrilla,
hálela en dirección suya,
incline el frente y sáquela.
Para reemplazar, coloque
el extremo de la parrilla (con
el freno) en el soporte, incline
el frente y empuje la parrilla.
NOTA: La parrilla no está diseñada para deslizarse
en la posición especial inferior (R).
posicones, incluyendo
especial (R) para asar
cosas de gran tamaño,
como un pavo grande.
no tiene 6
El hor
una posición baja
INTERRUPCIÓN DEL SUMINISTRO
ELÉCTRICO
PRECAUCION: No intente
encender el horno de ignición eléctrica durante
un fallo del suministro eléctrico.
No será posible encender el horno ni el asador
cuando ocurra una interrupción del suministr
eléctrico. El gas no cir
incandescente esté caliente.
Si el hor
interrupción del suministr
del horno se apagará automáticamente y éste no
se podrá encender de nuevo hasta que regrese
la electricidad.
no está encendido cuando ocurr
culará a menos que la barra
o eléctrico, el quemador
o
e una
LOS RESPIRADEROS DEL HORNO
El horno recibe ventilación a
través de aberturas en los
conductos de la parte
posterior de la superficie de
cocción. No bloquee estas
aberturas cuando esté
cocinando en el horno—es
importante que no se
interrumpa la circulación de
aire caliente que sale del
horno y el aire fresco que va
a los quemadores del horno.
No toque las aberturas de
ventilación o las superficies
cercanas durante la
operación del horno o el
asador—pudieran calentarse.
•
Los mangos de las cazuelas y sartenes sobre la
superficie de cocción pudieran calentarse
demasiado si se dejan muy cerca del respiradero.
• No deje productos plásticos sobre la superficie
de cocción—pueden derretirse si se deja cerca
la ventilación.
• No deje recipientes cerrados sobre la superficie de
cocción. La presión de los recipientes cerrados
puede elevarse, lo que los haría explotar.
• Los artículos de metal se pondrán bien calientes si
se dejan sobre la superficie de cocción y podrían
causar quemaduras.
Los productos plásticos
que se encuentren
sobre la superfcie de
cocció´n pueden
derretirse si se los deja
cerca de la ventilación.
La apariencia y la
ubicación de
la ventilación
puede variar.
LUZ DEL HORNO
Use el interruptor OVEN LIGHT (luz del
horno)
o apagar la luz.
del panel de control para encender
59
Page 60

CÓMO UTILIZAR
E
D
C
B
A
R
COMO UTILIZAR EL HORNO
Para evitar posibles quemaduras, coloque las parrillas en la posición correcta antes de encender el horno.
CÓMO PREPARAR SU COCINA
PARA HORNEAR
El horno no está diseñado para cocción con la
puerta abierta.
1
Presione el botón BAKE.
Presione los
2
para fijar a temperatura que
se desee.
Presione el botón
3
La palabra “
mostrarán. A medida que el horno se calienta, la
ventanilla mostrará los cambios en temperatura.
Cuando el horno alcance la temperatura que usted
fijó, se escuchará un tono.
Para cambiar la temperatura del horno durante el
ciclo BAKE, presione el botón
botónes numéricas para obtener la nueva
temperatura.
ON” (encendido) y “100°” (38°C.) se
Revise el nivel de cocción de la
4
comida cuando transcurra el tiempo
mínimo de la receta. Cocine por más
tiempo si es necesario.
5
Presione el botón
cuando termine de hornear.
botónes numéricas
START.
BAKE y luego los
STOP/CLEAR
PRECALENTAMIENTO
Precaliente el horno si la receta así lo indica. Para
precalentar, encienda el horno fijando la temperatura
correcta. Precalentamiento es necesario para
hornear con convección, y para resultados mejores
para galletas, pasteles, pastellitas, panes, etc.
Los resultados obtenidos al hornear serán mejores
si las bandejas de hornear se colocan lo más
posible en el centro del horno en vez de en la parte
delantera o la posterior. Las bandejas no deberán
tocarse entre sí o tocar las paredes del horno.
Si necesita usar dos parrillas, colóquelas de forma
escalonada de manera que una no quede
directamente sobr
1
1
⁄2 plgs. (2.5 a 4 cm) entre las bandejas, así como
también entre las bandejas y la pared posterior del
horno, la puerta y los lados.
Tipo de Alimento la Parrilla
Tortas congeladas (en una tartera de hornear) B o C
Pasteles de tipo “angel food”, pound, o bundt A
Bizcochos, “muffins”, bizcochos de chocolate, C
galletas, pastellitas, pasteles de varias capas, tortas
Cazuelas B o C
Asados R o A
e la otraDeje un espacio de 1 a
Posición de
60
El horno tiene una
posición baja especial
(R) para asar cosas
de gran tamaño,
como un pavo grande.
La parrilla no está
diseñada para
deslizarse en la
posición especial
inferior (R).
HUMEDAD EN EL HORNO
A medida que su horno se calienta, el cambio
de temperatura en el aire dentro del horno puede
causar que se formen gotas de agua en el cristal
de la puerta. Estas gotas no causan daño y se
evaporarán a medida que el horno continúe
calentándose.
Page 61

COMO UTILIZAR EL HORNO
CÓMO UTILIZAR
PAPEL DE ALUMINIO
No se debe jamás cubrir
la superficie inferior del
horno con papel de
aluminio.
Usted puede usar papel de
aluminio para recubrir la
bandeja y la rejilla del
asador. Sin embargo, tiene
que moldear el aluminio
etándolo a la rejilla y cortar las ranuras de la
apr
misma manera que las tiene la rejilla.
Una hoja de papel aluminio más pequeña se puede
usar para recolectar las salpicaduras, poniéndola en
una parrilla más baja que esté unas cuantas
pulgadas por debajo de los alimentos.
Nunca cubra una parrilla completamente con
papel de aluminio. Esto perturbará la circulación
del calor y evitará que se obtengan buenos
resultados al hornear.
Corte las ranuras de la
misma manera que las
tiene la rejilla
COMO ASAR AL FUEGO DIRECTO
La puerta del horno debe estar cerrada durante el
proceso de asar al fuego directo.
1
Coloque la carne o el pescado en la
rejilla y sobre la bandeja.
Coloque la parrilla en la posición
2
recomendada que se sugiere en la
Guía para asar.
La puerta debe ser cerrado durante
3
asar al fuego directo.
Presione el botón
4
vez para
Para cambiar a LO Broil (asar en
nivel bajo), presione el botón
nuevamente.
HI/LO
5
Presione el botón START.
6
Cuando termine de asar de la
parrilla, presione el botón
CLEAR/OFF.
Sirva la comida de
inmediato, y deje la
bandeja por fuera del
horno para que se enfríe
durante la comida para
una limpieza más fácil.
LO Broil para cocinar
Use
alimentos como pollo o
cortes gruesos de carne
completamente sin que se
en en exceso.
dor
HI Broil (asar en nivel alto).
BROIL HI/LO una
BROIL
Utilice siempre la bandeja y
parrilla de asador que viene
con su cocina. Los jugos son
protegidos por la rejilla y se
mantienen más fríos,
evitando así las salpicaduras
y el humo excesivo.
61
Page 62

CÓMO UTILIZAR
E
D
C
B
A
R
COMO UTILIZAR EL HORNO
GUÍA PARA ASAR AL FUEGO DIRECTO
El tamaño, peso, espesor, la temperatura inicial
y su preferencia de cocción afectarán el tiempo
de asado. Esta guía está basada en carnes a
temperatura del refrigerador.
Alimento Cantidad y/o espesor parrillas* minutos minutos Observaciones
Tocino
Carne molida 1 libra (450 g) (4 hamburguesas) C 10 7–10 Separe igualmente. Hasta 8 porciones
Bien cocida 1/2″–3/4″ (13–19 mm) de espesor toman aprox. el mismo tiempo.
Bistec
Poco cocido 1″ (2,5 cm) de espesor C 9 7 Los bistecs de menos de 1″ (2,5 cm) de
Medio cocido (1–1
Bien cocido C 13 8–9 de dorarse. Se recomienda freír en
Poco cocido 11⁄2″ (3,8 cm) de espesor C 10 6–7 Córteles la grasa.
Medio cocido (2–21⁄2 libras [907 g–1,13 kg]) C 12–15 10–12
Bien cocido C 25 16–18
Pollo 1 entero [2–21⁄2 libras (907 g–1,13 kg)] B 30–35 15–20 Cubra con mantequilla derretida.
1/2 libra (227 g) C 4 3 Coloque en un solo nivel.
(aprox. 8 trozos finos)
1
⁄2 libras [450 g–680 g]) C 12 5–6 espesor secocinan completamente antes
separado a lo largo. Ase al fuego directo primero el lado con
Con hueso, 4 trozos de pechuga B 25–30 10–15 piel hacia abajo.
Posición de 1
r
e
lado 2olado
El horno tiene 6
posiciones de parrilla.
una sartén.
62
Colas de langosta 2–4 C 13–16 No dé Corte a través de la concha y separe
Pescado 1/4″–1/2″ (6–13 mm) D 6 6 Maneje y dé vuelta con cuidado. Cubra
Trozos de jamón 1″ (2,5 cm) de espesor C 8 8 Aumente el tiempo de 5 a 10 minutos
Precocidos 1/2″ (13 mm) de espesor D 6 6 por lado para jamón de 11⁄2″ (3,8 cm)
Chuletas de puerco 2 (1/2″ [13 mm] de espesor) D 10 8 Córteles la grasa.
Bien cocidas 2 (1
Chuletas
Medio cocidas 2 (1″ [2,5 cm] de espesor), D 6 4–7 Córteles la grasa.
Bien cocidas aprox. 10–12 oz. D 10 10
Medio cocidas 2 (11⁄2″ [3,8 cm] de espesor), D 10 4–6
Bien cocidas
† El Departamento de
solo 140°F (60°C) significa que ciertos organismos intoxicantes pueden sobrevivir.” (Fuente: Safe Food Book, Your Kitchen Guide (Libro sobre
de
cordero
(6–8-oz. c/u [170 g–227 g]) vuelta. hasta abrirla. Cubra con mantequilla
de espesor
″ [2,5 cm] de espesor), D 15 8
aprox. 1 libra (450 g)
(284–340 g)
ox. 1 libra (450 g)
apr
Agricultura de los Estados Unidos señala que
alimentos seguros. Su guía de cocina). USDA Rev. Junio 1985).
* Consulte la ilustración para la descripción de las posiciones de las parrillas.
D
17
12–14
“La carne poco cocinada es popular
derretida antes de asar al fuego directo
y después de la mitad del tiempo.
con mantequilla de limón antes de asar
al fuego directo y durante el asado al fuego
ecto si lo desea. Precaliente el horno
dir
para aumentar el dorado.
de espesor o curado en casa.
pero se debe saber que cocinarla a tan
,
Page 63

CÓMO UTILIZAR
COMO UTILIZAR EL RELOJ Y CONTADOR
PARA CONFIGURAR EL RELOJ
El reloj se debe configurar a la hora correcta del día
para que las funciones automáticas de tiempo del
horno funcionen correctamente. La hora del día no
se puede cambiar durante un ciclo de cocción
retrasado o de autolimpieza retrasado.
1
Presione el botón CLOCK una vez
para configurar.
Presione los botónes
2
ingresar la hora del día. Presione los
botónes numéricas en mañera que
lealos. Por ejemplo, para ingresar
12:34, presione
orden. Si los botónes numéricas no
se presionan dentro de un minuto
después de presionar el botón
CLOCK, la pantalla regresa a la
configuración original. Si esto ocurre,
presione el botón CLOCK una vez y
vuelva a ingresar la hora del día.
3
Presione el botón
la hora del día aparezca en la
pantalla para guardar la hora del día
y iniciar el reloj .
Para revisar la hora del día cuando la pantalla
muestre otra información, simplemente presione
el botón
CLOCK.
numéricas a
1, 2, 3, y 4 en ese
START hasta que
PARA CONFIGURAR EL CONTADOR
Presione el botón START. Después
3
de presionar el botón
desaparece; esto le indica que hay
una cuenta regresiva, aunque la
pantalla no cambia hasta que haya
pasado un minuto.
Cuando el temporizador alcanza
4
el control sonará 3 veces seguido de
un pitido cada 6 segundos hasta que
se presione el botón
ON/OFF
El tono de 6 segundos puede cancelarse siguiendo los
pasos incluidos en
Control del horno
temporizado
NOTA: El contador es para minutos únicamente.
El botón
CLEAR/OFF no afecta el contador.
bajo Tonos al finalizar un ciclo
.
.
Características especiales de la su
START, SET
:00,
TIMER
PARA REINICIAR EL CONTADOR
Si la pantalla todavía muestra el tiempo restante,
puede cambiarlo al presionar el botón
ON/OFF
la horaque desee aparezca en la pantalla.
Si el tiempo restante no está en la pantalla (el reloj,
hora de inicio o tiempo de cocción aparecen en la
pantalla), traiga de la memoria el tiempo restante
al presionar el botón
botónes numéricas para ingr
que desea.
, luego los botónes numéricas hasta que
TIMER ON/OFF y luego los
esar la nueva hora
TIMER
El contador no controla las operaciones del horno.
La configuración máxima en el contador es 9 horas
y 59 minutos.
1
esione el botón
Pr
esione los
Pr
2
hasta que aparezca el tiempo que
desea en la pantalla. El tiempo
máximo que puede ingresarse en
minutos es 59. Los tiempos mayor
a los 59 minutos deben cambiarse a
horas y minutos. Por ejemplo, para
esar 90 minutos como 1 hora 30
ingr
minutos, presione
den.
ese or
NOTA: Si comete un error, presione el
botón
TIMER ON/OFF y empiece
nuevamente.
TIMER ON/OFF.
botónes
numéricas
1, 3 y 0 en
es
PARA CANCELAR EL CONTADOR
Presione el botón TIMER ON/OFF dos veces.
INTERRUPCIÓN DEL SUMINISTRO
ELÉCTRICO
Si la hora apar
que ha habido una interrupción en el suministro
eléctrico. Reinicialice el reloj.
Para reinicializar el reloj, presione el botón CLOCK.
Ingrese la hora correcta del día presionando los
botónes numéricas. Presione el botón
ece inter
mitente en la pantalla, significa
START.
63
Page 64

CÓMO UTILIZAR
HORNEAR Y ASAR POR TIEMPO
64
NOTA: Los alimentos que se deterioran con
facilidad—como leche, huevos, pescado, rellenos,
carne de ave y cerdo—no deben dejarse reposar
por más de 1 hora antes y después de la cocción.
La temperatura ambiente promueve el crecimiento
de bacterias nocivas. Verifique que la luz del horno
esté apagada porque el calor proveniente de la
bombilla puede acelerar el crecimiento de bacterias.
CÓMO CONFIGURAR UN INICIO
INMEDIATO Y UN APAGADO
AUTOMÁTICO
El horno se enciende inmediatamente y cocina los
alimentos durante un período de tiempo seleccionado.
Al finalizar el tiempo de cocción, el horno se apaga
automáticamente.
1
Presione el botón BAKE.
Presione los botones
2
configurar la temperatura del horno.
Presione el botón
3
NOTA: Si su receta requiere precalentado
del horno, quizás necesite agregar tiempo
adicional al tiempo de cocción.
Presione los botones numéricas para
4
configurar el tiempo de cocción deseado.
El tiempo de cocción mínimo que puede
configurarse es 1 minuto.
La temperatura del horno que ha
configurado y el tiempo de cocción
ingresado aparecerán en la pantalla.
5
Presione el botón
Cuando el horno se enciende
pantalla mostrará la cuenta r
y el cambio de temperatura, comenzando en 100°F
(La pantalla de temperatura comenzará a cambiar cuando la
temperatura alcance los 100°F
alcance la temperatura configurada, sonarán 3 pitidos.
El horno continuará cocinando durante el tiempo
establecido, luego se apagará de manera automática, a
menos que se configure la característica
(Cocinar y Mantenar). V
especiales de su control del horno
Después de que el hor
de ciclo.
Si fuera necesario, pr
6
CLEAR/OFF para borrar la pantalla.
Quite los alimentos del horno.
Recuerde, aunque el horno se apaga
automáticamente, los alimentos que se
dejen en el hor
después de apagado el mismo.
ON en la hora configurada, la
esiva del tiempo de cocción
egr
/ 38°C
er la sección de
no se apaga, sonará el tono de fin
numéricas para
COOK TIME.
START.
/ 38°C
.
). Cuando el horno
Cook and Hold
Funciones
.
esione el botón
no seguirán cocinándose
CÓMO CONFIGURAR UN INICIO
RETARDADO Y UN APAGADO
AUTOMÁTICO
El horno se encenderá en el horario que usted haya
configurado, cocinará alimentos durante un período de
tiempo específico y luego se apagará automáticamente.
Antes de comenzar, cerciórese de que el reloj esté
marcando la hora correcta del día.
Presione el botón
1
Presione los botones
2
configurar la temperatura del horno.
3
Presione el botón
NOTA: Si su receta requiere precalentado
del horno, quizás necesite agregar tiempo
adicional al tiempo de cocción.
Presione los botones
4
configurar el tiempo de cocción deseado.
El tiempo de cocción mínimo que puede
configurarse es 1 minuto.
La temperatura del horno que ha
configurado y el tiempo de cocción
ingresado aparecerán en la pantalla.
esione el botón
Pr
5
Presione los botones
6
establecer la hora a la cual usted desea
que se encienda el horno y comience a
hornear.
Presione el botón
7
NOTA: Si utilarse la función de hornear a tiempo y no
presione
NOTA: Si desea verificar los horarios que ha configurado,
presione el botón
inicio configurada o presione el botón
verificar el tiempo de cocción que ha configurado.
Cuando el hor
pantalla mostrará la cuenta regresiva del tiempo de cocción
y el cambio de temperatura, comenzando en 100°F
(La pantalla de temperatura comenzará a cambiar cuando la
temperatura alcance los 100
alcance la temperatura configurada, sonarán 3 pitidos.
El horno continuará cocinando durante el tiempo
establecido, luego se apagará de manera automática, a
menos que se configure la característica
Ver la sección de
del hor
Después de que el horno se apaga, sonará el tono de fin
de ciclo.
START, sonará el tono.
DELAY START para controlar la hora de
no se enciende
Funciones especiales de su control
no
.
(continuación en la página siguiente)
°
BAKE.
numéricas para
COOK TIME.
numéricas para
Y START
DELA
numéricas para
START.
COOK TIME para
ON en la hora configurada, la
C
F
°
/ 38
). Cuando el hor
Cook and Hold.
.
/ 38°C
no
.
Page 65

CÓMO UTILIZAR
HORNEAR Y ASAR POR TIEMPO
CÓMO FIJAR EL INICIO RETARDO Y UN
APAGADO AUTOMÁTICO (continuación)
Si fuera necesario, presione el botón
8
CLEAR/OFF para borrar la pantalla.
Quite los alimentos del horno.
Recuerde, aunque el horno se apaga
automáticamente, los alimentos que se
dejen en el horno seguirán cocinándose
después de apagado el mismo.
CÓMO USAR LA SONDA (en modelos por convección)
En muchos alimentos, especialmente asados y carnes
de ave, la temperatura interna de los alimentos es la
mejor prueba para verificar la cocción. Mediante la
sonda de temperatura se evita tener que adivinar el
estado de la cocción y se logra el punto de cocción
exacto.
El uso de sondas
distintas a las otor
con este producto puede
provocarles daños a las
mismas.
Utilice las manijas de la
sonda y el enchufe
cuando las introduzca y
quite de los alimentos y
la salida.
• Para evitar daños a la
sonda, no utilice pinzas
para tirar del cable
cuando lo quite.
Para evitar r
•
sonda, verifique que los alimentos estén totalmente
descongelados antes de intr
• Para evitar quemaduras, no desenchufe la sonda
de la salida hasta que el hor
• Nunca deja la sonda dentro del horno durante el
ciclo de auto-limpieza.
• No almacene la sonda en el horno.
gadas
La sonda de temperatura
cuenta con una sonda similar
a un pincho en un extremo y
un enchufe en el otro extremo
que se introduce en la salida
del horno.
omper la
oducirla.
no se haya enfriado.
Después de preparar la
carne y colocarla en un
posafuentes o sobre la
rejilla de la bandeja para
asar, siga estas
instrucciones para una
colocación adecuada de
la sonda.
Introduzca la sonda por
completo en la carne. Esta
no debe tocar el hueso,
grasa o cartílago.
Para asados sin hueso,
introduzca la sonda dentro de la parte más carnosa
del asado. Para jamón o cor
introduzca la sonda en el centro del músculo
grande más bajo.
oduzca la sonda en el centr
Intr
como pan de carne o estofados.
oduzca la sonda dentr
Intr
del muslo inter
la pata de un pavo entero.
no desde abajo y en forma paralela a
(continuacón en la página siguiente)
dero con hueso,
o de platos tales
o de la parte más carnosa
Enchufe
Cable
Manijas
Sonde
65
Page 66

CÓMO UTILIZAR
COMO UTILIZAR LA SONDA (en modelos por convección)
CÓMO CONFIGURAR EL HORNO PARA COCCIÓN CUANDO SE USA LA SONDA
Introduzca la sonda en los alimentos.
1
Enchufe la sonda dentro de la salida del
2
horno. Verifique que esté introducida
hasta el fondo. Cierre la puerta del horno.
Presione el botón
3
esione los botones
Pr
4
configurar la temperatura interna
deseada de los alimentos o de la carne
entre 100°F
Presione el botón
5
Presione los botones
6
configurar la temperatura del horno
deseada.
7
Presione el botón
/ 38°C
PROBE.
numéricas para
and 200°F
BAKE.
numéricas para
START.
/ 76°C
Cuando la temperatura interna de los
8
alimentos alcanza el número que ha
configurado, la sonda y el horno se
apagan y los controles del horno
destellan. Para detener el destello,
presione el botón
guantes de cocina para quitar la sonda
de los alimentos. No utilice pinzas para
quitarla, porque podrían dañarla.
Para cambiar la temperatura del hor
.
con sonda, presione el botón
numéricas para configurar la nueva temperatura.
•
Si se quita la sonda de los alimentos antes de alcanzar la
temperatura final, sonará un tono y la pantalla destellará
hasta que se quite la sonda del horno.
• Puede utilizar el temporizador aunque no pueden
usarse operaciones del horno temporizadas mientras
se utilice la sonda.
CLEAR/OFF. Utilice
no durante la cocción
BAKE y luego los botones
66
Page 67

E
D
C
B
A
R
CÓMO UTILIZAR
COMO UTILIZAR EL HORNO POR CONVECCIÓN
(en algunos modelos)
El ventilador del horno por convección se apaga
cuando se abre la puerta de horno. NO DEJE la
puerta abierta durante largos períodos mientras
utiliza la cocción por convección.
Para ayudarlo a comprender la diferencia entre
horneado y asado por convección y horneado y
asado tradicional, le brindamos algunas pautas
generales.
HORNEADO POR CONVECCIÓN
• Precaliente el horno. Ver la sección Cómo usar el
horno: Precalentamiento y colocación de
bandejas.
• Ideal para alimentos cocidos en parrillas
múltiples.
• Bueno para grandes cantidades de alimentos
horneados.
En un horno por
convección, un ventilador
hace circular aire caliente
sobre, por debajo y
alrededor de los alimentos.
Esta circulación de aire
caliente se distribuye de
manera pareja a través de
la cavidad del horno.
Como resultado, los
alimentos se cocinan y
doran en forma pareja,
a menudo en menos
tiempo que mediante
el calor normal.
• Buenos resultados con galletas, bizcochos,
brownies, magdalenas, bollos de crema,
panecillos dulces, pastel “angel food” y pan.
El ventilador por convección hace circular el aire
caliente en forma pareja sobre y alrededor de los
alimentos.
ASADO POR CONVECCIÓN
• Bueno para grandes
cortes de carne
tierna, sin cubrir.
El ventilador por
convección hace
circular el aire caliente
en forma pareja sobre
ededor de los
y alr
alimentos. Al usar la
parrilla y la bandeja
para asar provistas, el
aire caliente circulará
e y alrededor de
sobr
los alimentos que se
estén asando. El aire caliente sella los jugos
rápidamente para lograr un producto jugoso y tierno
mientras, al mismo tiempo, se cr
externa marrón dorada.
Los asados o car
posición (A).
nes de ave debe cocinarse en la
Los asados o carnes de
ave debe cocinarse en
la posición (A).
ea un rica capa
Cuando esté asando por
convección, resulta
importante que utilice
la bandeja para asar y
la parrilla para mejores
esultados de asado
r
por convección. La
bandeja se utiliza para
etener los derrames de
r
grasa y la parrilla se usa para prevenir salpicaduras
de grasa.
• Coloque el estante en la posición (A).
• Coloque la parrilla en la bandeja para asar.
Parrilla
Bandeja
67
Page 68

CÓMO UTILIZAR
COMO UTILIZAR EL HORNO POR CONVECCIÓN
(en algunos modelos)
CONVERSIÓN AUTORECIPE™
Usted puede utilizar sus recetas favoritas en el horno
por convección.
Al usar
convertirá automáticamente la temperatura
del horno de horneado común a
temperaturas de horneado por convección.
que ingresó en su receta. El horno la
convertirá automáticamente a la
temperatura de cocción por convección.
CONVECTION BAKE, el horno
Utilizando los botones
1
ingrese la temperatura recomendada
en la receta.
esione el botón
Pr
2
En la pantalla se verá la temperatura
ST
ART
numéricas,
.
• Utilice el tamaño de bandeja recomendado en la
receta.
• Algunas instrucciones en paquetes de estofados
congelados, platos principales o alimentos
horneados han sido desarrollados utilizando hornos
por convección. Para mejores resultados,
precaliente el horno y utilice la temperatura para
horneado común incluida en el paquete.
Presione el botón CLEAR/OFF cuando
haya terminado el horneado.
ELEMENTOS DE COCCIÓN PARA COCINA POR CONVECCIÓN
Antes de utilizar el horno por convección, verifique
que sus elementos de cocción dejen espacio para
circulación de aire en el horno. Si va a hornear con
varias bandejas, deje un espacio entre ellas.
Además, asegúrese de que las bandejas no se
toquen entre sí o a las paredes del horno.
Papel y plástico
Los recipientes de papel y plástico resistentes
al calor recomendados para el uso en hornos
comunes pueden utilizarse en hornos por
convección. También pueden utilizarse los
elementos de cocción plásticos resistentes a
temperaturas de 400
se encuentra por debajo de 400°F / 205°C.
°
C, cuando el hor
°
F / 205
no
Metal y vidrio
Puede utilizarse cualquier clase de elemento de
cocción en su horno por convección. Sin embargo,
las bandejas de metal se calientan más rápido y se
las recomienda para horneado por convección.
• Las bandejas oscuras o con acabado mate
hornearán alimentos más rápido que las brillantes.
• Las bandejas de vidrio o cerámica cocinan más
despacio.
Cuando hornee galletas, obtendrá mejores
esultados si usa una plancha plana para galletas
r
en lugar de una bandeja de lados bajos.
ecetas como pollo al hor
Para r
bandeja con lados bajos. El aire caliente no puede
circular bien alrededor de los alimentos en una
bandeja con lados altos.
no, utilice una
68
CÓMO CONFIGURAR EL HORNO PARA HORNEADO O ASADO POR CONVECCIÓN
o
Para cambiar la temperatura del horno, presione
el botón
ROAST
configurar la nueva temperatura.
BAKE
Presione los botones numéricas
2
para configurar la temperatura del
horno deseada.
Pr
3
CONVECTION BAKE o CONVECTION
y luego los botones numéricas para
o CONVECTION ROAST.
esione el botón
ST
AR
T
.
Presione el botón CONVECTION
1
Cuando el horno comienza a calentar, podrá verse la
temperatura cambiante, comenzando a 100°F / 38°C.
Cuando el hor
sonarán 3 pitidos
NOTA:
Mientras cocine por convección se escuchará un
•
ventilador. El ventilador se detendrá cuando se
abra la puerta pero el calor no lo hará.
• El ventilador no arrancará hasta que se alcance
la temperatura de pr
no alcanza la temperatura configurada,
.
Presione el botón
4
cuando haya finalizado.
ecalentamiento.
CLEAR/OFF
Page 69

E
D
C
B
A
R
CÓMO UTILIZAR
COMO UTILIZAR EL HORNO POR CONVECCIÓN
(en algunos modelos)
HORNEAR CON ESTANTES MÚLTIPLES
Debido a que el aire caliente circula en forma pareja
en todo el horno, los alimentos pueden hornearse
con excelentes resultados usando estante múltiples.
El horneado con estantes múltiples puede
incrementar un poco los tiempos de cocción de
algunos alimentos, pero el resultado total es el
ahorro de tiempo. Las galletas, muffins, bizcochos y
otros panes rápidos logran resultados muy buenos
con el horneado con estantes múltiples.
CÓMO CONFIGURAR EL HORNO PARA ASAR POR CONVECCIÓN
CUANDO UTILICE LA SONDA
Para mejores resultados
cuando ase pavos y asados
grandes, recomendamos el uso
de la sonda incluida en el
horno por convección.
La pantalla destellará PROBE y el control del horno
indicará si la sonda se encuentra enchufada dentro de la
salida, y usted no ha configurado una temperatura de
sonda y presionado el botón
Coloque el estante en la posición (A).
1
Introduzca por completo la sonda en
los alimentos.
Enchufe la sonda dentro de la salida
2
del horno. Verifique que esté
oducida hasta el fondo. Cierr
intr
puerta del horno.
esione el botón
Pr
3
ROAST
Presione los botones
4
para configurar la temperatura del
horno deseada.
5
esione el botón
Pr
esione los botones numéricas para
Pr
6
configurar la temperatura interna de
los alimentos deseada.
Para cambiar la temperatura del horno durante el
ciclo de asado por convección, pr
CONVECTION ROAST y luego los botones
numéricas para configurar la nueva temperatura
deseada.
Presione el botón
7
START.
.
(en modelos por convección)
e la
CONVECTION
numéricas
PROBE.
esione el botón
START.
Cuando hornee
alimentos más
grandes en 3
estantes, coloque
un estante en la
da
2
(A) posición, otro
ta
en la 4
y el tercer estante en
la 6
Cuando hornee
galletas, coloque los estante
en las posiciones 4ta(C), 5ta(D), y 6ta(E).
Cuando el horno comienza a calentar, la palabra
LO aparecerá en la pantalla.
Después de que la temperatura interna de los
alimentos alcance los 100°F / 38°C, la temperatura
interna cambiante podrá verse en la pantalla.
(C) posición
ta
(E) posición.
8
Cuando la temperatura interna de los
alimentos alcanza el número que
usted ha configurado, la sonda y el
horno se apagan y los controles del
horno destellan. Para detener el
destello, presione el botón
CLEAR/OFF. Utilice guantes de
cocina para quitar la sonda de los
alimentos. No utilice pinzas para
quitarla, porque podrían dañarla.
Cuando hornee
por convección
con sólo 1
estante, siga las
posiciones de
estantes
recomendadas en
la sección
usar el horno.
Cómo
PRECAUCIÓN: Para evitar
posibles quemaduras, no desenchufe la sonda de
salida del horno hasta que éste se haya enfriado.
No almacene la sonda en el horno.
AS:
NOT
• Si se quita la sonda de los alimentos antes de
alcanzar la temperatura final, sonará un tono y
la pantalla destellará hasta que se quite la sonda
del horno.
• Mientras cocine con esta característica se
escuchará un ventilador
cuando se abra la puerta pero el calor no se
apagará.
Mientras se utilice la sonda se puede utilizar el
•
temporizador aunque no las operaciones del horno
temporizadas.
. El ventilador se detendrá
69
Page 70

CÓMO UTILIZAR
Pollo entero (2 a 3 lbs. / 1.1 a 1.4 kg)
Carnes
Minutos/Lb.
(450 g)
Temp. interna
Vaca
Cerdo
Jamón
Cordero
Frutos de mar
Carnede ave
140°F/60°C
160°F/77°C
170°F/82°C
180–185°F/82–85°C
180–185°F/82–85°C
180–185°F/82–85°C
180–185°F/82–85°C
180–185°F/82–85°C
180–185°F/82–85°C
Costilla (3 a 5 lbs. / 1.4 a 2.3 kg)
†
Costilla sin hueso, lomo
Solomillo de carne vacuna
Estofado (2
1
⁄
2
1
⁄
2
1
⁄
2
1
⁄
2
1
⁄
2
a 3 lbs. / 1.1 a 1.4 kg)
Con hueso (3 to 5 lbs./ 1.4 kg a 2.3 kg)
Sin hueso (3 to 5 lbs./ 1.4 kg a 2.3 kg
Costillitas de cerdo
1
⁄
2
( a 1” / 1.3 a 2.5 cm
de espesor)
4 costillitas
6 costillitas
Enlatado (3 lbs. / 1.4 kg completamente cocido)
Punta de paleta (5 lbs. / 2.3 kg completamente cocido)
Pierna (5 lbs. / 2.3 kg completamente cocido)
Con hueso (3 to 5 lbs./ 1.4 kg a 2.3 kg)
Sin hueso (3 to 5 lbs./ 1.4 kg a 2.3 kg)
Pescado, entero (3 a 5 lbs. / 1.4 kg a 2.3 kg)
Colas de langosta (6 a 8 oz. / 170 a 225 g cada una)
Gallinas de Cornualles, sin relleno (1 to 1 lbs. / .45 a 1.4 kg)
Gallinas de Cornualles, rellenas (1 to 1 lbs. / .45 a 1.4 kg)
Pato (4 a 5 lbs. / 1.8 a 2.3 kg)
Pavo, entero*
Sin relleno (10 a 16 lbs. / 4.5 a 7.3 kg)
Sin relleno (18 a 24 lbs. / 8.2 a 10.9 kg)
Pechuga de pavo (4 to 6 lbs. / 1.8 a 2.7 kg)
20–24
24–28
28–32
20–24
24–28
28–32
10–14
14–18
35–45
23–27
23–27
30–35 total
35–40 total
40–45 total
14–18
14–18
14–18
17–20
A punto
Cocido
A punto
Cocido
17–20
20–24
20–24
30–40 total
20–25 total
24–26
50–55 total
55–60 total
24–26
8–11
7–10
16–19
325°F/165°C
325°F/165°C
325°F/165°C
325°F/165°C
325°F/165°C
325°F/165°C
325°F/165°C
325°F/165°C
300°F/150°C
325°F/165°C
325°F/165°C
325°F/165°C
325°F/165°C
325°F/165°C
325°F/165°C
325°F/165°C
325°F/165°C
325°F/165°C
325°F/165°C
325°F/165°C
325°F/165°C
400°F/205°C
350°F/175°C
350°F/175°C
350°F/175°C
350°F/175°C
325°F/165°C
325°F/165°C
325°F/165°C
325°F/165°C
2 costillitas
Temp. horno
Jugoso
A punto
Coccido
†
Jugoso
A punto
Coccido
†
Jugoso
A punto
140°F/60°C
140°F/60°C
140°F/60°C
140°F/60°C
160°F/77°C
140°F/60°C
160°F/77°C
170°F/82°C
160°F/77°C
170°F/82°C
160°F/77°C
170°F/82°C
170°F/82°C
170°F/82°C
170°F/82°C
170°F/82°C
170°F/82°C
170°F/82°C
170°F/82°C
COMO UTILIZAR EL HORNO POR CONVECCIÓN
(en algunos modelos)
GUÍA DE ASADO POR CONVECCIÓN
* Las aves rellenas generalmente requieren 30-45 minutos de tiempo adicional de cocción. Cubra las patas y la pechuga con papel metálico para evitar
que la carne se oscurezca demasiado o se seque.
† El Departamento de Agricultura de los Estados Unidos señala que “La carne poco cocinada es popular, pero se debe saber que cocinarla a tan
solo 140°F (60°C) significa que ciertos organismos intoxicantes pueden sobrevivir.” (Fuente: Safe Food Book, Your Kitchen Guide [Libro sobre
alimentos seguros. Su guía de cocina]. USDA Rev. Junio 1985).
70
Page 71

CÓMO UTILIZAR
COMO UTILIZAR LAS CARACTERÍSTICAS DE
HORNEADO Y ASADO POR CONVECCIÓN
TEMPORIZADOS
Mientras cocine con esta característica se escuchará
un ventilador. El ventilador se detendrá cuando se
abra la puerta pero el calor no lo hará.
NOTA: Los alimentos que se deterioran con
facilidad—como leche, huevos, pescado, rellenos,
carne de ave y cerdo—no deben dejarse reposar
(en algunos modelos)
por más de 1 hora antes y después de la cocción.
La temperatura ambiente promueve el crecimiento
de bacterias nocivas. Verifique que la luz del horno
esté apagada porque el calor proveniente de la
bombilla puede acelerar el crecimiento de bacterias.
CÓMO CONFIGURAR UN INICIO INMEDIATO Y UN APAGADO AUTOMÁTICO
El horno se enciende inmediatamente y cocina los
alimentos durante un período de tiempo seleccionado.
Al finalizar el tiempo de cocción, el horno se apaga
automáticamente.
1
Presione el botón CONVECTION BAKE.
Presione los botones
2
configurar la temperatura del horno
deseada.
Presione el botón COOK TIME.
3
NOTA: Si su receta requiere precalentamiento, puede
necesitar agregar tiempo adicional al período de cocción.
Presione los botones
4
configurar el tiempo de cocción deseado.
El tiempo de cocción mínimo que puede
configurarse es 1 minuto.
La temperatura del hor
configurado y el tiempo de cocción
esado apar
ingr
5
Presione el botón
numéricas para
numéricas para
no que ha
ecerán en la pantalla.
START.
Cuando el horno se enciende ON en la hora configurada, la
pantalla mostrará la cuenta regresiva del tiempo de cocción
y el cambio de temperatura, comenzando en 100°F
(La pantalla de temperatura comenzará a cambiar cuando la
/ 38°C
temperatura alcance los 100°F
alcance la temperatura configurada, sonarán 3 pitidos.
El horno continuará cocinando durante el tiempo
establecido, luego se apagará de manera automática, a
menos que se configure la característica
(Cocinar y Mantenar). Ver la sección de Funciones
especiales de su control del horno
Después de que el horno se apaga, sonará el tono de fin
de ciclo.
Si fuera necesario, presione el botón
6
CLEAR/OFF para borrar la pantalla. Quite
los alimentos del horno. Recuerde,
aunque el horno se apaga
automáticamente, los alimentos que se
dejen en el hor
después de apagado el mismo.
). Cuando el horno
.
no seguirán cocinándose
/ 38°C
.
Cook and Hold
CÓMO CONFIGURAR UN INICIO RETARDADO Y UN APAGADO AUTOMÁTICO
El horno se encenderá en el horario que usted haya
configurado, cocinará alimentos durante un período de
tiempo específico y luego se apagará automáticamente.
Asegúrese de que el reloj muestre el horario correcto.
1
Presione el botón
Presione los botones
2
configurar la temperatura del hor
deseada.
3
Presione el botón
NOTA: Si su receta requiere precalentamiento, puede
necesitar agr
egar tiempo adicional al tiempo de cocción.
CONVECTION BAKE.
numéricas para
no
COOK TIME.
Presione los botones
4
configurar el tiempo de cocción deseado.
El tiempo de cocción mínimo que usted
puede configurar es 1 minuto. La
temperatura del horno que ha
configurado y el tiempo de cocción
ingresado aparecerán en la pantalla.
esione el botón
Pr
5
esione los botones
Pr
6
configurar la hora en que desea que el
horno se encienda y comience la cocción.
7
esione el botón
Pr
(continuación en la página siguiente)
numéricas para
Y START
DELA
numéricas para
T
AR
ST
.
.
71
Page 72

CÓMO UTILIZAR
COMO UTILIZAR LAS CARACTERÍSTICAS DE
HORNEADO Y ASADO POR CONVECCIÓN
TEMPORIZADOS
(en algunos modelos)
CÓMO CONFIGURAR UN INICIO RETARDADO Y UN APAGADO AUTOMÁTICO (cont.)
NOTA: Si desea verificar los horarios que ha configurado,
presione el botón
inicio configurada o presione el botón
verificar la extensión de cocción que ha configurado.
Cuando el horno se enciende
pantalla mostrará la cuenta regresiva del tiempo de cocción
y el cambio de temperatura, comenzando en 100°F
(La pantalla de temperatura comenzará a cambiar cuando la
temperatura alcance los 100°F
alcance la temperatura configurada, sonarán 3 pitidos.
El horno continuará cocinando durante el tiempo
establecido, luego se apagará de manera automática, a
menos que se configure la característica
DELAY START para controlar la hora de
COOK TIME para
ON en la hora configurada, la
/ 38°C
/ 38°C
). Cuando el horno
Cook and Hold.
.
Ver la sección de
del horno
Después de que el horno se apaga, sonará el tono de fin
de ciclo.
.
Funciones especiales de su control
Si fuera necesario, presione el botón
8
CLEAR/OFF para borrar la pantalla.
Quite los alimentos del horno.
Recuerde, aunque el horno se apaga
automáticamente, los alimentos que se
dejen en el horno seguirán cocinándose
después de apagado el mismo.
FUNCIONES ESPECIALES DE SU CONTROL DEL HORNO
El nuevo control de botones tiene funciones
adicionales que puede utilizar. Las siguientes
son las funciones y cómo se pueden activar.
Los modos de funciones especiales sólo se pueden
activar mientras la pantalla muestra la hora del día.
Permanecen en la memoria del control hasta que
los pasos se repitan.
Cuando la pantalla muestre su selección, presione
el botón
permanecerán en la memoria después de
una falla en el suministro eléctrico.
START. Las funciones especiales
72
APAGADO DE 12 HORAS
Con esta función, si se olvidara y dejara el horno
encendido, el control apagará automáticamente el
horno después de 12 horas durante las funciones de
neado o después de 3 horas durante la función
hor
de asado a la parrilla.
Si desea apagar esta función, siga los pasos a
continuación.
Presione los botónes
1
BROIL HI/LO al mismo tiempo
y
por 3 segundos hasta que la pantalla
muestre
Presione el botón DELAY START. La
2
pantalla muestra
en 12 horas). Presione el botón
DELAY START nuevamente y la
pantalla muestra
apagado).
Presione el botón
3
desactivar el apagado y deje el
control establecido en este modo
de función especial.
SF.
BAKE y
12 shdn (apagado
no shdn (sin
START para
SELECCIÓN DE TEMPERATURA EN
FAHRENHEIT O CELSIUS
Su control de hor
las selecciones de temperatura Fahrenheit, pero
esto puede modificarse para usar selecciones en
Celsius.
y
y
y
no está configurado para utilizar
Presione los botones BAKE y
1
BROIL HI/LO al mismo tiempo
durante 3 segundos hasta que en la
pantalla pueda verse
esione los botones
Pr
2
COOK TIME al mismo tiempo. La
pantalla pueda verse
Presione de nuevo los botones
3
BROIL HI/LO y COOK TIME al
mismo tiempo. La pantalla pueda
verse C (Celsius).
4
Presione el botón START.
SF.
BROIL HI/LO y
F (Fahr
enheit).
Page 73

CÓMO UTILIZAR
FUNCIONES ESPECIALES DE SU CONTROL DEL HORNO
TONOS AL FINALIZAR UN CICLO
TEMPORIZADO
Al finalizar un ciclo con control de tiempo, sonarán
tres tonos “biiip” de corta duración seguidos por un
tono “biiip” cada seis segundos hasta que se
presione el botón
cancelar este tono “biiip” que se escucha
continuamente cada 6 segundos, si lo desea.
Pasos para cancelar el tono “biiip” que se
escucha cada 6 segundos:
y
CLEAR/OFF. Usted puede
Presione los botones BAKE y
1
BROIL HI/LO al mismo tiempo por
tres segundos hasta que la pantallita
muestre
Presione el botón TIMER ON/OFF.
2
La pantallita muestra
(continuous beep, es decir, “biiip”
continuo). Presione el botón
ON/OFF
muestra
el tono “biiip” que se escucha cada 6
segundos).
3
Presione el botón START.
SF.
CON BEEP
TIMER
nuevamente. La pantallita
BEEP. (Con esto se cancela
BLOQUEO DE CONTROLES
12 HORAS, 24 HORAS O BLOQUEO
DEL RELOJ
Sus controles están configurados para usar un reloj
de 12 horas.
Si prefiere tener un reloj de estilo militar de 24 horas
o anular la visualización del reloj, siga los siguientes
pasos.
Presione los botones BAKE y
1
BROIL HI/LO al mismo tiempo
y
Presione el botón
reloj estilo militar de 24 horas. En la pantalla podrá
verse
24 hr. Si esta es la opción que desea,
presione el botón
Presione el botón
visualización del reloj. En la pantalla podrá verse
OFF. Si esta es la opción que desea, presione el
botón
START.
NOTA: Si el reloj se encuentra en el modo sin
visualización, usted no podrá utilizar la función
DELAY START (Inicio retardado).
durante 3 segundos hasta que
en la pantalla pueda verse
Presione el botón CLOCK una vez.
2
En la pantalla podrá verse
3
Si esta es la opción que desea,
presione el botón
CLOCK de nuevo para cambiar al
START.
CLOCK de nuevo para anular la
START pad.
SF.
12 hr.
El control le permitirá trabar las almohadillas para
que no puedan activarse cuando se las toque o
cuando se limpie el panel de vidrio.
Para bloquear los controles:
Presione los botones 9 y 0 al mismo
1
tiempo durante 3 segundos hasta
y
NOTA: Todas las funciones de cocción se
cancelarán cuando se bloqueen los controles.
y
que el control emita dos pitidos. Si
no se borra, la pantalla mostrará
LOC en forma continua y la hora.
Para desbloquear los controles,
2
presione los botones
tiempo durante 3 segundos hasta
que los controles emitan dos pitidos,
y
LOC desapar
9 y 0 al mismo
ecerá de la pantalla.
COOK AND HOLD (Cocinar y mantener)
Su nuevo control posee una característica de cocinar
y esperar que mantiene calientes los alimentos
cocidos hasta 3 horas después de finalizada la
función de cocción.
Esta característica puede utilizarse solo cuando se
realiza cocción temporizada.
Para activar esta característica, siga los siguientes
pasos.
Presione los botones BAKE y BROIL
1
HI/LO
al mismo tiempo durante 3
y
segundos hasta que en la pantalla
pueda verse
Presione el botón COOK TIME.
2
En la pantalla podrá verse
(mantener apagado).
esione el botón
Pr
3
de nuevo para activar esta
característica. En la pantalla podrá
verse
esione el botón
Pr
4
activar la característica cocinar y
esperar y dejar el control configurado
en este modo de características
especiales.
SF.
Hld OFF
COOK TIME
Hld ON (mantener encendido).
T
AR
ST
para
73
Page 74

CÓMO UTILIZAR
CÓMO UTILIZAR LA FUNCIÓN SABBATH
(DISEÑADA PARA USO EN EL SABBATH Y LOS DÍAS DE FIESTA JUDÍOS)
La función Sabbath se puede usar para horneado/
asado únicamente. No se puede usar para convección,
asado a la parrilla, auto limpieza o cocción de retrasar
inicio (Delay Start).
CÓMO CONFIGURAR LAS FUNCIONES
HORNEADO/ASADO NORMAL (
funçión Sabbath)
Cerciórese de que el reloj muestre la hora del día
correcta y el horno esté apagado.
Presione y sostenga los botones
1
BAKE y BROIL HI/LO, al mismo
y
Para ajustar la temperatura del horno, presione el
botón BAKE, presione los botones numéricas para
esar la
ingr
START.
NOTA: Cuando la pantalla se muestra ⊃ el horno
está en la función Sabbath. Cuando la pantalla se
muestra
NOTA: Los botones CLEAR/OFF y COOK TIME
están activos durante la función Sabbath.
tiempo,
muestre
Toque el botón DELAY START hasta
2
que
pantalla.
3
Presione el botón
⊃ aparece en la pantalla.
4
Presione el botón
señal.
Presione los botones
5
ingresar la temperatura deseada. La
temperatura se puede configurar entr
170°F y 550°F (77°C y 288°C). No
aparece una señal de la temperatura.
Presione el botón
6
7
Después de un périodo de retraso
al azar de aproximadamente 30
segundos a 1 minuto, aparece
en la pantalla, indicando que el
horno está horneando/asando.
Si ⊃ no aparece en la pantalla,
inicie de nuevo en el paso 4.
temperatura nueva, y presione el botón
⊃ el hor
⊃
hasta que la pantalla
SF.
SAb bAtH aparezca en la
⊃
no está hor
neando/asando.
con la
START y el signo
BAKE. No hay
numéricas para
START.
⊃
e
⊃
NOTA: El horno se enciende automáticamente cuando
la puerta se abra y se apaga cuando la puerta se cierra.
El foco se puede retirar. Consulte la sección
Reemplazo de la luz del horno. En algunos modelos
con un interruptor de luz en el panel del control, la luz
del horno se puede encender y dejar que permanezca
encendido.
CÓMO CONFIGURAR LA FUNCIÓN
HORNEADO/ASADO PROGRAMADO—
INICIO INMEDIATO Y APAGADO
AUTOMÁTICO (con la funçión Sabbath)
Cerciórese de que el reloj muestre la hora del día
correcta y el horno esté apagado.
Presione y sostenga los botones
1
BAKE y BROIL HI/LO, al mismo
y
tiempo,
muestre
2
Toque el botón DELAY START hasta
que
pantalla.
3
Presione el botón
⊃ aparece en la pantalla.
4
Presione el botón COOK TIME.
Presione los botones numéricas
5
para establecer el tiempo de cocción
deseado entre 1 minuto y 9 horas y 59
minutos. En la pantalla aparece el
tiempo de cocción ingresado.
6
Presione el botón
Presione el botón
7
señal.
Presiones los botones
8
ingresar la temperatura deseada. No
aparece una señal de la temperatura.
Pr
9
Después de un périodo de r
10
al azar de aproximadamente 30
segundos a 1 minuto, aparece
en la pantalla, indicando que el horno
está hor
aparece en la pantalla, inicie de
nuevo en el paso 7.
hasta que la pantalla
SF.
SAb bAtH aparezca en la
START y el signo
START.
BAKE. No hay
numéricas para
esione el botón
neando/asando. Si
ST
AR
T
.
etraso
⊃
⊃ no
⊃
⊃
74
Page 75

CÓMO UTILIZAR
CÓMO UTILIZAR LA FUNCIÓN SABBATH
CÓMO CONFIGURAR LA FUNCIÓN
HORNEADO/ASADO PROGRAMADO—
INICIO INMEDIATO Y APAGADO
AUTOMÁTICO (continuación)
NOTA: Cuando la pantalla se muestra ⊃ el horno
está en la función Sabbath. Cuando la pantalla se
muestra ⊃ el horno está horneando/asando.
Para ajustar la temperatura del horno, presione el
botón
ingresar la temperatura nueva, y presione el botón
START.
Cuando la cocción concluya, la pantalla cambiará
de
⊃ a ⊃ y 0:00 aparece en la pantalla indicando
que el horno se ha apagado pero que todavía está
en el modo Sabbath. Retire el alimento cocinado.
⊃
BAKE, pr
⊃
esione los botones
numéricas para
CÓMO SALIR DE LA FUNCIÓN SABBATH
1
Presione el botón CLEAR/OFF.
Si el horno está cocinando, espere
2
por un período de retraso al azar de
aproximadamente 30 segundos a 1
minuto, hasta que únicamente
aparezca en la pantalla.
Presione y sostenga
3
BAKE como BROIL HI/LO al mismo
y
tiempo, hasta que aparezca
la pantalla.
Toque el botón
4
12 shdn o no shdn aparezca en la
pantalla.
se apagará automáticamente
después de 12 horas.
que el horno no se apagará
automáticamente.
Presione el botón START.
5
NOTA: Si hay una interrupción en el
suministro eléctrico mientras el horno
está en Sabbath, el horno se apagará
automáticamente y permanecerá
apagado cuando se reestablezca el
suministro. El control del horno se debe
reinicializar.
12 shdn indica que el horno
tanto el botón
DELAY START hasta
no shdn indica
⊃
SF en
75
Page 76

CÓMO UTILIZAR
CÓMO AJUSTAR EL TERMOSTATO DEL HORNO
CÓMO AJUSTAR EL TERMOSTATO
DEL HORNO
Usted pudiera sentir que su nuevo horno cocina
de manera diferente al otro que tenía. Le
recomendamos que use su horno durante
varias semanas para que se familiarice con éste.
Si cree que su nuevo horno es cocinando muy
caliente o muy frío, usted mismo puede ajustar el
termostato.
No recomendamos el uso de termómetros, tales
como los que se pueden encontrar en las tiendas
de víveres, para comprobar los puntos de fijación
de temperatura de su nuevo horno. Estos
termómetros pudieran tener una variación de
20–40°F (11–22°C).
NOTA: Este ajuste no afectará las temperaturas
para asar o auto limpieza. Se conservarán en la
memoria después de una interrupción en el
suministro eléctrico.
Presione los botónes
1
HI/LO
y
segundos hasta que la pantalla
muestre SF.
Presione el botón BAKE. Aparece en
2
la pantalla un número de dos dígitos.
Presione el botón BAKE una vez para
disminuir (-) la temperatura, o dos
veces para aumentar (+) la
temperatura.
3
La temperatura del horno se puede
ajustar hasta (+) 35°F más caliente
botónes numéricas en mañera que
lealos. Por ejemplo, para ajustar la
temperatura del horno 15°F, presione
1 y 5.
Cuando haya hecho el ajuste,
4
presione el botón
regresar a la hora del día. Use el
horno normalmente.
NOTA: El ajuste de la temperatura
para hornear ajuster tambien las
temperaturas para Hornear o Asar
con Convección.
al mismo tiempo por 3
o (–) 35°F más frío. Presione los
BAKE y BROIL
START para
76
CONSEJO PARA HORNEAR
EL TIPO DE MARGARINA AFECTARÁ LA CALIDAD DEL PRODUCTO HORNEADO
La mayoría de las recetas para hornear se han
elaborado usando productos de alto contenido de
grasa como, por ejemplo, mantequilla o margarina
(80% de grasa). Si usted disminuye la cantidad de
grasa, es posible que la receta no dé los mismos
esultados que se obtienen con un producto que
r
tenga un contenido más alto de grasa.
eceta puede no darle buenos resultados si los
La r
pasteles, tortas, pastelitos, galletas o dulces se
elaboran con productos para untar que tengan un
bajo contenido de grasa. Mientras menor sea el
contenido de grasa tal producto para untar, más
notables se harán estas diferencias.
Las normas federales exigen que los productos
etiquetados como “margarina” contengan al menos
80% de grasa por peso. Por otra parte, las materias
para untar que contienen poca grasa, contienen
menos grasa y más agua. El alto contenido de
humedad de estas pr
la textura y el sabor de los alimentos horneados.
Para obtener mejores resultados con sus antiguas
recetas favoritas, use margarina, mantequilla o
productos para untar que contengan al menos
70% de aceite vegetal.
oductos para untar afecta
Page 77

CÓMO UTILIZAR
CÓMO UTILIZAR EL CAJÓN CALENTADOR ELÉCTRICO
El cajón calentador conservará alimentos cocinados
a la temperatura a la que se servirán.
OPERACIÓN DEL CAJÓN CALENTADOR
Presione el botón WARMING
1
DRAWER
se encienden en la pantalla y “Set”
(configuración) comienza a destellar.
En el botón numérica, pr
2
para Bajo, 2 para Medio o 3 para
Alto. La pantalla “1” cambia de
acuerdo con el botón numérica
seleccionada.
Presione el botón
3
(caliente) y el número permanecen
encendidos. “Set” (configuración)
deja de destellar.
Para cancelar, presione el botón
DRAWER
NOT
el cajón calentador.
NOTAS:
• El cajón calentador no puede usarse durante el
ciclo de auto-limpieza.
• El cajón calentador cuenta con tres ajustes: 1, 2 y
3. Estas configuraciones mantienen diferentes
niveles de temperatura en el cajón calentador.
• En algunos modelos, si utiliza el horno y el cajón
calentador al mismo tiempo, sólo podrán verse en
pantalla las configuraciones del horno.
.
A: Presionar el botón
Botón Numérica
1 Lo [bajo] (tortas)
2 Med (cazuelas)
3 Hi [alto] (carnes)
. “Hot” (caliente) y “1”
esione
START. “Hot”
WARMING
CLEAR/OFF ) no apaga
Ajuste
1
Siempre empiece con alimentos calientes. Nunca la
utilice para calentar alimentos fríos excepto masa de
levadura que esté subiendo, galletas crujientes,
hojuelas fritas o cereales secos.
DURANTE EL USO DEL CAJÓN
CALENTADOR
El cajón calentador conservará alimentos cocinados
a la temperatura a la que se servirán. Siempre
empiece con alimentos calientes. Nunca la utilice
para calentar alimentos fríos excepto masa de
levadura que esté subiendo, galletas crujientes,
hojuelas fritas o cereales secos.
Nunca forre el cajón con papel aluminio. El papel
aluminio actúa como un aislador excelente y
capturará el calor debajo de sí mismo. Esto va a
afectar el comportamiento del cajón y pudiera
dañar al acabado interior.
Permita que el cajón se caliente 25 minutos
previamente.
• No coloque líquido o agua en el cajón calentador.
• Para alimentos húmedos, cúbralos con una tapa o
papel de aluminio.
• Para alimentos crujientes, no los tape.
• Los alimentos deben mantenerse calientes en los
recipientes en los que se cocinaron o transferirlos
a platos de servicio a prueba de calor
.
PRECAUCION: Si entran en
contacto dir
plástico o la envoltura de plástico puderian derretirse.
El plástico derretido no se puede quitar y no está
amparado por la garantía.
•
Antes de colocar recipientes en el cajón calentador,
quite las cucharas de servicio, etc.
ecto con el cajón, los r
ecipientes de
77
Page 78

CÓMO UTILIZAR
COMO UTILIZAR EL CAJÓN CALENTADOR ELÉCTRICO
CUADRO DE SELECCIÓN DE
TEMPERATURA
Para mantener varios alimentos calientes, fije la
temperatura según el alimento que necesita la
temperatura más alta.
• La temperatura, el tipo y cantidad de alimento y el
tiempo que se lo mantenga afectará la calidad del
alimento.
• El alimento en vidrio térmico y recipientes de
vidriocerámica puede necesitar un valor de
termostato más alto en comparación con el
alimento en recipientes de metal.
• Si se abre el cajón repetidas veces, el aire caliente se
escapa y el alimento se enfría.
• Deje que transcurra más tiempo para que la
temperatura dentro del cajón se estabilice después
de agregar recipientes.
• Con cargas más grandes, tal vez sea necesario
usar un valor de termostato más alto y cubrir
algunos de los alimentos cocidos.
• No use recipientes de plástico o envoltorio
de plástico.
Tipo de alimento Ajuste
Tocino 3
Panes 2
Cazuelas 2
Pollo, frito 3
Huevos 2
Pescado 3
Salsa con jugo de carne,
Jamón 3
Muffins 2
Anillos de cebolla 3
Tortas 1
Pizza 3
Papas asadas 3
Puré de papas 2
Tortillas 2
salsas
3
PARA COCINAR ALIMENTOS NO
FRESCOS HASTA QUE ESTÉN
CRUJIENTES
• Coloque el alimento en platos o bandejas de
aristas bajas.
• Precaliente en el ajuste 1 (bajo).
• Verifique si está crujiente después de 45 minutos.
Agregue tiempo si fuera necesario.
COMO CALENTAR TAZONES Y PLATOS
DE SERVICIO
Si desea calentar tazones y platos de servicio,
fije el control en
• Unicamente use platos a prueba de calor.
• Si desea calentar loza muy fina, verifique con
el fabricante de loza cuál es la tolerencia
máxima al calor.
• Es posible que precaliente un plato de servicio
vacío mientras se precaliente el cajón.
1.
PRECAUCION: Los platos
podrían estar muy calientes. Siempre use
agarraderas para quitar los platos calientes.
78
PRECAUCION: No deje
alimentos en el calentador por más de dos horas.
Page 79

CÓMO UTILIZAR
OPERACIÓN DEL HORNO DE AUTO LIMPIEZA
ANTES DE UN CICLO DE LIMPIEZA
Recomendamos
que deje una
ventana abierta
para ventilar o
que utilice una
campana de
ventilador
durante el
primer ciclo de
auto limpieza.
Remueva las
parrillas del horno, la bandeja del asador, la parrilla
del asador, todos los instrumentos de cocción y
cualquier papel de aluminio del horno que haya
quedado pues no podrán resistir las altas
temperaturas de limpieza.
NOTA: Las parrillas en níquel deberían ser
removidos antes deempezar el ciclo de
limpieza automática.
La suciedad ubicada en el marco frontal de la
cocina y fuera de la junta de la puerta deberán
limpiarse a mano. Limpie estas áreas con agua
caliente, esponjillas embebidas en jabón o
limpiadores tales como Soft Scrub
bien con agua limpia y seque.
Limpie las manchas más
grandes de la solera del horno.
®
. Enjuague
No frote ni limpie la junta de la puerta—el material
de fibra de vidrio de la junta tiene una resistencia
extremadamente baja a la abrasión. El que la junta
de la puerta esté intacta y ajuste perfectamente es
esencial para la operación eficiente del horno,
desde el punto de vista de la energía, y para
obtener buenos resultados al hornear. Si observa
que la junta se desgasta, se roe o se daña de
cualquiera forma, o si no está en su sitio en la
puerta, deberá pedir que la r
Limpie las manchas más grandes de la solera
del horno.
Verifique que la tapa de la bombilla de luz
del horno esté en su lugar y que la luz del
horno esté apagada.
IMPORTANTE: Ciertas aves son extremadamente
sensibles al humo emitido durante el ciclo de
limpieza de una estufa y su salud puede ser
afectada. Mueva a las aves a otra habitación que
tenga mejor ventilación.
NOTA: Tenga cuidado al abrir el horno después de
finalizado el ciclo de auto-limpieza. El horno puede
seguir caliente.
eemplacen.
CÓMO PREPARAR EL HORNO PARA LA LIMPIEZA
Presione el botón SELF CLEAN.
1
Presiones los botones
2
para ingresar el tiempo de limpieza
deseado, si un tiempo otra de 4
horas está deseado. El tiempo de
limpieza es normalmente de 4 horas.
Puede cambiar el tiempo de limpieza
a cualquier tiempoentre 3 y 5 horas,
dependiendo de la suciedad del
no.
hor
Presione el botón
3
La puerta se cerrará con el segur
automaticamente. La pantalla se muestra el tiempo
de limpieza restante. No será posible abrir la puerta
sino hasta que la temperatura baje de la
temperatura indicada para el seguro y la luz que
dice
LOCKED DOOR se apague.
El horno se apaga automáticamente cuando termina
el ciclo de limpieza.
numéricas
START.
o
4
• La leyenda LOCK DOOR (trabar puerta)
comenzará a destellar y el control del horno dará
una señal si configura el ciclo de limpieza y olvida
de cerrar la puerta del horno.
• Para parar un ciclo de limpieza, pr
CLEAR/OFF. Cuando se apague la luz que dice
LOCKED DOOR indicando que la temperatura
baje de la temperatura indicada para el seguro,
abra la puerta.
Cuando se apague la luz que dice
DOOR
, el seguro de la puerta se
desenganchará automáticamente.
esione el botón
LOCKED
79
Page 80

CÓMO UTILIZAR
OPERACIÓN DEL HORNO DE AUTO LIMPIEZA
CÓMO DEMORAR EL INICIO DE LA LIMPIEZA
Antes de comenzar, asegúrese de que el reloj
muestre la hora correcta del día.
Presione el botón
1
Presione los botones
2
para ingresar el tiempo de limpieza
deseado.
3
Touch the
earliest start time you can set will
appear in the display.
4
Presione los botones
para ingresar la hora del dia deseado
para iniciar el ciclo de auto limpieza.
Presione el botón
5
La puerta se cerrará con el seguro
automaticamente. La pantalla se muestra el tiempo
para iniciar. No será posible abrir la puerta sino
hasta que la temperatura baje de la temperatura
indicada para el seguro y la luz que dice
DOOR
se apague.
DELAY START pad. The
SELF CLEAN.
numéricas
numéricas
START pad.
LOCKED
DESPUÉS DE UN CICLO DE LIMPIEZA
El horno se apaga automáticamente cuando termina
el ciclo de limpieza.
Cuando se apague la luz que dice
6
•
La leyenda
comenzará a destellar y el control del horno dará
una señal si configura el ciclo de limpieza y olvida
de cerrar la puerta del hor
• Para parar un ciclo de limpieza, presione el botón
CLEAR/OFF. Cuando se apague la luz que dice
LOCKED DOOR indicando que la temperatura
baje de la temperatura indicada para el seguro,
abra la puerta.
, el seguro de la puerta se
DOOR
desenganchará automáticamente.
LOCK DOOR (trabar puerta)
no.
LOCKED
Es posible que observe ceniza blanca en el horno.
Limpie con un paño húmedo después de que el
horno se enfríe.
Si las manchas blancas persisten, retírelas con una
esponjilla con jabón y enjuague por completo con
una mezcla de agua y vinagre.
Estos depósitos son por lo general residuos de sal
que no se pueden limpiar durante el ciclo de
limpieza.
Si el hor
limpieza, repita el ciclo.
no no está limpio después de un ciclo de
• No es posible configurar el horno para cocinar
hasta tanto no esté frío para que la puerta se
pueda abrir.
• Mientras el horno está en el proceso de autolimpieza, puede pr
que se vea la hora. Para volver a la cuenta
regresiva de limpieza, presione el botón COOK
TIME
.
• Si se dificulta deslizar las parrillas, aplique una
cantidad pequeña de aceite vegetal o aceite de
cocina a una toalla de papel y limpie con ésta los
bordes de las parrillas del horno.
esionar el botón
CLOCK para
80
Page 81

CUIDADO Y LIMPIEZA DE LA COCINA
CUIDADO Y LIMPIEZA
Cerciorese de que la energia eléctrica
esta desconectada y toda superficie
estan fría antes de limpiar cuaqluier
parte de su cocina.
Si se quita la cocina para efectuar
una limpieza, reparaciones o
cualquier otra razón, verifique que
el dispositivo anti-volcaduras se
coloque de manera adecuada
cuando vuelva a instalarse la
cocina. Si no toma esta
precaución, la cocina puede
volcarse y provocar daños.
ENSAMBLAJE DE QUEMADORES
SELLADOS
Apague todos los
controles antes de
quitar las piezas
del quemador.
Las parrillas y
tapas de los
quemadores y
las cabezas de los
quemadores
pueden levantarse
fácilmente, lo que
facilita su limpieza.
No puede levantar
los electrodos.
Parrilla
apa del quemador
T
PRECAUCION: No haga
funcionar la superficie de cocción si no tiene
todas las piezas de las quemadores y las
parrillas en su lugar.
El electrodo del encendedor por chispa queda
expuesto cuando se quita la cabeza del
quemador. Cuando uno de los quemadores se
pone en la posición de
quemadores chispean. No intente desarmar o
limpiar alrededor del quemador mientras que otro
quemador esté encendido. Usted podría r
un electrochoque y pudiera volcar cualquier
recipiente caliente que se encuentre sobre
la superficie de cocción.
LITE (encender) todos los
ecibir
Cabeza del quemador
Electrodo
Superficie de cocción
81
Page 82

CUIDADO Y LIMPIEZA DE LA COCINA
TAPAS Y CABEZALES DE LOS QUEMADORES
TAPAS DE LOS QUEMADORES
Levántelas cuando
estén frías. Lave las
tapas de los
quemadores con
agua jabonosa
caliente y
enjuáguelas con
agua limpia. Las
puede restregar
con un estr
de plástico para
quitarle las
partículas de alimentos requemadas.
opajo
Tapa es en su lugar correcto
Tapa NO en su lugar correcto.
CABEZALES DE LOS QUEMADORES
Para una ignición adecuada,
cerciórese de que el hueco
pequeño de la sección que se
ajusta sobre el electrodo se
mantenga abierto. Una aguja
de coser o un alambre
desnudo es bueno para quitar
atascos.
Las ranuras en las cabezales
de los quemadores de su
cocina deben mantenerse
limpias en todo momento, para obtener una llama
uniforme y libre.
Las salidas de gas o electr
permitirán que el quemador funcione adecuadamente.
Cualquier derrame sobr
limpiarse muy bien. Tenga cuidado de no golpear un
odo con elementos dur
electr
Usted debe limpiar los quemadores de superficie
periódicamente, especialmente después de que ocurran
derramamientos, los cuales pueden obstruir las aberturas.
Levántelas cuando estén frías.
Para quitar los alimentos r
cabezales de los quemadores en una solución de agua
caliente y detergente líquido suave durante unos 20 a 30
minutos. Para manchas más difíciles de quitar
cepillo de dientes.
odos tapados o sucios no
ca de un electrodo debe
e o cer
os ya que podría dañarse.
equemados, sumerja las
Ranura
Electrodo
, use un
DESPUÉS
Antes de colocar de nuevo las tapas y las cabezales de
los quemadores, sacuda el exceso de agua y séquelas
completamente poniéndolas en un horno a temperatura
templada durante 30 minutos.
DE LIMPIEZA
REMPLAZAR
Coloque las tapas y las cabezales de los
quemadores sobre los electrodos en la cocina.
Asegúrese de que las tapas y los cabezales se
encuentren en los lugares correctos. Hay dos tapas y
cabezales pequeños, una tapa y cabezal mediana,
otra grande y otra extra grande.
Montaje de cabezal
Cabezal y tapa de
quemador mediano
Cabezal y tapa de
quemador grande
y tapa de
quemador pequeño
Frente de la cocina
quemador extra grande
Cabezal y tapa de
quemador pequeño
Cabezal y tapa de
82
NOTAS:
• No utilice lana de acero o polvos limpiadores para
limpiar los quemadores.
• Los quemadores no se encenderán si se quita la tapa.
Page 83

CUIDADO Y LIMPIEZA DE LA COCINA
LAS PARRILLAS DE LOS QUEMADORES
Su cocina cuenta con tres parrillas de estilo
profesional. Estas parrillas tienen posiciones
específicas. Para mayor estabilidad, estas parrillas
sólo deben usarse en su posición correcta; no
pueden intercambiarse de izquierda a derecha o de
frontal a trasera. Verifique que la sección frontal de
ambas parrillas se encuentre en el frente. La parrilla
frontal cuenta con un arco en el frente. Asegúrese
de que la sección arqueada se encuentre hacia el
frente de la cocina.
LIMPIEZA
Levante las parrillas y retírelas cuando estén frías.
Las parrillas deben lavarse con regularidad y, desde
luego, después de ocurrir derramamientos. Lávelas
con agua caliente y jabonosa y enjuáguelas con
agua limpia.
Al reponer las parrillas, cerciórese de que estén
colocadas correctamente sobre los quemadores.
Reinstale las parrillas para que se formen arcos
continuos con las barras centrales de las tres
parrillas.
No deje un quemador funcionando por un largo
período de tiempo sin poner un recipiente sobre la
parrilla. El acabado de la parrilla pudiera astillarse si
no hay ningún recipiente que absorba el calor.
Para limpiar manchas de alimentos requemados,
colóquelas en un recipiente cubierto con 1/4 de
taza de amoníaco y r
emojelas por varias horas o
de la noche a la mañana. Lave, enjuague totalmente
y seque.
Aunque son duraderas, las parrillas gradualmente
perderán su lustrosidad, aunque usted las cuide con
esmero. Esto se debe a que están
continuamenteexpuestas a temperaturas altas.
Observará esto más rápido con las parrillas de color
claro.
NOTA: No limpie las parrillas en el ciclo de auto
limpieza del horno.
Apariencia puede variar.
Puede limpiar las parrillas en
el lavaplatos.
SUPERFICIE DE COCCIÓN
Para evitar que se dañe el acabado de esmalte
porcelanizado de la superficie de cocción y para
evitar que se tor
cualquier derramamiento. Los alimentos que
contienen mucho ácido (tomates, col picada en
salmuera, jugos de fruta, etc.) o alimentos con un
alto contenido de azúcar pudieran causar una
mancha opaca si se dejan asentar. Cuando la
superficie se ha enfriado, límpiela y enjuáguela.
Para limpiar otros derramamientos como
salpicaduras de grasa, etc., lávelas con jabón y
agua una vez que la superficie se haya enfriado.
Entonces enjuáguela y séquela con un paño seco.
ne opaco, limpie inmediatamente
A: No guarde los
NOT
materiales inflamables
o del hor
dentr
ca de la superficie
o cer
de cocción.
No almacene o use
gasolina u otros vapores
y líquidos inflamables en
oximidad a éste o a cualquier otr
pr
electrodoméstico.
A:
NOT
Levantar la superficie de la cocina puede causar
daños y una operación inadecuada.
No levante la superficie de la cocina.
no, cajón
o aparato
83
Page 84

CUIDADO Y LIMPIEZA DE LA COCINA
SUPERFICIES DE ACERO INOXIDABLE
No utilice almohadillas de acero ya que rayan la
superficie.
Para limpiar la superficie de acero inoxidable, utilice
agua tibia jabonosa o un limpiador o lustrador de
acero inoxidable. Siempre limpie la superficie en
dirección de la veta. Siga las instrucciones del
producto para limpiar la superficie de acero
inoxidable.
Para consultar sobre la compra de limpiadores o
lustradores de acero inoxidable, o para encontrar la
ubicación del distribuidor más cercano, llame a
nuestro número gratuito de atención al cliente:
1-800-243-0000
O visite nuestro sitio Web en:
us.lgservice.com
LOS RESPIRADORES DEL HORNO
Nunca bloquee los respiraderos (aberturas para la
circulación del aire) de su cocina. Estos proveen la
entrada y salida de aire necesarias para que la
cocina pueda funcionar de manera adecuada con la
combustión correcta. Las aberturas de aire están
localizadas en la parte posterior de la superficie de
cocción, en las partes superiores e inferior
puerta del horno y en la parte inferior de la cocina,
debajo del cajón calentador.
es de la
PANEL DE CONTROL DEL HORNO
Trabe los controles antes de limpiar. .
Vea la información sobre Bloqueo de Controles
information en la sección Características especiales
de su Control del hor
no
de este manual.
Limpie los derrames con un paño húmedo.
También puede utilizar un limpiador de vidrio.
Quite suciedades más rebeldes con agua tibia
jabonosa. No utilice abrasivos de ninguna clase.
Destrabe los controles de presión después
de la limpieza.
PANEL DE CONTROL FRONTAL Y BOTONES
Es una buena idea limpiar el panel de contr
vez que termine de usar el horno. Use un paño
húmedo para limpiar o enjuagar
un jabón suave y agua o una solución de 50/50 de
vinagre y agua. Para enjuagar, use agua limpia.
Séquelo con un paño suave.
No use limpiadores abrasivos, limpiadores líquidos
fuertes, estropajos plásticos o productos
limpiador
control, ya que estos productos dañarían el
acabado del panel.
No doble las perillas de control halándolas hacia
arriba o hacia abajo o colgando una toalla y otra
carga similar en las mismas. Esto puede dañar el
eje de la válvula de gas.
es para hor
nos para limpiar el panel de
. Para limpiar
ol cada
, use
Se pueden sacar los
botones de mando para
facilitar la limpieza.
Verifique que las perillas
estén en la posición
OFF (apagado) y
sáquelas de los
vástagos para la
limpieza.
Para volver a instalar las perillas, asegúrese de que
la perilla tenga la posición
en la parte superior y deslice la perilla directamente
en el vástago.
Botones de la
quemador
OFF (apagado) centrada
es de
la superficie
84
Page 85

CUIDADO Y LIMPIEZA DE LA COCINA
PUERTA DEL HORNO
La puerta del horno es desmontable, pero es
pesada. Usted probablemente necesite ayuda para
quitarla y volver a colocarla.
PARA QUITAR LA PUERTA
Para quitar la puerta,
ábrala unas cuantas
pulgadas hasta la
posición especial de
parada que la
mantendrá abierta.
Sujétela firmemente por
cada lado y levántela
hacia arriba sacándola
de las bisagras.
NOTA: Tenga cuidado
de no poner las manos
entre la bisagra y el
marco de la puerta del
horno, ya que la bisagra pudiera saltar hacia atrás y
atraparle los dedos.
Levánte la puerta
hacia arriba sacándola
de las bisagras
PARA REPONER LA PUERTA
Para reponer la puerta, cer
bisagras estén en la posición especial de parada.
Coloque las ranuras de la parte inferior de la puerta
sobre las bisagras. Entonces comience a bajar la
puerta lentamente y uniformemente sobre ambas
bisagras a la vez. Si las bisagras saltan hacia atrás
contra el marco del horno, póngalas hacia afuera
otra vez.
ciórese de que las
INTERIOR DE LA PUERTA
• No permita que el
exceso de agua llegue
a alguno de los orificos
o ranuras en la puerta.
• Como el área interior
de la junta hermética
de la puerta se limpia
durante el ciclo de auto
limpieza, usted no
necesita limpiarla a
mano. Cualquier
residuo de jabón
que quede en el
revestimiento interior
de la puerta causa
manchas al calentarse
el horno.
• El área exterior de la
junta hermética de la
puerta puede limpiarse con
un estropajo enjabonado.
La junta de la puerta tiene al
fondo una abertura para la
circulación de aire. No frote ni
limpie la junta de la puerta—el
material de fibra de vidrio de
la junta no tiene casi ninguna
resistencia a la abrasión. Si
notara que la junta se está
desgastando, deshilachando
o dañando de cualquier
manera o si ésta se ha
separado de la puerta, tendrá
que reemplazarla.
EXTERIOR DE LA PUERTA
• Use agua y jabón para limpiar perfectamente la
parte superior, los costados y el frente de la puerta
del horno. Enjuague bien. También puede usar un
limpiador para vidrio para limpiar el vidrio en el
exterior de la puerta.
• Las salpicaduras de salsas, jugos de frutas, salsas
de tomate y materiales para rociar que contengan
ácido pueden causar descoloración y deben
limpiarse de inmediato. Cuando la superficie esté
fría, limpie y enjuague.
• No use limpiadores para hornos, polvos abrasivos,
estropajos de acero o abrasivos fuertes en el
exterior de la puerta.
LA SOLERA DEL HORNO
La solera del horno tiene un acabado de esmalte
porcelanizado. Para facilitar la limpieza, proteja la
solera del hor
colocando una tartera de hornear en la parrilla que
quede debajo de la parrilla en la que usted está
cocinando. Esto es particularmente importante
cuando hornee un pastel de fruta u otros alimentos
con un alto contenido de ácido. Los r
calientes de fruta u otr
contenido acídico (como los tomates o la col picada
en salmuera y salsas con vinagre o jugo de limón)
pudieran causar picaduras y daño a la superficie de
esmalte porcelanizado y por eso deben limpiarse
inmediatamente.
no contra derramamientos excesivos
ellenos
os alimentos con un alto
No se debe jamás cubrir la superficie inferior del
horno con papel de aluminio. Esto perturbará la
culación del calor y evitará que se obtengan
cir
buenos resultados al hornear.
Para limpiar los derramamientos, use jabón y agua,
un limpiador abrasivo o un estropajo enjabonado.
Enjuague bien para quitar los r
antes de iniciar el ciclo de auto limpieza.
e verifique que la parte inferior del hor
Siempr
encuentr
e en su lugar después de la limpieza.
esiduos de jabón
no se
85
Page 86

CUIDADO Y LIMPIEZA DE LA COCINA
LA BANDEJA Y LA REJILLA DEL ASADOR
Después de asar al fuego
directo, saque la bandeja
del horno. Retire la rejilla
de la bandeja. Vierta con
cuidado la grasa de la
bandeja en un recipiente
apropiado.
Lave y enjuague la
bandeja y la rejilla del
asador con agua caliente usando un estropajo de
plástico o un estropajo que contenga jabón.
Si los alimentos se han quemado y están
incrustados, rocíe un poco de detergente sobre la
rejilla mientras ésta està caliente y cúbrala con
toallas de papel mojadas o con una toallita de lavar
Rejilla
Bandeja
platos. El remojar la bandeja eliminará los alimentos
que se han quemado.
La bandeja del asador se puede limpiar con un
limpiador para hornos de tipo comercial.
Tanto la bandeja como la rejilla del asador se
pueden limpiar en la lavadora de platos.
No almacene la bandeja y la rejilla del asador
cuando estén sucias en ninguna parte de su cocina.
NOTICIA: No lave la bandeja ni la rejilla del asador
en el ciclo de auto limpieza del horno.
LAS PARRILLAS DEL HORNO Y DEL CAJÓN
Las parrillas en níquel
deberían ser removidos
antes deempezar el ciclo
de limpieza automática.
Para limpiar las parrillas en níquel, use un limpiador
abrasivo. Después de la limpieza, enjuáguelos con
agua limpia y séquelos con un paño seco. Si se
hiciera difícil deslizar superficies sobre las parrillas
del horno, pásele un trapo mojado con aceite
vegetal a los extremos de los soportes de las
parrillas.
REEMPLAZO DE LA LUZ DEL HORNO
PRECAUCION: Antes de
eemplazar la bombilla, desconecte la energía
r
eléctrica de la cocina desde el interruptor principal o
caja de fusibles. Espere hasta que la cubierta de la
bombilla y la bombilla se haya enfriado.
La bombilla del horno está cubierta con un cristal
desmontable que se
sujeta en su lugar con un
e en forma de arco.
alambr
Quite la puerta del hor
si así lo desea, para
alcanzar la cubierta con
facilidad.
no,
alambr
e en forma
co
de ar
Para retirarla:
Desconecte la energía eléctrica de la cocina.
1
Ponga una mano debajo de la cubierta para que
2
esta última no se caiga al soltarla. Con los
dedos de esa misma mano, empuje firmemente
el alambr
Levante y quite la cubierta.
tornillo para quitar la cubierta.
No toque una bombilla caliente con una tela
3
mojada. Reemplace la bombilla con una
bombilla para aparatos electrodomésticos
de 40 vatios.
Para reponer la cubierta:
Colóquela en la muesca del r
1
luz. Deslice el alambre hacia delante para el
centro de la cubierta hasta que ésta se encaje
en su lugar. Cuando esté bien colocado, el
e sujetará firmemente la cubierta.
alambr
Cer
ciórese de que el alambre esté en la
concavidad, en el centro de la cubierta.
2
Conecte la ener
e sujetador de la cubierta hacia atrás.
No quite ningun
eceptáculo de la
gía eléctrica a la cocina.
86
Page 87

CUIDADO Y LIMPIEZA DE LA COCINA
CAJÓN CALENTADOR DESMONTABLE
NOTA: Antes de hacer cualquier ajuste, limpieza o
servicio, desconecte la fuente de alimentación
eléctrica de la cocina en el panel de distribución
doméstico quitando el fusible o apagando el
disyuntor. Asegúrese de que el elemento de
calentamiento del cajón esté frío.
La mayor parte de la limpieza puede hacerse con el
cajón en su lugar. Sin embargo, puede retirarse el
cajón si fuera necesaria una limpieza más a fondo.
Use jabón y agua tibia para limpiarlo bien.
Para retirar el cajón:
Tire del cajón hacia afuera hasta que se
1
detenga.
Oprima el
2
disparador del
riel izquierdo
hacia arriba y
accione el
disparador del
riel derecho
hacia abajo
mientras tira
del cajón
hacia adelante
sacándolo.
Para volver a colocarlo:
Coloque el
1
riel izquierdo
del cajón
alrededor de
la guía del riel
izquierdo
interior y
córralo
deslizándolo
levemente
para
engancharlo.
Coloque el riel del cajón derecho alrededor
2
de la guía del riel derecho interior y córralo
deslizándolo levemente para engancharlo.
Deslice el cajón totalmente hacia adentro.
3
87
Page 88

DETECCIÓN DE PROBLEMAS
ANTES DE LLAMAR AL SERVICIO TÉCNICO
Antes de llamar al servicio técnico, examine esta lista. Puede ahorrarle tiempo y dinero. La lista incluye
situaciones comunes que no son el resultado de mano de obra o materiales defectuosos del artefacto.
Problema Causa Posible Soluciones
Los quemadores de
superfice no encienden o
no queman de manera
uniforme. ((El quemador
derecho frontal está
diseñado para tener
llamas un poco más
pequeñas entre las
posiciones horarias de
las 6:00 y las 9:00.
Es normal.)
• El enchufe eléctrico no esté conectado • Cerciórese de que el enchufe eléctrico esté conectado
completemente en una toma en una toma de corriente activa.
de corriente.
• Los huecos del quemador en el lado • Quite las cabezas de los quemadores y las tapas de los
del quemador pudieran estar obstruídos. quemadores y límpielos. Inspeccione la área del electrodo
• Montaje del quemador incorrecto. • Cerciórese que las piezas de los quemadores hayan
para comprobar si hay alimentos o grasa requemados. Vea
la sección
sido instaladas correctamente. Vea la sección
y Limpieza de la Cocina.
Cuidido y Limpieza de la Cocina.
Cuidido
La llama del quemador • Proporción inadecuada de aire en gas. • Si la cocina está conectada al gas LP, póngase en
es muy grande contacto con la persona que instaló su cocina o
o amarilla que hizo la conversión.
Los quemadores de la • Es posible que la válvula de cierre del • Para inspeccionar la válvula de cierre del gas del horno,
superficie se encienden gas del horno fuera accidentalmente quite el cajón calentador (Vea la sección Cuidido y
pero no el horno movida durante una limpieza o Limpieza de la Cocina) y busque la palanca de
una mudanza. interrupción del gas de la parte trasera de la cocina.
La palanca se
muestra cerrada.
ARA ABRIR.
TIRE P
Señales de control • Olvidó marcar una temperatura de • Presione el botón BAKE y la temperatura deseada o
después de marcar hornear o tiempo de limpieza. el botón SELF CLEAN y el tiempo deseado de limpieza.
tiempo de cocción o
tiempo de inicio
Los alimentos no se
hornean ni se asan de manera adecuada.
corretamente
• Los controles del horno no se han fijado • Vea la sección Como Utilizar el Horno.
ea la sección
V
La posición de la parrilla no es la correcta.
•
• Se están usando utensilios de cocina • Vea la sección
incorrectos o de un tamaño inapropiado.
El termosta
•
to del horno necesita ajuste.
•
ea la sección
V
•
Como Utilizar el Horno.
Como Utilizar el Horno.
ermosta
Como
Ajustar el
T
to del Horno.
88
• No se ha fijado bien la hora en el reloj. • Vea la sección Usar el Reloj y Contador.
pel de aluminio no se usó
El pa
•
apropiadamente en el horno.
• La solera del horno no está asentado • Vea las
firmemente en su posición
.
• Vea la sección
Instrucciones para la Instalación.
Cuidido y Limpieza de la Cocina.
Page 89

DETECCIÓN DE PROBLEMAS
ANTES DE LLAMAR AL SERVICIO TÉCNICO
Problema Causa Posible Soluciones
Los alimentos no se asan • Los controles del horno no están • Cerciórese que presione el botón BROIL HI/LO.
al fuego directo como es fijados bien.
se debido
• La puerta del horno no está cerrada. • Vea la sección Como Utilizar el Horno.
• Se está usando la parrilla en una • Vea la Guía para Asar al Fuego Directo.
posición incorrecta.
• Los alimentos se están cocinando • Use la bandeja para asar y rejilla que vinieron con
en una cazuela caliente. su cocina. Verifique que esté fría.
• Los utensilios empleados no son los • Use la bandeja para asar y rejilla que vinieron con
apropiados para asar al fuego directo. su cocina.
• El papel de aluminio que se usó para • Vea la sección Como Utilizar el Horno.
cubrir la rejilla de la bandeja del
asador no se colocó correctamente ni
tampoco se hicieron las ranuras según
se recomienda.
• La solera del horno no está asentada • Vea las Instrucciones para la Installación.
firmemente en su posición.
La temperature del • El termostato necesita ajustes. • Vea la sección Como Ajustar el Termostato del Horno.
horno es demasiado
fría o caliente
La pantalla es blanco o
el contador no funciona completemente en una toma en una toma de corriente activa.
La luz del horno • La bombilla puede estar floja o • Ajuste o cambie la bombilla.
no funciona o fundida.
lo de auto limpieza
El cic
del horno no funciona alta para programar la función de ambiente y vuelva a fijar los controles.
Sonido crujiente o del • Este es el sonido del metal que se • Esto es normal
del estallidos enfría y se calienta tanto durante la
• El enchufe eléctrico no esté conectado • Cerciórese de que el enchufe eléctrico esté conectado
de corriente.
• El interruptor automático del circuito • Reemplace el fusible o reinicialice el interruptor de circuitos.
de su casa está trabado o se fundió
un fusible.
• Los controles del horno no están • Vea la sección Usar el Reloj y Contador.
programados de manera correcta.
• El enchufe eléctrico no esté conectado
completemente en una toma de corriente.
• La tempera
auto limpieza.
• Los controles del horno no se • Vea la sección Operación del Horno de Auto Limpieza.
fijaron adecuadamente.
cocción como durante la limpieza.
tura del horno está muy • Deje que la cocina se enfríe hasta alcanzar la temperatura
• Cerciórese de que el enchufe eléctrico esté conectado
en una toma de corriente activa.
89
Page 90

DETECCIÓN DE PROBLEMAS
ANTES DE LLAMAR AL SERVICIO TÉCNICO
Problema Causa Posible Soluciones
Humo excesivo • Quedó suciedad excesivo en el horno. • Presione el botón CLEAR/OFF. Abra las ventanas para que
• Esto es normal en un horno nuevo • Para acelerar el proceso, configure un ciclo de
ay desaparece con el tiempo. auto-limpieza durante un mínimo de 3 horas. Ver la
La puerta del horno no se • El horno está muy caliente. • Deje que el horno se enfríe por debajo de la temperatura
abre después de un ciclo de trabado.
de limpieza
el humo salga de la cocina. Espere hasta que la luz
LOCKED DOOR se apague. Limpie el exceso de suciedad
y reinicialice el ciclo de limpieza.
sección Cómo Utilizar el Horno Auto-limpieza.
El horno no esta limpio
después del ciclo de auto fijaron adecuadamente.
limpieza
En la pantalla destella • Se ha seleccionado el ciclo de • Cierre la puerta del horno.
“LOCK DOOR” auto-limpieza pero la puerta
(puerta trabada) no está cerrada.
La luz LOCKED DOOR • La puerta del horno está trabada • Presione el botón CLEAR/OFF. Deje enfriar el horno.
(
puerta trabada) se porque la temperatura dentro
enciende cuando del horno no ha descendido por
desea cocinar debajo de la temperatura de trabado.
“F— y un numero o •
una lettra”
en la pantalla
Se hace difícil deslizar • Las parilllas de niquel (en algunos • Aplique una pequeña cantidad de aceite vegetal a una
las parrillas del horno modelos)
destellan
• Los controles del horno no se • Vea la sección Operación del Horno de Auto Limpieza.
• El horno estaba muy sucio. • Limpie los derrames más rebeldes antes de iniciar el ciclo
de limpieza. Los hornos muy sucios pueden necesitar una
nueva auto-limpieza o una limpieza más prolongada.
Hay un código de error de función. • Presione el botón
durante una hora.
• Si se repite el código de fallo: • Desconecte el suministro de energía de la cocina durante
5 minutos y entonces vuélvalo a conectar. Si se repite el
código de fallo, llame al técnico de servicio.
fueron limpiados en un cic
de auto limpieza. del horno. Do not spray with Pam®or other lubricant sprays.
lo
toalla de pa
CLEAR/OFF.
uelva a hacer funcionar el horno.
V
pel y aplíquela a los extremos de las parillas
Deje que el horno se enfríe
90
Aparece
pantalla (modelos por temperatura de sonda después
convección) de enchufarla.
La pantalla se pone • El interruptor automático del circuito • Reemplace el fusible o reinicialice el interruptor de circuitos.
en blanco de su casa está trabado o se fundió
“sonda”
en la
Esto le recuerda de ingresar una
•
un fusible.
• El reloj se encuentra en el modo • Vea la sección
sin visualización. del Horno.
Ingrese una tempera
•
tura de sonda.
Funciones Especiales de su Control
Page 91

DETECCIÓN DE PROBLEMAS
ANTES DE LLAMAR AL SERVICIO TÉCNICO
Problema Causa Posible Soluciones
No puedre lograr que • No se presionaron correctamente • Los botones BAKE y BROIL HI/LO se deben presionar
la pantalla muestra “SF” los botones de control. al mismo tiempo y sostenerse por 3 segundos.
Pantalla intemitente • Hubo una interrupción en el • Reinicialice el reloj.
suministro eléctrico.
Interrupción en el • Hubo una interrupción en el • Reinicialice el reloj. Si el horno no estaba en uso, usted
suministro eléctrico, suministro eléctrico. debe reconfigurarlo presionando el botón CLEAR/OFF,
hora estallante configurando el reloj y reconfigurando cualquier función
de cocción.
Un olor a “quemado” • Esto es normal en un horno nuevo • Para acelerar el proceso, configure un ciclo de
o "aceitoso” sale de ay desaparece con el tiempo. auto-limpieza durante un mínimo de 3 horas. Ver la
la ventilación sección Cómo Utilizar el Horno Auto-limpieza.
Olor fuerte • Durante las primeras semanas de • Esto es temporal.
uso del horno cierto olor es normal,
debido al material aislador alrededor
del revestimiento interior del horno.
Ruido a ventilador • El ventilador puede encenderse y • Esto es normal. El ventilador funcionará hasta que
(modelos por convección) apagarse automáticamente. termine la función o se abra la puerta.
El ventilador por • No se ha alcanzado la temperatura • El ventilador se encenderá automáticamente cuando
convección no funciona de precalentamiento. se alcance la temperatura de precalentamiento.
(modelos por convección)
El cajon calentador no
se desliza suavemente hacia adentro. Vea la sección Cuidido y Limpieza de
o se atasca la Cocina.
El cajón calentador • El interruptor automático del circuito
no funciona de su casa está trabado o se fundió
• El cajón no está alineado. • Extienda completamente el cajón y empújelo totalmente
• El cajón está sobrecargado o la • Disminuya el peso. Vuelva a distribuir el contenido
carga no está equilibrada.
un fusible.
• El horno es autolimpiante. • Espere que termine el ciclo autolimpieza y que
• Los controles se han ajustado • Vea la sección
incorrectamente. Calentador Eléctrico .
del cajón.
•
Reemplace el fusible o reinicialice el interruptor de circuitos.
el horno se enfríe.
Como Utlizar el Cajon
Exceso de condensación • Hay líquido en el cajón calnetador • Quite el líquido.
en el cajón
Los alimentos se secan • Se escapa la humedad. • Cubra los alimentos con la tapa o con papel de aluminio.
en el cajón calentador
• Alimentos destapados. • Cúbralos con la tapa o con papel de aluminio.
• La temperatura tiene un valor • Redúzcalo.
demasiado alto.
• El cajón no está totalmente cerrado. • Presione el cajón hasta que el sujetador enganche.
91
Page 92

NOTAS
92
Page 93

NOTAS
93
Page 94

NOTAS
94
Page 95

LG ELECTRONICS, INC.
COCINA A GAS LG GARANTÍA LIMITADA – EE.UU.
LG Electronics Inc. reparará o reemplazará su producto, a criterio de LG, si llegara a tener defectos en los materiales o en la
mano de obra con un uso normal, durante el período de garantía establecido a continuación, vigente desde la fecha original
de compra del producto por parte del consumidor. Esta garantía limitada solamente cubre al comprador original del producto
y tiene vigencia sólo en los EE.UU.
PERÍODO DE GARANTÍA:
MANO DE OBRA: Un año desde la fecha de
compra original
PIEZAS: Un año desde la fecha de
compra original
ELEMENTOS CUBIERTOS:
Cualquier pieza de la cocina que falle debido a un
defecto de los materiales o mano de obra. Durante
esta garantía limitada de un año, LG también
ofrece,
reparaciones en el hogar para reemplazar la pieza
defectuosa.
ESTA GARANTÍA REEMPLAZA CUALQUIER OTRA GARANTÍA, EXPRESA O IMPLÍCITA, INCLUYENDO, SIN
LIMITACIÓN, CUALQUIER GARANTÍA DE COMERCIABILIDAD O APTITUD PARA UN OBJETIVO PARTICULAR. EN LA
MEDIDA EN QUE CUALQUIER GARANTÍA IMPLICITA SEA REQUERIDA POR LA LEY, SE LIMITA EN DURACIÓN AL
PERÍODO DE GARANTÍA EXPRESO ANTERIOR. LG NO SERÁ RESPONSABLE DE DAÑOS RESULTANTES, INDIRECTOS
O INCIDENTALES DE CUALQUIER NATURALEZA, INCLUYENDO, GANANCIAS O INGRESOS PERDIDOS, EN
CONEXIÓN CON EL PRODUCTO. ALGUNOS ESTADOS NO PERMITEN LA LIMITACIÓN DE LA DURACIÓN DE UNA
GARANTÍA IMPLÍCITA O LA EXCLUSIÓN DE DAÑOS INCIDENTALES O RESULTANTES, Y POR LO TANTO LAS
LIMITACIONES O EXCLUSIONES ANTERIORES PUEDEN NO APLICARSE EN SU CASO.
ESTA GARANTÍA LIMITADA NO SE APLICA A:
1. Visitas a su hogar para corregir la instalación de su artefacto, instruir al usuario sobre cómo utilizar su artefacto, cambiar
fusibles o corregir el cableado del hogar, o para cambiar bombillas de luz accesibles para el dueño.
2. Reparaciones cuando su artefacto se utiliza en otro lugar que no sea un hogar unifamiliar.
3. Retiro y entrega. Su artefacto está diseñado para poder ser reparado en el hogar.
4. Daños provocados por accidentes, alteraciones, uso indebido, abuso, incendio, inundación, instalación inadecuada, casos
fortuitos o uso de productos no aprobados por la Corporación LG.
5. Reparación de piezas o sistemas provocados por modificaciones no autorizadas hechas al artefacto.
6. Costos de reemplazo de piezas o de mano de obra en reparaciones para unidades operadas fuera de los EE.UU..
7. Cualquier costo de mano de obra durante el período de garantía limitada.
en forma gratuita, la mano de obra y
CÓMO SE BRINDA EL SERVICIO:
Servicio doméstico:
Guarde el recibo de venta o ticket de entrega del distribuidor con
fecha respectiva como evidencia de la Fecha de Compra y como
prueba de garantía, y envíe una copia del recibo de venta al
técnico en el momento en que se brinde el servicio de garantía.
Llame al
al Centro de Servicio Autorizado LG más cercano.
O visite nuestro sitio Web en
1-800-243-0000 y elija la opción apropiada para ubicar
www.lgservice.com.
Esta garantía se extiende al comprador original y cualquier dueño posterior para pr
dentr
o de los EE.UU. En Alaska, la garantía excluye el costo de envío o visitas para efectuar arr
estados no permiten la exclusión o limitación de daños incidentales o resultantes, por lo tanto esta exclusión o limitación
puede no aplicarse en su caso. Esta garantía le otorga derechos legales específicos y usted puede contar con otros
echos, que pueden variar de estado a estado. Para conocer sus der
der
local o estatal, o al Fiscal General de su estado.
ARA CONTACTAR LG ELECTRONICS POR CORREO:
P
LG Customer Interactive Center
P. O. Box 240007
201 James Record Road
Huntsville, Alabama 35824
ATTN: CIC
echos legales, consulte a su oficina del consumidor
Información sobre registro de producto
Modelo:
Número de serie: ____________________________________
Fecha de compra: ____________________________________
____________________________________________
oductos adquiridos para uso doméstico
eglos en su hogar. Algunos
95
Page 96

INTRODUCTION
CONSIGNES DE SÉCURITÉ IMPORTANTES
Que faire si vous sentez du gaz....................................97
Dispositif antibasculement ............................................97
Sécurité de base....................................................98-102
MODE D'EMPLOI
Utilisation des brûleurs de surface......................103, 104
Tableau de commande – modèles à convection.........105
Tableau de commande – modèles sans convection...106
Utilisation du four .................................................107-110
Horloge et minuterie....................................................111
Cuisson et rôtissage minutés..............................112, 113
Utilisation de la sonde (modèles à convection)...113, 114
Four à convection (certains modèles)..................115-118
Cuisson et rôtissage par convection minutés
(certains modèles)...............................................119, 120
Fonctions spéciales du four ................................120, 121
Fonction pour le jour du Sabbath........................122, 123
Ajustement du thermostat du four...............................124
Trucs pour la cuisson..................................................124
Tiroir chauffe-plat électrique................................125, 126
Autonettoyage du four.........................................127, 128
SOIN ET ENTRETIEN
Soin et nettoyage ........................................................129
Capuchons et têtes des brûleurs ................................130
Grilles des brûleurs .....................................................131
Surface de cuisson......................................................131
Surfaces en acier inoxydable......................................132
Évents du four.............................................................132
Tableau de commande ...............................................132
Panneau avant et boutons ..........................................132
Porte du four ...............................................................133
Fond du four................................................................133
Lèchefrite et grille de rôtissage ...................................134
Grilles du four et du tiroir.............................................134
Remplacement de la lampe du four ............................134
Tiroir chauffe-plat amovible.........................................135
MERCI!
Nous vous félicitons de votre achat et
vous souhaitons la bienvenue dans la
famille LG. Votre nouvelle cuisinière à
gaz LG combine des fonctions
précises de cuisson à une utilisation
simple et à un modèle stylisé.
En suivant le mode d'emploi et
d'entretien, votre cuisinière à gaz vous
procurera des années de service sans
problème.
9696
GUIDE DE DÉPANNAGE
Avant de faire un appel au service après-vente...136-139
GARANTIE
Renseignements pour l'enregistrement du produit......141
Page 97

CONSIGNES DE SÉCURITÉ IMPORTANTES
LISEZ LE MANUEL ENTIER AVANT L'UTILISATION
AVERTISSEMENT Les renseignements fournis dans ce manuel
doivent être suivis afin d'assurer votre sécurité. Ils aideront à minimiser le risque d'incendie ou
d'explosion, de choc électrique ou de dommages matériels, de blessures ou de mort.
AVERTISSEMENT :
DISPOSITIF ANTIBASCULEMENT
• TOUTES LES CUISINIÈRES PEUVENT
BASCULER
• ELLES PEUVENT VOUS BLESSER
• INSTALLEZ LE DISPOSITIF
ANTIBASCULEMENT FOURNI AVEC LA
CUISINIÈRE
• SUIVEZ LES DIRECTIVES D'INSTALLATION
AVERTISSEMENT : Si vous ne suivez pas exactement les directives
dans ce manuel, vous courez un risque de dommages matériels, de blessures ou de mort.
• N'entreposez ni n'utilisez d'essence ou de liquides inflammables à proximité de cet
appareil ou tout autre.
QUE FAIRE SI VOUS SENTEZ DU GAZ
• Ne tentez pas d'allumer la cuisinière.
• Ne touchez aucun interrupteur électrique;
n'utilisez pas un téléphone dans la maison.
• Rendez-vous chez un voisin et téléphonez
immédiatement à votre fournisseur de gaz.
Suivez les directives du fournisseur de gaz.
DISPOSITIF ANTIBASCULEMENT
Toutes les cuisinières peuvent basculer et causer des blessures.
Afin d'éviter le basculement accidentel de la
cuisinière, fixez-la au mur à l'aide du dispositif
antibasculement fourni.
Si vous voulez vous assurer que le dispositif est
bien posé et enclenché, faites basculer la cuisinière
lentement vers l'avant. Le dispositif devrait
s'enclencher et empêcher la cuisinière de basculer.
• Si vous ne pouvez pas entrer en contact avec
le fournisseur de gaz, téléphonez au service
d'incendie.
L'installation et le service après-vente doivent
être effectués par un installateur qualifié, une
agence de service ou le fournisseur de gaz.
une fois la cuisinière remise dans l'enclave.
Autrement, la cuisinière pourrait basculer et causer
des blessures si vous, ou un enfant, vous assoyez
ou vous appuyez sur la porte ouverte.
Voyez l'information sur le dispositif antibasculement
dans ce manuel. Le non-respect de ces consignes
pourrait entraîner un basculement et des blessures.
Si vous retirez la cuisinière de son enclave,
assurez-vous que le dispositif est bien enclenché
97
Page 98

CONSIGNES DE SÉCURITÉ IMPORTANTES
LISEZ LE MANUEL ENTIER AVANT L'UTILISATION
AVIS DE SÉCURITÉ
La Safe Drinking Water and Toxic Enforcement Act de la
Californie exige du gouverneur de l'État, qu'il publie une liste
des substances reconnues par l'État comme cause de
malformations congénitales ou d'autres troubles du système
reproducteur, et exige que les commerces avisent les clients
de l'exposition possible à de telles substances.
Les appareils à gaz peuvent entraîner une exposition
mineure à quatre de ces substances, soit le benzène,
l'oxyde de carbone, le formaldéhyde et la suie, provenant
principalement de la combustion incomplète du gaz naturel
ou du gaz liquéfié. Des brûleurs bien ajustés, indiqué par
une flamme bleuâtre plutôt que jaune, minimisera la
combustion incomplète. L'exposition à ces substances peut
être minimisée en assurant une ventilation vers l'extérieur
par une fenêtre ouverte, un ventilateur ou une hotte.
SÉCURITÉ DE BASE
Demandez à l'installateur de vous montrer l'emplacement du robinet de coupure du gaz et la façon
de le fermer si nécessaire.
• Faites installer la cuisinière et faites-la connecter à la terre
par un installateur qualifié, conformément aux instructions
d'installation. Tout ajustement ou service devrait être fait
par un installateur ou un technicien de service qualifié.
• Ne tentez pas de réparer ou de remplacer une pièce de la
cuisinière à moins que ce ne soit directement recommandé
dans ce manuel. Tout autre service devrait être fait par un
technicien qualifié.
• Ne branchez la cuisinière qu'à une prise de courant 120 V
mise à la terre. N'enlevez pas la broche de terre ronde de
la fiche de la cuisinière. Si vous n'êtes pas familier avec le
système de mise à la terre de votre demeure, il vous en
revient de faire remplacer une prise sans mise à la terre,
par une prise triphasée avec mise à la terre, conformément
au Code national de l'électricité. N'utilisez pas une rallonge
électrique avec cet appareil ménager.
• Placez la cuisinière à un endroit hors de la circulation dans
la cuisine et loin de toute source de courant d'air pour
prévenir une mauvaise circulation de l'air.
• Assurez-vous que tout le matériel d'emballage a été enlevé
avant d'utiliser la cuisinière, afin d'éviter un incendie ou des
dommages causés par la fumée, découlant d’un morceau
d'emballage qui s'enflamme.
• Assurez-vous que la cuisinière est bien ajustée par un
technicien ou un installateur qualifié, pour le type de gaz
(naturel ou PL) utilisé. Votre cuisinière peut être convertie
pour un ou l'autre type de gaz. Voyez les directives
d'installations.
AVERTISSEMENT : Ces
ajustements doivent être faits par un technicien de
service qualifié, conformément aux directives du
fabricant, et à tous les codes et règlements dans votre
région. Le non-respect de ces consignes peut
entraîner des blessures graves ou des dommages
matériels. L'agence qualifiée qui effectue le travail
assume la responsabilité de la conversion.
• Suite à une utilisation prolongée de la cuisinière, le
plancher peut devenir très chaud et le revêtement de
plancher peut ne pas supporter un tel usage. Ne
placez jamais la cuisinière sur des carreaux de vinyle
ou un linoléum qui ne peut pas supporter un tel usage
intensif. Ne posez jamais la cuisinière sur un tapis de
cuisine.
• Ne laissez jamais les enfants seuls et sans
surveillance quand la cuisinière est chaude ou en
service. Ils pourraient subir des brûlures graves.
• Ne laissez personne grimper, se tenir debout ou se
suspendre sur la porte du four, le tiroir chauffe-plat ou
la table de cuisson. On risque d'endommager la
cuisinière et de la faire basculer, ce qui pourrait causer
des blessures graves.
•MISE EN GARDE : Les articles
d'intérêt pour les enfants ne devraient pas être rangés
dans des armoires au-dessus de la cuisinière ou sur le
dosseret. Un enfant pourrait grimper sur la cuisinière
pour les atteindre et se blesser gravement.
98
Page 99

CONSIGNES DE SÉCURITÉ IMPORTANTES
LISEZ LE MANUEL ENTIER AVANT L'UTILISATION
SÉCURITÉ DE BASE
AVERTISSEMENT :
JAMAIS cet appareil comme chaufferette pour
réchauffer la pièce. Cela pourrait causer un
empoisonnement par oxyde de carbone et un
surchauffage du four.
• Ne portez jamais de vêtements lâches ou pendants
quand vous utilisez la cuisinière. Soyez prudent quand
vous vous étirez pour saisir un article dans une armoire
au-dessus de la cuisinière. Un tissu inflammable
pourrait s'enflammer en contact avec la flamme ou les
surfaces chaudes du four, causant des brûlures
graves.
• Ne rangez pas de matières inflammables dans le four,
le tiroir chauffe-plat ou près de la table de cuisson.
• Ne rangez ni n'utilisez aucune matière combustible,
essence ou autre liquide ou matière inflammable près
de cette cuisinière ou de tout autre appareil.
• Ne laissez pas la graisse de cuisson ni d'autres
matières inflammables s'accumuler sur ou près de la
cuisinière.
N'utilisez
• N'utilisez pas d'eau sur un feu de graisse. Ne saisissez
jamais une poêle enflammée. Éteignez les brûleurs et
étouffez le feu en couvrant la poêle complètement avec
un couvercle hermétique, une tôle à biscuits ou un
plateau plat. Utilisez un extincteur à poudre ou mousse
chimique. La graisse enflammée hors de la poêle peut
être éteinte en la couvrant de bicarbonate de soude ou,
si possible, à l'aide d'un extincteur à poudre ou mousse
chimique. Un feu dans le haut du four ou dans le tiroir
chauffe-plat peut être complètement étouffé en fermant
la porte du four ou le tiroir et en éteignant tous les
brûleurs ou en utilisant un extincteur à poudre ou
mousse chimique.
• Laissez les grilles des brûleurs et autres surfaces
refroidir avant de les toucher ou de les laisser à la
portée d'un enfant.
• Ne bloquez jamais les évents (bouches d’air) de la
cuisinière. Elles servent d’entrées et de sorties d'air,
nécessaires au bon fonctionnement de la cuisinière et
à une bonne combustion. Les évents sont situés à
l'arrière de la table de cuisson, dans le haut et le bas
de la porte du four, et dans le bas de la cuisinière, sous
le tiroir chauffe-plat ou le panneau décoratif.
• Les grosses égratignures ou les gros chocs aux portes
en verre peuvent causer le bris ou l'éclatement du
verre.
BRÛLEURS DE SURFACE
Utilisez des poêles de la taille appropriée; évitez d'utiliser des poêles instables ou qui basculent facilement.
Choisissez des ustensiles de cuisine à fond plat assez grands pour couvrir les grilles des brûleurs. Pour éviter les
déversements, assurez-vous que les ustensiles de cuisine sont assez grands pour contenir tous les aliments. Cela
réduira le temps de nettoyage et empêchera l'accumulation dangereuse d'aliments, car un gros bouillonnement ou un
gros déversement pourrait causer un incendie. Utilisez des poêles avec un manche facile à saisir et qui ne retient
pas la chaleur.
• Utilisez toujours la position LITE pour allumer les brûleurs
de la table de cuisson, et assurez-vous que les brûleurs
sont bien allumés.
• Ne laissez jamais un brûleur fonctionner à flamme élevée,
sans surveillance. Un débordement peut causer de la
fumée et des déversements graisseux pouvant
s’enflammer.
• Ajustez la flamme d'un brûleur de façon à ce qu'elle ne
dépasse pas le rebord de l'ustensile. Une flamme
excessive peut être dangereuse.
99
Page 100

CONSIGNES DE SÉCURITÉ IMPORTANTES
LISEZ LE MANUEL ENTIER AVANT L'UTILISATION
BRÛLEURS DE SURFACE(suite)
• N'utilisez que des poignées sèches; des poignées humides
ou mouillées peuvent causer des brûlures par vapeur. Ne
laissez pas les poignées toucher une flamme nue quand
vous soulevez l'ustensile. N'utilisez pas une serviette ou un
gros chiffon à la place d'une poignée.
• Si vous utilisez des ustensiles en verre, assurez-vous
qu'elle est conçue pour l'utilisation sur une table de
cuisson.
• Afin de minimiser le risque de brûlures, d'inflammation des
matières inflammables ou de déversement, tournez les
poignées des ustensiles vers l'intérieur ou l'arrière de la
cuisinière, en évitant de les laisser au-dessus des brûleurs
adjacents.
• Suveillez bien les aliments pendant la friture à flamme
élevée.
• Ne laissez aucun article sur la table de cuisson. L'air chaud
de l'évent peut enflammer des articles inflammables et
augmenter la pression dans un contenant hermétique,
entraînant un éclatement.
• Si vous utilisez une combinaison d'huile et de graisse pour
la friture, mélangez-les avant de les chauffer ou au fur et à
mesure que la graisse fond.
• Autant que possible, utilisez un thermomètre à friture pour
éviter le surchauffage des graisses au point de fumée.
• Utilisez le moins de graisse que possible pour une bonne
friture. Trop remplir la poêle de graisse peut causer des
déversements lors de l'ajout des aliments.
• Ne flambez pas d'aliments sur la table de cuisson; si vous
le faites sous une hotte, mettez le ventilateur en marche.
• N'utilisez pas un wok sur la table de cuisson si celui-ci est
muni d'un collier métallique qui se place sur la grille du
brûleur, comme support. Ce collier peut agir comme piège
à chaleur, ce qui endommagerait la grille et la tête du
brûleur. Le brûleur pourrait aussi ne pas bien fonctionner.
Le niveau d'oxyde de carbone pourrait alors surpasser les
limites admissibles, ce qui serait nuisible à la santé.
• Les aliments à frire devraient être aussi secs que possible.
Le gel sur les aliments surgelés ou l'humidité sur les
aliments frais peut faire bouillir le gras chaud et le faire
déborder.
• Ne déplacez jamais une poêle remplie de graisse chaude,
surtout une friteuse. Attendez que la graisse refroidisse.
• Ne laissez aucun article en plastique sur la table de
cuisson, car il pourrait fondre s'il se trouve trop près de
l'évent.
• Gardez tous les plastiques loin des brûleurs de la table de
cuisson.
• Afin d'éviter le risque de brûlure, assurez-vous toujours que
les commandes des brûleurs sont en position éteinte
(OFF) et que les grilles sont refroidies avant de tenter de
les enlever.
• Si la cuisinière se trouve près d'une fenêtre, n'y suspendez
pas de rideaux longs qui pourraient être soufflés au-dessus
des brûleurs, créant ainsi un risque d'incendie.
• Si vous sentez du gaz, coupez le gaz à la cuisinière et
contactez un technicien qualifié. N'utilisez jamais une
flamme nue pour détecter une fuite.
• Tournez toujours la commande du brûleur en position
éteinte avant d'enlever l'ustensile de cuisine.
• Ne soulevez pas la table de cuisson. Vour risqueriez de
l'endommager et de causer un mauvais fonctionnement de
la cuisinière.
100
BIEN CUIRE LA VIANDE ET LA VOLAILLE
Faites bien cuire la viande et la volaille. La température
INTERNE de la viande doit être d'au moins 71 °C (160 °F),
et celle de la volaille, d'au moins 82 °C (180 °F). Cuire les
aliments à cette température protège habituellement contre
les maladies d'origine alimentaire.
 Loading...