

LG LRG30355SB, LRG30357ST, LRG30355ST, LRG30355SW, LRG30357SB Technical Service Manual
...
1
2
3
Co
n
vec
ti
o
n
OV
E
N
C
O
N
TRO
LS
L
E
F
T
RE
AR
LG
TO
P
C
O
N
TR
O
L
S
4
5
6
7
8
9
0
L
E
F
T
F
R
O
N
T
P
O
WE
RBU
R
N
E
R
CENTER
SI
M
M
ER
B
URNER
RI
G
HT
R
EAR
PO
WERPLUS BU
R
N
ER
RI
G
HT
F
RO
NT
Website http://us.lgservice.com
SEALED BURNER
30" GAS RANGE
TECHNICAL SERVICE GUIDE
Printed in U.S.A.
MFL38056601

IMPORTANT SAFETY NOTICE
The information in this service guide is intended for use by
individuals possessing adequate backgrounds of electrical,
electronic, and mechanical experience. Any attempt to repair a
major appliance may result in personal injury and property
damage. The manufacturer or seller cannot be responsible for the
interpretation of this information, nor can it assume any liability in
connection with its use.
WARNING
If the information in this manual is not followed exactly, a fire or
explosion may result causing property damage, personal injury or
death. If you smell gas:
- Do not try to light any appliance.
- Do not touch any electrical switch; do not use any phone in
the building.
- Immediately call the gas supplier from a neighbor’s phone.
Follow the gas supplier’s instructions.
- If you cannot reach the gas supplier, call the fire department.
WARNING
To avoid personal injury, disconnect power before servicing
this product. If electrical power is required for diagnosis or test
purposes, disconnect the power immediately after performing the
necessary checks.
RECONNECT ALL GROUNDING DEVICES
If grounding wires, screws, straps, clips, nuts, or washers used
to complete a path to ground are removed for service, they must
be returned to their original position and properly fastened.
LG Electronics U.S.A., Inc.
Technical Service Guide
Copyright © 2006
All rights reserved. This service guide may not be reproduced in whole or in part
in any form without written permission from LG Electronics U.S.A., Inc..
– 2 –

Table of Contents
Bake and Broil Burner Flame Adjustments ...........................................................................................................32
Bake Burner and Glow-bar Igniter ............................................................................................................................ 31
Broil Burner and Glow-bar Igniter .........................................................................................................................30
Component Locator Views ...........� 20
Control Panel ......................................� 37
Control Panel and Touch Board .� 38
Control Panel Assembly .................� 37
Control Features ...............................� 7
Convection Fan Motor ....................� 34
Door Assemblies ................................� 27
Door Latch Assembly ......................� 43
Electronic Range Control (ERC) ...� 38
Failure Codes and Component Testing ..................................................................................................................49
Gas Manifold .......................................� 42
Gas Shut-off Valve ............................� 24
Glow-bar Igniter ...............................� 29
Ignitor Switches .................................� 42
Installation Requirements .............� 5
Introduction .........................................� 4
Lock Motor and Door Latch Switch Circuit Information .................................................................................46
Maintop Burner Assembly ............� 39
Maintop Burner Valves ...................� 41
Maintop Removal ..............................� 25
Manifold Panel ...................................� 41
Meat Probe Outlet ...........................� 35
Nomenclature ....................................� 4
Oven Burner Ignition System .....� 29
Oven Calibration ...............................� 46
Oven Components and Replacement ..................................................................................................................... 29
Oven Door Hinge Removal ...........� 26
Oven Door Removal .........................� 23
Oven Door Switch .............................� 28
Oven Light Bulb ................................� 28
Oven Temperature Sensor ..........� 35
Range Components and Replacement .................................................................................................................. 23
Range Removal ..................................� 23
Range Top Components and Replacement .........................................................................................................39
Safety Valve and Pressure Regulator ...................................................................................................................... 36
Schematics and Wiring Diagrams ............................................................................................................................ 57
Service Test Mode .............................� 48
Side Panel Removal .........................� 25
Spark Module ......................................� 37
Warming Drawer Removal ...........� 23
Warranty ..............................................� 6
– 3 –
Introduction
1
2
3
C
o
n
v
e
c
t
i
o
n
O
V
E
N
C
O
N
T
R
O
L
S
L
E
F
T
R
E
A
R
L
G
T
O
P
C
O
N
T
R
O
L
S
4
5
6
7
8
9
0
L
E
F
T
FR
O
N
T
P
O
W
E
R
B
U
R
N
E
R
C
E
N
T
E
R
S
I
M
M
E
R
B
U
R
N
E
R
R
I
G
H
T
R
E
A
R
P
O
W
E
R
P
L
U
S
B
U
R
N
E
R
R
I
G
H
T
F
R
O
N
T
1
2
3
C
o
n
v
e
ct
i
o
n
O
V
E
N
C
O
N
T
R
O
L
S
L
E
F
T
R
E
A
R
L
G
T
O
P
C
O
N
T
R
O
L
S
4
5
6
7
8
9
0
L
E
F
T
F
R
ON
T
P
O
W
E
R
B
U
R
N
E
R
C
E
N
T
E
R
S
I
M
M
E
R
B
U
R
NE
R
R
I
G
H
T
R
E
A
R
P
O
W
E
R
P
L
U
S
B
U
R
N
E
R
R
I
G
H
T
F
R
O
N
T
The new gas range has an electronic tactile touch-
•
control panel for the oven. This easy-to-operate
touch-control panel is user friendly and simple to
understand.
The range includes many helpful features including
•
a self-cleaning oven.
The convection baking and roasting feature
•
provides even cooking and superior baking every
time.
New servicing features include front accessibility to
•
most components and easy replacement access to
the oven door locking assembly.
All models are available in natural gas and are
•
supplied with an LP regulator conversion feature
and LP orifice spuds for the surface burners.
The information on the following pages will help you
•
service these new all gas ranges effectively and
efficiently.
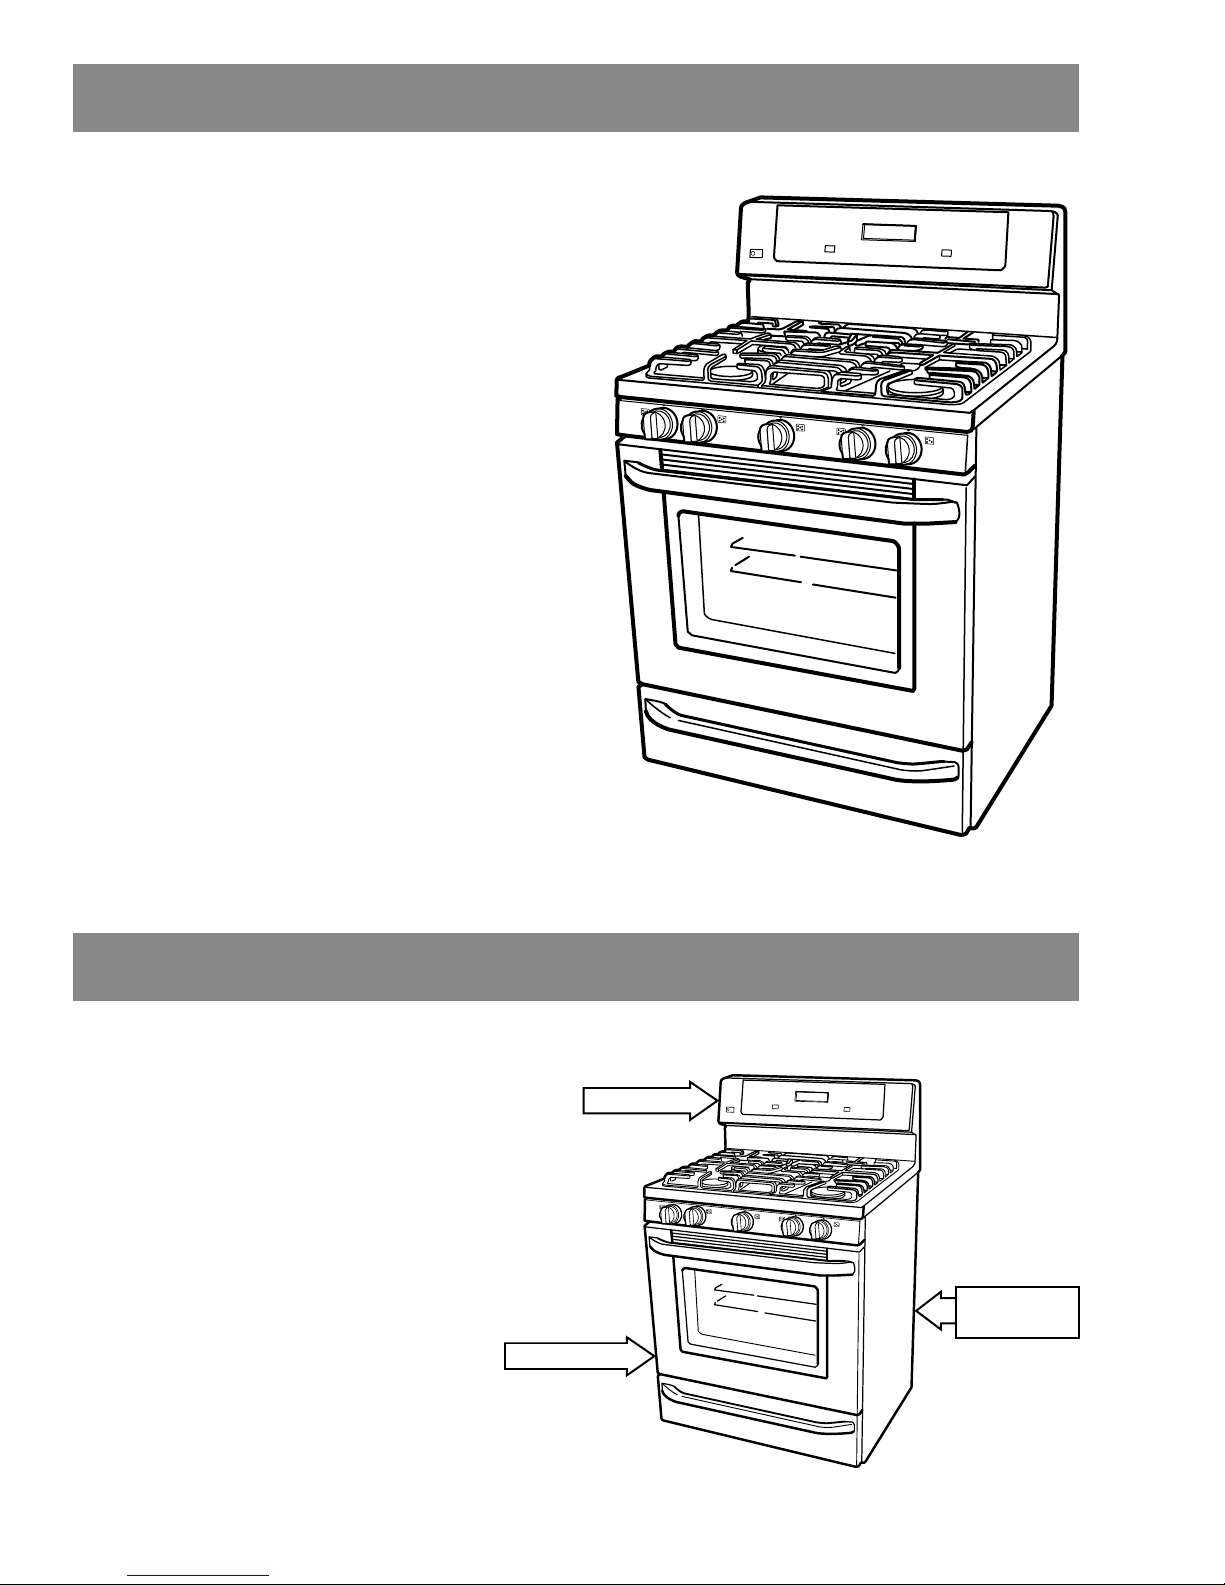
The nomenclature plate of this range
Nomenclature
Mini-manual
is located on the oven frame above
the warming drawer.
In addition to the model and serial
numbers, this plate shows the ratings
of the burners, and the type of
fuel and pressure the cooktop was
adjusted for when it left the factory.
The mini-manual is placed in
an envelope located behind the
Nomenclature
LP Conversion
Instructions
backguard.
An LP (Propane) gas conversion
instructions sheet is attached to the
back side of the range.
– 4 –
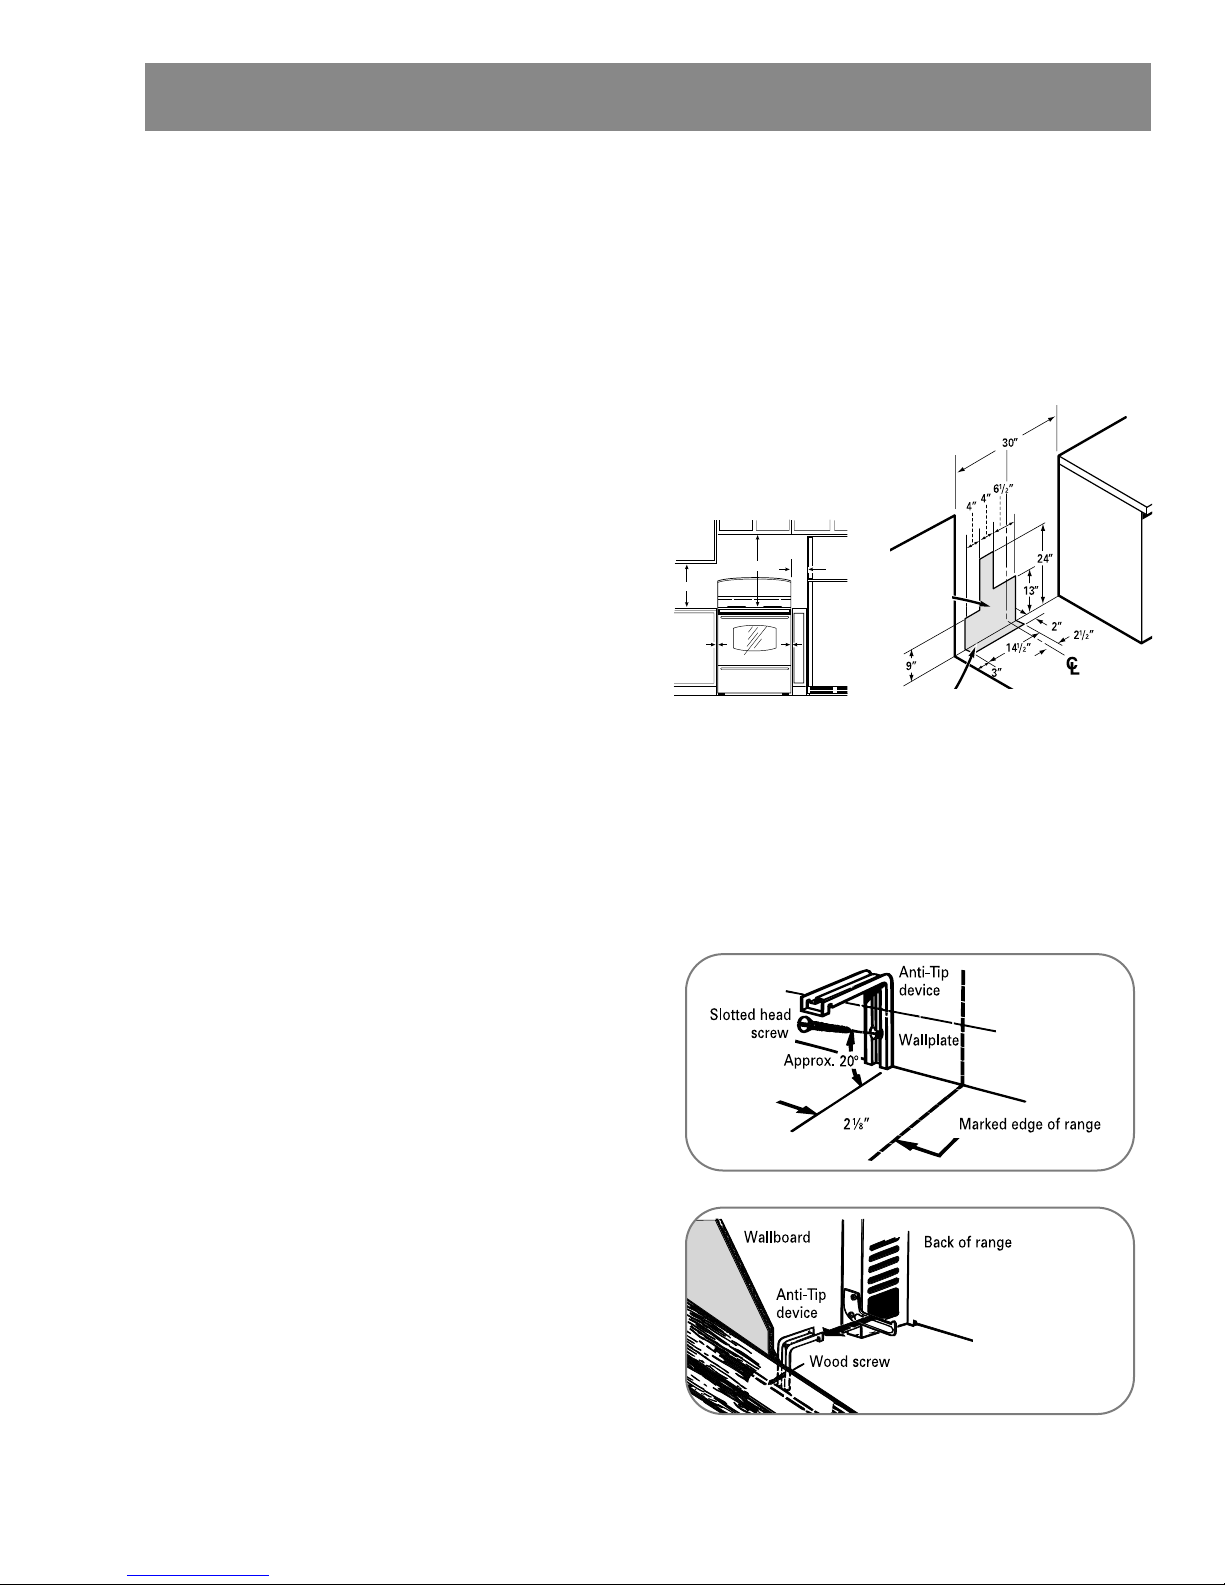
6"
MI
N
30" MIN
18" MIN
0"
0"
*
*
MINIMUM DIMENSIONS BETWEEN
COOKTOP AND WALLS ABOVE COOKTOP
.
Installation Requirements
Installation information is for reference only.
See the Installation Instructions shipped with
the product for complete details and before
attempting to install the range.
Power Supply
This appliance must be supplied with proper
voltage and frequency, connected to an
individually grounded branch circuit, and
protected by a circuit breaker or time delay fuse
as noted on rating plate.
Wiring must conform to the National Electrical
Codes.
Grounding Specifications
Ground Path Resistance 0.10W Max.
Insulation Resistance 250KW Min.
Gas Supply
A flexible metal appliance connector used to
connect the range to the gas supply line should
have an I.D. of 1/2” and be 5 feet in length
for ease of installation. In Canada, flexible
connectors must be single wall metal connectors
no longer than 6 feet in length.
Minimum Clearances
Recommended
Spacing to
Heat Sensitive
Surfaces.
Recommended
area for 120V
outlet and gas
pipe stub and
shut-off valve.
Recommended area
for through-the-floor
connection of pipe stub
and shut-off valve.
Your range is designed to operate at a pressure
of 5” of water column on natural gas or, if
designed for LP gas (propane or butane), 10” of
water column.
Make sure you are supplying your range with the
type of gas for which it is designed.
This range is convertible for use on natural or
propane gas. If you decide to use this range on
LP gas, conversion must be made by a qualified
LP installer before attempting to operate the
range on that gas.
For proper operation, the pressure of natural gas
supplied to the regulator must be between 5” and
13” of water column. For LP gas, the pressure
supplied must be between 10” and 13” of water
column.
When checking for proper operation of the
regulator, the inlet pressure must be at least 1”
greater than the operating (manifold) pressure as
given above.
Anti-Tip Device
WARNING: All ranges can tip causing injury. Install
anti-tip device packed with range. The anti-tip device should be attached to the wall.
The pressure regulator located at the inlet of the
range manifold must remain in the supply line
regardless of whether natural or LP gas is being
used.
Check for proper operation by carefully tipping the
range forward.
– 5 –
Warranty
LG GAS RANGE WARRANTY– USA
LG Electronics Inc. will repair or replace your product, at LG’s option, if it proves to be defective in material or
workmanship under normal use, during the warranty period set forth below, effective from the date of original consumer
purchase of the product. This limited warranty is good only to the original purchaser of the product and effective only
when used in U.S.A.
THIS WARRANTY IS IN LIEU OF ANY OTHER WARRANTIES, EXPRESS OR IMPLIED, INCLUDING
WITHOUT LIMITATION, ANY WARRANTY OF MERCHANTABILITY OR FITNESS FOR A PARTICULAR
PURPOSE. TO THE EXTENT ANY IMPLIED WARRANTY IS REQUIRED BY LAW, IT IS LIMITED IN
DURATION TO THE EXPRESS WARRANTY PERIOD ABOVE. LG WILL NOT BE LIABLE FOR ANY
CONSEQUENTIAL, INDIRECT, OR INCIDENTAL DAMAGES OF ANY KIND, INCLUDING LOST
REVENUES OR PROFITS, IN CONNECTION WITH THE PRODUCT. SOME STATES DO NOT ALLOW
LIMITATION ON HOW LONG AN IMPLIED WARRANTY LASTS OR THE EXCLUSION OF INCIDENTAL
OR CONSEQUENTIAL DAMAGES, SO THE ABOVE LIMITATIONS OR EXCLUSIONS MAY NOT APPLY TO
YOU.
THIS LIMITED WARRANTY DOES NOT APPLY TO:
1. Service calls to correct the installation of your appliance, to instruct you how to use your appliance, to replace house
fuses or correct house wiring, or to replace owner-accessible light bulbs.
2. Repairs when your appliance is used in other than normal, single-family household use.
3. Pickup and delivery. Your appliance is designed to be repairable in the home.
4. Damage resulting from accident, alteration, misuse, abuse, fire, flood, improper installation, acts of God, or use of
products not approved by LG Corporation.
5. Repairs to parts or systems resulting from unauthorized modifications made to the appliance.
6. Replacement parts or repair labor costs for units operated outside the united states.
7. Any labor costs during the limited warranty period.
This warranty is extended to the original purchaser and any subsequent owner for products purchased for home use within
the USA. In Alaska, the warranty excludes the cost of shipping or service calls to your home.
Some states do not allow the exclusion or limitation of incidental or consequential damages, so this exclusion or limitation
may not apply to you. This warranty gives you specific legal rights, and you may also have other rights which vary from
states to states. To know what your legal rights are, consult your local or state consumer affairs or your state’s Attorney
General.
CUSTOMER ASSISTANCE INFORMATION:
WARRANTY PERIOD:
One Year
From the date of the
original purchase
HOW SERVICE IS HANDLED:
Any part of the range which fails due to a defect in materials or workmanship. During this
full one-year warranty, LG will also provide, free of charge, all labor and in-home service
to replace the defective part.
To Prove Warranty Coverage
Retain your Sales Receipt to prove date of purchase.
A copy of your Sales Receipt must be submitted at the time warranty
service is provided.
To Obtain Nearest Authorized
Service Center or Sales Dealer, or to
Obtain Product, Customer, or
Service Assistance
Call 1-800-243-0000 (Phone answered 24 hours - 365 days a year) and
choose the appropriate prompt from the menu; or visit our website at:
http://us.lgservice.com.
– 6 –
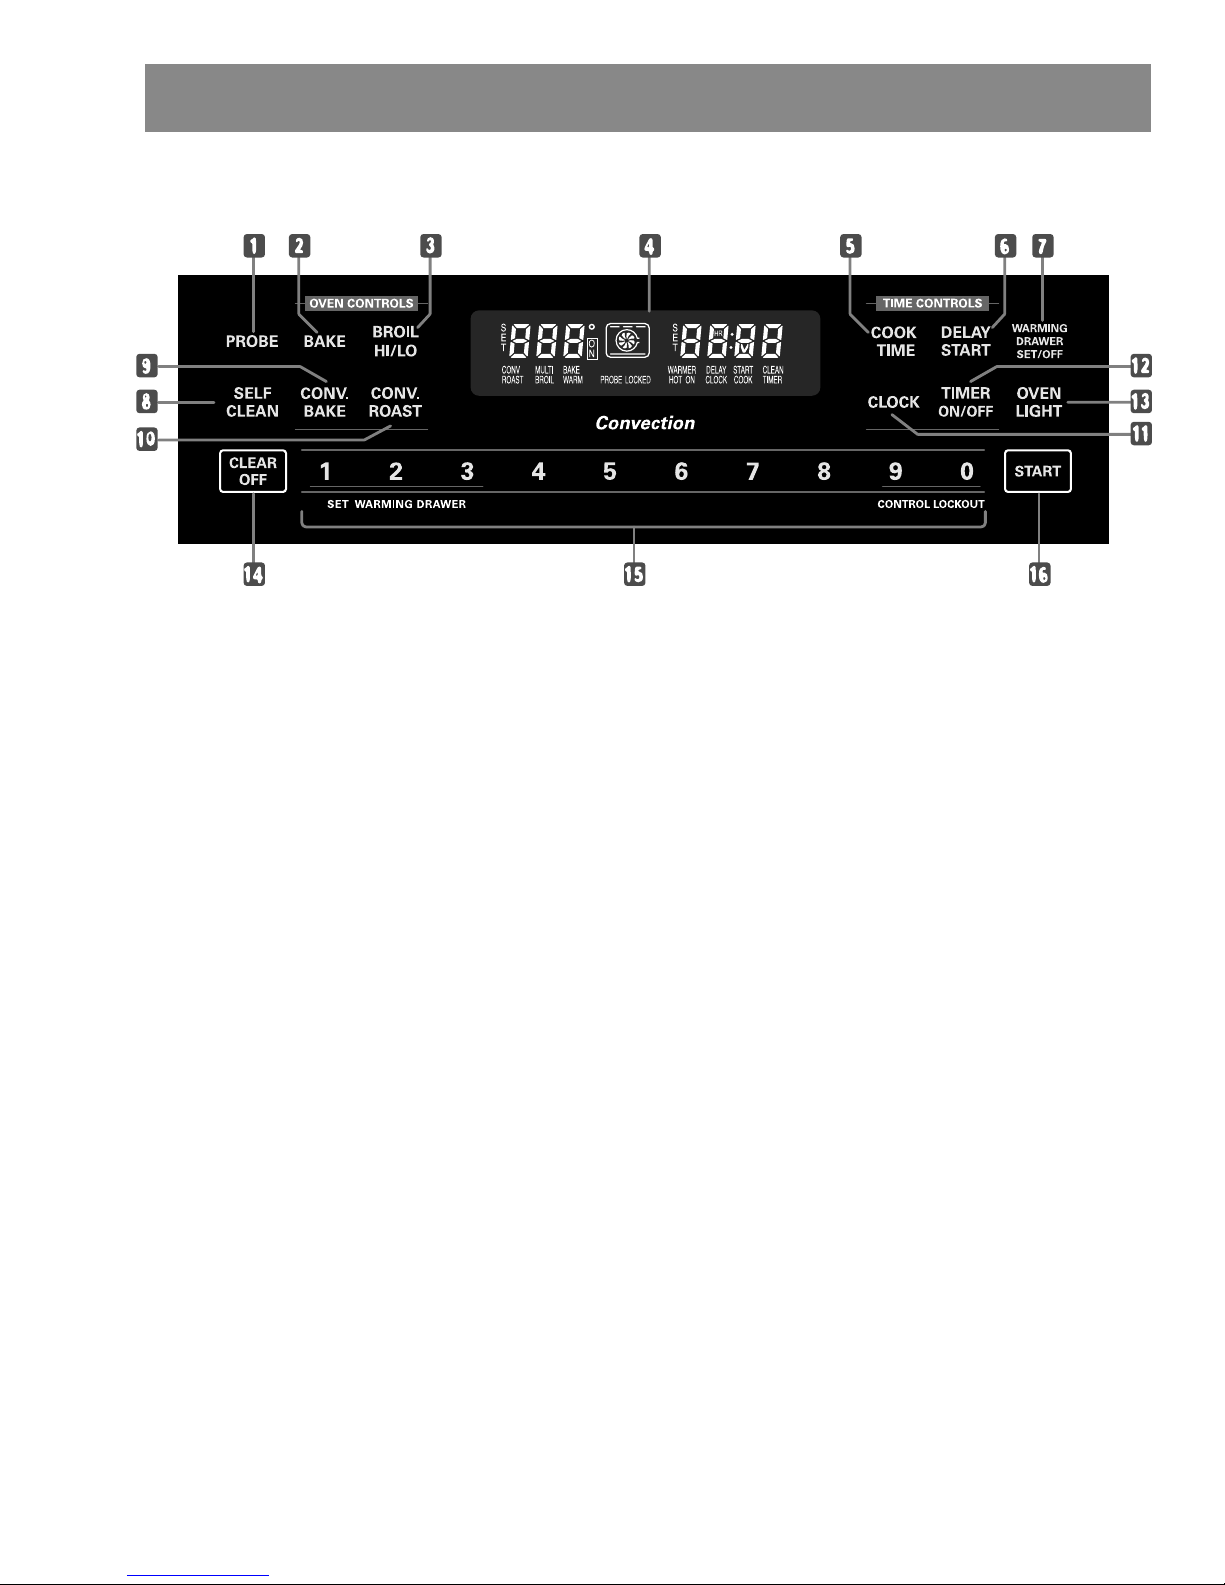
Control Features
Features and appearance may vary between models.
Convection Models - Oven Control, Clock and Timer Features
PROBE PAD: Touch this pad to select the probe
1.
function.
BAKE PAD: Touch this pad to select the bake
2.
function.
BROIL HI/LO PAD: Touch this pad to select the
3.
broil function.
DISPLAY: Shows the time of day, oven
4.
temperature, whether the oven is in the bake, broil
or self-cleaning mode and the times set for the
timer or automatic oven operations, convection
bake it will also show warming drawer settings.
Note: If “F– and a number or letter” flash in the display and
the oven control signals, this indicates a function error code.
If your oven was set for a timed oven operation and a power
outage occurred, the clock and all programmed functions
must be reset.
The time of day will flash in the display when there has been
a power outage. Reset the clock.
If “Err” appears in the display, you have tried to set a time
or temperature outside of the control’s limits. Touch CLEAR/
OFF pad and enter a new setting.
Touch the CLEAR/OFF pad. Allow oven to cool for one hour.
Put oven back into operation. If function error code repeats,
disconnect power to range and call for service.
COOK TIME PAD: Touch this pad and then touch
5.
the number pads to set the amount of time you
want your food to cook. The oven will shut off
when the cooking time has run out.
DELAY START PAD: Use along with COOK TIME
6.
or SELF CLEAN pads to set the oven to start and
– 7 –
stop automatically at a time you set.
WARMING DRAWER PAD: Touch this pad and
7.
then touch number pads 1–3 to use the warming
drawer. See the Using the electric warming drawer
section.
SELF CLEAN PAD: Touch this pad to select self-
8.
cleaning function. See the Using the self-cleaning
oven section.
CONVECTION BAKE PAD: Press to select baking
9.
with the convection function.
CONVECTION ROAST PAD: Press to select
10.
roasting with the convection function.
CLOCK PAD: Press before setting the time of day.
11.
TIMER ON/OFF PAD: Press to select the timer
12.
feature.
OVEN LIGHT PAD: Touch this pad to turn the
13.
oven light on or off.
CLEAR/OFF PAD: Touch this pad to cancel
14.
ALL oven operations except the clock, timer and
warming drawer settings.
NUMBER PADS: Use to set any function requiring
15.
numbers such as time of day on the clock, timer,
oven temperature, internal food temperature, start
time and length of operation for timed baking and
self-cleaning.
START PAD: Must be touched to start any cooking
16.
or cleaning function, and warming drawer settings.
(Continued next page)
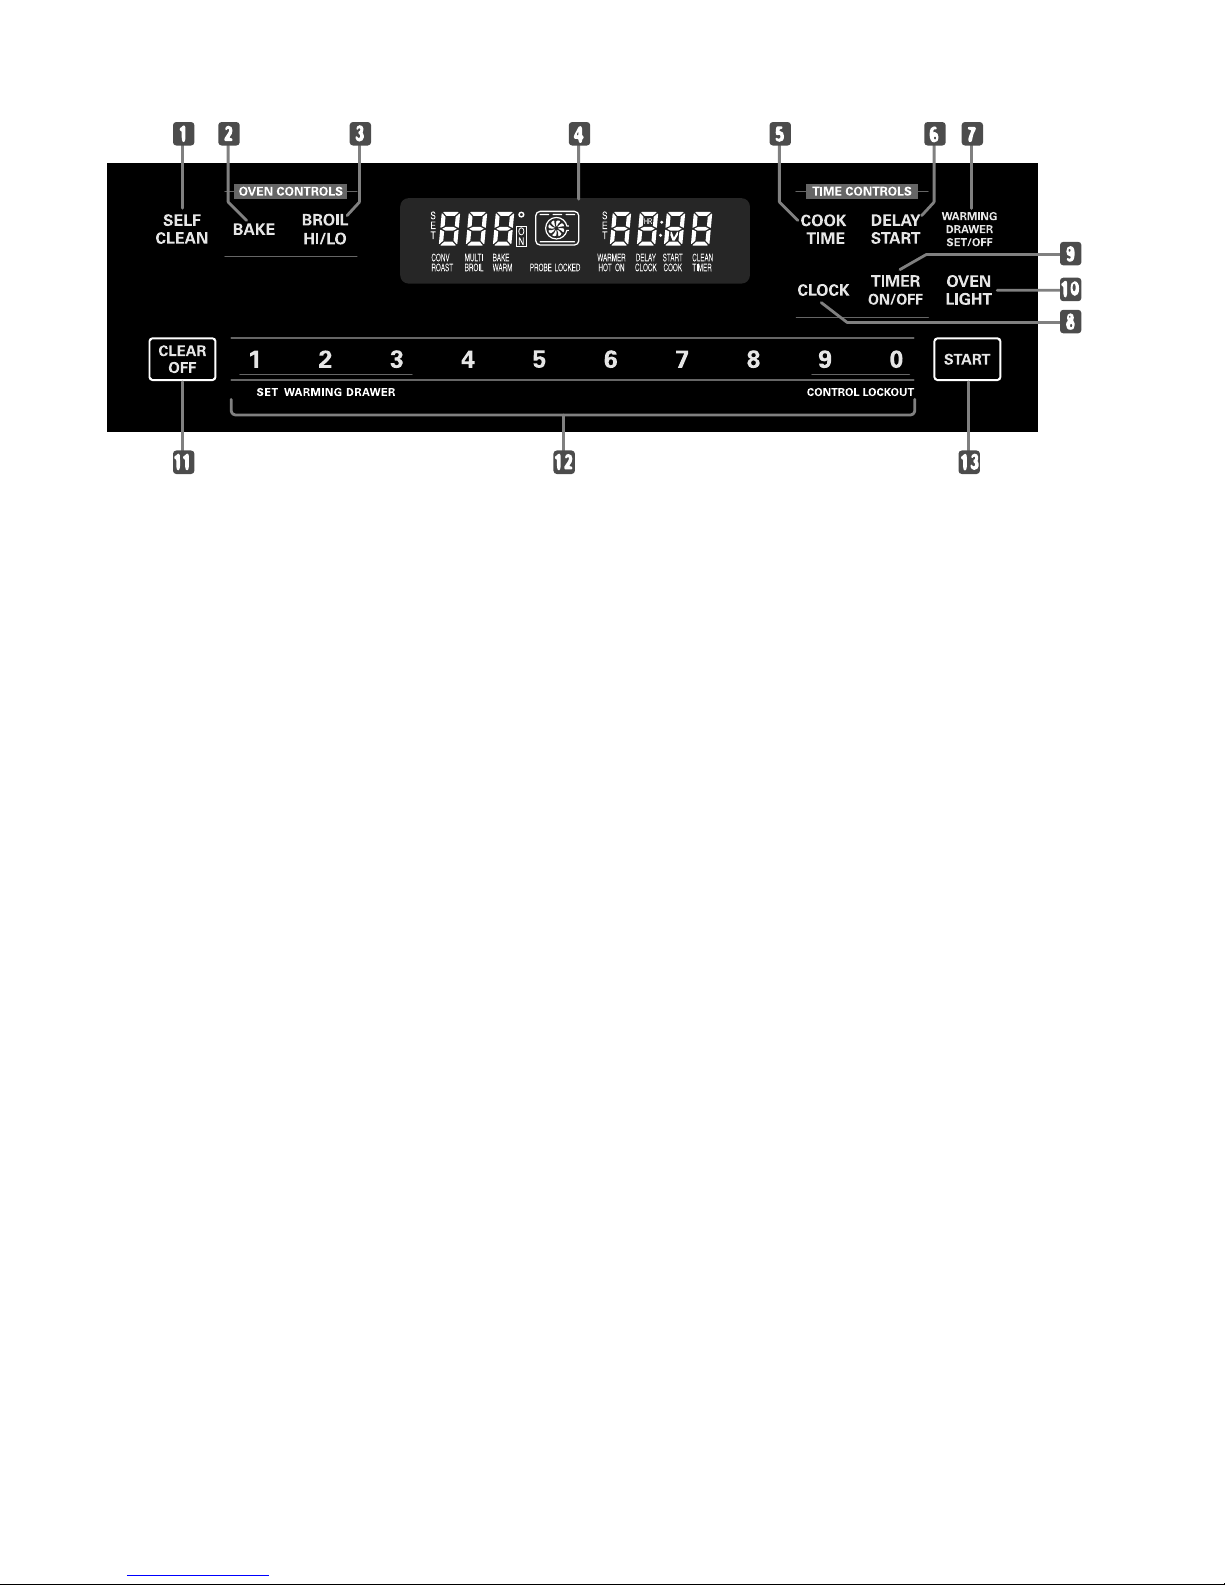
Features and appearance may vary between models.
Non-Convection Models - Oven Control, Clock and Timer Features
COOK TIME PAD: Touch this pad and then touch
SELF CLEAN PAD: Touch this pad to select self-
1.
cleaning function. See the Using the self-cleaning
oven section.
BAKE PAD: Touch this pad to select the bake
2.
function.
BROIL HI/LO PAD: Touch this pad to select the
3.
broil function.
DISPLAY: Shows the time of day, oven
4.
temperature, whether the oven is in the bake,
broil or self-cleaning mode and the times set for
the timer or automatic oven operations. It will also
show warming drawer settings.
5.
the number pads to set the amount of time you
want your food to cook. The oven will shut off
when the cooking time has run out.
DELAY START PAD: Use along with COOK TIME
6.
or SELF CLEAN pads to set the oven to start and
stop automatically at a time you set.
WARMING DRAWER PAD: Touch this pad and
7.
then touch number pads 1–3 to use the warming
drawer. See the Using the electric warming drawer
section.
CLOCK PAD: Press before setting the time of day.
8.
Note: If “F– and a number or letter” flash in the display and
the oven control signals, this indicates a function error code.
If your oven was set for a timed oven operation and a power
outage occurred, the clock and all programmed functions
must be reset.
The time of day will flash in the display when there has been
a power outage. Reset the clock.
If “Err” appears in the display, you have tried to set a time
or temperature outside of the control’s limits. Touch CLEAR/
OFF pad and enter a new setting.
Touch the CLEAR/OFF pad. Allow oven to cool for one hour.
Put oven back into operation. If function error code repeats,
disconnect power to range and call for service.
TIMER ON/OFF PAD: Press to select the timer
9.
feature.
OVEN LIGHT PAD: Touch this pad to turn the
10.
oven light on or off.
CLEAR/OFF PAD: Touch this pad to cancel
11.
ALL oven operations except the clock, timer and
warming drawer settings.
NUMBER PADS: Use to set any function requiring
12.
numbers such as time of day on the clock, timer,
oven temperature, internal food temperature, start
time and length of operation for timed baking and
self-cleaning.
START PAD: Must be touched to start any cooking
13.
or cleaning function, and warming drawer settings.
– 8 –
(Continued next page)

Oven Vent
How to Set the Oven for Broiling
Your oven is vented through ducts at the rear of the
range. Do not block these ducts when cooking in the
oven—it is important that the flow of hot air from the
oven and fresh air to the oven burner be uninterrupted.
Avoid touching the vent openings or nearby surfaces
during oven or broiler operation—they may become
hot.
Handles of pots and pans on the cooktop may
•
become hot if left too close to the vent.
Do not leave plastic or flammable items on the
•
cooktop— they may melt or ignite if left too close
to the vent.
Do not leave closed containers on the cooktop.
•
The pressure in closed containers may increase,
which may cause them to burst.
Metal items will become very hot if they are left on
•
the cooktop, and could cause burns.
How to Set the Oven for Baking or
Roasting
Your oven is not designed for open-door cooking.
Touch the BAKE pad.
1.
Touch the number pads to set the desired
2.
temperature.
Touch the START pad. The word ON and 100°F
3.
(40° if set for celsius), will be displayed. As the
oven heats up, the display will show the changing
temperature. When the oven reaches the
temperature you set, a tone will sound.
Note: To change the oven temperature during
BAKE cycle, press the BAKE pad and then the
number pads to get the new temperature.
Check food for doneness at minimum time on
4.
recipe. Cook longer if necessary.
Touch the CLEAR/OFF pad when cooking is
5.
complete.
Your oven is not designed for open-door cooking.
Place the meat or fish on the broiler grid in the
1.
broiler pan.
Follow suggested shelf positions in the Broiling
2.
Guide (page 15 of Use & Care.)
The oven door must be closed during broiling.
3.
Touch the BROIL HI/LO pad once for HI Broil. To
4.
change to LO Broil, touch the BROIL HI/LO pad
again.
Touch the START pad.
5.
When broiling is finished, touch the CLEAR/OFF
6.
pad.
Using the Clock and Timer
To Set the Clock
The clock must be set to the correct time of day for the
automatic oven timing functions to work properly. The
time of day cannot be changed during a timed baking
or self-cleaning cycle.
On models with a CLOCK pad, touch it once to
1.
set.
Touch the number pads the same way you read
2.
them. For example, to set 12:34, touch the number
pads 1, 2, 3 and 4 in that order.
If number pads are not touched within one minute
after you touch the CLOCK pad, the display
reverts to the original setting. If this happens,
touch the CLOCK pad and reenter the time of day.
Touch the START pad until the time of day shows
3.
in the display. This enters the time and starts the
clock.
To check the time of day when the display is showing
other information:
On models with a CLOCK pad, simply touch the
CLOCK pad.
– 9 –
(Continued next page)

To Set the Timer
The timer does not control oven operations. The
maximum setting on the timer is 9 hours and 59
minutes.
Touch the TIMER ON/OFF pad.
1.
Touch the number pads until the amount of time
2.
you want shows in the display. The maximum time
that can be entered in minutes is 59. Times more
than 59 minutes should be changed to hours and
minutes. For example, to enter 90 minutes as 1
hour 30 minutes, touch 1, 3 and 0 in that order.
Note: If you make a mistake, press the TIMER
ON/OFF pad and begin again.
Touch the START pad. After pressing the START
3.
pad, SET disappears; this tells you the time is
counting down, although the display does not
change until one minute has passed.
When the timer reaches :00, the control will beep 3
4.
times followed by one beep every 6 seconds until
the TIMER ON/OFF pad is touched.
Using the Timed Baking and Roasting
Features
Note: Foods that spoil easily—such as milk, eggs, fish,
stuffings, poultry and pork—should not be allowed to
sit for more than 1 hour before or after cooking. Room
temperature promotes the growth of harmful bacteria.
Be sure that the oven light is off because heat from the
bulb will speed harmful bacteria growth.
To Set an Immediate Start and Automatic Stop
The oven will turn on immediately and cook for a
selected length of time. At the end of the cooking time,
the oven will turn off automatically.
Touch the BAKE pad.
1.
Touch the number pads to set the desired oven
2.
temperature.
Touch the COOK TIME pad.
3.
Note: If your recipe requires preheating, you may
need to add additional time to the length of the
cooking time.
The 6 second tone can be canceled by following the
steps in the Special features of your oven control
section under Tones at the End of a Timed Cycle.
Note: The timer is a minute timer only. The CLEAR/
OFF pad does not affect the timer.
To Reset the Timer
If the display is still showing the time remaining, you
may change it by touching the TIMER ON/OFF pad,
then touch the number pads until the time you want
appears in the display.
If the remaining time is not in the display (clock, delay
start or cooking time are in the display), recall the
remaining time by touching the TIMER ON/OFF pad
and then touching the number pads to enter the new
time you want.
To Cancel the Timer
Touch the TIMER ON/OFF pad twice.
Power Outage
If a flashing time is in the display, you have
experienced a power failure. Reset the clock.
On models with a CLOCK pad, touch it once to
reset. Enter the correct time of day by touching the
appropriate number pads. Touch the START pad.
Touch the number pads to set the desired length
4.
of cooking time. The minimum cooking time you
can set is 1 minute The oven temperature. And the
cooking time entered will be in the display.
Touch the START pad.
5.
The oven will turn ON, and the display will show
the cooking time countdown and the changing
temperature starting at 100°F (40° if set for
Celsius). The temperature display will start to
change once the oven temperature reaches 100°F.
(40°C). When the oven reaches the temperature
you set, 3 beeps will sound.
The oven will continue to cook for the set amount
of time, then turn off automatically, unless the
Cook and Hold feature was set. See the Special
features of your oven control section.
After the oven turns off, the end-of-cycle tone will
sound.
Touch the CLEAR/OFF pad to clear the display
6.
if necessary. Remove the food from the oven.
Remember, even though the oven turns off
automatically, food left in the oven will continue
cooking after the oven turns off.
– 10 –
(Continued next page)

To Set a Delayed Start and Automatic Stop
Using the Probe (Convection Models)
The oven will turn on at the time of day you set,
cook for a specific length of time and then turn off
automatically. Make sure the clock shows the correct
time of day.
Touch the BAKE pad.
1.
Touch the number pads to set the desired oven
2.
temperature.
Touch the COOK TIME pad.
3.
Note: If your recipe requires preheating, you may
need to add additional time to the length of the
cooking time.
Touch the number pads to set the desired length of
4.
cooking time. The minimum cooking time you can
set is 1 minute. The oven temperature. And the
cooking time entered will be in the display.
Touch the DELAY START pad.
5.
Touch the number pads to set the time of day you
6.
want the oven to turn on and start cooking.
Touch the START pad.
7.
Note: An attention tone will sound if you are using
timed baking and do not touch the START pad.
Note: If you would like to check the times you
have set, touch the DELAY START pad to check
the start time you have set or touch the COOK
TIME pad to check the length of cooking time you
have set.
When the oven turns ON at the time of day
you set, the display will show the cooking time
countdown and the changing temperature starting
at 100°F (40° if set on Celsius). The temperature
display will start to change once the oven
temperature reaches 100°F (40°C). When the
oven reaches the temperature you set, beeps will
sound.
For many foods, internal food temperature is the best
test for doneness. The temperature probe takes the
guesswork out of cooking foods to the exact doneness
you want.
Use of probes other than the one provided with this
product may result in damage to the probe.
Use the handles of the probe and plug when inserting
and removing them from the food and outlet.
To avoid damaging your probe, do not use tongs
•
to pull on the cable when removing it.
To avoid breaking the probe, make sure food is
•
completely defrosted before inserting.
To prevent possible burns, do not unplug the probe
•
from the outlet until the oven has cooled.
Never leave your probe inside the oven during a
•
self-cleaning cycle.
Do not store the probe in the oven.
•
After preparing the meat and placing it on a trivet or on
the broiler pan grid, follow these directions for proper
probe placement.
Insert the probe completely into the meat. It should not
touch the bone, fat or gristle.
For roasts with no bone, insert the probe into the
meatiest part of the roast. For bone-in ham or lamb,
insert the probe into the center of the lowest large
muscle.
Insert the probe into the center of dishes such as meat
loaf or casseroles.
Insert the probe into the meatiest part of the inner
thigh from below and parallel to the leg of a whole
turkey.
The oven will continue to cook for the set amount
of time, then turn off automatically, unless the
Cook and Hold feature was set. See the Special
features of your oven control section.
After the oven turns off, the end-of-cycle tone will
8.
sound.Touch the CLEAR/OFF pad to clear the
display if necessary. Remove the food from the
oven. Remember, even though the oven turns off
automatically, food left in the oven will continue
cooking after the oven turns off.
– 11 –
(Continued next page)

To Set Oven For Cooking when Using Probe
Insert the probe into the food.
1.
Plug the probe into the outlet in the oven. Make
2.
sure it’s pushed all the way in. Close the oven
door.
Touch the PROBE pad.
3.
Touch the number pads to set the desired internal
4.
food or meat temperature between 100°F (38°C)
and 200°F (93°C).
Touch the BAKE pad.
5.
Touch the number pads to set the desired oven
6.
temperature.
Touch the START pad.
7.
When the internal temperature of the food reaches
8.
the number you have set, the probe and the oven
turn off and the oven control signals. To stop the
signal, touch the CLEAR/OFF pad. Use hot pads
to remove the probe from the food. Do not use
tongs to pull on it, they might damage it.
Using the Convection Oven
The convection oven fan shuts off when the oven
door is opened. DO NOT leave the door open for long
periods of time while using convection cooking.
To help you understand the difference between
convection bake and roast and traditional bake and
roast, here are some general guidelines.
Convection Bake
Preheat the oven. See the Using the Oven–
•
Preheating and Pan Placement section.
Ideal for foods cooked on multiple shelves.
•
Good for large quantities of baked foods
•
Good results with cookies, biscuits, brownies,
•
cupcakes, cream puffs, sweet rolls, angel food
cake and bread.
The convection fan circulates the heated air evenly
over and around the food.
Convection Roast
To change the oven temperature during probe cooking,
touch the BAKE pad and then the number pads to set
the new temperature.
Note: If the probe is removed from the food before the
final temperature is reached, a tone will sound and the
display will flash until the probe is removed from the
oven. You can use the timer even though you cannot
use timed oven operations while using the probe.
Good for large tender cuts of meat, uncovered.
•
The convection fan circulates the heated air evenly
over and around the food. Using the grid and broiler
pan provided, heated air will be circulated over and
around the food being roasted. The heated air seals in
juices quickly for a moist and tender product while, at
the same time, creating a rich golden brown exterior.
When you are convection roasting it is important that
you use the broiler pan and grid for best convection
roasting results. The pan is used to catch grease spills
and the grid is used to prevent grease spatters.
Place the shelf in the second shelf position from
•
the bottom.
Place the grid on the broiler pan.
•
Auto Recipe ™ Conversion
You can use your favorite recipes in the convection
oven.
When using CONVECTION BAKE, the oven will
automatically convert the oven temperature from
regular baking to Convection Bake temperatures.
1.
2.
– 12 –
Using the number pads, enter the temperature
recommended in the recipe.
Touch the START pad. The display will show the
temperature you entered from your recipe. The
(Continued next page)

oven will automatically convert it to the convection
cooking temperature.
Touch the CLEAR/OFF pad when baking is
3.
finished.
To Set the Oven for Convection Baking or
Roasting
Touch the CONVECTION BAKE or CONVECTION
1.
ROAST pad.
Note: Use pan size recommended in the recipe Some
package instructions for frozen casseroles, main
dishes or baked goods have been developed using
commercial convection ovens. For best results in this
oven, preheat the oven and use the temperature, for
regular baking, on the package.
Cookware for Convection Cooking
Before using your convection oven, check to see if
your cookware leaves room for air circulation in the
oven. If you are baking with several pans, leave space
between them. Also, be sure the pans do not touch
each other or the walls of the oven.
Paper and Plastic: Heat-resistant paper and plastic
containers that are recommended for use in regular
ovens can be used in convection ovens. Plastic
cookware that is heat-resistant to temperatures of
400°F (204°C) can also be used, when oven is below
400°F (204°C).
Metal and Glass: Any type of cookware will work in
your convection oven. However, metal pans heat the
fastest and are recommended for convection baking.
Darkened or matte-finished pans will bake faster
•
than shiny pans.
Glass or ceramic pans cook more slowly.
•
Touch the number pads to set the desired oven
2.
temperature.
Touch the START pad.
3.
To change the oven temperature, touch the
CONVECTION BAKE or CONVECTION ROAST pad
and then the number pads to set the new temperature.
When the oven starts to heat the changing
temperature, starting at 100°F, will be displayed. When
the oven reaches the temperature you set, 3 beeps will
sound.
4. Touch the CLEAR/OFF pad when finished.
Note: You will hear a fan while cooking with
convection. The fan will stop when the door is opened
but the heat will not turn off. The fan will not start until
the preheat temperature is reached.
Multi-Shelf Baking
Because heated air is circulated evenly throughout the
oven, foods can be baked with excellent results using
multiple shelves.
Multi-shelf baking may increase cook times slightly for
some foods but the overall result is time saved.
– 13 –
(Continued next page)

To Set the Oven for Convection Roasting
when Using the Probe (Convection Models)
Using the Timed Convection Baking and
Roasting Features (Convection Models)
The display will flash PROBE and the oven control will
signal if the probe is inserted into the outlet, and you
have not set a probe temperature and touched the
START pad.
Place the shelf in the second shelf position from
1.
the bottom. Insert the probe completely into the
food.
Plug the probe into the outlet in the oven. Make
2.
sure it is pushed all the way in. Close the oven
door.
Touch the CONVECTION ROAST pad.
3.
Touch the number pads to set the desired oven
4.
temperature.
Touch the PROBE pad.
5.
Touch the number pads to set the desired internal
6.
food temperature.
To change the oven temperature during the
Convection Roast cycle, touch the CONVECTION
ROAST pad and then touch the number pads to
set the new desired temperature.
Touch the START pad.7.
When the oven starts to heat, the word LO will
be in the display.
After the internal temperature of the food
reaches 100°F (38°C), the changing internal
temperature will be shown in the display.
You will hear a fan while cooking with this feature. The
fan will stop when the door is opened but the heat will
not turn off.
To Set an Immediate Start and Automatic Stop
The oven will turn ON immediately and cook for a
selected length of time. At the end of the cooking time,
the oven will turn OFF automatically.
Touch the CONVECTION BAKE pad.
1.
Touch the number pads to set the desired oven
2.
temperature.
Touch the COOK TIME pad.
3.
Touch the number pads to set the desired length of
4.
cooking time. The minimum cooking time you can
set is 1 minute.
Touch the START pad.
5.
The oven will turn ON, and the display will show
the cooking time countdown and the changing
temperature starting at 100°F. (The temperature
display will start to change once the oven
temperature reaches 100°F.) When the oven
reaches the temperature you set, 3 beeps will
sound.
The oven will continue to cook for the set amount
of time, then turn off automatically, unless the
Cook and Hold feature was set. See the Special
features of your oven control section.
When the internal temperature of the food reaches
8.
the number you have set, the probe and the oven
turn off and the oven control signals. To stop the
signal, touch the CLEAR/OFF pad. Use hot pads
to remove the probe from the food. Do not use
tongs to pull on it, they might damage it.
If the probe is removed from the food before
•
the final temperature is reached, a tone will
sound and the display will flash until the probe
is removed from the oven.
You will hear a fan while cooking with this
•
feature. The fan will stop when the door is
opened but the heat will not turn off.
You can use the timer even though you
•
cannot use timed oven operations while using
the probe.
6.
– 14 –
After the oven turns OFF, the end-of-cycle tone will
sound.
Touch the CLEAR/OFF pad to clear the display
if necessary. Remove the food from the oven.
Remember, even though the oven turns off
automatically, food left in the oven will continue
cooking after the oven turns off.
(Continued next page)

To Set a Delayed Start and Automatic Stop
Special Features of the Oven Control
The oven will turn on at the time of day you set,
cook for a specific length of time and then turn off
automatically. Make sure the clock shows the correct
time of day.
Touch the CONVECTION BAKE pad.
1.
Touch the number pads to set the desired oven
2.
temperature.
Touch the COOK TIME pad.
3.
Touch the number pads to set the desired length of
4.
cooking time. The minimum cooking time you can
set is 1 minute. The oven temperature that you set
and the cooking time that you entered will be in
the display.
Touch the DELAY START pad.
5.
Touch the number pads to set the time of day you
6.
want the oven to turn on and start cooking.
Touch the START pad.
7.
Note: To check the times you have set, touch the
DELAY START pad to check the start time you
have set or touch the COOK TIME pad to check
the length of cooking time you have set.
When the oven turns ON at the time of day
you set, the display will show the cooking time
countdown and the changing temperature starting
at 100°F (40° if set for Celcius). The temperature
display will start to change once the oven
temperature reaches 100°F (40°C). When the
oven reaches the temperature you set, 3 beeps
will sound.
The oven will continue to cook for the set amount
of time, then turn off automatically, unless the
Cook and Hold feature was set. See the Special
features of your oven control section.
After the oven turns off, the end-of-cycle tone will
sound.
Touch the CLEAR/OFF pad to clear the display
8.
if necessary. Remove the food from the oven.
Remember, even though the oven turns off
automatically, food left in the oven will continue
cooking after the oven turns off.
Your new touch pad control has additional features
that you may choose to use. The following are the
features and how you may activate them.
The special feature modes can only be activated while
the display is showing the time of day. They remain in
the control’s memory until the steps are repeated.
When the display shows your choice, touch the START
pad. The special features will remain in memory after a
power failure.
12 Hour Shut Off
With this feature, should you forget and leave the oven
or warming drawer on, the control will automatically
turn them off. The warming drawer will be turned off
after 12 hours. The oven will be turned off after 12
hours during baking functions or after 3 hours during a
broil function.
If you wish to turn OFF this feature, follow the steps
below.
Touch the BAKE and BROIL HI/LO pads at the
1.
same time for 3 seconds until the display shows SF.
Touch the DELAY START pad. The display will
2.
show 12 shdn (12 hour shut off). Touch the
DELAY START pad again and the display will
show no shdn (no shut off).
Touch the START pad to activate the no shut-off
3.
and leave the control set in this special features
mode.
Fahrenheit or Celsius Temperature Selection
Your oven control is set to use the Fahrenheit
temperature selections but you may change this to use
the Celsius selections.
Touch the BAKE and BROIL HI/LO pads at the
1.
same time for 3 seconds until the display shows SF.
Touch the BROIL HI/LO and COOK TIME
2.
pads at the same time. The display will show F
(Fahrenheit).
Touch the BROIL HI/LO and COOK TIME pads
3.
again at the same time. The display will show C
(Celsius).
4.
– 15 –
Touch the START pad.
(Continued next page)

Tones at the End of a Timed Cycle
12-Hour, 24-Hour or Clock Blackout
At the end of a timed cycle, 3 short beeps will sound
followed by one beep every 6 seconds until the
CLEAR/OFF pad is touched. This continual 6-second
beep may be canceled.
To cancel the 6-second beep:
Touch the BAKE and BROIL HI/LO pads at the
1.
same time for 3 seconds until the display shows SF.
Touch the TIMER ON/OFF pad. The display
2.
shows CON BEEP (continual beep) and BEEP.
Touch the TIMER ON/OFF pad again. The display
shows BEEP. (This cancels the one beep every 6
seconds.)
Touch the START pad.
3.
Special Features of the Oven Control
Control Lockout
Your control will allow you to lock out the touch pads
so they cannot be activated when touched or cleaning
the glass panel.
To lock the controls:
Your control is set to use a 12-hour clock.
If you would prefer to have a 24-hour military time
clock or black out the clock display, follow the steps
below.
Touch the BAKE and BROIL HI/LO pads at the
1.
same time for 3 seconds until the display shows SF.
On models with a CLOCK pad, touch the CLOCK
2.
pad once. The display will show 12 hr. If this is the
choice you want, touch the START pad
Touch the CLOCK pad again to change to the 24hour military time clock. The display will show 24
hr. If this is the choice you want, touch the START
pad.
Touch the CLOCK pad again to black out the clock
display. The display will show OFF. If this is the
choice you want, touch the START pad.
Cook and Hold
Your new control has a cook and hold feature that
keeps cooked foods warm for up to 3 hours after the
cooking function is finished. This feature can only be
used when timed cooking.
Touch the 9 and 0 touch pads at he same time
1.
for 3 seconds until the control beeps twice. The
display will show LOC continuously and the time of
day if not blacked out.
Note: All cooking and timing functions will be
cancelled when locking out the control.
To unlock the control, touch the 9 and 0 touch
2.
pads at the same time for 3 seconds until the
control beeps twice, and LOC will be removed
from the display.
To activate this feature, follow the steps below:
Touch the BAKE and BROIL HI/LO pads at the
1.
same time for 3 seconds until the display shows SF.
Touch the COOK TIME pad. The display will show
2.
Hld OFF. Touch the COOK TIME pad again to
activate the feature. The display will show Hld ON.
Touch the START pad to activate the cook and
3.
hold feature and leave the control set in this
special features mode.
– 16 –
(Continued next page)

Using the Sabbath Feature
(Designed for use on the Jewish Sabbath and holidays)
The Sabbath feature can be used for baking/roasting
in the oven only. It cannot be used for convection,
broiling, self cleaning or Delay Start cooking.
Touch the START pad and ⊃ will appear in the
3.
display.
When the display shows ⊃ the oven is set in
Sabbath. When the display shows ⊃ ⊂ the oven is
in baking/roasting.
Note: The oven light comes on automatically when the
door is opened and goes off when the door is closed.
The bulb may be removed. On models with a light
switch on the control panel, the oven light may be
turned on and left on.
How to Set for Regular Baking/Roasting
(In Sabbath Mode)
Make sure the clock shows the correct time of day and
the oven is off.
Press and hold both the BAKE and BROIL HI/LO
1.
pads, at the same time, until the display shows SF.
Tap the DELAY START pad until SAb bAtH
2.
appears in the display.
Touch the START pad and ⊃ will appear in the
3.
display.
When the display shows ⊃ the oven is set in
Sabbath. When the display shows ⊃ ⊂ the oven is
in baking/roasting.
Touch the BAKE pad. No signal will be given.
4.
Using the number pads, enter the desired
5.
temperature between 170°F and 550°F. No signal
or temperature will be given.
Touch the COOK TIME pad.
4.
Touch the number pads to set the desired length
5.
of cooking time between 1 minute and 9 hours and
99 minutes. The cooking time that you entered will
be displayed.
Touch the START pad.
6.
Touch the BAKE pad. No signal will be given.
7.
Using the number pads, enter the desired
8.
temperature. No signal or temperature will be
given.
Touch the START pad.
9.
After a random delay period of approximately 30
10.
seconds to 1 minute, ⊃ ⊂ will appear in the display
indicating that the oven is baking/roasting. If ⊃ ⊂
doesn’t appear in the display, start again at Step 7.
To adjust the oven temperature, touch the BAKE pad,
enter the new temperature using the number pads,
and touch the START pad.
When cooking is finished, the display will change from
⊃ ⊂ to ⊃ and 0:00 will appear, indicating that the oven
has turned OFF but is still set in Sabbath. Remove the
cooked food.
Touch the START pad.
6.
After a random delay period of approximately 30
7.
seconds to 1 minute, ⊃ ⊂ will appear in the display
indicating that the oven is baking/roasting. If ⊃ ⊂
doesn’t appear in the display, start again at Step 4.
To adjust the oven temperature, touch the BAKE pad,
enter the new temperature using the number pads,
and touch the START pad.
Note: The CLEAR/OFF and COOK TIME pads are
active during the Sabbath feature.
How to Set for Timed Baking/Roasting–
Immediate Start and Automatic Stop
(In Sabbath Mode)
Make sure the clock shows the correct time of day and
the oven is off.
Press and hold both the BAKE and BROIL HI/LO
1.
pads, at the same time, until the display shows SF.
Tap the DELAY START pad until SAb bAtH
2.
appears in the display.
How to Exit the Sabbath Feature
Touch the CLEAR/OFF pad.
1.
If the oven is cooking, wait for a random delay
2.
period of approximately 30 seconds to 1 minute,
until only ⊃ is in the display.
Press and hold both the BAKE and BROIL HI/LO
3.
pads, at the same time, until the display shows SF.
Tap the DELAY START pad until 12 shdn or no
4.
shdn appears in the display. 12 shdn indicates
that the oven will automatically turn off after 12
hours. no shdn indicates that the oven will not
automatically turn off.
Touch the START pad.
5.
Note: If a power outage occurred while the oven
was in Sabbath, the oven will automatically turn off
and stay off even when the power returns. The oven
control must be reset.
(Continued next page)
– 17 –

Using the Electric Warming Drawer
Self Cleaning Oven
To Use the Warming Drawer:
Touch the WARMING DRAWER pad. “Hot” and “1”
1.
are lit on the display and “Set” begins to blink.
On the number pad, press 1 for Low, 2 for
2.
Medium or 3 for High. The display “1” changes
corresponding to the number pad selected.
Touch the START pad. “Hot” and the number
3.
remain lit. “Set” stops blinking.
To cancel the Warming Drawer:
Touch the WARMING DRAWER pad.
Note: Touching the CLEAR/OFF pad does not turn the
warming drawer off.
Number Pad Setting
1 Lo (pies)
2 Med (casseroles)
3 Hi (meats)
Notes: The warming drawer cannot be used during a
self-clean cycle.
The warming drawer has three settings: 1, 2 and
•
3. These settings maintain different temperature
levels in the warming drawer.
On some models, if using the oven at the same
•
time as the warming drawer, only the oven settings
will be displayed.
When Using the Warming Drawer
Always start with hot food. Do not use to heat cold
food other than crisping crackers, chips or dry cereal.
Before a Clean Cycle
For the first self-clean cycle, we recommend venting
your kitchen with an open window or using a
ventilation fan or hood.
Remove the broiler pan, broiler grid, all cookware,
probe and any aluminum foil from the oven—they
cannot withstand the high cleaning temperatures.
Note: If your oven is equipped with nickel oven
shelves, remove them before you begin the self-clean
cycle.
Soil on the front frame of the range and outside the
gasket on the door will need to be cleaned by hand.
Clean these areas with hot water, soap-filled scouring
pads or cleansers such as Soft Scrub®. Rinse well
with clean water and dry.
Do not clean the gasket. The fiberglass material of
the oven door gasket cannot withstand abrasion. It is
essential for the gasket to remain intact. If you notice it
becoming worn or frayed, replace it.
Wipe up any heavy spill overs on the oven bottom.
Make sure the oven light bulb cover is in place and the
oven light is off.
IMPORTANT: The health of some birds is extremely
sensitive to the fumes given off during the selfcleaning cycle of any range. Move birds to another
well ventilated room.
Note: Use caution when opening the oven after the
self-clean cycle has ended. The oven may still be hot.
How to Set the Oven For Cleaning
Touch the SELF CLEAN pad.
1.
Do not line the warming drawer or pan with
aluminum foil. Foil is an excellent heat insulator
and will trap heat beneath it. This will upset the
performance of the drawer and could damage the
interior finish.
Allow approximately 25 minutes for the warming
drawer to preheat.
Do not put liquid or water in the warming drawer.
•
For moist foods, cover them with a lid or aluminum
•
foil.
For crisp foods, leave them uncovered.
•
Food should be kept hot in its cooking container or
•
transferred to a heat-safe serving dish.
Remove serving spoons, etc., before placing
•
containers in warming drawer.
Using the number pads, enter the desired clean
2.
time, if a time other than 4 hours 20 minutes is
needed. (Clean cycle time is normally 4 hours 20
minutes. You can change the clean time to any
time between 3 hours and 5 hours, depending on
how dirty your oven is.)
Touch the START pad.
3.
The door locks automatically. The display will show
the clean time remaining. It will not be possible to
open the oven door until the temperature drops
below the lock temperature and the LOCKED light
goes off.
The oven shuts off automatically when the clean cycle
is complete.
When the LOCKED light is off, the door will be
4.
unlocked.
(Continued next page)
– 18 –

The word LOCKED will flash and the oven control
•
will signal if you set the clean cycle and forget to
close the oven door.
To stop a clean cycle, touch the CLEAR/OFF pad.
•
When the LOCKED light goes off, indicating the
oven has cooled below the locking temperature,
the door can be opened.
After a Clean Cycle
You may notice some white ash in the oven. Wipe
it up with a damp cloth after the oven cools.
If white spots remain, remove them with a soapfilled scouring pad and rinse thoroughly with a
vinegar and water mixture.
The oven door must be closed and all controls set
correctly for the cycle to work properly.
How to Delay the Start of Cleaning
Make sure the clock shows the correct time of day.
Touch the SELF CLEAN pad.
1.
Using the number pads, enter the desired clean
2.
time.
Touch the DELAY START pad. The earliest start
3.
time you can set will appear in the display.
Using the number pads, enter the time of day you
4.
want the clean cycle to start.
Touch the START pad.
5.
The door locks automatically. The display will
show the start time. It will not be possible to open
the oven door until the temperature drops below
the lock temperature and the LOCKED light goes
off. The oven shuts off automatically when the
clean cycle is complete.
When the LOCKED light is off, the door will unlock
6.
automatically.
Do not clean the gasket. The fiberglass material
of the oven door gasket cannot withstand
abrasion. It is essential for the gasket to remain
intact. If you notice it becoming worn or frayed,
replace it.
These deposits are usually a salt residue that
cannot be removed by the clean cycle.
If the oven is not clean after one clean cycle,
repeat the cycle.
You cannot set the oven for cooking until the
•
oven is cool enough for the door to unlock.
While the oven is self-cleaning, you can touch
•
the CLOCK pad to display the time of day.
To return to the clean countdown, touch the
COOK TIME pad.
If the shelves become hard to slide, apply a
•
small amount of vegetable oil or cooking oil to
a paper towel and wipe the edges of the oven
shelves with the paper towel.
The word LOCKED will flash and the oven control
•
will signal if you set the clean cycle and forget to
close the oven door.
To stop a clean cycle, touch the CLEAR/OFF pad.
•
When the LOCKED light goes off indicating the
oven has cooled below the locking temperature,
and open the door.
– 19 –
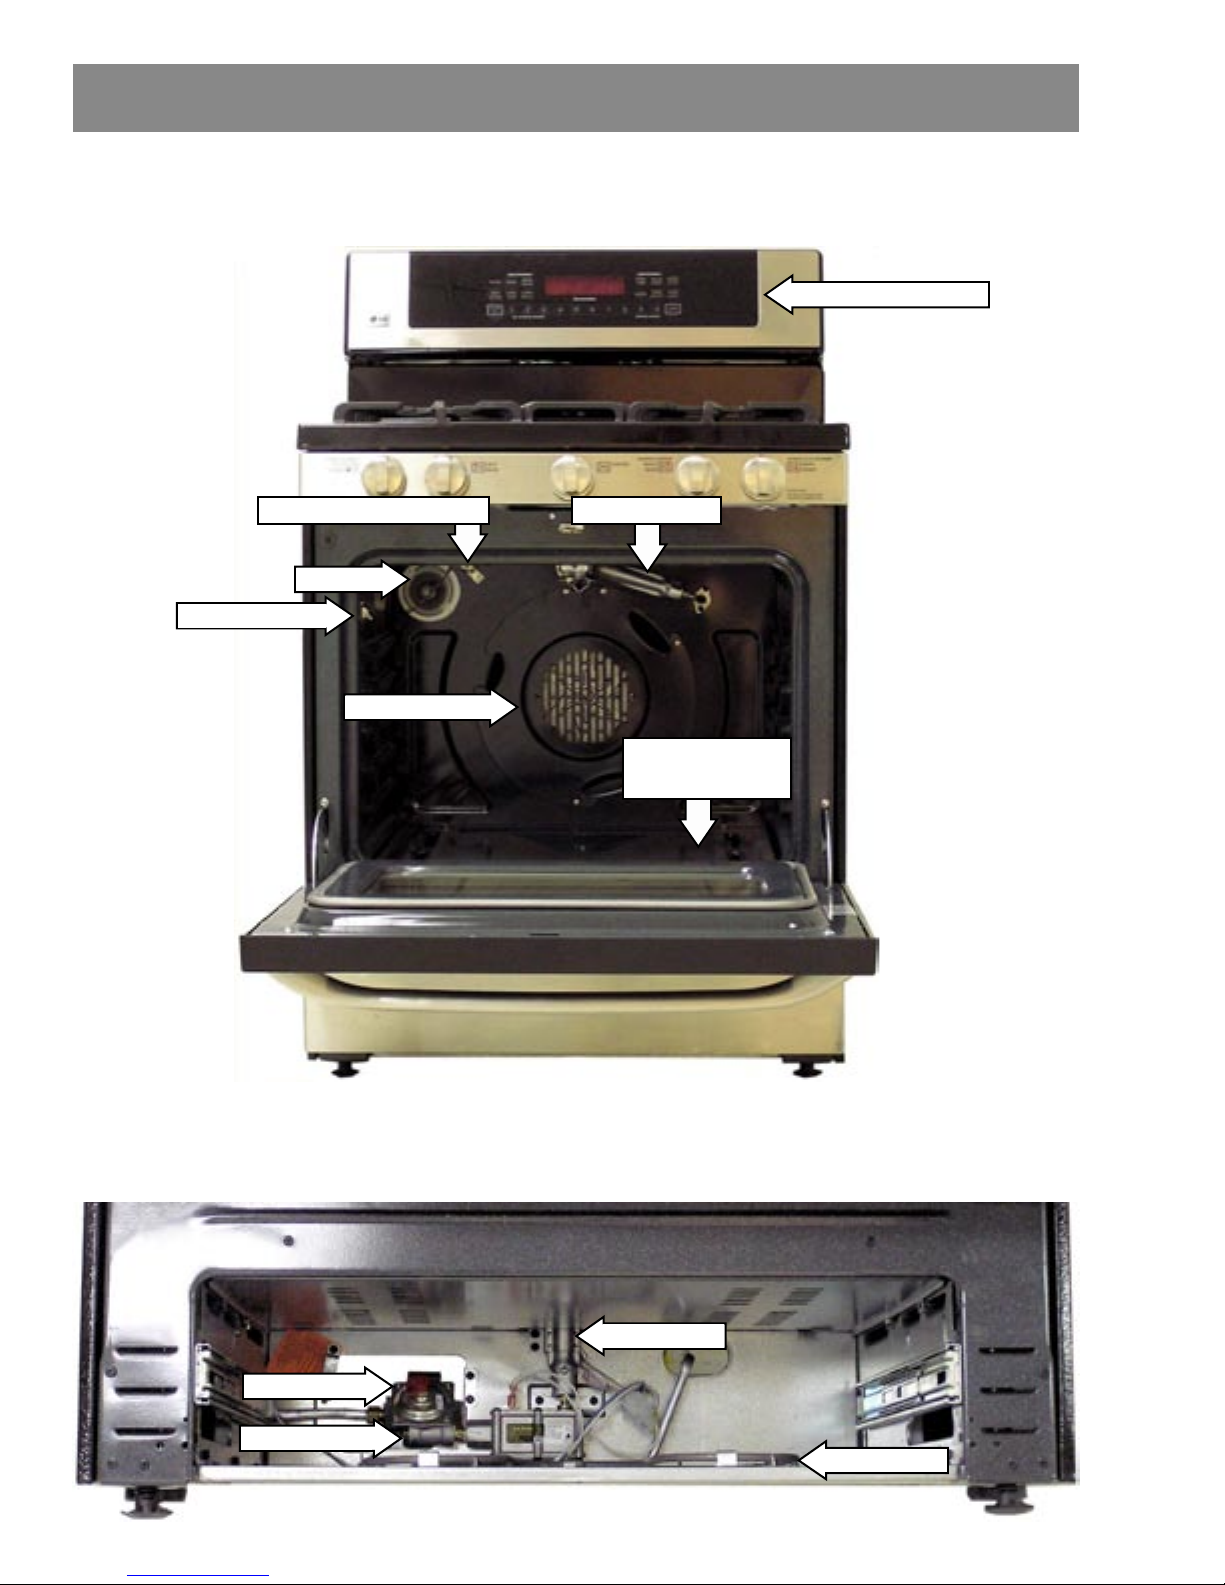
Component Locator Views
Gas Range with Convection Fan - Front View
Control Panel Assembly
Oven Temperature Sensor
Meat Probe Outlet
Broil Burner
Light
Convection Fan
Bake Burner Under
Bottom Pan
Warming Drawer Compartment
Combi-Valve
Gas Shut Off
Shown with warming drawer removed.
Bake Burner
Heat Element
(Continued next page)
– 20 –
 Loading...