

Page 1

ENGLISH
ESPAÑOL
OWNER’S MANUAL
ELECTRIC RANGE
Please read this owner's manual thoroughly before operating
and keep it handy for reference at all times.
LRE3027ST
MFL57206010
www.lg.com
Page 2
2
TABLE OF CONTENTS
TABLE OF CONTENTS
3 IMPORTANT SAFETY INSTRUCTIONS
10 OVERVIEW
1 0 Range overview
1 1 Control panel overview
12 FE ATURES
1 2 Settings
1 2 Clock
1 3 Timer on/off
1 3 Rapid preheat
1 3 Convection auto conversion
1 4 Thermostat
1 4 Language
1 4 Preheating alarm light
1 4 Beeper volume
1 4 Fahrenheit of Celsius
1 4 Oven light
1 5 Lockout
1 5 Start time
1 6 Cook time
26 Kids meal
27 Warm
27 Proof
27 Favo rites
28 Sabbath mode
28 WARMING DRAWER
28 Operating the warming drawer
30 CARE AND CLEANING
30 Cleaning the glass/ceramic cooktop.
31 Self clean
34 Cleaning the exterior
34 Changing the oven light
35 Removing and replacing the oven door and
warming drawer
37 FAQs
38 TROUBLESHOOTING
17 USING THE COOKTOP
1 7 Cooking areas
1 7 Using the cooktop elements
19 Using the proper cookware
20 USING THE OVEN
20 Before using the oven
20 Removing and replacing the oven racks
21 Bake
21 Convection bake
22 Convection roast
23 Broil
23 Speed broil
23 Recommended broiling guide
42 WARRANTY
Page 3
IMPORTANT SAFETY INSTRUCTIONS
3
IMPORTANT SAFETY INSTRUCTIONS
Read and follow all instructions before using your oven to prevent the risk of re, electric shock, personal injury, or damage when using the range. This guide does not cover
all possible conditions that may occur. Always contact your service agent or manufacturer about problems that you do not understand.
Download this owner's manual at: http://www.lg.com.
This is the safety alert symbol. This symbol alerts you to potential hazards
that can result in property damage and/or serious bodily harm or death.
All safety messages will follow the safety alert symbol and either the word
WARNING or CAUTION. These words mean:
WARNING
Indicates a hazardous situation which, if not avoided, could result in death or serious
injury.
ENGLISH
CAUTION
Indicates a hazardous situation which, if not avoided, could result in minor or moderate
injury.
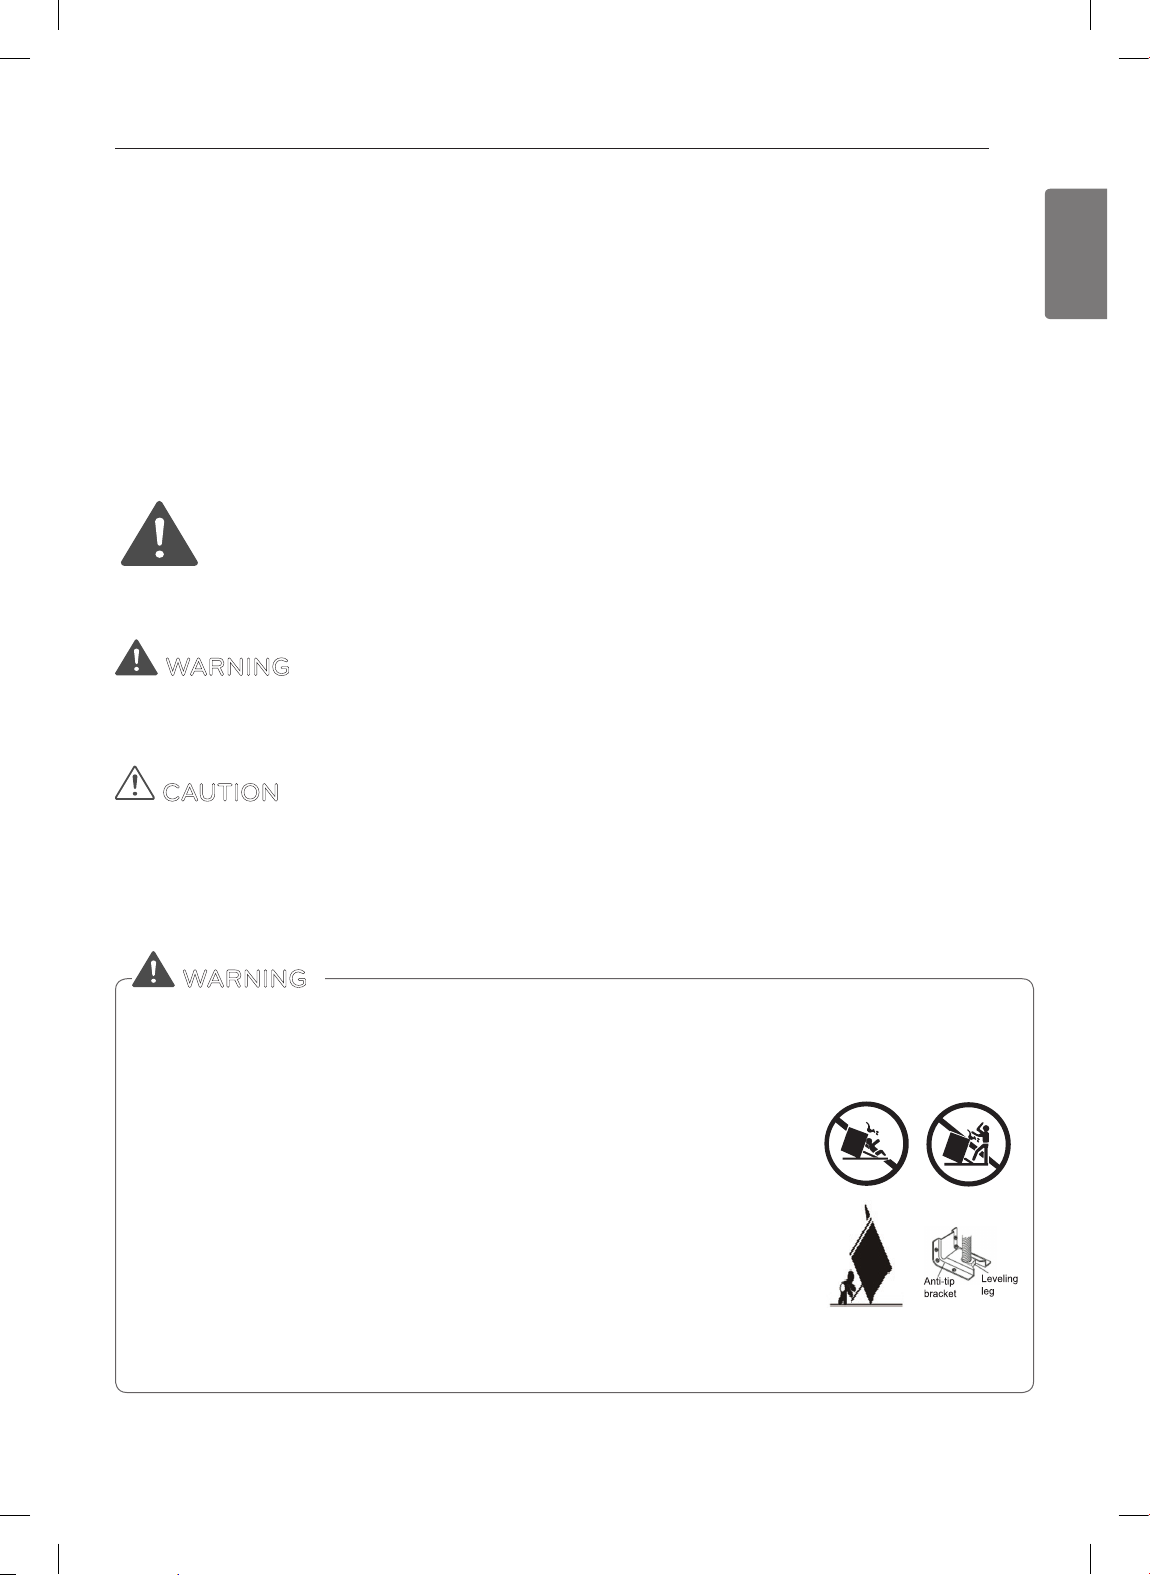
ANTI-TIP SAFETY PRECAUTIONS
WARNING
y It is possible for a child or adult to tip the range and be killed.
y Verify that the anti-tip device has been properly installed
and engaged to the oor or wall and engaged to the leveling leg of the range.
y Ensure the anti-tip device is reengaged when the range is
moved.
y To check that the anti-tip bracket is properly installed: Grasp
the top rear edge of the range back guard and carefully
attempt to tilt it forward. Verify that the anti-tip devices are
engaged.
y Do not operate the range without the anti-tip device in place
and engaged.
y Failure to follow these instructions can result in death or
serious burns to children or adults.
Page 4
4
IMPORTANT SAFETY INSTRUCTIONS
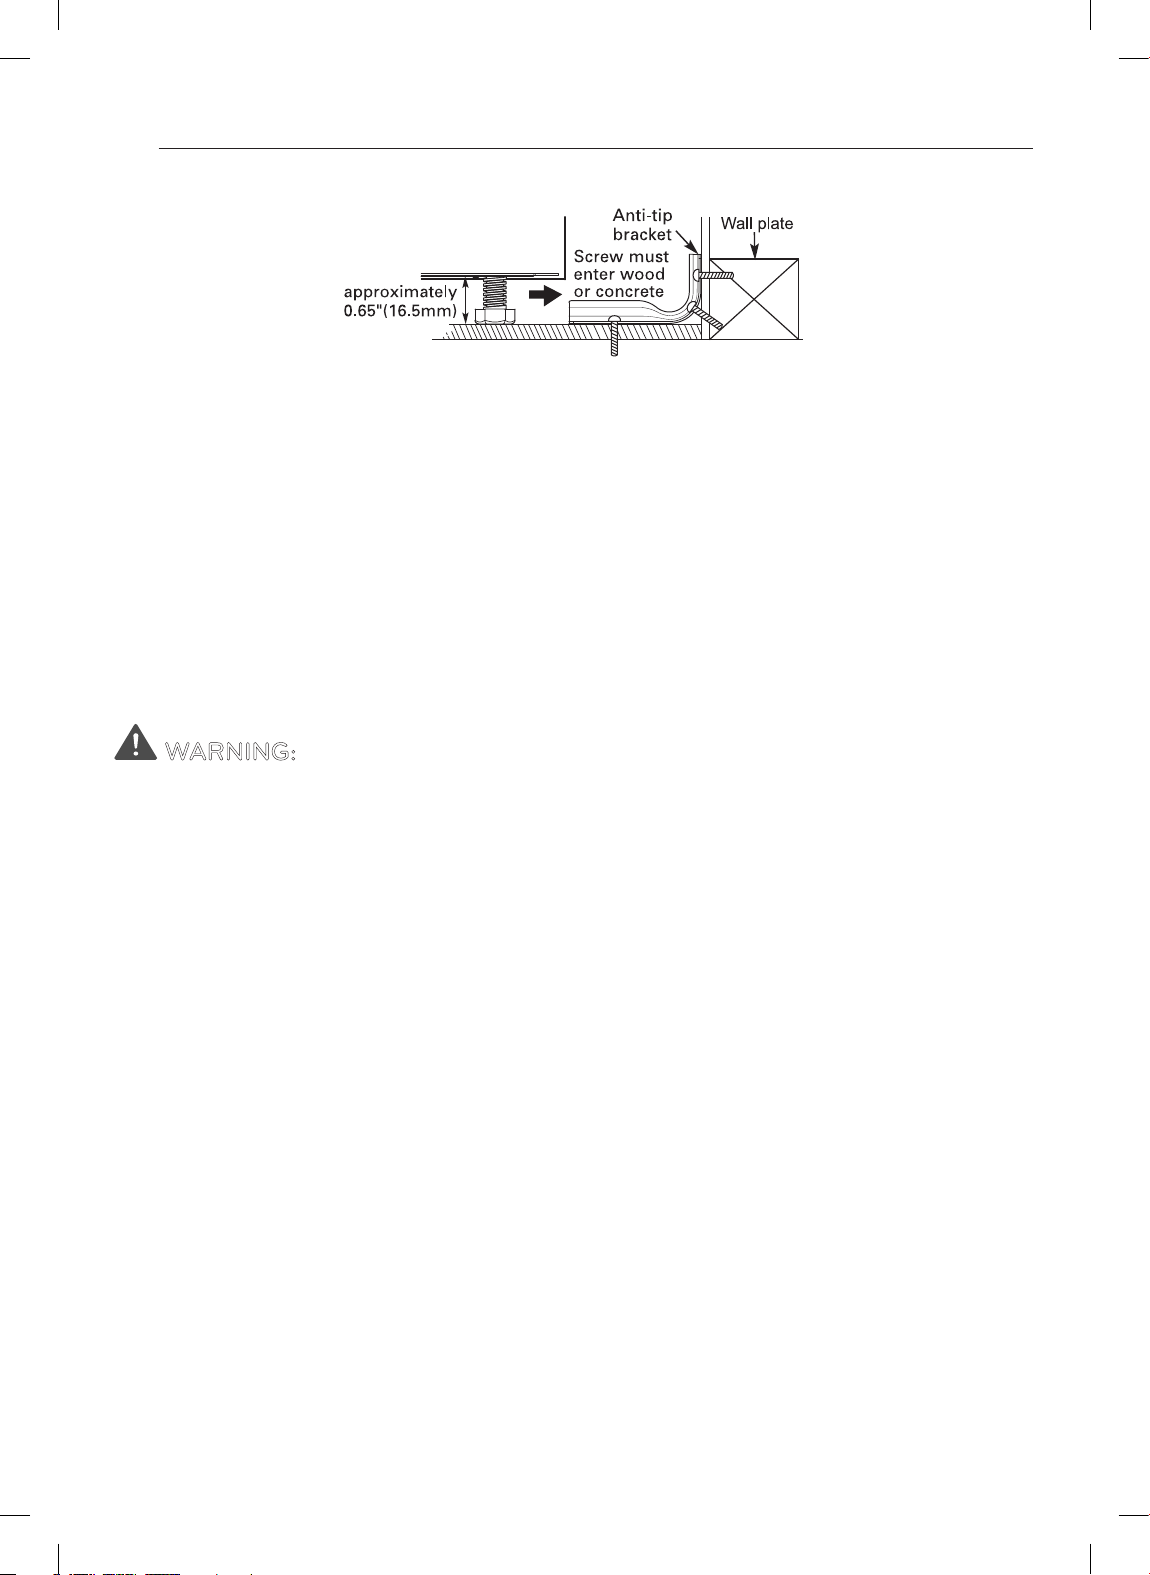
y To check that the anti-tip brackets are properly installed, remove any items on the cook-
top. Grasp the top rear edge of the range back guard and carefully attempt to tilt it
forward. Verify that the anti-tip devices are engaged.
y Remove the warming or storage drawers and visually inspect that the rear leveling legs
are fully inserted into the anti-tip brackets.
y Be certain that your appliance is properly installed and grounded by a qualied techni-
cian.
y Do not repair or replace any part of the appliance unless specically recommended in
the manual. All other servicing should be performed by a qualied technician.
y Always disconnect power from the appliance before servicing.
SAFETY PRECAUTIONS
WARNING: This product contains chemicals known to the State of California to
cause cancer. Wash hands after handling.
y DO NOT TOUCH HEATING ELEMENTS OR INTERIOR SURFACES OF THE OVEN.
Heating elements may be hot even though they are dark in color. Interior surfaces of
an oven become hot enough to cause burns. During and after use, do not touch or let
clothing or other ammable materials contact heating elements or interior surfaces
of oven until they have had sucient time to cool. Other surfaces, such as oven vent
openings and surfaces near these openings, oven doors, and windows of oven doors,
also get hot and may cause burns if not cooled.
y Use care when opening the oven door. Let hot air or steam escape from the oven
before removing or replacing food in the oven.
y DO NOT heat unopened food containers. Pressure in the containers may cause them
burst which may result in injury.
y Be certain that all packing materials are removed from the appliance before
operating. Keep plastic, clothes, and paper away from parts of the appliance that
may become hot.
y DO NOT force the door open. This can damage the automatic door locking system.
Use care when opening the oven door after the self cleaning cycle. Stand to the side
of the oven when opening the door to allow hot air or steam to escape. The oven may
still be VERY HOT.
y DO NOT use harsh etching, abrasive cleaners or sharp metal scrapers to clean
the oven door glass since they can scratch the surface. Scratches may cause the
glass to shatter.
y Be careful when removing and lifting the door.
y DO NOT lift the door by the handle. The door is very heavy.
y DO NOT use the oven for drying clothes. Only use the oven for its intended purpose.
Page 5
IMPORTANT SAFETY INSTRUCTIONS
5
y DO NOT use utensils for removing refuse (ash, food etc.)
y Refer to the installation manual for proper anti-tip bracket installation.
y Never remove the oven legs. The range will not be secured to the anti-tip brackets if
the legs are removed.
CAUTION
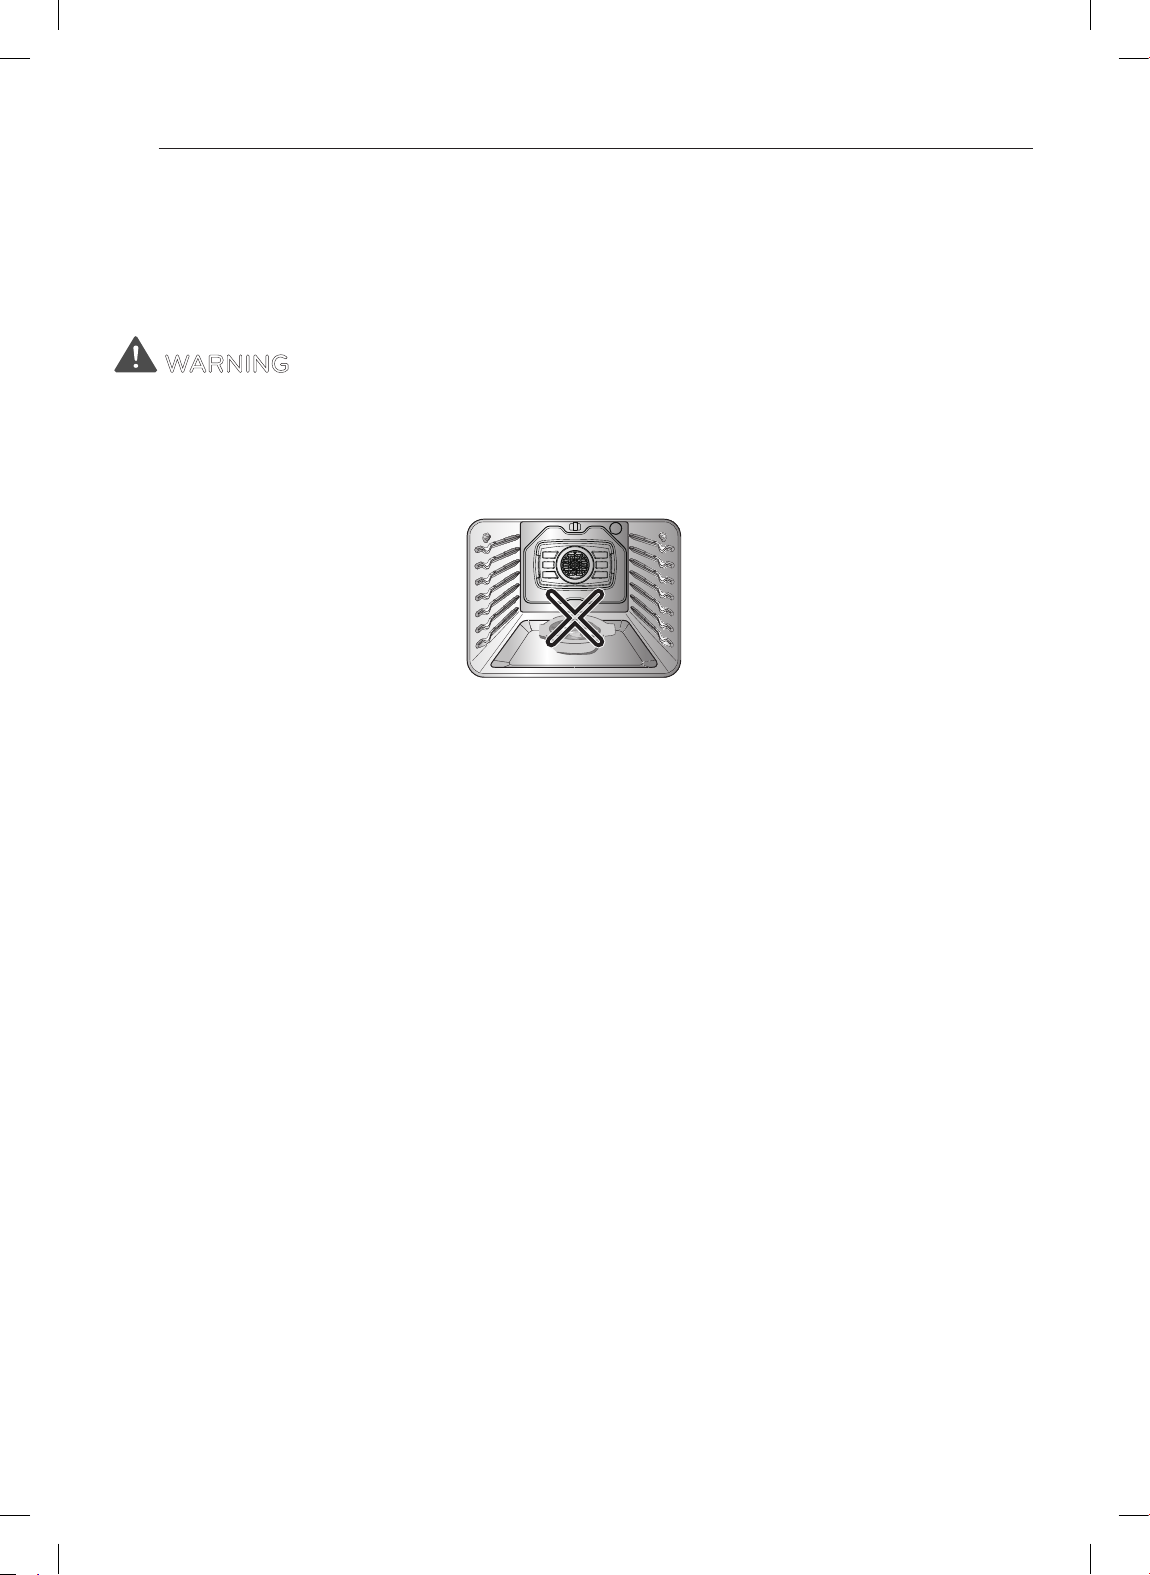
y DO NOT line the oven walls, racks, bottom, or any other part of the oven with
aluminum foil or any other material. Doing so will disrupt heat distribution, pro-
duce poor baking results and cause permanent damage to the oven interior (alumi-
num foil will melt to the interior surface of the oven).
y Never attempt to dry a pet in the oven.
y Do not leave metal objects, such as cans, around the burner.
WARNING
y DO NOT step or sit on the oven door. Install the anti-tip brackets packed with range.
- The range could be tipped and injury might result from spilled hot liquid, food, or
the range itself.
- If the range is pulled away from the wall for cleaning, service, or any other reason,
ensure that the anti-tip brackets are properly re-engage when the range is pushed
back against the wall.
y NEVER use your appliance for warming or heating the room.
y Keep children and pets away from the oven.
y DO NOT use water on grease res. Should an oven re occur, leave the oven
door closed and turn the oven o. If the re continues, throw baking soda on
the re or use a re extinguisher.
y Only use dry pot holders. Moist or damp pot holders on hot surfaces may result
in burns from steam. Do not let the pot holder touch hot heating elements. Do
not use a towel or other bulky cloth to remove food.
y Do not store items in or on the range. Flammable materials should not be stored
in or near the range.
y Wear proper apparel. Loose-tting or hanging garments should never be worn
while using the range.
y Never pour COLD WATER over a hot oven for cleaning.
y Do not use the range if it is damaged.
y Do not operate the oven without the charcoal heater mesh.
y Do not allow anyone to climb, stand or hang on the door, storage drawer or
cooktop. They could damage the range and even tip it over, causing severe personal injury.
ENGLISH
ELECTRICAL SAFETY
y Protective Liners. Do not use aluminum foil or any other material to line the oven
bottoms. Improper installation of these liners may result in a risk of electric shock or
re.
Page 6
6
IMPORTANT SAFETY INSTRUCTIONS
y Do Not allow aluminum foil or the temperature probe to contact heating elements.
y Before replacing your oven light bulb, switch o the electrical power to the
oven at the main fuse or circuit breaker panel. Failure to do so can result in severe
personal injury, death, or electrical shock.
WARNING
y Turn the POWER OFF before removing the warming oven drawer.
- Failure to do so can result in severe personal injury, death, or electrical shock.
PAN PLACEMENT
y Do not place food or cookware on the bottom of the oven cavity. Doing so will
cause permanent damage to the oven bottom nish.
y Never place plastic, paper, canned foods or combustible material in the oven.
y When cooking food in the warming drawer, always use a baking sheet or pan
with 4 raised sides. This will prevent food from sliding o.
DEEP FAT FRYERS
y Use extreme caution when moving or disposing of hot grease.
y Always heat fat slowly, and watch as it heats.
y If frying combinations of oils and fats, stir together before heating.
y Use a deep fat thermometer, if possible, to prevent overheating fat beyond the smok-
ing point.
y Use the least possible amount of fat for eective shallow or deep-fat frying. Filling the
pan with too much fat can cause spillovers when food is added.
SAFETY DURING USE
y Do not touch the oven racks while they are hot.
y If the rack must be moved while the oven is hot, do not let the potholder con-
tact the hot heating element in oven.
y Always use pot holders or oven mitts when removing food from the oven or the
center warming element. Cookware will be hot.
y Always use an oven mitt to remove the temperature probe after cooking.
y Use caution with the TIMED BAKE or DELAYED TIMED BAKE features. Use the
automatic timer when cooking cured or frozen meats and most fruits and vegetables. Foods that can easily spoil, such as milk, eggs, sh, meat or poultry,
Page 7
IMPORTANT SAFETY INSTRUCTIONS
7
should be chilled in the refrigerator rst. Even when chilled, they should not
stand in the oven for more than 1 hour before cooking begins, and should be
removed promptly when cooking is complete. Eating spoiled food can result in
sickness from food poisoning.
y Should an oven re occur, leave the oven door closed and turn the oven o. If
the re continues, throw baking soda on the re or use a re extinguisher.
y Should an oven re occur, DO NOT put water or our on the re. Flour may be
explosive and water can cause a grease re to spread and cause personal injury.
y DO NOT use the broiler pan without the grid. DO NOT cover the grid with alu-
minum foil.
y Do not use plastic to cover food. Use foil or oven resistant lids only.
y If the oven is heavily soiled with oil, self clean the oven before using the oven
again. It could cause a risk of re.
y Wipe up heavy soil on the oven bottom of the oven before using the Self Clean func-
tion.
y Use proper pan sizes. For smaller pots and pans, use the smaller heating elements.
For larger pots and pans, use the larger heating elements. Select utensils that have at
bottoms large enough to cover the heating elements. The use of undersized utensils
will expose a portion of the heating element to direct contact and may result in ignition of clothing.
y Never leave surface units unattended at high heat settings. Boil overs cause
smoking and greasy spillovers that may ignite.
y Glazed cooking utensils. Only certain types of glass, glass/ceramic, ceramic, earth-
enware, or other glazed utensils are suitable for a range-top service without breaking
due to the sudden change in temperature.
y Utensil handles should be turned inward and not extend over adjacent surface
units. To reduce the risk of burns, ignition of ammable materials, and spillage due to
unintentional contact with the utensil, the handle of a utensil should be positioned so
that it is turned inward, and does not extend over adjacent surface units.
ENGLISH
CHILD SAFETY
WARNING
y Keep children away from the oven.
y Accessible parts may become hot when the grill is in use.
y During normal operation (self-clean cycle, bake, etc.)DO NOT touch the hot sur-
face between the bottom of the oven door and the top of the drawer on the
front of the oven. Doing so is a burn hazard and will cause injury.
y Never let a child hang on the oven door.
y Do not allow children crawl into the oven.
CAUTION
y DO NOT leave small children unattended near the oven.
y During the self clean cycle, the outside of the oven can become very hot to the touch.
Page 8
8
IMPORTANT SAFETY INSTRUCTIONS
y NEVER leave children alone or unsupervised near the appliance when it is in
use or is still hot. Children should never be allowed to sit or stand on any part of
the appliance as they could be injured or burned.
y NEVER store items of interest to children in cabinets above the range. Children
climbing on the range or on the oven door to reach items could be seriously
injured.
y Let hot utensils cool in a safe place, out of reach of small children.
y Children should not be allowed to play with controls or other parts of the ap-
pliance.
GLASS/CERAMIC COOKING SURFACES
Stand to the side of the range when opening the oven door. The hot air and steam that
escape can cause burns to hands, face and eyes.
WARNING
y DO NOT TOUCH SURFACE UNITS OR AREAS NEAR UNITS.
y Surface units may be hot even though they are dark in color. Areas near surface units
may become hot enough to cause burns. During and after use, do not touch, or let
clothing or other ammable materials contact surface units or areas near units until
they have had sucient time to cool. This includes the cooktop and the area above
the oven door.
y Do not cook on a broken cooktop. If the cooktop should break, cleaning solutions
and spillovers may penetrate the broken cooktop and create a risk of electric shock.
Contact a qualied technician immediately.
y Clean cooktop with Caution. Do not use sponges or cloth to wipe spills on a hot
cooking area. Use a proper metal scraper.
y DO NOT use the glass cooktop surface as a cutting board.
y DO NOT place or store items that can melt or catch re on the glass cooktop, even
when it is not being used.
y Always turn the surface units on after placing cookware.
y DO NOT store heavy items above the cooktop surface that could fall and damage it.
y DO NOT place aluminum foil or plastic items such as salt and pepper shakers, spoon
holders, or plastic wrappings or any other material on the range when it is in use.
y Be sure you know which control pads operate each surface unit. Make sure you turned
on the correct surface unit.
y NEVER cook directly on the glass. Always use cookware.
y Always place the pan in the center of the surface unit you are cooking on. NEV-
ER leave surface units unattended at high heat setting. Proper contact of utensil to burner will also improve eciency.
- Boil overs cause smoking and greasy spillovers that may catch on re.
y Always turn the surface units o before removing cookware.
y DO NOT use plastic wrap to cover food.
- Plastic may melt onto the surface and be very dicult to remove.
y DO NOT touch surface units until it has cooled down.
y The surface elements may still be hot and burns may occur if the glass surface is
touched before it has cooled down suciently.
Page 9
IMPORTANT SAFETY INSTRUCTIONS
y Immediately clean the spills on cooking area to prevent a tough cleaning chore later.
y If cabinet storage is provided directly above cooking surface, limit it to items that are
infrequently used and can be safely stored in an area subjected to heat. Temperatures may be unsafe for items such as volatile liquids, cleaners or aerosol sprays.
y When warming foods do not use containers that seal. Allow venting for heated air to
escape.
y Some cleaners can produce dangerous fumes if applied to a hot surface.
y DO NOT use a steel-wool pad.
- It will scratch the surface.
y DO NOT use scrub pads or abrasive cleaning pads.
- They may damage your glass cooktop surface.
y Cookware with rough or bottoms can mark or scratch the cooktop surface.
y Do not slide anything metal or glass across the cooktop.
y Do not use cookware with dirt or dirt built-up on the bottom.
SAFETY WHEN CLEANING
CAUTION
9
ENGLISH
y Open window or turn on a ventilation fan or hood before self cleaning.
y Do Not Use Oven Cleaners. No commercial oven cleaner or oven liner protective
coating of any kind should be used in or around any part of the oven.
y Before self cleaning the oven. Remove broiler pan, all oven racks, meat probe and
any other utensils from the oven cavity.
y Never keep pet birds in the kitchen. The health of birds is extremely sensitive to
the fumes released during an oven self clean cycle. Fumes may be harmful or fatal to
birds. Move birds to well-ventilated room.
y Clean in the self clean cycle only parts listed in this manual. Before self clean the oven,
remove the broiler pan and any utensils of foods from the oven.
y It is normal for the cooktop of the range to become hot during a self clean cycle.
Therefore, touching the cooktop during a clean cycle should be avoided.
y Important Instruction. In the event the self clean error code F is displayed, and three
long beeps sound, the oven is malfunctioning in the self clean mode. Switch o the
electrical power to the main fuse or breaker and have serviced by a qualied technician.
y Make sure oven lights are cool before cleaning.
y Never pour water on the oven. Doing so may cause oven malfunction.
COOK MEAT AND POULTRY THOROUGHLY
To protect against food borne illnesses, cook meat and poultry thoroughly. The USDA
has indicated the following as safe minimum internal temperatures for consumption:
y Ground beef, veal, pork, or lamb: 160 °F
y Poultry: 165 °F
y Beef, veal, pork, or lamb: 145 °F
y Fish/seafood: 145°F
Page 10
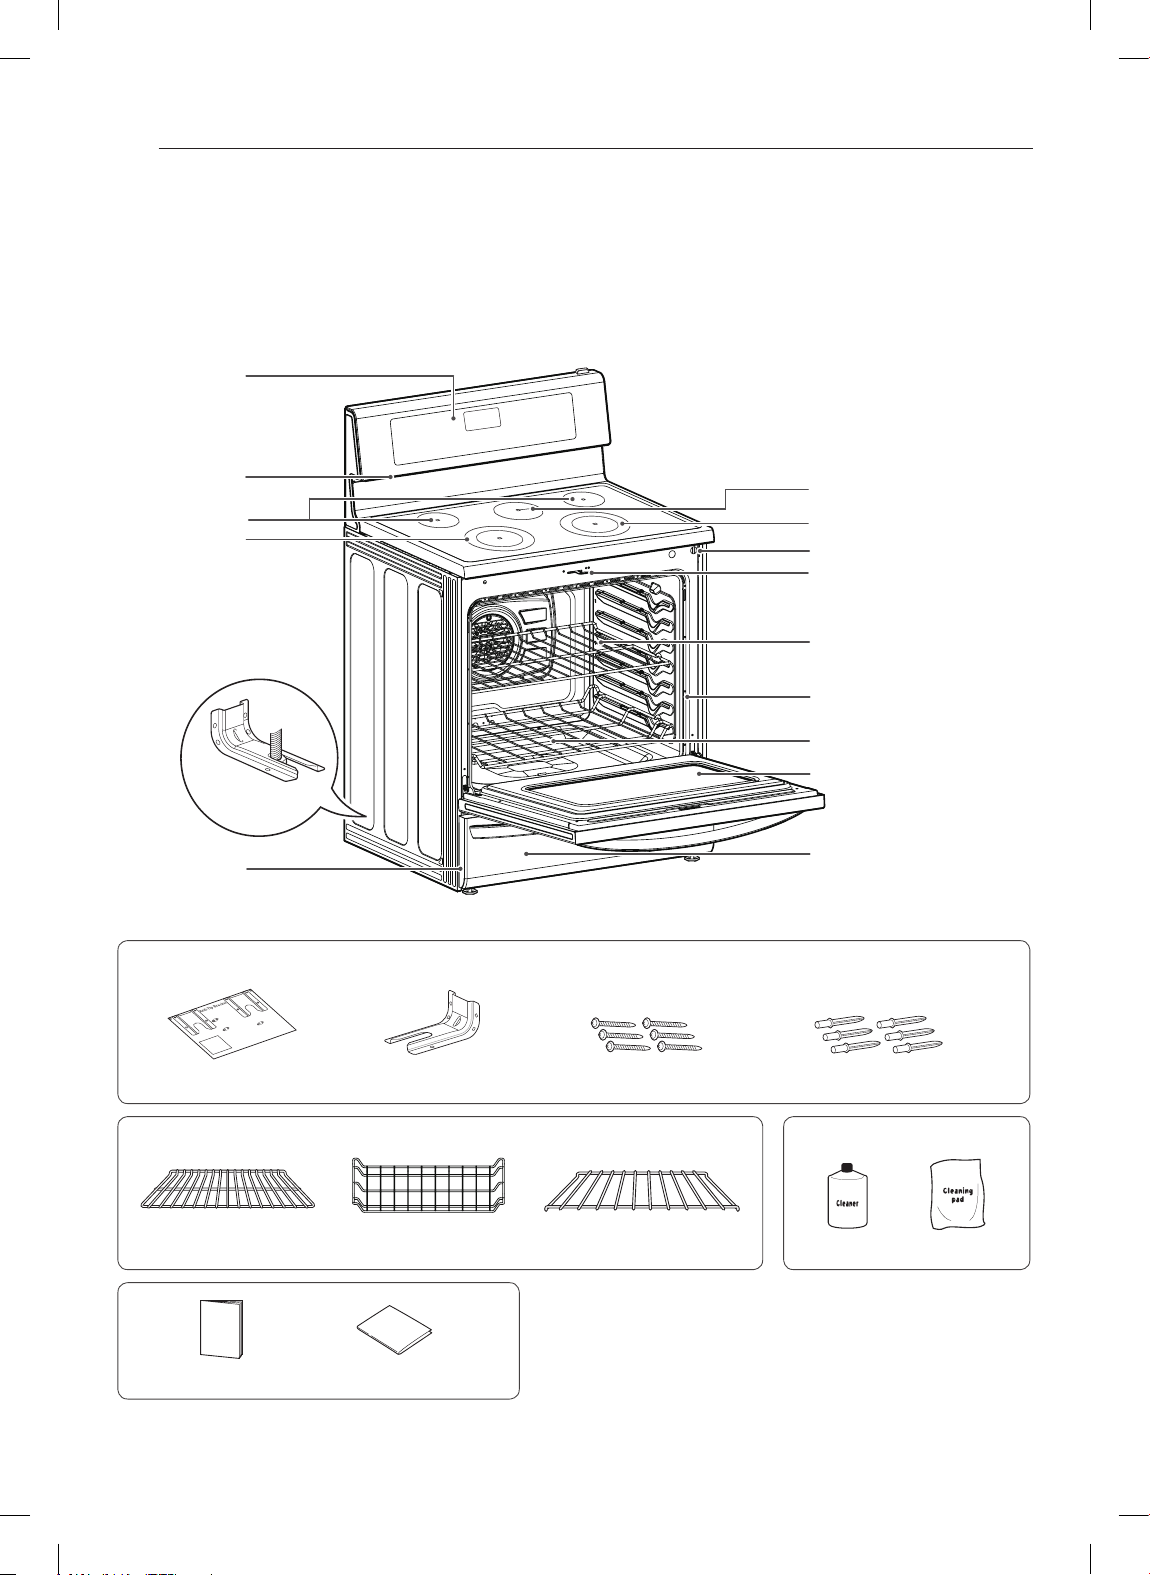
10
overview
OVERVIEW
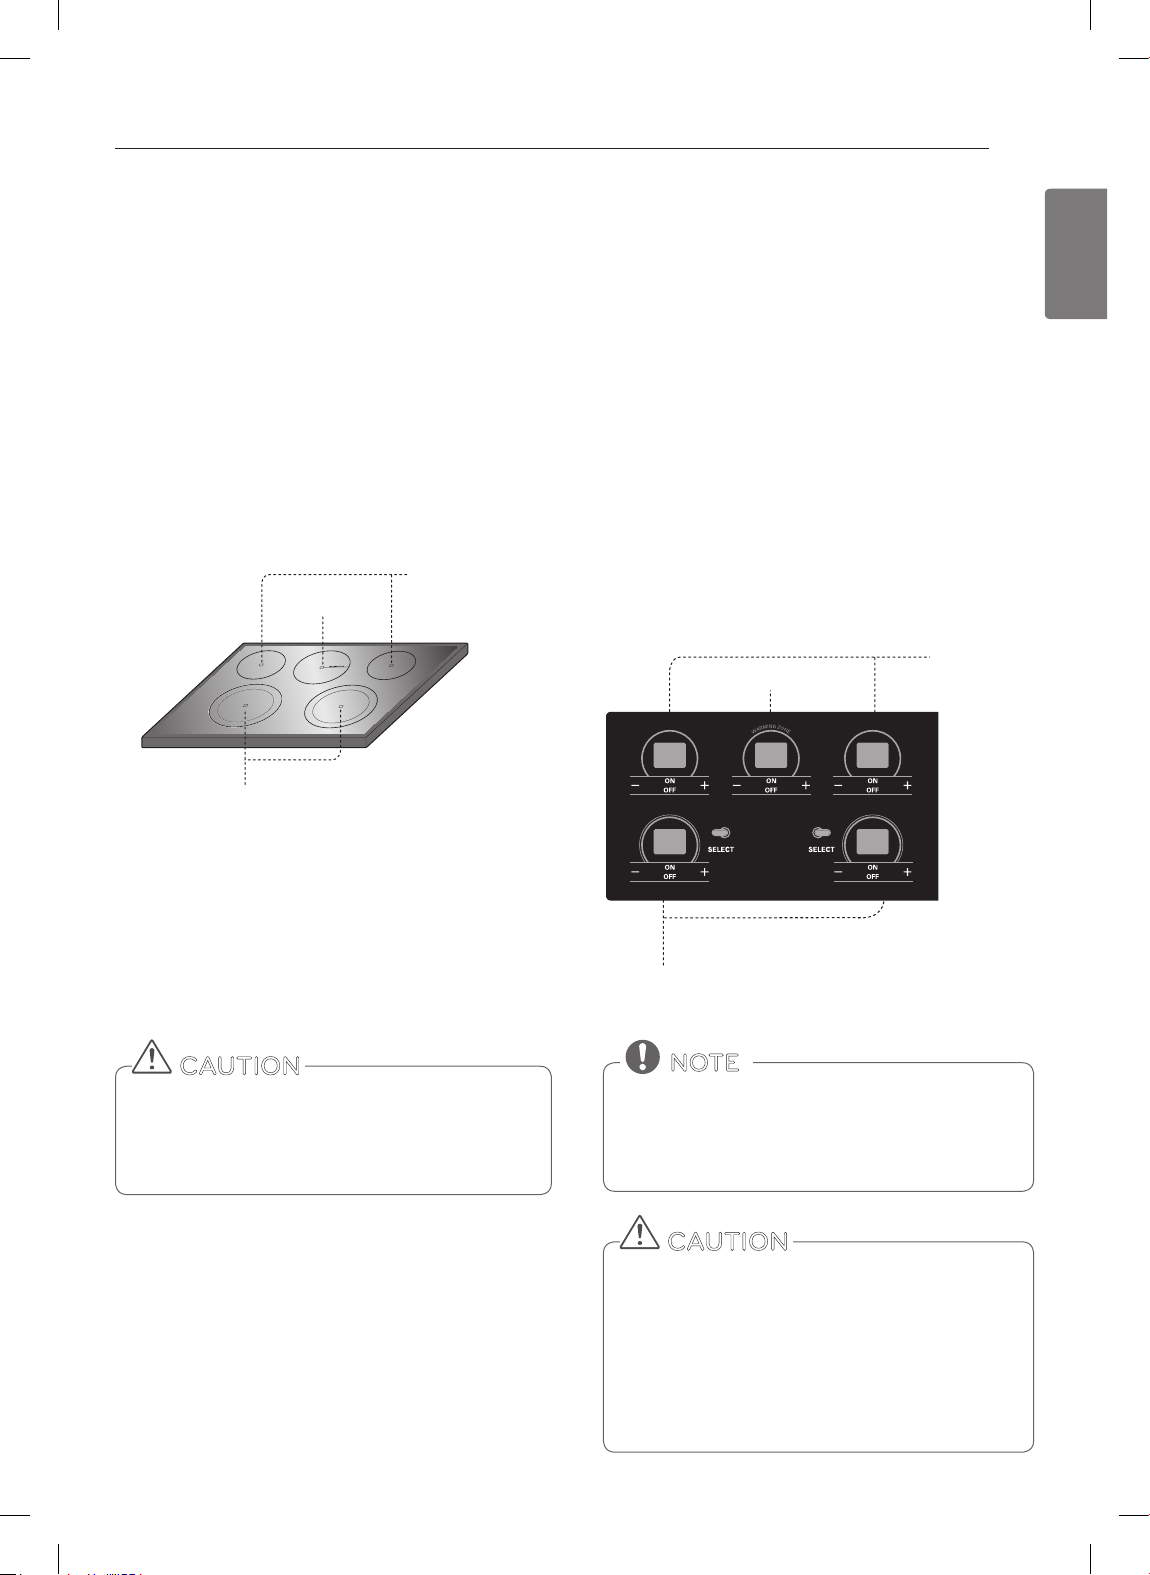
RANGE OVERVIEW
Control panel
Oven vent
Single element
Dual element
Anti-tip bracket
Rating label
Accessories for installation
Warming zone element
Dual element
Automatic oven light switch
Self clean latch
Standard rack
Gasket
Oset rack
Oven door
Warming drawer
Anti-tip (1ea)
Accessories for cooking Accessories for maintenance
Standard rack (2ea)
Owner’s manual Installation manual
Oset rack (1ea) Drawer rack
Screws (6ea)Template
Anchors (6ea)
Cooktop
Cleaner
Cooktop
Cleaning pad
Page 11
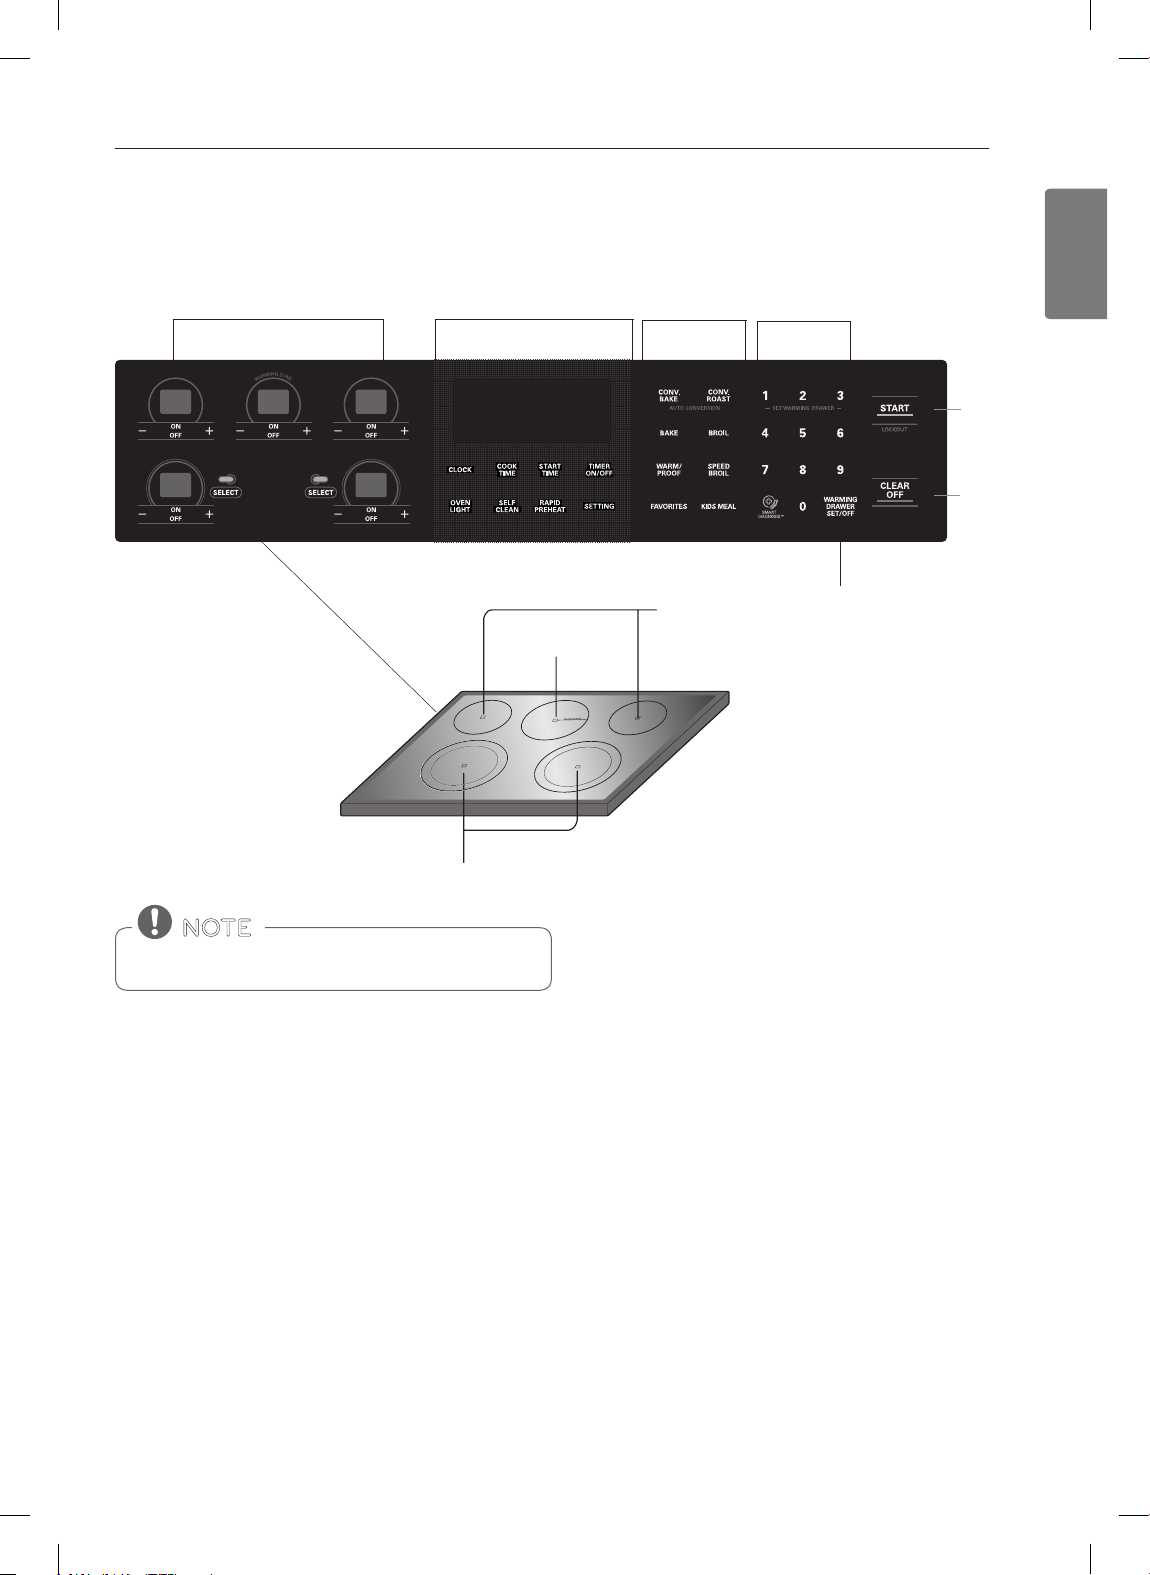
CONTROL PANEL OVERVIEW
OVERVIEW
11
ENGLISH
Cooktop Element Control
Dual Elements
Features
Warm Heater
Oven Controls
Single Elements
Number Buttons
Start /Lockout
Button
Clear O
Button
Warming Drawer
Button
NOTE
Cooktop Element Controls are set up in the same order as the
corresponding elements.
HS (Hot Surface) Indicator
The HS indicator will appear in the display once the element is turned o or during the self clean cycle. The HS indicator will
stay on until the surface has cooled to approximately 150˚F/66˚C or when the self clean cycle ends.
PF (Power Failure) / Flashing Time
Depending on the model of your range, the display will either show “PF” or a ashing clock. This means that the product
has just been plugged in, or that it has experienced a power interruption. To clear the “PF” message, press the “On/O” key
on the cooktop controls and the “Clear/O” key on the oven controls. If your oven displays a ashing clock, then press the
“Clock” key and reset the time, or press any key to stop ashing.
Page 12
12
FEATURES
FEATURES
SETTINGS
Use the SETTING button to set Convection Auto
Conversion, Thermostat, Language, Preheating Alarm
Light, Beeper Volume and to switch temperature scale
between Fahrenheit and Celsius.
CLOCK
The clock must be set to the correct time of the day in
order for the automatic oven timing functions to work
properly.
1. Press CLOCK.
2. Press the number buttons to enter the time.
For example, to set the clock for 10:30, press the
numbers: 1, 0, 3 and 0.
3. Press START.
NOTE
• The time of the day cannot be changed during a
Timed Baking or Self Clean cycle.
• To check the time of the day when the display
is showing other information, simply press the
CLOCK button.
• If no buttons are pressed within 25 seconds of
pressing the CLOCK button, the display will revert
to its original setting.
• If the display time is blinking, you may have experienced a power failure. Reset the time.
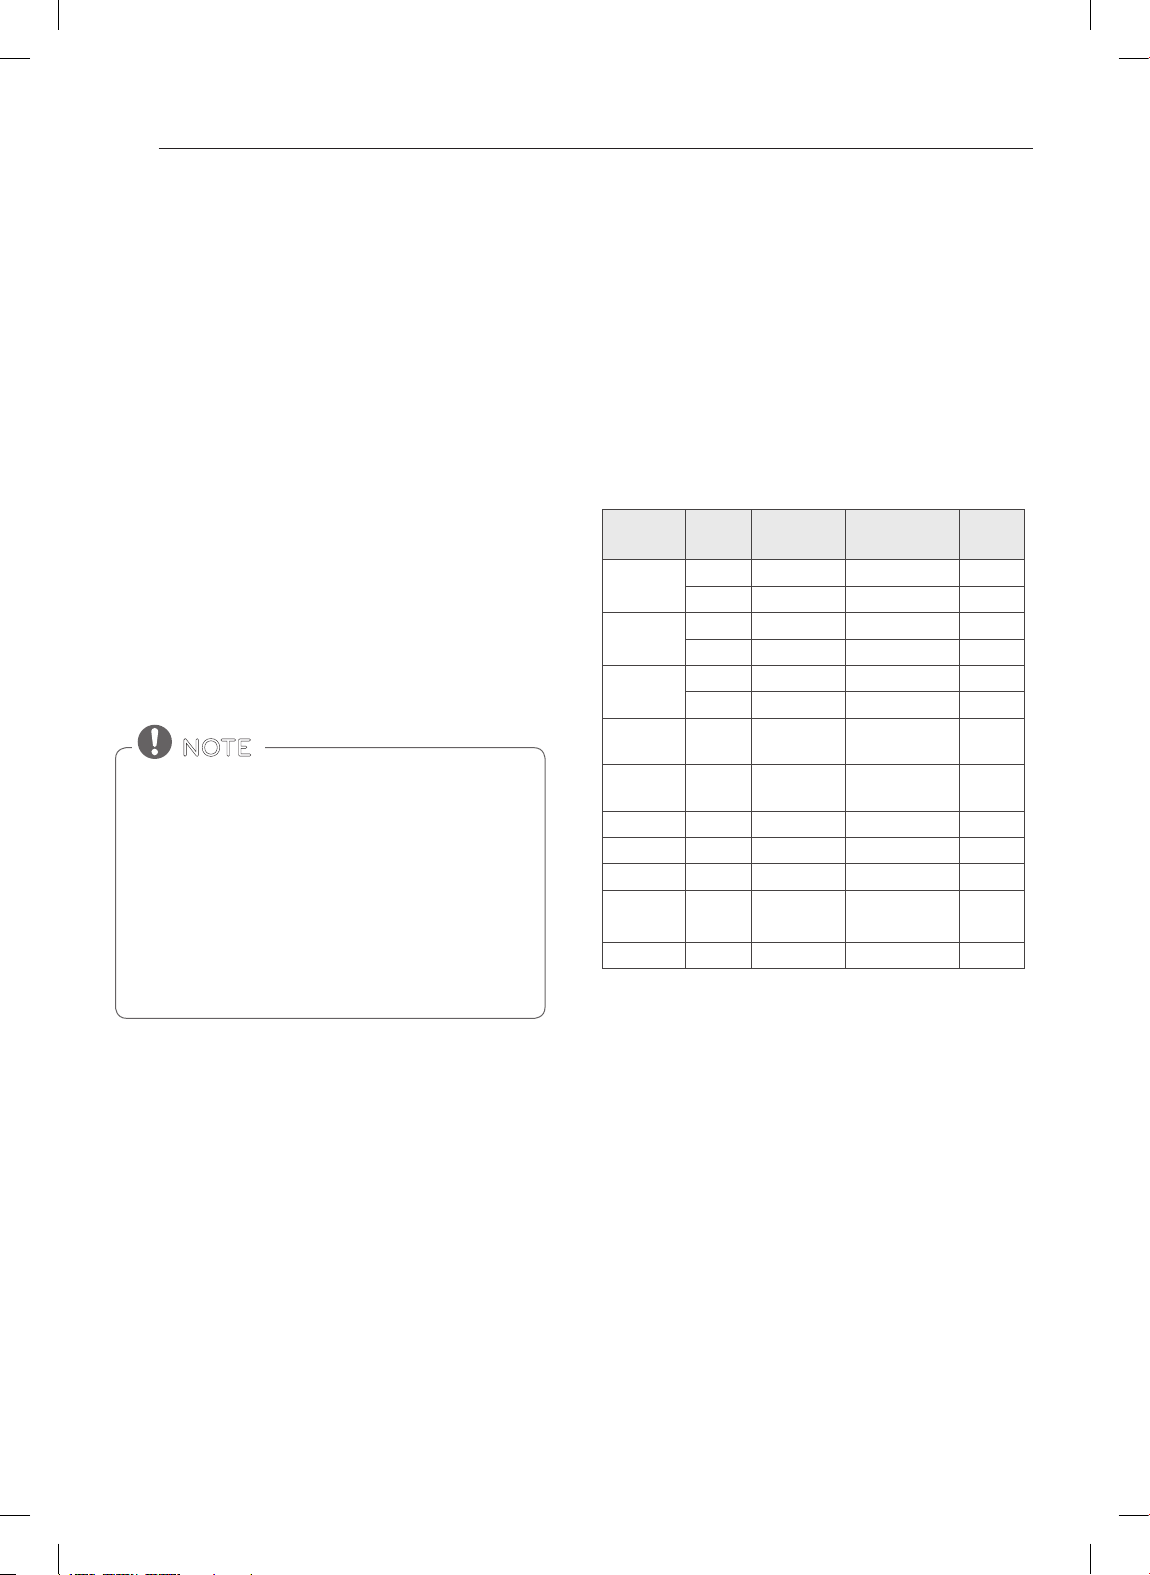
Minimum & Maximum default settings
All of the features listed have a minimum and a maximum
time or temperature setting that may be entered into the
control. An entry acceptance beep will sound each time a
control key is pressed.
An entry error tone (two short tones) will sound if the entry of the temperature or time is below the minimum or
above the maximum setting for the feature.
FEATURE MIN. TEMP.
/TIME
CLOCK
TIMER
COOK TIM E
CONVECTION
BAKE
CONVECTION
ROAST
BROIL Lo - 400°F Hi - 550°F 3 Hr.
BAKE 170°F / 75°C 550°F / 285°C 12 Hr.
PROOF 12 Hr.
WARM
SELF CLEAN 3 Hr. 5 Hr. 4 Hr.
12 Hr. 1:00 Hr. / Min. 12:59 Hr. / Min.
24 Hr. 0:00 Hr. / Min. 23:59 Hr. / Min.
12 Hr. 0:01 Min. 11:59 Hr. / Min.
24 Hr. 0:01 Min. 11:59 Hr. / Min
12 Hr. 0:01 Min. 11:59 Hr. / Min
24 Hr. 0:01 Min. 11:59 Hr. / Min
300°F / 150°C 550°F / 285°C 12 Hr.
300°F / 150°C 550°F / 285°C 12 Hr.
MAX. TEMP.
/ TIME
170°F/75°C,
3 hours
Default
Setting the hour mode on the clock
(12 or 24 hour.)
Your control is set to use a 12-hour clock. If you would prefer to have a 24-hour time clock, follow the steps below.
1. Press and hold the CLOCK button for three seconds.
2. Press the 1 button for 12-hour or the 2 button for
24-hour.
3. Press the START button to accept.
Page 13

TIMER ON/OFF
The TIMER ON/OFF serves as an extra timer in the kitchen
that will sound when the set time has run out. It does not
start or stop cooking.
The TIMER ON/OFF feature can be used during any of the
oven control functions.
Setting the Timer
1. To set hours and minutes: Press the TIMER ON/
OFF button once.
To set minutes and seconds: Press the TIMER ON/
OFF button twice.
FEATURES
RAPID PREHEAT
The Rapid Preheat feature can preheat your oven up to
20% faster than the normal preheat function.
Setting Rapid Preheat
1. Press the cook function button (ex. the BAKE but-
ton).
2. Using the number buttons, enter the cook time.
3. Press the START button
4. Press the RAPID PREHEAT button.
13
ENGLISH
2. Use the number buttons to set the timer.
For example, to set the timer for ve minutes: Press
the TIMER ON/OFF button once and then press the
5 button.
3. Press Timer or START button to start the timer. The
time will count down and the time will show in the
display.
NOTE
If TIMER ON/OFF or START button is not
pressed, the timer will return to the time of
day.
4. When the set time has run out, End will appear in the
display. The indicator tones will sound every 15 seconds until TIMER ON/OFF is pressed.
To Cancel the Timer
1. Press the TIMER ON/OFF button once. The display
will return to the time of day.
CONVECTION AUTO CONVERSION
When cooking using convection cycle (Conv. bake and
roast), the oven temperature is automatically reduced by
25°F. The display will show the changed temperature.
This feature is called ”AUTO CONVERSION”. Your range
comes with this feature “ENABLED”.
To DISABLE the auto conversion feature, follow below .
1. Press the SETTING button one time. “AUTO” will ap-
pear in the display.
2. Press the 1 button to ENABLE or press the 2 button
to DISABLE.
3. Press the START button to accept the change.
NOTE
If the remaining time is not shown in the display, recall the remaining time by pressing the TIMER ON/
OFF button.
Page 14
14
FEATURES
THERMOSTAT
You may nd that your new oven cooks dierently than
the one it replaced. Use your new oven for a few weeks
to become more familiar with it before changing the
temperature settings. If after familiarizing yourself with
the new oven, and you still think that it is too hot or too
cold, you can adjust the thermostat yourself.
Setting the thermostat
1. Press the SETTING button twice. “AdJU” will appear
in the display.
2. Using the number buttons, enter the amount of degrees that you wish to adjust the oven.
3. Press the SETTING button repeatedly to toggle between plus (+) or minus (-) to adjust the temperature
either up or down.
4. Press the START button to accept the change.
NOTE
• This adjustment will not aect the broiling or Self
Clean temperatures. The adjustment will be retained in memory after a power failure. The oven
temperature can be increased (+) or decreased (-) as
much as 35°F or 19°C.
• Once the temperature is increased or decreased,
the display will show the adjusted temperature until it readjusts.
PREHEATING ALARM LIGHT
When the oven reaches its set-temperature, the preheating alarm light will ash until the oven door is opened.
You can activate or deactivate the preheating alarm light.
1. Press the SETTING button four times. “PrE” will ap-
pear in the display.
2. Press the 1 button for ON or press the 2 button for
OFF.
3. Press the START button to accept the change.
BEEPER VOLUME
1. Press the SETTING button ve times .
2. “Beep” will appear in the display. Press the 1 button
for LOUD, 2 button for NORMAL, 3 button for LOW,
and press the 4 button for MUTE.
3. Press the START button to accept the change.
FAHRENHEIT OR CELSIUS
The oven temperature settings can either be set to Fahrenheit or Celsius. The oven defaults to Fahrenheit unless
changed by the user.
1. Press the SETTING button six times. “UNIT” will appear in the display.
2. Press the 1 button for F (Fahrenheit) or the 2 button
for C (Celsius).
3. Press the START button to accept the change.
LANGUAGE
The default language of the display is English. It can be
changed to Spanish or French
1. Press the SETTING button three times. “Lng” will ap-
pear in the display.
Press the 1 button for English, 2 button for Spanish,
or the 3 button for French.
2. Press the START button to accept the change.
OVEN LIGHT
The interior oven light automatically turns ON when the
door is opened. The oven light may also be manually
turned ON or OFF by pressing the OVEN LIGHT button.
NOTE
The oven light cannot be turned on if the Self Clean
function is active.
Page 15
LOCKOUT
The Lockout feature automatically locks the oven door
and prevents most oven and cooktop controls from being
turned on. It does not disable the clock, timer or the interior oven light.
1. Press and hold the START button for three seconds.
2. The lock melody will sound, OVEN LOCKOUT will
appear in the display and DOOR LOCKED will icker
in the display.
3. Once the oven door is locked, the DOOR LOCKED indicator will stop ickering and remain on along with
the lock icon .
4. To d eact iva te the Lockout feature, press and hold the
START button for three seconds. The unlock melody
will sound and UNLOCKING will appear in the display
until the controls are unlocked.
START TIME (Delayed timed COOK)
The automatic timer of the DELAYED TIMED COOK
function will turn the oven ON and OFF at the time you
select. This feature can only be used with the: BAKE,
CONVECTION BAKE and CONVECTION ROAST modes.
FEATURES
The oven will continue to cook for the set amount of time
and then turn o automatically. When the cooking time
has elapsed:
y END and the time of day will show in the display.
y The cook end indicator tone will sound every 60 sec-
onds until the CLEAR OFF button is pressed.
y When WARM is set, the warming function is activated
after cooking for the set time.
15
CAUTION
• Use the automatic timer when cooking cured
or frozen meats and most fruits and vegetables.
Foods that can easily spoil, such as milk, eggs, sh,
meat or poultry, should be chilled in the refrigerator. Even when chilled, they should not stand in
the oven for more than 1 hour before cooking
begins, and should be removed promptly when
cooking is completed.
• Eating spoiled food can result in sickness from
food poisoning.
ENGLISH
To set the oven for Delayed Start (example, to
BAKE at 300°F and start operating the bake
mode at 4:30):
Make sure that the clock is set for the correct time of day.
1. Press the BAKE button. 350°F will appear in the dis-
play.
2. Use the oven buttons to set the temperature: Press
3, 0 and 0.
3. Press the START TIME button.
4. Set the start time: Press 4, 3 and 0 for 4:30.
5. Press the START button. A short beep will sound and
the oven will begin baking.
NOTE
• To cancel the DELAYED TIMED COOK function, press
the CLEAR OFF button at any time.
• To change the cooking time, repeat steps 3-4 and
press the START button.
• If your oven clock is set as a 12 hour clock, you can
delay the cook time for 12 hours. If your oven clock
is set as a 24 hour clock, you can delay the cook
time for 24 hours.
Page 16
16
FEATURES
COOK TIME (TIMED COOK)
The TIMED COOK feature allows you to set the oven to
cook for a specic length of time. This feature can only
be used with the BAKE, CONVECTION BAKE, CONVECTION
ROAST and FAVORITE modes.
Setting the TIMED COOK function (example,
BAKE at 300°F for 30 minutes):
Make sure that the clock is set to the correct time of day.
1. Press the BAKE button. 350°F will appear in the dis-
play.
2. Use the number buttons to set the temperature.
Press 3, 0 and 0.
3. Press the COOK TIME button. TIMED will ash.
BAKE, 0:00 and 300°F will appear in the display.
4. Set the baking time: Press 3 and 0 (for 30 minutes).
The baking time can be set for any amount of time
between 1 minute and 11 hours and 59 minutes.
5. Press the START button. The display will show the
cooking time countdown.
NOTE
To set the WARM function to engage at the end of
the timed cook cycle, repeat steps 1-4 and then
press the WARM button. WARM will appear in the
display. (Refer to the "WARM" section on the previous page.
The oven will continue to cook for the set amount of time
and then turn o automatically. When the cooking time
has elapsed:
• END and the time of day will show in the display.
• The cook end indicator tone will sound every 60
seconds until the CLEAR OFF button is pressed.
• When WARM is set, the warming function is activated after cooking for the set time.
To change the cook time while operating the
oven (example, to change the cook time from
30 minutes to 1 hour and 30 minutes):
1. Press the COOK TIME button.
2. Press the number keys to change the baking time: 1,
3, 0.
3. Press the START button to accept the change.
Page 17
USING THE COOKTOP
COOKING AREAS
The cooking areas on your range are identied by permanent circles on the glass cooktop surface. For the most efcient cooking, t the pan size to the element size.
Pans should not extend more than 1/2 to 1-inch beyond the cooking area.
When a control is turned on, a glow can be seen through
the glass cooktop surface. The element will cycle on and
o to maintain the preset heat setting, even on Hi.
Single element
Warming zone
USING THE COOKTOP
Using the cooktop elements
To turn on a SINGLE element (left and right
rear elements):
1. Press the ON/OFF button that controls the element
that you would like to use (refer to the below cooktop element control image).
2. Press the + button once to adjust the element temperature to Hi, or the – button once to adjust the
element temperature to Lo.
3. Use the – / + buttons to adjust the element temperature settings. The element temperature settings
are adjustable at all times.
4. To turn o the element after cooking, press the ON/
OFF button once.
17
ENGLISH
Dual element
Hot surface indicator
HS (Hot Surface) will appear in the display once the element is turned o or during the self clean cycle. The
HS indicator will stay on until the surface has cooled to
approximately 150°F (66°C) or when the self clean cycle
ends.
CAUTION
It is normal for the surface elements to cycle on and
o during cooking, even on higher settings. This will
happen more frequently if cooking on a lower temperature setting.
Warming zone
control
Dual element controls
NOTE
• Hi is the highest temperature available.
• Lo is the lowest temperature available.
• Press and hold the
through the temperature settings.
or – buttons to quickly scroll
+
Single element
controls
CAUTION
• NEVER leave food on the cooktop unattended.
Spillovers can cause smoke. Greasy spillovers may
catch on re.
• The oven surface element may appear to have
cooled after it has been turned OFF. The element
may still be hot and burn may occur if this element
is touched before it has cooled suciently.
Page 18
18
USING THE COOKTOP
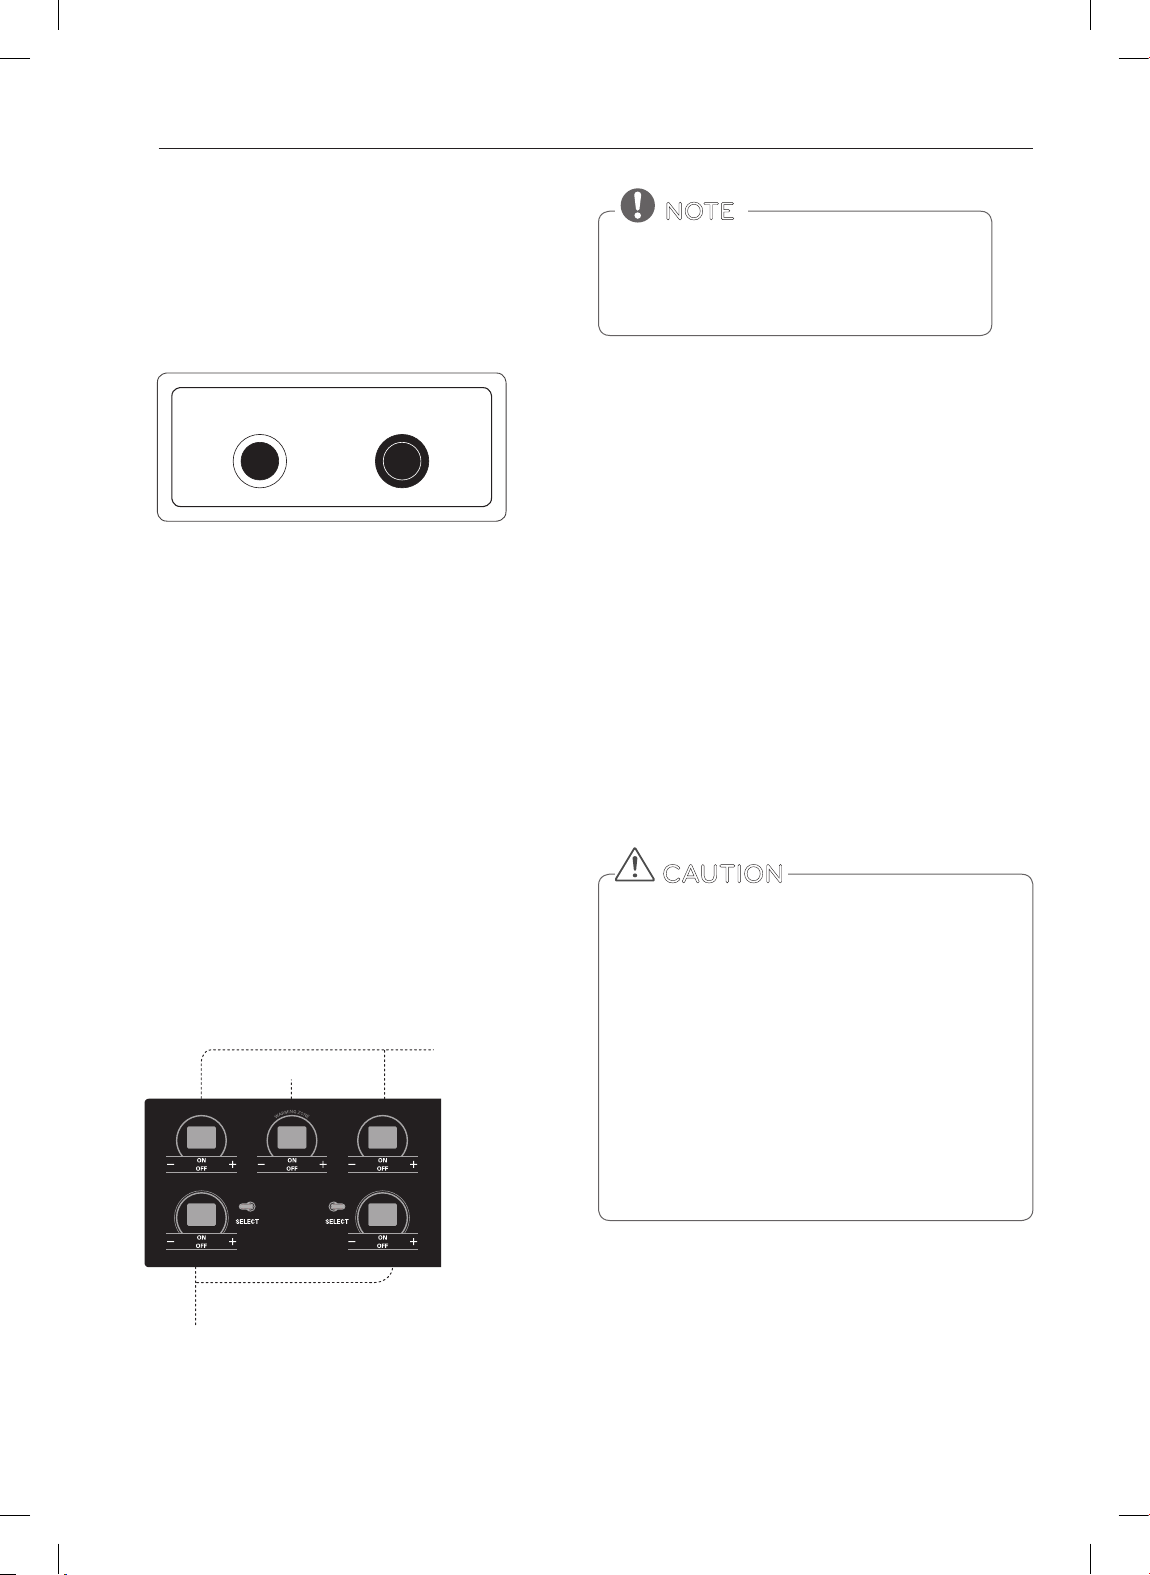
To turn on a DUAL element (left and right
front elements):
The front two elements on the cooktop are dual elements.
You are able to adjust the dual elements according to the
pot/pan size that you are using.
Inner element Outer element
A B
1. Press the ON/OFF button that controls the element
that you would like to use (refer to the below cooktop
element control image).
2. Press the SELECT button to select either the inner
(smaller) or outer (larger) element function. The dual
elements default to the inner element function. The
light bars above the SELECT button indicate whether
the element is adjusted for the inner or outer element
function. One bar will display for the inner element
and two bars will display for outer element.
3. Press the + button once to adjust the element temperature to Hi, or the – button once to adjust the element temperature to Lo.
4. Use the – / + buttons to adjust the element temperature settings. The element temperature settings are
adjustable at all times.
5. To turn o the element after cooking, press the ON/
OFF button once.
Warming zone
control
Single element
controls
NOTE
• Hi is the highest temperature available.
• Lo is the lowest temperature available.
• Press and hold the
or – buttons to quickly
+
scroll through the temperature settings.
To turn on the Warming Zone (center element):
Use the Warming Zone to keep food warm after it has
already been cooked. The warming zone is not meant for
cooking food. Attempting to cook uncooked or cold food
on the warming zone could result in a food borne illness.
1. Press the warming zone ON/OFF button. The warm-
ing zone indicator light will ash.
2. Press the + button once to adjust the temperature to
Hi, or the – button once to adjust the temperature to
Lo. Power level sequence is from – Lo, 2, 3, 4, Hi or
from + Hi, 4, 3, 2, Lo.
3. Use the – / + buttons to adjust the temperature set-
tings. The temperature settings are adjustable at all
times.
4. To turn o the warming zone, press the ON/OFF button once.
CAUTION
• Only use cookware and dishes that are safe for
oven and cooktop use.
• Always use oven mitts when removing food from
the cooktop and oven.
• Do not place sealed containers on the cooktop.
• DO NOT use plastic wrap to cover food while on
the cooktop. Plastic may melt onto the surface and
be very dicult to clean.
• When using the warming zone, food should be
kept in its container and covered with a lid or aluminum foil to maintain food quality.
• DO NOT leave food on the warming zone for more
than two hours.
Dual element controls
Page 19
Recommended surface cooking settings
Element Temp. Recommended Use
8.5-Hi
5.5-8.0
Single or
Dual
Element Temp. Recommended Use
Warming
Zone
3.5-5.0
2.2-3.0 y Stew or steam food
LO-2.0
Hi
2–4
Lo
y Bring liquid to a boil
y Start cooking
y Hold a rapid boil, f rying, deep fat fr y
y Quickly brow n or sear food
y Maintain a slow boil
y Fry or saute foods
y Cook soups, sauces and gravies
y Simmer
y Keep food warm
y Melt chocolate or butter
y Fried Foods
y Hot Beverage
y Soups (liquid)
y Dinner Plate with Food
y Sauces
y Soups (Cream)
y Stew
y Vegetables
y Meats
y Bread/Pastries
y Gravies
y Casseroles
y Eggs
Home canning tips
Be sure that the canner is centered over the surface
unit and at on the bottom.
y The base must not be more than 1 inch larger than the
element. Use of water bath canners with rippled bottoms may extend the time required to bring the water
to a boil and cooktops may be damaged.
y Some canners are designed with smaller bases for use
on smooth top surfaces.
y Use the high heat setting only until the water comes to
a boil or pressure is reached in the canner.
y Reduce to the lowest heat setting that maintains the
boil, or pressure. If the heat is not turned down, the
cooktop may be damaged.
USING THE COOKTOP
19
USING THE PROPER COOKWARE
Using the proper cookware can prevent many problems,
such as food taking longer to cook or achieving inconsistent results. Proper pans will reduce cooking times and
cook food more evenly. Stainless steel is recommended.
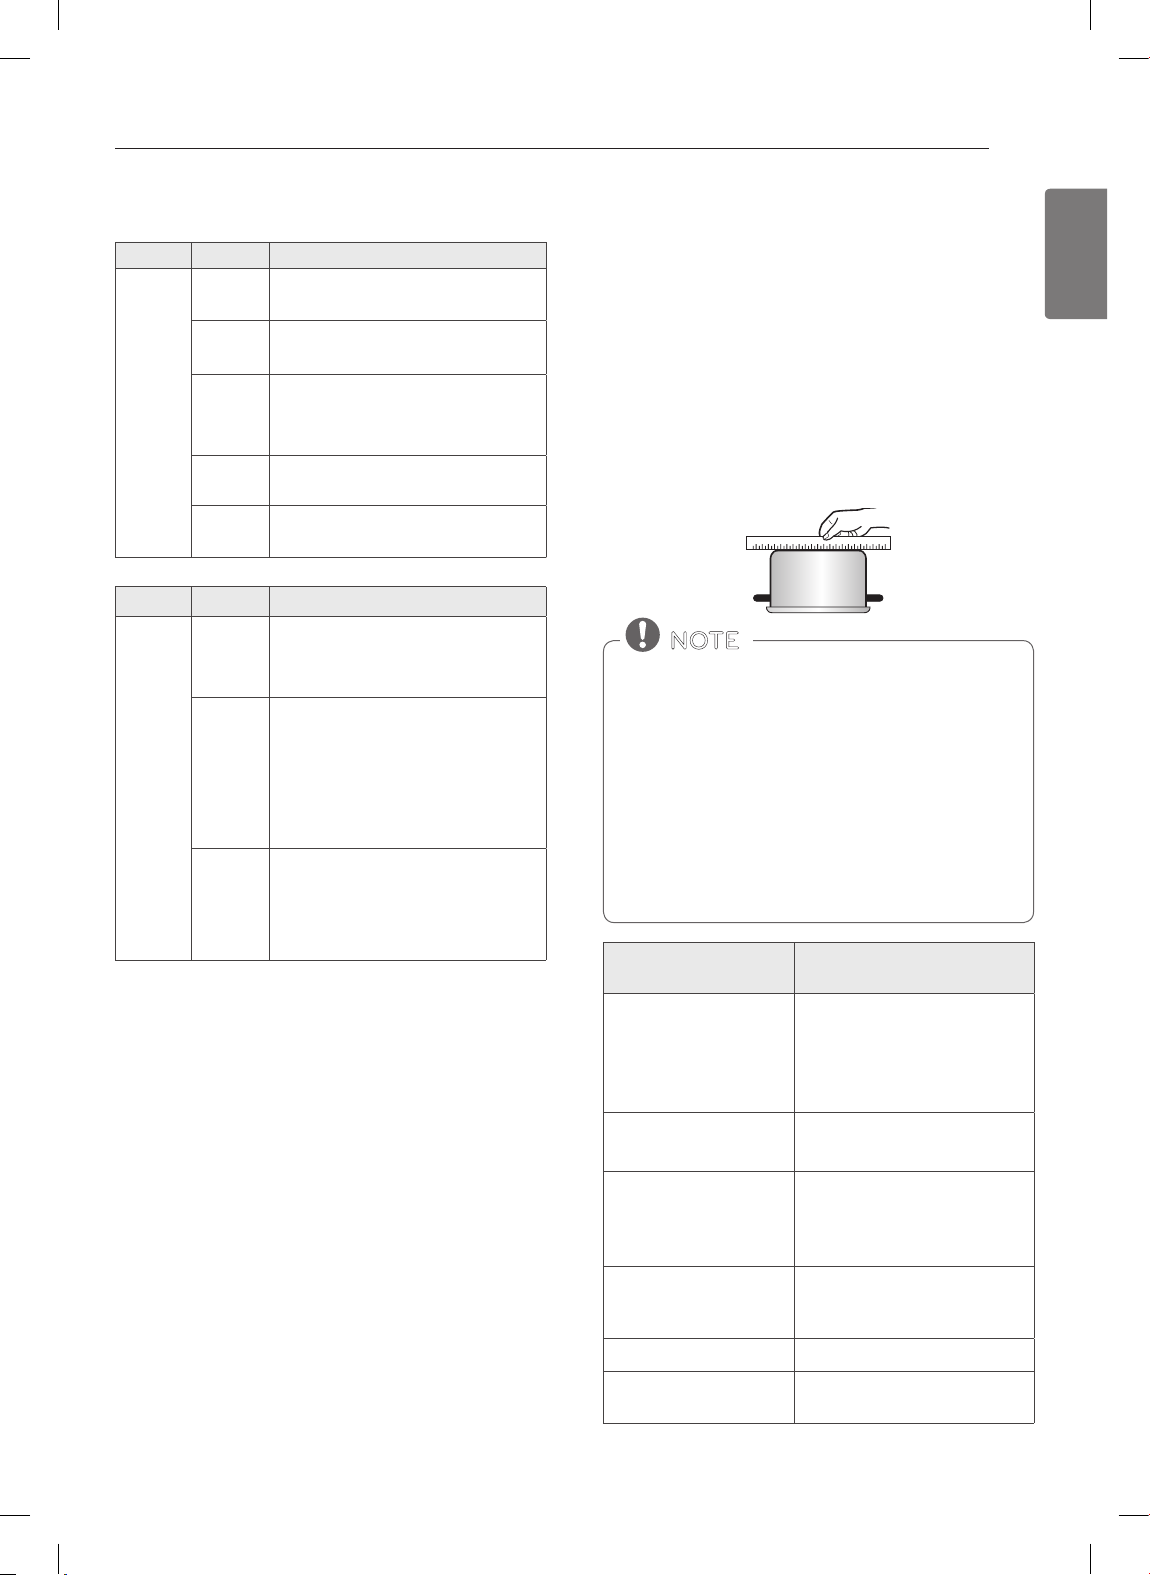
Check pans for flat bottoms by using
a straight edge or ruler
1. Place a ruler across the bottom of the pan.
2. Hold it up to the light.
3. No light should be visible under the ruler.
NOTE
• Do not use a small pan on a large element. Not
only does this waste energy, but it can also result
in spillovers burning onto the cooking area.
• Only use flat bottomed cookware. Do not use
cookware that is oversized or uneven such as
round bottom woks, rippled bottom cookware, or
oversized canners and griddles.
• Do not use foil or foil-type containers. Foil may
melt onto the glass. Do not use the cooktop if
metal has melted on it. Call an authorized Servicer.
Recommended
cookware
Curved, grooved, or warped
Flat bottom and
straight sides.
Heavy-gauge pans.
Pan sizes that match the
amount of food to be
prepared and the size of
the surface element.
Weight of handle does
not tilt pan. Pan is well
balanced.
Tight-tting lids. Loose-tting lids.
Flat bottom woks.
pan bottoms. Pans with
uneven bottoms do not cook
eciently and sometimes may
not boil liquid.
Very thin-gauge metal or glass
pans.
Pans that are smaller or larger
than the element.
Cookware with loose or broken handles. Heavy handles
that tilt the pan.
Woks with a ring-stand bottom.
Do not use
ENGLISH
Page 20
20
USING THE OVEN
USING THE OVEN
BEFORE USING THE OVEN
NOTE
• When using an oven thermometer in the oven cavity, the temperature may dier from the actual set
oven temperature.
• It is normal for the convection fan to run while preheating during a regular bake cycle.
• The convection fan motor may run periodically
during a regular bake cycle.
REMOVING AND REPLACING THE
OVEN RACKS
CAUTION
• Replace oven racks before turning the oven on to
prevent burns.
• DO NOT cover the racks with aluminum foil, or any
other material, or place anything on the bottom of
the oven. Doing so will result in poor baking and
may damage the oven bottom.
• Only arrange oven racks when the oven is cool.
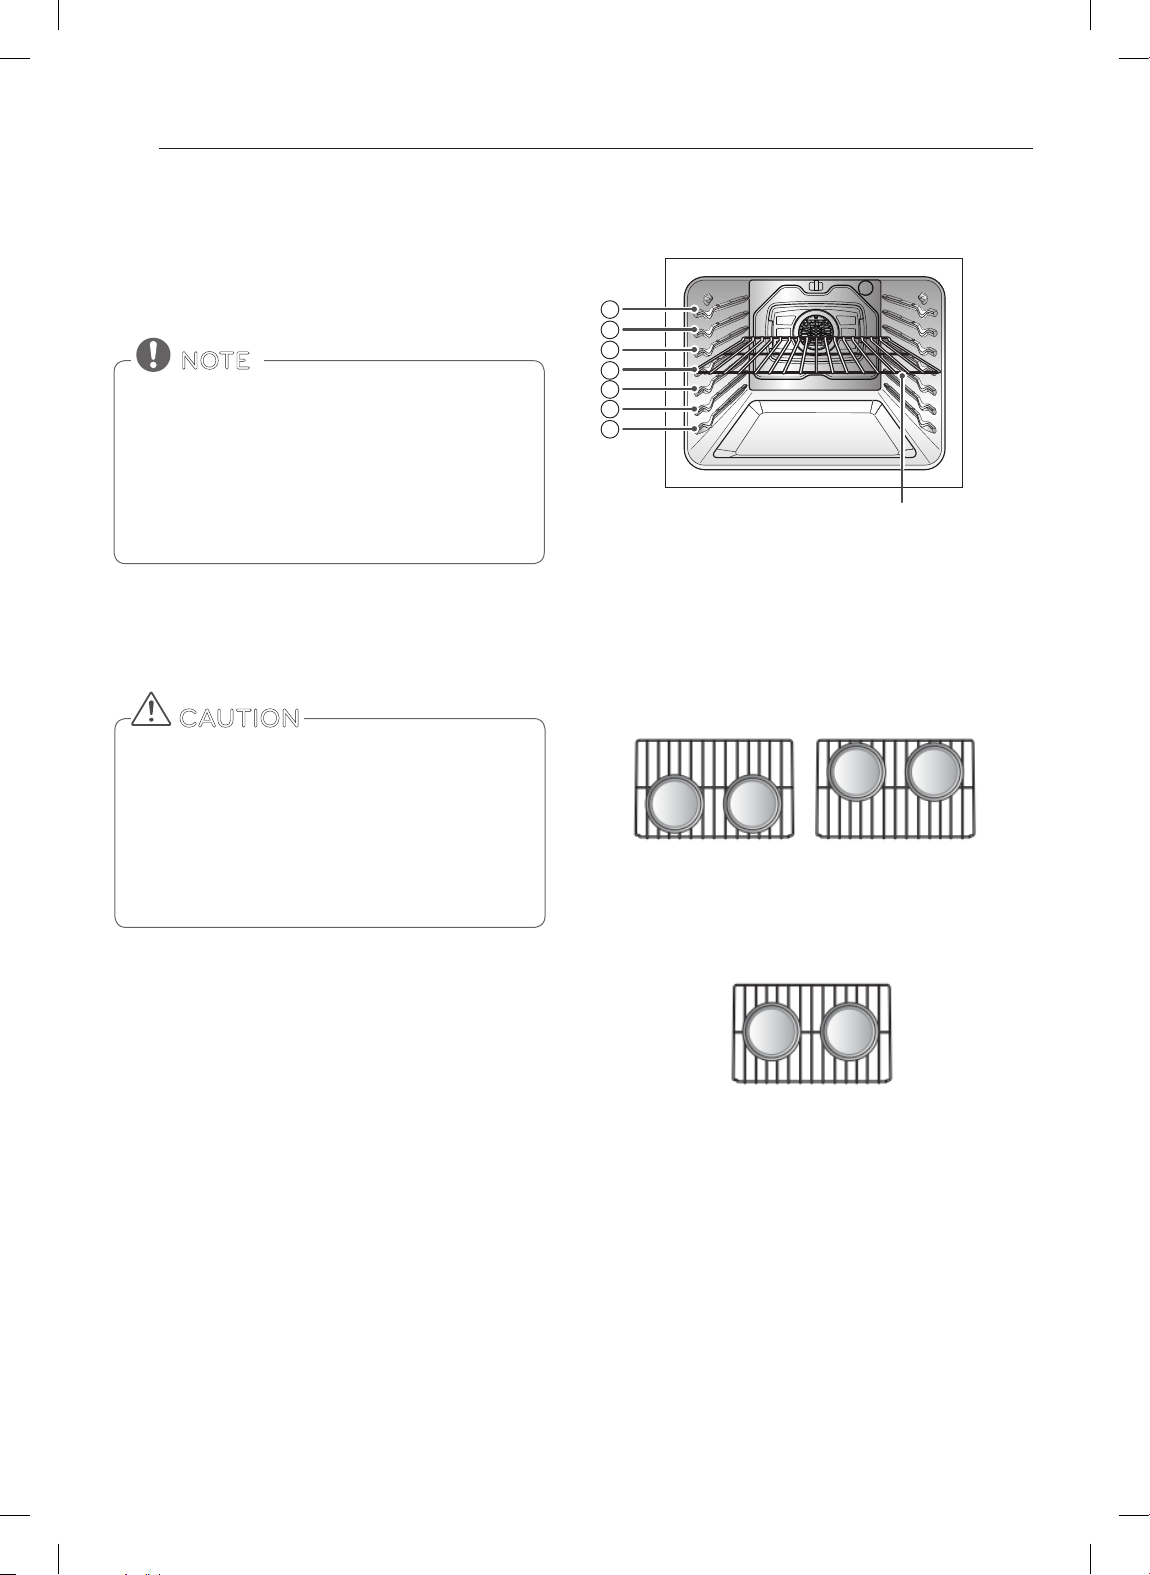
Rack and Pan Placement
G
F
E
D
C
B
A
Rack
If cooking on two racks, place the oven racks in positions
B and D. If cooking on three racks, place them in positions
B, D, and F (oset rack). Place the cookware as shown in
the Multiple rack baking/Single rack baking images below.
If baking with more than one pan, place the pans so that
each one has at least 1” to 1 1/2” of air space around them.
Standard Rack
(Position B)
Multiple rack baking
Standard Rack
(Position D)
Removing the racks
1. While wearing oven mitts, grasp the oven rack.
2. Pull the rack straight out until it stops.
3. Lift up the front of the rack.
4. Pull out the rack.
Replacing the racks
1. While wearing oven mitts, place the end of the rack
on the support.
2. Tilt the front end of the rack up.
3. Push the rack in.
4. Check that the rack is properly in place.
:
:
Standard Rack
Single rack baking
Oven vent
y Areas near the vent may become hot during operation
and may cause burns.
y Do not block the vent opening.
y Avoid placing plastics near the vent as heat may distort
or melt the plastic.
y It is normal for steam to be visible when cooking foods
with high moisture.
Page 21
OVEN CONTROLS
BAKE
BAKE is used to prepare foods such as pastries, breads,
casseroles. The oven can be programmed to bake at
any temperature from 170°F (77°C) to 550°F (288°C). The
default temperature is 350°F (177°C).
Setting the BAKE function (example, 375°F):
1. Press the BAKE button.
2. Set the oven temperature using the number buttons:
Press 3, 7 and 5.
3. Press the START button. The oven will start to preheat.
As the oven preheats, the temperature is displayed and
rises in 5 degree increments. Once the oven reaches the
set temperature, a tone will sound and the oven light will
blink on and o.
4. When cooking is complete, press the CLEAR OFF
button.
5. Remove food from the oven.
USING THE OVEN
21
CONVECTION BAKE
The convection system uses a fan to circulate the heat
evenly within the oven. Improved heat distribution allows
for even cooking and excellent results while cooking with
single or multiple racks.
Setting the CONVECTION BAKE function
(example, 375°F):
1. Press the CONV. BAKE button. The display will ash
350°F.
2. Set the oven temperature using the number buttons:
Press 3, 7 and 5.
3. Press the START button. The display will show CONV.
BAKE and the oven temperature starting at 100°F.
As the oven preheats, the display will show increasing
temperatures in 5 degree increments. Once the oven
reaches the set adjusted temperature, a tone will sound
and the oven light will ash on and o. The display will
show the auto converted oven temperature 3 50 °F,
CONV. BAKE and the fan icon.
4. When cooking has nished or to cancel, press the
CLEAR OFF button.
ENGLISH
NOTE
It is normal for the convection fan to operate periodically throughout a normal bake cycle. This is to
ensure even baking results.
Baking Tips
y Baking time and temperature will vary depending on
the ingredients, size, and shaped of the baking pan
used.
y If baking with more than one pan, place the pans
so that each one has at least 1” to 1 1/2” of air space
around them.
y Check for food doneness at the minimum recipe time.
y Use metal bakeware (with or without a nonstick nish),
heatproof glass-ceramic, ceramic or other bakeware
recommended for oven use.
y Dark metal pans or nonstick coatings will cook food
faster with more browning. Insulated bakeware will
slightly lengthen the cooking time for most foods.
NOTE
The oven fan will run while convection baking. The
fan will stop when the door is open, but the heat
will not turn o. In some cases, the fan may shut o
during a convection bake cycle.
Convection Bake with 3 racks:
To bake with three racks during Convection Bake, use rack
positions B, D (standard rack) and F (oset rack):
1. Press the CONV. BAKE button twice. "3 Racks" will
appear in the display.
2. Set the oven temperature using the number buttons.
3. Press the START button.
Tips for Convection Baking
y Cookies and biscuits should be baked on pans with no
sides or very low sides to allow heated air to circulate
around the food. Food baked on pans with a dark nish
will cook faster.
y When using Convection Bake with a single rack, place
oven rack in position D. If cooking on two racks, place
the oven racks in positions B and D. If cooking on three
Page 22
22
USING THE OVEN
racks, place in positions B, D (standard rack) and F (o-
set rack).
y Multiple oven rack cooking may slightly increase cook
times for some foods.
y Cakes, cookies and muns will have better results
when using multiple racks.
CONVECTION ROAST
The CONVECTION ROAST feature is designed to give optimum roasting performance. CONVECTION ROAST combines cooking with the convection fan to roast meats and
poultry. The heated air circulates around the food from all
sides, sealing in juices and avors. Foods are crispy brown
on the outside while staying moist on the inside. Convection roasting is especially good for large tender cuts of
meat, uncovered.
Setting the CONVECTION ROAST function
(example, 375°F):
1. Press the CONV. ROAST button. The display will ash
350°F.
2. Set the oven temperature using the number buttons:
Press 3, 7 and 5.
3. Press the START button. The display will show CONV.
ROAST and the oven temperature starting at 100°F.
Warming Drawer Rack Instructions
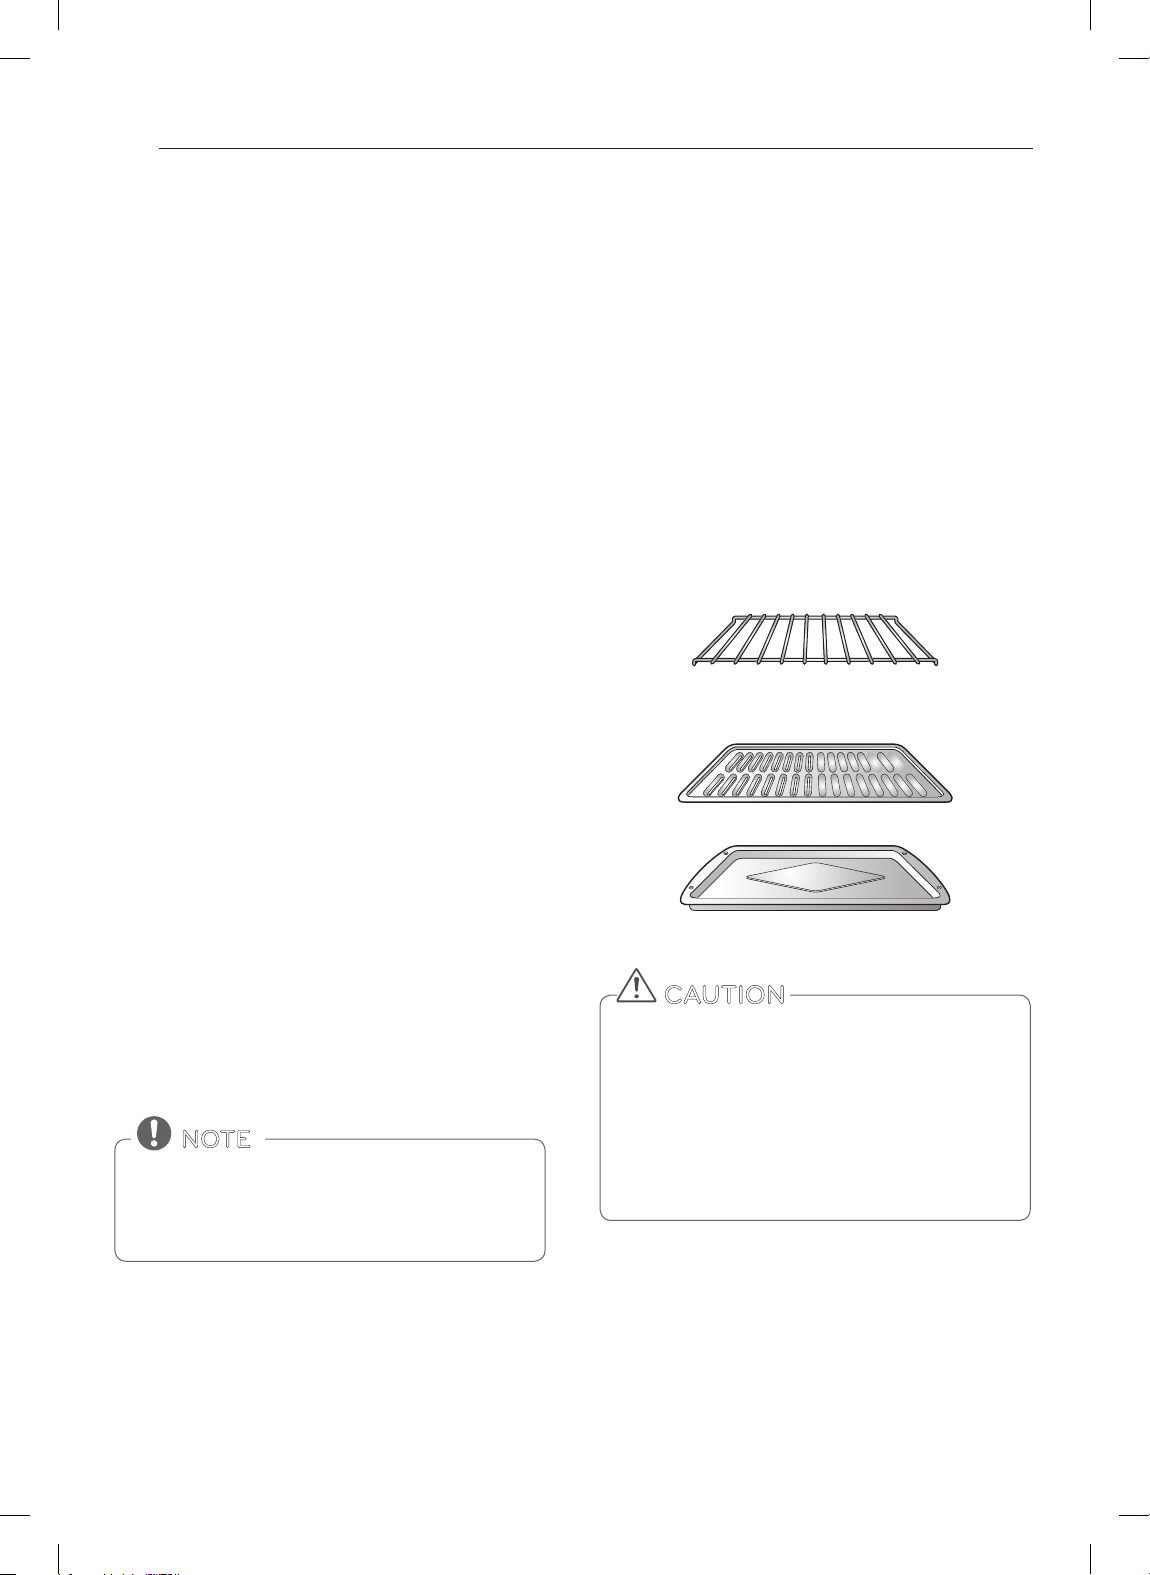
When preparing meats for convection roasting, use the
broiler pan, grid and warming drawer rack. The broiler
pan will catch grease spills and the grid will help prevent
grease splatters. The warming drawer rack will allow the
heat to circulate around the meat.
1. Place oven rack on bottom or next to the bottom rack
position.
2. Place the grid in the broiler pan.
3. Place the warming drawer rack on the grid. Make sure
that the warming drawer rack is securely seated on
the grid in the broiler pan.
4. Place the broiler pan on the oven rack.
Warming drawer rack
Grid (sold separately)
As the oven preheats, the display will show increasing
temperatures in 5 degree increments. Once the oven
reaches the set adjusted temperature, a tone will sound
and the oven light will ash on and o. The display will
show the auto converted oven temperature 3 50 °F,
CONV. ROAST and the fan icon.
4. When cooking has nished or to cancel, press the
CLEAR OFF button.
NOTE
The oven fan will run while convection roasting. The
fan will stop when the door is open, but the heat
will not turn o. In some cases, the fan may shut o
during a convection roast cycle.
Broiler Pan (sold separately)
CAUTION
• DO NOT use the warming drawer rack when
broiling. This will help prevent food from coming
in contact with the broil element and grease from
splattering.
• DO NOT use the broiler pan without the grid.
• DO NOT cover the grid with aluminum foil.
• Position food (fat side up) on the warming drawer
rack.
Page 23
USING THE OVEN
23
BROIL
The Broil function uses intense heat from the upper heating element to cook food. BROIL works best for tender cuts
of meats, sh, and thinly cut vegetables.
Some models may feature a hybrid broiler consisting of an
inner broiler that utilizes a carbon heating element which
provides instantaneous heat, and a traditional outer broiling element. During normal broiler operation, it is normal
for either element to cycle o intermittently.
This range is designed for open door broiling. The door
has a broil stop position.
CAUTION
• DO NOT use a broiler pan without a grid. Oil can
cause a grease re.
• DO NOT cover the grid and broiler pan with aluminum foil. Doing so will cause a re.
• Always use a broiler pan and grid for excess fat and
grease drainage. This will help to reduce splatter,
smoke, and are-ups.
SPEED BROIL
The Speed Broil setting is designed to reduce the amount
of time it takes to broil foods. By utilizing the inner broil
element, which provides heat instantaneously, there is no
need for preheating. Speed Broil should only be used for
small amounts of food that can be easily concentrated to
the center of the broiler pan.
NOTE
• When operating Speed Broil, the oset rack should
be used.
• All food should be placed in the center of the
broiler pan when utilizing Speed Broil.
Smoking
Due to the intense heat associated with broiling, it is normal to experience smoke during the cooking process. This
smoke is a natural byproduct of searing and should not
cause you to worry. If you are experiencing more smoke
than you are comfortable with, use the following tips to reduce the amount of smoke in your oven.
1. Always use a broiler pan. Do not use sautee pans or
regular baking sheets for safety reasons.
2. NEVER use a broiler pan that is not thoroughly cleaned
and at room temperature at the beginning of cooking.
3. ALWAYS run your cooktop ventilation system or vent
hood during broiling.
4. Keep the interior of your oven as clean as possible. Left
over debris from prior meals can burn or catch re.
5. Avoid fatty marinades and sugary glazes. Both of these
will increase the amount of smoke you experience. If
you would like to use a glaze, apply it at the very end
of cooking.
6. If you are experiencing signicant smoke with any
food item, consider:
y Lower the broiler to the LO setting.
y Lower the rack position to cook the food further away
from the broiler.
y Use the HI broil setting to achieve the level of searing
you desire, and then either switch to the LO broil setting, or switch to the BAKE function.
7. As a rule, fattier cuts of meat and sh will produce
more smoke than leaner items.
8. Adhere to the recommended broil settings and cooking guidelines in the chart on the following page
whenever possible.
ENGLISH
To set the oven to BROIL / SPEED BOIL
1. Open the oven door to the broil stop position (about
10 degrees from the closed position).
2. Press the BROIL or SPEED BOIL button once for Hi
or twice for Lo.
3. Press the START button. The oven will begin to heat.
4. If using Broil, it is best to let the oven preheat for approximately three minutes before cooking food. If
using Speed Broil, no preheat is necessary.
5. When cooking is complete, or to cancel at any time,
press the CLEAR OFF button.
RECOMMENDED BROILING GUIDE
The size, weight, thickness, starting temperature, and your
preference of doneness will aect broiling times. The following guide is based on meats at refrigerator temperature.
NOTE
Always use a broiler pan when broiling on the HI
setting or Speed Broil.
Page 24
24
USING THE OVEN
Broiling chart *oset rack
Item Cut Size/Thickness Doneness Broiler Setting Rack Position Time (min)
Side 1 Side 2
Beef Tenderloin/Filet 1"
NY Strip Steak/
Strip loin
Ribeye/Delmonico 3/4" - 1"
Bone-In Steaks 3/4" - 1"
1 1/2"
2"
3/4" - 1"
1 1/2"
1 1/2"
1 1/2"
Medium Rare Hi G 5:00 3:00
Medium Hi G 5:00 4:00
Medium Well Hi G 6:00 4:00
Well Done Hi G* 6:00 5:00
Medium Rare Hi G 6:00 4:00
Medium Hi G 7:00 4:00
Medium Well Hi G* 7:00 5:00
Well Done Hi G* 7:00 6:00
Medium Rare Hi G 7:00 5:00
Medium Hi G 8:00 6:00
Medium Well Hi G* 8:00 10:00
Well Done Hi F 10 :00 12: 00
Medium Rare Hi G 5:00 3:00
Medium Hi G 5:00 4:00
Medium Well Hi G 6:00 4:00
Well Done Hi G* 6:00 5:00
Medium Rare Hi G 6:00 5:00
Medium Hi G 7:00 6:00
Medium Well Hi G* 8:00 10:00
Well Done Hi G* 8:00 12 :00
Medium Rare Hi G 5:00 3:00
Medium Hi G 5:00 4:00
Medium Well Hi G 6:00 4:00
Well Done Hi G* 6:00 5:00
Medium Rare Hi G 6:00 5:00
Medium Hi G 7:00 6:00
Medium Well Hi G* 8:00 10:00
Well Done Hi G* 8:00 12 :00
Medium Rare Hi G 5:00 4:00
Medium Hi G 6:00 5:00
Medium Well Hi G* 7:00 6:00
Well Done Hi G* 8:00 7:00
Medium Rare Hi G 8:00 8:00
Medium Hi G* 10:00 8:00
Medium Well Hi F 10: 00 12:0 0
Well Done Hi F 10 :00 15:00
*Speed broil should only be used for small amounts of food that can be easily concentrated to the center of the broiler pan.
Speed broil works faster than the regular broil mode, so cook time should be reduced by approximately 20~25%.
Page 25
USING THE OVEN
25
Broiling chart * oset rack
Item Cut Size/Thickness Doneness Broiler Setting Rack Position Time (min)
Side 1 Side 2
Beef Skirt Steak 1/2"-3/4"
Flank Steak 1"
1 1/2"
Hamburgers 3/4" thick
Lamb Bone-in Chops 6 - 8 oz., 2 bone
Seafood Salmon portion/steak,
skin-on
Salmon portion/steak,
skin-o
Halibut portion, skin-o 3/4" - 1"
Shrimp, skin on <10/lbs.
Shrimp, skin o <10/lbs.
Lobster tail 1/3"
Pork Pork Chop 1"
Pork Tenderloin 12-16 oz., 1.5"
Sausage 1/4", 1.5"
Ham slices 1/2" thick
Chicken Breast, boneless, skinless 1/2" - 3/4"
Vegetable Asparagus spears 1/2" Th ick
Summer squash, zucchini 1/2" strips
Bakery Toast 4 pieces
English mun 2 split
3/4" - 1"
1 1/2"
3/4" - 1"
1 1/2"
1 1/2"
10-20/lbs.
21-30/lbs.
10-20/lbs.
21-30/lbs.
Medium Rare Hi G 4:00 3:00
Medium Hi G 5:00 3:00
Medium Well Hi G 5:00 4:00
Well Done Hi G 6:00 4:00
Medium Rare Hi G 7:00 5:00
Medium Hi G 8:00 6:00
Medium Well Hi G* 8:00 8:00
Well Done Hi F 10 :00 10:00
Medium Rate Hi G 7:00 5:00
Medium Hi G* 8:00 6:00
Medium Well Hi G* 8:00 8:00
Well Done Hi F 10 :00 10.00
Medium Rare Hi G 5:00 3:00
Medium Hi G 5:00 4:00
Medium Well Hi G* 6:00 4:00
Well Done Hi G* 6:00 5:00
Medium Hi G* 7:00 6:00
Broiler Hi G 6:00 4:00
Broiler Hi G 8:00 4:00
Broiler Hi G 6:00 4:00
Broiler Hi G* 6:00 6:00
Broiler Hi G 6:00 5:00
Broiler Hi G* 7:00 6:00
Broiler Hi G 4:00 3:00
Broiler Hi G 3:00 3:00
Broiler Hi G 3:00 2:00
Broiler Hi G 4:00 2:00
Broiler Hi G 3:00 2:00
Broiler Hi G 3:00 1:00
Broiler Hi G* 6:00
Broiler Hi G 6:00 5:00
Broiler Hi G* 9:00 8:00
Broiler Hi G* 6:00 4:00
Broiler Hi G 5:00 4:00
Broiler Hi F 6:00 4:00
Broiler Hi G* 4:00 3:00
Broiler Hi G* 7:00
Broiler Hi G 0:45 0:30
Broiler Pan Hi G 1:30
ENGLISH
*Speed broil should only be used for small amounts of food that can be easily concentrated to the center of the broiler pan.
Speed broil works faster than the regular broil mode, so cook time should be reduced by approximately 20~25%.
Page 26
26
USING THE OVEN
Broiling Tips
Beef
y Steaks and chops should always be allowed to rest for
ve minutes before cutting into them and eating. This
allows the heat to distribute evenly through the food
and creates a more tender and juicy result.
y Consider removing thick pieces of meat from the re-
frigerator 30 minutes prior to cooking. This will help
them cook more quickly and evenly, and will produce
less smoke when broiling. Please note that cooking
times will likely be shorter than the times indicated in
the Broiling Chart.
y For bone-in steaks or chops that have been “Frenched”
(all meat removed from around the bone), wrap the exposed sections of bone in foil to reduce burning.
Seafood
y When broiling skin-on sh, always use the Medium
broil setting and always broil the skin side last.
y Seafood is best consumed immediately after cooking.
Allowing seafood to rest after cooking can cause the
food to dry out.
y It is a good idea to rub a thin coating of oil on the sur-
face of the broiling pan before cooking to reduce sticking, especially with sh and seafood. You can also use a
light coating of non-stick pan spray.
Vegetables
y Toss your vegetables lightly in oil before cooking to
improve browning.
KIDS MEAL
This function is specially designed to cook popular kids
foods such as regular crust pizza, rising crust pizza, fresh
pizza, chicken nuggets, french fries, and hamburger
patties.
When using this function, there is no need to preheat the
oven prior to cooking.
Setting the KIDS MEAL function:
1. Press the KIDS MEAL button.
2. FROZEN PIZZA, REGULAR CRUST will appear in the
display. Press the STAR T button if cooking frozen
regular crust pizza.
3. Press the KIDS MEAL button continuously to scroll
through the dierent settings on the display. Select
from: FROZEN PIZZA, RISING, FRESH PIZZA, CHICK-
EN NUGGETS, FRENCH FRIES and HAMBURGER
PATTIES .
4. When the display shows the food that you would like
to prepare, press the START button.
5. Press the CLEAR OFF button once the food is done
cooking or to cancel.
Kids Meal Chart
Recommended
time
(minutes)
Food
Recommended
quantity
Shelf
position
Frozen pizza,
Regular crust
Frozen pizza,
Rising crust
Fresh pizza 12” D 15 -18
Chicken
nuggets
French fries 1-4 servings
Hamburger
patties
* This chart is for reference only.
12” D 14-2 0
12” D 18-2 2
1-4 servings
(3.5oz per 1
serving)
(3.5oz per 1
serving)
4-12 patties,
1/2” thick
F 14 -18
F 12-18
F 10 -14
Page 27

USING THE OVEN
27
WARM
This function will maintain an oven temperature of 170°F.
The WARM function will keep cooked food warm for serving up to 3 hours after cooking has nished. The Warm
function may be used without any other cooking operations or can be used after cooking has nished using
TIMED BAKE or DELAYED TIMED BAKE.
Setting the WARM function:
1. Press the WARM/PROOF button.
2. Press START.
3. Press the CLEAR OFF button at any time to cancel.
To set the WARM function after timed cooking:
1. Select the cooking function.
2. Enter the oven temperature using the number buttons.
3. Press the COOK TIME button and enter the cooktime using the number buttons.
4. Press the WARM/PROOF button.
5. Press the START button.
6. When cooking is nished, press the CLEAR OFF button to cancel the WARM function.
NOTE
The WARM function is intended to keep food warm.
Do not use it to cool food down.
PROOF
Setting the PROOF function:
This feature maintains a warm oven for rising yeast leavened products before baking.
1. Use rack B or C for proong.
2. Press the WARM/PROOF button twice. PrF will ap-
pear in the display.
NOTE
• To avoid lowering the oven temperature and
lengthening proong time, do not open the oven
door unnecessarily. Check bread products early to
avoid overproong.
• Do not use the proong mode for warming food or
keeping food hot. The proong oven temperature
is not hot enough to keep foods at safe temperatures. Use the WARM feature to keep food warm.
Proong will not operate when the oven is above
125° F. HOT will show in the display.
FAVORITES
The FAVORITES function is used to record and recall your
favorite recipe settings. You can store and recall up to
three dierent settings.
Setting the FAVORITES function:
1. Press the FAVORITES button once for Bread, twice
for Meat, and three times for Chicken. The default
temperature will appear and COOK will ash in the
display.
Press the
Category
Bread Press
Meat Press
Chicken Press
2. Press the number buttons to change the default temperature.
3. Press the START button. The preheat indicator tones
will sound 3 times when the oven reaches the programmed temperature.
Favorite
button
FAVORITE
once.
FAVORITE
twice.
FAVORITE
three times.
De fault Temp.
(may be
changed and
recalled)
375°F Bake
325°F Convection
350°F Convection
Cook mode
Roast
Roast
ENGLISH
3. Press the START button.
4. Press the CLEAR OFF button when proong is n-
ished.
NOTE
Only the oven temperature can be modified and
stored. The category name and cook mode will stay
the same.
Page 28

28
WARMING DRAWER
SABBATH MODE
Sabbath mode is typically used on the Jewish Sabbath
and Holidays. When the SABBATH mode is activated, the
oven does not turn o until the SABBATH mode is deactivated. In SABBATH mode, all function buttons, except
for the CLEAR OFF is inactive. Sb will appear in both the
cooktop and oven displays.
NOTE
If the oven light is turned ON and the SABBATH
mode is active, the oven light will remain ON until
the SABBATH mode is turned OFF. If the oven light
needs to be OFF, be sure to turn the oven light OFF
before activating the SABBATH mode. SABBATH
mode can only be used while baking (BAKE mode).
Setting the SABBATH mode
1. Press the BAKE button.
2. Press the number buttons to enter the bake temperature.
3. Press the START button.
4. Press and hold the SETTING button for three seconds. SB and will appear in the display when the
Sabbath mode is activated.
5. To cancel the Sabbath mode, press and hold the SETTING button for three seconds. To cancel the Bake
function, press the CLEAR OFF button at any time.
Changing the temperature while in SABBATH
mode
1. Press the BAKE button. (No tones will sound and the
display will not change.)
2. Set the temperature using the number buttons.
3. Press the START button.
WARMING DRAWER
Warming drawer rack in position
OPERATING THE WARMING
DRAWER
The warming drawer keeps hot cooked foods at serving
temperature.
All food placed in the warming drawer should be covered with a lid or aluminum foil to maintain quality. Do
not use plastic wrap to cover food. Plastic may melt onto
the drawer and be very dicult to clean. Use only utensils
and cookware recommended for oven use in the Warming Drawer.
Setting the Warming Drawer control
1. Press the WARMING DRAWER SET/OFF button (near
the number buttons). The indicator light will ash. (If
no further buttons are pressed within 25 seconds, the
display will clear.)
2. Use the number buttons to set the power level. 1 for
LOW, 2 for MEDIUM, and 3 for HIGH.
3. When the food is ready, or to cancel, press the
WARMING DRAWER SET/OFF button.
NOTE
There is a 15 second delay before the oven will rec-
ognize the temperature change.
NOTE
• The Warming Drawer will shut off automatically
after three hours.
• It is not recommended to heat cold food in the
Warming Drawer.
Page 29

Warming Drawer food/power level
Low
Low
Medium
recommendations
Setting Type of Food
Low
Medium
High
Dierent types of food may be placed in the warming
drawer at the same time. For best results, do not leave
food in the warming drawer for more than one hour. Do
not leave smaller quantities or heat-sensitive food, such as
eggs, in the warming drawer more than 30 minutes. The
maximum operating time is three hours.
y Rolls (Soft)
y Empty dinner plates
y Gravies
y Casseroles
y Eggs
y Vegetables
y Biscuits
y Rolls( hard )
y Pastries
y Roasts (Beef, Pork, Lamb)
y Bacon
y Hamburger patties
y Poultry
y Pork chops
y Pizza
y Fried Foods
WARMING DRAWER
29
CAUTION
y Do not use the warming drawer for storage of
racks, broiler pans, insert pans, plates, or utensils.
The warming drawer contains a heating element which
may damage any items not specically designed to be
used with it and should only be used to store cookware
specically supplied by LG with your range.
y Do not put food or foil directly on the surface or
base of the warming drawer. This may result in damage to your drawer and may spoil your food.
y Do not place plastic wrap in the warming drawer or
use it to cover food being heated in the warming
drawer. Plastic may melt onto the drawer or surround-
ing areas and is very dicult to remove. Use only aluminum foil or cookware that is capable of withstanding baking temperature to heat or cover your food.
y Do not use the warming drawer to heat water or
any other liquids. Spilled liquids may cause an electrical short or result in severe personal injury, electric
shock or death.
y Never place plastics, paper, canned foods or other
combustible material into the warming drawer. These
items pose a severe risk of re, damage and injury.
y In the unlikely event that an item falls behind the
warming drawer, always turn the power o and
wait for the warming drawer to cool before retrieving the item. Never attempt to retrieve any items that
fall behind the warming drawer without rst turning
the power o and ensuring the warming drawer cavity has cooled o. Failure to do so may result in severe
personal injury, electric shock or death.
ENGLISH
Page 30

30
CARE AND CLEANING
CARE AND CLEANING
CLEANING THE GLASS/CERAMIC
COOKTOP
CAUTION
• DO NOT use scrub pads or abrasive cleaning pads.
They may damage your cooktop surface.
• For your safety, wear an oven mitt or potholder
while cleaning the hot cooking surface.
Use Ceramic Cooktop Cleaner on the glass cooktop.
Other creams my not be as eective or may scratch,
damage or stain the cooktop surface.
To maintain and protect the surface of the glass cooktop,
follow these steps:
1. Before using the cooktop for the rst time, clean it
with a ceramic cooktop cleaner. This helps protect
the top and makes cleanup easier.
2. Daily use of ceramic cooktop cleaner will help keep
the cooktop looking new.
3. Shake the cleaning cream well. Apply a few drops of
cleaner directly to the cooktop.
4. Use a paper towel to clean the entire cooktop sur face.
5. Rinse with clear water and use a dry cloth or paper
towel to remove all cleaning residue.
NOTE
DO NOT heat the cooktop until it has been cleaned
thoroughly.
Burned-on Residue
1. While the cooktop is still hot, remove any burnt-on
deposits or spilled food from the glass/ceramic cooking surface with a suitable metal razor scraper (similar to scraping paint o of a windowpane - it will not
damage the decorated cooking surface). Hold the
scraper at an approximate 30° angle to the cooktop.
NOTE
• Do not use a dull or nicked blade.
• To prevent burns, please wear an oven mitt or pot-
holder while using the metal scraper.
1. When the cooking surface has cooled down, apply a
few dabs (about the size of a dime) of an approved
cleaner in each burner area and work the cleaning
cream over the cooktop surface with a damp paper
towel.
NOTE
Approved cleaners:
• Weiman CookTop Cleaning Cream
• (www.weiman.com)
• Cerama Bryte (www.ceramabryte.com)
• Golden Ventures Cerama Bryte
• Easy-Off 3 in 1 Glass Top Cleaner Spray (www.
easyo.us).
2. Clean with clear water and wipe the cooktop surface
with a clean, dry paper towel.
Page 31

CARE AND CLEANING
31
IMPORTANT:
If any sugar or food containing sugar (preserves, ketchup,
tomato sauce, jellies, fudge, candy, syrups, chocolate,etc.),
plastic or foil melts on the cooktop, remove the molten
material IMMEDIATELY with a metal razor scraper (it will
not damage the decorated cooking surface) while the
cooking surface is still hot to avoid the risk of damage to
the glass-ceramic surface. For your safety, please wear an
oven mitt or potholder while cleaning the hot cooking
surface.
Metal Marks and Scratches
1. Be careful not to slide pots and pans across the
cooktop. Doing so will leave metal markings on the
cooktop surface. To help remove these marks, use a
ceramic cooktop cleaner with a cleaning pad for ceramic cooktops.
2. If pots with a thin overlay of aluminum or copper are
allowed to boil dry, the overlay may leave black discoloration on the cooktop. This should be removed
immediately before heating again or the discolor-
ation may be permanent.
CAUTION
Cookware with rough or uneven bottoms can mark
or scratch the cooktop surface.
ENGLISH
SELF CLEAN
The self clean cycle uses extremely hot temperatures to
clean the oven cavity. While running the Self Clean cycle,
you may notice smoking or an odor. This is normal; especially if the oven is heavily soiled.
During Self Clean, the kitchen should be well ventilated to
minimize the odors from cleaning.
CAUTION
• DO NOT leave small children unattended near the
appliance. During the Self Clean cycle, the outside
of the range can become very hot to touch.
• If you have pet birds, move them to another wellventilated room. The health of some birds is extremely sensitive to the fumes given o during the
Self Clean cycle of any range.
• DO NOT line the oven walls, racks, bottom or any
other part of the range with aluminum foil or any
other material. Doing so will destroy heat distribution, produce poor baking results and cause permanent damage to the oven interior (aluminum foil
will melt to the interior surface of the oven).
• DO NOT force the door open. This can damage the
automatic door locking system. Use care when
opening the oven door after the Self Clean cycle.
Stand to the side of the oven when opening the
door to allow hot air or steam to escape. The oven
may still be VERY HOT.
• Do not slide metal or glass across the cooktop surface.
• Do not use cookware with any dirt build up on
bottom.
Cooktop Seal
To clean the cooktop seal around the edges of the glass,
lay a wet cloth on it for a few minutes, then wipe clean
with nonabrasive cleaners.
Before starting Self Clean:
• Remove the oven racks, broiler pan, broiler grid, all
cookware, aluminum foil or any other material from
the oven.
• The kitchen should be well ventilated to minimize
the odors from cleaning.
• Wipe any heavy spillovers on the bottom of the
oven.
• Make sure that the oven light bulb cover is in place
and the oven light is o.
• The oven light cannot be turned on during a self
clean cycle. The oven light cannot be turned on
until the oven temperature has cooled below 500˚F
(260˚C) after a self clean cycle is complete.
Page 32

32
CARE AND CLEANING
During the self clean cycle, the cooktop elements and
warming drawer cannot be used.
NOTE
• Remove oven racks and accessories before starting
the self clean cycle.
• If oven racks are left in the oven cavity during the
self clean cycle, they will discolor and become difcult to slide in and out.
• Clean the frame of the oven and door with hot
soapy water. Rinse well.
• Do not clean the gasket. The berglass material of
the oven door gasket cannot withstand abrasion.
It is essential for the gasket to remain intact. If you
notice it becoming worn or frayed, replace it.
• Wipe up any heavy spillovers on the oven bottom.
• Make sure that the oven light bulb cover is in place
and the oven light is o.
Setting Self Clean
The Self- Clean function has cycle times of 3, 4, or 5 hours.
Self Clean Soil Guide
Soil Level Cycle Setting
Lightly soiled oven cavity 3 Hour Self Clean
Moderately Soiled Oven Cavity 4 Hour Self Clean
Heavily Soiled Oven Cavity 5 Hour Self Clean
1. Remove all racks and accessories from the oven.
2. Press the SELF CLEAN button. The oven defaults to
the recommended four hour self clean for a moderately soiled oven. Press twice for a ve hour self clean
or three times for a three hour self clean.
3. Press START.
4. Once the Self Clean is set, the oven door will lock
automatically and the lock icon will display. You will
not be able to open the oven door until the oven is
cooled. The lock will release automatically when the
oven has cooled.
CAUTION
DO NOT force the oven door open when the lock
icon is displayed. The oven door will remained locked
until the oven temperature has cooled. Forcing the
door open will damage the door.
Setting Self Clean with a delayed
start
1. Remove all racks and accessories from the oven.
2. Press the SELF CLEAN button. The oven defaults to
the recommended four hour self clean for a moderately soiled oven. Press twice for a ve hour self clean
or three times for a three hour self clean.
3. Press the START TIM E button.
4. Use the number buttons to enter the time of day you
would like the Self Clean to start.
5. Press the START button.
NOTE
It may become necessary to cancel or interrupt a
self clean cycle due to excessive smoke or re in the
oven. To cancel the Self Clean function, press the
CLEAR OFF button.
Page 33

CARE AND CLEANING
33
During Self Clean
y The self clean cycle uses extremely hot temperatures
to clean the oven cavity. While running the Self Clean
cycle, you may notice smoking or an odor. This is normal; especially if the oven is heavily soiled.
y As the oven heats, you may hear sounds of metal parts
expanding and contracting. This is normal and will not
damage the oven.
y Do not force the oven door open when LOCKED is dis-
played. The oven door will remained locked until the
oven temperature has cooled. Forcing the door open
will damage the door.
NOTE
• The Self Clean cycle cannot be started if the Lockout feature is active.
• Once the Self Clean cycle is set, the oven door will
lock automatically. You will not be able to open the
oven door until the oven is cooled. The lock will release automatically.
• Once the door has been locked, the LOCKED indicator light will stop ashing and remain on. Allow
about 15 seconds for the oven door lock to activate.
• If the clock is set for a 12 hour display (default) the
Delayed Self Clean can never be set to start more
than 12 hours in advance.
After the Self Clean cycle
ENGLISH
y The oven door will remain locked until oven tempera-
ture has cooled.
y You may notice some white ash in the oven. Wipe it o
with a damp cloth or a soap-lled steel wool pad after
the oven cools. If the oven is not clean after one clean
cycle, repeat the cycle.
y If oven racks were left in the oven and do not slide
smoothly after a clean cycle, wipe racks and rack supports with a small amount of vegetable oil to make
them glide easier.
y Fine lines may appear in the porcelain because it went
through heating and cooling. This is normal and will
not aect performance.
Page 34

34
CARE AND CLEANING
CLEANING THE EXTERIOR
Painted and Decorative Trim
For general cleaning, use a cloth with hot soapy water. For
more dicult soils and built-up grease, apply a liquid detergent directly onto the soil. Leave it on for 30 to 60 minutes. Rinse with a damp cloth and dry. Do not use abrasive
leaners.
Stainless Steel Surfaces (on some
models)
To avoid scratches, do not use a steel wool pads.
1. Place a small amount of stainless steel appliance
cleaner or polish on a damp cloth or paper towel.
2. Clean a small area, rubbing with the grain of the stainless steel if applicable.
3. Dry and bu with a clean, dry paper towel or soft
cloth.
4. Repeat as necessary.
Oven door
y Use soapy water to thoroughly clean the oven door.
Rinse well. DO NOT immerse the door in water.
y You may use a glass cleaner on the outside glass of the
oven door. DO NOT spray water or glass cleaner on the
door vents.
y DO NOT use oven cleaners, cleaning powders, or harsh
abrasive cleaning materials on the outside of the oven
door.
y DO NOT clean the oven door gasket. The oven door gas-
ket is made of a woven material that is essential for a
good seal. Care should be taken not to rub, damage, or
remove this gasket.
Broiler Pan and Grid
y Do not store a soiled broiler pan or grid anywhere in
the range.
y Do not clean the broiler pan or grid in a self cleaning
mode.
y Remove the grid from the pan. Carefully pour out the
grease from the pan into a proper container.
y Wash and rinse the broiler pan and grid in hot water
with a soap-lled or plastic scouring pad.
y If food has burned on, sprinkle the grid with cleaner
while hot and cover with wet paper towels or a dishcloth. Soaking the pan will remove burned-on foods.
y Both the broiler pan and grid may be cleaned with a
commercial oven cleaner or in the dishwasher.
CHANGING THE OVEN LIGHT
The oven light is a standard 40-watt appliance bulb. It will
turn on when the oven door is open. When the oven door
is closed, press the OVEN LIGHT button to turn it on or
o.
1. Unplug the range or disconnect power.
2. Turn the glass bulb cover in the back of the oven
counterclockwise to remove.
3. Turn the bulb counterclockwise to remove from
socket.
4. Insert the new bulb and turn it clockwise.
5. Insert the glass bulb cover and turn it clockwise.
CAUTION
Do not use harsh cleaners or harsh abrasive cleaning
materials on the outside of the oven door. Doing so
can cause damage.
Do not hand clean
oven door gasket
Remove any
debris from door
6. Plug in the range or reconnect the power.
WARNING
• Make sure that the oven and bulb are cool.
• Disconnect the electrical power to the range at the
main fuse or circuit breaker panel. Failure to do so
can result in severe personal injury, death, or electrical shock.
Page 35

REMOVING AND REPLACING
About 5˚
THE OVEN DOOR AND WARMING
DRAWER
CAUTION
• The door is very heavy. Be careful when removing
and lifting the door.
• DO NOT lift the door by the handle.
• DO NOT hit the glass with pots, pans, or any other
object.
• Scratching, hitting, jarring or stressing the glass
may weaken its structure, causing an increased risk
of breakage at a later time.
Removing the oven door
1. Fully open the door. Pull the hinge locks down
toward the door frame, to the unlocked position. A
tool, such as a small at-blade screwdriver, may be
required.
Slot
Hinge lock
Hinge arm
Door frame
CARE AND CLEANING
Replacing the oven door
1. Firmly grasp both sides of the door at the top.
Bottom edge
Hinge arm
2. With the door at the same angle as the removal
position, seat the indentation of the hinge arm into
the bottom edge of the hinge slot. The notch in the
hinge arm must be fully seated into the bottom of
the slot.
Slot
Push hinge locks up to lock
of slot
Indentation
Hinge lock
Hinge arm
Door frame
35
ENGLISH
Push hinge locks down to unlock
2. Firmly grasp both sides of the door at the top.
Close the door to the removal position (approximately ve degrees) which is halfway between the
broil stop position and fully closed.
Removal Position
3. Lift the door up and out until the hinge arm is clear
o of the slot. Put the door on the oor.
3. Fully open the door. If the door will not fully open,
the indentation is not seated correctly in the bottom
edge of the slot.
4. Push the hinge locks down against the front frame
of the oven cavity to the locked position. Close the
oven door.
Page 36

36
Remove screws
CARE AND CLEANING
Removing the Warming Drawer
WARNING
Disconnect the electrical power to the range at the
main fuse or circuit breaker panel. Failure to do so
can result in severe personal injury, death, or electrical shock.
Most cleaning can be done with the drawer in place; however, the drawer may be removed if further cleaning is
needed. Use warm water to thoroughly clean.
1. Fully open the drawer.
2. Remove the two screws.
Remove screws
Replacing the Warming Drawer
1. Pull the bearing glides to the front of the chassis
glide.
2. Align the glide on each side of the drawer with the
glide slots on the range.
3. Push the drawer into the range until levers “click ”
(approximately 2 inch).
4. Pull the drawer open again to seat bearing glides into
position.
5. Replace the two screws.
3. Locate the glide lever on each side of the drawer. Push
down on the left glide lever and pull up on the right
glide lever.
Lever
Lever
Push down with nger
4. Pull the warming drawer away from the range.
Pull up with nger
Page 37

FAQs
FAQ s
37
ENGLISH
What types of cookware are recommended
to use with my cook top?
y The pans must have a at bottom and straight sides.
y Only use heavy- gauge pans.
y The pan size must match the amount of food to be pre-
pared and the size of the surface element.
y Use tight tting lids.
y Only use at bottom woks.
Why does “HS” appear on the cooktop
display?
HS (Hot Surface) will appear in the display once the element is turned o or during the self clean cycle. The HS
indicator will stay on until the surface has cooled to approximately 150°F (66°C) or when the self clean cycle ends.
What does “PF” in the display mean?
“PF” means there has been a power interruption in your
home. Press Clear/o Key and the “On/O” key on the
cook-top controls to clear this code. It may also require
you to reset the time for the display.
Is it normal to hear a clicking noise coming
from the back of my oven when I am using
it?
Yes, this is normal. The controller has relays that open and
close during baking.
Can I leave my racks in the oven when
running a Self Clean cycle?
No. Although it will not damage the racks, it will discolor
them and may make them hard to slide in and out during
use. Remove all items from the oven before starting a Self
Clean cycle.
What should I do if my racks are sticky and
have become hard to slide in and out?
Over time, the racks may become hard to slide in and out.
Apply a small amount of olive oil to the ends of the racks.
This will work as a lubricant for easier gliding.
What should I do for hard to remove stains
on my cooktop?
The cooktop should be cleaned after every use to prevent
permanent staining. When cooking high sugar based
food, such as tomato sauce, is it recommended to clean
the stain while the cooktop is still warm. Use a safety
mitt when cleaning to prevent burns. Refer to the CARE
AND CLEANING section of this owner's manual for further
instruction.
Should I broil with the door opened or
closed?
Your electric range is designed for open door broiling.
The door has a broil stop position. The broil stop position
is about 10 degrees from the closed position.
During convection cooking the fan stops
when I open the door. Is that normal?
Yes, this is normal. When the door is opened, the
convection fan will stop until the door is closed.
Can I use aluminum foil to catch drippings
in my oven cavity?
No. If aluminum foil is placed on the bottom of the oven
cavity, it will burn and you will not be able to remove
it. The heater for the oven is below the oven cavity and
provides direct heat to the bottom of the cavity. If you
already have burnt foil on the bottom, do not worry, as it
will not hinder the performance.
Can I use aluminum foil on the racks?
It is not recommend to place aluminum foil inside the
oven cavity. Using foil on the racks will restrict air ow
which could result in poor cooking results.
Why aren't the function buttons working?
Make sure that the range is not in Lockout mode. The
lock symbol will show in the display if Lockout is
activated. To deactivate Lockout, press and hold the
START button for three seconds. The unlock melody will
sound and UNLOCKING will appear in the display until the
controls are unlocked.
Why is the time flashing ?
This means that the product has just been plugged in, or
that it has experienced a power interruption. To clear the
ashing time, press any key and reset the clock if needed.
Page 38

38
TROUBLESHOOTING
BEFORE REQUESTING SERVICE
Problem Possible Causes / Solutions
Range is not level. y Poor installation. Place an oven rack in the center of the oven. Place a level on the oven
rack. Adjust leveling legs at the base of the range until the oven rack is level.
y Floor is not level. Make sure that the oor is strong and stable enough to adequately
support the range. If oor is sagging or sloping, contact a carpenter to correct the situation.
y Kitchen cabinet alignment may make range appear unlevel. Be sure cabinets are square
and have sucient room for range clearance.
Oven control is beeping and
displaying an F code error.
Surface units will not maintain
a rolling boil or cooking is not
fast enough.
Surface units do not work
properly.
Surface unit stops glowing
when changed to a lower
setting.
Areas of discoloration on the
cooktop.
y Electronic control has detected the fault condition. Press CLEAR OFF to clear the display
and stop beeping. Reprogram oven. If fault recurs, record fault number. Press CLEAR
OFF and contact a Service agent.
CODE Description CODE Description
F-1 Opened Sensor F-6 Oven hot
F-2 Shorted Sensor F-9 No heating
F-3 Key Short Error F-10 Door Lock Fail
y Improper cookware is being used. Use pans that are at and match the diameter of the
surface unit selected.
y In some areas, the power (voltage) may be low. Cover pan with a lid until desired heat
is obtained.
y A fuse in your home may be blown or the circuit breaker tripped. Replace the fuse or
reset the circuit breaker.
y Cooktop controls are improperly set. Check to see that the correct control is set for the
surface unit you are using.
y This is normal. The unit is still on and hot.
y Food spillovers not cleaned before next use. See the Care and Cleaning section.
y Hot surface on a model with a light-colored cooktop. This is normal. The surface may
appear discolored when it is hot. This is temporary and will disappear as the glass cools.
Frequent cycling on and o of
surface units.
y This is normal. The element will cycle on and o to maintain the heat setting.
Page 39

TROUBLESHOOTING
Problem Possible Causes / Solutions
Oven will not work. y Plug is not completely inserted in the electrical outlet. Make sure that the electrical plug
is plugged into a live, properly grounded outlet.
y A fuse in your home may be blown or the circuit breaker tripped. Replace the fuse or
reset the circuit breaker.
y Oven controls improperly set. See the "Using the oven" section.
y Oven is too hot. Allow the oven to cool.
Oven light does not work. y Replace or tighten bulb. See the "Oven light" section.
39
ENGLISH
Oven smokes excessively during broiling.
Food does not bake or roast
properly.
Food does not broil properly. y Improper rack position being used. Refer to the "Removing and replacing oven racks"
Food does not broil properly. y Aluminum foil used on the broiling pan and grid has not been tted properly and slit as
y Control not set properly. Refer to the "Using the oven" section.
y Meat is too close to the broil element. Reposition the rack to provide proper clearance
between the meat and the element.
y Meat is not properly prepared. Remove excess fat from meat. Cut remaining fatty edges to
prevent curling.
y Broiler pan is upside down and the grease is not draining. Always place the grid on the
broiler pan with ribs up and slots down to allow grease to drip into the pan.
y Grease has built up on oven surfaces. Regular cleaning is necessary when broiling fre-
quently.
y Old grease or food spatters cause excessive smoking. Clean the interior of the oven.
y Oven controls improperly set. See the "Using the oven" section.
y Rack position is incorrect or the rack is not level. Refer to the "Rack and Pan Placement"
section.
y Incorrect cookware or cookware of improper size being used. Refer to the "Using the
proper cookware" section.
section.
y Cookware not suited for broiling.
recommended.
y In some areas the power voltage may be low. Preheat the broil element for 5-7 minutes.
Refer to the Broiling Guide.
Displayed Time is ashing. y This is normal. This means that the product has just been plugged in, or that it has ex-
perienced a power interruption. To clear the ashing time, press any key and reset the
clock if needed.
Oven control display PF message.
y “PF” means there has been a power interruption in your home. Press Clear/o Key and
the “On/O” key on the cooktop controls to clear this code. It may also require you to
reset the time for the display.
Page 40

40
TROUBLESHOOTING
Problem Possible Causes / Solutions
Oven temperature too hot or
too cold.
Scratches or abrasions on
cooktop surface.
Metal marks. y Scraping of metal utensils on cooktop surface. Do not slide metal utensils on cooktop
Brown streaks or specks. y Boilovers are cooked onto surface. Use a blade scraper to remove soil. Refer to the "Care
Areas of discoloration with
metallic sheen.
Oven will not self clean. y The oven temperature is too high to set a self clean operation. Allow the range to cool
“Crackling” or “popping”
sound.
y Oven Sensor needs to be adjusted. Refer to the "Using the oven" section.
y Coarse particles such as salt or sand between cooktop and utensils can cause scratches.
y Be sure cooktop surface and bottoms of utensils are clean before usage. Small scratches
do not aect cooking and will become less visible with time.
y Cleaning materials not recommended for ceramic-glass cooktop have been used. Refer
to the "Care and Cleaning" section.
y Cookware with rough bottom has been used. Use smooth, at-bottomed cookware.
surface. Use a ceramic-glass cooktop cleaning creme to remove the marks.
y Refer to the "Care and Cleaning" section.
and Cleaning" section.
y Mineral deposits from water and food. Remove using a ceramic-glass cooktop cleaning
creme. Use cookware with clean, dry bottoms.
and reset the controls.
y Oven controls improperly set. Refer to the "Care and Cleaning" section.
y A self clean cycle cannot be started if the lockout feature is activated.
y This is the sound of the metal heating and cooling during both the cooking and Self
Clean functions. This is normal.
Fan noise. y A convection fan may automatically turn on and o. This is normal.
Convection fan stops. y Convection fan stops during a convection bake cycle. This is normal and is done to allow
for more even heating during the cycle. This is not a failure of the range and should be
considered normal operation.
Excessive smoking during a
self clean cycle.
Oven door will not open after
a self clean cycle.
Oven not clean after a self
clean cycle.
CLEAN and door ash in the
display.
y Excessive soil. Press the CLEAR OFF button. Open the windows to rid the room of smoke.
Wait until the self clean mode is cancelled. Wipe up the excess soil and reset.
y Oven is too hot. Allow the oven to cool.
y Oven controls not properly set. See the Self Clean section.
y Oven was heavily soiled. Clean up heavy spillovers before starting the self clean cycle.
Heavily soiled ovens may need to self clean again or for a longer period of time.
y The self clean cycle has been selected but the door is not closed. Close the oven door.
Page 41

Problem Possible Causes / Solutions
TROUBLESHOOTING
41
ENGLISH
LOCKED appears in the display.
Burning or oily odor emitting
from the vent.
Oven racks are dicult to
slide.
Oven door remains locked
after the self clean cycle.
Moisture collects on oven
window or steam comes from
oven vent.
y The oven door is locked because the temperature inside the oven is too hot. Press the
CLEAR OFF button. Allow the oven to cool
y This is normal in a new oven and will lessen in time. To speed the process, set a self clean
cycle for a minimum of 3 hours. Refer to the "self clean" section.
y The shiny, silver-colored racks were cleaned in a self clean cycle. Apply a small amount
of vegetable oil to a paper towel and wipe the edges of the oven racks with the paper
towel.
y Oven interior is still hot. Allow about one hour for the oven to cool after the completion
of a self clean cycle. The door can be opened when the LOCK indicator disappears from
the display.
y The control lock is activated.
y This is normal when cooking foods high in moisture.
y Excessive moisture was used when cleaning the window.
Page 42

42
WARRANTY
WARRANTY (USA)
LG Electronics Inc. will repair or replace your product, at LG’s option, if it proves to be defective in material or workmanship
under normal use, during the warranty period set forth below, eective from the date of original consumer purchase of the
product. This limited warranty is good only to the original purchaser of the product and eective only when used in U.S.A.
WARRANTY PERIOD
On e Year
From the date of the original purchase.
HOW SERVICE IS HANDLED
Any part of the oven that fails due to a defect in materials or work-
manship. During this full one-year warranty, LG will also provide,
free of charge, all labour and in-home service to replace the defec-
tive part.
THIS WARRANTY IS IN LIEU OF ANY OTHER WARRANTIES, EXPRESS OR IMPLIED, INCLUDING WITHOUT LIMITATION, ANY
WARRANTY OF MERCHANTABILITY OR FITNESS FOR A PARTICULAR PURPOSE. TO THE EXTENT ANY IMPLIED WARRANTY IS
REQUIRED BY LAW, IT IS LIMITED IN DURATION TO THE EXPRESS WARRANTY PERIOD ABOVE. LG WILL NOT BE LIABLE FOR
ANY CONSEQUENTIAL, INDIRECT, OR INCIDENTAL DAMAGES OF ANY KIND, INCLUDING LOST REVENUES OR PROFITS, IN
CONNECTION WITH THE PRODUCT. SOME STATES DO NOT ALLOW LIMITATION ON HOW LONG AN IMPLIED WARRANTY
LASTS OR THE EXCLUSION OF INCIDENTAL OR CONSEQUENTIAL DAMAGES, SO THE ABOVE LIMITATIONS OR EXCLUSIONS
MAY NOT APPLY TO YOU.
THIS LIMITED WARRANTY DOES NOT APPLY TO:
1. Service calls to correct the installation of your appliance, to instruct you how to use your appliance, to replace house
fuses or correct house wiring, or to replace owner-accessible light bulbs.
2. Repairs when your appliance is used in other than normal, single-family household use.
3. Pickup and delivery. Your appliance is designed to be repairable in the home.
4. Damage resulting from accident, alteration, misuse, abuse, re, ood, improper installation, acts of God, or use of products not approved by LG Corporation.
5. Repairs to parts or systems resulting from unauthorized modications made to the appliance.
6. Replacement parts or repair labour costs for units operated outside the united states.
7. Any labour costs during the limited warranty period.
This warranty is extended to the original purchaser for products purchased for home use within the U.S.A. In Alaska, the
warranty excludes the cost of shipping or service calls to your home. Some states do not allow the exclusion or limitation of
incidental or consequential damages, so this exclusion or limitation may not apply to you. This warranty gives you specic
legal rights, and you may also have other rights which vary from state to state. To know what your legal rights are, consult
your local or state consumer aairs or your state’s Attorney General.
CUSTOMER ASSISTANCE INFORMATION:
To Prove Warranty Coverage Retain your Sales Receipt to prove date of pur-
chase.
A copy of your Sales Receipt must be submitted at
the time warranty service is provided.
To Obtain the Nearest Authorized Service Center or Sales Dealer, or
to Obtain Product, Customer, or Service Assistance
Call 1-800-243-0000 (Phone answered 24
hours - 365 days a year) and choose the appropriate prompt from the menu; or visit our website at:
http://us.lgservice.com.
Page 43

ESPAÑOL
MANUAL DEL USUARIO
COCINA ELÉCTRICA
Lea atentamente este manual del usuario antes de poner el
electrodoméstico en funcionamiento y téngalo en todo momento a
mano para su referencia.
LRE3027ST
P/No.: MFL57206010
www.lg.com
Page 44

2
ÍNDICE
ÍNDICE
IMPORTANTES INSTRUCCIONES DE
3
SEGURIDAD
DESCRIPCIÓN GENERAL
11
1 1 Descripción general de la cocina
1 2 Descripción general del panel de control
CARACTERÍSTICAS
13
1 3 Configuración
1 3 Reloj
1 4 Timer on/off (Temporizador encendido/
apagado)
1 4 Precalentamiento rápido
1 4 Conversión automática de convección
1 5 Termo stat o
1 5 Idioma
1 5 Luz de alarma de precalentamiento
1 5 Volumen de la alerta sonora
1 5 Fahrenheit o Celsius
1 5 Luz del horno
1 6 Bloqueo
1 6 Hora de inicio
1 7 Tiempo de cocción
22 Hornear
22 Horneado por convección
23 Asado por convección
24 Asado a la parrilla
24 Asado a la parrilla rápido
24 Guía recomendada de asado a la parrilla
27 Alimentos para niños
28 Calentar
28 Fermentación
28 Favorites (Favoritos)
29 Modo Sabbath
CAJÓN CALENTADOR
29
29 Funcionamiento del cajón calentador
CUIDADO Y LIMPIEZA
31
31 Limpieza de la estufa de vitrocerámica
32 Auto-limpieza
35 Limpieza exterior
35 Reemplazo de la luz del horno
36 Sacar y volver a colocar la puerta del horno y
el cajón calentador
USO DE LA ESTUFA
18
1 8 Áreas de cocción
1 8 Uso de las hornallas de la estufa
20 Uso de los recipientes de cocción adecuados
USO DEL HORNO
21
21 Antes de usar del horno
21 Sacar y volver a colocar los estantes del
horno
PREGUNTAS FRECUENTES
38
ANTES DE LLAMAR AL SERVICIO
39
TÉCNICO
GARANTÍA
43
Page 45

IMPORTANTES INSTRUCCIONES DE SEGURIDAD
3
IMPORTANTES INSTRUCCIONES DE SEGURIDAD
Lea y siga todas las instrucciones antes de usar su horno para evitar riesgos de
incendios, descargas eléctricas, lesiones a las personas o daños al utilizar la cocina.
Esta guía no incluye todas las situaciones posibles que se podrían producir. Siempre
comuníquese con su agente de servicio técnico o con el fabricante cuando haya
problemas que no comprenda.
Usted puede descargar el manual de usuario en http://www.lg.com.
Este es el símbolo de alerta de seguridad. Este símbolo lo alerta sobre los
posibles riesgos que pueden causar daños a la propiedad y/o lesiones físicas
graves o la muerte. Todos los mensajes de seguridad estarán precedidos
por el símbolo de alerta de seguridad y la palabra «ADVERTENCIA» o
«PRECAUCIÓN». Estas palabras signican:
ADVERTENCIA
Indica una situación peligrosa que, de no evitarse, podría causar la muerte o lesiones
graves.
ESPAÑOL
PRECAUCIÓN
Indica una situación peligrosa que, de no evitarse, podría causar una lesión menor o
moderada.
PRECAUCIONES DE SEGURIDAD ANTI-VUELCO
ADVERTENCIA
yUn niño o un adulto podría tumbar la cocina, causándole la
muerte.
yVerifique que el dispositivo anti-vuelco haya sido
correctamente instalado y esté fijo al piso o a la pared y
enganchado a la pata de nivelación de la cocina.
yAsegúrese de que se vuelva a colocar el dispositivo anti-
vuelco cuando se mueva la cocina.
yPara verificar que los soportes anti-vuelco estén
correctamente instalados: Tome el borde superior
trasero de la protección posterior de la cocina e intente
cuidadosamente inclinarla hacia adelante verique que los
soportes anti-vuelco estén enganchados.
yNo ponga en funcionamiento la cocina sin el dispositivo
anti-vuelco colocado y enganchado.
yDe no seguir estas instrucciones, podrían producirse la
muerte o quemaduras graves en niños o adultos.
Mensula
Anti-vuelco
Tubo
Nivelador
Page 46

4
IMPORTANTES INSTRUCCIONES DE SEGURIDAD
Aproximadamente
0,65” (16,5 mm)
Soporte
Anti-vuelco
Debe introducirse
el tornillo en la
madera o en el
hormigón
Pared
yPara vericar que los soportes anti-vuelco estén correctamente instalados, retire todos
los elementos de la estufa. Tome el borde superior trasero de la protección posterior
de la cocina e intente cuidadosamente inclinarla hacia adelante. Verifique que los
soportes anti-vuelco estén colocados.
yRetire el cajón calentador o de almacenamiento y controle visualmente que las patas
de nivelación traseras estén completamente insertadas en los soportes anti-vuelco.
yAsegúrese de que un técnico calicado realice la instalación y puesta a tierra de este
electrodoméstico en forma adecuada.
yNo repare ni reemplace ninguna parte del electrodoméstico, salvo que esté
específicamente recomendado en el manual. Cualquier otra reparación deberá ser
realizada por un técnico calicado.
ySiempre desconecte la electricidad del electrodoméstico antes de realizar una
reparación.
PRECAUCIONES DE SEGURIDAD
ADVERTENCIA:
Este producto contiene químicos conocidos por el Estado
de California como causantes de cáncer y defectos de nacimiento u otros daños
reproductivos. Lávese las manos después de usarlo.
yNO TOQUE LAS HORNALLAS NI LAS SUPERFICIES INTERIORES DEL HORNO.
Las hornallas podrían estar calientes incluso cuando presenten un color oscuro.
Las superficies interiores del horno se calientan lo suficiente como para causar
quemaduras. Durante y luego de su uso, no toque ni permita que la vestimento
u otro material inflamable entre en contacto con las hornallas o las superficies
interiores del horno hasta que hayan tenido tiempo suciente para enfriarse. Otras
superficies, como los orificios de venteo del horno y la superficie cercana a estos
oricios, las puertas del horno, y las ventanas de las puertas del horno también se
calientan y podrían causar quemaduras si no se han enfriado.
yAbra la puerta del horno con cuidado. Permita que salga del horno el aire caliente
o el vapor antes de sacar o colocar nuevamente la comida en el horno.
yNO caliente envases de comida sin abrir. La presión de los envases podría hacerlos
explotar causando lesiones.
yAsegúrese de retirar todos los materiales del embalaje antes de la puesta en
funcionamiento. Mantenga el plástico, las telas y el papel lejos de las partes del
electrodoméstico que se podrían calentar.
yNO fuerce la puerta del horno para abrirla. Esto podría dañar el sistema de
bloqueo automático de la puerta. Abra la puerta del horno con cuidado luego
del ciclo de auto-limpieza. Manténgase a un costado del horno al abrir la puerta
para permitir que escape el aire caliente o el vapor. El horno podría estar aun MUY
CALIENTE.
Page 47

IMPORTANTES INSTRUCCIONES DE SEGURIDAD
5
yNO use limpiadores ásperos, abrasivos o raspadores metálicos filosos para
limpiar el vidrio de la puerta del horno ya que podrían rayar la supercie. Los
rayones podrían hacer que se quiebre el vidrio.
yTenga cuidado al sacar y levantar la puerta.
yNO levante la puerta de la manija. La puerta es muy pesada.
yNO utilice el horno para secar ropa. Utilice el horno únicamente para el propósito
para el que fue diseñado.
yNO utilice utensilios para extraer restos (ceniza, comida, etc.)
y Consulte el manual para la correcta instalación del soporte anti-vuelco.
y Nunca quite las patas del horno. El rango no serán asegurados a los soportes anti-
vuelco, si las piernas se retiran.
PRECAUCIÓN
yNO cubra las paredes del horno, estantes, parte inferior, o cualquier otra parte
del horno con papel de aluminio o cualquier otro material. Hacerlo alterará
la distribución del calor, producirá malos resultados en la cocción y provocará un
daño permanente en el interior del horno (el papel de aluminio se derretirá en la
supercie interior del horno).
yNunca intente secar una mascota en el horno.
y No deje objetos metálicos, como latas, alrededor del quemador.
ESPAÑOL
ADVERTENCIA
yNo pise ni se siente sobre la puerta del horno. Instale los soportes anti-vuelco
que se encuentran embalados junto con la cocina.
-La cocina podría tumbarse y el derrame de líquidos o alimentos calientes o la caída
de la cocina misma podrían provocar lesiones.
-Si se separa la cocina de la pared, para limpiarla, repararla, o por cualquier otro
motivo, asegúrese de que se coloquen nuevamente los soportes anti-vuelco en
forma correcta cuando se vuelva a empujar la cocina contra la pared.
yNUNCA utilice su electrodoméstico para entibiar o calentar el ambiente.
yMantenga a los niños y a las mascotas lejos del horno.
yNO use agua en incendios producidos por grasa. Si se produce un incendio,
mantenga la puerta del horno cerrada y apague el horno. Si el fuego continúa,
arroje bicarbonato de sodio sobre el fuego o utilice un extinguidor.
yUtilice únicamente agarraderas secas. La humedad de las agarraderas sobre
las superficies calientes podría producir quemaduras de vapor. No permita
que las agarraderas entren en contacto con los elementos calentadores. No
utilice un repasador u otro paño grueso para quitar la comida.
yNo almacene elementos dentro o sobre la cocina. No deben almacenarse los
materiales inamables en, o cerca de, la cocina.
yUse prendas adecuadas. No debería usarse vestimenta holgada o que cuelgue
mientras se usa la cocina.
yNunca derrame AGUA FRÍA sobre un horno caliente para limpiarlo.
yNo utilice la cocina si está dañada.
yNo ponga en funcionamiento el horno sin la hornalla calentadora de carbón.
Page 48

6
IMPORTANTES INSTRUCCIONES DE SEGURIDAD
yNo permita que nadie se suba, pare o cuelgue de la puerta, cajón de
almacenamiento o estufa de la cocina. Podrían dañar la cocina e incluso
tumbarla, causando lesiones personales graves.
SEGURIDAD ELÉCTRICA
yRevestimiento Protector. No use aluminio o cualquier otro material para revestir
la parte inferior del horno. La instalación incorrecta de este revestimiento podría
causar riesgo de descarga eléctrica o incendio.
yNo permita que papel de aluminio o la sonda de temperatura entren en contacto
con los elementos calentadores.
yAntes de reemplazar la lamparita de su horno, desconecte la energía eléctrica
del horno desde el fusible principal o el panel interruptor de circuitos. No
hacerlo podría causar lesiones graves, la muerte o descargas eléctricas.
ADVERTENCIA
yAPAGUE antes de retirar el cajón inferior del horno.
-No hacerlo podría causar lesiones graves, la muerte o descargas eléctricas.
COLOCACIÓN DE LA BANDEJA
yNo coloque comida o recipientes de cocción en la parte inferior de la cavidad
del horno. Hacerlo causará un daño permanente en el acabado de la parte inferior
del horno.
yNunca coloque plástico, papel, alimentos enlatados o material combustible
dentro del horno.
yAl cocinar alimentos en el horno inferior, utilice siempre una bandeja para
horno o bandeja con los 4 lados levantados. Esto evitará que los alimentos se
deslicen.
FREIDORAS
yTenga extrema precaución al trasladar o desechar la grasa caliente.
ySiempre caliente la grasa lentamente, y contrólela mientras se calienta.
ySi va a freír una combinación de aceites y grasas, mézclelos antes de calentarlos.
yUtilice un termómetro para frituras para evitar que la grasa se caliente por encima
del punto de humeo.
yUtilice la menor cantidad posible de grasa para rehogar o freír de manera efectiva.
Llenar el recipiente con demasiada grasa podría causar derrames al agregar los
alimentos.
Page 49

IMPORTANTES INSTRUCCIONES DE SEGURIDAD
SEGURIDAD DURANTE SU USO
yNo toque los estantes del horno cuando estén calientes.
y Si el bastidor debe ser movido mientras el horno está caliente, no permita que la
agarradera en contacto con el elemento de calentamiento en el horno caliente
ySiempre utilice agarraderas o guantes de cocina al retirar la comida del horno o
de la hornalla calentadora central. Los recipientes de cocción estarán calientes.
ySiempre utilice un guante de cocina para retirar la sonda de temperatura luego
de la cocción.
yUtilice con precaución las funciones TIMED BAKE (HORNEADO TEMPORIZADO)
o DELAYED TIMED BAKE (HORNEADO TEMPORIZADO RETARDADO). Utilice
el reloj temporizador automático al cocinar carnes curadas o congeladas y la
mayoría de las frutas y vegetales. Los alimentos que pueden echarse a perder
fácilmente como la leche, huevos, pescado, carne o aves deben ser primero
enfriados en el refrigerador. Incluso cuando hayan sido enfriados, no deben
permanecer en el horno durante más de 1 hora antes de iniciar la cocción y se
los debe retirar rápidamente luego de que la cocción haya terminado. Ingerir
alimentos en mal estado puede producir intoxicaciones.
ySi se produce un incendio, mantenga la puerta del horno cerrada y apague el
horno. Si el fuego continúa, arroje bicarbonato de sodio sobre el fuego o utilice
un extinguidor.
ySi se produce un incendio, NO ponga agua o harina en el fuego. La harina podría
ser explosiva y el agua podría causar que un incendio causado por grasa se propague
causando lesiones personales.
yNO utilice la asadera sin la rejilla. NO cubra la rejilla con papel de aluminio.
yNo utilice plástico para cubrir los alimentos. Utilice únicamente papel aluminio o
tapas resistentes para horno.
ySi el horno se encuentra muy manchado de aceite, realizar una auto-limpieza
del horno antes de utilizarlo nuevamente. Esto podría generar un peligro de
incendio.
yBarra la suciedad del fondo del horno antes de utilizar la función de Auto-Limpieza.
yUtilice el tamaño adecuado de recipientes. Para ollas y sartenes más pequeñas,
utilice las hornallas más pequeñas. Para ollas y sartenes más grandes, utilice
las hornallas más grandes. Elija aquellos utensilios que tengan una base lo
sucientemente plana como para cubrir las hornallas. El uso de utensilios de tamaño
insuciente, expondrá parte de la hornalla calentadora al contacto directo y podría
causar que se incendie la vestimenta.
yNunca deje las hornallas de superficie desatendidas con configuraciones de
alta temperatura. La cocción excesiva causa derrames humeantes y grasosos que
podrían prenderse fuego.
yUtensilios de cocina vidriados. Sólo ciertos tipos de vidrio, vitrocerámica, cerámica,
barro u otros tipos de utensilios vidriados son aptos para utilizar en la parte superior
de la cocina sin que se rompan debido al brusco cambio de temperatura.
yLas asas de los utensilios deben siempre apuntar hacia adentro y no
extenderse sobre las hornallas de superficie adyacentes. Para reducir el riesgo
de quemaduras, incendio de materiales inamables y derrames debido al contacto
accidental con el utensilio, el asa del utensilio debe estar ubicado de manera tal que
apunte hacia adentro y no se extienda sobre las hornallas de supercie adyacentes.
7
ESPAÑOL
Page 50

8
IMPORTANTES INSTRUCCIONES DE SEGURIDAD
SEGURIDAD DE LOS NIÑOS
ADVERTENCIA
yMantenga a los niños lejos del horno.
yNunca permita que un niño se cuelgue de la puerta del horno.
yNo permita que los niños se arrastren hacia adentro del horno.
y Las partes accesibles pueden calentarse cuando la parrilla está en uso.
y Durante la operación normal (auto-limpieza ciclo, hornear, etc) NO toque la su-
percie caliente entre la parte inferior de la puerta del horno y la parte superior
del cajón en la parte frontal del horno. Si lo hace, es un riesgo de quemaduras
y provocar lesiones.
PRECAUCIÓN
yNo deje a niños pequeños sin supervisión cerca del horno.
yDurante el ciclo de auto-limpieza, la parte externa del horno puede estar muy
caliente al tacto.
yNUNCA deje a los niños solos o sin supervisión cerca del electrodoméstico
cuando el mismo esté en uso o todavía esté caliente. Nunca se debe
permitir que los niños se sienten o paren en ninguna de las partes del
electrodoméstico, ya que podrían lastimarse o quemarse.
yNUNCA almacene objetos de interés para los niños en los gabinetes que se
encuentran sobre la cocina. Los niños que trepen a la cocina o a la puerta del
horno para alcanzar objetos, podrían sufrir lesiones graves.
yPermita que los utensilios calientes se enfríen en un lugar seguro, fuera del
alcance de los niños pequeños.
yNo debería permitirse que los niños jueguen con los controles u otras partes
del electrodoméstico.
SUPERFICIES DE COCCIÓN DE VITROCERÁMICA
Manténgase a un costado de la cocina al abrir la puerta del horno. El aire caliente y el
vapor que escapan pueden causar quemaduras en las manos, el rostro y los ojos.
ADVERTENCIA
yNO TOQUE LAS HORNALLAS DE SUPERFICIE O ÁREAS CERCA DE LAS
HORNALLAS.
yLas hornallas de superficie podrían estar calientes incluso cuando presenten un
color oscuro. Las áreas cercanas a las hornallas de superficie podrían calentarse
lo suficiente como para causar quemaduras. Durante y luego de su uso, no toque
ni permita que la vestimenta u otro material inflamable entre en contacto con las
hornallas de superficie o las áreas cerca de las hornallas hasta que hayan tenido
tiempo suciente para enfriarse. Esto incluye la estufa y el sector que se encuentra
sobre la puerta del horno.
Page 51

IMPORTANTES INSTRUCCIONES DE SEGURIDAD
9
yNo cocine sobre una estufa rota. Si la estufa se rompiera, los líquidos de limpieza
y los derrames podrían penetrar por la estufa rota y provocar un peligro de descarga
eléctrica. Comuníquese con un técnico calicado inmediatamente.
yLimpie la estufa con Precaución. No utilice esponjas o paños para limpiar
derrames en una superficie de cocción caliente. Utilice una espátula metálica
adecuada.
yNO utilice la supercie de vidrio de la estufa como tabla de cortar.
yNO coloque ni almacene sobre la estufa de vidrio objetos que podrían derretirse o
prenderse fuego, incluso cuando no se la esté usando.
ySiempre encienda las hornallas de supercie luego de colocar el recipiente de
cocción.
yNO almacene sobre la supercie de la estufa objetos pesados que podrían caerse y
dañarla.
yNO coloque papel de aluminio u objetos de plástico como saleros y pimenteros,
posa cucharas o envoltorios plásticos o cualquier otro material sobre la cocina
cuando esté en uso.
yAsegúrese de saber qué botones del control operan cada unidad de superficie.
Verique haber encendido la unidad de supercie correcta.
yNUNCA cocine directamente sobre el vidrio. Use siempre recipientes de cocción.
ySiempre coloque el recipiente en el centro de la hornalla de superficie en la
que está cocinando. Nunca deje las hornallas de supercie desatendidas con
configuraciones de alta temperatura. Contacto adecuado de utensilio y el
quemador también mejorará la eciencia.
-La cocción excesiva causa derrames humeantes y grasosos que podrían prenderse
fuego.
ySiempre apague las hornallas de superficie antes de sacar el recipiente de
cocción.
yNO utilice envoltorios plásticos para cubrir los alimentos.
-El plástico podría derretirse sobre la supercie y resultar muy difícil de quitar.
ESPAÑOL
y NO toque las hornallas de supercie hasta que se hayan enfriado.
yLas hornallas de la superficie podrían todavía estar calientes y podrían producirse
quemaduras si se toca la superficie de vidrio antes de que se haya enfriado lo
suciente.
yLimpie inmediatamente los derrames sobre el área de cocción para evitar una
posterior tarea intensa de limpieza.
ySi posee gabinetes de almacenamiento directamente sobre la supercie de cocción,
limítelos a objetos que se usen con poca frecuencia y que puedan almacenarse de
manera segura en un lugar expuesto al calor. Las altas temperaturas pueden ser
peligrosas para objetos como líquidos volátiles, limpiadores o aerosoles.
yAl calentar alimentos, no utilice recipientes que se cierren al vacío. Permita que se
ventile para que escape el aire caliente.
y Algunos limpiadores pueden producir humos peligrosos si se aplica a una supercie
caliente.
yNo utilice esponjas de lana de acero.
-Rayarán la supercie.
Page 52

10
IMPORTANTES INSTRUCCIONES DE SEGURIDAD
yNO utilice esponjas de bra o esponjas de limpieza abrasivas.
-Podrían dañar la supercie de vidrio de la estufa.
yLos recipientes de cocción con fondos ásperos podrían marcar o rayar la
supercie de la estufa.
yNo deslice ningún objeto metálico o de vidrio por la estufa.
yNo utilice recipientes de cocción sucios o con suciedad acumulada en la base.
SEGURIDAD AL LIMPIAR
PRECAUCIÓN
yAbra una ventana y encienda un ventilador o extractor antes de realizar la
auto-limpieza.
yNo Utilizar Limpiadores de Horno. No debe utilizarse ningún limpiador de hornos
o protector de recubrimiento del horno comercial de ningún tipo dentro o alrededor
de alguna parte del horno.
yAntes de realizar la auto-limpieza del horno. Retire la asadera, todos los estantes
del horno, el termómetro para carne y cualquier otro utensilio de la cavidad del
horno.
yNunca mantenga aves domésticas en la cocina. La salud de las aves es
extremadamente sensible a los gases liberados durante un ciclo de auto-limpieza
del horno. Los gases podrían ser nocivos o fatales para las aves. Traslade las aves a
un ambiente bien ventilado.
yLimpie con el ciclo de auto-limpieza solo las partes indicadas en este manual. Antes
de realizar la auto-limpieza del horno, retire la asadera y cualquier otro utensilio de
cocina del horno.
yEs normal que la estufa de la cocina se caliente durante el ciclo de auto-limpieza. Por
lo tanto, debe evitar tocar la estufa durante un ciclo de limpieza.
yInstrucciones Importantes. En el caso de que aparezca el código de error de
auto-limpieza F, y se escuchen tres tonos largos, el horno está funcionando mal
en el modo auto-limpieza. Desconecte la energía eléctrica del horno desde el
fusible principal o el panel interruptor de circuitos y hágalo reparar por un técnico
calicado.
yAsegúrese de que las luces del horno estén frías antes de limpiar.
y Nunca derrame agua sobre el horno. Hacerlo podría provocar el mal funcionamiento
del horno.
COCINAR BIEN LA CARNE Y LAS AVES
Para evitar enfermedades transmitidas por los alimentos, cocine bien la carne y las
aves. La USDA ha indicado las siguientes temperaturas internas mínimas como seguras
para el consumo.
yCarne molida de vaca, ternera, cerdo o cordero: 160° F
yAves 165° F
yCarne de vaca, ternera, cerdo o cordero: 145° F
yPescado/Frutos del Mar 145° F
Page 53

DESCRIPCIÓN GENERAL
DESCRIPCIÓN GENERAL DE LA COCINA
Panel de control
DESCRIPCIÓN GENERAL
11
ESPAÑOL
Venteo del
horno
Hornalla simple
Hornalla Dual
Soporte Anti-vuelco
Valoración
de la etiqueta
Accesorios para la instalación
Hornalla de la zona
de calentamiento
Hornalla Dual
Interruptor de la luz
del horno automático
Traba de auto-limpieza
Estante estándar
Junta
Estante de extensión
Puerta del horno
Cajón calentador
Anti-vuelco (1 de cada uno)
Accesorios para cocinar Accesorios para el mantenimiento
Estante estándar
(2 de cada uno)
Manual del usuario Manual de instalación
Estante de extensión
(1 de cada uno)
Tornillos (6 de cada uno)Plantilla
Canasto cajón
Tacos de anclaje (6 de cada uno)
Limpiador
para Estufas
Esponja Limpiadora
para Estufas
Page 54

12
DESCRIPCIÓN GENERAL
DESCRIPCIÓN GENERAL DEL PANEL DE CONTROL
Control de la Hornalla de la Estufa
Características
Calentador
Controles del
Horno
Hornallas Simples
Botones Numéricos
Botón del Cajón
Calentador
Botón
Start /Lockout
(Inicio/Bloqueo)
Botón
Clear O (Borrar)
Hornallas Duales
NOTA
Los Controles de las Hornallas de la Estufa están ubicados en el
mismo orden que las hornallas correspondientes.
Indicador HS (Superficie Caliente)
El error HS aparecerá en la pantalla cuando se haya apagado la hornalla o durante el ciclo de auto-limpieza. El indicador HS permanecerá
encendido hasta que la supercie se haya enfriado hasta aproximadamente 150˚F/66˚C o cuando nalice el ciclo de auto-limpieza.
PF (Fallo de alimentación) / Reloj Parpadeando
Dependiendo del modelo de su estufa, el display mostrará ya sea "PF" o el Reloj Parpadeando. Esto significa que el
producto ha sido conectado, o que ha experimentado una interrupción de la alimentación. Para eliminar el mensaje "PF",
presione el botón "On / O" en los controles de la Hornalla de la Estufa y el "Clear / O" en los controles del horno. Si su
horno muestra un reloj parpadeando, pulse la tecla “Clock" y reinicie el tiempo o presione cualquier tecla para que deje
de parpadear.
Page 55

CARACTERÍSTICAS
CARACTERÍSTICAS
13
CONFIGURACIÓN
Utilice el botón SETTING para configurar la Conversión
Automática de Convección, el Termostato, el Idioma, la Luz de
Alarma de Precalentamiento, el Volumen de la Alerta Sonora
y para cambiar de escala de temperatura entre Fahrenheit y
Celsius.
RELOJ
Debe configurarse el reloj con la hora correcta del día en
el orden correcto para que las funciones de temporización
automática del horno funcionen correctamente.
1. Presione CLOCK.
2. Presione los botones numéricos para ingresar la hora.
Por ejemplo, para poner el reloj a las 10:30, presione los
números: 1, 0, 3 y 0.
3. Presione START.
NOTA
• No puede modificarse la hora del día durante el
Horneado Temporizado o un ciclo de Auto-Limpieza.
• Para ver la hora del día cuando la pantalla está
mostrando otra información, simplemente presione el
botón CLOCK.
• Si no se presiona ningún botón luego de los 25 segundos
de presionar el botón CLOCK, la pantalla volverá a su
conguración original.
• Si la hora de la pantalla está parpadeando, podría
haberse producido una interrupción eléctrica. Vuelva a
congurar la hora.
Configurar el modo horario en el reloj
(12 o 24 horas.)
Su control está configurado para usar un reloj de 12 horas. Si
usted prefiere tener un reloj de 24 horas, siga los siguientes
pasos.
Configuraciones Predeterminadas Mínimas y
Máximas
Todas las características enumeradas tienen una conguración
de tiempo o temperatura máxima que puede ingresarse en el
control. Un tono de aceptación de la entrada sonará cada vez
que presione una tecla del control.
Un tono de error de entrada (dos tonos cortos) sonará si la
entrada de la temperatura o el tiempo están por debajo del
mínimo o por encima del máximo de las conguraciones para la
función.
CARAC TE-
RÍSTICA
MIN. TEMP./
TIEMPO
M AX . TE M P./
TIEMPO
Predetermi-
nado
RELOJ
TEMPORIZADOR
TIEMPO DE
COCCIÓN
HORNEADO
POR
CONVECCIÓN
ASADO POR
CONVECCIÓN
ASADO A LA
PARRILLA
HORNEAR
FERMENTAR
CALENTAR 170°F/75°C, 3 hor as
AUTOLIMPIEZA
12 Hs . 1:00 Hs. / Mi n. 12:59 Hs. / Min.
24 Hs. 0: 00 Hs. / Min. 23:59 Hs. / M in.
12 Hs . 0:01 Min. 11:59 Hs. / Min.
24 Hs. 0:01 Min. 11:59 Hs. / Min.
12 Hs . 0:01 Min. 11:59 Hs. / Min.
24 Hs. 0:01 Min. 11:59 Hs. / Min.
300°F / 150°C 550°F / 285°C 12 Hs.
300°F / 150°C 550°F / 285°C 12 Hs.
Lo - 400° F Hi - 550° F 3 Hs.
170°F /75°C 550° F / 285°C 12 Hs.
3 Hs. 5 Hs. 4Hs.
12 Hs .
ESPAÑOL
1. Presione y mantenga el botón CLOCK durante tres
segundos.
2. Presione el botón 1 para 12 horas o el botón 2 para 24
horas.
3. Presione el botón STAR T para aceptar.
Page 56

14
CARACTERÍSTICAS
TIMER ON/OFF (TEMPORIZADOR
ENCENDIDO/APAGADO)
El TIMER ON/OFF sirve como un temporizador extra en
la cocina que sonará cuando haya transcurrido el tiempo
congurado. No inicia ni detiene la cocción.
La función TIMER ON/OFF se puede utilizar durante cualquiera
de las funciones de control del horno.
Configuración del Temporizador
1. Para congurar horas y minutos: Presione el botón
TIMER ON/OFF una vez.
Para ingresar minutos y segundos: Presione el botón
TIMER ON/OFF dos veces.
2. Use los botones numéricos para congurar el
temporizador.
Por ejemplo, para congurar el temporizador en cinco
minutos: Presione el botón TIMER ON/OFF una vez y
luego presione el botón 5.
3. Presione el botón Timer o START para iniciar el
temporizador. El tiempo irá en cuenta regresiva y se
mostrará la hora en la pantalla.
NOTA
Si no se presiona el botón TIMER ON/OFF o START,
el temporizador volverá a mostrar la hora del día.
4. Cuando haya transcurrido el tiempo congurado,
aparecerá END en la pantalla. Los tonos indicadores
sonarán cada 15 segundos hasta que se presione TIMER
ON/OFF.
Para Cancelar el Temporizador
1. Presione el botón TIMER ON/OFF una vez. El
temporizador volverá a mostrar la hora del día.
PRECALENTAMIENTO RÁPIDO
La función Precalentamiento Rápido puede precalentar su horno
hasta un 20% más rápido que la función de precalentamiento
normal.
Configuración del Precalentamiento Rápido
1. Presione el botón para la función de cocción (por ej. el
botón BAKE).
2. Usando los botones numéricos, ingrese el tiempo de
cocción.
3. Presione el botón STAR T.
4. Presione el botón RAPID PREHEAT.
CONVERSIÓN AUTOMÁTICA DE
CONVECCIÓN
Al cocinar con “ciclo de convección” (Conv. bake
and roast), la temperatura del horno se reduce
automáticamente a 25° F. La pantalla mostrará el cambio
de temperatura.A esta característica se le llama “AUTO
CONVERSION”(conversión automática).
Su estufa viene con esta característica “ENABLED“
(activada).
Para "DISABLE"(desactivar) la función de conversión automática,
haga lo siguiente.
1. Presione el botón SETTING una vez. Aparecerá “AUTO” en
la pantalla.
2. Presione el botón 1 para HABILITAR o presione el botón 2
para DESHABILITAR.
3. Presione el botón STAR T para aceptar el cambio.
NOTA
Si la pantalla no muestra el tiempo restante, recupere el
tiempo restante presionando el botón TIMER ON/OFF.
Page 57

CARACTERÍSTICAS
15
TERMOSTATO
Podría resultarle que el horno nuevo cocina distinto que el que
reemplazó. Utilice su nuevo horno durante unas semanas parta
familiarizarse con él antes de cambiar las configuraciones de
la temperatura. Si luego de familiarizarse con su nuevo horno,
usted todavía cree que la temperatura es demasiado alta o
demasiado baja, puede ajustar usted mismo el termostato.
Configuración del Termostato
1. Presione el botón SETTING dos veces. Aparecerá “AdJU”
en la pantalla.
2. Usando los botones numéricos, ingrese el número de
grados en que desea ajustar en horno.
3. Presione el botón SETTING repetidamente para alternar
entre más (+) o menos (-) para ajustar la temperatura en
forma ascendente o descendente.
4. Presione el botón STAR T para aceptar el cambio.
NOTA
• Este ajuste no afectará las temperaturas de asado o AutoLimpieza. El ajuste se guardará en la memoria incluso
ante la falta de suministro eléctrico. La temperatura del
horno puede aumentarse (+) o disminuirse (-) hasta 35°F o
19° C.
• Una vez que se aumente o disminuya la temperatura, la
pantalla mostrará la temperatura ajustada hasta que se
ajuste nuevamente.
LUZ DE ALARMA DE
PRECALENTAMIENTO
Cuando el horno alcanza su temperatura programada, la luz
de alarma de precalentamiento parpadeará hasta que se abra
la puerta del horno. Usted puede activar o desactivar la luz de
alarma de precalentamiento.
1. Presione el botón SETTING cuatro veces. Aparecerá “PrE”
en la pantalla.
2. Presione el botón 1 para ACTIVADA o presione el botón 2
para DESACTIVADA.
3. Presione el botón STAR T para aceptar el cambio.
VOLUMEN DE LA ALERTA SONORA
1. Presione el botón SETTING cinco veces.
2. Aparecerá “Beep” en la pantalla. Presione el botón 1 para
ALTO, el botón 2 para NORMAL, el botón 3 para BAJO, y
presione el botón 4 para MUDO.
3. Presione el botón STAR T para aceptar el cambio.
FAHRENHEIT O CELSIUS
La temperatura del horno se puede configurar en
grados Fahrenheit o Celsius. El horno muestra en forma
predeterminada grados Fahrenheit salvo que sea cambiado por
el usuario.
1. Presione el botón SETTING seis veces. Aparecerá “UNIT”
en la pantalla.
2. Presione el botón 1 para F (Fahrenheit) o el botón 2 para C
(Celsius).
3. Presione el botón STAR T para aceptar el cambio.
ESPAÑOL
IDIOMA
El idioma predeterminado de la pantalla es el inglés. Puede
cambiarse a español o francés.
1. Presione el botón SETTING tres veces. Aparecerá “Lng” en
la pantalla.
Presione el botón 1 para inglés, el botón 2 para español, o
el botón 3 para francés.
2. Presione el botón STAR T para aceptar el cambio.
LUZ DEL HORNO
La luz interior del horno se enciende automáticamente cuando
se abre la puerta. También puede encenderse y apagarse
manualmente la luz del horno presionando el botón OVEN
LIGHT.
NOTA
No se puede encender la luz del horno si está activada la
función Auto-limpieza.
Page 58

16
CARACTERÍSTICAS
BLOQUEO
La función de bloqueo bloquea el horno automáticamente y
evita que la mayoría de los controles del horno se activen. No
desactiva el reloj, el temporizador ni la luz interior del horno.
1. Presione y mantenga el botón START durante tres
segundos.
2. Sonará la melodía de bloqueo, aparecerá OVEN LOCKOUT
en la pantalla y DOOR LOCKED parpadeará en la pantalla.
3. Una vez que la puerta esté bloqueada, el indicador DOOR
LOCKED dejará de parpadear y permanecerá junto con el
ícono de bloqueo.
.
4. Para desactivar la funció Horno, presione y mantenga el botón START durante tres segundos. Sonará la
melodía de desbloqueo, y UNLOCKING aparecerá en
la pantalla hasta que se desbloqueen los controles.
HORA DE INICIO (COCCIÓN
temporizada retardada)
El temporizador automático de la función COCCIÓN
TEMPORIZADA RETARDADA ENCENDERÁ y APAGARÁ el horno
en el horario que usted seleccione. Esta función puede utilizarse
únicamente con los: Modos HORNEAR, HORNEADO POR
CONVECCIÓN y ASADO POR CONVECCIÓN.
Para configurar el horno para Inicio Retardado
(por ejemplo, para HORNEAR a 300°F y poner en
funcionamiento el modo hornear a las 4:30):
Asegúrese de que el reloj esté congurado en la hora correcta
del día.
NOTA
• Para cancelar la función COCCIÓN TEMPORIZADA
RETARDADA, presione el botón CLEAR OFF en cualquier
momento.
• Para cambiar el horario de cocción, repita los pasos 3-4 y
presione el botón STAR T.
• Si el reloj de su horno está congurado en 12 horas, usted
podrá postergar el horario de cocción hasta 12 horas. Si
el reloj de su horno está congurado en 24 horas, usted
podrá postergar el horario de cocción hasta 24 horas.
El horno continuará cocinando por la cantidad de tiempo
congurada y luego se apagará automáticamente. Cuando haya
transcurrido el tiempo de cocción:
yEND y la hora del día se mostrará en la pantalla.
yEl tono indicador de nalización de cocción sonará cada 60
segundos hasta que se presione el botón CLEAR OFF.
yCuando se configura WARM, la función calentar se activa
luego de cocinar por el tiempo establecido.
PRECAUCIÓN
• Utilice el reloj temporizador automático al cocinar
carnes curadas o congeladas y la mayoría de las frutas y
vegetales. Los alimentos que pueden echarse a perder
fácilmente como la leche, huevos, pescado, carne o aves
deben ser enfriados en el refrigerador. Incluso cuando
han sido enfriados, no deben permanecer en el horno
durante más de 1 hora antes de iniciar la cocción, y se los
debe retirar rápidamente luego de que la cocción haya
terminado.
• Ingerir alimentos en mal estado puede producir
intoxicaciones.
1. Presione el botón BAKE. Aparecerá 350°F en la pantalla.
2. Use los botones del horno para congurar la temperatura:
Presione 3, 0 y 0.
3. Presione el botón STAR T TIM E.
4. Congure la hora de inicio: Presione 4, 3 y 0 para 4:30.
5. Presione el botón STAR T. Se escuchará un tono corto y el
horno comenzará a hornear.
Page 59

CARACTERÍSTICAS
17
TIEMPO DE COCCIÓN (COCCIÓN
TEMPORIZADA)
La función COCCIÓN TEMPORIZADA le permite configurar
el horno para que cocine durante un período de tiempo
específico. Esta función puede utilizarse únicamente con los
modos HORNEAR, HORNEADO POR CONVECCIÓN ASADO POR
CONVECCIÓN y FAVORITOS.
Configuración de la función COCCIÓN
TEMPORIZADA (por ejemplo, HORNEAR a 300°
durante 30 minutos):
Asegúrese de que el reloj esté congurado en la hora correcta
del día.
1. Presione el botón BAKE. Aparecerá 350°F en la pantalla.
2. Use los botones numéricos para congurar la temperatura:
Presione 3, 0 y 0.
3. Presione el botón COOK TIME. TIMED parpadeará. BAKE,
0:00 y 300°F aparecerá en la pantalla.
4. Configuración del tiempo de horneado: Presione 3
y 0 (para 30 minutos). El tiempo de cocción puede
configurarse por cualquier cantidad de tiempo entre 1
minuto y 11 horas y 59 minutos.
5. Presione el botón STAR T. La pantalla mostrará la cuenta
regresiva de la cocción.
F
NOTA
Para congurar la función CALENTAR para que se active al
nalizar el ciclo de cocción temporizada, repita los pasos
1-4 y luego presione el botón WARM. Aparecerá WARM
en la pantalla. (Remítase a la sección «CALENTAR» en la
página anterior)
El horno continuará cocinando por la cantidad de tiempo
configurada y luego se apagará automáticamente. Cuando
haya transcurrido el tiempo de cocción:
• END y la hora del día se mostrará en la pantalla.
• El tono indicador de nalización de cocción sonará cada
60 segundos hasta que se presione el botón CLEA R OFF.
• Cuando se congura WARM, la función calentar se activa
luego de cocinar por el tiempo establecido.
Para cambiar el tiempo de cocción mientras el horno
está en funcionamiento (por ejemplo, para cambiar
el tiempo de cocción de 30 minutos a 1 hora y 30
minutos):
1. Presione el botón COOK TIME.
2. Presione las teclas numéricas para cambiar el tiempo de
horneado: 1, 3, 0.
3. Presione el botón STAR T para aceptar el cambio.
ESPAÑOL
Page 60

18
USO DE LA ESTUFA
USO DE LA ESTUFA
ÁREAS DE COCCIÓN
Las áreas de cocción de su cocina están identificadas por
círculos permanentes sobre la supercie de vidrio de la estufa.
Para una cocción más eficiente, haga coincidir el tamaño del
recipiente con el tamaño de la hornalla.
Los recipientes de cocción no deberían sobrepasar más de
1/2 a 1 pulgada el área de cocción.
Cuando se enciende un control, puede verse un brillo a
través de la superficie de vidrio de la estufa. La hornalla
realizará ciclos de encendido y apagado para mantener la
conguración de calor preestablecida, incluso cuando esté
congurada en HI (Alta).
Zona de
calentamiento
Hornalla simple
Uso de las hornallas de la estufa
Para encender una hornalla SIMPLE (hornallas
posterior derecha e izquierda)
1. Presione el botón ON/OFF que controla la hornalla que
usted desea usar (remítase a la anterior imagen de control
de hornalla de la estufa).
2. Presione el botón + una vez para ajustar la temperatura de
la hornalla en Hi (Alta), o el botón – una vez para ajustar la
temperatura de la hornalla en Lo (Baja).
3. Use los botones – / + para ajustar la configuración de
la temperatura de la hornalla. La configuración de la
temperatura de la hornalla se puede ajustar en cualquier
momento.
4. Para apagar la hornalla luego de cocinar, presione el
botón ON/OFF una vez.
Control de la zona
de calentamiento
Controles de la
hornalla simple
Hornalla Dual
Indicador HS (Superficie Caliente)
Aparecerá HS en la pantalla cuando se haya apagado la
hornalla o durante el ciclo de auto-limpieza. El indicador
HS permanecerá encendido hasta que la superficie se haya
enfriado hasta aproximadamente 150˚F/66˚C o cuando nalice
el ciclo de auto-limpieza.
PRECAUCIÓN
Es normal que las hornallas de la supercie realicen ciclos
de encendido y apagado durante la cocción, incluso en las
conguraciones más altas. Esto ocurrirá con más frecuencia
cuando se cocine con una configuración de cocción más
baja.
Controles de la hornalla Dual
NOTA
• Hi es la temperatura más alta disponible.
• LO es la temperatura más baja disponible.
• Presione y mantenga los botones + o – para desplazarse
rápidamente por las conguraciones de temperatura.
PRECAUCIÓN
• NUNCA deje comida en la estufa sin supervisión. Los
derrames pueden provocar humo. Los derrames grasosos
podrían prenderse fuego.
• La hornalla para asado a la parrilla del horno podría
parecer fría luego de que se la haya apagado. La hornalla
podría todavía estar caliente y podría producirse una
quemadura si se toca esta hornalla antes de que se haya
enfriado lo suciente.
Page 61

USO DE LA ESTUFA
19
Encender una hornalla DUAL (hornallas anterior
derecha e izquierda):
Las dos hornallas frontales de la estufa son hornallas duales.
Usted puede ajustar las hornallas duales de acuerdo al tamaño
de la olla/sartén que está usando.
Hornalla interior Hornalla exterior
A B
1. Presione el botón ON/OFF que controla la hornalla que
usted desea usar (remítase a la anterior imagen de control
de hornalla de la estufa).
2. Presione el botón SELECT para seleccionar la función de
la hornalla interior (más pequeña) o exterior (más grande).
Las hornallas duales se activan en forma predeterminada
en la función de hornalla interior. Las barras luminosas
por encima del botón SELECT indican si la hornalla está
ajustada en la función de hornalla interior o exterior. Se
mostrará una barra para la hornalla interior y dos barras
para la hornalla exterior.
3. Presione el botón + una vez para ajustar la temperatura de
la hornalla en Hi (Alta), o el botón – una vez para ajustar la
temperatura de la hornalla en Lo (Baja).
4. Use los botones – / + para ajustar la configuración de
la temperatura de la hornalla. La configuración de la
temperatura de la hornalla se puede ajustar en cualquier
momento.
5. Para apagar la hornalla luego de cocinar, presione el botón
ON/OFF una vez.
Control de la zona
de calentamiento
Controles de la
hornalla simple
NOTA
• Hi es la temperatura más alta disponible.
• LO es la temperatura más baja disponible.
• Presione y mantenga los botones + o – para
desplazarse rápidamente por las configuraciones
de temperatura.
Encender la Zona de Calentamiento (hornalla
central):
Use la Zona de Calentamiento para mantener la comida caliente
luego de que ya haya sido cocinada. La zona de calentamiento
no fue pensada para cocinar alimentos. Intentar cocinar
alimentos sin cocinar o fríos en la zona de calentamiento puede
provocar enfermedades transmitidas por los alimentos.
1. Presione el botón ON/OFF de la zona de calentamiento. La
luz indicadora de la zona de calentamiento parpadeará.
2. Presione el botón + una vez para ajustar la temperatura en
Hi (Alta), o el botón – una vez para ajustar la temperatura
en Lo (Baja). La secuencia de nivel de potencia es desde –
Lo, 2, 3, 4, Hi o desde+ Hi, 4, 3, 2, Lo.
3. Use los botones – / + para ajustar la configuración de la
temperatura. La temperatura de la hornalla se puede
ajustar en cualquier momento.
4. Para apagar la zona de calentamiento, presione el botón
ON/OFF una vez.
PRECAUCIÓN
• Utilice únicamente recipientes de cocción y platos
seguros para su uso en el horno y la estufa.
• Siempre utilice agarraderas al retirar la comida de la
estufa y del horno.
• No coloque recipientes sellados sobre la estufa.
• NO utilice envoltorios plásticos para cubrir los alimentos
cuando se encuentran sobre la estufa. El plástico podría
derretirse sobre la superficie y resultar muy difícil de
limpiar.
• Al utilizar la zona de calentamiento, debe mantenerse la
comida en su recipiente y cubrirla con una tapa o papel
aluminio para mantener la calidad de la comida.
• NO dejar alimentos en la zona de calentamiento durante
más de dos horas.
ESPAÑOL
Controles de la hornalla Dual
Page 62

20
USO DE LA ESTUFA
Configuración de cocción de superficie
recomendada
Hornalla Temp. Uso Recomendado
8,5-Hi yHacer hervir líquidos
yComenzar l a cocción
5,5-8,0 yRealizar un hervor, rehogado o freído rápido
yDorar o sel lar los alimentos en fo rma rápida.
Simple o
Dual
3,5-5,0 yRealizar u n hervor lento
yFreír o saltear alimentos
yCocinar so pas, salsas y fon dos de cocción
2,2-3,0 yGuisar o cocinar al vapor alimentos
yCocer a fue go lento
LO-2,0 yMantener la comida caliente
yDerret ir chocolate o mante ca
Hornalla Temp. Uso Recomendado
Hi yAlimentos Fritos
yBebidas Calientes
ySopas (líquidas)
2–4 yPlato de Cena co n Alimentos
ySalsas
Zona de
Calenta-
miento
Lo yPan/Pastelería
ySopas (cremosas)
yGuisos
yVegetales
yCarnes
yFondos de Cocción
yCazuelas
yHuevos
Consejos para conservas caseras
Asegúrese de que la olla para conservas esté centrada
sobre la hornalla de supercie y que tenga una base plana.
yLa base no debe ser más de 1 pulgada más grande que la
hornalla. El uso de ollas para conservas a baño maría con
bases onduladas podrían prolongar el período necesario
para que el agua entre en hervor y pueden dañarse las
estufas.
yAlgunas ollas para conservas están diseñadas con bases más
pequeñas para utilizar sobre supercies de vitrocerámica.
yUse la conguración de temperatura alta solo hasta que el
agua entre en hervor o la olla alcance la presión.
y Reduzca hasta la conguración de temperatura más baja
que mantenga el hervor o la presión. Si no disminuye la
temperatura, podría dañarse la estufa.
USO DE LOS RECIPIENTES DE
COCCIÓN ADECUADOS
El uso de los recipientes de cocción adecuados puede evitar
muchos problemas, tales como que la comida tarde más tiempo
en cocinarse o lograr resultados diferentes. Los recipientes de
cocción adecuados reducirán el tiempo de cocción y cocinarán
los alimentos en forma más pareja. Se recomienda el uso de
acero inoxidable.
Controle que los recipientes de
cocción tengan bases planas
utilizando un borde recto o una regla
1. Coloque una regla a lo largo de la base del recipiente de
cocción.
2. Sosténgala a la luz.
3. No debe verse luz por debajo de la regla.
NOTA
• No utilice un recipiente pequeño en una hornalla
grande. Esto no solo desperdicia energía, sino que
además puede provocar derrames que se quemen en la
zona de cocción.
• Use solo recipientes de cocción de base plana. No
utilice recipientes de cocción sobredimensionados
o desparejos, tales como woks de fondo redondo,
utensilios de fondo ondulado u ollas para conservas y
planchas sobredimensionadas.
• No utilice recipientes de papel de aluminio o similares.
El papel de aluminio podría derretirse sobre el vidrio. No
utilice la estufa si se ha derretido metal sobre él. Llame a
un Técnico autorizado.
Recipientes de Cocción
Recomendados
Sartenes de base curva, ranurada
Base plana y lados rectos.
Recipientes de cocción de
gran espesor.
Tamaño de los recipientes
de cocción adecuado para
la cantidad de comida a
preparar y el tamaño de la
hornalla.
El peso de las asas no
debe tumbar la sartén.
La sartén debe estar bien
equilibrada.
Tapas bien ajustadas. Tapas ojas.
Woks de base plana.
o deformada. Las sartenes con
bases desparejas no cocinan
ecazmente y a veces podrían no
hervir los líquidos.
Recipientes de cocción metálicos
de muy poco espesor o de vidrio.
Recipientes de cocción que sean
más pequeños o más grandes que
la hornalla.
Recipientes de cocción con asas
sueltas o rotas. Asas pesadas que
tumben la sartén.
Woks con una base en forma de
anillo.
No Utilizar
Page 63

USO DEL HORNO
21
USO DEL HORNO
ANTES DE USAR DEL HORNO
NOTA
• Cuando se utiliza un termómetro de horno en la
cavidad del horno, la temperatura puede diferir de la
temperatura de ajuste real del horno.
• Es normal que el ventilador de convección funcione
mientras se precalienta durante un ciclo de horneado
regular.
• El motor del ventilador de convección se puede ejecutar
periódicamente durante un ciclo de horneado regular.
SACAR Y VOLVER A COLOCAR LOS
ESTANTES DEL HORNO
PRECAUCIÓN
• Volver a colocar los estantes del horno antes de
encender el horno para evitar quemaduras.
• NO cubra los estantes con papel de aluminio o cualquier
otro material, ni coloque nada sobre el fondo del horno.
Hacerlo podría causar un horneado deciente y podría
dañar la parte inferior del horno.
• Acomode los estantes del horno únicamente cuando el
horno este frío.
Colocación del Estante y la Bandeja
G
F
E
D
C
B
A
Estante
Si está cocinando en dos estantes, coloque los estantes del
horno en las posiciones B y D. Si está cocinando en tres estantes,
colóquelos en las posiciones B, D y F (
Coloque el recipiente de cocción como se muestra en las
Figuras 1 y 2 (debajo).
Si está horneando con más de una bandeja, colóquelas de
forma tal que cada una tenga al menos entre 1” y 1 1/2” de
espacio de aire alrededor.
Estante estandar
(Posicion B)
estante de extensión)
Estante estandar
(Posicion D)
ESPAÑOL
.
Retirar los estantes:
1. Usando guantes de cocina, agarre el estante del horno.
2. Tire del estante hacia afuera en forma recta hasta que haga
tope.
3. Levante la parte delantera del estante.
4. Tire del estante hacia afuera.
Volver a colocar los estantes:
1. Usando guantes de cocina, coloque el extremo del estante
en el soporte.
2. Incline el extremo delantero del estante hacia arriba.
3. Empuje el estante hacia adentro.
4. Controle que el estante esté colocado correctamente.
Horneado con parrillas múltiples
Estante estandar
hornear solo rack
Venteo del horno
y Las zonas cercanas al venteo pueden calentarse du-
rante el funcionamiento y podría causar quemaduras.
y No bloquee el oricio del venteo.
y Evite colocar plásticos cerca del venteo ya que el calor
podría deformar o derretir el plástico.
y Es normal que se observe vapor cuando se está coci-
nando comidas muy húmedas.
Page 64

22
USO DEL HORNO
CONTROLES DEL HORNO
BAKE (HORNEADO)
BAKE se usa para preparar alimentos tales como pastelería
panes, cazuelas. Puede programarse el horno para que hornee a
cualquier temperatura desde 170° F (77° C) hasta 550°F (288° C).
La temperatura predeterminada es de 350° F (177° C).
Configuración de la función BAKE (por ejemplo, 375° F):
1. Presione el botón BAKE.
2. Configure la temperatura del horno usando los botones
numéricos: Presione 3, 7 y 5.
3. Presione el botón START. El horno comenzará a
precalentarse.
A medida que el horno se precaliente, se muestra la
temperatura que aumenta de a 5 grados. Una vez que el horno
alcanza la temperatura congurada, sonará un tono y la luz del
horno parpadeará.
4. Al nalizar la cocción, presione el botón CLEAR OFF.
5. Retire la comida del horno.
NOTA
Es normal que el ventilador de convección se active
periódicamente durante un ciclo de horneado normal.
Esto es para asegurar resultados de horneado parejos.
CONVECTION BAKE (HORNEADO
POR CONVECCIÓN)
El sistema de convección utiliza un ventilador para hacer circular
el aire en forma pareja dentro del horno. Esta distribución
del calor mejorada permite una cocción pareja y excelentes
resultados cuando se cocina en uno o varios estantes.
Configuración de la función CONVECTION BAKE (por
ejemplo, 375° F):
1. Presione el botón CONV. BAKE. En la pantalla parpadeará
35 0° F.
2. Configure la temperatura del horno usando los botones
numéricos: Presione 3, 7 y 5.
3. Presione el botón STAR T. La pantalla mostrará CONV.
BAKE y la temperatura del horno a partir de los 100°F.
A medida que el horno se precaliente, la pantalla mostrará la
temperatura que aumenta de a 5 grados. Una vez que el horno
alcance la temperatura configurada, sonará un tono y la luz
del horno parpadeará. La pantalla mostrará la temperatura del
horno convertida automáticamente a 350°F, CONV. BAKE y el
ícono del ventilador.
4. Cuando la cocción ha nalizado o para cancelar, presione
el botón CLE AR OFF.
Consejos para el Horneado
yEl tiempo y la temperatura de horneado variarán
dependiendo de los ingredientes, el tamaño y la forma de la
bandeja para hornear que se utilice.
ySi está horneando con más de una bandeja, colóquelas de
forma tal que cada una tenga al menos entre 1” y 1 1/2” de
espacio de aire alrededor.
yControle si la comida ya está lista en el tiempo mínimo que
indica la receta.
yUtilice utensilios para hornear metálicos (con o sin acabado
antiadherente), vitrocerámica resistente a altas temperaturas,
cerámica u otro utensilio para hornear recomendado para su
uso en el horno.
y Las bandejas de metal es oscuros o con cobe rtura antiad herente
cocinarán los alimentos más rápido quedando más dorados.
Los utensilios con aislamiento prolongarán levemente el
tiempo de cocción de la mayoría de los alimentos.
NOTA
El ventilador del horno se pondrá en funcionamiento
durante el horneado por convección. El ventilador se
detendrá al abrir la puerta pero no se apagará el calor. En
algunos casos el ventilador puede detenerse durante un
ciclo de horneado por convección.
Horneado por Convección con 3 estantes:
Para hornear con tres estantes durante el Horneado por
Convección, use las posiciones de estante B, D (estante
estándar) y F (estante de extensión):
1. Presione el botón CONV. BAKE dos veces. Aparecerá
“3 racks” (3 estantes) en la pantalla.
2. Configure la temperatura del horno usando los
botones numéricos.
3. Presione el botón START.
Consejos para el Horneado por Convección
yLas galletas y biscochos deben hornearse en bandejas que no
tengan lados o con lados muy bajos, para permitir que el aire
caliente circule alrededor de la comida. La comida horneada
en bandejas con acabado oscuro se cocinará más rápido.
Page 65

USO DEL HORNO
23
yCuando usa el Horneado por Convección con un solo
estante, coloque el estante del horno en la posición D. Si está
cocinando en dos estantes, coloque los estantes del horno
en las posiciones B y D. Si está cocinando en tres estantes,
colóquelos en las posiciones B, D y F.
yCocinar en varios estantes del horno puede aumentar
levemente los tiempos de cocción de algunos alimentos.
yLas tortas, galletas y panecillos tendrán muy buenos
resultados si se usan varios estantes.
CONVECTION ROAST (ASADO POR
CONVECCIÓN)
La característica CONV Roast (rostizado por convección)
se encuentra diseñada para ofrecer un óptimo
desempeño de rostizado. La característica de rostizado
por convección combina una cocción con el ventilador
de convección para rostizar carnes y aves. El aire caliente
circula alrededor de los alimentos por todos los lados,
sellando los jugos y sabores. Las comidas quedan
doradas y crujientes por afuera y jugosas por dentro. El
rostizado por convección es especialmente bueno para
cortes de carne grandes y tiernos sin cubrir.
Configuración de la función CONVECTION ROAST
(por ejemplo, 375° F):
Instrucciones de la Parrilla Asadora
Al preparar las carnes para asarlas por convección, utilice la
asadera, la rejilla y la parrilla asadora. La asadera retendrá los
derrames de grasa y la rejilla ayudará a evitar las salpicaduras de
grasa. La parrilla asadora permitirá que el calor circule alrededor
de la carne.
1. Coloque el estante del horno en la parte inferior o en la
posición del estante más cercano a la base.
2. Coloque la rejilla en la asadera.
3. Coloque la parrilla asadora sobre la rejilla. Asegúrese de
que la parrilla asadora esté bien armada sobre la rejilla en
la asadera.
4. Coloque la asadera en el estante del horno.
Estante del cajón calentador
Rejilla (se vende por separado)
ESPAÑOL
1. Presione el botón CO NV. ROAST. En la pantalla
parpadeará 350°F.
2. Configure la temperatura del horno usando los
botones numéricos: Presione 3, 7 y 5.
3. Presione el botón START. La pantalla mostrará
CONV. ROAST y la temperatura del horno a partir
de los 100°F.
A medida que el horno se precaliente, la pantalla
mostrará la temperatura que aumenta de a 5 grados. Una
vez que el horno alcance la temperatura configurada,
sonará un tono y la luz del horno parpadeará. La
pantalla mostrará la temperatura del horno convertida
automáticamente a 350°F, CONV. ROAST y el ícono del
ventilador.
4. Cuando la cocción ha finalizado o para cancelar,
presione el botón CLE AR O FF.
NOTA
El ventilador del horno se pondrá en funcionamiento
durante el asado por convección. El ventilador se detendrá
al abrir la puerta pero no se apagará el calor. En algunos
casos el ventilador puede detenerse durante un ciclo de
asado por convección.
Asadera (se vende por separado)
PRECAUCIÓN
• NO use la parrilla asadora cuando esté haciendo
asado a la parrilla. Esto evitará que la comida entre en
contacto con el elemento asador y que salpique grasa.
• NO utilice la asadera sin la rejilla.
• NO cubra la rejilla con papel de aluminio.
• Coloque la comida (lado grasoso hacia arriba) sobre la
parrilla asadora.
Page 66

24
USO DEL HORNO
BROIL (ASADO A LA PARRILLA)
La función Asado a la parrilla utiliza el calor intenso de la hornalla
superior para cocinar la comida. El ASADO A LA PARRILLA
funciona mejor con cortes tiernos de carne, pescado y vegetales
namente cortados.
Algunos modelos pueden tener una asadera híbrida que consiste
de una asadera interna que utiliza una hornalla calentadora de
carbón que brinda calor instantáneo y una hornalla asadora
externa tradicional. Durante la operación normal de la función
de asado a la parrilla, es normal que ambas hornallas realicen
ciclos de apagado en forma intermitente.
Esta cocina ha sido diseñada para asar con la puerta abierta. La
puerta tiene una posición de tope para asar.
PRECAUCIÓN
• NO utilice una asadera sin una rejilla. El aceite puede
provocar un incendio por grasa.
• NO cubra la rejilla y la asadera con papel de aluminio.
Hacerlo provocará un incendio.
• Utilice siempre una asadera y rejilla para el drenaje del
exceso de grasa. Esto ayudará a reducir las salpicaduras,
el humo, y las llamaradas.
SPEED BROIL (ASADO A LA
PARRILLA RÁPIDO)
La configuración Asado a la Parrilla Rápido está diseñada para
reducir la cantidad de tiempo que lleva asar los alimentos.
Utilizando la hornalla asadora interna, que brinda calor
instantáneamente, no hay necesidad de precalentar. El Asado
a la Parrilla Rápido debería usarse únicamente para pequeñas
cantidades de comida que puedan concentrarse fácilmente en el
centro de la asadera.
NOTA
• Al poner en funcionamiento el Asado Rápido a la Parrilla,
debe utilizarse el estante de extensión.
• Todos los alimentos deben colocarse en el centro de la
asadera al utilizar la función de Asado Rápido a la Parrilla.
Humo
Debido al calor intenso relacionado con el asado, es normal notar
humo durante el proceso de cocción. Este humo es un resultado
natural del sellado y no debería preocuparle. Si usted nota una
cantidad de humo que lo hace sentir incómodo, siga los siguientes
consejos para reducir la cantidad de humo en su horno.
1. Utilice siempre una asadera. No utilice sartenes para saltear
o bandejas para horno convencionales por cuestiones de
seguridad.
2. NUNCA utilice una asadera que no esté completamente
limpia y a temperatura ambiente al iniciar la cocción.
3. SIEMPRE ponga en funcionamiento el sistema de ventilación
de su estufa o campana de ventilación, durante el asado.
4. Mantenga el interior de su horno tan limpio como sea
posible. Los restos de comidas anteriores pueden quemarse
o prenderse fuego.
5. Evite las marinadas grasosas y los glaseados azucarados.
Ambos aumentarán la cantidad de humo que usted percibirá.
Si usted desea realizar un glaseado, aplíquelo al final de la
cocción.
6. Si usted nota una cantidad importante de humo con
cualquier alimento, pruebe:
yBajar el asador a la conguración LO (baja).
yBajar la posición del estante para cocinar los alimentos más
lejos del asador.
yUse la conguración de asado HI (alta) para lograr el nivel
de sellado deseado y luego cambie a la configuración de
asado LO (baja), o cambie a la función BAKE (hornear).
7. Como regla general, los cortes más grasosos de carne y
pescado producirán más humo que los elementos más
magros.
8. Siga las conguraciones de asado a la parrilla recomendadas
y pautas de cocina en el cuadro de la página siguiente
siempre que sea posible.
Para configurar el horno para ASADO A LA
PARRILLA / ASADO A LA PARRILLA RÁPIDO
1. Abra la puerta del horno hasta la posición de tope para
asar (aproximadamente 10 grados de la posición cerrada).
2. Presione el botón BROIL (ASADO A LA PARRILLA) o
SPEED BROIL (ASADO A LA PARRILLA RÁPIDO) una vez
para Hi (alto) o dos veces para Lo (bajo).
3. Presione el botón STAR T. El horno comenzará a calentar.
4. Si se usa la función de Asado a la Parrilla, es mejor permitir
que el horno se precaliente durante cinco minutos antes
de cocinar los alimentos. Si usa la función de Asado a la
Parrilla Rápido, no es necesario precalentar.
5. Al finalizar la cocción, o para cancelar en cualquier
momento, presione el botón CL EAR OF F.
GUÍA RECOMENDADA DE ASADO A
LA PARRILLA
El tamaño, peso, espesor, temperatura inicial y su preferencia en
relación al punto de cocción, afectarán los tiempos de asado. La
siguiente guía se basa en carnes a temperatura del refrigerador.
NOTA
Utilice siempre una asadera cuando esté asando a la
parrilla en la conguración Hi (Alta) o cuando esté usando
la función de Asado a la Parrilla Rápido.
Page 67

USO DEL HORNO
25
Cuadro de Asado a la Parrilla
Elemento
Carne
vacuna
Corte
Lomo/Filet 1"
1 1/2 "
2"
Lomo de ternera/
Bife angosto
Lomo ancho/delmónico 3/4" - 1"
Lomo con hueso 3/4" - 1"
3/4" - 1"
1 1/2 "
1 1/2 "
1 1/2 "
Tamaño/
Espesor
Punto de
cocción
Jugoso Hi (Alta) G 5: 00 3:00
Término medio Hi (Alta) G 5:0 0 4:00
Cocido Hi (Alta) G 6:00 4:00
Bien Cocido Hi (Alta) G* 6:00 5:00
Jugoso Hi (Alta) G 6:00 4:00
Término medio Hi (Alta) G 7:00 4:00
Cocido Hi (Alta) G* 7:00 5:00
Bien Cocido Hi (Alta) G* 7: 00 6:00
Jugoso Hi (Alta) G 7: 00 5: 00
Término medio Hi (Alta) G 8:00 6:00
Cocido Hi (Alta) G* 8:00 10:00
Bien Cocido Hi (Alta) F 10:00 12 :00
Jugoso Hi (Alta) G 5: 00 3:00
Término medio Hi (Alta) G 5:0 0 4:00
Cocido Hi (Alta) G 6:00 4:00
Bien Cocido Hi (Alta) G* 6:00 5:00
Jugoso Hi (Alta) G 6:00 5:00
Término medio Hi (Alta) G 7:00 6:00
Cocido Hi (Alta) G* 8:00 10:00
Bien Cocido Hi (Alta) G* 8:00 12: 00
Jugoso Hi (Alta) G 5: 00 3:00
Término medio Hi (Alta) G 5:0 0 4:00
Cocido Hi (Alta) G 6:00 4:00
Bien Cocido Hi (Alta) G* 6:00 5:00
Jugoso Hi (Alta) G 6:00 5:00
Término medio Hi (Alta) G 7:00 6:00
Cocido Hi (Alta) G* 8:00 10:00
Bien Cocido Hi (Alta) G* 8:00 12: 00
Jugoso Hi (Alta) G 5: 00 4:00
Término medio Hi (Alta) G 6:00 5:00
Cocido Hi (Alta) G* 7:00 6:00
Bien Cocido Hi (Alta) G* 8:00 7:00
Jugoso Hi (Alta) G 8:00 8:00
Término medio Hi (Alta) G* 10:0 0 8:00
Cocido Hi (Alta) F 10:00 12:00
Bien Cocido Hi (Alta) F 10:00 15:00
Conguración
del Asador
Posición del
Estante
estante de extensión
*
Tiempo (min)
Lado 1 Lado 2
ESPAÑOL
* Speed Broil sólo debe ser utilizado para pequeñas cantidades de alimentos que pueden ser fácilmente concentrados en el
centro de la bandeja para asar. Acelere el tiempo de asado es más rápido que el modo de asar a la parrilla regulr por lo que debe
reducir el tiempo de unos 20 ~ 25%
Page 68

26
USO DEL HORNO
Cuadro de Asado a la Parrilla
Elemento Corte Size/Thickness
Entraña 1/2"-3/4 "
Arrachera 1"
Hamburguesas 3/4" de espesor
Cordero Costillas con hueso 6 - 8 oz., 2 hueso Cocido Hi (Alta) G* 7:00 6:00
Frutos del
Mar
Cerdo
Pollo
Vegetales
Porción/bife de salmón, con piel
Porción/bife de salmón, sin piel
Porción de lenguado, sin piel
Gambas, con piel
Gambas, sin piel
Cola de langostino 1/ 3#
Costilla de Cerdo 1"
Lomo de Cerdo 12-16 oz., 1.5"
Salchichas 1/4#, 1. 5"
Rebanadas de jamón 1/2" de espesor
Pechuga, deshuesada, sin
piel
Puntas de espárragos 1/2" de espesor
3/4" - 1"
1 1/2 "
3/4" - 1"
1 1/2 "
3/4" - 1"
1 1/2 "
<10/l bs.
10-2 0/lbs .
21-30/lbs.
<10/l bs.
10-2 0/lbs .
21-30/lbs.
1/2" - 3/4"
Zapallitos, zucchini Fetas de 1/2"
Panadería
Tostada 4 piezas
Punto de
cocción
Jugoso Hi (Alta) G 4:00 3:00
Término medio Hi (Alta) G 5:0 0 3:00
Cocido Hi (Alta) G 5:00 4:00
Bien Cocido Hi (Alta) G 6:00 4:00
Jugoso Hi (Alta) G 7: 00 5: 00
Término medio Hi (Alta) G 8:00 6:00
Cocido Hi (Alta) G* 8:00 8:00
Bien Cocido Hi (Alta) F 10:00 10 :00
Jugoso Hi (Alta) G 5: 00 3:00
Término medio Hi (Alta) G 5:0 0 4:00
Cocido Hi (Alta) G* 6:00 4:00
Bien Cocido Hi (Alta) G* 6:00 5:00
Asador a la parrilla
Asador a la parrilla
Asador a la parrilla
Asador a la parrilla
Asador a la parrilla
Asador a la parrilla
Asador a la parrilla
Asador a la parrilla
Asador a la parrilla
Asador a la parrilla
Asador a la parrilla
Asador a la parrilla
Asador a la parrilla
Asador a la parrilla
Asador a la parrilla
Asador a la parrilla
Asador a la parrilla
Asador a la parrilla
Asador a la parrilla
Asador a la parrilla
Asador a la parrilla
Mun inglés 2 cortes Asadera
Conguración del
Asador
Hi (Alta) G 6:00 4:00
Hi (Alta) G 8:00 4:00
Hi (Alta) G 6:00 4:00
Hi (Alta) G* 6:00 6:00
Hi (Alta) G 6:00 5:00
Hi (Alta) G* 7: 00 6:00
Hi (Alta) G 4:00 3:00
Hi (Alta) G 3:00 3:00
Hi (Alta) G 3:00 2:00
Hi (Alta) G 4:00 2:00
Hi (Alta) G 3:00 2:00
Hi (Alta) G 3:00 1:0 0
Hi (Alta) G* 6:00
Hi (Alta) G 6:00 5:00
Hi (Alta) G* 9:00 8:00
Hi (Alta) G* 6:00 4:00
Hi (Alta) G 5:00 4:00
Hi (Alta)
Hi (Alta)
Hi (Alta)
Hi (Alta)
Hi (Alta)
Posición del
Estante
F 6:00 4:00
G* 4:00 3:00
G* 7:00
G 0:45 0:30
G 1:30
estante de extensión
*
Tiempo (min)
Lado 1 Side 2
* Speed Broil sólo debe ser utilizado para pequeñas cantidades de alimentos que pueden ser fácilmente concentrados en el
centro de la bandeja para asar. Acelere el tiempo de asado es más rápido que el modo de asar a la parrilla regulr por lo que debe
reducir el tiempo de unos 20 ~ 25%
Page 69

USO DEL HORNO
27
Consejos para el Asado a la Parrilla
Carne vacuna
ySiempre debe dejarse descansar el lomo y las costillas
durante cinco minutos antes de cortarlos y comerlos. Esto
permite que el calor se distribuya en forma pareja en toda la
comida y brindando un resultado más tierno y jugoso.
yConsidere retirar los trozos anchos de carne del refrigerador
30 minutos antes de la cocción. Esto ayudará a que se
cocinen más rápidamente y en forma más pareja y se
producirá menos humo al asarlos. Note que los tiempos de
cocción probablemente sean más cortos que los tiempos
indicados en el Cuadro de Asado a la Parrilla.
yLos cortes de lomo con hueso y costillas con corte francés
(en el que se saca toda la carne de alrededor del hueso),
envolver las secciones expuestas del hueso con papel de
aluminio para reducir el quemado.
Frutos del Mar
yAl asar pescado con piel, siempre use la configuración de
asado a la parrilla Media y siempre ase el lado de la piel al
nal.
yEs mejor consumir los frutos del mar inmediatamente
después de cocinarlos. Si se deja descansar los frutos del mar
después de cocinarlos la comida se secará.
yEs una buena idea frotar una delgada capa de aceite sobre
la supercie de la asadera antes de cocinar para evitar que
se peguen especialmente los pescados y mariscos. Puede
utilizar una delgada capa de rocío anti-adherente para
frituras.
Vegetales
yMezcle sus vegetales levemente con aceite antes de
cocinarlos para lograr un mejor dorado.
KIDS MEAL (ALIMENTOS PARA
NIÑOS)
Esta función está especialmente diseñada para cocinar los
alimentos más populares entre los niños como la pizza de
bordes regulares, pizza de bordes levantados, croquetas de
pollo, papas fritas y hamburguesas.
Al utilizar esta función no es necesario precalentar el horno
antes de la cocción.
Configuración de la función ALIMENTOS PARA
NIÑOS
1. Presione el botón KIDS MEAL.
2. FROZEN PIZZA, REGULAR CRUST aparecerá en la
pantalla. Presione el botón START si desea cocinar pizza
de bordes regulares congelada.
3. Presione el botón KIDS MEAL continuamente para
desplazarse por las diferentes configuraciones de la
pantalla. Elija entre: FROZEN PIZZA (PIZZA CONGELADA),
RISING, FRESH PIZZA (PIZZA FRESCA DE BORDES
LEVANTADOS), CHICKEN NUGGETS (CROQUETAS DE
POLLO), FRENCH FRIES (PAPAS FRITAS) y HAMBURGER
PATTIES (HAMBURGUESAS).
4. Cuando la pantalla muestre la comida que usted desea
preparar, presione el botón START.
5. Presione el botón CLEAR OFF cuando la comida se
terminó de cocinar o para cancelar.
Cuadro de Alimentos para Niños
Alimento
Pizza congelada
de borde s
regulares
Pizza congelada
de borde s
levantados
Pizza fresca 12” D
Croquetas de
pollo
Papas fr itas 1-4 porcion es
Hamburguesas 4-12
Cantidad
Recomen-
dada
12” D
12” D
1-4 porcio nes
(3.5oz por porción)
(3.5oz por porción)
hamburguesas,
1/2” de espes or
Posición
del
Estante
F
F
F
Tiempo
recomendado
(minutos)
14-2 0
18-2 2
15-18
14 -18
12-18
10 -14
ESPAÑOL
Este cuadro es solo a modo de referencia.
*
Page 70

28
USO DEL HORNO
CALENTAR
Esta función mantendrá el horno a una temperatura de 170ºF.
La función CALENTAR mantendrá caliente la comida cocinada
para servir hasta 3 horas después de finalizada la cocción. La
función Calentar puede utilizarse sin ninguna otra función de
cocción o puede utilizarse luego de terminado el tiempo de
cocción usando HORNEADO TEMPORIZADO u HORNEADO
TEMPORIZADO RETARDADO.
Configuración de la función CALENTAR:
1. Presione el botón WARM/PROOF.
2. Presione START.
3. Presione el botón CLEAR OFF en cualquier momento para
cancelar.
Para configurar la función CALENTAR luego de la
cocción temporizada:
1. Seleccione la función para cocinar.
2. Ingrese la temperatura del horno usando los
botones numéricos.
3. Presione el botón COOK TIME e ingrese el tiempo
de cocción usando los botones numéricos.
4. Presione el botón WARM/PROOF.
5. Presione el botón START.
6. Al nalizar la cocción, presione el botón CLEAR OFF
para cancelar la función CALENTAR.
NOTA
La función CALENTAR está pensada para mantener la
comida caliente. No la utilice para enfriar los alimentos
FERMEN TAR
Configuración de la función FERMENTAR:
Esta función mantiene el horno caliente para leudar productos
con levadura antes de hornearlos.
1. Utilice el estante B o C para fermentar.
2. Presione el botón WARM/PROOF dos veces .
Aparecerá PrF en la pantalla.
3. Presione el botón START.
4. Presione el botón CLEAR OFF cuando haya nalizado
el leudado.
NOTA
• Para evitar bajar la temperatura del horno y prolongar
el tiempo de leudado, no abra la puerta del horno
innecesariamente. Controle los panicados pronto para
evitar una fermentación excesiva.
• No utilice el modo de fermentación para calentar la
comida o mantener la comida caliente. La temperatura
de fermentación del horno no es lo sucientemente alta
como para mantener la comida a temperaturas seguras.
Utilice la función CALENTAR para mantener la comida
caliente. La fermentación no se realizará cuando el
horno esté por encima de los 125º F. HOT se mostrará en
la pantalla.
FAVORITOS
La función FAVORITOS se usa para grabar y recuperar la
conguración de sus recetas favoritas. Usted puede almacenar y
recuperar hasta tres conguraciones diferentes.
Configuración de la función FAVORITOS:
1. Presione el botón FAVOR ITES una vez para Pan, dos
veces para Carne y tres veces para Pollo. Aparecerá
la temperatura predeterminada y parpadeará COOK
(COCINAR) en la pantalla.
Categoría
Pan Presione
Carne Presione
Pollo Presione
2. Presione los botones numéricos para cambiar la
temperatura predeterminada.
3. Presione el botón STAR T. Los tonos indicadores de
precalentamiento sonarán 3 veces cuando el horno alcance
la temperatura programada.
Presione
el botón
Favorite
FAVORITE una
vez.
FAVORITE dos
veces.
FAVORITE tres
veces.
Temp. Prede-
terminada
(puede
cambiarse y
recuperarse)
375°F Hornear
325°F Asado por
convección
350°F Asado por
convección
Modo de
Cocción
NOTA
Solo se puede modificar y almacenar la temperatura el
horno. El nombre de la categoría y modo de cocción
seguirán igual.
Page 71

CAJÓN CALENTADOR
29
MODO SABBATH
El modo Sabbath se usa principalmente en el Sabbath y las
estas judías. Cuando se activa el modo Sabbath, el horno no se
enciende hasta que se desactiva el modo Sabbath. En el modo
Sabbath, todos los botones de función, salvo el botón CLEAR
OFF están inactivos. Aparecerá Sb en las pantallas del horno y
de la estufa.
NOTA
Si la luz del horno está encendida y el modo SABBATH está
activo, la luz del horno permanecerá encendida hasta que
se desactive el modo SABBATH. Si necesita apagar la luz
del horno, asegúrese de apagarla antes de activar el modo
SABBATH. El modo SABBATH solo puede usarse mientras
se hornea (modo HORNEAR).
Configuración del modo SABBATH
1. Presione el botón BAKE.
2. Presione los botones numéricos para ingresar la
temperatura de horneado.
3. Presione el botón STAR T.
4. Presione y mantenga el botón SETTING durante tres
segundos. Aparecerá SB y en la pantalla cuando se
active el modo Sabbath.
5. Para cancelar el modo Sabbath, presione y mantenga
el botón SETTING durante tres segundos. Para cancelar
la función Hornear, presione el botón CLEAR OFF en
cualquier momento.
Cambiar la temperatura en el modo SABBATH
1. Presione el botón BAKE. (No sonará ningún tono y la
pantalla no cambiará.)
2. Congure la temperatura usando los botones numéricos.
3. Presione el botón STAR T.
NOTA
Hay un retraso de 15 segundos hasta que el horno
reconoce el cambio de temperatura.
CAJÓN CALENTADOR
ESPAÑOL
Estante del cajón calentador en su posición
FUNCIONAMIENTO DEL CAJÓN
CALENTADOR
El cajón calentador mantiene los alimentos cocinados a la
temperatura justa para servirlos.
Toda comida colocada en el cajón de calentador, debe cubrirse
con una tapa o papel aluminio para mantener la calidad.
No utilice envoltorios plásticos para cubrir los alimentos. El
plástico podría derretirse sobre el cajón y resultar muy difícil de
limpiar. Utilice únicamente utensilios y recipientes de cocción
recomendados para su uso en el Cajón Calentador.
Configuración del control del Cajón
Calentador
1. Presione el botón WARMING DRAWER SET/OFF (cerca de
los botones numéricos). La luz indicadora parpadeará. (Si
no se presiona ningún botón luego de los 25 segundos, la
pantalla se borrará.)
2. Use los botones numéricos para configurar el nivel de
potencia. 1 para BAJO, 2 para MEDIO, y 3 para ALTO.
3. Cuando la comida esté lista, o para cancelar, presione el
botón WARMING DRAWER SET/OFF.
NOTA
• El Cajón Calentador se apagará automáticamente luego
de tres horas.
• No se recomienda calentar comidas frías en el Cajón
Calentador.
Page 72

30
Baja
Baja
Media
Alta
CAJÓN CALENTADOR
Recomendaciones para el Nivel de
Potencia del Cajón Calentador por
Alimento
CONFIGURACIÓN Tipo de Alimento
Baja
Media
Se pueden colocar distintos tipos de alimentos en el cajón
calentador al mismo tiempo. Para obtener mejores resultados, no
deje alimentos en el cajón calentador durante más de una hora.
No deje cantidades más pequeñas o alimentos sensibles al calor,
como por ejemplo huevos, en el cajón calentador durante más
de 30 minutos. El tiempo máximo de funcionamiento es de tres
horas.
yPanecillos (blandos)
yPlatos de cenar vacíos
yFondos de Cocción
yCazuelas
yHuevos
yVegetales
yGalletas
yPanecillos (duros)
yPastelería
yAsado (Carne vacuna, Cerdo,
Cor dero)
yTocino
yHamburguesas
yAves
yCostillas de Cerdo
yPizza
yAlimentos Fritos
PRECAUCIÓN
yNo utilice el cajón calentador para almacenar estantes,
asaderas, bandejas internas, platos o utensilios. El cajón
calentador contiene una hornalla que podría dañar cualquier
objeto que no esté especícamente diseñado para ser usado
en él, y debe usarse únicamente para almacenar recipientes
de cocción que LG le haya suministrado especícamente con
su cocina.
yNo coloque comida o papel de aluminio directamente
sobre la superficie o la base del cajón calentador. Esto
podría dañar su cajón y arruinar sus alimentos.
yNo coloque envoltorios plásticos en el cajón calentador
ni lo use para cubrir los alimentos que se estén
calentando en el cajón calentador. El plástico podría
derretirse sobre el cajón y los objetos que lo rodean
y es muy difícil de quitar. Utilice únicamente papel de
aluminio o recipientes de cocción que puedan soportar
una temperatura de horneado para calentar o cubrir sus
alimentos.
yNo utilice el cajón calentador para calentar agua o
cualquier otro líquido. Los líquidos derramados podrían
causar un cortocircuito eléctrico o provocar lesiones
personales graves, descargas eléctricas o la muerte.
yNunca coloque plásticos, papel, alimentos enlatados u otro
material combustible dentro del cajón calentador. Estos
elementos representan un grave riesgo de incendio, daño y
lesiones.
yEn el improbable caso de que un objeto caiga detrás
del cajón calentador, siempre apague la electricidad
y espere a que el cajón calentador se enfríe antes de
recuperar el objeto. Nunca intente recuperar ningún objeto
que haya caído detrás del cajón calentador sin primero
apagar el suministro eléctrico y asegurarse de que la cavidad
del cajón calentador se haya enfriado. No hacerlo podría
causar lesiones graves, descargas eléctricas o la muerte.
cajón calentador
Page 73

CUIDADO Y LIMPIEZA
31
CUIDADO Y LIMPIEZA
LIMPIEZA DE LA ESTUFA DE
VITROCERÁMICA
PRECAUCIÓN
• NO utilice esponjas de fibra o esponjas de limpieza
abrasivas. Podrían dañar la supercie de su estufa.
• Para su seguridad, utilice un guante de cocina o
agarradera para limpiar la supercie caliente de la estufa.
Use Limpiador para Estufas Cerámicas sobre la estufa de vidrio.
Otras cremas podrían no ser tan efectivas o podrían rayar, dañar
o manchar la supercie de la estufa.
Para mantener y proteger la superficie de vidrio de la estufa,
siga los siguientes pasos:
1. Antes de usar la estufa por primera vez, límpiela con
limpiador para estufas cerámicas. Esto ayuda a proteger la
supercie y facilita la limpieza.
2. El uso diario de limpiador para estufas cerámicas ayudará a
que la estufa luzca como nueva.
3. Agite bien la crema de limpieza. Aplique unas pocas gotas
directamente sobre la estufa.
4. Utilice un paño de papel para limpiar toda la supercie de
la estufa.
5. Enjuague con agua limpia y use un paño seco o paño de
papel para retirar los residuos de la limpieza.
Residuos Carbonizados
1. Mientras la estufa esté todavía caliente, quite todos
los depósitos carbonizados o comida derramada de la
supercie de la estufa de vitrocerámica con una espátula
metálica (similar a las que se usan para sacar la pintura de
una ventana - no dañará la supercie de cocción decorada).
Sostenga la espátula a unos 30º aproximadamente de la
estufa.
NOTA
• No utilice una hoja roma o mellada.
• Para evitar quemaduras, por favor utilice un guante de
cocina o agarradera mientras usa la espátula de metal.
2. Cuando la supercie de cocción se haya enfriado, aplique
unas pocas gotas (aproximadamente del tamaño de
una moneda de diez centavos de dólar) de un limpiador
aprobado en el área de cada quemador y frote la crema de
limpieza sobre la superficie de la estufa con un paño de
papel húmedo.
ESPAÑOL
NOTA
NO caliente la estufa hasta que la haya limpiado
completamente.
NOTA
Limpiadores aprobados
• Weiman CookTop Cleaning Cream
• (www.weiman.com)
• Cerama Bryte (www.ceramabryte.com)
• Golden Ventures Cerama Bryte
• Easy-O 3 in 1 Glass Top Cleaner Spray (www.easyo.us).
3. Limpie con agua y seque la supercie de la estufa con un
paño de papel limpio y seco. cuidado y limpieza
:
Page 74

32
CUIDADO Y LIMPIEZA
IMPORTANTE:
Si se derrite sobre la estufa azúcar o algún producto que
contenga azúcar (conservas, kétchup, salsa de tomate, jaleas,
crema de chocolate, dulces, jarabes, chocolate, etc.), plástico o
papel de aluminio, retire el material derretido INMEDIATAMENTE
con una espátula metálica (no dañará la supercie de cocción
decorada) mientras la supercie de cocción esté todavía caliente
para evitar el riesgo de dañar la supercie de vitrocerámica. Para
su seguridad, por favor utilice un guante de cocina o agarradera
para limpiar la supercie caliente de la estufa.
Marcas de Metal y Rayones
1. Tenga cuidado de no deslizar ollas y sartenes por la estufa.
Si lo hace, dejará marcas de metal sobre la superficie
de la estufa. Para intentar quitar estas marcas, utilice
un limpiador para estufas cerámicas con una esponja
limpiadora para estufas cerámicas.
2. Si se deja una olla con una delgada capa de revestimiento
de aluminio o cobre que hierva hasta secarse, el
revestimiento podría dejar una coloración negra sobre la
estufa. Esto debería quitarse inmediatamente antes de
volver a calentar o la coloración podría ser permanente.
PRECAUCIÓN
Los recipientes de cocción con fondos ásperos o
desparejos podrían marcar o rayar la supercie de la
estufa.
AUTO-LIMPIEZA
El ciclo de auto-limpieza utiliza temperaturas extremadamente
elevadas para limpiar la cavidad del horno. Al ejecutar el ciclo de
Auto-Limpieza, puede percibir humo u olores. Esto es normal;
especialmente si el horno está muy sucio.
Durante la Auto-Limpieza, la cocina debe estar bien ventilada
para minimizar los olores de la limpieza.
PRECAUCIÓN
• NO deje a niños pequeños sin supervisión cerca del
electrodoméstico. Durante el ciclo de auto-limpieza, la
parte externa de la cocina puede estar muy caliente al
tacto.
• Si usted tiene aves domésticas, trasládelas a otro
ambiente bien ventilado. La salud de algunas aves es
extremadamente sensible a los gases liberados durante
un ciclo de auto-limpieza de cualquier cocina.
• NO cubra las paredes del horno, estantes, parte inferior o
cualquier otra parte de la cocina con papel de aluminio o
cualquier otro material. Hacerlo arruinará la distribución
del calor, producirá malos resultados en la cocción y
provocará un daño permanente en el interior del horno (el
papel de aluminio se derretirá en la supercie interior del
horno).
• NO fuerce la puerta del horno para abrirla. Esto podría
dañar el sistema de bloqueo automático de la puerta.
Abra la puerta del horno con cuidado luego del ciclo de
Auto-Limpieza. Manténgase a un costado del horno al
abrir la puerta para permitir que escape el aire caliente o
el vapor. El horno podría estar aún MUY CALIENTE.
yNo deslice ningún objeto metálico o de vidrio sobre la
supercie de la estufa.
yNo utilice recipientes de cocción con suciedad acumulada
en la base.
Sello de la Estufa
Para limpiar el sello de la estufa alrededor de los bordes del
vidrio, coloque un paño húmedo durante unos minutos, luego
limpie con limpiadores no abrasivos. Cuidado y limpieza.
Antes de iniciar la Auto-Limpieza:
• Quite los estantes del horno, la asadera, la rejilla para
asado a la parrilla, todos los recipientes de cocción, el
papel de aluminio y cualquier otro material del horno.
• La cocina debe estar bien ventilada para minimizar los
olores de la limpieza.
• Limpie los derrames grandes de la parte inferior del
horno.
• Asegúrese de que la cubierta de la bombilla del horno
esté colocada y que la luz del horno esté apagada.
• No se puede encender la luz del horno durante un ciclo
de auto-limpieza. No se puede encender la luz del horno
hasta que la temperatura del horno haya descendido por
debajo de los 500˚F (260˚C) luego de que haya nalizado
un ciclo de auto-limpieza.
Page 75

CUIDADO Y LIMPIEZA
33
Durante un ciclo de auto-limpieza no se podrán utilizar las
hornallas de la estufa ni el cajón calentador.
NOTA
• Retire los estantes del horno y los accesorios antes de
iniciar un ciclo de auto-limpieza.
• Si se dejan los estantes del horno en la cavidad del horno
durante un ciclo de auto-limpieza, se decolorarán y será
difícil deslizarlos hacia adentro y hacia afuera.
• Limpie el marco de la cocina y la puerta con agua
jabonosa caliente. Enjuague bien.
• No limpie la junta. El material de bra de vidrio de la junta
de la puerta del horno no soporta una limpieza abrasiva.
• Es esencial que la junta permanezca intacta. Si usted nota
que se está desgastando o deshilachando, reemplácela.
• Limpie los derrames grandes de la parte inferior del
horno.
• Asegúrese de que la cubierta de la bombilla del horno
esté colocada y que la luz del horno esté apagada.
Configuración de la Auto-limpieza
La función de Auto-Limpieza tiene ciclos que pueden durar 3, 4,
o 5 horas.
Guía de Suciedad para la Auto-limpieza
Nivel de Suciedad Conguración del Ciclo
Cavidad del horno levemente sucia Auto-limpieza de 3 Horas
Cavidad del horno moderadamente
sucia
Cavidad del horno muy sucia Auto-limpieza de 5 Horas
1. Extraiga todos los estantes y accesorios del horno.
2. Presione el botón SELF CLEAN. En forma predeterminada,
el horno realiza la auto-limpieza recomendada de cuatro
horas para un horno moderadamente sucio. Presione dos
veces para realizar una auto-limpieza de cinco horas o tres
veces para una auto-limpieza de tres horas.
3. Presione START.
4. Una vez que esté congurada la auto-limpieza, la puerta
del horno se bloqueará automáticamente y aparecerá en la
pantalla el ícono de bloqueo. No podrá abrir la puerta del
horno hasta que el horno este frío. El bloqueo se liberará
automáticamente cuando el horno se haya enfriado.
Auto-limpieza de 4 Horas
ESPAÑOL
PRECAUCIÓN
NO fuerce la puerta del horno para abrirla cuando aparezca
en la pantalla el ícono de bloqueo. La puerta del horno
continuará bloqueada hasta que haya descendido la
temperatura del horno. Si fuerza la puerta para abrirla, se
dañará la puerta.
Configuración de la Auto-limpieza
con un Inicio Retardado
1. Extraiga todos los estantes y accesorios del horno.
2. Presione el botón SELF CLEAN. En forma predeterminada,
el horno realiza la auto-limpieza recomendada de cuatro
horas para un horno moderadamente sucio. Presione dos
veces para realizar una auto-limpieza de cinco horas o tres
veces para una auto-limpieza de tres horas.
3. Presione el botón STAR T TIM E.
4. Use los botones numéricos para ingresar la hora del día a la
que desea que se inicie la Auto-Limpieza.
5. Presione el botón STAR T.
NOTA
Podría ser necesario cancelar o interrumpir un ciclo de
auto-limpieza debido a la presencia de humo excesivo o
fuego en el horno. Para cancelar la función Auto-Limpieza,
presione el botón CLEAR OFF.
Page 76

34
CUIDADO Y LIMPIEZA
Durante La Auto-Limpieza
yEl ciclo de auto-limpieza utiliza temperaturas
extremadamente elevadas para limpiar la cavidad del horno.
Al ejecutar el ciclo de Auto-Limpieza, puede percibir humo
u olores. Esto es normal; especialmente si el horno está muy
sucio.
yA medida que el horno se caliente, podría oír sonidos de
partes metálicas que se expanden y contraen. Esto es normal
y no dañará el horno.
yNO fuerce la puerta del horno para abrirla cuando aparezca
en la pantalla LOCKED (BLOQUEADO). La puerta del horno
continuará bloqueada hasta que haya descendido la
temperatura del horno. Si fuerza la puerta para abrirla, se
dañará la puerta.
NOTA
• No se puede activar el ciclo de Auto-Limpieza si la
Función Bloqueo está activa.
• Una vez que esté congurada la auto-limpieza, la puerta
del horno se bloqueará automáticamente. No podrá
abrir la puerta del horno hasta que el horno esté frío. El
bloqueo se liberará automáticamente cuando el horno se
haya enfriado.
• Una vez que la puerta se ha bloqueado, La luz
indicadora de BLOQUEO (LOCKED) dejará de parpadear
y permanecerá encendida. Espere aproximadamente 15
segundos para que el bloqueo de la puerta del horno se
active.
• Si el reloj está configurado en la pantalla de 12 horas
(predeterminado) no se puede configurar la AutoLimpieza Retardada para que empiece más de 12 horas
adelante.
Luego del Ciclo de Auto-Limpieza
yLa puerta del horno continuará bloqueada hasta que haya
descendido la temperatura del horno.
yEs posible que note algo de ceniza blanca en el horno.
Límpiela con un paño húmedo o una esponja de lana de
acero enjabonada luego de que el horno se enfríe. Si el
horno no queda limpio después de un ciclo de limpieza,
repita el ciclo,
ySi se hubieran dejado estantes del horno dentro del horno
y no se deslizan suavemente luego de un ciclo de autolimpieza, limpie los estantes y los soportes de los estantes
con una pequeña cantidad de aceite vegetal para que se
deslicen más fácilmente.
yEs posible que aparezcan delgadas líneas en la porcelana
porque pasó del calor al frío. Esto es normal y no afectará el
funcionamiento. Cuidado y limpieza
Page 77

CUIDADO Y LIMPIEZA
35
LIMPIEZA EXTERIOR
Revestimiento Pintado y Decorativo
Para la limpieza general, utilice un paño con agua caliente
jabonosa. Para suciedades más difíciles y grasa acumulada,
aplique detergente líquido directamente sobre la suciedad.
Déjelo actuar de 30 a 60 minutos. Enjuague con un paño
empapado y seque. No utilice limpiadores abrasivos.
Superficies de Acero Inoxidable (en
algunos modelos)
Para evitar rayones, no utilice esponjas de lana de acero.
1. Coloque una pequeña cantidad de limpiador de
electrodomésticos de acero inoxidable o lustre en un paño
húmedo o paño de papel.
2. Limpie un área pequeña, frotando en el sentido del grano
del acero inoxidable, si corresponde.
3. Seque y sacuda con un paño de papel limpio y seco o un
paño suave.
4. Repite cuantas veces sea necesario.
Puerta del horno
yUse agua jabonosa para limpiar completamente la puerta del
horno. Enjuague bien. NO sumerja la puerta en agua.
yPuede utilizar limpiavidrios en el vidrio externo de la puerta
del horno. NO rocíe agua o limpiavidrios en los venteos de la
puerta.
yNO utilice limpiadores de horno, polvos limpiadores, o
materiales ásperos de limpieza abrasiva en el lado externo de
la puerta del horno.
yNO limpie la junta de la puerta del horno. La junta de la
puerta del horno está confeccionada en un material tejido
que es esencial para un buen sellado. Debe tenerse cuidado
de no frotar, dañar, o quitar esta junta.
PRECAUCIÓN
No utilice limpiadores ásperos o materiales ásperos de
limpieza abrasiva en el lado externo de la puerta del horno.
Hacerlo podría provocar daños.
Asadera y Rejilla
ESPAÑOL
yNo guarde una asadera o rejilla sucia en ninguna parte del
horno.
yNo limpie la asadera o la rejilla en el modo auto-limpieza.
yQuite la rejilla de la asadera. Con cuidado, vuelque la grasa
de la asadera en un recipiente adecuado.
yLave y enjuague la asadera y la parrilla en agua caliente con
una esponja enjabonada o una esponja de plástico.
ySi se hubiera quemado comida, salpique la parrilla con
limpiador mientras todavía este caliente y cubra con toallas
de papel húmedas o un repasador. Sumerja la asadera para
quitar la comida quemada.
yTanto la asadera como la parrilla pueden lavarse con un
limpiador de hornos comercial o en el lavavajillas.
REEMPLAZO DE LA LUZ DEL
HORNO
La luz del horno es una bombilla para electrodomésticos de 40
watts estándar. Se encenderá cuando la puerta del horno esté
abierta. Cuando la puerta del horno esté cerrada, presione el
botón OVEN LIGHT para encenderla o apagarla.
1. Desenchufe la cocina o desconecte el suministro eléctrico.
2. Gire la cubierta de vidrio de la bombilla que se encuentra
en el fondo del horno en el sentido contrario a las agujas
del reloj para sacarla.
3. Gire la bombilla en el sentido contrario a las agujas del
reloj para sacarla del portalámparas.
4. Inserte la nueva bombilla y hágala girar en el sentido de las
agujas del reloj.
5. Inserte la cubierta de vidrio de la bombilla y hágala girar
en el sentido de las agujas del reloj.
6. Enchufe la cocina o conecte nuevamente el suministro
eléctrico.
No limpie a mano
la junta de la
puerta del horno
Elimine cualquier
residuo de la puerta
ADVERTENCIA
• Asegúrese de que el horno y la bombilla estén fríos.
• Desconecte la energía eléctrica de la cocina desde el
fusible principal o el panel interruptor de circuitos.
No hacerlo podría causar lesiones graves, la muerte o
descargas eléctricas.
Page 78

36
Aproximadamente 5º
CUIDADO Y LIMPIEZA
SACAR Y VOLVER A COLOCAR LA
PUERTA DEL HORNO Y EL CAJÓN
CALENTADOR
PRECAUCIÓN
• La puerta es muy pesada. Tenga cuidado al remover y
levantar la puerta.
• NO levante la puerta de la manija.
• NO golpee el vidrio con ollas, sartenes o cualquier
otro objeto.
• Los rayones, golpes, choques bruscos o el tensado
del vidrio podrían debilitar su estructura, causando
mayor riesgo de rotura en el futuro.
Sacar la puerta del horno
1. Abra completamente la puerta.Tire de los seguros de
la bisagra hacia el marco de la puerta, en la posición de
desbloqueo. Una herramienta, tal como un pequeño
desarmador de punta plana, puede ser necesario.
Volver a colocar la puerta del horno
1. Sostenga rmemente de la parte superior ambos lados de
la puerta.
Extremo inferior
Brazo de
la bisagra
2. Con la puerta en el mismo ángulo que la posición de
extracción, coloque la Muesca del brazo de la bisagra en el
borde inferior de la ranura de la bisagra. La Muesca en el
brazo de la bisagra debe estar completamente asentado en
la parte inferior de la ranura.
de la ranura
Muesca
Ranura
Traba de la
bisagra
2. Sostenga rmemente de la parte superior ambos lados de
la puerta. Cierre la puerta hasta la posición de remoción
(aproximadamente cinco grados). Que está entre la posición
de ¡°Paro de horno¡° y completamente cerrada.
3. Levante la puerta hacia arriba y hacia afuera hasta que el
brazo de la bisagra haya salido de la ranura. Ponga la puerta
en el suelo.
Brazo de la
bisagra
Marco de
la puerta
Tirar de los seguros de la bisagra hacia
abajo para desbloquear.
Posición para Remover
Ranura
Empuje los seguros de la bisagra hacia arriba
para bloquear.
3. Abra completamente la puerta. Si la puerta no se
abre completamente, la Muesca no está posicionada
correctamente en el borde inferior de la ranura.
4. Empuje los seguros de la bisagra hacia arriba contra el
marco frontal de la cavidad del horno hasta la posición de
bloqueo. Cierre la puerta del horno.
Traba de la
bisagra
Brazo de la
bisagra
Marco de
la puerta
Page 79

CUIDADO Y LIMPIEZA
Quite los tornillos
37
Sacar el Cajón Calentador
ADVERTENCIA
Desconecte la energía eléctrica de la cocina desde el
fusible principal o el panel interruptor de circuitos.
No hacerlo podría causar lesiones graves, la muerte o
descargas eléctricas.
La mayor parte de la limpieza se puede realizar con el cajón en su
lugar; sin embargo, si es necesario se puede sacar el cajón para
realizar una limpieza más a fondo. Use agua tibia para limpiar
por completo.
1. Abra la puerta del cajón por completo.
2. Quite los dos tornillos.
Quite los tornillos
Volver a Colocar el Cajón Calentador
1. Tire de los rieles portantes hacia el frente del bastidor del
riel.
2. Alinee la palanca deslizante a cada lado del cajón con las
ranuras de los rieles de la cocina.
3. Empuje el cajón hacia la cocina hasta que las palancas
hagan “clic” (aproximadamente 2 pulgadas).Tire del cajón
para abrirlo nuevamente para asentar los rieles portantes
en su posición.
4. Si usted no oye que las palancas hagan “clic” o los rieles
portantes no quedan bien asentados, retire el cajón y
repita los pasos 2-4.
5. Coloque nuevamente los dos tornillos.
ESPAÑOL
3. Localice la palanca deslizante a cada lado del cajón.
Presione hacia abajo sobre la palanca deslizante izquierda y
tire hacia arriba sobre la palanca deslizante derecha.
Palanca
Palanca
Presione hacia abajo
con el dedo
4. Saque el cajón calentador de la cocina.
Tire hacia arriba
con el dedo
Page 80

38
PREGUNTAS FRECUENTES
PREGUNTAS
FRECUENTES
¿Qué tipo de recipientes de cocción se
recomiendan para usar con mi estufa?
yLos recipientes deben tener base plana y lados rectos.
yUse únicamente recipientes de gran espesor.
yEl tamaño de los recipientes de cocción debe ser el adecuado
para la cantidad de comida a preparar y el tamaño de la
hornalla.
yUse tapas bien ajustadas.
yUse solo woks de base plana.
¿Por qué aparece “HS” en la pantalla de la
estufa?
Aparecerá HS (Superficie Caliente) en la pantalla cuando se
haya apagado la hornalla o durante el ciclo de auto-limpieza. El
indicador HS permanecerá encendido hasta que la superficie
se haya enfriado hasta aproximadamente 150˚F/66˚C o cuando
nalice el ciclo de auto-limpieza.
¿Qué significa “PF” en la pantalla?
"PF" signica que ha habido un corte de energía en su hogar.
Oprima la tecla Clear / o y la tecla "On / O" en los controles
de la Hornalla de la Estufa para eliminar este código. También
puede requerir que reinicie la hora de la pantalla.
¿Es normal oír un chasquido proveniente de
la parte trasera de mi horno cuando lo estoy
usando?
Sí, es normal. El controlador tiene relays que se abren y cierran
durante el horneado.
Durante la cocción por convección el
ventilador se detiene cuando abro la puerta.
¿Es eso normal?
Sí, es normal. Cuando se abre la puerta, el ventilador de
convección se detendrá hasta que la puerta se cierre.
¿Puedo usar papel de aluminio para retener
los goteos en la cavidad de mi horno?
No. Si se coloca papel de aluminio en la parte inferior de la
cavidad del horno, este se quemará y no podrá quitarlo. El
calentador del horno está debajo de la cavidad del horno y
brinda calor directo a la parte inferior de la cavidad. Si usted ya
ha quemado papel aluminio en la parte inferior, no se preocupe,
ya que no afectará el rendimiento.
¿Puedo usar papel de aluminio en los
estantes?
No se recomienda colocar papel aluminio dentro de la cavidad
del horno. El uso de papel aluminio en los estantes limitará
el flujo de aire, lo que podría dar un resultado de cocción
deciente.
¿Puedo dejar mis estantes en el horno
cuando se está ejecutando un ciclo de
Auto-Limpieza?
No. Si bien no dañará los estantes, los decolorará y podría
dicultar su deslizamiento hacia afuera y hacia adentro durante
su uso. Retire todos los elementos del horno antes de iniciar un
ciclo de Auto-Limpieza.
¿Qué debo hacer si mis estantes están
pegajosos y se ha vuelto difícil deslizarlos
hacia adentro y hacia afuera?
Con el tiempo es posible que sea difícil deslizar los estantes hacia
adentro y hacia afuera. Aplique una pequeña cantidad de aceite
de oliva en los extremos de los estantes. Esto funcionará como
un lubricante para un deslizamiento más fácil.
¿Qué debo hacer con las manchas difíciles
de quitar sobre mi estufa?
Debe limpiarse la estufa después de cada uso para evitar
manchas permanentes. Cuando se cocinen alimentos con un
alto contenido de azúcar, tales como la salsa de tomates, se
recomienda limpiar la mancha cuando la estufa todavía esté
caliente. Use guantes de cocina cuando limpie para evitar
quemarse. Remítase a la sección de CUIDADO Y LIMPIEZA de
este manual del usuario para mayores instrucciones.
¿Debo asar a la parrilla con el horno abierto
o cerrado?
Su cocina eléctrica ha sido diseñada para asar con la puerta
abierta. La puerta tiene una posición de tope para asar. La
posición de tope para asar es de aproximadamente 10 grados de
la posición cerrada.
¿Por qué no funcionan los botones de
funciones?
Asegúrese de que la cocina no esté en el modo Lockout
(Bloqueo). El símbolo de bloqueo se mostrará en la pantalla
si la función Bloqueo de Horno está activada. Para desactivar
la función Bloqueo, presione y mantenga el botón START
durante tres segundos. Sonará la melodía de desbloqueo, y
UNLOCKING (DESBLOQUEO) aparecerá en la pantalla hasta que
se desbloqueen los controles.
¿Por qué el reloj esta parpadeando?
Esto signica que el electrodoméstico ha sido conectado,
o que ha experimentado una interrupción en la
alimentación. Presione el botón "Clock" y reinicie el
tiempo, o presione cualquier tecla para que deje de
parpadear.
Page 81

RESOLUCIÓN DE PROBLEMAS
ANTES DE LLAMAR AL SERVICIO TÉCNICO
Problema Posibles Causas / Soluciones
La cocina no está nivelada. yInstalación deciente Coloque un estante del horno en el centro del horno. Coloque un nivel en
el estante del horno. Ajuste las patas de nivelación de la base de la cocina hasta que el estante
del horno esté a nivel.
yEl suelo no está nivelado. Asegúrese de que el suelo sea los sucientemente fuerte y estable
como para soportar la cocina adecuadamente. Si el suelo está pandeado o tiene una pendiente,
comuníquese con un carpintero para corregir la situación.
yLa alineación de los gabinetes de la cocina puede hacer que la cocina parezca desnivelada.
Asegúrese de que los gabinetes estén a escuadra y que haya suciente espacio libre para la
cocina.
El control del horno está sonando
y muestra el código de error F.
yEl control electrónico ha detectado la falla. Presione CLEAR OFF para borrar la pantalla y detener
el sonido. Reprograme el horno. Si la falla reaparece, registre el número de falla. Presione CLEAR
OFF y comuníquese un agente del Servicio Técnico.
CÓDIGO Descripción CÓDIGO Descripción
F-1 Sensor abierto F-6 Horno caliente
F-2 Sensor en cortocircuito F-9 No calienta
F-3 Error de Tecla en
Cortocircuito
F-10 Falla del Bloqueo de la
Puerta
39
ESPAÑOL
Las hornallas de supercie no
mantienen un hervor intenso o la
cocción no es lo sucientemente
rápida.
Las hornallas de supercie no
funcionan correctamente.
Las hornallas de supercie dejan
de resplandecer cuando se
cambia a una conguración más
baja.
Áreas de decoloración sobre la
estufa.
Las hornallas de supercie
realizan ciclos frecuentes de
encendido y apagado.
ySe están usando recipientes de cocción inadecuados. Use recipientes de base plana que
coincidan con el diámetro de la hornalla de supercie elegida.
yEn algunas áreas, la potencia (voltaje) puede ser baja.
-Cubra el recipiente con una tapa hasta obtener la temperatura deseada.
yPuede haberse quemado un fusible de su hogar o puede haber saltado el interruptor de
circuitos. Reemplace el fusible o restablezca el interruptor de circuitos.
yControles de la estufa congurados incorrectamente.
-Controle que esté congurado el control correcto para la hornalla de supercie que está
usando.
yEsto es normal. La hornalla todavía está encendida y caliente.
yDerrames de alimentos sin limpiar antes del siguiente uso. Véase la sección de Cuidado y
Limpieza.
ySupercie caliente de un modelo con estufa de color claro. Esto es normal. La supercie puede
parecer decolorada cuando está caliente. Esto es temporal y desaparecerá cuando el vidrio se
enfríe.
yEsto es normal. La hornalla realizará ciclos de encendido y apagado para mantener la
conguración de calor.
Page 82

40
RESOLUCIÓN DE PROBLEMAS
Problema Posibles Causas / Soluciones
El horno no funciona. yEl enchufe no está totalmente insertado en el tomacorriente eléctrico. Asegúrese de que el
enchufe eléctrico esté correctamente enchufado a un tomacorriente con suministro eléctrico
conectado a tierra correctamente.
yPuede haberse quemado un fusible de su hogar o puede haber saltado el interruptor de
circuitos. Reemplace el fusible o restablezca el interruptor de circuitos.
yControles del horno congurados incorrectamente.
-Véase la sección Uso del horno.
yHorno demasiado caliente.
-Permita que la temperatura del horno descienda por debajo de la temperatura de bloqueo.
La luz del horno no funciona. yReemplace o ajuste la bombilla. Véase la sección Cambio de la Luz del Horno de este Manual
del Usuario.
El horno humea en forma
excesiva durante el asado a la
parrilla.
Los alimentos no se hornean o
asan correctamente.
Los alimentos no hierven
correctamente.
Los alimentos no hierven
correctamente.
Hora que se muestra parpadea. yEsto signica que el electrodoméstico ha sido conectado, o que ha experimentado una
El control del horno
muestra el mensaje PF.
yControl congurado incorrectamente. Siga las instrucciones detalladas en Conguración de los
Controles el Horno.
yLa carne está demasiado cerca de la hornalla para asar a la parrilla. Cambie de posición el estante
para brindar espacio suciente entre la carne y la hornalla.
yLa carne no está preparada correctamente. Quite el exceso de grasa de la carne. Corte los bordes
grasosos restantes para evitar que se curven.
yLa asadera está al revés y la grasa no está drenando. Siempre coloque la parrilla sobre la asadera con
los surcos hacia arriba y las ranuras hacia abajo para permitir que la grasa gotee en la asadera.
ySe acumuló grasa en las supercies del horno. Es necesario realizar una limpieza habitual cuando se
ase a la parrilla frecuentemente.
yLas salpicaduras viejas de grasa o alimentos provoca un humeo excesivo. Limpie el interior del
horno. Los alimentos no se hornean o asan correctamente. Limpie el interior del horno.
yControles del horno congurados incorrectamente.
-Véase la sección Uso del horno.
yLa posición del estante es incorrecta o el estante no está nivelado. Remítase a la sección
Colocación del Estante y la Bandeja.
yUtilización de recipientes de cocción incorrectos o del tamaño inadecuado. Remítase a la sección
Uso de los Recipientes de Cocción Adecuados.
yDebe ajustarse el sensor del horno.
-Véase Ajustando la temperatura del horno en la sección opcional.
ySe está utilizando una posición incorrecta del horno. Remítase a la sección Colocación del
Estante y la Bandeja.
yRecipientes de cocina no aptos para asar a la parrilla. Use la asadera y parrilla que vinieron junto
con su cocina.
yEl papel de aluminio usado en la asadera y la parrilla no se ajustó correctamente o no se
realizaron oricios como se recomienda.
-Véase la sección Uso del Horno.
yEn algunas áreas, la potencia (voltaje) puede ser baja.
-Precaliente la hornalla para asar a la parrilla durante 5-7 minutos.
-Véase la Guía de Asado a la Parrilla.
interrupción en la alimentación. Presione el botón "Clock" y reinicie el tiempo, o presione
cualquier tecla para que deje de parpadear.
y"PF" signica que ha habido un corte de energía en su hogar. Oprima la tecla Clear / o y la tecla
"On / O" en los controles de la Hornalla de la Estufa para eliminar este código. También puede
requerir que reinicie la hora de la pantalla.
Page 83

RESOLUCIÓN DE PROBLEMAS
Problema Posibles Causas / Soluciones
Temperatura del horno
demasiado elevada o demasiado
baja.
Rayones o desgaste sobre la
supercie de la estufa.
Marcas de Metal. yRayones de utensilios de metal sobre la supercie de la estufa. No deslice utensilios de metal
Estrías o puntos marrones yLos derramamientos por ebullición se cocinaron en la supercie. Utilice la espátula para quitar la
Áreas de decoloración con brillo
metálico.
El horno no realiza la autolimpieza.
Sonido crepitante o de
explosiones.
Ruido del ventilador.
El Ventilador de Convección se
detiene.
Humo excesivo durante un ciclo
de auto-limpieza.
Puerta del horno no abre luego
de un ciclo de auto-limpieza.
Puerta del horno no está limpia
luego de un ciclo de autolimpieza.
CLEAN y puerta parpadea en la
pantalla.
yDebe ajustarse el sensor del horno.
-Véase Ajustando la temperatura del horno en la sección opcional.
yLas partículas gruesas, tales como la sal o la arena, entre la estufa y los utensilios pueden causar
rayones.
yAsegúrese de que la supercie de su estufa y la base de los utensilios estén limpias antes de usar.
Los pequeños rayones no afectan la cocción y se harán menos visibles con el tiempo.
ySe han utilizado materiales de limpieza no recomendados para su uso en estufas de
vitrocerámica. Véase Limpieza de la Estufa de Vidrio en la sección de MANTENIMIENTO.
ySe han utilizado recipientes de cocción con la base áspera. Use recipientes de cocción de base
suave y plana.
sobre la supercie de la estufa. Utilice una crema limpiadora para estufas de vitrocerámica para
quitar estas marcas.
yVéase Limpieza de la Estufa de Vidrio en la sección de MANTENIMIENTO.
suciedad. Véase Limpieza de la Estufa de Vidrio en la sección de MANTENIMIENTO.
yDepósitos minerales de agua y alimentos. Remueva utilizando una crema limpiadora para estufas
de vitrocerámica. Utilice utensilios de cocción con bases limpias y secas.
yLa temperatura del horno es demasiado alta como para congurar la operación de auto-
limpieza.
-Permita que la cocina se enfríe y vuelva a congurar los controles.
yControles del horno congurados incorrectamente.
-Véase la sección Uso del Horno Auto-limpiante.
yNo se puede activar un ciclo de Auto-Limpieza si la Función Bloqueo está activa.
yEste es el sonido del metal calentándose y enfriándose durante las funciones de cocción y Auto-
Limpieza yy.
-Esto es normal.
yUn ventilador de convección puede apagarse y encenderse automáticamente.
-Esto es normal.
yEl Ventilador de Convección se detiene durante un ciclo de horneado por convección.
-Esto es normal y se hace para permitir que el calor sea más parejo durante el ciclo.
-No es una falla de la cocina y debe considerarse una operación normal.
ySuciedad Excesiva.
-Presione el botón CLEAR OFF. Abra las ventanas para liberar el humo del ambiente. Espere
hasta que se cancele el modo auto-limpieza. Limpie el exceso de suciedad y vuelva a
congurar la limpieza.
yEl horno está demasiado caliente.
-Permita que la temperatura del horno descienda por debajo de la temperatura de bloqueo.
yControles del horno congurados incorrectamente.
-Véase la sección Auto-Limpieza.
yEl horno tenía demasiada suciedad.
-Limpie los derrames grandes antes de iniciar el ciclo de limpieza. Los hornos con demasiada
suciedad podrían requerir una nueva auto-limpieza o durante un tiempo más prolongado.
ySe ha seleccionado el ciclo de auto-limpieza pero el horno no está cerrado.
-Cierre la puerta del horno.
41
ESPAÑOL
Page 84

42
RESOLUCIÓN DE PROBLEMAS
Problema Posibles Causas / Soluciones
La función LOCKED
(BLOQUEADO) está activada en
la pantalla cuando usted desea
cocinar.
El venteo emite un olor a
quemado o a aceite.
Los estantes del horno son
difíciles de desplazar.
yLa puerta del horno está bloqueada porque la temperatura en el interior del horno no ha
descendido por debajo de la temperatura de desbloqueo.
-Presione el botón CLEAR OFF. Permita que el horno se enfríe.
yEsto es normal en un horno nuevo y desaparece con el tiempo.
-Para acelerar el proceso, congure un ciclo de auto-limpieza por un mínimo de 3 horas. Véase
la sección Auto-Limpieza.
yLos brillantes estantes plateados fueron limpiados en un ciclo de auto-limpieza.
-Aplique una pequeña cantidad de aceite vegetal en un paño de papel y limpie los bordes de
los estantes del horno con el paño de papel.
La puerta del horno se
desbloqueará luego del ciclo de
auto-limpieza.
La humedad se acumula en la
ventana del horno o sale vapor
por el venteo del horno.
yEl interior del horno todavía está caliente. Deje pasar una hora aproximadamente para que el
horno se enfríe luego de que nalice un ciclo de auto-limpieza. La puerta puede abrirse cuando
no aparezca en la pantalla en indicador LOCK (BLOQUEO).
yLos controles y la puerta podrían estar bloqueados.
yEsto es normal cuando se cocinan alimentos excesivamente húmedos.
ySe utilizó humedad excesiva cuando se limpió la ventana.
Page 85

GARANTÍA
43
GARANTÍA (EE. UU.)
LG Electronics Inc. reparará o reemplazará su producto, a discreción de LG, si se comprueba que los materiales o su confección
presentaban defectos con el uso normal, durante el período de garantía establecido a continuación, vigente a partir de la fecha de
compra del producto por parte del comprador original. Esta garantía es válida únicamente para el comprador original del producto y
tendrá validez únicamente cuando se la use en los EE. UU.
PERÍODO DE GARANTÍA COMO SÉ MANEJA EL SERVICIO TÉCNICO
Un Año
A partir de la fecha original de compra.
ESTA GARANTÍA REEMPLAZA CUALQUIER OTRA GARANTÍA, EXPRESA O IMPLÍCITA, INCLUYENDO AUNQUE SIN LIMITACIÓN, CUALQUIER
GARANTÍA DE COMERCIABILIDAD O APTITUD PARA UN PROPÓSITO DETERMINADO. CUANDO LA LEY NO EXIJA NINGUNA GARANTÍA
EXPLÍCITA, LA DURACIÓN DE LA MISMA SE ENCUENTRA LIMITADA AL PERÍODO DE GARANTÍA EXPRESA INDICADO ANTERIORMENTE.
LG NO SERÁ RESPONSABLE POR LOS DAÑOS EMERGENTES, INDIRECTOS O DIRECTOS, DE NINGÚN TIPO, INCLUYENDO LA PÉRDIDA DE
INGRESOS O GANANCIAS, EN RELACIÓN AL PRODUCTO. ALGUNOS ESTADOS NO PERMITEN LIMITACIONES EN CUANTO A LA DURACIÓN
DE UNA GARANTÍA O LA EXCLUSIÓN DE LOS DAÑOS INCIDENTALES O EMERGENTES, POR LO TANTO, LAS LIMITACIONES ANTERIORES
PODRÍAN NO APLICARSE.
Cualquier parte del horno que falle debido a materiales o confección
defectuosos. Durante esta garantía completa durante un año, LG
además brindará, sin cargo, la mano de obra y servicio técnico en el
domicilio para reemplazar la parte defectuosa.
ESPAÑOL
ESTA GARANTÍA LIMITADA NO INCLUYE:
1. Llamadas al servicio técnico para corregir la instalación de su electrodoméstico, para enseñarle a usar su producto, para reemplazar
los fusibles de la vivienda o corregir el cableado de la vivienda o para reemplazar bombillas de luz de fácil acceso para el usuario.
2. Las reparaciones cuando su electrodoméstico se use para otro n diferente del uso normal para un hogar de una sola familia.
3. Recogida y entrega. Su electrodoméstico está diseñado para ser reparado en el hogar.
4. Daños causados por accidentes, modicaciones, uso indebido, abuso, incendios, inundaciones, instalación inadecuada, desastres
naturales o el uso de productos no aprobados por LG Corporation.
5. Las reparaciones de partes o sistemas como resultado de modicaciones no autorizadas realizadas al electrodoméstico.
6. Reemplazo de partes o costo de mano de obra para unidades usadas fuera de los Estados Unidos.
7. Todos los costos de mano de obra durante el período de garantía limitada.
Se extiende la presente garantía al comprador original para aquellos productos comprados para uso domiciliario dentro de los EE.
UU. En Alaska, la garantía excluye los gastos de envío o las llamadas por parte del servicio técnico a su domicilio. Algunos estados no
permiten exclusiones o limitaciones de los daños incidentales o emergentes, por lo tanto, esta exclusión o limitación podría no aplicarse.
La presente garantía le otorga derechos legales especícos, es posible que usted tenga otros derechos que pueden variar entre estados.
Para conocer cuáles son sus derechos, consulte con su ocina de consumo estatal o local o con el Procurador General de su estado.
CENTRO DE ASISTENCIA AL CLIENTE:
Para Demostrar la Cobertura de la Garantía Conserve su Comprobante de Venta para demostrar la
fecha de compra.
Debe enviar una copia de su Comprobante de Venta en
el momento en que se presta servicio técnico bajo la
garantía.
Para Conocer el Centro de Servicios Técnicos Autorizado o Representante
de Ventas más Cercano, o para Obtener Asistencia por Producto, Cliente o
Servicio Técnico.
Llame al 1-800-243-0000 (Atendido las 24 horas, los 365
días del año) y elija la opción correcta del menú; o visite
nuestro sitio web en: http://us.lgservice.com.
Page 86

NOTAS
Page 87

NOTAS
Page 88

LG Customer Information Center
1-800-243-0000
1-888-865-3026
1-888-542-2623
USA, Consumer User
USA, Commercial User
CANADA
Register your product Online!
www.lg.com
Printed in Mexico
 Loading...