

Page 1

OWNER’S MANUAL
MICROWAVE OVEN
PLEASE READ THIS OWNER’S MANUAL THOROUGHLY BEFORE
OPERATING AND KEEP IT HANDY FOR REFERENCE AT ALL TIMES.
LMV1760
MFL0631761_0
**
www.lg.com
Copyright © 2018 LG Electronics Inc. All Rights Reserved.
Page 2

Thank you for purchasing a LG microwave oven.
Please record the model number and serial
number of this unit for future reference. We
also suggest you record the details of your
contact with LG (LG Electronics U.S.A., Inc.)
concerning this unit.
Staple your receipt here as proof of purchase.
PRECAUTIONS TO AVOID POSSIBLE
Model No:
Serial No:
Dealer:
Dealer Phone No:
Customer Relations
LG Electronics U.S.A., Inc.
Service Division Bldg. #3
201 James Record Rd.
Huntsville, AL 35824-0126
EXPOSURE TO EXCESSIVE
MICROWAVE ENERGY
(a) Do not attempt to operate this oven with
the door open. Open door operation
can result in harmful exposure to
microwave energy. It is important
not to defeat or tamper with the
safety interlocks.
(b) Do not place any object between the
oven front face and the door or allow soil
or cleaner residue to accumulate on
sealing surfaces.
(c) Do not operate the oven if it is
damaged. It is particularly important
that the oven door:
(1) closes properly,
(2) is not damaged or bent,
(3) has hinges and latches that are not
broken or loosened,
(4) has undamaged door seals and
sealing surfaces.
(d) The oven should not be adjusted or
repaired by anyone except properly
qualified service personnel.
- 2 -
Page 3

TABLE OF CONTENTS
PRECAUTIONS TO AVOID POSSIBLE
EXPOSURE TO EXCESSIVE MICROWAVE
ENERGY.............................................................. 2
TABLE OF CONTENTS ...................................... 3
IMPORTANT SAFETY INSTRUCTIONS .......... 4~5
SPECIFICATIONS ................................................. 6
Location of Model Number .................................... 6
Oven Specifications .............................................. 6
Electrical Rating .................................................... 6
Electrical Requirements ........................................ 6
Grounding Instructions.......................................... 6
FEATURES ....................................................... 7~9
Microwave Oven Features .................................... 7
Oven Control Panel........................................... 8~9
USING YOUR MICROWAVE OVEN .............. 10~19
Learn About Your Microwave Oven.......................
Audible Signals......................................................
Clock......................................................................
Interrupting Cooking...............................................
Child Lock..............................................................
Vent Hi/Low/Off......................................................
Cooktop Light.........................................................
Add 30 Sec.............................................................
Time Defrost...........................................................
Timed Cooking.......................................................
Multi-stage Cooking...............................................
Melt........................................................................
Soften....................................................................
Melt Table..............................................................
Soften Table..........................................................
Energy Saving.......................................................
Microwave Power Levels.......................................
Auto Defrost...........................................................
Operating Tips........................................................
Defrosting Tips.......................................................
10
10
10
10
10
11
11
11
11
12
12
13
13
13
13
13
14
15
15
16
Using Quick Touch.............................................
Popcorn..............................................................
Pizza...................................................................
Frozen Entree.....................................................
Potato ...............................................................
Auto Cook..........................................................
Cooking Guide for Auto Cook............................
Auto Reheat........................................................
Cooking Guide for Auto Reheat..........................
MAINTENANCE.................................................20~21
Care And Cleaning.............................................
Cleaning the Grease Filters ..............................
Charcoal Filter Replacement ............................
Cooktop/Night Light Replacement .....................
Oven Light Replacement ...................................
COOKING UTENSILS............................................. 22
Microwave Utensil Guide ...................................
FAQS........................................................................23
TROUBLESHOOTING.............................................
LIMITED WARRANTY-USA ...............................
17
17
17
17
17
18
18
19
19
20
20
20
21
21
22
24
25~28
- 3 -
Page 4
IMPORTANT SAFETY INSTRUCTIONS
NOTE: Turn the microwave’s vent fan on
whenever you use the oven range cooktop
below it.The fan captures smoke, steam, and
odors and also prevents the heat from the
cooktop from damaging microwave components.
If the microwave is cooking, the vent fan turns on
automatically if the sensors detect too much heat
from the cooktop. This is normal, and is designed
to prevent microwave component damage.
IMPORTANT SAFETY INSTRUCTIONS
The safety instructions below will tell you how to use your oven and avoid harm to yourself
or damage to your oven.
Suitable for use above both gas and electric cooking
Hazards or unsafe practices
WARNING
CAUTION
that may result in severe
personal injury or death.
Hazards or unsafe practices
that may result in minor
personal injury or property
damage.
WARNING - To reduce the risk of
burns, electric shock, fire, injury to persons,
or exposure to excessive microwave energy.
• Read all the instructions before using your oven
• Do not allow children to use this oven without
close supervision.
Read and follow the specific
•
PRECAUTIONS TO AVOID
POSSIBLE EXPOSURE TO
EXCESSIVE MICROWAVE
ENERGY
found on page 2.
Do not use corrosive chemicals or vapors, such as
•
sulfide and chloride, in this appliance. This type of
oven is specifically designed to heat, cook, or dry
food. It is not designed for industrial or laboratory use.
Do not store this appliance outdoors. Do not use
•
this product near water - for example, near a kitchen
sink, in a wet basement, near a swimming pool, or in
a similar location.
• Do not use the oven cavity for storage purposes.
Do not leave paper products, cooking utensils, or
food in the oven cavity when not in use.
• Clean the ventilating hood frequently. Do not allow
grease to accumulate on the hood or the filters.
Use care when cleaning the vent hood filters.
•
Corrosive cleaning agents such as lye-based oven
cleaners may damage the filters.
Do not tamper with the built-in safety switches
•
on the oven door. The oven has several built-in
safety switches to make sure the power is off when
the door is open.
•
Turn the fan on to disperse steam or smoke under
the hood.
ventilated at all times. Turn off cooking equipment if
you see flames or a fire occurs.
Keep the area under the hood properly
•
equipment up to 36 inches wide.
• Do not use this oven for commercial purposes
It is designed for household use only.
• When cleaning the door and the surfaces that
touch the door, use only mild, non-abrasive
soaps or detergents and a sponge or soft cloth.
• If your oven is dropped or damaged have it
thoroughly checked by a qualified service technician
before using it again.
• To avoid a fire hazard
- Do not severely overcook food. Severely
overcooked foods can start a fire in the oven.
Watch the oven carefully, especially if you have
paper, plastic, or other combustibles in the oven.
- Do not store combustible items (bread,
cookies, etc.) in the oven, because if lightning
strikes the power lines it may cause the oven to
turn on.
- Do not use wire twist-ties in the oven. Be sure
to inspect purchased items for wire twist-ties and
remove them before placing the item in the oven.
• If a fire should start in the oven:
- Keep the oven door closed.
- Turn the oven off.
- Disconnect the power cord or shut off the
power at the fuse or circuit breaker panel.
• To avoid electric shock
- This appliance must be grounded.
only to a properly grounded outlet. See the
electrical GROUNDING INSTRUCTIONS
page 6.
- Do not operate this appliance
damaged cord or plug, if it is not working
properly or if it has been damaged or dropped.
- Do not immerse the electrical cord or plug in
water.
- Keep the cord away from heated surfaces.
if it has a
Connect it
on
- 4 -
Page 5

IMPORTANT SAFETY INSTRUCTIONS
• To avoid improperly cooking some foods.
- Do not heat any types of baby bottles or baby
food. Uneven heating may occur and possibly
cause personal injury.
- Do not heat small-necked containers, such as
syrup bottles.
- Do not deep-fat fry in your microwave oven.
- Do not attempt home canning in your
microwave oven.
- Do not heat the following items in the
microwave oven: whole eggs in the shell, water
with oil or fat, sealed containers, or closed glass
jars. These items may explode.
• Do not cover or block any openings in the oven.
• Use your oven only for the operations described in
this manual.
• Do not run the oven empty, without food in it.
Do not let the cord hang over the edge of the table or
•
counter.
• Preserve the oven floor:
- Do not heat the oven floor excessively.
- Do not allow the gray film on special microwave-
cooking packages to touch the oven floor. Put the
package on a microwavable dish.
- Do not cook anything directly on the oven floor or
turntable. Use a microwavable dish.
- Keep a browning dish at least 3/16 inch above floor.
Carefully read and follow the instructions for the
browning dish. If you use a browning dish
incorrectly, you could damage the oven floor.
• Install or locate this appliance only in accordance
with the provided installation instructions.
• This appliance should be serviced only by qualified
service personnel. Contact the nearest authorized
service facility for examination, repair, or adjustment.
• Liquids, such as water, coffee, or tea are able to be
overheated beyond the boiling point without
appearing to be boiling. Visible bubbling or boiling
when the container is removed from the microwave
oven is not always present.
THIS COULD RESULT IN VERY HOT LIQUIDS
SUDDENLY BOILING OVER WHEN THE
CONTAINER IS DISTURBED OR A SPOON OR
OTHER UTENSIL IS INSERTED INTO THE LIQUID.
To reduce the risk of injury to persons;
- Do not overheat the liquid.
- Stir the liquid both before and halfway through
heating it.
- Do not use straight-sided containers with narrow
necks.
- After heating, allow the container to stand in the
microwave oven for a short time before removing
the container.
- Use extreme care when inserting a spoon or other
utensil into the container.
SAVE THESE INSTRUCTIONS
FEDERAL COMMUNICATIONS COMMISSION
RADIO FREQUENCY INTEREFERENCE
STATEMENT (U.S.A. ONLY)
WARNING
w
This equipment generates and uses ISM frequency
energy and if not installed and used properly, that is
in strict accordance with the manufacturer's
instructions, may cause interference to radio and
television reception. It has been type tested and
found to comply with limits for ISM Equipment
pursuant to part 18 of FCC Rules, which are designed
to provide reasonable protection against such
interference in a residential installation. However,
there is no guarantee that interference will not occur
in a particular installation. If this equipment does
cause interference to radio or television reception,
which can be determined by turning the equipment off
and on, the user is encouraged to try to correct the
interference by one or more of the following:
WARNING:
installation manual,otherwise there could be injury to persons or other objects!
:
• Reorient the receiving antenna of the radio or
television.
• Relocate the Microwave Oven with respect to the
receiver.
• Move the microwave oven away from the receiver.
• Plug the microwave oven into a different outlet so
that the microwave oven and the receiver are on
different branch circuits.
The manufacturer is not responsible for any radio or
TV interference caused by unauthorized
modification to this microwave oven. It is the
responsibility of the user to correct such interference.
Your microwave oven must be installed following the guide of
- 5 -
Page 6
OVEN
SPECIFICATIONS
ELECTRICAL RATING
ELECTRICAL
REQUIREMENTS
The oven is designed to operate on a Standard
120V/60Hz household outlet. Be sure the circuit is at
least 15A or 20A and the microwave oven is the only
appliance on the circuit. It is not designed for 50Hz
or any circuit other than a 120V/60Hz circuit.
GROUNDING
INSTRUCTIONS
WARNING
SPECIFICATIONS
Please read this owner’s manual. It will tell you how
to use all the fine features of this microwave oven.
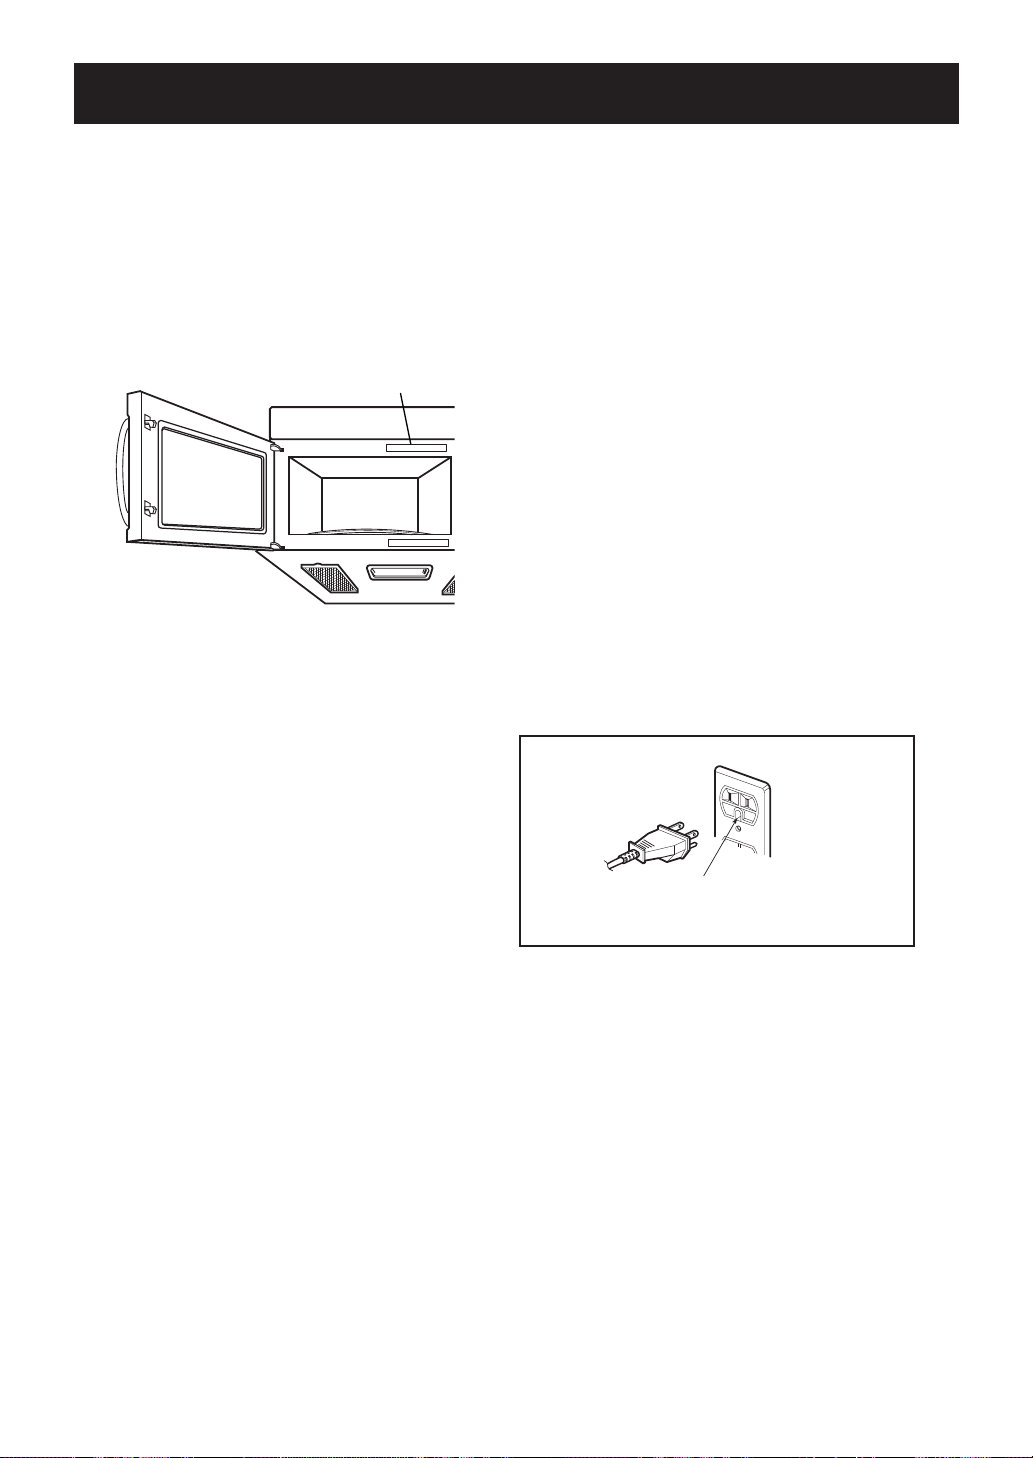
LOCATION OF
MODEL NUMBER
To request service information or replacement parts,
the service center will require the complete model
number of your microwave oven. The number is on the
left side of control panel as shown in the illustration
below.
MODEL NUMBER LABEL
Output Power 1,000W (IEC 60705 Standard)
Outer Dimensions 29-15/16” x 16-7/16” x 16-15/16”
Cavity Volume
Net Weight 48.9 lbs.
1.7 Cu.ft
This appliance must be grounded. If an electrical
short circuit occurs, grounding reduces the risk of
electric shock by providing an escape wire for the
electric current. The cord for this appliance has a
grounding wire with a grounding plug. Put the plug into
an outlet that is properly installed and grounded.
w
grouning plug improperly, you risk electric shock.
Ask a qualified electrician if you do not understand the
grounding instructions or if you wonder whether the
appliance is properly grounded.
Because this appliance fits under the cabinet, it has a
short power-supply cord. See the separate Installation
Instructions for directions on properly placing the cord.
Keep the electrical power cord dry and do not pinch or
crush it in any way.
If it is necessary to use an extension cord, use only a
3-wire extension cord that has a 3-blade grounding
plug, and a 3-slot receptacle that will accept the plug
on the appliance. The marked rating of the extension
cord shall be equal to or greater than the electrical
rating of the appliance.
- If you use the
* Electrical Rating of the Oven:120V AC 60Hz
* 14 Amps / 1600 Watts ( MWO + Cooktop Lamp +
Ventilation Fan)
Ensure proper ground
exists before use
For a permanently connected appliance:
This appliance must be connected to a grounded,
metallic, permanent wiring system, or an equipment
grounding conductor should be run with the circuit
conductors and connected to the equipment grounding
terminal or lead on the appliance.
- 6 -
Page 7
FEATURES
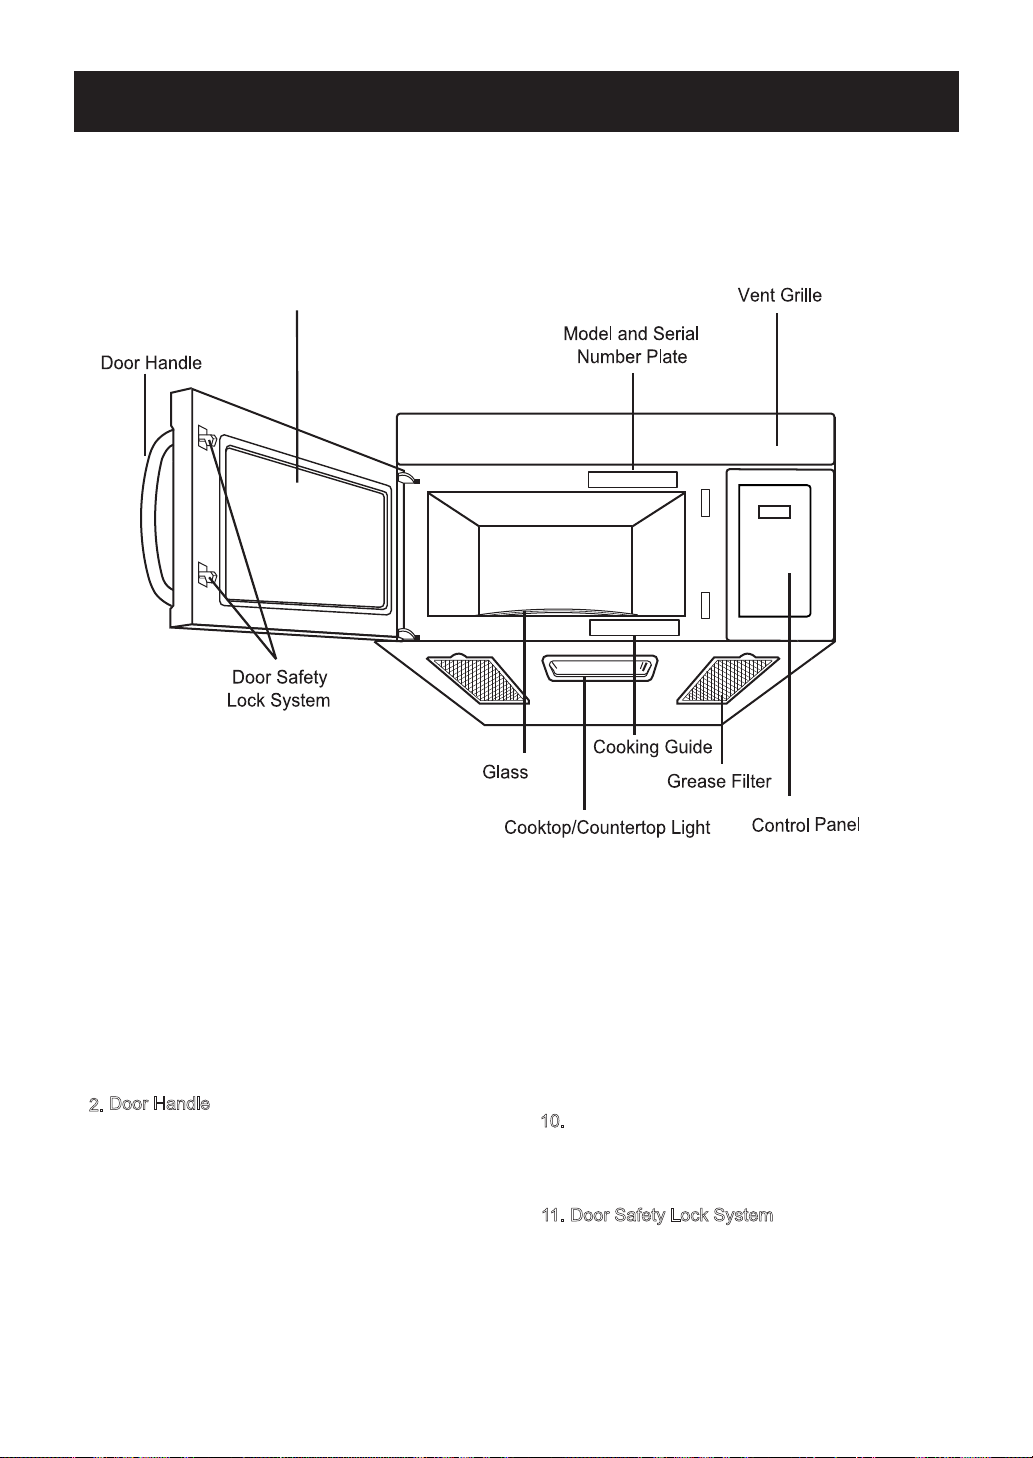
MICROWAVE OVEN FEATURES
Metal Shielded
Window
Tray
WARNING:
w
Do not operate the oven when empty or without the glass tray. It is best to leave a glass of water in the oven
when not in use. The water will safely absorb all microwave energy, if the oven is accidentally started.
Your microwave oven is designed to make your cooking experience as enjoyable and productive as
possible. To get you up and running quickly, the following is a list of the oven’s basic features:
Metal Shielded Window. The shield prevents
1.
microwaves from escaping. It is designed as a
screen to allow you to view food as it cooks.
Door Handle
2.
3.
Model and Serial Number Plate
Charcoal Filter (behind Vent Grille)
4.
Vent Grille
5.
Control Panel. Press the buttons on this panel
6.
to perform all functions.
Grease Filter
7.
8.
Cooking
9.
Cooktop/Countertop Light
Glass Tray. The glass tray moves food as it
10.
cooks for more even cooking.
It must be in the oven during operation for best
cooking results.
Door Safety Lock System
11.
Guide Label
- 7 -
Page 8

OVEN CONTROL PANEL
1
FEATURES
10
11
2
3
4
5
6
7
8
9
12
13
14
15
16
17
18
19
20
21
22
23
Page 9

FEATURES
1. DISPLAY.
indicators to tell you time of day, cooking time
settings and cooking functions selected.
. Popcorn.
popcorn in your microwave oven.
3. Potato. Touch this pad to cook up to 4
potatoes without entering a cook time or power.
. Frozen Entree. uch this pad to cook a 10
ounce (284 to 567 g) frozen entree without entering
a cook time or power.
. Auto Cook. uch this pad to cook microwavable
foods without entering a cook time or power.
. Soften.
cream,cream cheese,frozen juice.
. Melt.
chocolate,cheese,marshmallow.
. Time. ch this pad followed by number pads
to set a cooking time.
. NUMBER
time, power level, quantities or weights.
The Display includes a clock and
Touch this pad when popping
Touch this pad to soften butter,ice
Touch this pad to melt butter or margarine,
Touch number pads to enter cooking
. Time Defrost. uch this pad to set a defrost
time.
. Auto Defrost. uch this pad followed by
number pads to thaw frozen meat by weight.
. Power Level.
cooking power level.
. Clock.
18. START Enter.
If you open the door after oven begins to cook,
retouch START Enter.
19. STOP Clear.
or clear all entries.
20 .gnivaS ygrenE .
21. More.
cooking time each time you press it.
Touch this pad to enter the time of day.
Touch this pad to select a
Touch this pad to start a function.
Touch this pad to stop the oven
Touch this pad to save energy.
Touch this pad to add ten seconds of
. Less.
Light On/Off.
. Pizza. ch this pad to reheat one or several
. Auto Reheat. Touch this pad to reheat
Touch this pad to subtract ten seconds
of cooking time each time you press it.
Touch this pad to turn the
cooktop/countertop light on or off.
slices of pizza without entering a cook time or
power.
microwavable foods without entering a cook
time or power.
22. Add 30 Sec.
cooking time each time you press it.
. Vent Hi/Low/Off.
Vent on or off.
NOTE: If you try to enter incorrect instructions,
you will not hear any tones. Touch STOP Clear
and re-enter the instructions.
Touch this pad to add 30 seconds of
Touch this pad to turn the
- 9 -
Page 10
USING YOUR MICROWAVE OVEN
LEARN ABOUT YOUR MICROWAVE OVEN
This section discusses the concepts behind microwave cooking and introduces you to the basics you need to
know to operate your microwave oven. Please read this information before use.
AUDIBLE SIGNALS
Audible signals are available to guide you when
setting and using your oven:
• A programming tone will sound each time
you touch a pad.
• Four tones signal the end of a cooking cycle.
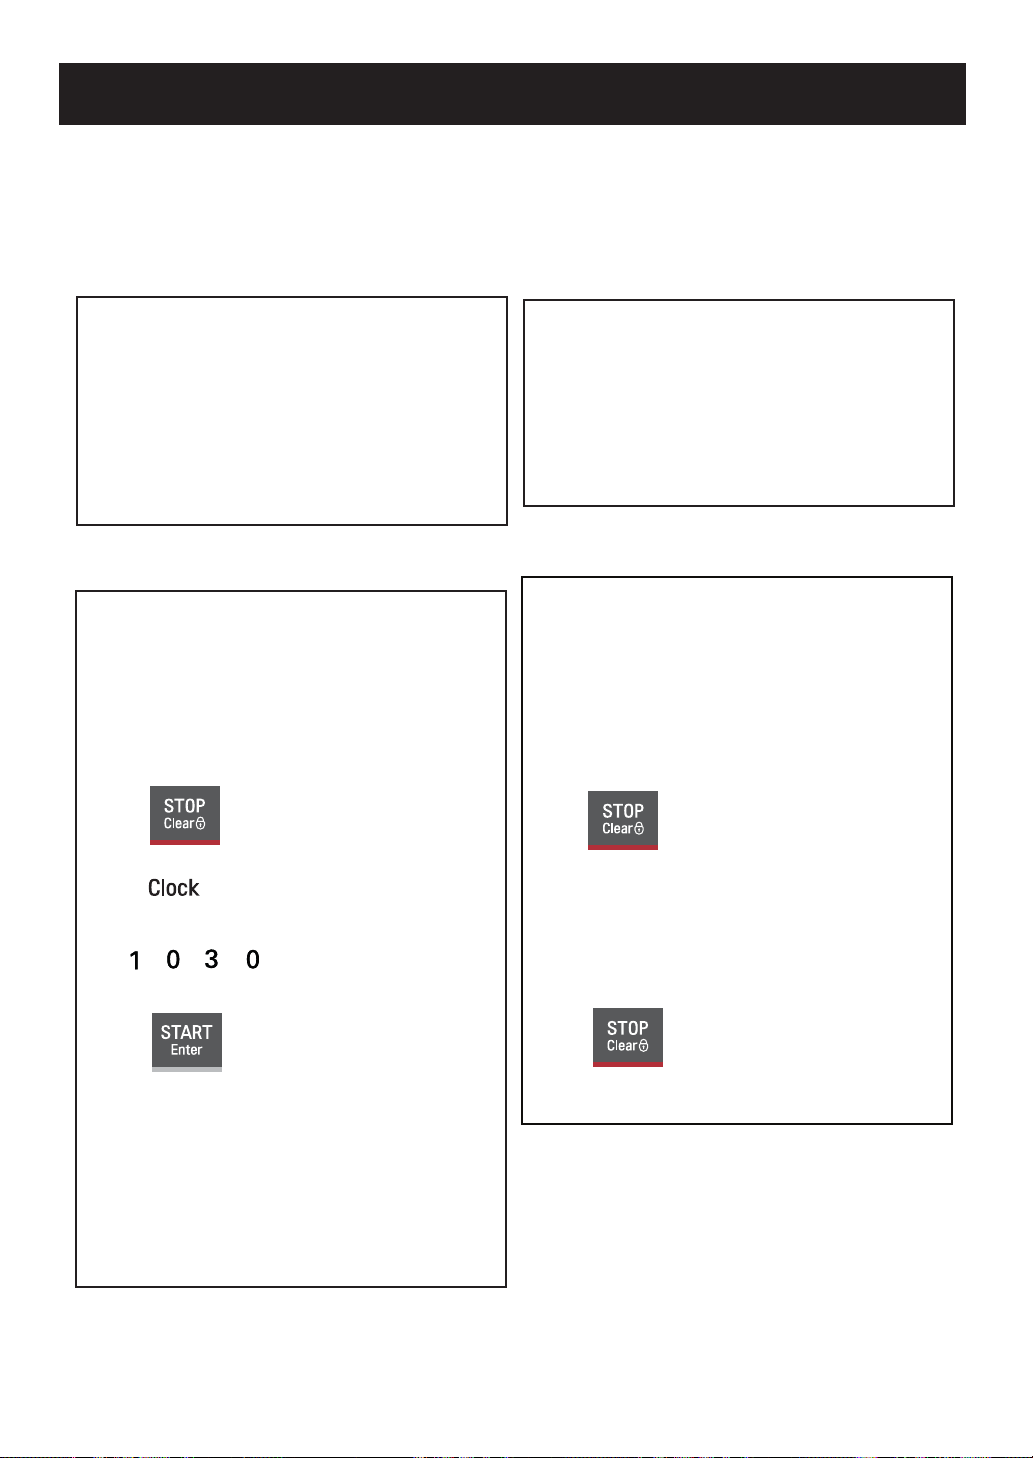
CLOCK
When your microwave oven is first plugged in or
after a power failure, the Display will show “:”.
If a time of day is not set, “:” will show on the Display
until you touch “Clock”.
Example: To set the clock for 10:30(AM or PM).
Touch: Display Shows:
1.
2.
1
2
INTERRUPTING COOKING
You can stop the oven during a cycle by opening
the door. The oven stops heating and the fan
stops, but the light stays on.
To restart cooking, close the door and Touch
START.
If you do not want to continue cooking,
open the door and touch STOP&OHDU.
CHILD LOCK
Use this safety feature to lock the control panel
when you are cleaning the oven, or so that children
cannot use the oven unsupervised.
To set CHILD LOCK:
Touch: Display Shows:
Touch and hold until
:
:
00
1.
To cancel CHILD LOCK:
you hear 2 beeps and
“Loc” appears in the
display.
(approximately
4 seconds)
:
30
3.
4.
NOTES:
•
If you enter in an incorrect time and touch “
you cannot set time of day. Enter the correct time.
• If you touch STOPClear while setting the clock, the
Display will show the last time of day set or “:”
if no time of day has been set.
10
10
Clock”,
:
30
Touch: Display Shows:
Touch and hold until
1.
- 10 -
“Loc” disappears in the
display.
(approximately
4 seconds)
Page 11
:
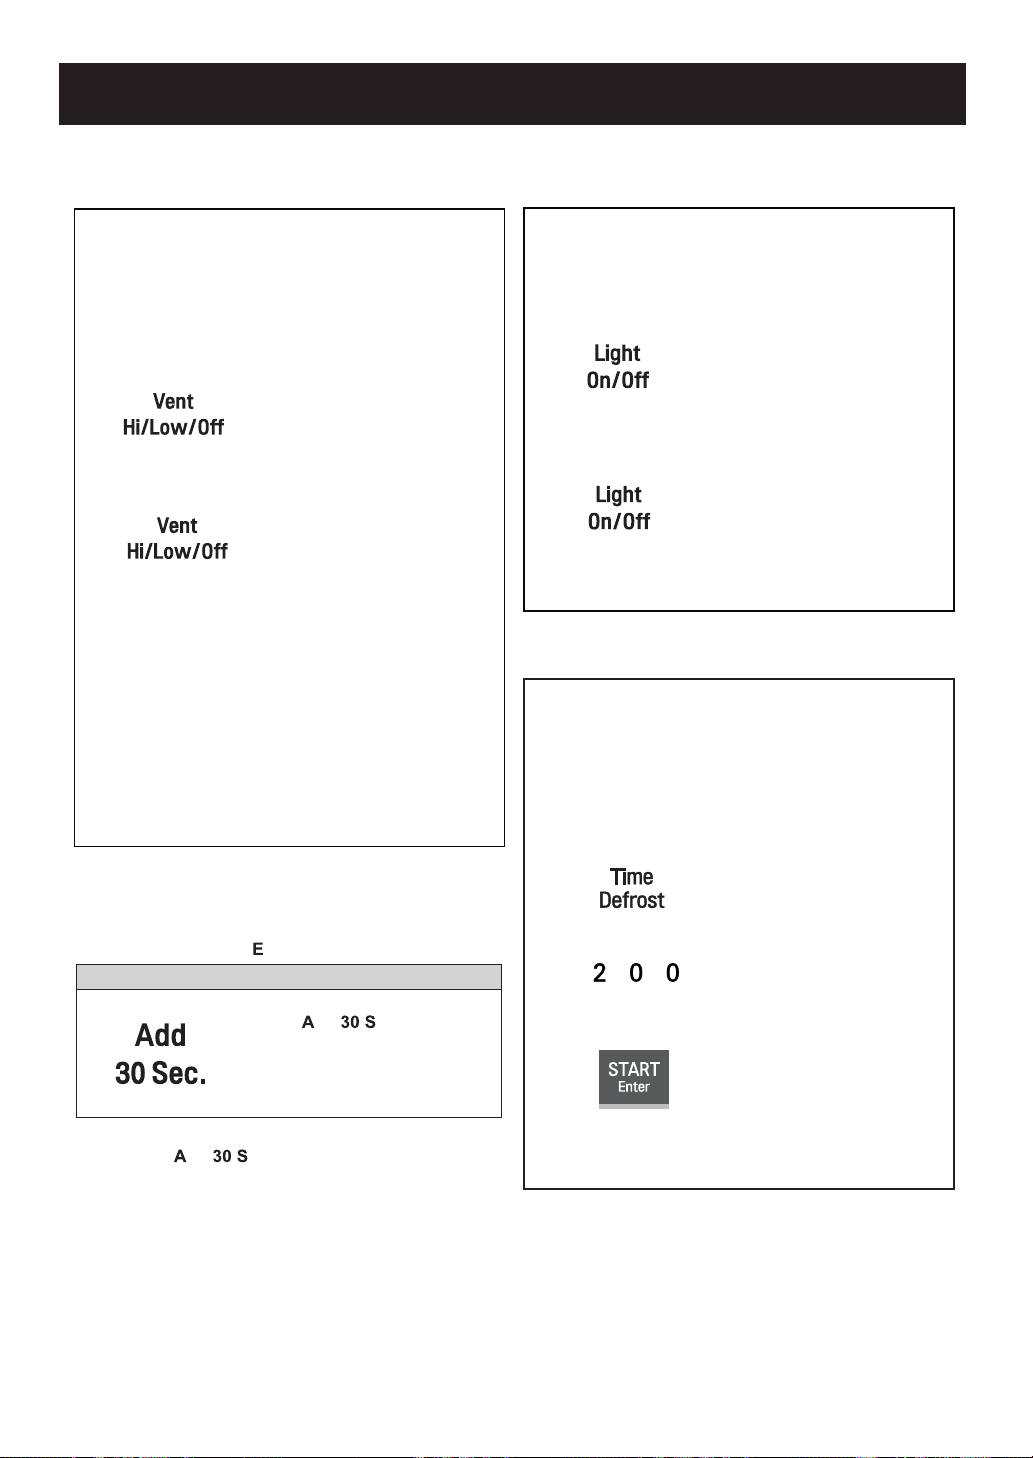
USING YOUR MICROWAVE OVEN
The ent
ent
Touch: Display Shows:
1.
Once for HIGH
Twice for Low
2.
Turn off fan when desired
NOTE: If the temperature from the range or cooktop
below the oven gets too hot, the exhaust fan in the
vent hood will automatically turn on at the HIGH
setting to protect the oven.
It may stay on up to an hour to cool the oven.
When this occurs, the ent pad will not turn the fan
off. You cannot turn the exhaust fan off during
microwave cooking.
::
:
COOKTOP LIGHT
The pad on the bottom left of the control panel
controls the cooktop light.
Example: To set the Lamp for .
Touch: Display Shows:
1.
Once for light
Twice for light
2.
To turn off, touch pad one
or two times depending on
light setting.
::
:
TIME DEFROST
Using Time Defrost can defrost for a selected
length of time.
Example: To set Time Defrost for 2 minutes.
Touch: Display Shows:
ADD 30 SEC
A time-saving pad, this simplified control lets you
quickly set and start microwave cooking without the
need to touch START
Example: To cook for 2 minutes.
NOTE:
If you touch dd ec, it will add 30 seconds up to
99 min 59 seconds.
nter.
Touch
The oven begins cooking
and display shows time
counting down.
dd ec 4 times.
1.
2.
3.
At the end of the Time defrost four tones will sound.
- 11 -
2
Time counting down.
:
0
:
00
Page 12

:
USING YOUR MICROWAVE OVEN
TIMED COOKING
This feature lets you program a specific cook time
and power. For best results, there are 10 power
level settings in addition to HIGH (100%) power .
Refer to the “Microwave Power Levels Table” on
page for more information.
14
NOTE: If you do not select a power level, the oven
will automatically cook at HIGH (100%) power.
Example: To cook for 5 minutes, 30 seconds
at 80% power.
Touch: Display Shows:
1.
2.
3.
4.
5
P-
P-
:
: 0
30
hi
80
MULTI-STAGE COOKING
For best results, some recipes call for different cook
powers during different stages of a cook cycle. You
can program your oven to switch from one power
level to another for up to 2 stages.
Example: To set a 2-stage cook cycle.
Touch: Display Shows:
1.
2.
To set a 3 minute cook
time for first stage.
3.
4.
To set an 80% cook
power for the first stage.
3
P-
P-
: 0
:
hi
80
00
5.
Time counting down
and COOK.
- 12 -
5.
6.
To set a 7 minute cook
time for second stage.
7.
8.
To set a 50% cook power
for the second stage.
9.
When the first stage is over, you will hear two
10.
short tones as the oven begins the second
cook stage.
Time counting down
and COOK.
7
P-
P-
: 0
:
hi
50
00
Page 13

USING YOUR MICROWAVE OVEN
MELT
Melt provides four preset categories for melt.
Butter, Chocolate, Cheese, Marshmallows.
Details MELT TABLE
Example: To Melt 16 oz Cheese.
1. Touch STOP Clear.
Melt
2
NOTE: After 4 seconds, the oven will start
2. Touch Melt pad three times.
3. Choose 16 oz.
4. Touch START Enter.
automatically. When the cook time
is over, you will hear four beeps and
End will display.
SOFTEN
Soften provides four preset categories for melt.
Butter, Ice Cream, Cream Cheese, Frozen Juice.
Example: To Soften 3 oz Cream Cheese.
MELT TABLE
Category
Butter
Chocolate
Cheese
Marshmallows
Touch pad
times
11 stick 2 sticks
2
3
4
Touch pad number
123
3 sticks
4 oz 8 oz
8 oz 16 oz
5 oz 10 oz
_
_
_
SOFTEN TABLE
Category
Butter 1 1 stick 2 sticks3 sticks
Ice Cream
Cream Cheese
Frozen Juice
Touch pad
times
2
3
4
Energy Saving feature saves energy by turning off
the display by touching the Energy Saving Button.
The display will automatically turn off
of idleness if the clock has not been set.
If the clock has been set, then the display will not
automatically turn off.
Touch pad number
123
pint quart
3 oz 8 oz
6 oz 12 oz 16 oz
after
half
gallon
_
5 minutes
1. Touch STOP Clear.
Soften
1
NOTE: After 4 seconds, the oven will start
2. Touch Soften pad three times.
3. Choose 3 oz.
4. Touch START Enter.
automatically. When the cook time
is over, you will hear four beeps and
End will display.
- 1 -
1.
2.
3.
Touch STOP Clear .
:
Touch
turn the display off.
Touch
Turn the display on.
Energy Saving to
Energy Saving to
:
Page 14

0 = 0% of full power
USING YOUR MICROWAVE OVEN
MICROWAVE POWER LEVELS
For best results, some recipes call for different cook
powers. The lower the cook power, the slower the
cooking. Each number from 1 to 9 stands for a
different percentage of full cook power.
The following chart gives the percentage of cook
power each number pad stands for, and the cook
power name usually used.
COOK Power NAME WHEN TO USE IT
100% of full power
9 = 90% of full power
8 = 80% of full power
7 = 70% of full power
6 = 60% of full power
5 = 50% of full power
4 = 40% of full power
High
Medium-High
Medium
It also tells you when to use each cook power. Follow
recipe or food package instructions if available.
NOTE: Refer to a reliable cookbook for cooking times
based on the 1000 Watt cook power of your microwave
oven.
• Quick heating many convenience foods and
foods with high water content, such as soups and
beverages.
• Cooking tender cuts of meat, ground meat,
• Heating cream soups
• Heating rice, pasta, or casseroles
• Cooking and heating foods that need a
Cook Power lower than high (for example,
whole fish and meat loaf) or when food is
cooking too fast
• Reheating a single serving of food
• Cooking requiring special care, such as cheese
and egg dishes, pudding, and custards
• Finishing cooking casseroles
• Cooking ham, whole poultry, and pot roasts
• Simmering stews
• Melting chocolate
• Heating pastries
3 = 30% of full power
2 = 20% of full power
1 = 10% of full power
NOTE: Once cook time has been entered, you can also use the ower Level pad as a second Kitchen
Timer by entering “0” for the Cook Power. The oven will count down the cooking time you set without
cooking.
Medium-Low,
Defrost
Low
None
• Manually defrosting foods, such as bread, fish,
meats, poultry, and precooked foods
• Softening butter, cheese, and ice cream
• Keeping food warm
• Standing time
- 1 -
Page 15

USING YOUR MICROWAVE OVEN
AUTO DEFROST
defrost sequences are preset in the oven.
The auto defrost feature provides you with the best
defrosting method for frozen foods. The cooking guide
will show you which defrost sequence is recommended
for the food you are defrosting.
For added convenience, the Auto Defrost
includes a built-in beep mechanism that reminds
you to check, turn over, separate, or rearrange to get
best defrost results.
are provided.
1 MEAT
2 POULTRY
3 FISH
4 BREAD
*
Example: To defrost 1.2 lbs of ground beef.
vailable weight is 0.1~6.0 lbs.
Touch: Display Shows:
1.
2.
To enter the weight
3.
NOTE:
When you touch the START
changes to defrost time count down. The oven will beep
during the Defrost cycle. At this time, open the door
and turn, separate, or rearrange the food.
Remove any portions that have thawed.
Return frozen portions to the oven and touch
START
nter to resume the defrost cycle.
different defrosting levels
1. 2
Time counting down.
nter pad, the display
OPERATING TIPS
• For best results, remove fish, shellfish, meat, and
poultry from its original closed paper or plastic
package (wrapper). Otherwise, the wrap will hold
steam and juice close to the foods, which can cause
the outer surface of the foods to cook.
• For best results, shape your ground meat into the
form of a doughnut before freezing. When
defrosting, scrape off thawed meat when the beep
sounds and continue defrosting.
• Place foods in a shallow container.
This table shows you food type selections and the
weights you can set for each type. For best
results, loosen or remove covering on food.
- 1 -
FOOD
Auto Defrost
Meat
Poultry
Fish
BREAD
Category
MEAT
0.1 to 6.0 lbs
POULTRY
0.1 to 6.0 lbs
FISH
0.1 to 6.0 lbs
TOUCH
1 Time(s) 0.1 to 6.0 lbs (45g to 2722g)
2 Time(s) 0.1 to 6.0 lbs (45g to 2722g)
3 Time(s) 0.1 to 6.0 lbs (45g to 2722g)
4 Time(s)
BEEF
Ground beef, Round steak, Cubes for
stew, Tenderloin steak, Pot roast, Rib
roast, Rump roast, Chuck roast,
Hamburger patty.
LAMB
Chops (1-inch thick), Rolled roast.
PORK
Chops (
Spareribs, Countrystyle ribs.
Rolled roast, Sausage.
POULTRY
Whole (under 4 lbs), Cut up,
Breasts (boneless).
CORNISH HENS
Whole.
TURKEY
Breast (under 6 lbs).
FISH
Fillets, Whole Steaks.
SHE LLFISH
Crab meat, Lobster tails, Shrimp,
Scallops.
Sliced bread, Buns, Baguette, etc.
Separate slices and place between paper
towel or flat plate
After defrosting, let stand for 1-2 minutes
WEIGHTS YOU
CAN SET
(tenths of a pound)
0.1 to 1.0 lbs (45g to 450g)
Food
1
/2-inch thick), Hot dogs,
. T
urn food over at beep
.
.
Page 16

USING YOUR MICROWAVE OVEN
DEFROSTING TIPS
• When using Auto Defrost, the weight to be entered
is the net weight in pounds and tenths of pounds
(the weight of the food minus the container).
• Before starting, make sure you have removed any
of the metal twist-ties which often come with frozen
food bags, and replace them with strings or elastic
bands.
• Open containers such as cartons before they are
placed in the oven.
• Always slit or pierce plastic pouches or packaging.
• If food is foil wrapped, remove foil and place it in a
suitable container.
• Slit the skins, if any, of frozen food such as
sausage.
• Bend plastic pouches of food to ensure even
defrosting.
• Always underestimate defrosting time. If defrosted
food is still icy in the center, return it to the
microwave oven for more defrosting.
• The length of defrosting time varies according to
how solidly the food is frozen.
• The shape of the package affects how quickly food
will defrost. Shallow packages will defrost more
quickly than a deep block.
• As food begins to defrost, separate the pieces.
Separated pieces defrost more easily.
• Use small pieces of aluminum foil to shield parts
of food such as chicken wings, leg tips, fish tails, or
areas that start to get warm. Make sure the foil does
not touch the sides, top, or bottom of the oven. The
foil can damage the oven lining.
• For better results, let food stand after defrosting.
(For more information on standing time, see the
“Microwave Cooking Tips” section.)
• Turn over food during defrosting or standing time.
Break apart and remove food as required.
- 1 -
Page 17

:
USING YOUR MICROWAVE OVEN
Using Quick Touch
Your oven’s menu has been preprogrammed to cook
food automatically. Tell the oven what you want.
Then let you microwave oven cook your selections.
POPCORN
Popcorn lets you pop 3.0, and 3.5 ounce
bags of commercially packaged microwave
popcorn. Pop only one package at a time. If you
are using a microwave popcorn popper, follow
manufacturer’s instructions.To set your microwave
oven correctly, follow this chart:
Example: To pop a 3.0 oz. bag.
Touch: Display Shows:
3. 0
once for 3.5 oz
twice for 3.0 oz
Time counting down and
COOK.
When the cook time is over,
you will hear four beeps and End will display.
PIZZA
Pizza lets you reheat up to 3 slices of pizza.
A slice is based on a 5 ounce slice.
NOTE:
• Place on a low plate & paper towel.
• Do not cover.
FROZEN ENTREE
Frozen Entree lets you cook 10 and 20 ounce plates of
commercially packaged microwave frozen entree
without entering cooking times and power levels.
Remove tray from outer carton.
Do not remove film cover, but cut it to vent.
Example: To reheat a 20 oz. frozen entree.
Touch: Display Shows:
2 0
once for 10 oz
twice for 20 oz
When the cook time is over,
you will hear four beeps and End will display.
Time counting down and
COOK.
POTATO
The Potato lets you cook potatoes with preset times and
cook powers. You can choose from 1 to 4 potatoes.
NOTE:
•
Cooking times are based on an average 8 ounce potato.
• Before baking, pierce potato with fork several times.
• After baking, let stand for 5 minutes.
Example: To cook 2 Potatoes.
Touch: Display Shows:
2
Example: To reheat 2 slices of Pizza.
Touch: Display Shows:
2
once for 1 slice
twice for 2 slices
three times for 3 slices
Time counting down and
COOK.
When the cook time is over,
you will hear four beeps and End will display.
once for 1 potato
twice for 2 potatoes
three times for 3 potatoes
four times for 4 potatoes
Time counting down and
COOK.
When the cook time is over,
you will hear four beeps and End will display.
- 1 -
Page 18
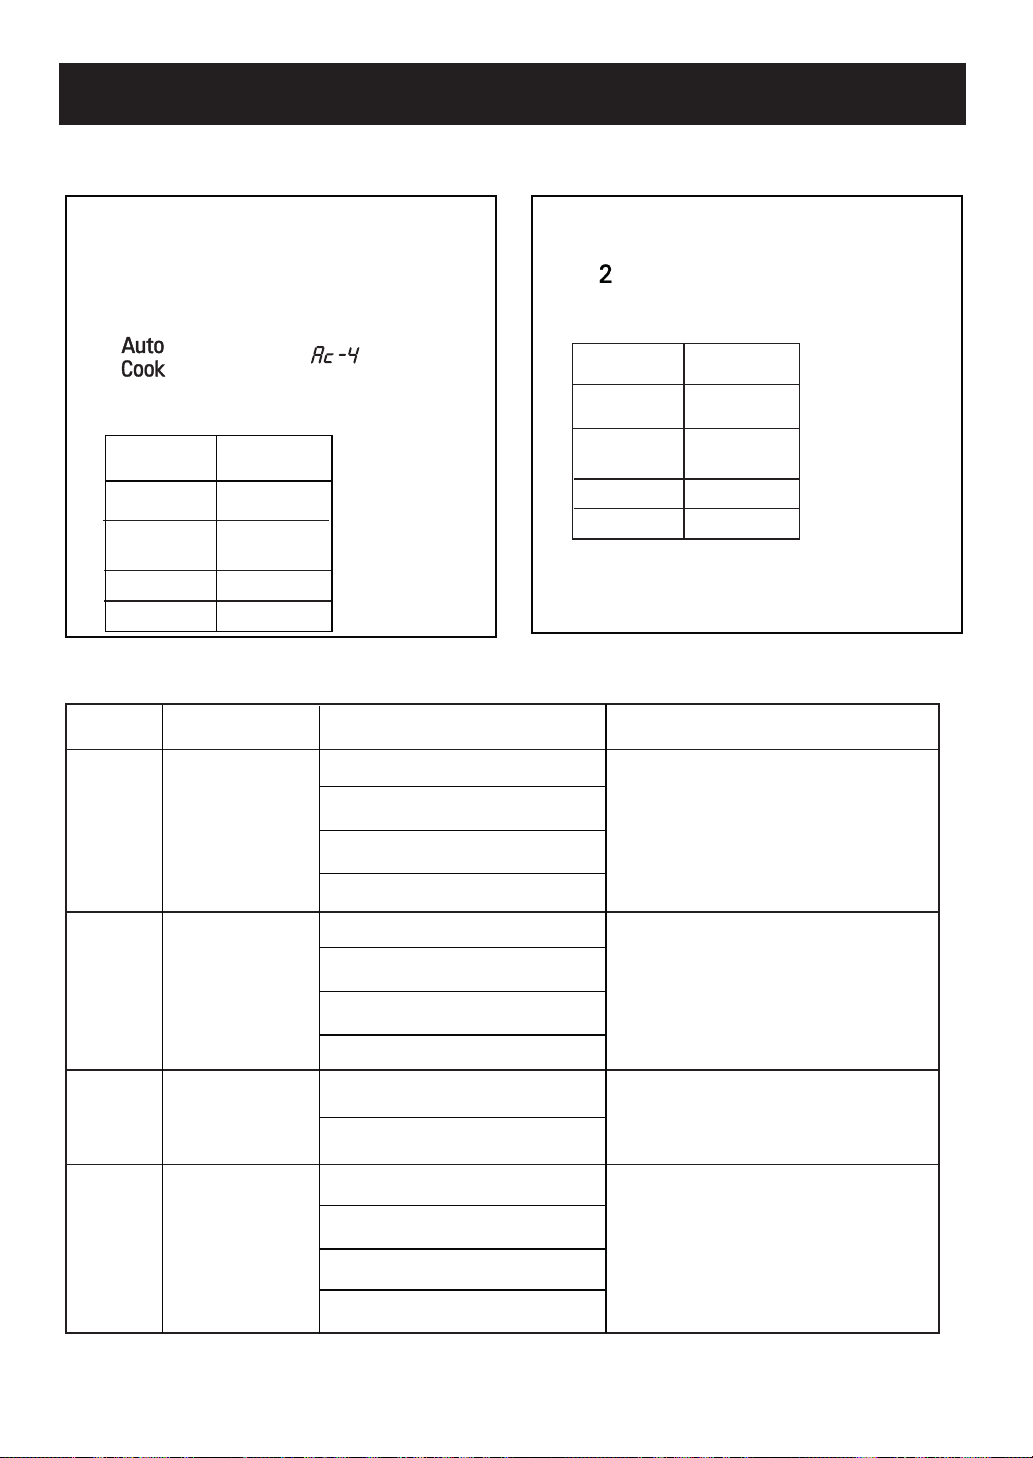
AUTO COOK
USING YOUR MICROWAVE OVEN
Auto Cook provides four preset categories for cooking.
Example: To cook 2 cups of Casserole.
Touch: Display Show
s:
1.
Choose food category.
Category
Fresh
vegetable
Frozen
vegetable
Rice
Casserole
Touch pad
of Time(s)
1
2
3
4
COOKING GUIDE FOR AUTO COOK
CODE
1
2
3
CATEGORY
FRESH
VEGETABLE
FROZEN
VEGETABLE
RICE
QUANTITY
1 cup
2 cups
3 cups
4 cups
1 cup
2 cups
3 cups
4 cups
1 cup
2 cups
Touch: Display Shows:
2.
Enter quantity/servings.
Category
Fresh
vegetable
Frozen
vegetable
Rice
Casserole
When the cook time is over,
you will hear four beeps and End will display.
Place in a microwavable bowl or
casserole.
Add water according to the quantity.
Cover with vented plastic wrap.
Let stand 3 minutes.
* 1-2 cups: add 2 tbsp water.
* 3-4 cups: add 2 tbsp water.
Place in a microwavable bowl or
casserole.
Cover with vented plastic wrap.
Let stand 3 minutes.
* 1-2 cups: add 2 tbsp water.
* 3-4 cups: add 2 tbsp water.
Place in a microwavable bowl or
casserole.
Cover with vented plastic wrap.
Let stand 5 minutes.
Time counting down and
COOK.
Number of
cups
1 - 4 cups
1 - 4 cups
1 - 2 cups
1 - 4 cups
DIRECTIONS
1 cup
4
CASSEROLE
2 cups
3 cups
4 cups
Place in a microwavable bowl or
casserole.
Cover with vented plastic wrap.
Stir and let stand 3 minutes.
- 1 -
Page 19
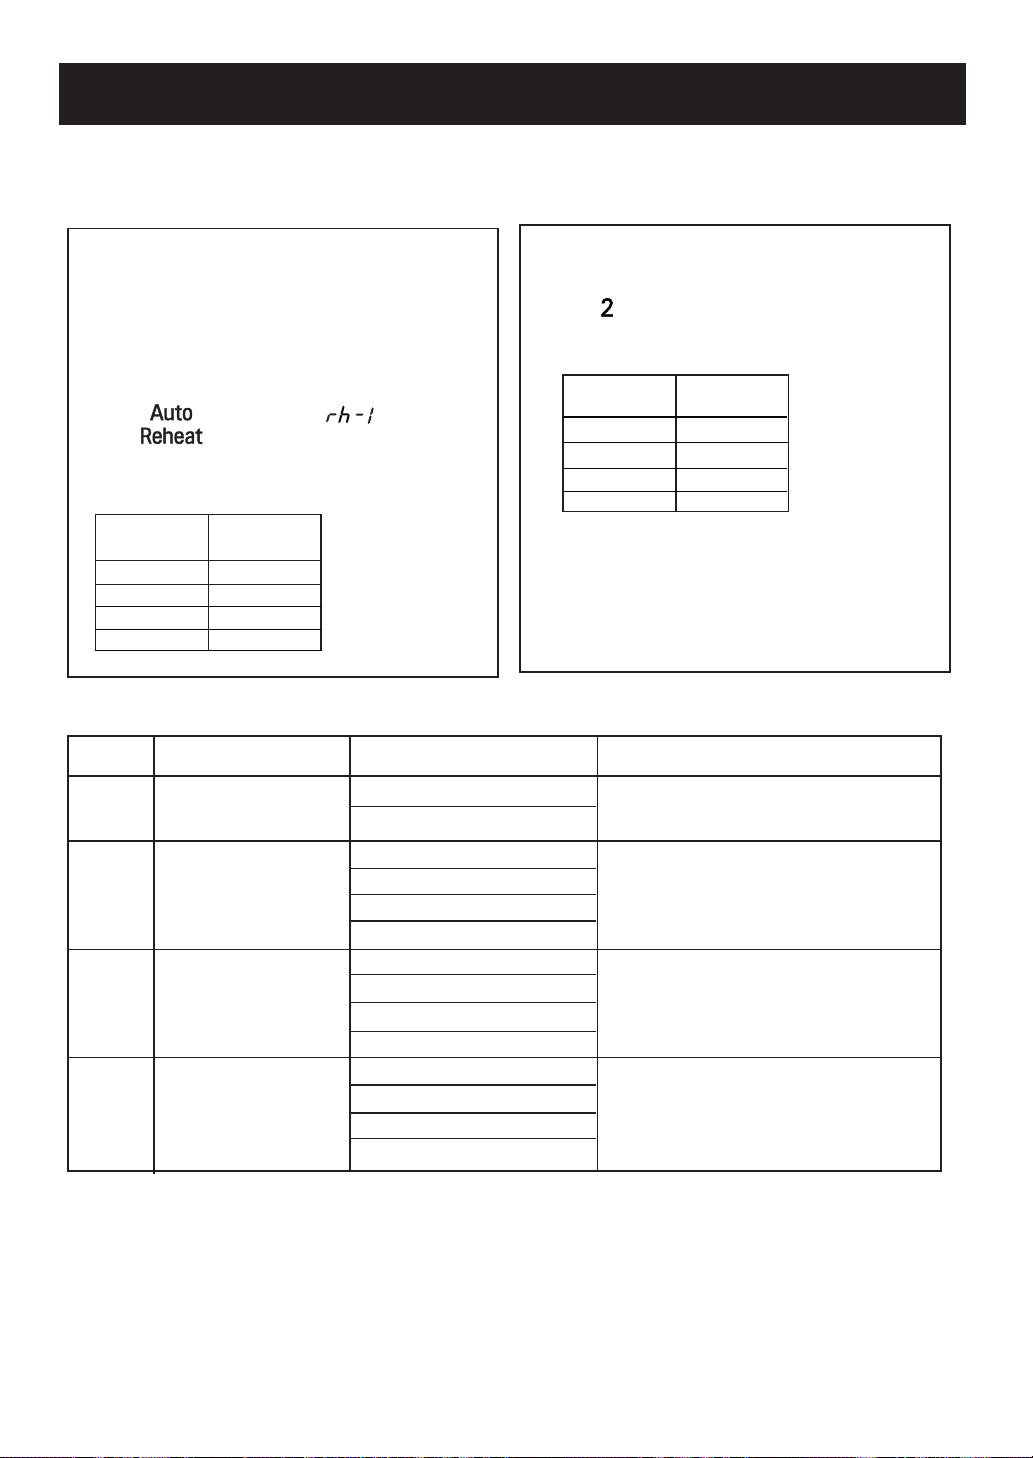
USING YOUR MICROWAVE OVEN
AUTO REHEAT
Auto Reheat provides four preset categories for
reheating.
Example: To reheat 2 servings of Dinner plate.
Touch: Display Shows:
1.
Choose food category.
Category
Dinner plate
Soup/sauce
Casserole
Roll/Muffin
Touch pad
of Time(s)
1
2
3
4
COOKING GUIDE FOR AUTO REHEAT
CODE CATEGORY
1
2
3
4
DINNER PLATE
SOUP/SAUCE
CASSEROLE
ROLL/MUFFIN
SERVING AMOUNT DIRECTION
1 serving (10 oz.)
2 servings (15 oz.)
1 cup
2 cups
3 cups
4 cups
1 cup
2 cups
3 cups
4 cups
1 piece (2 oz.)
2 pieces (4 oz.)
3 pieces (6 oz.)
4 pieces (8 oz.)
Touch: Display Shows:
2.
Enter quantity/servings.
Category
Dinner plate
Soup/sauce
Casserole
Roll/Muffin
When the cook time is over,
you will hear four beeps and End will display.
Place on a low plate.
Cover with vented plastic wrap.
Let stand 3 minutes.
Place in shallow microwavable casserole.
Cover with vented plastic wrap.
Stir and let stand 3 minutes.
Place in a microwavable bowl or casserole.
Cover with plastic wrap.
Stir and let stand 3 minutes.
Place on paper towel.
Do not cover.
Time counting down and
COOK.
Number of
cups/Items
1 - 2 servings
1 - 4 cups
1 - 4 cups
1 - 4 pieces
- -
Page 20
MAINTENANCE
CARE AND CLEANING
For best performance and safety, keep the oven
clean inside and outside. Take special care to
keep the inner door panel and the oven front
frame free of food or grease build-up.
Never use abrasive powder or pads. Wipe the
microwave oven inside and out, including the
hood bottom cover, with a soft cloth and a warm
(not hot) mild detergent solution. Then rinse and
wipe dry.
Use a chrome cleaner and polish on chrome,
metal and aluminum surfaces. Wipe spatters
immediately with a wet paper towel, especially
after cooking chicken or bacon. Clean your oven
weekly or more often, if needed.
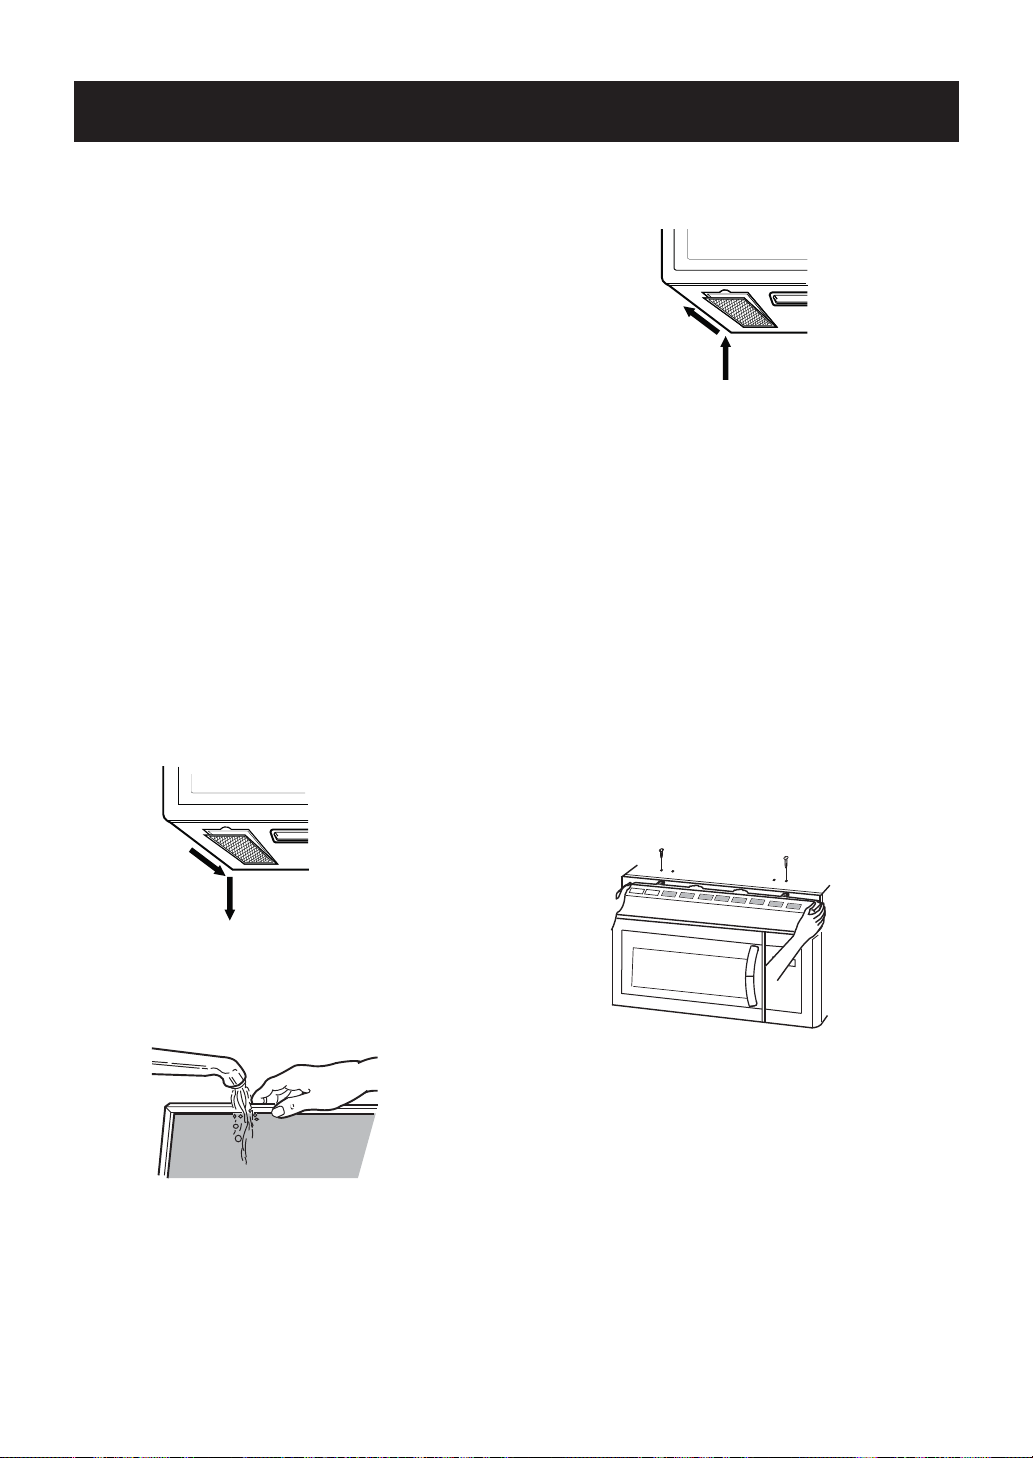
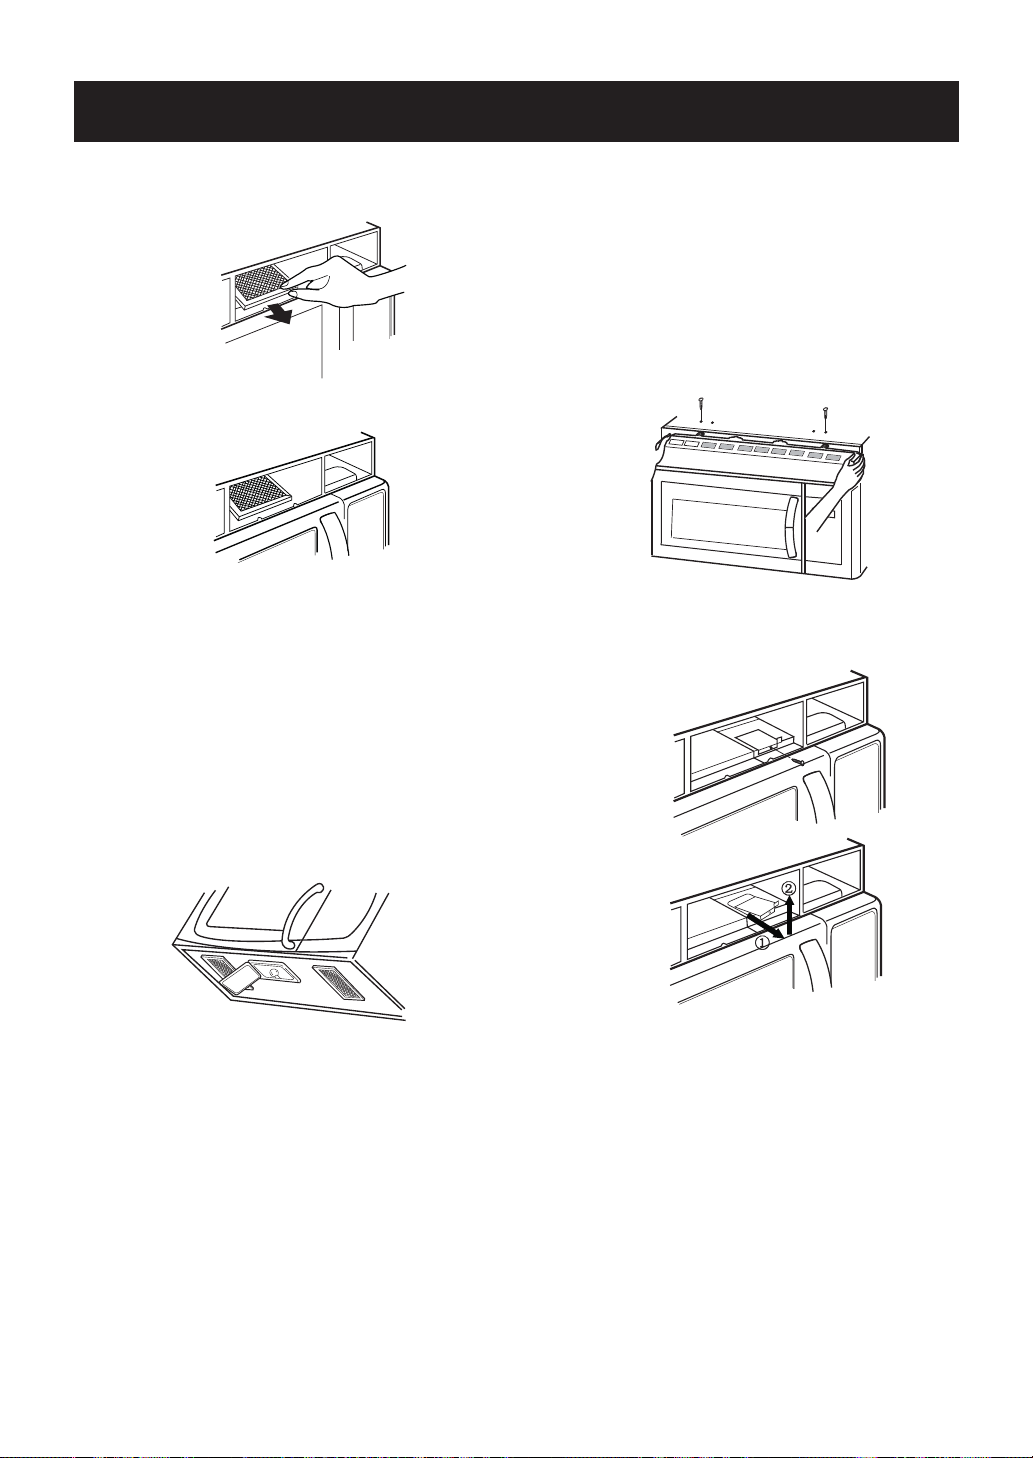
CLEANING THE GREASE
FILTERS
The grease filters should be removed and
cleaned often, at least once a month.
1.
To remove the grease filters, slide each
filter to the side, then pull the filters downward.
The filters will drop out.
3. To reinstall the filters, slide them into the side
slots, then push up and forward to lock.
ĸĸ
ķ
NOTE:
Do not operate the hood without the filters
in place.
CHARCOAL FILTER
REPLACEMENT
If your oven is vented inside, the charcoal filter
should be replaced every 6 to 12 months, and more
often if necessary. The charcoal filter cannot be
cleaned. To order a new charcoal filter, call
1-800-243-0000 or go to www.lg.com/us/support/
parts-accessories.
1. Turn the power off at the main power supply and
gloves
wear
2. Remove the two vent grille mounting screws.
(2 outside screws)
3. Tip the grille forward, then lift it out.
ķ
ĸĸ
2. Soak grease filters in hot water and a
detergent. Rinse well and shake to dry.
Do not use
dishwasher. The
ammonia or place them in a
aluminum will darken.
mild
- 2 -
Page 21
MAINTENANCE
4. Open the door.
5.
Remove the old filter.
6. Slide a new charcoal filter into place and close the
door. The filter should rest at the angle shown.
7.
Slide the bottom of the vent cover into place. Push
the top until it snaps into place. Replace the
mounting screws. Turn the power back on at the
main power supply and set the clock.
COOKTOP/NIGHT LIGHT
REPLACEMENT
OVEN LIGHT REPLACEMENT
1. Unplug the oven or turn off power at the main
power supply and wear gloves.
2.
Remove the vent cover mounting screws.
(2 outside screws)
3. Tip the cover forward, then lift out to remove.
Remove the cover screw,pull the cover
4.
forward and then lift up the bulb holder.
1. Unplug the oven or turn off power at the
main power supply.
2. Remove the bulb cover mounting screws.
3. Replace the bulb with a 30 watt appliance bulb.
4. Replace the bulb cover and mounting screws.
5. Turn the power back on at the main power supply.
- 2 -
5. Replace the bulb with a 30 watt appliance bulb.
6.
Replace the bulb holder and screw.
7. Slide the top of the vent cover into place. Push
the bottom until it snaps into place. Replace the
mounting screws. Turn the power back on at the
main power supply.
Page 22

COOKING UTENSILS
MICROWAVE UTENSIL GUIDE
USE
OVENPROOF GLASS (treated for high
intensity heat):
utility dishes, loaf dishes, pie plates,
cake plates, liquid measuring cups,
casseroles and bowls without metallic
trim.
CHINA:
bowls, cups, serving plates and platters
without metallic trim.
PLASTIC:
Plastic wrap (as a cover)-- lay the plastic
wrap loosely over the dish and press it to
the sides.
Vent plastic wrap by turning back one
edge slightly to allow excess steam to
escape. The dish should be deep
enough so that the plastic wrap will not
touch the food. As the food heats it may
melt the plastic wrap wherever the wrap
touches the food.
Use plastic dishes, cups,
semirigid freezer containers, and plastic
bags only for short cooking time. Use
these with care because the plastic
may soften from the heat of the food.
DO NOT USE
METAL UTENSILS:
Metal shields the food from microwave energy and produces
uneven cooking. Also avoid metal skewers, thermometers, or foil
trays. Metal utensils can cause arcing, which can damage your
microwave oven.
METAL DECORATION:
Metal-trimmed or metal-banded dinnerware, casserole dishes,
etc. The metal trim interferes with normal cooking and may
damage the oven.
ALUMINUM FOIL:
Avoid large sheets of aluminum foil because they hinder cooking
and may cause harmful arcing. Use small pieces of foil to shield
poultry legs and wings. Keep ALL aluminum foil at least 1 inch
from the side walls and door of the oven.
WOOD:
Wooden bowls and boards will dry out and may split or crack
when you use them in the microwave oven. Baskets react in the
same way.
TIGHTLY COVERED UTENSILS:
Be sure to leave openings for steam to escape from covered
utensils. Pierce plastic pouches of vegetables or other food items
before cooking. Tightly closed pouches could explode.
PAPER:
Paper towels, waxed paper, paper
napkins, and paper plates with no
metallic trim or design. Look for the
manufacturer's label for use in the
microwave oven.
BROWN PAPER:
Avoid using brown paper bags.
They absorb too much heat and could burn.
FLAWED OR CHIPPED UTENSILS:
Any utensil that is cracked, flawed, or chipped may break in the
oven.
METAL TWIST TIES:
Remove metal twist ties from plastic or paper bags.
They become hot and could cause a fire.
Do not use recycled paper products in the microwave oven.
They sometimes contain impurities that cause sparks to occur.
- 2 -
Page 23

FAQS
FREQUENTLY ASKED QUESTIONS
Q. Can I use either metal or aluminum pans in my microwave oven?
A. Usable metal includes aluminum foil for shielding (use small, flat pieces), and shallow foil trays (if tray
is 3/4 inch deep and filled with food to absorb microwave energy). Never allow metal to touch walls or
door.
Q. Sometimes the door of my microwave oven appears wavy. Is this normal?
A. This appearance is normal and does not affect the operation of your oven.
Q. What are the humming noises that I hear when my microwave oven is operating?
A. You hear the sound of the transformer when the magnetron tube cycles on and off.
Q. Why does the dish become hot when I microwave food in it? I thought that this should not
happen.
A. As the food becomes hot it will conduct the heat to the dish. Use hot pads to remove food after
cooking.
Q. What does “standing time” mean?
A. ”Standing time” means that food should be taken out of the oven and covered for additional time after
cooking. This process allows the cooking to finish, saves energy and frees the oven for other purposes.
Q. Can I pop popcorn in my microwave oven? How do I get the best results?
A. Yes. Pop packaged microwave popcorn following manufacturer’s guidelines or use the preprogrammed
Popcorn button.
Do not use regular paper bags. Use the “listening test” by stopping the oven as soon as the popping
slows to a “pop” every one or two seconds. Do not try to repop unpopped kernels. You can also use
special microwave poppers. When using a popper, be sure to follow manufacturer’s directions. Do not pop
popcorn in glass utensils.
Q. Why does steam come out of the air exhaust vent?
A. Steam is normally produced during cooking. The microwave oven has been designed to vent this
steam out the top vent.
Steam exhaust here
- 2 -
Page 24

TROUBLESHOOTING
BEFORE CALLING FOR SERVICE
Check the following list to be sure a service call
is really necessary. A quick review of this
manual as well as the additional information in
this checklist may prevent an unneeded
service call.
If nothing on the oven operates:
•
check for a blown circuit fuse or a tripped
main circuit breaker.
•
check if oven is properly connected to electric
circuit in house.
check that controls are set properly.
•
If the oven interior light does not work:
• the light bulb is loose or defective.
If the oven will not cook:
• check that cooking program was entered correctly.
check that door is firmly closed.
•
check that Start button was touched.
•
check that probe was inserted correctly into
•
receptacle.
•
check that timer wasn't started instead of a
cook function.
If oven takes longer than normal to cook or
cooks too rapidly:
be sure the Power Level is programmed properly.•
If food cooks unevenly:
• be sure food is evenly shaped.
be sure food is completely defrosted before cooking.•
•
check placement of aluminum foil strips used to
prevent overcooking.
If food is undercooked:
•
check recipe to be sure all directions (amount,
time, power levels) were correctly followed.
be sure microwave oven is on a separate circuit.•
• be sure food is completely defrosted before cooking.
If food is overcooked:
•
check recipe to be sure all directions (amount,
power level, time, size of dish) were followed.
If arcing (sparks) occur:
• be sure microwavable dishes were used.
.desut’nerewseittsiwteriweruseb•
• be sure oven wasn’t operated when empty.
If the Display shows a time counting down but
the oven is not cooking:
• check that door is firmly closed.
• check that timer wasn’t started instead of a cooking
function.
If the time of day clock does not always
keep correct time:
• check that the power cord is fully inserted into the
outlet receptacle.
•
be sure the oven is the only appliance on
the electrical circuit.
- 2 -
Page 25

LIMITED WARRANTY (USA)
ARBITRATION NOTICE: THIS LIMITED WARRANTY CONTAINS AN ARBITRATION PROVISION THAT
REQUIRES YOU AND LG TO RESOLVE DISPUTES BY BINDING ARBITRATION INSTEAD OF IN COURT,
UNLESS YOU CHOOSE TO OPT OUT. IN ARBITRATION, CLASS ACTIONS AND JURY TRIALS ARE NOT
PERMITTED. PLEASE SEE THE SECTION TITLED “PROCEDURE FOR RESOLVING DISPUTES” BELOW.
Should your LG Microwave (“Product”) fail due to a defect in materials or workmanship under normal and proper
use, during the warranty period set forth below, LG Electronics (“LG”) will, at its option, repair or replace the
Product. This limited warranty is valid only to the original retail purchaser of the Product and applies only when
purchased and used within the United States including U.S. Territories.
WARRANTY PERIOD:
LABOR: One Year from the Date of Purchase*.
PAR TS(except as listed below): One Year from the
Date of Purchase*.
MAG NETRON: Ten Years from the Date of
Purchase*.
Replacement Units and Repair Parts are warranted
for the remaining portion of the original unit's warranty
period.
* Retain your Sales Receipt to prove the date of
purchase. A copy of your Sales Receipt must be
submitted at the time warranty service is provided.
•Replacement products and parts are warranted for the remaining portion of the original warranty period or ninety
(90) days, whichever is greater.
•Replacement products and parts may be new, reconditioned, refurbished, or otherwise factory remanufactured.
•Proof of original retail purchase specifying the Product model and date of purchase is required to obtain
warranty service under this limited warranty.
EXCEPT TO THE EXTENT PROHIBTED BY APPLICABLE LAW, ANY IMPLIED WARRANTY OF
MERCHANTABILITY OR FITNESS FOR A PARTICULAR PURPOSE ON THE PRODUCT IS LIMITED IN
DURATION TO THE DURATION OF THE ABOVE LIMITED WARRANTY. UNDER NO CIRCUMSTANCES
SHALL LG OR ITS U.S. DISTRIBUTORS/DEALERS BE LIABLE FOR ANY INDIRECT, INCIDENTAL,
CONSEQUENTIAL, SPECIAL, OR PUNITIVE DAMAGES, INCLUDING, WITHOUT LIMITATION, LOST
GOODWILL, LOST REVENUES OR PROFITS, WORK STOPPAGE, IMPAIRMENT OF OTHER GOODS, COST
OF REMOVAL AND REINSTALLATION OF THE PRODUCT, LOSS OF USE, OR ANY OTHER DAMAGES
WHETHER BASED IN CONTRACT, TORT, OR OTHERWISE. LG’S TOTAL LIABILITY, IF ANY, SHALL NOT
EXCEED THE PURCHASE PRICE PAID BY YOU FOR THE PRODUCT.
Some states do not allow the exclusion or limitation of incidental or consequential damages or limitations on how
long an implied warranty lasts, so the above exclusions or limitations may not apply to you. This limited warranty
gives you specific legal rights and you may also have other rights that vary from state to state.
HOW SERVICE IS HANDLED:
Please call 1-800-243-0000 and choose the
appropriate option. (Phones are answered 24 hours
a day, 365 days per year.) Please have the product
type (Microwave) and your ZIP code ready.
Or visit our website at: www.lg.com
THIS LIMITED WARRANTY DOES NOT COVER:
•Service trips to deliver, pick up, or install, educate how to operate, correct wiring, or correct unauthorized repairs.
•Damage or failure of the Product to perform during power failures and interrupted or inadequate electrical service.
•Damage or
owner’s manual.
•Damage or failure to the Product caused by accidents, pests and vermin, lightning, wind, fire, floods, acts of God,
or any other causes beyond the control of LG.
•Damage or failure caused by unauthorized modification or alteration, or if used for other than the intended purpose.
•Damage or failure resulting from misuse, abuse, improper installation, repair, or maintenance. Improper
repair includes use of parts not authorized by LG. Improper installation or maintenance includes installation or
maintenance contrary to the Product owner’s manual.
failure resulting from operating the Product in a corrosive atmosphere or contrary to the Product
- -
Page 26

•Damage or failure caused by incorrect electrical current, voltage, or ventilation/plumbing codes.
Wall
Bolt
d
3/16 Hole on Studs
5/8 Hole on Drywall Only
•Damage or failure caused by transportation and handling, including scratches, dents, chips, and/or other damage
to the finish of the Product, unless such damage is reported within one (1) week of delivery.
•Damage or missing items to any display, open box, or discounted Product.
•Refurbished Product or any Product sold “As Is”, “Where Is”, “With all Faults”, or similar disclaimer.
•Products with original serial numbers that have been removed, altered, or cannot be readily determined.
•Increases in utility costs and additional utility expenses.
•Any noises associated with normal operation.
•Use of accessories, components, or consumable cleaning products that are not authorized by LG.
•Replacement of light bulbs, filters, fuses or any other consumable parts.
•When Product is used for other than normal and proper household use (e.g. commercial or industrial use, offices,
and recreational facilities or vehicles) or contrary to the Product’s owner’s manual.
•Costs associated with removal and reinstallation of your Product for repairs.
•Shelves, drawers and accessories, except for internal/functional parts covered under this limited warranty.
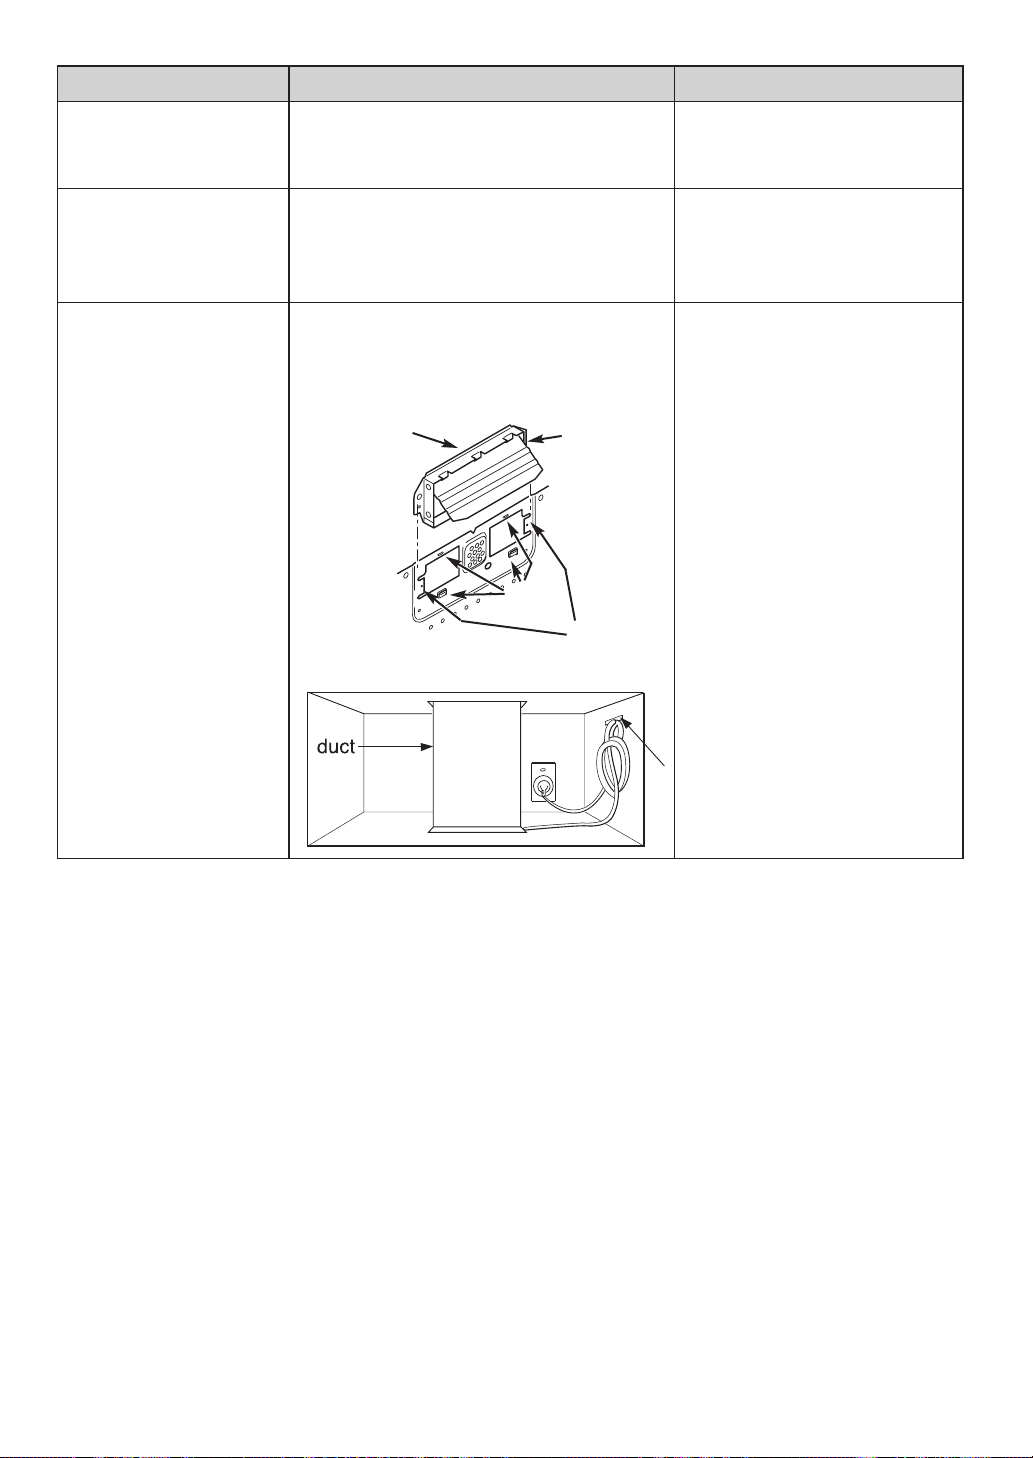
Problem Cause Solution
Microwave oven
Installation issue
- Vibration noise
- Unit is not level
- Installation damage
1. Mounting bracket screw not xed
completely
2. Mounting plate not aligned
Minimum 66
From the Floor
A
Center Line
For Wall Venting Only
Draw Lines
on Studs
Draw
Center Line
Mounting Plate
Check with installer rst
B
C
Support Tab
Mounting
Plate
Space More Than Wall Thickness
Toggle Wings1
Toggle Bolt
Support Tab
3. Product carried/installed improperly
- -
En
Page 27
Problem Cause Solution
Exhaust
Damper
(hinge side up)
Spark / Arcing Aluminum foil or metal utensil used in
microwave mode
Unit has no power 1. House power turned off (power supply)
2. Tripped breaker
3. The power cord is not installed properly
Vent is not working
1. Improper blower unit direction or installation
- Weak or no ventilation
- Abnormal noise during
operation
2. Improper ductwork or damper connection
- Product overheating
Adapter
Slide exhaust
adapter into
guides on
rear panel.
Locking
Tabs
Guides
DO NOT use aluminum foil or
metal utensils in microwave mode
- Check user instructions
1. Check house power supply
2. Check proper power cord
connection
3. Check extension cord
1. Check blower unit direction and
reinstall if necessary.
2. Properly align the exhaust
ports and blower plate opening.
3. Blower unit exhaust ports
should be completely exposed
to the outside
4. After installation, check the air
ventilation path
The cost of repair or replacement under the above excluded circumstances shall be borne by the
consumer.
TO OBTAIN WARRANTY SERVICE AND ADDITIONAL INFORMATION
Call 1-800-243-0000 and select the appropriate option from the menu.
Or visit our website at http://www.lg.com
Or by mail: LG Electronics Customer Service P.O. Box 240007 Huntsville, AL 35813 ATTN: CIC
PROCEDURE FOR RESOLVING DISPUTES:
ALL DISPUTES BETWEEN YOU AND LG ARISING OUT OF OR RELATING IN ANY WAY TO THIS LIMITED
WARRANTY OR THE PRODUCT SHALL BE RESOLVED EXCLUSIVELY THROUGH BINDING ARBITRATION, AND
NOT IN A COURT OF GENERAL JURISDICTION. BINDING ARBITRATION MEANS THAT YOU AND LG ARE EACH
WAIVING THE RIGHT TO A JURY TRIAL AND TO BRING OR PARTICIPATE IN A CLASS ACTION.
Definitions. For the purposes of this section, references to “LG” mean LG Electronics U.S.A., Inc., its parents,
subsidiaries and affiliates, and each of their officers, directors, employees, agents, beneficiaries, predecessors
in interest, successors, assigns and suppliers; references to “dispute” or “claim” shall include any dispute, claim
or controversy of any kind whatsoever (whether based in contract, tort, statute, regulation, ordinance, fraud,
misrepresentation or any other legal or equitable theory) arising out of or relating in any way to the sale, condition or
performance of the product or this Limited Warranty.
- 2 -
Page 28

Notice of Dispute. In the event you intend to commence an arbitration proceeding, you must first notify LG in writing
at least 30 days in advance of initiating the arbitration by sending a letter to LG at LG Electronics, USA, Inc. Attn:
Legal Department- Arbitration 1000 Sylvan Ave, Englewood Cliffs 07632. You and LG agree to engage in good faith
discussions in an attempt to amicably resolve your claim. The notice must provide your name, address, and telephone
number; identify the product that is the subject of the claim; and describe the nature of the claim and the relief being
sought. If you and LG are unable to resolve the dispute within 30 days, either party may proceed to file a claim for
arbitration.
Agreement to Binding Arbitration and Class Action Waiver. Upon failure to resolve the dispute during the 30 day
period after sending written notice to LG, you and LG agree to resolve any claims between us only by binding arbitration
on an individual basis, unless you opt out as provided below. Any dispute between you and LG shall not be combined or
consolidated with a dispute involving any other person’s or entity’s product or claim. More specifically, without limitation
of the foregoing, any dispute between you and LG shall not under any circumstances proceed as part of a class or
representative action. Instead of arbitration, either party may bring an individual action in small claims court, but that
small claims court action may not be brought on a class or representative basis.
Arbitration Rules and Procedures. To begin arbitration of a claim, either you or LG must make a written demand for
arbitration. The arbitration will be administered by the American Arbitration Association (“AAA”) and will be conducted
before a single arbitrator under the AAA’s Consumer Arbitration Rules that are in effect at the time the arbitration is
initiated (referred to as the “AAA Rules”) and under the procedures set forth in this section. The AAA Rules are available
online at www.adr.org/consumer. Send a copy of your written demand for arbitration, as well as a copy of this provision,
to the AAA in the manner described in the AAA Rules. You must also send a copy of your written demand to LG at LG
Electronics, USA, Inc. Attn: Legal Department- Arbitration 1000 Sylvan Avenue Englewood Cliffs, NJ 07632. If there is a
conflict between the AAA Rules and the rules set forth in this section, the rules set forth in this section will govern. This
arbitration provision is governed by the Federal Arbitration Act. Judgment may be entered on the arbitrator’s award in
any court of competent jurisdiction. All issues are for the arbitrator to decide, except that issues relating to the scope and
enforceability of the arbitration provision and to the arbitrability of the dispute are for the court to decide. The arbitrator is
bound by the terms of this provision.
Governing Law. The law of the state of your residence shall govern this Limited Warranty and any disputes between us
except to the extent that such law is preempted by or inconsistent with applicable federal law.
Fees/Costs. You do not need to pay any fee to begin an arbitration. Upon receipt of your written demand for arbitration,
LG will promptly pay all arbitration filing fees to the AAA unless you seek more than $25,000 in damages, in which case
the payment of these fees will be governed by the AAA Rules. Except as otherwise provided for herein, LG will pay
all AAA filing, administration and arbitrator fees for any arbitration initiated in accordance with the AAA Rules and this
arbitration provision. If you prevail in the arbitration, LG will pay your attorneys’ fees and expenses as long as they are
reasonable, by considering factors including, but not limited to, the purchase amount and claim amount. Notwithstanding
the foregoing, if applicable law allows for an award of reasonable attorneys’ fees and expenses, an arbitrator can award
them to the same extent that a court would. If the arbitrator finds either the substance of your claim or the relief sought
in the demand is frivolous or brought for an improper purpose (as measured by the standards set forth in Federal Rule
of Civil Procedure 11(b)), then the payment of all arbitration fees will be governed by the AAA Rules. In such a situation,
you agree to reimburse LG for all monies previously disbursed by it that are otherwise your obligation to pay under the
AAA Rules. Except as otherwise provided for, LG waives any rights it may have to seek attorneys’ fees and expenses
from you if LG prevails in the arbitration.
Hearings and Location. If your claim is for $25,000 or less, you may choose to have the arbitration conducted solely on
the basis of (1) documents submitted to the arbitrator, (2) through a telephonic hearing, or (3) by an in-person hearing
as established by the AAA Rules. If your claim exceeds $25,000, the right to a hearing will be determined by the AAA
Rules. Any in-person arbitration hearings will be held at a location within the federal judicial district in which you reside
unless we both agree to another location or we agree to a telephonic arbitration.
Opt Out. You may opt out of this dispute resolution procedure. If you opt out, neither you nor LG can require the other to
participate in an arbitration proceeding. To opt out, you must send notice to LG no later than 30 calendar days from the
date of the first consumer purchaser’s purchase of the product by either: (i) sending an e-mail to optout@lge.com, with
the subject line: “Arbitration Opt Out” or (ii) calling 1-800-980-2973. You must include in the opt out e-mail or provide by
telephone: (a) your name and address; (b) the date on which the product was purchased; (c) the product model name or
model number; and (d) the serial number (the serial number can be found (i) on the product; or (ii) online by accessing
https://www.lg.com/us/support/repair-service/schedule-repair-continued and clicking on “Find My Model & Serial
Number”).
You may only opt out of the dispute resolution procedure in the manner described above (that is, by e-mail or
telephone); no other form of notice will be effective to opt out of this dispute resolution procedure. Opting out of this
dispute resolution procedure will not affect the coverage of the Limited Warranty in any way, and you will continue to
enjoy the full benefits of the Limited Warranty. If you keep this product and do not opt out, then you accept all terms and
conditions of the arbitration provision described above.
- -
Page 29

 Loading...