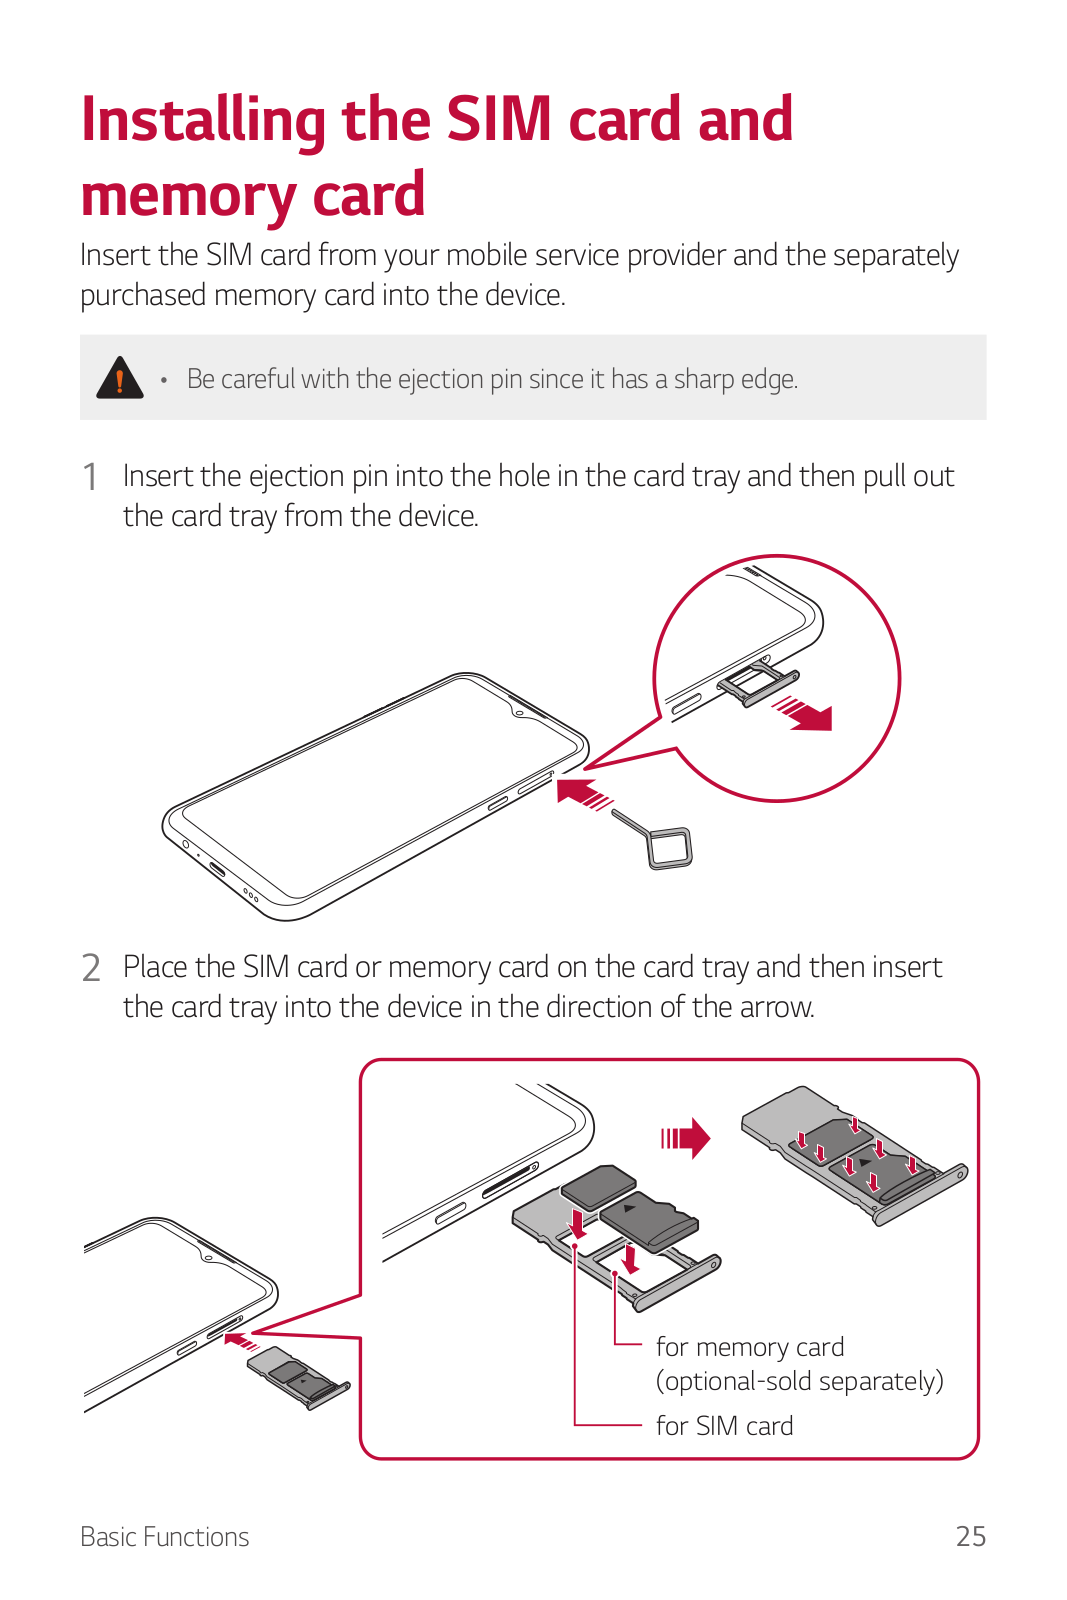
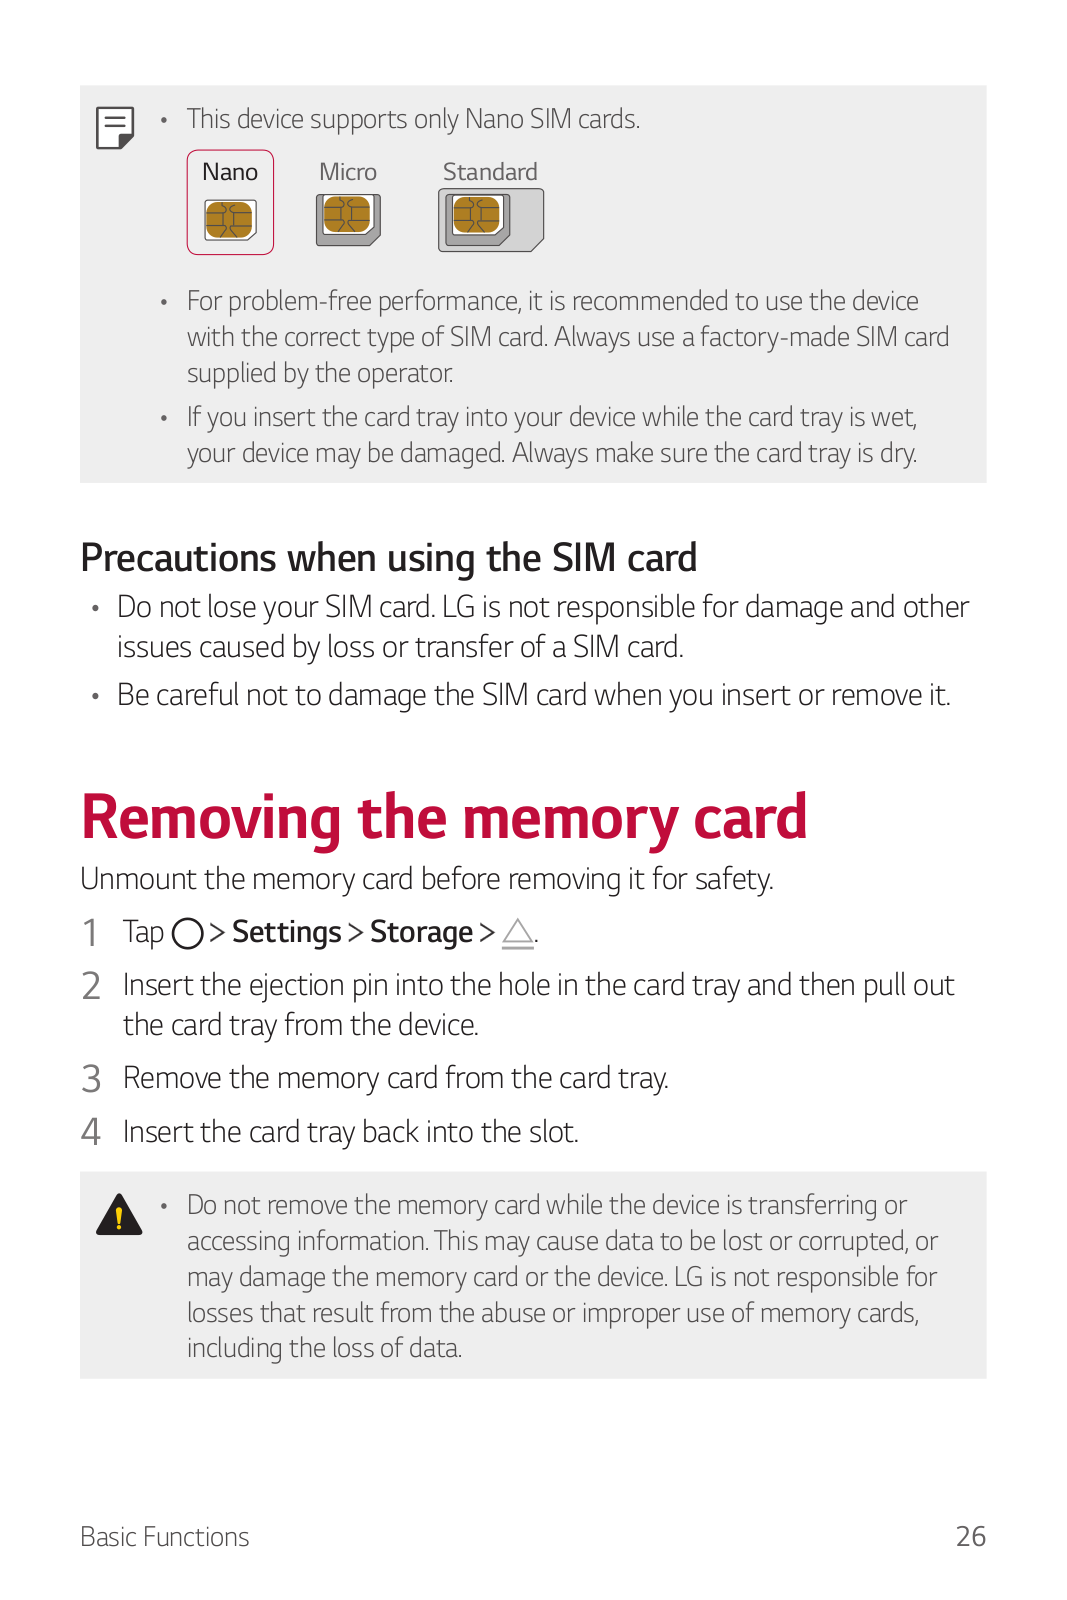
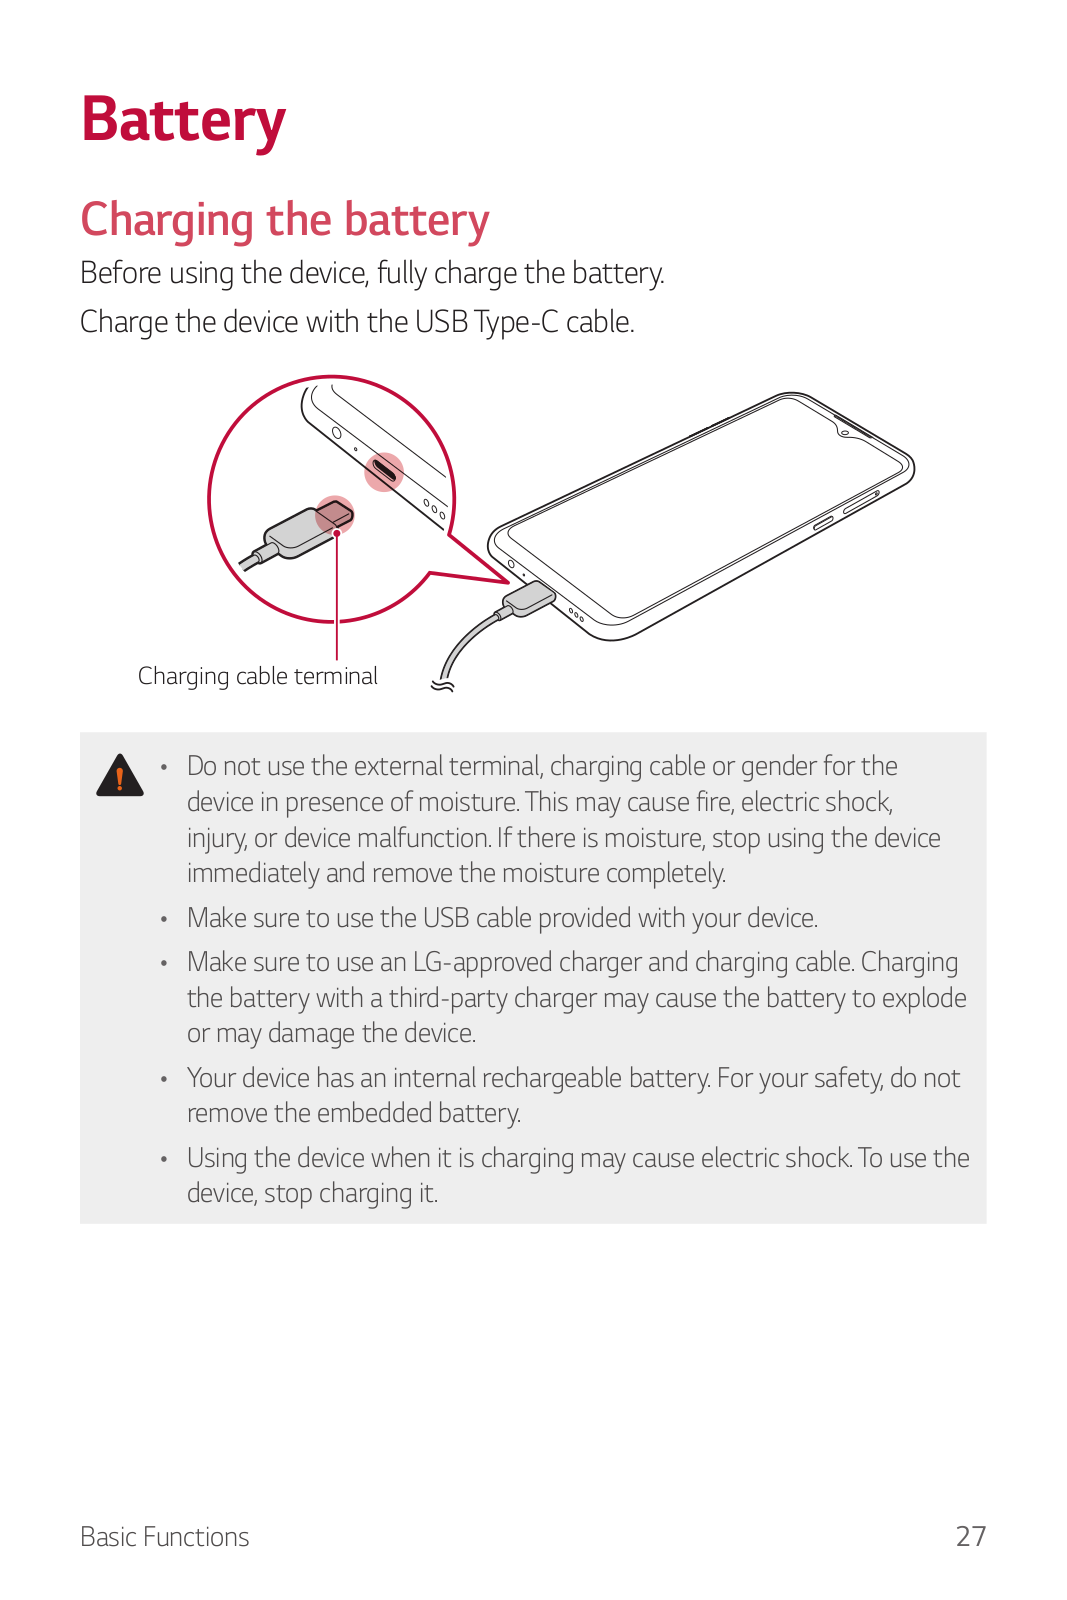
LG LMK410WM Owner’s Manual

<![if ! IE]>

<![endif]>FRANÇAIS ENGLISH

USER GUIDE

LM-K410WM

Copyright ©2020 LG Electronics Inc. All rights reserved.

MFL71708401 (1.0)

www.lg.com

About this user guide

ENGLISH

Thank you for choosing this LG product. Please carefully read this user guide before using the device for the first time to ensure safe and proper use.

Always use genuine LG accessories. The supplied items are designed only for this device and may not be compatible with other devices.

Descriptions are based on the device default settings.

Default apps on the device are subject to updates, and support for these apps may be withdrawn without prior notice. If you have any questions about an app provided with the device, please contact an LG Service Centre. For user-installed apps, please contact the relevant service provider.

Modifying the device’s operating system or installing software from unofficial sources may damage the device and lead to data corruption or data loss. Such actions will violate your LG licence agreement and void your warranty.

Some content and illustrations may differ from your device, depending on the area, service provider, software version, or OS version, and are subject to change without prior notice.

Software, audio, wallpaper, images, and other media supplied with your device are licenced for limited use. If you extract and use these materials for commercial or other purposes, you may be infringing copyright laws. As a user, you are fully responsible for the illegal use of media.

Additional charges may incur for data services, such as messaging, uploading, downloading, auto-syncing and location services. To avoid additional charges, select a data plan suitable to your needs. Contact your service provider to obtain additional details.

1

Instructional notices

WARNING: Situations that could cause injury to the user and third parties.

CAUTION: Situations that may cause minor injury or damage to the device.

NOTE: Notices or additional information.

About this user guide

2

Table of contents

01

Custom-designed

Features

42 Screen lock

47Memory card encryption

48Taking screenshots

49Entering text

51 Content sharing

6 Camera features

9 Gallery features

12Sound quality and effects features

12 Google Assistant

14 Fingerprint recognition

18 Multi-tasking feature

02

Basic Functions

20Product components and accessories

21Parts overview

24Turning the power on or off

25Installing the SIM card and memory card

26Removing the memory card

27Battery

29 Touch screen

32 Home screen

03

Useful Apps

54Installing and uninstalling apps

55App trash

56App Shortcuts

57Phone

61Messaging

62Camera

72Gallery

76Contacts

78QuickMemo+

80Clock

82Music

83Calculator

83ThinQ

84Audio Recorder

84FM Radio

85Update centre

85Smart cleaning

3

85LG Mobile Switch

86App trash

86 SmartWorld

86RemoteCall Service

87Google apps

04

Settings

91 Settings

91 Network & internet

97 Connected devices

100Sound

101Display

102Lock screen & security

104Extensions

106Digital Wellbeing & parental controls

106Apps & notifications

106Battery

107Storage

107Accounts

107Google

108System

111Accessibility

05

Appendix

115LG Language Settings

115LG Bridge

116Phone software update

118Anti-Theft Guide

119Open Source Software Notice Information

119Regulatory information (FCC/IC ID number, etc.)

120Trademarks

121More information

123 FAQ

06

For Your Safety

07

LIMITED WARRANTY

Table of contents

4

01

Custom-designed

Features

Camera features

Wide-angle camera

You can take photos or record videos with a wider range than your actual field of vision by using the wide-angle on the rear camera.

Tap , then tap / to switch between the standard and wideangle.

Change the camera angle.

Rear Camera

See Starting the camera for details.

You can switch between the standard and wide-angle camera lenses on the rear camera only.

Custom-designed Features

6

Portrait

You can take a sharp portrait by applying the camera lens blur effect.

1Tap , then tap Portrait.

2Tap to take a photo.

To adjust blur strength, drag the slide bar to the left or right.

Keep the distance to your subject within 1.3 ~ 5.0 feet when using the rear camera.

This feature is not available if the surroundings are too dark.

After applying this feature, tap the desired position on the preview screen to automatically apply the exposure value and focus when using the rear camera, or exposure value only when using the front camera.

Custom-designed Features

7

AI CAM

You can effectively take photos or record videos since the camera recognizes the object when taking a photo or recording a video.

1Tap , then tap AI CAM.

2When the object is recognized, the best effect for the scene is applied.

To apply other effects, tap the scene icon.

Pet, city, flower, food, landscape, person, sunset, auto, total 8 categories can be recognized automatically.

Sunset

Flower

The result of the scene recognition may differ depending on the illumination or the location of the subject while taking photos. Keywords do not appear on the actual photos or videos.

This feature is available only when the front and rear cameras are in the Auto mode.

Custom-designed Features

8

Gallery features

Creating a movie

You can create a new movie by putting images and videos together.

1Tap Photos tab, then tap Create movie.

2Select images or videos for your movie and tap Next.

3Edit the selected images and videos and then tap Save.

Custom-designed Features

9

Deleting files

You can select images or videos to delete by tapping at its thumbnail.

Adding files

You can select images or videos to add after tapping at the bottom of the screen. You can also select the images or videos you have already previously added.

Touch and hold a file, and then tap another file for multiple selection.

Rearranging files

To rearrange the images and videos, touch and hold the file you want to move, then dragging it to the desired location.

Resetting the movie edits

You can reset the edits made to the movie (e.g. play time) by tapping .

Previewing a file

Check your new video before saving it by tapping . After the playback time elapses, the next file is played automatically.

A maximum of 50 images and videos can be used to create a video.

The playback time for an image is 3 seconds by default and it cannot be changed. Videos can be trimmed down to a minimum of 1 second.

This feature may not support some image or video formats.

Custom-designed Features

10

Creating a GIF

You can easily create a GIF file using recorded videos or photos.

Making a GIF by using recorded videos

1At the desired starting point while watching a video, tap .

2Select the length of the GIF you want to create.

GIF is generated for the time selected from the current time.

For videos less than 5 seconds, GIF images are automatically generated for the remaining time.

Making a GIF by using photos

1While viewing an album, tap Create GIF.

2Select the desired photos to create a GIF file and then tap Next.

You can add more images and adjust the GIF speed, screen ratio, and file order.

You may use this feature solely for creative purposes. The use of this feature involving infringement of any other person’s rights, such as copyright or defamatory or offensive statements, may be subject to civil, criminal, or administrative liabilities and/or penalties under applicable laws. You shall not copy, reproduce, distribute, or otherwise make illegal use of any copyrighted materials without permission of the rightful owner or copyright holder. To the fullest extent permitted by applicable law, LG Electronics disclaims all expressed and implied warranties as well as liabilities associated thereto.

A maximum of 100 images can be used to create a GIF file.

Custom-designed Features

11

Sound quality and effects features

DTS:X 3D Surround

You can play a song or video in three-dimensional, immersive and vivid sound. To use this feature, connect earphones, speaker or other external audio devices to your device.

Tap Settings Sound Sound quality and effects DTS:X 3D Surround, then tap to activate this feature.

Adjusting the sound direction

You can adjust the sound direction as desired.

1Tap Settings Sound Sound quality and effects DTS:X 3D Surround.

2Select sound direction.

Google Assistant

Google Assistant overview

Your device has the built-in Google Assistant feature. Find answers and get things done while on-the-go.

To use this feature, first connect to the network and sign in to your Google Account.

Custom-designed Features

12

Launching Google Assistant

1Touch and hold from the Home screen to launch Google Assistant or press the Google Assistant key on the left side of the device.

2Tap GET STARTED.

3Follow the on-screen instructions and say “Ok Google” or “Hey Google”.

The device saves your voice data for recognition.

4Set whether to use the voice match unlock function.

If you use the voice match unlock function, you can unlock the device even when the device screen is turned off or the device is charging by saying “OK Google” or “Hey Google.”.

This feature may be more vulnerable to security than the other screen locks, such as Knock Code, Pattern, PIN, and Password.

When a similar voice or your recorded voice is used, the screen may be unlocked.

You need to unlock the device by using the specified method if you fail to unlock the device with voice recognition. See Setting a screen lock for details.

5 Tap Save.

Accessing by Voice

1When the home screen is turned off or locked, say “OK Google” or

“Hey Google.”.

2When the Google Assistant screen appears, say a command or ask a question.

Custom-designed Features

13

Accessing from Home Screen

1Touch and hold on the Home screen.

2Say a command or question when you see on the bottom of the screen.

In an environment where wireless performance of Wi-Fi or mobile data is poor, the Google Assistant function may be restricted and the speech recognition accuracy rate may be lowered.

If the speech is ambiguous, the microphone is covered, a media player is playing, or the surrounding is loud, the speech recognition accuracy rate may be lowered. When you are using the product via voice commands, accurate pronunciation and being in a quiet environment will improve speech recognition accuracy rate.

Fingerprint recognition

Fingerprint recognition overview

You must register your fingerprint on your device first before using the fingerprint recognition function.

You can use the fingerprint recognition function in the following cases:

To unlock the screen.

To view the locked content in the QuickMemo+.

Confirm a purchase by signing in to an app or identifying yourself with your fingerprint.

Your fingerprint can be used by the device for user identification. Very similar fingerprints from different users may be recognized by the fingerprint sensor as the same fingerprint.

If the device cannot detect your fingerprint, or you forgot the value specified for registration, visit the nearest LG Customer Service Centre with your device and ID card.

Custom-designed Features

14

Precautions for fingerprint recognition

Fingerprint recognition accuracy may decrease due to a number of reasons. To maximize the recognition accuracy, check the following before using the device.

The device has a fingerprint sensor. Ensure that the fingerprint sensor is not damaged by a metallic object, such as a coin or key.

When water, dust or other foreign substances are on the fingerprint sensor or your finger, the fingerprint registration or recognition may not work. Clean and dry your finger before having the fingerprint recognized.

A fingerprint may not be recognized properly if the surface of your finger has a scar or is not smooth due to being soaked in water.

If you bend your finger or use the fingertip only, your fingerprint may not be recognized. Make sure that your finger covers the entire surface of the fingerprint sensor.

Scan only one finger for each registration. Scanning more than one finger may affect fingerprint registration and recognition.

The device may generate static electricity if the surrounding air is dry. If the surrounding air is dry, avoid scanning fingerprints, or touch a metallic object such as a coin or key before scanning fingerprints to remove static electricity.

Custom-designed Features

15

Registering fingerprints

You can register and save your fingerprint on the device to use fingerprint identification.

1 Tap

Settings Lock screen & security Fingerprints.

A lock screen must be set to use this feature.

If the screen lock is not active, configure the lock screen by following the on-screen instructions. See Setting a screen lock for details.

2Locate the fingerprint sensor on the back of the device and gently put your finger on it to register the fingerprint.

Gently press the fingerprint sensor so that the sensor can recognize your fingerprint.

Ensure that your fingertip covers the entire surface of the fingerprint sensor.

3Follow the on-screen instructions.

Repeat scanning the fingerprint by moving your finger little by little until the fingerprint registers.

4When the fingerprint registration is done, tap OK.

Tap Add more to register another fingerprint. If you register only one fingerprint and the corresponding finger is not in a good condition, the fingerprint recognition may not work well. As a preventive measure against this kind of situation, register multiple fingerprints.

Custom-designed Features

16

Managing fingerprints

You can edit or delete registered fingerprints.

1Tap Settings Lock screen & security Fingerprints.

2Unlock according to the specified lock method.

3From the fingerprint list, tap a fingerprint to rename it. To delete it, tap .

Unlocking the screen with a fingerprint

You can unlock the screen or view the locked content by using your fingerprint. Activate the desired function:

1Tap Settings Lock screen & security Fingerprints.

2Unlock according to the specified lock method.

3On the fingerprint settings screen, activate the desired function:

Screen lock: Unlock the screen with a fingerprint.

Content lock: Unlock content with a fingerprint. To do this, make sure that the content lock is set.

Custom-designed Features

17

Multi-tasking feature

Multi window

You can use two apps at the same time by separating the screen into the multiple windows.

1Tap from the Home touch buttons.

Recently-used apps appear.

2Tap at the top of the desired app to use the Multi window feature.

The selected app appears at the top half of the screen.

Alternatively,

1Touch and hold while using an app.

Recently-used apps appear on the split screen.

2Tap at the top of the desired app to use the Multi window feature.

The selected app appears at the bottom half of the screen.

To deactivate the Multi window feature, touch and hold on the Home touch button.

To adjust the size of the split screen, drag at the centre of the screen.

The Multi window feature is not supported by some LG apps and the apps downloaded from the Play Store.

Overview screen

The Overview screen provides a preview of your recently used apps.

To view the list of recently used apps, tap on the Home, then tap the displayed app.

Custom-designed Features

18

02

Basic Functions

Product components and accessories

The following items are included with your device.

Device

Charger

USB cable

Quick Start Guide

Jelly Phone Case

Ejection pin

The items described above may be optional.

The items supplied with the device and any available accessories may vary depending on the area and service provider.

Always use genuine LG Electronics accessories. Using accessories made by other manufacturers may affect your device's call performance or cause malfunctions. This may not be covered by LG's repair service.

Some of the device parts are made of tempered glass. If you drop your device on a hard surface or subject it to severe impact, the tempered glass may be damaged. If this happens, stop using your device immediately and contact an LG Customer Service Centre.

If any of these basic items are missing, contact the dealer from which you purchased your device.

To purchase additional items, contact an LG Customer Service Centre.

Some items in the product box are subject to change without notice.

The appearance and specifications of your device are subject to change without notice.

Device specifications may vary depending on the area or service provider.

Remove the protective film from the Fingerprint sensor before use of the fingerprint recognition feature.

Basic Functions

20

Parts overview

Front camera lens

Volume keys (+/-)

Google Assistant key

Earpiece

Proximity/Ambient light lens sensor

Nano-SIM/Memory card tray

Power/Lock key

Touch screen

Stereo headset jack

Microphone

Rear camera lenses

(Macro/Super Wide/

Depth/Standard sensor)

Charger/USB cable port

Flash

Fingerprint sensor

Speaker

Microphone

Do NOT attempt to remove the back cover.

This device has a non-removable battery. Do not attempt to remove the back cover. Doing so may severely damage the battery and device, which could cause overheating, fire, and injury.

Basic Functions

21

Proximity/Ambient light sensor

-- Proximity sensor: During a call, the proximity sensor turns off the screen and disables touch functionality when the device is in close proximity to the human body. It turns the screen back on and enables touch functionality when the device is outside a specific range.

-- Ambient light sensor: The ambient light sensor analyzes the ambient light intensity when the auto-brightness control mode is turned on.

Volume keys

-- Adjust the volume for ringtones, calls or notifications.

-- While using the Camera, gently press a Volume key to take a photo. To take continuous photos, press and hold the Volume key.

-- Press the Volume Down (-) key twice to launch the Camera app when the screen is locked or turned off. Press the Volume Up (+) key twice to launch Capture+.

Power/Lock key

-- Briefly press the key when you want to turn the screen on or off.

-- Press and hold the key when you want to select a power control option.

Google Assistant key

-- Your device has the Google Assistant built-in. Find answers and get things done while on-the-go. To get started, just tap the Google Assistant key on the side of the phone.

-- Activate Google Assistant. See the Google Assistant for details.

Basic Functions

22

Fingerprint sensor

-- Turn on the fingerprint recognition feature to simplify the process of unlocking the screen. See Fingerprint recognition overview for details.

Some functions may be restricted for access, depending on the device specifications.

Do not put heavy objects on the device or sit on it. Failure to do so may damage the touch screen.

Screen-protective film or accessories may interfere with the proximity sensor.

If your device is wet or is being used in a humid place, the touch screen or buttons may not function properly.

Hold the device correctly as shown below. If you cover the microphone hole with a hand, finger, or protective case while using the device, you may sound unclear during a call.

Good example

Bad example


Microphone

Do not cover the microphone.


Microphone

Do not cover the microphone.

Basic Functions

23

Turning the power on or off

Turning the power on

When the power is turned off, press and hold the Power/Lock key.

When the device is turned on for the first time, initial configuration takes place. The first booting time for the smart phone may be longer than usual.

Turning the power off

Press and hold the Power/Lock key, then select Power off.

Restarting the device

When the device is not working properly or does not respond, restart it by following the instructions below.

1Press and hold the Power/Lock key and the Volume Down (-) key at the same time until the power is turned off.

2When the device is restarted, release the key.

Power control options

Press and hold the Power/Lock key, then select an option.

Power off: Turn the device off.

Power off and restart: Restart the device.

Basic Functions

24

LG LMK410WM Owner’s Manual
Installing the SIM card and memory card

Insert the SIM card from your mobile service provider and the separately purchased memory card into the device.

Be careful with the ejection pin since it has a sharp edge.

1Insert the ejection pin into the hole in the card tray and then pull out the card tray from the device.

2Place the SIM card or memory card on the card tray and then insert the card tray into the device in the direction of the arrow.

for memory card (optional-sold separately)

for SIM card

Basic Functions

25

This device supports only Nano SIM cards.

Nano Micro Standard

For problem-free performance, it is recommended to use the device with the correct type of SIM card. Always use a factory-made SIM card supplied by the operator.

If you insert the card tray into your device while the card tray is wet, your device may be damaged. Always make sure the card tray is dry.

Precautions when using the SIM card

Do not lose your SIM card. LG is not responsible for damage and other issues caused by loss or transfer of a SIM card.

Be careful not to damage the SIM card when you insert or remove it.

Removing the memory card

Unmount the memory card before removing it for safety.

1Tap Settings Storage .

2Insert the ejection pin into the hole in the card tray and then pull out the card tray from the device.

3Remove the memory card from the card tray.

4Insert the card tray back into the slot.

Do not remove the memory card while the device is transferring or accessing information. This may cause data to be lost or corrupted, or may damage the memory card or the device. LG is not responsible for losses that result from the abuse or improper use of memory cards, including the loss of data.

Basic Functions

26

Battery

Charging the battery

Before using the device, fully charge the battery.

Charge the device with the USB Type-C cable.

Charging cable terminal

Do not use the external terminal, charging cable or gender for the device in presence of moisture. This may cause fire, electric shock, injury, or device malfunction. If there is moisture, stop using the device immediately and remove the moisture completely.

Make sure to use the USB cable provided with your device.

Make sure to use an LG-approved charger and charging cable. Charging the battery with a third-party charger may cause the battery to explode or may damage the device.

Your device has an internal rechargeable battery. For your safety, do not remove the embedded battery.

Using the device when it is charging may cause electric shock. To use the device, stop charging it.

Basic Functions

27

Remove the charger from the power socket after the device is fully charged. This prevents unnecessary power consumption.

Another way to charge the battery is by connecting a USB cable between the device and a desktop or laptop computer. This may take a longer time than plugging the adapter to a wall outlet.

Do not charge the battery by using a USB hub that is unable to maintain the rated voltage. Charging may fail or unintentionally stop.

Precautions when using the device

Make sure to use the USB cable provided; do not use third party USB cables or chargers with your device. The LG limited warranty does not cover the use of third party accessories.

Failure to follow the instructions in this guide and improper use may damage the device.

Using the battery efficiently

Battery lifespan may decrease if you keep many apps and functions running simultaneously and continuously.

Cancel background operations to increase battery life. To minimize battery consumption, follow these tips:

Turn off the Bluetooth® or Wi-Fi network function when not using them.

Set the screen timeout to as short a time as possible.

Minimize the screen brightness.

Set a screen lock when the device is not used.

Check the battery level while using any downloaded apps.

Basic Functions

28

Touch screen

You can familiarize yourself with how to control your device by using touch screen gestures.

Tapping

Lightly tap with your fingertip to select or run an app or option.

Touching and holding

Touch and hold for several seconds to display a menu with available options.


Basic Functions

29

Loading...
+ 285 hidden pages