

Page 1

OWNER’S MANUAL
AIR CONDITIONER
Please read this manual carefully before operating
your set and retain it for future reference.
TYPE : Ceiling Cassette
http://www.lghvac.com
www.lg.com
P/NO : MFL67449211
ENGLISH
FRANÇAIS
ESPAÑOL
Page 2
2 Multi Air Conditioner
Multi-Type Air Conditioner Ownerʼs Manual
TABLE OF CONTENTS
FOR YOUR RECORDS
Write the model and serial numbers here:
Model #
Serial #
You can find them on a label on the side of each unit.
Dealer's Name
Date Purchased
n Staple your receipt to this page in the event you need
it to prove date of purchase or for warranty issues.
READ THIS MANUAL
Inside you will find many helpful hints on how to use
and maintain your air conditioner properly. Just a little
preventive care on your part can save you a great deal
of time and money over the life of your air conditioner.
You'll find many answers to common problems in the
chart of troubleshooting tips. If you review our chart of
Troubleshooting Tips first, you may not need to call
for service at all.
PRECAUTION
• Contact the authorized service technician for
repair or maintenance of this unit.
• Contact the installer for installation of this unit.
• The air conditioner is not intended for use by
young children or invalids without supervision.
• Young children should be supervised to ensure
that they do not play with the air conditioner.
• When the power cord is to be replaced,
replacement work shall be performed by
authorized personnel only using only genuine
replacement parts.
A. Safety Precautions ..........................3
B. Electrical Safety...............................6
Temporary Use of an Adapter...........6
Symbols used in this Manual ............6
C. Product Introduction.......................7
Indoor Units.......................................7
Outdoor Unit......................................7
D. Operating Instructions....................8
How to insert the Batteries ................8
Wireless Remote Controller
Maintenance......................................8
Operation Indication Lamps ..............8
Operating Method .............................8
Wireless Remote Controller ..............9
Wired Remote Controller (Optional)
...10
Operation Mode ..............................11
Dehumidification mode....................12
Fan Mode ........................................12
Auto Operation ................................12
Power Cooling.................................12
PLASMA Purification Operation
(Optional) ........................................13
Celsius/Fahrenheit Switching..........13
Setting the Current Time .................13
Sleep Timer Setting.........................14
On Timer Setting .............................14
Off Timer Setting .............................14
To cancel the Timer Setting ............15
Up/Down Airflow Direction Control
(Optional) ........................................15
Left/Right Airflow Direction Control
(Optional) ........................................15
Individual vane angle control
(Optional) ........................................16
Forced operation .............................17
Auto Restart Function .....................17
E. Maintenance and Service..............18
Ceiling Cassette Type .....................18
Operation Tips!................................19
Page 3
Owner's Manual 3
Safety Precautions
ENGLISH
ENGLISH
Safety Precautions
To prevent injury to the user or other people and property damage, the following instructions must be followed.
n Incorrect operation due to ignoring instruction will cause harm or damage. The seriousness is classified by
the following indications.
n Meanings of symbols used in this manual are as shown below.
This symbol indicates the possibility of death or serious injury.
This symbol indicates the possibility of injury or damage.
Be sure not to do.
Be sure to follow the instruction.
Always use a power plug and socket with
a ground terminal.
• There is a risk of electric shock.
Do not use a defective or underrated
circuit breaker. Use the correctly rated
breaker and fuse.
• There is risk of fire or electric shock .
Do not use a multi consent. Always use
this appliance on a dedicated cicuit and
breaker.
• Otherwise it can cause electric shock or fire.
For electrical work, contact the dealer, seller,
a qualified electrician, or an Authorized
Service Center. Do not disassemble or repair
the product by yourself.
• There is risk of fire or electric shock.
Always ground the product as per the
wiring diagram. Do not connect the
ground wire to gas or water pipes
lightening rod or telephone ground wire.
• There is risk of fire or electric shock.
Install the panel and the cover of control
box securely.
• There is risk of fire or electric shock due to
dust , water etc.
Use the correctly rated breaker or fuse.
• There is risk of fire or electric shock.
Do not modify or extend the power cable.
If the power cable or cord has scrathes or
skin peeled off or deteriorated then it
must be replaced.
• There is risk of fire or electric shock.
For installation, removal or reinstall ,
always contact the dealer or an
Authorized Service Center.
• There is risk of fire, electric shock, explosion,
or injury.
Do not install the product on a defective
installation stand. Be sure that the
installation area does not deteriorate with
age.
• It may cause product to fall.
Never install the outdoor unit on a
moving base or a place from where it
can fall down.
• The falling outdoor unit can cause damage or
injury or even death of a person.
When the product is soaked (flooded or
submerged) in water , contact an
Authorized Service Center for repair
before using it again.
• There is risk of fire or eletric shock.
In outdoor unit the step-up capacitor
supplies high voltage electricity to the
electrical components. Be sure to
discharge the capacitor completely
before conducting the repair work.
• An charged capacitor can cause electrical
shock.
When installing the unit, use the
installation kit provided with the product.
• Otherwise the unit may fall and cause severe
injury.
Be sure to use only those parts which
are listed in the svc parts list. Never
attempt to modify the equipment.
•
The use of inappropriate parts can cause an
electrical shock, excessive heat generation or fire.
Page 4

4 Multi Air Conditioner
Safety Precautions
Indoor/outdoor wiring connections must
be secured tightly and the cable should
be routed properly so that there is no
force pulling the cable from the
connection terminals.
• Improper or loose connections can cause
heat generation or fire.
Safely dispose off the packing materials.
Like screws, nails, batteries, broken
things etc after installation or svc and
then tear away and thraw away the plastic
packaging bags.
• Children may play with them and cause
injury.
Make sure to check that the power cable
plug is not dirty, loose or broken and
then only insert the plug completely.
• Dirty, loose or broken power plug can cause
electric shock or fire.
Be sure to check the refrigerant to the
used. Please read the label on the product.
• Incorrect refrigerant used can prevent the
normal operation of the unit.
Don't use a power cord, a plug or a loose
socket which is damaged.
• Otherwise it may cause a fire or electrical
shock.
Do not touch , operate, or repair the
product with wet hands. Hold the plug by
hand when taking out
• There is risk of electric shock or fire.
Do not place a heater or other heating
appliances near the power cable.
• There is risk of fire and electric shock.
Do not allow water to run into electric
parts. Install the unit away from water
sources.
• There is risk of fire, failure of the product, or
electric shock.
Do not store or use or even allow
flammable gas or combustibles near the
product.
• There is risk of fire.
Do not use the product in a tightly closed
space for a long time. Perform ventilation
regularly.
• Oxygen deficiency could occur and hence
harm your health.
Do not open the front grille of the product
during operation. (Do not touch the
electrostatic filter, if the unit is so equipped.)
• There is risk of physical injury, electric shock,
or product failure.
If strange sounds, smell or smoke comes
from product.Immediately turn the breaker
off or disconnect the power supply cable.
• There is risk of electric shock or fire.
Ventilate the product room from time to
time when operating it together with a
stove, or heating element etc.
• Oxygen deficiency can occur and hence harm
your health.
Turn the main power off and unplug the
unit when cleaning or repairing the
product.
• There is risk of electric shock.
When the product is not to be used for a
long time, disconnect the power supply
plug or turn off the breaker.
• There is risk of product damage or failure, or
unintended operation.
Take care to ensure that nobody
especially kids could step on or fall onto
the outdoor unit.
• This could result in personal injury and
product damage.
Take care to ensure that power cable
could not be pulled out or damaged
during operation.
• There is risk of fire or electric shock.
Do not place ANYTHING on the power
cable.
• There is risk of fire or electric shock.
Do not plug or unplug the power supply plug to turn the unit
ON/OFF .
• There is risk of fire or electric shock.
When flammable gas leaks, turn off the gas and open a window
for ventilation before turn the product on.
• Do not use the telephone or turn switches on or off. There is risk of
explosion or fire.
Two or more people must lift and
transport the product.
• Avoid personal injury.
Do not install the product where it will be
exposed to sea wind (salt spray) directly.
• It may cause corrosion on the product.
Install the drain hose to ensure that the
condensed water is drained away properly.
• A bad connection may cause water leakage.
Keep level even when installing the
product.
• To avoid vibration or noise.
Do not install the product where the noise
or hot air from the outdoor unit could
damage or disturb the neighborhoods.
• It may cause a problem for your neighbors
and hence dispute.
Always check for gas (refrigerant)
leakage after installation or repair of
product.
• Low refrigerant levels may cause failure of
product.
Page 5
Owner's Manual 5
Safety Precautions
ENGLISH
ENGLISH
Do not use the product for special purposes,
such as preserving foods, works of art, etc. It
is a consumer air conditioner, not a precision
refrigeration system.
• There is risk of damage or loss of property.
Do not block the inlet or outlet of air flow.
• It may cause product failure.
Use a soft cloth to clean. Do not use
harsh detergents, solvents or splashing
water etc .
• There is risk of fire, electric shock, or damage
to the plastic parts of the product.
Do not touch the metal parts of the
product when removing the air filter.
• There is risk of personal injury.
Do not step on or put anyting on the
product. (outdoor units)
• There is risk of personal injury and failure of
product.
Always insert the filter securely after
cleaning. Clean the filter every two weeks
or more often if necessary.
• A dirty filter reduces the efficiency.
Do not insert hands or other objects
through the air inlet or outlet while the
product is operating.
• There are sharp and moving parts that could
cause personal injury.
Be cautious when unpacking and
installing the product.
• Sharp edges could cause injury.
If the refrigerant gas leaks during the
repair, do not touch the leakaing
refrigerant gas.
• The refrigernat gas can cause frostbite (cold
burn)
Do not tilt the unit when removing or
uninstalling it.
• The condensed water inside can spill .
Do not mix air or gas other than the
specified refrigerant used in the system .
• If air enters the refrigerant system, an
excessively high pressure results, causing
equipment damage or injury.
If the refrigerant gas leaks during the
installation, ventilate the area immediately.
• Otherwise it can be harmfull for your health.
Dismantling the unit, treatment of the
refrigerant oil and eventual parts should
be done in accordance with local and
national standards.
Replace the all batteries in the remote
control with new ones of the same type.
Do not mix old and new batteries or
different types of batteries.
• There is risk of fire or product failure.
Do not recharge or disassemble the
batteries. Do not dispose off batteries in
a fire.
• They may burn or explode.
If the liquid from the batteries gets onto
your skin or clothes, wash it well with
clean water. Do not use the remote if the
batteries have leaked.
• The chemicals in batteries could cause burns
or other health hazards.
If you eat the liquid from the batteries,
brush your teeth and see doctor. Do not
use the remote if the batteries have
leaked.
• The chemicals in batteries could cause burns
or other health hazards.
Do not let the air conditioner run for a
long time when the humidity is very high
and a door or a window is left open.
• Moisture may condense and wet or damage
furniture.
Do not expose your skin or kids or
plants to the cool or hot air draft.
• This could harm to your health.
Do not drink the water drained from the
product.
• It is not sanitary and could cause serious
health issues.
Use a firm stool or ladder when cleaning,
maintaining or repairing the product at
an height.
• Be careful and avoid personal injury.
Page 6
6 Multi Air Conditioner
Electrical Safety
• This appliance must be properly grounded.
To minimize the risk of electric shock, you must alway plug into a grounded oulet.
• Do not cut or remove the grounding prong from the power plug.
• Attaching the adapter ground terminal to the wall receptacle cover screw does not ground the appliance
unless the cover screw is metal and not insulated, and the wall receptacle is grounded through the
house wiring.
• If you have any doubt whether the air conditioner is properly grounded, have the wall receptacle and
circuit checked by a qualified electrician.
We strongly discourage the use of an adapter due to potential safety hazards. For temporary connections,
use only a genuine adapter, available from most local hardware stores. Ensure that the large slot in the
adapter is aligned with the large slot in the receptacle for a proper polarity connection.
To disconnect the power cord from the adapter, use one hand on each to avoid damaging the ground
terminal. Avoid frequently unplugging the power cord as this can lead to eventual ground terminal damage.
• Never use the appliance with a broken adapter.
This symbol alerts you to the risk of electric shock.
This symbol alerts you to hazards that may cause harm to the
air conditioner.
This symbol indicates special notes.
NOTE
Symbols used in this Manual
Temporary Use of an Adapter
Electrical Safety
Page 7
Owner's Manual 7
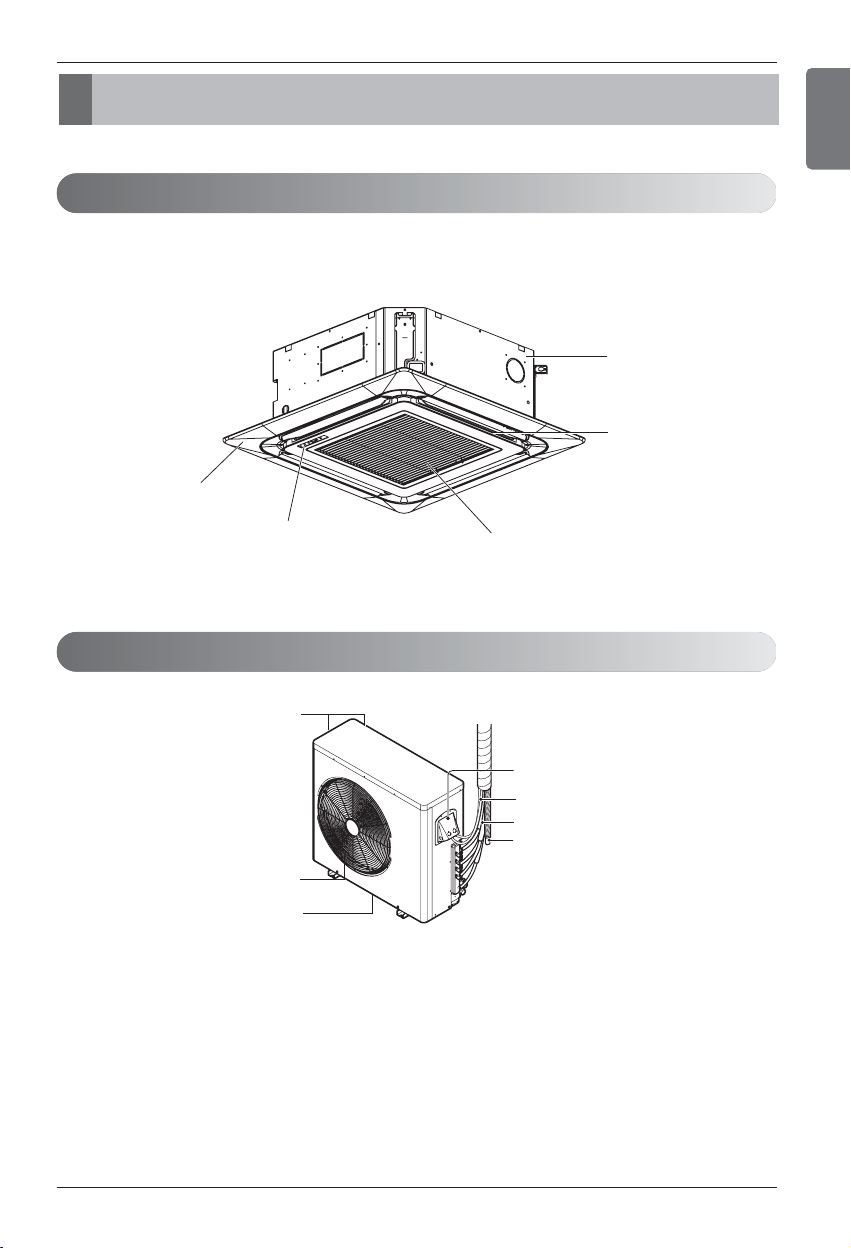
h The figure can be changed according to model.
Product Introduction
ENGLISH
Outdoor Unit
Indoor Unit
Product Introduction
[Ceiling Cassette Type]
Front Panel
Cabinet
Air Discharge
Signal receiver
Air intake vents
Air outlet vents
Base plate
Air Inlet
Control cover
Connecting wire
Connection pipe
Drain hose
Page 8
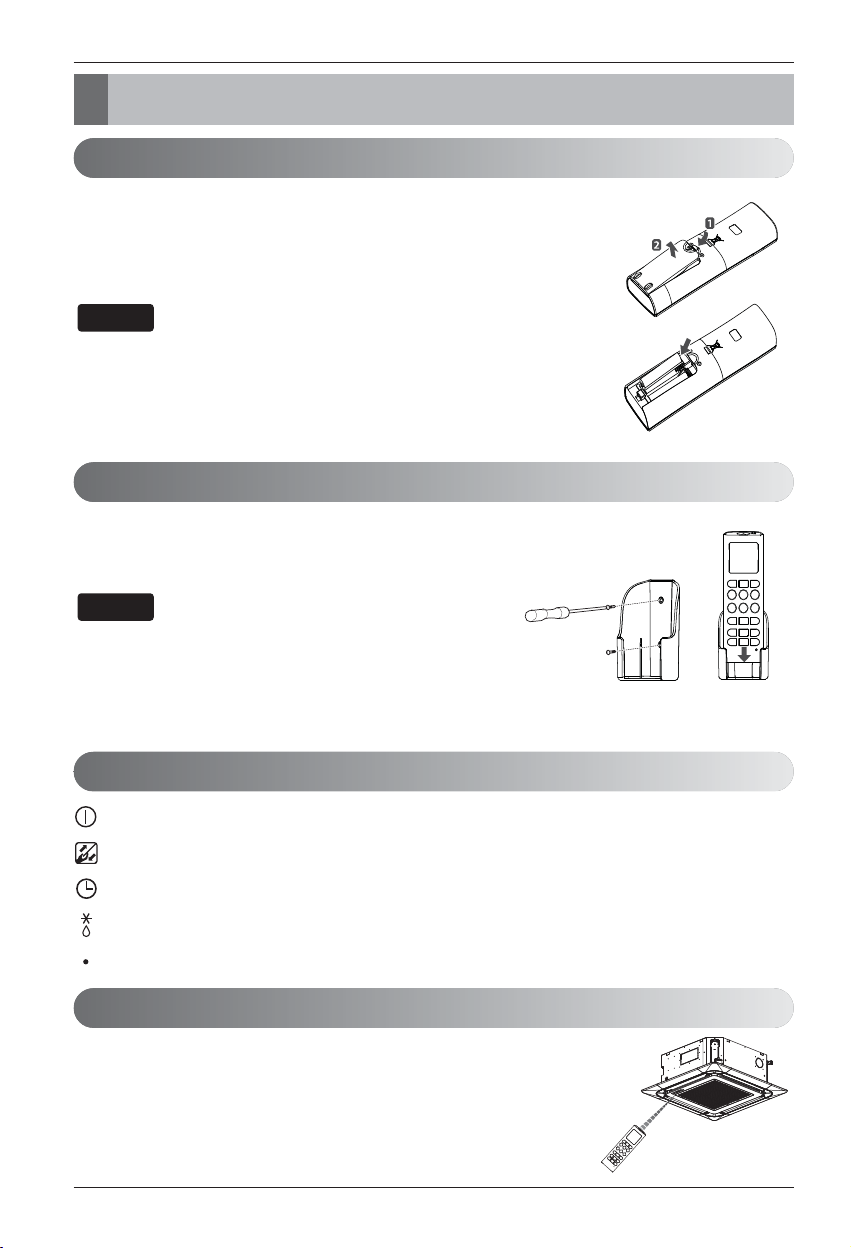
Wireless Remote Controller Maintenance
1. Remove the battery cover by pulling it according to the arrow
direction.
2. Insert new batteries making sure that the (+) and (-) of battery are
installed correctly.(Battery Size = AAA)
3. Reattach the cover by sliding it back into position.
1. Always use/replace both batteries of same type.
2. If the system is not to be used for a long time, remove the
batteries to save their working life.
3. If the display screen of remote controller starts, fading replace
both of the batteries.
1. Choose a suitable place where its safe & easy to reach.
2. Fix the holder to wall etc with the supplied screws firmly.
3. Slide the remote controller inside the holder.
1. Remote controller should never be exposed to direct sunlight.
2. Signal transmitter & receiver should always be clean for proper
communication. Use a soft cloth to clean them.
3. In case some other appliances also get operated with remote control,
change their position or consult your serviceman.
1. The signal receiver is inside the unit.
2.
Aim the remote controller towards the unit to operate it.
There should not be any blockage in between.
Operating Method
8 Multi Air Conditioner
Operating Instructions
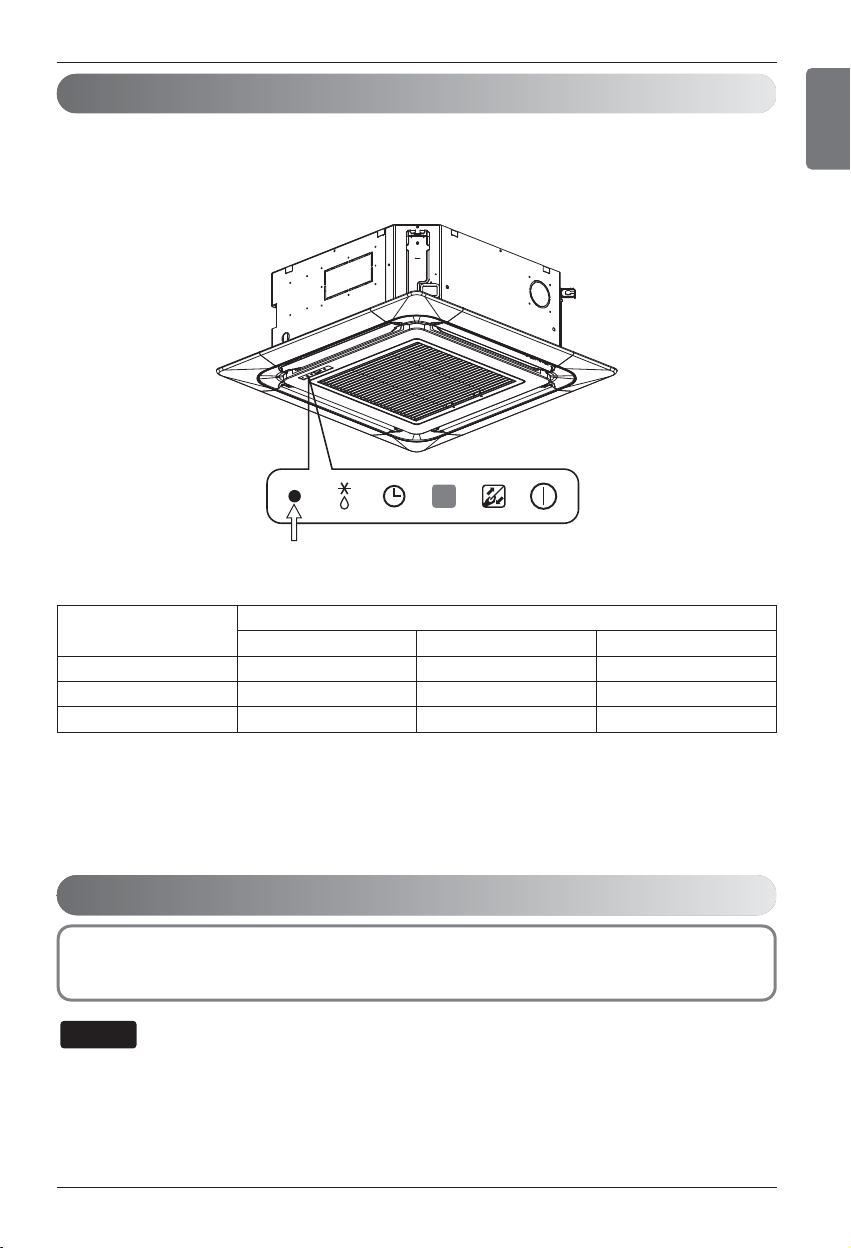
On/Off : Lights up during the system operation.
Filter Sign : Lights up after 2400 hours from the time of first operating unit.
Timer : Lights up during Timer operation.
Defrost Mode : Lights up during Defrost Mode or Hot Start operation.(Heat pump model only)
Forced : To operate the unit when the remote control can't be used for any reason.
How to insert the Batteries
Operating Instructions
Operation Indication Lamps
NOTE
NOTE
Page 9
Owner's Manual 9
Operating Instructions
ENGLISH
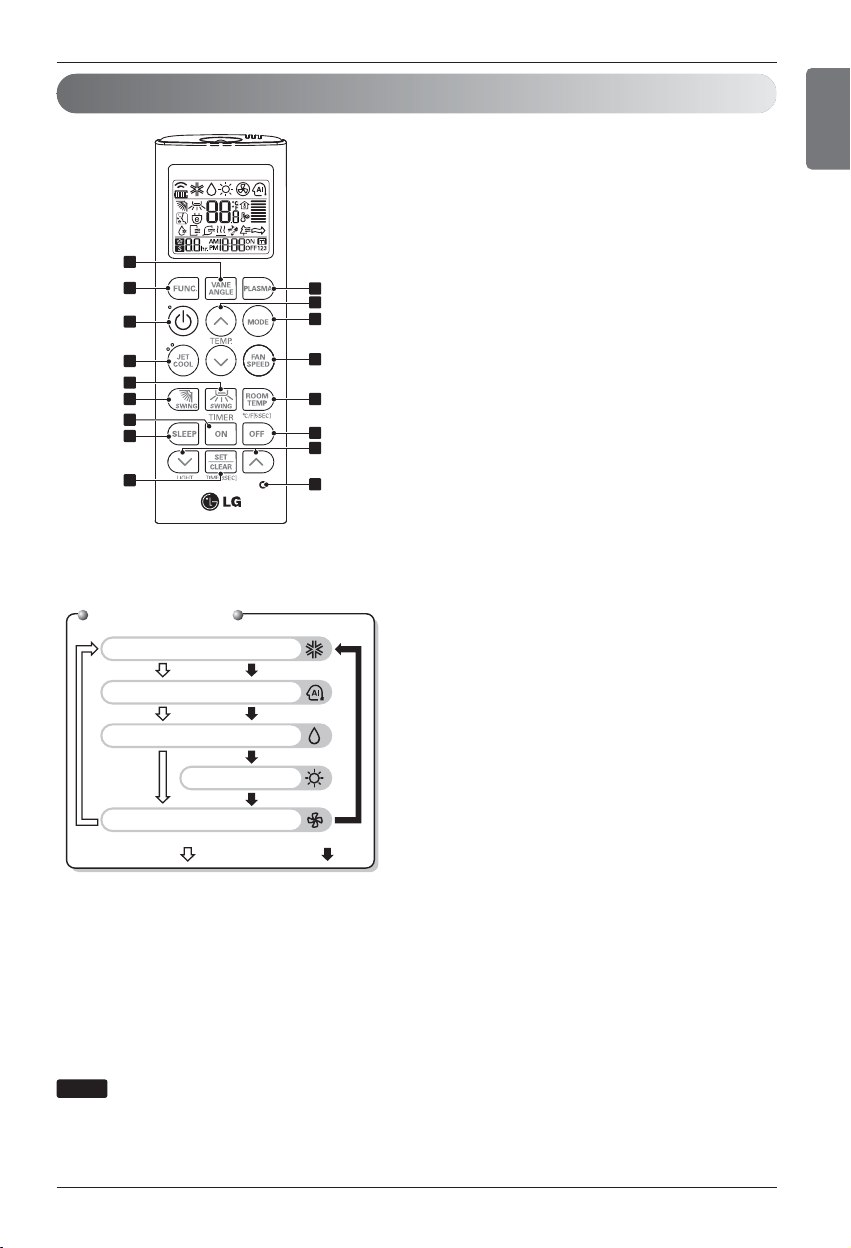
Wireless Remote Controller
1. VANE ANGLE Button
Used to set each vane angle.
2. FUNCTION SETTING Button
Used to set or clear Auto Clean, Smart Clean, Electric
heater or Individual vane angle control.
3. ON/OFF Button
Used to turn on/off the unit.
4. JET COOL Button
Speed cooling operates super high fan speed.
5. LEFT/RIGHT AIRFLOW Button (OPTIONAL)
Used to set the desired left/right(horizontal) airflow
direction.
6. UP/DOWN AIRFLOW Button
Used to stop or start louver movement and set the
desired up/down airflow direction.
7. ON TIMER Button
Used to set the time of starting operation.
8. SLEEP TIMER Button
Used to set the time of sleeping operation.
9. SET / CLEAR Button
Used to set/clear the timer.
Used to set the current time(if it input for 3sec.)
10. PLASMA Button (OPTIONAL)
Used to start or stop the plasma-purification function.
11. ROOM TEMPERATURE SETTING Button
Used to select the room temperature.
12. OPERATION MODE SELECTION Button
Used to select the operation mode.
13. INDOOR FAN SPEED SELECTION Button
Used to select fan speed in four steps low, medium,
high and chaos.
14. ROOM TEMPERATURE CHECKING Button
Used to check the room temperature.
15. OFF TIMER Button
Used to set the time of stopping operation.
16. TIMER SETTING(Up/Down)/LIGHT Button
Used to set the timer.
Used to adjust the brightness.(if it is not time adjust
mode)
17. RESET Button
Used to reset the remote controller.
h Some functions may not be operated and displayed depending on the product type.
NOTE
1
2
3
4
5
6
7
8
9
Operation Mode
Cooling Mode
Auto Operation
Dehumidification mode
Heating Mode
Fan Mode
•
Cooling Model( ), Heat Pump Model( )
10
11
12
13
14
15
16
17
Page 10

10 Multi Air Conditioner
Operating Instructions
Wired Remote Controller (Optional)
※ Some functions may not be operated and displayed depending on the product type.
※ If you want to know more information, please refer to Wide Wired Remote Control Manual.
Model : PREMTB10U
1 Operation indication screen
2 Set temperature button
3 Fan Speed button
4 Set back button
5 Operation mode selection button
6 Wireless remote controller receiver
• Some product donʼt receive the wireless signals.
7 Sub function button
8 Ventilation button
9 Reservation button
10 Air flow button
11 Cooling desired temperature
12 Function setting button
13 Up, Down, Left, Right button
14 On/Off button
15 Heating desired temperature
16 Setting/Cancel button
17 Exit button
1
10
9
8
7
11
2
3
4
12
13
14
15
5
6
16
17
Page 11
Owner's Manual 11
Operating Instructions
ENGLISH
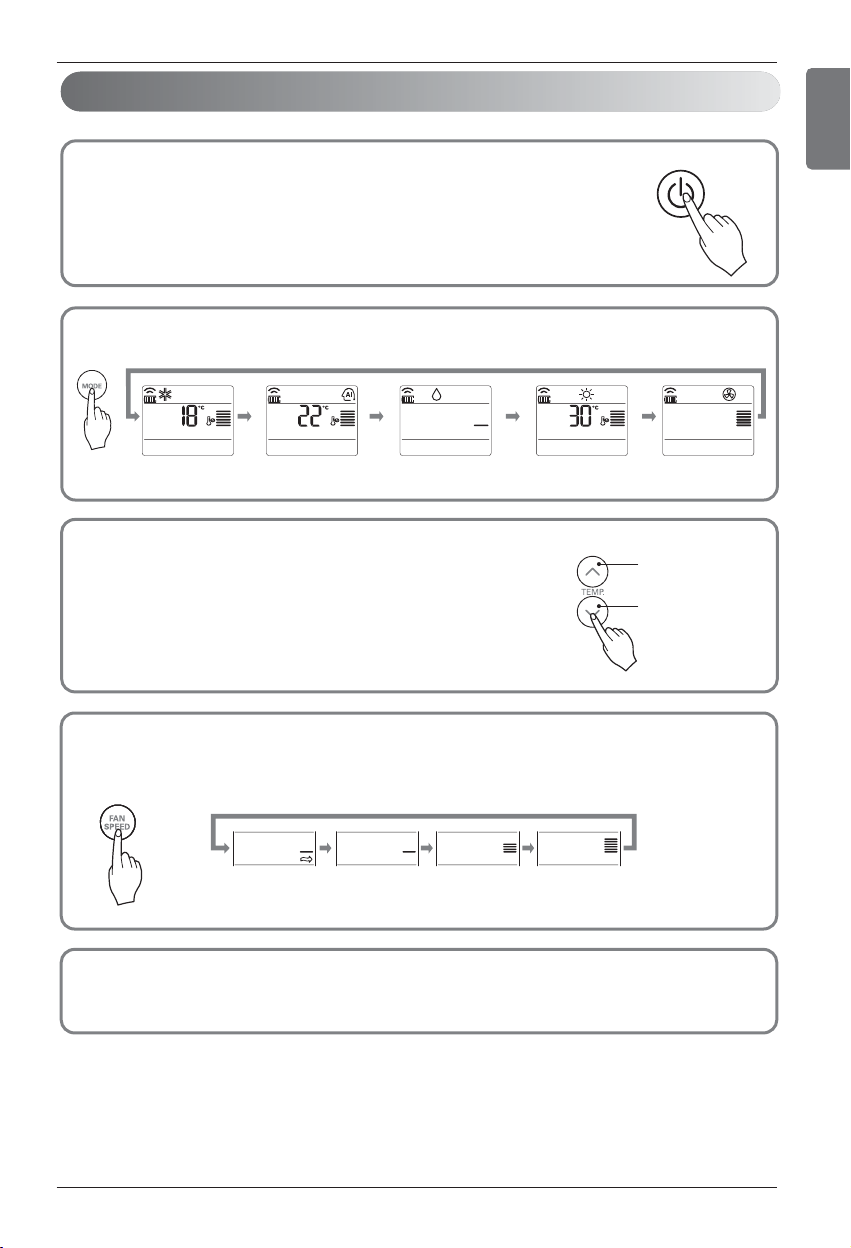
Cooling Mode
Dehumidification
mode
Heating Mode
Auto Operation
Fan Mode
To lower the temperature
To raise the temperature
Press the ON/OFF BUTTON to turn the unit on.
The unit will respond with a beep.
Open the door of the remote controller and press the operation mode button. Each time the button
is pressed, the operation mode is shifted in the direction of the arrow.
For cooling or heating operation set the desired indoor
temperature by pressing the ROOM TEMPERATURE SETTING
BUTTONS.
For cooling the temperature can be set within
18°C~30°C(64°F~86°F) and for heating the temperature range is
16°C~30°C(60°F~86°F).
Set the fan speed with the remote controller. You can select the fan speed by pressing the
INDOOR FAN SPEED SELECTOR BUTTON.
Each time the button is pressed, the fan speed mode is shifted.
1
2
3
4
Natural wind
o
For fresher feeling, press the INDOOR FAN SPEED SELECTOR BUTTON selector and set to CHAOS or Natural wind
mode. In this mode, the wind blows like a natural breeze by automatically changing fan speed.
Operation Mode
Page 12
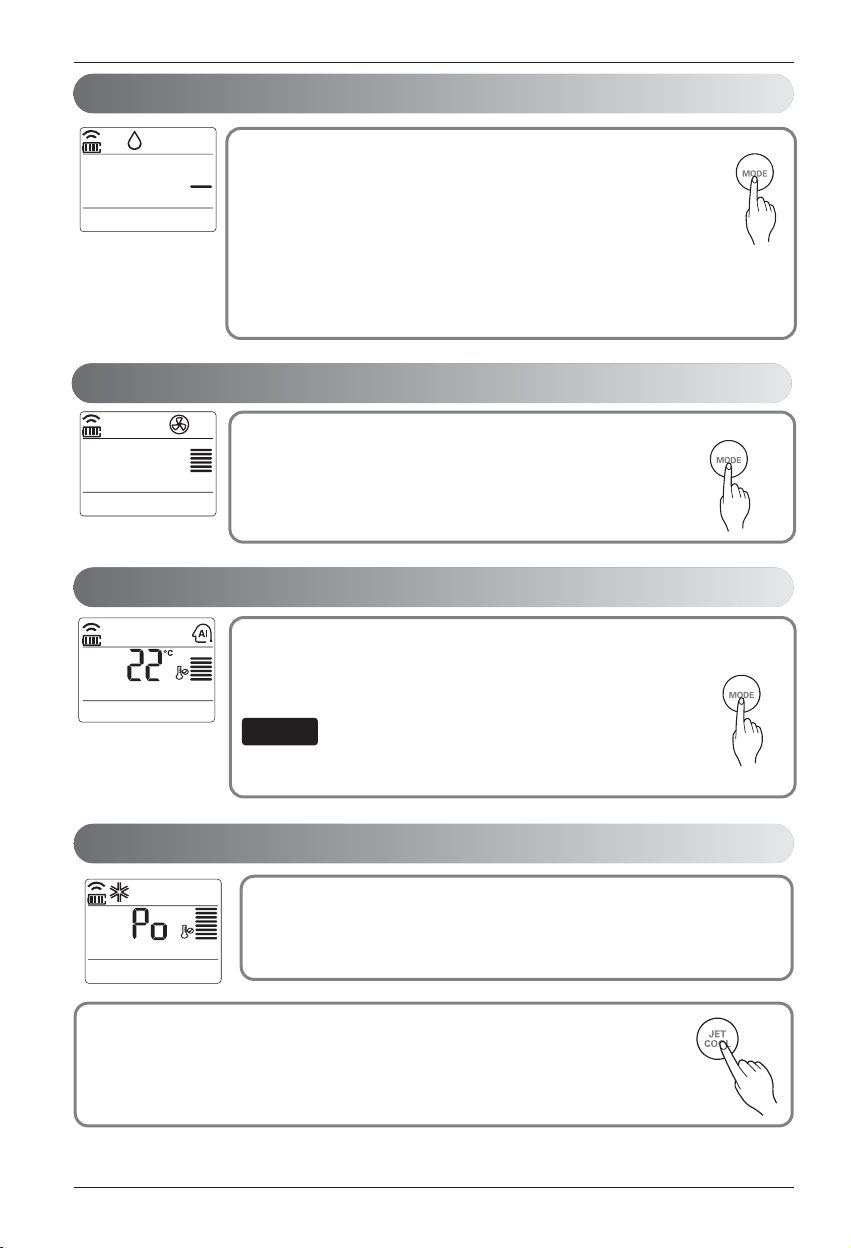
12 Multi Air Conditioner
Operating Instructions
This operation circulates the air without cooling or heating. It can be
activated by pressing the OPERATION MODE SELECTION BUTTON.
Once the air circulation is activated you can select the air speed by
pressing the INDOOR FAN SPEED SELECTOR BUTTON.
During Healthy Dehumidification Operation
o If you select the dehumidification mode on the OPERATION MODE SELECTION
BUTTON, the product starts to run the dehumidification function. It automatically
sets the room temperature and airflow volume to the best condition for
dehumidification, based on the sensed current room temperature.
In this case, however, the setting temperature is not displayed on the remote
ontroller and you are not able to control the room temperature either.
o During the healthy dehumidification function, the airflow volume is automatically set
according to the optimization algorithm responding to the current room temperature status,
so that the room condition is kept healthy and comfortable even in the very humid season.
In this operation mode, the system is automatically operated by the
electronic controls.
- You can set the desired temperature between 64°F and 86°F for Auto
Operation mode.
This function properly operates when you use the remote controller
matching each model.
NOTE
Auto Operation
Fan Mode
Dehumidification mode
Jet cool function can be used to cool the room quickly in hot summer. When this
function is turned on, the air conditioner runs in cooling operation mode with super high
fan speed and 18°C(64°F) setting temperature for 30 minutes for fast and effective
cooling.
You can activate this operation by pressing the JET COOL BUTTON.
To change from jet cool mode to high fan speed cooling mode, press the JET COOL
BUTTON or INIDOOR FAN SPEED SELECTOR BUTTON or the ROOM TERPERATURE
SETTING BUTTON again.
Power Cooling
Page 13
Owner's Manual 13
Operating Instructions
ENGLISH
Plasma filter is a technology developed by LG to get rid of microscopic
contaminants in the intake air by generating a plasma of high charge electrons.
This plasma kills and destroys the contaminants completely to provide clean and
hygienic air.
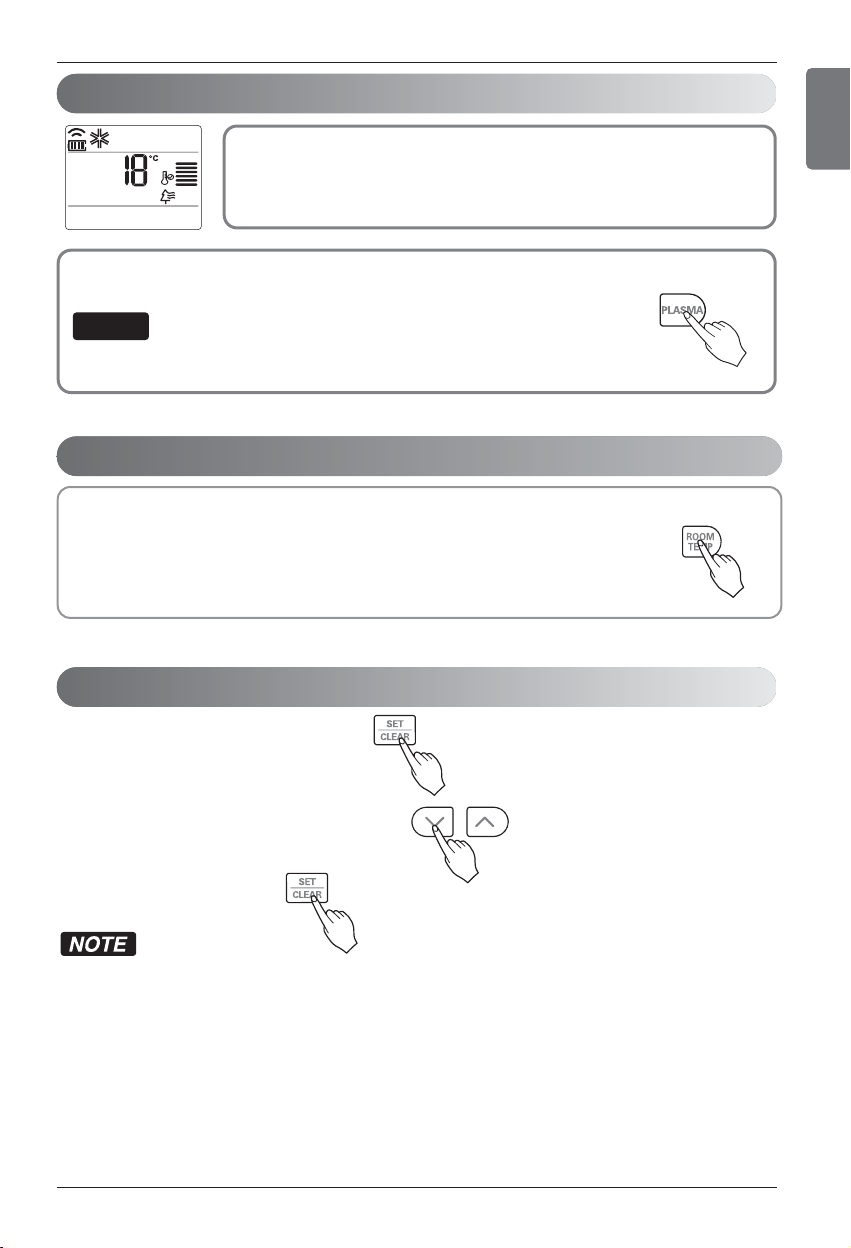
Plasma purification can be started by pressing the PLASMA BUTTON on the remote controller.
Repressing it will deactivate the operation.
This feature can be used in any operation mode and any fan speed can be used while
plasma filter is functioning.
PLASMA Purification Operation (Optional)
Press the °C/°F SWITCH button to change from Celsius to Fahrenheit or from Fahrenheit to Celsius.
Whenever press TEMPERATURE SETTING button in Fahrenheit mode, the temperature
will increase/drop 1°F.
Celsius/Fahrenheit Switching
1. Press the SET / CLEAR button for 3 seconds.
2. Press TIME SETTING buttons until the desired
time is set. (If you press down the button for a long
time, it will change quickly in the units of 10 min.)
3. Press the SET / CLEAR button.
Check the indicator for A.M. and P.M.
Setting the Current Time
NOTE
Page 14
14 Multi Air Conditioner
Operating Instructions
1. Press the TIMER button to turn timer on or off.
2. Press TIME SETTING buttons until the desired time
is set. (7 hours is the maximum setting)
3. Press the SET / CLEAR button.
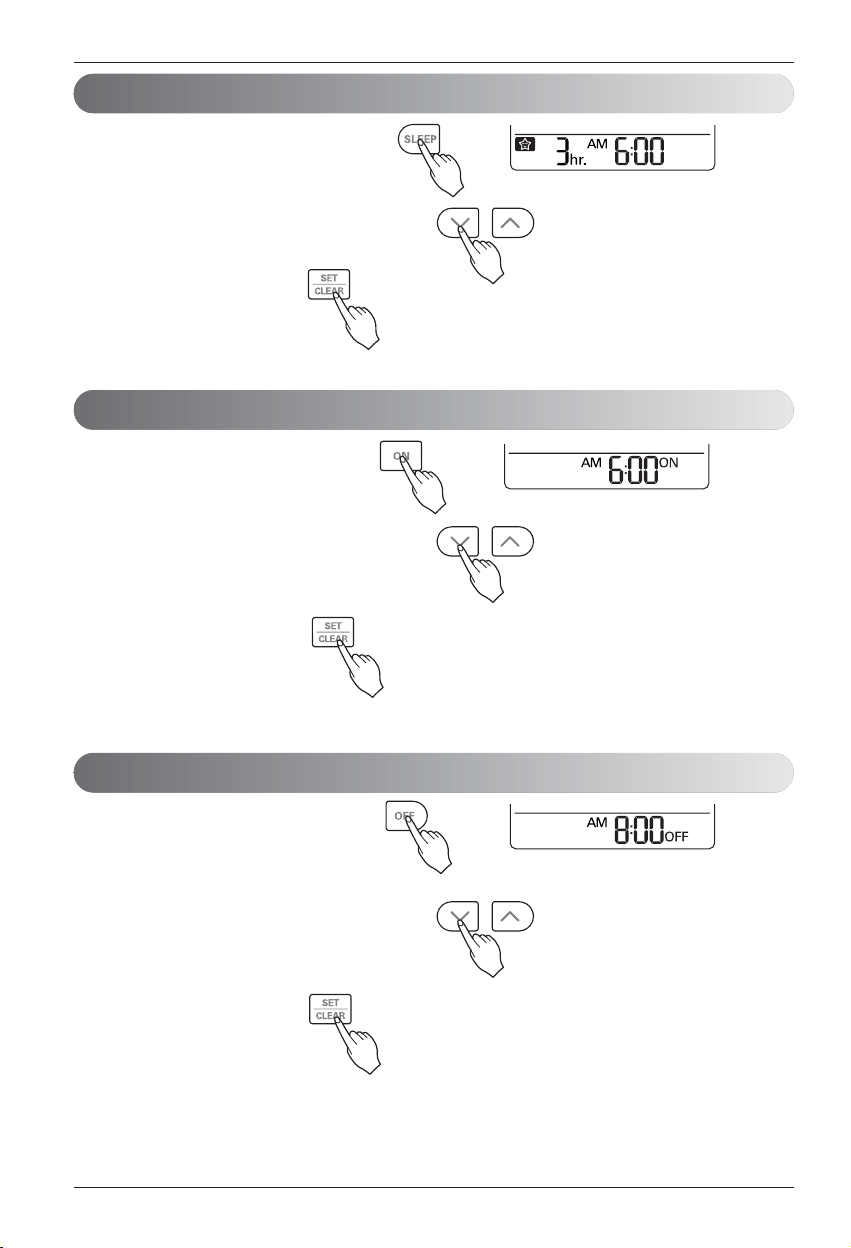
Sleep Timer Setting
Timer Sleep
1. Press the ON button to turn timer on or off.
2. Press TIME SETTING buttons until the desired time
is set.
3. Press the SET / CLEAR button.
On Timer Setting
Timer ON
1. Press the OFF button to turn timer on or off.
2. Press TIME SETTING buttons until the desired time
is set.
3. Press the SET / CLEAR button.
Off Timer Setting
Timer OFF
Page 15
Owner's Manual 15
Operating Instructions
ENGLISH
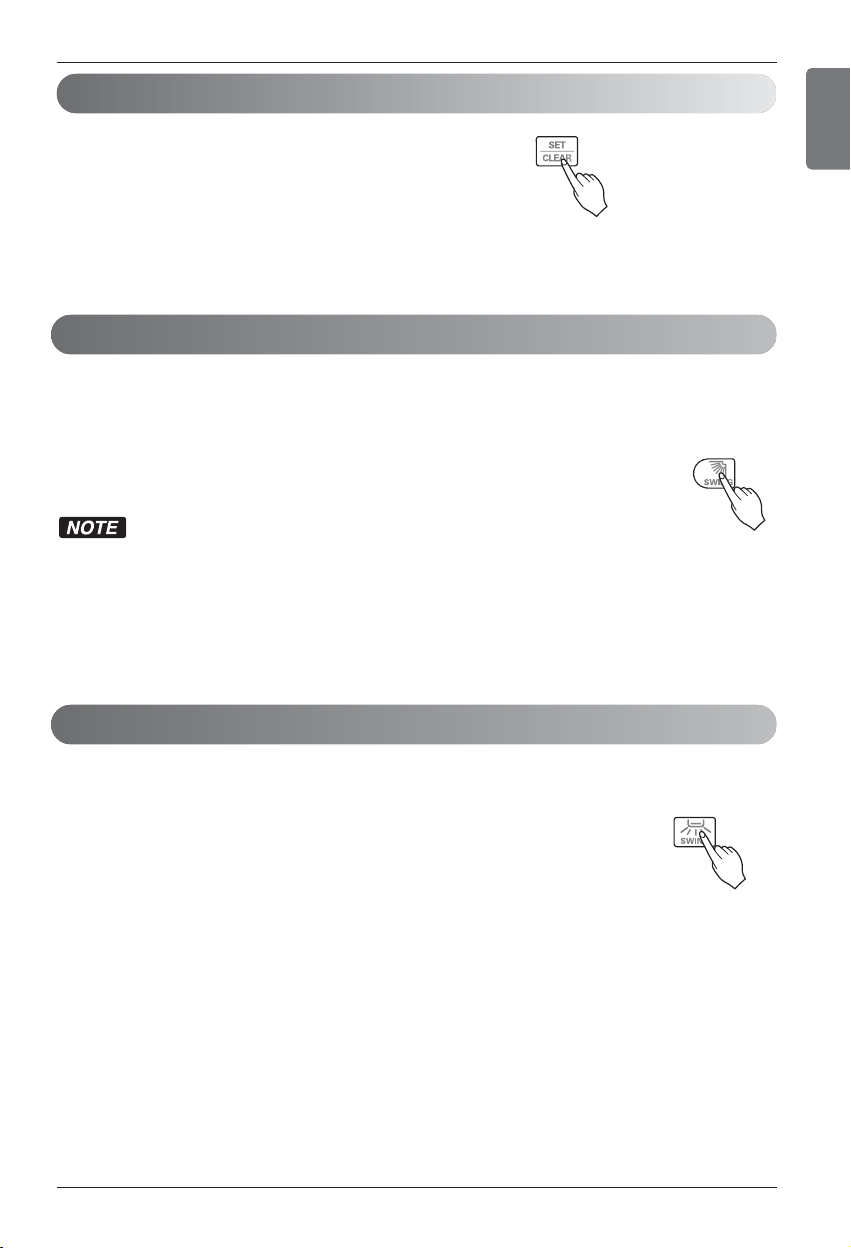
The up/down airflow (Vertical Airflow) can be adjusted by using the remote controller.
1. Press the ON/OFF button to start the unit.
2. Press UP/DOWN AIRFLOW button and the louvers will swing up and down.
Press the UP/DOWN AIRFLOW button again to set the vertical louver at the desired airflow direction.
• If you press the UP/DOWN AIRFLOW button, the horizontal airflow direction is changed automatically based
on the Auto Swing algorithm to distribute the air in the room evenly and at the same time to make the human
body feel more comfortable, as if enjoying a natural breeze.
• Always use the remote controller to adjust the up/down airflow direction. Manually moving the vertical airflow
direction louver by hand, could damage the air conditioner.
• When the unit is shut off, the up/down airflow direction louver will close the air outlet vent of the system.
The left/right(horizontal) airflow can be adjusted by using the remote control.
1. Press the ON/OFF button to start the unit.
2. Press the LEFT/RIGHT AIRFLOW button and the louvers will swing left and right. Press
the Horizontal Airflow Direction Control Button again to set the horizontal louver at the
desired airflow direction.
h Up/Down and Left/Right Airflow function isnʼt shown on display of remote controller.
Left/Right Airflow Direction Control (Optional)
Up/Down Airflow Direction Control (Optional)
To cancel the Timer Setting
• If you wish to cancel all timer setting, press the SET/CLEAR button.
• If you wish to cancel each timer setting, press the
each timer button to turn timer sleep or on or off as you want.
And then press the SET/CLEAR button aiming the remote
controller at the signal receptor.
(The timer lamp on the air conditioner and the display will go off.)
Page 16
16 Multi Air Conditioner
Operating Instructions
• There may be differences between vane angle set values and the wind discharge port directions.
• Set desired angle with checking the vane angle movement of the product.
• The individual vane control function is an additional function of a product, and it may not work in some
products.
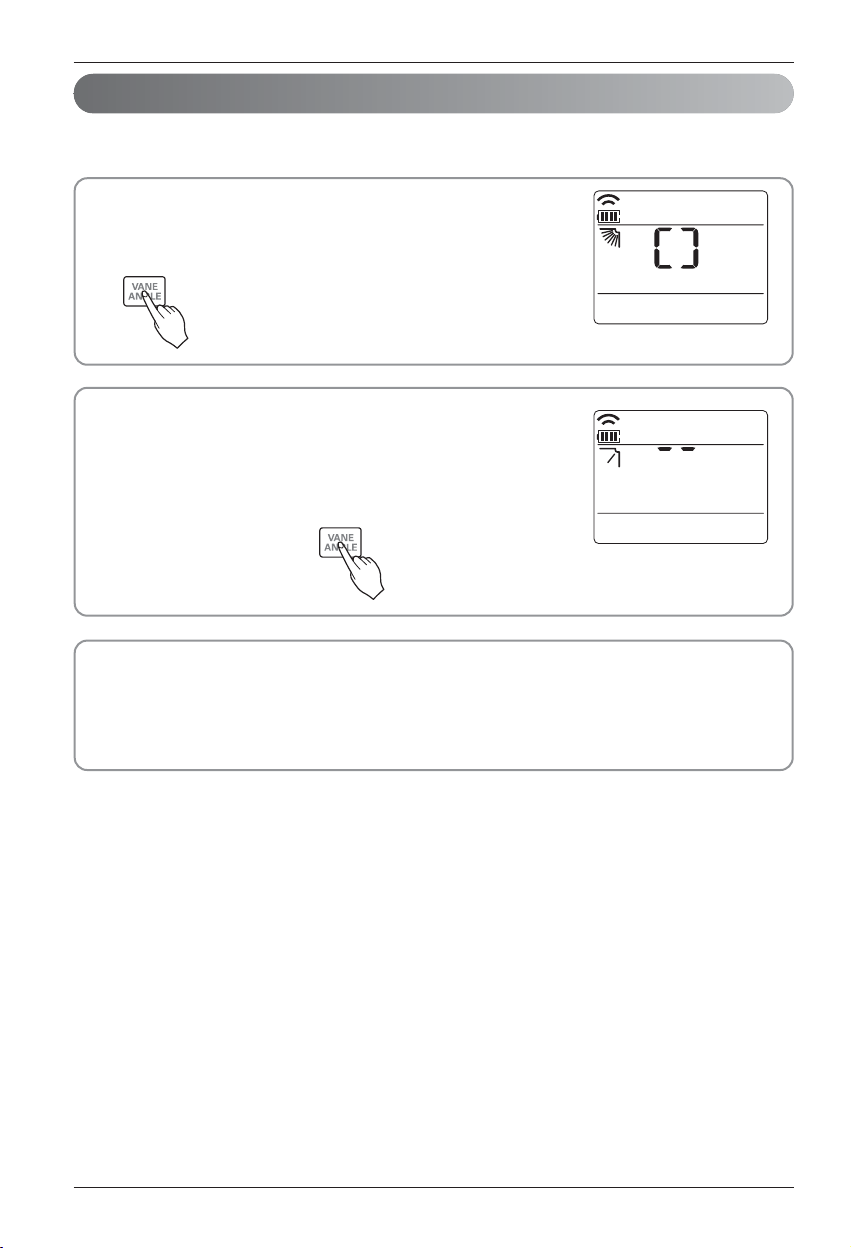
Individual vane angle control (Optional)
It is the function that can control 4 vane angles individually in the ceiling type 4Way
cassette product group.
Press the VANE ANGLE button.
Individual vane angle control symbol will blink.
• If you press the VANE ANGLE button for 3
seconds, all vanes are set to standard angle.
1
Set each vane angle by pressing VANE ANGLE button.
• Every time TEMPERATURE SETTING button is pressed,
corresponding vane angle and set values are displayed.
• When the button is pressed, the display window appears as of the
figure in the right, and the angle can be set to 1~6.
2
Page 17
Owner's Manual 17
Operating Instructions
ENGLISH
Forced operation is used when the remote controller can't be used. The operation will be started if the ON/OFF
button is pressed. If you want to stop the operation, re-press the button.
Test operation
During the TEST OPERATION, the unit operates in cooling mode at high speed fan, regardless of room temperature
and resets in 18 minutes.
During test operation, if remote controller signal is received, the unit operates as remote controller
sets.
If you want to use this operation, Press and hold the ON/OFF button for 3~5 seconds, then the buzzer sound 1
'beep'. If you want to stop the operation, re-press the button.
This feature is enabled by factory default setting, but you can disable it by pressing the ON/OFF button for 6
seconds. The unit will beep twice and the lamp will blink 8 times.
To enable it, press the button again for 6 seconds. The unit will beep twice and the blue lamp will blink 4 times.
NOTE
This function is useful in the situation of power failure.
When power regains after a failure this feature restore the previous operating condition
and the air conditioner will run in the same settings.
Auto Restart Function
Heat pump Model
Room Temp. ≥ 24°C(75.2°F)
21°C(69.8°F) ≤ Room Temp. < 24°C(75.2°F)
Room Temp. < 21°C(69.8°F)
Operating mode
Cooling
Healthy Dehumidification
Heating
Indoor FAN Speed
High High High
Setting Temperature
22°C(71.6°F) 23°C(73.4°F) 24°C(75.2°F)
Forced operation
[Ceiling Cassette Type]
Forced Operation
Button
Page 18
18 Multi Air Conditioner
Operating Instructions
Before performing any maintenance, turn off the main power to the system, disconnect the circuit breaker and
unplug the power cord.
Maintenance and Service
Ceiling Cassette Type
Grille, Case and Remote Control
p Turn the system off before cleanining, To clean, wipe with a soft, dry cloth. Do not use bleach or abrasives.
Supply power must be disconnected before cleaning the indoor unit.
NOTE
Air Filters
The air filters behind the front grille should be checked
and cleaned once every 2 weeks or more often if
neccessary.
n Never use any of the followings:
• Water hotter than 40°C.
Could cause deformation and/or discoloration.
• Volatile substances.
Could damage the
surfaces of the air
conditioner.
B
e
n
z
e
n
e
S
C
O
U
R
I
N
C
L
B
A
R
G
E
S
I
N
N
E
R
1
Remove the Air filters.
n
Take hold of the tab and pull slightly forward to
remove the filter.
CAUTION:
When the air filter is to
be removed, do not touch the metal
parts of the indoor unit.
It may cause an injury.
2
Clean dirt from the air filter using a vacuum
cleaner or washing with water.
n
If dirt is conspicuous, wash with a neutral
detergent in lukewarm water.
n
If hot water (50°C or more) is used, it may be
deformed.
3
After washing with water, dry well in the
shade.
n
Do not expose the air filter to direct sunlight
or heat from a fire when drying it.
4
Install the air filter.
Page 19

Owner's Manual 19
Maintenance and Service
ENGLISH
Operation Tips!
Do not overcool the room.
This is not good for the health and
wastes electricity.
Keep blinds or curtains
closed.
Do not let direct sunshine enter
the room when the air conditioner
is in operation.
Keep the room temperature
uniform.
Adjust the vertical and horizontal
airflow direction to ensure a
uniform temperature in the room.
Make sure that the
doors and windows
are shut thight.
Avoid opening doors and
windows as much as
possible to keep the cool
air in the room.
Clean the air filter
regularly.
Blockages in the air filter
reduce the airflow and lower
cooling and dehumidifying
effects. Clean at least once
every two weeks.
Ventilate the room
occasionally.
Since windows are kept
closed, it is a good idea
to open them and
ventilate the room now
and ten.
Use high fan speed
for effective and fast
cooling.
The unit gives its rated
cooling capacity when the
fan speed is high.
Page 20

20 Multi Air Conditioner
Page 21

MANUEL D’UTILISATION
CLIMATISEUR
Veuillez lire attentivement ce manuel avant d’utiliser
votre appareil, et le conserver pour toute consultation ultérieure.
TYPE : Casete Plafond
http://www.lghvac.com
www.lg.com
FRANÇAIS
Page 22

2 Climatiseur Mural
Climatiseur type multi-unités
TABLE DES MATIÈRES
POUR VOS DOSSIERS
Écrivez les numéros de modèle et de série ci-après :
Nº de modèle
Nº de série
Vous les trouverez sur une étiquette dans la partie latérale
de chaque unité.
Nom du revendeur
Date dʼachat
n Agrafez votre reçu à cette page au cas où vous en
auriez besoin pour prouver la date dʼachat ou pour vous
prévaloir de la garantie.
LISEZ CE MANUEL
Vous y trouverez plusieurs conseils utiles sur la manière
d'utiliser et d'entretenir correctement votre climatiseur.
Quelques petites mesures préventives vous permettront
dʼépargner beaucoup de temps et dʼargent pendant la
durée de vie de votre climatiseur.
Vous trouverez une série de réponses aux problèmes les
plus fréquents dans le tableau du guide de dépannage. Si
vous passez en revue notre Guide de dépannage
d'abord, il se peut que vous nʼayez pas du tout besoin
dʼappeler le Service Après-Vente.
PRÉCAUTION
• Contactez le service technique agréé pour la
réparation ou l'entretien de cette unité.
• Contactez un technicien autorisé pour l'installation
de cette unité.
• Ce climatiseur ne doit pas être actionné par des
petits enfants ou par des personnes infirmes sans
surveillance.
• Les petits enfants doivent être surveillés afin de
vous assurer qu'ils ne jouent pas avec le climatiseur.
• Si le cordon dʼalimentation doit être remplacé, ce
travail ne doit être confié qu'à du personnel autorisé
et il ne doit être effectué qu'en utilisant des pièces
de rechange authentiques.
A. Précautions de sécurité.........................3
B. Sécurité électrique .................................6
Utilisation temporaire d'un adaptateur......6
Symboles utilisés dans ce manuel ...........6
C. Description du produit...........................7
Unité intérieure.........................................7
Unité extérieure........................................7
D. Instructions dʼutilisation .......................8
D. Comment insérer les piles ...................8
Entretien de la télécommande sans fils....8
Voyants de fonctionnement......................8
Méthode de fonctionnement.....................8
Fonctionnement de la Télécommande.....9
Dénominations et fonctions (en option)..10
Mode de fonctionnement........................11
Fonction déshumidificationsaine ............12
Mode ventilateur.....................................12
Fonctionnement automatique.................12
Refroidissement rapide ..........................12
Fonctionnement du purificateur dʼair
PLASMA (en option)...............................13
Affichage en degrés Celsius/Fahrenheit
.....13
Réglage de l'heure .................................13
Réglage de la veille programmée...........14
Réglage de la mise en marche
programmée...........................................14
Réglage de l'arrêt programmé................14
Annulation des réglages programmés....15
Commande verticale de direction du débit
d'air (selon les modèles) ........................15
Commande horizontale de direction du
débit d'air (selon les modèles)................15
Réglage individuel de l'angle des volets
(selon les modèles) ................................16
Funzionamento Manuale........................17
Fonction Redémarrage automatique......17
E. Entretien et service ..............................18
Type cassette plafond ............................18
Conseils dʼutilisation...............................19
Page 23

Manuel du propriétaire 3
Précautions de sécurité
FRANÇAIS
FRANÇAIS
Précautions de sécurité
Les instructions ci-après doivent être observées dans le but de prévenir tout risque de dommages corporels ou matériels.
n L'utilisation non conforme, résultant du non-respect des instructions, est susceptible de provoquer des
dommages corporels ou matériels et dont la gravité est signalée par les indications suivantes.
n Les significations des symboles utilisés dans ce manuel sont indiquées ci-dessous
AVERTISSEMENT
ATTENTION
Ce symbole indique un risque de blessure grave, voire mortelle.
Ce symbole indique un risque de blessure ou des
dommages matériels.
Veillez à ne pas faire cela.
Veillez à suivre cette instruction.
AVERTISSEMENT
Utilisez toujours une fiche d'alimentation et une
prise de courant avec borne de mise à la terre.
• Autrement, vous risquez de provoquer un choc
électrique.
Nʼutilisez pas un disjoncteur défectueu ou
valeur nominale inférieure. Utilisez un
disjoncteur et un fusible appropriés.
• Autrement, vous risquez de provoquer un
incendie ou un choc électrique.
Nʼutilisez pas de bloc dʼalimentation à prises
multiples. Utilisez toujours cet appareil sur un
circuit dédié protégé par un disjoncteur.
• Autrement, vous risquez de provoquer un
incendie ou un choc électrique.
Pour lʼinstallation électrique, contactez votre
distributeur ou vendeur, un électricien qualifié
ou le S.A.V. agréé. Ne démontez ni ne réparez
vous-même lʼappareil.
• Autrement, vous risquez de provoquer un
incendie ou un choc électrique.
Faites toujours une mise à la terre de lʼappareil
suivant le schéma de câblage. Ne reliez pas le
fil de terre à une canalisation de gaz, à une
conduite d'eau, à un paratonnerre ou à un fil de
terre téléphonique.
• Autrement, vous risquez de provoquer un
incendie ou un choc électrique.
Installez correctement le panneau et le
couvercle du boîtier de commande.
• Autrement, vous risquez de provoquer un
incendie ou un choc électrique à cause de la
poussière, de lʼhumidité, etc.
Utilisez un disjoncteur ou un fusible à valeur
nominale appropriée.
• Autrement, vous risquez de provoquer un
incendie ou un choc électrique.
Ne modifiez ni ne prolongez le cordon
dʼalimentation. Si le cordon dʼalimentation venait à
être abîmé, déchiré ou épluché, remplacez-le.
• Autrement, vous risquez de provoquer un
incendie ou un choc électrique.
Pour toute installation, enlèvement ou
réinstallation, contactez toujours votre
distributeur ou le S.A.V agrée.
• Autrement, vous risquez de provoquer un
incendie ou un choc électrique, une explosion ou
des blessures.
Nʼinstallez pas ce produit sur un support
défecteux. Assurez-vous que lʼemplacement
choisi pour lʼinstallation nʼest pas abîmé par
temps.
• Autrement, le produit risque de tomber par terre.
Nʼinstallez jamais lʼunité extérieure sur une
surface instable, ni dans un endroit où elle
risque de tomber par terre.
• La chute de lʼunité extérieure pourrait provoquer
des dommages, des blessures, voire la mort.
Si le produit est mouillé (plongé ou submergé),
contactez un S.A.V. agrée pour le faire réparer
avant de le réutiliser.
• Autrement, vous risquez de provoquer un
incendie ou un choc électrique.
Le transformateur élévateur de lʼunité
extérieure fournit aux composantes électriques
de lʼélectricité haute tension. Assurez-vous de
décharger complètement le condensateur avant
de mener à bien un travail de réparation.
• Un condensateur chargé peut être à lʼorigine dʼun
choc électrique.
Lors de lʼinstallation, utilisez le kit dʼinstallation
fourni avec lʼappareil.
• Autrement, l'unité risque de tomber et de
provoquer des dommages graves.
Assurez-vous dʼutiliser uniquement les pièces
énumérées dans le catalogue de pièces
détachées. Nʼessayer jamais de modifier cet
appareil.
• L'utilisation des pièces inadéquates peut causer
un choc électrique, un dégagement excessif de
chaleur ou un incendie.
Page 24

4 Climatiseur Mural
Précautions de sécurité
Les connexions électriques des unités
intérieure et extérieure doivent être bien
solides et les câbles doivent être acheminés
correctement, de sorte quʼil nʼy ait aucune
force qui tire le cordon vis-à-vis des bornes de
connexion.
• Les connexions inadéquates ou lâches peuvent
causer un dégagement excessif de chaleur ou un
incendie.
Veillez à la mise au rebut sûre des matériaux
dʼemballage. Par exemple, des vis, des clous,
des piles, des objets cassés, etc., après
installation ou service. Puis déchirez et jetez
les sacs dʼemballage en plastique.
• Les enfants pourraient jouer avec ces matériaux
et subir des blessures.
Assurez-vous de vérifier que la prise du cordon
d'alimentation nʼest pas sale, lâche ou cassée,
puis veuillez insérer complètement la fiche.
• Une prise sale, lâche ou cassée peut provoquer
un choc électrique ou un incendie.
Assurez-vous de vérifier que le condenseur
soit correctement utilisé. Veuillez lire lʼétiquette
sur lʼappareil.
• Lʼutilisation incorrecte du condenseur risque
d'empêcher le bon fonctionnement de l'unité.
Nʼutilisez pas un cordon dʼalimentation, une
fiche ou une prise lâche sʼils sont
endommagés.
• Autrement, vous risquez de provoquer un
incendie ou un choc électrique.
Ne touchez, nʼactionnez ne pas réparez
lʼappareil avec les mains humides. Prenez la
prise avec la main pour la débrancher.
• Autrement, vous risquez de provoquer un
incendie ou un choc électrique.
Ne placez pas le cordon dʼalimentation près
dʼun poêle ni tout autre appareil de chauffage.
• Autrement, vous risquez de provoquer un
incendie ou un choc électrique.
Assurez-vous que lʼeau nʼentre pas en contact
avec les pièces électriques. Installez lʼunité loin
des sources dʼeau.
• Autrement, vous risquez de provoquer un
incendie ou un choc électrique ou un
dysfonctionnement de lʼappareil.
Ne stockez ni nʼutilisez de gaz ou de
combustibles inflammables près de lʼappareil
• Autrement, il y a risque dʼincendie.
Nʼutilisez pas lʼappareil dans un endroit fermé
hermétiquement pendant une période
prolongée. Aérez la pièce régulièrement.
• Il peut y avoir un manque dʼoxygène, qui nuirait à
votre santé.
Nʼouvrez pas la grille avant de lʼappareil en
cours de fonctionnement. (Ne touchez pas le
filtre électrostatique, si lʼunité en est équipée).
• Autrement, vous risquez de subir des blessures
physiques, un choc électrique, ou de provoquer un
dysfonctionnement de lʼappareil.
Si lʼunité dégage des sons étranges, des
odeurs ou de la fumée, éteignez
immédiatement le disjoncteur ou débranchez le
cordon dʼalimentation.
• Autrement, vous risquez de provoquer un
incendie ou un choc électrique.
Aérez la pièce où se trouve lʼappareil de temps
en temps lorsque vous lʼutilisez simultanément
avec un poêle ou avec tout autre appareil de
chauffage.
• Il peut y avoir un manque dʼoxygène, qui nuirait à
votre santé.
Débranchez lʼappareil avant de procéder à des
opérations de nettoyage ou dʼentretien.
• Autrement, vous risquez de provoquer un choc
électrique.
Si lʼappareil va rester inutilisé pendant une
longue période, débranchez-le ou mettez le
disjoncteur sur la position arrêt.
• Autrement, vous risquez dʼendommager
l'appareil, d'en causer un dysfonctionnement ou
la mise en marche involontaire.
Assurez-vous que personne, en particulier les
enfants, ne puissent marcher ou tomber sur
lʼunité extérieure.
• Ceci pourrait provoquer des blessures
personnelles et endommager lʼappareil.
Veillez à ce quʼon ne tire n'y que l'on
endommage le cordon dʼalimentation pendant
le fonctionnement de lʼappareil.
• Autrement, vous risquez de provoquer un
incendie ou un choc électrique.
Ne placez aucun objet sur le cordon
dʼalimentation.
• Autrement, vous risquez de provoquer un
incendie ou un choc électrique.
Ne mettez en marche ni n'arrêtez le climatiseur en branchant ou en
débranchant la fiche d'alimentation.
• Autrement, vous risquez de provoquer un incendie ou un choc électrique.
Sʼil y a une fuite de gaz inflammable, fermez le robinet à gaz et ouvrez une
fenêtre pour ventiler la pièce avant de mettre en marche le climatiseur.
• Nʼutilisez pas le téléphone, ni ne mettez les interrupteurs en marche ou en
arrêt. Ceci risquerait de provoquer une explosion ou un incendie.
ATTENTION
Faites appel à deux personnes ou plus pour
soulever et déplacer cet appareil.
• Évitez les blessures personnelles.
Nʼinstallez pas lʼappareil dans un endroit où il
serait exposé directement au vent de la mer
(pulvérisation dʼeau de mer).
• Ceci pourrait corroder lʼappareil.
Installez le raccord de drainage de manière à
assurer un drainage approprié.
• Une mauvaise connexion peut provoquer des
fuites dʼeau.
Maintenez lʼappareil de niveau lors de son
installation.
• Ceci permet dʼéviter des vibrations et des bruits.
Nʼinstallez pas lʼappareil dans un endroit où le
bruit ou lʼair chaud dégagés par lʼunité
extérieure pourraient gêner vos voisins.
• Ceci peut provoquer des problèmes à vos voisins
et de là, être à lʼorigine de disputes avec eux.
Vérifiez toujours sʼil y a des fuites de gaz
(frigorigène) après installation ou réparation de
lʼappareil.
• Des niveaux de frigorigène trop bas peuvent être
à lʼorigine dʼune défaillance de lʼappareil.
Page 25

Manuel du propriétaire 5
Précautions de sécurité
FRANÇAIS
FRANÇAIS
N'utilisez pas cet appareil pour des fins
particulières telles que la préservation
d'aliments, d'œuvres d'art, etc. C'est un
climatiseur grand public, non pas un système
de refroidissement de précision.
• Autrement, il y a risque de dommages à la
propriété ou de pertes matérielles.
Nʼobstruez pas lʼentrée ou la sortie du flux
dʼair.
• Ceci peut provoquer un mauvais fonctionnement
de lʼappareil.
Utilisez un chiffon doux pour le nettoyage.
Nʼutilisez pas de détergents agressifs, de
dissolvants, ni n'aspergez de l'eau, etc.
• Ceci risquerait de provoquer un incendie, un choc
électrique ou des dommages aux pièces
plastiques de lʼappareil.
Ne touchez pas les pièces métalliques du
climatiseur lorsque vous enlevez le filtre à air.
• Autrement, vous risquez de subir des blessures.
Ne marchez ne placez aucun objet sur
lʼappareil (unités extérieures).
• Autrement, ceci risquerait de provoquer des
blessures et une défaillance de lʼappareil.
Insérez toujours fermement le filtre après
nettoyage. Nettoyez le filtre tous les quinze
jours ou plus souvent si nécessaire.
• Un filtre sale réduit lʼefficacité du climatiseur.
N'insérez pas les mains ou d'autres objets à
travers l'entrée ou la sortie d'air lorsque le
climatiseur est en marche.
• Il y a des bords aiguisés et des pièces mobiles
qui pourraient vous blesser.
Prenez soin lors du déballage et de
lʼinstallation de lʼappareil.
• Les bords aiguisés peuvent provoquer des
blessures.
Sʼil y a une fuite de gaz frigorigène pendant la
réparation, ne touchez pas au gaz échappé.
• Le contact du gaz frigorigène avec la peau peut
causer des engelures (« brûlure froide »).
N'inclinez pas l'unité lors dʼun déplacement ou
dʼune désinstallation.
• L'eau condensée qui se trouve à lʼintérieur
pourrait se renverser.
Ne mélangez pas d'air ou de gaz autre que le
gaz frigorigène spécifié utilisé dans le
système.
• Si de lʼair entre dans le système réfrigérant, la
pression devient excessivement élevée, ce qui
peut provoquer des dommages à lʼappareil ou
des blessures personnelles.
S'il se produit une fuite de gaz frigorigène
pendant l'installation de l'appareil, aérez
immédiatement la pièce.
• Autrement, ceci peut être nocif pour votre santé.
Le démantèlement de l'unité, le traitement de
l'huile réfrigérante et des pièces ultimes devrait
se faire conformément aux normes locales et
nationales.
Remplacez toutes les piles de la télécommande
par des piles neuves du même type. Ne
mélangez pas de piles neuves avec des piles
usées ou différents types de piles.
• Autrement, vous risquez de provoquer un
incendie ou un dysfonctionnement.
Ne rechargez ni ne démontez les piles. Ne les
jetez pas au feu.
• Elles pourraient brûler ou exploser.
En cas de contact du liquide des piles avec
votre peau ou vos vêtements, lavez-les à l'eau.
N'utilisez pas la télécommande si les piles ont
coulé.
• Les produits chimiques à lʼintérieur des piles
peuvent causer des brûlures ou d'autres
blessures.
Si vous ingurgitez le liquide de la pile,
lavezvous les dents et consultez votre
dentiste. Ne pas utiliser la télécommande si
les piles ont fuit.
• Les produits chimiques àlʼintérieur des piles
pourraient vous causer des brûlures ou d'autres
ennuis de santé.
Ne laissez pas le climatiseur fonctionner
pendant longtemps lorsque le taux d'humidité
est très élevé et que la porte ou une fenêtre a
été laissée ouverte.
• Il peut y avoir une condensation dʼhumidité qui
risque de mouiller ou dʼendommager vos
meubles.
N'exposez pas votre peau, ni les enfants ou les
plantes au courant dʼair froid ou chaud.
• Ceci peut nuire à leur santé.
Ne buvez pas l'eau qui s'écoule de lʼappareil.
• Ce n'est pas hygiénique et pourrait entraîner de
sérieux problèmes de santé.
Utilisez une banquette ou une échelle solide
lorsque vous menez à bien des opérations de
nettoyage ou dʼentretien de lʼappareil.
• Faites attention et évitez de vous blesser.
Page 26

6 Climatiseur Mural
Sécurité électrique
• Cet appareil doit être correctement mis à la terre. Pour réduire au minimum le risque de choc électrique,
vous devez toujours brancher lʼappareil sur une prise de courant mise à la terre.
• Ne coupez ni n'enlevez la broche de mise à la terre de la fiche dʼalimentation.
• Raccordez la borne de mise à la terre de l'adaptateur à la vis du couvercle de la prise murale n'assure
pas la mise à la terre, à moins que la vis du couvercle soit métallique et non isolée et que la prise
murale soit mise à la terre par l'intermédiaire de l'installation électrique.
• Si vous doutez que le climatiseur soit correctement relié à la terre, demandez à un électricien qualifié
dʼexaminer la prise murale ainsi que le circuit électrique.
Nous décourageons vivement l'utilisation d'un adaptateur en raison des risques potentiels pour la sécurité.
Pour des connexions temporaires, utilisez uniquement un adaptateur d'origine, disponible dans la plupart
des magasins de matériel électrique. Assurez-vous que la grande encoche de l'adaptateur est alignée
avec la grande encoche de la prise murale afin de les brancher en respectant la polarité.
Pour débrancher le cordon d'alimentation de l'adaptateur, prenez chacun d'eux avec une main, afin ne pas
endommager la borne de terre. Évitez de débrancher fréquemment le cordon d'alimentation car ceci
pourrait endommager la borne de terre.
• Ne branchez jamais cet appareil à l'aide d'un adaptateur cassé.
AVERTISSEMENT
AVERTISSEMENT
Ce symbole indique un risque de choc électrique.
Ce symbole indique des risques pouvant endommager le
climatiseur.
Ce symbole indique des remarques particulières.
REMARQUE
Symboles utilisés dans ce manuel
Utilisation temporaire d'un adaptateur
Sécurité électrique
Page 27

FRANÇAIS
Manuel du propriétaire 7
Description du produit
FRANÇAIS
Unité extérieure
h La imagen pueden variar según el modelo.
Unité intérieure
Description du produit
Panneau avant
Récepteur de signaux
Grilles d’entrée d’air
[Type cassette plafond]
Entrée d'air
Châssis
Évacuation d'air
Couvercle du tableau
de commande
Câble de connexion
Tuyau de raccordement
Raccord de drainage
Grilles de sortie d’air
Plaque de base
Page 28

Entretien de la télécommande sans fils
1.
Enlevez le couvercle du réceptacle à piles suivant le sens de la flèche.
2. Insérez des piles neuves en veillant à bien placer les pôles (+) et (-).
(Type de pile = AAA)
3. Replacez le couvercle en le poussant de nouveau dans sa position.
1. Utilisez/remplacez toujours les deux piles par des piles du même
type.
2. Si le système ne va pas être utilisé pendant une longue période,
enlevez les piles pour prolonger leur durée de vie.
3. Si l'écran dʼaffichage de la télécommande commence à devenir
sombre, remplacez les deux piles.
REMARQUE
1. Choisissez un endroit convenable où on puisse lʼatteindre
facilement et elle soit en même temps protégée.
2. Fixez solidement le support au mur, etc. à lʼaide des vis
fournies.
3. Glissez la télécommande à l'intérieur du support.
1. La télécommande ne devrait jamais être exposée à la
lumière directe du soleil.
2. L'émetteur et le récepteur de signaux devraient être toujours propres pour une communication
appropriée. Utilisez un chiffon doux pour les nettoyer.
3. Au cas où dʼautres appareils seraient également actionnés depuis la télécommande, changez la
position de ceux-là ou consultez un technicien agrée.
REMARQUE
8 Climatiseur Mural
Instructions dʼutilisation
1. Le récepteur de signal se trouve à lʼintérieur de lʼunité.
2. Pointez la télécommande en direction de lʼunité pour la commander. Il ne doit y
avoir aucun obstacle entre la télécommande et lʼunité.
Méthode de fonctionnement
On/Off : Les indicateurs sʼallument durant le fonctionnement.
Signe du filtre : Les indicateurs sʼallument après 2400 heures à partir de la première mise en route de lʼappareil.
Minuteur : Les indicateurs sʼallument durant le fonctionnement du minuteur.
Mode décongélation : Les indicateurs sʼallument durant le mode de décongélation ou de hot start (démarrage chaleur).
(Seulement pour les modèles disposant dʼune pompe à chaleur)
Forcé : Pour opérer lʼunité quand la télécommande ne peut pas être utilisée pour une raison quelconque.
Comment insérer les piles
Instructions dʼutilisation
Voyants de fonctionnement
Page 29

Manuel du propriétaire 9
Instructions dʼutilisation
FRANÇAIS
Fonctionnement de la Télécommande
1. Touche de réglage de l'angle des volets
Permet de régler l'inclinaison de chaque volet de
manière indépendante.
2. Touche de réglage des fonctions
Permet de régler ou annuler les fonctions d'autonettoyage, de
nettoyage intelligent, de chauffage électrique ou de réglage
individuel de l'angle des volets.
3. Touche marche/arrêt
Permet d'allumer ou éteindre l'unité.
4. Touche de refroidissement rapide
Permet un refroidissement rapide en projetant de
l'air frais à grande vitesse.
5. Touche de contrôle du débit d'air gauche/droite
(selon les modèles)
Permet de régler le débit d'air dans la direction de votre choix
vers la gauche/droite (commande horizontale).
6. Touche de contrôle du débit d'air haut/bas
Permet d'arrêter ou de démarrer le mouvement des volets
et de régler le débit d'air dans la direction de votre choix
vers le haut/bas (commande verticale).
7. Touche de mise en marche programmée
Permet de régler l'heure de démarrage.
8. Touche de veille programmée
Permet de régler le délai de veille programmée.
9. Touche de réglage/annulation
Permet de définir ou annuler les réglages programmés.
Permet également de régler l'heure (maintenez la
touche enfoncée pendant 3 secondes).
10. Touche de filtration plasma (selon les modèles)
Permet de démarrer ou arrêter la fonction de
filtration plasma.
11. Touches de réglage de la température
Permettent de sélectionner la température de la pièce.
12. Touche de sélection du mode de fonctionnement
Permet de sélectionner le mode de fonctionnement.
13. Touche de réglage de la vitesse du ventilateur
intérieur
Permet de régler la vitesse du ventilateur parmi
quatre options : basse, moyenne, élevée et Chaos.
14. Touche de vérification de la température
Permet de vérifier la température de la pièce.
15. Touche d'arrêt programmé
Permet de régler l'heure d'arrêt.
16. Touches de réglage de la programmation
(haut/bas)/luminosité
Permettent d'ajuster les réglages programmés.
Permettent également d'ajuster la luminosité. (Sauf
en mode d'ajustement des réglages programmés.)
17. Bouton de réinitialisation
Permet de réinitialiser la télécommande.
h Sur certains produits, certaines fonctions ne
sont pas disponibles.
REMARQUE
1
2
3
4
5
6
7
8
9
10
11
12
13
14
15
16
17
Mode de fonctionnement
Fonction refroidissement
Fonctionnement automatique
Fonction déshumidification saine
Fonction chauffage
Mode ventilateur
•
Modèle refroidissement ( ),
modèle pompe à chaleur ( )
Page 30

10 Climatiseur Mural
Instructions dʼutilisation
Dénominations et fonctions (en option)
※ Certaines fonctions ne peuvent pas être utilisées et affichées selon le type de produit.
※ Si vous voulez avoir plus dʼinformation, veuillez vous référer au manuel de la télécommande avec fil.
Modèle : PREMTB10U
1 Écran d'indication du fonctionnement
2 Touche de réglage de la température
3 Touche de réglage de la vitesse du ventilateur
4 Touche du mode d'abaissement de la
température
5 Touche de sélection du mode de fonctionnement
6 Récepteur de la télécommande sans fil
• Certains produits ne reçoivent pas les signaux sans
fil.
7 Touche d'accès aux fonctions annexes
8 Touche de ventilation
9 Touche de programmation
10 Touche du débit d'air
11 Température de refroidissement souhaitée
12 Touche de réglage des fonctions
13 Touches haut, bas, gauche et droite
14 Touche marche/arrêt
15 Température de chauffage souhaitée
16 Touche de réglage/annulation
17 Touche Quitter
1
10
9
8
7
11
2
3
4
12
13
14
15
5
6
16
17
Page 31

Manuel du propriétaire 11
Instructions dʼutilisation
FRANÇAIS
Fonction
refroidissement
Fonction
déshumidification
saine
Fonction chauffage Mode ventilateur
Fonctionnement
automatique
Pour abaisser la température.
Pour augmenter la température.
Appuyez sur la TOUCHE ON/OFF pour mettre lʼappareil en marche.
Lʼunité émettra un bip sonore.
Ouvrez le couvercle basculant de la télécommande et appuyez sur la touche de mode de
fonctionnement.
Chaque fois que vous appuyez sur cette touche, le mode de fonctionnement change dans le sens
de la flèche.
En mode de refroidissement ou de chauffage, réglez la
température intérieure désirée en appuyant sur les
TOUCHES DE RÉGLAGE DE LA TEMPÉRATURE
AMBIANTE.
En mode refroidissement, la température peut être réglée
entre 18°C~30°C(64°F~86°F) alors quʼon mode chauffage, la
plage de température va de 16°C~30°C(60°F~86°F).
Réglez la vitesse du ventilateur à lʼaide de la télécommande. Vous pouvez régler la vitesse du
ventilateur, en appuyant sur le SÉLECTEUR DE VITESSE DU VENTILATEUR INTÉRIEUR.
Chaque fois que vous appuyez sur cette touche, le mode de vitesse du ventilateur change.
1
2
3
4
Ventilation naturelle
o
Pour obtenir une sensation plus fraîche, appuyez sur le bouton SÉLECTEUR DE LA VITESSE DU VENTILATEUR
INTERIEUR et réglez-le en mode CHAOS ou ventilation naturelle. Le vent soufflera alors comme une brise naturelle
grâce aux changements automatiques de la vitesse du ventilateur.
Mode de fonctionnement
Page 32

12 Climatiseur Mural
Instructions dʼutilisation
Pendant le fonctionnement en mode déshumidification saine
o Si vous sélectionnez le mode de fonctionnement déshumidification à lʼaide de la
TOUCHE DE SÉLECTION DU MODE DE FONCTIONNEMENT, la fonction de
déshumidification se met en marche. Lʼappareil règle automatiquement la température
ambiante ainsi que le volume dʼair, de manière à créer les meilleures conditions de
déshumidification et sur la base de la température ambiante réelle ayant été captée.
Dans ce cas, cependant, la température réglée nʼest pas affichée sur la télécommande et vous ne
pouvez pas non plus régler la température ambiante.
o En mode de déshumidification saine, le volume dʼair, réglé automatiquement suivant lʼalgorithme
dʼoptimisation en fonction de la température ambiante réelle, rend la pièce saine et confortable
même en saison très humide.
Lorsque le mode est sélectionné, le système fonctionne automatiquement grâce
aux commandes électroniques.
- Vous pouvez régler la température souhaitée entre 64°F et 86°F pour le mode
Fonctionnement automatique.
Cette fonction fonctionne correctement lorsque vous utilisez la télécommande adaptée au
modèle.
REMARQUE
Cette fonction permet de faire circuler lʼair sans le refroidir ni le réchauffer
.
Vous pouvez lʼactiver en appuyant sur la TOUCHE DE SELECTION DE
MODE DE FONCTIONNEMENT. Elle peut être activée en appuyant sur
la TOUCHE CIRCULATION DʼAIR. Une fois que la circulation dʼair est
activée, vous pouvez sélectionner la vitesse de lʼair en appuyant sur le
BOUTON SÉLECTEUR DE VITESSE DU VENTILATEUR INTÉRIEUR.
Fonctionnement automatique
Mode ventilateur
Fonction déshumidificationsaine
La fonction de refroidissement rapide peut être utilisée pour refroidir la pièce rapidement durant
les étés très chauds. Lorsque cette fonction est activée en mode refroidissement, le ventilateur
commence à marcher à une vitesse extrêmement rapide pendant 30 minutes, réglant ainsi la
température ambiante sur 18°C(64°F) et en atteignant un refroidissement rapide et efficace.
Pour activer cette fonction, appuyez sur la TOUCHE JET COOL (REFROIDISSEMENT RAPIDE).
Pour passer du mode refroidissement rapide au mode de refroidissement par fonctionnement du
ventilateur à une vitesse élevée, appuyez sur la TOUCHE REFROIDISSEMENT RAPIDE ou sur le
BOUTON SÉLECTEUR DE VITESSE DU VENTILATEUR INTÉRIEUR ou de nouveau sur la TOUCHE DE
RÉGLAGE DE LA TEMPÉRATURE AMBIANTE.
Refroidissement rapide
Page 33

Manuel du propriétaire 13
Instructions dʼutilisation
FRANÇAIS
Le filtre de plasma est une technologie développée par LG pour éliminer les
contaminants microscopiques de l'air aspiré en produisant un plasma avec une charge
élevée dʼélectrons.
Ce plasma tue et détruit au complet les contaminants pour fournir un air propre et
hygiénique.
La fonction de purification par plasma peut être activée en appuyant sur la TOUCHE PLASMA de la
télécommande. Appuyez-y de nouveau annuler cette fonction.
Cette fonction peut être activée en n'importe quel mode de fonctionnement et le ventilateur peut
marcher à n'importe quelle vitesse lorsque le filtre de plasma est actionné.
REMARQUE
Fonctionnement du purificateur dʼair PLASMA (en option)
1. Appuyez sur la touche SET/CLEAR pendant 3
secondes.
2. Utilisez les touches de réglage de l'heure jusqu'à
ce que la bonne heure soit affichée. (Maintenez la
touche enfoncée pour changer l'heure par
incréments de 10 minutes.)
3. Appuyez sur la touche SET/CLEAR.
Attention aux mentions AM et PM.
REMARQUE
Réglage de l'heure
Appuyez sur la touche d'alternance °C/°F pour changer les degrés Celsius en Fahrenheit et inversement.
En mode Fahrenheit, chaque fois que vous appuyez sur les touches de réglage de la
température, la température augmente ou diminue de 1 degrés à la fois.
Affichage en degrés Celsius/Fahrenheit
Page 34

14 Climatiseur Mural
Instructions dʼutilisation
1. Appuyez sur la touche SLEEP pour activer ou
désactiver la veille programmée.
2. Utilisez les touches de réglage de l'heure jusqu'à ce
que le délai souhaité soit affiché. (7 heures est le
réglage maximal.)
3. Appuyez sur la touche SET/CLEAR.
Réglage de la veille programmée
Veille programmée
1. Appuyez sur la touche ON pour régler la mise en
marche programmée.
2. Utilisez les touches de réglage de l'heure jusqu'à ce
que l'heure souhaitée soit affichée.
3. Appuyez sur la touche SET/CLEAR.
Réglage de la mise en marche programmée
Heure de mise en marche programmée
1. Appuyez sur la touche OFF pour régler l'arrêt
programmé.
2. Utilisez les touches de réglage de l'heure jusqu'à ce
que l'heure souhaitée soit affichée.
3. Appuyez sur la touche SET/CLEAR.
Réglage de l'arrêt programmé
Heure d'arrêt programmé
Page 35

Manuel du propriétaire 15
Instructions dʼutilisation
FRANÇAIS
Vous pouvez ajuster le débit d'air vers le haut/bas (commande verticale) à l'aide de la télécommande.
1. Appuyez sur la touche marche/arrêt pour démarrer l'unité.
2. Appuyez sur la touche de contrôle du débit d'air haut/bas. Les volets se mettent à osciller de haut en bas.
Appuyez une nouvelle fois sur cette touche pour bloquer les volets verticaux dans la direction du débit d'air
souhaitée.
•
Si vous appuyez sur la touche de contrôle du débit d'air haut/bas, la direction horizontale du débit d'air est modifiée
automatiquement en fonction de l'algorithme Auto Swing pour répartir l'air de façon homogène dans la pièce, tout en
offrant un écoulement d'air plus agréable pour le corps humain, comme avec une ventilation naturelle.
• Utilisez toujours la télécommande pour ajuster la direction du débit d'air haut/bas. L'ajustement manuel des
volets de direction du débit d'air verticaux pourrait endommager le climatiseur.
• Lorsque l'unité est éteinte, les volets de direction du débit d'air haut/bas fermeront l'évent de sortie d'air du
système.
Vous pouvez ajuster le débit d'air vers la gauche/droite (commande horizontale) à l'aide de la télécommande.
1. Appuyez sur la touche marche/arrêt pour démarrer l'unité.
2. Appuyez sur la touche de contrôle du débit d'air gauche/droite. Les volets se mettent à
osciller de gauche à droite. Appuyez une nouvelle fois sur cette touche pour bloquer les
volets horizontaux dans la direction du débit d'air souhaitée.
h La fonction de commande verticale et horizontale du débit d'air n'apparaît pas dans
l'afficheur de la télécommande.
REMARQUE
Commande horizontale de direction du débit d'air (selon les modèles)
Commande verticale de direction du débit d'air (selon les modèles)
Annulation des réglages programmés
• Si vous voulez annuler tous les réglages programmés, appuyez sur la touche SET/CLEAR.
• Si vous voulez annuler chaque réglage programmé individuellement, appuyez sur
la touche correspondante pour sélectionner au choix la veille programmée, la mise
en marche programmée ou l'arrêt programmé. Puis, appuyez sur la touche SET/CLEAR
en dirigeant la télécommande vers le récepteur du signal. (Le symbole de programmation
affiché sur le climatiseur et dans l'afficheur disparaîtra.)
Page 36

16 Climatiseur Mural
Instructions dʼutilisation
• Il peut exister des différences entre les valeurs réglées de l'angle des volets et la direction des volets.
• Réglez l'angle de votre choix tout en vérifiant le mouvement des volets du produit.
• La fonction de réglage individuel des volets est une fonction annexe et il se peut qu'elle ne soit pas
disponible sur certains produits.
Réglage individuel de l'angle des volets (selon les modèles)
Cette fonction permet de contrôler l'angle des quatre volets individuellement sur
les climatiseurs de type cassette 4 voies.
Appuyez sur la touche VANE ANGLE. Le symbole de réglage individuel
de l'angle des volets se met à clignoter.
• Si vous appuyez pendant trois secondes sur la touche
VANE ANGLE, tous les volets sont réglés sur un angle
standard.
1
Réglez l'angle de chaque volet en appuyant sur la touche VANE
ANGLE.
• Chaque fois que vous appuyez sur la touche TEMPERATURE
SETTING, l'angle et les valeurs de réglage du volet correspondant
s'affichent.
• Lorsque vous appuyez sur la touche, l'afficheur apparaît comme
dans la figure de droite et vous pouvez régler l'angle entre 1 et 6.
2
Page 37

Manuel du propriétaire 17
Instructions dʼutilisation
FRANÇAIS
Le fonctionnement forcé est employé lorsquʼil est impossible dʼutiliser la télécommande. Ce mode démarre
lorsque vous appuyez sur le bouton ON/OFF. Pour lʼarrêter, appuyez à nouveau sur le bouton.
Test de fonctionnement
Durant le TEST DE FONCTIONNEMENT, lʼunité est en mode Froid avec une vitesse du ventilateur élevée, quelle que soit la température de
la pièce, et elle se réinitialise au bout de 18 minutes. Durant le test de fonctionnement, si lʼunité reçoit un signal de la télécommande, elle
fonctionne conformément aux instructions de la télécommande. Pour utiliser le mode Test, appuyez sur le bouton ON/OFF et maintenez-le
enfoncé pendant 3 à 5 secondes ; un signal sonore retentit. Pour lʼarrêter, appuyez à nouveau sur le bouton.
Cette fonction est réglée en usine, mais vous pouvez la désactiver en appuyant sur le bouton ON/OFF pendant 6 secondes.
Lʼunité émet deux signaux sonores et le voyant bleu clignote 8 fois. Pour activer la fonction, appuyez à nouveau sur le bouton
pendant six secondes. Lʼunité émet deux signaux sonores et le voyant bleu clignote quatre fois.
REMARQUE
Cette fonction est utile en cas de panne de courant.
Lorsque le courant revient après une coupure, cette fonction permet de restaurer les conditions de
fonctionnement précédentes et le climatiseur récupère ses paramètres.
Modèle réversible
Température de la pièce ≥24°C(75.2°F)
21°C(69.8°F) ≤_Température de la pièce < 24°C(75.2°F)
Température de la pièce < 21°C(69.8°F)
Mode de fonctionnement
Froid
Déshumidification saine
Chaud
Vitesse du ventilateur intérieur
Haut Haut Haut
Température réglée
22°C(71.6°F) 23°C(73.4°F) 24°C(75.2°F)
Fonction Redémarrage automatique
Funzionamento Manuale
[Type Casete Rlafond]
Touche de marche
forcée
Page 38

18 Climatiseur Mural
Entretien et service
Avant dʼeffectuer toute opération dʼentretien, veuillez placer lʼinterrupteur principal du système sur la position
arrêt, puis débranchez lʼinterrupteur et le cordon dʼalimentation.
ATTENTION
Entretien et service
Grille, logement et télécommande
p Éteindre lʼappareil avant de le nettoyer. Pour le nettoyer, lʼessuyer avec un chiffon doux et sec. Ne pas utiliser
de produits blanchissants ou abrasifs.
Vous pouvez débrancher le courant avant de nettoyer lʼunité dʼentrée.
REMARQUE
Filtres à air
Les filtres à air se trouvant sous la grille doivent être
vérifiés et nettoyés tous les 15 jours ou plus si
nécessaire.
n Ne jamais utiliser les éléments suivants :
• Eau dʼune température supérieure à 40ºC qui
pourrait le déformer ou le décolorer.
• Substances volatiles qui
pourraient endommager
les surfaces du
climatiseur.
B
e
n
z
e
n
e
S
C
O
U
R
I
N
C
L
B
A
R
G
E
S
I
N
N
E
R
1
Retrait des filtres.
n
Retirer les onglets et tirer doucement pour
enlever le filtre.
ATTENTION :
Lors du retrait du
filtre à air ne pas toucher les parties
métalliques de lʼunité dʼentrée.
Risque de blessure.
2
Nettoyer le filtre à air à lʼaide dʼun aspirateur
ou le laver à lʼeau claire.
n
Si la saleté est profonde, le laver avec une
solution dʼeau tiède et de détergent.
n
Ne pas utiliser dʼeau chaude (50ºC ou plus)
qui pourrait le déformer.
3
Après le lavage du filtre à air, le faire
sécher à lʼombre.
n
Ne pas exposer le filtre à air directement
aux rayons du soleil ou à la chaleur dʼun feu
lors du séchage.
4
Installation du filtre à air.
Type cassette plafond
Page 39

Manuel du propriétaire 19
Entretien et service
FRANÇAIS
Conseils dʼutilisation
Ne refroidissez pas à lʼexcès
la pièce.
Ce n'est pas bon pour la santé et
cela vous fera gaspiller
l'électricité.
Maintenez fermés stores et
rideaux.
Veillez à ce que le soleil nʼentre pas
directement dans la pièce lorsque le
climatiseur est en fonctionnement.
Gardez une température
ambiante uniforme.
Réglez la direction du flux dʼair
vertical et horizontal afin dʼassurer
une température ambiante uniforme.
Veillez à ce que les
portes et les fenêtres
soient bien fermées.
Évitez autant que possible
dʼouvrir les portes et les
fenêtres afin de conserver
l'air froid dans la pièce.
Nettoyez régulièrement les filtres à air.
Les obstructions dans le filtre à
air réduisent le flux d'air ainsi que
les effets de refroidissement et
de déshumidification.
Nettoyez-les au moins une fois
tous les quinze jours.
Aérez la salle de
temps en temps.
Puisque les fenêtres
restent fermées, il est
conseillé de les ouvrir et
d'aérer la pièce de temps
en temps.
Utilisez la vitesse élevée du
ventilateur pour un
refroidissement rapide et efficace.
La capacité de
refroidissement de lʼunité
est dʼautant plus grande
que le ventilateur tourne à
une vitesse élevée.
Page 40

20 Climatiseur Mural
Page 41

MANUAL DEL PROPIETARIO
AIRE ACONDICIONADO
Por favor lea este manual detenidamente antes de
utilizar su equipo y guárdelo para consultas futuras.
TIPO: Casete de Techo
http://www.lghvac.com
www.lg.com
ESPAÑOL
Page 42

2 Aire acondicionado
Manual de usuario para varios tipos de sistemas de aire acondicionado
CONTENIDO
PARA SUS ARCHIVOS
Escriba el número de modelo y el de serie aquí:
Nº de modelo
Nº de serie
Podrá encontrarlos en una etiqueta en el lateral de cada unidad.
Nombre del distribuidor
Fecha de compra
n
Adjunte y grape su recibo a esta página en casi de necesitar
probar la fecha de compra o por motivos de la garantía.
LEA ESTE MANUAL
Dentro encontrará muchas sugerencias útiles sobre el uso y
mantenimiento corrector del aire acondicionado. Apenas
unos simples cuidados preventivos de su parte pueden
ahorrarle mucho tiempo y dinero a lo largo de la vida útil de
su aire acondicionado. Encontrará muchas respuestas a los
problemas comunes en el gráfico de sugerencias para la
solución de averías. Si examina antes su tabla de
Sugerencias para la solución de averías, puede que no
necesite llamar al servicio técnico.
PRECAUCIÓN
• Entre en contacto con un técnico de servicio autorizado
para realizar la reparación o el mantenimiento de esta
unidad.
• Entre en contacto con el instalador para la instalación
de esta unidad.
• El aire acondicionado no está diseñado para su uso por
niños pequeños o personas discapacitadas sin
supervisión.
• Los niños pequeños deben estar supervisados para
asegurarse que no juegan con el aire acondicionado.
• Si el cordon de alimentacion es danado, este debe de
sustituirse por un cordon o ensamble especial
disponible por parte del fabricante o su agente de
servicio autorizado.
A. Precauciones de seguridad ..........................3
B. Seguridad eléctrica .........................................6
Uso temporal de un adaptador..........................6
Símbolos utilizados en este manual..................6
C. Presentación del producto.............................7
Unidades interiores............................................7
Unidad exterior .................................................7
D. Instrucciones de funcionamiento .................8
Inserción de pilas...............................................8
Mantenimiento del mando a distancia
inalámbrico ........................................................8
Indicadores luminosos de funcionamiento ........8
Método de funcionamiento ................................8
Operación del mando a distancia......................9
Nombre y función de los botones del
controlador remoto (Opcional).........................10
Modo funcionamiento ......................................11
Funcionamiento de deshumidificación sana....12
Modo Ventilador ..............................................12
Funcionamiento automático ............................12
Refrigeracion rapida ........................................12
Funcionamiento de purificación PLASMA
(opcional).........................................................13
Cambio Centígrados/Fahrenheit .....................13
Ajuste de la hora actual...................................13
Ajuste del temporizador de
apagado automático........................................14
Ajuste del temporizador de encendido ............14
Ajuste del temporizador de apagado...............14
Para cancelar el ajuste del temporizador ........15
Control de dirección de aire arriba/abajo
(opcional).........................................................15
Control de dirección de aire izquierda/derecha
(opcional).........................................................15
Control de ángulo de aletas individual
(opcional).........................................................16
Funcionamiento Forzado.................................17
Función de reinicio automático........................17
E.Mantenimiento y servicio ............................18
Tipo casete de techo .......................................18
Sugerencias.....................................................19
Page 43

Manual del propietario 3
Precauciones de seguridad
ESPAÑOL
Precauciones de seguridad
Para evitar lesiones al usuario u otras personas o daños a la propiedad, deberá seguir las instrucciones a continuación.
n El funcionamiento incorrecto debido a la omisión de las instrucciones causará lesiones o daños. La seriedad se
clasificará mediante las siguientes indicaciones:
n
El significado de los símbolos utilizados en este manual se muestra a continuación.
Este símbolo indica la posibilidad de muerte o lesión seria.
Este símbolo sólo indica la posibilidad de lesión o daños a la propiedad.
Asegúrese de no hacer esto.
Asegúrese de seguir las instrucciones.
Utilice siempre un enchufe y una toma de
alimentación con el terminal de tierra.
• Existe riesgo de descarga eléctrica.
No utilice un interruptor defectuoso o de
capacidad equivocada. Utilice un interruptor
y fusible de la capacidad correcta.
• Existe riesgo de incendio o descarga
eléctrica.
No utilice un multiconector. Utilice
siempre este electrodoméstico en un
circuito e interruptor dedicado.
• De lo contrario podría ser causa de incendio
o descarga eléctrica.
Para trabajos eléctricos, entre en
contacto con el distribuidor, el vendedor,
un electricista cualificado, o un centro de
servicio autorizado. No desmonte o
repare el producto usted mismo.
• Existe riesgo de incendio o descarga
eléctrica.
Ponga siempre el producto a tierra
conforme al diagrama de cableado. No
conecte el cable de puesta a tierra a los
cables de tierra de los conductos de
agua, gas, del pararrayos o teléfono.
• Existe riesgo de incendio o descarga
eléctrica.
Instale firmemente el panel y la cubierta
de la caja de control.
•
Existe riesgo de incendio o descarga eléctrica
debido a la acumulación de polvo, agua, etc.
Utilice un interruptor o fusible de la
capacidad correcta.
• Existe riesgo de incendio o descarga
eléctrica.
No modifique ni alargue el cable de
alimentación. Si el cable de alimentación
sufriera daños, estuviera pelado, o deteriorado,
deberá sustituirse por otro en perfecto estado.
• Existe riesgo de incendio o descarga
eléctrica.
Para las labores de instalación,
desmontaje o reinstalación, entre
siempre en contacto con el distribuidor o
un centro de servicio autorizado.
• Existe riesgo de incendio, descarga eléctrica,
explosión o lesiones.
No instale el producto sobre un soporte
de instalación defectuoso. Asegúrese
que el área de instalación no se deteriora
con el tiempo.
• Podría provocar averías en el producto.
No instale nunca la unidad exterior sobre
una base móvil o en un lugar del que
podría caerse.
• La caída de la unidad exterior podría causar
daños, lesiones, o incluso la muerte.
Si el producto estuviera mojado (debido a
inundaciones, etc.), póngase en contacto
con el centro de servicio autorizado para
realizar labores de reparación antes de
volver a utilizar el producto.
• Existe riesgo de incendio o descarga
eléctrica.
El condensador de aumento de la unidad
exterior suministra electricidad de alta
tensión a los componentes eléctricos.
Asegúrese de descargar completamente
el condensador antes de realizar tareas
de reparación.
• Un condensador cargado de electricidad
puede causar descargas eléctricas.
Utilice el equipo de instalación incluido
con el producto durante la instalación de
la unidad.
• De lo contrario la unidad podría caer y causar
lesiones severas.
Asegúrese de utilizar únicamente
aquellas piezas listadas en la lista de
piezas del circuito virtual conmutado
(SVC). Nunca intente modificar el equipo.
• El uso de piezas no adecuadas puede ser
causa de descarga eléctrica, generación
excesiva de calor o incluso incendio.
Page 44

4 Aire acondicionado
Precauciones de seguridad
Las conexiones del cableado
interior/exterior deben estar firmemente
aseguradas, y el cable deberá tenderse
correctamente a fin de evitar tensiones no
deseadas en los terminales de conexión.
• Las conexiones flojas o inadecuadas pueden
ser causa de una generación excesiva de
calor o incluso incendio.
Deseche los materiales de embalaje de
forma segura. Como tornillos, clavos,
pilas, piezas rotas, etc., tras la instalación
o SVC y, a continuación, retire y deseche
los plásticos de embalaje.
• Los niños podrían jugar con los desechos y
sufrir lesiones.
Asegúrese de comprobar que el enchufe
del cable de alimentación no esté sucio,
flojo o roto y, sólo entonces, inserte el
enchufe en la toma de pared.
• Un enchufe sucio, flojo o roto puede ser
causa de descarga eléctrica o incendio.
Asegúrese de comprobar el tipo de
refrigerante empleado. Por favor, lea la
etiqueta informativa del producto.
• El uso de un refrigerante incorrecto podría
evitar el funcionamiento normal de la unidad.
No utilice cables, tomas o enchufes
dañados.
• De lo contrario podría ser causa de incendio
o descarga eléctrica.
No toque, opere, o repare el producto con las
manos húmedas. Sujete el enchufe firmemente
con la mano antes de tirar para extraerlo.
• Existe riesgo de descarga eléctrica o
incendio.
No coloque un radiador u otros
electrodomésticos generadores de calor
cerca del cable de alimentación.
• Existe riesgo de incendio o descarga
eléctrica.
No permita que el agua se introduzca en
las piezas eléctricas. Instale la unidad
lejos de posibles fuentes de agua.
• Existe riesgo de incendio, avería en el
producto o descarga eléctrica.
No almacene, ni utilice, ni tan siquiera
permita la presencia de gases inflamables o
combustibles cerca del producto.
• Existe riesgo de incendio.
No utilice el producto en un espacio
cerrado durante mucho tiempo. Realice
periódicamente la ventilación del
producto.
• Podría sufrir una carencia de oxígeno y,
consecuentemente, sufrir daños en su salud.
No abra la rejilla de entrada frontal del
producto durante su funcionamiento. (No
toque el filtro electrostático, si la unidad
está equipada con uno.)
• Existe riesgo de lesiones físicas, descarga
eléctrica o averías en el producto.
Si escucha ruidos, percibe olores
extraños, o si su producto emite humo.
Cierre inmediatamente el interruptor o
desconecte el cable de alimentación.
• Existe riesgo de descarga eléctrica o
incendio.
Ventile periódicamente el cuarto donde
se encuentra el producto siempre que
funcione cerca de una estufa, elemento
calefactor, etc.
• Podría sufrir una carencia de oxígeno y,
consecuentemente, sufrir daños en su salud.
Desconecte la alimentación y desenchufe
la unidad antes de realizar labores de
limpieza o reparación del producto.
• Existe riesgo de descarga eléctrica.
Cuando no piense utilizar el producto
durante un largo período de tiempo,
desconecte el enchufe de suministro de
alimentación o cierre el interruptor.
• Existe riesgo de daños o averías en el
producto o funcionamiento involuntario.
Tenga cuidado de asegurarse que nadie,
especialmente niños, puede caminar por
encima de o caerse sobre la unidad de
exterior.
• Esto podría causar lesiones personales y
daños al producto.
Tenga cuidado de asegurar que el cable
de alimentación no pueda extraerse o
dañarse durante el funcionamiento.
• Existe riesgo de incendio o descarga
eléctrica.
No coloque NINGÚN objeto sobre el cable
de alimentación.
• Existe riesgo de incendio o descarga
eléctrica.
No enchufe ni desenchufe el cable de alimentación a fin de
ENCENDER/APAGAR la unidad.
• Existe riesgo de incendio o descarga eléctrica.
Si existen fugas de gas inflamable, apague el gas y abra una ventana
para la ventilación del cuarto antes de volver a encender el producto.
• No utilice el teléfono ni abra y cierre interruptores. Existe riesgo de
explosión o incendio.
Son necesarias dos o más personas para
levantar y transportar el producto.
• Evite lesiones personales.
No instale el producto donde pueda estar
directamente expuesto al viento del mar
(salitre).
• Podría causar la oxidación del producto.
Instale la manguera de desagüe para
asegurar que el agua condensada se
drene correctamente.
• Una mala conexión puede causar fugas de
agua.
Mantenga el nivel incluso durante la
instalación del producto.
• Para evitar vibraciones o ruido.
No instale el producto donde el ruido o el
aire caliente de la unidad exterior pudieran
ocasionar daños o molestar a los vecinos.
• Podría causar problemas y disputas con sus
vecinos.
Compruebe siempre si existen fugas de
gas (refrigerante) tras la instalación o
reparación del producto.
• Los niveles bajos de refrigerante pueden
causar averías en el producto.
Page 45

Manual del propietario 5
Precauciones de seguridad
ESPAÑOL
No utilice el producto con propósitos
especiales, como la preservación de
alimentos, obras de arte, etc. Este es un
aire acondicionado de consumidor, no un
sistema de refrigeración de precisión.
• Existe el riesgo de daños o pérdidas de
propiedad.
No bloquee la entrada o salida del flujo
de aire.
• Podría provocar averías en el producto.
Emplee un paño suave para limpiar la
unidad. No utilice detergentes fuertes,
disolventes, etc.
• Existe el riesgo de fuego, descarga eléctrica
o daños a las piezas plásticas del producto.
No toque las piezas metálicas del
producto al desmontar el filtro de aire.
• Existe el riesgo de lesiones personales.
No pise ni coloque nada sobre el
producto. (Unidades de exterior)
• Existe el riesgo de lesiones personales y
averías en el producto.
Inserte siempre el filtro de forma segura
tras su limpieza. Limpie el filtro cada dos
semanas o más a menudo en caso de
necesidad.
• Un filtro sucio reducirá la eficacia del
producto.
No introduzca las manos u otros objetos
en la entrada o la salida de aire mientras
el producto esté en funcionamiento.
• Existen piezas afiladas y móviles que podrían
causar lesiones personales.
Tenga cuidado al desempaquetar e
instalar el producto.
• Los bordes afilados podrían causar lesiones.
Si el producto sufriera fugas de gas refrigerante
durante las labores de reparación, no entre en
contacto con el refrigerante.
• El gas refrigerante puede causar lesiones por
congelación (quemaduras por frío)
No incline la unidad durante los procesos
de desmontaje o desinstalación.
• El agua condensada del interior podría
verterse.
No realice mezclas distintas a las
especificadas por el refrigerante utilizado
en el sistema.
• Si el aire entrara en el sistema de
refrigeración, podría causar una presión
excesivamente alta, provocando daños en el
equipo o lesiones personales.
Si el gas refrigerante sufriera fugas
durante la instalación, ventile
inmediatamente el área.
• De lo contrario podría resultar perjudicial para
su salud.
El desmontaje de la unidad, el tratamiento
del aceite refrigerante y de distintas
piezas, deberá realizarse conforme a las
normativas locales y nacionales.
Sustituya las pilas del mando a distancia
por otras nuevas del mismo tipo.
No mezcle pilas viejas y nuevas o de
distintos tipos.
• Existe riesgo de incendio o averías en el
producto.
No recargue ni abra las pilas. No las tire
al fuego.
• Pueden quemarse o explotar.
Si el líquido de las pilas entra en contacto
con su piel o ropas, lávese bien con agua
limpia. No utilice el mando a distancia si
las pilas han experimentado fugas.
• Los productos químicos de las pilas podrían
causar quemaduras u otros peligros para la
salud.
Si el líquido de las pilas alcanzara su
boca, cepille sus dientes y consulte a un
médico.No utilice el mando a distancia si
las pilas han experimentado fugas.
•
Los productos químicos de las pilas
podrían causar quemaduras u otros
perjuicios a la salud.
No deje el aire acondicionado en
funcionamiento durante mucho tiempo
cuando la humedad sea muy alta y haya
dejado abierta una puerta o ventana.
• La humedad podría condensarse y mojar o
dañar el mobiliario.
No exponga a los niños, plantas, o su
propia piel, directamente a la corriente de
aire frío o caliente.
• Esto podría resultar perjudicial para su salud.
No beba el agua de desagüe del
producto.
• No es potable y podría causar problemas
serios de salud.
Utilice un taburete o escalera firme al
realizar labores de limpieza,
mantenimiento, o reparación del
producto desde una cierta altura.
• Tenga cuidado y evite las lesiones
personales.
Page 46

6 Aire acondicionado
Seguridad eléctrica
• Este pequeño electrodoméstico debe estar correctamente puesto a tierra.
Para reducir al mínimo el riesgo de descargas eléctricas, siempre deberá enchufar la unidad en una toma con
puesta a tierra.
• No corte ni quite la clavija de puesta a tierra del enchufe de alimentación.
• Fijar el terminal de puesta a tierra del adaptador al tornillo de la tapa de la toma de pared no pondrá a tierra la
unidad a menos que el tornillo de la tapa sea metálico y no esté aislado, y la toma de pared esté puesta a tierra a
través del cableado de la casa.
• Si tiene alguna duda sobre si el aire acondicionado está puesto a tierra correctamente, solicite a un electricista
cualificado que revise la toma de pared y el circuito.
Desaconsejamos firmemente el uso de un adaptador debido a los potenciales peligros de seguridad. En conexiones
temporales, utilice únicamente un adaptador original, disponible en la mayoría de sus almacenes locales de ferretería.
Asegúrese que la ranura grande del adaptador esté alineada con la ranura grande de la toma para realizar una
conexión correcta de la polaridad.
Para desconectar el cable de alimentación del adaptador, coloque una mano en cada uno para evitar dañar la clavija
de puesta a tierra. Evite desenchufar con frecuencia el cable de alimentación, ya que esto podría provocar daños
eventuales a la clavija de puesta a tierra.
• No utilice nunca la unidad con un adaptador roto.
Este símbolo le alerta del riesgo de descarga eléctrica.
Este símbolo le alerta de los peligros que pueden causar daños al
aire acondicionado.
Este símbolo indica notas especiales.
NOTA
Símbolos utilizados en este manual
Uso temporal de un adaptador
Seguridad eléctrica
Page 47

Manual del propietario 7
A continuación encontrará una breve presentación de las unidades de interior y exterior.
Por favor, consulte la información específica relativa al tipo de su unidad interior.
Presentación del producto
ESPAÑOL
Unidad exterior
h La imagen pueden variar según el modelo.
Unidades interiores
Presentación del producto
[Tipo casete de techo]
Carcasa
Salida de aire
Panel frontal
Receptor de señal
Orificios de entrada de aire
Orificios de salida de aire
Placa base
Entrada de aire
Cubierta de control
Cable de conexión
Tubería de conexión
Manguera de drenaje
Page 48

Mantenimiento del mando a distancia inalámbrico
1. Desmonte la tapa de la batería tirando de ella en la dirección de
la flecha.
2.
Inserte las nuevas pilas asegurándose de que los signos (+) y (-) de la
pila están instalados correctamente.(Tamaño de las baterías = AAA)
3. Monte de nuevo la tapa deslizándola nuevamente en posición.
1. Utilice/Sustituya siempre ambas pilas por otras del mismo tipo.
2. Si no piensa utilizar el sistema durante un largo período de
tiempo, retire las pilas a fin de extender su vida útil.
3. Si la información en la pantalla del mando a distancia
comenzara a desvanecerse, sustituya ambas pilas.
NOTA
1. Seleccione para éste un lugar seguro y de fácil acceso.
2. Fije el soporte a la pared mediante los tornillos incluidos.
3. Deslice el mando a distancia en su soporte.
1. El mando a distancia nunca debe ser expuesto a la luz directa
del sol.
2. Debe mantener siempre limpio el transmisor/receptor de señal
a fin de asegurar una correcta comunicación. Emplee un paño suave para limpiarlo.
3. Si el mando a distancia opera además otros equipos, cambie su posición o consulte al técnico de
servicio.
NOTA
Método de funcionamiento
8 Aire acondicionado
Instrucciones de funcionamiento
1. El receptor de señal se encuentra en el interior de la unidad.
2. Apunte a la unidad con el mando a distancia a fin de ponerla en
funcionamiento. No deben existir obstáculos entre ambos.
Encendido/Apagado : Se ilumina durante el funcionamiento del sistema.
Señal del filtro : Se ilumina pasadas 2400 horas desde que se utilizara por primera vez el producto.
Temporizador : Se ilumina durante el funcionamiento del Temporizador.
Modo de descongelación : Se ilumina durante el modo de descongelación o funcionamiento de puesta en marcha en caliente
(sólo en modelos de bomba de calor).
Forzado : Para utilizar la unidad cuando no pueda utilizarse el mando a distancia.
Inserción de pilas
Instrucciones de funcionamiento
Indicadores luminosos de funcionamiento
Page 49

Manual del propietario 9
Instrucciones de funcionamiento
ESPAÑOL
Operación del mando a distancia
1. Botón VANE ANGLE
Se utiliza para ajustar el ángulo de cada aleta.
2. Botón de CONFIGURACIÓN DE FUNCIONES
Se utilizar para seleccionar Limpieza automática,
Limpieza inteligente, calefactor electrónico o Control
de ángulo de aletas individuales.
3. Botón de encendido/apagado
Enciende/apaga la unidad.
4. Botón JET COOL
Refrigeración rápida con alta velocidad del ventilador.
5. Botón de control de dirección de aire
izquierda/derecha (opcional)
Se utiliza para ajustar la dirección deseada
(izquierda/derecha) del flujo de aire.
6. Botón de flujo de aire ARRIBA/ABAJO
Se utiliza para detener o iniciar el movimiento de
las aletas y seleccionar la dirección arriba/abajo del
flujo de aire.
7. Botón de temporizador encendido
Se puede seleccionar el tiempo de finalización del
funcionamiento.
8. Botón de temporizador de apagado automático
Se puede seleccionar el tiempo de finalización del
funcionamiento.
9. Botón PLASMA (OPCIONAL)
Se utiliza para configurar/borrar el temporizador. Se
utiliza para ajustar la hora actual (si la entrada se
hace durante 3 s).
10. PLASMA Button (OPTIONAL)
Se utiliza para iniciar o parar la función de
purificación de plasma.
11. Botón de ajuste de temperatura interior
Se utiliza para seleccionar la temperatura de la
habitación.
12. Botón de selección de modo de
funcionamiento
Se utiliza para seleccionar el modo de funcionamiento.
13. Botón de velocidad del ventilador interior
Se utiliza para seleccionar la velocidad del ventilador en
cuatro niveles: bajo, medio, alto y caos.
14. Botón de comprobación de temperatura interior
Se utiliza para comprobar la temperatura de la
habitación.
15. Botón de apagado del temporizador
Se utiliza para seleccionar el tiempo de
finalización del funcionamiento.
16. Botón de ajuste de temporizador
(arriba/abajo)/Luz
Se utiliza para configurar el temporizador. Se
utiliza para ajustar el brillo. (Si no está en el modo
de ajuste de tiempo)
17. Botón de reinicio
Se utiliza para reiniciar el mando a distancia.
h
Dependiendo del producto, algunas funciones
pueden no estar operativas o no mostrarse.
NOTA
1
2
3
4
5
6
7
8
9
10
11
12
13
14
15
16
17
Modo funcionamiento
Modo funcionamiento
Funcionamiento automático
Funcionamiento de deshumidificación sana
Funcionamiento de calefacción
Modo Ventilador
• Modelo enfriamiento ( ), Modelo bomba de calor ( )
Page 50

10 Aire acondicionado
Instrucciones de funcionamiento
Nombre y función de los botones del controlador remoto (Opcional)
※ Algunas funciones pueden no ser operadas y mostradas dependiendo del tipo de producto.
※ Si usted quiere conocer más información, favor de consultar el Manual del Control Remoto Amplio por Cable.
Modelo : PREMTB10U
1 Pantalla de indicación de operación
2 Botón para establecer temperatura
3 Botón de velocidad de ventilador
4 Botón SET BACK
5 Botón de selección de modo de operación
6 Receptor de control remoto inalámbrico
• Algunos productos no reciben las señales
inalámbricas.
7 Botón de sub-función
8 Botón de ventilación
9 Botón de reservación
10 Botón de flujo de aire
11 Botón de temperatura deseada
12 Botón para establecer función
13 Botón Arriba, Abajo, Izquierda, Derecha
14 Botón Encendido/Apagado (ON/OFF)
15 Temperatura de calefacción deseada
16 Botón Establecer/Cancelar
17 Botón Salir
1
10
9
8
7
11
2
3
4
12
13
14
15
5
6
16
17
Page 51

Manual del propietario 11
Instrucciones de funcionamiento
ESPAÑOL
Presione el botón ON/OFF para encender la unidad. La unidad responderá con
una señal sonora
Abra la puerta del mando a distancia y presione el botón modo de funcionamiento. Cada vez que
presione el botón, el modo de funcionamiento cambiará en la dirección de la flecha.
Establezca la temperatura interior deseada, para la operación
de enfriamiento o calefacción presionando los BOTONES DE
AJUSTE DE TEMPERATURA AMBIENTE. La temperatura de
enfriamiento debe establecerse entre los 18 °C y los 30 °C
y(64°F y los 86°F), para la calefacción, entre los 16 °C y los
30 °C(60°F y los 86°F).
Establezca la velocidad del ventilador mediante el mando a distancia. Usted puede seleccionar la
velocidad del ventilador. Cada vez que presione el botón, cambiará el modo de velocidad del
ventilador.
1
2
3
4
Viento natural
o
Para lograr una sensación más fresca, presione el BOTÓN SELECTOR DE VELOCIDAD DEL VENTILADOR
INTERIOR y configure el modo CAOS o Brisa natural.
En este modo, el viento sopla como una brisa natural cambiando automáticamente la velocidad del ventilador.
Modo funcionamiento
Modo funcionamiento
Funcionamiento
automático
Funcionamiento de
deshumidificación sana
Funcionamiento
de calefacción
Modo Ventilador
Aumentar la temperatura
Reducir la temperatura
Page 52

12 Aire acondicionado
Instrucciones de funcionamiento
La función de chorro de aire frío puede ser empleada para enfriar rápidamente un
cuarto en un día caluroso. Cuando esta función esté activa, el aire acondicionado
funcionará en modo operación de enfriamiento, con una velocidad ultrarrápida del
ventilador y una temperatura de 18 °C(64°F) durante 30 minutos a fin de lograr un
enfriamiento rápido y eficaz.
Podrá activar este funcionamiento presionando el BOTÓN JET COOL (enfriamiento por chorro de aire).
Para cambiar del modo enfriamiento por chorro de aire al modo enfriamiento por velocidad alta del
ventilador, presione de nuevo el BOTÓN JET COOL o BOTÓN SELECTOR DE VELOCIDAD DEL
VENTILADOR INTERIOR o el BOTÓN DE AJUSTE DE TEMPERATURA AMBIENTE.
Refrigeracion rapida
En el modo de funcionamiento, el sistema se active de forma automática
mediante los controles electrónicos.
- Puede ajustar la temperatura deseada entre 64°F y 86°F para el modo de
funcionamiento automático.
Esta función funciona correctamente si utiliza un controlador a distancia que corresponda
a cada modelo.
NOTA
Durante el funcionamiento de la deshumidificación sana
o
Si selecciona el modo deshumidificación mediante el BOTÓN DE SELECCIÓN DEL MODO
DE FUNCIONAMIENTO, el producto activará la función de deshumidificación. Establece
automáticamente la temperatura ambiente y el volumen del flujo de aire a las mejores
condiciones para la deshumidificación, basándose en la temperatura ambiente actual detectada.
En este caso, sin embargo, la temperatura establecida no se muestra en el mando a distancia y
usted tampoco podrá controlar la temperatura ambiente.
o
Durante la función de deshumidificación sana el volumen del flujo de aire se establece automáticamente
según el algoritmo de optimización que responde al estado actual de la temperatura ambiente, para
mantener las condiciones del cuarto sanas y confortables incluso en estaciones muy húmedas.
Esta operación hace circular el aire del cuarto sin enfriarlo ni calentarlo.
Puede ser activado presionando el BOTÓN SELECCIÓN DEL MODO
DE OPERACIÓN. Una vez activada la circulación de aire, usted podrá
seleccionar la velocidad del aire presionando el BOTÓN SELECTOR DE
VELOCIDAD DEL VENTILADOR INTERIOR.
Funcionamiento automático
Modo Ventilador
Funcionamiento de deshumidificación sana
Page 53

Manual del propietario 13
Instrucciones de funcionamiento
ESPAÑOL
El filtro de plasma es una tecnología desarrollada por LG a fin de lograr eliminar los
contaminantes microscópicos presentes en el aire de entrada mediante la
generación de un plasma con electrones de altas cargas.
Este plasma elimina y destroza completamente los contaminantes para
proporcionar un aire limpio e higiénico.
La purificación por plasma puede iniciarse presionando el BOTÓN PLASMA en el mano a distancia.
Volver a presionarlo cancelará su ejecución.
Esta característica puede emplearse en cualquier modo de funcionamiento y a cualquier
velocidad del ventilador.
NOTA
Funcionamiento de purificación PLASMA (opcional)
Pulse el botón °C/°F para cambiar de Centígrados a Fahrenheit y viceversa.
Cuando pulse el botón de ajuste de temperatura en el modo Fahrenheit, la temperatura
subirá/bajará 1°F.
Cambio Centígrados/Fahrenheit
1. Pulse el botón SET / CLEAR durante 3 segundos.
2. Pulse los botones TIME SETTING hasta ajustar la
hora deseada. (Si mantiene el botón pulsado,
cambiará rápidamente en unidades de 10 min.)
3. Pulse el botón SET / CLEAR.
Compruebe el indicador de A.M. y P.M.
NOTA
Ajuste de la hora actual
Page 54

14 Aire acondicionado
Instrucciones de funcionamiento
1. Pulse el botón TIMER para activar o apagar el
temporizador.
2. Pulse los botones TIME SETTING hasta ajustar la
hora deseada. (7 horas es el ajuste máximo)
3. Pulse el botón SET / CLEAR.
Ajuste del temporizador de apagado automático
Apagado automático
1. Pulse el botón ON para activar o apagar el
temporizador.
2. Pulse los botones TIME SETTING hasta ajustar la
hora deseada.
3. Pulse el botón SET / CLEAR.
Ajuste del temporizador de encendido
Temporizador encendido
1. Pulse el botón OFF para activar o apagar el
temporizador.
2. Pulse los botones TIME SETTING hasta ajustar la
hora deseada.
3. Pulse el botón SET / CLEAR.
Ajuste del temporizador de apagado
Temporizador apagado
Page 55

Manual del propietario 15
Instrucciones de funcionamiento
ESPAÑOL
El flujo de aire arriba/abajo (flujo de aire vertical) se puede cambiar con el mando a distancia.
1. Pulse el botón encendido/apagado para poner en funcionamiento la unidad.
2. Pulse el botón ARRIBA/ABAJO y la aletas oscilarán arriba y abajo.
Pulse el botón ARRIBA/ABAJO de nuevo para ajustar la aleta vertical en la dirección deseada.
• Si pulsa el botón de dirección arriba/abajo, la dirección horizontal del aire cambia automáticamente según el
algoritmo de oscilación automáticamente para distribuir el aire de manera uniforme y, al mismo tiempo, para
que resulte más cómodo, como si se tratara de una brisa natural.
• Utilice siempre el mando a distancia para ajustar la dirección arriba/abajo del flujo de aire. Si mueve la aleta
de dirección del flujo de aire manualmente, podría dañar el aparato.
• Cuando se apaga la unidad, la aleta de dirección del aire arriba/abajo cierre la salida de aire del sistema.
El flujo de aire a izquierda/derecha (horizontal) se puede ajustar con el mando a distancia.
1. Pulse el botón encendido/apagado para poner en funcionamiento la unidad.
2. Pulse el botón de dirección IZQUIERDA/DERECHA y las aletas oscilarán a izquierda y
derecha. Pulse el botón de control del flujo de aire horizontal de nuevo para ajustar la
aleta horizontal en la dirección deseada.
h La función arriba/abajo e izquierda/derecha no se muestra en la pantalla del mando a distancia.
NOTA
Control de dirección de aire izquierda/derecha (opcional)
Control de dirección de aire arriba/abajo (opcional)
Para cancelar el ajuste del temporizador
• Si desea cancelar los ajustes del temporizador, pulse SET/CLEAR .
• Si desea cancelar cada ajuste del temporizador, pulse cada botón
del temporizador para encender o apagar el temporizador según lo desee.
Y pulse SET/CLEAR con el mando a distancia orientado al receptor de señal.
(Se apagará la luz del temporizador en el aparato de aire acondicionado y la pantalla.)
Page 56

16 Aire acondicionado
Instrucciones de funcionamiento
• Puede haber diferencias entre los valores de ajuste de los ángulos de las aletas y las direcciones de los
orificios de descarga.
• Ajuste el ángulo deseado con la comprobación del movimiento del ángulo de la aleta del producto.
• El control individual del ángulo de las aletas es una función añadida del producto y puede no funcionar en
algunos productos.
Control de ángulo de aletas individual (opcional)
Es la función que permite controlar 4 ángulos de aleta individualmente en el grupo
de productos de cassette de 4 direcciones para techo.
Pulse el botón VANE ANGLE. Parpadeará el símbolo de control
individual del ángulo de las aletas.
• Si pulsa el botón VANE ANGLE durante 2 segundos,
todas las aletas se moverán a su ángulo estándar.
1
Ajuste el ángulo de cada aleta pulsando el botón VANE ANGLE.
• Cada vez que se pulsa el botón TEMPERATURE SETTING, se
muestran los valores de ángulo y ajuste de la aleta correspondiente.
• Cuando se pulsa el botón, la pantalla aparece como en la figura de la
derecha, y el ángulo se puede ajustar a 1-6.
2
Page 57

Manual del propietario 17
Instrucciones de funcionamiento
ESPAÑOL
La operación forzada se usa cuando no puede usarse el control remoto. La operación comenzará cuando se
pulse el botón ON/OFF (ENCENDIDO/APAGADO). Si desea detener la operación, vuelva a pulsar el botón.
Funcionamiento de prueba
Durante el FUNCIONAMIENTO DE PRUEBA, la unidad funcionará en modo refrigeración con una velocidad de ventilador alta,
independientemente de la temperatura de la sala y se reiniciará a los 18 minutos. Durante el funcionamiento de prueba, si se recibe señal del
control remoto, la unidad funcionará con las órdenes del control remoto. Si desea usar esta operación, mantenga pulsado el botón ON/OFF
(ENCENDIDO/APAGADO) durante 3~5 segundos y podrá oír un pitido. Si desea detener la operación, vuelva a pulsar el botón.
Esta función está habilitada de forma predeterminada de fábrica pero puede deshabilitarla pulsando el botón ON/OFF
(ENCENDIDO/APAGADO) durante 8 segundos. La unidad emitirá dos pitidos y el indicador azul parpadeará 6 veces. Para
habilitarlo, pulse el botón de nuevo durante 6 segundos. La unidad emitirá dos pitidos y el indicador azul parpadeará 4 veces.
NOTA
Esta función es útil en caso de un fallo eléctrico.
Cuando se recupere la alimentación, esta función recupera la situación de funcionamiento anterior y el aire
acondicionado funcionará con la misma configuración.
Función de reinicio automático
Modelo con bomba de calor
Temp. de sala ≥24°C(75.2°F)
21°C(69.8°F) ≤_Temp. de sala < 24°C(75.2°F)
Temp. de sala < 21°C(69.8°F)
Modo de funcionamiento
Refrigeración
Deshumidificación saludable
Calefacción
Velocidad de ventilador de interior
Alto High Alto
Selección de temperatura
22°C(71.6°F) 23°C(73.4°F) 24°C(75.2°F)
Funcionamiento Forzado
[Tipo casete de techo]
Botón de
funcionamiento forzado
Page 58

18 Aire acondicionado
Mantenimiento y servicio
Antes de realizar labores de mantenimiento, desconecte la alimentación del sistema, cierre el interruptor y
desenchufe el cable de alimentación.
Mantenimiento y servicio
Tipo casete de techo
Parilla, carcasa y mando a distancia
p Apague el sistema antes de limpiar. Para limpiar, utilice un paño suave y seco. No utilice lejía ni productos
abrasivos.
La alimentación debe estar desconectada antes de limpiar la unidad interior.
NOTA
Filtros de aire
Los filtros del aire de detrás de la parrilla frontal deberían
verificarse y limpiarse una vez cada 2 semanas o más
frecuentemente si es necesario.
n No utilice nunca nada de lo siguiente:
• Agua más caliente de 40°C.
Podría deformar y/o decolorar.
• Substancias volátiles.
Podrían dañarse las
superficies del aire
acondicionado.
B
e
n
z
e
n
e
S
C
O
U
R
I
N
C
L
B
A
R
G
E
S
I
N
N
E
R
1
Saque los filtros de aire.
n
Tome la pestaña y jale de ella hacia adelante
para extraer el filtro.
PRECAUCIÓN:
Cuando haya que
retirar el filtro del aire, no toque las
partes metálicas de la unidad interior.
Podría ocasionar daños.
2
Limpie la suciedad del filtro del aire mediante
una aspiradora o lavándolo con agua.
n
Si queda suciedad oculta, lave con detergente
neutro en agua tibia
n
Si se usa agua caliente (50°C o más), podría
deformarse el aparato.
3
Después de lavar con agua, séquelo bien
a la sombra.
n
No exponga el filtro del aire a la luz solar
directa o al calor de un fuego para secarlo.
4
Instale el filtro de aire.
Page 59

Manual del propietario 19
Mantenimiento y servicio
ESPAÑOL
Sugerencias
No enfríe demasiado el
habitáculo.
Esto no es sano para su salud y
además representa un derroche
de electricidad.
Mantenga cerradas cortinas
y persianas.
No permita que la luz directa del
sol entre en el habitáculo mientras
el aire acondicionado se
encuentre en funcionamiento.
Mantenga uniforme la
temperatura del habitáculo.
Ajuste la dirección del flujo de
aire vertical y horizontal para
asegurar una temperatura
uniforme en todo el habitáculo.
Asegúrese que las
puertas y ventanas
estén bien cerradas.
En lo posible, vite abrir
puertas y ventanas para
mantener el aire frío en el
interior del habitáculo.
Limpie el filtro de aire
con regularidad.
Las obstrucciones en el filtro de
aire reducen el flujo de aire y
reduce los efectos de enfriamiento
y deshumidificación. Límpielo al
menos cada dos semanas.
Ventile el habitáculo
ocasionalmente.
Como las ventanas
permanecen cerradas,
es buena idea abrirlas
para ventilar el cuarto de
vez en cuando.
Configure el ventilador
a alta velocidad para
lograr un enfriamiento
rápido y eficaz.
Cuando la velocidad del
ventilador sea alta, la
unidad proporcionará su
capacidad nominal de
enfriamiento.
Page 60

USA, press #2 for PTAC, TTW
USA, press #3 for DFS, Multi V
CANADA
888-865-3026
888-865-3026
1-888-LG-Canada
www.lge.com
LG Customer Information Center
Register your product Online!
LGEUS
LG Electronics, Air conditioning Division
1000 Sylvan Ave., Englewood Cliffs, NJ 07632
LGEC I
LG ELECTRONICS CANADA INC.
20 NORELCO DRIVE.
NORTH YORK, ONTARIO M9L 2X6.
US
1. Please call the installing contractor of your product, as warranty service will be provided by them.
2. If you have service issues that have not been addressed by the contractor, please call 1-888-865-3026.
CANADA
Service call Number # : (888) LG Canada, (888) 542-2623
 Loading...