


ATTACHMENT K – USERS MANUAL
© 2001 PCTEST Lab


DANGER
To avoid shock hazard:
• Do not remove the covers.
• Do not operate this product unless the stand is attached.
• Do not connect or disconnect this product during an electrical storm.
• The power cord plug must be connected to a properly wired and grounded power outlet.
• Any equipment to which this product will be attached must also be connected to properlywired and
grounded power outlets.
• To isolate the monitor from the electrical supply, you must remove the plug from the power outlet.
The power outlet should be easily accessible.
Handling:
• Your color monitor is heavy, so handle it with care. IBM recommends that this monitor is moved or
lifted by two people.
DANGER
Pour éviter les risques d’électrocution :
• Ne retirez pas les capots du moniteur.
• N’utilisez pas ce produit si le socle n’est pas fixé.
• Ne connectez, ni ne déconnectez ce produit pendant un orage.
• Le câble d’alimentation doit être connecté à une prise électrique correctement mise à la terre et en
bon état de marche.
• Tout équipement auquel ce produit est relié doit être également connecté à une prise correctement
mise à la terre et en bon état de marche.
• Pour isoler le moniteur de la source d’alimentation électrique, vous devez le débrancher de la prise
électrique. Cette prise doit être facile d’accès.
Manutention :
• Votre moniteur couleurs est lourd et doit donc être manipulé avec soin. IBM vous conseille de le
déplacer ou de le porter à deux.
GEFAHRENHINWEIS
Um die Gefahr eines elektrischen Schlags zu vermeiden, folgendes beachten:
• Unter keinen Umständen die Abdeckungen abnehmen.
• Das Produkt nicht in Betrieb nehmen, wenn der Sockel nicht montiert ist.
• Das Gerät nicht während eines Gewitters an eine Steckdose anschließen oder von ihr trennen.
• Das Netzkabel ist an eine ordnungsgemäß verdrahtete und geerdete Steckdose anzuschließen.
• Jedes Gerät, mit dem dieses Produkt verbunden wird, muß ebenfalls an eine ordnungsgemäß
verdrahtete und geerdete Steckdose angeschlossen werden.
• Um den Monitor von der Stromversorgung zu trennen, muß der Stecker aus der Steckdose
gezogen werden. Die Steckdose sollte leicht zugänglich sein.
Handhabungshinweis:
• Ihr Farbbildschirm ist schwer. Sie sollten daher beim Transport vorsichtig vorgehen. IBM empfiehlt
Ihnen, den Bildschirm zu zweit anzuheben bzw. zu tragen.

3These user’s setup instructions cover typical user environments. The on-screen messages
may differ depending on the level of your hardware and software. In some cases you may
need to vary the setup procedures.
For more information, refer to your computer or operating system manuals or consult your
system administrator or dealer.
Ces instructions de configuration d’exploitation s’appliquent aux environnements
d’utilisation types. Les messages affichés à l’écran peuvent varier en fonction du niveau de
votre matériel et de vos logiciels informatiques. Dans certains cas, vous pouvez être amenés
à changer de procédures de configuration.
Pour de plus amples informations à ce sujet, veuillez vous reporter aux manuels de votre
ordinateur et de votre système d’exploitation, ou consultez l’administrateur de votre système
ou votre revendeur.
Diese Einstellungsanweisungen durch den Benutzer gelten für typische
Betriebsumgebungen. Die Bildschirmmeldungen können je nach Art der verwendeten
Hardware und Software auch anders lauten. In einigen Fällen müssen die
Einstellungsschritte unter Umständen abgeändert werden.
Weitere Informationen finden Sie im Computer- oder Betriebssystemhandbuch, oder wenden
Sie sich an Ihren Systemadministrator oder Fachhändler.
En estas instrucciones de configuración se describen entornos de usuarios típicos. Los
mensajes en pantalla, pueden diferir según sea el nivel del hardware y del software. En
algunos casos, necesitará seguir otros procedimientos para la configuración.
Para obtener más información, puede consultar los manuales del ordenador o del sistema
operativo o ponerse en contacto con el administrador del sistema o con el distribuidor.
Queste istruzioni di configurazione per l’utente coprono gli ambienti operativi comuni. I
messaggi che appaiono sul video possono differire a seconda dell’hardware e del software
utilizzati. In alcuni casi potrebbe essere necessario variare le procedure di configurazione.
Per ulteriori informazioni, fare riferimento ai manuali del computer o del sistema operativo, o
consultare il proprio amministratore di sistema o il concessionario.

ii
First Edition (May / 2001)
This publication could contain technical inaccuracies or typographical errors. Changes are made periodically to the information
herein; these changes will be made in later editions. IBM may make improvements and/or changes in the product(s) and/or
program(s) at any time.
It is possible that this publication may contain reference to, or information about, IBM products (machines and programs),
programming, or services that are not announced in your country.
Requests for copies of this publication and for technical information about IBM products should be made to your IBM Authorized
Dealer or IBM Retailer.
No part of this publication may be reproduced or distributed in any form or by any means without prior permission in writing from
the International Business Machines Corporation.
© Copyright International Business Machines Corporation 2000. All rights reserved.
Note to U.S.Government users- - Documentation related to restricted rights- - use, duplication or disclosure is subject to
restrictions set forth in GSA ADP Schedule Contract with IBM Corp.
Notices
References in this publication to IBM products, programs, or services do not imply that IBM intends to make these available in all
countries in which IBM operates. Any reference to an IBM product, program or service is not intended to state or imply that only
IBM’s product, program, or service may be used. Any functionally equivalent product, program, or service that does not infringe
any of IBM’s intellectual property rights or other legally protectable rights may be used instead of the IBM product, program, or
service. Evaluation and verification of operation in conjunction with other products, programs, or services, except those expressly
designated by IBM, are the user’s responsibility.
IBM may have patents or pending patent applications covering subject matter in this document. The furnishing of this document
does not give you any license to these patents.
Trademarks
The following terms, used in this publication, are trademarks or service marks of the IBM Corporation in the United States, other
countries, or both:
HelpCenter IBM
E
NERGY STAR is a U.S. registered mark.
Microsoft®, Window®, and Windows NT@ are trademarks of Microsoft corporation in the United States, other countries, or both.
Other company, product, and service name may be trademarks or service marks of others.

ENGLISH
1
Setup............................................................................................................................2
Hardware Requirements......................................................................................2
Handling Instructions ...........................................................................................2
Workplace preparation.........................................................................................2
Working Practices................................................................................................3
Connecting your Monitor......................................................................................4
Switching on your Monitor....................................................................................4
Adjusting the Monitor Position .............................................................................5
Caring for your Monitor........................................................................................5
Configuring your Monitor..........................................................................................6
Setup Diskette for Microsoft Windows95 or Microsoft Windows98......................6
Setup Diskette for Microsoft Windows 2000........................................................7
Auto Setup ..................................................................................................................8
Auto Setup...........................................................................................................8
Auto Setup for DOS.............................................................................................9
Auto Setup for Microsoft Windows3.1, Microsoft Windows95,
Microsoft Windows98, Microsoft Windows NT or Microsoft Windows2000
........
10
Manual Setup............................................................................................................12
Adjusting Your LCD Monitor ...................................................................................13
User controls......................................................................................................13
On-screen display (OSD) controls.....................................................................15
Further Information..................................................................................................18
Display modes ...................................................................................................18
Power Management...........................................................................................19
Troubleshooting.......................................................................................................20
Further Help.......................................................................................................22
Specifications...........................................................................................................24
Warranty....................................................................................................................27
Compliances...............................................................................see at rear of manual
Service Information....................................................................see at rear of manual
Contents
2
Hardware Requirements
This monitor requires a computer with a suitable on-board sub-system or
Video Adapter card that can support XGA 1024 x 768, SVGA 800 x 600, or
VGA 640 x 480 at 60Hz.
Setup
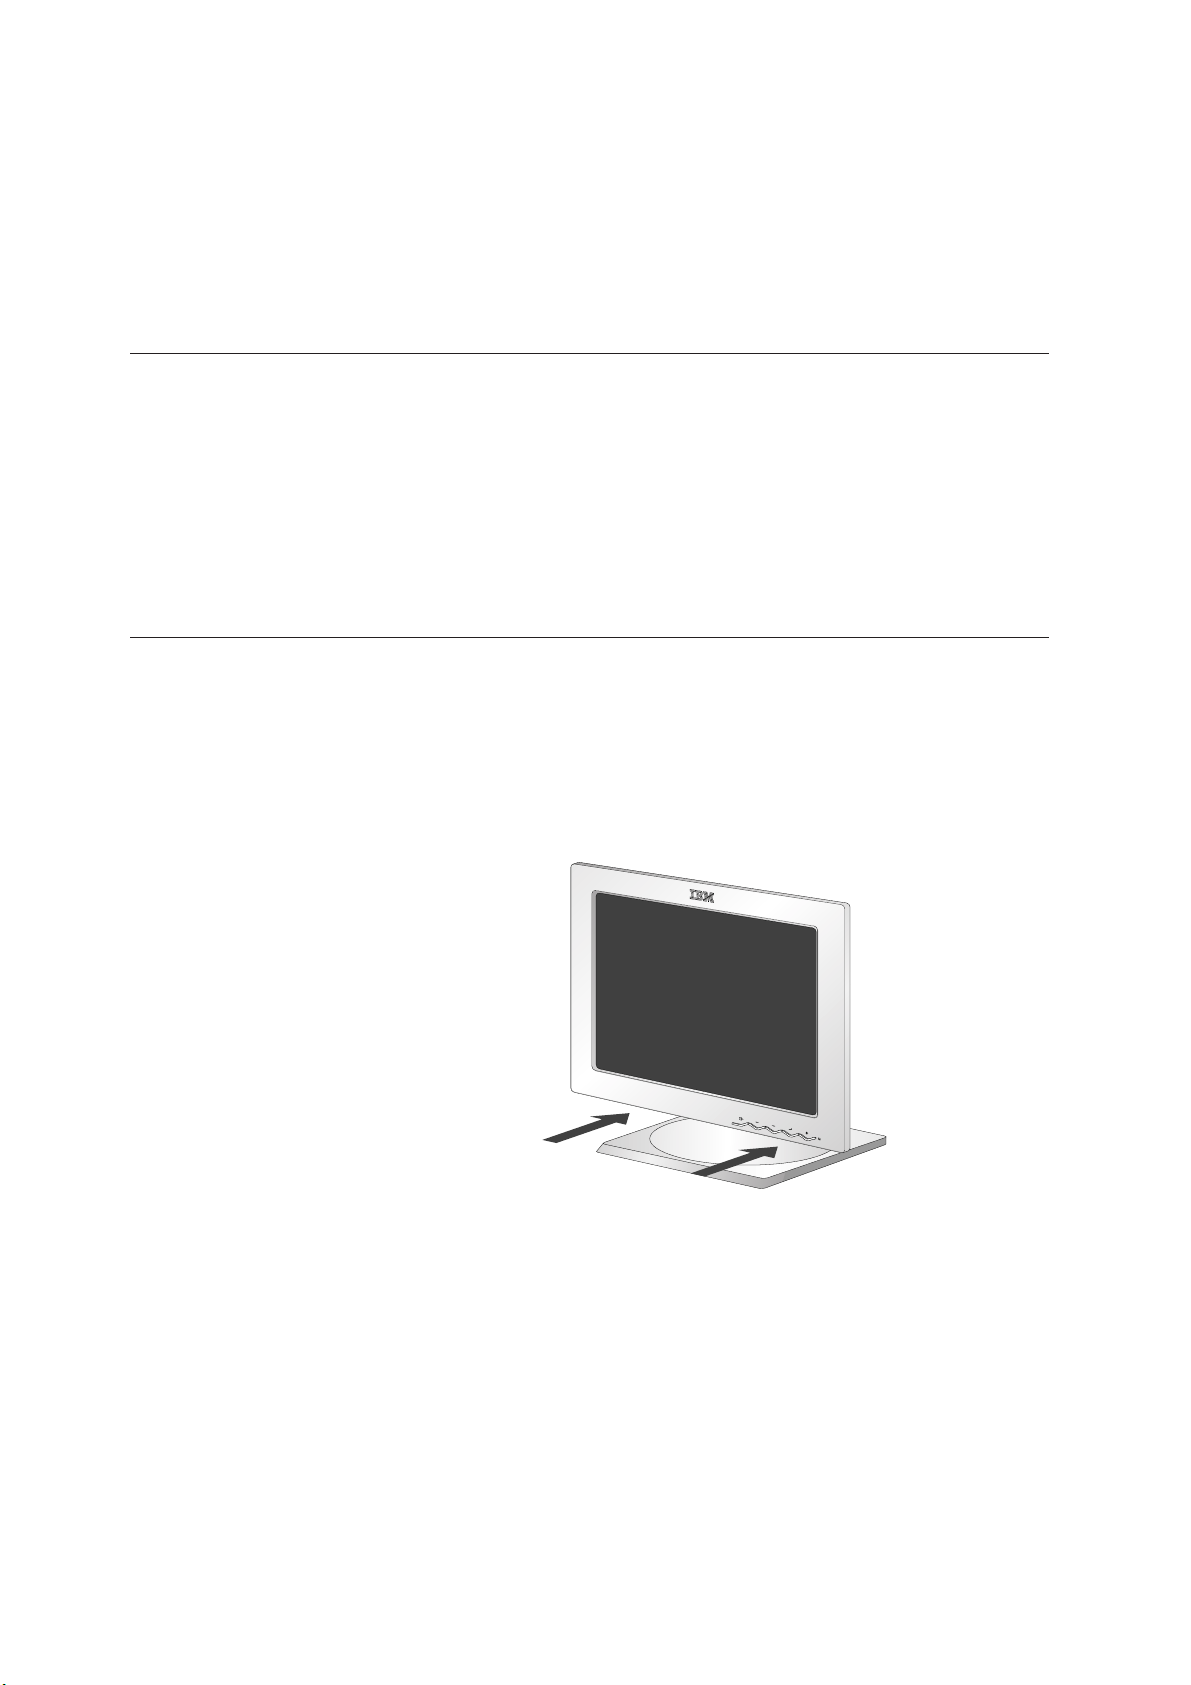
Do not support the monitor
within the screen area. The
Liquid Crystal Display is glass
and can be damaged by rough
handling or excessive
pressure.
Handling InstructionsHandling Instructions
1. Lift the monitor by placing both hands under the lower part of the cover.
(The display will rise to maximum lift height when locking clip has been
removed. See page 5 for details on removing the locking clip.)
2. Before using your monitor for the first time, remove the clear protective
film from the front of the screen.

ENGLISH
3
i
This section gives advice
on how you can work
comfortably and reduce
fatigue.
Rest
Take regular breaks. Vary your posture, stand up and stretch occasionally
as prolonged use of computer workstations can be tiring.
Back
You should sit back in your chair and use the backrest.
Hands
Use a light touch on the keyboard, keeping your hands and fingers relaxed.
Allow a space in front of the keyboard to rest your wrists when not typing.
Consider using a wristpad.
Eyesight
Working with monitors, in common with any prolonged close work, can be
visually demanding. Look away from the screen periodically and have your
eyesight checked regularly.
Screen settings
Set the screen brightness and contrast to a comfortable level. You may
have to adjust this as the lighting changes during the day. Many application
programs let you select color combinations which can help you to view in
comfort. See the User controls section on page 13 for more information.
Working Practices
i
This section gives advice
on what you should
consider before you set up
your monitor.
Workplace Preparation
Height
The monitor should be positioned so that the top of the screen is slightly
below your eye level when you sit at your workstation.
Orientation
- Choose a position that gives the least reflection from lights and windows,
usually at a right angle to any windows.
- Positon the monitor directly in front of you so that you do not have to twist
your body to use it.
- Tilt the monitor to a comfortable viewing angle.
4
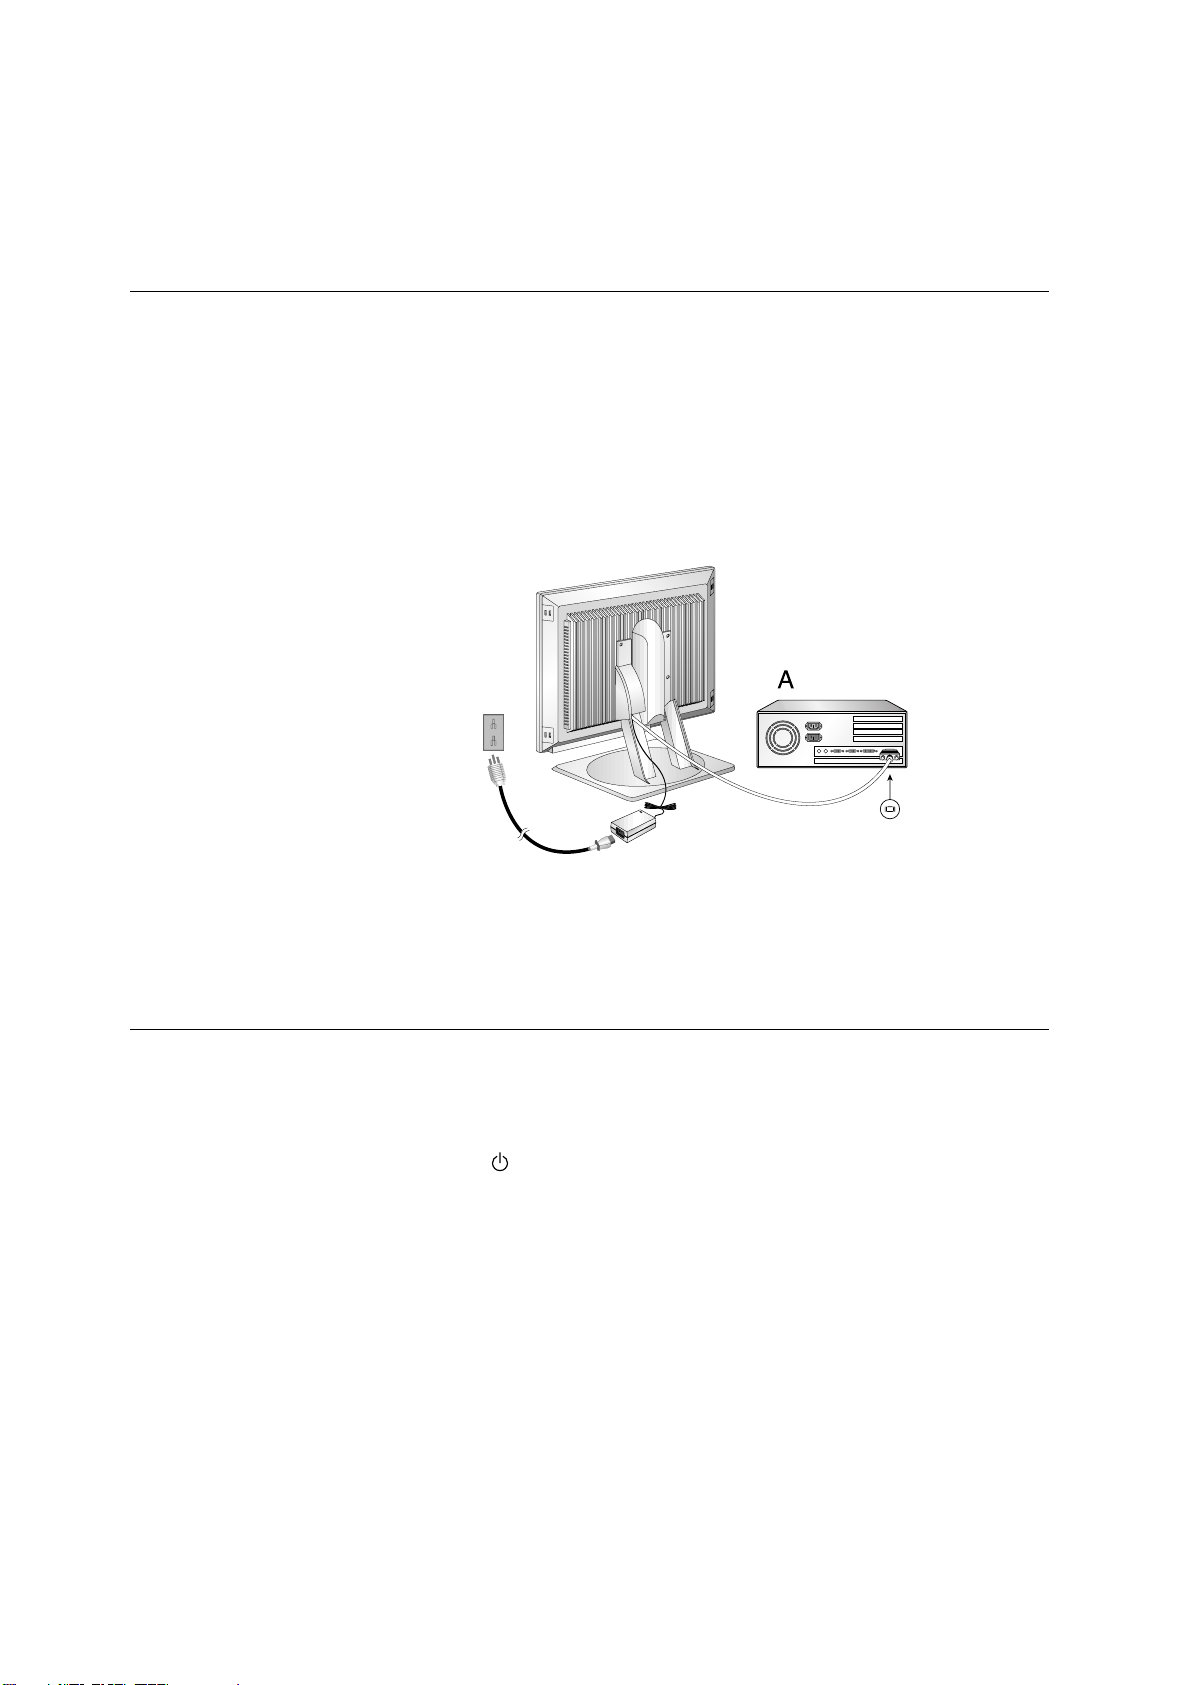
1. Turn off your computer and all attached devices.
2. Connect the monitor signal cable to the Video output of your computer
and tighten the thumscrews. Ensure that the connectors align. Do not
force the connectors as this may bend the pins.
3. Connect the power cord. Connect it to the power adapter first insert the
plug into a properly grounded outlet.
1. Switch on the power source to your monitor.
2. Switch on your monitor by pushing and releasing the power switch
marked [ ].
[To switch off your monitor, push and release the power switch again.]
3. Switch on your computer.
4. Run AUTO SETUP by following the instructions in the Auto Setup
section on page 8.
Be sure to read the ‘Safety
Information’ at the front of this
User Guide before carrying out
this procedure.
i
If you system is equipped
with a digital Video card
using a DVI connector, change
the signal cable to the DVI-D
cable provided (See page 22
for details)
i
The AC adapter and signal
cable are connected to
your monitor. If you wish to
change these or to fit a
different stand, see Further
Help on page 22.
Connecting your Monitor
Switching on your Monitor
ENGLISH
5
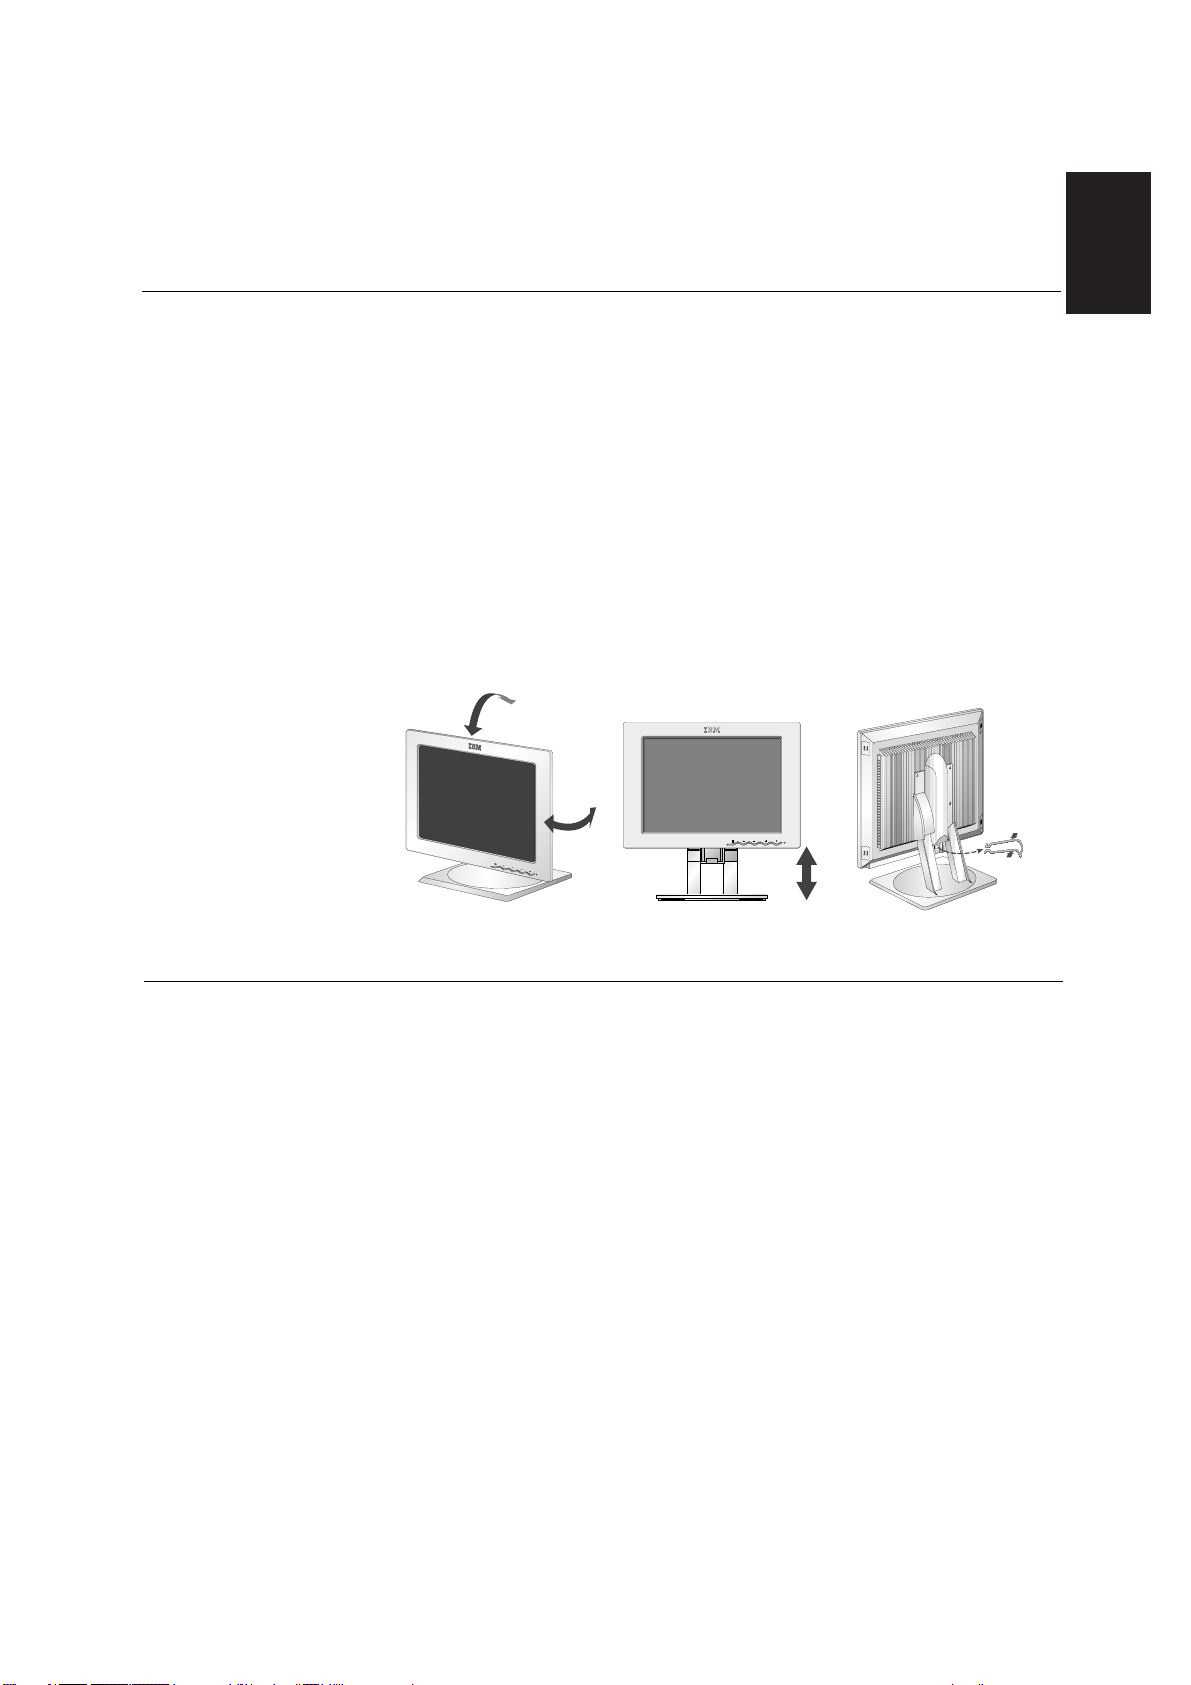
Viewing Angle
You can tilt the screen backward and forward as shown below(figure A).
Rotate
You can rotate the screen leftward and rightward as shown below(figure A).
Height
You can adjust height of the screen(figure B).
Before adjusting your monitor for the first time, remove the locking clip
on rear of the stand. Carefully put down and hold the screen of monitor
and then squeeze at arrows shown to remove(figure C).
Be sure to turn off the power before you perform any maintenance on the
monitor. Clean your monitor as follows:
• Gently wipe the covers and the screen with a soft cloth.
• Remove finger marks and grease with a damp cloth and mild detergent.
• Never use flammable cleaning materials to clean your IBM monitor or
any other electrical apparatus.
Adjusting the Monitor Position
Caring for your Monitor
(A)
(B)
(C)
038F/En

6
To use the Plug and Play feature in Windows 95 or Windows 98, files
should be loaded from the IBM Monitor Installation diskette.
1. Turn off the computer and all attached devices.
2. Ensure that the monitor is connected correctly.
3. Turn on the monitor and then the system unit. Allow the system to boot
into Microsoft Windows95 or Microsoft Windows98.
Your computer’s Plug and Play code may warn you that your system
hardware has changed. This probably means that it has detected your
new monitor for the first time.
4. Open the D
ISPLAY PROPERTIES window by clicking on START, SETTINGS,
CONTROL PANEL and then double clicking on the DISPLAY icon.
5. Select the S
ETTINGS tab.
• In case of Windows 95 :
6 -
1. Select the CHANGE DISPLAY TYPE
button.
2
.Select the CHANGE MONITOR
TYPE
button.
• In case of Windows 98 :
6 -
1.Select the ADVANCED button.
2.Select the MONITOR tab.
3. Open the UPGRADE DEVICE DRIVER WIZARD window by clicking on
C
HANGE button and then select the NEXT button.
If the UPGRADE DEVICE DRIVER WIZARD is open go to step 6-3. if not
contine to step 4.
4. Select the “Display a list of the known drivers for this device so that
I can choose a specific driver” and then select the NEXT button.
7. Insert the Setup diskette into drive A: and select the H
AVE DISK button.
8. Select OK.
9. Choose IBM T545H monitor and select OK. The files will be copied from
the diskette to your hard drive.
10.Close all open windows and remove the diskette.
11.Reboot the system.
The system will automatically select the maximum refresh rate and
corresponding Color Matching Profiles.
Configuring your Monitor
Setup Diskette for Microsoft®Windows®95 or Microsoft®Windows®98
This section must be
completed before
continuing with the
Microsoft Windows95 or
Microsoft Windows98 Auto
Setup on page 8.
i
On LCD monitors, unlike
CRTs, a faster refresh rate
does not improve display
quality. IBM recommends
using either 1024 x 768 at a
refresh rate of 60Hz or 640 x
480 at a refresh rate of 60Hz.

ENGLISH
7
To use the Plug and Play feature in Windows 2000, files should be loaded
from the IBM Monitor Installation diskette.
1. Turn off the computer and all attached devices.
2. Ensure that the monitor is connected correctly.
3. Turn on the monitor and then the system unit. Allow the system to boot
into Microsoft Windows2000.
4. Open the DISPLAY PROPERTIES window by clicking on START, SETTINGS,
CONTROL PANEL and then double clicking on the DISPLAY icon.
5. Select the SETTINGS tab.
6. Select the ADVANCED button.
7. Select the M
ONITOR
tab.
8. Select the PROPERTIES button.
9. Select the DRIVER tab.
10.Open the U
PGRADE DEVICE DRIVER WIZARD
window by clicking on U
PDATE
D
RIVER
and then select the N
EXT
button.
11.Select the “Display a list of the known drivers for this device so that I can
choose a specific driver” and then select the NEXT button.
12.Insert the Setup diskette into drive A: and select the HAVE DISK button.
13.Select OK.
14.Choose IBM T545H monitor and select OK. The files will be copied
from the diskette to your hard drive.
15.Close all open windows and remove the diskette.
16.Reboot the system.
The system will automatically select the maximum refresh rate and
corresponding Color Matching Profiles.
Setup Diskette for Microsoft®Windows®2000 Professional
This section must be
completed before
continuing with the
Microsoft Windows2000 Auto
Setup on page 8.
i
On LCD monitors, unlike
CRTs, a faster refresh rate
does not improve display
quality. IBM recommends
using either 1024 x 768 at a
refresh rate of 60Hz or 640 x
480 at a refresh rate of 60Hz.

8
When you first use your monitor you must perform Auto Setup. This procedure
sets up your monitor to process the video signals from your computer without
image discoloration or smearing. After you perform Auto Setup, the settings are
stored and used each time you turn on the monitor.
In order to optimise the displayed image a set-up utility is provided on the
IBM Monitor Installation Diskette. Operation of this utility is dependent on the
operating system on your computer. For correct operation locate the operating
system on your computer from the table below and follow the appropriate
instructions. You may choose to run AUTO SETUP for each operating system
that you use. This means that if you sometimes use your monitor while running
any version of Windows and sometimes also use it from within DOS (not a DOS
window), you must run AUTO SETUP for both Windows and DOS. You may run
versions of AUTO SETUP in any order.
Before you begin AUTO SETUP for your computer:
1. Make a backup copy of the setup diskettes supplied with the monitor.
2. Make sure the computer video mode is set in the range of the
supported screen resolution shown in the table on page18.
You should perform AUTO SETUP for each screen mode you use.
Auto Setup
Before carrying out this
section, it is very important
that The Setup Diskette for
Windows 95 or Windows 98
has been run.(see page6)
i
The Setup Utility included
on the setup diskette is for
displaying dot patterns. They
do not replace or modify the
display driver.
i
The Auto Setup
instructions require the
monitor to be warmed up for 15
minutes. This is not required
for normal operation.
i
By pressing the and
keys simultaneously allows
direct access to the auto set-up
controls.
i
If your computer does not
run with the setup
diskettes shipped with the
monitor, refer to Manual Setup
on page 12
i
The AUTO SETUP process
only applies to the current
screen mode. When a new
mode is selected, repeat this
section to reset the monitor.
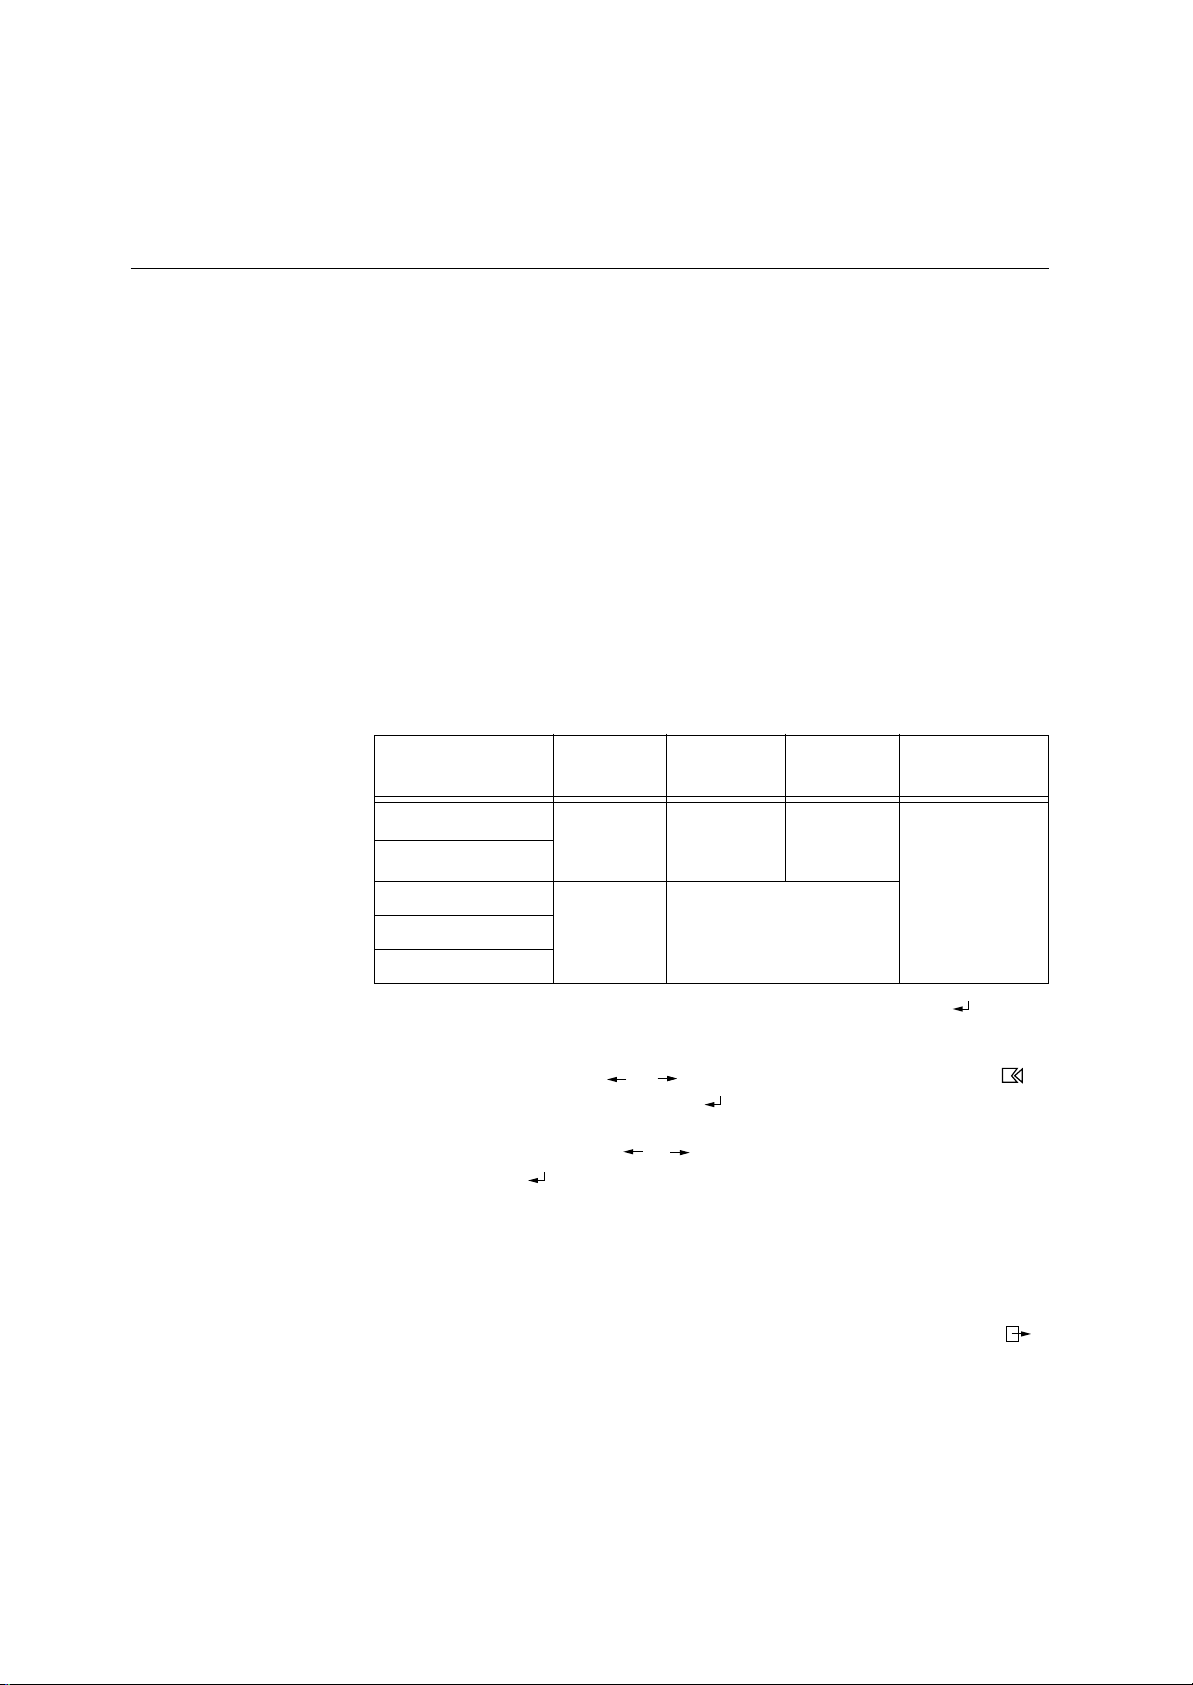
Operating System
DOS
Auto Setup for DOS on page 9
Auto Setup Microsoft Windows 3.1,
Windows 95, Windows 98, Windows 2000
or Microsoft Windows NT 4.0 workstation
on page 10
Microsoft Windows 3.1
Microsoft Windows 95
Microsoft Windows 98
Microsoft Windows 2000
Microsoft Windows NT 4.0
workstation
Corresponding Auto Setup procedure
Auto Setup

ENGLISH
9
1. Turn on the monitor first; then the computer.
If the message CHECK SIGNAL CABLE is displayed, or if nothing is
displayed check:
• that the video interface cable is not connected properly.
• the correct video adapter card is not installed.
2. Wait approximately 15 minutes, until the monitor warms up.
3. Insert the diskette labelled ‘IBM Monitor Installation Disk’ into the
diskette drive.
4. Display the command prompt screen of the DOS full-screen display.
5. At the command prompt, type ‘A:’ and press ENTER.
6. Type ‘TESTPATD’ and press ENTER.
7. Select from the screen the number for the color or text mode you want
to setup.
8. Select from the screen the number for the video mode you want to
setup.
You may repeat this process for as many of the color and video modes
as you need.
9. When the dot pattern appears, press the OSD Enter button at the
bottom of the monitor to display the initial OSD menu.
10. Use an Arrow button ( or ), to select the IMAGE SET-UP icon
and press the OSD Enter button to access the function.
11. Using an Arrow button ( or ), select AUTO and press the OSD
Enter button . This activates the AUTO SETUP procedure, which will
optimize the display settings with the provided dot patterns.
The image may be affected during this procedure and you may notice
small changes to the test pattern.
12. When finished, the OSD main menu returns.
Press the Exit button to exit from the OSD.
13. Press the ESCAPE key to exit the test pattern program.
14. Type ‘Exit’ at the command prompt to return to Windows.
If you use other operating systems, perform the appropriate AUTO SETUP
for those systems, also: see
Auto Setup Microsoft Windows 3.1, Windows 95, Windows 98,
Windows 2000 or Microsoft Windows NT on page 10.
Auto Setup for DOS
i
If the monitor is in standby
mode (STANDBY ON), it
may automatically turn off while
you are waiting for it to warm
up. If this happens, switch off
the monitor and switch it on
again after a few seconds.
i
If you are using PC-DOS/V,
change to U.S. mode by
typing ‘CHEV US’ and pressing
ENTER at the command
prompt.
You must use when you run
DOS Auto Setup.
i
The size and diversity of
the dot pattern varies with
the screen resolution.
i
If the screen flickers,
repeat the setup several
times until the flicker is
minimised, or adjust it manually
by following Manual Setup on
page 12.
10
1. Turn on the monitor first; then the computer.
If the message CHECK SIGNAL CABLE is displayed, or if nothing is
displayed check:
• that the video interface cable is not connected properly.
• the correct video adapter card is not installed.
2. Wait approximately 15 minutes, until the monitor warms up.
3. Drag the icon bar and tool bar, if they are displayed, to the bottom of
the screen.
4. Insert the diskette labelled ‘IBM Monitor Installation Disk’ into the
diskette drive.
5. Check the operating system installed on your computer and follow the
instructions from the table below.
6. When the test pattern appears, press the OSD Enter button at the
bottom of the monitor to display the initial OSD menu.
7. Use an Arrow button ( or ), to select the IMAGE SET-UP icon
and press the OSD Enter button to access the function.
8. Using an Arrow button ( or ), select AUTO and press the OSD
Enter button . This activates the AUTO SETUP procedure, which will
optimize the display settings with the provided test pattern. The image
may be affected during this procedure and you may notice small
changes to the test pattern.
To abort the AUTO SETUP function, press the ESC key.
9. When finished, the OSD main menu returns. Press the Exit button
once to exit from the OSD.
Auto Setup for Microsoft®Windows®3.1, Windows®95 or
Microsoft®Windows®2000
i
If the monitor is in standby
mode (STANDBY ON), it
may automatically turn off while
you are waiting for it to warm up.
i
The size and diversity of the
dot pattern varies with the
screen resolution.
i
Position the mouse pointer
at the bottom center of the
screen. This allows AUTO
SETUP to run properly
Operating
System
Microsoft Windows 95
Microsoft Windows 3.1
Microsoft Windows 98
Microsoft Windows 2000
Microsoft Windows NT
Step1
Open
PROGRAM
Manger
Open
PROGRAM
Manger
Select
START
Select RUN
Select
RUN
Type
‘A:\TESTPAT’
and press
ENTER
Step2 Step3 Step4

ENGLISH
11
10. Press the ESC key to return to Windows.
You have completed the monitor setup for Windows. If you use other operating systems, perform the appropriate AUTO SETUP for those systems, also: see
Auto Setup for DOS on page 9.
 Loading...