

LG LI507N Users manual

APPENDIX G :
USER’S MANUAL
FCC ID : BEJLI507N

ENGLISH
T541 Flat Panel Monitor
User Guide

ii
First Edition (June / 2002)
This publication could contain technical inaccuracies or typographical errors. Changes are made periodically to the information
herein; these changes will be made in later editions. IBM may make improvements and/or changes in the product(s) and/or
program(s) at any time.
It is possible that this publication may contain reference to, or information about, IBM products (machines and programs),
programming, or services that are not announced in your country.
Requests for copies of this publication and for technical information about IBM products should be made to your IBM Authorized
Dealer or IBM Retailer.
No part of this publication may be reproduced or distributed in any form or by any means without prior permission in writing from
the International Business Machines Corporation.
© Copyright International Business Machines Corporation 2002. All rights reserved.
Note to U.S. Government Users -- Documentation related to restricted rights -- Use, duplication or disclosure is subject to
restrictions set forth in GSA ADP Schedule Contract with IBM Corp.
Notices
References in this publication to IBM products, programs, or services do not imply that IBM intends to make these available in all
countries in which IBM operates. Any reference to an IBM product, program or service is not intended to state or imply that only
IBM’s product, program, or service may be used. Any functionally equivalent product, program, or service that does not infringe
any of IBM’s intellectual property rights or other legally protectable rights may be used instead of the IBM product, program, or
service. Evaluation and verification of operation in conjunction with other products, programs, or services, except those expressly
designated by IBM, are the user’s responsibility.
IBM may have patents or pending patent applications covering subject matter in this document. The furnishing of this document
does not give you any license to these patents.
Trademarks
The following terms, used in this publication, are trademarks or service marks of the IBM Corporation in the United States, other
countries, or both:
HelpCenter
IBM
E
NERGY STAR is a U.S. Govt. registered trademark.
Microsoft, Windows, and Windows NT are trademarks of Microsoft Corporation in the United States, other countries, or both.
Other company, product, and service names may be trademarks or service marks of others.
Note : For important information, refer to the Monitor Safety and Warranty manual that comes with this monitor.

ENGLISH
1
Setting up the monitor ...............................................................................................2
System Hardware Requirements .........................................................................2
Handling Instructions ...........................................................................................2
Monitor Installation ....................................................................................................3
Connecting your Monitor......................................................................................3
Switching on your Monitor....................................................................................4
Monitor Driver Installation .........................................................................................5
Driver installation for Windows 95 or Windows 98...............................................5
Driver installation for Windows 2000 or Windows Me..................................................6
Driver installation for Windows XP ................................................................................7
Image Setup for Analog Input ..................................................................................8
Auto Setup ...........................................................................................................8
AutoSetup for Windows 3.1, Windows 95, Windows 98, Windows 2000,
Windows Me, Windows XP or Windows NT
................................................................
9
Adjusting the image settings in DOS .................................................................10
Manually adjusting the image settings ...............................................................11
Ergonomic Considerations......................................................................................12
Workplace preparation.......................................................................................12
Working Practices ..............................................................................................12
Adjusting the Monitor Position ...............................................................................13
Caring for your Monitor ......................................................................................13
Adjusting Your LCD Monitor ...................................................................................14
User controls......................................................................................................14
On-screen display (OSD) controls .....................................................................15
Further Information ..................................................................................................18
Display modes ...................................................................................................18
Power Management...........................................................................................19
Troubleshooting .......................................................................................................20
Specifications ...........................................................................................................22
Contents
T541 Flat Panel Monitor User Guide

2
Setting up the monitor
Handling InstructionsHandling Instructions
1. Do not support the monitor within the screen area. The Liquid Crystal
Display is glass and can be damaged by rough handling or excessive
pressure.
2. Before using your monitor for the first time, remove the clear protective
film from the front of the screen.
System Hardware Requirements
This monitor requires a computer with a suitable on-board sub-system or
Video Adapter card that can support XGA 1024 x 768, SVGA 800 x 600, or
VGA 640 x 480 at 60Hz.
ENGLISH
3
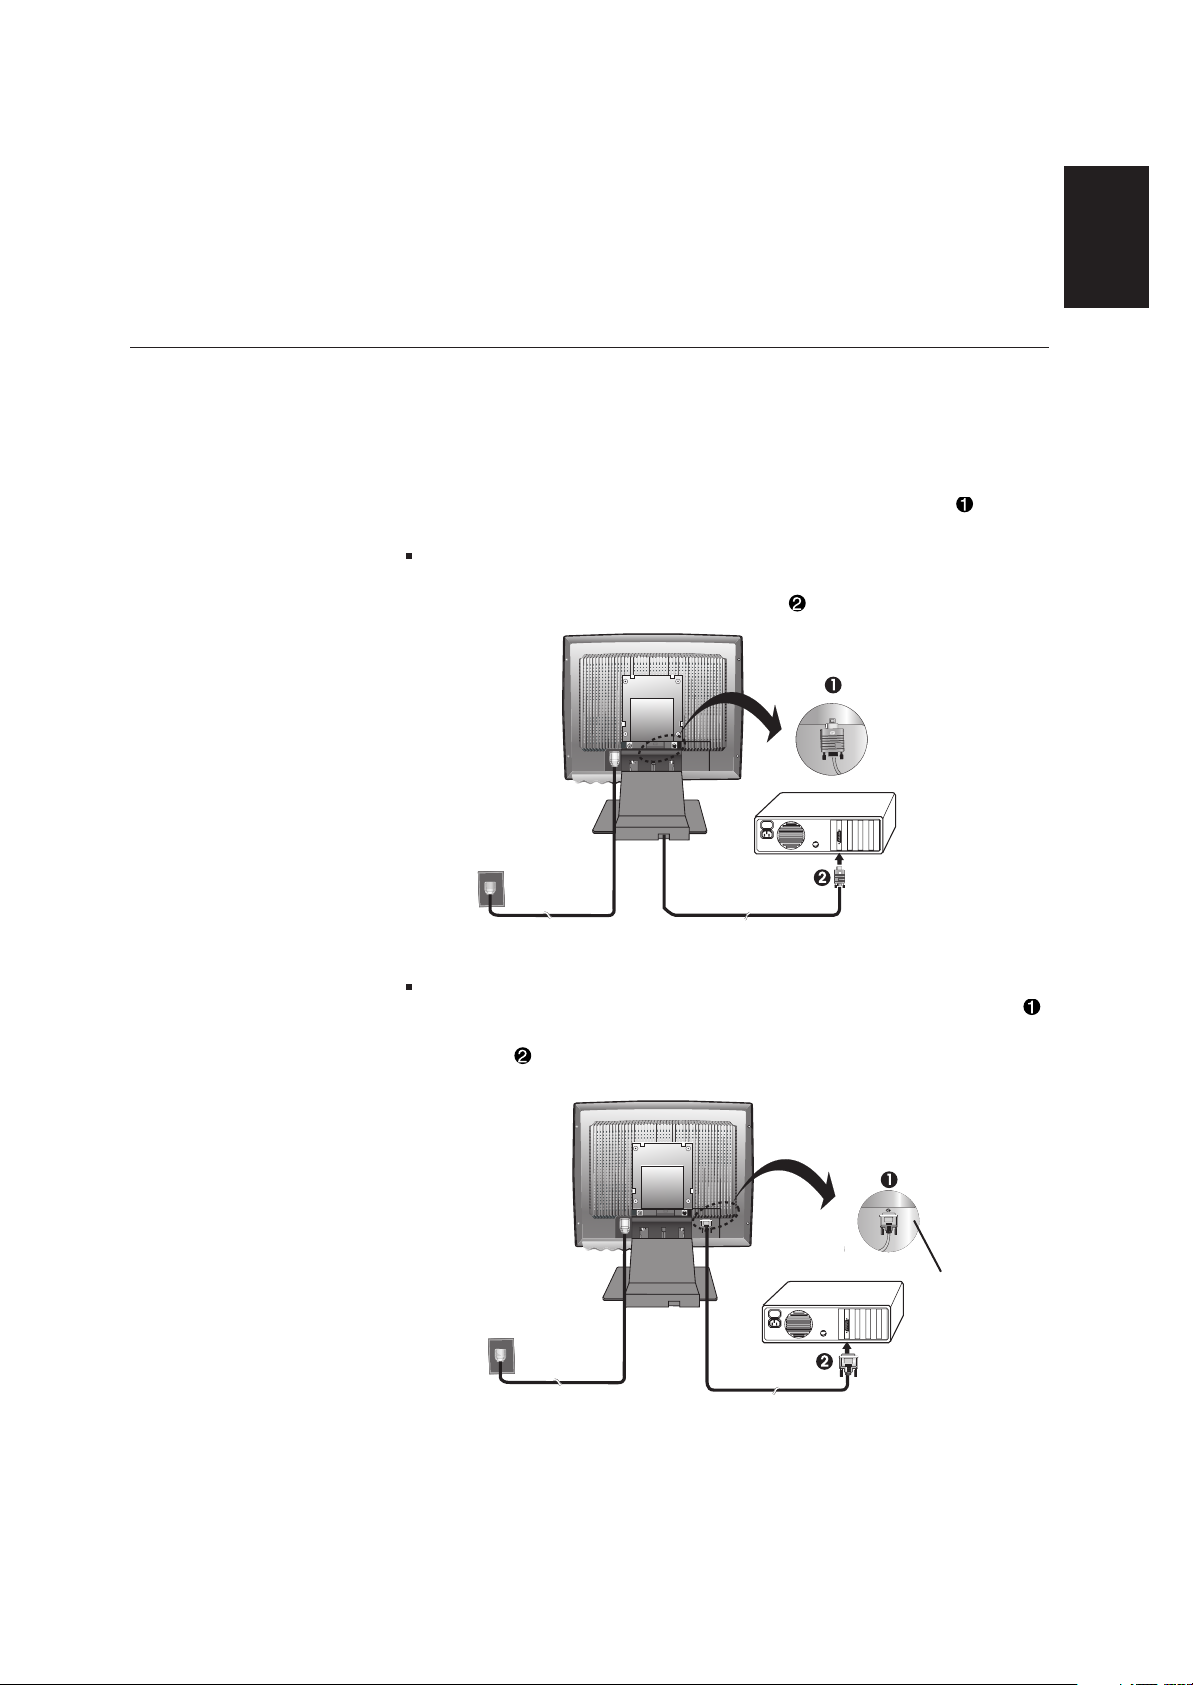
Connecting your Monitor
Monitor Installation
1. Turn off your computer and all attached devices. Next, unplug the
power cord(s) to your computer and all attached devices.
2. Connect the signal cable.
The analog signal cable is already connected to your monitor. The
analog connector is the blue connector.
When connecting the analog signal cable (Figure A)
Connect the free end of the attached signal cable to the 15-pin Monitor
port on the computer and tighten screws.
If connecting a DVI-D digital signal cable (Figure B)
Connect one end of the monitor signal cable to the white connector
on the rear panel of the monitor. Connect the other end to the white
connector on the rear panel of the computer and tighten the screws.
(Figure B)
(Figure A)
Cable not supplied
(Optional)

4
1. Switch on your monitor by pushing and releasing the power switch marked [ ]
at the front of the bezel.
[To switch off your monitor, push and release the power switch again.]
2. Switch on your computer.
3. If you are using the analog connector, run AUTO SETUP by following the
instructions in the Auto Setup section on page 8.
Switching on your Monitor
3. Connect the power cord to the monitor and then plug the power cord into a
properly grounded outlet. Next, reconnect the power cord(s) to your computer
and all attached devices.

ENGLISH
5
To use the Plug and Play feature in Microsoft®Windows®95 or Windows
98, files should be loaded from the IBM Monitor CD.
1. Turn off the computer and all attached devices.
2. Ensure that the monitor is connected correctly.
3. Turn on the monitor and then the system unit. Allow the system to boot
into Windows95 or Windows98.
Your computer’s Plug and Play code may warn you that your system
hardware has changed. This means that it has detected your new
monitor for the first time.
4. Open the DISPLAY PROPERTIES window by clicking START, SETTINGS,
CONTROL PANEL and then double - clicking on the DISPLAY icon.
5. Click the SETTINGS tab.
• In case of Windows 95 :
6 - 1. Click the CHANGE DISPLAY TYPE button.
2. Click the CHANGE MONITOR TYPE button.
• In case of Windows 98 :
6 - 1.Click the ADVANCED button.
2. Click the MONITOR tab.
3.
Open the
UPGRADE DEVICE DRIVER WIZARD window by clicking on
CHANGE button and then select the NEXT button.
4. Click the “Display a list of the known drivers for this device so that
I can choose a specific driver” and then select the NEXT button.
7. Insert the Setup CD into the CD driver: and click the HAVE DISK button.
8. Click OK.
9. Ensure that the CD drive letter is selected, and then select the ‘Drivers’
folder.
10.Choose IBM T541 monitor and Click OK. The files will be copied from
the CD to your hard disk drive.
11.Close all open windows and remove the CD.
12.Restart the system.
The system will automatically select the maximum refresh rate and
corresponding Color Matching Profiles.
Monitor Driver Installation
Driver installation for Windows 95 or Windows 98
This section must be
completed before
continuing with the
Windows95 or Windows98
Auto Setup on page 9.
i
On LCD monitors, unlike
CRTs, a faster refresh rate
does not improve display
quality. IBM recommends
using either 1024 x 768 at a
refresh rate of 60Hz or 640 x
480 at a refresh rate of 60Hz.

6
To use the Plug and Play feature in Microsoft Windows 2000 or Microsoft
Windows Millennium Edition(Me) files should be loaded from the IBM
Monitor CD.
1. Turn off the computer and all attached devices.
2. Ensure that the monitor is connected correctly.
3. Turn on the monitor and then the system unit. Allow the system to boot
into Windows 2000 or Windows Me.
4. Open the DISPLAY PROPERTIES window by clicking START, SETTINGS,
CONTROL PANEL and then double-clicking the DISPLAY icon.
5. Click the SETTINGS tab.
6. Click the ADVANCED button.
7. Click the MONITOR tab.
8. Click the PROPERTIES button.
9. Click the DRIVER tab.
10.Open the UPGRADE DEVICE DRIVER WIZARD window by clicking on UPDATE
DRIVER and then Click the NEXT button.
11.Select the “Display a list of the known drivers for this device so that I can
choose a specific driver” and then Click the NEXT button.
12.Insert the Setup CD into the CD drive : and click the HAVE DISK button.
13.Click OK.
14.Ensure that the CD drive letter is selected, and then select the ‘Drivers’
folder.
15.Choose IBM T541 monitor and Click OK. The files will be copied from
the CD to your hard disk drive.
16.Close all open windows and remove the CD.
17.Restart the system.
The system will automatically select the maximum refresh rate and
corresponding Color Matching Profiles.
Driver Installation for Windows 2000 or Windows Me
This section must be
completed before
continuing with the
Windows2000 ,Windows Me
Auto Setup on page 9.
i
On LCD monitors, unlike
CRTs, a faster refresh rate
does not improve display
quality. IBM recommends
using either 1024 x 768 at a
refresh rate of 60Hz or 640 x
480 at a refresh rate of 60Hz.

ENGLISH
7
To use the Plug and Play feature in Microsoft Windows XP files should be
loaded from the IBM Monitor CD.
1. Turn off the computer and all attached devices.
2. Ensure that the monitor is connected correctly.
3. Turn on the monitor and then the system unit. Allow the system to boot
into Windows XP.
4. Open the DISPLAY PROPERTIES window by clicking START, SETTINGS,
CONTROL PANEL and then double-clicking the DISPLAY icon.
5. Click the SETTINGS tab.
6. Click the ADVANCED button.
7. Click the MONITOR tab.
8. Click the PROPERTIES button.
9. Click the DRIVER tab.
10.Open the Hardware Update Wizard window by clicking on UPDATE
DRIVER and then Click the NEXT button.
11.Select the “Install from a list or Specific location(Advanced)” and then
Click the NEXT button.
12.Insert the Setup CD into the CD drive : and click the HAVE DISK button.
13.Click OK.
14.Ensure that the CD drive letter is selected, and then select the ‘Drivers’
folder.
15.Choose IBM T541 monitor and Click OK. The files will be copied from
the CD to your hard disk drive.
16.Close all open windows and remove the CD.
17.Restart the system.
The system will automatically select the maximum refresh rate and
corresponding Color Matching Profiles.
Driver Installation for Windows XP
This section must be
completed before
continuing with the
Windows XP Auto Setup on
page 9.
i
On LCD monitors, unlike
CRTs, a faster refresh rate
does not improve display
quality. IBM recommends
using either 1024 x 768 at a
refresh rate of 60Hz or 640 x
480 at a refresh rate of 60Hz.

8
For digital input, image setup is not required.
When you first use your monitor, you must perform Auto Setup for analog
input. If you are using digital input, continue with the instructions on page
12. This procedure sets up your monitor to process the video signals from
your computer without image discoloration or smearing. After you perform
Auto Setup, the settings are stored and used each time you turn on the
monitor.
In order to optimize the displayed image a set-up utility is provided on the
IBM Monitor CD. Operation of this utility is dependent on the operating
system on your computer. You may choose to run AUTO SETUP for each
operating system that you use. This means that if you sometimes use your
monitor while running any version of Windows and sometimes also use it
from within DOS (not a DOS window), you must run AUTO SETUP for both
Windows and DOS. You may run versions of AUTO SETUP in any order.
Before you begin AUTO SETUP for your computer, make sure the
computer video mode is set in the range of the supported screen
resolution shown in the table on page 18.
You should perform AUTO SETUP for each screen mode you use.
Image Setup for analog input
Auto Setup
Before carrying out this
section, it is very important
that the correct monitor
drivers have been
installed.(See pages 5 and 7)
i
The Setup Utility included
on the setup CD displays a
test pattern of dots. It does not
replace or modify the display
drivers.
i
The Auto Setup instructions
require the monitor to be
warmed up for 15 minutes.
This is not required for normal
operation.
i
If your computer does not
run with the setup CD
shipped with the monitor, refer
to Manual Setup on page 11.
i
The AUTO SETUP process
only applies to the current
screen mode. When a new
mode is selected, repeat this
section to reset the monitor.
 Loading...