

LG LHT854 User Manual
Model: LHT854
For service/
support Call:
Toll Free Number
1-800-243-0000
http://us.lgservice.com
© Copyright 2008, LG Electronics U.S.A., Inc.
Unique Features
5.1ch ez Set-up
Listen sound from TV, DVD
and Digital Device with vivid
5.1ch mode.
Go to page 18
Full HD up-scaling
(1080p)
View Full HD picture quality
with simple setup.
Go to page 12
Portable In
Listen to music from your
portable device (MP3,
Notebook, etc).
Go to page 17
Made for iPod
Enjoy music from iPod with
simple connection.
Go to page 19
HT963SA-AP_DUSALLK 1/31/08 1:16 PM Page 1
2
CAUTION: TO REDUCE THE RISK OF ELECTRIC SHOCK DO NOT REMOVE COVER
(OR BACK) NO USER-SERVICEABLE PARTS INSIDE REFER SERVICING TO QUALIFIED
SERVICE PERSONNEL.
This lightning flash with arrowhead symbol within an equilateral triangle is intended to alert the user to the presence of uninsulated dangerous voltage within the
product’s enclosure that may be of sufficient magnitude to constitute a risk of
electric shock to persons.
The exclamation point within an equilateral triangle is intended to alert the user to
the presence of important operating and maintenance (servicing) instructions in
the literature accompanying the product.
WARNING: TO PREVENT FIRE OR ELECTRIC SHOCK HAZARD, DO NOT EXPOSE THIS
PRODUCT TO RAIN OR MOISTURE.
WARNING: Do not install this equipment in a confined space such as a book case or similar
unit.
CAUTION: Do not block any ventilation openings. Install in accordance with the manufacturer's instructions.
Slots and openings in the cabinet are provided for ventilation and to ensure reliable operation
of the product and to protect it from overheating.
The openings should never be blocked by placing the product on a bed, sofa, rug or other
similar surface. This product should not be placed in a built-in installation such as a bookcase
or rack unless proper ventilation is provided or the manufacturer's instruction have been
adhered to.
CAUTION:
This product employs a Laser System.
To ensure proper use of this product, please read this owner ’s manual carefully and retain it
for future reference. Should the unit require maintenance, contact an authorized service center.
Use of controls, adjustments or the performance of procedures other than those specified
herein may result in hazardous radiation exposure.
To prevent direct exposure to laser beam, do not try to open the enclosure. Visible laser radiation when open. DO NOT STARE INTO BEAM.
NOTE TO CABLE/TV INSTALLER: This reminder is provided to call the cable TV system
installer’s attention to Article 820-40 of the National Electric Code (U.S.A.). The code provides
guidelines for proper grounding and, in particular, specifies that the cable ground shall be connected to the grounding system of the building, as close to the point of the cable entry as practical.
CAUTION: The apparatus should not be exposed to water (dripping or splashing) and no objects
filled with liquids, such as vases, should be placed on the apparatus.
CAUTION concerning the Power Cord
Most appliances should be placed on a dedicated circuit;
That is, a single outlet circuit which powers only that appliance and has no additional outlets or
branch circuits. Check the specification page of this owner's manual to be certain.
Do not overload wall outlets. Overloaded wall outlets, loose or damaged wall outlets, extension
cords, frayed power cords, or damaged or cracked wire insulation are dangerous. Any of these
conditions could result in electric shock or fire. Periodically examine the cord of your appliance,
and if its appearance indicates damage or deterioration, unplug it, discontinue use of the
appliance, and have the cord replaced with an exact replacement part by an authorized servicer.
Protect the power cord from physical or mechanical abuse, such as being twisted, kinked,
pinched, closed in a door, or walked upon. Pay particular attention to plugs, wall outlets, and the
point where the cord exits the appliance.
To disconnect power from the unit, unplug the unit from the outlet. When installing the product,
ensure that the plug is easily accessible.
FCC WARNING: This equipment may generate or use radio frequency energy. Changes or
modifications to this equipment may cause harmful interference unless the modifications are
expressly approved in the instruction manual. The user could lose the authority to operate this
equipment if an unauthorized change or modification is made.
REGULATORY INFORMATION: FCC Part 15
This epuipment has been tested and found to comply with the limits for a Class B digital device,
pursuant to Part 15 of the FCC Rules. These limits are designed to provide reasonable protection
against harmful interference when the product is operated in a residential installation.
This product generates, uses, and can radiate radio frequency energy and, if not installed and
used in accordance with the instruction manual, may cause harmful interference to radio
communications. However, there is no guarantee that interference will not occur in a particular
installation. If this product does cause harmful interference to radio or television reception, which
can be determined by turning the product off and on, the user is encouraged to try to correct the
interference by one or more of the following measures:
• Reorient or relocate the receiving antenna.
• Increase the separation between the product and receiver.
• Connect the product into an outlet on a circuit different from that to which the receiver is
connected.
• Consult the dealer or an experienced radio/TV technician for help.
FCC COMPLIANCE: The responsible party for this product’s compliance is:
Marketed and Distributed by LG Electronics U.S.A., Inc.,
1000 Sylvan Avenue, Englewood Cliffs, NJ.
Phone: 1-201-816-2000.
Safety Precaution
CAUTION
RISK OF ELECTRIC SHOCK
DO NOT OPEN
HT963SA-AP_DUSALLK 1/31/08 1:16 PM Page 2

3
IMPORTANT SAFETY INSTRUCTIONS
CAUTION:
PLEASE READ AND OBSERVE ALL WARNINGS AND INSTRUCTIONS IN THIS OWNER’S MANUAL.
AND THOSE MARKED ON THE PRODUCT. RETAIN THIS MANUAL FOR FUTURE REFERENCE.
This product has been designed and manufactured to assure personal safety. Improper use can result in electric shock or fire hazard. The safeguards
incorporated in this product will protect you if you observe the following procedures for installation, use, and servicing.
This product does not contain any parts that can be repaired by the user.
DO NOT REMOVE THE CABINET COVER, OR YOU MAY BE EXPOSED TO DANGEROUS VOLTAGE. REFER SERVICING TO QUALIFIED SERVICE PERSONNEL ONLY.
1. Read these instructions. - All these safety and operating instructions
should be read before the product is operated.
2. Keep these instructions. - The safety, operating and use instructions
should be retained for future reference.
3. Heed all warnings. - All warnings on the product and in the operating
instructions should be adhered to.
4. Follow all instructions. - All operating and use instructions should be
followed.
5. Do not use this apparatus near water. - For example: near a bath
tub, wash bowl, kitchen sink, laundry tub, in a wet basement; or near a
swimming pool; and other areas located near water.
6. Clean only with dry cloth. - Unplug this product from the wall outlet
before cleaning. Do not use liquid cleaners.
7.
Do not block any ventilation openings. Install in accordance with the
manufacturer's instructions. -
Slots and openings in the cabinet are
provided for ventilation and to ensure reliable operation of the product
and to protect it from over-heating. The openings should never be
blocked by placing the product on a bed, sofa, rug or other similar surface. This product should not be placed in a built-in installation such as
a bookcase or rack unless proper ventilation is provided or the manufacturer’s instructions have been adhered to.
8. Do not install near any heat sources such as radiators, heat
registers, stoves, or other apparatus (including amplifiers) that
produce heat.
9. Do not defeat the safety purpose of the polarized or groundingtype plug. A polarized plug has two blades with one wider than
the other. A grounding type plug has two blades and a third
grounding prong. The wide blade or the third prong are provided
for your safety. If the provided plug does not fit into your outlet,
consult an electrician for replacement of the obsolete outlet.
10. Protect the power cord from being walked on or pinched particularly at plugs, convenience receptacles, and the point where they
exit from the apparatus.
11. Only use attachments/accessories specified by the manufacturer.
12. Use only with the cart, stand, tripod, bracket, or table specified by
the manufacturer, or sold with the apparatus. When a cart is used,
use caution when moving the cart/apparatus combination to avoid
injury from tip-over.
13. Unplug this apparatus during lightning storms or when unused
for long periods of time.
14.
Refer all servicing to qualified service personnel. Servicing is
required when the apparatus has been damaged in any way, such
as power-supply cord or plug is damaged, liquid has been spilled
or objects have fallen into the apparatus, the apparatus has been
exposed to rain or moisture, does not operate normally, or has
been dropped.
HT963SA-AP_DUSALLK 1/31/08 1:16 PM Page 3
4
Contents
Setting up . . . . . . . . . . . . . . . . . . . . . . . . . . . . . . . . .5-6
Hooking up the unit . . . . . . . . . . . . . . . . . . . . . . . . . .7-8
Remote control . . . . . . . . . . . . . . . . . . . . . . . . . . . . . . .9
Main Unit . . . . . . . . . . . . . . . . . . . . . . . . . . . . . . . . . .10
OSD Initial language settings . . . . . . . . . . . . . . . . . . .11
Initial Setting the Area Code . . . . . . . . . . . . . . . . . . . .11
Adjust the settings . . . . . . . . . . . . . . . . . . . . . . . . .11-13
Setting the sound mode . . . . . . . . . . . . . . . . . . . . . . .13
Displaying Disc Information . . . . . . . . . . . . . . . . . . . .14
Playing a disc or file . . . . . . . . . . . . . . . . . . . . . . .14-16
Viewing photo files . . . . . . . . . . . . . . . . . . . . . . . . . . .16
Listening to the radio . . . . . . . . . . . . . . . . . . . . . . . . .17
Listening to music from your portable player . . . . . . .17
Listening to music from your USB device . . . . . . . . .18
5.1ch ez Set-up . . . . . . . . . . . . . . . . . . . . . . . . . . . . .18
Listening to music from your iPod . . . . . . . . . . . . . . .19
Controlling your TV with the supplied Remote Control20
Language Codes . . . . . . . . . . . . . . . . . . . . . . . . . . . .21
Area Codes . . . . . . . . . . . . . . . . . . . . . . . . . . . . . . . . .21
Troubleshooting . . . . . . . . . . . . . . . . . . . . . . . . . . . . .22
Types of Playable Discs . . . . . . . . . . . . . . . . . . . . . . .23
Specifications . . . . . . . . . . . . . . . . . . . . . . . . . . . . . . .24
What is SIMPLINK?
Some functions of this unit are controlled by TV’s remote control when this unit and
LG TV with SIMPLINK are connected through HDMI connection.
• Controllable functions by LG TV’s remote control; Play, Pause, Scan, Skip, Stop,
Power Off, etc.
• Refer to the TV owner’s manual for the details of SIMPLINK function.
• LG TV with SIMPLINK function has the logo as shown above.
• Use a higher version cable than 1.2A HDMI cable.
Welcome to your new DVD Receiver
HT963SA-AP_DUSALLK 1/31/08 1:16 PM Page 4
Setting up
Connect the red end of each wire to the
terminals marked +(plus) and the black
end to the terminals marked - (minus).
cc
Connect the wires to the speakers.
Connect the other end of each wire to the correct speaker according to
the colour coding
:
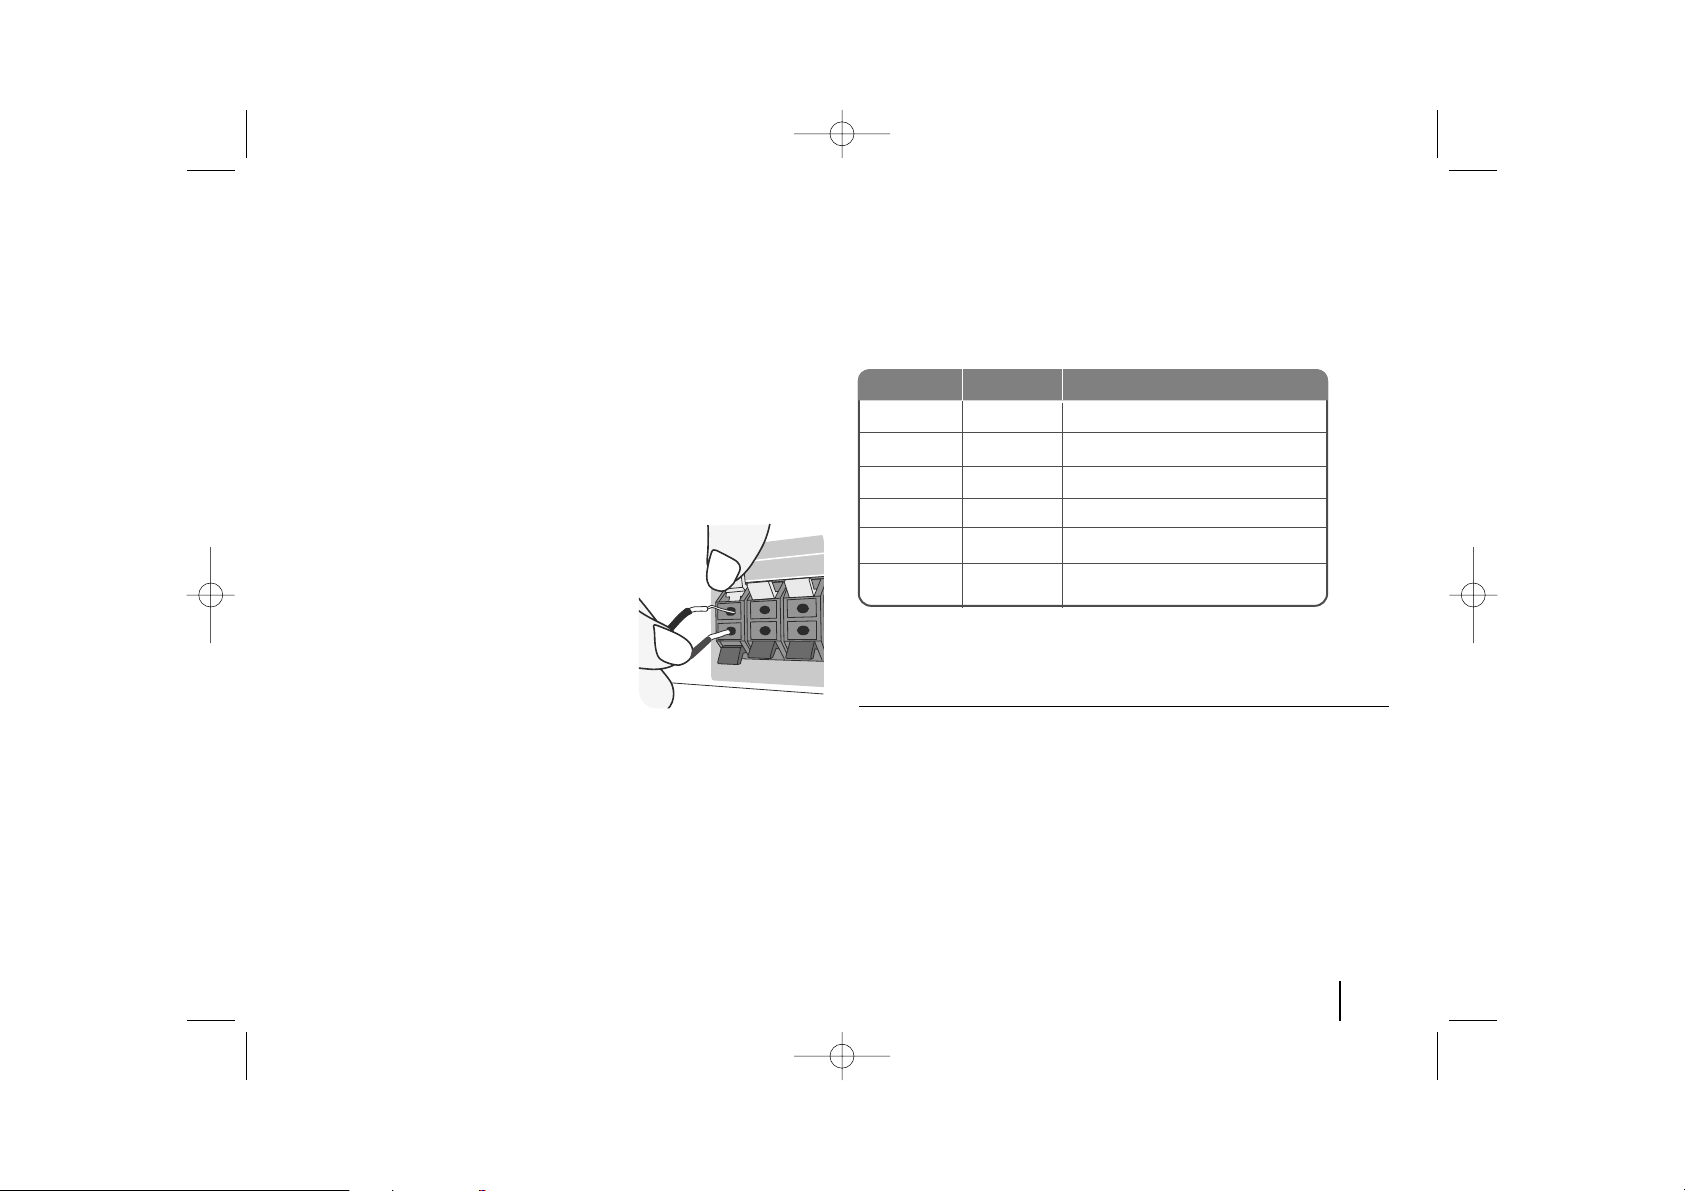
To connect the cable to the speakers, press each plastic finger pad to open the
connection terminals on the base of each speaker. Insert the wire and release
the finger pad.
Be careful of the following
Be careful to make sure children not to put their hands or any objects into the
*speaker duct.
*Speaker duct: A hall for plentiful bass sound on speaker cabinet(enclosure).
Attaching the speakers to the DVD receiver
aa
You will have received six speaker cables.
Each one is colour-coded by a band near each end and wires one of the
six speakers to the DVD receiver.
bb
Connect the wires to the DVD receiver.
Match each wire’s coloured band to the same coloured connection terminal on the reverse of the DVD receiver. To connect the cable to the DVD
receiver, press each plastic finger pad to open the connection terminal.
Insert the wire and release the finger pad.
Grey
Blue
Green
Orange
Red
White
Rear
Rear
Centre
Sub Woofer
Front
Front
Behind you and to your right.
Behind you and to your left.
Above screen, directly in front of you.
In front of you, to th e r ight of
the screen.
In front of you, to the left of
the screen.
POSITION
SPEAKER
COLOUR
5
HT963SA-AP_DUSALLK 1/31/08 1:16 PM Page 5
6
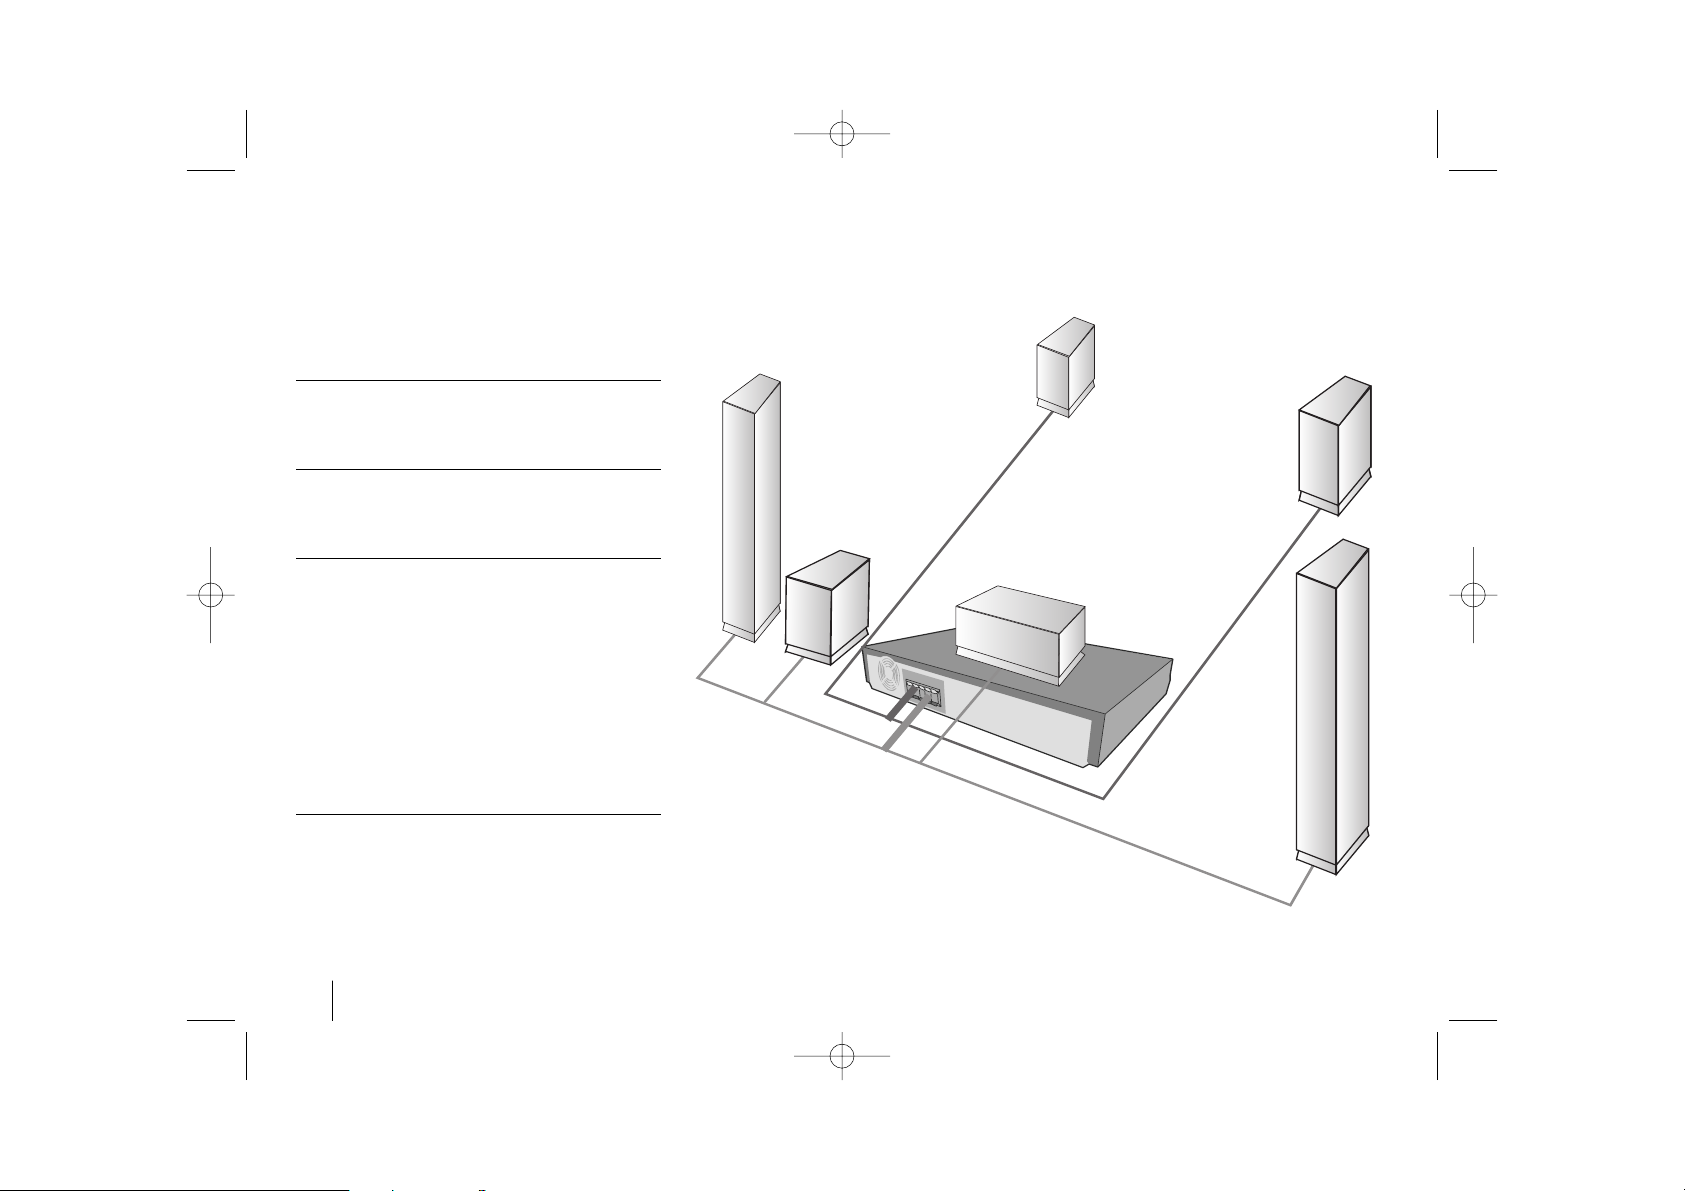
Setting up
Front speaker
(Right)
Front speaker
(Left)
Rear
speaker
(Left)
Subwoofer
Center speaker
Rear
speaker
(Right)
Speaker Positioning
In the case of normal position use the 6 speakers (2 front speakers, centre speaker, 2 rear
speakers and subwoofer).
Front speakers
According to your listening position set up the speakers for equal distance. And by hearing position set up
the interval between speakers to 45 degree.
Centre speaker
The centre speakers and front speakers are ideally
the same height. But normally place it above or below
the television.
Rear speakers
Place left and right behind the listening area. These
speakers recreate sound motion and atmosphere
required for surround sound playback. For best
results, do not install the rear speakers too far behind
the listening position and install them at or above the
level of the listener’s ears. It is also effective to direct
the rear speakers towards a wall or ceiling to further
disperse the sound.
In the case of a smaller room size, if the audience is
near to the rear wall set the rear speakers opposite
each other, and set the rear speakers above 60 - 90
cm than the listener’s ears.
Subwoofer
This can be placed in any front position.
HT963SA-AP_DUSALLK 1/31/08 1:16 PM Page 6
7
Hooking up the unit
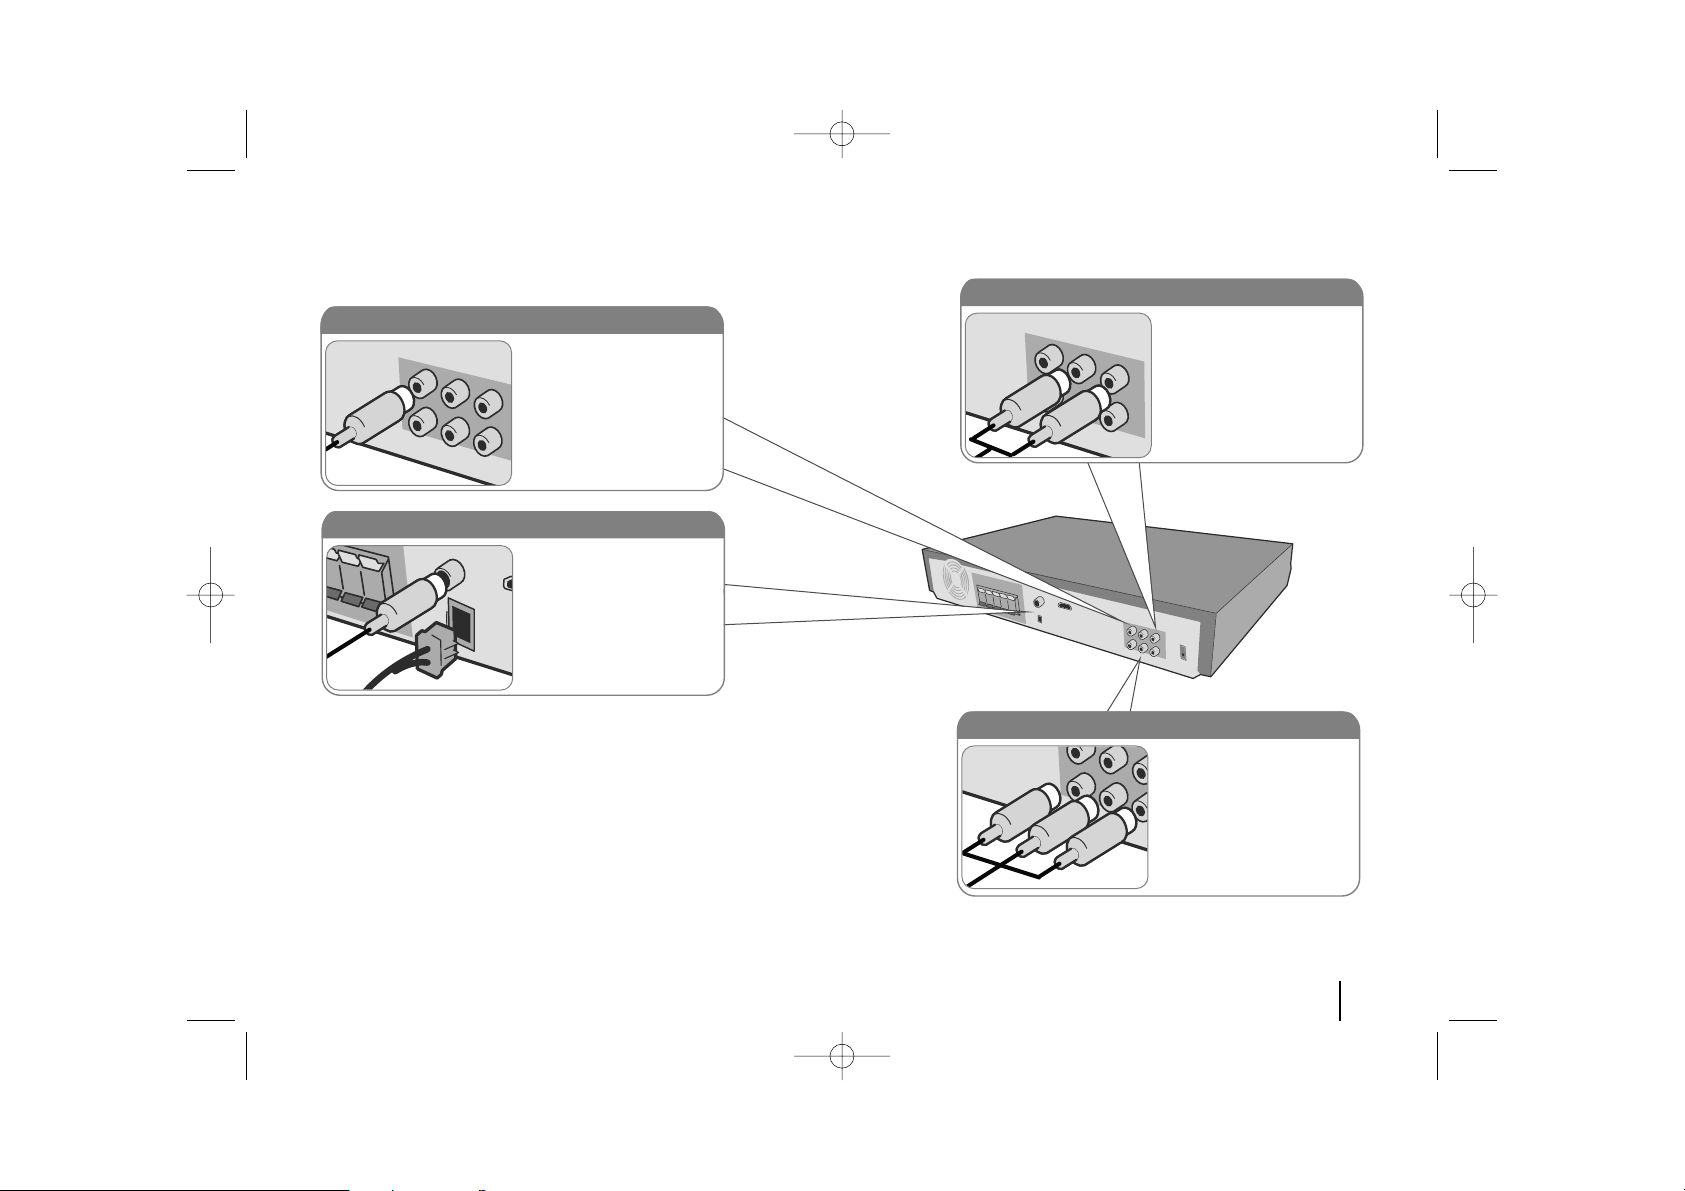
a Connect jacks on the unit and your TV (DVD player or Digital Device etc.) using the cables.
b Plug the power cord into the power source.
Audio In connection
The unit Audio jacks are
color coded (red for right
audio and white for left
audio). If your TV has only
one input for audio (mono),
connect it to the left (white)
audio jack on the unit.
AM/FM connection
AM - Connect the AM loop
aerial to the DVD receiver.
FM - Connect the FM aerial.
The reception will be its best
when the two loose ends of
the aerial are in a straight and
horizontal line.
Video Out connection
Connect the VIDEO OUTPUT jack on the unit to the
corresponding input jacks on
your TV using a Video cable.
Component Video connection
Connect the COMPONENT/PROGRESSIVE
SCAN OUTPUT jacks on the
unit to the corresponding
input jacks on your TV using
a Y PB PR cable.
HT963SA-AP_DUSALLK 1/31/08 1:16 PM Page 7
8
Hooking up the unit
Hooking up the unit - more you
can do
Resolution Setting
You can change the resolution for component video
and HDMI output.
To change the resolution using setup menu to select
the desired resolution - Auto, 480i, 480p, 720p, 1080i,
1080p.
Available resolution according to connection
[HDMI OUT]: Auto, 1080p, 1080i, 720p and 480p (or
576p)
[COMPONENT VIDEO OUT]: 480p and 480i
[VIDEO OUT]: 480i
Notes on HDMI Out connection
• If your TV does not accept your resolution setting,
abnormal picture appears on the screen.
Please read owner’s manual for TV, and then set
the resolution that your TV can accept.
• Use the HDMI cable within 5 meters
• If the volume bar is not displayed on TV screen,
restart the unit
Enjoying audio form an external source
You can enjoy audio form an external source through
your unit.
Press INPUT repeatedly to select the desired input
source. - AUX, AUX OPT, PORTABLE, USB, OSD
IPOD, IPOD
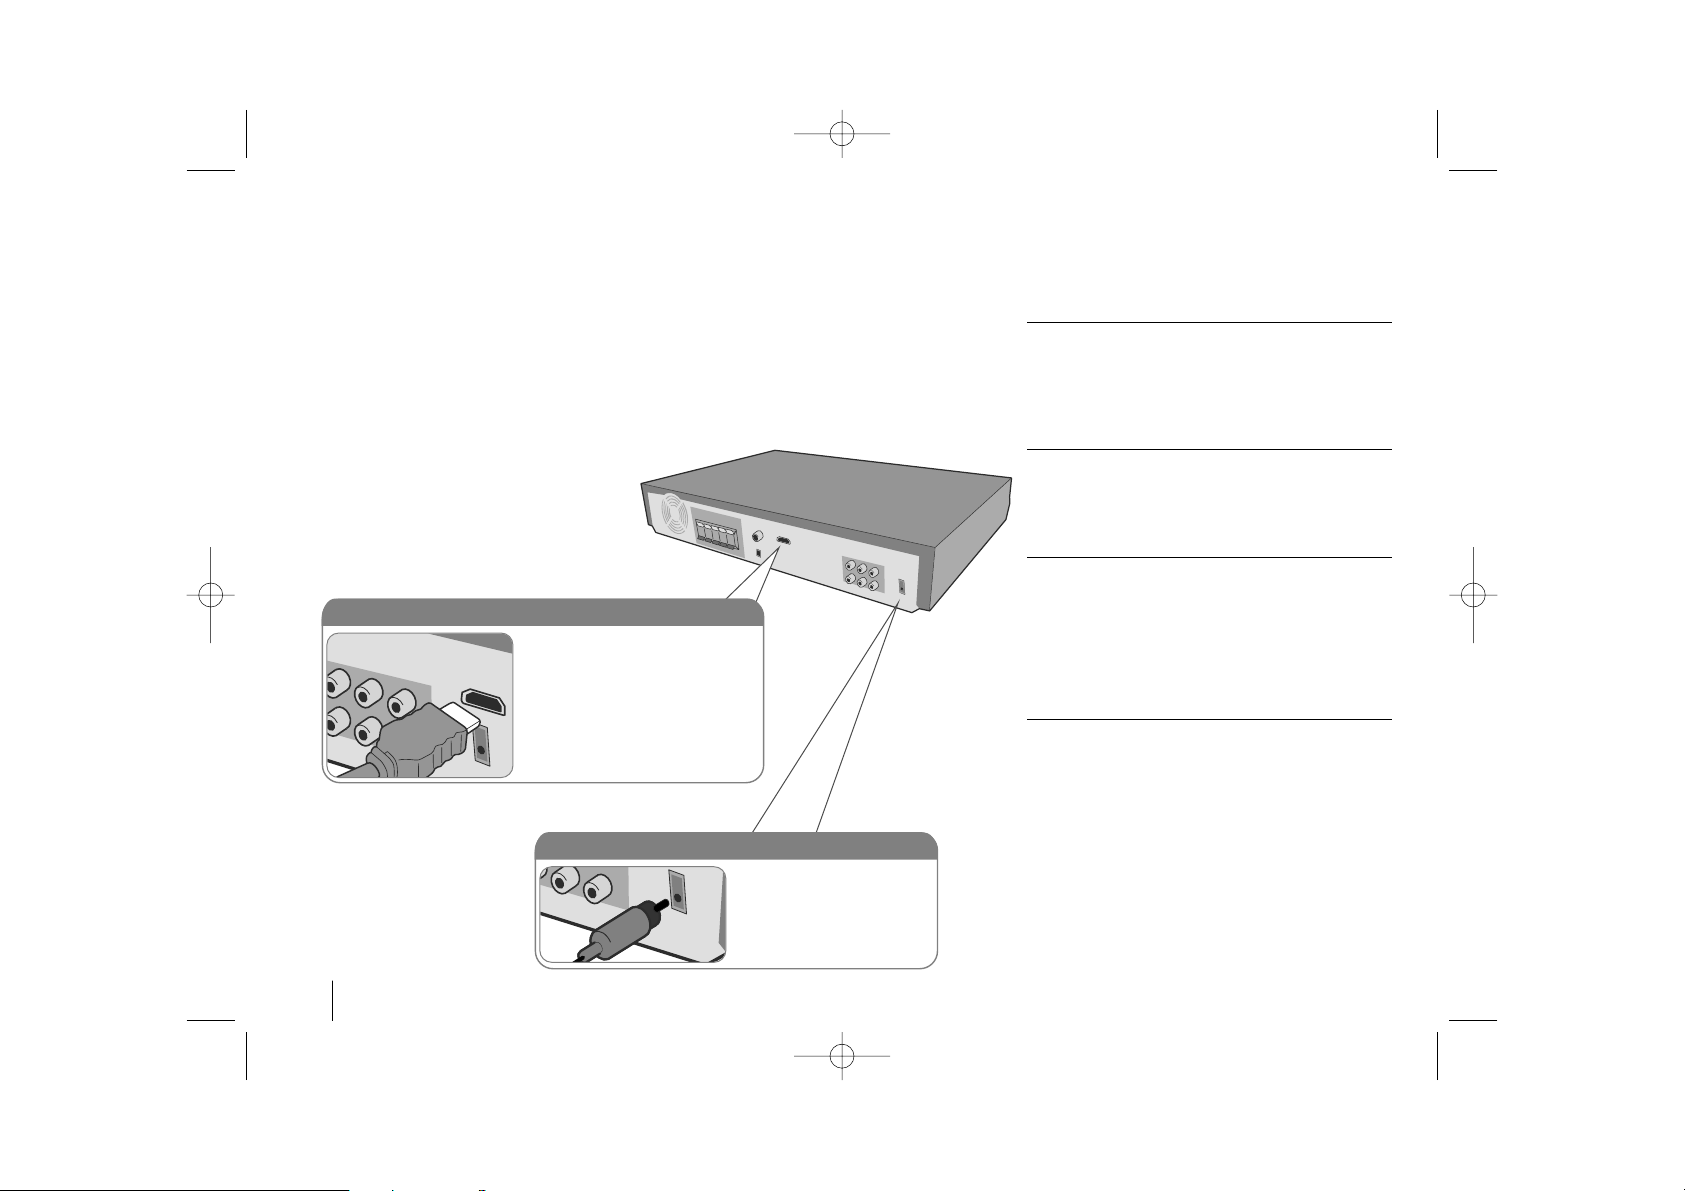
Digital Audio in connection
Connect the unit’s OPTICAL
IN jack to jack on optical out
of your TV (or Digital Device
etc.)
HDMI Out connection
Connect the HDMI OUTPUT jack
on the unit to the HDMI input jack
on a HDMI compatible TV using an
HDMI cable.
HT963SA-AP_DUSALLK 1/31/08 1:16 PM Page 8
 Loading...