

LG LH-C3602SC User Manual
NS-H3005.fm Page -1 Thursday, February 23, 2006 11:38 PM
Home Theater In A Box | Système de cinéma maison | Sistema de Teatro en Casa
NS-H3005

NS-H3005.fm Page 0 Thursday, February 23, 2006 11:38 PM
CAUTION
Risk of Electric Shock
Do Not Open
NS-H3005.fm Page 1 Thursday, February 23, 2006 11:38 PM
Insignia NS-H3005
Home Theater
System
Contents
Introduction . . . . . . . . . . . . . . . . . . . . . . . . . . . . . .1
Safety information . . . . . . . . . . . . . . . . . . . . . . . . .1
Features. . . . . . . . . . . . . . . . . . . . . . . . . . . . . . . . .2
Using discs. . . . . . . . . . . . . . . . . . . . . . . . . . . . . . .5
Connecting your home theater system . . . . . . . . .7
Setting up the VCR . . . . . . . . . . . . . . . . . . . . . . .11
Setting up the DVD player . . . . . . . . . . . . . . . . . .14
Using your home theater system . . . . . . . . . . . . .18
Using the VCR . . . . . . . . . . . . . . . . . . . . . . . . . . .18
Using the DVD player. . . . . . . . . . . . . . . . . . . . . .24
Using the radio. . . . . . . . . . . . . . . . . . . . . . . . . . .29
Maintaining. . . . . . . . . . . . . . . . . . . . . . . . . . . . . .30
Troubleshooting . . . . . . . . . . . . . . . . . . . . . . . . . .31
Specifications. . . . . . . . . . . . . . . . . . . . . . . . . . . .32
Accessories . . . . . . . . . . . . . . . . . . . . . . . . . . . . .33
Code lists . . . . . . . . . . . . . . . . . . . . . . . . . . . . . . .33
Limited warranty. . . . . . . . . . . . . . . . . . . . . . . . . .34
Copyright . . . . . . . . . . . . . . . . . . . . . . . . . . . . . . .34
Français. . . . . . . . . . . . . . . . . . . . . . . . 35
Español . . . . . . . . . . . . . . . . . . . . . . . . 74
Manufactured under license from Dolby Laboratories.
“Dolby,” “Pro Logic,” and the double-D symbol are trademarks
of Dolby Laboratories. Confidential Unpublished works.
Copyright 1992- 1997 Dolby Laboratories. All rights
reserved.
Manufactured under license from Digital Theater Systems,
Inc. US Pat. No. 5,451,942 5,956,674, 5,974,380, 5,978,762
and other worldwide patents issued and pending. “DTS” and
“DTS Digital Surround” are registered trademarks of Digital
Theater Systems, Inc. Copyright 1996, 2003 Digital Theater
Systems, Inc. All rights reserved.
Introduction
Congratulations on your purchase of a
high-quality Insignia product. Your NS-H3005
represents the state of the art in combination
home theater system design and is designed for
reliable and trouble-free performance.
Safety information
Electric shock warning
Warning
To reduce the risk of electric shock, do not remove the cover or
back. There are no user-serviceable parts inside. Refer
servicing to qualified service personnel.
Warning
To prevent fire or electric shock hazard, do not expose this
home theater system to rain or moisture.
Caution
The home theater system should not be exposed to water
(dripping or splashing) and no objects filled with liquids, such
as vases, should be placed on the home theater system.
Ventilation
Caution
Do not block any ventilation openings. Install in accordance
with these instructions.
Slots and openings in the cabinet are provided for ventilation
and to ensure reliable operation of the home theater system
and to protect it from over-heating.
The openings should never be blocked by placing the home
theater system on a bed, sofa, rug, or other similar surface.
This home theater system should not be placed in a built-in
installation such as a bookcase or rack unless correct
ventilation is provided or these instructions have been adhered
to.
Laser warning
Warning
This home theater system uses
a laser system.
To ensure correct use of this
home theater system, read this
user guide carefully and retain
it for future reference. Should
the home theater system
require maintenance, contact
an authorized service center.
Changing controls, making adjustments, or carrying out
procedures other than those specified herein may result in
hazardous radiation exposure.
To prevent direct exposure to the laser beam, do not try to
open the enclosure. There is visible laser radiation when open.
Do not stare into the beam.
This lightning flash with arrowhead symbol within
an equilateral triangle is intended to alert the user
to the presence of uninsulated dangerous voltage
within the home theater system’s enclosure that
may be of sufficient magnitude to constitute a risk
of electric shock to persons.
The exclamation point within an equilateral triangle
is intended to alert the user to the presence of
important operating and maintenance (servicing)
instructions in the literature accompanying the
home theater system.
Warning
Visible and invisible laser radiation is present when the home
theater system is open and interlocks are defeated.
www.insignia-products.com
1
NS-H3005.fm Page 2 Thursday, February 23, 2006 11:38 PM
Insignia NS-H3005 Home Theater System
Power cord
Caution
We recommend that most appliances be placed upon a
dedicated circuit—a single outlet circuit which powers only that
appliance and has no additional outlets or branch circuits.
Check “Specifications” on page 32 for power requirements.
Do not overload wall outlets. Overloaded wall outlets, loose or
damaged wall outlets, extension cords, frayed power cords, or
damaged or cracked wire insulation are dangerous. Any of
these conditions could result in electric shock or fire.
Periodically examine the home theater system cord, and if its
appearance indicates damage or deterioration, unplug it,
discontinue use of the home theater system, and have the cord
replaced with an exact replacement part by an authorized
service provider.
Protect the power cord from physical or mechanical abuse,
such as being twisted, kinked, pinched, closed in a door, or
walked upon. Pay particular attention to plugs, wall outlets, and
the point where the cord exits the home theater system.
To disconnect power from the outlet, pull out the plug. When
installing the home theater system, make sure that the plug is
easily accessible.
Important safety instructions
Caution
Read and observe all warnings and instructions in this manual
and those marked on the home theater system. Retain this
manual for future reference.
This home theater system has been designed and
manufactured to assure personal safety. Incorrect use can
result in electric shock or fire hazard. The safeguards
incorporated in this home theater system will protect you if you
observe the following procedures for installation, use, and
servicing. This home theater system does not contain any
parts that can be repaired by you.
Do not remove the cabinet cover or you may be exposed to
dangerous voltage. Refer servicing to qualified service
personnel only.
• Read all of these safety and operating
instructions before the home theater system
is operated.
• Retain the safety, operation, and use
instructions for future reference.
• Adhere to all warnings on the home theater
system and in the operating instructions.
• Follow all operation and use instructions.
• Do not use this home theater system near
water. For example, do not use this home
theater system near a bath tub, wash bowl,
kitchen sink, laundry tub, in a wet basement,
near a swimming pool, and other areas
located near water.
• Clean only with dry cloth. Unplug this home
theater system from the wall outlet before
cleaning. Do not use liquid cleaners.
• Do not block any ventilation openings. Install
in accordance with these instructions. Slots
and openings in the cabinet are provided for
ventilation, to ensure reliable operation of the
home theater system and to protect it from
over-heating. Do not block the openings by
placing the home theater system, on a bed,
sofa, rug or other similar surface. Do not
place this in a built-in installation such as a
bookcase or rack unless proper ventilation is
provided or these instructions have been
adhered to.
• Do not install near any heat sources such as
radiators, heat registers, stoves, or other
electronic devices (including amplifiers) that
produce heat.
• Do not defeat the safety purpose of the
polarized or grounding-type plug. A polarized
plug has two blades with one wider than the
other. A grounding type plug has two blades
and a third grounding prong. The wide blade
or the third prong are provided for your safety.
If the provided plug does not fit into your
outlet, consult an electrician for replacement
of the obsolete outlet.
• Protect the power cord from being walked on
or pinched particularly at plugs, receptacles,
and the point where they exit from the home
theater system.
• Use only attachments or accessories
specified by Insignia.
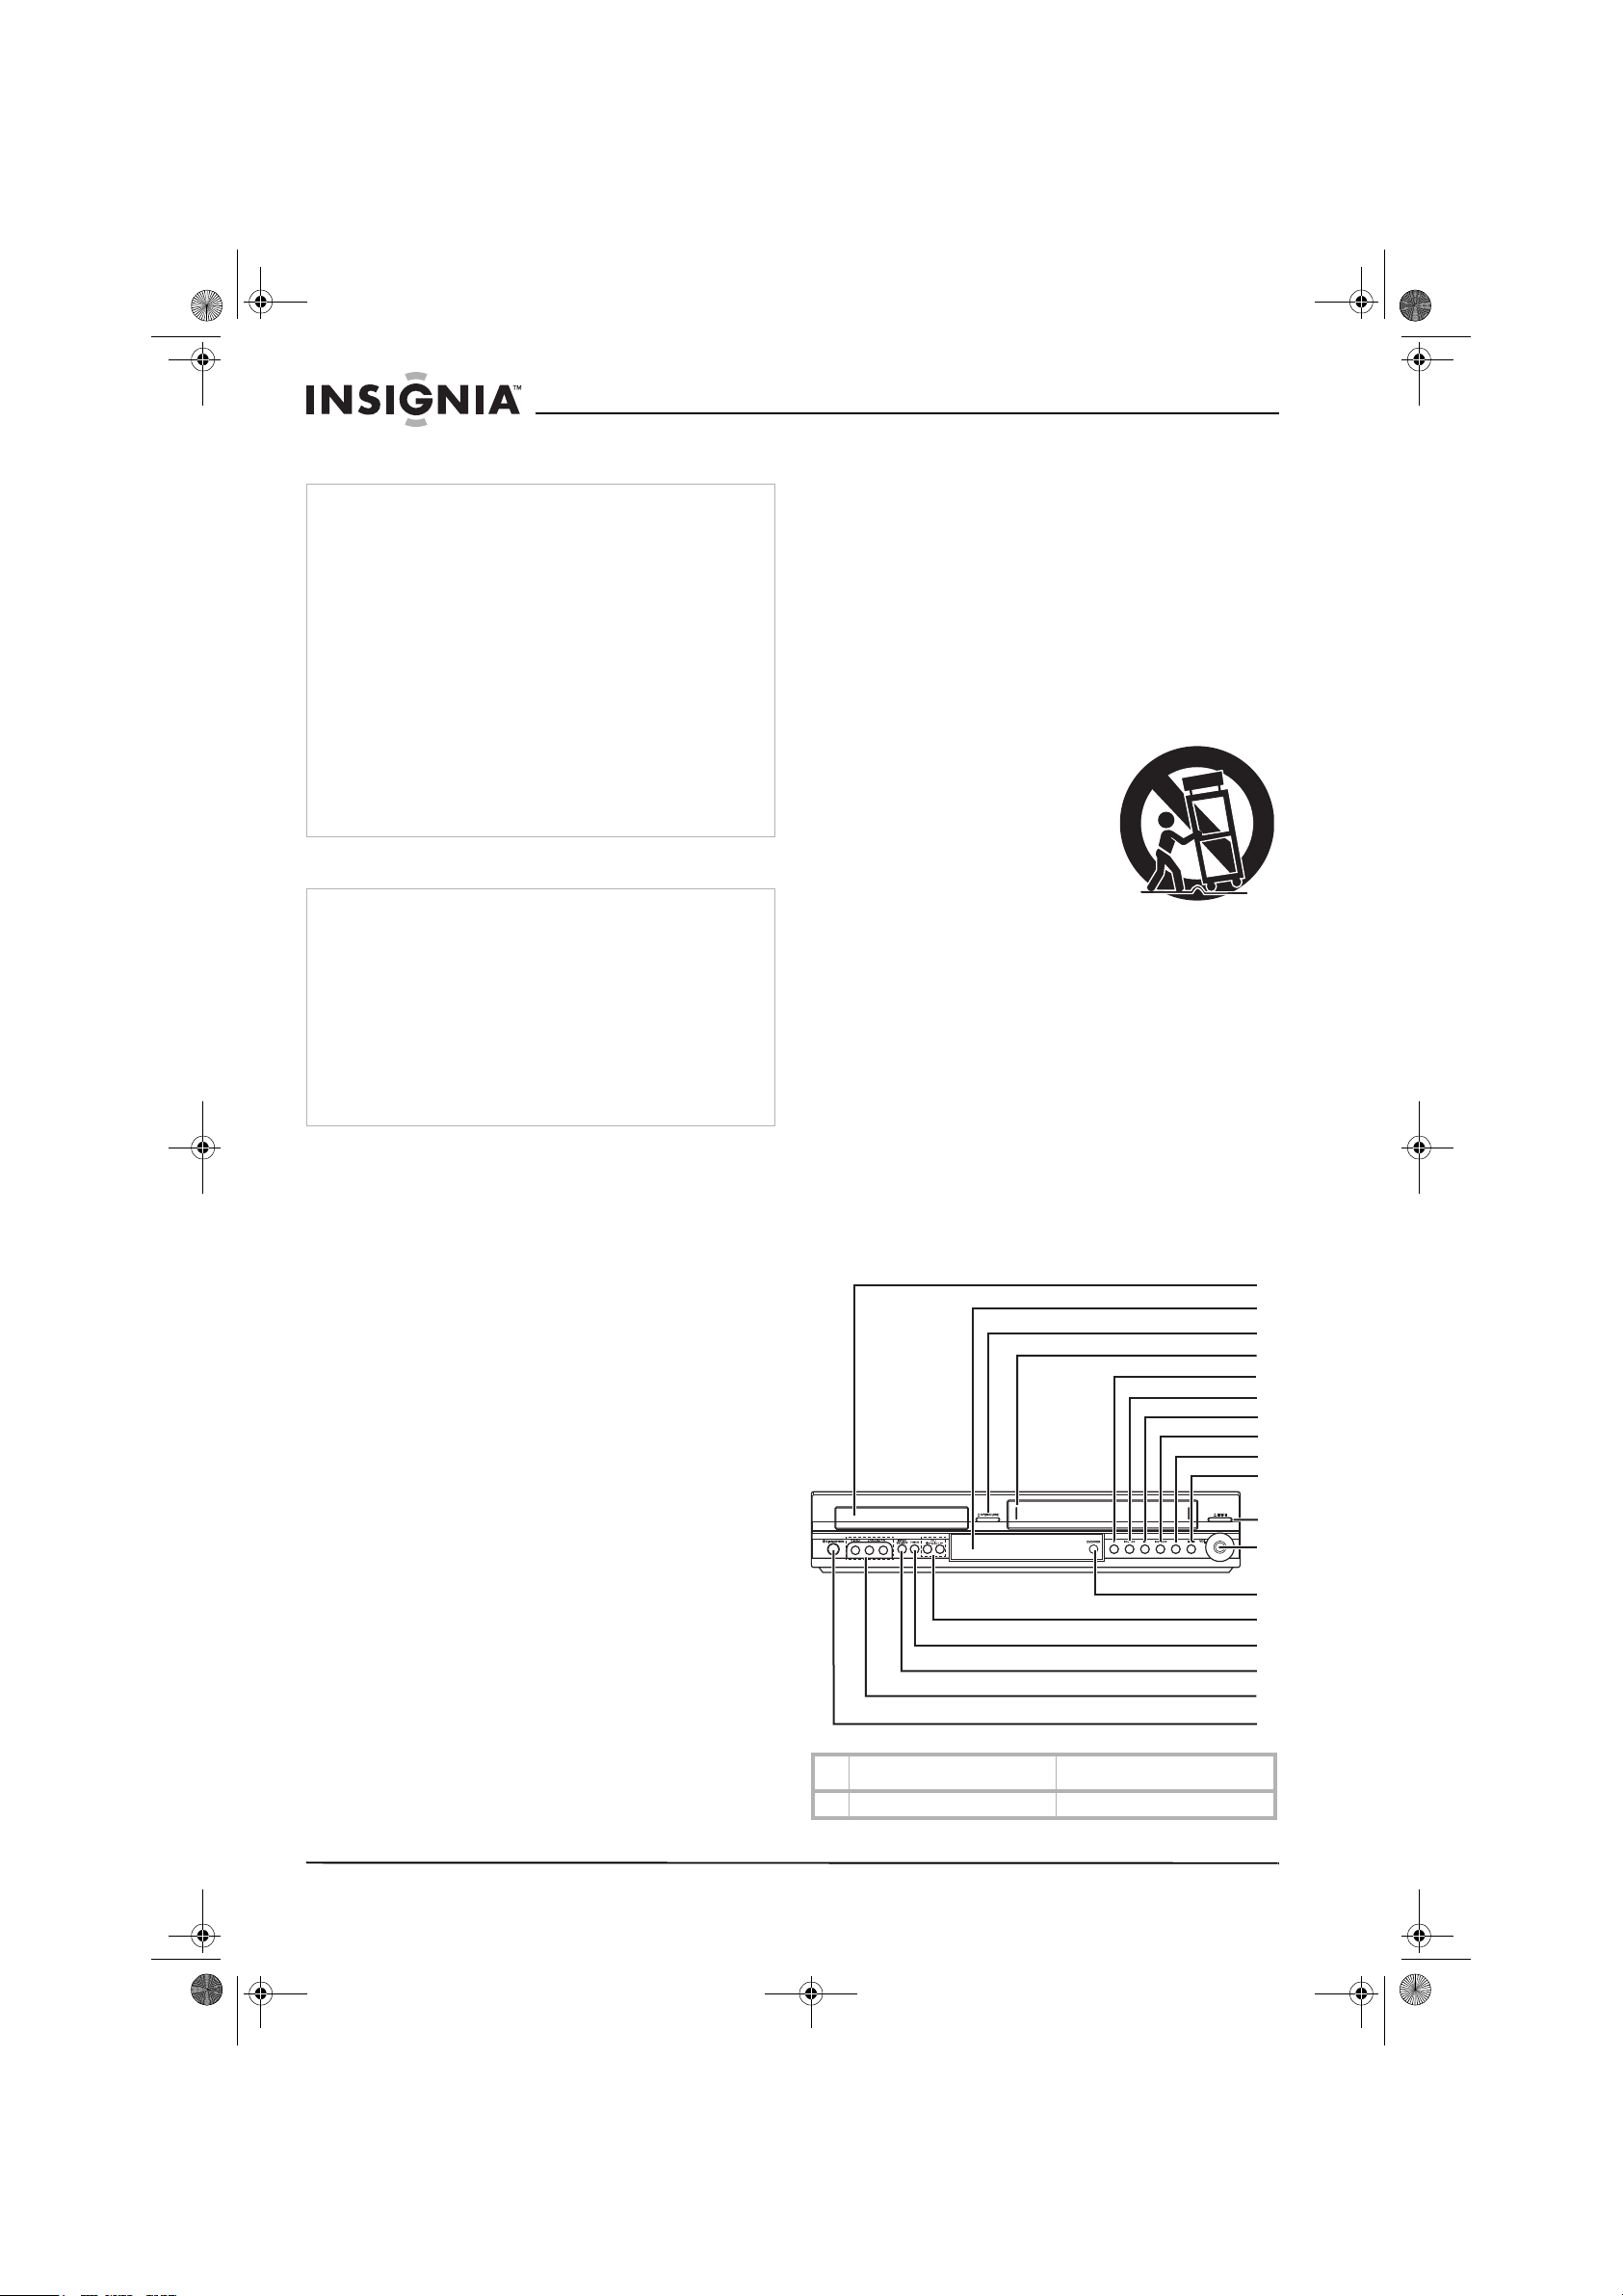
• Use only with the cart,
stand, tripod, bracket, or
table specified by
Insignia, or sold with this
home theater system.
When a cart is used, use
caution when moving the
cart/home theater
system combination to
avoid injury from tip-over.
• Unplug this home theater system during
lightning storms or when unused for long
periods of time.
• Refer all servicing to qualified service
personnel. Servicing is required when the
home theater system has been damaged in
any way, such as power-supply cord or plug
is damaged, liquid has been spilled or objects
have fallen into the home theater system, the
home theater system has been exposed to
rain or moisture, does not operate normally,
or has been dropped.
Features
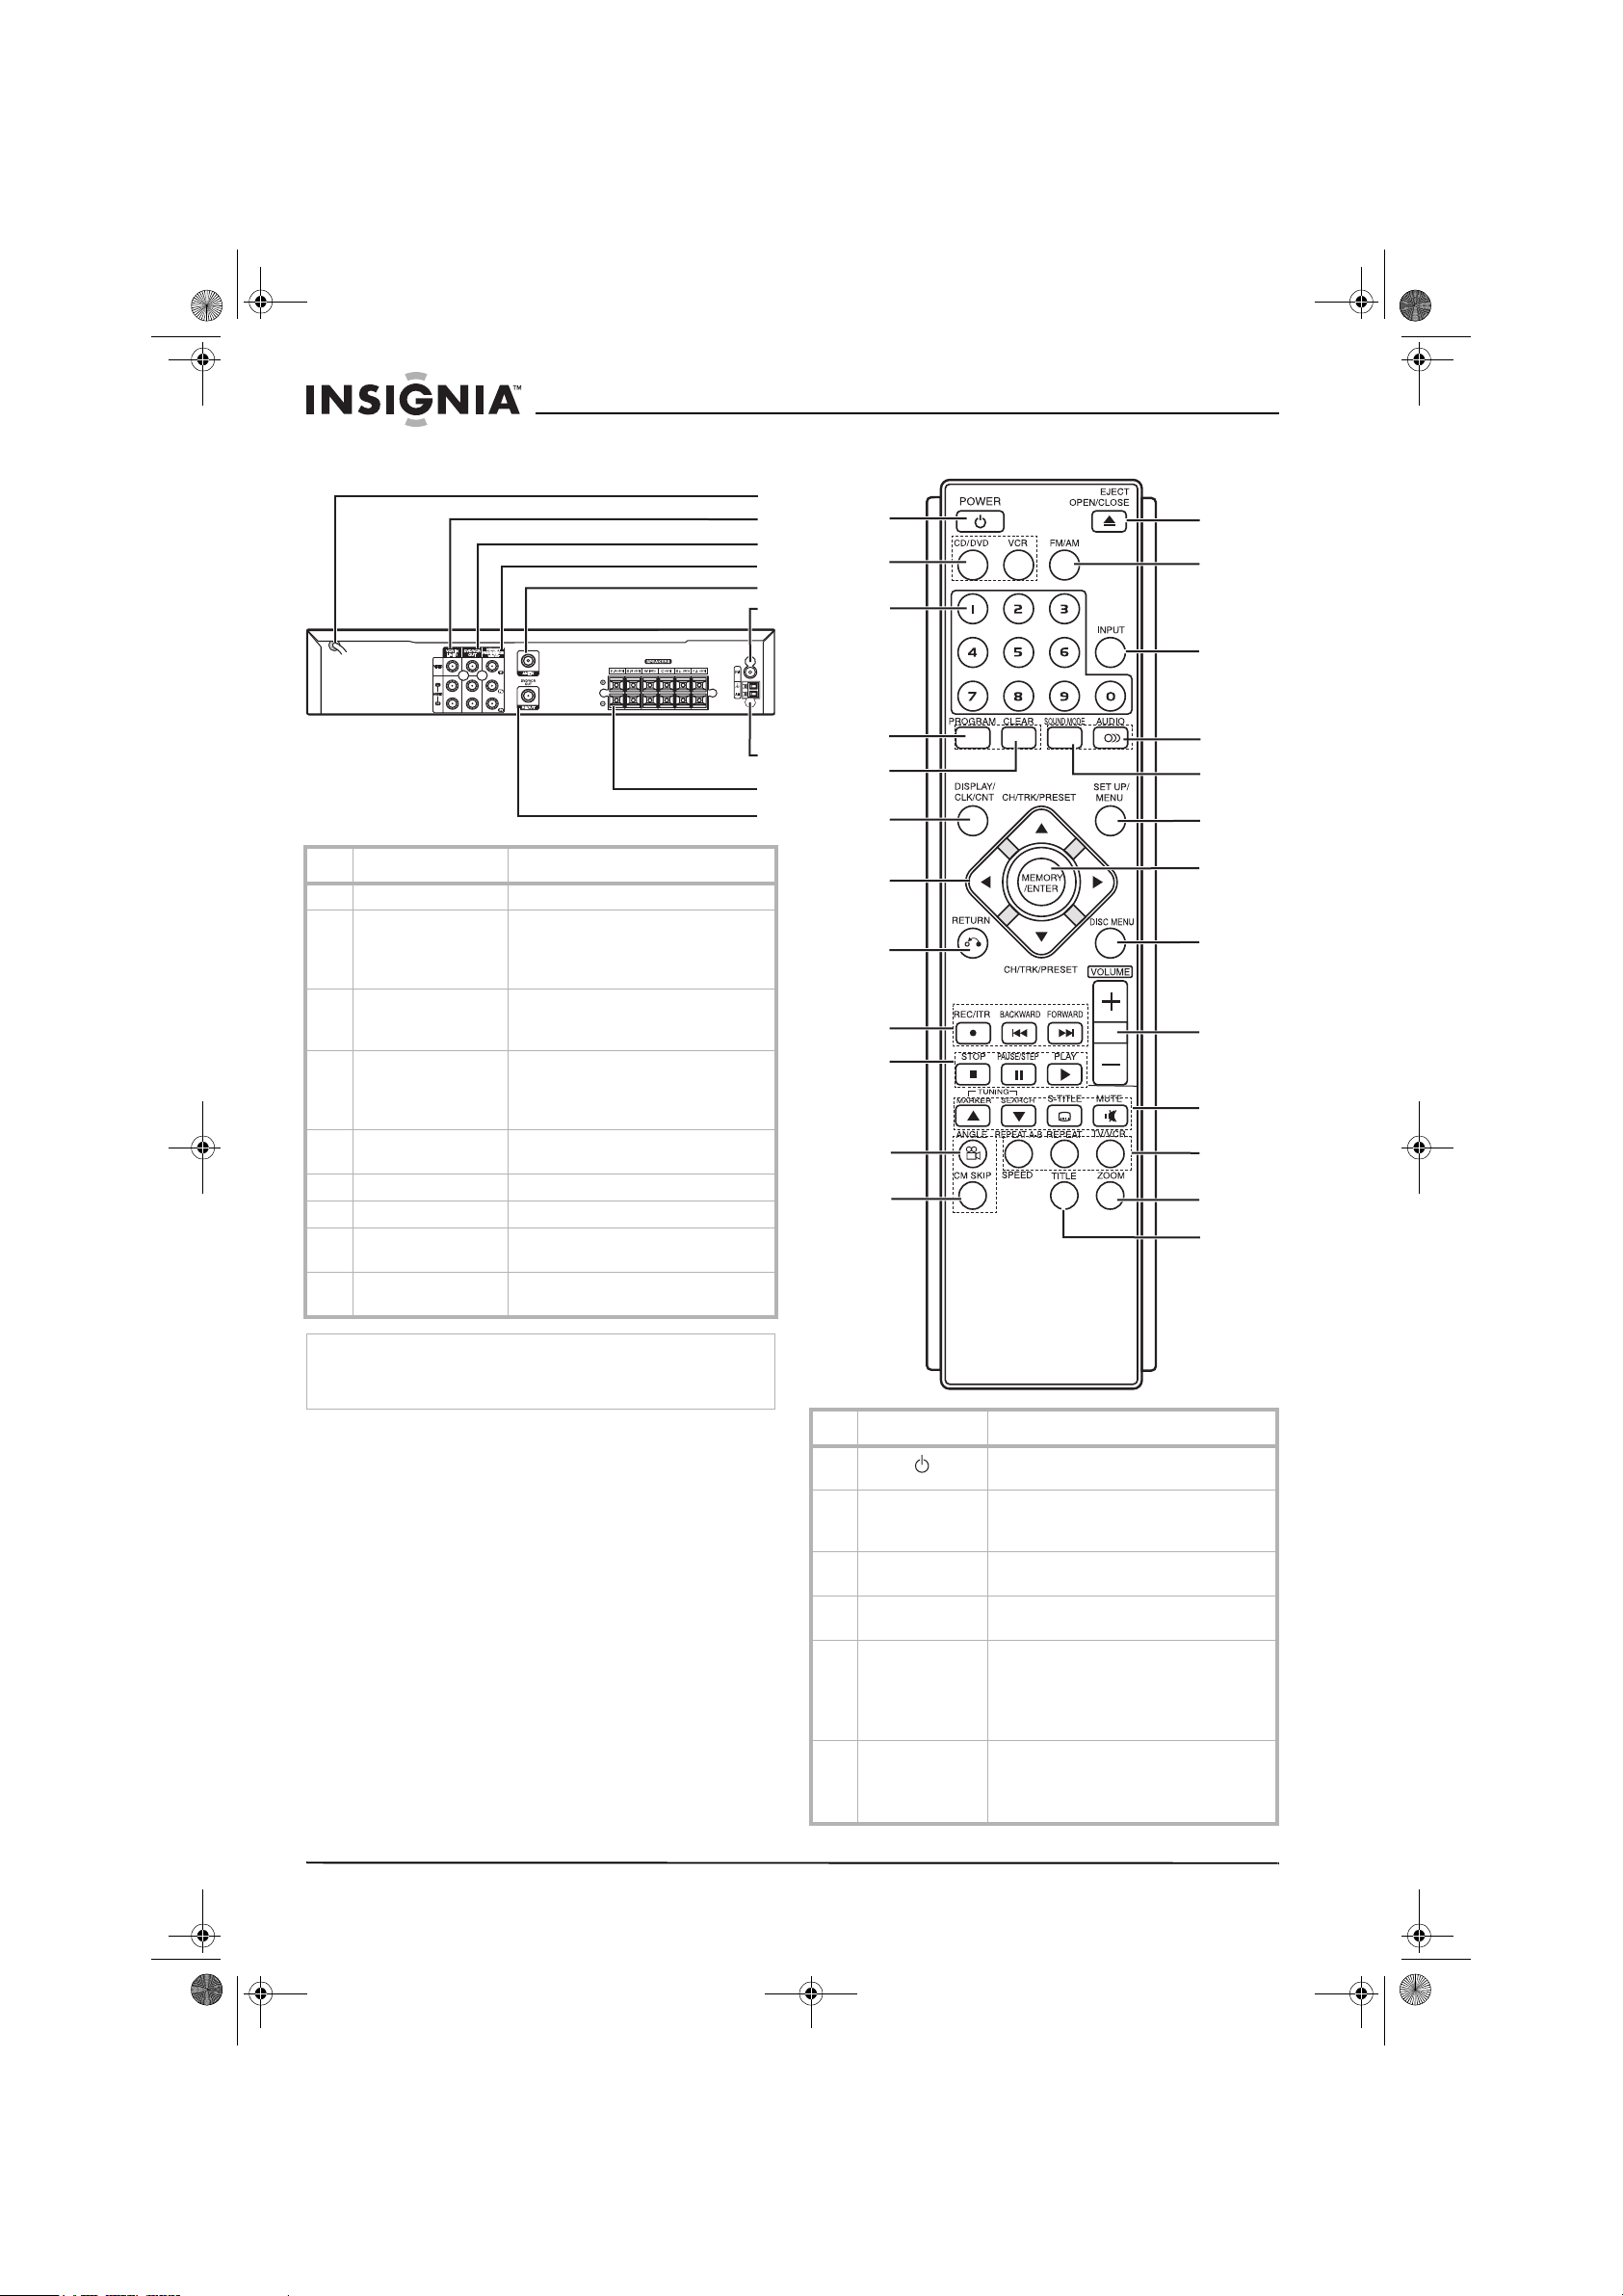
Front panel
1
2
3
4
5
6
7
8
9
10
11
12
13
14
15
16
17
18
Component Description
1 Disc tray (DVD) Insert a disc here.
2
www.insignia-products.com
MUTE REC COPY
CHPTRK
TITLE
RPT ALL
A B
MP3 TV
DVD SAP
PROG
PROLOGIC
DIGITAL
PCM WMA
ST
PHOTO
P/SCAN
Hi-Fi
dts
II
RADIO
1
2
3
4
5
6
7
8
9
10
11
12
13
14
15
16
17
18
19
20
21
NS-H3005.fm Page 3 Thursday, February 23, 2006 11:38 PM
Insignia NS-H3005 Home Theater System
Component Description
2 Remote sensor and display
window
3 Open/Close Opens or closes the disc tray.
4 Tape compartment (VCR) Insert a video tape here.
5 REC/ITR Press to record or to activate
6 Reverse SKIP/SCAN / DVD: Press to go to the
7
Play
8 Forward SKIP/SCAN / DVD: Press to go to the
9 Stop Press to stop playback of a
10
Pause/Step
/
11 Eject Press to eject the tape from
12 Volume control Turn the knob clockwise to
13 DVD/VCR (output select) Press to select DVD or VCR as
14 CH/PRESET +/- Press to scan up or down
15 FM/AM Press to switch between FM
16 Input select Select the VCR’s input source
17 Line 2 Video In/Audio In
(Left/Right)
18 Standby/On Press to switch the home
Point the remote control here.
For more information about
the display window, see
“Display window” on page 3.
Instant Timer Recording.
beginning of the current
chapter or track or to the
previous chapter or track.
Press and hold for two
seconds to fast reverse
search.
VCR: Press to rewind the tape
during Stop mode or to fast
reverse picture search.
Press to play a recorded tape
or disc.
beginning of the next chapter
or track.
Press and hold for two
seconds to fast forward
search.
VCR: Press to advance the
tape during Stop mode or to
fast forward picture search.
tape or disc.
Press to temporarily pause
playback of a tape or disc.
Press repeatedly for
frame-by-frame playback.
the VCR.
increase the volume. Turn the
knob counterclockwise to
decrease the volume.
your output source to view on
the television.
through the radio or television
stations in memory or to
control tracking during video
tape playback.
and AM bands.
(Tuner, Line1, or Line2)
Connect the audio and video
output from an external
source such as an audio
system, television, monitor, or
VCR.
theater system on or off.
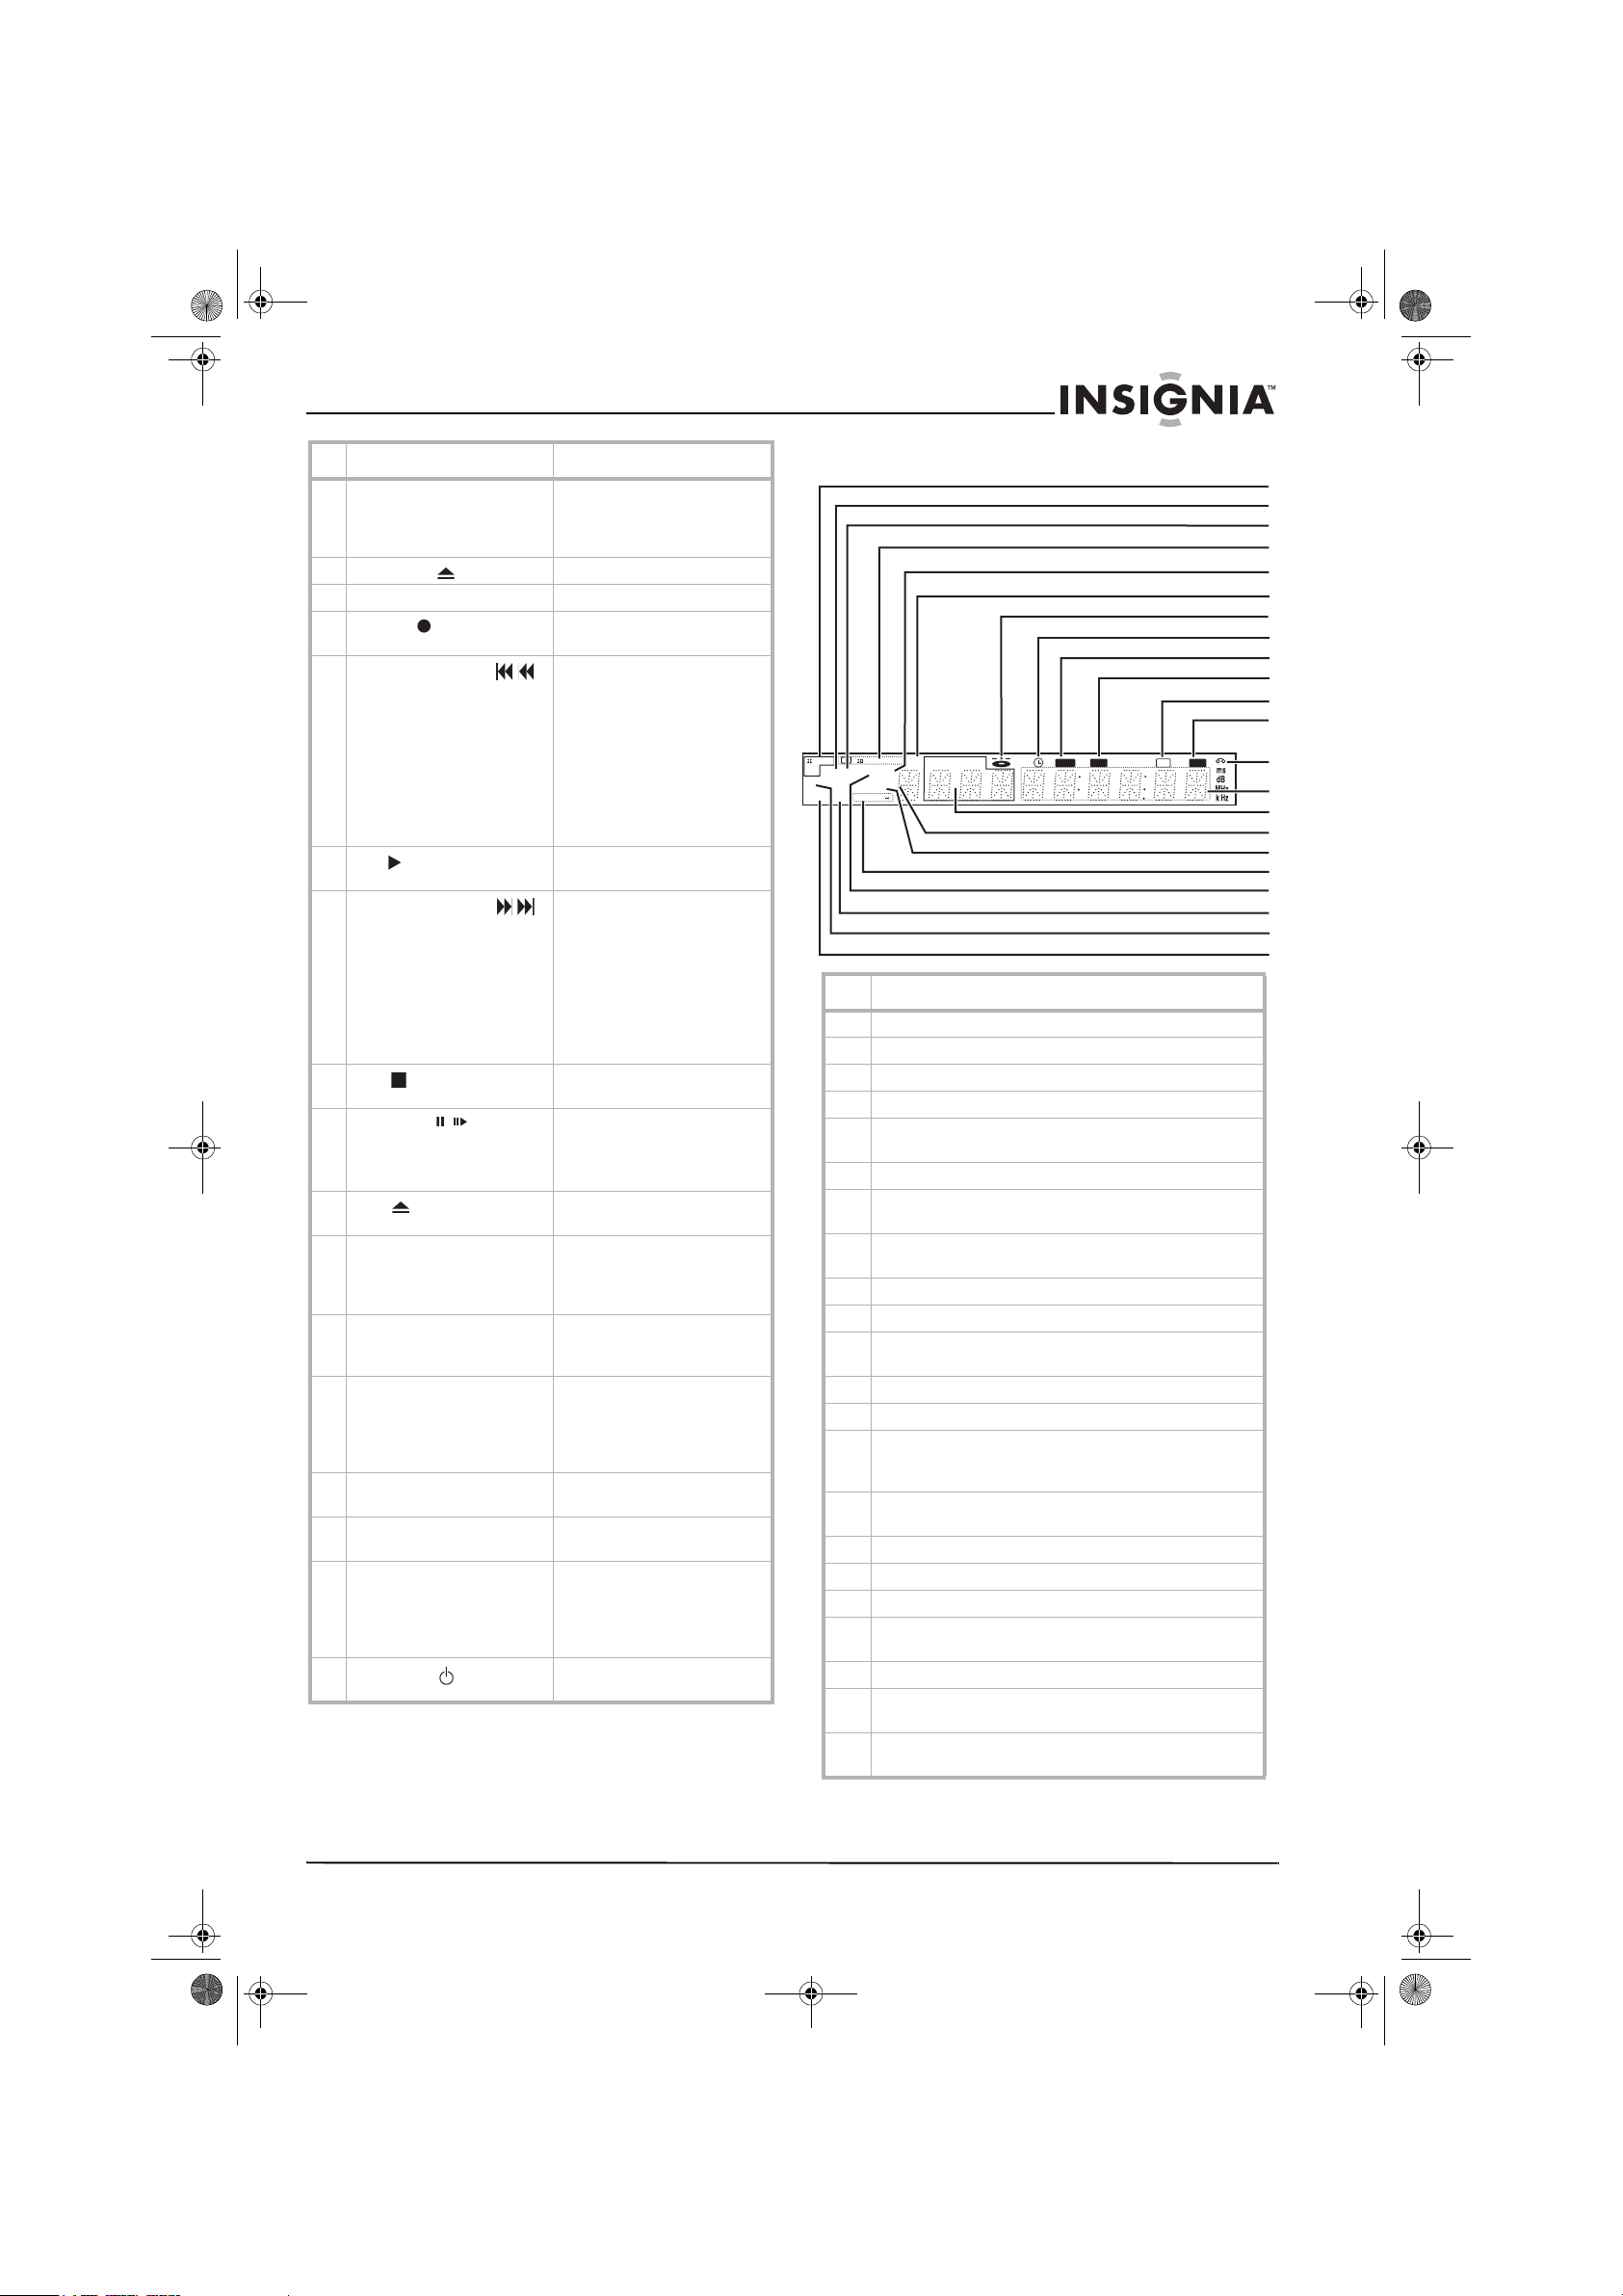
Display window
Description
1 Displays the current audio stream.
2 Lights up when a WMA disc is playing.
3 Lights up when the radio is playing.
4 Displays the current surround mode.
5 Lights up when an SAP bilingual broadcast is being
received.
6 Lights up when the programmed playback is active.
7 Lights up when a disc is loaded in the DVD. Flashes
when the disc tray is opened.
8 Lights up when the VCR is in VCR Timer Recording
mode or a VCR timer recording is programmed.
9 Lights up when a DVD to VCR copy is in progress.
10 Lights up when the VCR is recording a tape.
11 Lights up when the recorder is playing back a tape that
was recorded in Hi-Fi.
12 Lights up when the volume is muted.
13 Lights up when a tape is loaded into the VCR.
14 Displays the total playing time, elapsed playing time,
frequency, remaining time, current deck status,
surround mode, and volume.
15 Displays the current chapter number, track number, or
channel number.
16 Lights up when the home theater system is in TV mode.
17 Lights up to indicate an MP3 or WMA disc is inserted.
18 Displays the repeat playback mode.
19 Lights up to indicate a DVD is loaded into the home
theater system.
20 Lights up when a stereo broadcast is being received.
21 Lights up to indicate a JPEG file disc is loaded into the
home theater system.
22 Lights up to indicate the home theater system is in
progressive scan mode.
www.insignia-products.com
3
1
2
3
4
5
6
7
8
9
10
11
12
13
14
15
16
17
18
19
20
21
22
23
24
25
NS-H3005.fm Page 4 Thursday, February 23, 2006 11:38 PM
Back panel Remote control
1
2
3
4
5
6
7
8
9
Component Description
1 AC power cord Plug into an electrical outlet.
2 VCR in line 1 (Video
in/Audio in
(left/right))
3 DVD/VCR out video
out/audio out
(left/right))
4 Component/
progressive scan
video out (Y, Pb, Pr)
(DVD out)
5 Television antenna in Connect the VHF/UHF antenna or
6 FM antenna Connect the FM antenna to this jack.
7 AM antenna Connect the AM antenna to this jack.
8 Speaker connections Connect the six speakers to these
9 Coaxial out Connect to a television that has
Connect the audio/video output of an
external source such as an audio
system, television or monitor, or VCR
to these jacks.
Connect to a television that has audio
and video inputs.
Connect to a television that has
component (Y, Pb, Pr) inputs.
CATV cable to this terminal.
jacks.
coaxial inputs.
Insignia NS-H3005 Home Theater System
Caution
Do not touch the inner pins of the jacks on the back panel.
Electrostatic discharge may cause permanent damage to the
home theater system.
4
www.insignia-products.com
Component Description
1 Power Press to turn the home theater system
2 CD/DVD/VCR
select
30-9 number
keypad
4 Program Press to open or close the Program
5 Clear Press to remove a track number on the
6 Display/CLK/CNT Press to view the on-screen display.
on or off.
Press to select the output source
(CD/DVD or VCR) to view on the
television.
Press to enter numbers such as in a
menu.
menu.
Program menu or a mark on the Marker
Search menu.
Press to clear preset stations from the
tuner memory.
Press to switch between the clock, tape
counter, and tape remaining modes on
the display.
NS-H3005.fm Page 5 Thursday, February 23, 2006 11:38 PM
Insignia NS-H3005 Home Theater System
Component Description
7
Left /Right /
Up /Down
8 Return Press to return from the Setup menu.
9 REC/ITR Press to record a tape or activate Instant
Backward
Forward
10 Stop Press to stop playback.
Pause/Step
Play
11 Angle Press to select a DVD camera angle, if
12 CM Skip Press to skip forward through
13 Eject/Open/
Close
14 FM/AM Tuner
select
15 Input Press to select the VCR’s source (Tuner,
16 Audio Press to select an audio language (DVD)
17 Sound Mode Press to select the sound mode.
18 Set up/Menu Press to access or leave the DVD Setup
19 Memory/Enter Press to select a menu item.
20 Disc Menu Press to access the menu on the DVD
21 Volume (+/-) Press to adjust the speaker volume.
22 Marker Press to mark any point during playback.
Search Press to display the Marker Search
Subtitle Press to select a subtitle language.
Mute Press to turn the sound on and off.
23 Repeat/A-B/
Speed
Repeat Press to repeat a chapter, track, title, or
TV/VCR Press to switch to view channels
24 Zoom Press to enlarge the DVD video image.
Press to navigate through the on-screen
menu. Also use to change channels on
the VCR or stations on the radio.
Timer Recording.
In DVD mode: Press and hold to search
backward, press to go to the beginning
of the current chapter or track, or press
to go to the previous chapter or track.
In VCR mode: Press to rewind the tape if
the VCR is in Stop mode or press to
perform a fast reverse picture search.
In DVD mode: Press and hold to search
forward or press to go to the beginning
of the next chapter or track.
In VCR mode: Press to advance the tape
if the VCR is in Stop mode or press to
perform a fast forward picture search.
Press to temporarily pause playback or
recording.
Press repeatedly for frame-by-frame
playback.
Press to start playback.
one is available on the DVD.
30 seconds of recorded material.
Press to open and close the disc tray or
eject a tape in the VCR.
Switch between the FM or AM band on
the radio.
Line 1, or Line 2)
or an audio channel (CD).
menu and VCR menu.
Press to display functions on the
television screen.
Press to store a radio station’s frequency
in the tuner’s memory.
disc.
menu.
Press to repeat a marked section.
Press to select a recording speed.
all.
selected by the VCR tuner or by the
television tuner.
Component Description
25 Title Press to access the DVD’s Title menu.
Note
This remote control uses the same buttons for both the VCR
and the DVD player. To control the VCR, press the VCR button.
To control the DVD, press the DVD button.
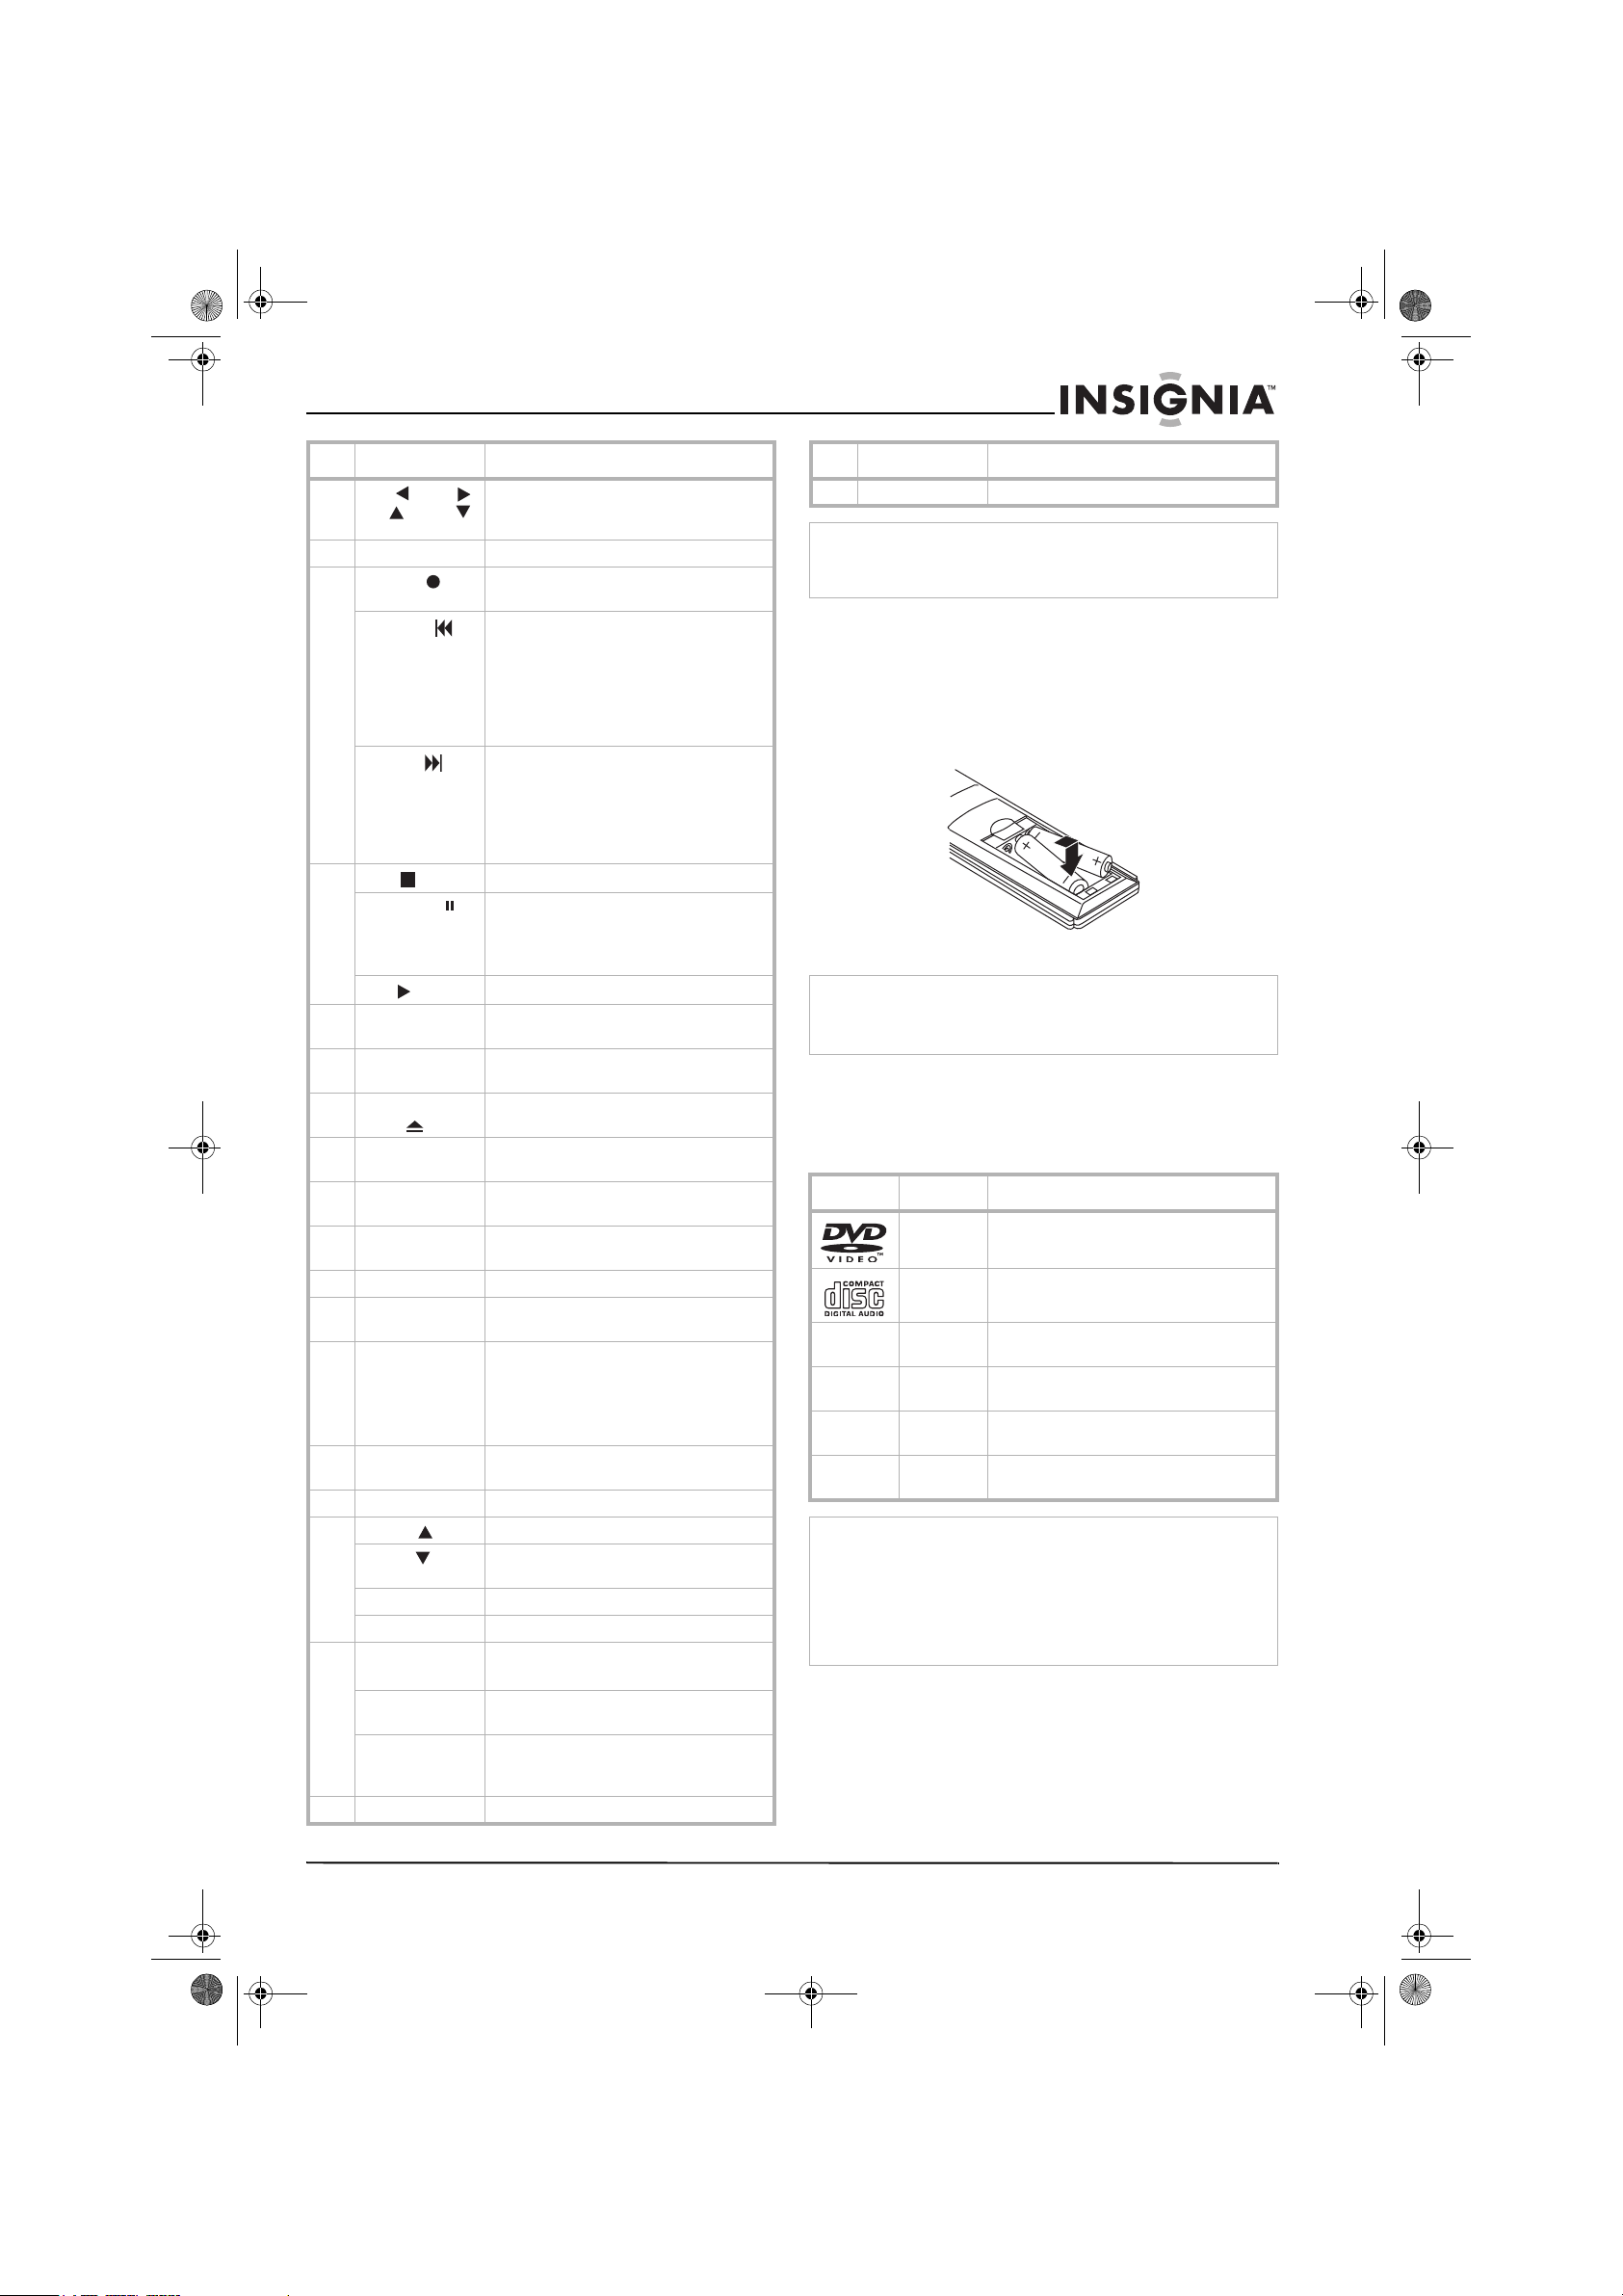
Installing batteries in the remote control
To install batteries in the remote control:
1 Detach the battery cover on the back of the
remote control.
2 Insert two AAA (R03) batteries with + and -
aligned correctly.
3 Replace the battery cover.
Caution
• Do not mix old and new batteries.
• Never mix different types of batteries (such as standard and
alkaline).
Using discs
Playable Discs
This DVD player plays the following discs:
Disc Description
DVD DVD video disc (8 or 12 cm)
CD Audio CD disc (8 or 12 cm)
DVD-RW DVDs containing MP3, WMA, or JPEG
DVD+RW DVDs containing MP3, WMA, or JPEG
CD-R CDs containing MP3, WMA, or JPEG
CD-RW CDs containing MP3, WMA, or JPEG
Note
• Depending on the conditions of the recording equipment or
the CD-R/RW (or DVD-RW, DVD+RW) disc itself, some
discs cannot be played on the player.
• Do not attach any seal or label to either side (the labeled
side or the recorded side) of a disc.
• Do not use irregularly shaped CDs (such as heart-shaped
or octagonal). Doing so may result in malfunctions.
DVD basics
Some playback operations of DVDs may be
programmed by the DVD manufacturer. This
player plays DVDs according to disc content
designed by the DVD manufacturer. Some
playback features of the player may not be
available or other functions may be added.
files
files
files
files
www.insignia-products.com
5
NS-H3005.fm Page 6 Thursday, February 23, 2006 11:38 PM
Insignia NS-H3005 Home Theater System
Make sure that you refer to the instructions
supplied with the DVDs. Some DVDs made for
business purposes may not play on the player.
Regional codes
This DVD player is designed and
manufactured for playback of Region 1
1
encoded DVD software. The region
indicates which type of player can play those
discs. This player can only play DVDs labeled 1
or ALL. If you try to play any other discs, the
message Check Regional Code appears on the
television screen. Some DVDs that have no
region code label may still be subject to area
restrictions and therefore not playable.
code on the labels of some DVDs
Disc glossary
Title (DVD video discs only)
A title is the main film content or accompanying
feature content or additional feature content, or
music album. Each title is assigned a title
reference number to make it easy for you to
locate it.
Chapter (DVD video discs only)
Chapters are sections of a video or a musical
piece that are smaller than titles. A title is
composed of one or more chapters. Each
chapter is assigned a chapter number to make it
easy for you to locate the chapter you want.
Some discs may not have chapters.
Track (Audio CD only)
Tracks are sections of a musical piece on an
audio CD. Each track is assigned a track number
to make it easy for you to locate the track you
want.
Audio glossary
DTS
Lets you enjoy 5.1(or six) discrete channels of
high quality digital audio from DTS program
sources such as DVDs and CDs bearing the
trademark. DTS Digital Surround delivers up to
six channels of transparent audio and results in
exceptional clarity throughout a true 360 degree
sound field. The term DTS is a trademark of
DTS Technology, LLC. This player is
manufactured under license from DTS
Technology, LLC.
Dolby Digital
The Dolby Digital surround format lets you enjoy
up to 5.1 channels of digital surround sound
from a Dolby Digital program source. If you play
DVDs with the mark, you can enjoy even
better sound quality, greater spatial accuracy,
and improved dynamic range.
Pro Logic
Use this mode when playing a movie or Dolby
Digital 2 channel which carries the mark.
This mode provides the effect of being in a
movie theatre or live concert house—an effect
with an intensity which can only be obtained
through Dolby Pro Logic Surround. The effect of
the front, back, left, and right movement of the
sound image, as well as the sense of fixed
position in the sound image, is much clearer and
more dynamic than before.
Pro Logic (II)
Dolby Pro Logic II creates five full-bandwidth
output channels from two-channel sources. This
is done using an advanced, high-purity matrix
surround decoder that extracts the spatial
properties of the original recording without
adding any new sounds or tonal colorations.
( )
Movie mode
The Movie mode is for use with stereo television
shows and all programs encoded in Dolby
Surround. The result is enhanced sound field
directionality that approaches the quality of
discrete 5.1-channel sound.
Music mode
The Music mode is for use with any stereo music
recordings.
Matrix mode
The Matrix mode is the same as the Music mode
except that the directional enhancement logic is
turned off. It may be used to enhance mono
signals by making them seem
larger
3D SURROUND
This player can produce a 3D surround effect,
using 3D Surround Sound technology, which
simulates multi-channel audio playback from two
conventional stereo speakers instead of the five
or more speakers normally required to listen to
multi-channel audio from a home theatre. This
feature works with DVDs encoded with Dolby
Pro Logic and Dolby Digital audio tracks.
BYPASS
Software with multichannel surround audio
signals is played according to the way it was
recorded.
Sound mode
You can enjoy surround sound by selecting one
of the pre-programmed sound fields according to
the program you want to listen to.
DVD playback
You can change the Digital Audio Output mode
by pressing the AUDIO button on the remote
control during playback. Although the DVD
contents differ from disc to disc, the following
explains the basic operation when this feature is
used.
• After you select two channel by pressing the
AUDIO button, press the SOUND MODE
button repeatedly. The sound mode
selections are as follows:
•Bypass
• PRO Logic
•Movie
•Music
•Matrix
• 3D Surround
• After you select 5.1 channel by pressing the
AUDIO button, press the SOUND MODE
button. BYPASS is the only option.
.
6
www.insignia-products.com
Antenna
Antenna
Cable TV
wall jack
Back of home theater system
Flat Wire
(300 ohm)
300/75
ohm
adapter
(not
supplied)
NS-H3005.fm Page 7 Thursday, February 23, 2006 11:38 PM
Insignia NS-H3005 Home Theater System
CD playback
Each time you press SOUND, the audio CD
sound mode is changed in the following order:
•Bypass
• PRO Logic
•Music
•Matrix
• 3D Surround
Note
• The player memorizes the last mode setting for each source
individually.
• You can identify the encoding format of program software
by looking at its packaging.
Dolby Digital discs are labeled with the logo .
Dolby Surround encoded programs are labeled with the
logo .
DTS Digital Surround discs are marked with DTS.
• When you play sound tracks with 96kHz sampling
frequency, the output signals are converted to 48kHz
sampling frequency.
Connecting your home
theater system
Note
• Depending on your television and other equipment you
want to connect, there are various ways to connect the
home theater system. Use connections described on
page 7 through page 9.
• Refer to your television, VCR, and Stereo System manuals
to make the best connections.
• Make sure that the home theater system is connected
directly to the television. Tune the television to the correct
video input channel.
• Do not connect your home theater system through another
VCR. The DVD image could be distorted by the copy
protection system.
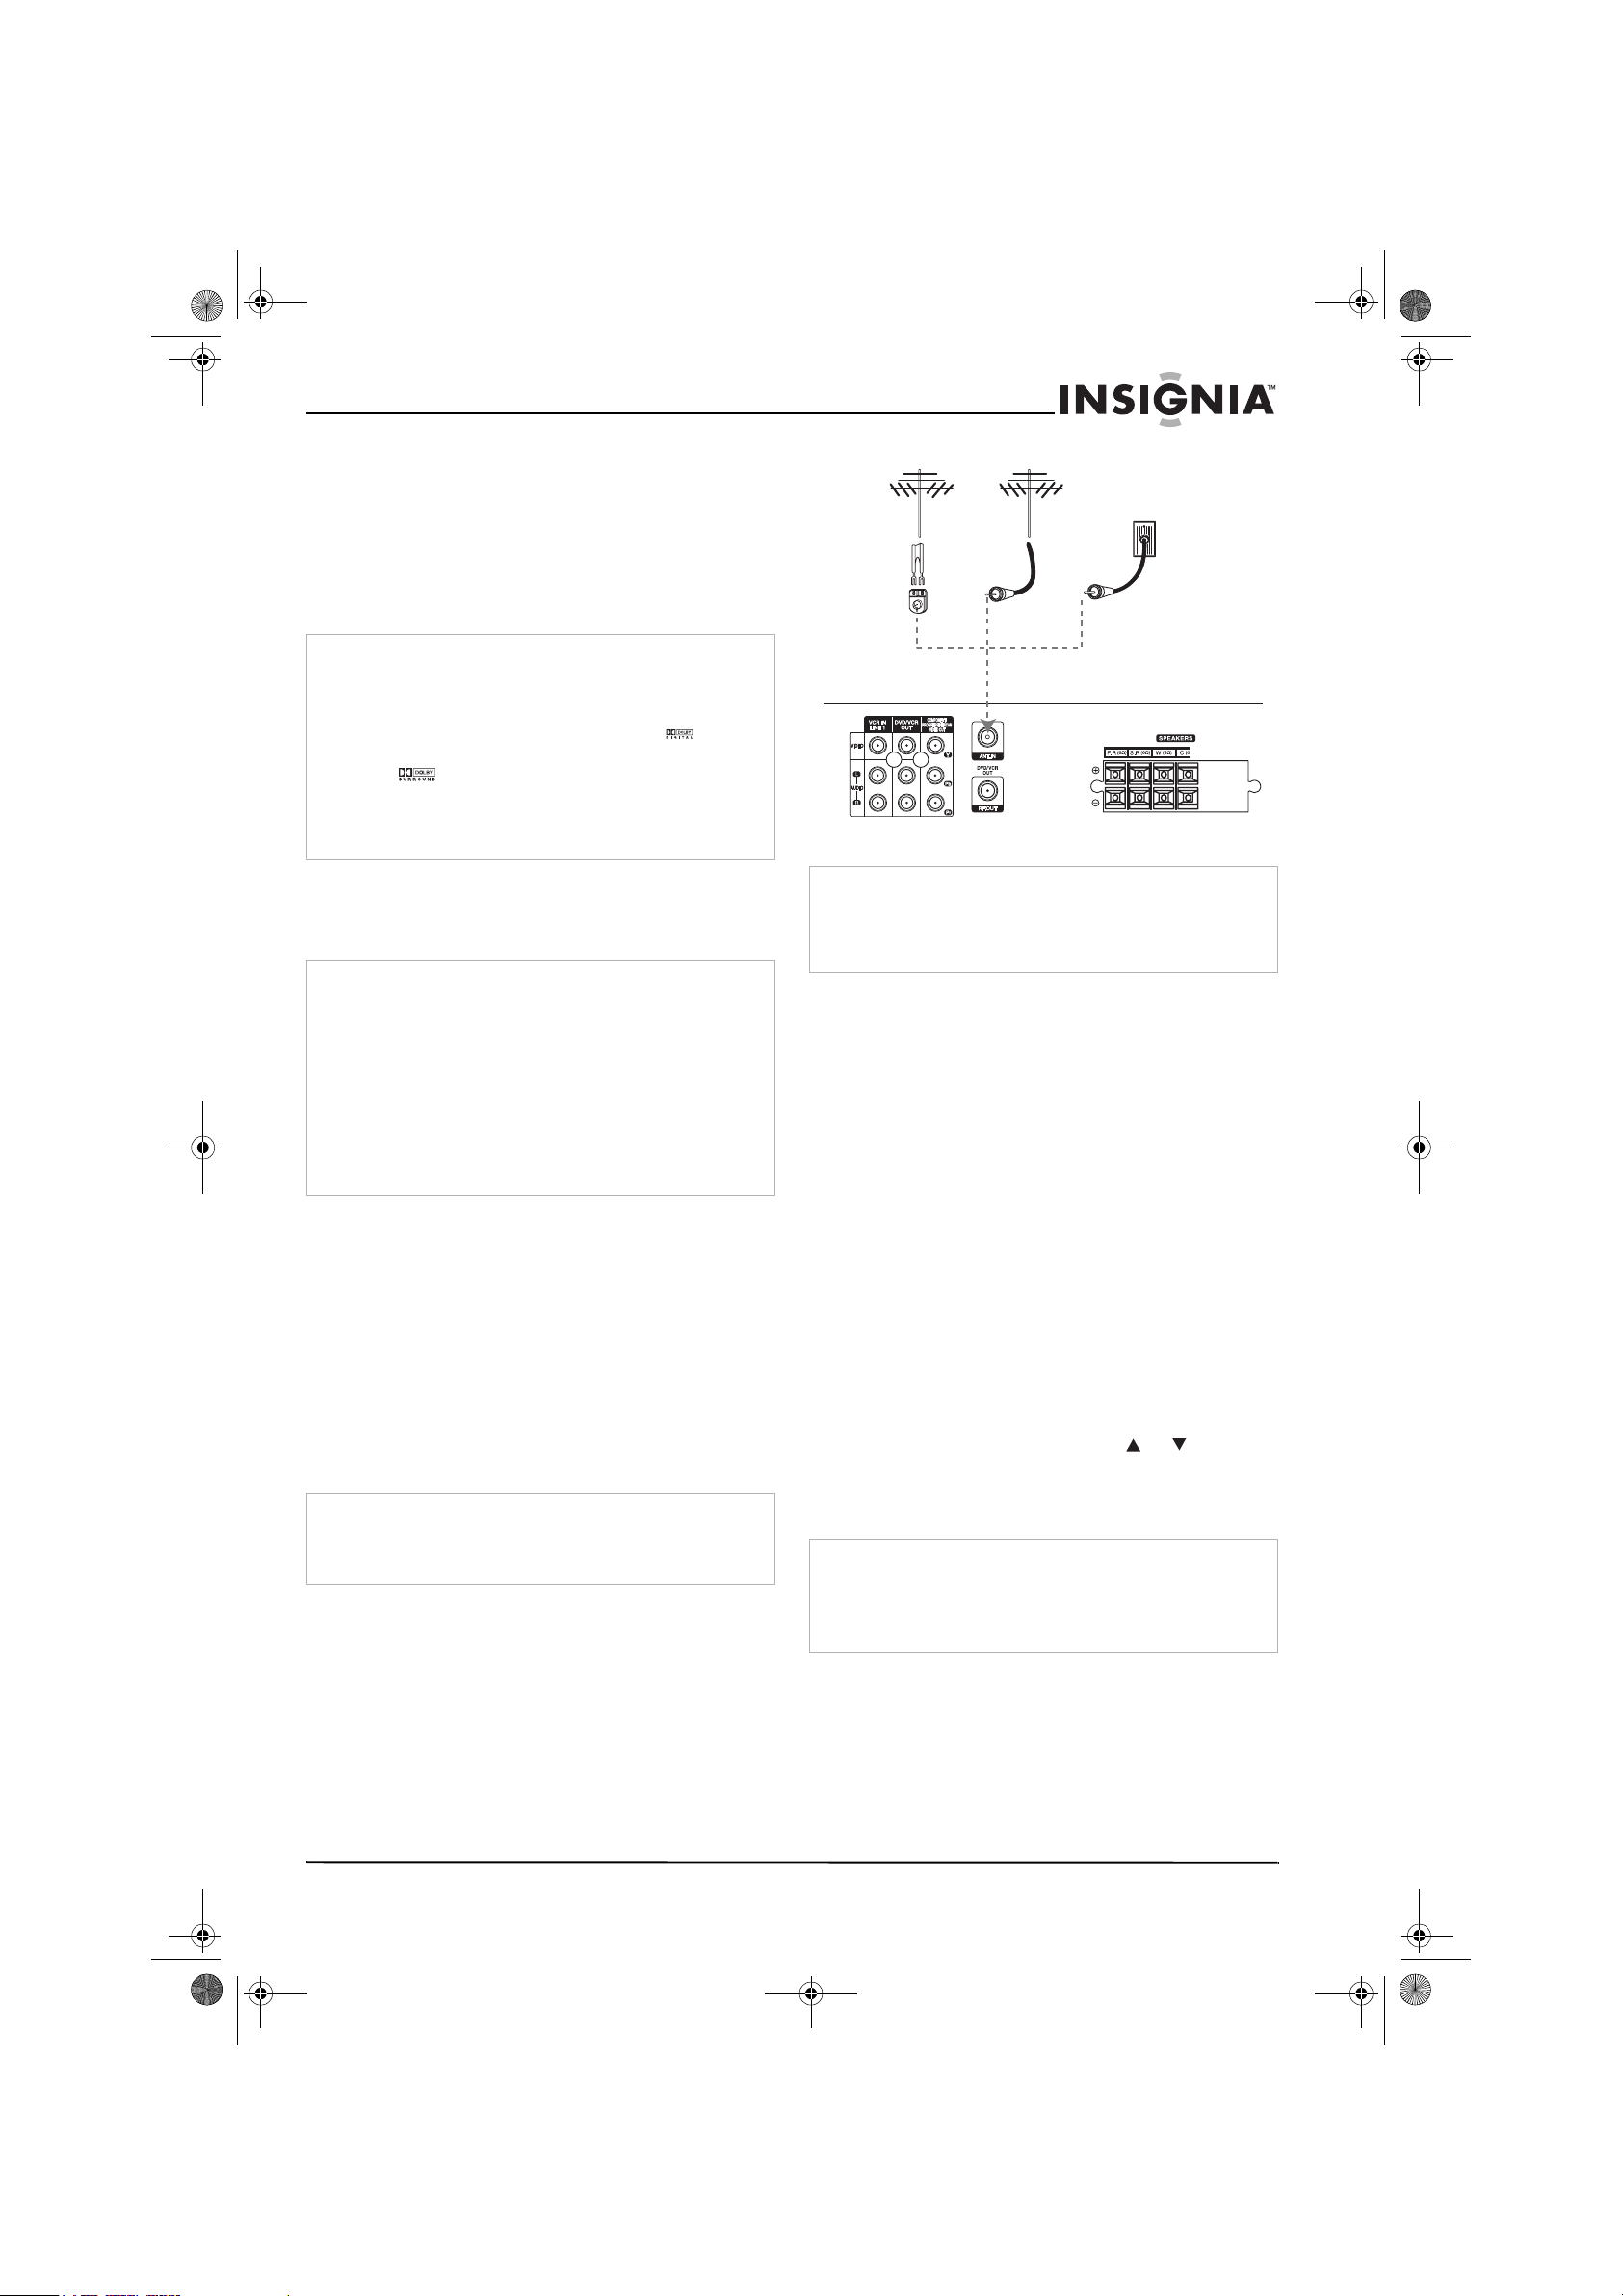
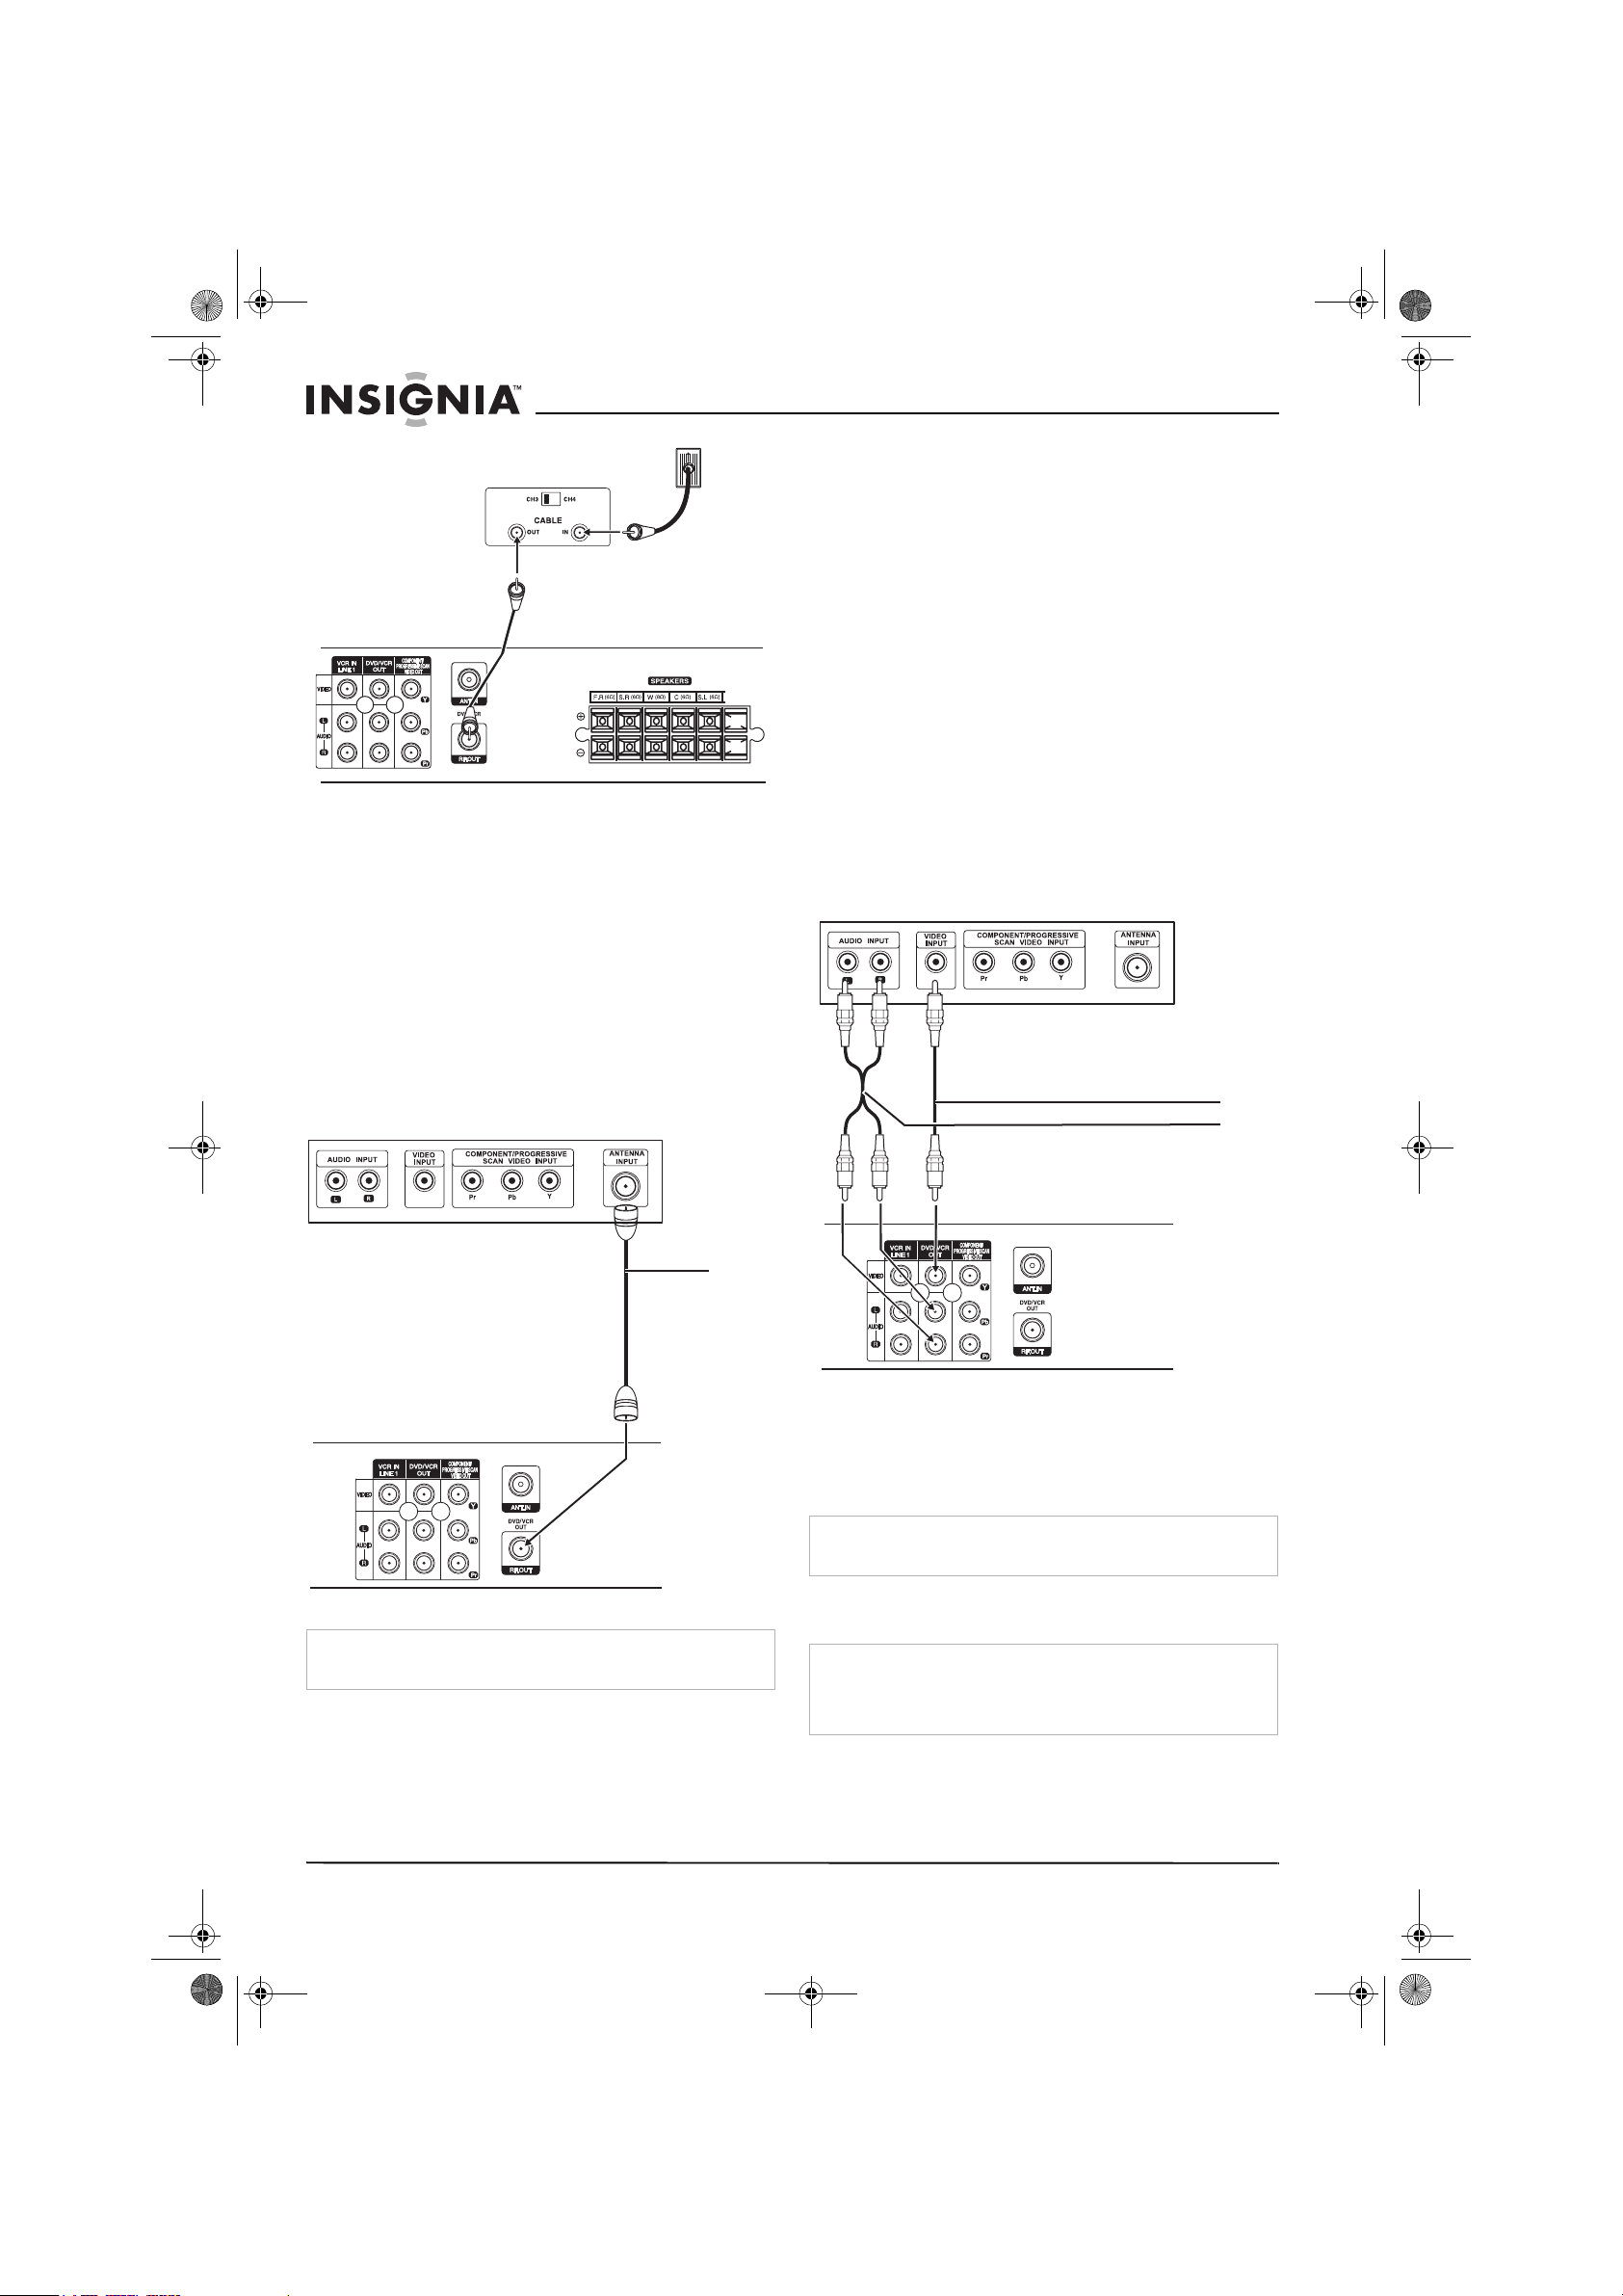
Connecting antenna or cable TV to the
home theater system
To connect the antenna or cable TV to your
home theater system:
1 Disconnect the antenna or cable TV leads
from the back of your television.
2 Identify the type of cable from your antenna
or cable TV. If it is a round cable as
illustrated, it is a 75 ohm coaxial antenna
cable. This cable connects directly to the jack
marked ANTENNA/CABLE IN on your home
theater system.
Note
If your antenna lead wire is a flat type antenna cable, connect it
to an antenna adapter (300-ohm to 75-ohm) (not supplied) and
plug the adapter onto the ANTENNA/CABLE IN jack. The
adapter does not screw onto the jack, it just plugs over it.
Note
During DVD or VCR playback, the home theater system is
designed so that sound is heard only from the home theater
system’s five speakers and subwoofer. No sound output is
provided to the television if it is connected to the MONITOR
OUT jack on the home theater system with optional cables.
Connecting without a cable box
If your cable wire is connected to your television
without a converter or descrambler box, unscrew
the wire from your television and attach it to the
ANTENNA/CABLE IN jack on the home theater
system. Use the supplied round coaxial cable to
connect between the home theater system’s
ANTENNA/CABLE OUT jack and the 75 ohm
antenna input jack on the television. With this
connection, you can receive all midband, super
band, and hyperband channels.
Connecting with a cable box
If a cable converter box is required in your cable
system, follow these instructions. This cable
hookup permits both television and home
theater system operation.
To view or record CATV channels:
1 Tune the television to the home theater
system output channel (CH 3 or 4).
2 Set the home theater system channel
selector to the output channel of the cable
converter box by using the or on your
home theater system. (Example: CH3)
3 Select the channel to view or record at the
cable converter box.
Note
• With this connection, you cannot record one program while
viewing another.
• If you are using a cable box to tune channels, it is not
necessary to complete Auto Channel Programming as
indicated on page 12.
www.insignia-products.com
7
Back of home theater system
Cable TV
wall jack
Back panel of typical
cable box
Coaxial
cable
Back of home theater system
Video
Audio
Back of home theater system
NS-H3005.fm Page 8 Thursday, February 23, 2006 11:38 PM
Connecting the home theater system to
the television
Connect the home theater system to your
television using one of the following methods:
• “RF coaxial connection” on page 8
• “Audio/Video connection” on page 8
• “Component Video (ColorStream®)
connection” on page 8
• “Progressive Scan (ColorStream® pro)
connection” on page 9
RF coaxial connection
Connect the ANTENNA/CABLE OUT jack on the
home theater system to the ANTENNA in jack
on the television using the 75-ohm coaxial cable.
Insignia NS-H3005 Home Theater System
To set the home theater system’s RF output
channel:
1 While the home theater system is turned off,
press and hold CH/PRESET (-/+) on the front
panel for about five seconds. The home
theater system turns itself on and RF-03 or
RF-04 appears in the display window.
2 Press CH/PRESET (-/+) on the front panel to
change the RF output channel (CH 03 or CH
04).
3 Turn the home theater system off, then turn it
on again.
4 Select the television’s CH to 3 or 4 depending
on the RF output channel you selected.
Audio/Video connection
To connect the home theater system to the
television using the A/V jacks:
1 Connect the home theater system VIDEO
OUT jack on the home theater system to the
video in jack on the television using the
supplied video cable.
Note
If you use this connection, tune the television to the home
theater system’s RF output channel (CH 3 or 4).
8
2 Connect the left and right home theater
system AUDIO OUT jacks on the home
theater system to the audio left/right in jacks
on the television using the supplied audio
cables.
Note
If you use this connection, set the television’s source selector
to VIDEO.
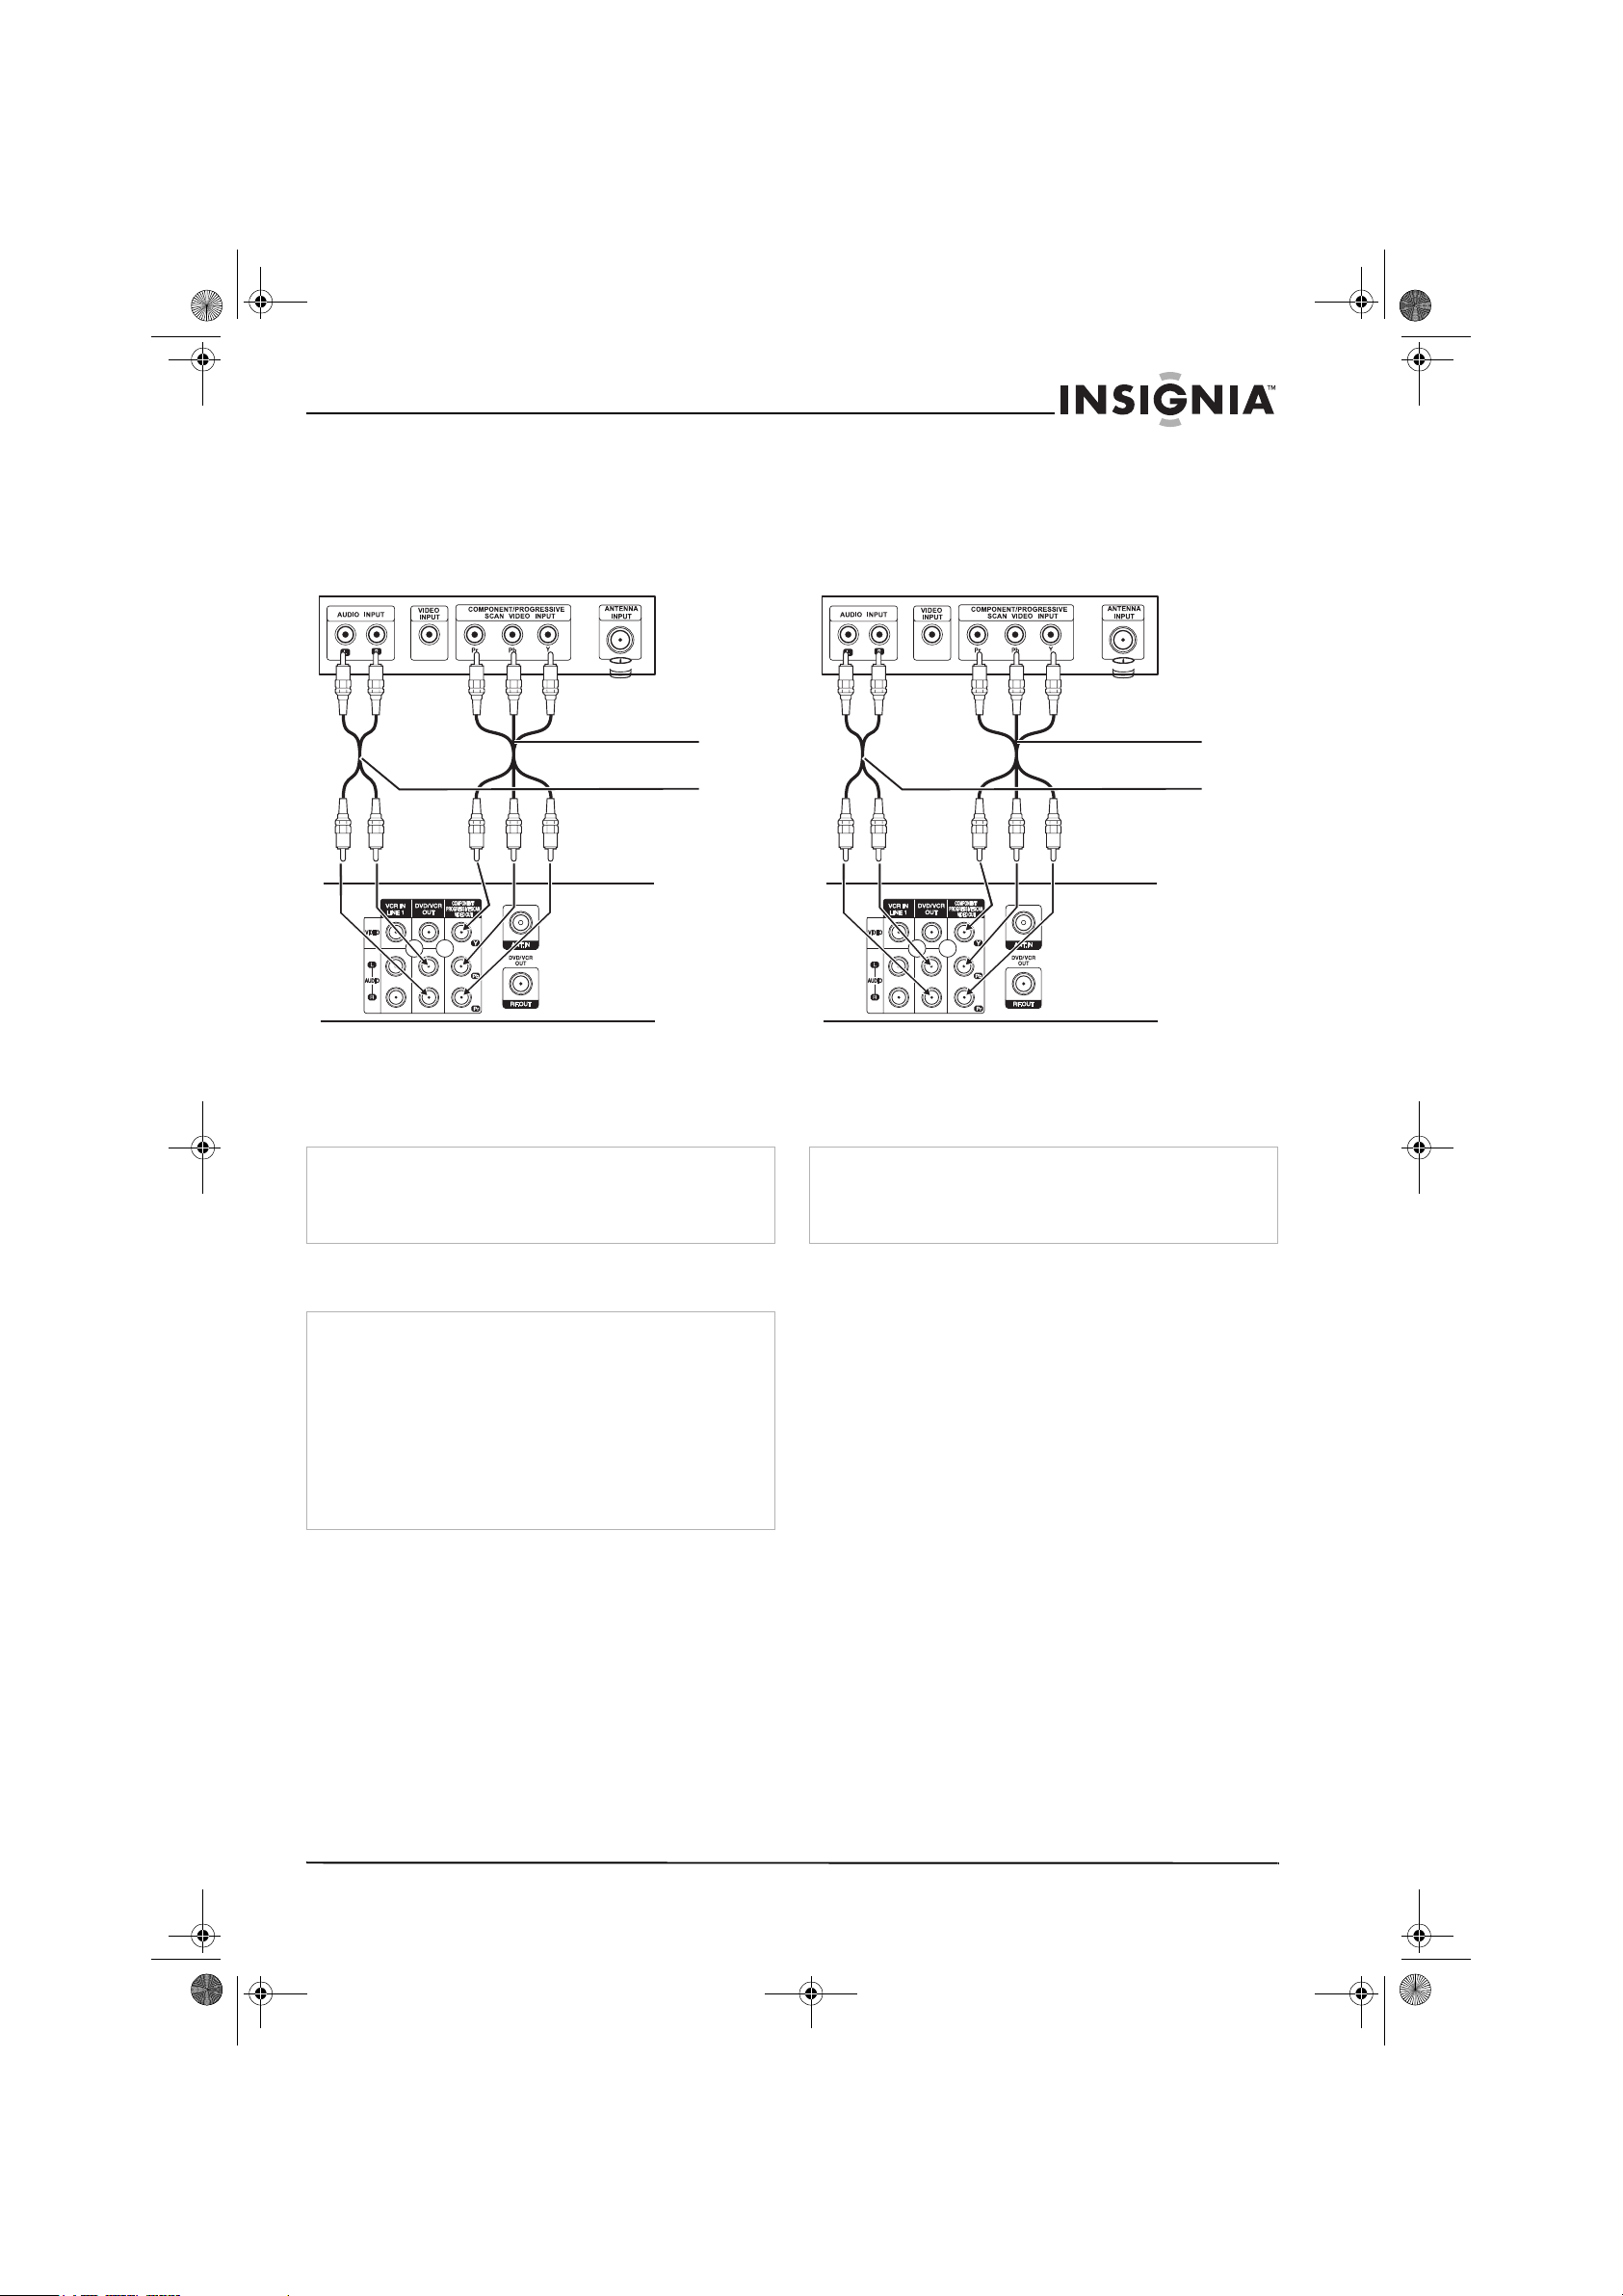
Component Video (ColorStream®)
connection
Note
DVD playback can also be done using the COMPONENT/
PROGRESSIVE SCAN VIDEO OUT connection. The tuner
and VCR only output through the RF.OUT (R) or home theater
system OUT (A, V) jack.
www.insignia-products.com
Component
Audio
Back of home theater system
Component
Audio
Back of home theater system
NS-H3005.fm Page 9 Thursday, February 23, 2006 11:38 PM
Insignia NS-H3005 Home Theater System
To connect the DVD player to the television
using component video:
1 Connect the COMPONENT/PROGRESSIVE
SCAN VIDEO OUT jacks on the home
theater system to the corresponding in jacks
on the television using Y, Pb, and Pr cables
(C).
To connect the DVD player to the television
using progressive scan:
1 Connect the COMPONENT/PROGRESSIVE
SCAN VIDEO OUT jacks on the home
theater system to the corresponding in jacks
on the television using Y, Pb, and Pr cable
(C).
2 Connect the left and right home theater
system AUDIO OUT jacks to the audio left
and right in jacks on the television using the
supplied audio cables.
Note
• Set the Progressive Scan to On on the DVD Setup menu for
progressive scan, see “Picture menu” on page 17.
• Progressive scan does not work with the analog video
connections (yellow VIDEO OUT and S-VIDEO OUT jack).
Progressive Scan (ColorStream® pro)
connection
Note
• DVD playback can also be done using the COMPONENT/
PROGRESSIVE SCAN VIDEO OUT connection. The tuner
and VCR only output through the RF.OUT (R) or home
theater system OUT (A, V) jack.
• If your television is a high-definition or
television, you can take advantage of the home theater
system’s progressive scan output for the highest video
resolution possible.
• If your television does not accept the Progressive Scan
format, the picture appears scrambled if you try using
progressive scan on the home theater system.
digital-ready
2 Connect the left and right home theater
system AUDIO OUT jacks to the audio left
and right in jacks on the television (A) using
the supplied audio cables.
Note
• Set the Progressive Scan to On on the DVD Setup menu for
progressive scan, see “Picture menu” on page 17.
• Progressive scan does not work with the analog video
connections (yellow VIDEO OUT and S-VIDEO OUT jack).
www.insignia-products.com
9
L
R
VIDEO
O
UTPU
T
AUD
IO
O
UTPU
T
Back of home theater system Front of home theater system
Accessory device jack panel
Accessory component such as a VCR,
camcorder, video camera, satellite
receiver, or laser disc player
OR
AM loop antenna
FM wire antenna
Front speaker
(right)
Center speaker
Front speaker
(left)
Rear speaker (right)
Rear speaker
(left)
Subwoofer
Stopper
NS-H3005.fm Page 10 Thursday, February 23, 2006 11:38 PM
Insignia NS-H3005 Home Theater System
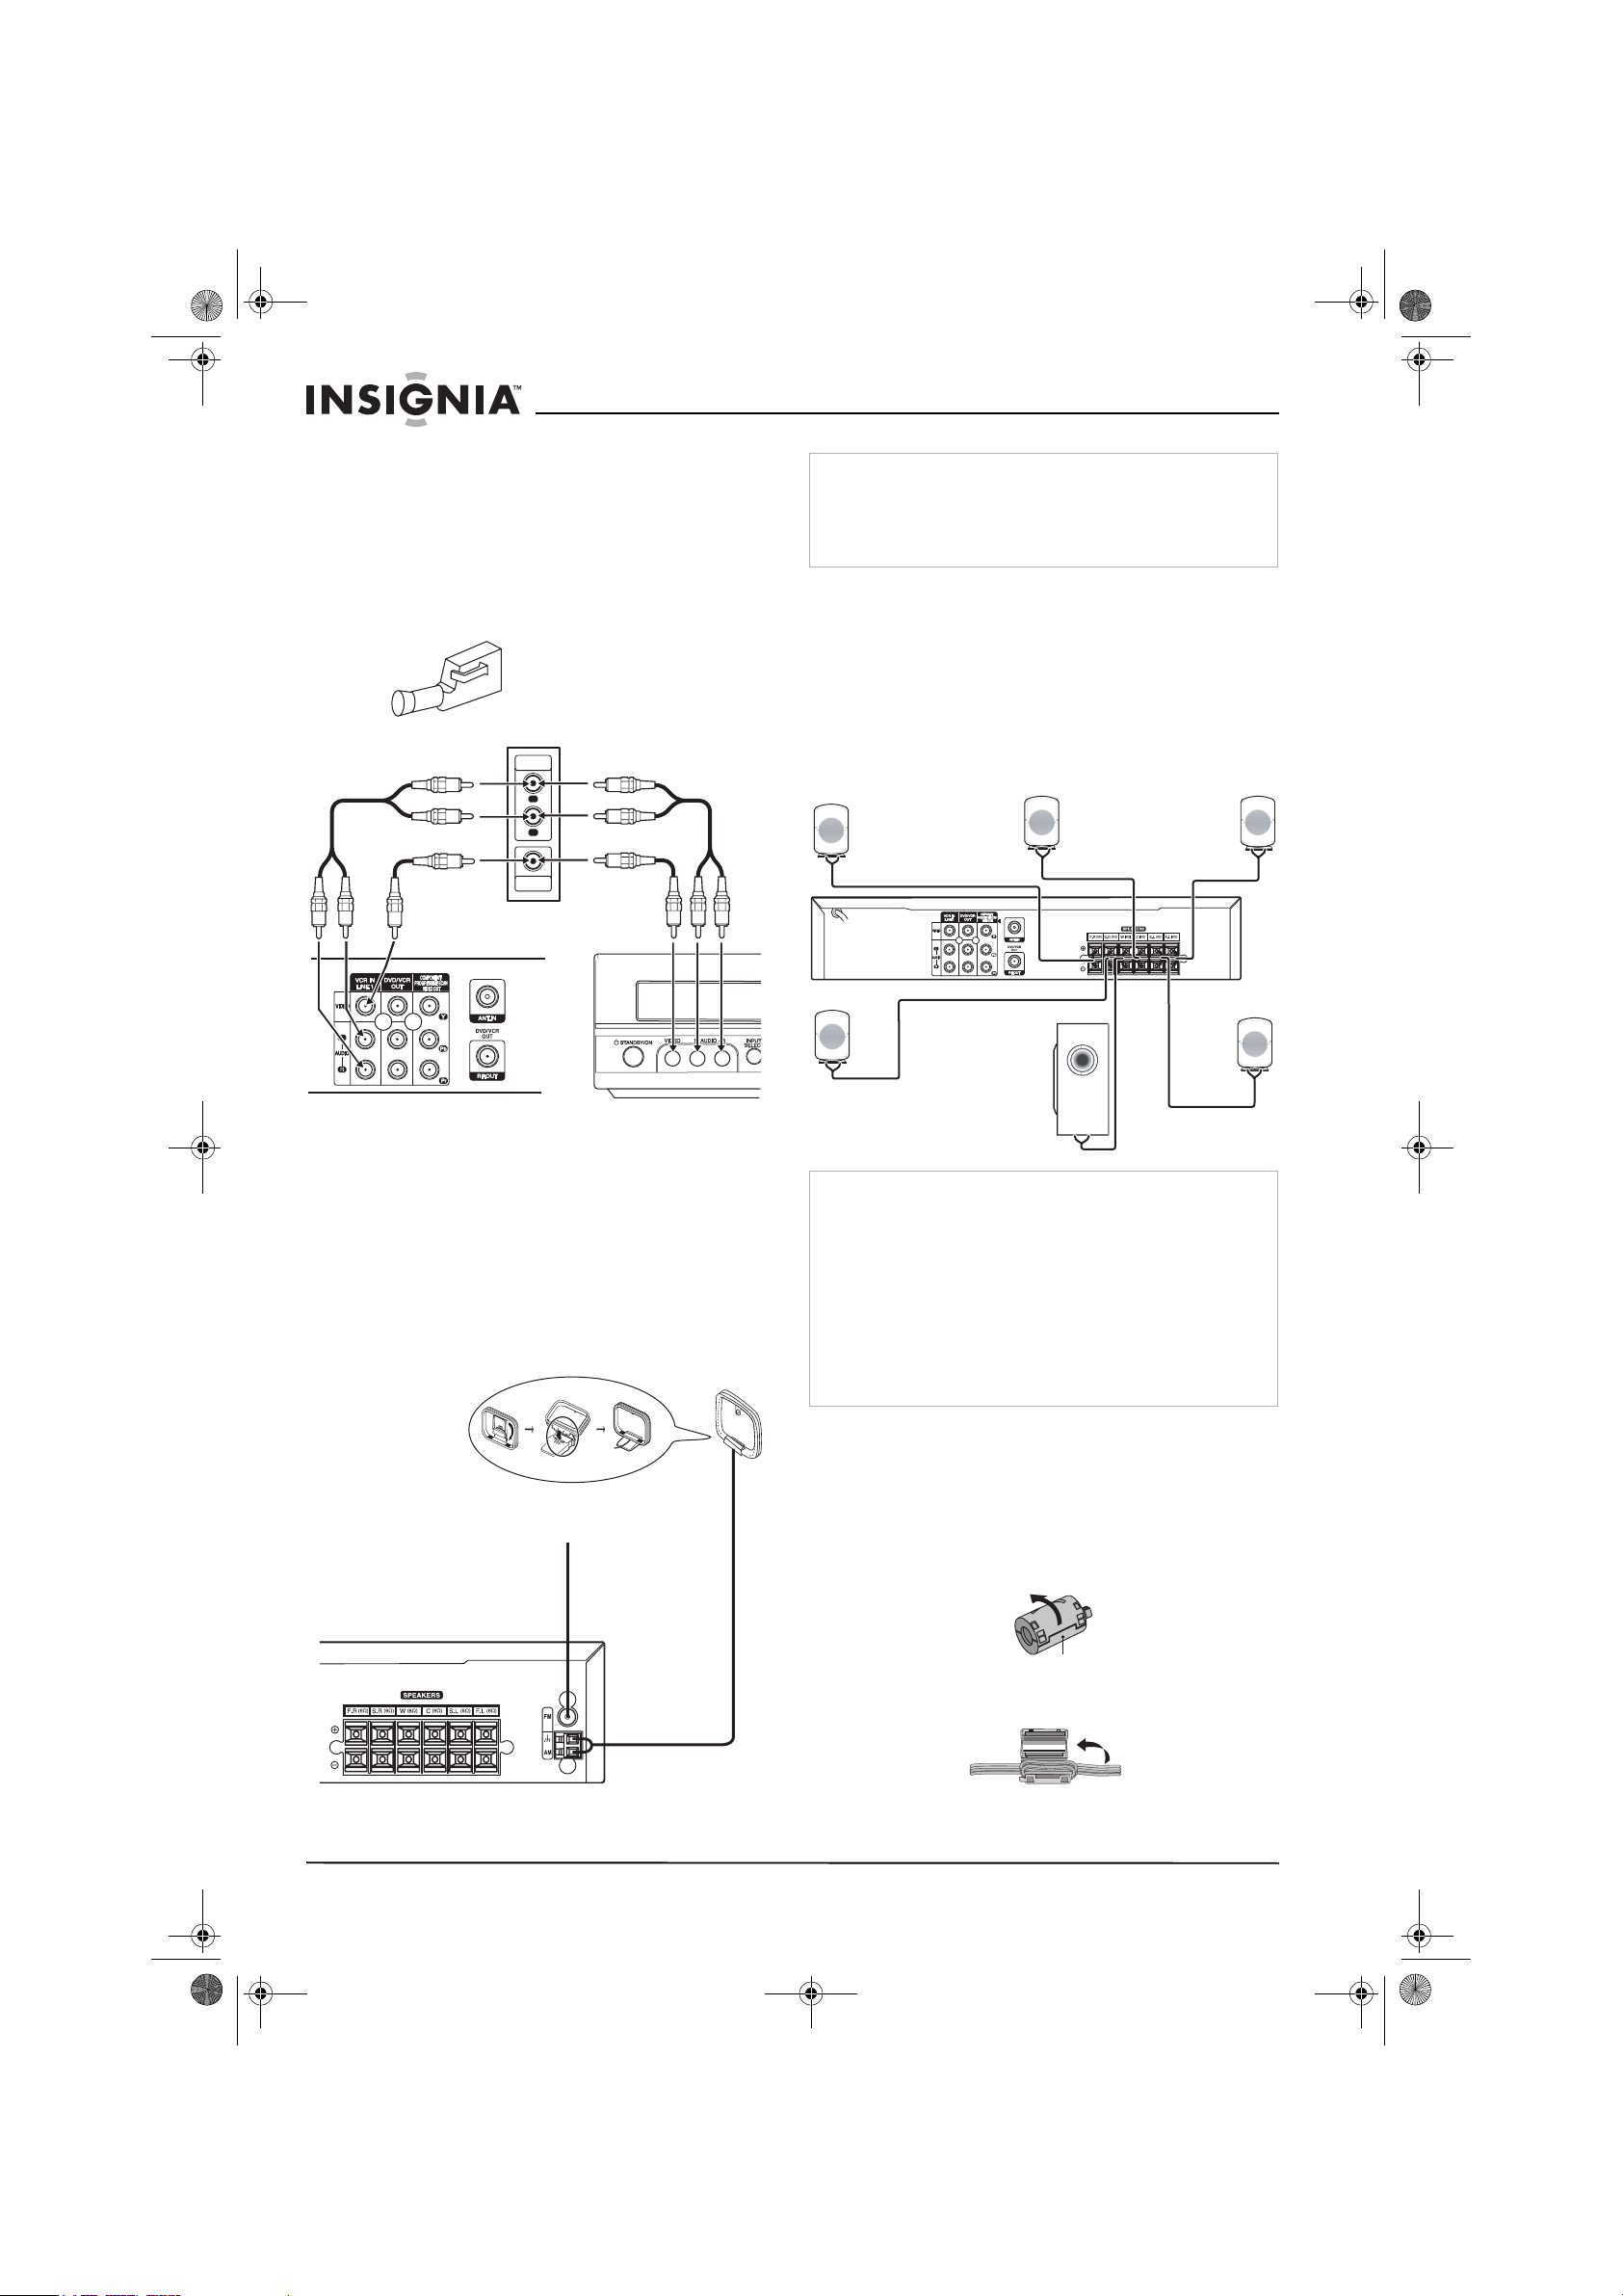
Connecting devices to your home theater
system
To connect devices to your home theater
system:
• Connect the LINE 1 or LINE 2 jacks on the
home theater system to the AUDIO/VIDEO
OUT jacks on your accessory component
using the optional audio/video cables.
Note
• To prevent noise pickup, keep the AM loop antenna away
from the home theater system and other devices.
• Be sure to fully extend the FM wire antenna.
• After connecting the FM wire antenna, keep it as close to
horizontal as possible.
Connecting speakers to your home theater
system
Connect the speakers using the supplied
speaker cables.
To obtain the best possible surround sound,
adjust the speaker distance and level settings.
For more information, see “Speaker Setup” on
page 17.
Connecting the radio antennas to your
home theater system
Connect the supplied AM and FM antennas so
you can listen to the radio.
To connect the radio antennas:
1 Connect the AM loop antenna to the AM
antenna connector.
2 Connect the FM wire antenna to the FM
antenna connector.
Note
• Make sure that you match the speaker cable to the
appropriate terminal on the connectors: + to + and – to –. If
the cables are reversed, the sound is distorted and lacks
bass.
• When making the sound louder, adjust the sound level
carefully to avoid excessive volume output to the speakers.
• Only 2-channel stereo (Front Left, Front Right, and
Subwoofer) is available in VCR mode. Sound might not be
heard from center or rear speakers during VCR playback.
(For further details about sound mode, see “Sound mode”
on page 6.)
• Do not remove the front covers of the speakers.
Attaching the ferrite core
Be sure to attach the ferrite core to the speaker
cables. The ferrite core reduces unwanted
noises.
To attach the ferrite core:
1 Open the ferrite core by pressing the stopper.
2 Wind the cable once around the ferrite core.
10
www.insignia-products.com
 Loading...