

ไทย
E N G L I S H
คู่มือการใช้
User Guide
LG-P520
P/N :
MFL67013106 (1.0) H
LG-P520_THA_Thailand_Cover_1.0_1109_PC.indd 1 2010-12-16 오후 9:37:48

Bluetooth QD ID
B016931
โปรแกรมรับรองผลิตภัณฑ์ LG
เรียน ท่านผู้มีอุปการะคุณ
ขณะนี้ บริษัท LG ได้ดำเนินงานตรวจสอบสินค้าและผลิตภัณฑ์
ของทาง LG เพื่อคุ้มครองผู้บริโภค จากการจำหน่ายผลิตภัณฑ์
ลอกเลียนแบบจากตลาดลักลอบนำเข้าสินค้ารวมถึงเพื่อให้แน่ใจ
ว่าลูกค้าได้รับบริการทางด้านการประกันสินค้าอย่างเป็นทางการ
เพื่อ ให้ แน่ใจ ว่าโทรศัพท์ของท่าน เป็นผลิตภัณฑ์แท้จากทาง
LG, หนึ่งข้อความพร้อมด้วย IMEI เครื่อง จะถูกส่งมายัง บริษัท
LG โดยอัตโนมัติ นับตั้งแต่วันที่ซื้อผลิตภัณฑ์และเริ่มใช้บริการ
ทั้งนี้ LG จะเป็นผู้ชำระค่าบริการ SMS สำหรับโปรแกรมตรวจ
สอบผลิตภัณฑ์นี้ี้
สำหรับสิทธิพิเศษ ท่านจะได้รับสิทธิในการต่อระยะเวลาการรับ
ประกันฟรีเพิ่มขึ้นหนึ่งเดือน โดยสิทธิพิเศษนี้ครอบคลุม เฉพาะ
การรับประกันตัวเครื่อง ไม่รวมแบตเตอรี่ และ อุปกรณ์เสริมอื่นๆ.
ทันทีที่โทรศัพท์ของคุณได้รับการตรวจสอบและรับรอง
คุณจะได้รับข้อความรับรอง “โทรศัพท์เครื่องนี้ คือผลิตภัณฑ์
จากบริษัท LG”
โดยทุกหมายเลข IMEI ที่ส่งถึงบริษัท LG สามารถการันตีได้ว่า
จะได้รับสิทธิการรับประกันสินค้า อันเนื่อง จากข้อบกพร่องจาก
มาตรฐานในขั้นตอนการผลิต โดยไม่จำเป็นต้องแสดงหลักฐาน
ในการซื้อหรือ บัตรรับประกันสินค้า นับตั้งแต่วันแรกที่ท่านซื้อ
ผลิตภัณฑ์์
LG-P520_THA_Thailand_Cover_1.0_1109_PC.indd 2 2010-12-16 오후 9:37:48

คู่มือการใช้ LG-P520 — ไทย
ข้อมูลบางอย่างในคู่มือเล่มนี้อาจแตกต่างจากโทรศัพท์ของคุณ
ขึ้นอยู่กับซอฟต์แวร์ของโทรศัพท์หรือผู้ให้บริการของคุณ

2
โปรดอ่านคำแนะนำเบื้องต้นต่อ
ไปนี้ การไม่ปฏิบัติตามคำแนะ
นำเหล่านี้อาจทำให้เกิด
อันตรายหรือผิดกฎหมาย
การรับพลังงานคลื่นความถี่วิทยุ
ข้อมูลเกี่ยวกับการรับพลัง
งานคลื่นความถี่วิทยุและค่า
SAR (Specific Absorption
Rate)
โทรศัพท์เคลื่อนที่รุ่น LG-P520
นี้ ได้รับการออกแบบตรง
ตามข้อกำหนดเรื่องความปลอด
ภัยในการใช้งานอันเกี่ยวกับการ
รับพลังงานคลื่นความถี่วิทยุ
ข้อกำหนดนี้ใช้หลักเกณฑ์ทาง
วิทยาศาสตร์ที่รวมถึงการ
กำหนดค่าเผื่อไว้ ทั้งนี้เพื่อ
ความปลอดภัยของผู้ใช้ทุกคน
โดยไม่ขึ้นกับอายุและสุขภาพ
• ข้อกำหนดเกี่ยวกับการรับพลัง
งานคลื่นความถี่วิทยุใช้หน่วย
วัดที่เรียกว่า Specific
Absorption Rate หรือ SAR
การทดสอบ SAR ได้กระทำ
ด้วยการใช้วิธีการที่
ได้มาตรฐาน โดยให้เครื่อง
โทรศัพท์ส่งสัญญาณที่แรง
ที่สุดและมีการรับรองขนาด
สัญญาณแล้ว โดยการส่ง
สัญญาณดังกล่าวได้กระทำ
ในทุกย่านความถี่ที่
โทรศัพท์ใช้อยู่
• แม้ว่าระดับ SAR ของโทร
ศัพท์LGแต่ละรุ่นจะแตกต่าง
กันบ้าง แต่ทุกรุ่นจะได้รับ
การออกแบบให้อยู่ภายใน
ข้อกำหนดการรับ
พลังงานคลื่นความถี่วิทยุ
• ข้อจำกัด SAR ที่แนะนำโดย
International Commission
on Non-Ionizing Radiation
Protection (ICNIRP) คือ
2 วัตต์/กก. โดยเฉลี่ยตาม
เนื้อเยื่อหนัก 10 กรัม
•
ค่า SAR สูงสุดสำหรับโทร
ศัพท์รุ่นนี้ ซึ่งทำการทดสอบ
โดย DASY4 ขณะถือแนบ
กับหูคือ 0.964 วัตต์/กก.
(10 กรัม) และเมื่อพกพา
ไว้กับตัวคือ 0.801 วัตต์/กก.
(10 กรัม)
คำแนะนำเพื่อความปลอดภัยและการใช้
งานอย่างมีประสิทธิภาพ
3
•
ข้อมูลระดับ SAR
สำหรับผู้ที่อยู่ในประเทศ/
พื้นที่ที่ยอมรับข้อจำกัด SAR
ซึ่งแนะนำโดย Institute of
Electrical and Electronics
Engineers (IEEE) คือ 1.6
วัตต์/กก. โดยเฉลี่ยต่อเนื้อเยื่อ
1 กรัม
การดูแลและการบำรุง
รักษาเครื่องโทรศัพท์
คำเตือน: ใช้แบตเตอรี่
อุปกรณ์ชาร์จ และอุปกรณ์
เสริมที่ผ่านการรับรองให้
ใช้กับโทรศัพท์รุ่นนี้เท่านั้น
การใช้อุปกรณ์ประเภทอื่นๆ
อาจทำให้การรับรองหรือการ
รับประกันของเครื่องสิ้นสุดลง
หรือก่อให้เกิดอันตรายได้
• อย่าถอดแยกชิ้นส่วนของ
เครื่องโทรศัพท์ ควรนำไป
ให้ช่างเทคนิคผู้มีความรู้เมื่อ
จำเป็นต้องมีการตรวจซ่อม
• ควรวางให้ห่างจากอุปกรณ์
เครื่องใช้ไฟฟ้า เช่น โทรทัศน์
วิทยุ และเครื่องคอมพิวเตอร์
• ควรตั้งโทรศัพท์ไว้ห่าง
จากแหล่งความร้อน เช่น
เครื่องระบายความร้อน
หรือเตาประกอบอาหาร
• ไม่ควรทำโทรศัพท์ตก
• ไม่ควรนำเครื่องโทรศัพท์ไว้
ในที่ที่มีการสั่นสะเทือนหรือ
การกระแทก
• ปิดเครื่องโทรศัพท์ในบริเวณ
ที่มีข้อบังคับพิเศษว่าห้ามใช้
ตัวอย่างเช่น ห้ามใช้โทรศัพท์
ในโรงพยาบาล เนื่องจาก
อาจมีผลต่อการทำงานเครื่อง
มือทางการแพทย์ ที่ไวต่อ
สัญญาณรบกวน
•
ห้ามสัมผัสโทรศัพท์ด้วยมือ
เปียก ขณะกำลังชาร์จแบตเตอรี่
เพราะอาจถูกไฟฟ้าดูดและอาจ
ทำให้โทรศัพท์ชำรุดเสียหายได้
•
ห้ามชาร์จโทรศัพท์ใกล้วัตถุไวไฟ
เนื่องจากโทรศัพท์อาจร้อนและ
ทำให้ติดไฟซึ่งอาจทำให้เกิด
เพลิงไหม้

4
•
ใช้ผ้าแห้งเช็ดทำความสะอาด
ภายนอกเครื่องโทรศัพท์
(อย่าใช้สารละลาย เช่น เบนซิน
ทินเนอร์ หรือแอลกอฮอล์)
• อย่าชาร์จโทรศัพท์โดยวางไว้
บนพื้นผิวอ่อนนุ่ม
• ควรชาร์จโทรศัพท์ในบริเวณท
มีการถ่ายเทอากาศดี
• ไม่ควรนำเครื่องโทรศัพท์ไว้ใน
ที่ที่มีฝุ่นหรือควันมากเกินไป
• อย่าวางโทรศัพท์ใกล้บัตรเคร
ดิตหรือบัตรโดยสารที่มีแถบแม่
เหล็ก เพราะอาจทำความเสีย
หายต่อข้อมูลในแถบแม่เหล็ก
ได้
• อย่าเคาะหน้าจอด้วยวัตถุมีคม
เพราะอาจทำความเสียหายแก่
โทรศัพท์ได้
• วางเครื่องโทรศัพท์ให้ห่างจาก
ของเหลวหรือความชื้น
•
ใช้อุปกรณ์เสริม เช่น
หูฟัง ด้วยความระมัดระวัง
อย่าแตะต้องเสาอากาศโดยไม่จำเป็น
การทำงานอย่างมีประสิทธิภาพ
ของโทรศัพท์
อุปกรณ์อิเล็กทรอนิกส์
• ห้ามใช้โทรศัพท์เคลื่อนที่
ใกล้อุปกรณ์ทางการแพทย์
โดยไม่ได้รับอนุญาตเสีย
ก่อน หลีกเลี่ยงการวางโทร
ศัพท์เหนือเครื่องควบคุมจัง
หวะการเต้นของหัวใจ เช่น
ใส่ในกระเป๋าเสื้อ เป็นต้น
• โทรศัพท์เคลื่อนที่บาง
เครื่องอาจก่อให้เกิด
สัญญาณคลื่นรบกวนกับ
เครื่องช่วยฟังได้
•
ดังนั้น โทรทัศน์ วิทยุ
เครื่องคอมพิวเตอร์ ฯลฯ
อาจได้รับการรบกวนบ้าง
เล็กน้อย
ความปลอดภัยบน
ท้องถนน
ตรวจสอบกฎหมายและ
ระเบียบข้อบังคับว่าด้วยเรื่อง
การใช้โทรศัพท์เคลื่อนที่ใน
พื้นที่ที่คุณขับขี่ยานพาหนะ
คำแนะนำเพื่อความปลอดภัยและการใช้
งานอย่างมีประสิทธิภาพ

5
•
ห้ามใช้โทรศัพท์มือถือในขณะขับรถ
• มีสมาธิในการขับขี่ด้วยความ
ระมัดระวังอย่างเต็มที่
• หากสามารถกระทำได้
ให้ใช้ชุดอุปกรณ์แฮนด์ฟรี
•
ขับเข้าข้างทาง
แล้วจอดรถก่อนโทรออกหรือรับสาย
หากสภาพการขับขี่ทำให้จำเป็น
ต้องดำเนินการดังกล่าว
• พลังงานคลื่นความถี่วิทยุอาจ
มีผลกระทบต่อระบบอิเล็ก
ทรอนิกส์บางชนิดในรถของ
คุณ เช่น วิทยุติดรถยนต์
อุปกรณ์เพื่อความปลอดภัย
เป็นต้น
•
หากรถของคุณติดตั้งถุงลมนิรภัย
ห้ามติดตั้งอุปกรณ์พกพาแบบ
ไร้สายซึ่งขัดขวางการทำงาน
ของถุงลม ซึ่งอาจทำให้ถุงลม
ไม่ทำงาน หรืออาจทำให้คุณ
ได้รับบาดเจ็บรุนแรงจากการทำ
งานผิดปกติของถุงลมนิรภัยได
้
• หากคุณกำลังฟังเพลงในขณะ
อยู่ข้างนอก โปรดตรวจดูว่า
ระดับเสียงอยู่ที่ระดับที่เหมาะ
สม เพื่อให้คุณยังสามารถได้
ยินเสียงจากรอบข้างได้
โดยเฉพาะอย่างยิ่งเมื่อ
อยู่ข้างถนน
หลีกเลี่ยงการทำลาย
ความสามารถในการ
ได้ยิน
ความสามารถในการได้ยิน
อาจถูกทำลายได้หากคุณฟัง
เสียงดังเป็นระยะเวลานาน
ดังนั้น เราขอแนะนำว่าคุณ
ไม่ควรเปิดหรือปิดเครื่องใกล้
กับหูของคุณ นอกจากนี้ คุณ
ควรตั้งระดับเสียงเพลงและ
ระดับเสียงสายสนทนาไว้ใน
ระดับที่เหมาะสม
หมายเหตุ: เสียงและ
แรงดันที่มากเกินไปจากหู
ฟังสามารถทำให้สูญเสีย
การได้ยินได้
บริเวณที่ทำให้เกิดระเบิดได้
ห้ามใช้โทรศัพท์ในพื้นที่ที่อยู่
ระหว่างมีการระเบิดต่างๆ
ให้ปฏิบัติตามข้อห้ามอย่าง
เคร่งครัด

6
บริเวณที่อาจเกิดการระเบิดได้
• ห้ามใช้โทรศัพท์ใกล้จุดเติม
น้ำมันเชื้อเพลิง
• ห้ามใช้โทรศัพท์ใกล้น้ำมัน
เชื้อเพลิงหรือสารเคมี
•
ห้ามขนถ่ายหรือเก็บก๊าซ
หรือของเหลวที่ติดไฟง่าย
หรือระเบิดได้ในห้องโดยสาร
ของรถ ซึ่งคุณใช้เก็บโทรศัพท์
หรืออุปกรณ์เสริมต่างๆ ของคุณ
บนเครื่องบิน
อุปกรณ์ไร้สายสามารถก่อให้
เกิดคลื่นรบกวนต่อเครื่องบินได้
• ให้ปิดโทรศัพท์เคลื่อนที่ของ
คุณก่อนขึ้นเครื่องบิน
• อย่าใช้โทรศัพท์เมื่อเครื่องบิน
จอดก่อนได้รับการอนุญาต
จากพนักงานประจำเครื่อง
เด็ก
เก็บโทรศัพท์ในที่ปลอดภัยและ
ห่างจากมือเด็ก รวมทั้งเก็บชิ้น
ส่วนขนาดเล็กซึ่งอาจทำ
อันตรายหากเด็กนำใส่ปาก
การโทรฉุกเฉิน
การโทรฉุกเฉินอาจไม่สามารถ
ใช้กับเครือข่ายมือถือบางเครือ
ข่ายได้ จึงไม่ควรใช้โทรศัพท์
นี้เพียงอย่างเดียวในกรณีโทร
ฉุกเฉิน ให้ตรวจสอบกับผู้ให้
บริการในพื้นที่ของคุณ
ข้อมูลเกี่ยวกับแบต
เตอรี่และการดูแลรักษา
• คุณไม่จำเป็นต้องคายประจุ
แบตเตอรี่ออกจนหมดก่อน
เริ่มการชาร์จ แบตเตอรี่นี้
ต่างจากแบตเตอรี่อื่นเนื่อง
จากไม่มี Memory Effect
ประสิทธิภาพของแบตเตอรี่
จึงไม่ด้อยลง
•
ใช้เฉพาะแบตเตอรี่และที่ชาร์จ
ของ LG เท่านั้น เครื่องชาร์จ
ของ LG ได้รับการออกแบบมา
เพื่อยืดอายุการใช้งานของแบต
เตอรี่ให้นานที่สุด
• อย่าถอดชิ้นส่วนหรือทำให้
แบตเตอรี่ลัดวงจร
• รักษาความสะอาดของหน้า
สัมผัสแบตเตอรี่
คำแนะนำเพื่อความปลอดภัยและการใช้
งานอย่างมีประสิทธิภาพ

7
•
เปลี่ยนแบตเตอรี่ก้อนใหม่ทันที
เมื่อประสิทธิภาพการใช้งานลด
ต่ำลงจนถึงระดับที่ไม่อาจใช้
งานต่อได้ แบตเตอรี่นี้สามารถ
ชาร์จใหม่ได้หลายร้อยครั้งจน
กว่าจะจำเป็นต้องเปลี่ยนก้อน
ใหม่
• ชาร์จแบตเตอรี่ใหม่อีกครั้ง
หากไม่ได้ใช้เป็นเวลานาน
เพื่อเพิ่มเวลาการใช้งาน
•
อย่าให้เครื่องชาร์จแบต
เตอรี่โดนแสงแดดโดยตรง
หรือใช้ในสภาพที่มีความชื้นสูง
เช่น ในห้องน้ำ
• อย่าวางแบตเตอรี่ทิ้งไว้ใน
สภาพอากาศที่ร้อนหรือเย็น
เพราะประสิทธิภาพของแบต
เตอรี่อาจด้อยลง
• หากมีการใส่แบตเตอรี่ชนิดที่
ไม่ถูกต้อง อาจทำให้เกิดการ
ระเบิดได้
• ควรปฏิบัติตามคำแนะนำของ
ผู้ผลิตในการทิ้งแบตเตอรี่
ที่ใช้แล้ว
•
หากคุณต้องการเปลี่ยน
แบตเตอรี่ โปรดนำไปที่จุด
บริการหรือตัวแทนจำหน่าย
ที่ได้รับการแต่งตั้งจาก
LG Electronics ที่ใกล้ที่สุด
เพื่อขอความช่วยเหลือ
• ถอดปลั๊กอุปกรณ์ชาร์จ
ออกจากเต้าเสียบทุกครั้ง
หลังจากแบตเตอรี่โทร
ศัพท์เต็มแล้วเพื่อลดการ
ใช้พลังงานสิ้นเปลืองของ
อุปกรณ์ชาร์จ
• อายุการใช้งานแบตเตอรี่
จะขึ้นอยู่กับการกำหนด
ค่าเครือข่าย, การตั้งค่า
ผลิตภัณฑ์, รูปแบบการ
ใช้, แบตเตอรี่ และ
สภาพแวดล้อม

8
การติดตั้งซิมการ์ดและแบตเตอรี่ในเครื่อง
การใส่ซิมการ์ด
เมื่อคุณสมัครใช้บริการเครือ
ข่ายโทรศัพท์เคลื่อนที่
คุณจะได้รับ ซิมการ์ด พลักอิน
พร้อมรายละเอียดการสมัครรับ
บริการ เช่น PIN ของคุณ
บริการเสริมที่มีให้เลือกใช้ได้
และอื่นๆ
ข้อสำคัญ!
ซิมการ์ดพลักอินและขั้วสัม
ผัสอาจชำรุดเสียหายได้ง่าย
หากถูกขูดขีดหรือหักงอ ดังนั้น
จึงควรใช้งาน ใส่ หรือ
ถอดการ์ดด้วยความระมัดระวัง
เก็บซิมการ์ดทั้งหมดให้พ้นมือ
เด็กเล็ก
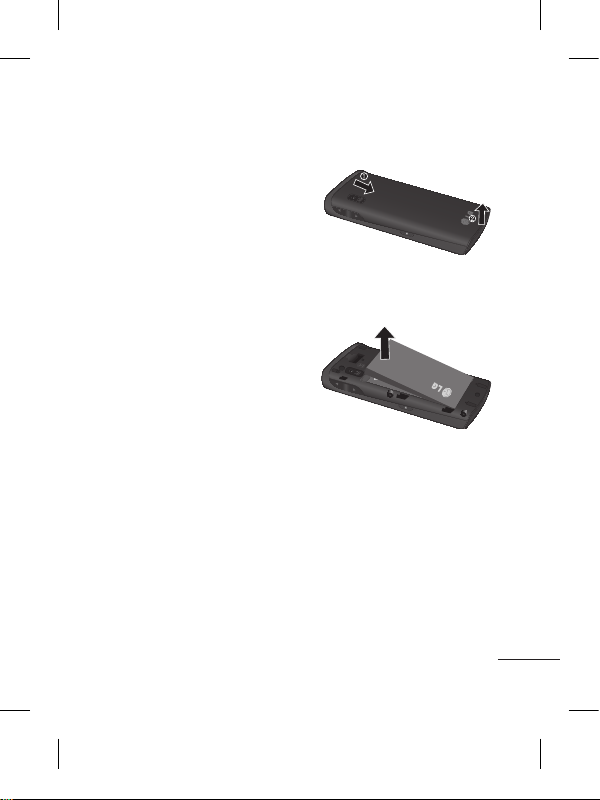
ภาพประกอบ
โปรดปิดอุปกรณ์และเลิกการ
เชื่อมต่อกับแท่นชาร์จก่อน
ถอดแบตเตอรี่
1 ถอดฝาครอบด้านหลัง
2 ยกแบตเตอรี่ออก
3 การใส่ซิมการ์ด
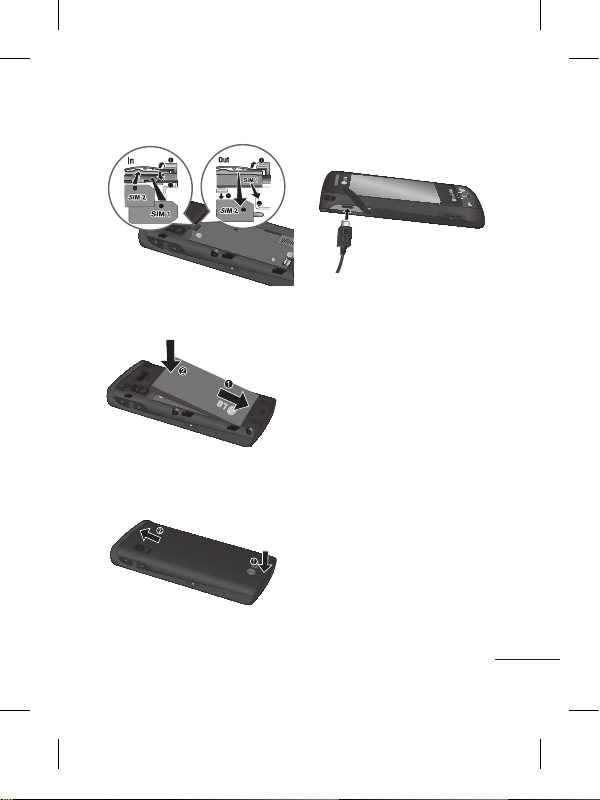
9
4 การใส่แบตเตอรี่
5 ประกอบฝาหลัง
6 การชาร์จแบตเตอรี่
10
คำเตือน:
ตรวจสอบให้แน่ใจว่าซิมการ์ด
ของคุณมีรอยตัดที่เรียบก่อน
ที่จะใส่เข้าไปในช่อง
คุณจะเห็นไอคอนสัญญาณเครือ
ข่ายสองไอคอนได้ที่ด้านบน
ซ้ายของหน้าจอเมื่อคุณใส่สอง
ซิมการ์ด
ในการเลือกหรือสลับซิมการ์ด
ให้กดเมนู และซิมการ์ดคู่
เคล็ดลับ!
คุณจะเห็นดูสัญญาณ
เครือข่ายที่ไฮไลต์โดยสีพื้น
หลังเมื่อคุณสลับ
ซึ่งช่วยให้ระบุ
ความแรงของสัญญาณของ
ซิมการ์ดที่เลือกได้ง่าย
การใช้ซิมการ์ดคู่
11
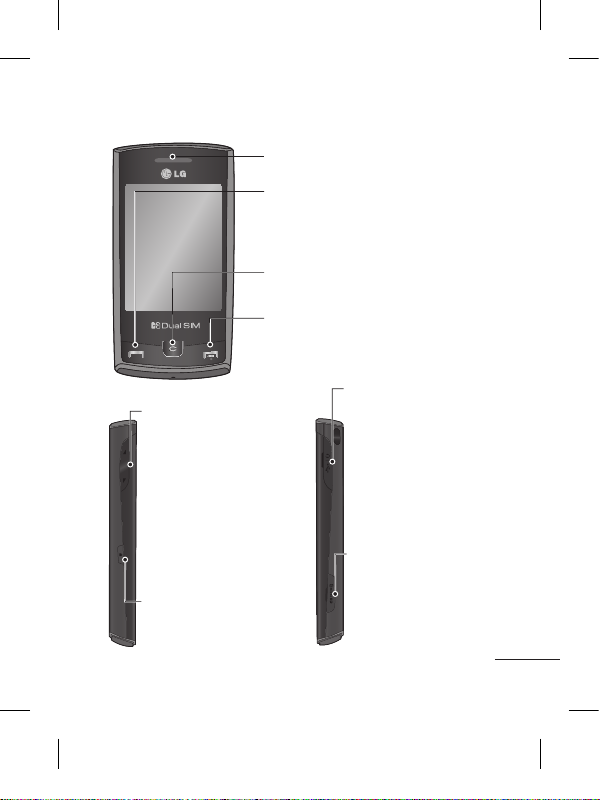
ส่วนประกอบตัวเครื่อง
หูฟัง
ปุ่มโทรออก/รับสาย
เพื่อโทรออกและรับสายเรียกเข้า
ปุ่มวางสาย
ปุ่มปรับระดับเสียง
• เมื่อหน้าจออยู่ที่หน้าจอหลัก:
ระดับเสียงเรียกเข้าและเแบบเสียง
• ระหว่างการใช้สาย:
ระดับเสียงหูฟัง
• ปุ่มลดระดับเสียง:
กดค้างไว้เพื่อเปิดใช้/
เลิกใช้โหมดเงียบ
ปุ่มลบ
ย้อนกลับไปหน้าจอก่อนหน้า
เครื่องชาร์จ,
สายเคเบิล
ช่องเสียบการ์ดหน่วยความจำ
Micro SD
ปุ่มล็อค
• กดครู่หนึ่งเพื่อเปิด/
ปิดหน้าจอ

12
เคล็ดลับสำหรับหน้าจอสัมผัส
• ในการเลือกรายการ
ให้แตะที่กลางไอคอน
• ไม่ต้องออกแรงกดมาก หน้า
จอสัมผัสจะไวต่อการสัมผัสที่
เบาและแน่นอน
• ใช้ปลายนิ้วในการสัมผัส
ที่ตัวเลือกที่ต้องการ
ระวังอย่าแตะโดนปุ่มอื่นๆ
• เมื่อไม่มีการใช้งานโทรศัพท์
LG-P520
เครื่องจะกลับไปล็อคหน้าจอ
ควบคุมหน้าจอสัมผัส
การควบคุมบนหน้าจอสัมผัสของ
LG-P520 สามารถเปลี่ยนแปลง
ได้ ขึ้นอยู่กับงานที่คุณกำลังทำ
การเปิดแอปพลิเคชัน
ในการเปิดแอปพลิเคชันใดก็
ตาม เพียงแตะที่ไอคอนนั้น
การเลื่อนหา
ลากจากด้านหนึ่งไปยังอีกด้าน
หนึ่งเพื่อเลื่อนในหน้าจอบาง
หน้าจอ เช่นรายการข้อมูลการ
โทร คุณสามารถเลื่อนขึ้นหรือ
ลงได้อีกด้วย
การใช้หน้าจอสัมผัส
13
คุณสามารถลากและคลิกสิ่งที่คุณต้องการได้ในหน้าจอหลักทุก
ประเภท
หน้าจอหลักของคุณ
หน้าจอหลัก Widget - เมื่อคุณแตะ
ที่ด้านล่างซ้ายของหน้าจอ
พาเนล Widget
สำหรับโทรศัพท์มือถือจะปรากฏขึ้น
เมื่อคุณลงทะเบียน Widget
โดยการลาก Widget
จะถูกสร้างขึ้นในจุดที่ถูกลาก
ใช้งาน
หน้าจอหลักโทรด่วน - เมื่อคุณแตะ
รายการโทรด่วนจะปรากฏขึ้น
คุณสามารถโทร ส่งข้อความ หรือ
แก้ไขรายชื่อได้โดยตรงในหน้าจอ
หลักนี้
ใช้งาน
14
หน้าจอเมนูของคุณ
คุณสามารถลากจากด้านหนึ่ง
ไปยังอีกด้านหนึ่งเพื่เลื่อนสิ่งที่
คุณต้องการได้ในทุกหน้าจอเมนู
ในการสลับระหว่างหน้าจอเมนู
เพียงลากนิ้วบนหน้าจอจาก
ซ้ายไปขวาหรือขวาไปซ้าย
อย่างรวดเร็ว
1
หน้าจอการโทรส่งข้อความหรือโทรออกในเมนูนี้
2 หน้าจอมัลติมีเดีย- ใช้เมนู
Google หรือส่งอีเมล
3 หน้าจอแอพพลิเคชัน-
ให้แอปพลิเคชันในเมนูนี้
15
การโทร
การโทรออก
1 แตะ เพื่อเปิดปุ่มกด
2 ป้อนหมายเลขโดยใช้ปุ่มกด
3 แตะ เพื่อเริ่มการออก
เคล็ดลับ! ในการป้อน +
เพื่อโทรออกต่างประเทศ
ให้กดค้างไว้ที่
0
+
กดปุ่มเปิดปิดเพื่อล็อคหน้าจอ
สัมผัสเพื่อป้องกันการโทรออก
โดยไม่ตั้งใจ
การโทรออกโดยใช้รายชื่อ
1 จากหน้าจอหลัก ให้แตะที่
เพื่อเปิด รายชื่อ
2 แตะที่กล่องฟิลด์ชื่อที่ด้าน
บนของหน้าจอ และป้อน
ตัวอักษรสองสามตัวแรก
ของรายชื่อที่ต้องการโทร
โดยใช้ปุ่มกด
3
จากรายการที่ฟิลเตอร์นี้
ให้แตะที่ไอคอนโทร ถัดจาก
รายชื่อที่ต้องการโทร หมายเลข
เริ่มต้นจะถูกใช้ในการโทร
หากรายชื่อนั้นมีหมายเลข
มากกว่าหนึ่งหมายเลข
4
หรือ คุณอาจแตะที่ชื่อแ
ละเลือกหมายเลขที่จะใช้
หากรายชื่อนั้นมีหมายเลขมากกว่า
หนึ่งหมายเลข คุณอาจแตะ
เพื่อโทรโดยใช้หมายเลขเริ่ม
ต้นก็ได้
การเปลี่ยนการตั้งค่าการ
โทรทั่วไป
1 แตะที่ ตั้งค่าการโทร
ในเมนู การตั้งค่า
2 เลื่อนแล้วแตะ
การตั้งค่าทั่วไป
• ปฏิเสธการรับสาย -
เลื่อนสวิตช์ไปทางซ้ายเพื่อ
เปิด คุณสามารถแตะที่
ปฏิเสธรายการ เพื่อเลือก
การโทรทั้งหมด รายชื่อหรือ
กลุ่มที่ระบุ หรือการโทร
จากหมายเลขที่ไม่รู้จัก
16
(เช่น หมายเลขที่ไม่อยู่ในราย
ชื่อของคุณ)
• ส่งเบอร์ตัวเอง - เลือกว่าคุณ
จะแสดงหมายเลขของคุณใน
การโทรออกหรือไม่
• โทรซ้ำอัตโนมัติ -
เลื่อนสวิตช์ไปทางซ้ายเพื่อ
เปิด หรือทางขวาเพื่อ ปิด
• โหมดตอบรับ
กดปุ่มรับสาย: คุณสามารถ
รับสายเรียกเข้าได้โดยการ
กดปุ่ม
รับได้ทุกปุ่ม: คุณสามารถรับ
สายเรียกเข้าได้โดยการกด
ได้ทุกปุ่ม ยกเว้นปุ่ม
• เตือนทุกนาที -
เลื่อนสวิตช์ไปทางซ้ายเพื่อ
เปิด ฟังเสียงเตือนทุกนาที
ระหว่างการใช้สาย
• โหมดตอบรับ BT - เลือก
แฮนด์ฟรี เพื่อให้สามารถรับ
สายได้โดยใช้ชุดหูฟังบลูทูธ
หรือเลือก ตัวเครื่อง เพื่อรับ
สายโดยกดปุ่มบนตัวเครื่อง
• บันทึกเบอร์ใหม่ -
เลือก ปิด หรือ ปิด
เพื่อบันทึกหมายเลขใหม่
รายชื่อ
การค้นหารายชื่อ
1 แตะที่ รายชื่อ
2 แตะที่ ค้นหา
3 คุณจะเห็นรายชื่อ การพิมพ์
ตัวอักษรแรกของชื่อในฟิลด์
ชื่อจะทำให้เมนูข้ามไปพื้นที่
ของรายชื่อตามตัวอักษรนั้น
การเพิ่มรายชื่อใหม่
1 แตะที่ รายชื่อ และแตะที่
เพิ่ม
2 เลือกว่าจะบันทึกรายชื่อไป
ยังหน่วยความจำภายใน
หรือ ซิม
3 ป้อนชื่อและนามสกุล
4 คุณสามารถป้อนหมาย
เลขที่แตกต่างกันได้สูงสุด 5
หมายเลขต่อหนึ่งรายชื่อ

17
5 เพิ่มอีเมล์แอดเดรส คุณ
สามารถป้อนอีเมล์แอดเดรส
ที่แตกต่างกันได้สูงสุดสอง
อีเมล์ต่อหนึ่งรายชื่อ
6 กำหนดรายชื่อให้กับกลุ่ม
หนึ่งกลุ่มหรือมากกว่า
7 แตะที่ บันทึก
เพื่อบันทึกรายชื่อ
การเปลี่ยนการตั้งค่าของรายชื่อ
คุณสามารถปรับการตั้งค่าราย
ชื่อเพื่อให้ตรงกับ รายชื่อ
ในแบบที่คุณต้องการได้
แตะที่ปุ่มตัวเลือก
แล้วแตะที่ ตั้งค่า
• ชื่อที่แสดง - เลือกว่าจะ
แสดงชื่อหรือนามสกุลของ
รายชื่อก่อนก็ได้
•
คัดลอก - คัดลอกราย
ชื่อจากซิมไปยังตัวเครื่อง
หรือจากตัวเครื่องไปยังซิม
คุณสามารถคัดลอกทีละราย
การ หรือทั้งหมดในครั้งเดียว
• ย้าย - ตัวเลือกนี้ทำงานใน
ลักษณะเดียวกับคัดลอก แต่
รายชื่อจะถูกจัดเก็บไว้ในที่ตั้ง
ใหม่เท่านั้น ดังนั้น เมื่อคุณ
ย้ายรายชื่อจากซิมไปยัง
หน่วยความจำภายใน
รายชื่อนั้นจะถูกลบออก
จากหน่วยความจำซิม
• ส่งทุกรายชื่อผ่านบลูทูธ -
ส่งรายชื่อทั้งหมดไปยัง
เครื่องอื่นผ่านบลูทูธ
• สำรองรายชื่อ/
เรียกคืนรายชื่อ บันทึกหรือเรียกคืนข้อมูล
รายชื่อไปยังที่เก็บอื่น
• ลบรายชื่อทั้งหมด -
ลบรายชื่อทั้งหมดของคุณ
แตะที่ ใช่ เพื่อลบทั้งหมด
ข้อความ
โทรศัพท์ LG-P520
ของคุณได้ผสมผสาน SMS
และ MMS ไว้ในเครื่องเดียว
และมีเมนูที่ใช้ง่าย
การส่งข้อความ
1 แตะที่ ข้อความ ในเมนู
แล้วแตะที่ เขียนข้อความ
เพื่อเริ่มเขียนข้อความใหม่
18
2 แตะที่ แทรก เพื่อเพิ่มภาพ
วิดีโอ เสียง รูปแบบ
อัตโนมัติ และอื่นๆ
3
แตะที่ ถึง ที่ด้านบนของ
หน้าจอเพื่อป้อนผู้รับ
จากนั้นป้อนหมายเลขหรือ
แตะ เพื่อเลือกรายชื่อ
คุณสามารถเพิ่มรายชื่อ
หลายรายการได
้
4 แตะที่ ส่ง เมื่อพร้อม
คำเตือน:
หากมีการใส่รูปภาพ, วิดีโอ
หรือเสียงลงใน SMS
ข้อความดังกล่าวจะแปลงเป็น
MMS โดยอัตโนมัติ
ซึ่งคุณจะเสียค่าใช้จ่ายตามนั้น
การป้อนข้อความ
คุณสามารถเลือกวิธีป้อน
ข้อมูลได้โดยแตะที่ และ
วิธีป้อนข้อมูล
แตะ เพื่อเปิดโหมด T9
ไอคอนนี้จะแสดงเฉพาะเมื่อคุณ
เลือก ปุ่มกด เป็นวิธีป้อนข้อมูล
แตะที่
เพื่อเปลี่ยนระหว่างตัวเลข
สัญลักษณ์
และการป้อนข้อความ
ใช้ปุ่ม Shift เพื่อเปลี่ยน
ระหว่างการป้อนตัวพิมพ์ใหญ่
หรือพิมพ์เล็ก
การจดจำลายมือ
ในโหมดการจดจำลายมือ
คุณจะเขียนบนหน้าจอและ
LG-P520 ของคุณจะแปลง
ลายมือของคุณเป็นข้อความ
การตั้งค่าอีเมล์
แตะที่ อีเมล์ ในหน้าจอ
แอพพลิเคชัน ถ้าไม่ได้
ตั้งค่าอีเมล์แอคเคาท์
ให้เริ่มวิซาร์ดการตั้งค่าอีเมล์
และดำเนินการจนเสร็จสิ้น
คุณสามารถตรวจสอบและ
แก้ไขการตั้งค่าได้โดยเลือก
นอกจากนี้ คุณยังสามารถ
ตรวจสอบการตั้งค่าเพิ่ม
เติม ซึ่งมีข้อมูลโดยอัตโนมัติ
เมื่อคุณสร้างแอคเคาท์

19
การเปลี่ยนการตั้งค่า
ข้อความตัวอักษร
แตะที่ ข้อความ แล้ว
แตะที่ ตั้งค่า เลือก
ข้อความตัวอักษร
ศูนย์ข้อความตัวอักษร -
ป้อนรายละเอียดของศูนย์ข้อความ
รายงานผลการส่ง - เลื่อน
สวิตช์ไปทางซ้ายเพื่อรับการ
ยืนยันว่าข้อความถูกส่งแล้ว
ช่วงที่มีผลใช้ - เลือกระยะ
เวลาที่จัดเก็บข้อความไว้ใน
ศูนย์ข้อความ
ชนิดข้อความ แปลงข้อความตัวอักษรเป็น
ตัวอักษร, เสียง, แฟกซ์,
X.400 หรือ อีเมล์
การเข้ารหัสตัวอักษร -
เลือกวิธีเข้ารหัสตัวอักษรของ
คุณ ตัวเลือกนี้จะมีผล
ต่อขนาดของข้อความ
และค่าบริการส่งข้อความของคุณ
การส่งข้อความยาว เลือกเพื่อส่งข้อความยาวแบบ
หลาย SMS หรือเป็น MMS
สำหรับอีเมล์ Push ขาเข้า
ตรวจดูอีเมล์ Push: แตะที่
เกมส์&แอปฯ แล้วแตะที่
แอพพลิเคชัน
*ข้อควรระวัง:
ผู้ใช้อาจไม่สามารถใช้อีเมล์
Push และเข้าใช้ WAP (หรือ
MMS) พร้อมกันได้ ขึ้นอยู่กับ
พื้นที่หรือผู้ให้บริการซิม
การเปลี่ยนการตั้งค่า
ข้อความมัลติมีเดีย
แตะที่ ข้อความ
แล้วแตะที่ ตั้งค่า และ
ข้อความมัลติมีเดีย
โหมดเรียกข้อมูล -
เลือกระหว่าง เครือข่ายหลัก
หรือ เครือข่ายโรมมิ่ง
ถ้าคุณเลือก กำหนดเอง
คุณจะได้รับเฉพาะข้อความแจ้ง
MMS และสามารถตัดสินใจว่า
จะดาวน์โหลดแบบเต็มหรือไม่
รานงานผลการส่ง เลือกเพื่อให้ส่งและ/
หรือขอรายงานผลการส่ง
20
อ่านข้อความตอบรับ -
เลือกเพื่อให้ส่งและ/
หรือขอการตอบกลับ
ความสำคัญ เลือกระดับความสำคัญของ
MMS
อายุข้อความ - เลือกระยะเวลา
ที่จัดเก็บข้อความไว้ในศูนย์รับ
ฝากข้อความ
ระยะเวลาสไลด์ - เลือก
ระยะเวลาที่จะให้สไลด์ปรากฏ
บนหน้าจอ
การแนบเอกสารที่ไม่รองรับ -
เลือกว่าคุณจะจำกัดเอกสาร
แนบเอกสารที่ไม่รองรับหรือไม่
เวลาส่ง - เลือกระยะเวลาใน
การรอก่อนส่งข้อความ
ศูนย์ MMS - เลือกหนึ่งศูนย์
จากรายการหรือเพิ่มศูนย์
ข้อความใหม่
บริการเครือข่ายสังคม
(SNS)
โทรศัพท์ LG-P520 มี SNS ที่
ให้คุณสนุกสนานและจัดการ
เครือข่ายสังคมของคุณได้
เคล็ดลับ: Facebook
เป็นแอปพลิเคชันที่โหลด
ไว้ล่วงหน้าในโทรศัพท์
และเข้าใช้ได้ง่าย Twitter
เป็นแอปพลิเคชัน Java
ที่ใช้เทคโนโลยี Java
แอพพลิเคชันอื่นๆ
จะเข้าใช้บริการ WAP
(Wireless Application
Protocol)
หมายเหตุ: คุณสมบัติ SNS
เป็นแอปพลิเคชันที่ใช้ข้อมูล
จำนวนมาก เมื่อเชื่อมต่อและ
ใช้บริการออนไลน์อาจมีค่าใช้
จ่ายเพิ่มเติม โปรดสอบถาม
ข้อมูลการคิดค่าใช้จ่ายกับผู้
ให้บริการเครือข่ายของคุณ
Facebook (SNS ต่อ)
หน้าหลัก: ล็อกอิน จากนั้นคุณ
จะเห็นข้อมูลอัพเดตสถานะของ
เพื่อนๆ ของคุณ ป้อนความเห็น
ของคุณเกี่ยวสถานะใหม่และ
ตรวจดูอื่นๆ
21
โปรไฟล์: คุณสามารถเลือก
กระดาน > อัปเดตสถานะ
และเขียนสถานะปัจจุบันได้
ดูรายละเอียดข้อมูลและ
อัปโหลดภาพถ่ายโดยแตะที่
อัลบั้ม > อัปโหลดภาพถ่าย
เพื่อน: ค้นหาเพื่อนของคุณใน
Facebook โดยการเลือกแท็บ
ค้นหา
ข้อความ:
คุณสามารถดูโฟลเดอร์ถาดเข้า/
ส่ง และเขียนข้อความ SNS ได้
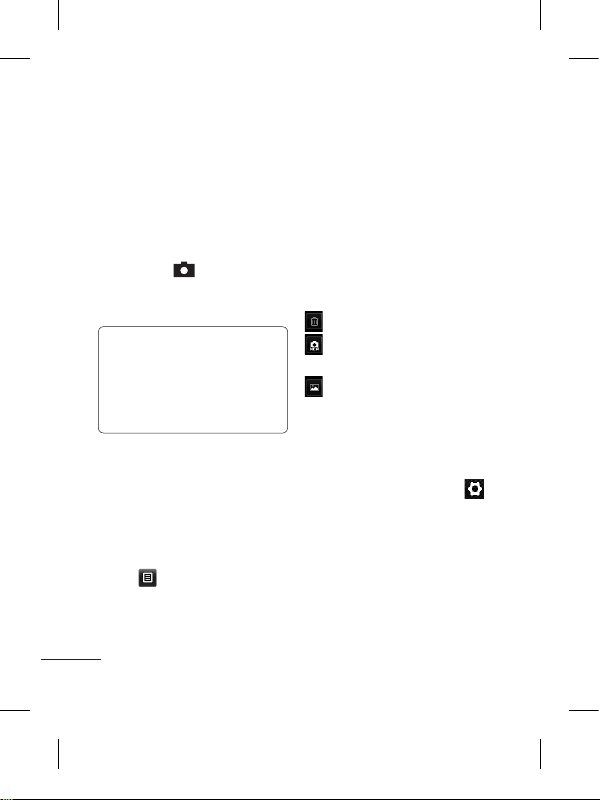
กล้องถ่ายรูป
การถ่ายภาพด่วน
1 แตะที่เมนู กล้องถ่ายรูป
2 เมื่อกล้องจับโฟกัสที่วัตถุ
แล้ว ให้แตะที่ ที่ตรง
กลางด้านขวาของหน้าจอ
เพื่อถ่ายภาพ
เคล็ดลับ: ในการสลับโหมด
กล้องถ่ายรูปหรือโหมดวิดีโอ
ให้เลื่อนไอคอนกล้องถ่ายรูป
หรือวิดีโอที่ตรงกลางขวาของ
ช่องมองภาพขึ้น/ลง
ภายหลังการถ่ายรูป
ภาพที่ถ่ายจะปรากฏบนหน้าจอ
ตัวเลือกที่คุณเลือกใช้ได้มีดังนี้
แตะที่
ส่ง –
แตะเพื่อส่งรูปภาพเป็นข้อความ,
อีเมล์ หรือผ่านทางบลูทูธ
ใช้เป็น –
แตะเพื่อตั้งค่าภาพหน้าจอหลัก
(พื้นหลังหน้าจอหลัก,
พื้นหลังล็อคหน้าจอ,
ภาพรายชื่อ, ภาพสายเรียกเข้า,
ภาพสายโทรออก, ภาพเริ่มต้น
และภาพปิดเครื่อง)
แก้ชื่อ – แตะเพื่อแก้ชื่อรูปภาพ
แก้ไข – แตะเพื่อแก้ไขรูปภาพ
แตะเพื่อลบภาพ
22
แตะเพื่อถ่ายภาพอื่นทันที
โดยที่ภาพปัจจุบันของคุณจะได้
รับการบันทึกไว้
แตะเพื่อดูคลังภาพที่บันทึกไว้
การใช้การตั้งค่าขั้นสูง
จากช่องมองภาพ ให้แตะ
เพื่อเปิดตัวเลือกการตั้งค่าขั้น
สูงทั้งหมด
คุณสามารถเปลี่ยนการตั้งค่า
กล้องถ่ายรูปได้โดยเลื่อนปุ่ม
หมุน หลังจากเลือกตัวเลือก
ให้แตะปุ่ม ตกลง
ขนาด – เปลี่ยนขนาดของรูป
ภาพเพื่อประหยัดหน่วยความจำ
ความสมดุลแสง –
เลือกระหว่าง อัตโนมัติ,
หลอดไฟ, แสงอาทิตย์,
ฟลูออเรสเซนต์ และ มืดครึ้ม
เอฟเฟกต์สี –
เลือกโทนสีสำหรับรูปภาพใหม่
ช็อตต่อเนื่อง –
จัดให้วัตถุอยู่ในช่องมองภาพ
แล้วกดปุ่มถ่ายภาพเหมือนกับ
การถ่ายภาพปกติ กล้องจะถ่าย
ภาพต่อเนื่องอย่างรวดเร็ว
เวลาถ่ายภาพ – ตั้งเวลาถ่าย
ภาพทำให้คุณสามารถตั้งช่วง
เวลาหน่วงหลังจากที่กด
ชัตเตอร์แล้ว เลือก ปิด, 3
วินาที, 5 วินาที หรือ 10
วินาที ซึ่งเป็นวิธีการที่ช่วย
ให้คุณถ่ายรูปตนเองได้
โหมดกลางคืน –
ใช้สำหรับการถ่ายภาพในที่มืด
คุณภาพของภาพ –
เลือกระหว่าง ละเอียดมาก,
ละเอียด และ ปกติ
คุณภาพที่ละเอียดมากขึ้นเท่าใด
ความคมชัดของรูปภาพก็มาก
ขึ้นเท่านั้น อย่างไรก็ตาม
ขนาดไฟล์จะเพิ่มตามไปด้วย
ซึ่งหมายความว่าคุณจะสามารถ
จัดเก็บรูปภาพในหน่วยความจำ
ได้น้อยลง
เลือกที่จัดเก็บ – เลือกว่าจะ
บันทึกรูปภาพที่หน่วยความ
จำเครื่อง หรือที่หน่วยความ
จำภายนอก
ซ่อนไอคอน – เลือกซ่อน
ไอคอนตั้งค่ากล้องถ่ายรูปเอง
หรือโดยอัตโนมัติ
23
แสดงภาพที่ถ่าย – เลือก
เปิด เพื่อตรวจสอบรูปภาพ
ที่คุณถ่ายทันที
เสียงชัตเตอร์ – เลือกเสียง
ชัตเตอร์เสียงใดเสียงหนึ่งจาก
สามเสียง
หน้าจอกริด – เลือกระหว่าง
ปิด, 4 ส่วน หรือ 9 ส่วน
รีเซ็ตการตั้งค่า – เรียกคืนการ
ตั้งค่าเริ่มต้นของกล้องถ่ายรูป
กล้องวิดีโอ
การถ่ายวิดีโอด่วน
ในการสลับโหมดกล้องถ่ายรูป
หรือโหมดวิดีโอ ให้เลื่อน
ไอคอนกล้องถ่ายรูปหรือวิดีโอ
ที่ตรงกลางขวาของช่อง
มองภาพขึ้น/ลง
1 ให้ถือโทรศัพท์ในแนวนอน
และหันไปทางสิ่งที่จะถ่าย
2 กดที่จุดสีแดง
3 Rec จะปรากฏขึ้นที่ด้าน
ล่างของช่องมองภาพและ
ตัวตั้งเวลาทางด้านล่าง
เพื่อแสดงระยะเวลาของ
วิดีโอของคุณ
4 ในการหยุดบันทึกภาพวิดี
โอชั่วคราว ให้แตะที่
แล้วเริ่มบันทึกต่อโดยเลือก
5 แตะที่ บนหน้าจอ
หลังจากถ่ายวิดีโอ
ภาพนิ่งที่แสดงวิดีโอที่ถ่ายจะปรากฏ
ขึ้นบนหน้าจอ ชื่อของวิดีโอจะแสดง
อยู่ที่ด้านล่าง
ของหน้าจอ พร้อมกับมีไอคอน 8
ไอคอนเรียงอยู่ทางด้านซ้ายและขวา
แตะเพื่อเล่นวิดีโอ
ตัวเลือกที่คุณเลือกใช้ได้มีดังนี้
แตะที่
ส่ง – แตะเพื่อส่งวิดีโอเป็น
ข้อความ, อีเมล์ หรือผ่านทาง
บลูทูธ
แก้ชื่อ – แตะเพื่อแก้ชื่อวิดีโอ
แตะเพื่อลบวิดีโอที่คุณเพิ่ง
ถ่ายไว้ และยืนยันโดยการ
แตะที่ ใช่ ช่องมองภาพจะ
ปรากฏขึ้นอีกครั้ง
แตะเพื่อถ่ายภาพวิดีโออื่น
ต่อทันที โดยที่วิดีโอปัจจุบัน
ของคุณจะได้รับการบันทึกไว้
24
แตะเพื่อดูคลังภาพของ
วิดีโอและภาพที่บันทึกไว้
การใช้การตั้งค่าขั้นสูง
จากช่องมองภาพ ให้แตะ
เพื่อเปิดตัวเลือกการตั้งค่าขั้นสูง
ทั้งหมด คุณสามารถเปลี่ยนการ
ตั้งค่ากล้องวิดีโอได้โดยเลื่อน
ปุ่มหมุน หลังจากเลือกตัวเลือก
ให้แตะปุ่ม ตกลง
เอฟเฟกต์สี – เลือกโทนสีเพื่อ
ใช้กับรูปภาพมุมมองใหม่
ความสมดุลแสง – สมดุลแสง
จะช่วยให้มั่นใจได้ว่าส่วนที่เป็น
สีขาวที่ปรากฏในวิดีโอจะสวย
สมจริง เพื่อให้กล้องปรับความ
สมดุลแสงได้อย่างถูกต้อง
คุณอาจจำเป็นต้องกำหนด
สภาวะแสงก่อน เลือกระหว่าง
อัตโนมัติ, หลอดไฟ,
แสงอาทิตย์, ฟลูออเรสเซนต์
และ มืดครึ้ม คุณภาพ - เลือก
ระหว่าง ละเอียดมาก,
ละเอียด และ ปกติ
คุณภาพที่ละเอียดมากขึ้น
เท่าใด ความคมชัดของภาพ
วิดีโอก็จะมากขึ้นเท่านั้น
แต่ขนาดไฟล์จะเพิ่มตามไปด้วย
ดังนั้นคุณจะสามารถจัดเก็บวิดี
โอในหน่วยความจำได้น้อยลง
ระยะเวลา – ตั้งค่าจำกัดระ
ยะเวลาสำหรับวิดีโอของคุณ
เลือกระหว่าง ปกติ และ MMS
เพื่อจำกัดขนาดวิดีโอให้สามารถ
ส่งเป็นข้อความ MMS ได้
เลือกที่จัดเก็บ – เลือกว่าจะ
บันทึกรูปภาพที่หน่วยความจำ
เครื่อง หรือที่หน่วยความจำ
ภายนอก
การบันทึกเสียง –
เลือก ปิดเสียง
เพื่อบันทึกวิดีโอโดยไม่มีเสียง
ซ่อนไอคอน – เลือกว่าจะซ่อน
ไอคอนในเมนูกล้องถ่ายรูปโดย
อัตโนมัติหรือกำหนดด้วยตนเอง
รีเซ็ตการตั้งค่า – รีเซ็ตการตั้ง
ค่ากล้องถ่ายวิดีโอทั้งหมด

25
เพลง
ในการเข้าใช้งานเครื่องเล่นเพลง
ให้แตะที่ เพลง จากขั้นตอนนี้
คุณสามารถเข้าใช้งานโฟลเดอร์
ต่างๆ ดังนี้:
เล่นล่าสุด –
เล่นเพลงที่คุณเล่นล่าสุด
ทุกแทร็ค – มีเพลงทั้งหมดที่
คุณมีในโทรศัพท์ยกเว้นเพลง
เริ่มต้นที่โหลดล่วงหน้า
ศิลปิน – ดูรายการเพลงที่เก็บ
ไว้ตามศิลปิน
อัลบั้ม – ดูรายการเพลงที่เก็บ
ไว้ตามอัลบั้ม
แนวเพลง – ดูรายการเพลง
ที่เก็บไว้ตามแนวเพลง
รายการเพลง – ประกอบ
ด้วยรายการเพลงที่คุณสร้างไว้
สับเปลี่ยนแทร็ค –
เล่นแทร็คในลำดับสุ่ม
การโอนเพลงไปยัง
โทรศัพท์
วิธีการที่ง่ายที่สุดในการโอน
ไฟล์เพลงไปที่โทรศัพท์ คือ
ทางบลูทูธ หรือสายเคเบิล
ข้อมูล
คุณยังสามารถใช้
LG PC Suite ได้
ในการโอนเพลงโดยใช้บลูทูธ:
1 ตรวจสอบให้แน่ใจว่า
อุปกรณ์ทั้งคู่ได้เปิดบลูทูธ
และเชื่อมต่อกันแล้ว
2
เลือกไฟล์เพลงบนอุปกรณ์
อื่น แล้วเลือกส่งไฟล์นั้น
ผ่านทางบลูทูธ
3 เมื่อส่งไฟล์แล้ว
คุณจะต้องยอมรับไฟล์บน
โทรศัพท์โดยแตะที่ ใช่
4 ไฟล์จะปรากฏขึ้นใน เพลง
> ทุกแทร็ค
การจัดการไฟล์
คุณสามารถจัดเก็บไฟล์มัลติมี
เดียลงในหน่วยความจำของ
โทรศัพท์ได้ ทำให้คุณเข้าใช้
งานรูปภาพ เสียง วิดีโอ และ
เกมส์ทั้งหมดได้อย่างง่ายดาย
หรือคุณยังสามารถบันทึกไฟล์ลง
ในการ์ดหน่วยความจำได้ การ
26
ใช้การ์ดหน่วยความจำทำให้คุณ
เพิ่มพื้นที่ในหน่วยความจำของ
โทรศัพท์ได้
โดยแตะที่ แฟ้มข้อมูล
คุณจะสามารถเปิดรายการ
ของโฟลเดอร์ที่คุณเก็บไฟล์
มัลติมีเดียทั้งหมดได้
เกมส์และแอปพลิเคชัน
เพื่อความเพลิดเพลิน
คุณสามารถดาวน์โหลดเกมส์
และแอปพลิเคชันใหม่ลงใน
โทรศัพท์ได้
วิทยุ FM
โทรศัพท์ LG-P520
ของคุณมีคุณสมบัติวิทยุ FM
ดังนั้น คุณสามารถรับฟังสถานีที่
คุณชื่นชอบได้ตลอดเวลา
การค้นหาสถานี
คุณสามารถใช้โทรศัพท์ค้นหา
สถานีวิทยุได้ โดยการค้นหา
ด้วยตนเองหรือค้นหาอัตโนมัติ
สถานีเหล่านั้นจะถูกบันทึกไว้
ในหมายเลขช่องสถานีที่ระบุไว้
ดังนั้น คุณจึงไม่จำเป็นต้องปรับ
ตั้งสถานีใหม่อีก คุณต้องต่อชุด
หูฟังกับโทรศัพท์ก่อนเนื่องจาก
ชุดหูฟังจะทำหน้าที่เป็นเสา
อากาศวิทยุ
ในการปรับตั้งอัตโนมัติ:
1 เลื่อนและแตะที่ วิทยุ FM
แล้วแตะ
2 แตะที่ สแกนอัตโนมัติ
ข้อความยืนยันจะปรากฏขึ้น
เลือก ใช่ เครื่องจะค้นหา
สถานีวิทยุที่มีอยู่โดย
อัตโนมัติ
หมายเหตุ:
คุณยังสามารถ
ค้นหาสถานีด้วยตนเองได้ด้วย
การใช้
และ หากคุณกด
และ ค้างไว้ จะเป็นการ
ค้นหาสถานีโดยอัตโนมัติ
แอพพลิเคชัน
การเพิ่มเหตุการณ์ลงในปฏิทิน
1 แตะที่ ปฏิทิน
2 เลือกวันที่ที่ต้องการเพิ่ม
เหตุการณ์

27
3 แตะที่ เพิ่ม
การตั้งเวลาการปลุก
1 แตะที่ ตั้งปลุก
2 แตะที่ เพิ่ม
แล้วคุณจะ
สามารถตั้งค่าและบันทึกการ
เตือนของคุณในเมนูนี้ได้
บันทึกเสียง
ใช้เครื่องบันทึกเสียง
เพื่อบันทึกเสียงเตือนความจำ
หรือไฟล์เสียงอื่นๆ
การใช้เครื่องคิดเลข
1 แตะ เครื่องคิดเลข
ในหน้าจอมัลติมีเดีย
2
แตะปุ่มตัวเลขเพื่อป้อนตัวเลข
การแปลงหน่วย
1 แตะที่ ตัวแปลงหน่วย
ในหน้าจแอพพลิเคชัน
2 เลือกว่าคุณจะแปลง
สกุลเงิน พื้นที่ ความ
ยาว น้ำหนัก อุณหภูมิ
ปริมาตร หรือความเร็ว
3 จากนั้น ให้เลือกหน่วย
และป้อนค่าที่คุณต้อง
การแปลง
PC Suite
คุณสามารถซิงโครไนซ์
คอมพิวเตอร์กับโทรศัพท์
ของคุณเพื่อให้แน่ใจว่า
รายละเอียดที่สำคัญทั้ง
หมดของคุณและวันที่
ต่างๆตรงกัน และยัง
สามารถสำรองข้อมูล
ไฟล์ได้
การติดตั้ง LG PC Suite
ลงในคอมพิว เตอร์
1
ไปที่ www.lgapplication.com
2 คลิก Manual & Software
3 ดาวน์โหลด LG Mobile
support tool
4
ปฏิบัติตามคำแนะนำบน
หน้าจอ เพื่อทำให้วิซาร์ด
LG PC Suite Installer
เสร็จสมบูรณ์
28
5 เมื่อติดตั้งเสร็จเรียบ
ร้อยแล้ว ไอคอน LG
PC Suite จะปรากฏขึ้น
บนเดสก์ทอป
คำเตือน: ห้ามตัดการ
เชื่อมต่อกับโทรศัพท์ใน
ขณะโอนไฟล์
เว็บไซต์
เบราว์เซอร์ ช่วยให้คุณ
เข้าถึงโลกของเกมส์
เพลง ข่าว กีฬา ความ
บันเทิง และอีกมากมายได้
โดยตรงถึงโทรศัพท์ของ
คุณ ไม่ว่าจะอยู่ที่ไหน
หรือกำลังทำอะไร
การเข้าใช้เว็บไซต์
1 แตะที่ เบราว์เซอร์
2 ในการไปยังหน้าจอหลัก
ของเบราว์เซอร์ ให้เลือก
หน้าหลัก หรือเลือก
ไปยัง URL และพิมพ์ URL
ตามด้วย เชื่อมต่อ
หมายเหตุ: มีค่าใช้จ่ายใน
การเชื่อมต่อกับบริการเหล่า
นี้และการดาวน์โหลดเนื้อหา
โปรดสอบถามข้อมูลการคิด
ค่าใช้จ่ายกับผู้ให้บริการ
เครือข่ายของคุณ
การเข้าใช้บริการของ
Google
คุณสามารถเปิดใช้บริการของ
Google ได้ในแอปพลิเคชั่นนี้
แตะที่ Google
ในหน้าจอมัลติมีเดีย
ตั้งค่า
การปรับแต่งรูปแบบเสียงของคุณ
คุณสามารถกำหนดการตั้งค่า
โปรไฟล์แต่ละโปรไฟล์โดยใช้
เมนูตั้งค่า
1 แตะที่ โปรไฟล์
2 เลือกรูปแบบเสียงที่คุณ
ต้องการแก้ไข

29
3 คุณจะสามารถเปลี่ยน
ตัวเลือกเสียงและการ
เตือนทั้งหมดที่มีอยู่ใน
รายการได้ รวมทั้งการ
ตั้งค่า เสียงเรียกเข้า และ
ระดับเสียง, เสียงข้อความ
และอื่นๆ
การเปลี่ยนการตั้งค่าโทรศัพท์
อิสระในการปรับการทำงาน
ของโทรศัพท์ LG-P520
ในแบบที่คุณต้องการได้
จากหน้าจอหลัก ให้เลือก
แล้วเลื่อนไปที่ ตั้งค่าโทรศัพท์
การเปลี่ยนการตั้งค่าการ
เชื่อมต่อ
การตั้งค่าการเชื่อมต่อจะได้
รับการตั้งค่ามาจากผู้ให้บริการ
ระบบแล้ว ดังนั้น คุณจึงสนุก
กับโทรศัพท์ใหม่ของ
คุณได้ทันที ในการเปลี่ยน
การตั้งค่าใดๆ ให้ใช้เมนูนี้:
แตะที่ การเชื่อมต่อ
การส่งและการรับไฟล์โดยใช้บลูทูธ
ในการส่งไฟล์:
1
เปิดไฟล์ที่คุณต้องการส่ง
โดยทั่วไปจะเป็นไฟล์ภาพถ่าย,
วิดีโอ หรือเพลง
2 เลือก ส่ง เลือก บลูทูธ
3
หากคุณจับคู่อุปกรณ์ บลูทูธ
แล้ว โทรศัพท์ LG-P520
จะไม่ค้นหาอุปกรณ์
บลูทูธ อื่นโดยอัตโนมัติ
หากคุณยังไม่จับคู่อุปกรณ์
บลูทูธ โทรศัพท์ LG-P520
จะค้นหาอุปกรณ์อื่นๆ ที่ใช้
บลูทูธ ภายในรัศมี
4 เลือกอุปกรณ์ที่คุณต้องการ
ส่งไฟล์ไป
5 ไฟล์ของคุณจะถูกส่งออกไป
ในการรับไฟล์:
1
ในการรับไฟล์
คุณต้องตั้งค่าบลูทูธเป็น
เปิด และ มองเห็นได้
โปรดดูข้อมูลเพิ่มเติมที่
การเปลี่ยนการตั้งค่า
บลูทูธ ด้านล่าง

30
2 เครื่องจะแสดงข้อความ
ให้คุณยอมรับไฟล์จาก
ผู้ส่ง แตะที่ ใช่ เพื่อรับ
ไฟล์
3 คุณจะเห็นว่าไฟล์ได้รับ
การบันทึกไว้แล้ว สำหรับ
ไฟล์ภาพ คุณสามารถเลือก
ดู ไฟล์หรือ ใช้เป็นพื้นหลัง
โดยทั่วไป ไฟล์จะถูกบันทึก
ในโฟลเดอร์ที่เหมาะสมใน
แฟ้มข้อมูล
การเปลี่ยนการตั้งค่าบลูทูธ:
แตะที่ บลูทูธ ในแท็บ ตั้งค่า
และเลือก แล้วเลือก ตั้งค่า
การจับคู่กับอุปกรณ์บลูทูธอื่น
ในการจับคู่โทรศัพท์ LG-P520
กับอุปกรณ์อื่น คุณสามารถ
กำหนดรหัสผ่านเพื่อป้องกัน
การเชื่อมต่อได้
1 ตรวจสอบว่าได้ตั้งค่าบลูทูธ
เป็น เปิด และ มองเห็นได้
คุณสามารถเปลี่ยนการตั้งค่า
การมองเห็นได้ในเมนู ตั้งค่า
2 แตะที่ ค้นหา
3 โทรศัพท์ LG-P520
จะค้นหาอุปกรณ์
เมื่อการค้นหาเสร็จสมบูรณ์
รีเฟรช จะปรากฏขึ้น
บนหน้าจอ
4 เลือกอุปกรณ์ที่คุณต้องการ
จับคู่ด้วย และป้อนรหัสผ่าน
จากนั้นให้แตะ ตกลง
5 โทรศัพท์ของคุณจะเชื่อมต่อ
กับอุปกรณ์อื่น ซึ่งคุณจำเป็น
ต้องป้อนรหัสผ่านเดียวกัน
6 การเชื่อมต่อบลูทูธของคุณ
แบบป้องกันด้วยรหัสผ่าน
พร้อมใช้งานแล้ว

31
การอัปเดตซอฟต์แวร์
อัปเดตซอฟต์แวร์
โทรศัพท์
การอัปเดตซอฟต์แวร
โทรศัพท์มือถือ LG จากอิน
เตอร์เน็ต
สำหรับข้อมูลเพิ่มเติมเกี่ยวกับ
การใช้ฟังก์ชันนี้ โปรดดูที่
http://update.lgmobile.com
หรือ http://www.lg.com/
common/index.jsp →
เลือกประเทศ → บริการ
คุณสมบัตินี้ให้คุณอัปเดตเฟิร์ม
แวร์ของโทรศัพท์เป็นเวอร์ชัน
ล่าสุดได้อย่างสะดวกจากอิน
เตอร์เน็ตโดยไม่ต้องไปที่ศูนย์
บริการ
เนื่องจากการอัปเดตเฟิร์มแวร์
โทรศัพท์มือถือต้องการให้ผู้ใช้
ดำเนินการอัปเดตอย่างระมัด
ระวัง โปรดตรวจสอบคำแนะนำ
และหมายเหตุที่ปรากฏขึ้นใน
แต่ละขั้นตอนก่อนดำเนินการ
ต่อไป โปรดทราบว่าการถอด
สายข้อมูล USB หรือแบตเตอรี่
ระหว่างการอัปเกรดอาจทำให้
โทรศัพท์มือถือ
ชำรุดเสียหายได้
32
อุปกรณ์เสริม
คุณสามารถใช้อุปกรณ์เสริมต่างๆ กับโทรศัพท์ของคุณได้ เลือกใช้
อุปกรณ์เหล่านี้ตามลักษณะการสื่อสารส่วนตัวของคุณ
อุปกรณ์ชาร์จ ชุดหูฟังสเตอริโอ
แบตเตอรี่
สายเคเบิลข้อมูล
และซีดี
คู่มือการใช้
หมายเหตุ
• ใช้แต่อุปกรณ์เสริมของแท้ของ LG เท่านั้น
• การไม่ปฏิบัติตามข้อแนะนำนี้อาจมีผลให้การรับประกัน
ของเครื่องโทรศัพท์สิ้นสุดลง
• อุปกรณ์เสริมอาจแตกต่างกันในบางพื้นที่
33
อุณหภูมิแวดล้อม
สูงสุด: +55°C (คายประจุ) +45°C (ขณะชาร์จ)
ต่ำสุด: -10°C
ข้อมูลทางเทคนิค

34
เนื้อหาในบทนี้จะแสดงถึงปัญหาต่างๆ ที่คุณอาจพบในขณะใช้
โทรศัพท์ คุณอาจต้องสอบถามผู้ให้บริการเพื่อแก้ไขปัญหาบาง
ประการ แต่ปัญหาส่วนใหญ่คุณสามารถแก้ไขได้เองอย่างง่าย
ดาย
ข้อความ
สาเหตุที่
เป็นไปได้
วิธีการแก้ไขที่เป็นไปได้
ข้อผิดพลาด
ของซิม
การ์ด
ไม่ได้ใส่ซิมการ์ด
ในโทรศัพท์
หรือใส่ซิมการ์ด
ไม่ถูกต้อง
ตรวจสอบให้แน่ใจว่าใส่ซิมการ์ด
อย่างถูกต้อง
ไม่มีการ
เชื่อมต่อกับ
เครือข่าย
สัญญาณอ่อน
อยู่นอกพื้นที่
เครือข่าย GSM
ย้ายตำแหน่งไปยังบริเวณที่ใกล้กับ
หน้าต่างมากขึ้นหรืออยู่ในที่เปิด
โล่ง ตรวจสอบพื้นที่ให้บริการกับ
ผู้ให้บริการ
รหัสไม่
ตรงกัน
ในการเปลี่ยน
รหัสป้องกัน คุณ
ต้องยืนยันรหัส
ใหม่โดยป้อนรหัส
ใหม่อีกครั้ง
ติดต่อผู้ให้บริการ
ตั้งค่าฟังก์
ชันไม่ได้
ผู้ให้บริการไม่สนับ
สนุน หรือต้อง
ลงทะเบียน
ติดต่อผู้ให้บริการ
ไม่สามารถ
โทรออกได้
ข้อผิดพลาดใน
การโทรออก
มีการใส่ซิมการ์ด
ใหม่ ถึงขีดจำกัด
การโทรของคุณ
แล้ว
ระบบเครือข่ายใหม่ยังไม่ได้รับ
อนุญาต ตรวจสอบข้อกำหนดใหม่
ติดต่อผู้ให้บริการ หรือตั้งค่าการจำ
กัดการโทรใหม่โดยใช้รหัส PIN 2
การแก้ปัญหา

35
ข้อความ
สาเหตุที่
เป็นไปได้
วิธีการแก้ไขที่เป็นไปได้
ปิดเครื่อง
ไม่ได้
กดปุ่มเปิด/ปิด
ไม่นานพอ
แบตเตอรี่หมด
ขั้วสัมผัสแบต
เตอรี่สกปรก
กดปุ่มเปิด/ปิดอย่างน้อยสองวินาที
เสียบอุปกรณ์ชาร์จให้นานขึ้น
ทำความสะอาดขั้วสัมผัสแบตเตอรี่
ข้อผิดพลาด
เกี่ยวกับการ
ชาร์จ
แบตเตอรี่หมด
โดยสิ้นเชิง
อุณหภูมิสูง
หรือต่ำเกินไป
มีปัญหาที่
ขั้วสัมผัส
ไม่มีกระแส
ไฟฟ้าอุปกรณ์
ชาร์จชำรุด
อุปกรณ์ชาร์จ
ไม่ถูกต้อง
แบตเตอรี่ชำรุด
ชาร์จแบตเตอรี่
ตรวจดูให้แน่ใจว่าอยู่ในอุณหภูมิ
แวดล้อมที่เหมาะสม รอสักครู่
จากนั้นชาร์จแบตเตอรี่อีกครั้ง
ตรวจสอบกระแสไฟฟ้าและการ
เชื่อมต่อกับโทรศัพท์
ตรวจสอบขั้วสัมผัสแบตเตอรี่
และทำความสะอาดหากจำเป็น
เสียบปลั๊กเข้ากับเต้าเสียบอื่นหรือ
ตรวจสอบแรงดันไฟฟ้า
หากอุปกรณ์ชาร์จไม่ทำงาน
ให้เปลี่ยนอุปกรณ์ชาร์จใหม่
ใช้อุปกรณ์เสริมของแท้ของ LG
เท่านั้น
เปลี่ยนแบตเตอรี่
สัญญาณ
เครือข่าย
ขาดหายไป
สัญญาณอ่อน
เกินไป
การเชื่อมต่อกับผู้ให้บริการอื่นเป็น
ไปโดยอัตโนมัติ

36
ข้อความ
สาเหตุที่
เป็นไปได้
วิธีการแก้ไขที่เป็นไปได้
โทรเบอร์
ไม่ได้
กำลังใช้ฟังก์ช่ัน
กำหนดเบอร์
โทรออก
ตรวจสอบการตั้งค่า
ศูนย์บริการ LG โดย บริษัท แอลจี
อีเลคทรอนิคส์ (ประเทศไทย) จำกัด
ศูนย์ซ่อมสำนักงานใหญ่ตากสิน
เลขที่ 72/127 ถ. สมเด็จพระเจ้าตากสิน
แขวงบุคคโล เขตธนบุรี กรุงเทพฯ 10600
วันและเวลาทำการ : จันทร์-อาทิตย์,
07:00 - 19:00น.
Call center : 0-2878-5757
การแก้ปัญหา

LG-P520 User Guide
-
English
Some of the contents in this manual may differ from your phone
depending on the software of the phone or your service provider.

Product Authentication program
Dear Customers,
To protect all LG customers from counterfeit and grey market
products and make sure that you receive offi cial warranty
service, LG is now running a product authentication program.
To make sure your handset is a genuine product of LG, ONLY
one SMS containing the IMEI No. of your purchased handset
will be automatically sent to LG on the date of purchase. LG
will bear the cost of one SMS for the product authentication
program.
For promotion, you will receive one additional month of
warranty for free. One additional month of warranty covers
only mobile phone, not batteries and accessories. Once your
phone is authenticated, you will receive the message ‘Your
handset is a genuine LG product.’
The IMEI No. sent to LG guarantees your handset to be free
from manufacturing defects during the warranty period from
the date of purchase without proof of purchase or warranty
card.

3
Guidelines for safe and efficient use
Please read these simple
guidelines. Not following these
guidelines may be dangerous
or illegal.
Exposure to radio
frequency energy
Radio wave exposure and
Specific Absorption Rate
(SAR) information
This mobile phone model
LG-P520 has been designed
to comply with applicable
safety requirements for
exposure to radio waves. These
requirements are based on
scientific guidelines that include
safety margins designed to
assure the safety of all users,
regardless of age and health.
• The radio wave exposure
guidelines employ a unit
of measurement known
as the Specific Absorption
Rate, or SAR. Tests for
SAR are conducted using
standardised methods with
the phone transmitting at its
highest certified power level
in all used frequency bands.
• While there may be
differences between the SAR
levels of various LG phone
models, they are all designed
to meet the relevant
guidelines for exposure to
radio waves.
• The SAR limit recommended
by the International
Commission on Non-Ionising
Radiation Protection (ICNIRP)
is 2 W/kg averaged over 10g
of tissue.
• The highest SAR value for
this model phone tested by
DASY4 for use close to the
ear is 0.964 W/kg (10g) and
when worn on the body is
0.801 W/kg (10g).
• SAR data information for
residents in countries/regions
that have adopted the SAR
4
limit recommended by the
Institute of Electrical and
Electronics Engineers (IEEE),
which is 1.6 W/kg averaged
over 1g of tissue.
Product care and
maintenance
WARNING: Only use
batteries, chargers and
accessories approved for
use with this particular
phone model. The use of any
other types may invalidate
any approval or warranty
applying to the phone, and
may be dangerous.
• Do not disassemble this unit.
Take it to a qualified service
technician when repair work
is required.
•
Keep away from electrical
appliances such as TVs, radios,
and personal computers.
• The unit should be kept away
from heat sources such as
radiators or cookers.
• Do not drop.
• Do not subject this unit to
mechanical vibration or shock.
• Switch off the phone in any
area where you are required
by special regulations. For
example, do not use your
phone in hospitals as it may
affect sensitive medical
equipment.
• Do not handle the phone
with wet hands while it is
being charged. It may cause
an electric shock and can
seriously damage your phone.
• Do not charge a handset
near flammable material as
the handset can become hot
and create a fire hazard.
• Use a dry cloth to clean
the exterior of the unit (do
not use solvents such as
benzene, thinner or alcohol).
Guidelines for safe and efficient use

5
• Do not charge the phone
when it is on soft furnishings.
• The phone should be charged
in a well-ventilated area.
• Do not subject this unit to
excessive smoke or dust.
•
Do not keep the phone next to
credit cards or transport tickets;
it can affect the information on
the magnetic strips.
• Do not tap the screen with
a sharp object as it may
damage the phone.
• Do not expose the phone to
liquid, moisture or humidity.
•
Use accessories like earphones
cautiously. Do not touch the
antenna unnecessarily.
• Do not use the phone or
accessories in places with
high humidity such as pools,
greenhouses, solariums or
tropical environments, it may
cause damage to the phone
and invalidation of warranty.
Efficient phone
operation
Electronic devices
• Do not use your mobile
phone near medical
equipment without requesting
permission. Avoid placing the
phone over pacemakers, i.e.
in your breast pocket.
• Some hearing aids might be
disturbed by mobile phones.
• Minor interference may affect
TVs, radios, PCs, etc.
Road safety
Check the laws and regulations
on the use of mobile phones in
the area when you drive.
• Do not use a hand-held
phone while driving.
• Give full attention to driving.
• Use a hands-free kit, if
available.

6
• Pull off the road and park
before making or answering
a call if driving conditions so
require.
• RF energy may affect some
electronic systems in your
vehicle such as car stereos
and safety equipment.
• When your vehicle is
equipped with an air
bag, do not obstruct it
with installed or portable
wireless equipment. It can
cause the air bag to fail or
cause serious injury due to
improper performance.
• If you are listening to music
whilst out and about, please
ensure that the volume
is at a reasonable level
so that you are aware of
your surroundings. This is
particularly important when
near roads.
Avoid damage to your
hearing
Damage to your hearing can
occur if you are exposed to loud
sound for long periods of time.
We therefore recommend that
you do not turn the handset on
or off close to your ear. We also
recommend that music and call
volumes are set to a reasonable
level.
NOTE: Excessive sound
pressure from earphones
can cause hearing loss.
Blasting area
Do not use the phone where
blasting is in progress. Observe
restrictions, and follow the rules
and regulations.
Guidelines for safe and efficient use

7
Potentially explosive
atmospheres
• Do not use the phone at a
refuelling point.
• Do not use near fuel or
chemicals.
• Do not transport or store
flammable gas, liquid, or
explosives in the same
compartment of your vehicle
as your mobile phone and
accessories.
In aircraft
Wireless devices can cause
interference in aircraft.
• Turn your mobile phone off
before boarding any aircraft.
• Do not use it on the ground
without permission from the
crew.
Children
Keep the phone in a safe
place out of the reach of small
children. It includes small parts
which may cause a choking
hazard if detached.
Emergency calls
Emergency calls may not
be available with all mobile
networks. Therefore, you should
never depend solely on the phone
for emergency calls. Check with
your local service provide r.
Battery information and
care
• You do not need to
completely discharge the
battery before recharging.
Unlike other battery systems,
there is no memory effect
that could compromise the
battery’s performance.
• Use only LG batteries and
chargers. LG chargers are
designed to maximise the
battery life.
• Do not disassemble or short-
circuit the battery pack.

8
• Keep the metal contacts of
the battery pack clean.
• Replace the battery when
it no longer provides
acceptable performance.
The battery pack may be
recharged hundreds of times
until it needs replacing.
• Recharge the battery if it has
not been used for a long time
to maximise usability.
• Do not expose the battery
charger to direct sunlight or
use it in high humidity, such
as in the bathroom.
• Do not leave the battery
in hot or cold places, this
may deteriorate the battery
performance.
• There is a risk of explosion if
the battery is replaced by an
incorrect type.
• Dispose off used
batteries according to the
manufacturer’s instructions.
Please recycle when
possible. Do not dispose as
household waste.
• If you need to replace the
battery, take it to the nearest
authorised LG Electronics
service point or dealer for
assistance.
• Always unplug the charger
from the wall socket after
the phone is fully charged
to save unnecessary power
consumption of the charger.
• Actual battery life will depend
on network configuration,
product settings, usage
patterns, battery and
environmental conditions.
Guidelines for safe and efficient use
9
Installing the SIM card and the handset battery
Installing the SIM Card
When you subscribe to a
cellular network, you are
provided with a plug-in
SIM card loaded with your
subscription details, such as
your PIN, any optional services
available and many others.
Important!
The plug-in SIM card and its
contacts can be easily damaged
by scratches or bending, so be
careful when handling, inserting
or removing the card. Keep all
SIM cards out of the reach of
small children.
Illustrations
Always switch the device off
and disconnect the charger
before removing the battery.
1 Remove the back cover.
2 Lift battery away.
3 Insert the SIM card.
Slide the SIM card into the
SIM card holder making
sure that the gold contact
area on the card is facing
downwards. To remove the
SIM card, pull it gently in the
opposite direction.

10
4 Insert the battery pack.
5 Attach the back cover.
6 Charge the battery.
Installing the SIM card and the handset battery

11
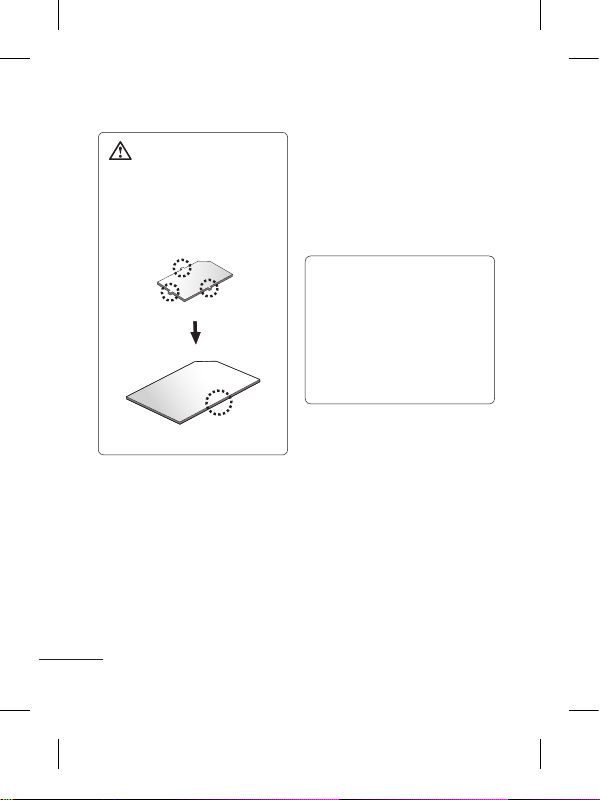
WARNING: Make sure
that your SIM card has a
neat and clean cut before
you insert it into the holder.
You can see two Network Signal
icons on the left-top of the
screen when you insert two
SIM-Cards.
To select or switch the SIMcard, press Menu and select
Dual SIM settings.
TIP! You can see the
network signals highlighted
by background colour when
you switch them. It makes
you easily identify the
strength of your signal of
the selected SIM-Card.
Using Dual SIM-card

12
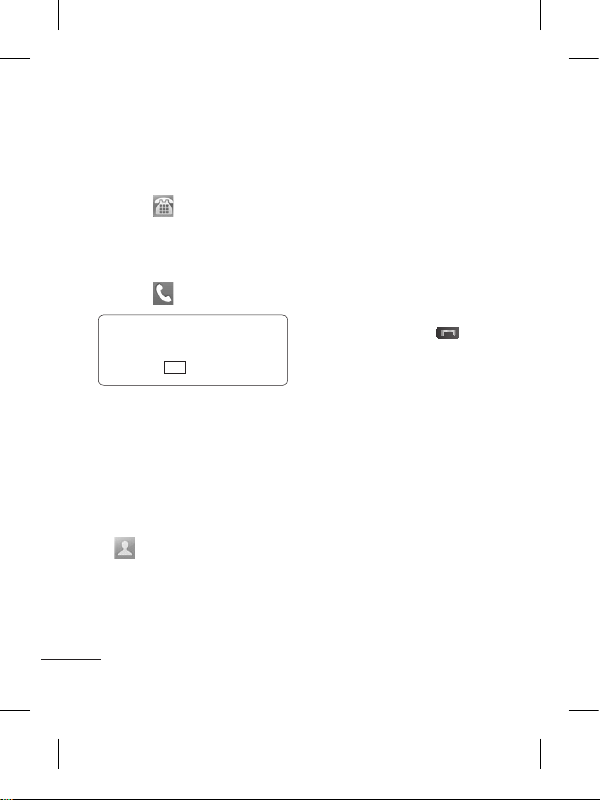
Earpiece
Call key
• Go to call logs.
• Dials a phone number and answers
incoming calls.
End key
• End or reject a call.
• Long press for power on/off.
• Come back to idle screen from menu.
Volume keys
• When the screen is
at the Home screen:
Ring tone and touch
tone volume.
• During a call: Earpiece
volume.
• Down volume key:
Press and hold to
activate/ deactivate
Silent mode.
Back key
Go back to a previous screen.
• Handsfree or Stereo
earphone connector.
• Charger/USB cable
connector.
Lock key
• Short press to turn on/off
the screen.
Phone Components
Micro SD memory card
socket
13
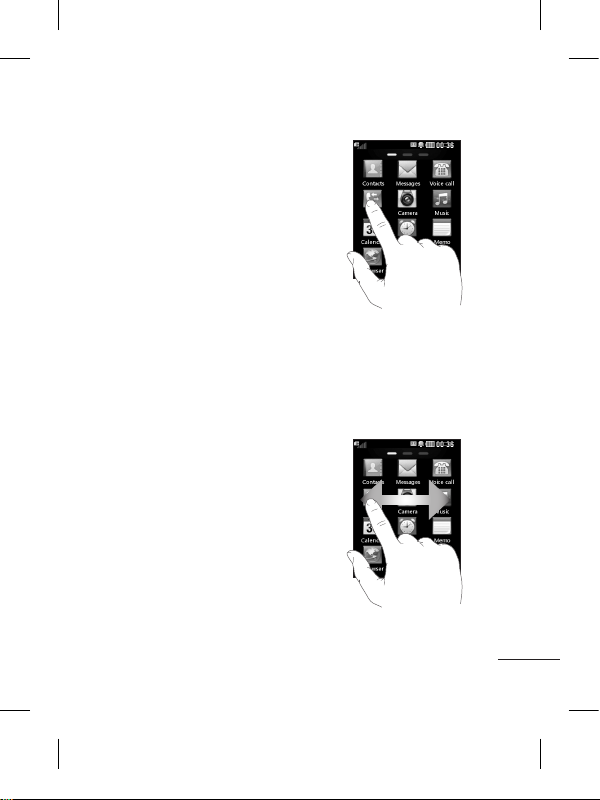
Using your touch screen
Touch screen tips
• To select an item, touch the
centre of the icon.
• Do not press too hard. The
touchscreen is sensitive
enough to pick up a light, firm
touch.
• Use the tip of your finger to
touch the option you require.
Be careful not to touch any
other keys.
• Whenever your LG-P520 is
not in use, it will return to the
lock screen.
Control the touch screen
The controls on the LGP520 touch screen change
dynamically depending on the
task you are carrying out.
Opening Applications
To open any application, simply
touch its icon.
Scrolling
Drag from side to side to scroll.
On some screens, such as the
call history list, you can also
scroll up or down.
14
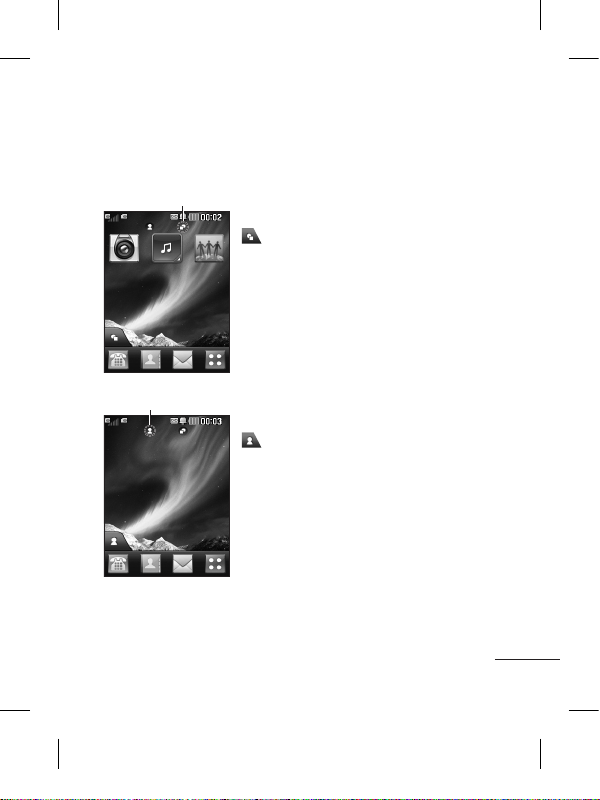
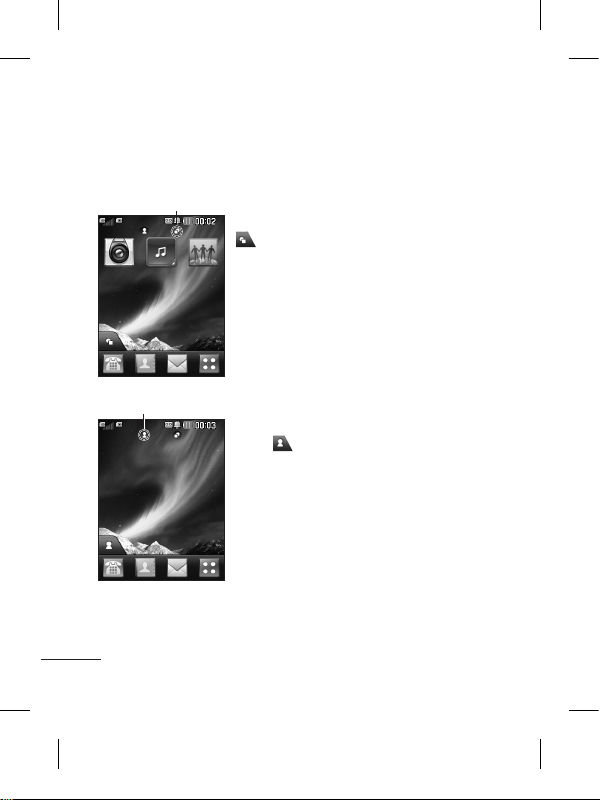
You can drag and click what you need right away in all home
screen types.
Your home screen
Widget home screen - When you touch
on the bottom left of the screen, the
mobile widget panel appears. When you
register widget by dragging it, the widget is
created in the spot.
Active
Speed dial home screen - When you
touch
, the speed dial list appears. You
can call, send a message,edit the contact
or remove speed dial directly in this home
screen.
Active

15
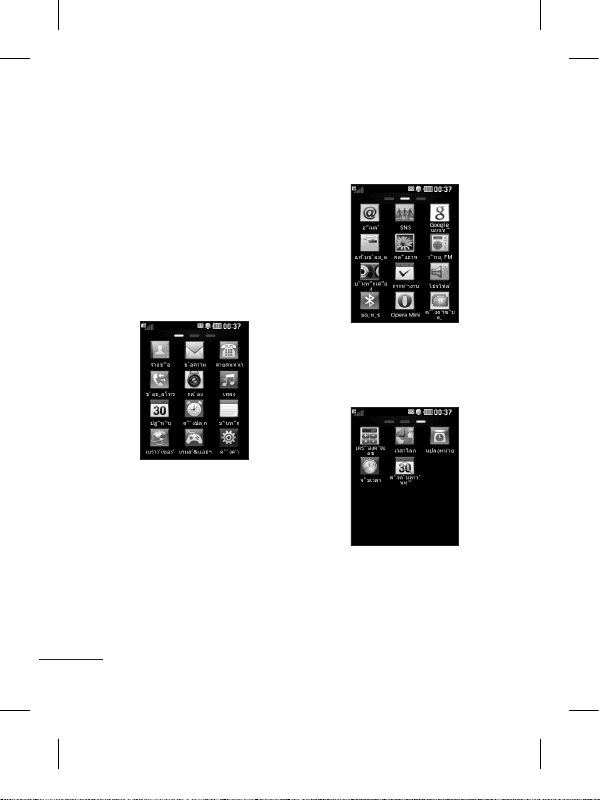
Your menu screen
You can drag from side to
side to scroll what you need
right away in all menu screen.
To swap between the menu
screens just wipe quickly over
the display from left to right, or
right to left.
Screen 1 - You can open
Contacts, Messages, Voice call,
Logs, Camera, Music, Calendar,
Alarms, Memo, Browser, Games
and apps and Settings modules
from this screen.
Screen 2 - You can open
E-mail, SNS, Google Search,
My stuff, Gallery, FM radio,
Voice recorder, Tasks, Profiles,
Bluetooth, Opera Mini and Dual
SIM settings modules from this
screen.
Screen 3 - You can open
Calculator, World clock, Unit
converter, Stopwatch, Date
finder modules from this
screen.
16
Calls
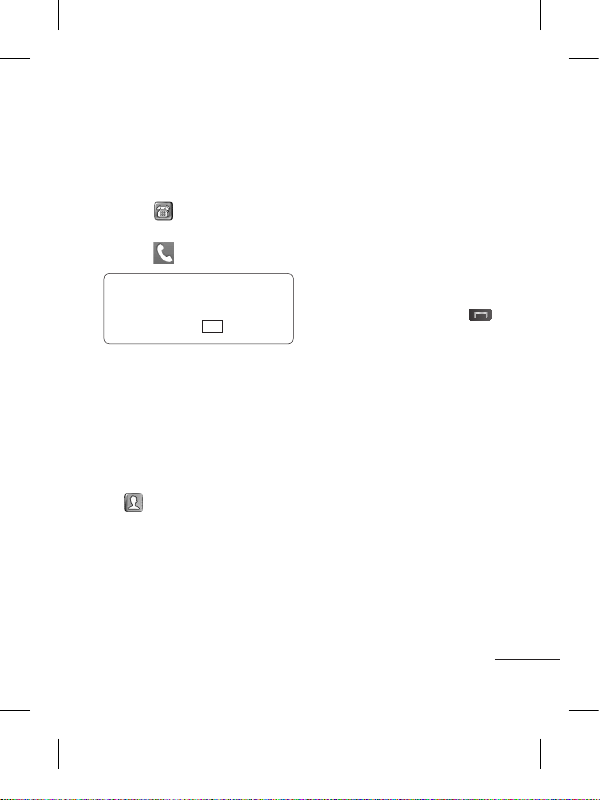
Making a Call
1 Touch to open the
keypad.
2 Key in the number using the
keypad.
3 Touch
to initiate the call.
TIP! To enter + for making
an international call, press
and hold
0
+
.
Press the lock key to lock the
touchscreen to prevent calls
being made by mistake.
Making a call from your
contacts
1 From the home screen touch
to open the Contacts.
2 Tap the Name field box on
the top of the screen and
enter the first few letters of
the contact you would like to
call using the keypad.
3 From the filtered list, touch
the Call icon next to the
contact you want to call.
The call will use the default
number if there is more than
one for that contact.
4 Or, you can touch the contact
name and select the number
to use if there is more than
one for that contact to use.
You can also touch
to
initiate the call to the default
number.
Changing the common
call setting
1 Touch Call settings in the
Settings menu.
• Call reject - Slide the switch
right for ON. You can touch the
Reject list to choose All calls,
contacts or groups or calls from
unknown numbers or callers
(i.e. not in your contacts).
• Send my number - Choose
whether to display your
number on an outgoing call.

17
• Auto redial - Slide the switch
right for ON or left for OFF.
• Answer mode
Press send key: Allows you
to only answer an incoming
call by pressing the
ke y.
Press any key: Allows you to
answer an incoming call by
pressing any key, except the
ke y.
• Minute minder - Slide the
switch right to ON to hear
a tone every minute during
a call.
• BT answer mode - Select
Always to handsfree to be
able to answer a call using a
Bluetooth headset, or select
Always to handset to press a
handset key to answer a call.
• Save new number - Slide
the switch right for ON to
save a new number after
getting call from an unknown
number.
Contacts
Searching for a contact
1 Touch Contacts.
2 You see a list of contacts.
Typing in the first letter of a
contact’s name in the Name
field will jump the menu to
that alphabetical area of
the list.
Adding a new contact
1 Touch Contacts and touch
Add.
2 Choose whether to save
the contact to your Internal
memory, SIM1 or SIM2.
3 Enter your first and last name.
4 You can enter up to five
different numbers per
contact.
5 Add an email addresses. You
can enter up to two different
email addresses per contact.
6 Assign the contact to one or
more groups.

18
7 Touch Save to save the
contact.
Changing your contact
settings
You can adapt your contact
settings so that your Contacts
suits your own preferences.
Touch Options key
and
touch Settings.
• Display name - Choose
whether to display the first or
last name of a contact first.
• Copy - Copy your contacts
from your SIM1 to your
handset, SIM2 to your
handset or vice versa,SIM1 to
SIM2 or vice versa. You can
do this one contact at a time,
or all at once.
•
Move - This works in the same
way as Copy, but the contact
is stored at the new location
only. Therefore, once a contact
is moved from the SIM to
the Internal memory it will be
deleted from the SIM memory.
• Send all contacts via
Bluetooth - Sends all contacts
to other handset via Bluetooth.
• Back up contacts/ Restore
contacts - Save or restore
the contacts data to the other
storage.
• Delete all contacts - Delete
all your contacts. Touch Yes
if you are sure you want to
delete all your contacts from
Internal memory or SIM1 or
SIM2.
Messaging
Your LG-P520 combines SMS
and MMS into one intuitive and
easy-to-use menu.
Sending a message
1
Touch Messages in menu.
And touch Write message
to begin composing a new
message.
2 Touch Insert to add an
image, video, sound,
template and so on.

19
3 Touch To at the top of
the screen to enter the
recipients. Then enter the
number or touch
to
select a contact. You can
even add multiple contacts.
4 Touch the message icon on
the bottom of the screen
when ready to send the
message.
WARNING: If an
image, video or sound is
added to an SMS it will be
automatically converted to
an MMS and you will be
charged accordingly.
Entering Text
You can choose your input
method by tapping
and
Input method.
Touch
to turn on T9 mode.
This icon is only shown when
you choose Keypad as the
input method.
Touch to
change between
numbers, symbols and text
input.
U
se Shift key to change between
capital or lowercase input.
Handwriting recognition
In Handwriting mode you simply
write on the screen and your
LG-P520 will convert your
handwriting into your message.
Setting up your email
Touch E-mail in Screen 2
If the email account is not set
up, start the email set up wizard
and finish it.
You can check and edit settings
by selecting
. You can also
check the additional settings
that were filled in automatically
when you created the account.

20
Changing your text
message settings
Touch Messages and
touch Settings. Select Text
message.
Text message centre - View
and Enter the details of your
message centre.
Delivery report - Slide
the switch Right to receive
confirmation that your
messages have been delivered.
Validity period - Choose how
long your messages are stored
at the message centre.
Message types - Convert
your text into Text, Voice, Fax,
X.400 or E-mail.
Character encoding - Choose
how your characters are
encoded. This impacts the size
of your messages and therefore
data charges.
Send long text as - Choose
to send long messages as
Multiple SMS or as an MMS.
*Attention: Depending on
the region or SIM operator,
user may not be able
to use push e-mail and
access WAP (or MMS)
simultaneously.
Changing your
multimedia message
settings
Touch Messages and, touch
Settings and Multimedia
message.
Retrieval mode - Choose
between Home network or
Roaming network.
Delivery report - Slide the
switch right to request and/or
allow a delivery report.
Read receipt - Slide the switch
right to request and/or allow a
read receipt.
Priority - Choose the priority
level of your MMS.

21
Validity period - Choose how
long your message is stored at
the message centre.
Slide duration - Choose how long
your slides appear on the screen.
Unsupported attachment -
Choose whether the
unsupported attachment is
restricted or not.
Delivery time - Choose how
long to wait before a message
is delivered.
MMS centre - Choose one
from the list or add a new
message centre.
Social network services
(SNS)
Your LG-P520 has SNS that
lets you enjoy and manage your
social network.
TIP: Facebook, Twitter
and Myspace are java
applications based on java
technology.
NOTE: SNS feature is a
data intensive application.
An additional costs may be
incurred when connecting
and using online services.
Check your data charges
with your network provider.
Facebook (Continued
SNS)
Home: Log in and you will see
your friend’s updated status.
Input your comment about new
status or check others.
Profile: You can select the Wall
> Status updates and write
the current status. See your
info detail and upload the photo
by touching Album > Upload
Photo.
Friends: Search your friends in
facebook by selecting Search tap.
Message: You can see the
Inbox/Sent folder, and write a
SN message.
22
Camera
Taking a quick photo
1 Touch Camera menu.
2 When the camera has
focused on your subject,
touch the
on the rightcenter of the screen to take
a photo.
TIP: To switch to the camera
mode or video mode, slide
up/down the camera or
video icon on the centreright of the viewfinder.
After taking a photo
Your captured photo will appear
on the screen.
The following options are
available.
Touch
.
Send - Touch to send the photo
as a Message, Email or via
Bluetooth.
Set as - Touch to set a screen
image (Homescreen wallpaper,
Lockscreen wallpaper, Contacts
image, Incoming call image,
Outgoing call image, Startup
image and Shutdown image).
Rename - Touch to rename
the photo.
Edit - Touch to edit the photo.
Touch to delete the image.
Touch to take another
photo immediately.
Touch to view a gallery of
your saved photos.
Using the advanced
settings
From the viewfinder, touch
to open all advanced settings
options.
After selecting the option, touch
the OK button.
Size - Change the size of the
photo to save memory

23
White balance - Choose
between Auto, Incandescent,
Sunny, Fluorescent, and
Cloudy.
Colour effect - Choose a color
tone for your new photo.
Continuous shot - Position the
subject in the viewfinder, then
press the capture button as
if taking a normal photo. The
camera will take shots in quick
succession.
Self-timer - The self-timer
allows you to set a delay after
the shutter is pressed. Select
Off, 3 seconds, 5 seconds, or
10 seconds. This is ideal if you
want to be included in a photo.
Night mode - Useful to user in
dark places.
Image quality - Choose
between Super fine, Fine, and
Normal. The finer the quality,
the sharper the photo. However,
the file size will increase as a
result, which means you’ll be
able to store fewer photos in
the memory.
Select storage - Choose
whether to save your photos to
the Handset memory or to the
External memory.
Hide icons - Choose the
camera setting icons to hide
manually or automatically.
Show captured image -
Choose On to check the picture
you took right away.
Shutter sound - Select one of
the three shutter sounds.
Grid screen - Choose
between Off, Simple cross, or
Trisection.
Reset settings - Restore all
camera default settings.

24
Video camera
Making a quick video
To switch to the video mode,
slide down the camera icon
on the right centre of the
viewfinder.
1 Holding the phone
horizontally, point the lens
towards the subject of the
video.
2 Press the red dot
.
3
Rec will appear at the
bottom of the viewfinder
with a timer at the bottom
showing the length of the
video.
4 To pause the video, touch
and resume by selecting
.
5 Touch
on screen to stop
recording.
After making a video
A still image representing your
captured video will appear on
the screen. The name of the
video runs along the bottom of
the screen together with icons
down the left and right sides.
Touch to play the video.
The following options are
available.
Touch
.
Send - Touch to send the video
as a Message, Email or via
Bluetooth.
Rename - Touch to rename
the video.
Touch to delete the video
you have just made and confirm
by touching Ye s. The viewfinder
will reappear.
Touch to shoot another
video immediately. Your current
video will be saved.
Touch to view a gallery of
saved videos and images.

25
Using the advanced
settings
From the viewfinder, touch
to open all advanced settings
options. You can change the
video camera setting by scrolling
the wheel. After selecting the
option, touch the OK button.
Colour Effect - Choose a color
tone to use for your new view.
White balance - The white
balance ensures any the white
areas in your video are realistic.
To enable your camera to adjust
the white balance correctly, you
may need to determine the light
conditions. Choose between
Auto, Incandescent, Sunny,
Fluorescent, and Cloudy.
Quality - Choose between
Super fine, Fine and Normal.
The finer the quality, the
sharper a video will be, but
the file size will increase. As a
result, you will be able to store
fewer videos in the phone’s
memory.
Duration - Set a duration limit
for your video. Choose between
Normal and MMS to limit the
maximum size to send as an
MMS message.
Select storage - Choose
whether to save your videos to
the Handset memory or to the
External memory.
Audio recording - Choose Mute
to record a video without sound.
Hide icons - Select whether
to hide the icons in the camera
menu automatically or manually.
Reset settings - Reset all the
video camera settings.
Music
To access the music player,
touch Music. From here, you
can access a number of folders:
Recently played - Plays the
songs you have played recently.
All tracks - Contains the songs
you have on your phone except
the pre-loaded default music.

26
Artists - Browse through your
music collection by artist.
Albums - Browse through your
music collection by album.
Genres - Browse through your
music collection by genre.
Playlists - Contains all the
playlists you have created.
Shuffle tracks - Play your
tracks in a random order.
Transferring music onto
your phone
The easiest way to transfer
music onto your phone is via
Bluetooth or the data cable.
To transfer music using
Bluetooth:
1 Make sure both devices have
Bluetooth switched on and
are connected to each other.
2 Select the music file on the
other device and select send
via Bluetooth.
3 When the file is sent, you
will have to accept it on your
phone by touching Ye s.
4 The file should appear in
Music > All tracks.
Managing files
You can store multimedia files
in your phone’s memory so you
have easy access to all your
Images, sounds, videos, Flash
Contents, Documents and Other
content. You can also save your
files to a memory card. Using
a memory card allows you to
free up space in your phone’s
memory.
By touching My stuff, you can
open a list of the folders that
store all your multimedia files.
FM Radio
Your LG-P520 has an FM radio
feature so you can tune into
your favourite stations to listen
to while on the move.

27
Searching for stations
You can tune your phone to
radio stations by searching
for them either manually or
automatically. They will then
be saved to specific channel
numbers, so you don‘t have to
keep re-tuning. You must first
attach the headset to the phone
as this acts as the aerial.
To auto tune:
1 Scroll and touch FM radio,
and touch
.
2 Touch Auto scan. A
confirmation message
appears. Select Yes , then the
stations will be automatically
found and allocated to a
channel in your phone.
NOTE: You can also
manually tune into a
station by using
and
displayed in the centre of
the screen. If you press and
hold
and , the stations
will be automatically found.
Application
Adding an event to your
calendar
1 Touch Calendar.
2 Select the date you would
like to add an event to.
3 Touch Add.
Setting your alarm
1 Touch Alarms.
2 Touch Add, then you can set
and save your alarm in this
menu.
Voice recorder
Use your voice recorder to
record voice memos or other
audio files.
Using your calculator
1 Touch Calculator in
Screen 3.
2 Touch the number keys to
enter numbers.

28
Converting a unit
1 Touch Unit converter in
Screen 3
2 Choose whether you want
to convert Currency, Area,
Length, Weight, Temperature,
Volume or Velocity.
3 Then select the unit and
enter the value you would
like to convert from.
PC Suite
You can synchronize your
PC with your phone. This will
ensure all your important details
and dates match, and also act
as a back up to help put your
mind at ease.
Installing LG PC Suite on
your computer
1 Go to www.lgapplication.com
2 Click Manual & Software.
3 Download LG Mobile
support tool. In LG Mobile
support tool, you can select
mobile sync download. Then
pc suite package will be
downloaded in your PC. If
you unpack that file, you can
install PC Suite.
4 Follow the instructions on
screen to complete the LG
PC Suite Installer wizard.
5 Once installation is complete,
the LG PC Suite icon will
appear on your desktop.
WARNING: Do not
disconnect your phone
during the transfer.
The web
Browser gives you a fast, full-
colour world of games, music,
news, sport, entertainment and
loads more, straight to your
mobile phone. Wherever you
are and whatever you’re into.

29
Accessing the web
1 Touch the Browser.
2 To go straight to the browser
home page, select Home.
Alternately, select Enter
address and type in the
URL, followed by Connect.
NOTE: You will incur extra
cost by connecting to these
services and downloading
content. Check data
charges with your network
provider.
Access to Google Service
You can launch google services
in this application. Touch Google
Search in the Screen 2.
Settings
Personalising your profiles
You can quickly change your
profile by touching the Screen 2
You can personalise each profile
setting using the settings menu.
1 Touch Profiles.
2 Choose the profile you want
to edit.
3 You can then change all the
sounds and alert options
available in the list, incTouch
Calculator in Application
screenluding your Ringtone
and Volume, Message tone
settings and more.
Changing your phone
settings
Use the freedom of adapting
the LG-P520 to your own
preferences.
From the home screen, select
then choose .

30
Using memory manager
From the home screen select
then choose . Select
Device settings and choose
Memory info.
Changing your
connectivity settings
Your connectivity settings
have already been set up by
your network operator, so you
can enjoy your new phone
immediately. To change any
settings, use this menu:
Touch Connectivity.
Sending and receiving
your files using Bluetooth
To send a file:
1 Open the file you want to
send, typically this will be a
photo, video or music file.
2 Choose Send via. Choose
Bluetooth.
3 If you have already paired
the Bluetooth device,
your LG-P520 will not
automatically search for other
Bluetooth devices. If not,
your LG-P520 will search
for other Bluetooth enabled
devices within range.
4 Choose the device you want
to send the file to.
5 Your file will be sent.
To receive a file:
1 To receive files, your
Bluetooth must be both ON
and Visible. See Changing
your Bluetooth settings
below for more information.
2 A message will prompt you
to accept the file from the
sender. Touch Yes to receive
the file.
3 You will see where the file
has been saved. For image
files, you can choose to View
the file. Files will usually be
saved to the appropriate
folder in My stuff.

31
Changing your Bluetooth
settings:
Touch Bluetooth in the
MULTIMEDIA tab. And select
and choose Settings.
Pairing with another
Bluetooth device
By pairing your LG-P520
and another device, you can
set up a passcode protected
connection.
1 Check that your Bluetooth
is ON and Visible. You can
change your visibility in the
Settings menu.
2 Touch Search.
3 Your LG-P520 will search for
devices. When the search
is completed, Refresh will
appear on screen.
4 Choose the device you want
to pair with and enter the
passcode, then touch OK.
5 Your phone will then connect
to the other device, on which
you will need to enter the
same passcode.
6 Your passcode protected
Bluetooth connection is now
ready.

32
Phone Software update
LG Mobile Phone Software
update from internet
For more information on using
this function, please visit the
http://update.lgmobile.com or
http://www.lg.com/common/
index.jsp → select country and
language → Support.
This Feature allows you to
update the firmware of your
phone to the latest version
conveniently from the internet
without the need to visit a
service centre.
As the mobile phone firmware
update requires the user’s full
attention for the duration of the
update process, please make
sure to check all instructions
and notes that appear at each
step before proceeding. Please
note that removing the USB
data cable or battery during the
upgrade may seriously damage
you mobile phone.
Software update

33
There are various accessories for your mobile phone. You can
select these options according to your personal communication
requirements.
Charger
Stereo
headset
Battery Data
cable and
CD
User
guide
NOTE
• Always use genuine LG accessories.
• Failure to do this may invalidate your warranty.
• Accessories may vary in different regions.
Accessories

34
Technical data
Ambient Temperatures
Max.: +55°C (discharging) +45°C (charging)
Min.: -10°C

35
This chapter lists some problems you might encounter while
using your phone. Some problems require you to call your service
provider, but most are easy to correct yourself.
Message Possible Causes Possible Corrective Measures
USIM error
There is no USIM
card in the phone
or it is inserted
incorrectly.
Make sure that the SIM card is
correctly inserted.
No network
connection/
Loosing
network
Weak Signal outside
of GSM network area
Operator applied new
services
Move towards a window or into
an open area. Check the network
operator coverage map.
See if the SIM card is older than
6~12 month.
If so, change your SIM at the office
of your network provider.
Codes do
not match
To change a security
code, you will need
to confirm the new
code by entering it
again.
The two codes you
have entered do not
match.
The default code is [0000]. If you
forget the code, contact your service
provider.
Any
application
cannot be
set
Not supported by
service provider or
registration required
Contact your service provider.
Troubleshooting

36
Message Possible Causes Possible Corrective Measures
Calls not
available
Dialing error
New SIM card
inserted
Prepaid charge limit
reached
New network not authorised.
Check for new restrictions.
Contact your service provider or
reset limit with PIN 2.
Phone
cannot be
switched on
On/Off key pressed
long enough
Battery is not
charged
Battery contacts
are dirty
Press the On/Off key down for at
least two seconds.
Keep charger attached for a longer
time Clean the contacts.
Take out the battery and insert
again.
Charging
error
Battery is not
charged
Outside temperature
is too hot or cold
Contact problem
No voltage
Charger defective
Wrong charger
Battery defective
Charge battery.
Make sure phone is charging under
normal temperatures.
Check the charger and connection
to the phone. Check the battery
contacts and clean them if
necessary.
Plug into a different socket.
If the charger does not warm up,
replace it.
Only use original LG accessories.
Replace battery.
Touch function
doesn’t work
or is abnormal
Touchpad calibration
fault
Perform the touchpad calibration via
phone setting menu.
Troubleshooting

37
Message Possible Causes Possible Corrective Measures
Number not
permitted
The Fixed Dial
Number function
is on.
Check settings.
Impossible to
receive/send
SMS & Picture
Memory full
Delete some existing messages in
the phone.
Files not
open
Unsupported file
format
Check the file format that can be
supported
SD Card not
working
FAT 16 file system
supported only
Check SD card file system via card
reader or format SD card using
phone
The screen
does not
turn on when
I receive a
call.
Proximity sensor
problem
If you use any protection tape or
case, check it is covered the area
around proximity sensor
Make sure that the area around the
proximity sensor is clean.
No sound
Vibration or manner
mode
Check the setting status of sound
menu to make sure you are not in
vibrate or silent mode.
Hang up or
freeze
Intermittent software
problem
Take out the battery and insert
battery.
Turn on the phone.
Try to do software update service
via web site

38
“LG Service Center”
by LG Electronics (Thailand) Co. Ltd.
72/127 Somdetprachaw Taksin Rd.,
Bookalo, Thonburi, Bangkok 10600
LG Service Working day: Mon - Sun
07:00 - 19:00
Call center: 0-2878-5757

Memo

Memo

Memo

Memo

Memo

Memo
 Loading...