

ENGLISH
ENGLISH
USER GUIDE
LG-P520
P/N : MFL67013104 (1.0) H
LG-P520
P/N : MFL67013104 (1.0) H
www.lg.comwww.lg.com

Bluetooth QD ID B016931
-
LG-P520 User Guide
Some of the contents in this manual may differ from your phone
depending on the software of the phone or your service provider.
English

Contents
Guidelines for safe and
efficient use .......................... 4
Installing the SIM card and the
handset battery .................. 10
Installing the SIM Card ....... 10
Illustrations ........................ 10
Using Dual SIM-card ........... 12
Phone Components ............. 13
Using your touch screen ..... 14
Touch screen tips ...............14
Control the touch screen .... 14
Your home screen ............... 15
Your menu screen ...............16
Calls .................................... 17
Making a Call ..................... 17
Making a call from your
contacts ............................ 17
Changing the common call
setting ............................... 17
2
Contacts .............................. 18
Searching for a contact ...... 18
Adding a new contact ......... 18
Changing your contact
settings ............................. 19
Messaging .......................... 19
Entering Text ...................... 20
Handwriting recognition ...... 20
Setting up your email ......... 20
Changing your text message
settings ............................ 21
Changing your multimedia
message settings ............... 21
Social network services
(SNS)................................. 22
Facebook (Continued SNS).. 22
Camera ...............................23
Taking a quick photo .......... 23
After taking a photo ............ 23
Using the advanced
settings ............................. 23

3
Video camera ...................... 25
Making a quick video ......... 25
After making a video ..........25
Using the advanced
settings ............................. 26
Music .................................. 26
Transferring music onto your
phone ............................... 27
Managing files .................... 27
FM Radio .......................... 27
Searching for stations ....... 28
Application .......................... 28
Adding an event to your
calendar ............................ 28
Setting your alarm .............. 28
Voice recorder ................... 28
Using your calculator .......... 28
Converting a unit ................ 29
PC Suite .............................. 29
Installing LG PC Suite on your
computer ........................... 29
The web .............................. 29
Accessing the web ............. 30
Access to Google Service ... 30
Settings .............................. 30
Personalising your profiles .. 30
Changing your phone
settings ............................. 30
Using memory manager ..... 31
Changing your connectivity
settings ............................. 31
Sending and receiving your
files using Bluetooth ........... 31
Pairing with another
Bluetooth device ................ 32
Software update ................. 33
Phone Software update ......33
Accessories ........................ 34
Technical data..................... 35
Troubleshooting .................. 36

Guidelines for safe and efficient use
Please read these simple
guidelines. Not following these
guidelines may be dangerous
or illegal.
Exposure to radio
frequency energy
Radio wave exposure and
Specific Absorption Rate
(SAR) information
This mobile phone model
LG-P520 has been designed
to comply with applicable
safety requirements for
exposure to radio waves. These
requirements are based on
scientific guidelines that include
safety margins designed to
assure the safety of all users,
regardless of age and health.
• The radio wave exposure
guidelines employ a unit
of measurement known
as the Specific Absorption
Rate, or SAR. Tests for
SAR are conducted using
4
standardised methods with
the phone transmitting at its
highest certified power level
in all used frequency bands.
• While there may be
differences between the SAR
levels of various LG phone
models, they are all designed
to meet the relevant
guidelines for exposure to
radio waves.
• The SAR limit recommended
by the International
Commission on Non-Ionising
Radiation Protection (ICNIRP)
is 2 W/kg averaged over 10g
of tissue.
• The highest SAR value for
this model phone tested by
DASY4 for use close to the
ear is 0.964 W/kg (10g) and
when worn on the body is
0.801 W/kg (10g).
• SAR data information for
residents in countries/regions
that have adopted the SAR
5
limit recommended by the
Institute of Electrical and
Electronics Engineers (IEEE),
which is 1.6 W/kg averaged
over 1g of tissue.
Product care and
maintenance
WARNING: Only use
batteries, chargers and
accessories approved for
use with this particular
phone model. The use of any
other types may invalidate
any approval or warranty
applying to the phone, and
may be dangerous.
• Do not disassemble this unit.
Take it to a qualified service
technician when repair work
is required.
•
Keep away from electrical
appliances such as TVs, radios,
and personal computers.
• The unit should be kept away
from heat sources such as
radiators or cookers.
• Do not drop.
• Do not subject this unit to
mechanical vibration or shock.
• Switch off the phone in any
area where you are required
by special regulations. For
example, do not use your
phone in hospitals as it may
affect sensitive medical
equipment.
• Do not handle the phone
with wet hands while it is
being charged. It may cause
an electric shock and can
seriously damage your phone.
• Do not charge a handset
near flammable material as
the handset can become hot
and create a fire hazard.
• Use a dry cloth to clean
the exterior of the unit (do
not use solvents such as
benzene, thinner or alcohol).

Guidelines for safe and efficient use
• Do not charge the phone
when it is on soft furnishings.
• The phone should be charged
in a well-ventilated area.
• Do not subject this unit to
excessive smoke or dust.
•
Do not keep the phone next to
credit cards or transport tickets;
it can affect the information on
the magnetic strips.
• Do not tap the screen with
a sharp object as it may
damage the phone.
• Do not expose the phone to
liquid, moisture or humidity.
•
Use accessories like earphones
cautiously. Do not touch the
antenna unnecessarily.
• Do not use the phone or
accessories in places with
high humidity such as pools,
greenhouses, solariums or
tropical environments, it may
cause damage to the phone
and invalidation of warranty.
6
Efficient phone
operation
Electronic devices
• Do not use your mobile
phone near medical
equipment without requesting
permission. Avoid placing the
phone over pacemakers, i.e.
in your breast pocket.
• Some hearing aids might be
disturbed by mobile phones.
• Minor interference may affect
TVs, radios, PCs, etc.
Road safety
Check the laws and regulations
on the use of mobile phones in
the area when you drive.
• Do not use a hand-held
phone while driving.
• Give full attention to driving.
• Use a hands-free kit, if
available.

7
• Pull off the road and park
before making or answering
a call if driving conditions so
require.
• RF energy may affect some
electronic systems in your
vehicle such as car stereos
and safety equipment.
• When your vehicle is
equipped with an air
bag, do not obstruct it
with installed or portable
wireless equipment. It can
cause the air bag to fail or
cause serious injury due to
improper performance.
• If you are listening to music
whilst out and about, please
ensure that the volume
is at a reasonable level
so that you are aware of
your surroundings. This is
particularly important when
near roads.
Avoid damage to your
hearing
Damage to your hearing can
occur if you are exposed to loud
sound for long periods of time.
We therefore recommend that
you do not turn the handset on
or off close to your ear. We also
recommend that music and call
volumes are set to a reasonable
level.
NOTE: Excessive sound
pressure from earphones
can cause hearing loss.
Blasting area
Do not use the phone where
blasting is in progress. Observe
restrictions, and follow the rules
and regulations.

Guidelines for safe and efficient use
Potentially explosive
atmospheres
• Do not use the phone at a
refuelling point.
• Do not use near fuel or
chemicals.
• Do not transport or store
flammable gas, liquid, or
explosives in the same
compartment of your vehicle
as your mobile phone and
accessories.
In aircraft
Wireless devices can cause
interference in aircraft.
• Turn your mobile phone off
before boarding any aircraft.
• Do not use it on the ground
without permission from the
crew.
8
Children
Keep the phone in a safe
place out of the reach of small
children. It includes small parts
which may cause a choking
hazard if detached.
Emergency calls
Emergency calls may not
be available with all mobile
networks. Therefore, you should
never depend solely on the phone
for emergency calls. Check with
your local service provider.
Battery information and
care
• You do not need to
completely discharge the
battery before recharging.
Unlike other battery systems,
there is no memory effect
that could compromise the
battery’s performance.

9
• Use only LG batteries and
chargers. LG chargers are
designed to maximise the
battery life.
• Do not disassemble or short-
circuit the battery pack.
• Keep the metal contacts of
the battery pack clean.
• Replace the battery when
it no longer provides
acceptable performance.
The battery pack may be
recharged hundreds of times
until it needs replacing.
• Recharge the battery if it has
not been used for a long time
to maximise usability.
• Do not expose the battery
charger to direct sunlight or
use it in high humidity, such
as in the bathroom.
• Do not leave the battery
in hot or cold places, this
may deteriorate the battery
performance.
• There is a risk of explosion if
the battery is replaced by an
incorrect type.
• Dispose off used
batteries according to the
manufacturer’s instructions.
Please recycle when
possible. Do not dispose as
household waste.
• If you need to replace the
battery, take it to the nearest
authorised LG Electronics
service point or dealer for
assistance.
• Always unplug the charger
from the wall socket after
the phone is fully charged
to save unnecessary power
consumption of the charger.
• Actual battery life will depend
on network configuration,
product settings, usage
patterns, battery and
environmental conditions.
Installing the SIM card and the handset battery
Installing the SIM Card
When you subscribe to a
cellular network, you are
provided with a plug-in
SIM card loaded with your
subscription details, such as
your PIN, any optional services
available and many others.
Important!
The plug-in SIM card and its
contacts can be easily damaged
by scratches or bending, so be
careful when handling, inserting
or removing the card. Keep all
SIM cards out of the reach of
small children.
Illustrations
Always switch the device off
and disconnect the charger
before removing the battery.
10
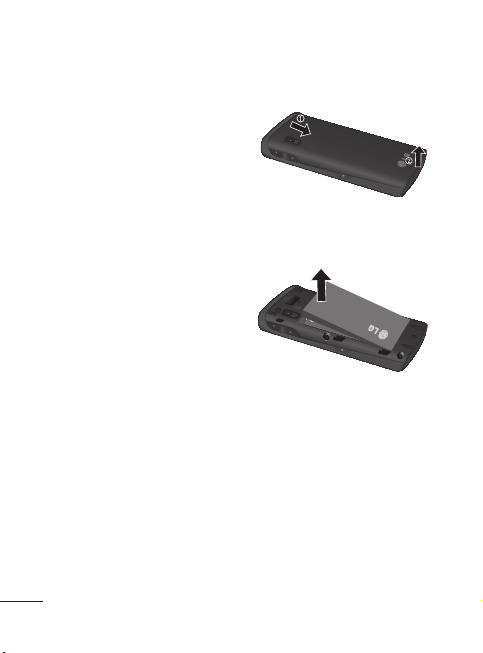
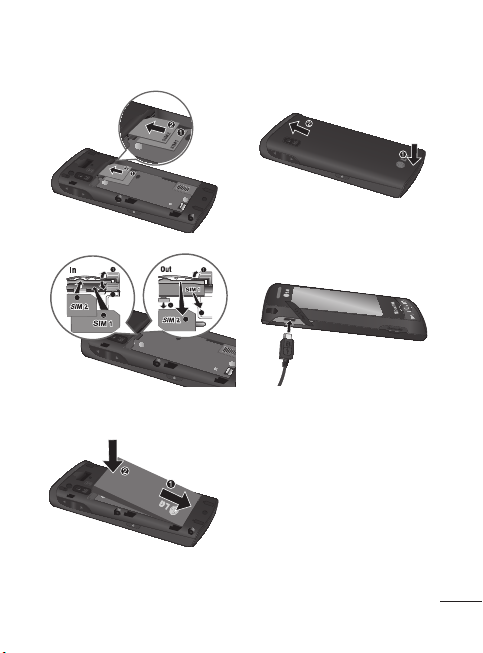
1 Remove the back cover.
2 Lift battery away.
3 Insert the SIM card.
Slide the SIM card into the
SIM card holder making
sure that the gold contact
area on the card is facing
downwards. To remove the
SIM card, pull it gently in the
opposite direction.
11
4 Insert the battery pack.
5 Attach the back cover.
6 Charge the battery.
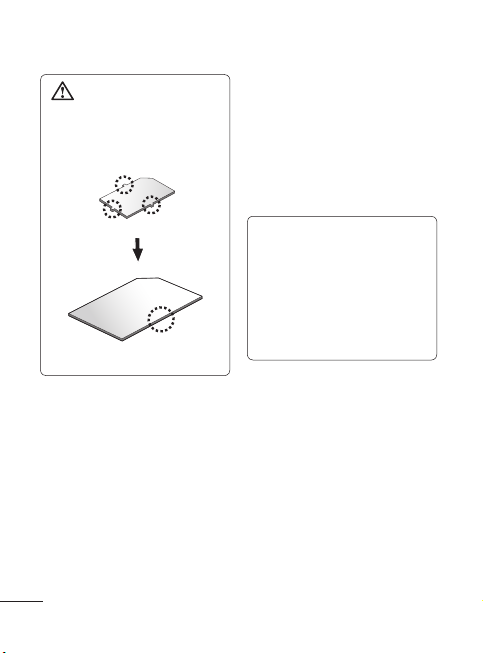
WARNING: Make sure
that your SIM card has a
neat and clean cut before
you insert it into the holder.
12
Using Dual SIM-card
You can see two Network Signal
icons on the left-top of the
screen when you insert two
SIM-Cards.
To select or switch the SIMcard, press Menu and select
Dual SIM settings.
TIP! You can see the
network signals highlighted
by background colour when
you switch them. It makes
you easily identify the
strength of your signal of
the selected SIM-Card.
13
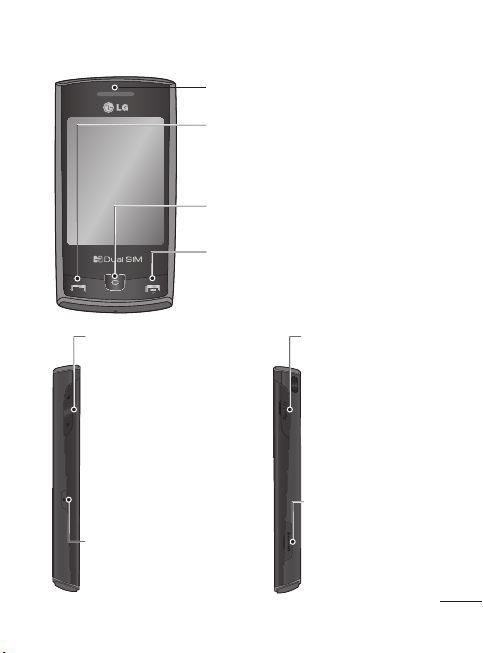
Phone Components
Volume keys
• When the screen is
at the Home screen:
Ring tone and touch
tone volume.
• During a call: Earpiece
volume.
• Down volume key:
Press and hold to
activate/ deactivate
Silent mode.
Lock key
• Short press to turn
on/off the screen.
Earpiece
Call key
• Go to call logs.
• Dials a phone number and answers
incoming calls.
Back key
Go back to a previous screen.
End key
• End or reject a call.
• Long press for power on/off.
• Come back to idle screen from menu.
• Handsfree or Stereo
earphone connector.
• Charger/USB cable
connector.
Micro SD memory card
socket
Using your touch screen
Touch screen tips
• To select an item, touch the
centre of the icon.
• Do not press too hard. The
touchscreen is sensitive
enough to pick up a light, firm
touch.
• Use the tip of your finger to
touch the option you require.
Be careful not to touch any
other keys.
• Whenever your LG-P520 is
not in use, it will return to the
lock screen.
Control the touch screen
The controls on the LGP520 touch screen change
dynamically depending on the
task you are carrying out.
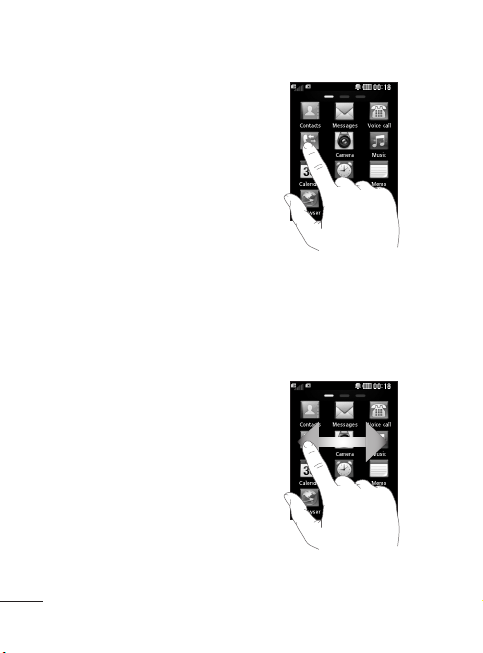
Opening Applications
To open any application, simply
touch its icon.
14
Scrolling
Drag from side to side to scroll.
On some screens, such as the
call history list, you can also
scroll up or down.

15
Your home screen
You can drag and click what you need right away in all home
screen types.
Active
Widget home screen - When you touch
on the bottom left of the screen, the
mobile widget panel appears. When you
register widget by dragging it, the widget is
created in the spot.
Active
Speed dial home screen - When you
touch , the speed dial list appears. You
can call, send a message,edit the contact
or remove speed dial directly in this home
screen.
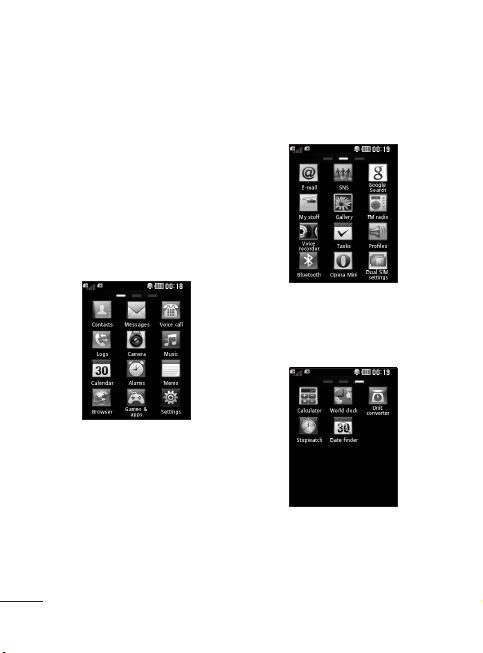
Your menu screen
You can drag from side to
side to scroll what you need
right away in all menu screen.
To swap between the menu
screens just wipe quickly over
the display from left to right, or
right to left.
1 Call screen- Send the
message or make a call in
this menu.
16
2 Multimedia screen- Use
Google menu or send
e-mail.
3 Application screen- Use
applications in this menu.
17
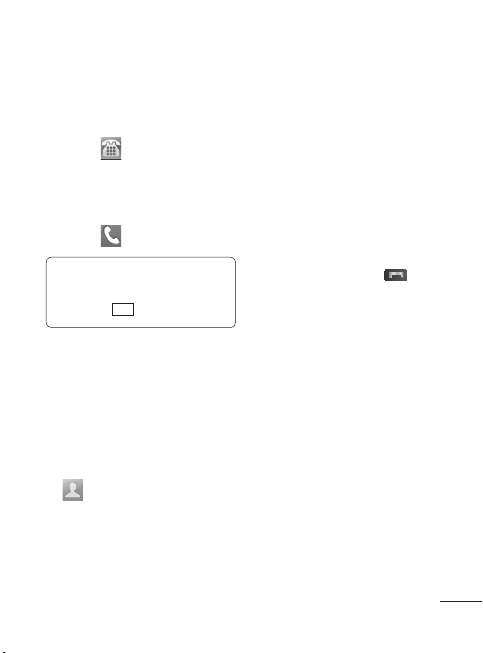
Calls
Making a Call
1 Touch to open the
keypad.
2 Key in the number using the
keypad.
3 Touch to initiate the call.
TIP! To enter + for making
an international call, press
and hold
+
0
.
3 From the filtered list, touch
the Call icon next to the
contact you want to call.
The call will use the default
number if there is more than
one for that contact.
4 Or, you can touch the contact
name and select the number
to use if there is more than
one for that contact to use.
You can also touch to
initiate the call to the default
number.
Press the lock key to lock the
touchscreen to prevent calls
being made by mistake.
Making a call from your
contacts
1 From the home screen touch
to open the Contacts.
2 Tap the Name field box on
the top of the screen and
enter the first few letters of
the contact you would like to
call using the keypad.
Changing the common
call setting
1 Touch Call settings in the
Settings menu.
• Call reject - Slide the switch
right for ON. You can touch the
Reject list to choose All calls,
contacts or groups or calls from
unknown numbers or callers
(i.e. not in your contacts).
• Send my number - Choose
whether to display your
number on an outgoing call.

• Auto redial - Slide the switch
right for ON or left for OFF.
• Answer mode
Press send key: Allows you
to only answer an incoming
call by pressing the key.
Press any key: Allows you to
answer an incoming call by
pressing any key, except the
key.
• Minute minder - Slide the
switch right to ON to hear
a tone every minute during
a call.
• BT answer mode - Select
Always to handsfree to be
able to answer a call using a
Bluetooth headset, or select
Always to handset to press a
handset key to answer a call.
• Save new number - Slide
the switch right for ON to
save a new number after
getting call from an unknown
number.
18
Contacts
Searching for a contact
1 Touch Contacts.
2 You see a list of contacts.
Typing in the first letter of a
contact’s name in the Name
field will jump the menu to
that alphabetical area of
the list.
Adding a new contact
1 Touch Contacts and touch
Add.
2 Choose whether to save
the contact to your Internal
memory, SIM1 or SIM2.
3 Enter your first and last name.
4 You can enter up to five
different numbers per
contact.
5 Add an email addresses. You
can enter up to two different
email addresses per contact.
6 Assign the contact to one or
more groups.

19
7 Touch Save to save the
contact.
Changing your contact
settings
You can adapt your contact
settings so that your Contacts
suits your own preferences.
Touch Options key and
touch Settings.
• Display name - Choose
whether to display the first or
last name of a contact first.
• Copy - Copy your contacts
from your SIM1 to your
handset, SIM2 to your
handset or vice versa,SIM1 to
SIM2 or vice versa. You can
do this one contact at a time,
or all at once.
•
Move - This works in the same
way as Copy, but the contact
is stored at the new location
only. Therefore, once a contact
is moved from the SIM to
the Internal memory it will be
deleted from the SIM memory.
• Send all contacts via
Bluetooth - Sends all contacts
to other handset via Bluetooth.
• Back up contacts/ Restore
contacts - Save or restore
the contacts data to the other
storage.
• Delete all contacts - Delete
all your contacts. Touch Yes
if you are sure you want to
delete all your contacts from
Internal memory or SIM1 or
SIM2.
Messaging
Your LG-P520 combines SMS
and MMS into one intuitive and
easy-to-use menu.
Sending a message
1
Touch Messages in menu.
And touch Write message
to begin composing a new
message.
2 Touch Insert to add an
image, video, sound,
template and so on.
3 Touch To at the top of
the screen to enter the
recipients. Then enter the
number or touch to
select a contact. You can
even add multiple contacts.
4 Touch the message icon on
the bottom of the screen
when ready to send the
message.
WARNING: If an
image, video or sound is
added to an SMS it will be
automatically converted to
an MMS and you will be
charged accordingly.
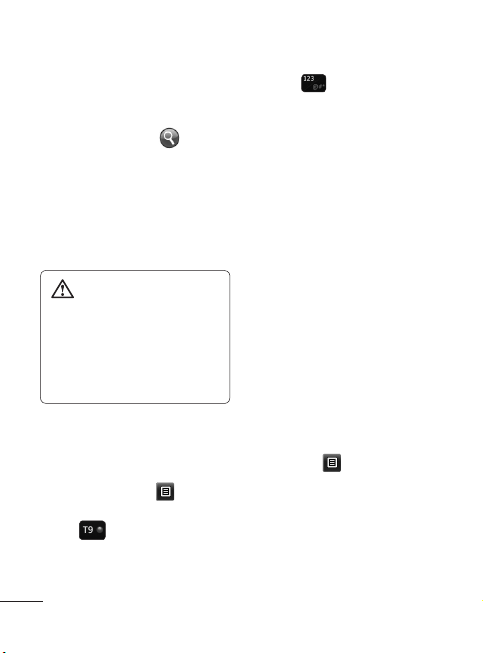
Entering Text
You can choose your input
method by tapping and
Input method.
Touch to turn on T9 mode.
This icon is only shown when
you choose Keypad as the
input method.
20
Touch to change between
numbers, symbols and text
input.
U
se Shift key to change between
capital or lowercase input.
Handwriting recognition
In Handwriting mode you simply
write on the screen and your
LG-P520 will convert your
handwriting into your message.
Setting up your email
Touch E-mail in Multimedia
screen.
If the email account is not set
up, start the email set up wizard
and finish it.
You can check and edit settings
by selecting . You can also
check the additional settings
that were filled in automatically
when you created the account.

21
Changing your text
message settings
Touch Messages and
touch Settings. Select Text
message.
Text message centre - View
and Enter the details of your
message centre.
Delivery report - Slide
the switch Right to receive
confirmation that your
messages have been delivered.
Validity period - Choose how
long your messages are stored
at the message centre.
Message types - Convert
your text into Text, Voice, Fax,
X.400 or E-mail.
Character encoding - Choose
how your characters are
encoded. This impacts the size
of your messages and therefore
data charges.
Send long text as - Choose
to send long messages as
Multiple SMS or as an MMS.
*Attention: Depending on
the region or SIM operator,
user may not be able
to use push e-mail and
access WAP (or MMS)
simultaneously.
Changing your
multimedia message
settings
Touch Messages and, touch
Settings and Multimedia
message.
Retrieval mode - Choose
between Home network or
Roaming network.
Delivery report - Slide the
switch right to request and/or
allow a delivery report.
Read receipt - Slide the switch
right to request and/or allow a
read receipt.
Priority - Choose the priority
level of your MMS.

Validity period - Choose how
long your message is stored at
the message centre.
Slide duration - Choose how long
your slides appear on the screen.
Unsupported attachment -
Choose whether the
unsupported attachment is
restricted or not.
Delivery time - Choose how
long to wait before a message
is delivered.
MMS centre - Choose one
from the list or add a new
message centre.
Social network services
(SNS)
Your LG-P520 has SNS that
lets you enjoy and manage your
social network.
TIP: Facebook, Twitter and
Myspace are java applications
based on java technology.
22
NOTE: SNS feature is a
data intensive application.
An additional costs may be
incurred when connecting
and using online services.
Check your data charges
with your network provider.
Facebook (Continued
SNS)
Home: Log in and you will see
your friend’s updated status.
Input your comment about new
status or check others.
Profile: You can select the Wall
> Status updates and write
the current status. See your
info detail and upload the photo
by touching Album > Upload
Photo.
Friends: Search your friends in
facebook by selecting Search tap.
Message: You can see the
Inbox/Sent folder, and write a
SN message.
23
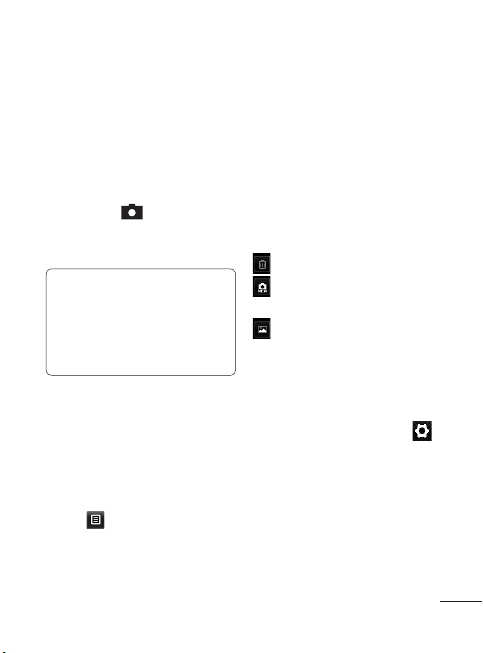
Camera
Taking a quick photo
1 Touch Camera menu.
2 When the camera has
focused on your subject,
touch the on the rightcenter of the screen to take
a photo.
TIP: To switch to the camera
mode or video mode, slide
up/down the camera or
video icon on the centreright of the viewfinder.
After taking a photo
Your captured photo will appear
on the screen.
The following options are
available.
Touch .
Send - Touch to send the photo
as a Message, Email or via
Bluetooth.
Set as - Touch to set a screen
image (Homescreen wallpaper,
Lockscreen wallpaper, Contacts
image, Incoming call image,
Outgoing call image, Startup
image and Shutdown image).
Rename - Touch to rename
the photo.
Edit - Touch to edit the photo.
Touch to delete the image.
Touch to take another
photo immediately.
Touch to view a gallery of
your saved photos.
Using the advanced
settings
From the viewfinder, touch
to open all advanced settings
options.
After selecting the option, touch
the OK button.
Size - Change the size of the
photo to save memory.

White balance - Choose
between Auto, Incandescent,
Sunny, Fluorescent, and
Cloudy.
Colour effect - Choose a color
tone for your new photo.
Continuous shot - Position the
subject in the viewfinder, then
press the capture button as
if taking a normal photo. The
camera will take shots in quick
succession.
Self-timer - The self-timer
allows you to set a delay after
the shutter is pressed. Select
Off, 3 seconds, 5 seconds, or
10 seconds. This is ideal if you
want to be included in a photo.
Night mode - Useful to user in
dark places.
Image quality - Choose
between Super fine, Fine, and
Normal. The finer the quality,
the sharper the photo. However,
the file size will increase as a
result, which means you’ll be
24
able to store fewer photos in
the memory.
Select storage - Choose
whether to save your photos to
the Handset memory or to the
External memory.
Hide icons - Choose the
camera setting icons to hide
manually or automatically.
Show captured image -
Choose On to check the picture
you took right away.
Shutter sound - Select one of
the three shutter sounds.
Grid screen - Choose
between Off, Simple cross, or
Trisection.
Reset settings - Restore all
camera default settings.

25
Video camera
Making a quick video
To switch to the video mode,
slide down the camera icon
on the right centre of the
viewfinder.
1 Holding the phone
horizontally, point the lens
towards the subject of the
video.
2 Press the red dot .
3 Rec will appear at the
bottom of the viewfinder
with a timer at the bottom
showing the length of the
video.
4 To pause the video, touch
and resume by selecting .
5 Touch on screen to stop
recording.
After making a video
A still image representing your
captured video will appear on
the screen. The name of the
video runs along the bottom of
the screen together with icons
down the left and right sides.
Touch to play the video.
The following options are
available.
Touch .
Send - Touch to send the video
as a Message, Email or via
Bluetooth.
Rename - Touch to rename
the video.
Touch to delete the video
you have just made and confirm
by touching Yes. The viewfinder
will reappear.
Touch to shoot another
video immediately. Your current
video will be saved.
Touch to view a gallery of
saved videos and images.

Using the advanced
settings
From the viewfinder, touch
to open all advanced settings
options. You can change the
video camera setting by scrolling
the wheel. After selecting the
option, touch the OK button.
Colour Effect - Choose a color
tone to use for your new view.
White balance - The white
balance ensures any the white
areas in your video are realistic.
To enable your camera to adjust
the white balance correctly, you
may need to determine the light
conditions. Choose between
Auto, Incandescent, Sunny,
Fluorescent, and Cloudy.
Quality - Choose between
Super fine, Fine and Normal.
The finer the quality, the
sharper a video will be, but
the file size will increase. As a
result, you will be able to store
fewer videos in the phone’s
memory.
26
Duration - Set a duration limit
for your video. Choose between
Normal and MMS to limit the
maximum size to send as an
MMS message.
Select storage - Choose
whether to save your videos to
the Handset memory or to the
External memory.
Audio recording - Choose Mute
to record a video without sound.
Hide icons - Select whether
to hide the icons in the camera
menu automatically or manually.
Reset settings - Reset all the
video camera settings.
Music
To access the music player,
touch Music. From here, you
can access a number of folders:
Recently played - Plays the
songs you have played recently.
All tracks - Contains the songs
you have on your phone except
the pre-loaded default music.

27
Artists - Browse through your
music collection by artist.
Albums - Browse through your
music collection by album.
Genres - Browse through your
music collection by genre.
Playlists - Contains all the
playlists you have created.
Shuffle tracks - Play your
tracks in a random order.
Transferring music onto
your phone
The easiest way to transfer
music onto your phone is via
Bluetooth or the data cable.
To transfer music using
Bluetooth:
1 Make sure both devices have
Bluetooth switched on and
are connected to each other.
2 Select the music file on the
other device and select send
via Bluetooth.
3 When the file is sent, you
will have to accept it on your
phone by touching Yes.
4 The file should appear in
Music > All tracks.
Managing files
You can store multimedia files
in your phone’s memory so you
have easy access to all your
Images, sounds, videos, Flash
Contents, Documents and Other
content. You can also save your
files to a memory card. Using
a memory card allows you to
free up space in your phone’s
memory.
By touching My stuff, you can
open a list of the folders that
store all your multimedia files.
FM Radio
Your LG-P520 has an FM radio
feature so you can tune into
your favourite stations to listen
to while on the move.

Searching for stations
You can tune your phone to
radio stations by searching
for them either manually or
automatically. They will then
be saved to specific channel
numbers, so you don‘t have to
keep re-tuning. You must first
attach the headset to the phone
as this acts as the aerial.
To auto tune:
1 Scroll and touch FM radio,
and touch .
2 Touch Auto scan. A
confirmation message
appears. Select Yes, then the
stations will be automatically
found and allocated to a
channel in your phone.
NOTE: You can also
manually tune into a
station by using and
displayed in the centre of
the screen. If you press and
hold and , the stations
will be automatically found.
28
Application
Adding an event to your
calendar
1 Touch Calendar.
2 Select the date you would
like to add an event to.
3 Touch Add.
Setting your alarm
1 Touch Alarms.
2 Touch Add, then you can set
and save your alarm in this
menu.
Voice recorder
Use your voice recorder to
record voice memos or other
audio files.
Using your calculator
1 Touch Calculator in
Application screen.
2 Touch the number keys to
enter numbers.

29
Converting a unit
1 Touch Unit converter in
Application screen.
2 Choose whether you want
to convert Currency, Area,
Length, Weight, Temperature,
Volume or Velocity.
3 Then select the unit and
enter the value you would
like to convert from.
PC Suite
You can synchronize your
PC with your phone. This will
ensure all your important details
and dates match, and also act
as a back up to help put your
mind at ease.
Installing LG PC Suite on
your computer
1 Go to www.lgapplication.com
2 Click Manual & Software.
3
Download LG Mobile
support tool. In LG Mobile
support tool, you can select
mobile sync download. Then
pc suite package will be
downloaded in your PC. If
you unpack that file, you can
install PC Suite.
4 Follow the instructions on
screen to complete the LG
PC Suite Installer wizard.
5 Once installation is complete,
the LG PC Suite icon will
appear on your desktop.
WARNING: Do not
disconnect your phone
during the transfer.
The web
Browser gives you a fast, full-
colour world of games, music,
news, sport, entertainment and
loads more, straight to your
mobile phone. Wherever you
are and whatever you’re into.

Accessing the web
1 Touch the Browser.
2 To go straight to the browser
home page, select Home.
Alternately, select Enter
address and type in the
URL, followed by Connect.
NOTE: You will incur extra
cost by connecting to these
services and downloading
content. Check data
charges with your network
provider.
Access to Google Service
You can launch google
services in this application.
Touch Google Search in the
Multimedia screen.
30
Settings
Personalising your profiles
You can quickly change
your profile by touching the
Multimedia screen.
You can personalise each profile
setting using the settings menu.
1 Touch Profiles.
2 Choose the profile you want
to edit.
3 You can then change all the
sounds and alert options
available in the list, including
your Ringtone and Volume,
Message tone settings and
more.
Changing your phone
settings
Use the freedom of adapting
the LG-P520 to your own
preferences.
From the home screen, select
then choose .

31
Using memory manager
From the home screen select
then choose . Select
Device settings and choose
Memory info.
Changing your
connectivity settings
Your connectivity settings
have already been set up by
your network operator, so you
can enjoy your new phone
immediately. To change any
settings, use this menu:
Touch Connectivity.
Sending and receiving
your files using Bluetooth
To send a file:
1 Open the file you want to
send, typically this will be a
photo, video or music file.
2 Choose Send via. Choose
Bluetooth.
3 If you have already paired the
Bluetooth device, your LG-
P520 will not automatically
search for other Bluetooth
devices. If not, your LGP520 will search for other
Bluetooth enabled devices
within range.
4 Choose the device you want
to send the file to.
5 Your file will be sent.
To receive a file:
1 To receive files, your
Bluetooth must be both ON
and Visible. See Changing
your Bluetooth settings
below for more information.
2 A message will prompt you
to accept the file from the
sender. Touch Yes to receive
the file.
3 You will see where the file
has been saved. For image
files, you can choose to View
the file. Files will usually be
saved to the appropriate
folder in My stuff.

Changing your Bluetooth
settings:
Touch Bluetooth in the
MULTIMEDIA tab. And select
and choose Settings.
Pairing with another
Bluetooth device
By pairing your LG-P520
and another device, you can
set up a passcode protected
connection.
1 Check that your Bluetooth
is ON and Visible. You can
change your visibility in the
Settings menu.
2 Touch Search.
3 Your LG-P520 will search for
devices. When the search
is completed, Refresh will
appear on screen.
4 Choose the device you want
to pair with and enter the
passcode, then touch OK.
32
5 Your phone will then connect
to the other device, on which
you will need to enter the
same passcode.
6 Your passcode protected
Bluetooth connection is now
ready.

33
Software update
Phone Software update
LG Mobile Phone Software
update from internet
For more information on using
this function, please visit the
http://update.lgmobile.com or
http://www.lg.com/common/
index.jsp → select country and
language → Support.
This Feature allows you to
update the firmware of your
phone to the latest version
conveniently from the internet
without the need to visit a
service centre.
As the mobile phone firmware
update requires the user’s full
attention for the duration of the
update process, please make
sure to check all instructions
and notes that appear at each
step before proceeding. Please
note that removing the USB
data cable or battery during the
upgrade may seriously damage
you mobile phone.

Accessories
There are various accessories for your mobile phone. You can
select these options according to your personal communication
requirements.
Charger Stereo
headset
Battery
Data
cable and
CD
User
guide
NOTE
• Always use genuine LG accessories.
• Failure to do this may invalidate your warranty.
• Accessories may vary in different regions.
34

35
Technical data
Ambient Temperatures
Max.: +55°C (discharging) +45°C (charging)
Min.: -10°C

Troubleshooting
This chapter lists some problems you might encounter while
using your phone. Some problems require you to call your service
provider, but most are easy to correct yourself.
Message Possible Causes Possible Corrective Measures
There is no USIM
USIM error
No network
connection/
Loosing
network
Codes do
not match
Any
application
cannot be
set
36
card in the phone
or it is inserted
incorrectly.
Weak Signal outside
of GSM network area
Operator applied new
services
To change a security
code, you will need
to confirm the new
code by entering it
again.
The two codes you
have entered do not
match.
Not supported by
service provider or
registration required
Make sure that the SIM card is
correctly inserted.
Move towards a window or into
an open area. Check the network
operator coverage map.
See if the SIM card is older than
6~12 month.
If so, change your SIM at the office
of your network provider.
The default code is [0000]. If you
forget the code, contact your service
provider.
Contact your service provider.

37
Message Possible Causes Possible Corrective Measures
New network not authorised.
Check for new restrictions.
Contact your service provider or
reset limit with PIN 2.
Press the On/Off key down for at
least two seconds.
Keep charger attached for a longer
time Clean the contacts.
Take out the battery and insert
again.
Calls not
available
Phone
cannot be
switched on
Dialing error
New SIM card
inserted
Prepaid charge limit
reached
On/Off key pressed
long enough
Battery is not
charged
Battery contacts
are dirty
Charging
error
Touch function
doesn’t work
or is abnormal
Battery is not
charged
Outside temperature
is too hot or cold
Contact problem
No voltage
Charger defective
Wrong charger
Battery defective
Touchpad calibration
fault
Charge battery.
Make sure phone is charging under
normal temperatures.
Check the charger and connection
to the phone. Check the battery
contacts and clean them if
necessary.
Plug into a different socket.
If the charger does not warm up,
replace it.
Only use original LG accessories.
Replace battery.
Perform the touchpad calibration via
phone setting menu.

Troubleshooting
Message Possible Causes Possible Corrective Measures
Number not
permitted
Impossible to
receive/send
SMS & Picture
Files not
open
SD Card not
working
The screen
does not
turn on when
I receive a
call.
No sound
Hang up or
freeze
38
The Fixed Dial
Number function
is on.
Memory full
Unsupported file
format
FAT 16 file system
supported only
Proximity sensor
problem
Vibration or manner
mode
Intermittent software
problem
Check settings.
Delete some existing messages in
the phone.
Check the file format that can be
supported
Check SD card file system via card
reader or format SD card using
phone
If you use any protection tape or
case, check it is covered the area
around proximity sensor
Make sure that the area around the
proximity sensor is clean.
Check the setting status of sound
menu to make sure you are not in
vibrate or silent mode.
Take out the battery and insert
battery.
Turn on the phone.
Try to do software update service
via web site

Memo

Memo

Memo

Memo

ﺮﮕﯾﺩ ﯽﺗﺍﺮﺑﺎﺨﻣ ﻪﮑﺒﺷ ﻪﺑ ﺩﺪﺠﻣ ﻝﺎﺼﺗﺍ
.ﺖﺳﺍ ﺭﺎﮐﺩﻮﺧ
.ﺪﯿﻨﮐ ﯽﺳﺭﺮﺑ ﺍﺭ ﺕﺎﻤﯿﻈﻨﺗ
ﺭﺎﯿﺴﺑ ﻝﺎﻨﮕﯿﺳ
.ﺖﺳﺍ ﻒﯿﻌﺿ
یﺮﯿﮔ ﻩﺭﺎﻤﺷ ﺖﯿﻠﺑﺎﻗ
.ﺖﺳﺍ ﻦﺷﻭﺭ ﺖﺑﺎﺛ
ﯽﺑﺎﯾ ﺐﯿﻋ
ﻡﺎﯿﭘﯽﻟﺎﻤﺘﺣﺍ یﺎﻫ ﺖﻠﻋﻦﮑﻤﻣ یﺎﻫ ﻞﺣ ﻩﺍﺭ
ﻪﮑﺒﺷ ﻦﻔﻠﺗ
ﯽﻣ ﺖﺳﺩ ﺯﺍ ﺍﺭ
ﺪﻫﺩ
ﺯﺎﺠﻣ ﻩﺭﺎﻤﺷ
ﺖﺴﯿﻧ
38

ﺍﺭ ﺵﻮﻣﺎﺧ/ﻦﺷﻭﺭ ﺪﯿﻠﮐ ﻪﯿﻧﺎﺛ ﻭﺩ ﻞﻗﺍﺪﺣ
.ﺪﯿﻫﺩ ﺭﺎﺸﻓ
ﻪﺑ ﻞﺼﺘﻣ یﺮﺗ ﯽﻧﻻﻮﻃ ﺕﺪﻣ یﺍﺮﺑ ﺍﺭ ﺭژﺭﺎﺷ
.ﺪﯾﺭﺍﺩ ﻪﮕﻧ ﯽﺷﻮﮔ
.ﺪﯿﻨﮐ کﺎﭘ ﺍﺭ ﺱﺎﻤﺗ ﺡﻮﻄﺳ
.ﺪﯿﻨﮐ ژﺭﺎﺷ ﺍﺭ یﺮﺗﺎﺑ
ﻂﯿﺤﻣ یﺎﻣﺩ ﻪﮐ ﺪﯿﻨﮐ ﻞﺻﺎﺣ ﻥﺎﻨﯿﻤﻃﺍ
ﺮﺒﺻ ﻪﻈﺤﻟ ﺪﻨﭼ ،ﺖﺳﺍ ﺐﺳﺎﻨﻣ ﻑﺍﺮﻃﺍ
.ﺪﯿﯾﺎﻤﻧ ژﺭﺎﺷ ﻪﺑ ﻡﺍﺪﻗﺍ ﻩﺭﺎﺑﻭﺩ ﻭ ﺪﯿﻨﮐ
ﺍﺭ ﯽﺷﻮﮔ ﻪﺑ ﻥﺁ ﻝﺎﺼﺗﺍ ﺰﯿﻧ ﻭ ﻕﺮﺑ ﻊﺒﻨﻣ
ﯽﺳﺭﺮﺑ ﺍﺭ یﺮﺗﺎﺑ ﺱﺎﻤﺗ ﺡﻮﻄﺳ .ﺪﯿﻨﮐ ﯽﺳﺭﺮﺑ
.ﺪﯿﻨﮐ ﺰﯿﻤﺗ ﺍﺭ ﺎﻬﻧﺁ ﻡﻭﺰﻟ ﺕﺭﻮﺻ ﺭﺩ ﻭ
ﺍﺭ ژﺎﺘﻟﻭ ﺎﯾ ﻭ ﺪﯿﻧﺰﺑ یﺮﮕﯾﺩ ﺰﯾﺮﭘ ﻪﺑ ﺍﺭ ﺭژﺭﺎﺷ
.ﺪﯿﻨﮐ ﯽﺳﺭﺮﺑ
ﺾﯾﻮﻌﺗ ﺍﺭ ﻥﺁ ،ﺩﻮﺷ ﯽﻤﻧ ﻡﺮﮔ ﺭژﺭﺎﺷ ﻪﭽﻧﺎﻨﭼ
ﻩﺩﺎﻔﺘﺳﺍ LG ﯽﻠﺻﺍ ﯽﺒﻧﺎﺟ ﻡﺯﺍﻮﻟ ﺯﺍ
.ﺪﯿﻨﮐ ﺾﯾﻮﻌﺗ ﺍﺭ یﺮﺗﺎﺑ
37
.ﺪﯿﻨﮐ
ﻂﻘﻓ
.ﺪﯿﻨﮐ
ﺵﻮﻣﺎﺧ/ﻦﺷﻭﺭ ﺪﯿﻠﮐ
ﺭﺎﺸﻓ ﻡﺯﻻ ﺕﺪﻣ ﻪﺑ ﺍﺭ
.ﺪﯾﺍ ﻩﺩﺍﺪﻧ
.ﺖﺳﺍ ﯽﻟﺎﺧ یﺮﺗﺎﺑ
یﺮﺗﺎﺑ ﻝﺎﺼﺗﺍ ﻁﺎﻘﻧ
.ﺖﺳﺍ ﻒﯿﺜﮐ
ﹰ
ﻼﻣﺎﮐ یﺮﺗﺎﺑ
ﯽﻟﺎﺧ
.ﺖﺳﺍ
ﻩﺩﻭﺪﺤﻣ ﺯﺍ ﺝﺭﺎﺧ ﺎﻣﺩ
.ﺖﺳﺍ
ﺐﻃﺎﺨﻣ ﺯﺍ ﻝﺎﮑﺷﺍ
.ﺖﺳﺍ
ﺩﻮﺟﻭ ﯽﺟﻭﺮﺧ ژﺎﺘﻟﻭ
.ﺩﺭﺍﺪﻧ
.ﺖﺳﺍ ﺏﺍﺮﺧ ﺭژﺭﺎﺷ
ﻦﯾﺍ ﻪﺑ ﻁﻮﺑﺮﻣ ﺭژﺭﺎﺷ
.ﺖﺴﯿﻧ ﻦﻔﻠﺗ
.ﺖﺳﺍ ﺏﻮﯿﻌﻣ یﺮﺗﺎﺑ
ﻡﺎﯿﭘﯽﻟﺎﻤﺘﺣﺍ یﺎﻫ ﺖﻠﻋﻦﮑﻤﻣ یﺎﻫ ﻞﺣ ﻩﺍﺭ
ﻦﺷﻭﺭ ﯽﺷﻮﮔ
.ﺩﻮﺷ ﯽﻤﻧ
ژﺭﺎﺷ یﺎﻄﺧ

ﯽﺑﺎﯾ ﺐﯿﻋ
ﺎﺑ ﯽﺷﻮﮔ ﺯﺍ ﻩﺩﺎﻔﺘﺳﺍ ﻦﯿﺣ ﺭﺩ ﺖﺳﺍ ﻦﮑﻤﻣ ﻪﮐ ﯽﺗﻼﮑﺸﻣ ﺯﺍ ﯽﺧﺮﺑ ﻞﺼﻓ ﻦﯾﺍ ﺭﺩ
ﻪﮐ ﺖﺳﺍ ﻥﺁ ﻡﺰﻠﺘﺴﻣ ﺕﻼﮑﺸﻣ ﺯﺍ ﯽﺧﺮﺑ .ﻢﯿﻨﮐ ﯽﻣ ﯽﺳﺭﺮﺑ ﺍﺭ ﺪﯾﻮﺷ ﻪﺟﺍﻮﻣ ﻥﺁ
ﻭ ﻩﺩﻮﺑ ﻩﺩﺎﺳ ﺎﻫ ﻥﺁ ﺯﺍ یﺭﺎﯿﺴﺑ ﺎﻣﺍ ،ﺪﯿﻨﮐ ﻪﻌﺟﺍﺮﻣ ﺩﻮﺧ ﯽﺗﺍﺮﺑﺎﺨﻣ ﻪﮑﺒﺷ ﻪﺑ ﺎﻤﺷ
ﺭﻮﻃ ﻪﺑ ﺕﺭﺎﮐ ﻢﯿﺳ ﻪﮐ ﺪﯾﻮﺷ ﻦﺌﻤﻄﻣ
.ﺪﺷﺎﺑ ﻩﺪﺷ یﺭﺍﺬﮔﺎﺟ ﺢﯿﺤﺻ
ﺯﺎﺑ ﻂﯿﺤﻣ ﮏﯾ ﻪﺑ ﺎﯾ ﻩﺮﺠﻨﭘ ﮏﯾ ﯽﮑﯾﺩﺰﻧ ﺭﺩ
ﺩﻮﺧ ﯽﺗﺍﺮﺑﺎﺨﻣ ﻪﮑﺒﺷ ﺶﺷﻮﭘ ﻪﺸﻘﻧ .ﺪﯾﻭﺮﺑ
.ﺪﯾﺮﯿﮕﺑ ﺱﺎﻤﺗ ﯽﺗﺍﺮﺑﺎﺨﻣ ﻪﮑﺒﺷ ﺎﺑ
.ﺪﯾﺮﯿﮕﺑ ﺱﺎﻤﺗ ﯽﺗﺍﺮﺑﺎﺨﻣ ﻪﮑﺒﺷ ﺎﺑ
ﻩﺪﺸﻧ ﺭﺎﺒﺘﻋﺍ ﺪﯿﯾﺎﺗ ﺯﺎﺠﻣ ﺪﯾﺪﺟ ﻪﮑﺒﺷ
ﯽﺳﺭﺮﺑ ﺍﺭ ﺪﯾﺪﺟ یﺎﻫ ﺖﯾﺩﻭﺪﺤﻣ .ﺖﺳﺍ
ﺎﯾ ﻪﺘﻓﺮﮔ ﺱﺎﻤﺗ ﯽﺗﺍﺮﺑﺎﺨﻣ ﻪﮑﺒﺷ ﺎﺑ .ﺪﯿﻨﮐ
ﯽﻧﺎﺸﻧﺯﺎﺑ ﺍﺭ 2 ﻦﯿﭘ ﺯﺍ ﻩﺩﺎﻔﺘﺳﺍ ﺖﯾﺩﻭﺪﺤﻣ
.ﺪﯿﻨﮐ ﻊﻓﺭ ﺍﺭ ﺕﻼﮑﺸﻣ ﻦﯾﺍ ﺪﯿﻧﺍﻮﺗ
ﻦﻔﻠﺗ ﺭﺩ ﺕﺭﺎﮐ ﻢﯿﺳ
.ﺖﺳﺍ ﻩﺪﺸﻧ یﺭﺍﺬﮔﺎﺟ
ﺍﺭ
.ﺪﯿﻨﮐ ﯽﺳﺭﺮﺑ
ﺩﺪﺠﻣ ﻥﺩﺮﮐ ﺩﺭﺍﻭ ﺎﺑ ﺪﯾﺎﺑ
ﯽﻤﻧ ﯽﻧﺎﺒﯿﺘﺸﭘ ﺕﺎﻣﺪﺧ
ﺯﺍ ﻩﺩﺎﻔﺘﺳﺍ یﺍﺮﺑ ﺎﯾ ﺩﻮﺷ
.ﺪﯿﻨﮐ
.GSM ﻪﮑﺒﺷ ﺯﺍ ﺝﺭﺎﺧ
،ﯽﺘﯿﻨﻣﺍ ﺪﮐ ﺮﯿﯿﻐﺗ یﺍﺮﺑ
ﺪﯿﯾﺄﺗ ﺍﺭ ﻥﺁ ،ﺪﯾﺪﺟ ﺪﮐ
.ﺖﺳﺍ ﻡﺯﻻ ﻡﺎﻧ ﺖﺒﺛ ﻥﺁ
ﺭﺩ ﺪﯾﺪﺟ ﺕﺭﺎﮐ ﻢﯿﺳ
ﻪﺑ .ﺖﻓﺮﮔ ﺭﺍﺮﻗ ﯽﺷﻮﮔ
ﺖﺳﺍ ﻩﺪﯿﺳﺭ ژﺭﺎﺷ ﺪﺣ
ﺖﺳﺭﺩ ﺎﯾ ﺖﺴﯿﻧ
ﻒﯿﻌﺿ ﻝﺎﻨﮕﯿﺳ
.ﺖﺳﺍ
.ﺪﯿﻨﮐ
ﻩﺪﻨﻫﺩ ﻪﺋﺍﺭﺍ ﻂﺳﻮﺗ
یﺮﯿﮔ ﻩﺭﺎﻤﺷ یﺎﻄﺧ
ﯽﻣ ﺩﻮﺧ
ﻢﯿﺳ یﺎﻄﺧ
ﻪﮑﺒﺷ ﺎﺑ ﻝﺎﺼﺗﺍ
ﺖﺴﯿﻧ ﺭﺍﺮﻗﺮﺑ
ﻥﺎﺴﮑﯾ ﺎﻫﺪﮐ
ﺪﻨﺘﺴﯿﻧ
ﯽﻤﻧ ﺍﺭ ﺩﺮﮐﺭﺎﮐ
ﻢﯿﻈﻨﺗ ﻥﺍﻮﺗ
ﺩﻮﻤﻧ
ﺩﻮﺟﻮﻣ ﺎﻫ ﺱﺎﻤﺗ
ﺖﺴﯿﻧ
ﻡﺎﯿﭘﯽﻟﺎﻤﺘﺣﺍ یﺎﻫ ﺖﻠﻋﻦﮑﻤﻣ یﺎﻫ ﻞﺣ ﻩﺍﺭ
36

ﯽﻨﻓ ﺕﺎﻋﻼﻃﺍ
ﻂﯿﺤﻣ یﺎﻫﺎﻣﺩ
(ژﺭﺎﺷ) ﺩﺍﺮﮔ ﯽﺘﻧﺎﺳ ﻪﺟﺭﺩ +45 (ژﺭﺎﺷﺩ) ﺩﺍﺮﮔ ﯽﺘﻧﺎﺳ ﻪﺟﺭﺩ +55 :ﺮﺜﮐﺍﺪﺣ
ﺩﺍﺮﮔ ﯽﺘﻧﺎﺳ ﻪﺟﺭﺩ 10- :ﻞﻗﺍﺪﺣ
35

ﯽﺒﻧﺎﺟ ﻡﺯﺍﻮﻟ
ﺍﺭ ﻡﺯﺍﻮﻟ ﻦﯾﺍ .ﺖﺳﺍ ﺩﻮﺟﻮﻣ ﺎﻤﺷ ﻩﺍﺮﻤﻫ ﻦﻔﻠﺗ ﯽﺷﻮﮔ یﺍﺮﺑ ﯽﻔﻠﺘﺨﻣ ﯽﺒﻧﺎﺟ ﻡﺯﺍﻮﻟ
.ﺪﯿﻨﮐ ﺏﺎﺨﺘﻧﺍ ﺩﻮﺧ ﯽﺼﺨﺷ ﯽﻃﺎﺒﺗﺭﺍ یﺎﻫﺯﺎﯿﻧ ﻖﺒﻃ
ﻮﯾﺮﺘﺳﺍ
ﻭ ﺕﺎﻋﻼﻃﺍ
یﺩ ﯽﺳ
.ﺪﯿﻨﮐ ﻩﺩﺎﻔﺘﺳﺍ LG ﻞﺻﺍ ﯽﺒﻧﺎﺟ ﻡﺯﺍﻮﻟ ﺯﺍ ﻂﻘﻓ ﻪﺸﯿﻤﻫ •
ﺭﺎﺒﺘﻋﺍ ﻪﺟﺭﺩ ﺯﺍ ﺍﺭ ﻪﻣﺎﻧ ﺖﻧﺎﻤﺿ ﺖﺳﺍ ﻦﮑﻤﻣ ﻢﻬﻣ ﻞﺻﺍ ﻦﯾﺍ ﺖﯾﺎﻋﺭ ﻡﺪﻋ •
.ﺪﻨﺷﺎﺑ ﺕﻭﺎﻔﺘﻣ ﻒﻠﺘﺨﻣ ﯽﺣﺍﻮﻧ ﺭﺩ ﺖﺳﺍ ﻦﮑﻤﻣ ﯽﺒﻧﺎﺟ ﻡﺯﺍﻮﻟ
ﺭژﺭﺎﺷ ﺖﺳﺪﻫ
یﺮﺗﺎﺑ ﻞﺑﺎﮐ
یﺎﻤﻨﻫﺍﺭ
ﺮﺑﺭﺎﮐ
ﻪﺟﻮﺗ
.ﺪﻨﮐ ﻂﻗﺎﺳ
•
34

ﻩﺎﮕﺘﺳﺩ ﺎﺑ ﻥﺪﺷ ﻂﺒﺗﺮﻣ
ﺮﮕﯾﺩ ﺙﻮﺗﻮﻠﺑ
LG-P520 ﯽﺷﻮﮔ ﻥﺪﺷ ﻂﺒﺗﺮﻣ ﺎﺑ
ﮏﯾ ﺪﯿﻧﺍﻮﺗ ﯽﻣ ،ﺮﮕﯾﺩ ﻩﺎﮕﺘﺳﺩ ﮏﯾ ﺎﺑ
ﺭﻮﺒﻋ ﺪﮐ یﺍﺭﺍﺩ ﻩﺪﺷ ﺖﻇﺎﻔﺣ ﻝﺎﺼﺗﺍ
ﻭ ﻩﺩﻮﺑ
ﻦﺷﻭﺭ ﺙﻮﺗﻮﻠﺑ ﺪﯿﻨﮐ ﯽﺳﺭﺮﺑ 1
ﺪﯿﻧﺍﻮﺗ ﯽﻣ ﺎﻤﺷ .ﺪﺷﺎﺑ ﺖﯾﻭﺭ ﻞﺑﺎﻗ
یﻮﻨﻣ ﺭﺩ ﺍﺭ ﺩﻮﺧ ﻥﺩﻮﺑ ﺖﯾﻭﺭ ﯽﻠﺑﺎﻗ
.ﺪﯿﻫﺩ ﺮﯿﯿﻐﺗ
.ﺪﯿﻫﺩ ﺭﺎﺸﻓ ﺍﺭ ﻮﺠﺘﺴﺟ 2
ﻩﺎﮕﺘﺳﺩ LG-P520 ﯽﺷﻮﮔ 3
ﺯﺍ ﺲﭘ .ﺪﻨﮐ ﯽﻣ ﻮﺠﺘﺴﺟ ﺍﺭ ﺎﻫ
ﻪﺤﻔﺻ ﺭﺩ
ﺪﯿﻫﺍﻮﺧ ﯽﻣ ﻪﮐ ﯽﻫﺎﮕﺘﺳﺩ
یﺯﺎﺳ ﻂﺒﺗﺮﻣ ﻥﺁ ﺎﺑ ﺍﺭ ﯽﺷﻮﮔ
ﺩﺭﺍﻭ ﺍﺭ ﺭﻮﺒﻋ ﺰﻣﺭ ﻭ ﺏﺎﺨﺘﻧﺍ ﺍﺭ ﺪﯿﻨﮐ
.ﺪﯿﻨﮐ ﺲﻤﻟ ﺍﺭ
ﺮﮕﯾﺩ ﻩﺎﮕﺘﺳﺩ ﻪﺑ ﺎﻤﺷ ﻦﻔﻠﺗ
ﺪﯾﺎﺑ ﻥﺁ یﺍﺮﺑ ﻪﮐ ﺩﻮﺷ ﯽﻣ ﻞﺼﺘﻣ
.ﺪﯿﯾﺎﻤﻧ ﺩﺭﺍﻭ ﺍﺭ ﺩﻭﺭﻭ ﺪﮐ
ﺖﻇﺎﻔﺣ ﺙﻮﺗﻮﻠﺑ ﻝﺎﺼﺗﺍ ﻥﻮﻨﮐﺍ
.ﺖﺳﺍ ﻩﺩﺎﻣﺁ ﺩﻭﺭﻭ ﺪﮐ ﺎﺑ ﻩﺪﺷ
33
.ﺪﯿﻨﮐ ﺩﺎﺠﯾﺍ
ﺕﺎﻤﯿﻈﻨﺗ
یﺯﺎﺳﻮﻧ ،ﻮﺠﺘﺴﺟ
.ﺩﻮﺷ ﯽﻣ ﺮﻫﺎﻇ
4
ﺪﯿﯾﺄﺗ ﺲﭙﺳ ﻭ
5
6

:ﻞﯾﺎﻓ ﺖﻓﺎﯾﺭﺩ یﺍﺮﺑ
ﺙﻮﺗﻮﻠﺑ ،ﺎﻫ ﻞﯾﺎﻓ ﺖﻓﺎﯾﺭﺩ یﺍﺮﺑ 1
ﺖﯾﻭﺭ ﻞﺑﺎﻗ ﻢﻫ ﻭ ﻦﺷﻭﺭ ﻢﻫ ﺪﯾﺎﺑ
ﻪﺑ ﺮﺘﺸﯿﺑ ﺕﺎﻋﻼﻃﺍ یﺍﺮﺑ .ﺪﺷﺎﺑ
ﺮﯾﺯ ﺭﺩ
ﺙﻮﺗﻮﻠﺑ ﺕﺎﻤﯿﻈﻨﺗ ﺮﯿﯿﻐﺗ
.ﺪﯿﻨﮐ ﻪﻌﺟﺍﺮﻣ
ﺎﻤﺷ ﺯﺍ ﻭ ﺩﻮﺷ ﯽﻣ ﺮﻫﺎﻇ ﯽﻣﺎﯿﭘ
ﻝﺎﺳﺭﺍ ﺯﺍ ﺍﺭ ﻞﯾﺎﻓ ﻪﮐ ﺪﻫﺍﻮﺧ ﯽﻣ
ﺖﻓﺎﯾﺭﺩ یﺍﺮﺑ .ﺪﯿﻨﮐ ﺖﻓﺎﯾﺭﺩ ﻩﺪﻨﻨﮐ
.ﺪﯿﻫﺩ ﺭﺎﺸﻓ ﺍﺭ ﻪﻠﺑ ،ﻞﯾﺎﻓ
ﺪﯿﻫﺍﻮﺧ ﺍﺭ ﻞﯾﺎﻓ ﻩﺮﯿﺧﺫ ﻞﺤﻣ
ﯽﻣ ،یﺮﯾﻮﺼﺗ یﺎﻫ ﻞﯾﺎﻓ یﺍﺮﺑ .ﺪﯾﺩ
ﻩﺩﺎﻔﺘﺳﺍ ﺎﯾ ﻞﯾﺎﻓ ﻩﺪﻫﺎﺸﻣ ﺪﯿﻧﺍﻮﺗ
ﺏﺎﺨﺘﻧﺍ ﺍﺭ
ﻪﻨﯿﻣﺯﺮﯾﻮﺼﺗ ﻥﺍﻮﻨﻋ ﻪﺑ
ﻪﺷﻮﭘ ﺭﺩ ﻻﻮﻤﻌﻣ ﺎﻫ ﻞﯾﺎﻓ .ﺪﯿﻨﮐ
ﻦﻣ ﺕﺎﻋﻮﺿﻮﻣ ﺭﺩ ﻊﻗﺍﻭ ﻪﻃﻮﺑﺮﻣ
ﺲﻤﻟ ﺍﺭ ﺙﻮﺗﻮﻠﺑ ،ﺕﺎﻤﯿﻈﻨﺗ ﻪﻧﺎﺑﺯ ﺭﺩ
ﺍﺭ
.ﺪﻧﻮﺷ ﯽﻣ ﻩﺮﯿﺧﺫ
:ﺙﻮﺗﻮﻠﺑ ﺕﺎﻤﯿﻈﻨﺗ ﺮﯿﯿﻐﺗ
ﺕﺎﻤﯿﻈﻨﺗ ﺲﭙﺳ ﻭ ﻭ .ﺪﯿﻨﮐ
.ﺪﯿﻨﮐ ﺏﺎﺨﺘﻧﺍ
ﺯﺍ ﺎﻫ ﻞﯾﺎﻓ ﺖﻓﺎﯾﺭﺩ ﻭ ﻝﺎﺳﺭﺍ
ﻝﺎﺳﺭﺍ ﺪﯿﻫﺍﻮﺧ ﯽﻣ ﻪﮐ ﯽﻠﯾﺎﻓ 1
ﻦﯾﺍ ﹰﻻﻮﻤﻌﻣ ،ﺪﯿﻨﮐ ﺯﺎﺑ ﺍﺭ ﺪﯿﯾﺎﻤﻧ
ﯽﻘﯿﺳﻮﻣ ﺎﯾ ﻢﻠﯿﻓ ،ﺲﮑﻋ ﻞﯾﺎﻓ
2
ﻪﻨﯾﺰﮔ .ﺪﯿﻨﮐ ﺏﺎﺨﺘﻧﺍ ﺍﺭ
.ﺪﯿﻨﮐ ﺏﺎﺨﺘﻧﺍ ﺍﺭ ﺙﻮﺗﻮﻠﺑ
ﺍﺭ ﺙﻮﺗﻮﻠﺑ ﻩﺎﮕﺘﺳﺩ ﻼﺒﻗ ﺮﮔﺍ 3
3
ﺮﮕﯾﺩ LG-P520 ،ﺪﯾﺍ ﻩﺩﺮﮐ ﻂﺒﺗﺮﻣ
یﺎﻫ ﻩﺎﮕﺘﺳﺩ ﺭﺎﮐﺩﻮﺧ ﺭﻮﻃ ﻪﺑ
ﯽﻤﻧ ﻮﺠﺘﺴﺟ ﺍﺭ ﺮﮕﯾﺩ
LG-P520 ،ﺕﺭﻮﺼﻨﯾﺍﺮﯿﻏ ﺭﺩ .ﺪﻨﮐ
یﺎﻫ ﻩﺎﮕﺘﺳﺩ ﺭﺎﮐﺩﻮﺧ ﺭﻮﻃ ﻪﺑ
ﻝﺎﻌﻓ ﺎﻫ ﻥﺁ
ﺩﺭﺍﺩ ﺭﺍﺮﻗ ﻩﺩﻭﺪﺤﻣ ﻥﺎﻤﻫ ﺭﺩ ﻭ ﺖﺳﺍ
ﻝﺎﺳﺭﺍ یﺍﺮﺑ ﺍﺭ ﺮﻈﻧ ﺩﺭﻮﻣ ﻩﺎﮕﺘﺳﺩ
ﺙﻮﺗﻮﻠﺑ ﻪﮐ یﺮﮕﯾﺩ
.ﺪﻨﮐ ﯽﻣ ﻮﺠﺘﺴﺟ ﺍﺭ
.ﺪﯿﻨﮐ ﺏﺎﺨﺘﻧﺍ ﻥﺁ ﻪﺑ ﻞﯾﺎﻓ
.ﺪﺷ ﺪﻫﺍﻮﺧ ﻝﺎﺳﺭﺍ ﻞﯾﺎﻓ
ﺙﻮﺗﻮﻠﺑ ﻖﯾﺮﻃ
:ﻞﯾﺎﻓ ﻝﺎﺳﺭﺍ یﺍﺮﺑ
.ﺖﺳﺍ
ﻝﺎﺳﺭﺍ 2
ﺙﻮﺗﻮﻠﺑ
4
5
32

ﻦﻔﻠﺗ ﺕﺎﻤﯿﻈﻨﺗ ﺮﯿﯿﻐﺗ
LG-P520 ﯽﺷﻮﮔ ﻪﮐ ﯽﻠﻤﻋ یﺩﺍﺯﺁ ﺯﺍ
ﺎﺑ ﻖﺑﺎﻄﻣ ﻭ ﻩﺩﺮﮐ ﻢﻫﺍﺮﻓ ﺎﻤﺷ یﺍﺮﺑ
،ﺪﻨﮐ ﯽﻣ ﻞﻤﻋ ﺎﻤﺷ یﺎﻫ ﺖﯾﻮﻟﻭﺍ
ﻩﺩﺮﮐ ﺏﺎﺨﺘﻧﺍ ﺍﺭ
.ﺪﯾﻭﺮﺑ
.ﺪﯿﻨﮐ ﻩﺩﺎﻔﺘﺳﺍ
،ﯽﻠﺻﺍ ﻪﺤﻔﺻ ﺯﺍ
ﻦﻔﻠﺗ ﺕﺎﻤﯿﻈﻨﺗ ﻪﺑ ﺲﭙﺳ ﻭ
ﻪﻈﻓﺎﺣ ﺮﯾﺪﻣ ﺯﺍ ﻩﺩﺎﻔﺘﺳﺍ
ﻩﺩﺮﮐ ﺏﺎﺨﺘﻧﺍ ﺍﺭ ،ﯽﻠﺻﺍ ﻪﺤﻔﺻ ﺯﺍ
.ﺪﯾﻭﺮﺑ
ﻦﻔﻠﺗ ﺕﺎﻤﯿﻈﻨﺗ ﻪﺑ ﺲﭙﺳ ﻭ
.ﺪﯿﻨﮐ ﺏﺎﺨﺘﻧﺍ ﺍﺭ
ﻪﻈﻓﺎﺣ ﺕﺎﻋﻼﻃﺍ
ﻝﺎﺼﺗﺍ ﺕﺎﻤﯿﻈﻨﺗ ﺮﯿﯿﻐﺗ
ﻞﺒﻗ ﺯﺍ ﯽﺷﻮﮔ ﻝﺎﺼﺗﺍ ﺕﺎﻤﯿﻈﻨﺗ
ﻡﺎﺠﻧﺍ ﺎﻤﺷ ﻪﮑﺒﺷ ﺭﻮﺗﺍﺮﭘﺍ ﻂﺳﻮﺗ
ﺯﺍﺪﯿﻧﺍﻮﺗ ﯽﻣ ﻦﯾﺍﺮﺑﺎﻨﺑ ﺖﺳﺍ ﻪﺘﻓﺮﮔ
ﺕﺬﻟ ﺍﺪﺘﺑﺍ ﻥﺎﻤﻫ ﺯﺍ ﺩﻮﺧ ﺪﯾﺪﺟ ﯽﺷﻮﮔ
،ﺕﺎﻤﯿﻈﻨﺗ ﺯﺍ ﮏﯾ ﺮﻫ ﺮﯿﯿﻐﺗ یﺍﺮﺑ .ﺪﯾﺮﺒﺑ
:ﺪﯿﻨﮐ ﻩﺩﺎﻔﺘﺳﺍ ﻮﻨﻣ ﻦﯾﺍ ﺯﺍ
.ﺪﯿﻫﺩ ﺭﺎﺸﻓ ﺍﺭ
31
ﺕﺎﻣﺪﺧ ﻪﺑ ﯽﺳﺮﺘﺳﺩ
ﻩﺍﺭ ﻪﻣﺎﻧﺮﺑ ﻦﯾﺍ ﺭﺩ ﺍﺭ google ﺕﺎﻣﺪﺧ
ﻪﻧﺎﺳﺭﺪﻨﭼ ﻪﺤﻔﺻ ﺭﺩ .ﺪﯿﻨﮐ یﺯﺍﺪﻧﺍ
.ﺪﯿﻨﮐ ﺲﻤﻟ ﺍﺭ
ﺎﻫ ﻪﺼﺨﺸﻣ یﺯﺎﺳ ﯽﺼﺨﺷ
ﺩﻮﺧ ﻪﺼﺨﺸﻣ ﺖﻋﺮﺳ ﻪﺑ ﺪﯿﻧﺍﻮﺗ ﯽﻣ
یﺍ ﻪﻧﺎﺳﺭﺪﻨﭼ ﻪﺤﻔﺻ ﺲﻤﻟ ﺎﺑ ﺍﺭ
ﺎﺑ ﺍﺭ ﻪﺼﺨﺸﻣ ﻢﯿﻈﻨﺗ ﺮﻫ ﺪﯿﻧﺍﻮﺗ ﯽﻣ
ﯽﺼﺨﺷ ﺕﺎﻤﯿﻈﻨﺗ یﻮﻨﻣ ﺯﺍ ﻩﺩﺎﻔﺘﺳﺍ
.ﺪﯿﻨﮐ ﺲﻤﻟ ﺍﺭ
ﺪﯿﻫﺍﻮﺧ ﯽﻣ ﻪﮐ یﺍ ﻪﺼﺨﺸﻣ 2
.ﺪﯿﯾﺎﻤﻧ ﺏﺎﺨﺘﻧﺍ ﺍﺭ ﺪﯿﻨﮐ ﺶﯾﺍﺮﯾﻭ
ﻝﺎﺼﺗﺍ
ﺎﻫﺍﺪﺻ ﻪﯿﻠﮐ ﺪﯿﻧﺍﻮﺗ ﯽﻣ ﻥﻮﻨﮐﺍ
ﺭﺩ ﺩﻮﺟﻮﻣ ﺭﺍﺪﺸﻫ یﺎﻫ ﻪﻨﯾﺰﮔ ﻭ
ﺕﺎﻤﯿﻈﻨﺗ ﻪﻠﻤﺟ ﺯﺍ ﺍﺭ ﺖﺴﯿﻟ
،ﺍﺪﺻ ﻥﺍﺰﯿﻣ ﻭ ﮓﻧﺯ ﮓﻨﻫﺁ
یﺭﺎﯿﺴﺑ ﻭ ﻡﺎﯿﭘ ﮓﻨﻫﺁ ﺕﺎﻤﯿﻈﻨﺗ
.ﺪﯿﻫﺩ ﺮﯿﯿﻐﺗ ،ﺮﮕﯾﺩ ﺩﺭﺍﻮﻣ
Google
Google ،یﺍ
ﺕﺎﻤﯿﻈﻨﺗ
.ﺪﯿﻫﺩ ﺮﯿﯿﻐﺗ
.ﺪﯿﻨﮐ یﺯﺎﺳ
ﺎﻫ ﻪﺼﺨﺸﻣ 1
3

ﺯﺍ ﻊﯾﺮﺳ ﻭ ﮓﻧﺭﺎﮕﻧﺭ ﯽﯾﺎﯿﻧﺩ ﺮﮔﺭﻭﺮﻣ
،ﺵﺯﺭﻭ ،ﺭﺎﺒﺧﺍ ،ﯽﻘﯿﺳﻮﻣ ،ﺎﻫ یﺯﺎﺑ
ﻦﻔﻠﺗ ﺭﺩ ﺎﻤﯿﻘﺘﺴﻣ ﺍﺭ ﯽﻣﺮﮔﺮﺳ
ﺎﺠﮐ ﺮﻫ ﺭﺩ .ﺪﻨﮐ ﯽﻣ یﺮﯿﮔﺭﺎﺑ ﺎﻤﺷ
ﻪﮐ یﺭﺎﮐ ﺮﻫ ﻪﺑ ﻭ ﺪﯿﺘﺴﻫ ﻪﮐ
.ﺪﯿﻟﻮﻐﺸﻣ
ﻪﮑﺒﺷ ﻪﺑ ﯽﺳﺮﺘﺳﺩ
.ﺪﯿﻨﮐ ﺲﻤﻟ ﺍﺭ ﺮﮔﺭﻭﺮﻣ 1
ﻪﺑ ﻢﯿﻘﺘﺴﻣ ﯽﺳﺮﺘﺳﺩ یﺍﺮﺑ 2
ﺍﺭ ﯽﻠﺻﺍ ،ﺮﮔﺭﻭﺮﻣ ﯽﻠﺻﺍ ﻪﺤﻔﺻ
ﺱﺭﺩﺁ ﻥﺩﺮﮐ ﺩﺭﺍﻭ ﺎﯾ .ﺪﯿﻨﮐ ﺏﺎﺨﺘﻧﺍ
ﺮﻈﻧ ﺩﺭﻮﻣ URL ﻭ ﻩﺩﺮﮐ ﺏﺎﺨﺘﻧﺍ ﺍﺭ
ﺍﺭ
ﻝﺎﺼﺗﺍ ﺲﭙﺳ ﻭ ﺪﯿﻨﮐ ﭗﯾﺎﺗ ﺍﺭ
ﻭ ﺕﺎﻣﺪﺧ ﻦﯾﺍ ﻪﺑ ﻝﺎﺼﺗﺍ ﺎﺑ
یﺎﻫ ﻪﻨﯾﺰﻫ ،ﻥﺁ ﺐﻟﺎﻄﻣ یﺮﯿﮔﺭﺎﺑ
ﺪﻫﺍﻮﺧ ﺖﻓﺎﯾﺭﺩ ﺎﻤﺷ ﺯﺍ ﯽﻓﺎﺿﺍ
ﻪﺋﺍﺭﺍ ﺎﺑ ﻩﺩﺍﺩ یﺎﻫ ﻪﻨﯾﺰﻫ ﻩﺭﺎﺑﺭﺩ .ﺪﺷ
.ﺪﯾﺮﯿﮕﺑ ﺱﺎﻤﺗ ﺩﻮﺧ ﻪﮑﺒﺷ ﻩﺪﻨﻫﺩ
.ﺪﯿﻨﮐ ﺏﺎﺨﺘﻧﺍ
: ﻪﺟﻮﺗ
ﺏﻭ
ﺭﺩ LG PC Suite ﺐﺼﻧ
ﺭﺩ www.lgapplication.com ﻪﺑ 1
ﺭﻮﺸﮐ ﺲﭙﺳ ﻭ ﻪﻘﻄﻨﻣ ﻪﻧﺎﯾﺍﺭ
.ﺪﯿﻨﮐ ﺏﺎﺨﺘﻧﺍ ﺍﺭ ﺩﻮﺧ
Manual & Software 2
ﮏﯿﻠﮐ ﺍﺭ (ﺭﺍﺰﻓﺍ ﻡﺮﻧ ﻭ ﺎﻤﻨﻫﺍﺭ)
LG Mobile support 3
.ﺪﯿﻨﮐ یﺮﯿﮔﺭﺎﺑ ﺍﺭ tool
LG ﻞﯿﻤﮑﺗ یﺍﺮﺑ ﺍﺭ ﺐﺼﻧ ﻞﺣﺍﺮﻣ 4
PC Suite Installer wizard
LG ﻩﺪﻨﻨﮐ ﺐﺼﻧ ﯽﯾﻭﺩﺎﺟ ﻪﻣﺎﻧﺮﺑ)
.ﺪﯿﻨﮐ ﻝﺎﺒﻧﺩ (PC Suite
LG ﺩﺎﻤﻧ ،ﺪﺷ ﻞﻣﺎﮐ ﺐﺼﻧ ﯽﺘﻗﻭ
ﺮﻫﺎﻇ پﺎﺗ ﮏﺳﺩ ﺭﺩ PC Suite
،ﻝﺎﻘﺘﻧﺍ ﻡﺎﮕﻨﻫ ﺭﺩ
.ﺪﯿﻨﮑﻧ ﻊﻄﻗ ﺍﺭ ﻦﻔﻠﺗ ﻝﺎﺼﺗﺍ
ﻪﻧﺎﯾﺍﺭ
.ﺪﯿﻨﮐ
5
.ﺩﻮﺷ ﯽﻣ
:ﺭﺍﺪﺸﻫ
30

ﻥﺩﺮﮐ ﺩﺭﺍﻭ یﺍﺮﺑ ﺍﺭ یﺩﺪﻋ یﺎﻫﺪﯿﻠﮐ 2
.ﺪﯿﻨﮐ ﺲﻤﻟ ﺩﺍﺪﻋﺍ
ﺪﺣﺍﻭ ﻞﯾﺪﺒﺗ
ﺍﺭ ﺪﺣﺍﻭ ﻝﺪﺒﻣ ،ﻪﻣﺎﻧﺮﺑ ﻪﺤﻔﺻ ﺭﺩ 1
.ﺪﯿﻨﮐ ﺲﻤﻟ
،ﻝﻮﭘ ﺪﺣﺍﻭ ﻞﻣﺎﺷ ﺮﻈﻧ ﺩﺭﻮﻣ ﺪﺣﺍﻭ
ﻢﺠﺣ ،ﺎﻣﺩ ،ﻥﺯﻭ ،ﻝﻮﻃ ،ﺢﻄﺳ
ﺏﺎﺨﺘﻧﺍ ﻞﯾﺪﺒﺗ یﺍﺮﺑ ﺍﺭ ﺖﻋﺮﺳ ﺎﯾ
.ﺪﯿﻨﮐ
ﻭ ﻩﺩﺮﮐ ﺏﺎﺨﺘﻧﺍ ﺍﺭ ﺪﺣﺍﻭ ﺲﭙﺳ
ﻥﺁ ﻪﺑ ﺪﯿﻫﺍﻮﺧ ﯽﻣ ﻪﮐ یﺭﺍﺪﻘﻣ
.ﺪﯿﯾﺎﻤﻧ ﺩﺭﺍﻭ ﺍﺭ ﺩﻮﺷ ﻞﯾﺪﺒﺗ
PC Suite
ﻡﺎﮕﻤﻫ ﻦﻔﻠﺗ ﺎﺑ ﺍﺭ ﻪﻧﺎﯾﺍﺭ ﺪﯿﻧﺍﻮﺗ ﯽﻣ
ﻢﻬﻣ ﺕﺎﯿﺋﺰﺟ ﻪﯿﻠﮐ ﺭﺎﮐ ﻦﯾﺍ ﺎﺑ .ﺪﯿﻨﮐ
ﺎﻤﺷ یﺎﻫﺭﺎﮐ ﻦﯿﻨﭽﻤﻫ ﻭ ﺎﻫ ﺦﯾﺭﺎﺗ ﻭ
ﺎﻫ ﻥﺁ ﺯﺍ ﻭ ﻩﺪﺷ ﻡﺎﮕﻤﻫ ﻪﻧﺎﯾﺍﺭ ﺎﺑ
ﻩﺩﻮﺳﺁ ﺎﺗ ﺩﻮﺷ ﯽﻣ ﻪﯿﻬﺗ ﻥﺎﺒﯿﺘﺸﭘ
.ﺪﯿﺷﺎﺑ ﺮﻃﺎﺧ
29
ﻢﯾﻮﻘﺗ ﻪﺑ ﺩﺍﺪﯾﻭﺭ ﮏﯾ ﻥﺩﻭﺰﻓﺍ
.ﺪﯿﻨﮐ ﺲﻤﻟ ﺍﺭ ﻢﯾﻮﻘﺗ یﻮﻨﻣ 1
یﺩﺍﺪﯾﻭﺭ ﺪﯿﻫﺍﻮﺧ ﯽﻣ ﻪﮐ ﯽﺨﯾﺭﺎﺗ 2
ﺏﺎﺨﺘﻧﺍ ﺍﺭ ﺩﻮﺷ ﻪﻓﺎﺿﺍ ﻥﺁ ﻪﺑ
2
.ﺪﯿﻨﮐ ﺲﻤﻟ ﺍﺭ
3
ﺲﻤﻟ ﺍﺭ ﺭﺍﺪﺸﻫ یﺎﻫ ﮓﻧﺯ یﻮﻨﻣ 1
ﻩﺮﯿﺧﺫ ﻭ ﻢﯿﻈﻨﺗ ﻮﻨﻣ ﻦﯾﺍ ﺭﺩ ﺍﺭ ﺩﻮﺧ
ﺖﺷﺍﺩﺩﺎﯾ ﻂﺒﺿ یﺍﺮﺑ ﺕﻮﺻ ﻂﺒﺿ ﺯﺍ
ﺮﮕﯾﺩ ﯽﺗﻮﺻ یﺎﻫ ﻞﯾﺎﻓ ﺎﯾ ﯽﺗﻮﺻ یﺎﻫ
ﻦﯿﺷﺎﻣ
ﺭﺍﺪﺸﻫ ﮓﻧﺯ ﻢﯿﻈﻨﺗ
،ﺪﯿﻨﮐ ﺲﻤﻟ ﺍﺭ
ﺭﺍﺪﺸﻫ ﮓﻧﺯ ﺪﯿﻧﺍﻮﺗ ﯽﻣ ﺲﭙﺳ
ﺏﺎﺴﺣ ﻦﯿﺷﺎﻣ ﺯﺍ ﻩﺩﺎﻔﺘﺳﺍ
،یﺍ ﻪﻧﺎﺳﺭﺪﻨﭼ ﻪﺤﻔﺻ ﺭﺩ 1
.ﺪﯿﻨﮐ ﺲﻤﻟ ﺍﺭ ﺏﺎﺴﺣ
ﻪﻣﺎﻧﺮﺑ
.ﺪﯿﻨﮐ
ﻥﺩﻭﺰﻓﺍ یﻮﻨﻣ 3
.ﺪﯿﻨﮐ
ﻥﺩﻭﺰﻓﺍ یﻮﻨﻣ 2
.ﺪﯿﯾﺎﻤﻧ
ﺕﻮﺻ ﻂﺒﺿ
.ﺪﯿﻨﮐ ﻩﺩﺎﻔﺘﺳﺍ

ﺎﻫ ﻞﯾﺎﻓ ﺖﯾﺮﯾﺪﻣ
ﻪﻧﺎﺳﺭ ﺪﻨﭼ ﻞﯾﺎﻓ ﻉﻮﻧ ﺮﻫ ﺪﯿﻧﺍﻮﺗ ﯽﻣ
ﺪﯿﻨﮐ ﻩﺮﯿﺧﺫ ﯽﺷﻮﮔ ﻪﻈﻓﺎﺣ ﺭﺩ ﺍﺭ یﺍ
یﺯﺎﺑ ﻭ ﺎﻫ ﻢﻠﯿﻓ ،ﺎﻫﺍﺪﺻ ،ﺮﯾﻭﺎﺼﺗ ﻪﺑ ﺎﺗ
ﻊﯾﺮﺳ ﻭ ﻥﺎﺳﺁ ﯽﺳﺮﺘﺳﺩ ﺩﻮﺧ یﺎﻫ
ﺪﯿﻧﺍﻮﺗ ﯽﻣ ﻦﯿﻨﭽﻤﻫ .ﺪﯿﺷﺎﺑ ﻪﺘﺷﺍﺩ
ﺕﺭﺎﮐ ﮏﯾ یﻭﺭ ﺍﺭ ﺩﻮﺧ یﺎﻫ ﻞﯾﺎﻓ
ﺯﺍ ﻩﺩﺎﻔﺘﺳﺍ .ﺪﯿﻨﮐ ﻩﺮﯿﺧﺫ ﻪﻈﻓﺎﺣ
ﯽﻣ ﻥﺎﮑﻣﺍ ﺎﻤﺷ ﻪﺑ ﻪﻈﻓﺎﺣ
ﻩﺩﺮﮐ ﯽﻟﺎﺧ ﺍﺭ ﺩﻮﺧ ﻦﻔﻠﺗ ﻪﻈﻓﺎﺣ ﺪﻫﺩ
.ﺪﯿﯾﺎﻤﻧ ﻩﺮﯿﺧﺫ ﺕﺭﺎﮐ ﺭﺩ ﺍﺭ ﺐﻟﺎﻄﻣ ﻭ
ﺪﯿﻧﺍﻮﺗ ﯽﻣ
یﺎﻫ ﻞﯾﺎﻓ یﻭﺎﺣ یﺎﻫ ﻪﺷﻮﭘ ﺯﺍ ﯽﺘﺴﯿﻟ
ﻦﻣ ﺕﺎﻋﻮﺿﻮﻣ ﺲﻤﻟ ﺎﺑ
.ﺪﯿﻨﮐ ﺯﺎﺑ ﺍﺭ یﺍ ﻪﻧﺎﺳﺭﺪﻨﭼ
ﺎﻫ ﻪﻣﺎﻧﺮﺑ ﻭ ﺎﻫ یﺯﺎﺑ
ﺪﯾﺪﺟ یﺎﻫ ﻪﻣﺎﻧﺮﺑ ﻭ ﺎﻫ یﺯﺎﺑ ﺪﯿﻧﺍﻮﺗ ﯽﻣ
ﺎﻫ ﻥﺁ ﺯﺍ ﻭ ﻩﺩﺮﮐ یﺮﯿﮔﺭﺎﺑ ﻦﻔﻠﺗ ﺭﺩ ﺍﺭ
ﺕﺭﺎﮐ
.ﺪﯾﺮﺒﺑ ﺕﺬﻟ
ﺎﻫ ﮓﻨﻫﺁ ﻪﺑ - ﯽﻓﺩﺎﺼﺗ یﺎﻫ ﮓﻨﻫﺁ
ﺵﻮﮔ ﻢﻫ ﺭﺩ ﻭ ﯽﻓﺩﺎﺼﺗ ﺕﺭﻮﺻ ﻪﺑ
.ﺪﯿﻫﺩ
ﯽﺷﻮﮔ ﻪﺑ ﯽﻘﯿﺳﻮﻣ ﻝﺎﻘﺘﻧﺍ
ﯽﻘﯿﺳﻮﻣ ﻝﺎﻘﺘﻧﺍ یﺍﺮﺑ ﻩﺍﺭ ﻦﯾﺮﺗ ﻩﺩﺎﺳ
ﻞﺑﺎﮐ ﺎﯾ ﺙﻮﺗﻮﻠﺑ ﺯﺍ ﻩﺩﺎﻔﺘﺳﺍ ،ﯽﺷﻮﮔ ﻪﺑ
.ﺖﺳﺎﻫ ﻩﺩﺍﺩ
ﺯﺍ ﻩﺩﺎﻔﺘﺳﺍ ﺎﺑ ﻞﯾﺎﻓ ﻝﺎﻘﺘﻧﺍ یﺍﺮﺑ
:ﺙﻮﺗﻮﻠﺑ
ﻭﺩ ﺮﻫ ﺭﺩ ﻪﮐ ﺪﯿﻨﮐ ﯽﺳﺭﺮﺑ
ﻪﺑ ﻭ ﻩﺩﻮﺑ ﻦﺷﻭﺭ ﺙﻮﺗﻮﻠﺑ ﻩﺎﮕﺘﺳﺩ
.ﺪﻨﺷﺎﺑ ﻞﺼﺘﻣ ﻢﻫ
ﺮﮕﯾﺩ ﻩﺎﮕﺘﺳﺩ ﺭﺩ ﯽﻘﯿﺳﻮﻣ ﻞﯾﺎﻓ
ﻖﯾﺮﻃ ﺯﺍ ﻝﺎﺳﺭﺍ ﻭ ﻩﺩﺮﮐ ﺏﺎﺨﺘﻧﺍ ﺍﺭ
.ﺪﯿﻨﮐ ﺏﺎﺨﺘﻧﺍ ﺍﺭ ﺙﻮﺗﻮﻠﺑ
ﺪﯾﺎﺑ ،ﺩﻮﺷ ﯽﻣ ﻝﺎﺳﺭﺍ ﻞﯾﺎﻓ ﯽﺘﻗﻭ
ﻭ ﻩﺩﺮﮐ ﺲﻤﻟ ﺍﺭ ﻪﻠﺑ ﺩﻮﺧ ﯽﺷﻮﮔﺭﺩ
.ﺪﯿﻨﮐ ﺪﯿﯾﺄﺗ ﺍﺭ ﻥﺁ
ﻪﻤﻫ < ﯽﻘﯿﺳﻮﻣ ﺭﺩ ﺪﯾﺎﺑ ﻞﯾﺎﻓ 4
.ﺩﻮﺷ ﺮﻫﺎﻇ ﺎﻫ ﮓﻨﻫﺁ
1
2
3
28

ﯽﻘﯿﺳﻮﻣ
ﻩﺪﻨﻨﮐ ﺶﺨﭘ ﻪﺑ ﯽﺳﺮﺘﺳﺩ یﺍﺮﺑ
.ﺪﯿﻨﮐ ﺲﻤﻟ ﺍﺭ
ﻪﮐ ﯽﯾﺎﻫ ﻪﻧﺍﺮﺗ -
ﯽﻣ ﺶﺨﭘ ﺍﺭ ﺪﯾﺍ ﻩﺩﺮﮐ ﺶﺨﭘ ﺍﺮﯿﺧﺍ
ﮓﻨﻫﺁ ﻪﻤﻫ ﻞﻣﺎﺷ -
ﺶﯿﭘ ﯽﻘﯿﺳﻮﻣ ﺰﺟ ﻪﺑ ﻦﻔﻠﺗ یﺎﻫ
ﯽﻘﯿﺳﻮﻣ ﻪﻋﻮﻤﺠﻣ ﺭﺩ -
ﯽﻘﯿﺳﻮﻣ ﻪﻋﻮﻤﺠﻣ ﺭﺩ -
.ﺪﯿﻨﮐ ﻮﺠﺘﺴﺟ ﻡﻮﺒﻟﺁ ﺱﺎﺳﺍ ﺮﺑ ﺩﻮﺧ
ﯽﻘﯿﺳﻮﻣ ﻪﻋﻮﻤﺠﻣ ﺭﺩ -
ﻪﯿﻠﮐ یﻭﺎﺣ -
ﻩﺩﺮﮐ ﺩﺎﺠﯾﺍ ﻪﮐ ﯽﺸﺨﭘ یﺎﻫ ﺖﺴﯿﻟ
27
ﯽﻘﯿﺳﻮﻣ ،ﯽﻘﯿﺳﻮﻣ
ﺯﺍ یﺩﺍﺪﻌﺗ ﻪﺑ ﺪﯿﻧﺍﻮﺗ ﯽﻣ ﺎﺠﻨﯾﺍ ﺯﺍ
:ﺪﯿﻨﮐ ﺍﺪﯿﭘ ﯽﺳﺮﺘﺳﺩ ﺎﻫ ﻪﺷﻮﭘ
ﻩﺪﺷ ﺶﺨﭘ ﺍﺮﯿﺧﺍ
ﺎﻫ ﮓﻨﻫﺁ ﻪﻤﻫ
ﯽﻣ ﻩﺪﺷ یﺭﺍﺬﮔﺭﺎﺑ ﻞﺒﻗ ﺯﺍ ﺽﺮﻓ
ﻮﺠﺘﺴﺟ ﺪﻨﻣﺮﻨﻫ ﺱﺎﺳﺍ ﺮﺑ ﺩﻮﺧ
ﯽﻘﯿﺳﻮﻣ ﮏﺒﺳ ﺱﺎﺳﺍ ﺮﺑ ﺩﻮﺧ
.ﺪﯿﻨﮐ ﻮﺠﺘﺴﺟ
ﺶﺨﭘ یﺎﻫ ﺖﺴﯿﻟ
.ﺪﺷﺎﺑ ﯽﻣ ﺪﯾﺍ
.ﺪﻨﮐ
.ﺪﺷﺎﺑ
ﻥﺍﺪﻨﻣﺮﻨﻫ
.ﺪﯿﻨﮐ
ﺎﻫ ﻡﻮﺒﻟﺁ
ﺎﻫ ﮏﺒﺳ
ﺶﯾﺍﺰﻓﺍ ﺰﯿﻧ ﻞﯾﺎﻓ ﻩﺯﺍﺪﻧﺍ ،ﺖﺒﺴﻧ ﻪﺑ
یﺎﻫ ﻢﻠﯿﻓ ﻪﺠﯿﺘﻧﺭﺩ .ﺪﻨﮐ ﯽﻣ ﺍﺪﯿﭘ
ﻦﻔﻠﺗ ﻪﻈﻓﺎﺣ ﺭﺩ ﺪﯿﻧﺍﻮﺗ ﯽﻣ ﺍﺭ یﺮﺘﻤﮐ
یﺍﺮﺑ ﺍﺭ ﯽﺻﺎﺧ ﻥﺎﻣﺯ ﺕﺪﻣ -
ﺩﻭﺪﺤﻣ یﺍﺮﺑ .ﺪﯿﻨﮐ ﻦﯿﯿﻌﺗ ﺩﻮﺧ ﻢﻠﯿﻓ
ﮏﯾ ﻝﺎﺳﺭﺍ ﺖﻬﺟ ﺮﺜﮐﺍﺪﺣ ﻩﺯﺍﺪﻧﺍ ﻥﺩﺮﮐ
ﻭ یﺩﺎﻋ یﺎﻫ ﻪﻨﯾﺰﮔ ﻦﯿﺑ ﺯﺍ ،MMS ﻡﺎﯿﭘ
ﺪﯿﻨﮐ ﺏﺎﺨﺘﻧﺍ -
ﻪﻈﻓﺎﺣ ﺭﺩ ﺎﻤﺷ یﺎﻫ ﻢﻠﯿﻓ ﻪﮐ
ﻩﺮﯿﺧﺫ ﯽﺟﺭﺎﺧ ﻪﻈﻓﺎﺣ ﺭﺩ ﺎﯾ ﯽﺷﻮﮔ
ﻥﻭﺪﺑ یﺭﺍﺩﺮﺒﻤﻠﯿﻓ یﺍﺮﺑ -
.ﺪﯿﻨﮐ ﺏﺎﺨﺘﻧﺍ ﺍﺭ ﺍﺪﺻ ﯽﺑ ،ﺍﺪﺻ
ﺪﯿﻨﮐ ﻢﯿﻈﻨﺗ -
ﺭﺎﮐﺩﻮﺧ ﺭﻮﻃ ﻪﺑ ﻦﯿﺑﺭﻭﺩ یﻮﻨﻣ یﺎﻫﺩﺎﻤﻧ
ی ﻪﻤﻫ -
ﺍﺭ یﺭﺍﺩﺮﺒﻤﻠﯿﻓ ﻦﯿﺑﺭﻭﺩ ﺕﺎﻤﯿﻈﻨﺗ
.ﺪﯿﻨﮐ ﻩﺮﯿﺧﺫ
ﻥﺎﻣﺯ ﺕﺪﻣ
.ﺪﯿﻨﮐ ﺏﺎﺨﺘﻧﺍ MMS
ﻩﺮﯿﺧﺫ ﻞﺤﻣ ﺏﺎﺨﺘﻧﺍ
.ﺩﻮﺷ
ﺍﺪﺻ ﻂﺒﺿ
ﺎﻫﺩﺎﻤﻧ ﻥﺩﺮﮐ ﯽﻔﺨﻣ
.ﺪﻧﻮﺷ ﯽﻔﺨﻣ ﯽﺘﺳﺩ ﺎﯾ
ﺕﺎﻤﯿﻈﻨﺗ ﯽﻧﺎﺸﻧﺯﺎﺑ
.ﺪﯿﻨﮐ ﯽﻧﺎﺸﻧﺯﺎﺑ

ﻢﻠﯿﻓ ﺯﺍ یﺮﻟﺎﮔ ﮏﯾ ﻭ ﻩﺩﺮﮐ ﺲﻤﻟ
ﺍﺭ ﻩﺪﺷ ﻩﺮﯿﺧﺫ یﺎﻫ ﺲﮑﻋ ﻭ ﺎﻫ
.ﺪﯿﻨﮐ ﻩﺪﻫﺎﺸﻣ
ﻪﺘﻓﺮﺸﯿﭘ ﺕﺎﻤﯿﻈﻨﺗ ﺯﺍ ﻩﺩﺎﻔﺘﺳﺍ
ﻪﻤﻫ ﺎﺗ ﺪﯿﻨﮐ ﺲﻤﻟ ﺍﺭ ،ﺏﺎﯾﺎﻤﻧ ﺯﺍ
ﺯﺎﺑ ﻪﺘﻓﺮﺸﯿﭘ ﺕﺎﻤﯿﻈﻨﺗ یﺎﻫ ﻪﻨﯾﺰﮔ
ﺪﯿﻠﮐ ﻥﺪﻧﺎﺧﺮﭼ ﺎﺑ ﺪﯿﻧﺍﻮﺗ ﯽﻣ .ﺩﻮﺷ
ﺍﺭ یﺭﺍﺩﺮﺒﻤﻠﯿﻓ ﻦﯿﺑﺭﻭﺩ ﻢﯿﻈﻨﺗ ،ﺭﻭﺪﻣ
،ﻪﻨﯾﺰﮔ ﺏﺎﺨﺘﻧﺍ ﺯﺍ ﺪﻌﺑ .ﺪﯿﻫﺩ ﺮﯿﯿﻐﺗ
.ﺪﯿﻫﺩ ﺭﺎﺸﻓ ﺍﺭ
ﺏﺎﺨﺘﻧﺍ ﮓﻧﺭ ﺡﺮﻃ ﮏﯾ -
.ﺩﻮﺷ ﻝﺎﻤﻋﺍ ﺪﯾﺪﺟ یﺎﻤﻧ ﺭﺩ ﺎﺗ ﺪﯿﻨﮐ
یﺪﯿﻔﺳ ﻝﺩﺎﻌﺗ -
ﺪﯿﻔﺳ ﯽﺣﺍﻮﻧ ﻪﮐ ﺩﻮﺷ ﯽﻣ ﺚﻋﺎﺑ
ﯽﻌﯿﺒﻃ ﺎﻤﺷ یﺎﻫ ﻢﻠﯿﻓ ﺭﺩ ﮓﻧﺭ
ﻥﺩﺮﮐ ﻝﺎﻌﻓ یﺍﺮﺑ .ﺪﻨﺳﺮﺑ ﺮﻈﻧ ﻪﺑ
ﻝﺩﺎﻌﺗ ﺢﯿﺤﺻ ﻢﯿﻈﻨﺗ ﺖﻬﺟ ﻦﯿﺑﺭﻭﺩ
ﻦﯿﯿﻌﺗ ﺍﺭ یﺭﻮﻧ ﻂﯾﺍﺮﺷ ﺪﯾﺎﺑ ،ﺪﯾﺪﯿﻔﺳ
،ﺭﺎﮐﺩﻮﺧ یﺎﻫ ﻪﻨﯾﺰﮔ ﻦﯿﺑ ﺯﺍ .ﺪﯿﻨﮐ
یﺮﺑﺍ ﺎﯾ ﺖﻨﺳﺭﻮﺌﻠﻓ ،ﯽﺑﺎﺘﻓﺁ ،ﯽﺑﺎﻬﺘﻟﺍ
یﺎﻫ ﻪﻨﯾﺰﮔ ﻦﯿﺑ ﺯﺍ -
ﺍﺭ ﯽﮑﯾ یﺩﺎﻋ ﻭ ﺏﻮﺧ ،ﺏﻮﺧ ﯽﻠﯿﺧ
ﺮﺘﻬﺑ ﺖﯿﻔﯿﮐ ﻪﭼ ﺮﻫ .ﺪﯿﻨﮐ ﺏﺎﺨﺘﻧﺍ
ﺎﻣﺍ ﺖﺳﺍ ﺮﺘﺸﯿﺑ ﻢﻠﯿﻓ ﺡﻮﺿﻭ ،ﺪﺷﺎﺑ
ﺪﯿﯾﺄﺗ ﻪﻤﮐﺩ
ﮓﻧﺭ ﻩﻮﻠﺟ
یﺪﯿﻔﺳ ﻝﺩﺎﻌﺗ
.ﺪﯿﻨﮐ ﺏﺎﺨﺘﻧﺍ ﺍﺭ ﯽﮑﯾ
ﺮﯾﻮﺼﺗ ﺖﯿﻔﯿﮐ
یﺭﺍﺩﺮﺒﻤﻠﯿﻓ ﺯﺍ ﺪﻌﺑ
ﻩﺪﻨﻫﺩ ﻥﺎﺸﻧ ﻪﮐ ﺖﺑﺎﺛ ﺮﯾﻮﺼﺗ ﮏﯾ
ﻪﺤﻔﺻ یﻭﺭ ﺖﺳﺍ ﻩﺪﺷ ﻪﺘﻓﺮﮔ ﻢﻠﯿﻓ
ﻪﯿﺷﺎﺣ ﺭﺩ ﻢﻠﯿﻓ ﻡﺎﻧ .ﺩﻮﺷ ﯽﻣ ﺮﻫﺎﻇ
ﺩﺎﻤﻧ ﺖﺸﻫ ﻩﺍﺮﻤﻫ ﻪﺑ ﻪﺤﻔﺻ ﻦﯿﯾﺎﭘ
ﭗﭼ ﻭ ﺖﺳﺍﺭ ﺖﻤﺳ ﻦﯿﯾﺎﭘ ﺖﻤﺴﻗ ﺭﺩ
ﺶﺨﭘ ﻢﻠﯿﻓ ﺎﺗ ﺪﯿﻨﮐ ﺲﻤﻟ
.ﺖﺳﺍ ﺩﻮﺟﻮﻣ ﺮﯾﺯ یﺎﻫ ﻪﻨﯾﺰﮔ
ﺎﺗ ﺪﯿﻨﮐ ﺲﻤﻟ ﺍﺭ ﻪﻨﯾﺰﮔ ﻦﯾﺍ - ﻝﺎﺳﺭﺍ
ﺎﺑ ﺎﯾ ﻞﯿﻤﯾﺍ ،ﻡﺎﯿﭘ ﮏﯾ ﻥﺍﻮﻨﻋ ﻪﺑ ﻢﻠﯿﻓ
ﺍﺭ ﻢﻠﯿﻓ ﻡﺎﻧ ﻭ ﻩﺩﺮﮐ ﺲﻤﻟ - ﻡﺎﻧ ﺮﯿﯿﻐﺗ
ﻪﺑ ﻪﮐ ﯽﻤﻠﯿﻓ ﻭ ﻩﺩﺮﮐ ﺲﻤﻟ
ﺪﯿﻨﮐ ﻑﺬﺣ ﺍﺭ ﺪﯾﺍ ﻪﺘﻓﺮﮔ ﯽﮔﺯﺎﺗ
.ﺪﯿﻨﮐ ﺪﯿﯾﺎﺗ
ﺪﻫﺍﻮﺧ ﺮﻫﺎﻇ ﹰﺍﺩﺪﺠﻣ ﺏﺎﯾﺎﻤﻧ
ﻢﻠﯿﻓ ﻪﻠﺻﺎﻓﻼﺑ ﺎﺗ ﺪﯿﻫﺩ ﺭﺎﺸﻓ
ﯽﻠﻌﻓ ﻢﻠﯿﻓ .ﺩﻮﺷ ﻪﺘﻓﺮﮔ یﺮﮕﯾﺩ
.ﺩﻮﺷ ﯽﻣ ﺮﻫﺎﻇ
.ﺩﻮﺷ
.ﺪﯿﻨﮐ ﺲﻤﻟ ﺍﺭ
.ﺩﻮﺷ ﻝﺎﺳﺭﺍ
.ﺪﯿﻫﺩ ﺮﯿﯿﻐﺗ
ﻪﻠﺑ ﺲﻤﻟ ﺎﺑ ﺍﺭ ﻥﺁ ﻭ
.ﺪﺷ
.ﺩﻮﺷ ﯽﻣ ﻩﺮﯿﺧﺫ
ﺙﻮﺗﻮﻠﺑ
26

،ﺵﻮﻣﺎﺧ ﻦﯿﺑ ﺯﺍ - یﺍ ﻪﮑﺒﺷ ﻪﺤﻔﺻ
.ﺪﯿﻨﮐ ﺏﺎﺨﺘﻧﺍ ﯽﺸﺨﺑ ﻪﺳ ﺎﯾ ﻩﺩﺎﺳ
ﺕﺎﻤﯿﻈﻨﺗ ﻪﻤﻫ - ﺕﺎﻤﯿﻈﻨﺗ ﯽﻧﺎﺸﻧﺯﺎﺑ
.ﺪﯿﻨﮐ ﯽﺑﺎﯾﺯﺎﺑ ﺍﺭ ﻦﯿﺑﺭﻭﺩ ﺽﺮﻓ ﺶﯿﭘ
یﺭﺍﺩﺮﺒﻤﻠﯿﻓ ﻦﯿﺑﺭﻭﺩ
یﺭﻮﻓ یﺭﺍﺩﺮﺒﻤﻠﯿﻓ
ﻦﯿﺑﺭﻭﺩ ﺖﻟﺎﺣ ﻦﯿﺑ ﺖﯿﻌﺿﻭ ﺮﯿﯿﻐﺗ یﺍﺮﺑ
ﺭﺩ ﻢﻠﯿﻓ ﺎﯾ ﻦﯿﺑﺭﻭﺩ ﺩﺎﻤﻧ ،ﻢﻠﯿﻓ ﺖﻟﺎﺣ ﺎﯾ
/ﻻﺎﺑ ﻪﺑ ﺍﺭ ﺏﺎﯾﺎﻤﻧ ﺖﺳﺍﺭ ﺖﻤﺳ ﺰﮐﺮﻣ
ﺕﺭﻮﺻ ﻪﺑ ﺍﺭ ﯽﺷﻮﮔ ﻪﮐ ﯽﻟﺎﺣ ﺭﺩ
ﯽﺳﺪﻋ ،ﺪﯾﺍ ﻪﺘﺷﺍﺩ ﻪﮕﻧ ﯽﻘﻓﺍ
ﺩﺭﻮﻣ ﻩژﻮﺳ ﺖﻤﺳ ﻪﺑ ﺍﺭ ﻦﯿﺑﺭﻭﺩ
.ﺪﯿﻫﺩ ﺭﺎﺸﻓ ﺍﺭ
ﺮﻫﺎﻇ ﺏﺎﯾﺎﻤﻧ ﻦﯿﯾﺎﭘ ﺭﺩ ﻂﺒﺿ 3
ﻦﯿﯾﺎﭘ ﺭﺩ ﺰﯿﻧ ﺮﻤﯾﺎﺗ ﮏﯾ .ﺩﻮﺷ ﯽﻣ
ﻪﮐ ﺩﻮﺷ ﯽﻣ ﻩﺩﺍﺩ ﻥﺎﺸﻧ ﻪﺤﻔﺻ
.ﺖﺳﺍ ﻢﻠﯿﻓ ﻝﻮﻃ ﺮﮕﻧﺎﺸﻧ
،یﺭﺍﺩﺮﺒﻤﻠﯿﻓ ﻥﺩﺮﮐ ﻒﻗﻮﺘﻣ یﺍﺮﺑ
ﺯﺍ یﺍﺮﺑ ﻭ ﺪﯿﻨﮐ ﺲﻤﻟ ﺍﺭ ﺪﯿﻠﮐ
.ﺪﯿﻨﮐ ﺏﺎﺨﺘﻧﺍ ﺍﺭ
.ﺪﯿﻨﮐ ﺲﻤﻟ ﻪﺤﻔﺻ یﻭﺭ ﺮﺑ ﺍﺭ
25
.ﺪﯿﻧﺍﺰﻐﻠﺑ ﻦﯿﯾﺎﭘ
.ﺪﯾﺮﯿﮕﺑ ﺮﻈﻧ
ﺰﻣﺮﻗ ﻪﻄﻘﻧ 2
،ﻥﺁ یﺮﯿﮔﺮﺳ
ﺭﺩ ﻢﻫ ﻥﺎﺗﺩﻮﺧ ﺪﯿﻫﺍﻮﺨﺑ ﻪﮐ ﺖﺳﺍ
.ﺪﯿﺷﺎﺑ ﻪﺘﺷﺍﺩ ﺭﻮﻀﺣ ﺲﮑﻋ
ﺭﺩ ﺲﮑﻋ ﻦﺘﻓﺮﮔ یﺍﺮﺑ -
یﺎﻫ ﻪﻨﯾﺰﮔ ﻦﯿﺑ ﺯﺍ -
ﺏﺎﺨﺘﻧﺍ یﺩﺎﻋ ﻭ ﺏﻮﺧ ،ﺏﻮﺧ ﯽﻠﯿﺧ
ﺮﺗﻻﺎﺑ ﺲﮑﻋ ﺖﯿﻔﯿﮐ ﻪﭼ ﺮﻫ .ﺪﯿﻨﮐ
ﯽﻣ ﺮﺘﺸﯿﺑ ﺰﯿﻧ ﻞﯾﺎﻓ ﻩﺯﺍﺪﻧﺍ ،ﺩﻮﺟﻭ ﻦﯾﺍ
یﺮﺘﻤﮐ یﺎﻫ ﺲﮑﻋ ﺩﺍﺪﻌﺗ ﯽﻨﻌﯾ ،ﺩﻮﺷ
.ﺪﯿﻨﮐ ﻩﺮﯿﺧﺫ ﻪﻈﻓﺎﺣ ﺭﺩ ﺪﯿﻧﺍﻮﺗ ﯽﻣ ﺍﺭ
ﺪﯿﻨﮐ ﺏﺎﺨﺘﻧﺍ -
1
ﻪﮐ ﺪﯿﻨﮐ ﺏﺎﺨﺘﻧﺍ ﺍﺭ ﻦﯿﺑﺭﻭﺩ ﻢﯿﻈﻨﺗ
ﯽﻔﺨﻣ ﺭﺎﮐﺩﻮﺧ ﺎﯾ ﯽﺘﺳﺩ ﺕﺭﻮﺻ ﻪﺑ
ﻦﺷﻭﺭ -
ﻪﻠﺻﺎﻓﻼﺑ ﺲﮑﻋ ﺎﺗ ﺪﯿﻨﮐ ﺏﺎﺨﺘﻧﺍ ﺍﺭ
4
5
.ﺖﺳﺍ ﺐﺳﺎﻨﻣ ﯽﮑﯾﺭﺎﺗ
ﺎﺑ .ﺖﺳﺍ ﺮﺘﺸﯿﺑ ﻥﺁ ﺡﻮﺿﻭ ،ﺪﺷﺎﺑ
ﻪﻈﻓﺎﺣ ﺭﺩ ﺎﻤﺷ یﺎﻫ ﺲﮑﻋ ﻪﮐ
یﺍﺪﺻ ﻪﺳ ﺯﺍ ﯽﮑﯾ -
ﻩﺮﯿﺧﺫ ﻞﺤﻣ ﺏﺎﺨﺘﻧﺍ
ﻪﻈﻓﺎﺣ ﺎﯾ ﺩﻮﺷ ﻩﺮﯿﺧﺫ ﯽﺷﻮﮔ
یﺎﻫﺩﺎﻤﻧ -
ﺎﻫﺩﺎﻤﻧ ﻥﺩﺮﮐ ﯽﻔﺨﻣ
ﻩﺪﺷ ﻪﺘﻓﺮﮔ ﺲﮑﻋ ﺶﯾﺎﻤﻧ
ﻩﺩﺍﺩ ﺶﯾﺎﻤﻧ ﻥﺪﺷ ﻪﺘﻓﺮﮔ ﺯﺍ ﺪﻌﺑ
.ﺪﯿﻨﮐ ﺏﺎﺨﺘﻧﺍ ﺍﺭ ﺮﺗﺎﺷ
ﺐﺷ ﺖﻟﺎﺣ
ﺮﯾﻮﺼﺗ ﺖﯿﻔﯿﮐ
.ﯽﺟﺭﺎﺧ
.ﺪﻧﻮﺷ
.ﺩﻮﺷ
ﺮﺗﺎﺷ یﺍﺪﺻ

ﻪﺘﻓﺮﺸﯿﭘ ﺕﺎﻤﯿﻈﻨﺗ ﺯﺍ ﻩﺩﺎﻔﺘﺳﺍ
ﻪﻤﻫ ﺎﺗ ﺪﯿﻨﮐ ﺲﻤﻟ ﺍﺭ ،ﺏﺎﯾﺎﻤﻧ ﺯﺍ
ﺯﺎﺑ ﻪﺘﻓﺮﺸﯿﭘ ﺕﺎﻤﯿﻈﻨﺗ یﺎﻫ ﻪﻨﯾﺰﮔ
ﺍﺭ
ﺪﯿﯾﺄﺗ ﻪﻤﮐﺩ ،ﻪﻨﯾﺰﮔ ﺏﺎﺨﺘﻧﺍ ﺯﺍ ﺪﻌﺑ
ﺎﺗ ﺪﯿﻫﺩ ﺮﯿﯿﻐﺗ ﺍﺭ ﺲﮑﻋ ﻩﺯﺍﺪﻧﺍ -
ﺩﻮﺷ ﯽﯾﻮﺟ ﻪﻓﺮﺻ ﻪﻈﻓﺎﺣ ﺭﺩ
یﺎﻫ ﻪﻨﯾﺰﮔ ﻦﯿﺑ ﺯﺍ -
ﻭ ﺖﻨﺳﺭﻮﺌﻠﻓ ،ﯽﺑﺎﺘﻓﺁ ،ﻥﺎﺑﺎﺗ ،ﺭﺎﮐﺩﻮﺧ
یﺍﺮﺑ ﮓﻧﺭ ﺡﺮﻃ ﮏﯾ - ﮓﻧﺭ ﻩﻮﻠﺟ
.ﺪﯿﻨﮐ ﺏﺎﺨﺘﻧﺍ ﺩﻮﺧ ﺪﯾﺪﺟ ﺲﮑﻋ
ﺭﺩ ﺍﺭ ﻩژﻮﺳ -
ﺪﻨﻧﺎﻣ ﺲﭙﺳ ﻭ ﻩﺩﺍﺩ ﺭﺍﺮﻗ ﺏﺎﯾﺎﻤﻧ
ﺹﻮﺼﺨﻣ ﻪﻤﮐﺩ ،ﯽﻟﻮﻤﻌﻣ ﯽﺳﺎﮑﻋ
ﻦﯿﺑﺭﻭﺩ .ﺪﯿﻫﺩ ﺭﺎﺸﻓ ﺍﺭ ﺲﮑﻋ ﻦﺘﻓﺮﮔ
ﻪﺑ ﻭ ﺖﻋﺮﺳ ﻪﺑ ﺍﺭ ﺲﮑﻋ ﻦﯾﺪﻨﭼ
ﺎﻤﺷ ﻪﺑ ﺭﺎﮐﺩﻮﺧ ﺮﻤﯾﺎﺗ -
ﻪﻈﺤﻟ ﺪﻨﭼ ﺎﺑ ﻪﮐ ﺪﻫﺩ ﯽﻣ ﻥﺎﮑﻣﺍ
ﺲﮑﻋ ،ﺮﺗﺎﺷ ﻥﺩﺍﺩ ﺭﺎﺸﻓ ﺯﺍ ﺪﻌﺑ ﺮﯿﺧﺄﺗ
،ﺵﻮﻣﺎﺧ یﺎﻫ ﻪﻨﯾﺰﮔ ﻦﯿﺑ ﺯﺍ .ﺪﯾﺮﯿﮕﺑ
ﺍﺭ ﯽﮑﯾ
ﺐﺳﺎﻨﻣ ﯽﺘﻗﻭ یﺍﺮﺑ ﻦﯾﺍ .ﺪﯿﻨﮐ ﺏﺎﺨﺘﻧﺍ
.ﺪﯿﻨﮐ ﺏﺎﺨﺘﻧﺍ یﺮﺑﺍ
ﯽﻟﺍﻮﺘﻣ یﺭﺍﺩﺮﺒﺴﮑﻋ
.ﺩﺮﯿﮔ ﯽﻣ ﯽﻟﺍﻮﺘﻣ ﺕﺭﻮﺻ
ﻪﯿﻧﺎﺛ 10 ﺎﯾ ﻪﯿﻧﺎﺛ 5 ،ﻪﯿﻧﺎﺛ 3
.ﺩﻮﺷ
.ﺪﯿﻫﺩ ﺭﺎﺸﻓ
ﻩﺯﺍﺪﻧﺍ
یﺪﯿﻔﺳ ﻝﺩﺎﻌﺗ
ﺭﺎﮐﺩﻮﺧ ﺮﻤﯾﺎﺗ
ﺎﺗ ﺪﯿﻨﮐ ﺲﻤﻟ ﺍﺭ ﻪﻨﯾﺰﮔ ﻦﯾﺍ - ﻝﺎﺳﺭﺍ
ﺎﺑ ﺎﯾ ﻞﯿﻤﯾﺍ ،ﻡﺎﯿﭘ ﮏﯾ ﻥﺍﻮﻨﻌﺑ ﺲﮑﻋ
ﺎﺗ ﺪﯿﻨﮐ ﺲﻤﻟ -
ﺮﯾﻮﺼﺗ) ﺩﻮﺷ ﻢﯿﻈﻨﺗ ﻪﺤﻔﺻ ﺮﯾﻮﺼﺗ
ﻪﻨﯿﻣﺯ ﺮﯾﻮﺼﺗ ،ﯽﻠﺻﺍ ﻪﺤﻔﺻ ﻪﻨﯿﻣﺯ
،ﻦﯿﺒﻃﺎﺨﻣ ﺮﯾﻮﺼﺗ ،ﻞﻔﻗ ﻪﺤﻔﺻ
ﺱﺎﻤﺗ ﺮﯾﻮﺼﺗ ،یﺩﻭﺭﻭ ﺱﺎﻤﺗ ﺮﯾﻮﺼﺗ
ﺲﮑﻋ ﻡﺎﻧ ﻭ ﻩﺩﺮﮐ ﺲﻤﻟ -
ﺍﺭ ﺲﮑﻋ ﻭ ﻩﺩﺮﮐ ﺲﻤﻟ -
ﻑﺬﺣ ﺮﯾﻮﺼﺗ ﺎﺗ ﺪﯿﻫﺩ ﺭﺎﺸﻓ
ﺲﮑﻋ یﺮﻟﺎﮔ ﺎﺗ ﺪﯿﻫﺩ ﺭﺎﺸﻓ
ﻩﺩﺍﺩ ﺶﯾﺎﻤﻧ ﻩﺪﺷ ﻩﺮﯿﺧﺫ یﺎﻫ
.ﺩﻮﺷ ﻝﺎﺳﺭﺍ ﺙﻮﺗﻮﻠﺑ
ﻥﺍﻮﻨﻋ ﻪﺑ ﻩﺩﺎﻔﺘﺳﺍ
ﺮﯾﻮﺼﺗ ﻭ ﻉﻭﺮﺷ ﺮﯾﻮﺼﺗ ،ﯽﺟﻭﺮﺧ
.(ﻥﺪﺷ ﺵﻮﻣﺎﺧ
ﻡﺎﻧ ﺮﯿﯿﻐﺗ
.ﺪﯿﻫﺩ ﺮﯿﯿﻐﺗ ﺍﺭ
ﺶﯾﺍﺮﯾﻭ
.ﺪﯿﻨﮐ ﺶﯾﺍﺮﯾﻭ
.ﺩﻮﺷ
ﺲﮑﻋ ﹰﺍﺭﻮﻓ ﺎﺗ ﺪﯿﻨﮐ ﺲﻤﻟ
.ﺩﻮﺷ ﻪﺘﻓﺮﮔ یﺮﮕﯾﺩ
.ﺩﻮﺷ
24

ﻕﻭﺪﻨﺻ ﻪﺷﻮﭘ ﺪﯿﻧﺍﻮﺗ ﯽﻣ :
ﮏﯾ ﻭ ﻩﺩﺮﮐ ﻩﺪﻫﺎﺸﻣ ﺍﺭ ﻝﺎﺳﺭﺍ/ﺖﻓﺎﯾﺭﺩ
.ﺪﯿﺴﯾﻮﻨﺑ SN ﻡﺎﯿﭘ
ﻦﯿﺑﺭﻭﺩ
یﺭﻮﻓ ﺲﮑﻋ ﻦﺘﻓﺮﮔ
.ﺪﯿﻨﮐ ﺲﻤﻟ ﺍﺭ ﻦﯿﺑﺭﻭﺩ یﻮﻨﻣ 1
ﺱﻮﮐﻮﻓ ﻩژﻮﺳ یﻭﺭ ﻦﯿﺑﺭﻭﺩ ﯽﺘﻗﻭ 2
ﺖﻤﺳ ﺰﮐﺮﻣ ﺭﺩ ﺍﺭ ،ﺩﺮﮐ
ﺎﺗ ﺪﯿﻨﮐ ﺲﻤﻟ ﻪﺤﻔﺻ ﺖﺳﺍﺭ
.ﺩﻮﺷ ﻪﺘﻓﺮﮔ ﺲﮑﻋ
ﻦﯿﺑ ﺖﯿﻌﺿﻭ ﺮﯿﯿﻐﺗ یﺍﺮﺑ
ﺩﺎﻤﻧ ،ﻢﻠﯿﻓ ﺖﻟﺎﺣ ﺎﯾ ﻦﯿﺑﺭﻭﺩ ﺖﻟﺎﺣ
ﺖﻤﺳ ﺰﮐﺮﻣ ﺭﺩ ﻢﻠﯿﻓ ﺎﯾ ﻦﯿﺑﺭﻭﺩ
ﻦﯿﯾﺎﭘ/ﻻﺎﺑ ﻪﺑ ﺍﺭ ﺏﺎﯾﺎﻤﻧ ﺖﺳﺍﺭ
ﺲﮑﻋ ﻦﺘﻓﺮﮔ ﺯﺍ ﺪﻌﺑ
ﺮﻫﺎﻇ ﻪﺤﻔﺻ یﻭﺭ ﻩﺪﺷ ﻪﺘﻓﺮﮔ ﺲﮑﻋ
.ﺖﺳﺍ ﺩﻮﺟﻮﻣ ﺮﯾﺯ یﺎﻫ ﻪﻨﯾﺰﮔ
23
:ﻪﺘﮑﻧ
.ﺪﯿﻧﺍﺰﻐﻠﺑ
.ﺪﺷ ﺪﻫﺍﻮﺧ
.ﺪﯿﻨﮐ ﺲﻤﻟ ﺍﺭ
ﻡﺎﯿﭘ
ﻪﻣﺎﻧﺮﺑ ﮏﯾ SNS ﯽﮔﮋﯾﻭ :ﻪﺟﻮﺗ
یﺎﻫ ﻪﻨﯾﺰﻫ .ﺖﺳﺍ ﯽﺗﺎﻋﻼﻃﺍ
ﻭ ﻝﺎﺼﺗﺍ ﺎﺑ ﺖﺳﺍ ﻦﮑﻤﻣ ﯽﻓﺎﺿﺍ
ﺎﻤﺷ ﺯﺍ ﻦﯾﻼﻧﺁ ﺕﺎﻣﺪﺧ ﺯﺍ ﻩﺩﺎﻔﺘﺳﺍ
یﺎﻫ ﻪﻨﯾﺰﻫ ﻩﺭﺎﺑﺭﺩ .ﺩﻮﺷ ﺖﻓﺎﯾﺭﺩ
ﻪﮑﺒﺷ ﻩﺪﻨﻫﺩ ﻪﺋﺍﺭﺍ ﺎﺑ ﻩﺩﺍﺩ ﻝﺎﻘﺘﻧﺍ
.ﺪﯾﺮﯿﮕﺑ ﺱﺎﻤﺗ ﺩﻮﺧ
(SNS ﻪﻣﺍﺩﺍ) Facebook
ﻩﺪﺷ ﻢﺘﺴﯿﺳ ﺩﺭﺍﻭ :ﯽﻠﺻﺍ ﻪﺤﻔﺻ
ﺍﺭ ﺩﻮﺧ ﻥﺎﺘﺳﻭﺩ ﺪﯾﺪﺟ ﺖﯿﻌﺿﻭ ﻭ
ﻊﺟﺍﺭ ﺍﺭ ﺩﻮﺧ ﺕﺍﺮﻈﻧ .ﺪﯿﻨﮐ ﻩﺪﻫﺎﺸﻣ
ﺮﯾﺎﺳ ﺎﯾ ﻩﺩﺮﮐ ﺩﺭﺍﻭ ﺪﯾﺪﺟ ﺖﯿﻌﺿﻭ ﻪﺑ
.ﺪﯿﻨﮐ ﯽﺳﺭﺮﺑ ﺍﺭ ﺕﺍﺮﻈﻧ
ﺪﯾﺪﺟ ﺩﺭﺍﻮﻣ < ﺭﺍﻮﯾﺩ :
ﺖﯿﻌﺿﻭ ﻭ ﻩﺩﺮﮐ ﺏﺎﺨﺘﻧﺍ ﺍﺭ ﺖﯿﻌﺿﻭ
ﺩﻮﺧ ﺕﺎﻋﻼﻃﺍ .ﺪﯿﺴﯾﻮﻨﺑ ﺍﺭ ﺩﻮﺧ ﯽﻠﻌﻓ
یﺭﺍﺬﮔﺭﺎﺑ ﺍﺭ ﺲﮑﻋ ﻭ ﻩﺩﺮﮐ ﻩﺪﻫﺎﺸﻣ ﺍﺭ
یﺭﺍﺬﮔﺭﺎﺑ < ﻡﻮﺒﻟﺁ ﺭﺎﮐ ﻦﯾﺍ یﺍﺮﺑ ،ﺪﯿﻨﮐ
.ﺪﯿﻨﮐ ﺲﻤﻟ ﺍﺭ ﺲﮑﻋ
ﺭﺩ ﺍﺭ ﺩﻮﺧ ﻥﺎﺘﺳﻭﺩ :
،ﻮﺠﺘﺴﺟ ﺏﺎﺨﺘﻧﺍ ﺎﺑ facebook
ﻪﺼﺨﺸﻣ
ﻥﺎﺘﺳﻭﺩ
.ﺪﯿﻨﮐ ﻮﺠﺘﺴﺟ

ﺪﯿﻨﮐ ﺏﺎﺨﺘﻧﺍ -
یﻭﺭ ﺕﺪﻣ ﻪﭼ ﺎﻤﺷ یﺎﻫﺪﯾﻼﺳﺍ ﻪﮐ
ﺏﺎﺨﺘﻧﺍ -
ﻩﺪﺸﻧ ﯽﻧﺎﺒﯿﺘﺸﭘ ﺖﺳﻮﯿﭘ ﺪﯿﻨﮐ
ﻪﭼ ﺪﯿﻨﮐ ﺏﺎﺨﺘﻧﺍ -
.ﺖﺳﺍ ﻩﺪﺷ ﻝﺎﺳﺭﺍ ﻡﺎﯿﭘ ﺮﻫ ﻞﺒﻗ ﺕﺪﻣ
ﺖﺴﯿﻟ ﺯﺍ ﺰﮐﺮﻣ ﮏﯾ -
ﺪﯾﺪﺟ ﺰﮐﺮﻣ ﮏﯾ ﺎﯾ ﺪﯿﻨﮐ ﺏﺎﺨﺘﻧﺍ
ﺪﯾﻼﺳﺍ ﻥﺎﻣﺯ ﺕﺪﻣ
.ﺪﻧﺎﻤﺑ ﻪﺤﻔﺻ
ﻩﺪﺸﻧ ﯽﻧﺎﺒﯿﺘﺸﭘ ﺖﺳﻮﯿﭘ
.ﺮﯿﺧ ﺎﯾ ﺖﺳﺍ ﺩﻭﺪﺤﻣ
ﻞﯾﻮﺤﺗ ﻥﺎﻣﺯ
MMS ﺰﮐﺮﻣ
.ﺪﯿﯾﺎﻤﻧ ﻪﻓﺎﺿﺍ
ﯽﻋﺎﻤﺘﺟﺍ ﻪﮑﺒﺷ ﺕﺎﻣﺪﺧ
(SNS)
SNS ﺩﺮﮑﻠﻤﻋ ﻪﺑ ﺰﻬﺠﻣ LG-P520
ﺯﺍ ﺪﻫﺩ ﯽﻣ ﻥﺎﮑﻣﺍ ﺎﻤﺷ ﻪﺑ ﻪﮐ ﺖﺳﺍ
ﻥﺁ ﻭ ﺪﯾﺮﺒﺑ ﺕﺬﻟ ﺩﻮﺧ ﯽﻋﺎﻤﺘﺟﺍ ﻪﮑﺒﺷ
ﻪﻣﺎﻧﺮﺑ ﮏﯾ Facebook
ﻦﻔﻠﺗ ﺭﺩ ﻞﺒﻗ ﺯﺍ ﻪﮐ ﺖﺳﺍ یﺩﺮﺑﺭﺎﮐ
ﯽﺳﺮﺘﺳﺩ ﻭ ﻩﺪﺷ یﺮﯿﮔﺭﺎﺑ ﺎﻤﺷ
ﮏﯾ Twitter .ﺖﺳﺍ ﻥﺎﺳﺁ ﻥﺁ ﻪﺑ
یﺭﻭﺁ ﻦﻓ ﻪﯾﺎﭘ ﺮﺑ ﻭ java ﻪﻣﺎﻧﺮﺑ
.ﺪﯿﻨﮐ ﺖﯾﺮﯾﺪﻣ ﺍﺭ
:ﻪﺘﮑﻧ
.ﺪﺷﺎﺑ ﯽﻣ Java
ﻡﺎﯿﭘ ﺕﺎﻤﯿﻈﻨﺗ ﺮﯿﯿﻐﺗ
یﺍ ﻪﻧﺎﺳﺭﺪﻨﭼ
ﺲﭙﺳ ﻭ ﻩﺩﺮﮐ ﺲﻤﻟ ﺍﺭ ﺎﻫ ﻡﺎﯿﭘ
ﺍﺭ
یﺍ ﻪﻧﺎﺳﺭﺪﻨﭼ ﻡﺎﯿﭘ ﻭ ﺕﺎﻤﯿﻈﻨﺗ
ﺎﯾ
ﯽﮕﻧﺎﺧ ﻪﮑﺒﺷ - ﯽﺑﺎﯾﺯﺎﺑ ﺖﻟﺎﺣ
.ﺪﯿﻨﮐ ﺏﺎﺨﺘﻧﺍ ﺍﺭ ﮓﻨﯿﻣﻭﺭ ﻪﮑﺒﺷ
ﺏﺎﺨﺘﻧﺍ ﺍﺭ ﯽﺘﺳﺩ ﻪﻨﯾﺰﮔ ﺮﮔﺍ ﻦﯾﺍﺮﺑﺎﻨﺑ
ﻪﺑ ﻁﻮﺑﺮﻣ یﺎﻫ ﻥﻼﻋﺍ ﻂﻘﻓ ،ﺪﯿﻨﮐ
ﻭ ﺩﺮﮐ ﺪﯿﻫﺍﻮﺧ ﺖﻓﺎﯾﺭﺩ ﺍﺭ MMS
ﺪﯾﺮﯿﮕﺑ ﻢﯿﻤﺼﺗ ﺪﯿﻧﺍﻮﺗ ﯽﻣ ﺲﭙﺳ
ﺩﻮﻠﻧﻭﺍﺩ ﻞﻣﺎﮐ ﺭﻮﻃ ﻪﺑ ﺍﺭ ﺎﻬﻧﺁ ﺎﯾﺁ ﻪﮐ
ﺪﯿﻨﮐ ﺏﺎﺨﺘﻧﺍ -
ﺎﯾ/ﻭ ﺩﻮﺷ ﺖﺳﺍﻮﺧﺭﺩ ﻞﯾﻮﺤﺗ ﺵﺭﺍﺰﮔ
.ﺩﻮﺷ ﻩﺩﺍﺩ ﺖﻓﺎﯾﺭﺩ ﻩﺯﺎﺟﺍ ﻥﺁ ﻪﺑ
ﻪﮐ ﺪﯿﻨﮐ ﺏﺎﺨﺘﻧﺍ -
ﺎﯾ/ﻭ ﺩﻮﺷ ﺖﺳﺍﻮﺧﺭﺩ ﻥﺪﻧﺍﻮﺧ ﺦﺳﺎﭘ
.ﺩﻮﺷ ﻩﺩﺍﺩ ﺖﻓﺎﯾﺭﺩ ﻩﺯﺎﺟﺍ ﻥﺁ ﻪﺑ
یﺎﻫ ﻡﺎﯿﭘ ﺖﯾﻮﻟﻭﺍ ﻥﺍﺰﯿﻣ -
.ﺪﯿﻨﮐ ﺏﺎﺨﺘﻧﺍ ﺍﺭ ﺩﻮﺧ MMS
ﻡﺎﯿﭘ ﻪﮐ ﺪﯿﻨﮐ ﺏﺎﺨﺘﻧﺍ -
ﻩﺮﯿﺧﺫ ﻡﺎﯿﭘ ﺰﮐﺮﻣ ﺭﺩ ﺕﺪﻣ ﻪﭼ ﺎﻤﺷ
.ﺪﯿﻨﮐ ﺲﻤﻟ
.ﺮﯿﺧ ﺎﯾ ﺪﯿﻨﮐ
ﻞﯾﻮﺤﺗ ﺵﺭﺍﺰﮔ
ﻥﺪﻧﺍﻮﺧ ﺦﺳﺎﭘ
ﺖﯾﻮﻟﻭﺍ
ﺭﺎﺒﺘﻋﺍ ﺕﺪﻣ
.ﺩﻮﺷ
22

،ﯽﻨﺘﻣ ﻡﺎﯿﭘ ﻪﺑ ﺍﺭ ﺩﻮﺧ ﻦﺘﻣ - ﻡﺎﯿﭘ ﻉﻮﻧ
ﻞﯾﺪﺒﺗ ﻞﯿﻤﯾﺍ ﺎﯾ X.400
ﻩﻮﺤﻧ - ﺎﻫ ﻪﺴﯾﻮﻧ یﺭﺍﺬﮔﺰﻣﺭ
.ﺪﯿﻨﮐ ﺏﺎﺨﺘﻧﺍ ﺍﺭ ﺎﻫ ﻪﺴﯾﻮﻧ یﺭﺍﺬﮔﺰﻣﺭ
ﻭ ﻩﺪﺷ ﻩﺩﺮﺸﻓ ﻡﺎﯿﭘ ﻩﺯﺍﺪﻧﺍ ﺭﺎﮐ ﻦﯾﺍ ﺎﺑ
ﺰﯿﻧ ﺎﻫ ﻩﺩﺍﺩ ﻝﺎﻘﺘﻧﺍ ﻪﻨﯾﺰﻫ ﻪﺠﯿﺘﻧ ﺭﺩ
یﺍﺮﺑ -
ﺪﻨﭼ
ﺍﺭ ﻪﻨﯾﺰﮔ ﻦﯾﺍ ،
،یﺩﻭﺭﻭ ﻩﺩﺍﺩ ﻝﺎﺳﺭﺍ ﻞﯿﻤﯾﺍ یﺍﺮﺑ
:ﺪﯿﻨﮐ ﯽﺳﺭﺮﺑ ﺍﺭ ﻩﺩﺍﺩ ﻝﺎﺳﺭﺍ ﻞﯿﻤﯾﺍ
ﻭ ﻩﺩﺮﮐ ﺲﻤﻟ ﺍﺭ ﺎﻫ ﻪﻣﺎﻧﺮﺑ ﻭ ﺎﻫ یﺯﺎﺑ
.ﺪﯿﻨﮐ ﺲﻤﻟ ﺍﺭ ﺎﻫ ﻪﻣﺎﻧﺮﺑ ﺲﭙﺳ
ﺎﯾ ﻪﻘﻄﻨﻣ ﻪﺑ ﻪﺘﺴﺑ :
ﺖﺳﺍ ﻦﮑﻤﻣ ،ﻢﯿﺳ ﺭﻮﺗﺍﺮﭘﺍ
ﻩﺩﺍﺩ ﻝﺎﺳﺭﺍ ﻞﯿﻤﯾﺍ ﺯﺍ ﺪﻧﺍﻮﺘﻧ ﺮﺑﺭﺎﮐ
WAP ﻪﺑ ﻥﺎﻣﺰﻤﻫ ﻭ ﺪﻨﮐ ﻩﺩﺎﻔﺘﺳﺍ
ﻪﺘﺷﺍﺩ ﯽﺳﺮﺘﺳﺩ (MMS ﺎﯾ)
21
،یﺮﺑﺎﻤﻧ ،ﯽﺗﻮﺻ
.ﺪﺑﺎﯾ ﯽﻣ ﺶﻫﺎﮐ
ﻥﺍﻮﻨﻋ ﻪﺑ ﺪﻨﻠﺑ ﻡﺎﯿﭘ ﻝﺎﺳﺭﺍ
ﺕﺭﻮﺻ ﻪﺑ ﺪﻨﻠﺑ ﻡﺎﯿﭘ ﻝﺎﺳﺭﺍ
MMS ﮏﯾ ﺎﯾ SMS
.ﺪﯿﻨﮐ ﺏﺎﺨﺘﻧﺍ
ﻪﺟﻮﺗ*
.ﺪﺷﺎﺑ
.ﺪﯿﻨﮐ
ﺲﻤﻟ ﺍﺭ ﻞﯿﻤﯾﺍ ،ﻪﻣﺎﻧﺮﺑ ﻪﺤﻔﺻ ﺭﺩ
ﻩﺪﺸﻧ ﻢﯿﻈﻨﺗ ﻞﯿﻤﯾﺍ کﺍﺮﺘﺷﺍ ﺮﮔﺍ
ﻞﯿﻤﯾﺍ ﻢﯿﻈﻨﺗ ﯽﯾﻭﺩﺎﺟ ﻪﻣﺎﻧﺮﺑ ،ﺖﺳﺍ
ﻥﺎﯾﺎﭘ ﺐﺼﻧ ﻪﺑ ﻭ ﺪﯿﻨﮐ یﺯﺍﺪﻧﺍ ﻩﺍﺭ ﺍﺭ
ﺏﺎﺨﺘﻧﺍ ﺎﺑ ﺍﺭ ﺕﺎﻤﯿﻈﻨﺗ ﺪﯿﻧﺍﻮﺗ ﯽﻣ
ﺭﺩﺎﻗ ﻦﯿﻨﭽﻤﻫ .ﺪﯿﻨﮐ ﺶﯾﺍﺮﯾﻭ ﻭ ﯽﺳﺭﺮﺑ
ﺎﺑ ﻪﮐ یﺮﮕﯾﺩ ﺕﺎﻤﯿﻈﻨﺗ ﺩﻮﺑ ﺪﯿﻫﺍﻮﺧ
ﻢﯿﻈﻨﺗ ﺭﺎﮐﺩﻮﺧ ﺭﻮﻃ ﻪﺑ کﺍﺮﺘﺷﺍ ﺩﺎﺠﯾﺍ
.ﺪﯿﻨﮐ ﯽﺳﺭﺮﺑ ﺍﺭ ﺪﻧﺍ ﻩﺪﺷ
ﯽﻨﺘﻣ ﻡﺎﯿﭘ ﺕﺎﻤﯿﻈﻨﺗ ﺮﯿﯿﻐﺗ
ﺍﺭ ﺕﺎﻤﯿﻈﻨﺗ ﺲﭙﺳ ﻭ ﺎﻫ ﻡﺎﯿﭘ ﻪﻨﯾﺰﮔ
ﺏﺎﺨﺘﻧﺍ ﺍﺭ
ﯽﻨﺘﻣ ﻡﺎﯿﭘ .ﺪﯿﻨﮐ ﺲﻤﻟ
ﻡﺎﯿﭘ ﺰﮐﺮﻣ ﺕﺎﯿﺋﺰﺟ -
ﺖﻤﺳ ﻪﺑ ﺍﺭ ﺪﯿﻠﮐ -
ﻞﯾﻮﺤﺗ ﺪﯿﯾﺎﺗ ﻡﺎﯿﭘ ﺎﺗ ﺪﯿﻫﺩ ﺭﺎﺸﻓ ﭗﭼ
ﻡﺎﯿﭘ ﻪﮐ ﺪﯿﻨﮐ ﺏﺎﺨﺘﻧﺍ -
.ﺪﯿﻨﮐ ﺖﻓﺎﯾﺭﺩ ﺍﺭ ﺎﻫ ﻡﺎﯿﭘ
ﻡﺎﯿﭘ ﺰﮐﺮﻣ ﺭﺩ ﺕﺪﻣ ﻪﭼ ﺎﺗ ﺎﻤﺷ یﺎﻫ
ﻞﯿﻤﯾﺍ ﻢﯿﻈﻨﺗ
.ﺪﯿﻨﮐ
.ﺪﯿﻫﺩ
.ﺪﯿﻨﮐ
ﯽﻨﺘﻣ ﻡﺎﯿﭘ ﺰﮐﺮﻣ
.ﺪﯿﻨﮐ ﺩﺭﺍﻭ ﺍﺭ
ﻞﯾﻮﺤﺗ ﺵﺭﺍﺰﮔ
ﺭﺎﺒﺘﻋﺍ ﺕﺪﻣ
.ﺪﻨﻧﺎﻤﺑ ﯽﻗﺎﺑ

ﻦﺘﻣ ﻥﺩﺮﮐ ﺩﺭﺍﻭ
ﺎﺑ ﺍﺭ ﻦﺘﻣ ﻥﺩﺮﮐ ﺩﺭﺍﻭ ﺵﻭﺭ ﺪﯿﻧﺍﻮﺗ ﯽﻣ
ﺏﺎﺨﺘﻧﺍ
یﺩﻭﺭﻭ ﺵﻭﺭ ﻭ یﻭﺭ ﻪﺑﺮﺿ
،T9 ﺖﻟﺎﺣ ﻥﺩﺮﮐ ﻦﺷﻭﺭ یﺍﺮﺑ
ﯽﺘﻗﻭ ﻂﻘﻓ ﺩﺎﻤﻧ ﻦﯾﺍ .ﺪﯿﻨﮐ ﺲﻤﻟ ﺍﺭ
ﻪﺤﻔﺻ ﻪﮐ ﺩﻮﺷ ﯽﻣ ﻩﺩﺍﺩ ﺶﯾﺎﻤﻧ
ﺏﺎﺨﺘﻧﺍ یﺩﻭﺭﻭ ﺵﻭﺭ ﻥﺍﻮﻨﻋ ﻪﺑ ﺍﺭ
ﺖﻣﻼﻋ ،ﺩﺍﺪﻋﺍ ﺖﻟﺎﺣ ﻦﯿﺑ ﺮﯿﯿﻐﺗ یﺍﺮﺑ
.ﺪﯿﻨﮐ ﺲﻤﻟ ﺍﺭ
گﺭﺰﺑ ﻑﻭﺮﺣ ﺖﻟﺎﺣ ﻦﯿﺑ ﺮﯿﯿﻐﺗ یﺍﺮﺑ
ﻩﺩﺎﻔﺘﺳﺍ
ﻝﺎﻘﺘﻧﺍ ﺪﯿﻠﮐ ﺯﺍ ،ﮏﭼﻮﮐ ﻭ
.ﺪﯿﻨﮐ
ﺪﯿﻠﮐ
.ﺪﯿﯾﺎﻤﻧ
،ﻦﺘﻣ یﺩﻭﺭﻭ ﻭ ﺎﻫ
.ﺪﯿﻨﮐ
ﻂﺧ ﺖﺳﺩ ﺺﯿﺨﺸﺗ
یﻭﺭ ﯽﮔﺩﺎﺳ ﻪﺑ ،ﻂﺧ ﺖﺳﺩ ﺖﻟﺎﺣ ﺭﺩ
ﯽﺷﻮﮔ ﻭ ﺪﯿﺴﯾﻮﻧ ﯽﻣ ﺶﯾﺎﻤﻧ ﻪﺤﻔﺻ
ﻡﺎﯿﭘ ﻪﺑ ﺍﺭ ﺎﻤﺷ ﻂﺧ ﺖﺳﺩ LG-P520
.ﺪﻨﮐ ﯽﻣ ﻞﯾﺪﺒﺗ
ﻡﺎﯿﭘ ﻝﺎﺳﺭﺍ
ﻭ .ﺪﯿﻨﮐ ﺲﻤﻟ ﺍﺭ ﺎﻫ ﻡﺎﯿﭘ ،ﻮﻨﻣ ﺭﺩ 1
ﻦﺘﺷﻮﻧ
،ﺪﯾﺪﺟ ﻡﺎﯿﭘ ﻦﺘﺷﻮﻧ یﺍﺮﺑ
.ﺪﯿﻨﮐ ﺲﻤﻟ ﺍﺭ
،ﺍﺪﺻ ،ﻢﻠﯿﻓ ،ﺮﯾﻮﺼﺗ ﻥﺩﻭﺰﻓﺍ یﺍﺮﺑ 2
ﺲﻤﻟ ﺍﺭ ﻥﺩﺮﮐ ﺩﺭﺍﻭ ،ﻩﺮﯿﻏ ﻭ ﻮﮕﻟﺍ
ﻪﺤﻔﺻ یﻻﺎﺑ ﺭﺩ ﺍﺭ
ﻥﺎﮔﺪﻧﺮﯿﮔ ﻭ ﻩﺩﺮﮐ ﺲﻤﻟ ﺶﯾﺎﻤﻧ
ﺍﺭ ﻩﺭﺎﻤﺷ ﺲﭙﺳ .ﺪﯿﻨﮐ ﺩﺭﺍﻭ ﺍﺭ
ﺏﺎﺨﺘﻧﺍ یﺍﺮﺑ ﺍﺭ
ﯽﺘﺣ .ﺪﯿﻨﮐ ﺲﻤﻟ ﺐﻃﺎﺨﻣ ﮏﯾ
ﻪﻓﺎﺿﺍ ﺐﻃﺎﺨﻣ ﺪﻨﭼ ﺪﯿﻧﺍﻮﺗ ﯽﻣ
ﺲﻤﻟ ﺍﺭ
ﻝﺎﺳﺭﺍ ،ﺪﺷ ﻩﺩﺎﻣﺁ ﯽﺘﻗﻭ 4
ﻢﻠﯿﻓ ،ﺮﯾﻮﺼﺗ ﺮﮔﺍ
،ﺩﻮﺷ ﻩﺩﻭﺰﻓﺍ SMS ﻪﺑ ﯽﯾﺍﺪﺻ ﺎﯾ
ﻞﯾﺪﺒﺗ ﺭﺎﮐﺩﻮﺧ ﺭﻮﻃ ﻪﺑ SMS
ﻝﺎﺳﺭﺍ ﻪﻨﯾﺰﻫ ﻭ ﻩﺪﺷ MMS ﻪﺑ
.ﺩﻮﺷ ﯽﻣ ﺖﻓﺎﯾﺭﺩ ﺎﻤﺷ ﺯﺍ MMS
ﻡﺎﯿﭘ
.ﺪﯿﻨﮐ
ﻩﺪﻧﺮﯿﮔ 3
ﺎﯾ ﻩﺩﺮﮐ ﺩﺭﺍﻭ
.ﺪﯿﻨﮐ
.ﺪﯿﻨﮐ
:ﺭﺍﺪﺸﻫ
20

ﯽﭙﮐ ﺪﻨﻧﺎﻣ ﺰﯿﻧ ﻪﻨﯾﺰﮔ ﻦﯾﺍ -
ﺐﻃﺎﺨﻣ ﺎﻣﺍ ،ﺪﻨﮐ ﯽﻣ ﻞﻤﻋ ﻥﺩﺮﮐ
ﻭ ﻪﺘﻓﺮﮔ ﺭﺍﺮﻗ ﺪﯾﺪﺟ ﻞﺤﻣ ﺭﺩ ﻂﻘﻓ
ﮏﯾ ﺮﮔﺍ ﻦﯾﺍﺮﺑﺎﻨﺑ .ﺩﻮﺷ ﯽﻣ ﻩﺮﯿﺧﺫ
ﻪﻈﻓﺎﺣ ﻪﺑ ﻢﯿﺳ ﺯﺍ ﺍﺭ ﺐﻃﺎﺨﻣ
ﻪﻈﻓﺎﺣ ﺯﺍ ،ﺪﯿﻫﺩ ﻝﺎﻘﺘﻧﺍ ﯽﻠﺧﺍﺩ
.ﺩﻮﺷ ﯽﻣ کﺎﭘ ﻢﯿﺳ
ﻖﯾﺮﻃ ﺯﺍ ﻦﯿﺒﻃﺎﺨﻣ ﻪﻤﻫ ﻝﺎﺳﺭﺍ •
ﺯﺍ ﺍﺭ ﻦﯿﺒﻃﺎﺨﻣ ﻪﻤﻫ - ﺙﻮﺗﻮﻠﺑ
ﺮﮕﯾﺩ ﯽﺷﻮﮔ ﻪﺑ ﺙﻮﺗﻮﻠﺑ ﻖﯾﺮﻃ
ﯽﺑﺎﯾﺯﺎﺑ/
ﻦﯿﺒﻃﺎﺨﻣ ﺯﺍ ﻥﺎﺒﯿﺘﺸﭘ ﻪﯿﻬﺗ •
ﺍﺭ ﻦﯿﺒﻃﺎﺨﻣ یﺎﻫ ﻩﺩﺍﺩ - ﻦﯿﺒﻃﺎﺨﻣ
ﯽﺑﺎﯾﺯﺎﺑ ﻭ ﻩﺩﺮﮐ ﻩﺮﯿﺧﺫ ﺮﮕﯾﺩ ﻞﺤﻣ ﺭﺩ
ﻪﻤﻫ -
ﻦﯿﺒﻃﺎﺨﻣ ﻪﻤﻫ ﻑﺬﺣ •
ﺮﮔﺍ .ﺪﯿﻨﮐ ﻑﺬﺣ ﺍﺭ ﻦﯿﺒﻃﺎﺨﻣ
ﺪﯿﻫﺍﻮﺧ ﯽﻣ ﻪﮐ ﺪﯿﺘﺴﻫ ﻦﺌﻤﻄﻣ
ﻪﻠﺑ ،ﺪﯿﻨﮐ کﺎﭘ ﺍﺭ ﻦﯿﺒﻃﺎﺨﻣ ﻪﻤﻫ
ﻝﺎﻘﺘﻧﺍ •
.ﺪﻨﮐ ﯽﻣ ﻝﺎﺳﺭﺍ
.ﺪﻨﮐ ﯽﻣ
.ﺪﯿﻫﺩ ﺭﺎﺸﻓ ﺍﺭ
ﯽﻧﺎﺳﺭ ﻡﺎﯿﭘ
ﺯﺍ ﯽﺒﯿﮐﺮﺗ LG-P520 ﻝﺪﻣ ﯽﺷﻮﮔ
ﻭ ﻩﺩﺎﺳ یﻮﻨﻣ ﮏﯾ ﺭﺩ ﺍﺭ MMS ﻭ SMS
.ﺖﺳﺍ ﻩﺪﻧﺎﺠﻨﮔ ﻢﻬﻓ ﻞﺑﺎﻗ
19
.ﺪﯿﻨﮐ ﺩﺭﺍﻭ ﺍﺭ ﯽﮔﺩﺍﻮﻧﺎﺧ ﻡﺎﻧ ﻭ ﻡﺎﻧ 3
ﻒﻠﺘﺨﻣ ﻩﺭﺎﻤﺷ ﺞﻨﭘ ﺎﺗ ﺪﯿﻧﺍﻮﺗ ﯽﻣ 4
.ﺪﯿﻨﮐ ﺩﺭﺍﻭ ﺐﻃﺎﺨﻣ ﺮﻫ یﺍﺮﺑ ﺍﺭ
ﯽﻣ .ﺪﯿﻨﮐ ﺩﺭﺍﻭ ﻞﯿﻤﯾﺍ ﺱﺭﺩﺁ ﮏﯾ
ﻒﻠﺘﺨﻣ ﻞﯿﻤﯾﺍ ﺱﺭﺩﺁ ﻭﺩ ﺎﺗ ﺪﯿﻧﺍﻮﺗ
.ﺪﯿﻨﮐ ﺩﺭﺍﻭ ﺐﻃﺎﺨﻣ ﺮﻫ یﺍﺮﺑ
ﻩﻭﺮﮔ ﺪﻨﭼ ﺎﯾ ﮏﯾ ﻪﺑ ﺍﺭ ﺐﻃﺎﺨﻣ
ﺍﺭ
.ﺪﯿﻫﺩ ﺹﺎﺼﺘﺧﺍ
ﻩﺮﯿﺧﺫ ،ﺐﻃﺎﺨﻣ ﻩﺮﯿﺧﺫ یﺍﺮﺑ 7
.ﺪﯿﻨﮐ ﺲﻤﻟ
ﺐﻃﺎﺨﻣ ﺕﺎﻤﯿﻈﻨﺗ ﺮﯿﯿﻐﺗ
ﻡﺎﺠﻧﺍ یﺭﻮﻃ ﺍﺭ ﺐﻃﺎﺨﻣ ﺕﺎﻤﯿﻈﻨﺗ
ﺩﺭﺍﻮﻣ ﻖﺒﻃ
ﻪﮐ ﺪﯿﻨﮐ ﺏﺎﺨﺘﻧﺍ - ﻡﺎﻧ ﺶﯾﺎﻤﻧ •
ﺐﻃﺎﺨﻣ ﯽﮔﺩﺍﻮﻧﺎﺧ ﻡﺎﻧ ﺎﯾ ﻡﺎﻧ ﺍﺪﺘﺑﺍ
ﻢﯿﺳ ﺯﺍ ﺍﺭ ﻦﯿﺒﻃﺎﺨﻣ -
.ﺪﯿﻨﮐ ﯽﭙﮐ ﺲﮑﻌﻟﺎﺑ ﻭ ﯽﺷﻮﮔ ﻪﺑ
ﻪﺑ ﻦﯿﺒﻃﺎﺨﻣ ﻪﻤﻫ ﺎﯾ ﺐﻃﺎﺨﻣ
ﻦﯿﺒﻃﺎﺨﻣ ﻪﮐ ﺪﯿﻫﺩ
.ﺪﺷﺎﺑ ﺎﻤﺷ ﻩﺪﯾﺰﮔﺮﺑ
ﺲﭙﺳ ﻭ
ﮏﯾ یﺍﺮﺑ ﺍﺭ ﺭﺎﮐ ﻦﯾﺍ ﺪﯿﻧﺍﻮﺗ ﯽﻣ
ﺎﻫ ﻪﻨﯾﺰﮔ ﺪﯿﻠﮐ
.ﺪﯿﻨﮐ ﺲﻤﻟ ﺍﺭ ﺕﺎﻤﯿﻈﻨﺗ
.ﺩﻮﺷ ﻩﺩﺍﺩ ﺶﯾﺎﻤﻧ
ﻥﺩﺮﮐ ﯽﭙﮐ •
.ﺪﯿﻫﺩ ﻡﺎﺠﻧﺍ ﻥﺎﻣﺰﻤﻫ ﺭﻮﻃ
5
6

ﯽﯾﻮﮔ ﺦﺳﺎﭘ یﺍﺮﺑ ﻭ ﻩﺩﺮﮐ ﺏﺎﺨﺘﻧﺍ
ﯽﺷﻮﮔ یﻭﺭ ﺍﺭ ﺪﯿﻠﮐ ﮏﯾ ،ﺱﺎﻤﺗ ﻪﺑ
ﻩﺮﯿﺧﺫ یﺍﺮﺑ -
ﺍﺭ ﺵﻮﻣﺎﺧ ﺎﯾ ﻦﺷﻭﺭ ،ﺪﯾﺪﺟ ﻩﺭﺎﻤﺷ
.ﺪﯿﻫﺩ ﺭﺎﺸﻓ
ﺪﯾﺪﺟ ﻩﺭﺎﻤﺷ ﻩﺮﯿﺧﺫ •
.ﺪﯿﻨﮐ ﺏﺎﺨﺘﻧﺍ
ﻦﯿﺒﻃﺎﺨﻣ
ﺐﻃﺎﺨﻣ یﻮﺠﺘﺴﺟ
.ﺪﯿﻨﮐ ﺲﻤﻟ ﺍﺭ ﻦﯿﺒﻃﺎﺨﻣ 1
.ﺪﯿﻨﮐ ﺲﻤﻟ ﺍﺭ ﻮﺠﺘﺴﺟ 2
ﻦﯿﺒﻃﺎﺨﻣ ﺯﺍ ﯽﺘﺴﯿﻟ ﺪﯿﻧﺍﻮﺗ ﯽﻣ 3
ﻦﯿﻟﻭﺍ ﭗﯾﺎﺗ ﺎﺑ .ﺪﯿﻨﮐ ﻩﺪﻫﺎﺸﻣ ﺍﺭ
ﺖﻤﺴﻗ ﺭﺩ ﺐﻃﺎﺨﻣ ﻡﺎﻧ ﻑﺮﺣ
ﺖﺴﯿﻟ یﺩﺪﻋ ﯽﻓﺮﺣ یﻮﻨﻣ ﻪﺑ ،ﻡﺎﻧ
ﺪﯾﺪﺟ ﺐﻃﺎﺨﻣ ﻥﺩﻭﺰﻓﺍ
ﻥﺩﻭﺰﻓﺍ ﺲﭙﺳ ﻭ ﻦﯿﺒﻃﺎﺨﻣ یﻮﻨﻣ 1
ﺭﺩ ﺐﻃﺎﺨﻣ ﻪﮐ ﺪﯿﻨﮐ ﺏﺎﺨﺘﻧﺍ
ﺎﯾ ﺩﻮﺷ ﻩﺮﯿﺧﺫ ﯽﻠﺧﺍﺩ ﻪﻈﻓﺎﺣ
.ﺪﯾﻭﺭ ﯽﻣ
.ﺪﯿﻨﮐ ﺲﻤﻟ ﺍﺭ
.ﻢﯿﺳ
ﺪﯿﻨﮐ ﺏﺎﺨﺘﻧﺍ - ﻦﻣ ﻩﺭﺎﻤﺷ ﻝﺎﺳﺭﺍ •
ﺎﻤﺷ ﻩﺭﺎﻤﺷ ،ﯽﺟﻭﺮﺧ ﺱﺎﻤﺗ ﺭﺩ
.ﺮﯿﺧ ﺎﯾ ﺩﻮﺷ ﻩﺩﺍﺩ ﻥﺎﺸﻧ
ﺍﺭ ﺪﯿﻠﮐ -
ﺭﺎﮐﺩﻮﺧ یﺮﯿﮔ ﻩﺭﺎﻤﺷ •
ﯽﮔﮋﯾﻭ ﻦﯾﺍ ﺎﺗ ﺪﯿﻫﺩ ﺭﺎﺸﻓ ﭗﭼ ﻪﺑ
ﺪﯿﻫﺩ ﺭﺎﺸﻓ ﺖﺳﺍﺭ ﻪﺑ ﺎﯾ ﺩﻮﺷ ﻦﺷﻭﺭ
ﺎﻤﺷ ﻪﺑ:ﺪﯿﻫﺩ ﺭﺎﺸﻓ ﺍﺭ ﻝﺎﺳﺭﺍ ﺪﯿﻠﮐ
ﻥﺩﺍﺩ ﺭﺎﺸﻓ ﺎﺑ ﻂﻘﻓ ﺪﻫﺩ ﯽﻣ ﻥﺎﮑﻣﺍ
یﺩﻭﺭﻭ ﺱﺎﻤﺗ ﮏﯾ ﻪﺑ
ﻥﺎﮑﻣﺍ ﺎﻤﺷ ﻪﺑ
،ﺪﯿﻠﮐ ﺮﻫ ﻥﺩﺍﺩ ﺭﺎﺸﻓ ﺎﺑ ﺪﻫﺩ ﯽﻣ
یﺩﻭﺭﻭ ﺱﺎﻤﺗ ﻪﺑ
ﭗﭼ ﻪﺑ ﺍﺭ ﺪﯿﻠﮐ -
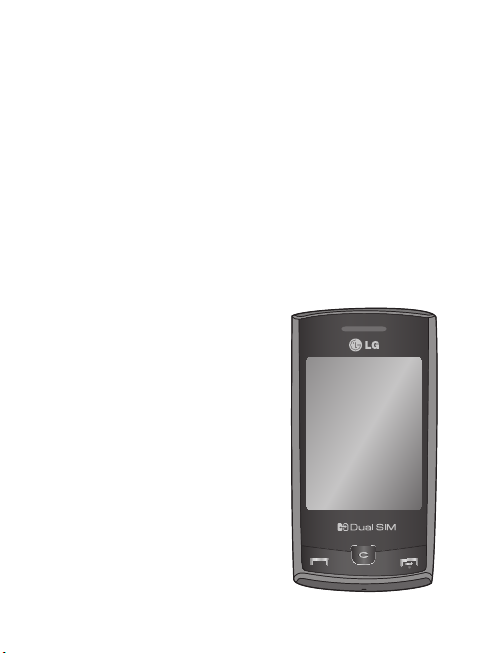
ﻦﺷﻭﺭ ﯽﮔﮋﯾﻭ ﻦﯾﺍ ﺎﺗ ﺪﯿﻫﺩ ﺭﺎﺸﻓ
ﻪﻘﯿﻗﺩ ﺭﻭﺁﺩﺎﯾ ﻕﻮﺑ ﮏﯾ ﻪﻘﯿﻗﺩ ﺮﻫ
ﻪﻨﯾﺰﮔ -
2
ﺎﺑ ﻭ ﺪﯿﻨﮐ ﺏﺎﺨﺘﻧﺍ ﺍﺭ یﺮﻓﺯﺪﻨﻫ
ﺙﻮﺗﻮﻠﺑ ﺖﺳﺪﻫ ﮏﯾ ﺯﺍ ﻩﺩﺎﻔﺘﺳﺍ
ﺍﺭ ﯽﺷﻮﮔ ﺎﯾ ﺪﯿﻫﺩ ﺦﺳﺎﭘ ﺱﺎﻤﺗ ﻪﺑ
.ﺩﻮﺷ ﺵﻮﻣﺎﺧ ﺎﺗ
ﯽﯾﻮﮔ ﺦﺳﺎﭘ ﺖﻟﺎﺣ •
.ﺪﯿﻫﺩ ﺦﺳﺎﭘ
:ﺪﯿﻠﮐ ﺮﻫ ﻥﺩﺮﺸﻓ
ﺪﯿﻠﮐ ﺰﺟ ﻪﺑ
.ﺪﯿﻫﺩ ﺦﺳﺎﭘ
ﻪﻘﯿﻗﺩ ﺭﻭﺁﺩﺎﯾ •
ﺯﺍ ﺪﻌﺑ ﺱﺎﻤﺗ ﻦﯿﺣ ﺭﺩ ﻭ ﺩﻮﺷ
BT ﺎﺑ ﯽﯾﻮﮕﺨﺳﺎﭘ ﺖﻟﺎﺣ •
ﺪﯿﻠﮐ
.ﺪﯾﻮﻨﺸﺑ
18

ﺱﺎﻤﺗ ﺩﺎﻤﻧ ،ﻩﺪﺷ ﺮﺘﻠﯿﻓ ﺖﺴﯿﻟ ﺯﺍ
ﺍﺭ ﺮﻈﻧ ﺩﺭﻮﻣ ﺐﻃﺎﺨﻣ ﺭﺎﻨﮐ ﺭﺩ
ﮏﯾ ﺯﺍ ﺮﺘﺸﯿﺑ ﺮﮔﺍ .ﺪﯿﻨﮐ ﺲﻤﻟ
ﻪﺘﺷﺍﺩ ﺩﻮﺟﻭ ﺐﻃﺎﺨﻣ یﺍﺮﺑ ﻩﺭﺎﻤﺷ
ﺶﯿﭘ ﻩﺭﺎﻤﺷ ﺯﺍ ﺱﺎﻤﺗ ﻦﯾﺍ ،ﺪﺷﺎﺑ
.ﺪﻨﮐ ﯽﻣ ﻩﺩﺎﻔﺘﺳﺍ ﺽﺮﻓ
ﺲﻤﻟ ﺍﺭ ﺐﻃﺎﺨﻣ ﻡﺎﻧ ﺪﯿﻧﺍﻮﺗ ﯽﻣ ﺎﯾ
ﻩﺭﺎﻤﺷ ﮏﯾ ﺯﺍ ﺮﺘﺸﯿﺑ ﺮﮔﺍ ﻭ ﻩﺩﺮﮐ
،ﺪﺷﺎﺑ ﻪﺘﺷﺍﺩ ﺩﻮﺟﻭ ﺐﻃﺎﺨﻣ یﺍﺮﺑ
ﺏﺎﺨﺘﻧﺍ ﺍﺭ ﺮﻈﻧ ﺩﺭﻮﻣ ﻩﺭﺎﻤﺷ
یﺍﺮﺑ ﺪﯿﻧﺍﻮﺗ ﯽﻣ ﻦﯿﻨﭽﻤﻫ .ﺪﯿﻨﮐ
،ﺽﺮﻓ ﺶﯿﭘ ﻩﺭﺎﻤﺷ ﺎﺑ ﺱﺎﻤﺗ ﻉﻭﺮﺷ
.ﺪﯿﻨﮐ ﺲﻤﻟ ﺍﺭ
ﺱﺎﻤﺗ یﺩﺎﻋ ﺕﺎﻤﯿﻈﻨﺗ ﺮﯿﯿﻐﺗ
یﻮﻨﻣ ﺭﺩ ﺍﺭ ﺱﺎﻤﺗ ﺕﺎﻤﯿﻈﻨﺗ ﻪﻨﯾﺰﮔ 1
17
.ﺪﯿﻨﮐ ﺲﻤﻟ ﺕﺎﻤﯿﻈﻨﺗ
ﺍﺭ ﻥﺁ ﻭ ﻪﺘﻓﺭ یﺩﺎﻋ ﺕﺎﻤﯿﻈﻨﺗ ﻪﺑ 2
ﭗﭼ ﻪﺑ ﺍﺭ ﺪﯿﻠﮐ -
ﺪﯿﻧﺍﻮﺗ ﯽﻣ .ﺩﻮﺷ ﻦﺷﻭﺭ ﺎﺗ ﺪﯿﻧﺍﺰﻐﻠﺑ
ﺲﻤﻟ ﺍﺭ ﻩﺪﺷ ﺩﺭ ﺩﺭﺍﻮﻣ ﺖﺴﯿﻟ
ﻦﯿﺒﻃﺎﺨﻣ ،ﺎﻫ ﺱﺎﻤﺗ ﻪﻤﻫ ﻭ ﺪﯿﻨﮐ
ﺍﺭ ﺎﻫ ﺱﺎﻤﺗ ﺎﯾ ﺹﺎﺧ یﺎﻫ ﻩﻭﺮﮔ ﺎﯾ
ﻩﺭﺎﻤﺷ) ﻩﺪﺸﻧ ﺖﺒﺛ یﺎﻫ ﻩﺭﺎﻤﺷ ﺯﺍ
(ﺖﺴﯿﻧ ﻦﯿﺒﻃﺎﺨﻣ ﺭﺩ ﻪﮐ ﯽﯾﺎﻫ
.ﺪﯿﻨﮐ ﺲﻤﻟ
ﺱﺎﻤﺗ ﺩﺭ •
.ﺪﯿﻨﮐ ﺏﺎﺨﺘﻧﺍ
3
ﺱﺎﻤﺗ یﺭﺍﺮﻗﺮﺑ
،ﺪﯿﻠﮐ ﻪﺤﻔﺻ ﻥﺩﺮﮐ ﺯﺎﺑ یﺍﺮﺑ 1
ﺯﺍ ﻩﺩﺎﻔﺘﺳﺍ ﺎﺑ ﺍﺭ ﻦﻔﻠﺗ ﻩﺭﺎﻤﺷ
4
ﺲﻤﻟ ﺍﺭ
ﺖﻬﺟ + ﻥﺩﺮﮐ ﺩﺭﺍﻭ یﺍﺮﺑ
+
0
ﺍﺭ
ﺎﺗ ﺪﯿﻫﺩ ﺭﺎﺸﻓ ﺍﺭ ﺵﻮﻣﺎﺧ/ﻦﺷﻭﺭ ﺪﯿﻠﮐ
ﻩﺭﺎﻤﺷ ﺯﺍ ﻭ ﻩﺪﺷ ﻞﻔﻗ ﯽﺴﻤﻟ ﻪﺤﻔﺻ
.ﺪﯿﻨﮐ ﺲﻤﻟ ﺍﺭ
.ﺪﯿﻨﮐ ﺩﺭﺍﻭ ﺪﯿﻠﮐ ﻪﺤﻔﺻ
،ﺱﺎﻤﺗ ﻉﻭﺮﺷ یﺍﺮﺑ 3
،ﯽﻠﻠﻤﻟﺍ ﻦﯿﺑ ﺱﺎﻤﺗ یﺭﺍﺮﻗﺮﺑ
.ﺪﯾﺭﺍﺪﻬﮕﻧ ﻭ ﻩﺩﺍﺩ ﺭﺎﺸﻓ
.ﺩﻮﺷ یﺮﯿﮔﻮﻠﺟ ﯽﻗﺎﻔﺗﺍ یﺮﯿﮔ
ﺯﺍ ﻩﺩﺎﻔﺘﺳﺍ ﺎﺑ ﺱﺎﻤﺗ یﺭﺍﺮﻗﺮﺑ
ﻦﯿﺒﻃﺎﺨﻣ ﺖﺳﺮﻬﻓ
ﺲﻤﻟ ﺍﺭ ،ﯽﻠﺻﺍ ﻪﺤﻔﺻ ﺯﺍ 1
.ﺩﻮﺷ ﺯﺎﺑ ﻦﯿﺒﻃﺎﺨﻣ ﺎﺗ ﺪﯿﻨﮐ
یﻻﺎﺑ ﺭﺩ ﻡﺎﻧ ﻪﻨﯿﻣﺯ ﺭﺩﺎﮐ یﻭﺭ
ﻭ ﺪﯿﻧﺰﺑ ﻪﺑﺮﺿ ﺶﯾﺎﻤﻧ ﻪﺤﻔﺻ
ﻪﯿﻟﻭﺍ ﻑﻭﺮﺣ ،ﺪﯿﻠﮐ ﻪﺤﻔﺻ ﺎﺑ
ﺍﺭ ﺱﺎﻤﺗ یﺍﺮﺑ ﺮﻈﻧ ﺩﺭﻮﻣ ﺐﻃﺎﺨﻣ
.ﺪﯿﻨﮐ ﺩﺭﺍﻭ
ﺎﻫ ﺱﺎﲤ
2
.ﺪﯿﻨﮐ
!ﻪﺘﮑﻧ
2

یﻮﻨﻣ ﺯﺍ - یﺍ ﻪﻧﺎﺳﺭﺪﻨﭼ ﻪﺤﻔﺻ 2
ﻞﯿﻤﯾﺍ ﺎﯾ ﺪﯿﻨﮐ ﻩﺩﺎﻔﺘﺳﺍ Google
.ﺪﯿﯾﺎﻤﻧ ﻝﺎﺳﺭﺍ
ﻮﻨﻣ ﻪﺤﻔﺻ
ﺭﺩ یﺭﻮﻓ ﺖﮐﺮﺣ یﺍﺮﺑ ﺪﯿﻧﺍﻮﺗ ﯽﻣ ﺎﻤﺷ
ﻑﺮﻃ ﮏﯾ ﺯﺍ ﺍﺭ ﻪﻨﯾﺰﮔ ،ﻮﻨﻣ ﻪﺤﻔﺻ ﻞﮐ
ﻪﺑ ﻦﺘﻓﺭ یﺍﺮﺑ .ﺪﯿﺸﮑﺑ ﺮﮕﯾﺩ ﻑﺮﻃ ﻪﺑ
ﺍﺭ ﻪﺤﻔﺻ ﺖﺳﺍ ﯽﻓﺎﮐ ،ﻮﻨﻣ ﺕﺎﺤﻔﺻ
ﺖﺳﺍﺭ ﻪﺑ ﭗﭼ ﺯﺍ ﺎﯾ ﭗﭼ ﻪﺑ ﺖﺳﺍﺭ ﺯﺍ
.ﺪﯿﻨﮐ کﺎﭘ ﺖﻋﺮﺳ ﻪﺑ
ﯽﻣﺎﯿﭘ ،ﻮﻨﻣ ﻦﯾﺍ ﺭﺩ -ﺱﺎﻤﺗ ﻪﺤﻔﺻ
ﺭﺍﺮﻗﺮﺑ ﯽﺳﺎﻤﺗ ﺎﯾ ﺪﯿﻨﮐ ﻝﺎﺳﺭﺍ
ﺪﯿﯾﺎﻤﻧ
1
ﻦﯾﺍ یﺎﻫ ﻪﻣﺎﻧﺮﺑ ﺯﺍ - ﻪﻣﺎﻧﺮﺑ ﻪﺤﻔﺻ 3
.ﺪﯿﻨﮐ ﻩﺩﺎﻔﺘﺳﺍ ﻮﻨﻣ
16

ﻦﻔﻠﺗ ﯽﻠﺻﺍ ﻪﺤﻔﺻ
یﻭﺭ ﺪﯿﻫﺍﻮﺧ ﯽﻣ ﺍﺭ ﻪﭼ ﻥﺁ ﹰﺍﺭﻮﻓ ﺪﯿﻧﺍﻮﺗ ﯽﻣ ،ﯽﻠﺻﺍ ﻪﺤﻔﺻ ﺖﻟﺎﺣ ﻉﺍﻮﻧﺍ ﻪﻤﻫ ﺭﺩ
.ﺪﯿﻨﮐ ﮏﯿﻠﮐ ﻭ ﺪﯿﺸﮑﺑ ﻪﺤﻔﺻ
ﺭﺩ ﺍﺭ ﯽﺘﻗﻭ - ﺖﺠﯾﻭ ﯽﻠﺻﺍ ﻪﺤﻔﺻ
ﺲﻤﻟ ﺶﯾﺎﻤﻧ ﻪﺤﻔﺻ ﻦﯿﯾﺎﭘ ﭗﭼ ﺖﻤﺳ
ﯽﻣ ﺮﻫﺎﻇ ﻞﯾﺎﺑﻮﻣ ﺖﺠﯾﻭ ﻪﺤﻔﺻ ،ﺪﯿﻨﮐ ﯽﻣ
ﺍﺭ ﻥﺁ ،ﺖﺠﯾﻭ ﻥﺪﯿﺸﮐ ﺎﺑ ﻪﮐ ﯽﻣﺎﮕﻨﻫ .ﺩﻮﺷ
ﺎﻫﺭ ﻪﮐ ﯽﻠﺤﻣ ﺭﺩ ﺖﺠﯾﻭ ،ﺪﯿﻨﮐ ﯽﻣ ﻡﺎﻧ ﺖﺒﺛ
.ﺩﺩﺮﮔ ﯽﻣ ﺩﺎﺠﯾﺍ ﺩﻮﺷ ﯽﻣ
ﻝﺎﻌﻓ
ﺎﺑ - ﻊﯾﺮﺳ یﺮﯿﮔ ﻩﺭﺎﻤﺷ ﯽﻠﺻﺍ ﻪﺤﻔﺻ
ﻊﯾﺮﺳ یﺮﯿﮔ ﻩﺭﺎﻤﺷ ﺖﺴﯿﻟ ، ﻥﺩﺮﮐ ﺲﻤﻟ
ﺱﺎﻤﺗ ﺪﯿﻧﺍﻮﺗ ﯽﻣ ﺎﻤﺷ .ﺩﻮﺷ ﯽﻣ ﺮﻫﺎﻇ
ﺍﺭ ﺐﻃﺎﺨﻣ ﺎﯾ ﺪﯿﻨﮐ ﻝﺎﺳﺭﺍ ﯽﻣﺎﯿﭘ ،ﺪﯾﺮﯿﮕﺑ
.ﺪﯿﯾﺎﻤﻧ ﺶﯾﺍﺮﯾﻭ ﯽﻠﺻﺍ ﻪﺤﻔﺻ ﺭﺩ ﺎﻤﯿﻘﺘﺴﻣ
15
ﻝﺎﻌﻓ

ﺶﯾﺎﻤﯿﭘ
ﮏﯾ ﺯﺍ ﺍﺭ ﺩﻮﺧ ﺖﺸﮕﻧﺍ ،ﺶﯾﺎﻤﯿﭘ یﺍﺮﺑ
ﺭﺩ .ﺪﯿﺸﮑﺑ ﺮﮕﯾﺩ ﺖﻤﺳ ﻪﺑ ﺖﻤﺳ
ﺪﻨﻧﺎﻣ ﯽﺸﯾﺎﻤﻧ ﺕﺎﺤﻔﺻ ﺯﺍ ﯽﺧﺮﺑ
ﺪﯿﻧﺍﻮﺗ ﯽﻣ ﺎﻫ ﺱﺎﻤﺗ ﻪﭽﺨﯾﺭﺎﺗ ﺖﺴﯿﻟ
.ﺪﯿﻨﮐ ﺖﮐﺮﺣ ﻦﯿﯾﺎﭘ ﺎﯾ ﻻﺎﺑ ﻪﺑ
ﯽﺴﳌ ﻪﺤﻔﺻ ﺯﺍ ﻩﺩﺎﻔﺘﺳﺍ
ﯽﺴﻤﻟ ﻪﺤﻔﺻ ﻩﺭﺎﺑﺭﺩ ﯽﺗﺎﮑﻧ
ﺩﺎﻤﻧ ﻂﺳﻭ ،ﺩﺭﻮﻣ ﮏﯾ ﺏﺎﺨﺘﻧﺍ یﺍﺮﺑ •
.ﺪﯿﻨﮐ ﺲﻤﻟ ﺍﺭ
ﯽﺴﻤﻟ ﻪﺤﻔﺻ .ﺪﯿﻫﺪﻧ ﺭﺎﺸﻓ ﺩﺎﯾﺯ
ﻪﺑ ،ﺖﺳﺍ ﺱﺎﺴﺣ ﯽﻓﺎﮐ ﻩﺯﺍﺪﻧﺍ ﻪﺑ
.ﺪﯿﻫﺩ ﺭﺎﺸﻓ ﯽﻣﺍﺭﺁ
،ﺮﻈﻧ ﺩﺭﻮﻣ یﺎﻫ ﻪﻨﯾﺰﮔ ﺏﺎﺨﺘﻧﺍ یﺍﺮﺑ
ﻩﺩﺎﻔﺘﺳﺍ ﺩﻮﺧ ﺖﺸﮕﻧﺍ کﻮﻧ ﺯﺍ
یﺎﻫ ﻪﻨﯾﺰﮔ ﻪﮐ ﺪﯿﻨﮐ ﺖﻗﺩ .ﺪﯿﻨﮐ
.ﺪﯿﻨﮑﻧ ﺲﻤﻟ ﺍﺭ ﻑﺍﺮﻃﺍ
ﻩﺩﺎﻔﺘﺳﺍ LG-P520 ﺯﺍ ﻪﮐ ﻥﺎﻣﺯ ﺮﻫ
ﯽﻣﺮﺑ ﻞﻔﻗ ﻪﺤﻔﺻ ﻪﺑ ،ﺩﻮﺷ ﯽﻤﻧ
.ﺩﺩﺮﮔ
ﯽﺴﻤﻟ ﻪﺤﻔﺻ ﻝﺮﺘﻨﮐ
ﯽﺴﻤﻟ ﻪﺤﻔﺻ ﺭﺩ ﺩﻮﺟﻮﻣ یﺎﻫ ﻝﺮﺘﻨﮐ
ﻡﺎﺠﻧﺍ ﻪﮐ یﺭﺎﮐ ﻪﺑ ﻪﺘﺴﺑ LG-P520
.ﺪﻨﻨﮐ ﯽﻣ ﺮﯿﯿﻐﺗ ﺪﯿﻫﺩ ﯽﻣ
ﺎﻫ ﻪﻣﺎﻧﺮﺑ ﻥﺩﺮﮐ ﺯﺎﺑ
ﺖﺳﺍ ﯽﻓﺎﮐ ،ﻪﻣﺎﻧﺮﺑ ﺮﻫ ﻥﺩﺮﮐ ﺯﺎﺑ یﺍﺮﺑ
.ﺪﯿﻫﺩ ﺭﺎﺸﻓ ﺍﺭ ﻥﺁ ﺩﺎﻤﻧ
•
•
•
14

ﯽﺷﻮﮔ
ﻥﺎﯾﺎﭘ ﺪﯿﻠﮐ
ﻥﺩﺮﮐ کﺎﭘ ﺪﯿﻠﮐ
.ﺪﯾﺩﺮﮔﺮﺑ ﯽﻠﺒﻗ ﻪﺤﻔﺻ ﻪﺑ
ﻦﻔﻠﺗ ﺕﺎﻌﻄﻗ
ﻝﺎﺼﺗﺍ ﻞﺤﻣ
یﺮﻓﺯﺪﻨﻫ
ﯽﺷﻮﮔ ﺎﯾ
ﻮﯾﺮﺘﺳﺍ
ﺖﮐﻮﺳ
ﻪﻈﻓﺎﺣ ﺕﺭﺎﮐ
Micro
13
ﺱﺎﻤﺗ ﻪﺑ ﻭ ﺩﺮﯿﮔ ﯽﻣ ﺍﺭ ﻦﻔﻠﺗ ﻩﺭﺎﻤﺷ
.ﺪﻫﺩ ﯽﻣ ﺦﺳﺎﭘ یﺩﻭﺭﻭ یﺎﻫ
SD
ﺱﺎﻤﺗ ﺪﯿﻠﮐ
ﯽﻠﺻﺍ ﻪﺤﻔﺻ ﺭﺩ ﺶﯾﺎﻤﻧ ﻪﺤﻔﺻ ﯽﺘﻗﻭ
ﮓﻨﻫﺁ ﻭ ﮓﻧﺯ ﮓﻨﻫﺁ یﺍﺪﺻ ﻥﺍﺰﯿﻣ :ﺖﺳﺍ
یﺍﺪﺻ ﻥﺍﺰﯿﻣ ﻢﯿﻈﻨﺗ
ﻭ ﻩﺩﺍﺩ ﺭﺎﺸﻓ
ﻝﺎﻌﻓﺮﯿﻏ/ﻝﺎﻌﻓ ﺖﻣﺎﺻ ﺖﻟﺎﺣ ﺎﺗ ﺪﯾﺭﺍﺪﻬﮕﻧ
ﻥﺩﺮﮐ ﻦﺷﻭﺭ/ﺵﻮﻣﺎﺧ یﺍﺮﺑ ﺮﺼﺘﺨﻣ ﺭﺎﺸﻓ •
ﻥﺩﺮﮐ ﻦﺷﻭﺭ/ﺵﻮﻣﺎﺧ یﺍﺮﺑ ﯽﻧﻻﻮﻃ ﺭﺎﺸﻓ
ﺍﺪﺻ ﻢﯿﻈﻨﺗ یﺎﻫﺪﯿﻠﮐ
•
.ﺪﯿﻠﮐ
:ﺱﺎﻤﺗ ﻦﯿﺣ ﺭﺩ •
.ﯽﺷﻮﮔ
:ﺍﺪﺻ ﻥﺍﺰﯿﻣ ﺶﻫﺎﮐ ﺪﯿﻠﮐ •
.ﺩﻮﺷ
ﻞﻔﻗ
.ﺶﯾﺎﻤﻧ ﻪﺤﻔﺻ
•
.ﻦﻔﻠﺗ

.ﺪﯿﻨﮐ ژﺭﺎﺷ ﺍﺭ یﺮﺗﺎﺑ 6
ﯽﺷﻮﮔ یﺮﺗﺎﺑ ﻭ ﺕﺭﺎﮐ ﻢﯿﺳ
.ﺪﯿﻨﮐ ﺩﺭﺍﻭ ﺍﺭ یﺮﺗﺎﺑ 4
ﺭﺍﺮﻗ ﺶﯾﺎﺟ ﺮﺳ ﺍﺭ ﯽﺘﺸﭘ ﺏﺎﻗ 5
.ﺪﯿﻫﺩ
12

.ﺪﯾﺭﺍﺩﺮﺑ ﺍﺭ ﯽﺘﺸﭘ ﺏﺎﻗ
.ﺪﯾﺭﻭﺎﯿﺑ ﻥﻭﺮﯿﺑ ﺍﺭ یﺮﺗﺎﺑ 2
.ﺪﯿﻨﮐ ﺩﺭﺍﻭ ﺍﺭ ﺕﺭﺎﮐ ﻢﯿﺳ 3
11
ﯽﺷﻮﮔ یﺮﺗﺎﺑ ﻭ ﺕﺭﺎﮐ ﻢﯿﺳ
1
کﺮﺘﺸﻣ ﯽﻟﻮﻠﺳ ﻪﮑﺒﺷ ﮏﯾ ﺭﺩ ﯽﺘﻗﻭ
ﻩﺍﺮﻤﻫ ﺕﺭﺎﮐ ﻢﯿﺳ ﮏﯾ ،ﺪﯾﻮﺷ ﯽﻣ
ﻭ ﺩﻮﺟﻮﻣ یﺭﺎﯿﺘﺧﺍ ﺕﺎﻣﺪﺧ ﻪﻧﻮﮔﺮﻫ
ﺎﻤﺷ ﺭﺎﯿﺘﺧﺍ ﺭﺩ ﺮﮕﯾﺩ ﺩﺭﺍﻮﻣ یﺭﺎﯿﺴﺑ
ﻢﺧ ﺎﯾ ﺵﺍﺮﺧ ﻪﻧﻮﮔﺮﻫ ﺎﺑ ﻥﺁ ﺱﺎﻤﺗ
ﺕﺭﺎﮐ ﻦﺘﺷﺍﺩ ﻪﮕﻧ ﻡﺎﮕﻨﻫ ﻦﯾﺍﺮﺑﺎﻨﺑ
ﻢﯿﺳ .ﺪﯿﻨﮐ ﺖﻗﺩ ﻩﺍﺮﻤﻫ ﻦﻔﻠﺗ ﺯﺍ ﻥﺁ
ﻥﺎﮐﺩﻮﮐ ﺱﺮﺘﺳﺩ ﺯﺍ ﺭﻭﺩ ﺍﺭ ﺎﻫ ﺕﺭﺎﮐ
،یﺮﺗﺎﺑ ﻥﺩﺮﮐ ﺝﺭﺎﺧ ﺯﺍ ﻞﺒﻗ ﻪﺸﯿﻤﻫ
ﺕﺭﺎﮐ ﻢﯿﺳ ﺐﺼﻧ
،ﻦﯿﭘ ﻪﻠﻤﺟ ﺯﺍ کﺍﺮﺘﺷﺍ ﺕﺎﯿﺋﺰﺟ ﺎﺑ
.ﺩﺮﯿﮔ ﯽﻣ ﺭﺍﺮﻗ
ﺢﻄﺳ ﻭ ﻩﺪﺷ ﺩﺭﺍﻭ ﺕﺭﺎﮐ ﻢﯿﺳ
،ﺪﻨﯿﺑ ﯽﻣ ﺐﯿﺳﺁ ﯽﻧﺎﺳﺁ ﻪﺑ ﻥﺪﺷ
ﻥﺩﺮﮐ ﺝﺭﺎﺧ ﺎﯾ ﻥﺩﺮﮐ ﺩﺭﺍﻭ ،ﺖﺳﺩ ﺭﺩ
ﺍﺭ ﺭژﺭﺎﺷ ﻭ ﻩﺩﺮﮐ ﺵﻮﻣﺎﺧ ﺍﺭ ﻦﻔﻠﺗ
!ﻢﻬﻣ
.ﺪﯿﻫﺩ ﺭﺍﺮﻗ
ﺮﯾﻭﺎﺼﺗ
.ﺪﯿﻨﮐ ﺍﺪﺟ

ﺭﺍﺪﺸﻫ
ﺭﺩ ﺕﺭﺎﮐ ﻢﯿﺳ ﻥﺩﺮﮐ ﺩﺭﺍﻭ ﺯﺍ ﻞﺒﻗ
ﻭ ﺢﻄﺳ ﺪﯿﻨﮐ ﯽﺳﺭﺮﺑ ،ﻥﺁ ﻩﺎﮕﯾﺎﺟ
ﺵﺍﺮﺧ ﻥﻭﺪﺑ ﻭ ﺰﯿﻤﺗ ﺕﺭﺎﮐ یﺎﻫ ﻪﺒﻟ
.ﺪﺷﺎﺑ
ﺕﺭﺎﮐ ﻢﯿﺳ ﻭﺩ ﺯﺍ ﻩﺩﺎﻔﺘﺳﺍ
ﺪﯿﻧﺍﻮﺗ ﯽﻣ ،ﺕﺭﺎﮐ ﻢﯿﺳ ﻭﺩ ﻥﺩﺮﮐ ﺩﺭﺍﻭ ﺎﺑ
ﺖﻤﺳ ﺭﺩ ﺍﺭ ﻪﮑﺒﺷ ﻝﺎﻨﮕﯿﺳ ﺩﺎﻤﻧ ﻭﺩ
ﻩﺪﻫﺎﺸﻣ ﺶﯾﺎﻤﻧ ﻪﺤﻔﺻ یﻻﺎﺑ ﭗﭼ
،ﺕﺭﺎﮐ ﻢﯿﺳ ﺾﯾﻮﻌﺗ ﺎﯾ ﺏﺎﺨﺘﻧﺍ یﺍﺮﺑ
ﻭ ﺕﺎﻤﯿﻈﻨﺗ ﻭ ﺪﯿﻫﺩ ﺭﺎﺸﻓ ﺍﺭ ﻮﻨﻣ
ﺍﺭ ﺕﺭﺎﮐ ﻢﯿﺳ ﻭﺩ ﻪﻨﯾﺰﮔ ﺲﭙﺳ
ﻡﺎﮕﻨﻫ ﺪﯿﻧﺍﻮﺗ ﯽﻣ ﺎﻤﺷ
ﻝﺎﻨﮕﯿﺳ ،ﺎﻫ ﺕﺭﺎﮐ ﺾﯾﻮﻌﺗ
ﻪﻨﯿﻣﺯ ﮓﻧﺭ ﺎﺑ ﻪﮐ ﻪﮑﺒﺷ یﺎﻫ
ﻩﺪﻫﺎﺸﻣ ﺍﺭ ﺪﻧﺍ ﻩﺪﺷ ﻪﺘﺴﺟﺮﺑ
ﯽﻣ ﯽﻧﺎﺳﺁ ﻪﺑ ﺐﯿﺗﺮﺗ ﻦﯾﺪﺑ .ﺪﯿﻨﮐ
ﺕﺭﺎﮐ ﻢﯿﺳ ﻝﺎﻨﮕﯿﺳ ﺕﺭﺪﻗ ﺪﯿﻧﺍﻮﺗ
.ﺪﯿﻨﮐ ﯽﯾﺎﺳﺎﻨﺷ ﺍﺭ ﯽﺑﺎﺨﺘﻧﺍ
.ﺪﯿﻨﮐ
.ﺪﯿﻨﮐ ﺏﺎﺨﺘﻧﺍ
!ﻪﺘﮑﻧ
10

یﺮﺗﺎﺑ ﺎﺑ ﯽﺷﻮﮔ یﺮﺗﺎﺑ ﺾﯾﻮﻌﺗ
ﺭﺎﺠﻔﻧﺍ ﺮﻄﺧ ﺪﻧﺍﻮﺗ ﯽﻣ ﺐﺳﺎﻨﻣﺎﻧ
.ﺪﺷﺎﺑ ﻪﺘﺷﺍﺩ ﯽﭘ ﺭﺩ ﺍﺭ ﯽﺷﻮﮔ
ﻖﺒﻃ ﺍﺭ ﻞﻤﻌﺘﺴﻣ یﺎﻫ یﺮﺗﺎﺑ
ﻩﺪﺷ ﻪﺋﺍﺭﺍ یﺎﻫ ﻞﻤﻌﻟﺍﺭﻮﺘﺳﺩ
ﺭﻭﺩ ﻩﺪﻧﺯﺎﺳ ﻪﻧﺎﺧﺭﺎﮐ ﻂﺳﻮﺗ
ﻥﺎﮑﻣﺍ ﺕﺭﻮﺻ ﺭﺩ ﹰﺎﻔﻄﻟ .ﺪﯾﺯﺍﺪﻧﺎﯿﺑ
ﺍﺭ ﺎﻬﻧﺁ .ﺪﯿﯾﺎﻤﻧ ﺖﻓﺎﯾﺯﺎﺑ ﺍﺭ ﺎﻬﻧﺁ
ﺭﻭﺩ ﯽﮕﻧﺎﺧ یﺎﻫ ﻪﻟﺎﺑﺯ ﺎﺑ ﻩﺍﺮﻤﻫ
.ﺪﯾﺯﺍﺪﻧﺎﯿﻧ
ﺾﯾﻮﻌﺗ ﺍﺭ یﺮﺗﺎﺑ ﺖﺳﺍ ﻡﺯﻻ ﺮﮔﺍ
ﻪﺑ ﺍﺭ ﻥﺁ ﮏﻤﮐ یﺍﺮﺑ ،ﺪﯿﻨﮐ
ﺰﮐﺮﻣ ﺎﯾ ﺵﻭﺮﻓ ﺰﮐﺮﻣ ﻦﯾﺮﺘﮑﯾﺩﺰﻧ
LG Electronics ﺯﺎﺠﻣ ﺕﺎﻣﺪﺧ
.ﺪﯾﺮﺒﺑ
ﻞﻣﺎﮐ ﻥﺪﺷ ژﺭﺎﺷ ﺯﺍ ﺪﻌﺑ ﻪﺸﯿﻤﻫ
ﺭﺩ ﯽﯾﻮﺟ ﻪﻓﺮﺻ ﺭﻮﻈﻨﻣ ﻪﺑ ،ﻦﻔﻠﺗ
ﺰﯾﺮﭘ ﺯﺍ ﺍﺭ ﻥﺁ ،ﺭژﺭﺎﺷ یﻭﺮﯿﻧ ﻑﺮﺼﻣ
.ﺪﯿﺸﮑﺑ
ﻪﺑ یﺮﺗﺎﺑ ﯽﻌﻗﺍﻭ ﺮﻤﻋ ﻝﻮﻃ
ﺕﺎﻤﯿﻈﻨﺗ ،ﻪﮑﺒﺷ یﺪﻨﺑﺮﮑﯿﭘ
یﺮﺗﺎﺑ ،ﻩﺩﺎﻔﺘﺳﺍ یﺎﻫﻮﮕﻟﺍ ،ﻝﻮﺼﺤﻣ
.ﺩﺭﺍﺩ ﯽﻄﯿﺤﻣ ﻂﯾﺍﺮﺷ ﻭ
9
LG یﺎﻫﺭژﺭﺎﺷ ﻭ ﺎﻫ یﺮﺗﺎﺑ ﺯﺍ ﻂﻘﻓ •
•
ﻪﺑ LG یﺎﻫﺭژﺭﺎﺷ .ﺪﯿﻨﮐ ﻩﺩﺎﻔﺘﺳﺍ
ﻪﮐ ﺪﻧﺍ ﻩﺪﺷ ﯽﺣﺍﺮﻃ یﺍ ﻪﻧﻮﮔ
.ﺪﻨﻧﺎﺳﺮﺑ ﺮﺜﮐﺍﺪﺣ ﻪﺑ ﺍﺭ یﺮﺗﺎﺑ ﺮﻤﻋ
•
ﻝﺎﺼﺗﺍ ﺭﺍﺪﻣ ﺩﺎﺠﯾﺍ ﺎﯾ ﻥﺩﺮﮐ ﺯﺎﺑ ﺯﺍ
.ﺪﯿﻨﮐ یﺭﺍﺩﺩﻮﺧ یﺮﺗﺎﺑ ﺭﺩ ﻩﺎﺗﻮﮐ
ﺰﯿﻤﺗ ﺍﺭ یﺮﺗﺎﺑ یﺰﻠﻓ ﻝﺎﺼﺗﺍ ﺡﻮﻄﺳ
ﺩﺮﮑﻠﻤﻋ یﺮﺗﺎﺑ ﺮﮕﯾﺩ ﻪﮐ ﯽﻧﺎﻣﺯ
ﺾﯾﻮﻌﺗ ﺍﺭ ﻥﺁ ،ﺩﺭﺍﺪﻧ ﯽﺑﻮﻠﻄﻣ
•
ﺎﻫﺪﺻ ﻥﺍﻮﺗ ﯽﻣ ﺍﺭ یﺮﺗﺎﺑ .ﺪﯿﻨﮐ
ﻪﺑ ﺯﺎﯿﻧ ﻪﮐ ﯽﻧﺎﻣﺯ ﺎﺗ ﺩﺮﮐ ژﺭﺎﺷ ﺭﺎﺑ
.ﺪﺷﺎﺑ ﻪﺘﺷﺍﺩ ﺾﯾﻮﻌﺗ
ﺩﺭﻮﻣ یﺩﺎﯾﺯ ﺕﺪﻣ یﺍﺮﺑ یﺮﺗﺎﺑ ﺮﮔﺍ
ﺍﺭ ﻥﺁ ،ﺪﺷﺎﺑ ﻪﺘﻓﺮﮕﻧ ﺭﺍﺮﻗ ﻩﺩﺎﻔﺘﺳﺍ
•
ﻥﺁ ﺪﯿﻔﻣ ﺮﻤﻋ ﺎﺗ ﺪﯿﻨﮐ ژﺭﺎﺷ ﹰﺍﺩﺪﺠﻣ
.ﺪﺑﺎﯾ ﺶﯾﺍﺰﻓﺍ
ﺭﻮﻧ ﺽﺮﻌﻣ ﺭﺩ یﺮﺗﺎﺑ ﻥﺩﺍﺩ ﺭﺍﺮﻗ ﺯﺍ
ﻩﺩﺎﻔﺘﺳﺍ ﺎﯾ ﻭ ﺪﯿﺷﺭﻮﺧ ﻢﯿﻘﺘﺴﻣ
•
ﺏﻮﻃﺮﻣ ﺭﺎﯿﺴﺑ یﺎﻫ ﻂﯿﺤﻣ ﺭﺩ ﻥﺁ ﺯﺍ
یﺭﺍﺩﺩﻮﺧ ﻥﺁ ﻝﺎﺜﻣﺍ ﻭ ﻡﺎﻤﺣ ﺪﻨﻧﺎﻣ
ﻡﺮﮔ ﺭﺎﯿﺴﺑ یﺎﻫ ﻥﺎﮑﻣ ﺭﺩ ﺍﺭ یﺮﺗﺎﺑ
ﻦﮑﻤﻣ ﺭﺎﮐ ﻦﯾﺍ ،ﺪﯿﻨﮑﻧ ﺎﻫﺭ ﺩﺮﺳ ﺎﯾ
ﺮﯿﺛﺄﺗ یﺮﺗﺎﺑ ﺩﺮﮑﻠﻤﻋ ﺮﺑ ﺖﺳﺍ
.ﺪﺷﺎﺑ ﻪﺘﺷﺍﺩ ﺏﻮﻠﻄﻣﺎﻧ
•
•
.ﺪﯾﺭﺍﺩ ﻪﮕﻧ
•
•
•
.ﺪﯿﻨﮐ
•

ﺮﺛﺆﻣ ﻭ ﻦﻤﯾﺍ ﻩﺩﺎﻔﺘﺳﺍ یﺎﻫ ﻞﻤﻌﻟﺍﺭﻮﺘﺳﺩ
ﻥﺎﮐﺩﻮﮐ
ﺱﺮﺘﺳﺩ ﺯﺍ ﺭﻭﺩ ﻦﻣﺍ ﯽﻧﺎﮑﻣ ﺭﺩ ﺍﺭ ﻦﻔﻠﺗ
ﺭﺩ .ﺪﯿﻫﺪﺑ ﺭﺍﺮﻗ ﻝﺎﺳﺩﺮﺧ ﻥﺎﮐﺩﻮﮐ
ﻪﮐ ﺩﺭﺍﺩ ﺩﻮﺟﻭ ﯽﮑﭼﻮﮐ ﺕﺎﻌﻄﻗ ﻦﻔﻠﺗ
ﺖﺳﺍ ﻦﮑﻤﻣ ﻥﺪﺷ ﺍﺪﺟ ﺕﺭﻮﺻ ﺭﺩ
ﺚﻋﺎﺑ ﻭ ﻩﺪﺷ ﻩﺪﯿﻌﻠﺑ ﻥﺎﮐﺩﻮﮐ ﻂﺳﻮﺗ
.ﺩﻮﺷ ﯽﮕﻔﺧ
یﺭﺍﺮﻄﺿﺍ یﺎﻫ ﺱﺎﻤﺗ
ﺱﺎﻤﺗ یﺭﺍﺮﻗﺮﺑ ﻥﺎﮑﻣﺍ ﺖﺳﺍ ﻦﮑﻤﻣ
یﺎﻫ ﻪﮑﺒﺷ ﻪﻤﻫ ﺭﺩ یﺭﺍﺮﻄﺿﺍ یﺎﻫ
،ﻦﯾﺍﺮﺑﺎﻨﺑ .ﺪﺷﺎﺒﻧ ﺩﻮﺟﻮﻣ ﻩﺍﺮﻤﻫ ﻦﻔﻠﺗ
یﺎﻫ ﺱﺎﻤﺗ ﺹﻮﺼﺧ ﺭﺩ ﺪﯾﺎﺒﻧ ﺰﮔﺮﻫ
ﺩﻮﺧ ﻩﺍﺮﻤﻫ ﻦﻔﻠﺗ ﻪﺑ ﻂﻘﻓ یﺭﺍﺮﻄﺿﺍ
ﺎﺑ ﺮﺘﺸﯿﺑ ﺕﺎﻋﻼﻃﺍ یﺍﺮﺑ .ﺪﯿﻨﮐ ﺎﮑﺗﺍ
.ﺪﯾﺮﯿﮕﺑ ﺱﺎﻤﺗ ﺩﻮﺧ ﯽﺗﺍﺮﺑﺎﺨﻣ ﻪﮑﺒﺷ
ﻥﺁ ﺯﺍ ﺖﺒﻗﺍﺮﻣ ﻭ یﺮﺗﺎﺑ ﺕﺎﻋﻼﻃﺍ
ﻼﻣﺎﮐ یﺮﺗﺎﺑ ژﺭﺎﺷ ﺖﺴﯿﻧ ﻡﺯﻻ •
ژﺭﺎﺷ ﺍﺩﺪﺠﻣ ﺍﺭ ﻥﺁ ﺎﺗ ﺩﻮﺷ ﯽﻟﺎﺧ
ﻢﺘﺴﯿﺳ ﺮﯾﺎﺳ ﻑﻼﺧﺮﺑ .ﺪﯿﻨﮐ
یﺍ ﻪﻈﻓﺎﺣ ﺮﯿﺛﺄﺗ ﭻﯿﻫ ،یﺮﺗﺎﺑ یﺎﻫ
ﺩﺮﮑﻠﻤﻋ ﻪﺑ ﺪﻧﺍﻮﺘﺑ ﻪﮐ ﺩﺭﺍﺪﻧ ﺩﻮﺟﻭ
.ﺪﻨﮐ ﺩﺭﺍﻭ ﻪﻣﺪﺻ یﺮﺗﺎﺑ
ﻝﺎﻤﺘﺣﺍ ﻪﮐ ﯽﯾﺎﻫ ﻂﯿﺤﻣ
ﺩﺭﺍﺩ ﺩﻮﺟﻭ ﺎﻬﻧﺁ ﺭﺩ ﺭﺎﺠﻔﻧﺍ
یﺎﻫ ﻞﺤﻣ ﺭﺩ ﻦﻔﻠﺗ ﺩﺮﺑﺭﺎﮐ ﺯﺍ •
.ﺪﯿﻨﮐ یﺭﺍﺩﺩﻮﺧ یﺮﯿﮔ ﺖﺧﻮﺳ
ﺩﺍﻮﻣ ﺕﺭﻭﺎﺠﻣ ﺭﺩ ﻩﺎﮕﺘﺳﺩ ﺯﺍ
ﻩﺩﺎﻔﺘﺳﺍ ﯽﯾﺎﯿﻤﯿﺷ ﺎﯾ ﯽﺘﺧﻮﺳ
.ﺪﯿﻨﮑﻧ
ﺎﯾ ﺎﻫﺯﺎﮔ ﻥﺩﺮﮐ ﺭﺎﺒﻧﺍ ﺎﯾ ﻞﻤﺣ ﺯﺍ
ﺩﺍﻮﻣ ﺎﯾ ﻝﺎﻌﺘﺷﺍ ﻞﺑﺎﻗ ﺕﺎﻌﯾﺎﻣ
ﻪﻠﯿﺳﻭ ﺯﺍ ﯽﺘﻤﺴﻗ ﺭﺩ ﻩﺮﺠﻔﻨﻣ
ﺎﯾ ﻩﺍﺮﻤﻫ ﻦﻔﻠﺗ ﯽﺷﻮﮔ ﻪﮐ ﻪﯿﻠﻘﻧ
یﺭﺍﺩﺩﻮﺧ ﺩﺭﺍﺩ ﺭﺍﺮﻗ ﻥﺁ ﯽﺒﻧﺎﺟ ﻡﺯﺍﻮﻟ
.ﺪﯿﻨﮐ
ﺎﻤﯿﭘﺍﻮﻫ ﺭﺩ
ﺪﻨﻧﺍﻮﺗ ﯽﻣ ﻢﯿﺳ ﯽﺑ یﺎﻫ ﻩﺎﮕﺘﺳﺩ
ﺎﻤﯿﭘﺍﻮﻫ یﺎﻫ ﻢﺘﺴﯿﺳ ﺭﺩ ﺍﺭ ﯽﺗﻻﻼﺘﺧﺍ
.ﺪﻨﻨﮐ ﺩﺎﺠﯾﺍ
،ﺎﻤﯿﭘﺍﻮﻫ ﻪﺑ ﻥﺪﺷ ﺭﺍﻮﺳ ﺯﺍ ﻞﺒﻗ
.ﺪﯿﻨﮐ ﺵﻮﻣﺎﺧ ﺍﺭ ﺩﻮﺧ ﻩﺍﺮﻤﻫ ﻦﻔﻠﺗ
ﻦﯿﻣﺯ یﻭﺭ ﺎﻤﯿﭘﺍﻮﻫ ﻪﮐ ﯽﻣﺎﮕﻨﻫ
ﺭﺩﺎﮐ ﺯﺍ ﻩﺯﺎﺟﺍ ﺐﺴﮐ ﻥﻭﺪﺑ ﺖﺳﺍ
.ﺪﯿﻨﮑﻧ ﻦﺷﻭﺭ ﺍﺭ ﻦﻔﻠﺗ ﺯﺍﻭﺮﭘ
•
•
•
•
8

ﻪﺑ ﻪﮐ ﺪﯿﻨﮑﻧ ﺩﺎﯾﺯ ﺭﺪﻗ ﻥﺁ ﺍﺭ ﺍﺪﺻ
ﺩﻮﺷ ﺩﺭﺍﻭ ﺐﯿﺳﺁ ﺎﻤﺷ ﯽﯾﺍﻮﻨﺷ
ﺽﺮﻌﻣ ﺭﺩ ﯽﻧﻻﻮﻃ ﯽﺗﺪﻣ یﺍﺮﺑ ﺮﮔﺍ
ﺖﺳﺍ ﻦﮑﻤﻣ ،ﺪﯾﺮﯿﮕﺑ ﺭﺍﺮﻗ ﺪﻨﻠﺑ یﺍﺪﺻ
ﻦﯾﺍﺮﺑﺎﻨﺑ .ﺪﻨﯿﺒﺑ ﺐﯿﺳﺁ ﺎﻤﺷ ﯽﯾﺍﻮﻨﺷ
ﺵﻮﻣﺎﺧ ﺎﯾ ﻦﺷﻭﺭ ﺯﺍ ﻢﯿﻨﮐ ﯽﻣ ﻪﯿﺻﻮﺗ
ﺩﻮﺧ ﺵﻮﮔ ﺭﺎﻨﮐ ﺭﺩ ﯽﺷﻮﮔ ﻥﺩﺮﮐ
ﯽﻣ ﻪﯿﺻﻮﺗ ﻦﯿﻨﭽﻤﻫ .ﺪﯿﻨﮐ ﺏﺎﻨﺘﺟﺍ
ﺰﯿﻧ ﻭ ﯽﻘﯿﺳﻮﻣ یﺍﺪﺻ ﻥﺍﺰﯿﻣ ﻢﯿﻨﮐ
ﻭ ﺐﺳﺎﻨﻣ ﺢﻄﺳ ﮏﯾ ﺭﺩ ﻪﺑ ﺎﻫ ﺱﺎﻤﺗ
.ﺩﻮﺷ
ﻢﯿﻈﻨﺗ ﯽﻘﻄﻨﻣ
ﺭﺎﺸﻓ ﻭ ﺩﺎﯾﺯ ﺭﺎﯿﺴﺑ یﺍﺪﺻ
:ﻪﺟﻮﺗ
ﺎﻫ ﯽﺷﻮﮔ ﺯﺍ ﻩﺪﺷ ﺝﺭﺎﺧ یﺍﺪﺻ
ﺎﻤﺷ ﯽﯾﺍﻮﻨﺷ ﻪﺑ ﺖﺳﺍ ﻦﮑﻤﻣ
.ﺪﻧﺎﺳﺮﺑ ﺐﯿﺳﺁ
ﺭﺎﺠﻔﻧﺍ ﻪﯿﺣﺎﻧ
ﯽﯾﺎﻫ ﻞﺤﻣ ﺭﺩ ﻩﺍﺮﻤﻫ ﻦﻔﻠﺗ ﺩﺮﺑﺭﺎﮐ ﺯﺍ
ﻡﺎﺠﻧﺍ ﻝﺎﺣ ﺭﺩ ﺭﺎﺠﻔﻧﺍ ﺕﺎﯿﻠﻤﻋ ﻪﮐ
ﺎﻫ ﺖﯾﺩﻭﺪﺤﻣ .ﺪﯿﻨﮐ یﺭﺍﺩﺩﻮﺧ ﺖﺳﺍ
ﻭ ﻦﯿﻧﺍﻮﻗ ﻪﯿﻠﮐ ﺯﺍ ﻭ ﻩﺩﺮﮐ ﺖﯾﺎﻋﺭ ﺍﺭ
7
.ﺪﯿﻨﮐ یﻭﺮﯿﭘ ﺕﺍﺭﺮﻘﻣ
ﺖﯿﮐ ﮏﯾ ﺯﺍ ،ﻥﺎﮑﻣﺍ ﺕﺭﻮﺻ ﺭﺩ •
.ﺪﯿﻨﮐ ﻩﺩﺎﻔﺘﺳﺍ یﺮﻓﺯﺪﻨﻫ
ﺏﺎﺠﯾﺍ ﯽﮔﺪﻨﻧﺍﺭ ﻂﯾﺍﺮﺷ ﻪﭽﻧﺎﻨﭼ
ﺦﺳﺎﭘ ﺎﯾ ﻦﺘﻓﺮﮔ ﺱﺎﻤﺗ ﺯﺍ ﻞﺒﻗ ،ﺪﻨﮐ
ﯽﻨﻣﺍ ﻞﺤﻣ ﺭﺩ ﺱﺎﻤﺗ ﮏﯾ ﻪﺑ ﻥﺩﺍﺩ
.ﺪﯿﻨﮐ کﺭﺎﭘ
ﻦﮑﻤﻣ ﯽﯾﻮﯾﺩﺍﺭ ﺲﻧﺎﮐﺮﻓ یژﺮﻧﺍ
ﻢﺘﺴﯿﺳ ﺯﺍ ﯽﺧﺮﺑ ﺮﺑ ﺖﺳﺍ
ﻪﯿﻠﻘﻧ ﻪﻠﯿﺳﻭ ﮏﯿﻧﻭﺮﺘﮑﻟﺍ یﺎﻫ
ﻭ ﻭﺭﺩﻮﺧ یﺎﻫﻮﯾﺮﺘﺳﺍ ﺪﻨﻧﺎﻣ ﺎﻤﺷ
.ﺩﺭﺍﺬﮕﺑ ﺮﯿﺛﺄﺗ ﻥﺁ ﯽﻨﻤﯾﺍ ﺕﺍﺰﯿﻬﺠﺗ
ﺰﻬﺠﻣ ﺎﻤﺷ ﻭﺭﺩﻮﺧ ﻪﮐ ﯽﺗﺭﻮﺻ ﺭﺩ
ﺕﺍﺰﯿﻬﺠﺗ ﺎﺑ ،ﺖﺳﺍ ﺍﻮﻫ ﻪﺴﯿﮐ ﻪﺑ
ﻞﺑﺎﻗ ﻢﯿﺳ ﯽﺑ ﺎﯾ ﻩﺪﺷ ﺐﺼﻧ
ﺭﺍﺮﻗ ﻥﺁ ﻩﺍﺭ ﺮﺳ ﺮﺑ ﯽﻌﻧﺎﻣ ،ﻞﻤﺣ
ﻞﯿﻟﺩ ﻪﺑ ﺖﺳﺍ ﻦﮑﻤﻣ ﺍﺮﯾﺯ .ﺪﯿﻫﺪﻧ
،ﺖﺳﺭﺩﺎﻧ ﺩﺮﮑﻠﻤﻋ ﺎﯾ ﻭ ﻥﺩﺮﮑﻧ ﻞﻤﻋ
.ﺪﻨﮐ ﺩﺎﺠﯾﺍ یﺪﺟ یﺎﻫ ﺐﯿﺳﺁ
ﯽﻘﯿﺳﻮﻣ ﻪﺑ ﺖﮐﺮﺣ ﻡﺎﮕﻨﻫ ﺮﮔﺍ
ﻪﮐ ﺪﯿﻨﮐ ﺖﻗﺩ ،ﺪﯿﻫﺩ ﯽﻣ ﺵﻮﮔ
ﺪﯿﻧﺍﻮﺘﺑ ﺎﺗ ﺪﺷﺎﺒﻧ ﺪﻨﻠﺑ ﺩﺎﯾﺯ ﺍﺪﺻ
ﺰﯿﻧ ﺩﻮﺧ ﻑﺍﺮﻃﺍ ﻂﯿﺤﻣ ﻪﺟﻮﺘﻣ
ﺎﻫ ﻩﺩﺎﺟ ﺭﺎﻨﮐ ﺭﺩ ﻪﺘﮑﻧ ﻦﯾﺍ .ﺪﯿﺷﺎﺑ
.ﺖﺳﺍ ﻢﻬﻣ ﺭﺎﯿﺴﺑ ﺎﻫ ﻥﺎﺑﺎﯿﺧ ﻭ
•
•
•
•

ﺮﺛﺆﻣ ﻭ ﻦﻤﯾﺍ ﻩﺩﺎﻔﺘﺳﺍ یﺎﻫ ﻞﻤﻌﻟﺍﺭﻮﺘﺳﺩ
ﯽﺷﻮﮔ ﺯﺍ ﻪﻨﯿﻬﺑ ﻩﺩﺎﻔﺘﺳﺍ
ﮏﯿﻧﻭﺮﺘﮑﻟﺍ یﺎﻫﺭﺍﺰﺑﺍ
،ﻪﻃﻮﺑﺮﻣ ﻦﯿﻟﻮﺌﺴﻣ ﺯﺍ ﻩﺯﺎﺟﺍ ﻥﻭﺪﺑ •
ﺕﺭﻭﺎﺠﻣ ﺭﺩ ﻩﺍﺮﻤﻫ ﻦﻔﻠﺗ ﺯﺍ
ﻩﺩﺎﻔﺘﺳﺍ ﯽﮑﺷﺰﭘ ﺕﺍﺰﯿﻬﺠﺗ
ﻩﺍﺮﻤﻫ ﻦﻔﻠﺗ ﻥﺩﺍﺩ ﺭﺍﺮﻗ ﺯﺍ .ﺪﯿﻨﮑﻧ
،ﺐﻠﻗ ﯽﮑﯾﺮﺤﺗ ﺰﮐﺮﻣ یﻭﺭ ﺩﻮﺧ
،ﻦﻫﺍﺮﯿﭘ یﻮﻠﺟ ﺐﯿﺟ ﺭﺩ ﯽﻨﻌﯾ
.ﺪﯿﻨﮐ یﺭﺍﺩﺩﻮﺧ
ﯽﯾﺍﻮﻨﺷ ﮏﻤﮐ ﻞﯾﺎﺳﻭ ﺯﺍ ﯽﺧﺮﺑ
ﺎﺑ ﺕﺭﻭﺎﺠﻣ ﺮﺛﺍ ﺭﺩ ﺖﺳﺍ ﻦﮑﻤﻣ
ﻝﻼﺘﺧﺍ ﺭﺎﭼﺩ ﻩﺍﺮﻤﻫ یﺎﻫ ﻦﻔﻠﺗ
.ﺪﻧﺩﺮﮔ
یﻭﺭ ﺖﺳﺍ ﻦﮑﻤﻣ ﯽﺋﺰﺟ ﻞﺧﺍﺪﺗ
ﻩﺮﯿﻏ ﻭ ﺎﻫ ﻪﻧﺎﯾﺍﺭ ،ﻮﯾﺩﺍﺭ ،ﻥﻮﯾﺰﯾﻮﻠﺗ
.ﺩﺭﺍﺬﮕﺑ ﺮﯿﺛﺄﺗ
ﻩﺩﺎﺟ ﯽﻨﻤﯾﺍ
ﺕﺍﺭﺮﻘﻣ ﻭ ﻦﯿﻧﺍﻮﻗ ﯽﮔﺪﻨﻧﺍﺭ ﻡﺎﮕﻨﻫ
ﺭﺩ ﻩﺍﺮﻤﻫ ﻦﻔﻠﺗ ﺯﺍ ﻩﺩﺎﻔﺘﺳﺍ ﻪﺑ ﻁﻮﺑﺮﻣ
.ﺪﯿﻨﮐ ﺖﯾﺎﻋﺭ ﺍﺭ ﻒﻠﺘﺨﻣ ﯽﺣﺍﻮﻧ
ﯽﺘﺳﺩ یﺎﻫ ﯽﺷﻮﮔ ﻥﺩﺮﺑ ﺭﺎﮐ ﻪﺑ ﺯﺍ
.ﺪﯿﻨﮐ یﺭﺍﺩﺩﻮﺧ ﯽﮔﺪﻨﻧﺍﺭ ﻦﯿﺣ ﺭﺩ
ﯽﮔﺪﻨﻧﺍﺭ ﻪﺑ ﺍﺭ ﺩﻮﺧ ﺱﺍﻮﺣ ﻪﻤﻫ
.ﺪﯿﻫﺪﺑ
ﻥﺩﺮﮐ ﺰﯿﻤﺗ یﺍﺮﺑ ﮏﺸﺧ ﻪﭼﺭﺎﭘ ﺯﺍ •
ﻩﺎﻔﺘﺳﺍ ﻩﺎﮕﺘﺳﺩ ﯽﺟﺭﺎﺧ ﺡﻮﻄﺳ
ﻩﺪﻨﻨﮐ کﺎﭘ یﺎﻬﻟﻮﻠﺤﻣ ﺯﺍ) ﺪﯿﻨﮐ
ﻩﺩﺎﻔﺘﺳﺍ ﻞﮑﻟﺍ ﺎﯾ ﺮﻨﯿﺗ ،ﻦﯾﺰﻨﺑ ﺪﻨﻧﺎﻣ
ﻪﯿﺛﺎﺛﺍ یﻭﺭ ژﺭﺎﺷ ﻡﺎﮕﻨﻫ ﺍﺭ ﯽﺷﻮﮔ
.ﺪﯿﻫﺪﻧ ﺭﺍﺮﻗ ﻡﺮﻧ
ﻪﯾﻮﻬﺗ ﺯﺍ ژﺭﺎﺷ ﻡﺎﮕﻨﻫ ﺪﯾﺎﺑ ﯽﺷﻮﮔ
.ﺪﺷﺎﺑ ﺭﺍﺩﺭﻮﺧﺮﺑ ﯽﻓﺎﮐ
ﺽﺮﻌﻣ ﺭﺩ ﯽﺷﻮﮔ ﻥﺩﺍﺩ ﺭﺍﺮﻗ ﺯﺍ
•
یﺭﺍﺩﺩﻮﺧ ﻆﯿﻠﻏ ﺭﺎﺒﻏ ﻭ ﺩﺮﮔ ﺎﯾ ﺩﻭﺩ
یﺎﻫ ﺕﺭﺎﮐ ﺕﺭﻭﺎﺠﻣﺭﺩ ﺍﺭ ﯽﺷﻮﮔ
ﻞﻘﻧ ﻭ ﻞﻤﺣ یﺎﻫ ﻂﯿﻠﺑ ﺎﯾ یﺭﺎﺒﺘﻋﺍ
•
ﺖﺳﺍ ﻦﮑﻤﻣ ﺭﺎﮐ ﻦﯾﺍ .ﺪﯿﻫﺪﻧ ﺭﺍﺮﻗ
یﺎﻫﺭﺍﻮﻧ ﺭﺩ ﺩﻮﺟﻮﻣ ﺕﺎﻋﻼﻃﺍ یﻭﺭ
.ﺩﺭﺍﺬﮕﺑ ﺮﯿﺛﺄﺗ ﯽﺴﯿﻃﺎﻨﻐﻣ
ﻪﺤﻔﺻ یﻭﺭ ﺰﯿﺗ کﻮﻧ ﻞﯾﺎﺳﻭ ﺎﺑ
ﻪﺑ ﺭﺎﮐ ﻦﯾﺍ ،ﺪﯿﻧﺰﻧ ﻪﺑﺮﺿ ﻦﻔﻠﺗ
.ﺪﻧﺎﺳﺭ ﯽﻣ ﺐﯿﺳﺁ ﻦﻔﻠﺗ
ﺽﺮﻌﻣ ﺭﺩ ﯽﺷﻮﮔ ﻥﺩﺍﺩ ﺭﺍﺮﻗ ﺯﺍ
.ﺪﯿﻨﮐ یﺭﺍﺩﺩﻮﺧ ﺖﺑﻮﻃﺭ ﺎﯾ ﺕﺎﻌﯾﺎﻣ
•
ﺎﺑ ﻥﻮﻓﺪﻫ ﺪﻨﻧﺎﻣ ﯽﺒﻧﺎﺟ ﻡﺯﺍﻮﻟ ﺯﺍ
ﻞﯿﻟﺩ ﯽﺑ .ﺪﯿﻨﮐ ﻩﺩﺎﻔﺘﺳﺍ ﻁﺎﯿﺘﺣﺍ
•
.ﺪﯿﻧﺰﻧ ﺖﺳﺩ ﻦﻔﻠﺗ ﻦﺘﻧﺁ ﻪﺑ
.(ﺪﯿﻨﮑﻧ
•
•
•
.ﺪﯿﻨﮐ
•
•
•
•
6

ﯽﻗﺮﺑ ﻞﯾﺎﺳﻭ ﺯﺍ ﺭﻭﺩ ﺍﺭ ﯽﺷﻮﮔ
ﻪﻧﺎﯾﺍﺭ ﻭ ،ﻮﯾﺩﺍﺭ ،ﻥﻮﯾﺰﯾﻮﻠﺗ ﺪﻨﻧﺎﻣ
.ﺪﯿﻫﺩ ﺭﺍﺮﻗ
ﯽﺗﺭﺍﺮﺣ ﻊﺑﺎﻨﻣ ﺯﺍ ﺭﻭﺩ ﺪﯾﺎﺑ ﻩﺎﮕﺘﺳﺩ
ﻪﮕﻧ ﻥﺁ ﻝﺎﺜﻣﺍ ﻭ ﻕﺎﺟﺍ ،یﺭﺎﺨﺑ ﺪﻨﻧﺎﻣ
.ﺩﻮﺷ یﺭﺍﺩ
.ﺪﺘﻓﺎﯿﻧ ﯽﺷﻮﮔ ﺪﯿﺷﺎﺑ ﺐﻗﺍﺮﻣ
ﻥﺎﮑﺗ ﺎﯾ ﺵﺯﺮﻟ ﺽﺮﻌﻣ ﺭﺩ ﺍﺭ ﯽﺷﻮﮔ •
.ﺪﯿﻫﺪﻧ ﺭﺍﺮﻗ ﺪﯾﺪﺷ یﺎﻫ
یﺍ ﻩﮋﯾﻭ ﻦﯿﻧﺍﻮﻗ ﻪﮐ ﯽﯾﺎﻫ ﻥﺎﮑﻣ ﺭﺩ
ﻩ ﺍﺮﻤﻫ ﻦﻔﻠﺗ ﻪﮐ ﺪﻨﮐ ﯽﻣ ﺏﺎﺠﯾﺍ
ﹰﺎﻤﺘﺣ ،ﺪﯾﺭﺍﺩ ﻪﮕﻧ ﺵﻮﻣﺎﺧ ﺍﺭ ﺩﻮﺧ
ﺯﺍ ،ﹰﻼﺜﻣ .ﺪﯿﻨﮐ ﺵﻮﻣﺎﺧ ﺍﺭ ﯽﺷﻮﮔ
ﻥﺎﺘﺳﺭﺎﻤﯿﺑ ﺭﺩ ﻩﺍﺮﻤﻫ ﻦﻔﻠﺗ ﺩﺮﺑﺭﺎﮐ
ﺖﺳﺍ ﻦﮑﻤﻣ ﻪﻧﺮﮔﻭ ،ﺪﯿﻨﮐ یﺭﺍﺩﺩﻮﺧ
ﺱﺎﺴﺣ ﯽﮑﺷﺰﭘ ﺕﺍﺰﯿﻬﺠﺗ یﻭﺭ
.ﺩﺭﺍﺬﮕﺑ ﺮﯿﺛﺄﺗ
،ﺩﻮﺷ ﯽﻣ ژﺭﺎﺷ یﺮﺗﺎﺑ ﻪﮐ ﯽﻣﺎﮕﻨﻫ
.ﺪﯾﺭﺍﺪﻧ ﻪﮕﻧ ﺖﺳﺩ ﺭﺩ ﺍﺭ ﯽﺷﻮﮔ
ﻕﺮﺑ ﺚﻋﺎﺑ ﺪﻧﺍﻮﺗ ﯽﻣ ﺭﺎﮐ ﻦﯾﺍ
ﻦﻔﻠﺗ ﻪﺑ ﹰﺍﺪﯾﺪﺷ ﻭ ﻩﺪﺷ ﯽﮕﺘﻓﺮﮔ
.ﺪﻧﺎﺳﺮﺑ ﺐﯿﺳﺁ
ﺩﺍﻮﻣ ﺭﺎﻨﮐ ﺭﺩ ﯽﺷﻮﮔ ﻥﺩﺮﮐ ژﺭﺎﺷ ﺯﺍ •
ﻥﻮﭼ ،ﺪﯿﻨﮐ ﺰﯿﻫﺮﭘ ﻝﺎﻌﺘﺷﺍ ﻞﺑﺎﻗ
ﻭ ﻩﺪﺷ ﻍﺍﺩ ﯽﺷﻮﮔ ﺖﺳﺍ ﻦﮑﻤﻣ
.ﺩﻮﺷ یﺯﻮﺳ ﺶﺗﺁ ﺚﻋﺎﺑ
5
•
یﺍﺮﺑ SAR یﺍ ﻩﺩﺍﺩ ﺕﺎﻋﻼﻃﺍ •
ﻪﮐ ﯽﺣﺍﻮﻧ/ﺎﻫﺭﻮﺸﮐ ﻦﯿﻨﮐﺎﺳ
ﻂﺳﻮﺗ ﻩﺪﺷ ﻪﯿﺻﻮﺗ SAR ﻥﺍﺰﯿﻣ
•
ﻭ ﻕﺮﺑ ﻦﯿﺳﺪﻨﻬﻣ ﻪﺴﺳﺆﻣ
،ﺪﻧﺍ ﻪﺘﻓﺮﯾﺬﭘ ﺍﺭ (IEEE) ﮏﯿﻧﻭﺮﺘﮑﻟﺍ
ﻡﺮﮔ 1 ﺭﺩ ﻡﺮﮔﻮﻠﯿﮐ ﺮﺑ ﺕﺍﻭ 1.6
•
.ﺖﺳﺍ ﻥﺪﺑ ﺖﻓﺎﺑ
ﻩﺎﮕﺘﺳﺩ ﺯﺍ یﺭﺍﺪﻬﮕﻧ ﻭ ﺖﺒﻗﺍﺮﻣ
•
،ﺎﻫ یﺮﺗﺎﺑ ﺯﺍ ﻂﻘﻓ:ﺭﺍﺪﺸﻫ
ﻪﮐ ﯽﺒﻧﺎﺟ ﺕﺍﺰﯿﻬﺠﺗ ﻭ ﺎﻫﺭژﺭﺎﺷ
ﺹﺎﺧ ﻝﺪﻣ ﻦﯾﺍ ﺎﺑ ﻩﺩﺎﻔﺘﺳﺍ یﺍﺮﺑ
.ﺪﯿﻨﮐ ﻩﺩﺎﻔﺘﺳﺍ ﺪﻧﺍ ﻩﺪﺷ ﻪﯿﺻﻮﺗ
،ﺕﺍﺰﯿﻬﺠﺗ ﻉﺍﻮﻧﺍ ﺮﯾﺎﺳ ﺯﺍ ﻩﺩﺎﻔﺘﺳﺍ
،ﻩﺪﺷ ﻪﯿﺻﻮﺗ ﻉﺍﻮﻧﺍ ﺯﺍ ﺮﯿﻏ ﻪﺑ
ﻥﺪﺷ ﻞﻃﺎﺑ ﺚﻋﺎﺑ ﺖﺳﺍ ﻦﮑﻤﻣ
ﻦﯾﺮﻓﺁ ﺮﻄﺧ ﻭ ﻩﺪﺷ ﻪﻣﺎﻧ ﺖﻧﺎﻤﺿ
•
ﹰﺍﺪﯿﮐﺍ ﻩﺎﮕﺘﺳﺩ ﻦﯾﺍ ﻥﺩﺮﮐ ﺯﺎﺑ ﺯﺍ •
ﯽﺷﻮﮔ ﻪﭽﻧﺎﻨﭼ .ﺪﯿﻨﮐ یﺭﺍﺩﺩﻮﺧ
ﻂﻘﻓ ،ﺪﺷﺎﺑ ﻪﺘﺷﺍﺩ ﺮﯿﻤﻌﺗ ﻪﺑ ﺯﺎﯿﻧ
ﻪﻌﺟﺍﺮﻣ ﺯﺎﺠﻣ یﺎﻫ ﻦﯿﺴﻨﮑﺗ ﻪﺑ
.ﺪﺷﺎﺑ
.ﺪﯿﻨﮐ

ﺮﺛﺆﻣ ﻭ ﻦﻤﯾﺍ ﻩﺩﺎﻔﺘﺳﺍ یﺎﻫ ﻞﻤﻌﻟﺍﺭﻮﺘﺳﺩ
یﺎﻫ ﺵﻭﺭ ﺯﺍ ﻩﺩﺎﻔﺘﺳﺍ ﺎﺑ SAR یﺎﻫ
ﯽﺷﻮﮔ ﻪﮐ ﯽﻟﺎﺣ ﺭﺩ ﻭ ،ﺩﺭﺍﺪﻧﺎﺘﺳﺍ
ﻩﺪﺷ ﺪﯿﯾﺄﺗ یﻭﺮﯿﻧ ﻥﺍﺰﯿﻣ ﻦﯾﺮﺗﻻﺎﺑ ﺭﺩ
ﺭﺍﺮﻗ ﺲﻧﺎﮐﺮﻓ یﺎﻫﺪﻧﺎﺑ ﻪﯿﻠﮐ ﺭﺩ
.ﺖﺳﺍ ﻪﺘﻓﺮﮔ ﻡﺎﺠﻧﺍ ،ﻪﺘﺷﺍﺩ
ﯽﯾﺎﻫ ﺕﻭﺎﻔﺗ ﺖﺳﺍ ﻦﮑﻤﻣ ﻪﭼﺮﮔﺍ •
یﺎﻫ ﻝﺪﻣ ﺭﺩ SAR ﺡﻮﻄﺳ ﻦﯿﺑ
ﺩﻮﺟﻭ LG یﺎﻫ ﯽﺷﻮﮔ ﻒﻠﺘﺨﻣ
ﺎﻫ ﻝﺪﻣ ﻪﻤﻫ ﺎﻣﺍ ،ﺪﺷﺎﺑ ﻪﺘﺷﺍﺩ
ﻪﮐ ﺪﻧﺍ ﻩﺪﺷ ﯽﺣﺍﺮﻃ یﺍ ﻪﻧﻮﮔ ﻪﺑ
ﺭﺍﺮﻗ ﻪﺑ ﻁﻮﺑﺮﻣ یﺎﻫ ﻞﻤﻌﻟﺍﺭﻮﺘﺳﺩ
ﺭﺩ ﯽﯾﻮﯾﺩﺍﺭ ﺝﺍﻮﻣﺍ ﺽﺮﻌﻣ ﺭﺩ ﻦﺘﻓﺮﮔ
.ﺪﺷﺎﺑ ﻩﺪﺷ ﺖﯾﺎﻋﺭ ﺎﻬﻧﺁ
ﻂﺳﻮﺗ ﻩﺪﺷ ﻪﯿﺻﻮﺗ SAR ﻥﺍﺰﯿﻣ
ﺖﻈﻓﺎﺤﻣ ﯽﻠﻠﻤﻟﺍ ﻦﯿﺑ ﻥﻮﯿﺴﯿﻤﮐ
ﻩﺰﯿﻧﻮﯾ ﺮﯿﻏ ﺕﺎﻌﺸﺸﺗ ﺮﺑﺍﺮﺑ ﺭﺩ
ﻡﺮﮔﻮﻠﯿﮐﺮﺑ ﺕﺍﻭ 2 ﺮﺑﺍﺮﺑ ،(ICNIRP)
ﺖﻓﺎﺑ ﻡﺮﮔ 10 ﺭﺩ ﻂﺳﻮﺘﻣ ﺭﻮﻃ ﻪﺑ
.ﺖﺳﺍ ﻥﺪﺑ
یﺮﯿﮔ ﻩﺯﺍﺪﻧﺍ SAR ﺭﺍﺪﻘﻣ ﻦﯾﺮﺗﻻﺎﺑ
ﻦﯾﺍ یﺍﺮﺑ DASY4 ﻂﺳﻮﺗ ﻩﺪﺷ
ﺭﺎﻨﮐ ﻩﺩﺎﻔﺘﺳﺍ ﻡﺎﮕﻨﻫ ﻩﺎﮕﺘﺳﺩ
ﻡﺮﮔﻮﻠﯿﮐ ﺮﺑ ﺕﺍﻭ 0.964 ﺵﻮﮔ
ﻩﺩﺎﻔﺘﺳﺍ یﺍﺮﺑ ﻭ ﺖﺳﺍ (ﻡﺮﮔ 10)
ﻡﺮﮔﻮﻠﯿﮐ ﺮﺑ ﺕﺍﻭ 0.801 ﻥﺪﺑ یﻭﺭ
.ﺪﺷﺎﺑ ﯽﻣ (ﻡﺮﮔ 10)
ﻪﺑ ﺍﺭ ﺮﯾﺯ یﺎﻫ ﻞﻤﻌﻟﺍﺭﻮﺘﺳﺩ ﹰﺎﻔﻄﻟ
ﺖﯾﺎﻋﺭ ﻡﺪﻋ .ﺪﯿﻨﮐ ﻪﻌﻟﺎﻄﻣ ﺖﻗﺩ
ﺖﺳﺍ ﻦﮑﻤﻣ ﺎﻫ ﻞﻤﻌﻟﺍﺭﻮﺘﺳﺩ ﻦﯾﺍ
ﺐﺟﻮﻣ ﺎﯾ ﻪﺘﺷﺍﺩ ﯽﭘ ﺭﺩ ﯽﯾﺎﻫﺭﺮﺿ
.ﺩﺩﺮﮔ ﻦﯿﻧﺍﻮﻗ ﺾﻘﻧ
یژﺮﻧﺍ ﺽﺮﻌﻣ ﺭﺩ ﻦﺘﻓﺮﮔ ﺭﺍﺮﻗ
ﯽﯾﻮﯾﺩﺍﺭ ﺲﻧﺎﮐﺮﻓ
ﺝﺍﻮﻣﺍ ﺽﺮﻌﻣ ﺭﺩ ﻦﺘﻓﺮﮔﺭﺍﺮﻗ ﺕﺎﻋﻼﻃﺍ
(SAR) ﻩﮋﯾﻭ ﺏﺬﺟ ﺐﯾﺮﺿ ﻭ ﯽﯾﻮﯾﺩﺍﺭ
ﻝﺪﻣ ﻩﺍﺮﻤﻫ ﻦﻔﻠﺗ ﯽﺷﻮﮔ ﻦﯾﺍ
ﻩﺪﺷ ﯽﺣﺍﺮﻃ یﺍ ﻪﻧﻮﮔ ﻪﺑ LG-P520
ﻂﯾﺍﺮﺷ ﻭ ﺕﺍﺭﺮﻘﻣ ﻊﺑﺎﺗ ﻪﮐ ﺖﺳﺍ
•
ﺽﺮﻌﻣ ﺭﺩ ﻦﺘﻓﺮﮔ ﺭﺍﺮﻗ ﻪﺑ ﻁﻮﺑﺮﻣ ﻡﺯﻻ
ﻡﺯﻻ ﻂﯾﺍﺮﺷ ﻦﯾﺍ .ﺪﺷﺎﺑ ﯽﯾﻮﯾﺩﺍﺭ ﺝﺍﻮﻣﺍ
ﯽﻤﻠﻋ یﺎﻫ ﻞﻤﻌﻟﺍﺭﻮﺘﺳﺩ ﺮﺑ ﯽﻨﺘﺒﻣ
یﺎﻫ ﻪﺒﻟ ﺯﺍ ﻩﺩﺎﻔﺘﺳﺍ ﻪﻠﻤﺟ ﺯﺍ ﺖﺳﺍ
ﻩﺪﺷ ﯽﺣﺍﺮﻃ یﺍ ﻪﻧﻮﮔ ﻪﺑ ﻪﮐ ﯽﻨﻤﯾﺍ
ﺯﺍ ﺮﻈﻨﻓﺮﺻ
•
ﺎﯾ “ﻩﮋﯾﻭ ﺏﺬﺟ ﺐﯾﺮﺿ” ﻥﺍﻮﻨﻋ ﺖﺤﺗ
،ﺩﺍﺮﻓﺍ ﻪﯿﻠﮐ ﯽﻨﻤﯾﺍ ﻪﮐ ﺪﻧﺍ
ﻦﯿﻤﻀﺗ ﺍﺭ ،ﺎﻬﻧﺁ ﯽﺘﻣﻼﺳ ﻊﺿﻭ ﻭ ﻦﺳ
ﺭﺍﺮﻗ ﻪﺑ ﻁﻮﺑﺮﻣ یﺎﻫ ﻞﻤﻌﻟﺍﺭﻮﺘﺳﺩ
ﺯﺍ ﯽﯾﻮﯾﺩﺍﺭ ﺝﺍﻮﻣﺍ ﺽﺮﻌﻣ ﺭﺩ ﻦﺘﻓﺮﮔ
ﺹﻮﺼﺨﻣ یﺮﯿﮔ ﻩﺯﺍﺪﻧﺍ ﺪﺣﺍﻭ ﮏﯾ
ﺖﺴﺗ .ﺪﻨﻨﮐ ﯽﻣ ﻩﺩﺎﻔﺘﺳﺍ ،SAR
.ﺪﻨﮐ ﯽﻣ
•
4

29 ......................................................ﻪﻣﺎﻧﺮﺑ
29 ...............ﻢﯾﻮﻘﺗ ﻪﺑ ﺩﺍﺪﯾﻭﺭ ﮏﯾ ﻥﺩﻭﺰﻓﺍ
29 .......................... ﺭﺍﺪﺸﻫ ﮓﻧﺯ ﻢﯿﻈﻨﺗ
29 ........................................ﺕﻮﺻ ﻂﺒﺿ
29 .........................................ﺪﺣﺍﻭ ﻞﯾﺪﺒﺗ
29 .................................PC Suite
30 ............ﻪﻧﺎﯾﺍﺭ ﺭﺩ LG PC Suite ﺐﺼﻧ
30 ........................................................... ﺏﻭ
30 ..........................ﻪﮑﺒﺷ ﻪﺑ ﯽﺳﺮﺘﺳﺩ
31 ......Google ﺕﺎﻣﺪﺧ ﻪﺑ ﯽﺳﺮﺘﺳﺩ
31 ................................................ ﺕﺎﻤﯿﻈﻨﺗ
31 ......... ﺎﻫ ﻪﺼﺨﺸﻣ یﺯﺎﺳ ﯽﺼﺨﺷ
31 ........................ﻦﻔﻠﺗ ﺕﺎﻤﯿﻈﻨﺗ ﺮﯿﯿﻐﺗ
31 ...................ﻪﻈﻓﺎﺣ ﺮﯾﺪﻣ ﺯﺍ ﻩﺩﺎﻔﺘﺳﺍ
31 ..................... ﻝﺎﺼﺗﺍ ﺕﺎﻤﯿﻈﻨﺗ ﺮﯿﯿﻐﺗ
ﻖﯾﺮﻃ ﺯﺍ ﺎﻫ ﻞﯾﺎﻓ
32 .................................................ﺙﻮﺗﻮﻠﺑ
.. ﺮﮕﯾﺩ ﺙﻮﺗﻮﻠﺑ ﻩﺎﮕﺘﺳﺩ ﺎﺑ ﻥﺪﺷ ﻂﺒﺗﺮﻣ
33 ...........................................
34 .............................................ﯽﺒﻧﺎﺟ ﻡﺯﺍﻮﻟ
35 ..........................................ﯽﻨﻓ ﺕﺎﻋﻼﻃﺍ
36 ................................................ ﯽﺑﺎﯾ ﺐﯿﻋ
3
ﺖﻓﺎﯾﺭﺩ ﻭ ﻝﺎﺳﺭﺍ

19 ..............................................ﯽﻧﺎﺳﺭ ﻡﺎﯿﭘ
20 ..........................................ﻡﺎﯿﭘ ﻝﺎﺳﺭﺍ
20 ..................................... ﱳﻣ ﻥﺩﺮﮐ ﺩﺭﺍﻭ
20 ........................ ﻂﺧ ﺖﺳﺩ ﺺﯿﺨﺸﺗ
21 ..................................... ﻞﯿﻤﯾﺍ ﻢﯿﻈﻨﺗ
21 .............. ﯽﻨﺘﻣ ﻡﺎﯿﭘ ﺕﺎﻤﯿﻈﻨﺗ ﺮﯿﯿﻐﺗ
22 . یﺍ ﻪﻧﺎﺳﺭﺪﻨﭼ ﻡﺎﯿﭘ ﺕﺎﻤﯿﻈﻨﺗ ﺮﯿﯿﻐﺗ
22 ...(SNS) ﯽﻋﺎﻤﺘﺟﺍ ﻪﮑﺒﺷ ﺕﺎﻣﺪﺧ
23 ............ (SNS ﻪﻣﺍﺩﺍ
23 ...................................................... ﻦﯿﺑﺭﻭﺩ
23 ............................ یﺭﻮﻓ ﺲﮑﻋ ﱳﻓﺮﮔ
23 .......................... ﺲﮑﻋ ﱳﻓﺮﮔ ﺯﺍ ﺪﻌﺑ
24 ....... ﻪﺘﻓﺮﺸﯿﭘ ﺕﺎﻤﯿﻈﻨﺗ ﺯﺍ ﻩﺩﺎﻔﺘﺳﺍ
25 ..................................یﺭﺍﺩﺮﺒﻤﻠﯿﻓ ﻦﯿﺑﺭﻭﺩ
25 ................................یﺭﻮﻓ یﺭﺍﺩﺮﺒﻤﻠﯿﻓ
26 ..............................یﺭﺍﺩﺮﺒﻤﻠﯿﻓ ﺯﺍ ﺪﻌﺑ
26 ....... ﻪﺘﻓﺮﺸﯿﭘ ﺕﺎﻤﯿﻈﻨﺗ ﺯﺍ ﻩﺩﺎﻔﺘﺳﺍ
27 ................................................ ﯽﻘﯿﺳﻮﻣ
28 .............ﯽﺷﻮﮔ ﻪﺑ ﯽﻘﯿﺳﻮﻣ ﻝﺎﻘﺘﻧﺍ
28 ..................................... ﺎﻫ ﻞﯾﺎﻓ ﺖﯾﺮﯾﺪﻣ
28 ........................... ﺎﻫ ﻪﻣﺎﻧﺮﺑ ﻭ ﺎﻫ یﺯﺎﺑ
) Facebook
ﺐﻟﺎﻄﻣ ﺖﺳﺮﻬﻓ
4 ﺮﺛﺆﻣ ﻭ ﻦﻤﯾﺍ ﻩﺩﺎﻔﺘﺳﺍ یﺎﻫ ﻞﻤﻌﻟﺍﺭﻮﺘﺳﺩ
10 ..................... ﺕﺭﺎﮐ ﻢﯿﺳ ﻭﺩ ﺯﺍ ﻩﺩﺎﻔﺘﺳﺍ
11 ...................ﯽﺷﻮﮔ یﺮﺗﺎﺑ ﻭ ﺕﺭﺎﮐ ﻢﯿﺳ
11 .............................. ﺕﺭﺎﮐ ﻢﯿﺳ ﺐﺼﻧ
11 .................................................ﺮﯾﻭﺎﺼﺗ
13 ..........................................ﻦﻔﻠﺗ ﺕﺎﻌﻄﻗ
14 ..................... ﯽﺴﳌ ﻪﺤﻔﺻ ﺯﺍ ﻩﺩﺎﻔﺘﺳﺍ
14 ...............ﯽﺴﳌ ﻪﺤﻔﺻ ﻩﺭﺎﺑﺭﺩ ﯽﺗﺎﮑﻧ
14 .........................ﯽﺴﳌ ﻪﺤﻔﺻ ﻝﺮﺘﻨﮐ
15 ...............................ﻦﻔﻠﺗ ﯽﻠﺻﺍ ﻪﺤﻔﺻ
16 ............................................ ﻮﻨﻣ ﻪﺤﻔﺻ
17 ................................................... ﺎﻫ ﺱﺎﲤ
17 .......................................ﺱﺎﲤ یﺭﺍﺮﻗﺮﺑ
ﺖﺳﺮﻬﻓ ﺯﺍ
17 ........................................... ﻦﯿﺒﻃﺎﺨﻣ
17 .............. ﺱﺎﲤ یﺩﺎﻋ ﺕﺎﻤﯿﻈﻨﺗ ﺮﯿﯿﻐﺗ
18 ............................................... ﻦﯿﺒﻃﺎﺨﻣ
18 .......................... ﺐﻃﺎﺨﻣ یﻮﺠﺘﺴﺟ
18 ....................... ﺪﯾﺪﺟ ﺐﻃﺎﺨﻣ ﻥﺩﻭﺰﻓﺍ
19 ................. ﺐﻃﺎﺨﻣ ﺕﺎﻤﯿﻈﻨﺗ ﺮﯿﯿﻐﺗ
ﻩﺩﺎﻔﺘﺳﺍ ﺎﺑ ﺱﺎﲤ یﺭﺍﺮﻗﺮﺑ
2

ﯽﺳﺭﺎﻓ — ﺮﺑﺭﺎﮐ یﺎﻤﻨﻫﺍﺭ LG-P520
ﺎﯾ ﻦﻔﻠﺗ ﺭﺍﺰﻓﺍ ﻡﺮﻧ ﻪﺑ ﻪﺘﺴﺑ ﺖﺳﺍ ﻦﮑﻤﻣ ﺎﻤﻨﻫﺍﺭ ﻪﭼﺮﺘﻓﺩ ﻦﯾﺍ ﺕﺎﯾﻮﺘﺤﻣ ﺯﺍ ﯽﺧﺮﺑ
.ﺪﺷﺎﺑ ﺕﻭﺎﻔﺘﻣ ﻦﻔﻠﺗ ﻦﯾﺍ ﺎﺑ ،ﺎﻤﺷ ﯽﺗﺍﺮﺑﺎﺨﻣ ﻪﮑﺒﺷ
 Loading...