

Page 1

User Guide
LG-P509
ENGLISH
P/N : MFL67008601 (1.0)
H
www.lg.com
Page 2

Bluetooth QD ID B016768
Page 3
Congratulations on your purchase of the
advanced and compact LG-P509 phone
by LG, designed to operate with the latest
digital mobile communication technology.
Some of the contents in this manual may differ
from your phone depending on the software of
the phone or your service provider.
• This handset is not
recommended for the visually
impaired because of its
touch-screen keypad.
• Copyright ©2010 LG
Electronics, Inc. All rights
reserved. LG and the LG logo
are registered trademarks
of LG Group and its related
entities. All other trademarks
are the property of their
respective owners.
• Google™, Google Maps™,
Google mail™, YouTube™,
Google Talk™ and Android
Market™ are trademarks of
Google, Inc.
LG-P509 User Guide
Page 4

OVERVIEW
This guide provides you with everything you need
to get started. For more information and support,
please visit www.t-mobile.com/support where you
can:
Register for my.t-mobile.com to check your
•
minutes, pay your bill, upgrade your phone, and
change your rate plan.
Review the User Manual and troubleshooting
•
FAQs.
View the latest troubleshooting solutions in the
•
Support Forums or ask a question of your own.
You can also access Help information on your
phone:
From any Home screen, touch the Application
1.
Launcher icon.
Touch My Account or My Device.
2.
Page 5

SERVICE ACTIVATION
If you are a new T-Mobile® customer and your
service has not been activated, simply call Customer
Care at 1-800-937-8997 from your landline phone
and a T-Mobile Activations representative will assist
you. You will need the following information when
activating service:
Service Agreement and agent code on your
•
Agreement.
Your name, home address, home phone, and
•
billing address.
NOTE: For business and government accounts,
please provide the name of your company or
government agency, address, and tax ID.
Your Social Security number, current driver’s
•
license number, and date of birth for credit
check purposes.
Your choice of T-Mobile rate plan and
•
services (see www.t-mobile.com for latest plan
information).
SIM serial number and IMEI number (located
•
on the box bar code label).
By activating service, you acknowledge that you have read,
understand, and agree to be bound by each of T-Mobile’s Terms
and Conditions and your Service Agreement.
Page 6

Contents
OVERVIEW.....................4
SERVICE ACTIVATION .5
Important notice ............9
Understanding Your
Phone ........................... 20
Front View .............................20
Rear View ..............................23
Installing the SIM card and
battery ...................................24
Charging your Phone........ 27
Charging with USB ............29
Turning the Phone On
and Off ..................................30
Installing the memory
card ........................................30
Formatting the memory
card ........................................ 32
Notifications panel .............34
Viewing the Status bar ..... 34
Your Home screen .......37
Getting to Know the Home
Screen ....................................37
Touch screen tips ...............39
Lock your phone ................40
Unlock screen ......................41
Home screen ..................... 43
Applications: How to
View, Open and Switch ....43
Getting back to a recently
used applications ...............44
Working with Menus .........50
Managing Notifications ..... 51
Searching Your Phone and
the Web ................................53
Locking the Screen ...........55
Customizing the Home
Screen ...................................59
Applications.........................62
Onscreen Keyboard .......... 68
Text Input Methods ...........68
Using the Swype
Keyboard ..............................69
Swype Text Entry Tips ....... 69
Swype Settings ................... 70
Google Account
Set-up ...........................73
Creating your Google
account ..................................73
Signing in your Google
account ..................................74
Call ................................76
Making a call ........................76
Calling your contacts .........76
Answering and rejecting a
call ...........................................77
Adjusting call volume ........77
Making a second call ........ 78
Viewing your Call logs ...... 78
Call settings ......................... 79
Contacts ...................... 80
Searching for a contact ...80
Adding a new contact ......80
Favorite contacts ................. 81
Messaging/E-mail ...... 82
Messaging ............................82
Sending a message ..........82
Threaded box .................... 83
Using smilies ....................... 83
6 LG-P509 | User Guide
Page 7

Changing your message
settings .................................84
Opening Email and the
Accounts Screen ............... 84
Reading Your Messages ..86
Responding to a
Message ...............................86
Starring Messages ..............87
Composing and Sending
Email ......................................88
Working with Account
Folders ...................................89
Adding and Editing Email
Accounts ..............................89
Social Networking .............90
Adding your account to
your phone ............................ 91
Viewing and updating your
status ..................................... 91
Removing accounts on your
phone ....................................92
Camera .........................93
Getting to know the
viewfinder ............................. 93
Using the focus mode .....94
Taking a quick photo .......95
Once you’ve taken the
photo .....................................95
Using the advanced
settings .................................96
Viewing your saved
photos ...................................99
Video camera .............100
Getting to know the
viewfinder ...........................100
Shooting a quick video ....101
After shooting a video ....102
Using the advanced
settings ............................... 102
Watching your saved
videos ..................................104
Adjusting the volume
when viewing a video ...... 104
Your photos and
videos ..........................105
Setting a photo as
wallpaper ............................ 105
Multimedia .................106
View mode ......................... 106
Timeline view .....................106
My Images options
menu ....................................107
Sending a photo ...............107
Sending a video ................107
Using an image ................108
Creating a slideshow .......108
Checking your photo ......108
Transferring files using USB
mass storage devices ..... 109
Music .................................... 110
Playing a song ................... 110
Using the radio ....................111
Searching for stations ....... 111
Resetting channels ............112
Listening to the radio .......112
Google applications .... 113
Google Maps™ ...................113
Market™ ................................114
Google Mail™ ......................115
Google Talk™ .......................116
7
Page 8

Contents
Utilities......................... 117
Setting your alarm .............117
Using your calculator ........117
Adding an event to your
calendar ................................118
Changing your calendar
view.........................................119
ThinkFree Office .................119
Voice Recorder .................120
Recording a sound or
voice ..................................... 120
Sending the voice
recording ............................ 120
The Web ......................121
Browser .................................121
Using options ......................121
Adding and accessing
bookmarks ..........................122
Changing Web browser
settings ................................122
Settings ...................... 123
Wireless & networks .........123
Sound ...................................123
Display ..................................123
Location & Security ........123
Applications........................125
Accounts & sync ...............125
Privacy ..................................125
SD card & phone
storage .................................126
Search ..................................126
Language & keyboard .....126
Voice input & output........126
Accessibility ........................127
Date and time ....................127
8 LG-P509 | User Guide
About phone ......................127
Wi-Fi ...........................128
Turn on Wi-Fi ....................128
To connect to Wi-Fi ......... 128
Sharing your phone’s
mobile data connection ..129
USB tethering & portable
Wi-Fi hotspot settings ....130
To share your phone’s data
connection via USB ...........131
USB tethering and data
sharing ..................................131
To share your phone’s data
connection as a portable
Wi-Fi hotspot .....................133
To rename or secure your
portable Wi-Fi hotspot ....134
DivX Mobile ................136
Technical data ............ 137
Accessories ................138
Before using the mobile
phone, please read
first! ............................. 139
FAQ .............................142
For Your Safety ...........154
Page 9

Important notice
Please check to see if any problems you have
encountered with your phone are described in this
section, before taking the phone in for service or
calling a service representative.
1. Phone memory
When available space on your phone memory is
less than 10%, your phone cannot receive a new
message. You need to check your phone memory
and delete some data, such as applications or
messages, to make more memory available.
To uninstall an application
From the Home screen, touch the Application
1.
Launcher icon g Settings g Applications g
Manage applications.
When all applications appear, scroll and select the
2.
application you want to uninstall.
Touch Uninstall and then OK to uninstall the
3.
application you desire.
9
Page 10

Important notice
2. Optimizing Battery Life
You can extend your battery's life between charges
by turning off features that you don't need to run
constantly in the background. You can also monitor
how applications and system resources consume
battery power.
To extend the life of your battery
Turn off radio communications that you aren't
•
using, such as Wi-Fi, Bluetooth, or GPS.
Turn down screen brightness and set a shorter
•
screen timeout.
Turn off automatic syncing for Google Mail™,
•
Calendar, Contacts, and other applications.
Some applications you’ve downloaded may
•
cause your battery’s life to be reduced.
To check the battery charge level
From the Home screen, touch the Application
1.
Launcher icon g Settings g About phone g
Status.
The battery status (charging or discharging)
2.
and level (as a percentage of fully charged) are
displayed at the top of the screen.
10 LG-P509 | User Guide
Page 11
To monitor and control what uses the battery
From the Home screen, touch the Application
1.
Launcher icon g Settings g About phone g
Battery use.
The top of the screen displays battery usage
2.
time. Either how long since last connected to a
power source or, if connected to a power source,
how long you were last running on battery
power. The body of the screen lists applications
or services using battery power from greatest
amount to least.
3. Installing an Open Source OS
If you install an open source OS on your phone, and
do not use the OS provided by the manufacturer,
this may cause your phone to malfunction.
WARNING: If you install and use an OS other
than the one provided by the manufacturer, your
phone is no longer covered by the warranty.
11
Page 12

Important notice
WARNING: To protect your phone and
personal data, download applications only from
trusted sources, such as Android Market™. If
some applications are not properly installed on
your phone, your phone may not work normally or
a serious error can be occurred. You will need to
uninstall those applications and all of its data and
settings from the phone.
4. Using Unlock pattern
Set unlock pattern to secure your phone. Opens
a set of screens that guide you through drawing a
screen unlock pattern.
WARNING: Take precautions when using
the Unlock pattern. It is very important that you
remember the unlock pattern you set. You are
allowed 5 attempts to enter the Unlock pattern.
If you used up all 5 opportunities, you will have to
wait 30 seconds to attempt unlocking again.
When you can’t recall your Unlock pattern, PIN,
or Password:
If you logged into your Google account on the
phone and failed to use the correct pattern 5 times,
touch the Forgot pattern button. Then, you are
12 LG-P509 | User Guide
Page 13

required to sign in with your Google account and
prompted to create a new unlock pattern.
If you haven’t created a Google account on the
phone or you forgot it, you need to perform a Hard
Reset.
Caution: If you perform a Hard Reset, all user
applications and user data will be deleted. Please
remember to back up any important data before
performing a Hard Reset.
Turn the power off.
1.
Press and hold the following keys at the same
2.
time for 10 seconds: Power Key + Home Key +
Down Volume Key.
When the power turns on, release these keys.
3.
5. Using Hard Reset
* Using Hard Reset (Factory Reset)
If it does not restore to the original condition, use
Hard Reset to initialize your phone.
If the user turns on the phone by pressing and
holding the Power Key + Home Key + Down
Volume Key at the same time (for 10 seconds), the
phone will turn on and perform the factory reset
immediately.
13
Page 14
Important notice
WARNING: If you perform Hard Reset, all user
applications and user data will be deleted. Please
remember to back up any important data before
performing Hard Reset.
6. Connecting to Wi-Fi networks
To use Wi-Fi on your phone, you need access to
a wireless access point, or “hotspot.” Some access
points are open and you can simply connect to
them. Others are hidden or implement other
security features, so you must configure your phone
in order to connect to them.
Turn off Wi-Fi when you're not using it to extend the
life of your battery.
To turn Wi-Fi on and connect to a Wi-Fi network
From the Home screen, touch the Application
1.
Launcher icon g Settings g Wireless & networks
Wi-Fi settings.
g
Touch Wi-Fi to turn it on and begin scanning for
2.
available Wi-Fi networks.
A list of available Wi-Fi networks is displayed.
•
Secured networks are indicated by a lock icon.
14 LG-P509 | User Guide
Page 15

Touch a network to connect to it.
3.
If the network is open, you are prompted
•
to confirm that you want to connect to that
network by touching Connect.
If the network is secured, you're prompted to
•
enter a password or other credentials. (Ask
your network administrator for details.)
The Status bar will display an icon that indicates
4.
your Wi-Fi status.
7. Using a microSD card
Pictures, along with Music and Video files, can only
be saved to external memory.
In order to use the built-in camera, you must first
insert a microSD card to your phone.
Without inserting a memory card, you will not be
able to save pictures and video you have taken.
WARNING: Do not insert or remove the
memory card when the phone is on. Otherwise,
it may damage the memory card as well as your
phone, and the data stored on the memory card
may be corrupted. To remove the memory card
safely, please touch the Applicati
icon
g Settings g SD card & phone storage
settings g Unmount SD card.
on Launcher
15
Page 16
Important notice
8. Opening and Switching Applications
Multi-tasking is easy with Android because open
applications run in the background when you open
another application. There’s no need to quit an
application before opening another. You are allowed
to switch among several open applications. Android
manages each application, stopping and starting
them as needed, to ensure that idle applications
don’t consume resources unnecessarily.
To stop the application you use
From the Home screen, touch the Application
1.
Launcher icon g Settings g Applicationsg
Manage applications.
Touch the desired application and touch Force
2.
stop to stop using it.
TIP: Getting back to recent Apps
Press and hold the Home Key. A screen
will display a list of the most recently used
applications.
16 LG-P509 | User Guide
Page 17

9. Connecting your phone to a computer via
USB
Use the USB cable with your phone to connect
1.
the phone to a USB port on your computer.
You will receive a notification that the USB is
connected.
Opens the Notifications panel for USB Connected
2.
and touch Turn on USB storage.
Touch OK to confirm that you want to transfer
3.
files between your phone’s microSD card and the
computer.
When the phone is connected as USB storage, you
will receive a notification that your phone’s microSD
card is mounted as a drive on your computer. You
can now copy files to and from the microSD card.
10. Unlock screen when using data
connection
Your screen will lock if untouched for a period of
time when using data connection. To turn on your
LCD screen, press any key on the phone (except
volume keys).
TIP: To use a microSD card on you phone again,
you need to open the Notifications panel and
touch "Turn off USB storage".
17
Page 18

Important notice
During this time, you can’t access the microSD card
from your phone, so you can’t use applications that
rely on the microSD card, such as Camera, Gallery
and Music.
To disconnect your phone from the computer,
carefully follow your computer’s instructions to
disconnect USB devices correctly, to avoid losing
information on the card.
Safely disconnect the USB device on your
1.
computer.
Open the Notifications panel and touch Turn off
2.
USB storage.
11. Hold the phone straight up
Please hold the mobile phone straight up as a
regular phone.
While making/receiving calls or sending/receiving
data, try to avoid holding the lower part of the
phone where the antenna is located. It may affect
call quality.
18 LG-P509 | User Guide
Page 19

12. When the screen freezes
If the phone does not respond to user input or the
screen freezes:
Remove the battery, insert it again and power on
the phone. If it still does not work, please contact
the service center.
13. Do not connect your phone when you
power on/off your PC
Make sure to disconnect your phone from the PC
via USB cable when powering your PC on or off as it
might result in PC errors.
19
Page 20

Understanding Your Phone
To turn on the phone, press and hold the Power/
Lock Key for 3 seconds. To turn off the phone, press
the Power/Lock Key for 3 seconds and touch Power
off. Then touch OK to confirm.
Front View
5 Power/Lock
Key
1 Proximity
Sensor
2 Phone icon
3 Menu Key
4 Home Key
Proximity Sensor senses proximity towards
1.
other objects (such as your head) so that touch
commands are not accidentally activated during
a call.
20 LG-P509 | User Guide
6 Earpiece
7 Touchscreen
8 Application
Launcher icon
9 Search Key
10 Back Key
Page 21
WARNING: Placing a heavy object on the
phone or sitting on it can damage its LCD and
touch screen functionalities. Do not cover on the
LCD’s proximity sensor with a protective film. This
can cause the sensor to malfunction.
Phone icon accesses Dialer, Call log, Contacts,
2.
and Favorites.
Menu Key opens a context menu with options
3.
that affect the current screen of an application.
TIP: Press Menu Key whenever you touch an
application to check what options are available.
Home Key returns to the Home screen. If
4.
you’re already viewing one of the Home screen
extension panes, it navigates you to the central
Home screen pane. Press and hold to view the
most recently used applications.
Power/Lock Key locks the screen. Press and
5.
hold to open the phone options menu (for the
following options): Silent mode, Airplane mode,
and Power off.
Earpiece lets you hear callers and automated
6.
prompts.
Touchscreen displays all the information needed
7.
to operate your phone, such as applications,
call status, date, time, signal status, and battery
strength.
21
Page 22

Understanding Your Phone
Application Launcher icon opens the Launch
8.
menu to view installed applications.
Search Key opens Quick Search BoxTM, from the
9.
Home screen to search the phone and the web.
In many applications, you may touch this key to
search within the application itself. Touch and
hold to open GoogleTM search by voice.
Back Key returns to the previous screen. Also
10.
closes pop-up display items such as menus and
dialog boxes.
22 LG-P509 | User Guide
Page 23
Rear View
1 3.5mm
Headset Jack
2 Camera Lens
3 Volume
Keys
4 Back Cover
5 Microphone
6 Accessory/
Charger Port
3.5mm Headset Jack allows you to plug in an
1.
optional headset for convenient, hands-free
conversations. The 3.5mm jack also allows you to
plug in headphones to listen to music.
Camera Lens use for taking pictures and
2.
recording videos. Keep clean for optimal
performance.
Volume Keys allow you to adjust the ringer, media
3.
volumes and the in-call volume during a call.
23
Page 24
Understanding Your Phone
Back Cover encloses the battery compartment.
4.
Microphone transmits your voice to the other
5.
caller and to Voice-activated functions.
Accessory/Charger Port allows you to connect the
6.
phone charger, USB cable, or other compatible
accessories.
Tip! The LG-P509 does not support Video call.
Tip! If the LG-P509 has errors when you use
it or you cannot turn it on, remove the battery,
install it again and turn it on after 5 seconds.
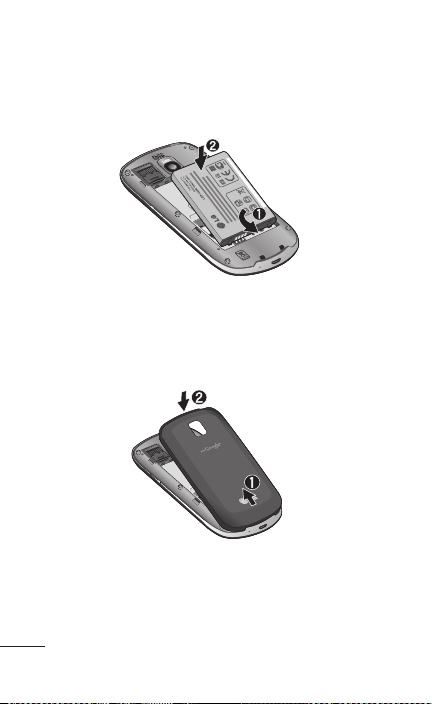
Installing the SIM card and battery
Before you can start exploring your new phone, you’ll
need to set it up. To insert the SIM card and battery:
Hold the phone with both hands and use the
1.
fingernail cutout at the top of the phone to pull
open the battery cover (as shown below).
24 LG-P509 | User Guide
Page 25
Slide the SIM card into the SIM card slot. Make
2.
sure the gold contact area on the card is facing
downwards.
25
Page 26
Understanding Your Phone
Align the battery contacts with the terminals near
3.
the bottom of the phone, then press the battery
into place.
Replace the battery cover over the back of the
4.
phone (as demonstrated below). Apply a steady
downward pressure until the battery cover clicks
into place.
26 LG-P509 | User Guide
Page 27
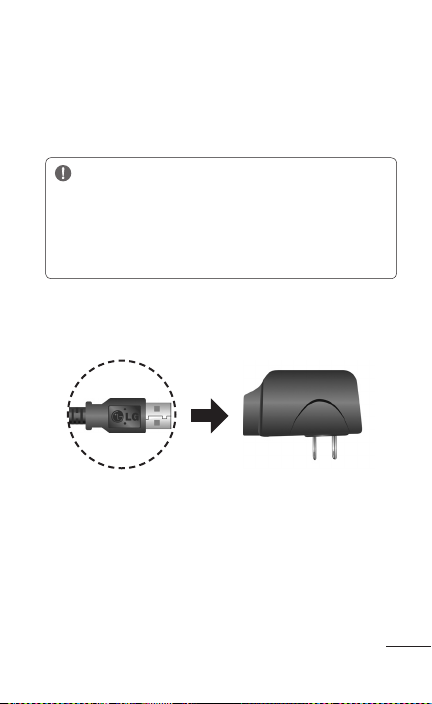
Charging your Phone
Your LG-P509 comes with a wall adapter and a
USB cable which connect together to charge your
phone. To charge your phone:
NOTICE: Please use only an approved
charging accessory to charge your LG phone.
Improper handling of the charger port, as well as
the use of an incompatible charger, may cause
damage to your phone and void the warranty.
Connect the wall adapter and USB cable as
1.
shown. The LG logo on the USB cable should
face toward you.
27
Page 28

Understanding Your Phone
Gently uncover the Accessory/Charger port, then
2.
plug one end of the USB cable into the phone’s
charger port and the other end into an electrical
outlet. The charge time varies depending upon
the battery level.
Battery temperature protection
Though extremely rare, if the battery becomes
overheated, the phone will automatically turn off.
Battery charge level
You can find the battery charge level at the top right
of the screen. When the battery level becomes low,
the phone will notify you. Once the battery level
becomes exceedingly low, the phone will shut off
without notice. As a result, unsaved items may be
lost.
28 LG-P509 | User Guide
Page 29
NOTE: The battery must be fully charged initially
to improve battery lifetime. The LG-P509 has
an internal antenna. Be careful not to scratch or
damage this rear area, as that will cause loss of
performance.
Charging with USB
You can use your computer to charge your phone.
To be able to charge with the USB cable, you need
to have the necessary USB drivers installed on your
PC first. Connect one end of the USB cable to the
charger port on your phone and connect the other
end to a USB port on your PC. It is best to use the
rear USB port when connecting to a desktop PC.
The USB hub should be powered by an external
power source.
NOTES:
Low-power USB ports are not supported,
•
such as the USB port on your keyboard or
bus-powered USB hub.
The LG USB Driver is downloadable
•
from the following site: http://www.
lgmobilephones.com g Click Mobile
Support g Select the Carrier(T-Mobile) g
Select the Model g Click USB Cable Driver
to download.
29
Page 30

Understanding Your Phone
Turning the Phone On and Off
Turning the phone on
Press and hold the Power/Lock Key for a
couple of seconds.
Turning the phone off
Press and hold the Power/Lock Key
1.
the pop-up menu appears.
Touch Power Off in the pop-up menu.
2.
Touch OK to confirm that you want to turn off the
3.
phone.
Installing the memory card
To store multimedia files, such as captured images and
videos, you must insert a memory card into your phone.
NOTE: The LG-P509 supports up to a 32 GB
memory card.
until
30 LG-P509 | User Guide
Page 31

To insert a memory card:
Turn the phone off before inserting or removing
1.
the memory card. Remove the back cover.
Slide the slot protection upwards to unlock it and
2.
flip it up to open it. Then insert the memory card
into the slot, making sure the gold contact area
is facing downwards. Then flip the slot protection
down to close it.
31
Page 32

Understanding Your Phone
Slide the slot protection downwards to lock it and
3.
replace the battery cover.
WARNING: Do not insert or remove the
memory card when the phone is on. Otherwise,
it may damage the memory card as well as your
phone, and the data stored on the memory card
may be corrupted.
Formatting the memory card
Your memory card may already be formatted. If it
isn’t, you must format it before you can use it.
NOTE: All files on the memory card are deleted
when you format it.
From the Home screen, touch the Application
1.
Launcher icon to open the applications menu.
Touch Settings.
2.
Touch SD card & phone storage.
3.
32 LG-P509 | User Guide
Page 33

Touch Unmount SD Card and OK to confirm.
4.
Touch Format SD card, then confirm your choice.
5.
If you set the pattern lock, enter the pattern lock
6.
and select Erase Everything. The card will then be
formatted and ready to use.
NOTE: If there is content on your memory
card, the folder structure may be different after
formatting since all the files will be deleted.
TIP: If your memory card is already unmounted,
you can use the following step to format it. Touch
the Application Launcher icon g Settings g SD
card & phone storage g Format SD Card.
33
Page 34

Understanding Your Phone
Notifications panel
The Notifications panel runs across the top of your
screen.
Touch and slide the Notifications panel down with
your finger or from the Home screen, press the
Menu Key and select Notifications. Here, you can
check and manage Wi-Fi, Bluetooth, GPS status as
well as other notifications.
Wi-Fi
Bluetooth
GPS
3G
connection
Ring
Viewing the Status bar
The Status bar uses different icons to display
phone information, such as signal strength, new
messages, battery life, and active Bluetooth and
data connections.
Below is a table explaining the meaning of icons
you’re likely to see in the Status bar.
34 LG-P509 | User Guide
Page 35

[Status bar]
Icon Description
No SIM card installed
No signal
Connected to a Wi-Fi network
Wired headset connected
Call forwarded
Call on hold
Speakerphone is on
Phone microphone is muted
Missed call
35
Page 36

Understanding Your Phone
Icon Description
Bluetooth is on
Connected to a Bluetooth device
System warning
Alarm is set
New voicemail
Flight mode is set
Silent mode is set
Vibrate mode is set
No microSD card installed
Battery is fully charged
Battery is charging
Data in
Data out
Data in and out
Phone is connected via USB cable
Downloading data
Uploading data
GPS is on
Receiving location data from GPS
36 LG-P509 | User Guide
Page 37

Your Home screen
Getting to Know the Home Screen
The Home screen is your starting point to access all
the features on your phone. It displays application
shortcuts, icons, widgets, and other features.
Status Bar
Shows device status information
including the time, signal strength,
battery status, and notification icons.
Application Icon
Touch an icon (application, folder,
etc.) to open and use it.
Quick Icons
Provide easy, one-touch access to
the functions you use the most.
Applications Launcher Icon
Touch to open the Launch screen to
view installed applications.
37
Page 38

Your Home screen
Quick Icons
On the home screen, the Quick Icons are located
on a bar along the bottom of the Home screen and
the Launch screen.
: opens the Phone application which displays
the dialpad so you can dial an unsaved number.
Includes additional tabs across the top of the screen
to access Call log, Contacts and Favorites.
: opens the Launch screen which displays phone
options and applications.
: opens the Messaging application.
To return to the Home screen
Press the Home Key at any time, from any
application.
To view other Home screen panels
Slide your finger left or right across the Home
screen. The Home screen spans five panels, allowing
more space for icons, widgets, shortcuts, etc.
The dots indicate which Home screen pane you are viewing.
Location Indicator
38 LG-P509 | User Guide
Page 39

Touch screen tips
Here are some tips on how to navigate around your
phone.
Touch - To choose a menu/option or open an
application, touch it.
Touch and hold - To open an options menu or grab
an object you want to move, touch and hold it.
Drag - To scroll through a list or move slowly, drag
across the touch screen.
Flick - To scroll through a list or move quickly, flick
across the touch screen (drag quickly and release).
Swiping - Swiping means to quickly drag your finger
vertically or horizontally on the screen to move the
area of focus or to scroll through a list. For example:
slide your finger left or right on the Home screen to
scroll among the five panels.
Rotating the screen - The screen can be rotated
to change the orientation from portrait (default)
to landscape. For example: rotate the phone
horizontally to change to landscape orientation when
entering text to provide a larger keyboard or when
viewing web content to minimize scrolling.
39
Page 40

Your Home screen
Notes:
To select an item, touch the icon.
•
Do not to press too hard; the touch screen
•
is sensitive enough to pick up a light, firm
touch.
Use the tip of your finger to touch the
•
option you want. Be careful not to touch any
other keys.
Lock your phone
When you are not using your LG-P509, press the
Power/Lock Key to lock your phone. This helps
prevent accidental presses and saves battery power.
Also, if you do not use the phone for a while, the
Home screen or current screen you are viewing, is
replaced with the lock screen to conserve battery
life.
If there are any applications running when
•
you lock the phone, they may be still running
in lock mode. It is recommended to exit all
programs before entering lock mode to avoid
unnecessary charges. (e.g., phone call, web
access and data communications)
40 LG-P509 | User Guide
Page 41

Setting an unlock pattern: You can draw your own
unlock pattern by connecting four or more dots.
When the phone’s screen locks and you have set an
unlock pattern, press the Power/Lock Key and draw
the pattern to unlock it.
Caution: To set an unlock pattern, you must first
create a Gmail account.
Unlock screen
Whenever your LG-P509 is not in use, it will return
to the lock screen. Drag the unlock icon from left to
right to unlock the screen.
41
Page 42

Your Home screen
Silent Mode
From the Notifications panel, touch the icon
to set Silent Mode (the icon is displayed if the
Vibrate menu is set to Never or Only when not in
Silent mode; otherwise, the icon is displayed).
If you don't have an unlock pattern set, simply drag
to the left.
To wake up your phone, press the Menu, Home,
Back, Search or Power/Lock Keys. The lock screen
will appear. Touch the unlock icon and drag your
finger to the left to unlock your Home screen. The
last screen you were working on opens.
42 LG-P509 | User Guide
Page 43

Home screen
Simply swipe your finger to the left or right to view
your Home screen panels.
You can also customize each panel with widgets and
shortcuts to your favorite applications, folders and
wallpapers.
NOTE: Some screen images may be different
depending on your phone provider.
In your LG Home screen, you can view quick
keys at the bottom of the screen. The quick keys
provide easy, one-touch access to the functions
you use the most.
Touch the Application Launcher icon at the
bottom of the screen to view all your installed
applications.
Applications: How to View, Open and Switch
All of the applications on your phone, including
any applications that you downloaded and installed
from Android MarketTM or other sources, are
grouped together on one Launch screen that you
access from your Home screen. If you have more
applications than can fit on the Launch screen, you
can slide the screen up or down to view more.
43
Page 44

Your Home screen
Getting back to a recently used applications
Press and hold the Home
1.
show you a pop-up with icons of applications that
you've used recently.
Touch an icon to open the desired application
2.
or press the Back
application or screen.
Key
. The screen will
Key
to return to the current
44 LG-P509 | User Guide
Page 45

Overview
Touch to open the Launch screen
Slide the screen up or down to
bring more icons into view
Touch an application icon to open
the application
Touch to close the Launch screen
Quick Icons
Home screen
Launch screen
45
Page 46

Your Home screen
Opening and Closing the Launch screen
Opening the Launch screen
With your LG-P509, it’s easy to access the Launch
screen no matter what feature you’re currently using.
Simply press the Home key , then touch the
Application Launcher icon
Closing the Launch screen
To manually close the Launch screen, press the
Home Key .
NOTE: The Launch screen closes automatically
when you touch an icon to open its application.
Dragging an icon onto your Home screen also
closes the Launch screen automatically.
Customizing the Launch Screen
The items on the Launch screen are listed
alphabetically. You can customize the Launch screen
by moving the position of applications so that you
don’t have to scroll the screen up to access the
applications you use most often. You can also add
additional categories to the screen to organize your
files.
.
46 LG-P509 | User Guide
Page 47

Moving application positions
From the Home screen, touch the Application
1.
Launcher icon .
Press the Menu Key and touch Move item.
2.
Drag the application icon to the position you want,
3.
then lift your finger. Application icons to the right
of the position shift accordingly.
Adding a category
From the Home screen, touch the Application
1.
Launcher icon .
Press the Menu Key and touch Add
2.
category.
Enter the category name, then touch OK.
3.
Opening and Switching Applications
Multi-tasking is easy with AndroidTM because
open applications keep running even when you
open another application. There’s no need to quit
an application before opening another. You can
use and switch among several open applications.
Android manages each application, stopping
and starting them as needed, to ensure that idle
applications don’t consume resources unnecessarily.
47
Page 48

Your Home screen
Opening an application
Open an application simply by touching its icon on
the screen.
TIP: You can customize your Home screen
with the application icons you use most often.
Applications are located on the Launch screen,
but you can copy any application icon to your
Home screen for faster access. No matter where
the icon is, on the Launch screen or your Home
screen, just touch it to open and use it.
Opening multiple applications
Touch an application icon to open it.
1.
Press the Home Key .
2.
NOTE: If the application icon you want is on your
Home screen, simply touch the icon to open and
use it.
Touch the Application Launcher icon .
3.
Touch the icon for the other application you want
4.
to open.
Switching between multiple applications
Press and hold the Home Key . A window
1.
opens with icons of applications that you’ve used
recently.
48 LG-P509 | User Guide
Page 49

Touch the application icon you want to open.
2.
touch the Back Key
to return to the current
Or
application.
Touch an icon to open an
application you’ve used recently.
Adding application icons to the Home screen
Customize your Home screen with the applications
you use most
Open the Launch screen.
1.
Touch and hold the application icon you want to
2.
often.
add to your Home screen. Your Launch screen will
be minimized so that you can place the icon on a
Home screen.
Lift your finger to place it, or drag the icon to
3.
where you want it on the screen, then lift your
finger.
49
Page 50

Your Home screen
Working with Menus
There are two kinds of Android menus: Options
menus and Context menus.
Options menus
Options menus contain tools that apply to the
activities of the current screen or application, not
to any specific item on the screen. To open the
available Options menu, press the Menu Key .
Not all applications have Options menus; if you
press the Menu Key on a screen that has no
Options menu, nothing will happen.
Some applications have more Options menu items
than can fit in the options menu; touch More to
open the additional items.
Options menus contain items that
apply to the current screen or to
the application as a whole.
Touch to open more menu items.
50 LG-P509 | User Guide
Page 51

Context menus
Context menus contain options that apply to a
specific item on the screen. To open a Context
menu, touch and hold an item on the screen. Not
all items have Context menus. If you touch and
hold an item that has no Context menu, nothing will
happen.
When you
touch and hold
certain items
on a screen, a
Context menu
opens.
Managing Notifications
Notification icons report the arrival of new
messages, calendar events, alarms, as well as
ongoing events, such as when you are in a call.
When you receive a notification, text appears briefly
and the notification icon will be displayed in the
Status bar.
51
Page 52

Your Home screen
You can open the Notifications panel to view a list of
all recent notifications. Depending on your settings,
you may hear a notification sound and/or the phone
may vibrate.
Applications whose activities produce notifications,
such as Gmail
settings, which you can use to configure whether,
and how, they send notifications.
To open the Notifications panel
Touch and drag the Status bar to the bottom
•
of the screen.
OR
From the Home screen, press the Menu Key
•
The Notifications panel displays your wireless
provider and a list of your current notifications,
organized into ongoing and event-based
notifications.
To respond to a notification
Open the Notifications panel. Your current
1.
notifications are listed in the panel, each with a
brief description.
Touch a notification to view it.
2.
The Notification panel will close and the
application that corresponds to your response will
open. For example, new voicemail notifications
52 LG-P509 | User Guide
TM
and Google Talk, have their own
and touch Notifications.
Page 53

dial your voicemail box, and network disconnect
notifications open the list of configured networks
so you can reconnect.
To clear all notifications
Open the Notifications panel.
1.
Touch Clear at the top right of the panel.
2.
All event-based notifications will be cleared;
ongoing notifications will remain in the list.
To close the notifications panel
Touch and drag the tab at the bottom of the
Notifications panel to the top of the screen or just
touch the Back Key . The panel will also close
when you touch a notification.
Searching Your Phone and the Web
You can search for information on your phone
and on the web by using the Quick Search Box or
Google search. Some applications, such as Gmail,
Contacts, and Browser have the ability to search
contents within those specific applications.
Along with being able to search by typing in search
terms, you are also able to search by voice.
53
Page 54

Your Home screen
Phone and Web search using text entry
Press the Search Key.
1.
When you press the Search Key on the
Home screen or in other applications that
support this function, the Quick Search Box will
open automatically.
In some applications, such as Gmail, Contacts,
and Browser, the application’s own search box
opens when you press the Search Key . This is
indicated by the application’s icon on the left side of
the search box.
Press the Menu Key and touch Search .
2.
Enter the text you’re searching for in the Quick
Search Box.
You can use the Search preferences to configure
some aspects of Google web search (for example,
whether it makes suggestions below the Quick
Search Box as you type), and what phone features
you want to include in searches.
Touch the Search icon to search for the entered
3.
terms.
OR
If what you want to search for what appears in the
suggestions list, touch that item to conduct the
search.
54 LG-P509 | User Guide
Page 55

Locking the Screen
You can lock your screen so that only you can
unlock it to make calls, access your data, buy
applications, etc.
Setting a Lock Pattern for the First Time
Press the Home Key , then touch the
1.
Application Launcher icon
Touch Settings g Location & security.
2.
Touch Set up screen lock (under the Screen
3.
unlock section).
Touch Pattern.
4.
Read the instruction screen, touch Next to see
5.
tutorial instructions on how to create an unlock
pattern, then touch Next when you’re ready to
create your unlock pattern.
Draw the pattern you wish to use and touch
6.
Continue.
Redraw the pattern and touch Confirm.
7.
.
55
Page 56

Your Home screen
Draw your unlock pattern.
Touch Continue to draw your
From then on, any time you wish to turn the phone
on or unlock the screen, you will need to draw your
unlock pattern to unlock the screen.
Changing Your Lock Pattern
Press the Home Key , then touch the
1.
Application Launcher icon
Touch Settings g Location & security.
2.
Touch Change screen lock (under the Screen
3.
unlock section).
Draw your current lock pattern.
4.
Touch Pattern to change it (or touch None to
5.
remove it).
Draw the pattern you wish to use and touch
6.
Continue.
Redraw the pattern and touch Confirm.
7.
pattern again to confirm it.
.
56 LG-P509 | User Guide
Page 57

Using a PIN or Password to Lock the Screen
Press the Home Key , then touch the
1.
Application Launcher icon
2.
Touch Settings g Location & security.
Touch Change screen lock (under the Screen
3.
unlock section).
4.
Enter your current lock pattern and touch PIN to
lock the screen with a number sequence or touch
Password for an alphanumeric lock sequence.
5.
Enter the PIN or Password you wish to use and
touch Continue.
Enter the PIN or Password again and touch OK.
6.
From then on, you will need to enter the
sequence and touch OK to unlock the screen.
.
57
Page 58

Your Home screen
NOTES:
• You have 5 opportunities to enter your unlock
Pattern, PIN or Password. If you used all the
5 opportunities, you can attempt it after 30
seconds.
• When you can’t recall your unlock Pattern, PIN,
or Password:
- If you’ve created a Google account on the
phone, touch Forgot pattern? Then, you are
required to sign in with your Google account
to unlock your phone.
- If you haven’t created a Google account on
the phone, you need to perform a factory
reset.
(Caution: If you perform a factory reset, all
user applications and user data will be deleted.
Please remember to back up any important
data before performing a factory reset.)
Turn the power off.
1.
Press and hold the following keys for 5
2.
seconds: Down Volume Key + Home Key +
Power/Lock Key.
When the power turns on, release these keys.
3.
58 LG-P509 | User Guide
Page 59

Customizing the Home Screen
You can personalize your Home screen by adding
application icons, shortcuts, widgets, and other
items to any Home screen. You can also change the
wallpaper.
To add an item to the Home screen
Go to the Home screen pane where you want to
1.
add the item.
Press the Menu Key and touch Add.
2.
Or, just touch and hold an empty spot on the
Home screen.
NOTE: If there is no available space on a
particular Home screen pane, Add will not be
available; you must delete or remove an item
before you can add another item. In this case,
you have the option of switching to another
Home screen pane.
In the menu that opens, touch the type of item
3.
to add.
59
Page 60

Your Home screen
You can add the following types of items to the
Home screen:
Shortcuts: Add shortcuts to applications, a
bookmarked webpage, a favorite contact, a
destination in Google Maps, a Gmail label, a music
playlist, and more. The shortcuts available depend
on the applications you have installed.
Widgets: Add any of a variety of widget applications
to your Home screen, including a clock, a music
player, a picture frame, a power manager, a calendar
of upcoming appointments, a News and Weather
widget, and more. Note that more widgets can also
be found on Android MarketTM.
Folders: Add a folder where you can organize other
Home screen shortcuts and icons, or folders that
contain all your contacts, contacts with phone
numbers, or starred contacts. Your folders’ contents
are kept up-to-date automatically.
To move an item on the Home screen
Touch and hold the item.
1.
Drag the item to a new location on the screen.
2.
Pause at the left or right edge of the screen
to drag the item onto the next available Home
screen pane.
When the item is where you want it, lift your
3.
finger.
60 LG-P509 | User Guide
Page 61

To remove an item from the Home screen
Touch and hold the item, note that the Launch
1.
icon changes to an icon of a trash can.
Drag the item to the Trash Can icon.
2.
When the icon turns red, lift your finger.
3.
To change the Home screen wallpaper
Press the Home Key, then press the Menu Key
1.
and touch Wallpaper.
You can also touch and hold an empty spot on
the Home screen, then touch Wallpapers in the
menu that opens.
Touch Gallery, Live wallpapers, or Wallpapers.
2.
Touch Gallery to use a picture on your phone
as a wallpaper. You can crop the picture before
setting it as a wallpaper.
Touch Live wallpapers to open a list of animated
wallpapers installed on your phone. Live
wallpapers can change according to the time of
day, respond to touching the screen, tell the time,
or offer other information. Touch Wallpapers to
open a screen of wallpaper images that come
with the phone. Slide the thumbnail images left
and right to view the available images.
Touch Set wallpaper or Save.
3.
61
Page 62

Your Home screen
To rename a folder
Touch the folder icon to open it.
1.
2.
Touch and hold the folder window’s title bar.
Edit the current folder name.
3.
4.
Touch OK.
Applications
The Application menu provides quick access to the
most frequently used applications.
The following pages contains a description of each
application. If the application is already described
in another section of this user manual, then a cross
reference to that particular section is provided.
TIP: You cannot delete the preloaded
applications. (Only their icons can be deleted
from the screen.)
The following applications are available:
Browser
Open the browser to start surfing the web. The
browser is fully optimized and comes with advanced
functionality to enhance the Internet browsing
feature on your phone.
62 LG-P509 | User Guide
Page 63

Calculator
This feature allows you to use the phone as a
calculator. The calculator provides the basic
arithmetic functions: addition, subtraction,
multiplication, and division. You also have access to
an advanced panel, which includes more advanced
functions.
Calendar
With the Calendar feature, you can:
Consult the calendar by month, week, or day.
•
Set schedules and note anniversaries.
•
Create an event list.
•
Write memos to keep track of your schedule.
•
Set an alarm to act as a reminder, if necessary.
•
Check your event memory status.
•
Camera
Use your 3.2 megapixel camera feature to produce
photos in JPEG format.
NOTE: A microSD card must be inserted before
the Camera will take and store photos.
63
Page 64

Your Home screen
Contacts
Use the Contacts application to add, view, and
communicate with your friends, family, and
acquaintances.
Gallery
Gallery allows you to view photos and play videos.
For photos, you can also perform basic editing tasks,
view a slideshow, set photos as wallpaper or contact
icon, and share as a picture message or other
available means.
Gmail
Google Mail (Gmail) is a web-based email service.
Depending on your synchronization settings, Gmail
can automatically synchronize with your Gmail
account on the web.
Maps
Google Maps allow you to track your current
location, view real-time traffic issues, and view
detailed destination directions. There is also a
search tool included to help you locate places of
interest or a specific address. You can view locations
on a vector, aerial map, or at the street level.
64 LG-P509 | User Guide
Page 65

Market
Android Market provides access to downloadable
applications and games to install on your phone.
Android Market also allows you to provide feedback
and comments about an application, or flag an
application that might be incompatible with your
phone.
Messaging
This application allows you to use the Short
Message Service (SMS) to send and receive text
messages to and from other mobile phones.
You can also use the Multimedia Message Service
(MMS) to create multimedia messages to send and
receive from other mobile phones.
Music
Music allows you to play music files that you have
stored on your microSD card. You can also create
playlists.
My Account
This option provides you with account specific
information, such as your current status, current
activity, Bill Summary, Plan Services, Voicemail
Settings, Find a Retail Store, and FAQ’s Info.
65
Page 66

Your Home screen
My Device
Use the My Device application to configure device
settings, view Tips & Tricks, personalize your
CallerTunes, Ringtones, or Wallpapers, or view
battery storage information.
Settings
This menu includes settings for your display,
security, memory, and any extra settings associated
with your phone.
Swype Tips
Using the SwypeTips application you can watch a
video or start a tutorial that teaches you how to use
the Swype function most efficiently.
Talk
Google Talk allows you to communicate with other
people who are also connected with Google Talk on
the phone or on the web via instant messaging.
TeleNav GPS Navigator
TeleNav GPS Navigator is a driving aid that
uses both audible and visual directions for GPS
navigation.
66 LG-P509 | User Guide
Page 67

ThinkFree Office
ThinkFree Office Mobile for Android provides a
central place for managing your documents online
or offline.
Video Player
The Video Player application plays video files stored
on your microSD card.
Visual Voicemail
Visual Voicemail enables users to view a list of
people who left a voicemail message, and listen
to any message they want without being limited to
chronological order.
Voice Dialer
Voice Dialer is a voice recognition software used to
activate a wide variety of functions on your phone.
Voice Recorder
The Voice Recorder allows you to record an audio
file up to one minute long and then immediately
send it as a message.
67
Page 68

Your Home screen
Voice Search
The Voice Search feature is a voice-activated
application that allows you to search for items via
the Google search engine.
YouTube
YouTube is a video sharing website on which users
can view, upload and share videos.
Onscreen Keyboard
You can enter text using the onscreen keyboard.
The onscreen keyboard displays automatically on
the screen when you need to enter text. To manually
display the keyboard, simply touch a text field where
you want to enter text.
Text Input Methods
Swype (default): Swype™ is a text input
•
method that allows you to enter a word by
sliding your finger from letter to letter, lifting
your finger between words.
Android keyboard: The Android keyboard can
•
also be used to enter text. To switch to the
Android keyboard, touch and hold a text field,
then touch Input method g Android keyboard.
68 LG-P509 | User Guide
Page 69

Using the Swype Keyboard
The default keyboard uses Swype™. Swype uses
error correcting algorithms. Swype also includes a
touch predictive text system.
Toggles from
123/ABC Mode
to SYM Mode
Allows you to
view Swype Tips
and Help.
Swype Text Entry Tips
You can access the Swype Tips application and
watch a video or tutorial on using Swype. You can
also use the following Swype text entry tips.
Create a squiggle (like an S shape) to create a
•
double letter (such as pp in apple).
69
Page 70

Your Home screen
Touch and hold a key to enter the alternate
•
letter or symbol located at the top right corner
of the key.
Move your finger over the apostrophe to enter
•
contractions.
Double-touch on the word you want to change
•
or correct a misspelled word.
Touch the delete key to erase one character.
•
Touch and hold the delete key to erase an
entire word.
Swype Settings
To configure Swype settings:
From the Home screen, press the Menu Key g
1.
Settings g Language & keyboard g Swype.
Touch one of the following Swype settings to
2.
configure the setting:
Preferences settings
Preferences settings provide access to Swype
operation preferences.
Language: Allows you to select the current text
•
input language. Default language is set to US
English.
Word prediction: Uses a built-in word database
•
to predict words while entering text in Swype.
70 LG-P509 | User Guide
Page 71

Audio feedback: Turns sounds generated by
•
the Swype application on and off.
Vibrate on keypress: Activates a vibration
•
sensation as you enter text using the keypad.
Enable tip indicator: Turns on an on-screen
•
flashing indicator that provides helpful user
information.
Swype Advanced Settings
Swype Advanced settings provides access to Swype
Advanced Operation settings.
Auto-spacing: Automatically inserts a space
•
between words. When you finish a word, just lift
your finger and start the next word.
Auto-capitalization: Automatically capitalizes
•
the first letter of a sentence.
Show complete trace: Sets the length of time
•
the word trace line remains on-screen as you
swipe across the screen.
Word choice window: Sets the amount of times
•
the word choice selection window displays
on screen. Move the slider between Never or
Always and touch OK.
Speed vs. accuracy: Sets how quickly Swype
•
responds to on-screen input. Move the slider
between Fast Response (speed) or Error
Tolerance (accuracy) and touch OK.
71
Page 72

Your Home screen
Help
This menu provides help and a tutorial to guide you
through the process.
Swype help: Displays the Swype User Manual.
•
Tutorial: Provides an on-screen tutorial.
•
About
The about menu provides the current software
version for the Swype application.
72 LG-P509 | User Guide
Page 73

Google Account Set-up
The first time you open a Google application on
your phone, you will be required to sign in with
your existing Google account. If you do not have a
Google account, you’re prompted to create one.
Creating your Google account
From the Home screen, touch the Application
Launcher icon to open the applications menu.
Touch Gmail and then Next g Create to start the
1.
Google Mail™ set up wizard.
Touch a text field to open the touch keyboard,
2.
and enter your name and username for your
Google account. When entering text, you can
move to the next text field by touching Next on
the keyboard.
When you’re finished inputting your username,
3.
touch Next. Your phone then communicates with
Google servers to verify username availability.
Then follow the instructions and enter the
4.
required and optional information about the
account.
73
Page 74

Google Account Set-up
Signing in your Google account
Enter your e-mail address and password, then
1.
touch Sign in.
After sign in, you can use Google Mail™ and take
2.
advantages of Google services on your phone.
Once you have set up your Google account on
3.
your phone, your phone will be automatically
synchronized with your Google account on
the web. (It depends on your synchronization
settings.)
After sign in, you can use Google Mail™, Google
Calendar, Android Market™ and Google Maps™;
Download applications from Android Market™;
back up your settings to Google servers; and take
advantage of other Google services on your phone.
IMPORTANT
Some applications, such as Calendar, work
•
only with the first Google Account you add.
If you plan to use more than one Google
Account with your phone, be sure to sign
into the one you want to use with such
applications first. When you sign in, your
contacts, Gmail messages, Calendar events,
and other information from these applications
and services on the web are synchronized with
your phone. You will be prompted to sign in or
74 LG-P509 | User Guide
Page 75

to create a Google Account the first time you
start an application that requires one, such as
Gmail or Android Market™.
If you want to use the backup feature to restore
•
your settings to this phone from another phone
that was running Android release 2.0 or later,
you must enable that option during set up.
If you have an enterprise account through
•
your company or other organization, your IT
department may have special instructions on
how to sign into that account.
75
Page 76

Call
Making a call
From the Home screen, touch to open the
1.
dialpad.
Enter the number on the dialpad. To delete a
2.
digit, touch the Clear icon .
Touch the Call icon to make a call.
3.
To end a call, touch the End icon .
4.
TIP: To enter “+” to make international calls,
touch and hold down .
Calling your contacts
From the Home screen, touch to open your
1.
contact list.
Scroll through the contact list or touch Search
2.
and enter the first letter(s) of the contact you
want to call.
In the contact list, touch the contact you want to
3.
call.
When the Contact’s details are displayed, touch the
phone number you want to dial.
76 LG-P509 | User Guide
Page 77

Answering and rejecting a call
When the screen is locked
When your phone rings, drag the Answer icon
to the right.
Drag the Decline icon to the left to reject an
incoming call. Drag the Excuse msg bar upwards
from the bottom if you want to send a message to
the caller. If the caller is unknown, the Excuse msg
bar is not available.
When the screen is unlocked
When your phone rings, touch the Answer icon .
Touch the Decline icon to reject an incoming call.
Touch the Send SMS button if you want to send a
message to the caller. If the caller is unknown, the
Send SMS button is not available.
Adjusting call volume
To adjust the In-call volume during a call, press the
volume keys on the right side of the phone.
77
Page 78

Call
Making a second call
During your initial call, touch .
1.
Dial the number, or search your contacts to select
2.
the number you want to call.
Touch the Call icon to connect the call.
3.
Both calls will be displayed on the call screen.
4.
Your initial call will be put on hold.
Touch to swap between calls or touch to
5.
make a conference call.
To end active calls, touch End.
6.
NOTE: You will be charged for each call you
make.
Viewing your Call logs
From the Home screen, touch and choose the
Call log tab.
From the Call log, you can view a complete list of all
dialed, received, and missed calls.
TIP: Touch any single call log entry to view the
date, time, and duration of the call.
TIP: Press the Menu Key, then touch Clear call
log to delete all the recorded items.
78 LG-P509 | User Guide
Page 79

Call settings
You can configure phone call settings, such as call
forwarding, and other special features offered by
your carrier.
From the Home screen, press the Menu Key
1.
and touch Settings.
Touch Call settings.
2.
79
Page 80

Contacts
You can add contacts on your phone and
synchronize them with the contacts in your Google
Account or other accounts that support syncing
contacts.
Searching for a contact
From the Home screen, touch
1.
your contact list.
Touch Search and enter the contact name using
2.
the keypad.
Adding a new contact
From the Home screen, touch and enter the
1.
new contact’s number, then press the Menu Key,
touch Add to contacts and then Create new
contact.
If you want to add a picture to the new contact,
2.
touch . Choose from Take a picture or Pick
from gallery.
Select the contact type by touching .
3.
Touch a category of contact information and
4.
enter the details about your contact.
Touch Save.
5.
to open
80 LG-P509 | User Guide
Page 81

Favorite contacts
You can classify frequently called contacts as
favorites.
To add a contact to your favorites
From the Home screen, touch to open your
1.
contact list.
Touch a contact to view its details.
2.
Touch the star to the right of the contact’s name.
3.
The star turns gold and is added to your favorites.
To remove a contact from your favorites list
From the Home screen, touch to open your
1.
contact list.
Touch the Favorites tab and choose a contact to
2.
view its details.
Touch the gold star to the right of the contact’s
3.
name. The star turns grey and the contact is
removed from your favorites.
81
Page 82

Messaging/E-mail
Messaging
Your LG-P509 combines SMS and MMS into one
intuitive, easy-to-use menu.
Sending a message
Touch the Messaging icon on the Home
1.
screen, and touch New message to open a blank
message.
Enter a contact name or number in the To
2.
field. As you enter the contact name, matching
contacts appear. You can touch a suggested
recipient. You can also add multiple recipients.
NOTE: You will be charged for a text message for
every recipient you send the message to.
Touch the text field to start composing a
3.
message.
Press the Menu Key to open the options menu.
4.
Choose from Call, Add subject, Attach, Send,
Insert Smiley, Discard, Templates, All threads and
Add to Contacts.
Touch Send to send your message.
5.
The message screen opens, where you can
view your sent message. Responses appear on
the screen. As you view and send additional
messages, a message thread is created.
82 LG-P509 | User Guide
Page 83

WARNING: The 160-character limit
may vary from country to country depending on
how the SMS is coded and language.
WARNING: If an image, video, or
audio file is added to an SMS message, it will be
automatically converted into an MMS message,
and you will be charged accordingly.
NOTE: When you get an SMS message
during a call, you will hear a ring notification.
Threaded box
Messages (SMS, MMS) exchanged with another
party can be displayed in chronological order so
that you can conveniently see an overview of your
conversation.
Using smilies
Liven up your messages using smilies.
When writing a new message, press the Menu Key,
then choose Insert Smiley.
83
Page 84

Messaging/E-mail
Changing your message settings
Your LG-P509 message settings are predefined,
so you can send messages immediately. You can
change the settings based on your preferences.
Opening Email and the Accounts Screen
You can use the Email application to read email
from services other than Gmail. The Email
application supports the following account types:
POP3, IMAP and Exchange.
To open the Email application
From the Home screen, touch Email.
•
The first time you open the Email application,
a setup wizard opens to help you add an email
account.
After the initial setup, Email displays the contents
of your Inbox (if you have only one account) or the
Accounts screen (if you have multiple accounts).
84 LG-P509 | User Guide
Page 85

The Accounts screen
The Accounts screen lists your Combined Inbox and
each of your email accounts.
Open the Email application. If you’re not on the
1.
Account screen, press the Menu Key and touch
Accounts.
- Touch to open your Combined Inbox, with
messages sent to all of your accounts.
- Touch to open a list of your starred messages.
- Touch the folder icon to open the account’s
folders.
Select the Email service provider.
2.
You can touch an account to view its Inbox. The
account from which you send email by default is
indicated with a checkmark.
To open your Combined Inbox
If you have configured Email to send and receive
email from more than one account, you can view all
messages sent to all accounts in your Combined
Inbox.
From the Home screen, touch Email.
1.
Touch Combined Inbox (in the Accounts screen).
2.
Messages in the Combined Inbox are color coded
along their left sides, by account, using the same
colors that are used for your accounts in the
Accounts screen.
85
Page 86

Messaging/E-mail
Only your account’s most recent emails are
downloaded to your phone. To download older
email messages, touch Load more messages at the
bottom of the emails list.
Reading Your Messages
Touch the message you want to read. The message
opens in a screen that includes information about
who sent it, the date it was sent, and other related
information.
You can touch that status indicator to open Quick
Contact.
Responding to a Message
You can reply to, forward, or delete messages.
To mark a message as unread
You can set a message to appear as though it has
not been read – for example, to remind yourself to
read it again later.
While reading a message, press the Menu Key
•
and touch Mark as unread.
86 LG-P509 | User Guide
Page 87

To delete a message
While reading a message, touch Delete.
•
-OR-
While reading a message, press the Menu Key
•
and touch Delete.
For many types of accounts, deleted messages are
moved to a Trash folder, so you can retrieve them in
case they were deleted by mistake.
Starring Messages
You can add stars to important messages to make it
easy to keep track of them.
To star a message
While reading a message, touch the star in
•
its header.
-OR-
From a list of messages in a folder, touch a
•
message’s star . The star turns gold.
To unstar a message
Touch the star again.
•
To view your starred messages
Touch the Starred folder in the Accounts
•
screen. A folder opens with your starred
messages.
87
Page 88

Messaging/E-mail
Composing and Sending Email
To compose and send a message
While in the Email application, press the Menu
1.
Key and touch Compose.
2.
Enter an address for the message’s intended
recipient. As you enter text, matching addresses
are offered from your Contacts. Separate multiple
addresses with commas.
3.
Press the Menu Key and touch Add Cc/Bcc
to copy other contacts/email addresses to the
message.
4.
Compose your message.
Press the Menu Key and touch Add attachment
5.
to send a photo g pictures, videos, audio and
other files.
Touch Send.
6.
If you’re not ready to send the message, touch
Save as draft to save it in a Drafts folder. Touch
a draft message in a Drafts folder to resume
working on it. Your message will also be saved
as a draft if you touch the Back Key before
sending it. Touch Discard to abandon and delete
a message, including any saved drafts. If you
aren’t connected to a network, for example, if
you’re working in airplane mode, the messages
that you send are stored in your Drafts folder
88 LG-P509 | User Guide
Page 89

until. If it contains any pending messages, the
Drafts is displayed on the Accounts screen.
Please note that messages sent using an Exchange
account will not be located on the phone; they will,
however, be located on the Exchange server itself.
If you want to see your sent messages in the Sent
folder (or with the Sent label), you will often need to
open the Sent folder/label and select Refresh from
the options menu.
Working with Account Folders
Each account has Inbox, Outbox, Sent, and Drafts
folders. Depending on the features supported
by your account’s service provider, you may have
additional folders.
Adding and Editing Email Accounts
To add an email account
Press the Menu Key and touch Add account.
1.
Touch the type of account you would like to add.
2.
Then enter your email address and password and
3.
touch Next.
Enter a name for the account, confirm how you
4.
want your name to appear in outgoing mail, then
touch Done.
89
Page 90

Messaging/E-mail
To change an account’s settings
Open the Accounts screen.
1.
Touch and hold the account whose settings you
2.
want to change.
In the menu that opens, touch Account settings.
3.
To delete an email account
Open the Accounts screen.
1.
Touch and hold the account you want to delete.
2.
Touch Remove account in the menu that opens.
3.
Touch OK in the dialog box to confirm that you
4.
want to delete the account.
Social Networking
With your phone, you can enjoy social networking
and manage your micro-blog in on-line
communities. You can update your current status,
upload photos and view your friends’ status updates
in real-time.
You can add your Facebook and Twitter accounts to
your phone. If you don’t have an account, you can
visit their sites to set it up.
NOTE: An additional costs may be incurred when
connecting and using online services. Check your
data charges with your network provider.
90 LG-P509 | User Guide
Page 91

Adding your account to your phone
From the Home screen, choose any social
1.
networking application you want to use.
Enter your e-mail address and password that you
2.
set up on your community, then touch Log in.
TIP: If you add a social networking widget on
your Home screen, the widget will show your
status when your phone updates from the
network.
You can also access the social network directly by
touching the widget.
Viewing and updating your status
Choose a social networking application you want
1.
to access.
Update your status with comments or upload
2.
photos.
NOTE: This is dependent on network services.
TIP: You can use information about friends only
in social network applications or sync all data to
Contacts.
91
Page 92

Messaging/E-mail
Removing accounts on your phone
From the Home screen, press the Menu Key and
touch Settings g Accounts & sync g touch the
account you want to delete g Remove account.
92 LG-P509 | User Guide
Page 93

Camera
Getting to know the viewfinder
1
2
3
4
5
Zoom Zoom in or zoom out. Alternatively, you can
1.
use the side volume keys.
Brightness This defines and controls the
2.
amount of sunlight entering the image. Slide the
brightness indicator along the bar, towards “-”
for a lower brightness image, or towards “+” for a
higher brightness image.
Scene mode Choose from Auto, Portrait,
3.
Landscape, Sports, Night, and Sunset.
Focus Touch this icon to select the image size.
4.
Choose from VGA, QVGA or QCIF.
Settings Touch this icon to open the settings
5.
menu. See Using the advanced settings on page
96.
Video mode Slide this icon down to switch to
6.
video mode.
Take a photo Touch this icon to capture an
7.
image.
6
7
8
93
Page 94

Camera
Gallery This enables you to access your saved
8.
photos from within the camera mode. Simply
touch, and your gallery will appear on the screen.
NOTE: You need to insert a memory card first to
take a picture. Without inserting a memory card,
you will not be able to take a picture.
TIP: You can close all the shortcut options to give
a clearer viewfinder screen. Just touch the center
of the viewfinder once. To recall the options,
touch the screen again.
Using the focus mode
You can choose from the following focus modes:
Auto Focus – Set the camera to focus automatically.
Macro – Macro mode allows you to take extreme
close-ups. If you are trying to take a close-up shot
but the focus box remains red, try turning the
macro mode on.
Face tracking –Allows your camera detects and
focuses on human faces automatically.
Manual – Set the camera to focus manually.
94 LG-P509 | User Guide
Page 95

Taking a quick photo
Open the Camera application.
1.
Holding the phone horizontally, point the lens
2.
towards the subject you want to photograph.
Touch and hold the capture button lightly, and
3.
a focus box will appear in the center of the
viewfinder screen.
Position the phone so you can see the subject in
4.
the focus box.
When the focus box turns green, the camera has
5.
focused on your subject.
Take your finger off the capture button.
6.
Once you’ve taken the photo
Your captured photo will appear on the screen.
Touch to share your photo as Bluetooth,
Share
Email, Facebook, Gmail, Messaging, Picasa
or Twitter.
NOTE: Additional charges may apply when MMS
messages are downloaded while roaming.
Touch to use the image as Contact icon or
Set as
Wallpaper.
Touch to edit the name of the selected
Rename
picture.
95
Page 96

Camera
Touch to delete the image.
Touch to take another photo immediately. Your
current photo will be saved.
Touch to view the photo in the Gallery.
Using the advanced settings
In the viewfinder, touch to open the advanced
options.
You can change the camera setting. After selecting
the option, touch the Back Key.
Image size – Touch to set the size (in pixels) of
the picture you take. Select a pixel value from
the numerical options: 3M (2048x1536), 2M
(1600x1200), 1M (1280x960), VGA (640x480),
QVGA (320x240).
ISO – The ISO rating determines the sensitivity of
the camera’s light sensor. The higher the ISO, the
more sensitive the camera will be. This is useful
under darker conditions. Select from ISO values of
Auto, 400,200 and 100.
White balance – Choose from Auto, Incandescent,
Sunny, Fluorescent, and Cloudy.
Color effect – Choose a color effect for your new
photo.
96 LG-P509 | User Guide
Page 97

Once you’ve made your selections, use the Back
Key to close the menu. You are then ready to take
a picture.
NOTE: You can change a color picture to black
and white or sepia, but you cannot change a
black-and-white or sepia picture to color.
Timer – The self-timer allows you to set a delay
after the shutter is pressed. Select Off, 3 secs.,
5 secs., or 10 secs. This is ideal if you want to be
included in a photo.
Shot mode – Choose from Normal, Continuous
shot, Beauty shot, Art shot, Face effect and
Cartoon.
Image quality – Choose from Super Fine, Fine, and
Normal. The finer the quality, the sharper the photo.
However, the file size will increase as a result, which
means you’ll be able to store fewer photos in the
memory.
Auto review – If you set Auto review on, the camera
will automatically display the picture immediately
after taking it.
Shutter sound – Select one of the four shutter
sounds.
97
Page 98

Camera
Tag location – Activate to use your phone’s
location-based services. Take pictures wherever you
are and tag them with the location. If you upload
tagged pictures to a blog that supports geotagging,
you can see the pictures displayed on a map.
NOTE: This function is only available when GPS
is active.
Reset – Restore all camera settings to default.
– Touch whenever you want to know how this
function operates. This provides you with a quick
guide.
TIP: When you exit the camera, all settings will
return to their defaults, except image size and
image quality. Any nondefault settings must be
reset, such as Color effect and ISO. Check these
before you take your next photo.
TIP: The settings menu is superimposed over the
viewfinder, so when you change elements of the
image color or quality, you will see a preview of
the image change behind the settings menu.
98 LG-P509 | User Guide
Page 99

Viewing your saved photos
You can access your saved photos from within
1.
the camera mode. Just touch and you will be
directed to the Gallery.
TIP: Flick left or right to view other photos or
videos.
- Touch to see a slideshow.
- Touch to share the contents or delete
Touch More for the following options below.
Details - Check information of contents.
Set as - Set as contact icon or wallpaper.
Crop -Crop your photo. Move your finger across
the screen to select the area.
To My Album Online - Send the photo to your
online album
Rotate - Rotate left or right.
99
Page 100

Video camera
Getting to know the viewfinder
1
2
3
4
5
Zoom Zoom in or zoom out. Alternatively, you
1.
can use the side volume keys. Make sure to set
the zoom function before recording because you
cannot control it while recording.
Brightness This defines and controls the
2.
amount of sunlight entering the Video. Slide the
brightness indicator along the bar, towards “-”
for a lower brightness Video, or towards “+” for a
higher brightness Video.
Video size Touch to set the size (in pixels) of the
3.
video you record. Choose your video image size
from VGA (640x480), QVGA (320x240) or
QCIF (176x144).
Scene mode Set the camera to adjust to the
4.
environment. Choose from Auto, Portrait,
Landscape, Sports, Night and Sunset.
6
7
8
100 LG-P509 | User Guide
 Loading...