

LG LFCC22426S User Manual

FRANÇAISENGLISH ESPAÑOL
OWNER'S MANUAL
FRENCH DOOR
REFRIGERATOR
Read this owner's manual thoroughly before operating the appliance
and keep it handy for reference at all times.
LFCC22426*
MFL70761701
Rev.00_080318
Copyright © 2018 LG Electronics Inc. All Rights Reserved.
www.lg.com
2
TABLE OF CONTENTS
3 PRODUCT FEATURES
4 SAFETY INSTRUCTIONS
4 IMPORTANT SAFETY INSTRUCTIONS
9 PRODUCT SPECIFICATIONS
10 PRODUCT OVERVIEW
10 Exterior
11 Interior
13 INSTALLATION
13 Installation Overview
14 Unpacking the Refrigerator
14 Choosing the Proper Location
16 Removing/Assembling Handles
17 Removing/Assembling the Doors and Drawers
22 Connecting the Water Line
25 Leveling and Door Alignment
26 Turning on the Power
35 MAINTENANCE
35 Cleaning
36 Replacing the Water Filter
41 TROUBLESHOOTING
41 FAQs: Frequently Asked Questions
42 Before Calling for Service
49 LIMITED WARRANTY
49 FOR USA
52 FOR CANADA
27 OPERATION
27 Before Use
28 Control Panel
29 Automatic Icemaker
30 Storing Food
31 Humidity Controlled Crispers (On Some Models)
31 Durabase
32 Glide‘N’Serve (On Some Models)
32 Detaching/Assembling the Storage Bins
33 Adjusting the Refrigerator Shelves
®
34 SMART FUNCTIONS
34 Smart Diagnosis™ Function

PRODUCT FEATURES
Depending on the model, some of the following functions may not be available.
DOOR ALARM
The Door Alarm function is designed to prevent refrigerator malfunctioning that could occur if a refrigerator door
or freezer drawer remains open. If a refrigerator door or freezer drawer is left open for more than 60 seconds, a
warning alarm sounds at 30-second intervals.
HUMIDITY CONTROLLED CRISPERS
The Humidity Controlled Crispers are designed to help keep fruits and vegetables fresh and crisp. Control the
amount of humidity in the crispers by adjusting the settings between Fruit (Low) and Vegetables (High).
GLIDE‘N’SERVE
The Glide‘N’Serve provides storage space with a variable temperature control that keeps the compartment
colder than the refrigerator. It is a convenient place to store sandwiches or meat to be cooked.
AUTO-CLOSING HINGE
The refrigerator doors and freezer drawers close automatically with a slight push. (The door only closes
automatically when it is open at an angle less than 30°.)
3PRODUCT FEATURES
ICE PLUS
Ice production is increased when the freezer section is maintained at the coldest temperature for a 24-hour
period.
4 SAFETY INSTRUCTIONS
SAFETY INSTRUCTIONS
READ ALL INSTRUCTIONS BEFORE USE
Your safety and the safety of others are very important.
We have provided many important safety messages in this manual and on your appliance. Always read and
follow all safety messages.
This is the safety alert symbol.
This symbol alerts you to potential hazards that can kill or injure you and others.
All safety messages will follow the safety alert symbol and either the word WARNING or CAUTION.
These words mean:
WARNING
You may be killed or seriously injured if you do not follow instructions.
CAUTION
You may be injured or cause damage to the product if you do not follow instructions.
All safety messages tell you what the potential hazard is, tell you how to reduce the chance of injury, and tell
you what may happen if the instructions are not followed.
IMPORTANT SAFETY INSTRUCTIONS
WARNING
To reduce the risk of explosion, fire, death, electric shock, scalding or injury
to persons when using this product, follow basic precautions, including the
following:
INSTALLATION
• To reduce the risk of injury to persons, adhere to all industry recommended safety procedures including the
use of long-sleeved gloves and safety glasses.
• Never attempt to operate this appliance if it is damaged, malfunctioning, partially disassembled, or has
missing or broken parts, including a damaged cord or plug.
• Only connect this product to a dedicated grounded electrical outlet rated for use with this product (115 V, 60
Hz, AC only). It is the user’s responsibility to replace a standard 2-prong wall outlet with a standard 3-prong
wall outlet.
• Do not use an outlet that can be turned off with a switch. Do not use an extension cord.
• The appliance must be positioned for easy access to a power source.
• When moving the refrigerator, be careful not to roll over or damage the power cord.
• Contact an authorized service center when installing or relocating the refrigerator.
• Do not, under any circumstances, cut or remove the third (ground) prong from the power cord.
• Keep packing materials out of the reach of children. Packaging material can be dangerous for children.
There is a risk of suffocation.
• Do not install the refrigerator in a damp or dusty place where insulation on electrical parts may deteriorate.
• Do not place the refrigerator in direct sunlight or expose it to the heat from heating appliances such as
stoves or heaters.
• Do not bend or pinch the power cord excessively or place heavy objects on it.

OPERATION
• This product is not to be used for special purposes such as the storage of medicine or test materials or for
use on ships, etc.
• DO NOT allow children to climb, stand, or hang on the refrigerator doors or on the shelves in the
refrigerator. They could damage the refrigerator and seriously injure themselves.
• Do not allow children to climb into the refrigerator. They could be trapped and suffocated.
• Children should be supervised to ensure that they do not play with the refrigerator.
• Keep fingers out of pinch point areas; clearances between the doors and cabinets are necessarily small. Be
careful closing doors when children are nearby.
• Do not touch frozen food or the metal parts in the freezer compartment with wet or damp hands. Doing so
may cause frostbite.
• Do not refreeze frozen food that has thawed completely. Doing so may result in a serious health hazard.
• Do not use an adapter plug or plug the power plug into a multi-outlet extension cord.
• Do not use a cord that shows cracks or abrasion damage along its length or at either the plug or connector
end. Immediately have all power cords that have become frayed or otherwise damaged repaired or replaced
by qualified service personnel.
• Do not operate the refrigerator or touch the power cord with wet hands.
• Do not modify or extend the power cord.
• Do not use an uncertified power outlet. Do not plug appliance into a damaged wall outlet.
• Do not put hands, feet or other objects into the air vents or bottom of the refrigerator. Doing so could result
in personal injury or electric shock.
• In the event of a gas leak (propane/LPG), ensure the area is adequately ventilated and contact an
authorized service center before resuming use. Do not touch the refrigerator or power cord of the
refrigerator.
• Disconnect the power cord immediately and contact an authorized service center if there is a strange noise,
odor, or smoke coming from the appliance.
• Do not use any fuse (such as copper, steel wire, etc.) other than a standard fuse.
• Do not place or use an electrical appliance inside the refrigerator, unless it is of a type recommended by the
manufacturer.
• Do not put animals inside the appliance.
• Do not place heavy or fragile objects, liquid filled containers, combustible substances, or flammable objects
(such as candles and lamps) on the appliance.
• Avoid contact with any moving parts of the ejector mechanism or with the heater that releases the ice
cubes. DO NOT place fingers in the automatic icemaker when the refrigerator is plugged in.
• When dispensing ice from the dispenser, do not use a fragile container.
• This appliance is not intended for use by persons (including children) with reduced physical, sensory or
mental capabilities, or lack of experience and knowledge, unless they have been given supervision or
instruction concerning the use of the appliance by a person responsible for their safety.
• If connected to a circuit protected by fuses, use time delay fuse.
5SAFETY INSTRUCTIONS

6 SAFETY INSTRUCTIONS
• Keep ventilation openings, in the appliance enclosure or in the built-in structure, clear of obstruction.
• Do not use mechanical devices or other means to accelerate the defrosting process, other than those
recommended by the manufacturer.
• Do not damage the refrigerant circuit.
• Do not use electrical appliances inside the food storage compartments of the appliance, unless they are of
the type recommended by the manufacturer.
• The refrigerant and insulation blowing gas used in the appliance require special disposal procedures. When
disposing, please consult with service agent or a similarly qualified person.
MAINTENANCE
• Do not use a hair dryer to dry the inside of the refrigerator.
• Do not light a candle to remove odors in the refrigerator.
• In the event of a refrigerant leak, move flammable objects away from the refrigerator. Ensure the area is
adequately ventilated and contact an authorized service center.
• Keep flammable materials and vapors, such as gasoline, away from the refrigerator.
• This appliance is intended to be used in household and similar applications such as staff kitchen areas
in shops, offices and other working environments; farm houses and by clients in hotels, motels and other
residential type environments; bed and breakfast type environments; catering and similar non-retail
applications.
• This appliance can be used by children aged from 8 years and above and persons with reduced physical,
sensory or mental capabilities or lack of experience and knowledge if they have been given supervision or
instruction concerning use of the appliance in a safe way and understand the hazards involved. Children
shall not play with the appliance. Cleaning and user maintenance shall not be made by children without
supervision.
• Unplug the power plug before cleaning or repairing the refrigerator.
• The refrigerator and freezer compartment lights are interior LED lighting, and service should be performed
by a qualified technician.
• Unplug the power plug immediately in the event of a blackout or thunderstorm.
• Turn the power off if water or dust penetrates into the refrigerator. Call a service agent.
• Do not store glass containers or soda in the freezer compartment. Contents may expand when frozen,
break the container and cause injury.
• Do not store, disassemble or repair the appliance yourself or allow unqualified personnel to do so.
• If the electrical supply cord is damaged, it must only be replaced by the manufacturer or its service agent or
a similar qualified person in order to avoid a hazard.
• Do not store explosive substances such as aerosol cans with a flammable propellant in this appliance.
• Do not use or place flammable substances (chemicals, medicine, cosmetics, etc) near the refrigerator or
store them inside the refrigerator. Do not place the refrigerator in the vicinity of flammable gas.
DISPOSAL
• Junked or abandoned refrigerators are dangerous, even if they are sitting for only a few days. When
disposing of the refrigerator, remove the packing materials from the door or take off the doors but leave the
shelves in place so that children may not easily climb inside.
• If disposing of a refrigerator, make sure the refrigerant is removed for proper disposal by a qualified servicer.
If you release the refrigerant, you may be fined or imprisoned in accordance with the relevant environmental
law.
GROUNDING INSTRUCTIONS
• Improper connection of the equipment-grounding conductor can result in a risk of electric shock. Check with
a qualified electrician or service personnel if you are in doubt whether the appliance is properly grounded.
Do not modify the plug provided with the appliance; if it will not fit the outlet, have a proper outlet installed by
a qualified electrician.
• Have a qualified electrician check the wall outlet and wiring for proper grounding.
• Never unplug the appliance by pulling on the power cord. Always grip the plug firmly and pull straight out
from the outlet. Failure to do so may damage the power cord, resulting in a risk of fire and electric shock.
CAUTION
To reduce the risk of minor or moderate injury to persons, malfunction, or damage
to the product or property when using this product, follow basic precautions,
including the following:
7SAFETY INSTRUCTIONS
INSTALLATION
• Do not install the refrigerator where there may be a danger of the unit falling.
• The refrigerator must be properly installed in accordance with the Installation Instructions.
OPERATION
• Do not use aerosols near the refrigerator.
• This appliance is intended to be used only in domestic and similar applications.
• Do not strike or apply excessive force to any glass surface. Do not touch glass surfaces if they are cracked
or broken.
• Do not overfill or pack items too tightly into door bins. Doing so may cause damage to the bin or personal
injury if items are removed with excessive force.
• Do not overfill the appliance with food. Doing so may cause personal injury or property damage.
• Do not hang on to or place heavy objects on the refrigerator’s dispenser.
• Do not strike or apply excessive force to any glass surface. It may break.
MAINTENANCE
• Do not use strong detergents like wax or thinners for cleaning. Clean with a soft cloth.
• Remove foreign objects (such as dust and water) off the prongs of the power plug and contact areas. Do
not use a wet or damp cloth when cleaning the plug.
• Do not spray water directly on the inside or outside of the refrigerator.
• Do not clean glass shelves or covers with warm water when they are cold. They may break if exposed to
sudden temperature changes.

8 SAFETY INSTRUCTIONS
This appliance contains a small amount of isobutane refrigerant (R600a), but which is also
combustible. When transporting and installing the appliance, care should be taken to ensure
that no parts of the refrigerating circuit are damaged. Refrigerant squirting out of the pipes could
ignite or cause an eye injury. If a leak is detected, avoid any naked flames or potential sources of
ignition and air the room in which the appliance is standing for several minutes.
In order to avoid the creation of a flammable gas air mixture if a leak in the refrigerating circuit
occurs, the size of the room in which the appliance may be sited depends on the amount of
refrigerant used. The room must be 10.8 square feet (1 square meter) in size for every 8g of
R600a refrigerant inside the appliance. The amount of refrigerant in your particular appliance is
shown on the identification plate inside the appliance. Never start up an appliance showing any
signs of damage. If in doubt, consult your dealer.
SAVE THESE INSTRUCTIONS

PRODUCT SPECIFICATIONS
The appearance and specifications listed in this manual may vary due to constant product improvements.
Electrical requirements: 115 V, 60 Hz
Min. / Max. water pressure: 20 - 120 psi (138 - 827 kPa)
Model LFCC22426*
Description Standard-depth, French door refrigerator, bottom freezer
Net weight 251 lb (114 kg)
9PRODUCT SPECIFICATIONS
10 PRODUCT OVERVIEW
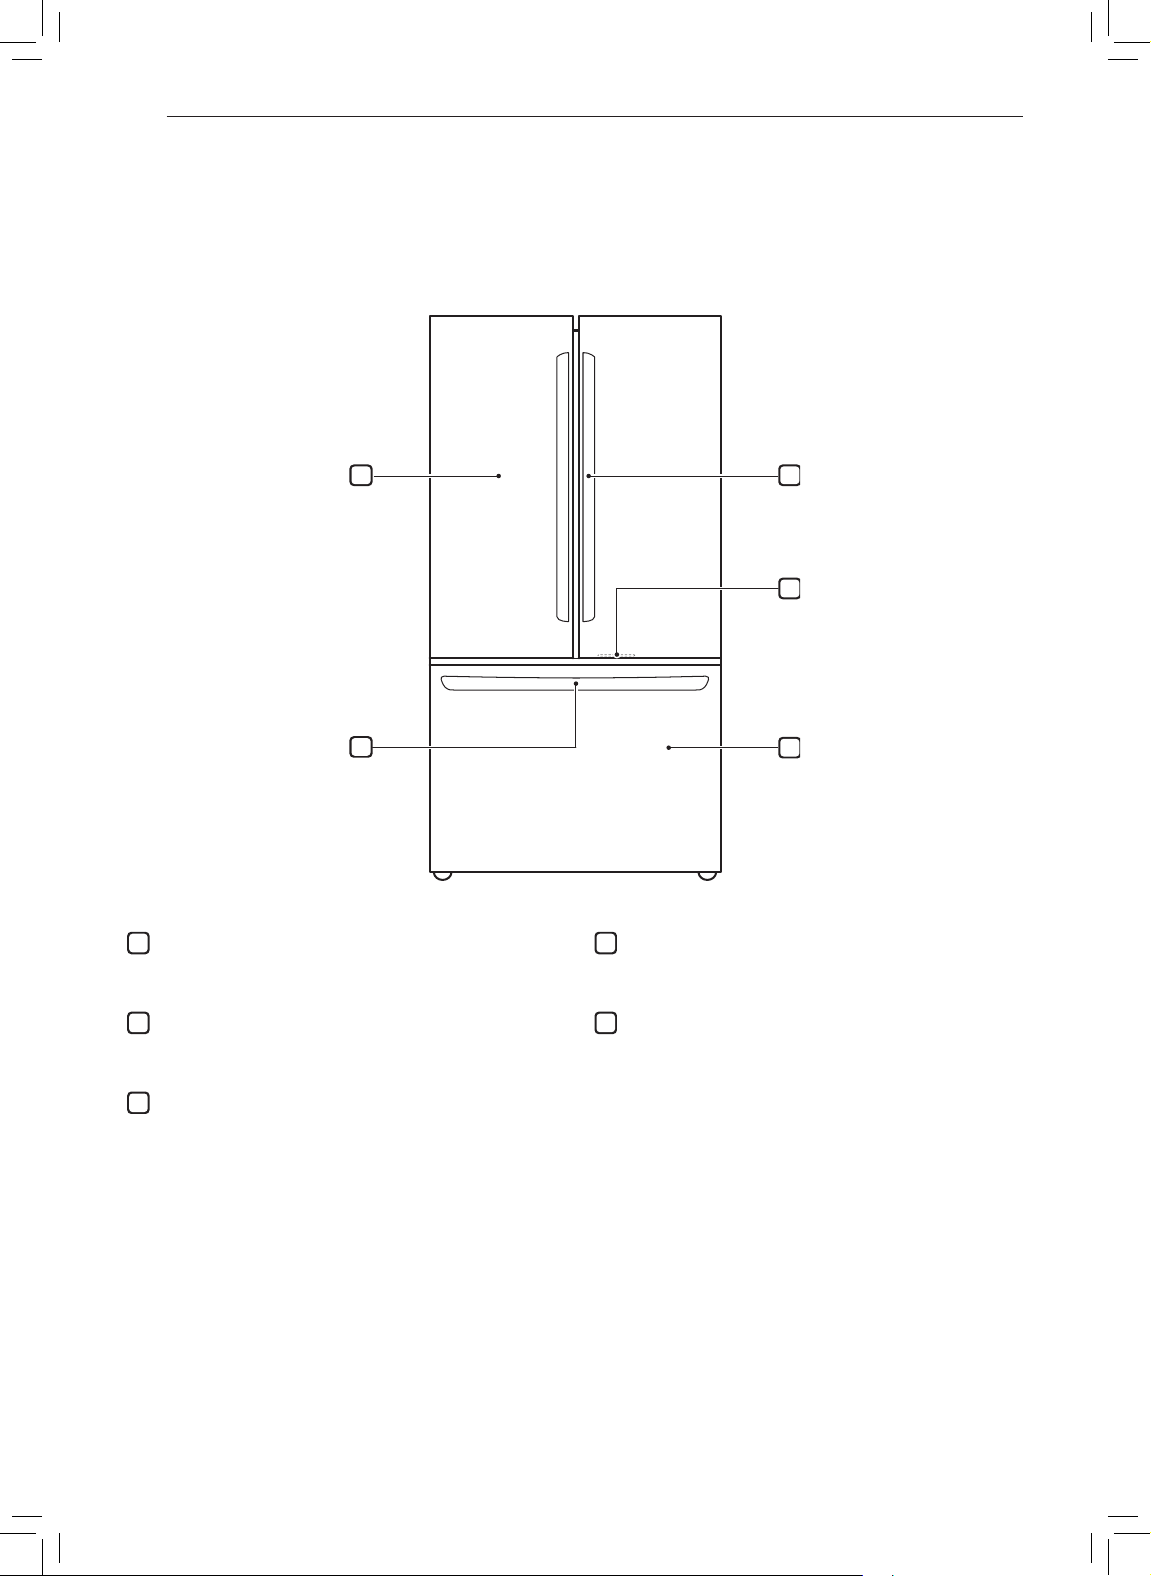
PRODUCT OVERVIEW
The images in this guide may be different from the actual components and accessories, which are subject to
change by the manufacturer without prior notice for product improvement purposes.
Exterior
21
3
4
Refrigerator
1
Helps to preserve fresh food
Handle
2
Opens and closes the refrigerator door.
LED Light
3
Lights up when the freezer door is opened.
5
EZ Handle
4
Opens the freezer door easily.
Freezer
5
Helps to preserve frozen food
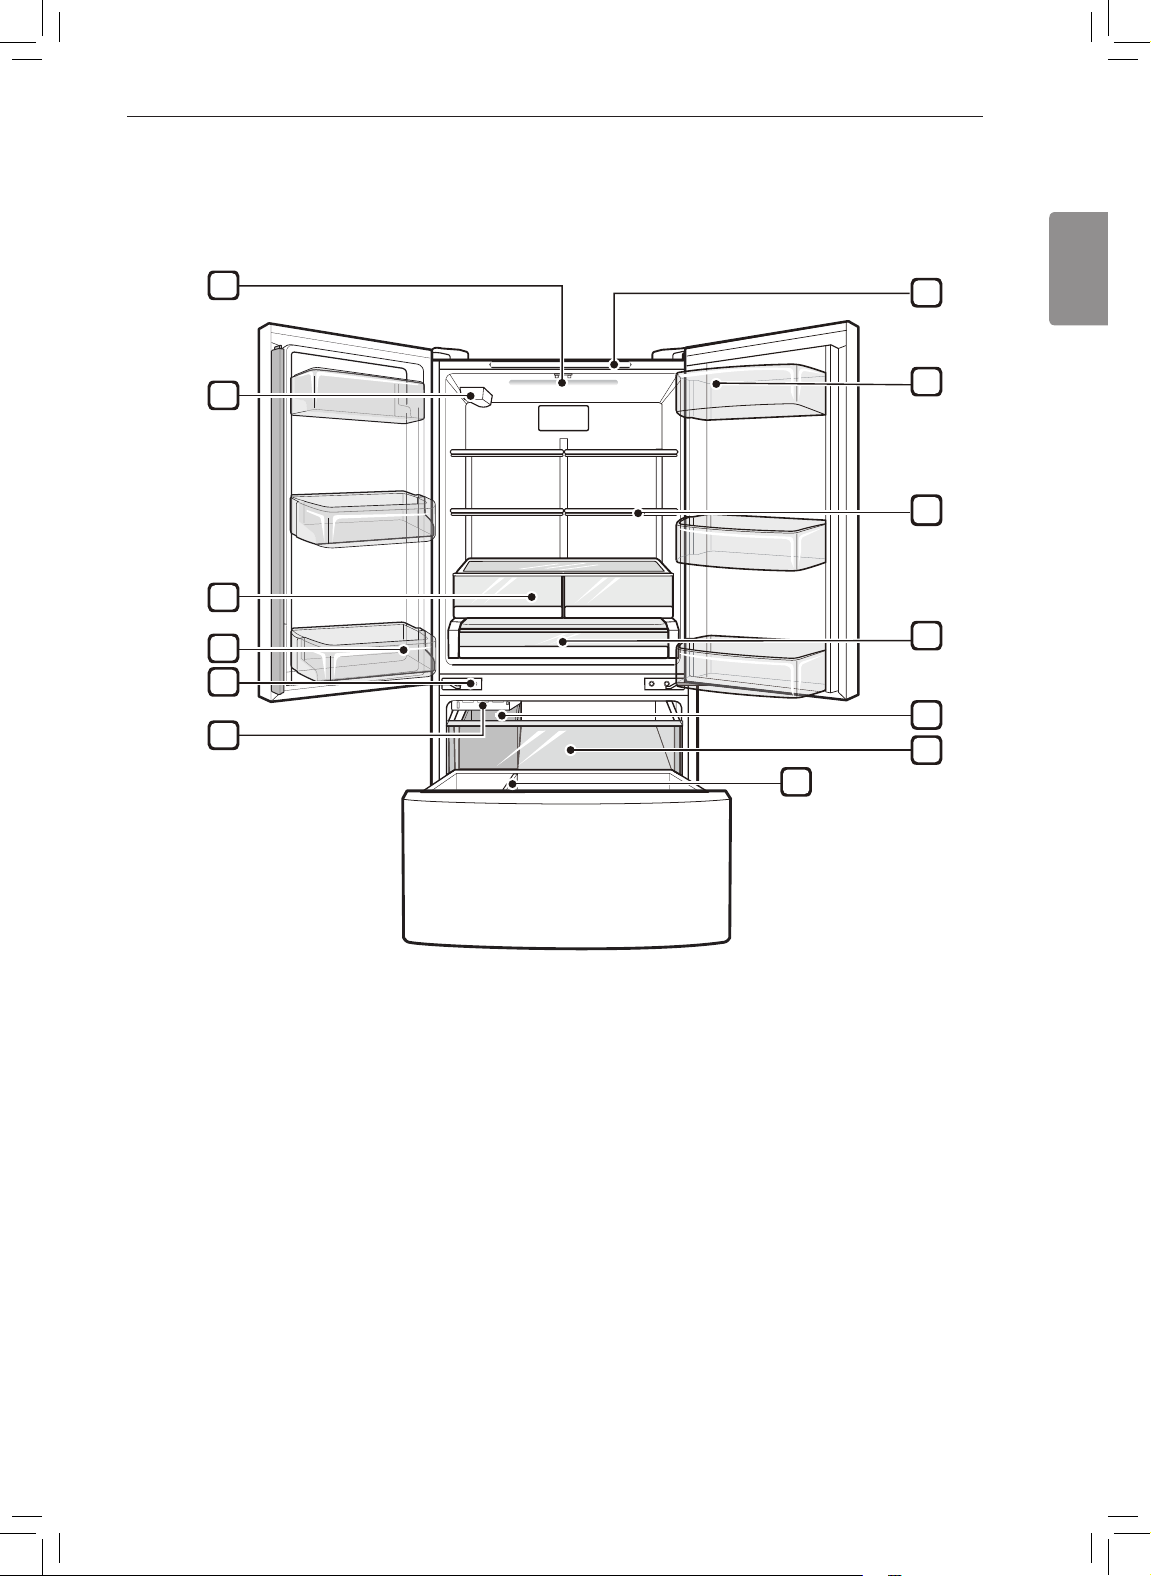
Interior
11PRODUCT OVERVIEW
Standard Door : LFCC22426*
1
2
3
4
5
6
ENGLISH
7
8
9
10
11
12
13

12 PRODUCT OVERVIEW
LED Interior Lighting
1
Lights up the inside of the refrigerator.
Water filter
2
Purifies water.
NOTE
• The filter should be replaced every 6
months. See the Replacing the Water Filter
section in this manual for details.
Crisper
3
Helps vegetables and fruit to stay crisp.
Humidity Controlled Crisper (On Some
Models)
Helps vegetables and fruit to stay crisp and
controls humidity.
Fixed Door Bin
4
Stores chilled food or drinks.
Auto-Closing Hinge (On Some Models)
5
Closes the refrigerator doors and freezer
drawers automatically.
NOTE
• The door only closes automatically when
it is open at an angle of less than 30°.
Automatic Icemaker (Freezer)
6
Produces and stores ice automatically in freezer
compartment.
Control Panel
7
Sets the refrigerator and freezer temperatures.
Dairy Bin (On Some Models)
8
Store dairy products.
Adjustable Refrigerator Shelf
9
Adjusts shelves to meet individual storage
needs.
Glide‘N’Serve (On Some Models)
10
Stores food items at a different temperature than
the regular refrigerator area.
In-Door Ice Bin
11
If a large amount of ice is needed, transfer the
ice in the in-door ice bin to an ice storage bin in
the freezer.
Pullout Drawer
12
Provides extra storage within the freezer
compartment.
®
Durabase
13
and Durabase® Divider
Provides storage for large food items.
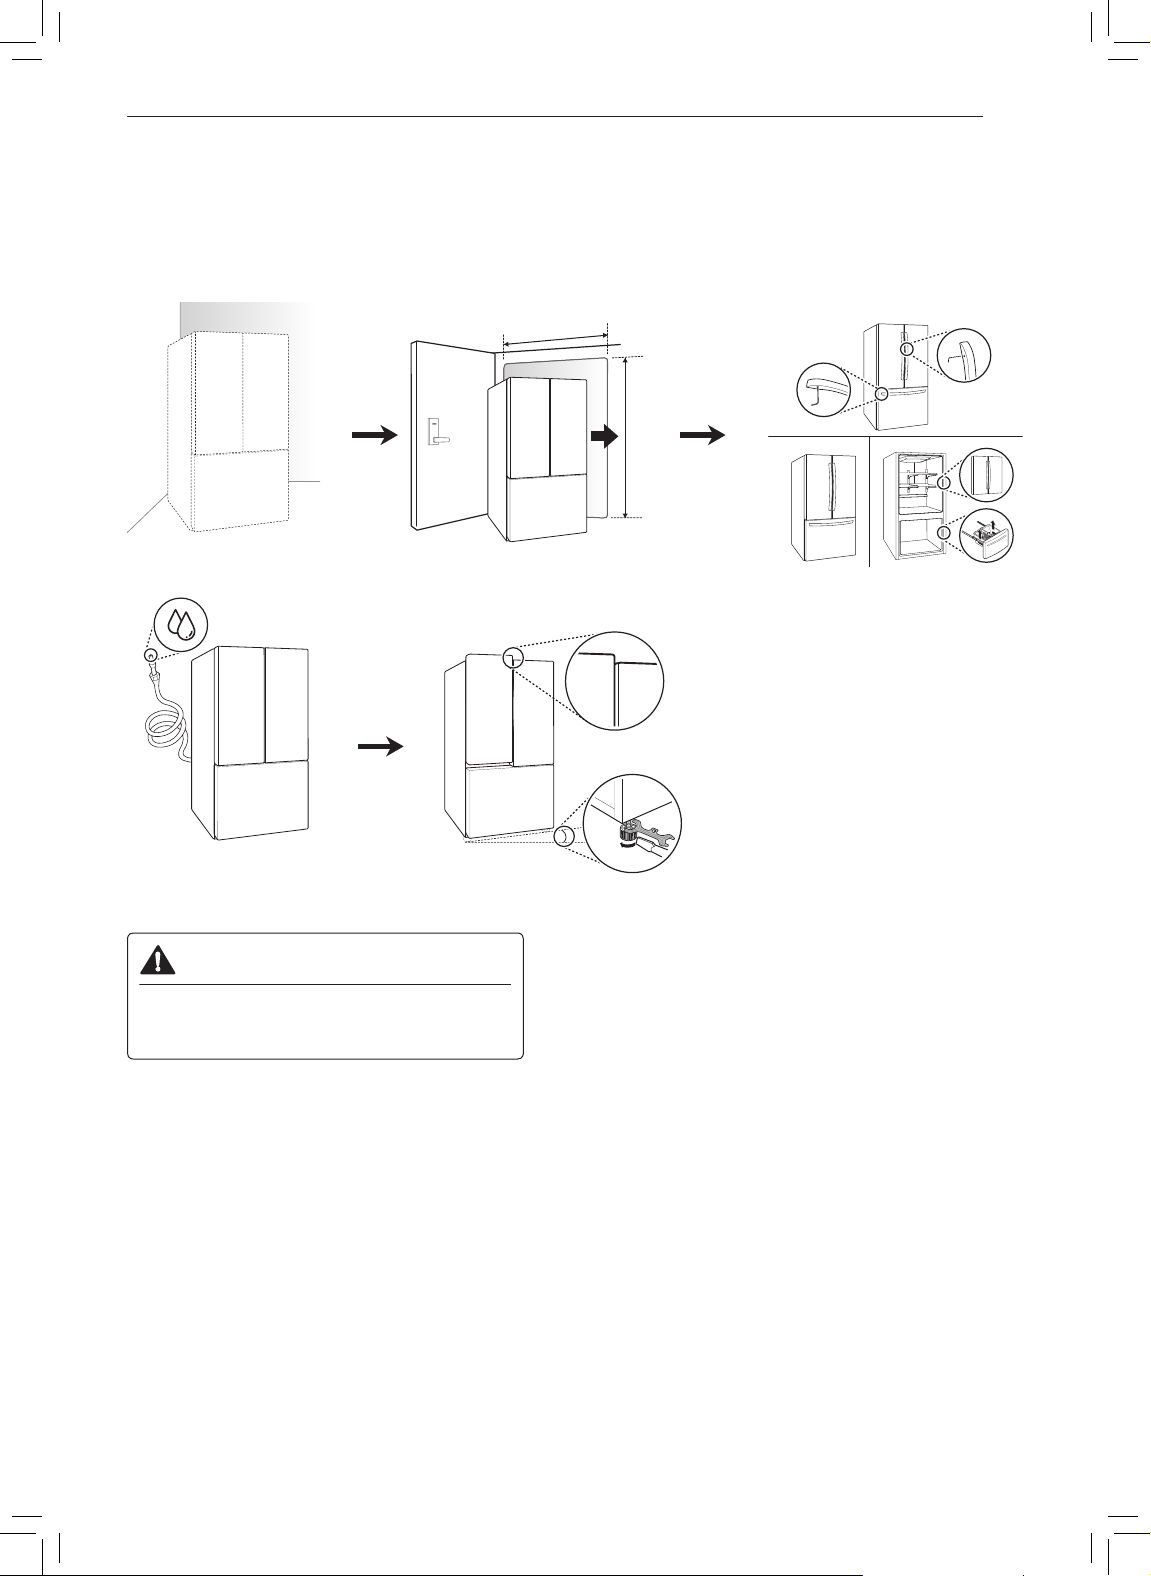
INSTALLATION
Installation Overview
Please read the following installation instructions rst after purchasing this product or transporting it to another
location.
13INSTALLATION
Unpacking the
Refrigerator
Connecting the Water
Line
CAUTION
• Connect to potable water supply only.
• Fill with potable water only.
Choosing the Proper
Location
Leveling and Door
Alignment
Disassembling/
Assembling

14 INSTALLATION
Unpacking the Refrigerator
WARNING
• Use two or more people to move and install the
refrigerator. Failure to do so can result in back
injury or other injury.
• The refrigerator is heavy. Protect the floor when
moving the refrigerator for cleaning or service.
Always pull the refrigerator straight out when
moving it. Do not wiggle or walk the refrigerator
when trying to move it, as floor damage could
occur.
• Keep flammable materials and vapors, such as
gasoline, away from the refrigerator. Failure to
do so can result in fire, explosion, or death.
NOTE
• Remove tape and any temporary labels from
your refrigerator before using. Do not remove any
warning labels, the model and serial number label,
or the Tech Sheet that is located under the front of
the refrigerator.
• To remove any remaining tape or glue, rub the area
briskly with your thumb. Tape or glue residue can
also be easily removed by rubbing a small amount
of liquid dish soap over the adhesive with your
fingers. Rinse with warm water and dry.
• Do not use sharp instruments, rubbing alcohol,
flammable fluids, or abrasive cleaners to remove
tape or glue. These products can damage the
surface of your refrigerator.
• Reinstall or adjust shelves as needed. Refrigerator
shelves are installed in the shipping position.
Reinstall shelves according to your individual
storage needs.
Choosing the Proper
Location
Water
Water supply must be easily connected for the
automatic icemaker.
NOTE
• The water pressure must be 20 - 120 psi or 138 -
827 kPa or 1.4 - 8.4 kgf/cm2. If the refrigerator is
installed in an area with low water pressure (below
20 psi or 138 kPa or 1.4 kgf/cm2), you can install a
booster pump to compensate for the low pressure.
Electricity
Use an individual, grounded outlet:115 Volts, 60 Hz,
AC, 15 Amps minimum.
WARNING
• Do not overload house wiring and cause a fire
hazard by plugging in multiple appliances in the
same outlet with the refrigerator.
• To reduce the risk of electric shock, do not install
the refrigerator in a wet or damp area.
Flooring
To avoid noise and vibration, the unit must be
installed and leveled on a solidly constructed floor. If
required, adjust the leveling legs to compensate for
the unevenness of the floor.
NOTE
• Installing on carpeting, soft tile surfaces, a platform
or weakly supported structure is not recommended.
Ambient Temperature
Install this appliance in an area where the
temperature is between 55 °F (13 °C) and 110 °F
(43 °C).
If the temperature around the appliance is too low or
high, cooling ability may be adversely affected.
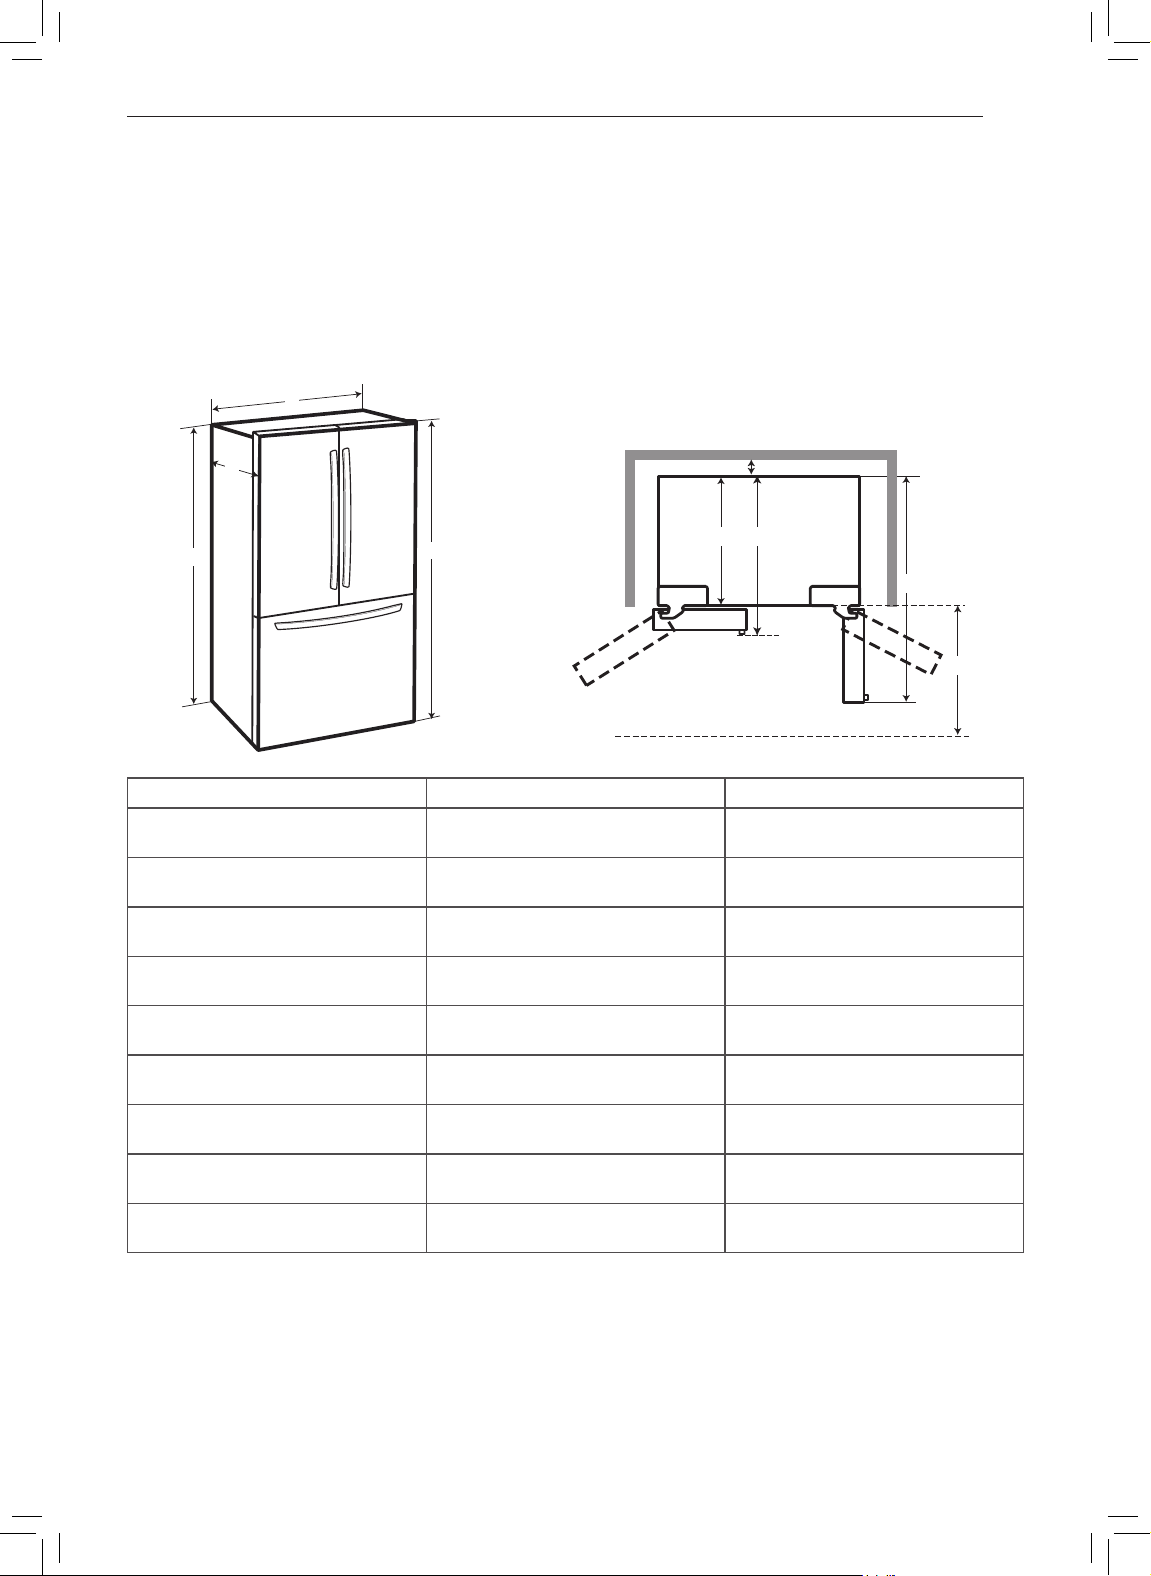
Dimensions and Clearances
• Check the dimensions of the appliance and the installation path to ensure there is sufficient room to move the
refrigerator through doors or narrow openings.
• If an opening is too narrow to fit the refrigerator through, the doors must be removed.
• The installation location chosen for the refrigerator should allow space behind the unit for connections and
airflow and space in front to open the doors and drawers.
• Too small of a distance from adjacent items may result in lowered freezing capability and increased electricity
consumption charges. Allow at least 24 inches (610 mm) in front of the refrigerator to open the doors, and at
least 2 inches (50.8 mm) between the back of the refrigerator and the wall.
B
15INSTALLATION
A
C
D
E
F
I
G
H
- List LFCC22426*
A Depth without handle
B Width
C Height to Top of Case
D Height to Top of Hinge
E Back Clearance
F Depth without Door
G Depth (Total with Door Open 90°)
H Front Clearance
I Depth With handle
28 3/4''
(728 mm)
35 3/4"
(908 mm)
68 3/8"
(1737 mm)
69 3/4"
(1772 mm)
2"
(50 mm)
24 3/4''
(630 mm)
43 1/2''
(1103 mm)
24"
(610 mm)
31 1/4''
(792 mm)
16 INSTALLATION
Removing/Assembling
Handles
• When moving the refrigerator through a narrow
opening, removing the doors is preferred.
• The appearance of the handles may vary from what
is shown.
WARNING
When assembling or disassembling the
refrigerator handles:
• Grasp the handle firmly to avoid dropping it.
• Do not swing the handle into nearby people or
animals.
• Make sure that the bracket hole of the handle
fits properly into the stopper bolt of the door.
Assemble the set screws to fix the handle into
place.
• Make sure that there is not a gap between the
door and handle after assembling the handle.
Tools Needed
3/32 in. Allen wrench
1/8 in. Allen wrench
1/4 in. Allen wrench
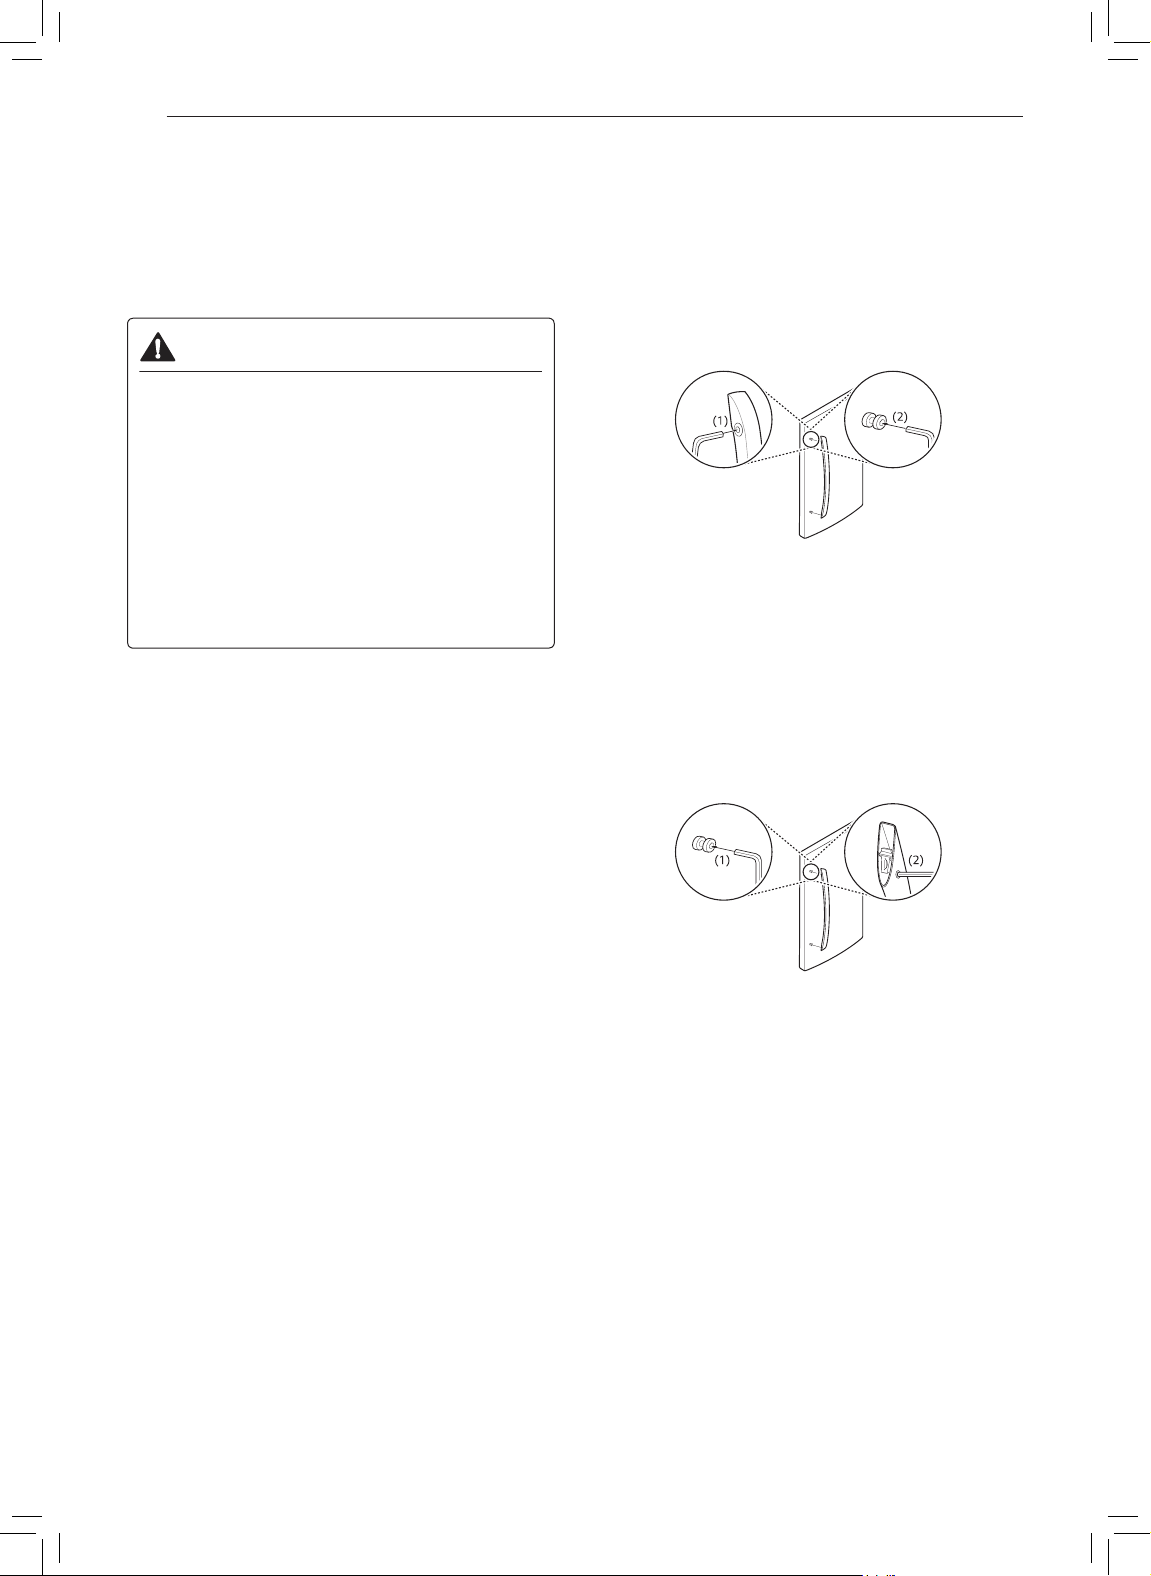
Removing the Refrigerator Handles
Loosen the set screws (1) with a 3/32 in. Allen
1
wrench and remove the handle.
Loosen the mounting fasteners (2) that connect
2
to the refrigerator door and handle using a 1/4
in. Allen wrench, and remove the mounting
fasteners.
Assembling the Refrigerator Handles
Assemble the mounting fasteners (1) at both ends
1
of the handle with a 1/4 in. Allen wrench.
Place the handle on the door by fitting the handle
2
footprints over the mounting fasteners and
tightening the set screws (2) with a 3/32 in. Allen
wrench.

17INSTALLATION
Removing the Freezer Drawer Handle
Loosen the set screws (1) located on the lower
1
side of the handle with a 1/8 in. Allen wrench and
remove the handle.
Loosen the mounting fasteners (2) with a 1/4
2
in. Allen wrench, and remove the mounting
fasteners.
Assembling the Freezer Drawer
Handle
Assemble the mounting fasteners (1) at both ends
1
of the handle with a 1/4 in. Allen wrench.
Place the handle on the door by fitting the handle
2
footprints over the mounting fasteners and
tightening the set screws (2) with a 1/8 in. Allen
wrench.
Removing/Assembling the
Doors and Drawers
If the entrance door is too narrow for the refrigerator
to pass through, remove the refrigerator doors and
move the refrigerator sideways through the doorway.
WARNING
• Use two or more people to remove and install
the refrigerator and freezer doors.
• Disconnect the electrical supply to the
refrigerator before installing.
• Do not put hands, feet or other objects into the
air vents or bottom of the refrigerator.
• Be careful when handling the hinge and stopper.
• Remove food and bins before detaching the
doors.
• Do not hold the handle when removing or
replacing the doors as the handle may come off.
Tools Needed
3/32 in. Allen wrench
1/8 in. Allen wrench
1/4 in. Allen wrench
Removing the Left Refrigerator Door
Open the door. Remove the top hinge cover
1
screw and the hinge cover.
Hinge Cover
 Loading...