

LG Electronics LFC23760 User Manual

BOTTOM FREEZER
REFRIGERATOR
Owner’s Manual
Please read this guide thoroughly
before operating and keep it handy for
reference at all times.
REFRIGERADOR
CON CONGELADOR
INFERIOR
Manual de Usuario
Lea detenidamente estas instrucciones antes de
usar el refrigerador y guárdelas como referencia
para el futuro.
Models / Modelos
LFC23760**
P/No. MFL47277004

TABLE OF CONTENTS
English Version 2
Spanish Version 32
Warranty (U.S.A.) 3 - 4
Safety Instructions 5 - 6
Grounding Requirements 6
Parts and Features 7
Refrigerator Installation 8 - 16
Unpacking your refrigerator
Installation 8
Base Grille 8
Removing, Reversing and Replacing
Your refrigerator doors 9 - 11
Pull out drawer 12
Leveling and door alignment 14
Using your refrigerator 15 - 22
Ensuring proper air circulation 15
Multi Flow
Door alarm
Setting the controls
Adjusting control settings 16
Food storage guide 16
Storing frozen food 16
Refrigerator Section 17
Refrigerator shelves 17
Chef Fresh 18
Crisper humidity control 18
Optibin Crisper 19
Crisper cover with lattice on inner surface 19
Design-A-Door 20
Dairy Bin 20
Egg Box 20
Freezer Section 20
Ice Bin 20
Wire Durabase 20
Tilting Door 21
Guide-out drawer basket 21
Care and Cleaning 22 - 23
General cleaning tips 22
Outside 22
Inside walls 22
Door liner and gaskets 22
Plastic parts 22
Condenser coils 22
Light bulb replacement 22 - 23
Power interruptions 23
When you go on vacation 23
About the Custom Cube Ice Maker 24
Connecting the Water Line 25 - 27
Troubleshooting Guide 28 - 31
8
15
15
15
2
visit our web site/http://www.lgservice.com
LG Electronics
LIMITED WARRANTY
United States of America
LG Electronics will repair or at its option replace, without charge, your product which proves to be defective
in material or workmanship under normal use during the warranty period listed below from the date of
original purchase.
This warranty is good only to the original purchaser of the product during the warranty period as long as it is
in the U.S. including Alaska, Hawaii, and U.S. Territories.
LG Refrigerator / Freezer Warranty Period
Product Parts Labor
Refrigerator / Freezer 1 year 1 year [In-Home Service (Except Model GR-051)]
Sealed System 7 years 1 year [In-Home Service (Except Model GR-051)]
(Compressor, Condenser, Evaporator)
No other express warranty is applicable to this product. THE DURATION OF ANY IMPLIED WARRANTIES.
INCLUDING THE IMPLIED WARRANTY OF MERCHANTABILITY, IS LIMITED TO THE DURATION OF
THE EXPRESS WARRANTY HEREIN. LG ELECTRONICS SHALL NOT BE LIABLE FOR THE LOSS OF
USE OF THE PRODUCT, INCONVIENCE, LOSS OR ANY OTHER DAMAGES, DIRECT OR
CONSEQUENTIAL, ARISING OUT OF THE USE OF OR INABILITY TO USE, THIS PRODUCT OR FOR
ANY BREACH OF ANY EXPRESS OR IMPLIED WARRANTY, INCLUDING THE IMPLIED WARRANTY
OF MERCHANTABILITY APPLICABLE TO THIS PRODUCT.
Some States do not allow the exclusion or limitation of incidental or consequential damages or limitations on how
long an implied warranty lasts; so these limitations or exclusions may not apply to you. This warranty gives you
specific legal rights and you may also have other rights which vary from state to state.
THE ABOVE WARRANTY DOES NOT APPLY TO:
1. Service trips to your home to deliver and pickup, install, instruct, or replace house fuses or correct house wiring or
plumbing, or correction of unauthorized repairs.
2. Damage to the product caused by accident, pests, fire, floods, or acts of God.
3. Repairs when your LG product is used in other than normal, single-family household use.
4. Damage resulting from accident, alteration, misuse, abuse, or improper installation.
Damages caused during and/or after delivery
5.
Display, discount, or refurbished units purchased with scratches, dents, or defects.
6.
Proof of purchase is required and must be provided to LG in order to validate warranty.
Therefore, these costs are paid by the consumer.
If the product is installed outside the normal service area, any cost of transportation involved in the repair of the product, or the
replacement of defective parts, shall be borne by the owner.
CUSTOMER ASSISTANCE NUMBERS:
To obtain Warranty Coverage: Retain your Bill of Sale to prove date of purchase.
A Copy of your Sales Receipt must be submitted at the time
warranty service is provided.
To obtain Product or Customer
Service Assistance: Press the appropriate menu option, and have your product type
To obtain the nearest
Authorized Service Center:
Call 1-800-243-0000
(24 hrs a day, 7 days per week, 365 days per year)
(Refrigerator), model number, serial number, and ZIP/Postal
Code ready.
Call 1-800-243-0000
(24 hrs a day, 7 days per week, 365 days per year)
Press the appropriate option, and have your product type
(Refrigerator), model number, serial number, and ZIP/Postal
Code ready.
3

Visite nuestro sitio web/http://www.lgservice.com
LG Electronics
GARANTÍA LIMITADA
Estados Unidos de América
LG Electronics reparará o en su defecto reemplazará sin cargo, el producto defectuoso en material o mano de
obra bajo uso normal durante el periodo de garantía que se menciona a continuación desde la fecha original de
compra.
Esta garantía es válida solo para el comprador original del producto durante el periodo de garantía mientras
permanezca en los E.E. U.U. Incluyendo Alaska, Hawaii y otros territorios de E.E.U.U.
Período de Garantía del refrigerador/Congelador LG
Producto
Refrigerador / Congelador 1 año 1 año [Servicio a domicilio (Excepto Modelo GR-051)]
Sistema Sellado 7 años 1 año [Servicio a domicilio (Excepto Modelo GR-051)]
(Compresor, Condensador, Evaporador)
No se aplicará otro tipo de garantía a este producto. LA DURACION DE OTRAS GARANTIAS ,
INCLUYENDO LA DE COMPRA, ESTAN LIMITADAS A LA DURACION DE ESTA GARANTIA. LG
ELECTRONICS NO SE HACE RESPONSABLE POR LA PERDIDA EN EL USO DEL PRODUCTO,
POR INCONVENIENCIA O CUALQUIER OTRO DAÑO DIRECTO O CONSECUENTE QUE PROVENGA
DEL USO Y/O NO USO DE ESTE PRODUCTO O POR ALGUNA VIOLACION A LAS GARANTIAS
IMPLEMENTADAS INCLUYENDO LA GARANTIA DE COMPRA APLICADA A ESTE PRODUCTO.
Algunos estados no permiten la exclusión o limitación de daños incidentales o consecuenciales o limitaciones
en cuanto al tiempo que dura una garantía implícita; por lo que algunas de estas limitaciones o exclusiones
pueden no aplicarse a usted. Esta garantía le otorga derechos legales específicos y usted puede además tener
otros derechos los cuales varían de Estado a Estado.
Partes Mano de Obra
LA GARANTIA ANTERIOR NO APLICA A :
1.
Servicio a su casa para entregar, recoger, instalar o reemplazar fusibles caseros, corregir cableado casero o
plomería corrección de reparaciones no autorizadas.
2.
Daño al producto causado por accidente, plagas, incendios, inundaciones o actos por naturaleza.
3.
Reparaciones cuando su producto LG sea usado diferente a lo normal.
Daño resultante de accidente, alteración, mal uso o instalación inadecuada.
4.
5.
Daños causados durante y después de la entrega.
6.
Reemplazo, descuento o restauración de unidades compradas con rayones, abolladuras o defectos.
La prueba de la compra se requiere y se debe proporcionar a LG para validar la garantia.
Por lo tanto, estos costos serán pagados por el consumidor.
Si el producto es instalado fuera del área normal de servicio, cualquier costo de transportación relacionado en la
reparación del producto, o el reemplazo de partes defectuosas, serán cargados al propietario.
NÚMEROS DE ASISTENCIA AL CLIENTE:
Para obtener cobertura de la Garantía:
Para obtener información:
Servicio de Asistencia:
Para obtener el Centro de Servicio Autorizado
más cercano:
Conserve su factura para comprobar la fecha de
compra.
Una copia de su recibo de compra debe ser entregada
cuando se le proporcione el servicio de garantía.
Llame al
(24 hrs al día, 7 días por semana, 365 días al año)
Presione la opción de menú apropiado, y tenga su tipo de
producto (Refrigerador), número de modelo, número de
serie, y ZIP Código Postal listos.
Llame al
(24 hrs al día, 7 días por semana, 365 días al año)
Presione la opción adecuada, y tenga su tipo de
producto(Refrigerador), número de modelo, número
de serie, y ZIP /código Postal listos.
1-800-243-0000
1-800-243-0000
4
IMPORTANT SAFETY INSTRUCTIONS
SAFETY MESSAGES
This guide contains many important safety messages. Always read and obey all safety messages.
This is the safety alert symbol. It alerts you to safety messages that inform you of hazards that can kill or
Hurt you or others, or cause damage to the product.
All safety messages will be preceded by the safety alert symbol and the hazard signal word DANGER,
WARNING, CAUTION. These words mean:
DANGER
You will be killed or seriously injured if you don’t follow instructions.
You can be killed or seriously injured if you don’t follow instructions.
WARNING
Indicates an imminently hazardous situation which, if not avoided,
CAUTION
All safety messages will identify the hazard, tell you how to reduce the chance of injury and tell you what can happen if
the instructions are not followed.
may result in minor or moderate injury, or product damage only.
WARNING
To reduce the risk of fire, electric shock, or injury to persons
when using your product, basic safety precautions should
be followed, including the following:
NEVER unplug your refrigerator by pulling on the power cord.
Always grip the plug firmly and pull it straight out from the outlet.
Repair or replace immediately all electric service cords that have
become frayed or otherwise damaged. Do not use a cord that
shows cracks or abrasion damage along its length or at either the
plug or connector end.
When moving your refrigerator away from the wall, be careful not
to roll over or damage the power cord.
DO NOT store or use gasoline or other flammable vapors and
liquids in the vicinity of this or any other appliance.
DO NOT allow children to climb, stand or hang on the refrigerator
doors or shelves in the refrigerator. They could damage the
refrigerator and seriously injure themselves.
Keep fingers out of “pinch point” areas; clearances between the
doors and cabinet are necessarily small. Be careful when you
open the doors when children are in the area.
Unplug your refrigerator before cleaning or making any repairs.
NOTE: We strongly recommend that any servicing be performed
by a qualified individual.
Before replacing a burned-out light bulb, unplug the refrigerator or
turn off power at the circuit breaker or fuse box in order to avoid
contact with a live wire filament. (Aburned-out light bulb may
break when being replaced.)
NOTE Setting: either or both controls to the OFF position does
not remove power to the light circuit.
Do not store bottles in the freezer compartment - they may
break when frozen, causing damage.
The refrigerator-freezer should be so positioned that the supply
plug is accessible for quick disconnection when accident happens.
For personal safety, this appliance must be properly grounded.
Have the wall outlet and the circuit checked by a qualified
electrician to make sure the outlet is properly grounded.
Read all instructions before using this appliance.
Use this appliance only for its intended purpose as described in
this use and care guide.
After your refrigerator is in operation, do not touch the cold
surfaces in the freezer compartment when hands are damp or
wet. Skin may adhere to the extremely cold surfaces.
In refrigerators with automatic icemakers, avoid contact with the
moving parts of the ejector mechanism, or with the heating
element that releases the cubes. DO NOT place fingers or hands
on the automatic icemaking mechanism while the refrigerator is
plugged in.
DO NOT refreeze frozen foods which have thawed completely.
The United States Department of Agriculture in Home and
Garden Bulletin No. 69 says:
“...You may safely refreeze frozen foods that have thawed if
they still contain ice crystals or if they are still cold below
40°F (4°C).”
“...Thawed ground meats, poultry, or fish that have any off-odor
or off-color should not be refrozen and should not be eaten.
Thawed ice cream should be discarded. If the odor or color of
any food is poor or questionable, get rid of it. The food may be
dangerous to eat.”
“Even partial thawing and refreezing reduces the eating quality
of foods, particularly fruits, vegetables and prepared foods. The
eating quality of red meats is affected less than that of many
other foods. Use refrozen foods as soon as possible to
Save as much of their quality as you can.”
SAVE THESE INSTRUCTIONS
5
DANGER: RISK OF CHILD ENTRAPMENT
Child entrapment and suffocation are not problems of the
past. Junked or abandoned refrigerators are still dangerous...
even if they will sit for “just a few days”. If you are getting rid
of your old refrigerator , please follow the instructions at right
to help prevent accidents.
CFC DISPOSAL
BEFORE YOU THROW AWAY
YOUR OLD REFRIGERATOR
OR FREEZER
Take off the doors.
Leave the shelves in place so that
children may not easily climb inside.
Your old refrigerator
CFCs (chlorofluorocarbons). CFCs are believed to harm
stratospheric Ozone.
This appliance contains fluid (refrigerant, lubricant), is made
of parts and materials which are reusable and / or
recyclable. All the important materials should be sent to the
collection center of waste material and can be reused after
rework (recycling). For take back, please contact with the
local agency
.
may have a cooling system that used
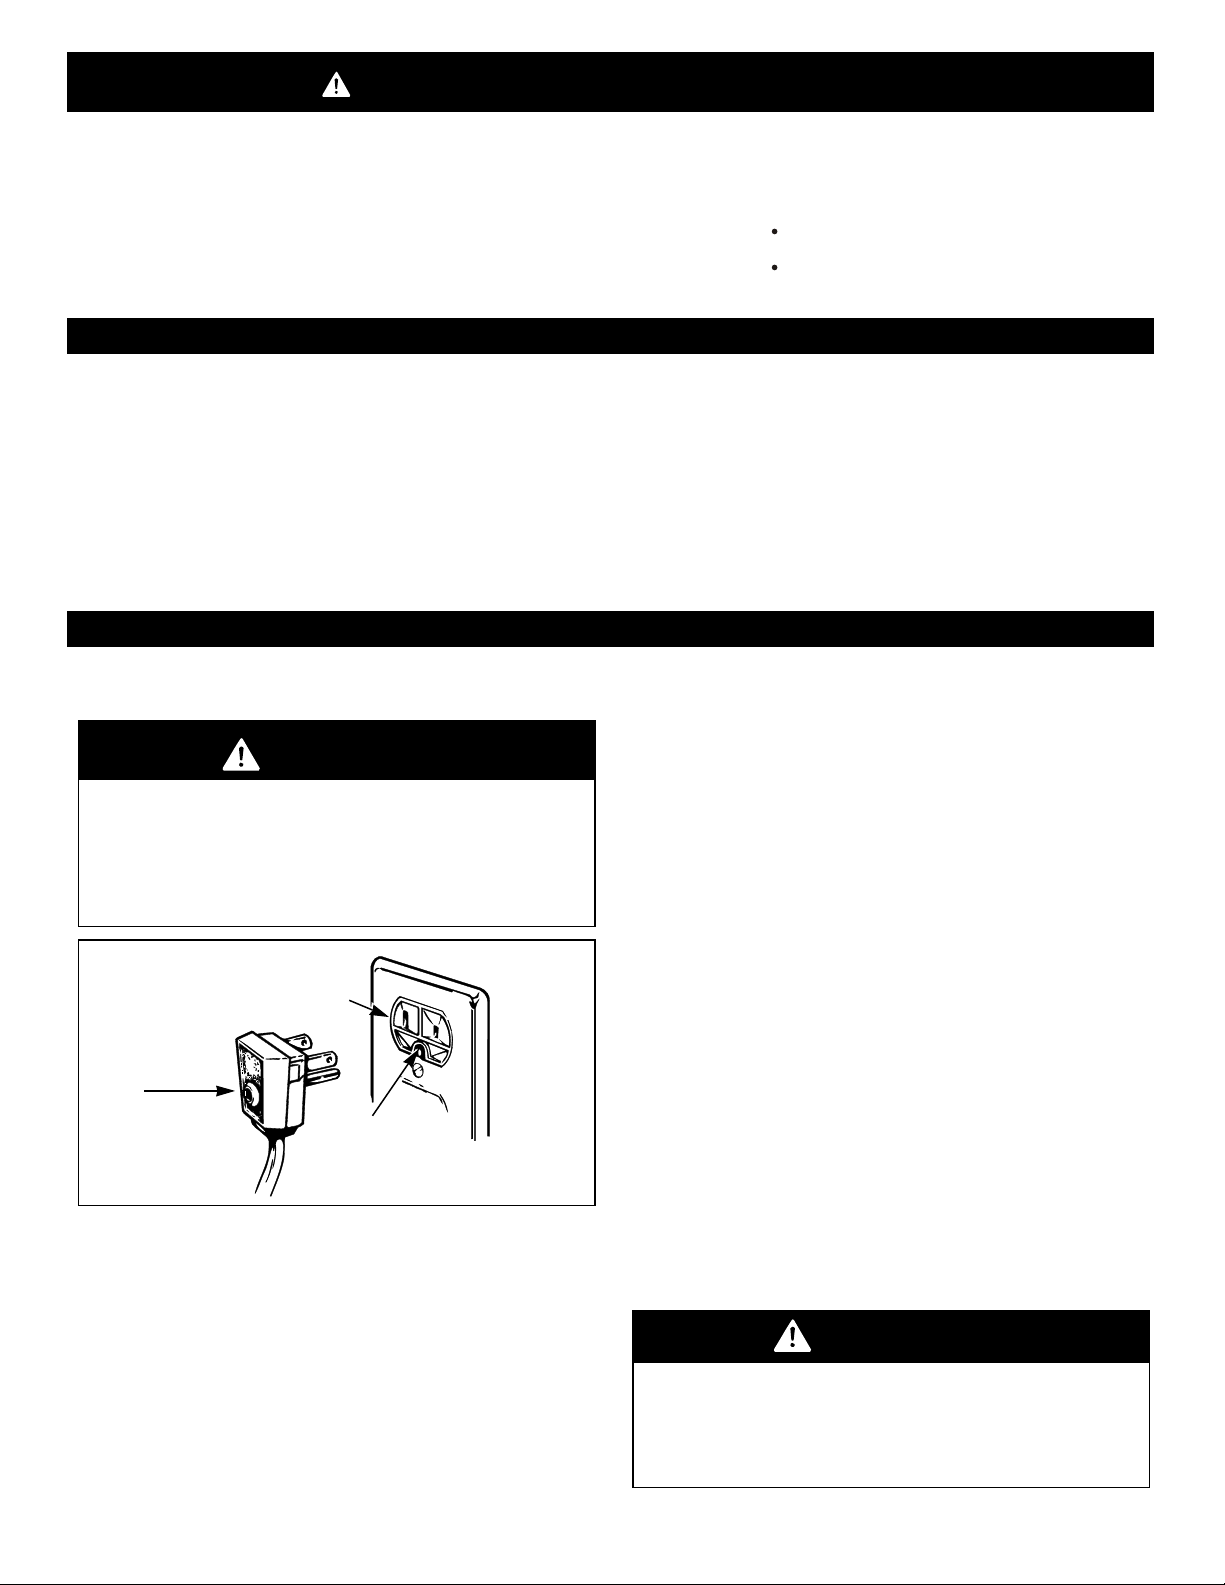
GROUNDING REQUIREMENTS
IMPORTANT: Please read carefully.
TO CONNECT ELECTRICITY
WARNING
Electrical Shock Hazard
FOR PERSONAL SAFETY, this appliance must be
properly grounded. Have the wall outlet and the circuit
checked by a qualified electrician to make sure the
outlet is properly grounded.
3-prong
grounding type
wall receptacle
3-prong
grounding
plug
Ensure proper
ground exists
before use.
RECOMMENDED GROUNDING METHOD
The refrigerator should always be plugged into its own
individual properly grounded electrical outlet rated for
115 Volts, 60 Hz, AC only, and fused at 15 or 20 amperes.
This provides the best performance and also prevents
overloading house wiring circuits which could cause a fire
hazard from overheated wires. It is recommended that a
Separate circuit serving only this appliance be provided.
Use a receptacle which cannot be turned off with a switch
or pull chain. Do not use an extension cord.
If you are throwing away your old refrigerator,
CFC refrigerant is removed for proper disposal by a
the
qualified service If you intentionally release this CFC
refrigerant, You can be subject to fines and imprisonment
under provisions of environmental legislation.
Where a standard two-prong wall outlet is encountered, it
is your personal responsibility and obligation to have it
replaced with a properly grounded three-prong wall outlet.
Do not, under any circumstances, cut or remove the third
(Ground) prong from the power cord.
NOTE: Before performing any type of installation, cleaning,
or removing a light bulb, turn the control (Thermostat,
Refrigerator Control or Freezer Control, depending on the
model) to OFF and then disconnect the refrigerator from
the electrical source. When you are finished, reconnect the
refrigerator to the electrical source and reset the control
(Thermostat, Refrigerator Control or Freezer Control,
depending on the model) to the desired setting.
r.
make sure
USE OF EXTENSION CORDS
Because of potential safety hazards under certain
conditions, we strongly recommend against the use of an
extension cord. However, if you still elect to use an
extension cord, it is absolutely necessary that it be a
UL-listed (in the United States), 3-wire grounding type
appliance extension cord having a grounding type plug and
outlet, and that the electrical rating of the cord be 15
amperes (minimum) and 120 volts.
Use of an extension cord will increase the clearance
needed for the back of the refrigerator.
WARNING
POWER CORD REPLACEMENT
If the power cord is damaged, it must be replaced
by the manufacturer, by our service center or by
qualified personal by LG Electronics, to avoid some
risk.
6
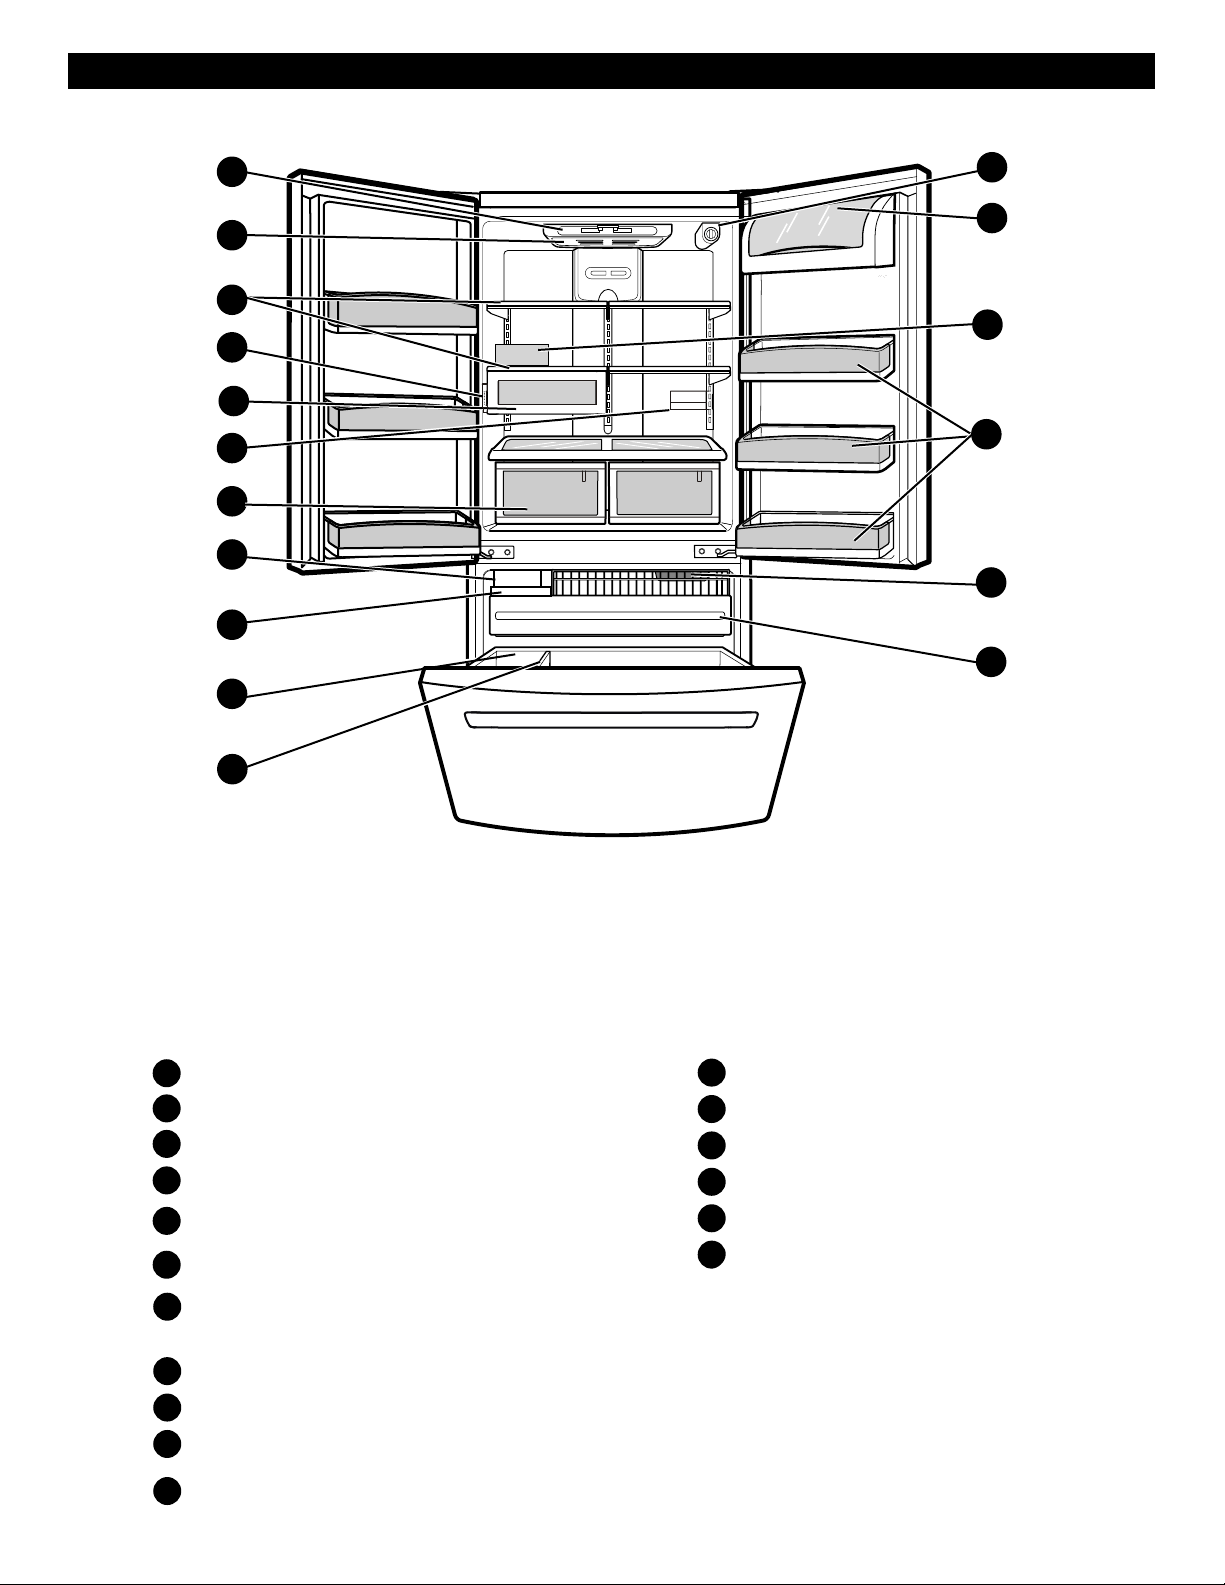
PARTS AND FEATURES
A
B
C
D
F
G
H
L
M
N
E
O
P
I
Q
J
K
Use this section to become more familiar with the parts and features.
NOTE:This guide covers several different models. The refrigerator you have purchased may have some
or all of the items listed below.The locations of the features shown below may not match your model.
A
Digital Sensor Control
B
Refrigerator Light
C
Shelves
D
Temperature Control*
Chef Fresh / Snack Pan
E
F
Can Dispenser*
Optibin Crisper
G
Keeps fruits and vegetable fresh and crisper
*
Filter (Inside)*
L
M
Dairy Bin
N
Egg Box*
O
Refrigerator Door Rack
P
Freezer Light
Q
Pull out Drawer
Customcube Icemaker
H
Ice Bin
I
J
Durabase
K
Divider
*on some models
7

REFRIGERATOR INSTALLATION
WARNING
Excessive Weight Hazard
Use two or more people to move and install
refrigerator.
Failure to do so can result in back or other injury.
UNPACKING YOUR REFRIGERATOR
Remove tape and any temporary labels from your
refrigerator before using. Do not remove any warningtype labels, the model and serial number label, or the
TechSheet that is attached to back wall of the refrigerator.
To remove any remaining tape or glue, rub the area
briskly with your thumb. Tape or glue residue can also be
easily removed by rubbing a small amount of liquid dish
soap over the adhesive with your fingers. Wipe with warm
water and dry.
Do not use sharp instruments, rubbing alcohol, flammable
fluids or abrasive cleaners to remove tape or glue. These
products can damage the surface of your refrigerator. For
more information, see the Important Safety Instructions
section.
Refrigerator shelves are installed in the shipping position.
Please reinstall shelves according to your individual
storage needs.
When Moving Your Refrigerator:
Your refrigerator is heavy. When moving the
refrigerator for cleaning or service, be sure to protect
the floor. Always pull the refrigerator straight out when
moving it. Do not wiggle or walk the refrigerator when
trying to move it, as floor damage could occur.
WARNING
3. Install this appliance in an area where the temperature
is between 55°F (13°C) and 110°F (43°C.) If the
temperature around the appliance is too low or high,
cooling ability may be adversely affected.
CAUTION: Avoid placing the unit near heat sources,
direct sunlight or moisture.
NEXT
1. Clean your refrigerator thoroughly and wipe off all dust
accumulated during shipping.
2. Install accessories such as ice cube bin, drawers,
shelves, etc., in their proper places. They are packed
together to prevent possible damage during shipment.
3. Let your refrigerator run for 2 or 3 hours before putting
food in it. Check the flow of cold air in the freezer
compartment to ensure proper cooling. Your refrigerator
is now ready for use.
WARNING:
Be careful when you work with hinge, base grille,
stopper etc. You may be injured.
Do not put hands or metal sticks into air vents, base
grille or bottom of refrigerator. You may be injured or
receive an electrical shock.
BASE GRILLE
To remove the base grille:
1. Grasp the grille with both hands.
2. Pull the grille toward yourself.
To install the base grille:
1. Place clips in openings in the metal panel.
2. Push the grille toward the refrigerator until it snaps
into place.
Explosion Hazard
Keep flammable materials and vapors, such as
gasoline, away from refrigerator.
Failure to do so can result in death, explosion or fire.
INSTALLATION
1. Avoid placing the unit near heat sources, direct sunlight,
or moisture.
2. To avoid vibration, the unit must be level. If required,
adjust the leveling screws to compensate for
unevenness of the floor. The front should be slightly
higher than the rear to aid in door closing. Leveling
screws can be turned easily by tipping the cabinet
slightly. Turn the leveling screws clockwise ( ) to
raise the unit, counterclockwise ( ) to lower it.
A proper distance from adjacents items
Please keep the refrigerator at a proper distance from other
things. Too small a distance from adjacent items may result
in lowered freezing capability and increased electricity
consumption charges.
(2.54 cm) 1”
8
REFRIGERATOR INSTALLATION
T O O L S Y O U M A Y N E E D
10 mm
1/4 in
3/8 in
Hex head socket wrench
Phillips screwdriver
Flat head screwdriver
Allen wrench
1/4 in
3/32 in
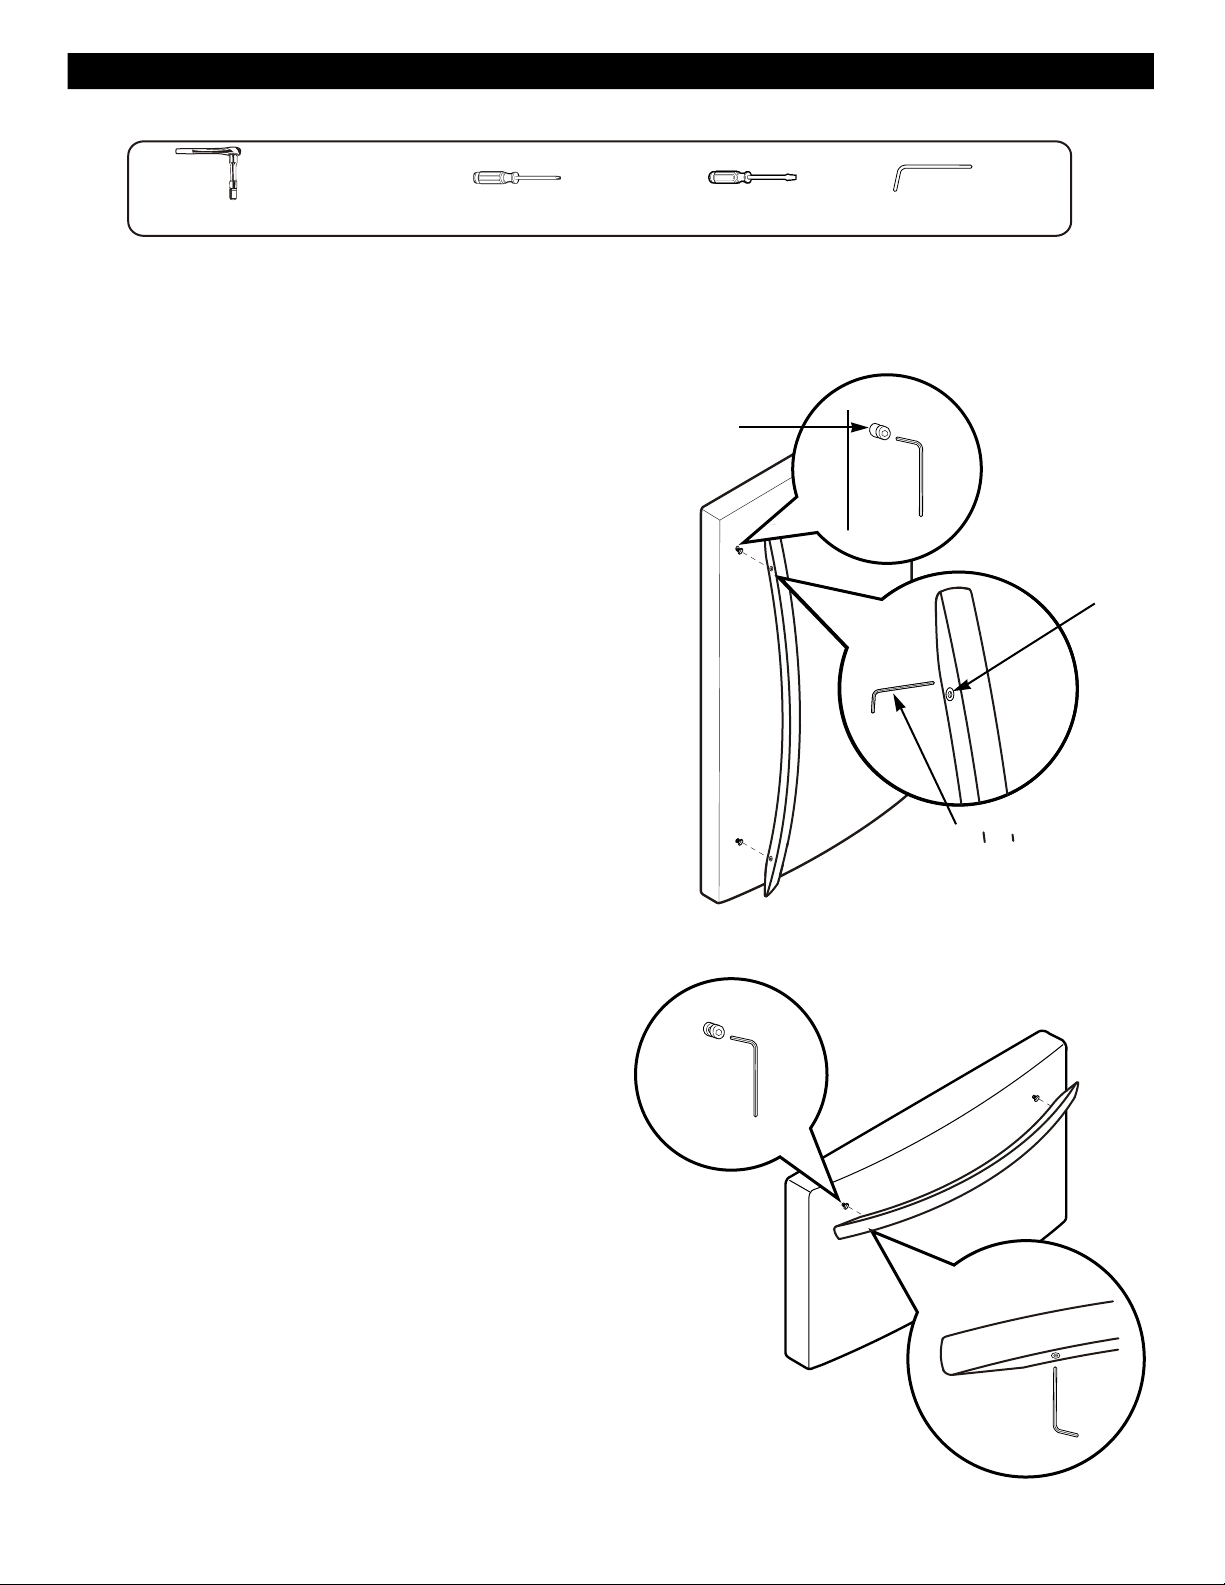
To move refrigerator through a house door, it maybe necessary to remove refrigerator and freezer door handles.
NOTE: Handle appearance may vary from illustrations on this page.
1. Removing Refrigerator Handle
• Loosen the set screws with the 3/32” Allen
wrench and remove the handle.
NOTE: If the handle mounting fasteners
Mounting
Fasteners
need to be tightened or removed, use a 1/4”
Allen wrench.
Set Screw
2. Removing Freezer Drawer Handle
• Loosen the set screws located on the lower
side of the handle with the 3/32” Allen
wrench and remove the handle.
NOTE: If the handle mounting fasteners
need to be tightened or removed, use a 1/4”
Allen wrench.
Allen Wrench
9
REFRIGERATOR INSTALLATION
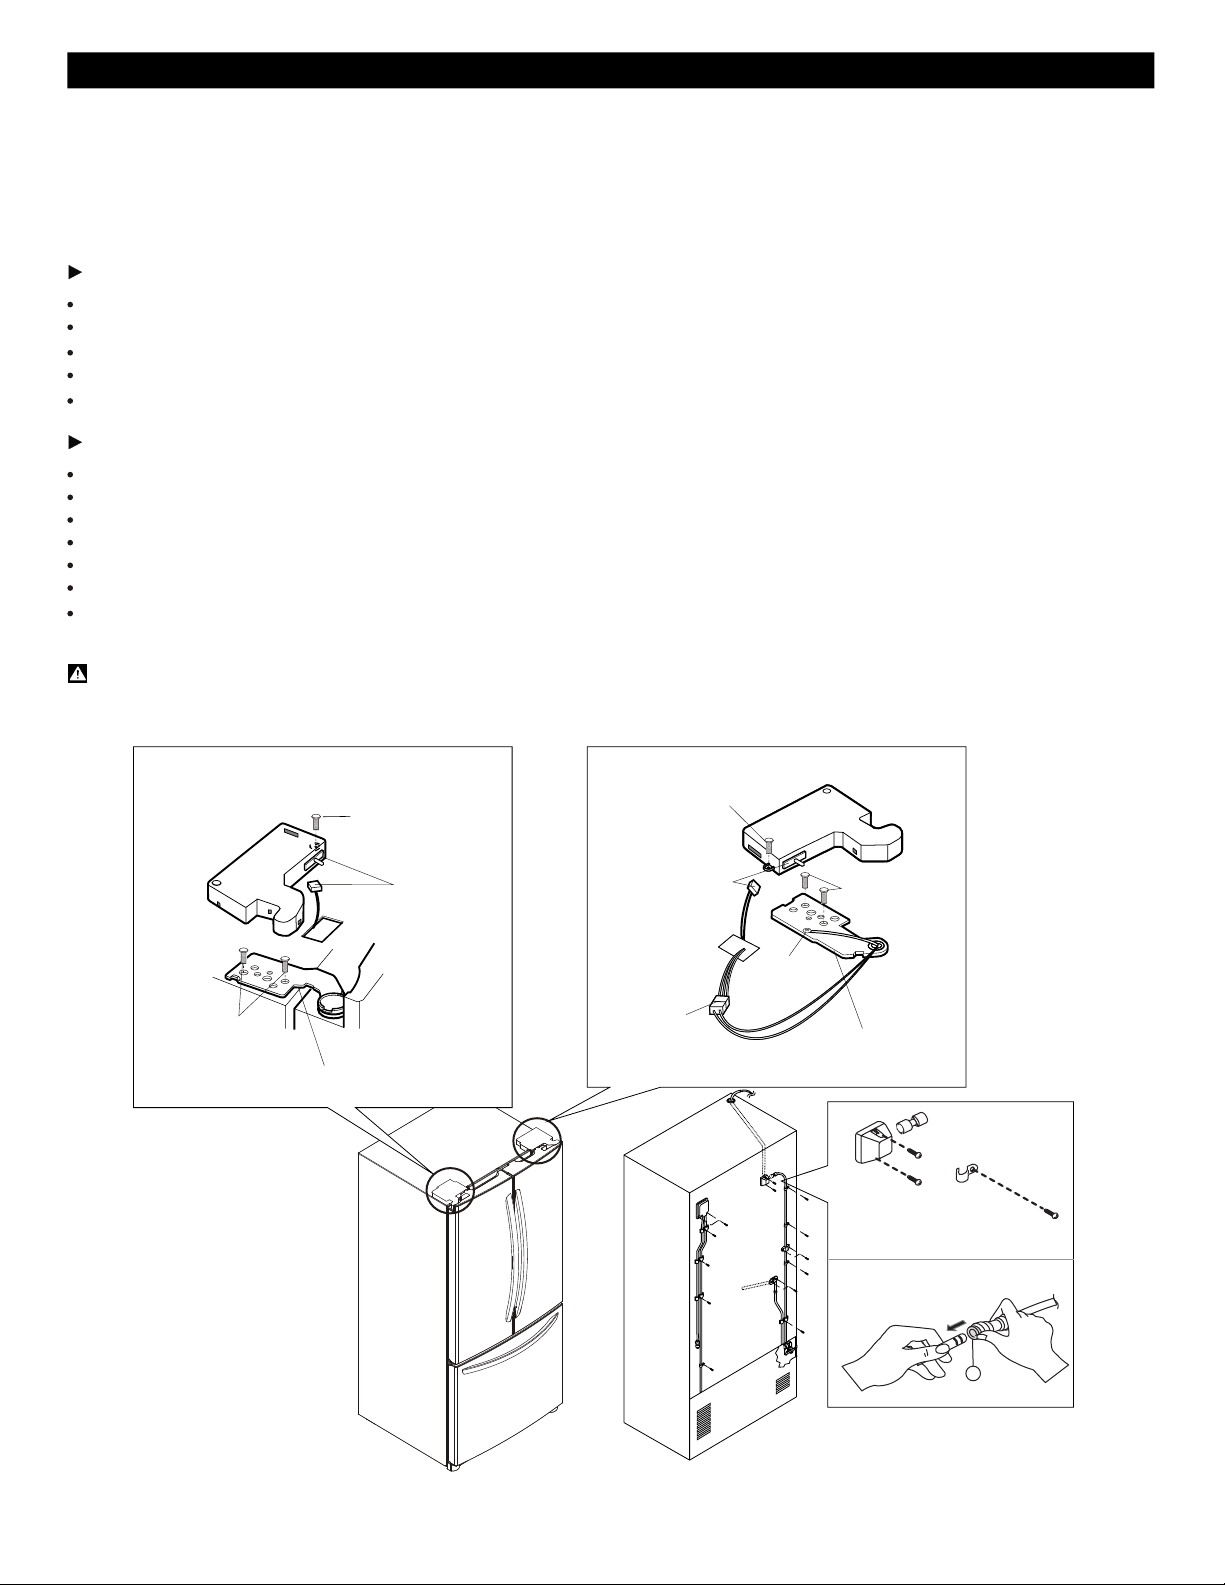
HOW TO REMOVE REFRIGERATOR DOOR
1.Removing Refrigerator Door
NOTE: Handle appearance may vary.
IMPORTANT: Before you begin, turn the refrigerator OFF and unplug it. Remove food and any bins from doors.
Left Door
Loosen the cover screw (1).
Disconnect door switch wire (2).
Loosen hinge bolts (3).
Lift off the top hinge (4).
Place the door on a non-scratching surface with the inside up.
Right Door
Loosen the cover screw (1).
Disconnect door switch wire (2).
Disconnect wire harness (5).
Loosen hinge bolts (3).
Loosen ground screw (6).
Lift off the top hinge (4).
Place the door on a non-scratching surface with the inside up.
CAUTION: When removing top hinge, be careful that the door does not fall forward.
(1)
(2)
(3)
(4)
(1)
(2)
(6)
(5)
(3)
(4)
Figure A
10
33
REFRIGERATOR INSTALLATION
2. Replacing Refrigerator Door
Right Door
Lower the door onto the middle hinge pin (7).
Make sure the door is aligned with the cabinet.
Replace the top hinge (4) installing hinge
screws (3) to secure it.
Make sure the gasket on the door is flush
against the cabinet and is not folded.
Support the door on the handle side while
securing. And make sure the door is straight
and the gap between the doors is even across
the front.
Install the ground screw (6).
Connect the door switch wire (2).
Tighten the cover screw (1).
Left Door
Lower the door onto the middle hinge pin (5).
Make sure the door is aligned with the cabinet.
Replace the top hinge (4) installing hinge
screws (3) to secure it.
Make sure the gasket on the door is flush
against the cabinet and is not folded.
Support the door on the handle side while
securing. And make sure the door is straight
and the gap between the doors is even across
the front.
Connect the door switch wire (2).
Tighten the cover screw (1).
7
5
NOTE: To use like reference the previous image.
11
REFRIGERATOR INSTALLATION
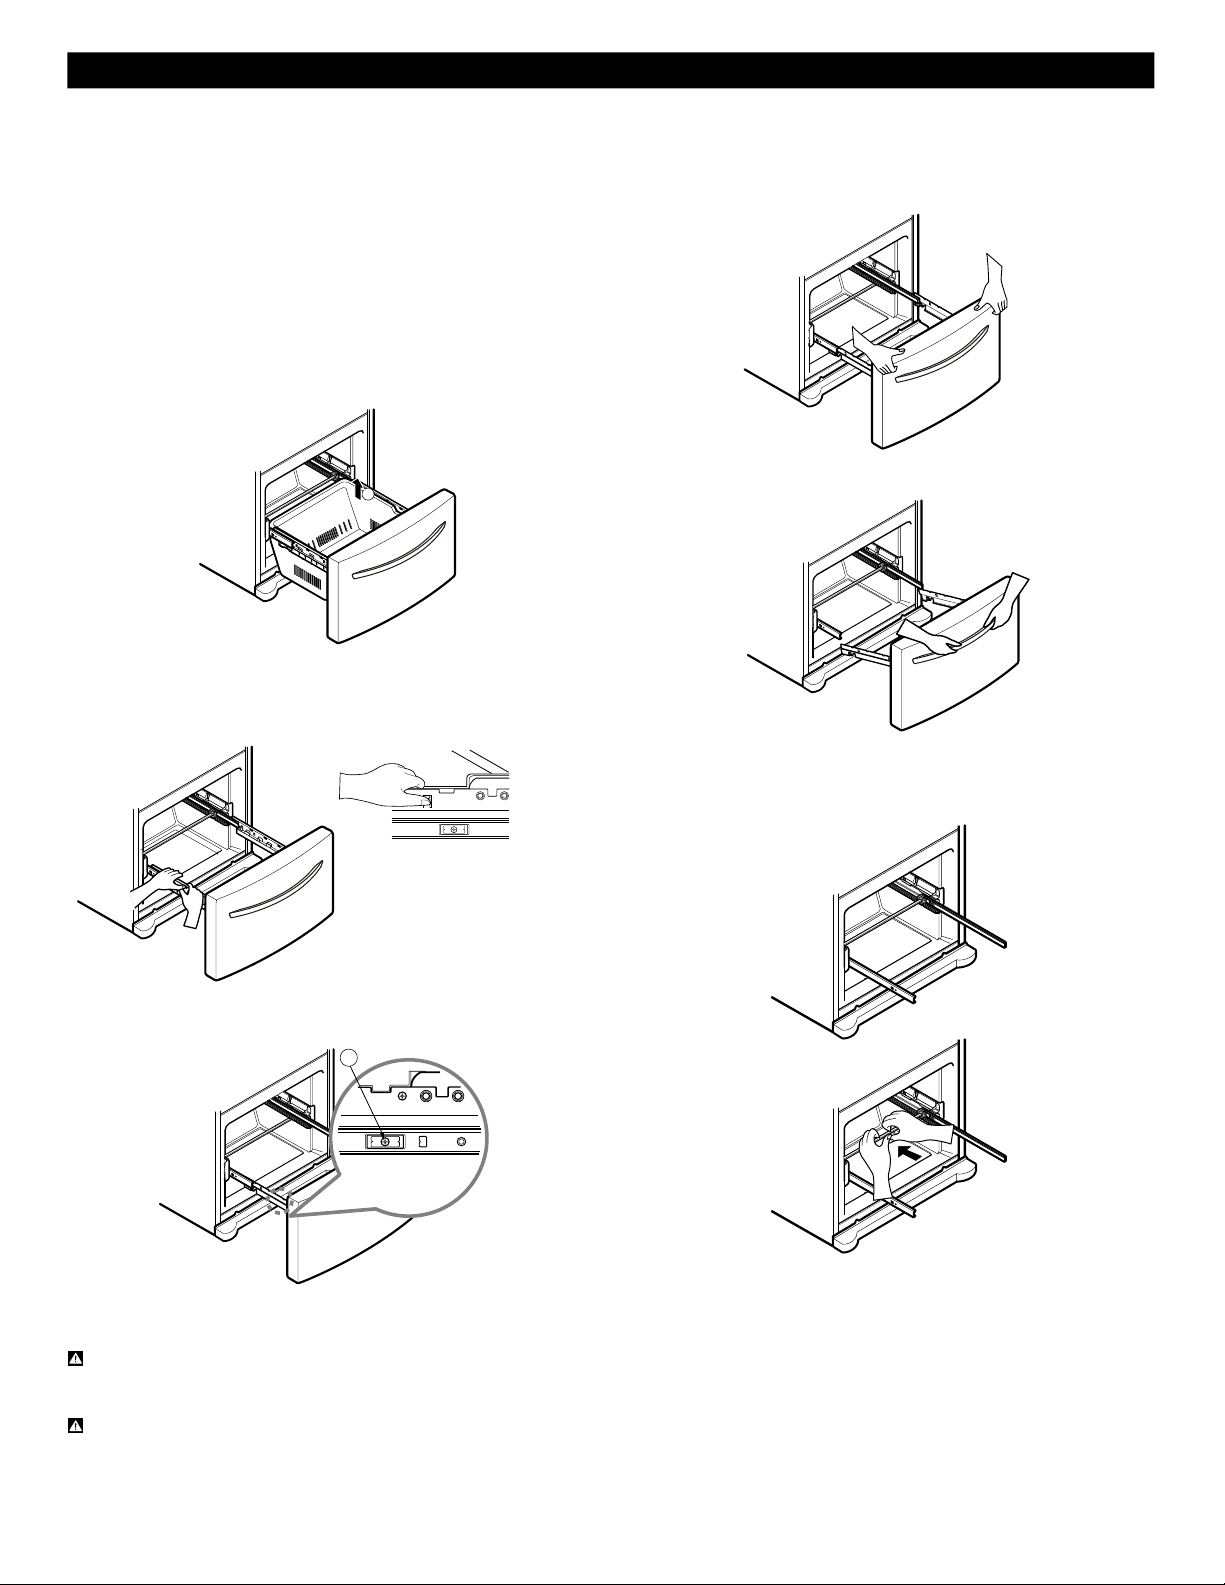
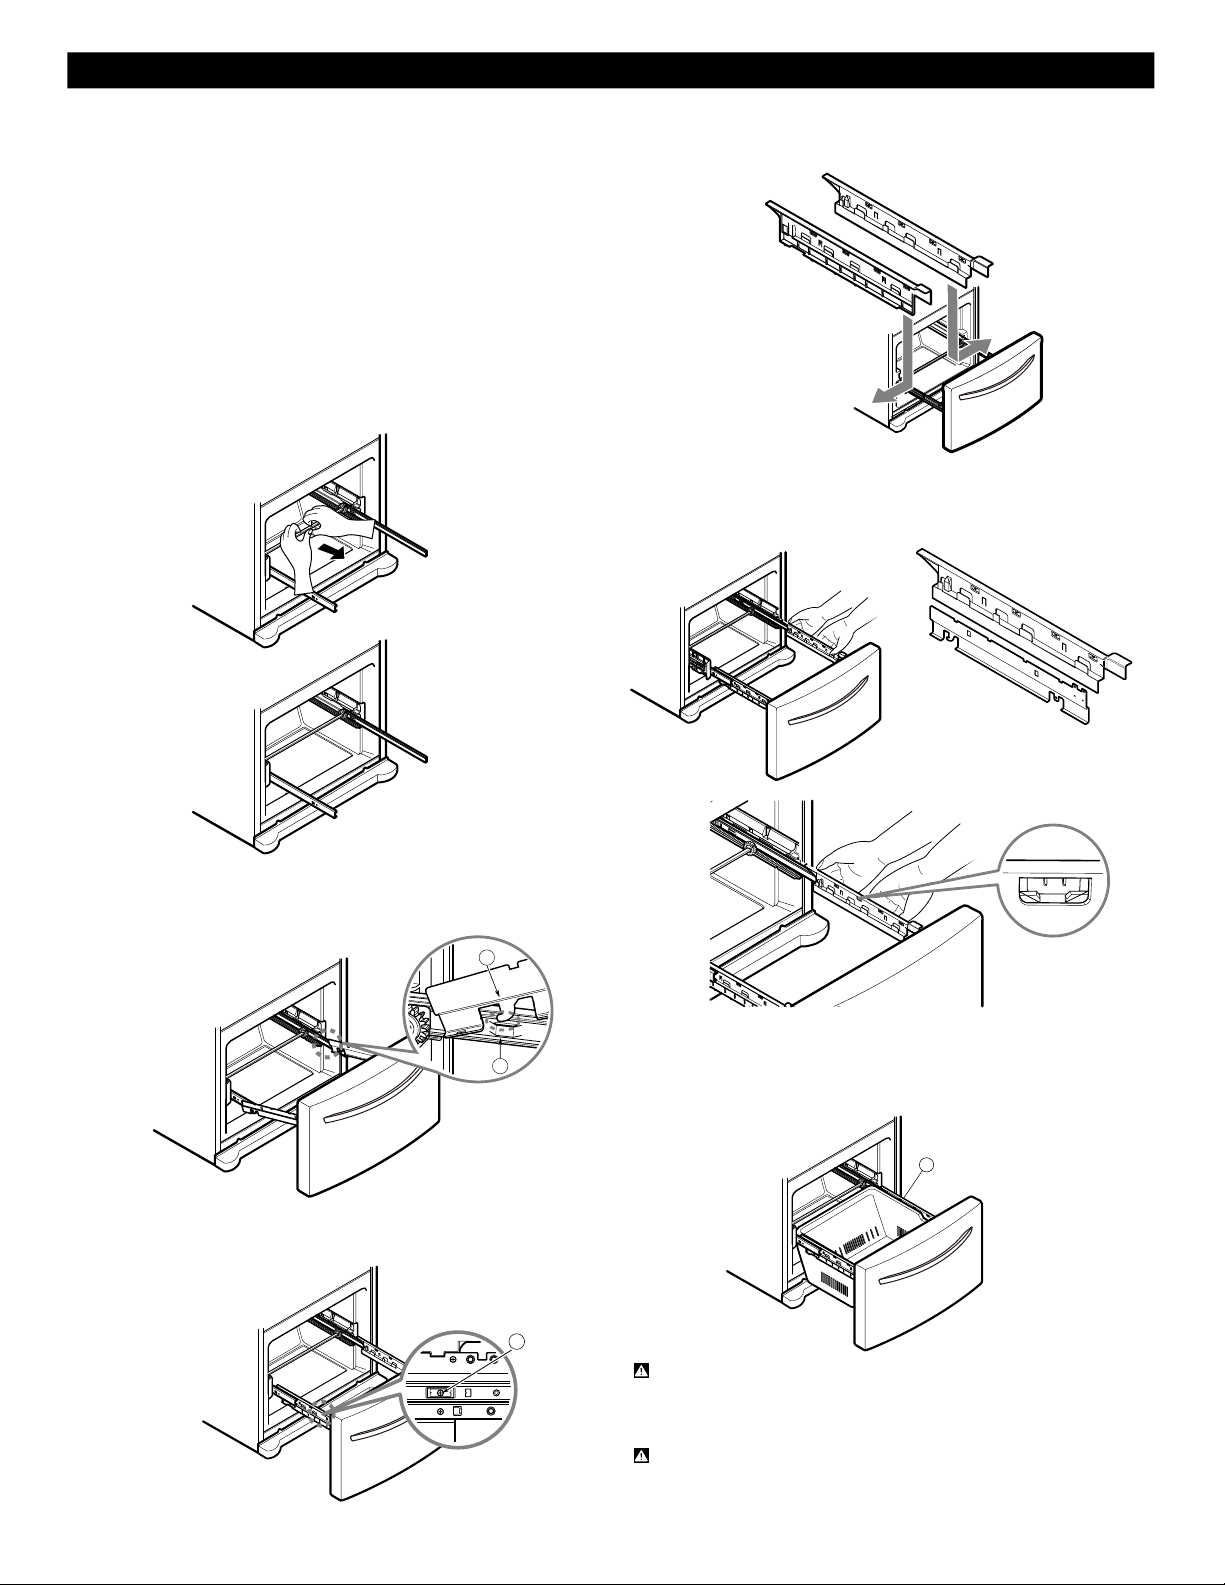
HOW TO REMOVE AND INSTALL THE
PULLOUT DRAWER
IMPORTANT: To avoid possible injury, product or property
damage, you will need two people to perform the following
instructions.
1. Removing Pullout Drawer
• Pull the drawer open to full lower extension. Remove the
lower basket (1) by lifting basket from rail system.
1
• With both hands, hold both sides of the door and pull it
up to separate it from the rails.
• Press both hangers with yours thumbs to lift it up.
• Separate the left and right rail cover
• Remove the screws(2) of the rail on both sides.
2
• With both hands, hold the center of the bar and push it
in to let both rails fitted simultaneously.
CAUTION: When you remove the drawer, do not hold
handle. If it comes off, it could cause personal injury.
CAUTION: When laying down the drawer, be careful
not to damage the floor or hurt your feet by the sharp
edges on hinge side.
12
REFRIGERATOR INSTALLATION
HOW TO REMOVE AND INSTALL THE
PULL OUT DRAWER
IMPORTANT: To avoid possible injur or product or property
damage, you will need two people to perform the following
instructions.
2. Installing Pullout Drawer
• With both hands, hold the center of the bar and pull it
out to let both rails out to full extension simultaneously.
• Make sure you have a right rail cover for each side.
Right
Rail cover
Left
Rail cover
• Align the top holes of the rail cover with the top holes of
the door supports to assemble the rail cover.
• Hook door supports (1) into rail tabes (2).
1
2
• Lower door into final position and tighten the screws (3).
3
Assembly hole
• With the drawer pulled out to full extension, insert the
lower basket (4) in the rail assembly.
4
WARNING: To prevent accidental child and pet
entrapment or suffocation risk. DO NOT allow them to
play inside of drawer.
WARNING: DO NOT step or sit down on Freezer Door.
13
REFRIGERATOR INSTALLATION
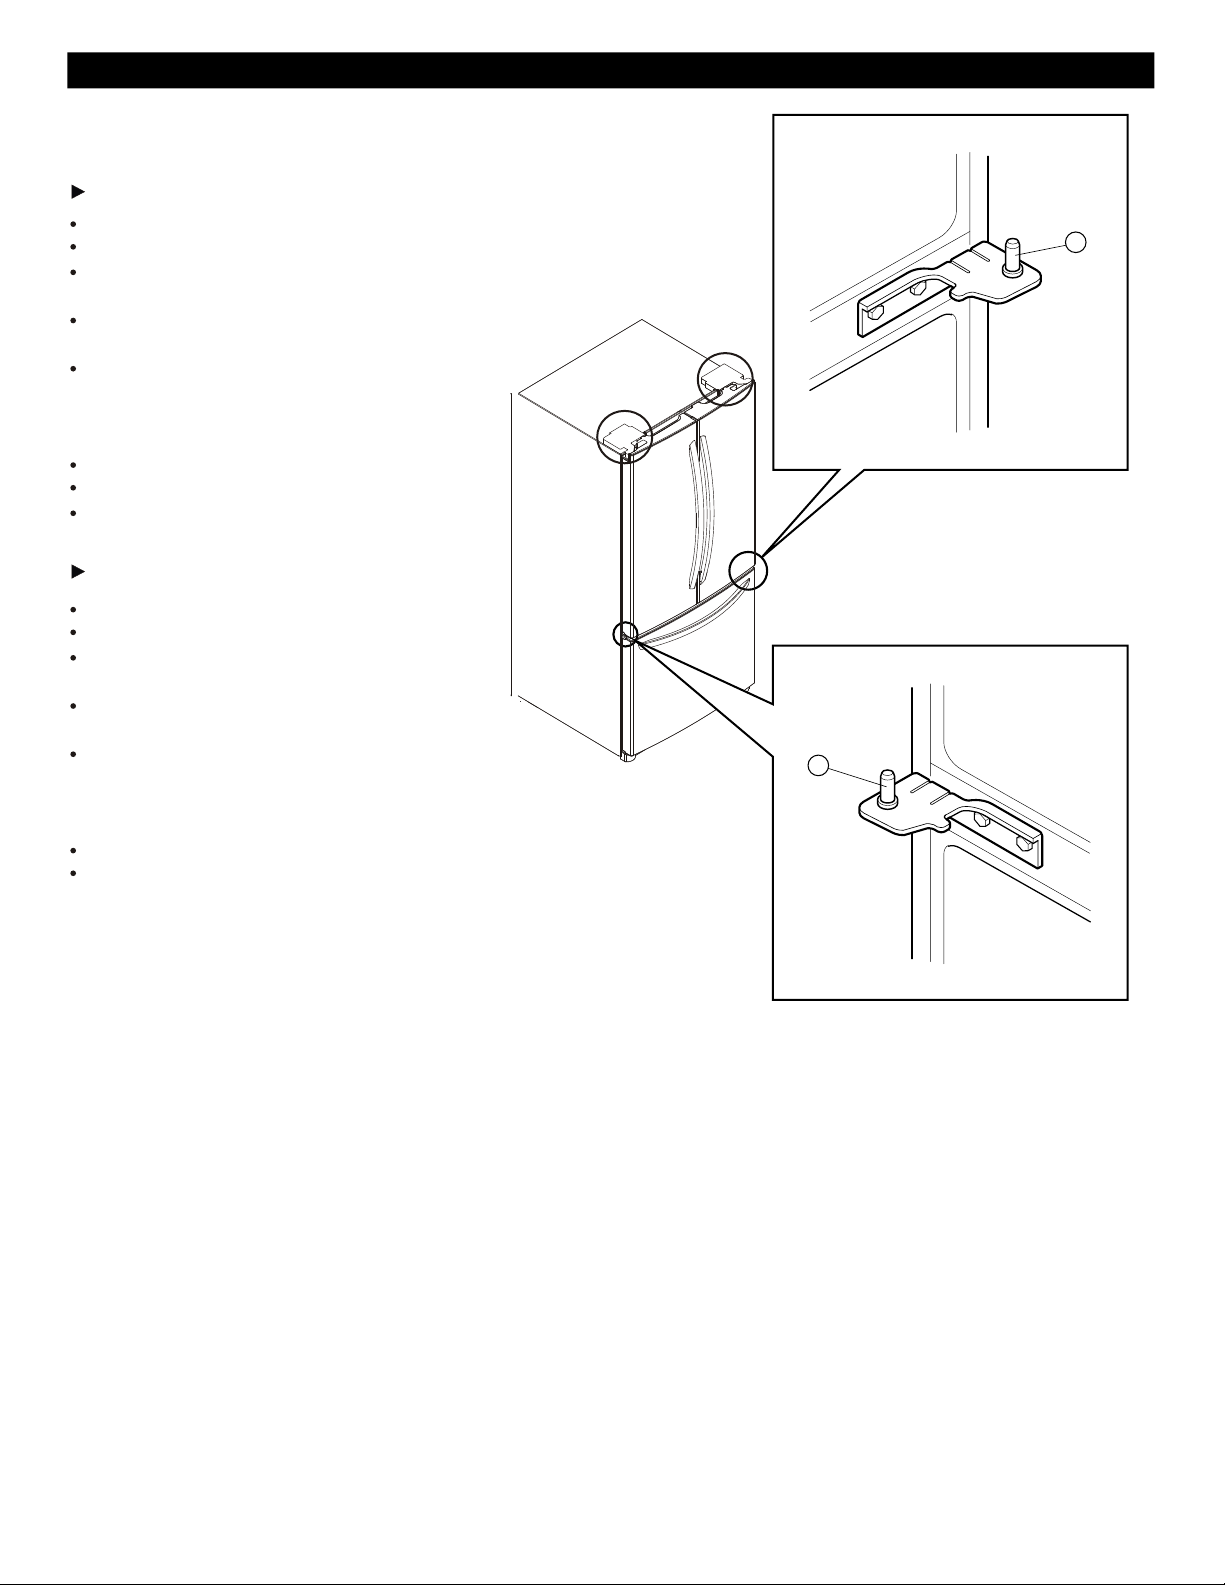
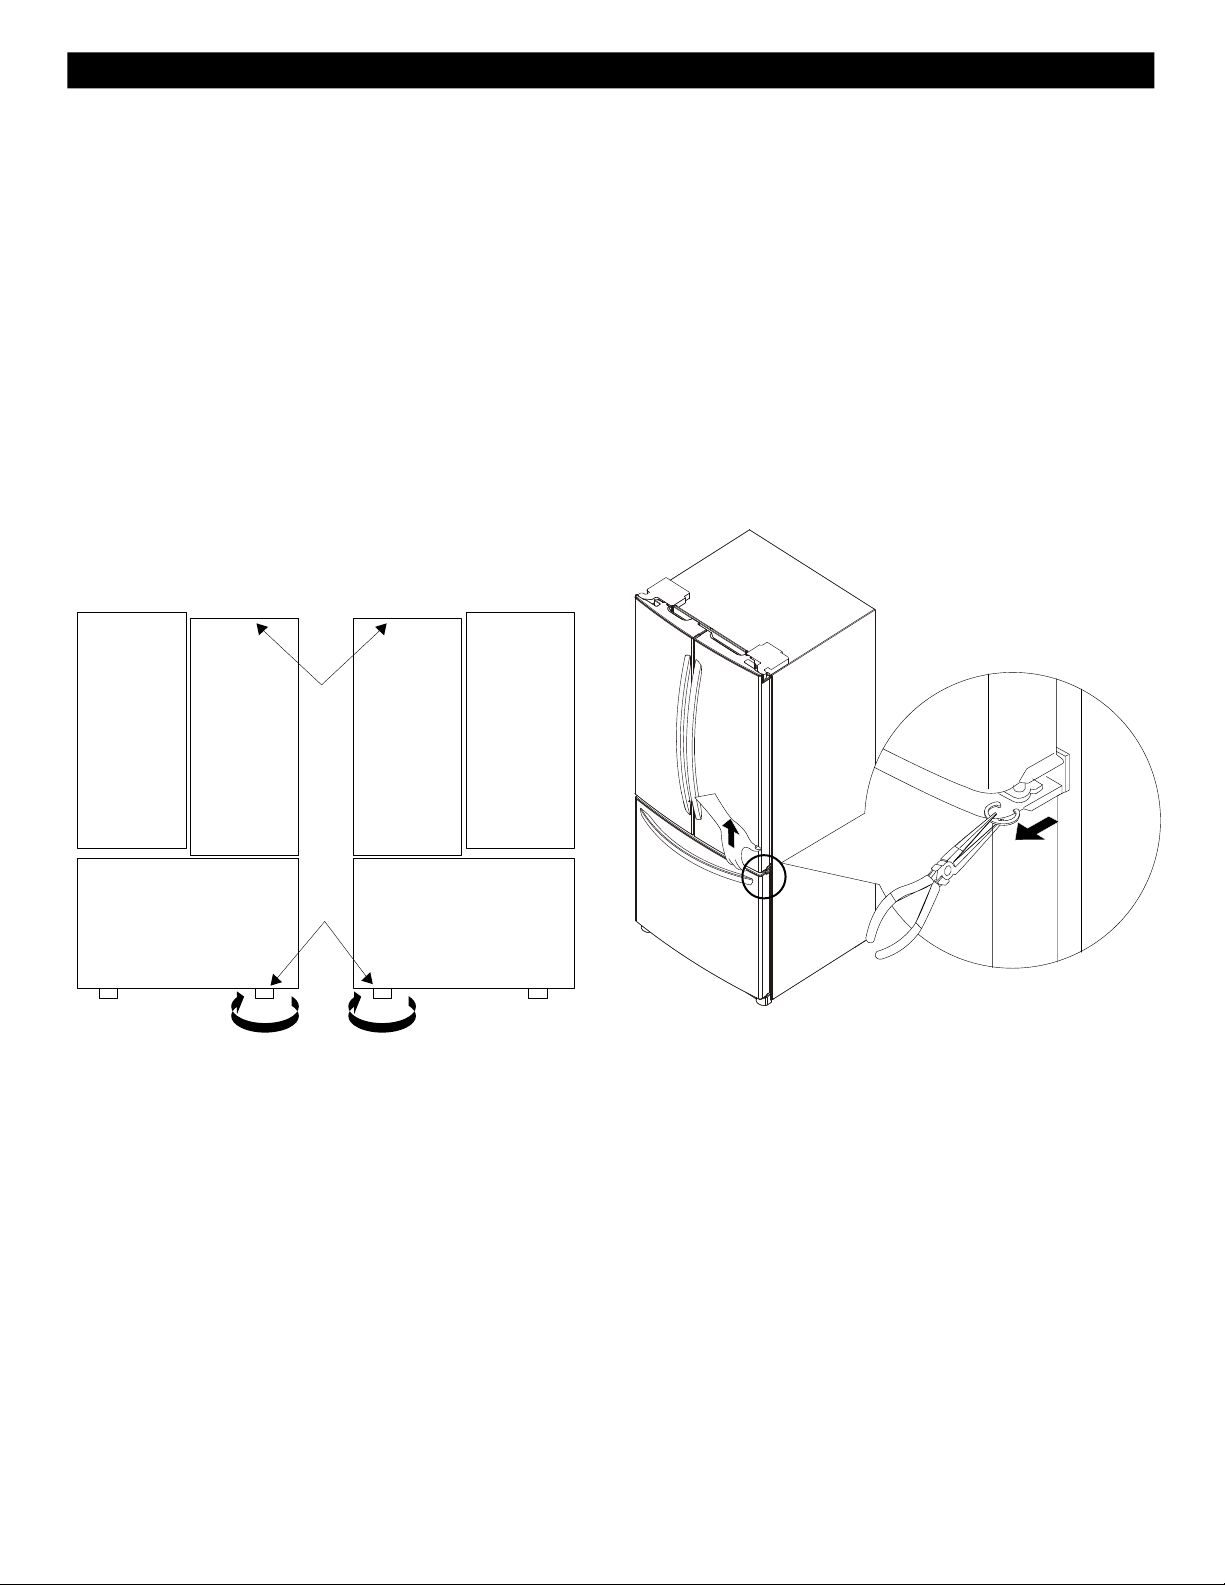
LEVELING AND DOOR ALIGNMENT
Leveling
Your refrigerator has two front leveling screws one on
the right and one on the left. If your refrigerator seems
unsteady or you want the doors to close easier, adjust the
Refrigerator’s tilt using the instructions below:
1. Plug the refrigerator’s power cord into a 3-prong
grounded outlet. Move the refrigerator into its final
position.
2. Turn the leveling screw clockwise to raise that side of
the refrigerator or counterclockwise to lower it. It may
take several turns of the leveling screw to adjust the tilt
of the refrigerator.
NOTE: Having someone push against the top of the
refrigerator takes some weight off the leveling screws.
This makes it easier to adjust the screws.
Door Alignment
If the space between your doors is uneven, follow the
instructions below to align the doors:
1. With one hand, lift up the door you want to raise at
middle hinge.
2. With other hand, use pliers to insert snap ring as
shown.
3. Insert additional snap rings until the doors are aligned.
(Three snap rings are provided with unit.)
3. Open both doors again and check to make sure that
they close easily. If not, tilt the refrigerator slightly more
to the rear by turning both leveling screws clockwise. It
may take several more turns, and you should turn both
leveling screws the same amount.
4. Re-adjust if necessary.
5. Replace the base cover.
NOTE: Your new refrigerator is uniquely designed with
two fresh food doors. Either door can be opened or
closed independently of one another. You may have to
exert slight pressure on doors to get them to close
completely.
14
USING YOUR REFRIGERATOR
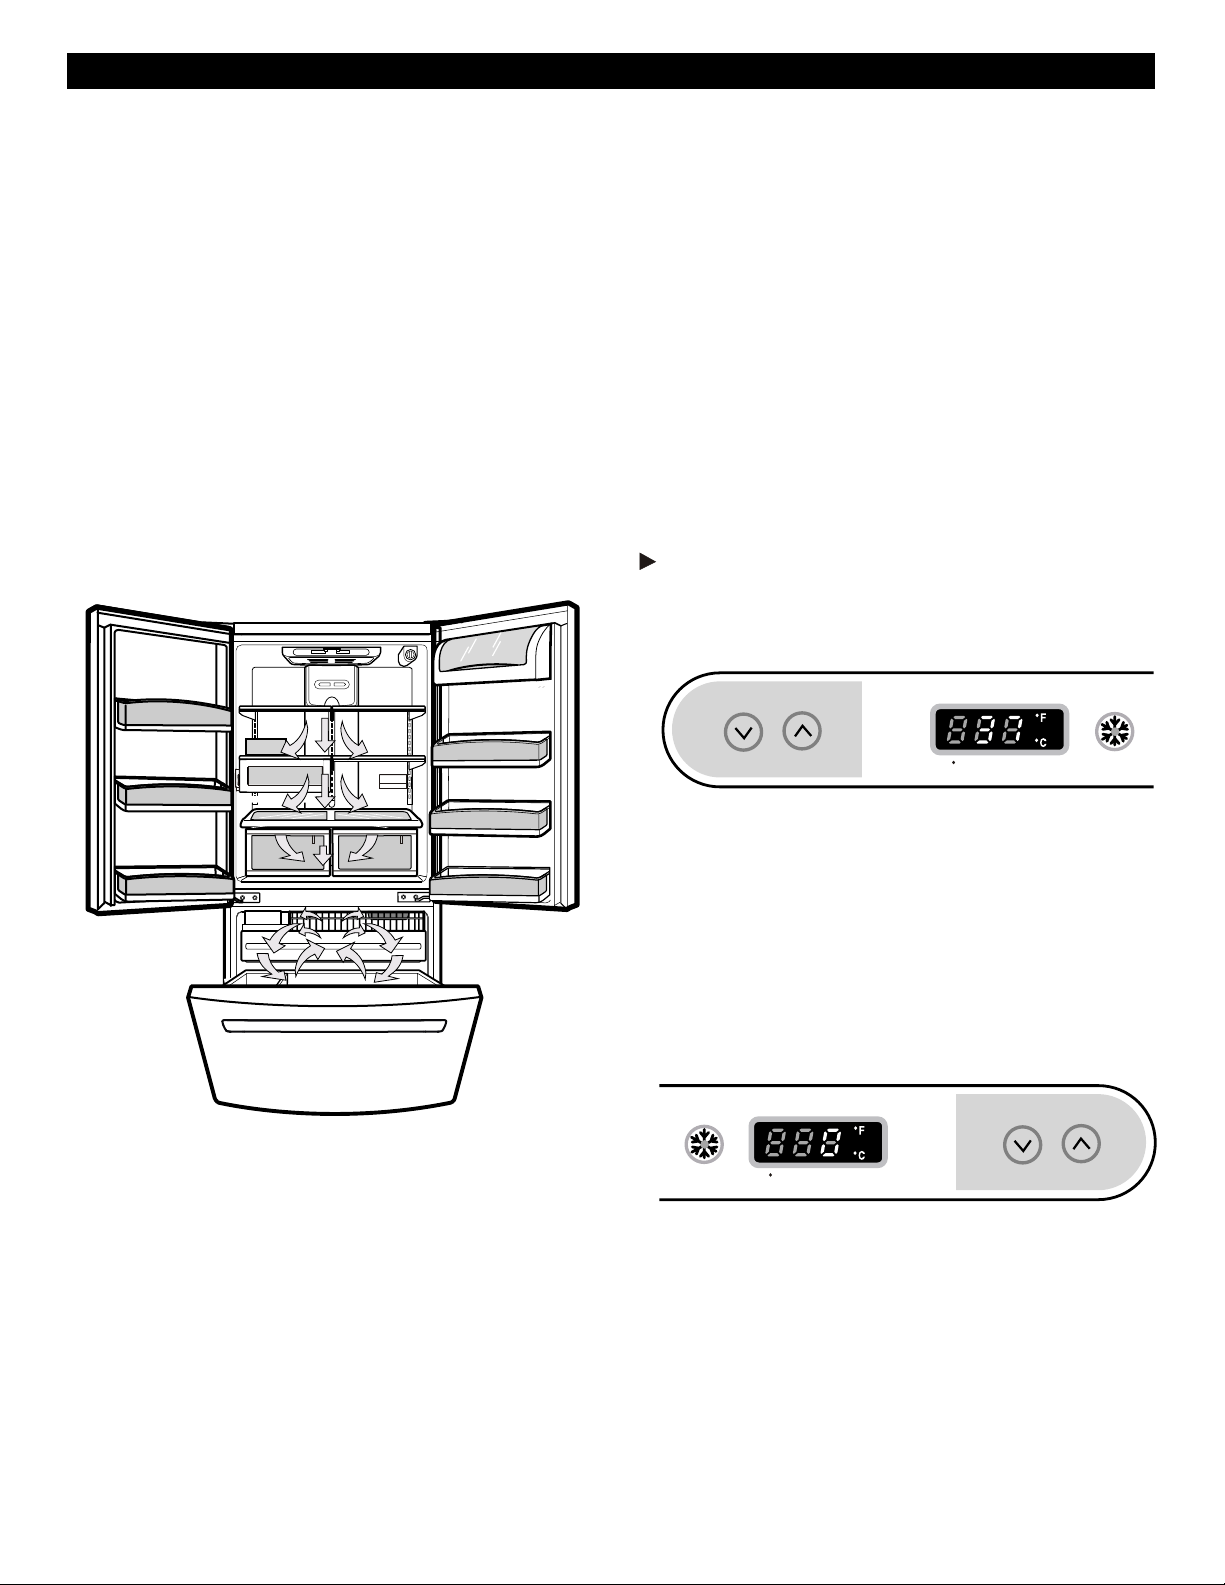
ENSURING PROPER AIR CIRCULATION
In order to ensure proper temperatures, air must flow
between the refrigerator and freezer sections. As shown in
the illustration below, air enters at top of freezer and
circulates down. From bottom of freezer, air is forced up to
top of refrigerator. Air enters refrigerator through top vent,
then circulates and exists at bottom, where it returns to
freezer.
MULTI-FLOW
Multi-Flow means powerful and effective cooling operation
This is especially noticeable when new food is placed in the
refrigerator compartment.
If water or foreign substances enter the cool air vent while
cleaning, efficiency will be lowered. In addition, if gasket is
damaged, efficiency may be lowered because of escaping
cool air.
DOOR ALARM
With this feature you will listen an alarm when the freezer or
refrigerator door is not closed within 1 minute after it is
opened. These tones repeat every 30 seconds. The alarm
is cancelled when the freezer or the refrigerator is closed
correctly.
SETTING THE CONTROLS
(Models without water dispenser)
Your refrigerator has two controls that let you regulate the
temperature in the freezer and refrigerator compartments.
Initially set the REFRIGERATOR CONTROL at 37°F (3°C)
and the FREEZER CONTROL at 0°F (-18°C). Leave it at
this setting for 24 hours (one day) to stabilize. Then adjust
the compartment temperature as desired.
Premium Model
Refrigerator control: 33°F/46°F (0°C to 8°C)
The lower the number setting, the colder the refrigerator
compartment will become.
REFRIGERATOR TEMP
(Identify your control type)
ICE PLUS
Do not block any of cool air vents with food packages. If
the vents are blocked, airflow will be interrupted and
temperature and moisture problems may occur.
IMPORTANT: Because air circulates between both sections,
sections, any odors formed in one section will transfer to the
other. You must thoroughly clean both sections to eliminate
odors. To prevent odor transfer and drying out of food, wrap
or cover foods tightly . (See the Food Storage Guide section
for details).
COLDER WARMER 37 F IS RECOMMENDED
Freezer control: -6°F/ 8°F (-21°C to -13°C)
When the setting is at a lower number, the freezer
compartment becomes colder. But the refrigerator
compartment becomes warmer because less cold air flows
into the refrigerator .
Ice Plus:
Press the Ice Plus key and the LED will turn on. This
function will remain activated for 24 hours and intensify the
cooling speed of freezer and increase the amount of ice.
ICE PLUS
0 F IS RECOMMENDED
FREEZER TEMP
COLDER WARMER
NOTE: If you want to change °F to °C, press and hold
COLDER key of freezer and COLDER key of refrigerator
over 3 sec at the same time. and if you want to change
to °
F, hold them for 3 sec again.
°C
15
USING YOUR REFRIGERATOR
ADJUSTING CONTROL SETTINGS
Give the refrigerator time to cool down completely before
adding food. It is best to wait 24 hours before you put food
into the refrigerator. The mid-settings indicated in the
previous section should be correct for normal household
refrigerator usage. The controls are set correctly when milk
or juice is as cold as you like and when ice cream is firm.
The refrigerator control functions as the thermostat for the
entire appliance (refrigerator and freezer sections.) The
higher the number setting, the longer the compressor will
run to keep the temperature colder. The freezer control
adjusts the cold air flow from the freezer to the refrigerator.
Setting the freezer control to a lower temperature keeps
more cold air in the Freezer compartment to make it colder.
If you need to adjust temperatures in the refrigerator or
freezer, start by adjusting the refrigerator first. Wait 24
hours after the refrigerator adjustment to check the freezer
temperature. If it is too warm or too cold, then adjust the
freezer control as well.
Use the settings listed in the chart below as a guide. Always
remember to wait at least 24 hours between adjustments.
CONDITION/REASON: ADJUSTMENT:
REFRIGERATOR section Turn
too warm
Door opened often
Large amount of food added
Room temperature very warm wait 24 hours,
FREEZER section too warm/ Turn FREEZER
ice not made fast enough control to next
Door opened often
Large amount of food added
Very cold room temperature Then re-check
(Can not
le often enough)
Heavy ice usage
Air vents blocked by items
REFRIGERATOR section too Turn
Cold
Controls not set correctly for
your conditions lower number,
FREEZER section too cold Turn FREEZER
Controls not set correctly for
your conditions lower number,
RECOMMENDED
REFRIGERATOR
control to next
higher number,
Then re-check
higher number,
wait 24 hours,
Move items out of
Air stream
REFRIGERATOR
control to next
wait 24 hours,
then re-check
Control to next
wait 24 hours,
then re-check
FOOD STORAGE GUIDE
Storing Fresh Food
Wrap or store food in the refrigerator in airtight and
moisture-proof material unless otherwise noted. This
prevents food odor and taste transfer throughout the
refrigerator. For dated products, check date code to
ensure freshness.
Butter or margarine
Keep opened butter in a covered dish or closed
compartment. When storing an extra supply, wrap
in freezer packaging and freeze.
Cheese
Store in the original wrapping until you are ready to
use it. Once opened, rewrap tightly in plastic wrap or
aluminum foil.
Milk
Wipe milk cartons. For best storage, place milk on interior
shelf, not on door shelf.
Eggs
Store in original carton on interior shelf, not on door shelf.
Fruit
Wash, let dry, and store in refrigerator in plastic bags or in
the crisper. Do not wash or hull berries until you are ready
to use them. Sort and keep berries in their original
container in a crisper, or store in a loosely closed paper
bag on a refrigerator shelf.
Leafy vegetables
Remove store wrapping and trim or tear off bruised and
discolored areas. Wash in cold water and drain. Place in a
plastic bag or plastic container and store in the crisper.
Vegetables with skins (carrots, peppers)
Place in plastic bags or plastic container and store
in crisper.
Fish
Use fresh fish and shellfish the same day purchased.
Chef fresh
Store most chef fresh in original wrapping as long as it is
airtight and moisture-proof. Rewrap if necessary.
Leftovers
Cover leftovers with plastic wrap or aluminum foil. Plastic
containers with tight lids can also be used.
STORING FROZEN FOOD
NOTE: For further information about preparing food for
freezing or food storage times, check a freezer guide or a
reliable cookbook.
16
USING YOUR REFRIGERATOR
Packaging
Successful freezing depends on correct packaging. When
you close and seal the package, it must not allow air or
moisture in or out. If you do, you could have food odor
and taste transfer throughout the refrigerator and also dry
out frozen food.
Packaging recommendations:
Rigid plastic containers with tight-fitting lids
Straight-sided canning/freezing jars
Heavy-duty aluminum foil
Plastic-coated paper
Non-permeable plastic wraps
Specified freezer-grade self-sealing plastic bags
Follow package or container instructions for proper
freezing methods.
Do not use:
Bread wrappers
Non-polyethylene plastic containers
Containers without tight lids
Wax paper or wax-coated freezer wrap
Thin, semi-permeable wrap
Freezing
IMPORTANT: Do not store bottles in the freezer
compartment - they may break when frozen,
causing damage.
Your freezer will not quick-freeze any large quantity of
food. Do not put more unfrozen food into the freezer than
will freeze within 24 hours (no more than 2 to 3 lbs of food
per cubic foot of freezer space). Leave enough space in
the freezer for air to circulate around packages. Be careful
to leave enough room at the front so the door can close
tightly.
Storage times will vary according to the quality and type
of food, the type of packaging or wrap used (airtight and
moisture-proof) and the storage temperature. Ice crystals
inside a sealed package are normal. This simply means
that moisture in the food and air inside the package have
condensed, creating ice crystals.
NOTE: Allow hot foods to cool at room temperature for
30 minutes, then package and freeze. Cooling hot foods
before freezing saves energy.
NOTE: Do not store food near the sensor; it may cause
the sensor to malfunction.
REFRIGERATOR SECTION
REFRIGERATOR SHELVES
The shelves in your refrigerator are adjustable to meet
your individual storage needs. These units are all glass
shelves.
Storing similar food items together in your refrigerator and
adjusting the shelves to fit different heights of items will
make finding the exact item you want easier; it will also
reduce the amount of time the refrigerator door is open,
saving energy.
IMPORTANT: Do not clean glass shelves with warm
water when they are cold. Shelves may break if exposed
to sudden temperature changes or impact, such as
bumping. For your protection, glass shelves are made
with tempered glass, which will shatter into small pebblesized pieces.
NOTE: Glass shelves are heavy. Use special care when
removing them to avoid dropping them.
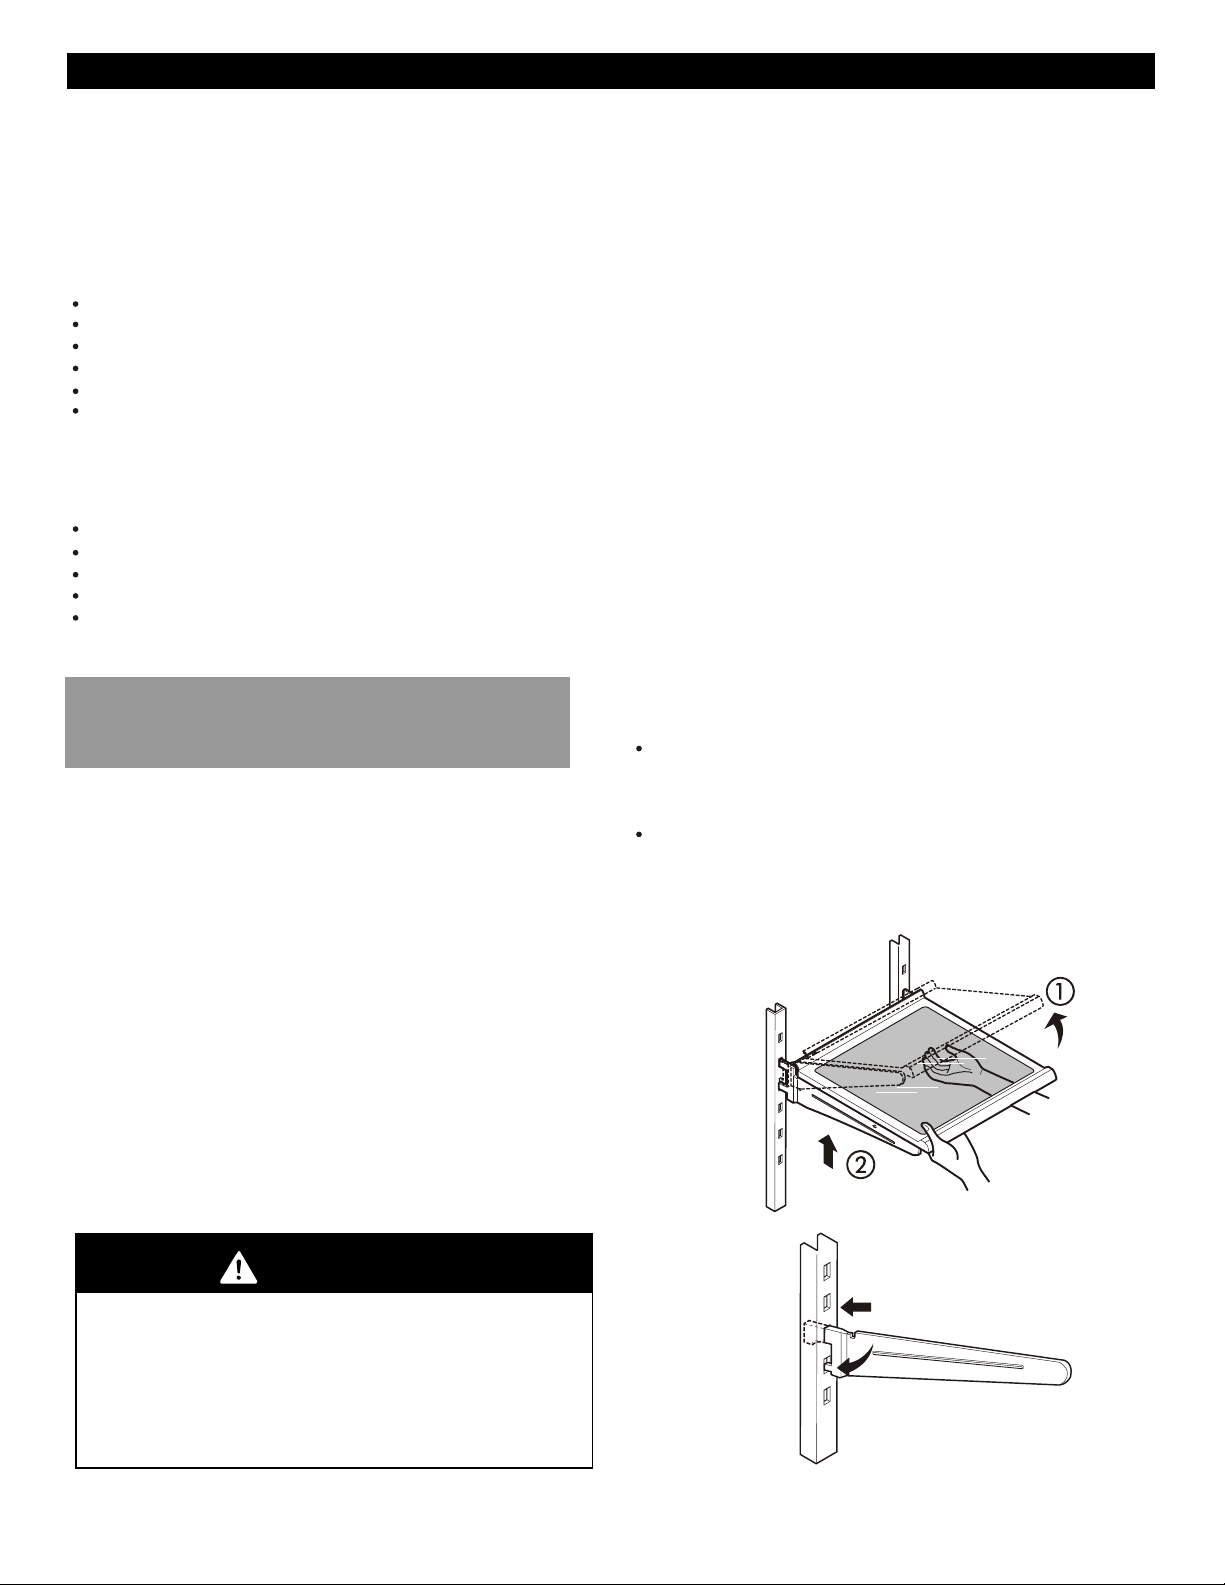
Adjusting Shelves
Remove shelves from the shipping position and replace
shelves in the position you want.
To remove a shelf: Tilt up the front of the shelf in the
direction of (1) and lift it in the direction of (2). Pull the
shelf out.
To replace a shelf: Tilt the front of the shelf up and guide
the shelf hooks into the slots at a desired height. Then
lower the front of the shelf so that the hooks drop into the
slots.
WARNING
Suffocation Hazard
When using dry ice, provide adequate ventilation.
Dry ice is frozen carbon dioxide
vaporizes, it can displace oxygen, causing dizziness,
light-headedness, unconsciousness and death by
suffocation. Open a window and do not breathe
the vapors.
(CO )2. When it
17
USING YOUR REFRIGERATOR
NOTE: Make sure that shelves are level from one side to
the other. Failure to do so may result in the shelf falling or
spilling food.
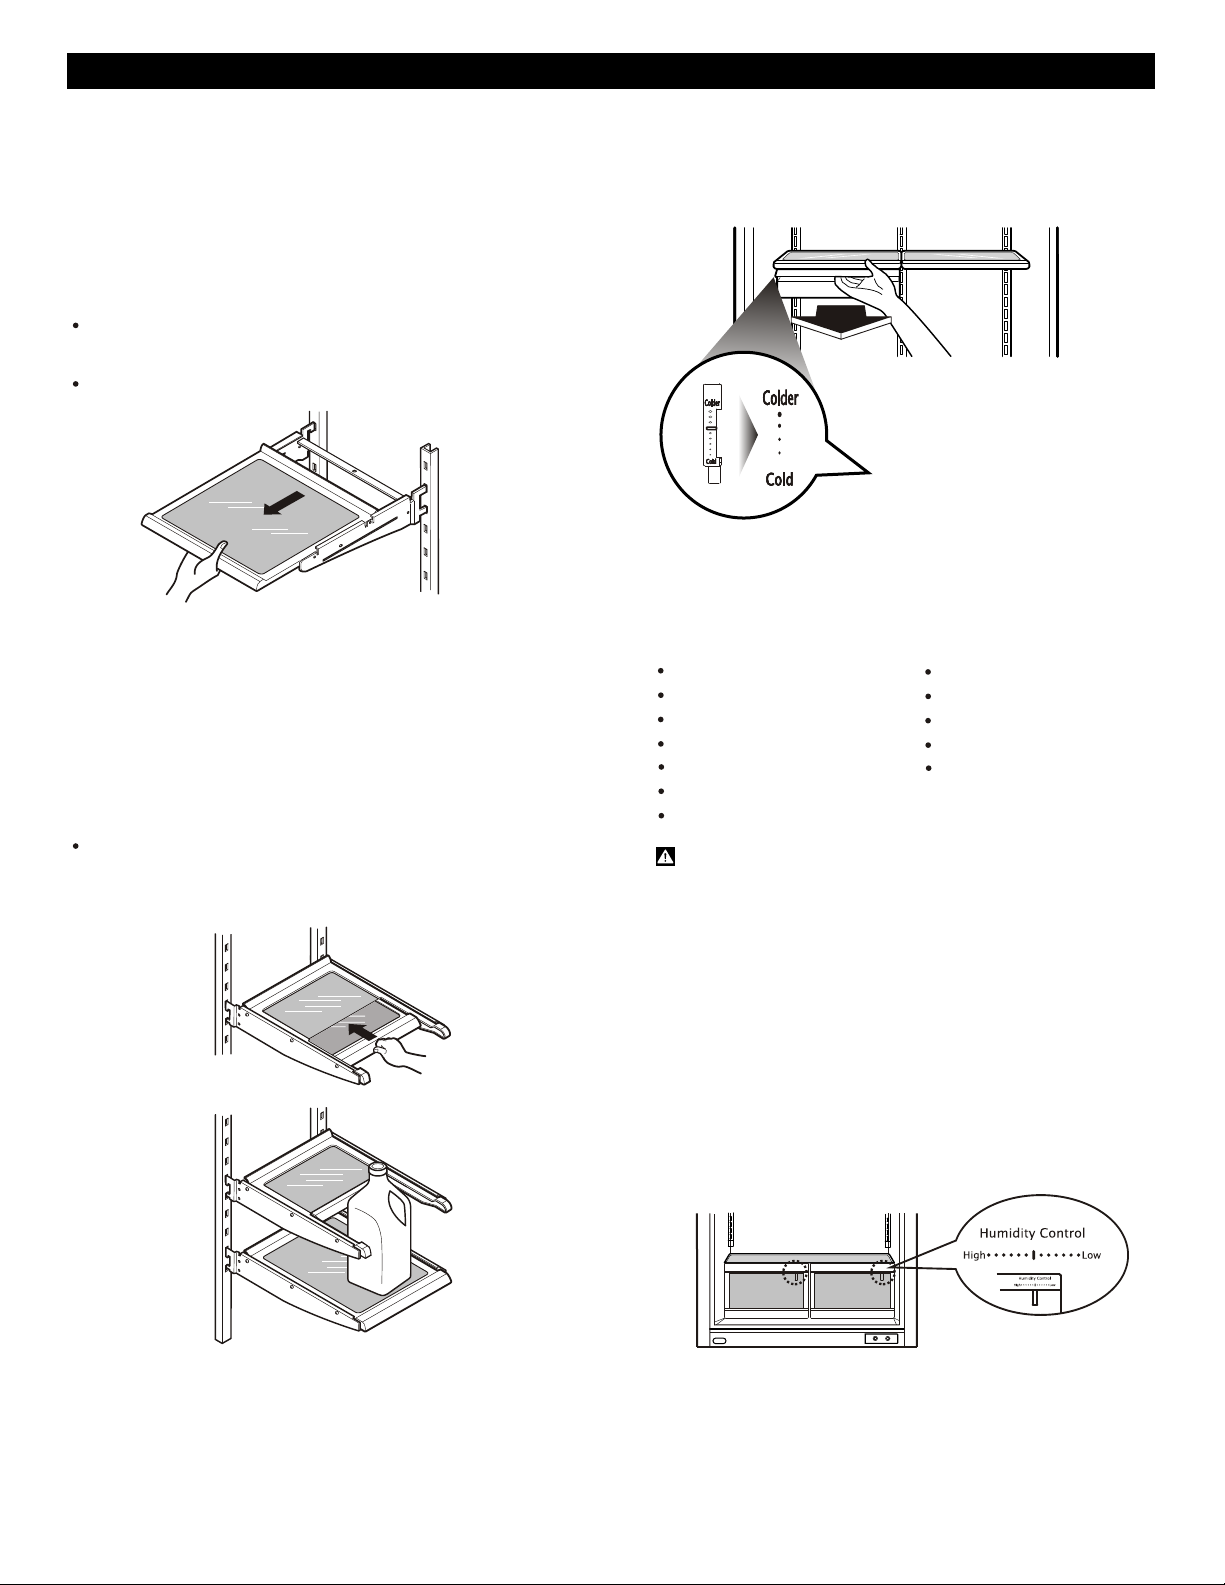
Sliding Out Shelves (optional on some models)
You can slide some glass shelves in and out of your
refrigerator as follows.
To slide the shelf out, carefully pull front of shelf
toward you.
To slide shelf in, push shelf in until it stops.
To remove a sliding shelf from its metal frame:
1. Pull the shelf out to the stop position.
2. Tilt the front of the shelf up and pull it past the stop
position.
3. Lift up the shelf to remove.
Replace the shelf by reversing the above steps.
Convenience Shelves (optional on some models)
Folding Shelf: You can store taller items such as gallon
containers or bottles by simply sliding the shelf back.
CHEF FRESH / SNACK PAN
While holding the chef fresh with one hand, pull it forward
slightly. Lift slightly and pull it out.
On some models is applied an
independent temperature
control.
NOTE: DO NOT store lettuce or other leafy produce in this
drawer.
COLD
Cauliflower
Cucumbers
Zucchinis
Apples
Corn
Oranges
Grapes
WARNING: Fruits and vegetables may be damage
at the coldest setting.
COLDER
Steaks
Hard cheeses
Cold cuts
Bacon
Hot dogs
CRISPER HUMIDITY CONTROL
(on some models)
You can control the amount of humidity in the moisturesealed crispers. Adjust the control to any setting between
“High” and “Low”
• “High”: Lets moist air out of the crisper for best storage
of fruits.
• “Low”: Keeps moist air in the crisper for best storage of
fresh, leafy vegetables.
18
 Loading...